

Soundstream VR-346, VR-346B, VR-346T, VR-346BT Owner's Manual

VR-346/VR-346B
VR-346T
In-Dash/2 DIN 3.4"
DVD/CD/MP3/MP4
AM/FMRadio
Built~in
Support
TV
tuner(
Bluetooth(only forVR-346BNR-346BT model)
O
MIC
Monitor
Player
only for VR-346T VR-346BTmodel)
/VR-346BT
144
HI
INT
APT
ADM
Owner's Manual
Take the
Familiarity
Performance
time
with
to
read
installation
from
your
through
new
ALE-
ALE+
this
owner's
and
operation
DVD-receiver.
0
~sET)
~
L
.
c::::::l
manual.
procedures
will
help
you
obtain
the
best
-
• Using the device at temperature below
BEFORE USING PLEASE HEAT UP THE PASSENGER COMPARTMENT TO THE
RECOMMENDED TEMPERATURE!
• Read carefully through this manual to familiarize you with this high-quality sound
system.
• Disconnect the vehicle's negative battery terminal while mounting and connecting the
unit.
• When replacing the fuse, be sure to use one with an identical amperage rating. Using a
fuse with a higher amperage rating may cause serious damage to the unit.
• DO NOT attempt to disassemble the unit. Laser beams from the optical pickup are
dangerous to the eyes.
-1
OOC
may cause the breakage
of
the device.
• Make sure that pins
malfunctions,
• If you have parked the car for a long time in hot
temperature
• DO NOT open covers and do not repair yourself. Consult the dealer
technician for help.
• Make sure you disconnect the power supply and aerial if you will not use the system for
a long period
• Make sure you disconnect the power supply if the system appears to be working
incorrectly, (For example: making unusual sounds, smelling strange, emitting smokes
from inside
syste.m.
· • The unit is designed for negative terminal
vehicle metal. Please confirm it before installation.
• Do not allow the speaker wires to be shorted together when the unit is switched on.
or
in
or
or
liquid having gotten inside
or
other foreign objects do not get inside the unit; they may cause
create safety hazards such as electrical shock
or
cold weather, wait until the
the car becomes normal before operating the unit.
during a thunderstorm.
it)
Have a qualified technician check the
of
the battery, which is connected to the
or
laser beam exposure.
or
an experienced
Otherwise it may overload
• Do not install the detachable panel before connecting the wire.
• Don't remove the detachable panel when encoding.
or
burn out the power amplifier.
2
Important
Safeguards ............................................................................................................... 2
Contents ................................ ;
.................................................................................................. 3
Accessories .............................................................................................................................. 4
I nstallation/U
n-1
nstallation
........................................................................................................ 5
Wiring Connections .................................................................................................................. 6
Front
Remote
Remove Battery ......................................................................................................................
Panel
Control
.............................................................................................................................. 7
........................................................................................................................ 9
11
Main Menu ............................................................................................................................. 12
General
Operation ................................................................................................................. 12
Radio Operation ..................................................................................................................... 16
DVD/USB/SD/MMC
TV Operations( Only
Bluetooth Section(Only
Anti-theft
Handling
System
&
Cleaning DISC
Operation ............................................................................................... 17
for VR-346TNR-3468Tmodel)
for VR-346BNR-346BTmodel) .........................................................
......................................................
19
20
.................................................................................................................... 22
..................................................................................................... 22
Troubleshooting Guide ........................................................................................................... 23
Specification ........................................................................................................................... 24
3
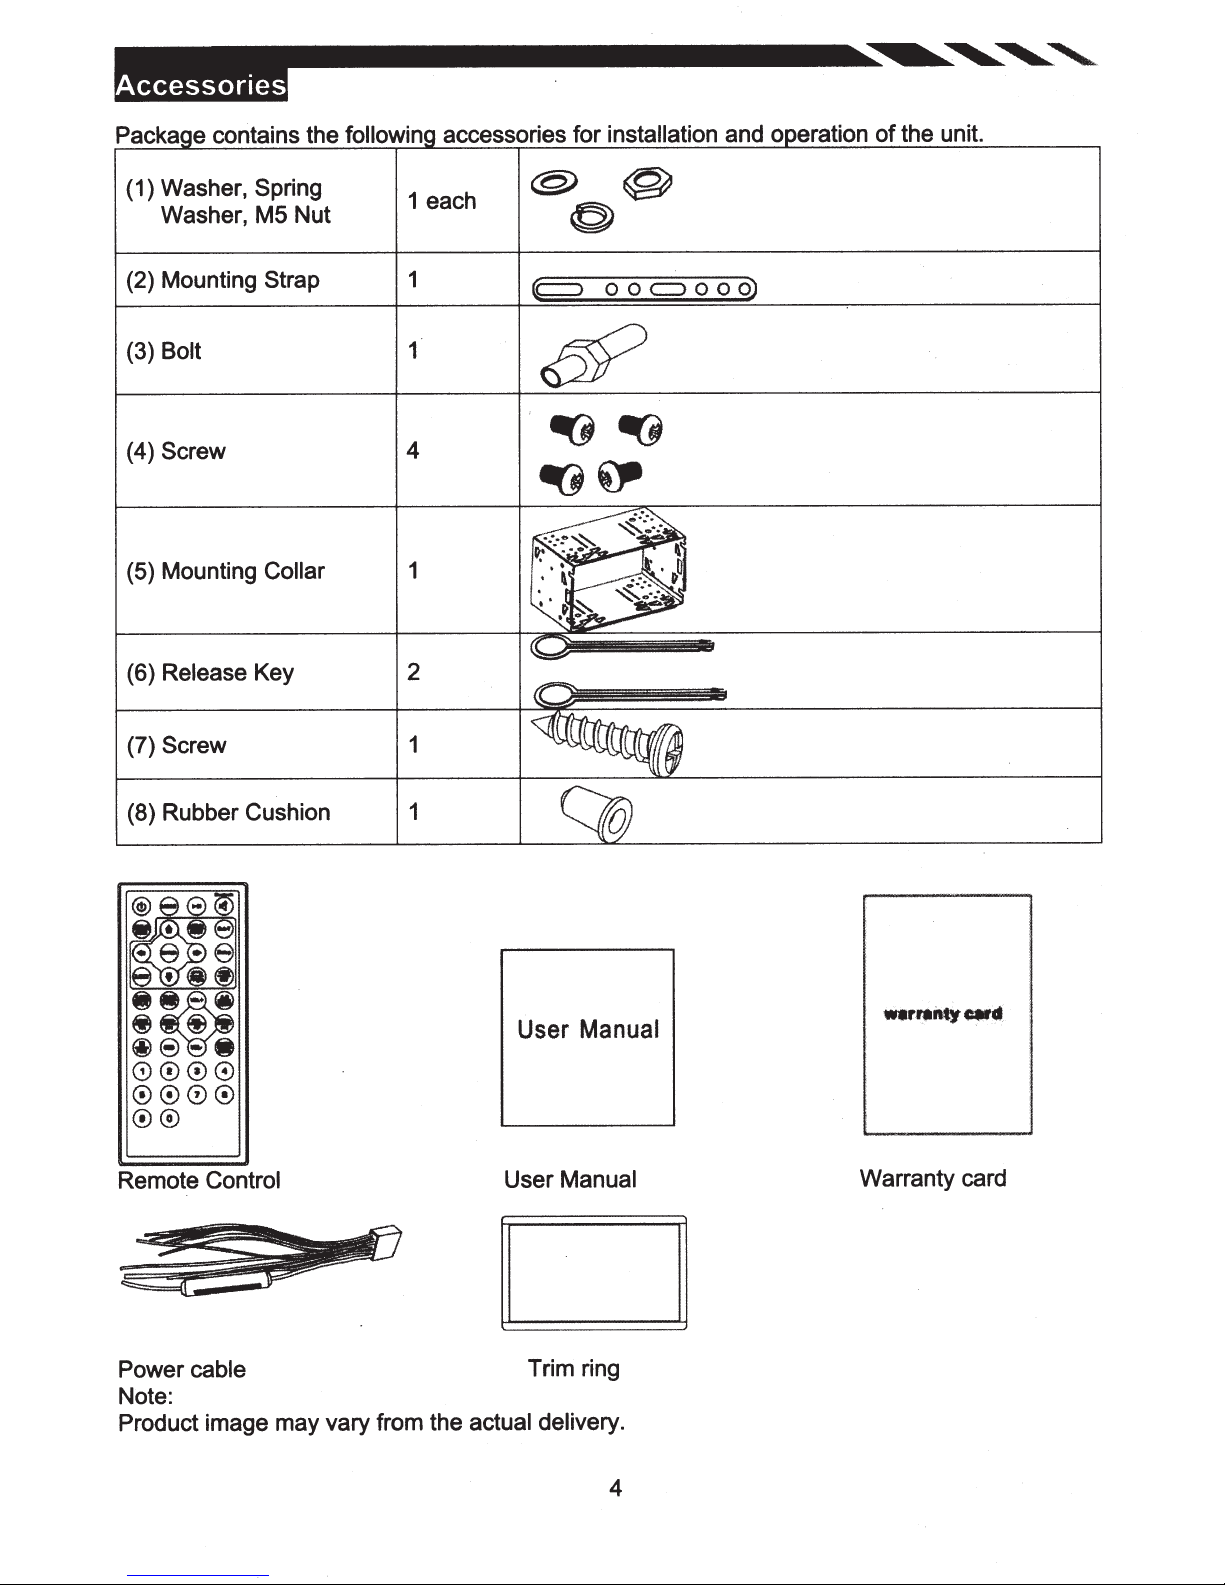
Packa e contains the
followin
accessories for
installation
and o eration of the unit.
(1) Washer,
Washer, M5 Nut
(2) Mounting Strap
Bolt
(3)
(4) Screw
(5) Mounting
(6) Release Key 2
Screw
(7)
Spring
4
Collar
1 each
1
1
1
C::::>
o o
c:::J
o o
o)
(8) Rubber Cushion 1
User Manual
Remote
Power
Note:
Product image may vary from the actual delivery.
Control
cable
User Manual
Trim ring
Warranty card
4
::=:::
-
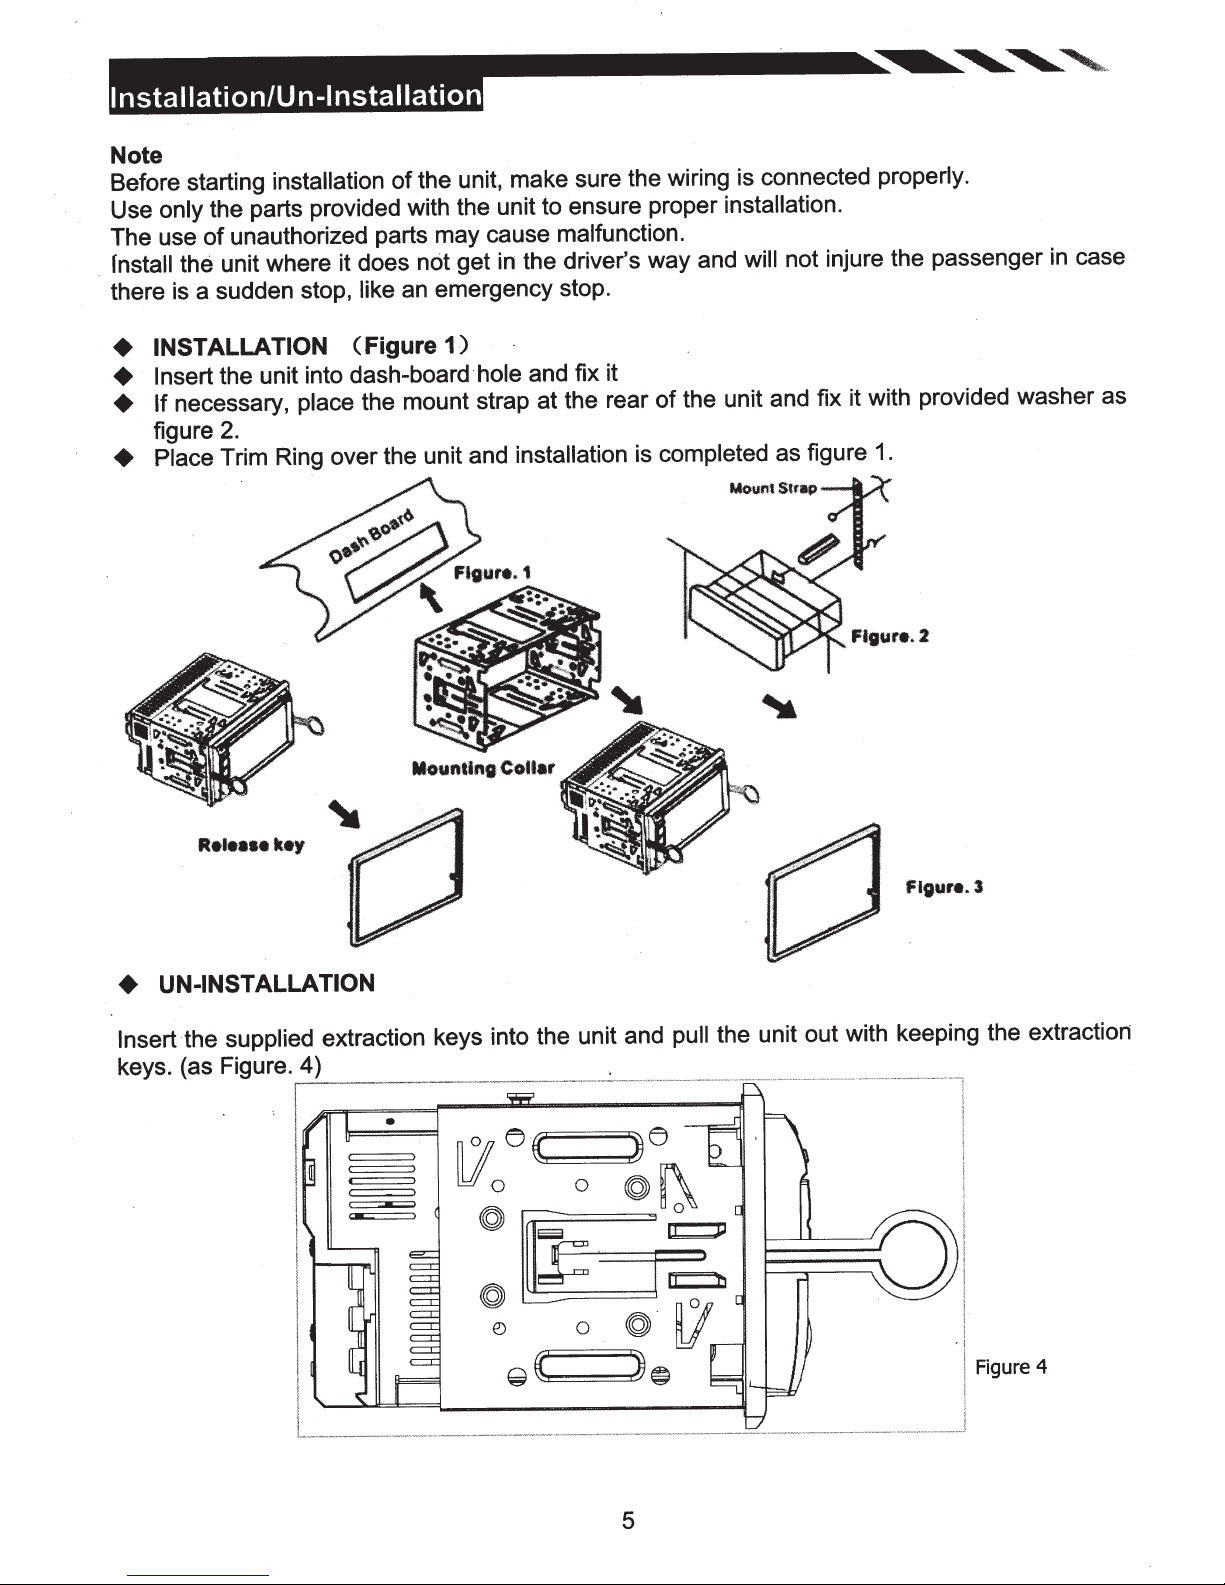
Note
Before starting
Use only
The use
rnstall the
.
there is a sudden stop,
the parts provided with the unit to ensure proper installation.
of
installation
unauthorized parts may cause malfunction .
unit where it does
--------~~~~
of the unit, make sure the wiring is connected properly.
not injure the passenger
will
like
the driver's way and
in
get
not
emergency stop.
an
'
case
in
INSTALLATION
+
Insert the unit into
+
If necessary, place
+
figure
Place Trim Ring over the unit and
+
2.
Rei••••
key
(figure
dash-board·hole
the mount strap at the rear
1)
and fix it
installation
the unit and fix it with provided washer as
of
is completed as figure
1.
Figure.
3
UN-INSTALLATION
+
Insert the
keys. (as Figure.
supplied
extraction keys into the unit and pull
·----------~---~---·~
~------
---·-----
-
-
-
@
€)
~
0
K
5
the
out with keeping the extraction
unit
····~
··
··~·
~-·-
---~
-~------~··
-
Figure 4
-
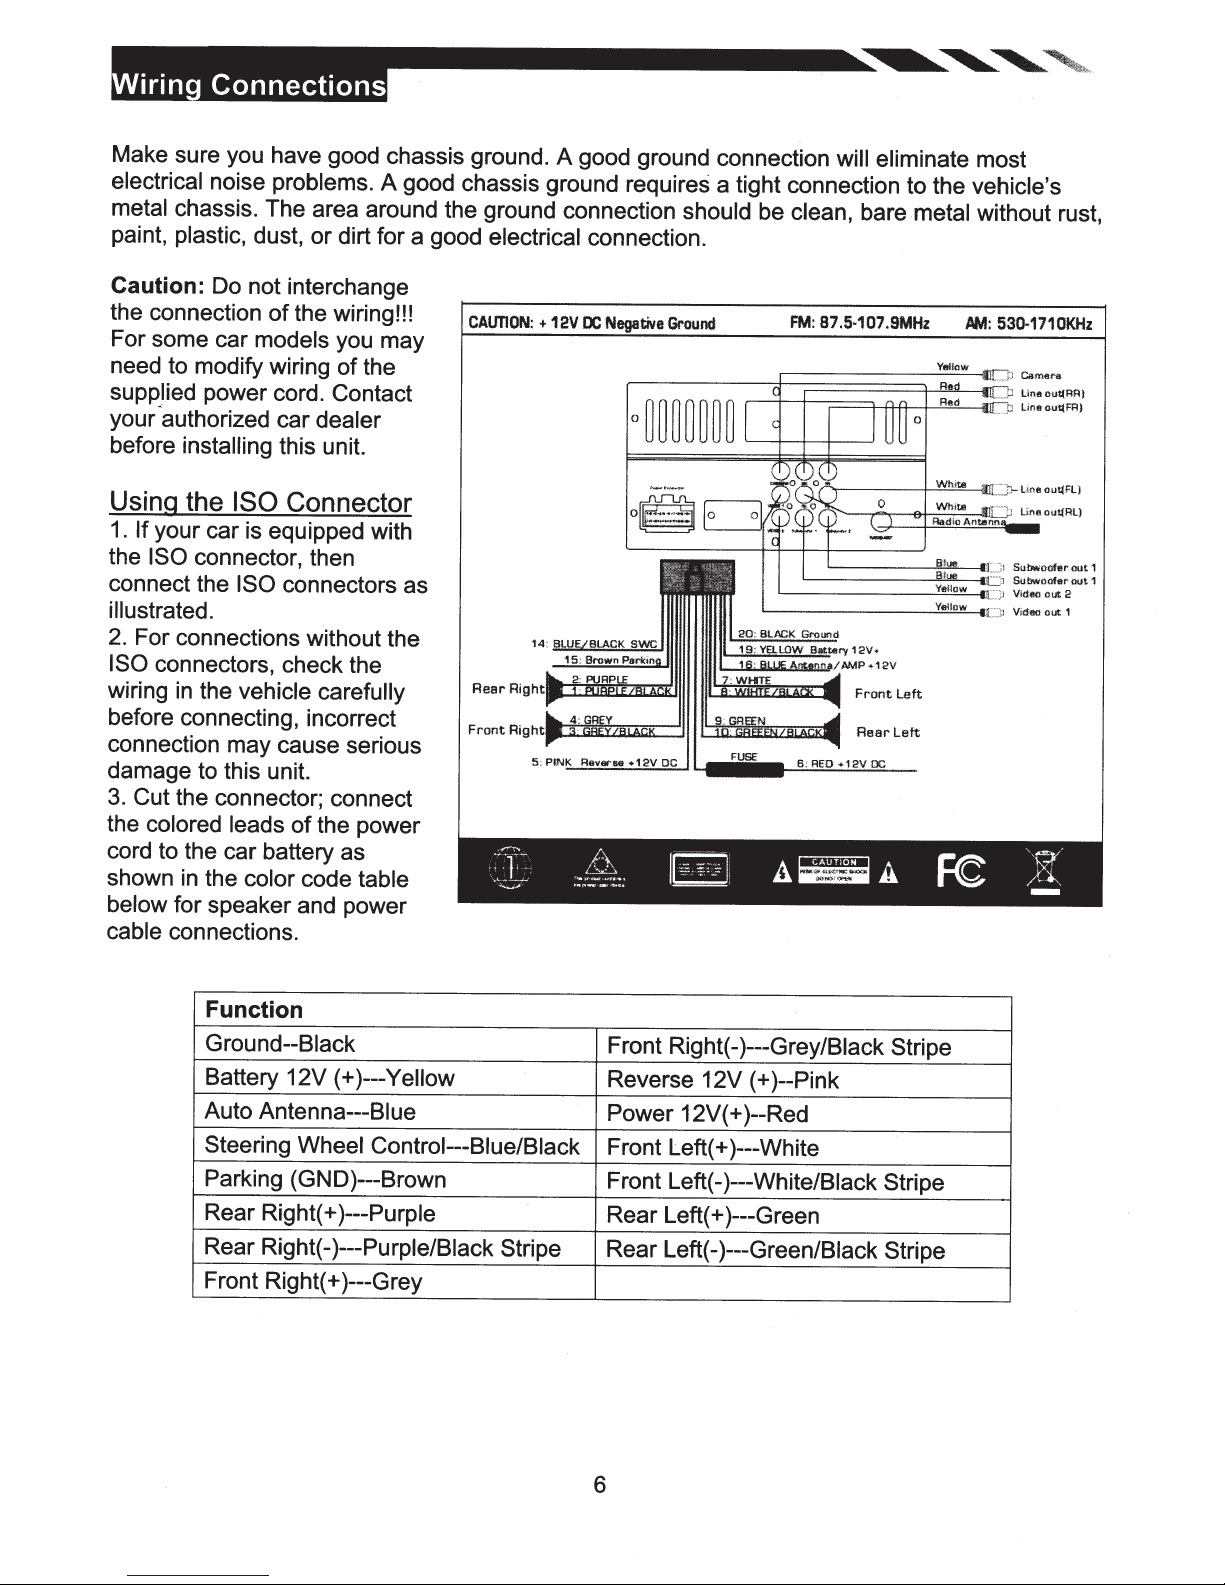
Make sure you have good chassis ground. A good ground connection
electrical
metal
paint, plastic,
Caution: Do not interchange
the connection
For some car
need to modify wiring
supplied power cord. Contact
your ·authorized
before
Using the ISO Connector
1.
If
the ISO connector, then
connect the ISO connectors as
illustrated.
2.
For connections without the
ISO
wiring
before connecting, incorrect
connection may cause serious
damage to this unit.
3.
Cut
the colored leads
cord to the car battery as
shown in the
below
cable
noise problems.
A good chassis ground requires a tight connection to the
chassis. The area around the ground connection
dust,
or
models
installing
dirt for a good
of
the wiring!!!
you may
of
car
dealer
this unit.
the
electrical
CAUTION:
connection.
+
12V
DC
Negative
your car is equipped with
connectors, check the
in
the
vehicle carefully
the connector; connect
of
the power
color
code
table
for speaker and power
connections.
should be
Ground
clean, bare metal
FM:
'---------"'-"""'---411
L-----~:.::::..:!.--l
will eliminate
87.5·
107.9MHz
'-------""=----
Rear
Left
most
vehicle's
without rust,
AM:
530·
1710KHz
l
..
Jl
Subwoofer
·a Subwoofer
i
L
)
Vi
deo
out
2
Video
out
1
out
out
1
1
Function
Ground--Black
Battery 12V (+)---Yellow
Auto
Antenna---Blue
Steering
Wheel Control---Blue/Black
Parking (GND)---Brown
Rear Right(+ )---Purple
Rear Right(-
)---Purple/Black Stripe
Front Right(+ )---Grey
Front Right(- )---Grey/Black Stripe
Reverse 12V (+)--Pink
Power 12V (+)--Red
Front Left(+ )---White
Front Left(-)---White/Biack
Stripe
Rear Left(+ )---Green
Rear Left(-
)---Green/Black Stripe
6
-------------.~~~
~
1
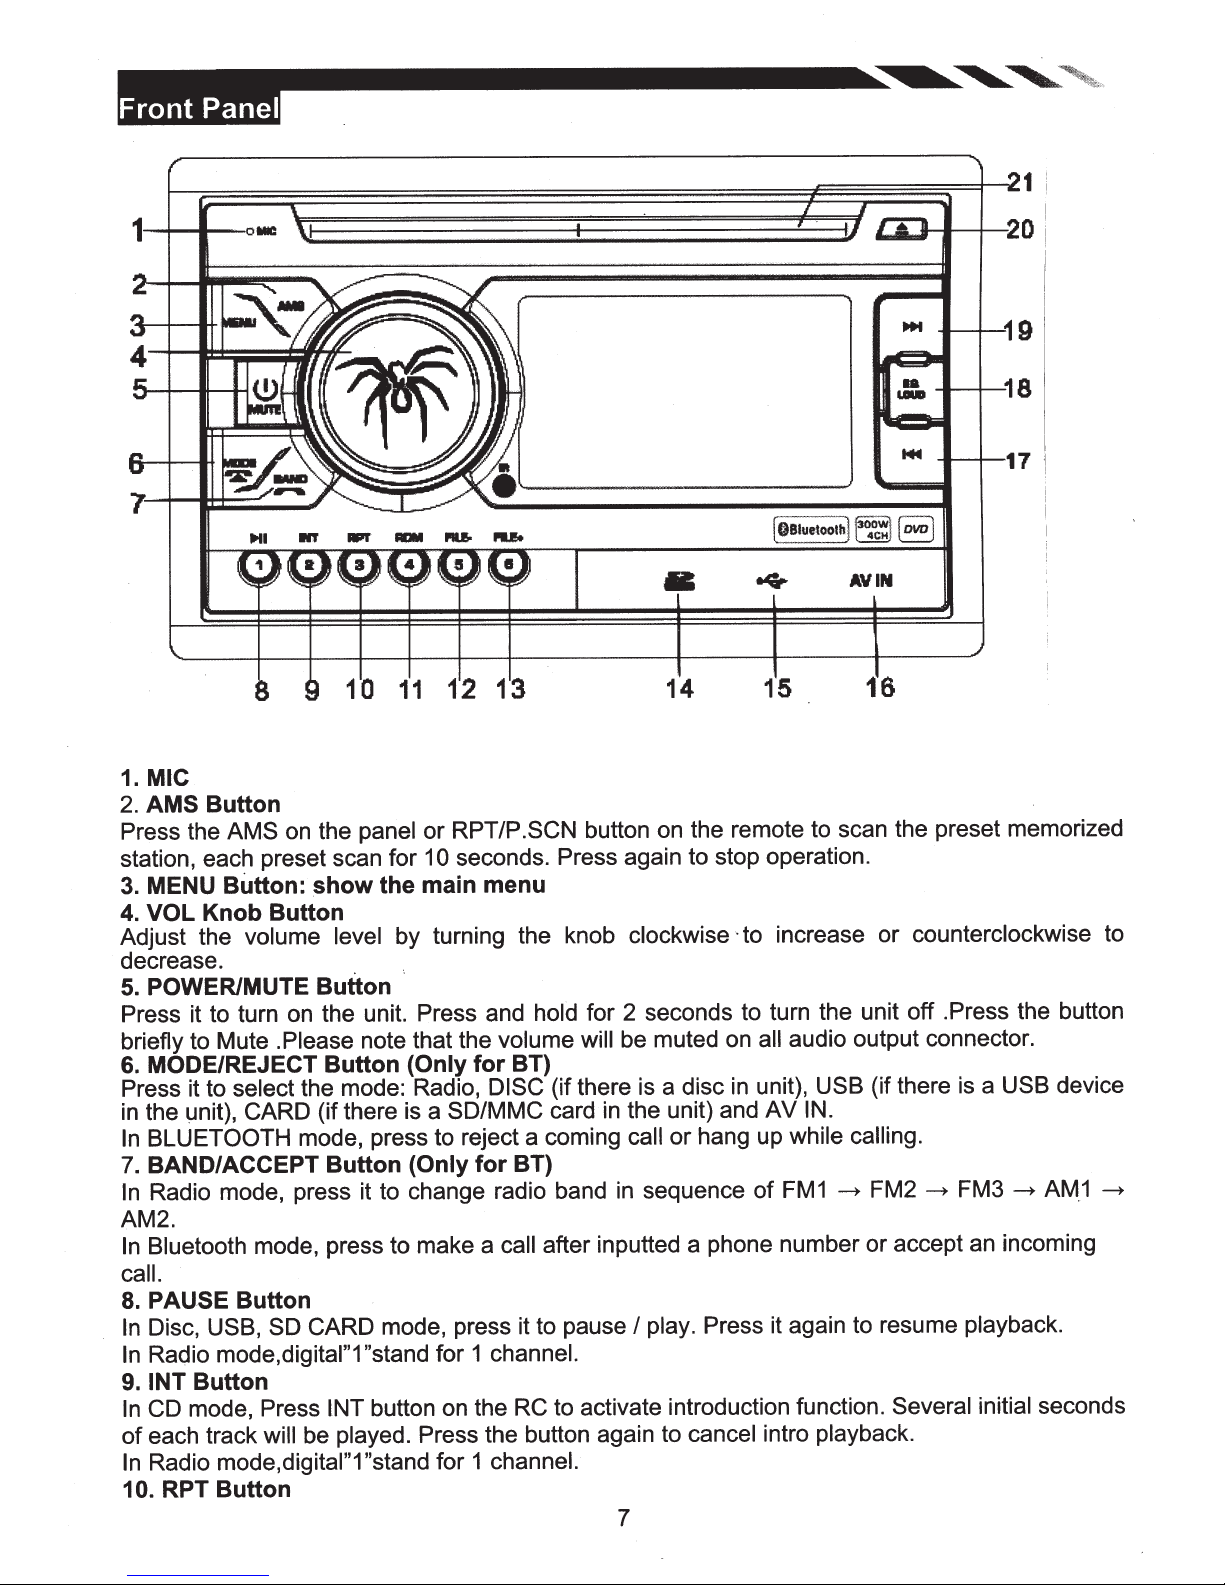
MIC
1.
AMS
2.
Press the
station, each preset scan for 1
MENU
3.
VOL
4.
Adjust the volume
decrease.
POWER/MUTE
5.
Press it to turn on the unit. Press and
briefly to Mute .Please note that the volume
MODE/REJECT
6.
Press it to select the mode: Radio,
the unit),
in
BLUETOOTH mode, press to reject a coming
In
BAND/ACCEPT
7.
Radio mode, press it to change radio band
In
AM2.
Bluetooth mode, press to make a
In
call.
PAUSE
8.
Disc, USB,
In
Radio
In
INT
9.
CD
In
each track
of
Radio
In
10. RPT
OIIIC
10
Button
on the
AMS
Button:
Knob
Button
mode, Press
Button
CARD
Button
SD CARD
mode,digital"1 "stand
will
mode,digital"1 "stand
Button
panel
show
level
Button
Button
(if there is a
Button
INT
be played. Press the button again to cancel intra playback.
13
12
11
RPT/P.SCN
or
0 seconds. Press again to stop operation.
main
the
by turning the knob
(Only
(Only
mode, press it to pause
button on the
menu
hold
BT)
for
DISC
SD/MMC
for
for 1
for 1 channel.
(if there is a disc
card
BT)
after inputted a phone number or accept an incoming
call
channel.
to activate introduction function.
RC
......,..._...-19
....,__-t--17
AVIN
•
14
button on the remote to scan the preset memorized
clockwise ·to increase or counterclockwise to
for 2 seconds to turn the unit off .Press the button
will be muted on
the unit) and
in
call or hang up
sequence
in
Press it again to resume playback.
play.
I
7
15
audio output connector.
all
unit), USB
in
IN.
AV
while calling.
FM1
of
16
(if there is a
FM2
~
Several
USB device
FM3
~
initial seconds
~
AM.1
~
During DVD file playback, press the RPT button on the panel show: RPT
-----------------~~~~
playing type or RPT/P.SCN button on the remote to scan the preset memorized station, each
preset scan for 10 seconds. Press again to stop operation.
In
Radio mode,digital"3"stand for 3 channel.
11.
ROM
During DVD file playback, long press
to set random playback on or off. During USB/SO CARD file playback, long press
the RC or BAND button on the front panel to select: RANDOM
RANDOM OFF.
In
Radio mode,digital"4"stand for 4 channel.
12. FILEIn
USB,SD mode to select a file to play on
In
Radio mode,digital"5"stand for 5 channel.
13. FILE+
In
USB,SD mode to select next a file to play on
In
Radio mode,digital"6"stand for 6 channel.
14. IR
IR Remote control signal receiving window. Max distance is 6-8 meters, 45 angels.
Button
Button
Button
Sensor
ROM
button on the RC
or
BAND button on the front panel
DIR~RANDOM
1-+RPT
ROM
ALL,cycle
button on
ALL-+
15. LCD SCREEN
16. SD/MMC CARD
SD/MMC card slot, for Multimedia playback files only. Insert a SD/MMC CARD into this slot and
the unit will automatically start reading and playback the card. * Supported Music File Format:
MP3, WMA Files.
17. USB
USB slot, for Multimedia playback files only. Insert a USB into this slot and the unit will
automatically start reading and playback· the card. * Supported Music File Format: MP3,
Files.
18.
Put the AV plug into the AV-IN jack which was marked on front panel.
19.
In
RADIO mode, press to start automatic searching, press and hold for two seconds to start
manual searching, then press to tune each frequency step downward.
In
DVD I SD I USB mode, press
hold for two seconds to activate fast reverse (REW) search
20. LOUD
Press the button show the SOUND setting, and rotating the VOL Knob to select and choose.
21
.
In
Radio mode, press to start automatic searching, press and hold for two seconds to start
manual searching, then press them to tune each frequency step upward.
In
DVD I SD I USB mode, press
two seconds to activate fast forward (FF) search
22. EJECT
Press to eject a disc. If the disc is not removed for about 1 0 seconds after eject, the disc is
reinserted automatically.
23. LCD SCREEN
slot
AV-in
J-4~
._~J.J
Jack
Button
Button
Button
Button
slot
H~
button to skip to the previous track. Press H .. button and
in
a track
.,
....
button to skip to the next track. Press
in
a track.
.,
....
button and hold for
WMA
NOTE: When turn off the power, the unit will switch to standby mode
The power light will continue lighting.
8
unle~s
cut the ACC power.
~--------------------~~~~
~
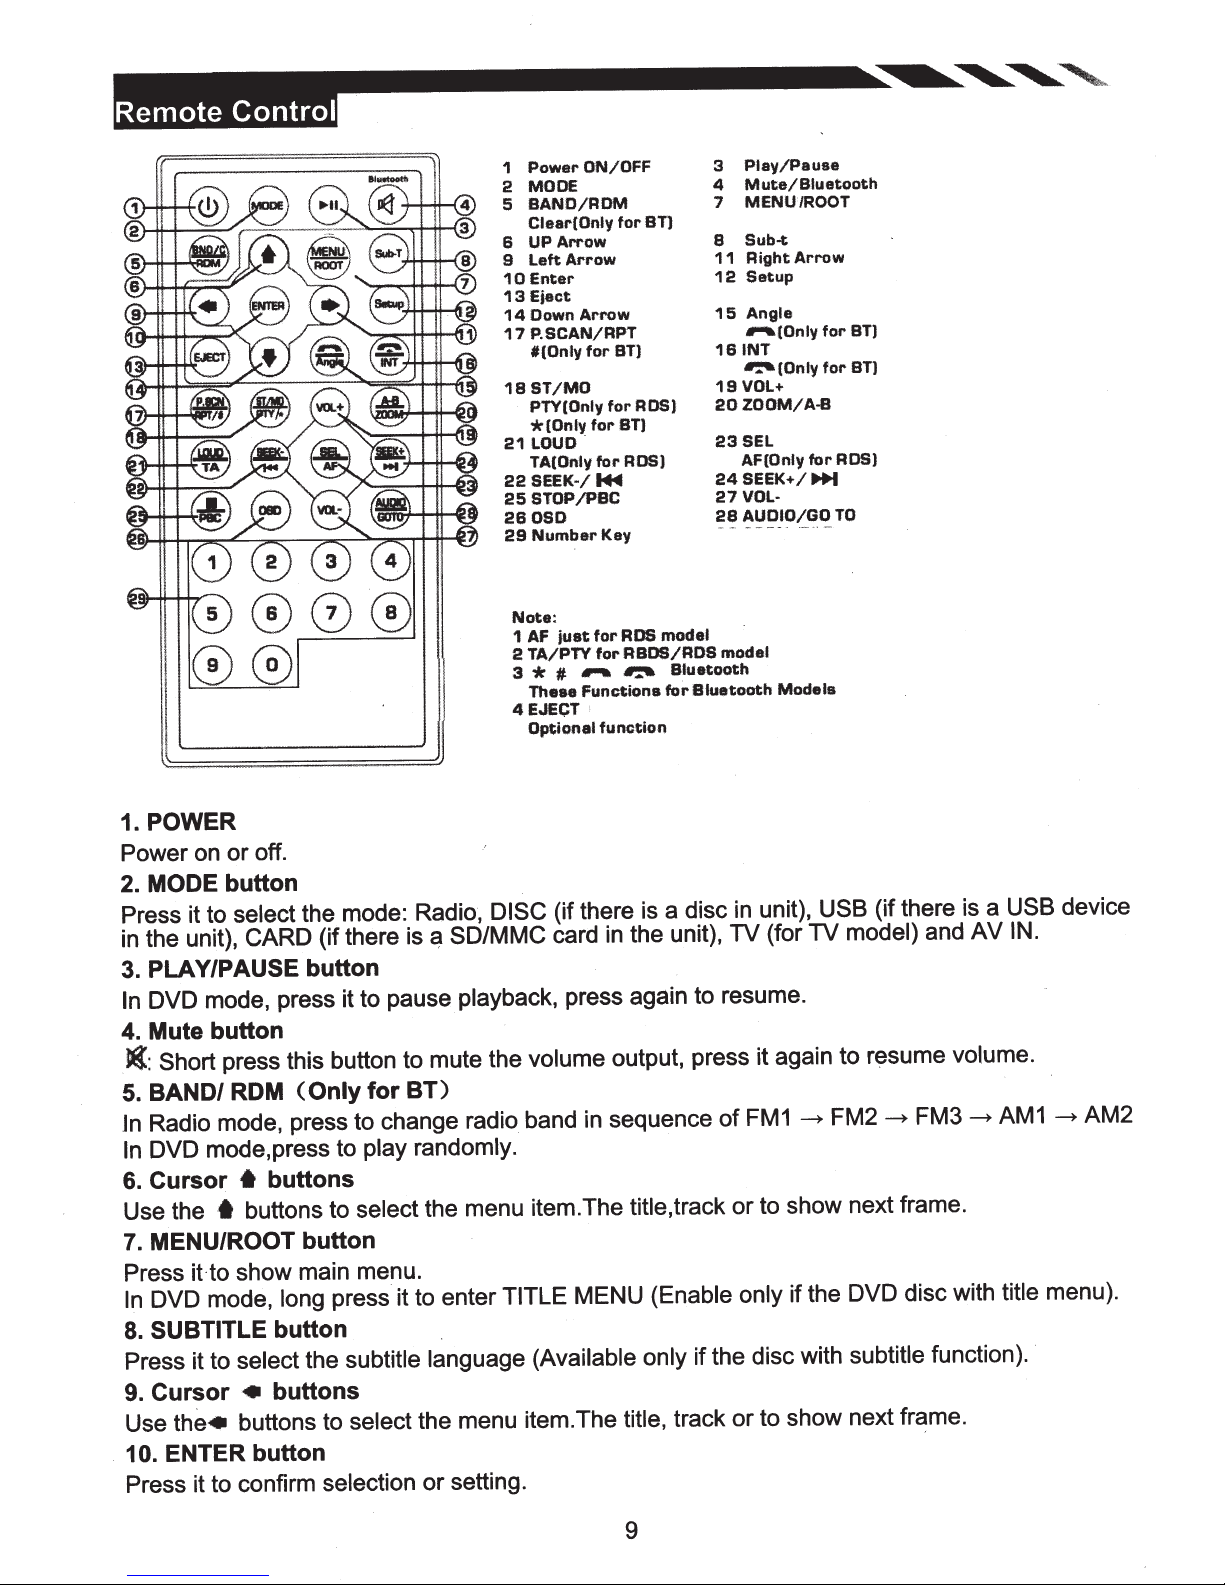
Play/Pause
ON/OFF
Power
1
2 MODE
BAND/ROM
5
Ctear(Only
UPArrow
6
Left
9
Enter
10
Eject
13
Down
14
P.SCAN/RPT
17
t(Only
ST/MO
18
PTY(Only
*(Only
21LOUO.
TA(Only
22SEEK·/~
STOP/PBC
25
260SD
Number
29
Arrow
Arrow
for
forST)
for
Key
for
BT)
for
an
ADS)
ADS)
3
Mute/Biuetooth
4
MENU/ROOT
7
Sub-t
8
11
12
15
161NT
19
20ZOOM/A-B
23SEL
24SEEK+/
27
28
Arrow
Right
Setup
Angle
...-.(Only
~(Only
VOL+
AF(Only
VOL·
AUDIO/GO
for
...
for
for
ADS)
TO
an
BT)
~
000
0®
POWER
1.
Power on or off.
MODE
2.
Press it to
the unit),
in
PLAY/PAUSE button
3.
DVD mode, press it to pause
In
Mute button
4.
Short
Jat:
BAND/
5.
Radio mode, press to change radio band
In
DVD mode,press to
In
Cursor
6.
Use the
MENU/ROOT button
7.
Press
DVD mode,
In
SUBTITLE
8.
Press it to
Cursor
9.
Use
10.
.
Press it to confirm
button
select
CARD
the mode: Radio,
(if there
is~
DISC
SD/MMC
playback,
press this button to mute the volume output, press it again to resume volume.
BT)
ROM
(Only
for
play randomly.
• buttons
buttons to select the menu item.The title,
·t
show main menu.
it-to
press it to enter
long
button
language (Available only
the menu item.The title, track or to show next frame.
the•
select
•
the subtitle
buttons
buttons to
select
ENTER button
selection
or setting.
Note:
1 AF
TA/PTY
2
*
3
These
EJECT
4
Optional
for
just
...-.
#
Functions
for
function
(if there is a disc
in
card
press again to resume.
sequence
in
TITLE
MENU
model
RDS
RBDS/ADS
~
the unit), TV (for TV
model
Bluetooth
Bluatooth
for
of
in
FM1
Models
unit),
~
USB
model)
FM2
track or to show next frame.
(Enable only
if the DVD disc with title menu).
if the disc with subtitle
(if there is a
AV
and
~
FM3
~
function).
USB device
IN.
AM2
~
AM1
9
 Loading...