

Page 1
Operating manual
7" Wide Touch Screen
In-Dash Fully Motorized TFT Monitor /DVD/AM/FM
Page 2

1
SAFETY INFORMATION
PLEASE READ COMPLETELY AND BECOME FAMILIAR WITH THE CONTENTS
OF THIS MANUAL BEFORE INSTALLATION AND OPERATION OF THIS UNIT,
AND KEEP IT CAREFULLY FOR FUTURE REFERENCE.
This unit is a class 1 laser product. The laser beam may cause hazardous
radiation if exposure to laser system directly. Do not attempt to disassemble the
unit personally.
This unit has been designed and manufactured to assure personal safety. Improper
use can result in electric shock or fire hazard. The safeguards incorporated in this
unit protect you if you observe the following procedures for installation, use and
servicing. This unit doesn't contain any parts that can be repaired by the user. If the
unit requires maintenance, contact an authorized service center.
Warnings
-Do not expose the product to rain, water or excessive moisture. This could cause
electrical shorts, fire or other damage.
-This product is designed to operate with a 12 volt DC, negative ground battery
system. Use the proper power supply.
-The monitor is operated automatically. Do not push in or pull out the monitor or try to
reverse the monitor manually! Do not attempt to adjust the monitor angle upward or
downward manually. It will cause damage to the Monitor Mechanism Structure.
-Do not impact the monitor with a hard object. It may cause permanent damage.
-Do ground all equipments and works in order to avoid causing damage to the unit
by electrostatic discharges.
-The user who handles this product takes all necessary precautions to avoid ESD
(Electro-Static Discharge) failures.
-Do not attempt to install or service your unit by yourself. Installation or servicing of
the unit by persons without training and experience in electronic equipment and
automotive accessories may be dangerous and could expose you to the risk of
electric shock or other hazards.
Page 3

2
Cautions:
To reduce the risk of fire or electric shock, and annoying interference, use only the
recommended accessories.
While driving, keep the volume level low enough to be aware of road and traffic
conditions.
Parking in direct sunlight can produce very high temperatures inside your vehicle.
Give the interior a chance to cool down before starting playback.
Do not use any chemical solvent, cleaning agent or corrosive detergent to clean
away dirt on the surface of the TFT monitor screen. It may cause irreversible damage.
Small black and shiny dots inside the liquid crystal panel are normal for liquid
crystal product.
In extremely cold temperatures, the movement of the picture may be slow and the
picture may be dark, but this is not a malfunction. The unit will work normally once
reach its operating temperature.
Do not use and store the unit in dusty, high temperature and high humidity
environments.
Do not use the unit immediately when you bring it from cold to warm place. Fast
growing temperature, may cause moisture condensing which influence the unit for
certain time.
NOTE:
This user's manual only for reference.
Modifying rights are reserved.
Modifications are subject to change without notice.
Page 4

3
FEATURES
- Fully Motorized Screen Telescopes Out And Up Including Front To Back Angling
- (Optional) Navigation Black Box Module With Navteq Maps Of North America
- Drop Down Detachable Front Panel For Invisible DVD Insertion Slot
- Electronic Touch Screen Functions Include DVD, Radio, USB, & MP-3/4
- Front Panel Display When The Monitor Is Closed
- Electronic Touch Screen Functions Include OSD Functions
- DVD/DVD-RW/CD/CD-R/CD-RW/MP-3/MP-4/Divx
- Menus Can Be Displayed On Screen Via OSD (Fourteen Languages)
- 30-Second Electronic Anti-shock Mechanism
- Accessory iPod Input Connection (Cable Not Included)
- USB Mini Input For Mp-3 Music, Divx, Xvid & Mp-4 Movies
- IR Repeater For External Remote Eye
- Antenna Trigger Wire
- Amplifier Trigger Wire
- Brake Screen Safety Trigger
- AM/FM With 30 Pre-sets (18/FM - 12AM)
- Auto Store Pre-set Scan
- 4-Channel High Power 50 X 4 Channels (Mosfet Power)
- Dual RCA Outputs (Front & Rear)
- Sub Woofer Selectable Frequency Outputs (80, 120, 160Hz)
- Variable Sub Woofer Volume Control
- 1-Auxiliary Video Input For Back-up Camera
- 1-A/V In For Secondary Source Input
- 1-RCA Video Output
- LO/DX And Stereo Mono Selector Switch
- Electronic (Bass, Treble, Volume, Balance, Fader)
- Pre-set EQ Functions (Rock, Pop, Classic, Jazz, User)
- Digital Clock
- DVD, PAL/NTSC Selectable
- USA/EUROPE Frequency Stepping
- Resolution: 1440 X 234
- Panel Brightness: 350 NIT
- ISO/DIN
- Full Function Remote Control
- Last Position DVD Memory
- Improved Graphic User Interface
Page 5

4
TABLE OF CONTENTS
Safety Information………………………………………………….………………………1
Features……………………………………………………………….………………………3
Table of Contents…………………………………….…………….………………………..4
Accessories………………………………………….…….………………………………….5
Unit Installation………………………………………….….………………………………6
Unit Removal…………………………………………….…….……………………………..8
Wiring Connection…………………………………………..……………………………….9
Front Panel………………………………………………………..…..……………………12
Remote Control……………………………………………………………………………17
Basic Operation……………………………………………………………………………22
Touch Screen Operations…………………………………………………….……………24
Touch Screen Calibrate……………………………………….………………………24
Main Menu…………………………………………………….………………………25
Radio Operations…………………………………………………….……………….26
DVD Operations…………………………………………………….……………….28
USB Operations…………………………………………………….………………..31
iPod Operations…………………………………………………….………………..32
AV IN Operations…………………………………………………….………………34
AUX Operations…………………………………………………….………………35
NAVI Operations…………………………………………………….…………….…36
System Setup…………………………………………………….……………….……40
DVD Setup Menu……………………………………………………………….………..…44
Troubleshooting………………………….……………………………………….….…...50
Specifications…………………………………………………………………………….....53
Disc Notes…………………………………………………………………………………...54
Page 6
5
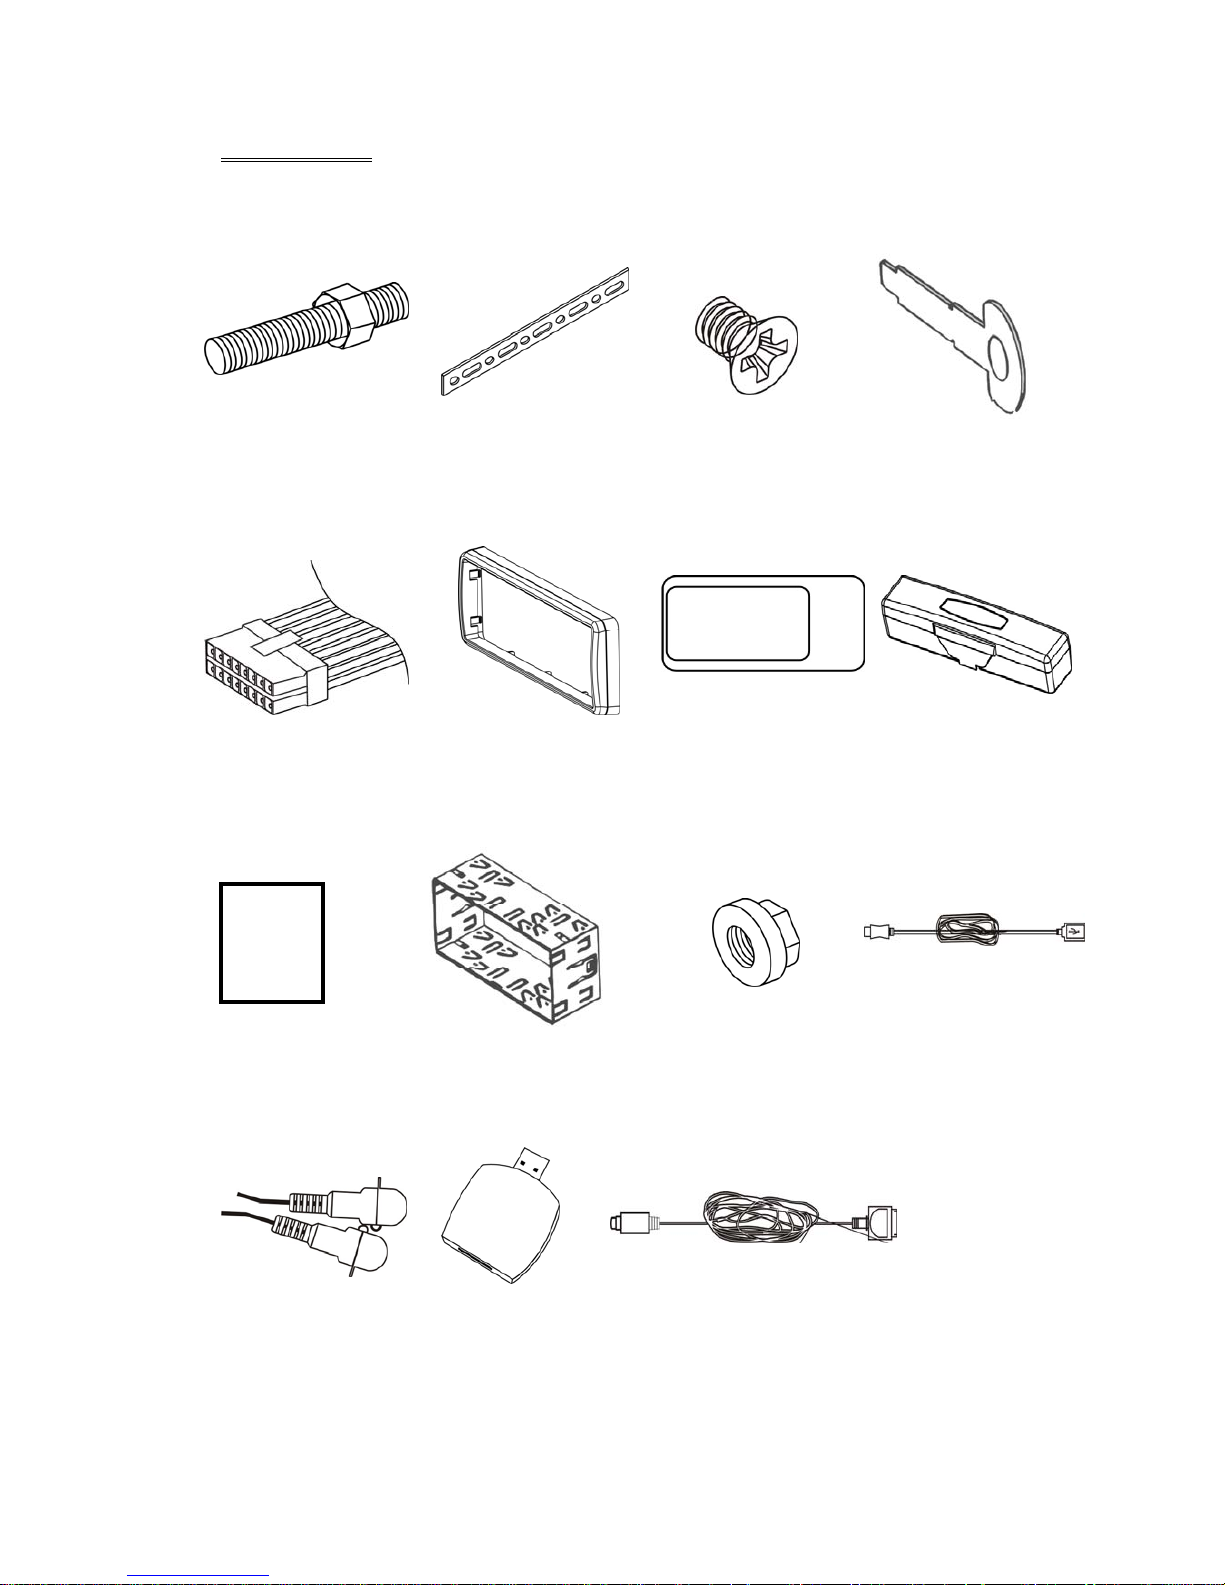
ACCESSORIES
Bolt Steel Bar x 1 M5X5 Screws x 4 Keys x 2
Connecter Wire x 1 Trim Bezel x 1 Remote Control x 1 Box x 1
Operational Manual x 1 Mounting Sleeve x 1 Nut M5 x 1 USB Cable x 1
AUX Cable x 1 SD Card Adapter x 1 iPod Cable x 1(option)
1 2 3
5 6
8
9 10
11
13 14 15
12
4
7
Page 7

6
UNIT INSTALLATION
Please read all of the instructions before beginning the installation. Recommend
having your unit installed by a professional installation shop.
Tools and Supplies:
You will need these tools and supplies to install your unit:
- Torx type, flat-head and Philips screwdrivers
- Wire cutters and strippers
- Tools to remove existing radio (screwdriver, socket wrench set or other tools)
- Electrical tape
- Crimping tool
- Volt meter/test light
- Crimp connections
- 16 gauge wire for power connections
- 8 gauge speaker wire
Warnings:
Choose the mounting location where the unit will not interfere with the safe driving
conditions.
Install the unit where it does not get in the driver's way and can not injure the
passenger if there is a sudden stop, like an emergency stop.
Avoid installing the unit where it would be subject to high temperature, such as from
direct sunlight, or from hot air, from the heater, or where it would be subject to dust,
dirt or excessive vibration.
Cautions:
Before finally installing the unit, connect the wiring temporarily and make sure it is all
connected up properly, the unit and the system work properly.
Use only the parts included with the unit to ensure proper installation. The use of
unauthorized parts can cause malfunctions.
Consult with your nearest dealer if installation requires the drilling of holes or other
modifications of the vehicle.
If installation angle exceeds 30 degrees from horizontal, the unit might not give its
optimum performance.
Page 8
7
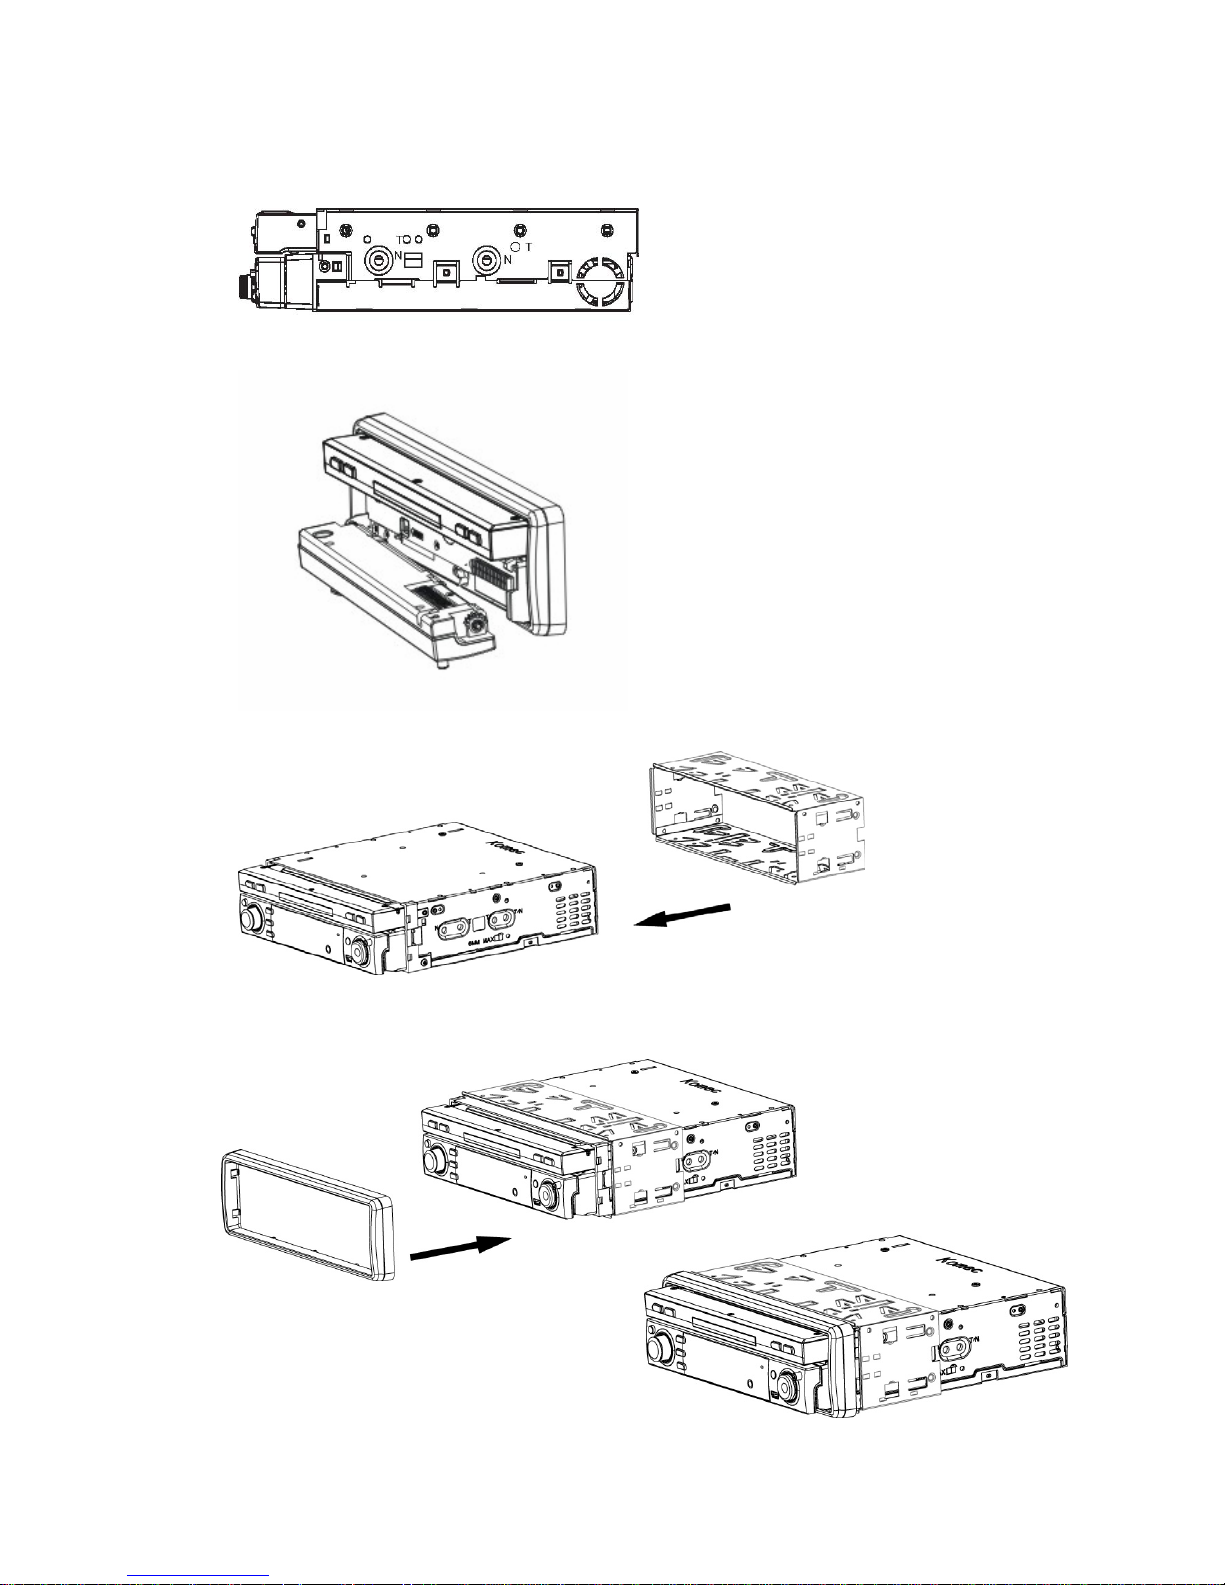
● Securing the Unit to the Mounting Bracket.
Installation Method
1. Install the front panel into the unit.
2. Bend the claws outward for tight fit, if necessary. Install the Mounting Box into the
dashboard, tighten the unit in place.
3. Install the Frame to the unit.
Page 9
8
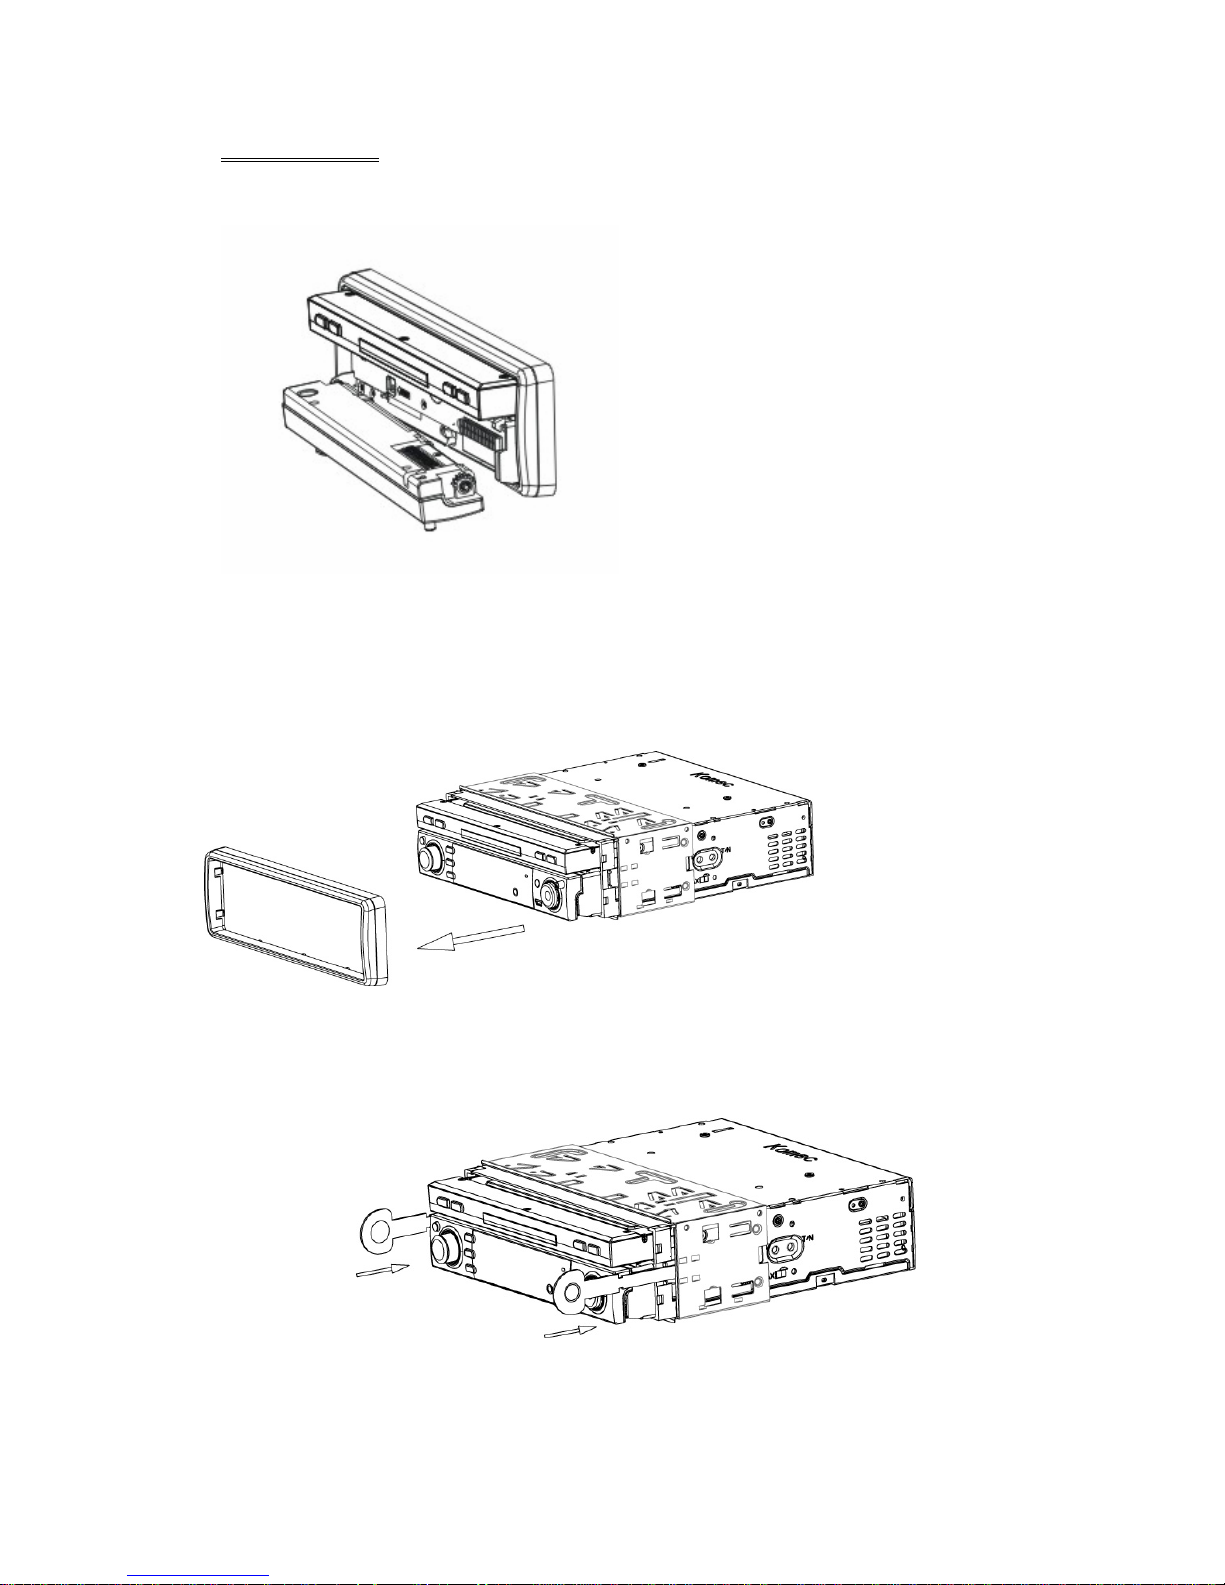
UNIT REMOVAL
1. Detach the front panel.
2. Insert the keys that supply to the unit at both sides of the unit (shown as illustrated)
until pull the keys to make it possible to remove the unit from the dashboard.
Page 10

9
WIRING CONNECTION
Cautions:
-To prevent short circuits, remove the key from the ignition and disconnect the
terminal of the battery.
-Make the proper input and output cable connections for each unit.
-Connect the wiring harness cables in the following order: ground wire, battery wire,
ignition wire.
-Reconnect the terminal of the battery.
-Do not connect the yellow wire of this product directly to the battery terminal.
-Do remember to connect the red wire of this product to the ACC. of the ignition key
switch. Failure to do may result in draining off the battery charge prematurely.
-If the fuse blows, first make sure that the cables have not caused a short circuit, then
replace the old fuse with new one with the same rating.
-Do not let unconnected cables or terminals touch the metal on the car or other
conductor.
-To prevent short circuits, do not remove the caps form unused terminals or from the
ends of the unconnected cables.
-After the monitor unit is installed, check whether the brake lamps, blinkers, wiper, etc.
on the vehicle are working properly. If not, please make sure they are proper installed.
-Insulate unconnected wires with vinyl tape or other similar material.
Disconnecting the Battery
To prevent a short circuit, be sure to turn off the ignition and remove the negative (-)
battery cable prior to installation.
Reconnecting the Battery
When wiring is complete, reconnect the battery negative terminal.
Warning:
Be sure to use the correct type and amperage Fuse to avoid damaging the unit.
Fuse of the Battery wire in Main Unit: 1 amp;
Fuse of the ACC wire in Main Unit: 1 amp;
Page 11
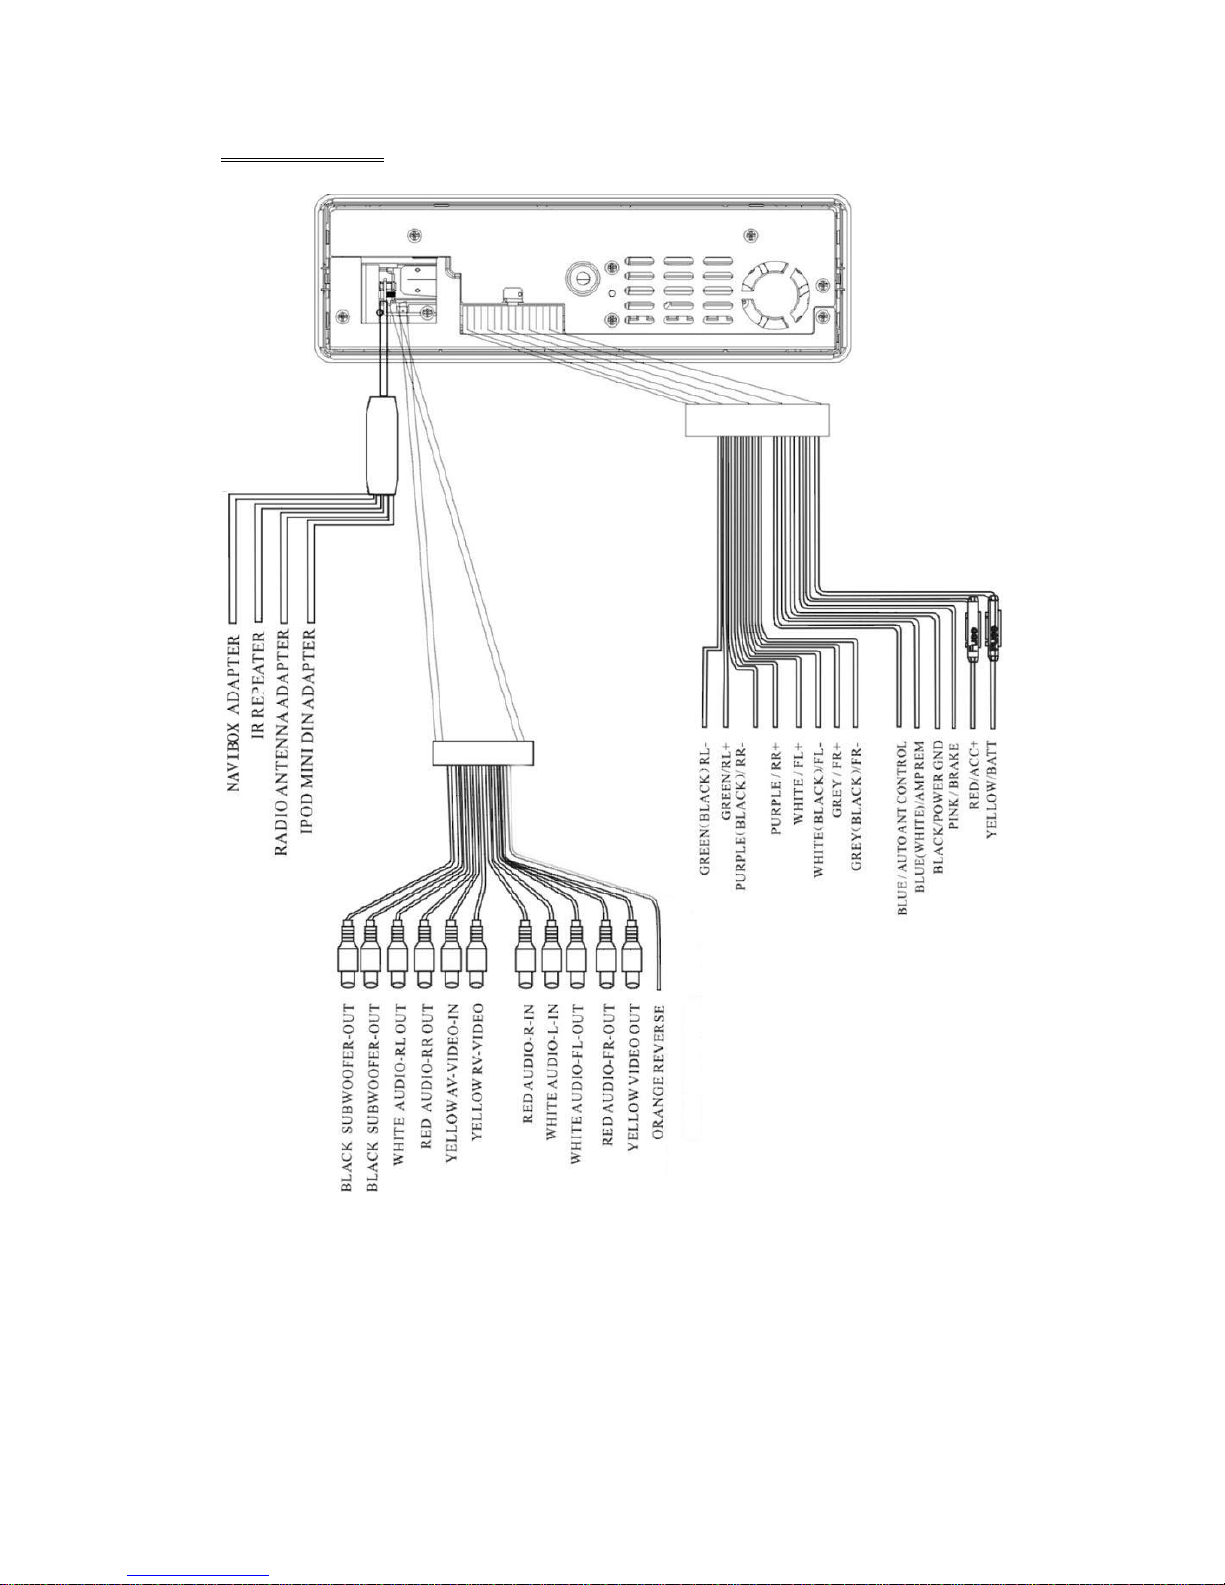
10
Wiring Diagram
NOTE:
Please separate Battery Units before setting products to prevent from fire and electric
shock. Mounting the antenna near to a radio antenna will result in noise. In this case,
consult your dealer concerning mounting location.
Page 12
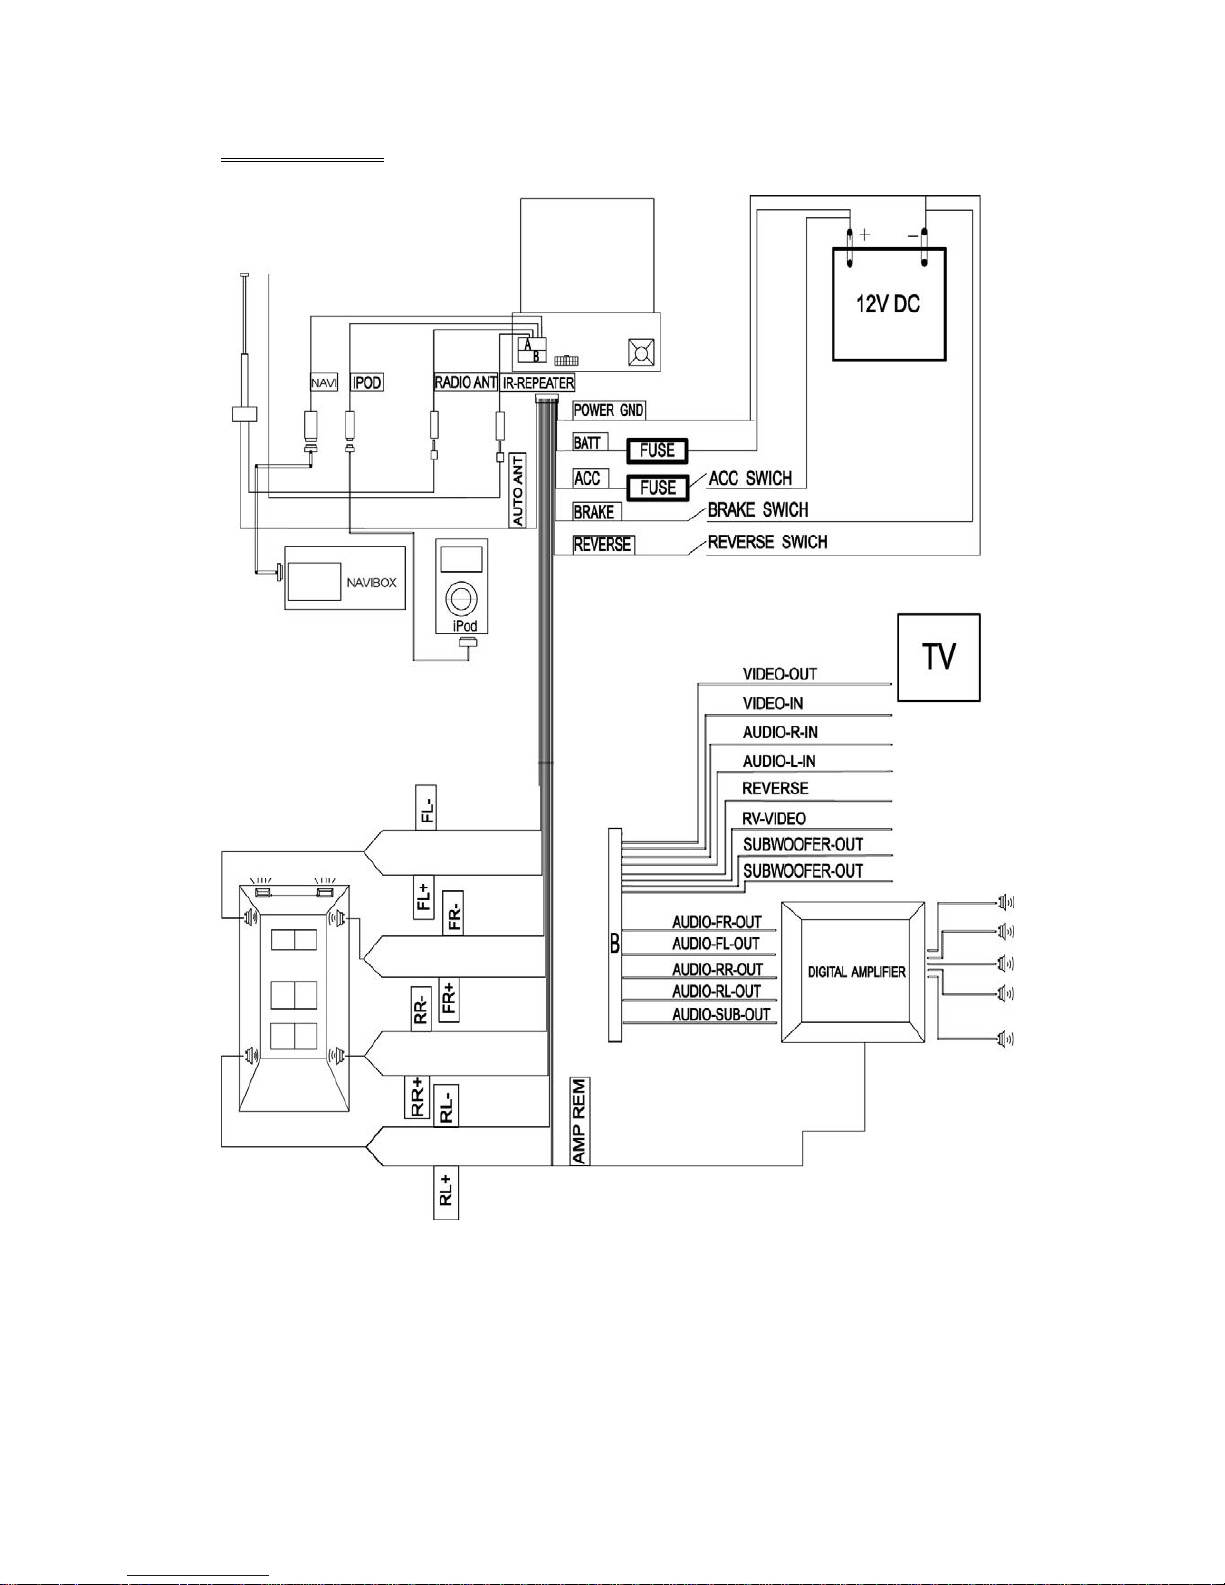
11
Wiring Diagram
Page 13
12
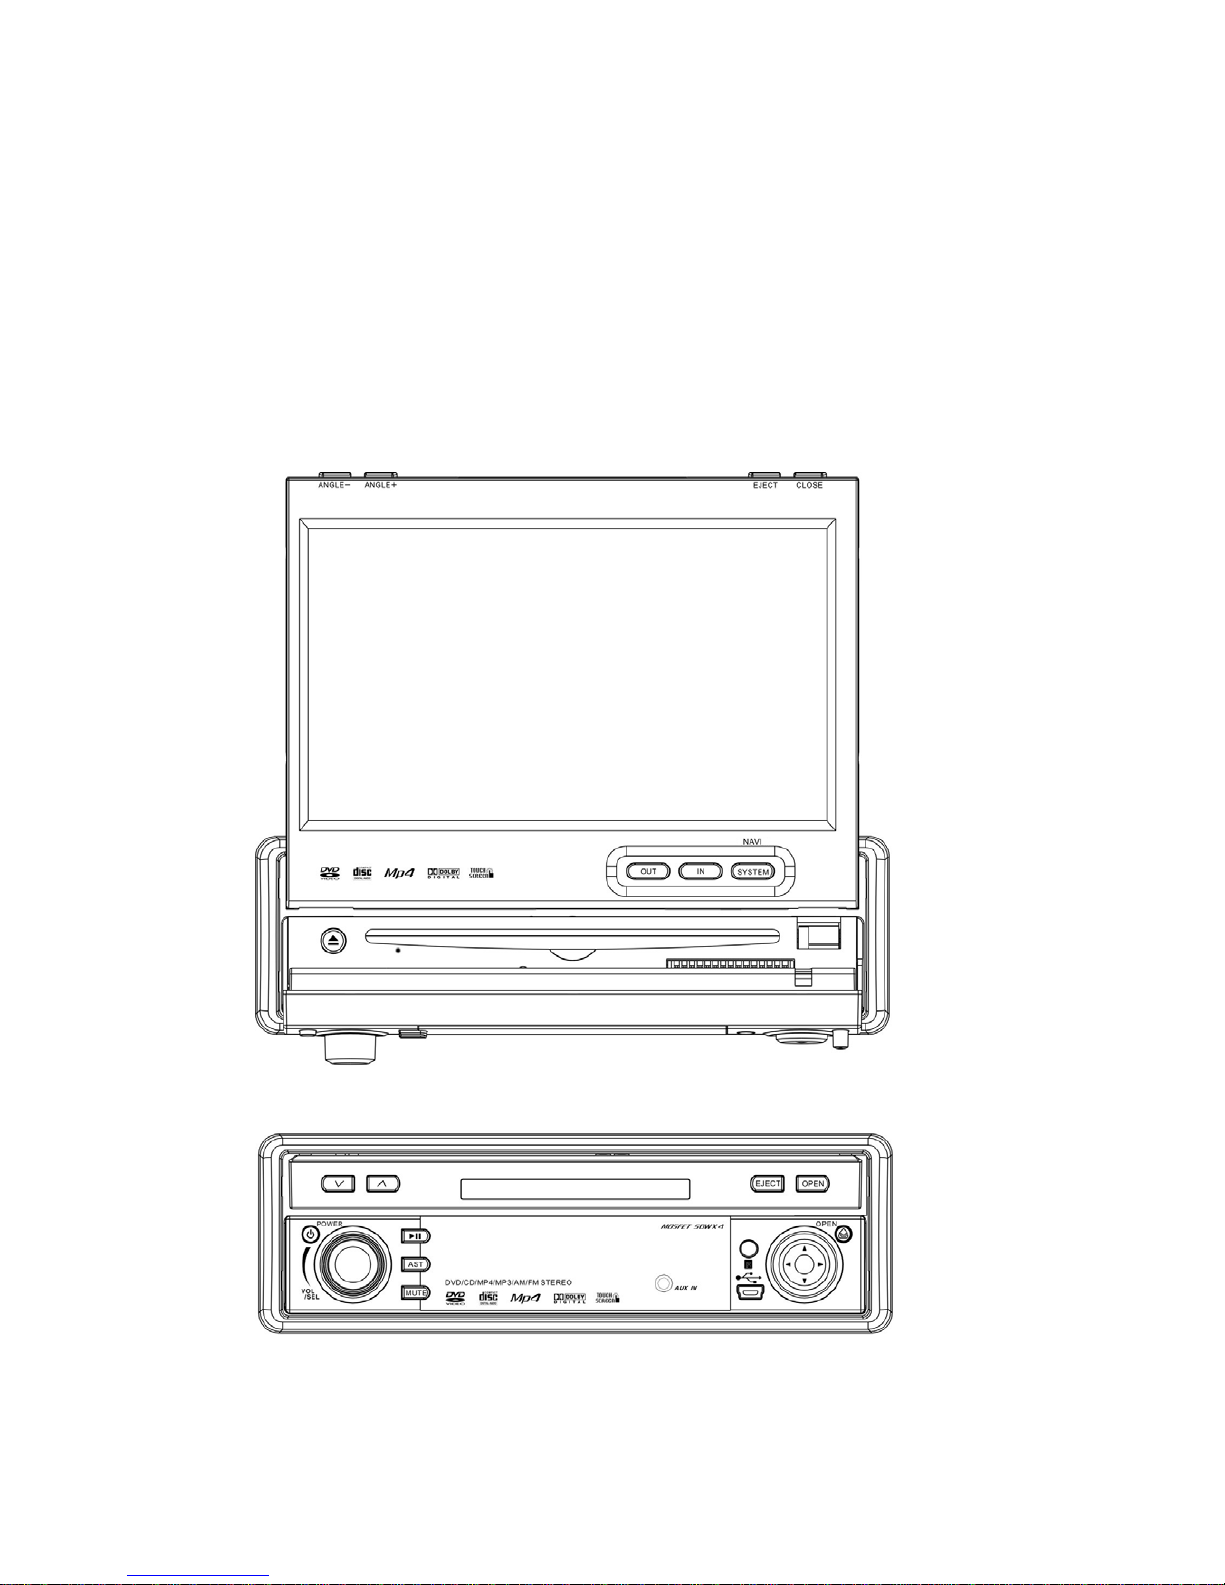
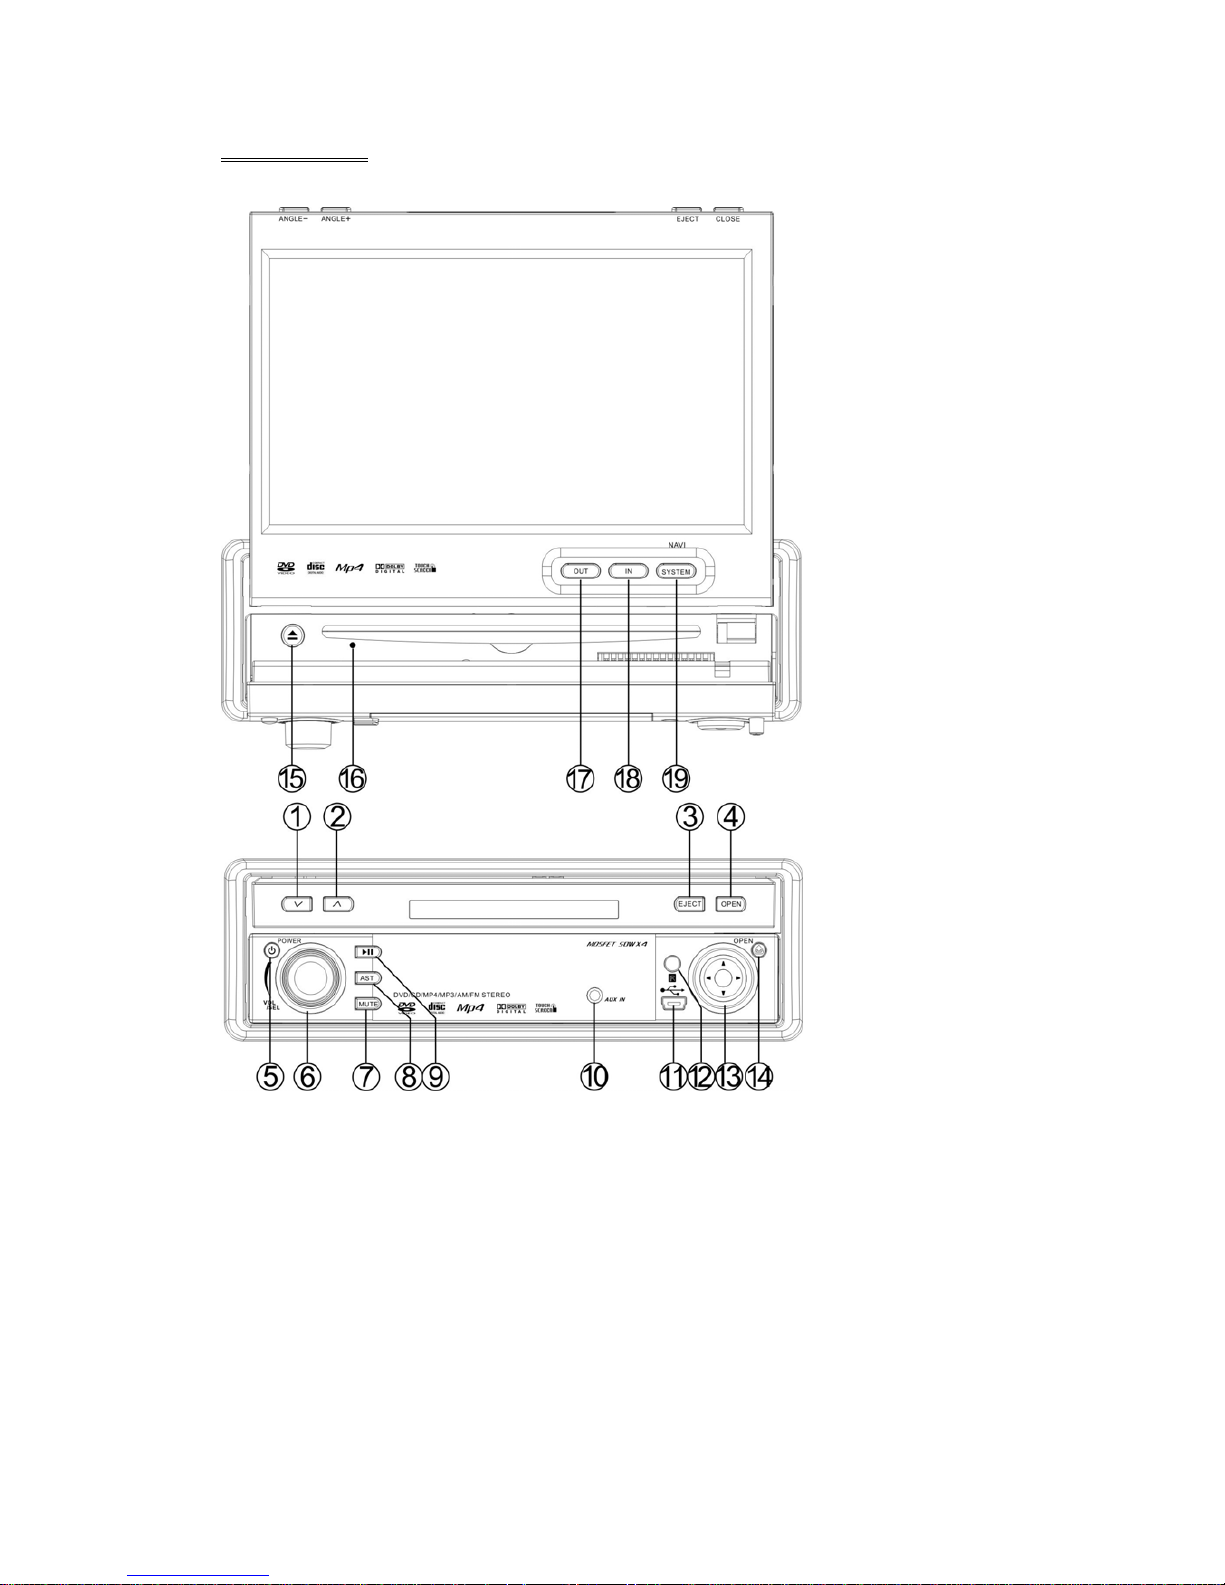
FRONT PANEL
1. ANGLE - 11. MINI USB
2. ANGLE + 12. REMOTE
3. EJECT 13. LEFT / UP / RIGHT / DOWN / ENTER / BAND
4. OPEN / CLOSE 14. REL
5. POWER / SOURCE 15. EJECT
6. VOLUME / SEL 16. RESET
7. MUTE 17. OUT
8. AST 18. IN
9. PLAY / PAUSE 19. SYSTEM / NAVI
10. AUX IN
Page 14

13
1. [ANGLE -] / 2. [ANGLE +]
Adjust the view angle of the monitor to choose the best displaying effect.
1- Continual angle adjustment
Hold on pressing the [ANGLE +] / [ANGLE -] buttons to adjust the angle of TFT
monitor upward / downward by continual increasing / decreasing.
2- Single step angle adjustment
Press the [ANGLE +] / [ANGLE -] buttons to adjust the angle of TFT monitor upward /
downward by singly increasing / decreasing.
3. [EJECT]
When flip down the front panel, press to eject / load a disc.
4. [OPEN] / [CLOSE]
When unit power off, press the [OPEN] button to turn unit on and the monitor will
spread out and turn around to the last angle position.
When unit power on, press to open / close the Monitor.
1- Open the TFT Monitor
Press the [OPEN] button, the monitor will spread out and turn around to the last angle
position.
2- Close the TFT Monitor
Press the [CLOSE] button, the monitor will turn downward and completely retract in.
5. [POWER/SOURCE]
Press the [POWER/SOURCE] button to turn the unit ON;
Hold on pressing the button to turn the unit OFF.
When the unit in turned ON, press the [POWER/SOURCE] button to toggle between
the different modes as following:
RADIO – DVD – USB – IPOD – AV IN – AUX – NAVI – RADIO
NOTE:
The unit could be switched to DVD Mode if disc inside;
The unit could be switched to USB Mode if Mini USB connected;
The unit could be switched to IPOD Mode if iPod connected;
6. [VOL/SEL]
Rotate the button clockwise / anticlockwise to increase / decrease the volume.
Press the button vertically to return the main menu.
Hold on pressing the button vertically to enter the EQ setting as following:
USER – POP – CLASSIC – ROCK – JAZZ – USER
Page 15

14
7. [MUTE]
Press the [MUTE] button to switch off the sound; press it again to resume to the
previous volume level.
8. [AST]
Press to seek radio station automatically under RADIO Mode.
9. [
ll]
Press to pause playback when playing; press again to continue playing.
10. AUX IN
Connect an external audio device to this jack to listen to the device through your car
speakers.
11. MINI USB
The unit will be switched to DVD Mode automatically when USB connected, and play
the songs, pictures, videos in USB.
12. REMOTE
Infrared Remote Receiver.
13. [LEFT] / [UP] / [RIGHT] / [DOWN] / [ENTER] / [BAND]
Under the DVD Setup menu:
Press the [∨] / [∧] buttons to move the cursor upward / downward to select item.
Press the [<] / [>] buttons to move the cursor leftward / rightward to select item.
Press vertically to confirm the operation.
Under RADIO Mode:
Press the [<] / [>] buttons to switch the stored stations.
Hold on pressing the [<] / [>] buttons to fast seeking the next available channel by
decreasing / increasing the tuning frequency; seeking will stop by pressing any button.
Press the [∨] / [∧] buttons to decrease / increase the frequency step by step.
Hold on pressing the [∨] / [∧] buttons to fast seeking by decreasing / increasing the
tuning frequency; seeking will stop when loose the button.
Press vertically to switch the FM/AM wave band as following:
FM1 - FM2 - FM3 - AM1- AM2 - FM1
14. REL
Press to flip down the front panel.
15. [EJECT]
When flip down the front panel, press to eject / load a disc.
Page 16

15
16. [RESET]
Press to reset the unit.
17. [OUT] / 18. [IN]
Press the [OUT] / [IN] buttons to move the monitor forward / backward by singly step.
There are 4 steps to move the monitor forward / backward totally.
Under the NAVI mode, hold on pressing the [OUT] / [IN] buttons to decrease /
increase the brightness of panel.
19. [SYSTEM/NAVI]
Press to enter / exit the NAVI mode.
Hold on pressing to enter / exit the System Parameter Setup menu.
Page 17
16
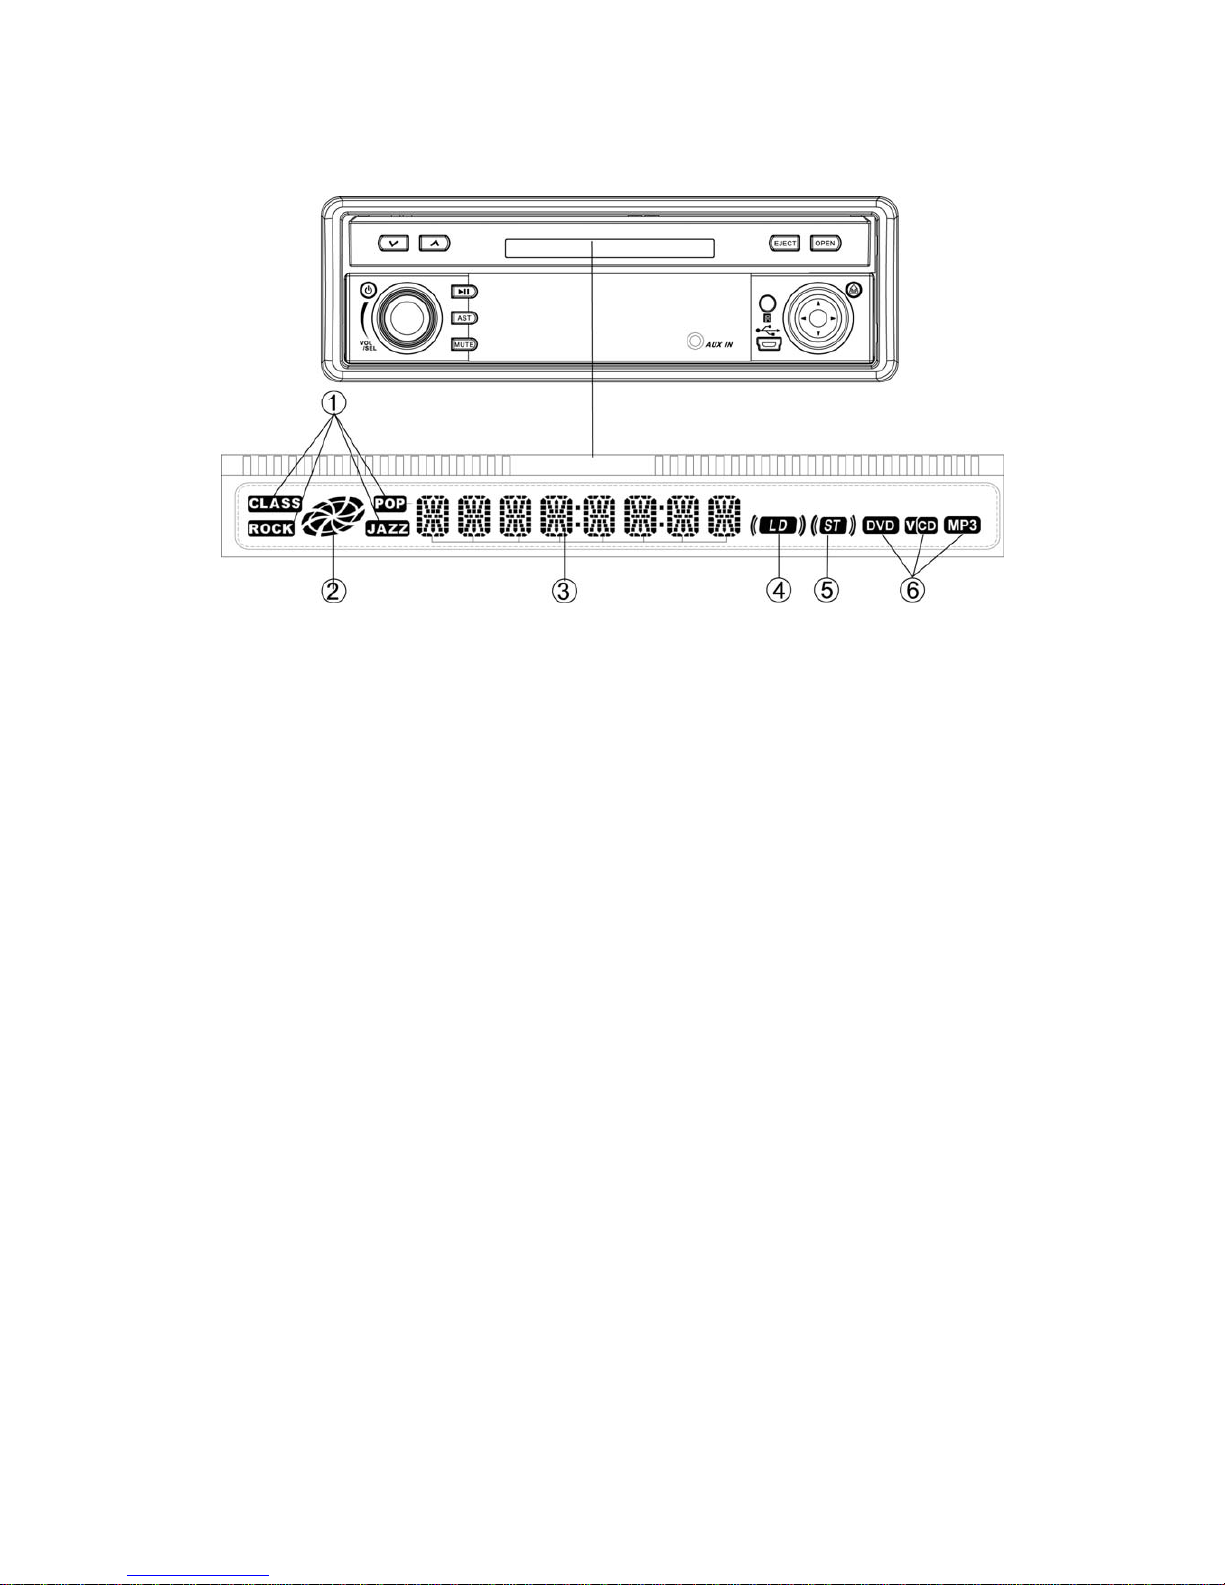
FRONT PANEL DISPLAY
1. EQ Indicator:
It turns on to indicate the POP/CLASSIC/JAZZ/ROCK when corresponding setup.
It turns off when custom setup.
2. Disc Icon:
It rotates when playing disc under the DVD Mode.
3. Main Display Area:
Display the information such as working mode, characters, playback time & number of
track, radio frequency etc.
4. LOUD Icon:
It displays when the LOUD function on.
It disappears when the LOUD function off.
5. ST Icon:
It displays when the STEREO function on.
It disappears when the STEREO function off.
6. Disc Type Indicator:
It turns on to indicate DVD, CD, VCD, and MP3 when playing corresponding discs.
Page 18
17
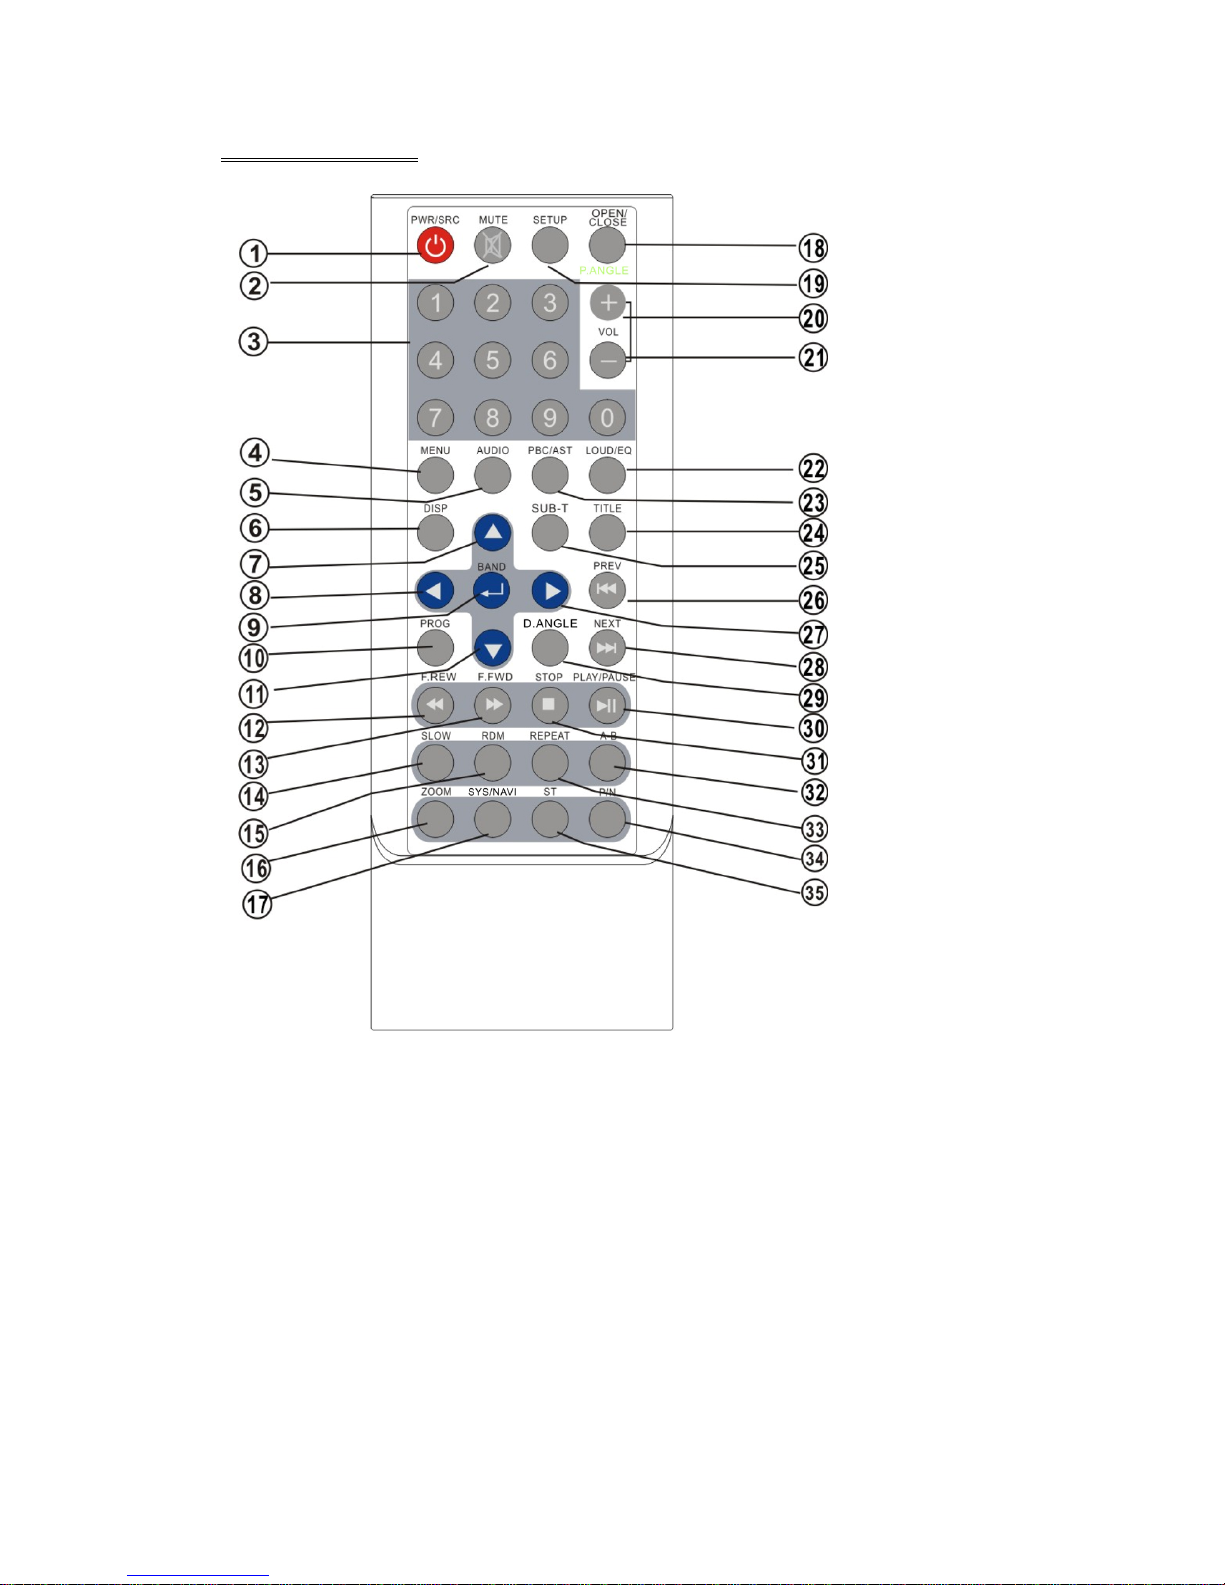
REMOTE CONTROL
1. POWER / SOURCE 13. F.FWD 25. SUBTITLE
2. MUTE 14. SLOW 26. PREVIOUS
3. NUMBER BUTTONS 15. RANDOM 27. RIGHT
4. MENU 16. ZOOM 28. NEXT
5. AUDIO 17. SYSTEM / NAVI 29. D.ANGLE
6. DISPLAY 18. OPEN / CLOSE 30. PLAY / PAUSE
7. UP 19. SETUP 31. STOP
8. LEFT 20. VOLUME + 32. A-B
9. ENTER / BAND 21. VOLUME - 33. REPEAT
10. PROGRAM 22. LOUD / EQ 34. PAL / NTSC
11. DOWN 23.PBC / AST 35. STEREO
12. F.REW 24. TITLE
Page 19

18
1. [POWER/SOURCE]
Same functions as key on front panel.
2. [MUTE]
Press the [MUTE] button to switch off the sound; press it again to resume to the
previous volume level.
3. [NUMBERS 0~9]
For 1~6, press these buttons to store the current radio station or recall the stored
station under the Radio Mode.
For 0~9, press these buttons to select the tracks, and input the code.
4. [MENU]
Press to return to the boot menu when playing DVD disc.
Press to select PBC on / off when playing VCD disc.
5. [AUDIO]
Press to select dialogue language when playing DVD disc.
Press to select left audio channel, right audio channel or stereo when playing VCD
disc.
6. [DISPLAY]
Press to display current playback information when playing DVD disc.
7. [∧] / 8. [<] / 11. [∨] / 27. [>] Direction Key
Under the DVD Setup menu:
Press the [∨] / [∧] buttons to move the cursor upward / downward to select item.
Press the [<] / [>] buttons to move the cursor leftward / rightward to select item.
Press vertically to confirm the operation.
Under RADIO Mode:
Press the [<] / [>] buttons to switch the stored stations.
Hold on pressing the [<] / [>] buttons to fast seeking the next available channel by
decreasing / increasing the tuning frequency; seeking will stop by pressing any button.
Press the [∨] / [∧] buttons to decrease / increase the frequency step by step.
Hold on pressing the [∨] / [∧] buttons to fast seeking by decreasing / increasing the
tuning frequency; seeking will stop when loose the button.
9. [BAND/ENTER]
In radio mode, press the [BAND] button to switch the wave band as following:
FM1 - FM2 - FM3 - AM1- AM2 - FM1
In DVD mode, press the [ENTER] button to confirm the Setup Menu.
Page 20

19
10. [PROGRAM]
Press to enter / exit the PROGRAM Function when playing the VCD, CD, MP3 disc.
12. [F.REW]
Press to select fast reverse with different speed.
13. [F.FWD]
Press to select fast forward with different speed.
14. [SLOW]
Press to activate slow motion playback. (DVD Mode only)
15. [RANDOM]
Press to turn RAMDOM function on / off when playing CD / VCD disc (PBC OFF).
16. [ZOOM]
Press to magnify the picture display when play DVD, VCD disc.
17. [SYSTEM/NAVI]
Same functions as key on front panel.
18. [OPEN/CLOSE]
Press to open / close the monitor.
19. [SETUP]
Press to enter the DVD SETUP menu.
20. [VOL+] / 21. [VOL-]
Press to increase / decrease the volume.
22. [LOUD/EQ]
Press to adjust the EQ setting as following:
USER – POP – CLASSIC – ROCK – JAZZ – USER
Hold on pressing to turn the LOUD function on / off.
23. [PBC/AST]
Press to turn the PBC function on / off when playing VCD disc.
Hold on pressing to seek radio station automatically under RADIO Mode.
24. [TITLE]
Press to enter the title menu when playing DVD disc.
25. [SUB-T]
Press to select the subtitle language when playing DVD disc.
Page 21

20
26. [PREVIOUS]
Press to skip to play the pervious track.
28. [NEXT]
Press to skip to play the next track.
29. [D.ANGLE]
Press the [ANGLE] button during playback to select different viewing angles with
interactive DVD media.
30. [PLAY/PAUSE]
Press to pause the playback when playing; press again to continue playing.
31. [STOP]
Press to stop the playback.
32. [A-B]
Press to setup A-B repeat playing.
33. [REPEAT]
Press to select the chapter / title / disc to repeat playing.
34. [P/N]
Press the button to switch the video output (PAL/NTSC) when playing DVD disc.
35. [STEREO]
Press to turn the stereo on / off under Radio Mode.
Page 22
21
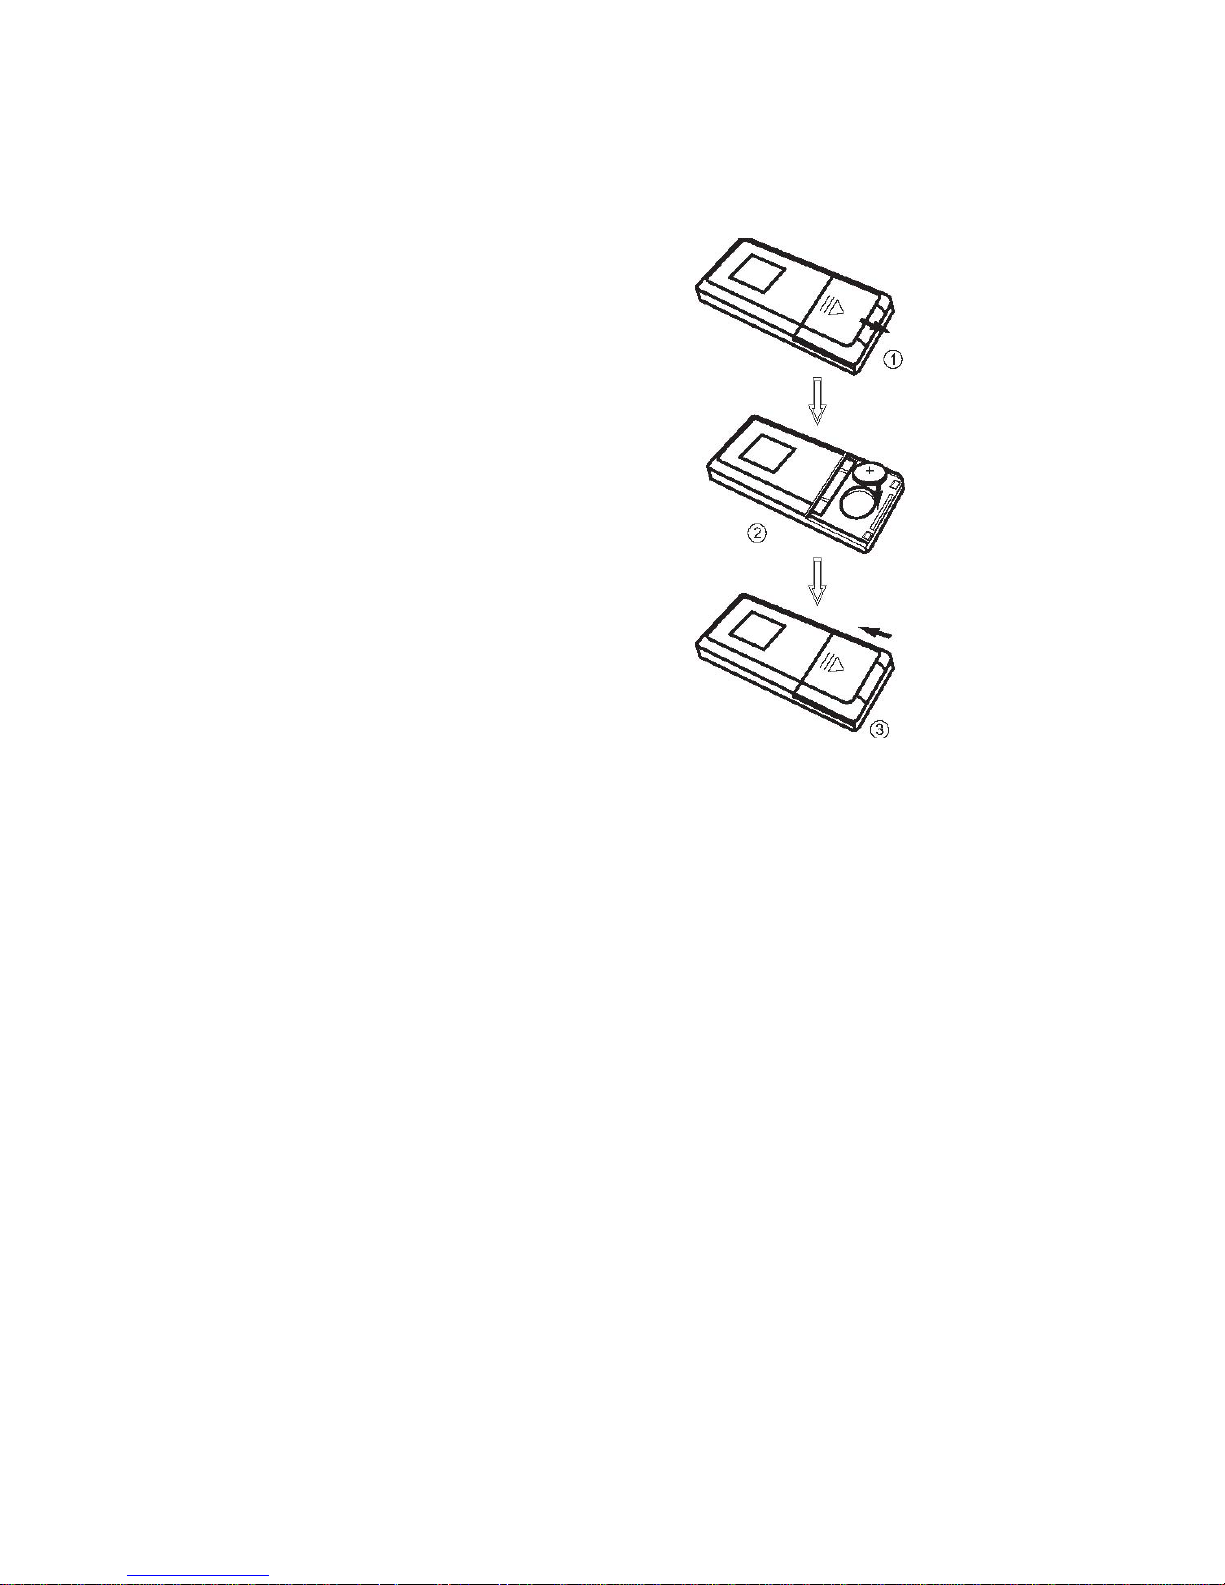
REPLACING THE BATTERIES
If the remote control has no function or if the operating range reduced, replace the old
battery with new one.
1. Pull out the battery holder. Follow the
arrow 1 slide it to the right toward the
battery while at the same time pull the
battery holder away from the remote
control.
2. Place the new battery. Place the new
lithium battery with the (+) side up.
3. Push the holder back. Using the finger
to push in the holder back until the
locking sound is heard.
Page 23

22
BASIC OPERATIONS
Startup
Press the [POWER/SOURCE] button on the panel or remote control to startup the
power, the TFT monitor will spread out automatically and the system return to the
working Mode when last turn off.
Turnoff
Hold on pressing the [POWER/SOURCE] button on the panel or remote control to
turnoff the power, the TFT monitor will retract automatically.
NOTE:
Close the ACC without turnoff, the unit will turn off automatically; and the TFT monitor
will retract within 10 seconds automatically to protect the TFT monitor. Start the ACC
again, the unit will startup and return to the last working Mode automatically, but the
monitor does not spread out.
Working Mode
When the unit in turned ON, press the [POWER/SOURCE] button to toggle between
the different modes as following:
RADIO – DVD – USB – IPOD – AV IN – AUX – NAVI – RADIO
NOTE:
The unit could be switched to DVD Mode if disc inside;
The unit could be switched to USB Mode if Mini USB connected;
The unit could be switched to IPOD Mode if iPod connected;
Detachable Front Panel
The front panel is detachable.
Taking out the front panel, the unit will turnoff automatically and the TFT monitor will
retract after 2 mins automatically.
NOTE:
1, don’t make any operation within 2 mins.
2, this function is burglarproof for unit security.
Page 24
23
Auto Antenna Control
Connect the auto antenna control wire AUTO_ANT (see Wiring Diagram); the antenna
will lift when the unit startup; it will descend when the unit turnoff.
Brake Control
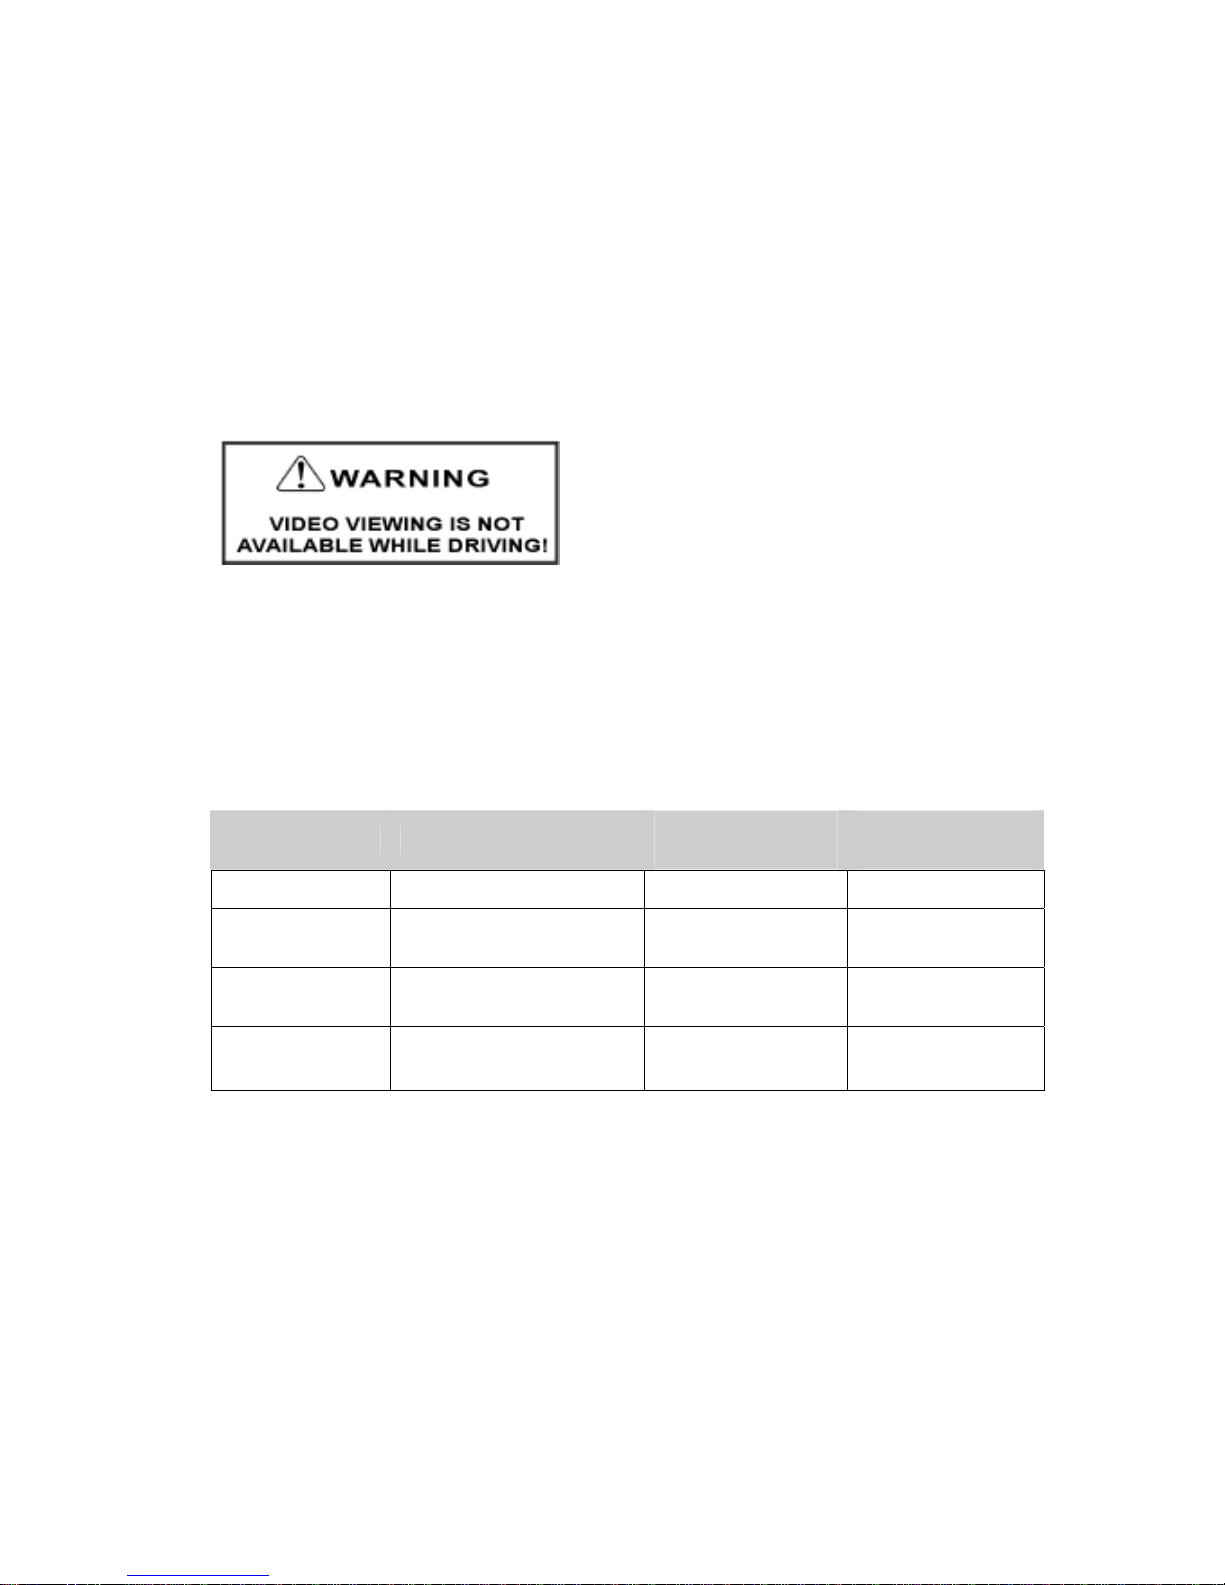
It is necessary to connect the Brake Control wire to the Hand-brake switch of the car.
While driving, the TFT monitor will display the alarm picture (see as follows) in order to
ensure the safety.
Under the Rear View Mode, the Brake Control function is no effective.
Protection of the TFT Monitor
During the movement of the TFT monitor, if it is halted by force, then the unit will begin
self-protection to prevent from any damage on the motorized mechanical structure.
Press the [OPEN] button or shut down the ACC and then restart, the TFT monitor will
act as the follow list to recover; if not, then please consult with an authorized service
center.
Halt Self-protection
Press the [OPEN]
button
Shut down the
ACC and restart
While extending Retraction Extending Retraction
While retraction
Stop at the halt place and
retract after 3 seconds
Extending Retraction
While turning
upward
Turning downward and
retraction
Extending
Turning downward
and retract ion
While turning
downward
Stop at the halt place
Turning downward
and retract ion
Turning downward
and retract ion
Page 25
24
TOUCH SCREEN OPERATIONS
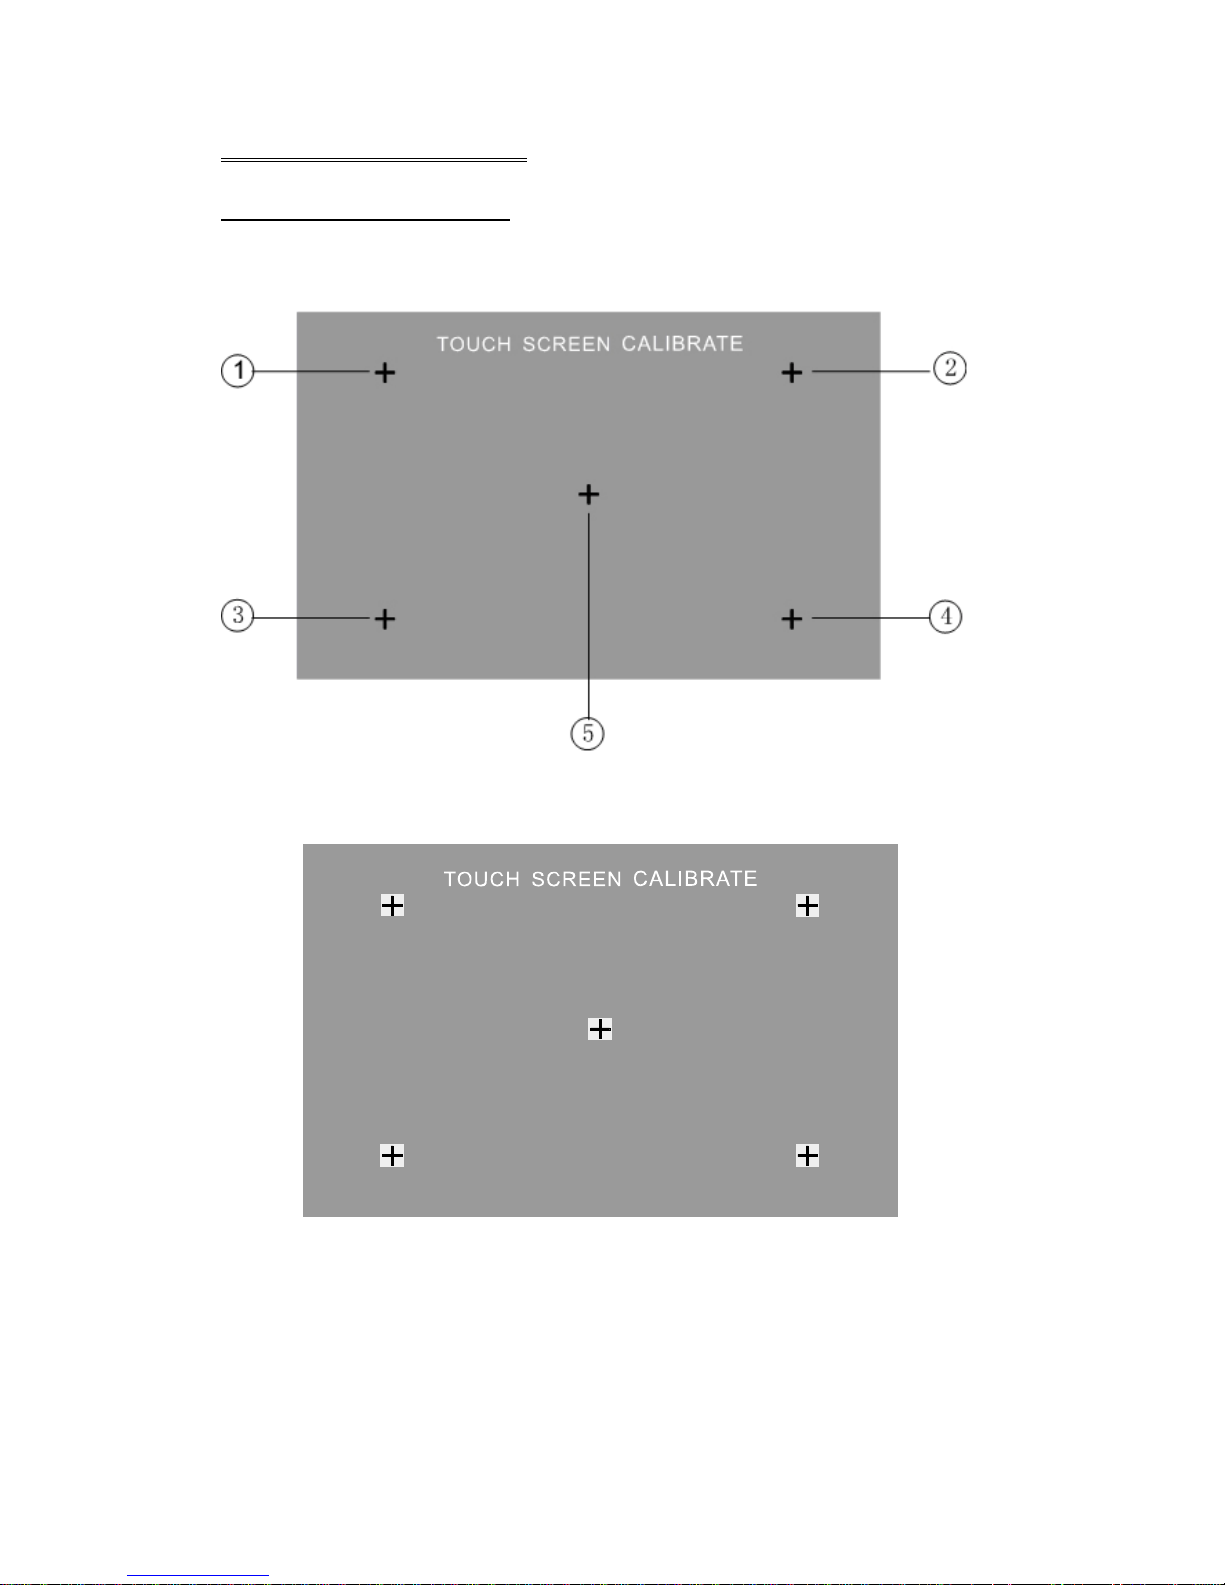
TOUCH SCREEN CALIBRATE
When “Power Off”, press the buttons 1, 2, 3, 4, 5, [BAND] of remote control to enter
the CALIBRATE page:
To touch the points from 1 to 5 until the points change to brighter by using a ballpoint
pen or pencil.
After all 5 points change to brighter, the unit would finish the CALIBRATE and power
off again. Then the Touch Screen is restored to their default positions.
Page 26
25
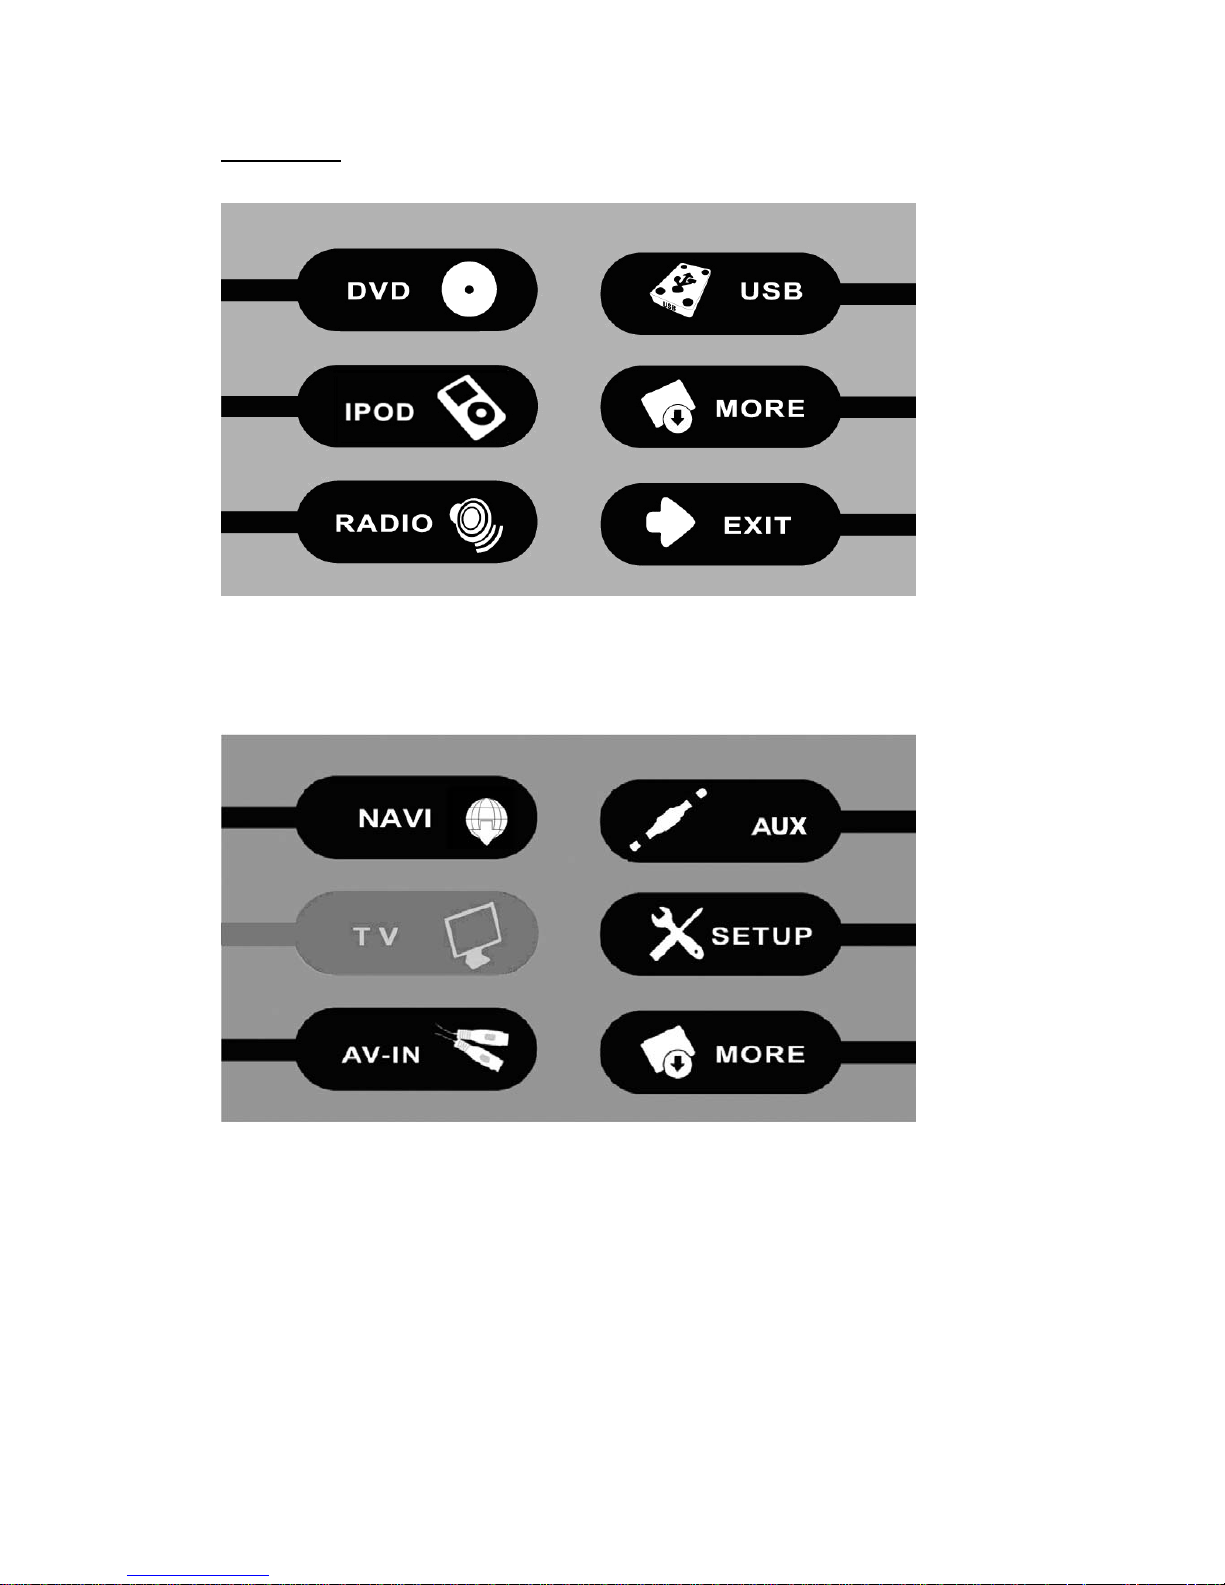
MAIN MENU
Touch the icon “MORE” to enter the 2
nd
page of main menu:
NOTE:
This is no TV for this unit.
Page 27
26
RADIO OPERATIONS
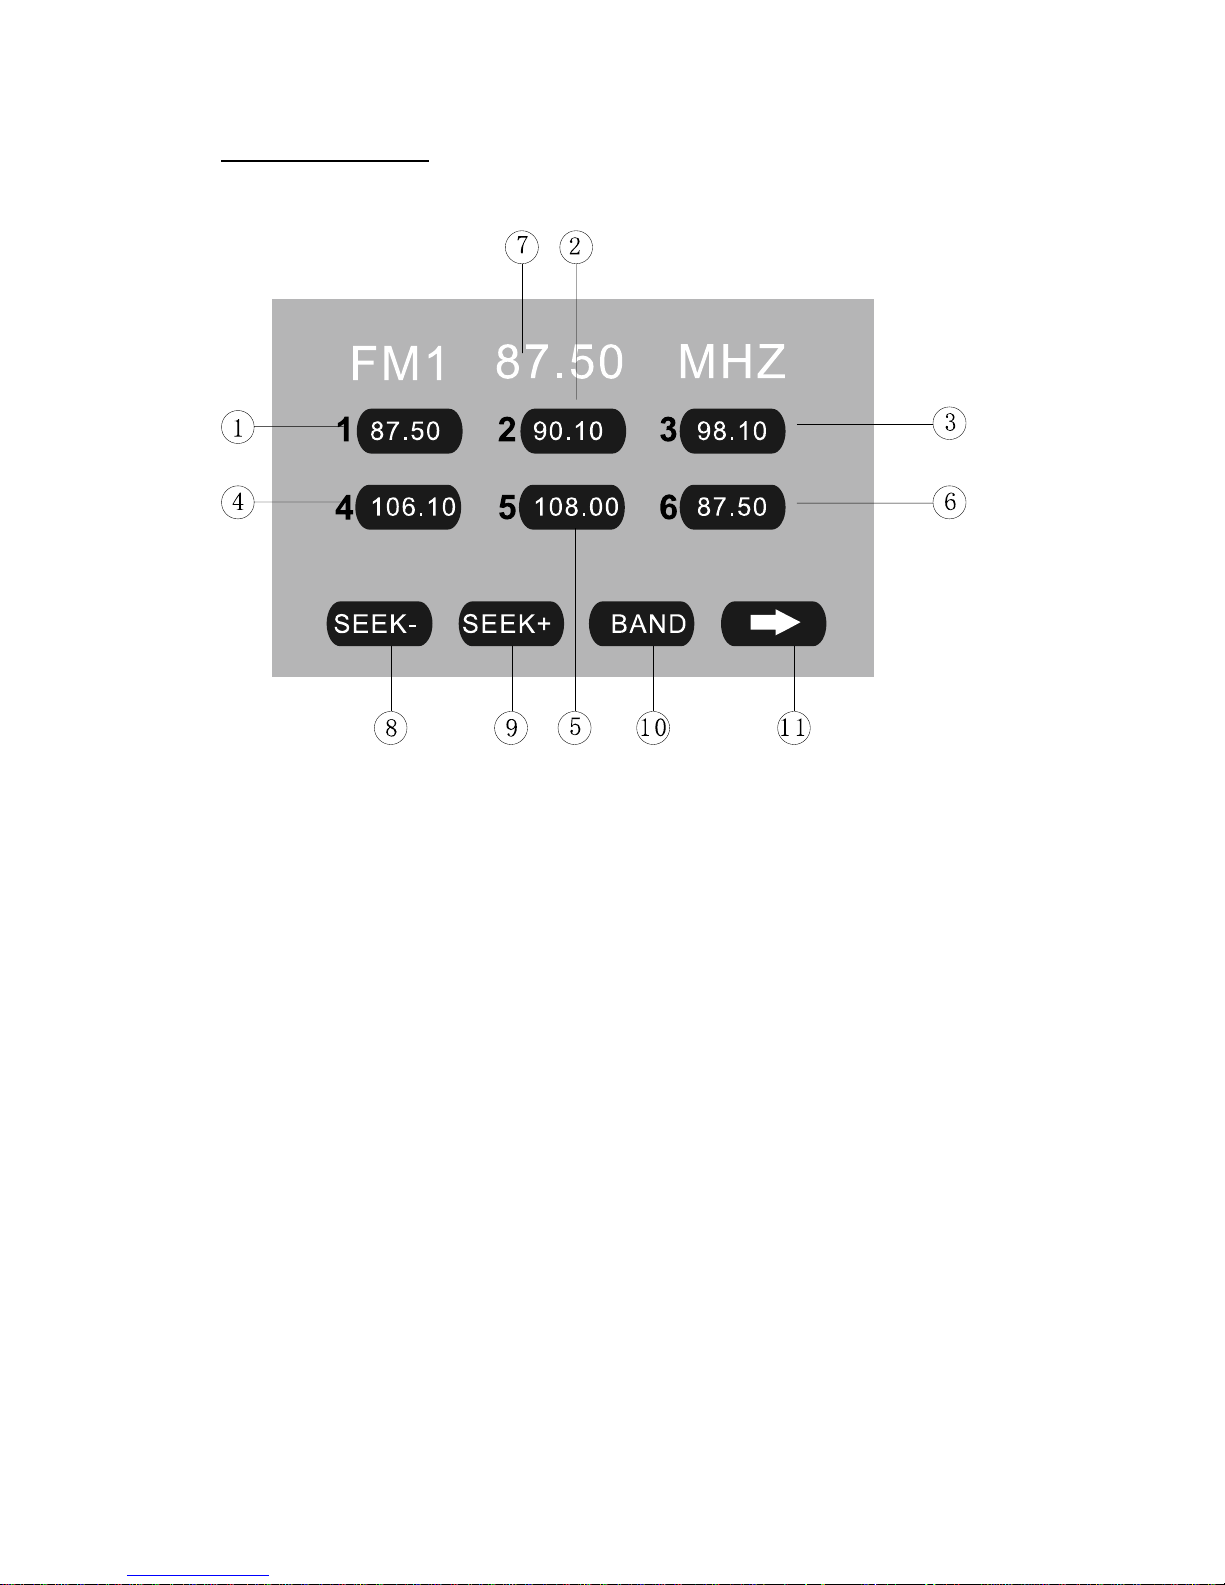
Touch the icon “RADIO” to enter the 1st operation page of RADIO Mode:
1~6. STORED CHANNEL
Manual Store Radio Station
Hold on touching the icon, you can store current radio frequency to the stored channel.
For example, the current frequency is 98.5MHZ, by hold on touching the icon 1, you
can store the radio station of 98.5MHZ to the channel 1.
After manual store radio station, the former stored stations will be instead.
In each wave band, the number icons 1 to 6 represent the stored radio stations.
To hold on pressing the number buttons 1~6 of remote control performs same
operation.
Recall a Preset Station
Touch the icon 1~6 to recall the corresponding stored station in M1~M6 channels.
To press the number buttons 1~6 of remote control performs same operation.
7. FREQUENCY
8. SEEK – / 9. SEEK +
Touch the icon to seek the next available channel by increasing / decreasing the
tuning frequency.
Press any button to stop seeking.
Seeking will stop automatically when seek an available channel then play this station.
The unit will stop on the beginning frequency if no available station after seeking one
cycle.
To hold on pressing [>] / [<] buttons of remote control performs same operation.
Page 28
27
10. BAND
Touch the icon to switch the FM/AM wave band as following:
FM1 - FM2 - FM3 - AM1- AM2 - FM1
To press the [BAND] button of panel or remote control performs same operation.
11. NEXT PAGE
Touch the icon to enter the 2
nd
page of RADIO Mode:
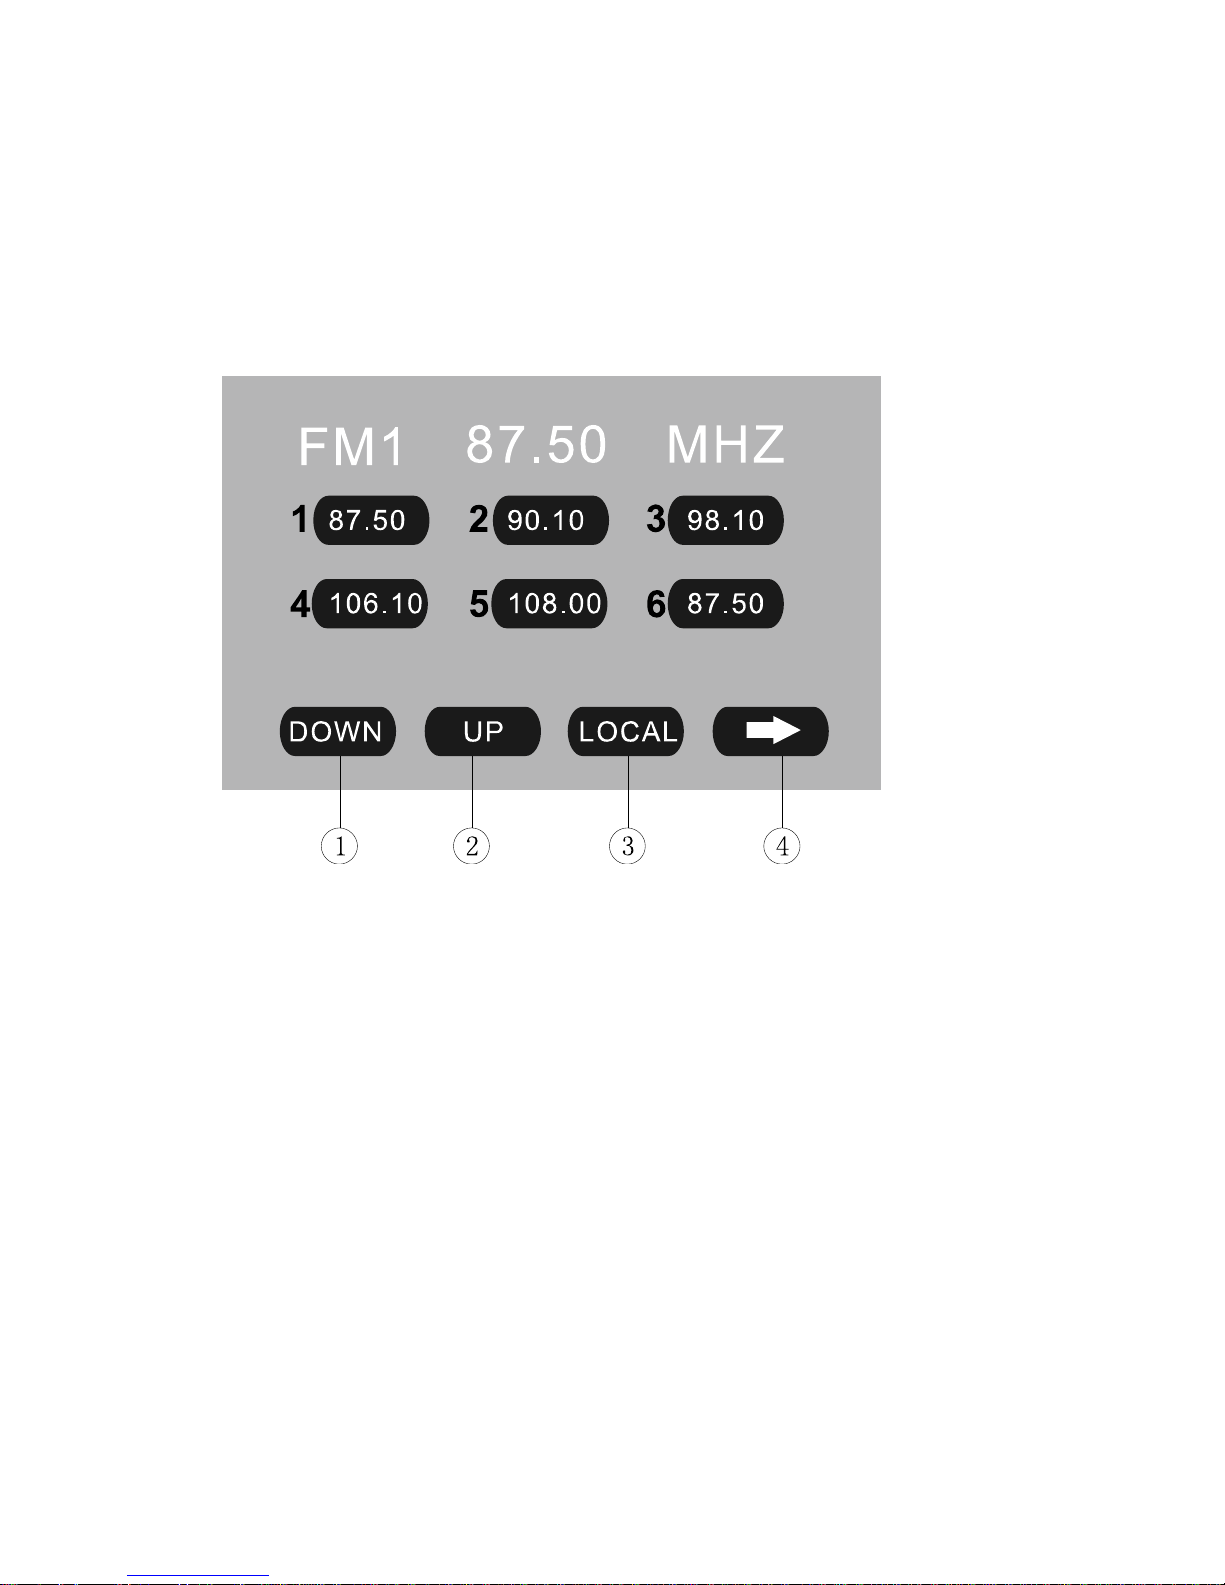
1. DOWN / 2. UP
Touch the icons to adjust the frequency downward / upward by step decreasing /
increasing.
Hold on touching the icons has same function with [SEEK-] / [SEEK+].
To press the [∨] / [∧] buttons of remote control performs same operation.
3. LOCAL: ON / OFF
When you are using the local searching function of LOCAL, you can only receive the
radio station with strong enough signals and fine state.
4. NEXT PAGE
Touch the icon to enter the 3
rd
page of RADIO Mode:
Page 29
28
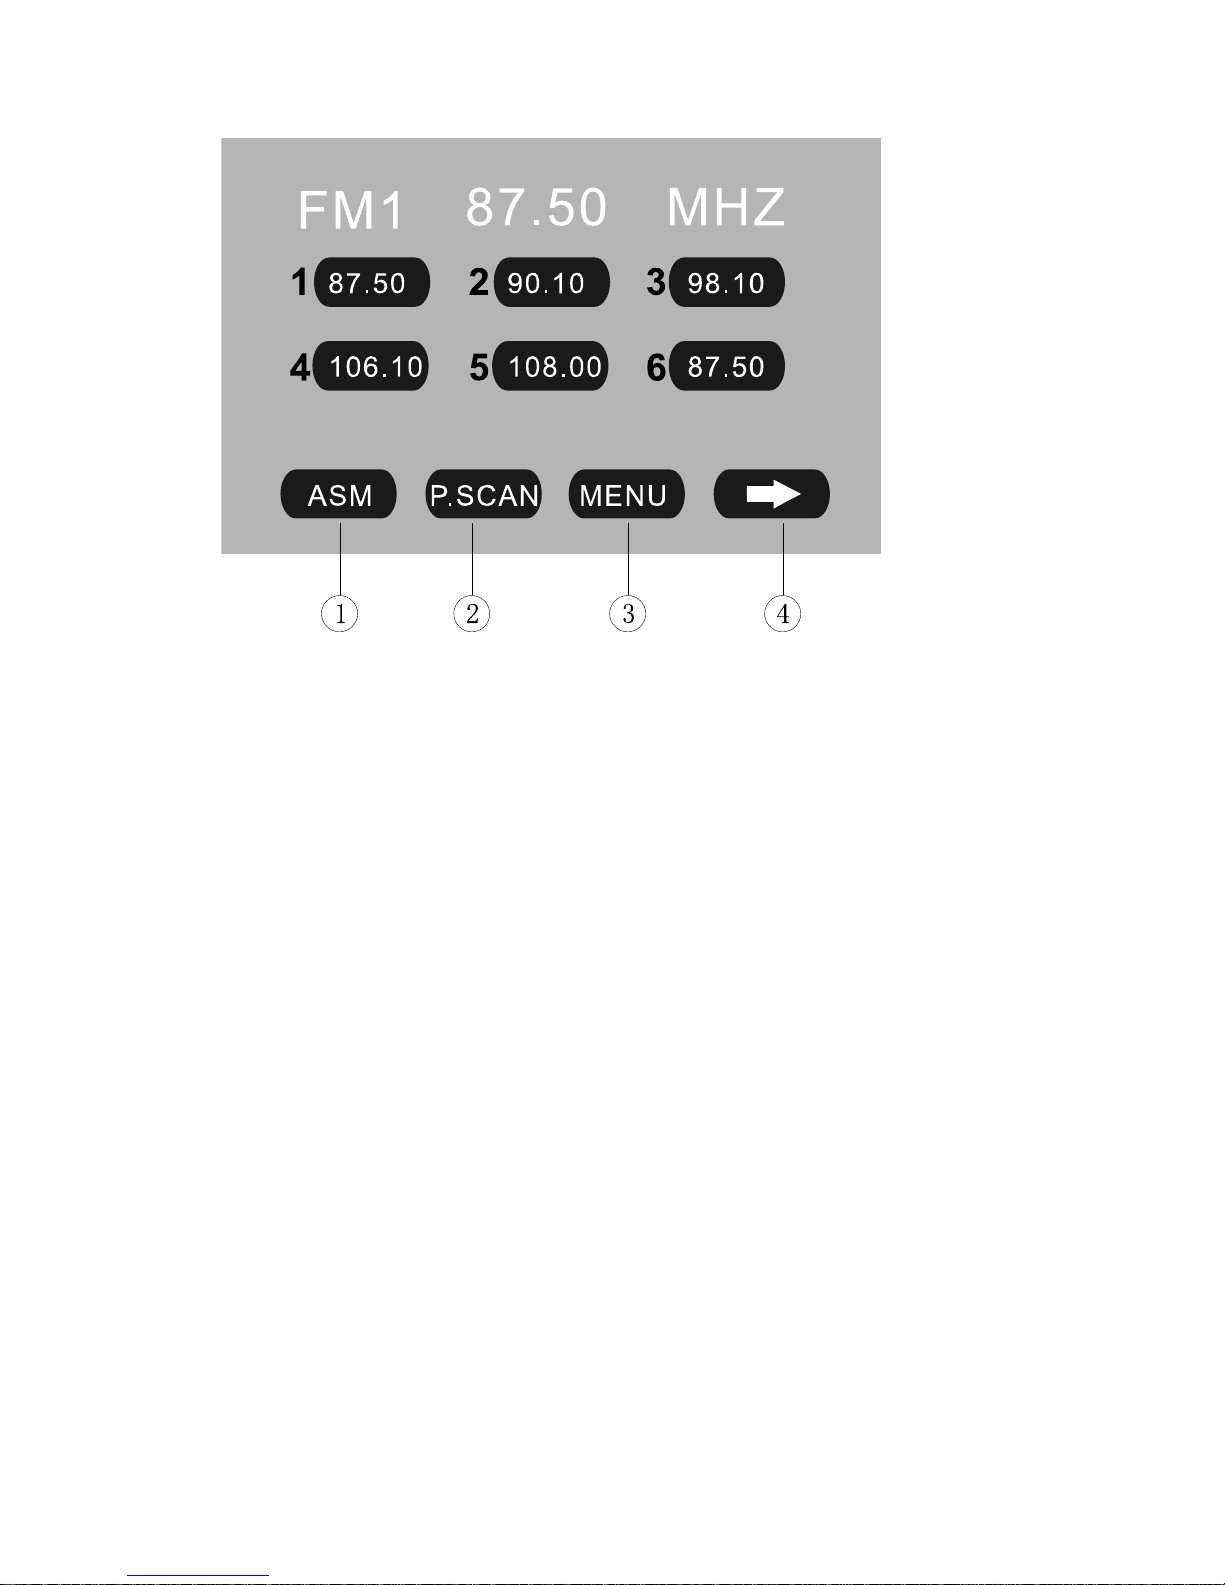
1. ASM
Seeking and store the stations
1. Hold on touching the icon to seek stations with the strongest signal from the
lowest frequency point in the entire wave bands; press any button to stop seeking.
After seeking, the former stored stations will be instead.
2. Store the received effective radio frequency to the six stored channels M1~M6.
3. The unit will play the stations one by one for few seconds; press any button to stop
playing.
4. It is independent for FM & AM frequency. There are 3 wave bands of FM1、FM2、
FM3 & 2 wave bands of AM1、AM2, each can store 6 radio stations, totally 30
radio stations.
5. The unit will stop on the beginning frequency if no available station after seeking
one cycle.
6. To press the [AST] button of panel or hold on pressing the [PBC/AST] button of
remote control performs same operation.
2. P. S C A N
The unit will play the stored stations one by one for few seconds from FM1, FM2, FM3,
AM1, AM2; press any button to stop playing.
3. MENU
Touch the icon to return the main menu.
4. NEXT PAGE
Touch the icon to enter the 1
st
page of RADIO Mode.
Page 30
29
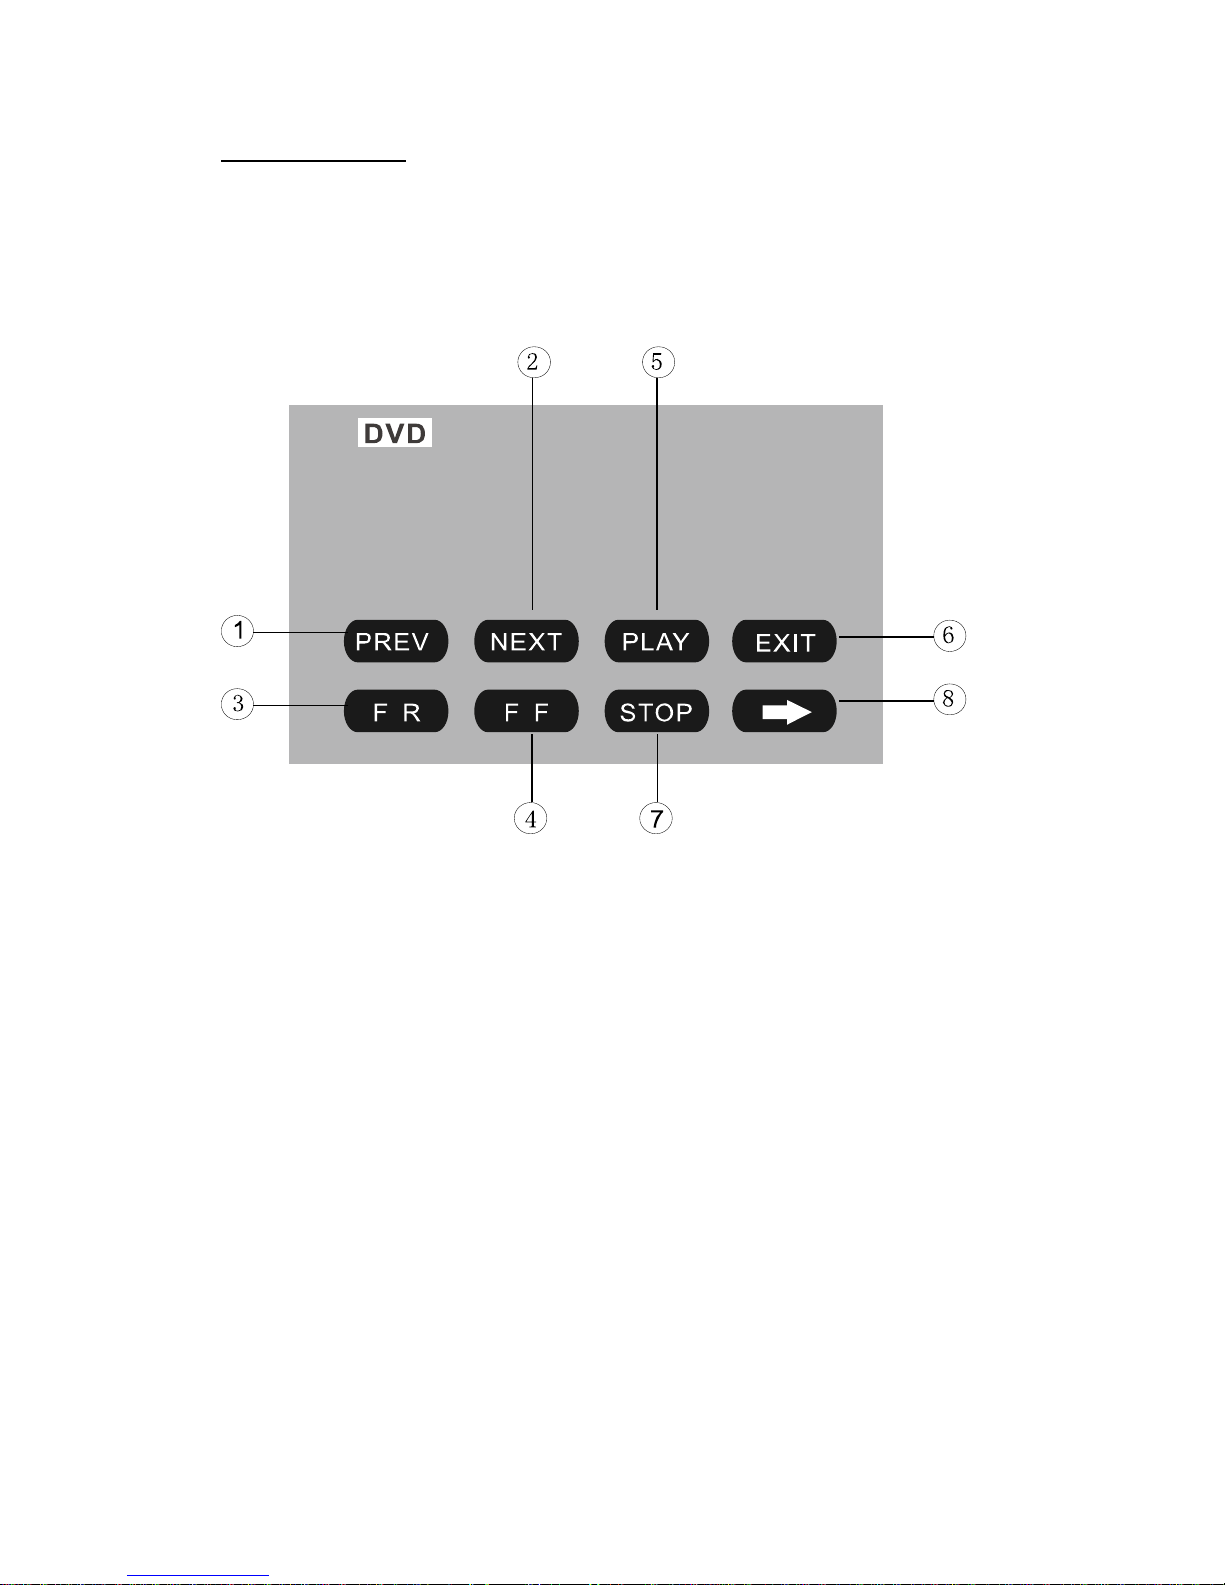
DVD OPERATIONS
Touch the icon “DVD” to enter the DVD Mode if disc inside.
The unit will switch to DVD Mode automatically if loading disc.
The unit will switch to RADIO Mode automatically if ejecting disc.
1st operation page of DVD Mode:
1. PREV / 2. NEXT
Touch the icon to go to the pervious / next chapter, track or song.
To press the [Previous] / [Next] buttons of remote control performs same operation.
3. F. RE V / 4. F. FW D
Touch the icon to select fast reverse / forward search. Touch the [PLAY] icon to
resume to normal playback.
To press the [F.REV] / [F.FWD] buttons of remote control performs the same
operation.
5. PLAY
Touch the icon to play or pause the disc.
To press the [PLAY/PAUSE] button of panel or remote control performs the same
operation.
6. EXIT
Touch the icon to exit the TOUCH ICONS display.
Page 31
30
7. STOP
During movie playback, touch the icon once; the DVD player memorizes the location
where you stopped (touch the [PLAY] icon to resume playing from the memorized
location). If you touch the icon twice, the playback will start from the beginning of the
disc when you touch the [PLAY] icon.
To press the [STOP] button of remote control performs the same operation.
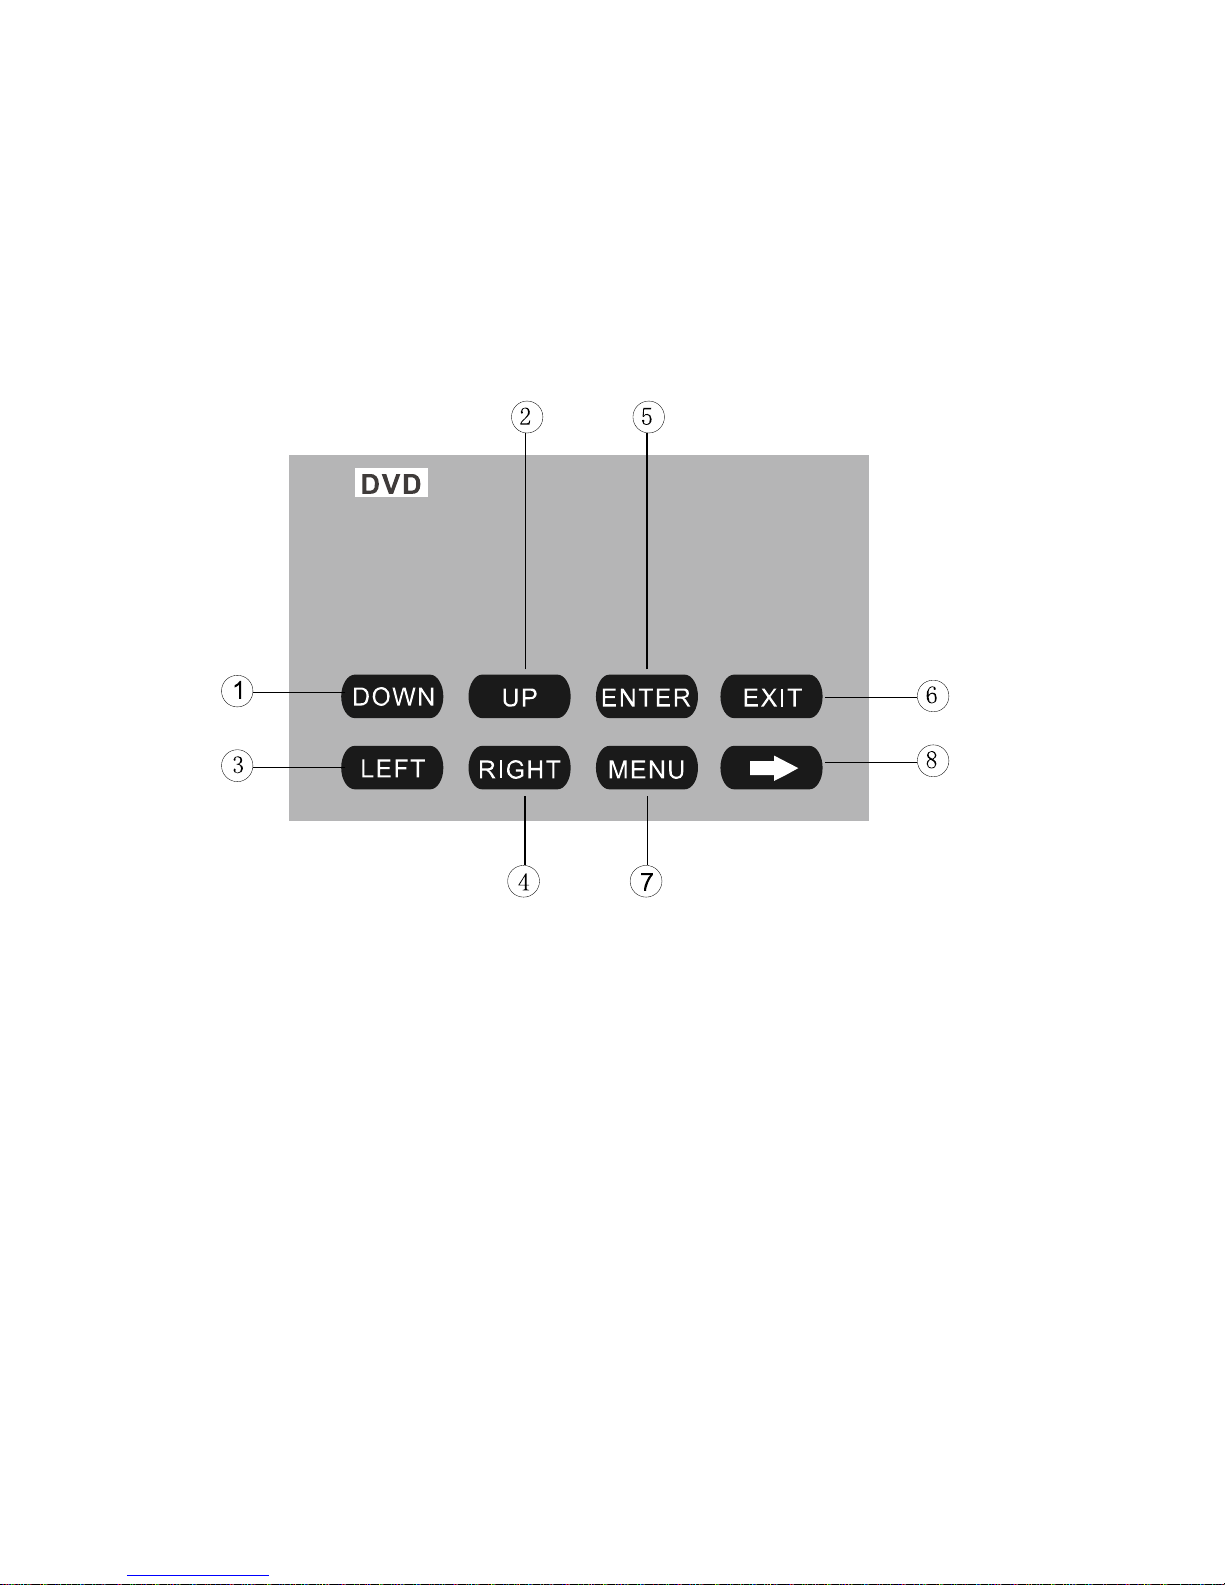
8. NEXT PAGE
Touch the icon to enter the 2
nd
page of DVD Mode:
1~4. DOWN / UP / LEFT / RIGHT
Touch the direction icons (UP / DOWN / LEFT / RIGHT) to move the cursor to the
selected item.
To press the direction buttons (UP / DOWN / LEFT / RIGHT arrow) of remote control
performs same operation.
5. ENTER
Touch the icon to confirm the selection.
To press the [ENTER] button of remote control performs same operation.
6. EXIT
Touch the icon to exit the TOUCH ICONS display.
7. MENU
Touch the icon to return the main menu.
8. NEXT PAGE
Touch the icon to enter the 1
st
page of DVD Mode.
Page 32

31
USB OPERATIONS
Touch the icon “USB” to enter the USB Mode if USB connected.
The unit will switch to USB Mode automatically if connecting USB.
When disconnecting USB, the unit will switch to RADIO Mode automatically if there is
no disc in the unit; and the unit will switch to DVD Mode automatically if there is a disc
inside.
Under USB Mode, all operations are same as DVD operations.
SD Card Adapter
Connect the SD Card Adapter by USB port, the unit will be switched to DVD Mode
automatically, and play the songs, pictures, videos in SD Card.
Page 33
32
IPOD OPERATIONS
Touch the icon “IPOD” to enter the IPOD Mode if iPod connected.
The unit will switch to IPOD Mode automatically if connecting iPod.
The unit will switch to RADIO Mode automatically if disconnecting iPod.
NOTE:
It is available for iPod operations with an additional iPod cable which is optional
accessory.
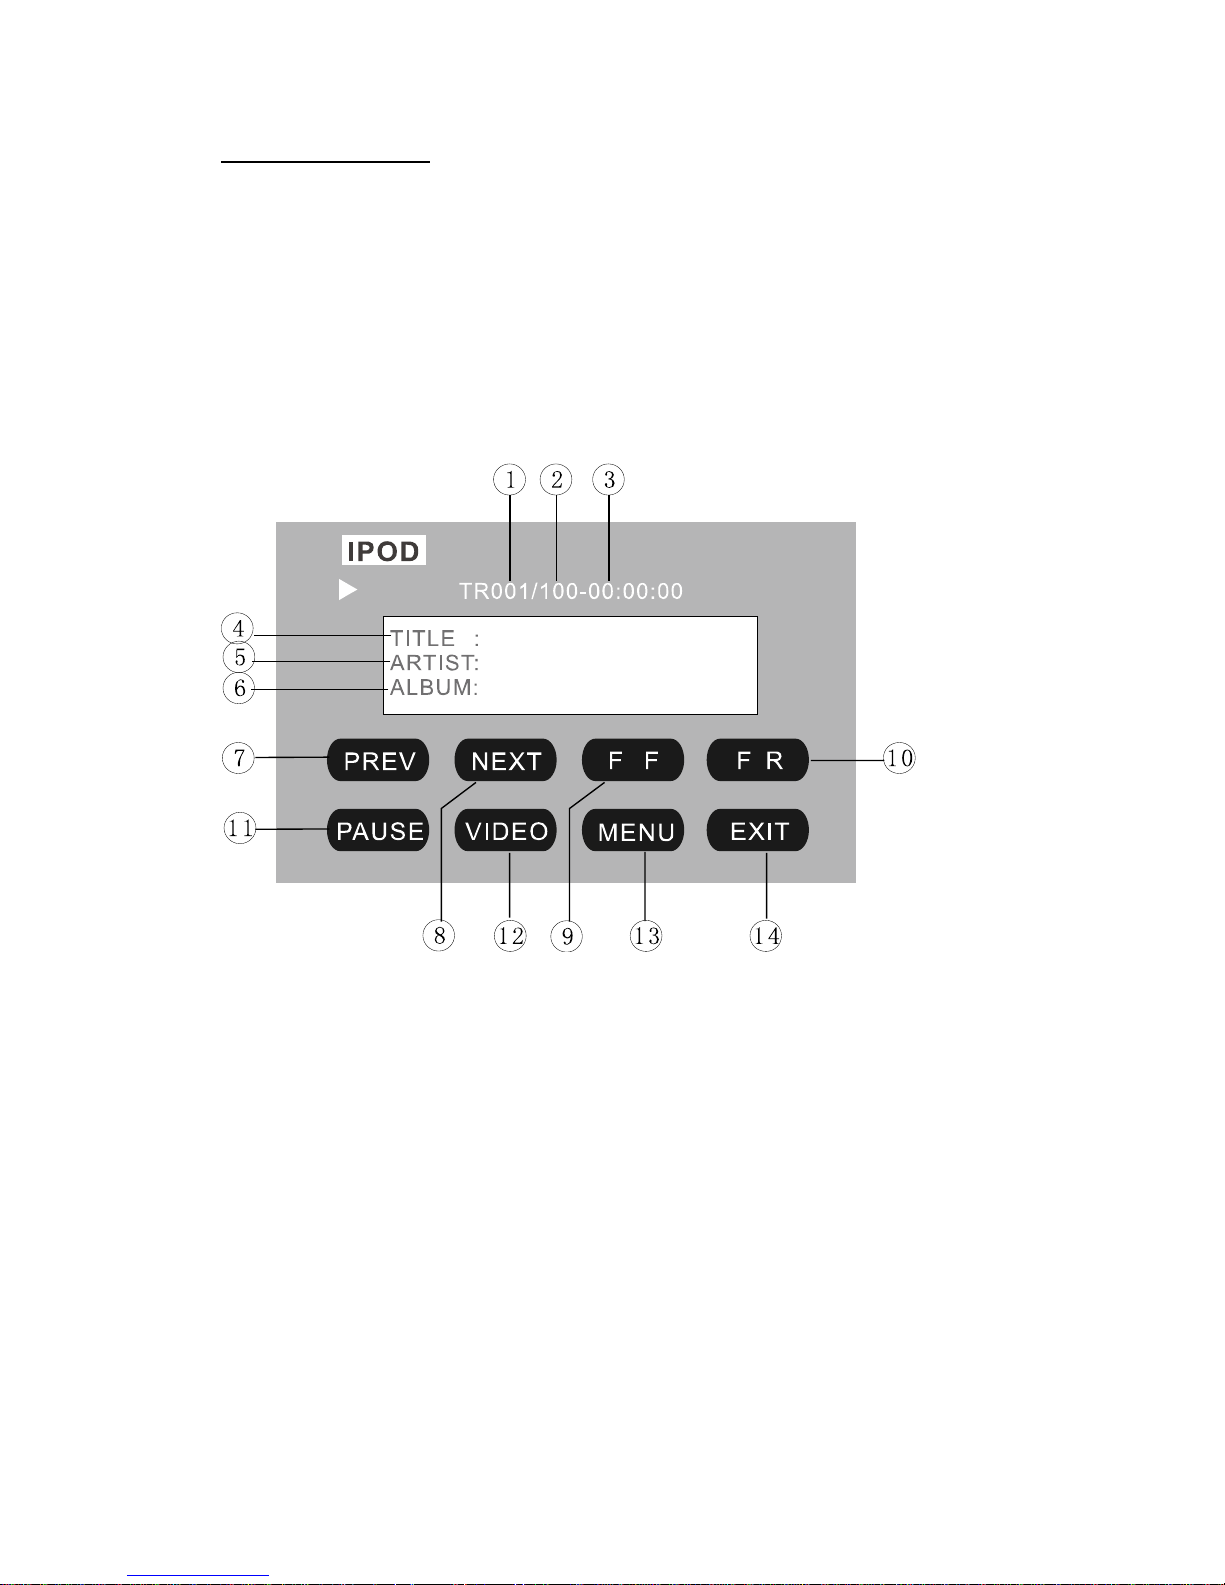
Music Operation
1. The Number of Playing Song
2. The Total Songs in Play List
3. The Playing Time
4. The Name of Playing Song
5. The Name of Artist
6. The Name of Album
7. PREV / 8. NEXT
Touch the icon to go to the pervious / next chapter, track or song.
To press the [PREVIOUS] / [NEXT] buttons of remote control performs same
operation.
9. F. RE V / 10. F. FW D
Hold on touching the icon to select fast reverse / forward search. Touch the [PLAY] to
resume to normal playback.
To press the [F.REV] / [F.FWD] buttons of remote control performs the same
operation.
Page 34
33
11. PLAY / PAUSE
Touch the icon to play or pause the disc.
To press the [PLAY/PAUSE] button of panel or remote control performs the same
operation.
12. VIDEO
Touch the icon to switch to the VIDEO operation.
13. MENU
Touch the icon to return the main menu.
14. EXIT
Touch the icon to exit the TOUCH ICONS display.
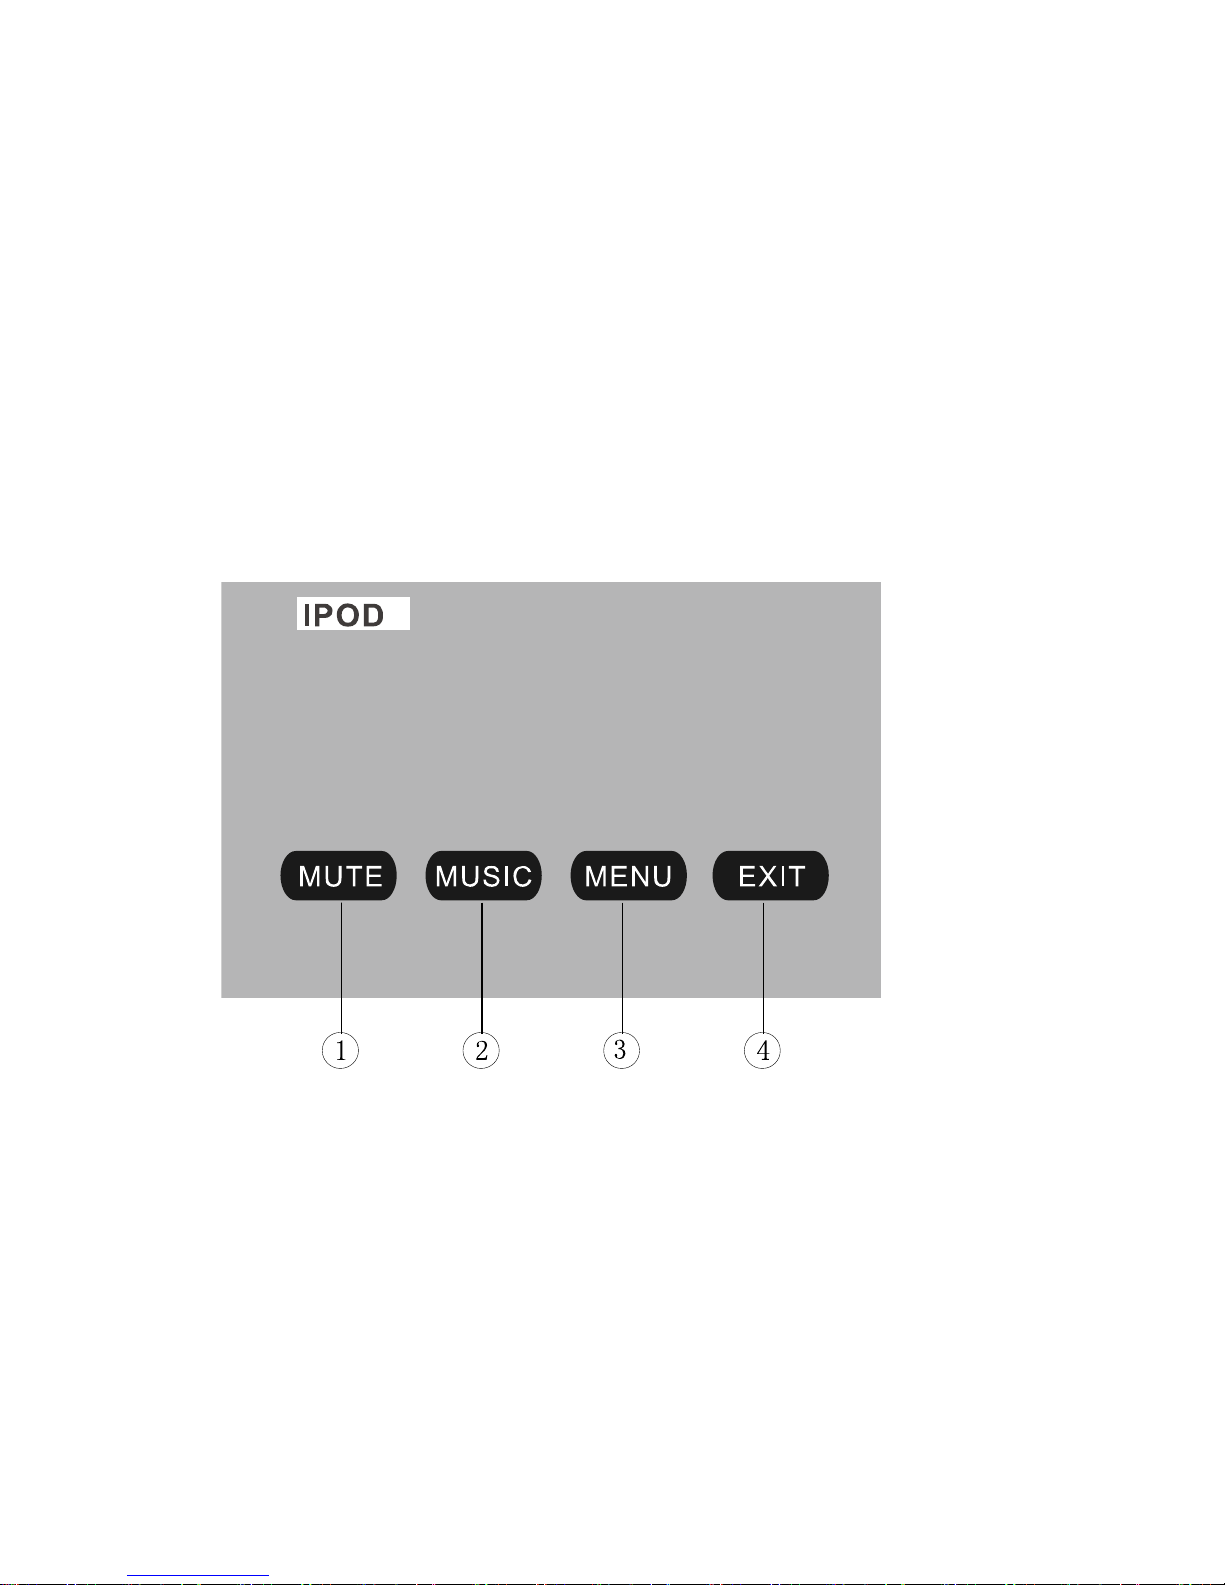
Video Operation
1. MUTE
Touch the icon to switch off the sound; touch it again to resume to the previous volume
level.
2. MUSIC
Touch the icon to switch to the MUSIC operation.
3. MENU
Touch the icon to return the main menu.
4. EXIT
Touch the icon to exit the TOUCH ICONS display.
Page 35
34
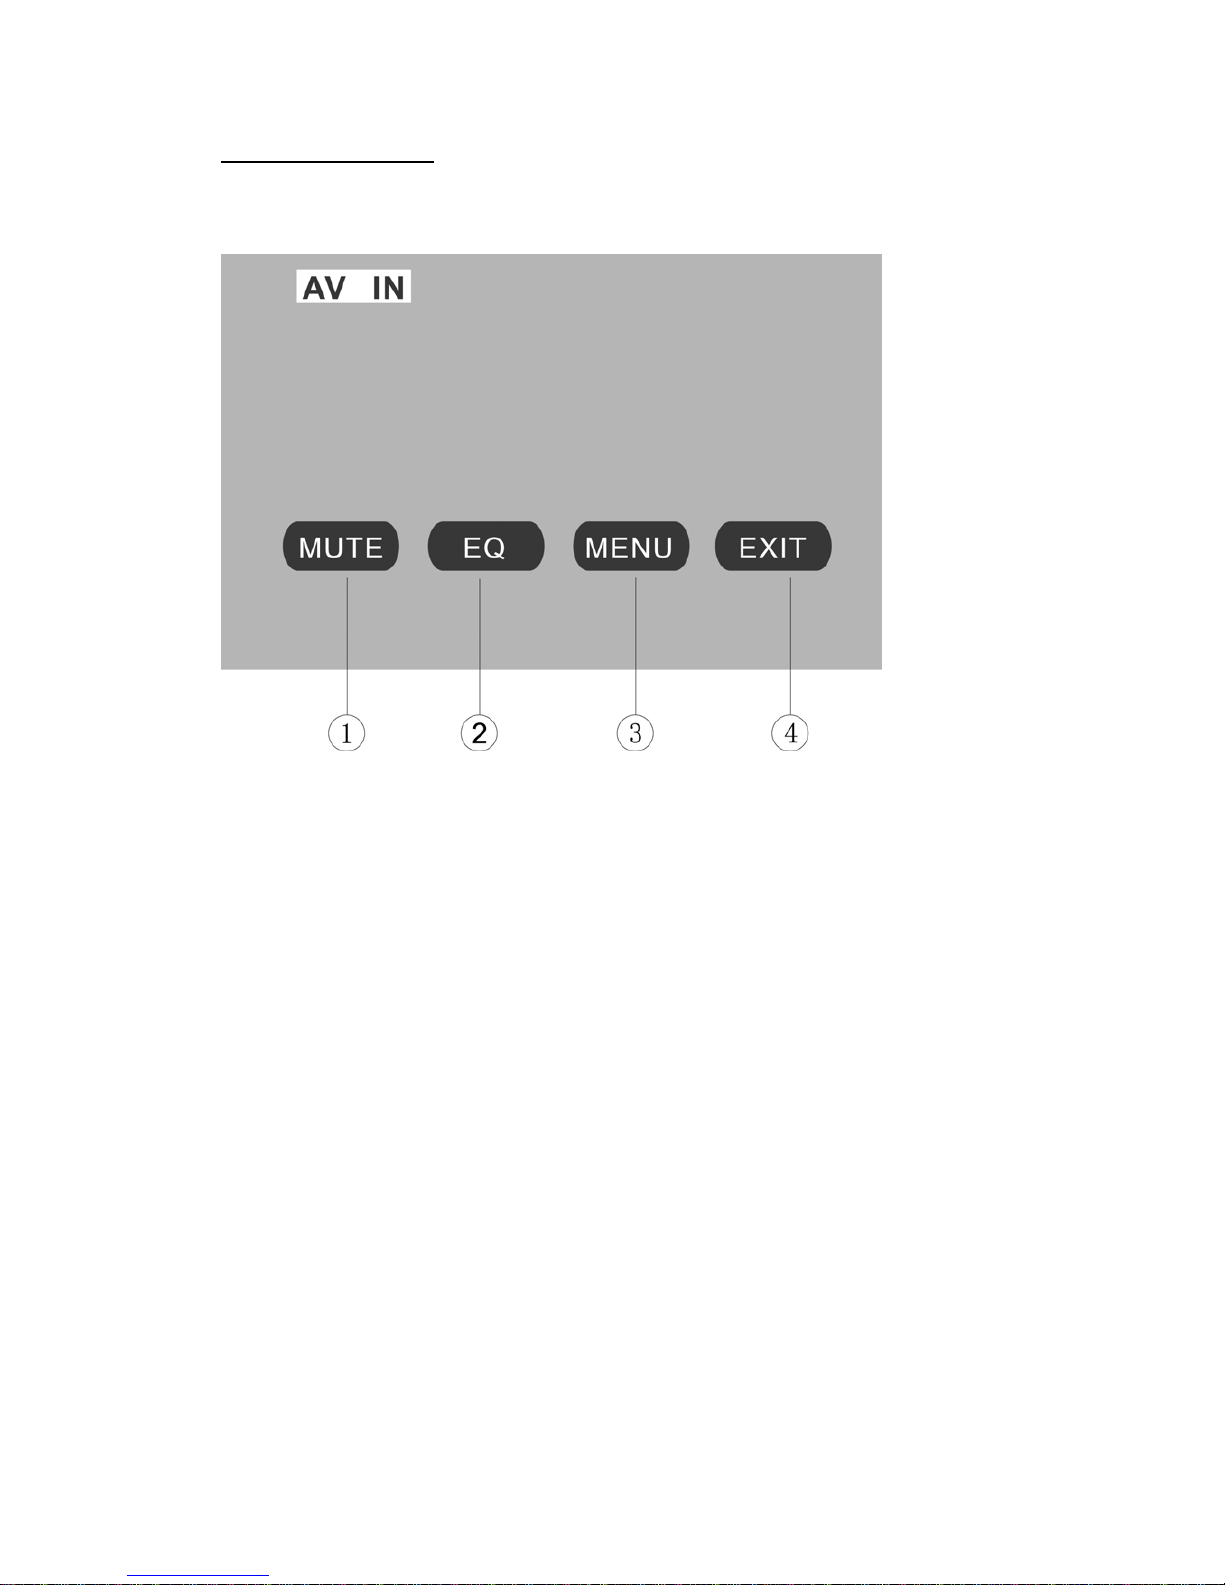
AV IN OPERATIONS
Touch the icon “AV IN” to enter the AV IN Mode:
1. MUTE
Touch the icon to switch off the sound; touch it again to resume to the previous volume
level.
2. EQ
The user can set to adjust the audio output to your preference:
USER – POP – CLASSIC – ROCK – JAZZ – USER
3. MENU
Touch the icon to return the main menu.
4. EXIT
Touch the icon to exit the TOUCH ICONS display.
NOTE:
There are 2 RCA Audio Inputs & 1 RCA Video Input for unit.
Page 36
35
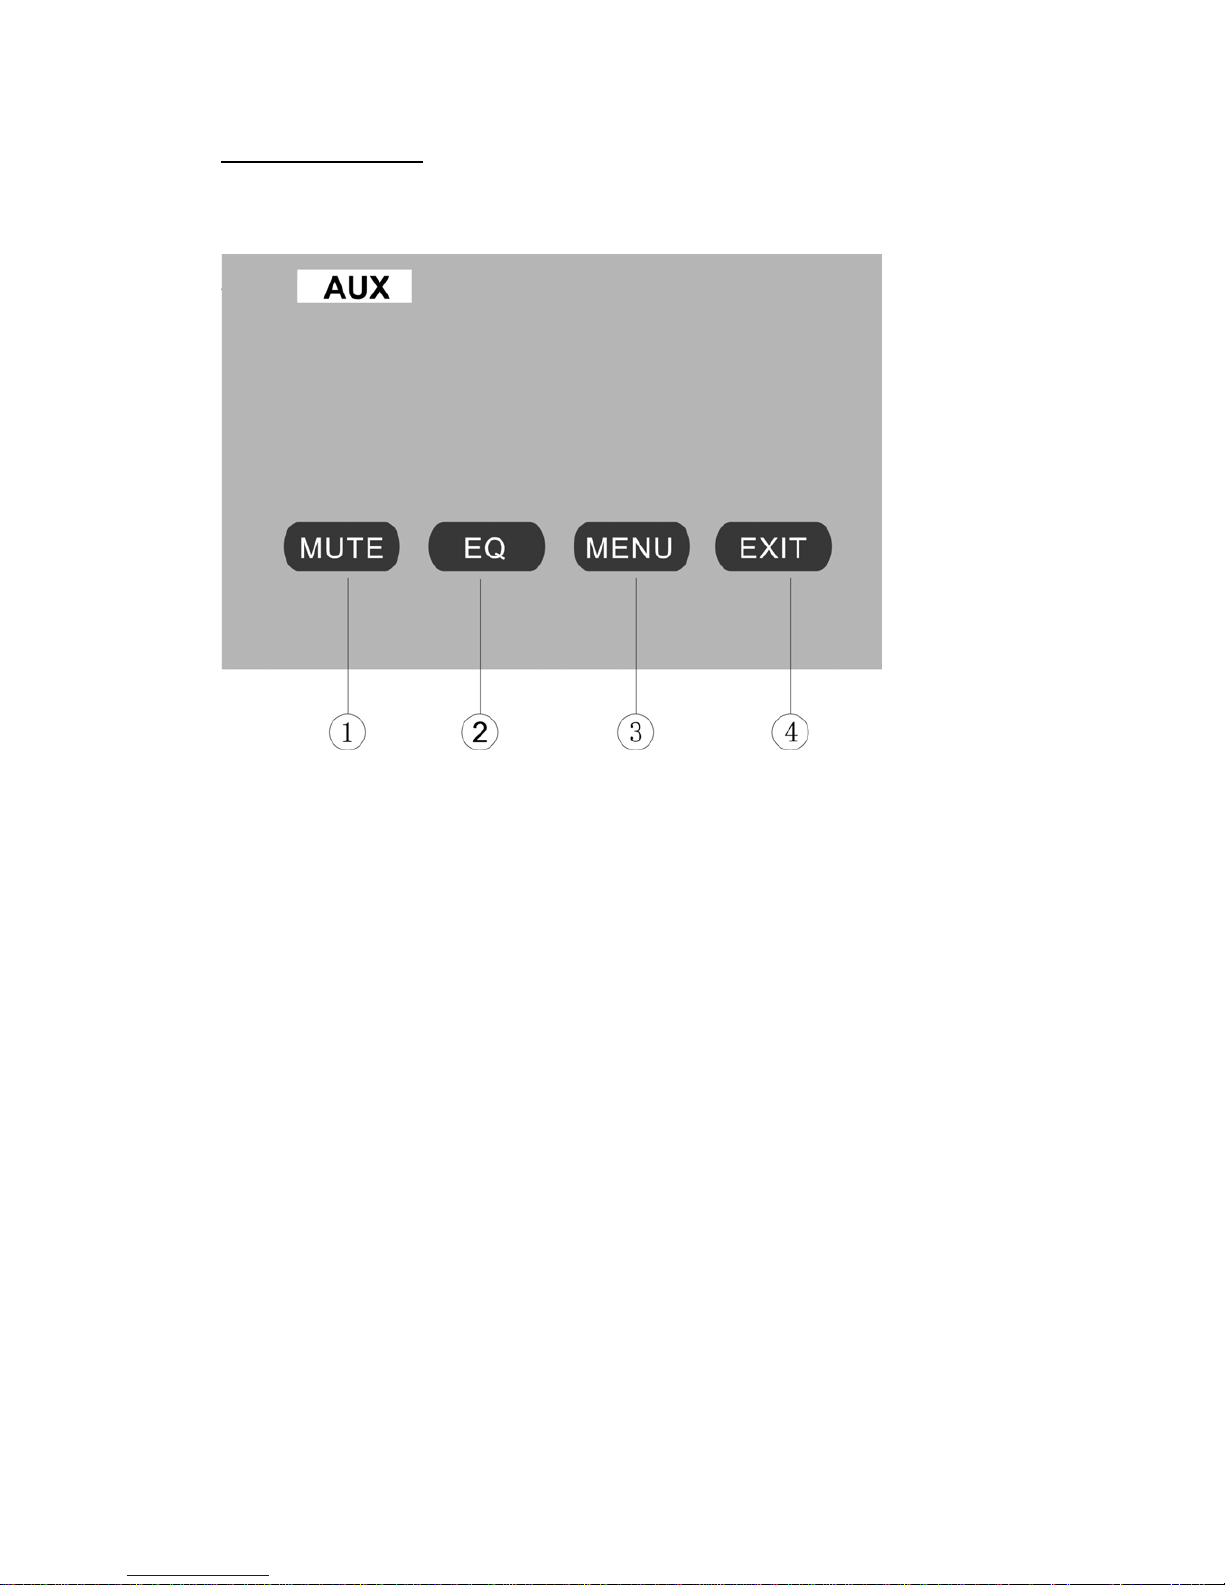
AUX OPERATIONS
Touch the icon “AUX” to enter the AUX Mode:
1. MUTE
Touch the icon to switch off the sound; touch it again to resume to the previous volume
level.
2. EQ
The user can set to adjust the audio output to your preference:
USER – POP – CLASSIC – ROCK – JAZZ – USER
3. MENU
Touch the icon to return the main menu.
4. EXIT
Touch the icon to exit the TOUCH ICONS display.
NOTE:
Connect an external audio device to AUX IN jack to listen to the device through
your car speakers.
Page 37
36
NAVI OPERATIONS
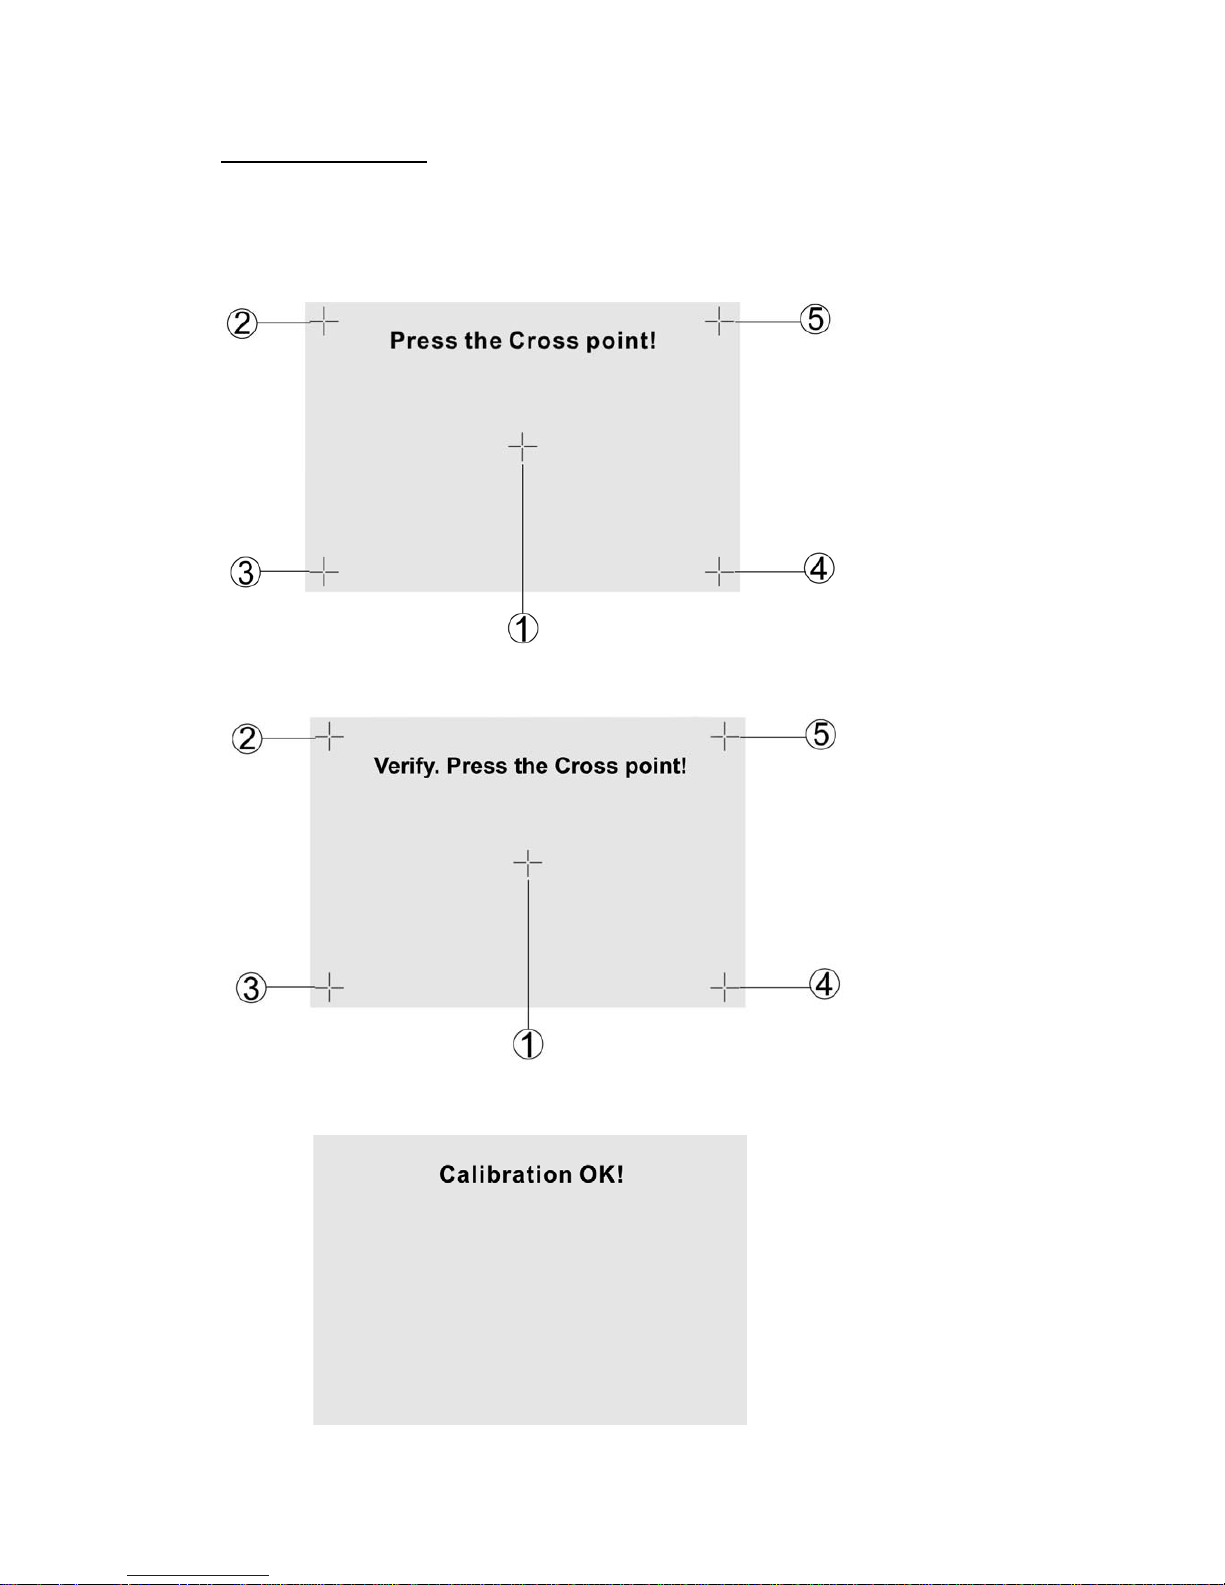
Touch Screen Calibrate
When 1
st
time to enter NAVI mode, you will see the CALIBRATE screen. Please touch
the points from 1 to 5 by using a ballpoint pen or pencil.
To verify the calibration, please touch the points from 1 to 5 again.
Then the following screen is displayed:
Page 38
37
The Touch Screen is restored to their default positions. Touch anywhere of panel to
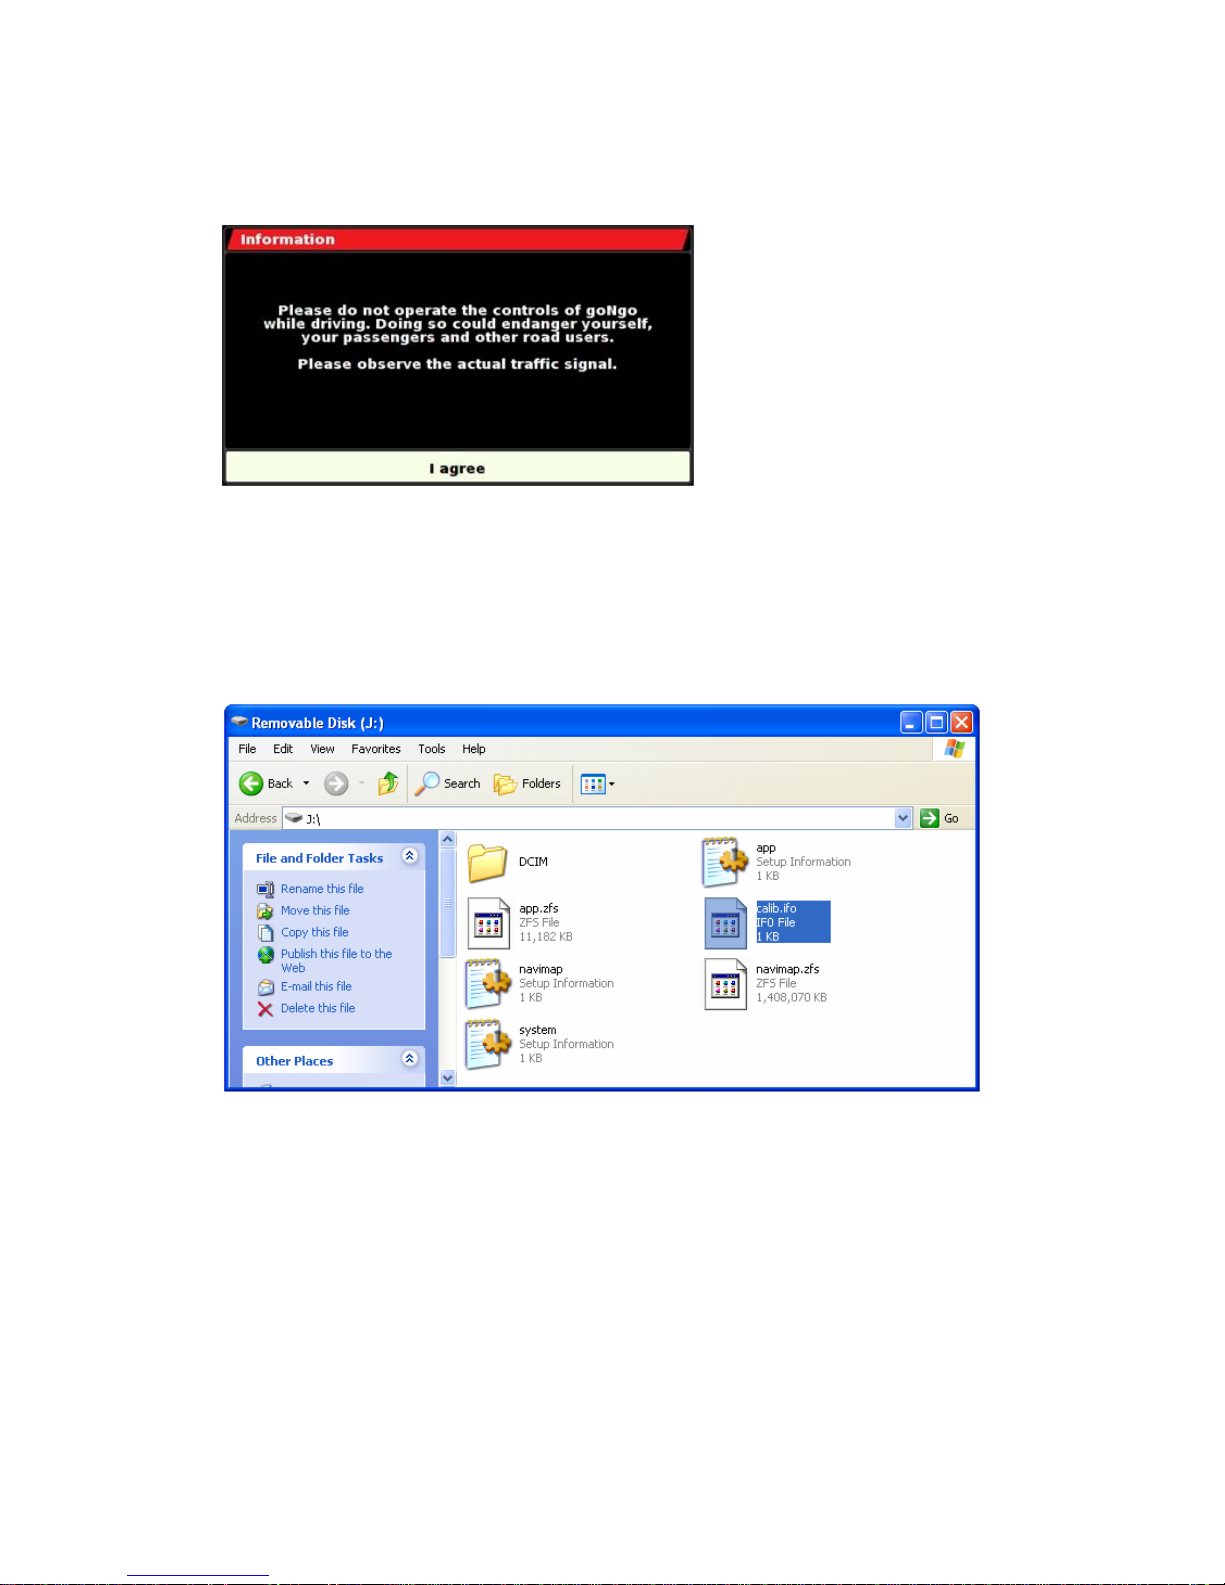
finish the calibration and go to the following screen:
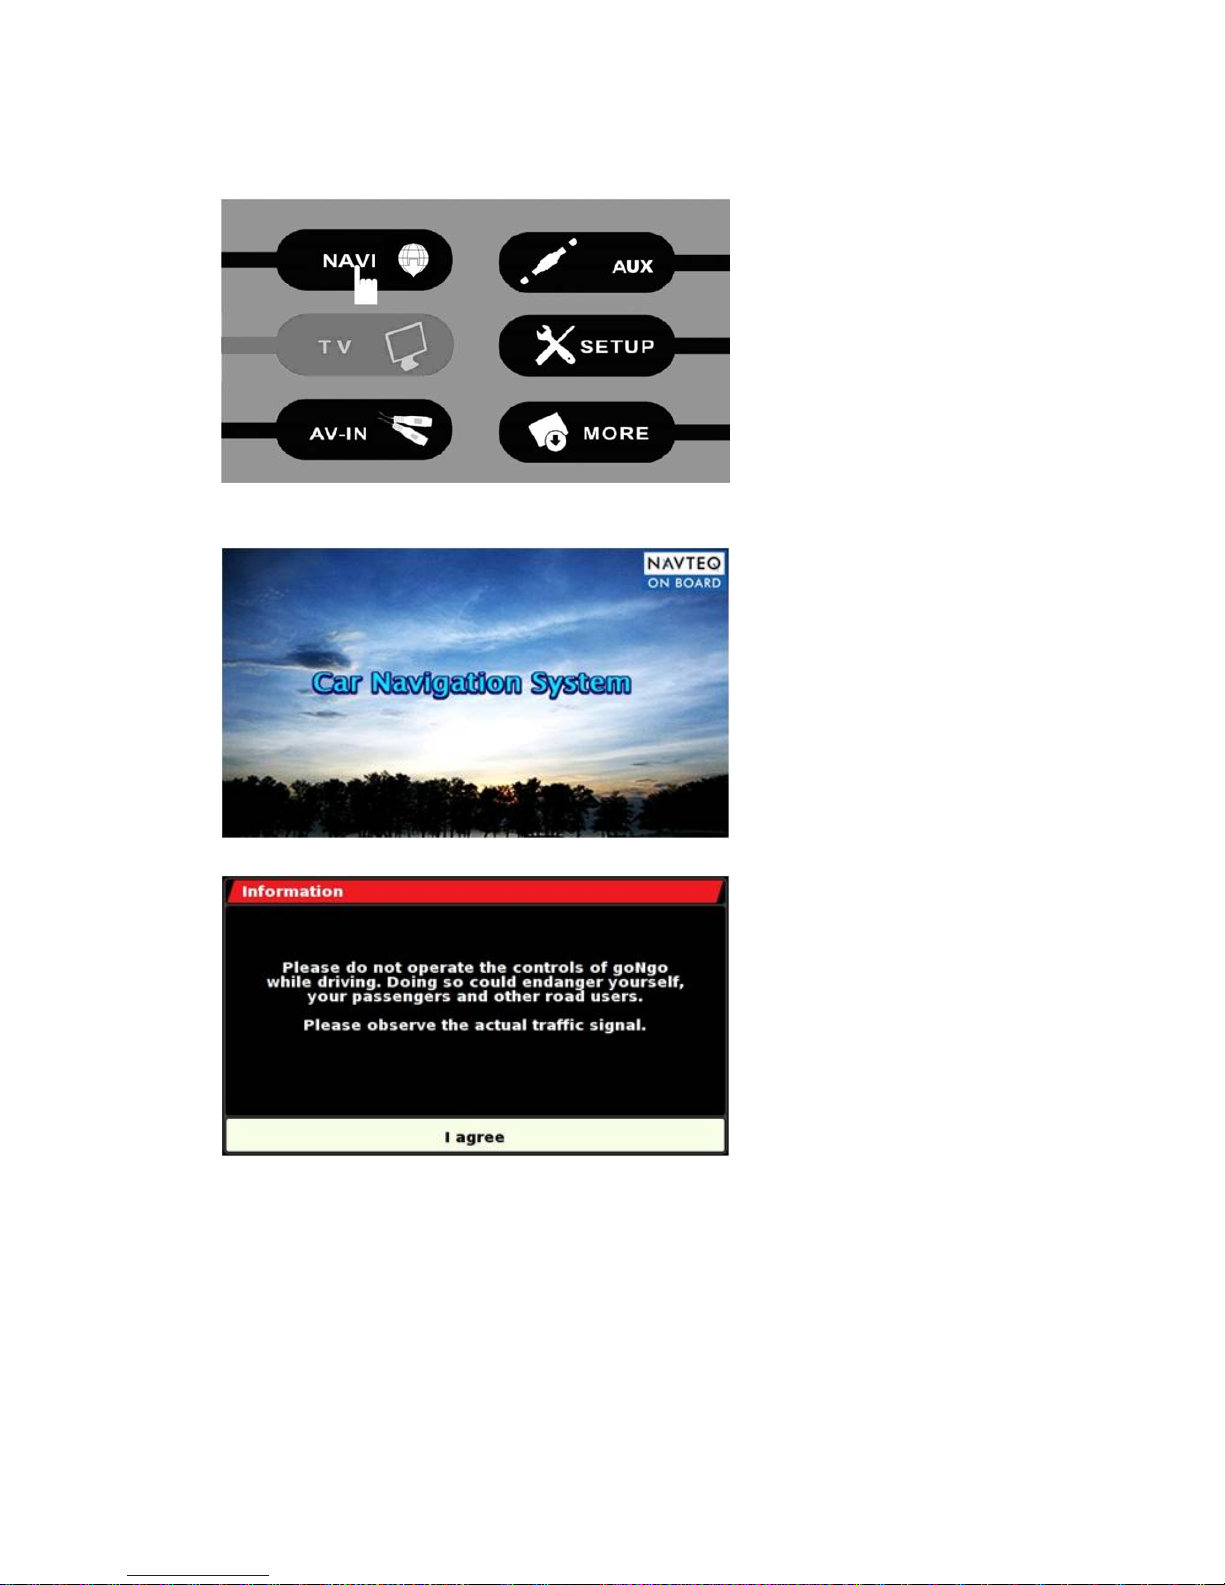
Read information and touch “I agree” button at the bottom of the screen, then enter
the NAVI mode.
NOTE:
If change the NAVIbox to connect another unit, please take out the SD card from the
NAVIbox and connect with computer, the following screen is displayed on computer:
Delete the file “calib.ifo” only. Insert the SD card into NAVIbox again, and connect the
NAVIbox with another unit.
Page 39
38
Go to NAVI mode
Touch the icon “NAVI” to enter the NAVI Mode if NAVIbox connected:
Following screen will be displayed:
Read information and touch “I agree” button at the bottom of the screen.
Enter the NAVI mode by main menu, the NAVI operations are effective only, all other
processes are disable such as Radio, CD etc.
NOTE:
Under NAVI mode, please view all operations by Navigation Device NAVIBOX-1
User’s manual.
Page 40
39
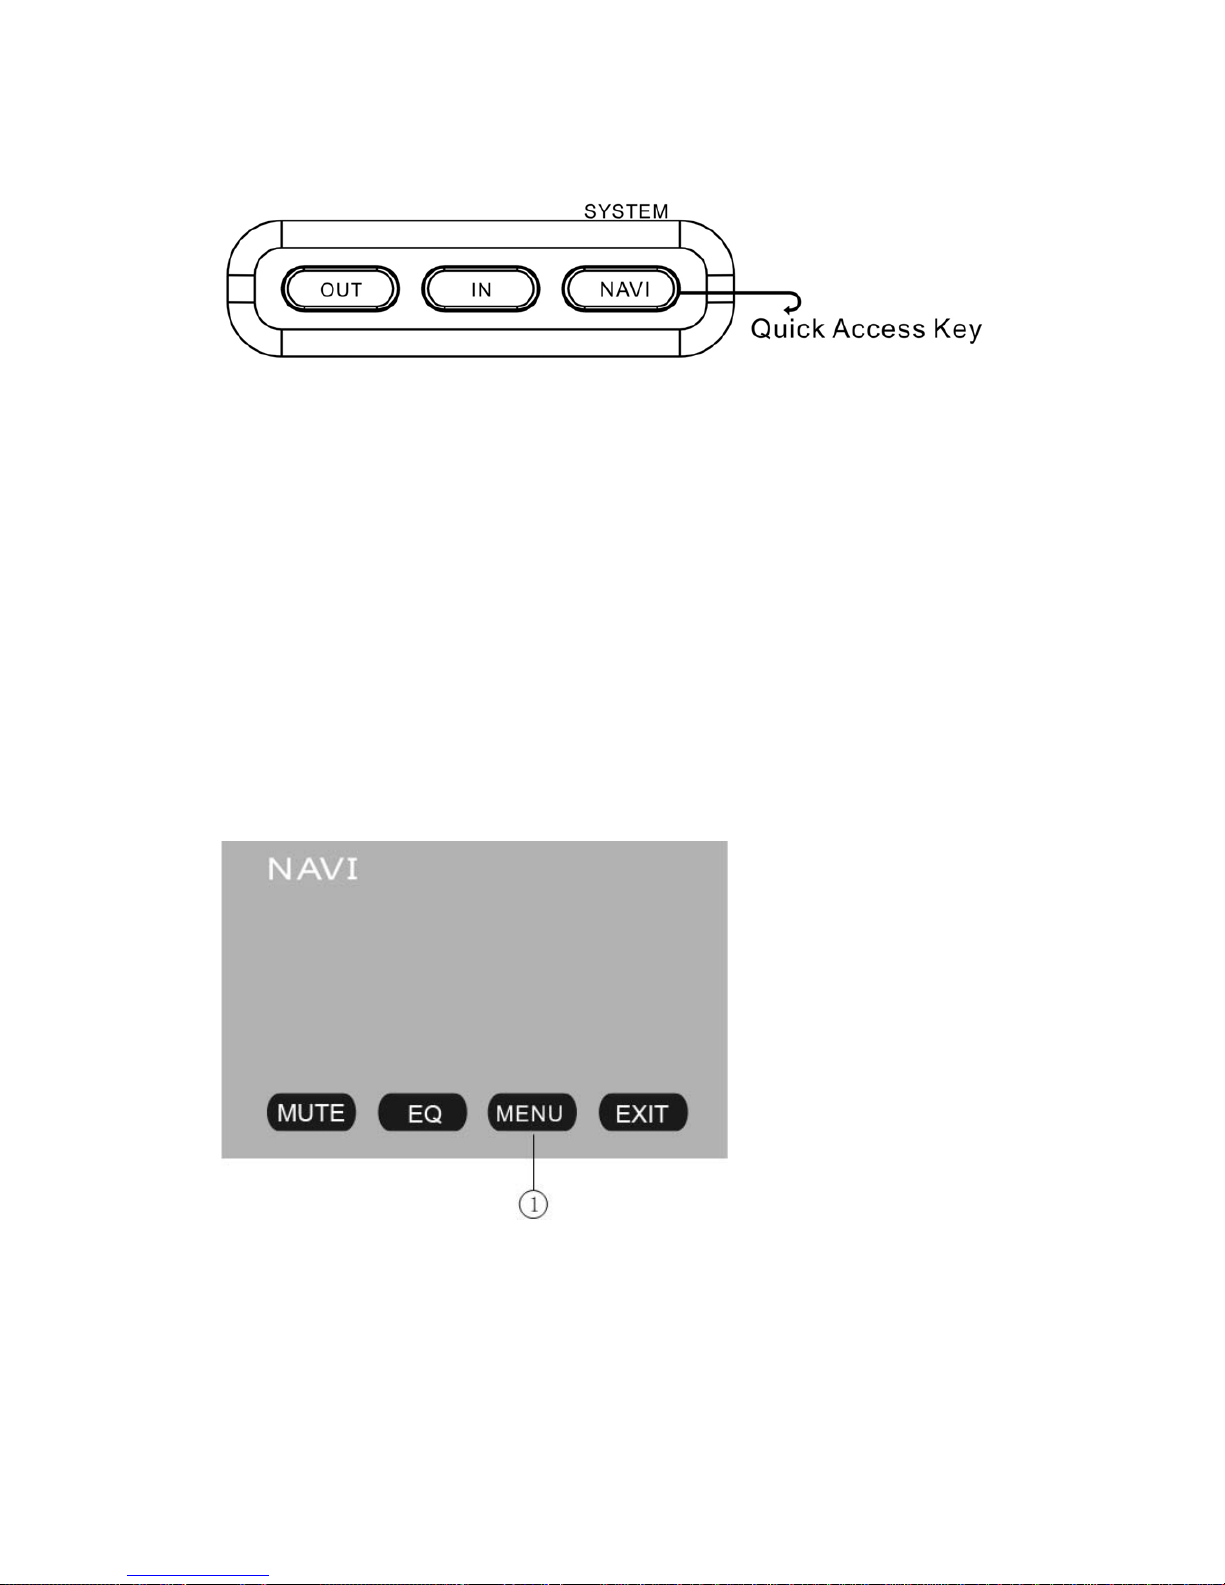
Quick Access Key [NAVI]
Under any working mode, press the [NAVI] button to switch to NAVI mode; press the
NAVI button again to return the previous working mode.
For example, under Radio mode, press the [NAVI] button to switch to NAVI mode;
press the button again to quit the NAVI mode and return back the Radio mode.
Enter the NAVI mode by Quick Access Key, the previous working mode is still working
on background.
For example, under Radio mode, press the [NAVI] button to switch to NAVI mode, and
you can still listen to the radio stations. But when voice of Navigation comes, the radio
will be interrupted until voice of Navigation ends.
No NAVIbox Connection
Touch the “NAVI” icon to enter the following screen if the NAVIbox not connected:
1. MENU
Touch the icon to return the main menu.
Page 41
40
SYSTEM SETUP
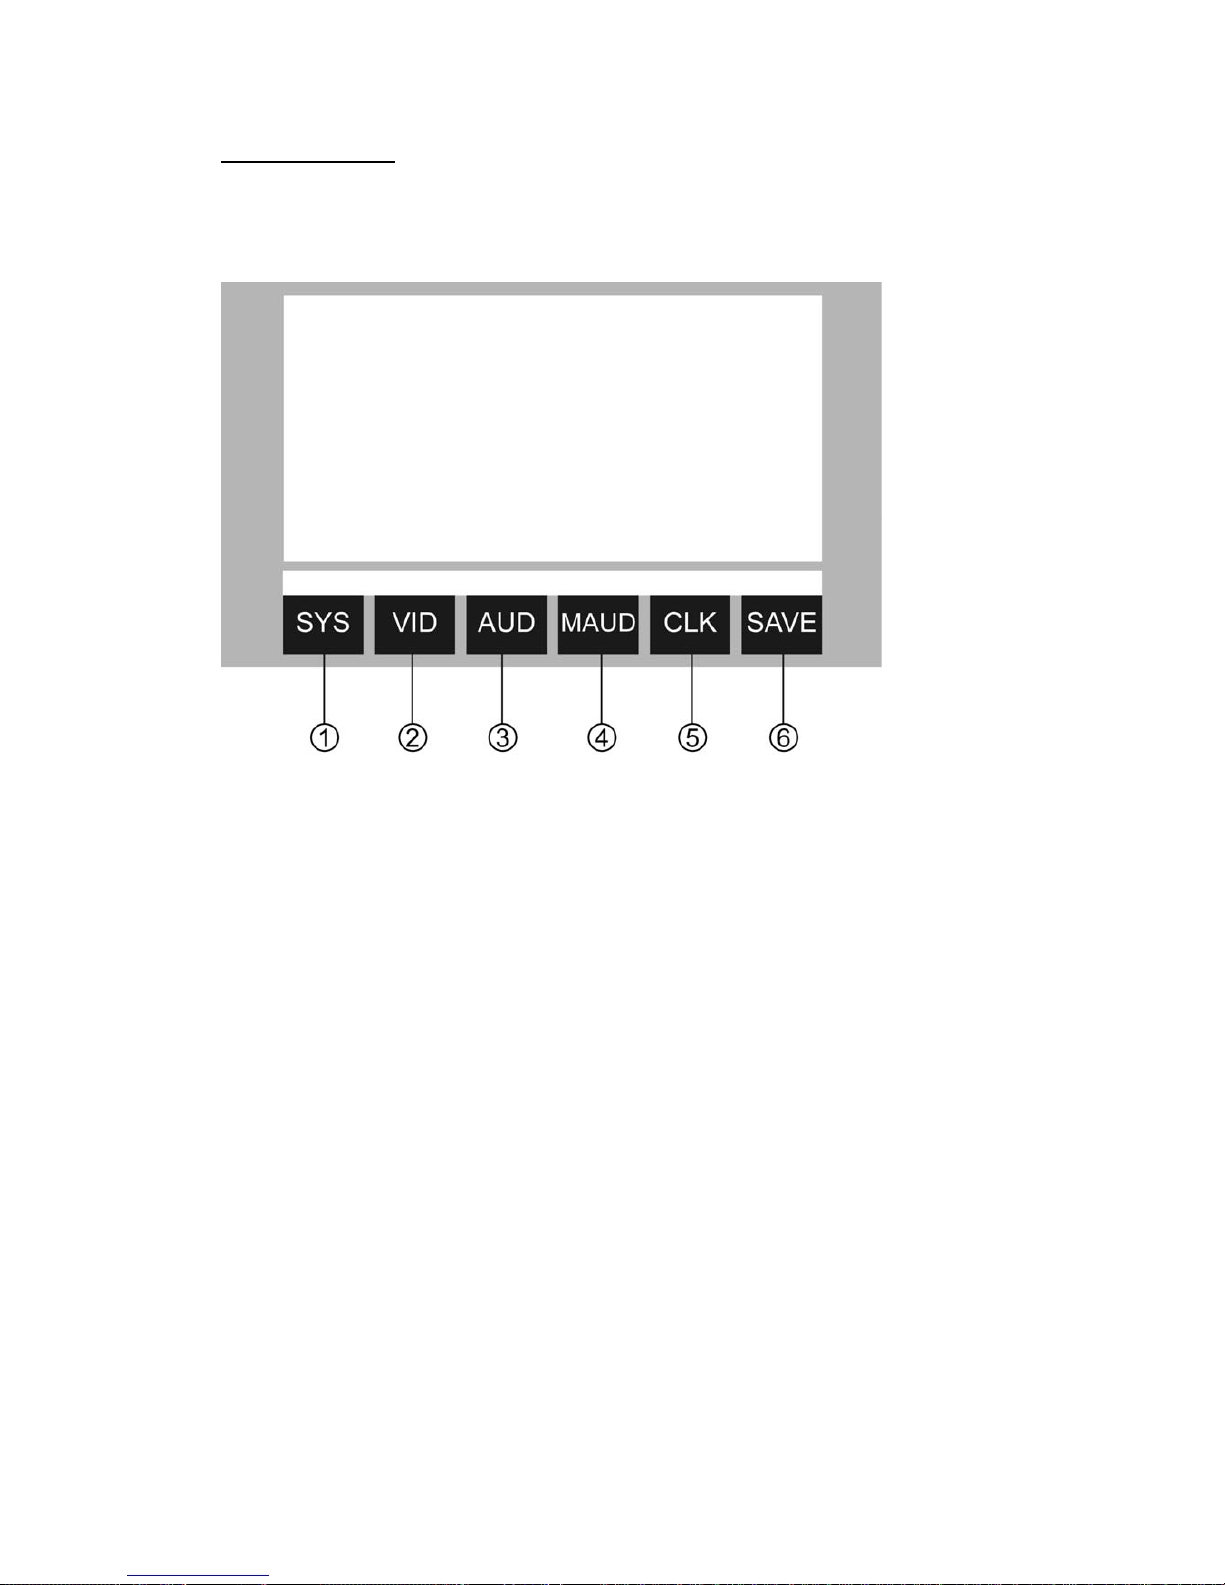
Touch the icon “SETUP” or press the [SYSTEM] button of panel to enter the SETUP of
system parameters:
1. SYSTEM SETUP
2. VIDEO SETUP
3. AUDIO SETUP
4. MORE AUDIO SETUP
5. CLOCK SETUP
Touch the icon 1~5 to select the main menus directly.
6. SAVE SETTINGS
Touch the icon 5 to save all settings and exit SETUP.
SETUP MENU OPERATION
Press the [BAND] button of remote control to switch the main menus as following:
SYSTEM – VIDEO – AUDIO – MORE AUDIO – CLOCK – SYSTEM
Press the [∨] / [∧] buttons of remote control to select the item you want to change.
Press the [<] / [>] buttons of remote control to change the value of item.
Holding on pressing the [SYSTEM] button of panel to exit SETUP of system
parameters.
Page 42
41
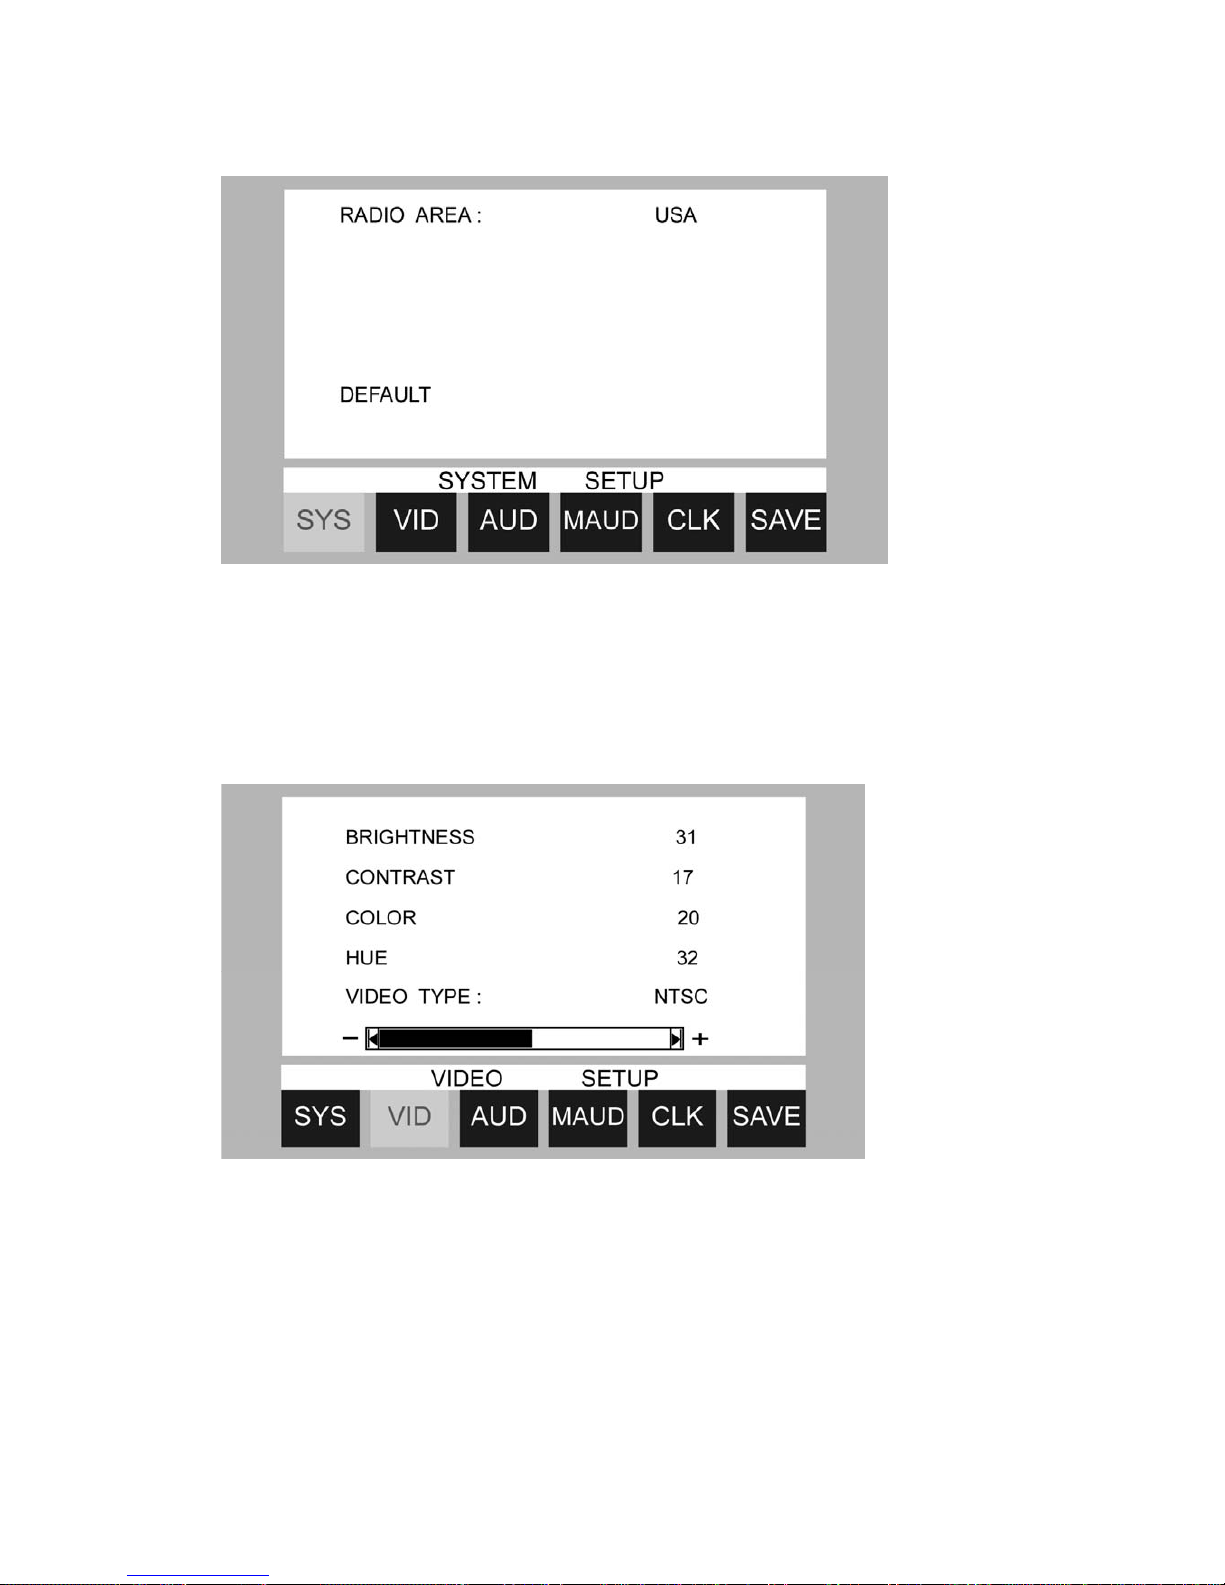
SYSTEM SETUP
RADIO AREA: USA – JAPAN – OIRT – EUROPE – ASIA – USA
DEFAULT: the unit will restore all default settings of Sound Parameter, Picture
Parameter & Tuner Parameter.
VIDEO SETUP
BRIGHTNESS: 0 ~ 64
CONTRAST: 0 ~ 64
COLOR: 0 ~ 64
HUE: 0 ~ 64
VIDEO TYPE: NTSC – PAL – AUTO – NTSC
NOTE:
It is available to setup of HUE under NTSC VIDEO TYPE only.
Page 43
42
AUDIO SETUP
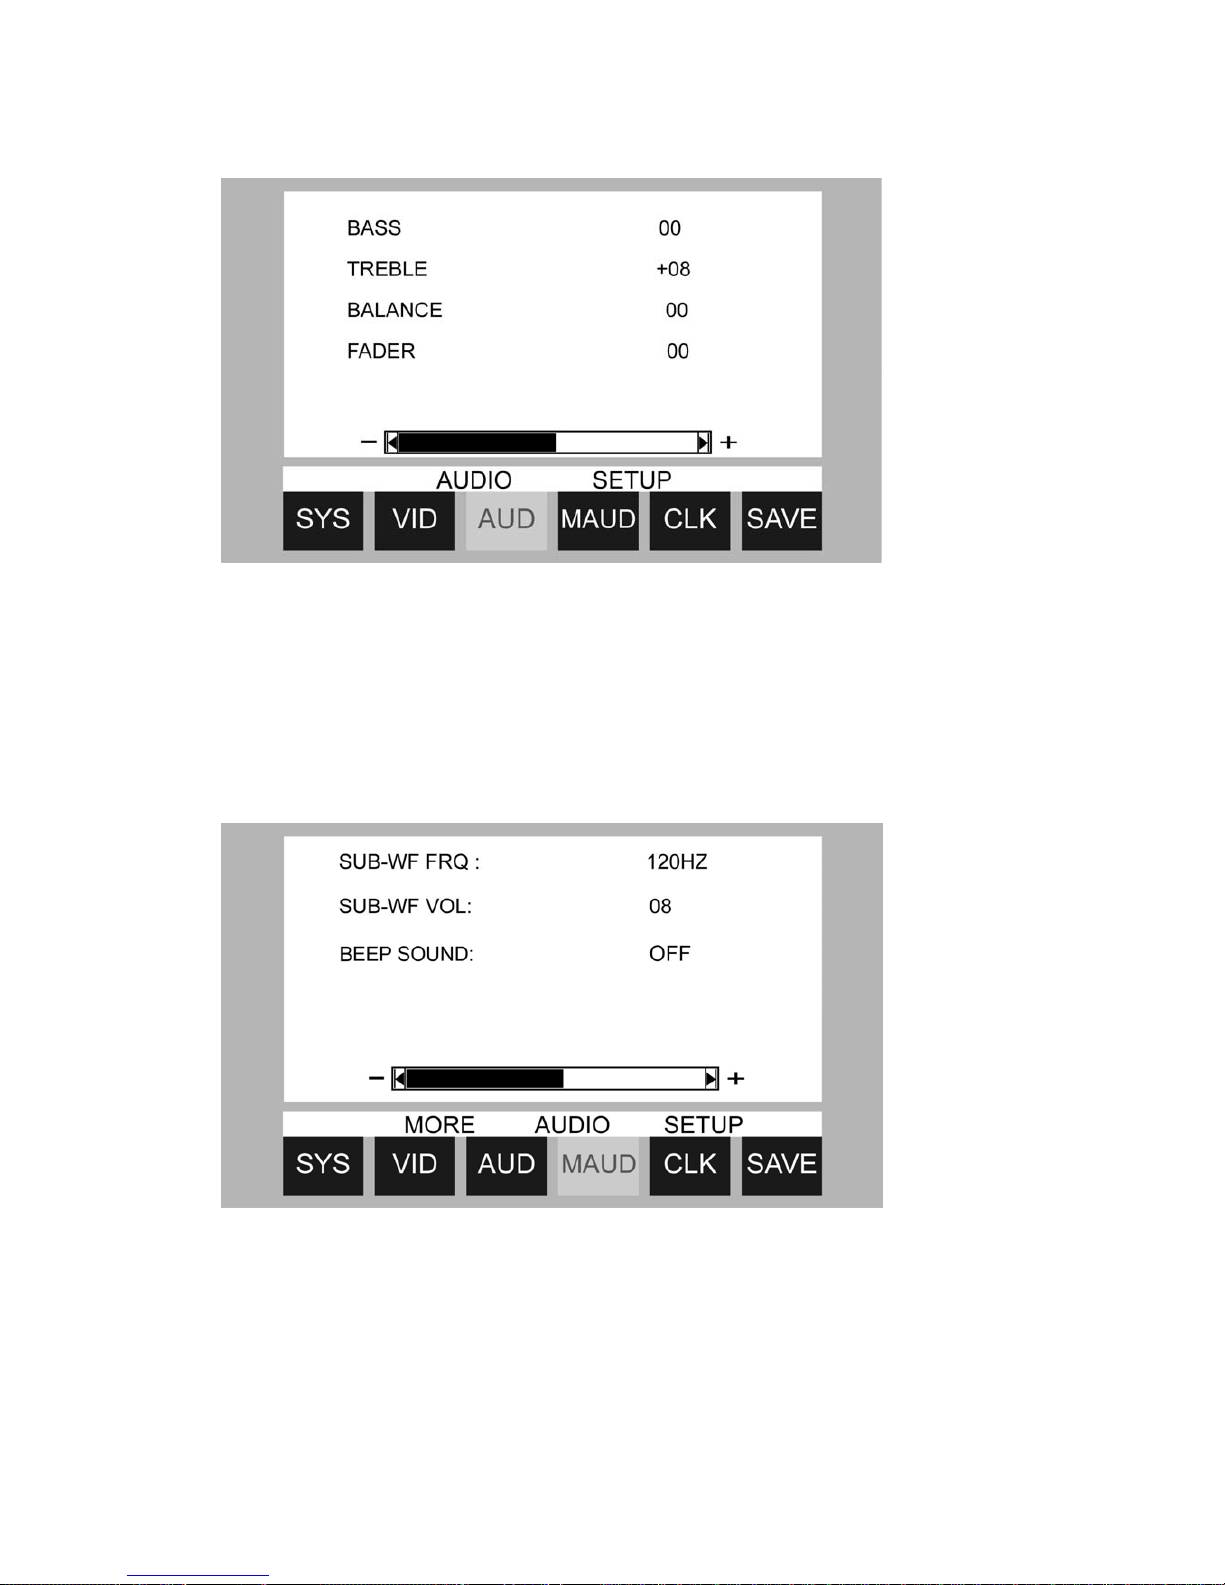
BASS: - 15 ~ + 15
TREBLE: - 15 ~ + 15
BALANCE: L 15 ~ R 15
FADER: F 15 ~ R 15
MORE AUDIO SETUP
SUB-WF FRQ: 80HZ – 120HZ – 160HZ – OFF – 80HZ
SUB-WF VOL: 0 ~ 15
BEEP SOUND: ON / OFF
Page 44
43
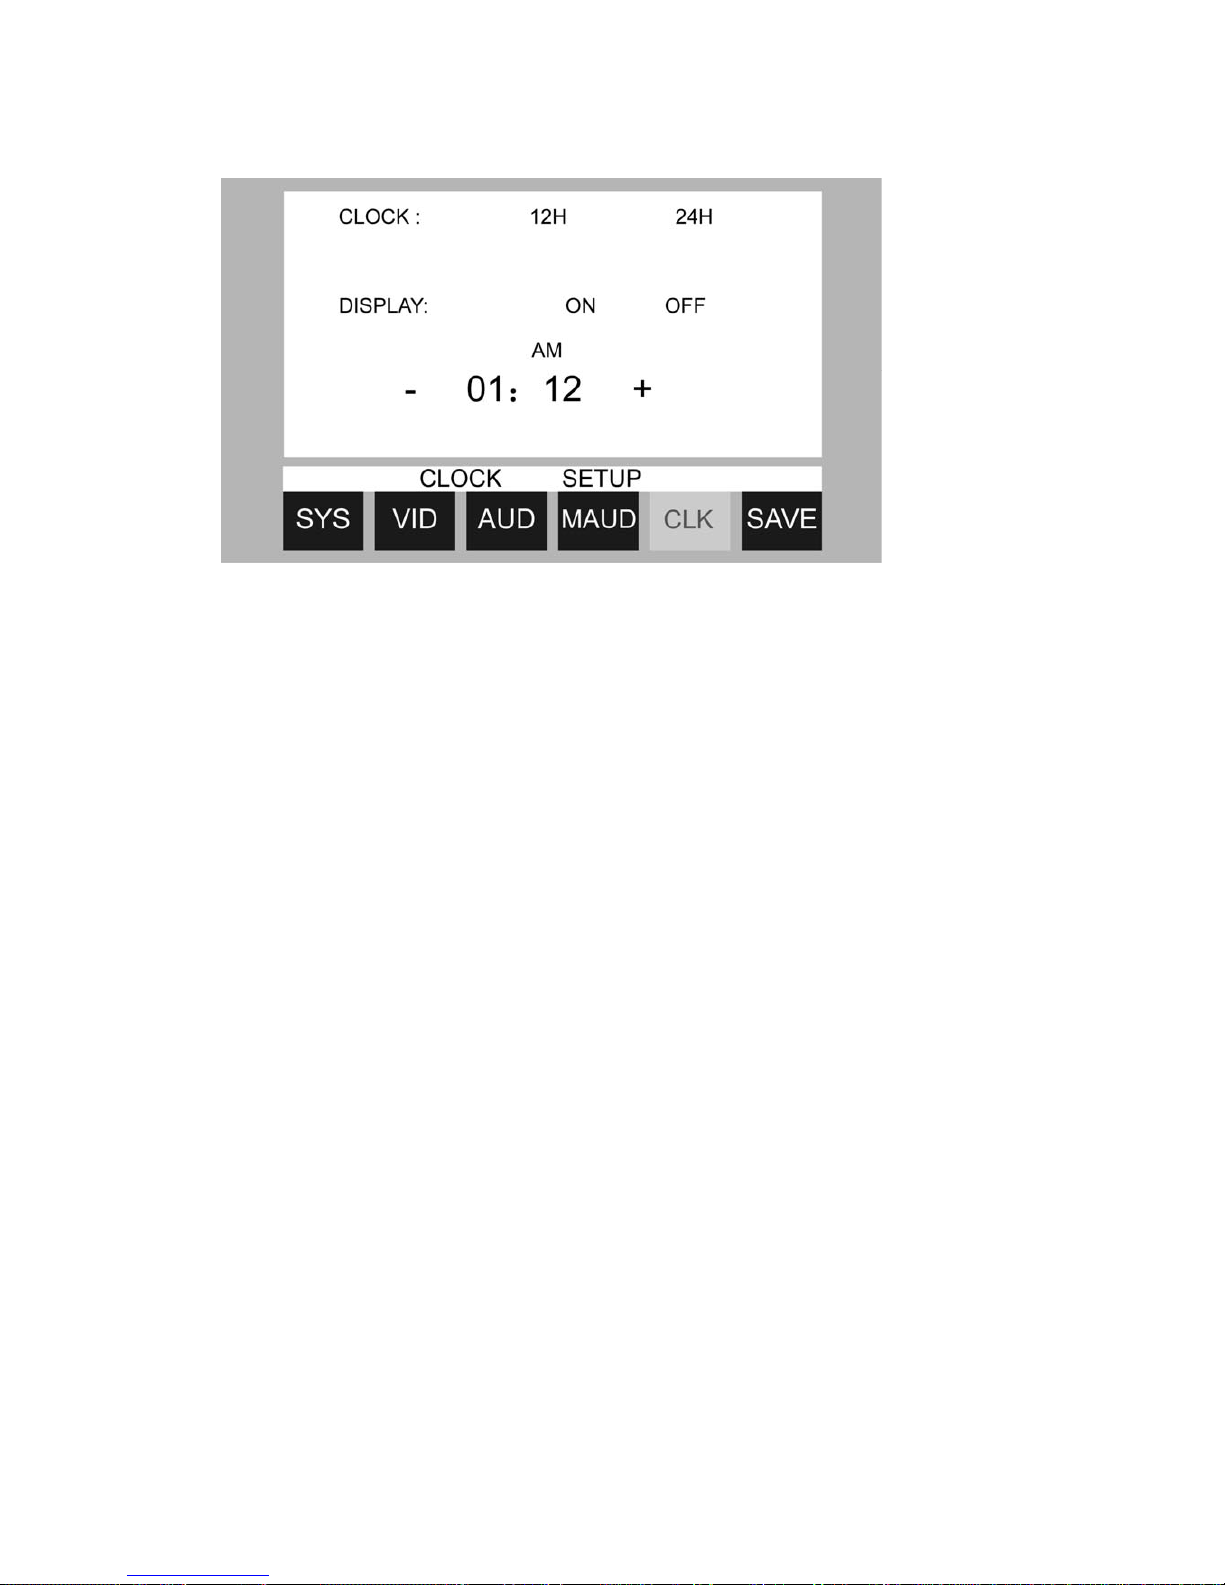
CLOCK SETUP
CLOCK: 12H / 24H
DISPLAY: ON / OFF
HOUR: 00 ~ 23
MINUTE: 00 ~ 59
Page 45

44
DVD SETUP MUNE
SETUP MENU OPERATION
Press the [SETUP] button of remote control to enter the DVD SETUP Menu.
Press the [<] / [>] buttons to switch the main menus as following:
SYSTEM – LANGUAGE – AUDIO – VIDEO – SPEAKER – DIGITAL
Press the [∧] / [∨] buttons to enter the submenus from main menus.
Press the [∧] button on the top submenu or press the [∨] button on the bottom of
submenu to exit the submenus to main menus.
Press the [∧] / [∨] buttons to select the submenus as your need.
Press the [>] or [ENTER] buttons to enter the items of submenus.
ress the [<] button to exit the items of submenus.
Press the [∨] / [∧] buttons to select the item you want to change.
Press the [ENTER] button to confirm the item you have selected and exit to the
submenus.
Press the [SETUP] button of remote control or press the [ENTER] button on the
submenu EXIT SETUP to exit the DVD SETUP Menu and save all settings.
NOTE:
Effective only DVD, USB Mode.
Page 46
45
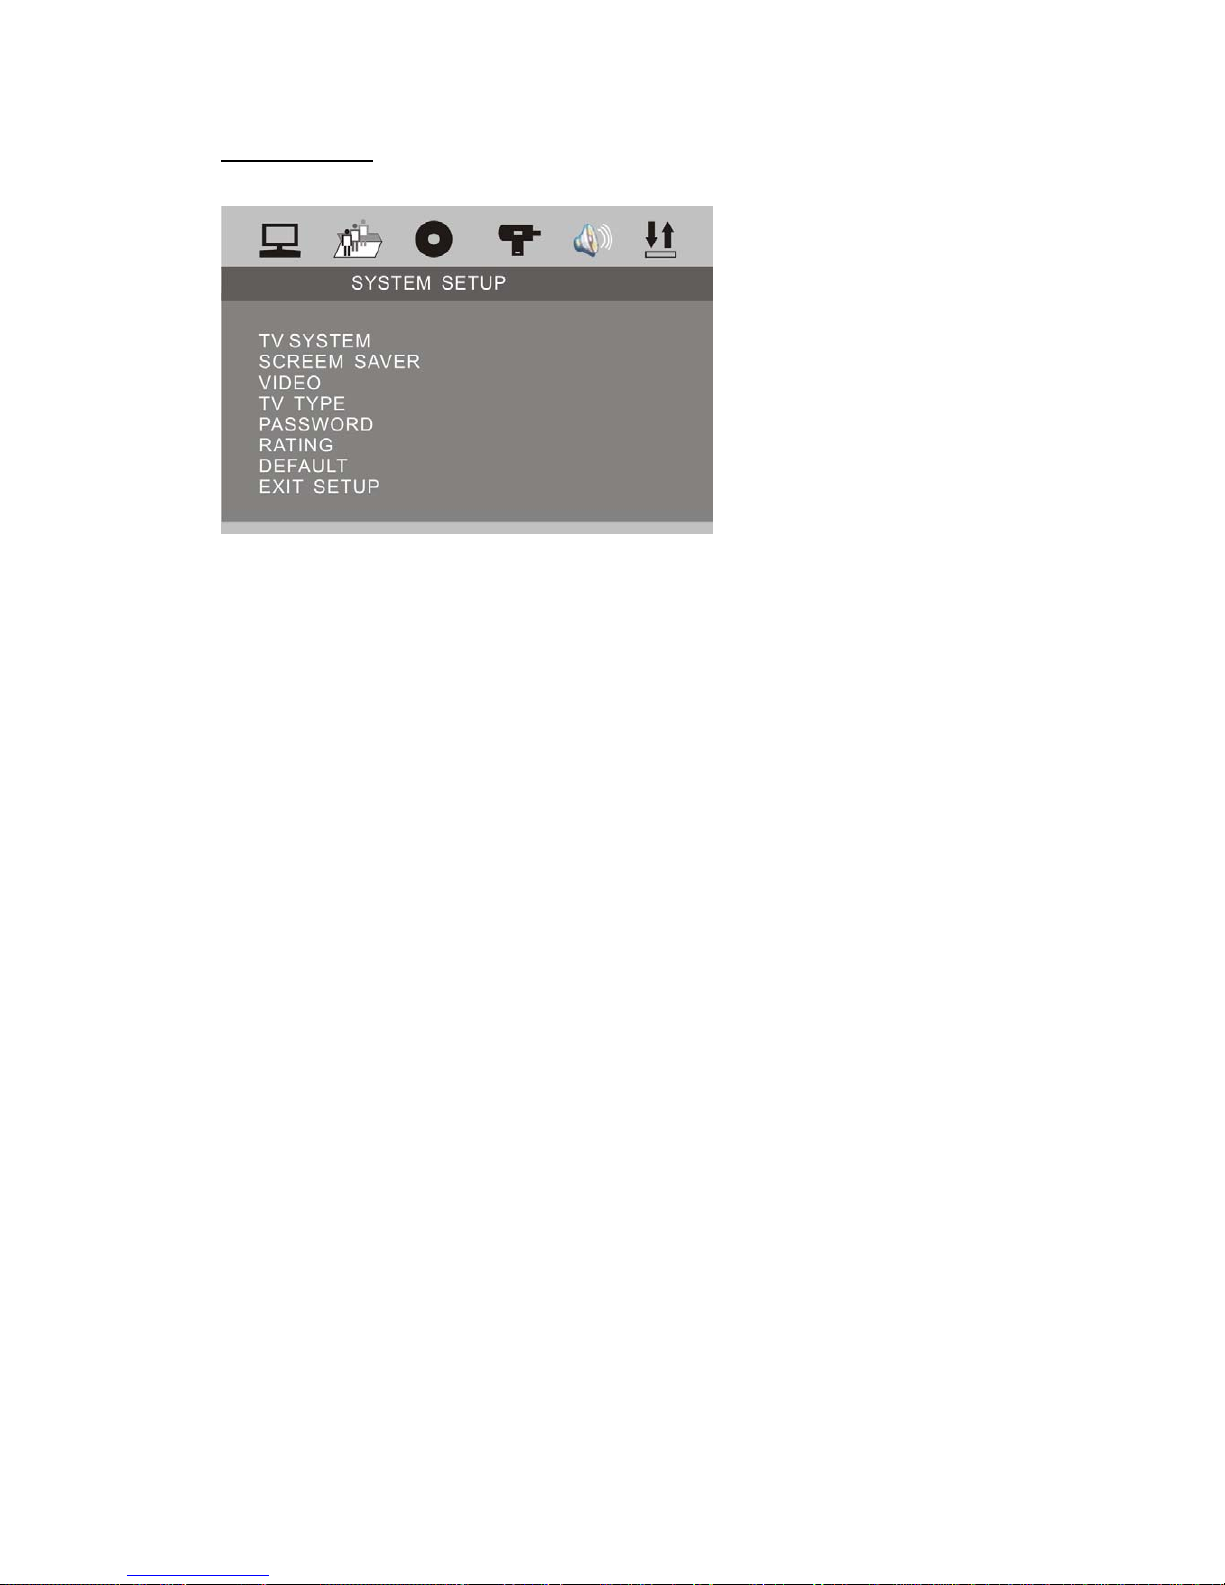
SYSTEM MENU
TV SYSTEM
Following options are available for the TV Display:
NTSC
SCREEN SAVER
Select ON or OFF.
VIDEO
Following options are available for the TV Display:
INTERLACE-YUV TV-RGB P-SCAN YPBPR S-VIDEO
TV TYPE
Following options are available for the TV Display:
4 : 3 PS 4 : 3 LB 16 : 9
PASSWORD
Setup the password for Parental Ratings change. The default password is 0000.
RATING
Following options are available for the Parental Ratings:
1 KID SAFE 2 G 3 PG 4 PG 13
5 PG - R 6 R 7 NC - 17 8 ADULT
The Parental Ratings could be changed after the correct password input.
DEFAULT
The unit will restore all default settings by selecting this option.
Page 47
46
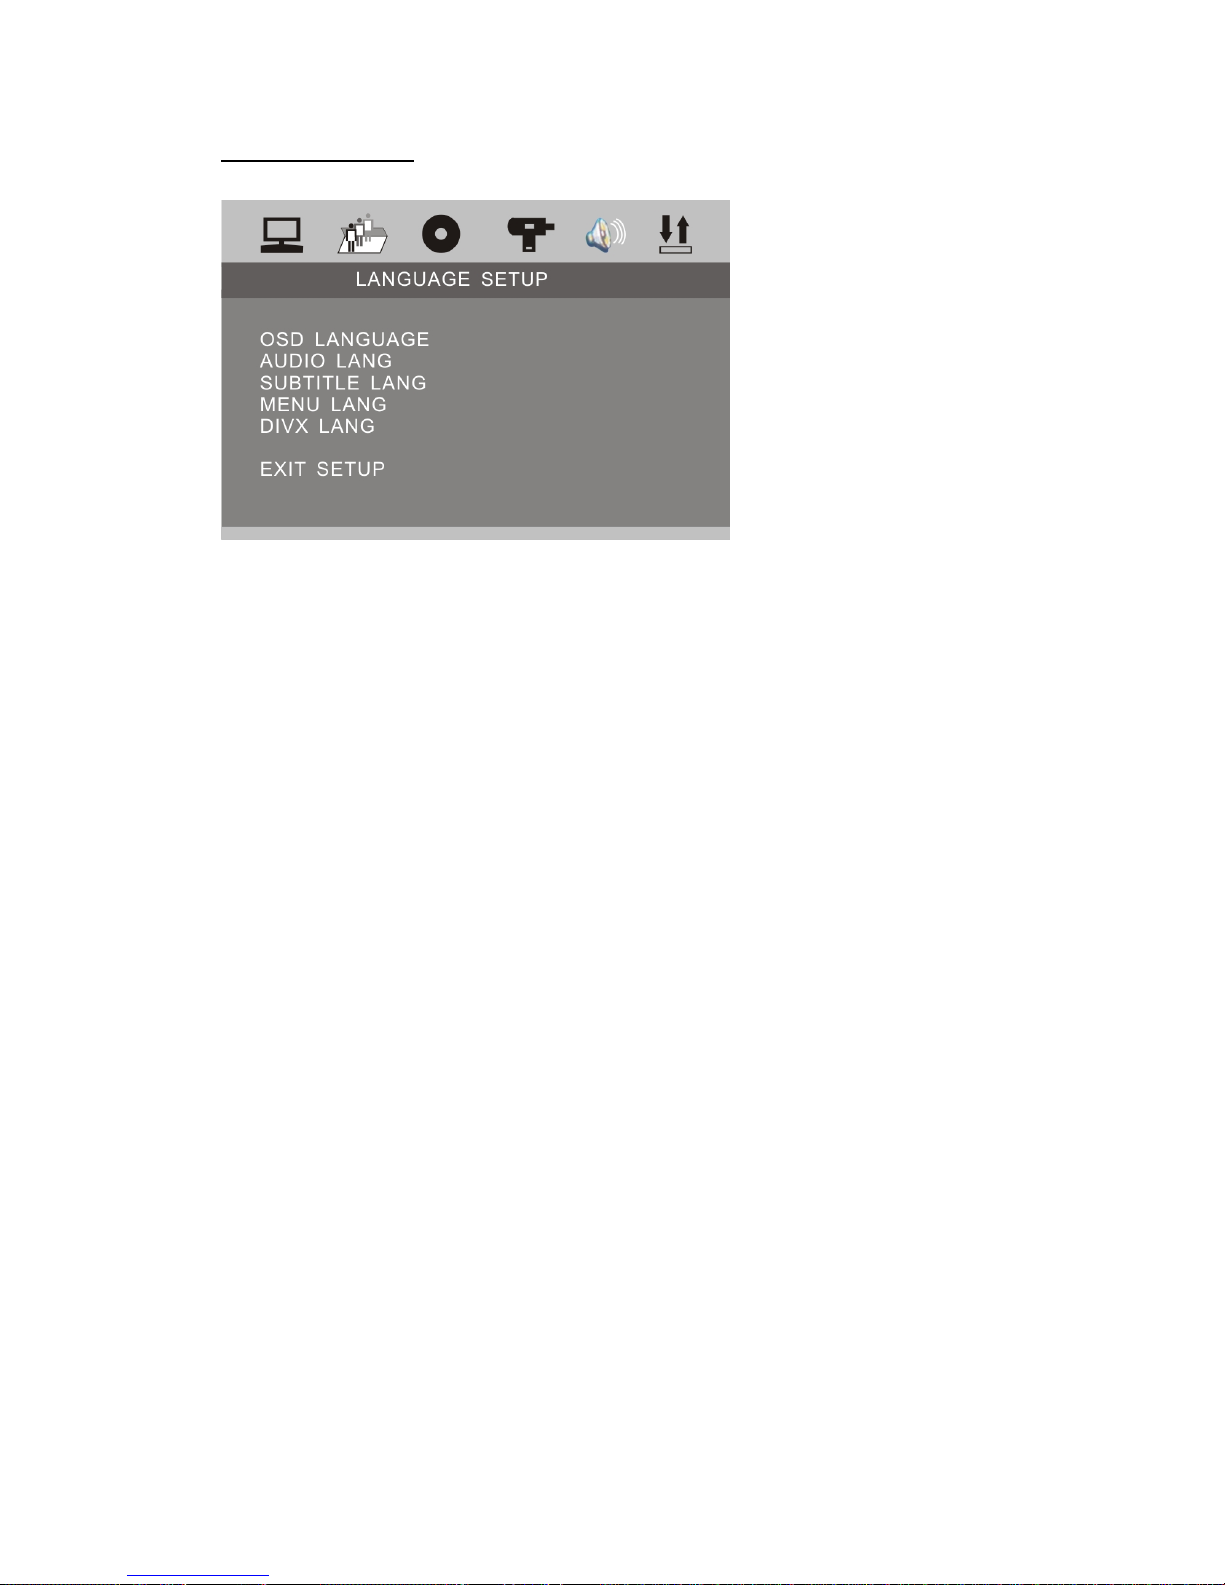
LANGUAGE SETUP
OSD LANGUAGE
Following options are available for the OSD LANGUAGE:
ENGLISH GERMAN SPANISH FRENCH PORTUGUESE
ITALIAN RUSSIAN DUTCH SWEDISH KOREAN
DANISH NORWEGIAN POLISH HUNGARIAN
AUDIO LANGUAGE
Following options are available for the AUDIO LANGUAGE:
ENGLISH GERMAN SPANISH FRENCH PORTUGUESE
ITALIAN RUSSIAN DUTCH SWEDISH KOREAN
DANISH NORWEGIAN POLISH HUNGARIAN
SUBTITLE LANGUAGE
Following options are available for the SUBTITLE LANGUAGE:
ENGLISH GERMAN SPANISH FRENCH PORTUGUESE
ITALIAN RUSSIAN DUTCH SWEDISH KOREAN
DANISH NORWEGIAN POLISH HUNGARIAN
MENU LANGUAGE
Following options are available for the MENU LANGUAGE:
ENGLISH GERMAN SPANISH FRENCH PORTUGUESE
ITALIAN RUSSIAN DUTCH SWEDISH KOREAN
DANISH NORWEGIAN POLISH HUNGARIAN
DIVX LANGUAGE
Following options are available for the DIVX LANGUAGE:
CENTRAL EU
WESTERN EU
KOREAN
Page 48
47
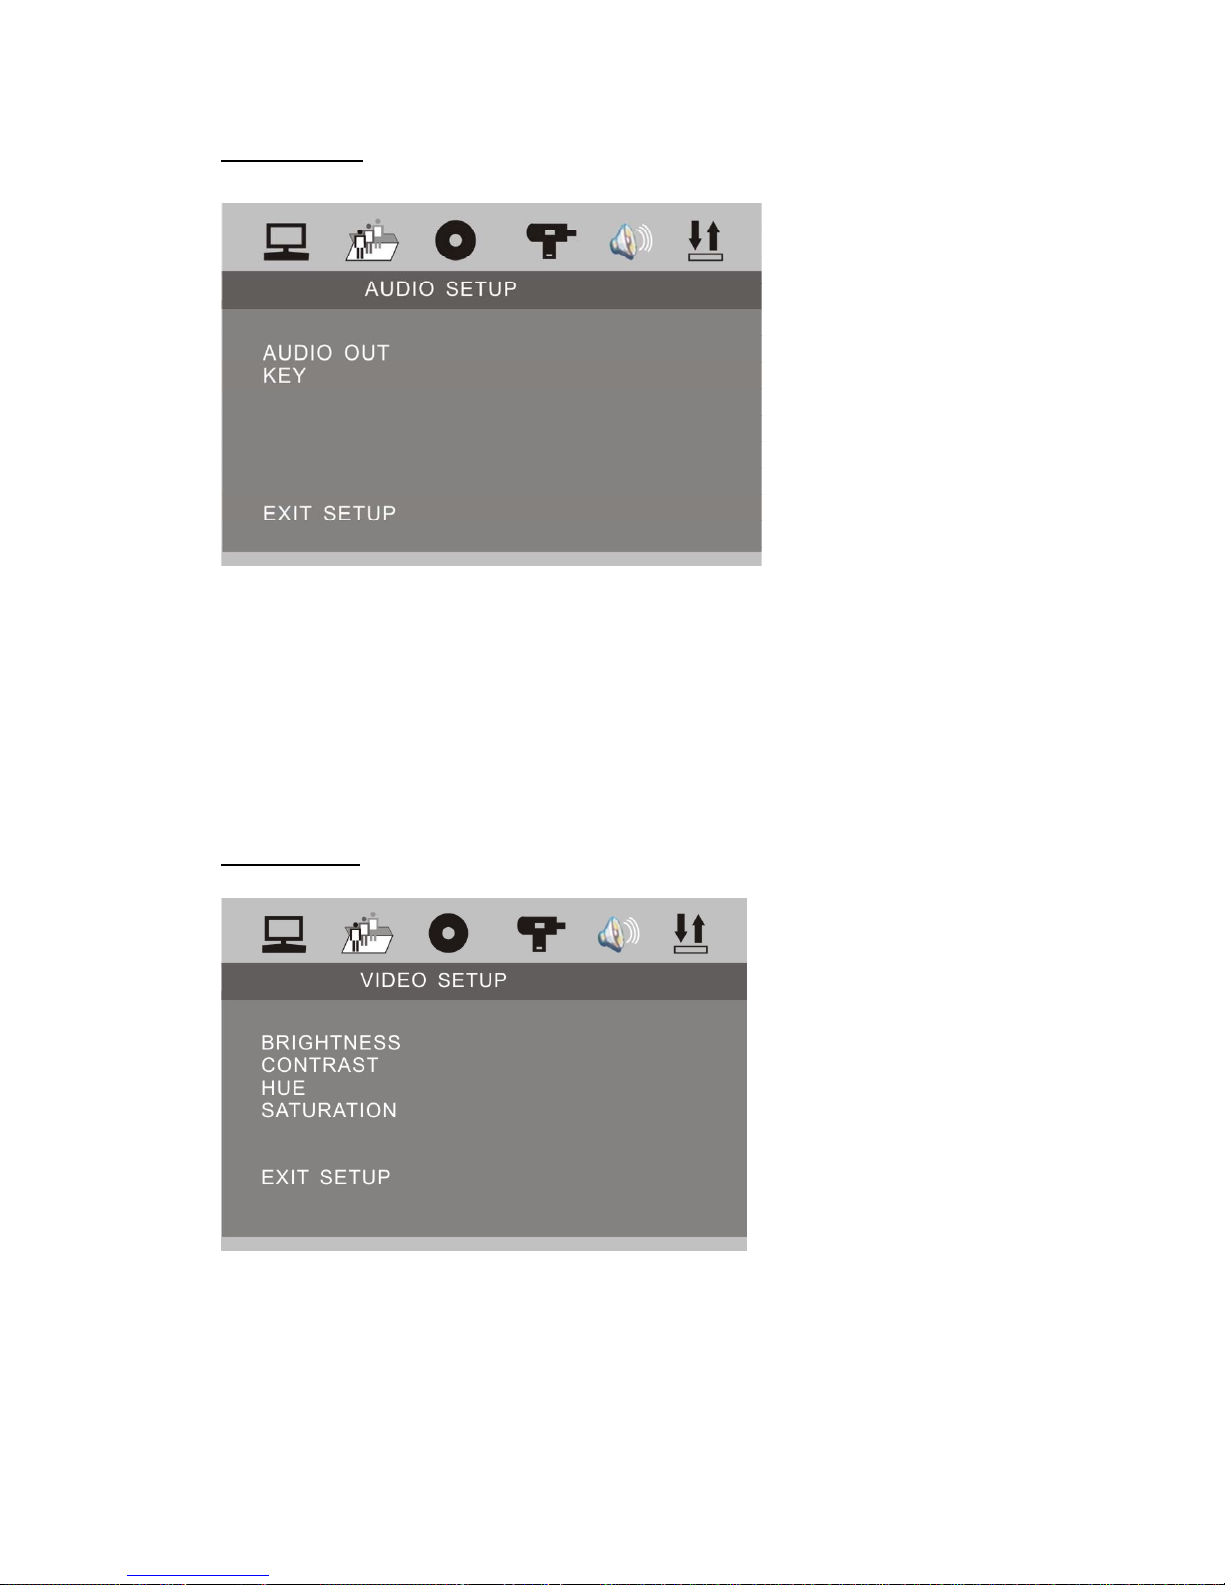
AUDIO SETUP
AUDIO OUT
Following options are available for the AUDIO OUT:
SPDIF / OFF SPDIF / RAW SPDIF / PCM
KEY
Following options are available for the KEY:
b -4 -2 0 +2 +4 #
VIDEO SETUP
BRIGHTNESS
Following options are available for the BRIGHTNESS:
0 2 4 6 8 10 12
Page 49
48
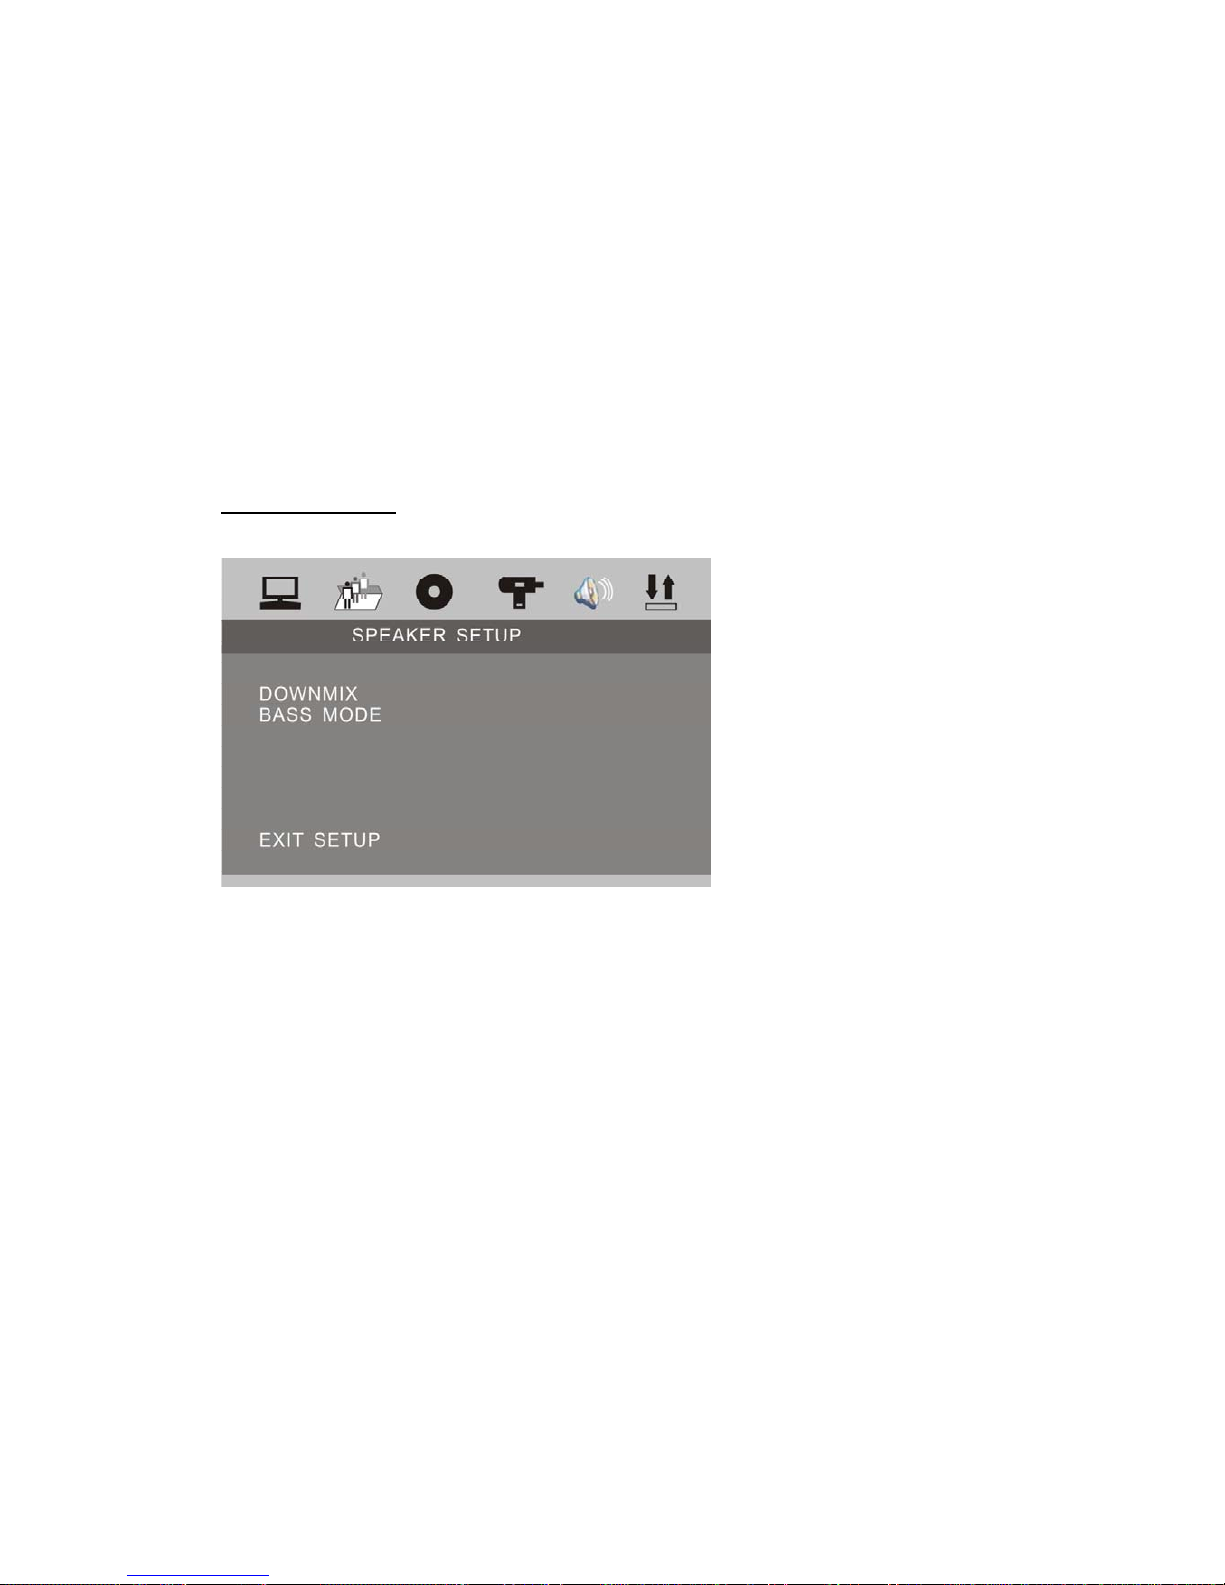
CONTRAST
Following options are available for the CONTRAST:
0 2 4 6 8 10 12
HUE
Following options are available for the HUE:
-6 -4 -2 0 +2 +4 +6
SATURATION
Following options are available for the SATURATION:
0 2 4 6 8 10 12
SPEAKER SETUP
DOWNMIX
Following options are available for the DOWNMIX:
LT / RT Stereo VSS
BASS MODE
Following options are available for the BASS MODE:
ALL LG SPK ALL SM SPK MIXED SPK
Page 50
49
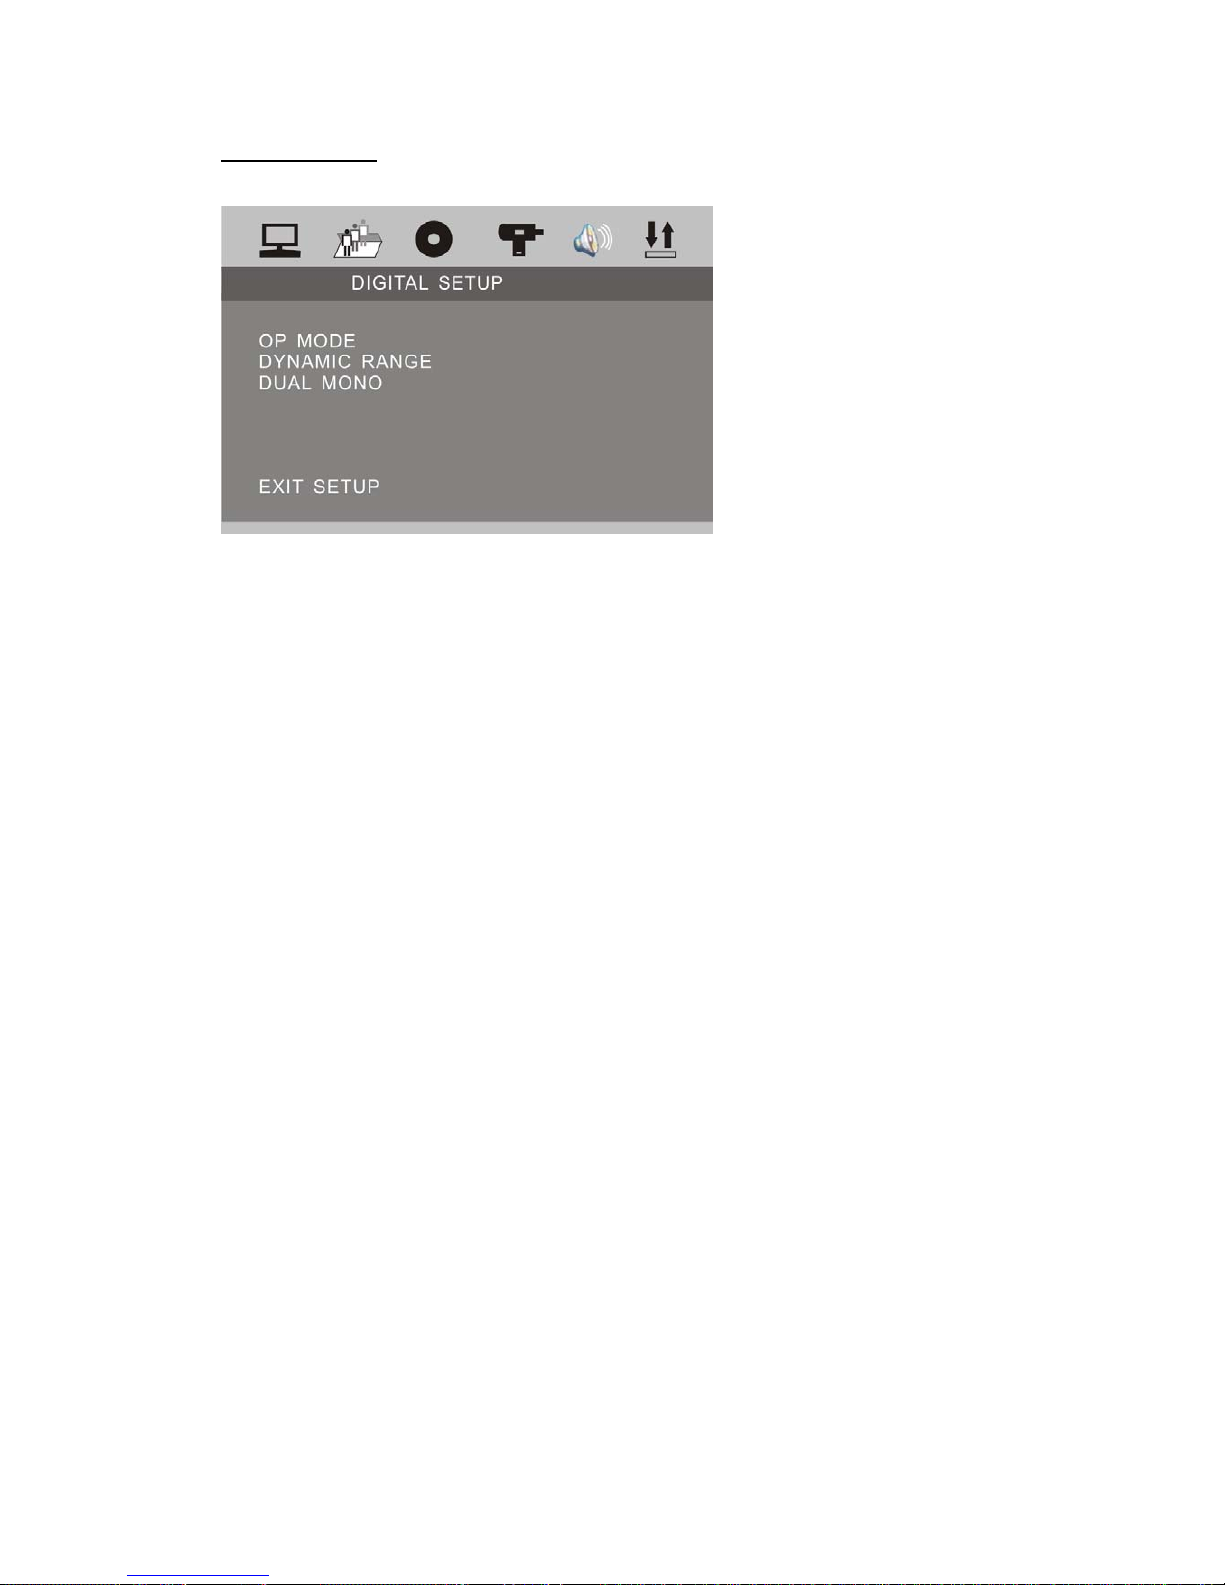
DIGITAL SETUP
OP MODE
Following options are available for the OP MODE:
LINE OUT RF REMOD
DYNAMIC RANGE
Following options are available for the DYNAMIC RANGE:
FULL 6 / 8 4/ 8 2 /8 OFF
DUAL MONO
Following options are available for the DUAL MONO:
STEREO MONO L MONO R MIX MONO
Page 51
50
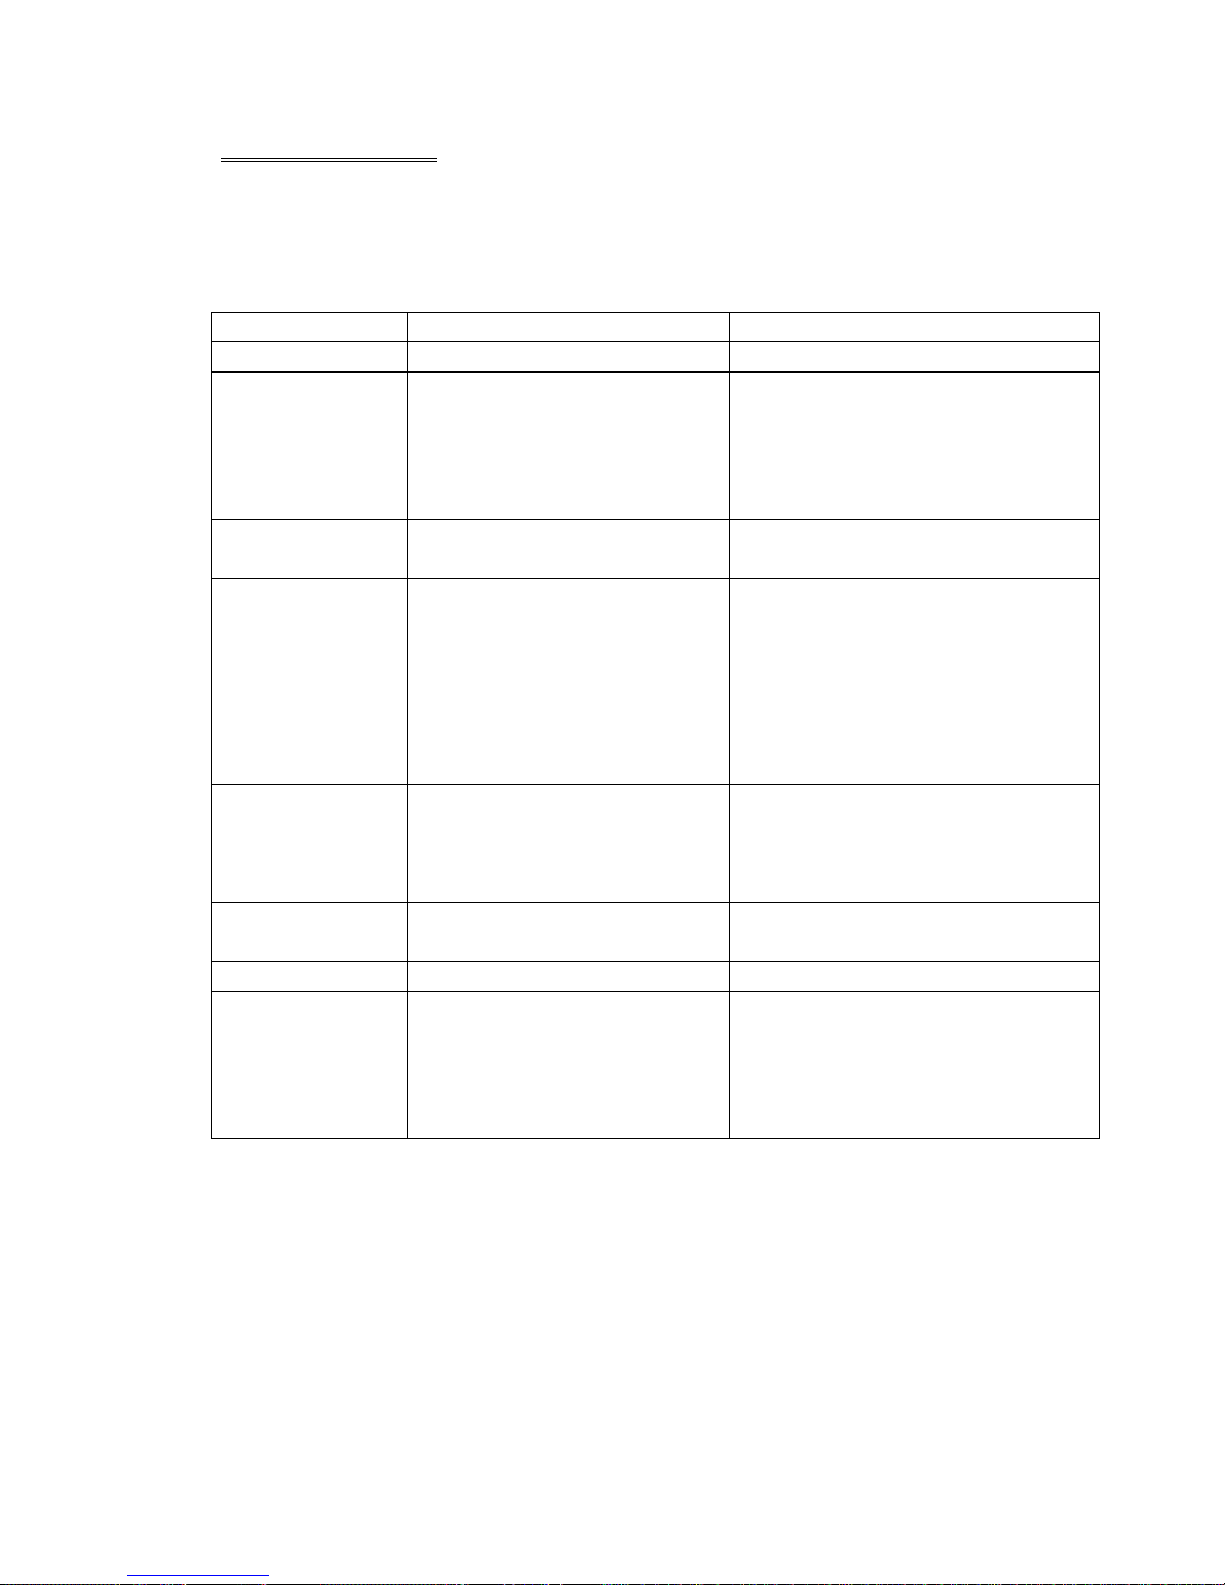
TROUBLE SHOOTING
If any of problem persists after checking the below list, Please consult your
nearest service dealer.
Never attempt to disassemble and repair unit personally.
Problem Cause Corrective Action
GENERAL
Unit will not power
on
ACC Fuse blown
Car battery fuse blown
illegal operation
Install new fuse with correct rating
Install new fuse with correct rating
Press the RESET button located in
the bottom right
corner of the front panel
Remote control
does not
Battery depleted
Battery installed incorrectly
Replace battery with new one
Remove battery and install correctly
No/low audio
output
Improper audio output
connection Volume set too low
Speakers damaged
Heavily biased volume balance
Speakers wiring is in contact
with metal Part or car
Check wiring and correct
Increase volume level
Review wiring diagram and check
MUTE connection Replace speakers
Adjust the channel balance to the
center position Insulate all speaker
wiring connections
Poor sound quality
or distortion
Pirate disc is in use
Speaker power rating not
compatible with unit
Speaker is shorted
Use original copy
Connect proper speakers
Check speaker contact
Unit resets itself
when engine is off
Incorrect connection between
ACC and Positive battery wire
Check wiring and correct
TUNER
Weak station
searching
Auto antenna is not fully
extended
Auto antenna not properly
connected LOCAL function is
activated
Connect the auto antenna control
cable properly Connect the auto
antenna control cable properly Turn
LOCAL function off
Page 52

51
Problem Cause
Corrective Action
TFT MONITOR
Monitor does not
open automatically
TFT Auto Open is turned of
Turn TFT Auto open on
No image
Incorrect connection to parking
brake wire PARKING is activated
and parking brake is not
engaged
Check wiring and correct
Stop vehicle in safe place and apply
parking brake
Flashing image or
interference
appears on screen
DVD is not compatible with
current TV system settings
Image blurred, distorted, or dark
Change setup to accommodate disc
Prolonged image
or improper
height/width ratio
display
Improper video signal
connections Improper aspect
ratio setup
Check wiring and correct
Use correct aspect ratio setting
Monitor stops at
incorrect position
Moving path is blocked
Press OPEN key to restart monitor
movement
VCD
Cannot insert disc Disc already inside unit Eject current disc and insert new one
Disc does not play
back
Disc is warped or scratched
Disc is dirty or wet
Incompatible disc is used
Disc rating exceeds Parental
Lock rating limit
Disc region code is not
compatible with unit
Disc is inserted upside down
Use disc in good condition
Clean disc with soft cloth
Use compatible disc Change parental
Lock settings to lower restriction
Use compatible disc
Change Parental Lock settings to
lower restriction Use disc with proper
region cod
Insert disc with label side up
Image blurred ,
distorted, or dark
Disc is illegally copied Use original disc
PBC cannot be
used during VCD
playback
PBC is not available on the disc
No repeat or
searching while
playing VCD
PBC is on Turn PBC off
Page 53
52
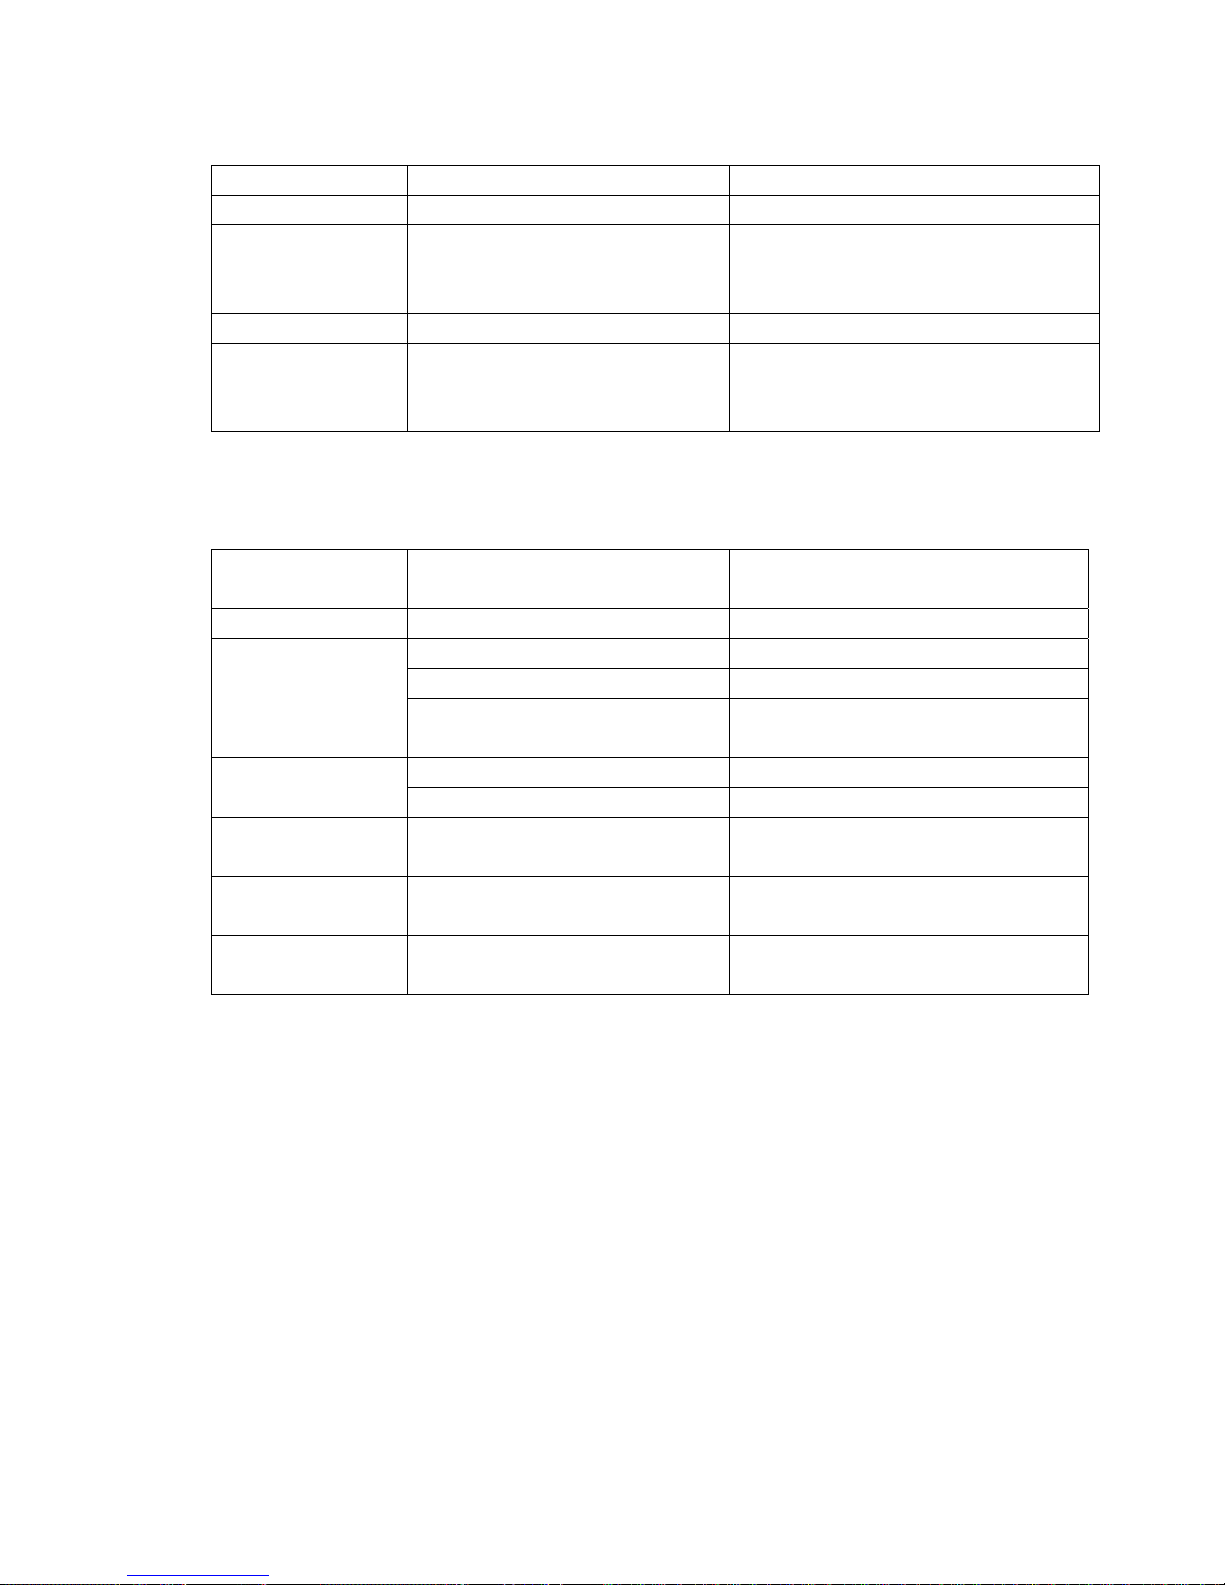
Problem Cause Corrective Action
MP3
Interruption
occurred during
playback
Disc is dirty or scratched Clean disc or replace
Can not read disc File is damaged/bad recording Recreate disc with good files
Incorrect playback
message
displayed
Message is longer than LCD can
display
Error Messages
Message
Displayed
Cause Corrective Action
Loading Disc is being read
Disc is dirty Clean disc with soft cloth
Disc is upside down Insert disc with label side up
No disc
Disc not present in loading
compartment
Insert disc
Disc is dirty Clean disc with soft cloth
Bad Disc
Disc is upside down Insert disc with label side up
Unknown disc
Disc format is not compatible
with this unit
Region Error
DVD is not compatible with
region code of unit
Error illegal mechanism operation
Press EJECT key for5 seconds to
reset loading mechanism
Page 54

53
SPECIFICATIONS
GENERAL
Supply Voltage : 14.4 V DC (10.8-16 V DC Allowable)
Load Impedance : 4 Ω
Max Power Output : 50 W x 4
Bass 100Hz : ≥ 10dB
Treble 10KHz : ≥ 10dB
Dimension (approx) : 187 x 188 x 60 mm (d/w/h)
Mounting (approx) : 160 x 178 x 50 mm (d/w/h)
FM TUNER
Frequency Range : 87.5-107.9 MHz (USA)
: 87.5-108.0 MHz (Europe/China)
IF : 10.7 MHz
Usable Sensitivity : ≤ 15 dBµV
Stereo Separation : ≥ 27 dB(1KHz)
Frequency Response : 20-10000 Hz
AM TUNER
Frequency Range : 530-1710 KHz (USA)
: 522-1620 KHz (Europe)
: 531-1602 KHz (China)
IF : 450 KHz
Usable Sensitivity : ≤ 34 dBµV
DVD PLAYER
Signal System : PAL/NTSC
Signal-to-noise Radio : ≥ 80 dB(1KHz)
Distortion : ≤ 0.5%
MONITOR
Resolution : 1440 (w) x 234 (H) (RGB)
Brightness : 350 cd/m
2
Contrast : 300:1
NOTE:
Specifications and design are subject to modification without notice due to
improvements in technology.
Page 55
54
DISC NOTES
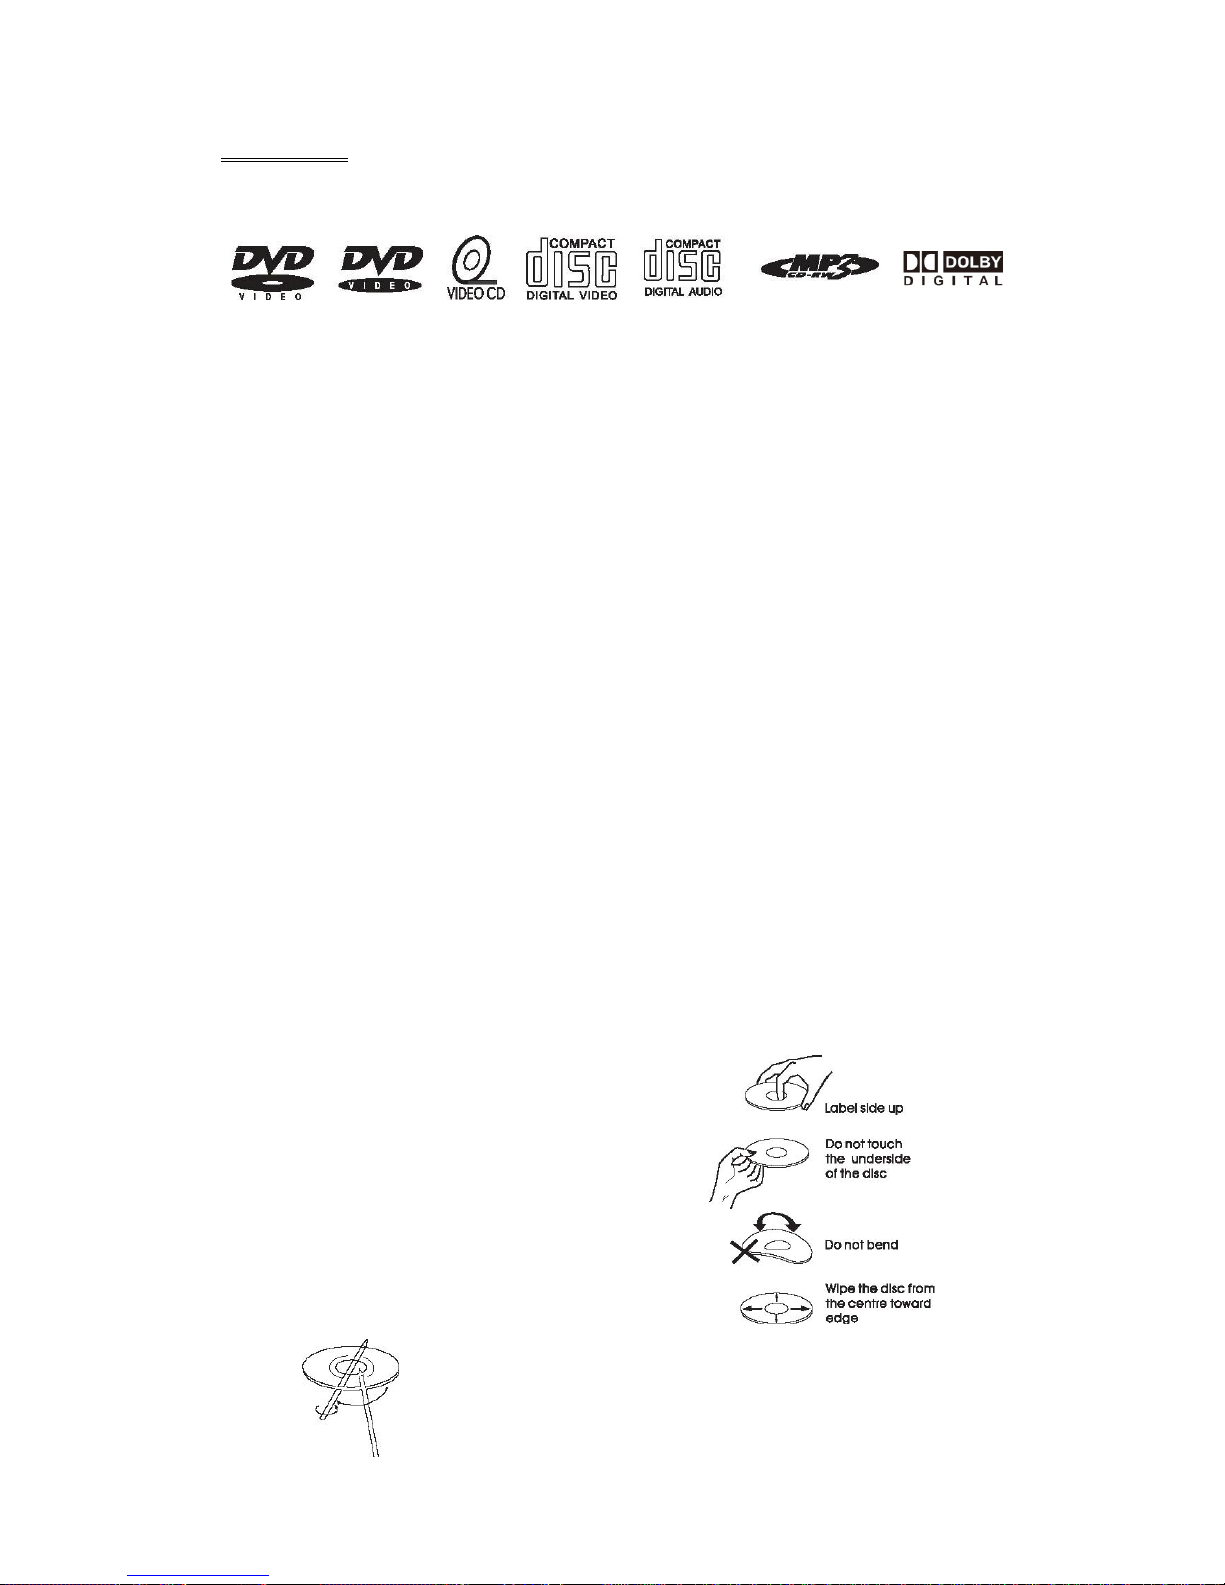
■ Disc formats supported by this player
Handling and Cleaning
● Dirty, dusty, scratched or warped discs will cause misoperation.
● Do not place stickers or make scratches on discs.
● Do not warp discs.
● A disc should always be kept in its case when not in use to prevent from damage.
● Do not place discs in the following places:
1. Direct sunlight.
2. Dirty, dusty and damp areas.
3. High temperature places.
4. On the seats or dashboard.
Disc Cleaning
Use a dry soft cloth to wipe the surface. If the disc is quite dirty, use a soft
cloth slightly moist with isopropyl (rubbing) alcohol. Never use solvent such
as benzene, thinner or conventional record cleaners which may mar the
surface of the disc.
NOTE:
A disc may became somewhat scratched (although not enough to made it unusable)
depending on your handing it in the condition of the usage environment. These
scratches are not an indication of any problem with the player.
“Dolby” and the double-D symbol are trademarks of Dolby Laboratories.
Repairing New Discs with Rough Spots
A new disc may have rough edges on its inside
and outside edges. If a disc with rough edges is
used, the proper setting will not be performed
and the player will not play the disc. Therefore,
remove the rough edges in advance by using a
ballpoint pen or pencil. To remove the rough edges,
press the side of the pen or pencil against the
inside and outside edges of the disc.
 Loading...