

Soundstream VIR-4344 Owner's Manual
OWNER’S MANUAL
Mobile Video System

- 1 -
TABLE OF CONTENTS
Table of Contents…………………………………….…………….………………………..1
Safety Information………………………………………………….………………………2
Features…………………………………………………………….………………………3
Accessories……………………………………….…….………………………………….4
Wire Connection……………...……………………………..……………………………….5
Unit Installation and Removal………………………….….………………………………8
Front Panel………………………………………………………..…..……………………12
Base Panel.………………………………………………………..…..……………………14
Remote Control……………………………………………………………………………15
Touch Screen Operations………………………………………………….……………20
Touch Screen Calibrate…………………………………….………………………20
Main Menu…………………………………………………….………………………21
Radio Operations…………………………………………………….……………….22
DVD Operations…………………………………………………….……………….23
Bluetooth Operations…………………………………………………….…………28
i-POD Operations………………………………………………….………………..34
SD CARD Operations……………………………………………….………………..35
USB Operations…………………………………………………….………………..35
AV IN Operations…………………………………………………….………………36
AUX IN Operations………………………………………………….………………36
NAVI Operations…………………………………………………….…………….…37
ATSC Operations…………………………………………………….…………….…41
System Parameters Setup………………………………..….……………….……42
Specifications…………………………………………………………………………….....45
Trouble shooting………………………….……………………………………….….…...46
Disc Notes…………………………….…………………………………………….….…...48

- 2 -
SAFETY INFORMATION
Please read the manual carefully before operating this unit and keep it for
future reference.
CAUTION: This unit is a class 1 laser product. To prevent direct exposure to the
laser system, do not open the unit. The laser beam may hurt your eyes.
If the unit requires adjustments, contact an authorized service centre.
USE THIS PRODUCT SAFELY
Be sure you fully understand the following safety information:
When driving
Keep the unit at an appropriate sound level. Driving with the sound at a level
preventing you from hearing sounds outside and around the car may cause an
accident.
When cleaning
Do not expose the product to water or excessive moisture. This could cause short
circuit, fire or other severe damage.
When parked
Parking in direct sunlight can result in very high temperature levels inside your car.
Let the interior and unit cool down before switching the unit on.
NOTE:
Do not use and store the player in dusty, hot or humid environment.
FUSE REPLACEMENT – WARNING!
Never replace any fuse with one of a higher value than the fuse supplied
with your unit. Using a higher current rated fuse may cause damage to
your unit and/or electrical wiring.

- 3 -
FEATURES
• Motorized TFT-LCD w/ 4 Pre-Set Angles & Last Angle Memory
• Theft Deterrent Detachable Faceplate
• Accepts Add-On GPS Navigation Module, NAVIBOX-1
• Accepts Add-On Digital TV Tuner Module, DTV-1
• Car-Spec DVD Transport for Extreme Temperature Exposure
• Playback from DVDR/RW & CDR/RW Including VCD, MP3, MP4 & DiviX
• Recall Memory for Last DVD Position
• i-Pod Input Connection (requires IP-1C cable)
• Mini-USB Connection for MP3 & MP4 Playback From 4GB Flash Drive
• 4GB SD Card Reader for MP3, MP4, DiviX & Xvid Playback
• 1GB Internal Memory for Background & Screen Saver Images
• 18 FM / 12 AM Station Memory
• 50w x 4 MOSFET Powered Speaker Level Outputs
• Front & Rear Pre-Amp Outputs
• Dedicated Variable Subwoofer Pre-Amp Output w/ LPF (80, 120, 160Hz)
• A/V Outputs for Multiple Components
• A/V Inputs for Secondary Source
• Front Panel 3.5mm Auxiliary A/V Input
• Reverse Camera Input w/ Trigger
• Custom & Pre-Set EQ Settings
• Audio Staging Controls
• 12/24 Hour Clock
• USA/European Frequency Stepping
• NTSC/PAL Auto Selection
• 432 x 240 Screen Resolution
• 400cd Backlight Brightness
Bluetooth Features
• Work with Most Bluetooth V2.0 Enabled Phones
• Noise & Echo Cancellation
• Contacts List Transferred for Easy Access Dialing
• Caller ID Shows Name and Number from Contacts List
• Recent Calls & Talk Time Logs
• A2DP for MP3 Playback
NOTE:
This user's manual is only for reference.
Modifying rights are reserved.
Specifications are subject to change without notice.
- 4 -
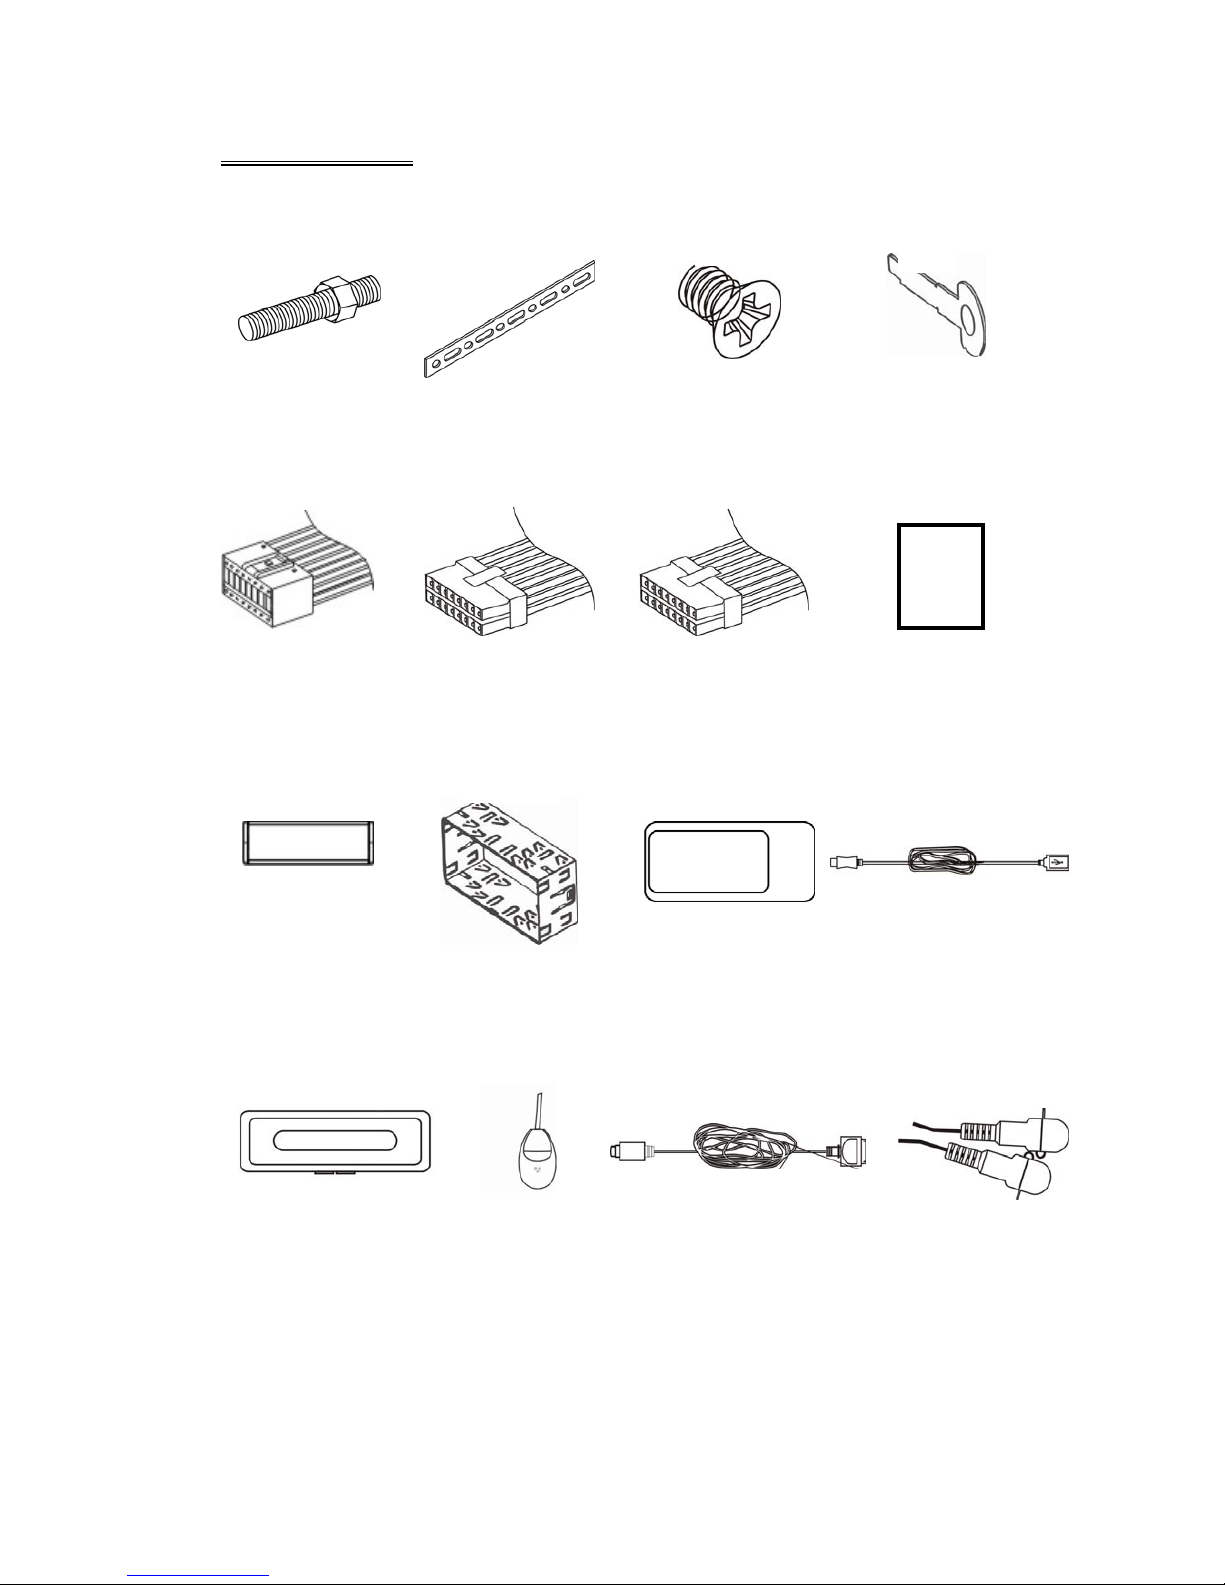
ACCESSORIES
Bolt x 1 Back Strap x 1 M5X5 Screws x 4 Keys x 2
Power Wire x 1 Connecter Wire x 1 Connecter Wire x 1 Operational Manual x1
(White) (Yellow)
Trim Bezel x 1 Mounting Sleeve x 1 Remote Control x 1 USB Cable x 1
Faceplate Case x 1 Microphone x 1 iPod Cable x 1 AUX Cable x 1
(Optional)
1
2
3
5
6
8 9
10
12
7
11
13 14 15 16
4
- 5 -
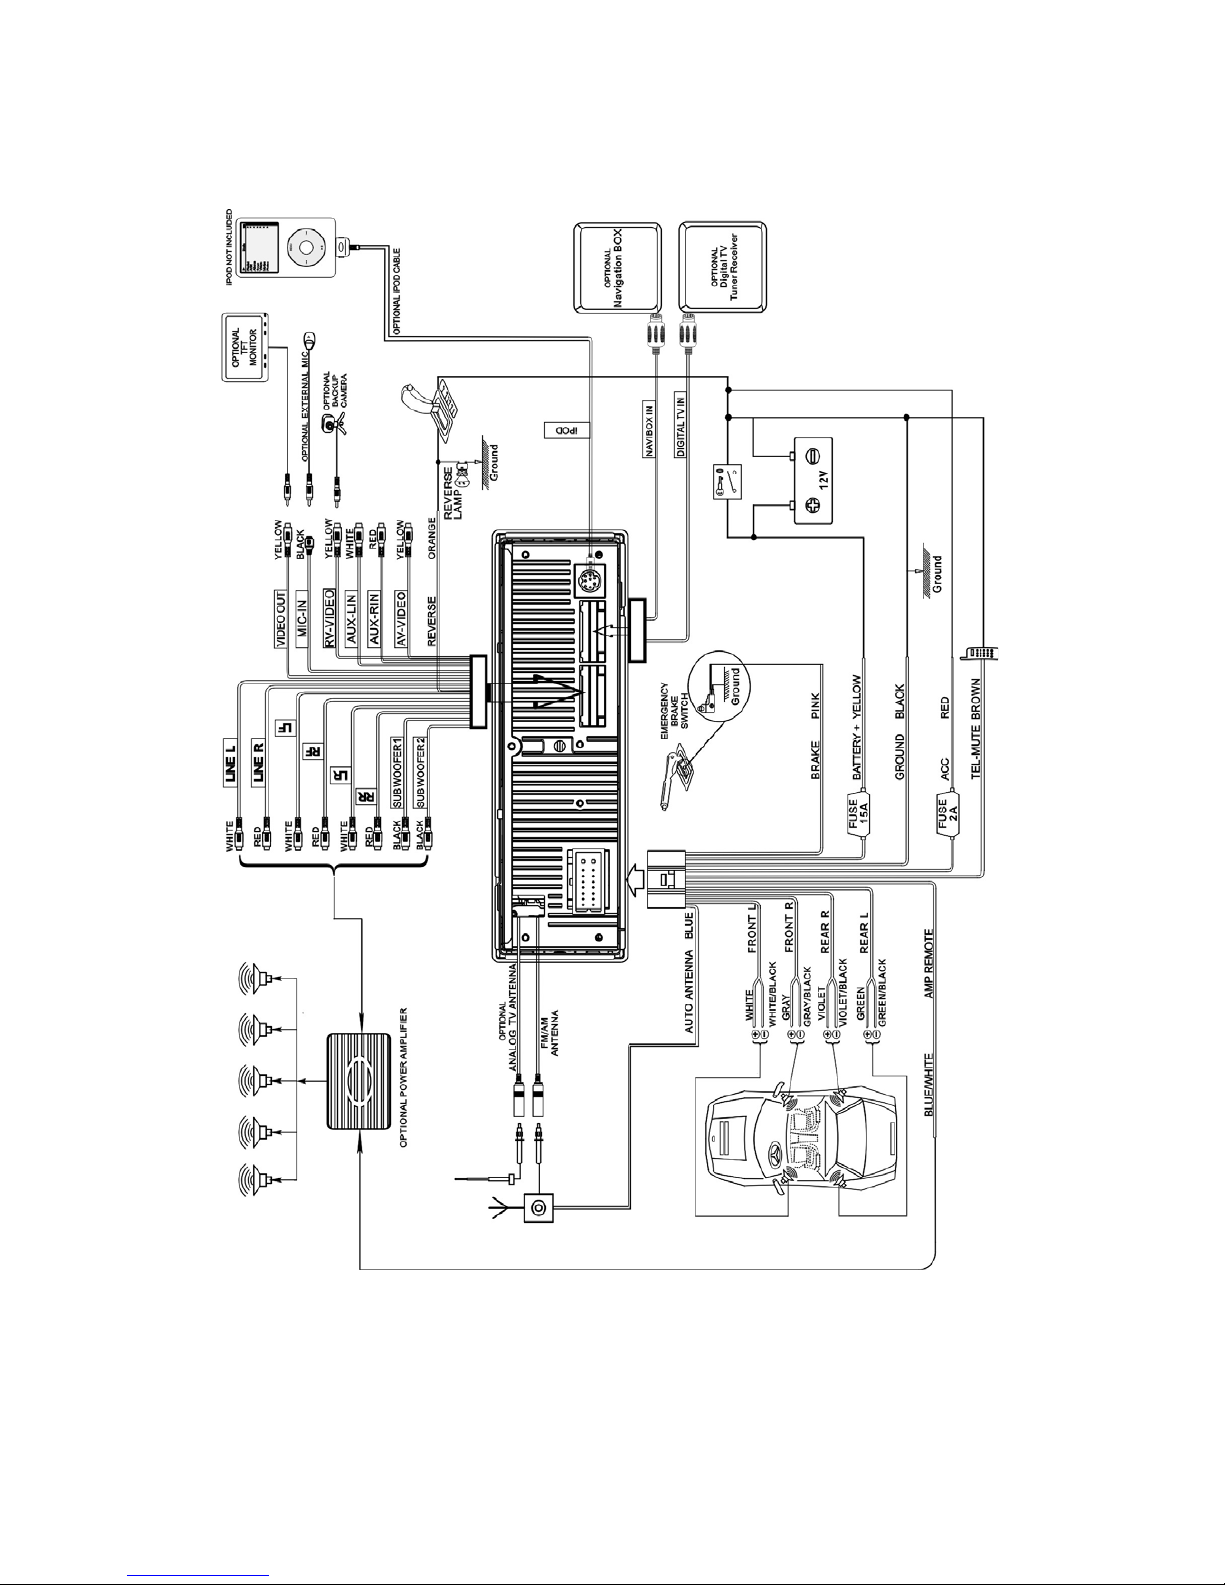
WIRE CONNECTION
1. RADIO & ANALOG TV ANTENNA (OPTIONAL)
2. 15PIN SOCKET
3. AUDIO / VIDEO OUTPUT & INPUT
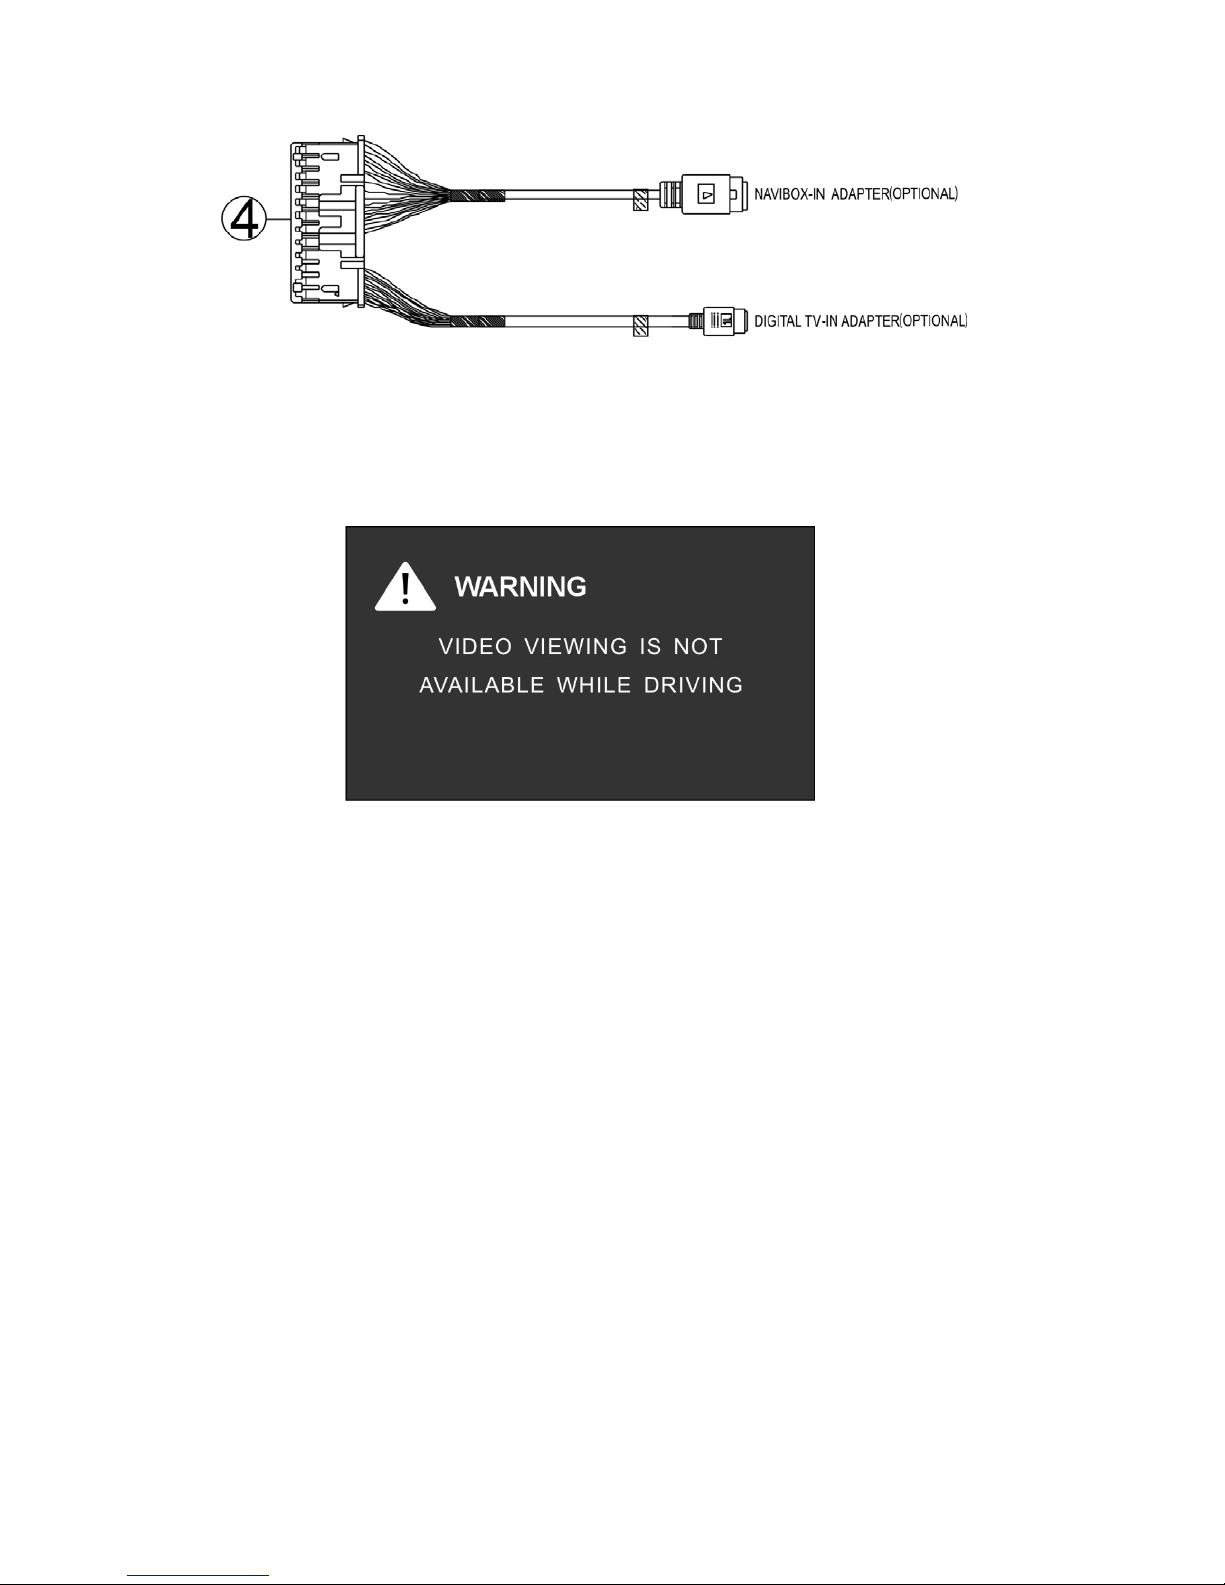
4. NAVI & DIGITAL TV ADAPTER (OPTIONAL)
5. IPOD ADAPTER
- 6 -
Brake Control
Connect the brake control wire AUTO_ANT (see Wiring Diagram). It is necessary to
connect the Brake Control wire to the Hand-brake switch of the car. While driving, the
TFT monitor will display the alarm picture (see as follows) in order to ensure the
safety.
Under the Rear View Mode, the Brake Control function is no effective.
Telephone Mute Control (Optional)
Connect the telephone mute control wire TEL_MUTE (see Wiring Diagram). If there
is a vehicle call comes in, the sound volume will mute off automatically, and TFT
monitor shows: PHONE…; when call finished, the sound volume will recover to
former volume, and the words PHONE… disappear.
Auto Antenna Control
Connect the auto antenna control wire AUTO_ANT (see Wiring Diagram). The
antenna will lift when the unit startup; it will descend when the unit turnoff.
- 7 -
Wiring Diagram
- 8 -
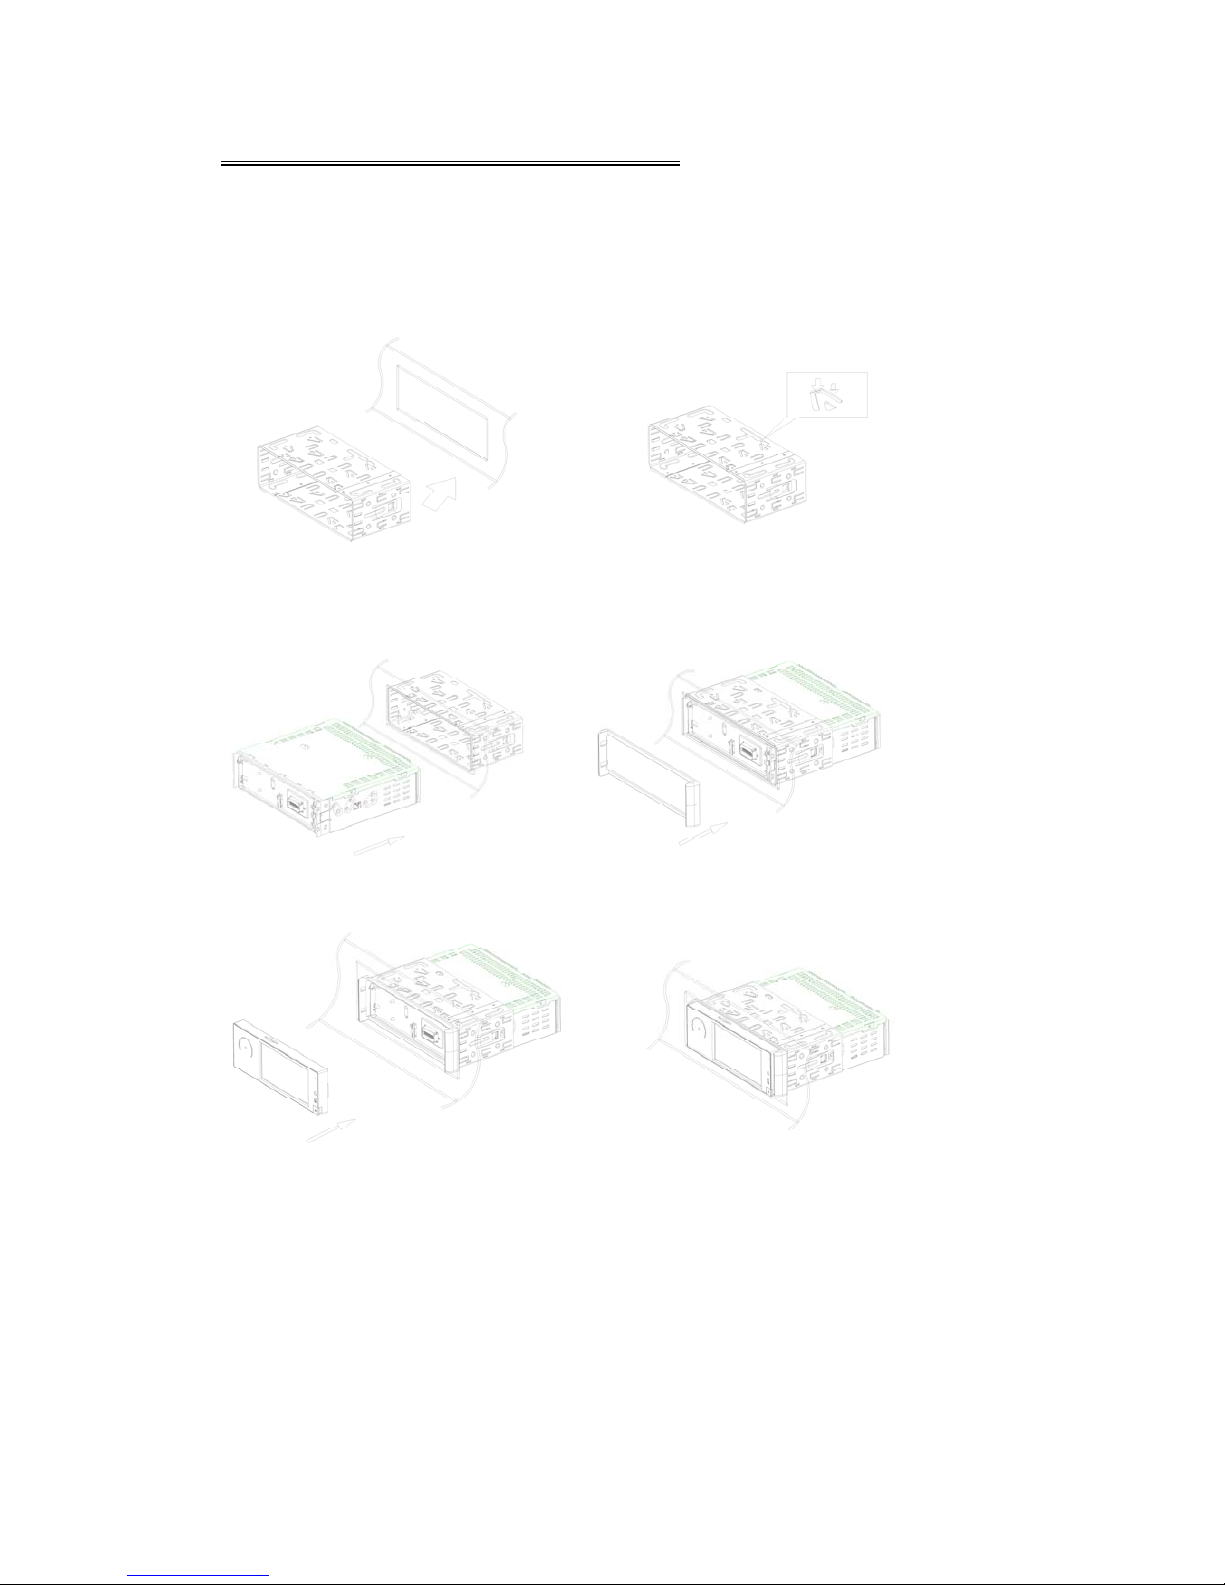
UNIT INSTALLATION AND REMOVEL
Installation Method 1:
1 Install the mounting sleeve 2 Bend the claws into place
into the dashboard. to secure the sleeve.
3 Slide the units into the mounting 4 Install the trim bezel onto the unit.
sleeve.
5 Install the face panel onto the unit. 6
Sketch map when installation is finished.

- 9 -
Removal Method 1:
1 Detach the face panel by 2 Detach the trim bezel.
pushing the release button.
3 Insert the keys into the aperture 4 Pull the unit out of the
between the unit and the mounting mounting sleeve.
sleeve to release the internal locks.
5 Sketch map when removal is finished.

- 10 -
Installation Method 2:
1 Tighten the bolt onto the rear 2 Tighten the back strap onto your
panel of the unit. car inside the dashboard.
3 Place the unit into the dashboard; 4 Screw the unit on the car on the
make the bolt bar across back strap; two sides with M5×5 SCREWS.
and then fix the bolt by the Nut M5.
5 Install the trim bezel onto the unit. 6 Install the face panel onto the unit.

- 11 -
Removal Method 2:
1 Detach the front panel by 2 Detach the trim bezel.
pushing the release button.
3 Unscrew the unit off the car on 4 Unscrew the Nut M5 screw on the rear
the two sides.
side of the unit and pull out the unit.
5
Sketch map when removal is finished.
- 12 -
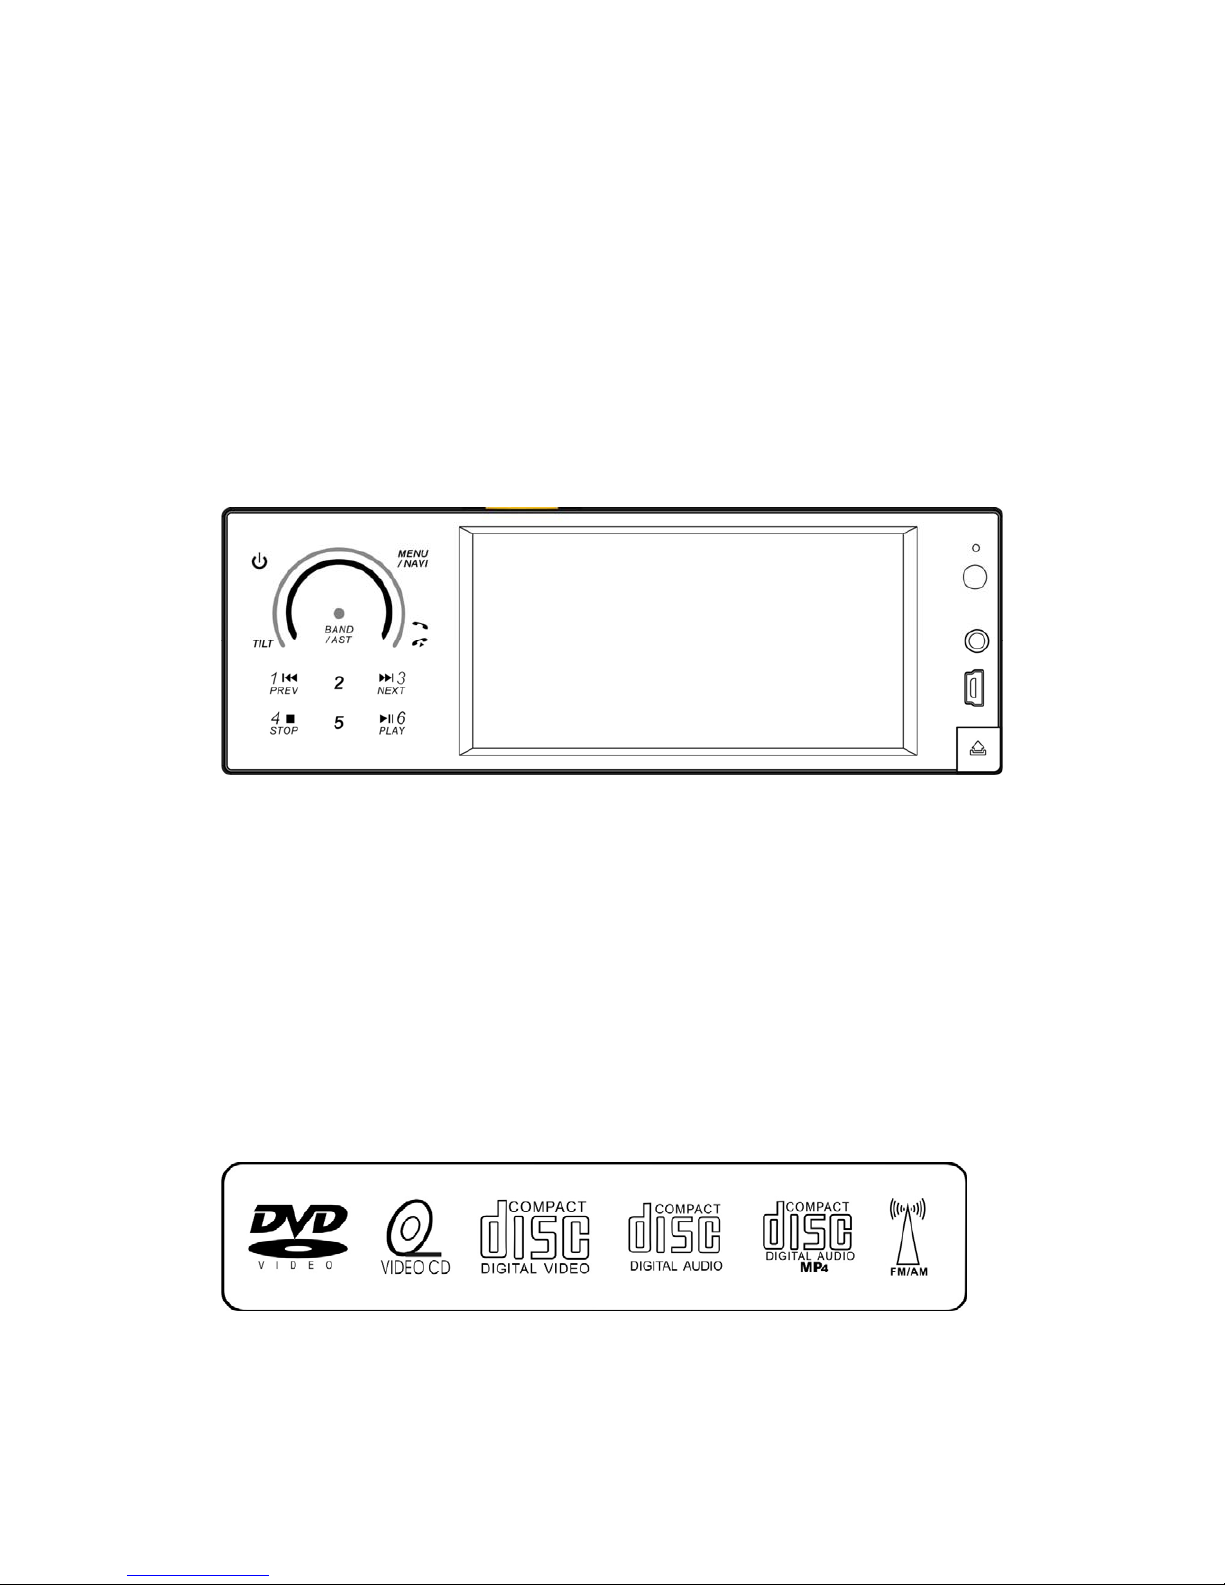
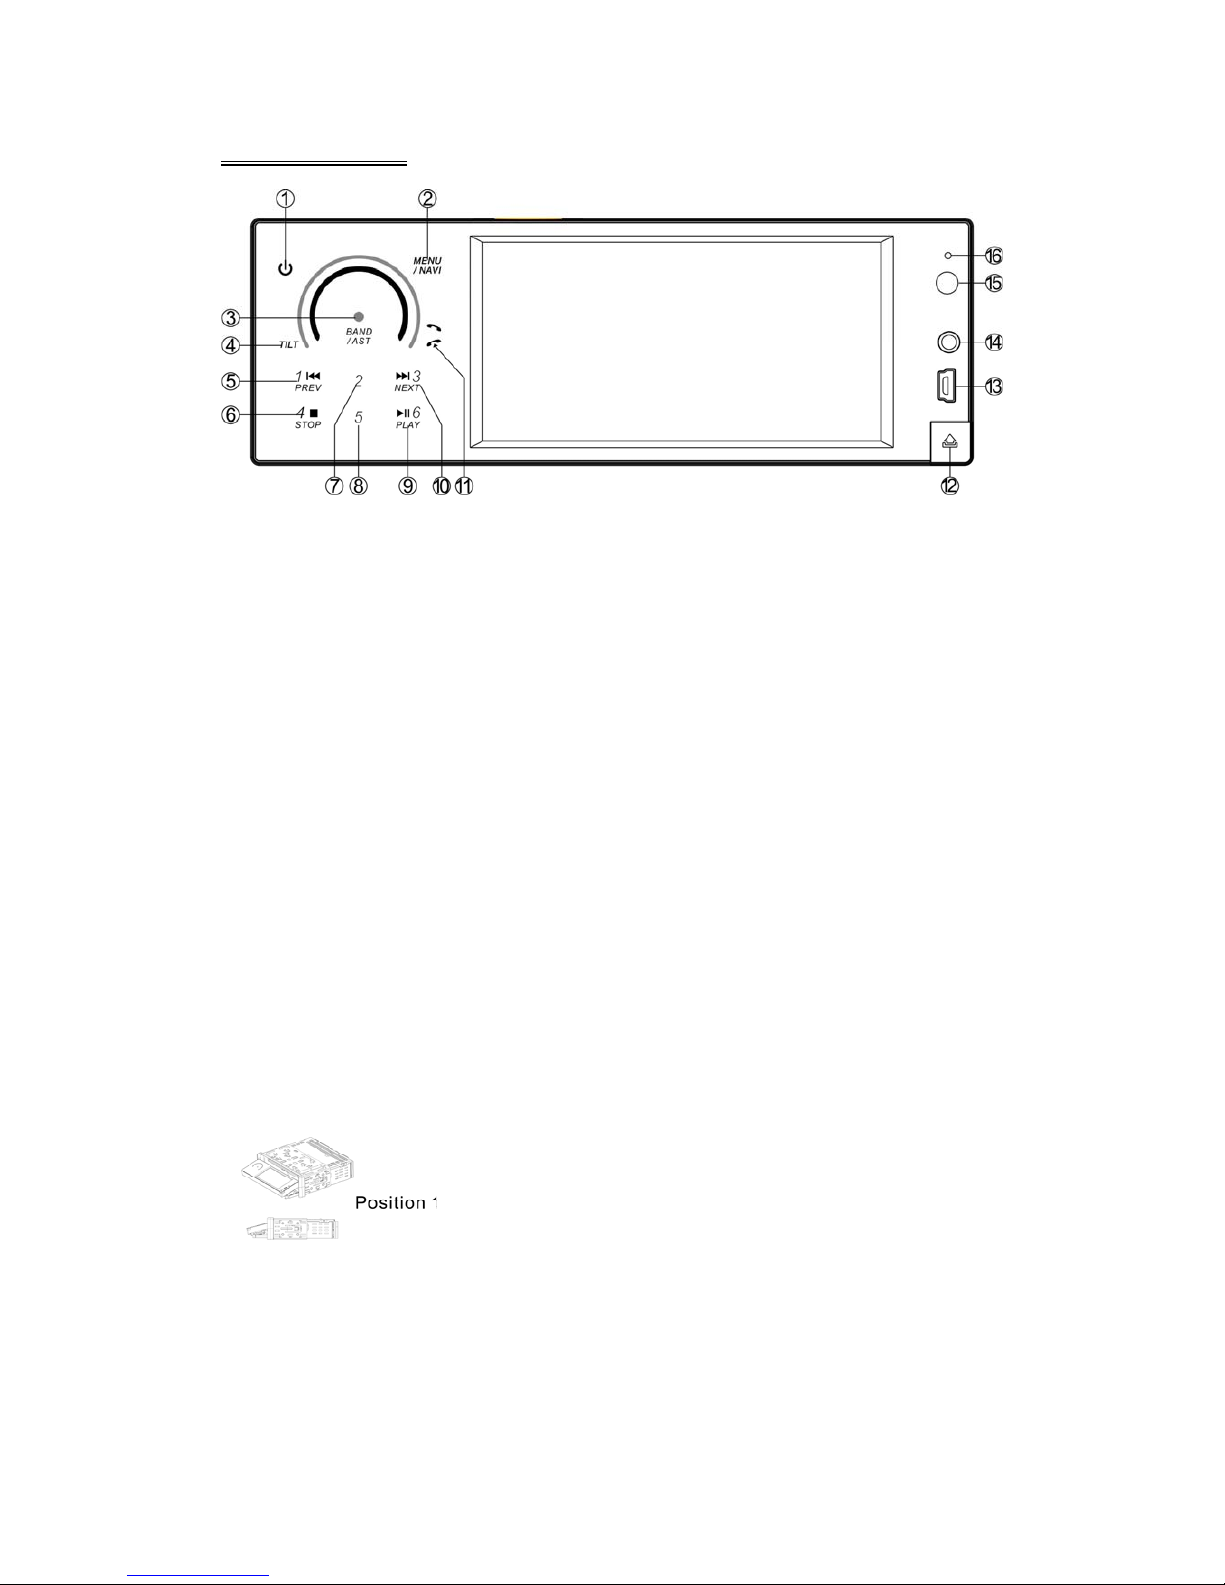
FRONT PANEL
1. POWER / SOURCE 2. MENU / NAVI 3. BAND / AST
4. TILT 5. PREV 6. STOP
7. F. REV 8. F. F WD 9. PLAY / PAUSE
10. NEXT 11. CALL / END CALL 12. REL
13. MIN USB 14. AUX IN 15. REMOTE
16. MIC
1. Power
When ACC is on, touch the button to turn the unit on; hold on touching the button to
turn off the unit.
When the unit is on, touch to switch between different modes.
2. Menu / Navi
Touch to access the Main Menu.
Hold on touching to access the NAVI mode.
3. Band / Auto Station Tune
Touch the icon to switch the FM/AM wave band as following:
FM1 - FM2 - FM3 - AM1- AM2 - FM1
Hold on touching to automatically program the 6 strongest stations available into the
presets in the each wave band; touch any icon to stop the tuning. After tune, the unit
will scan through all tunable presets stations and play them for 5 seconds each;
touch any icon to stop the playing.
4. Tilt
Inserting Disc
(该图排到文字右方,请参照 4368)
Touch the [TILT] button, the front panel will slide down to
Position 1; then insert a disc into the Disc Loading Slot;
the panel will slide back automatically.
Ejecting Disc
Touch the [TILT] button, the front panel will slide down to Position 1; then eject a disc;
the panel will slide back automatically if no action is taken.

- 13 -
TFT Viewing Angle Adjustment:
Hold on touching the [TILT] button to adjust the viewing angle as following:
Angle 1- Angle 2- Angle 3- Angle 4- Angle 1
Angle 1 Angle 2 Angle 3 Angle 4
5. Next / 10. Previous
Touch to go to the next / pervious chapter, track or song.
6. Stop
When DVD/VCD/CD disc playback, touch the icon once to stop the playback, touch
the [Play/Pause] icon to resume the playback again. Touch the icon twice to stop the
playback, touch the [Play/Pause] icon to start the playback from the beginning of disc.
When MP3 disc playback, touch the icon to stop the playback, touch the [Play/Pause]
icon to start the playback from the beginning of track.
7. / 8. Fast Forward / Fast Reverse
Touch to fast forward / fast reverse at 2x speed. Each touch changes speed from 2x
to 4x to 8x to 16x to 32x then back to normal play. Touch the [PLAY/PAUSE] icon to
resume to normal playback.
9. Play/Pause
Touch to pause or resume the playback.
11. Call / End Call
Touch to receive a cell phone call, touch again to reject or hang up a call.
12. REL
Press to take off the panel for burglar-proof purpose.
13. Mini USB
The unit will be switched to DVD Mode automatically when USB connected, and play
the songs, pictures, videos in USB.
14. AUX IN
Connect an external audio device to this jack to listen to the device through your car
speakers.
15. Remote
Remote infrared receiver.
16. MIC
Microphone.
Preset Stations
Radio Mode, touch the icons [1, 2, 3, 4, 5, 6] to select a preset station, hold on
touching to store current radio frequency to the preset station.

- 14 -
BASE PANEL
17. Reset
If the unit ever needs to be reset, you can do so by removing the face plate to gain
access to the reset button.
Press and hold this button to switch back to all the original factory settings.
Keep in mind this will erase all your preset radio stations and any EQ settings you
may have made and saved.
ٛ
 Loading...