

Soundstream VCM-10D, VCM-85D User Manual

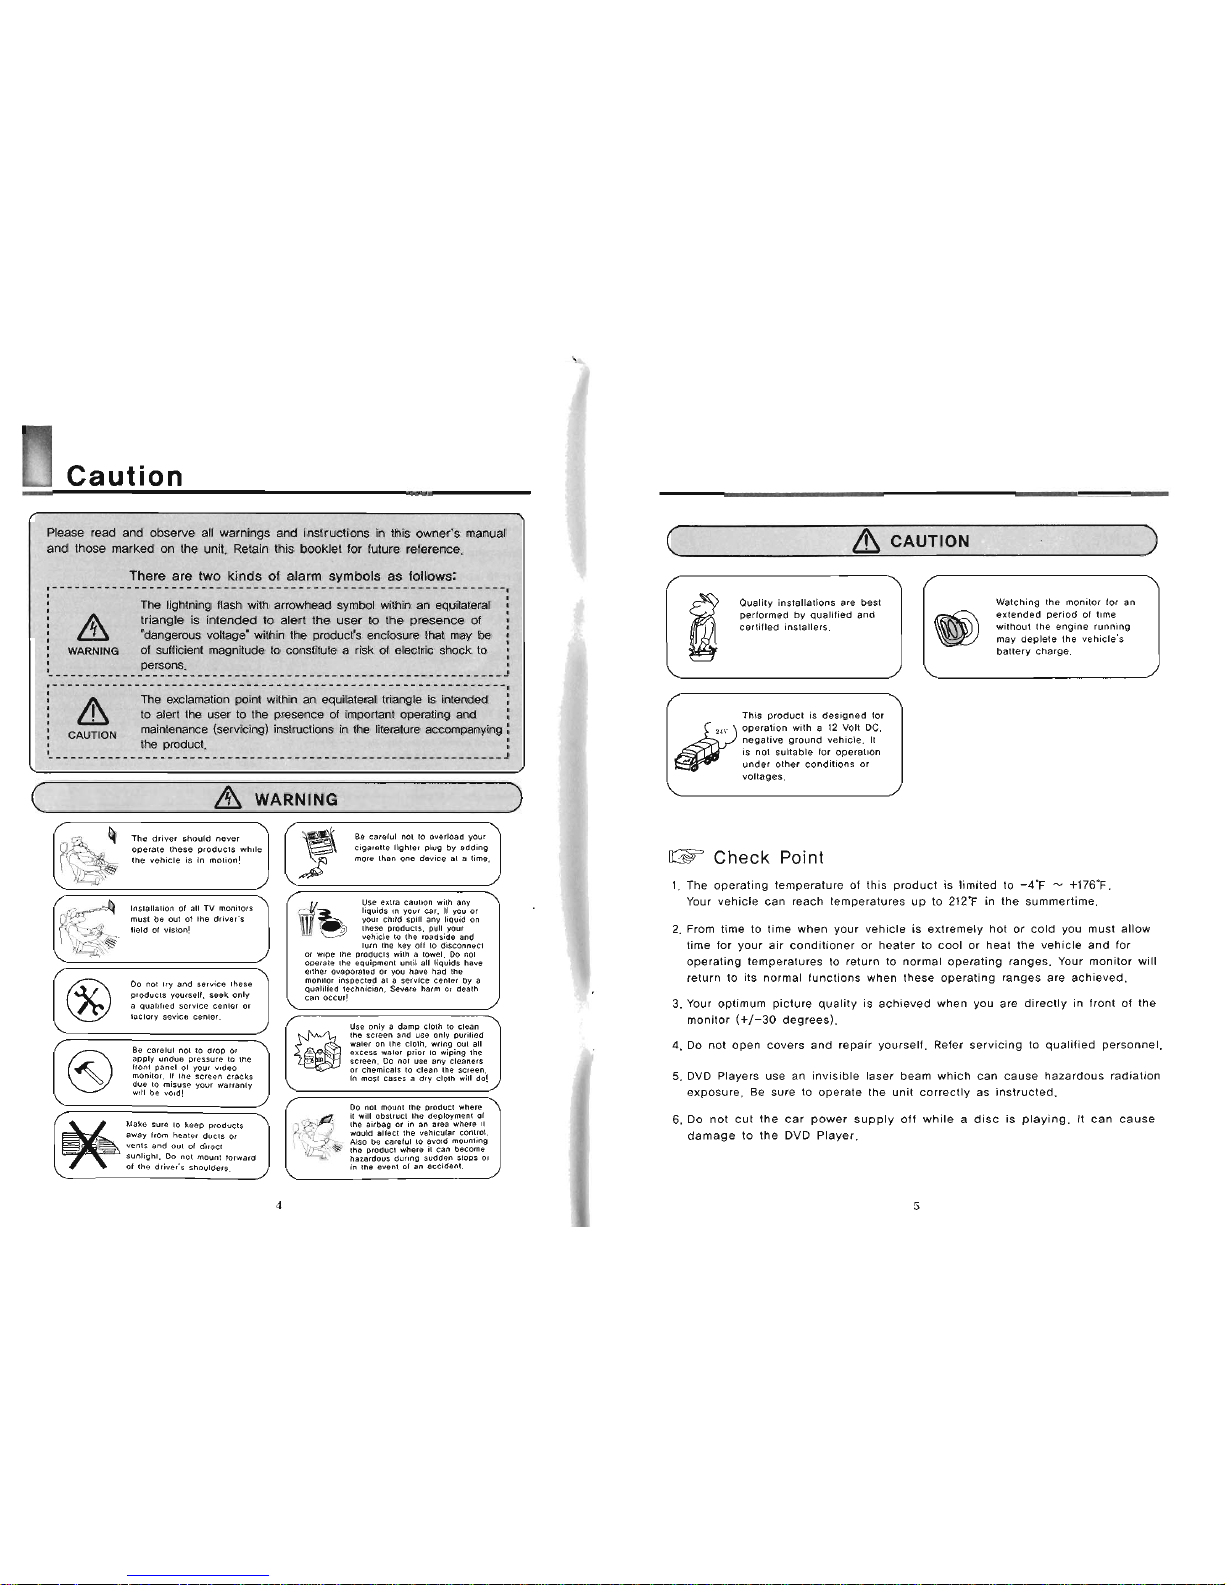
Please read and observe all warnings and instructions
in
this owner's manual
and those marked on the unit. Retain this booklet for future reference.
There are two
kinds
of
alarm symbols as follows:
I
,_
--------
_________
---------------------,
I
The lightning flash with arrowhead symbol within an equilateral
;
triangle is intended to alert the user to the presence
of
i
A
'dangerous voltage' within the productrs enclosure that may be
;
;
WARNING
01
sufficient magnitude to conslitute a risk of electric shock to
;
persons.
'.----.-------.-.-------------------------------------------->
,-------------------------------------------------------------
The exclamation point within an equilateral triangle is intended
the product.
to alert the user to the presence of important operating and
(servicing) instructions in the literature accompanying
:
L-.---.-.---.-.-.--------------------------------------------,
C
,
.
The
driver
.hO"ld
never
p'OdUCfr
Wvrecll.
*eel;
on,"
a
qualified
Scfrico
center
or
Be
C.ICI"I
no, ,a droL
or
aDDly
""durn
pre3sure
lo
(he
from
Dane,
ol
your
vldoo
monitor.
II
the
acreen
cracks
due
to
mlsule
YO",
warran!"
*I
be "Old!
(8
Make
sure
10
keep
proaucts
8W.Y
lrOm
hcsle.
duct,
or
vent3
and
out
0,
dlrsc,
SUollahf.
Do
not
mount
lorward
-1
the
ar8wr'r
rhoulders.
or
w,pe
,MI
produc,,
W,!"
a
tore,.
Do
not
operate
the
Equipmsnf
""fll
a,,
ilquidr
haw
ellher
eveooraled
or
you
ham
had
in-
Use
only
.
dam0 cloth
lo
clean
screen
Do
not
use
8""
r,eanorr
01
cnemice1r
lo
clean
me
rorcen
I"
most
carer
s
dry
clolh
.,I,
do!
DO
not
mount
the
prw,uc,
whcrc
in
ins
evon,
0,
.n
sccldcnl.
(
CAUTION
1
Ouallty in~lallatlons
are
best
performed
by
qualilied and
Certilled installers.
Watching the monitor
lor
an
exlended period d lime
withoul !he engine running
may deplete the vehicle's
battery charge.
This
DrDdUCt
If
designed
lor
operalion wllh
a
12
Volt
DC.
negative ground vehicle.
It
is no1 suitable
br
operalion
voltages.
GF
Check
Point
1.
The operating temperature of this product is limited to
-4'F
-
+176'F.
Your vehicle can reach temperalures up to
2127
in the summertime.
2.
From time to time when your vehicle is extremely hot or cold you musl allow
time for your air conditioner or heater to cool or heat the vehicle and for
operating temperatures to return to normal operating ranges. Your monitor will
return to its normal functions when these operating ranges are achieved.
3.
Your optimum picture quality is achieved when you are directly in front of the
monitor
(+I-30
degrees).
4.
Do not open covers and repair yourself. Refer servicing to qualified personnel.
5.
DVD Players use
an
invisible laser beam which can cause hazardous radiation
exposure.
Be
sure to operate the unit correctly as instructed.
6.
DO not cut the car power supply off while a disc is playing. It can cause
damage to the DVD Player.
C]
HOW
to operate the monitor
Remote Controller
Releasing the monitor
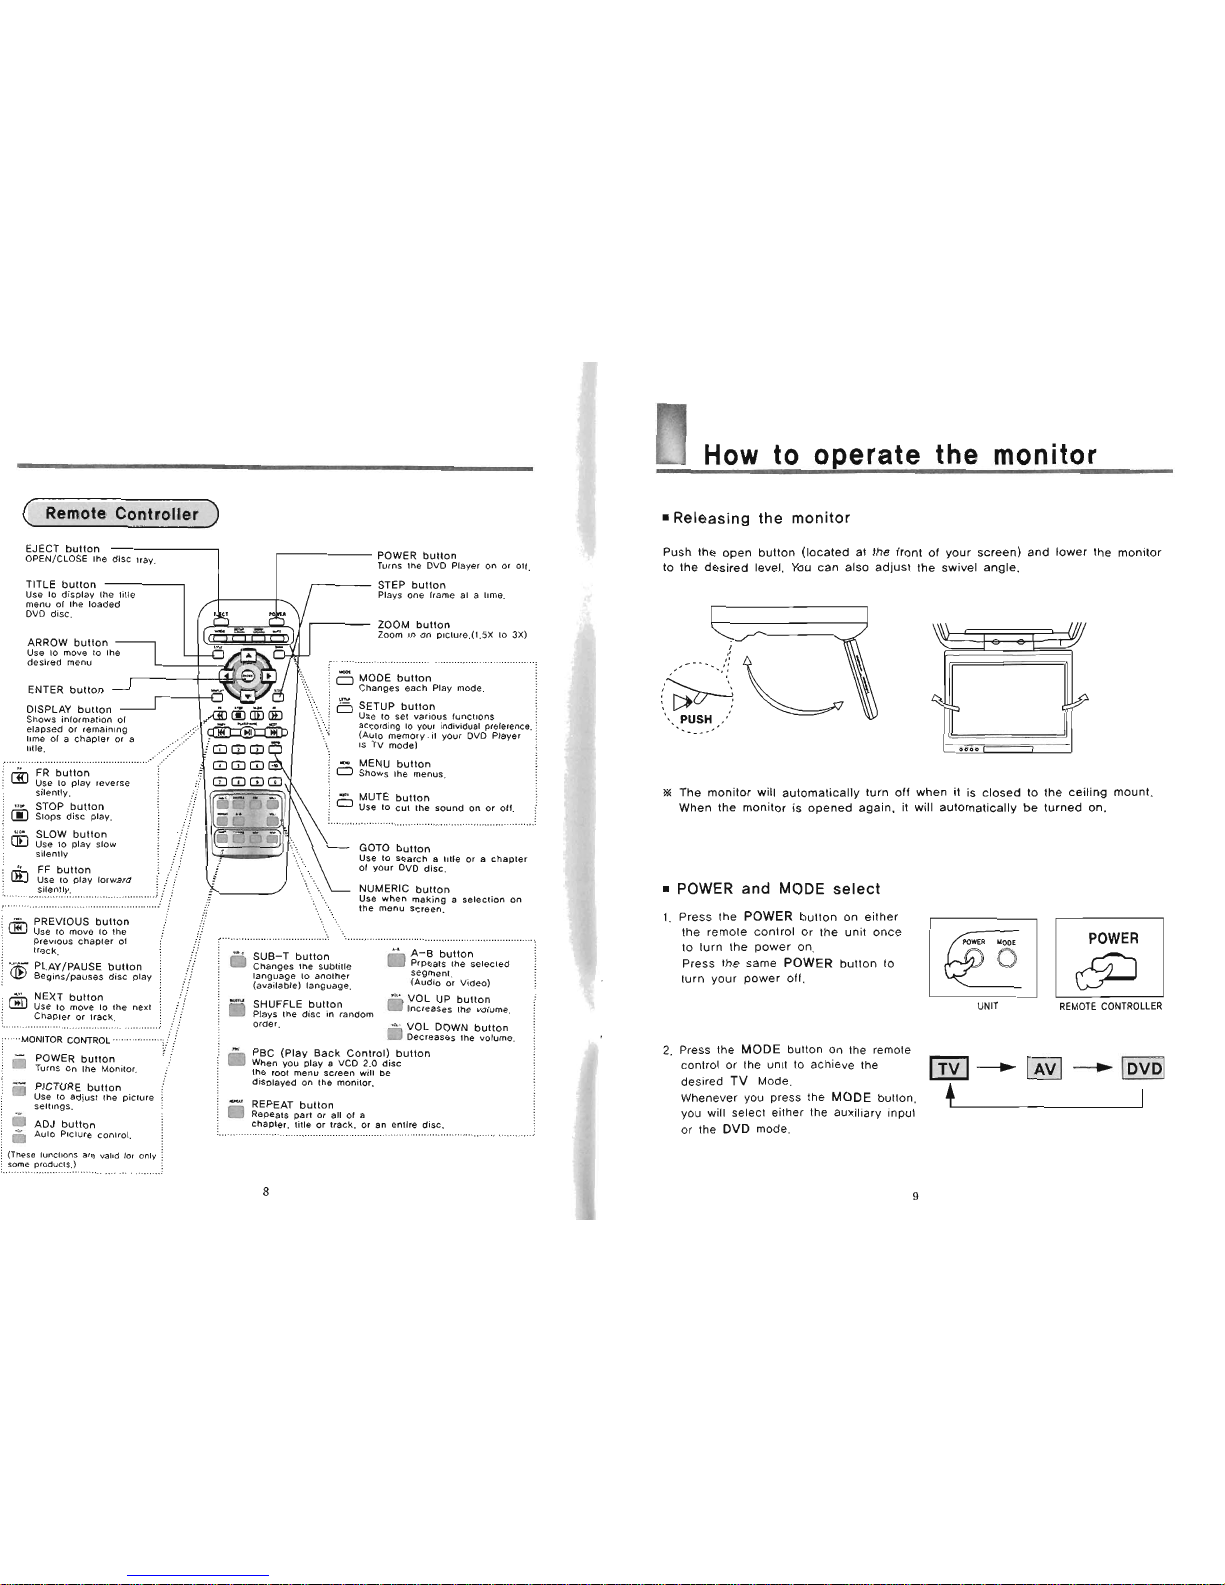
EJECT button
POWER button
Turns
!he
DVD
Player
on
or
011.
TITLE bullon
A
1,
,-
STEP butlon
Use
10
dlrplay
!he
lllle
Plays
one
frame
el
a
lime
manu
0,
the
loadad
..........
DVD
dssc.
ZOOM button
zoom
8"
On
p,cfure.I1,SX
lo
3x1
ARROW button
UE~
IO
move
lo
lhe
desired menu
ENTER button
DISPLAY button
Shows
inlormallon of
=lamed
or
remaining
,,me
of a chapter
or
a
lille.
-
MENU button
0
shows
the
menus.
-"
MUTE button
-
STOP butlon
use
lo
cut
the
round
on
or
ofl.
m
slops
play.
GOT0 button
Use
10
search
a
title
or
s
chapter
01
your
DVD
disc.
NUMERIC button
u=e
when
making a selection
on
:
the
menu
screen.
. .
.
.
'
PREVIOUS button
j
.
.
.
.
. .
.
.
1
&
use
to
move
lo
ine
i
.
.
.
.
....................................
......................................................................
:
*hs"ta.
"7
...
B
1
.
-
.
.
- - -
-
. .
-
-.
-. -.
...
...
i
track.
.!i
i
"
SUB-T button
3
PLAYIPAUSE button
!!
i
c?
changes !he rublille
legmen,.
seg~ntlpauses disc play
j
ii
i
language
lo
another
(Audio
or
video)
.
i:
:
lavailablel lanauaae
:
."
...
.
.,
NEXT button
...
...
!
Use
lo
move
to
the
nexl
j
!/
i
Chapter
or
track.
...
.
::
:
::
-
......................................................
:;
.
.
......'MONITOR
CONTROW'
...........
-"::
...
<
.
-
<:
:
POWER bullon
j
rums
on
the
~oni~or.
I
:
-
:
PICTURE butlon
i
7
use
lo
sdivsn
ihe
picture
!
i
reflingo.
:
fi
ADJ butlon
j
r'j
~uto
Pscfure
control.
. * -.
!
-
SHUFFLE button
fi
VOL UP button
i
m
Plays
,he
disc
in
random
Ine
i
otder.
'
VOL DOWN button
fl
oecresrer
the
volume.
"
PBC
(Play
Bat*
Control) outton
R
when
p~ab a VCD
2
o
am
tne
toot
menu
SCICen
WI
I
be
dlSL
aye.,
on
,he
mon
tor
i
-
REPEAT button
i
Repeats
part
or
all 01
a
i
chapter, title
or
,rack.
or
an
enllre dbs.
L
.................................................................................................................
Push the open button (located at the front of your screen) and lower the monitor
to the desired level. You can also adjust the swivel angle.
,.
PUSH
,.'
.......
%
The monitor will automatically turn off when it is closed to the ceiling mount.
When the monitor is opened again, it will automatically be turned on.
POWER and MODE select
1. Press the
POWER
button on eilher
the remote control or the unit once
lo turn the power on.
Press the same
POWER
button to
turn your power 011.
UNIT
REMOTE
CONTROLLER
2.
Press the
MODE
button on the remote
control or the unit to achieve the
desired
TV
Mode
.......
Whenever you preis the
MODE
butlon.
f
1
you will Select eilher the auxiliary input
or the
DVD
mode
i
(These
luncllonr
are
vald
lor
only
i
j
some
~rm"cl..l
...........................................................
8

=How to select channels automatically
1.
Press the MEMORY button on the unit or
SETUP(A.MEM0) bulton on the remote control
lo seiecl all available Channel.
(only
TV
mode)
X
Channel
may
not be selected in a bad
RF
signal region.
AUTOMEMORY
1
2.
Select the channel you want by pressing butlon or CH+. CH-.
1
How
to
select channels by manual
Use to add or delete channels manually.
1.
Select channels you wan1 by pressing the numeric buttons or adlust button
on the remote control.
2.
Select ADD or DEL with the
arrow
UPIDOWN buttons on the
remote control
U
Picture control
.Contrast. Bright, Color or Tint selections:
Use lo achieve the desired setlings.
I.
Press the (PICTURE) button to bring
up
lhe on-screen
picture control menu.
SCRlll
I,,
Aln
snrtn
e
nrsrr
2.
Select the desired menu by pressing the arrow
(UPIDOWN) buttons to move the cyan-colored cursor
window up or down, Highlight the desired function
to change Contrast. Brightness, Color. Tint etc.
nu
run
SCRIm
D
SYSTC1
.e,
Rrsrr
3.
Adjust Ihe current settings with the left and right
arrow bultons
on the remote control or the
ADJA or ADJI buttons on the unit lo achieve
B
wr
the desired settings.
 Loading...