

Soundstream VCM-81D Owner's Manual
V
8"
TFT-LCD SCREEN WITH
DVD PLAYER
OVERHEAD COMBO
A
grade screens constitute no more than 3 missing pixels
.
Name and function of each parts---.-----------
6
-
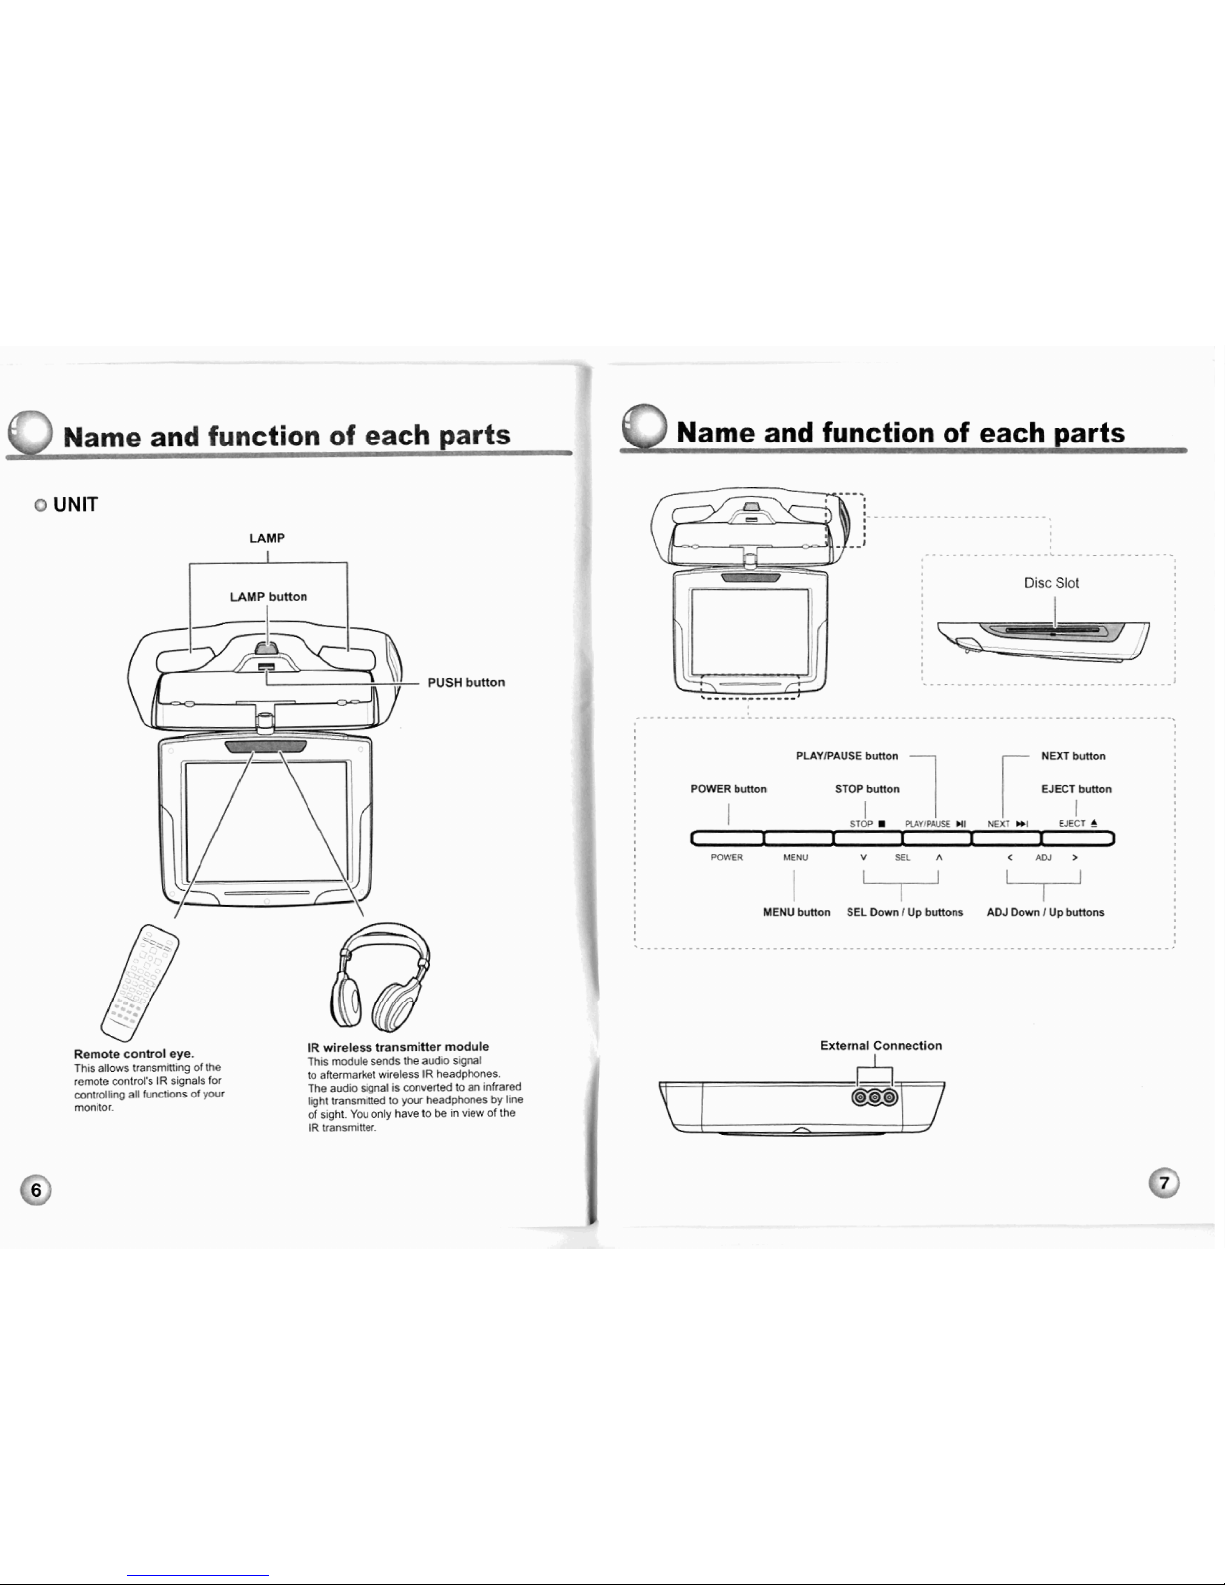
UNIT 6
-
Remote Controller
...................................
8
How to operate the monitor
...................
9
-
Releasing the monitor
............................
9
-
POWER On/Off 9
Picture Control
....
12
-
Contrast, Bright . Color or Tint selections:
........
12
DVD
Functions
24
EJECT
.
24
VOL+ 1 VOL
......................................
24
MUTE 24
PLAY OR PAUSE
...............................
24
AUDIO
24
STOP
............................................
25
ARROWS
25
SETUP
25
MENU
..............................
25
DISPLAY
.........................................
26
NUMBER BUTTONS
...................
..
26
SUBTITLE 27
TITLE
.
27
SLOW
..............................
-......
.....
27
FAST REVERSE SEARCHING
................
28
...............
FAST FORWARD SEARCHING
28
PREV
..............................................
29
NEXT
29
REPEATA-~ 29
REPEAT
..........................................
30
NTSC/PAL
.......................................
30
ANGLE
30
PBC
......................................
31
ZOOM
.............................................
31
GOTO
.............................................
31
..
TV Type
21
PBC (Play Back Control)
AUDIO
.
21
SUBTITLE
...
21
.........................................
...........................................
MENU
22
PARENTAL
22
............................
COUNTRY REGION
42
DEFAULT
22
i
-
PASSWORD SETUP
............................
23
PASSWORD MODE
23
..........................
PASSWORD CHANGE
43
Caution
f-'
'
Caution
\
Please read
and
observe
all
warnings
and
instructions in
this
owner's
manual
and
those
marked
on
the
unit.
Retain
this
bmklet
for future reference.
There
are
two
kinds
of
alarm
symbols
as
follows:
-------d---------*--*-**------**--*=------------*-*--++-------
I
I
The fightening
Rash
with
artowhead
symbol within an equilateral
I
triangle is inlended to
alert
the
user
lo
the
presence
of
I
I
"dangerous
voltagen
within the product's endmure that may
be
i
;
of
sufficient magnltude
to
constitute
a
risk
of
electric
shock
to
;
I
I
people.
-----*-*-----------.
-------=.--------*-+
--------------,,,*,J
m*--*---*---*-**-----
1
The
excla
ral
triangle is intended
I
0
I
rtant
operating and
maintenance
(servlclngl
~nsmcrrons
In
me
literature
accompanying
1
I
CAUTION
the
produ
I
**----*---**+----*-
----------------------,,,---------***J
\
/
1
CAUTION
n
W
Qual~ty Installations
are
best
Watchlng
the monltor
for
an
performed
by
qualrfied
and
extended
period
of
time
cert~lled ~nstalrers.
without
the
englne
running
may
deplete
the
vehicle's
bet;ery
charge.
This
product
1s
designed
for
-------
,***--*-
in1 within
2
7e
present
k.
.
,
operation
wrlh
a
12
Volt
DC.
Don't
touch
the
unit
there
IS
a
negahve
ground
vehicle.
It
flash
of
lightening. Ir
may
is
not
suitable
for
operation
receive
an
slaclric
shock.
under
other
conditions
or
mation
po
e
user
to
tl
,
..
voltages.
Do
not
cover
or
stop
up
healer
ducts
orvents.
It
may
t
of
a
fire
or
receives
a1
shock.
WARNING
w
the
win
n
electric
DO
not
mount
Ihe
pradud
where
InsfaHatron
of
nlt TV
monitors
11
WH
&stwet
me
deployment
01
must
be
out
of
The
dnver'a
[he
airbsg
or
In
an
area
&re
II
field
of
alghi.
wuld
afFec1
the
vehicular
mntrol.
Also
tm
carerut
to
avo~d
rnountrog
the
product
vrhere
11
can
bemme
hazardous
durlng
Sudden
slops
or
m
the
event
of
an
accadent.
Check
Point
I.
The operating temperature
of
this
product is limited
to
-4'~
-
+176?.
Your
vehicfe
can
reach
temperatures
up
to
2T27
in
the
summertime.
Do
nor
try
and
jemce
me
products
ycutsell.
seek
only
a
qual1fie6
service
center
or
factory
sevrce center.
Use
exIra
cautrm
with
any
flqu~ds
In
your
car.
If
you
or
pur
child
sp~ll
any
I~qbld
on
1Mse
products.
pulF
your
vehicle
to
!he roadslda
and
turn
fhe
key
off
to
dfmnnec!
or
;vlp
the
products
wlh
a
lowel.
Oo
nor
opeme
lhe
squrpment
unlit
all
I~qufds
have
either
eva~mted
or
you
have
had
zha
monitor
Inspected
a1
a
sewlee
center
by
a
qual~f~ed
technlclan.
Severe
harm
or
danger
can
be
wcured
2.
From
time
to
time
when
your
vehicle
is extremely
hot
or
cold
you
must
allow
time
for your air conditioner or
heater
to
cod
or
heat
the
vehicle
and
for
operating temperatures to return to normal operating ranges.
Your
monitor will
return
to
its
normal functions
when
these
operating ranges are achieved.'
3.
Your optimum
picture
quality
is
achieved
when
you are directly in front
of
the
monitor
(+/-30
degrees).
Be
carekl
not
to
drop
or
apply
under
pressure
to
the
front
panel
of
ywr
ndeo
monrtor It
the
scrsen
cracks
dw
ro
mrsuse,
your
wartanty
w~ll M vo~dl
4.
Do
not
open
covers
and
repair
yourself. Refer sewicing
to
qualified personnel.
Use
only
a
damp
&th
to
dean
lhe
screen
and
use
ontv
purlfied
water
on
lhe
cloth,
wring
our
all
excess
water
pnor
to
wrplng
Ihe
5.
DVD
Players
use
an
invisible
laser
beam
which
can
cause
hazardous
radiation
exposure.
Be
sure
to
operate
the
unit
correctly
as
instructed.
me
lighter
pl
I
than
one
den
ug
by
adding
ui~%
at
a
t~me
screen
Do
nu!
use
any
cleaners
W
or
~hem~c,als
to
clean
the
screen
In
most
cases
a
ery
ClOLh
will
do'
6.
Do
not
cut
the car power supply off
wh~le
a
disc
is playing.
It
can
cause
damage
to
the
DVD
Player.

Name
and
function
of
each
parts
m!i!*-
-
a
Remote
Controller
EJECT button
OPENlCLOSE
!he
disc
fray
I
TKLE
button
-
1
Urn
to
dlsptay
the
tm%
menu
of
the
Icudnd
i
!
POWER
button
Turns
the
DVD
Player 8 Un~t
on
or
off
....................................
;
I
"
MODE
button
4
:
Changes
each
Play
mode
...
DVD-~SC
'
c-2
ARROW
button
Use
to
move
to
the
desired
menu
'
.C
ENTER
bunon
Use
lo
select
rM
menu
item
?----?";
I
*
-
U
DlSPLAY
button
1
Shorn
infwrnal~on
of
I
I___.
elaow
or
remalnrna
,,
rlme
of
a
chapreror
ij
,I
C_J\JU
I
t:tFe
,,
,,.,
:r~~mmB.
'\
,
,
............................
i
k
FR
button
Use to
play
reuerse
sllenlly
IF
.
'
*v
STOP
button
,
,.
...
:
2.1
Stops
dlrc
play
.-
,
,
nr~nm-
SETUP
button
Use
10
set varrws
fuMons
ad~ng
to
yaur
~ndmdual
preference
(AM0
Memory
Not
wr
MENU
button
Shows
the
menus.
(ADDIDEL.
N9
u*)
MUTE
butlon
Uso
to
cul
the
~wmd
wr
M
off.
ZOOM
button
Zown
in
on
prclure.
AUQlO
bunon
selects
Ihe
settle-g
of
the
desired
audro oulnul
'M.
I
I'
.
SLOWbutton
I
08
I
.I
,
I0
use
to play
dav
,
I>
i
!
Use
lo
search
a
trfle
w
a
chapter
:
srlenlly.
,
I#
,
',
of
your
DVD
disc
I
'
FF
button
;
:;
i
!ib
use
to
play
rmrd
I
'I
'::
.
>
:
s1rmty
-
-
-
NUMERIC
bvlton
Jo
1
............................
I
I
7
Use
when
mak~ng
a
SeFecth
m
I
I
J
r
.
.
lhe
menu
Streen
............................
'
PREVIOUS bunon
:
tB
,
Use
to
move
10
lhe
.
'
...........
I
prevws
chapter
of
.:
,-.-.--
..1
L
.-...--..---------.-...--------..*
'.
I
8
track
2-
A-B
buttoll
i
j
SUB-T
button
:
-1
PLAYPAUSE
button
'.
Changes
the
subtitle
Repeat
the
deued
;
segment
I
@
B~mslpausesdrsc play.
i
:
language
to
another
(AU~IO
or
~eo)
I
(ava~lablel lenguape.
:
.'.
POWER button
:
Turns
on
he
Monitor
,
-
,
.
-
PICTURE button
:
Use
to
adlusl
Ihe
pldure
I
semngs
'-
1
,'I
:
;:
,
,
.:.-
-.
NTSCPALbmton
,-:
ANGLE
button
i
I
::
,
1
-
Selecl
the
NTSCPAL
in
Th~s
button
can
.
.
,
,r
,
:
cnnd~fron
of
DVD
mode.
control
the
prewed
E
f
.'
camera
anqle
--,:;
:
T
.
P8C
(Flay
Back
Control)
burton
VOL
UP
I
:
,
When
you
play
a
YCD
2
0
dust
me
root
menu
screen
wrll
be
lnmeases
Ihe
volume.
i
:
displayed
on
Ihe monltor
.-,
VOL
DOWN
burton
j
7;
REPEAT
button
Decreases
the volume
]
Repears
pan
or
all
ol
a
:
chaoler.
We
or
track,
:
or
an
entlre
disc
/
'--
ADJ
button
......................................................
:
.
'-
Adjustmen?
rn
each
me.
;
I
8
How
to
operate
the
monitor
w
T-.
0
Releasing
the
monitor
Push
the
open
button
(located
on
the
front
of
your
screen)
and
lower
the
monitor
to
the
desired
leve!.
You
can
also
adjust
the
swivel
angle.
0
POWER
OnlOft
1.
Press
the
POWER
button
on
either
the
remote
control
Or
the
unit once
to
turn
the
power
on.
Press
the
same
POWER
button
to
turn
the
power
off.
0
Selecting
the
mode
Selecting
the
mode
L
-
m-
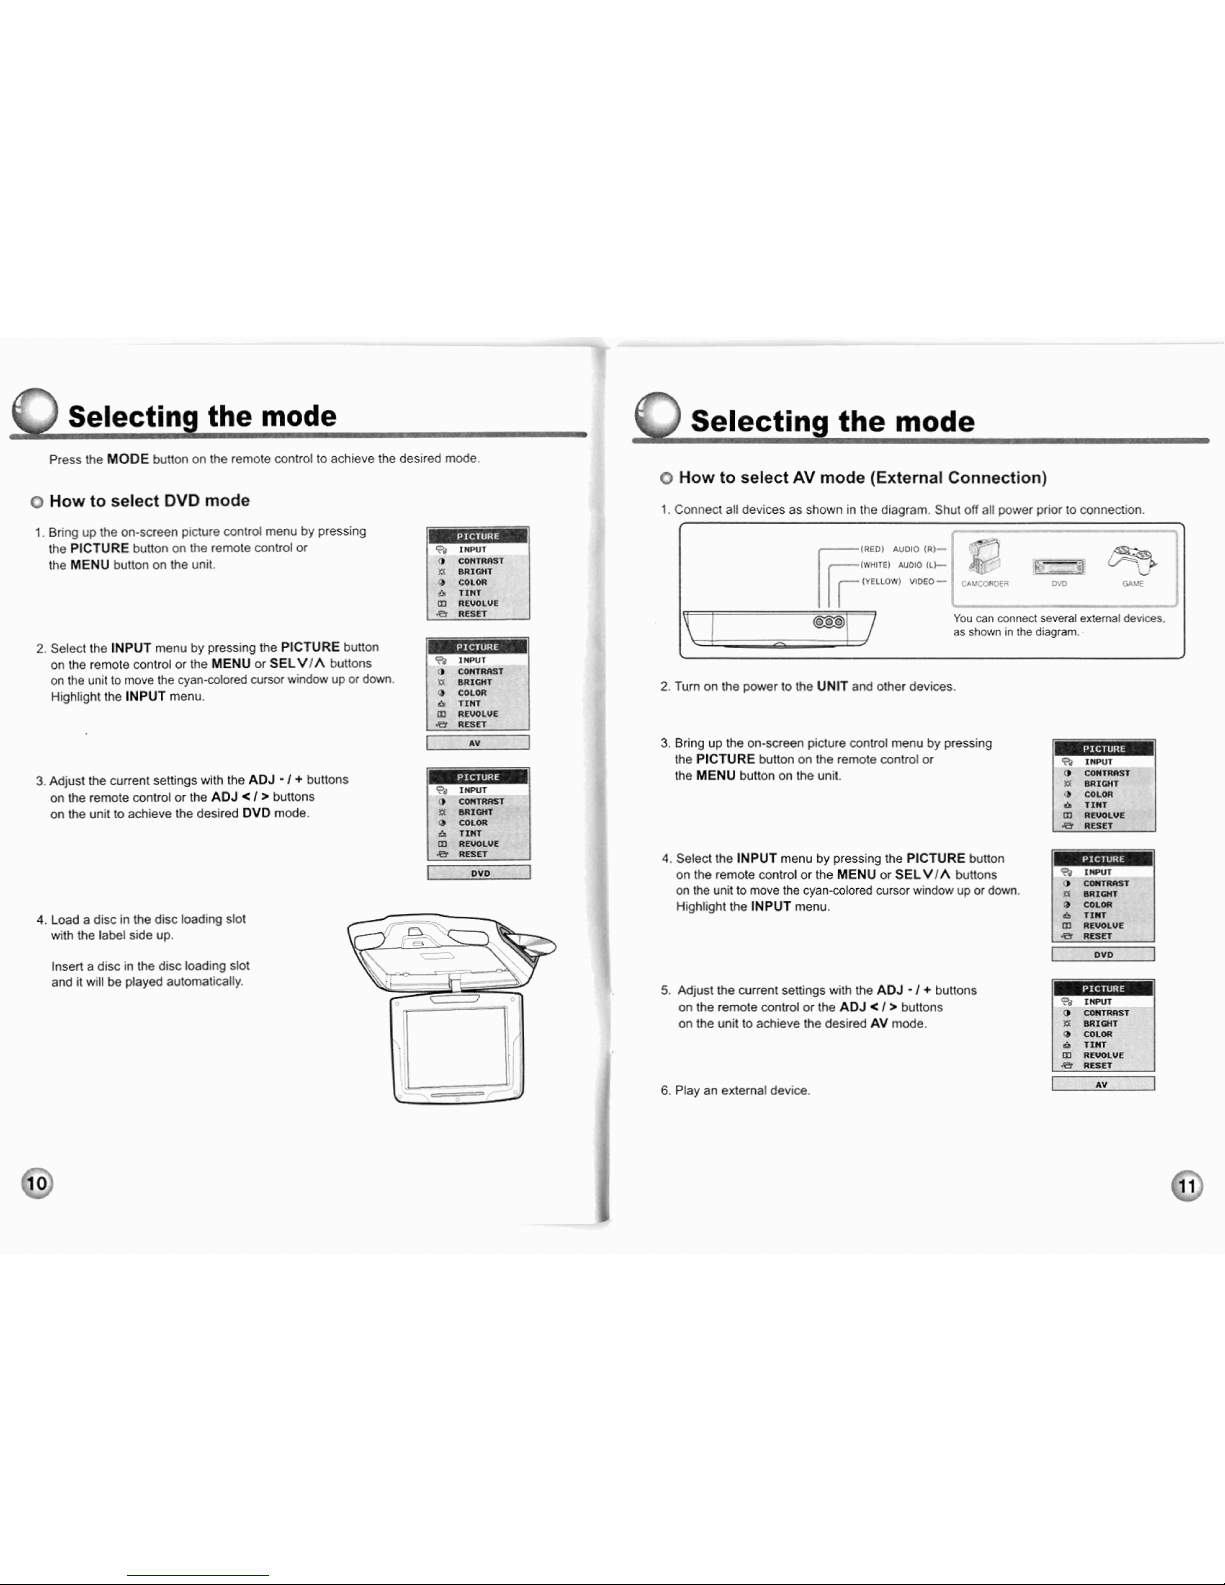
Press
the
MODE
button on the
remote
control to achieve
the
desired
mode.
O
How
to
select
AV
mode
(External
Connection)
1.
Connect
all devices
as
shown
in the
diagram.
Shut
off
all
power
prior
to
connection.
0
How
to
select
DVD
mode
1.
Bring
up
Ihe on-screen picture control
menu
by
pressing
the
PICTURE
button on
the
remote control
or
r
*
.
.
-.
. .
..-
IRED)
AUDIO
(RI-
-dr
IWHlTEl
AUDIO
(L+
J
FT
-
-
-
-L-
V
(YELLOW)
VlDEO-
CAV.r)ROEP
- -
?**,n:
.
"-
-
.
....--
-
-
I
-1
You
can
wnnect
several
external
dev~ces.
1
I
as
shown
In
the
diagram.
<
I
the
MENU
button
on
the
unit.
2.
Select
the
INPUT
menu
by
pressing
the
PICTURE
button
on
the remote control
or
the
MENU
or
SELVlh
buttons
COMlRAST
on
the
unit
lo
move
the
cyan-colored
cursor
window
up
or
down.
BRIGHT
Highlight
the
INPUT
menu.
COLOR
&
TINT
13
REUOLUE
--RESET
il
AV
2.
Turn
on
the
Dower
to
the
UNIT
and
ather
devices.
3.
Bring up the on-screen
picture
control
menu
by
pressing
the
PICTURE
button
on
the
remote
control
or
I
7b
IHPUI
I
3.
Adjust
the
current
settings
with
the
AOJ
-
I
+
butlons
on
the
rermte
control
or
the
AOJ
C
I
>
buttons
COMRST
on
the
unit
to
achieve
the
deslred
DVD
mode.
the
MENU
button
on
the
unit.
-6
COLOR
A
TlHt
u
UCWlLUE
BRIGHT
COLOR
71MT
REuOCUE
AKET
4.
Select the
INPUT
menu
by
pressing the
PICTURE
button
on
the
remote
control or
the
MENU
or
SELVJA
buttons
on
the unit to
move
the
cyan-colored
cursor
window
up
or
down.
Highl~ght the
INPUT
menu.
&
lrnu
m
REWLUE
RESET
4.
Load a disc
in
the
disc
loading
slot
with
the
label
side
up.
Insert a disc
in
the
disc
loading
slot
and it will
be
played automaticalty.
5.
Adjust
the
wmnt
settings
with
the
ADJ - E
+
buttons
on
the
remote
control
or
the
ADS
*
I
>
buttons
on
the
unit to
achieve
the
desired
AV
mode.
COHTRRST
BRIGHT
COLOR
rrnr
REVOLVE
RESET
6.
Play
an
external
device,
 Loading...