

Soundstream L1.600D, L1.1100D, L1.1600D, L1.2100D, L2.290 Owner's Manual & Installation Manual
...
L2.290
L2.400
L4.540
L4.480
L5.850
L1.600D
L1.1100D
L1.1600D
L1.2100D

CONGRATULATIONS !
You now own a Lil Wonde r 4 Ser ies Amplifier, the product of an
uncompromising design and engineering philosophy. We suggest
you take a moment to document the information below, which will
be helpful in the event of theft or if service is needed. Please retain
this manual and your sales receipt for future reference.
SOUNDSTREAM amplifiers are the result of American innovation
and the highest quality control standards. When properly installed,
they will provide you with many years of listening pleasure. Should
your amplifier ever need service or replacement due to theft, Please
record your information on the following lines to refer to in the
event that you may need it later.
IMPORTANT INFORMATION
Serial# ___________________________
Dealer's Name______________________
Date of Purchase____________________
Installation Shop____________________
Installation Date ____________________
1
FEATURES
l
Hi-Fi performance(for L5.850).
l Compact Size And Tiny Footprint.
l Double Side PCB And SMT Components.
l Full Mosfet Design.
l LPF/HPF/BPF Crossover.
l Adjustable BASSBOOST Frequency And Level(Except L5.850).
l Active X-over Function.
l Heavy-duty Aluminum Alloy Heatsink.
l Overload, Overheat, High/low Voltage Protection.
l ROHS Compliant.
Class-D + Class-AB Hybrid design,Best conbination of strong bass and
CONTROL FUNCTIONS
1. SPEAKERS
Connect speakers/subwoofers to these terminals. Be sure to check wire for proper
polarity. Never connect the speaker cables to chassis ground.
2. +12 Volt Power
Connect this terminal through a FUSE or CIRCUIT BREAKER to the positive terminal
of the vehicle battery or the positive terminal of an isolated audio system battery.
Warning: Always protect this power cable by installing a fuse or circuit breaker of the
appropriate size within 18 inches (45cm) of the battery terminal connection.
3.Remote Turn On
This terminal turns on the amplifier when (+)12 volt is applied to it . Connect it to
the remote turn on lead of the head unit or signal source.
4.GND
Connect this cable directly to the frame of the vehicle. Make sure the metal frame
has been stripped of all paint down to the bare metal. Use the shortest distance
possible. It is always a good idea to replace the factory ground at this time with a larger
cable equal to the new amplifier power cable or larger. Connecting to the battery is the
best ground in the vehicle, but typically not practical to run ground that far.
2

CONTROL FUNCTIONS
5. RCA input jacks
These RCA input jacks are for use with source units that have RCA outputs. A
source unit with a minimum level of 200mV is required for proper operation. The use of
high quality twisted pair cables is recommended to decrease the possibility of radiated
noise entering the system.
6.High level inputs
The high level inputs are for use with speaker level wiring.Some source units do
not have RCA outputs,so use this terminal for speaker level signal input.
CAUTION:Never use high level input when RCA inputs available.
7. Level Control
The level control will match the amplifiers sensitivity to the source units signal
voltage. The Operating range is 200mV minimum to 5V maximum. This is NOT a volume
control!
8.Low Pass Filter Control
This control is used to select the desired low pass x-over frequency. The frequency
can be adjusted from 40Hz to 220Hz for all bass mono models.
9.Subsonic Filter Control
This control can filter out unwanted low frequency from 10Hz (OFF) to 50Hz.This
function will increase the power handling of your woofers.
10.Bsss Boost Level switch
This switch can boost bass level by 0dB, 6dB or 12dB. The boost frequency is
centered at 50Hz.
11. X-over mode and frequency Control (4-ch)
These controls allow control over the frequencies played for the front channels.
There is an option for Low Pass. Full Range or High Pass. In LP or HP mode the frequency
range is from 50Hz to 4kHz.
12. X-over mode and frequency Control (4-ch)
These controls allow control over the frequencies played for the rear channels.
There is an option for Low/BandPass,Full Range or High Pass. In HP mode, the
frequency range is from 15Hz to 500Hz. In LP mode, the frequency range can be
switched from 50Hz to 800Hz. or 250Hz to 4kHz. In the higher range, the LPF can be set
at 4kHz for a middle bass while the front channels are also set at 4kHz for a tweeter
resulting in a 2-way x-over and eliminating the need for a passive x-over. Even with a set
up like this, the middle bass can still be protected by the HPF which is not defeatable. It
3
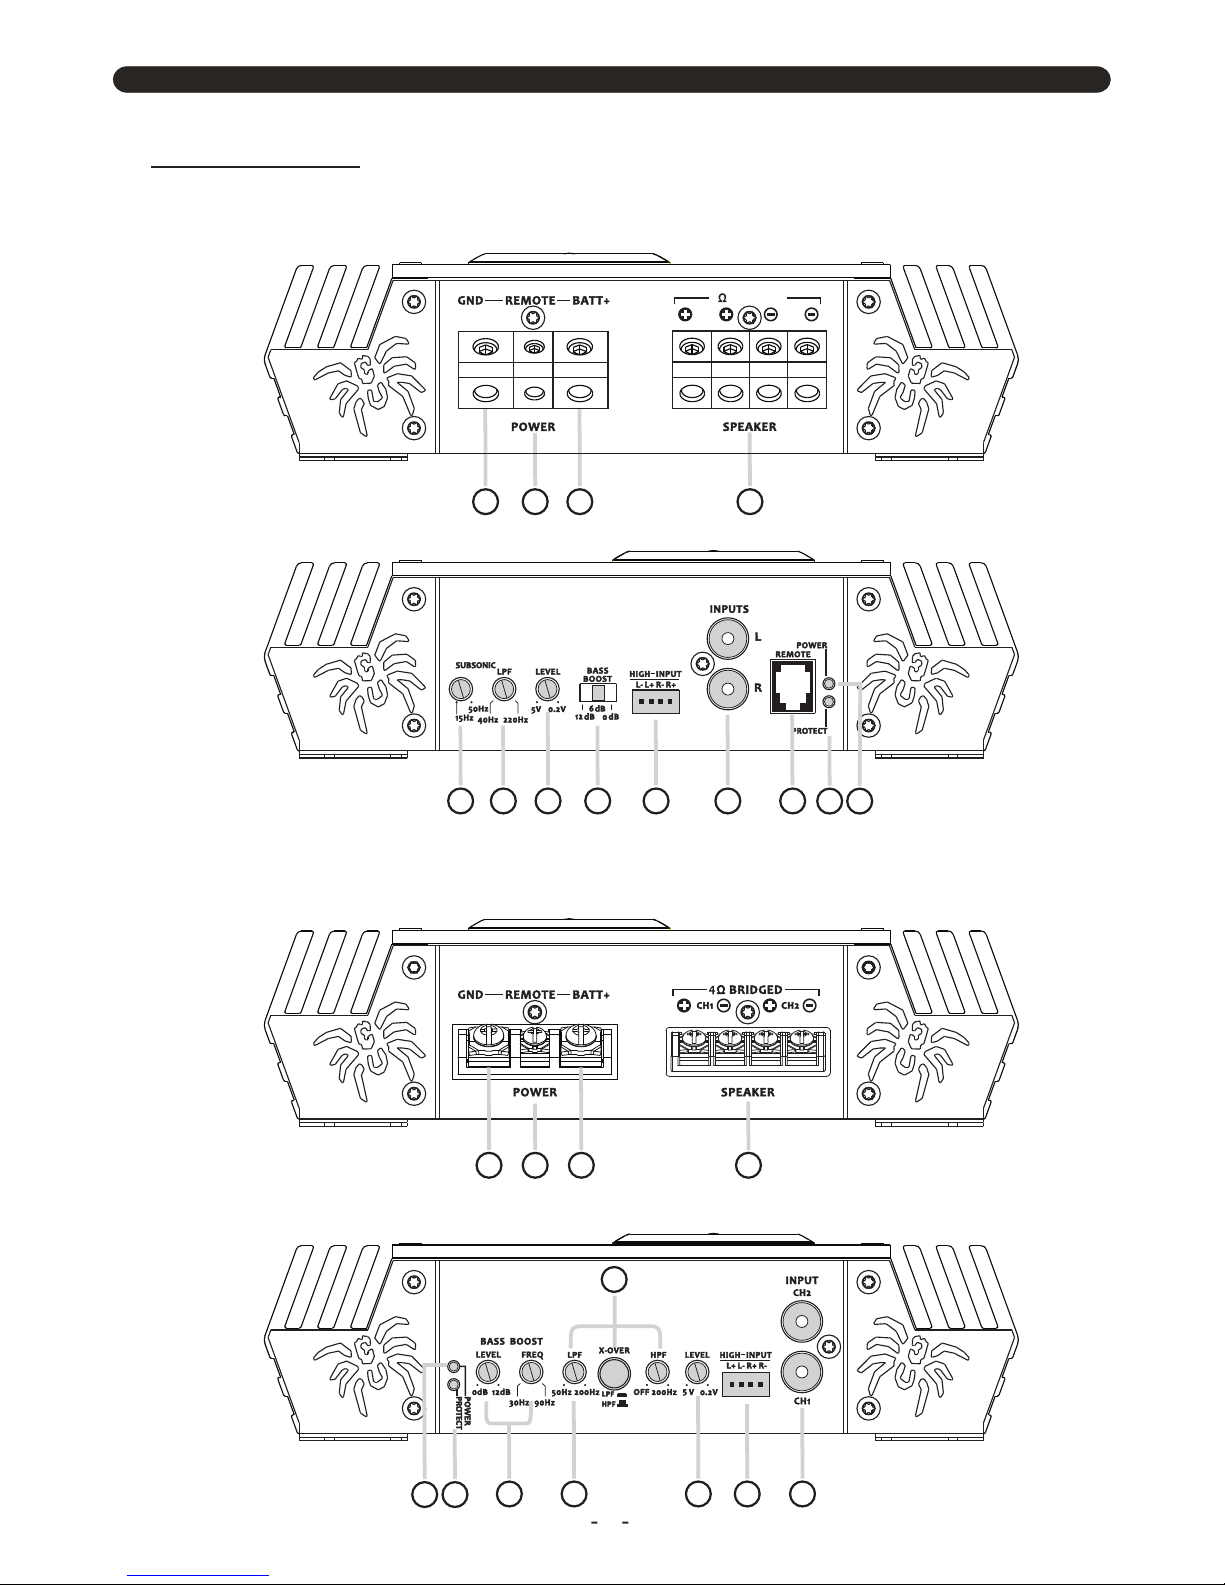
PANEL LAYOUT
Fig 1. L1.600D/L1.1100D/L1.1600D/L1.2100D Panel layout
Fig 2. L2.290/L2.400 Panel layout
PANEL LAYOUT
Fig 1. L1.600D/L1.1100D/L1.1600D/L1.2100D Panel layout
Fig 2. L2.290/L2.400 Panel layout
4 3 2 1
716 8 5
4 3 2 1
6 5789 10
6
20
16
2120
22 21
Min imu m
1
4

CONTROL FUNCTIONS
can be set anywhere in the 15Hz to 500Hz range creating a bandpass filter for the
middle bass by eliminating any damaging lower frequencies in the sub-bass region.
13.Bass Boost Level switch (4-ch)
This switch can boost bass level by 0dB, 6dB or 12dB. The boost frequency is
centered at 50Hz.
14.Input mode switch (4-ch)
This function is for switching the rear channels’ signal path. When switched to
4CH, all 4 RCAs inputs are required. When switched to 2CH, the rear channels get their
signal input from the front channels in parallel.
15.X-over mode and frequency Control (2-ch)
These controls allow control over the frequencies played for L2.900 & L2.400. There
is an option for Low Pass, Full Range or High Pass. In LP mode the frequency range is
from 50Hz to 200Hz, In HP mode the frequency range is from 15Hz to 200Hz.
16.Bass Boost Frequency and Level Control (Mono and 2-ch)
By adjusting these two knobs, you can boost a wanted frequency to wanted level.
The center boost frequency is adjustable from 30Hz to 90Hz, the boost level is
adjustable from 0dB to 12dB.
17.High-Pass-Filter for 4x full frequency channels
This knob adjust the high-pass frequency for 4x full frequency channels. The
high pass filter will turn off at the most counterclockwise position, the cutoff frequency
will increase when knob turning clockwise till 200Hz.
18.Woofer channel signal selector
The button select the signal source for subwoofer channel. When the button is up,
subwofer signal switched to the subwoofer channel’s RCA input jack. when the button is
down, it mix up 4x full freqencny channel’s bass signal and pass to subwoofer channel.
19.REMOTE
Connect the remote controller to control the subwoofer amplifier volume from the
driver seat location, for ease of adjustment during playing.
20. Power Indicator
This LED will light up when amplifier works properly.
21. Protection Indicator
The red LED will light up if there is a fault presented to the amplifier. Please
disconnect the amplifier and resolve the fault before reconnecting the amplifier.
5
Fig 3. L4.480/L4.540 Panel layout
Fig 4. L5.850 Panel layout
 Loading...