

Soundstream H-400Di Instruction Manual

1
Contents
Important Safety Instructions .................................2
Safety .......................................................................... 2
Warning ....................................................................... 2
Identifying the Parts ...............................................4
Main Unit ..................................................................... 4
Remote Control ........................................................... 5
Connections...........................................................6
Connect to FM Antenna .............................................. 6
Connect to TV ............................................................. 6
Connect to an External Audio Device ......................... 6
Connect to power........................................................ 7
Install Remote Control Batteries ...........................7
Battery Installation ..................................................... 7
Precautions Concerning Batteries .............................. 7
Basic Operation ..................................................... 8
Power .......................................................................... 8
Select the Correct TV System .................................... 8
Change System Menu Language ............................... 8
Set the Clock .............................................................. 8
Adjust Volume Level ................................................... 8
Select a Preset Sound Effect ...................................... 8
Super Bass Boost ....................................................... 8
Mute Sound ................................................................ 8
Adjust Brightness of Display Panel ............................ 8
Program Smart Remote Control to Control TV ........... 9
Play .......................................................................9
Play a Disc .................................................................. 9
Play from USB
.......................................................... 10
Play MP3/WMA/Picture Files .................................... 10
Play Control .............................................................. 10
Play Options ............................................................. 10
Picture View Options .................................................11
Play iPad/iPhone/iPod ...............................................11
Adjust Settings.....................................................12
Introduction ............................................................... 12
General Setup Page
................................................. 12
Audio Setup Page ..................................................... 12
Video Setup Page ..................................................... 12
Preference Page ....................................................... 13
Listening to the FM Radio ..................................14
Tuning in a Station .................................................... 14
Presetting Stations.................................................... 14
Tune to a Preset Radio Station................................. 14
Other Features ...................................................15
Set the Alarm Timer .................................................. 15
Set the Sleep Timer .................................................. 15
Troubleshooting ...................................................15
Specications
......................................................16
Standard Accessories .........................................16
2
The ligh tning flash w i t h arrowhe a d
symbol, within an equilateral triangle, is
intended to alert the user to the presence
of uninsulated “dangerous voltage” within
the product’s enclosure that may be of
sufficient magnitude to constitute a risk of
electric shock to persons.
The exclamation point within an
equilateral triangle is intended to
alert the user to the presence of
important operating and maintenance
(servicing) instructions in the literature
accompanying the appliance.
Safety
1) Read these instructions.
2) Keep these instructions.
3) Heed all warnings.
4) Follow all instructions.
5) Do not use this apparatus near water.
6) Clean only with dry cloth.
7) Do not block any ventilation openings. Install in
accordance with the manufacturer’s instructions.
8) Do not install near any heat sources such as
radiators, heat registers, stoves, or other
apparatus (including amplifiers) that produce heat.
9) For countries with a polarized mains, do not
defeat the safety purpose of the polarized or
grounding-type plug. A polarized plug has two
blades with one wider than the other. A
grounding-type plug has two blades and a third
grounding prong. The wide blade or the third
prong is provided for your safety. If the provided
plug does not fit into your outlet, consult an
electrician for replacement of the obsolete outlet.
Caution:To prevent electric shock, match the
wide blade of the plug to the wide slot, fully insert.
10) Protect the power cord from being walked
on or pinched particularly at plugs, convenience
receptacles, and the point where they exit from
the apparatus.
11) Only use attachments/accessories specified by
the manufacturer.
12) Use only with the cart, stand, tripod, bracket, or
table specified by the manufacturer, or sold with
the apparatus. When a cart is used, use caution
when moving the cart/apparatus combination to
avoid injury from tip-over.
13) Unplug this apparatus during lightning storms or
when unused for long periods of time.
14) Refer all servicing to qualified service personnel.
Servicing is required when the apparatus has
been damaged in any way, such as power supply cord or plug is damaged, liquid has been
spilled or objects have fallen into the apparatus,
the apparatus has been exposed to rain or
moisture, does not operate normally, or has been
dropped.
15) Battery usage CAUTION - To prevent battery
leakage which may result in bodily injury,
property damage, or damage to the apparatus:
- Install all batteries correctly, + and - as
marked on the apparatus.
- Do not mix batteries (old and new or carbon
and alkaline, etc.).
- Remove batteries when the unit is not used
for a long time.
16) The batteries shall not be exposed to excessive
heat such as sunshine, fire or the like.
17) Apparatus shall not be exposed to dripping or
splashing.
18) Do not place any sources of danger on the
apparatus (e.g. liquid filled objects, lighted
candles).
19) This product may contain lead and mercury.
Disposal of these materials may be regulated
due to environmental considerations.
20) When the appliance coupler is used as the
disconnect device, the appliance coupler shall
remain readily operable.
21) Do not expose the apparatus to any dripping or
splashing and make sure no object filled with
liquids such as vases, etc., are placed on them.
Warning
Before operating this system, check the voltage
of this system to see if it is identical to the
voltage of your local power supply.
The ventilation should not be obstructed by
covering the ventilation openings with items such
as newspaper, table-cloths, curtains etc. Make
sure there is at least 20 cm of space above and
at least 5 cm of space on each side of the unit.
Do not place this unit close to strong magnetic
field.
Do not place the unit on top of the amplifier or
receiver.
Don’t place this unit close to the damper for the
moisture will affect the life of the laser head.
Important Safety Instructions

3
If the system is brought directly from a cold to
a warm location, or is placed in a very damp
room, moisture may condense on the lens
inside the player. Should this occur, the system
will not operate properly. Remove the disc and
leave the system turned on for about an hour
until the moisture evaporates.
To keep the laser pickup clean, do not touch it,
and always close the disc tray.
Should any solid object or liquid fall into the
system, unplug the system and have it checked
by qualified personnel before operating it any
further.
Do not attempt to clean the unit with chemical
solvents as this might damage the finish. Use a
clean, dry or slightly damp cloth.
When removing the power plug from the wall
outlet, always pull directly on the plug, never
yank on the cord.
Depending on the electromagnetic waves used
by a television broadcast, if a TV is turned on
near this unit while it is also on, lines might
appear on the TV screen. Neither this unit nor
the TV are malfunctioning. If you see such lines,
keep this unit well away from the TV set.
Do not move the unit during playback
During playback, the disc rotates at high speed.
Do NOT lift or move the unit during playback.
Doing so may damage the disc or the unit.
When moving this unit
When changing places of installation or packing
the unit for moving, be sure to remove the disc
and return the disc tray to its closed position in
the player. Then, press the power switch to
turn the power off, and disconnect the power
cord. Moving this unit with the disc loaded may
result in damage to this unit.
Manufactured under license from Dolby
Laboratories. Dolby and the double-D symbol are
trademarks of Dolby Laboratories.
This unit includes this label:
The type plate is located on the rear of the unit.
4
Identifying the Parts
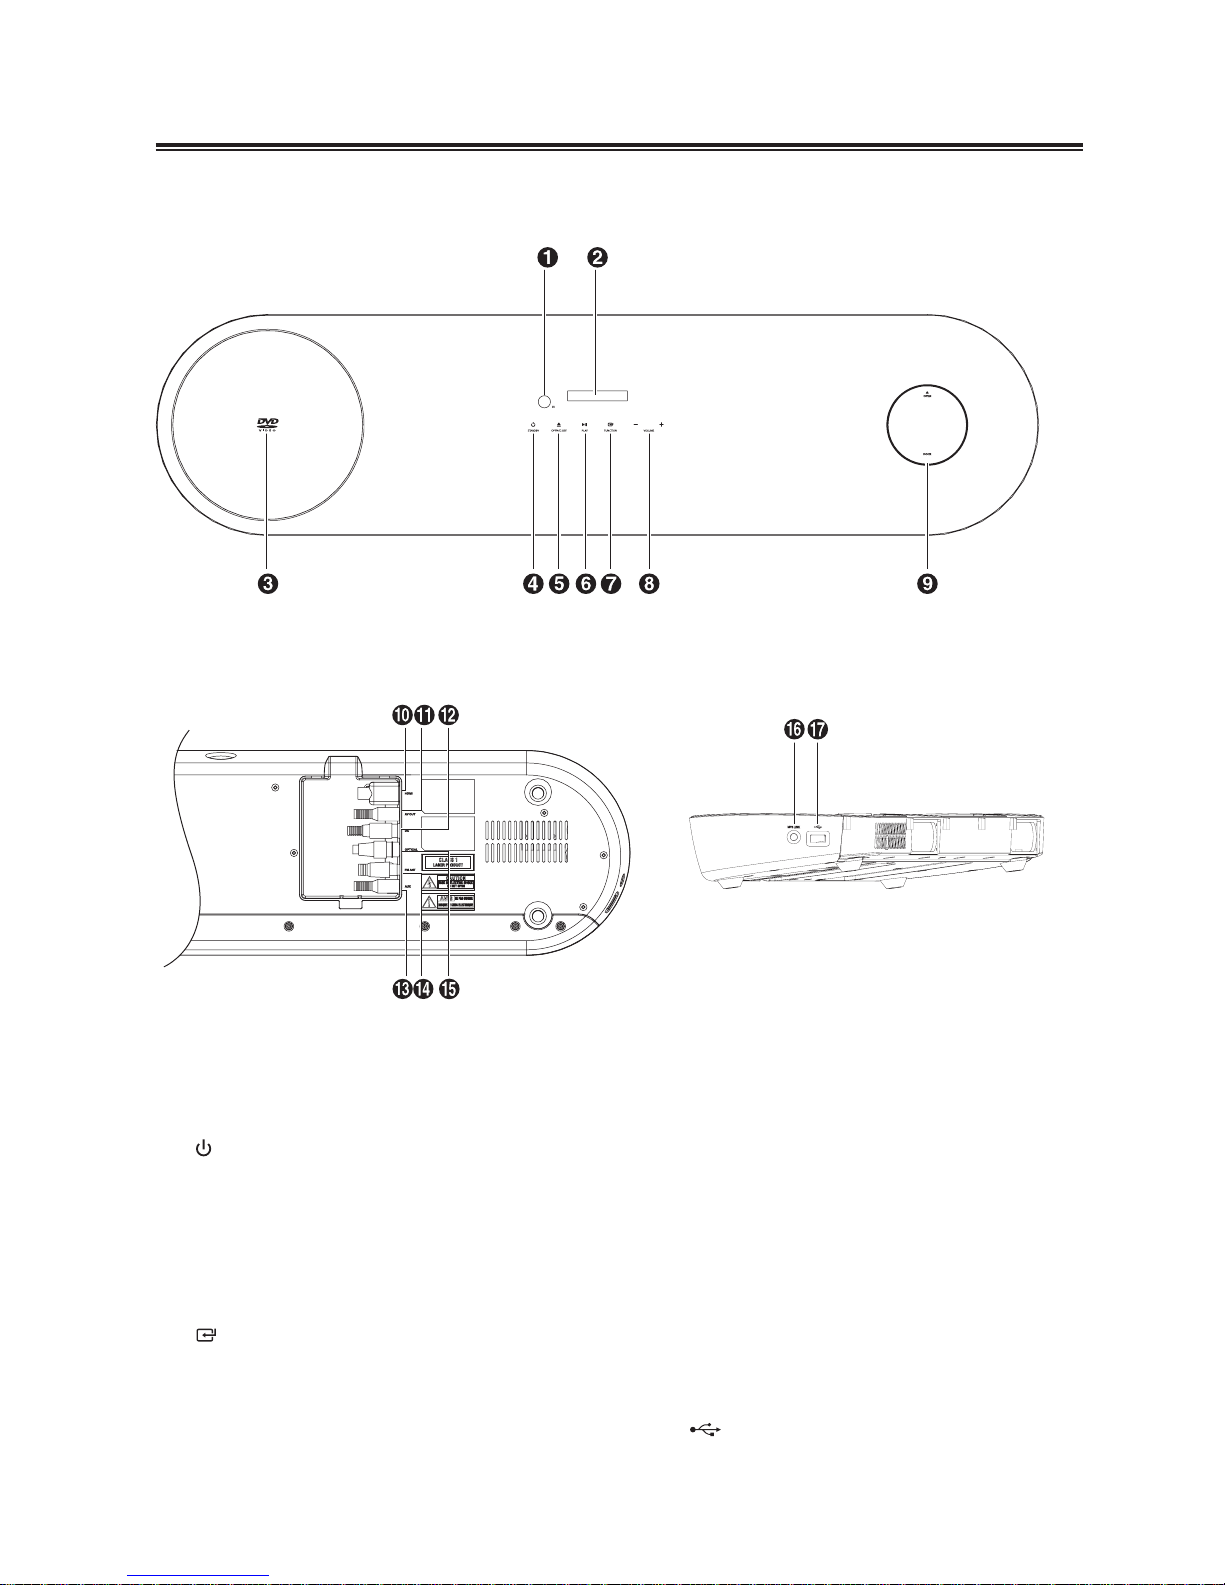
Main Unit
TOP
BOTTOM SIDE
1
iR
Remote control sensor
2
Display Panel
Show the current status.
3
Disc Compartment
4
Standby
Turn on this product or switch to Eco Power
standby mode.
5
K
Open/Close
Open or Close disc compartment.
6
BF
Play/Pause
Start or pause play.
7
FUNCTION
Select a source.
8
VOLUME + / Adjust volume level
9
Dock for iPad/iPhone/iPod
Load an iPad/iPhone/iPod.
10
HDMI Socket
Connect to a TV.
11
AV OUT Terminal
Connect to a TV
12
DC
Connect to adaptor
13
AUX Terminals
Connect to an external audio device
14
FM Antenna Socket
Connect to a FM Antenna.
15
OPTICAL Terminals
Connect to a digital amplifier.
16
MP3 LINK
Connect to an external audio device.
17
USB Socket.
5
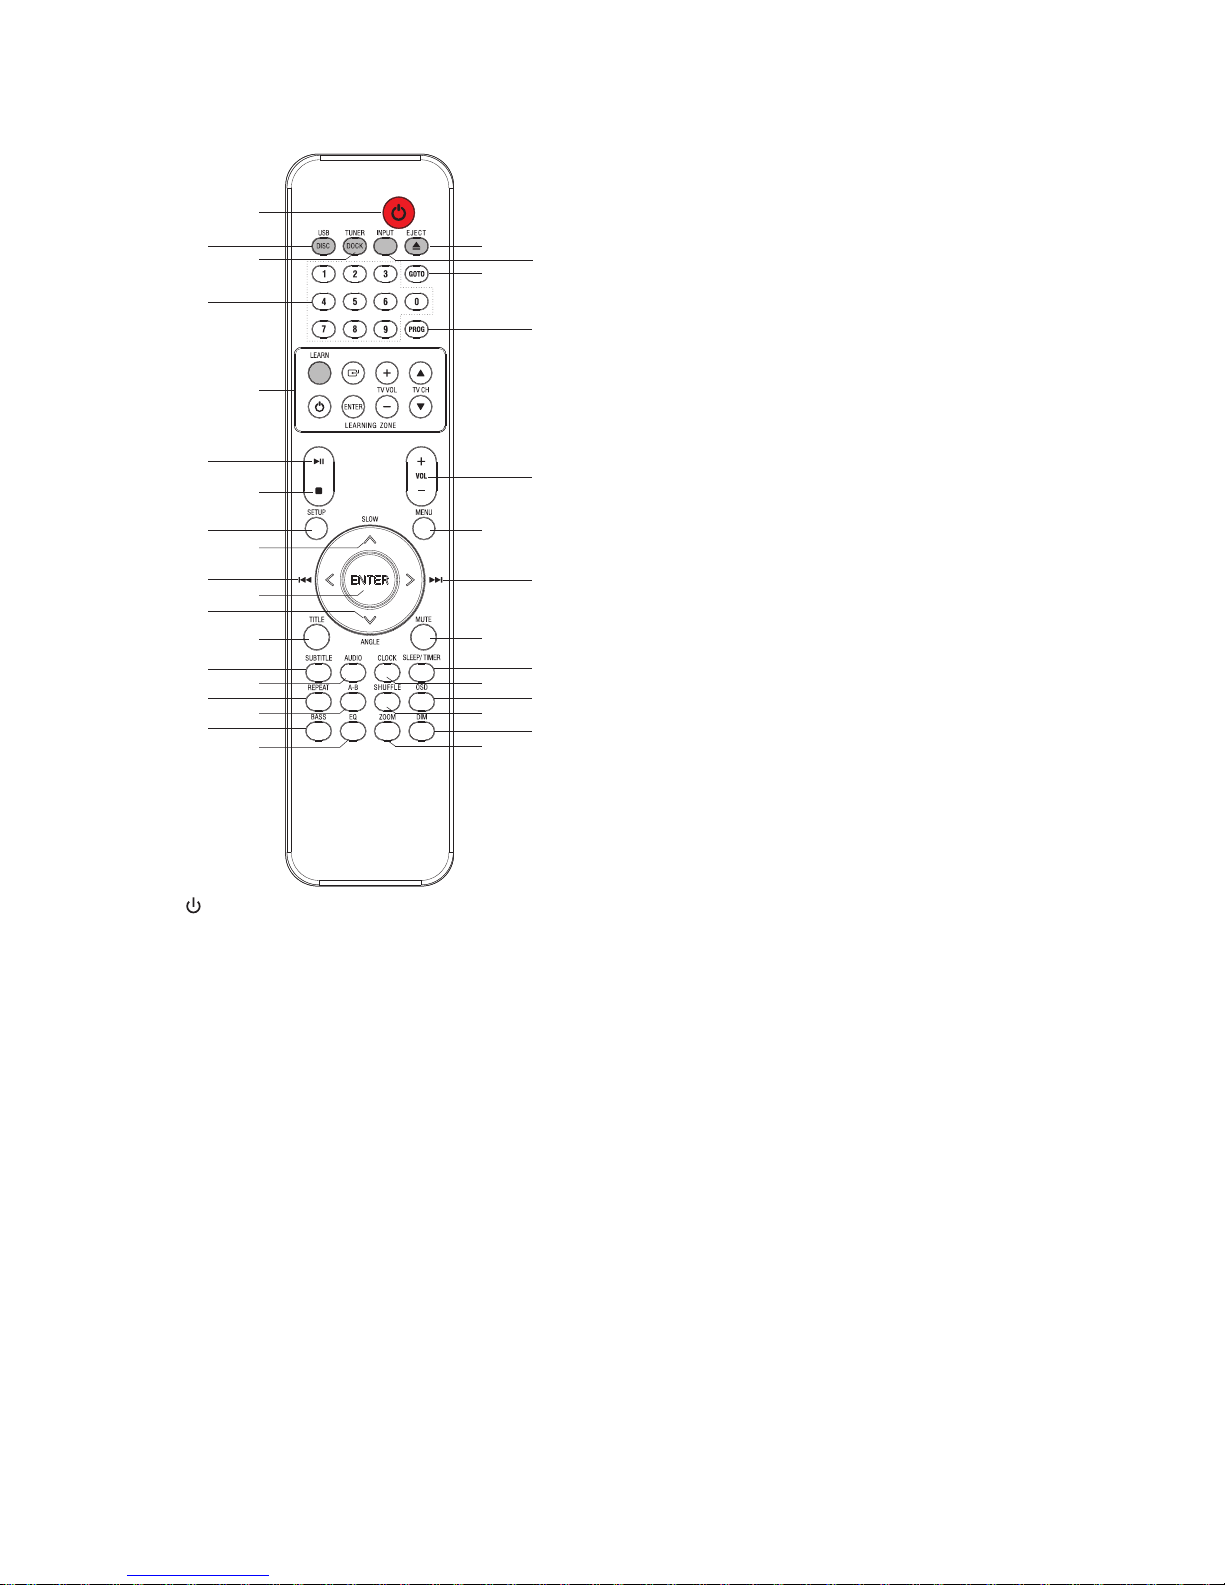
Remote Control
8
SETUP
Access or exit system setup menu.
9
SLOW /
Navigate up through menus.
Tune to a radio station.
Rotate a picture.
10
H
/
Skip to previous title/ chapter/ tracks.
Navigate left through menus.
Search backward within a track/disc.
Tune to a radio station by searching backward.
11
ENTER
Confirm a selection.
12
ANGLE /
Select a camera angle to view video play.
Navigate down through menus.
Tune to a radio station.
Rotate a picture.
13
TITLE
Access title menu.
14
SUBTITLE
Select a subtitle language during video play.
15
AUDIO
Select an audio channel during video play.
16
REPEAT
Select repeat play modes
17
A-B
Repeat a specific section within a track/chapter.
18
BASS
Enable and adjust bass level.
19
EQ
Select a preset sound effect:
POP, CLASSIC, ROCK, JAZZ, FLAT.
20
K/EJECT
Open/Close the disc compartment.
21
INPUT
Select AUX, MP3 LINK, OPTICAL function.
22
GOTO
Access quick menu of title/ chapter/ track
selection.
23
PROG
Program tracks
Program titles/chapters for DVD playback
Program radio stations
Erase file from program list.
24
VOL+/VOL- (Volume)
Increase the volume level.
Decrease the volume level.
25
MENU
For video discs: Access or exit disc menu.
For video disc with playback control: turn on/off
PBC.
For USB/data disc playback: switch between
folder/file list/program list.
1
Turn on this product or switch to the Eco Power
standby mode.
2
DISC/USB
Select DISC or USB function.
3
DOCK/TUNER
Select DOCK function.
Select TUNER function.
4
Numeric keypad (0~9)
Select a title/ chapter/ track.
Input password.
Select a preset radio station.
5
LEARNING ZONE
You can store some functions of TV in learning
zone on smart remote control.
6
BF
Start or pause play
(Press and hold) change the grid for tuner
searching.
7
L
Stop play
Erase a preset radio station.
6
26
G /
Skip to next title/ chapter/ tracks.
Navigate right through menus.
Search forward within a track/disc.
Tune to a radio station by searching forward.
27
MUTE
Press this button to mute or resume the sound.
28
SLEEP/TIMER
Set sleep timer
Set alarm timer
29
CLOCK
Display current clock
(Press and hold in standby mode) activate clock
setup.
30
OSD
Display play information on TV.
31
SHUFFLE
Select shuffle play modes
32
DIM
Adjust brightness level of display panel.
33
ZOOM
Zoom in/out image on screen.
Connections
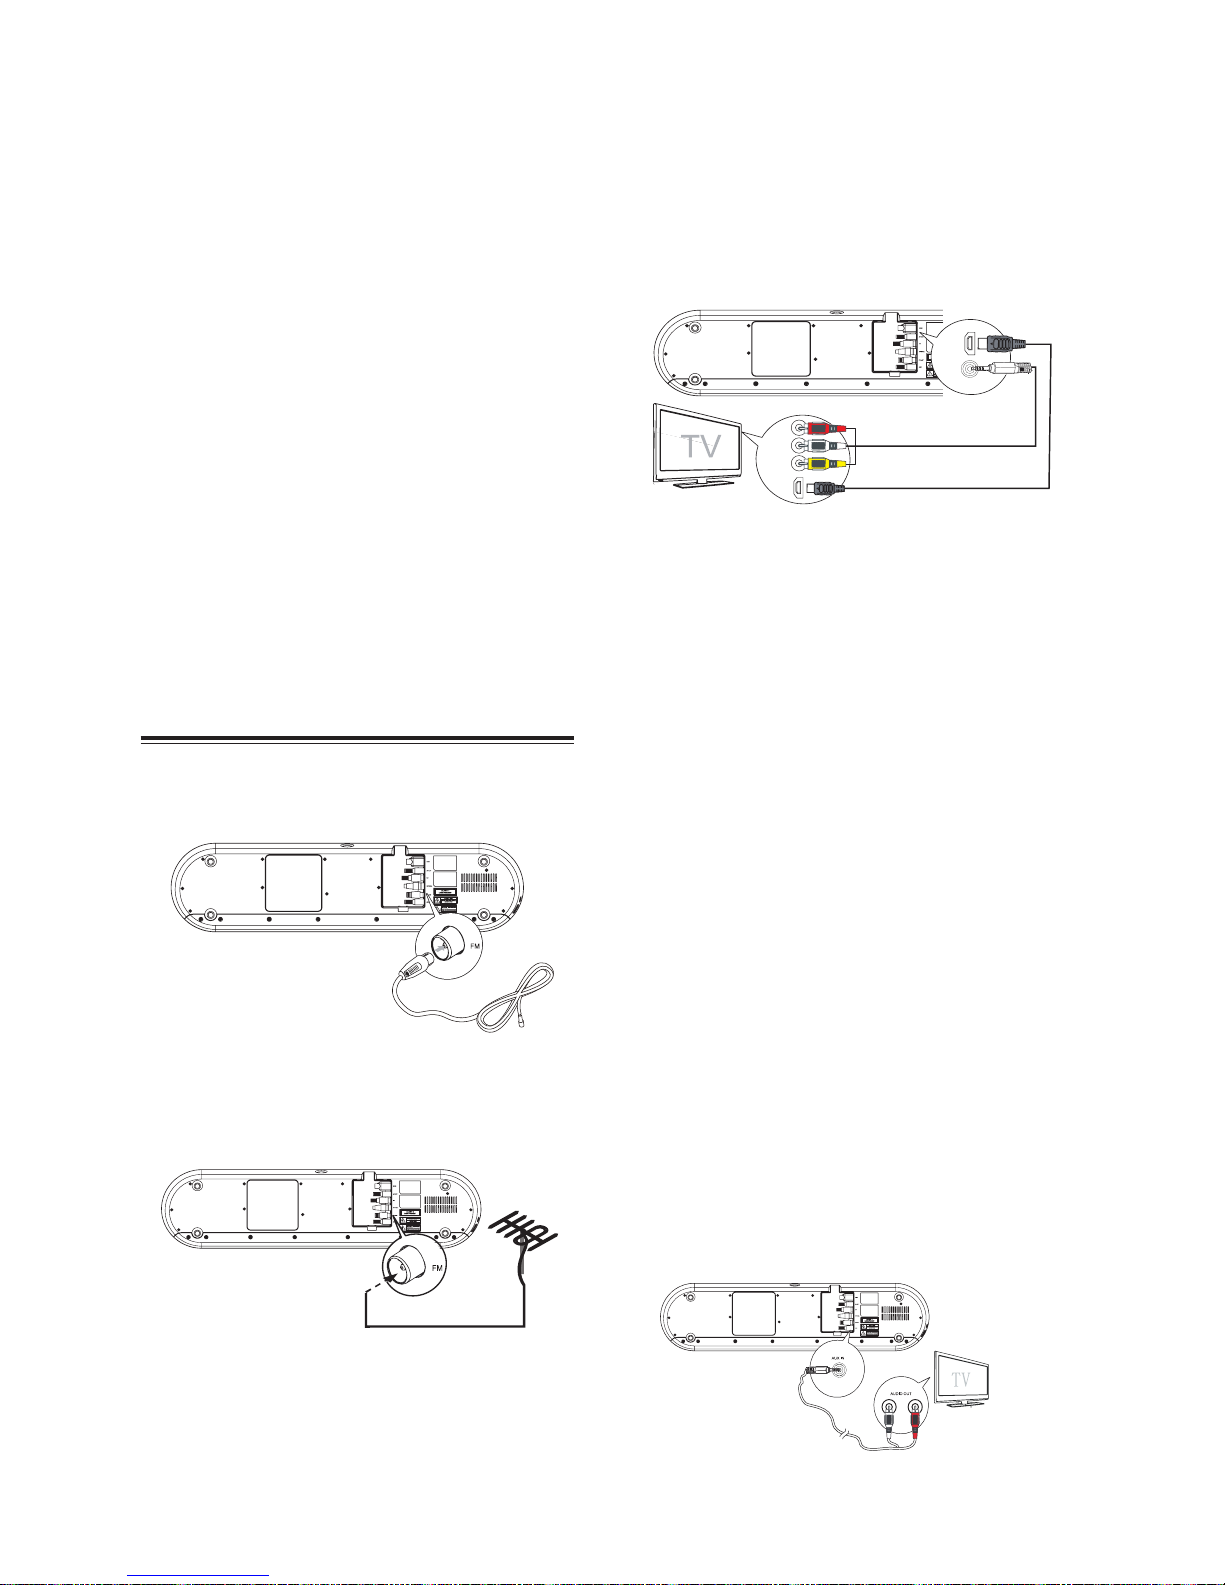
Connect to FM Antenna
Connect the supplied FM wire antenna to the FM
antenna socket on the unit.
If reception is poor, connect the outside antenna.
Note:
Before attaching a 75 ohm coaxial lead (the
kind with a round wire going to an outside
antenna), disconnect the supplied FM wire
antenna.
Caution:
To avoid noise, keep antennas away from the
system, the connecting cord and the AC power
cord.
Connect to TV
IMPORTANT!
- You only need to make one video connection
from the following options, depending on the
capabilities of your TV.
Note:
- Connect the DVD system directly to the TV.
HDMI
VIDEO IN
HDMI
AV OUT
1 Using AV socket
Connect RCA cables to:
- The AV socket on this unit.
- The audio input R/L sockets on the TV or other
external audio device.
- The Video input socket on the TV
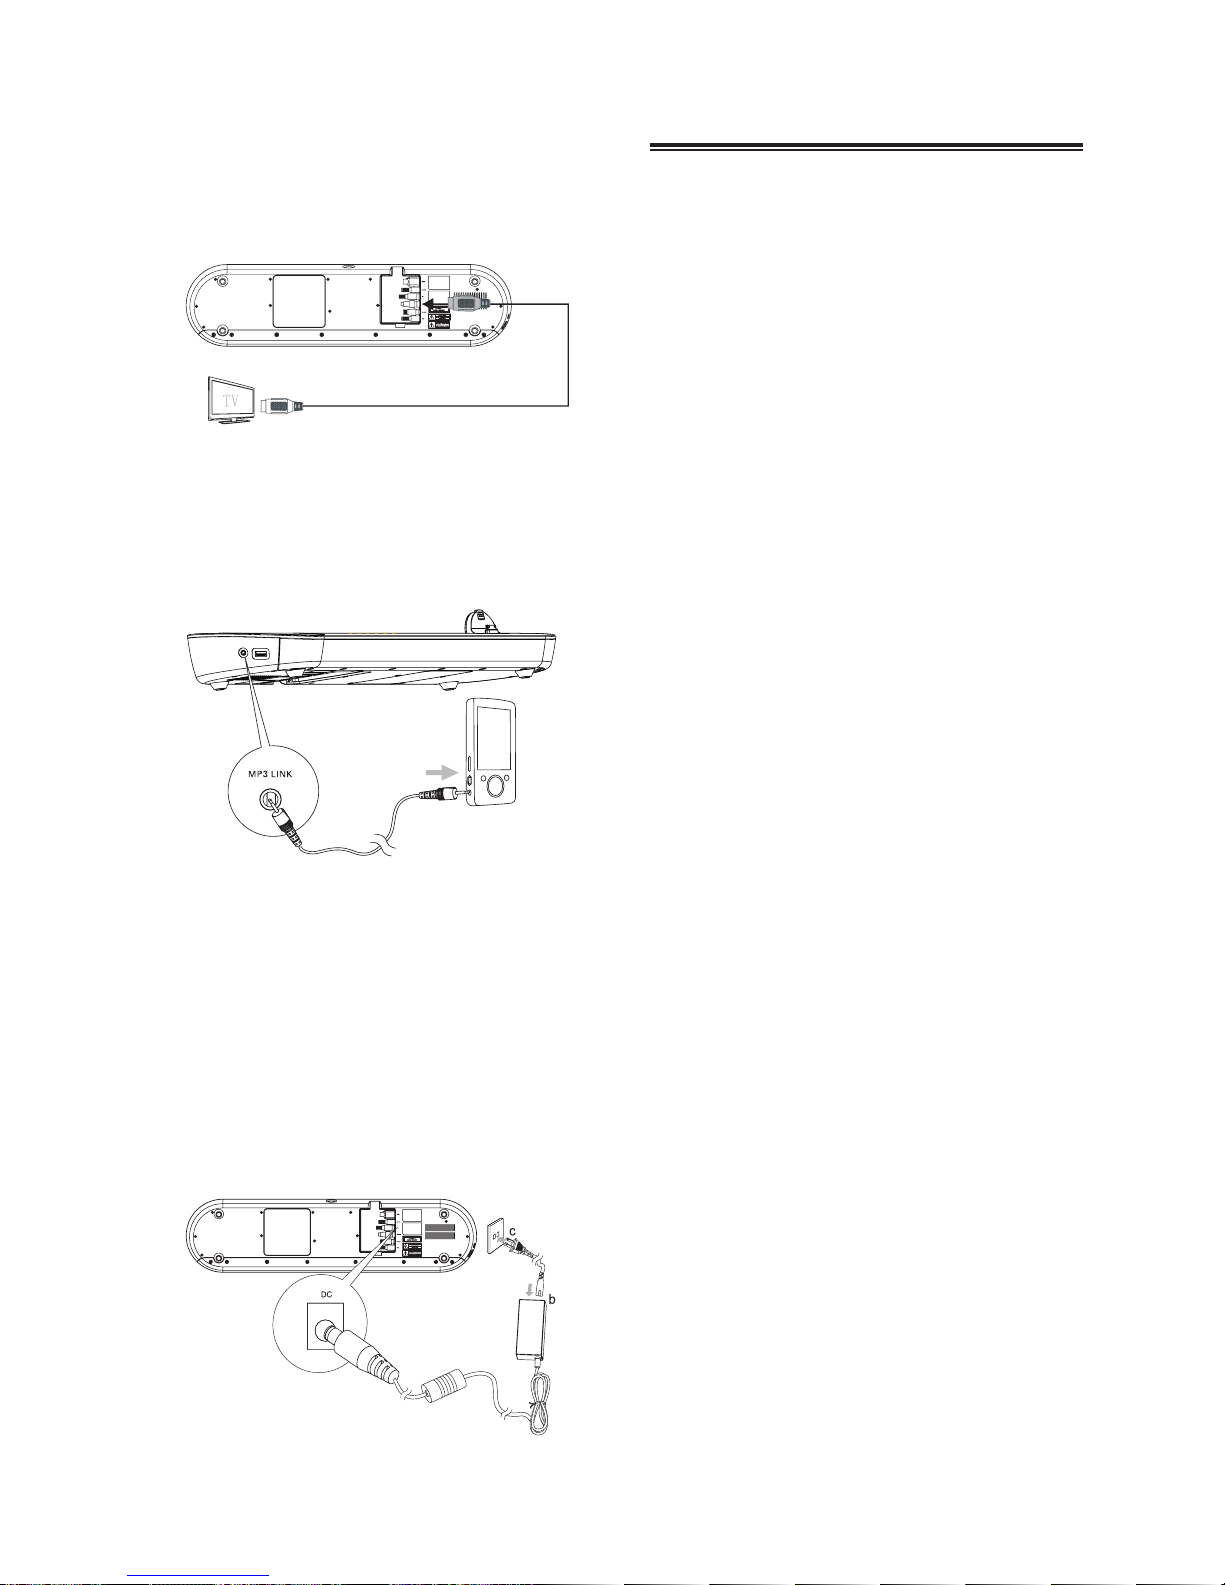
2 Using HDMI socket
Connect HDMI (High Definition Multimedia
Interface), DVI (Digital Visual Interface), or HDCP
(High-bandwidth Digital Contents Protection)compliant TVs through HDMI for the best picture
quality. This connection transmits both video and
audio signals. Through this connection, you can
watch DVDs that contain HD (High-Definition)
content.
Note:
Some TVs do not support HDMI audio
transmission.
Connect an HDMI cable to:
- The HDMI socket on this unit.
- The HDMI socket on the TV.
Note:
If your TV has only a DVI connection, connect
through an HDMI/DVI adaptor. An extra
audio connection is needed to complete this
connection.
Connect to an External Audio Device
You can also listen to an external audio device
through this unit.
1 Using AUX socket
7
Connect audio cables to:
- The AUX IN sockets on this unit.
- The audio output sockets on TV or other
external device.
2 Using OPTICAL socket
Connect an optical cable to:
- The OPTICAL socket of this unit.
- The OPTICAL output socket of a TV or other
external digital recorder.
3 Using MP3-Link socket
Connect MP3-Link cable to
- The MP3-Link socket of this unit
- The headphone socket of audio player
Press the FUNCTION button repeatedly to select
the audio output source of your connection
Connect Power
Caution:
- Risk of product damage!
- Ensure that the power supply voltage corresponds
to the voltage printed on the back or the
underside of the unit.
- Before connecting AC power cord, ensure you
have completed all other connections!
Connect the power adaptor to the DC socket on
the unit and a wall outlet.
The provided Remote Control allows the unit to
be operated from a distance. When operating the
Remote Control, point it towards the remote sensor
on the front panel of the unit.
Even if the Remote Control is operated within
the effective range (5m), remote control
operation may be impossible if there are any
obstacles between the unit and the remote
control.
If the Remote Control is operated near other
products which generate infrared rays, or if other
remote control devices using infrared rays
are used near the unit, it may operate incorrectly.
Conversely, the other products may operate
incorrectly.
Battery Installation
1 Remove the battery compartment cover.
2 Insert two “AAA” (R03 or UM-4) dry batteries.
Make sure that the batteries are inserted
with their positive “
”±and negative “”±poles
positioned correctly.
3 Close the cover.
Precautions Concerning Batteries
Be sure to insert the batteries with correct
positive “
” and negative “” polarities.
Use batteries of the same type. Never use
different types of batteries together.
Either rechargeable or non-rechargeable
batteries can be used. Refer to the precautions
on their labels.
When the Remote Control is not to be used for a
long time (more than a month), remove the
battery from the Remote Control to prevent it
from leaking.
If the batteries leak, wipe away the leakage
inside the battery compartment and replace the
batteries with new ones.
Do not use any batteries other than those
specified. Do not mix new batteries with old
ones.
Do not heat or disassemble batteries. Never
throw them in fire or water.
Do not carry or store batteries with other metallic
objects. Doing so could cause batteries to short
circuit, leak or explode.
Never recharge a battery unless it is confirmed
to be a rechargeable type.
Install Remote Control Batteries

8
Power
You can use all the functions on unit’s panel or the
remote control after connecting the unit to a power
supply (called Standby Mode).
Turning the System On
Press the
button to turn the system on from
standby mode.
Note:
When turning the system on, the system will
continue in the mode it was in when it was last
used.
Turning the System Off
Press the
button again to turn the system off
and go to standby mode.
Note:
Be sure to unplug the power cord from the outlet
when the system is not in use for an extended
period of time.
Select the Correct TV System
Change this setting if the video does not appear
correctly. By default, this setting matches the most
common setting for TV in your country.
1 No disc mode, press the SETUP button.
2 Select [Preference Page].
3 Select [TV Type] and then press the button.
4 Select a setting and then press the ENTER
button.
- [PAL] - For TV with PAL color system.
- [Auto] - For TV that is compatible with both
NTSC and PAL (multi-system).
- [NTSC] - For TV with NTSC color system.
5 To exit the menu, press the SETUP button.
Change System Menu Language
1 Press the SETUP button.
2 Select [General Setup Page].
3 Select [OSD language] and then press the
button.
4 Select a setting and then press the ENTER
button.
5 To exit the menu, press the SETUP button .
Set the Clock
The built-in clock shows the correct time in the display.
1 In standby mode, press and hold the CLOCK
button to activate the clock setting mode, hour
indicator will blink.
2 Set the hour with the button or button.
3 Press the ENTER or CLOCK button to confirm.
Minute indicator will blink.
4 Set the minute with the button or button.
5 Press the ENTER or CLOCK button to confirm,
the built-in clock starts operating and the seconds
start counting from 0.
Note:
* The operating time of every step shouldn’t be
longer than 15 seconds or it will return to the
original display.
* If there is a power failure or the power system is
turned off, the clock will lose its setting.
* In standby mode, press and hold the CLOCK
button for a few seconds, then press the
BF
button to select 12/24 hour format.
To confirm the clock time:
When you press the CLOCK button, the clock time
is displayed. Wait for a few seconds until the display
returns to its original state.
Adjust Volume Level
During play, press the VOL+/- buttons to
increase/decrease the volume level.
Select a Preset Sound Effect
During play, press the EQ button repeatedly to
select:
- [POP]
- [CLASSIC]
- [ROCK]
- [JAZZ]
- [FLAT]
Super Bass Boost
Press the BASS button repeatedly to select the
bass boost level.
Mute Sound
During play, press the MUTE button to mute
or restore sound. Press this button again or
VOLUME+ button to cancel the effect.
Adjust Brightness of Display Panel
Press the DIM button repeatedly to select different levels of brightness for the display panel.
Basic Operation
9
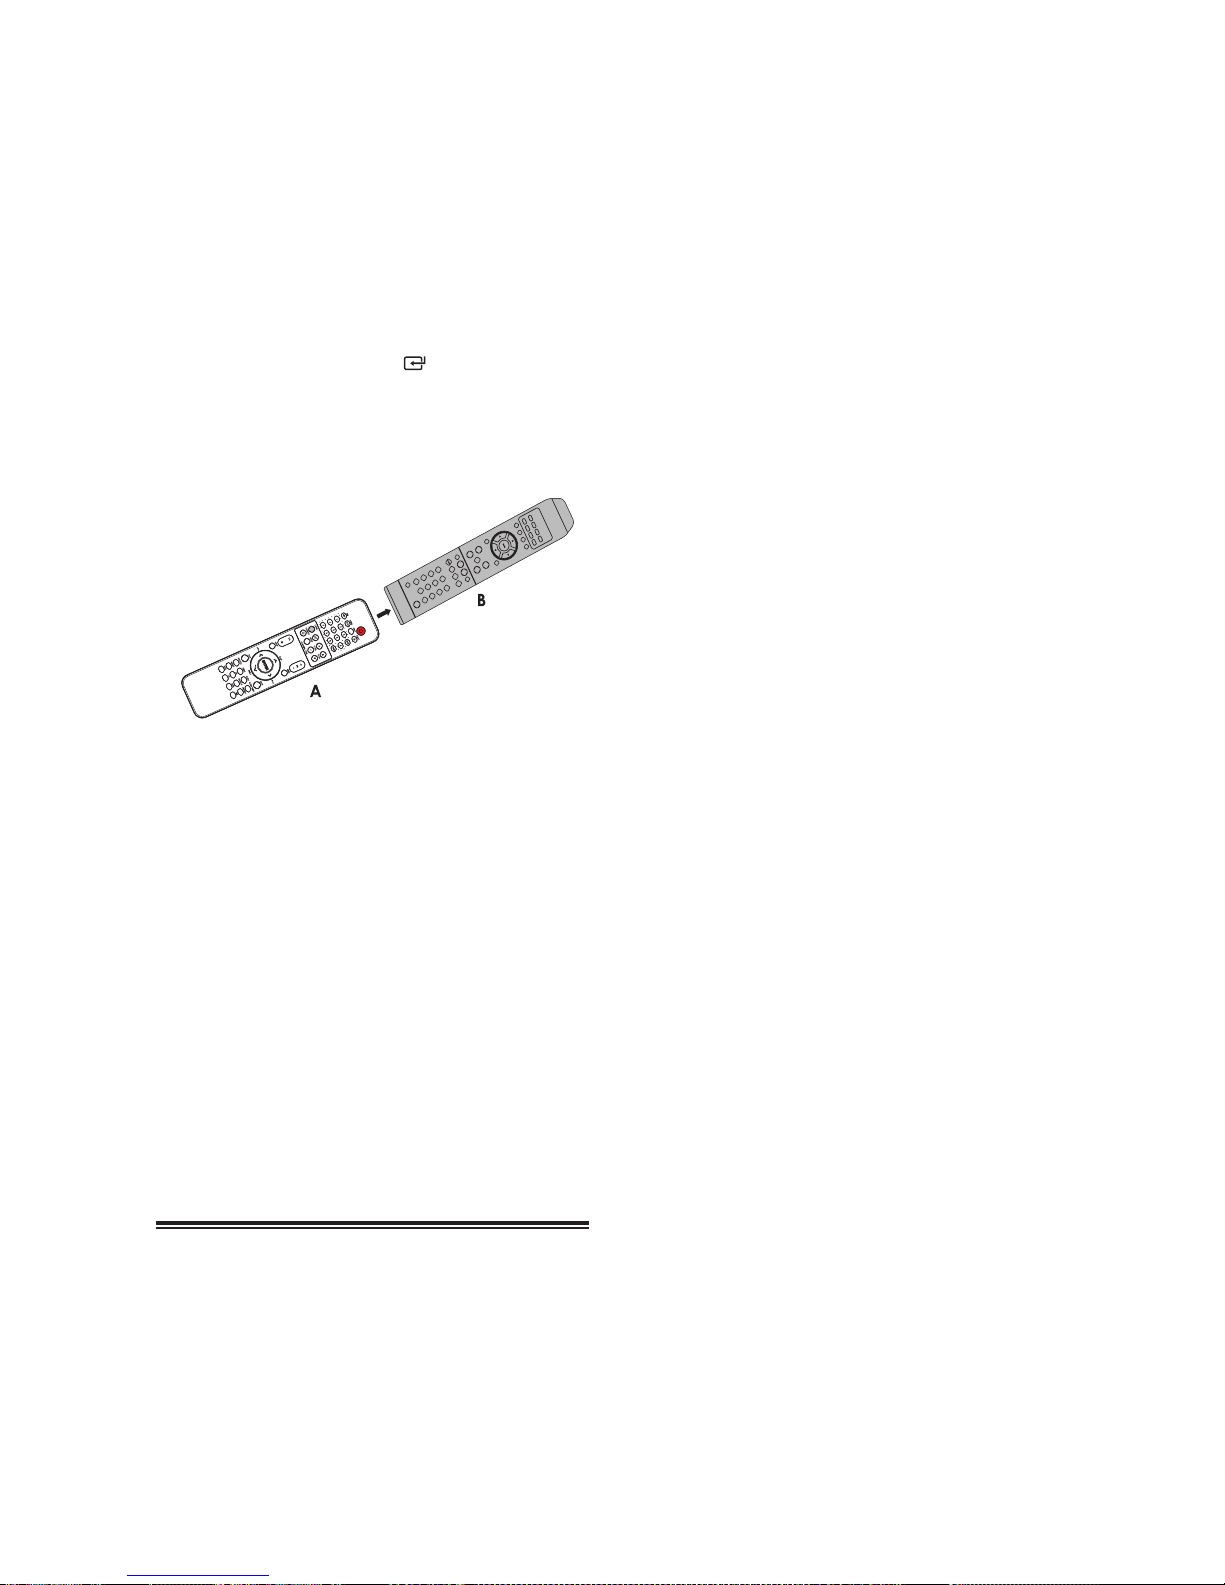
Program Smart Remote Control to
Control TV
You can store a total of 7 most frequently used functions of your TV in the learning zone of the smart
remote control. This feature allows you to use only
one remote control to operate your TV and player
together.
By default, the remote control codes of a TV are
stored in the smart remote control. The available
preset buttons are Standby,
(FUNCTION), EN-
TER, TV VOL+/VOL-, TV CH+/CH-.
NOTE:
During the learning process, the normal remote
control functions are disabled.
1 Place the smart remote control (A) within 5 to
50mm distance from the TV remote control (B).
2 Press and hold the LEARN button for 2 seconds
to activate the learning mode. A red indicator on the
smart remote control (A) will light up.
3 Press one of the TV (learning zone) buttons on
the smart remote control (A). The red indicator will
flash.
4 Press the button on the TV remote control (B)
that is to be stored on the smart remote control (A).
When the code is received successfully, the red
indicator will flash 3 times, then it will turn red again.
If the red indicator flashes but does not turn red, the
code received was incorrect.
5 Repeat steps 3 and 4 to program more buttons
on the smart remote control (A).
6 Press LEARN to save the learning and exit
learning mode.
Play
Playing a Disc
Caution!
- Never look at the laser beam inside the unit!
- Risk of product damage! Never play discs with
accessories such as disc stabilizer rings or disc
treatment sheets.
- Never put any objects other than discs into the
disc compartment.
1
Press the DISC/USB button to select the DISC
source.
2
Use the K Open/Close button to open the disc
tray.
3
Place a disc onto the disc tray (with the printed
side up) and use the K DISC button to close the
disc tray.
4
The unit will read the disc and play it
automatically.
- To stop play, press the
L
button.
- To pause or resume play, press the
BF
button.
- To skip to the previous/next title/chapter/
track, press the
H/G
buttons.
If play does not start automatically:
- Select a title/chapter/track and then press the
BF
or ENTER button.
Use the Disc Menu
When you load a DVD/(S)VCD disc, a menu may be
displayed on the TV screen.
To access or exit the menu manually:
Press the MENU button.
For VCD with PlayBack Control (PBC) feature
(version 2.0 only):
With the PBC feature, you can play VCD
interactively according to the menu screen.
During play, press the MENU button to enable/
disable PBC.
- When PBC is enabled, the menu screen is
displayed.
- When PBC is disabled, normal play is
resumed.
Select an Audio Language
You can select an audio language on video DVDs.
During disc play, press the AUDIO button.
- The language options appear. If the selected
audio channel is unavailable, the default
audio channel is used.
Note:
For some DVDs, the language can only be
changed from the disc menu. Press the SETUP
button to access that menu.
Select a Subtitle Language
You can select a subtitle language on DVDs.
During play, press the SUBTITLE button.
Note:
For some DVDs, the language can only be
changed from the disc’s menu. Press the SETUP
button to access that menu.
10
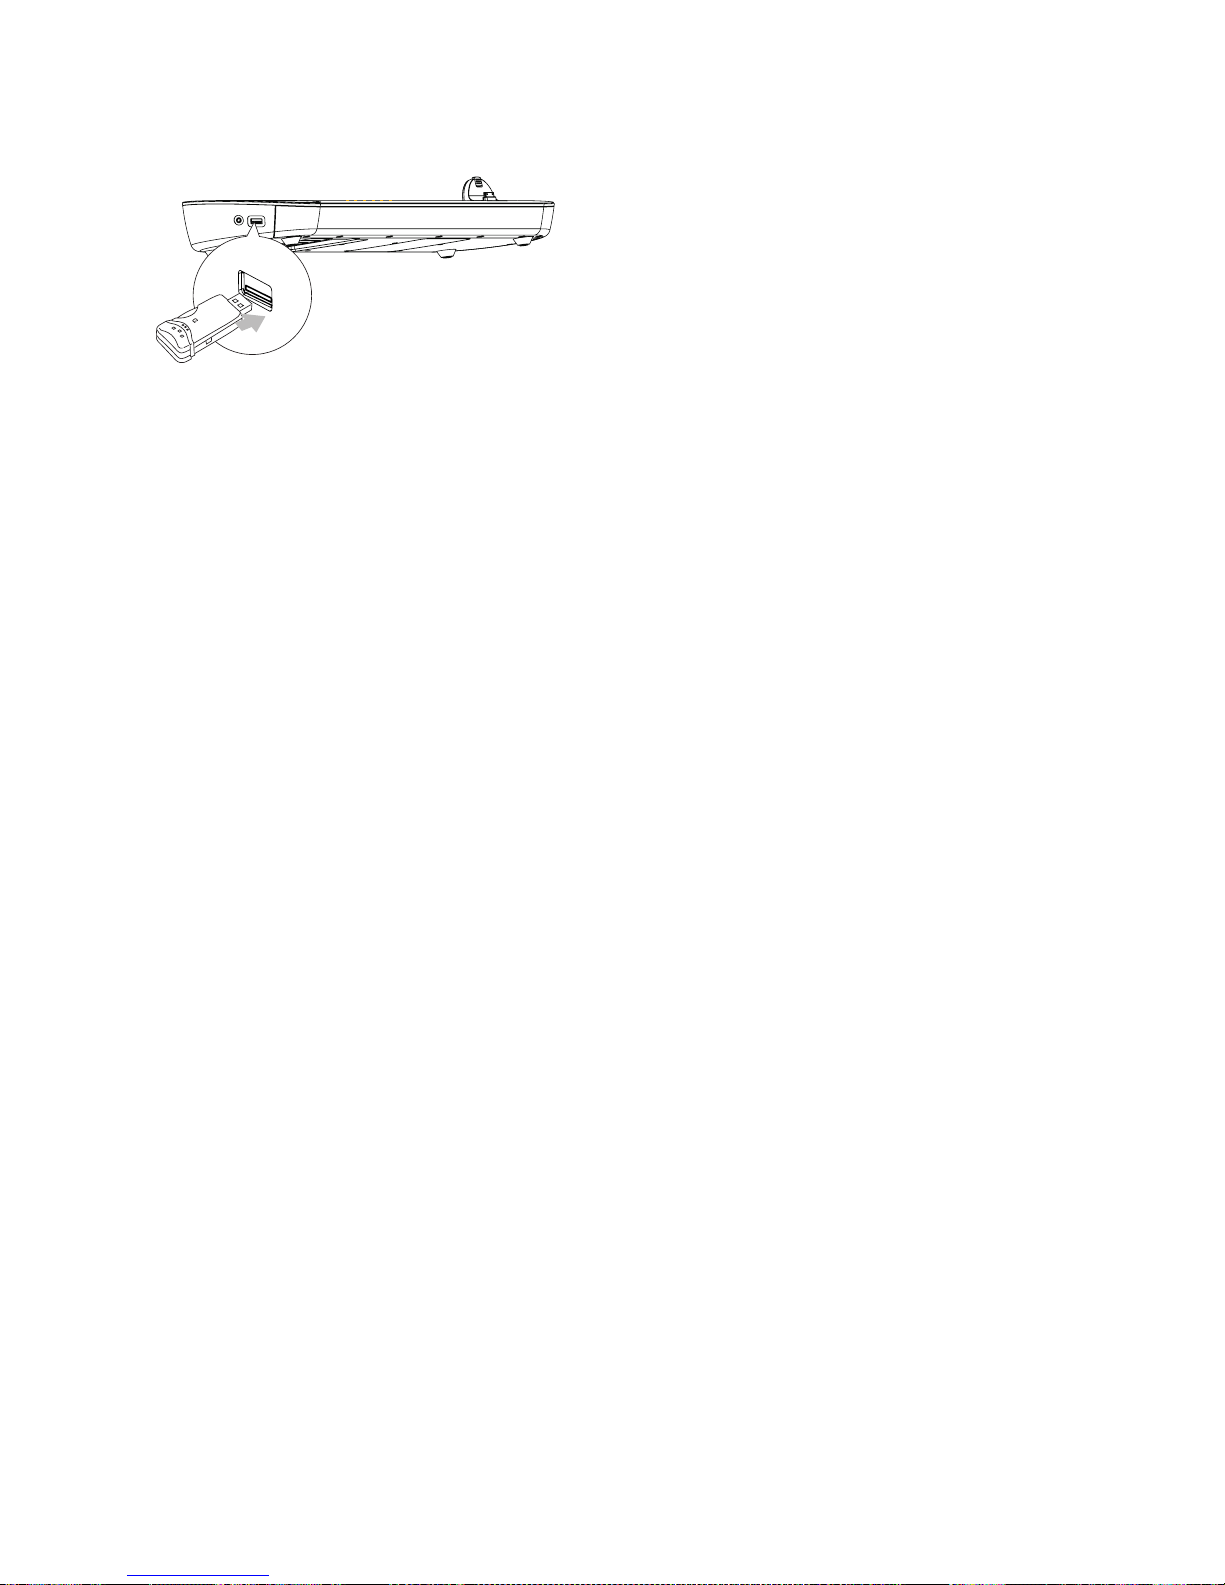
Play from USB
1 Insert the USB device.
2 Press the DISC/USB button to select the USB
source.
3 Press the / buttons to select a folder, then
press the ENTER button to confirm.
4 Press the / buttons to select a file from the
folder.
5 Press the
BF
to start play.
- To stop play, press the
L
button.
- To pause or resume play, press the
BF
button.
- To skip to the previous/next file, press the
H/G
buttons.
Play MP3, WMA, and Picture Files
You can play MP3, WMA, and picture files copied
onto a CD-R/RW recordable DVD or USB device.
1 Insert a disc or connect a USB device.
2 Press DISC/USB to select a source
3 Press the / buttons to select a folder, then
press the ENTER button to confirm.
4 Press the / buttons to select a file from the
folder.
5 Press the
BF
button to start play.
- To stop play, press the
L
button.
- To pause or resume play, press the
BF
button.
- To skip to the previous/next file, press the
H/G
buttons.
Play Control
Repeat A-B (DVD/VCD/CD/MP3/WMA)
1 During music or video play, press the A-B button
at the start point.
2 Press the A-B button at the end point.
- The selected section starts to play repeatedly.
- To cancel repeat play, press the A-B button
again.
Note:
The section A and B can be set only within
the same track/title.
Search Forward/Backward
During play, press and hold
H/G
buttons
repeatedly to select the search speed.
- To resume play at normal speed, press the
BF
button.
Search by Time or Chapter/Track Number
During the DVD/VCD playback, press the GOTO
button to access the quick menu:
- For the Track/Title/Chapter field, enter the
track/title/chapter number.
- For the Disc time/Track time/Title time/
Chapter time, enter the play position in
hours, minutes and seconds.
- Play starts automatically at your selected
point.
- For Repeat/Audio/Subtitle/Angle fields, you
can select one repeat mode/audio mode/
subtitle language/view angle for play.
- For the Display field, you can select one
mode to view the disc time information.
During MP3/WMA play, press the GOTO button
repeatedly until a time field or track field is displayed.
- For the time field, enter the play position
in hours, minutes and seconds. Play starts
automatically at your selected point.
- For the track field, enter the track. Press the
enter button to play.
Resume Video Play From Last Stopped Point
In stop mode and when the disc has not been
removed, press the
BF
button.
To cancel resume mode and stop play completely:
In stop mode, press the
L
button.
Note:
This feature is only available for DVD/VCD play.
Play Options
Display Play Information
During play, press the OSD button
repeatedly to display play information.
Zoom in/out Image
During video play, press the ZOOM button repeatedly to zoom in/out of the image.
- When the image is zoomed in, you can press
the ,,, to pan through the image.
Program
For video discs/audio CDs:
1 During play or in stop mode, press the PROG
button to access the program menu.
2 Enter the tracks/chapters to add to the program.
3 Repeat step 2 until the program is completed.
4 Select [Start] to play the program.
 Loading...