

Page 1

CONTENTS
SSV10.4F User’s Manual - Contents
U S E R ’ S M A N U A L
2 General precautions
2 Safety precautions
3 Installation precautions
3 Operation precautions
4 Features
4 What is included?
5 Monitor controls and features
6 Remote control
6 Remote control battery replacement
7 System wiring
8 Monitor installation
9 Releasing and opening the monitor
10 Powering up the monitor
10 Turning on the dome lights
11 Troubleshooting
12 Specifications
Congratulations on your purchase
of a Sound Storm Video Monitor.
It has been designed, engineered and
manufactured to bring you the highest
level of performance and quality, and
will afford you years of viewing
pleasure.
Thank you for making Sound Storm
your choice in car video entertainment!
page
SSV10.4F
10.4" Flip Down TFT Monitor
L A B O R A T O R I E S
®
Page 2
SSV10.4F User’s Manual User’s Manual - page 2
General precautions
Safety precautions
Please read this manual completely
and carefully prior to attempting to
install your new Sound Storm mobile
video equipment. Installed correctly,
your Sound Storm equipment will
provide you with years of enjoyable
and safe usage.
Installation of this equipment in any
portion of a vehicle which impairs or
distracts the driver is improper and
dangerous. Sound Storm assumes
no liability whatsoever for failure to
follow the proper installation of this
product.
Please keep this manual in a safe place
for future reference.
• Do not operate this equipment while
driving – safe driving should always
be your highest priority.
• This product should not be installed
in a location which allows the monitor
screen to be visible to the driver of the
vehicle. In some states and countries,
the viewing of images on a screen
inside a vehicle is illegal, even by
people other than the driver. Be sure
that the installation and operation of
this system is in compliance with local
rules and regulations.
SHOCK HAZARD! Do not open the case
of this product. There are dangerous
voltages present within the unit. There are
no user-serviceable parts within the unit.
• Do not open or attempt to repair this
unit yourself. Dangerous high voltages
are present which may result in electric
shock. Refer any repairs to a qualified
service technician.
• Do not attempt to repair a damaged,
broken or faulty power cord. Replace
it with a new one immediately.
• To avoid risk of electronic shock or
damage to the monitor, do not permit
any of this equipment to become damp
or wet from water or drinks. If this does
occur, immediately unplug the power
cord and send the monitor to your
local dealer or service center as soon
as possible.
• If there is smoke or any peculiar odor
present during use or if there is damage
to any of the component enclosures,
immediately unplug the power cord
and send the monitor to your local
dealer or service center as soon as
possible .
Page 3

SSV10.4F User’s Manual User’s Manual - page 3
Operating precautions
Turn the unit off when it is not in use.
Avoid dropping any metal objects or
inflammable items into the monitor
ventilation slots.
Do not place objects on or suspend
objects from the power cord, as this
may damage the cord.
Installation precautions
Choose a mounting location in your
vehicle where the unit will not distract
or otherwise interfere with the driver’s
ability to control the vehicle.
Do not install components in areas
which are susceptible to rain, moisture,
direct sunlight, extreme heat or cold,
excessive dust, dirt or humidity.
If installation requires drilling holes or
other modifications to the vehicle,
consult with your nearest dealer or
professional car audio installer.
Use only the installation parts and
hardware provided with the unit to
ensure proper installation. Using other
parts can cause malfunction and
possible damage to your Sound Storm
video monitor.
Use only a power source with 12 Volts
DC (negative ground).
Before final installation, temporarily
connect the wiring according to the
diagram near the end of this manual,
check it to ensure that it has been
connected properly, and test the unit
to make sure it is working correctly.
After the monitor is installed, do not
arbitrarily pull it down or strike it. This
may loosen the mounting screws and
cause it to fall down.
Page 4

SSV10.4F User’s Manual - page 4
Features What is included?
Monitor Controls and Features
Your new video monitor features the
following:
• TFT Active Matrix LCD display
• Overhead console mounting
bracket
• On-screen menu system
• Audio/video input controls
• Built-in dome lights
• Wireless remote control
When first unpacking your new flipdown monitor, please check first that
the package contains all of the items
below. If something is missing, contact
the store where you purchased the
player.
• LCD monitor housing
• Wireless remote control with
batteries
• RCA video cable
• Video/power interface cable
with inline fuse
• Metal mounting plate
• (4) silver 1/2" machine screws
(for attaching monitor to mounting plate)
Page 5
Monitor Controls and Features
SSV10.4F User’s Manual - page 5
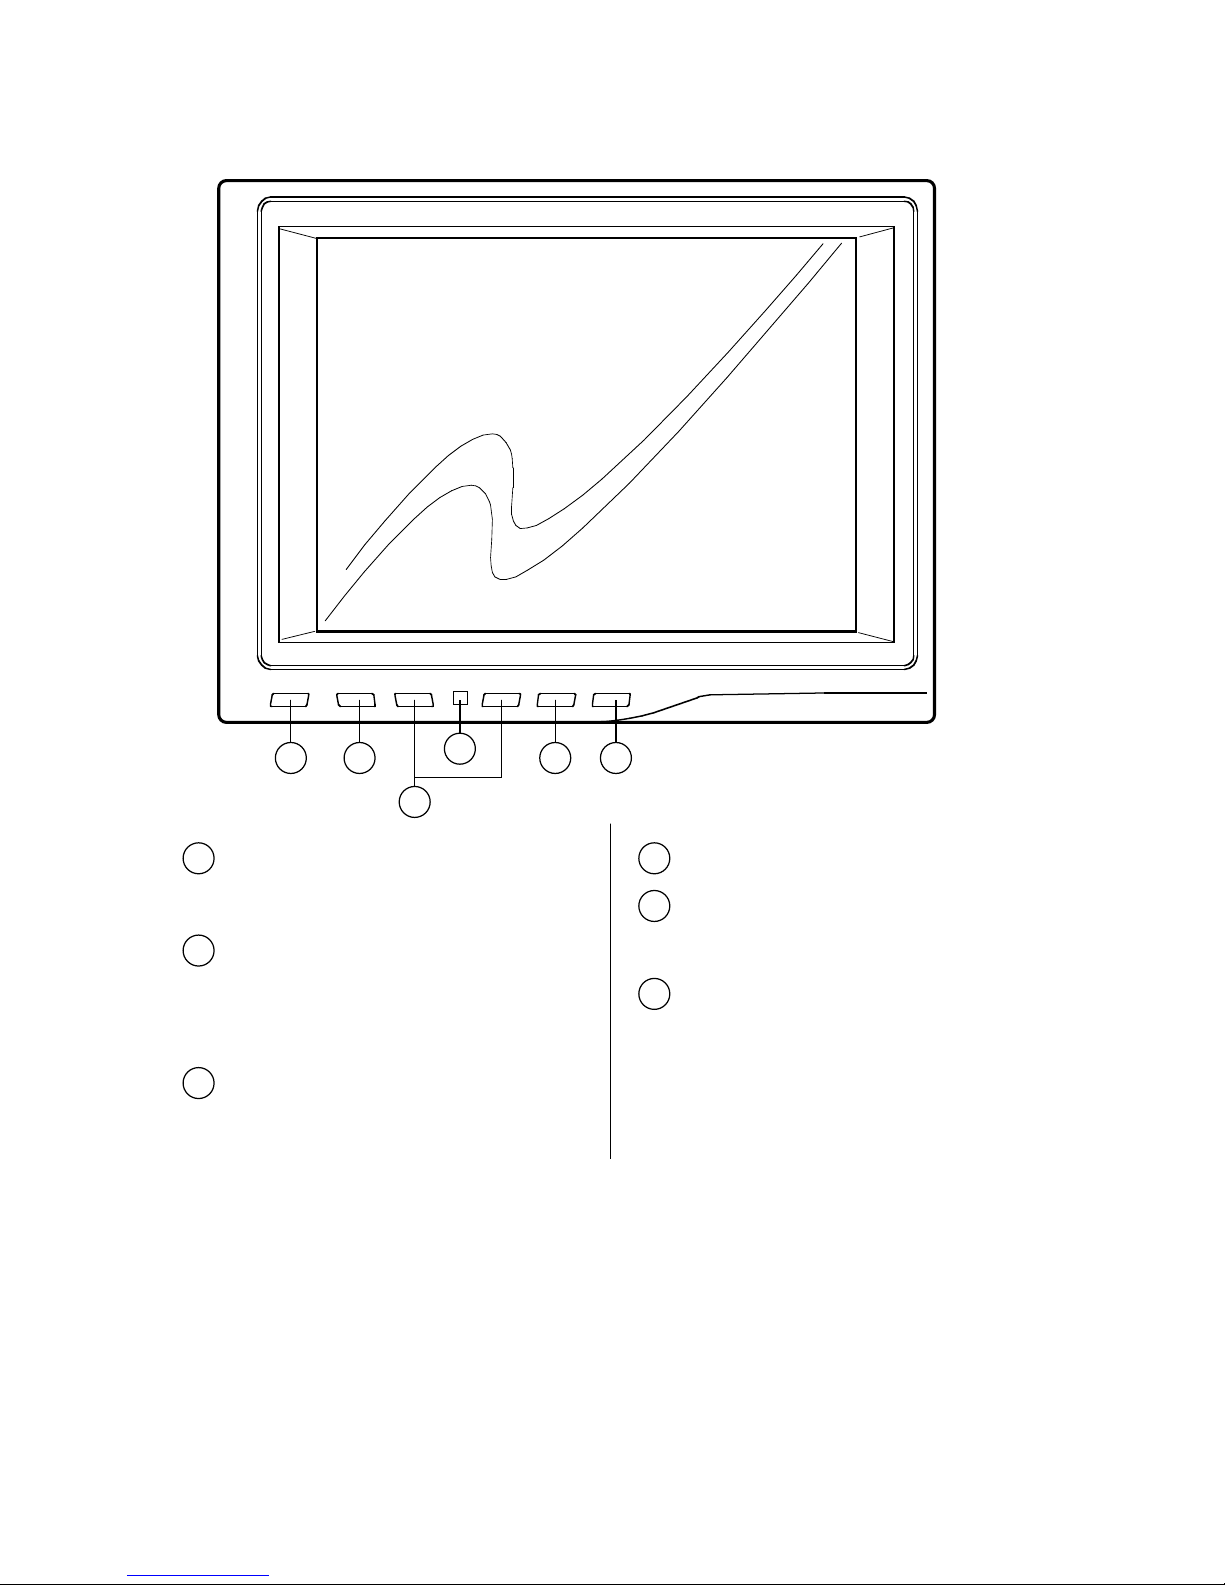
REMOTE IR SENSOR
4
UP/DOWN BUTTONS
These buttons are used to increase
or decrease parameters in the onscreen display menu system.
3
MENU
This button enables the on-screen
display menu system. Once enabled,
this button is used as an ENTER
button.
2
1
POWER ON/OFF
This button turns the monitor system
on and off.
5
A/V SOURCE SELECTOR
Use this button to switch between
A/V Source 1 and A/V Source 2.
6
TIME
This monitor shuts off automatically
after a certain period of non-use. Use
the time button to change the length
of time required before auto shut-off.
3
POWER MENU + – AV SELECT TIME
REMOTE
1 2 5 6
4
Page 6
SSV10.4F User’s Manual- page 6
Remote Control
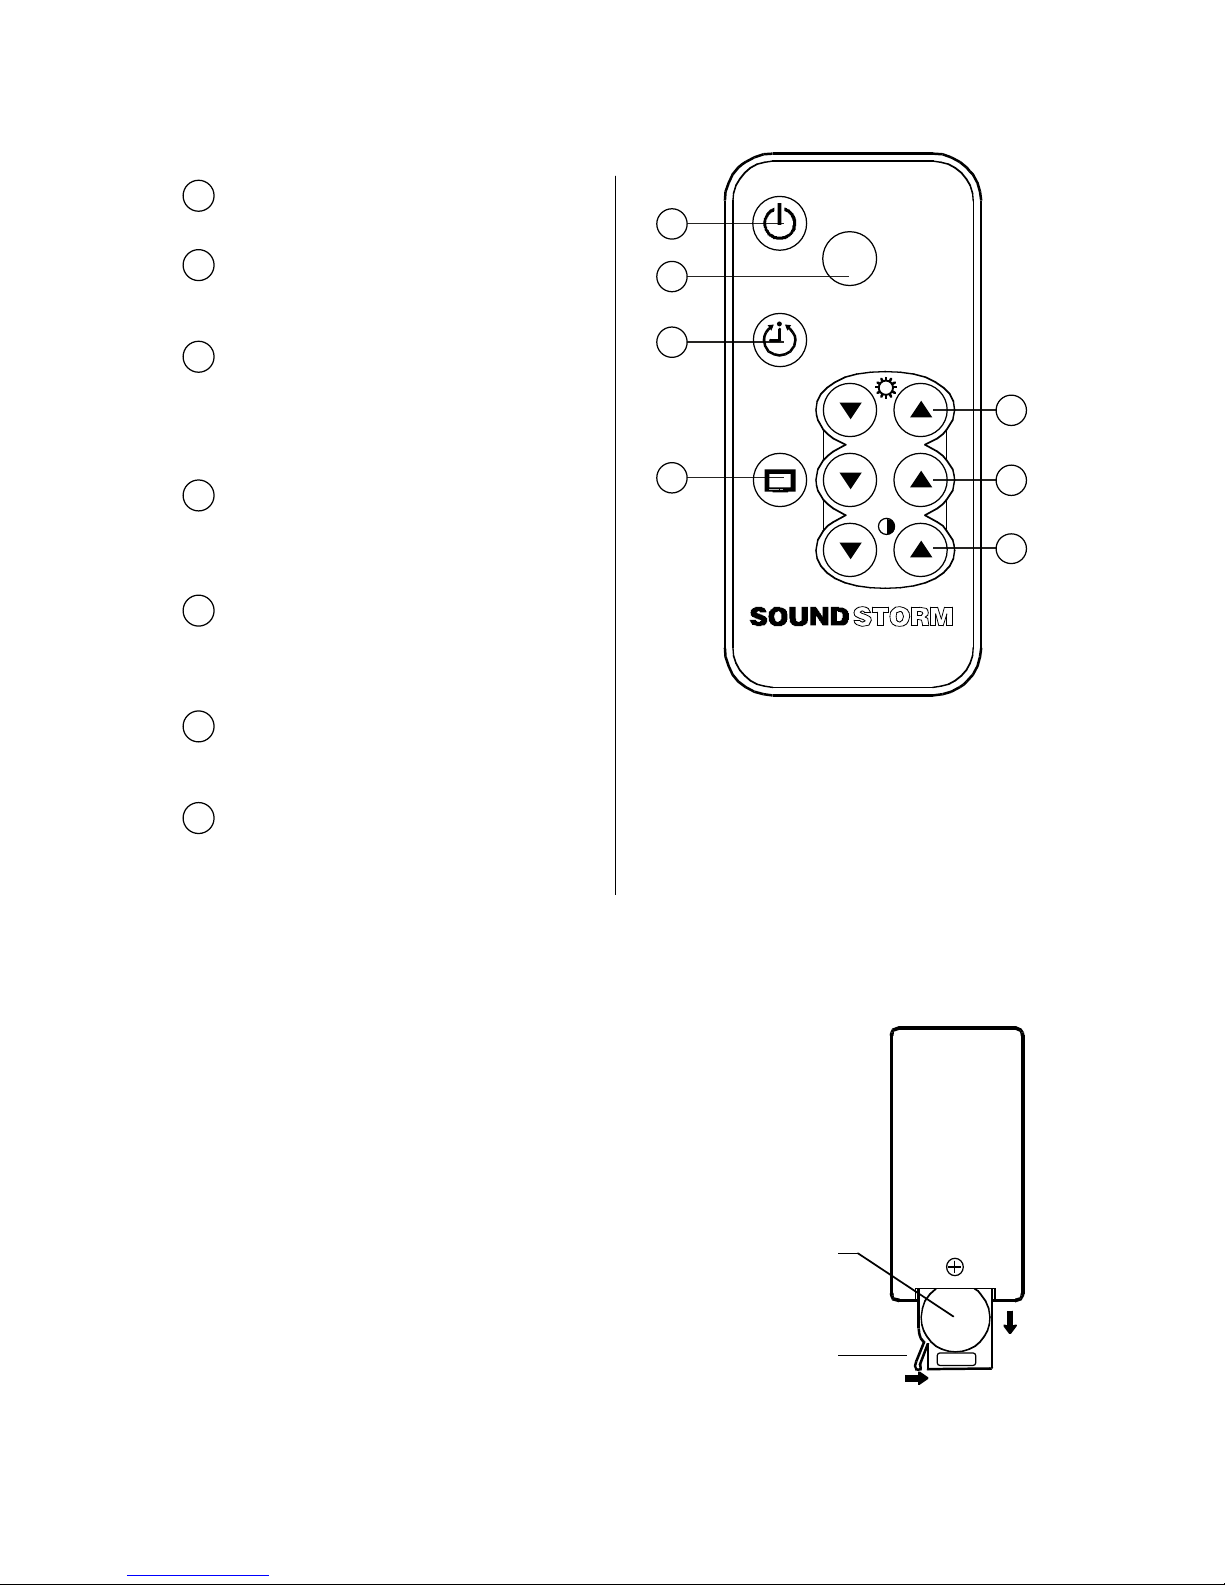
Release button
Battery
The remote battery is held in a small “drawer” on
one edge of the remote. To open this drawer, press
and hold the small button on the edge of this drawer
(as shown below) and slide the drawer out.
Insert a new battery and push the drawer back fully
into the remote.
Changing the battery in the remote control
POWER
Press to turn unit ON or OFF.
1
VIDEO SOURCE SELECT
Pressing this button will switch the
monitor to the other video input source.
2
BRIGHTNESS UP/DOWN
Use these buttons to decrease or
increase the brightness of the
displayed image.
5
COLOR ADJUSTMENT
Use these buttons to adjust the color
of the displayed image.
6
CONTRAST ADJUSTMENT
Use these buttons to decrease or
increase the contrast of the displayed
image.
7
5
6
7
1
3
4
2
3
TIMER
This monitor shuts off automatically
after a certain period of non-use. Use
the time button to change the length
of time required before auto shut-off.
4
PRESET PICTURE
This button returns the monitor to its
factory settings for brightness, color
and contrast.
select
L A B O R A T O R I E S
®
A/V
color
timer
power
preset
picture
!
Page 7
On a towel or soft cloth, gently place the monitor assembly “face down” on a stable
work surface.
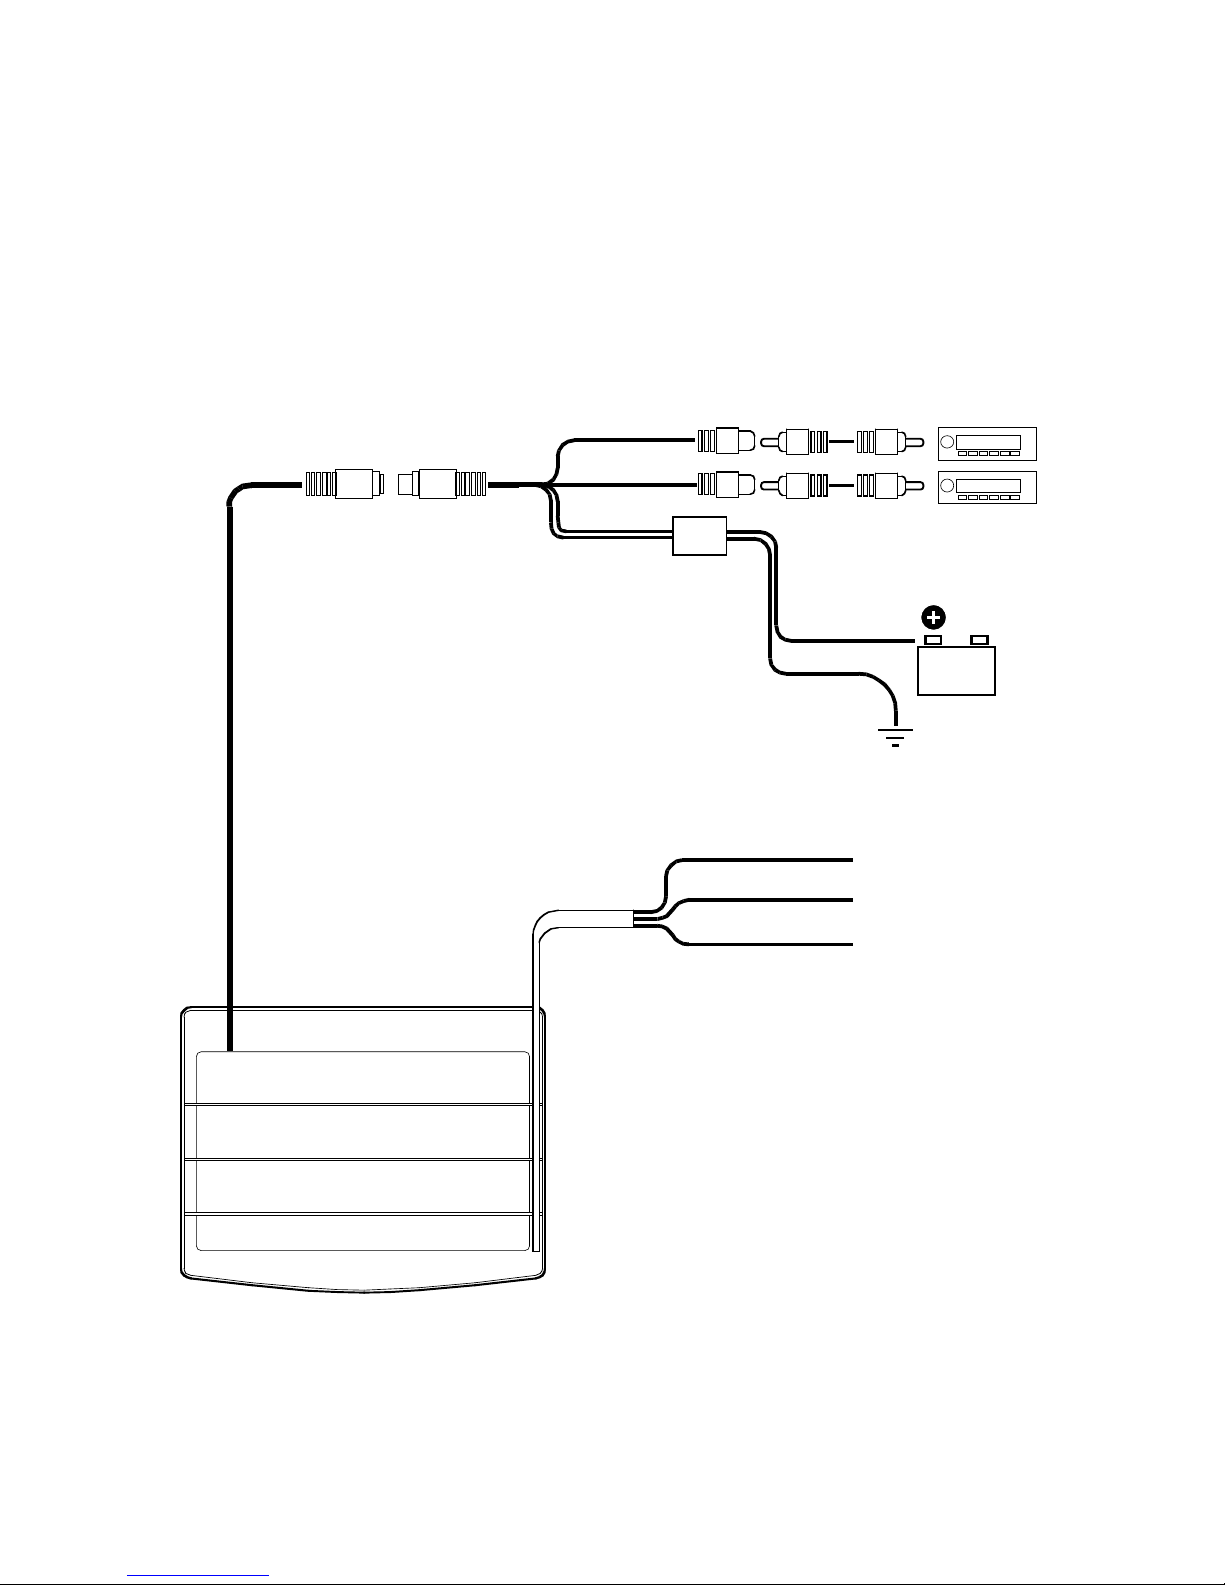
Using the wires provided, complete the audio, video and power connections in
your vehicle as shown in the diagram below.
VIDEO SOURCE 1
(DVD player,
video game, etc.
)
VIDEO SOURCE 2
(DVD player,
video game, etc.
)
RED
BLACK
to Chassis Ground
DOME LIGHTS
SSV10.4F User’s Manual - page 7
System wiring
VIDEO INPUT 1
(YELLOW)
FUSE
BROWN
BLACK
BLUE
to Door Control Line
to +12 VDC Battery
to Chassis Ground
BLACK
VIDEO INPUT 2
(WHITE)
12V
Battery
Page 8
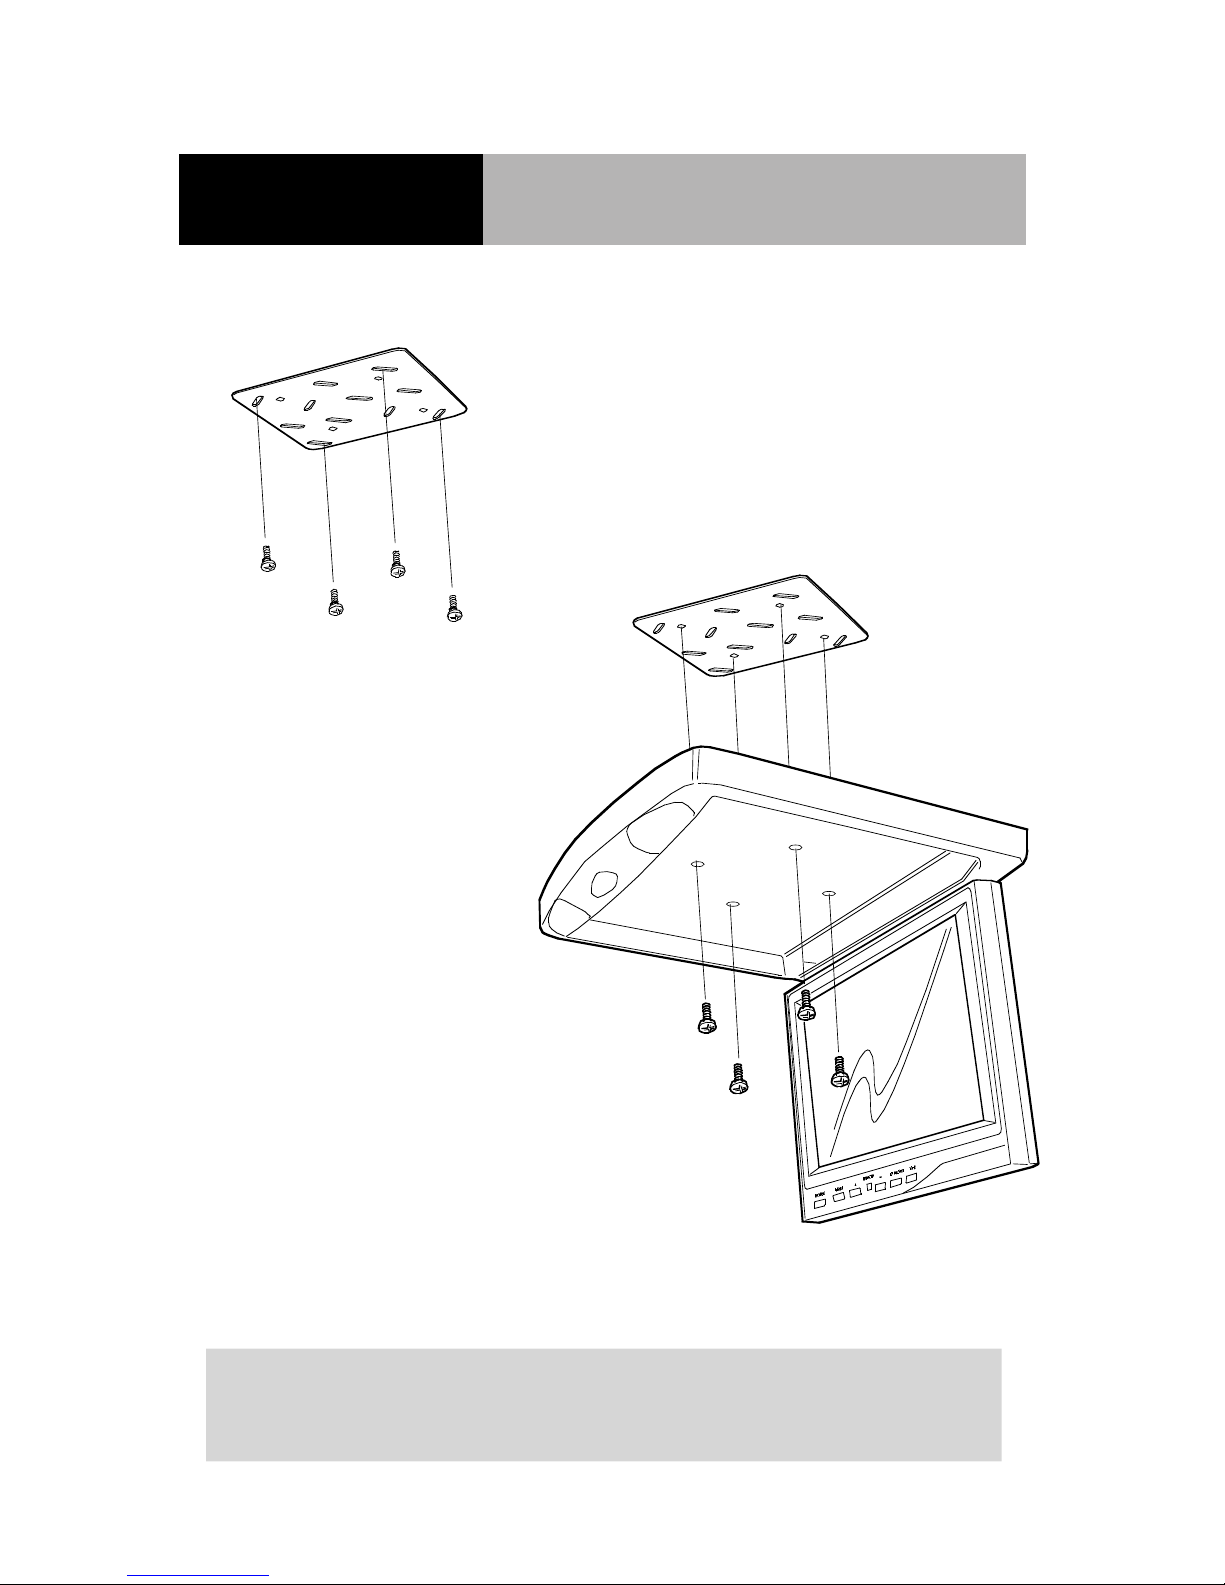
Thread all the wires through the
round hole in the center of the
mounting plate.
Install the monitor onto the
mounting plate, using the four
screws provided.
Using the four black self-tapping
screws provided, attach the monitor
mounting plate by screwing through
the headliner and into the existing
roof supports or the wood bracket
you made (see TIP below).
SSV10.4F User’s Manual - page 8
Monitor installation
INSTALLATION TIP
Make a MOUNTING BRACKET out of wood. This bracket mounts under the headliner,
and provides a mounting surface to which the housing of the flip-down monitor can
be attached.
If you have any doubts about this type of installation, please consult
your local mobile electronics retailer. Making holes in the roof of
your vehicle will cause damage which is expensive to repair.
CAUTION: Make sure the
screws are NOT long enough
to go through the roof!
1/2" black self tapping
sheet metal screws
silver finish
threaded machine
screws
Page 9
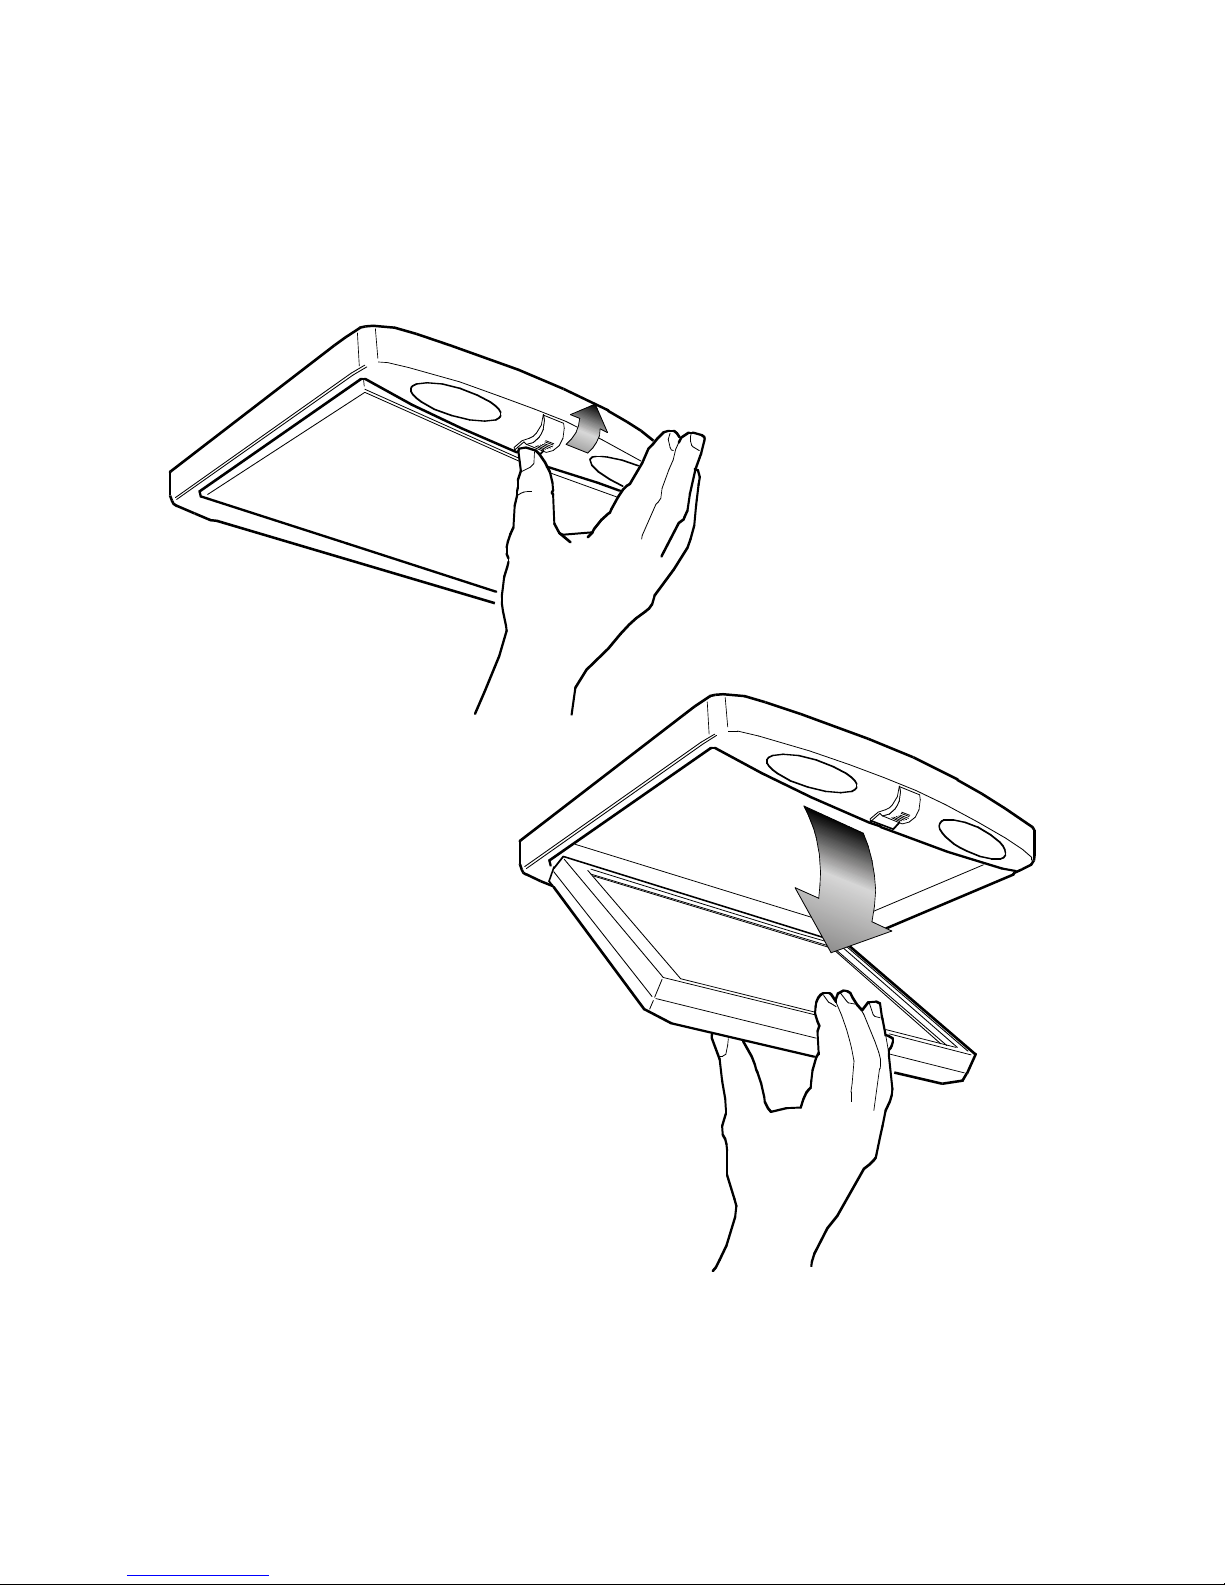
To lower the monitor, press the Monitor Release button and pull the monitor down.
It will drop freely to 45º.
To lower the monitor further, continue pulling down and the internal mechanism
will permit further movement and will hold the monitor in the position in which you
leave it.
To avoid accidental damage, we suggest you always close the monitor assembly
when it is not in use. To do so, rotate the monitor back to a 0º left-to-right position,
and push it up into the monitor base until you hear a “click.” Test that it is secured
by gently pulling down on monitor frame.
SSV10.4F User’s Manual - page 9
Releasing and lowering the monitor
Push the monitor
release button forward
Pull the monitor screen
down to the desired angle
Page 10
To turn the monitor on, press and hold the POWER button for two seconds. When
the power is ON, if an input signal is present, the picture will be displayed on the
screen. If no signal is present, the monitor will display the message "NO SIGNAL."
If you know a video input signal is present but the monitor displays "NO SIGNAL,"
be sure to try pressing the AV SELECT button to see if your input source is connected
to the other AV input.
To adjust the monitor image, press MENU to access the various adjustment controls
such as BRIGHTNESS and CONTRAST. Use the +/- buttons to adjust each parameter
until you are satisfied with the picture quality.
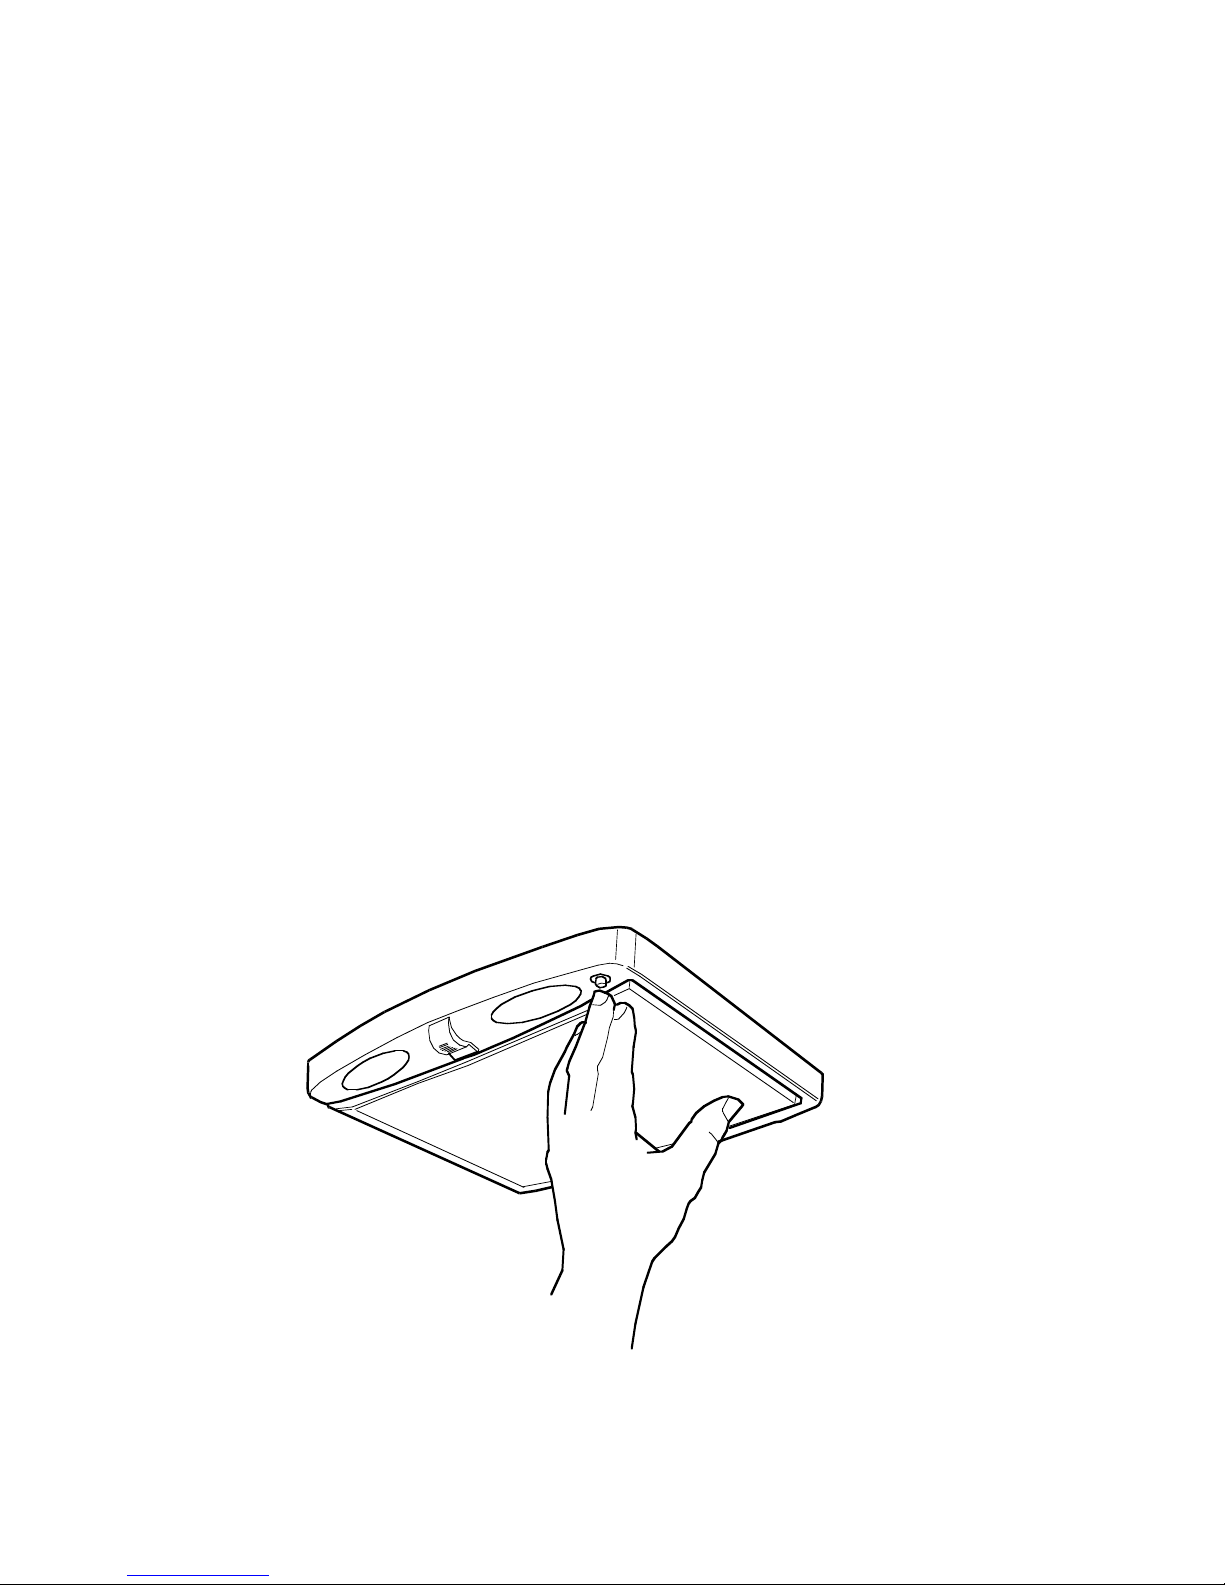
This unit features dual dome lights, which turn on when you open a door. To turn
the dome lights on or off manually, simply press the round button near the right
dome light.
SSV10.4F User’s Manual - page 10
Powering up the monitor
Turning on the dome lights
Page 11

Troubleshooting
SSV10.4F User’s Manual - page 11
If you experience operation or performance problems with this product, compare your
installation with the electrical wiring diagram on the previous page. If problems persist,
read the following troubleshooting tips which may help eliminate the problems.
No picture or
sound.
Power cord is not
properly connected.
A/V input cables not
properly connected.
A/V input source is not
operating properly.
Check that power connections
are properly made and all fuses
are in functioning condition.
Check all cables.
Replace or repair A/V source
(DVD player, video game, etc.)
No picture. A/V signal not present.
Contrast and/or
brightness is set
improperly.
TV reception is poor
(applies to system with TV
tuner only)
Check all cables. If necessary,
repair or replace A/V source.
Adjust contrast and brightness
levels to see if picture appears.
Check and adjust antenna
system. Move to another area
with better reception, if
possible.
Remote control
does not function
properly.
Battery is dead.
Remote is not being used
in direct line-of-sight with
the player or remote IR
sensor. Transmission is
best within 6 feet/35º
angle of IR sensor on the
monitor.
Replace battery.
Be sure when being used, the
remote is being pointed directly
toward the player or remote IR
sensor (if installed).
SYMPTOM CAUSE REMEDY
Page 12
Specifications
SSV10.4F User’s Manual - page 12
A/V SYSTEM
Screen size
Video Compatibility
LCD panel type
Resolution, pixels
Brightness
GENERAL
Operating voltage
Dimensions (L x W x H)
10.4"
NTSC/PAL auto-compatible
Active Matrix TFT
1152 x 234
450 NITS
12V DC
12.5 x 11.4" x 1.5"
SSV10.4F
10.4" Flip Down
TFT Monitor
All specifications subject to change without notice.
MODEL
L A B O R A T O R I E S
®
 Loading...