

Page 1
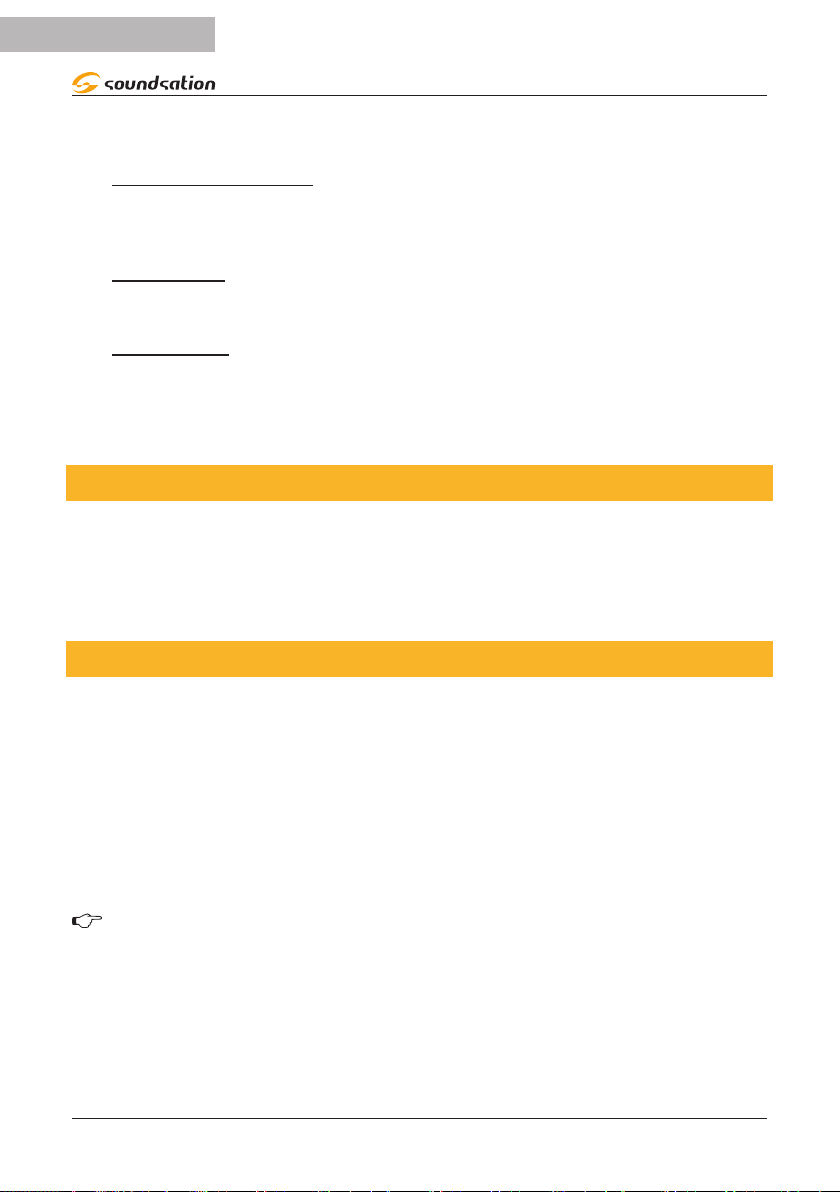
LIGHTBLASTER 102 COB
LED BLINDER
USER MANUAL
Please read this manual carefully and properly take care of it
Page 2

ENGLISH
Dear customer,
First of all thanks far purchasing a SOUNDSATION® product. Our mission is to satisfy
all possible needs of musical instrument and professional audio users offering a wide
range of products using the latest technologies.
We hope you will be satised with this item and, if you want to collaborate, we are
looking for a feedback from you about the operation of the product and possible
improvements to introduce in the next future. Go to our website www.soundsation-
music.com and send an e-mail with your opinion, this will help us to build instruments
ever closer to customer’s real requirements.
One last thing: read this manual before using the instrument, an incorrect operation
can cause damages to you and to the unit. Take care!
The SOUNDSATION Team
2
Page 3

ENGLISH
LIGHTBLASTER 102 COB User manual
TABLE OF CONTENTS
1. INTRODUCTION ......................................................................................................... 6
1.1. UNPACKING .............................................................................................................................................................6
1.2. Accessories ...............................................................................................................................................................7
2. OVERVIEW .................................................................................................................. 7
3. PRODUCT SPECIFICATION ........................................................................................ 7
4. MAINS CONNECTIONS .............................................................................................7
5. DMX CONNECTION ................................................................................................... 8
5.1. DMX Terminator .....................................................................................................................................................8
5.2. 3-Pin vs 5-Pin DMX cables .................................................................................................................................9
6. REAR PANEL .............................................................................................................10
6.1. Control Panel .........................................................................................................................................................10
7. FUNCTION CHART ...................................................................................................11
8. CHANNEL CHART ....................................................................................................12
9. SPECIFICATIONS ......................................................................................................13
10. WARRANTY AND SERVICE ..................................................................................... 14
11. WARNING.................................................................................................................14
3
Page 4

ENGLISH
LIGHTBLASTER 102 COB User manual
IMPORTANT SAFETY SYMBOLS
The symbol is used to indicate that some hazardous live terminals are
involved within this apparatus, even under the normal operating con-
ditions, which may be sufcient to constitute the risk of electric shock
or death.
The symbol is used in the service documentation to indicate that spe-
cic component shall be replaced only by the component specied in
that documentation for safety reasons.
Protective grounding terminal
Alternating current/voltage
Hazardous live terminal
Denotes the apparatus is turned on
Denotes the apparatus is turned off
WARNING:
CAUTION:
0.5m
Describes precautions that should be observed to prevent the danger
of injury or death to the operator.
Describes precautions that should be observed to prevent danger of
the apparatus.
To protect the environment, please try to recycle the packing material
as much as possible
The projector is for indoor use only, IP20. Use only in dry locations.
Keep this device away from rain and moisture, excessive heat, humid-
ity and dust. Do not allow contact with water or any other uids, or
metallic objects.
Don’t throw this product away just as general trash, please deal with
the product follow the abandon electronic product regulation in your
country.
Locate the xture in a well ventilated spot, away from any ammable
materials and/or liquids. The xture must be xed at least 50cm from
surrounding walls
TAKING CARE OF YOUR PRODUCT
f Read these instructions
f Keep these instructions
f Heed all warning
4
Page 5

ENGLISH
LIGHTBLASTER 102 COB User manual
f Follow all instructions
1) Water / Moisture
The apparatus should be protected from moisture and rain and can not be used near
water; for example near a bathtub, a kitchen sink, a swimming pool, etc.
2) Condensation
To avoid condensation to be formed inside, allow this unit to adapt to the surrounding
temperatures when bringing it into a warm room after transport. Condense sometimes
prevents the unit from working at full performance or may even cause damages.
3) Heat
The apparatus should be located away from heat sources such as radiators, stoves or
other appliances that produce heat. Don not use it when maximum ambient temperature is higher than 40°C.
4) Ventilation
Do not block areas of ventilation opening. Failure to do could result in re. Always
install according to the manufacturer’s instructions.
5) Object and Liquid Entry
Objects do not fall into and liquids are not spilled into the inside of the apparatus for
safety.
6) Power Cord and Plug
Protect power cord from being walked on or pinched particularly at plugs, convenience
receptacles, and the point where they exit from the apparatus. Do not defeat the safety
purpose of the polarized or grounding-type plug. A polarized plug has two poles; a
grounding-type plug has two poles and a third grounding terminal. The third prong is
provided for your safety. If the provided plug does not t into your outlet, refer to an
electrician for replacement. Unplug the unit when it is not used for a longer time.
7) Power Supply
In case of external power supply, the apparatus should be connected to the power supply only of the type as marked on the apparatus or described in the manual. Failure to
do could result in damage to the product and possibly the user. Unplug this apparatus
during lightning storms or when unused for long periods of time.
8) Electrical Connection
Always disconnect from the power source before servicing or replacing fuse and be
sure to replace with same fuse size and type. Cut off power before moving, repairing
and cleaning the unit. Improper electrical wiring may invalidate the product warranty.
5
Page 6
ENGLISH
LIGHTBLASTER 102 COB User manual
To avoid electric shock, all xtures must be connected to circuits with a suitable ground.
Do not power on and power off the xture in a short time.
9) DMX connection
When use DMX controller, please make sure that there is no interference sources (e.g.
intercom, high frequency radio waves and radiation source).
10) Cleaning
Clean only with a dry cloth. Do not use any solvents such as benzene or alcohol.
11) Servicing
Do not implement any servicing other than those means described in the manual. Refer
all servicing to qualied service personnel only. Only use accessories/attachments or
parts recommended by the manufacturer.
1. INTRODUCTION
Thank you for purchasing our LIGHTBLASTER 102 COB. Enjoy your new equipment and
make sure to read this manual carefully before operation.
This user manual is made to provide both an overview of controls, as well as information on how to use them.
1.1. UNPACKING
Your LIGHTBLASTER 102 COB was carefully packed to ensure safe transport. Despite
this, we recommend you to carefully examine the package and its contents for any
signs of physical damage, which can occur during transport. Each unit has the following
parts:
f LED Blinder
f Power Cord
f DMX Cable (3 Pins)
f User manual
ATTENTION: Packaging bag is not a toy! Keep out of reach of children!!! Keep in
a safe place the original packaging material for future use.
If anything damaged during transport, notify the shipper immediately and keep the
packing material for inspection. Again, please save the carton and all packing materi-
als. If the xture must be returned to manufacturer, it is important that the xture be
returned in the original manufacturer box and packing. Please do not take any action
without rst contacting us.
6
Page 7

ENGLISH
LIGHTBLASTER 102 COB User manual
1.2. Accessories
SOUNDSATION can supply a wide range of quality accessories that you can use with
your SPIRE Series moving head, like Cables, Splitters, DMX controllers, and a wide range
of other xtures.
All products in our catalogue has been long tested with this device, so we recommend
you to use Genuine SOUNDSATION Accessories and Parts.
Ask your SOUNDSATION dealer or check out our website www.soundsationmusic.com
for any accessories you could need to ensure best performance of the product.
2. OVERVIEW
Lightblaster LED blinders series combines the benets of LED technology (energy saving, reliability and durability over time) with lighting requirements in the photographic,
television and stage industry. The design is very essential and functional; the chassis
is completely metal to facilitate the cooling of light sources. Programming and setting
are extremely simple, and DMX512 allows these blinders to be remote controlled. All
PARs are equipped with color temperature regulation system, which allows you to mix
cold and warm white (3200 - 6500K) depending on your needs. The advanced cooling
system reduces fan noise according to the internal temperature and allows them to be
used even in situations where low noise is required. The advanced dimmer system pro-
vides various adjustment curves to t the device to different requirements. Finally, the
absence of icker and dithering allows the use in television studios. The xtures come
with 100W COB LEDs (50W CW + 50W WW) with high brightness and durability
3. PRODUCT SPECIFICATION
f 2x100W COB LED (50W Cold White + 50W Warm White)
f Color Temperature: 3200-6500K with mixing regulation
f Light Intensity: 11600 Lux @1m
f Advanced Dimmer System with different Variation Curves
f Long life span (50000 - 100000 hours)
f 60° Lens Angle
f No icker, No dithering, No Jitter
f Advanced cooling system for fan noise reduction
4. MAINS CONNECTIONS
Connect the device to the mains with the supplied power cable. Please note that power
voltage and frequency are the same as the marked voltage and frequency of device
7
Page 8

ENGLISH
LIGHTBLASTER 102 COB User manual
when connecting power. Wire correspondence is as follows:
Cable (EU) Pin International
Brown Live L
Blue Neutral N
Yellow/Green Earth
The earth must to be connected! Pay attention to the safety! Before taking
into operation for the rst time, the installation has to be approved by an
expert.
5. DMX CONNECTION
DMX xtures are designed to receive data through a serial Daisy Chain. A Daisy Chain
connection is where the DATA OUT of one xture connects to the DATA IN of the next
xture. The order in which the xtures are connected is not important and has no effect
on how a controller communicates to each xture. Use an order that provides for the
easiest and most direct cabling.
DMX Termonator
DMX use of 3-Pin XLR Connectors
OUTPUTINPUT
DMX 512
Unit 1 Unit 2 Last Unit
3-Pin XLR
Pin 1: GND
Pin 2: DMX Pin 3: DMX +
Connect xtures using shielded 2-conductor twisted pair cable with 3-pin XLR male to
female connectors. The shield connection is pin 1, while pin 2 is Data Negative (S-), and
pin 3 is Data positive (S+).
CAUTION: Wires must not come into contact with each other; otherwise the
xtures will not work at all, or will not work properly.
5.1. DMX Terminator
DMX is a resilient communication protocol, however errors still occasionally occur.
In order to prevent electrical noise from disturbing and corrupting the DMX control
signals, a good habit is to connect DMX output of last xture in the chain to a DMX
terminator, especially over long signal cable runs.
The DMX terminator is simply an XLR connector with a 120Ω (ohm), 1/4 Watt resistor
connected across Signal (-) and Signal (+), respectively, pins 2 and 3, which is then
8
Page 9

ENGLISH
DMX Terminator
LIGHTBLASTER 102 COB User manual
plugged into the output socket on last projector in the chain. The connections are
illustrated below.
120ohm, 1/4 W
resistor
Complimentary signal cable can transmits signals to 20 unit xtures at most.
Signal amplier is a must to connect more xtures.
5.2. 3-Pin vs 5-Pin DMX cables
DMX connection protocols used by controllers and xtures manufacturers are not standardized around the world. However, two are the most common standards: 5-Pin XLR
and 3-Pin XLR system. If you wish to connect MOOD 185 WASH to a 5-Pin XLR input
xture, you need to use an adapter-cable or make it by yourself.
Following the wiring correspondence between 3-Pin and 5-Pin plug and socket standards
5-Pins XLR (socket)
Pin 1: GND (Screen)
Pin 2: Signal (-)
Pin 3: Signal (+)
Pin 4: N/C
Pin 5: N/C
3-Pins XLR (socket)
Pin 1: GND (Screen)
Pin 2: Signal (-)
Pin 3: Signal (+)
3-Pins XLR (plug)
Pin 1: GND (Screen)
Pin 2: Signal (-)
Pin 3: Signal (+)
5-Pins XLR (plug)
Pin 1: GND (Screen)
Pin 2: Signal (-)
Pin 3: Signal (+)
Pin 4: N/C
Pin 5: N/C
9
Page 10

ENGLISH
5
6. REAR PANEL
LIGHTBLASTER 102 COB User manual
DMX OUT
4
5
DMX IN
6
MENU UP DOWN ENTER
F
POWER OUT
POWER IN
RoHS
3
2
1
FUSE
LIGHTBLASTER 102 COB
1) Fuse
2) POWER IN
3) POWER OUT
4) DMX Output 3 PINs
5) DMX INPUT 3 PINS
6) CONTROL PANEL (For further details see “6.1 Control Panel” on page 10)
6.1. Control Panel
1
MENU UP DOWN ENTER
2 3
1) Menu Button
This button allows to scroll all the device’s functions.
10
4
Page 11

ENGLISH
LIGHTBLASTER 102 COB User manual
2) UP Button
Using this button, it is possible to increase the function’s value
3) DOWN Button
Using this button, it is possible to decrease the function’s value
4) ENTER Button
This button allows to save a new function’s value and it shows also the operative temperature
5) 4 x 7 SEGMENTS display
It shows the current function’s name or function’s value
7. FUNCTION CHART
N°
1 8 channel address codes, (001—512)
2 4 channel address codes, (001—512)
3
4
5
6 Voice control change
7
8
9
10 W Shade selection, (000—255)
FUNCTION
NAME
DESCRIPTION
Jump change 1, (01—99)
Jump change speed
Jump change 2, (01—99)
Group change speed
Gradual change, (01—99)
Pulse\Gradual change speed
R Shade selection, (000—255)
(NOT ACTIVE IN THIS MODEL)
G Shade selection, (000—255)
(NOT ACTIVE IN THIS MODEL)
B Shade selection, (000—255)
(NOT ACTIVE IN THIS MODEL)
11
Page 12

ENGLISH
8. CHANNEL CHART
DIMMER W - From dark to bright (0% ≤ value ≤ 100%) CH1
Strobe: from slow to fast CH2
LIGHTBLASTER 102 COB User manual
FUNCTION 8CH 4CH
Function select: 0-51 no use, 51-100 jump change, 101-160
jump change,161-240 gradual change, 241-255 voice control
Function speed: from slow to fast CH4
R Dimmer: from dark to bright (NOT ACTIVE IN THIS MODEL) CH5 CH1
G Dimmer: from dark to bright (NOT ACTIVE IN THIS MODEL) CH6 CH2
B Dimmer: from dark to bright (NOT ACTIVE IN THIS MODEL) CH7 CH3
DIMMER W- From dark to bright (0% ≤ value ≤ 100%) CH8 CH4
CH3
12
Page 13

LIGHTBLASTER 102 COB User manual
9. SPECIFICATIONS
Voltage 110V ~ 240V 50-60HZ
Electrical
Light Source
Control Mode
Light Body Material Aluminum
Optical system Lens Angle 60 °
Strobe 1-10t/s
Dimmer frequency 1000Hz
Driver electric current 700mA
Physical
Environment & safety
Power consumption 200W
Fuse
LED 100WX2PCS
Color 3200-6500K
DMX512 8/4CH OPTIONAL
Master/slave
Manual control
Sound Active
Auto
Light size (WxHxD) 370 x 180 x 190 mm
Net weight 4,5Kg
Stock Dry Place
Min working temperature –20°C
Max working temperature 40°C
5A 250V fast blow 20mm glass
ENGLISH
13
Page 14

ENGLISH
LIGHTBLASTER 102 COB User manual
10. WARRANTY AND SERVICE
All SOUNDSATION products feature a limited two-year warranty. This two-year warranty is specic
to the date of purchase as shown on your purchase receipt.
The following cases/components are not covered from the above warranty:
• Any accessories supplied with the product
• Improper use
• Fault due to wear and tear
• Any modication of the product effected by the user or a third party
SOUNDSATION shall satisfy the warranty obligations by remedying any material or manufacturing
faults free of charge at SOUNDSATION’s discretion either by repair or by exchanging individual
parts or the entire appliance. Any defective parts removed from a product during the course of a
warranty claim shall become the property of SOUNDSATION.
While under warranty period, defective products may be returned to your local SOUNDSATION
dealer together with original proof of purchase. To avoid any damages in transit, please use the
original packaging if available. Alternatively you can send the product to SOUNDSATION SERVICE
CENTER – Via Enzo Ferrari , 10 – 62017 Porto Recanati - Italy . In order to send a product to service
center you need an RMA number. Shipping charges have to be covered by the owner of the product.
For further information please visit www.soundsationmusic.com
11. WARNING
PLEASE READ CAREFULLY – EU and EEA (Norway, Iceland and Liechtenstein) only
This symbol indicates that this product is not to be disposed of with your household waste, according to the WEEE Directive (2202/96/EC) and your national law.
This product should be handed over to a designated collection point, e.g., on an authorized onefor-one basis when you buy a new similar product or to an authorized collection site for recycling
waste electrical and electronic equipment (WEEE).
Improper handling of this type of waste could have a possible negative impact on the environment
and human health due to potentially hazardous substances that are generally associated with EEE.
At the same time, your cooperation in the correct disposal of this product will contribute to the
effective usage of natural resources.
For more information about where you can drop off your waste equipment for recycling, please
contact your local city ofce, waste authority, approved WEEE scheme or your household waste
disposal service.
14
Page 15

FRENEXPORT SPA – Via Enzo Ferrari, 10 - 62017 Porto Recanati - Italy
This product is imported in EU by
www.soundsationmusic.com
Soundsation® is a registered trademark of FRENEXPORT SPA - Italy
Page 16

www.soundsationmusic.com
Ver 1.1 - Mar. 2018
 Loading...