

Page 1

HYPER PLAY 6AMW
Portable Pa Systems with UHF Wireless MIC,
MP3/Bluetooth, and Battery
USER MANUAL
MANUALE UTENTE
Please read this manual carefully and properly take care of it
Leggete questo manuale e conservatelo per future consultazioni
Page 2

Dear customer,
First of all thanks far purchasing a SOUNDSATION® product. Our mission is to satisfy
all possible needs of musical instrument and professional audio users offering a wide
range of products using the latest technologies.
We hope you will be satised with this item and, if you want to collaborate, we are
looking for a feedback from you about the operation of the product and possible
improvements to introduce in the next future. Go to our website www.soundsation-
music.com and send an e-mail with your opinion, this will help us to build instruments
ever closer to customer’s real requirements.
One last thing: read this manual before using the instrument, an incorrect operation
can cause damages to you and to the unit. Take care!
The SOUNDSATION Team
Gentile Cliente,
Grazie per aver scelto un prodotto SOUNDSATION®. La nostra missione è quella di
offrire ai nostri utenti una vasta gamma di strumenti musicali ed apparecchiature audio
e lighting con tecnologie di ultima generazione.
Speriamo di aver soddisfatto le vostre aspettative e, se voleste collaborare, saremmo
lieti di ricevere un vostro feedback sulla qualità del prodotto al ne di migliorare costantemente la nostra produzione. Visitate il nostro sito www.soundsationmusic.com ed
inviateci una mail con la vostra opinione, questo ci aiuterà a sviluppare nuovi prodotti
quanto più vicini alle vostre esigenze.
Un’ultima cosa, leggete il presente manuale al ne di evitare danni alla persona ed al
prodotto, derivanti da un utilizzo non corretto.
Il Team SOUNDSATION
Page 3

ENGLISH
TABLE OF CONTENTS
1. BEFORE YOU START ...................................................................................................6
1.1. Unpacking .................................................................................................................................................................6
1.2. Getting Started .......................................................................................................................................................6
2. OVERVIEW .................................................................................................................. 6
2.1. Main Features ..........................................................................................................................................................7
3. Audio Connections .................................................................................................... 7
4. REAR PANEL FUNCTIONS .........................................................................................8
4.1. Mixer Controls .........................................................................................................................................................8
4.2. Digital Media Player Control Panel ...............................................................................................................10
4.3. Using USB Flash drives and SD-Cards .........................................................................................................11
4.4. UHF Wireless Receiver Control Panel ...........................................................................................................11
4.5. Remote Control ....................................................................................................................................................12
4.6. Using the Bluetooth™ Connection ................................................................................................................12
5. UHF WIRELESS MICROPHONE ...............................................................................13
6. RECHARGEABLE BATTERY ......................................................................................14
6.1. Battery Replacement ..........................................................................................................................................14
6.2. Charging the Battery ..........................................................................................................................................15
6.3. Battery safety and disposal instructions .....................................................................................................16
7. SPECIFICATIONS ......................................................................................................18
8. CERTIFICATE OF CONFORMITY .............................................................................. 19
9. WARRANTY AND SERVICE .....................................................................................20
10. WARNING.................................................................................................................20
3
Page 4
ENGLISH
HYPER PLAY 6AMW User manual
IMPORTANT SAFETY SYMBOLS
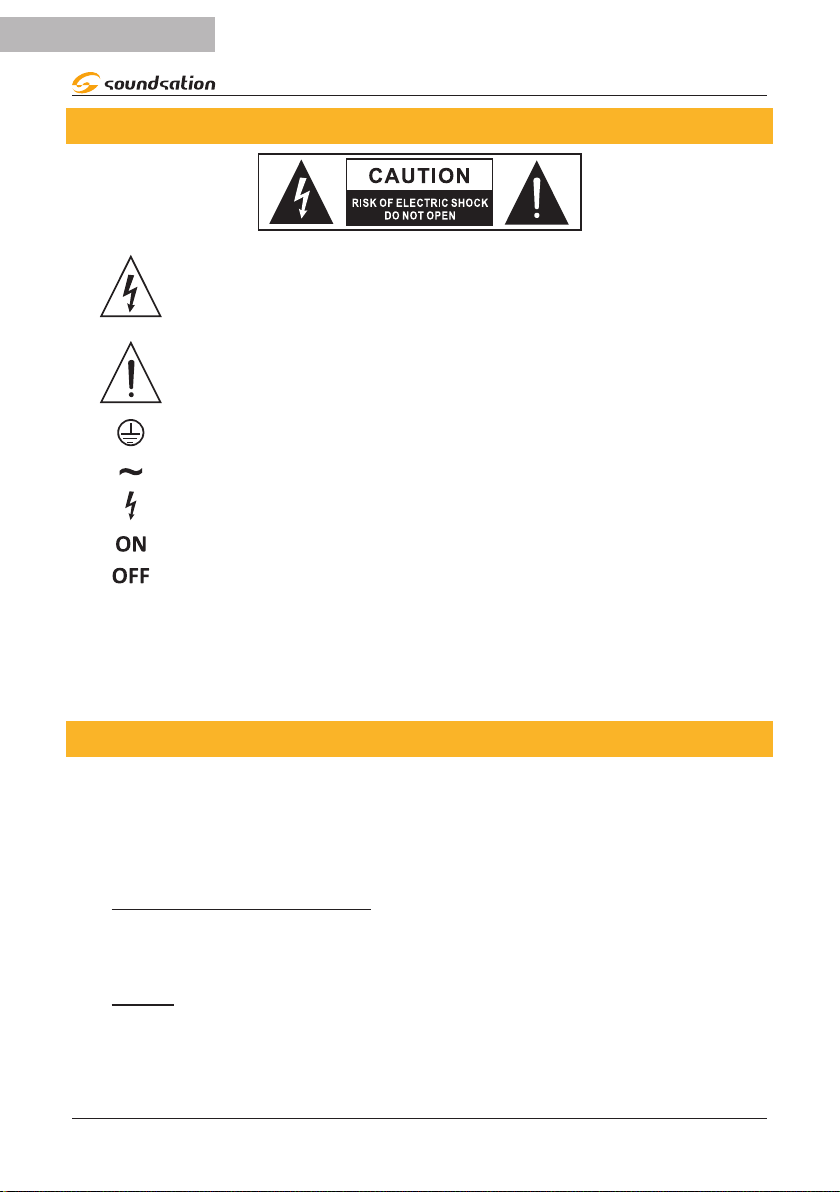
The symbol is used to indicate that some hazardous live terminals are
involved within this apparatus, even under the normal operating con-
ditions, which may be sufcient to constitute the risk of electric shock
or death.
The symbol is used in the service documentation to indicate that spe-
cic component shall be replaced only by the component specied in
that documentation for safety reasons.
Protective grounding terminal
Alternating current/voltage
Hazardous live terminal
Denotes the apparatus is turned on
Denotes the apparatus is turned off
WARNING:
CAUTION:
Describes precautions that should be observed to prevent the danger
of injury or death to the operator.
Describes precautions that should be observed to prevent danger of
the apparatus.
IMPORTANT SAFETY INSTRUCTIONS
f Read these instructions
f Keep these instructions
f Heed all warning
f Follow all instructions
1) Water and Moisture
The apparatus should be protected from moisture and rain and can not be used near
water; for example near a bathtub, a kitchen sink, a swimming pool, etc.
2) Heat
The apparatus should be located away from heat sources such as radiators, stoves or
other appliances that produce heat.
4
Page 5
ENGLISH
HYPER PLAY 6AMW User manual
3) Ventilation
Do not block areas of ventilation opening. Failure to do could result in re. Always
install according to the manufacturer's instructions.
4) Object and Liquid Entry
Objects do not fall into and liquids are not spilled into the inside of the apparatus for
safety.
5) Power Cord and Plug
Protect the power cord from being walked on or pinched particularly at plugs, convenience receptacles, and the point where they exit from the apparatus. Do not defeat
the safety purpose of the polarized or grounding-type plug. A polarized plug has two
poles; a grounding-type plug has two poles and a third grounding terminal. The third
prong is provided for your safety. If the provided plug does not t into your outlet, refer
to an electrician for replacement.
6) Power Supply
The apparatus should be connected to the power supply only of the type as marked on
the apparatus or described in the manual. Failure to do could result in damage to the
product and possibly the user. Unplug this apparatus during lightning storms or when
unused for long periods of time.
7) Fuse
To prevent the risk of re and damaging the unit, please use only of the recommended fuse type as described in the manual. Before replacing the fuse, make sure the unit
turned off and disconnected from the AC outlet.
8) Electrical Connection
Improper electrical wiring may invalidate the product warranty.
9) Cleaning
Clean only with a dry cloth. Do not use any solvents such as benzol or alcohol.
10) Servicing
Do not implement any servicing other than those means described in the manual. Refer
all servicing to qualied service personnel only. Only use accessories/attachments or
parts recommended by the manufacturer.
WARNING: Please remember the high sound pressure do not only temporar-
ily damage your sense of hearing, but can also cause permanent damage. Be
careful to select a suitable volume.
5
Page 6

ENGLISH
HYPER PLAY 6AMW User manual
1. BEFORE YOU START
1.1. Unpacking
Thank you for purchasing HYPER PLAY 6AMW Series portable PA systems. Each unit
has been well tested and shipped in perfect operating conditions. Carefully unpack the
carton and check the contents to ensure that all parts are present and in good conditions:
f 1 Loudspeaker
f 1 Handheld Wireless Microphone
f 1 Remote Control
f 1 Power Adapter
f 1 Padded Cover
f This User manual
If anything damaged during transport, notify the shipper immediately and keep packing material for inspection. Again, please save its carton and all packing materials. If the
unit must be returned to the manufacturer, it is important that the unit is returned in
the original manufacturer’s packing. Please do not take any action without rst contacting us.
1.2. Getting Started
HYPER PLAY 6AMW Series portable PA systems are part of a wider range of SOUNDSATION Pro Audio product line. These active speakers are compact, light weight and very
easy to use. They are ideal for any live music purpose. Make sure there is enough space
around the unit for proper ventilation and prevent overheating; do not place the unit
on top of hot devices such as radiators or power ampliers. The speaker is connected
to mains through the supplied power adapter. The product meets the required safety
standards.
Our products are subject to a continuous process of further development. Therefore
modications to the technical features remain subject to change without further notice.
2. OVERVIEW
HYPER PLAY 6AMW is a new battery-powered portable loudspeaker with 6,5” woofers.
HYPER PLAY 6AMW in addition to MP3 player, USB, SD-card, and Bluetooth™ connection of MULTIMEDIA version, integrate a UHF wireless microphones with handheld
transmitter and a 2-band graphic EQ.
HYPER PLAY 6AMW is AC or battery operated with a duration of about 5 hours and the
Built-in Class-D ampliers deliver 150W Program Power. The stylish polypropylene en-
6
Page 7

ENGLISH
HYPER PLAY 6AMW User manual
closure is strong and lightweight, with metallic grille, and 36mm standard pole mount
hole.
2.1. Main Features
f Portable 2-Way Active Speaker with Rechargeable Battery
f Sturdy polypropylene enclosure yet compact and lightweight
f 300W* Peak Power Class-D power amplier
f 6,5” woofer with 1” compression driver
f MP3 player with USB, SD Card and Bluetooth™
f UHF Handheld Wireless Microphone
f 2 Microphone/Line inputs
f 1 Stereo Input (Mini Jack /RCA)
f 2-Band Graphic EQ
f Lead Rechargeable Battery with 5-hour battery life
f 36 mm standard pole mount
f Handle on top
* Peak Power, AC powered
3. Audio Connections
You will need several cables for the various connections TO and FROM the speaker. See
the pictures below that show the internal wiring of these cables. Be sure to use only
high quality cables.
Use commercial RCA cables to wire stereo unbalanced sources with RCA output connectors to stereo RCA Line inputs of HYPER PLAY 6AMW unit.
You can, of course, also connect balanced equipment to unbalanced inputs. Use either
mono and stereo jack, making sure ring and collar are connected together (or pins 1 &
3 in the case of XLR connectors).
Balanced use of 1/4” jack TRS connector
Unbalanced use of 1/4” jack TS connector
Strain relief
clamp
Sleeve
Sleeve
Ground shield
Tip
Tip
Signal
/ Headphones connection with 1/4” TRS
connector
Strain relief
clamp
Sleeve
Ring
Tip
Sleeve
Ground shield
Ring
Cold (- Ve)
Tip
Hot (+ Ve)
7
Page 8
ENGLISH
HYPER PLAY 6AMW User manual
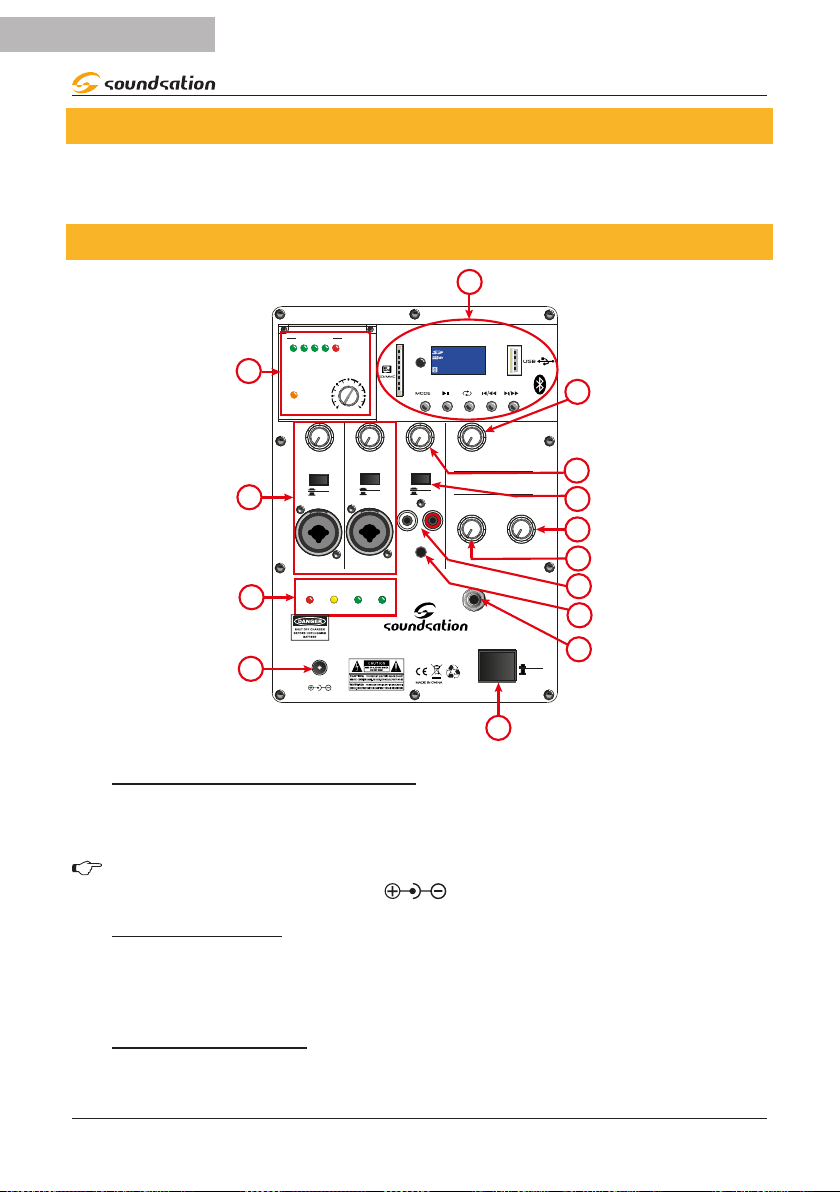
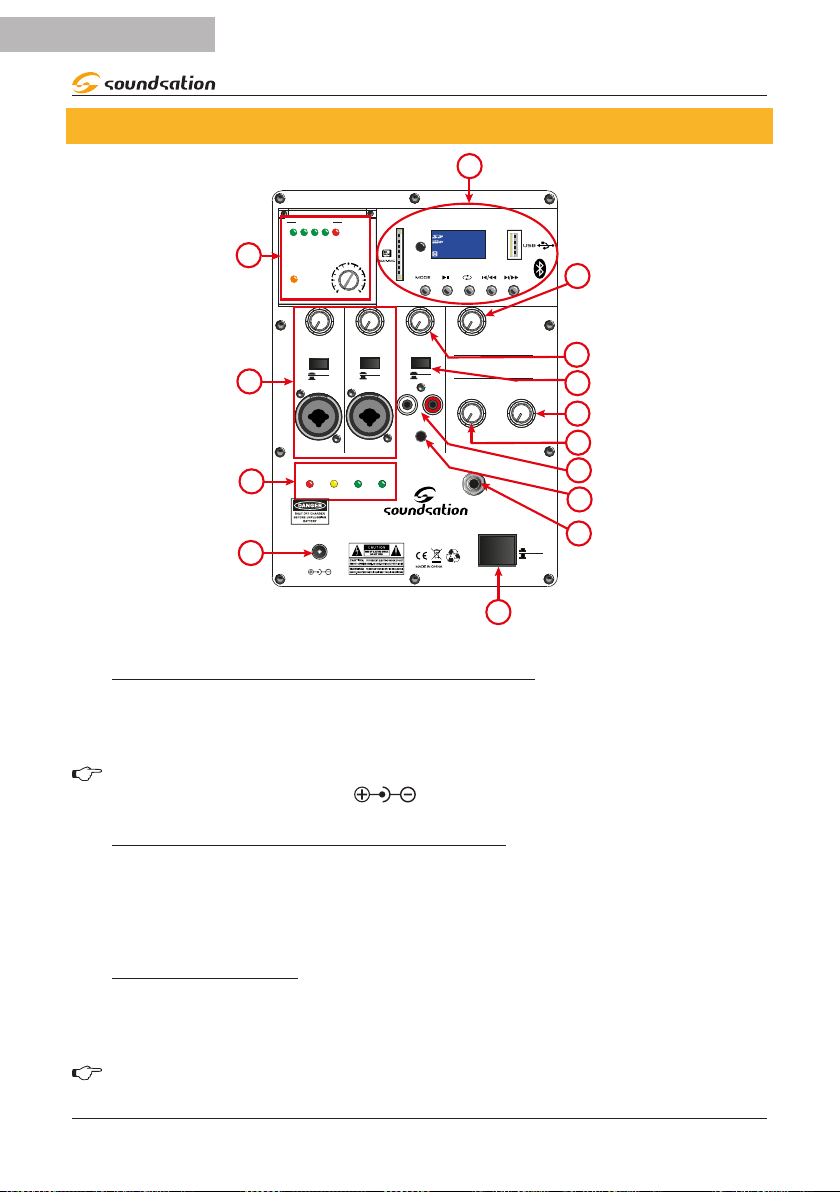
4. REAR PANEL FUNCTIONS
HYPER PLAY 6AMW active loudspeaker have several connectors, controls, and indicators the use of which you should understand their use.
4.1. Mixer Controls
11
DIGITAL MEDIA PLAYER
FM
00:00
MASTER
MP3
MIC IN
LINE
LINE
CH 2
HYPER PLAY 6AMW
TREBLE
RL
CH 3
MHz
REP
100 100
MIX OUT
BASS
POWER
ON
OFF
10
9
8
7
6
5
4
3
12
13
14
1
AF LEVEL
-30 -20 -10 0 3dBu
UHF WiRELESS RECEIVER
RF
POWER-VOL
OFF 15
100 100 100 100
LEVEL LEVEL LEVEL
MIC IN
LINE
CH 1
BATTERY STATUS
25% 50% 75% 100%
+19V DC IN
2
1) AC ADAPTER Connection
Connect the device to the supplied power adapter, and then to a mains outlet. Be sure
that mains voltage correspond to the adapter input voltage (within 110-240VAC).
NOTE: Should you need to replace or lose this adapter, be sure that the new
one’s output is +19V DC, 3.42A, (with internal positive)
2) POWER Switch
Press this switch to turn the speaker ON/OFF. When the speaker is ON the switch is in
low position otherwise it is in high position to indicate that the System is OFF. Make
sure MASTER LEVEL control is down before you turn it ON.
3) MIX OUT SOCKET
It is a MONO Output with unbalanced line-level signal. It contains the mix of all inputs
and all controls. It can be used for recording purposes or simply to connect the HYPER
8
Page 9

ENGLISH
HYPER PLAY 6AMW User manual
PLAY 6AMW system to a mixer o any other audio system.
NOTE: This output is not affected by MASTER LEVEL and 2-Band EQ (TREBLE
/ BASS).
4) MINI-JACK Stereo Input
This stereo mini-jack plug can be used to connect mobile phones, tablets, computers,
etc. Please use knob number 9 to adjust its level.
5) RCA STEREO Input
These are unbalanced RCA pin jacks that can be used to connect any external stereo
device such as Mp3 Player, CD player, Mixer, Etc. Please use knob number 9 to adjust
its level.
NOTE: The Mini Jack and RCA stereo inputs can not be used at the same time
6) TREBLE KNOB
Using this knob it is possible to adjusts the higher frequency sounds.
7) BASS KNOB
Using this knob it is possible to adjusts the lower frequency sounds.
8) LINE / MP3 Selection
This switch toggles between the stereo mini-jack (4) or stereo RCA (5) connectors and
the multimedia player (11), whose level is adjusted by knob n. 9.
9) LINE/MP3 LEVEL
This knob controls the overall signal level of stereo mini-jack (4) or stereo RCA (5) and
MP3/Bluetooth™ player (11).
10) Master LEVEL
This knob controls the overall level of the speaker.
11) Digital MEDIA player
This panel controls all functions related to the multi-player and hosts the Bluetooth™
receiver as well as USB and SD-Card slots. For further information about how to use it,
see “4.2. Digital Media Player Control Panel” on page 10.
12) UHF Wireless RECEIVER
This portable PA system features a wireless microphone for maximum mobility during
your performances. For further information about how to use it, see “4.2. Digital Media
Player Control Panel” on page 1012.
9
Page 10

ENGLISH
HYPER PLAY 6AMW User manual
13) MIC/LINE INPUTS AND CONTROLS
HYPER PLAY 6AMW has 2 Mic/Line Inputs and in this panel section it is possible to
control their level using the appropriate knobs and select the input type
The inputs accept balanced XLR or balanced/unbalanced 1/4” Jack plugs with Mic or
Line level signals. There is no phantom power so, in case of microphones, please be advised the you can use all kind of dynamic microphones, or use condenser microphones
with their own battery power.
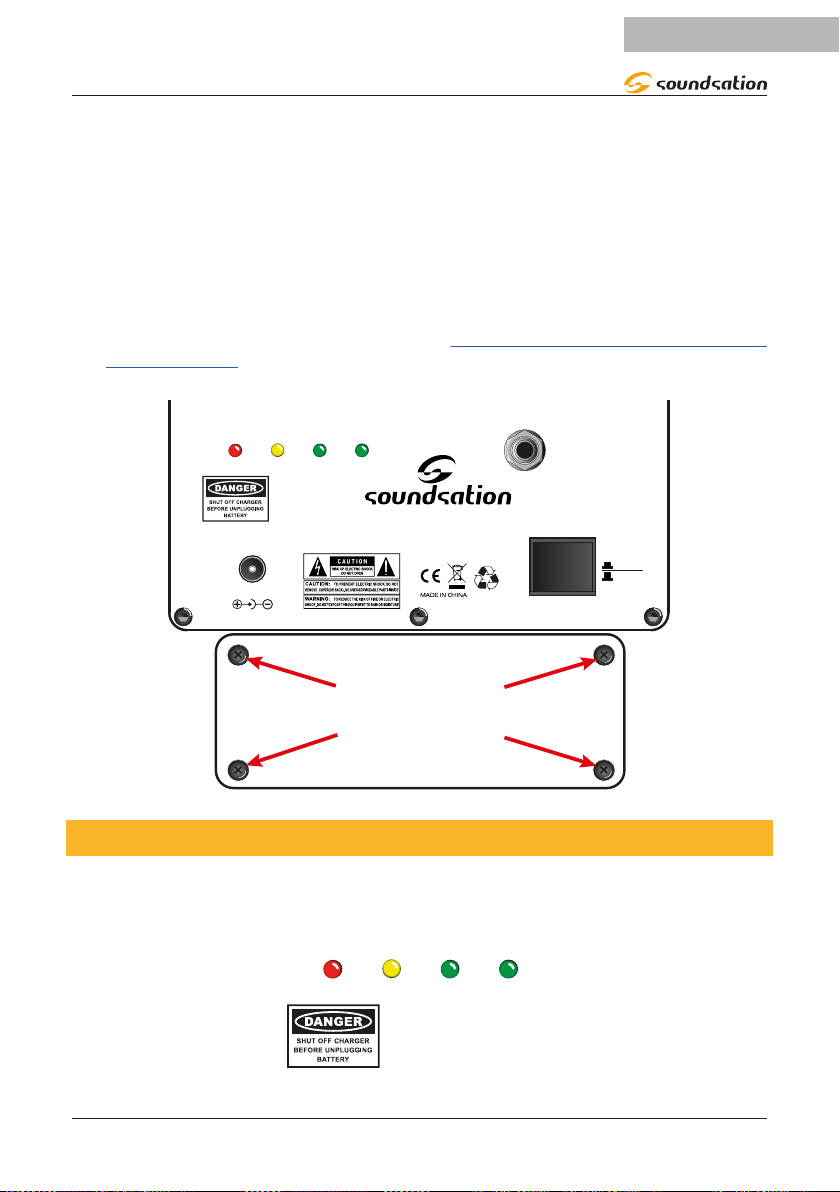
14) Battery CHARGE And Level Status
When you connect the adapter, you can check battery charge (even without switching
the unit on) basing on how many of the four LEDs are on. When charge level is below
25%, the red LED ashes and indicates that you need to re-charge the battery as soon
as possible. For further details battery and charge function, please refer to “6. RECHARGEABLE BATTERY” on page 14.
4.2. Digital Media Player Control Panel
3
DIGITAL MEDIA PLAYER
4
2
FM
00:00
MHz
REP
1
5 6 7 8 9
HYPER PLAY 6AMW feature a multimedia player that allows you to use this speaker even
without audio sources or cables: just connect your smartphone or tablet via Bluetooth™
and that’s it. There is also a slot for SD-Cards and a USB plug to connect your devices.
The reader accepts audio streaming in any format via Bluetooth™. In the case of SD-
Cards and USB devices, it plays audio les in MP3 (up to 320kbps) and WAV (44.1kHz
- 16bit).
1. USB Type-A plug: lets you to read USB drives in MS-DOS® format
2. LCD display
3. Remote control sensor: allows the speaker to be controlled by the supplied remote
control. Fur details see “4.5. Remote Control” on page 12.
10
Page 11
ENGLISH
HYPER PLAY 6AMW User manual
4. SD-Card slot: allows you to read SD-Cards in MS-DOS® format.
5. MODE button: by pressing repeatedly, it switches among Bluetooth™, USB, SD-Card
modes and OFF (player and display off).
6. Button (Play / Pause): plays audio of the selected device.
7. (Repeat): by pressing this button repeatedly, the writing lights on the
display, and allows you to browse between two play modes (valid only when using
USB drives and SD-Cards):
f Loop playback of current song.
f : Loop playback of all songs, in all folders, in ascending order.
8. Button (Rewind): Press to go back one track; holding down for one second
allows you to rewind to the beginning of current track
9. Button (Fast Forward): Press to move to next track; holding down for one
second lets you skip to the end of current track
4.3. Using USB Flash drives and SD-Cards
When you insert a USB drive into the outlet, the player reads the content automatically
and plays the rst track in ascending order. The display shows , indicating that
you are playing an audio le from the connected USB device. In the case of SD-Card, the
player displays . Then there is the time code of current playing track . At
the second line there are - from left to right - the song number in the current folder and
its title.
NOTE: In the case of use of a USB drive and an SD-Card simultaneously, the
reader will play rst track of last connected device.
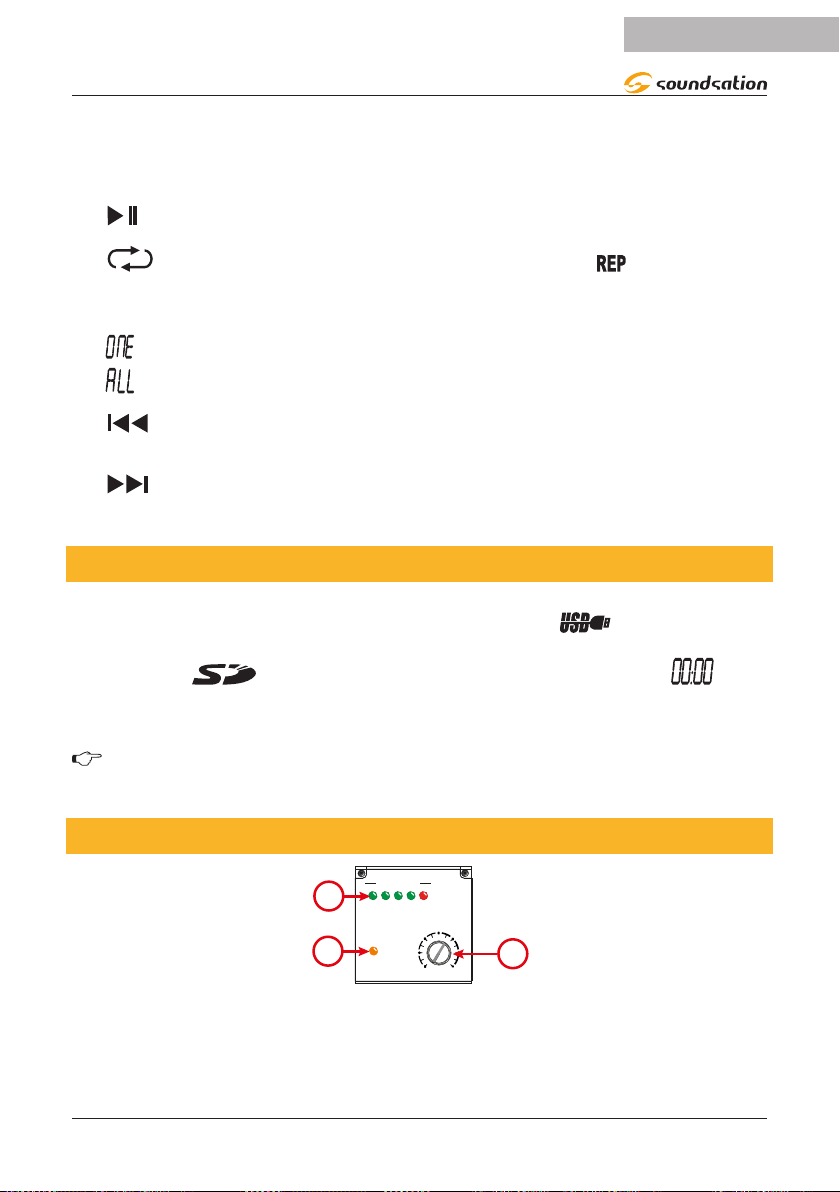
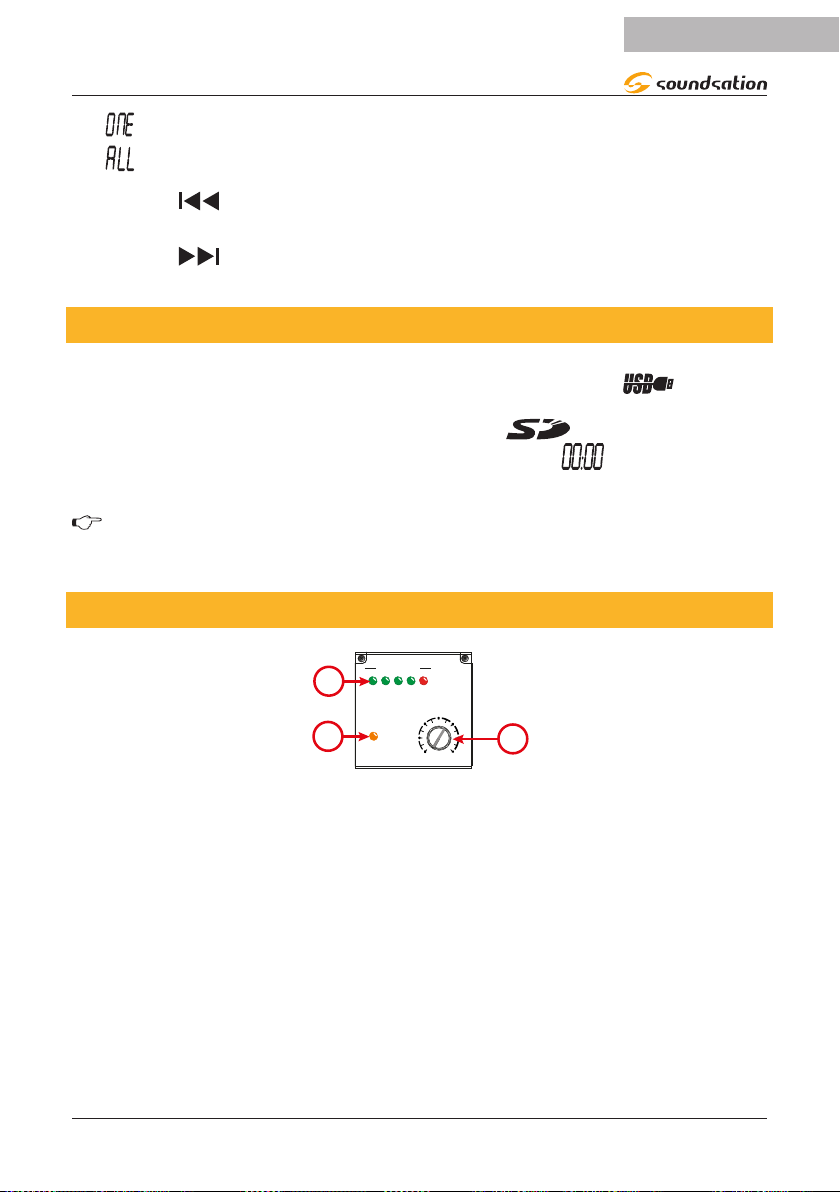
4.4. UHF Wireless Receiver Control Panel
AF LEVEL
3
-30 -20 -10 0 3dBu
UHF WiRELESS RECEIVER
RF
2
POWER-VOL
OFF 15
1
1. This knob turns ON/OFF the wireless microphone and adjusts its output level.
2. RF LED (orange) lights up when there is radio signal from the handheld transmitter.
11
Page 12

ENGLISH
HYPER PLAY 6AMW User manual
3. AF Meter (4 Green LED + peak red LED). The peak red LED will light with a strong
audio signal from the transmitter. Occasional ickering of the peak LED on loud
input signals to the transmitter is normal. However, If the peak LED lights continuously, the output level should be decreased or audio distortion may result.
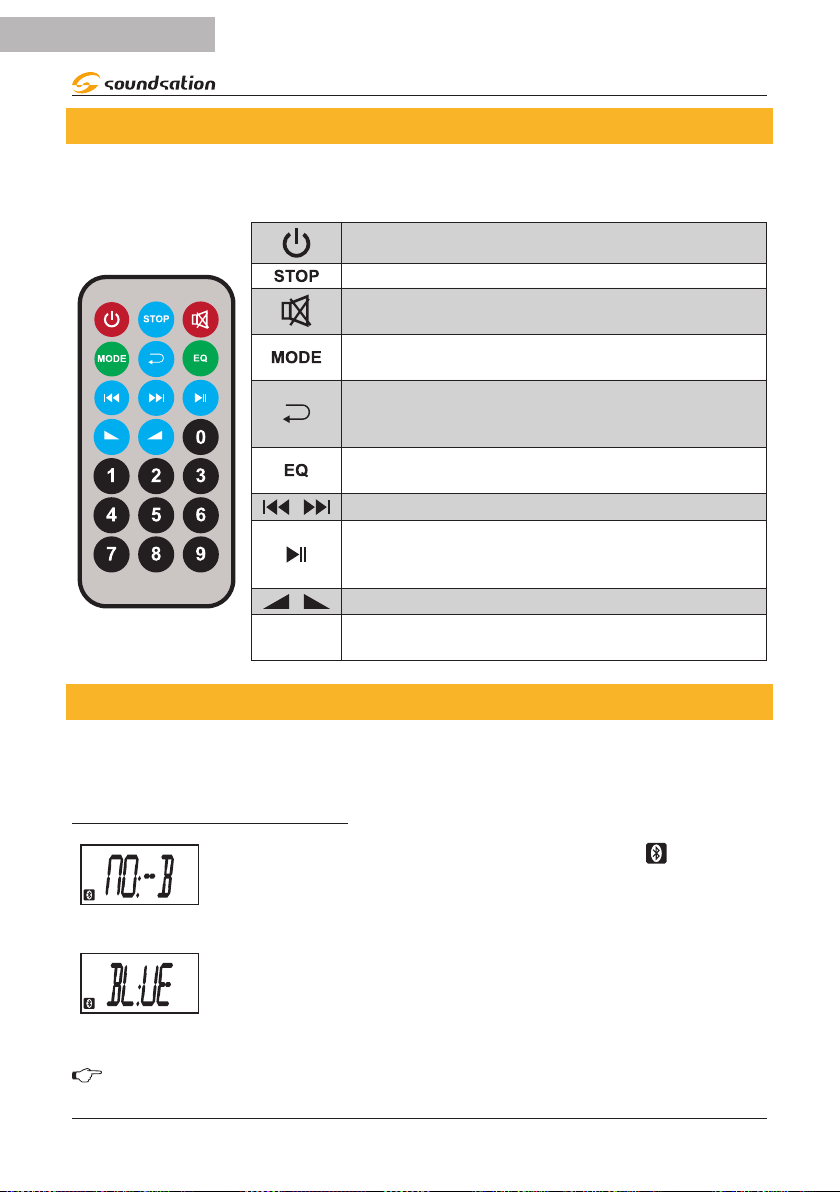
4.5. Remote Control
The multimedia player of HYPER PLAY 6AMW comes with a remote control to operate
within an area of about 5 m (without obstacles) all main functions.
Turns the MP3 player on/off.
Stops the song.
It mutes playback. When active, the song continues
to play.
It allows you to enter in the individual menus (blue-
tooth, USB/SD and OFF.
By repeatedly pressing, it switches from normal
play mode, current track loop (ONE), and all tracks
loop (ALL).
By repeatedly pressing, it switches among 5 equalization curves (EQ0 - EQ4).
0 - 9
They skip to the next or previous song.
Play or pause the rst song in the list or the last
played track. If pressed again, it resumes playback
from the same point.
Increase or decrease the volume (from 00 to 26).
They recall the song corresponding to the same
position in the list.
4.6. Using the Bluetooth™ Connection
To play music from your Bluetooth™ device you must rst pair it.
Pairing
Press MODE key until appears on left side of the display. It shows “NO-b”, that is the
player is not paired yet.
At this point turn on Bluetooth™ mode on your smartphone or tablet. A device called
12
Page 13

ENGLISH
HYPER PLAY 6AMW User manual
“Bluetooth” will be shown among the various available devices. Select it and start
pairing process. Once nished, your play list will be directly played on your HYPER PLAY
6AMW.
NOTE: HYPER PLAY 6AMW player control panel also acts on your Bluetooth™
device; so that, for example, by pressing the button , you play / pause the
song; pressing , you skip to the next track, and so on. The Repeat button
, however, are deliberately disabled and can be managed only by the
Bluetooth™ device.
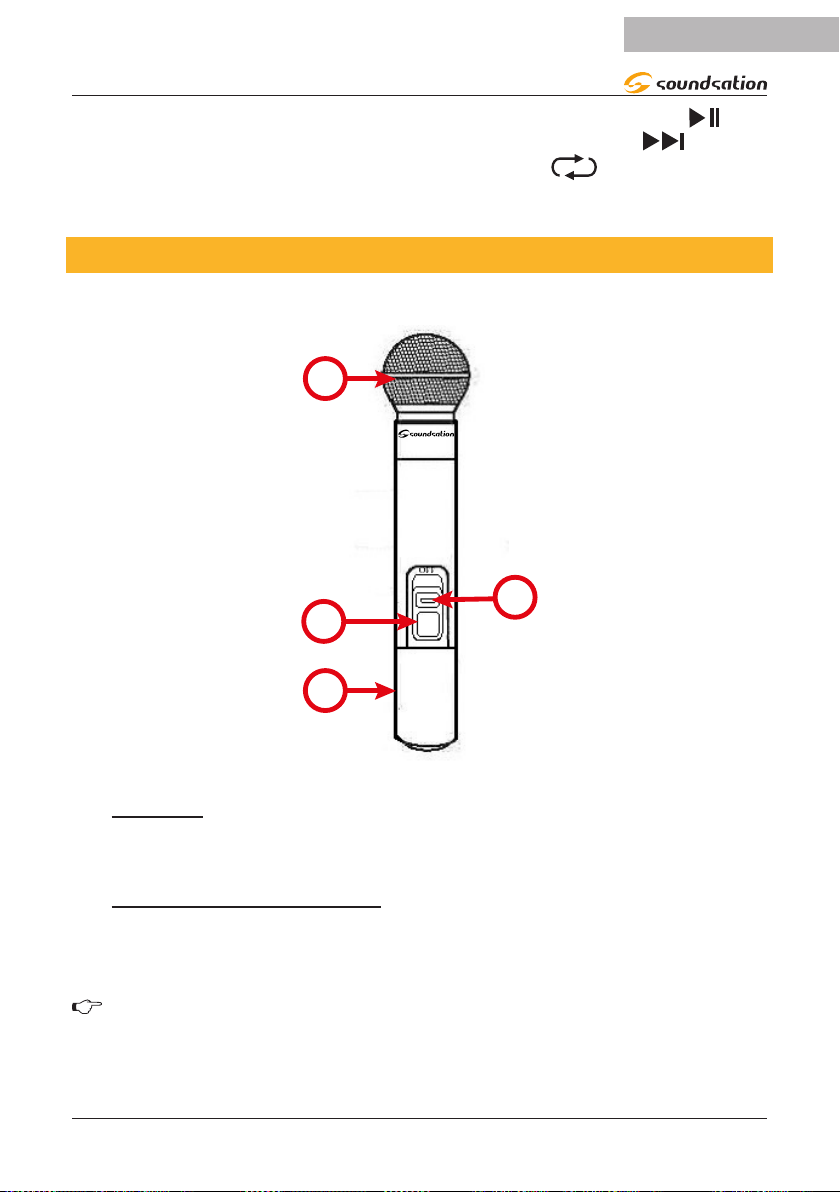
5. UHF WIRELESS MICROPHONE
These portable PA systems feature a handheld wireless microphones. Below there are
all details.
1
4
2
3
1) GRILL:
It protects the microphone capsule. Do not remove this cap to prevent damages to the
internal components.
13
Page 14

ENGLISH
HYPER PLAY 6AMW User manual
2) ON/OFF SWITCH:
It has 3 positions: when it’s all down, transmitter is OFF. When it is in central position
(MUTE), the transmitter is on but audio is disabled; nally, when it’s all up (ON), the
transmitter is working and the audio is active.
NOTE: Standby central position allows the unit to transmit without audio.
This option is important to prevent interference in the receiver due to the
absence of a radio transmitting signal. It is, therefore, suggested to ALWAYS
use this MUTE position when you temporarily don’t sing or play but the
wireless microphone is connected to an audio system (e.g. during a pause in
a show). You can move the switch to OFF position (all down) only when you
are sure that the sound system volume is.
3) Battery Compartment
Batteries are housed inside the transmitter. Use 2x 1.5V AA type batteries (not included), paying attention to their polarity.
For battery replacement follow the instructions below:
f Remove the battery compartment cover by unscrewing it.
f Insert or replace the batteries in the compartment, observing the +/- polarity marked
inside.
f Replace the battery compartment cover by screwing it.
4) LED:
This LED lights up briey when you turn on the microphone. Under normal operating conditions (switch 3 in MUTE or ON position) and batteries in normal conditions,
this LED does not light. It is ON when batteries charge level is low and they must be
replaced.
6. RECHARGEABLE BATTERY
This PA system works with both AC or battery power. It feature 12V-2600mAH lead rechargeable batteries, housed inside the unit and accessible through the rear panel unit.
Please see below how to open the speaker and access the battery.
Note: If you power the unit with the external cable for an extended period,
you should remove the battery for longer life.
6.1. Battery Replacement
WARNING: This operation must be done by professional personnel. Please
contact you local dealer or contact SOUNDSATION after-sales service.
To remove or replace the battery, follow the instructions below:
14
Page 15
ENGLISH
HYPER PLAY 6AMW User manual
f Turn off the unit, unplug the mains cable.
f Unscrew the 4 screws shown in the following picture and remove the plastic cover.
f Pull out the battery and disconnect the two wires paying attention to colors (red for
positive, black for negative).
f Replace the battery with a similar both in size and electrical characteristics
(12V-2600mAH Lead Battery, model TP12-2.6). See size details in “Do not put batteries in the mouth. If swallowed, contact a physician or local poison control center
immediately.” on page 17”.
f Close the cover with the screws.
f Contact SOUNDSATION support service on https://www.soundsationmusic.com/en/
services/support in case of problems.
BATTERY STATUS
25% 50% 75% 100%
HYPER PLAY 6AMW
+19V DC IN
MIX OUT
POWER
ON
OFF
Remove these four
screws
6.2. Charging the Battery
The battery, when fully charged has a duration of about 5 hours of continuous use at
maximum volume.
BATTERY STATUS
25% 50% 75% 100%
15
Page 16

ENGLISH
HYPER PLAY 6AMW User manual
The full charge cycle lasts about 2 hours. For the rst charge cycle, however, it would
be better that it lasted more than 3 times normal charge cycle (that is 6 hours). This
considerably lengthens battery life.
f Connect the unit to a power outlet through the supplied power adapter. It is not
necessary to turn on the unit.
f The CHARGE LED (yellow) lit and the four LEDs (1 red; 3 Green) start lighting as the
level of charge increases from the rst LED (25%) to the maximum level (100%).
f After a charging time for a full charge, the 3 green LEDs are lit and then you can
disconnect the power adapter (yellow LED switches off). Once reached the maximum
level, however, the charging circuit turns off, even if you leave it plugged.
f When you switch on the unit, you can check the state of the charge (even during
charging process), basing on the number of green LEDs on. When the LOW red LED
start blinking and the other three LEDs are off, you need to re-charge the battery as
soon as possible.
6.3. Battery safety and disposal instructions
Please follow the instructions below for safe handling and proper disposal of user-serviceable batteries.
f Charge rechargeable batteries with the instructions and correct charging equipment
supplied with your SOUNDSATION product.
f Store batteries in a cool, dry place at normal room temperature. Remove batteries
from devices that will be stored unused for extended periods.
f Dispose of batteries according to the local laws and regulations of your region. Some
batteries may be recycled, and may be accepted for disposal at your local recycling
center.
f Contact SOUNDSATION Customer Support if you have questions about the proper
handling of batteries. Batteries may present a risk of re, explosion, or chemical burn
if mistreated.
f Do not disassemble, puncture, modify, drop, throw, or cause other unnecessary
shocks to batteries.
f Do not dispose of batteries in a re or trash incinerator, or leave batteries in hot
places such as an automobile under direct sunlight.
f Do not store batteries near an oven, stove, or another heat source.
f Do not connect batteries directly to an electrical source, such as a building outlet or
automobile power-point.
f Do not place batteries into a microwave oven, or into any other high-pressure con-
tainer.
f Do not immerse batteries in water or otherwise get them wet.
f Do not short circuit batteries; for example, do not carry loose batteries in a pocket
or purse with other metal objects, which may inadvertently cause a battery to short
16
Page 17

ENGLISH
HYPER PLAY 6AMW User manual
circuit.
f Do not use batteries, or charge rechargeable batteries, that appear to be leaking,
discolored, rusty, deformed, emit an odor or are otherwise abnormal.
f Do not touch leaking batteries directly; wear protective material to remove the bat-
teries and dispose of them properly immediately.
f Do not reverse the polarity (positive and negative terminals) of batteries.
f Do not continue to charge batteries beyond the specied time.
f Do not give batteries to young children, or store batteries where children may access
them.
f Do not put batteries in the mouth. If swallowed, contact a physician or local poison
control center immediately.
17
Page 18

ENGLISH
HYPER PLAY 6AMW User manual
7. SPECIFICATIONS
Speaker Type Portable 2-way active speaker with rechargeable battery
Frequency response 80Hz-20KHz
Max. SPL 110* dB
LF 6,5"
HF type 1” Compression Driver
Directivity (HxV) 90° x 60°, Symmetric
Crossover Frequency 5.1 kHz
Amp Power (Program/Peak) 150W* / 300W*, Class-D
Controls
2-Band EQ (BASS/TREBLE) Bass 100Hz (+/- 12dB); Treble 10kHz (+/- 12dB)
Connections 2xMic/Line Combo, AUX Stereo Mini Jack, Line In L&R RCA Jack
Indicators Power, Clip, Wireless Mic On, RF Mic, Battery Charge
Media player USB, SD-Card, Bluetooth™, LCD Display
Media player controls Stop, Play/Pause, Next track, Previous track, Mode
Power
Mains: 19V - 3,42A
Rechargeable Battery: 12V-2600mAH Lead Battery
Battery Model Name: TP12-2.6
Battery Size (WxHxD): 70mm x 47mm x 100mm
Charge/Discharge Cycle: 2hours / 5hours
Wireless Microphone
Frequency: UHF 863-865MHz (863.1 MHz)
Frequency Response: 50Hz – 17kHz
Transmitter Power: 10mW
Receiving Sensitivity -90 dBm
Total Harmonic Distortion < 0,1%
Modulation Type: FM
Battery Voltage: 3V (2x1.5V AA-Type Batteries)
Continuous Using: 7 hours
Hand-held Mic. Size (W/DxH): Ø35 (min) - Ø52 (max) x 245 mm
Hand-held Mic. Net Weight: 0.245 kg (batteries included)
Mechanics
Housing / Grille material Polypropylene / 0-8mm Steel
Handles 1 on top
Padded Cover YES
Pole Mount Standard D36 mm
Speaker Dimension (WxHxD) 220 x 320 x 200 mm
Packing Dimension (WxHxD) 420 x 633 x 340 mm
Net Weight 4.4 kg (Battery included)
Gross Weight 6 kg
* Vales referred to the unit connected to mains.
Our products are subject to change. Modications to technical features remain subject to change without notice.
2xMic/Line level, UHF Mic Level, AUX/Bluetooth/MP3 level, AUX-MP3
Switch, Master level
18
Page 19

HYPER PLAY 6AMW User manual
8. CERTIFICATE OF CONFORMITY
ENGLISH
TO: whom it may concer
EU DECLARATION OF CONFORMITY
of
Via Enzo Ferrari, 10 – 62017 Porto Recanati (MC) Italy
Declare under our sole responsibility that following products:
Models: SOUNDSATION HYPER PLAY 6AMW
Description: Battery-Powered Active Apeaker with UHF wireless system
conform to the essential requirements of:
• Directive on the general safety of product 2001/95/EU
• European Low Voltage Directive 2014/35/EU
• European EMC Directive 2014/30/EU
• European Radio Equipment Directive (RED) 2014/53/EU
comply with the following standards (depend on type of product):
• EN 60065:2014
• EN 62311:2008
• ETSI EN 301 357
• ETSI 300 328 V2.1.1 (2016-11)
• ETSI 303 345 V1.1.7 (2017-03)
• ETSI 303 357 V2.1.1 (2017-06)
• ETSI 301 489-9 V2.1.1 (2017-03)
• ETSI 301 489-17 V3.2.0 (2017-03)
conform to RoHS directive 2011/65/EC
and related amendments.
Porto Recanati, 21/03/2018
Position: _______________________
We, FRENEXPORT SPA,
19
Page 20

ENGLISH
HYPER PLAY 6AMW User manual
9. WARRANTY AND SERVICE
All SOUNDSATION products feature a limited two-year warranty. This two-year warranty is specic
to the date of purchase as shown on your purchase receipt.
The following cases/components are not covered from the above warranty:
• Any accessories supplied with the product
• Improper use
• Fault due to wear and tear
• Any modication of the product effected by the user or a third party
SOUNDSATION shall satisfy the warranty obligations by remedying any material or manufacturing
faults free of charge at SOUNDSATION’s discretion either by repair or by exchanging individual
parts or the entire appliance. Any defective parts removed from a product during the course of a
warranty claim shall become the property of SOUNDSATION.
While under warranty period, defective products may be returned to your local SOUNDSATION
dealer together with original proof of purchase. To avoid any damages in transit, please use the
original packaging if available. Alternatively you can send the product to SOUNDSATION SERVICE
CENTER – Via Enzo Ferrari , 10 – 62017 Porto Recanati - Italy . In order to send a product to service
center you need an RMA number. Shipping charges have to be covered by the owner of the product.
For further information please visit www.soundsationmusic.com
10. WARNING
PLEASE READ CAREFULLY – EU and EEA (Norway, Iceland and Liechtenstein) only
This symbol indicates that this product is not to be disposed of with your household waste, according to the WEEE Directive (2202/96/EC) and your national law.
This product should be handed over to a designated collection point, e.g., on an authorized onefor-one basis when you buy a new similar product or to an authorized collection site for recycling
waste electrical and electronic equipment (WEEE).
Improper handling of this type of waste could have a possible negative impact on the environment
and human health due to potentially hazardous substances that are generally associated with EEE.
At the same time, your cooperation in the correct disposal of this product will contribute to the
effective usage of natural resources.
For more information about where you can drop off your waste equipment for recycling, please
contact your local city ofce, waste authority, approved WEEE scheme or your household waste
disposal service.
20
Page 21

ITALIANO
SOMMARIO
1. PRIMA DI COMINCIARE ..........................................................................................24
1.1. Disimballaggio ......................................................................................................................................................24
1.2. Introduzione ...........................................................................................................................................................24
2. DESCRIZIONE ..........................................................................................................24
2.1. Caratteristiche principali....................................................................................................................................25
3. CONNESSIONI AUDIO .............................................................................................25
4. FUNZIONI DEL PANNELLO POSTERIORE ..............................................................25
4.1. Controlli del Mixer ...............................................................................................................................................26
4.2. Pannello di controllo del lettore multimediale .........................................................................................28
4.3. Utilizzo di unità USB e schede SD .................................................................................................................29
4.4. Pannello di controllo del Ricevitore Wireless UHF ..................................................................................29
4.5. Telecomando .........................................................................................................................................................30
4.6. Uso della connessione Bluetooth™ ..............................................................................................................30
5. RADIOMICROFONO VHF ........................................................................................31
6. BATTERIA RICARICABILE ........................................................................................32
6.1. Sostituzione della Batteria ................................................................................................................................32
6.2. Carica delle Batterie ............................................................................................................................................33
6.3. Sicurezza della batteria e istruzioni per lo smaltimento .......................................................................34
7. SPECIFICHE ...............................................................................................................36
8. CERTIFICATION / CERTIFICAZIONE .......................................................................37
9. GARANZIA E ASSISTENZA ......................................................................................38
10. AVVISO .....................................................................................................................38
21
Page 22

ITALIANO
IMPORTANTI SIMBOLI DI SICUREZZA
Il simbolo è usato per indicare che in questa apparecchiatura sono
presenti alcuni terminali sotto tensione pericolosi, anche in condizioni
di normale funzionamento, che possono costituire rischio di scosse
elettriche o di morte
Il simbolo viene utilizzato nella documentazione di servizio per indi-
care che uno specico componente può essere sostituito esclusivamente dal componente specicato nella documentazione per motivi di
sicurezza.
Terminale di Terra
Corrente/Tensione alternata
Terminale in tensione pericoloso
Indica che l’apparato è acceso
Indica che l’apparato è spento
WARNING:
Precauzioni da osservare per evitare il pericolo di ferimento o di morte
per l’utilizzatore.
CAUTION:
Precauzioni da osservare per evitare danni all’apparecchio.
CURA DEL PRODOTTO
f Leggete queste istruzioni
f Conservate queste istruzioni
f Rispettate tutte le avvertenze
f Seguite tutte le istruzioni
1) ACQUA / UMIDITA
L’apparecchio deve essere protetto dall’umidità e dalla pioggia, non può essere usato
in prossimità di acqua; ad esempio nei pressi di una vasca da bagno, di un lavandino, di
una piscina, etc.
2) Calore
L’apparecchio deve essere posto lontano da fonti di calore come radiatori, stufe o altri
22
Page 23

ITALIANO
MANUALE D’USO HYPER PLAY 6AMW
apparecchi che producono calore.
3) VENTILAZIONE
Non ostruite le prese d’aria per la ventilazione: ciò potrebbe provocare incendi. Installate sempre l’unità secondo le istruzioni del produttore.
4) Introduzione di oggetti e liquidi
Non introdurre oggetti o versare liquidi all’interno dell’apparato per ragioni di sicurezza
5) Cavo di alimentazione e spina
Evitate che il cavo di alimentazione venga calpestato o schiacciato, in particolare in
prossimità delle spine, delle prese e del punto in cui fuoriesce dall’apparecchio. Non
vanicate la nalità di sicurezza della spina con messa a terra. Una spina normale o
“polarizzata” ha due soli terminali; una spina con messa a terra ha un terzo polo di
terra. Questo ulteriore terminale serve per la vostra sicurezza. Se la spina fornita non si
inserisce nella presa, consultate un elettricista per l’eventuale sostituzione.
6) ALIMENTAZIONE
L’apparecchio deve essere collegato alla sorgente di alimentazione elettrica del tipo
indicato sull’apparecchio o descritto nel manuale. In caso contrario si potrebbero
provocare danni al prodotto ed eventualmente all’utente. Staccate la spina in caso di
temporali o quando non viene utilizzato per lunghi periodi di tempo.
7) Fusibile
Per evitare il rischio di incendi e di danni all’unità, utilizzate solo il tipo di fusibile descritto nel manuale. Prima di sostituire il fusibile, assicuratevi che l’apparecchio sia spento e scollegato dalla presa di corrente.
8) Collegamento alla rete elettrica
Il collegamento elettrico improprio può invalidare la garanzia del prodotto.
9) Pulizia
Pulite solo con un panno asciutto. Non utilizzate solventi come benzolo o alcol.
10) Manutenzione
Non effettuate qualsiasi altro intervento al di fuori di quelli descritti nel manuale. Per
eventuale assistenza rivolgetevi solo a personale qualicato. Utilizzate solo accessori /
componenti suggeriti dal produttore.
AVVISO: Vogliamo ricordare che un’alta pressione sonora non solo può dan-
neggiare temporaneamente il senso dell’udito, ma può anche causare danni
permanenti. Prestate attenzione afnché il volume sia sempre adeguato.
PRIMA DI INIZIARE.
23
Page 24

ITALIANO
MANUALE D’USO HYPER PLAY 6AMW
1. PRIMA DI COMINCIARE
1.1. Disimballaggio
Grazie per aver acquistato il sistema PA portatile HYPER PLAY 6AMW. Ogni unità è
stata testata e spedita in perfette condizioni operative. Disimballare con cura il cartone
e controllare il contenuto per assicurarsi che tutte le parti siano presenti e in buone
condizioni
f 1 Diffusore
f 1 Microfono senza lo portatile
f 1 Telecomando
f 1 Adattatore di alimentazione
f Copertura imbottita
f Questo Manuale di istruzioni
In caso di danni durante il trasporto, informare immediatamente lo spedizioniere e
conservare il materiale di imballaggio per l’ispezione. Si prega di conservare il cartone
originale e tutti i materiali di imballaggio. Se l’unità deve essere restituita al produttore,
è importante che l’unità venga restituita nella confezione originale del produttore. Si
prega di non intraprendere alcuna azione senza prima contattarci
1.2. Introduzione
Il sistema PA portatile HYPER PLAY 6AMW fa parte di una gamma più ampia di prodotti
SOUNDSATION Pro Audio. Questi diffusori attivi sono compatti, leggeri e molto facili da
usare. Sono ideali per qualsiasi scopo di musica dal vivo. Assicurarsi che ci sia abbastanza spazio intorno all’unità per una corretta ventilazione e prevenire il surriscaldamento;
non posizionare l’unità sopra dispositivi caldi come radiatori o amplicatori di potenza.
L’altoparlante è collegato all’alimentazione tramite l’adattatore di alimentazione in dotazione. Il prodotto soddisfa gli standard di sicurezza richiesti.
I nostri prodotti sono soggetti a un processo di ulteriore sviluppo continuo. Pertanto le
variazioni alle caratteristiche tecniche sono soggette a modiche senza preavviso.
2. DESCRIZIONE
HYPER PLAY 6AMW è un nuovo diffusore portatile alimentato a batteria con woofer da
6,5 “ che, oltre al lettore MP3, USB, scheda SD e connessione Bluetooth ™ della versione
MULTIMEDIA, integra un microfono wireless UHF con trasmettitore portatile e un equa-
lizzatore graco a 2 bande.
HYPER PLAY 6AMW è alimentato da rete o a batteria con una durata di circa 5 ore e gli
amplicatori in classe D integrati erogano una potenza di programma di 150W (300W
di picco). L’elegante custodia in polipropilene è robusta e leggera, con griglia metallica
e foro di montaggio su asta standard da 36 mm.
24
Page 25

ITALIANO
MANUALE D’USO HYPER PLAY 6AMW
2.1. Caratteristiche principali
f Diffusore attivo a 2-Vie con batteria ricaricabile.
f Robusto involucro in polipropilene compatto e leggero
f Amplicatore in classe D da 300W*
f Woofer da 6,5” con driver a compressione da 1”
f Lettore MP3 con USB, scheda SD e Bluetooth™
f Microfono senza li UHF
f Due Ingressi Microfono/Linea
f Equalizzatore graco a 2-Bande
f Batteria ricaricabile al piombo con 5-ore di durata
f Foro da 36 mm per asta standard
f Maniglia nella parte superiore dell’involucro
* Potenza di picco con collegamento alla rete elettrica.
3. CONNESSIONI AUDIO
Saranno necessari più cavi per le varie connessioni da e verso l’altoparlante. Fare riferimento alle immagini sotto che mostrano il cablaggio interno di questi cavi. Assicurarsi
di utilizzare solo cavi di alta qualità.
Utilizzare cavi RCA normalmente in commercio per collegare sorgenti stereo sbilanciate
con connettori di uscita RCA a ingressi stereo RCA Linea dell’unità GO-SOUND AMW.
Naturalmente, si possono collegare anche apparecchiature bilanciate a ingressi sbilanciati. Utilizzare jack mono e stereo, assicurandosi che anello e collare siano collegati
insieme (oppure i poli 1 e 3 nel caso di connettori XLR).
Uso bilanciato del connettore jack TRS 1/4“
Uso sbilanciato del connettore jack TS 1/4“
Ferma-cavo
Calza
Massa
Centrale
Segnale
/ presa cufa con connettore TRS 1/4”
Ferma-cavo
Calza
Anello
Centrale
Massa
Polo freddo (- Ve)
Segnale
Hot (+ Ve)
4. FUNZIONI DEL PANNELLO POSTERIORE
Il diffusore attivo HYPER PLAY 6AMW ha numerosi connettori, controlli e indicatori di
cui è importante conoscere l’uso.
25
Page 26
ITALIANO
4.1. Controlli del Mixer
MANUALE D’USO HYPER PLAY 6AMW
11
DIGITAL MEDIA PLAYER
FM
00:00
MASTER
MP3
MIC IN
LINE
LINE
CH 2
HYPER PLAY 6AMW
TREBLE
RL
CH 3
MHz
REP
100 100
MIX OUT
BASS
POWER
ON
OFF
10
9
8
7
6
5
4
3
12
13
14
1
AF LEVEL
-30 -20 -10 0 3dBu
UHF WiRELESS RECEIVER
RF
POWER-VOL
OFF 15
100 100 100 100
LEVEL LEVEL LEVEL
MIC IN
LINE
CH 1
BATTERY STATUS
25% 50% 75% 100%
+19V DC IN
2
1) CONNESSIONE per adattatore AC
Collegare il dispositivo all’adattatore di alimentazione in dotazione e quindi a una presa
di corrente. Assicurarsi che la tensione di rete corrisponda alla tensione di ingresso
dell’adattatore (entro 110-240 V CA).
NOTA: Se è necessario sostituire questo adattatore, assicurarsi che l’uscita del
nuovo sia ++19V DC, 3.42A, (con il positivo all’interno).
2) Interruttore di alimentazione
Premere questo interruttore per accendere / spegnere l’altoparlante. Quando l’altoparlante è acceso, l’interruttore è in posizione bassa, altrimenti è in posizione alta per
indicare che il sistema è spento. Assicurasi che il controllo MASTER LEVEL sia basso
prima di accendere il sistema.
3) USCITA MIX OUT
Questa è un’uscita MONO con segnale di linea sbilanciato. Contiene il mix di tutti gli in-
gressi e tutti i controlli. Può essere utilizzato per scopi di registrazione o semplicemente
per collegare il sistema HYPER PLAY 6AMW a un mixer o qualsiasi altro sistema audio.
NOTA: Questa uscita non è inuenzata, ne dal MASTER LEVEL, ne dall’Equa-
lizzatore a 2 bande (TREBLE / BASS).
26
Page 27

ITALIANO
MANUALE D’USO HYPER PLAY 6AMW
4) INGRESSO MINI-JACK STEREO
Questo ingresso mini-jack stereo può essere utilizzato per collegare telefoni cellulari,
tablet, computer, etc. Utilizzare la manopola n° 9 per regolare il livello.
5) INGRESSI STEREO RCA
Questi sono ingressi RCA sbilanciati che possono essere utilizzati per collegare qualsiasi
dispositivo stereo esterno come un lettore Mp3, un lettore CD, un mixer, ecc. Utilizzare
la manopola n° 9 per regolare il livello.
6) CONTROLLO TREBLE
Usando questa manopola è possibile regolare i suoni nelle alte frequenze.
7) CONTROLLO BASS
Usando questa manopola è possibile regolare i suoni nelle basse frequenze.
8) SELEZIONE STEREO IN / MP3
Questo interruttore commuta tra i connettori mini-jack stereo (4) o stereo RCA (5) e il
lettore multimediale (11), il cui livello è regolato dalla manopola n° 9.
9) livello LINE/Mp3
Questa manopola controlla il livello generale del segnale del mini-jack stereo (4) o
stereo RCA (5) e del lettore MP3 / Bluetooth ™ (11).
10) Master LEVEL
Questa manopola controlla il livello generale del diffusore.
11) LETTORE MULTIMEDIALE DIGITALE
Questo pannello controlla tutte le funzioni relative al lettore multimediale, include il
ricevitore Bluetooth ™ e gli slot per USB e scheda SD. Per ulteriori informazioni relative
all’uso consultare il paragrafo “4.2. Pannello di controllo del lettore multimediale“ (pagina 28).
12) RICEVITORE wireless UHF
Questo sistema PA portatile dispone di un microfono wireless per la massima mobilità
durante le tue esibizioni. Per ulteriori informazioni su come usarlo, vedere “4.4. Pannello
di controllo del Ricevitore Wireless UHF“(pagina 29)
13) INGRESSI E CONTROLLI MIC/LINE
HYPER PLAY 6AMW ha 2 ingressi Mic / Line e in questa sezione del pannello è possibile
controllarne il livello usando le apposite manopole e selezionare il tipo di segnale in
ingresso. Gli ingressi accettano connettori XLR bilanciati o jack 1/4 “bilanciati / sbilanciati con segnali di livello Mic o Line. Non c’è alimentazione phantom quindi, in caso di
microfoni, si consiglia di utilizzare tutti i tipi di microfoni dinamici o utilizzare microfoni
a condensatore con la propria alimentazione a batteria.
27
Page 28

ITALIANO
DIGITAL MEDIA PLAYER
MANUALE D’USO HYPER PLAY 6AMW
14) LIVELLO e CARICA DELLA BATTERIA
Quando si collega l’adattatore, è possibile controllare la carica della batteria (anche
senza accendere l’unità) in base a quanti dei quattro LED sono accesi. Quando il livello
di carica è inferiore al 25%, il LED rosso lampeggia e indica che è necessario ricaricare
la batteria il prima possibile. Per ulteriori dettagli sulla batteria e sulla funzione di carica,
fare riferimento al paragrafo “6. BATTERIA RICARICABILE “(pagina 32).
4.2. Pannello di controllo del lettore multimediale
3
4
2
FM
5 6 7 8 9
MHz
00:00
REP
1
GO-SOUND 8AMW e 10AMW dispongono di un lettore multimediale che consente di
utilizzare questi diffusori anche senza fonti audio o cavi: basta collegare lo smartphone
o il tablet tramite Bluetooth ™ e il gioco è fatto. C’è anche uno slot per schede SD e una
presa USB per collegare i tuoi dispositivi.
Il lettore accetta lo streaming audio in qualsiasi formato tramite Bluetooth ™. Nel caso
di schede SD e dispositivi USB, riproduce le audio in MP3 (no a 320 kbps) e WAV (44,1
kHz - 16 bit).
1. Presa USB Tipo A: consente di leggere le unità USB in formato MS-DOS®
2. Visualizzatore LCD
3. Sensore del telecomando: consente di controllare l’altoparlante tramite il telecomando in dotazione. Per ulteriori dettagli fare riferimento al paragrafo “4.5. Telecomando “(pagina 30).
4. Slot per scheda SD-Card: Permette di leggere le schede SD in formato MS-DOS®.
5. Pulsante MODE: premendo ripetutamente questo pulsante, si passa tra le modalità
Bluetooth ™, USB, SD-Card e OFF (lettore e visualizzatore spenti).
6. Pulsante (Play / Pause): attiva la riproduzione o la messa in pausa l’audio del
dispositivo selezionato.
7. Pulsante (Repeat): premendo ripetutamente questo pulsante, la scritta si
illumina sul display e consente di selezionare le due modalità di riproduzione (valide
solo quando si utilizzano unità USB e schede SD):
28
Page 29
ITALIANO
MANUALE D’USO HYPER PLAY 6AMW
f Riproduzione ciclica della canzone corrente
f : Riproduzione ciclica di tutti i brani, in tutte le cartelle, in ordine crescente.
8. Pulsante (Rewind): Premere per tornare indietro di una traccia; tenere premuto
per un secondo consente di riavvolgere all’inizio della traccia corrente
9. Pulsante (Fast Forward): Premere per passare alla traccia successiva; tenendo
premuto per un secondo, si salta alla ne della traccia corrente
4.3. Utilizzo di unità USB e schede SD
Quando si inserisce un’unità USB nella presa, il lettore legge automaticamente il contenuto e riproduce la prima traccia in ordine crescente. Il display mostra , a indicare
che si sta riproducendo un le audio dal dispositivo USB collegato Nel caso invece di
una Scheda SD, sul display viene visualizzato il simbolo . Sul display viene anche
indicato il tempo di avanzamento della traccia in riproduzione . Nella seconda riga
ci sono, da sinistra a destra, il numero del brano nella cartella corrente e il titolo
NOTA: Nel caso di utilizzo di una unità USB e di una scheda SD contempora-
neamente, il lettore riprodurrà la prima traccia dell’ultimo dispositivo connesso.
4.4. Pannello di controllo del Ricevitore Wireless UHF
AF LEVEL
3
-30 -20 -10 0 3dBu
UHF WiRELESS RECEIVER
RF
2
POWER-VOL
OFF 15
1
1. Questa manopola attiva / disattiva il microfono wireless e regola il suo livello di
uscita.
2. Il LED RF (arancione) si illumina quando c’è un segnale radio dal trasmettitore
portatile (radiomicrofono).
3. Misuratore di segnale AF (4 LED verde + LED rosso di picco). Il LED rosso di picco si
accenderà con un forte segnale audio dal radiomicrofono. Lo sfarfallio occasionale
del LED di picco sui forti segnali di ingresso al trasmettitore è normale. Tuttavia, se
il LED di picco rimane continuamente acceso, potrebbe risultare una distorsione
audio e quindi il livello di uscita dovrebbe essere diminuito (manopola 1).
29
Page 30
ITALIANO
MANUALE D’USO HYPER PLAY 6AMW
4.5. Telecomando
Il lettore multimediale dei diffusore HYPER PLAY 6AMW è dotato di un telecomando
per operare in un’area di circa 5 m (senza ostacoli) utilizzando tutte le funzioni principali.
Accende / spegne il lettore MP3
Interrompe la canzone
Disattiva la riproduzione audio. Quando è attivo, la
canzone continua ad andare avanti.
Consente di accedere ai singoli menu (bluetooth,
USB / SD e OFF)
Premendo ripetutamente, passa dalla modalità di
riproduzione normale, al loop di traccia corrente
(ONE) e al loop di tutte le tracce (ALL).
Premendo ripetutamente, si possono selezionare 5
curve di equalizzazione (EQ0 - EQ4).
Passa alla canzone successiva o precedente.
Riproduce o mette in pausa il brano selezionato.
Se premuto quando il brano è in pausa, riprende la
riproduzione dallo stesso punto.
Incrementa/Decrementa il volume (da 00 a 26).
0 - 9
Selezionano il numero di una canzone corrispondente alla stessa posizione nella lista
4.6. Uso della connessione Bluetooth™
Per riprodurre musica da un dispositivo Bluetooth ™, questo deve essere prima associato.
ASSOCIAZIONE (PAIRING)
Premere il tastino MODE no a quando non appare sul lato
sinistro del display. Viene visualizzato “NO-b”, ad indicare che il
dispositivo Bluetooth ™ non è ancora associato.
A questo punto bisogna attivare la modalità Bluetooth ™ nel
dispositivo che si intende associare (Smartphone, Tablet,Etc).
Verrà quindi mostrato un dispositivo chiamato “Bluetooth” tra i
vari dispositivi disponibili. Bisognerà quindi selezionarlo e avviare
il processo di associazione. Una volta terminato, la playlist del
dispositivo verrà riprodotta direttamente sul HYPER PLAY 6AMW.
NOTE: Il pannello di controllo del lettore HYPER PLAY 6AMW funziona anche
30
Page 31
ITALIANO
MANUALE D’USO HYPER PLAY 6AMW
sul dispositivo Bluetooth ™; così, ad esempio, premendo il pulsante , si
riproduce o mette in pausa la canzone; premendo il è pulsante , si passa
alla traccia successiva , e così via. Il pulsante Repeat , viene disattivato e
può essere gestito solo dal dispositivo Bluetooth ™.
5. RADIOMICROFONO VHF
Questi sistemi PA portatili sono dotati di radiomicrofoni. Di seguito ci sono tutti i dettagli
1
4
2
3
1) GRIGLIA:
Protegge la capsula del microfono. Si consiglia di non rimuovere al ne di evitare danni
ai componenti interni
2) INTERRUTTORE ON/OFF
Questo interruttore ha 3 posizioni: quando è tutto giù, il trasmettitore è OFF. Quando è
in posizione centrale (MUTE), il trasmettitore è acceso ma l’audio è disabilitato; inne,
quando è tutto su (ON), il trasmettitore funziona e l’audio è attivo
NOTA: La posizione centrale MUTE consente all’unità di trasmettere senza
audio. Questa opzione è importante per evitare interferenze nel ricevitore
a causa dell’assenza di un segnale di trasmissione radio. Pertanto, si suggerisce SEMPRE di utilizzare questa posizione quando temporaneamente non
si canta o si suona ma il radiomicrofono è collegato a un sistema audio (ad
31
Page 32

ITALIANO
MANUALE D’USO HYPER PLAY 6AMW
esempio durante una pausa in uno spettacolo). Si può spostare l’interruttore in posizione OFF (tutto in basso) solo quando sei sicuro che il volume del
sistema audio è basso.
3) VANO BATTERIA
Le batterie sono alloggiate all’interno del trasmettitore. Utilizzare 2 batterie tipo AA da
1,5 V (non incluse), facendo attenzione alla loro polarità.
Per la sostituzione della batteria seguire le istruzioni riportate di seguito:
f Rimuovere il coperchio del vano batteria svitandolo.
f Inserire o sostituire le batterie nello scomparto, osservando la polarità +/- indicata
all’interno.
f Rimettere il coperchio del vano batteria avvitandolo.
4) LED:
Questo LED si accende brevemente all’accensione del microfono. In condizioni di funzionamento normali (interruttore 3 in posizione MUTE o ON) e batterie in condizioni
normali, questo LED non si accende. Si accende quando il livello di carica delle batterie
è basso e devono essere sostituite.
6. BATTERIA RICARICABILE
Questo sistema PA funziona sia con alimentazione di rete che a batteria. È dotato di
batterie ricaricabili al piombo 12V-2600mAH, alloggiate all’interno dell’unità e accessibili attraverso l’unità del pannello posteriore. Si prega di vedere sotto come aprire
l’altoparlante e accedere alla batteria.
Nota: Se si alimenta l’unità con il cavo esterno per un periodo prolungato, è
necessario rimuovere la batteria per una maggiore durata
6.1. Sostituzione della Batteria
ATTENZIONE: Questa operazione deve essere eseguita da personale profes-
sionale. Si prega di contattare il rivenditore locale o contattare il servizio
post-vendita SOUNDSATION
Per rimuovere o sostituire la batteria, seguire le seguenti istruzioni:
f Spegnere l’unità, scollegare il cavo di alimentazione.
f Svitare le 4 viti mostrate nella gura sottostante e rimuovere il coperchio di plasti-
ca.
f Estrarre la batteria e scollegare i due li prestando attenzione ai colori (rosso per
positivo, nero per negativo).
32
Page 33

ITALIANO
MANUALE D’USO HYPER PLAY 6AMW
f Sostituire la batteria con una di dimensioni e caratteristiche elettriche simili (bat-
teria al piombo 12V-2600mAH, modello TP12-2.6). Vedere dettagli relative alle
caratteristiche nel paragrafo “7. SPECIFICHE “(pagina 36).
f Chiudere il coperchio con le viti.
f Estrarre la batteria e scollegare i due li prestando attenzione ai colori (rosso per
positivo, nero per negativo).
f Sostituire la batteria con una di dimensioni e caratteristiche elettriche simili (Batte-
ria al Litio 11.1V-2200mAH, modello HKD-22). Vedere dettagli relative alle caratteristiche nel paragrafo “7. SPECIFICHE “(pagina 36).
f Chiuder il coperchio rimettendo le viti.
f Contattare il servizio di supporto SOUNDSATION su https://www.soundsationmu-
sic.com/en/services/support nel caso di problemi.
BATTERY STATUS
25% 50 % 75% 100%
HYPER PLAY 6AMW
+19V DC IN
MIX OUT
POWER
OFF
ON
Rimuovere queste
quattro viti
6.2. Carica delle Batterie
La batteria, quando è completamente carica, ha una durata di circa 5 ore di uso continuo al massimo volume.
33
Page 34

ITALIANO
MANUALE D’USO HYPER PLAY 6AMW
BATTERY STATUS
25% 50% 75% 100%
Il ciclo di ricarica completa della batteria dura circa 2 ore. Per il primo ciclo di carica,
tuttavia, sarebbe meglio che durasse più di 3 volte il normale ciclo di carica (cioè 6 ore).
Ciò allunga considerevolmente la durata della batteria.
f Collegare l’unità a una presa di corrente attraverso l’adattatore di alimentazione in
dotazione. Non è necessario accendere l’unità.
f Il LED CHARGE (giallo) si accende e i quattro LED (1 rosso, 3 Verdi) iniziano a lam-
peggiare mentre il livello di carica aumenta dal primo LED (25%) al livello massimo
(100%).
f Dopo il tempo relativo ad una ricarica completa, i 3 LED verdi si accendono e quin-
di è possibile scollegare l’alimentatore (il LED giallo si spegne). Una volta raggiunto il livello massimo, tuttavia, il circuito di ricarica si spegne, anche se lo si lascia
collegato.
f Quando si accende l’unità, è possibile vericare lo stato della carica (anche durante
il processo di ricarica), in base al numero di LED verdi accesi. Quando il LED rosso
LOW inizia a lampeggiare e gli altri tre LED sono spenti, è necessario ricaricare la
batteria il prima possibile.
6.3. Sicurezza della batteria e istruzioni per lo smaltimento
Attenersi alle seguenti istruzioni per un maneggio sicuro e un corretto smaltimento
delle batterie a cura dell’utente.
f Caricare le batterie ricaricabili seguendo le istruzioni e l’attrezzatura di ricarica cor-
retta fornita con il prodotto SOUNDSATION.
f Conservare le batterie in un luogo fresco e asciutto a temperatura ambiente
normale. Rimuovere le batterie da dispositivi che rimarranno inutilizzati per lungi
periodi.
f Smaltire le batterie in accordo con le leggi e ai regolamenti locali della propria
regione. Alcune batterie potrebbero essere riciclate e potrebbero essere accettate
per lo smaltimento presso il centro di riciclo locale.
f Contattare l’Assistenza clienti SOUNDSATION in caso di domande sulla corretta
gestione delle batterie. Le batterie possono presentare un rischio di incendio,
esplosione o bruciatura chimica se non trattate adeguatamente.
f Non smontare, forare, modicare, far cadere, lanciare o causare altre sollecitazioni
non necessarie alle batterie.
34
Page 35

ITALIANO
MANUALE D’USO HYPER PLAY 6AMW
f Non smaltire le batterie gettandole nel fuoco o in un inceneritore di riuti. Si rac-
comanda inoltre di non lasciare le batterie in luoghi caldi come un’automobile alla
luce diretta del sole
f Non conservare le batterie vicino a un forno, una stufa o un’altra fonte di calore
f Non mettere le batterie nel forno a microonde o in altri contenitori ad alta pressio-
ne
f Non immergere le batterie nell’acqua o bagnarle in altro modo.
f Non cortocircuitare le batterie; ad esempio, non portare le batterie in tasca o in
borsa con altri oggetti metallici, che potrebbero inavvertitamente causare il corto
circuito della batteria.
f Non utilizzare batterie o caricare batterie ricaricabili che sembrano presentare
perdite, alterazioni di colore, ruggine, deformazioni, che emanano odori o sono
altrimenti anormali.
f Non toccare direttamente le batterie che perdono; indossare un materiale protetti-
vo per rimuovere le batterie e smaltirle correttamente immediatamente.
f Non invertire la polarità (terminali positivi e negativi) delle batterie
f Non continuare a caricare le batterie oltre il tempo specicato
f Non dare le batterie ai bambini piccoli o conservare le batterie dove i bambini
possono accedervi
f Non mettere le batterie in bocca. In caso di ingestione, contattare immediatamente
un medico o il più vicino centro antiveleni.
35
Page 36

ITALIANO
MANUALE D’USO HYPER PLAY 6AMW
7. SPECIFICHE
Tipo diffusore Diffusore attivo a 2-vie con Batteria ricaricabile
Risposta in frequenza 80Hz-20KHz
Max. SPL 110* dB
LF 6,5"
HF Driver a Compressione da 1”
Direttività (HxV) 90° x 60° , Simmetrico
Frequenza di Crossover 5.1 kHz
Amplicazione Max.(Program/Peak) 150W* / 300W*, Classe-D
Controlli
Equalizzatore a 2 Bande Bassi 100Hz (+/- 12dB); Alti 10kHz (+/- 12dB)
Connessioni 2 x Mic/Line Combo, AUX Stereo Mini Jack, Line In L&R RCA Jack
Indicatori LED Power, Clip, Wireless Mic On, RF Mic, Battery Charge
Lettore Multimediale USB, SD-Card, Bluetooth™, LCD Display
Controlli del Lettore Multimediale Stop, Play/Pause, Next track, Previous track, Mode
Alimentazione
Tensione di Alimentazione: 19V - 3,42A
Batteria Ricaricabile: Batteria al Piombo 12V-2600mAH
Nome modello Batteria: TP12-2.6
Misure Batteria (LxAxP): 70mm x 47mm x 100mm
Carica/Ciclo di Scarica: 2 Ore/ 5 Ore
Radiomicrofono
Frequenza: UHF 863-865MHz (863.1 MHz)
Risposta in Frequenza: 50Hz – 17kHz
Potenza Trasmettitore: 10mW
Sensibilità di Ricezione -90 dBm
Distorsione Armonica Totale < 0,1%
Tipo Modulazione: FM
Voltaggio Batterie: 3V (2x1.5V AA)
Durata in uso continuo: 7 Ore
Misure (L/PxA): Ø35 (min) - Ø52 (max) x 245 mm
Peso: 0.245 kg (batterie incluse)
Meccanica
Materiali Involucro / Griglia Polipropilene / 0-8mm Acciaio
Maniglie 1 sulla parte superiore
Copertura Imbottita SI
Foro per montaggio su palo Standard D36 mm
Dimensioni Diffusore (LxAxP) 220 x 320 x 200 mm
Dimensioni Imballo (LxAxP) 420 x 633 x 340 mm
Peso Netto 4.4 kg (Batteria inclusa)
Peso Lordo 6 kg
* Valori riferiti all’unità collegata alla rete.
I nostri prodotti sono soggetti a modiche. Le caratteristiche tecniche sono soggette a modiche senza preavviso.
2 x Mic/Line level, UHF Mic Level, AUX/Bluetooth/MP3 level, AUX-MP3
Switch, Master level
36
Page 37

MANUALE D’USO HYPER PLAY 6AMW
8. CERTIFICATION / CERTIFICAZIONE
ITALIANO
TO: whom it may concer
EU DECLARATION OF CONFORMITY
of
Via Enzo Ferrari, 10 – 62017 Porto Recanati (MC) Italy
Declare under our sole responsibility that following products:
Models: SOUNDSATION HYPER PLAY 6AMW
Description: Battery-Powered Active Apeaker with UHF wireless system
conform to the essential requirements of:
• Directive on the general safety of product 2001/95/EU
• European Low Voltage Directive 2014/35/EU
• European EMC Directive 2014/30/EU
• European Radio Equipment Directive (RED) 2014/53/EU
comply with the following standards (depend on type of product):
• EN 60065:2014
• EN 62311:2008
• ETSI EN 301 357
• ETSI 300 328 V2.1.1 (2016-11)
• ETSI 303 345 V1.1.7 (2017-03)
• ETSI 303 357 V2.1.1 (2017-06)
• ETSI 301 489-9 V2.1.1 (2017-03)
• ETSI 301 489-17 V3.2.0 (2017-03)
conform to RoHS directive 2011/65/EC
and related amendments.
Porto Recanati, 21/03/2018
Position: _______________________
We, FRENEXPORT SPA,
37
Page 38

ITALIANO
9. GARANZIA E ASSISTENZA
Tutti i prodotti SOUNDSATION dispongono di una garanzia di due anni. Questa garanzia di due
anni è valida dalla data di acquisto, come indicato dal documento di acquisto.
I seguenti casi / componenti non sono coperti dalla garanzia di cui sopra:
• Tutti gli accessori forniti con il prodotto
• Uso improprio
• Guasto dovuto all’usura
• Ogni modica del prodotto effettuata dall’utente o da terzi
SOUNDSATION deve soddisfare gli obblighi di garanzia dovuti a eventuali materiali non conformi
o difetti di fabbricazione, rimediando gratuitamente e a discrezione di SOUNDSATION sia mediante riparazione o sostituendo singole parti o l’intero apparecchio. Eventuali parti difettose rimosse
da un prodotto durante il corso di una richiesta di garanzia diventano di proprietà di SOUNDSATION.
Durante il periodo di garanzia, i prodotti difettosi possono essere restituiti al rivenditore SOUNDSATION locale con prova di acquisto originale. Per evitare danni durante il trasporto, si prega di
utilizzare l’imballo originale, se disponibile. In alternativa è possibile inviare il prodotto a SERVICE
CENTER SOUNDSATION - Via Enzo Ferrari, 10 - 62017 Porto Recanati - Italia. Per poter inviare un
prodotto al centro di assistenza è necessario un numero di RMA. Le spese di trasporto devono
essere coperte dal proprietario del prodotto.
Per ulteriori informazioni visitate il sito: www.soundsationmusic.com
10. AVVISO
LEGGETE ATTENTAMENTE - solo per UE e SEE (Norvegia, Islanda e Liechtenstein).
Questo simbolo indica che il prodotto non deve essere smaltito con i riuti domestici, in base alla
direttiva RAEE (2202/96/CE) e legislazione nazionale.
Il prodotto deve essere consegnato a un centro di raccolta differenziata o, in caso di ritiro dell’usato quando si acquista un nuovo prodotto simile, ad un rivenditore autorizzato per il riciclaggio di
apparecchiature elettriche ed elettroniche (WEEE).
Un uso improprio di questo tipo di riuti può avere un impatto negativo sull’ambiente e sulla
salute umana a causa di sostanze potenzialmente pericolose che sono generalmente associate alle
apparecchiature elettriche ed elettroniche. Allo stesso tempo, la vostra collaborazione per il corret-
to smaltimento di questo prodotto contribuirà a un utilizzo efcace delle risorse naturali.
Per ulteriori informazioni sui punti di raccolta delle apparecchiature da rottamare, contattate il
comune, l’autorità di gestione dei riuti, strutture coinvolte nel sistema RAEE o il servizio di smaltimento dei riuti domestici.
38
Page 39

This product is imported in EU by
FRENEXPORT SPA – Via Enzo Ferrari, 10 - 62017 Porto Recanati - Italy
Questo prodotto viene importato nella UE da
www.soundsationmusic.com
Soundsation® is a registered trademark of FRENEXPORT SPA - Italy
Soundsation® è un marchio di fabbrica registrato della FRENEXPORT SPA - Italy
Page 40

www.soundsationmusic.com
Ver. 1.0 - Mar. 2018
 Loading...