

Page 1
Manual
Model 2049
Stereo Compressor
Page 2

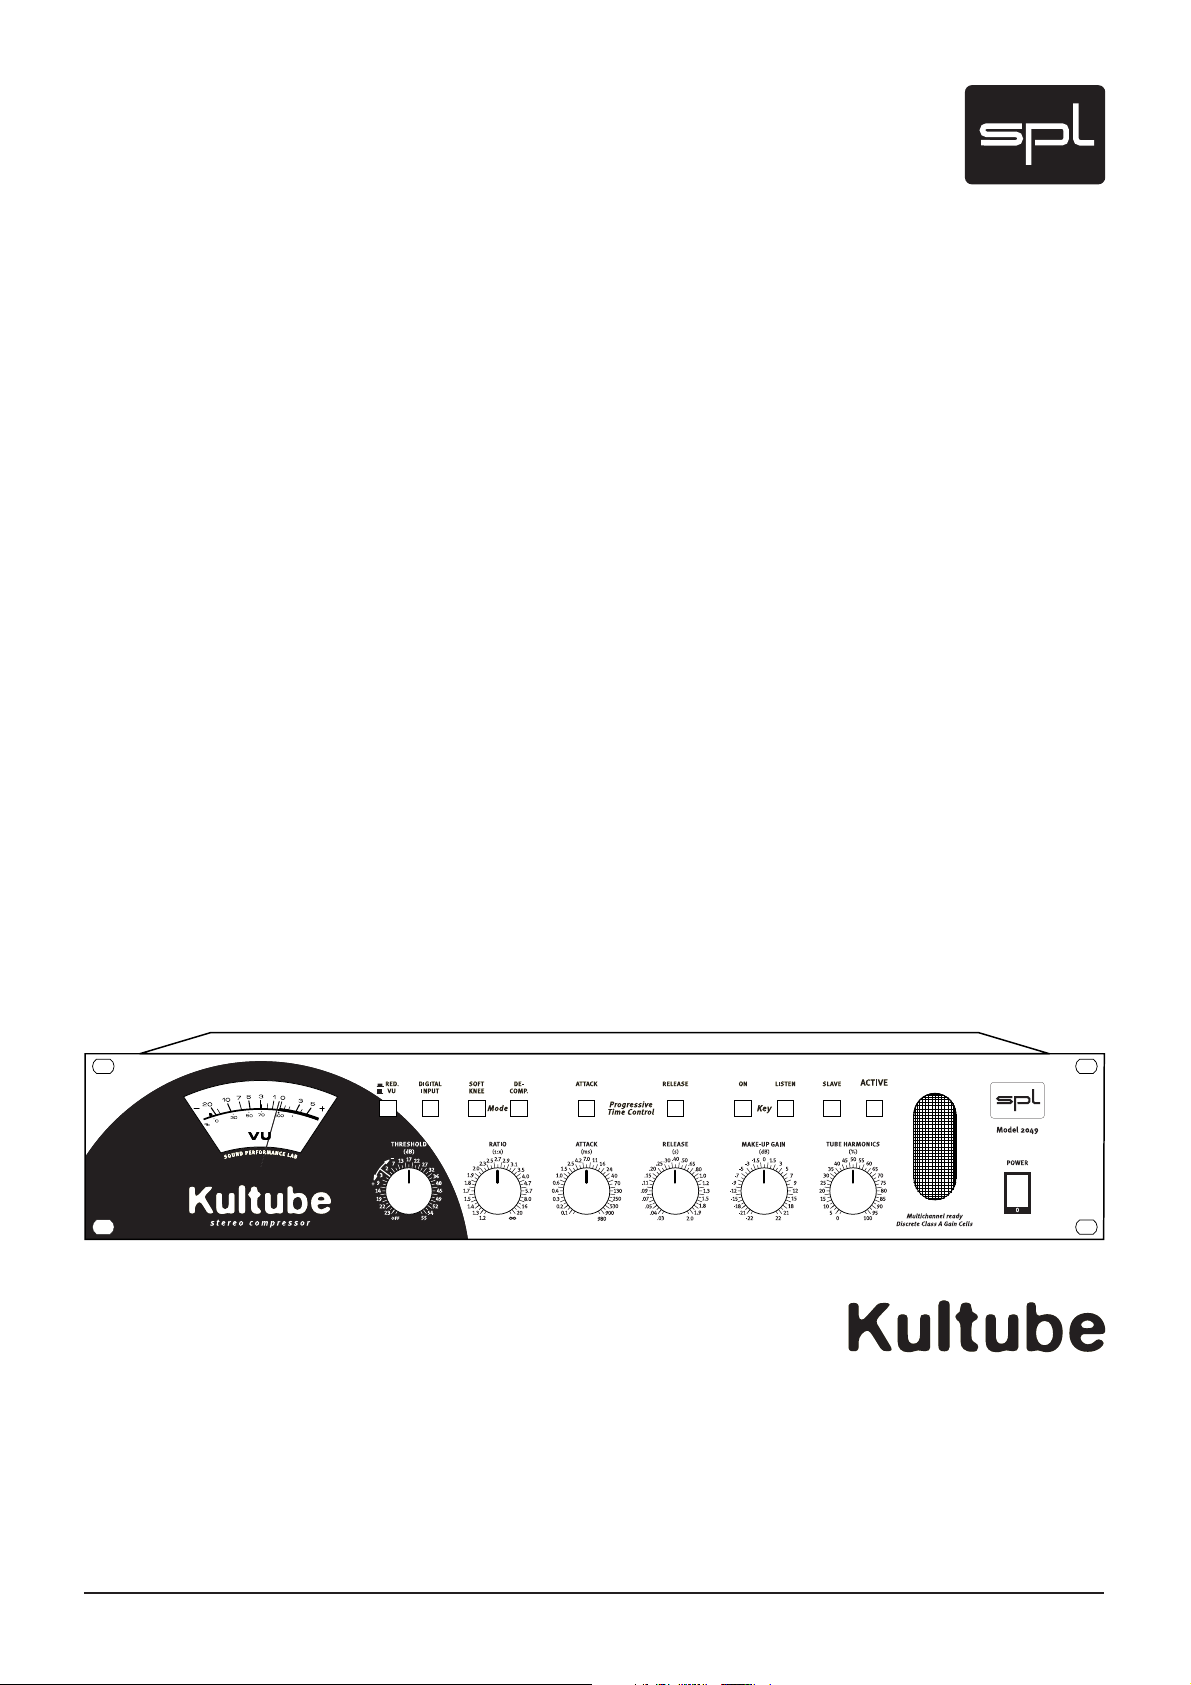
Kultube (Model 2049)
Manual
Version 1.1 – 11/2004
R & D: Ruben Tilgner
The information in this document has been carefully verified and is assumed
to be correct. However Sound Performance Lab (SPL) reserves the right to
modify the product described in this manual at any time. Changes without
notice. This document is the property of SPL and may not be copied or reproduced in any manner, in part or full without the authorization of SPL.
Limitations of Liability:
In no event will SPL be liable for any damages, including loss of data, lost
profits, cost of cover or other special, incidental, consequential or indirect
damages arising from the use of the unit, however caused and on any theory
of liability. This limitation will apply even if SPL or an authorized dealer has
been adviced of the possibility of such damage.
Sound Performance Lab
SPL electronics GmbH
P.O. Bo x 1 2 2 7
D- 41368 Niederkruechten, Germany
Phone +49 - 21 63 / 98 34 0
Fax +49 - 21 63 / 98 34 20
eMail: info@soundperformancelab.com
www.soundperformancelab.org
© 2004 SPL electronics GmbH. All Rights Reserved.
2
Page 3

Introduction .............................................................................................. 4
Particular Feature, Equipment ................................................................... 4
Hookup & Security Advices ........................................................................ 5
Power Supply ............................................................................................ 5
Connections
Rear Panel/Wiring ..................................................................................... 6
General Advices, Sockets & Switches ........................................................ 7
Control Elements
Red. /VU, Digital Input, Softknee, De Comp. ............................................. 9
PTC-Attack, PTC-Release, Key On, Key Listen, Slave, Active ....................... 9
Threshold, Ratio, Release, Make Up Gain .................................................. 11
Tube Harmonics ......................................................................................... 12
Operation – Understanding and enjoying the Kultube
The Threshold Control ............................................................................... 12
The Ratio Control ....................................................................................... 13
The Attack Control ..................................................................................... 14
Progressive Time Control – Attack ............................................................. 15
The Release Control ................................................................................... 16
Progressive Time Control – Release ........................................................... 17
Content
Applications – Using and enjoying the Kultube
Summed Signal Processing ....................................................................... 19
Single Track & Subgroup Processing .......................................................... 19
Sidechain .................................................................................................. 20
Multi Channel and 5.1 SurroundProcessings .............................................. 21
Specifications ............................................................................................ 22
Warranty .................................................................................................... 23
Your Notes ................................................................................................. 24
3
Page 4

Introduction
The Kultube is an extremely versatile compressor with a broad range of
control facilities that cover all typical compressor applications. From improved
stereo mixes in the “MIDI Studio“ to surround mastering with several devices
connected, all jobs can be undertaken to the highest degree of sound quality.
You can, for example, choose between the hard and soft-knee characteristic
and insert external devices via a side-chain input for external control. With the
unique “Progressive Time Control“ for attack and release, time constants can
be optimised by unique circuitry that reacts both to the input signal and to the
user settings - for example, fast impulses are intercepted by an attack time as
fast as 20 us. In master/slave mode, any number of devices can be controlled
from one master unit.
The adjustable tube saturation of the output stages combined with automatic output level adjustment can produce tube sound effects that range from
the delicate to the raucous whilst a useful decompressor mode can reanimate
overcompressed material (such as samples). The Kultube user has a unique
range of powerful compression tools always available, from subtle unobtrusive compression to very obvious ‘effect‘ compressions - it‘s all possible.
Used conventionally or as an effect, in the MIDI and project studio or in the
professional studio, the Kultube delivers outstanding audio quality with SPL‘s
acclaimed musicality and user-friendliness.
Applications cover those of a classic compressor for vocals and instruments,
in both mono and stereo, through to stereo operation for subgroup processing, stereo mastering, multi-channel or surround projects.
Particular Feature
SPL has developed discrete, very high performance gain cells that are used
instead of the usual VCAs and the Kultube is the first product to use them.
They ensure the highest level of musicality and clarity in signal processing
and demonstrate significantly improved distortion values over VCAs.
Equipment
• “Progressive Time Control“: user optimization of attack and release times
that work in conjunction with the unit‘s signal responsive circuitry to provide
the best attributes of manual and auto compressors at the same time
• Adjustable tube saturation with output level adjustment
• Selectable soft or hard knee characteristics
• Unique decompression mode
• Large VU meter displays gain reduction or (mono summed) output level
• Switchable side-chain inputs on the front panel
• Slave mode for multi-channel operation
4
Page 5

Hookup & Security Advices
Carefully select a place for setting up the Kultube. The unit should be situated
away from heat sources and direct sunlight. Avoid installation in environments
exposed to vibrations, dust, heat, cold or moisture. Keep the unit away from
transformers or motors or any other unit that could generate large variations
in power supply or cause electrical interferences. Do not install the unit in
proximity to power amplifiers or digital processors. You may consider placing
it in a rack containing other analog gear. Such placement can prevent interference from Word Clock, Smpte, MIDI, etc.
• Do not open the case. You may risk electric shock and may damage your
equipment.
• Leave repairs and maintenance to a qualified service technician. Should
foreign objects f all inside the case, contact your authorized dealer or suppor t
person.
• To avoid electric shock or fire hazards do not expose your unit to rain or
dampness.
• In case of lightning unplug the unit. Please unplug the cable by pulling on
the plug only; never pull on the cable.
• Never force a switch or knob.
• To clean the case use a lint-free cloth. Avoid cleaning agents as they may
damage the chassis. Manufactured in standard 19“ EIA format, it utilises
two rack units.
• Please support the back of the unit whenever it is being mounted into a
19 inch ra ck ( especially important when touring).
Built around a torroidal transformer, the power supply allows for a minimal
electromagnetic field with no hum or mechanical noise. The power supply‘s
output side is filtered by an RC circuit to extract noise and hums caused by
your power service. 6000 µf capacitors smooth out the positive and negative
half waves. An additional power supply filter is placed before the power switch
to eliminate disturbing influences.
All signal processing components are supplied with two separate current
regulators to exclude influences from the remaining components.
The 220 v current for the tube stage power is smoothed out with 200 µF
and stabilized precisely by current regulators. A current limiting ensures a
sparing warm up phase. The anode current is switched on after warm up. Both
measures ensure a remarkable extension of the tube‘s lifetime.
Power Supply
The supply voltage can be set to 230 V/50 Hz or 115 V/60 Hz. Check your
country‘s power requirements for the appropriate setting. An AC power cord
is included to feed the IEC-spec, 3-prong connector. Transformer, AC cord and
IEC-receptacle are VDE, UL and CSA approved.
The main fuse is rated at 315 mA for 230 v and 630 mA for 115 v.
Chassis ground and AC ground can be physically disconnected with the
“GND Lift” switch on the rear panel to eliminate hums.
5
Page 6
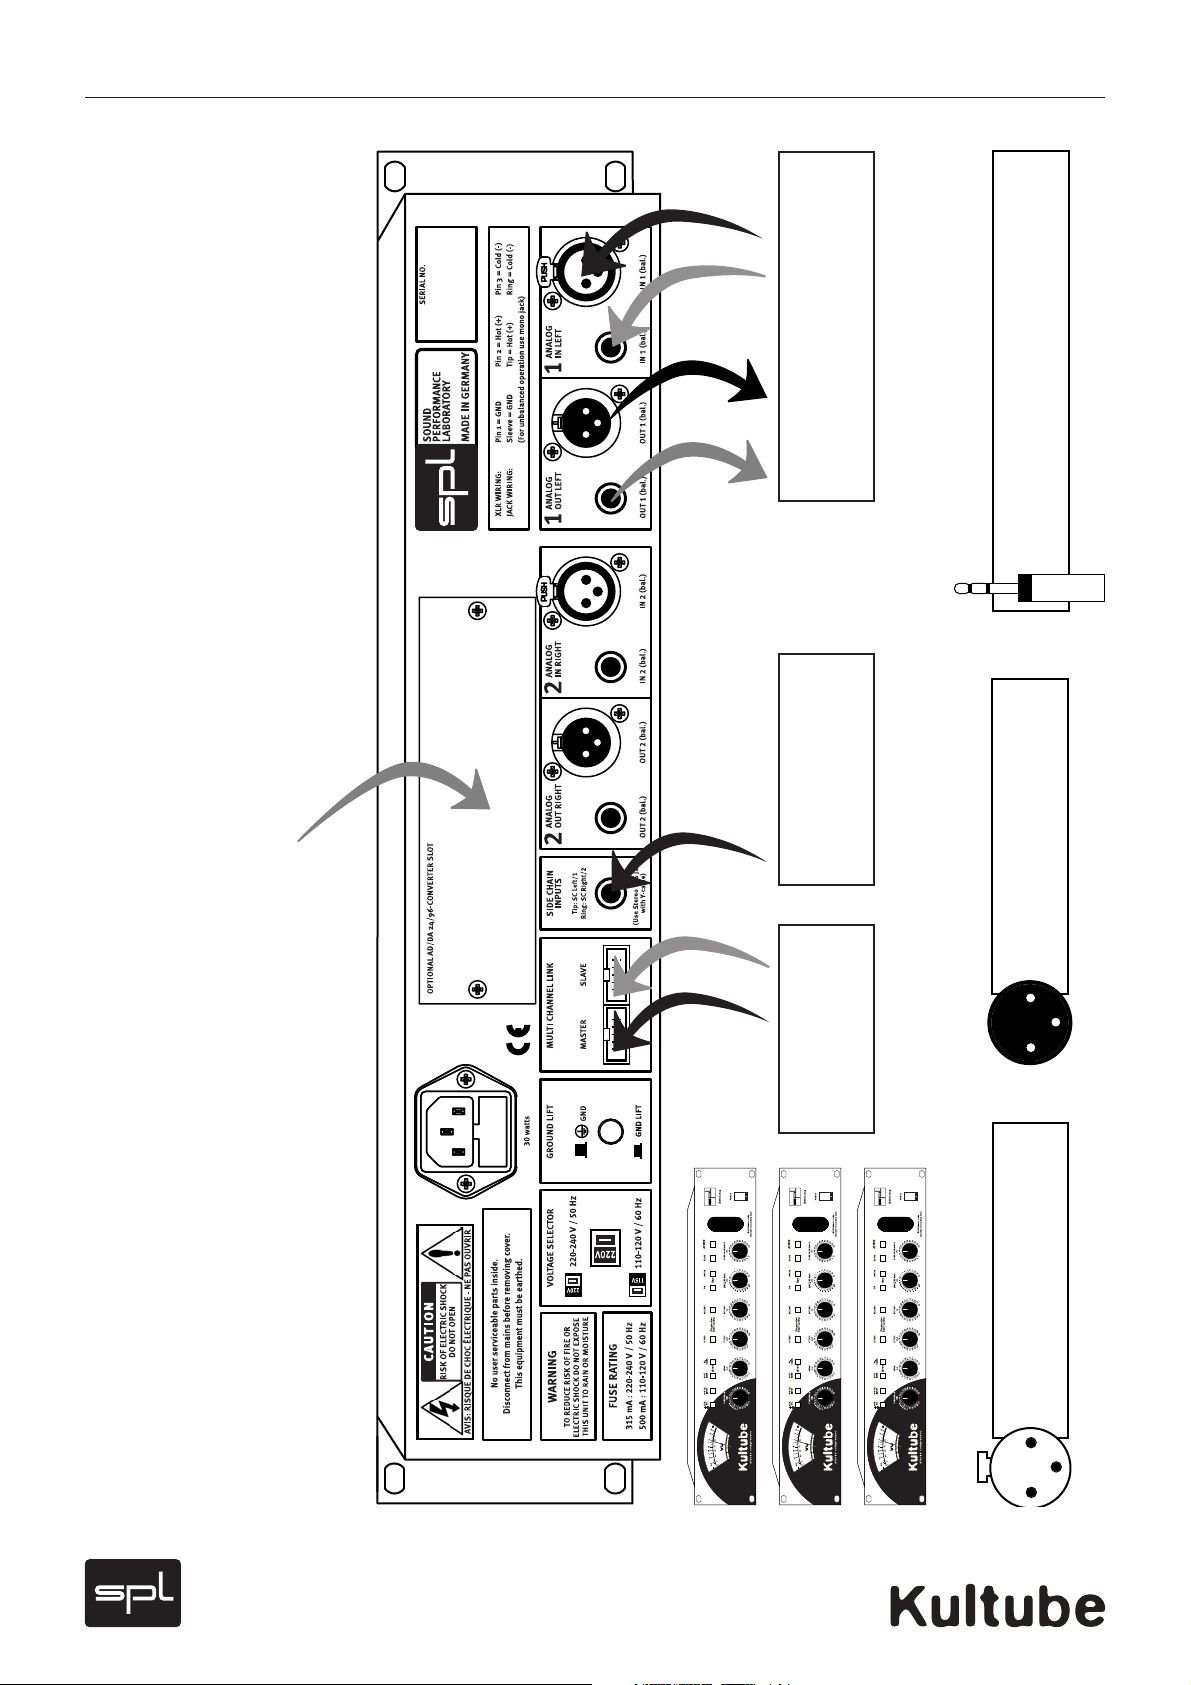
Connections
Rear Panel/Wiring
The Kultube can optionally be equipped with a 24 bit/96 kHz converter module
Connection to console:
Insert Sends > Analog Inputs
Insert Returns > Analog Outputs
Connector for external
processing units (e. g.
Equalizer)
Pin wiring Stereo Jack Connector:
Tip = Hot (+) Ring = Cold (-) Sleeve = GND
Pin wiring XLR Output:
1 = GND 2 = Hot (+) 3 = Cold (-)
2
3
1
Further Kultubes
as slaves in multi-
channel link mode
Pin wiring XLR Input:
1=GND 2=Hot (+) 3=Cold (-)
1
3
2
6
Page 7
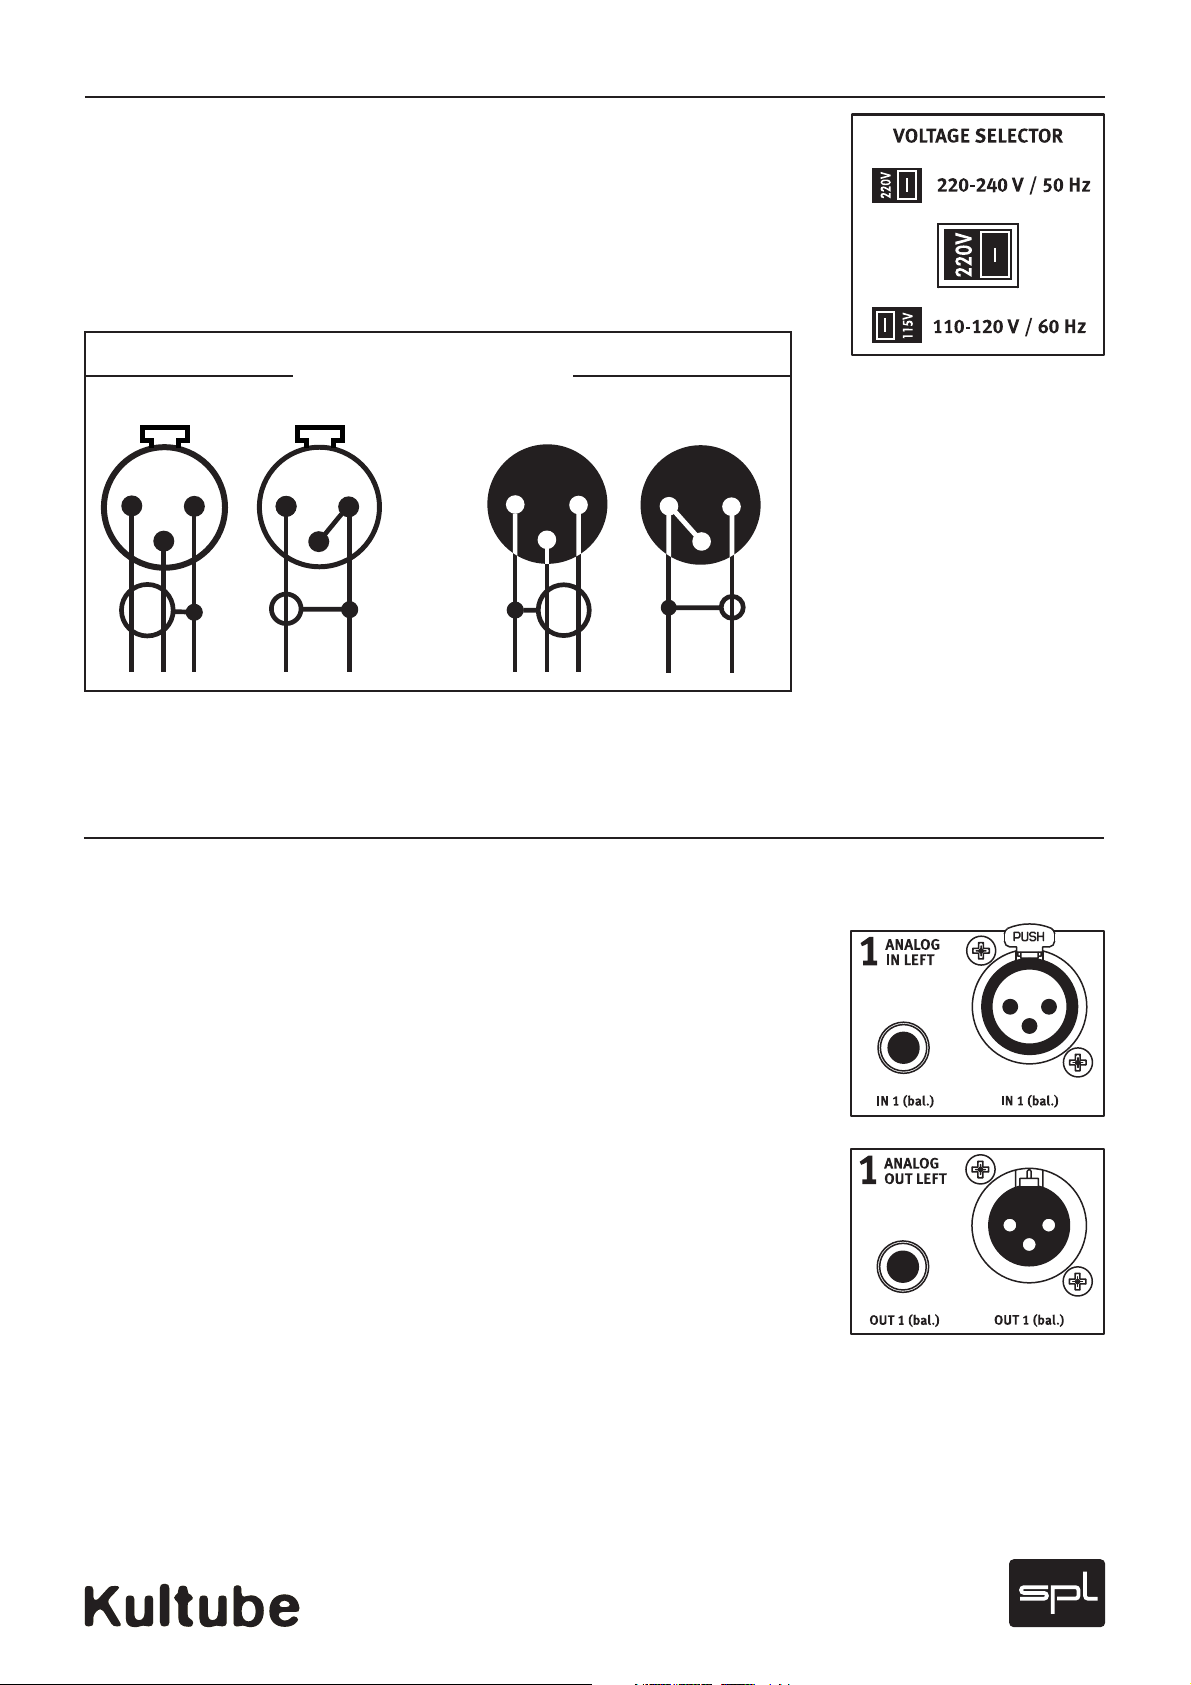
General Advices
Again, while Kultube‘s housing is EMV-proof and protects against
HF-interference, placement of the unit is very important since it amplifies
microphone signals as well as other unwanted signals. Before connecting the
Kultube or any other equipment turn off all power. Adjust the voltage setting
on the back so that it corresponds with the power conditions.
The following graph shows the correct wiring for connecting unbalanced
signals to the balanced XLR connectors:
Connections
Input
balanced
2
Alternatively unbalanced signals can be connected with mono Jack connec-
tors to the balanced Jack sockets.
1
3
unbalanced
2
1
3
balanced
1=GND
2=hot (+)
3=cold (-)
1
Output
2
3
unbalanced
1
2
3
Sockets & Rear Switch
Analog XLR and RCA jacks
Symmetrical XLR and RCA jacks are used for analog in- and outputs. An analog
mixing console is generally connected here (Insert Send/Return). Since the
RCA and XLR jacks are wired in parallel, unbalanced operation of the RCA
jack will have the same effect on the XLR jack and vice-versa. The Kultube is
configured for a nominal level of +4dBu and can handle an input level of max.
25 dBu, with max. +23 dBu available on the output. It is recommended to drive
the Kultube with a signal level of between 0 dBu and 12 dBu – this being the
optimum drive range for signal processing in which also the signal-to-noise
ratio is the best.
Connections
7
Page 8
Connections
Sockets & Rear Switch
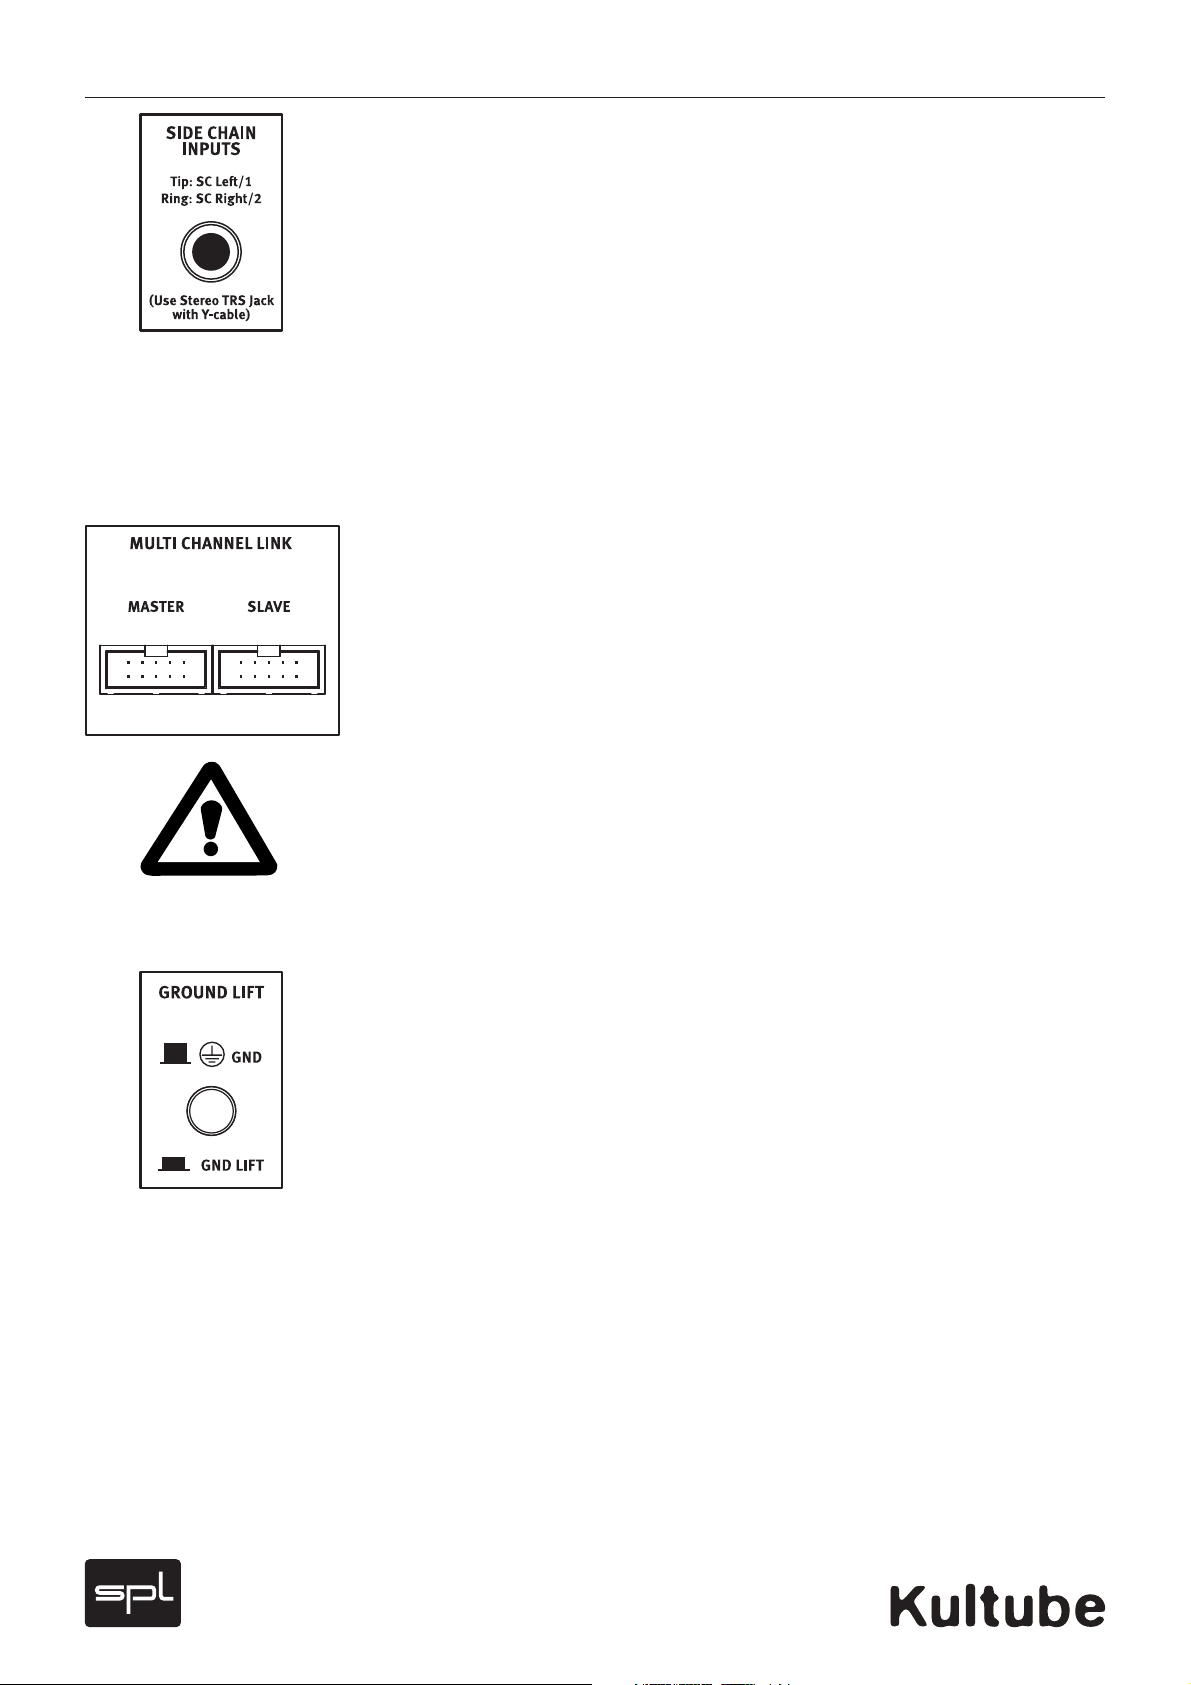
Sidechain inputs
This jack is used as a sidechain input for connecting an external audio signal
to control the Kultube (e. g. an equalizer for frequency dependent processing).
It is configured as a stereo RCA jack, with the left channel on the tip and the
right channel on the ring.
Ideally you should use a normal insert cable that combines a stereo RCA plug
(connected to the Kultube) and two mono RCA plugs (connected to the control
device). When using an equalizer you can connect its inputs to the unused
jack inputs on the Kultube. In this way both the equalizer and the Kultube get
the same signal, since the XLR and RCA jacks are wired in parallel.
To u se the sidechain input, activate the KEY ON switch on the front panel. To
monitor the signal, activate the KEY LISTEN switch. For other notes on using
the sidechain function, see the section on page 20.
Multi Channel Link
The MULTI CHANNEL LINK jacks can be used to connect multiple Kultube units
for multi-channel operation, so that they can be used together with a master
unit. Before connecting the link cable, determine which is the master unit and
connect the link cable to the MASTER jack. All linked devices are connected
only through the SLAVE jack.
CAUTION – NOTE WARNING: Always define only one master device! Never
connect more than one device through the MASTER jack – otherwise components may be destroyed!
After you have made the cable connections, the SLAVE switch on the front
panel of each slave unit must be activated. From now on all functions of all
slave units are controlled by the master.
See page 21 for additional information about multi-channel operation.
Hum? Ground Lift!
Hum can be eliminated with the GND/LIFT switch on the rear of the unit
(isolates the internal ground from chassis ground). Hum can occur for example
when the Kultube is connected to devices having a different ground potential.
Hum problems can also be avoided however by consistently installing balanced
wirings. For this reason the GND lift function is by default not activated.
8
Page 9

Switches
Please note also the information on various controls under „Understanding
and enjoying the Kultube“ starting page 12.
RED/VU
This switch changes the VU meter over to Gain Reduction mode. The indicator
needle then jumps to the 0 dB value and moves to the left with increasing
compression. The scaled values now refer to gain reduction.
If the RED/VU switch is not pressed, the VU meter indicates the output
level.
Control Elements
If neither the RED/VU nor the ACTIVE switch is pressed, the VU meter indicates the input level. In Slave mode gain reduction is controlled by the master
device.
DIGITAL INPUT
With the optionally available digital converter module you can use the DIGITAL
INPUT switch to select the converted digital signals as an input source for
the Kultube. The converter module thus adds digital in- and outputs to the
Kultube, allowing it to be easily integrated into a digital production chain.
SOFTKNEE
SOFTKNEE alters the slope of the compressor. Normally the unit operates in
hardknee mode, but pressing the SOFTKNEE switch places the unit in softknee mode.
Softknee provides generally less conspicuous and softer compression
results; the greatest possible loudness however can only be achieved in hardknee mode. The slope of the curves is shown on page 13.
DE-COMP:
This switch activates Decompression mode. This mode causes the compressor
to work in reverse: All signals above the preset threshold become louder, and
the Ratio controller determines the intensity of the volume increase. Please
note that the Make-Up controller now works exactly in reverse: the signal
becomes softer when the controller is turned to the right and louder when
turned to the left.
9
Page 10

Control Elements
Switches
Progressive Time Control: ATTACK
This function allows to switch in an adjustable automatization of the time
constants which is set up with the ATTACK control.
Put simply you can now influence the compression intensity for rapid signal
increases, or when the function is turned off determine the time until a certain
compression level is reached.
Progressive Time Control: RELEASE
The release times can also be switched to automatic based on the Release
control: the latter then determines an average value to return the release to.
Use of the Progressive Time Control is especially recommended with complex
summed signals.
KEY ON
KEY ON allows you to use an external signal as the control source for the
compressor.
This signal is brought in to the SIDECHAIN INPUT jack on the rear of the unit.
Now the control activity of the compressor is determined only by the external
signal.
KEY LISTEN
Use the KEY LISTEN switch to monitor the external sidechain signal. This
makes it easy for example to monitor and adjust a connected equalizer.
Whereas the VU meter normally indicates the in- and output level, enabling
KEY LISTEN causes the meter to indicate the sidechain signal. This provides a
quick way to check also whether a signal is present.
SLAVE
This allows you to switch the Kultube to Slave mode so that it can be controlled
from the Master device. All the function except for TUBE HARMONICS are now
controlled by the Master. Both the Master and all the Slave units now get the
same control signal. Also the Slave unit signals are evaluated for analysis.
ACTIVE
10
The ACTIVE switch turns on the Kultube. If the device is not turned on, the
input signal is fed directly to the output jacks via a relay hard bypass. The
ACTIVE switch thus allows for a quick A/B comparison. When the Kultube
is turned on the LED on the ACTIVE switch flashes to indicate the warm-up
process for the tubes. The unit is ready when the LED no longer flashes.
Page 11

Controls
THRESHOLD
The Threshold control determines the compressor threshold value. The value
scale for the THRESHOLD control indicates the level in dBu. Turning fully CCW
provides no control, and fully CW provides compression starting at a level of
approx. –40 dBu.
RATIO
The RATIO control is used to set the ratio between the original signal and the
compressed signal. A ratio of 1:4 means that a level increase of 4 dB on the
input results in an output change of 1 dB. The more the control is turned CW,
the more ‘dense’ the sound becomes. Turned fully CW the unit works as a
limiter.
ATTACK
The Attack control determines the time the compressor needs to achieve
a reduction of 63% at a level jump of 20 dB. When turned fully CCW this
time is approx. 100 ms, and turned fully CW the time is approx. 0.9 s. When
Progressive Time Control is enabled the effect is somewhat different: now you
are determining the degree to which the fast signal jumps are compressed,
whereas the attack time is automatically optimized (adapted). Progressive
Time Control mode is often advantageous , since the attack time is only as
fast as is necessary for the respective signal. The result is considerably unobtrusive and thus more musical compression behavior without undesired sideeffects.
Control Elements
RELEASE
The RELEASE control is used to set the time the compressor needs to back off
by 63% to the original value. Turned fully CCW this time is approx. 30 ms, or
approx. 2 s for fully CW. If Progressive Time Control is enabled, the Release
control is used to set the average value to which the automatic release time
is set back. The more the control is turned CW, the slower the averaging. This
gives much better results than with the conventional method of rigid release
time control especially with complex musical material.
MAKE UP GAIN
The MAKE UP GAIN controller is used to change the output level within a
range of approx. –22 dB to +22 dB. For compression you thus set the value
that is indicated on the VU meter in GAIN REDUCT MODE. Actuating the
ACTIVE switch makes the volume increase perceptible. With the built-in digital
converter option the MAKE UP GAIN control is also used to set the level for
the converter. In DE-COMP mode the MAKE UP GAIN control works exactly in
reverse: Turning fully CW results in a damping of –22 dB, whereas fully CCW
results in a gain of +22 dB.
11
Page 12

Control Elements
Operating
Controls
TUBE HARMONICS
The TUBE HARMONICS control allows you to drive the tube output stage infinitely variable to desperation: the more the control is turned in, the further
the tube gets into saturation and the more harmonics are produced.
The output level of this stage is automatically adjusted, ti.e. it keeps virtually
the same level as the input signal. This allows you to to change the entire
sonic behavior of the tubes with just one control.
Understanding and enjoying the Kultube
In this section we will describe the individual parameters of the Kultube in
greater and use diagrams to enhance your understanding of how and why the
Kultube works.
The Threshold control
Fig. 1,
„Threshold Input vs. Output“
This parameter is used to determine at which level (or loudness) the unit
even responds by specifying a corresponding threshold value. Sometimes you
only need to process individual peaks, and at other times you need to take
more drastic action and set the threshold lower.
Fig. 1 shows the curves for various threshold settings. The X-axis represents the input level, from –50 dBu to +22 dBu. The Y-axis shows the output
level. You can see a definite change where the compressor is starting to work.
Before this point the ratio between the in- and output is exactly the same, so
that for example an input level of –30 dBu will also be present on the output.
12
In the area where the curve turns sharply the ratio is approx. 1:4. This means
that only a fourth of the dynamic gain is present on the output. A level jump of
8 dB will be reflected by just 2 dB on the output.
Page 13

Understanding and enjoying the Kultube
The Ratio control
As indicated above, this determines the ratio between the in- and output
level above the threshold setting. The preset value specifies how the input
dynamics should behave with respect to the output: a ratio of 1 to 2 means
that only half of the dynamic change will be present on the output. At 10 dB of
dynamics there will only be 5 dB on the output, whereas using a ratio of 1:8
means 10dB becomes just 1.25 dB, etc.
In short, this determines how much dynamics is allowed to remain. If the
compressor is used to process vocals with very large variations in loudness,
you would select a high ratio value (1:5 – 1:10) to produce a well-balanced and
intelligible signal. When processing summed signals on the other hand, very
high settings will be used in part to process only the peaks of the signal. This
means careful setting of the threshold control is very important.
Operating
Fig. 2,
„Ratio Hardknee“
The slope of the compressor curve may be straight with a sudden rise (hardknee, Fig. 2), but it may also show a softly curved slope in which compression
begins slowly (soft-knee, Fig. 3).
Fig. 3,
„Ratio Softknee“
13
Page 14

Operating
Understanding and enjoying the Kultube
In the latter case the ratio changes depending on the in0ut signal. As the
preset threshold value is approached the ratio is comparatively small (1:1.5)
and doesn’t reach the preset maximum value until high input levels are
present. The result is much less conspicuous compression, since the process
does not kick in as suddenly as with hard-knee mode. On the other hand,
hard-knee results in greater loudness and density of the program material.
When using the de-compressor the ratio is exactly reversed, i.e. an input
level change of 2dB for example results in an output of 4dB. The printed ratio
values cannot be used here, since they clearly deviate. You should therefore
use the de-compressor with care, since it will always make the signals louder.
Setting of the threshold control should also be done with caution.
The Attack control
Among the most important functions of a compressor is controlling the
time constants. The attack control determines one of these times, namely the
kick-in behavior of the compressor. In general terms this determines the time
starting at which the signal should be reduced. This allows you to specify how
rapid signal jumps are handled.
Fig 4
„Attack Normal“
How this look with a sinus-burst (test signal) is shown in Fig. 4.
Here you can clearly see that the first part of the burst signal is unprocessed
and only responded to when the settings are faster. When attack times are
set very short, the compressor responds to even the most rapid transients,
so that the peaks are captured. With slower settings transients are allowed to
pass untouched – a kind of leveling in which the compressor responds more
to the average level. If you are processing a drum loop for example, changing
the attack time can cause a few transients to be passed through. Changing
the attack control now determines how many transients remain unprocessed.
14
Using very short values (0.5 ms) allows in part just a half-wave of a signal to
remain unprocessed, whereas medium values (10ms) result in a whole series
of waveforms to be ignored. This type of response is also frequently used to
make transients in a signal more clearly audible.
Page 15

Understanding and enjoying the Kultube
Processed in this way, drums get more self assertion and sound ‚faster’.
The best setting is not always easy to find, since you usually need to find a
compromise. Very fast settings run the risk of producing audible distortions
– especially in the case of low frequencies, since the compressor now tries
to control each waveform rise. The corresponding control signal assumes a
“saw-tooth” form which distorts the audio signal.
To suppress this effect, you would have to again increase the attack time
until the distortions no longer occur. In normal operation the Kultube attack
control works exactly as just described. There is a unique feature of the
Kultube however that greatly expands the compression possibilities by providing special technologies to achieve optimum results in all situations: the
Progressive Time Control (PTC), which is described in the following.
Progressive Time Control (Attack)
Simply put, the Progressive Time Control (PTC) is an adjustable automatic
process that works as follows.
The usual (rigid) attack control of a compressor functions, as described
above, such that a resistance value can be varied within the controller circuit
to determine the control response time. The main drawback to this, particularly when it comes to complex musical material, is that the setting only
applies to a moment, but is not ideal for every moment.
Operating
Automatic setting of the attack time (in response to the input signal) has
the advantage of making the optimum setting for each moment. For this the
changing of the resistance value that determines the attack times needs to be
automated. A special circuit determines the momentary ideal attack time and
sets the VCF appropriately. These times can vary between 20 µs and 980 ms
and are set in fractions of a second.
This automatic process is thus a guarantee for perfect compression results,
but the PTC in the Kultube goes even a step further: The attack control can be
used to determine the intensity with which fast signal jumps are compressed
in automatic mode. When you change the attack time using PTC, as for
example when processing drum sounds, you can specify the handling of rapid
signal jumps while at the same time ensuring that the attack behavior is not
affected. A drum loop thus retains its original sonic character while still appearing denser.
15
Page 16

Operating
Fig. 5,
„Attack PTC“
Understanding and enjoying the Kultube
Fig. 5 shows the control behavior using a sinus burst as an example. In various
settings it is clearly to see that the burst signal remains almost unchanged in
its form; only the intensity changes.
Fig. 6,
„Release Normal“
The PTC feature can provide outstanding results not only for percussive
signals but also for many other musical signals (vocals, guitar, bass, horns,
synthesizers, etc.), since compression is used with the greatest efficiency, is
unobtrusive and sounds „natural“. You should feel free to jump right in to
experimenting with the PTC and find out what it can do for you.
The Release control
The Release control is used to determine how long the compressor needs
after a reduction to drop back to the original value. How it works is shown in
Fig. 6.
16
Here you see the same sinus burst as for the attack diagrams, but just the
last burst-on part is shown. You can clearly see how the times within which
the original is reached change with various settings of the release control.
Page 17

Understanding and enjoying the Kultube
The release parameter is also for the most part responsible for unobtrusive
compression. This means it is hard to find the perfect setting as with the Attack
control – particularly in the case of complex summed signals a fixed release
time may hardly be usable. As with the attack times you must always find
a compromise: for very fast and short signal peaks (e.g. drums and percussion) you will want to select short release times (100 ms). But this setting is
usually unusable in all other parts of the musical piece, since now every single
dynamic change will be processed – which will quickly sound very rough and
distorted.
By selecting longer release times (1 s), the remaining sections will sound
quieter, but when short, loud peaks occur your music will start pumping. Here
again the PTC will yield better results.
Progressive Time Control (Release)
Here again we are talking about an automatic release that can be influenced by the release control. When PTC release control is activated, the
Kultube calculates an average of the levels that the music signal is providing.
Automatic control of the release time now refers to this average value, so that
while short, loud peaks are handled correspondingly fast, when it comes to
complex material (summed) the system will not respond to each and every
little peak near the average.
Operating
Furthermore the PTC allows you to affect the averaging: the faster the
release time in PTC mode, the more signal components are included in the
processing. This means you will want to select rather slower release values
for summed signals, whereas drum processing for example will yield the best
results using fast settings.
How various settings for a drum loop might look is shown in Figs. 7a-c. Line
A represents the control voltage for the discrete gain cell (instead of VCAs),
Line B the rectified musical signal, and C the averaging.
AB C
Fig. 7a
17
Page 18

Operating
Fig. 7b
Fig. 7c
Understanding and enjoying the Kultube
AB C
A
For settings with larger averages the change in the release time is easy to
recognize. With very small values the control voltage for the Gain Cell “sticks”
to the rectified signal and works almost like an envelope follower.
Fig. 8 on the next page shows the various effects of different release time
settings on a sinus burst, although the principle is not as easily seen here.
These changes are most clearly heard in a drum loop with lots of dynamics.
Tur ned fully CCW (fast averaging) the drums pump and you get lots of volume,
whereas turned fully CW the control is unobtrusive, but you gain less loudness. For summed signals a mid-range setting (0.8 s to 1.5 s) is therefore
recommended. As in the case o f at ta ck co nt rol w it h PTC, release control makes
sense not just for sum processing, but can also be used to outstanding advantage with other signal types such as bass, percussion, effects or that at least
as problematic as widespread signal type “untrained speaker”, while at the
same time greatly simplifying your processing.
BC
18
Page 19

Understanding and enjoying the Kultube
Operating
Fig 8 „Release – PTC“
Using and enjoying the Kultube
Summed signal processing
The main application area for the Kultube is in stereo summed signal compression together with an analog mixing console.
Here the Kultube is looped into the insert paths („Insert Send/Return“).
The insert paths are generally in front of the console master fader so that
the compressor is driven independent of the master fader settings. If additional effects devices (such as EQ) are located in the same insert loop, the
Kultube may be connected either in front or behind – there is no certain order
required.
Single track and subgroup processing
Another important application is single track processing (vocals, bass,
guitar, strings etc.). The Kultube is looped in the insert paths of the respective channels. Processing is then usually done during mixdown. The same
applies of course to subgroup processing for selectively compressing individual instrumental groups (such as drums).
Applications
Console:
Inserts Send/Return
Single tracks and
subgroups:
Channel inserts
19
Page 20

Applications
Using and enjoying the Kultube
Sidechain
External
compression control
Frequency-selective
Compression
De-Essing
Ducking:
Automatically a desired
level relation between two
signals (e.g. music and
microphone)
Ducking &
De-Compression:
Transferring rhythmic
structures to any signal
Use of the SIDECHAIN inputs expands the possibilities for controlling
compression. A typical application is frequency-selective compression,
whereby an external equalizer is used to raise the frequencies at which the
compressor should respond or to filter out the frequency band you wish the
compressor to ignore.
If a summed signal has a lot of bass for example that you want to preserve,
you often run into the problem that the compressor responds strongly to these
frequency ranges, making it difficult to process mid- and high frequencies.
By using the equalizer to reduce bass frequencies, the Kultube will no longer
respond to them as intensely and you can address the other ranges with no
difficulty.
Yet another typical application is de-essing: The corresponding frequency
range (around 6-8kHz) is raised so that the compressor engages precisely
there to reduce the sibilance. To monitor the filtered signal (i.e. the signal
supplied by the EQ), press the KEY LISTEN switch on the front panel. Now you
can easily monitor the EQ setting without any additional measures. As soon as
you need to use the signal in the sidechain, simply press the KEY ON switch.
Another interesting and useful feature is ducking, whereby the sidechain
is fed for example with a microphone signal. The music volume is reduced
whenever speech is introduced (great for DJs). Other very interesting effects
can be obtained by turning on decompression mode with the ducking application. To do this, turn the MAKE UP GAIN controller to full clockwise (means
lower in this mode!) and use the Threshold and Ration controllers to determine the desired processing point. Now the loudness of the music signal is
controlled by the sidechain, i.e. the louder the sidechain, the louder the music
signal becomes. This technique allows you to create totally new sounds! Here
is just one example: feed a synthpad to the audio input of the Kultube and a
drum loop to the sidechain. The synthpad now gets the same rhythm as the
drum loop!
Note on the VU meter: if the meter indicates output level, pressing the KEY
LISTEN switch will show the signal from the sidechain input
20
Page 21

Using and enjoying the Kultube
Multi-channel and 5.1 surround applications
Applications
The Kultube lets you use the MULTI CHANNEL LINK function to link any number
of devices for multi-channel or surround applications. Simply define a master
for controlling all the other units (slaves). Each slave must be defined as
a slave using the SLAVE switch on the front panel. All functions except for
TUBE HARMONICS output control are not controlled by the master: ACTIVE,
THRESHOLD, RATIO, ATTACK, RELEASE, MAKE-UP GAIN, SOFT KNEE, DE-COMP
and PTC. Please note that the PTC lights on the slaves will not come on even
though the master activates the function. The TUBE HARMONICS control must
be set individually on each unit, since this control is not affected by a control
voltage – such “remote control” would be extremely complex and would be
far out of proportion to the benefit, especially since this setting is generally
not changed continuously anyway.
The data from all slave units are also used to create control voltages, so that
all units operate with the same control voltage.
We recommend proceeding as follows when working with 5.1 surround:
The master unit is responsible for the front left and right channels. A second
Kultube processes the rear surround channels (SL & SR) and is operated in
slave mode. The third unit (2nd slave) is used to process the center and subchannel. All the settings are made on the master, with the ACTIVE switch used
to conveniently select all the devices. To process certain channels separately
you need to deactivate the SLAVE switch only on the corresponding device.
Multi Channel Link:
Multi channel or
surround processing in
master/slave-mode
Recommended confi -
guration for 5.1 processing
21
Page 22

Specifi cations
Measurements
Frequency range (100 kHz = -3 dB) .......... 10 Hz-150 kHz
Common mode rejection (@ 0 dBu) ......... 1 kHz: › 80 dB / 10 kHz: › 65 dB
THD & N (@ 0 dBu) .................................. › 82 dB
S/N (A-weighted) .................................... 90 dBu
Inputs
Input impedance ..................................... Line: 20 kOhm
Max. input level ...................................... Line: +22 dBu
Outputs
Max. output level (XLR & Jack) ................ +22 dBu
Output impedance ................................... ‹ 50 Ohm
Power Supply
Toroidal transformer ............................... 30 VA
Fuses ...................................................... 230 V/50 Hz: 500 mA
... 115 V/60 Hz: 800 mA
Dimensions
Standard-EIA-Housing (19 inch/2U) ......... 482 x 88 x 210 mm
Weight ..................................................... 4,3 kg
22
Page 23

SPL electronics GmbH (hereafter called SPL) products are warranted only in
the country where purchased, through the authorized SPL distributor in that
country, against defects in material or workmanship. The specific period of
this limited warranty shall be that which is described to the original retail
purchaser by the authorized SPL dealer or distributor at the time of purchase.
SPL does not, however, warrant its products against any and all defects:
1) arising out of materials or workmanship not provided or furnished by SPL,
or
2) resulting from abnormal use of the product or use in violation of instruc-
tions, or
3) in products repaired or serviced by other than authorized SPL repair
facilities, or
4) in products with removed or defaced serial numbers, or 5) in components
or parts or products expressly warranted by another manufacturer.
SPL agrees, through the applicable authorized distributor, to repair or
replace defects covered by this limited warranty with parts or products of
original or improved design, at its option in each respect, if the defective
product is shipped prior to the end of the warranty period to the designated
authorized SPL warranty repair facility in the country where purchased, or
to the SPL factory in Germany, in the original packaging or a replacement
supplied by SPL, with all transportation costs and full insurance paid each
way by the purchaser or owner.
Warranty
All remedies and the measure of damages are limited to the above services.
It is possible that economic loss or injury to person or property may result
from the failure of the product; however, even if SPL has been advised of this
possibility, this limited warranty does not cover any such consequential or
incidental damages. Some states or countries do not allow the limitations or
exclusion of incidental or consequential damages, so the above limitation may
not apply to you.
Any and all warranties, express or implied, arising by law, course of dealing,
course of performance, usage of trade, or otherwise, including but not limited
to implied warranties of merchantability and fitness for particular, are limited
to a period of 1 (one) year f rom either the date of manufacture. Some states or
countries do not allow limitations on how long an implied warranty lasts, so
the above limitations may not apply to you.
This limited warranty gives you specific legal rights, and you may also have
other rights which vary from state to state, country to country.
SPL electronics GmbH
41372 Niederkruechten, Germany
23
Page 24

Kultube – Manual
Your notes
..................................................................................
..................................................................................
..................................................................................
..................................................................................
..................................................................................
..................................................................................
..................................................................................
..................................................................................
..................................................................................
..................................................................................
..................................................................................
..................................................................................
..................................................................................
..................................................................................
..................................................................................
..................................................................................
..................................................................................
..................................................................................
24
..................................................................................
..................................................................................
..................................................................................
..................................................................................
 Loading...