

Page 1

NA105
Car Audio System Player
INSTRUCTION MANUAL
CD MP3 WMA USB AUX-IN BT
1A USB Universal Charge
Page 2

Safety
WARNING
Stop the car before operating the unit.
Important to know...
To prevent a short circuit, never put or leave any metallic objects
(such as coins or metal tools) inside the unit.
Caution: Adjust the volume so that you can hear sounds
outside the car. Driving with the volume too high may cause an
accident.
Condensation: When the car is air-conditioned, moisture may
collect on the laser lens. This may cause disc read errors. In this case,
remove the disc and wait for the moisture to evaporate.
The illustrations in this manual are examples used to explain more
clearly how the controls are used. Therefore, what appears on the
illustratio ns may di ffer from what appears on the actual
equipment.
If you experience problems during installation, consult your
Nakamichi dealer.
When you purchase external components, check with your
Nakamichi dealer to make sure that they work with your model and
in your area.
Maintenance
Cleaning the unit: Wipe off the dirt on the panel with a dry silicon or
soft cloth. Failure to observe this precaution may result in damage to
the monitor or unit.
Cleaning the connector: Wipe off dirt on the connector of the unit and
faceplate. Use a cotton swab or cloth.
Note: This equipment has been tested and found to comply with the
limits for a Class B digital device, pursuant to Part 15 of the FCC Rules.
These limits are designed to provide reasonable protection against
harmful interference in a residential installation. This equipment
generates uses and can radiate radio frequency energy and, if not
installed and used in accordance with the instructions, may cause
harmful interference to radio communications. However, there is no
guarantee that interference will not occur in a particular installation.
If this equipment does cause harmful inter ference to radio or
television reception, which can be determ ined by turning the
equipment off and on, the user is encouraged to try to correct the
interference by one or more of the following measures:
Reorient or relocate the receiving antenna.
Increase the separation between the equipment and receiver.
Connect the equipment into an outlet on a circuit different from
that to which the receiver is connected.
Consult the dealer or an experienced radio technician for help.
FCC Radiation Exposure Statement
This equipment complies with FCC radiation exposure limits set
forth for an uncontrolled environment. This equipment should be
installed and operated with minimum distance 20 cm between the
radiator & your body.
FCC STATEMENT
This device complies with Part 15 of the FCC Rules. Operation is
subject to the following two conditions:
(1) This device may not cause harmful interference.
(2) This device must accept any interference received, including
interference that may cause undesired operation.
Changes or modifications not expressly approved by the party
responsible for compliance could void the user's authority to operate
the equipment.
EN 1
Page 3

Preparation
What’s in the box
How to attach/detach the faceplate
Attach Detach
1
2
Do not expose the faceplate to direct sunlight, excessive heat, or
humidity. Also avoid places with too much dust or the possibility of
water splashing.
Keep the faceplate in its casing while detached.
The faceplate is a precision piece of equipment and can be
damaged by shocks or jolts.
To prevent deterioration, do not touch the terminals of the unit and
faceplate with your fingers.
2
How to reset your unit
Check and identify the contents of your package:
1
Main unit
(with sleeve)
Carrying case
(for front panel)
Disassembly tool
(2pcs)
Front panel
Screw x 4pcs
Remote
control
Trim plate
ISO male
connector
User manual
1
3
2
Reset
If this unit fails to operate properly, press the reset button.
The unit returns to factory settings when the reset button is pressed.
2 EN
Page 4

Installation / Connection
Basic Procedure
1 Remove the key from the ignition switch, then disconnect
the terminal of the car battery.
2 Make proper input and output wire connections.
3 Install the unit to your car.
4 Reconnect the terminal of the car battery.
5 Reset the unit.
W arning
The unit can only be installed in a car with a 12 V DC power supply, negative
ground.
If you connect the ignition wire (red) and the battery wire (yellow) to the car
chassis (ground), you may cause a short circuit, that in turn may start a fire.
Always connect those wires to the power source running through the fuse box.
Disconnect the battery’s negative terminal and make all electrical
connections before installing the unit.
Insulate unconnected wires with vinyl tape or other similar material. To
prevent a shor t circuit, do not remove the caps on the ends of the
unconnected wires or the terminals.
Be sure to ground this unit to the car’s chassis again after installation.
If the power is not turned ON, the speaker wire may have a short-circuit or
touched the chassis of the vehicle and the protection function may have
been activated. Therefore, the speaker wire should be checked.
W iring Connection
Exter nal Mic
Caution
If your car’s ignition does not have an ACC position, connect the ignition
wires to a power source that can be turned on and off with the ignition key. If
you connect the ignition wire to a power source with a constant voltage
supply, as with battery wires, the battery may die.
Install this unit in the console of your vehicle. Make sure the faceplate will
not hit the lid of the console (if any) when closing and opening.
After the unit is installed, check whether the brake lamps, blinkers, wipers,
etc. on the car are working properly.
Mount the unit so that the mounting angle is 30° or less.
If the fuse blows, first make sure the wires are not touching to cause a short
circuit, then replace the old fuse with one that has the same rating.
Connect the speaker wires correctly to the terminals to which they
correspond. The unit may be damaged or fail to work if you share
the wires or ground them to any metal part in the car.
When only two speakers are being connected to the system, connect the
connectors either to both the front output terminals or to both the rear
output terminals (do not mix front and rear).
Mounting and wiring this product requires skills and experience. For
safety’s sake, leave this work to professionals.
If you experience problems during installation, consult your Nakamichi
dealer.
Rear RCA Output (Left)
Rear RCA Output (Right)
L
R
REAR
FM/AM Antenna Socket
Antenna Jack n( ot included)
ISO Connector
1234567
B
A
8
5 7
8
4
ISO Connector Wiring Chart
Pin Color and function Pin Color and function
A4
A5
A7
A8
Yellow
Blue
Red
Black
Battery(+)
Connect to system control term inal
of the power AMP or auto antenna
relaycontrol terminal(Max 150MA 12VDC)
Ignition(ACC)
Ground
B1/B2
B3/B4
B5/B6
B7/B8
Violet
Grey
White
Green
+
/ Violet/Black
/ Grey/Black
+
+
/ White/Black
+
/ Green/Black
EN 3
Right rear speaker
Right front speaker
Left front speaker
Left rear speaker
Page 5
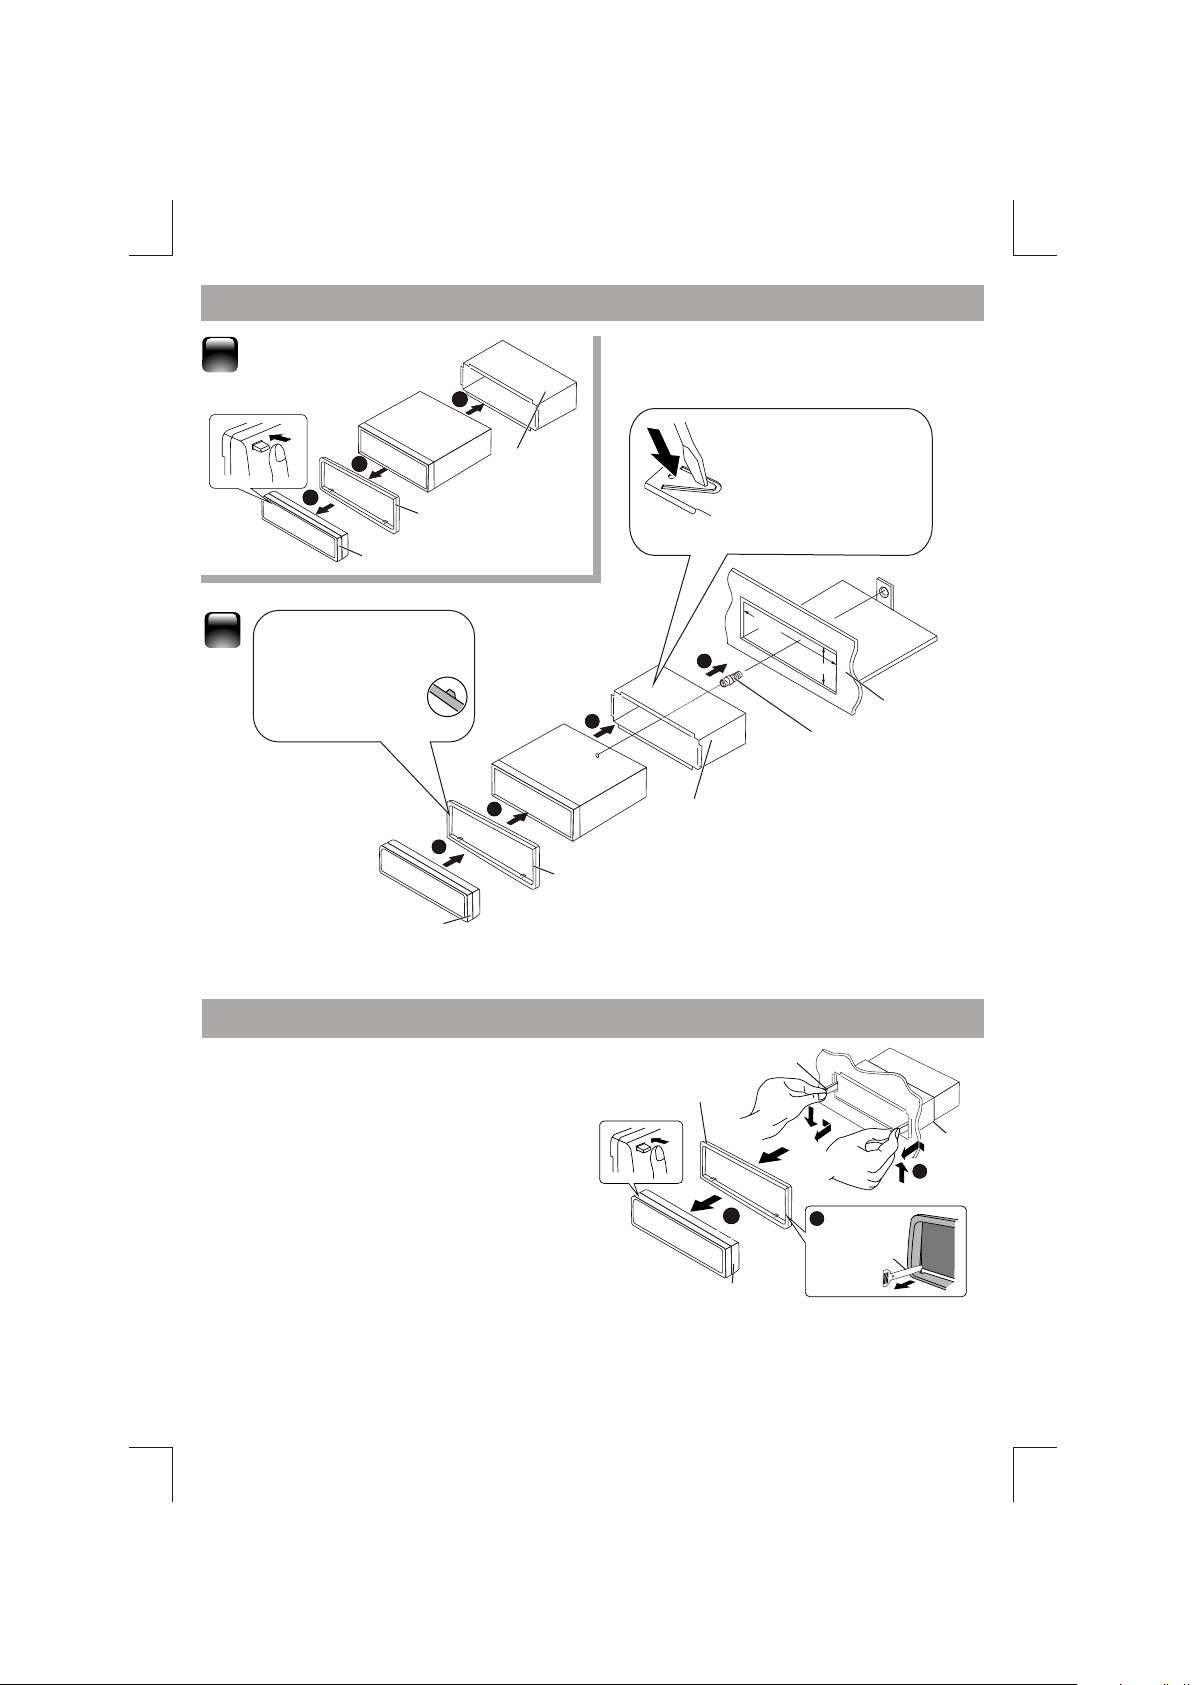
Installing the unit
1
3
2
1
Before attaching, make
2
sure the direction of the
escutcheon is correc t.
(Wider hooks on the
bottom side.)
Removing the unit
Trim plate
Control panel
Control panel
Sleeve
Bend the appropriate
tabs to hold the sleeve
firmly in place.
81
2
m
m
1
2
( not included in this packing )
3
4
Sleeve
Trim plate
35
m
m
Screw
Dashboard
1 Detach the control panel.
2 Engage the catch pin on the removal tools into the holes on
both sides of the escutcheon, then pull it out.
3 Insert the disassembly tools deeply into the slots on each
side, then follow the arrows instructions as shown on the
right.
Trim plate
Disassembly
1
Control panel
Sleeve
3
2
Disassembly
4 EN
Page 6
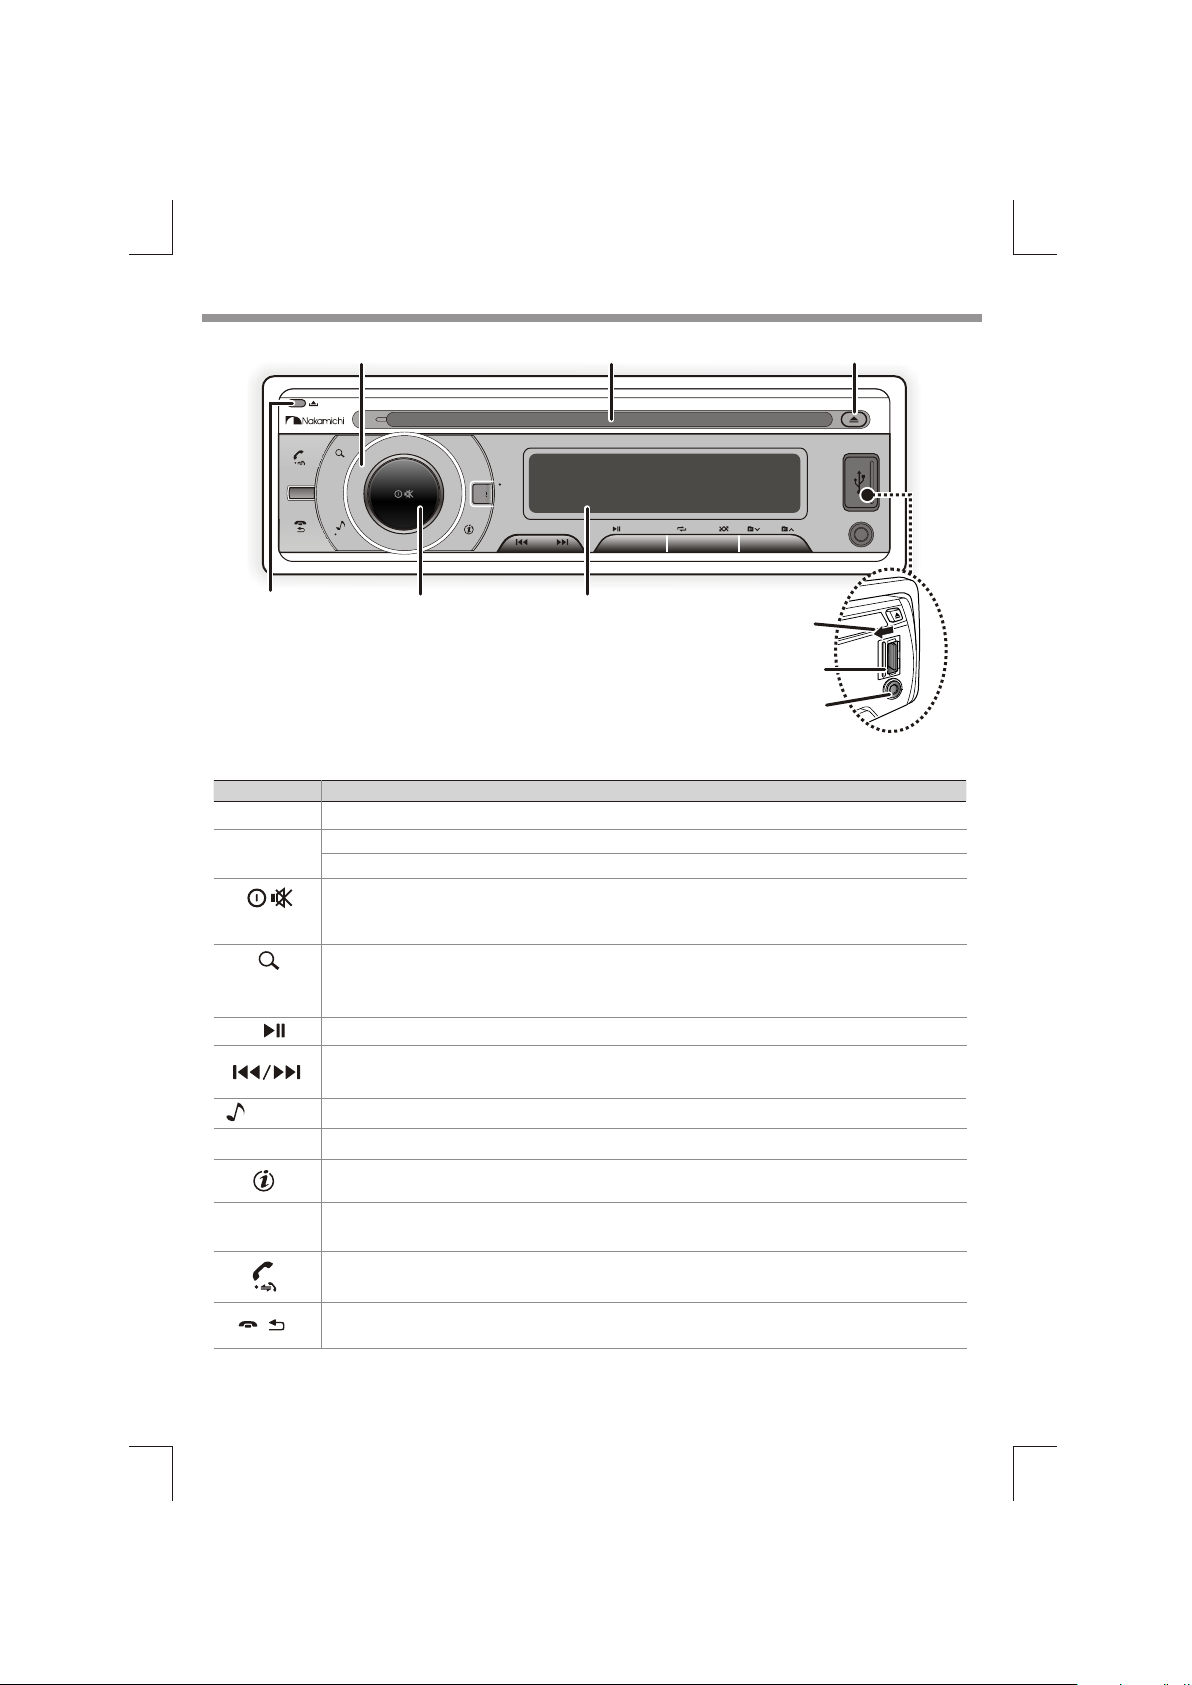
Basic Operation
Encoder Volume Knob
SRC
Detaches the
BAND
MENU
Power / Mute
DBSS
XBAS S
EQ
Loading slot
Display window
control panel
When you press or hold the following button(s)...
Main unit General operation
SRC
Rotatory
Volume knob
Power / Mute
BAND
1
MENU
DBSS
EQ / XBASS
/
Selec t the available sources (Radio, Disc, USB , Aux-In ), if the power is turned on.
Rotate it to increase or decrease the volume.
Select items.
■
Turn mute or restore volume.
■
Turn the unit on. Press and hold again to turn the unit off.
■
Confirms selection.
■
Selec t the FM bands (FM1/ FM2/ FM3) or AM1 (MW1) / AM2 (MW2)
■
Under media playback to access into search mode.
■
Press and hold to activate the Auto Store function.
Pause/resume playback of a Disc, USB.
■
Under Radio mode to enter into the Auto Seek mode, press and hold to enter into the Manual Seek mode.
■
Under Media playback mode to skip track / file, press and hold to fast forward / backward.
To access into the Audio Menu mode, press and hold to enter into the System Menu mode.
Press to turn On or Off dynamic bass boost sound.
■
To view the Clock.
■
Under Media playback mode to view play informations.
■
To adjust the EQ (Preset Equalizer) setting.
■
Turn On or Off the Xbass bosster function.
■
To answer / accept the call.
■
During the talking, press and hold to transfer the call.
■
To reject / end the call.
■
Returns to the previous item.
2 3 4 5 61
Push open the cover
Ejects the disc
AUX IN
USB terminal
Aux-In jack
EN 5
Page 7
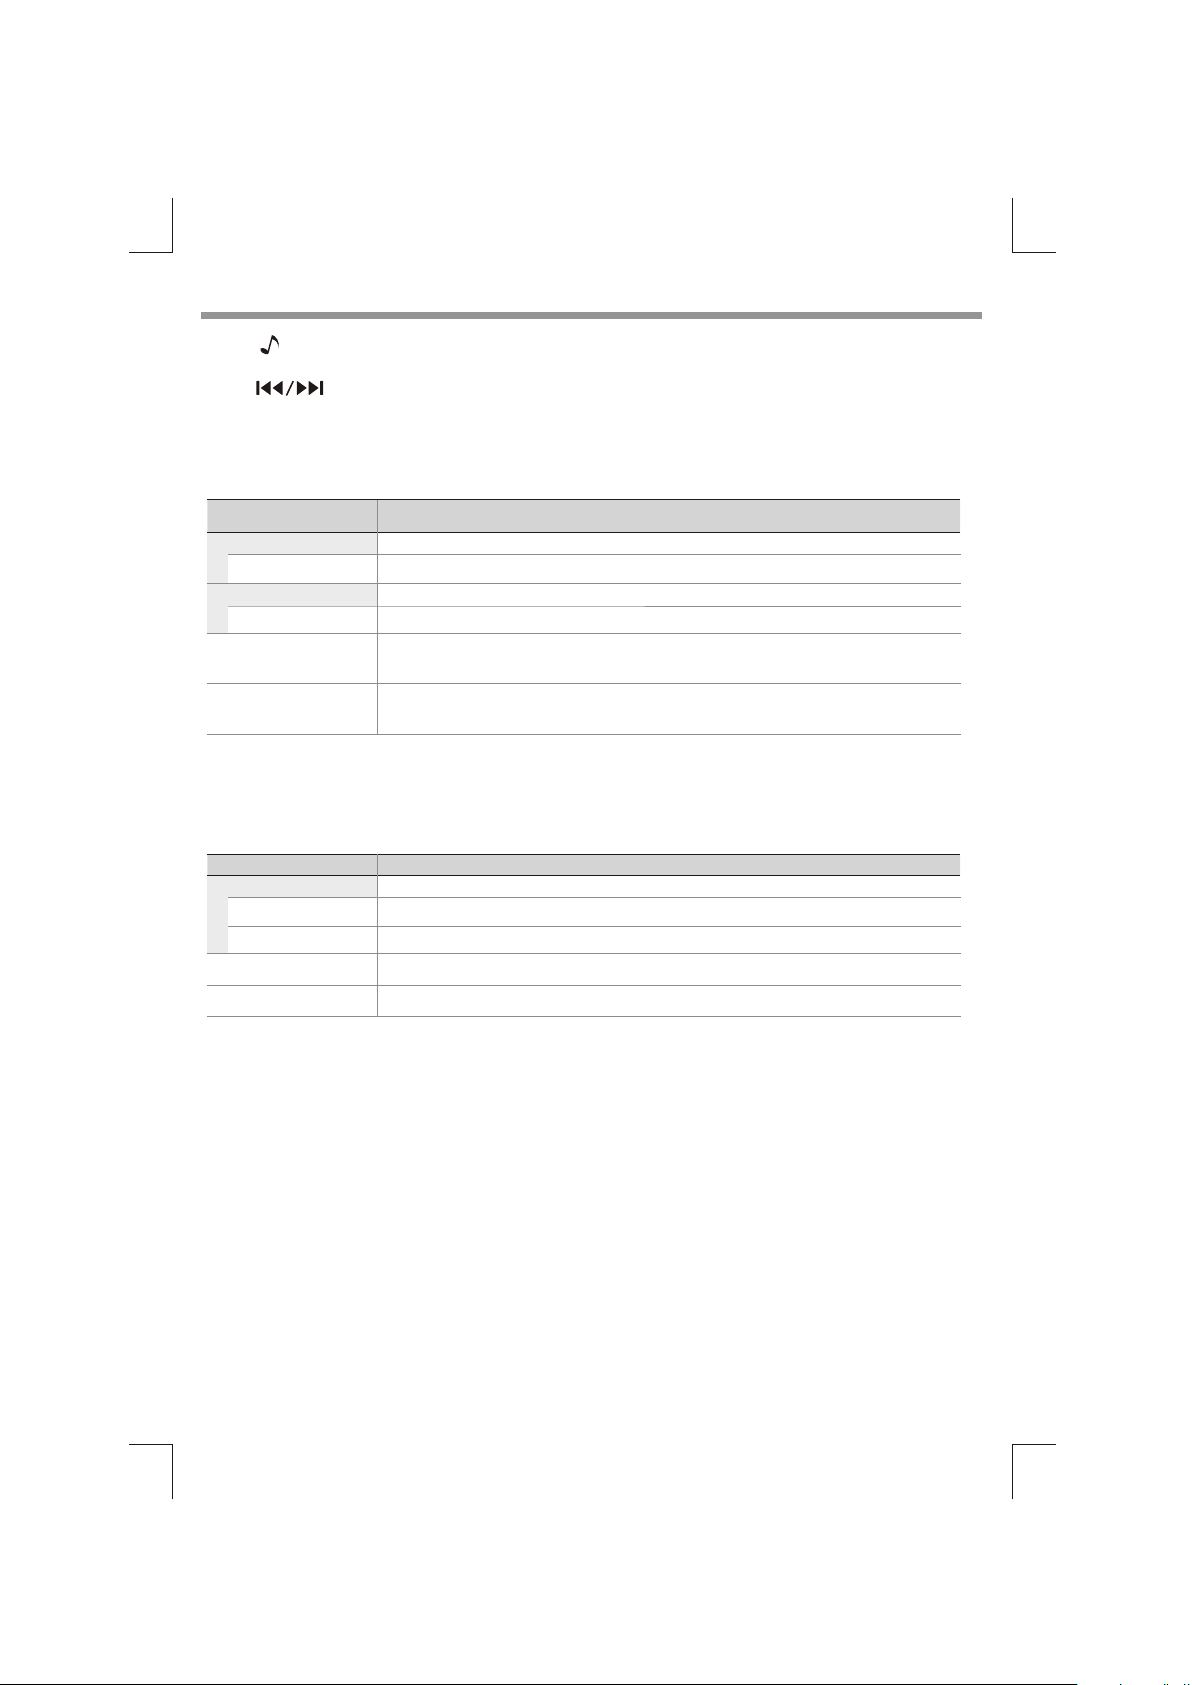
Function Settings
1 Press to access into the [AUDIO MENU] mode, press and hold to enter into the [MENU] mode.
2 Press repeatedly to select the item to be adjusted.
3 Turn the encoder volume knob to select a value / option.
MENU
[AUDIO MENU]...
Item Selectable Setting
BASS ADJUST
BASS LEVEL
TREBLE ADJUST
TREBLE LEVEL
BALANCE
FADER
Adjust the level -7 to +7.
Adjust the level -7 to +7.
Adjust the balance between the right and left speakers from 12R (full right) to
12L (full left).
Adjust the fader between the front and rear speakers from 12R (full rear) to
12L (full front).
[MENU]...
Item Selectable Setting
CLOCK
CLOCK SET
CLOCK FORMAT
BEEP TONE
DIMMER
Adjust the Hours and Minutes
Select the time format 12H or 24H
Turn On or Off this beep sound
Adjust the LCD display backlight level between Hight or Low
6 EN
Page 8
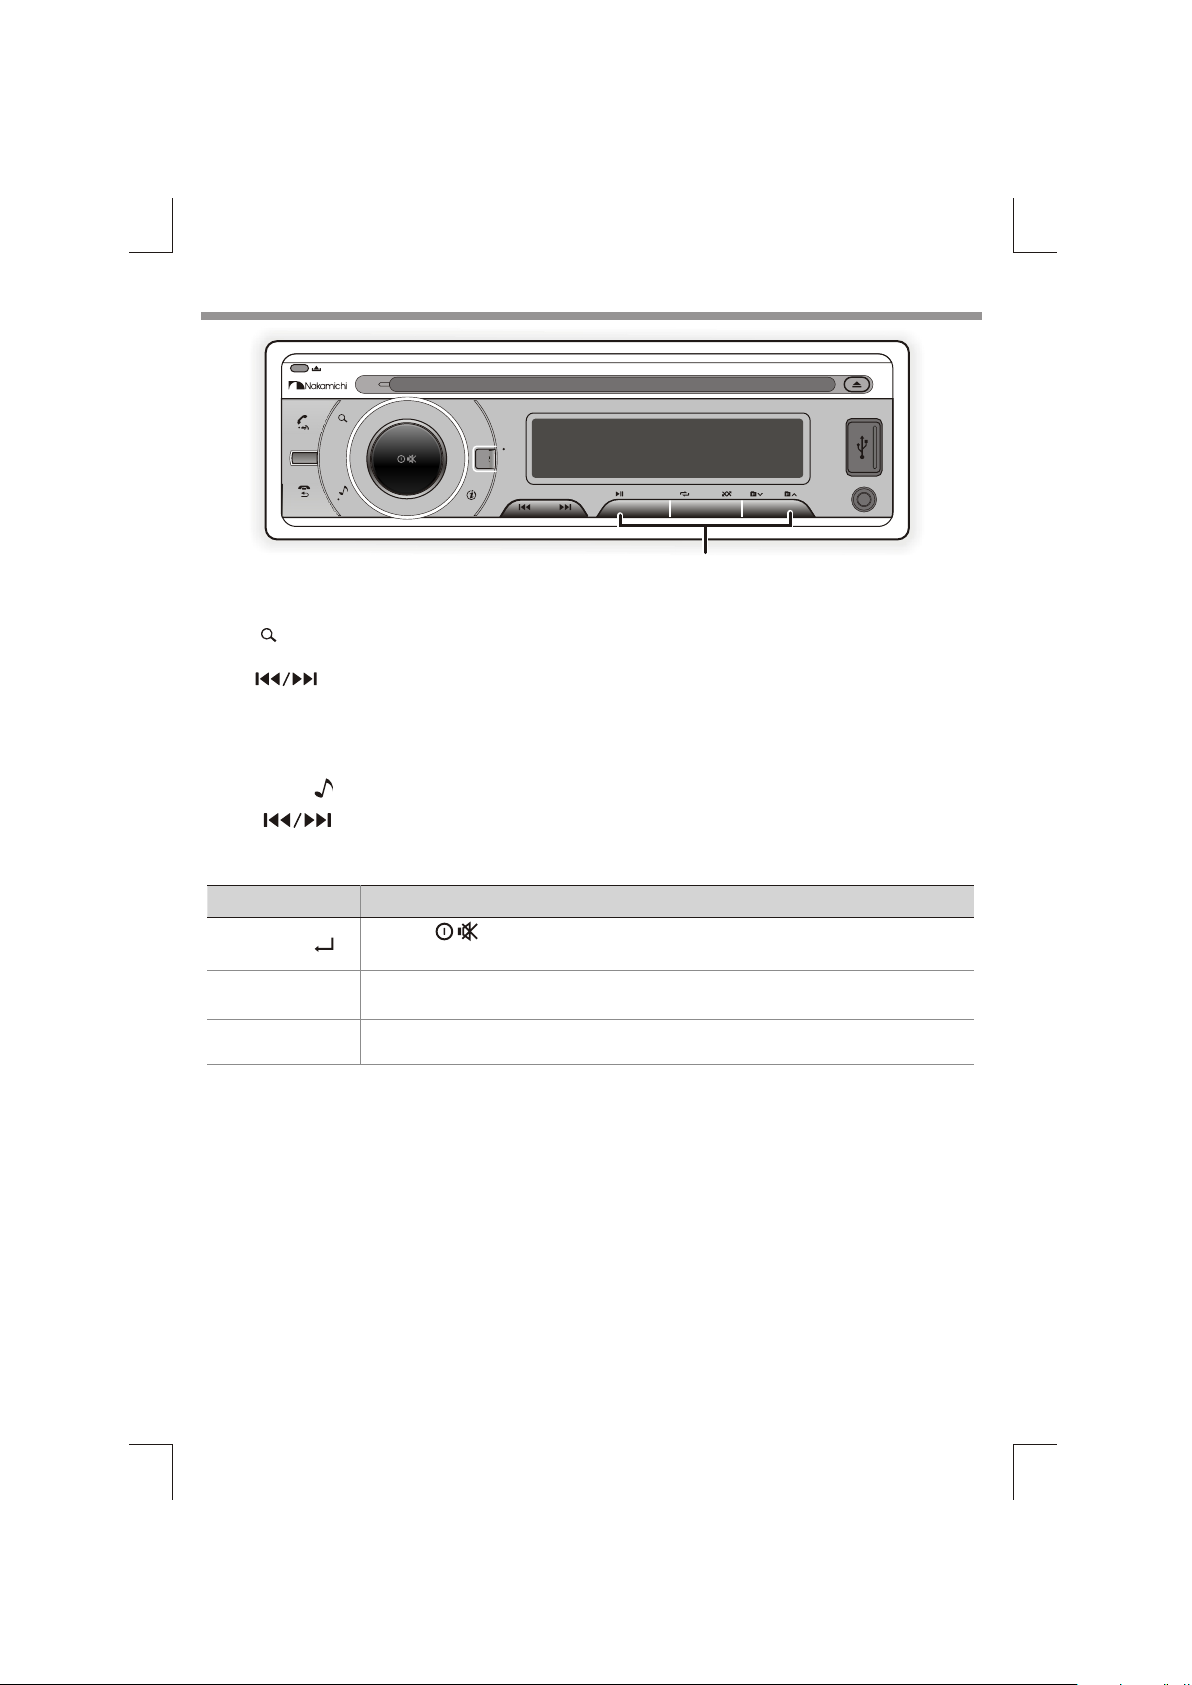
Listening to the Radio
BAND
SRC
MENU
1 Press repeatedly to a band ( FM1, FM2, FM3, AM1(MW1) or AM2 (Mw2)).
BAND
DBSS
XBAS S
EQ
2 3 4 5 61
■
Hold for about 2 seconds to memorize the current station .
■
Press briefly to recall memorized station.
2 Press to search for a station.
Adjust [MENU] mode settings
While listening to the radio...
1 Press and hold to enter into the [MENU] mode.
2 Press repeatedly to select the item to be adjusted.
3 Turn the encoder volume knob to select a value / option.
Item Selectable Setting
AUTO STORE
AREA
LOCAL SEEK
MENU
Press the to access into Auto Store mode, the six strongest stations of the selected band
are saved in preset channel automatically: FM1, FM2, FM3(1-6), AM1, AM2.
Select suitable country region of the radio: USA; LATIN; EUROPE; RUSSIA(Oirt); M-EAST; ASIA; JAPAN;
AUST (Australia)
To receive more radio stations or only stations with strong signal, you can adjust the radio
sensitivity.
AUX IN
EN 7
Page 9
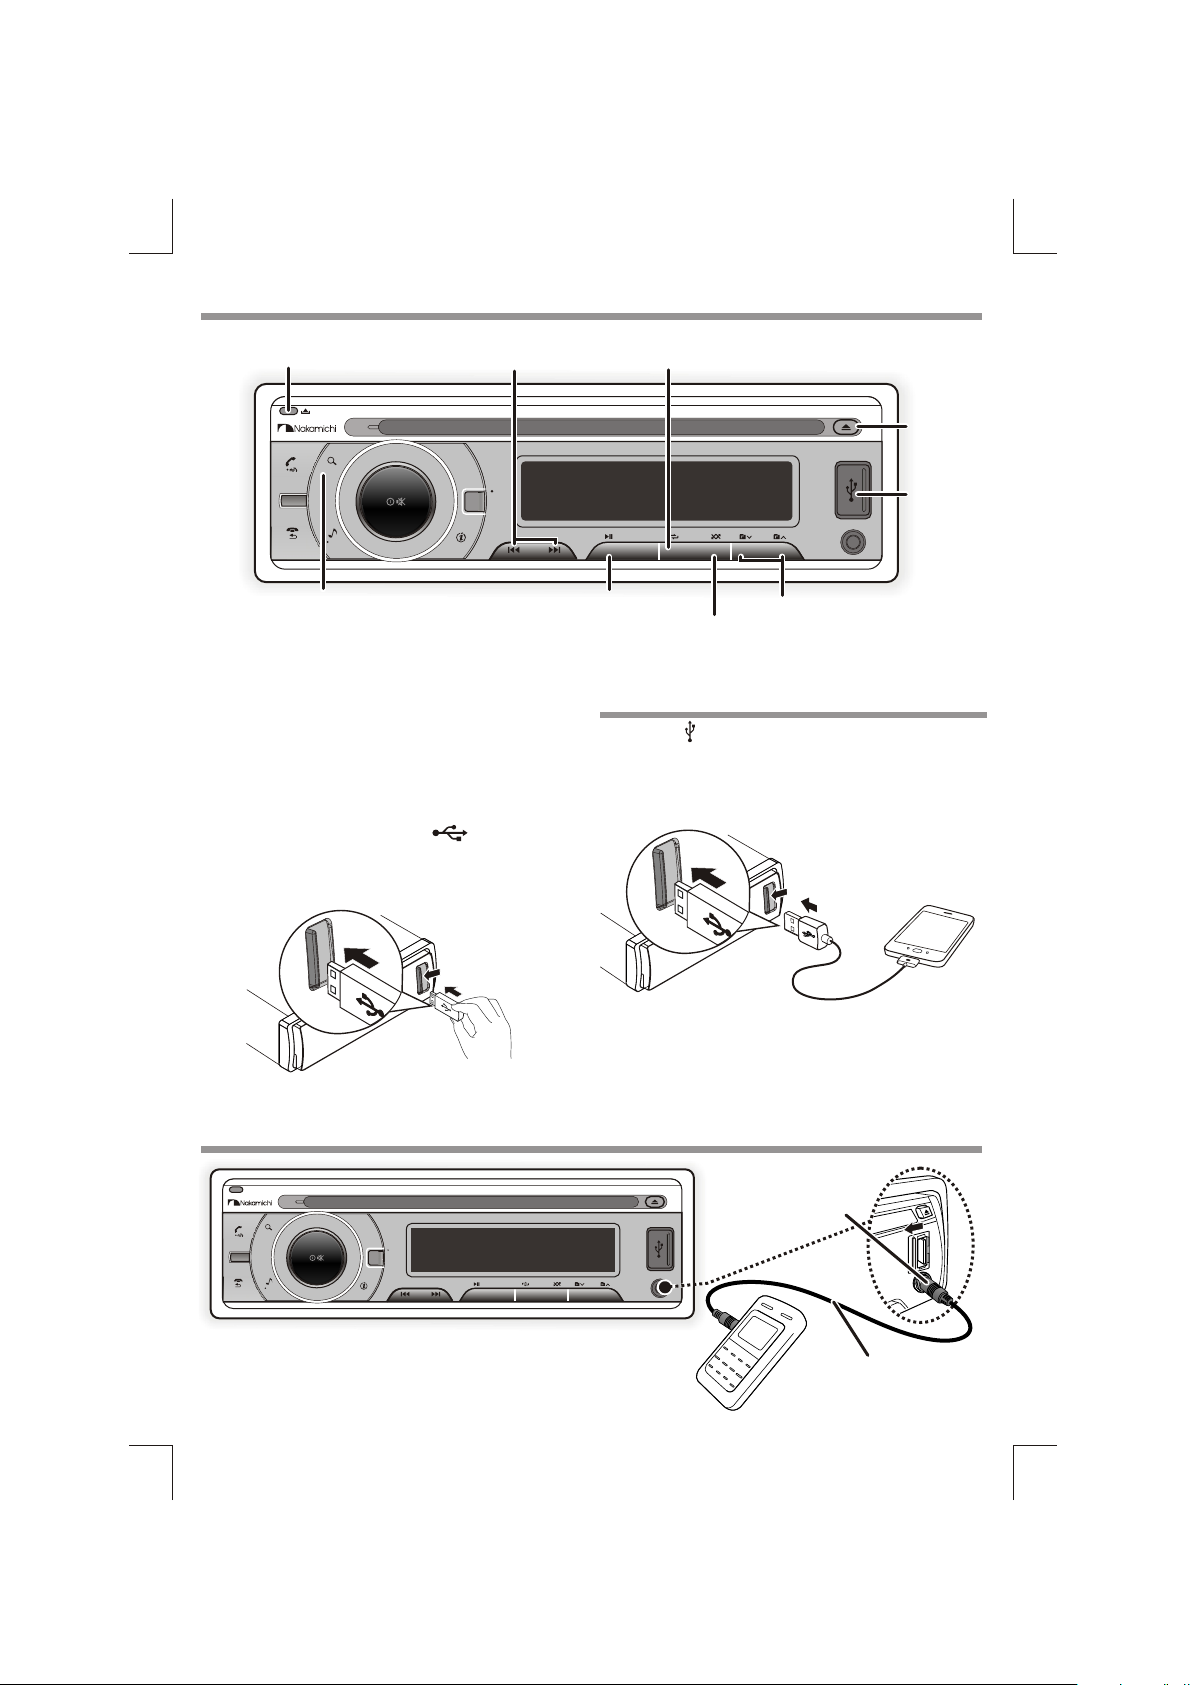
Listening to a Disc/ USB device
Detaches the
control panel
■
Press to select a track / file.
■
Press and hold for fast forward / backward.
BAND
SRC
MENU
DBS S
EQ
XBAS S
Press to pause. Press again to resume playback.Press into search mode
■
Press to start random play, press again to cancel random play.
■
Press and hold random a folder.
Playing a disc
Insert the disc into the Disc Slot with label side facing up, the
unit will play starts automatically.
Playing a USB device
1 Slide the USB socket cover market to the left.
2 Insert the USB device into the USB socket.
3 Press the SRC to select USB mode.The unit starts playing
from the USB device automatically.
■
Press to repeat one track, press again to repeat all tracks.
■
Press and hold repeat a folder.
Ejects
the disc
USB
terminal
2 3 4 5 61
AUX IN
Press to move next/previous folder.
USB Smart Phone 1A charging
1 Slide the USB socket to left.
2 Insert the iPhone or Smart Phone device into the USB socket.
3 Once the iPhone or Smart Phone is connected and recognized,
the iPhone/Smart Phone begins to charge.
Listening to the other external components
BAND
SRC
MENU
1 Press the SRC to select AUX-IN mode.
2 Turn on the external component and start playing.
DBSS
XBASS
EQ
2 3 4 5 61
AUX IN
Auxiliary input jack
3.5 mm Cable
(not included)
8 EN
Page 10
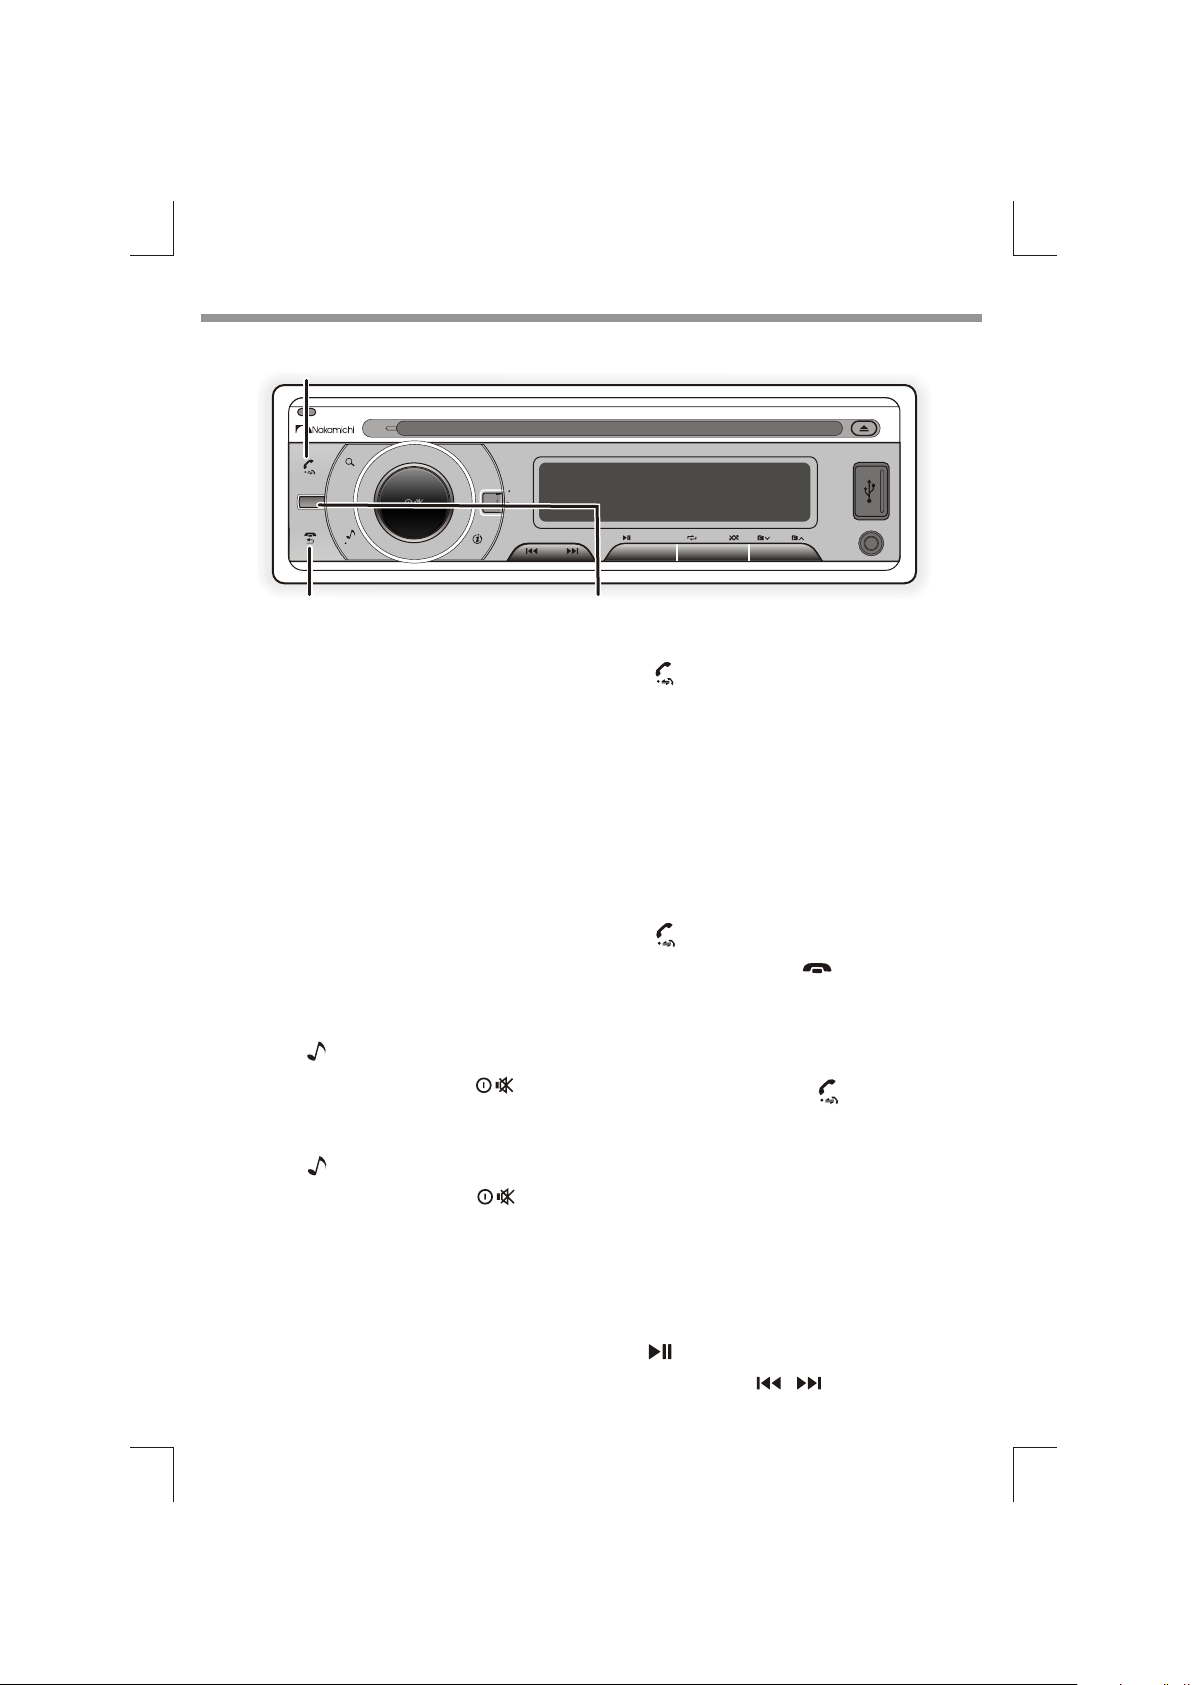
Operation of Bluetooth Hands-Free
■
Press to answer / accept the call.
■
Press and hold to transfer the call.
BAND
SRC
MENU
Press to reject / end the call.
DBSS
XBAS S
EQ
Press to change to "BT AUDIO" mode
You can make or receive phone calls with Bluetooth-enabled
phones through the unit. You can also listen to music from a
Bluetooth-enabled device.
Getting Started
Before use the Bluetooth device, you need to pair the device to
the unit. Pairing needs only to be done once.
Pairing the Bluetooth devices
1 Open your mobile phone and switch bluetooth on.
2 Search for other bluetooth device with your device.
3 Select “NAKAMICHI” in the pairing list.
4 Input the password “0000”
5 [Pairing OK] will be displayed on the panel if pairing is
successful, and the paired device will connect to the car audio
system automatically.
Disconnect the bluetooth
1 Press and hold to enter into the [MENU] mode.
2 Once the [BT DISCONN] is displayed, press to activate
the manual Disconnect mode.
MENU
Re-connect the bluetooth
1 Press and hold to enter into the [MENU] mode.
2 Once the [BT CONNECT] is displayed, press to activate
the manual Re-connect mode.
MENU
Making a Call
You can dial number through the mobile phone.
1 Use the Mobile Phone to dial and make an outgoing call.
2 Once completed the dialing, [CALLING] is displayed.
EN 9
2 3 4 5 61
AUX IN
To redial number
1 Press on front panel to redial.
2 The unit will display [CALLING], and the unit starts dialing
the number dialed last time.
Remark:
To make an outgoing call on this unit, the bluetooth
connection between the unit and the phone must be active.
Receiving a Call
1 If there is incoming call, the phone number is displayed. if the
incoming call has no phone number, [PHONE IN] is displayed.
2 Press to answer / accept the call.
3 When conversation ends, press to terminate the call.
Call Transfer
You can transfer voice from loudspeaker to mobile phones during
call.
During talking, press and hold voice transfers from
loudspeaker to mobile phone.
Bluetooth Audio Streaming A2DP
If the connected Bluetooth device supports Advanced Audio
Distribution Profile (A2DP), you can listen to the music stored on
the device through the unit. If the device also supports Audio
Video Remote Control Profile (AVRCP) profile, you can use the
control on the unit or its remote control to play music stored on
the device.
1 Press SRC repeatedly to select [BT AUDIO].
2 Press to start play, press it again to pause.
3 To track up/down, press / .
Page 11
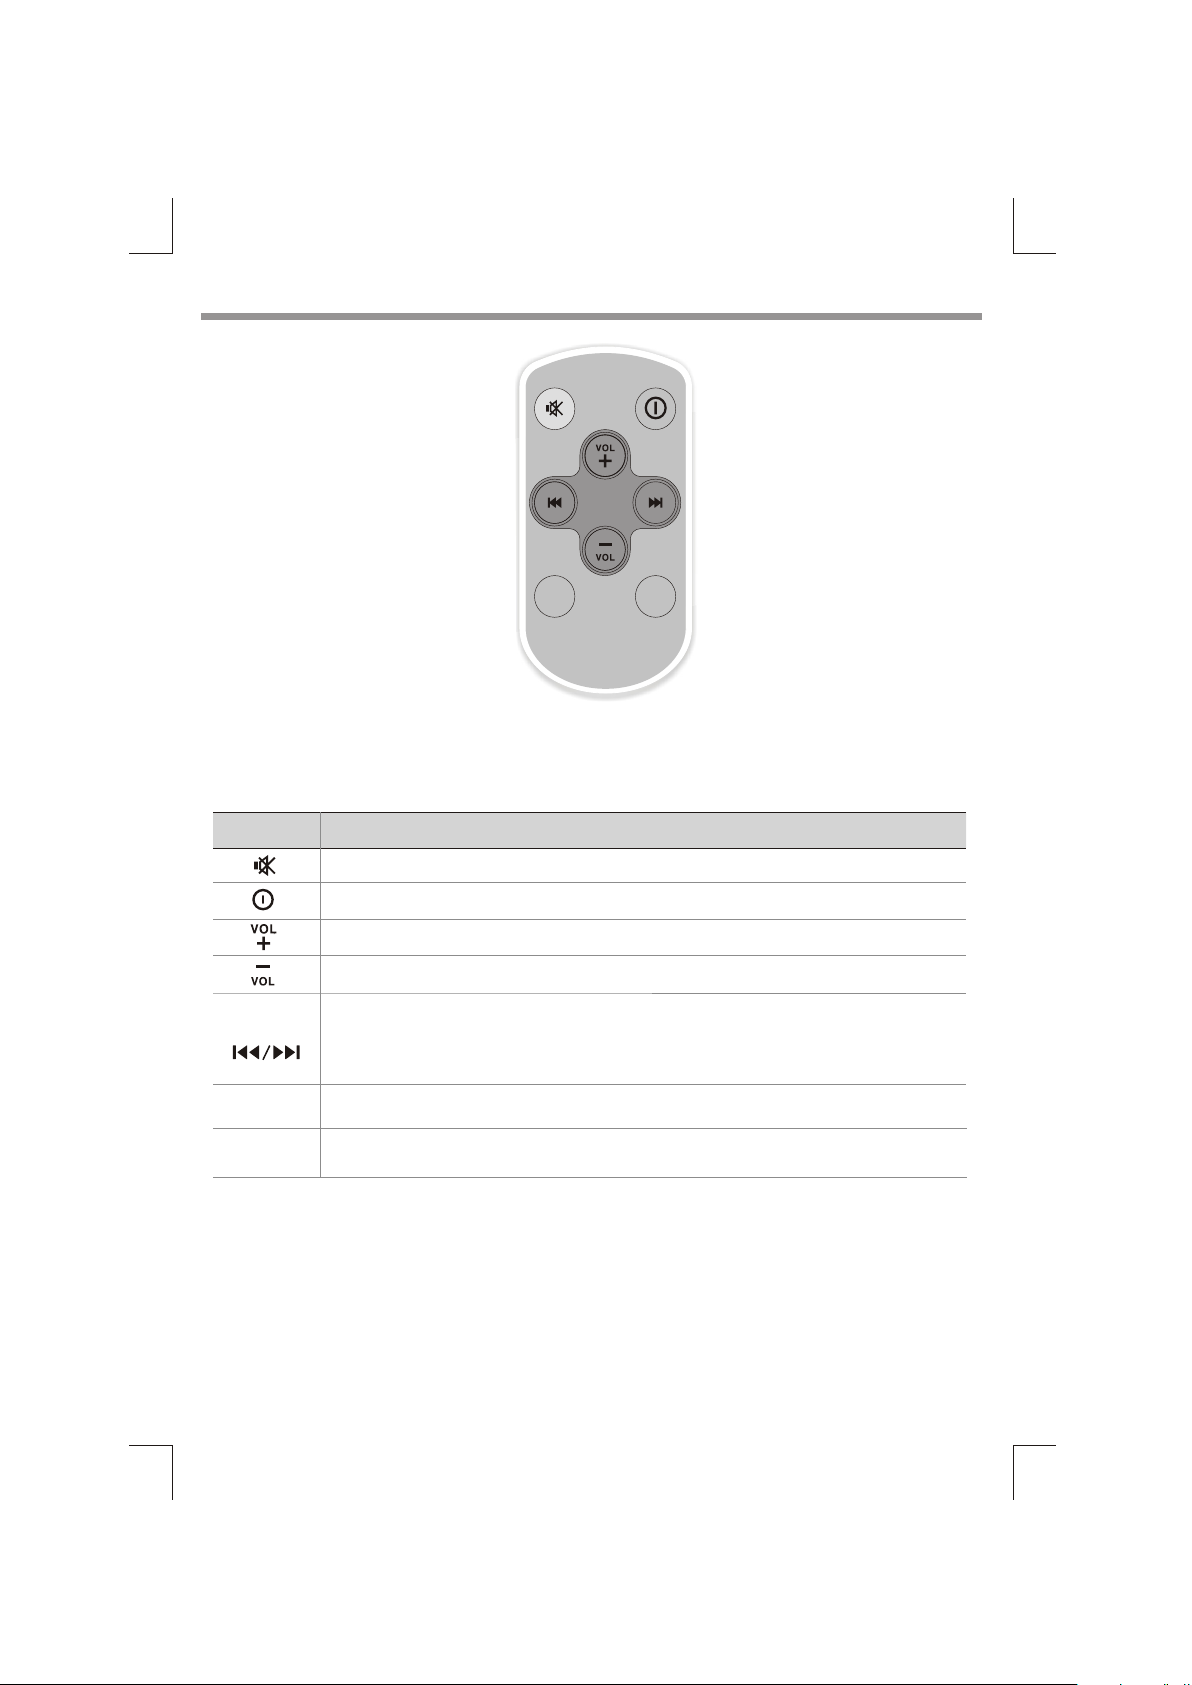
Remote Control Operation
SRC
AUDIO
When you press or hold the following button(s)...
Main unit General operation
Turn mute or restore volume.
Press turn the unit on or off.
Press increas the volume.
Press decreas the volume.
■
Under Radio mode to enter into the Auto Seek mode, press and hold to enter into the Manual Seek
mode.
■
Under Media playback mode to skip track / file, press and hold to fast forward / backward.
SRC
AUDIO
Selec ts the available sources (Radio, Disc, USB, Aux-In ), if the power is turned on. BT AUDIO or
Press to access into the Audio Menu mode.
10 EN
Page 12

Product Information
General
Power Supply: 12V DC (10.5-14.4V), negative ground
Fuse: 15A
Suitable Speaker Impedance: 4 -8
Aux-In level: 500mV
Audio Section
Maximum Power Output: 50W x 4 Channels
Continous Power Output: 20W x 4 RMS
Pre-AMP Output Voltage: 1.5 V
FM tuner section
Frequency Range: 87.5 -107.9MHz
87.5 - 108MHz
87.5 - 108MHz
Usable Sensitivity: Better than 8dB at S/N 30dB
(USA)
(ASIA)
(Europe)
AM tuner section
Frequency Range: 530 - 1710KHz
522 - 1620KHz
522 - 1620KHz
Usable Sensitivity: Better than 40dB at S/N 20dB
(USA)
(ASIA)
(Europe)
Bluetooth
Output power: Class 2
Frequency band: 2.4000GHz-2.4835GHz ISM Band
Range: 3 meters (free space)
Standard: Bluetooth 2.0 specification
About Audio file
■
USB or memory file system: FAT16, FAT32
■
MP3/WMA bit rate: 32-320kbps and varible bit rate
■
MP3 sampling frequencies: 8-48kHz
■
WMA sampling frequencies: 32kHz, 44.1kHz, 48kHz
■
ID3 tag v1.0 or later
USB Smart Phone 1A charging
Outpu t Voltage: 5 V DC
Outpu t Current: 1000 mA (1A)
USB devices
USB Flash Memory: USB 1.1 & 2.0 Compatible
EN 11
Page 13

www.nakamichicaraudio.comwww.nakamichicaraudio.com
 Loading...