

Page 1

SM-SA1004
4-CHANNEL CAR AMPLIFIER 4-КАНАЛЬНЫЙ УСИЛИТЕЛЬ МОЩНОСТИ
Instruction manual Руководство по эксплуатации
Page 2

2
Table of contents
TABLE OF CONTENTS .................................................................................................................... 2
PRECAUTIONS: READ FIRST! .......................................................................................................... 3
INSTALLATION ............................................................................................................................. 5
ACCESSORIES .............................................................................................................................. 5
CONNECTIONS ............................................................................................................................. 6
ADJUSTMENT................................................................................................................................ 9
TROUBLESHOOTING GUIDE .......................................................................................................... 10
SPECIFICATIONS ........................................................................................................................ 11
Page 3

3
Precautions: Read First!
If after reading the direction you feel uncomfortable about installing the amplifier in your car, or not
equipped or competent to do so, you should have the amplifier installed by an authorized installer.
It's your car!
Negative battery terminal must be disconnected before any electrical connections are made.
Be sure choosing a location that provides substantial ventilation for the amplifier.
The most preferred locations would be in your car's trunk, under the front seats or on the back wall of
a truck.
The location chosen should provide at least 2" of clearance above the amplifier for adequate
ventilation.
If the amplifier is to be mounted vertically be sure that it is in a place where adequate air will flow
along the length of its heat sink fins for cooling.
NEVER mount the amplifier up side down; this will cause the heat to rise back into the amplifier
causing thermal shutdown or possible permanent damage.
NEVER mount the amplifier in a location that is subject to direct sunlight or exposed to moisture.
Be sure to mount the amplifier to a strong, solid surface, which will not give way under the stress of a
sudden stop or accident.
Make sure that the mounting screws will not penetrate the gas tank, brake and fuel lines, wiring or
other critical parts of your car when installed.
NEVER operate the amplifier without the proper power and ground wire 10 gauge minimum.
NEVER operate the amplifier without proper fusing. Fuse holder must be located with in 0.5 meters
from the battery. This fuse is to protect the car not the electronics. In case of a short, the fuse will
blow instead of the wire burning up. Using other than the recommended fuse ratings at the battery
and at the amplifier may cause damage to the amplifier and will void your warranty.
Do not run wiring underneath or outside the car since exposure to the elements may cause the
insulation to deteriorate rapidly, resulting in short-circuits and/or intermittent operation. All cables
should be run beneath carpets and inside trim pieces.
To help minimize interference, it is best to run the power cables along the opposite side from the
audio cables.
Whenever wires pass through metal, rubber or plastic grommets must be used to prevent the mental
from wearing through the installation and causing a short.
Whenever possible, use cable ties, mounting clamps and similar wiring aids (available from an
electrical supply or auto parts store) Adding stress relief loops to wiring is also advisable to prevent
straining or breakage.
It is best to test the system before the amplifier is mounted and interior of car is reassembled.
Page 4

4
If the temperature inside your car reaches extreme levels (such as sitting locked up for several hours
in the hot sun or exposed to a very cold winter's day) the amplifier may go into protection mode and
shut off. Leave the unit off until the ambient temperature returns to normal.
The amplifier operates with any vehicle using a 12-volt negative ground system. If you are not sure
of the type of electrical system in your vehicle, consult your authorized dealer or qualified mechanic.
NEVER ground the speaker leads and NEVER allow the speaker leads to come in contact with each
other. Speaker wire should be 16 gauge or larger.
Remote turn on wire must be switched by the radio does not have a remote turn on or antenna
output, connect to wire that has a positive 12 volts when the key is turned to the accessory. If the
amplifier does not turn off the battery will die.
Do not listen to high volumes for extended periods of time or hearing damage may occur.
CONTINOUS EXPOSURE TO SOUND PRESSURE LEVELS OVER 100dB
MAY CAUSE PERMANENT HEARING LOSS. HIGH POWERED AUTOSOUND
SYSTEM MAY PRODUCE SOUND PRESSURE LEVELS WELL OVER
130dB. USE COMMON SENSE AND PRACTICE SAFE SOUND.
Page 5

5
Installation
MOUNTING:
1. After reading precaution, decide where you are going to install the unit. Also, see the picture below.
2. Once the location has been determined, remove the plastic decorative panels from left and right sides
of amplifier then place the amplifier in position. Using a felt tip pen or pencil mark the four holes to be
drilled for mounting. NEVER use the amplifier as a template for drilling. It is very easy to damage the
amplifier surface in manner.
3. Remove the amplifier. Drill four holes into mounting surface.
4. If possible, test the system to ensure it is operating correctly before final mounting of the amplifier.
5. Mount the amplifier using the supplied 4 self-threading screws.
Accessories
Amplifier 1 pc
Screw 4 pcs
Rubber washer 4 pcs
Bushing 4 pcs
Flat washer 4 pcs
Spring washer 4 pcs
Instruction manual 1 pc
Warranty card 1 pc
Consumer information 1 pc
Page 6

6
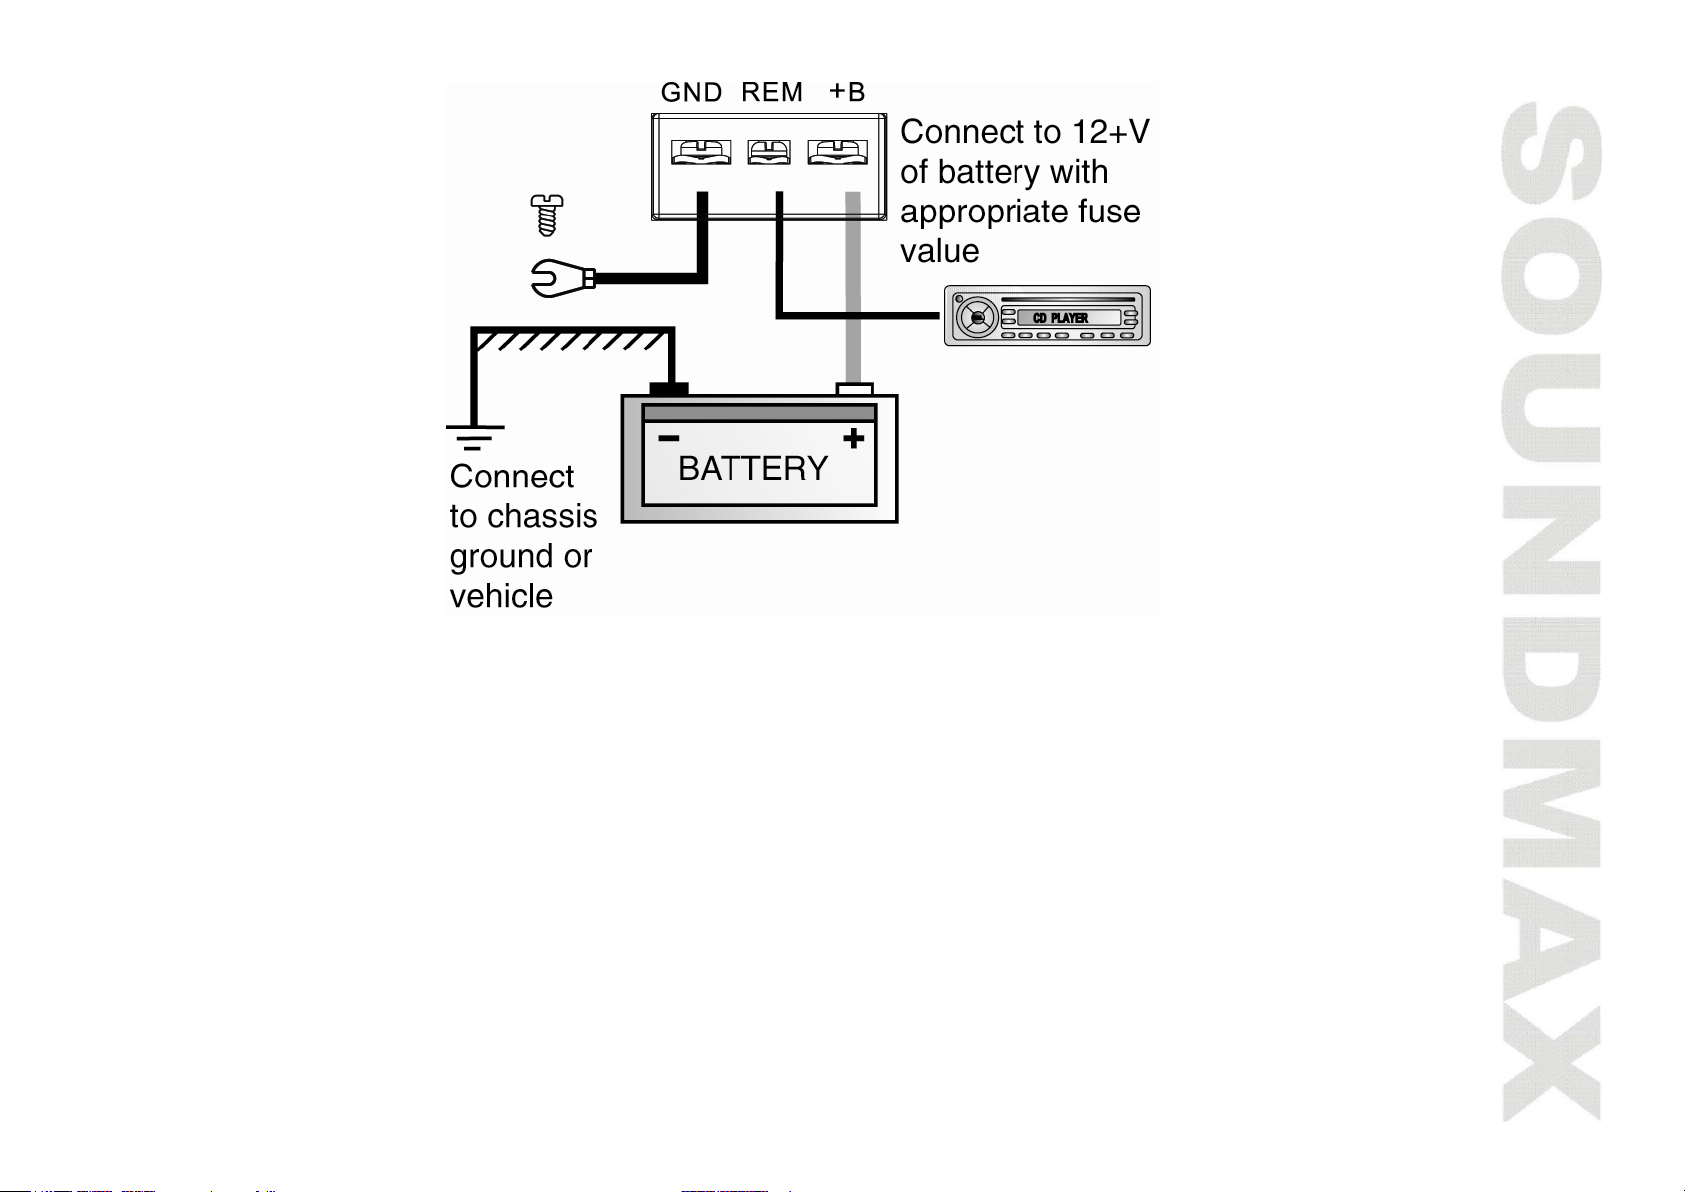
Connections
POWER CONNECTION
• GND: Ground terminal. Connect to the car chassis. Keep the length of the ground cable to the
minimum.
Locate the position on the chassis of the car to which the amplifier is to be grounded. The surface must
be free from any paint or dirt. This can be accomplished with a small grinding bit, sand paper or wire
wheel.
NOTE: The wiring connection should be reliable and ensure direct connection of the amplifier to the car
battery.
• REM: remote control terminal. Connect the remote wire (power antenna output) from the head unit to
the remote turn-on wire of the amplifier. If the head unit is not equipped with a remote/antenna output,
locate a wire that is controlled by the accessory position of the key. It is important to have the amplifier
turn off with the radio or key. If the amplifier remains on, the result will most likely be a dead battery.
The applied voltage should be 10 - 15 V DC.
• B+: Anode of power connection terminal. Connect the proper gauge power wire to the amplifier “B+”
terminal. Run wire towards the fuse holder that is no greater than 0.5 meters from the battery.
Remember, the fuse is to protect the safety of the car in the case of a short. Connect fuse holder to
battery, but do not install fuse at this time.
NOTE: It is important to have good-quality power and ground connections. Remember, to complete an
electrical circuit, the ground connection is just as important as the positive power connection. Before any
power connections are made, disconnect the ground cable at the battery.
Page 7
7
Speaker connection
This amplifier can operate in one-, two-, three- or four-channel mode. The minimum impedance for single
channel bridged operation is 4 or 8 ohms, mono operation 2 - 4 Ohm. Tri-channel power is referred to
stereo and mono at the same time. Minimum impedance remains the same for three channel
(front/subwoofer) systems when proper passive crossovers are used. Connect right and left speaker wire to
corresponding speaker output terminals of the amplifier. Be sure to have the positive wire from the speaker
connected to the positive speaker terminal of the amplifier and the negative wire from the speaker must
connect with the negative terminal of the amplifier. Reversing any of the connections will result in the
speaker cones moving out of phase which causes bass cancellation.
Page 8

8
2-channel bridged mode configuration 4-channel stereo configuration
3-channel bridged mode configuration
Page 9

9
Adjustment
1. Low inputs RCA. Preamplifier outputs of a source (head unit, CD player etc.) of an external electronic
crossover must be connected to them.
2. INPUT MODE switch. Switches between 2-channel and 4-channel audio signal output modes.
3. GAIN regulator. Rotate to adjust volume.
4. FREQUENCY regulator. Rotate to adjust high-pass and low-pass frequency (range from 50 to 500 Hz).
5. X-OVER switch. Set to HPF position when the amplifier is used to drive a tweeter/midrange system. Set
to LPF position when the amplifier is used to drive a subwoofer. Set to FULL position when the amplifier
will be used for driving full-range speakers.
6. BASS switch. Select 0dB/+6dB/+12dB bass boost mode.
7. PWR indicator. Illuminates green when the amplifier is on.
8. PRO indicator. Turns to red when the amp goes into protection mode.
9. GND terminal. For details see “Power connection” above.
10. REM terminal. For details see “Power connection” above.
11. +B terminal. For details see “Power connection” above.
12. Fuse. Protects the amplifier from damage of dangerous amounts of current.
13. Speaker connecting terminals. For details see “Speaker connection” above.
Page 10

10
SYMPTOM
PROBABLE CAUSE
SOLUTION
No audio
Low or N.C. remote turn-on connections
Check remote turn-on voltage at amp and head
unit
Blown fuse
Replace with new fast-blow fuse
Power wires not connected
Check butt splices or solder joints;
Check ground and battery connections
Blown or non-speakers connected
Use VOM or DVM to measure speaker coil
impedance; check speaker wiring connections
Distorted audio
Input sensitivity not set properly or
damaged speaker cones
See adjustment procedure and check each step;
inspect each speaker for damage and repair or
replace suspected component
Low turn-on voltage
Refer to head unit owner’s manual
Audio level low
Mute circuits is on head unit
Check electrical system for low voltage;
Check ground connection
Audio lacks
Speakers wired with wrong polarity,
causing cancellation of bass frequencies
Check polarity of wires from amplifiers to each
speak as defined by the system design;
Check battery voltage at amplifier during
operation
External fuse
blowing
Incorrect wiring or short circuit
Refer to electrical installation and check each
installation step
Whining noise on
audio with engine
running
Amplifier is picking up alternator noise
Install a line noise filter on the head unit’s power
wire;
Check alternator routing diodes or voltage
regulator for proper operation. Check all
grounds, check battery voltage, check RCA
cables
Ticking noise on
audio with engine
running
Amplifier is peaking up radiated spark
noise
Check RCA audio cable; Install an in-line noise
filter on the head unit’s power wire, check spark
plug wires
Troubleshooting Guide
Before you consult this listing, make sure the vehicle’s electrical system is working properly by verifying
that other electrical items (e. g. headlights, Windows, etc.) still function correctly.
Page 11

11
Specifications
MODEL
SM-SA1004
4 Ohms @ 0.02% THD
2 Ohms @ 0.02% THD
4 Ohms bridged 1% THD
4 x 100 W
4 x 190 W
2 x 360 W
Low pass filter
50 Hz – 500 Hz
High pass filter
50 Hz – 500 Hz
Maximum output power
800 W
Frequency range
10 Hz – 25 kHz
Signal-to-noise ratio
95 dB
Input sensitivity
200 mV - 7 V
Input impedance
10 k Ohms
Operation voltage (negative ground)
DC 12 V
Allowable load
2 Ohms
Fuse rating
30 A x 2
Dimensions
446 х 54 х 180 mm
Gross/Net weight
3.38 kg/3.92 kg
Note: Specifications & design subject to change without notice for improvement. The pictures have been
done for reference and can be different from real units.
Page 12

12
Содержание
СОДЕРЖАНИЕ................................................................................................................................................................. 12
ТРЕБОВАНИЯ БЕЗОПАСНОСТИ .................................................................................................................................. 13
УСТАНОВКА .................................................................................................................................................................... 15
КОМПЛЕКТ ПОСТАВКИ ................................................................................................................................................ 15
ПОДКЛЮЧЕНИЕ УСИЛИТЕЛЯ ...................................................................................................................................... 16
НАСТРОЙКИ .................................................................................................................................................................... 19
ВОЗМОЖНЫЕ НЕПОЛАДКИ И ИХ УСТРАНЕНИЕ ..................................................................................................... 21
ТЕХНИЧЕСКИЕ ХАРАКТЕРИСТИКИ ............................................................................................................................ 22
Page 13

13
Требования безопасности
• Если после изучения руководства Вы по каким-либо причинам сомневаетесь, что сможете
самостоятельно установить усилитель, обратитесь в сертифицированную Сервисную Службу.
• Перед тем, как производить любые подключения, отсоедините отрицательную клемму
аккумулятора.
• Устанавливайте усилитель таким образом, чтобы обеспечить его достаточную вентиляцию. Лучше
всего для этого подходят багажник, пространство под передними сидениями или задняя стенка
кабины грузовика. Вокруг усилителя должно оставаться свободное пространство не менее 5 см.
• Если усилитель крепится вертикально, воздушные потоки должны проходить вдоль пластин
радиатора охлаждения.
• Не устанавливайте усилитель в перевёрнутом положении во избежание перегрева, в результате
которого устройство может отключиться или выйти из строя.
• Не подвергайте усилитель воздействию прямого солнечного света или влаги.
• Крепите усилитель к прочной твёрдой поверхности, способной удержать его при ударах, резких
торможениях или авариях.
• При установке усилителя следите за тем, чтобы крепёжные винты не повредили топливный бак,
бензопровод, тормозные магистрали, проводку или другие важные узлы и коммуникации.
• Запрещается подключать усилитель проводами (силовыми и массы) сечением, меньше 5,27 мм2
(AWG №10).
• Не допускается работа усилителя без предохранителей. Блок предохранителей должен быть
расположен в пределах 0,5
метра от аккумулятора. Предохранитель не является электронным устройством; он разрывает цепь
при коротком замыкании, предотвращая таким образом возгорание проводов. Установка на
аккумулятор и усилитель предохранителей с номиналами, отличными от рекомендованных, может
привести к поломке усилителя, при этом гарантийные обязательства утрачивают силу.
• Во избежание повреждения изоляции проводов, что может привести к сбоям в работе усилителя
или короткому замыканию, не устраивайте проводку вне салона автомобиля; рекомендуется
пропускать провода под ковриками или внутренней облицовкой.
• Для снижения помех прокладывайте силовые и аудиокабели как можно дальше друг от друга
(например, по разным сторонам салона).
• Для предотвращения повреждения изоляции проводов в местах, где они проходят через отверстия
в металлических элементах, следует устанавливать проходные изолирующие втулки.
• При прокладке проводов по возможности используйте различный крепёж (зажимы, хомуты и др.),
а также оставляйте припуски, ослабляющие натяжение.
• Целесообразно проверить работу усилителя перед окончательной его установкой, пока
внутренняя облицовка не установлена на место.
Page 14

14
• Если температура в салоне слишком высокая или, наоборот, низкая, усилитель может перейти в
защитный режим и отключиться. В таких случаях не включайте усилитель до тех пор, пока
окружающая температура не станет нормальной.
• Усилитель может быть установлен в любом автомобиле, где есть питание 12В с отрицательной
«массой». Если вы не знаете, какой системой оснащён Ваш автомобиль, обратитесь в
сертифицированную Сервисную Службу или к квалифицированному специалисту.
• Запрещается подключать к корпусу и замыкать накоротко провода от динамиков. Эти провода
должны иметь сечение не меньше 0,832 мм2 (AWG №18).
• Усилитель должен отключаться при выключении магнитолы (источника сигнала), если она не
оснащена выходом для дистанционного управления, подключайте дистанционный выключатель к
проводу, на котором после поворота ключа в замке зажигания будет +12 В. Если усилитель не
отключать, аккумулятор разрядится
• Чтобы не повредить слух, не слушайте долго громкую музыку.
ДЛИТЕЛЬНОЕ ВОЗДЕЙСТВИЕ ГРОМКОГО ЗВУКА (ВЫШЕ 100 ДБ) МОЖЕТ ПРИВЕСТИ К
ПОТЕРЕ СЛУХА. МОЩНЫЕ АВТОМОБИЛЬНЫЕ АУДИОСИСТЕМЫ МОГУТ ВЫДАВАТЬ БОЛЕЕ
130 ДБ. БУДЬТЕ БЛАГОРАЗУМНЫ!
Page 15

15
Установка
• Выберите место для установки усилителя, учитывая приведенные выше требования безопасности.
• Приложите усилитель к выбранному месту и, в соответствии с расположением отверстий в нижней
части корпуса усилителя, наметьте точки для сверления четырех крепежных отверстий. Ни в коем
случае не используйте сам усилитель в качестве шаблона при сверлении, чтобы не повредить его.
• Уберите усилитель и просверлите 4 отверстия в поверхности, выбранной для установки
усилителя.
• Перед окончательной установкой усилителя проверьте работу системы.
• Закрепите усилитель четырьмя саморезами, входящими в комплект поставки.
Комплект поставки
Усилитель 1 шт
Саморез 4 шт
Прокладка 4 шт
Втулка 4 шт
Плоская шайба 4 шт
Пружинная шайба 4 шт
Руководство по эксплуатации 1 шт
Гарантийный талон 1 шт
Информация для потребителя 1 шт
Page 16

16
Подключение усилителя
ПОДКЛЮЧЕНИЕ ПИТАНИЯ УСИЛИТЕЛЯ
• GND: клемма заземления. Для подсоединения используйте провод возможно минимальной длины.
К разъему «GND» усилителя присоедините провод массы надлежащего сечения. Определите на
кузове автомобиля небольшой участок для подключения и зачистите его до металла.
ВНИМАНИЕ: Соединение должно быть надежным и обеспечивать непосредственное подключение
усилителя к аккумуляторной батарее.
• REM: удаленное управление усилителем. Соедините проводом небольшого сечения разъем REM
усилителя и провод управления усилителем источника сигнала. Важно, чтобы усилитель отключался
при выключении радио или ключом зажигания, иначе аккумулятор разрядится. Используемое
напряжение должно составлять 10 - 15 В постоянного тока.
• B+: Положительная клемма питания. К разъему усилителя «В+» подсоедините провод
надлежащего сечения и протяните его к блоку предохранителей, который должен располагаться не
далее 0,5 метра от аккумулятора. Подсоедините блок без вставленного предохранителя к
аккумулятору. Предохранитель обеспечивает безопасность автомобиля в случае короткого
замыкания.
ВНИМАНИЕ: Обязательно отсоединяйте провод массы от аккумулятора перед подключением
любых электрических схем.
Page 17

17
ПОДКЛЮЧЕНИЕ ДИНАМИКОВ
Этот усилитель может работать в режимах от одного до четырех каналов. Минимальная нагрузка при
работе на одном канале при мостовом подключении составляет 4 - 8 Ом, при монорежиме 2 - 4 Ом.
Строго соблюдая полярность, подключите провода правого и левого динамиков к соответствующим
разъемам усилителя. При неправильной полярности динамики будут работать в противофазе, что
приведет к гашению низких частот (басов).
Page 18

18
2-канальный мостовой режим
3-канальный режим (2+мостовой)
4-канальный стереорежим
Page 19

19
Настройки
1. Терминалы входного сигнала низкого уровня (RCA). Их следует подключать к аналогичным выходным
разъемам источника сигнала (магнитола, CD-проигрыватель и т.д.). Для подключения с выхода акустических
систем используйте кроссовер (преобразователь сигналов высокого уровня в низкий).
2. Переключатель INPUT MODE. Переключение между 2-канальным и 4-канальным режимами входного
сигнала.
3. Регулятор GAIN. Вращайте для регулирования уровня громкости звука.
4. Регулятор FREQUENCY. Вращайте, чтобы отрегулировать высокие и низкие частоты (в диапазоне от 50 до
500 Гц).
5. Переключатель X-OVER. Установите переключатель фильтров в положение «НРF», если усилитель
используется для работы только с высоко- и среднечастотными акустическими системами. Установите
переключатель фильтров в положение «LРF», если усилитель используется для работы только с сабвуфером.
Если усилитель работает с широкополосными динамиками, установите «FULL».
6. Переключатель BASS. Выберите уровень усиления НЧ-сигнала 0 дБ/+6 дБ/+12 дБ.
7. Индикатор PWR. Зеленый светодиод загорается, когда усилитель включен.
8. Индикатор PRO. Светодиод загорается красным светом, когда усилитель переключается в режим защиты от
перегрева или короткого замыкания.
9. Терминал GND. См. параграф “Подключение питания” выше.
10. Терминал REM. См. параграф “Подключение питания” выше.
11. Терминал +B. См. параграф “Подключение питания” выше.
12. Предохранитель. предохраняет усилитель от повреждений, вызываемых опасными величинами тока.
13. Выходные терминалы для подключения динамиков. См. параграф “Подключение динамиков” выше.
Page 20

20
Page 21

21
Возможные неполадки и их устранение
Неполадка
Возможная причина
Способ устранения
Нет звука
Ненадёжно или вообще не
подсоединён провод
дистанционного отключения.
Проверьте напряжение в цепи.
Сгорел предохранитель.
Замените его.
Не подключено питание.
Проверьте клеммы аккумулятора и
электрические цепи.
Неисправны или не подключены
динамики.
Проверьте катушки динамиков и линии
подключения.
Некачественный
звук
Неправильно настроена
чувствительность.
Неисправны динамики.
Перенастройте чувствительность,
контролируя каждое действие.
Проверьте динамики и, при
необходимости, замените их.
Низкий уровень входного сигнала
Отрегулируйте уровень входного сигнала.
Тихое звучание
Неполадки на линии источника
сигнала.
Проверьте электрические цепи.
Обеднённое
звучание
Не соблюдена полярность при
подключении динамиков,
вследствие чего басы глушатся.
Проверьте полярность подключения
каждого динамика и напряжение питания
усилителя во время работы.
Перегорел
предохранитель
Неправильное подключение в
электрической цепи или КЗ.
Проверьте все электрические цепи.
Воющий звук при
включении
двигателя
Усилитель реагирует на работу
генератора.
Установите шумоподавляющий фильтр на
линию питания источника сигнала
(например, магнитолы).
Проверьте управляющие диоды и
регулятор напряжения генератора.
Проверьте все электрические цепи и
линии соединений, RCA кабели.
Характерный
тикающий звук
при включении
двигателя
Усилитель реагирует на искрение.
Проверьте RCA аудио кабели; Установите
шумоподавляющий фильтр на линию
питания источника сигнала; Проверьте, не
искрят ли электрические соединения.
В таблице описаны простые проверки, способные помочь Вам устранить большую часть проблем, могущих возникнуть
при использовании данного устройства. Если нижеуказанные меры не помогли, обратитесь в сервисный центр или к
ближайшему дилеру.
Page 22

22
Технические характеристики
Модель
SM-SA1004
Выходная мощность при нагрузке:
4 Ом 0,02% КНИ
2 Ом @ 0,02% КНИ
4 Ом (мостовое соединение) 1% КНИ
4 x 100 Вт
4 x 190 Вт
2 x 360 Вт
Фильтр НЧ
50 Гц – 500 Гц
Фильтр ВЧ
50 Гц – 500 Гц
Максимальная выходная мощность
800 Вт
Диапазон воспроизводимых частот
10 Гц – 25 кГц
Соотношение сигнал/шум
95 дБ
Входная чувствительность
200 мВ - 7 В
Входное сопротивление
10 кОм
Рабочее напряжение (негативный полюсмасса)
12 В переменного тока
Допустимая нагрузка
2 Ом
Предохранитель
30 А x 2
Размеры устройства
446 х 54 х 180 мм
Вес брутто/нетто
3,38 кг/3,92 кг
В целях улучшения конструкция и технические характеристики усилителя могут быть
изменены без предварительного уведомления.
Схемы и рисунки в данной инструкции могут отличаться от реальных параметров.
Произведено:
Фенгшун Пеййинг Электро-Акустик Ко., Лимитед
Номер 288 Шунфа Роад, Тангкенг, Фенгшун,
Гуангдонг, Китай
Под контролем «ТЕХНО ЭЛЕКТРИК ЛИМИТЕД»,
Сделано в Китае
SM-SA1004_IM_02
 Loading...