

Page 1
SM-CSD693
16x24 cm 3-way coaxial 16x24 см 3-х полосная коаксиальная
car speakers акустическая система
Instruction manual Руководство по эксплуатации
Page 2
2
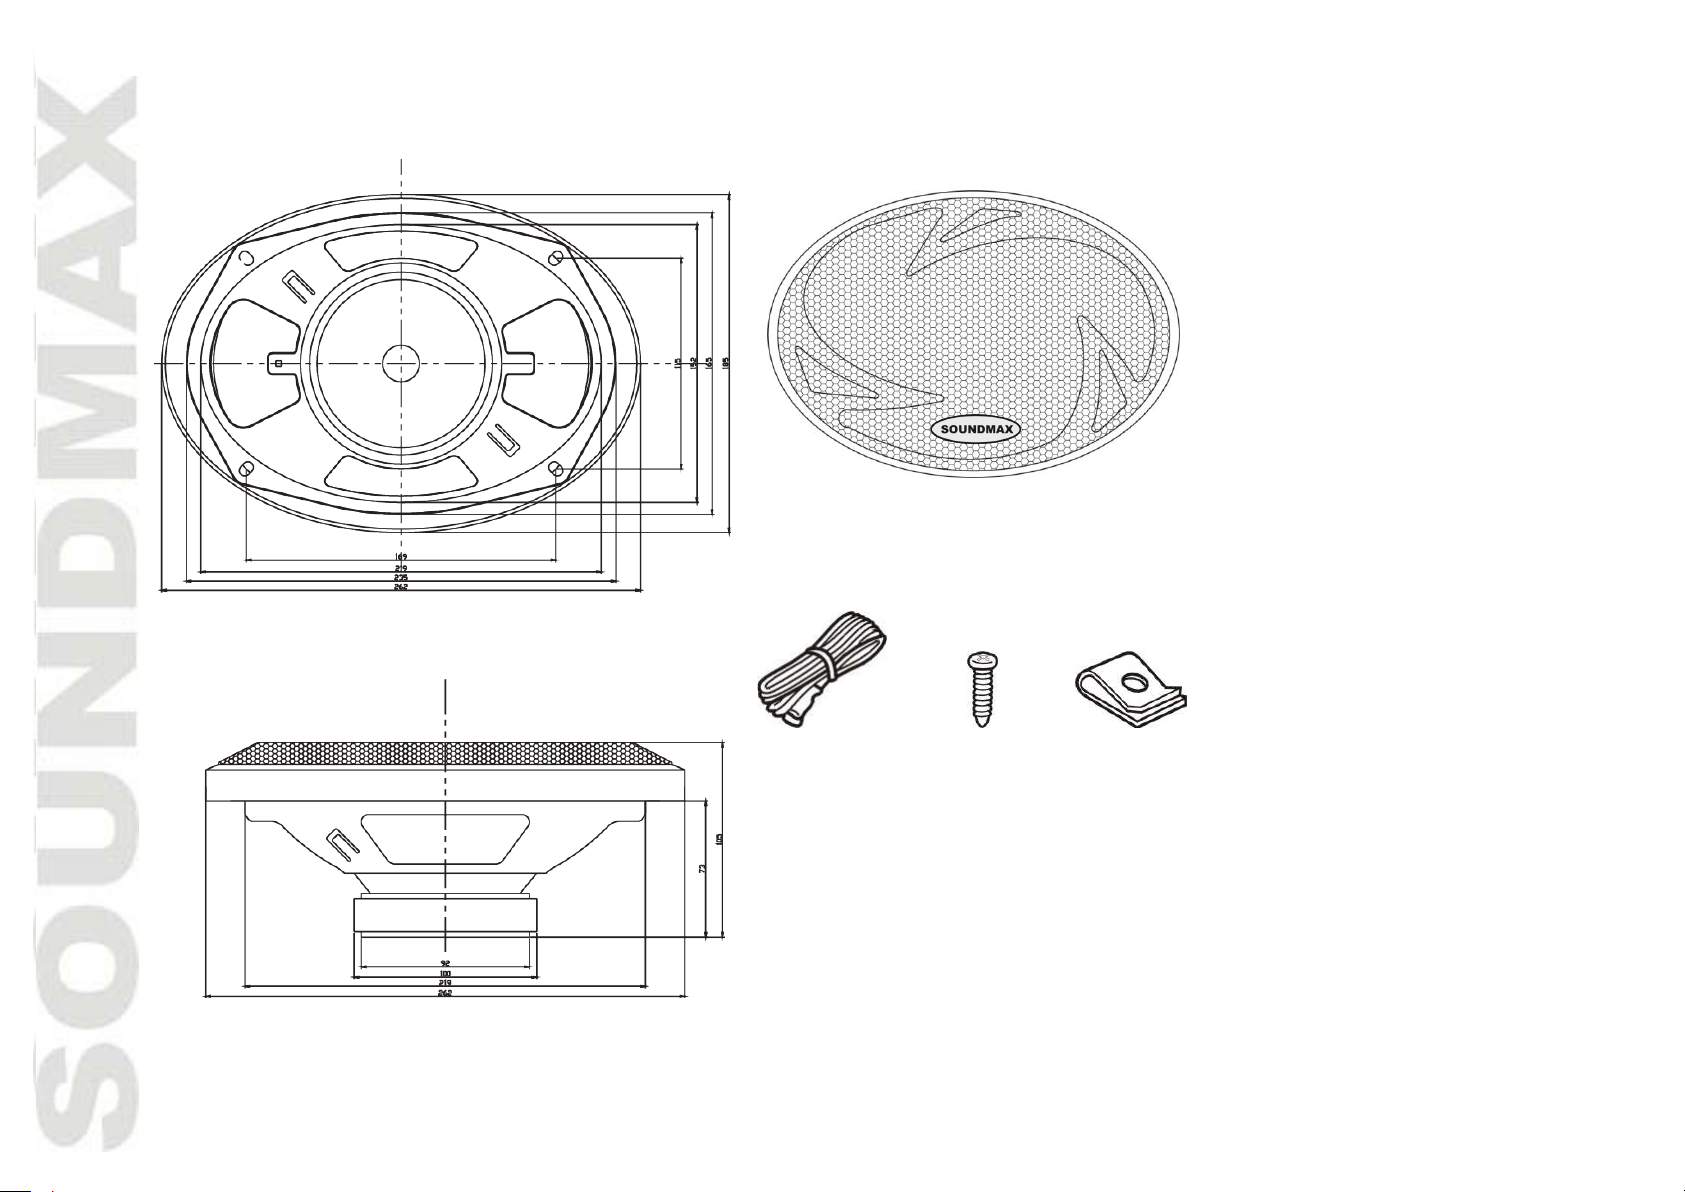
Description
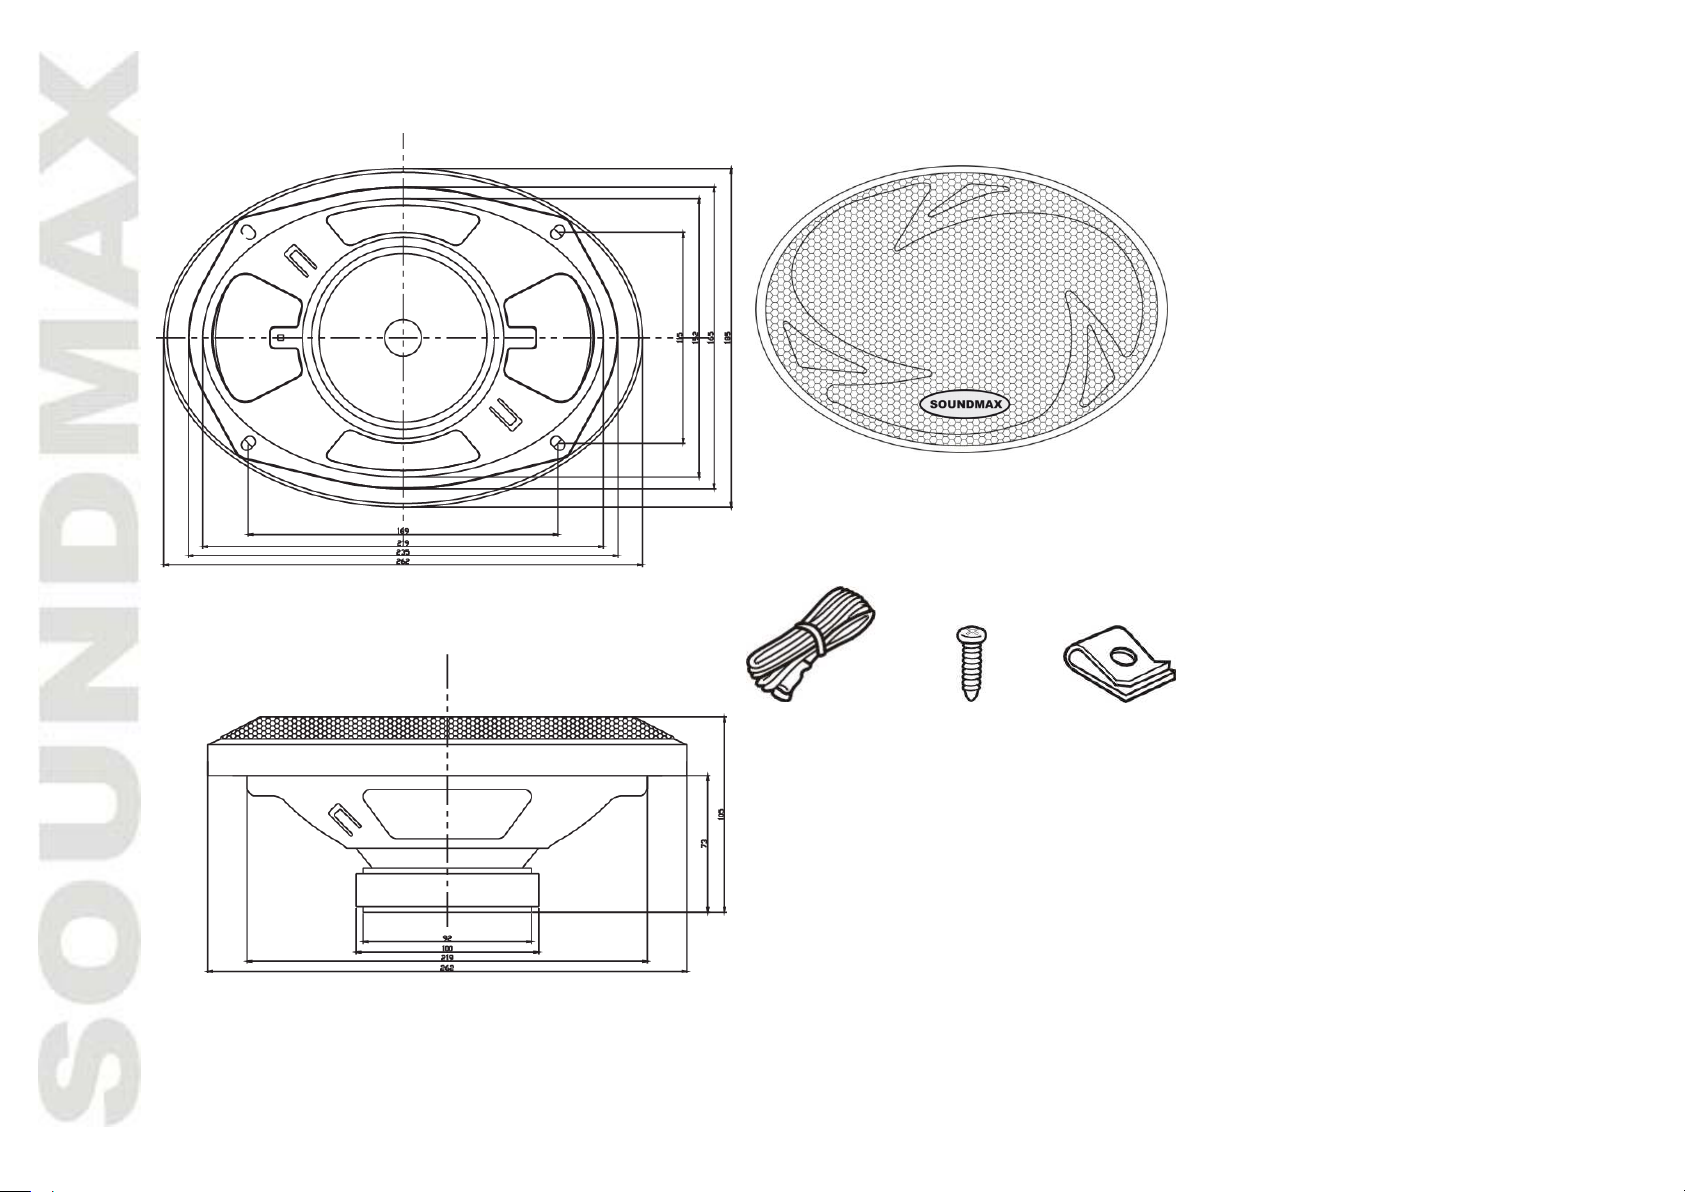
2.8 m (x 2) (x 8) (x 8)
The set of acoustic system
includes:
- speaker – 2 pcs
- metal grill – 2 pcs
- speaker wire – 2 pcs x 2.8 m
- screw – 8 pcs
- clip – 8 pcs
Page 3

3
Important safeguards
The owner’s manual contains important operating and maintenance instructions for your safety. It is
necessary to refer the manual.
Do not install the speakers where they may be subjected to excessive heat moisture, dust or where they
will be kicked repeatedly, brushed or bumped.
Before mounting and connecting the wires be sure that wire of the negative pole terminal is disconnected
from accumulator. Nonobservance of this demand may cause the short circuit or fire.
To prevent short circuit never put or leave any metal objects (e.g. coins or metal tools) inside the
acoustic system.
Make absolutely sure that the terminals for the speakers are connected to the proper outputs from the
music source.
Never run the wiring on the outside of the vehicle or under it where it can be damaged by road hazards or
the moving parts of the vehicle. Use existing wire channels, sills, panels and molding strips inside the
vehicle to hide the wiring for safety and a neat appliance.
Make sure the wire of the negative pole terminal is disconnected from accumulator while connecting the
speaker terminals. Turn on the various components and slowly advance the volume. Remember to check
and re-check all connections to insure proper installation and use.
Do not continuously use the speaker system beyond the nominal power handling capacity.
Keep recorded tapes, watches, and personal credit cards using magnetic coding away from the speaker
system to protect them from damage caused by the magnets in the speakers.
If you cannot find the appropriate mounting location, consult your car dealer or your nearest dealer
before mounting.
CAUTION: Take extreme caution when working near the gas tank, gas lines, brake or hydraulic lines and
electrical wiring.
Page 4
4
Mounting the speakers
Installation kits are available from your dealer or local stereo shop to help make your installation easy. These
kits also give your installation a clean, custom appearance. Questions about installations methods please
consult a professional auto sound dealer/installer for assistance.
Choose the place of installation for acoustic system. For most acoustic system stipulated regular places in
the automobile approach. In this case you need to know only assembly depth. Before installation acoustic
system check up their assembly depth.
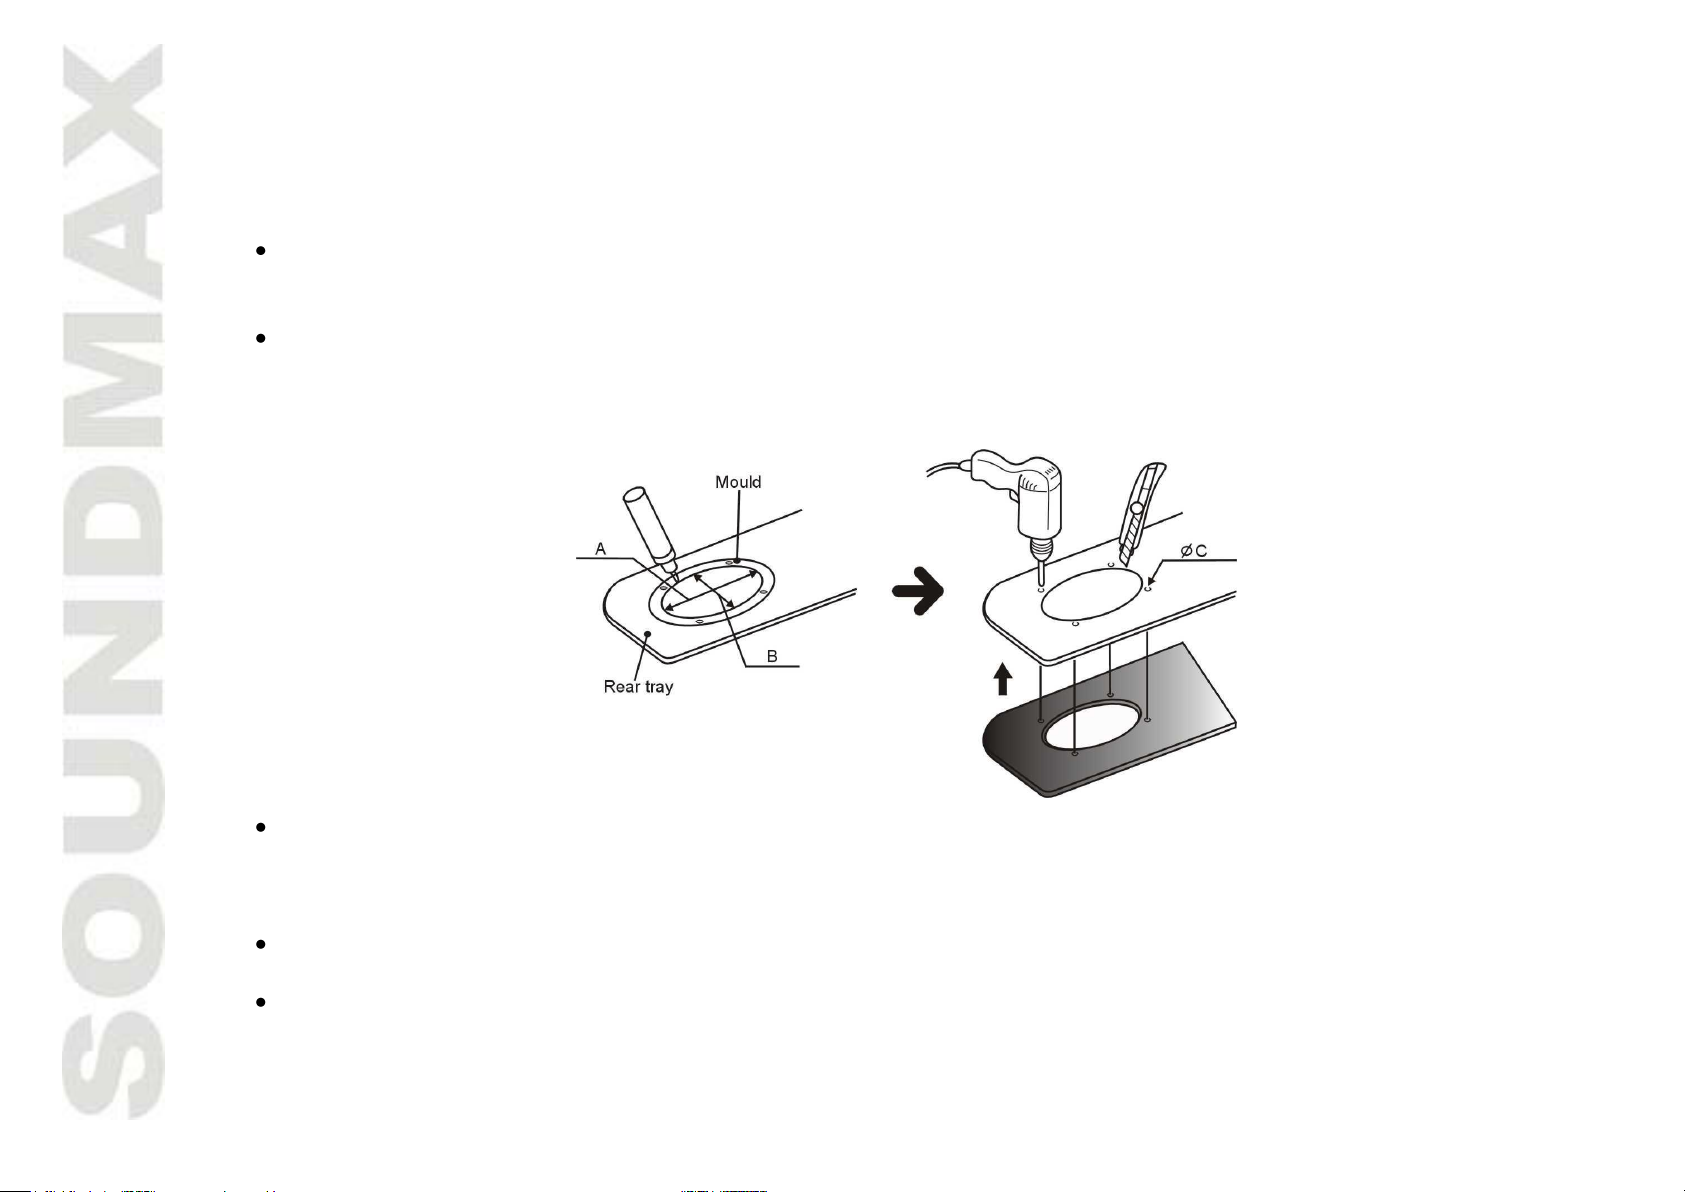
At a choice of a non-standard arrangement of speakers at which it is necessary to cut them in panels of
the automobile, use a mould (not included). For achievement of ideal arrangement of acoustic system
keep up geometry of a mould, as it is very important for correct installation of your system (А=151 mm,
В=220 mm, ØС=5 mm).
If it will be necessary to cut steel, reinstall the cosmetic panel in place and use the hole you have
previously cut as a template. This will help to insure proper cutting and a good fit. Now, mark the locations
for the speakers mounting screws, remove the panel and drill the screw holes. When finished you may
replace the panel.
After cutting and drilling all holes, inspect the mounting areas for any metal burrs or rough edges. File any
area that may interfere with the mounting of the speaker.
Clean any metal shavings from the mounting area and check for areas in which water may enter the
speaker cavity. Treat the area for water protection when necessary.
Page 5
5
Securing the speakers
Position the speaker into the mounting hole and re-confirm the correct mounting location and hole
placement.
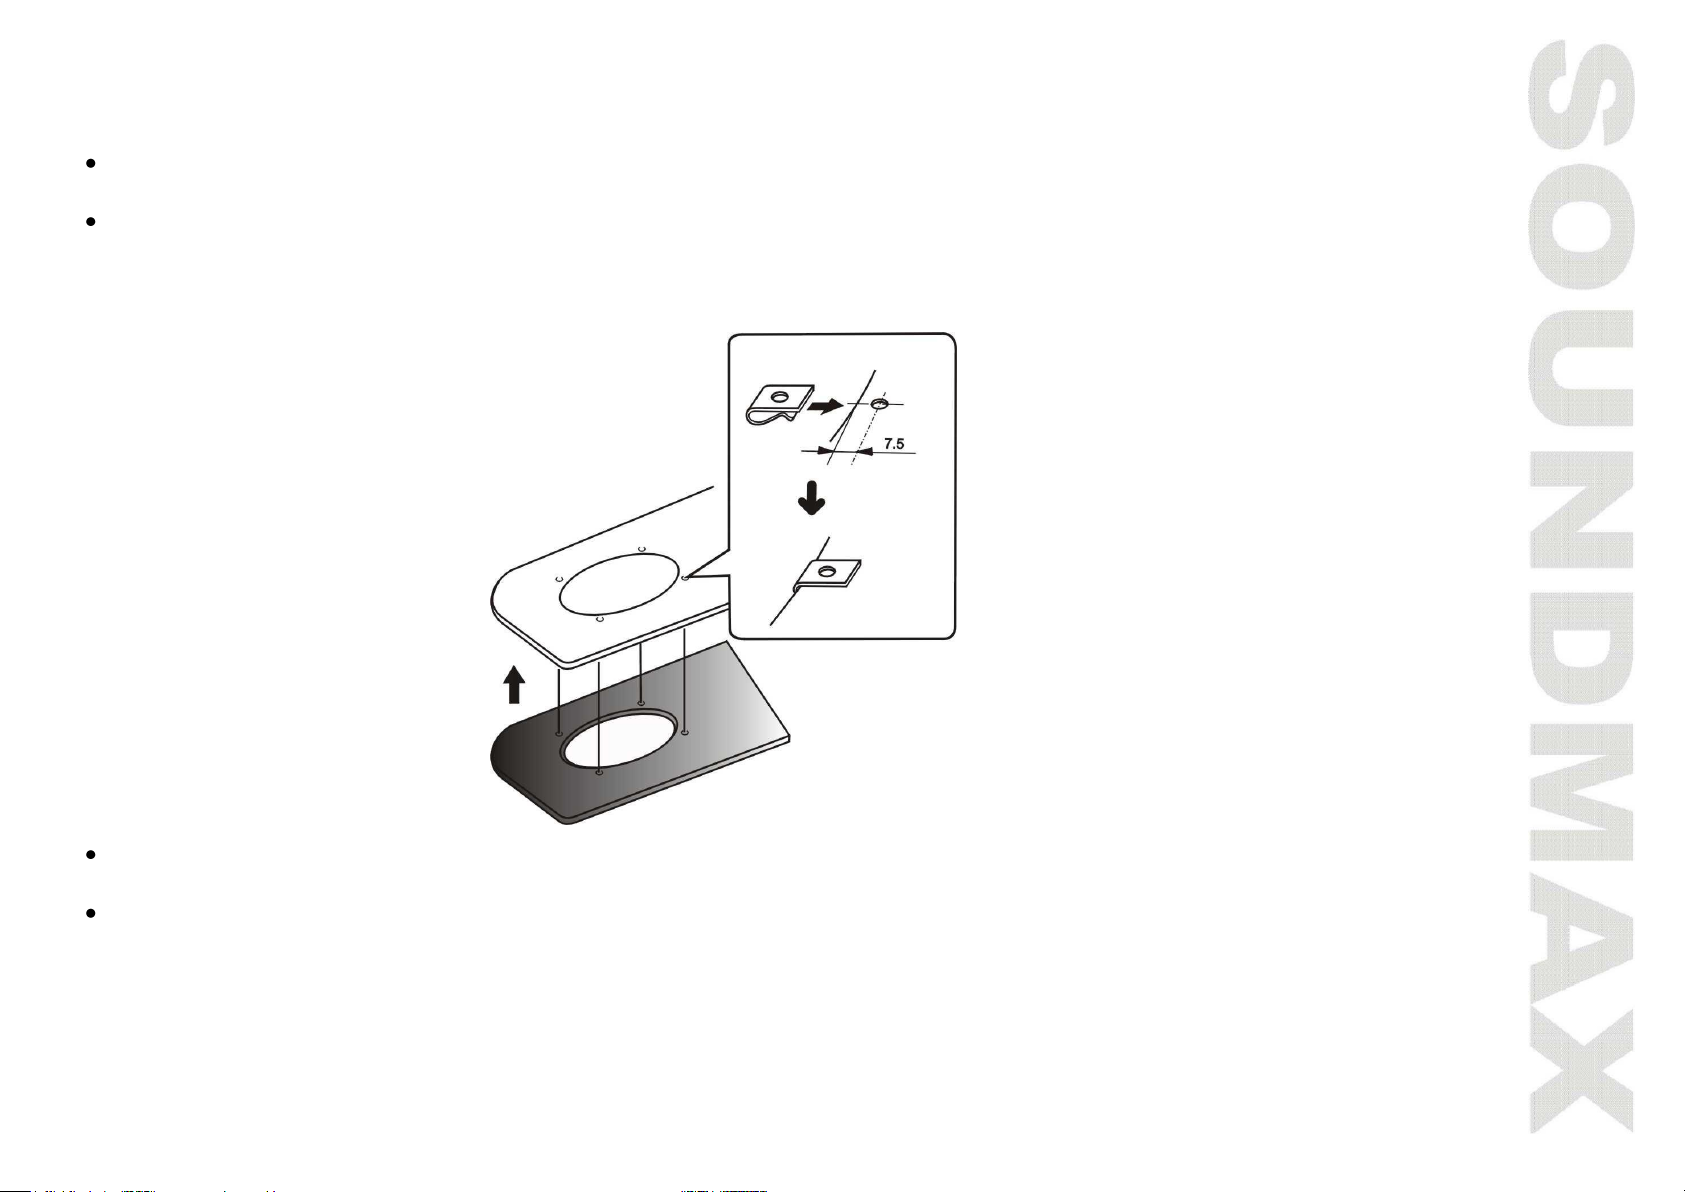
Screw clips are provided to ensure a snug fit. These should be placed over the metal surface and line up
the hole you have previously drilled with the screw clip. Place the speaker into the hole, align the holes
and proceed to insert the screws. Be sure to tighten the screws evenly so that it will not warp the speaker
frame.
Turn your system back on and confirm the speakers operation first at a low volume and then you may
increase the volume as you desire.
After installation acoustic system and having tested it the speaker grill will have to be inserted. Turn on
you system and follow these steps carefully:
- locate the speaker grill;
- now carefully inspect the place where the speaker grill will be mounted – there should be no
blowholes;
- fix the speaker grill by screws.
Page 6

6
If unit fails to operate properly
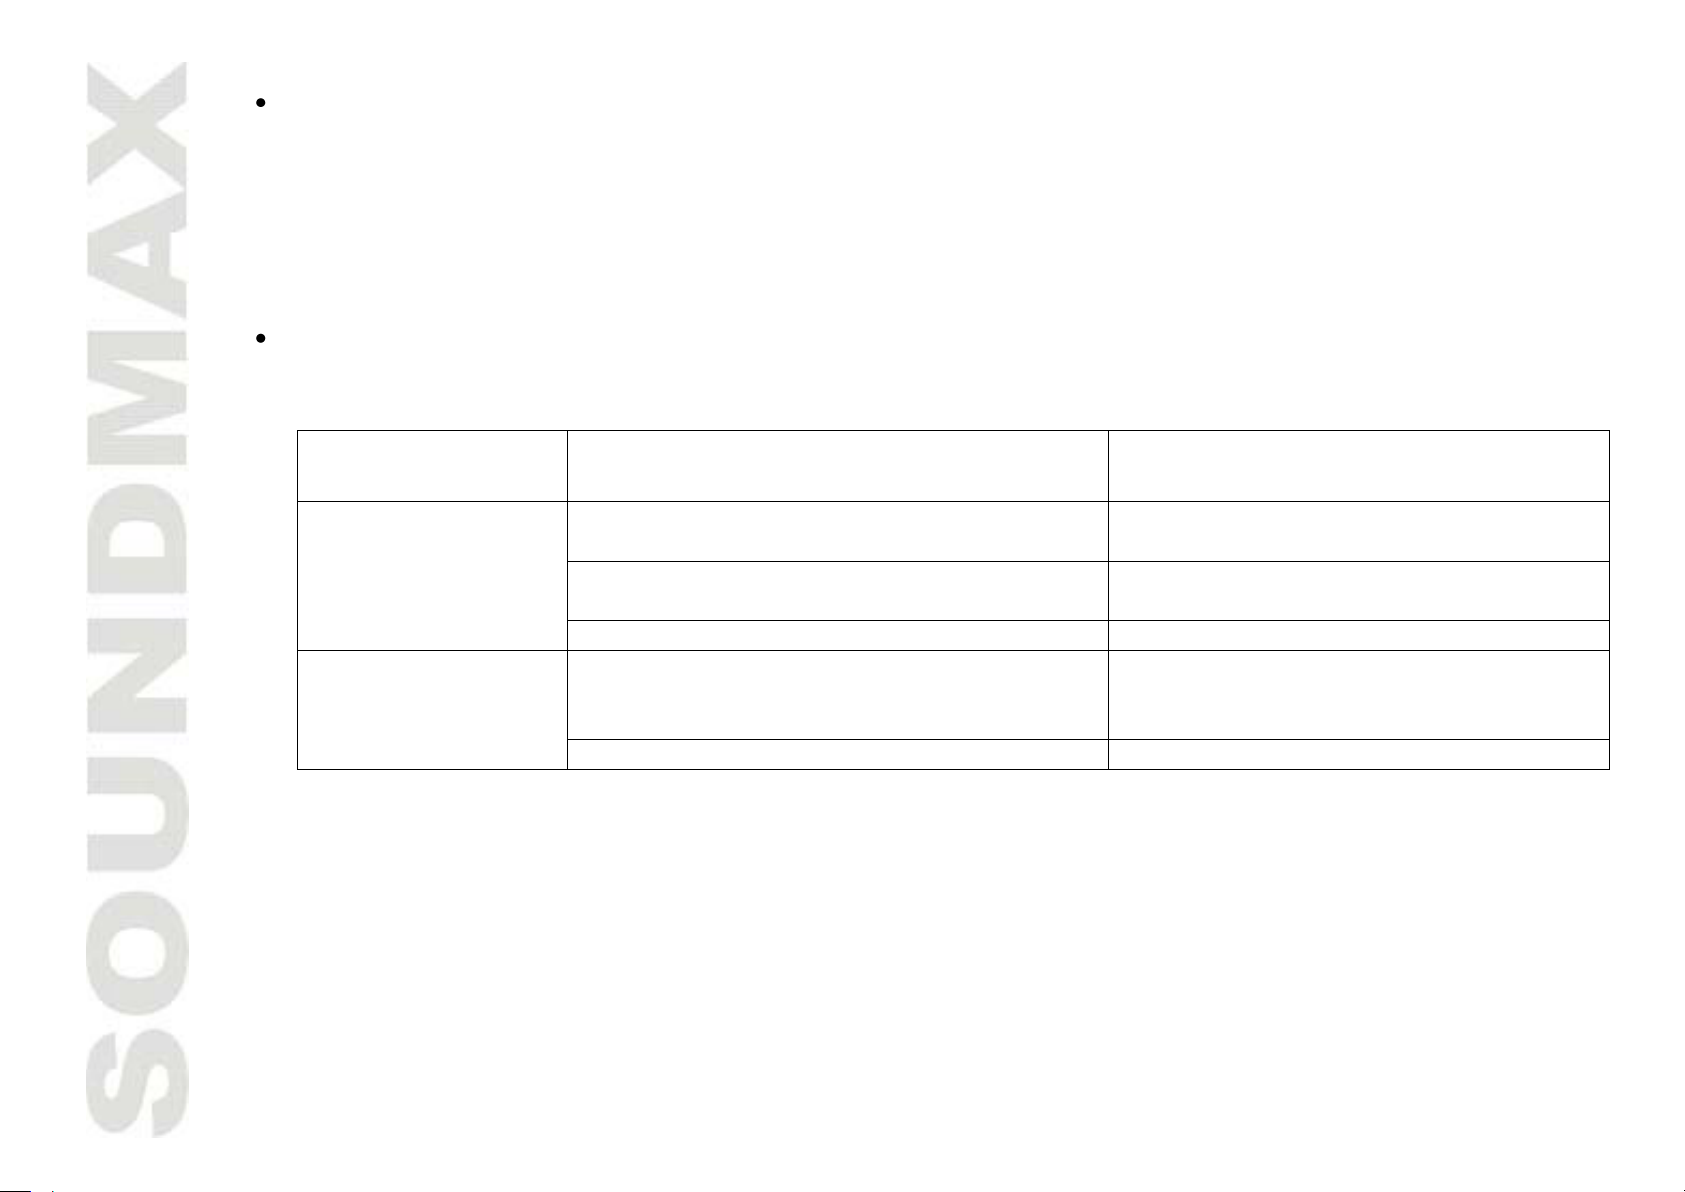
SYMPTOM
POSSIBLE CAUSE
SOLUTION
No sound
The volume control regulator set in the
minimal position
Adjust sound level
Bad power connections
Check to see that all the power and speaker
leads are securely connected
The audio cassette receiver is damaged
Take your unit to the local dealer for repair
Unnatural
sound
Acoustic system cables are connected
without observance of polarity (+ or -)
Check to see that all the power and speaker
leads are securely connected
Damage speaker wire or speaker
Replace the speaker or speaker wires
The audio cassette receiver is damaged
Take your unit to the local dealer for repair
Carefully read the instruction to make sure the unit is being operated properly. Check the following before
you take your unit to the local dealer for repair.
NOTE: Good ground connections eliminate most electrical noise problems and require tight contact with the
metal vehicle chassis. Remove plastics, paint or rust for good electrical contact.
Page 7

7
Specication
Loudspeaker сone woofer: 16x24 cm IMPP cone
midrange: 58 mm mylar
tweeter: 20 mm piezo
Magnet 15 Oz (425 g)
Peak output power 220 W
Rated output power 110 W
Impedance 4 Оhm
Sensitivity 92 dB
Frequency response 45 - 20000 Hz
Dimensions 262 x 185 x 105 mm
Net / Gross weight 1.6 kg / 2.75 kg
Page 8
8
Описание
2,8 м (x 2) (x 8) (x 8)
В состав комплекта
входит:
- акустическая система
- защитные
металлические решетки
– 2 шт.
- провод – 2 шт. x 2,8 м
- винт – 8 шт.
- хомут – 8 шт.
Page 9

9
Меры безопасности
В руководстве указаны важные указания по эксплуатации и уходу. Сохраните руководство по
эксплуатации для последующего использования.
Не устанавливайте динамики на неровной поверхности, а также в местах, подверженных
воздействию влажности, высокой температуры, пыли и сильной вибрации.
Перед креплением и подключением проводов убедитесь в том, что провод от отрицательной клеммы
(-) аккумулятора отсоединен. Несоблюдение этого требования может привести к возникновению
короткого замыкания или пожара.
Чтобы предотвратить возникновение короткого замыкания, никогда не кладите и не оставляйте
никаких металлических предметов (например, монет или металлических инструментов) внутри
акустической системы.
Убедитесь, что клеммы проводов динамиков подключены к соответствующим выходным зажимам
автомагнитолы.
Никогда не прокладывайте электропроводку с внешней стороны автомобиля или под ним, где она
может быть повреждена неровностями на дороге или подвижными деталями автомобиля. При
установке динамиков для маскировки и сохранности электропроводки, используйте
предусмотренные заранее места, такие как пороги, панели и обшивку салона.
Во время подключения клеммы проводов убедитесь, что провод от отрицательной клеммы (-)
аккумулятора отсоединен. Проверьте все соединения и убедитесь в правильности подключения, для
обеспечения идеальной работы акустической системы.
Избегайте длительного превышения номинальной мощности звукового сигнала, подаваемого на
акустические системы.
Не держите вблизи от акустических систем кассеты с записью, часы или кредитные карточки с
магнитным кодом во избежание их повреждения под воздействием магнитов, имеющихся в
динамиках.
Если Вы самостоятельно не можете найти подходящее место для установки акустических систем,
обращайтесь за советом в ближайшую автомобильную мастерскую или к ближайшему дилеру.
ВНИМАНИЕ: Соблюдайте технику безопасности при работе около бензобака, газовых магистралей,
гидравлических линий и линий электропроводки.
Page 10

10
Установка акустической системы
Наборы инструментов для установки автомобильной акустической системы можно приобрести у Вашего
дилера или в местном магазине аудио аппаратуры. Эти наборы помогут Вам легко произвести установку
динамиков. Со всеми вопросами, связанными с методами установки акустических систем, обращайтесь к
профессиональным дилерам автомобильной аудио аппаратуры.
Выберите место установки автомобильной акустической системы. Для большинства динамиков
подходят предусмотренные штатные места в автомобиле. В этом случае Вам понадобится знать
только монтажную глубину. Перед установкой динамиков проверьте их монтажную глубину.
При выборе нестандартного расположения динамиков, при котором необходимо врезать их в панели
автомобиля, используйте шаблон (не входит в комплект поставки). Для достижения идеального
расположения акустической системы следите за геометрией шаблона, так как точность размеров
влияет на качество установки акустической системы (А=151 мм, В=220 мм, ØС=5 мм).
Если под декоративной панелью проходит металлический корпус автомобиля, тогда для установки
акустической системы Вам необходимо действовать следующим образом:
- снимите декоративную панель;
- вырежьте посадочное место по шаблону;
- на металлическом корпусе сделайте разметку отверстий для установки крепежных винтов;
- просверлите отверстия под крепежные винты.
Page 11

11
После того, как отверстия вырезаны, проверьте место установки на наличие неровных поверхностей
и краев. Отшлифуйте поверхности, которые могут помешать установке акустической системы.
Удалите металлическую стружку с места установки динамиков и проверьте его на наличие пустот,
куда может попасть вода.
Установка защитной решетки
Установите акустическую систему в подготовленные места и еще раз убедитесь, что ее
расположение выбрано правильно.
В комплект динамиков входят хомуты, которые должны располагаться на металлической
поверхности корпуса автомобиля и совпадать с просверленными до этого отверстиями. Закрепите
хомуты с помощью винтов и убедитесь, что при этом каркас динамика не деформировался.
Включите автомагнитолу на минимальном уровне громкости и проверьте, что динамики работают.
После этого Вы можете установить необходимый уровень громкости.
Page 12
12
После установки динамика и его тестирования Вам необходимо установить защитные решетки.
ПРИЗНАК
ВОЗМОЖНАЯ ПРИЧИНА
УСТРАНЕНИЕ
Нет звука
Регулятор громкости установлен в
минимальное положение
Установите оптимальный уровень
громкости
Поврежден провод подключения
динамика или сам динамик
Проверьте провод или динамик
Автомагнитола неисправна
Обратитесь в сервисный центр
Неестественный
звук
Кабели акустической системы
подключены без соблюдения
полярности (+ и -)
Правильно подключите провод в
соответствии с примером
подключения
Автомагнитола неисправна
Обратитесь в сервисный центр
Выключите Вашу систему и следуйте приведенным ниже указаниям:
- установите защитную решетку;
- внимательно осмотрите место крепления защитной решетки на наличие пустот;
- закрепите защитную решетку с помощью винтов.
Причины неисправности акустической системы
Если Ваша акустическая система по каким-либо причинам не работает, то прежде чем обращаться в
сервисный центр, внимательно прочитайте данную инструкцию. В таблице приведены часто
встречающиеся причины, из-за которых прибор не функционирует.
ВНИМАНИЕ: Правильное заземление является гарантом хорошего звучания Вашей акустической
системы. Тщательно очистите поверхность, предназначенную для подключения заземляющего провода,
от краски, ржавчины и других загрязнений.
Page 13

13
Технические характеристики
Фенгшун Пеййинг Электро-Акустик Ко., Лимитед
Номер 288 Шунфа Роад, Тангкенг, Фенгшун,
Гуангдонг, Китай
Под контролем «ТЕХНО ЭЛЕКТРИК ЛИМИТЕД»
Сделано в Китае
SM-CSD693_IM_01
Произведено:
Диффузор
Магнит
Максимальная выходная
мощность
Номинальная мощность
Сопротивление
Чувствительность
Диапазон воспроизводимых
частот
Размеры
Вес нетто / брутто
НЧ: 16x24 см диффузор инжекционного литья
СЧ: 58 мм майларовый
ВЧ: 20 мм пьезотвитер
15 унций (425 г)
220 Ватт
110 Ватт
4 Ом
92 дБ
45 - 20000 Гц
262 x 185 x 105 мм
1,6 кг / 2,75 кг
Page 14

14
Page 15

15
 Loading...