

Page 1
DEUTSCH
PORTUGUÊS
ENGLISH
SVENSKA
FRANÇAIS
ČEŠTINA
NEDERLANDS
SLOVENSKÝ
ITALIANO
ROMÂNIA
ESPANOL
LIETUVOS
UR620
Hersteller
Wörlein GmbH Tel.: +49 9103/71670
Gewerbestrasse 12 Fax.: +49 9103/716712
D 90556 Cadolzburg Email. [email protected]
GERMANY Web: www.woerlein.com
Page 2
Safety, Environmental and Setup Instructions
EN
ENVIRONMENTAL PROTECTION
Do not dispose of this product with the normal household
waste at the end of its life cycle. Return it to a collection
point for the recycling of electrical and electronic devices.
This is indicated by the symbol on the product, user
manual or packaging
The materials are reusable according to their markings. By
reusing, recycling or other forms of utilization of old devices you
make an important contribution to the protection of our
environment.
Please contact your local authorities for details about collection
points.
WARNING
Risk of electric shock
Do not open!
Caution: To reduce the risk of electric shock, do not remove the
cover (or back). There are no user serviceable parts inside.
Refer servicing to qualified service personnel.
This symbol indicates the presence of dangerous
voltage inside the enclosure, sufficient enough to
cause electric shock.
This symbol indicates the presence of important
operating and maintenance instructions for the device
Used batteries are hazardous waste and NOT to be
disposed of with the household waste! As a
consumer you are legally obligated to return all
batteries for environmentally responsible recycling –
no matter whether or not the batteries contain harmful
substances*)
Return batteries free of charge to public collection points in your
community or shops selling batteries of the respective kind.
Only return fully discharged batteries
*) marked Cd = cadmium, Hg = mercury, Pb = lead
Only use mercury and cadmium-free batteries.
Used batteries are hazardous waste and NOT to
be disposed of with the household waste!!!
Keep batteries away from children. Children might
swallow batteries.
Contact a physician immediately if a battery was
swallowed.
Check your batteries regularly to avoid battery
leakage.
Batteries shall not be exposed to excessive heat
such as sunshine, fire or the like.
CAUTION: Danger of explosion if battery is
incorrectly replaced
Replace only with the same or equivalent type
Use the device in dry indoor environments only.
Protect the device from humidity.
This apparatus is for moderate climates areas
use, not suitable for use in tropical climates
countries.
No objects filled with liquids, such as vases,
shall be placed on the apparatus.
The mains plug or an appliance coupler is
used as the disconnect device, the
disconnect devices shall remain readily
operable.
Connect this device to a properly installed
and earthed wall outlet only. Make sure the
mains voltage corresponds with the
specifications on the rating plate.
Make sure the mains cable stays dry during
operation. Do not pinch or damage the
mains cable in any way.
A damaged mains cable or plug must
immediately be replaced by an authorized
service center.
In case of lightning, immediately disconnect
the device from the mains supply.
Children should be supervised by parents
when using the device.
Clean the device with a dry cloth only.
Do NOT use CLEANING AGENTS or
ABRASIVE CLOTHS!
Do not expose the device to direct sunlight
or other heat sources.
Install the device at a location with sufficient
ventilation in order to prevent heat
accumulation.
Do not cover the ventilation openings!
Install the device at a safe and vibration-free
location.
Install the device as far away as possible
from computers and microwave units;
otherwise radio reception may be disturbed.
Do not open or repair the enclosure. It is not
safe to do so and will void your warranty.
Repairs only by authorized service/ customer
center.
No naked flame sources, such as lighted
candles, should be placed on the unit.
When you are necessary to ship the unit
store it in its original package. Save the
package for this purpose.
In case of malfunction due to electrostatic
discharge or fast transient (burst), remove
and reconnect the power supply.
If the unit is not using for a long period of
time, disconnect it from the power supply by
unplugging the power plug. This is to avoid
the risk of fire.
Page 3
UR620 / English Instruction Manual
1
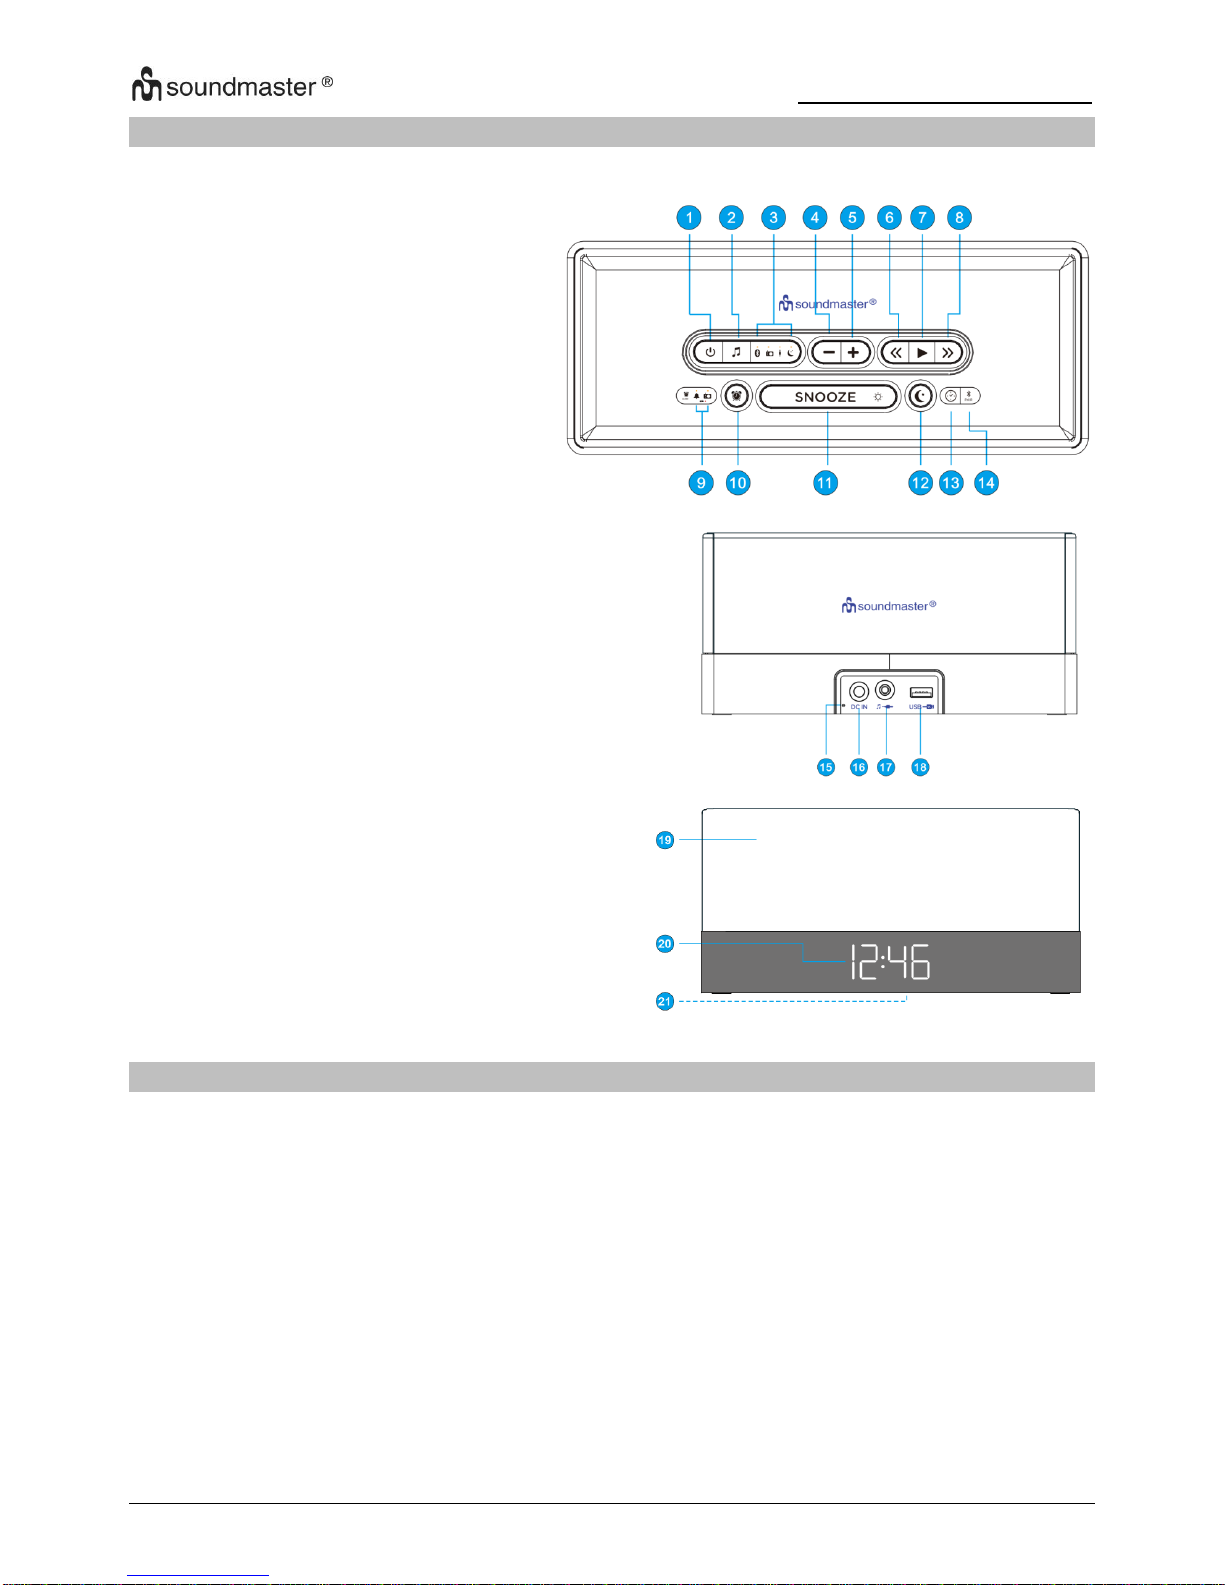
LOCATION OF CONTROLS
1
POWER ON / OFF
2
SOURCE
3
BLUETOOTH / FM RADIO /
AUX-IN / SLEEP LED (amber)
4
VOLUME -
5
VOLUME +
6
TUNE DOWN / HOUR
7
PLAY / RADIO PRESET
8
TUNE UP / MIN
9
ALARM BUZZER / ALARM
RADIO LED (amber)
LOW BATTERY LED (red)
10
ALARM
11
SNOOZE / BRIGHTNESS
12
SLEEP
13
TIME SET
14
BLUETOOTH PAIR
15
FM ANTENNA WIRE
16
DC IN JACK
17
LINE-IN JACK
18
USB CHARGING PORT
19
SPEAKERS
20
LED DISPLAY
21
BATTERY COMPARTMENT
(bottom of unit)
INSTALLATION
Use only the supplied AC/DC-adapter (AC In – 100-240V AC, 50/60Hz / DC Out – 5V 2.0A).
Do not connect the unit before checking the main voltage and before all other connections have
been made.
Insert the plug from the AC/DC-adapter to the DC jack (16) of the main unit. Then connect the
AC/DC-adapter to an AC outlet.
When you connect the unit at first time the display (20) will show “0:00” and start flashing.
To keep accurate time, this unit uses (2) “AAA batteries” (not included) for clock backup.
These batteries keep the clock operating in the event of a power interruption.
Page 4
UR620 / English Instruction Manual
2
BACKUP BATTERY INSTALLATION
Open the battery door (21) by pushing in on the tabs, then removing the door.
Insert two (2) ‘AAA’ batteries following the correct polarity indicated in the battery compartment.
Replace the battery door (21) back on the compartment.
NOTES: The batteries are used to back-up the clock and alarm times when the AC adaptor is
disconnected or there is a power failure.
Alkaline batteries are recommended for the longest backup time.
When replacing the battery, do not disconnect the AC power adapter otherwise the current time,
alarm, and station presets will be erased.
When to replace the battery: The red LED of battery indicator will light up when there are no
batteries or when the batteries are low.
CHANGING THE INPUT SOURCE
With the UR620 powered “ON”, repeatedly press the “SOURCE” button to change the input
source to cycle between FM Radio, Bluetooth or AUX IN.
PLAYING THE RADIO
With the clock radio plugged in and powered ‘ON’, press the “SOURCE” button, then select
FM and the frequency indicator will appear on the display.
Repeatedly press the “TUNE UP / MIN” or “TUNE DOWN / HOUR” button to manually adjust the
tuning on the display until the desired station appears.
For auto tuning, press and hold the “TUNE UP / MIN” or “TUNE DOWN / HOUR” button until the
display starts to scan then release the button and the tuner will search and stop on the next
strong station. Repeat this process until the desired station appears on the display.
NOTE: Fully extend the FM wire antenna to increase reception sensitivity. Keep digital music
players or mobile phones away from the FM antenna as this may cause interference. Do not
place the FM antenna near the AC power adaptor as this may lead to reception interference.
SETTING RADIO PRESETS
To store a radio station to memory, first follow the steps above to tune in the desired station.
Press and hold the “PLAY/RADIO PRESET” button to create a preset for the current station.
“P” will appear and “##” (the preset number) will blink on the display.
Press the “TUNE UP / MIN” or “TUNE DOWN / HOUR” button to select a preset number (01- 10).
Press the “PLAY/RADIO PRESET” button again to confirm the setting and the station will be
saved into memory. Repeat these steps for up to 10 presets, as desired.
To recall a preset station, repeatedly press the “PLAY/RADIO PRESET” button until the desired
preset number appears in the display and the station tunes in.
Page 5
UR620 / English Instruction Manual
3
SETTING THE CLOCK
Plug in the UR620, but leave the power “OFF”.
Press and hold the “TIME SET” button (13) until the clock flashes in the display.
Press the “TUNE DOWN / HOUR” button (6) repeatedly to set the hour, and press the
“TUNE UP / MIN” button (8) repeatedly to set the minute.
Press the “TIME SET” button (13) again to store the new clock setting.
NOTES: If you do not press any button for about 10 seconds while setting the clock, the clock
setting will be canceled.
SETTING THE ALARM
In standby mode, press and hold the “ALARM” button (10) and the display will begin flashing.
Press the “TUNE DOWN/HOUR” or “TUNE UP/MIN” button (6 or 8) to set the desired alarm time.
Press “ALARM” button (10) to confirm the alarm time set.
The amber LED of alarm source indicator (default as alarm radio) will blink.
Press “TUNE DOWN HOUR” or “TUNE UP / MIN” button (6 or 8) to set the desired alarm source
(Buzzer or Radio). Amber LED of the selected alarm source indicator will light up
Press “ALARM” button (10) to confirm the alarm source set, the volume level will blink on the
display (there is no volume setting if alarm source is set to Buzzer).
Press “TUNE DOWN / HOUR” or “TUNE UP / MIN” button to set the maximum alarm volume.
Press “ALARM” button (10) to confirm the alarm set.
To silence the alarm, press “ALARM” or “POWER ON / OFF” button (10 or 1).
NOTES: To deactivate the alarm, press “ALARM” button (10), the amber LED of alarm source
indicator will turn off. Before setting the alarm, make sure that the clock time is set correctly (see
setting the clock).
SNOOZE
When alarm sounds, pressing the “SNOOZE/ BRIGHTNESS” button (11) will temporarily silence
the alarm. The alarm will sound again after approximately 10 minutes.
To extend the snooze duration, repeatedly press the “SNOOZE / BRIGHTNESS” button (11) to
cycle through and select one of the snooze presets.
NOTE: Once the snooze function has been activated, press the “SNOOZE / BRIGHTNESS”
button (11) anytime and the display will show the remaining time. Repeatedly press the
“SNOOZE / BRIGHTNESS” button (11) to adjust or modify the current snooze time setting.
Page 6
UR620 / English Instruction Manual
4
SLEEP TIMER
The UR620 features a sleep timer to allow you to fall asleep while listening to the unit.
After the preset time duration ends, the unit will automatically shut off.
When the unit powered ON, press the “SLEEP” button (12). The amber LED of “SLEEP” indicator
will light up and “15” will appear on the display briefly indicating the unit will turn off after 15
minutes.
To increase the sleep time duration, up to a maximum of 90 minutes, repeatedly press the
“SLEEP” button (12) to select one of the following sleep time presets.
With the sleep timer active, press the “SLEEP” button (12) once to view the remaining sleep time.
To cancel the sleep timer function, repeatedly press the “SLEEP” button (12) until “OFF” appears
in the display.
SETTING THE BRIGHTNESS
There are three levels of display brightness available (the default setting is low). Press the
“SNOOZE / BRIGHTNESS” button (11) to cycle through and select the desired setting
NOTE: Make sure that the unit is not in alarm sound status.
STREAMING AUDIO WITH BLUETOOTH® WIRELESS
You can stream audio wirelessly to Clock Radio from up to 33’ away using your smartphone
tablet, laptop or other A2DP Bluetooth® enabled device.
Turn on the unit by pressing the “POWER ON/OFF” button (1).
Then press the “SOURCE” or “BLUETOOTH PAIR” button (2 or 14). The Bluetooth® LED
indicator will flash.
Turn on your Bluetooth® enabled device and search for and select “UR620”.
If asked for a password, enter “0000”.
The Bluetooth® LED indicator will change from flashing to solid, indicating that your Bluetooth®
device is now connected to UR620.
Press and hold the “BLUETOOTH PAIR” button (14) for 3 seconds to disconnect the Bluetooth®
connection.
NOTES: If the last paired Bluetooth® audio device is powered on and within range of the
speaker, the device will automatically reconnect to UR620. For the best audio performance, turn
the volume all the way up on your Bluetooth® device.
If the unit fails to pair with your Bluetooth® device, go to your Bluetooth® setting menu, then
select 'UR620 "Info". For Android device, select "Unpair", if using an Apple OS device, select
"Forget this Device". When UR620 appears in your list of Bluetooth® devices, select it to
complete pairing.
UR620 can only play audio from one source at a time. If UR620 is connected to a Line-In source,
the Bluetooth® will not function. Simply unplug the 3.5mm Line-In audio cable and press the
“SOURCE” or “BLUETOOTH PAIR” button (2 or 14) to switch to Bluetooth®.
Page 7
UR620 / English Instruction Manual
5
USB CHARGING PORT
The UR620 features one USB port (18) located on the rear of the unit (see “location of controls”).
The USB port supports power charging of most USB devices smartphones, tables, E-readers,
digital cameras and more. Use a USB cable (sold separately) to connect a rechargeable device
to UR620.
AUX IN CONNECTION
Insert one end of the 3.5mm audio cable (not included) into the “LINE OUT” jack on your external
device (mobile phone, MP3 player, digital media player, etc.) and the other end into the “LINE-IN”
jack (17) on rear of this unit.
To listen to the external audio source, turn this unit on by pressing the “POWER ON/OFF”
button (1), then power on the external audio source. Next press the “SOURCE” button (2) to
select.
AUX-IN mode. The amber LED of AUX-IN indicator will light up.
Press play on the external audio source and the sound will playback through the speakers of the
UR620.
NOTE: It is suggested that you unplug the audio cable when you are not listening to the external
audio unit.
TECHNICAL SPECIFICATION
Power supply
: Use only the supplied power adapter
Power input
: 100-240V~ 50/60Hz 0.4A
Power output
: DC 5V 2A
Backup battery
: 2x 1.5V “AAA” size batteries
USB output
: DC 5V 1A
FM range
: 87.5 – 108MHz
Bluetooth version
: Version 4.2
Audio power output
: 2x 3W RMS
IMPORTER
Wörlein GmbH Tel.: +49 9103 71 67 0
Gewerbestrasse 12 Fax.: +49 9103 71 67 12
D 90556 Cadolzburg Email: [email protected]
Germany Web: www.woerlein.com
Technische Änderungen und Druckfehler vorbehalten
Copyright by Woerlein GmbH, 90556 Cadolzburg, www.woerlein.com
Vervielfältigung nur mit ausdrücklicher Genehmigung der Woerlein GmbH
Page 8

Hiermit bestätigt Wörlein GmbH, dass sich dieses Gerät
in Übereinstimmung mit den grundlegenden
Anforderungen und den übrigen einschlägigen
Bestimmungen der Richtlinie 2014/53/EU befindet.
Eine Kopie der Konformitätserklärung kann unter
folgender Adresse bezogen werden.
Wörlein GmbH, Gewerbestrasse 12, D 90556 Cadolzburg,
Germany
Email: [email protected]
Tel.: +49 9103 71 67 0
Hereby, Wörlein GmbH declares that this device is in
compliance with the essential requirements and other
relevant provisions of Directive 2014/53/EU.
A copy of the Declaration of Conformity may be
obtained at the following location:
Wörlein GmbH, Gewerbestrasse 12, D 90556 Cadolzburg,
Germany
Email: [email protected]
Tel.: +49 9103 71 67 0
Par la présente, Wörlein GmbH déclare que cet appareil
est conforme aux exigences principales et autres clauses
applicables de la Directive 2014/53/EU.
Vous pouvez demander de recevoir une copie de la
déclaration de conformité en écrivant à l'adresse
suivante :
Wörlein GmbH, Gewerbestrasse 12, D 90556 Cadolzburg,
Germany
Email: [email protected]
Tel.: +49 9103 71 67 0
Wörlein GmbH verklaart hierbij dat dit apparaat in
overeenkomst is met de essentiële vereisten en andere
relevante bepalingen van de Richtlijn 2014/53/EU.
Er kan een kopie van de Conformiteitsverklaring worden
verkregen op de volgende locatie:
Wörlein GmbH, Gewerbestrasse 12, D 90556 Cadolzburg,
Germany
Email: [email protected]
Tel.: +49 9103 71 67 0
Con la presente, Wörlein GmbH dichiara che questo
dispositivo è conforme ai requisiti essenziali e altre
disposizioni contenute nella Direttiva 2014/53/EU.
Una copia della Dichiarazione di conformità è disponibile
al seguente indirizzo:
Wörlein GmbH, Gewerbestrasse 12, D 90556 Cadolzburg,
Germania
Email: [email protected]
Tel .: +49 9103 71 67 0
Härmed Wörlein GmbH deklarerar att denna enhet är i
överensstämmelse med de grundläggande kraven och
andra relevanta bestämmelser i direktiv 2014/53/EU.
En kopia av försäkran om överensstämmelse kan erhållas
på följande plats:
Wörlein GmbH, Gewerbestrasse 12, D 90.556
Cadolzburg, Tyskland
E-post: [email protected]
Tel .: +49 9103 71 67 0
Herved Wörlein GmbH erklærer, at denne enhed er i
overensstemmelse med de væsentlige krav og øvrige
relevante krav i direktiv 2014/53/EU.
En kopi af Overensstemmelseserklæringen kan fås på
følgende placering:
Wörlein GmbH, Gewerbestrasse 12, D 90556 Cadolzburg,
Tyskland
E-mail: [email protected]
Tel .: +49 9103 71 67 0
Tímto Wörlein GmbH prohlašuje, že toto zařízení je ve
shodě se základními požadavky a dalšími příslušnými
ustanoveními směrnice 2014/53/EU.
Kopii Prohlášení o shodě lze získat v následujícím
umístění:
Wörlein GmbH, Gewerbestrasse 12, D 90556 Cadolzburg,
Německo
E-mail: [email protected]
Tel .: +49 9103 71 67 0
Por este meio, Wörlein GmbH declara que este
dispositivo está em conformidade com os requisitos
essenciais e outras disposições da Directiva 2014/53/EU.
Uma cópia da Declaração de Conformidade pode ser
obtida no seguinte local:
Wörlein GmbH, Gewerbestrasse 12, D 90556 Cadolzburg,
Alemanha
Email: [email protected]
Tel .: +49 9103 71 67 0
 Loading...