

Page 1
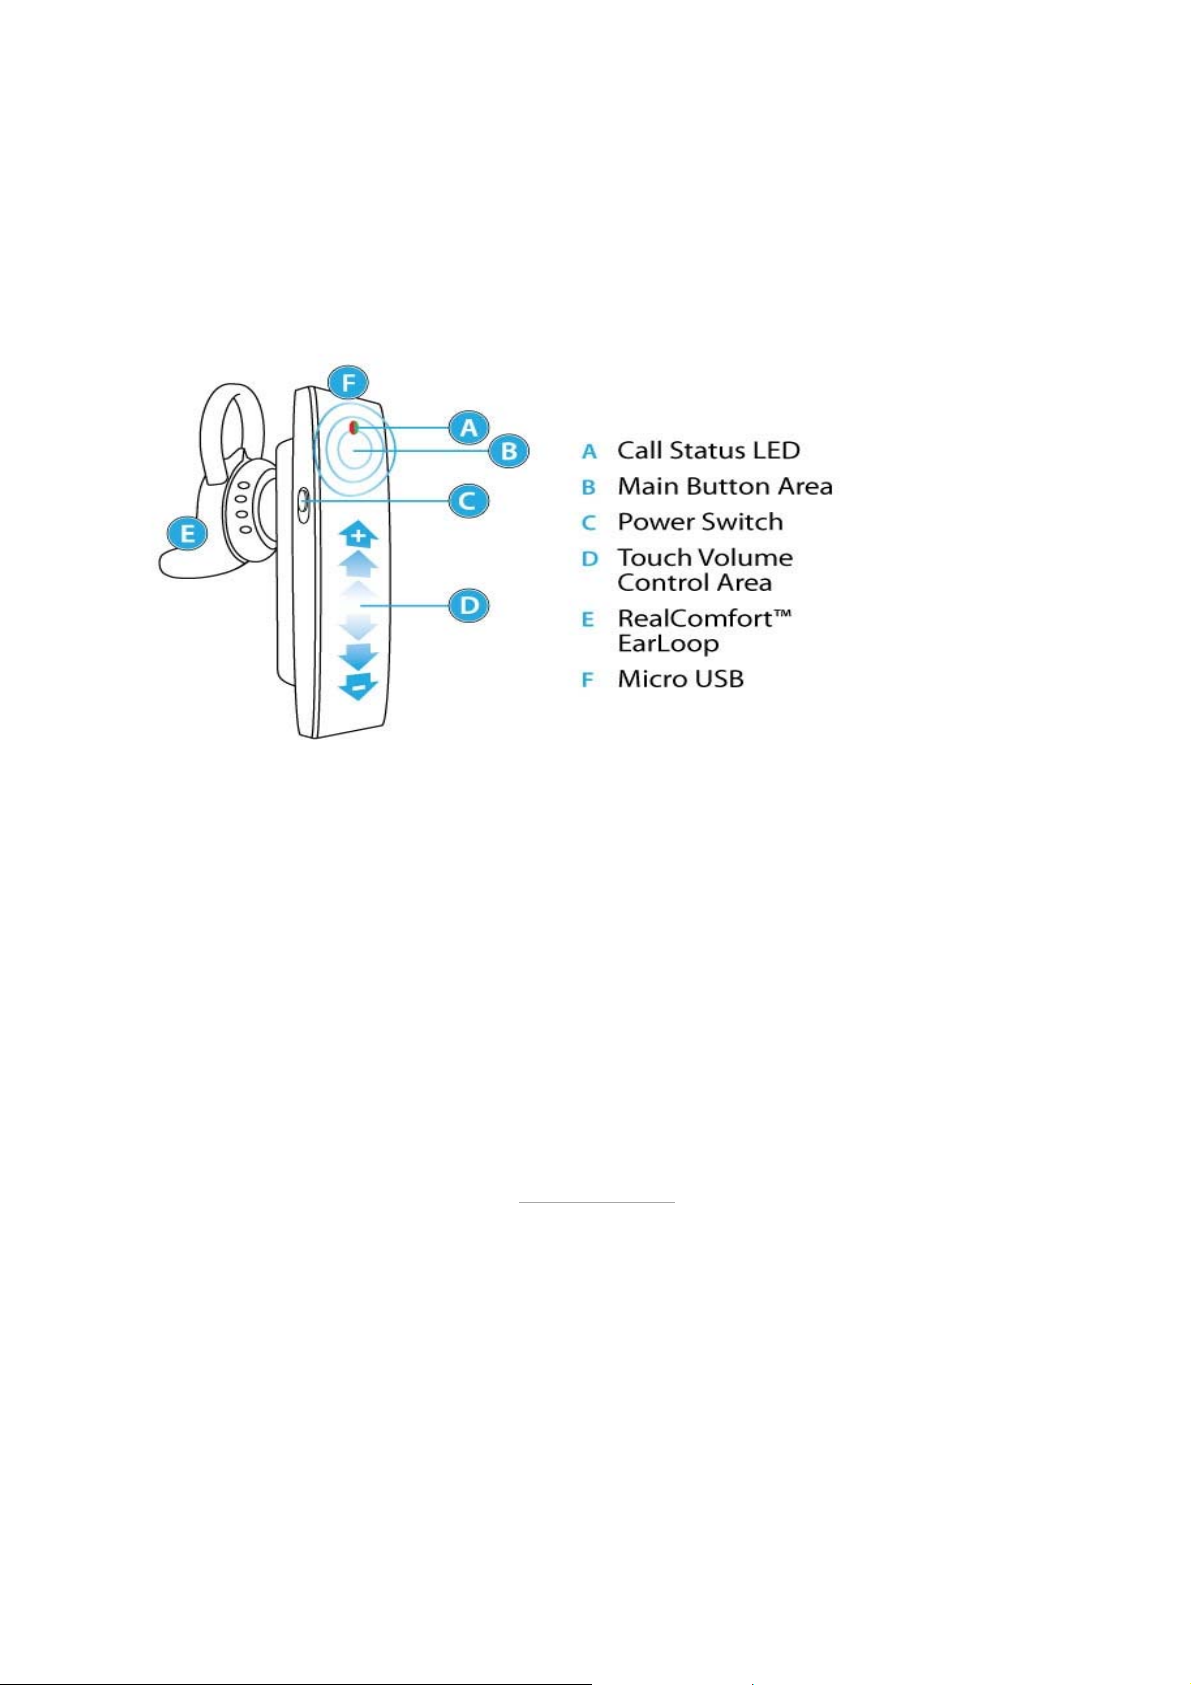
Getting to know the SOUND ID SIX
Thank you for choosing your Sound ID SIX Bluetooth Headset. With the SIX, Sound ID has redefined the
handsfree experienc e.
Compatible with all Bluetooth enabled mobile phones (2.0 and higher). Sound ID SIX combine innovation
features into one sleek and powerful headset, plus the refined sound quality you've come to expect from Sound
ID.
• EarPrint 3.0 - Personalize your sound settings with the swirl of a finger, check battery status and create
your own hands free Voice Menu. This App is free and is available for iPhone, Android 2.1 or higher
and select Blackberry phones. Check www.soundid.com
EarPrint.
• 3X NoiseNavigation has three microphones that eliminate intrusive wind and unwanted background
noise.
• Clear Carbon Smart Touch Surface that controls volume, mute, and voice menu,
• Caller ID and Voice Prompts giv e connection and status updates, and identify incoming calls from your
favorite numbers
for a list of phones that are compatible with
Page 2

• Voice Menu activates up to 5 favorite features, such as Voice Mail, Last Number Redial, or Auto Dial with
just a touch.
• All day RealComfort™ Ear Loops in small, medium and large plus an over the ear wearing option.
• ActiveConnect allows connection to any two Bluetooth A2DP devices (Mobile phones, Tablets, PC’s) for
music and video.
• Pass Thru Mode amplifies your surrounding environment between calls. Fine tune amplification with
PersonalSound.
• Convenient On/Off switch
• Micro USB Connectivity – charge headset and upgrade firmware with Micro USB connection.
• Over 4 hours of talk time, 75 hours standby
Achieve the Best Performance
1. Having the mobile phone on the opposite side as your headset or behind you will reduce wireless signals.
Keep the mobile phone and headset on the same side, preferably line-of-sight. If you experience
intermittent static, reposition the phone to find the best reception.
2. As you increase the separation between your phone and your headset the wireless signal strength will
be reduced and will produce static and/or disconnect. Reduce the distance.
3. If you put your phone in a purse or briefcase, keep the purse or briefcase on the same side as the
headset.
Turning the Headset On
The Sound ID SIX has a convenient On/Off Switch located on the side of the headset to ensure you conserve
battery life and avoid accidental pocket-dialing.
When the switch is down (GREEN showing) the power is on. When pushed up (RED showing) the power is off.
Page 3
Pairing with your Phone
Initial Pairing
If your headset has not been paired to a phone, just turn it on.
• Select "LOOK FOR DEVICES" in the Bluetooth menu on your mobile phone. Some phones, such as the
iPhone, will initiate this search automatically. Photo of a phone menu
• Select "SOUND ID SIX" when it appears on your screen. If asked to enter a PIN, enter "0000". You should
only have one Sound ID SIX in your phone Bluetooth menu at anytime.
Manual Pairing
Press and hold the main button on the headset for 3 seconds as you turn on your headset. The LED light should
begin flashing Red and Green indicating “pairing mode”.
Caution: be sure to remove or delete any previously paired Sound ID headsets from your phone’s Bluetooth
menu before attempting to pair. .
Answering a Call on Headset
Sound ID has a simplified one button interface. To answer a call on your Sound ID SIX, press the main button
area once.
Note: if you answer an incoming call with most handsets, the audio will be routed to the handset and not
the headset
Page 4

Transferring Call to Headset
If you use the answer button on your mobile phone to answer a call, you may have to switch the audio source on
the phone to your Sound ID SIX Headset. For more information, please consult the user guide for your mobile
phone.
Adjusting the Volume on Headset
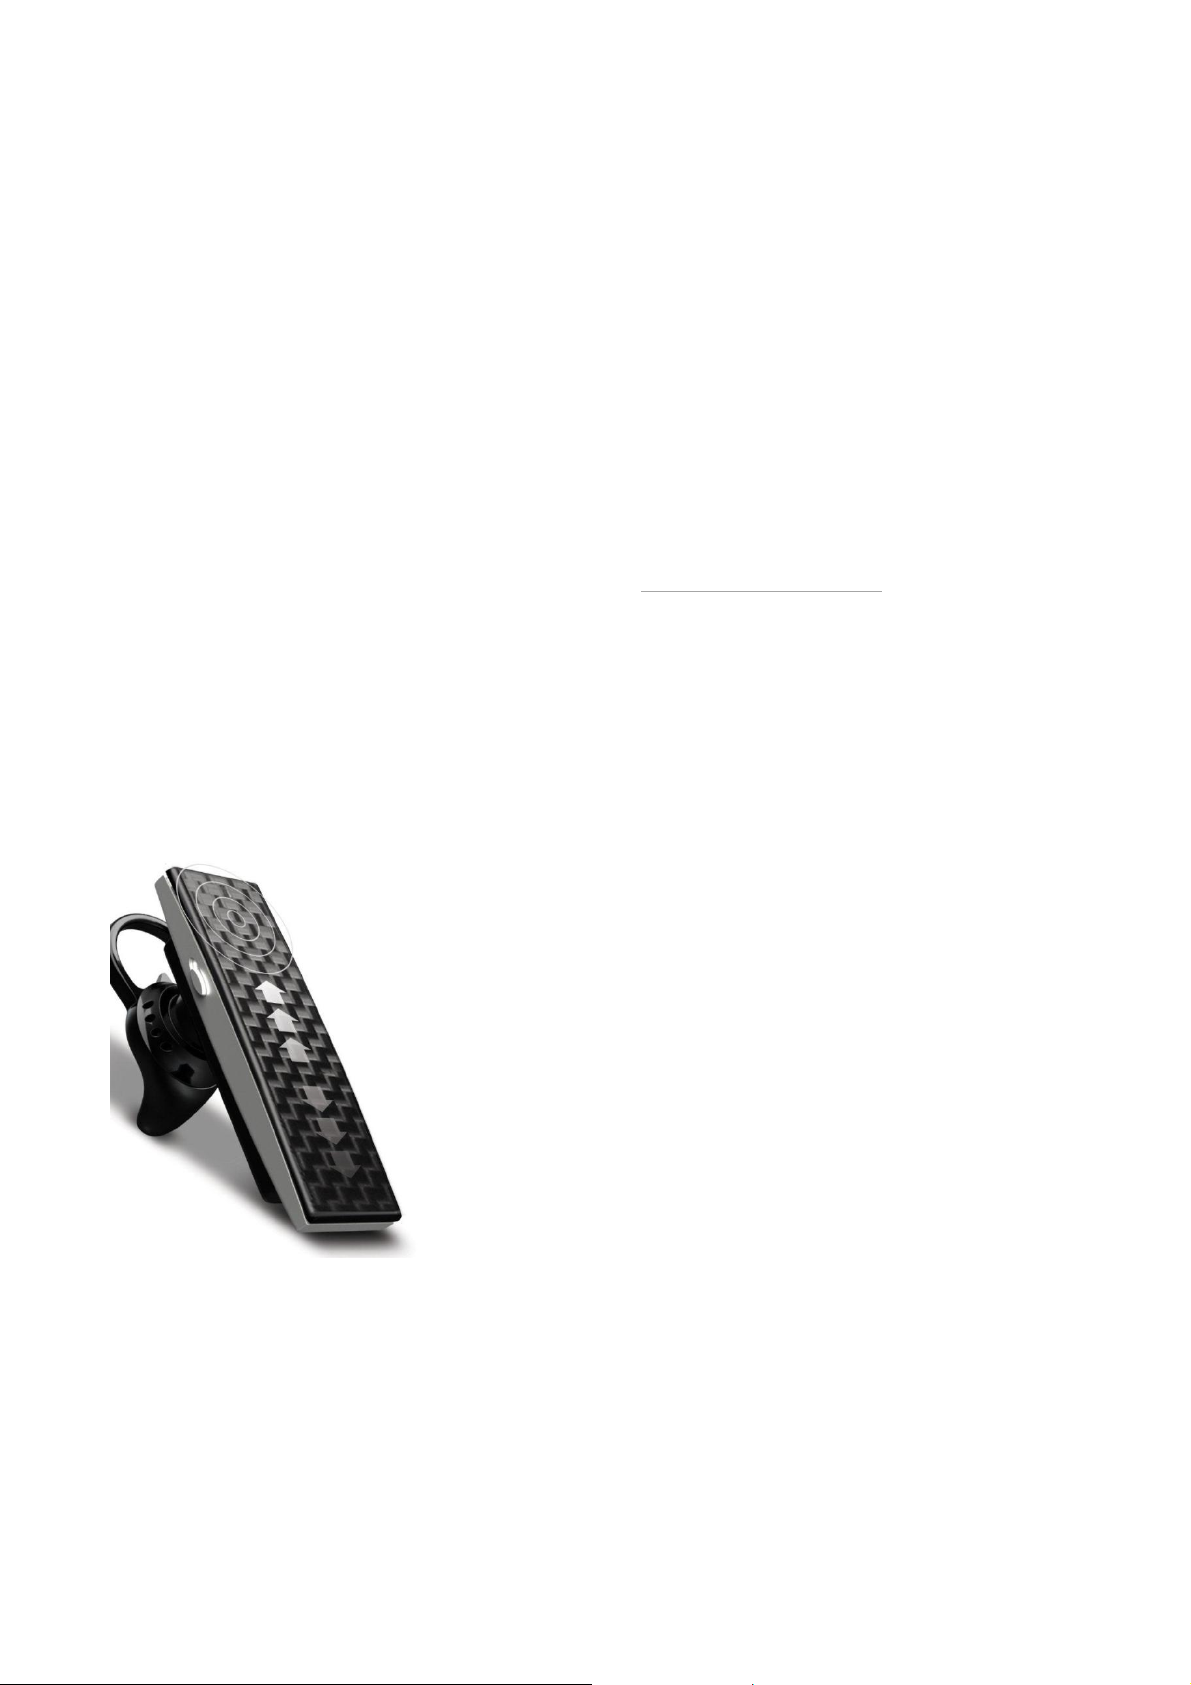
To manually adjust the volume use, the Touch Sensor Volume Control, by simply sliding your finger across the
headset. Insert photo. For best performance, touch the center of the headset top cover and slide your finger
from mouth towards ear to turn volume up, and from ear towards mouth to turn volume down. When you reach
max or min volume you will hear a beep. In addition you may adjust volume using the phone’s volume buttons.
The Sound ID SIX has built-in Automatic Volume Control (AVC). Once the volume is adjusted, the AVC will
monitor and automatically adjust the volume based on the surrounding noise level.
Voice Menu
The Sound ID SIX has a built in Voice Menu. To initiate the Voice Menu press and hold the Main Button area for
2 seconds until you hear the headset say “Voice Menu”, then lift your finger. The voice prompt will scroll
through the selections. Press the Main Button area again when you hear your desired selection. You can
customize Voice Menu by accessing the EarPrint App. (see EarPrint section below)
To activate Voice Dial within the voice menu selections your handset must support Voice Dialing. Check your
handset user manual to determine if you can use this feature.
Pass Thru Mode
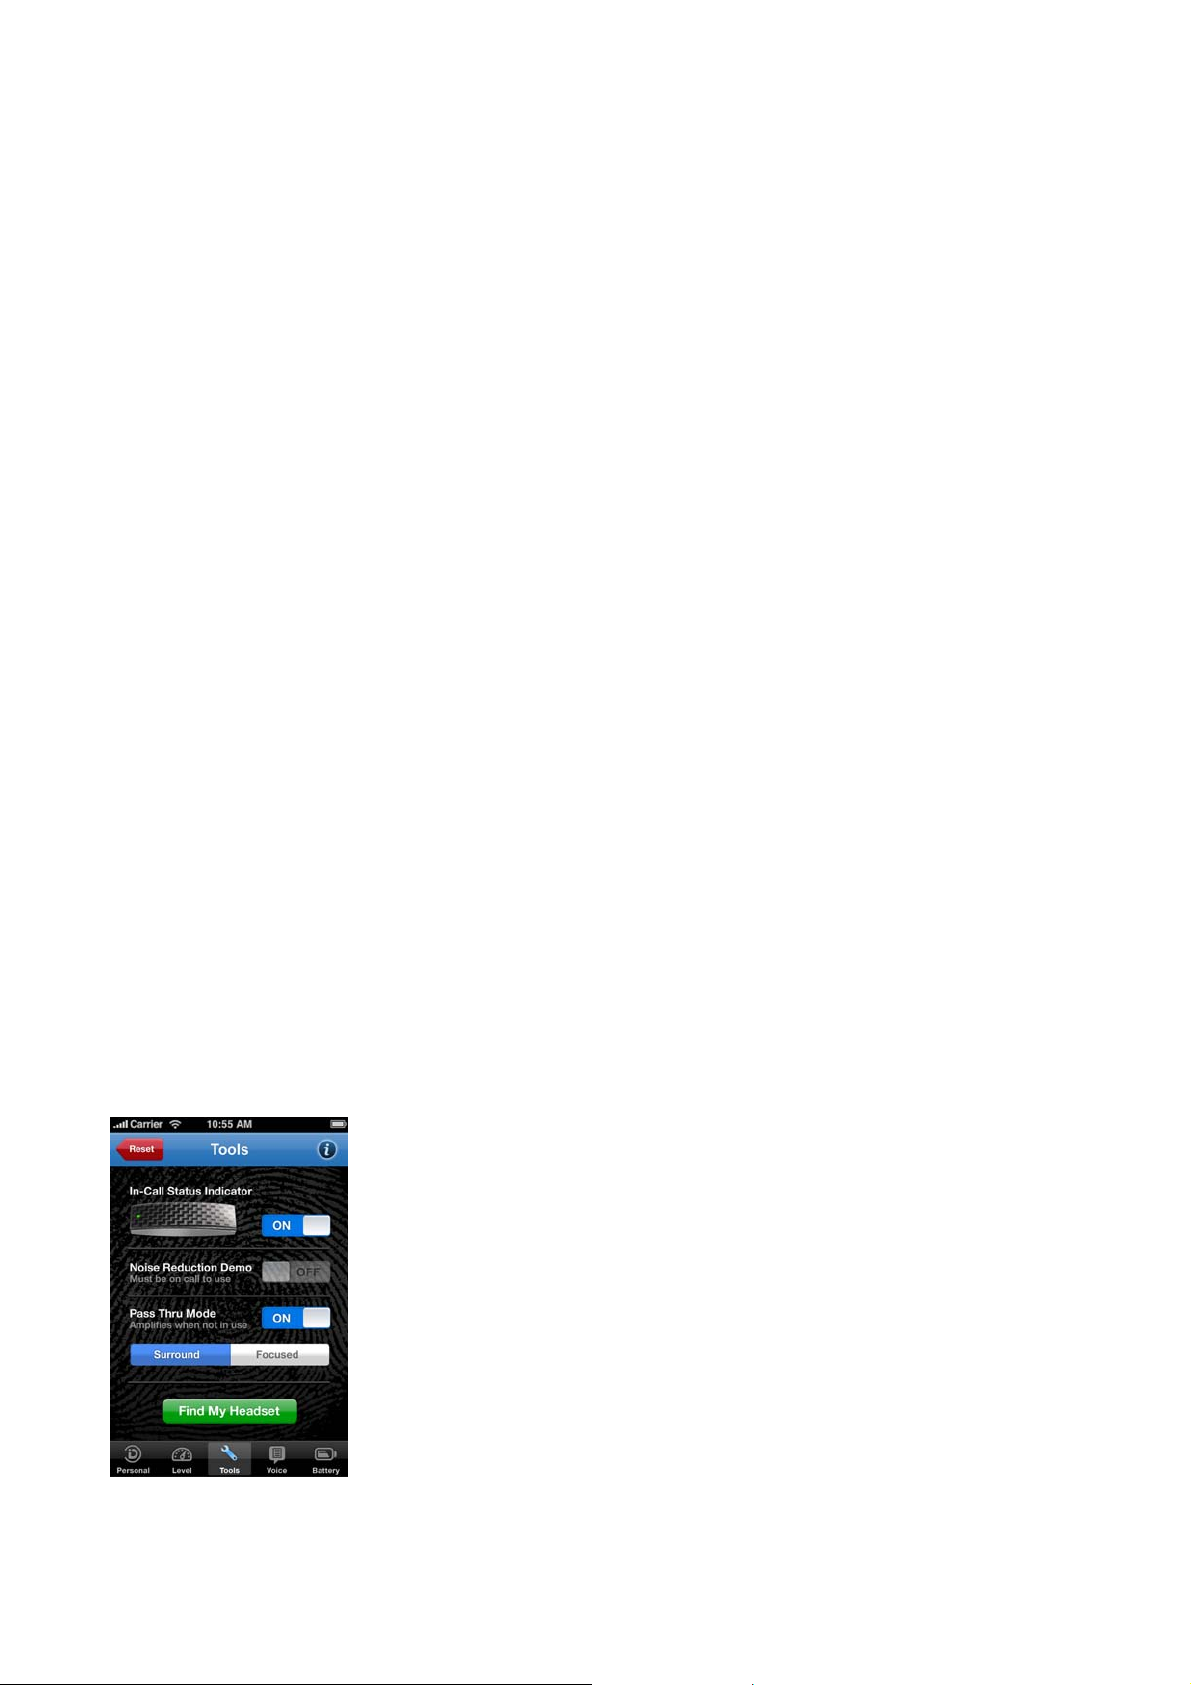
Pass Thru Mode amplifies the surroundings so you don’t have to remove the headset to hear. Pass Thru
maybe activated via EarPrint by simply turning it ON or OFF under the Tools Menu. (screen shot). Y ou may also
select “Surround” for normal listening situation or “Focus” for noisy ones. It even gets better. You may fine tune
Pass Thru Mode in the EarPrint PersonalSound Screen
For added convenience, you may add “Pass Thru Mode” to your Voice Menu to activate or deactivate with a
touch of a button.
Mute/Un-Mute
While in a call, hold your two fingers on the touch volume area (approximately 2 sec onds) until you hear a voice
prompt announcing “Mute/UnMute”.
Page 5

Charging your headset
Charging the battery for the first time we recommend you charge for a minimum of 4 hours. Subsequent charges
take up to 2.5 hours for a full charge. Disregard the green status light during the initial charge.
When the headset is charging, the status light is RE D. When the headset is fully charged, the status light
is GREEN.
Low Battery Warning
When the battery on your Sound ID SIX is low and in need of recharging, you will hear a Voice Prompt telling
you that your battery is low. The status light will also begin blinking RED.
Micro USB Charging
Your Sound ID SIX Headset incorporates a Micro USB socket for charging. The supplied cable features a Micro
USB connector on one side and a Standard USB connector on the other side. To charge your Sound ID SIX,
plug the side with the USB connector into the wall adapter and plug the side with the Micro USB connector into
your headset. The USB Charging Cable can also be used to charge your headset from any standard powered
USB port on devices like a Personal Computer or the iPhone charger. Note: Do not use the Sound ID SIX
charger to charge your phone
Firmware Updates
Firmware is the headsets operating system. Periodically, Sound ID will issue new firmware to add features,
improve performance and accommodate new mobile phones.
Firmware updates require a USB connection between your headset and a desktop/laptop with internet access.
The USB connector/charger cable is supplied with the Sound ID SIX. Updates ar e no t ava ilable through your
mobile device or the mobile version of this website.
To determine if there is a firmware update available for your device, please visit
desktop computer. You may check the firmware version in your headset. Simply turn on the headset, start the
EarPrint App on your iPhone, Blackberry or Android phone and select “Battery”.
EarPrint 3.0
Personalize your Sound ID SIX headset with EarPrint 3.0 the revolutionary App that gives you ultimate control on
both sides of the call. Explore the unique capabilities of PersonalSound, V o ice Menu, and other exclusive
features. The App is free and is available for iPhone, Android and Blackberry operating systems.
www. soundid.com on your
Page 6

When you first pair your headset to your mobile phone it may prompt you to download the free EarPrint
application if it is available for your specific phone.[ Only true for iPhone] consider splitting into iPhone Users,
BB Users and Android Users If not you can download EarPrint by searching “EarPrint” at your mob ile app store.
After downloading EarPrint you will be notified automatically when an upgrade is available. When activating the
EarPrint app insure that the Bluetooth radio on the mobile phone is active and that the headset is turned on.
Opening EarPrint without a Bluetooth connection can cause the app to malfunction. The remedy is typically to
turn “off” the phone and the headset. We suggest waiting 2-3 minutes after the phone is turned “on” to allow the
phone’s operating system to completely open.
Personal Sound
Personal Sound allows you to customize and save your listening preferences. You can adjust your Personal
Sound preference in Phone mode, A2DP (music/media) mode, and Pass Thru mode.
Customizing Personal Sound in Phone Mode
The Personal Sound screen can only be used when on a phone call. Once you have established an active
phone connection, open the EarPrint application. While listening to a remote caller, or by calling Sound ID Audio
Instructions at 1-877-379-1771, the listener can drag the ID icon across the screen to change the audio
characteristics to enhance your listening level. The setting level can be changed at anytime during a call.
Particular helpful during conference calls
Customizing Personal Sound when listening to music/media
When listening to music or other media forms (A2DP), open EarPrint and select the Personal Sound tab. You
can adjust the listening preference by dragging the ID icon across the screen.
Customizing Pass Thru Mode
When pas thru mode is activated (Focus for noisy situation or Surround for normal listening), open EarPrint and
elect the Personal Sound tab.
Page 7
Sound Level Meter
The sound level meter screen displays the sound level at the microphones of your headset in real time and
allows you to monitor your own voice (e.g. on an airplane). The green range corresponds to a soft noise level,
orange represents a normal to loud noise level, and red indicates a loud noise level that could result in hearing
damage after prolonged exposure.
Note: you cannot access the Sound Level Meter during a call, listening to music or while in Pass Thru Mode.
Tools: In-call Status Indicator
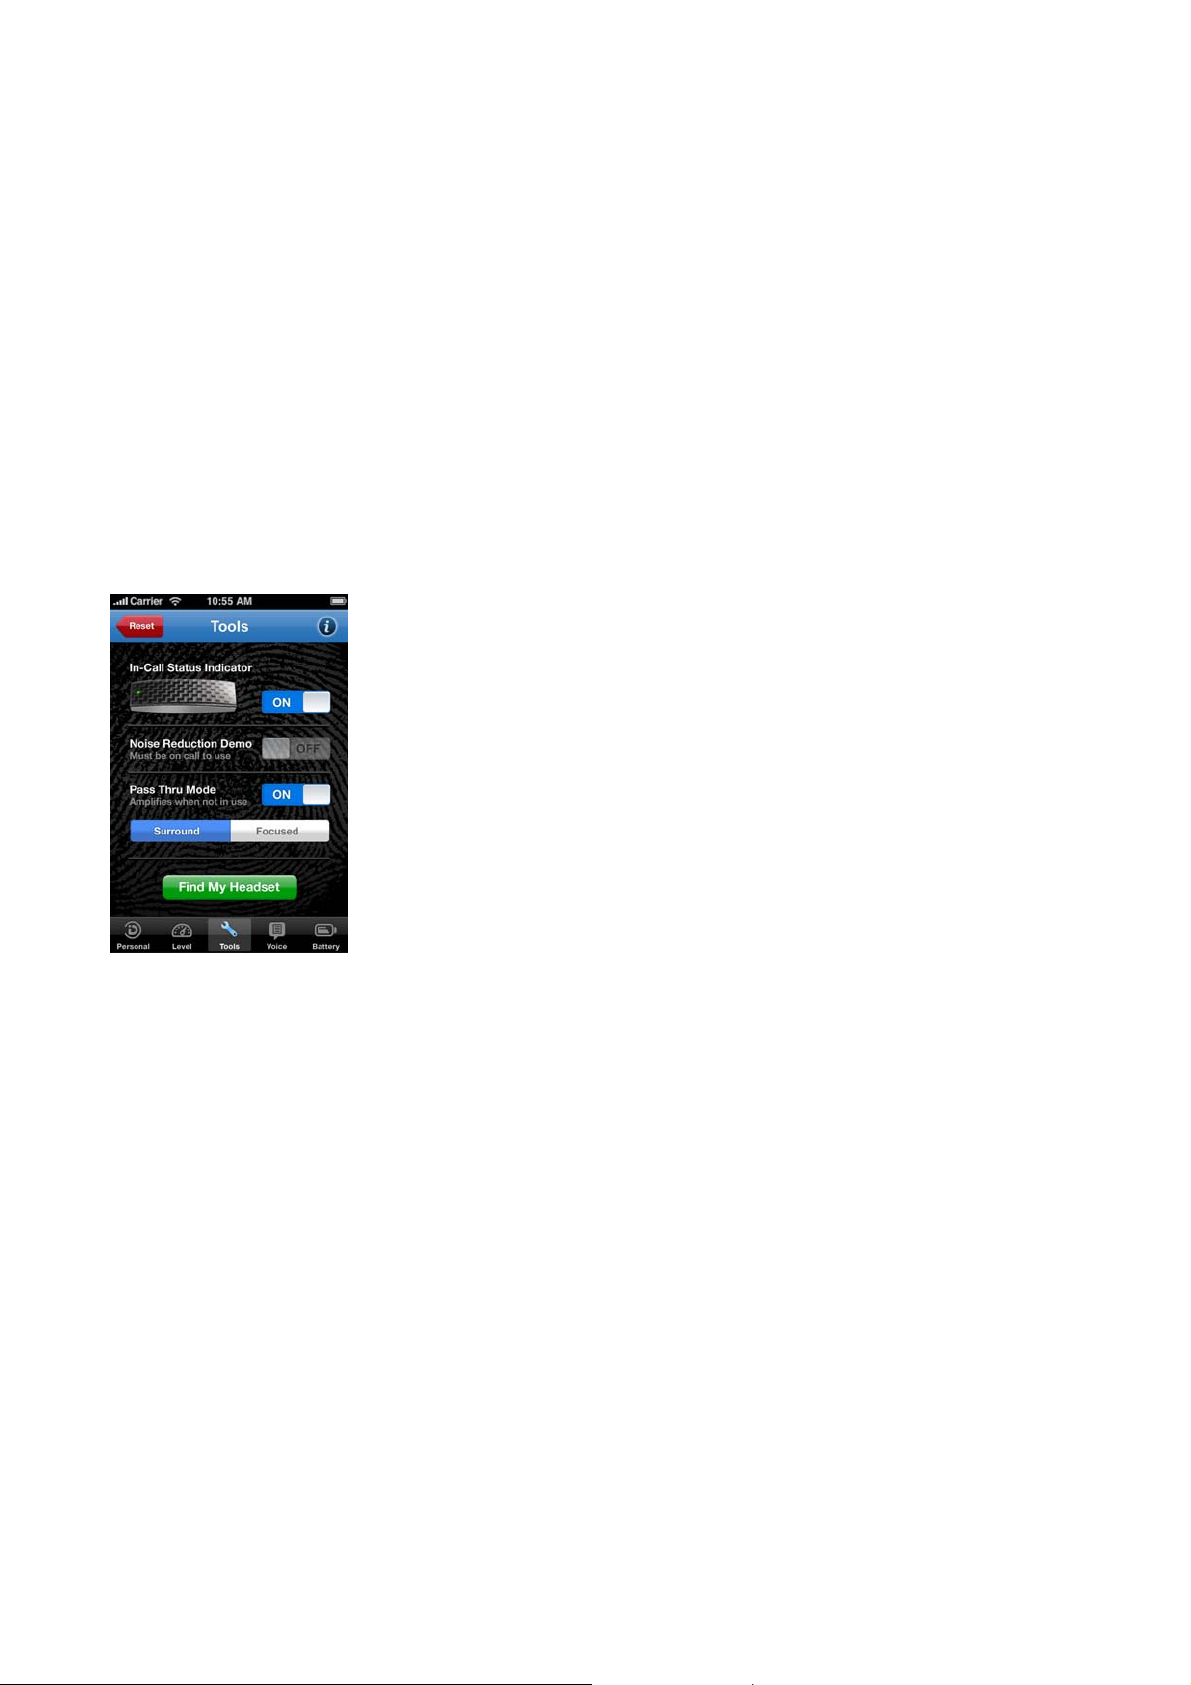
If ON, the LED will flash green when the user is on a call.
Tools: Noise Reduction Demo
Sound ID SIX automatically uses 3X NoiseNavigation to cancel unwanted noise for the listener on the other end
of the call.
When the Noise Reduction Demo is ENABLED, the 3X NoiseNavigation is turned OFF so the caller on the far
side can detect the change in call clarity and the increase in background noise.
Tools: Pass Thru Mode
Pass Thru Mode allows you to hear equally with both ears when not on a phone call. To activate Pass Thru
Mode select ON. To de-activate it select OFF or turn off the headset.
Pass Thru Mode allows you to select 'Focused Listening' or 'Surround Listening'. Focused Listening will focus on
the talker in front of you. Surround Listening will give you 360° surround sound. The default setting is Surround.
The next time Pass Thru Mode is activated, the setting will automatically be switched back to Surround Listening.
Page 8
Tools: Find Me
This feature will help locate a missing headset if it is in range of the phone and turned ON. The headset LED will
blink and will produce a sound for 20 seconds after activation. PLEASE MAKE SURE THAT THE HEADSET IS
NOT IN YOUR EAR WHEN YOU ACTIVATE THE FIND OPTION. THE LOUD SOUND PRODUCED IN THAT
MODE COULD BE DANGEROUS TO YOUR HEARING.
Tools: Reset Button
Restores all settings back to the factory settings and eliminates all previously paired phones.
Visual Battery Indicator
The visual battery indicator displays the remaining battery life of the headset. Advanced Lithium-Polymer battery
provides up to 4 hours talk time, lasting 75 hours on standby, and only takes 2.5 hours to charge.
Page 9
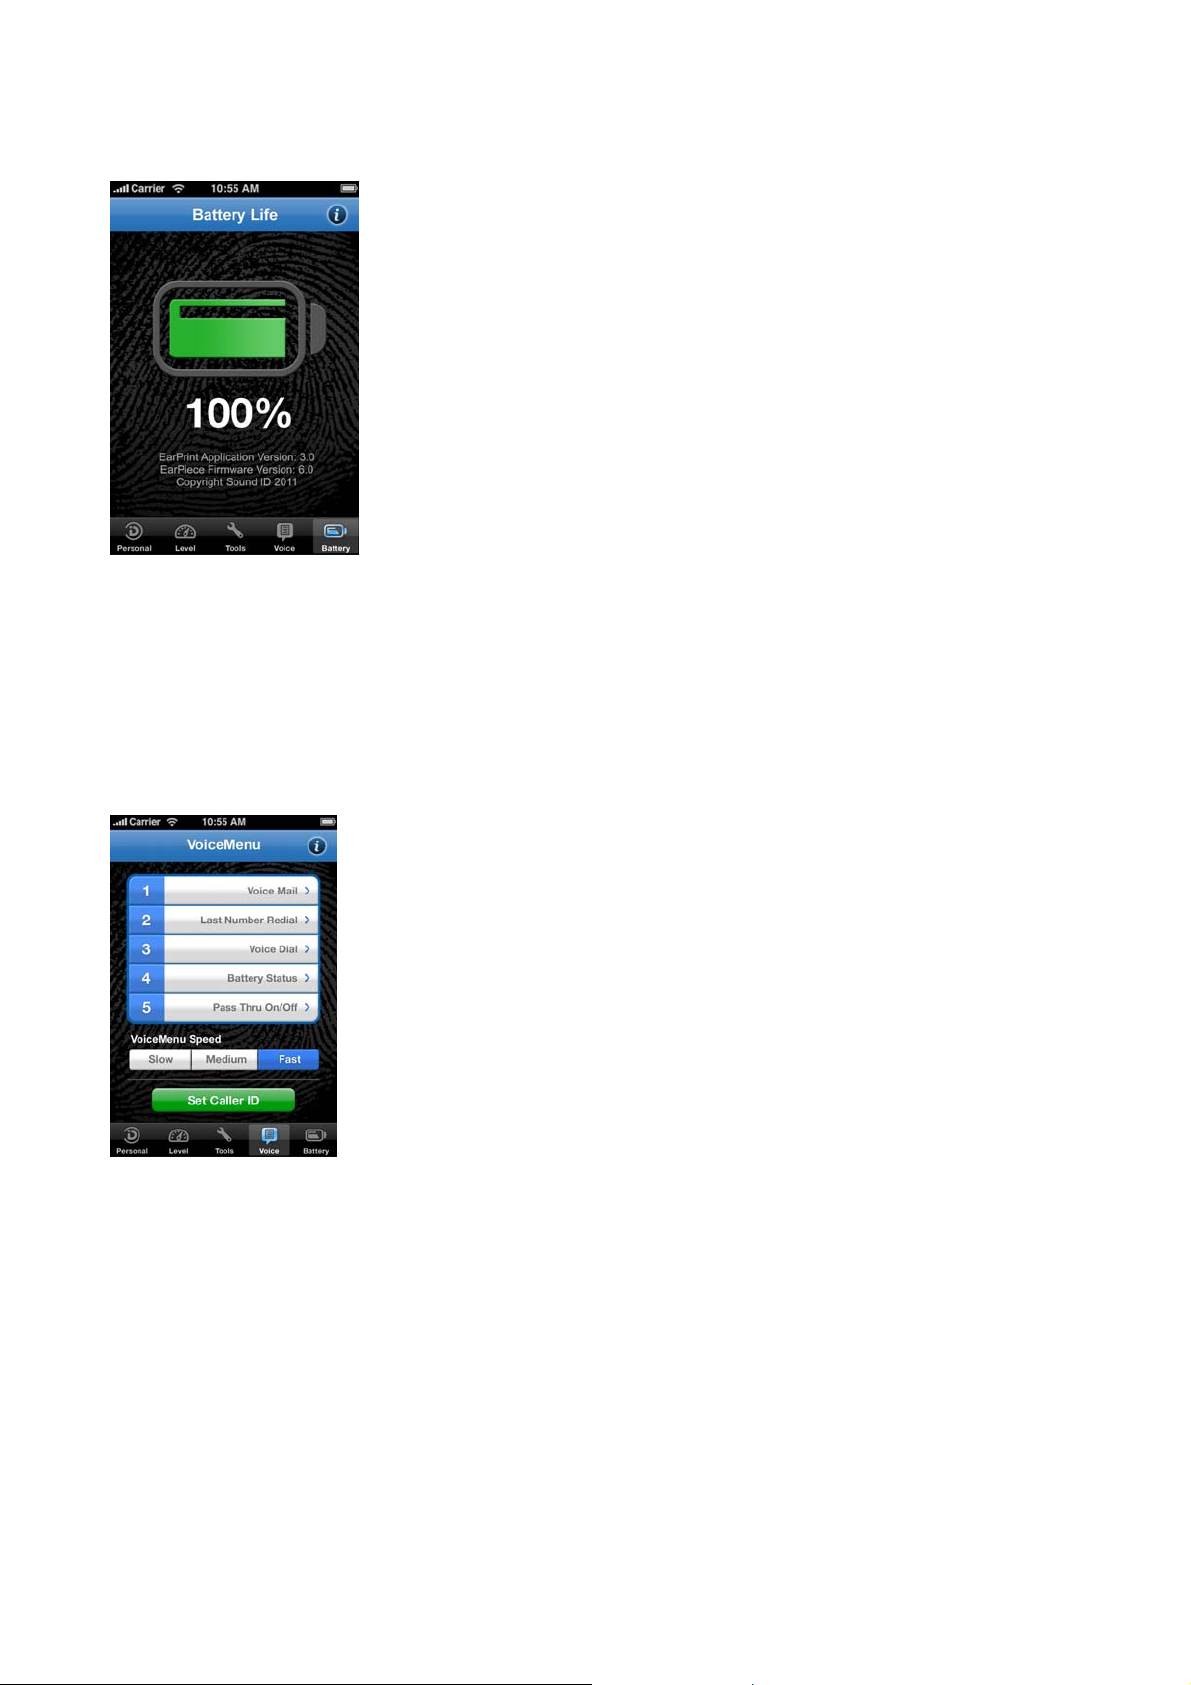
Voice Menu
EarPrint 3.0 allows you to customize your favorite tasks. You can select up to 5 features including: Voice Mail,
Voice Dial, Last Number Redial, and Auto Dial of favorite numbers. It also supports some third party apps such
as Vlingo, Jott Dial2, Bing411. You can change or rearrange your Voice Menu features at any time.
Not all phones support Voice Dial or Voicemail. (Voicemail will not work on iPhone).
Caller ID
You can also set Caller ID for your favorite numbers, which will notify you of a caller by name at the time of the
call and phone numbers for all others.
Page 10
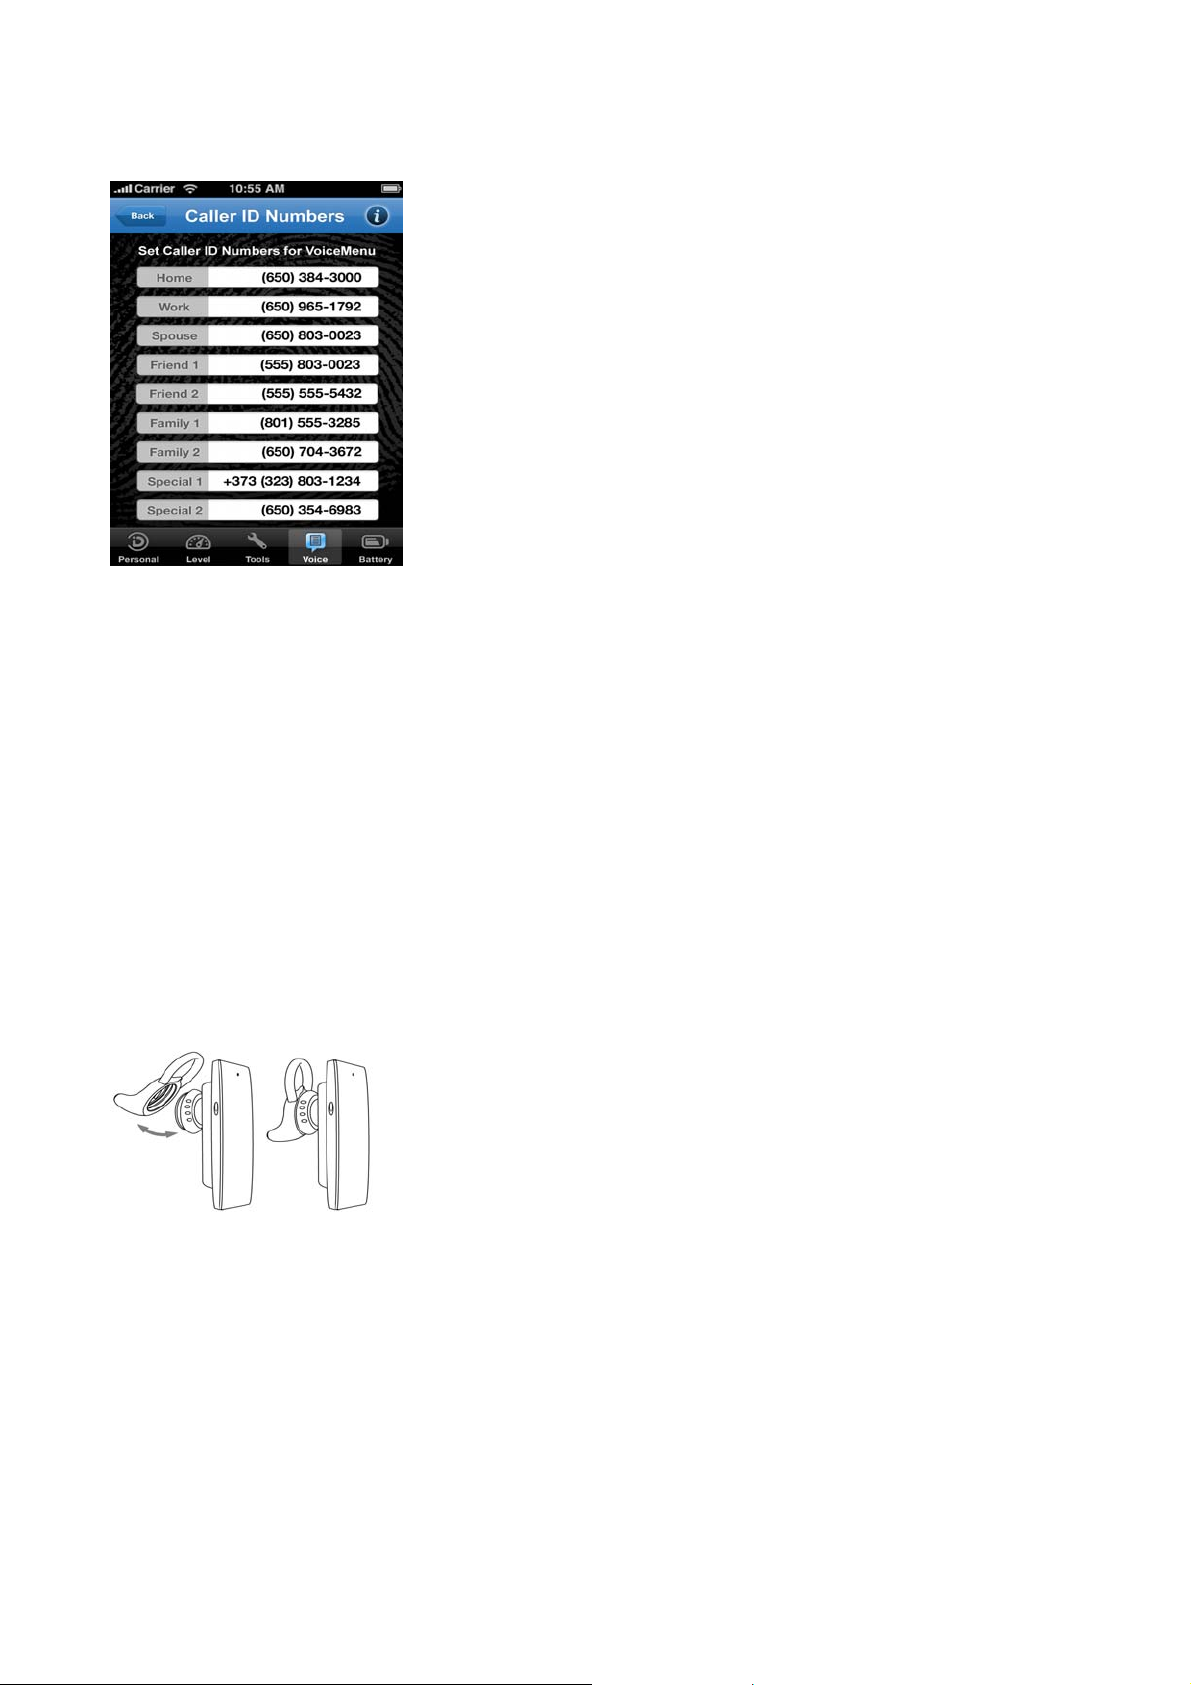
Installing the RealComfort EarLoops
Large, medium, and small RealComfort™ EarLoops are provided to insure all day comfort. (). The eartip with
the medium Ear Loop comes pre-installed on the headset, so check its fit first. If it’s not comfortable, try the other
two to find the best fit. If you need to change the eartip, gently pull it away from the headset, then snap on the
desired eartip and line the pointer with the L or R ear preference.
Please show illustration of removing the EarTip
Note do not pull on the Loop itself as this can lead to tearing
The Sound ID SIX design allows an Over-the-Ear wearing style. Simply snap the Over-the-Ear Hook to the neck
of the headset corresponding to "Left Ear" or "Right Ear" configuration. For users who do not wish to use a
RealComfort™ Ear Loop an ear cushion has been provided. In this case replace your eartip with the ear cushion.
Sound ID's Custom Ear Mold OptionSoft Custom Ear molds can be individually made for your ear to provide
enhanced comfort, security and sound quality. Doctors of Audiology or Audiologists are hearing professionals
Page 11

that can advise you about your hearing and take an impression of your ear. The process takes about 15 minutes.
The impression is sent to a laboratory; a custom ear mold is fabricated, and sent directly to you. Sound ID has
made arrangements with a number of Audiologists who can procure and adjust a custom eartip for you. For an
Audiologist nearest you please visit
www.soundid.com.
3X NoiseNavigation
Your Sound ID SIX headset employs Noise Canceling technologies and techniques with three microphones to
optimize speech intelligibility .Sound ID’s advanced sound processing and 3 microphones help isolate speech,
reduce wind noise, and background noise to enhance what is heard by the other party.
Connecting a 2nd Phone (MultiPoint
If your headset is connected to one phone and you wish to pair it with an additional phone or media device,
follow the steps below:
1. Turn the headset and primary phone OFF. (Red is showing on the ON/OFF switch).
2. Put the headset into pairing mode and connect it to your secondary phone or media device. (see
Getting Started).
3. Turn the headset OFF, Turn ON” the primary phone, then turn “ON” the headset. The headset
should be connected to both phones.
Connection)
Activating Bluetooth on Tablets (iPad), laptops and PC’s –
Your laptop, PC or tablet must support A2DP Media Profile to listen to Audio. In some PC’s the Bluetooth is data
only for Keyboards, mice and data transfer. In addition, Bluetooth keyboards and/or mouse may interfere
.
Listening to Music or Media - A2DP Profile
It is important to note that you must have an A2DP compatible device for this feature to work properly. Apple
users must have a 3G or above version of the iPhone. If you are unsure of the device features, consult the
devices’ User Manual.
A2DP allows you to stream audio from many sources, including turn by turn directions from your GPS, music,
podcasts, and more.
To A CTIVATE A2DP: Press play on your media device. Audio will automatically begin playing through your
Page 12

Sound ID SIX headset.
To DEACTI VATE A2DP: Press stop on your media device.
To REJEC T a phone call: Press and hold the Main Button for 2 seconds while the phone is ringing.
To VOICE DIAL: Press and hold the Main Button for 2 seconds. Note: You must have a phone that supports this
feature. Are you sure?
To REDIA L the last number called: Tap the Main Button twice. . Are you sure?
To RECONNECT with your mobile phone: The Sound ID SIX will automatically attempt re-connection with
your mobile phone after first being disconnected. If the connection is not made, you will need to manually
reconnect by turning your headset OFF, and then back ON.
To RESET your headset:
If you experience problems, you can perform a reset to factory default on your headset. Before resetting, be sure
to delete the “Sound ID SIX” from the phone’s Bluetooth menu.
Place the headset into pairing mode and wait for it to flash red and green. Then tap the Main Button twice. The
status light will turn ORANGE for a few seconds indicating “Reset” and then it will go into pairing mode. You
must then re-pair the headset to your phone.
Care and Maintenance
To keep your Sound ID SIX headset in best condition:
• Never leave it in direct sunlight or in a closed car during hot weather.
• Avoid placing it in back pockets and improper handling.
• Never immerse your Sound ID SIX in any liquid. Avoid hair spray, perfume, and sunscreens as they can
cause damage to the housing or electronic components.
• For the highest quality sound, you'll need to keep your Sound ID SIX clean and free from earwax. You
can do this by removing the eartip and washing it with warm water and mild soap. Rinse and be sure to
let it dry before use.
Safety Warnings
Page 13

The volume control should be set at a reasonable sound level. Prolonged exposure to excessive volume over
time can lead to hearing impairment. If you suspect hearing problems, consult with your physician or an
audiologist.
• This package contains small parts that may be hazardous to children under the age of five.
• The Sound ID SIX enables hands-free operation of mobile phones. Please obey mobile phone laws
while driving and pay full attention to the operation of the vehicle.
• Do not attempt to use this device if it is or has been submerged in liquid.
• If you have a pacemaker or other electrical medical devices, you should consult your physician before
using mobile phones or the Sound ID SIX headset.
• The use of wireless devices and their accessories may be prohibited or restricted in certain areas.
Always obey the laws and regulations on the use of these products.
Battery Information and Specs
Talk Time = Up to 4 hours depending on your phone. Talk time varies by phone and usage conditions.
Stand By Time = 75 hours
Charge Time = Approximately 2.5 hours
Battery Type = Advanced Lithium-Polymer with no "memory effect"
Low Battery Warning: Indicated by a Voice Prompt every 30 seconds.
Bluetooth Technology: Bluetooth Version 2.1+EDR with eSCO
Design and specifications are subject to change without notice.
Limited Warranty
Sound ID warrants to the original end user ("Customer") that new Sound ID branded products will be free from
Page 14

defects in workmanship and materials, under normal use, for one (1) year from the original purchase date.
Sound ID does not cover shipping costs to our repair facility. Sound ID will cover shipping for repaired or
replaced product to the consumer.
EXCLUSIONSThis warranty excludes physical damage to the surface of the product caused by wear and tear;
damage caused by misuse, neglect, attempts to open, repair, or modify the product, or any other cause beyond
the range of the intended use; damage caused by accident, fire, power changes, other hazards, or acts of God;
or use of the product with any non-Sound ID device, except as otherwise noted in this manual. Only batteries
whose fully charged capacity falls below 80% of their rated capacity are covered by this limited warranty.
EXCLUSIVE REMEDIESShould a covered defect occur during the warranty period and you notify Sound ID,
your sole and exclusive remedy shall be, at Sound ID's sole option and expense, to repair or replace the pr oduct.
If Sound ID cannot reasonably repair nor replace then Sound ID may, in its sole discretion, refund the purchase
price paid for the product. Replacement products or parts may be new or reconditioned or comparable versions
of the defective item.
OBTAINING WARRANTY SERVICECustomer must contact Sound ID within the applicable warranty period to
obtain warranty service authorization. Dated proof of original purchase is required. Contact Sound ID Technical
Support or Customer Service at
received without a warranty service authorization.
WARRANTIES EXCLUSIVE: THE FOREGOING WARRANTIES AND REMEDIES ARE EXCLUSIVE AND IN
LIEU OF ALL OTHER WARRANTIES, TERMS OR CONDITIONS, EXPRESS, IMPLIED OR STATUTORY,
INCLUDING WARRANTIES OF MERCHANTABILITY, FITNESS FOR A PARTICULAR PURPOSE, ACCURACY,
CORRESPONDENCE WITH DESCRIPTION, SATI SFACTORY QUALITY AND NON-INFRINGEMENT, ALL OF
WHICH ARE EXPRESSLY DISCLAIMED BY SOUND ID AND ITS SUPPLIERS.
LIMITATION OF LIABILITY: NEITHER SOUND ID NOR ITS SUPPLIERS SHALL BE LIABLE FOR INCIDENTAL,
CONSEQUENTIAL, INDIRECT, SPECIAL, OR PUNITIVE DAMAGES OF ANY KIND, LOSS OF INFORMATION
OR DATA, LOSS OF REVENUE, LOSS OF BUSINESS OR OTHER FINANCIAL LOSS ARISING OUT OF OR
IN CONNECTION WITH THE SALE OR USE OF THIS PRODUCT. SOUND ID’S ENTIRE LIABILITY SHALL BE
LIMITED TO REPLACEMENT, REPAIR, OR REFUND OF THE PURCHASE PRICE PAID, AT SOUND ID'S
OPTION.
DISCLAIMER: When implied warranties may not be excluded in their entirety, they will be limited to the duration
of the applicable written warranty. This warranty gives you specific legal rights; you may have other rights that
may vary depending on local law.
GOVERNING LAW : This Limited Warranty shall be governed by the laws of the State of California, U.S.A., and
www.soundid.com. Sound ID is not responsible for Customer products
Page 15

by the laws of the United States.
CAUTION — No operator-serviceable parts inside unit.
FCC Notice
The Sound ID SIX complies with part 15 of the FCC Rules. Operation is subject to the two following conditions:
1. This device may not cause harmful interference.
2. This device must accept any interference received, including interference that may cause undesired operation.
Information for the User
This equipment has been tested and found to comply with the limits for a Class B digital device, pursuant to Part
15 of the FCC Rules. These limits are designed to provide reasonable protection against harmful interference in
a residential installation. This equipment generates, uses, and can radiate radio frequency energy and, if not
installed and used in accordance with the instructions, may cause harmful interference to radio communications.
However, there is no guarantee that interference will not occur in a particular installation. If this equipment does
cause harmful interference to radio or television reception, which can be determined by turning the equipment off
and on, the user is encouraged to try to correct the interference by one or more of the following measures:
1. Reorient or relocate the receiving antenna.
2. Increase the separation between the equipment and receiver.
3. Connect the equipment into an outlet on a circuit different from that to which the receiver is connected.
4. Consult the dealer or an experienced radio/TV technici an for help.
The user may find the following publication prepared by the FCC helpful: "How to Identify and Resolve Radio-TV
Interference Problems" (Stock No. 004-000-00345-4). Available exclusively from: Superintendent of Documents,
Government Printing Office, Washington, DC 20402.
Users are not permitted to modify or make changes to the device in any way.
FCC Warning
Changes or modifications not express ly approved by the party responsible for complianc e to part 15 of the FCC
Rules could void the user's authority to operate the equipment.
Information for the UserDisposal of rechargeable batteries must comply with local environmental and recycling
regulations.
Trademarks and Registered Trademarks
Page 16

Sound ID, Ear Print and the Sound ID logo are among the registered and unregistered trademarks of Sound ID.
The Bluetooth trademarks are used by Sound ID under license.© Sound ID 2011
The information contained in the Sound ID user manual is believed to be correct at the time of printing. Sound ID
reserves the right to change or modify any information or specifications without notice. The contents of Sound
ID's user manuals are provided "as is". Except as required by applicable law, no warranties of any kind, either
express or implied, including, but not limited to, the implied warranties or merchantability and fitness for a
particular purpose, are made in relation to the accuracy, reliability, or contents of the manual.
Certifications and Compliance
CE
FCC ID: U3N-XP5
IC: 6975A-XP5
Bluetooth ID:
RoHS Compliant
Contact Information
For general information about the Sound ID SIX from Sound ID, please visit
having difficulty operating your device or desire more information, please contact Customer Service at
Register your Sound ID SIX Online
www.soundid.com to register your product online so we can provide you with the best possible service
Visit
and support.
Questions & Support
Please contact Sound ID Customer Support at
www.soundid.com. If you are
 Loading...