

Page 1

1
PART 1
GETTING STARTED
THE SOUNDBEAM®2 HANDBOOK
THE SOUNDBEAM PROJECT
Page 2

THE SOUNDBEAM®2 HANDBOOK
INTRODUCTION
Soundbeam was first introduced at the Frankfurt International Music Fair in
November, 1988. Ten years later, our own experiences with it - together with
the growing enthusiasm of many of its, by then, more than 1,000 users
worldwide - encouraged us to design a new, radically improved and, we
hope, even more user-friendly
Soundbeam 2, offering greatly enhanced
possibilities for imaginative and expressive music making to all ages and
abilities, amateur and professional alike.
For one thing, we have tried to make
Soundbeam 2 much more easily
accessible to first time users - plain sailing to connect, trouble free
to operate, and, if you get lost, simple to get back to where you started from
- in fact, fool-proof, we hope, even for the most timid of techno-phobes.
At the same time,
Soundbeam 2 opens up new imaginative horizons for
professional users already experienced in MIDI technology - the composers,
choreographers, performing musicians and dancers who will be able to
explore the greatly enhanced creative and expressive possibilities of this newly
expanded MIDI controller and performance instrument.
And, of course, whatever your interests - dance and movement, therapy or
just plain music making - don’t forget that Soundbeam is one of the very
few ways of playing a musical instrument which enables people with differing
levels of dexterity and physical ability to play together as musical equals.
This 3-part “Soundbeam
®
2 Handbook” - with its Appendix A, “Set-ups
and Pitch Sequences” - is designed to cover everything that anyone, from
beginners to advanced users, might need to know. We have tried
to provide, in as simple and logical a way as possible, a comprehensive
description of how
Soundbeam 2 works and how to use it, so that you
can explore the enjoyable and stimulating expressive possibilities it offers.
Edward and Judy Williams,
The Soundbeam Project, Bristol, January 2002.
THE SOUNDBEAM®2 HANDBOOK • PART 1 • GETTING STARTED
1
Page 3

SOUNDBEAM®2 HANDBOOK - PART 1
GETTING STARTED
HOW TO USE THIS HANDBOOK
3
WHAT IS SOUNDBEAM
®
4
A
. OPENING THE BOX 5
PREPARATIONS
10
MAKING THE CONNECTIONS
11
Sensor to Sensor Driver 11
Sensor Driver to Controller
12
Controller’s MIDI Output to
musical instrument’s MIDI Input
13
Musical instrument’s signal outputs to
amplifier and speakers
14
Musical instrument’s power unit
to the mains supply
14
Soundbeam’s power unit to
mains supply 14
SWITCHING ON 15
B. A LIGHTNING TOUR OF THE CONTROLS 23
PITCH SEQUENCE 25
RANGE 27
DIVISIONS 30
TRIGGER MODE 33
TRANSPOSE
36
MIDI UTILITIES
38
SENSOR
40
SET-UP
43
TO SUMMARISE - A FEW SIMPLE TIPS
46
FINALLY - IF YOU GET LOST...
47
MAKING MUSIC WITH SOUNDBEAM 2
48
CONTACTING US
50
SOUNDBEAM is a Registered Trademark throughout Europe and the USA.
2
THE SOUNDBEAM®2 HANDBOOK • PART 1 • GETTING STARTED
Page 4

How to Use This Handbook
Part 1 - Getting Started
The first section, entitled Opening The Box, will help you recognise the
various components of your new machine, check whether you’ve been sent
everything you need for the kit you ordered, and connect everything up.
After that, follow through A Lightning Tour of the Controls in the second
half of Part 1, trying out the different settings suggested and beginning to
get to grips with using Soundbeam for your own purposes.
Once you have started using Soundbeam in earnest, you will probably want
to move quickly on from the Locked Set-ups and Pitch Sequences
(pre-set in the factory) - with their various settings for Sensor, Range,
Divisions, Trigger Modes, Transpose and MIDI Utilities - to developing
your own new, personal ones, and saving them to the User Set-ups and
Pitch Sequences - ie those defined by you. For this, you can consult
Part 2 - Step by Step
which gives examples of all the procedures you need for any of the
Soundbeam operations. It may be useful to try them out first yourself,
as they stand, before adapting them for use for your own specific needs.
Part 3 - EXPLANATIONS
has detailed explanations of everything you need to know about how
Soundbeam 2 works, together with various practical suggestions, a section
on Trouble Shooting and a glossary of many of the terms you’ll come across
in the course of using Soundbeam to make music with electronic
musical instruments.
APPENDIX A - SET-UPS and PITCH SEQUENCES
has details of all the settings collected in each of the 30 Locked Set-ups,
and all the sequences of notes or chords in each of the 30 Locked Pitch
Sequences, as well as those for User Set-up 31 (repeated in User Set-ups
Nos 32 - 128). and for User Pitch Sequence 31 (repeated in User Pitch
Sequences Nos 32 - 100).
In the folder on the inside back cover of Part 3, you will find 3 blank
duplicates of each of the two forms for you to photocopy. They are for
recording details of the User Set-ups and Pitch Sequences you define
and Save yourself.
And finally, of course, if you’re really in difficulties you can ring Robin Wood’s
helpline - 01726 883265 (working hours, weekdays, British time)
Edward Williams, The Soundbeam Project, Bristol, England
THE SOUNDBEAM®2 HANDBOOK • PART 1 • GETTING STARTED
3
Page 5
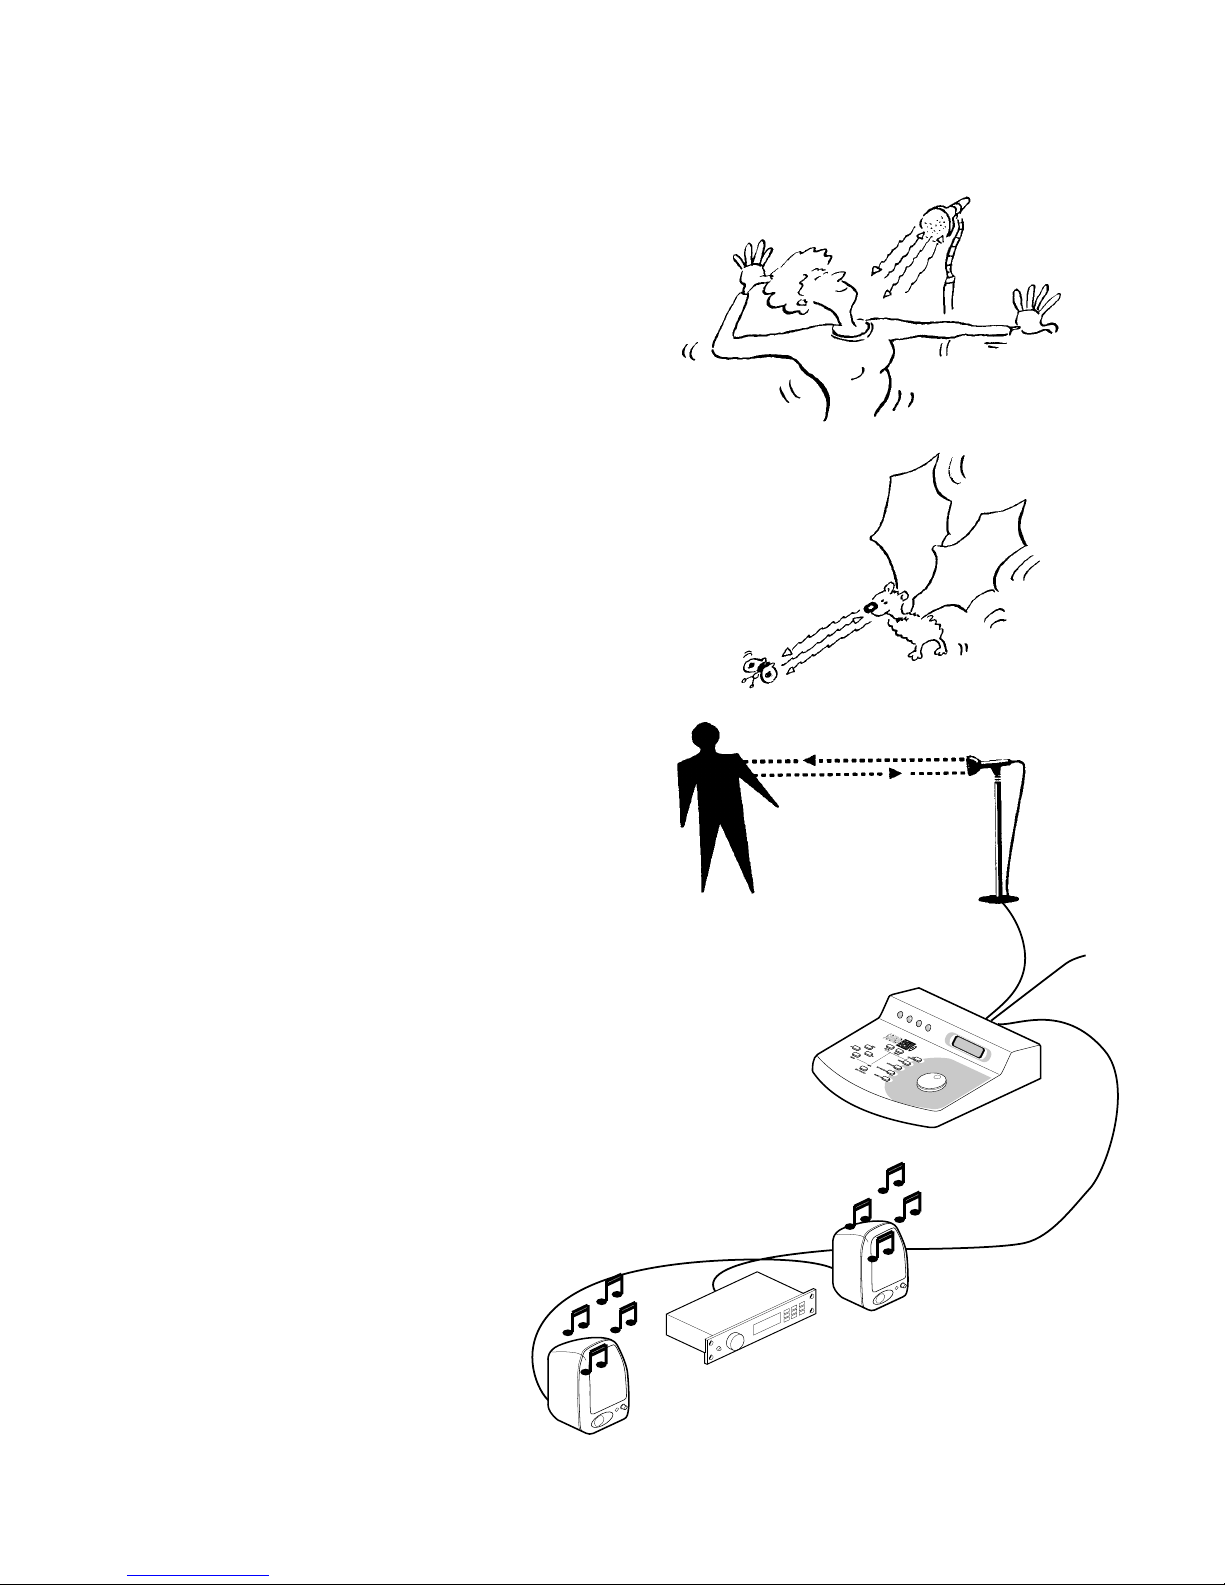
WHAT IS SOUNDBEAM®?
an invisible
expanding MIDI
keyboard in space
It sends out a ‘Beam’ of ultra-sonic pulses - like a bat -
too high for us to hear,
listens for ‘echoes’ from any interruption of the beam,
and converts them - together with their changing distance from
the Sensor and the speed of the movements in the Beam –
into MIDI instructions for playing electronic musical instruments.
4
THE SOUNDBEAM®2 HANDBOOK • PART 1 • GETTING STARTED
Page 6
GETTING STARTED
A. OPENING THE BOX
THE SOUNDBEAM®2 HANDBOOK • PART 1 • GETTING STARTED
5
Page 7
MIDI IN
MIDI OUT
A
MIDI IN
MIDI OUT
B
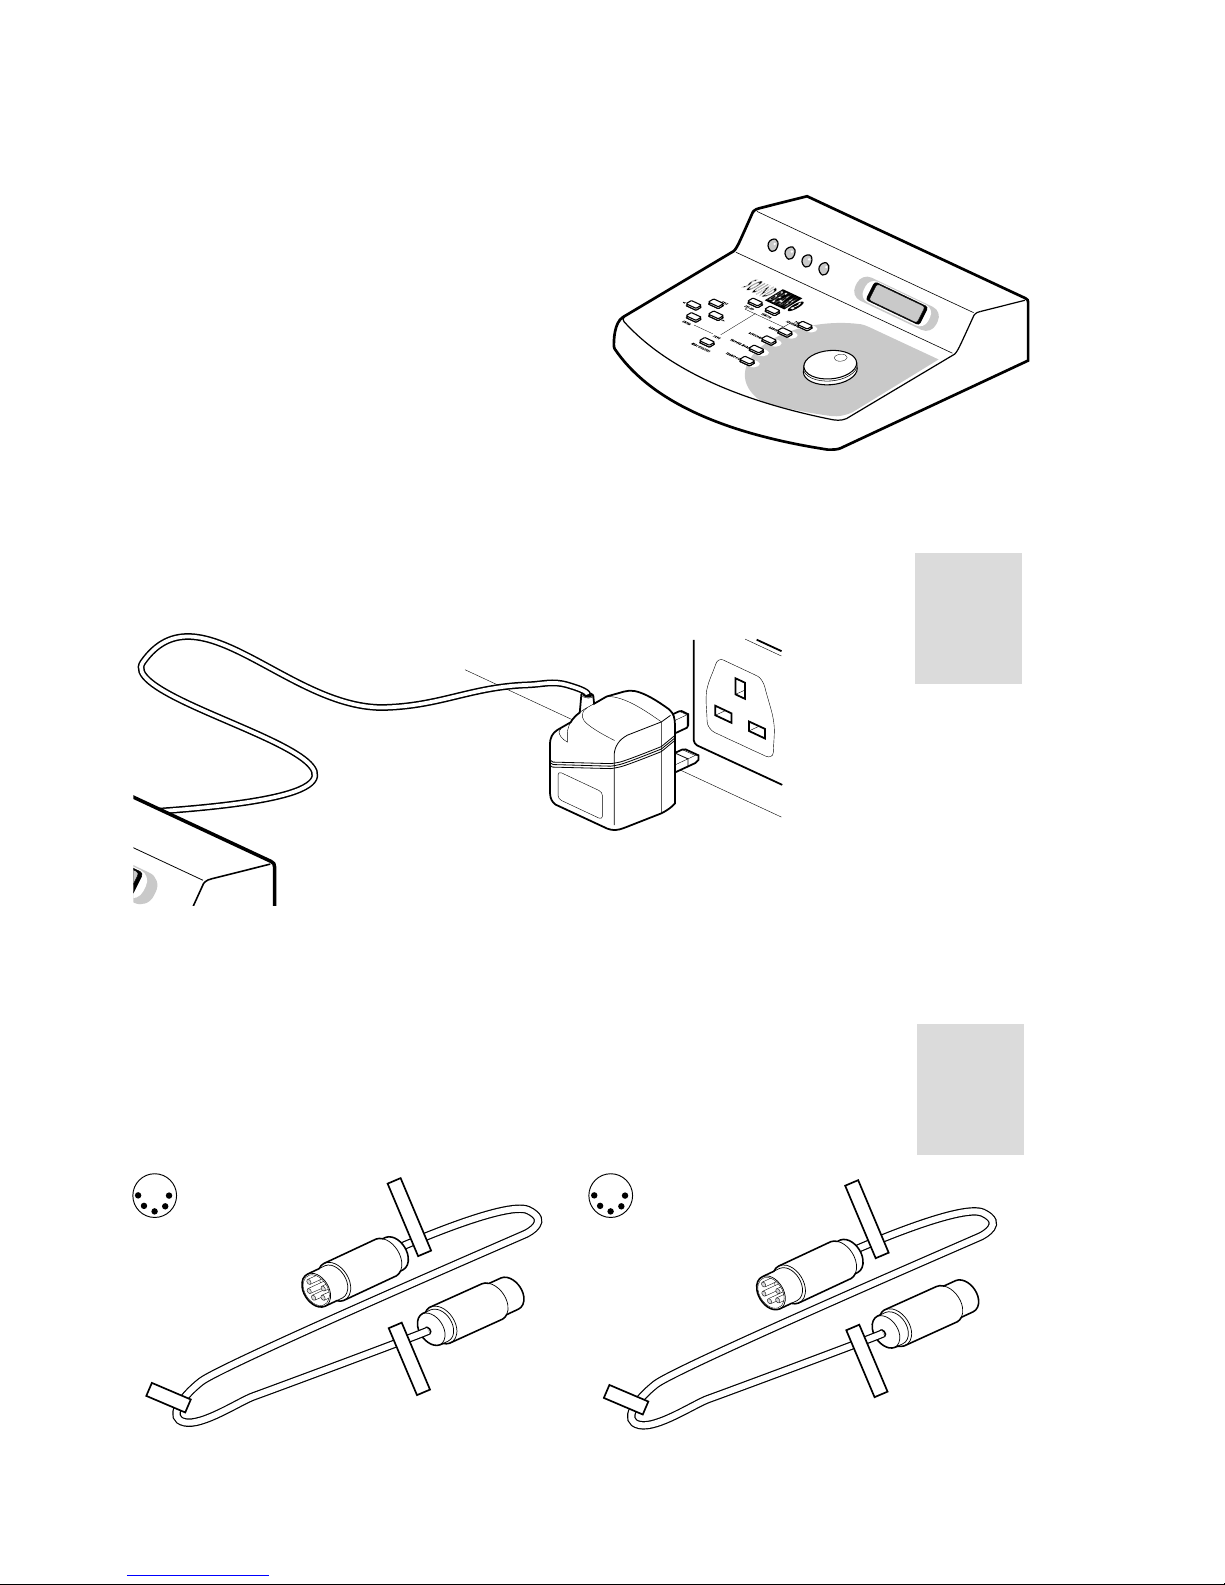
Your new SOUNDBEAM
®
2 kit will contain
a: The Soundbeam 2 Controller
- with a Power Unit to connect it to your Mains supply
b: 2 MIDI leads, A and B, with 5-pin connectors, each labelled at both ends
for connecting the ‘MIDI Out’ and ‘MIDI In’of the Controller to the MIDI
Input and Output of your MIDI musical instrument.
6
THE SOUNDBEAM®2 HANDBOOK • PART 1 • GETTING STARTED
* The ticks indicate
the number of
each item
normally supplied
with each Kit
Kit A ✓
Kit B ✓
Kit C ✓
Kit D ✓
Kit A ✓
Kit B ✓
Kit C ✓
Kit D ✓
Page 8
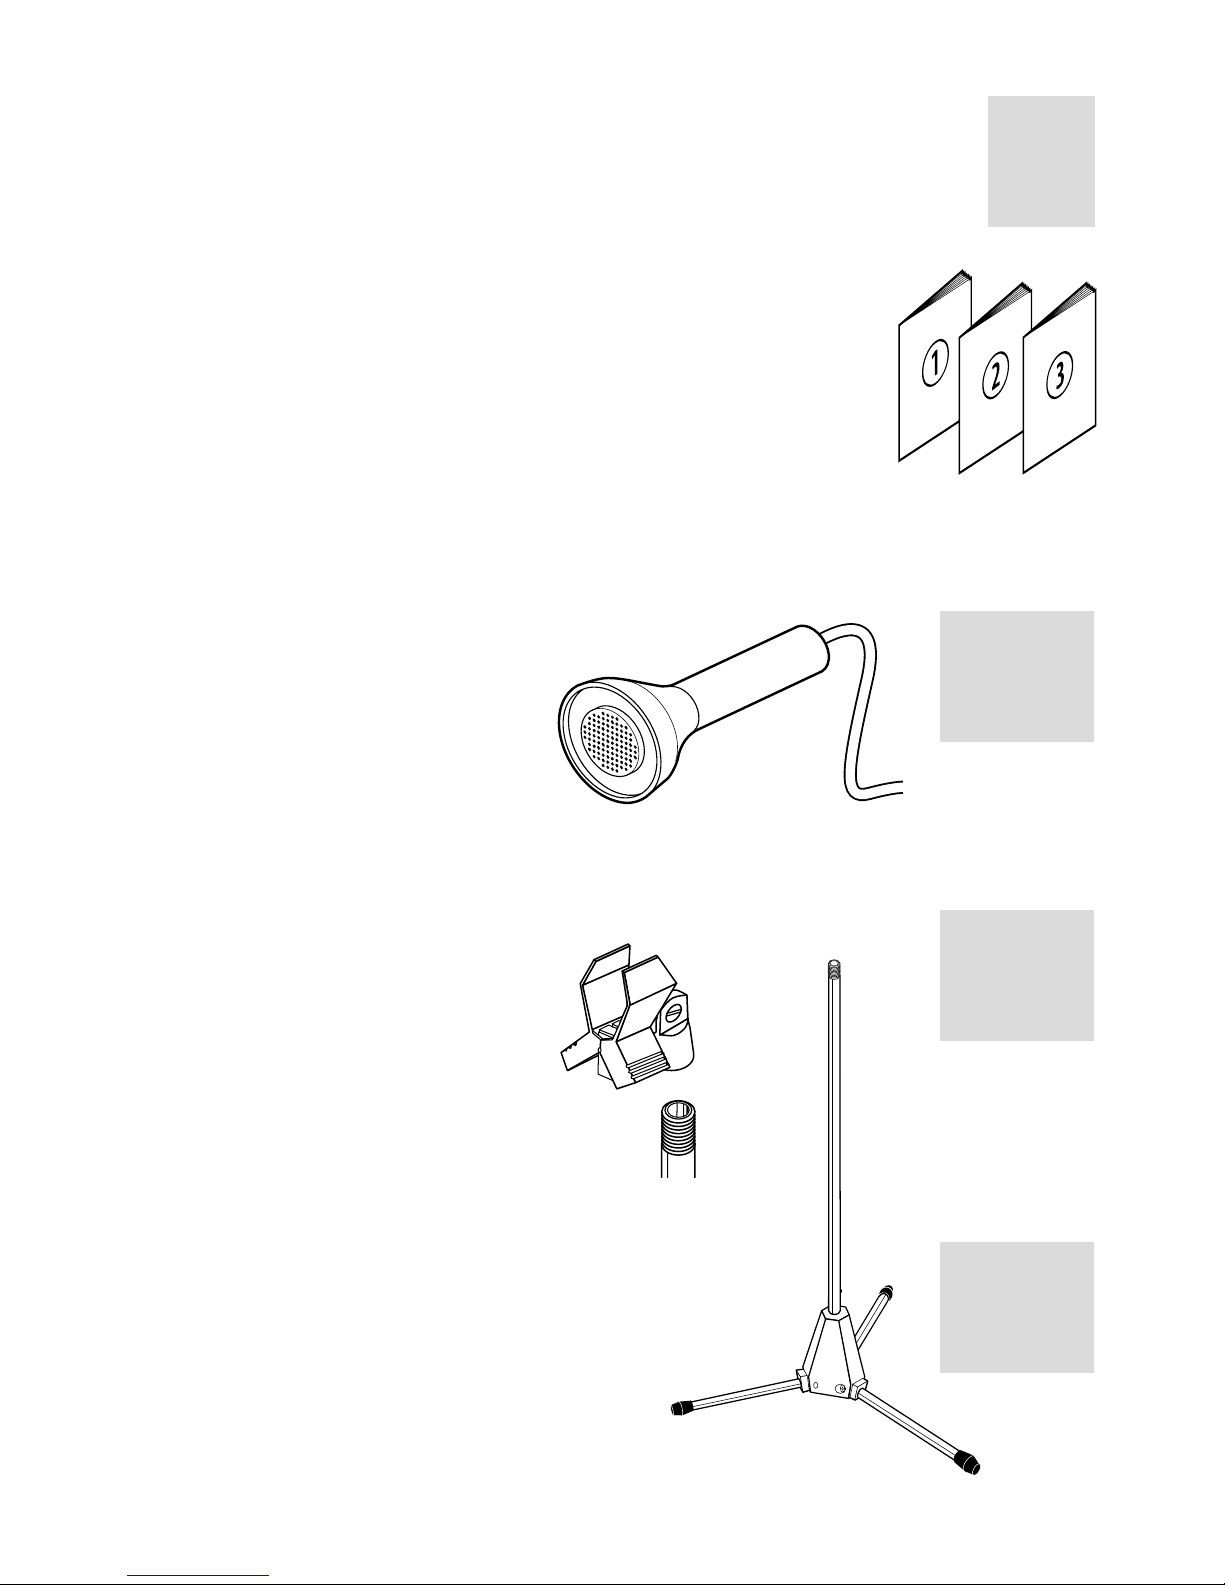
and
c: The Soundbeam 2 Handbook
Part 1 - Getting Started,
Part 2 - Step by step
Part 3 - Explanations.
Appendix A - Set-ups and Pitch Sequence
There will also be -
depending on whether you have ordered Kit A, B, C or D -
d: One or more
i. Sensors,
ii. Spring Clips - to clip Sensor(s) to Stand(s)
iii. Stands (optional) - on which
to fix the clips which hold
the Sensor(s) on
THE SOUNDBEAM®2 HANDBOOK • PART 1 • GETTING STARTED
7
Kit A ✓
Kit B ✓
Kit C ✓
Kit D ✓
Kit A ✓
Kit B ✓✓
Kit C ✓✓✓
Kit D ✓✓✓✓
Kit A ✓
Kit B ✓✓
Kit C ✓✓✓
Kit D ✓✓✓✓
Kit A ✓
Kit B ✓✓
Kit C ✓✓✓
Kit D ✓✓✓✓
Page 9
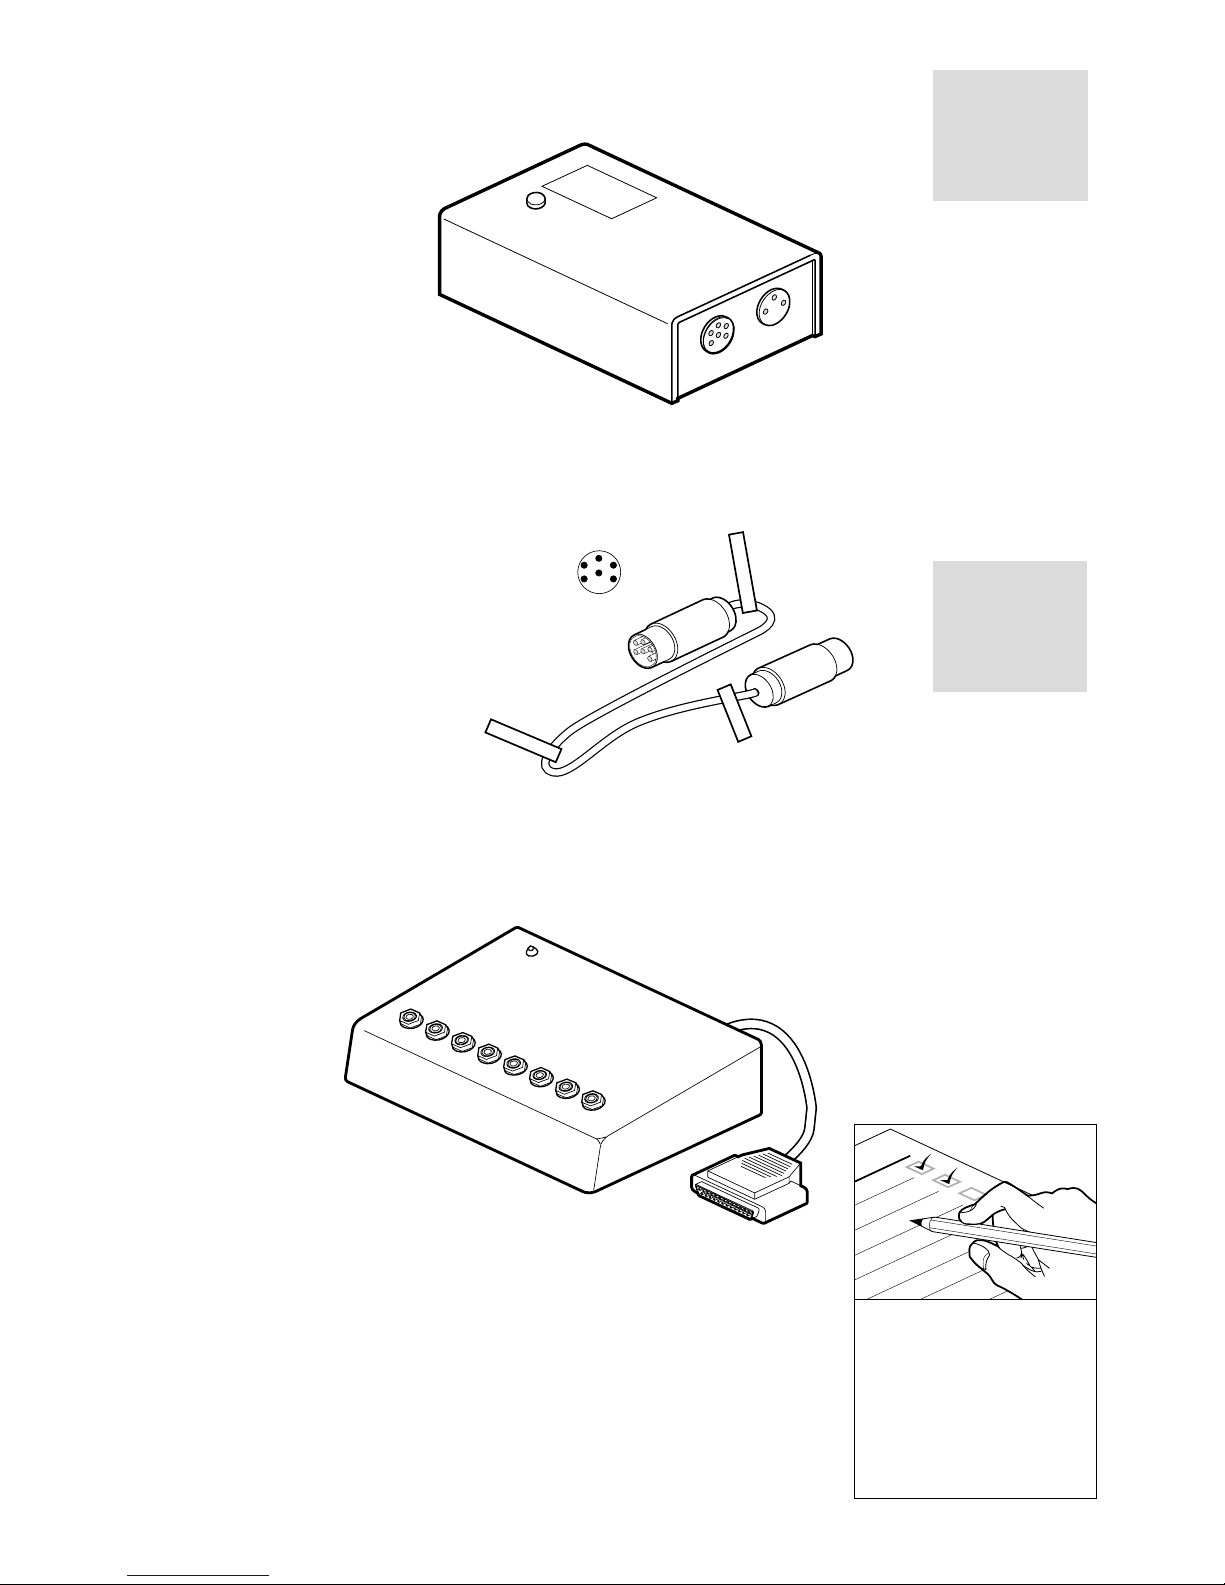
iv. Sensor Drivers - to power and control the Sensor(s) and to send
information from them back to the Controller.
v. Driver Leads - to connect the Sensor Driver(s)
to the Controller
and lastly - if you’ve ordered it there will be-
e: the 8-input Switchbox.
8
THE SOUNDBEAM®2 HANDBOOK • PART 1 • GETTING STARTED
SB2
DRIVER
DRIVER
Kit A ✓
Kit B ✓✓
Kit C ✓✓✓
Kit D ✓✓✓✓
Kit A ✓
Kit B ✓✓
Kit C ✓✓✓
Kit D ✓✓✓✓
Please make sure that all
the items for the Kit you
have ordered are present -
let Robin Wood, of EMS,
Cornwall, know immediately
if there are any omissions
or breakages.
Page 10
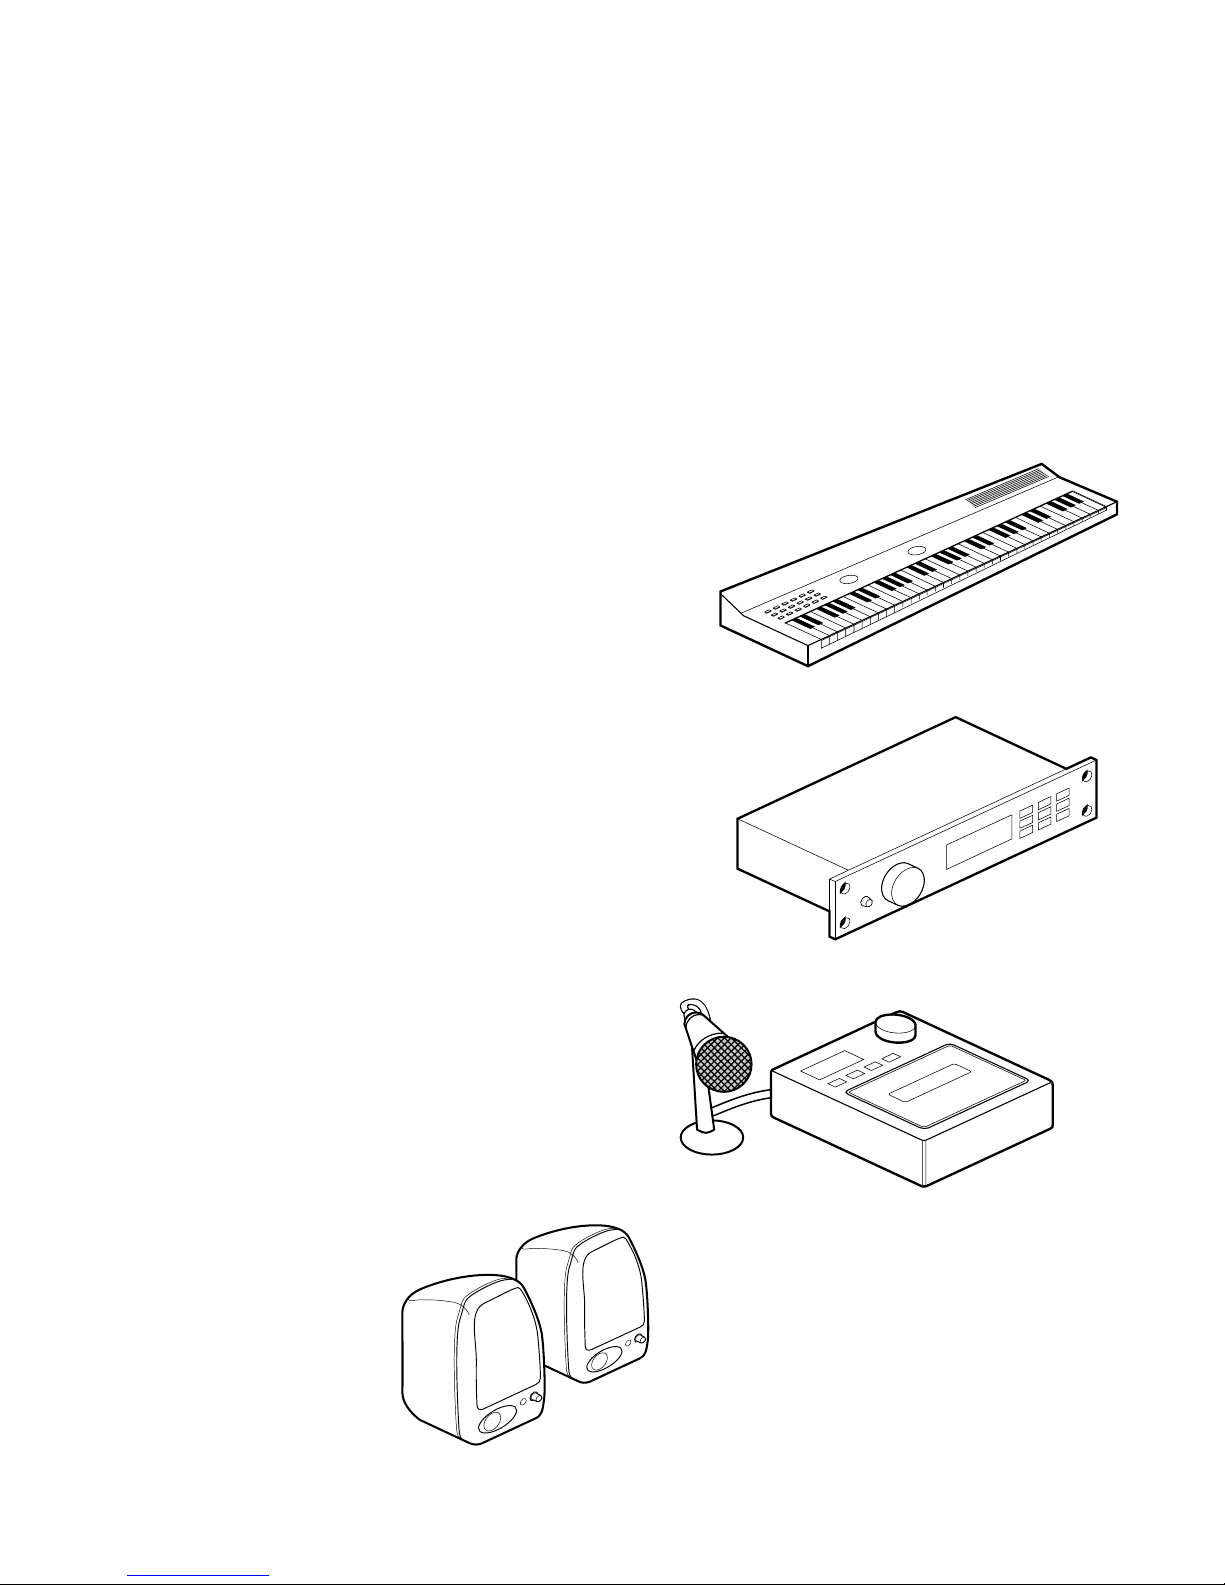
FINALLY - DON’T FORGET
Soundbeam is not itself a musical instrument -
it’s an exciting new and expressive new way
of playing one -
so…
you will need
an electronic musical instrument -
a MIDI Keyboard,
Sound Module
or Sampler.
And, unless you are using a keyboard
synthesiser with built-in amplifier and speakers,
you will also need an amplifier and a pair of
speakers - or a pair of self-powered speakers
with their own internal amplifier.
THE SOUNDBEAM®2 HANDBOOK • PART 1 • GETTING STARTED
9
Page 11
10
THE SOUNDBEAM®2 HANDBOOK • PART 1 • GETTING STARTED
Preparations
a: Some consideration of the space in which
you intend to use your new SOUNDBEAM 2 will save you time.
Setting up the Sensor(s), Sensor Driver(s) and Controller
in a clear space (minimum, say, 2m by 3m, unobstructed
by furniture, within a larger room) will help to avoid
unwanted interruptions of the Beam(s) and the
confusions they can easily cause.
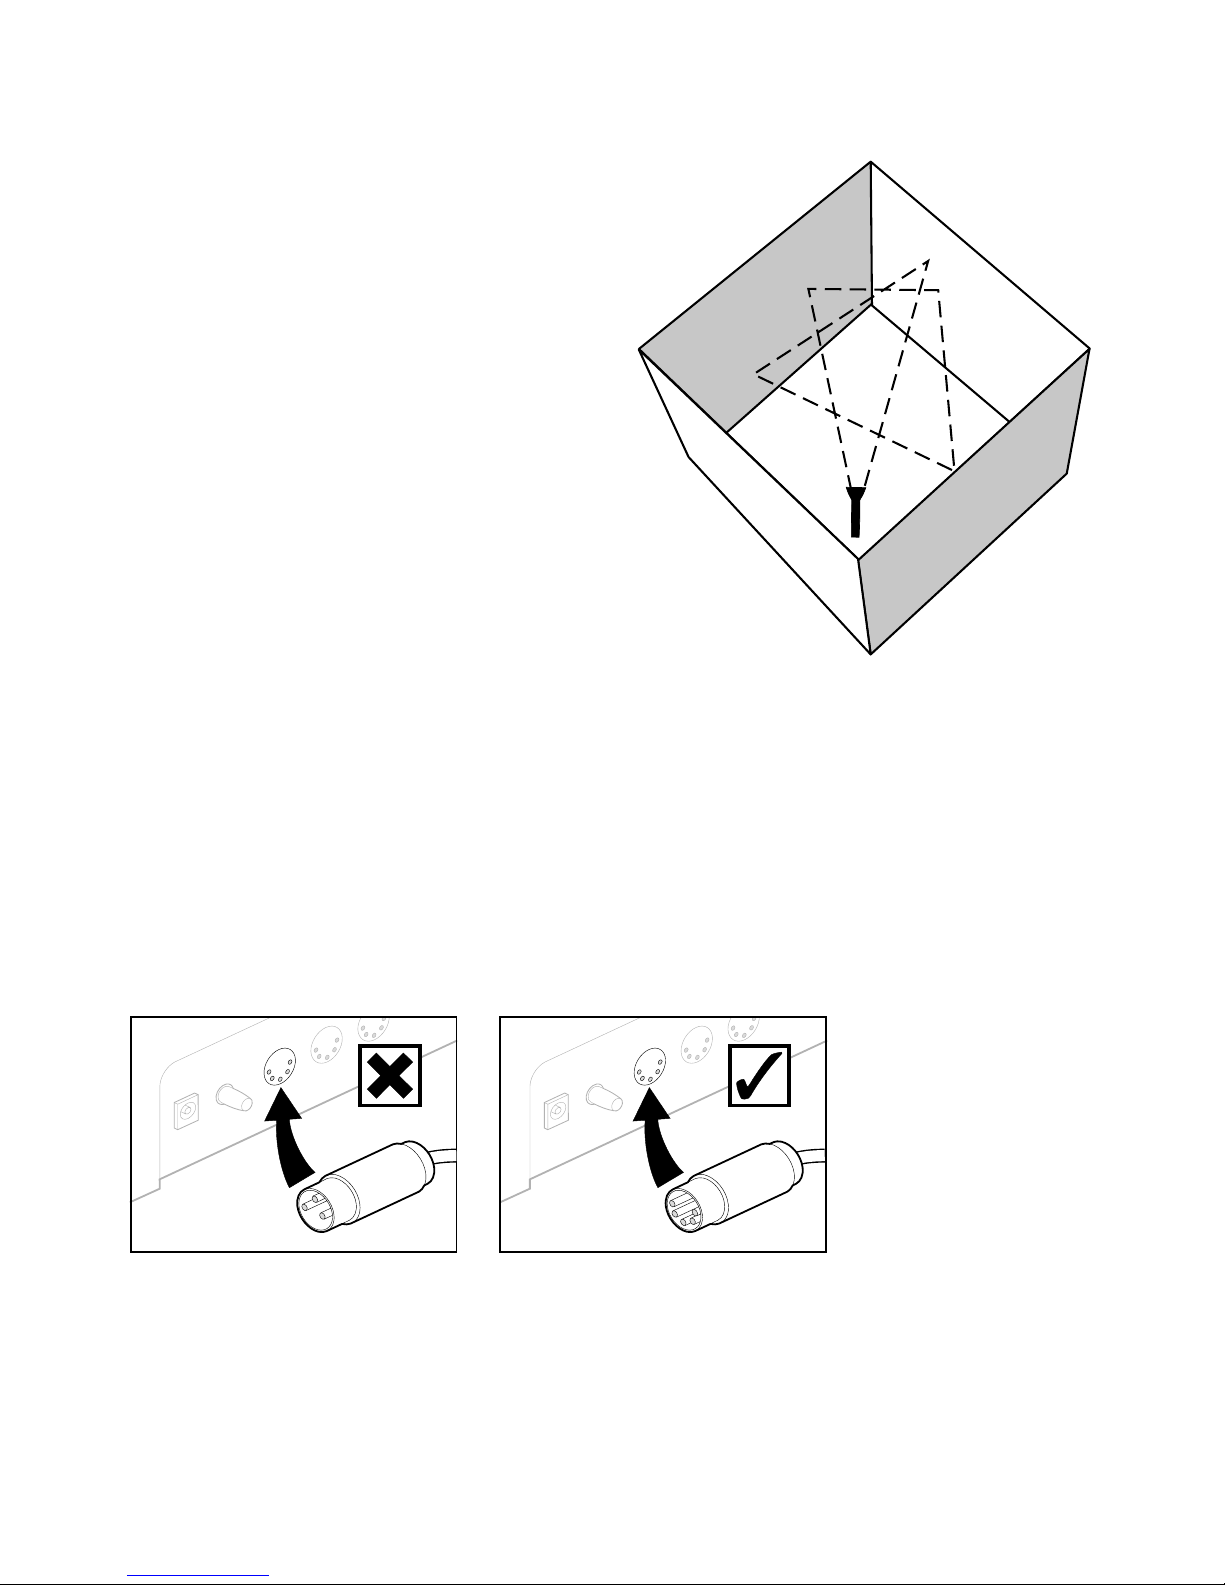
Just as hard, shiny wall surfaces produce reverberant
acoustics, similarly, the echoes of ultra-sonic pulses may
perform multiple bounces - like the ball in a squash court -
some of which may occasionally be picked up by the Sensor.
(See Handbook Part 3 “Explanations” 2.1.4. Suitable
Spaces for using Soundbeam pp. 16-17.)
b:
Inserting
3-pin. 5-pin and 6-pin plugs into
the designated sockets on the Sensor Drivers, Controller
and MIDI musical instruments
can be tricky
unless care is taken
to identify the proper match of plug to socket.
Then firm pressure -
not force - can be used to push them home.
Page 12
Making the Connections
Even if you have ordered a Soundbeam Kit with more
than one Beam (ie more than one Sensor and one
Sensor Driver), we strongly recommend that you
start by exploring Soundbeam
with just a single Beam
-
connecting more Sensors and Sensor Drivers later,
as you gain experience
Here’s how to get started
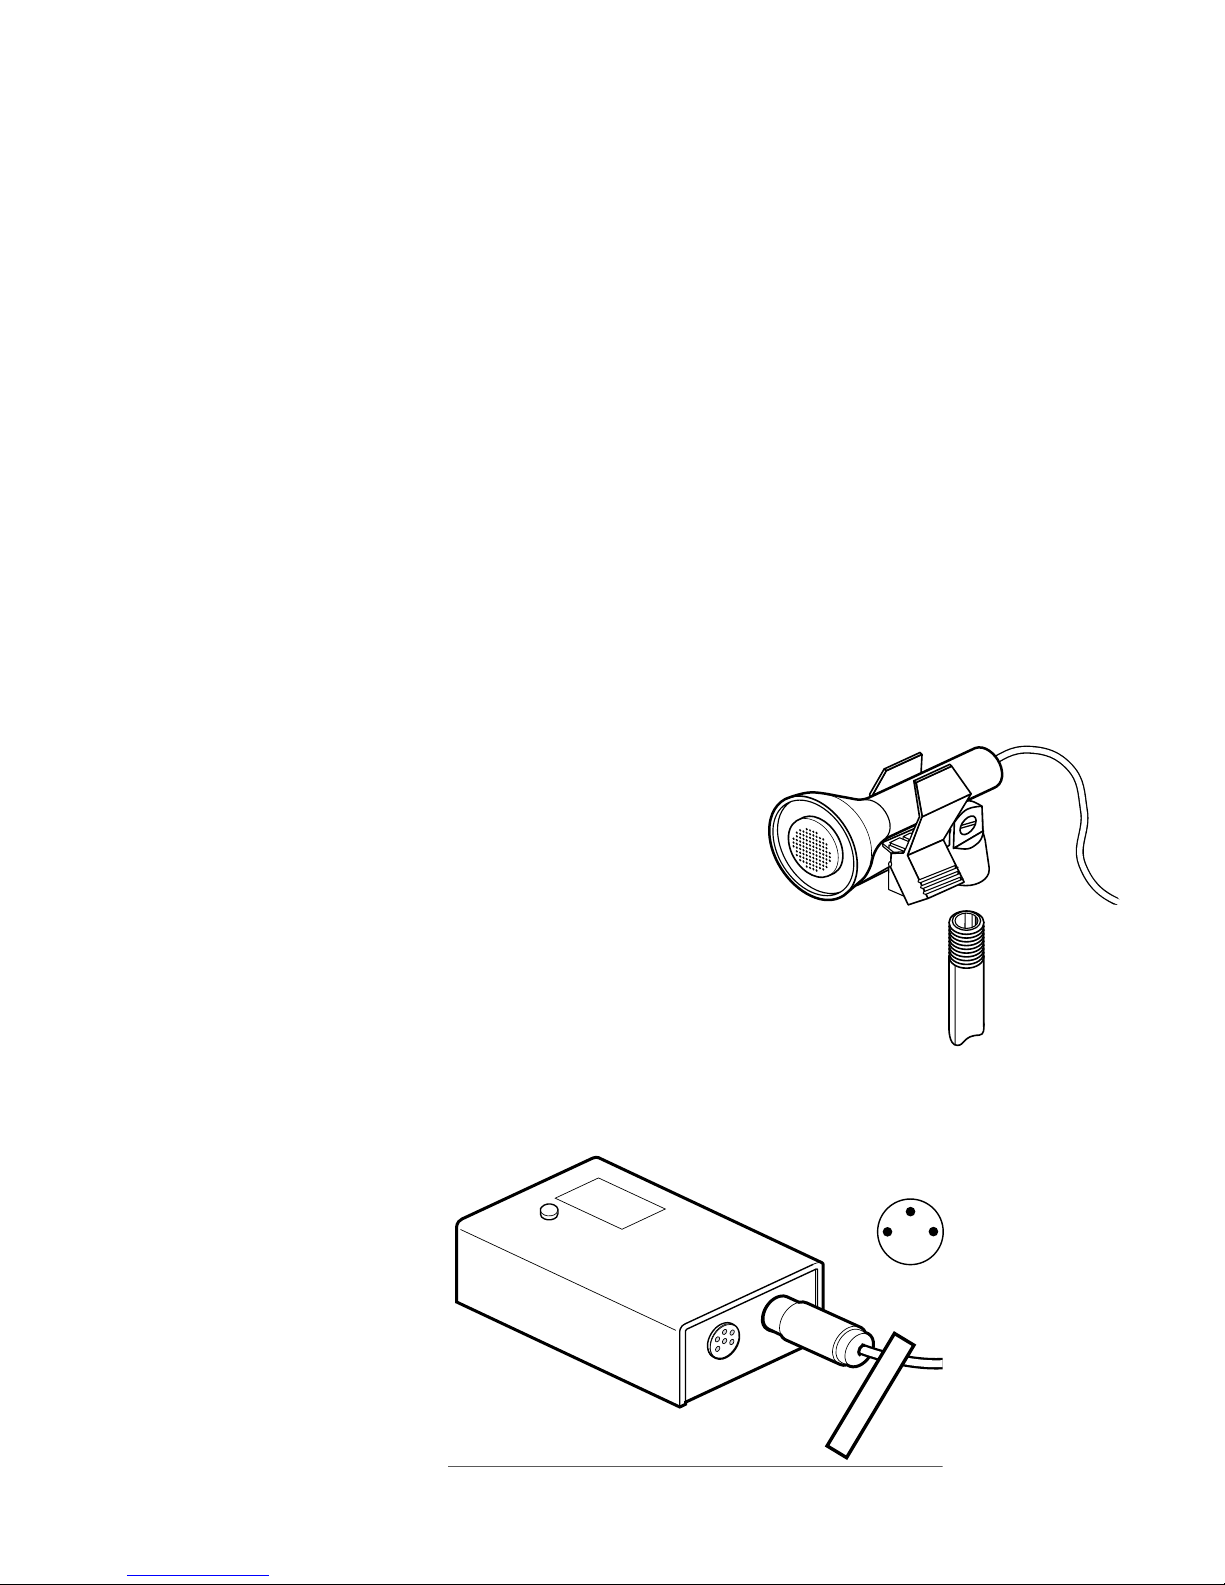
Connect the Sensor to the Sensor Driver
i. Mount the Sensor on the Stand
using the Spring Clip provided
ii. Using the Sensor’s fixed lead, insert the 3-pin connector plug labelled
‘Sensor’ into the socket marked ‘Sensor’ on the Sensor Driver
THE SOUNDBEAM®2 HANDBOOK • PART 1 • GETTING STARTED
11
SENSOR
Page 13
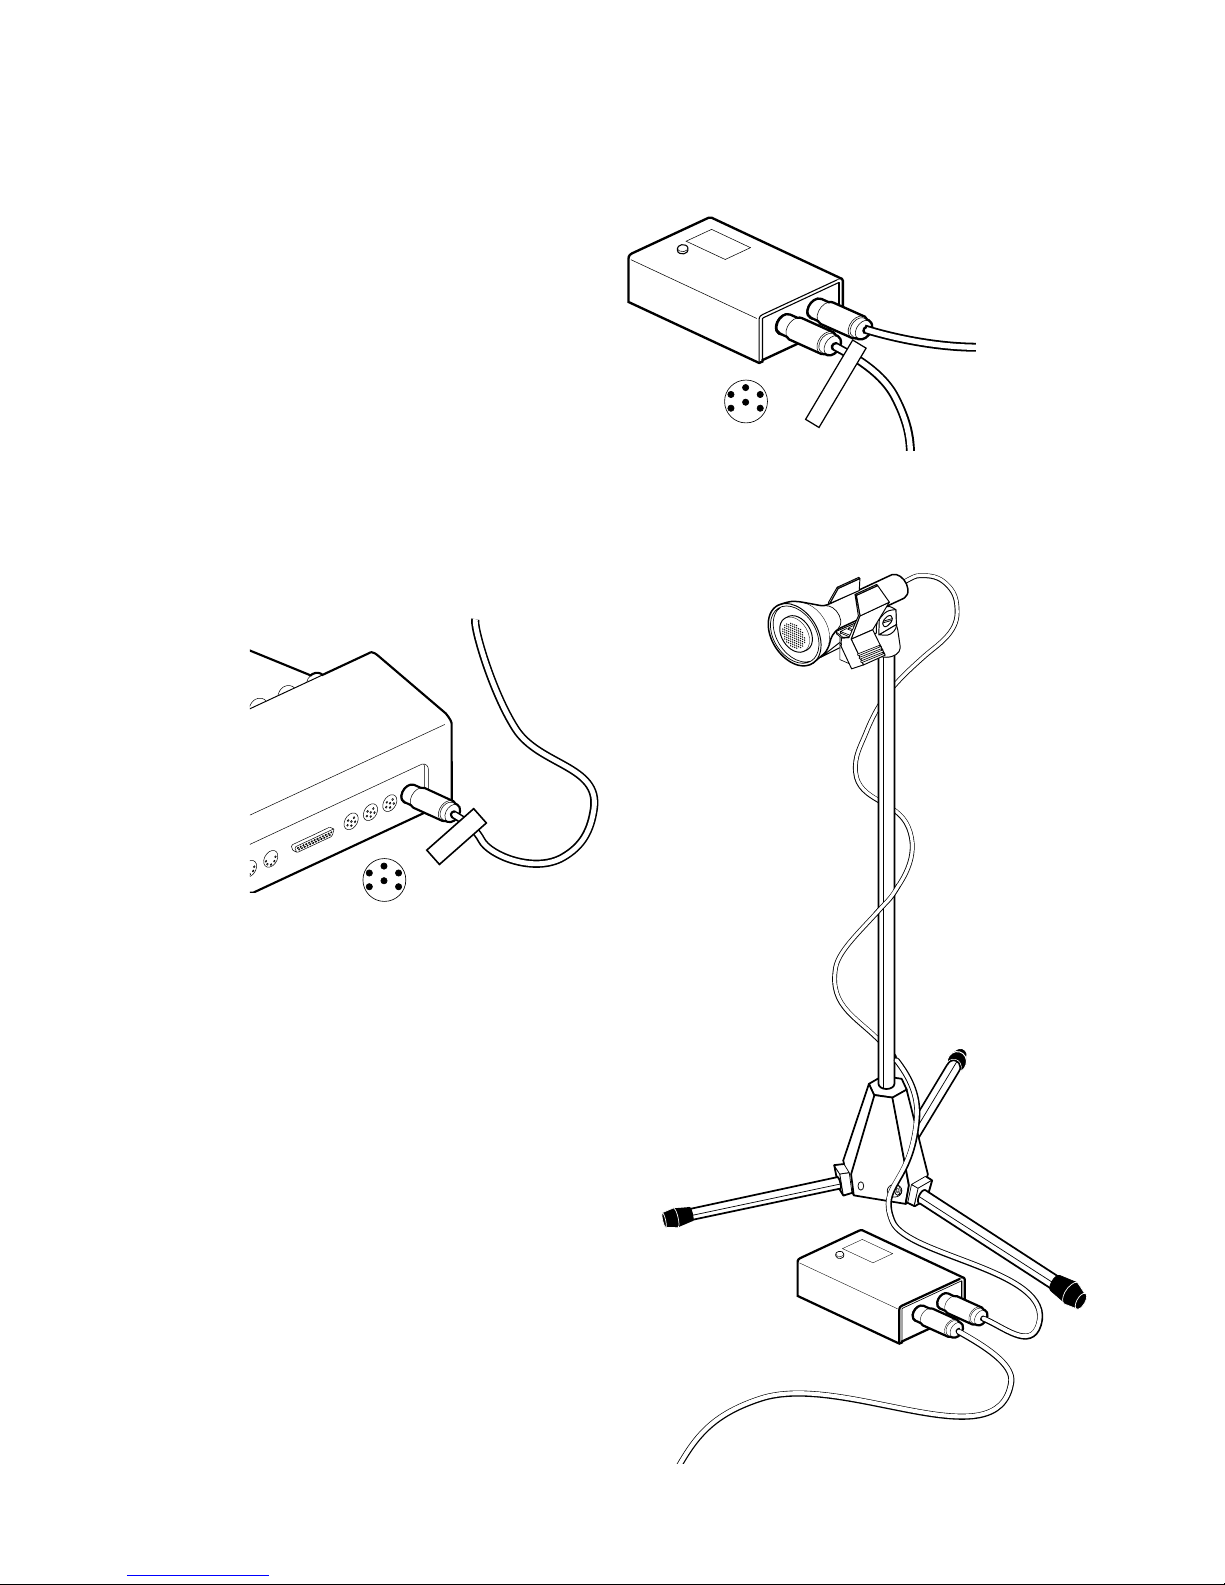
Connect the Sensor Driver to the Controller
i. Using the lead labelled ‘Driver’, insert 6-pin plug also labelled ‘Driver’ into
the 6 pin Socket marked ‘Controller’ on the Sensor Driver.
ii. Insert 6-pin plug at the other end of the ‘Driver’ lead -
labelled ‘SB2’ - into the sockets on the SB2 Controller’s
rear panel marked ‘Sensor Driver 1’.
iii. Place the Sensor Driver on the floor by the base of the Stand -
or anywhere you can easily see its LED flashing whenever the Beam
is interrupted.
12
THE SOUNDBEAM®2 HANDBOOK • PART 1 • GETTING STARTED
DRIVER
SB2
Page 14
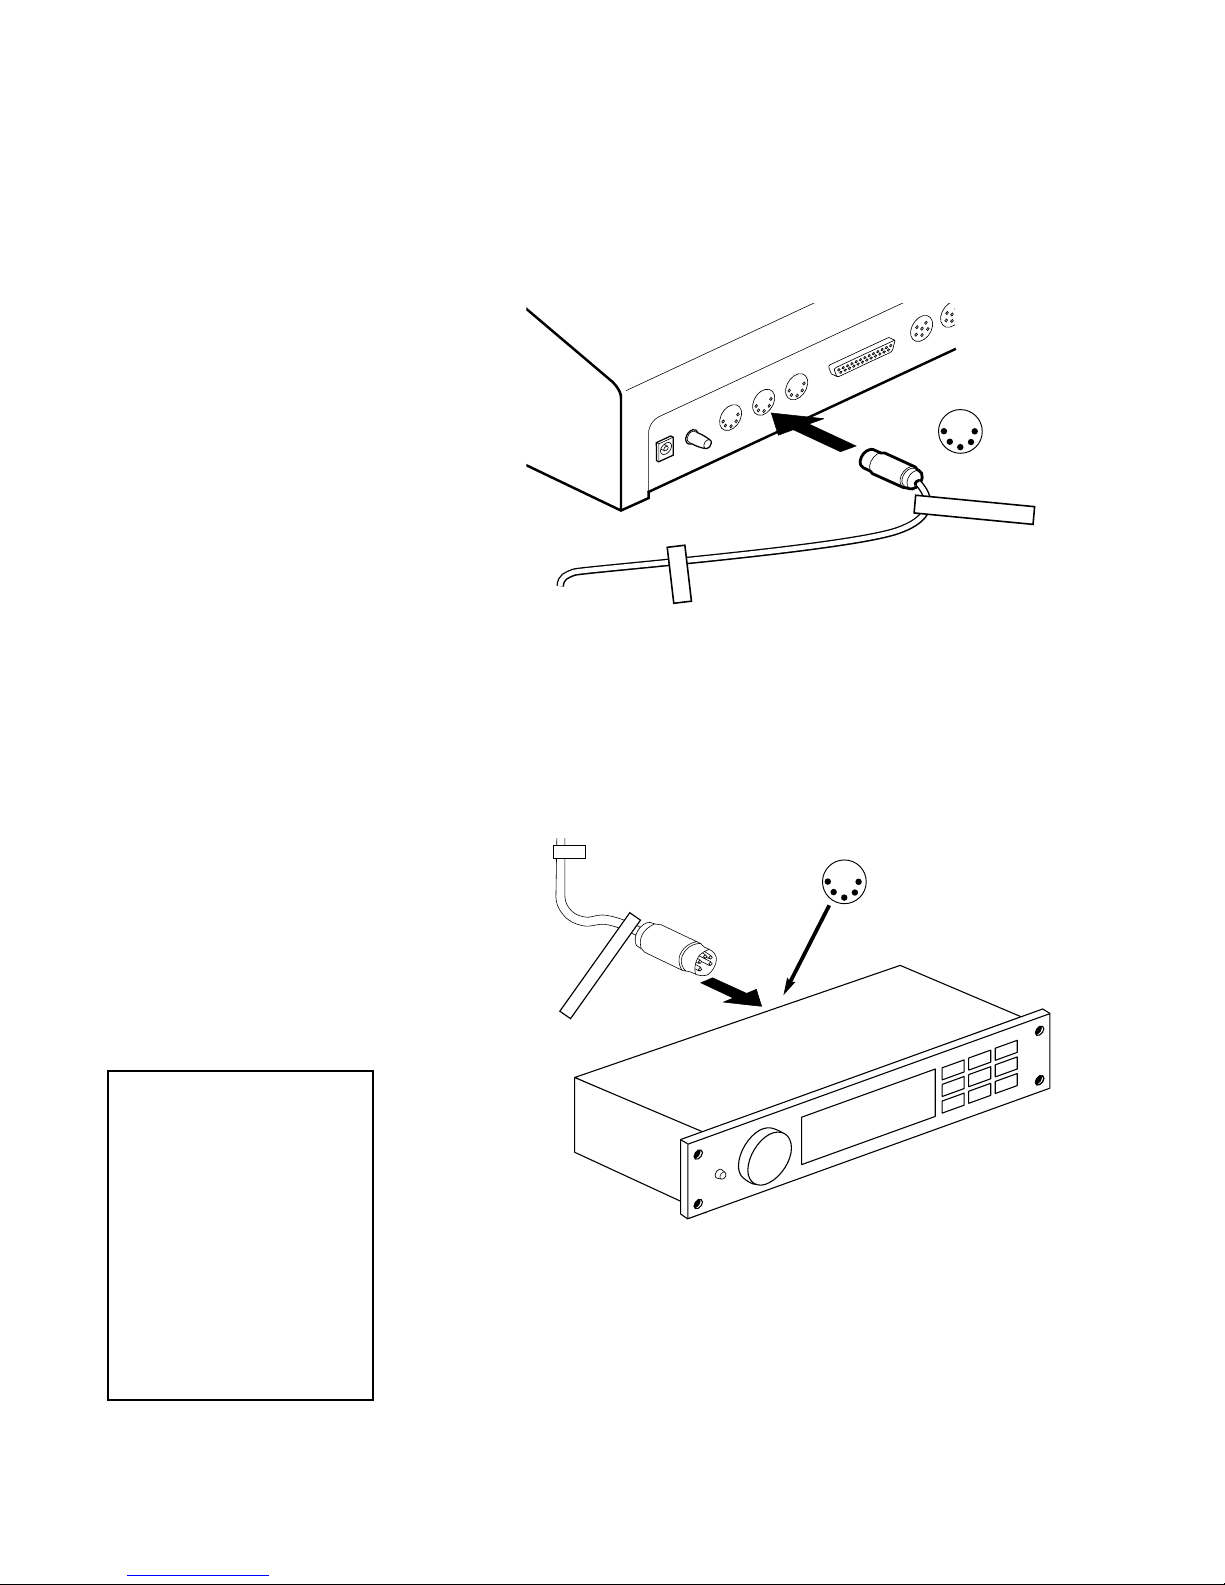
Connect the Controller’s MIDI output to the
MIDI input of your MIDI musical instrument
i. Using MIDI Lead A, insert 5-pin plug labelled ‘SB2 MIDI OUT’
into 5-pin socket labelled ‘MIDI Out’ on Controller back panel.
ii. Insert 5-pin plug at other end of MIDI Lead A -
labelled ‘SOUND MOD MIDI IN’ - into 5-pin socket on
sound module, sampler or MIDI keyboard marked ‘MIDI IN’
THE SOUNDBEAM®2 HANDBOOK • PART 1 • GETTING STARTED
13
SB2 MIDI OUT
A
SOUND MOD MIDI IN
A
You won’t need to use MIDI Lead
B (to connect the MIDI Out socket
of a MIDI keyboard to the MIDI In
socket of your Soundbeam 2
Controller) until you want to start
recording your own User Pitch
Sequences, as described in
Handbook Part 2 “Step by
Step” 3.2.4. To Record the
Notes of a Pitch Sequence p. 39.
Meanwhile, keep MIDI Lead B in
a safe place.
MIDI In
Page 15
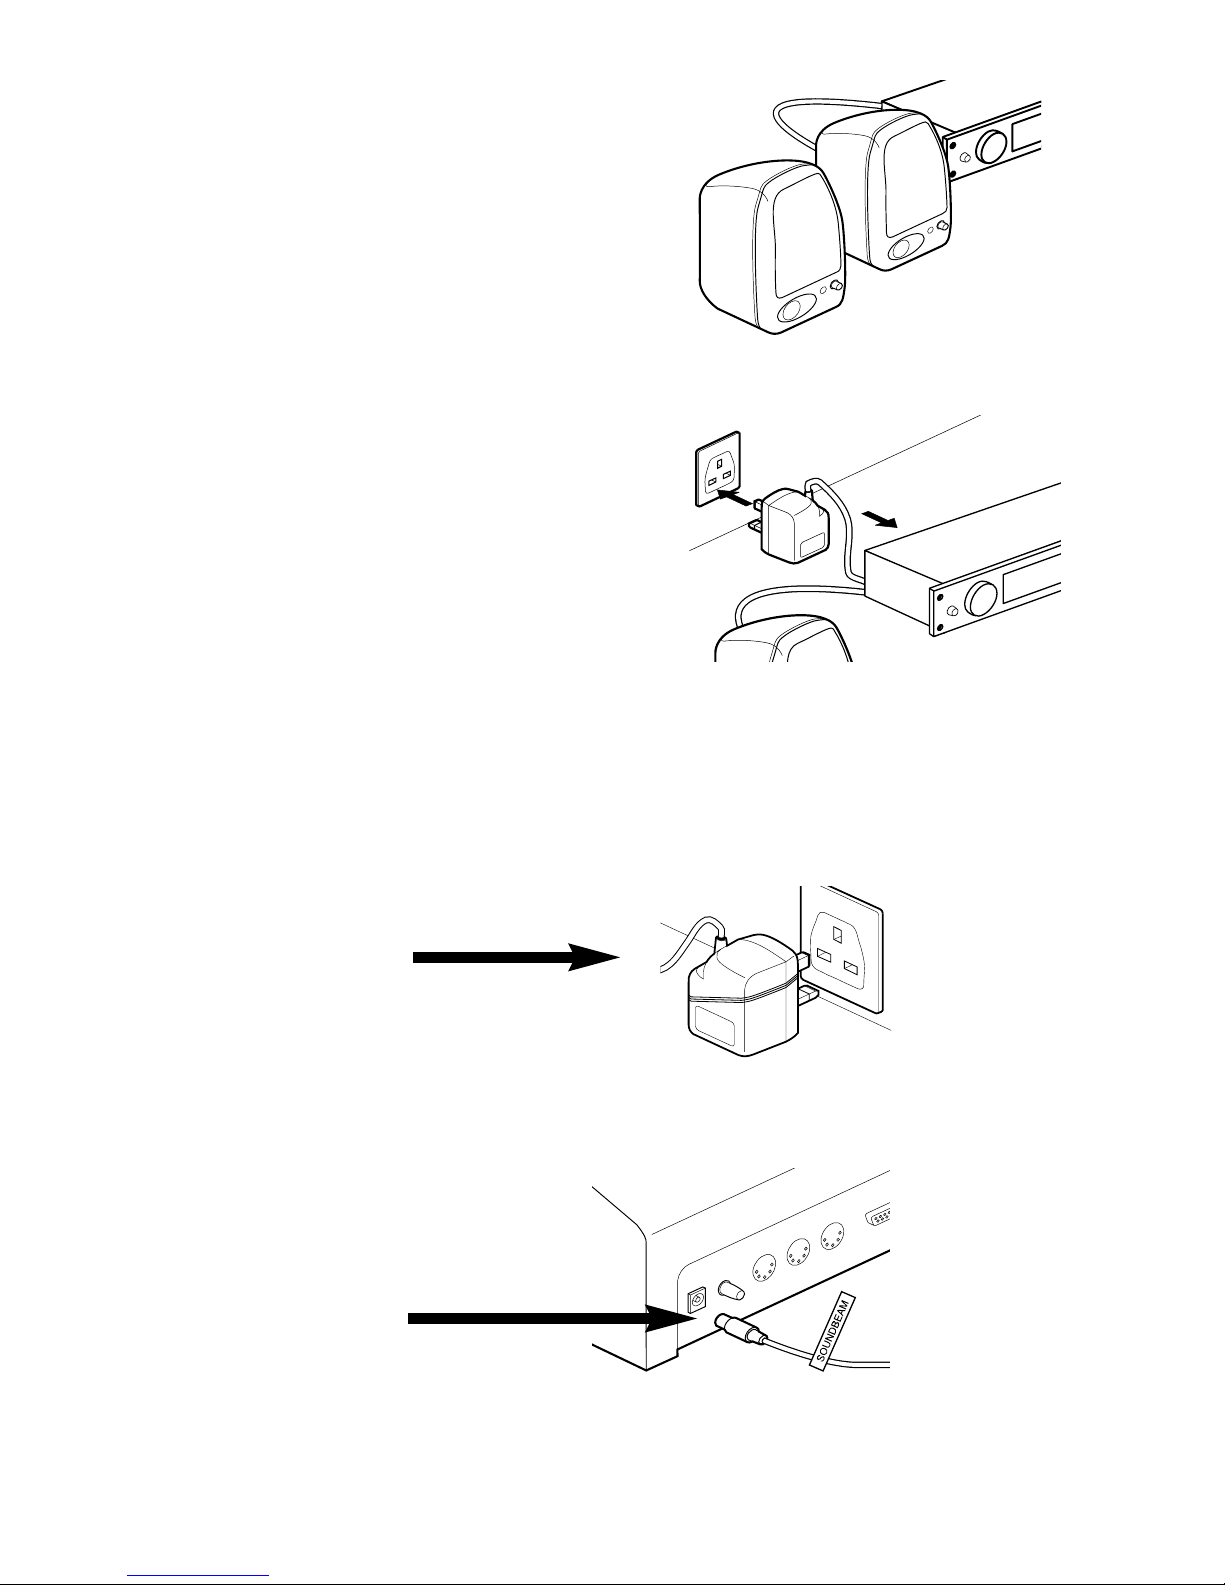
Connect the signal output(s)
of your MIDI musical instrument
to an amplifier and speakers or to a pair of self-powered speakers
Connect the Power Unit of your
MIDI musical instrument to your
room’s mains supply
Connect your Soundbeam Controller’s
Power Unit to the mains supply
i. Insert plug of Power Unit
into Mains Socket
ii. Insert connector labelled
‘SOUNDBEAM’ on Power Lead
into socket on Controller
rear panel labelled ‘Power 9v AC’
14
THE SOUNDBEAM®2 HANDBOOK • PART 1 • GETTING STARTED
Page 16
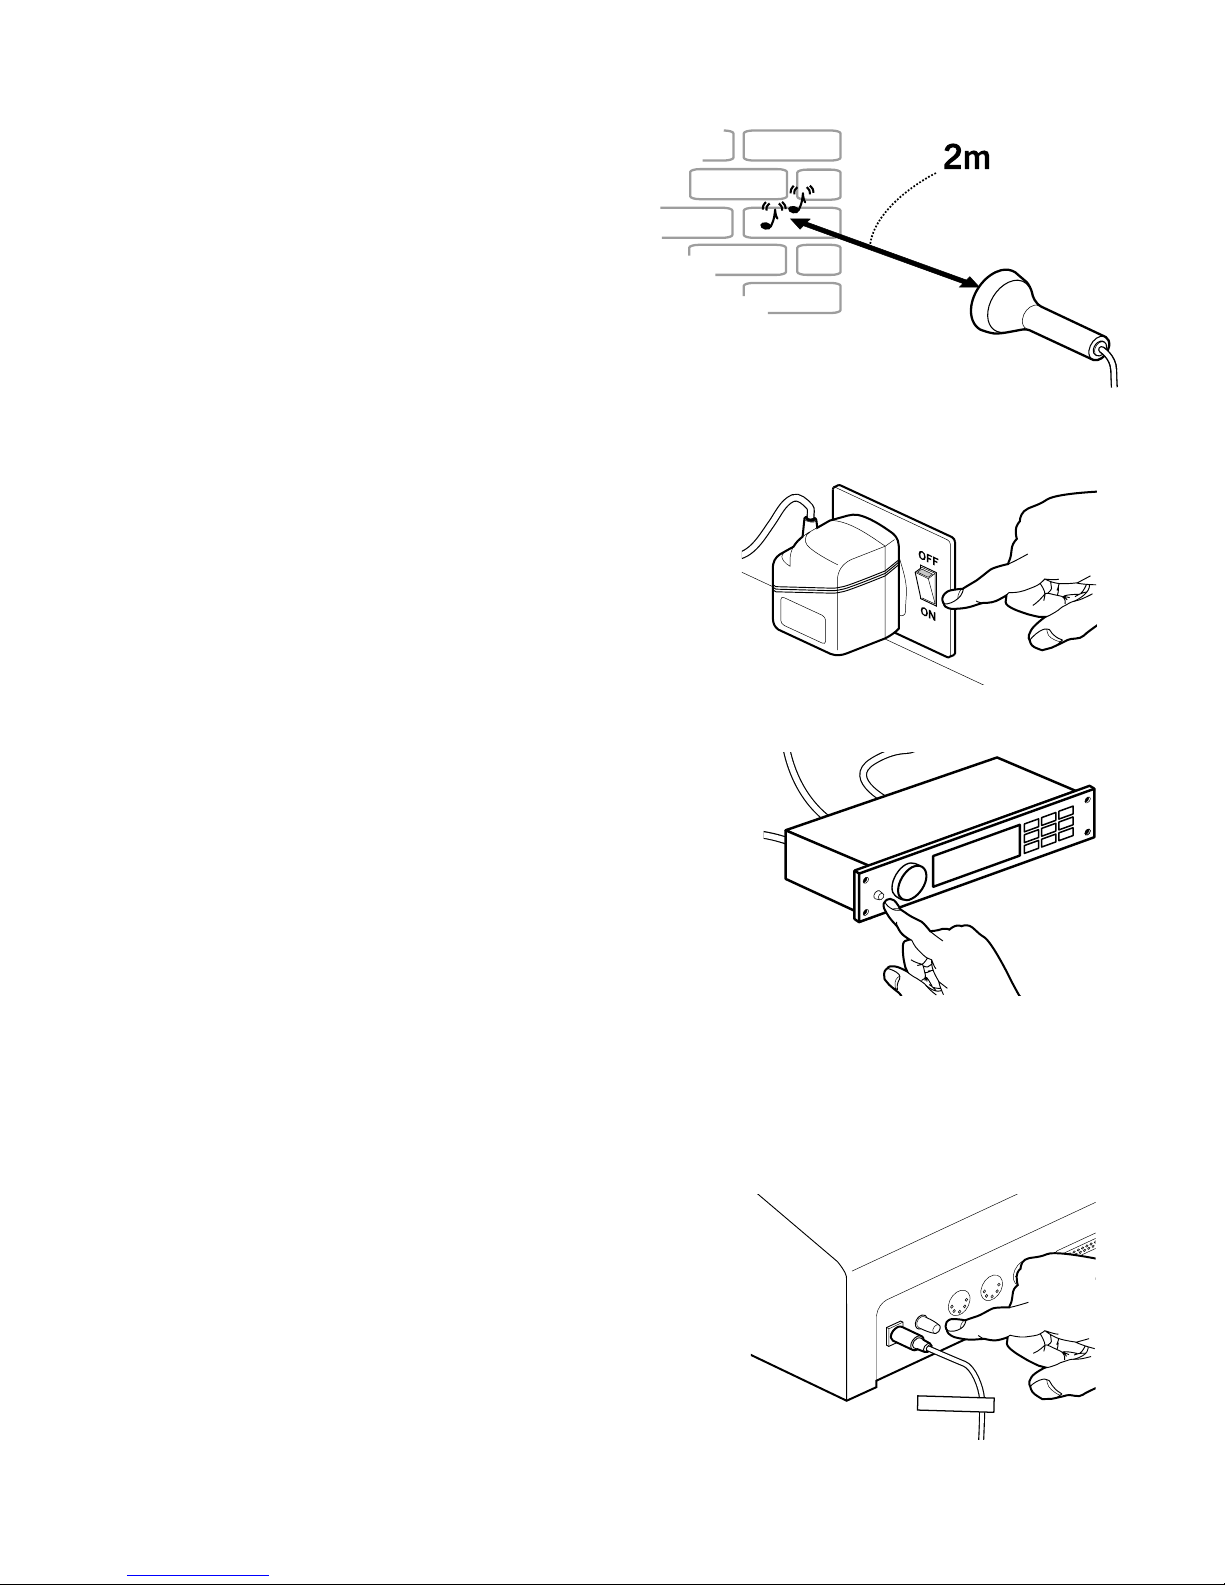
Switching On
First
make sure that
there’s nothing likely to
interrupt the Beam of the
Sensor within 2m in front of it.
Then
i. If there is a switch for
your room’s mains
supply, switch it on.
ii. Switch on the ‘Power’
switch of your MIDI
musical instrument.
Wait a second or two until the
instrument has finished its
‘start up’ routine -
then
iii. press the ‘Power’ switch
of your SOUNDBEAM 2
Controller
THE SOUNDBEAM®2 HANDBOOK • PART 1 • GETTING STARTED
15
SOUN
DBEAM
Page 17
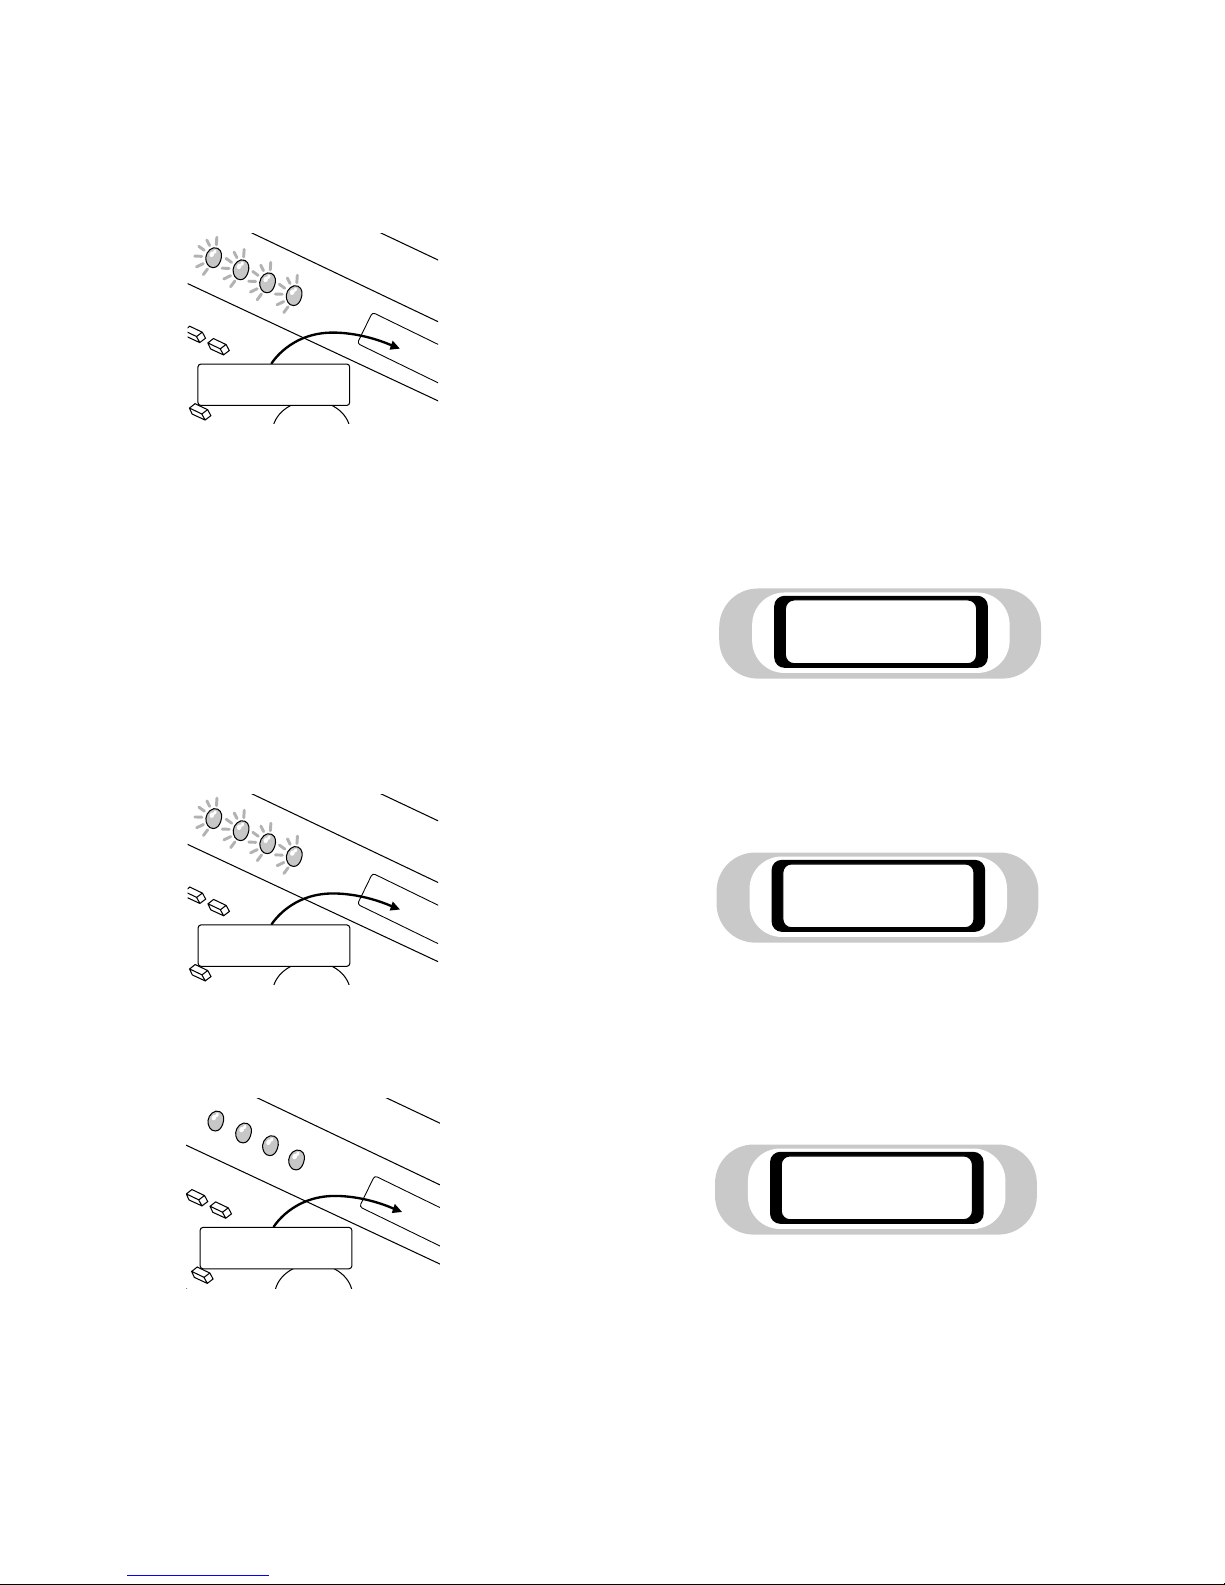
YOU SHOULD SEE
a: The 4 red indicator lights (on the left-hand side of the Controller’s upper
surface) light up for about 3 seconds
and, simultaneously,
b: On the LCD Screen (on the right-hand side of the upper part of the
Controller’s upper surface)
followed a second later by
(something like - but not exactly)
followed a second later by
At the same time you should hear a quiet buzzing sound. This is a by-product
of the mechanism of the Sensor, as it alternates rapidly between acting as a
loudspeaker (sending out ultra-sonic pulses) - and as a microphone (listening
for the echoes).
16
THE SOUNDBEAM®2 HANDBOOK • PART 1 • GETTING STARTED
SOUNDBEAM
CONTROLLER
VERSION 1.32
7/10/1999
Set-up: 001P
Echoes
SOUNDBEAM
CONTROLLER
VERSION 1.32
7/10/1999
Set-up: 001P
Echoes
Page 18
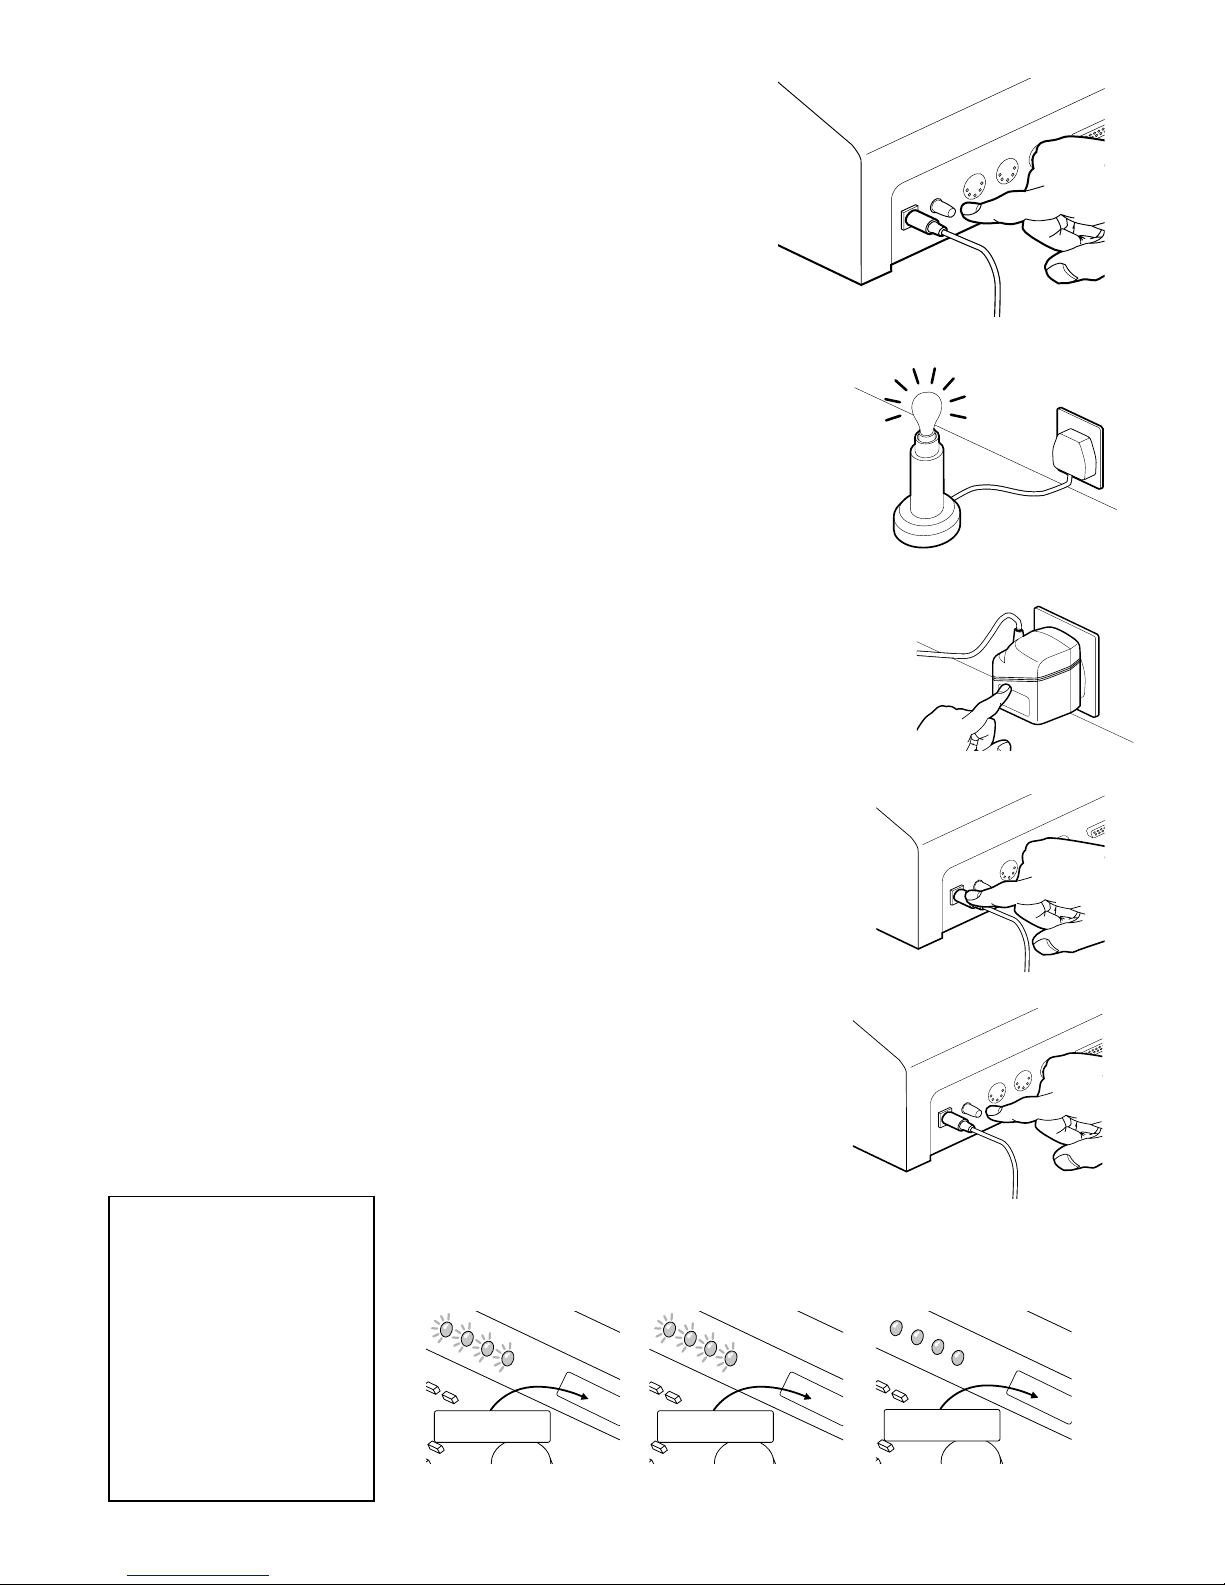
IF NOT (1)
If you Don’t see the lights and
screens described above
1.
Press (to release) the Power Switch on
the Controller’s back panel and
switch off the current…
2. Check that current is actually being
supplied to the room mains supply
socket you are using.
Try plugging
another device into this socket
- a lamp or electric fan, for example - and
switching it on to make sure.
3.
Check that the Soundbeam Power Unit plug is
properly pressed home
into the room mains supply socket
4.
Check that the Soundbeam Power Unit
connection is properly pressed home into
the Power supply socket on the back panel
of the Controller
5.
Press Controller’s Power Switch once more
to switch on current to SOUNDBEAM 2
You should now see the 4 Indicator Lights and the 3 Screens shown on the
previous page - and hear the ‘buzz’.
THE SOUNDBEAM®2 HANDBOOK • PART 1 • GETTING STARTED
17
If they still do not show,
try repeating the whole
connecting procedure once
more, very carefully, step
by step as described
above, before ringing
Robin Wood on the
helpline - 01726 883265
during working hours
(British time) on weekdays.
SOUNDBEAM
CONTROLLER
VERSION 1.32
7/10/1999
Set-up: 001P
Echoes
Page 19
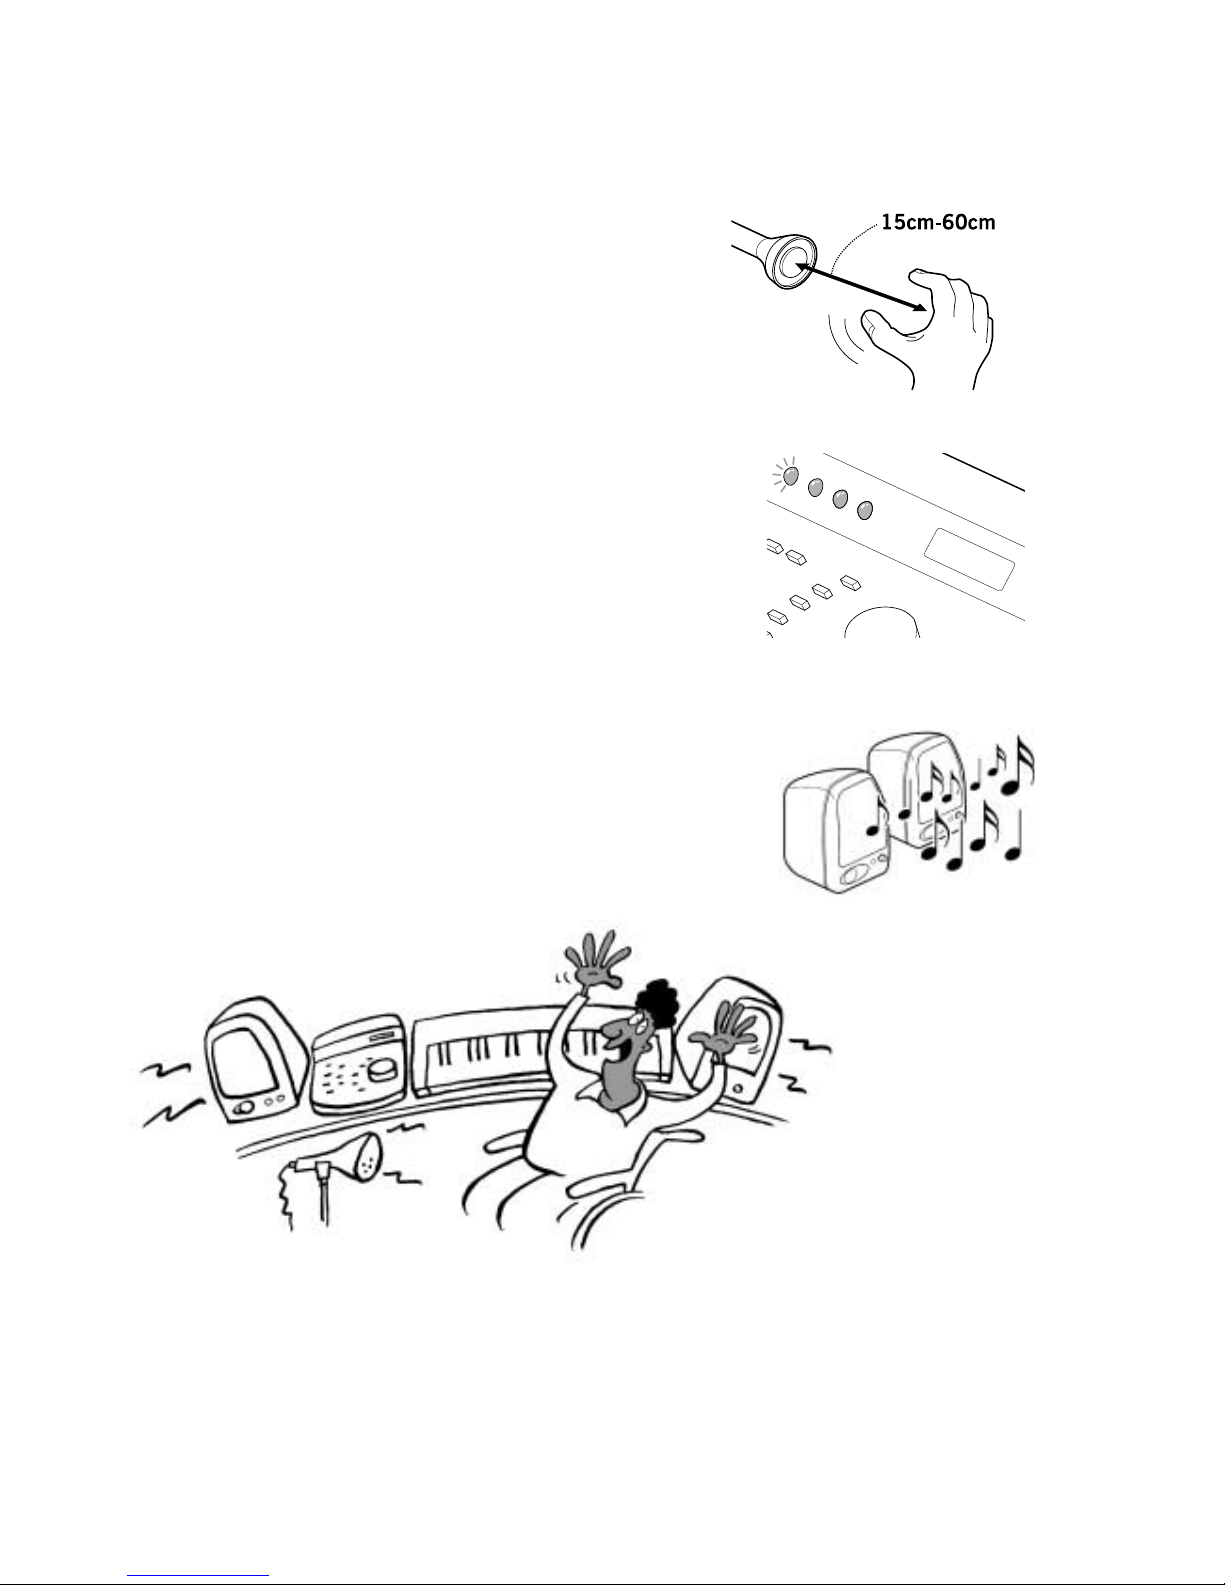
NEXT
if you now see the Indicator Lights
and Screens described on page 16
Move your hand backwards and forwards -
between about 15cms and 60cms away
from the Sensor.
YOU SHOULD SEE
The 1st (on the left) of the four indicator lights flashing on and
off to indicate that something is interrupting the Sensor’s Beam.
YOU SHOULD HEAR
A rising and falling sequence of musical notes
Your Soundbeam 2 is working - and your movements
in the Beam are triggering sounds from your MIDI
musical instrument.
18
THE SOUNDBEAM®2 HANDBOOK • PART 1 • GETTING STARTED
Success!
Page 20
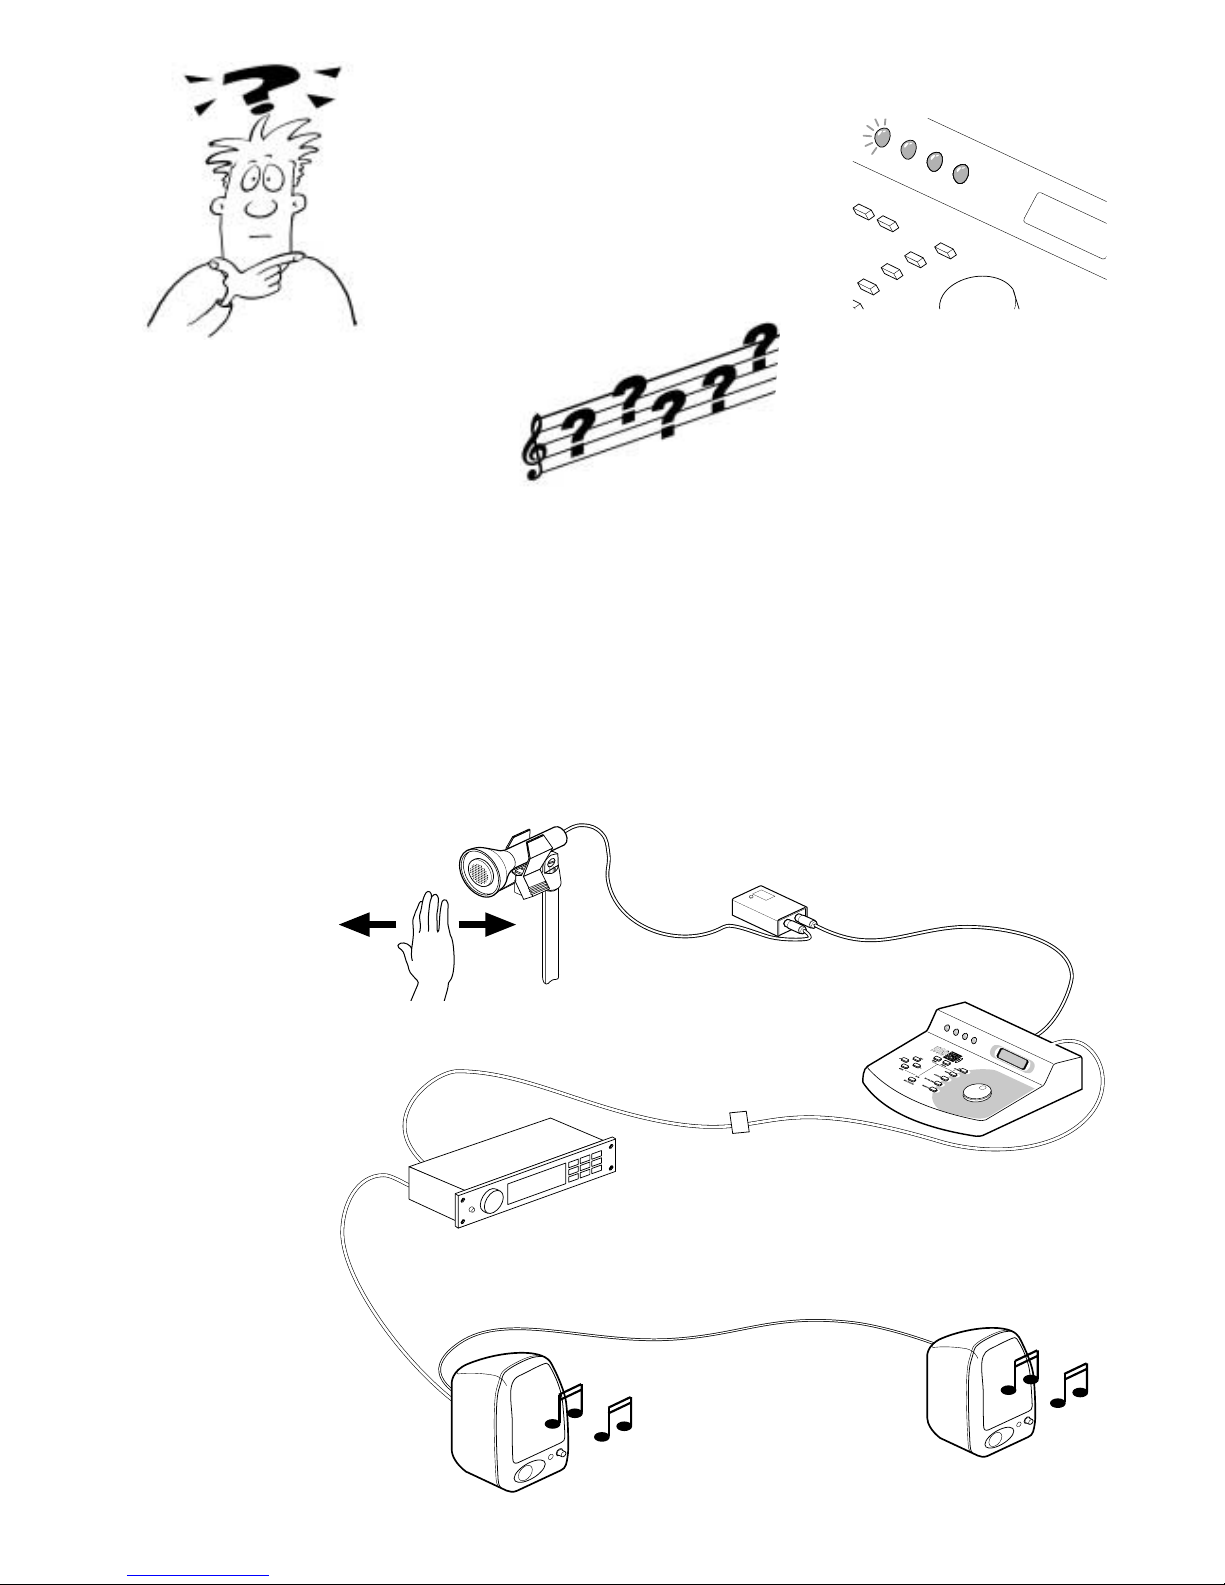
IF NOT (2)
If, however, you DO SEE the left-hand
indicator lamp flashing
but DON’T
HEAR
the music
then your Soundbeam 2 is probably working properly but
failing to activate your MIDI musical instrument.
This may be because of a failure in the chain that conveys
Soundbeam’s MIDI messages from the Controller to your MIDI
musical instrument and then on to amplifier and speakers.
These links are
THE SOUNDBEAM®2 HANDBOOK • PART 1 • GETTING STARTED
19
A
MIDI messages from the Controller travel via MIDI
Lead A to a MIDI musical instrument - keyboard,
sound module or sampler.
the resultant signals are sent to an amplifier and speakers for conversion…
…
into sound.
Page 21
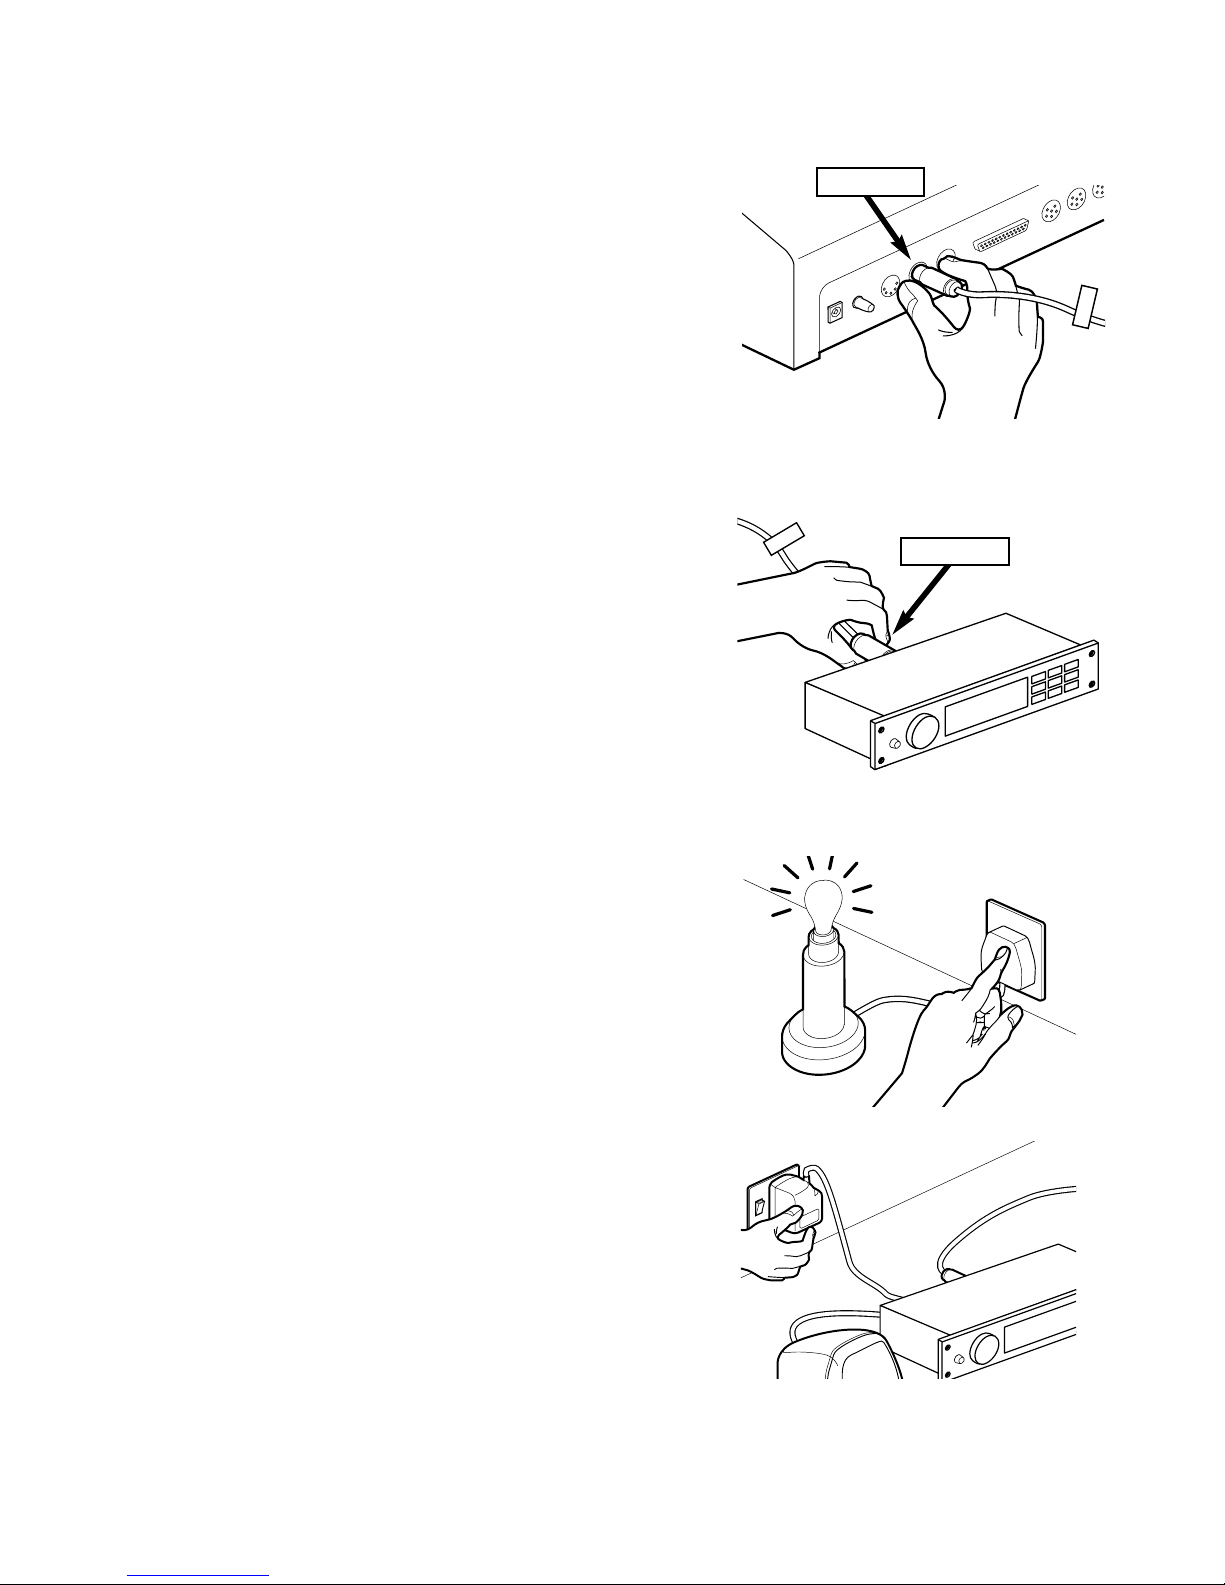
So check that
i. The correctly labelled 5-pin MIDI Out plug on MIDI Lead A
is pushed firmly home into the MIDI Out socket on the
Controller’s back panel
ii. The correctly labelled 5-pin MIDI In plug on MIDI Lead A
is pushed firmly home into the MIDI In socket of your
musical Instrument
iii. Current is actually being supplied to the socket of your
room’s mains supply - ie. try plugging in a lamp or
a fan as above.
iv. The plug of the Power Unit of your musical instrument
is firmly pushed home into the socket of your room’s
mains supply
20
THE SOUNDBEAM®2 HANDBOOK • PART 1 • GETTING STARTED
A
A
MIDI Out
MIDI In
Page 22
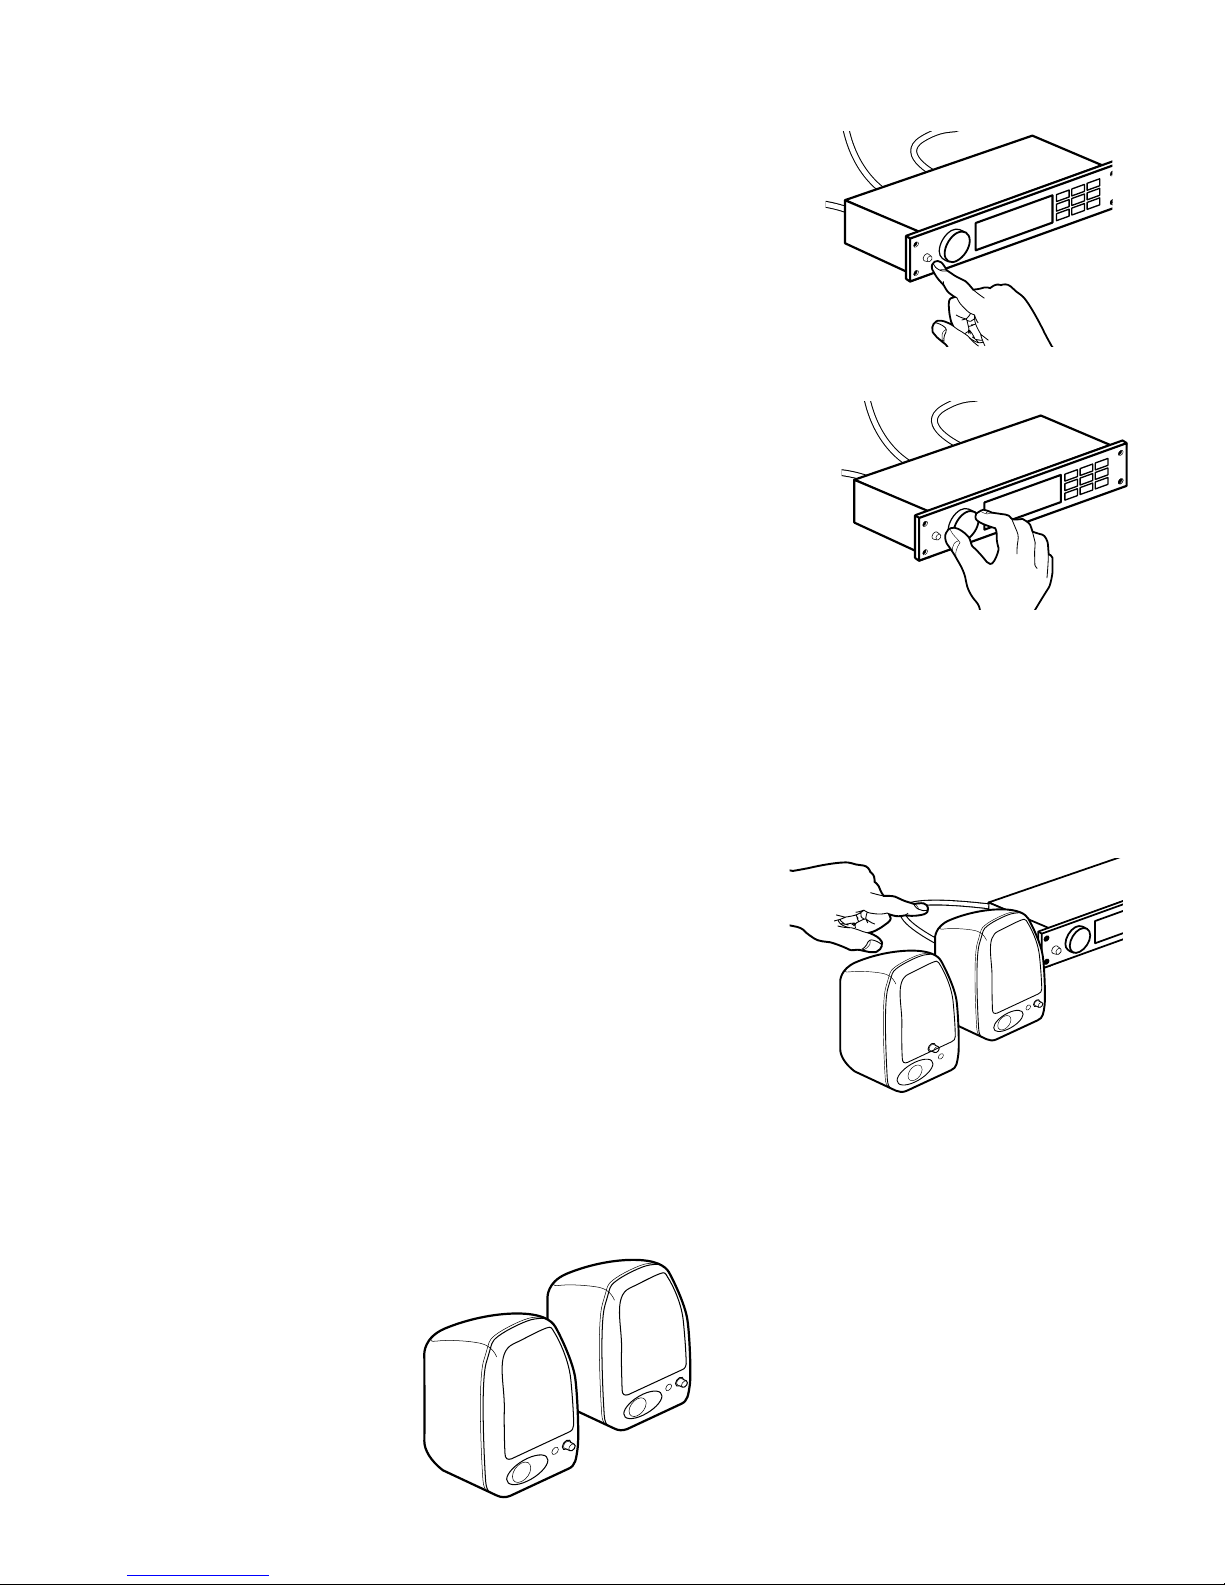
So check that…
cont
v. The Power switch on your musical
instrument is switched ON.
vi The volume control of the signal outputs
of your musical instrument is turned
up high enough for you to hear
any output.
vii. Unless you have a keyboard with internal amplifier and speakers -
the lead(s) carrying the (sound) signal from your musical instrument,
either
a. to an amplifier, and then on from the amplifier to the speakers
or
b. directly to a pair of self-powered speakers,
are properly connected
at each end
and finally
viii Your amplifier and speakers - or your self-powered speakers - are
connected to the mains supply and
switched on with the volume turned UP
THE SOUNDBEAM®2 HANDBOOK • PART 1 • GETTING STARTED
21
Page 23

22
THE SOUNDBEAM®2 HANDBOOK • PART 1 • GETTING STARTED
Page 24
THE SOUNDBEAM®2 HANDBOOK • PART 1 • GETTING STARTED
23
THE SOUNDBEAM®2 HANDBOOK
PART 1
B. A LIGHTNING TOUR
of the
controls
Page 25
24
THE SOUNDBEAM®2 HANDBOOK • PART 1 • GETTING STARTED
After you have had a preliminary try-out with
Soundbeam 2 and your MIDI keyboard, sampler
or sound module, by moving your hand, head,
foot - or anything else - in the Beam, you could
begin the following guided tour to give you an
idea of some of Soundbeam’s other possibilities and how to get to them.
If you have just finished the procedure in “Getting Started” or if you have just switched on Soundbeam 2 - the display will
be showing the default* screen -
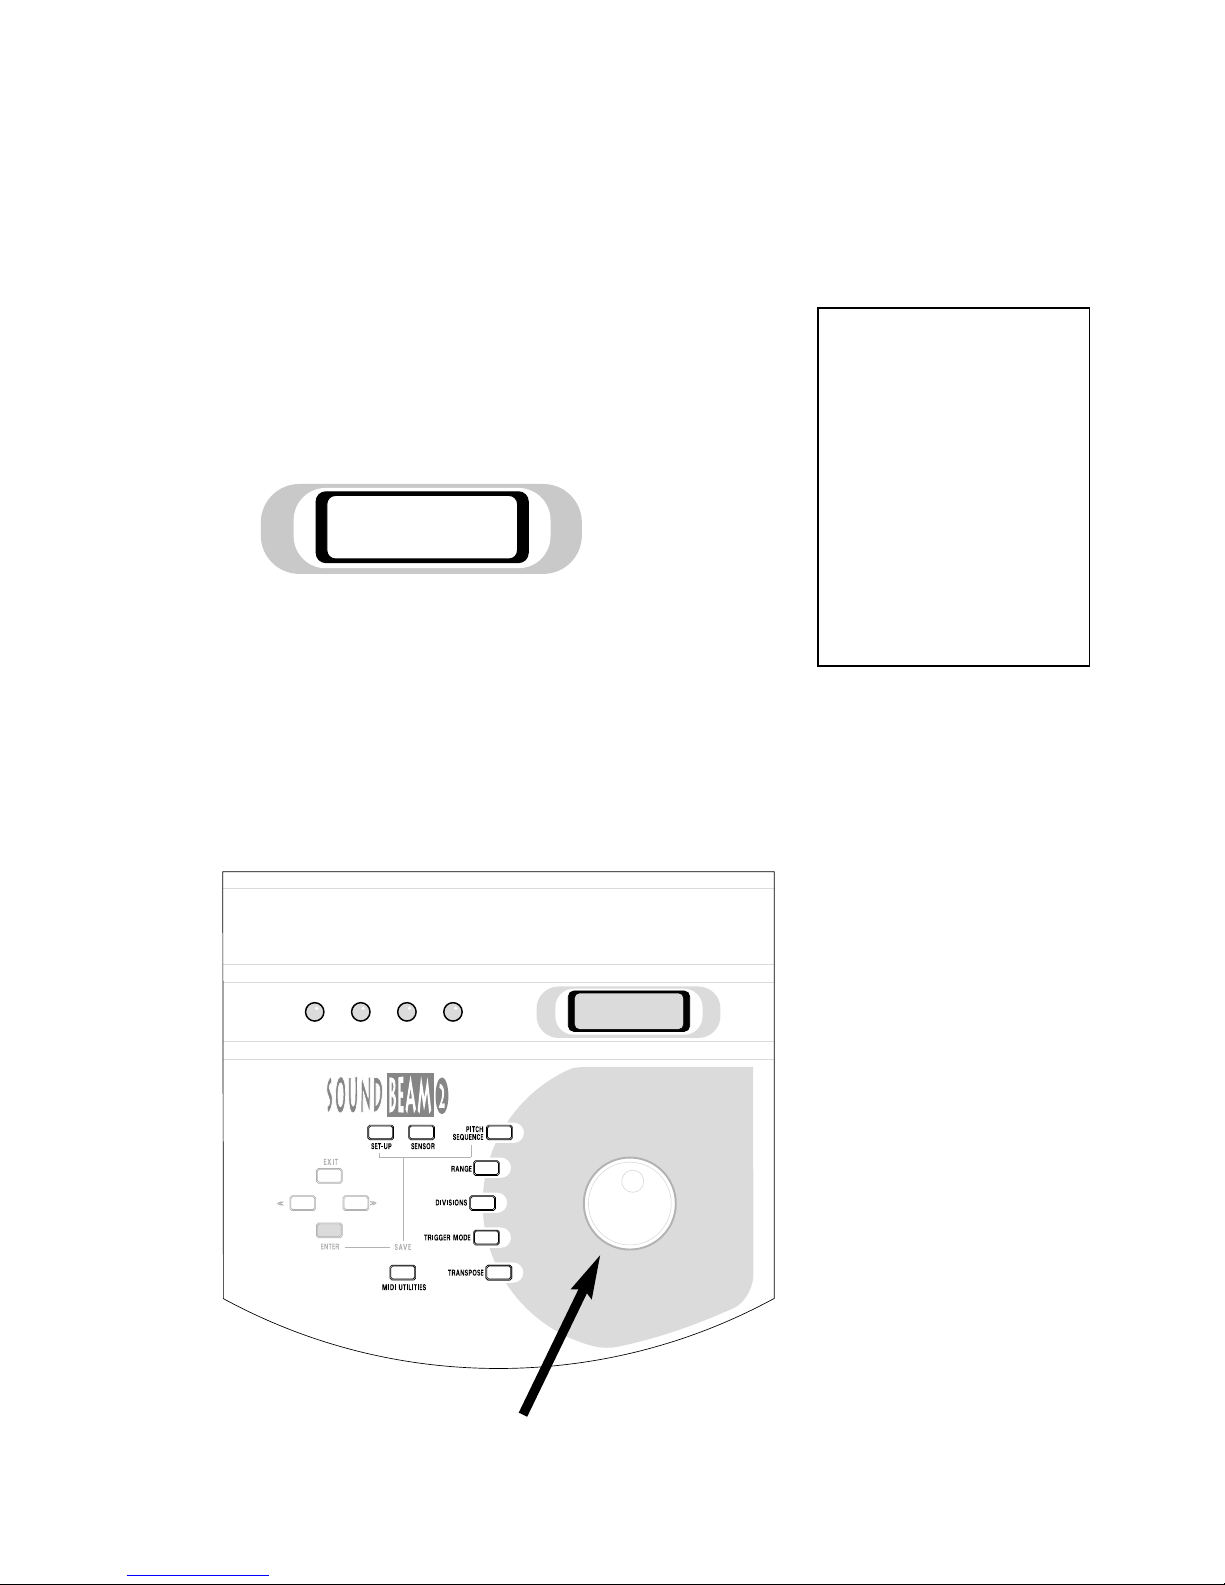
First, then, try changing some of the settings assigned
to Beam 1 in the default Set-up No. 001 P.
This is done by pressing one of the keys - Pitch Sequence, Range,
Divisions, Trigger Mode, Transpose, MIDI Utilities - to access the
specific setting you want to modify
and then using the Rotary Control Wheel to change it.
*The “Default” settings for Set-
up, Sensor, Pitch Sequence,
Range and so on, are those
which have been chosen (and
held in Soundbeam’s memory)
to re-appear each time
Soundbeam is switched on.
The default settings in the
User Set-ups and Pitch
Sequences can be changed
and preserved by Saving the
Set-up or Pitch Sequences
in which changes have
been made.
Set-up: 001 P
Echoes
Page 26
THE SOUNDBEAM®2 HANDBOOK • PART 1 • GETTING STARTED
25
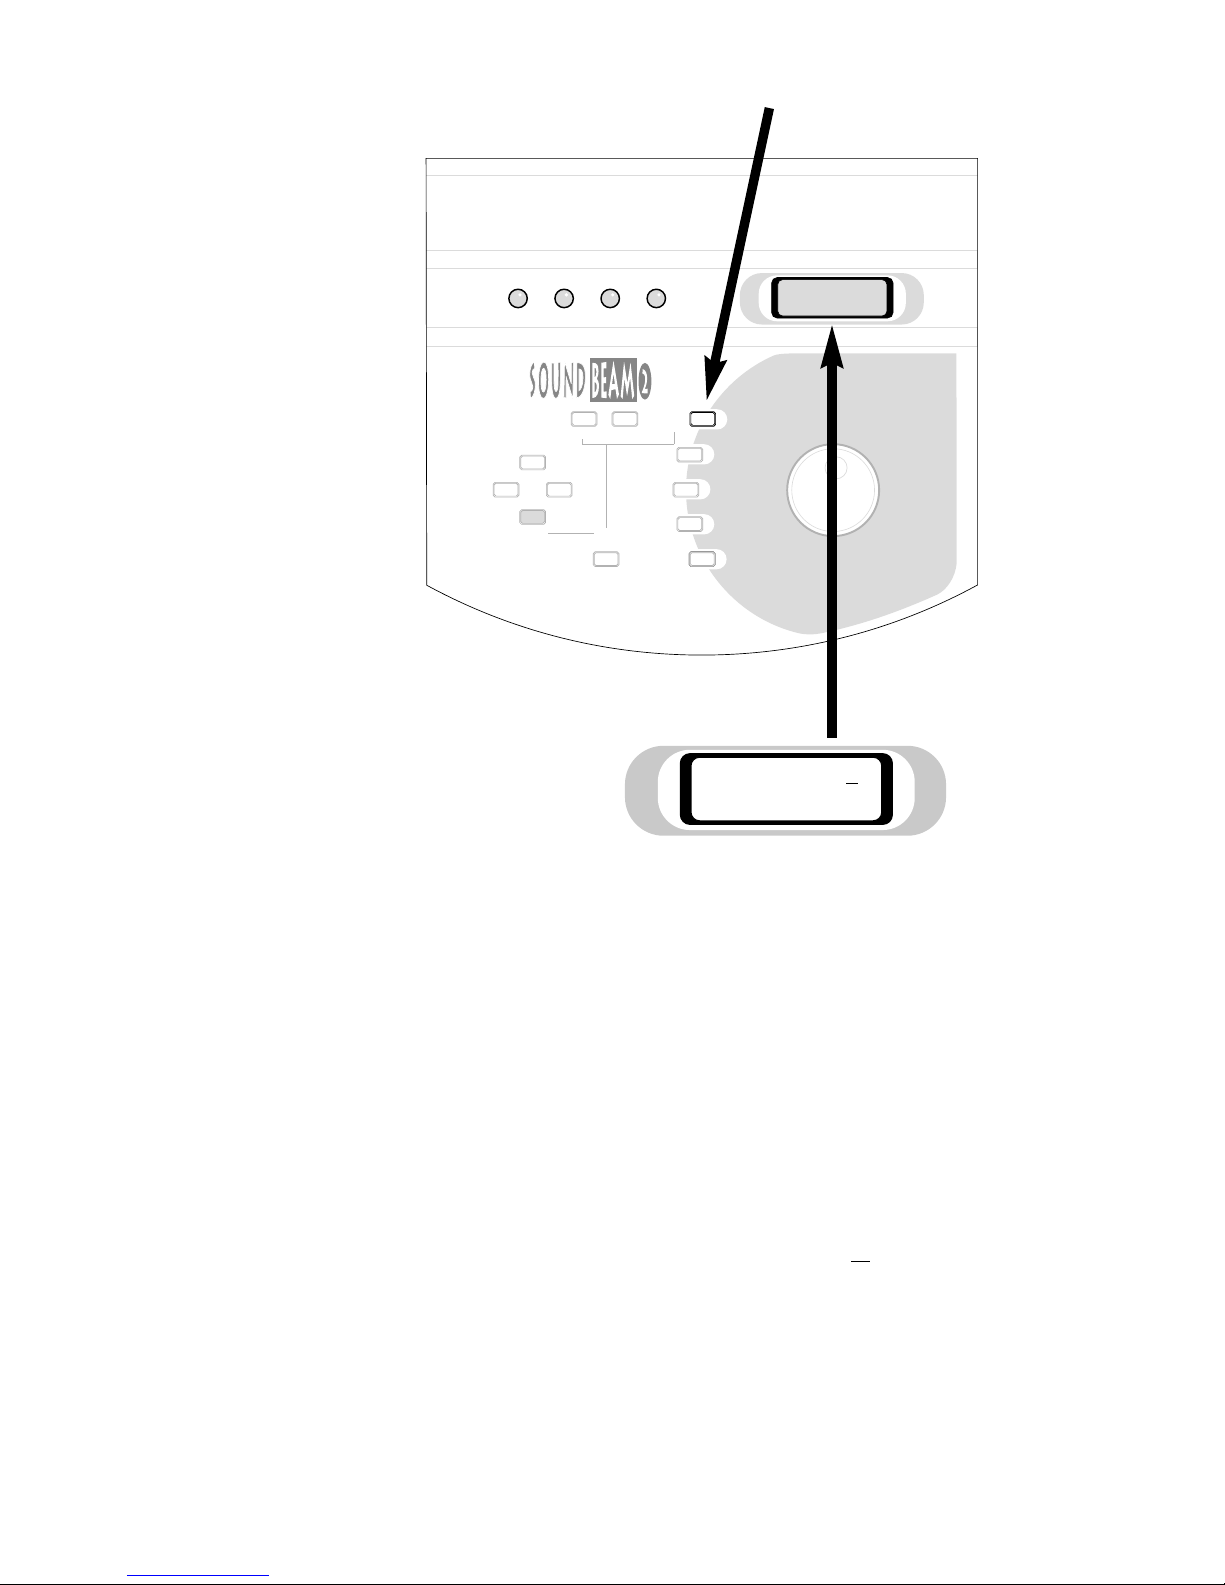
Start by pressing the
Pitch Sequence Key
The screen will show
the default Pitch
Sequence assigned
to Beam 1 in
Set-up 001
A Pitch Sequence is any sequence - scales, arpeggios, tunes - of up to 64 single
notes or 2-, 3- or 4-note chords. They can be assigned to up to 64 Divisions of
the Beams (at any Range). Soundbeam can store a library of 100 Pitch
Sequences. 30 of these are Locked Pitch Sequences (preset in the factory).
You, yourself, can define the other 70 Pitch Sequences by using a MIDI keyboard
to play the notes or chords into Soundbeam’s memory via the Controller’s
MIDI IN input.
Note the cursor under the ‘5’. This denotes
the number or letter which will be changed
when you turn the Rotary Control Wheel.
SET-UP SENSOR
PITCH
SEQUENCE
RANGE
DIVISIONS
TRIGGER MODE
TRANSPOSE
MIDI UTILITIES
ENTER
SAVE
EXIT
>>
<<
PitchSeq: 005
Maj Triad + 6th
Page 27
26
THE SOUNDBEAM®2 HANDBOOK • PART 1 • GETTING STARTED
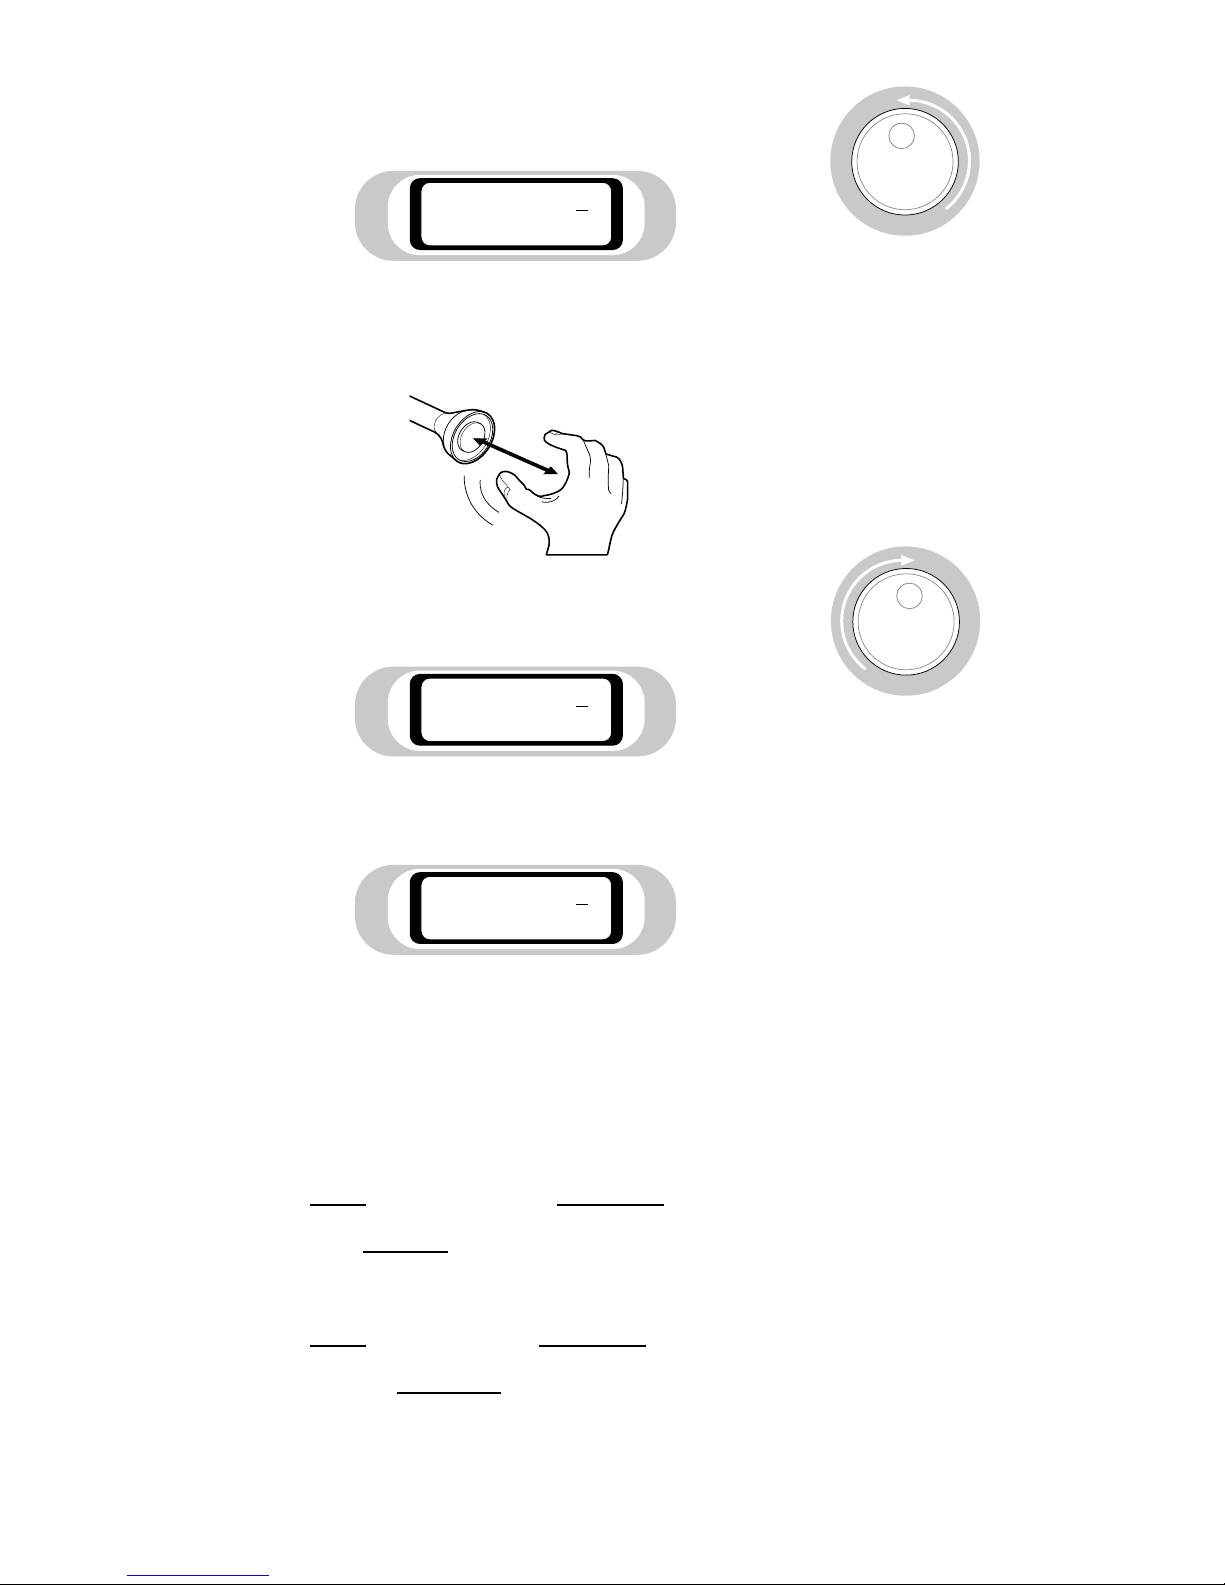
Now turn the Rotary Control Wheel anti-clockwise - a step at a time
(you can feel a click at each of the 4 steps) to Pitch Sequence 1.
The screen will show
Move your hand backwards and forwards in the Beam - between about
15cms and 60cms away from the Sensor - to hear the notes of a major
chord rippling up and down.
Next turn the Rotary Control Wheel clockwise to
Pitch Sequence 002 - then move your other hand
in the Beam to hear the new set of pitches.
Then slowly work through the remaining Locked Pitch Sequences, Nos. 01 to
27, triggering and listening to them in the same way. End by returning to
A Pitch Sequence is one of the two components of Soundbeam’s musical output
which can be defined by the user and Saved to Soundbeam’s memory for use
whenever required. The other is the Set-up.
N.B. Any Pitch Sequence can be assigned to
any one
SENSOR – or several SENSORS –
or even all 12 SENSORS
in
any one SET-UP – or several SET-UPS –
or even in all 128 SET-UPS
PitchSeq: 001
Arp. Major Triad
PitchSeq: 002
Arp. Minor Triad
PitchSeq: 005
Maj Triad + 6th
Page 28
SET-UP SENSOR
PITCH
SEQUENCE
RANGE
DIVISIONS
TRIGGER MODE
TRANSPOSE
MIDI UTILITIES
ENTER
SAVE
EXIT
>>
<<
THE SOUNDBEAM®2 HANDBOOK • PART 1 • GETTING STARTED
27
Now
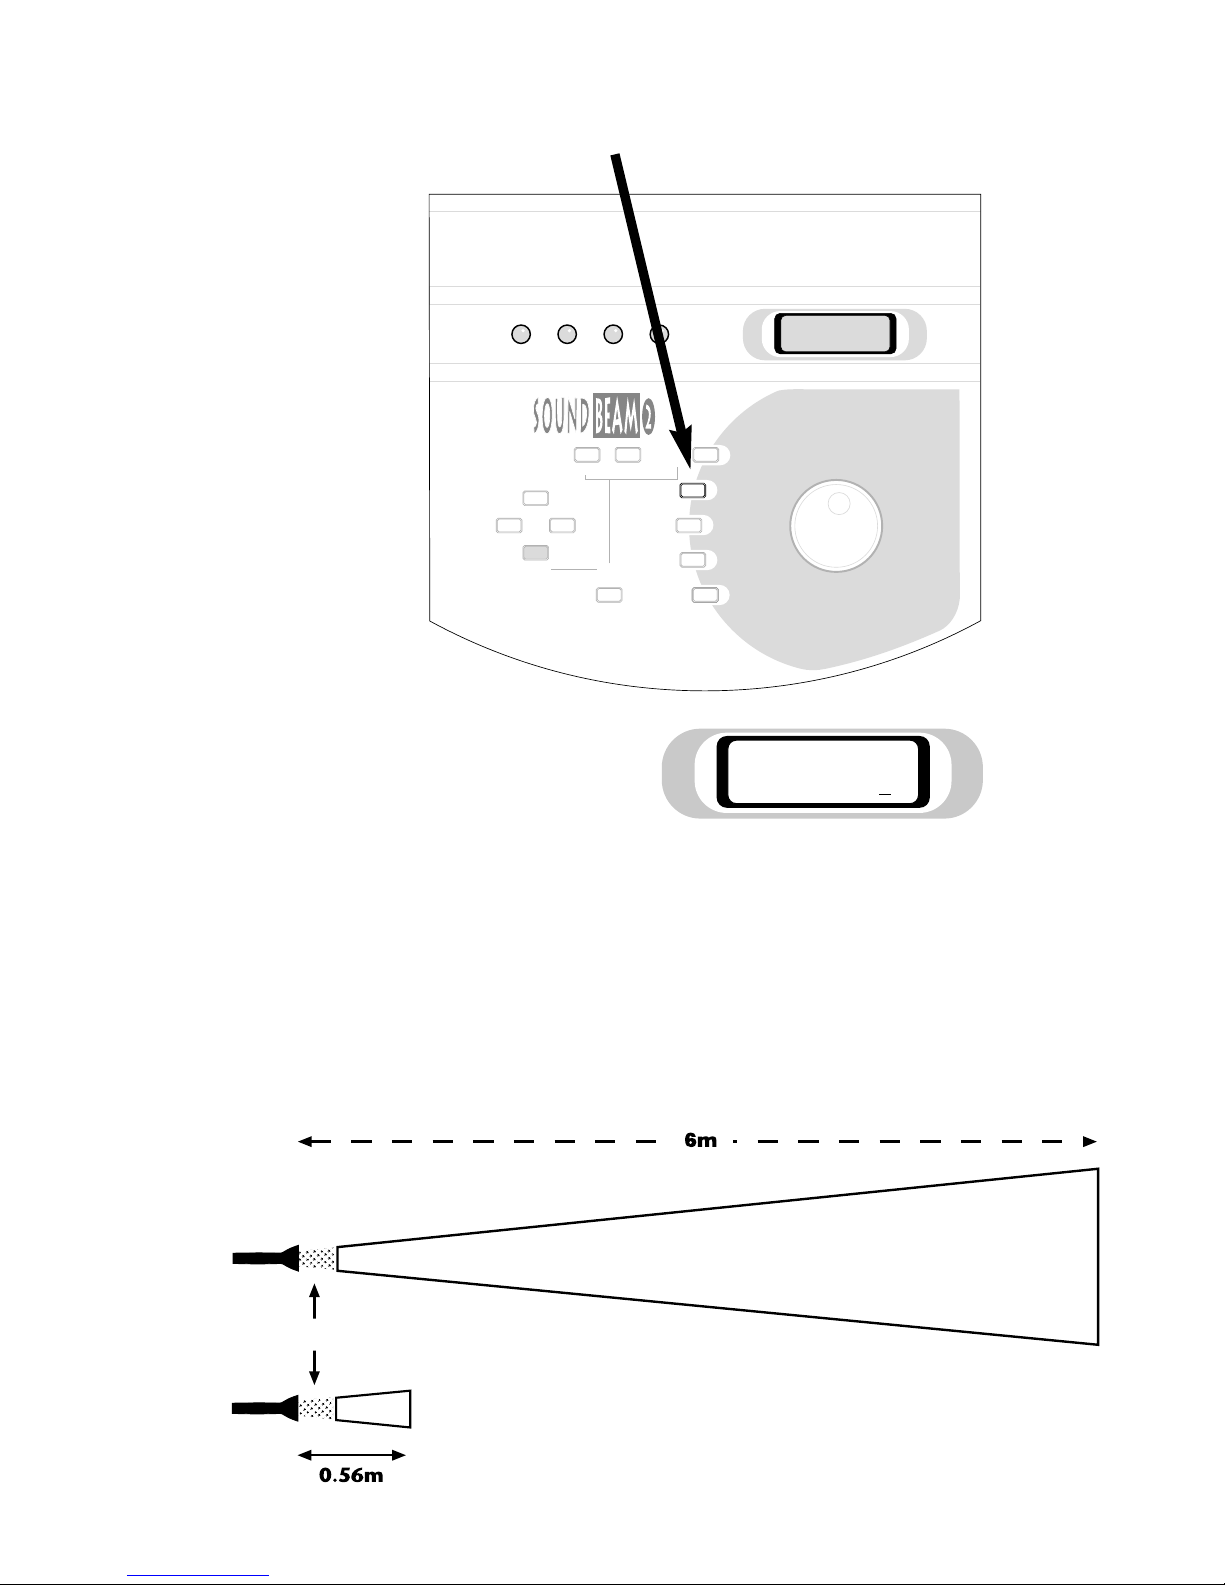
Press the
Range Key
The display will show
The Maximum Range of Soundbeam is the furthest distance from the Sensor
within which interruptions of the Beam will be detected. It can be set to any
distance from 0.56m to 6.00m. The Default Range is 0.60m and, unless you
change the Default Range setting, 0.60m will be selected each time you power
up Soundbeam 2.
NB. Interruptions of the first 17cms of the Beam from the
Sensor will not usually result in any notes being triggered.
Select Max Range
Beam 1: 0.60
m
0.17m
Page 29
3m
3m
28
THE SOUNDBEAM®2 HANDBOOK • PART 1 • GETTING STARTED
At this point, there are two possibilities you
might like to try.
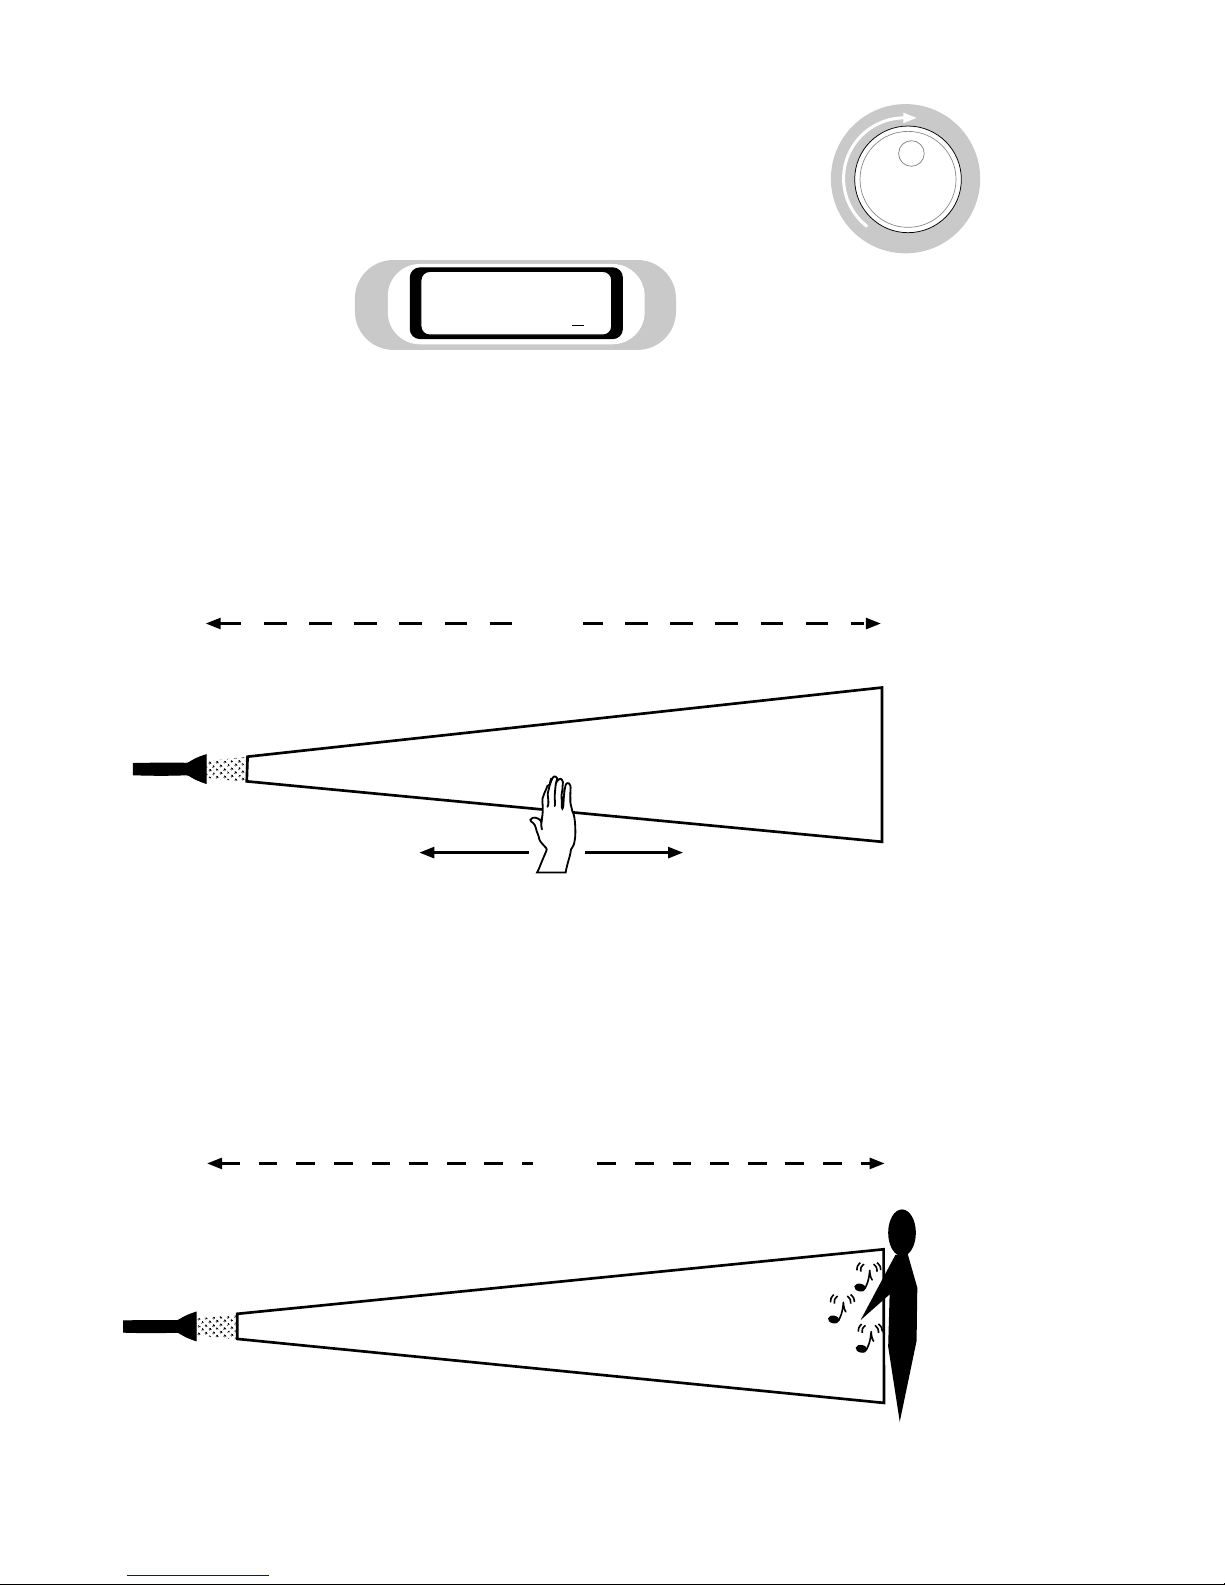
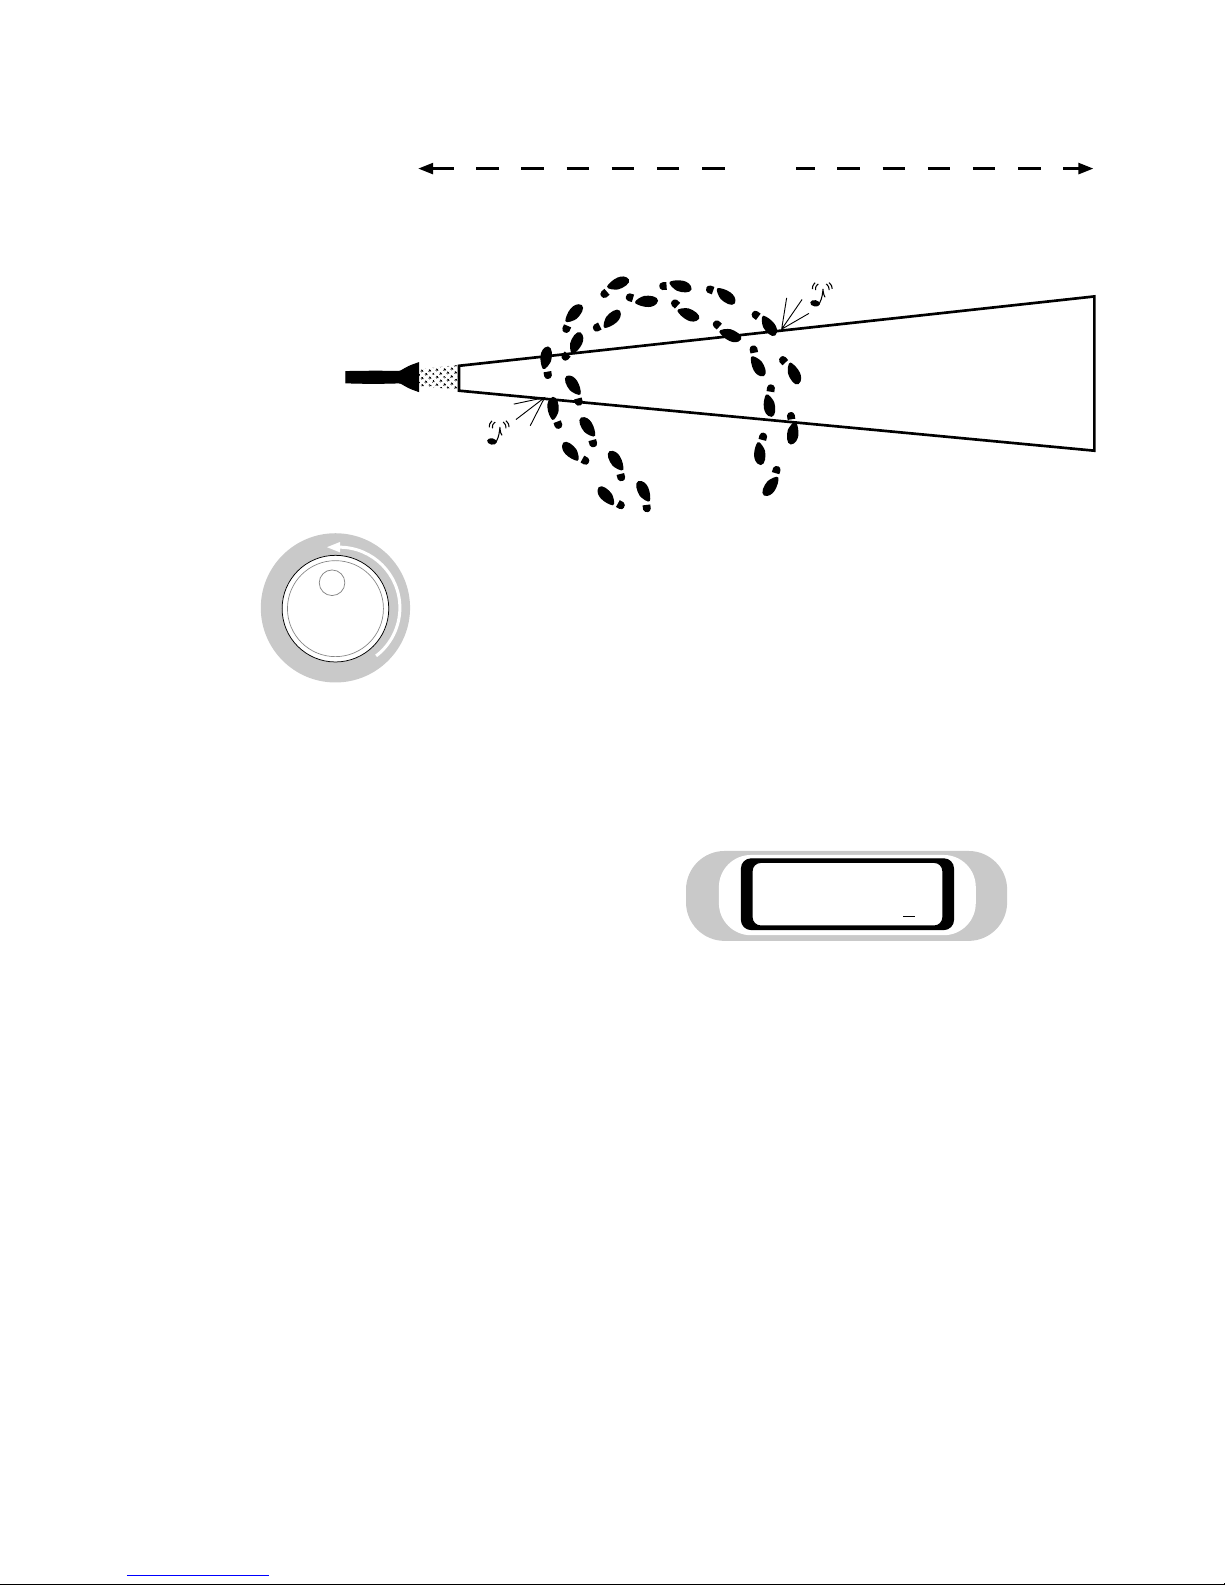
I: First
, If you have plenty of unencumbered space - 5m x 5m, say - turn
the Rotary Control Wheel clockwise to a setting of around 3.00m (10’)
The display will show
And the Sensor will now send pulses to - and listen to echoes from interruptions of the Beam up to 3m away.
Now, try walking towards the Sensor from, say, 4m away (in the
direction which the Sensor is pointing) - listening for the exact place
where your body meets the furthest end of the Beam from the Sensor
and starts to generate sounds.
Select Max Range
Beam 1: 3.00
m
Page 30
THE SOUNDBEAM®2 HANDBOOK • PART 1 • GETTING STARTED
29
Next, walk in and out of the 3m long Beam, listening to what happens
and trying to judge when you’re interrupting the Beam and when you’re
outside it.
Finally, turn the Rotary Control Wheel anti-clockwise to a setting of
about 1.00m.
This is a Range - a length of Beam - which will spread the notes out a bit more
than the default setting (0.60m), so that when you move your arm in front of
the Sensor you can more easily hear each one separately.
The screen will show
It is also possible to select a Minimum Range which defines the distance
between the Sensor and the nearest part of the Beam which will respond
to interruptions. For an explanation of Range and its applications, see
Handbook Part 3 “Explanations” 2. Gathering Information from
Movement - 2.1. to 2.2.3 pp. 12-26.
Select Max Range
Beam 1: 1.00
m
3m
Page 31
SET-UP SENSOR
PITCH
SEQUENCE
RANGE
DIVISIONS
TRIGGER MODE
TRANSPOSE
MIDI UTILITIES
ENTER
SAVE
EXIT
>>
<<
1m
30
THE SOUNDBEAM®2 HANDBOOK • PART 1 • GETTING STARTED
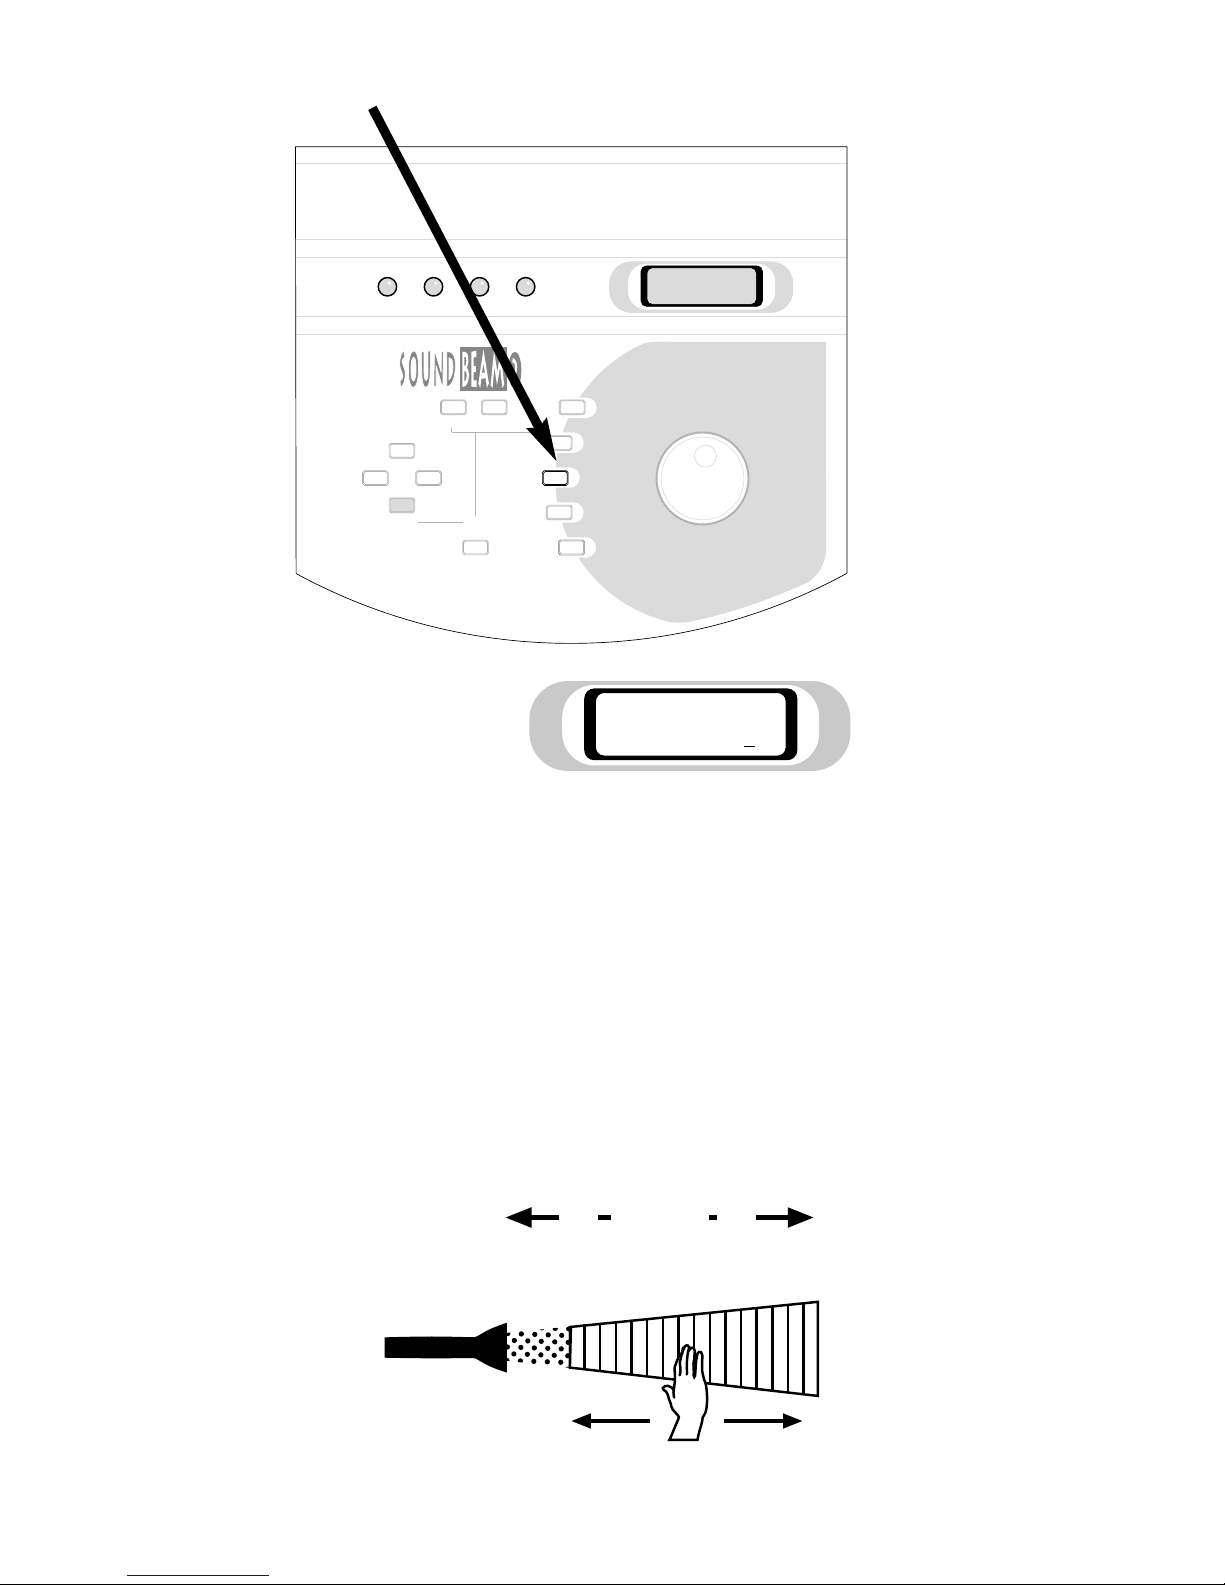
Now we can turn to the
Divisions Key
When you press this, the display will show
Divisions are the numbers of equal sections (from 1 to 64) into which the
Beam’s length - at any Range - can be divided. Each of the notes or chords
of a Pitch Sequence, can be assigned to one of these sections.
If you move your hand slowly along the Beam from the nearest point to the
Sensor to furthest away and back again (with the Range setting as you left it
above - at around 1m), you should be able to count the number of separate
notes you trigger - 16 of them, in fact, about 1cm apart along the Beam.
Divisions for:
Beam 1: 16
16 Divisions
Page 32
1m
1m
THE SOUNDBEAM®2 HANDBOOK • PART 1 • GETTING STARTED
31
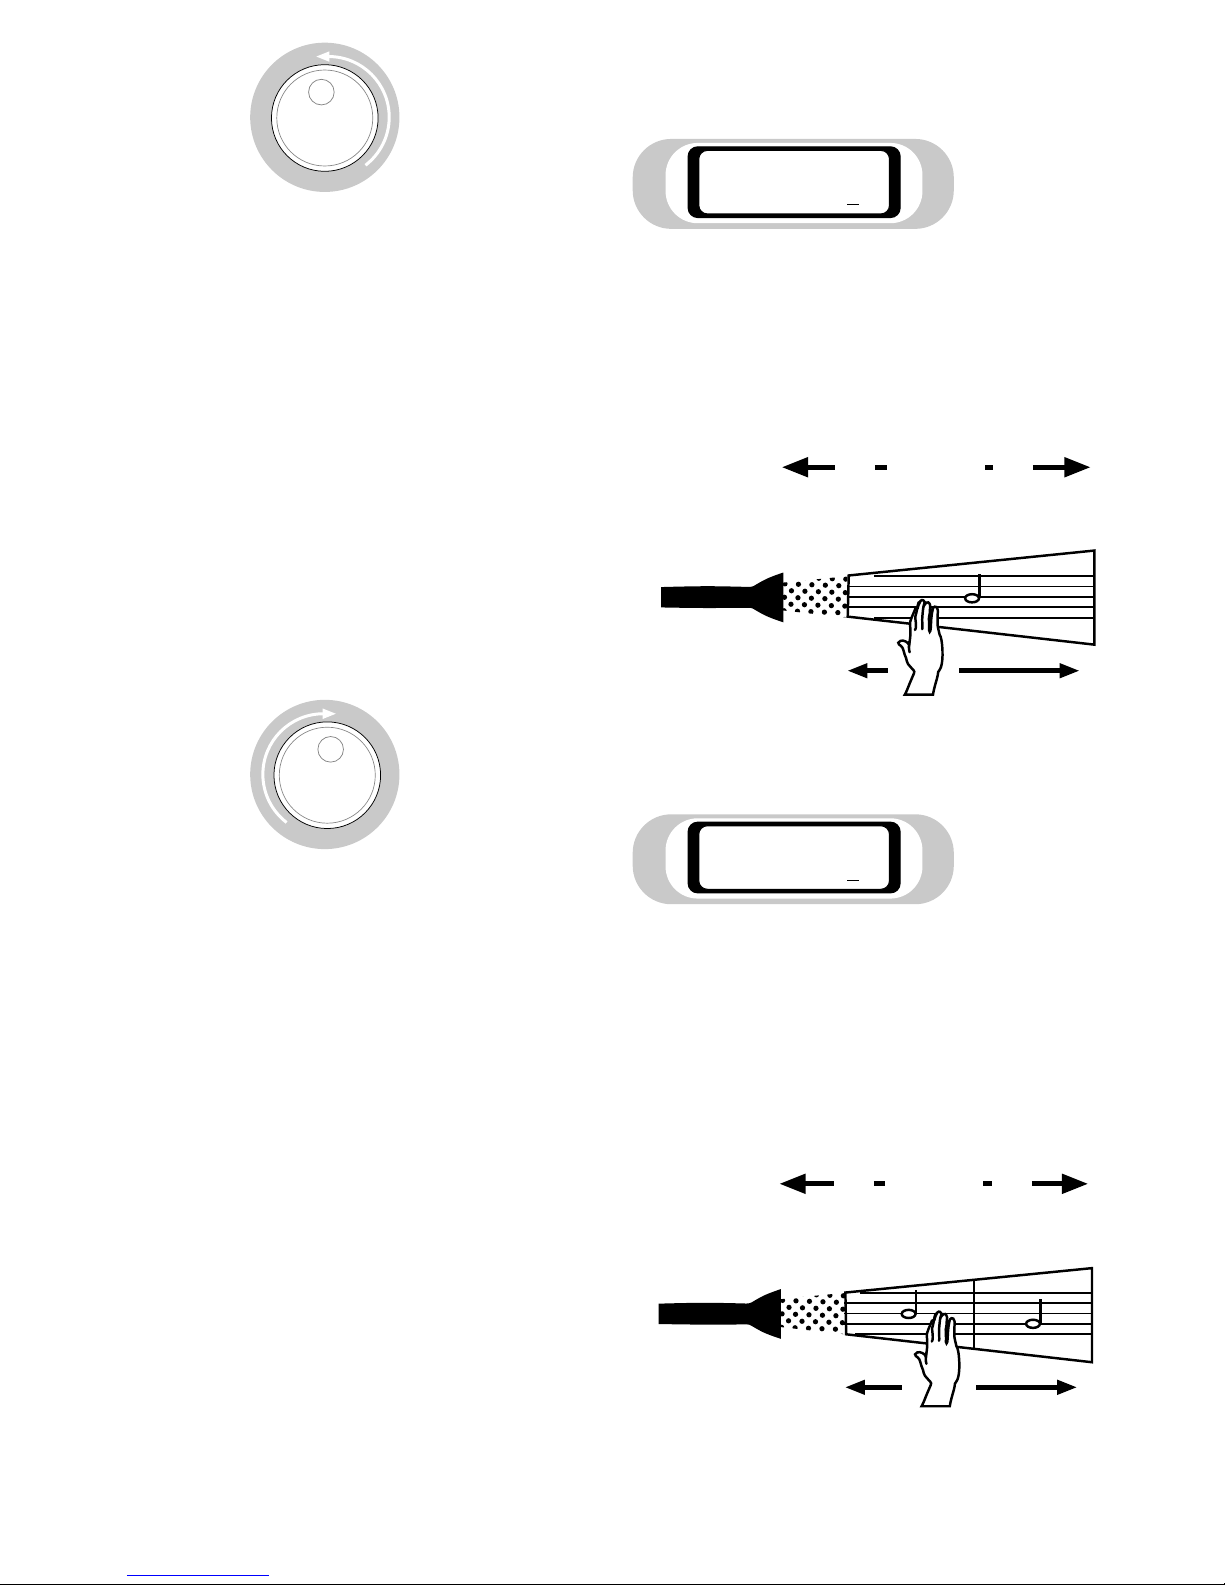
Now, turn the Rotary Control Wheel anti-clockwise until the number
of Divisions of the Beam is reduced to 1.
The screen will show
This time, moving your arm along the Beam - or interrupting it at any
place along it - will produce the same note.
Next, turn the Rotary Control Wheel clockwise to 02
The screen will show
This time, moving your arm along the Beam, or interrupting it either side of
halfway, will give you two different notes - one for each half of the length of
the Beam.
Divisions for:
Beam 1: 02
Divisions for:
Beam 1: 01
1 Division
2 Divisions
Page 33
32
THE SOUNDBEAM®2 HANDBOOK • PART 1 • GETTING STARTED
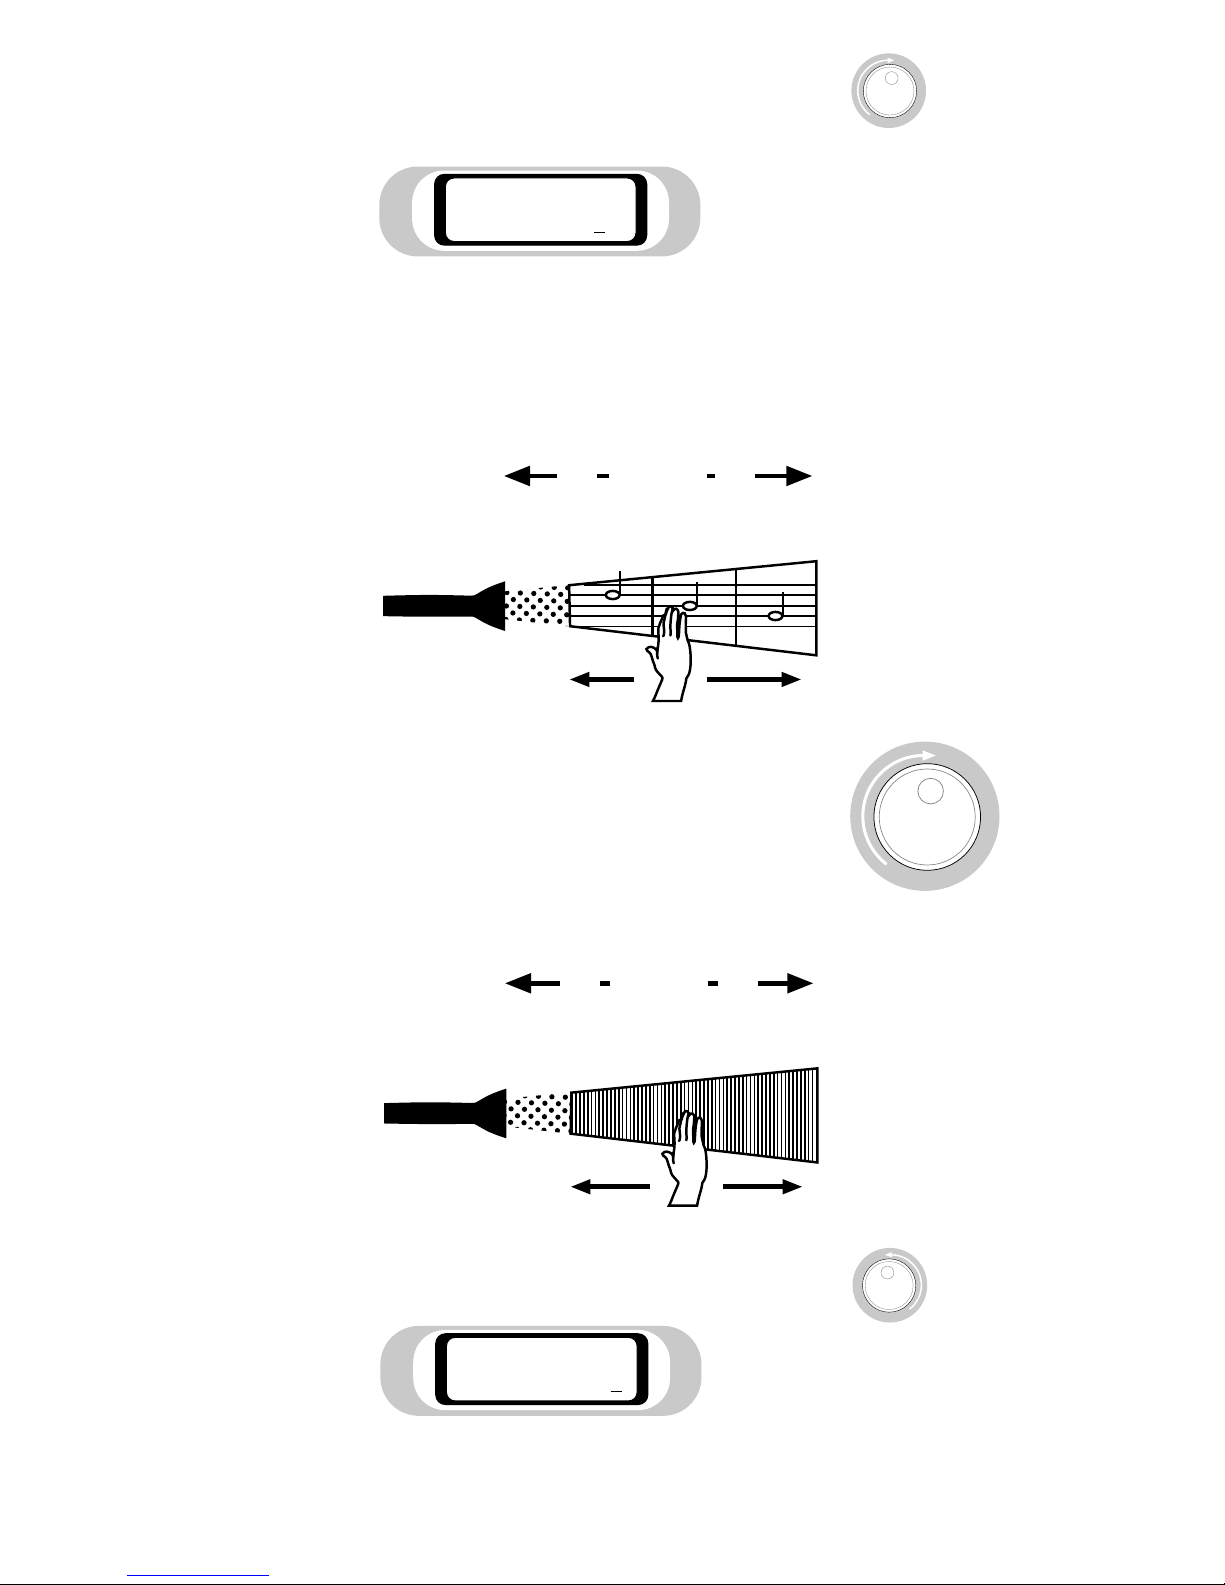
Once more,
turn the Rotary Control Wheel clockwise, this time on to 03
The screen will show
This time, moving your arm along the Beam will give you three
different notes - one for each third of the Beam’s length.
Next, use the Rotary Control Wheel to select successively 4, 5, 6, 7 and
so on - any number up to 64 Divisions. You will find your interruptions of
the Beam producing sequences of more and more audible notes of different
pitches within the same length of Beam (or Range).
Now,
turn the Rotary Control Wheel anti-clockwise back to 16.
Divisions for:
Beam 1: 03
1m
Divisions for:
Beam 1: 16
1m
3 Divisions
64 Divisions
Page 34
SET-UP SENSOR
PITCH
SEQUENCE
RANGE
DIVISIONS
TRIGGER MODE
TRANSPOSE
MIDI UTILITIES
ENTER
SAVE
EXIT
>>
<<
THE SOUNDBEAM®2 HANDBOOK • PART 1 • GETTING STARTED
33
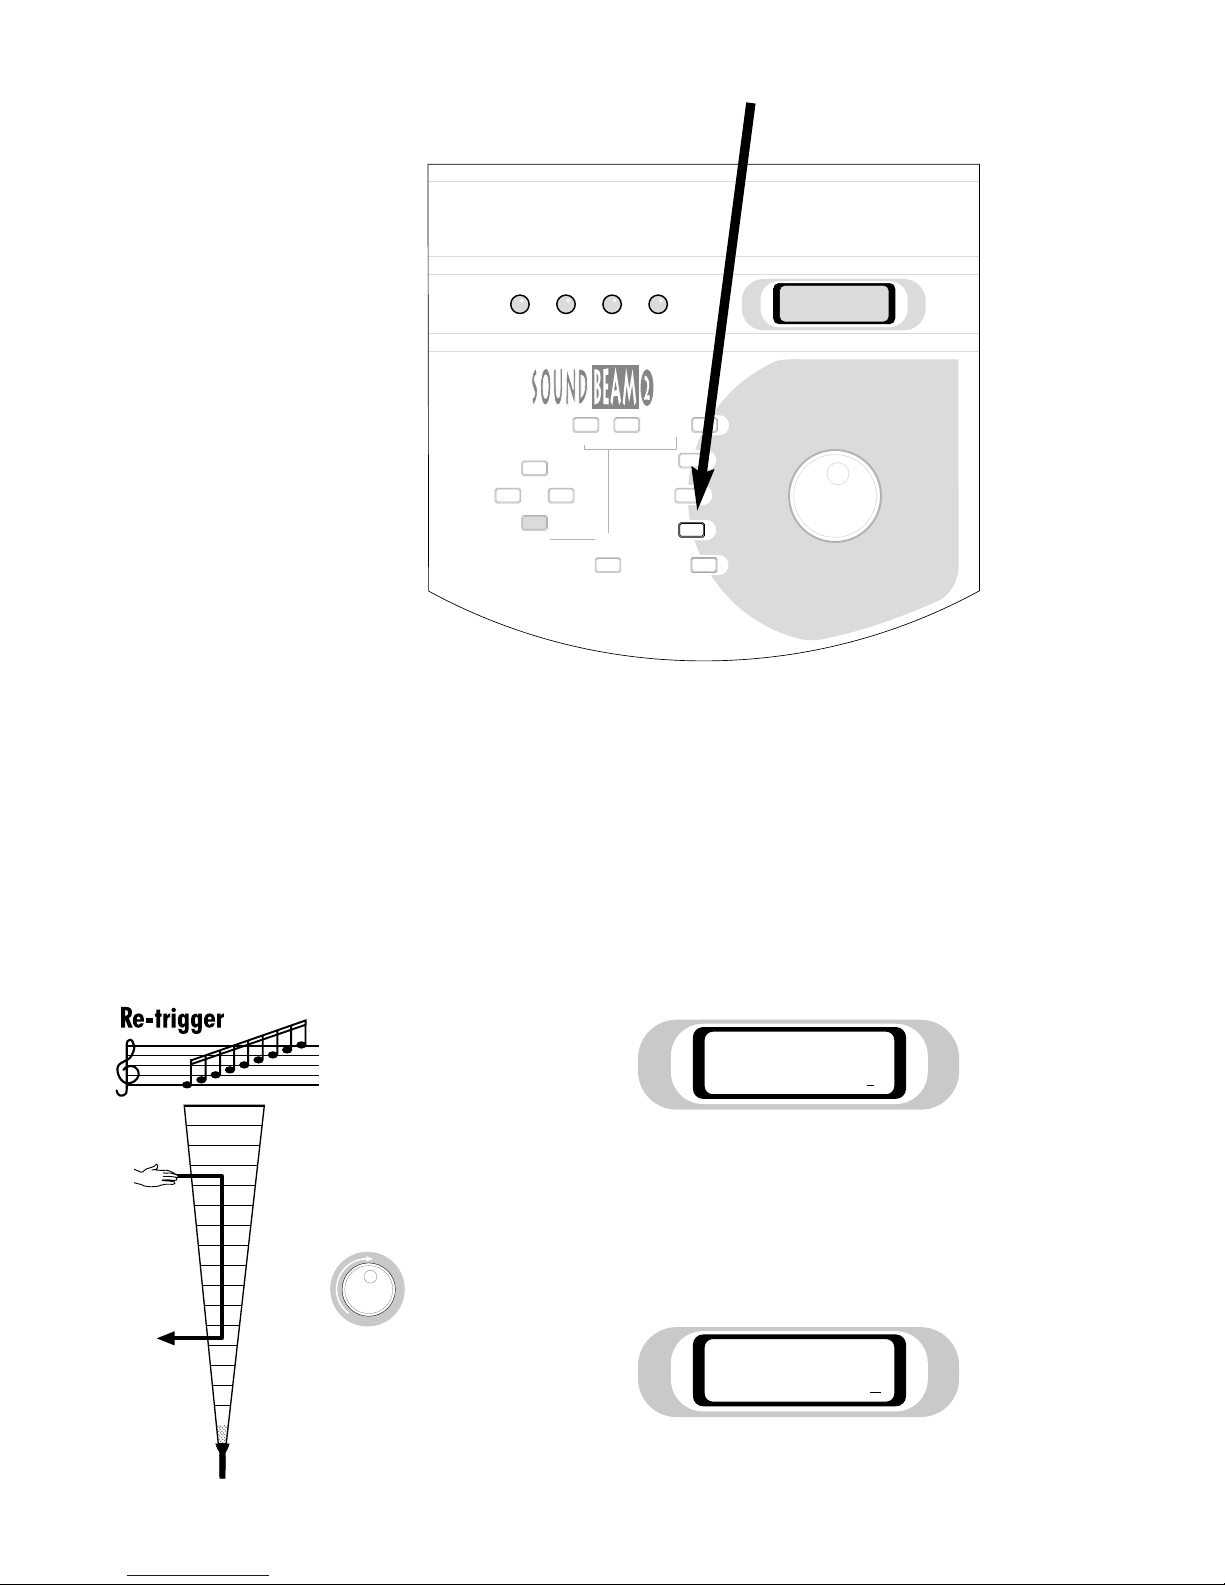
Turn to the
Trigger Mode Key
The Trigger Modes are the different ways of starting and stopping the
notes sounded by interruptions of the Beam. You will find a full
description of the effects of the various articulations listed below in
Handbook Part 3 “Explanations” 9. Trigger Modes pp. 85-90.
For the moment, listen to the effect - on the sounds produced by movements
of your hand in the Beam - of one or two different Trigger Modes.
Press the Trigger Mode Key, and the Display will show the default setting.
The screen will show
As you will have noticed already, with this Trigger Mode setting, a new note
is played every time your hand enters the Beam, or moves within the Beam
towards or away from the Sensor.
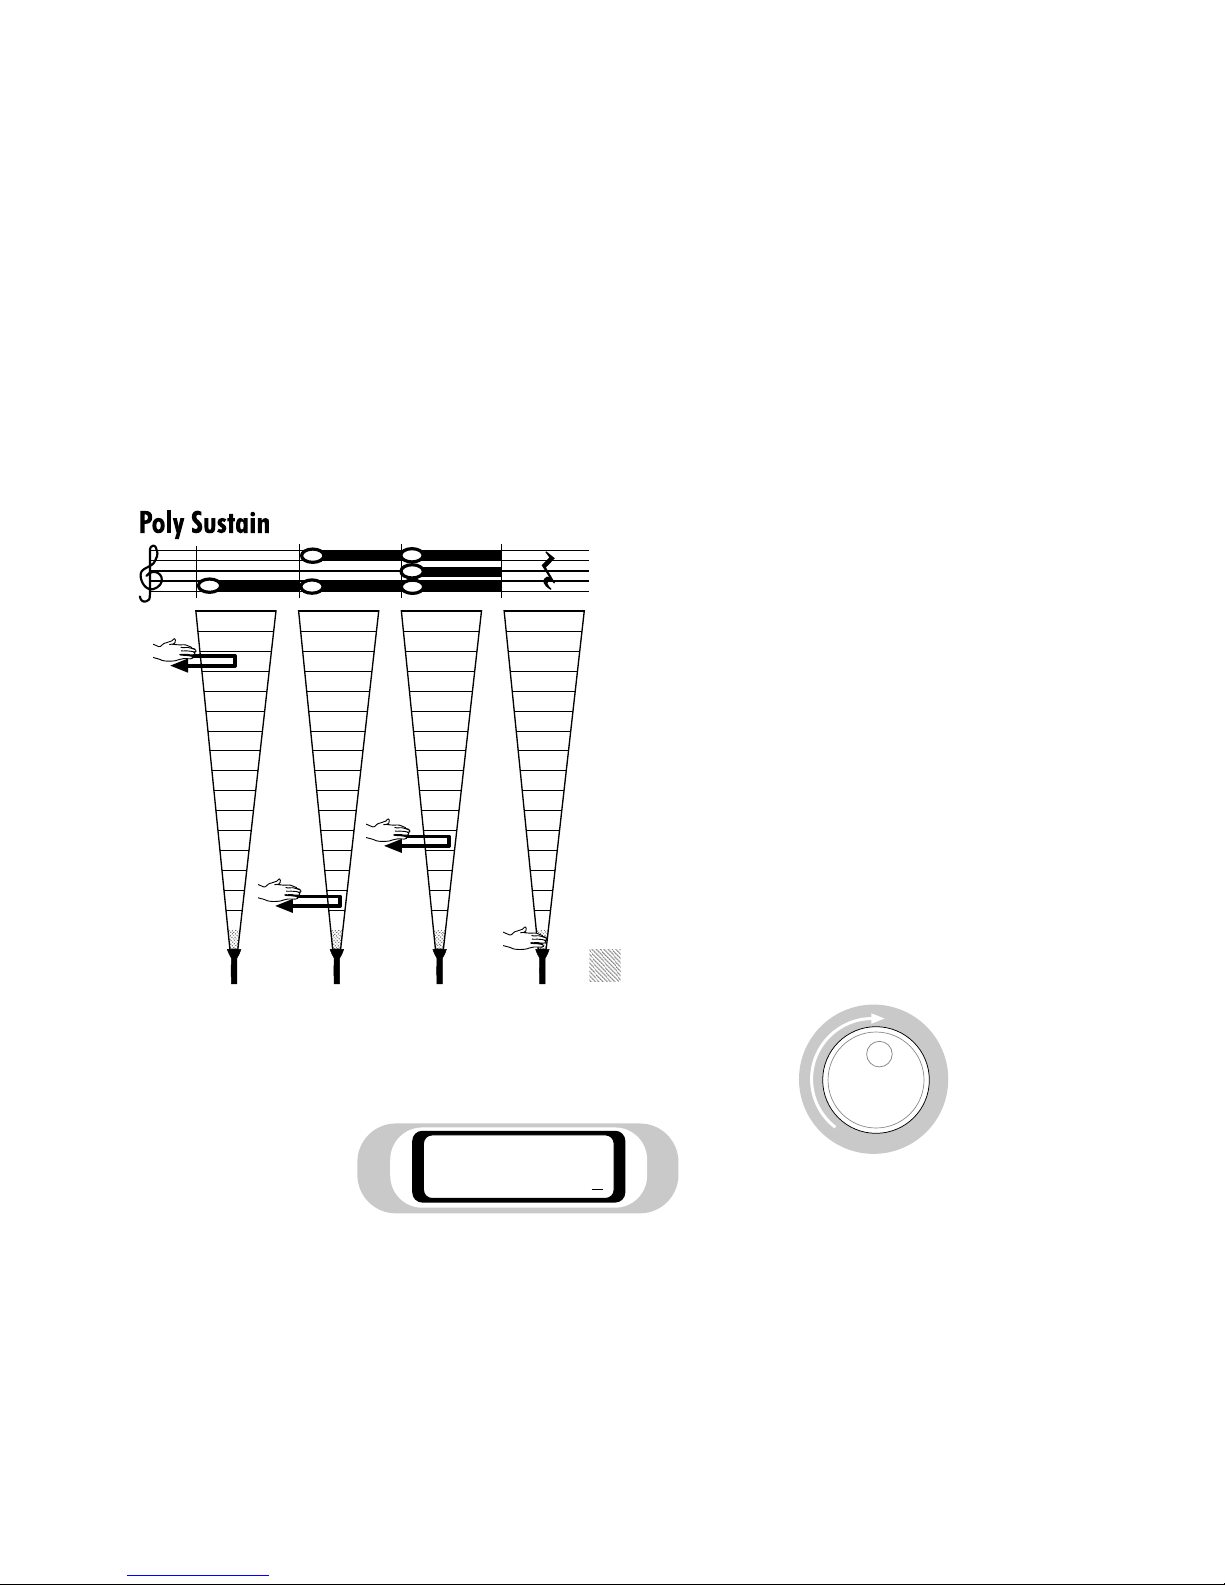
Now, turn the Rotary Control Wheel clockwise to select “Poly Sustain”
The screen will show
Trigger Beam 1
Re-Trigger
Trigger Beam 1
Poly Sustain
Page 35
Inactive Area
34
THE SOUNDBEAM®2 HANDBOOK • PART 1 • GETTING STARTED
In Poly Sustain Mode - if you are using sounds which can be sustained
indefinitely (e.g. organ, choir, bowed strings, wind instruments) - each time you
make a fresh interruption of the Beam, a new note will be sounded and
sustained, even when the interruption ceases.
Each new interruption adds a note to a growing chord or cluster of notes, which
will continue to sound until you silence it by passing your hand through the
Inactive Area of the Beam, close to the Sensor.
Note, however, that - unlike Re-Trigger - if, after interrupting the Beam, you
move your hand towards or away from the Sensor, no new notes will be sounded
until you remove your hand from the Beam, and then re-enter it again.
Try moving your hand in the Beam at various distances from the Sensor.
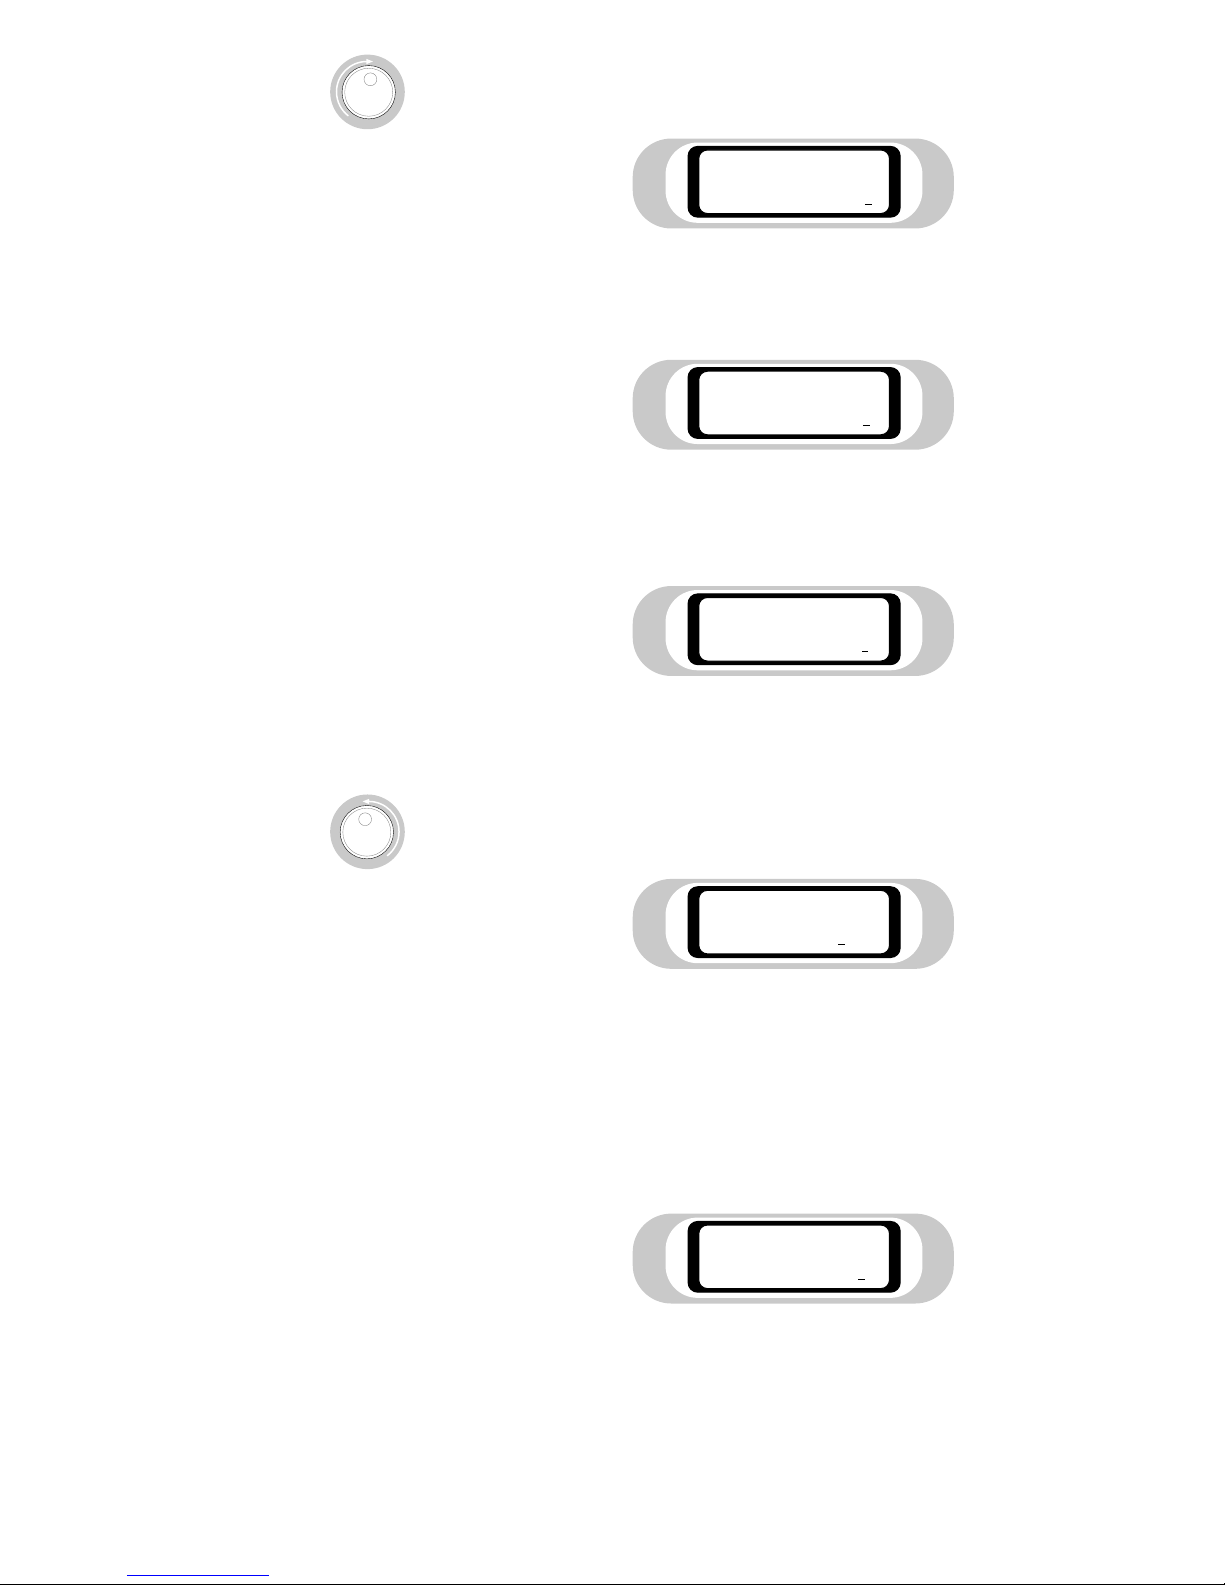
Next, turn the Rotary Control Wheel clockwise again
to select “Re-trig Sustain”
The screen will show
This has the same effect as Re-Trigger - as you move your hand in the Beam
towards and away from the Sensor, again you articulate a series of notes, but
this time all the notes you trigger go on sounding until you pass your hand
through the inactive area close to the Sensor - or switch to the next
Trigger Mode.
Trigger Beam 1
Re-trig Sustain
Page 36
THE SOUNDBEAM®2 HANDBOOK • PART 1 • GETTING STARTED
35
Trigger Beam 1
Gated SingleShot
Trigger Beam 1
Gated Re-Trigger
Trigger Beam 1
Trigger Off
Trigger Beam 1
Single Shot
Trigger Beam 1
Re-Trigger
try the other Trigger Modes by turning the Rotary Control Wheel
clockwise again
The screen will show
Separate interruptions of the Beam will trigger notes which are sustained (if no
other notes are triggered) for a variable length of time, set by the user.
Same as Re-Trigger (p.33), except that the last note triggered is sustained for a
variable specific time, set by the user.
Here, interruptions of the Beam don’t produce notes. The Beam is ‘muted’, and
although the Sensor continues to operate, information derived from interruptions
of the Beam is ignored.
Now, turn the Rotary Control Wheel anti-clockwise as far as it
will go to
Only separate interruptions of the Beam trigger notes.
and finally, with one last clockwise turn, back to
Page 37
SET-UP SENSOR
PITCH
SEQUENCE
RANGE
DIVISIONS
TRIGGER MODE
TRANSPOSE
MIDI UTILITIES
ENTER
SAVE
EXIT
>>
<<
36
THE SOUNDBEAM®2 HANDBOOK • PART 1 • GETTING STARTED
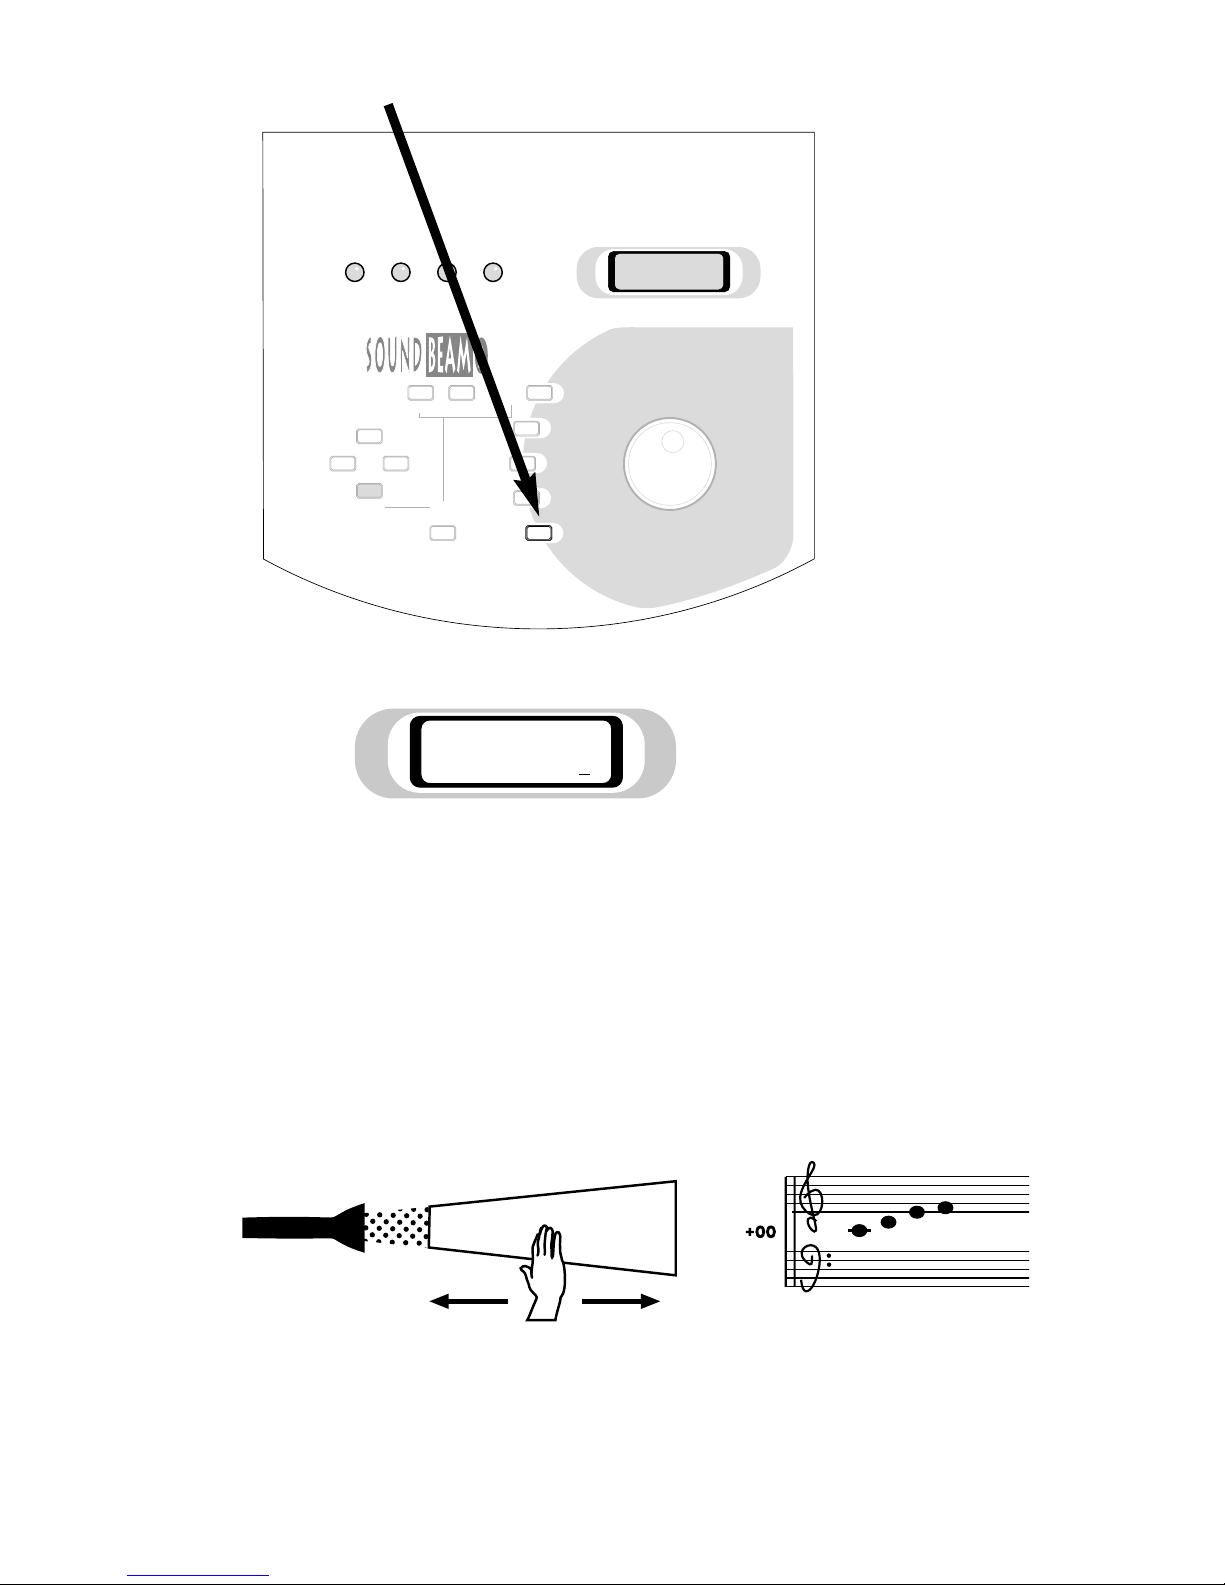
Now press
Transpose Key
The screen will show
This enables the whole Pitch Sequence - the sequence of notes which is
heard when you move your hand backwards and forwards to and from
the Sensor - to be shifted up (+) or down (
-
) by the number of semitones
you set with the Rotary Control Wheel.
To try this out, move your hand backwards and forwards in the Beam
(towards and away from the Sensor).
Transpose for
Beam 1 +00
Page 38
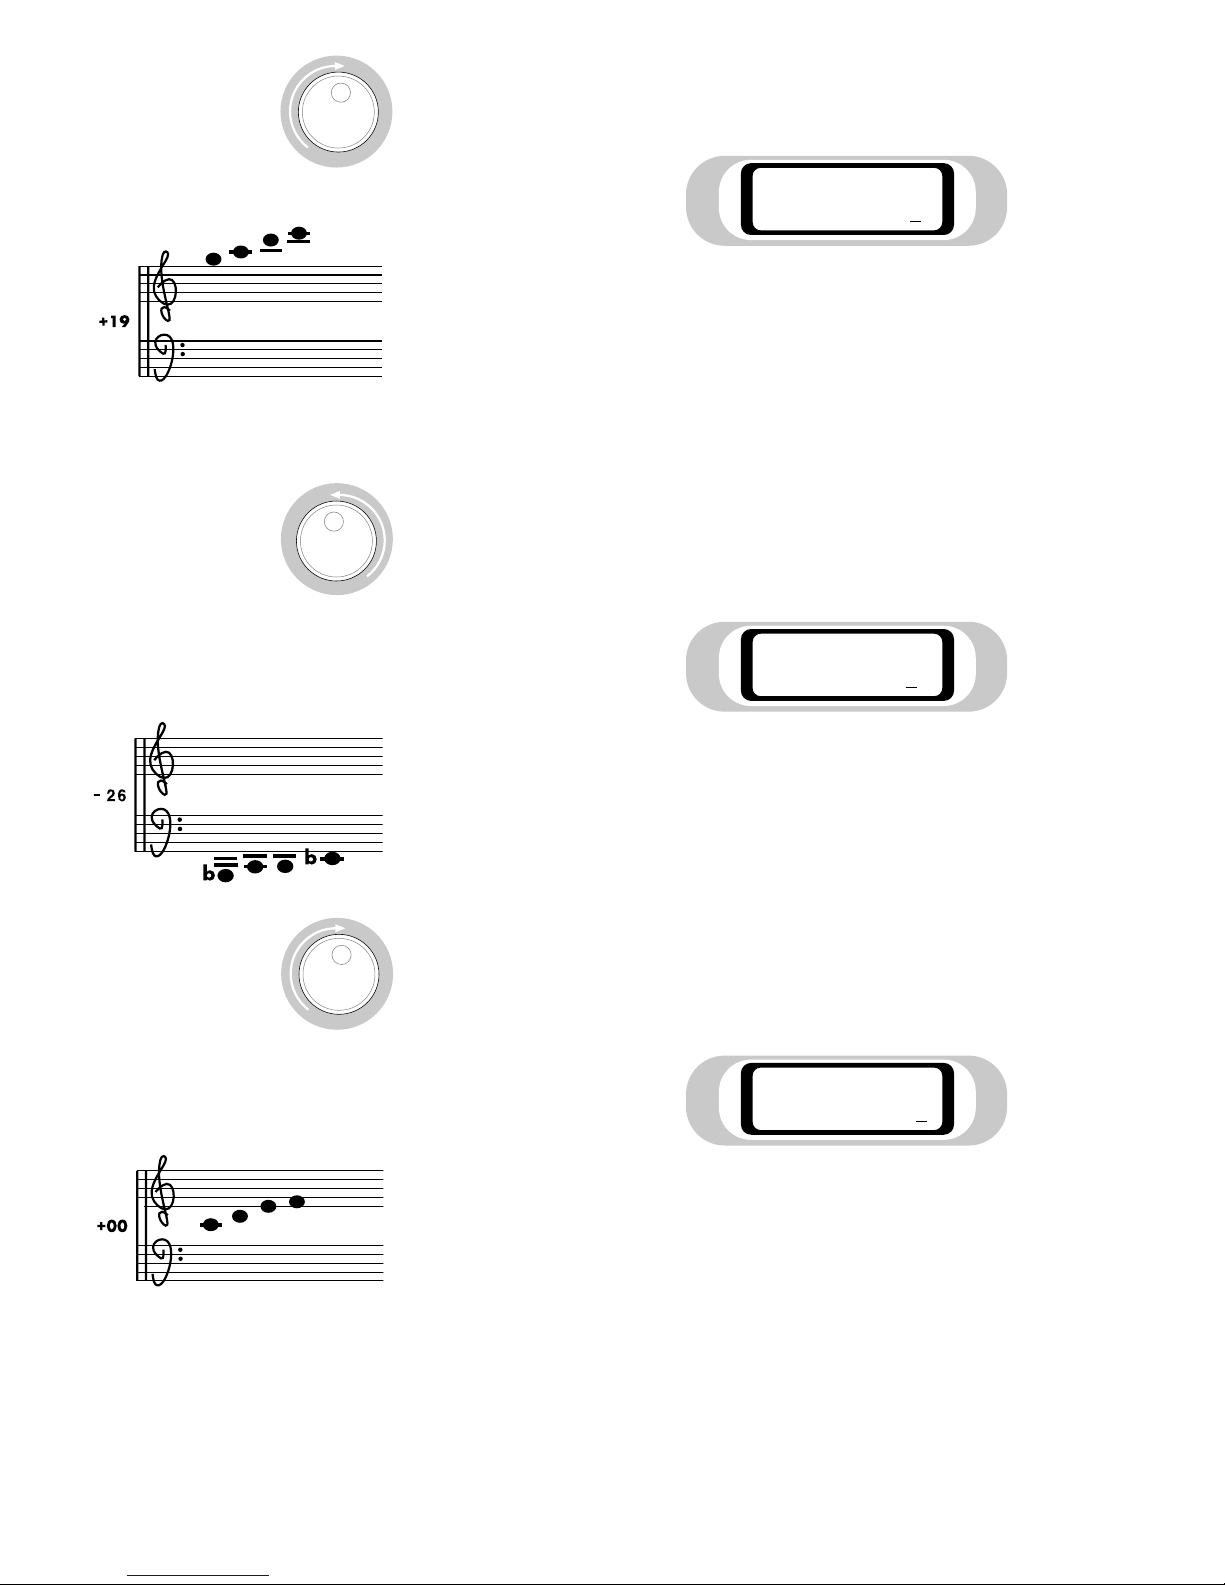
THE SOUNDBEAM®2 HANDBOOK • PART 1 • GETTING STARTED
37
Turn the Rotary Control Wheel clockwise to change the
Transpose setting - first to “+19”.
The screen will show
and you will hear the notes of the Pitch
Sequence shifted an octave and a fifth above the
original pitch.
Next turn the Rotary Control Wheel anti-clockwise again to change the
Transpose setting to “
-
26”.
The screen will show
and the whole Pitch Sequence will sound
2 octaves and a tone below the original pitch.
Finally, turn the Rotary Control Wheel clockwise once more to return
the Transpose setting to “+00”.
The screen will show
and the whole Pitch Sequence will sound
once more at the original pitch.
Transpose for
Beam 1 +00
Transpose for
Beam 1 +19
Transpose for
Beam 1
-
26
Page 39
SET-UP SENSOR
PITCH
SEQUENCE
RANGE
DIVISIONS
TRIGGER MODE
TRANSPOSE
MIDI UTILITIES
ENTER
SAVE
EXIT
>>
<<
38
THE SOUNDBEAM®2 HANDBOOK • PART 1 • GETTING STARTED
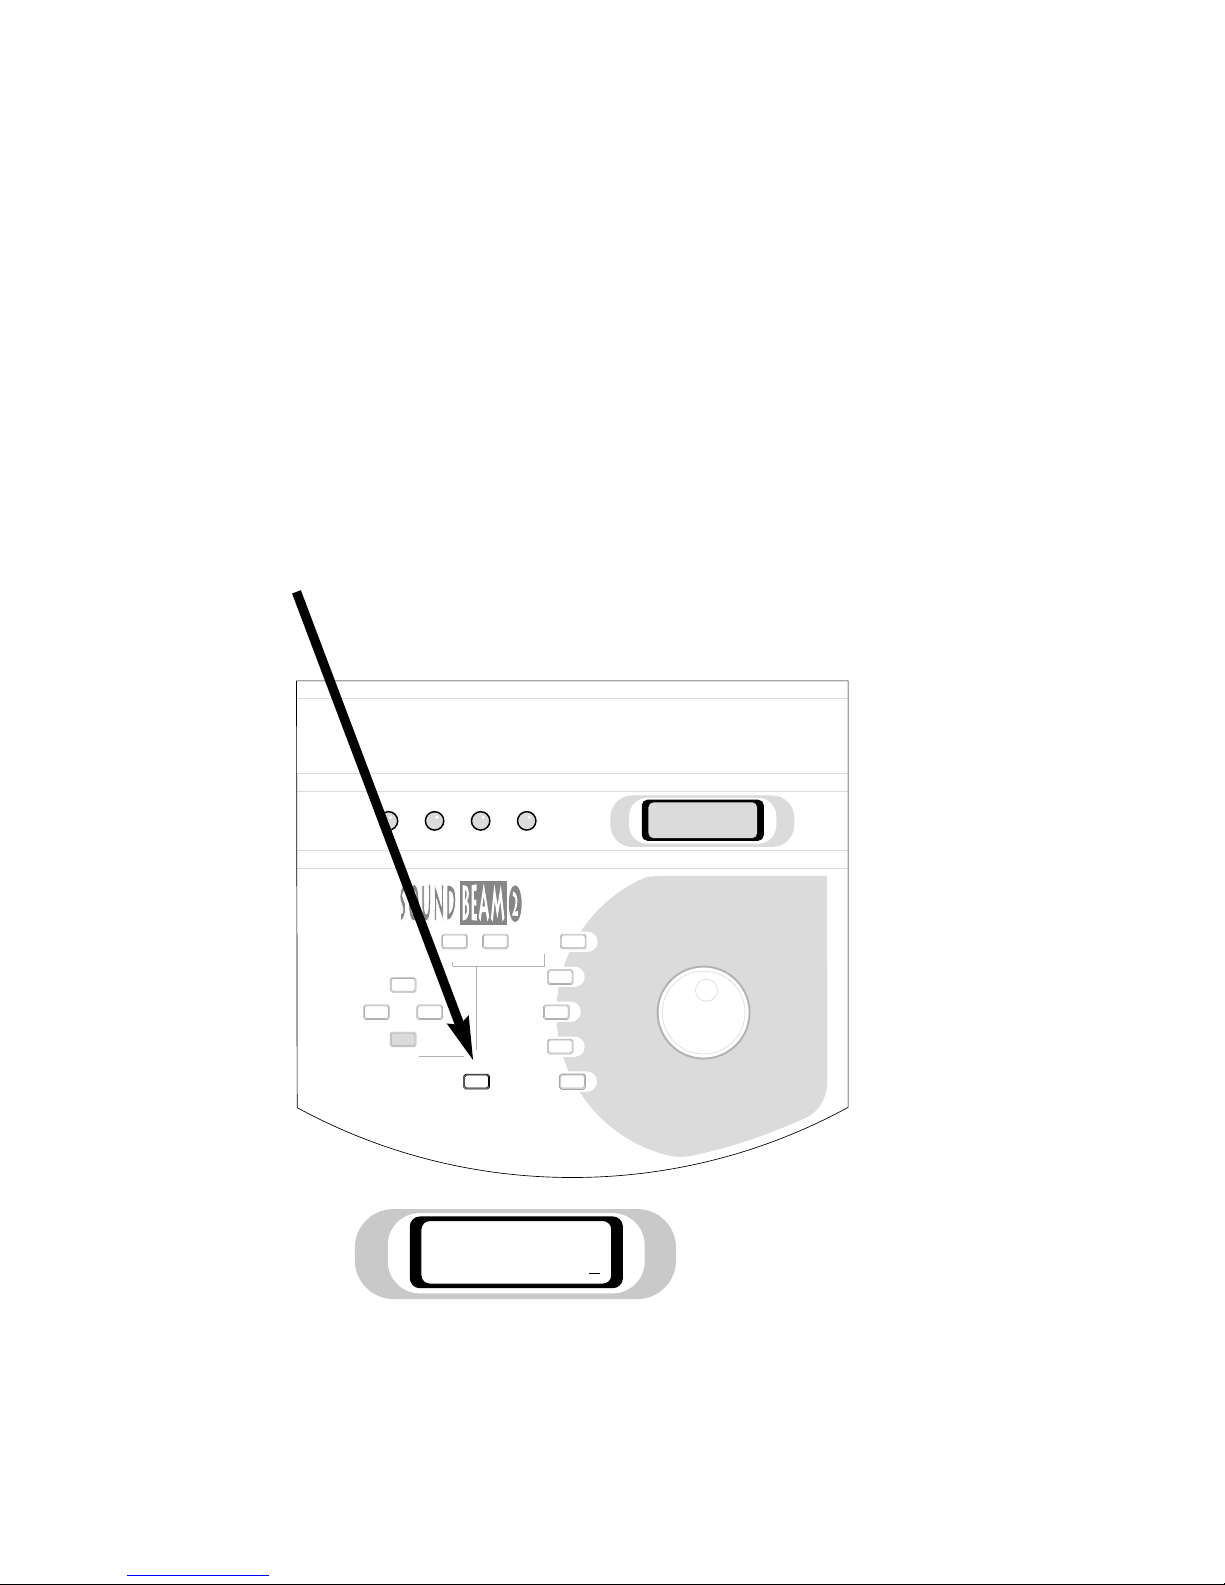
MIDI Utilities Key
This key is used to access settings for a number of different Soundbeam 2
possibilities - most of them to do with assigning sources and destinations for
MIDI messages and instructions. For the moment you can disregard them.
They are fully explained in the Handbook Part 3 “Explanations”
11. MIDI pp. 95-105.
However, you might like to try just one of these
MIDI Utilities, since you can use it to explore
the various sounds stored in your MIDI musical
instrument, and which you could select to use in
your own music-making.
Press the MIDI Utilities Key
The screen will show
MIDI Program Nos. denote the various sounds - or timbres - available in your
MIDI musical instrument.
Sensor Beam 1
MIDI Program 092
Page 40
THE SOUNDBEAM®2 HANDBOOK • PART 1 • GETTING STARTED
39
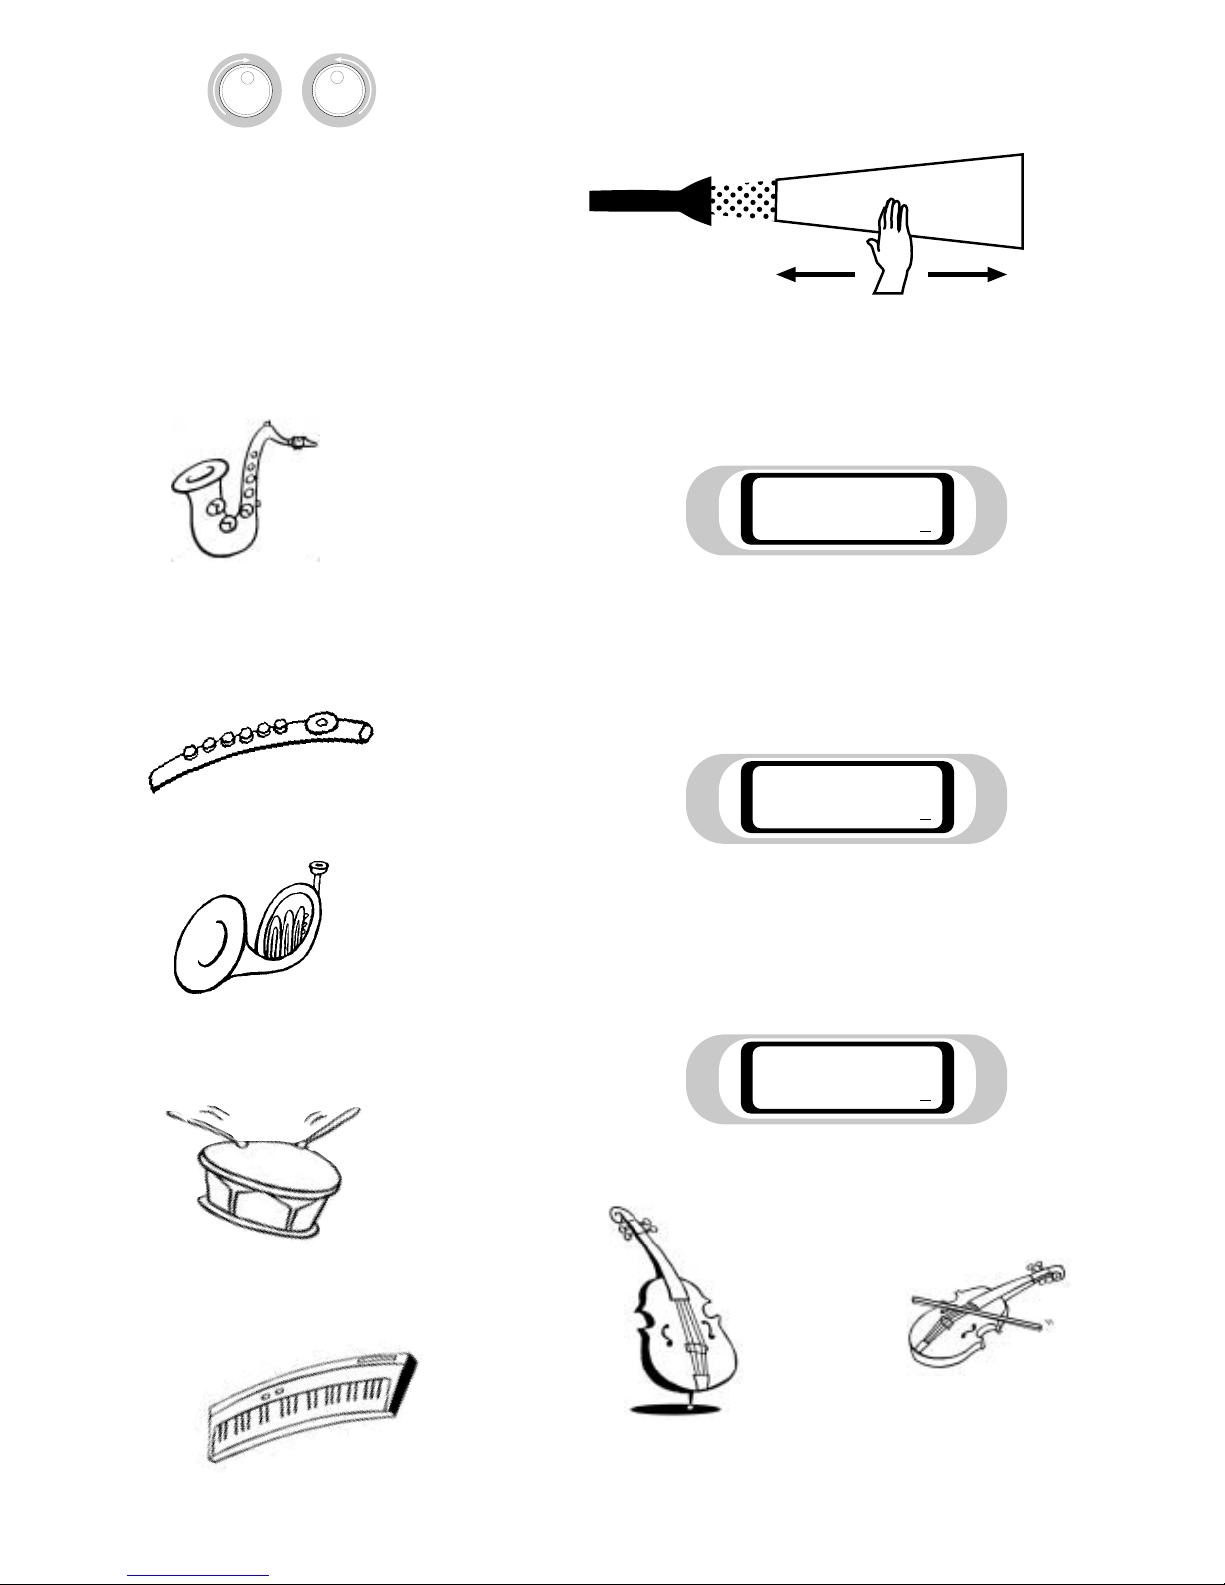
Next, use the Rotary Control Wheel to scroll through the changing sounds
from “001” to “128” and back to “092” - using your other hand (or your
head or foot) in the Beam to hear them.
As you scroll through, the screen will show the MIDI Program Nos.
denoting the sounds you will hear in turn
to
and finally, once more
Sensor Beam 1
MIDI Program 001
Sensor Beam 1
MIDI Program 128
Sensor Beam 1
MIDI Program 092
Page 41
40
THE SOUNDBEAM®2 HANDBOOK • PART 1 • GETTING STARTED
All the settings we have looked at so far - Pitch Sequence, Range,
Divisions, Trigger Mode, Transpose, MIDI Utilities - have been
those assigned to Beam 1, the first of the 12 possible Sensors (4
ultra-sonic Beams and 8 Switches) available in the default Set-up
001
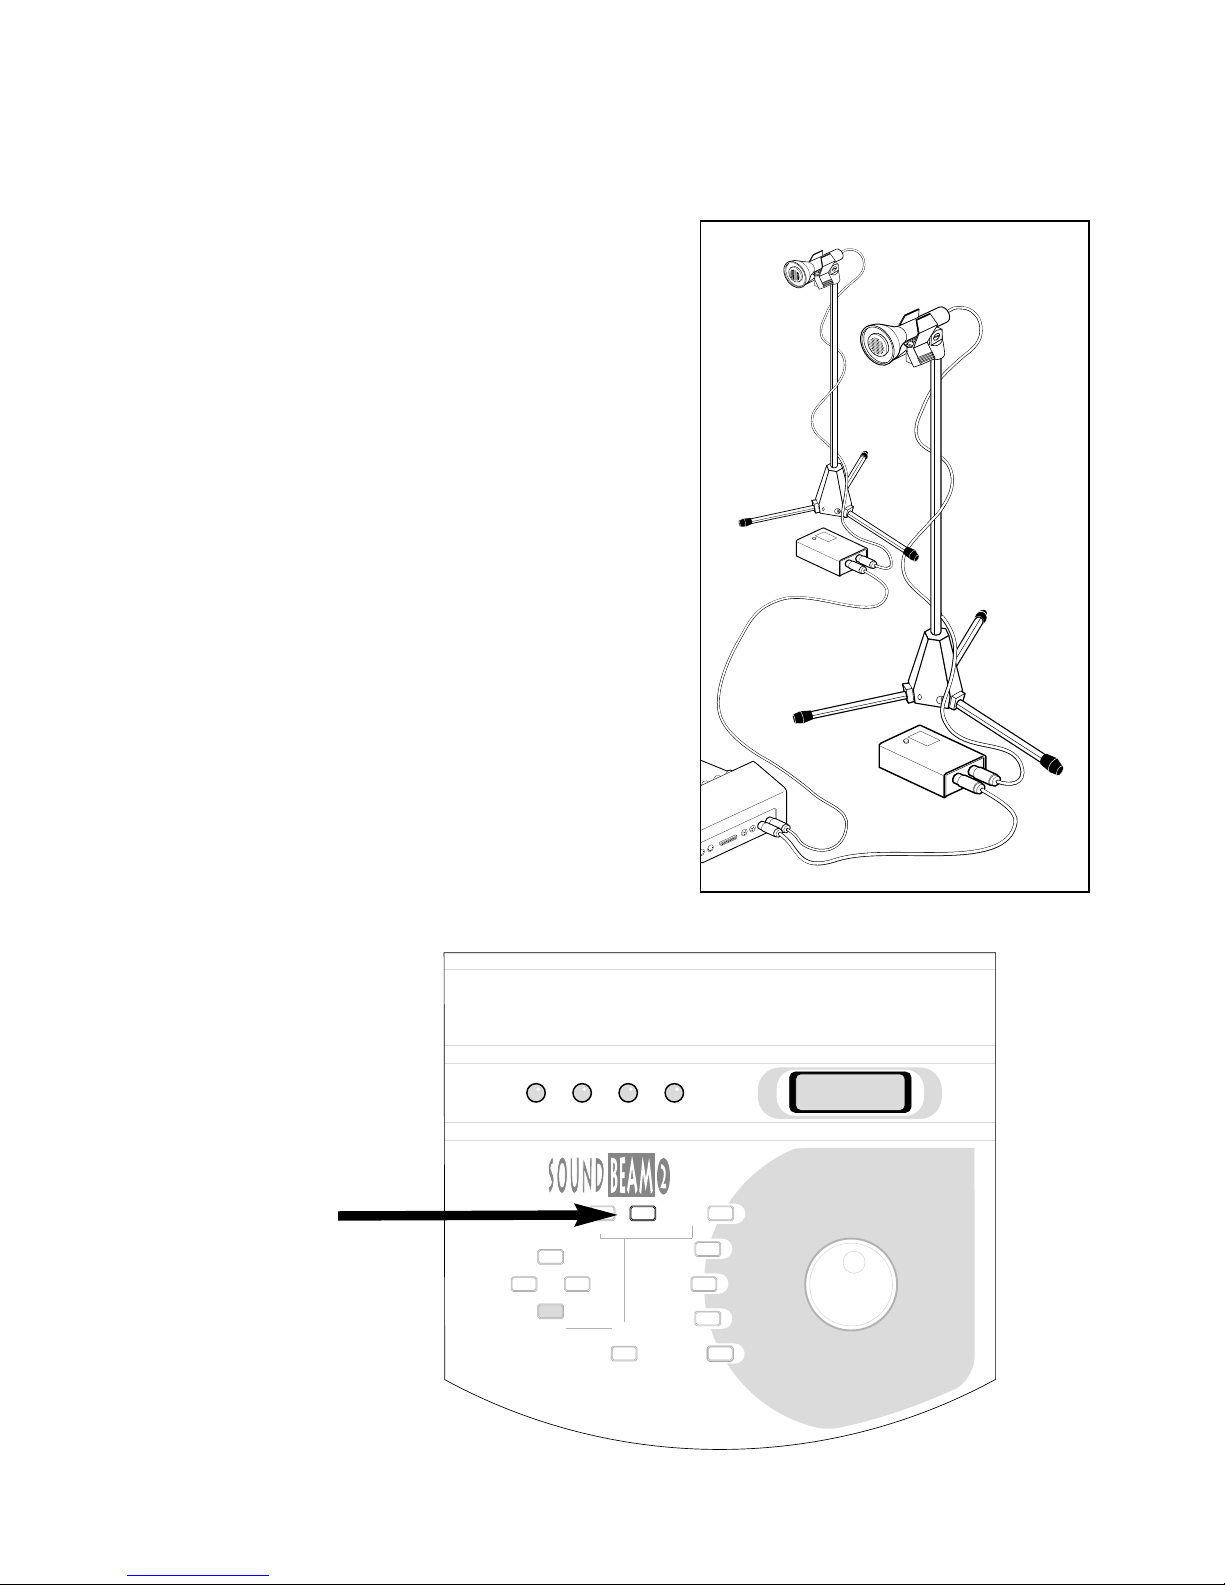
However, before we look at the Sensor Key, now is the
time - if, you have ordered a Soundbeam Kit B with 2
ultra-sonic Sensors - to connect your second Sensor to
your second Sensor Driver, and then connect that to
the Sensor 2 input on the back panel of your
Soundbeam Controller. Use the labelled leads supplied
in exactly the same manner as described in the first
section of Part 1 “Opening the Box” Making the
Connections pp. 11-14 (above).
NB. The single MIDI Lead A connecting the MIDI
output of your Soundbeam Controller to your MIDI
musical instrument will carry ALL the MIDI messages
from all 4 Beams and 8 Switches.
Interference
If you are using 2 or more Beams, you will find
that directing them towards each other - or even
inadvertently allowing the widening edges of two
parallel Beams to overlap - will generate some
interesting (but usually unwelcome) interference
patterns. You might find them worth trying - and
they’re easy to avoid
Now press
Sensor Key
SET-UP SENSOR
PITCH
SEQUENCE
RANGE
DIVISIONS
TRIGGER MODE
TRANSPOSE
MIDI UTILITIES
ENTER
SAVE
EXIT
>>
<<
Page 42
THE SOUNDBEAM®2 HANDBOOK • PART 1 • GETTING STARTED
41
and the screen will show
This means that any changes you make to settings
accessed via other Keys - Range, Division, Trigger Mode,
Transpose, Pitch Sequence or MIDI Utilities - will affect
only the settings applied to information derived from Beam 1.
Turn the Rotary Control Wheel clockwise
to
Next, using the Keys and the Rotary Control Wheel, try out
the default settings for Pitch Sequence, Range, Divisions,
Trigger Mode, Transpose and MIDI Utilities assigned to
interpreting your movements in Beam 2. They will nearly all
be different from the settings you experienced as you followed
‘A Lightning Tour of the Controls’ using Beam 1 and the
settings assigned to it.
Of course, if you only have one Sensor and no switches, there
will be no response to any Sensor other than Beam 1. However, you could
still try out the settings for Beam 2 by unplugging the Sensor/Driver
connections to Sensor Input 1 and re-connecting it to Sensor Input 2.
Then turn the Rotary Control Wheel clockwise
to scroll on through
and
Select Sensor:
Beam 2
Select Sensor:
Beam 3
Select Sensor:
Beam 4
Select Sensor:
Beam 1
Page 43
42
THE SOUNDBEAM®2 HANDBOOK • PART 1 • GETTING STARTED
Select Sensor:
Beam 1
to
and on through to
Finally - one more step clockwise back to where we started at
All the settings that you have used so far in this ‘A Lightning Tour of the
Controls’ - Sensor, Pitch Sequence, Range, Divisions, Trigger Mode,
Transpose and MIDI Utilities - have been assigned, by the currently
selected Sensor number, to the control of one of two channels of
information derived from interruptions of Beam 1 or Beam 2
in Set-up 001.
In addition, there are a further 10 channels of information - 2 more
Beams and, via the Switchbox, 8 Switches - all offering the same range
of control setting possibilities (except for Range in the case of Switches)
as those for Beams 1 and 2 we have been exploring.
Complete collections of all the settings available for each of the
4 Beams and 8 Switches can be saved as a Set-up. There are a total
of 128 possible Set-ups. 30 of these are preset in the factory, and ‘Locked’ so
that any subsequent changes you make to the settings are lost when another
Set-up is selected, or when Soundbeam is switched off - and are replaced
once more by the original factory preset settings.
You are currently using the Locked Set-up No. 001 - “Echoes”.
Select Sensor:
Switch 8
Select Sensor:
Switch 2
Select Sensor:
Switch 1
Page 44
THE SOUNDBEAM®2 HANDBOOK • PART 1 • GETTING STARTED
43
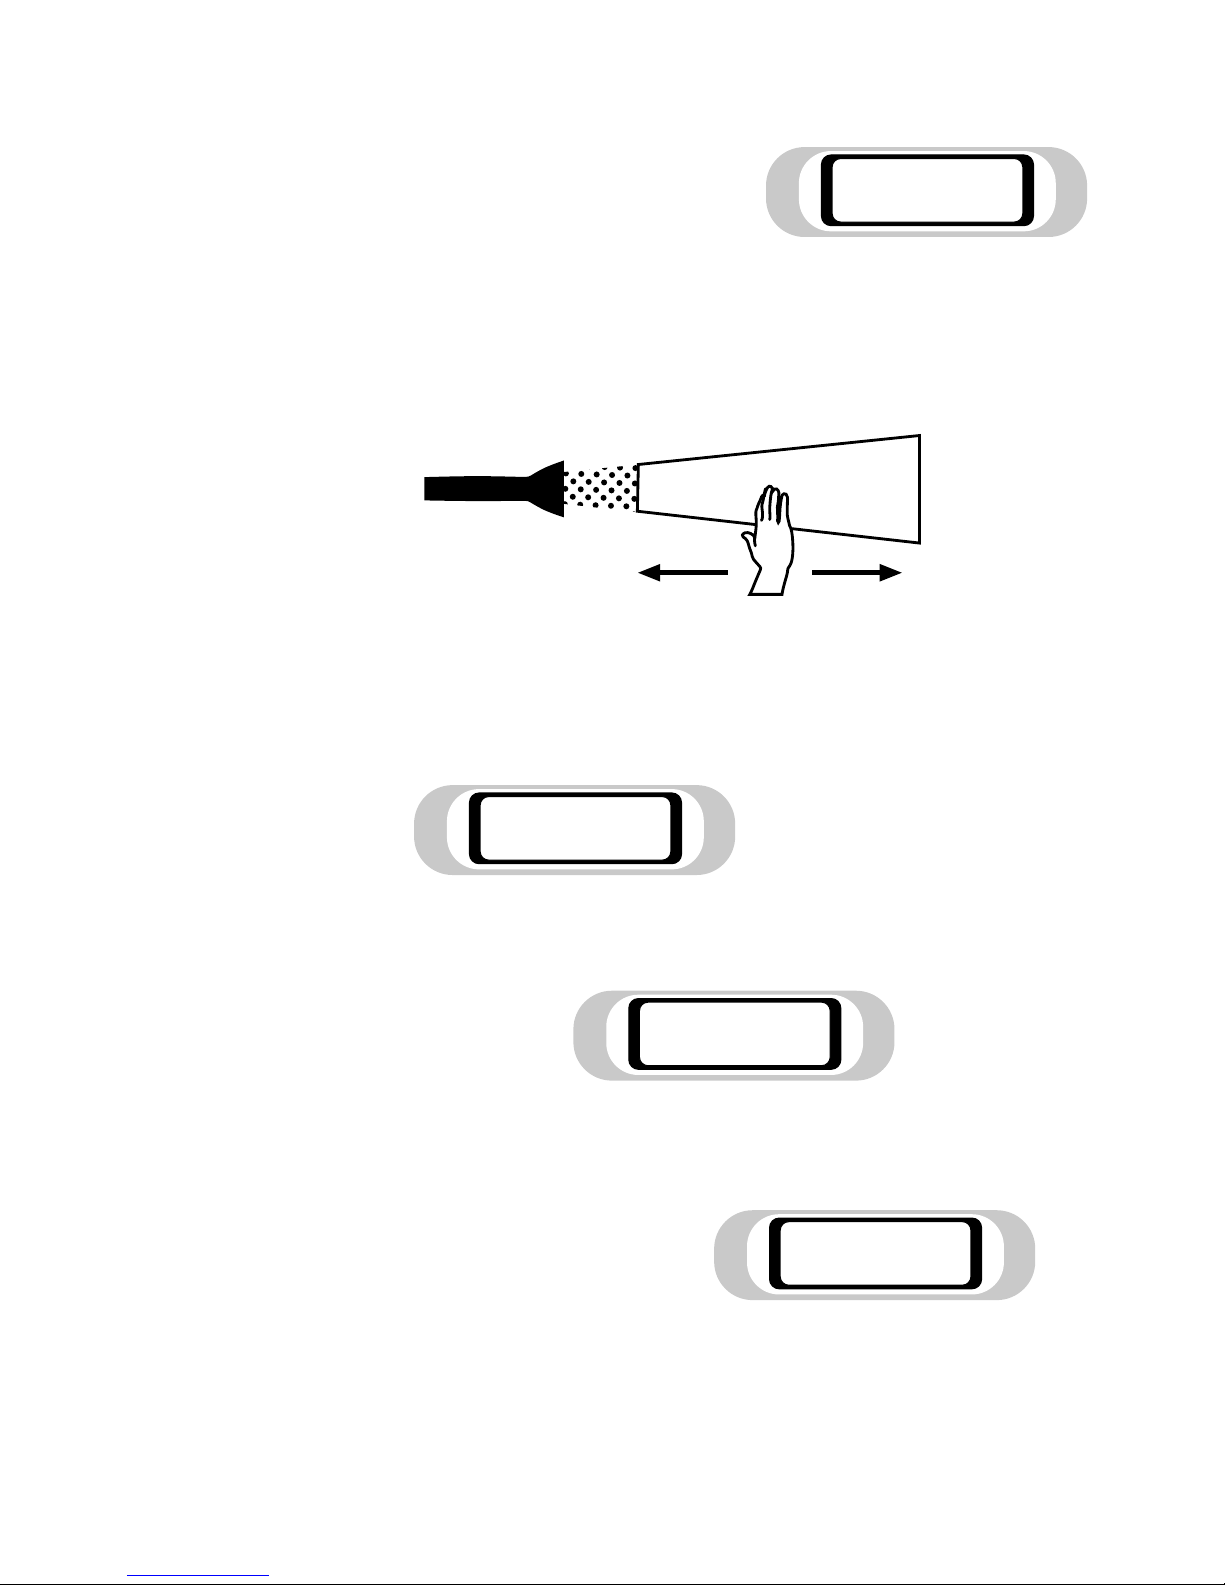
So now, press
Set-up Key
The screen will show
NB. The letter M after the Set-up number 001 shows that some of the default
settings of the Set-up have been Modified - but not Saved (which, in any case,
is not possible for Locked Set-ups). If none of the settings of Set-up 001 had
been changed, the Set-up number would have been followed by a P for Preset
SET-UP SENSOR
PITCH
SEQUENCE
RANGE
DIVISIONS
TRIGGER MODE
TRANSPOSE
MIDI UTILITIES
ENTER
SAVE
EXIT
>>
<<
Slct Set-up: 001
M
Echoes
Page 45

44
THE SOUNDBEAM®2 HANDBOOK • PART 1 • GETTING STARTED
Locked Set-ups
The first 30 of the 128 Set-ups available in Soundbeam 2 - Nos 001 to 030
- are pre-set in the factory, and Locked to protect them from being altered by
mistake - though they can be altered if you really want to. (See Handbook
Part 3 “Explanations” 5 Set-ups pp. 45-50 for how to do it.) We have
tried to design these Set-ups to offer a wide range of possibilities - music
making pure and simple, dance, special and mainstream education for both
classroom and one-to-one teaching, as well as sound and music therapy.
So, while you can make changes during your Soundbeam session to any of
the default settings of these 30 Locked Set-ups, they can’t be Saved; and if
you select another Set-up, and then return to the current one - or, later,
when you power-up Soundbeam again after switching off - all the original
default settings will be back in operation again.
However, you can copy your altered settings to a User Set-up (see
Handbook Part 2 “Step by Step” 1.3. To Copy the Modified Settings
of a Locked Set-up to a User Set-up pp. 11-13)
User-defined Set-ups
All the default parameter settings assigned to Beams 1 - 4 and Switches
1 - 8 in each of the remaining 98 User Set-ups - Nos. 31 - 128 - can be
re-defined by the user and Saved. They will re-appear in the new form when
you return to them after a change of Set-up - or when Soundbeam is
powered up again after being switched off.
Try using the Rotary Control Wheel to select another Set-up,
say No. 015 “Cine Dream” -
The screen will show
NB. When you scroll through the various Set-up names using the
Rotary Control Wheel, although the screen will show the name
and numbers of a Set-up, the new Set-up (and its settings)
won’t actually be activated untill Enter is pressed.
Selct Set-up: 015
Cine Dream
Page 46
Now press the Enter Key
The screen will show
Try some movements - in both Beams if you have two - to find
out what this set-up offers -
then
- press Set-up again, and use the Rotary Control Wheel -
followed by Enter - to try another one
and another
and another
THE SOUNDBEAM®2 HANDBOOK • PART 1 • GETTING STARTED
45
Set-up: 015P
Cine Dream
Set-up: 026P
Mystery
Set-up: 021P
Arabian Nights
Set-up: 012P
Gremlins
Page 47

46
THE SOUNDBEAM®2 HANDBOOK • PART 1 • GETTING STARTED
To Summarise - A Few Simple Tips
i: If you want to change the sequence of notes generated by
your movements in the selected Beam or by your operation of the
selected Switch
press PITCH SEQUENCE and use the Rotary Control Wheel
to try out other possibilities.
ii: If you want to make the selected Beam longer or shorter,
press RANGE and use the Rotary Control Wheel
to set a longer or shorter RANGE.
iii: If you want to get more (or less) notes into whatever length (Range)
of the selected Beam you have chosen -
press DIVISIONS and use the Rotary Control Wheel
to increase (or decrease) the number of Divisions.
iv: If you want to change the articulation - the way the sounds start, stop
or overlap each other - to build up chords, for example,
press TRIGGER MODE key and use the Rotary Control Wheel
to change to “Poly Sustain”, perhaps, or to “Re-Trigger
Sustain”.
v: If you want to make the notes of your Pitch Sequence sound higher
(or lower)
press TRANSPOSE and use the Rotary Control Wheel
to move the whole Pitch Sequence up or down.
vi: If you want to change to a different sound
press MIDI UTILITIES and use the Rotary Control Wheel to
change the MIDI Program No. Then, scroll through the
possibilities, listening to the changing sounds articulated by
the movements of your other hand in the Beam.
vii: If you have more than one Sensor (Beam or Switch) connected, and
you want to adjust the settings on a different one from the one you are
currently using
press SENSOR and use the Rotary Control Wheel to
select the one you want.
viii: If you want to try out a different collection of settings for SENSOR,
PITCH SEQUENCE, RANGE, DIVISIONS, TRIGGER MODE,
TRANSPOSE or MIDI UTILITIES
press SET-UP and use the Rotary Control Wheel to select
different Set-up No., then press ENTER to try it out.
Page 48

THE SOUNDBEAM®2 HANDBOOK • PART 1 • GETTING STARTED
47
Finally, if you get lost or confused by
Soundbeam 2’s many possibilities - or simply
want to go back to where you started
Switch off Soundbeam - then, after a short
pause, switch it on again.
After the start-up sequence, you’ll find yourself
back where you were when you first powered up
with the display showing
The settings will include
the default Sensor … Beam 1
the default Pitch Sequence … No. 005 - “Maj Triad +6th”
the default Range setting … 0.60m
the default number of Divisions … 16
the default Trigger Mode … Re-Trigger
the default Transpose … +00
the default MIDI Program … 092 - “Pad 4 (Choir)”
all part of
the default Set-Up … No. 001 - “Echoes”
Set-up: 001 P
Echoes
Page 49

48
THE SOUNDBEAM®2 HANDBOOK • PART 1 • GETTING STARTED
MAKING MUSIC WITH SOUNDBEAM 2
A NOTE FOR BEGINNERS
It’s important to realise that Soundbeam is not in itself a musical instrument, but a
ground-breaking new way of playing one – a sound module, perhaps, an electronic
keyboard, or a sampler. Effective, expressive use of Soundbeam will very much
depend on your understanding and management of whichever musical instrument
you decide to use. So, to begin with, if you haven’t already done so, you should try
to get to know the particular MIDI musical instrument that YOU are going to use.
Whatever it is, - keyboard, expander module, sampler, drum machine or any other
electronic musical instrument - it will have to have a MIDI Input and Output if it is
to be used with Soundbeam - so check this first!
(MIDI is the code which enables a Roland keyboard, for example, to
communicate with a Yamaha sound module)
If the instrument you will be using is a sound module supplied by us - the Yamaha
MU 50, for example - then you can easily explore a good deal of it from the
Soundbeam Controller. As soon as your sound module is connected to the MIDI
Out from the Soundbeam Controller, and to the signal input(s) of your amplifier
(and speakers) - or to your self-powered speakers - you can use the Controller’s
MIDI Utilities Key to select the MIDI Program No. page and the Rotary
Control Wheel to scroll through them while you move the other hand in the
Active Area of the Beam. In this way you can try out all 128 of the available sounds
assigned to MIDI Program Nos 001 to 128. (see pp. 38-39 above)
If the instrument belongs to the school or institution in which you work, perhaps
you could take it home for a few days or at weekends, so that you can try it out at
your leisure. Spend as much time as you possibly can exploring and playing about
with it - the design of modern electronic musical instruments means that playing
music is much easier than it used to be - and it’s fun!
Begin by finding out how to use the press buttons, sliders, switches, wheels and
other controls to try out as many as you can of the various sounds it has to offer.
Most MIDI musical instruments, nowadays, have a large range of sounds they can
make and store - and many possibilities for combining them. It will take you a long
time to explore them all - but, in the meanwhile, we have tried to make some of
the best of them available to you by way of the Locked Set-ups on your
Soundbeam 2
Page 50

THE SOUNDBEAM®2 HANDBOOK • PART 1 • GETTING STARTED
49
Listen to the difference between the short sounds (piano, xylophone, guitar)
which die away very quickly however long you hold down the keys - and the
long sustained sounds (organ, violin, saxophone) which go on sounding until
you take your finger off the key. Make a note of those - of both kinds - that
you like best.
Many electronic keyboards can play a number of different percussion rhythms
- fast or slow - and these can often be used to give a lively rhythmic
framework to whatever melodic or harmonic ideas you are developing with
hand or other body movements in the beam.
You can also usually put accompanying chords to these rhythms simply by
adjusting the appropriate controls (consult your instrument’s handbook) and
then touching one of a dozen or so notes at the bottom (left hand) end of
the keyboard.
Some keyboards can be set up so that body movements in Soundbeam can
be used to change these chords too. Try out this amazing new way of using
your own body movements in the beam (without touching the keyboard) to
make music!
Finally, it’s important to remember that, as with any other musical technique,
you won’t become a virtuoso in 10 minutes. A good deal of time, application,
exploration and practice will be needed - both with Soundbeam 2, and with
the sounds of the various MIDI musical instruments it can be connected to -
to find out which of its many possibilities will ultimately help you to achieve
your own personal musical goals.
Remember,
your most important bits of musical equipment
are still your own ears.
What sounds right to them will (probably!) be right
Page 51

Soundbeam 2 is manufactured for
The Soundbeam Project
by
Robin Wood,
EMS (Cornwall),
Trendeal Vean Barn,
Ladock, Truro,
Cornwall, England, TR2 4NW
Soundbeam Helpline
tel. 044 (0)1726 883265
fax. 044 (0)1726 883283
(weekdays, 9.00 to 17.00 British time)
Information, Training, Sales
Tim Swingler,
The Soundbeam Project,
Unit 3, Highbury Villas,
St Michaels Hill, Bristol,
England, BS2 8BY
tel. 044 (0)117 974 4142
fax. 044 (0)117 970 6241
email. [email protected]
Technical Information, Dance, Exhibitions, Museums, Installations
Mark Newbold,
The Soundbeam Project,
Unit 3, Highbury Villas,
St Michaels Hill, Bristol,
England, BS2 8BY
tel. 044 (0)117 923 7075
fax. 044 (0)117 970 6241
email. [email protected]
Visit Our Website at www.soundbeam.co.uk
SOUNDBEAM
®
is a registered Trade Mark throughout Europe
and the USA
50
THE SOUNDBEAM®2 HANDBOOK • PART 1 • GETTING STARTED
 Loading...