

Page 1

www. sotm-audio.com
sMS-200 Operating Instruction
Rev. : 1.0
S
O
t
M
Ultimate High Performance Audio
Page 2
목차(Contents)
Page
주의 사항(Precautions)
2
제품 기능(Features)
3
전면구조(Front Panel)
4
후면구조(Rear Panel)
5
제품 사양(Specification)
6
빠른 사용 설명(Quick start guide)
7
1. 제품 설치 - Installation
2. 오디오 연결 - Connecting to audio
3. 네트워크 케이블 연결 - Connecting to network
4. 전원 케이블 연결 - Connecting to power
5. 음원 저장 기기 준비 - Preparing the server devices
6. 전원 켜기 - Power on
Eunhasu Web GUI 사용 방법(How to use Eunhasu Web GUI)
8
1. Eunhasu Web GUI 연결 - Connect to Eunhasu Web GUI
8
2. 기능 선택 - Select functions
9
2-1. Roon ready icon
2-2. Squeezelite icon
2-3. MPD & DLNA icon
2-4. Configure system settings icon
2-4-1. Network config
2-4-2. Library config
2-4-3. System upgrade
Roon Ready 사용 방법(How to use Roon Ready)
13
Squeezelite 사용 방법(How to use Squeezelite)
15
MPD & DLNA 사용 방법(How to use MPD & DLNA)
17
- 1 -
Page 3
주의 사항(Precautions)
반드시 본 사용설명서를 모두 읽은 후 제품을 사용하십시오.
Please read this instruction carefully before use.
제품의 분해, 개조 등을 하지 마십시오.
Do not attempt to disassemble or modify the product.
제품에 진동, 충격을 가하지 마십시오.
Keep the product away from the external shocks or vibrations.
손상 되거나 피복이 벗겨진 케이블은 사용하지 마십시오.
Do not use the damaged or peeled cables.
제품을 야외에서 사용하지 마십시오.
Do not use the product outdoors.
제품의 외관, 내용물, 사양은 예고 없이 변경 될 수 있습니다.
Product specifications and features are subject to change without notice.
A/S 정보
Warranty Information
무상 A/S
Free warranty service
-
정상적인 사용 중 설계, 제조상의 결함으로 발생된 불량에 대하여 구입일로부터 1년간 A/S를 보증 합니다.
In case of the defect is found caused by the design or the production flaw while using the product properly, a manufacturer is
responsible for the faulty product and the free warranty service for 1 year from the date of purchasing.
-
무상 A/S기간 중 이라도 천재지변 등 불가 항력적인 요인으로 인한 제품의 고장 및 파손은 무상 A/S대상에서 제외 됩니다.
Even in the warranty service period, malfunction or damage of products caused by the inevitable incident such as a natural disaster is
not subject of the free warranty service.
유상 A/S
Warranty service at a cost
- 무상 A/S기간이 지난 제품.
The product that free warranty service period is expired.
- 소비자 과실로 인한 제품의 고장.
Malfunction of the product caused by a user’s fault.
- 사고로 인한 제품 고장.
Malfunction of the product caused by incidents.
- 지진, 수해, 낙뢰 등 천재지변으로 인한 제품의 고장
Malfunction of the product caused by a natural disaster such as earthquake, flood, lightning and etc.
- 유상 A/S의 경우 운송비는 소비자 부담 입니다.
In case of the warranty service at a cost, a customer should cover the transportation costs.
소비자 과실 유형
Samples of a user’s fault
- 제품의 분해, 개조 등을 한 제품
In case of attempts to disassemble or modify the product.
- 사용설명에 명시된 사용방법 미 준수로 인한 불량
In case of not following the operating instructions.
A/S를 의뢰하기 전 본 사용설명서와 홈페이지의 Q&A항목을 충분히 검토 하시기 바랍니다.
Please read this operating instructions and Q&A board on our website carefully before asking for the warranty service.
기본 구성품
Supplied contents
sMS-200 본체
sMS-200 Unit
9V 어댑터
9V Wall adapter
사용 설명서
Operating Instruction
- 2 -
Page 4
제품 기능(Features)
sMS-200은 네트워크를 이용하여 음악 파일을 공유하고 재생할 수 있는 소형 고성능 네트워크 파일
플레이어 입니다. 제품은 다음과 같은 기능을 갖추고 있습니다.
sMS-200 is a compact designed high performance network file player which is capable to share and play
music file through network system. It has the following features.
Web GUI
Easy system configuration
Selectable music player applications
Selectable and configurable USB audio devices
Network share folder and USB storage device setting
Roon Ready
DLNA audio renderer, OpenHome support
MPD(Music Player Daemon)
LMS(Logitech Media Server)
Squeezelite
Multi-zone network playback
USB audio output
1 x High-End audio grade USB port
2 x Standard USB ports for USB storage device
- 3 -
Page 5
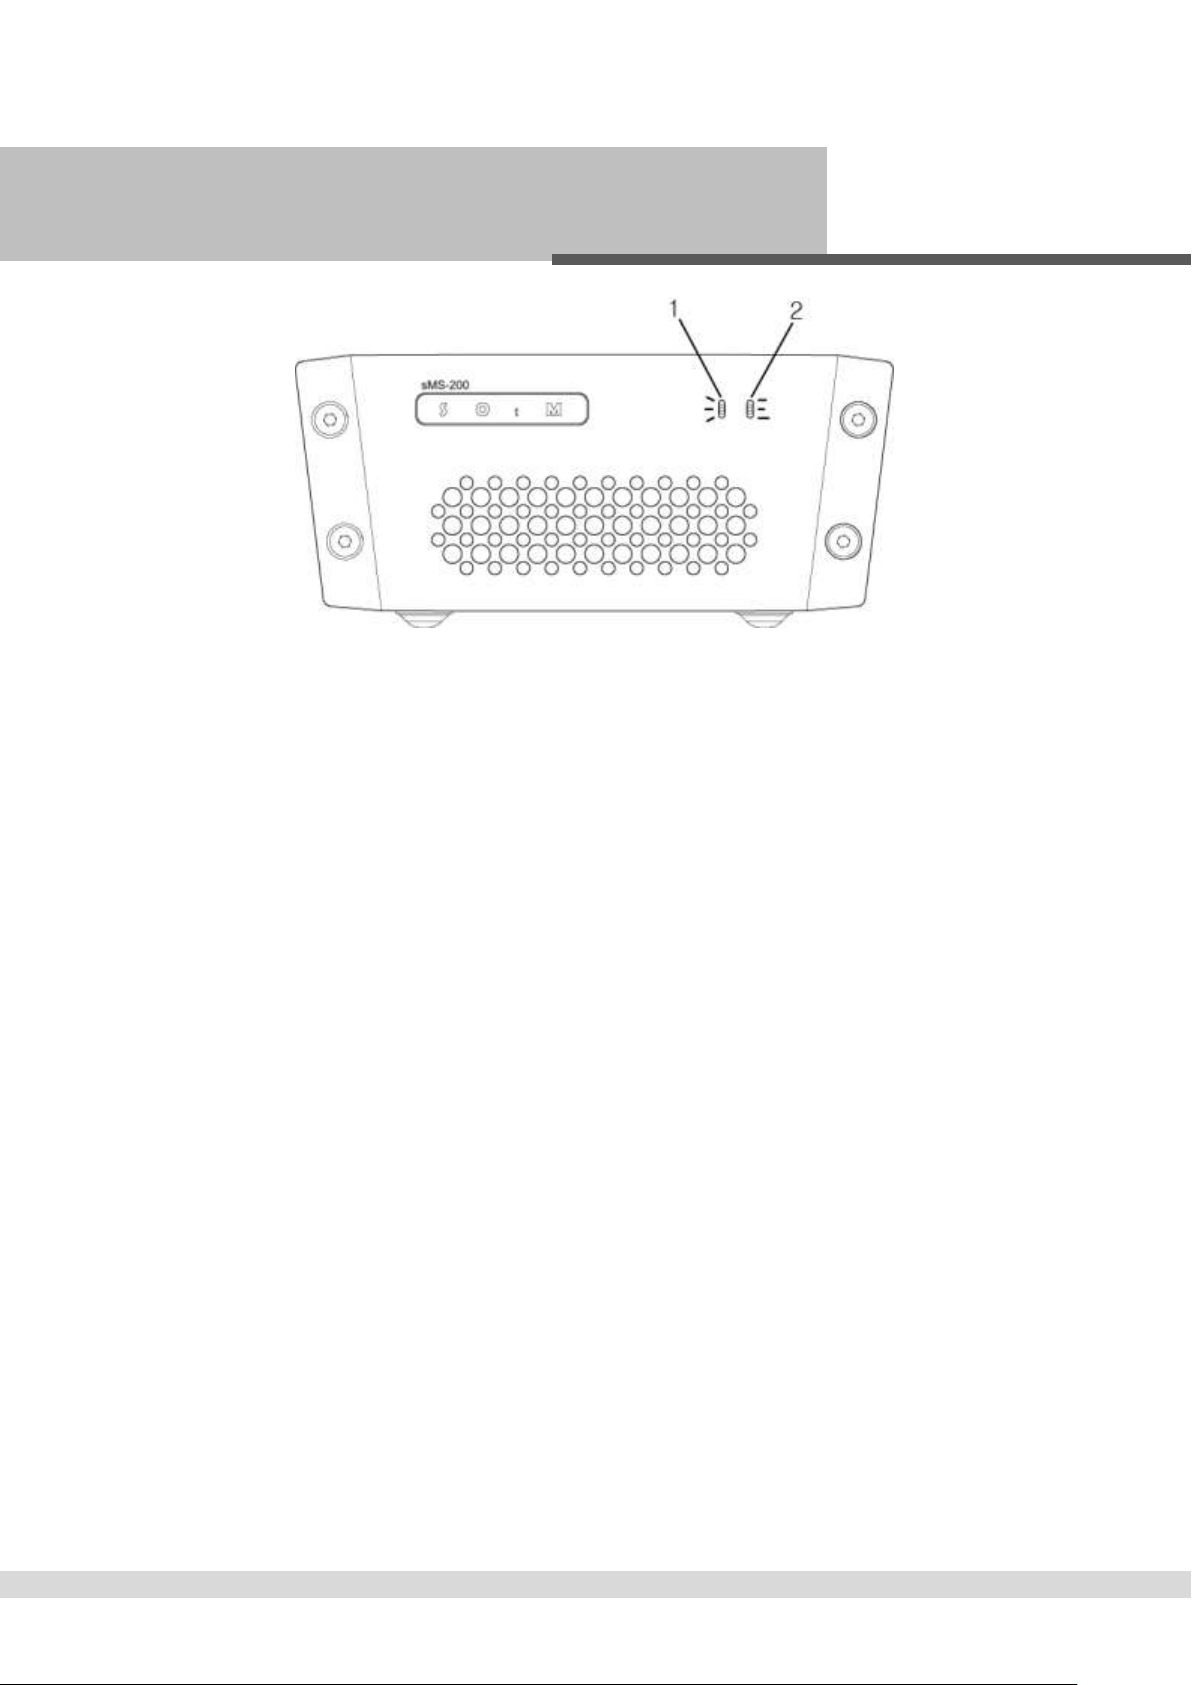
전면구조(Front Panel)
① 전원 및 상태 표시 램프
Power and status indicator lamp
전원 on 시 점등 되며 동작 상태에 따라 점멸 합니다.
The lamp illuminates when the unit is powered ON and blinks according to its operational status..
② 동작 정보 표시 램프
Operating indicator lamp
제품의 동작에 따라 점멸하며 정보를 표시합니다.
The lamp blinks according to its operational status.
- 4 -
Page 6
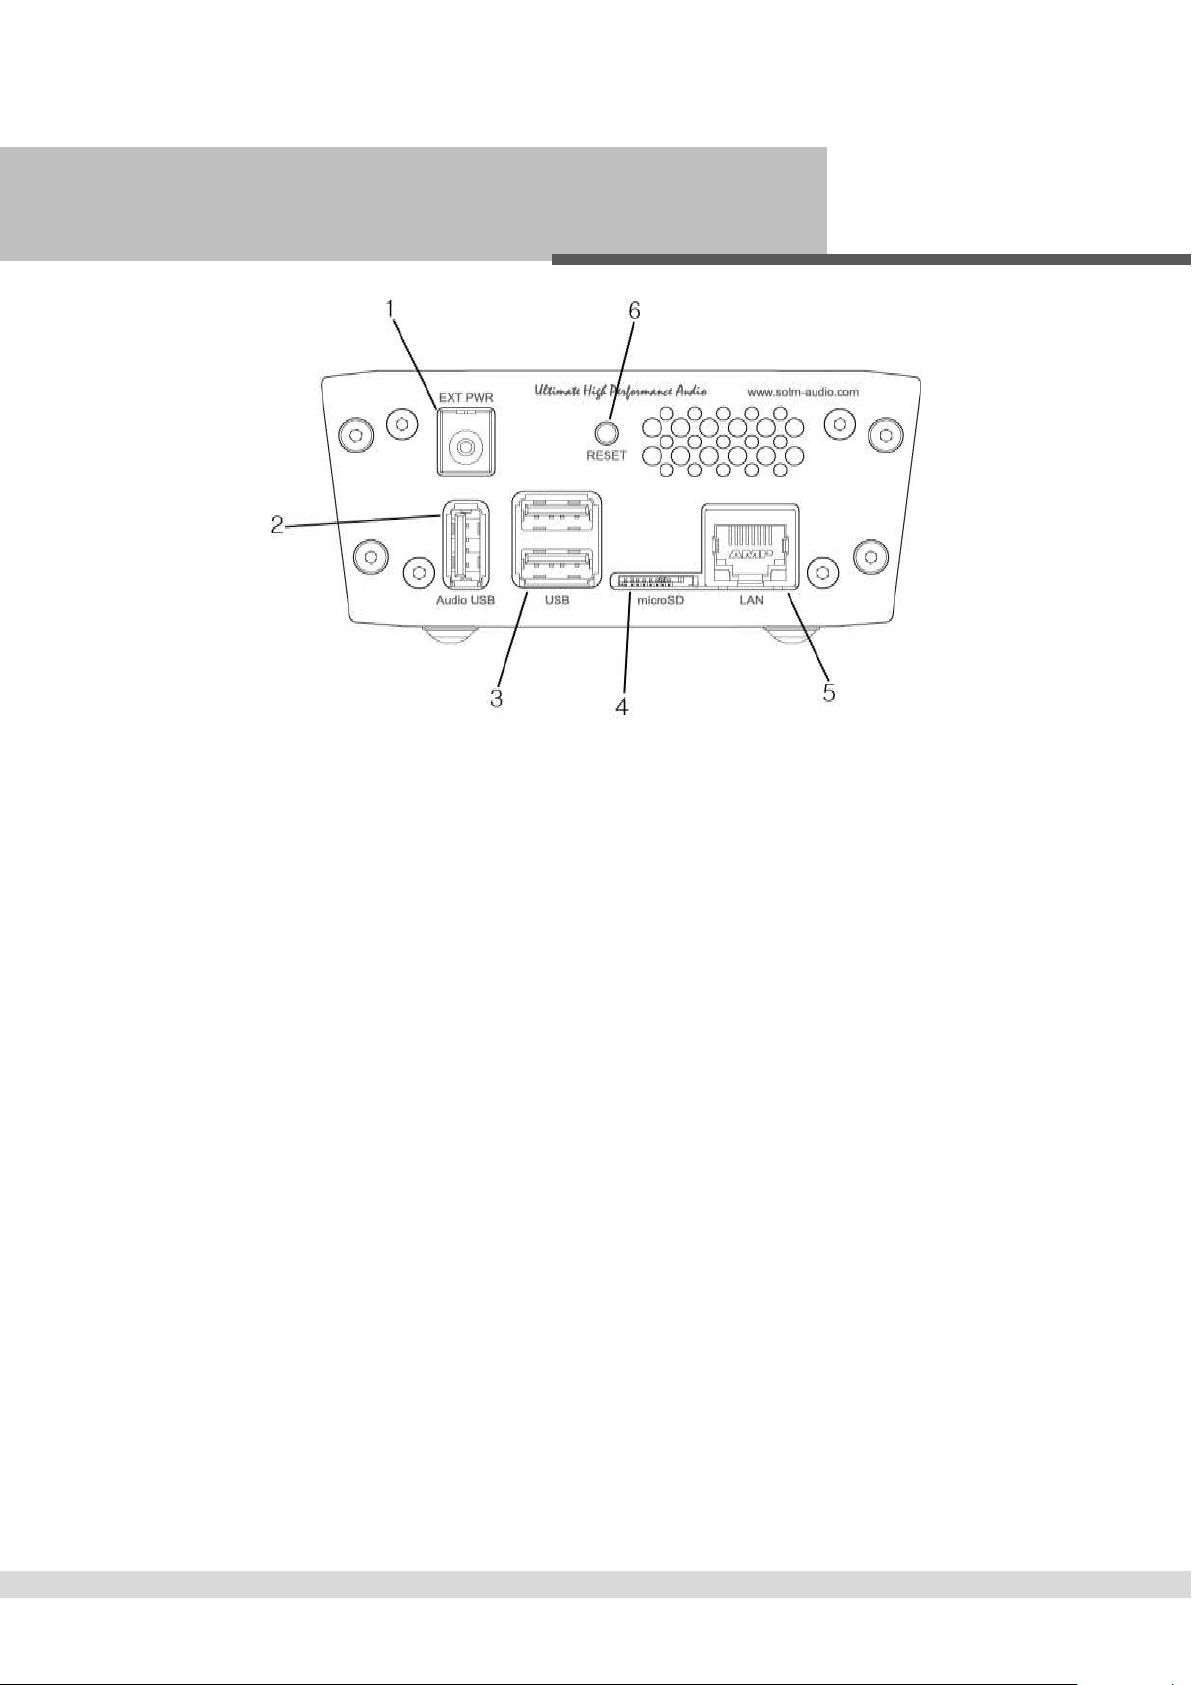
후면구조(Rear Panel)
① 전원 입력 잭 : 전원 공급 장치와 연결 합니다.
Power input jack : Connect to a power supply.
② 오디오 전용 USB 포트 : USB 오디오 기기를 연결 합니다.
High-End audio grade USB port : Connect to USB audio device.
③ USB 2.0 포트 : USB 저장 장치와 연결 합니다.
USB 2.0 port : Connect to USB storage device.
④ microSD 카드 커넥터 : 제품의 OS 가 저장되어 있는 microSD 카드가 삽입되어 있습니다.
microSD card connector : The micro SD card which the product OS is loaded on is inserted.
주의 : 제품 전원이 인가 되어 있을 때에는 절대 microSD 카드를 빼지 마십시오. 제품이 파손 될 수 있습니다.
Caution: do not pull out the micro SD card while the unit is powered on. Product might be damaged.
⑤ LAN 포트 : 네트워크 케이블을 이용하여 공유기와 연결 합니다.
LAN port : Connect to a router by network cable.
⑥ Reset 스위치 : 제품을 강제로 재시작 합니다.
Reset switch : Reset the product by force.
- 5 -
Page 7
제품 사양(Specification)
OS
Linux
Audio player
Roon Ready
DLNA renderer
Music Player Daemon(MPD)
Logitech Media Server(LMS)
Squeezelite
Audio feature
PCM 32bit/384KHz max, DSDx64, DSDx128, DSDx256
Ultra Low Jitter Clock
Ultra Low Noise Regulator
Active Noise canceller
USB port
High-End audio grade USB port x 1
USB 2.0 port x 2
Ethernet port
RJ45 100Mbps
Power requirement
Input Voltage : +6.5 ~ 14Vdc
Power : Max 15W
Operating environment
Operating temperature range: +10 ~ +30℃
Storage temperature : 0 ~ +40℃
Operating & storage humidity : 10% ~ 90%
Dimension
106×48x152(mm)
Weight
1.5Kg >
가정용 방송통신기자재
이 기기는 가정용(B 급)으로 전자파적합기기로서 주로 가정에서 사용하는 것을 목적으로 하며, 모든 지역에서 사용할 수 있습니다.
인증정보
적합성평가를 받은자의 상호 : SOtM
기자재의 명칭(모델명) : 뮤직서버(sMS-200)
인증번호 : MSIP-REM-SoM-sMS-200
제조자/제조국가 : SOtM/대한민국
- 6 -
Page 8
빠른 사용 설명 (Quick start guide)
1. 제품 설치 - Installation
sMS-200의 제품 박스를 열고 제품을 꺼내어 평평한 곳에 제품을 설치 합니다. 제품은 주변의 다른 기기 또는 벽과의 거리를
5cm이상 두어야 합니다.
Take out sMS-200 from the product box and put it on the proper place. The unit should be at least 5cm(2inch) away from the wall
or other devices.
2. 오디오 연결 - Connecting to audio system
USB 케이블을 이용하여 sMS-200 후면의 오디오 전용 USB 포트와 USB 오디오 기기를 연결 합니다.
By USB cable, connect the High-End audio grade USB port on the rear panel of sMS-200 to USB audio device.
3. 네트워크 케이블 연결 - Connecting to network
네트워크 케이블을 이용하여 sMS-200 후면의 LAN 포트와 공유기의 LAN 포트를 연결 합니다. 보다 안정적인 네트워크 연결을
위해 1000Mbps 속도를 지원하는 공유기를 사용하고 CAT6 이상의 고성능 네트워크 케이블을 사용 합니다.
By Ethernet cable, connect the LAN port on the rear panel of sMS-200 to a router. A gigabit speed router and above CAT6 Ethernet
cable are highly recommended to make stable network connection.
4. 전원케이블 연결 - Connecting to power
sMS-200 후면의 전원 입력 잭에 전원 장치의 전원 출력 케이블을 연결 합니다.
Connect to the power input jack on the rear panel of sMS-200 by the power cable from the power supply.
5. 음원 저장 기기 준비 - Preparing the server devices.
Roon Ready 기능을 사용하기 위해서는 Roon Server가 설치된 기기가 동일 네트워크에 연결되어 있어야 합니다.
DLNA renderer기능을 사용하기 위해서는 DLNA server(DLNA 서버)와 DLNA control point(DLNA 제어 기기)가 동일 네트워크에
연결되어 있어야 합니다.
MPD, Logitech Media Server를 사용하기 위해서는 음악파일이 저장되어 있는 USB 저장장치를 제품 후면의 USB 포트에
연결하거나 네트워크에 공유되어 있는 음악파일 경로를 설정하여야 합니다.
To use Roon Ready on sM-200, Roon Server should be on the same network.
To use DLNA renderer on sMS-200, DLNA server and DLNA control point should be on the same network.
To use MPD or Logitech Media Server, connect the USB storage device to the USB 2.0 port on the rear panel of sMS-200 or setup
network music folder path on Library config page..
6. 전원 켜기 - Power on
전원 장치에 AC전원을 연결 하면 전원이 인가되며 제품이 동작 됩니다.
Connect AC power to the power supply to power on the sMS-200.
- 7 -
Page 9
Eunhasu Web GUI 사용 방법 (How to use Eunhasu Web GUI)
1. Eunhasu Web GUI 연결 - Connect to Eunhasu Web GUI
PC나 스마트 기기의 웹브라우저를 실행하고 “http://eunhasu” 에 연결합니다. Apple사의 기기에서는 “http://eunhasu.local” 에
연결 합니다.
위의 방법으로 연결이 되지 않을 경우에는 공유기에 접속해 sMS-200의 IP 주소를 확인하고 웹브라우저를 이용해
IP주소(“http://xxx.xxx.xxx.xxx”) 에 연결해야 합니다.
IP주소를 통해서도 연결이 되지 않을 경우에는 전원 연결, 네트워크 연결 상태 등을 확인 해야 합니다.
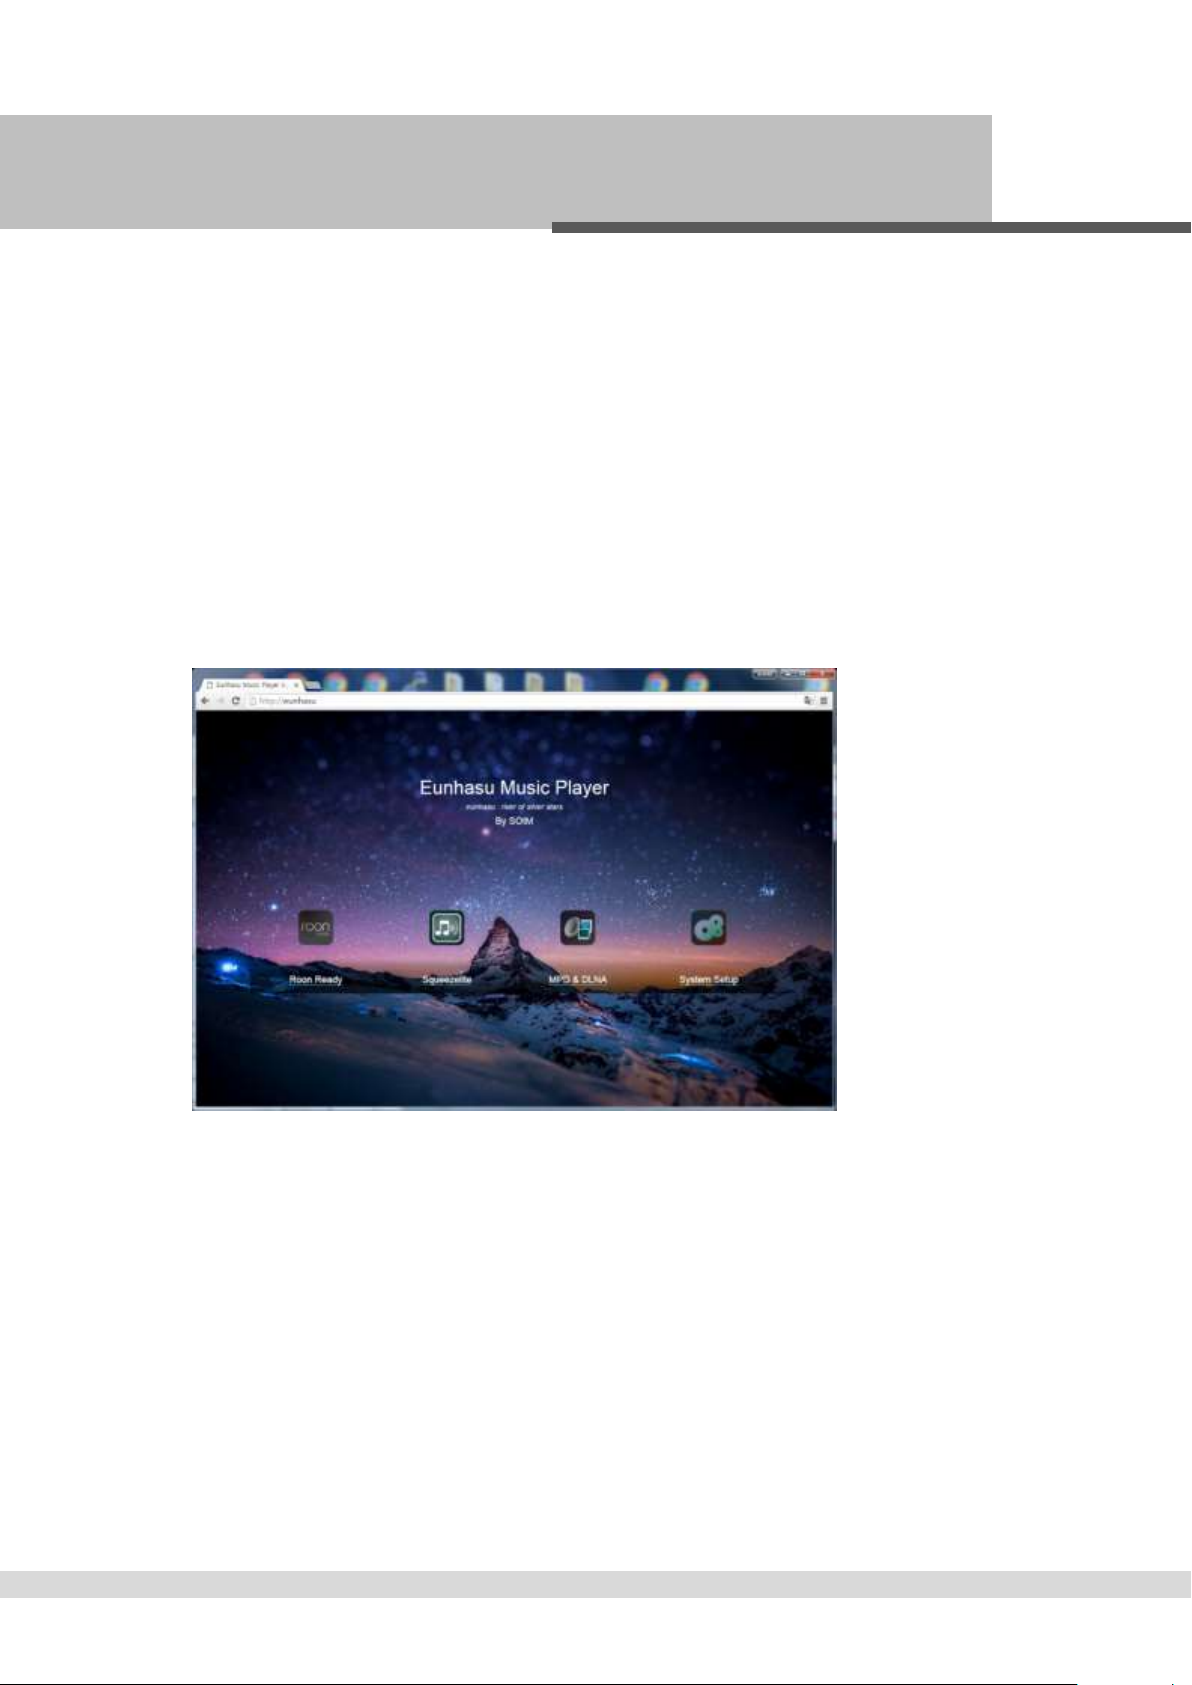
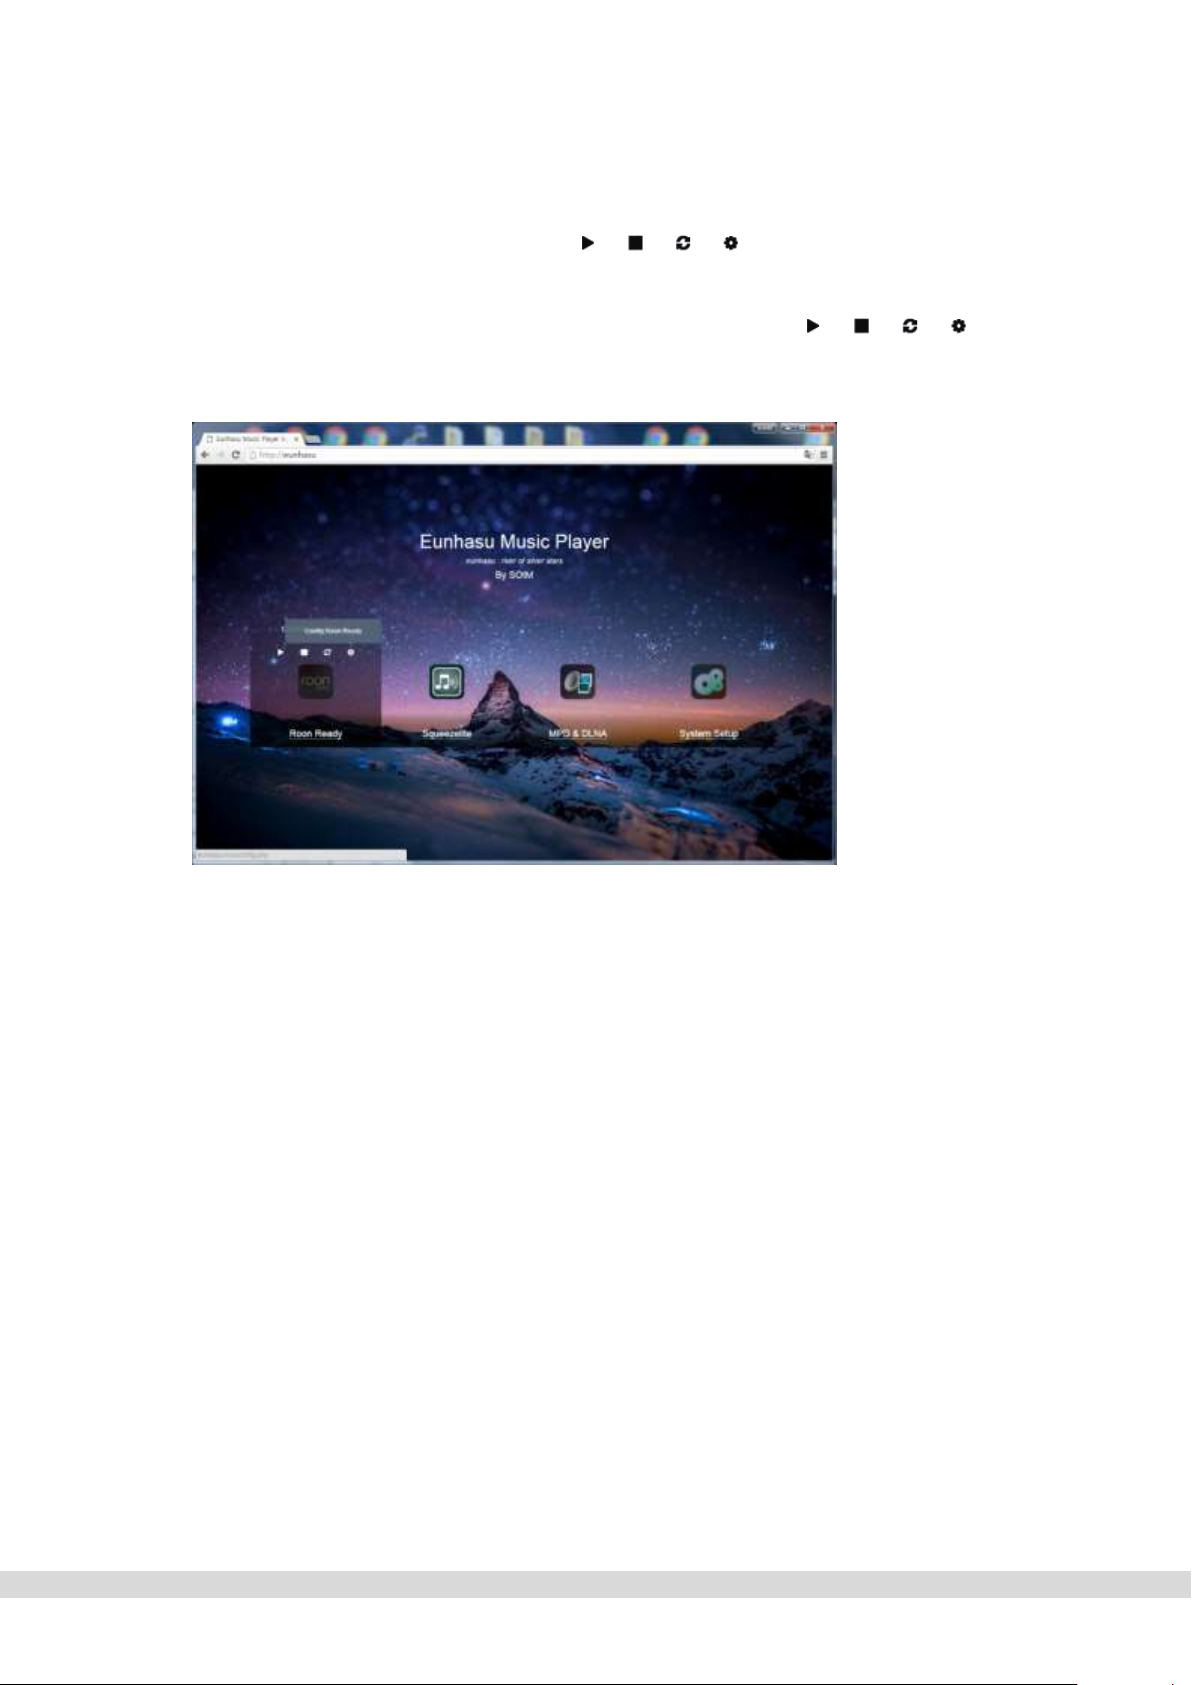
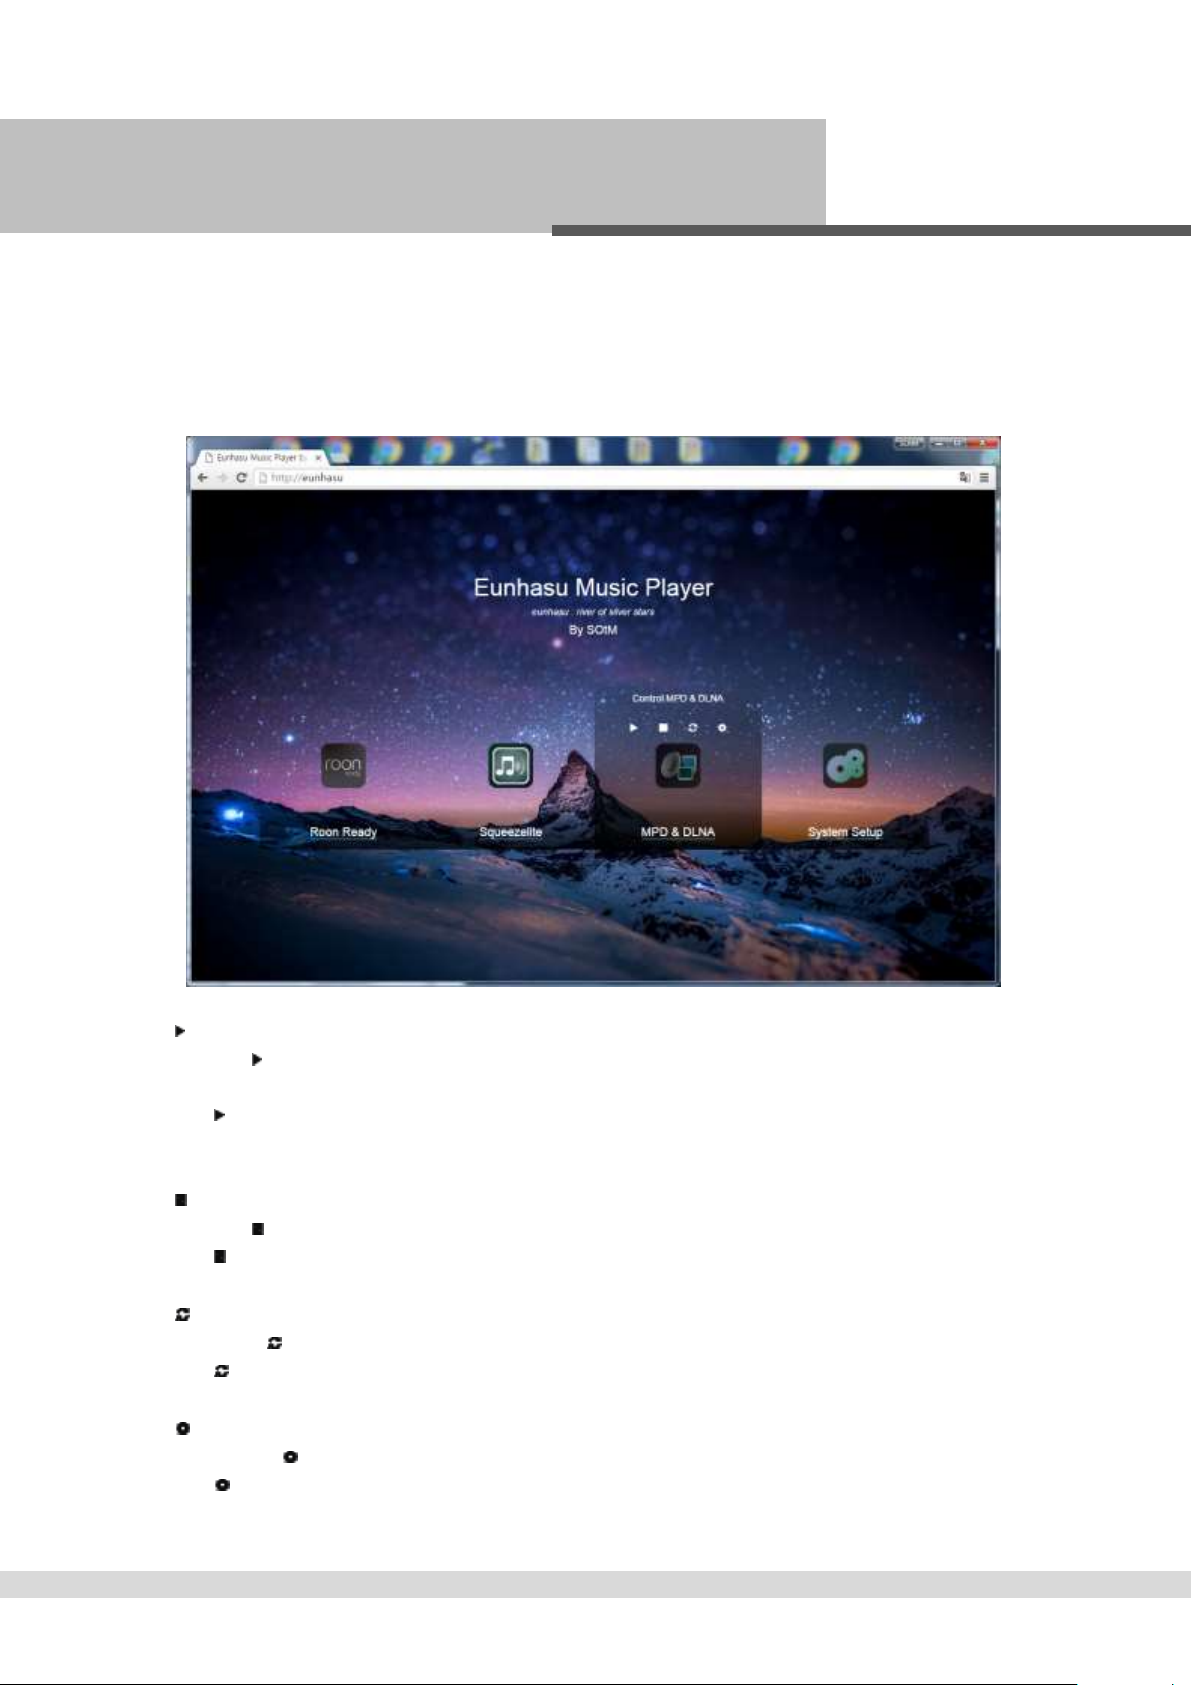
정상적으로 Eunhasu Web GUI에 연결되면 아래와 같은 처음 화면이 표시 됩니다.
Open the web browser on a PC or smart device and connect to “http://eunhasu” (without quotation marks).
On MAC OSX, connect to “http://eunhasu.local” (without quotation marks).
If either of above paths would not make connection to Eunhasu Web GUI, check the router setup to find out the IP address of
sMS-200. And then enter sMS-200 IP address (“http://xxx.xxx.xxx.xxx”) directly on the browser to connect to Eunhasu Web GUI.
If you still couldn’t access the Eunhasu Web GUI, you will need to check network status or power connection is okay.
If you connect to Eunhasu Web GUI successfully, you will see the home screen as like the image below.
- 8 -
Page 10
2. 기능 선택 - Select functions
Web GUI의 기능을 선택하기 위해서는 마우스를 이용하여 원하는 아이콘 위로 커서를 이동하여 자동으로 아이콘이
선택되도록 하며, 아래와 같이 사용에 필요한 동작 버튼 이 표시 되면 마우스로 클릭하여 선택할 수
있습니다.
터치 방식을 사용하는 스마트 기기에서는 아이콘을 터치하면 마우스를 이용하는 것과 같이 동작 버튼이 표시 됩니다.
To select the function on the Web GUI, mouse over the desired icon and then action buttons will be
appeared.
On the smart devices, touch over the desired player icon and then the action buttons will be appeared like when using a mouse.
2-1. Roon Ready 아이콘 - Roon Ready icon
Roon Ready 는 Roon Server 기기와 함께 사용하는 네트워크 음악 재생 플레이어로 쉽고 단순한 사용자 화면을 제공하며,
강력한 기능을 선사하는 최고의 네트워크 음악 재생 기능 입니다. 실행, 정지, 재실행, 환경설정을 할 수 있으며 자세한 사용
방법은 본 매뉴얼의 Roon Ready 사용 방법을 참고 하시기 바랍니다.
Roon Ready is the easy and user friendly network music file player working with Roon Server, it provides the most powerful music
playback function. By clicking Play, Stop, Restart or Configuration buttons over the icon, you can control Roon Ready on sMS-200.
Please refer to how to use Roon Ready on this manual.
2-2. Squeezelite 아이콘 - Squeezelite icon
Sqeezelite 는 Logitech Media Server와 함께 사용하는 네트워크 음악 재생 플레이어로 음악파일 재생과 함께 Tidal, Qobuz,
internet radio와 같은 강력하고 다양한 기능을 사용할 수 있습니다. 또한 sMS-200에 내장된 Logitech Media Server를
이용하여 별도의 서버 기기 없이도 사용할 수 있습니다. 실행, 정지, Logitech Media Server 열기, 재실행, 환결설정을 할 수
있으며 자세한 사용 방법은 본 매뉴얼의 Sqeezelite 사용 방법을 참고 하시기 바랍니다.
Squeezelite is a network music file player working with Logitech Media Server, it is integrated with versatile services such as Tidal,
Qobuz or internet radios. By clicking Play, Stop, Open LMS web interface, Restart or Configuration buttons over the icon, you can
control Squeezelite on sMS-200. Please refer to how to use Squeezelite on this manual.
- 9 -
Page 11
2-3. MPD & DLNA 아이콘 - MPD & DLNA icon
MPD는 USB 저장장치 또는 네트워크 공유 폴더의 음악 파일을 재생할 수 있는 고 음질 음악 재생 플레이어 입니다.
DLNA 는 MPD(Music Player Daemon)를 통해 DLNA 서버(DLNA server), DLNA 제어기기(DLNA control point)와 함께 사용하는
DLNA 오디오 재생(DLNA audio Renderer) 기능입니다. PC, NAS, 스마트기기 등이 이미 DLNA 서버기능을 제공하고 있어
다양한 기기와 네트워크를 통해 음악을 재생할 수 있습니다. 실행, 정지, 재실행, 환경설정을 할 수 있으며 자세한 사용
방법은 본 매뉴얼의 MPD & DLNA 사용 방법을 참고 하시기 바랍니다.
MPD is a music file player supports playing the music file saved on USB storage device or network share folder. And DLNA is a
DLNA audio renderer working with DLNA server and DLNA control point throughout MPD function. It is capable to play music files
with various devices like most PC, NAS or smart devices which have the DLNA server function. By clicking Play, Stop, Restart or
Configuration buttons over the icon, you can control MPD & DLNA on sMS-200. Please refer to how to use MPD & DLNA on this
manual.
2-4. Configure system settings 아이콘 - Configure system settings icon
sMS-200의 사용 환경을 설정하는 기능 입니다. 네트워크 연결, 라이브러리 설정, 시스템 업그레이드, 재시작, 전원 끄기
기능을 선택할 수 있습니다.
Network configuration, library configuration, system upgrade, restart and power off functions are available on this icon.
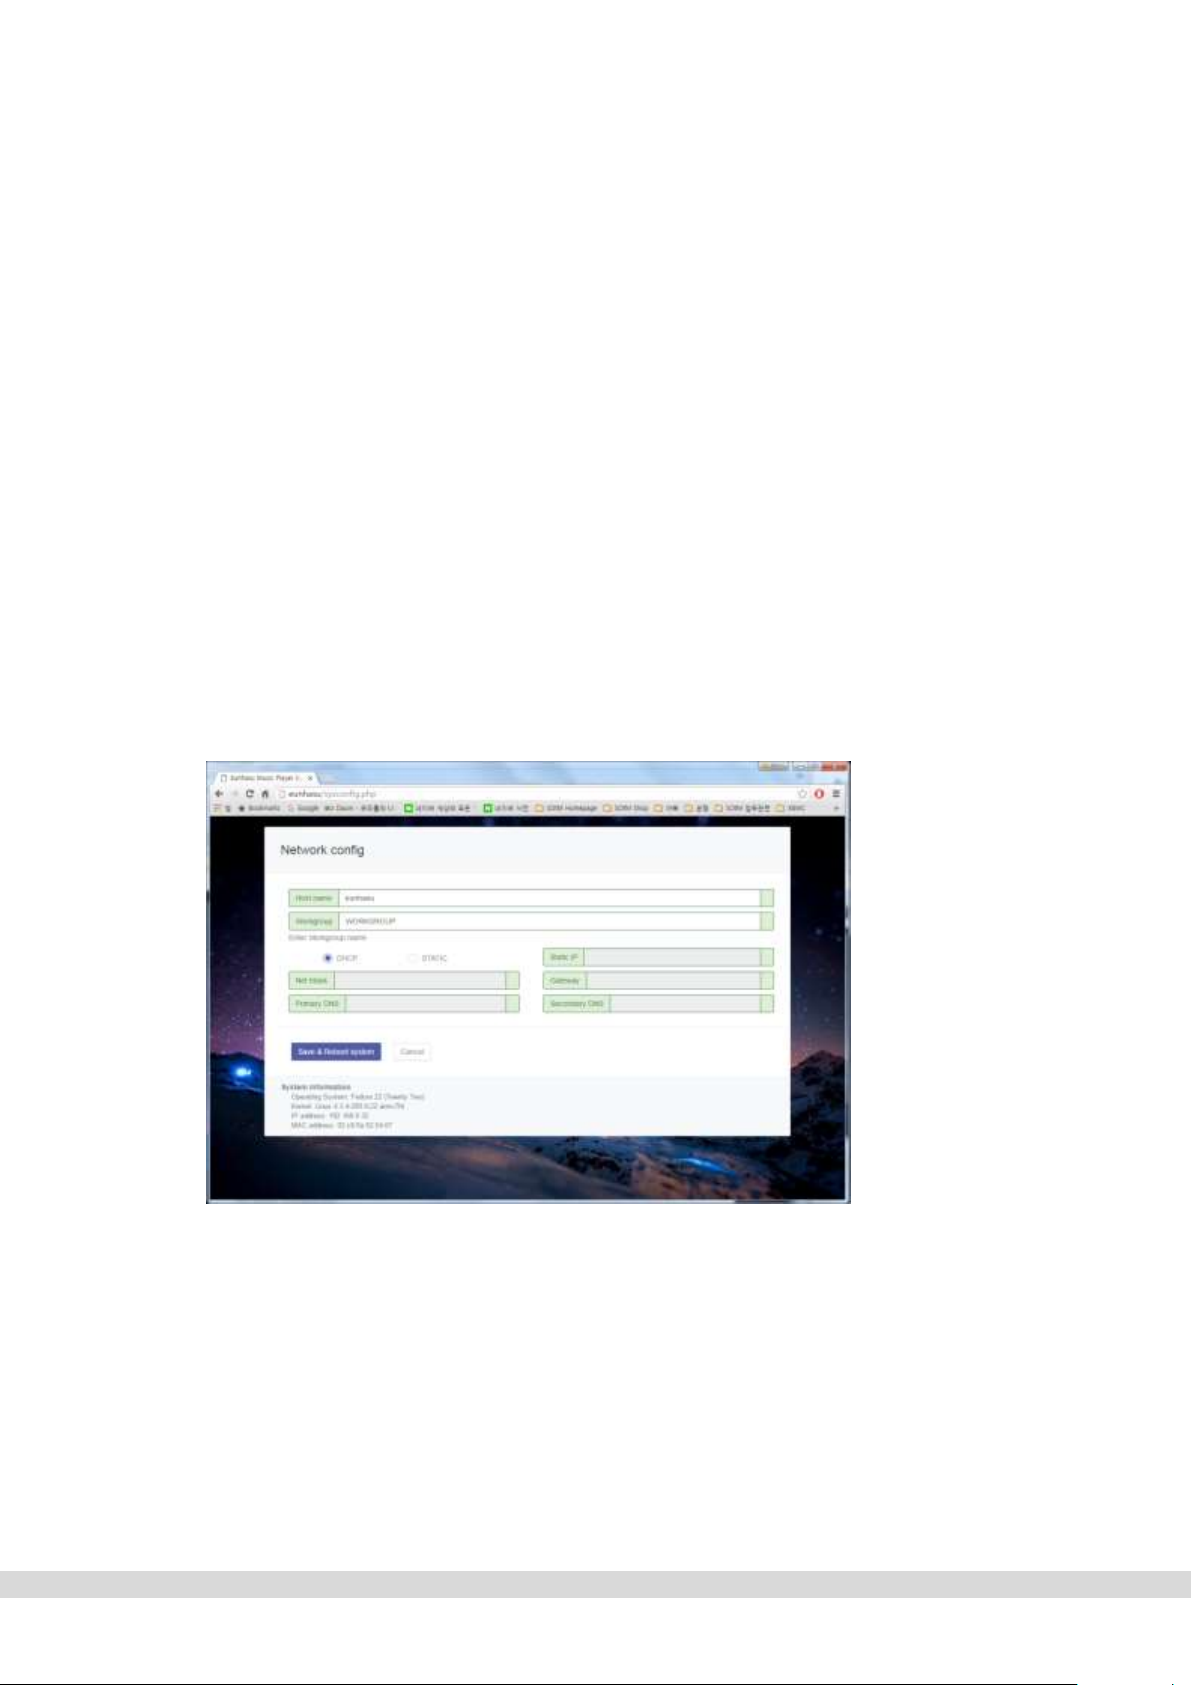
2-4-1. Network config(네트워크 연결)
sMS-200의 네트워크 연결 환경을 설정 합니다.
Set up the sMS-200 Network configuration.
Host name: 네트워크를 통해 보여지는 sMS-200의 이름 입니다. 여러 개의 sMS-200을 사용할 경우에는 서로 다른 Host
name를 사용해야 합니다.
Host name: A name of sMS-200 appearing on the network. If you use multiple sMS-200s on the network, you will need to
use different host name for each sMS-200.
Workgroup: 네트워크에 공유된 폴더 연결에 필요한 작업 그룹 이름 입니다. 일반적으로 “WORKGROUP”을 사용하며
필요 시 변경 할 수 있습니다.
Workgroup: A workgroup name for share folder on the network, normally “WORKGOUP” is used, but can change if
required.
DHCP or STATIC : DHCP를 선택하면 공유기와 같은 DHCP서버에서 sMS-200의 IP주소를 자동으로 할당합니다. STATIC을
선택하면 입력된 IP, Net Mask, Gateway, DNS를 이용하여 네트워크에 연결합니다.
(주의 : IP, Net Mask, Gateway, DNS 정보를 잘못 입력하면 네트워크에 연결되지 않으며 불편을 겪을 수 있으니 주의하여
- 10 -
Page 12
정확하게 입력해야 합니다.)
Select DHCP : The DHCP server like a router assigns IP address of sMS-200 and connects to the network.
Select STATIC : The sMS-200 is connected to the network using the entered IP, Net Mask, Gateway and DNS information
(Cautions : If you enter the wrong IP, Net Mask, Gateway and DNS information, the sMS-200 can’t be connected to the
network and may cause some inconvenience situation, so this should be very carefully done.)
Save & Reboot system: 변경한 정보를 저장하고 제품을 재 시작 합니다.
Save & Reboot system: Save the information and reboot the product
Cancel: 입력한 정보를 무시하고 처음 화면으로 돌아 갑니다.
Cancel: Go back to the home screen.
2-4-2. Library config(라이브러리 설정)
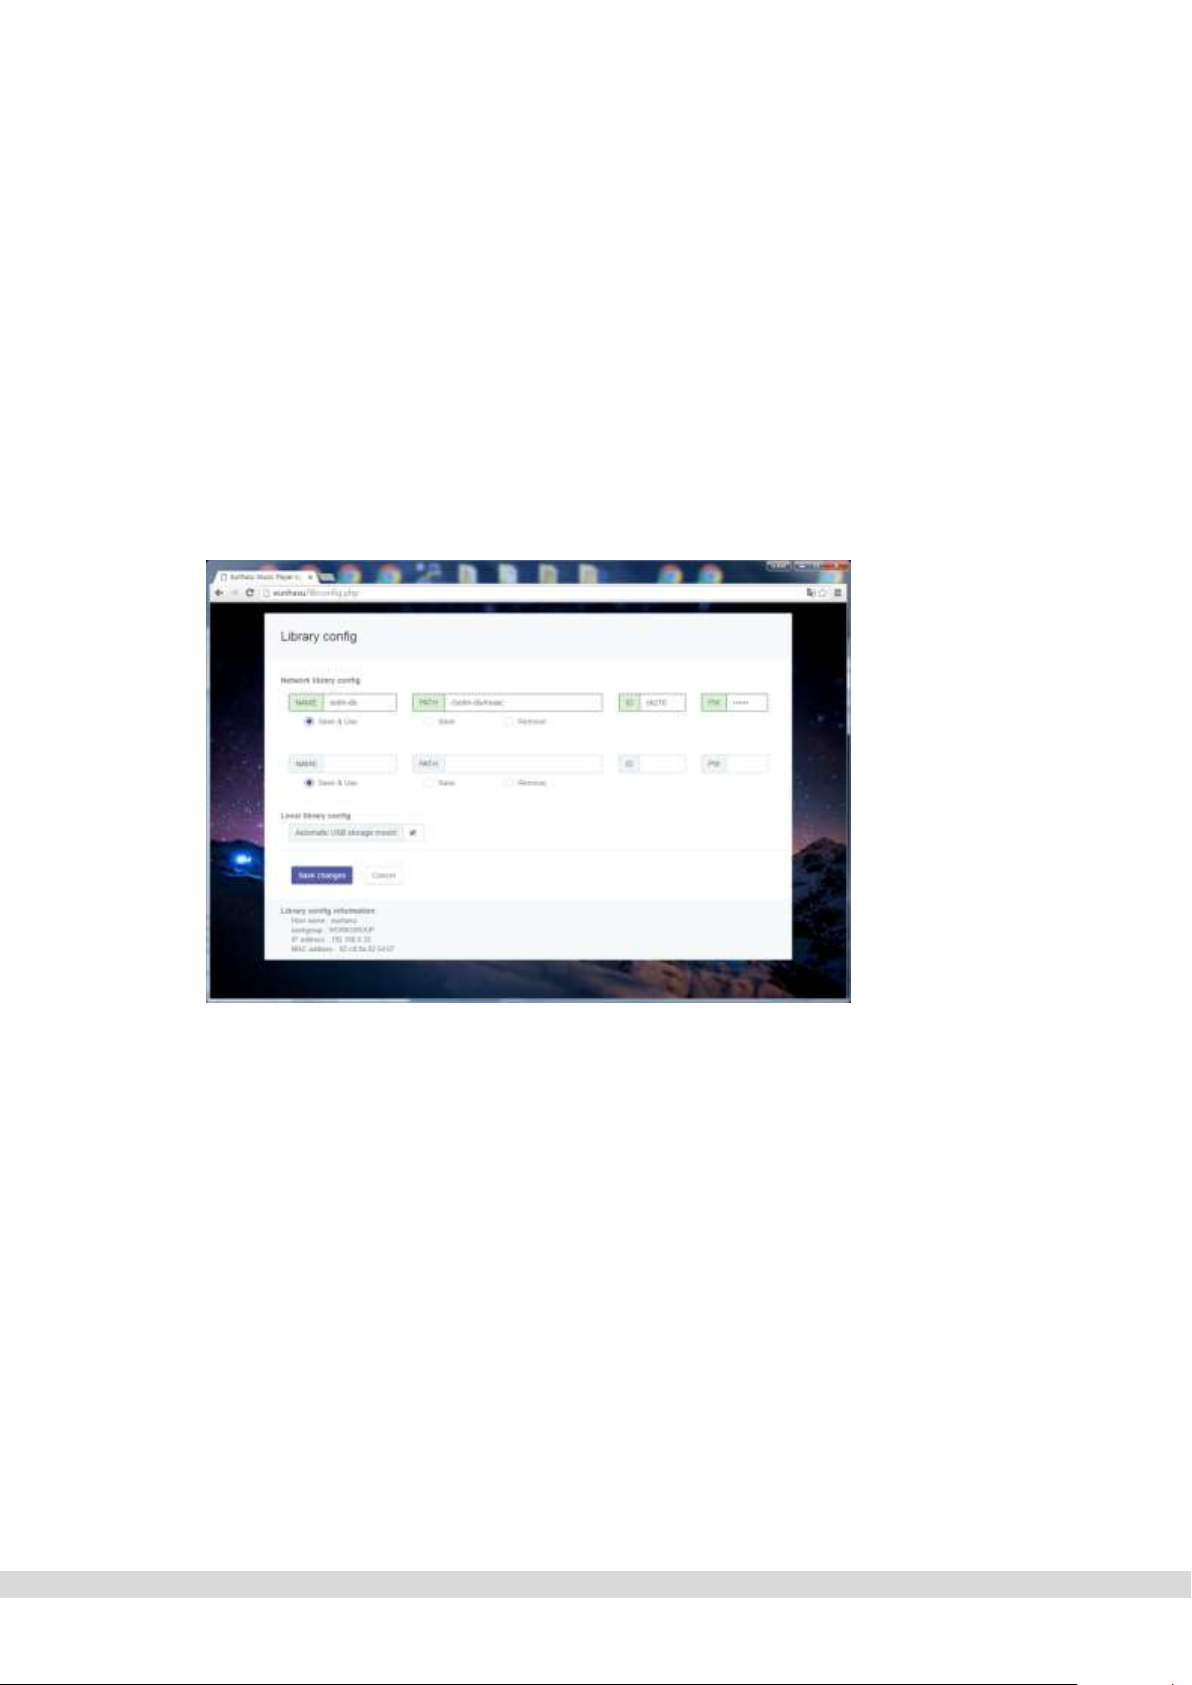
음악파일이 저장되어 있는 네트워크 공유폴더의 경로와 USB 저장장치 사용여부를 설정 합니다.
Set up the path for network library and enable the USB storage device to use.
NAME: Logitech Media Server나 MPD에 표시되는 라이브러리 폴더 이름을 입력합니다.
NAME: A library folder name appearing on Logitech Media Server or MPD.
PATH: 네트워크 공유폴더의 경로를 입력합니다. “//서버이름/공유폴더이름” 형식으로 입력합니다.
PATH: A network sharing folder path. The path should be like “//server name/sharing folder name”(without quotation marks)
format.
ID: 네트워크 공유폴더에 접근하기 위해 아이디가 필요하면 입력합니다.
ID: Enter an ID if it is required to access the network sharing folder.
PW: 공유폴더에 접근하기 위한 아이디에 패스워드가 필요하면 입력합니다.
PW: Enter a password if it is required to access the network sharing folder.
Save & Use: 입력한 정보를 저장하고 연결하여 사용 합니다.
Save & Use: Save the information you entered and use.
Save: 입력한 정보를 저장하지만 사용하지는 않습니다.
Save: Save the information you entered but not in use.
Remove: 입력한 정보를 삭제 합니다.
Remove: Remove the information you entered.
Automatic USB storage mount: USB 저장장치 사용 여부를 설정 하고, 최대 2개의 USB 저장 장치를 사용할 수 있습니다.
선택하면 USB 저장장치가 연결되고 자동으로 인식하여 Logitech Media Server나 MPD에서 USB1, USB2로 연결 됩니다.
Automatic USB storage mount: Enable or disable the USB storage device, up to 2 USB storage devices can be used.
- 11 -
Page 13
Check ‘Automatic USB storage mount’ to be enabled, the USB storage device will be auto-recognized and assign music
folder on Logitech Media Server or MPD as USB1 or USB2.
Save changes: 변경 되거나 추가된 정보를 저장 합니다.
Save changes: Save the new or modified information you entered.
참고: Save changes 버튼을 눌러 네트워크 공유폴더를 저장 해야만, 또 다른 네트워크 공유폴더를 추가 할 수 있습니다.
NOTE: The new network share folder information can be added after saving the current entered information.
Cancel: 입력한 정보를 무시하고 처음 화면으로 돌아 갑니다.
Cancel: Go back to the home screen.
2-4-3. System upgrade (시스템 업그레이드)
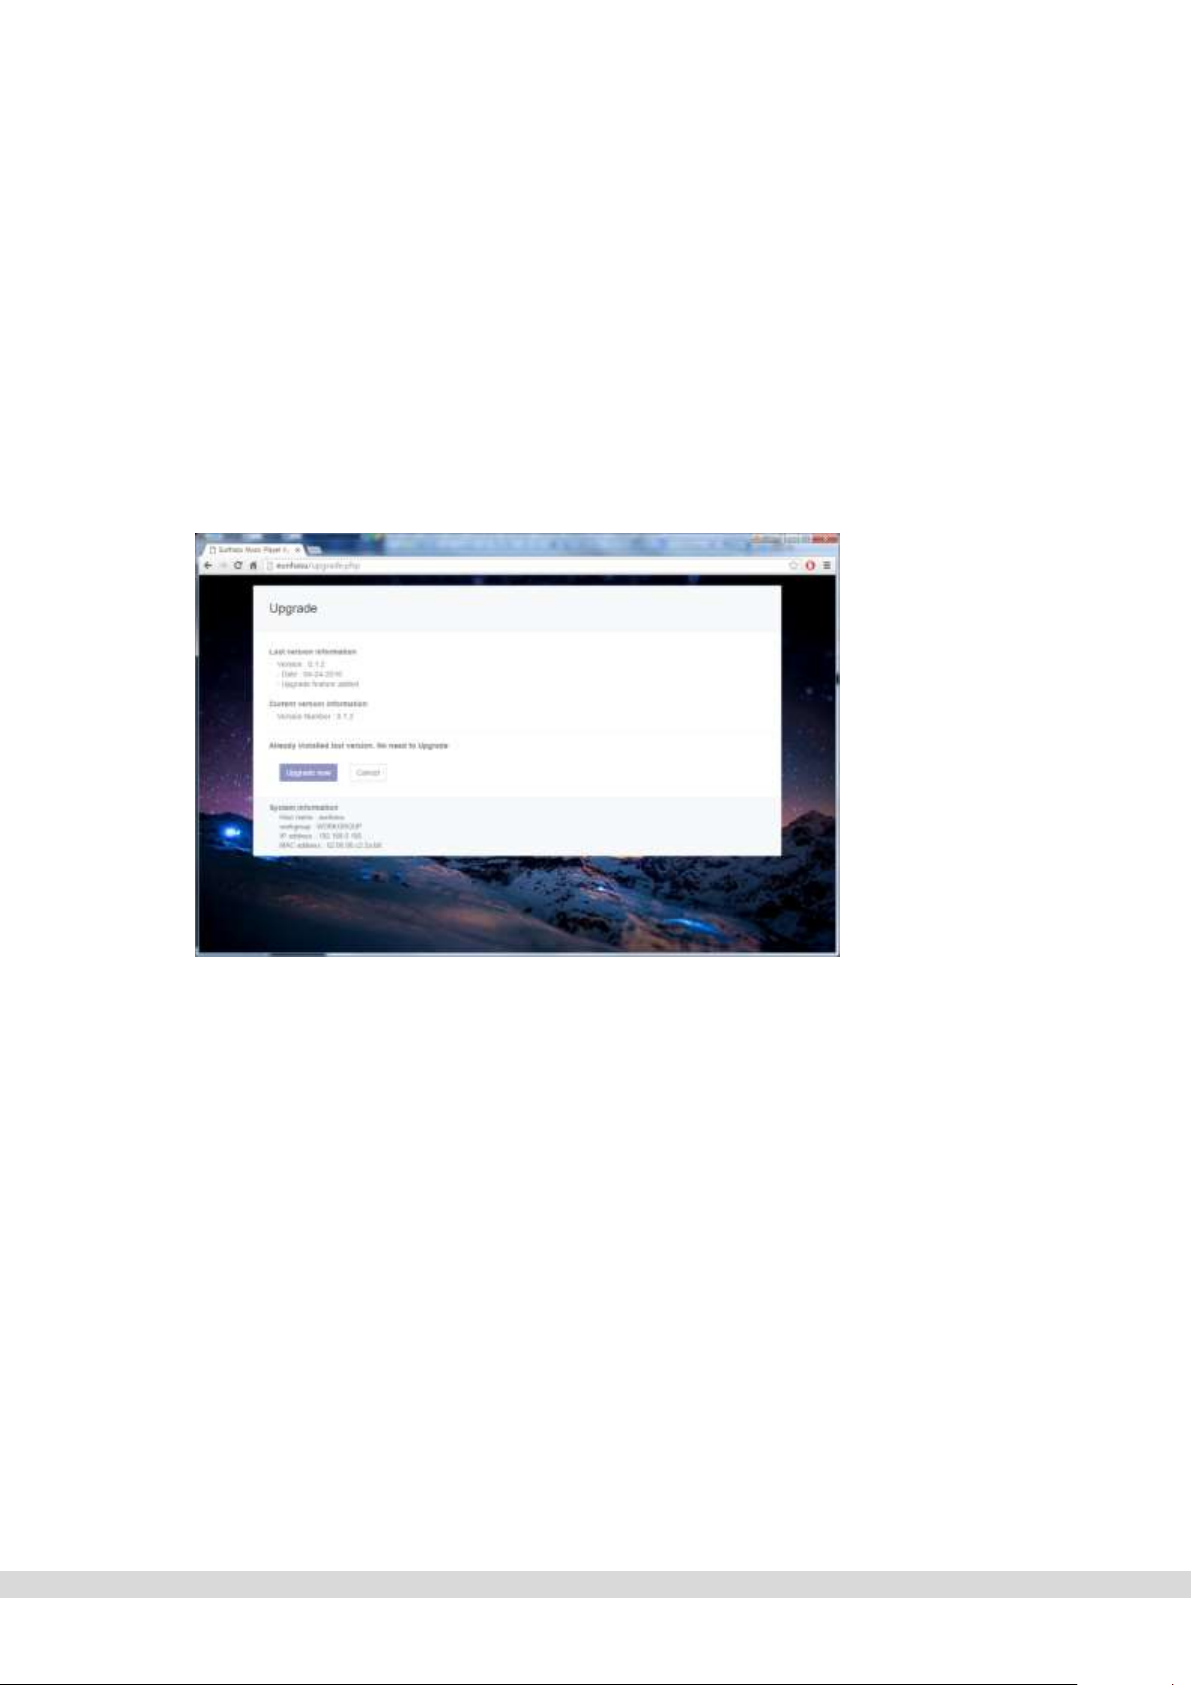
sMS-200의 소프트웨어를 업그레이드 합니다.
Upgrade sMS-200 software.
Last version information: 가장 최신 소프트웨어 정보를 표시 합니다.
Last version information: Display the latest software information.
Current version information: 현재 사용중인 소프트웨어 정보를 표시 합니다.
Current version information: Display the current software information in use.
Already installed last version. No need to Upgrade: 가장 최신 소프트웨어와 현재 사용중인 소프트웨어의 버전 정보를
비교하여 업그레이드가 필요한지 표시 합니다.
업그레이드가 필요하면 ‘'Upgrade will stop all applications and take a long time” 표시 됩니다.
Already installed last version. No need to Upgrade: Display whether the upgrade is needed or not by comparing the version
of the latest software and current software you are currently using. If the upgrade is needed, it will display as “Upgrade will
stop all applications and take a long time”.
Upgrade now: 모든 사용중인 프로그램을 중지하고 필요한 소프트웨어를 업그레이드 합니다.
주의: 업그레이드를 하게 되면 시간이 많이 걸릴 수 있으며 중간에 전원이 off되면 제품을 다른 방법을 이용하여
복구해야 하므로 절대로 전원을 off하지 말아야 합니다.
Upgrade now: It stops all program and upgrade the software.
CAUTION: The upgrade may require a long time, the power should be on in the mean time upgrading.
Cancel: 업그레이드를 하지 않고 처음 화면으로 돌아 갑니다.
Cancel: Go back to the home screen.
- 12 -
Page 14
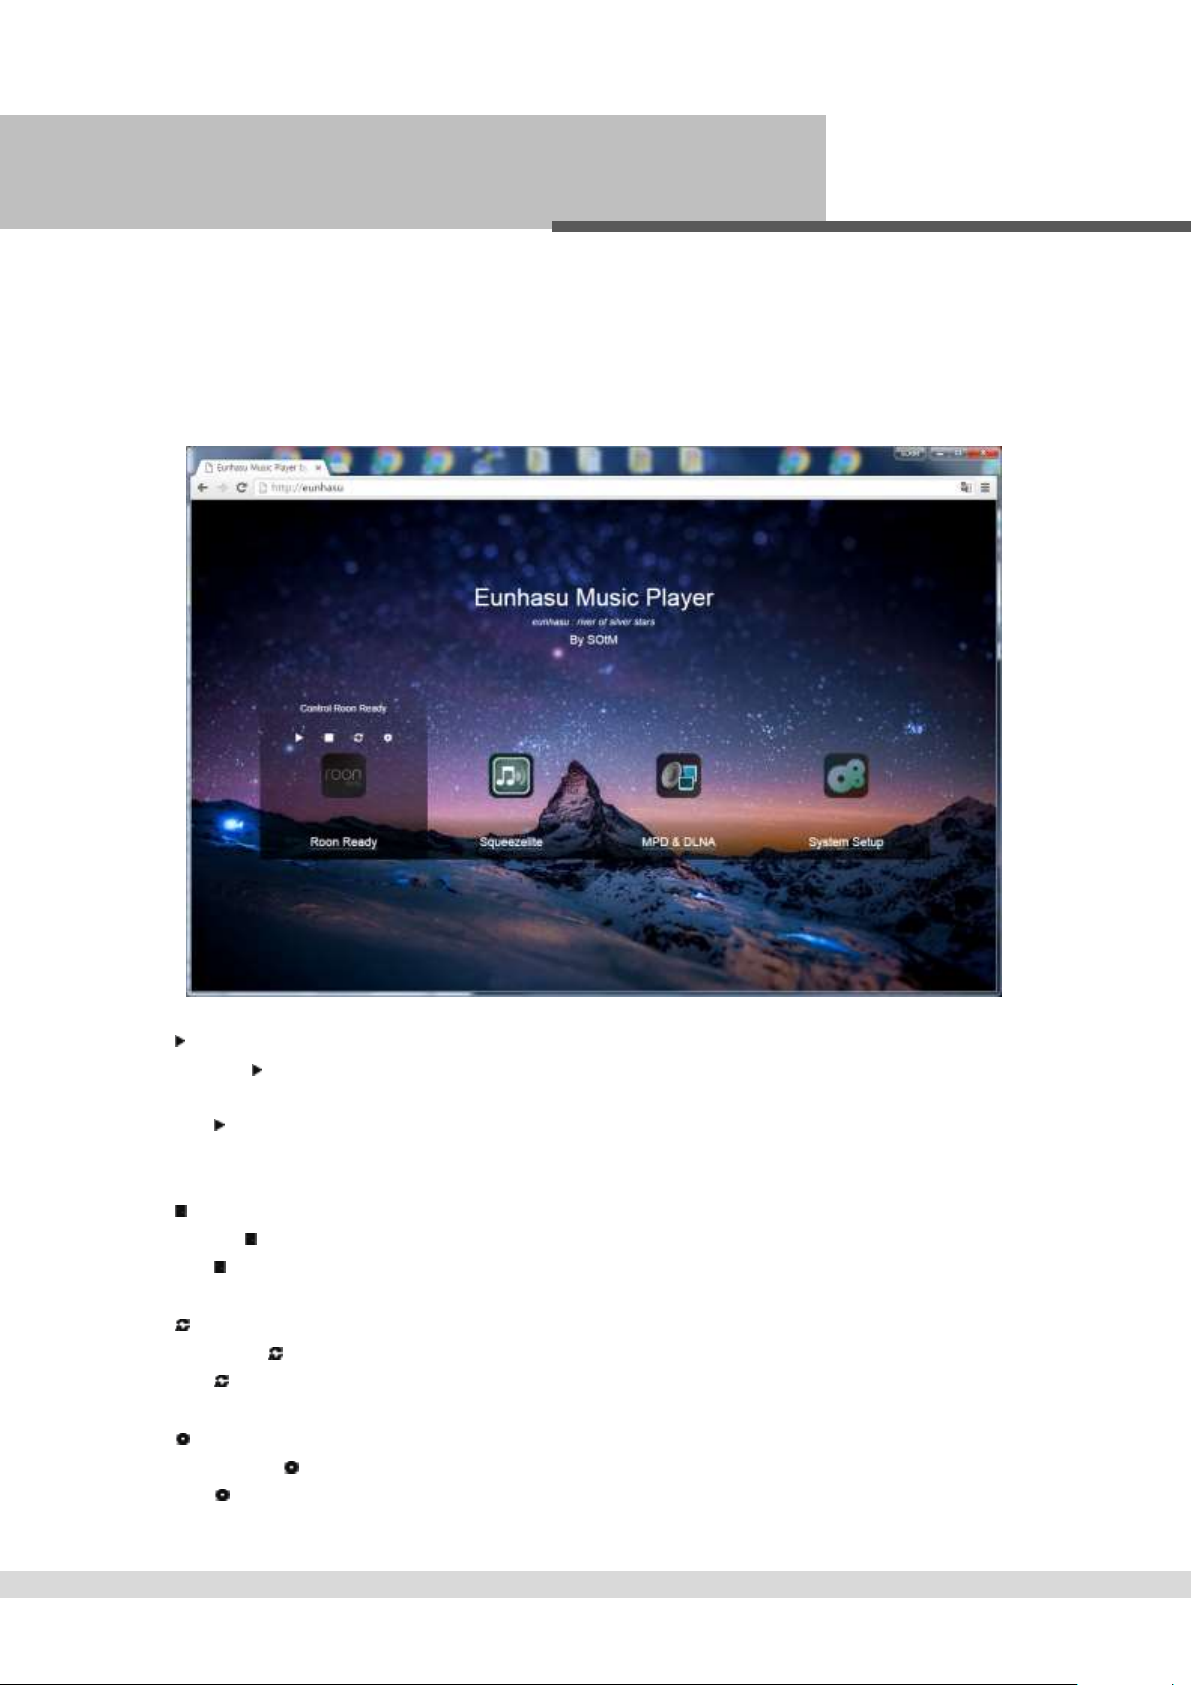
Roon Ready 사용방법 (How to use Roon Ready)
1. Roon Ready 아이콘 선택 - Choose Roon Ready icon
마우스를 이용하여 커서를 Roon Ready 아이콘으로 이동하거나 Roon Ready 아이콘을 터치하면 아래 이미지와 같이 Roon
Ready 사용에 필요한 동작 버튼이 자동으로 표시 됩니다.
동작 버튼을 이용해 Roon Ready를 시작, 정지, 재시작, 환경설정을 할 수 있습니다.
Mouse over the Roon Ready icon and then the action buttons will appear. On the smart devices, touch over the Roon Ready icon
and then the action buttons will appear like when using a mouse.
By using the action buttons, you can start, stop, restart or configure Roon Ready.
2. 시작 - Start Roon Ready
시작 버튼 을 선택하면 Roon Ready 기능을 시작 합니다. Roon Ready가 시작 되지 않은 상태에서는 Roon Ready 아이콘
아래에 ‘Roon Ready’라고 표시 되며 Roon Ready가 시작되어 동작되고 있으면 ‘Active’라고 표시 됩니다.
Click start button to start Roon Ready. ‘Active’ sign will be displaying under the Roon Ready icon once Roon Ready is started and
running.
3. 정지 - Stop Roon Ready
정지 버튼 을 선택하면 Roon Ready 기능을 정지 합니다.
Click stop button to stop Roon Ready.
4. 재시작 - Restart Roon Ready
재시작 버튼 을 선택하면 Roon Ready 기능을 정지 한 후 다시 시작 합니다.
Click restart button to stop and then start Roon Ready.
5. 환결설정 – Config Roon Ready
환경설정 버튼 을 선택하면 아래와 같이 Roon Ready 기능을 위한 환경설정 화면으로 이동 합니다.
Click config button to move to Roon Ready config screen.
- 13 -
Page 15
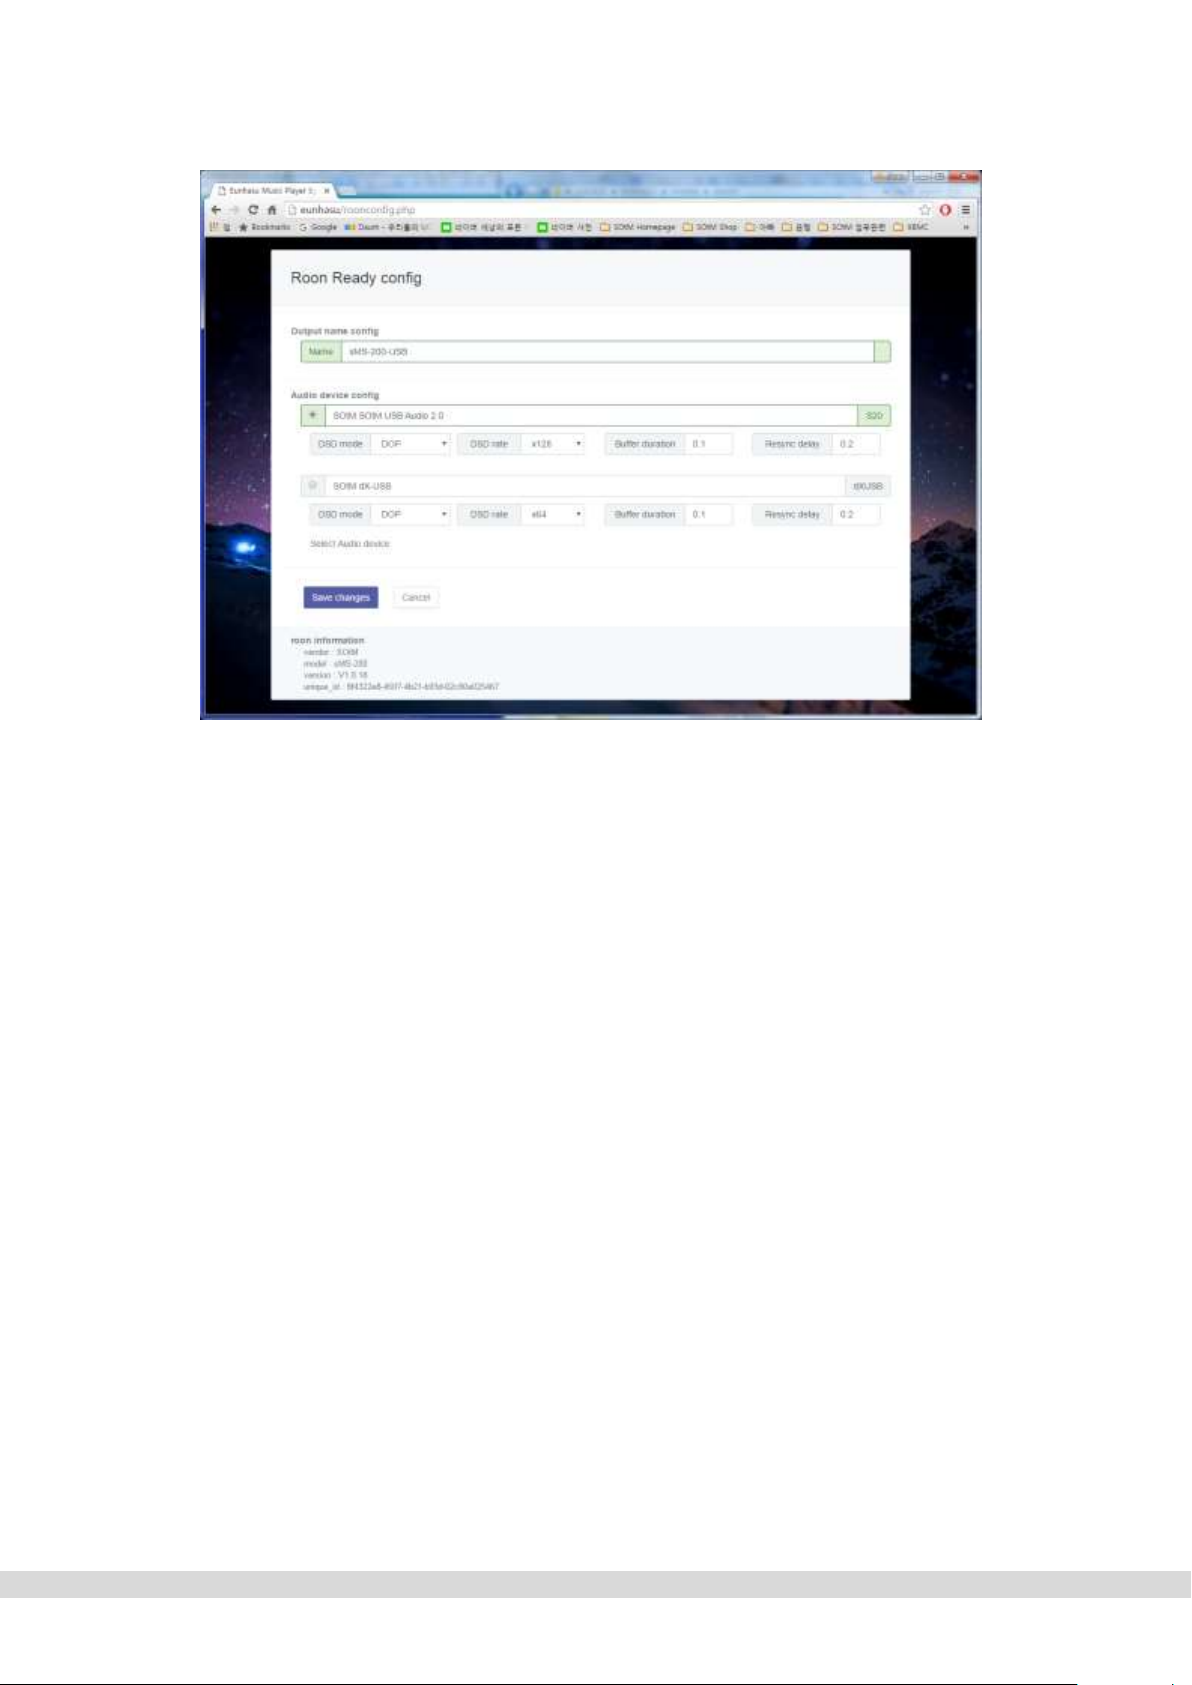
Name: Roon Server에서 보여지는 sMS-200의 Roon Ready 기능의 이름 입니다.
Name: A name of sMS-200’s Roon Ready appearing on Roon Server.
Audio device config: sMS-200에 연결된 모든 USB DAC의 설정 정보가 표시 되며 선택된 USB DAC는 기기 이름 앞쪽에
선택된 라디오 버튼과 함께 옅은 연두색으로 표시 되고, 나머지 사용 가능한 USB DAC은 옅은 남색으로 표시 됩니다.
사용하려는 USB DAC을 이름 앞쪽에 라디오 버튼으로 선택하고 ‘Save changes’를 누르면, 선택한 USB DAC을 사용할 수
있습니다.
Audio device config: The config information of all USB DACs connected to sMS-200 is displaying. The chosen USB DAC is
displaying in the light green box with the selected radio button in front and other available USB DACs are displaying in the
light blue box.
Select a radio button of USB DAC which is going to use and click ‘Save changes’ to use the USB DAC.
DSD mode: USB DAC가 지원하는 DSD 음악파일 재생 방법을 NONE, NATIVE, DOP, DCS, NATIVE/DOP, NATIVE/DCS 중
선택 합니다.
DSD mode: Choose one of DSD playback mode among NONE, NATIVE, DOP, DCS, NATIVE / DOP, NATIVE / DCS which USB
DAC can support.
DSD rate: USB DAC가 지원하는 최대 DSD 음악파일 속도를 x64, x128, x256 중 선택할 수 있습니다.
DSD rate: Choose one of DSD music file rate among x64, x128 or x256 which USB DAC can support.
Buffer duration: 오디오 출력 장치의 버퍼 지속 시간을 설정 합니다. 음악 재생에 문제가 있을 경우 값을 조절 합니다.
Buffer duration: Set up the buffer duration value. If music playback has any issue, need to adjust this value.
Save changes: 변경 된 정보를 저장 합니다. Roon Ready가 동작되고 있으면 자동으로 재시작 합니다.
Save changes : Save the information you entered or modified, and Roon Ready automatically will restart if Roon Ready is
started and running.
Cancel: 변경된 정보를 무시하고 처음 화면으로 돌아 갑니다.
Cancel: Go back to the home screen.
- 14 -
Page 16
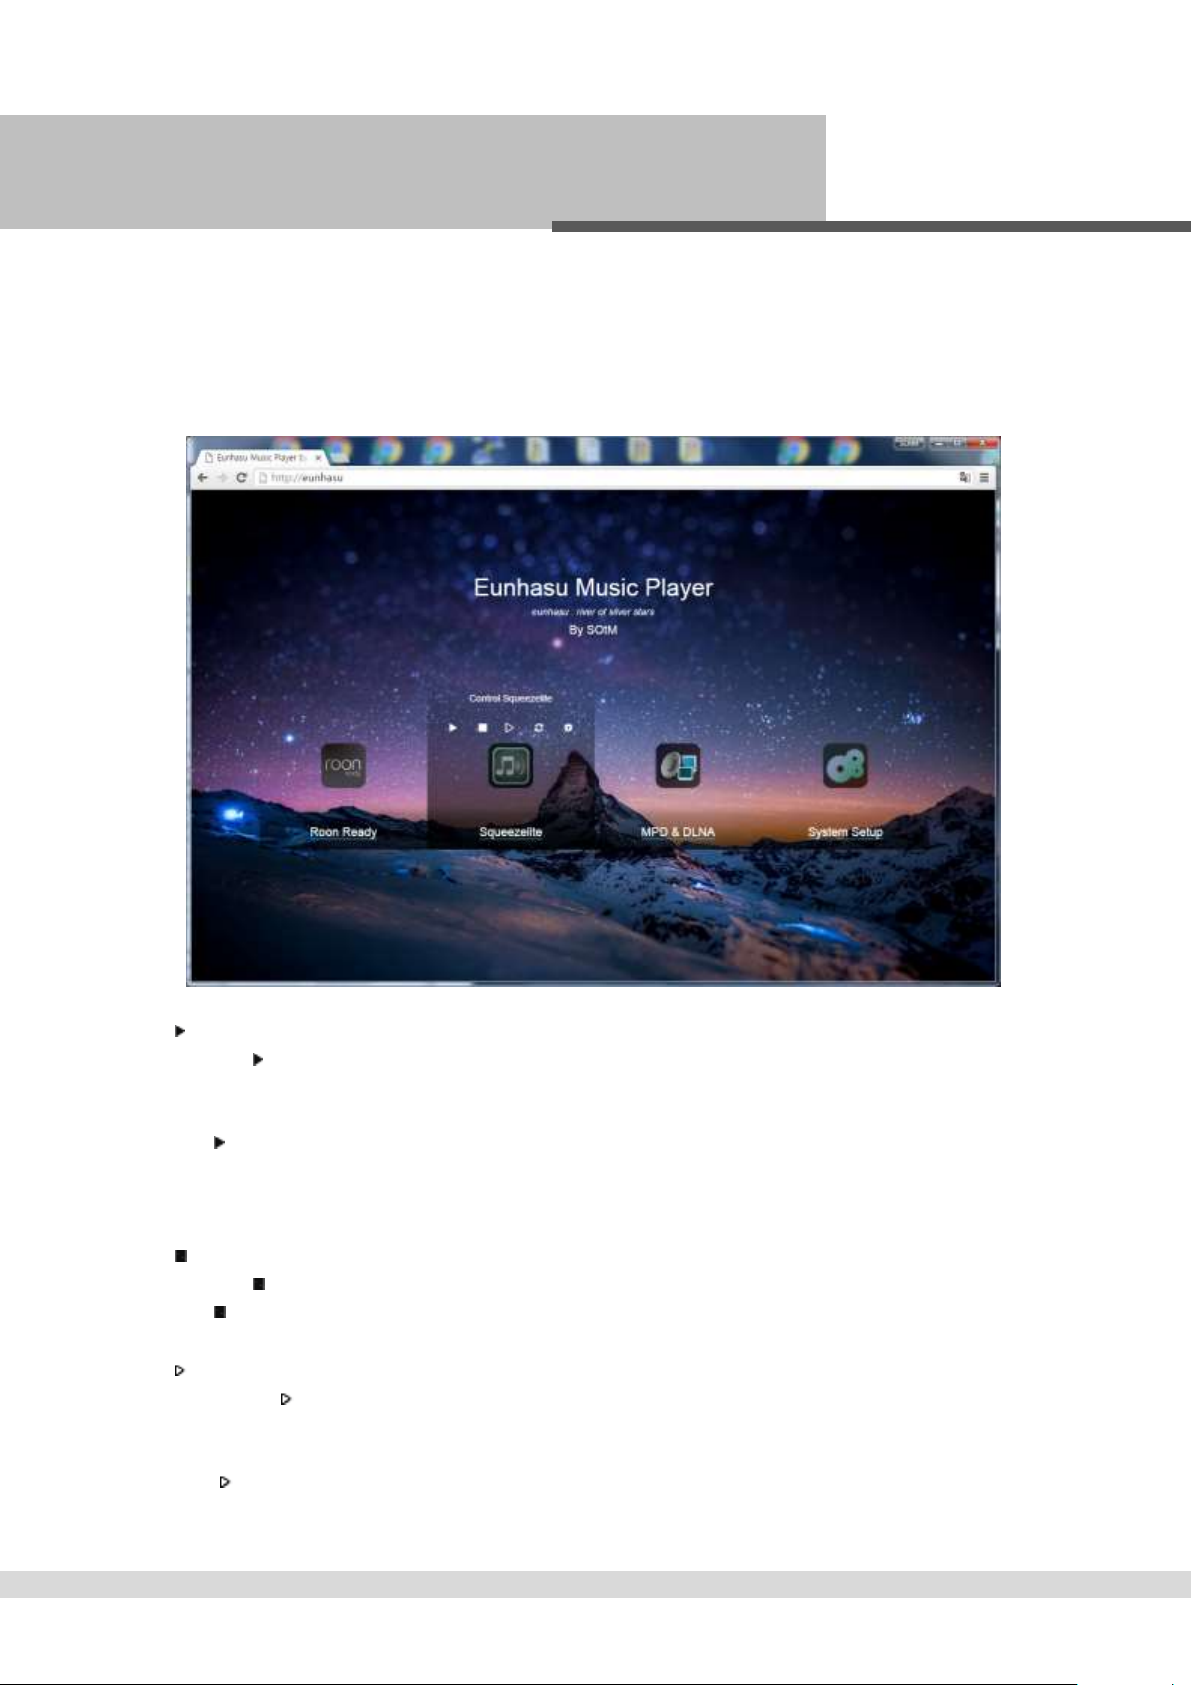
Squeezelite 사용 방법 (How to use Squeezelite)
1. Squeezelite 아이콘 선택- Choose Squeezelite icon
마우스를 이용하여 커서를 Squeezelite 아이콘으로 이동하거나 Squeezelite 아이콘을 터치하면 아래 이미지와 같이 Squeezelite
사용에 필요한 동작 버튼이 자동으로 표시 됩니다.
동작 버튼을 이용해 Squeezelite를 시작, 정지, Logitech Media Server 열기, 재시작, 환경설정을 할 수 있습니다.
Mouse over the Squeezelite icon and the action buttons will appear. On the smart devices, touch over the Squeezelite icon and the
action buttons will appear like when using a mouse.
By using the action buttons, you can start, stop, Open LMS web interface, restart or configure Roon Ready.
2. 시작 – Start Squeezelite
시작 버튼 을 선택하면 Squeezelite와 Logitech Media Server기능을 시작 합니다. Squeezelite가 시작 되지 않은 상태에서는
Squeezelite 아이콘 아래에 ‘Squeezelite’라고 표시 되며 Squeezelite가 시작되어 동작되고 있으면 ‘Active’라고 표시 됩니다.
Squeezelite시작 시 Logitech Media Server도 함께 시작 되기 때문에 30초 정도의 시간이 소요 됩니다.
Click start button to start Squeezelite and Logitech Media Server. ‘Active’ sign will be displaying under the Squeezelite icon once
Squeezelite is started and running.
When starting Squeezelite, it will take around 30seconds because Logitech Media Server is also starting together.
3. 정지 - Stop Squeezelite
정지 버튼 을 선택하면 Squeezelite와 Logitech Media Server 기능을 정지 합니다.
Click stop button to stop Squeezelite and Logitech Media Server.
4. LMS 열기 – Open LMS web interface
LMS열기 버튼 을 선택하면 sMS-200에서 실행 중인 Logitech Media Server의 웹 리모트 컨트롤(Web Remote Control)이
새로운 화면에서 열리며 음악파일을 탐색하고 재생 할 수 있습니다.
Logitech Media Server의 웹 리모트 컨트롤 화면은 Squeezelite를 실행 해야 열립니다.
Click open LMS web interface button to open LMS web remote control running on sMS-200 in the new browser and then you
will be able to browse and play music file.
- 15 -
Page 17
5. 재시작 - Restart Squeezelite
재시작 버튼 을 선택하면 Squeezelite 와 Logitech Media Server기능을 정지 한 후 다시 시작 합니다.
Click restart button to stop Squeezelite and Logitech Media Server and then restart.
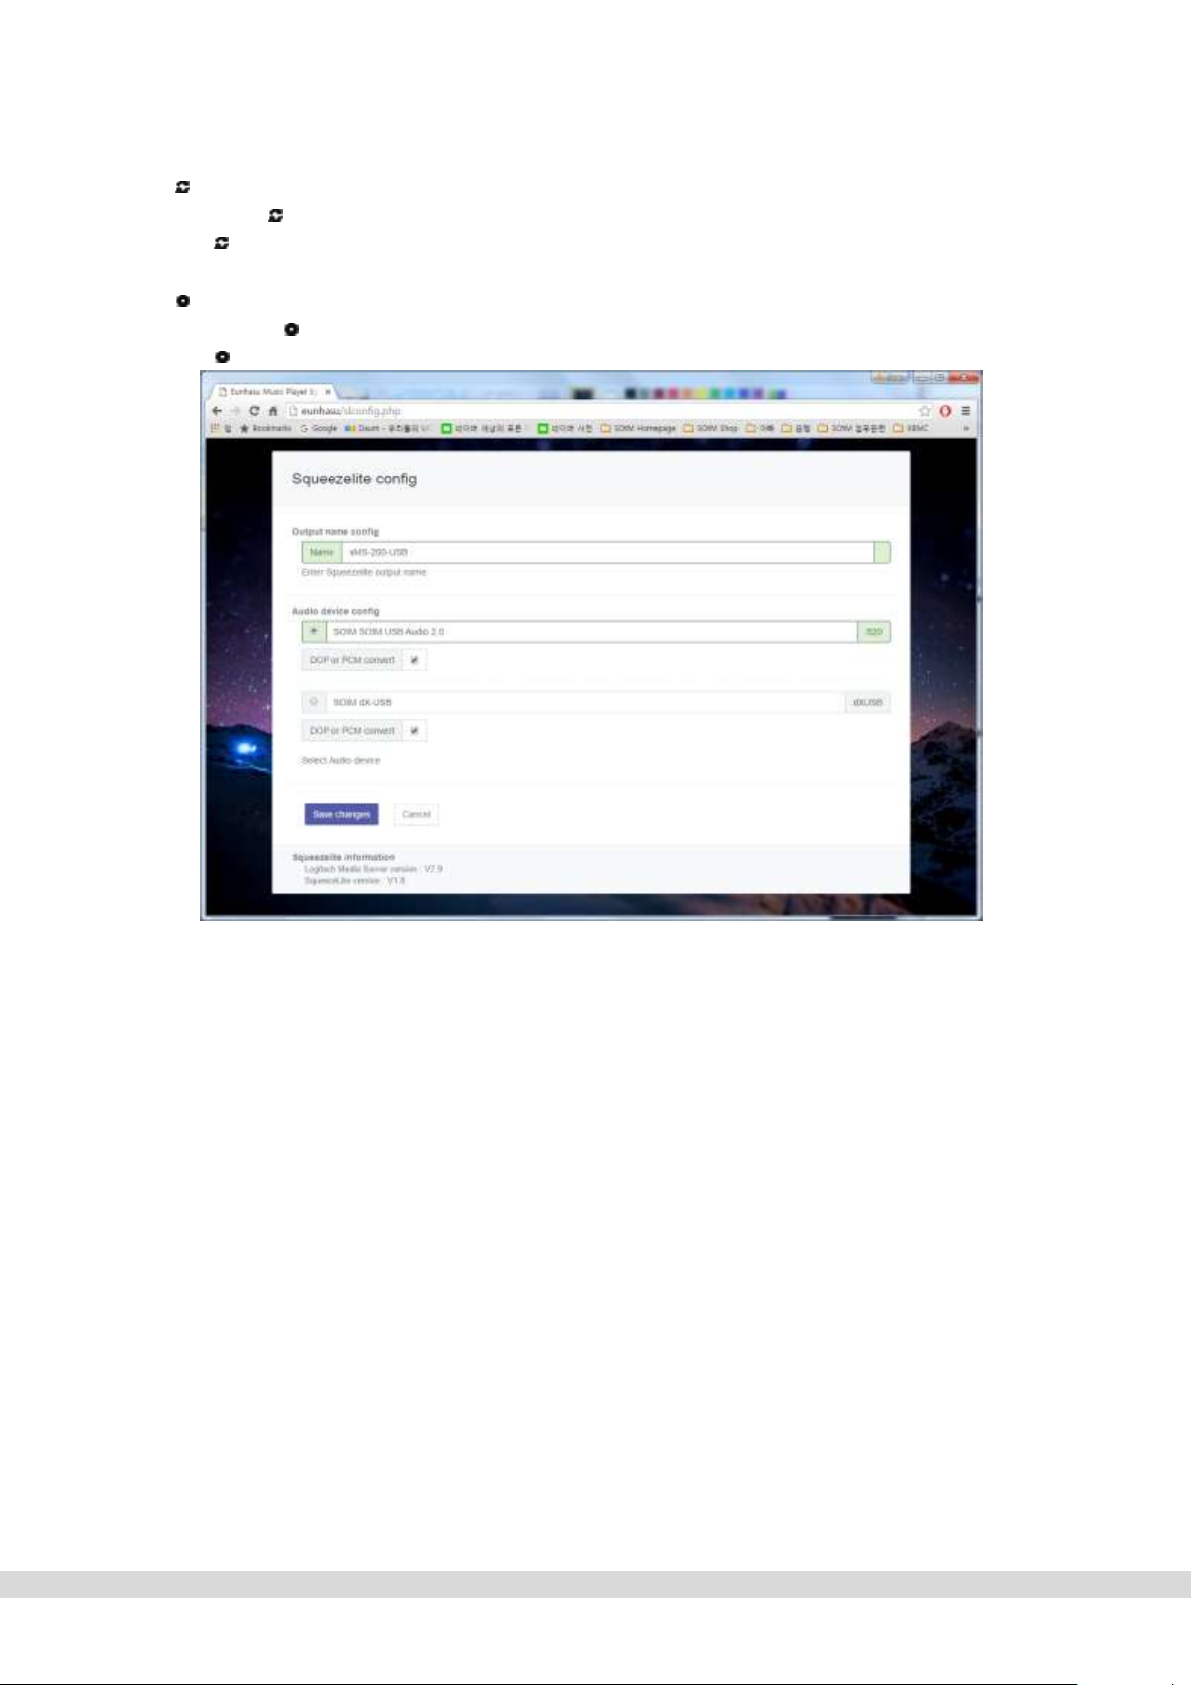
6. 환결설정 – Config Squeezelite
환경설정 버튼 을 선택하면 아래와 같이 Squeezelite 기능을 위한 환경설정 화면으로 이동 합니다.
Click config button to move to Squeezelite config screen.
Name: Logitech Media Server에서 보여지는 sMS-200의 Squeezelite 기능의 이름 입니다.
Name: A name of sMS-200’s Squeezelite appearing on Logitech Media Server
Audio device config: sMS-200에 연결된 모든 USB DAC의 설정 정보가 표시 되며 선택된 USB DAC는 기기 이름 앞쪽에
선택된 라디오 버튼과 함께 옅은 연두색으로 표시 되고, 나머지 사용 가능한 USB DAC은 옅은 남색으로 표시 됩니다.
사용하려는 USB DAC을 이름 앞쪽에 라디오 버튼으로 선택하여 ‘Save changes’를 누르면, 선택한 USB DAC을 사용할 수
있습니다.
Audio device config: The config information of all USB DACs connected to sMS-200 is displaying. The chosen USB DAC is
displaying in the light green box with the selected radio button in front and other available USB DACs are displaying in the
light blue box.
Select a radio button of USB DAC which is going to use and click ‘Save changes’ to use the USB DAC.
DOP or PCM convert: 선택하면 DSD 음악파일 재생 시 DOP기능을 사용하고, 선택하지 않으면 DSD 음악파일을
PCM으로 변환하여 재생 합니다.
DOP or PCM convert: Check for using DOP function while playing DSD music file, uncheck for using DSD to PCM
converting while playing DSD music file.
Save changes: 변경 된 정보를 저장 합니다. Squeezelite 가 동작하고 있다면 Squeezelite와 Logitech Media Server 기능을
재시작 하며 30초 정도의 시간이 소요 됩니다.
Save changes : Save the information you entered or modified, and Squeezelite and Logitech Media Server will automatically
restart if Squeezelite is started and running.
Restart will take around 30 seconds.
Cancel: 변경된 정보를 무시하고 처음 화면으로 돌아 갑니다.
Cancel: Go back to the home screen.
- 16 -
Page 18
MPD & DLNA 사용 방법 (How to use MPD & DLNA)
1. MPD & DLNA 아이콘 선택 - Choose MPD & DLNA icon
마우스를 이용하여 커서를 MPD & DLNA 아이콘으로 이동하거나 MPD & DLNA 아이콘을 터치하면 아래 이미지와 같이 MPD
& DLNA 사용에 필요한 동작 버튼이 자동으로 표시 됩니다.
동작 버튼을 이용해 MPD & DLNA를 시작, 정지, 재시작, 환경설정을 할 수 있습니다.
Mouse over the MPD & DLNA icon and then the action buttons will appear. On the smart devices, touch over the MPD & DLNA
icon and then the action buttons will appear like when using a mouse.
By using the action buttons, you can start, stop, restart or configure MPD & DLNA.
2. 시작 - Start MPD & DLNA
시작 버튼 을 선택하면 MPD & DLNA 기능을 시작 합니다. MPD & DLNA 가 시작 되지 상태에서는 MPD & DLNA 아이콘
아래에 ‘MPD & DLNA’ 가 표시 되며 MPD & DLNA가 시작되어 동작되고 있으면 ‘Active’가 표시 됩니다.
Click start button to activate MPD & DLNA. ‘Active’ sign will be displaying under the MPD & DLNA icon once MPD & DLNA is
started and running.
3. 정지 - Stop MPD & DLNA
정지 버튼 을 선택하면 MPD & DLNA 기능을 정지 합니다.
Click stop button to halt MPD & DLNA.
4. 재시작 - Restart MPD & DLNA
재시작 버튼 을 선택하면 MPD & DLNA 기능을 정지 한 후 다시 시작 합니다.
Click restart button to stop MPD & DLNA and then restart.
5. 환결설정 – Config MPD & DLNA
환경설정 버튼 을 선택하면 아래와 같이 MPD & DLNA 기능을 위한 환경설정 화면으로 이동 합니다.
Click config button to move to MPD & DLNA config screen.
- 17 -
Page 19
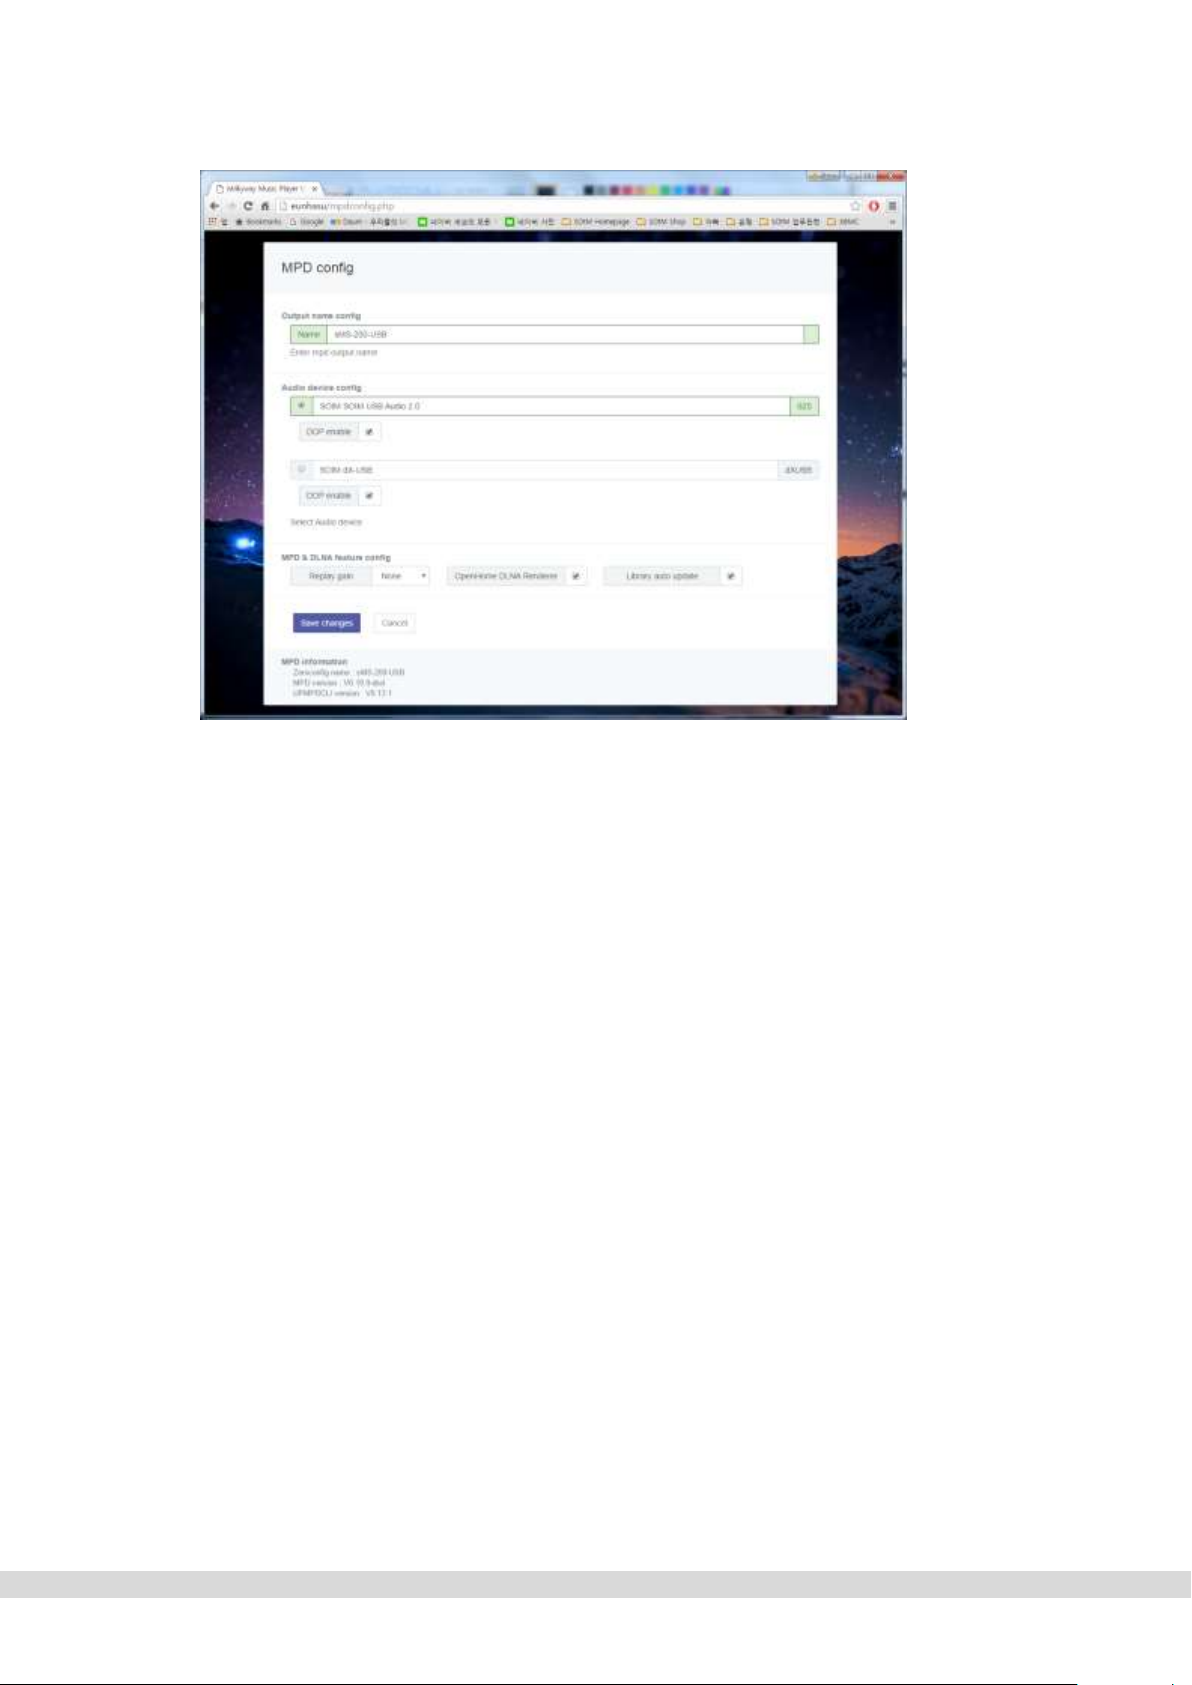
Name: MPD 제어 앱(App)과 DLNA 제어 앱(App)에서 보여지는 sMS-200의 MPD & DLNA 기능의 이름 입니다.
Name: A name of sMS-200’s MPD & DLNA appearing on MPD controlling App and DLNA controlling App.
Audio device config: sMS-200에 연결된 모든 USB DAC의 설정 정보가 표시 되며 선택된 USB DAC는 기기 이름 앞쪽에
선택된 라이오 버튼과 함께 옅은 연두색으로 표시 되고, 나머지 사용 가능한 USB DAC은 옅은 남색으로 표시 됩니다.
사용하려는 USB DAC을 이름 앞쪽에 라디오 버튼으로 선택하여 ‘Save changes’를 누르면, 선택한 USB DAC을 사용할 수
있습니다.
Audio device config: The config information of all USB DACs connected to sMS-200 is displaying. The chosen USB DAC is
displaying in the light green box with the selected radio button in front and other available USB DACs are displaying in the
light blue box.
Select a radio button of USB DAC which is going to use and click ‘Save changes’ to use the USB DAC.
DOP enable: 선택하면 DSD 음악파일 재생 시 DOP기능을 사용 합니다.
DOP enable: Check for using DOP function while playing DSD music file.
Replay gain: Replay gain기능을 None, Album, Track중에 선택 합니다.
Replay gain: Choose Replay gain among None, Album or Track.
OpenHome DLNA Renderer: 선택하면 OpenHome DLNA Renderer 기능이 지원 됩니다.
OpenHome DLNA Renderer: Check for using OpenHome DLNA Renderer feature.
Library auto update: 선택하면 음악파일의 변경 내용을 자동으로 검색하고 업데이트 합니다.
Library auto update: Check for auto-scanning and updating the library.
Save changes: 변경 된 정보를 저장 합니다. MPD & DLNA 가 동작하고 있다면 재시작 합니다.
Save changes : Save the information you entered or modified, and MPD & DLNA will automatically restart if MPD & DLNA
is started and running.
Cancel: 변경된 정보를 무시하고 처음 화면으로 돌아 갑니다.
Cancel: Go back to the home screen.
- 18 -
Page 20

S
O
t
M
Ultimate High Performance Audio
www. sotm-audio.com
- 19 -
 Loading...