

Page 1

Page 2

Page 3

User manual Kika Page 3 von 60
We are member of rehaKIND association
International Association for the
Rehabilitation of Children and Adolescents
Imprint:
Technical collaborator: Klaus Pfeil
As of 3/7/2013
Technical alterations and misprints excepted.
SORG Rollstuhltechnik GmbH + Co.KG
Benzstraße 3-5
68794 Oberhausen-Rheinhausen
Germany
© by SORG Rollstuhltechnik GmbH + Co.KG
Benzstraße 3-5, 68794 Oberhausen-Rheinhausen, Germany. All texts and pictures are
subject to copyright and may not be published not even as an excerpt! - without the explicit
authorization of SORG Rollstuhltechnik GmbH +
Co.KG
Page 4

Page 4 of 60 User manual Kika
Contents
1. General Information ........................... 5
1.1 Preamble ...............................................5
1.2 Reception...............................................6
1.3 Wheelchair overview............................7
1.4 Specifications........................................ 8
1.5 Application.............................................8
1.6 Additional electric drives.....................8
2. Safety instructions.............................. 9
2.1 General security advice .......................9
2.2 Before every use .................................10
2.3 How to avoid tipping ..........................10
2.4 Coping with obstacles........................11
2.5 Heat and water ...................................12
2.6 Driving in road traffic .........................12
3. Adjustments ......................................13
3.1 Leg support adjustment ....................14
3.1.1 Undivided leg-support ...............14
3.1.2. Hinged leg support (opt.) ................ 16
3.1.3. Leg support with support pad
(optional).............................................. 17
3.2 Seat heights ........................................18
3.3 Centre of gravity .................................19
3.4 Back height .........................................20
3.5 Retractable back extension with head
pad (optional).............................................21
3.6 Pelvic belt (optional) ..........................21
3.7 Back angle...........................................22
3.8 Side guard, clothing guard................22
3.9 Arm pads (optional) ...........................22
3.10 Adjustment of caster and rear
wheel ...........................................................22
3.11 Locking brake ...................................23
3.11.1 Standard locking brake ..........23
3.11.2 Drum brake (optional) ............24
3.11.3 Attendant brake (optional) ..... 25
3.12 Anti-tippers........................................26
3.13 Head rest (optional) .........................27
3.14 Lateral truss pads (optional) ..........27
3.15 Abduction wedge (optional) ...........27
3.16 Growth adaption (optional).............28
3.16.1 Seat depth extension ..............28
3.16.2. Seat width adjustment...........28
4 General Handling...............................30
4.1 Getting in and out...............................30
4.2 Push handles.......................................31
Adjusting the tension force.................31
Removing the push bars.....................32
4.2.1 Single-hand push handle, firm or
hinged (optional)..................................33
4.2.2 Push bar (optional) ....................33
4.3 Tilt function, back angle adjustment
and –extension..........................................34
4.3.1 Tilt function ................................34
4.3.2 Back angle adjustment................35
4.3.3 Folding the back to the front ....35
4.3.4 Retractable back extension (opt.) ...36
4.4 Anti-tipper............................................ 37
4.6 Leg supports ....................................... 38
4.6.1 Standard leg support.................38
4.6.2 Leg support, hinged (optional) ..38
4.6.3 Leg support with support pad
(optional)..............................................39
4.7 Locking brake ..................................... 40
4.7.1 Locking brake, standard ...........40
4.7.2 Attendant brake (optional)........40
4.7.3 Drum brakes (optional) .............40
4.8 Loading and transportation..............41
4.9 Safety of transportation....................41
4.10 Transportation of the wheelchair as
seat in a passenger vehicle.....................42
5 Maintenance...................................... 43
5.1 Cleaning and attendance..................43
5.2 Disinfection ......................................... 43
5.3 Inspection............................................44
5.4 Checklist and maintenance..............45
5.5 Checklist yearly inspection............... 47
5.6 Reparations.........................................48
5.7 Service .................................................48
5.8 Replacement parts ............................48
5.9 Disposal ...............................................48
5.10 Reuse.................................................48
5.11 Tyre change ......................................48
6 Technical data ................................... 50
6.1 Measures and dimensions ...............50
6.2 Meaning of labels...............................51
7 Warranty............................................. 52
8 Warranty Form................................... 56
9 Life cycle record ................................ 57
9.1 User chronology..................................57
9.2 Service book .......................................58
Retailer information............................. 60
Page 5

User manual Kika Page 5 von 60
1. General Information
1.1 Preamble
Kika will be your child’s reliable companion in
their everyday life. For this purpose, your child
has to familiarise with the wheelchair because,
as any other technical device, it may hold
numerous dangers if used inappropriately.
The following user manual is divided up into 5
function-specific chapters:
1. General Information
2. Safety Instructions
3. Adjustments
4. General Handling
5. Maintenance
(Chapters 6-9 discuss technical data and
warranty conditions)
Chapters 2 and 4 are supposed to acquaint
you and your child with the wheelchair and to
explain the daily handling. Chapter 3 is
directed EXCLUSIVELY to your rehabilitation
engineer since this chapter deals
unexceptionally with safety-relevant points. So
please, in your own interest, leave all
adjustment work to a qualified medical supply
store.
We work most carefully and thoroughly during
all stages of development and construction to
guarantee you the highest standard of quality,
individuality and safety. Through our
certification according to ISO 9001:2008 we
commit ourselves to continuously increase this
quality standard.
For reasons of simplification, in the following
chapters we will only refer to you; however the
information given is all the more important for
your child since it contains important safety
instructions.
1 ATTENTION
As the current owner of the wheelchair,
please keep this manual in a safe place and
make sure all work done on your wheelchair
by your medical supply store is documented
in detail in the respective chapter at the end
of this manual.
In case of a reuse of the wheelchair, this
manual serves as an important source of
information for your health insurance fund.
Additionally, it provides the verification of
regular inspections, which might be
important in the event of a warranty claim.
Therefore, please keep this manual with the
wheelchair and hand it back to your health
insurance in case of return of your Kika.
PLEASE NOTE
This user manual is intended for both you
and your rehabilitation engineer. It contains
instructions on the correct adjustment of
the medical aid which may exclusively be
conducted by a qualified member of the
specialised trade (cf. chapter 3).
Moreover, it is supposed to help you get
acquainted with the handling of your new
Kika and to avoid accidents (cf. chapter 4).
This manual covers all possible equipment
options that might be installed on a Kika
and thus may contain chapters that do not
conform to your particular configuration.
1 ATTENTION
Please read and mind this user manual with
its general safety instructions carefully
before putting Kika into service for the first
time.
If you have any questions, the sanitary trade
of your confidence or our competent team
will be glad to help you.
Service line +49 07254 / 9279-0
We appreciate your confidence!
Page 6

Page 6 of 60 User manual Kika
1.2 Reception
Each SORG wheelchair is mounted and tested
for functional efficiency and freedom from
defects by our specialists and is then packaged
in special paperboard containers by our
shipping experts.
PLEASE NOTE
For judicial reasons, we nevertheless need to
ask you to check your wheelchair
IMMEDIATELY after reception and in the
presence of the bearer for any damage that
might have occurred during transport. Please
note that, according to the legal situation,
belatedly recorded damage cannot be
asserted, neither to the forwarding company
nor to us!
Please do not sign the acknowledgement of
receipt of the forwarding company before
careful inspection.
The necessary steps and measures for
individual adjustments are stated in chapter 3
“Adjustments”.
1 ATTENTION
For safety reasons, all adjustments described
there are to be conducted exclusively by a
specialised trade member qualified for this
purpose.
PLEASE NOTE
For ecological reasons, we kindly ask you to
keep the packaging in case transportation
becomes necessary at a later point (returning,
shipping for inspection, etc.).
Page 7
User manual Kika Page 7 von 60
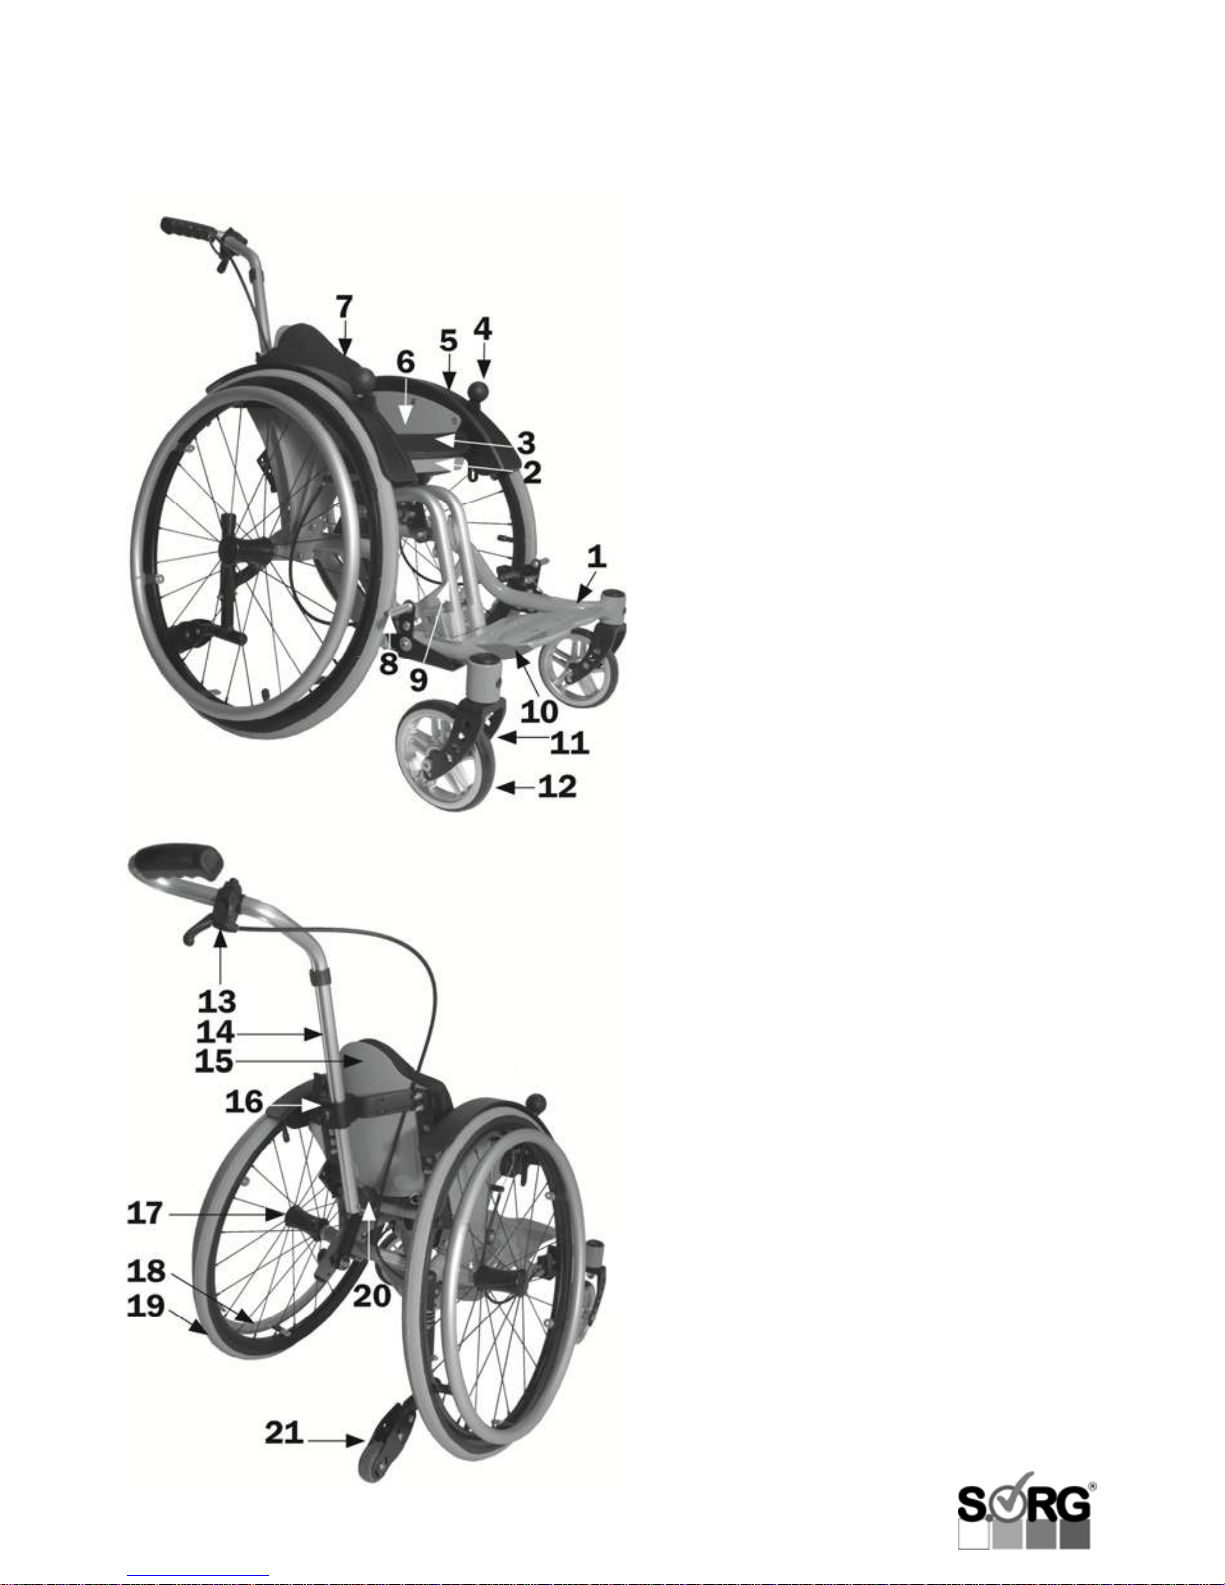
1.3 Wheelchair overview
The most important components of the
wheelchair:
1. Frame
2. Seat plate
3. Seat cushion
4. Locking brake – operating element
5. Wheel guards
6. Side part
7. Back cushion
8. Locking brake – pressing element
9. Foot rest holder
10. Foot rest
11. Caster fork
12. Caster
13. Release lever seat-tilt
14. Push handle
15. Moulded back
16. Clamp lever for push handle adjustment
17. Quick-release-axle
18. Handrims
19. Rear wheel
20. Back angle adjustment
21. Anti-tipper
Page 8

Page 8 of 60 User manual Kika
1.4 Specifications
Kika is a very lightweight, tiltable children’s
wheelchair with a rigid frame and a firm wheel
base. The entire seat-back-unit is tiltable by
30° via the gas pressure spring, and the back
angle may be adjusted 40° backwards or
folded frontwards. Thanks to its light weight, its
outstanding handling characteristics, as well as
the custom-fit adjustment options of the
ergonomically ideal grip point, Kika may also
be used as an activity wheelchair. Hence Kika
is the perfect combination of an activity
wheelchair AND a buggy.
Kika is indexed for children with a seat width
from 20 cm (approx. 7.9 in) and a weight of up
to 50 kg (approx. 110 lbs). It supports early
and careful activation of low-strength and/or
very small people. The tilting and back angle
adjustment contribute to shifting strains and
thus training the entire tonicity as well as
stimulating the cardiovascular system, the
metabolism and digestive tract. An upright
position of the pelvis and a good decubitusprophylaxis are being supported. Kika aids in
developing reflex control and perception,
prevents scolitotic processes and supports the
development of controlled muscular tonicity.
These possibilities conform to the following
disease patterns:
• spinal muscle atrophy
• Spina Bifida
• craniocerebral injury
• cerebral palsies
• all forms of paraplegia
• infantile cerebral palsy (ICP)
• paralysis
• athetosis
• ataxia
• unstable circulation and metabolism
• risk of decubitus
• difficulties in obtaining/maintaining an
upright position
• pathological patterns of movement
• distortion of perception
• asymmetries
• lack of body and head control
From SW 20 cm (approx. 7.1 in) and up to
a maximum payload of 50 kg (approx. 110
lbs), there are 2 different frame sizes
available, dependent on the wheel size
chosen:
• Frame size 1 (20’’ wheel)
• Frame size 2 (22’’ and 24’’ wheel)
Kika is not suitable for use in the following
cases:
• tonicity disregulation (hyper- and
hypotonicity)
• epilepsy/spasticities
The intended maximum payload must not
be excessed.
1.5 Application
Kika is suitable for both indoor and outdoor
use. It is designed exclusively for the
walking impaired or abatic child or
adolescent to whom the wheelchair has
been adjusted by a qualified specialist, for
individual use in self-transportation or
transportation with an assistant.
1 ATTENTION
The transportation of a person may only be
conducted on solid surface and using a seat
unit or a seat shell. The wheelchair does not
serve as a means of transportation for
goods or the like. It is not intended to be
used as a seat in a motor vehicle.
1.6 Additional electric
drives
Additional electric drives may only be
mounted on models we have released for
this purpose.
Page 9

User manual Kika Page 9 von 60
1 ATTENTION
The mounting of additional drives is to be
conducted by the producer of the respective
system or by a medical supply store assigned
to this purpose and entirely lies in their
responsibility.
2. Safety instructions
2.1 General security advice
Please make sure to read this user manual and
the safety instructions very carefully before
taking your new Kika into service. It is of
utmost importance that both the user and their
assistant are able to both understand and
realise all instructions. Since it is not possible
to list all dangers that may possibly occur
under different circumstances, please make
good use of caution and mind whenever you
are using your wheelchair!
Please use Kika exclusively according to the
specifications described in chapters 1.4 and
1.5. If used otherwise and/or inappropriately,
the wheelchair may considerably endanger you
and your surroundings. Furthermore, this may
lead to the expiry of our guarantee and product
liability!
Please make yourself and your child
acquainted with the respective functions,
specific characteristics, and the operation of
your wheelchair. Take sufficient time for this
and please make sure to conduct your first
driving practices with the support of an
experienced assistant.
It is very important that – in the presence of an
experienced assistant – you test the stability of
your new wheelchair to both sides, to the front,
and to the back. To do this, please slowly lean
as far as you can to each side, front, and back
while sitting in your wheelchair in order to, for
instance, pick up an object from the ground.
Attentively observe when exactly the
wheelchair starts tipping over and memorize
this point well.
To keep your wheelchair permanently safe
and functional, please consider the
instructions on handling (chapter 4) and
maintenance (chapter 5).
Do not ever leave your wheelchair
unattended – neither empty nor occupied!
The brakes might loosen unintentionally and
endanger you, your child, and your
surroundings considerably. Always position
your wheelchair against a wall or a corner so
it cannot roll away.
1 ATTENTION
Please do not by any means conduct
adjustments, maintenance and/or repair
work by yourself, but always turn to the
medical supply store of your confidence
whose trained staff has been introduced
proficiently to the conduction of this work
and is equipped with the necessary tools.
For functional reasons, your hands are
placed on rotating parts (i.e. the rear
wheels) while driving your wheelchair.
To
avoid injuring your hands, please make sure
not to reach into the spokes of the rear
wheels or the space between rear wheel
and lever brake.
Profile wheels with integrated handrims or
spoke covers (optional devices) reduce the
risk of finger injuries.
Page 10

Page 10 of 60 User manual Kika
2.2 Before every use
Please check the braking effect of the locking
brake (and the drum brake, depending on the
design) before every use. The locking brake
can only function properly with sufficient air
pressure and flawless tyre profile of the rear
wheels.
Check the correct tyre inflation pressure
according to the indication on the tyre
equipment. The correct inflation pressure is
printed on the wheelcover and should be at
least 7.5 bar for the rear wheels. By the way: it
will be a lot easier to drive and manoeuvre your
wheelchair with the correct air pressure of
caster and rear wheels.
Please check the safe and firm fit of the quickrelease-axles: If the quick-release-axle button is
not pressed, the rear wheels or casters must
not be removable. The axles need to be
cleaned from dust and fluff regularly.
Please conduct a general visual inspection to
duly discover and repair possible damage that
might lead to endangerment.
2.3 How to avoid tipping
Avoid using the foot rest(s) when getting in or
out of your wheelchair for it might tip forward.
Please fold the foot rest(s) to the side or to the
back in order to get closer to the wheelchair.
And make sure that you only conduct this
action on firm, even ground and with the
locking brake tightened.
Practice all driving techniques on even ground
and only with the support of an experienced
assistant at first. Only after that should you try
and tackle downgrade and upgrade paths –
again, with the support of an experienced
assistant.
1 ATTENTION
Avoid putting your wheelchair into bank
positions on uneven or sloping ground to
prevent it from tipping sidewards! Always
drive in right angle from the hillside/the
obstacle, never diagonally!
1 ATTENTION
BEFORE putting your wheelchair into a rest
position by tilting its seat or changing the
back angle to more than 90°, make sure to
turn both anti-tippers into functional
position.
Please drive downgrade or upgrade paths
exclusively with the anti-tipper feature
activated. When driving on upgrade paths
and offsets, bend the upper part of your
body forward as far as possible and drive
ramps and upgrades with a pitch or incline
of more than 6% only with the support of an
assistant. When driving downgrade paths,
please bend your upper body as much to the
back as possible.
Please always use both anti-tippers if the
back angle is adjusted to more than 90°
and/or the immersible back extension is
active – regardless of whether the
wheelchair is resting or being pulled.
Page 11
User manual Kika Page 11 von 60
1 ATTENTION
Active driving is only permitted with an
upright back (90°) and WITHOUT seat-tilt.
Adjusting the casters incorrectly (cf. chapter
3.9) or driving too fast (especially on
downgrade paths) may lead the casters to
judder, which may result in a dangerous and
abrupt braking of the wheelchair. Hence, do
not change the pre-adjusted position of the
casters in the caster fork, drive downgrade
paths very slowly and bend the upper part of
your body backwards while doing so.
In order to reach for objects on the sides or in
front of your wheelchair, please remember your
initial stability test and do not lean out too far.
If you feel insecure, you may use a reacher.
The standard brake is a locking brake and
should not be used to brake during driving
since this might make your wheelchair halt
abruptly with the risk of falling out for the
passenger. The drum brakes or attendant
brake (optional device) on the other hand,
allows you to gradually decelerate your speed
while driving.
Generally, we strongly recommend using an
anti-tipper for inexperienced and young
wheelchair drivers.
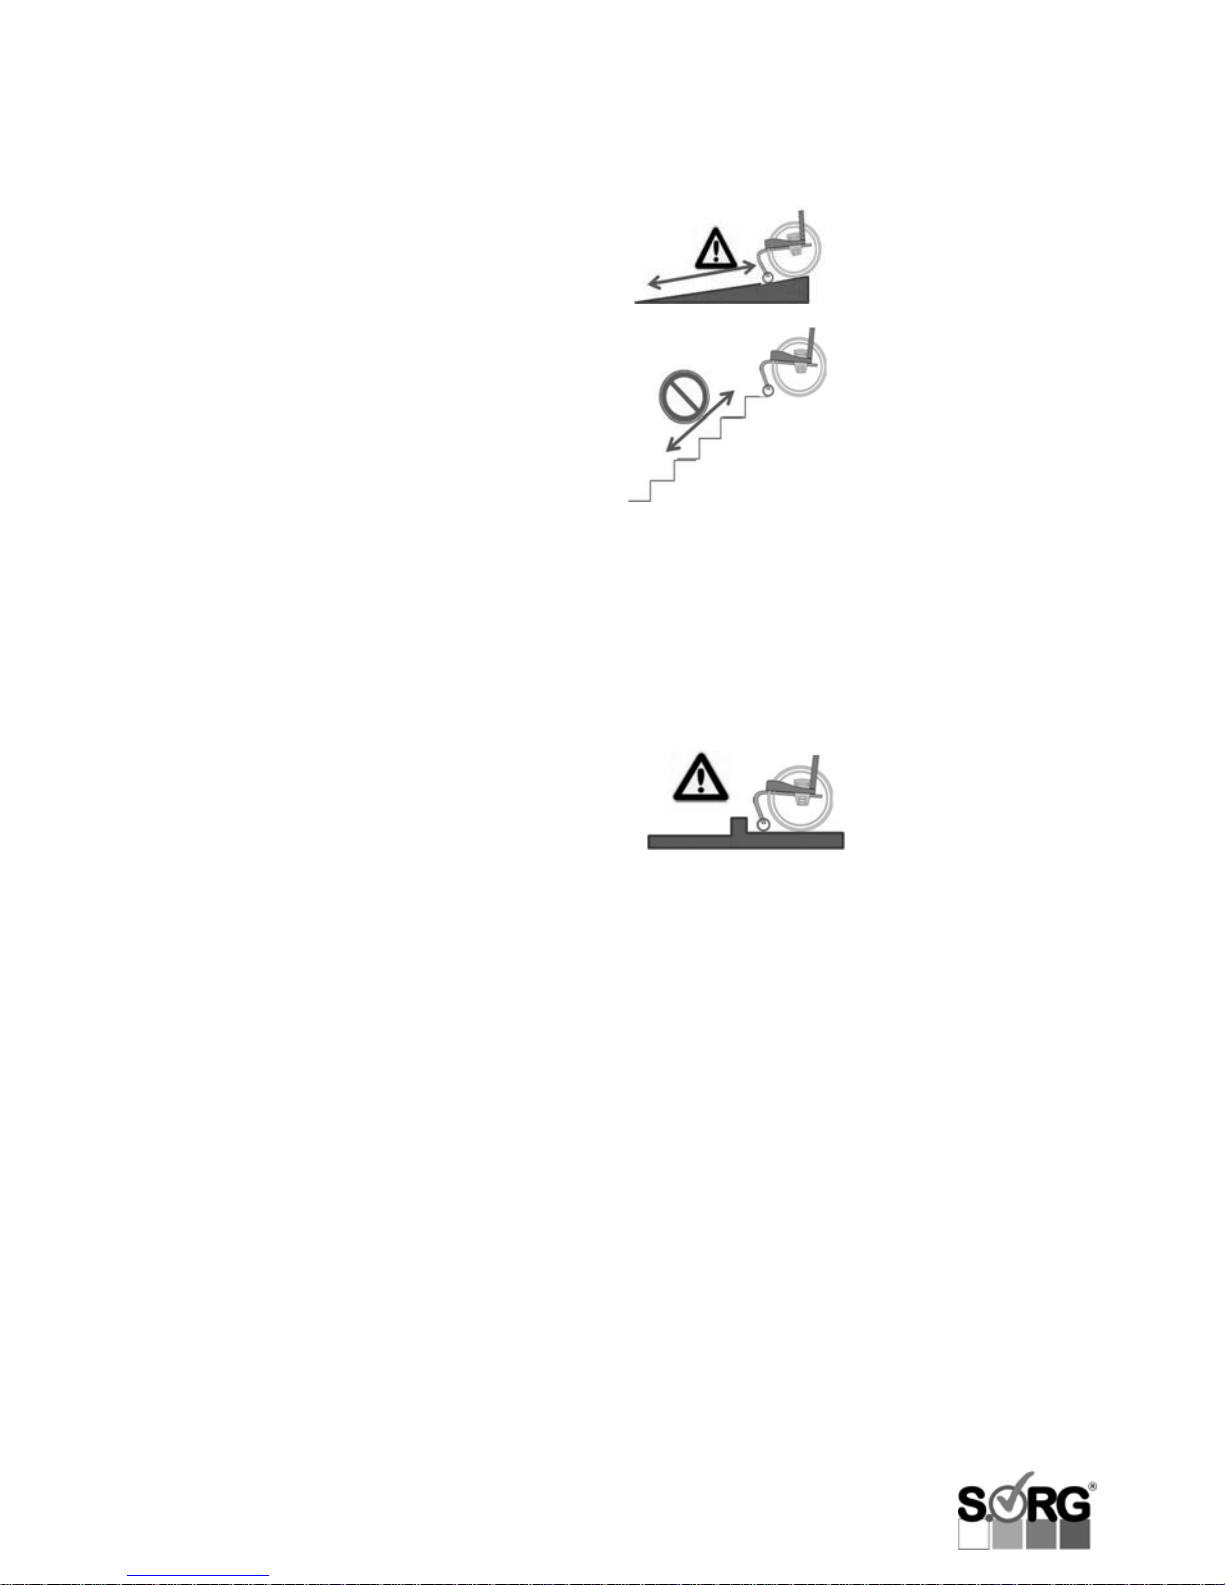
2.4 Coping with obstacles
To surmount level
differences, ramps or
lifts should be used
whenever possible.
We strongly advise you
to surmount stairs only
with the aid of two
experienced assistants.
For this, the safety wheel
needs to be deactivated.
Please mind that the
wheelchair may be held,
carried or lifted only on metal parts which
are firmly bolted to the frame.
Do not use escalators in any case – not
even with assistants!!! Department stores
and public buildings with escalators should
always have suitable lifts available.
Do not rapidly drive
towards offsets (e.g.
kerb stone edges) as
this implies an
increased danger of
tipping! Do not jump from stairs or offsets
with your wheelchair! This does not conform
to the intended usage of the wheelchair,
puts you and your surroundings in serious
danger, and may damage your wheelchair
heavily.
Please remember to fold your anti-tippers to
the inside while using lifts and lifting plates
and while surmounting offsets.
Before pulling a person seated in a
wheelchair backwards over an obstacle via
the push handles, please check the push
handles in their bracket and the rubber
pads on the push handle pipes for firm fit.
Page 12

Page 12 of 60 User manual Kika
2.5 Heat and water
Handrims heat up through strong friction,
especially by braking during fast driving or
along downgrade paths. Therefore, if you have
sensitive skin, we recommend you to wear
gloves like those used in race-cycling (with
leather palm protection – but never woollen
gloves) or special wheelchair gloves.
Using the wheelchair in damp locations or in
water should be avoided, as this may lead to
the corrosion of components, which affects the
driving quality and service life of your
wheelchair negatively.
1 ATTENTION
Textile components of the wheelchair, such as
cushion or plastic are inflammable. Therefore,
please keep any ignition sources, particularly
lighted cigarettes, away from the wheelchair.
1 ATTENTION
Exposed to direct solar radiation, dark surfaces
of the wheelchair (seat, back, clothing guards,
etc.) may heat up strongly. To avoid burns,
place the wheelchair in a shady place or
protect it from direct solar radiation with a
blanket (or a similar object).
2.6 Driving in road traffic
Keep in mind that as a driver/passenger in
your wheelchair you are a “participant in
public traffic” and therefore have to respect
the road traffic regulations.
Since your wheelchair does not count as
motor vehicle according to legal regulations,
you may use pavements driving at walking
pace.
In the dark, wear preferably light-coloured
clothes or clothes with reflectors. Avoid
driving on road surface or bicycle paths.
Your wheelchair is provided with reflectors
on the sides and on the back. Regularly
check whether they are clean and clearly
visible.
To use your wheelchair as a seat in a
passenger car, only use means of
transportation approved for the
transportation of wheelchairs.
Transporting a person sitting in a wheelchair
in a vehicle implies a considerable safety
risk for all people involved. We therefore
strongly recommend not using the
wheelchair as a seat in a passenger car and
sitting down on a conventional car seat
instead.
During a ride in a vehicle (including public
transport), you must not be seated in your
wheelchair without a restraint system for a
passenger.
1 ATTENTION
If using your wheelchair as a passenger seat
in a vehicle cannot be avoided, the
regulations according to DIN 75078-2 have
to be fulfilled! Please make sure to read
chapter 4.10 “Transportation in a passenger
car”!
Page 13

User manual Kika Page 13 von 60
A
3. Adjustments
The following indications on the adjustments of
Kika affect its usage safety! Therefore, we are
pointing out explicitly that all adjustments,
reparations, and any other sorts of changes
are to be conducted exclusively by the rehab
technicians of your medical supply store who
have been qualified by us!
The instructions relevant for you and the daily
handling of your wheelchair are described in
chapter 4 “General handling”.
If no other specifications are indicated, the
following torques are valid for screw joints:
• M5: 5 Nm
• M6: 7 Nm
• M8: 20 Nm
• M10 (si-nut): 25 Nm (caster)
• quick-release-axle fitting: 35 Nm
•
1 ATTENTION
A wheelchair is a medical aid which must be
adjusted to the individual situation of your child
by your rehab technician in order to obtain the
highest therapeutic benefit possible.
But every technical device inherits safety risks
in everyday usage. Therefore, we are pointing
out explicitly that all adjustments, reparations,
and any other sorts of changes are to be
conducted exclusively by the rehab technicians
of your medical supply store who have been
qualified by us!
Otherwise, you may endanger yourself, your
surroundings, and especially children
considerably, and, moreover, lose our warranty
claim!
1 ATTENTION
When conducting any adjustments, please
make sure to maintain distances between
all movable parts (e.g. pelottes, abduction
wedge, etc.) and fixed parts in order to
prevent human body parts from clamping in
between them.
Guidance values for this purpose are:
Finger area: <5 mm or >25 mm
Foot area: <25 mm or >45 mm
Head area: <60 mm or >250 mm
Page 14
Page 14 of 60 User manual Kika
3.1 Leg support adjustment
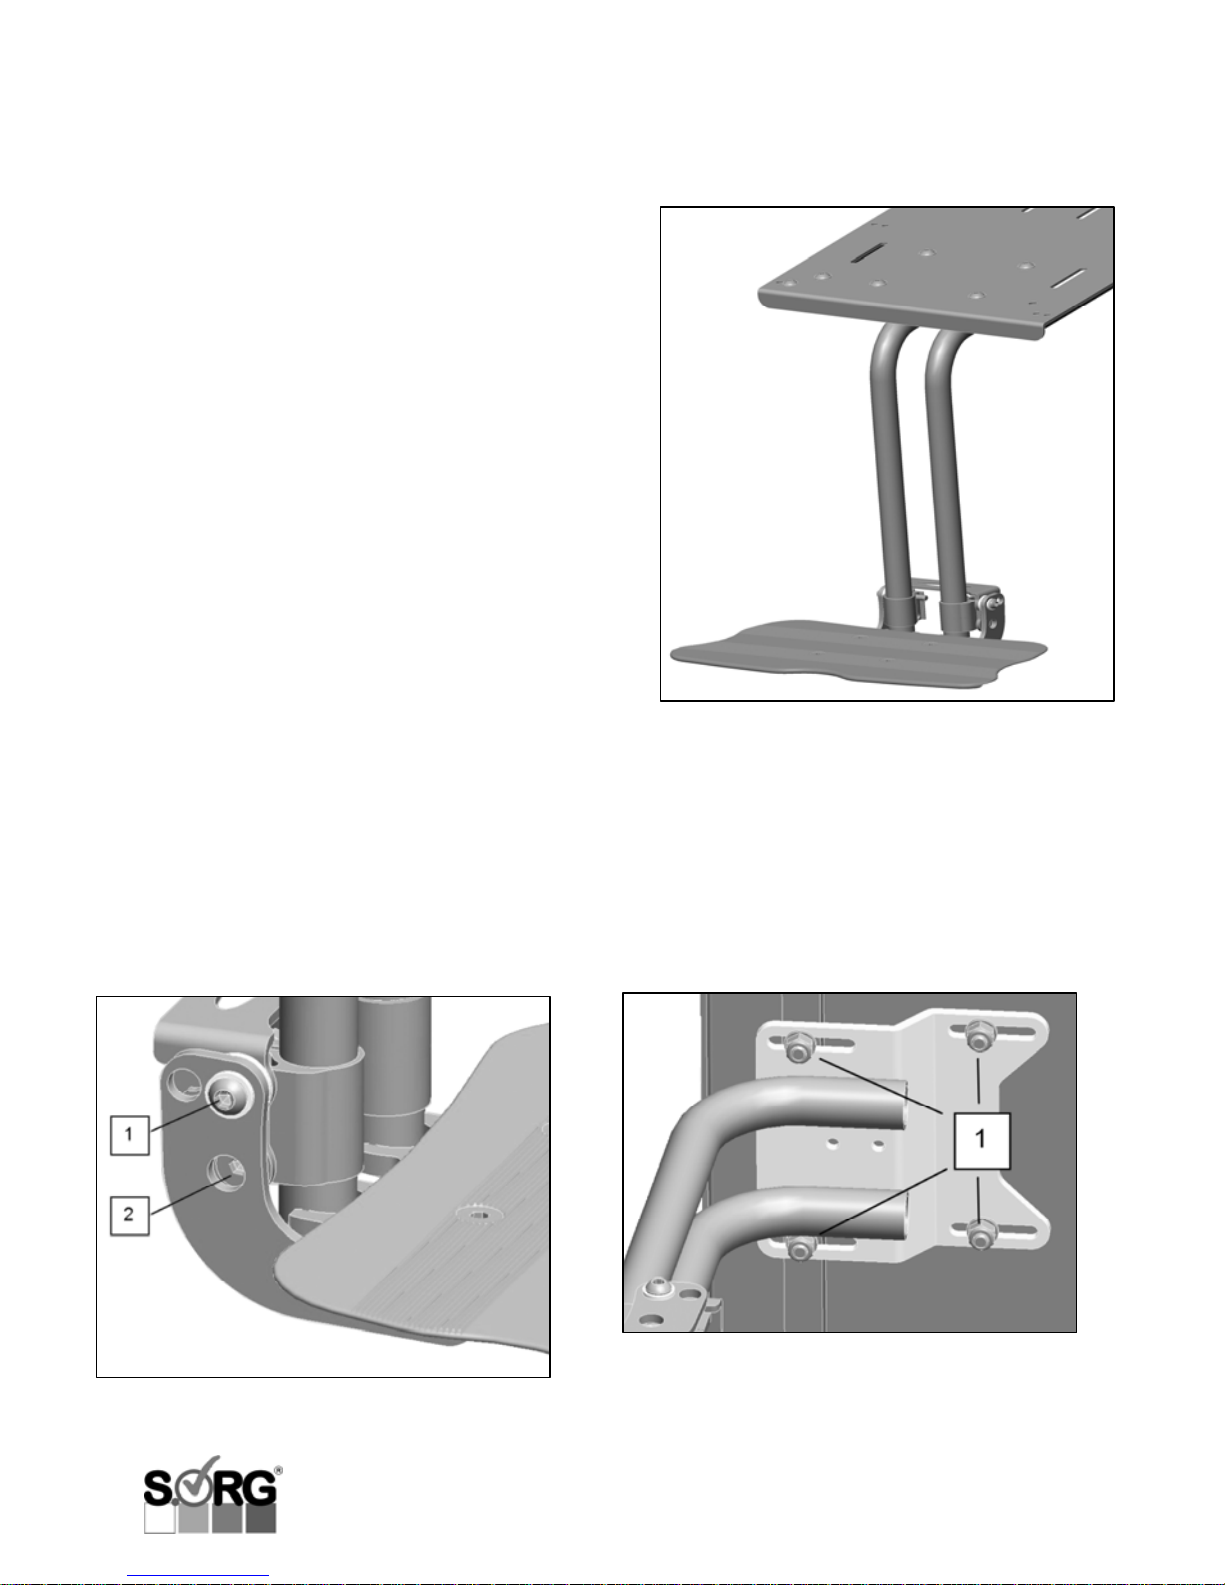
3.1.1 Undivided leg-support
The leg support is ideally adjusted if the
complete thigh rests (with a two finger distance
between seat and hollow of knee) evenly on
the seat cushion/shells while the leg is
standing on the foot rest in a right angle. A foot
rest positioned too high leads to a permanently
buckled position in the pelvic area. If it is
adjusted too low, unpleasant congestions in
the thighs might occur.
1 ATTENTION
Make sure not to use the leg support to get in
or out of the wheelchair to avoid the danger of
tipping!
Adjustment of the lower leg length
• loosen screws (pos. 1 and 2) on both
sides
• choose desired position, tighten screws
(pos. 2)
• tighten screws (pos. 1), making sure
that the foot rest can still be hinged
upwards
Adjustment of the depth
• loosen screws (pos. 1)
• place leg support bracket into desired
position
• retighten screws
Page 15
User manual Kika Page 15 von 60
A
Adjustment of the angle
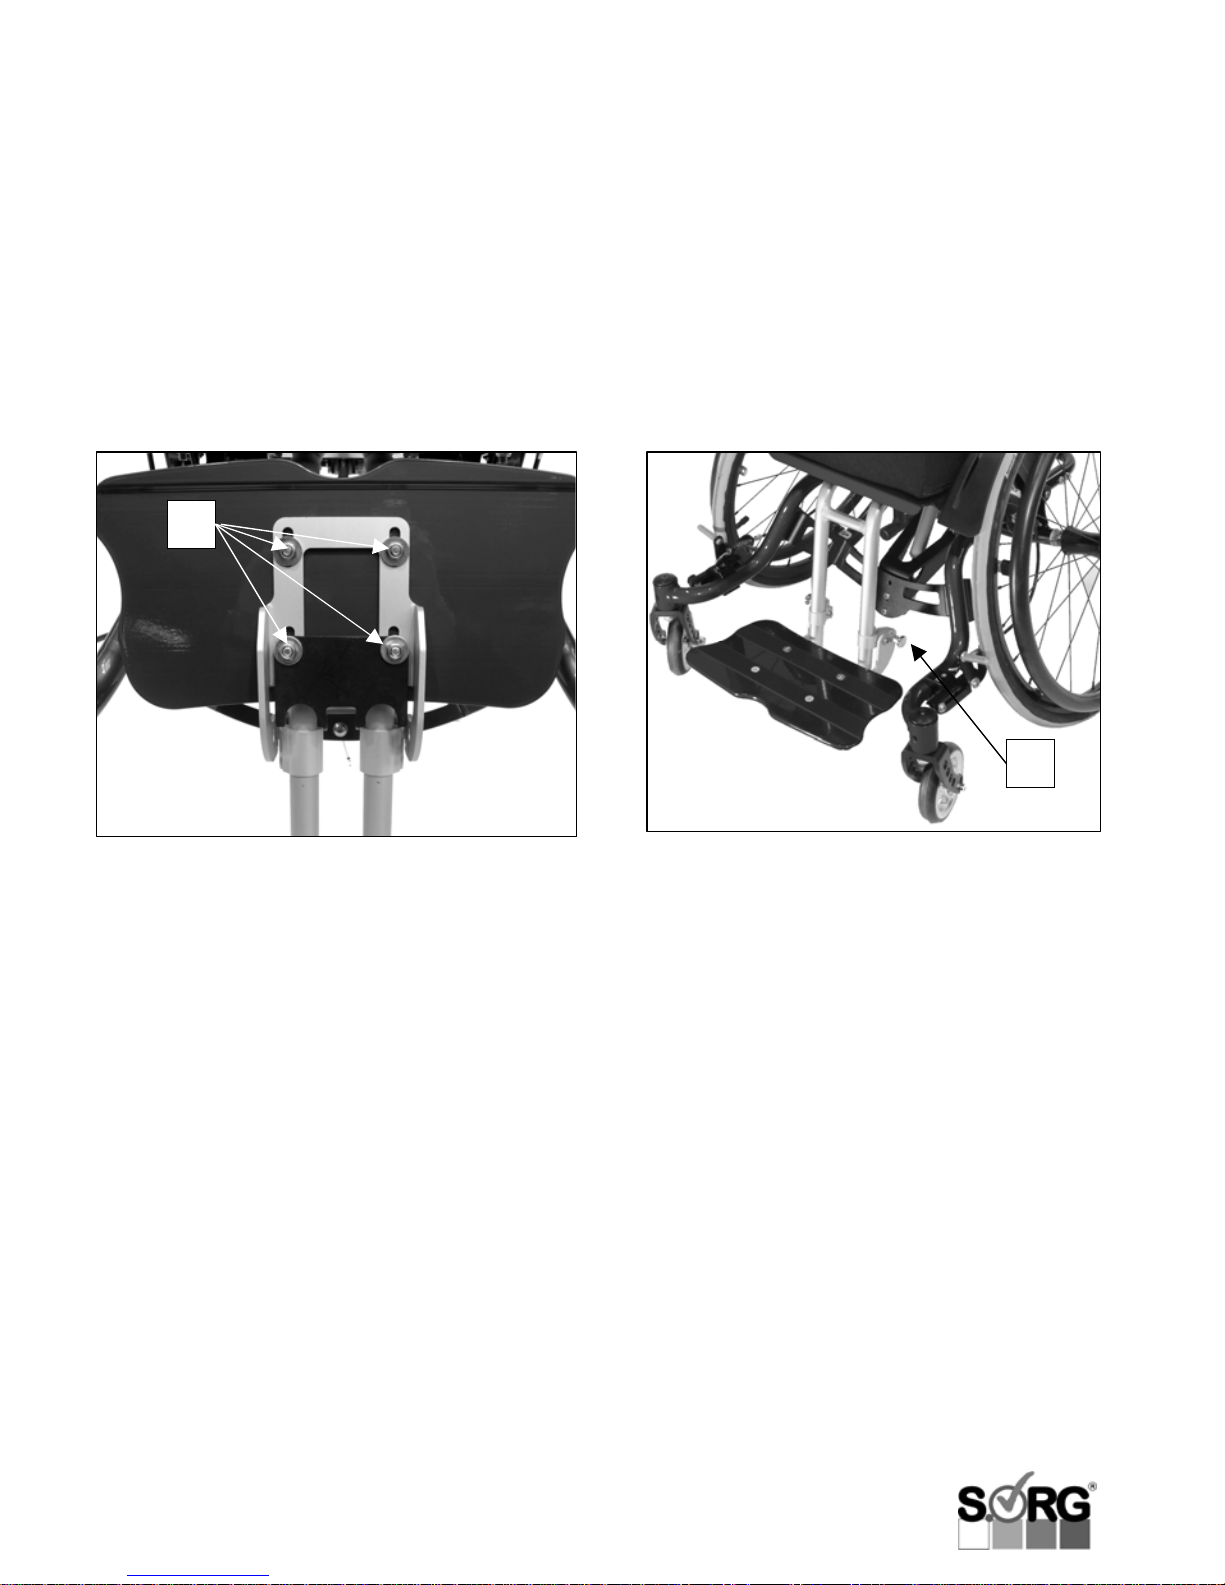
1 ATTENTION
By changing the distance between the footrest
and the carrier pipes (pos. 1), you may change
the angle of the footrest by ± 15°.
• loosen screws (pos. 1)
• place foot rest into desired position
• tighten screws
Locking device (optional)
• pull out the spring bolts (A) on both
sides, then turn the spring bolt by
90°
• hinge footrest backwards
• again, turn both spring bolts by 90°
until they engage into the slot
• to open the interlock, please proceed
analogically
1 ATTENTION
Do not start your ride until you have made
sure that the spring bolt is engaged firmly!
1 ATTENTION
Please make sure not to bend too far out of
the wheelchair when (un-)locking your
footrest for you may fall out! Please have
someone assist you.
Page 16
Page 16 of 60 User manual Kika
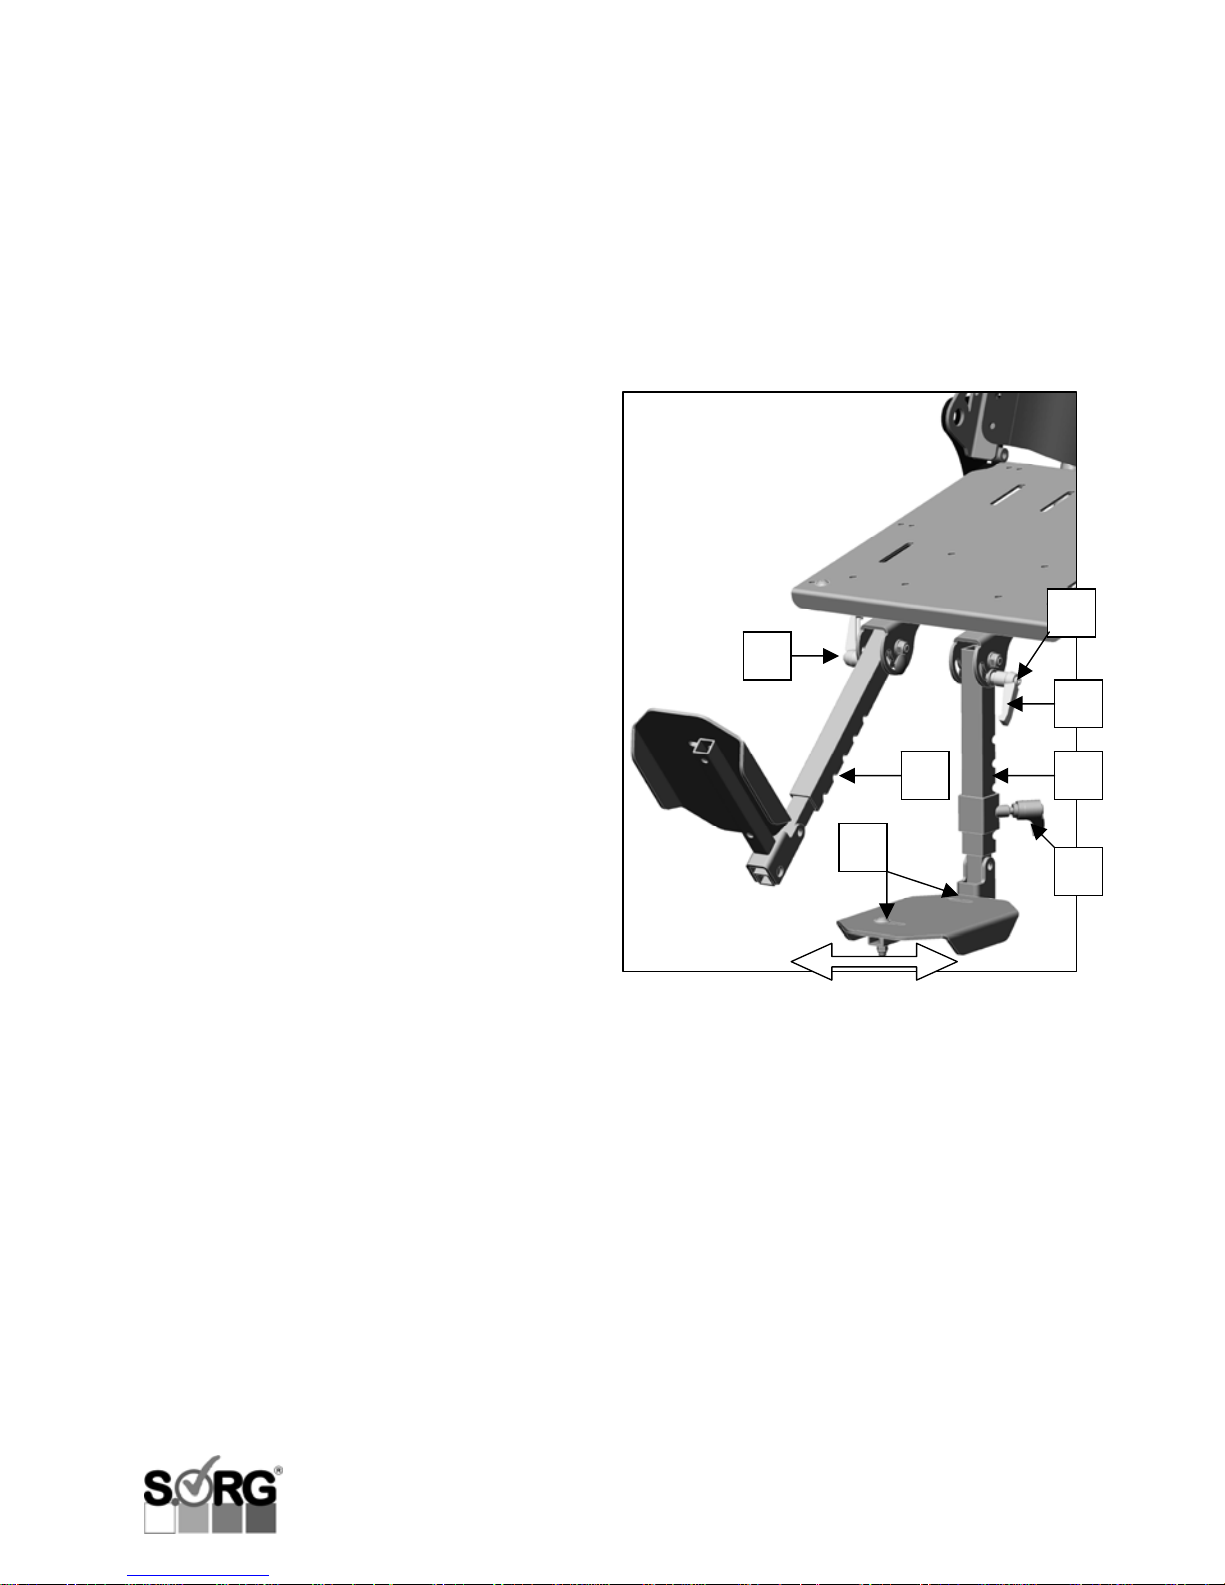
3.1.2. Hinged leg support (opt.)
The hinged leg support is divided: Both sides
can be altered in their angles up to a horizontal
position (180°), independently from one
another. This way the legs can be elevated in
the tilted seat position to improve blood
circulation.
Adjustment of the depth
is conducted on the fixation below the seat
plate.
Adjustment of the lower leg length
• loosen clamping lever (pos. 1) on both
sides
• choose desired position on the axle plate
(A)
• tighten clamping lever (pos. 1) firmly
• push button (B) on the grip part of the
clamping levers and pull out
• turn the grip part until it is in a safe position
Adjustment of the foot rests
• loosen both screws (pos. 3) on both foot
rests
• turn (abduction) and/or push foot rests into
desired position
• tighten all screw joints (pos. 3) firmly
Swinging up the leg supports
• loosen clamp lever (pos. 2) on both sides
• place leg support(s) into desired position(s)
• tighten clamping lever (pos. 2) firmly
1 ATTENTION
Please make sure to turn away the grip parts of
the clamping levers (pos. 1 and 2) backwards
so they cannot injure or inhibit your child.
1
B
2
2
A
A
3
Page 17
User manual Kika Page 17 von 60
1
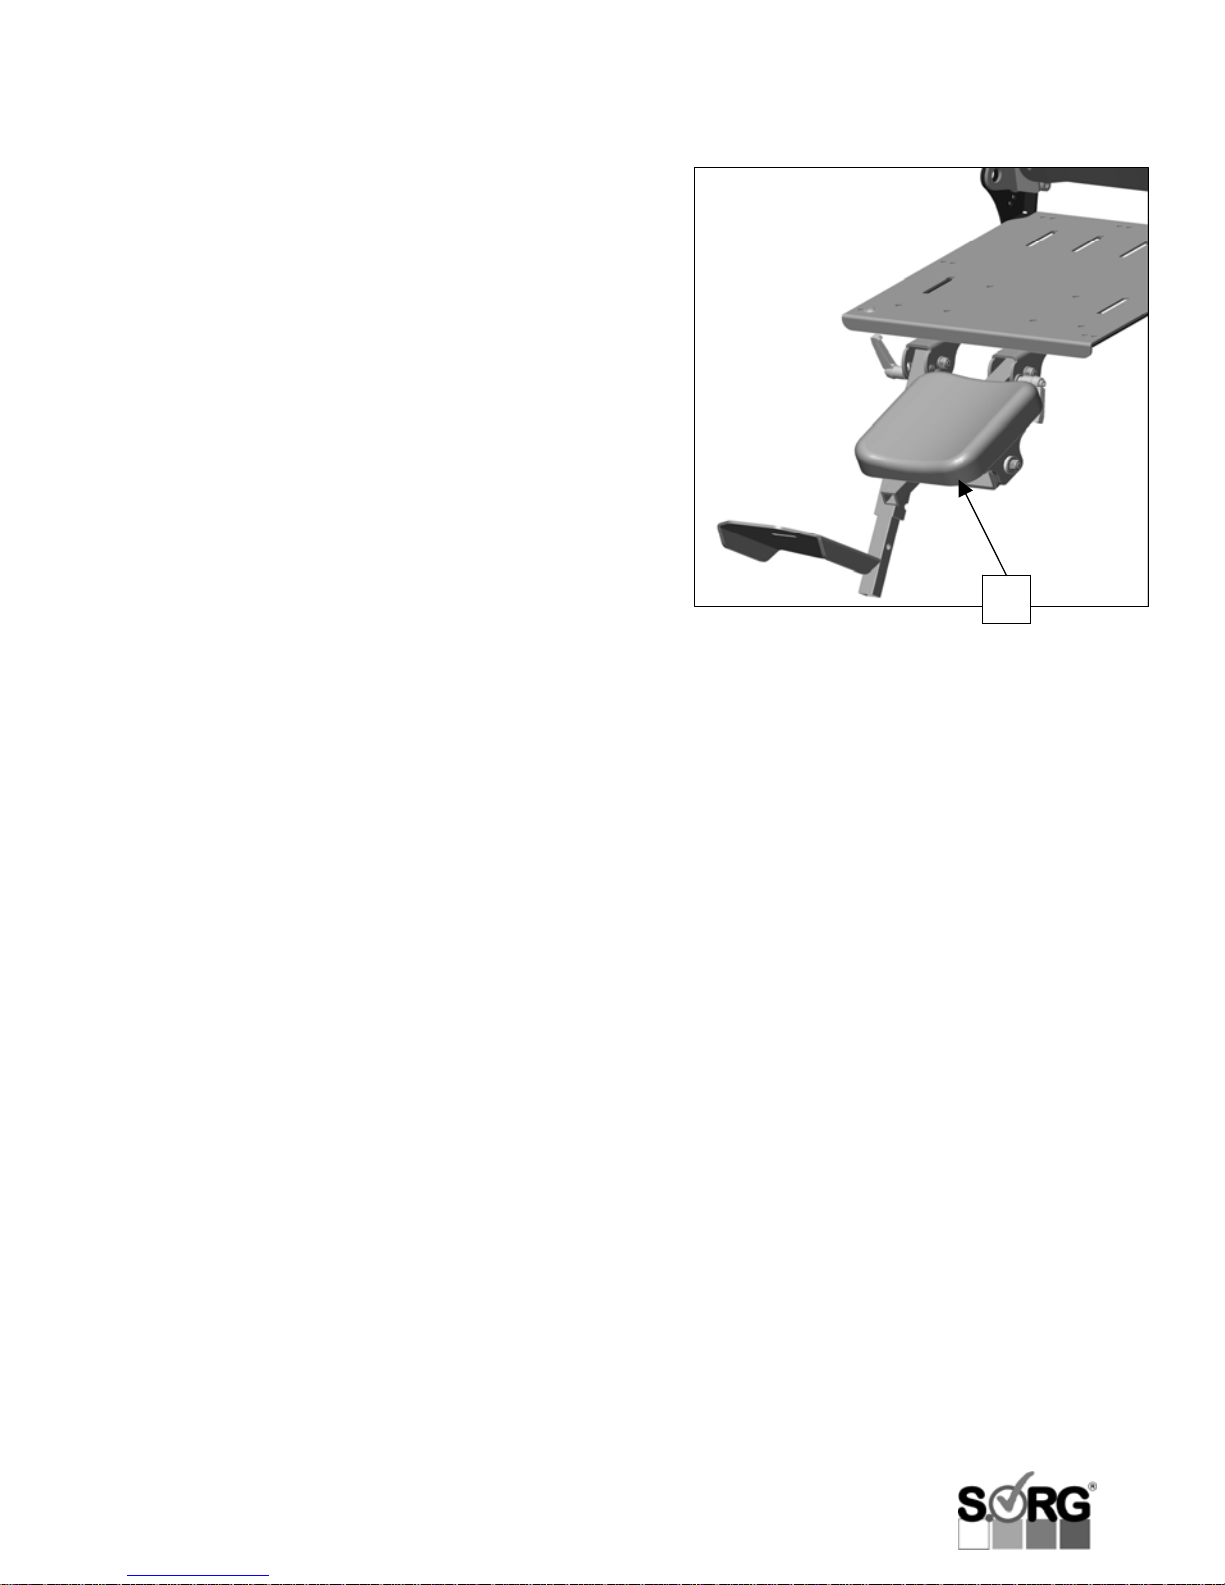
3.1.3. Leg support with support
pad (optional)
If you choose a leg support with support pad,
the opposite side is supplemented with a
divided swing-up leg support. The side with the
pad does not have a foot rest!
Adjustment of the support pad
• loosen the clamping lever (pos. 1) on the
lower side of the pad
• choose desired position on the axle plate
(A)
• tighten clamping lever (pos. 1) firmly
Swinging up the leg support
• loosen clamping lever (pos. 2)
• place leg support into desired position
• tighten clamping lever (pos. 2) firmly
Angle adjustment of the support pad
• loosen screw joint (B)
• adjust desired angle
• tighten screw joint
1 ATTENTION
Please make sure to turn away the grip parts of
the clamping levers (pos. 2) backwards so they
cannot injure or inhibit your child.
PLEASE NOTE
If your wheelchair is equipped with support
pads on both sides, please conduct
adjustments analogically.
Page 18
Page 18 of 60 User manual Kika
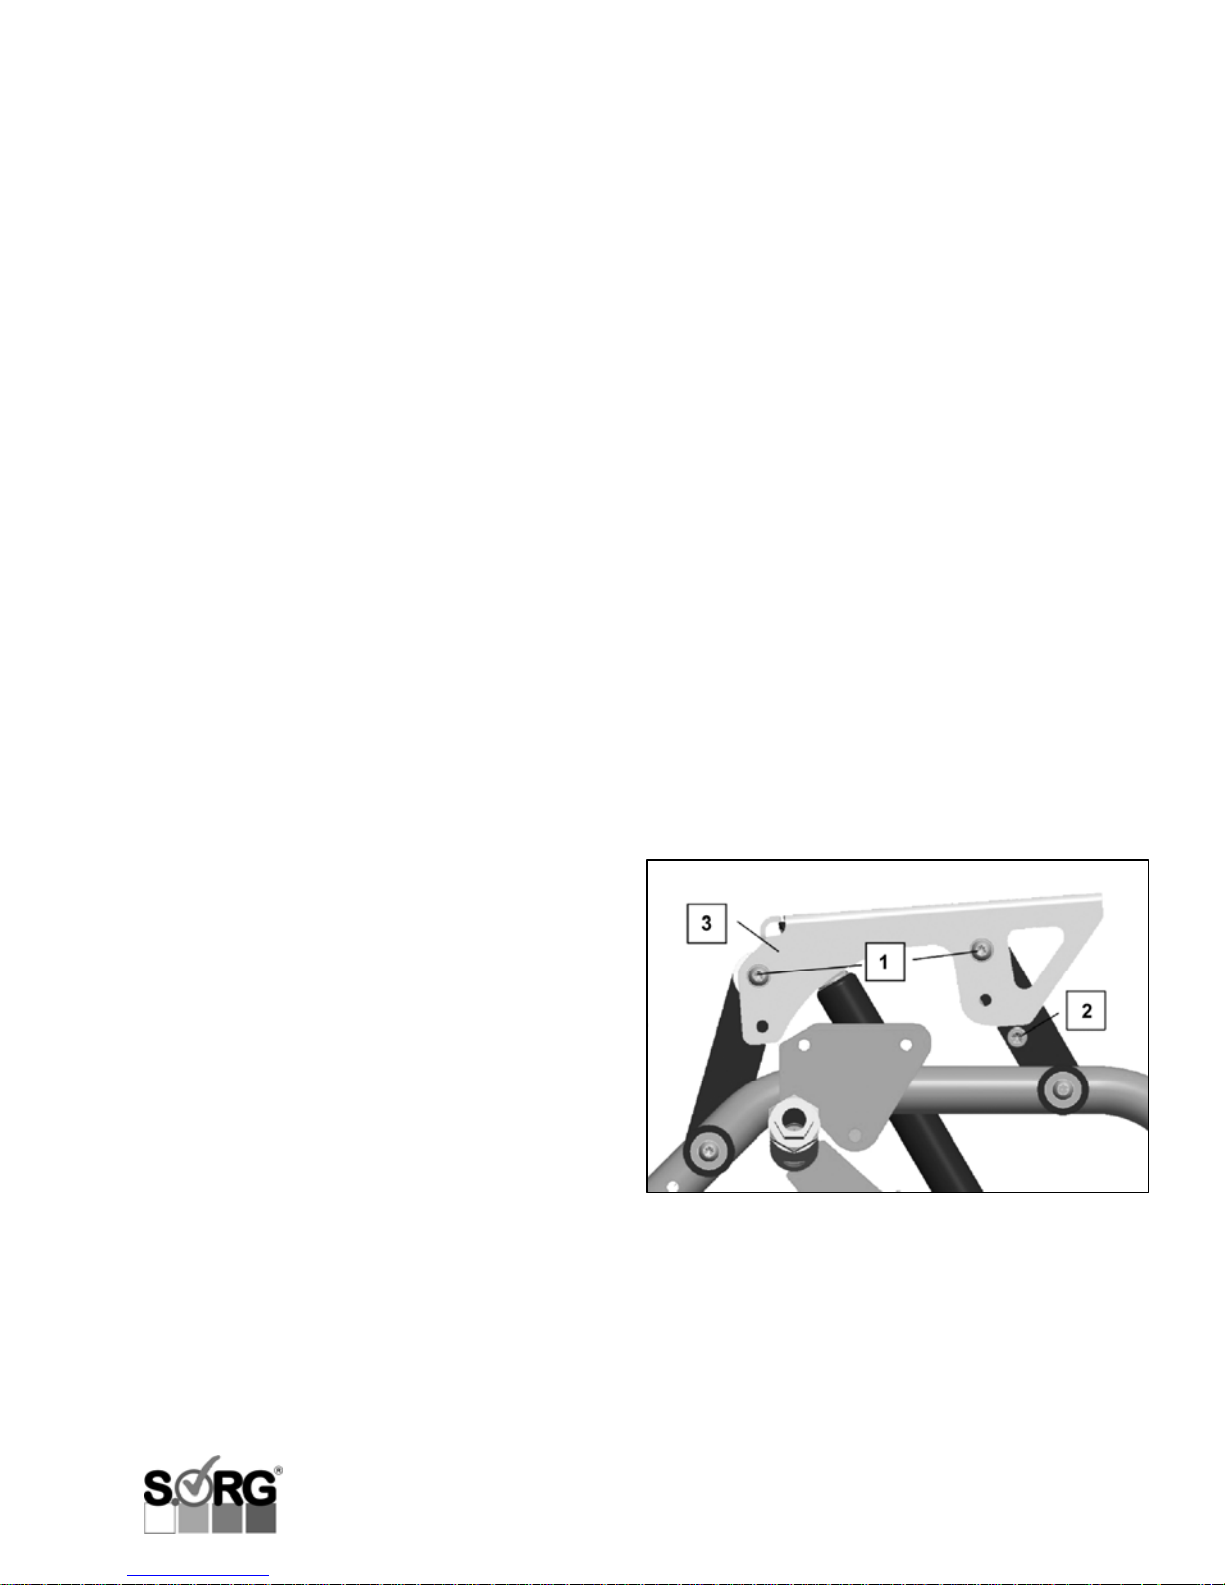
3.2 Seat heights
Usually, the seat height at the back is adjusted
to be approx. 2-3 cm (0.8-1.2 in) lower than at
the front in order to obtain a secure and
comfortable sitting position with even
distribution of the seat pressure and to
straighten up the pelvis. (Differing adjustments
may also make sense in individual cases.)
In the case of Kika, the entire seat unit may be
altered via the gas pressure spring (there is no
other option for this purpose). Therefore the
best way to obtain the desired seat inclination
is by using the tilting mechanism.
1 ATTENTION
When adjusting the seat height on the front,
you should always make sure that you can
access tables easily without your knees hitting
their edges. Corresponding to the position of
the foot rest, the casters must be free to rotate
360°.
Adjustment of seat height
By modifying the seat carrier plate, you may
alter the seat height by up to 2.5 cm (1 in)
differing from the height adjusted when the
wheelchair is leaving our factory.
• remove screw joints (pos. 1) on the front
and back completely
• mount seat carrier late (pos. 3) into desired
position
• retighten screw joints firmly
• remount end stop screw (pos. 2)
respectively on both sides
Page 19
User manual Kika Page 19 von 60
X
3.3 Centre of gravity
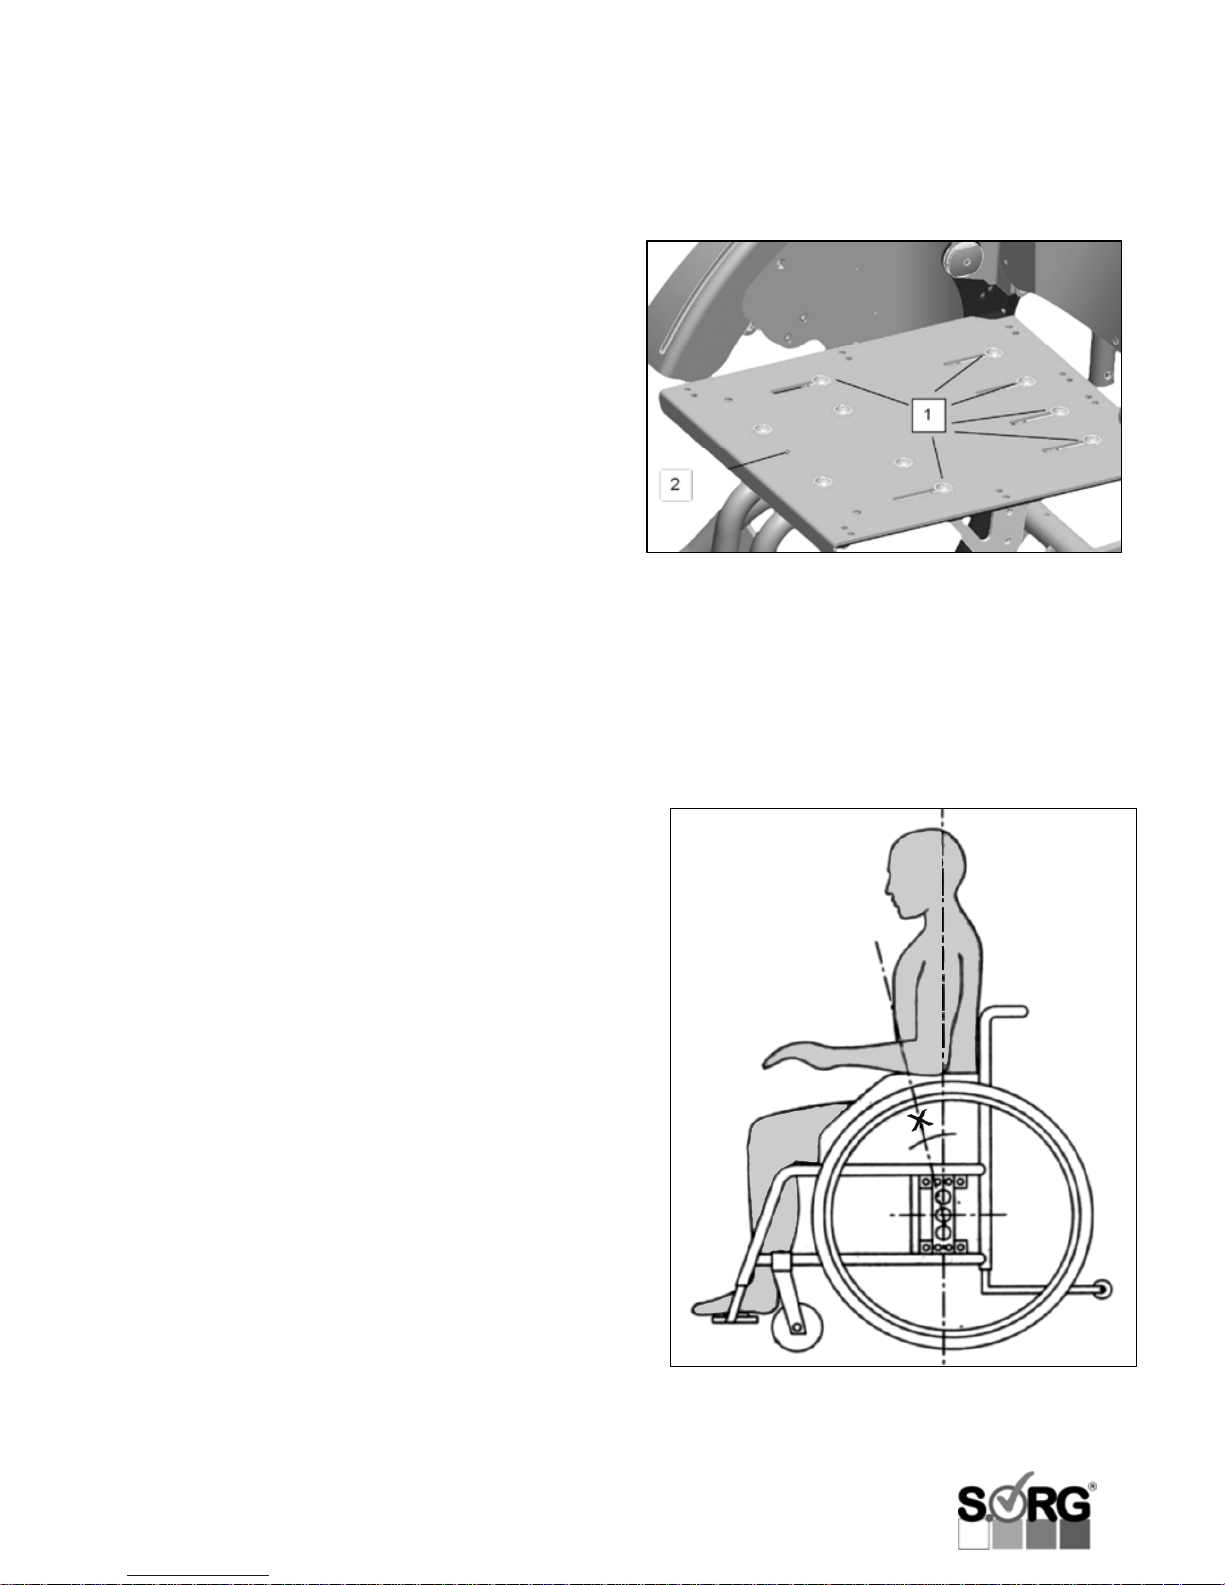
You may change the centre of gravity of the
wheelchair (X) by moving the seat plate (pos. 2)
in relation to the seat carrier part. When
leaving our factory, the wheelchair is
preadjusted into a tipping stable position. The
further back the seat is mounted, the more the
wheelchair tends to tip backwards. However, it
may also be tilted back on 2 wheels more
easily. This facilitates, for experienced
wheelchair users, to quickly and easily
surmount obstacles, as the wheelchair’s agility
is effectively improved.
1 ATTENTION
Even if the anti-tipper is activated and there is
actually no danger, a beginner may be
unsettled or even demotivated if the
wheelchair’s adjustments make it too prone to
tipping!
1 ATTENTION
Please work carefully, gradually, and only with
the aid of an experienced assistant towards
the maximum degree of tipping proneness
desired for by the user! Read the SAFETY
INSTRUCTIONS carefully. (p. 8 Fehler!
Verweisquelle konnte nicht gefunden
werden.ff).
• loosen screws (pos. 1) and place seat
(pos. 2) into desired position
• retighten screws firmly
• test new adjustments with the securing
support of an assistant!
Page 20
Page 20 of 60 User manual Kika
3.4 Back height
In order to provide as much moving space as
possible for the arms when driving the
wheelchair, the active driver’s back height
should generally reach to the bottom line of the
scapulae.
The upper edge of our firm moulded backs is
pulled up by approx. 5 cm in model 3 (and
approx. 2 cm in model 1). Thus a longer
support of the spine is achieved. Thanks to the
curved upper edge of the back sheet plate,
however, the scapulae can still be moved
freely. The back height may be increased by
2.5 cm without any additional parts.
Extension of back height
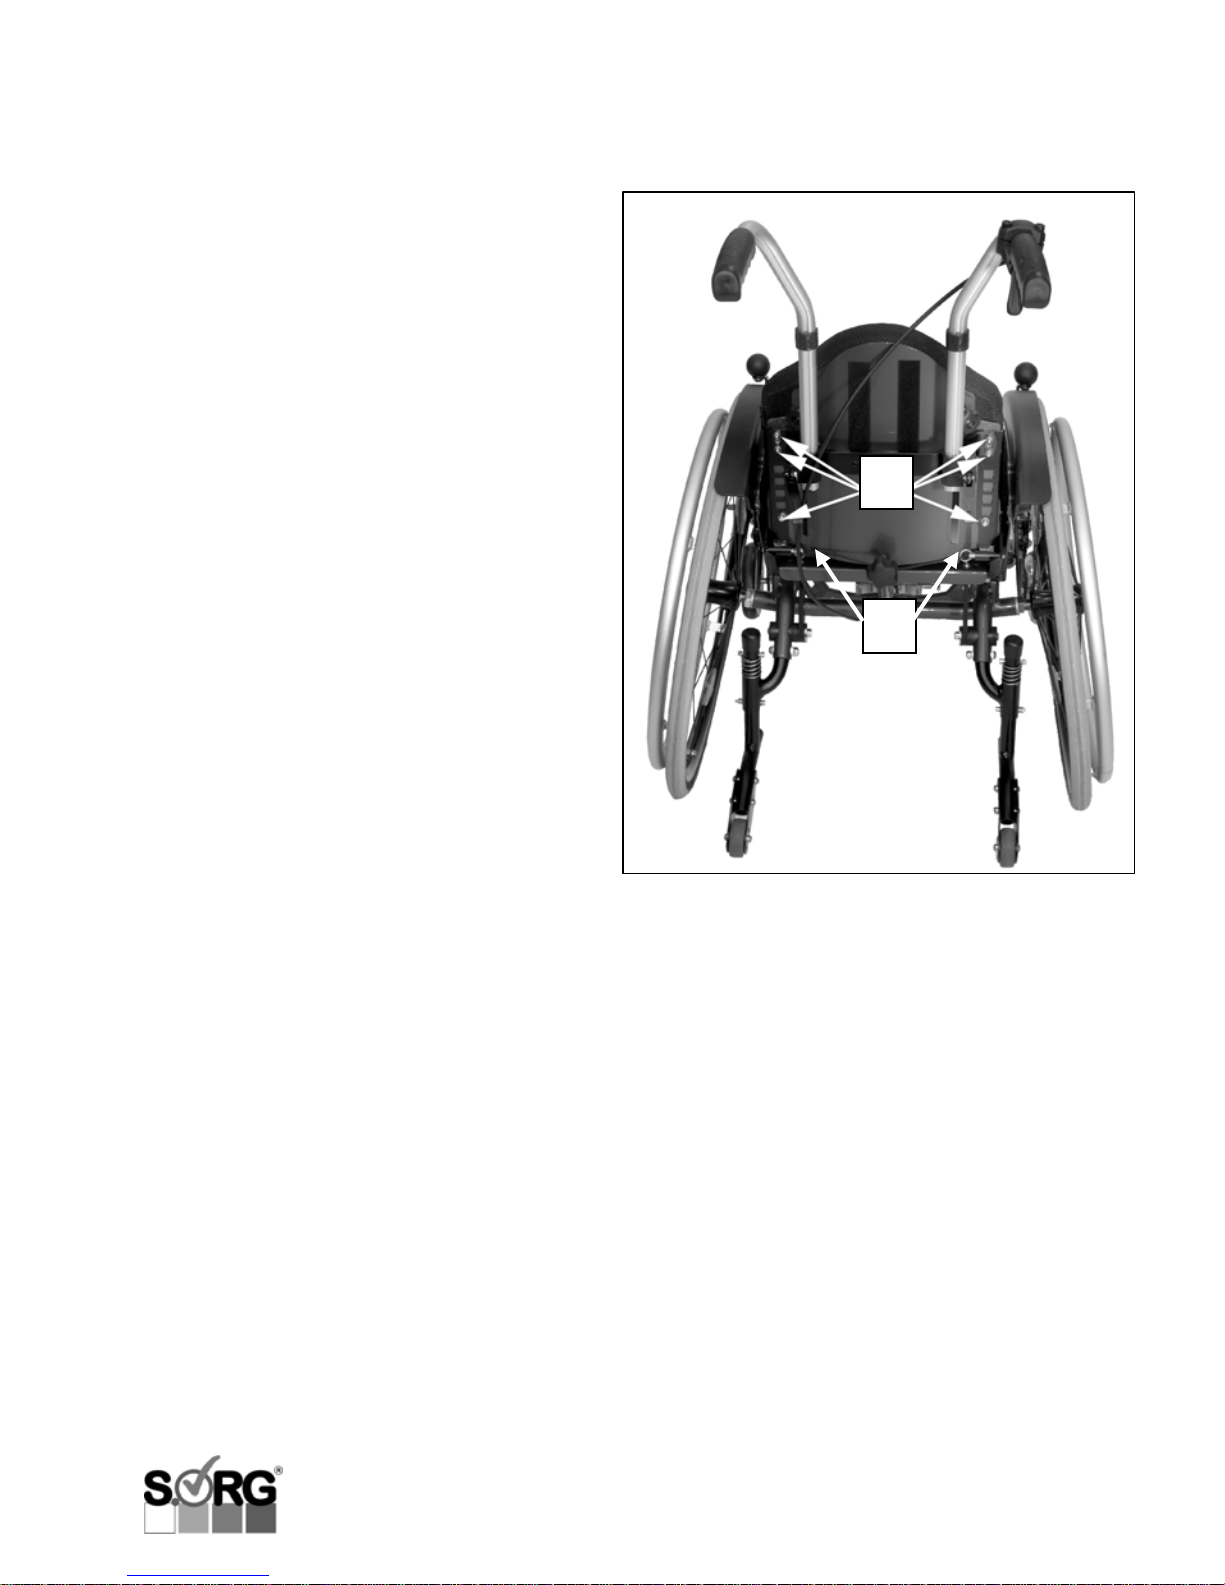
• remove all 6 screw joints (pos. 1) on the
seat support angle of the back sheet plate
(A)
• mount moulded back into new position
• tighten screw joints firmly
• readjust or replace the string which
activates the back angle adjustment (pos.
2) if necessary
1
2
Page 21
User manual Kika Page 21 von 60
3.5 Retractable back
extension with head pad
(optional)
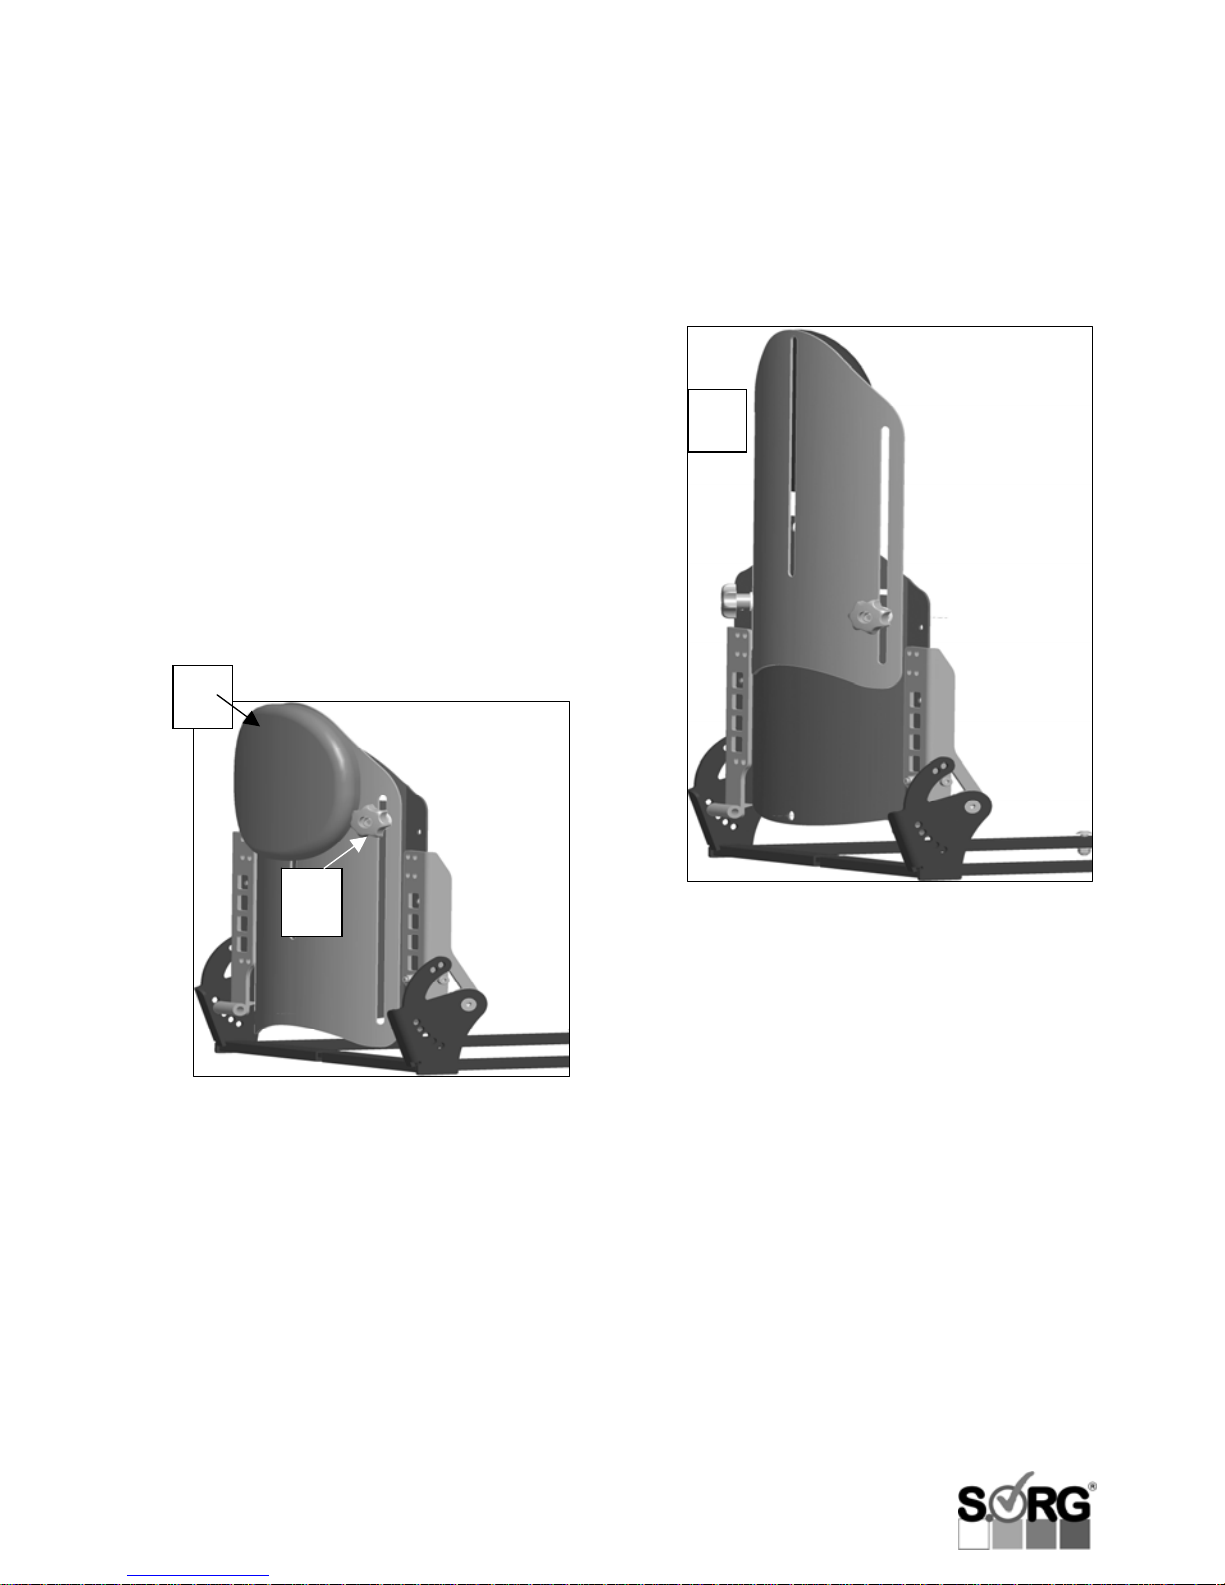
We strongly recommend this back extension in
order to make sure your child is able to decide
when they want to drive actively or rest. It
provides the same comfort as a buggy and
supports the head (white not inhibiting its
movement) when the wheelchair is tilted.
Activating and deactivating the back extension
• remove the head pad (A)
• loosen star knobs (pos. 1) on both sides
• pull up the back extension
• tighten star knobs (pos. 1) firmly
• attach the head rest onto the other side
with the aid of the Velcro strips
provided
3.6 Pelvic belt (optional)
Pull the free ends of the belt on both sides
through the space between the side part
and back adapter. Screw together the ears
of the belt ends into two of the bolts on the
black back adapter. To insert a moulded
back, loosen one of the screws and screw
together both bolts with the pelvic belt.
A
1
1
Page 22
Page 22 of 60 User manual Kika
3.7 Back angle
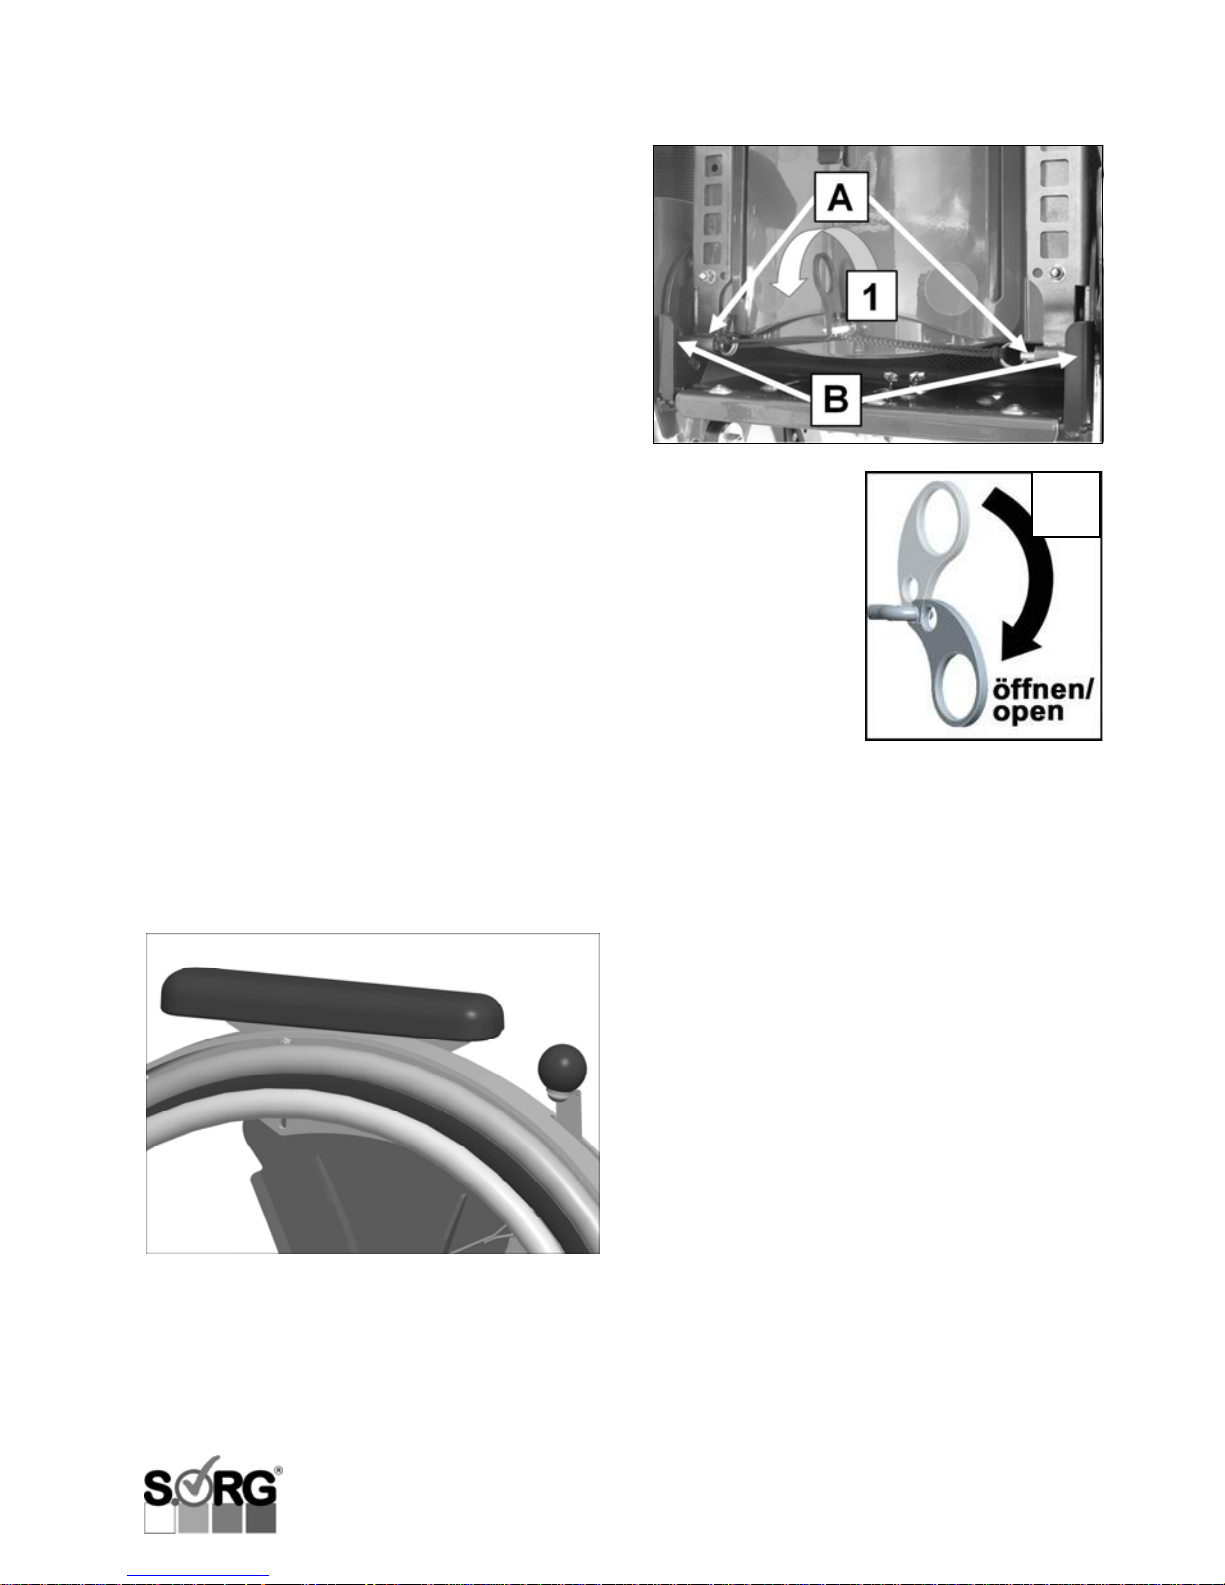
To alter the back angle, it suffices to fold down
the release lever (pos. 1) so the bolts (A) will
loosen from the locking plate (B). Keep the
lever in the released position until you have
adjusted the desired angle on the row of holes
of the locking plate. Then simply let go of the
lever so the bolts will snap into their holes.
PLEASE NOTE
Please check the condition of the strings for
abrasion regularly and replace them if
necessary!
1 ATTENTION
After each back angle adjustment, make sure
that BOTH bolts are firmly snapped into their
holes!
3.8 Side guard, clothing guard
Kika’s side guards and clothing guard are
preadjusted in relation to its wheel size, so no
further adjustments need to be done.
The lever for the locking brake is integrated
into the clothing guard.
3.9 Arm pads (optional)
The arm pads, too, are firmly screwed onto
the side guards so no further adjustments
need to be done.
3.10 Adjustment of caster
and rear wheel
Because of its firm wheel base, Kika is free
of adjustments concerning the caster–rear
wheel–constellation.
Page 23
User manual Kika Page 23 von 60
3.11 Locking brake
Each wheelchair is equipped with two locking
brakes. They are to be used EXCLUSIVELY to
secure the wheels in a rest position. They are
NOT designed to decelerate the wheelchair
while driving. For this purpose, please use the
handrims or, if provided, the drum brake or
attendant brake. Please be aware that
aliminuium handrims may heat quickly due to
friction.
For your own safety, always check whether the
brakes function correctly. Its function may be
restrained by too little air pressure in the tyres,
moisture, worn out profile, brake cable
adjusted too weakly, and too much distance
between the brake and the tyres.
3.11.1 Standard locking brake
First, please check the tyre air pressure of the
rear wheels (the necessary indications are
provided on the tyre cover) and inflate them if
necessary.
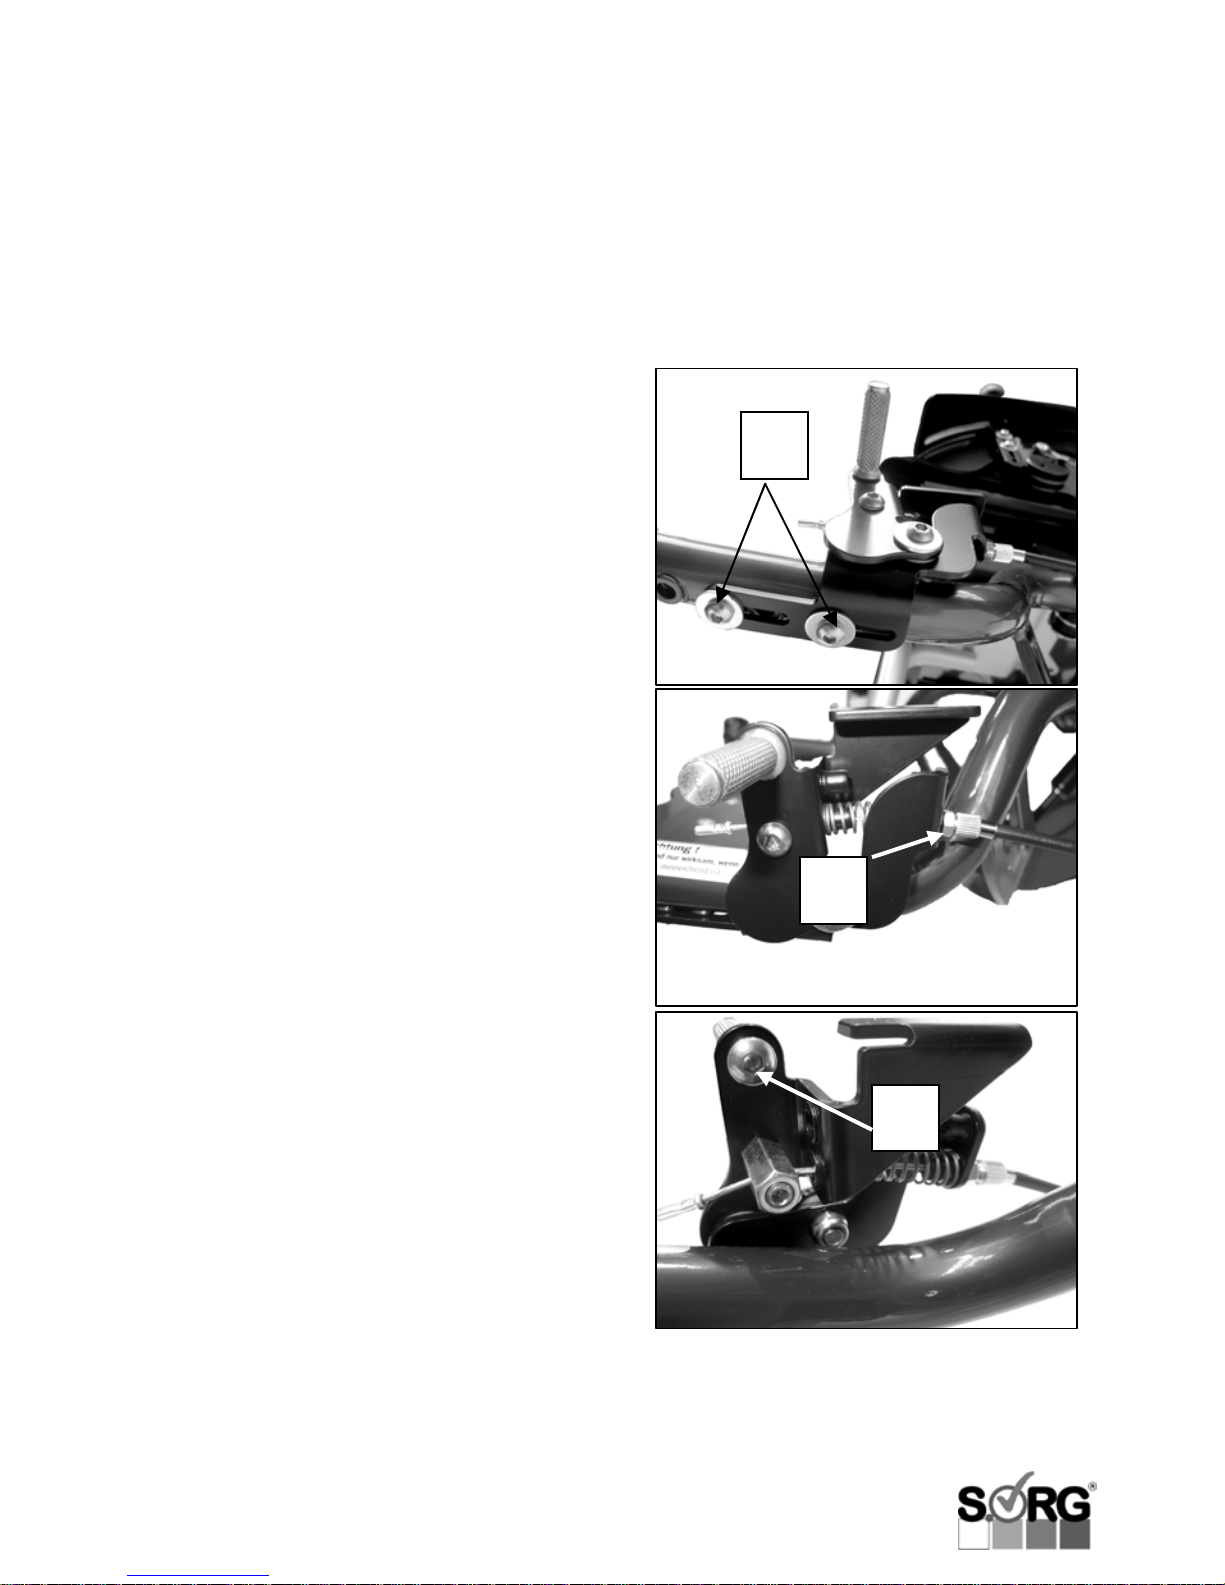
• loosen the screw joints on the bottom of
the locking brake (pos. 1)
• adjust brakes so the distance between
brake bolt and tyres is approx. 3 mm
(technical alternations reserved)
• tighten screws firmly
• test function with the securing support of
an assistant
• for vernier adjustments, readjust the set
screw (pos. 2)
Exchanging the brake bolt
• remove screw (pos. 3)
• insert new bolt
• retighten screw
1 ATTENTION
On a ramp with 6% incline, the rear wheels
of the wheelchair with passenger must not
slip with the locking brake tightened.
3
1
2
3
Page 24
Page 24 of 60 User manual Kika
A
B
C
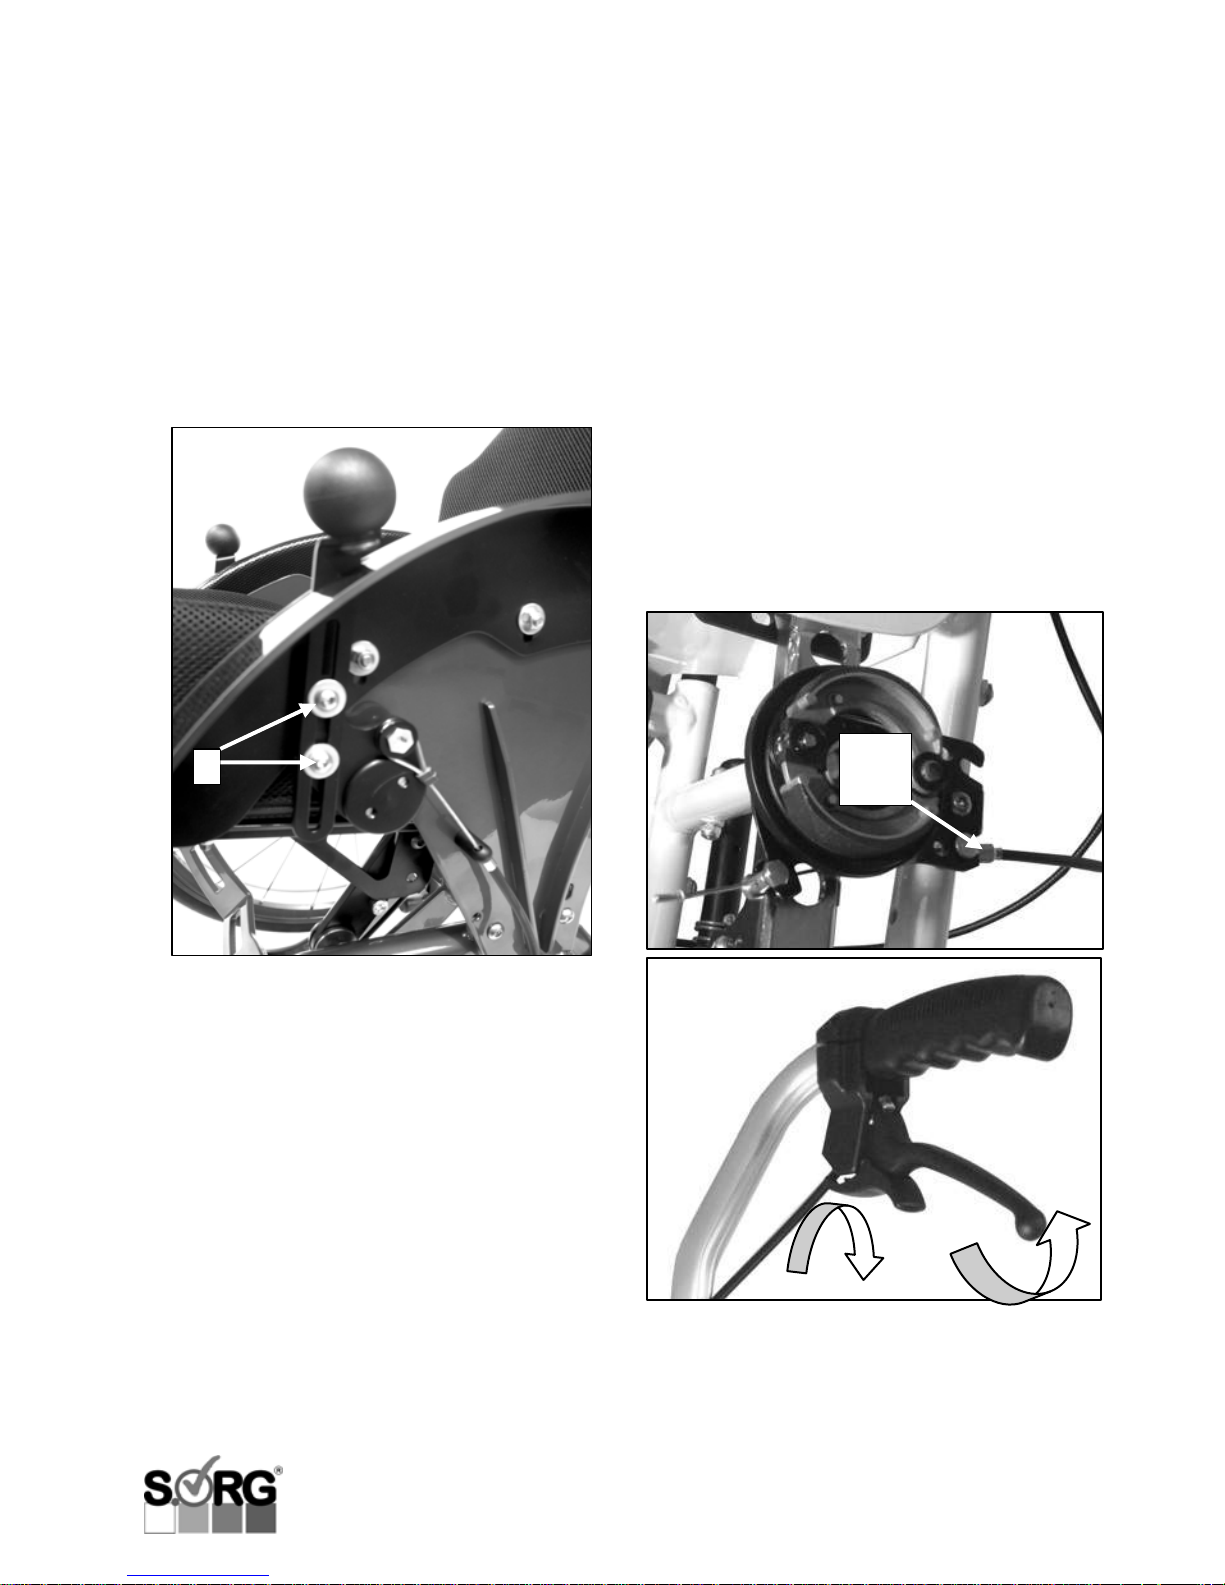
Adjustment of braking distance/brake lever
height
To adjust the length of the braking distance on
the brake lever
• remove both screws (pos. 1)
• place brake lever into desired position via
the ball head
• retighten both screws
3.11.2 Drum brake (optional)
The drum brake is, unlike to the locking brake,
also suitable for braking while driving.
The adjustment of the drum brake is to be
carried out through a set screw (A) at the lower
end of the brake cable. The brake is readjusted
by turning the set screw counter-clockwise.
In the second lock-in-position of the hand brake
lever (B), the brake must be so tight that the
rear wheels of the wheelchair with passenger
will not slip on a ramp with 6% incline (cf.
above).
To lock firmly, the latch lever (C) has to snap
into the brake lever (B). To unlock, please
pull the brake lever further which will release
the latch lever automatically.
1 ATTENTION
The brake shoes of the drum brake react
very sensitively to dirt, fluff, etc. Please clean
the brake regularly with a dry brush. When
removing and inserting the wheels with the
quick-release-axle, make sure not to damage
the brake as this would be a considerable
safety risk!
1
Page 25
User manual Kika Page 25 von 60
3.11.3 Attendant brake
(optional)
The cable brake operated by the attendant
serves exclusively as additional option for
locking the wheelchair independently from the
user.
It activates the standard locking brake
indecently from the driver via an additional
brake cable and saves 1.6 kg (3.5 lbs) of
weight compared to the drum brake!
The adjustment follows the same instructions
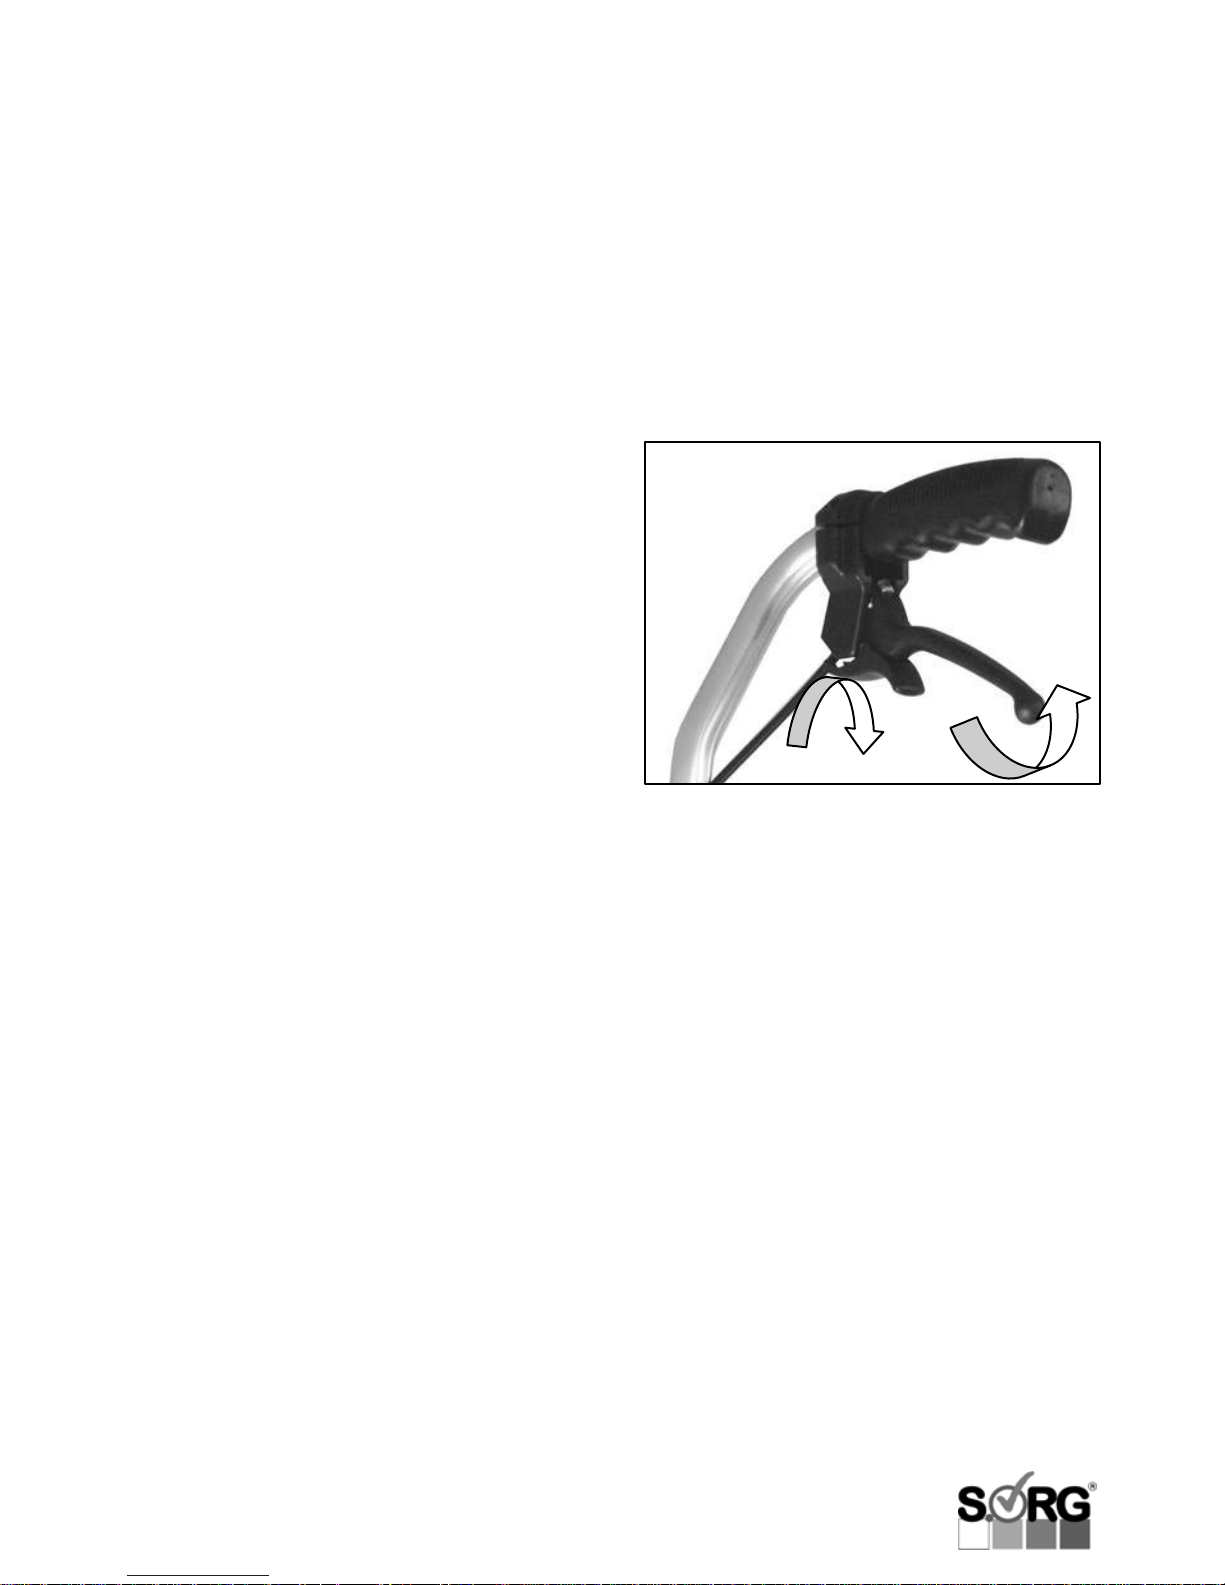
as for the drum brake described above. In the
second indexed position of the hand brake
lever (B), the brake must be firm enough to
ensure that the rear wheels of the wheelchair
with passenger do not slip on a 6% incline (cf.
above).
To lock firmly, the latch lever (C) has to snap
into the brake lever (B). To unlock, please pull
the brake lever further which will release the
latch lever automatically.
1 ATTENTION
Please mind that signs of wear may occur
on the brake bolt. So please check the
functional efficiency of your brake before
each ride and have your brake bolt
exchanged if necessary.
Please handle the tyre profile in the same
way, for it, too, may wear increasingly under
the influence of the attendant brake.
B
C
Page 26
Page 26 of 60 User manual Kika
1
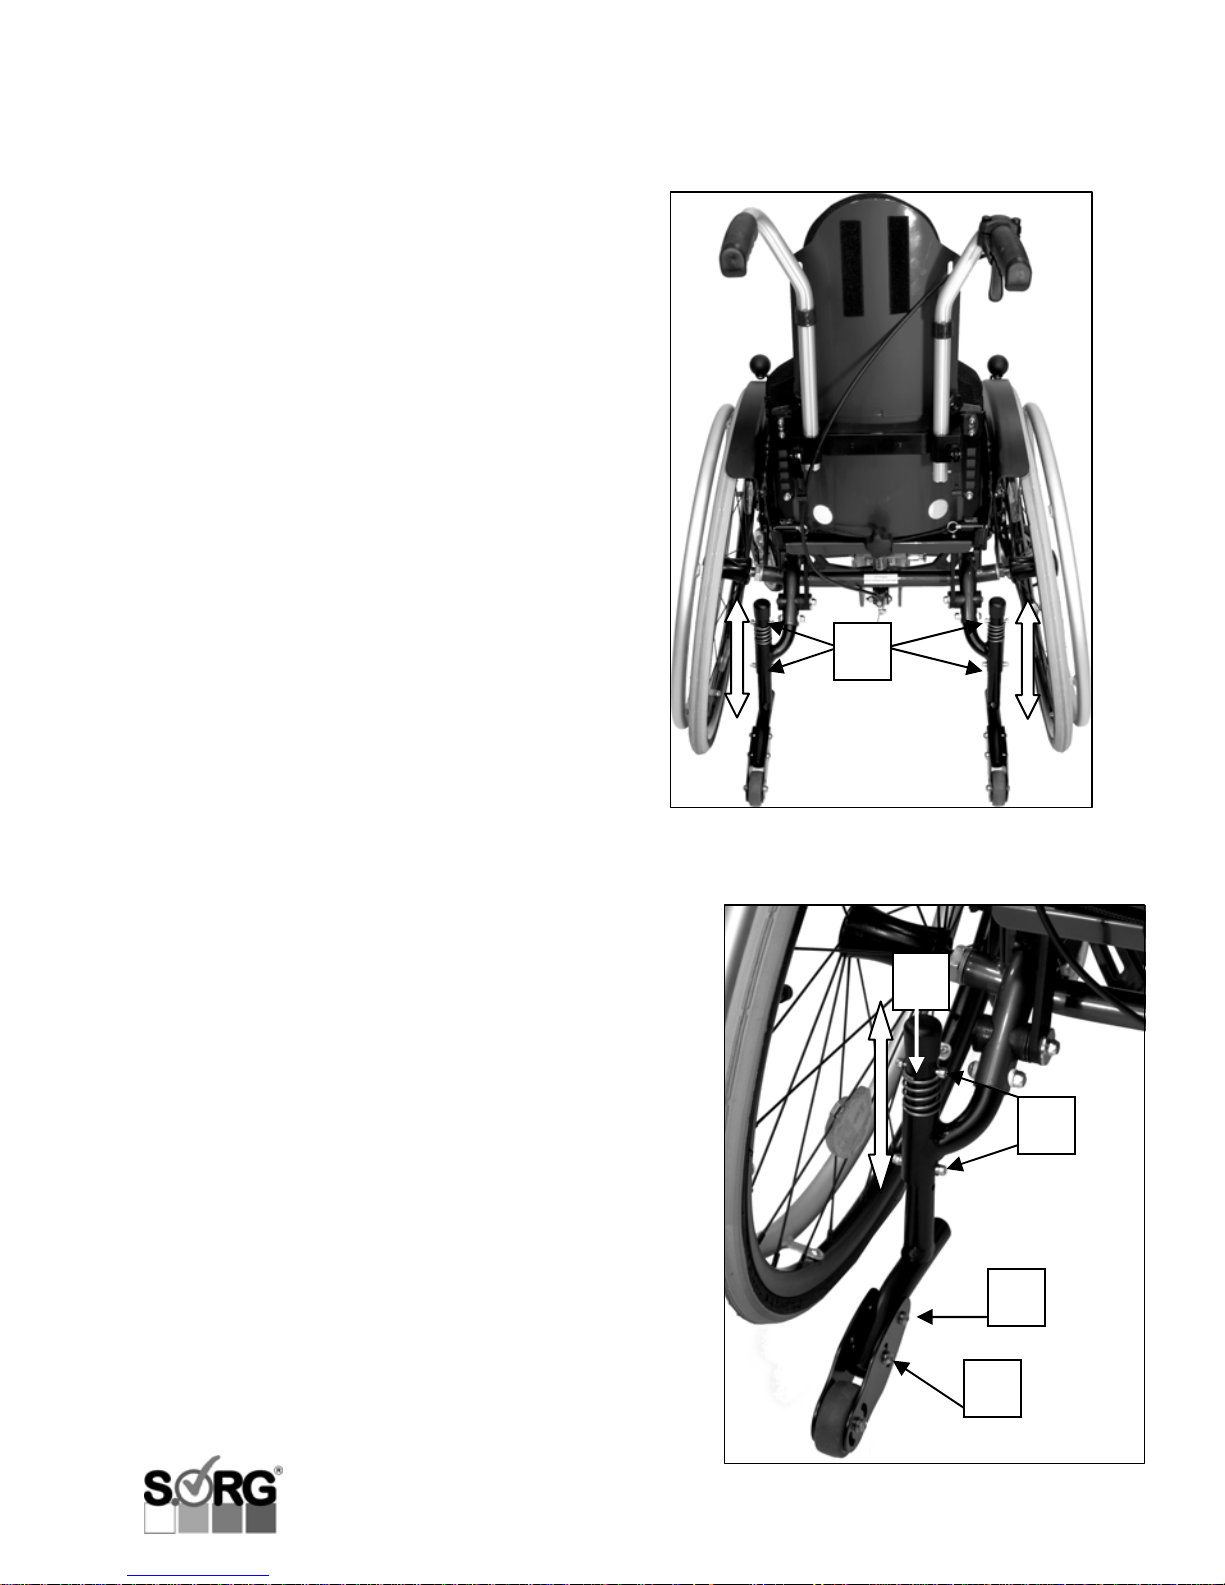
3.12 Anti-tippers
The anti-tippers prevent your wheelchair
tipping backwards unintentionally. Correct
adjustments are hence very important for the
function of the anti-tipper. The correct distance
to the ground is 2-5 cm.
1 ATTENTION
Please also read the respective chapters 2 of
the SAFETY INSTRUCTIONS.
Adjustment of distance to the ground
• measure current distance between the
anti-tipper and the ground
• remove rear wheels
• remove screw joints (pos. 1) completely
and insert them into suitable bores
• retighten screw joints according to
instructions with the necessary moment of
force
• check distance to the ground
• test function with securing support of an
assistant
When exchanging the springs (A),
please proceed in the same manner.
Further adjustments can be done via the small
wheel at the back of the anti-tipper.
• loosen screws (pos. 2) on both sides
• remove screws (pos. 3)
• choose among the three holes and insert
screws
• retighten all screws
1 ATTENTION
Make sure to make the same changes of the
anti-tippers on both sides!
1
2
3
A
Page 27
User manual Kika Page 27 von 60
A
B
1
1
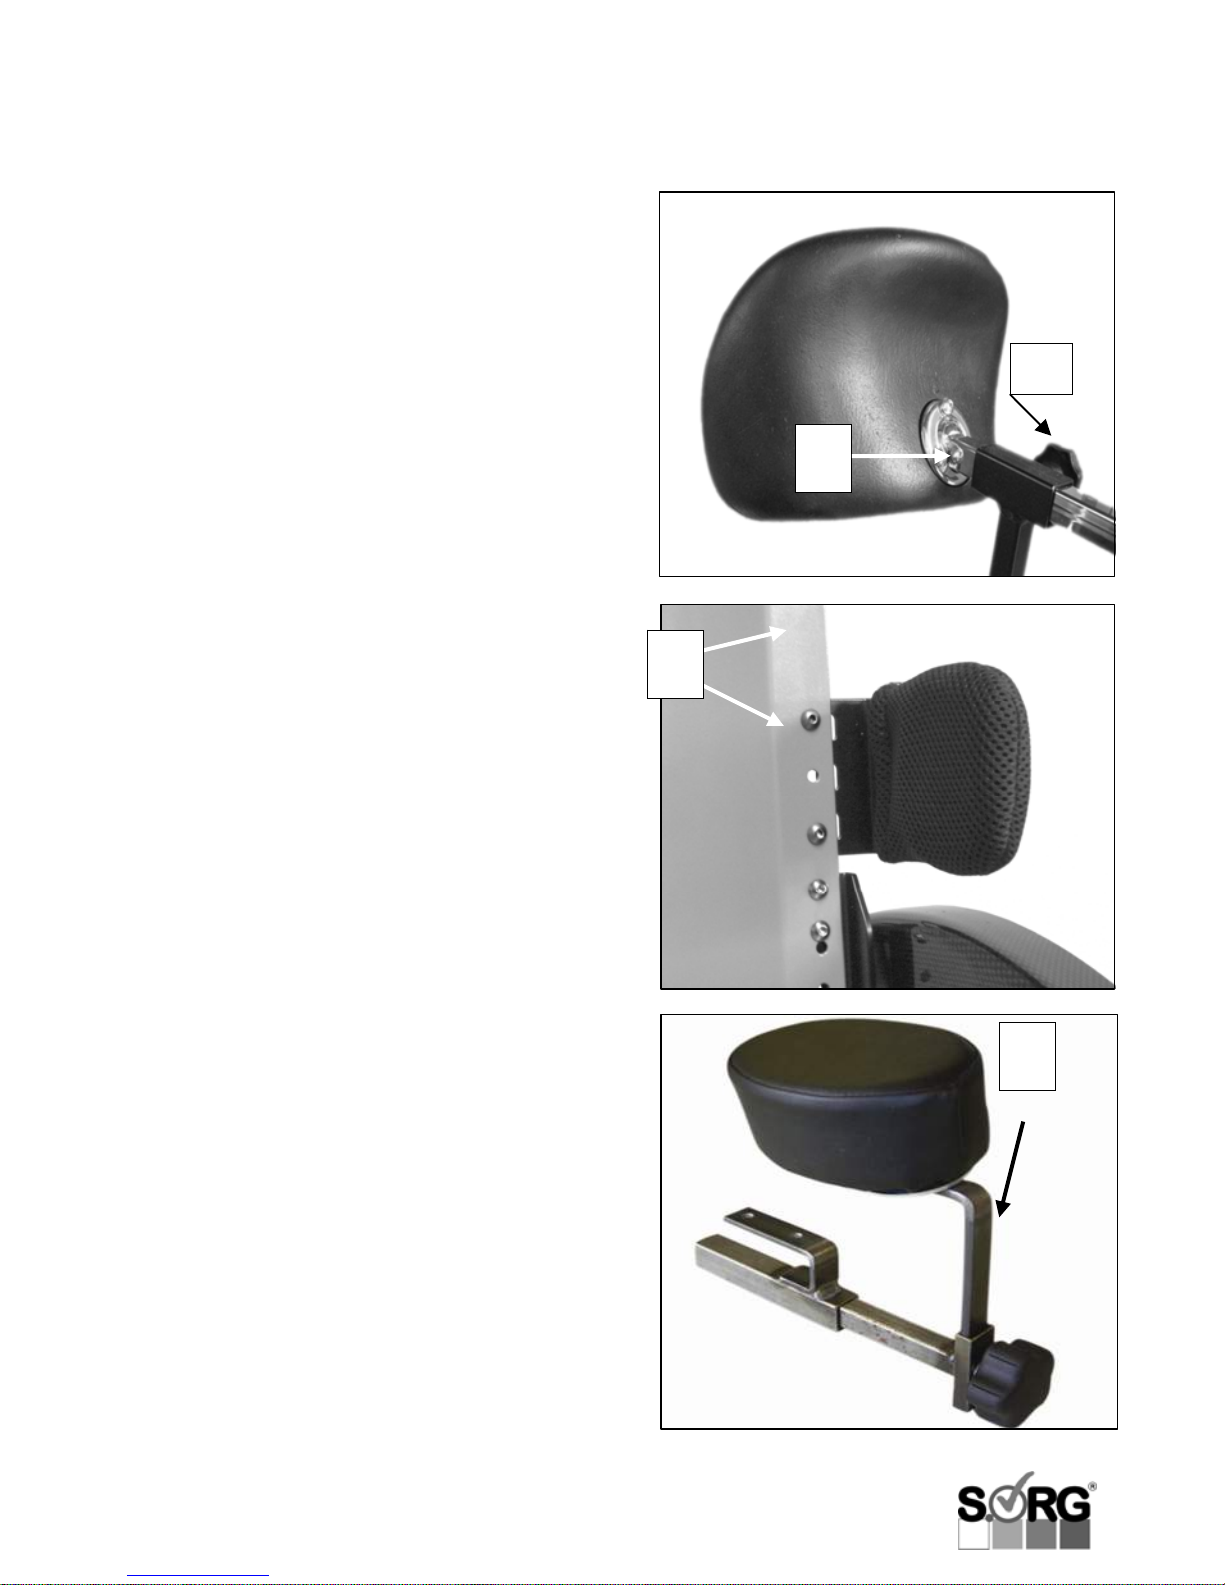
3.13 Head rest (optional)
Our head rests may be adjusted in height,
depth and angle.
• Adjustment in height (no image): loosen
star knob on the stabilising bar and
tighten it into desired position
• Adjustment in depth: loosen the star knob
(A) and set it tight after reaching the
desired position
• loosen the three screws (B) to adjust the
head rest in angle
3.14 Lateral truss pads
(optional)
If your Kika is equipped with lateral truss pads,
you may adjust them in vertical and horizontal
position via the different bolts in the moulded
back.
• loosen screws
• adjust desired position
• tighten screws firmly
3.15 Abduction wedge
(optional)
The abduction wedge is supposed to keep the
thighs apart. For children with too much
tonicity in their legs this is often beneficial in
order to attain better overall tonicity. For some
children it is only then that the wheelchair
becomes acceptable and usable.
Depth adjustment
• loosen star knob (pos. 2)
• adjust desired position
• tighten screws firmly
Height adjustment
• remove star knob screw joint completely
• adjust desired height
• retighten screws
Avoid taking the wedge with the wedge adapter
out of the guide pipe completely.
Page 28
Page 28 of 60 User manual Kika
1
2
max. 12 mm
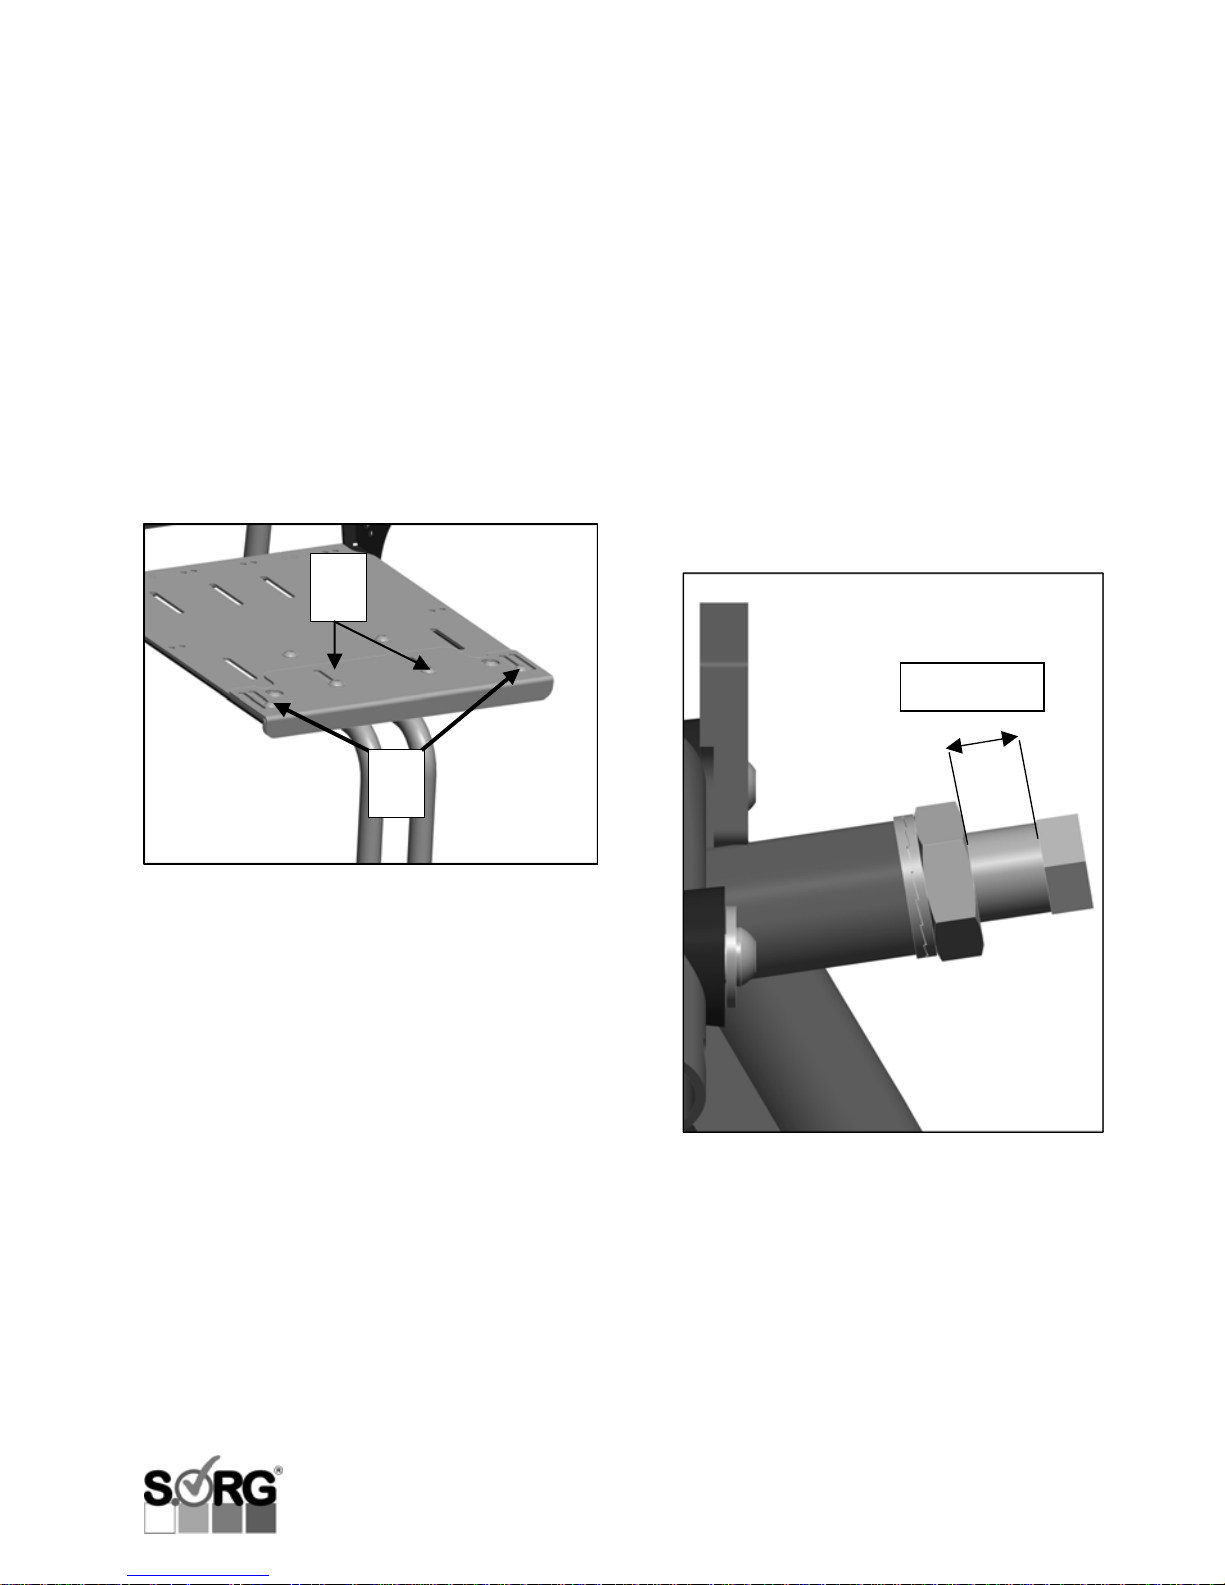
3.16 Growth adaption
(optional)
Kika’s back height is growth-adaptable by up to
2.5 cm (1 in) (cf. chapter 3.4) without any
additional parts. With the optional growthadaption-set, Kika can also “grow” in its seat
depth by 2-3 cm (0.8-1.2 in) and its seat width
by 2 cm (0.8 in).
3.16.1 Seat depth extension
• remove screw joints (pos. 1 + 2)
• mount delivered seat extension with the
delivered screws
• adjust desired extension and tighten
screw joints
3.16.2. Seat width adjustment
• remove rear wheels
• remove string which alters the back
angle
• remove screw joint of the moulded
back and the screen angle
• remove screw joints of the side parts
• loosen screw joint of the quick-release-
axle adapter
• unscrew the quick-release-axle adapter
by about 10 mm (the distance between
quick-release-axle adapter and screw
nut must not exceed 12 mm!)
Page 29
User manual Kika Page 29 von 60
1
2
3 4
img. 1
1
2
img. 2
1
img. 3
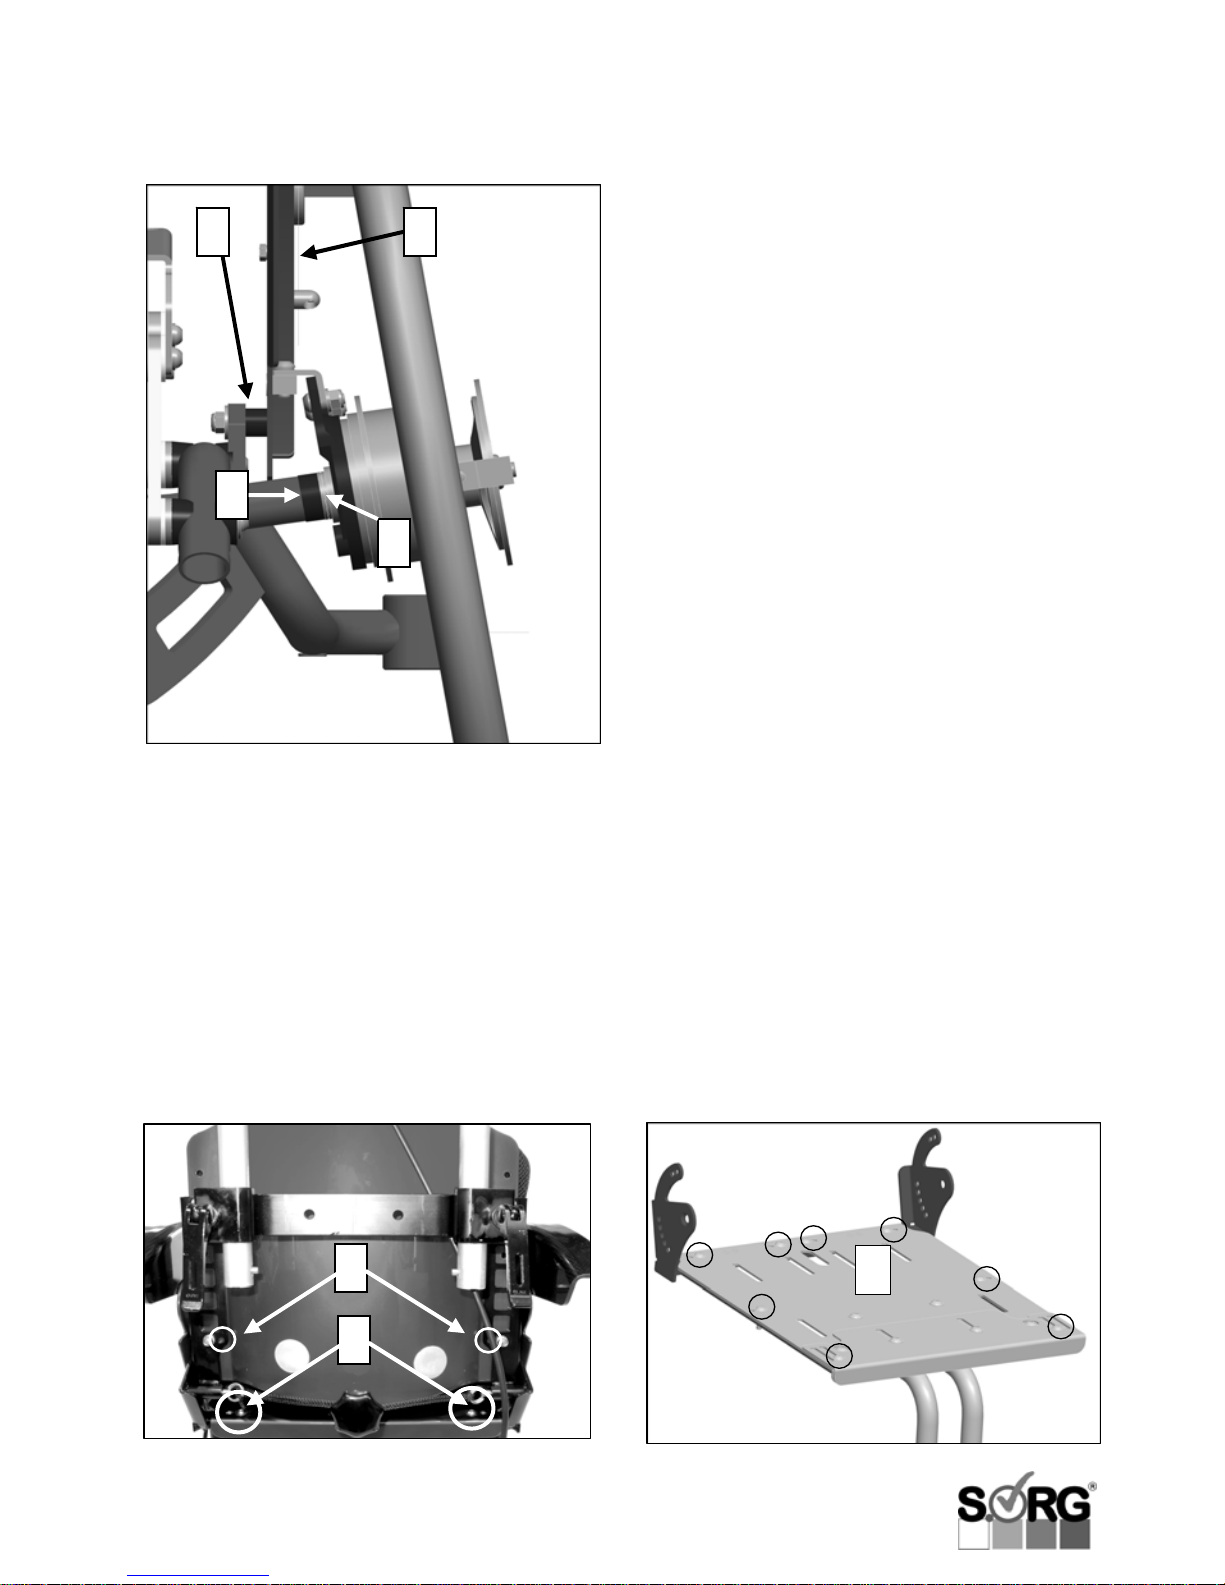
(image 1)
• for chairs with drum brakes: mount
delivered distance (pos. 1) between axle
and safety disc (pos. 2)
• insert distance parts (pos. 3) between
frame plate and side part (pos. 4) and
mount anew with delivered screw joint
(image 1)
(images 2 + 3)
• mount screen angle below the seat plate
with 4 screws each on the left and the
right by about 1 cm further towards the
exterior (image 2 +3, pos. 1)
• screw moulded back into the inner bolt
(pos. 2) of the screen angle (image 2)
• tighten all screw joints
• readjust brake pressure if necessary
(cf. chapter 3.5)
• insert and link up new string for the
back angle adjustment function
• slightly melt the ends of the string with
a flame (pocket lighter) to prevent them
from frazzling
Page 30

Page 30 of 60 User manual Kika
4 General Handling
The following indications on the operation of
Kika in everyday life are directed to you as a
user of the wheelchair and are supposed to
help you to use the individual functions of the
technical parts safely, competently and
conventionally so you can profit from your
wheelchair for a long time.
Please read the following indications on
operation carefully and mind the suggestions
on daily usage of your wheelchair.
4.1 Getting in and out
When getting in or out, please make sure that
the locking brakes are tightened.
Have an assistant turn the casters forwards or
drive backwards until the casters turn
forwards; then close the locking brakes. This
provides your wheelchair with extra safety from
tipping when getting in or out.
Please avoid stepping on the foot rest because
that might make your wheelchair tip forwards.
Do never lean on the clothing guard or the
brake lever/-buttons inside the clothing guard
when getting in or out for it may break.
To get in or out, you best lean on the handrims
with both hands or as centric on the seat as
possible.
Please familiarise yourself with the limits of
your wheelchair right from the beginning by
– essentially, in presence of an experienced
assistant! – carefully leaning towards all
directions and perhaps holding a heavy
object with your outstretched hand and
concentrating on the point where the
wheelchair starts tipping.
Please note that changes of the
wheelchair’s centre of gravity bring about
different conditions. Familiarise yourself
with them through appropriate tests –
again, only in the presence of an assistant!
In the long run, you can only prevent
dangers that you are well aware of!
Page 31
User manual Kika Page 31 von 60
4.2 Push handles
We offer three options to push Kika:
• Extendable push handles
• Single-hand push handle
• Push bar (2 variations)
1 ATTENTION
Before pulling a person sitting in a wheelchair
over an obstacle with the aid of the push
handles or push bar, please check if the
handles are connected firmly to the
wheelchair. The handles might loosen and thus
cause considerable risk moments. Please also
check whether the control lever and the set
screw are connected firmly to avoid safety risks
and to prevent losing the set screw.
When playing with other children, it is strongly
recommend to remove the push handle,
because the child might not able to anticipate
the swivel radius and might thus involuntarily
injure other children!
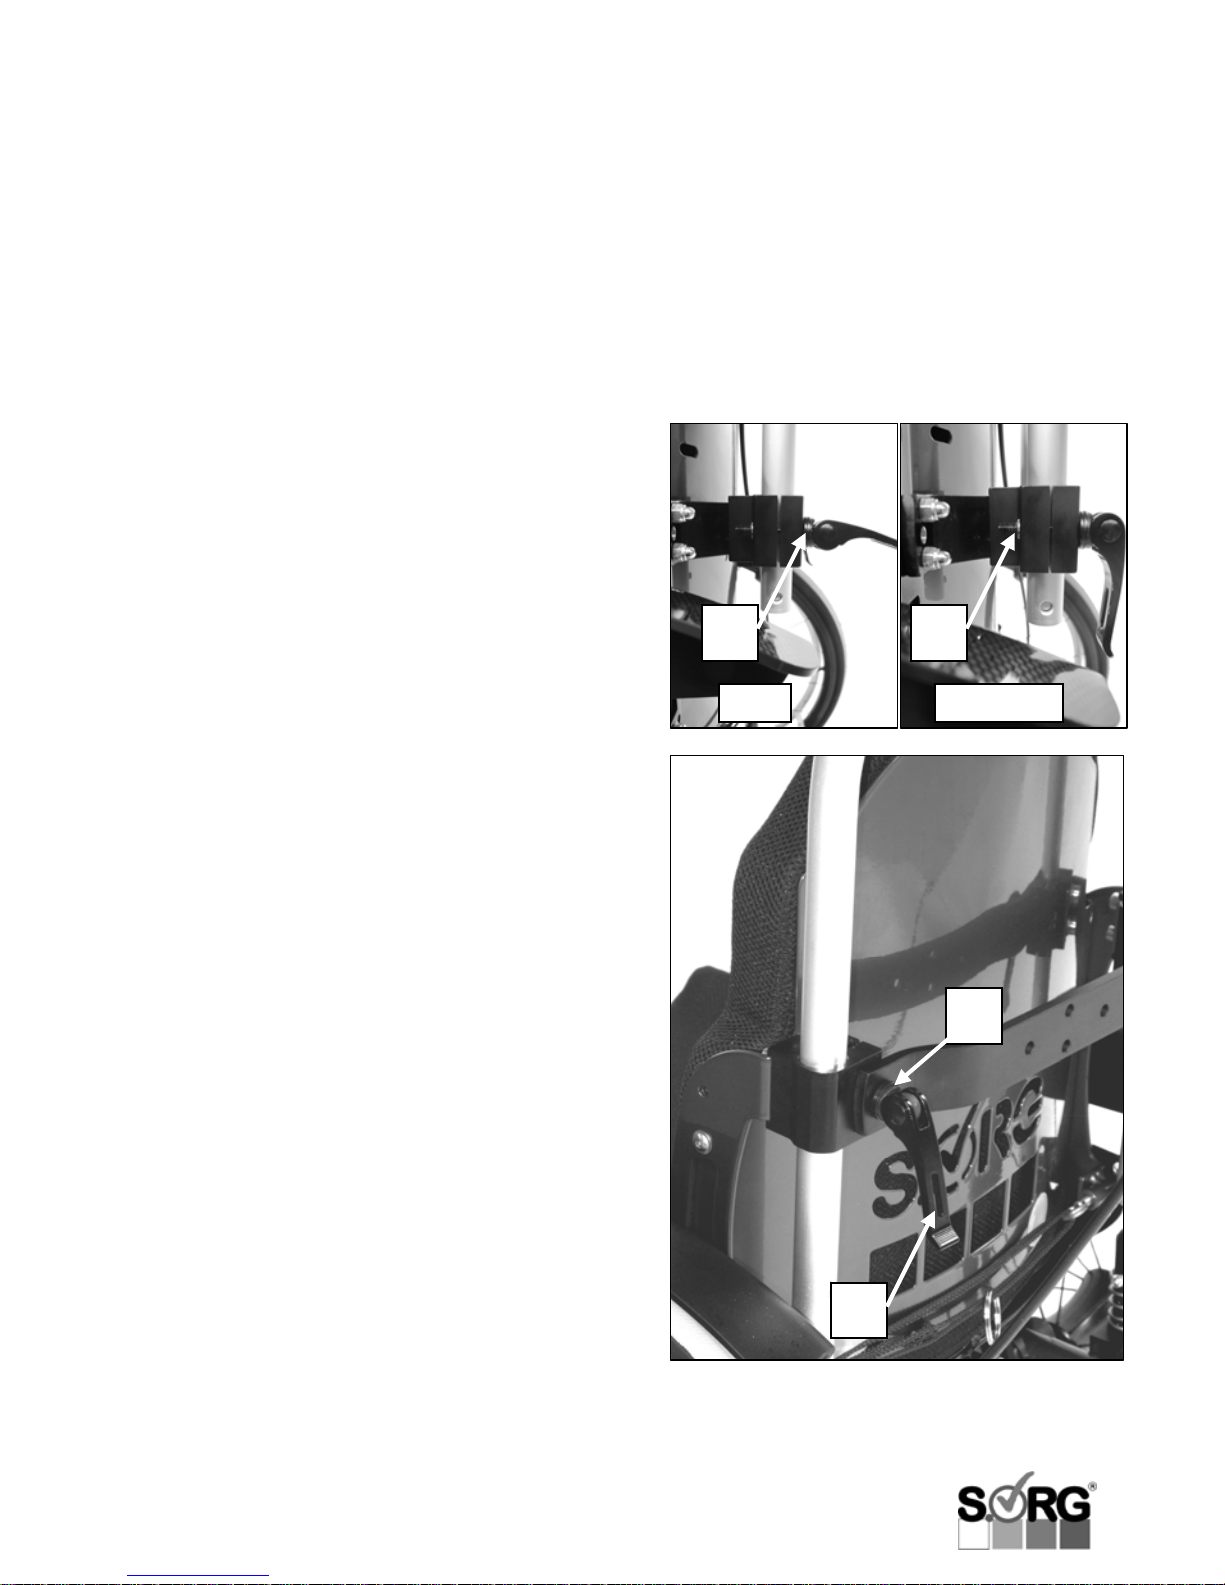
Adjusting the tension force
• put clamping lever (A) into an open
position , so it is set vertically on the
clamping device
• regulate the distance between the
clamping lever and the half-shell (C) via
the set screw (B)
• you have reached the ideal point if the
round end of the clamping lever (A) rests
exactly inside the half-shell (C)
• close clamping lever
• The pushing handle must not be movable
in closed position!
PLEASE NOTE
To adjust the height or remove, please
proceed in the same way for all variants.
A
C
C B
closed
open
Page 32
Page 32 of 60 User manual Kika
B
A
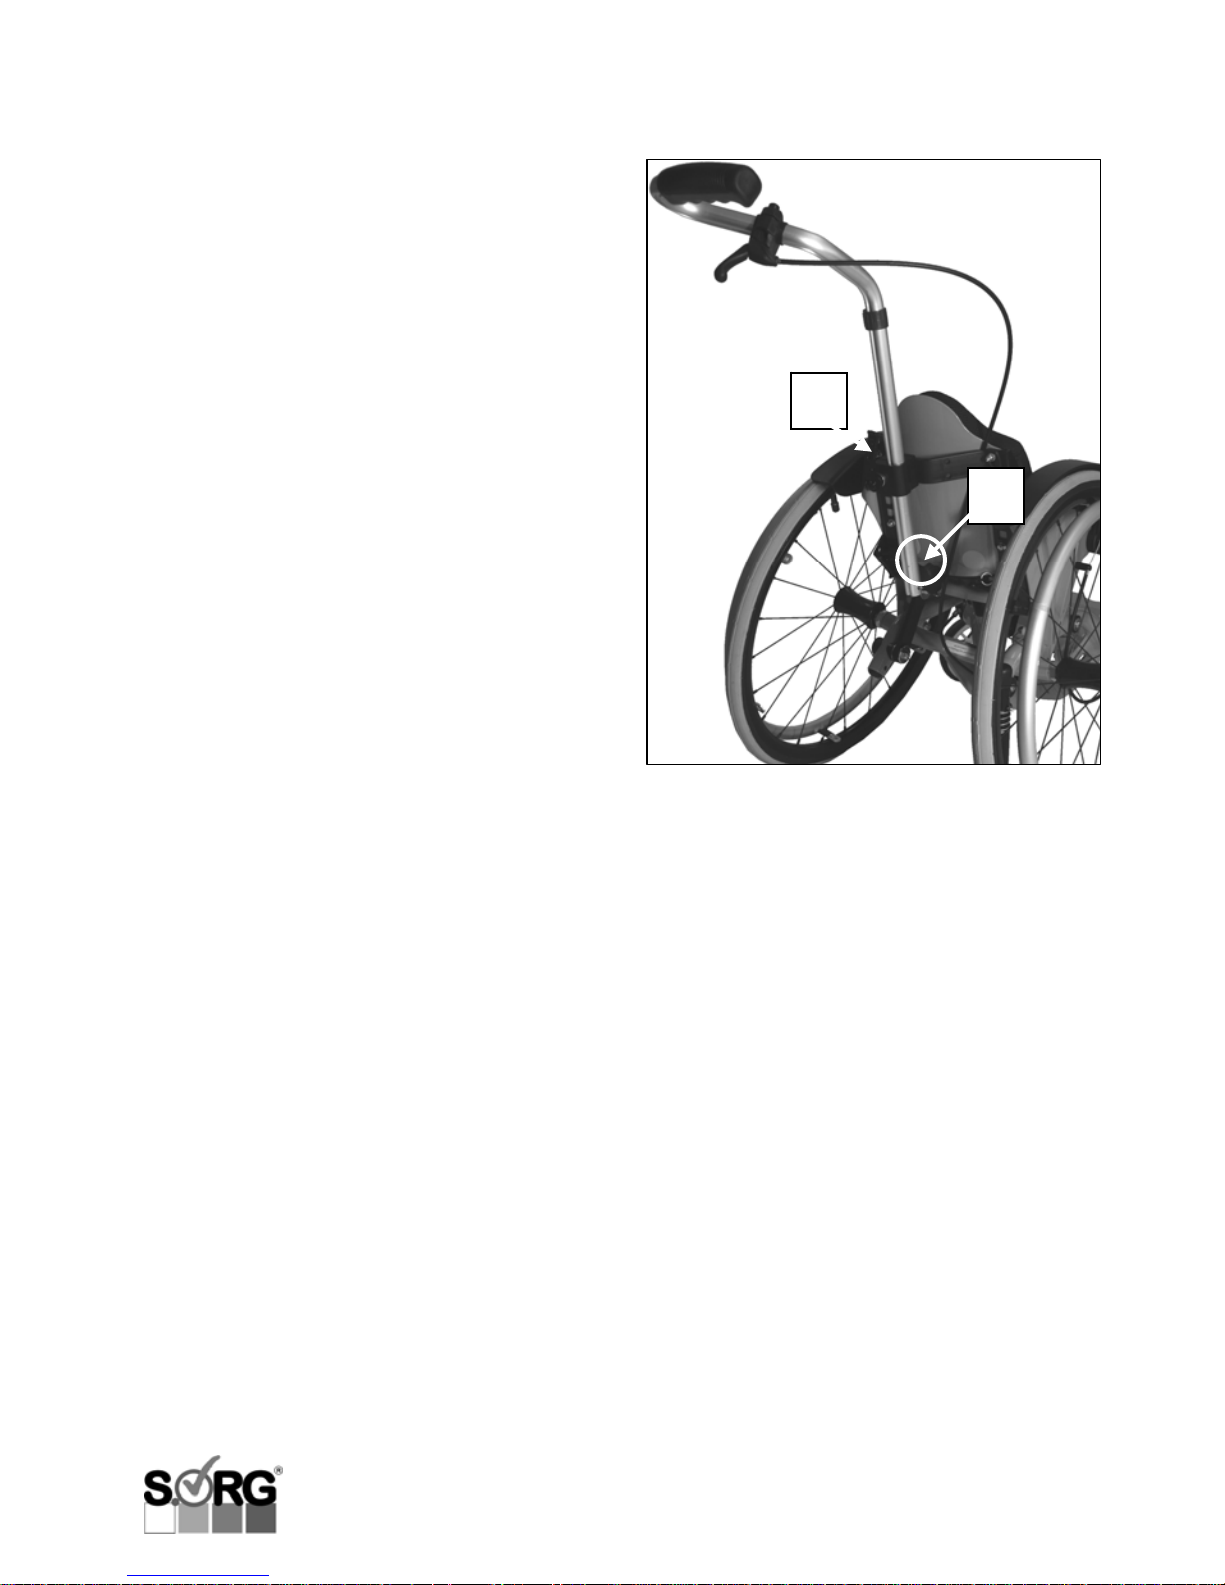
Removing the push bars
At the lower end of the aluminium pipe is a
stand spring which prevents the push handle
from slipping off the clamp while adjusting its
height.
Please open the fixation clamp (A). Push the
safety button (B) on the push handle down,
keep it firmly in this position, and,
simultaneously, pull the push handles out of
the guide pipe.
To insert the push handle, please open the
fixation clamp again. Push the safety button
and place the push handle, turned 90°
counter-clockwise, back into the adapter.
About halfway through (you will feel a blocking),
please turn the push handle back 90°
(clockwise), so the safety button can slip
unimpeded through the clamp alongside the
guiding slot.
Finally, close the clamp and make sure that the
push handles are attached perfectly firmly.
Page 33
User manual Kika Page 33 von 60
4.2.1 Single-hand push handle,
firm or hinged (optional)
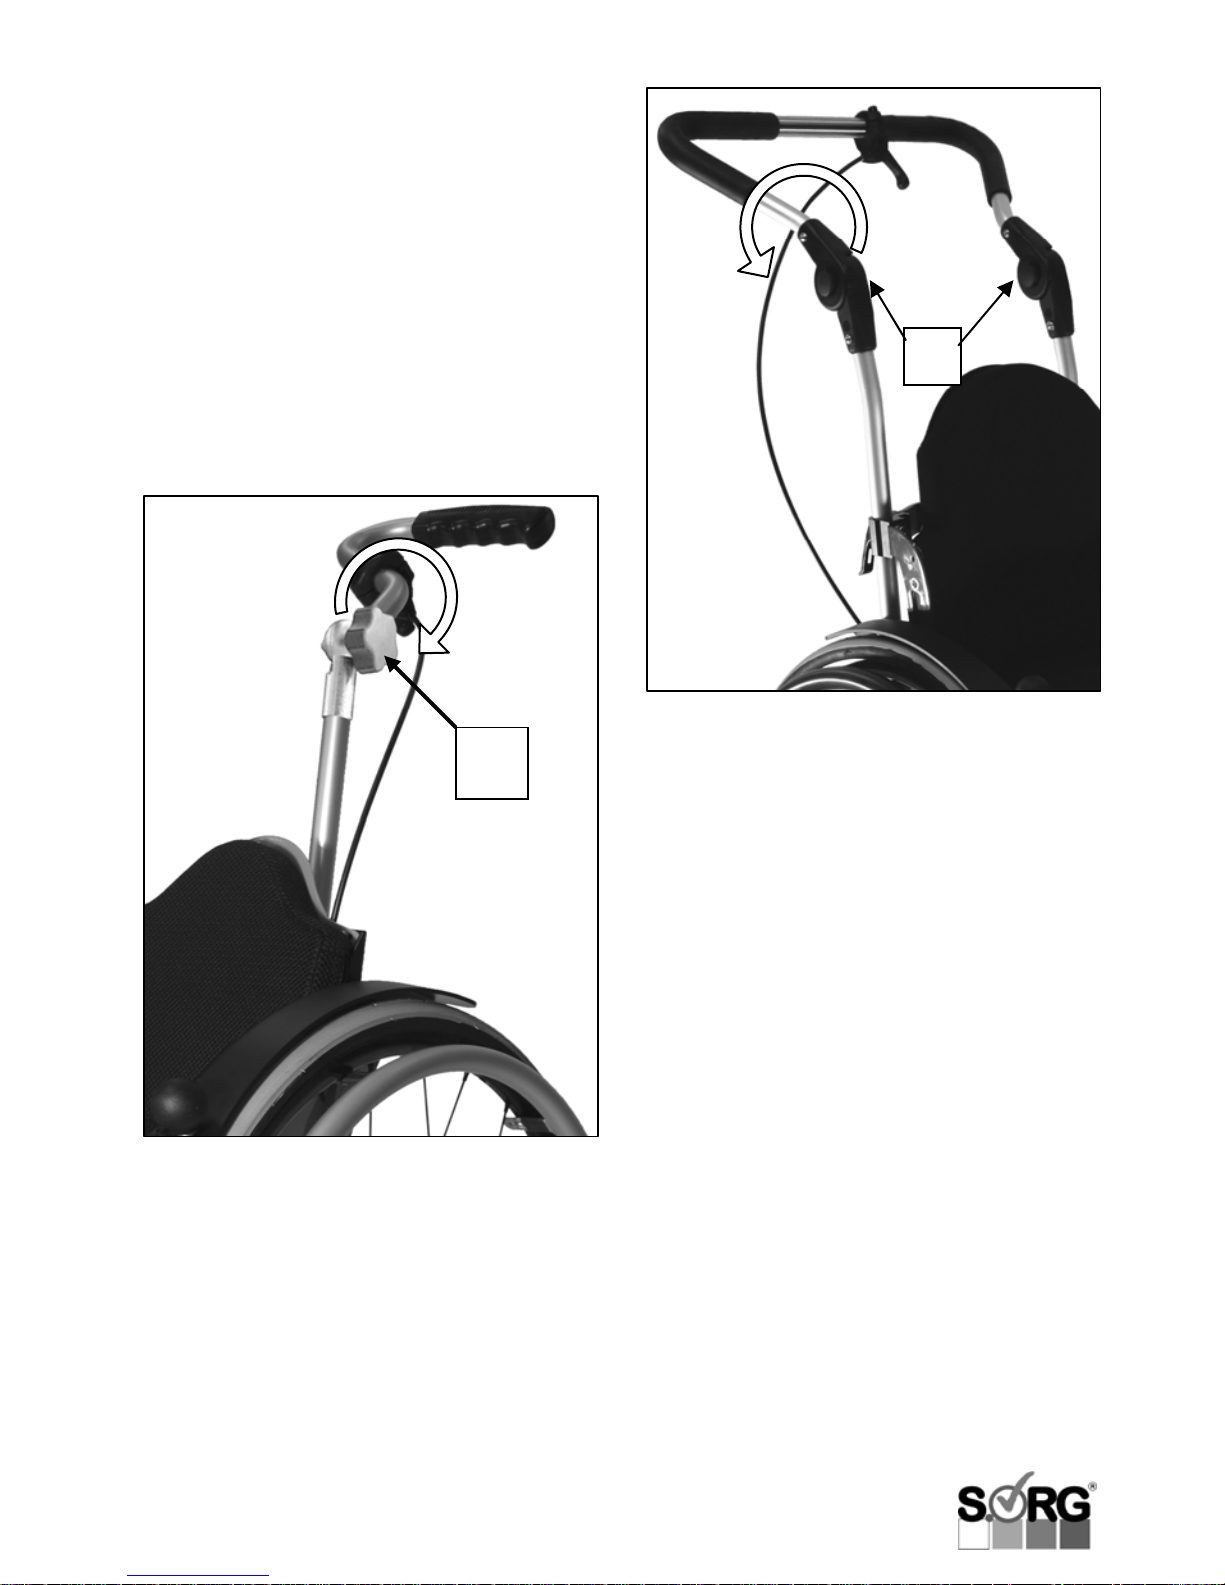
To vary the height of the push handle, loosen
the control lever. Make sure to tighten the
clamping lever after adjusting in order to be
able to handle the wheelchair reliably.
1 ATTENTION
Do not attach any bags or the like on the
handles, as this makes the wheelchair more
prone to tipping.
Hinging the push handle
• loosen the star knob (pos. 1)
• place push handle into desired position
• tighten star knob
4.2.2 Push bar (optional)
The push bar is a pushing aid for an
attending person and has been designed
exclusively for that purpose! To adjust the
height, please proceed as described above.
To adjust the angle, push the buttons (A) of
both angle-adjustment-devices
simultaneously and adjust the desired
position.
PLEASE NOTE
Keep in mind that the push bar may
influence Kika’s proneness to tipping.
1 ATTENTION
Do not attach any bags or the like on the
push bar, as the wheelchair might tip
backwards due to the altered centre of
gravity.
A
1
Page 34
Page 34 of 60 User manual Kika
4.3 Tilt function, back angle
adjustment and –extension
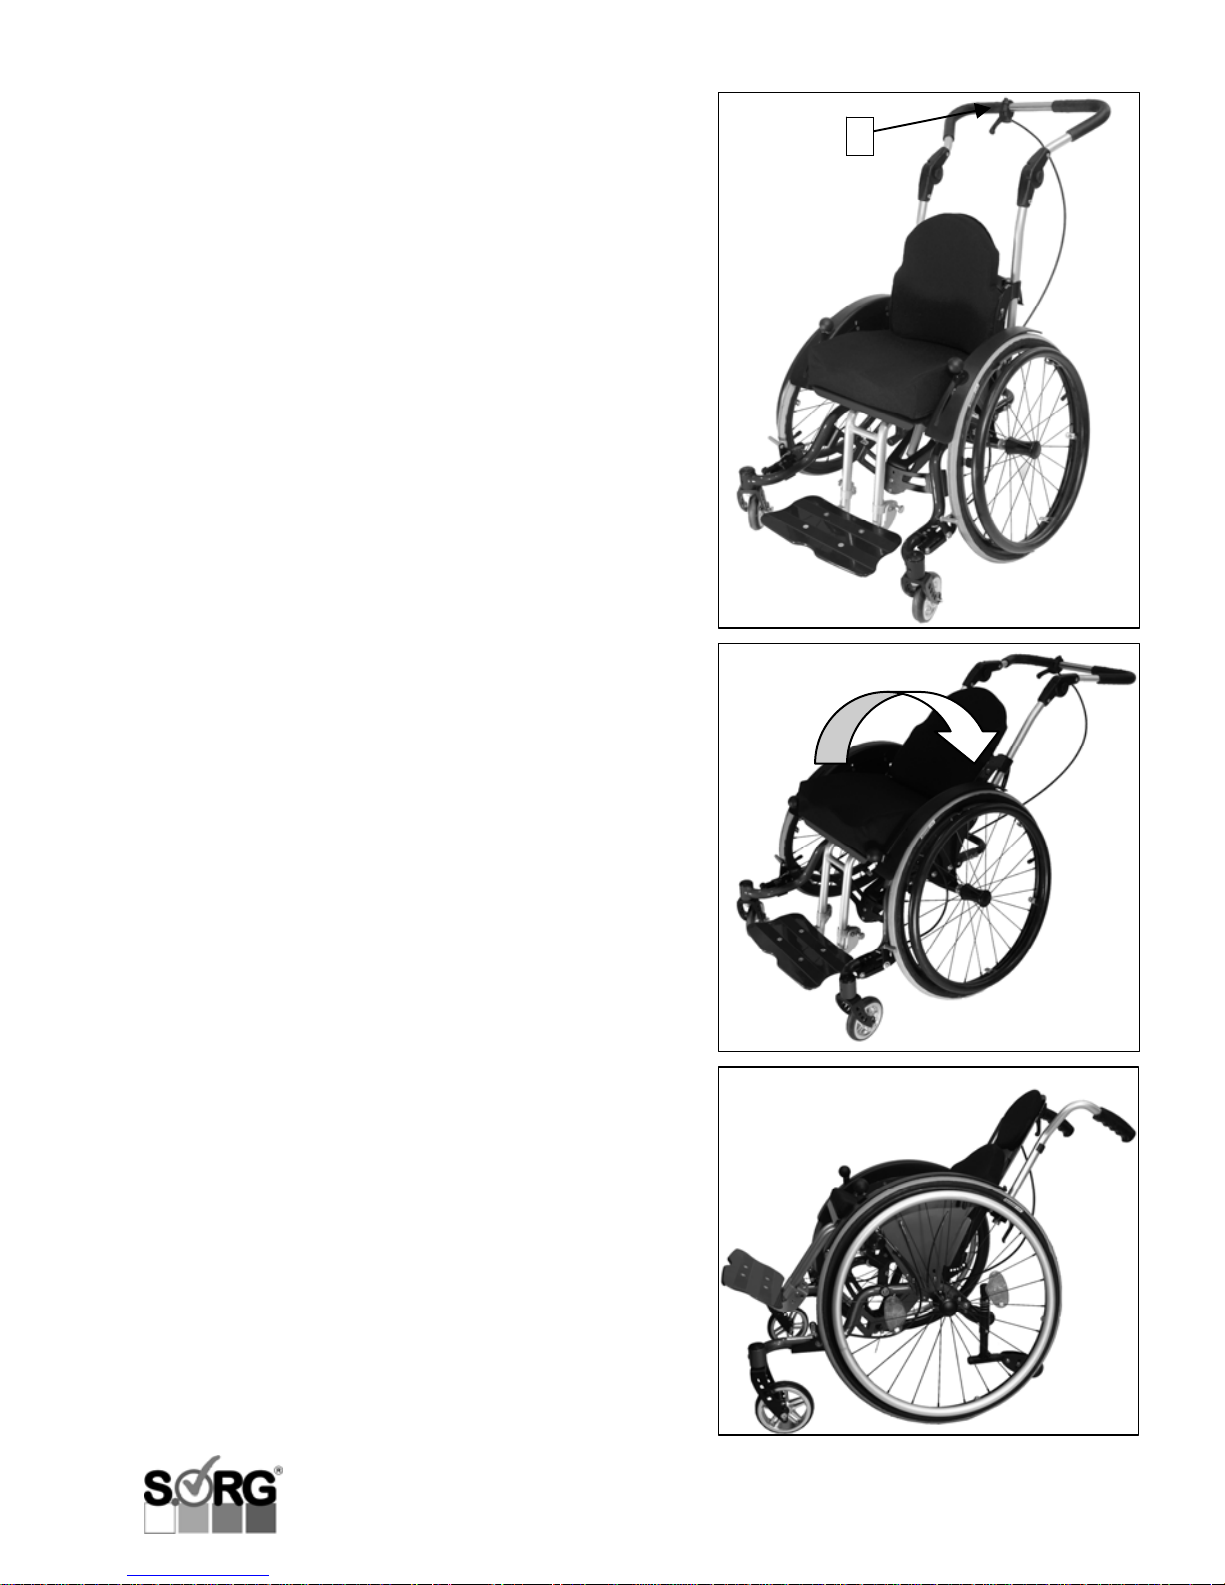
Kika’s entire seat unit may be tilted
continuously by 30° using the gas pressure
spring. Additionally, the back angle may be
adjusted from 80° to 90° via the ratchet joint.
1 ATTENTION
Both adjustments strongly affect the centre of
gravity and thus the proneness to tipping of the
wheelchair! Familiarise yourself with Kika’s
new tipping characteristics with the support of
an experienced assistant!
4.3.1 Tilt function
To tilt Kika, please activate the anti-tipper
before working the release lever (pos. 1) on the
push handle/bar and placing the seat-backunit into the desired position, using both
hands.
1 ATTENTION
Do not ever operate Kika’s tilt while driving! To
do that, please halt your wheelchair, activate
the anti-tipper and prevent the chair from
rolling away via the locking brake. To keep the
wheelchair on the ground with all its 4 wheels,
it may be necessary to place one foot on the
front frame part.
Also, please make sure to hold on to the push
bar with both hands while loosening the lever
to prevent an abrupt shift of the seating
position.
1
Page 35
User manual Kika Page 35 von 60
4.3.2 Back angle adjustment
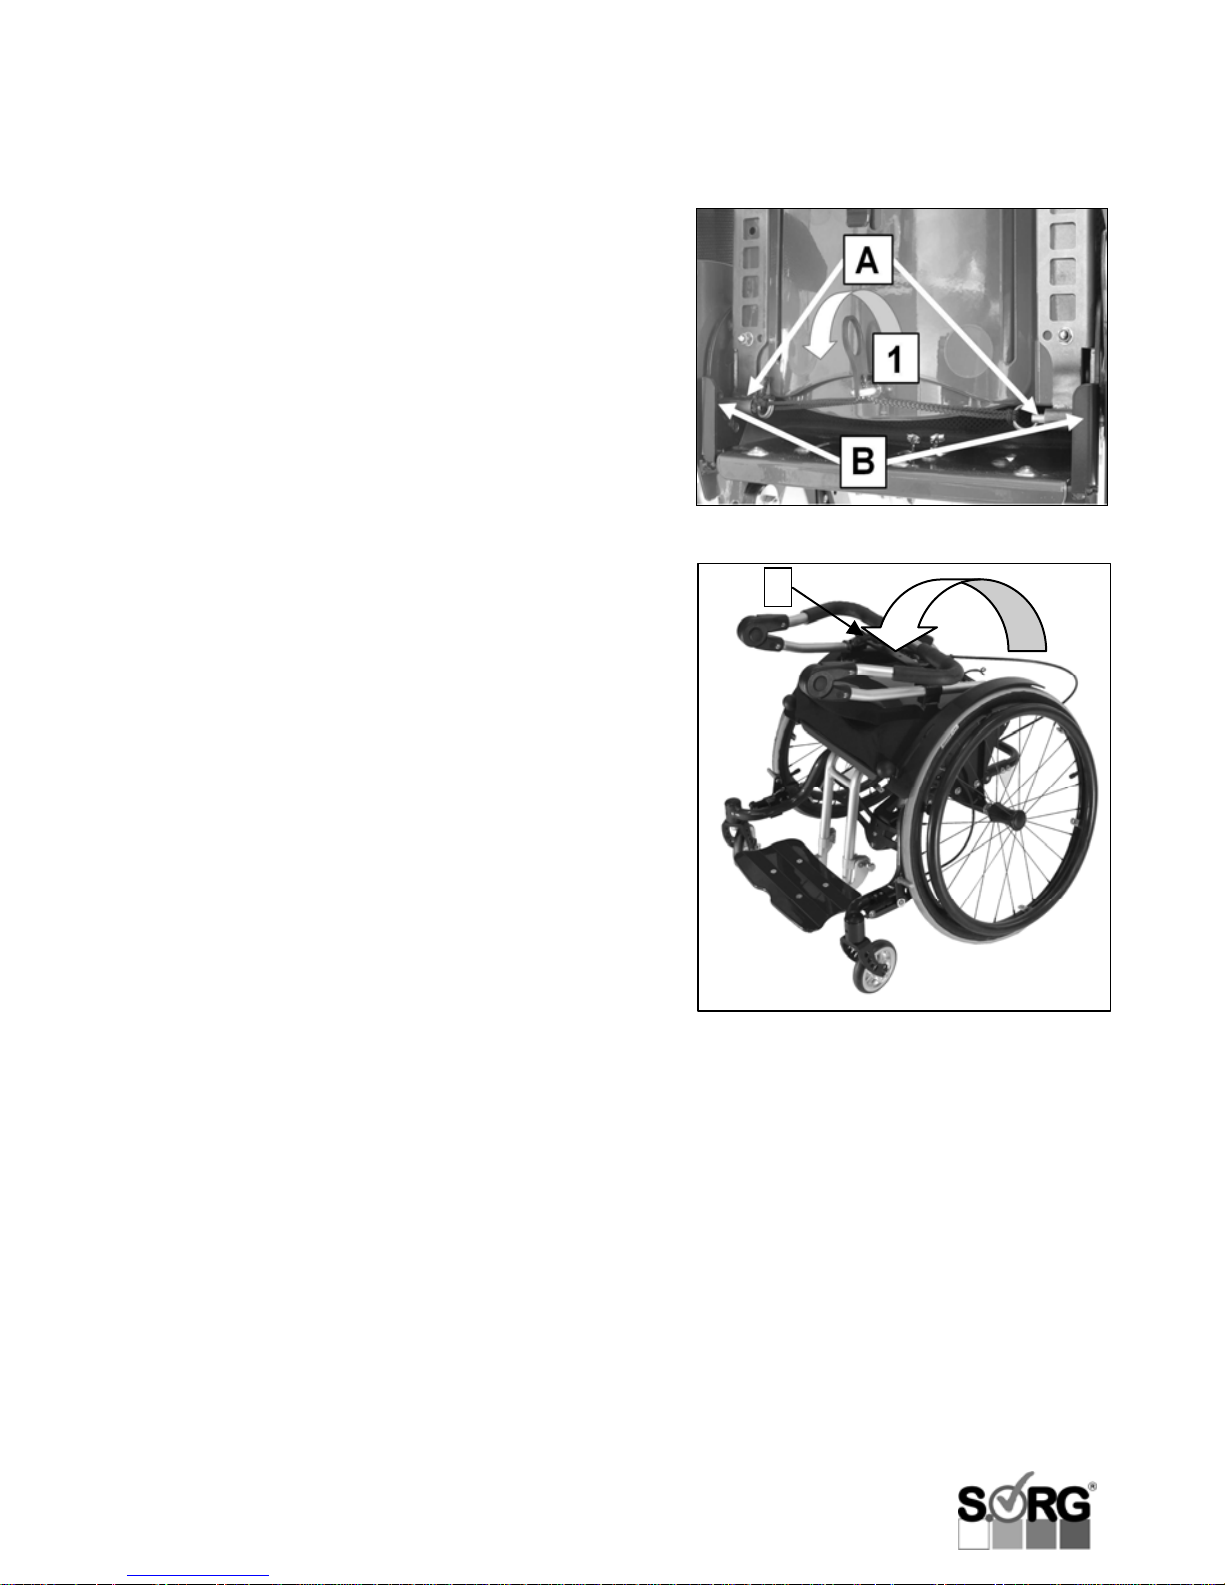
To adjust the back angle of your Kika, please
activate the anti-tipper first. Then work the
release lever (pos. 1) on the moulded back by
pulling it down. Now place the back unit into
the desired position. You need to hold the lever
in the released position while doing so.
1 ATTENTION
Make sure your child does not strain the
moulded back while you are adjusting the back
angle.
Make sure that the ratchet bolts (A) are
actually snapped into place on both sides. They
have to protrude the outer face of the ratchet
joint (B) by several mm.
4.3.3 Folding the back to the
front
To fold the back to the front, please proceed in
the same way and make the bolt snap into the
last position. The stabilising bar (pos. 2) may
then even serve as a handle to lift your Kika
(into a car etc.).
2
Page 36

Page 36 of 60 User manual Kika
4.3.4 Retractable back extension
(optional)
In order to be able to support your child’s head
while tilting or adjusting the back angle, we
offer a retractable back extension which saves
approx. 1 kg of weight compared to
conventional head rests.
Furthermore, it provides the same and highest
possible freedom of movement of your child’s
head as does a buggy.
• loosen both star knobs (pos. 1)
• place the extension plate into the desired
position
• tighten both star knobs
• remove the head cushion (pos. 2) and
place it into the desired position on the
front face
1 ATTENTION
Please keep in mind that extending the back,
too, may influence the wheelchair’s centre of
gravity and make sure to use the anti-tipper!
Page 37
User manual Kika Page 37 von 60
A
B
A
4.4 Anti-tipper
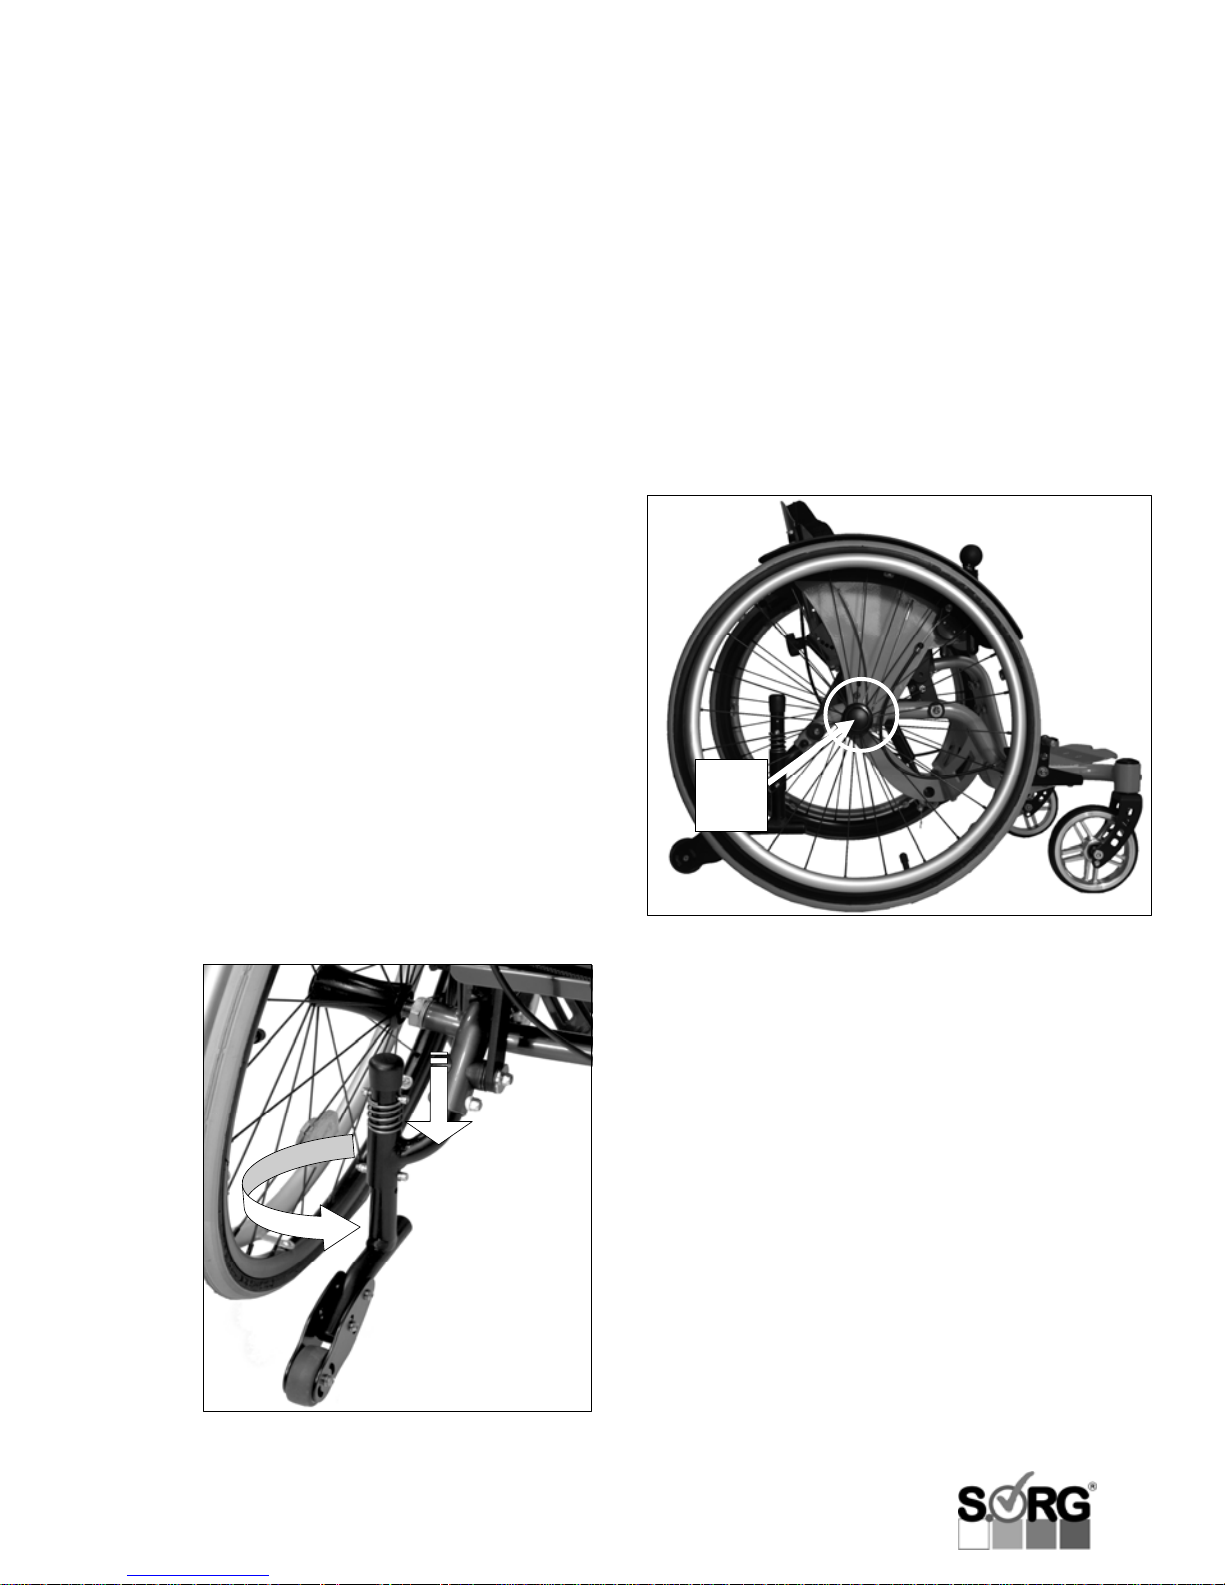
The anti-tippers are stored in a rotatable
position within the frame adapter (A). To
activate, push down the anti-tipper on the
upper end of the pipe with the foot – or better
with your hand –, turn it 180° backwards, and
release it so it can engage into the positioning
slot (B). To deactivate, please proceed the
same way.
1 ATTENTION
Please also read the respective SAFETY
INSTRUCTIONS in chapter 2.
1 ATTENTION
Please make sure that the extension is always
engaged in its end position because a loose
anti-tipper may lead to injuries in the
assistant’s ankle area.
PLEASE NOTE
To surmount barriers or obstacles, the antitipper may have to be swung in by the
assistant and swung out afterwards because
otherwise, the wheelchair might not be
sufficiently tilted to the back.
4.5 Wheels with quickrelease-axles
The quick-release-axles provide that all of
our rear wheels are easily demountable and
attachable without using any tools.
No person is allowed to be seated in the
wheelchair while mounting or demounting.
The wheelchair must be placed – supported
and tilt resistant – on even, firm ground and
it must be secured against rolling away and
tipping over.
Activate the anti-tipper and loosen the
locking brake on one side, push the arrestor
button (A) in the wheel hub and remove
/attach the rear wheel with the button (A)
pushed. After successful installation, the
arrestor button should protrude the wheel
nut by several millimetres.
1 ATTENTION
Please make sure that the quick-releaseaxle with the arrestor button and arrestor
bolt is always clean. Sand, earth, dirt,
moisture, and ice may lead to malfunctions
of the snap-action mechanism, which
inherits a considerable safety risk.
Page 38
Page 38 of 60 User manual Kika
4.6 Leg supports
4.6.1 Standard leg support
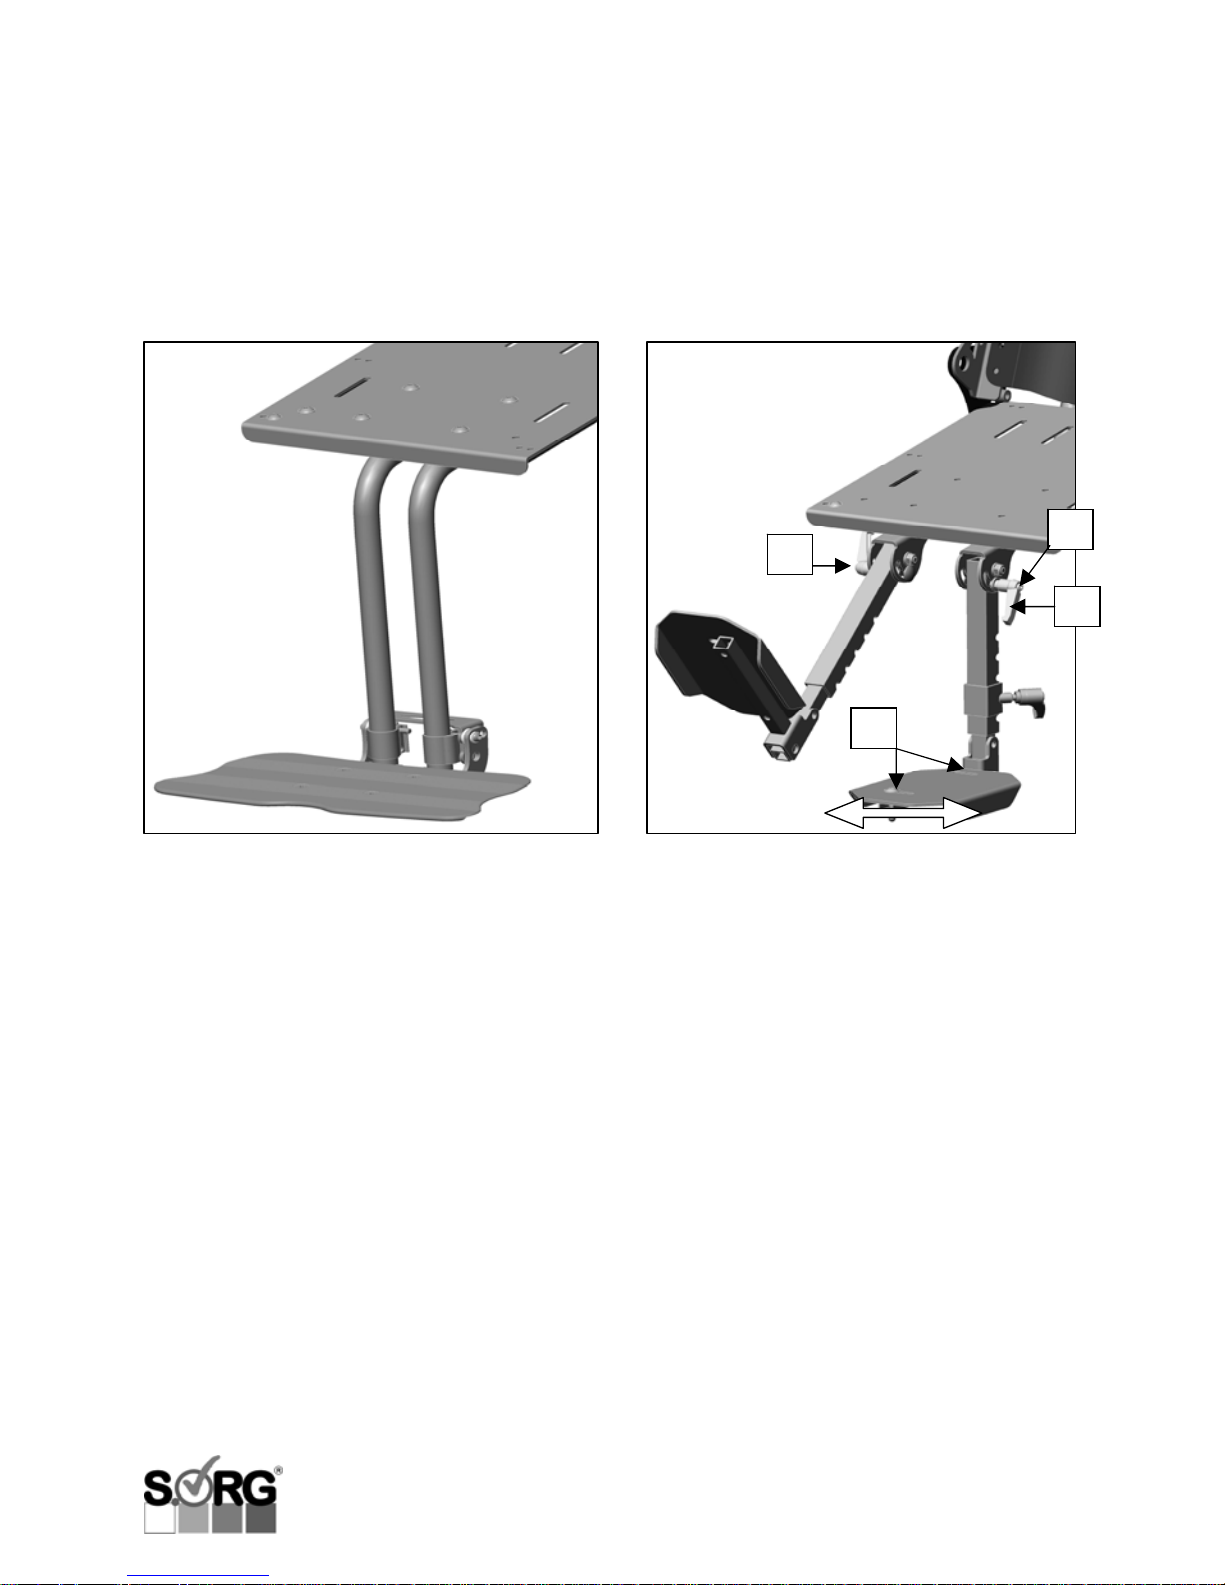
Kika’s standard leg support can be adjusted in
its angle and lower leg length. These
adjustments must be done by the medical
supply store!
To get into your wheelchair, if possible, hinge
the footrest backwards (after having arrested
the locking brake!) so you can get closer to the
seat. As soon as the child is seated safely in
the wheelchair, lift their legs, put the foot rest
back to the front, and position your child’s feet;
use heel holders if necessary (optional).
1 ATTENTION
Do not EVER let your child get into the
wheelchair via the foot rest for it may tip
forwards and harm your child considerably.
4.6.2 Leg support, hinged
(optional)
The hinged leg support allows to store the
legs at different heights, independently from
each other.
Adjustment of the foot rests (abduction)
• loosen both screws (pos. 2) on both
foot rests
• turn and/or move the foot rests into the
desired position (abduction)
• tighten all screw joints (pos. 2)
Hinging the leg supports
• loosen clamping lever (pos. 1) on both
sides
• place leg support(s) into desired
position(s)
• retighten clamping lever (pos. 1)
• push button (A) on the handle of the
clamping lever and keep it pushed
• turn the handle into a non-hazardous
position
Page 39
User manual Kika Page 39 von 60
2
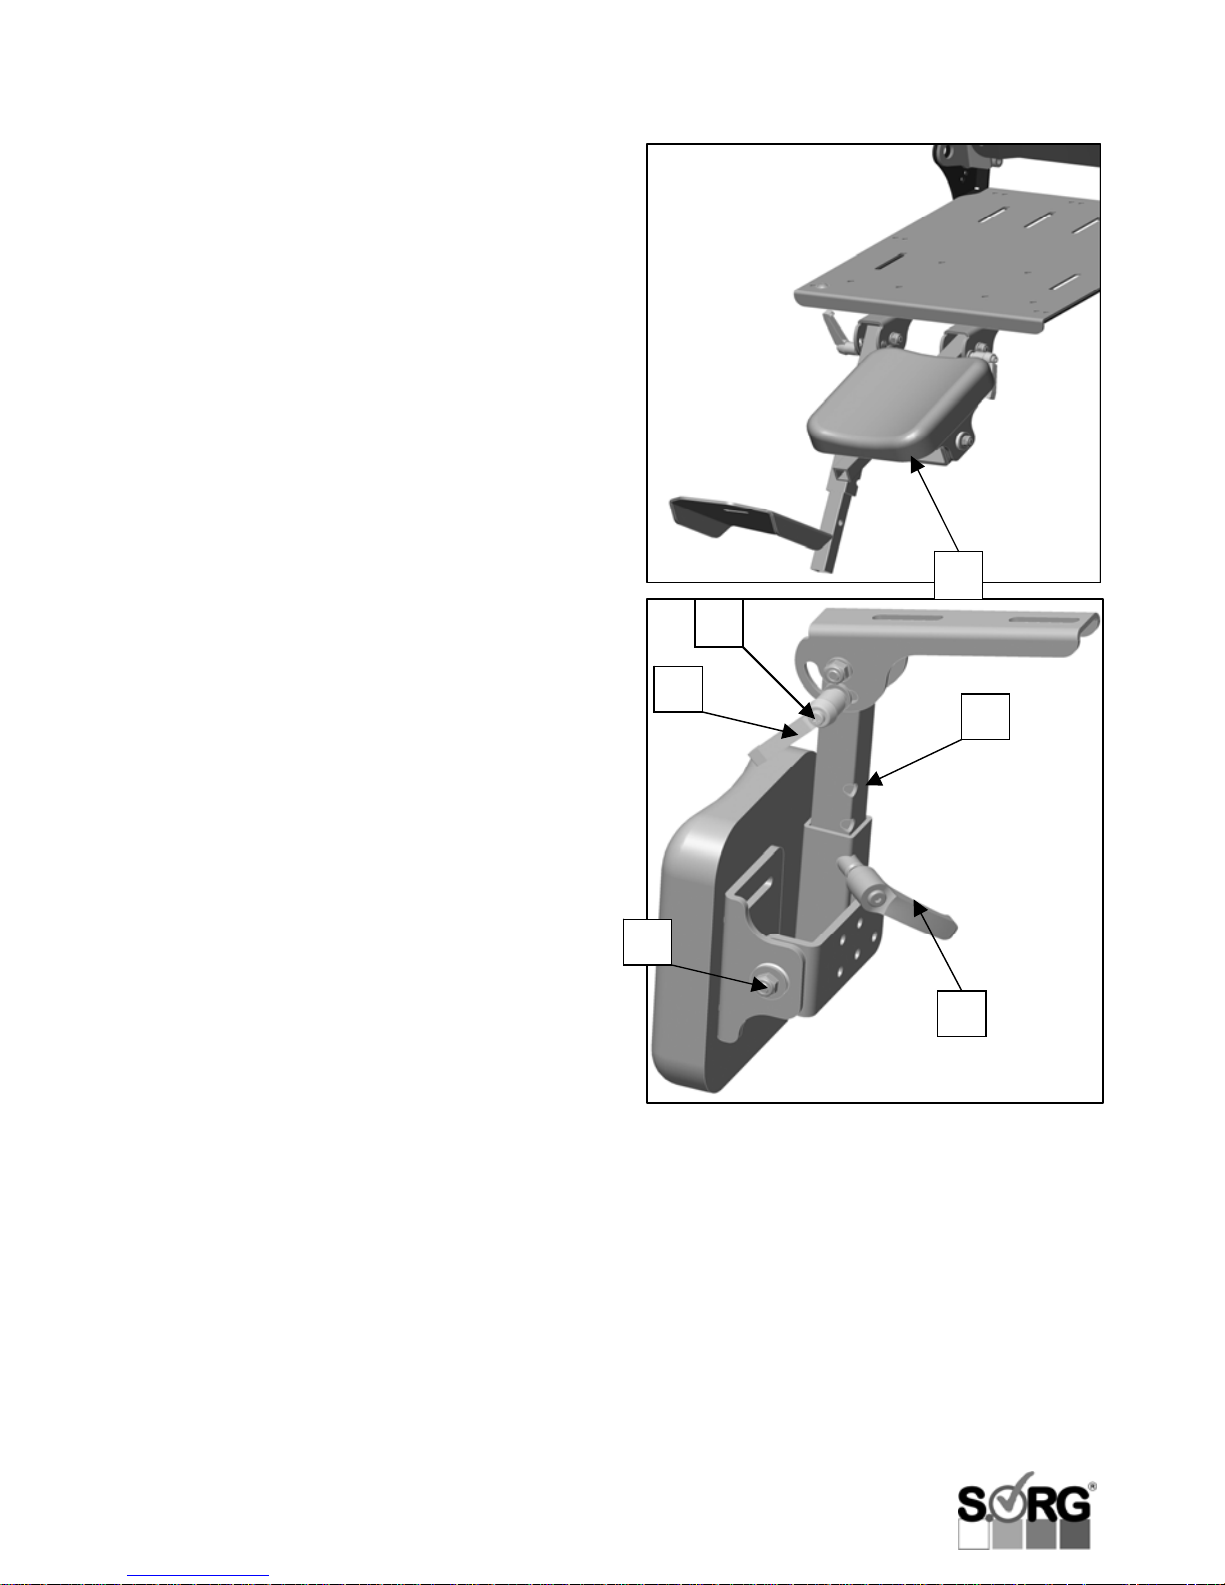
4.6.3 Leg support with support
pad (optional)
Adjustment of support pad
• loosen clamping lever (pos. 1) on the
bottom of the pad
• choose desired position on the row of
holes (A)
• retighten clamping lever (pos. 1)
Hinging the leg support
• loosen clamping lever (pos. 2)
• place leg support into desired position
• retighten clamping lever (pos. 2) firmly
• push button (B) on the handle of the
clamping lever and keep it pushed
• turn the handle into a non-hazardous
position
Angle adjustment of leg support pad
• loosen screw joint (C),
• adjust desired angle,
• tighten screw joint firmly.
1 ATTENTION
Please make sure that the handle of the
clamping lever of each leg support is turned
away to the back so they may not inhibit or
injure your child.
PLAESE NOTE
If your wheelchair is equipped with a leg
support pad on both sides, please proceed
analogically.
A
1
2
C
1
B
Page 40
Page 40 of 60 User manual Kika
4.7 Locking brake
4.7.1 Locking brake, standard
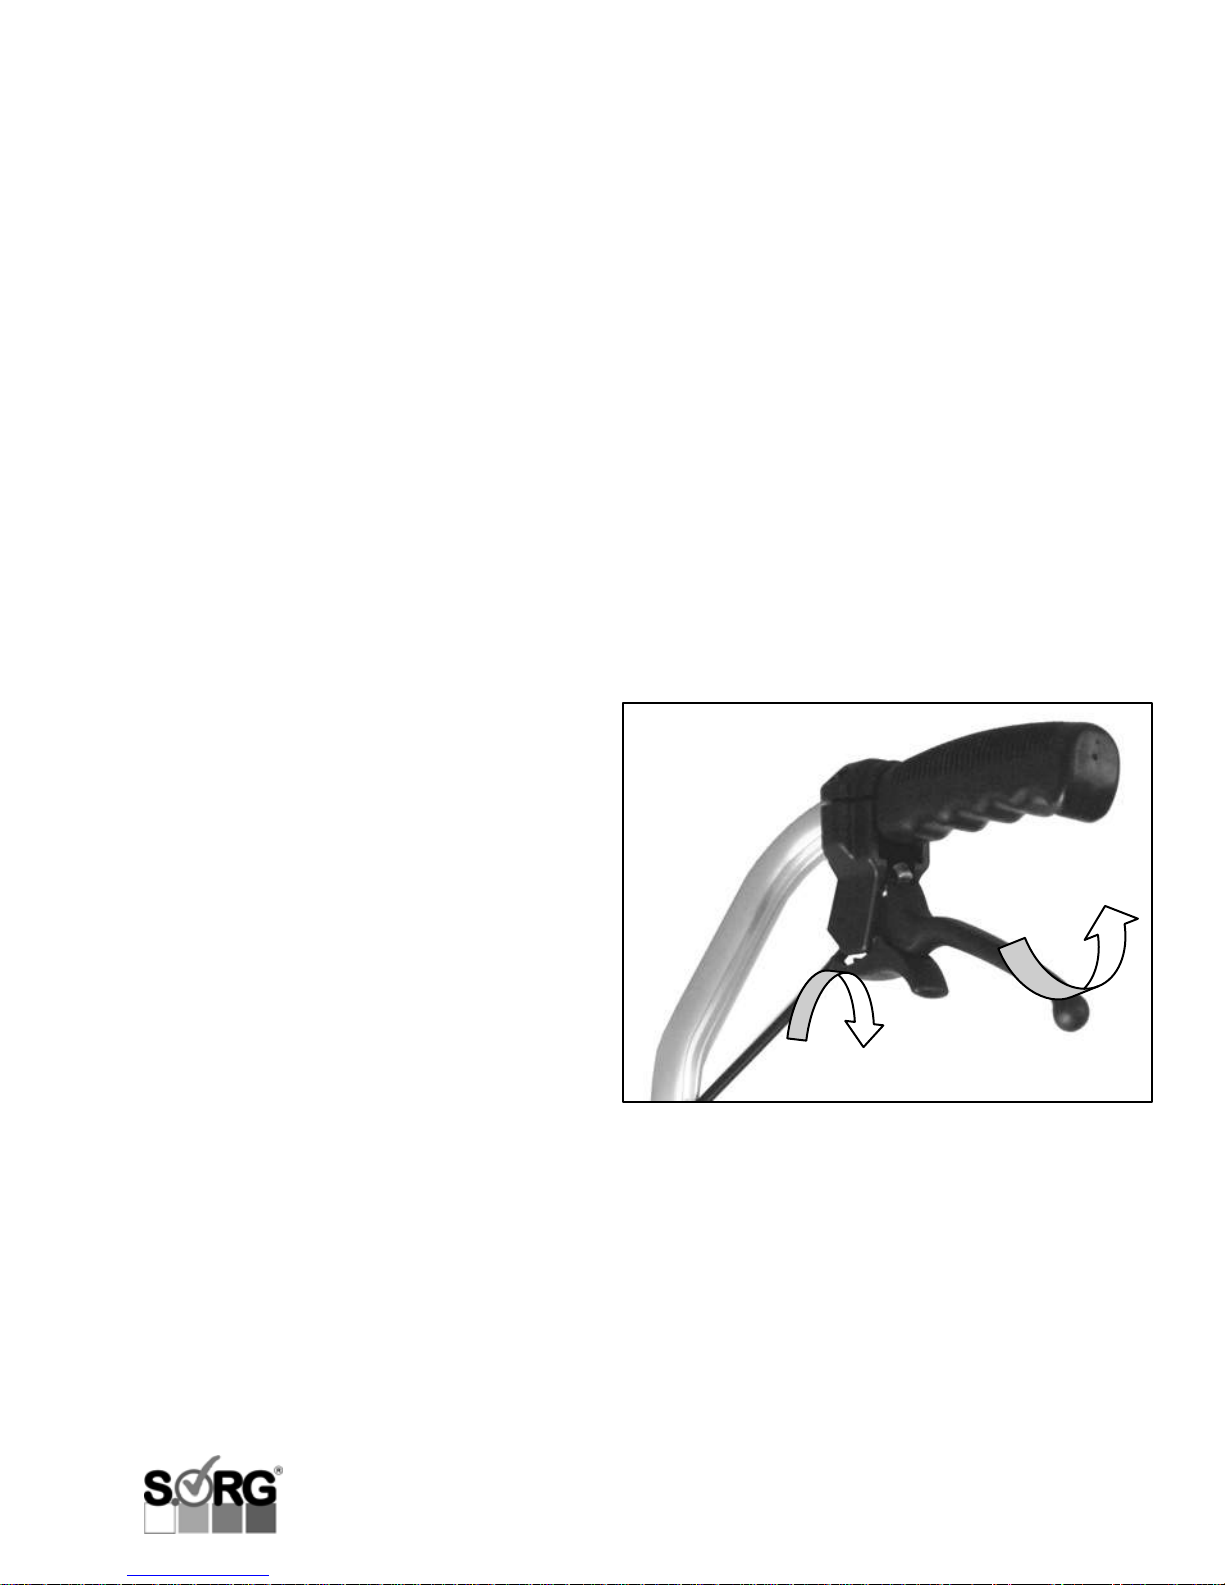
Each wheelchair is usually equipped with two
knee-lever brakes. They are to be used
exclusively to secure the wheels in a rest
position. Secure the wheelchair by pushing the
control lever forwards. Push the control lever
backwards, and you wheelchair is ready to ride
again.
1 ATTENTION
Make sure to read the respective passages in
chapter 2 “Safety instructions”!
4.7.2 Attendant brake (optional)
The operation of the attendant brake is
identical to that of the drum brake. Please
proceed analogically.
4.7.3 Drum brakes (optional)
The drum brake can – contrary to the
locking brake – be used to decelerate while
diving. Our drum brakes additionally
possess a mechanism for locking with which
they may be blocked in maximum brake
state (optionally, we also offer a child-proof
lock for this purpose).
To lock the brake firmly, the locking lever (C)
needs to engage on the brake lever (B). To
release, please pull the brake lever further
and the locking lever will automatically be
released.
B
C
Page 41

User manual Kika Page 41 von 60
4.8 Loading and
transportation
1 ATTENTION
The wheelchair is not to be transported without
suitable facilities (e.g. restraint system). In an
accident, forces may occur for which the
wheelchair has not been designed. Hence
there would be a significant safety risk.
For transportation please mind the following
points:
• fold the anti-tippers inwards
• remove the push handle(s)/bar
• loosen the locking brakes and remove the
rear wheels by pushing the small button
protruding the centre of the quick-releaseaxle and pull out the wheel with the button
pushed
• fold the back frontwards as described in
chapter 4.3.3. Unlock the back by turning
the locking lever in any direction, fold the
back frontwards and have the bolt snap
into the last position (the stabilising bar
may be used as carrying handle)
1 ATTENTION
Please note that the quick-release-axles are
very sensitive. So please avoid dirtying or
damaging them.
1 ATTENTION
When reinserting the wheels, please make
sure that the quick-release-axle is fitted firmly.
The button of the quick-release-axle must
protrude the axle by several millimetres after
snapping in place.
4.9 Safety of transportation
After storing Kika in the transportation
vehicle, please proceed the following way:
• If you do not remove the rear wheels,
please activate the locking brake!
• Store all demounted parts of the
wheelchair safely in the vehicle so they
cannot injure anyone in case of sudden
braking.
• Secure the wheelchair in the vehicle
with tension belts. Please only clamp
the tension belts on the frame parts.
The foot rest, side guards, back or seat
adapter are not suitable for this.
Before transportation, please gather
information from your passenger car
merchant on safe securing of the wheelchair
with clamp ears or other suitable safety
measures in your passenger car.
1 ATTENTION
Please arrest Kika via suitable measures
(e.g. belts) in the vehicle in order to prevent
it (or parts of it) from injuring the
passengers in case of sudden braking!
1 ATTENTION
Store loose objects, such as sticks, bags,
etc. safely, so they cannot spin around in
the car and injure someone.
Page 42

Page 42 of 60 User manual Kika
4.10 Transportation of the
wheelchair as seat in a
passenger vehicle
PLEASE NOTE:
We must point out that transporting a person
sitting in a wheelchair in a vehicle is a
considerable safety risk! We recommend
leaving the wheelchair for transportation and
sitting down on a suitable, firmly fixed seating
system.
According to the regulations of ISO 7176-19,
Kika is certified to resist the forces of a
respective crash test and hence is - in
combination with a suitable restraint belt
system - released to be used as a seat in
passenger vehicle.
We are glad to inform you about ISO 7176-19
and to give you advice on the measures
necessary.
Do not hesitate to call us: Service line +49
7254-92790.
The restraint system may only offer sufficient
safety in normal traffic situations (max. sharp
braking manoeuvres and the like), but not in
accidents outside the test values determined
in the standard. Especially not in a rear
collision.
PLEASE NOTE:
The headrest on the wheelchair exclusively
serves to support your child’s head posture but
does not serve for transportation securing!
Therefore, a separate headrest firmly installed
in the vehicle is absolutely essential!
1 ATTENTION
Kika may NOT be transported with a tilted or
angle-altered back! Make sure to put the back
rest into an upright position. If you need a
restraint system according to ISO 7176-19
for your wheelchair, please contact your
specialised trade.
INDICATIONS OF LIABILITY
Transportation in a wheelchair as a seat in a
passenger car is always conducted at your
own risk! SORG Rollstuhltechnik GmbH +
Co. KG explicitly excludes all liability claims
connected with a restraint system.
According to the current legal situation, the
driver or the assistant are to arrange for
professional securing of the wheelchair in a
passenger car and they are, if need be, the
ones liable for that.
Sorg Rollstuhltechnik GmbH + Co.KG holds
no liability for damage of people or material
arisen from transportation in a motor
vehicle.
Page 43

User manual Kika Page 43 von 60
5 Maintenance
5.1 Cleaning and attendance
PLEASE NOTE
Never treat the wheelchair with a high-pressure
cleaner! Please use silicon-free, water-based
cleaning and care supplies.
The indications on application given by the
manufacturer are to be followed. Do not use
any aggressive cleaning supplies such as
dissolvers or hard brushes etc.
SURFACE COATING
To tend the finish, we recommend using
customary branded finish care products.
Should the coating nevertheless be damaged
through scrapers, crushes, etc., you may
correct those spots with a touch up applicator
available in the specialised trade (apart from
metallic and dormant colours).
PLASTIC PARTS
The clothing guard and similar parts consist of
high quality plastics. Only clean these parts
with warm water and neutral cleaning agents
or soft soap.
1 ATTENTION
When using customary plastic cleaners, the
indications on application given by the
manufacturer are to be followed.
CUSHIONS AND COVERS
The covers of the moulded firm seat and back
parts may be removed with the zippers. We recommend washing them regularly with a mild
detergent and low temperatures in the washing
machine.
PLEASE NOTE
Please clean other pads and covers (e.g. from
seat shells) with warm water and hand flush
fluid. Many stains may be removed with a
sponge or a soft brush.
In case of doubt, please consult the medical
supply store which built your seat shell for
advice on cleaning the cover.
FRAME
The frame and the wheels should regularly
be cleaned wetted with a mild cleaning
agent. Please dry well afterwards.
CASTERS
Please remove rough dirt from the casters
regularly, clean them wetted with a mild
cleaning agent and dry well. Please grease
the wheel bearings
and similar parts with
customary lubrication greases.
PLEASE NOTE
Please check the carriage for corrosion
damage as well as other damage regularly.
Oiling all versatile parts lightly and regularly
obviates such damages and enables you to
profit from your wheelchair for a long time.
5.2 Disinfection
For disinfection water-based agents should
be used, such as: Terralin, Quartamon, Med
or Sagrotan.
The indications on application given by the
manufacturer are to be minded and
followed strictly.
PLEASE NOTE
Before disinfecting your wheelchair, please
clean all pads and handles in the way
indicated.
Page 44

Page 44 of 60 User manual Kika
5.3 Inspection
For reasons of safety and to prevent accidents
resulting from abrasion not recognised on time,
yearly inspection is designated under normal
operating conditions. It is to be conducted
according to the following maintenance
manual.
According to applicable law, this inspection is
part of the commitment of the benefactor towards the user of the wheelchair and has to be
borne by him. For detailed coordination, we recommend you arrange agreements with your
benefactor in the forefront of supplying
medical aids.
Please transfer these works to a professional
repair shop qualified for this purpose in order
to guarantee your wheelchair to have the
highest degree of safety and reliability possible
in any situation.
The staff of the professional repair shop is familiar with the technique of the vehicle,
possess suitable tools and will use original
replacement parts. Beginning abrasion can be
recognised and prevented by them in due time.
MAINTENANCE
The following maintenance manual presents
(considering possible reuse) a mandatory
guideline for the conduction of maintenance
work. It gives no information about the
extent of work actually necessary and
observed on the vehicle.
1 ATTENTION
Being a participant in public traffic, the
wheelchair driver is responsible for
maintaining the vehicle fail-safe state.
Insufficient or neglected care and maintenance of the wheelchair pose a significant
safety risk and automatically lead to
limitations of the product liability.
Page 45
User manual Kika Page 45 von 60
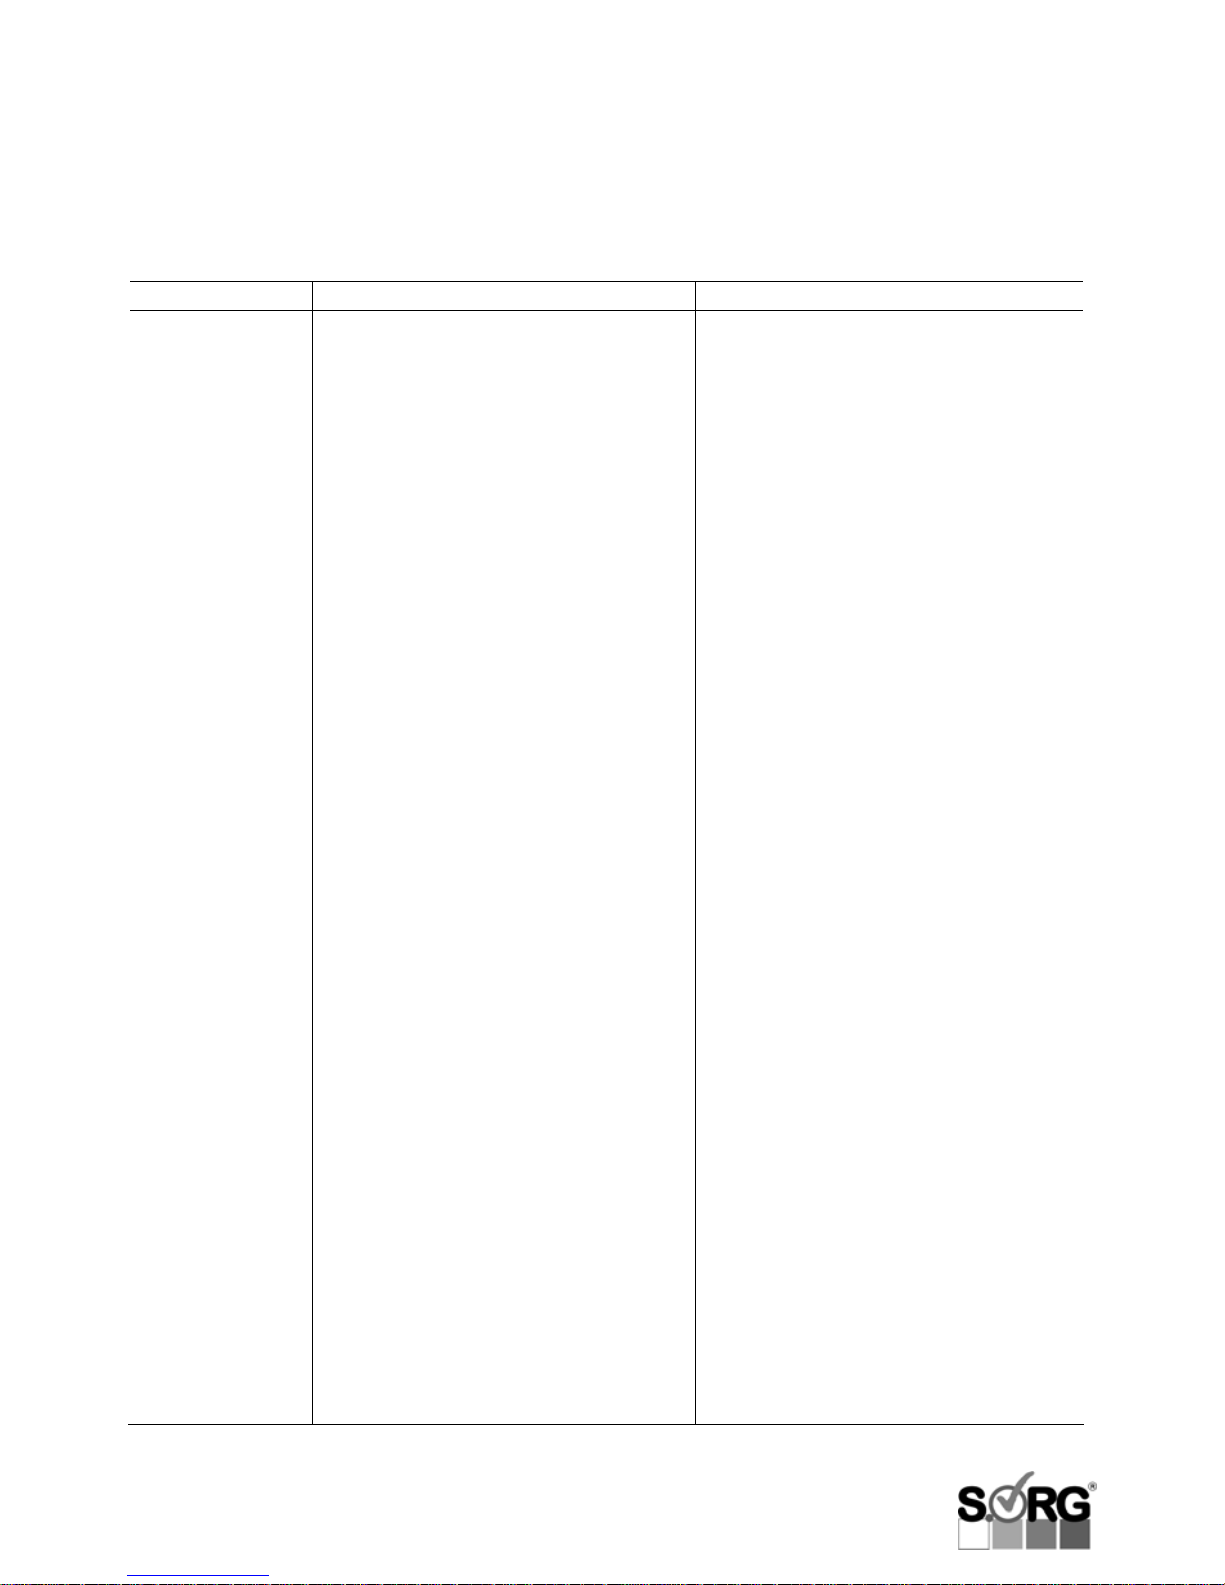
5.4 Checklist and maintenance
WHEN? WHAT? COMMENTS
Before each
use
Check wheels/quick-release-axles
for firm fit
You must not be able to pull the
wheel out of the quick-releaseaxle. The arrestor button must
protrude the hub several
millimetres (1 mm=0.4 in).
Check air pressure according to
the manufacturer’s indications on
the tyre.
Check brakes for flawless function
Close both brakes tightly. With
locked brakes, you must not be
able to push the wheelchair. At
most, it should be possible that it
slides across the surface with the
wheels blocked.
Check all screw joints for flawless
fit
Check frame tubes for damage
Conduct yourself or with the help
of an experienced assistant.
Conduct yourself or with the help of
an experienced assistant.
Please resolve insufficient air
pressure (indications on the tyre)
and/or dirt yourself.
Conduct with the help of an
experienced assistant. If the brake
does not take proper effect (worn
out profile or braking bolt, loose
brake lever etc.), immediately
contact a medical supply store for
qualified maintenance work.
Please fix too little air pressure
(indicated on the tyre) and/or dirt
yourself.
Please check:
- fixation of seat support angle
- fit of rear wheel adapter
- fixation foot rest
- fixation of moulded seat and
back/seat shell or belts
- connection between seat adapter
and back
- fixation wheel guard cover
- fixation anti-tippers
If the welded seams are deformed
and/or fissured, immediately
contact a medical supply store for
qualified maintenance.
Page 46

Page 46 of 60 User manual Kika
WHEN? WHAT? COMMENTS
Every 4 weeks Retighten all screw joints
With daily usage leading to
permanent vibration, the screws
may loosen. This is why we
recommend to retighten ALL
screw joints systematically.
Check tyre profile
Conduct yourself or with the help
of an experienced assistant.
Conduct yourself or with the help
of an experienced assistant.
Every 2-3
months
(depending on
driving
performance)
Clean and grease all versatile
parts
All moving parts, such as brakes,
brake levers, quick-release-axles,
caster bearings, anti-tipper
adapter, lower leg support, tiling
mechanism, retractable back,
ratchet joint for foldable back, etc.
Retighten spokes
Check gas pressure spring
Conduct yourself or with the help
of an experienced assistant. Clean
all components thoroughly before
greasing and remove leftover of
old oil. Then apply some drops of
oil and wipe away superfluous oil.
To be conducted by the medical
supply store!
To be conducted by the medical
supply store!
Every 6
months
(depending on
driving
performance)
Check frame for cracks, corrosion
and damage
Maintain locking brake
To be conducted by the medical
supply store! Please remove seat
and back unit as well as leg
support and side guards /clothing
guard for better exterior visual
control.
To be conducted by the medical
supply store! Inspect brake for
symptoms of fatigue or abrasion.
Page 47

User manual Kika Page 47 von 60
5.5 Checklist yearly inspection
Regular, yearly inspection conducted by a qualified medical supply store is an essential component of the wheelchair’s product liability/safety and long service life. Moreover, the inspections
serve as verification of the service ability for the benefactor in case of reusage.
PREPARATORY WORK
Please remove the moulded seat and back parts, the push handles, the wheel guard cover and
the foot rest. If necessary, please clean the wheelchair or individual parts of it prior to inspection.
VISUAL INSPECTION
Check frame, mounting parts and accessories for damage, defects in paint work and
corrosion.
GENERAL CHECK-UP
Check all fixing screws for firm fit and retighten if necessary.
Check fixation of all mounted parts and readjust if necessary.
Check fixation of all plastic parts, handles, mounted parts, spoke guard covers etc.
and readjust if necessary.
Check state of tyres and cover as well as tyre pressure and valves; replace if
necessary.
Check all spring-loaded devices (quick-release-axle, stand spring on push handle,
etc.) for functional efficiency and replace if necessary.
CARRIAGE
Check fixation of casters and rear wheels.
Check functional efficiency of the quick-release-axles.
Check tyres, air pressure and valve, exchange if needed.
Check caster bearing, caster fork and caster mounting bracket for condition,
functional efficiency and running characteristics.
BRAKES
Check brakes for functional efficiency.
OILING AND GREASING
Clean and grease all pivotal points of control levers and versatile parts as well as all
bearings.
FINAL CHECK-UP
General functional check-up of all mechanical adjusting devices.
Additional braking, steering and driving tests on upgrade and downgrade paths.
If required, the reparations necessary are to be conducted and documented in the service plan
at the end of this manual
Page 48

Page 48 of 60 User manual Kika
5.6 Reparations
Please do never conduct reparation and/or
maintenance work yourself, but turn trustfully
to your medical supply store. The staff there is
introduced to the conduction of such work,
possess all necessary tools and trained
workers.
5.7 Service
If you have any questions or need help, our
qualified rehab consultants are happy to assist
you. Or turn to your specialised trader, who is
trained according to our regulations and who is
capable of resuming consultation, service as
well as reparations.
5.8 Replacement parts
Original replacement parts are to be used exclusively! They are available at your medical
supply store.
PLEASE NOTE:
Parts from other companies may cause faults
and become a safety risk.
Lists of replacement parts with the respective
order numbers and drawings are available at
your specialised trade and may be requested
from us.
1 ATTENTION:
Because of the risk of accidents, securityrelevant parts or component groups are only to
be installed by a medical supply store qualified
for this purpose.
For correct delivery of the replacement parts,
the respective serial number of the wheelchair
needs to be indicated! It can be found on the
type plate on the frame of the wheelchair.
For each altering or modification of the
wheelchair by your medical supply store, the
respective information, like e.g. mounting
and/or application indications with the date
of the altering are to be enclosed to this
user manual.
5.9 Disposal
As a general rule, the disposal of the
wheelchair must conform to the respective
national legal regulations. You may seek
information about local disposal
organisations from your urban or communal
administration.
Our packing materials are 100% recyclable.
Metal parts may be put to scrap metal
recycling or sent to our factory.
Plastic and textile parts may be recycled as
well.
5.10 Reuse
Before every reuse, the wheelchair must undergo complete, thorough and qualified
inspection and disinfection.
PLEASE NOTE
The measures necessary for reuse are to be
conducted according to a validated hygiene
plan.
5.11 Tyre change
With a little bit of technical skill and suitable
tools, you can fix a flat tyre yourself. It is
advisable to always carry a reparation-set
and an air pump for emergencies. You may
purchase suitable air pumps at your
specialised trade. An alternative would be a
puncture repair spray which fills your tyre
Page 49

User manual Kika Page 49 von 60
with setting foam (available at the specialised
trade).
Demounting:
In case of a flat tyre, demount the tyre carefully
from the rim with suitable mounting tools.
Make sure not to damage the rim or the tube in
the process.
Reparation:
Repair the tube according to the indications given on the reparation-set, or replace it with a
new one. Examine the rim and the interior of
the tyre for foreign objects which might have
caused the flat tyre.
Only use rim bands which are in perfect
condition to protect the tube from damage by
spoke ends.
Mounting:
Push the rim band over the valve and place the
valve into the rim. Unscrew the valve screw nut.
Now you can draw up the rim band effortlessly.
Make sure that all spoke ends are covered.
Now push the lower tyre part over the bead of
the rim. Inflate the tyre until round. Insert the
weakly inflated tube into the tyre cover. Check
the tube for smooth fit. Then you can easily
mount the upper part of the tyre behind the
bead of the rim with both hands. Start with the
part of the valve which is faced away.
Inflation:
Check whether the tube is perfectly clamped
between tyre and cover.
Check fit of the valve.
First, inflate the tyre just as much so you can
still impress it with your thumb. Check the fit of
the tyre on the rim. If the tyre cover is not
centric on the rim, deflate the tyre a bit, and
readjust it. Then inflate the tyre to maximum
operating pressure (cf. tyre cover) and close
the valve with the protection cap.
Page 50

Page 50 of 60 User manual Kika
6 Technical data
6.1 Measures and dimensions
Dimension tolerance ±5°
Abbreviations:
SW = Seat width SD = Seat depth BH = Back Height LLL = Lower leg length
Data: Model: Kika
German Aid Index No°: 18.99.02.1009
Type N°: 603
Seat width (opt. + 2 cm) 20 – 30
Seat depth (opt. + 2 cm) 20 – 30
Back height (serially + 5 cm) 20 – 45
Lower leg length (LLL) Max. 37 cm
Seat tilt angle 0° - 30° (continuous)
Back angle Adjustable in 5 steps from 80° - 120°
Seat heights (20’’ wheels) 350 mm – 375 mm
Seat heights (22’’ wheels) 375 mm – 400 mm
Seat heights (24’’ wheels) 400 mm – 425 mm
Wheel sizes 20“ , 22“, 24“
Caster sizes 4“, 5“, 5,5“, 6“
Camber 9°
Corrosion protection material/coating Powder coating, high-grade steel, aluminium, galvanization
Tolerable inclination 7% = 4°
Tolerable decline 7% = 4°
Tipping safety 7% = 4°
Turning circle Ca. 100 cm
Max weight capacity 50 kg (110.2 lbs)
Empty weight (example) SW 24, 20’’ wheels, 4’’ PU = 10.9 kg
Width min. SW + 300 mm, max. SW + 370 mm
Length (without push
handles)
at 20’’ = 660 mm
at 22’’ = 705 mm
at 24’’ = 730 mm
Height (without push
handles)
min. 610 mm (20’’/BH 20)
max. 930 mm (24’’/BH 45)
Support point for
transportation stabilising bar on foldable back
Single weights (depending on
size) frame + leg support + seat + back = ca. 8 – 13 kg
Single weights (depending on
size) Rear wheels 1.2 – 2 kg
Tyre
All customary tyres in sizes of 1’’ and 1 3/8’’ respectively in ERTRO –
sizes 451 (20’’), 489 (22’’), 540 (24’’)
Or any fail-safe tyres with the dimensions given respectively.
Page 51
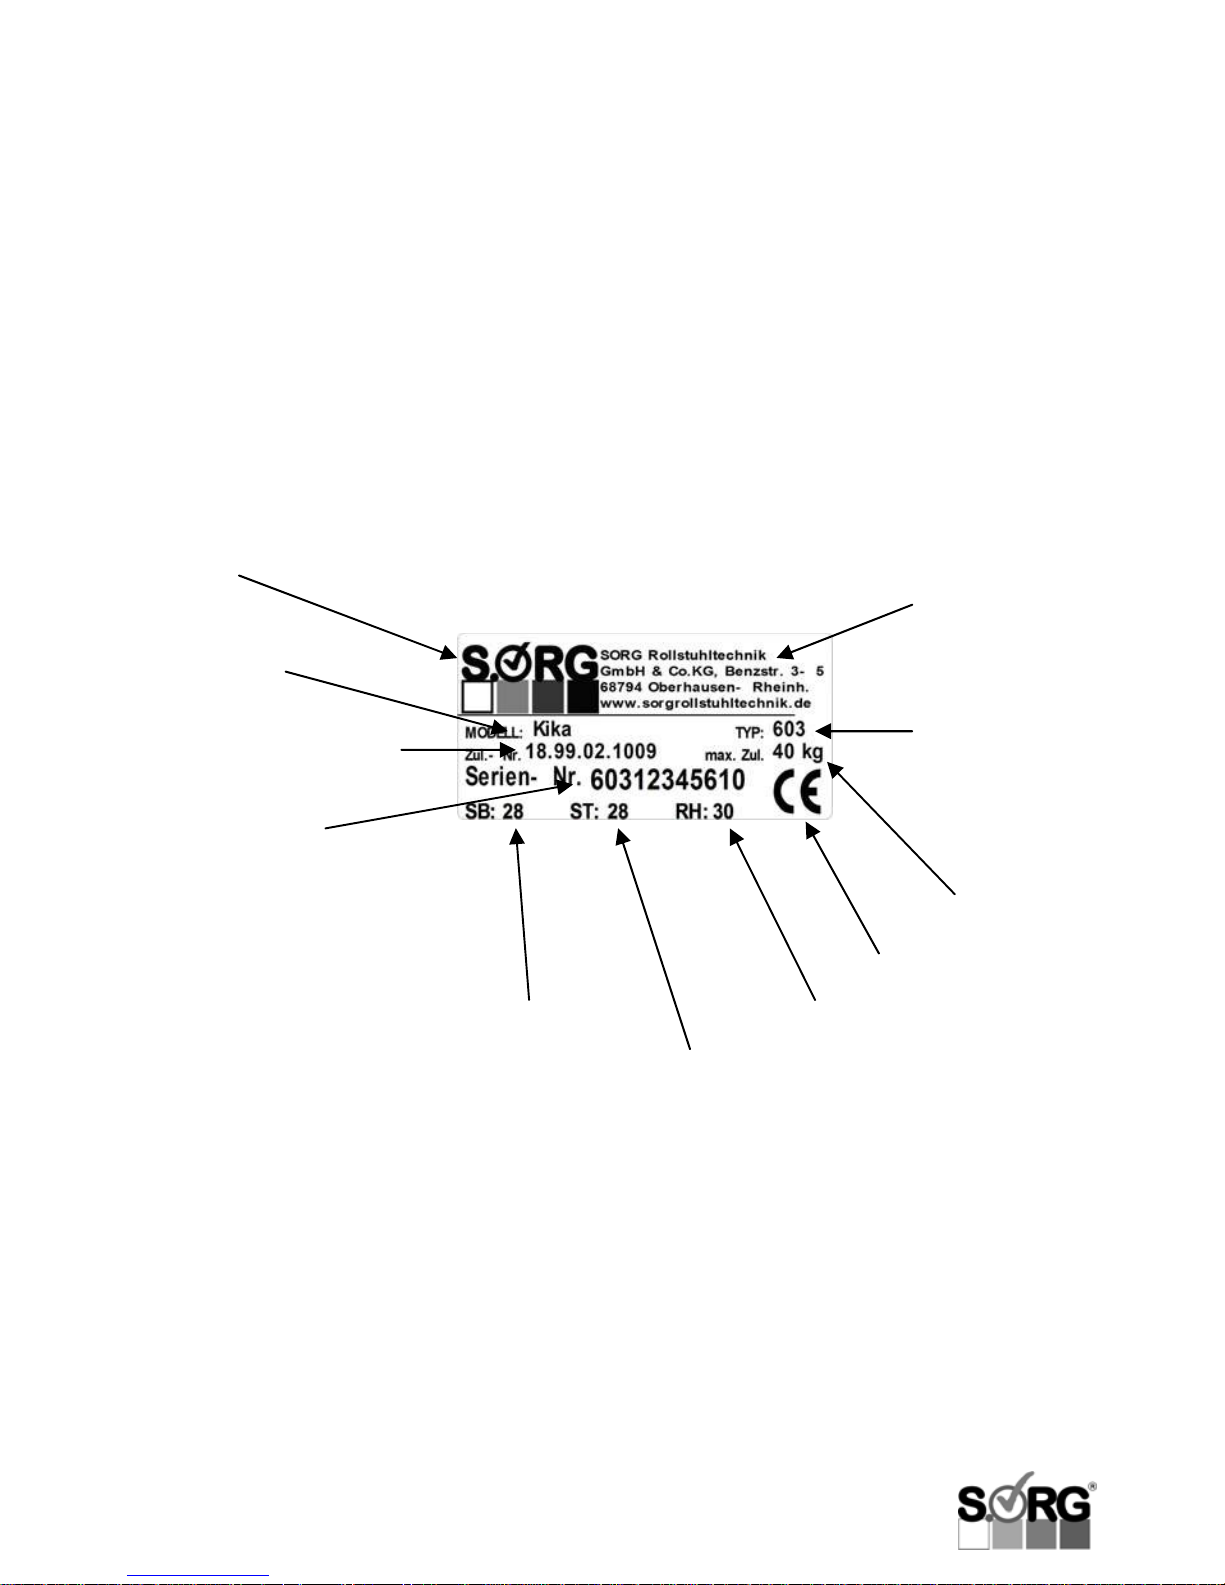
User manual Kika Page 51 von 60
6.2 Meaning of labels
The elements of the type plate on the axis of
Kika have the following meanings:
Manufacturer logo
Model name
German Aid Index No°
Serial number
Combined of:
Type-N°. (digits 1-3)
Order N° (digits 4-7)
Year of production (two last digits)
Seat width
Address of manufacturer
Type-number
Max. weight capacity
CE-sign
Back height
Seat depth
This product is compliant with all EUregulations 93/42/EWG for medical
products
Page 52

Page 52 of 60 User manual Kika
7 Warranty
Warranty bond
Quality assurance system
In producing our wheelchairs, we make sure
to maintain the highest quality possible and
to conform to all relevant DIN-standards and
EC-guidelines. Therefore we had our
company registered according to ISO
9001:2000 in 2003 and we regularly
undergo the required follow-up audits.
All our wheelchairs, mobile standing frames,
and seat shell base frames meet the
requirements of Medical Aid Act and possess
the respective CE marking (customized
products excluded).
Durability
According to the criteria of
international association children and
adolescent rehab incorporated society,
regarding quality and safety in the case of
reusing rehabilitation products, we as
producer can reliably guarantee a durability
of 5 years; presupposed that the wheelchair
is exposed to normal forces and that it is
maintained regularly by a specialised trade.
Beyond this period, we guarantee the provision of replacement parts for further 2 years
(special mountings excluded).
Service life
Products in reuse are subject to increased
strain. Therefore, we recommend, when
reusing Kika, not to extent a further service
life of 3 years in line with the durability.
The term “Service life” describes the period
of time in which a product is in permanent
use. Hence periods of storing at the
benefactor’s and/or specialised trade are
not part of the service life.
“Durability”, on the other hand, is the period
of time which we define based on our
experience and the technical factors; this
period of time may not be exceeded when
reusing the product.
However, we are pointing out that you can
influence this durability directly, for it is
significantly dependent on the maintenance
of the product.
In the best case, the functional efficiency
may reliably be extended beyond the
defined durability.
Page 53

User manual Kika Page 53 von 60
JURISTIC CONDITIONS OF
WARRANTY
I. Subject of warranty
This warranty applies to wheelchairs, mobile
standing frames, and seat shell base frames by
the company SORG Rollstuhltechnik GmbH +
Co.KG (in the following abbreviated to: SORG).
Legal claims associated with warranties for defects of the end consumer towards the medical
supply store or other service providers
responsible for the provision of the patient are
not affected.
II. Extent of warranty
SORG grants a period of warranty of 5
years after first use on replacement parts and
diagonal braces, considering the conditions in
section III and under disqualification according
to section IV. The warranty grants the end
consumer claims on receiving replacements
and subsequent improvements according to
the requirements of paragraph 2.
If production and/or material defects occur 2
years after first use, SORG may replace the entire wheelchair, or it may replace or repair
faulty parts of the frame and/or diagonal
braces. Hence, SORG is obligated to replace
defected parts only. Further claims for
reduction, compensation, or rescission of the
contract are not granted.
III. Claim conditions
The following points need to be fulfilled in
order to assert claims for warranty
payments:
• the wheelchair must be in first use
• the wheelchair must have been adjusted
a qualified specialised trade
• the transduction of complete provision
must have been conducted by the
specialised trade with an attached
nonconformity report
• changes on the wheelchair must not
exceed the adjustments intended by
SORG, unless they have been arranged
with SORG in the individual case
• our products may exclusively be repaired
and extended by qualified specialists
using original replacement parts only
Page 54

Page 54 of 60 User manual Kika
IV. Exclusion of warranty
Under the following circumstances we exclude
claims against us:
• if the conditions for claims according to sec-
tion III are not met
• if the reduction of utilisability of the
wheelchair is the result of improper usage,
especially in case of unarranged and
prohibited modifications
• if the reduction of utilisability of the
wheelchair is the result of normal abrasion
• if the reduction of utilisability of the
wheelchair is the result of changes in the
physical condition of the patient, e.g. due to
significant increase in weight
• if the reduction of utilisability of the
wheelchair is the result of high violence or if
the wheelchair has been vandalised
• if SORG assesses that the instructions of
maintenance and usage have not been
followed
• if SORG determines that the maintenance re-
gulations and instructions have not been
complied with
V. Liability
Sorg Rollstuhltechnik GmbH & Co.KG does not
warrant in case of negligence and is not liable
for voluntary acting of auxiliary persons.
Incidentally, the claims for replacements
restrict to damages predictable at the outset of
the conduction of the benefits.
VI. Secondary Regulations
• Cases of warranty are to be indicated in an
appropriate period of time
• Replaced items must be handed back to
SORG Rollstuhltechnik GmbH + Co. KG
• Warranty benefits are to be fulfilled in Ober-
hausen-Rheinhausen, Germany
• These warranty conditions are liable German
civil and commercial law
VII. Period of warranty for repairs
The period of warranty for repairs expires
along with the warranty of the wheelchair;
however, it runs for at least 1 year.
VIII. Complaint
In case of complaint, please send the following warranty form to us.
When sending back your wheelchair, please
remember to attach the invoice
number/delivery note number as well as a
short description explaining how the
incident came about.
This way, you may help us to prevent the
respective error in the future. You will find
the indications necessary on the type plate.
IX. Delivery damages
Deliveries must be checked for possible
damage immediately on reception and in
the presence of bearer (!); they have to be
reported to the carrier and us immediately!
Otherwise, no claims against them or us can
be enforced.
Ask the carrier for their „data“ (copy of their
driver’s licence or the like) so the transport
may be reconstructed accurately if
necessary. This conforms to the general
conditions of the carrying trade and the
current legal practice.
Page 55

User manual Kika Page 55 von 60
Room for notes
e.g. for constructional changes etc.
Page 56
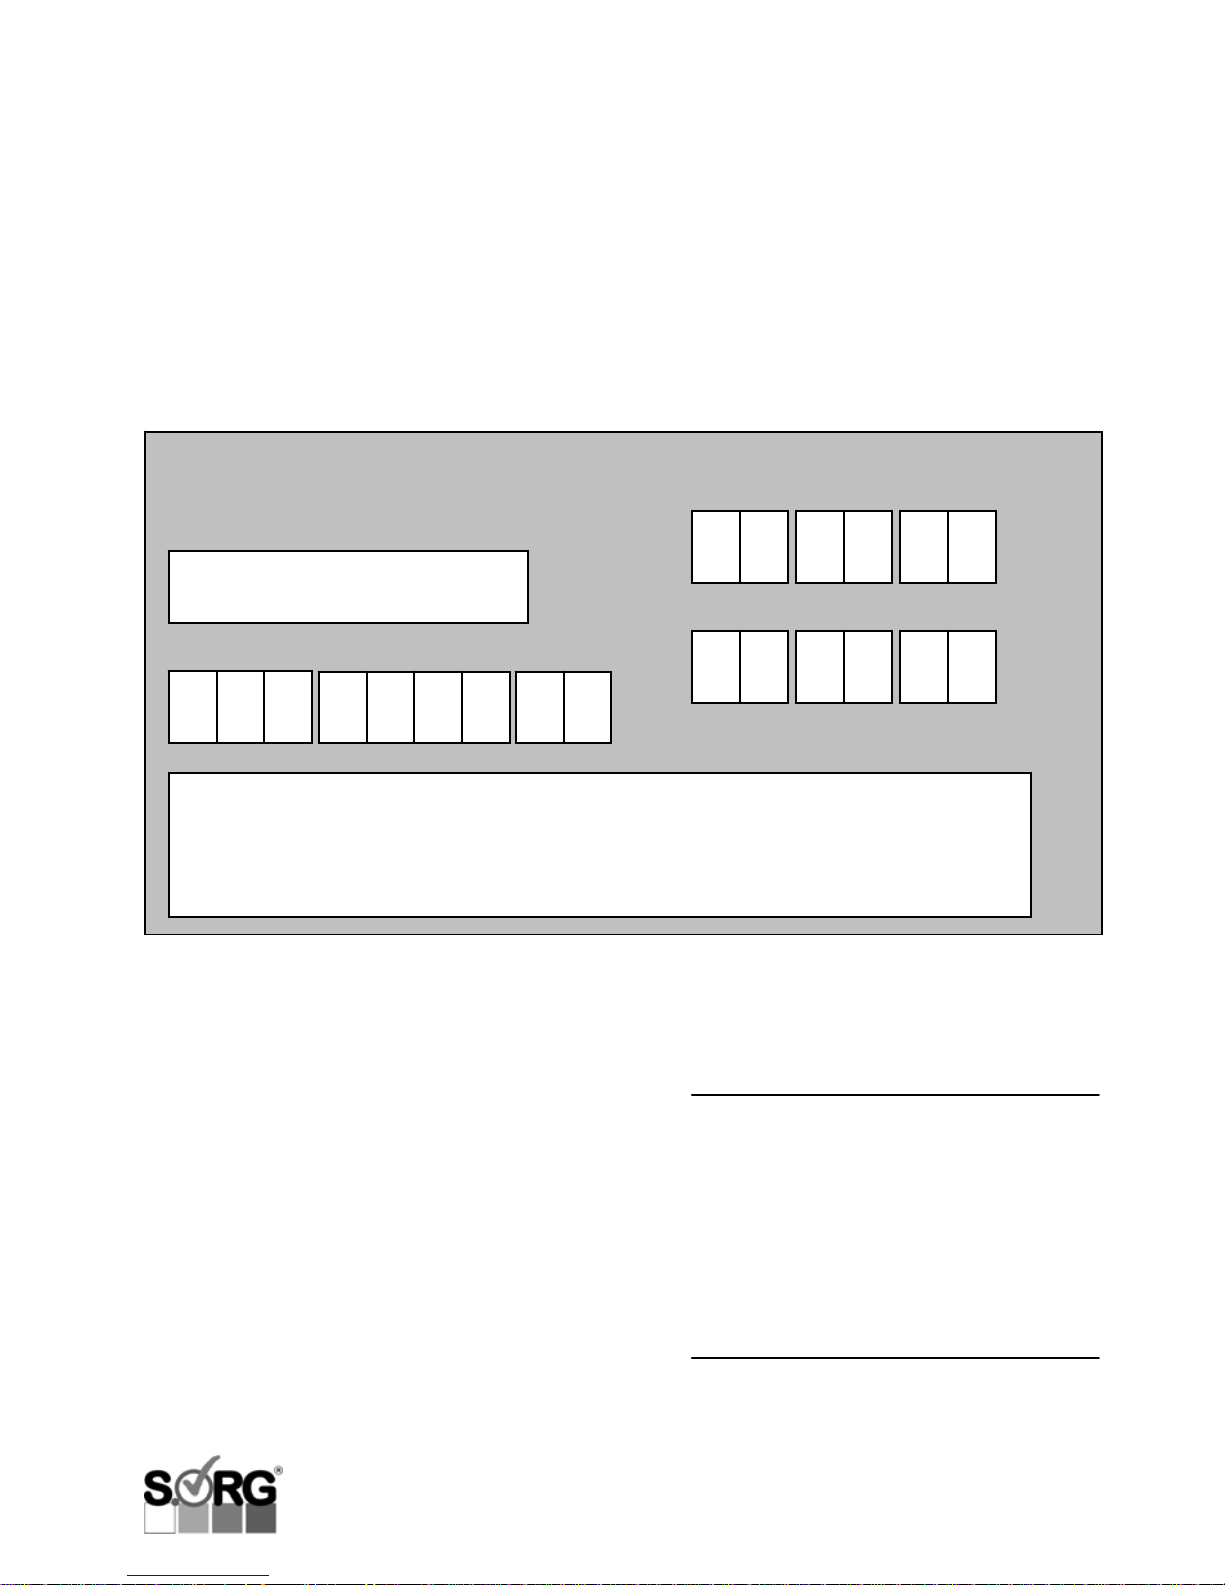
Page 56 of 60 User manual Kika
8 Warranty Form
Please fill in and, if necessary, make a
copy and send in.
Warranty
Model
Serial number
Retailer information
This product conforms to the EC
guidelines 93/42/EEC for medical aids.
Our staff has constructed and examined
this wheelchair most thoroughy for you!
For this we bail with our signature.
date of delivery
SW/SD/BH
Assembly worker:
Date Signature
Quality check:
Date Signature
Page 57
User manual Kika Page 57 von 60
9 Life cycle record
9.1 User chronology
1. Name of user/legal
agent
Date of birth
Street
Postal code/Town
Benefactor/Health
insurance company
2. Name of user/legal
agent
Date of birth
Street
Postal code/Town
Benefactor/Health
Insurance Company
3. Name of user/legal
agent
Date of birth
Street
Postal code/Town
Benefactor/Health
insurance company
4. Name of user/legal
agent
Date of birth
Street
Postal code/Town
Benefactor/Health
insurance company
Page 58

Page 58 of 60 User manual Kika
9.2 Service book
Maintenance due every 6 months
Maintenance
at issue:
Check and readjust all screw joints including spokes; check and, where needed,
readjust locking brakes/drum brakes; check and readjust all frame parts and
welded joints
Date,
Stamp
Medical
supply store,
Signature
Date,
Stamp
Medical
supply store,
Signature
Date,
Stamp
Medical
supply store,
Signature
Date,
Stamp
Medical
supply store,
Signature
Page 59

User manual Kika Page 59 von 60
9.3 Yearly inspection
and before every reuse!
Yearly
maintenance:
According to checklist on p. 46
Date,
Stamp
Medical
supply store,
Signature
Date,
Stamp
Medical
supply store,
Signature
Date,
Stamp
Medical
supply store,
Signature
Date,
Stamp
Medical
supply store,
Signature
Page 60
Page 60 of 60 User manual Kika
Retailer information
Y
our specialised trade
Company stamp
Technical alterations and misprints excluded
 Loading...