

Page 1
By Sorelle - A Division of C & T International, Inc.
46 Whelan Road, East Rutherford, N.J.07073 U.S.A.
Tel, +1(201) 531 1919 Fax, +1(201) 531 1920
Website: www.sorellefurniture.com
CAPE COD
Crib & Changer
Important Information:
Read all instructions BEFORE assembling crib.
KEEP INSTRUTIONS FOR FUTURE USE.
Page 2
1091 Cape Cod Crib and Changer Instruction Sheet
SORELLE
Crib Warnings:
WARNING:
*Infants can suffocate on soft bedding. Never add a pillow or comforter. Never place additional padding
under an infant.
*Failure to follow these warnings and the assembly instructions could result in serious injury or death.
DO NOT use this crib if you cannot exactly follow the accompanying instructions.
*To reduce the risk of SIDS, pediatricians recommend healthy infants be placed on their backs to
sleep, unless otherwise advised by your physician.
*Strangulation Hazard: STRINGS CAN CAUSE STRANGULATION! Do not place items with a string
around a child's neck, such as hood strings or pacifier cords. Do not suspend strings over a crib or
attach strings to toys.
*Strangulation Hazard: To help prevent strangulation tighten all fasteners. A child can trap parts of
the body or clothing on loose fasteners.
*Strangulation Hazard: Do not place crib near window or patio door where cords from blinds or
drapes may strangle a child.
*Fall Hazard: When child is able to pull to a standing position, set mattress to lowest position and
remove bumper pads, large toys and other objects that could serve as steps for climbing out. This crib
has an adjustable mattress support. For the convenience of the parent when the baby is very small, the
mattress support may be used in the highest position.
*Fall Hazard: Stop using crib when child begins to climb out or reaches a height of 35in. (89cm),
whichever occurs first. The child should be placed in a youth or regular bed.
*Check this product for damaged hardware, loose joints, loose bolts or other fasteners, missing parts,
or sharp edges before and after assembly and frequently during use. Securely tighten loose bolts and
other fasteners.Do not use crib if any parts are missing,damaged or broken.Contact C&T International
/ Sorelle for replacement parts and instructional literature if needed. Do not substitute parts.
*Follow warnings on all products in a crib.
*If refinishing, use a non-toxic finish specified for children's products.
*Never use plastic shipping bags or other plastic film as mattress covers because they can cause
suffocation.
*Infants can suffocate in gaps between crib sides and a mattress that is too small.
*Ensure a safe environment for the child by checking regularly, before placing the child in the crib, that
every component is properly and securely in place.
*To avoid head injury, do not allow any child to play underneath the crib.
*Never add an accessory such as a bassinet or changing table that extends over the sleeping area.
C
AUTION : ANY MATTRESS USED IN THIS CRIB SHALL
BE AT LEAST 27 1/4” (69CM) x 51 5/8” (131 CM) WITH
A THICKNESS NOT EXCEEDING 6” (15CM).
Page 2
Page 3
1091 Cape Cod Crib and Changer Instruction Sheet
Toddler Bed Warnings:
WARNING
INFANTS HAVE DIED IN TODDLER BEDS FROM ENTRAPMENT.
Openings in and between bed parts can entrap head and neck of a small child.
NEVER use bed with children younger than 15 months.
ALWAYS follow assembly instructions.
The maximum user weight is 50lbs (22.7kg)
WARNING
STRANGULATION HAZARD
NEVER place bed near windows where cords from blinds or drapes may strangle a child.
NEVER suspend strings over a bed.
NEVER place items with a string, cord, or ribbon, such as hood strings or pacifier cords,
around a child's neck. These items may catch on bed parts.
SORELLE
CAUTION
ENTRAPMENT HAZARD
To avoid dangerous gaps, any mattress used in this bed shall be a full-size crib mattress
at least 51 5/8 in (1310mm) in length, 27 1/4 in (690mm) in width and 4 in (100mm) in
thickness. The mattress thickness must not exceed 6 in (150mm).
Changing Table Warnings:
WARNING
FALL HAZARD - to prevent death or serious injury, always keep child within arm’s reach.
Read all instructions before use of the changing table.
KEEP THESE INSTRUCTIONS IN A SAFE PLACE FOR FUTURE USE.
Inspect the changing table periodically. Do not use the changing table if it is damaged or
broken. Contact C&T International Inc. with any questions.
Tighten all loose screws and bolts before each use.
The maximum recommended weight of the child is 30lbs for the changing table.
Use only the pad provided by C&T International / Sorelle or Manufacturer’s
Always secure the pad to the changing surface by inserting the strap through the hole in
the middle of the pad. See Instructions.
NEVER use crib without Changing Table attached
Page 3
Page 4

1091 Cape Cod Crib and Changer Instruction Sheet
NOTES ON ASSEMBLY:
-During the assembly process whenever using screws or bolts, check each by placing the screw/bolt on
the diagram of the item which is drawn actual size and design. Be sure to use the proper size and shape
specified in the instructions.
-To assemble this unit you may be required to place the unit on it’s side and face. It is strongly
recommended that assembly is done on a soft, non-abrasive surface to avoid damaging the finish.
NOTES ON USE:
Keep children and others safe by following these simple rules:
- Do not allow any child to play on furniture
- Do not allow climbing on any piece of furniture.
- Do not allow hanging from any piece of furniture.
- Always monitor your child’s activity when in the nursery.
NOTES ON CARE AND MAINTENANCE:
- Do not scratch or chip the finish.
- Inspect the product periodically, contact C&T International / Sorelle for replacement parts or questions.
- Do not store the product or any parts in extreme temperatures and conditions such as a hot attic or a
damp, cold basement. These extremes can cause a loss of structural integrity.
-To preserve the luster of the high quality finish on your product, it is recommended to place a felt pad
AU
under any items you place on the finish.
-Clean with a damp cloth, then a dry cloth to preserve the original luster and beauty of this fine finish.
BE A
-Do not use abrasive chemicals.
-Do not spray cleaners directly onto furniture.
-Lift slightly when moving on carpeting to prevent leg breakage.
A THI
-Use of a vaporizer near furniture will cause wood to swell and finish to peel.
SORELLE
Page 4
Page 5
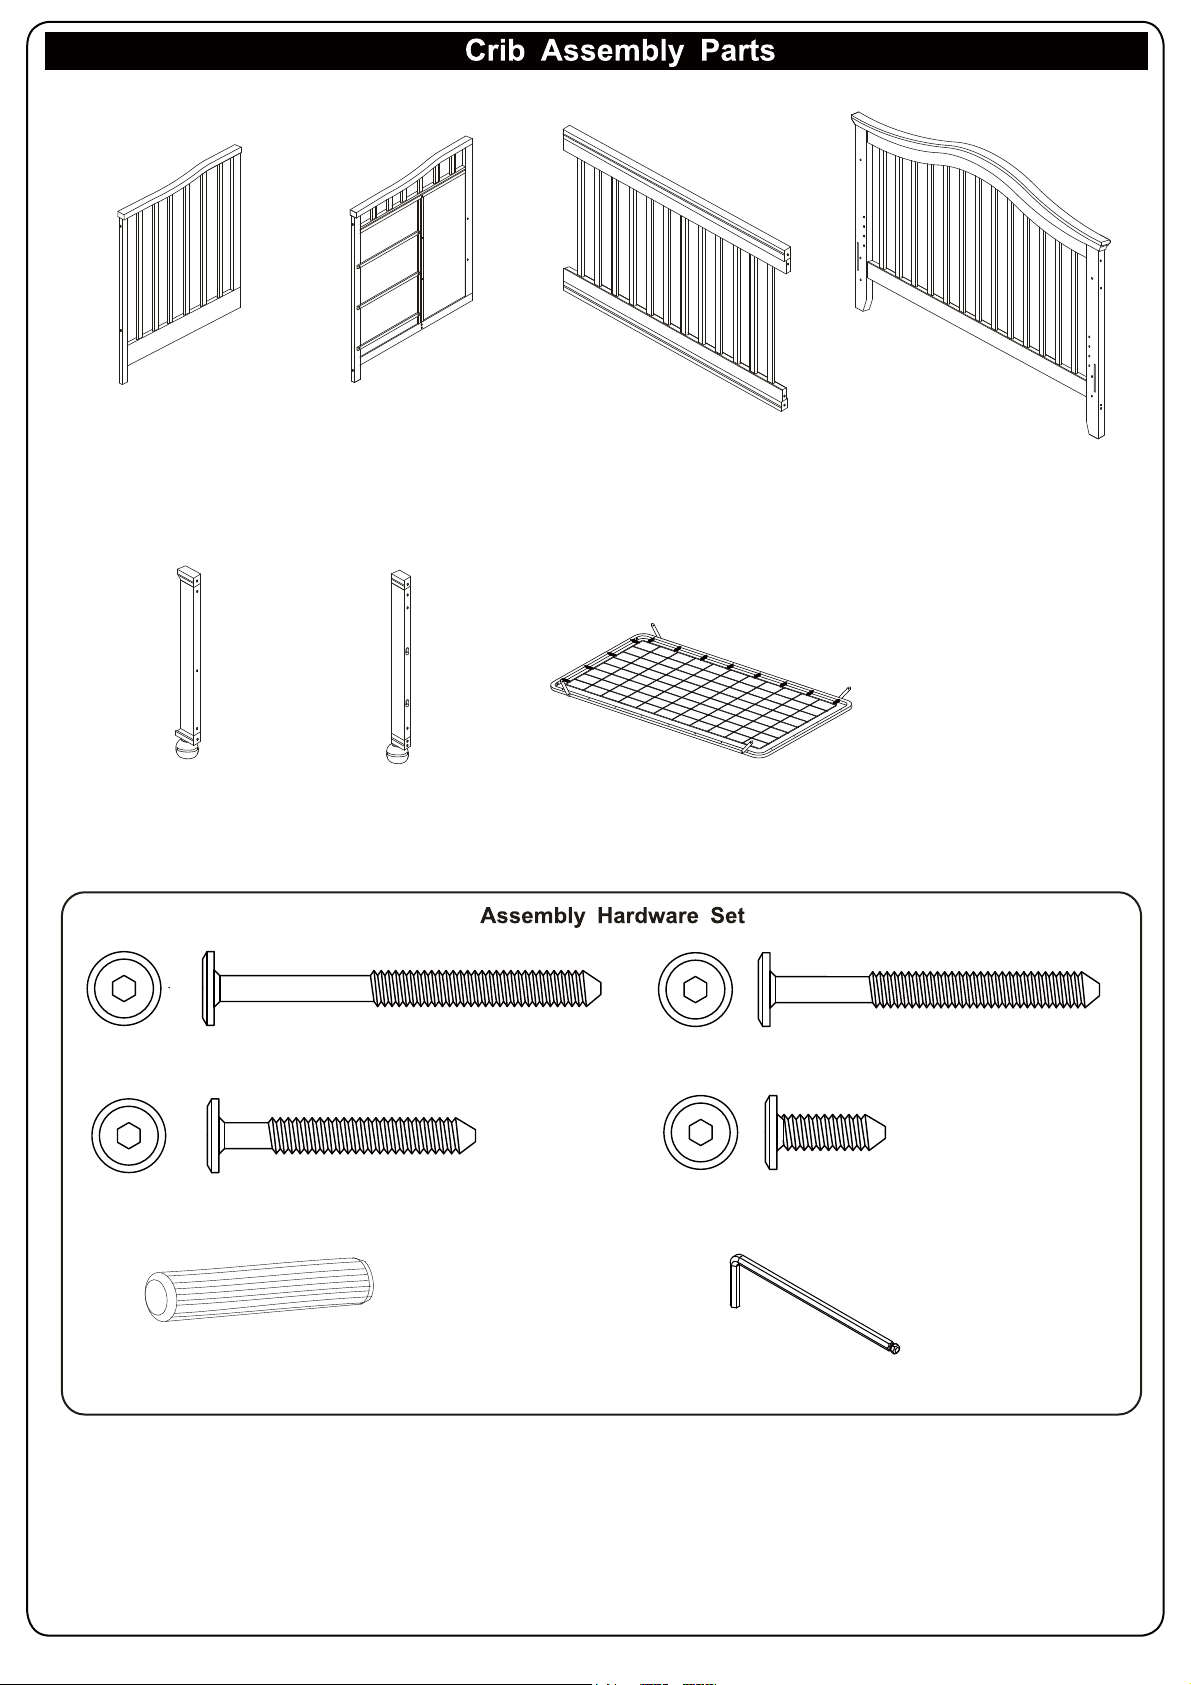
(A1) Left Crib End (1 pc)
(E1) Left Corner Post (1 pc) (F1) Middle Corner Post (1 pc) (G1) Mattress Support (1 pc)
(B1) Center Crib End (1 pc) (C1) Front Side Rail (1 pc) (D1) Back Side Rail (1 pc)
(a) M6 x 90mm Allen bolt (4 pcs)
(c1) M6 x 45mm Allen bolt (4 pcs)
(d) 8 x 30 mm Wood Dowels (6pcs)
(c) M6 x 55mm Allen bolt (4 pcs)
(o) M6 x 19mm Allen bolt (4 pcs)
(m) Allen Key (1 pcs)
Page 5
Page 6
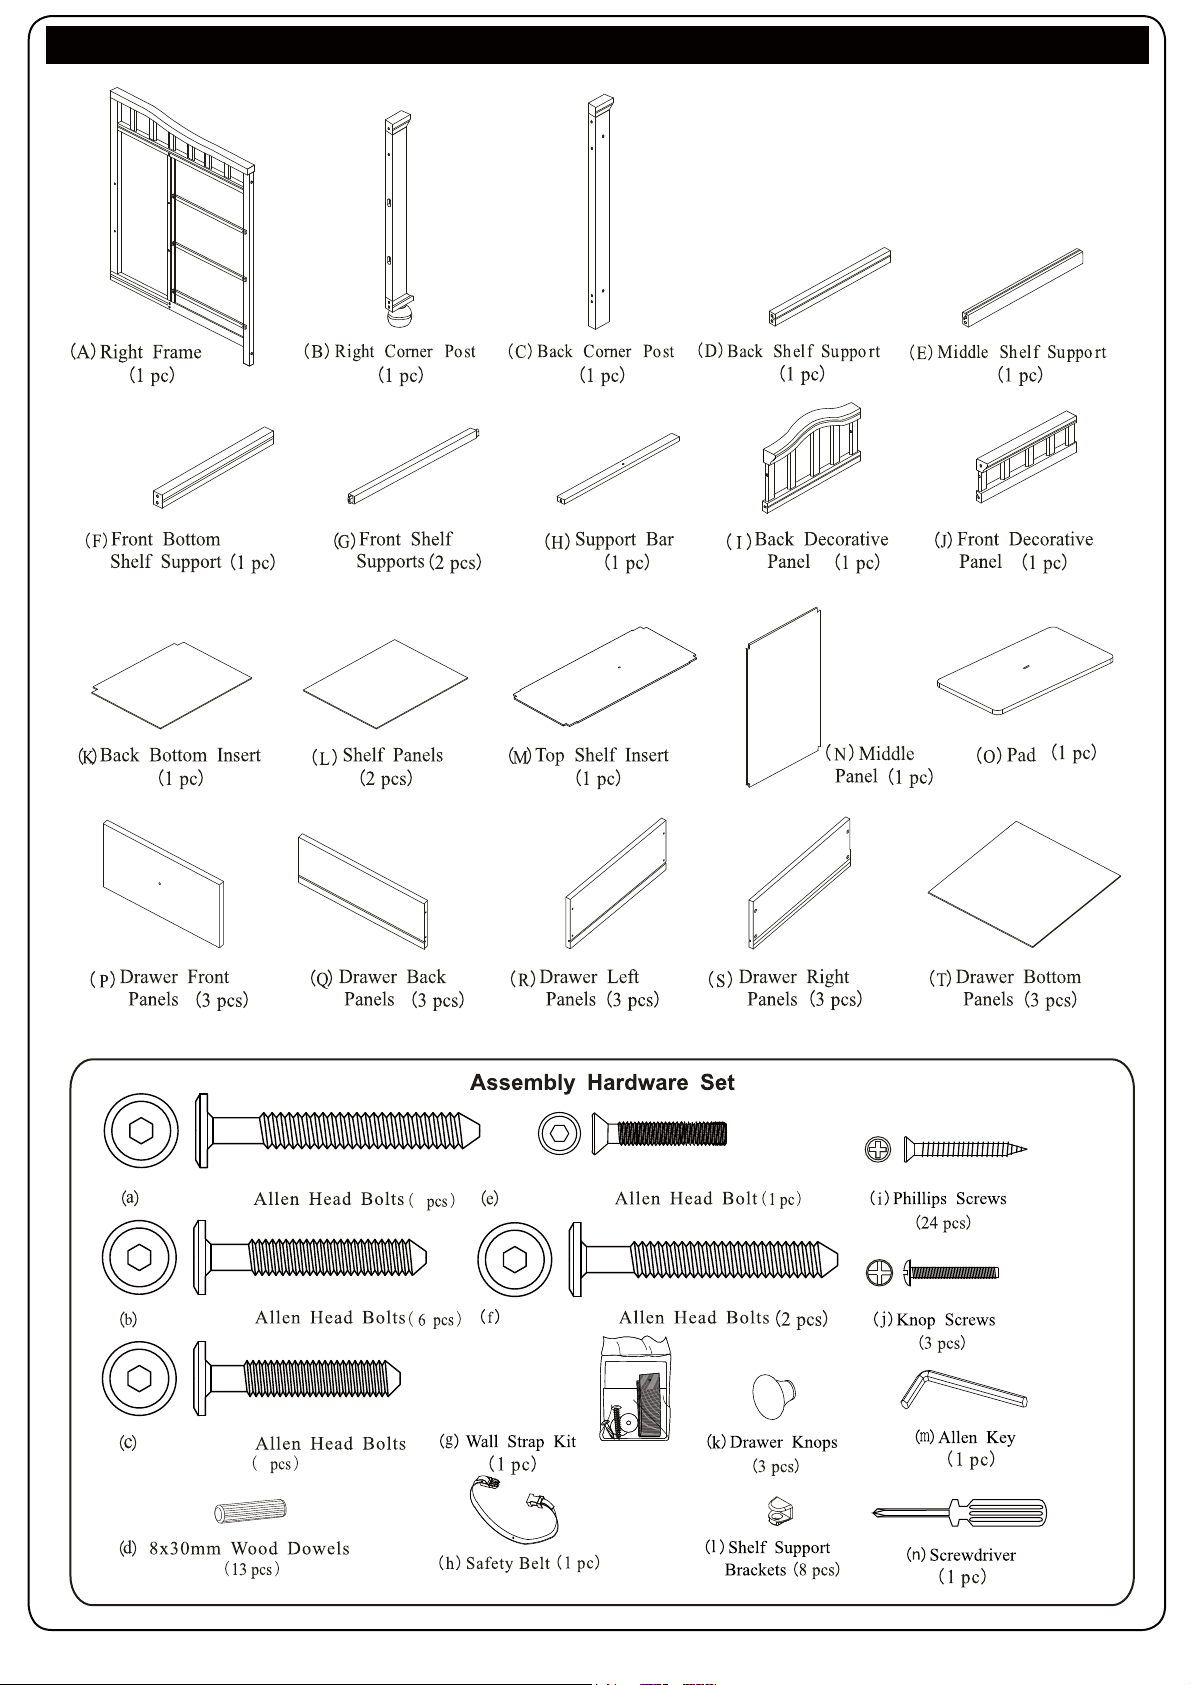
Changer Assembly Parts
M6 x 90mm
M6 x 70mm
M6 x 54mm
4
8
M6 x 22mm
M6 x 83mm
Page 6
Page 7
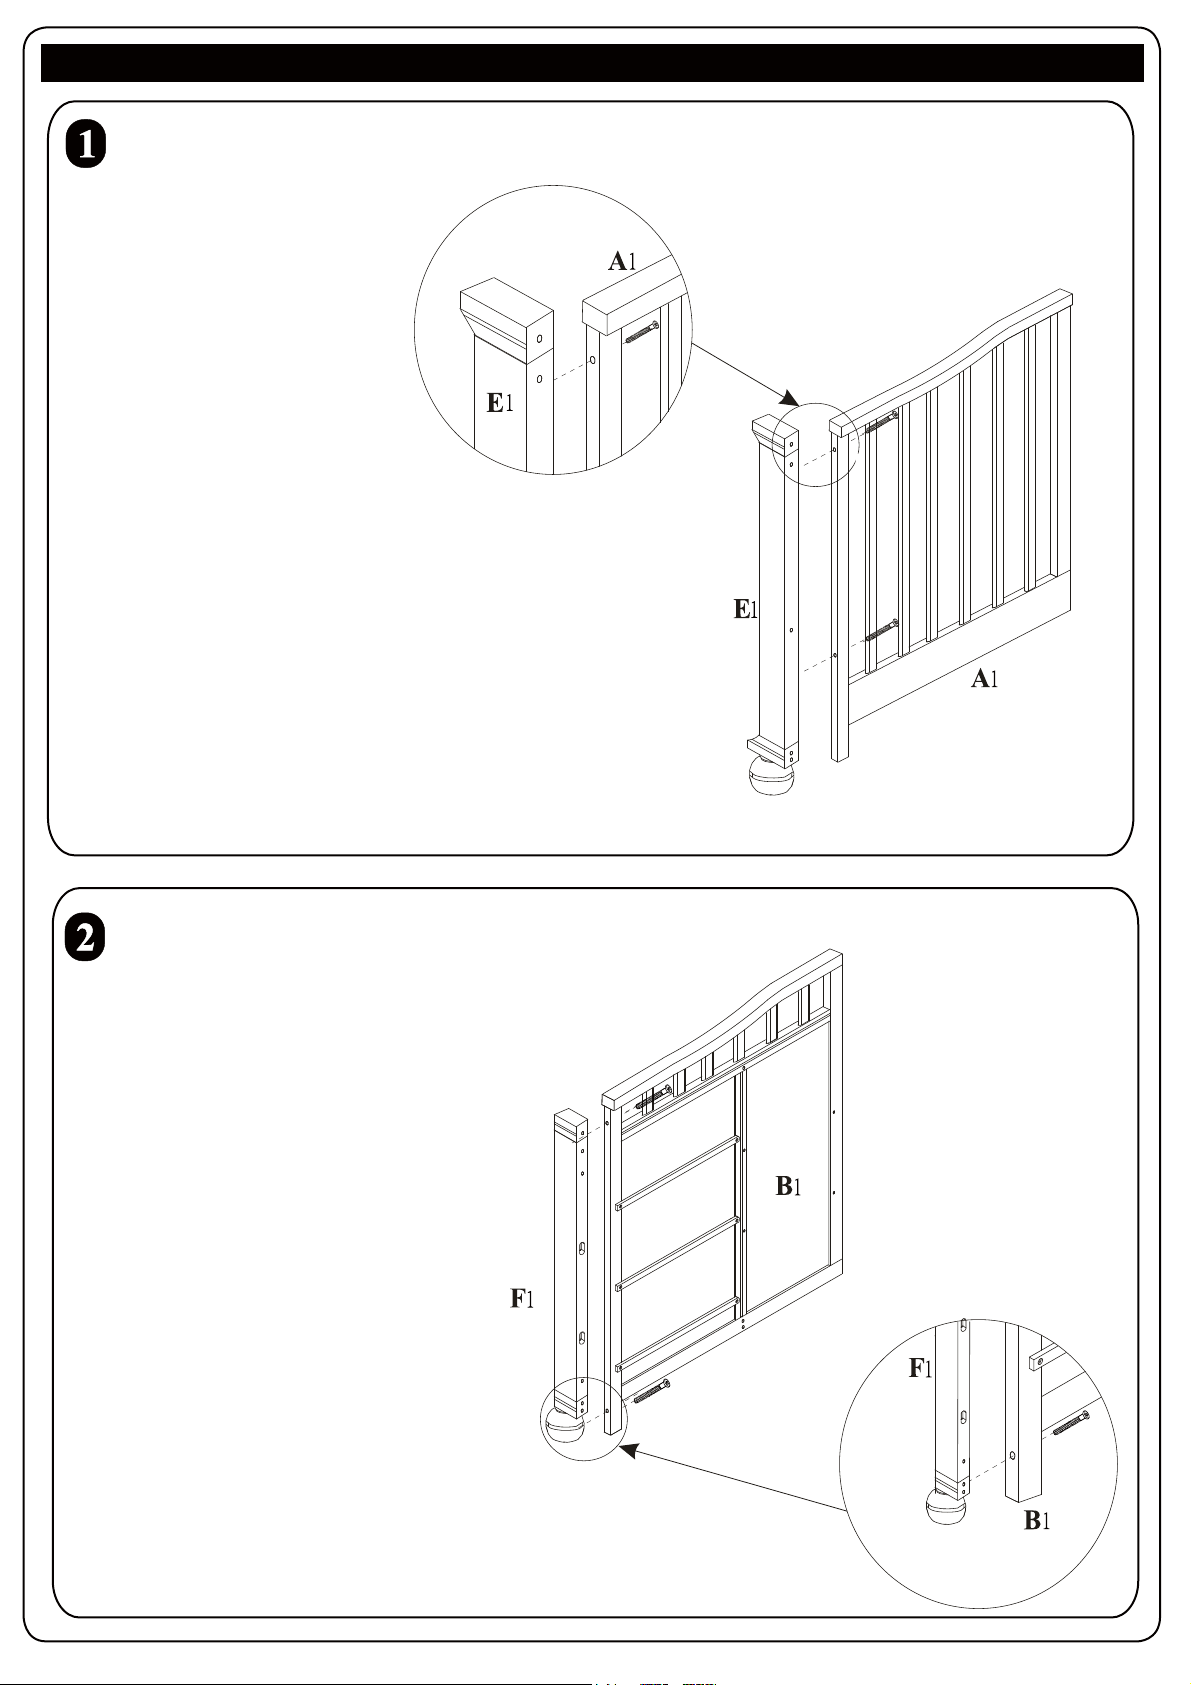
Crib Assembly
Left Crib End with Left Corner Post Assembly
Attach the Left Crib End(A1) to
the Left Corner Post(E1)
by using the 54mm bolt(c),
As shown in the pictures.
c
c
c
Center Crib End with Middle Corner Post Assembly
Attach the Center Crib End(B1) to
the Center Corner Post(F1)
by using the 54mm bolt(c) 2pcs,
As shown in the pictures.
c
Page 7
Page 8
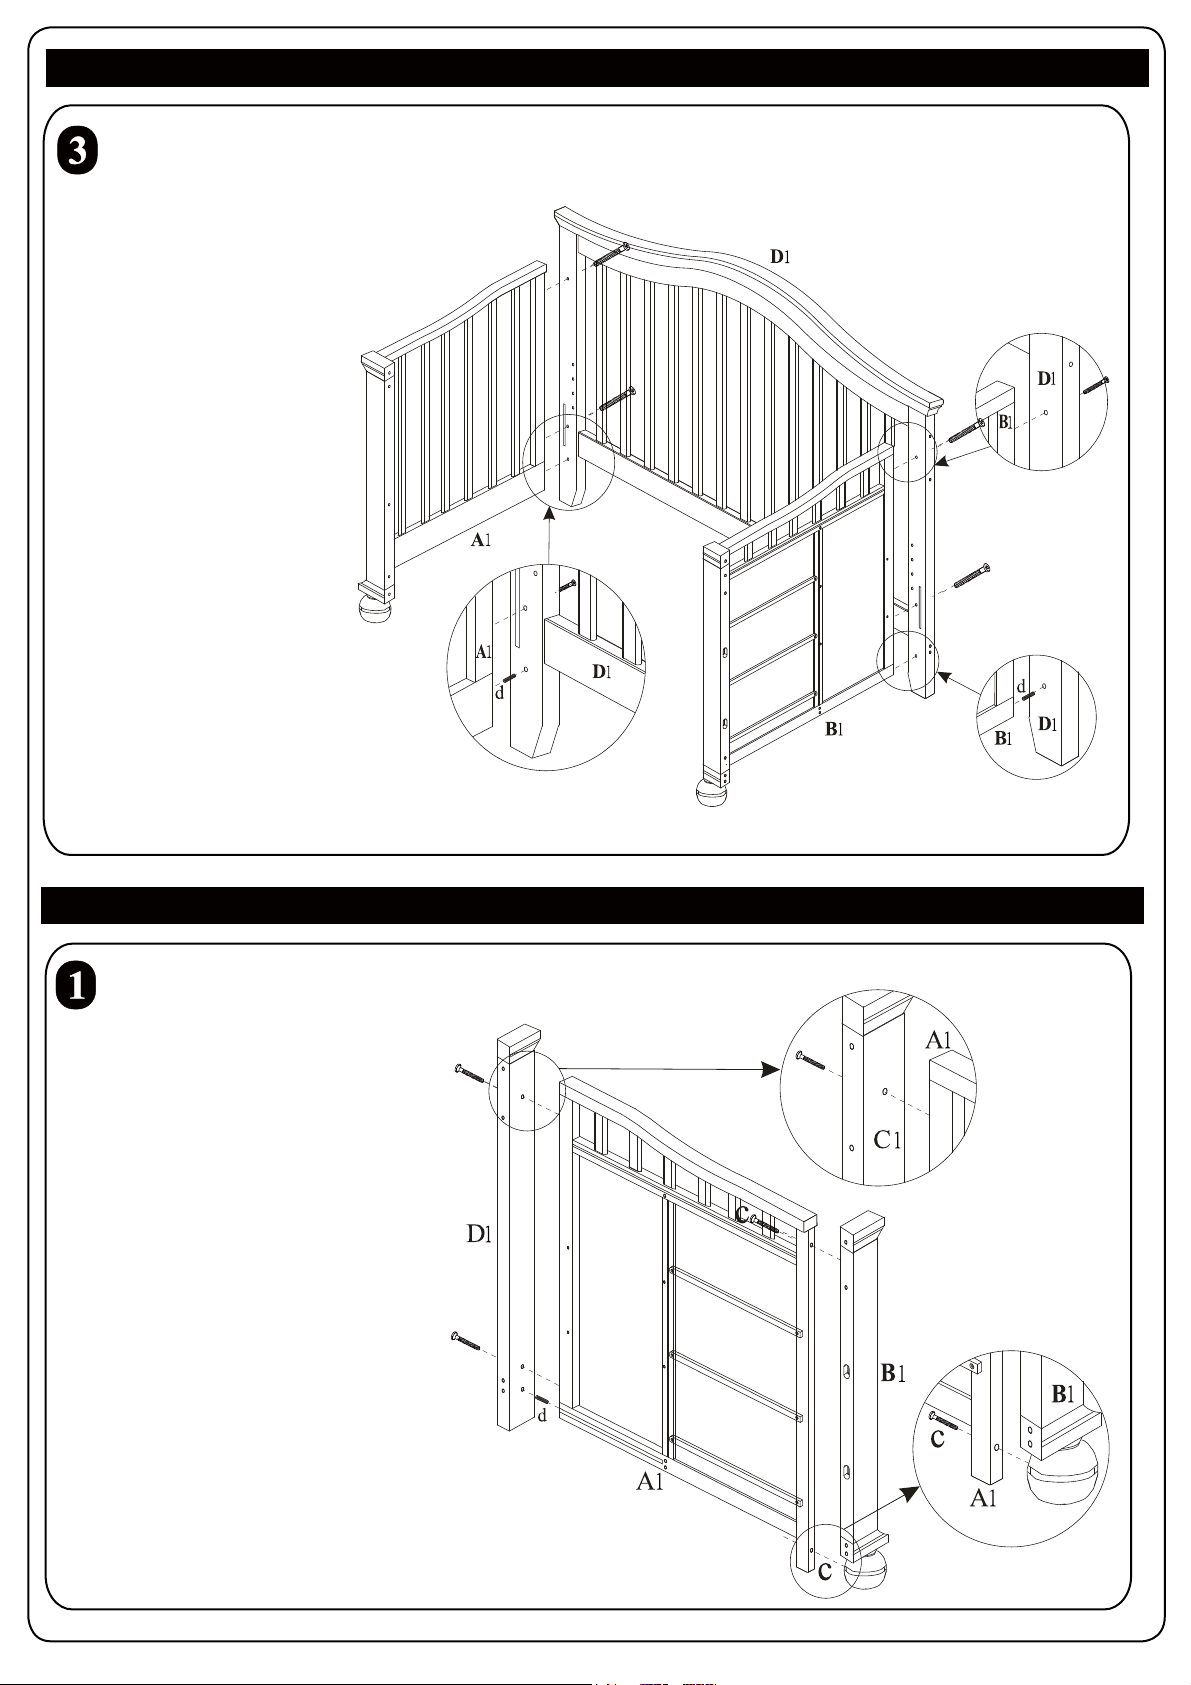
Headboard Assembly
Attach the Headboard(D1) to
the Left and Center Crib End
by using the43mm bolt(c
1) 4pcs
and the 30mm wood dowel
(d)2pcs, As shown in
the pictures.
Crib Assembly
c1
c1
c1
Changer Assembly
Right Frame with Right Corner post and Back Corner post
c1
c
1
c1
Attach the Right Frame(A1) to
the Right Corner Post(B1) and
Back Corner Post(C1) by using
the 54mm bolt(c) 4pcs and the
30mm wood dowel(d) 1pc,
As shown in the pictures.
c
c
c
Page 8
Page 9
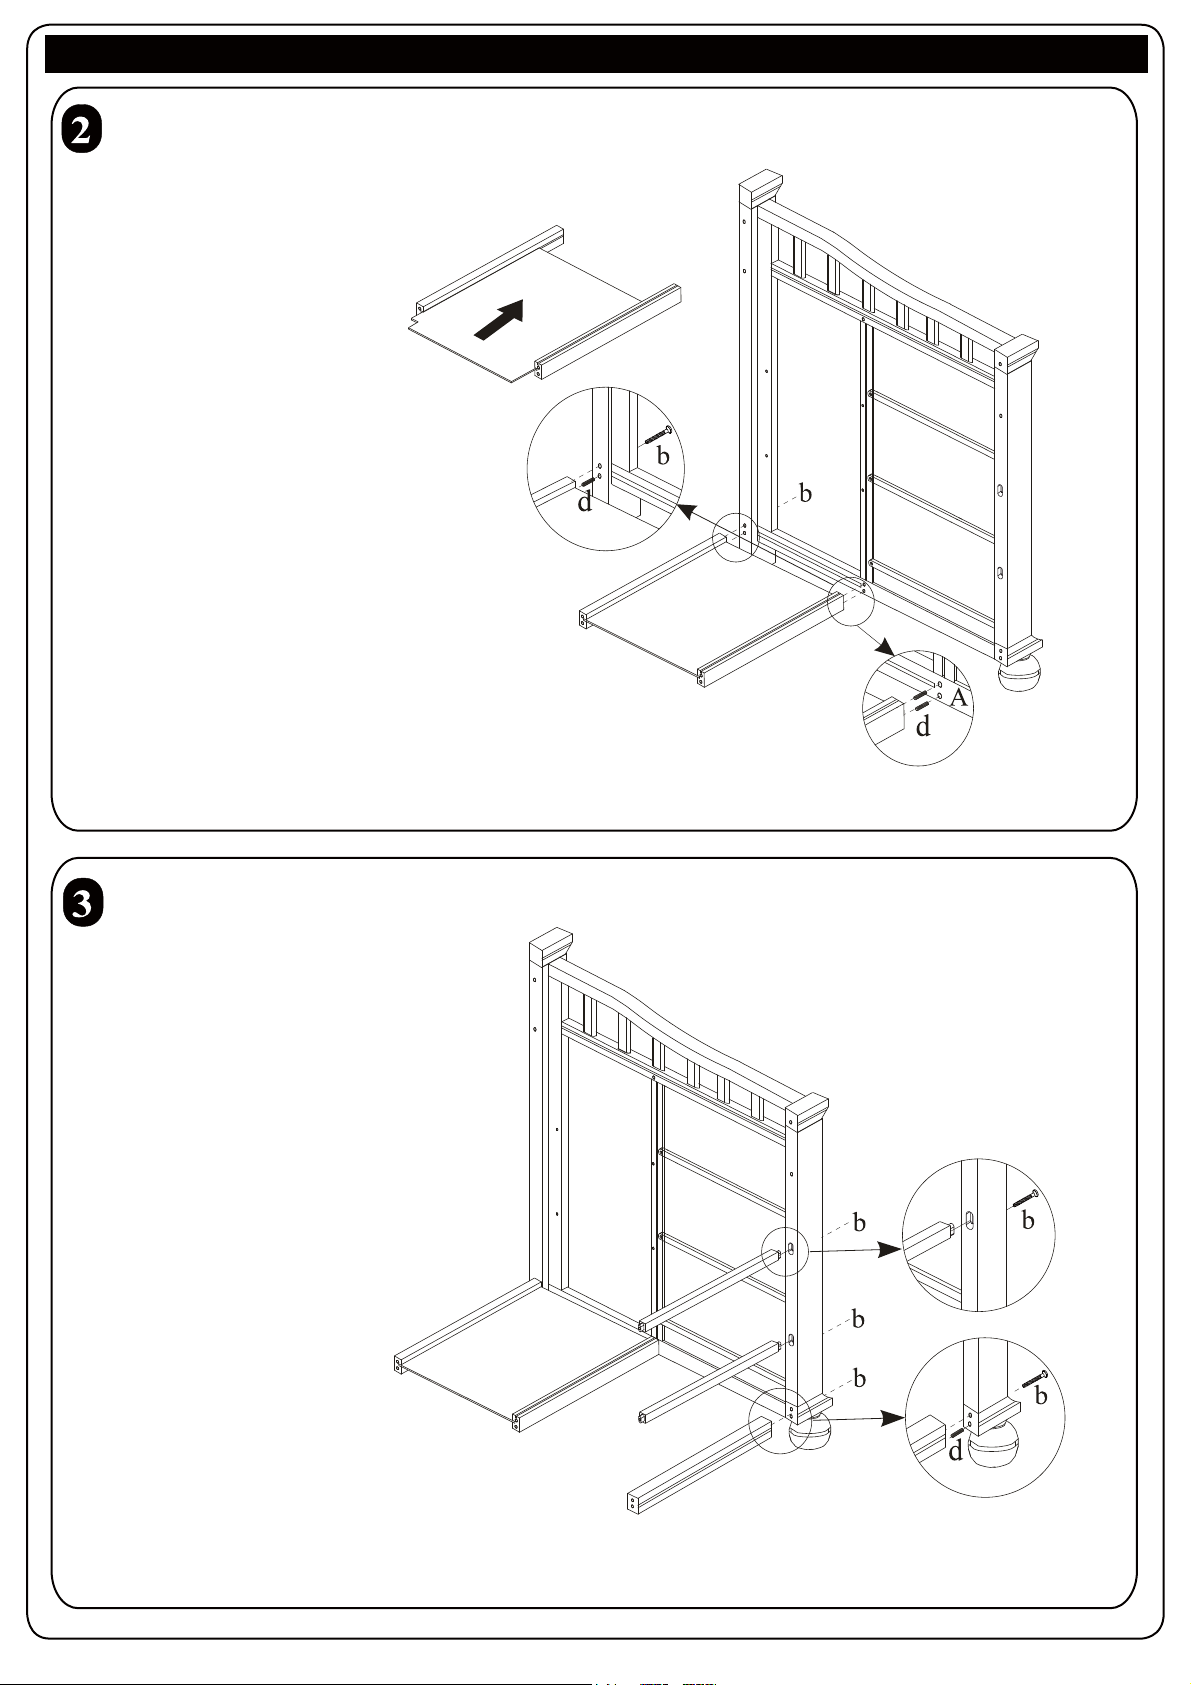
Changer Assembly
Back bottom insert (K) with Back shelf support (D)
and Middle shelf support (E) Assembly
D
K
E
C
E
Front bottom shelf support (F)and Front shelf support (G) Assembly
G
B
Page 9
G
B
G
F
F
Page 10
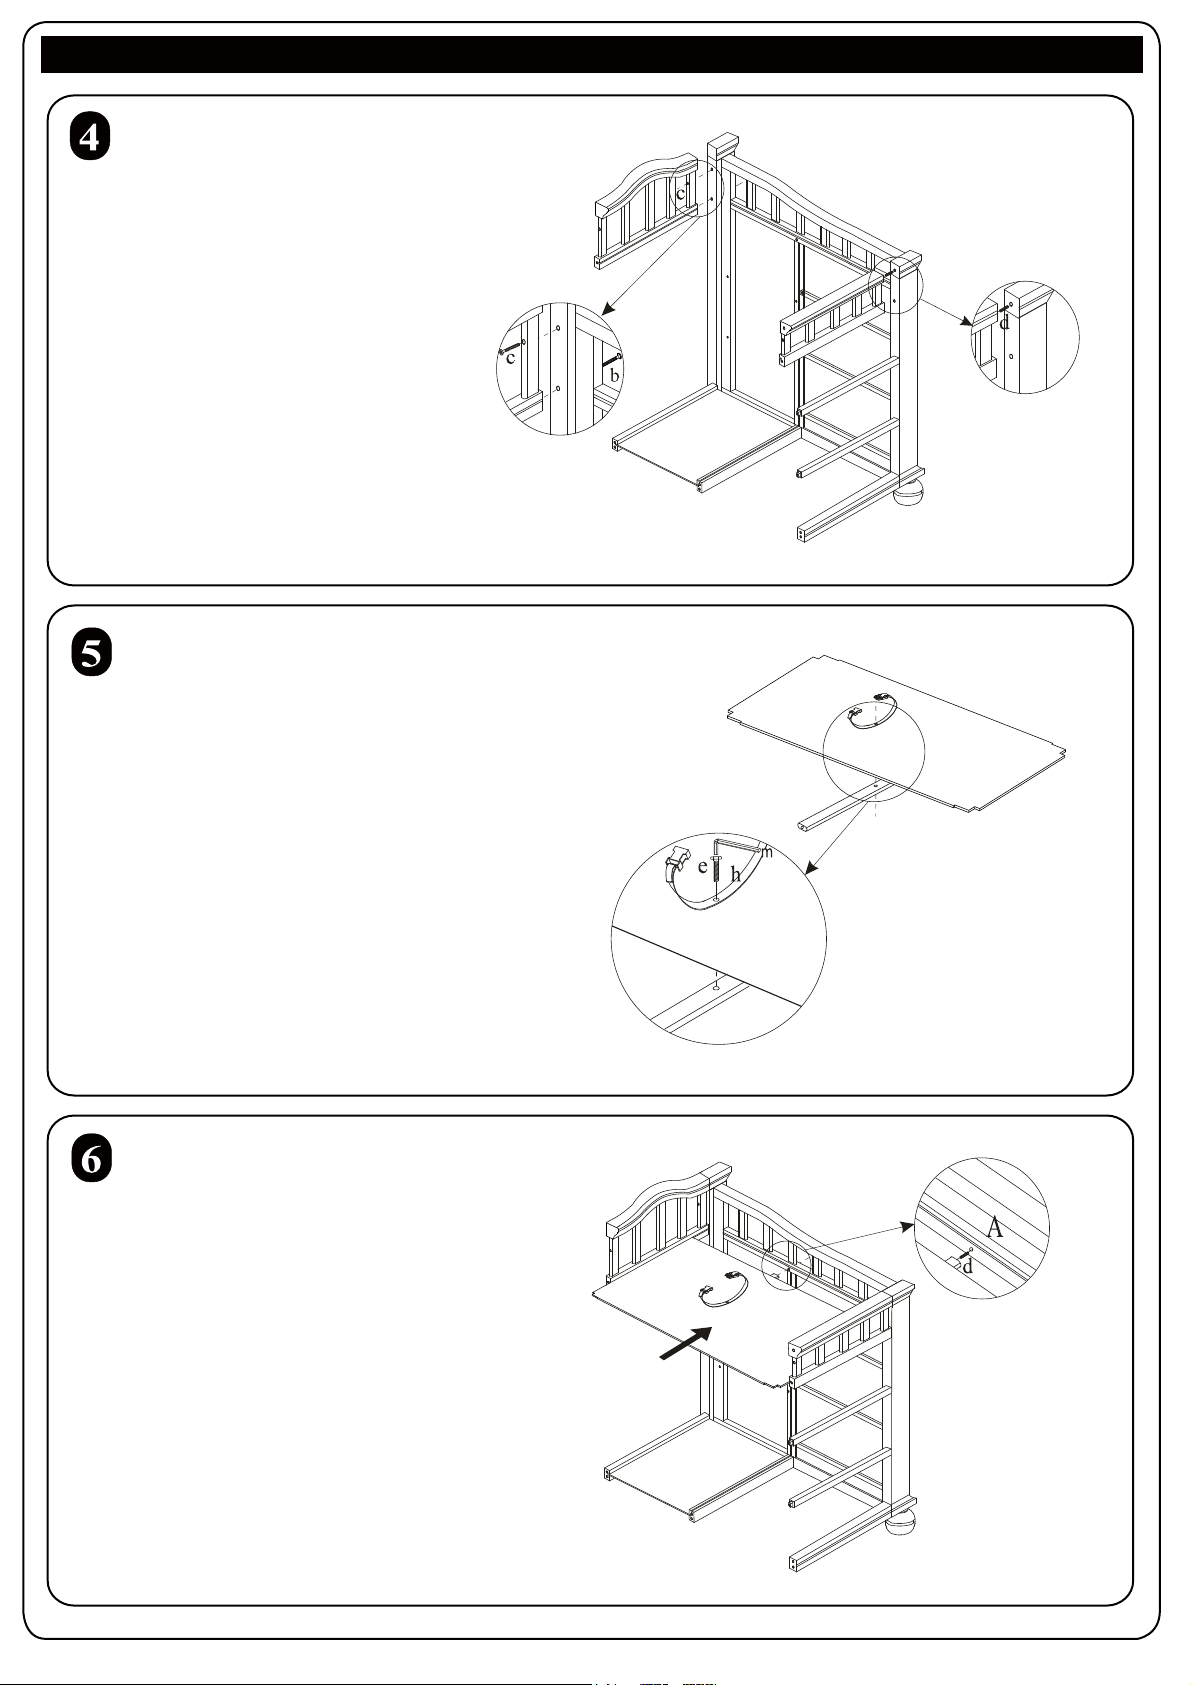
Changer Assembly
Back decorative panel (I)and
Front decorative panel (J) Assembly
I
C
Top shelf insert (M) with Safety belt(h)and
Support bar (H) Assembly
J
B
M
H
H
H
M
Page 10
Page 11
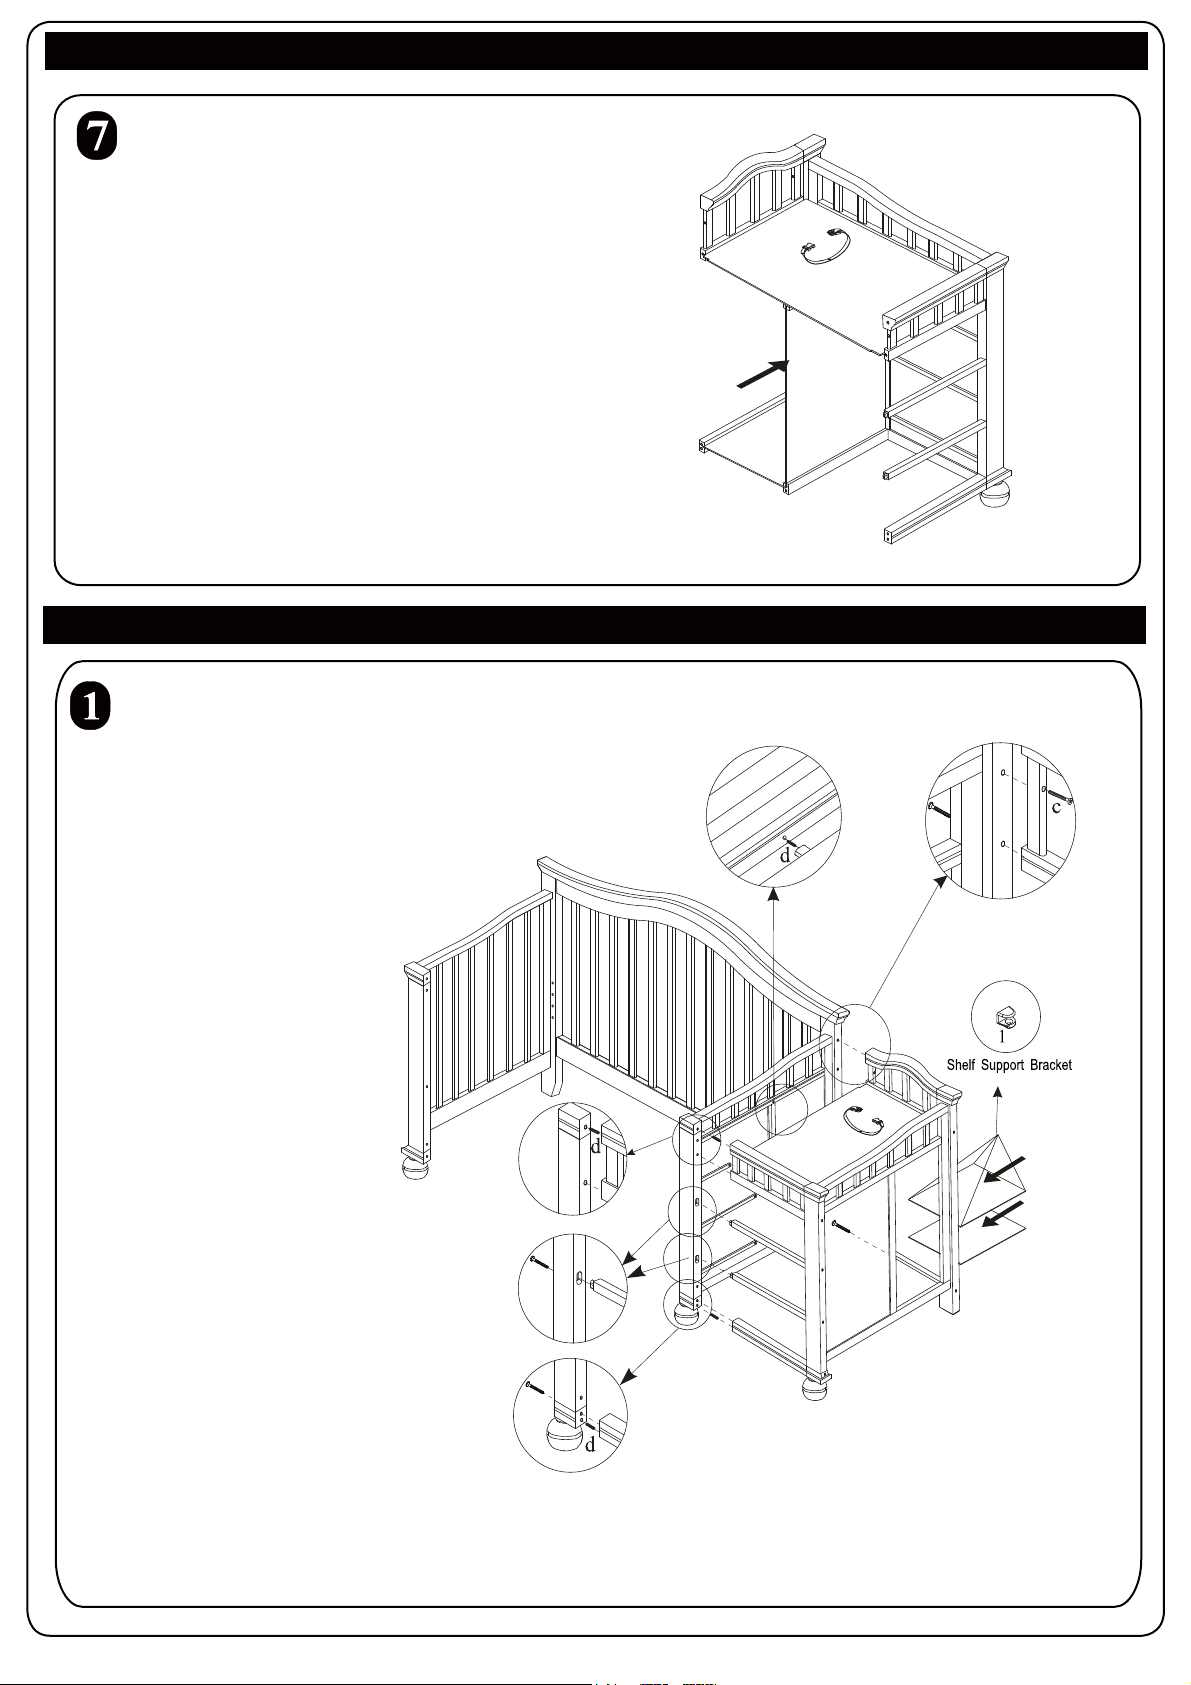
Changer Assembly
Middle panel (N) Assembly
Crib & Changer Assembly
N
Shelf panels (L) Assembly
Then attach the Changer to crib
H
F1
a
a
F1
f
L
L
F1
a
Page 11
Page 12
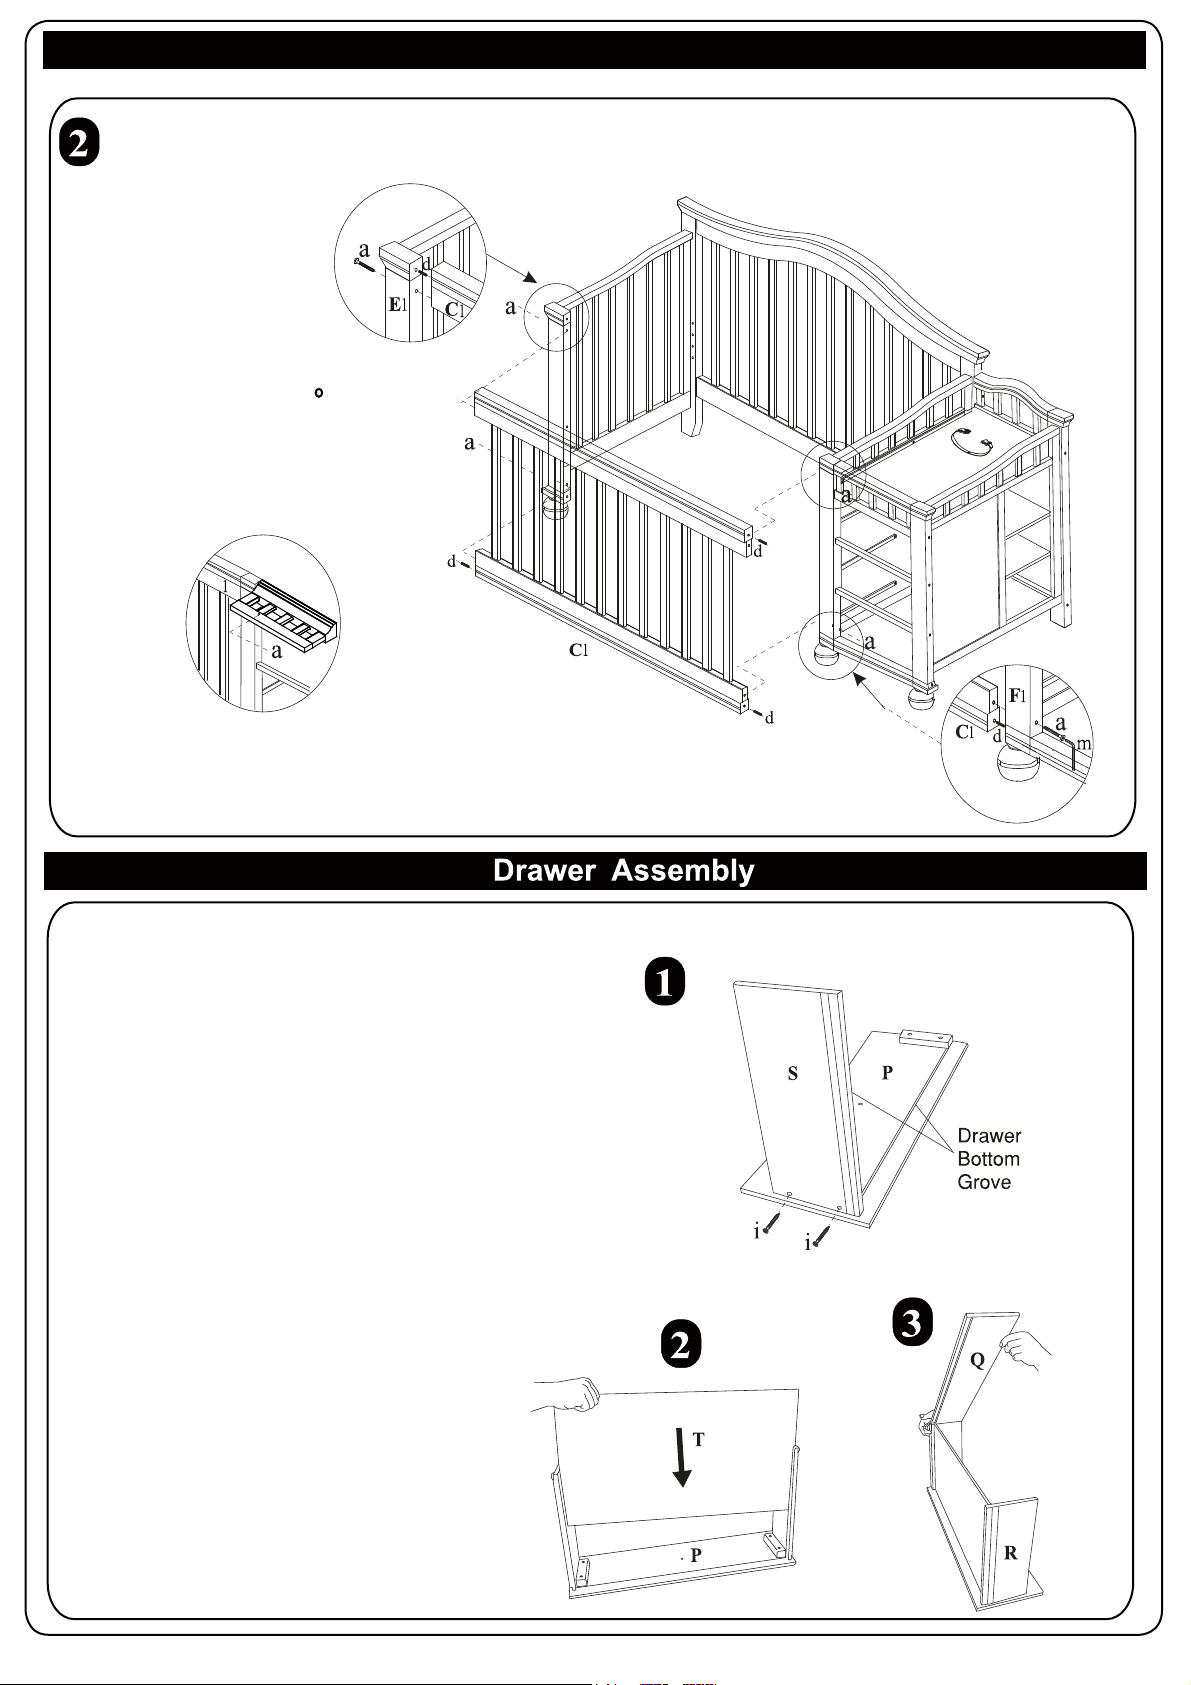
Crib & Changer Assembly
Front Side Rail (C) Assembly
Note: The front decorative panel
must turn round 90 when the
front side rail assembly
C
J
Page 12
Page 13
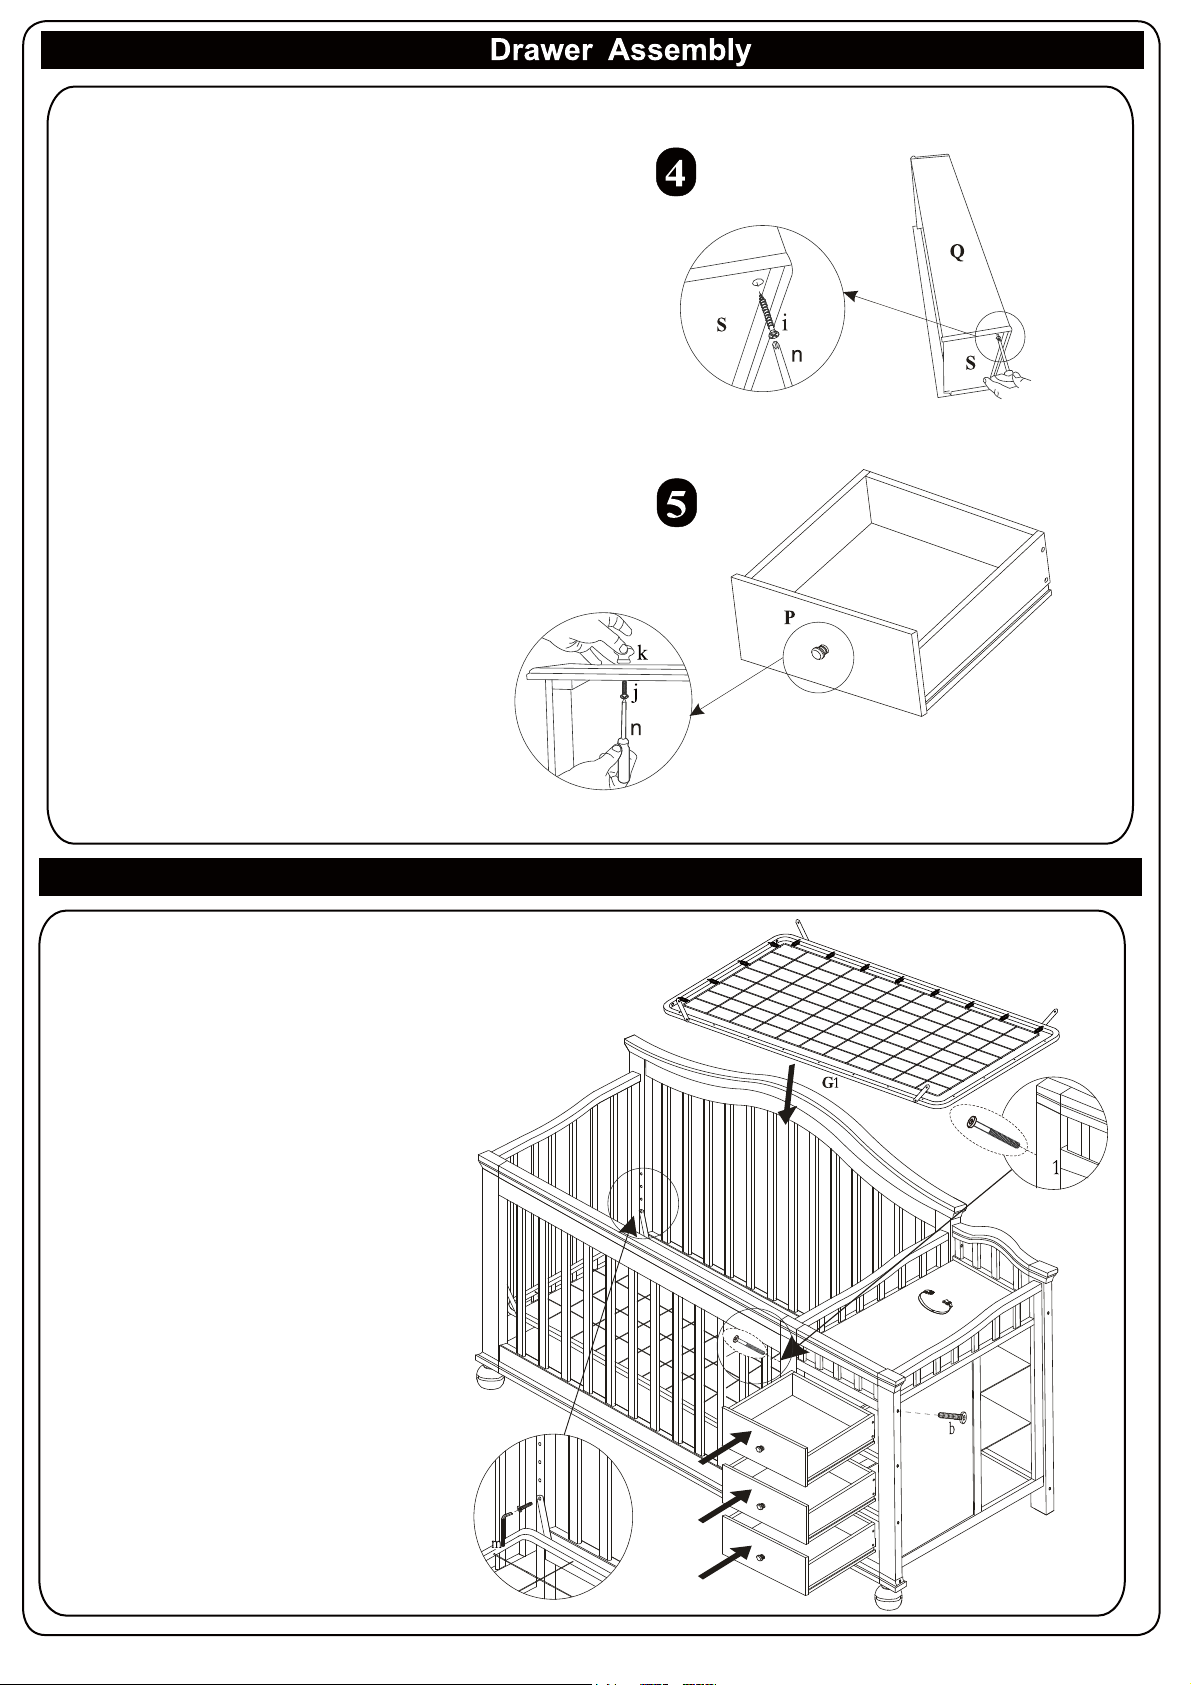
Mattress Support Assembly
f
f
J
F
o
Page 13
Page 14
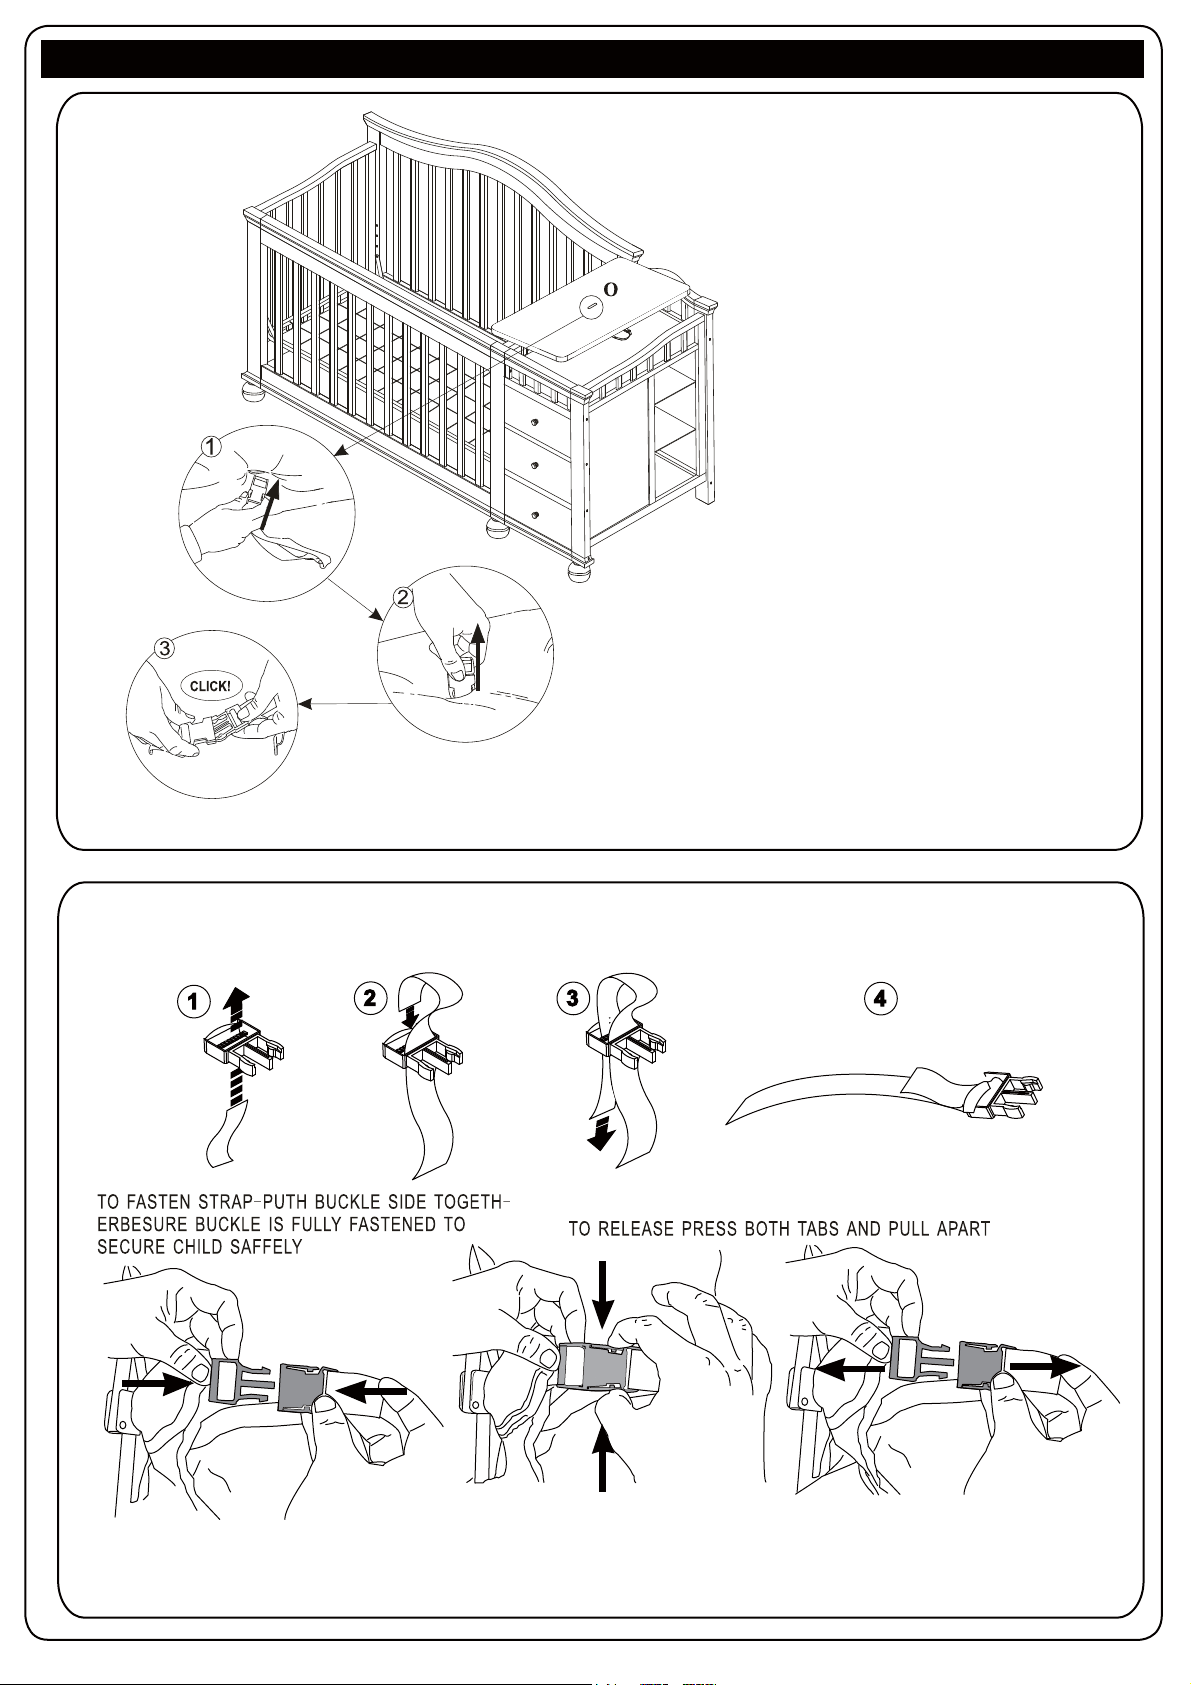
Changer Pad Assembly
FINALLY CHECK
• PRIOR TO USING THE CRIB, ENSURE ALL BOLTS
ARE TIGHTENED. DO NOT OVER TIGHTEN.
• ENSURE THAT THE MATTRESS IS THE
RECOMMENDED SIZE.
• ENSURE THE MATTRESS BASE IS LOCATED AT
THE CORRECT LEVEL TO SUIT THE CHILD.
• CRIB IS NOW READY TO USE.
Page 14
Page 15
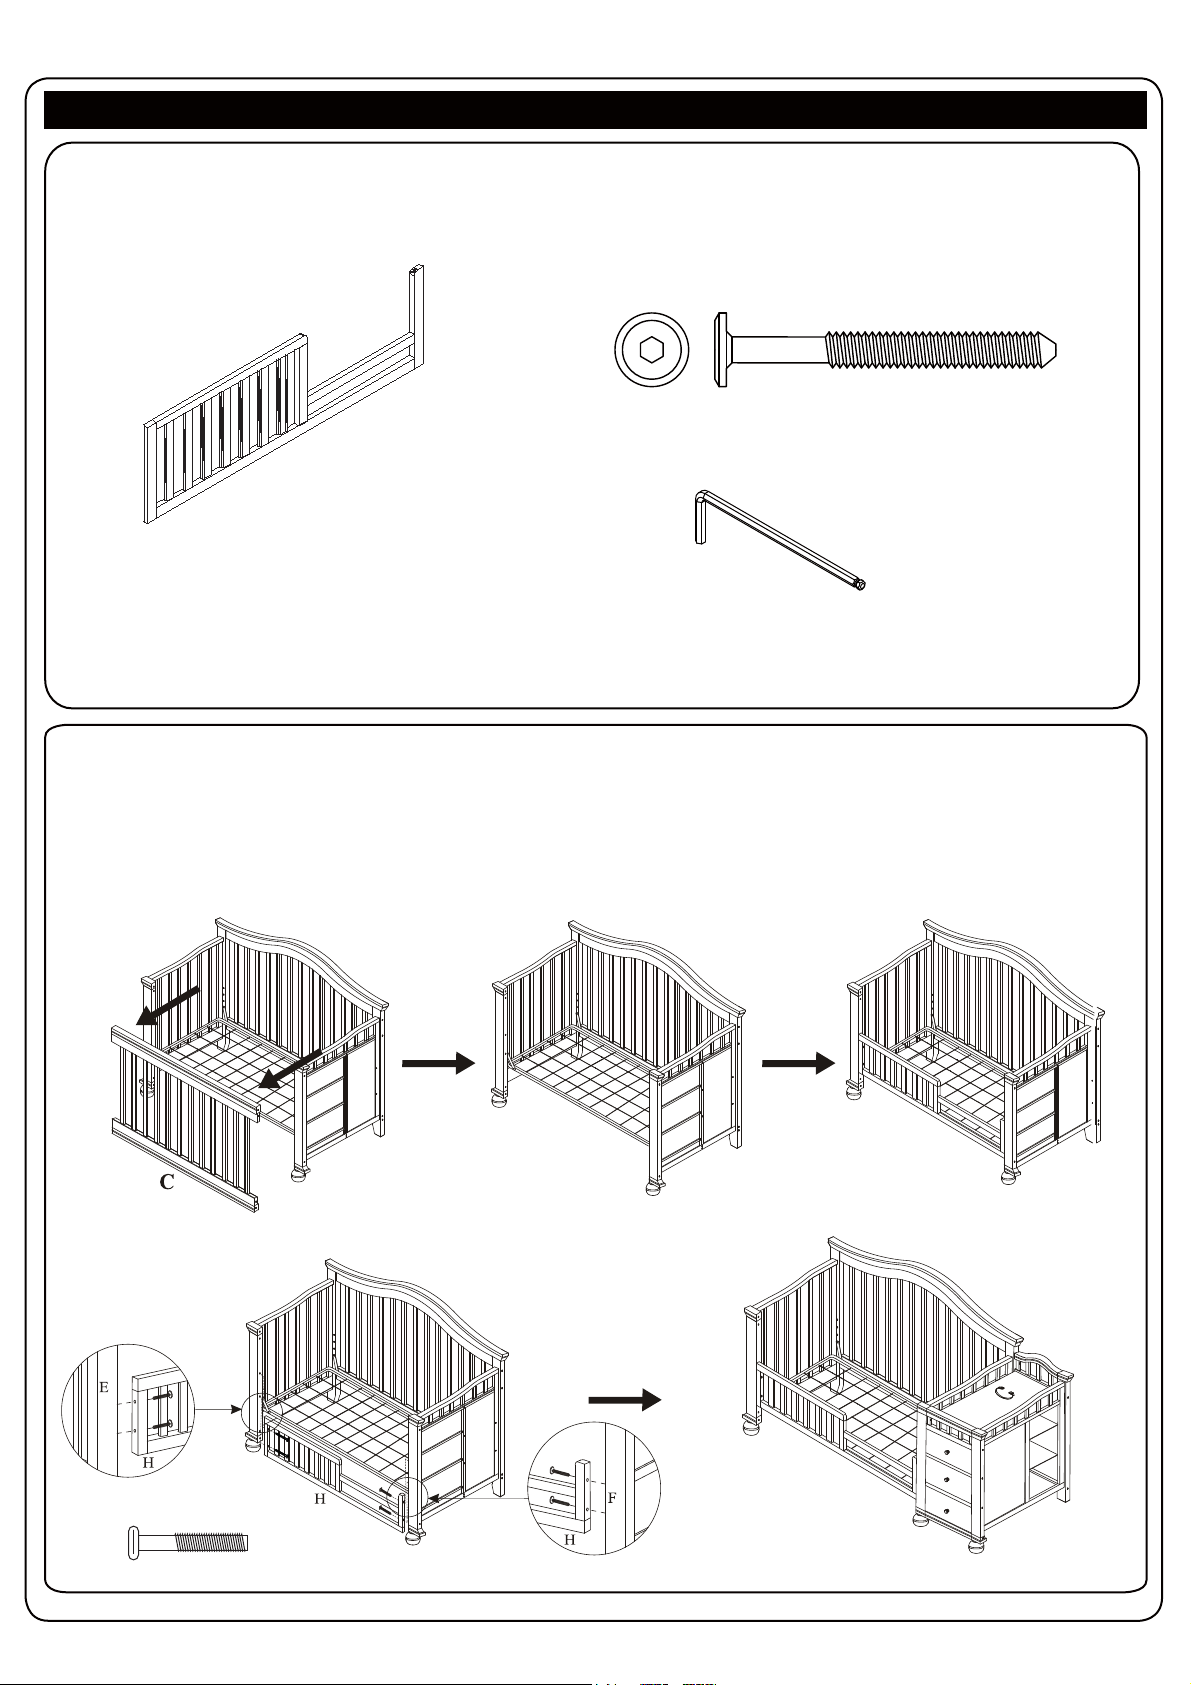
132 Toddler Rail Instruction Sheet
Toddler Rail Assembly
Parts and Hardware
(H) 132 Toddler Rail (1 pcs)
SORELLE
(b) M6 x 50mm Allen bolt (4 pcs)
(m) Allen Key (1 pcs)
WARNING:
PLEASE DO NOT TIGHTEN THE BOLTS IN ASSEMBLY PROCESS!
1. Before Toddler Rail assembly, please Remove Footboard(C) and Four (4) Bolts as per below (Fig.2)
MATTRESS SUPPORT MUST BE IN THE
LOWEST POSITION
2.Store crib footboard and balance hardware together in a safe place.
1
Fig.2
1
c
c
c
c
(c) (x4)
c
1
c
Page 15
Page 16
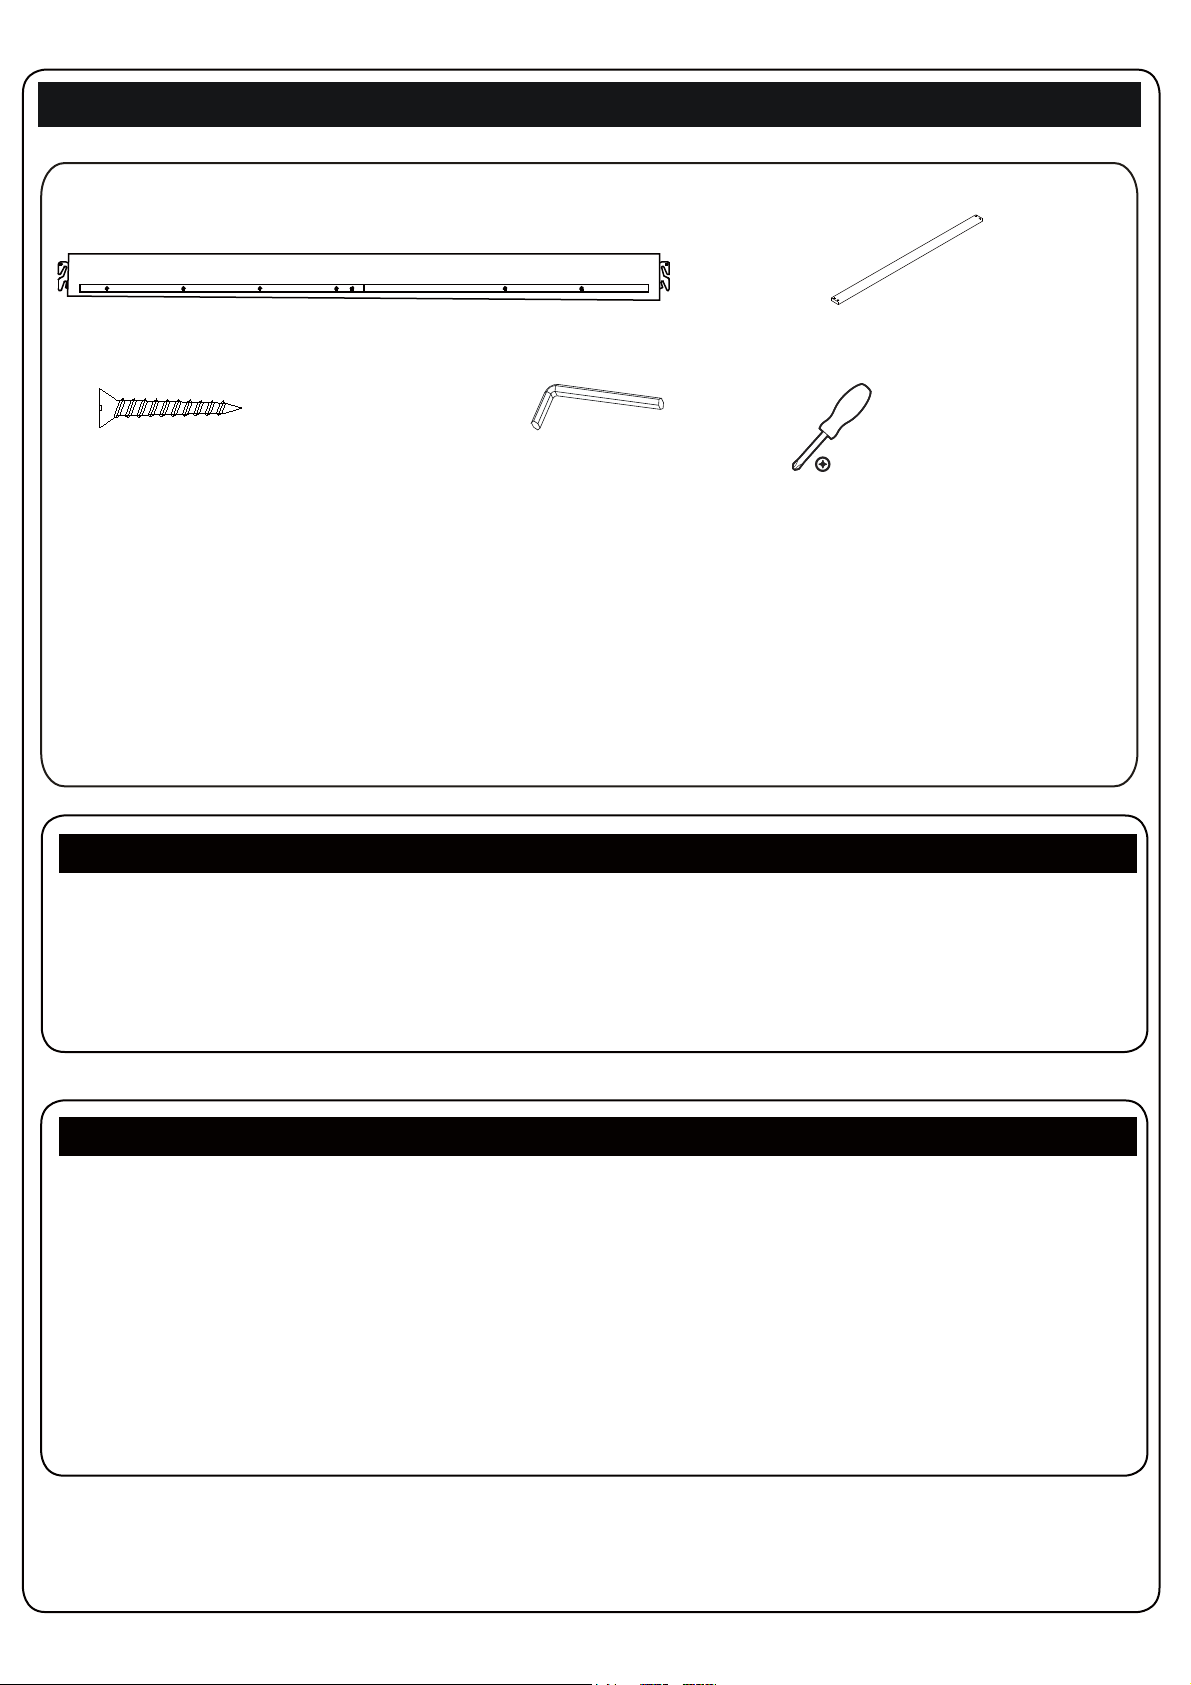
Fullsize Bed Conversion (Optional)
Additional Parts and Hardwares
(A) 216# Bed Rail (2 pcs)
(b) Ø4 X 30mm Phillips Screw (16 pcs)
Follow all instructions supplied with the 216# Adult Rail System. NOTE: 216# Adult Rail System
is not included. Please see your crib retailer, visit WWW.Sorellefurniture.com or contact C&T
International Inc. for more information.
( 216# Adult Rail System Not included, sold separately)
(B) 216# Mattress Support Bar (4 pcs)
(e) Allen Key (1 pcs)
Tool required
Disassembling Crib for Storage
To disassemble crib for storage, follow assembly steps in reverse.
Store all parts and hardware together in a safe place. Store the instruction manual in the supplied
envelope attached to mattress support crossbar for future reference for reassembly.
Cleaning and Storage
To clean, use only mild household soap and warm water. DO NOT use bleach or detergent. DO
NOT use abrasive cleaners which can scratch the finish. Use clean soft cloths to wash, rinse and
dry. With proper care, the quality finish will last a long time. Wood surfaces may be treated with
a light application of a good grade of non-toxic furniture polish. Read contents on back of polish
to make sure polish will not harm unit.
Store all parts from Crib, which are not used for Full Size Headboard, in original carton(s) (if
available) to prevent damage and allow reuse.
Page 16
 Loading...