


Manual
Balance Series
FA Electronic Balance(Electronic Analytical Balance)
FB Electronic Balance(Auto Internal Calibration Electronic Analytical Balance)
JA Electronic Balance(Electronic Precision Balance)
FA/FB/JA Series

Quick Use Guide
Power On
Power Off
Calibration
Tare Piece
Zero
Percentage
Units Conversion
Function Mode Conve
rsion
Hold on to click the button , until appear required hints
开 关
Max:
d
g
g
Max: gdg
开 关
Max:
Max:
100%0
皮去
100%0
gdg
g
100%0
gdg
g
100%0
零置
Max:
Max:
Max:
d
g
Basic Weighing
g
g
Max:
g
Max:
g
100%0
d
g
g
100%0
d
g
g
100%0
皮
准校
Max: gdg
0
Max:
Max: gdg
Max:
Max: gdg
Max:
Max: gdg
Cal
Cal
g
100%0
d
g
g
Cal
100%0
Cal
g
100%0
d
g
g
Cal
100%0
Cal
100%0
d
g
g
g
100%0
去
能功
皮
去
能功
皮
去
Max: gdg
Max: gdg
Max: gdg
d
g
d
g
Max: gdgg
Max: gd
g
Max: gd
g
Max:
g
Max: gd
g
Max: gd
g
g
100%0
g
100%0
g
100%0
g
g
100%0
g
g
100%0
零置
能功
能功
皮
去
能功
100%0
Menu
pcs
100%0
pcs
100%0
d
g
pcs
100%0
pcs
100%0
pcs
100%0
能功
能功
Max:
g
Max:
g
Max: gd%g
Max: gd%g
Max: gd%g
Max: d
Max: gdgg
Max:
g
Max:
g
Max:
g
Max:
g
Max: gd
g
Max: gd%g
Max:
g
Density
Max: gdg
d
g
g
100%0
d
g
Menu
pcs
100%0
Menu
100%0
100%0
100%0
%
100%0
100%0
d
g
p
100%0
d
g
oz
100%0
d
g
oz
g
100%0
d
g
ct
100%0
Menu
pcs
100%0
Menu
100%0
d
g
3
/cm
g
100%0
Menu
100%0
2

CONTENTS
1 BALANCE SERIES INTRODUCTION ...........................................................................................................................4
1.1 INTRODUCTION ...................................................................................................................................................... 5
1.2 BALANCE STRUCTURE .......................................................................................................................................... 6
1.3 OPERAING KEY FUNCTION INDEX ............................................................................................................................... 7
2 USAGE ...................................................................................................................................................................8
2.1 PACKAGE LIST .......................................................................................................................................................... 8
2.2 INSTALL, LEVEL ADJUSTMENT ....................................................................................................................................... 9
2.3 SAFETY GUIDELINES/POWER ....................................................................................................................................... 9
2.4 CALIBRATION ..........................................................................................................................................................10
3 WEIGHING ................................................................................................................................................................ 11
3.1 POWER ON/OFF .....................................................................................................................................................11
3.2 BASIC WEIGHING ....................................................................................................................................................11
3.3 TARE ..................................................................................................................................................................11
3.4 ZERO .................................................................................................................................................................11
4 MENU ....................................................................................................................................................................... 12
4.1 OVERVIEW .............................................................................................................................................................13
4.2 FUNCTION MENU OPERATION ..................................................................................................................................13
4.3 BASIC WEIGHING OPERATION...................................................................................................................................14
1、 Basic Weighing ............................................................................................................................................. 14
2、Weighing with Container ................................................................................................................................ 14
3、Unit Conversion .............................................................................................................................................. 14
4.4 FUNCTION WEIGHING OPERATION.............................................................................................................................15
1
、
Piece Count .................................................................................................................................................... 15
2、Weighing in Percent ........................................................................................................................................ 16
4.5 DENSITY WEIGHING (ONLY FOR JS SERIES) ....................................................................................................................17
1、DENSITY DEVICE INSTALLATION ...............................................................................................................................17
2、DENSITY MODE SELECT .........................................................................................................................................17
3、STANDARD MATERIAL SELECT .................................................................................................................................18
4、OPERATION ........................................................................................................................................................19
4.6 SYSTEM .................................................................................................................................................................22
3

4.7 DATE COMMUNICATION ............................................................................................................................................23
5 CONFIGURING BALANCE ...................................................................................................................................... 23
5.1 OPERATING THE CONFIGURING KEYS ..........................................................................................................................23
5.2 BALANCE FUNCTION SETTING LIST(* MEASN FACTORY SET) ...........................................................................................24
5.3 BALANCE SETTING FUNCATION EXPLAIN ........................................................................................................................25
5.4 BALANCE SETTING FOR QUICK WEIGHING ......................................................................................................................25
5.5 BALANCE SETTING FOR STRONG AIR ENVIROMENT ...........................................................................................................25
5.6 BALANCE SETTING FOR LINEAR CORRECTION ..................................................................................................................25
5.7 RECOVER FACTORY SETTING .......................................................................................................................................26
6 TECHNICAL PARAMETERS, FUNCTION OPTIONSL, PARTS OPTIONAL, DIMENSION ................................................ 26
6.1 TECHNICAL PARAMETERS .........................................................................................................................................29
6.2 RS232 PORT .........................................................................................................................................................29
6.3 FIGURE DIMENSION .................................................................................................................................................30
7 APPENDIX .............................................................................................................................................................. 31
7.1 RS232 PORT DATE COMMUNICATION ..........................................................................................................................31
7.2 FAILURE INFORMATION AND SOLUTIONS ......................................................................................................................32
7.3 MAINTENANCE AND CLEANING ..................................................................................................................................33
7.4 DENSITY PARAMETER TABLE ........................................................................................................................................34
4

1 BALANCE SERIES INTRODUCTION
1.1 Introduction
Same appearance, similar to the operation, not the
same sensor module. It contains four series products:
1. FA series electronic analytic balance
Readability: 0.1mg
2. FB series internal calibration balance
Readability: 0.1/1mg
3. JA series electronic precision balance
Readability: 1mg
4. JS series density balance
Readability: 0.1mg/1mg
The basic function of four series balance is almost same; expect special function (such as density measurement).
Detail as follow:
Series No FA FB JA JS
Weighing capacity (g)
Actual scale interval (g)
Accuracy class
Calibration method External Internal External External External
Density device None None None Have
contour dimension (mm) 365×223×338(length×width×height)
Package dimension(mm) 498×313×453(length×width×height)
Pan size(mm)
Effective height above pan
100- 220 120-220 220-420
0.0001 0.0001 0.001 0.001 0.0001 0.001
ø 90
150×165×2002(length×width×height)
100-500 110-210 300-500
Net weight(kg)
Gross weight(kg)
5.5 6 5.5 6
7.5 8 7.5 8
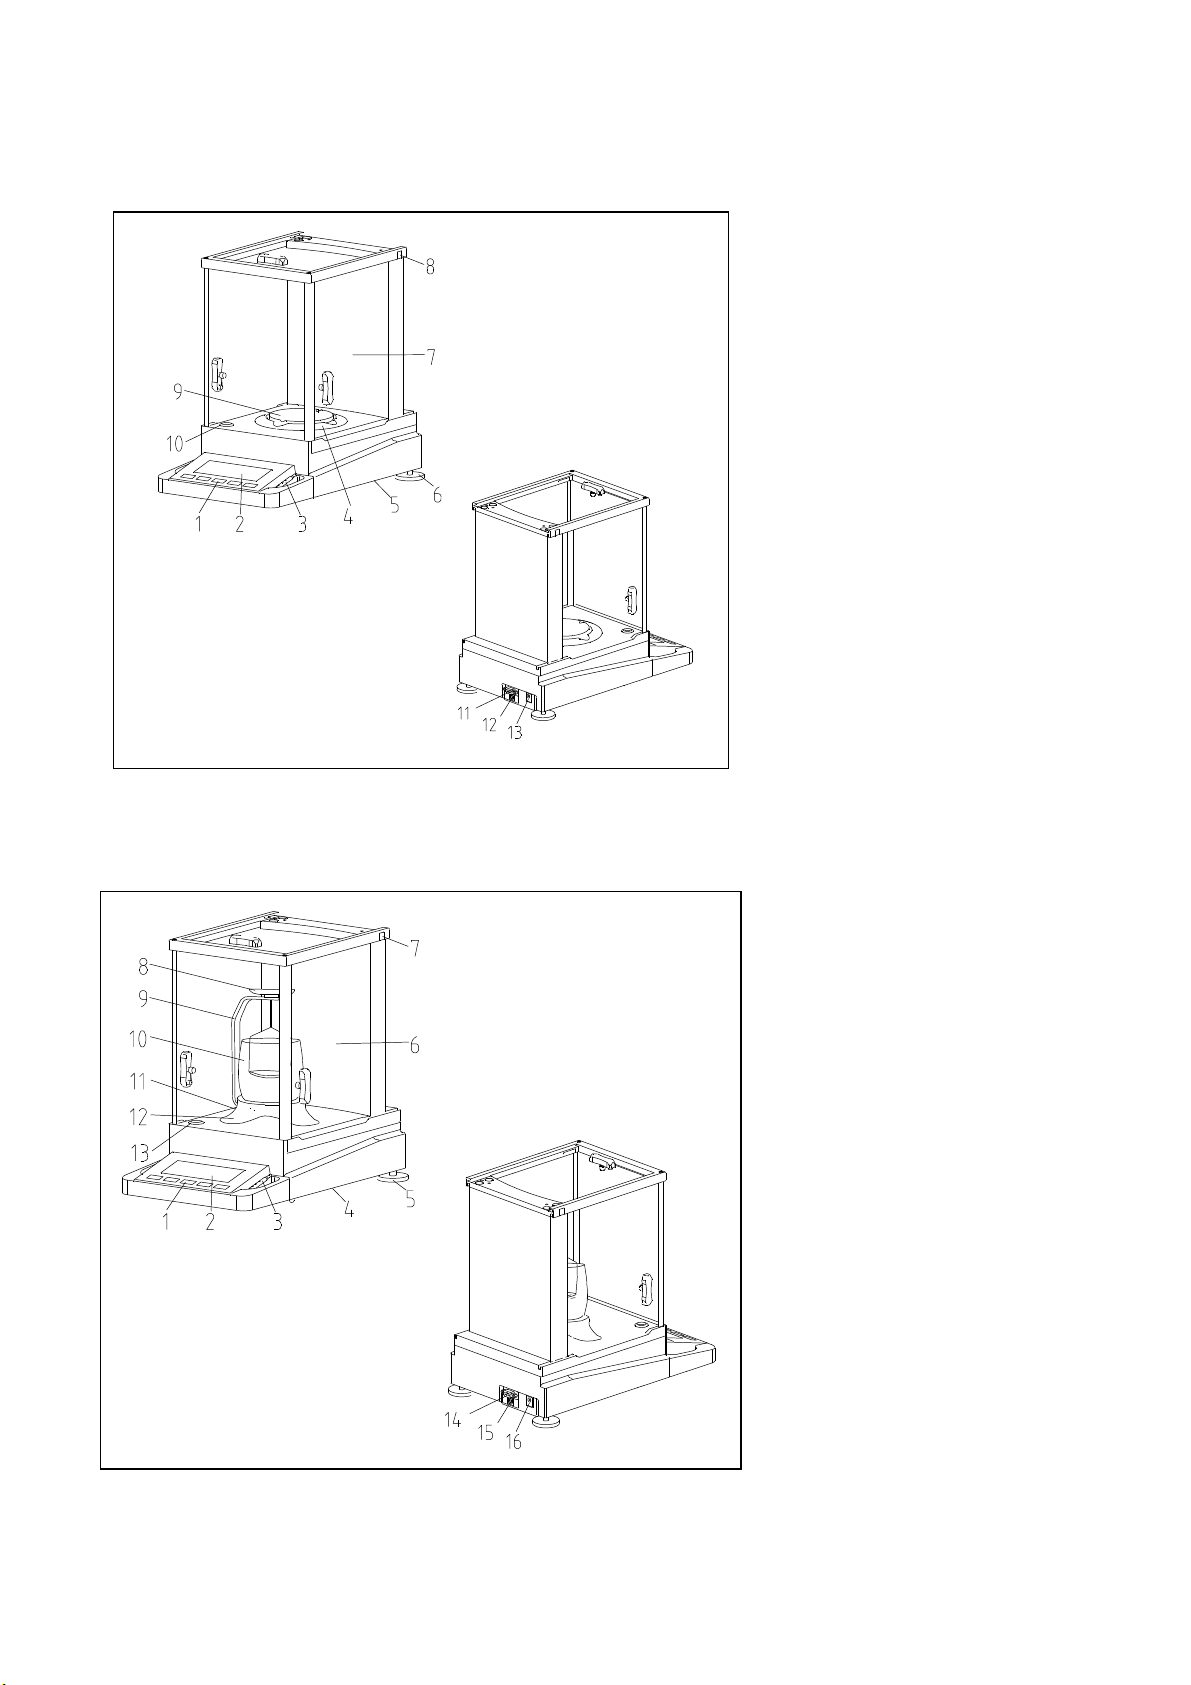
1.2 Balance Structure
1)Operating Key
2)Display Screen
3)Unlocked pen for glass doors
4)Windbreak
5)Handing ring for hook
(In the bottom of balance)
6)Leveling foot
7)Windproof cover
8)Lock for glass
9)Weighting pan
10)Level indicator
11)RS232 port
12)USB port(optional)
13)Power adapter socket
1) Operating Key
2) Display Screen
3) Unlocked pen for glass doors
4) Handing ring for hook
(In the bottom of balance)
5) Leveling foot
6) Windproof cover
7) Lock for glass
8) Testing Shelf
9) C-Style Bracket
10) Arched glass
11) Shelve table
12) Fixed Ring
13) Level indicator
14) RS232 port
15) USB port(optional)
16) Power adapter socket
6

ON/OFF ON/OFF
/
CAL /
TARE
TARE
ZERO
ZERO
ON/OFF ON/OFF
CAL
/
TARE
TARE
ZERO
ZERO
Return to function
Return to basic
1.3 Operating Key Function Index
The balance have two operating methods:weighing mode and function mode. According to the choice of
operating mode and the length of pressing key. It has different meaning.
Weighing Mode
Max: gdg
能开 关 功 准校皮去
Function Mode
Operating key in weighing mode
Press key for short time Press key for long time
ON(Shutdown State)
MODE
g
100%0
零置
CAL/
/
/
Unit convert Into function mode
Print Calibration
Weighting tare
Zero, cancel
MODE/
/
/
OFF(Start State)
Operating key in function mode
Press key for short time Press key for long time
Max:
g
能开 关 功 准校皮去
7
d
g
Menu
pcs
100%0
零置
MODE/ MODE/
/
/
Switch
Print
Enter, choice
Return to previous
menu
CAL/
/
/
OFF(Start State)
menu
weighing mode

2 USAGE
2.1 Package List
FA、FB、JA Balance Standard
Configuration:
FA、FB、JA Electronic Balance
♦ Balance 1 pc
♦ AC Power 1 pc
♦ Pan 1 pc
♦ Windbreak 1 pc
♦ Calibration weight 1 pc(Except
internal calibration balance)
♦ Manual 1 pc
♦ Certificate of quality 1 pc
♦ Guarantee card 1 pc
♦ Unlocked pen for glass doors 1pc
♦ Panel shelter 1 pc
JS Density balance
Configuration:
♦ Balance 1 pc
♦ AC Power 1 pc
♦ Pan 1 pc
♦ Windbreak 1 pc
♦ Calibration weight 1 pc(Except
internal calibration balance)
Manual 1 pc
♦ Certificate of quality 1 pc
JS Electronic Density Balance
♦ C-Style bracket 1pc ♦ Shelve table 1pc ♦ Arched glass 1pc ♦ Testing shelf 2pc ♦ Standard weight 1pc
Explanation:
Open the package, take out the balance and accessories. Then check the balance if there is damage, accessories
are complete. Check all the windproof door is in perfect condition and operation normally. If there is any fault,
please connect to the agency of Shanghai Sunny Hengping.
♦ Guarantee card 1 pc
♦ Unlocked pen for glass doors 1pc
♦ Panel shelter 1 pc
8

Different model balance has different calibration weight, please see parameter list at part six.
Please keep packing materials properly for transport
2.2 Install, level Adjustment
Best placed place
For high resolution analytical and precise balance, the right
placed place is the key for accurately weighing. So please
ensure that:
·Stable and no vibration position, as far as possible be level
·Avoid direct sunlight
·Avoid strenuous temperature variations
·Avoid air convection
Best placed place: the corner of shelter, stable table, as far as
possible from the door, window, radiator and the outlet of air
condition
Through regulating the leveling foot, make the level bubble moving to the
center of circle. Please adjust balance in the stable table, avoid the
position of the large air flow, virbration and high rate temperature change.
(as shown)
Notice: Please adjust level, when the balance move to a new place.
2.3 Safety Guidelines/Power
• Do not use the balance equipped with standard AC power in the
damage area.
• Please confirm the power adapter whether is match to your local
volatge before getting through the power.
• The balance can only be used in dry enviroment.
Power connection:
→Plug jack-plug of AC adapter in the socket of balance, another side
connect the power.
→Turn on the power, a buzzer emits beep. The balance could be used.
Notice:The balance should be warmed-up for 60 minutes in first time, to
9

achieve the working temperature, in order to obtain the accurate resultes.
Zero/
CAL/
2.4 Calibration
In order to obtain the accurate resultes, it is need to calibration according to the local acceleration of gravity.
Necessary situations to calibrate the balance:
·Before the first measurement
·After weighing for a period
·Weighing location changed
Should start the balance for 60 minutes before calibration to achieve the working temperature, in order to obtain
the accurate.
External Calibrtaion
Clear weighting pan, perpare calibration weights.
准校
Max:
0
Max: gdg
Max:
Max: gdg
Max:
Max:
Max:
d
g
g
Cal
Press , untill display " ".
The needed calibraion weight value will flicker on the display
Cal
g
100%0
d
g
g
Cal
100%0
screen.
Put the right calibration weight on the scale pan. When it
shows” “, remove weight.
g
When it displays " " and emits prompting
Cal
g
100%0
d
g
g
Cal
voice, the calibration is over. The balance return to the
working situtaion. When shows “ ”, the balance is
g
ready.
100%0
d
g
g
g
Cal
100%0
d
g
Hint:
Press short time, could interrupt calibration
10
g
100%0
any time.

ON/OFF
Tare/
ON/OFF
3 WEIGHING
3.1 Power On/Off
开 关
Max:
Max:
d
g
g
g
d
g
Power On
→Press
A self-test will be performed, and then return to zero, now it can be used.
100%0
Max:
关
开
Max:
d
g
g
g
g
d
g
g
3.2 Basic Weighing
Max: gdg
Max: gdg
Max:
d
g
g
100%0
Power Off
100%0
→Press for a while,then display screen power off.
100%0
→Put the sample on the weighing pan.
g
100%0
→Wait until it is stable.
g
100%0
→Read the data
g
100%0
3.3 Tare
皮
去
11
Max:
Max:
Max: gdg
→Put vacant container on the weighing pan.
→It shows weight of container.
d
g
g
g
g
d
g
g
g
100%0
→Press
100%0
→Put the sample on the container, it reads data of weight of sample.
100%0

If remove the container from balance, the data will be negative. The data will keep until power off or
ZERO
/
Tare/
MODE
/
press .
Notice: This function can not be used under zero or above the maximum weighing.
3.4 Zero
Max: gd
Max:
g
g
100%0
d
g
g
g
100%0
零置
In the menu, you can change the weighing unit or choose other functions for different settings. It can be found in
the 4.2.
Function menu
Press , balance return to zero.
4 MENU
4.1 Overview
12

Into the function menu: Press
TARE
/
MODE
/
ZERO
/
ZERO
/
MODE
/
pcs
MODE
/
Menu Navigation: Press to switch menu items.
Exit menu: Press for long time to return weighing mode, or press for short time to
return to last menu.
4.2 Function Menu Operation
能功
Max:
Max: gd
能
功
Max: g
Max: gd
Max:
Max: gd
Max: g
去
皮
Max:
Max:
d
g
g
g
g
100%0
Menu
pcs
100%0
Enter the function mode.
In the mode of basic weighing, press for long
time untill screen displys “ ”. It now in the piece mode.
d
g
Function menu switch
g
100%0
g
p
Press for short time to switch different items
100%0
d
g
g
g
g
oz
100%0
oz
g
100%0
d
100%0
ct
d
g
g
g
Menu
pcs
100%0
d
g
pcs
Function menu enter
Press for short time to into the next menu
13
100%0

ZERO
/
ZERO
/
TARE
/
MODE
/
M
ax:gd
g
Return
零
置
Max:
d
g
g
g
100%0
Press for short time to return last menu.
4.3 Basic Weighing Operation
1、 Basic Weighing
Max:
d
g
g
g
shows” ”, put the sample on the weighing pan. When it is stable,
100%0
Max:
d
g
g
Max: gdg
read the data.
g
100%0
g
100%0
2、Weighing with Container
Max:
Max: gdg
皮
去
Max:
Max: gdg
Max:
d
g
g
g
g
g
100%0
g
100%0
d
g
g
100%0
g
100%0
d
g
g
100%0
If it is necessary to weight the object (such as liguid) with a container
(the weight of container will not be including), please follow the streps:
·Put the vacant container on the scale pan firstly.
·Press , then it shows” ”.
·Then put the object for weighing into the container. Please read the data
after the balance is stable.
Press ,to make the balance return to zero, the balance
g
g
14
3、Unit Conversion
能功
Max: g
Max:
Max: gdg
d
g
g
100%0
d
g
g
p
100%0
oz
100%0
There are seveal units in the balance, including gram, pound, gold ounces,

ounces and carat. Press to shift the units.
TARE
/
MODE
/
MODE
/TARE
/
pcs
TARE
/
MODE/
TARE
/
Their relationship as follows
Pound 1P=453.59237g Gold Ounces 1oz.g=31.1034768g
Ounces 1oz=28.349523125 g Carat 1ct=0.2g
4.4 Function Weighing Operation
Press to switch piece count, percentage and system.
1、 Piece Count
The reference coefficient could be chose from 5pcs, 10pcs, 20pcs, 50pcs and 100pcs. The bigger the coefficient is,
the higher precision the result is.
Steps(Such as 10pcs):
·Put container on the balance. (Quit this step if no container is
needed.)
皮
去
Max :
d
g
g
g
100%0
·Press , then balance shows” ”;
g
·Place 10 sample on the weighing pan.
Max : gd
g
能功
皮
去
能功
皮
去
Ma x:
Ma x:
Ma x: gd
Ma x:
Menu
pcs
100%0
d
g
g
g
g
g
pcs
100%0
d
g
pcs
100%0
pcs
100%0
d
g
pcs
100%0
·Press for long time,then balance shows
“ “
·Press enter into piece count mode.
·Press to choose reference coefficient.
·Press to switch to “ “
pcs
·Put the same quantity of sample
·Press for longtime to exit.
Notice:The minimum weight =10d(d:minimum scale), Minimum weight of one piece not less than 1d. The
sample could not be more than maximum weight.
15

Switching between piece and weight reading
ZERO
/
TARE
/
ZERO
/
TARE
/
TARE
/
TARE
/
pcs
%
pcs
TARE
/
MODE
/MODE
/
· Add sample on the container, shows piece count
· Press , shows weight.
· Press again,return to showing piece.
100%
2、Weighing in Percent
Steps:
100%
%
100%
%
100%
%
100%
%
100%
·Put container on the balance. (Quit this step if no container is
needed.)
· Press , then balance shows” ”.
g
· Place sample on the weighing pan.
· Press untill balance show “ “.
· Press to switch “ ”.
· Press twice, then shows “ “.
%
%
· Remove reference sample, then balance shows “ “.
%
· Put the tested sample on the weighing pan.
· Press for long time to exit.
Notice:Notice:The minimum weight =10d(d:minimum scale),. The sample could not be more than maximum
weight.
Switching between percentage and weight reading
· Add sample on the container, shows percentage.
Ma x:
皮
去
Ma x: gd
d
g
g
g
%
100%0
· Press , shows weight.
· Press again,return to showing percentage.
g
100%0
16

4.5 Density Weighing*(The function is just for JS series)
1、Density device installation
Adjust two level adjusting foots.
The fixed ring is mounted to the table top.
秤盘
吊篮
Install the C-Style on the core of
weighting pan, and it could
turn agilely.
Put the shelve table on the working platform, the limited post fix
17

on the edge of fixed circle. Level rotate and the shelve table do not
meet the C-style bracket.
Put arched glass on the shelve table.
Then put the testing shelf on the C-style bracket.
2. Density Mode Select
Long press into the mode menu
Short press into the desity mode.
In the Density Mode, short press to shift:
Solid Density Measure → Liquid Density Measure
(g/cm3). Short press to shift unit of density
→ Standard Solid Set→ Standard Liquid Set
Short press to confirm.
18

3. Standard Material Select
When the material is soluble in water or the density of material is close to the density of water, user could choose
appropriate standard media to measure. The system has set eight kinds of solid density and eight kinds of liquid
density for chosen, also the system store the last choose, avoid repetitive operation. Factory preset material
density in system as follows:
Table One: Standard Liquid Density (Windows Default: 4)
Table Two: Standard Liquid Density (Windows Default: 4)
Table one: Table two:
S-LD Name Standard Density Value
(g/cm3)
1 Gasoline 0.70
2 Alcohol 0.79
3 Kerosene 0.80
4 Water(20℃) 0.998229
5 Water(4℃) 1.0000
6 Honey 1.40
7 Bromine(0℃)
3.12
8 Mercury 13.60
9 User-defined
4.
Opera
tion
1)
Solid
Densit
y
Measu
re
S-SD Name Standard Density Value
1 Wax 0.9
2 Aluminum 2.7
3 Copper 8.9
4 Steel 7.8597
5 Silver 10.5
6 Aluminum 11.3
7 Gold 19.3
8 Osmium 22.5
9 User-defined
1.
Balance display , and then remove the object on the weighting pan and press
(g/cm3)
2. Balance display , until showing put the measure solid on the weighting pan. When the
g
balance is table, press .
3. Balance display , until showing , immerse the measure solid to the liquid. When the
g
balance is stable, press .
4. Balance display , Showing the density of measure solid.
19

5. Short press , return to the step one.
6. In the process of measurement, press , to return to the step one directly.
2)Liquid Density Measure
1. Balance display , and remove the object on the weighing pan and basket, then short
press .
2. Balance display , until showing put the solid which have known the density on the
g
weighting pan. When the balance is stable, press.
3. Balance display , until showing . Immerse the solid into the measure liquid. When balance
g
is stable, press.
4. Balance display ,showing the density of measure liquid.
5. Short press , return to the step one.
6. In the process of measurement, short press to return to the step one directly.
3)Standard Solid Set
1. Balance display , XX means the solid system selecting currently.
2. Short press , to shift the kind of solid. Balance display , the range of XX is from 01 to 09.
XX
-XX
Each number stands each kind of standard solid.
3. Short press , select current solid. Balance display to return to the step one.
XX
4) Standard Liquid Set
1. Balance display ,XX means the liquid system selecting currently.
2. Short press ,to shift the kind of liquid. Balance display t, the range of XX is from 01 to 09.
XX
-XX
Each number stands each kind of standard liquid.
3. Short press , select current solid. Balance display to return to the step one.
XX
Notice: In the process of measurement, press at any time to return to the mode of basic weighing.
5)User-defined Standard Material
According to the method of test of solid density or liquid density to measure the density of a
standard material. When balance display the density of material, long press
Then store the density of standard material to the corresponding table number 09
20

6)Example----Solid Density Measure (Example for JA3003J)
1. Start the Balance and warm-up. Then install the density device.
2. Long press , enter the mode of switching –mode, short
press to . Short press enter the mode of
density of solid.
3. Short press to start measure.
Max:
4. Put the determined object into the weighting pan
d
g
g
g
100%00
5. After weighting stably, press
Max: gd
g
6. Put the determined object on the nacelle under the testing shelf.
g
100%0
Notice: Immerse the object into the liquid.
7. When balance is stable, shore press , balance display the
density of measured solid.
Notice: In order to ensure the accuracy of measurement, in the process of measurement, the test shelf do not
touch the glass, the C-style bracket do not touch the shelve table.
7). Example-----Liquid Density Measure (Example for JA3003J)
21

1. Start the Balance and warm-up. Then install the density device.
TARE
/
MODE
/
2. Long press , enter the mode of switching –mode, short press
enter . Short press enter the mode of density
Short press to into the . Press enter the
density of liquid.
3. Short press to start measure.
4. Use the determined liquid into cup (about 2/3 of cup)
Press to start measure.
5. Put the standard plumb on the weighting pan
Max:
d
g
g
g
100%0
6. Press after stable.
Max:
d
g
7. Put the standard plumb on the nacelle
Notice: Immerse plumb into the liquid.
8. Press after stable. The balance display the density
of the determined liquid.
Max: gd
g
Menu
3
/cm
g
100%0
4.6 System
This series balance can check temperature, data and time. Press untill shows “ ”, then
g
g
100%0
22

press key shortly to choose. Press to switch after enter system.
ON/OFF MODE
/
TARE
/
TARE
/
TARE
/
CAL/
4.7 Date Communication
Press , could output the current reading of weight from RS232C port. There is another way to output
reading date, shown at part seven.
5 CONFIGURING BALANCE
5.1 Operating the Configuring Keys
·Connet to the power. Keep pressing both the and on the shutdown of balance.
·Balance full – screen displays and displays self-inspection sign, then display
·Page area, line area and word area all display number from “ zero ” to a certain number automatic circulated
·The zero show in page, line or word area means that if now press shortly, the balance will
return to last menu.
·Nonzero digital in page or ine zrea, if press shortly, enter to the next menu.
· Nonzero digital in word area, if press shortly, select setting and showing “V” at same time.
C ×
Page area line area word area
· When balance displays , the “V” means the new setting is valid.
· All functions are set on when produced. No need to set all the functions. You can set some of the functions to
meet your special requirements.
23
Page area line area word area
C××× V

C 2 1 4 Auto print not stoppable at stability
5.2 Balance Function Setting List(* measn factory set)
Page Line Word Function Optional
C 1 1 1
C 1 1 2 stable *
C 1 1 3 Unstable
C 1 1 4 Very unstable
C 1 2 1
C 1 2 2 0.5 digit
C 1 2 3 1 digit *
C 1 2 4 2 digit
C 1 2 5 4 digit
C 1 2 6 8 digit
C 1 2 7 16 digit
C 1 2 8 32 digit
C 1 2 9 64 digit
C 1 3 1
C 1 3 2 Not displaying the last decimal place
C 1 3 3 Display the last decimal place stability
C 1 3 4 Display all decimal places at stability
C 1 4 1
C 1 4 2 Remove at stability *
C 1 5 1
C 1 5 2 Auto-zero off
C 2 1 1
C 2 1 2 Print on request after stability *
C 2 1 3 Auto print no stoppable regardless of stability
Adapting the balance to ambient
conditions
Ambient conditions
Stability range
Display
Remove the container
Auto-zero function
RS232C output
Remove regardless of stability
Print on request regardless of stability
Very stable
0.25 digit
Display all decimal places *
Auto-zero on *
C 2 2 1
C 2 2 2 2400
C 2 2 3 4800
C 2 2 4 9600 *
C 2 2 5 19200
24
1200
Baud

C 2 2 6 38400
C 2 2 7 57600
C 2 2 8 115200
C 2 3 1
C 2 3 2 6
C 2 3 3 7
C 2 3 4 8 *
C 2 4 1
C 2 4 2 2
C 2 5 1
C 2 5 2 Odd
C 2 5 3 Even
C 2 5 4 Retention for 1
C 2 3 5 Retention for 0
C 3 1 1 Version
C 3 1 2 Linear correction
C 3 1 3 Recovery factory set
Data Bit
Stop Bit
Parity
5
1 *
无 *
End
5.3 Balance Setting Funcation Explain
【Adapting the balance to ambient conditions】:Room to place the balance uses ordinary air-condition, generally
select C113. If the air is large, should select C114.
【Ambient conditions Stability range】:If need to weighing quickly, can extend the display range. If the air is
lager,should extend the range.
【Display】:Select your desired mode.
【Remove the container】:Please operate carefully if you select 141.
【Auto zero】:To do measurement ranging from a few to tens of digit around zero, please choose C152, and please
pay attention to drifting of the zero digit, that might affect the precision of the measurement.
5.4 Balance Setting for Quick Weighing
【Adapting the balance to ambient conditions】:Select C111or C112, the speed is more fast.
5.5 Balance Setting for Strong Air Enviroment
Avoid strong air , select C114, C126, C127, C128, C129, C141 or C211.
5.6 Balance Setting for Linear Correction
Balance completely preheating, first to calibraion, then shutdown the balance. Restart the balance, thenenter the
setting mode. Choose linear correction function (C312)
25

“ ”flickering means that there is nothing on the weighing pan. Press shortly. When send
TARE
/
TARE
/
out voice of “du” and stop flickering, it is means finishing corretion. Then the balance auto turn to the next
correcting point “ ” , it need to add 50g weight. Then press shortly to ensure. After
finishing all the correction point, the balance will display “ ”. Now the balance is still processing the
data, please wait. Finishing data processing, the balance will shut down automatically.
5.7 Recover Factory Setting
If customer need to recovery the factory setting, please enter the balance setting mode when starting. Choose
C313 to recover, then the balance will shut down automatically. Also it need to do linear correction.
6 TECHNICAL PARAMETERS, FUNCTION OPTIONSL,
PARTS OPTIONAL, DIMENSION
6.1 Technical Parameters
Standard Configuration Protection Class
·Power:100-240VAC、50/60Hz。 ·dustproof, waterproof
Output:DC12V、600mA ·Pollution prevention level: 2
·Installation category: 11
Raw Material Environment Requirement:
·Bass:pack alloy, painting ·Environment Conditions:
·Cover:plastic (ABS/PC)
·Weighing pan:stainless steel 20℃±7.5℃,fluctuations in temperature is not more
26
·Environment Temperature: 20℃±2.5℃ fluctuations in
temperature is not more than 1℃/h
than 5℃/h
·Relatice Humidity: 50%~75%; 40%~80%
·Working Voltage: 124DC; 12VDC

Parameter List
·There is no vibration, air and magnetic to effect
measurement.
·The preheating is at least 45 minutes, 1 hours is more better.
FA series
FA1204 FA2204
Actual division value(d)
Verification scale interval(g)
Weighing Capacity(Max)
Repeatability(s)
Linearity(-/+)
Maximum Permissible Error(Mpe)
Calibraion Weight 50g 50g
Type Standard
Dimension(W/D/H)(mm) 238×335×364
Packing Measurement(W/D/H)(mm)
Pan Size(mm) φ90
Effective height above pan(mm)
Net Weight(Gross Weight)kg 5.8(8.2)
0.0001g 0.0001g
0.001g 0.001g
120g 220g
0.0001g 0.0001g
0.0002g 0.0003g
GB/T26497-2011
520×385×555
220
FB series
27

FB124 FB224 FB223 FB323 FB423
Actual division value(g)
Weighing Capacity(g)
Repeatability(g)
Maximum Permissible Error(MPE)
Calibraion Weight(g)
0.0001 0.0001 0.001 0.001 0.001
120 220 220 320 420
0.0001 0.0001 0.001 0.001 0.001
GB/T26497-2011
100 200 200 200 200
Type Standard
Dimension(W/D/H)(mm)
Packing Measurement(W/D/H)(mm)
365×223×338
500×310×450
Pan Size(mm) φ90
Effective height above pan(mm)
Net Weight(kg)
Gross Weight(kg)
150×165×200
6
8
JS series
FA1104J FA2104J JA3003J JA5003J
Actual division value(g)
Weighing Capacity(g)
Measured the air quality ≥0.25
Measured by the buoyancy of water
Output RS232C
Maximum Permissible Error(MPE)
Calibraion Weight(g)
Type
Dimension(W/D/H)(mm)
Packing Measurement(W/D/H)(mm)
Pan Size(mm) φ90
Effective height above pan(mm)
Net Weight(kg)
Gross Weight(kg)
28
0.0001 0.0001 0.001 0.001
110 210 300 500
<- 0.125
GB/T26497-2011
100 200 200 500
安装
365×223×338
500×310×450
150×165×200
6
8

TARE
/
6.2 RS232 Port
29
Each balance can be connected to equipment through RS232. ( For example:
RS232 series printer or Computer with 9 needles).
Connect to printer, parameter setting:
C2 2×、C2 3×、C2 4×、C2 5× then press shortly.

6.3 Figure Dimension
Balance
30

acant
acant
7 APPENDIX
7.1 RS232 Port Date Communication
Connect to microcomputer setting as follow:
Microcomputer: (9 needle hole)——Balance(9 needle hole)
2(SI)——3(SO)
5(GND)——5(GND)
Port baud: 9600bps。
Data format: 10 bit Start bit:(0) Data bit: 8(ASCII code,low in the former) Stop bit(1)
No Parity
The data is for continuous output, does not need special reading command.
One string output format:
1 2 3 4 5 6 7 8 9 10 11 12 13 14 15 16
± V
code
Weighting area V
code
Unit
area
Return Line
feed
31

3~11 weighing area,same to the balance. The byte no showing is vacant code.
13~14 unit area,may be not same to the balance.
Balance display
13 14
g g(lowcase) vacant code
oz o(lowcase) z(lowcase)
oz.g o(lowcase) g(lowcase)
ct c(lowcase) t(lowcase)
p p(lowcase) vacant code
pcs p(lowcase) s(lowcase)
% % vacant code
Output
7.2 Failure Information and Solutions
Recovery Processing:Please contact your sales department or us if your balance works wrongly.
Some problems can be solved immediately.
1)If the self-test is not correctly performed, will display as follow:
E C ×
E C 2
E C 3
E C 4
2)Errors occurred during weighing
CPU broken, need to repair.
Keyboard error
Storage lost
A/D model is not started
a. Weight is too heavy, exceed the max weight:
·The sample is too heavy, please decrease the weight.
·The balance may be calibrated incorrectly (using calibration weight lighter than the standard),
32
H

please re-calibrate your balance.
ON/OFF TARE
/
ZERO/
b. Weight is too light:
L
·The weighing pan is not in place.
·Check below the weighing pan, see if it is touching any objects.
c. Display over 9999999. Display capacity exceeded.
E1
• If occurred at piece count, unload the balance ( disappear ), re-select the samples.
E1
20,50,100 or more pieces of samples can be taken as 10 pieces of samples. Each time multiply the weight by the
number ( divide the number of the pieces you take by 10 )
If occurred at weighing in percent, unload the balance ( disappear ), and reselect sample.
E4
d. When gross value <- 0, no tare
·Press “tare” key, tare.
·Unplug the power adapter. Then plug in after 10 seconds.
e. Error occurs when receiving data through RS232C
E8
·Press , , if disappears, please check data communication.
E8
·Unplug the power adapter. Then plug in after 10 seconds.,recheck the set of data communication.
f.The weighting data do nor changeable with weighting changing.
·Recheck the data communication.
·The balance may be calibrated incorrectly (using calibration weight heavier than the standard), please
re-calibrate your balance.
3)When balance display , it means storage lost. Please press “MODE” & “TARE” to try to
E C 3
restore data.
4)After power connection, press , the balance display for long time in
-——————————
self-checking. It indicates an unstable weighing location.
·The glass door is improperly shut down.
·Check below the weighing pan, see if it is touching any objects.
·Strong airflow, please reset the balance.
·There is more than 20% object on the weighing pan.
7.3 Maintenance and Cleaning
Maintenance
The regular maintenance will extend the life of balance.
33

Cleaning
Please use a soft and non-fluffy cloth to clean the figure and pa. If necessary, can use neuter cleaner.
Explain
It is recommended that clean the pan and workbench after weighing chemicals.
7.4 Density Parameter Table
Table 1(Sample size table)
Density effective number of three digital
(Repeatability≤±0.0001g/cm3)
JA3003J JA5003J FA1104J FA2104J
Densityρ
Sample Quality
(g/cm3)
(≥g)
0.10 0.020 0.020 0.0020 0.0020
Sample Quality
(≥g)
Density effective number of three digital
(Repeatability≤±0.0001g/cm3)
Sample Quality
(≥g)
Sample Quality
(≥g)
0.20 0.080 0.080 0.0080 0.0080
0.30 0.180 0.180 0.0180 0.0180
0.40 0.320 0.320 0.0320 0.0320
0.50 0.500 0.500 0.0500 0.0500
0.60 0.720 0.720 0.0720 0.0720
34

0.70 0.980 0.980 0.0980 0.0980
0.80 1.280 1.280 0.1280 0.1280
0.90 1.620 1.620 0.1620 0.1620
1.00 2.000 2.000 0.2000 0.2000
2.00 8.000 8.000 0.8000 0.8000
3.00 18.000 18.000 1.8000 1.8000
4.00 32.000 32.000 3.2000 3.2000
5.00 50.000 50.000 5.0000 5.0000
6.00 72.000 72.000 7.2000 7.2000
7.00 98.000 98.000 9.8000 9.8000
8.00 128.000 128.000 12.8000 12.8000
9.00 162.000 162.000 16.2000 16.2000
10.00 200.000 200.000 20.0000 20.0000
11.00 242.000 242.000 24.2000 24.2000
12.00 288.000 288.000 28.8000 28.8000
13.00 -- 338.000 33.8000 33.8000
14.00 -- 392.000 39.2000 39.2000
15.00 -- 450.000 45.0000 45.0000
Explanation: the solid density measurement, the sample of different quality, dimensional accuracy and
repeatability is different. In order to improve the measurement accuracy, reduce the measuring error; please refer
to the sample chart to choose the appropriate sample size
35

Table 2 (Commonly used material density table)
No Material Density No Material Density
1 Construction Steel 7.85 27 Interleaving Paper 0.9
2 Cast Steel 7.8 28 Fiber Paperboard 1.1~1.4
3 Grey Cast Steel 6.8~7.2 29 Waterproof Paper 1.0~1.1
4 High-Quality Cast Iron 7.0~7.6 30 Felt 0.24~0.38
5 Malleable Cast Iron 7.2~7.4 31 Rubber 1.3~1.8
6 Hard Alloy (Tungsten Alloy) 13.9~14.9 32 Cork 0.25~0.45
36

7 Tungsten Carbide
9.5~12.2 33 Mica 2.8~3.2
(Titanium Alloy)
8 Aluminum 2.77 34 Amino Plastic 1.45~1.55
9 Pressure Processing
2.67~2.8 35 Asbestos Cloth Plastic 2
Aluminum Alloy
10 Foundry Aluminum Alloy 2.6~2.85 36 Asbestos Screen Plastic 2
11 Babbitt Metal 7.5~10.5 37 Fibre Resin 1.35~1.45
12 Red Copper 8.89 38 Paper Fillin Plastic 1.4~1.7
13 Pressure Processing with
8.4~8.85 39 Fabric Bakelite 1.3~1.4
Brass
14 Casting Brass 8.622 40 Polyvinyl Chloride Plastics 1.28~1.37
15 Cast Bronze without Tin 7.5~8.6 41 Celluloid 1.35~1.40
16 Pressure Processing Tin
8.65~8.9 42 Organic Glass 1.18
Bronze
17 Nickel 8.9 43 Glass 2.5~2.7
18 Manganese 7.44 44 Leather 0.86~1.02
19 Magnesium 1.74 45 Graphite 1.9~2.3
20 Tin 7.3 46 Gasoline 0.66~0.75
21 Lead 11.34 47 Kerosene 0.78~0.82
22 Silver 10.5 48 Alcohol 0.807~0.810
23 Gold 19.361 49 Charcoal 0.27~0.58
24 Platinum 21.561 50 Smokey Coal 1.2~1.5
25 Zinc (Casting) 6.872 51 Anthracite 1.4~1.8
26
Wood(Humidity 15%)
0.4~1.05 52 Coke 0.27
Note: the value in the table is mostly approximation, for reference only.
37
 Loading...