


Copyright © 2018 BITMAIN TECHNOLOGIES LIMITED. All rights reserved.
SOPHON SS1
User Guide
V1.3

Copyright © 2018 BITMAIN TECHNOLOGIES LIMITED. All rights reserved.
Version Update Content Release Date
V1.3 Update Software Installation 2018/2/6
V1.0 - 2017/10/25

Copyright © 2018 BITMAIN TECHNOLOGIES LIMITED. All rights reserved.
CONTENT
1. Overview .......................................................................................................................................................4
2. System Installation ...................................................................................................................................5
2.1 HARDWARE INSTALLATION ........................................................................................................................ 5
2.1.1 MOTHERBOARD LAYOUT ....................................................................................................................... 5
2.1.2 I/O PANEL ................................................................................................................................................. 6
2.1.3 HARDWARE INSTALLATION ................................................................................................................... 6
2.1.3.1 PRE-INSTALLATION PRECAUTIONS ..................................................................................................... 6
2.1.3.2 MOTHERBOARD INSTALLATION OPERATION .................................................................................... 6
2.1.3.3 INSTALLING THE CPU ............................................................................................................................ 7
2.1.3.4 INSTALLING THE CPU FAN AND HEATSINK ...................................................................................... 9
2.1.3.5 INSTALLATION OF MEMORY MODULES (DIMM) .......................................................................... 10
2.1.3.6 EXPANSION SLOTS (PCI AND PCI EXPRESS SLOTS) ................................................................ 11
2.1.3.7 INSTALLING SC1+ ACCELERATOR CARD ...................................................................................... 12
2.2 SOFTWARE INSTALLATION ...................................................................................................................... 13
2.2.1 INSTALLING BASIC PACKAGE ............................................................................................................ 14
2.2.1.1 MSDK_16.5.1125-1_AMD64_SS1.DEB ........................................................................................ 14
2.2.1.2 BMDNN_RUNTIME_V1.31.TAR.GZ .................................................................................................... 15
2.2.1.3 IVS-DEMO_V1.0.TAR.GZ ..................................................................................................................... 15
2.2.1.4 QT-OPENSOURCE-LINUX-X64-5.9.2.RUN ...................................................................................... 15
2.2.2 INSTALLING APPLICATION PACKAGE............................................................................................... 16

Copyright © 2018 BITMAIN TECHNOLOGIES LIMITED. All rights reserved.
1. Overview
SOPHON SS1 is a specific server system for intelligent video and image analysis, powered by selfdeveloped customized tensor computing processor BM1680 and deep learning accelerating card
SC1+.
SOPHON SS1 server is a specific inference platform, which is designed to meet the huge needs of
deep learning inference. It provides the most convenient hardware infrastructure to help the
customers build personalized, intelligent service based on image recognition technology and to bring
customers the fastest AI enabling experience.

Copyright © 2018 BITMAIN TECHNOLOGIES LIMITED. All rights reserved.
2. System Installation
2.1 Hardware Installation
2.1.1 Motherboard layout

Copyright © 2018 BITMAIN TECHNOLOGIES LIMITED. All rights reserved.
2.1.2 I/O Panel
2.1.3 Hardware Installation
2.1.3.1 Pre-installation Precautions
Take note of the following precautions before you install motherboard components or change any
motherboard settings.
Unplug the power cord from the wall socket before touching any components.
To avoid damaging the motherboard’s components due to static electricity,
NEVER
place your
motherboard directly on the carpet or the like. Also remember to use a grounded wrist strap or
touch a safety grounded object before you handle the components.
Hold components by the edges and do not touch the ICs.
Whenever you uninstall any component, place it on a grounded anti-static pad or in the bag that
comes with the component.
When placing screws into the screw holes to secure the motherboard to the chassis, please do
not over-tighten the screws! Doing so may damage the motherboard.
2.1.3.2 Motherboard Installation Operation
This is an ATX form factor (12'' x 9.6'', 30.5 cm x 24.4 cm) motherboard. Before you install the
motherboard, study the configuration of your chassis to ensure that the motherboard fits into it.
△! Sure to unplug the power cord before installing or removing the motherboard. Failure to do so
may cause physical injuries to you and damages to motherboard components.

Copyright © 2018 BITMAIN TECHNOLOGIES LIMITED. All rights reserved.
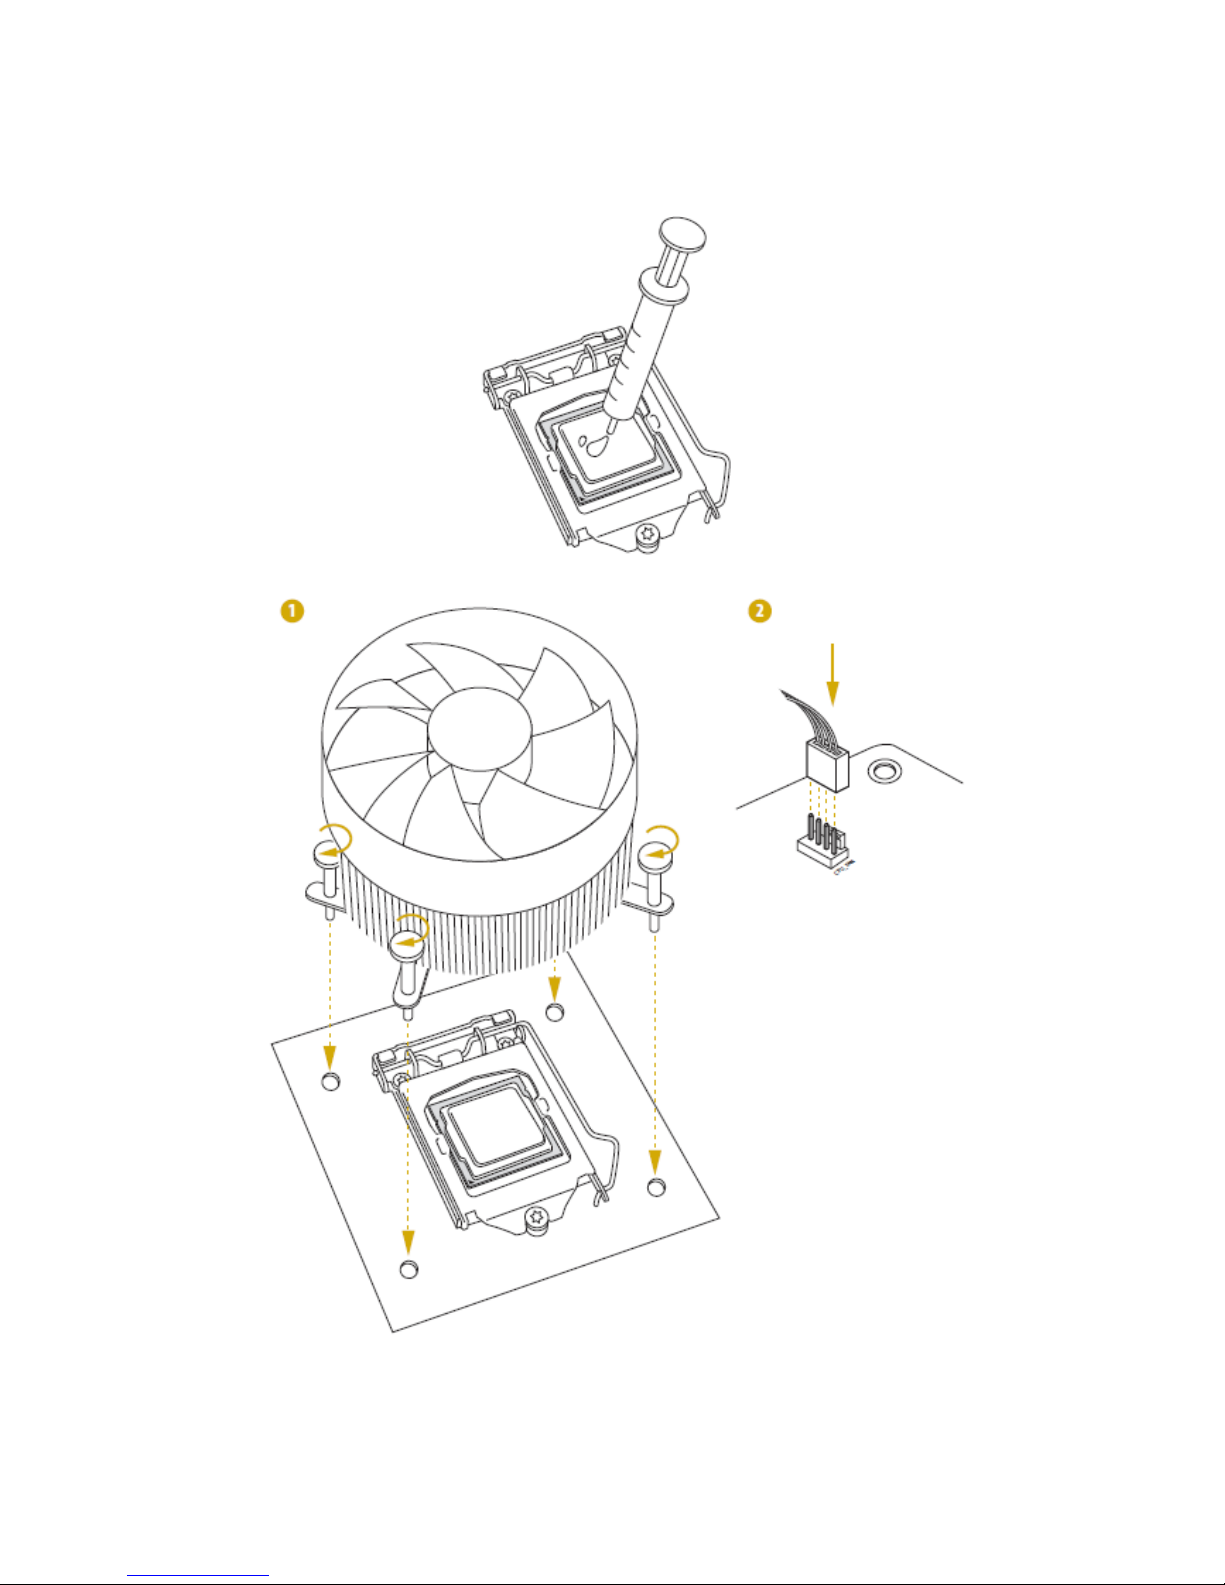
2.1.3.3 Installing the CPU
△!,Please check carefully before you insert CPU as below:
Check if the PnP cap is on the socket
Check if the CPU surface is unclean
Check if there are any bent pins in the socket
If any above situation is found, mustn’t force to insert the CPU into the socket. Otherwise, the CPU
will be seriously damaged.
△! Unplug all power cord before installing the CPU !

Copyright © 2018 BITMAIN TECHNOLOGIES LIMITED. All rights reserved.
Copyright © 2018 BITMAIN TECHNOLOGIES LIMITED. All rights reserved.
2.1.3.4 Installing the CPU Fan and Heatsink
Copyright © 2018 BITMAIN TECHNOLOGIES LIMITED. All rights reserved.
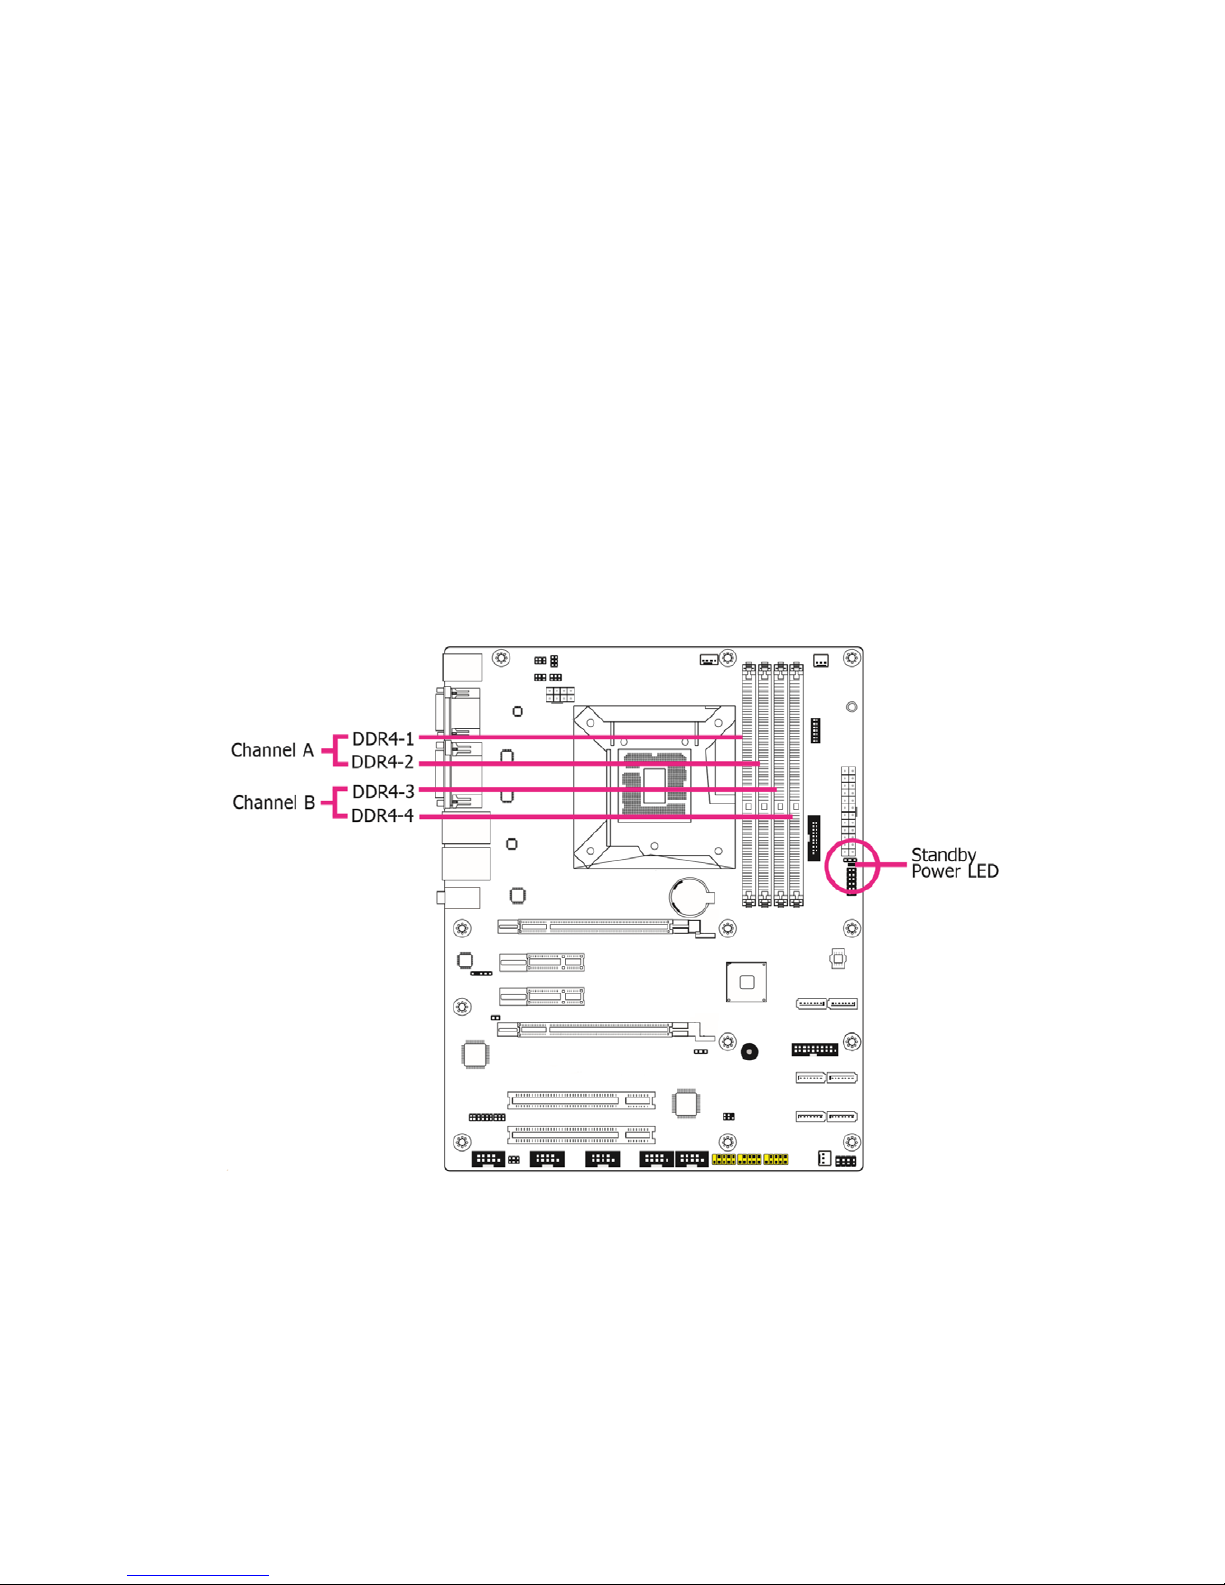
2.1.3.5 Installation of Memory Modules (DIMM)
SS1 provides four 288-pin DDR4 (Double Data Rate 4) DIMM slots with Dual Channel Memory
Technology support.
△! When the server memory configuration is dual channel mode, you must insert even number DDR
memories (same brand, main frequency rate, volume and particle);
△! It is unable to activate Dual Channel Memory Technology with only one or three memory module
installed;
△! It is not allowed to install a DDR, DDR2 OR DDR3 memory module into a DDR4 slot; otherwise,
this motherboard and DIMM may be damaged;
△! The DIMM only fits in one correct orientation. It will cause permanent damage to the motherboard
and the DIMM if you force the DIMM into the slot at incorrect orientation.
Dual Channel Memory Configuration:

Copyright © 2018 BITMAIN TECHNOLOGIES LIMITED. All rights reserved.
2.1.3.6 Expansion Slots (PCI and PCI Express Slots)
There are 2 PCI slots and 4 PCI express slots on this motherboard, shown as below:
Copyright © 2018 BITMAIN TECHNOLOGIES LIMITED. All rights reserved.
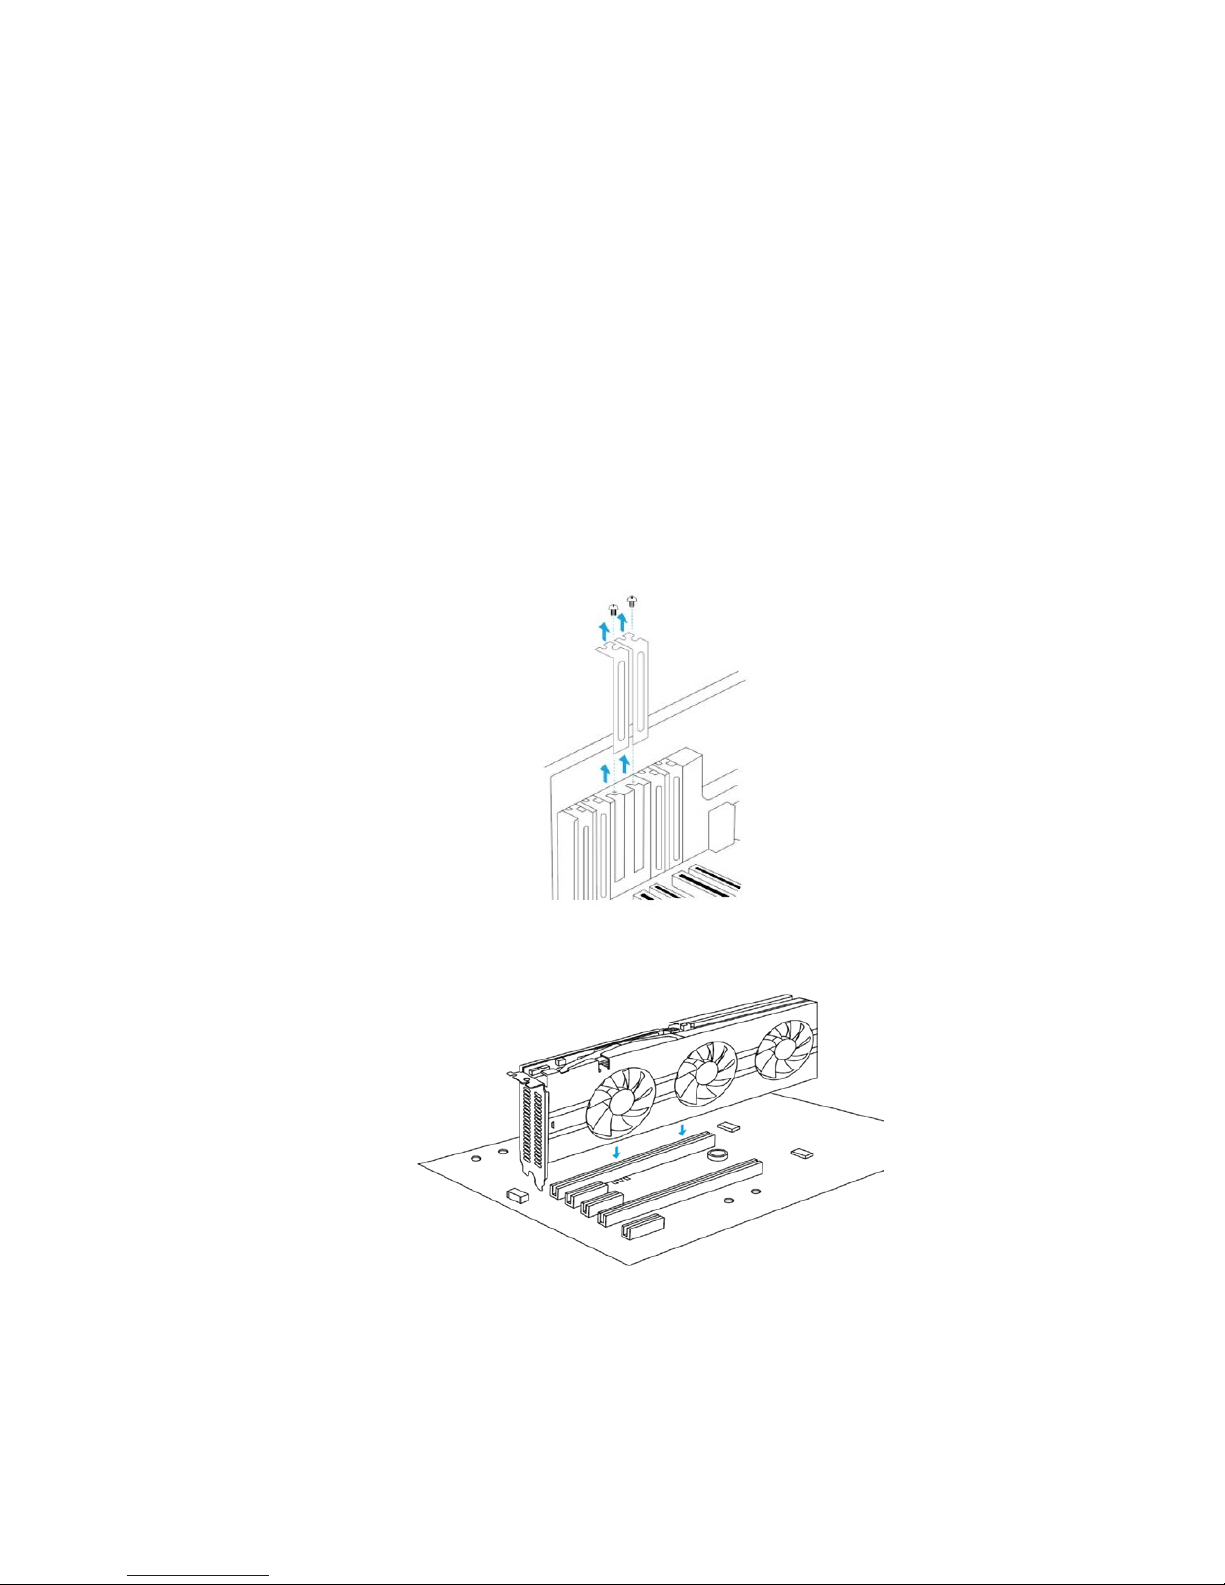
2.1.3.7 Installing SC1+ Accelerator Card
Because there are so many different computer systems on the market, the procedure to install the
SC1+ accelerator card can vary from system to system. Use the following instructions as a guideline
and consult the documentation of your computer sy stem for any further information on your individual
system.
2.1.3.7.1 Discharge your body’s static electricity by touching a grounded surface before touching
the accelerator card. A grounded surface is the computer chassis, or some other
surface you know to be grounded. Use the following procedure to install the SC1+
accelerator card into your computer system. Turn off your computer/server and
disconnect the power cord.
2.1.3.7.2 Open your computer cover/side panel and remove the slot covers.
2.1.3.7.3 Install the SC1+ card into the primary PCI Express x16 slot on your motherboard.
2.1.3.7.4 Connect two 6-pin power connectors from the 12V power supply to the power connector
on the top edge of the SC1+ card.
NEVER connecting one 12V power cable into two SC1+ cards, this may damage both
SC1+ cards and 12V power cable.

Copyright © 2018 BITMAIN TECHNOLOGIES LIMITED. All rights reserved.
2.1.3.7.5 Fix the SC1+ card with the screws. Install the cover/side panel and connect all the
power cords. SC1+ card installation is completed.
Full filled with SC1+ cards
The SC1+ accelerator card is PCI-E X8 Dual Slots Card, although SS1 server provides four PCI-E
Slots, there are only 2 slots could support SC1+ card.
SC1+ power supply mode
SC1+ card needs external p ower supply, directly from the ATX power. The interface for the 6-Pin
standard PCI-E power connector.
2.2 Software Installation
The software installation includes the basic driver/middleware and application package installing,
make sure your network connection is good enough during the installation.
The initial accounts for login is admin1 (username) and 000000 (password).
△! We don’t support operating system installed with the UEFI mode.
Currently we used Ubuntu 16.04.3 LTS 64-bit OS to run our application. Install Ubuntu 16.04.3 LTS
64-bit OS with the installation guide in
https://tutorials.ubuntu.com/tutorial/tutorial-install-ubuntudesktop?_ga=2.22738299.1773742736.1517819190-616731248.1517543500#0, pay attention to
below two steps during the installation:
△! Attention step 5 in the guide, you MUST select both items in this step.
△! Attention step 6 in the guide, DO NOT select “Enc rypt the new Ubuntu installation for security”
AND DO NOT select “Use LVM with the new Ubuntu installation”, or else, some drivers can never
being installed.

Copyright © 2018 BITMAIN TECHNOLOGIES LIMITED. All rights reserved.
△! Make sure you have run sudo apt update && sudo apt upgrade after OS installation.
2.2.1 Installing Basic Package
For SS1 user, you can skip to section 2.2.1.4 directly, 2.2.1.1 – 2.2.1.3 s hould have been installed
already (may different for few products based on the requirement of our customers).
You c an download driver/middleware from our site https://www.sophon.ai/drive/view.html?id=22
.
Follow below each section to install all packages one by one. Package name may b e changed in
later release due software updated.
2.2.1.1 msdk_16.5.1125-1_amd64_SS1.deb
The purpose of installing msdk is to drive intel CPU for hardware video decoding, you can also select
the other two methods to drive it. (some intel CPU may not support hardware video decoding)
Method 1: drive intel CPU by intel method, you can refer to info like as
https://software.intel.com/enus/articles/how-to-setup-media-server-studio-on-secondary-os-of-linux
Method 2: using a third part GPU for video decoding. Refer to related GPU product’s user guide for
how to do that in Ubuntu 16.04.3 LTS 64-bit.
Here we’ll introduce how to install BITMAIN msdk, we make s ure it works in S S1 server, but we do
not guarantee it can be used in the other computer/server due to it rely on the hardware environment
strictly. Contact BITMAIN please when you meet trouble in doing so.
△! BE SURE to close GUI mode and enter Command Line Interface, you can switch to CLI mode
from GUI by pressing “Ctrl + Alt + F1” on the keyboard. (switch back by “Ctrl + Alt + F7”)
Again, for msdk_16.5.1125-1_amd64_SS1.deb, you MUST NOT install it in GUI mode, otherwise,
system will run into abnormal status sometimes due to video driver confliction.
Install it by following command in the directory where the package is located (file name may be
changed in later release):
sudo dpkg -i msdk_16.5.1125-1_amd64_SS1.deb
Following the prompt message to key in “yes” and press Enter to continue:
… …
Notice:
this package can not be uninstall, and will roll kernel back to version 4.4.
Once installation starts, do not corrupt it by any operation or power off.
Otherwise, GUI will be destroyed and user have to enter console by Ctrl+Alt+F1
Continue:(yes/no) yes (key in yes and press Enter to continue)
Remove other libdrm/libva
Remove old MSS install files ...

Copyright © 2018 BITMAIN TECHNOLOGIES LIMITED. All rights reserved.
Unpacking msdk (16.5.1125-1) ...
… …
△! Reboot OS please after msdk_16.5.1125-1_amd64_SS1.deb install finished.
2.2.1.2 bmdnn_runtime_v1.31.tar.gz
Decompress package by below command in the directory where the package is located (file name
may be changed in later release):
sudo tar zxf bmdnn_runtime_v1.31.tar.gz
Enter the decompressed directory like as bmdnn_runtime_v1.31 (folder name maybe different based
on the package you received), and install by input below command:
./install.sh
2.2.1.3 ivs-demo_v1.0.tar.gz
Decompress package by below command in the directory where the package is located (file name
may be changed in later release):
sudo tar zxf ivs-demo_v1.0.tar.gz
Enter the decompressed directory like as ivs-demo_v1.0 (folder name maybe different based on the
package version you received), and install by input below command:
./install.sh
2.2.1.4 qt-opensource-linux-x64-5.9.2.run
You need to sign-up an account with valid E-Mail accounts during Qt installation.
△! DO SELECT below THREE components when Qt installation.

Copyright © 2018 BITMAIN TECHNOLOGIES LIMITED. All rights reserved.
Trigger the installation by key in below command in the directory where package located (file name
may be changed in later release):
sudo chmod +x qt-opensource-linux-x64-5.9.2.run && sudo ./qt-opensource-linux-x64-5.9.2.run
2.2.2 Installing Application Package
For SS1 server, we copied a pplication to /home/admin1/SOPHON/AppSDK_v1.3 already (the folder
name may different in later release).
You can also download related Application/SDK from our website below (contact our business
currently for the URL).
Face Detect & Recognition: https://www.sophon.ai/drive/view.html?id=11
Pedestrian Detection: https://www.sophon.ai/drive/view.html?id=13
Micro Checkpoint: https://www.sophon.ai/drive/view.html?id=14
Decompress each package to anywhere of your local drive, set each di rectory with executable and
read/write permission.
Follow the related application user guide for how to load and use our applications.
 Loading...