


Sony ericsson T61Z User Manual

Mobile Phone T61

T61 User’s Guide
Para obtener una copia en español de esta Guía del Usuario,
visite nuestra página Web en www.SonyEricsson.com
o, si se encuentra en Estados Unidos, también puede llamar
Register your new phone, purchase Sony Ericsson original
accessories, and see the latest in products by visiting us at
This manual is published by Sony Ericsson Mobile
Communications (USA) Inc., without any warranty.
Improvements and changes to this manual necessitated by
typographical errors, inaccuracies or current information, or
improvements to programs and/or equipment may be made
by Sony Ericsson Mobile Communications (USA) Inc., at
any time and without notice. Such changes will, however,
be incorporated into new editions of this manual.
Trademarks referred to herein are trademarks of their
“Ericsson”, “Ericsson
ACCESSORIES” are each registered U.S. Trademarks
owned by Telefonaktiebolaget L M Ericsson of Sweden and
o
are used with permission by Sony Ericsson Mobile
N
al 1-800-374-2776.
www.SonyEricsson.com
respective companies.
r
o
f
t
Communications (USA) Inc.
m
o
c
” and “ERICSSON ORIGINAL
LLLL
m
e
.
u
l
a
i
c
r
T9 Text Input is licensed under one or more of the following:
U.S. Pat. Nos. 5,818,437, 5,953,541, 5,187,480, 5,945,928,
and 6,011,554; Canadian Pat. No. 1,331,057; United Kingdom
Pat. No.2238414B; Hong Kong Standard Pat. No.
HK0940329; Republic of Singapore Pat. No. 51383; Euro.Pat.
No. 0 842 463 (96927260.8) DE/DK, FI, FR,
IT,NL,PT.ES,SE,GB; and additional patents are
“Microsoft”, “Windows” and the design plus words “Microsoft
Windows” are each either registered and/or pending U.S.
Trademarks owned by Microsoft Corporation of Redmond,
S
The BLUETOOTH trademarks are owned by Bluetooth SIG,
–
e
Please note: Some of the services in this manual are not
s
supported by all networks. This also applies to the GSM
International Emergency Number 112 or 911. Contact your
network operator or service provider if you are in doubt about
whether you can use a particular service or not. Please read the
Guidelines for safe and efficient use and the Limited warranty
chapters before you use your mobile phone.
©2002, Sony Ericsson Mobile Communications (USA) Inc.
Publication number: AE/LZT 123 2487 R1
pending worldwide.
r
E
y
n
Was h ingt o n, U. S .A.
o
Inc., U.S.A.
All rights reserved
03/02 PBM Printed in USA
s
s
c
i
o
n
I
n
c
.

N
o
.
c
n
I
n
o
s
s
c
i
r
E
y
n
o
S
–
e
s
u
l
a
i
c
r
e
m
m
o
c
r
o
f
t

Table of Contents
Features of Your Mobile Phone ...................4
Guidelines for Safe and Efficient Use...........5
Battery Information...................................11
Limited Warranty......................................13
Getting Started..........................................15
Getting To Know Your Phone...................18
Changing Front Covers .............................19
Calling.......................................................21
Personalizing Your Phone..........................31
Voice Control............................................39
Voicemail ..................................................44
Sending and Receiving Items.....................54
Setting Up Mobile Internet .......................55
Messaging..................................................60
WAP .........................................................69
Transferring and Exchanging
o
Information...............................................75
N
More Features............................................76
r
o
f
t
m
o
c
e
m
a
i
c
r
Synchronization.........................................79
Security .....................................................83
Troubleshooting........................................84
Accessories, Accessibility, and Internet.......87
Icons..........................................................88
Index.........................................................91
y
n
o
S
–
e
s
u
l
E
c
i
r
s
s
o
n
.
c
n
I
3

Features of Your Mobile Phone
Voice Services
With your mobile phone, there is no need to use your
hands. You can answer or reject incoming calls, record voice
labels, and record voice memos by simply speaking. You can
also use the Magic Word feature to activate voice
recognition by saying a single word. For more information,
see “Voice Control” on page 39.
Calendar/Synchronization
You can easily synchronize your mobile phone with your PC
software to keep track of appointments, meetings, contacts, to
dos, and to receive reminders. And with SyncML, you can use
WAP to synchronize with your internet phonebook. For more
information about synchronizing your calendar, see “Internet
Calendar Synchronization” on page 81.
Connectivity
You can surf the internet on your mobile phone, send and
receive email, access internet services, or connect the phone to
your laptop with a high-speed internet connection. You can use
your mobile phone as a modem with landline speeds. And with
t
o
high speed data transmission, you are always connected. For
N
more information, see “WAP” on page 69.
4 Features of Your Mobile Phone
c
r
o
f
o
m
m
e
c
r
u
l
a
i
Messaging/Chat
With Enhanced Messaging (EMS), a picture is truly worth
a thousand words. You can send pictures, ring tones,
animations, and sounds along with text messages. And you
can create your own ring tones and animations. For more
information, see “Text messages” on page 60.
Personalization
You can personalize your phone by changing the cover,
downloading ring tones, animations, and images, and
customizing your background picture. To personalize your
S
phone, visit www.SonyEricsson.com
–
e
Accessories
s
Sony Ericsson offers a number of innovative and unique
accessories including the FM Radio, the MP3 Player, the
Chatboard
Smartbacks
leaflet that came with your mobile phone for ordering
instructions.
y
n
o
™, the Bluetooth™ adapter/headset,
™, and many others. Refer to your Accessory
E
c
i
r
s
s
.
o
n
.
c
n
I

Guidelines for Safe and
Efficient Use
Your mobile phone is a highly sophisticated electronic
device. To get the most out of your mobile phone, please
read this text about product care, and safe and efficient use.
Product Care and Maintenance
Do not expose your product to liquid or moisture or to
humidity.
Do not expose your product to extreme high or low
temperatures.
Do not expose your product to lit candles, cigarettes, or
cigars, or to open flames, etc.
Do not drop, throw or try to bend your product as rough
treatment could damage it.
Do not paint your product as the paint could obstruct the
earpiece, microphone or any moveable parts and prevent
normal use.
Do not attempt to disassemble your product. Your product
does not contain consumer serviceable components. Only
Sony Ericsson authorized personnel should perform service.
N
o
t
c
r
o
f
o
m
m
e
c
r
u
l
a
i
Do not use any accessories other than Ericsson or Sony
Ericsson branded originals intended for use with your
product (hereinafter referred to as “original accessories”).
Use of non-original accessories may result in loss of
performance, damage to the product, fire, electric shock or
injury. The warranty does not cover product failures which
have been caused by use of non-original accessories.
Treat your product with care, keep it in a clean and dustfree place.
Antenna Care
Your mobile phone is equipped with either an internal or
–
e
external antenna.
s
To avoid impaired performance, please ensure that your
mobile phone’s antenna is not damaged.
Do not remove the antenna yourself.
Only use an antenna that has been specifically designed by
Sony Ericsson for your mobile phone. Use of unauthorized
or modified antennas could damage your mobile phone and
may violate the appropriate regulations, causing loss of
performance and SAR levels above the recommended limits
(see below).
n
o
S
Guidelines for Safe and Efficient Use 5
y
E
r
s
s
c
i
o
n
I
n
c
.

Efficient Use
For optimum performance with minimum power
consumption please:
• If your mobile phone is equipped with a retractable
antenna, Sony Ericsson recommends that the antenna
should be kept fully retracted (closed) while the phone is
worn on the body to avoid the antenna touching, or
coming in close proximity to, the body.
• Hold your mobile phone as you would any other
telephone. While speaking directly into the mouthpiece,
angle the antenna in a direction up and over your
shoulder.
• Do not touch the antenna when the mobile phone is in
use. Touching the antenna affects call quality, may cause
the mobile phone to operate at a higher power level than
needed and may shorten talk and standby times.
• Do not use the mobile phone when the front and/or
back cover is removed from the unit.
• If your mobile phone is equipped with infrared, never
direct the infrared ray at anyone’s eye and make sure that
it does not disturb any other infrared units.
t
o
N
6 Guidelines for Safe and Efficient Use
c
r
o
f
o
m
m
e
c
r
u
l
a
i
Radio Frequency (RF) Exposure and SAR
Your mobile phone is a low-power radio transmitter and
receiver. When it is turned on, it emits low levels of radio
frequency energy (also known as radio waves or radio
frequency fields).
Governments around the world have adopted
comprehensive international safety guidelines, developed
by scientific organizations*, e.g. ICNIRP (International
Commission on Non-Ionizing Radiation Protection),
through periodic and thorough evaluation of scientific
studies. These guidelines establish permitted levels of
S
radio wave exposure for the general population. All Sony
–
Ericsson mobile phone models are designed to operate
e
s
within these stringent levels. The levels include a safety
margin designed to assure the safety of all persons,
regardless of age and health, and to account for any
variations in measurements.
Specific Absorption Rate (SAR) is the unit of measurement
for the amount of radio frequency energy absorbed by the
body when using a mobile phone. The SAR value is
determined at the highest certified power level in laboratory
conditions, but the actual SAR level of the phone while
operating can be well below this value.
o
n
y
E
c
i
r
s
s
o
n
.
c
n
I

This is because the phone is designed to use the minimum
power required to reach the network. Therefore, the closer
you are to a base station, the more likely it is that the actual
SAR level will decrease.
Variations in SAR below the radio frequency exposure
guidelines do not mean that there are variations in safety.
While there may be differences in SAR levels among mobile
phone models, all mobile phone models must be designed
to meet radio frequency exposure guidelines.
Accessories can significantly affect SAR compliance. For
example, the Federal Communication Commission in the
U.S. requires that some manufacturers’ accessories shall be
tested, and Sony Ericsson has done so with respect to its
products. Sony Ericsson has not tested non-original
accessories in conjunction with Sony Ericsson mobile
phones. It is therefore recommended that only original
accessories are used in conjunction with Sony Ericsson
mobile phones.
More information on radio frequency exposure and SAR
can be found on: www.SonyEricsson.com
* Examples of radio-frequency exposure guidelines and
standards that Sony Ericsson mobile phone models are
designed to conform to:
N
o
t
c
r
o
f
o
m
m
e
c
r
u
l
a
i
• International Commission on Non-Ionizing Radiation
Protection (ICNIRP), “Guidelines for limiting exposure
to time-varying electric, magnetic, and electromagnetic
fields (up to 300 GHz)”, Health Physics, vol. 74,
pp 494-522, April 1998.
• 99/519/EC, “Council Recommendation of 12 July
1999 on the limitation of exposure of the general
public to electromagnetic fields (0 Hz to 300 GHz)”,
Official Journal of the European Communities,
1999.
• IEEE C95.1-1991, “Safety levels with respect to human
–
exposure to radio frequency electromagnetic fields,
e
3kHz to 300GHz”, The Institute of Electrical and
s
Electronics Engineers Inc. (IEEE).
• FCC Report and Order, ET Docket 93-62, FCC
96-326, Federal Communications Commission (FCC),
August 1996.
• Radiocommunications (Electromagnetic Radiation
Human Exposure) Standard 1999, Australian
Communications Authority (ACA), May 1999.
n
o
S
Guidelines for Safe and Efficient Use 7
y
E
r
s
s
c
i
o
n
I
n
c
.

Driving
Please check if local laws and/or regulations, in the
country/state where you are, restrict the use of mobile
phones while driving.
Law in many countries/states requires drivers to use a
Hands Free solution. Sony Ericsson recommends that you
use only Sony Ericsson or Ericsson branded Hands Free
solutions intended for use with this product.
Sony Ericsson is concerned about your safety. Always give
full attention to driving and pull off the road and park
before making or answering a call if driving conditions so
require.
RF energy may affect some electronic systems in motor
vehicles such as car stereo, safety equipment etc. In
addition, some vehicle manufacturers do not allow use of
mobile phones in their vehicles, unless a Hands Free kit
with an external antenna supports the installation. Check
with your vehicle manufacturer’s representative to be sure
that your mobile phone will not affect the electronic
systems in your vehicle.
t
o
N
8 Guidelines for Safe and Efficient Use
c
r
o
f
o
m
m
e
c
r
u
l
a
i
Vehicles Equipped with an Air Bag
An air bag inflates with great force. Do not place objects,
including either installed or portable wireless equipment, in
the area over the air bag or in the air bag deployment area. If
in-vehicle wireless equipment is improperly installed and
the air bag inflates, serious injury could result.
Electronic Devices
Most modern electronic equipment is shielded from RF
signals. However, certain electronic equipment may not be
shielded against the RF signals from your mobile phone,
S
therefore:
–
e
Pacemakers
s
The Health Industry Manufacturers Association
recommends that a minimum separation of six (6”) inches
(15 cm) be maintained between a handheld wireless phone
and a pacemaker to avoid potential interference with the
pacemaker. These recommendations are consistent with the
independent research by and recommendations of Wireless
Technology Research.
o
n
y
E
c
i
r
s
s
o
n
.
c
n
I

Persons with pacemakers:
• Should ALWAYS keep the phone more than six inches
from their pacemaker when the phone is turned ON;
• Should not carry the phone in a breast pocket;
• Should use the ear opposite the pacemaker to
minimize the potential for interference.
• If you have any reason to suspect that interference is
taking place, turn your phone OFF immediately.
Hearing Aids
Some digital wireless phones may interfere with some
hearing aids. In the event of such interference, you may
want to consult your service provider or call your local
Sony Ericsson Contact Center to discuss alternatives.
Other Medical Devices
If you use any other personal medical device, consult the
manufacturer of your device to determine if they are
adequately shielded from external RF energy. Your
physician may be able to assist you in obtaining this
information.
Turn your phone OFF in health care facilities when any
regulations posted in these areas instruct you to do so.
Hospitals or health care facilities may be using equipment
that could be sensitive to external RF energy.
N
o
t
c
r
o
f
o
m
m
e
c
r
u
l
a
i
Turn your phone OFF in any facility where posted notices
so require.
I
o
n
Aircraft
• Turn off your mobile phone before boarding any
aircraft.
• To prevent interference with communication systems,
you must not use your mobile phone while the plane
is in the air.
• Do not use it on the ground without permission from
the crew.
–
Blasting Areas
e
Turn off your mobile phone when in a blasting area or in
s
areas posted “turn off two-way radio” to avoid interfering
with blasting operations. Construction crews often use
remote control RF devices to set off explosives.
Explosive Atmosphere
Turn off your mobile phone when in any area with a
potentially explosive atmosphere. It is rare, but your mobile
phone or its accessories could generate sparks. Sparks in
such areas could cause an explosion or fire resulting in
bodily injury or even death.
n
o
S
Guidelines for Safe and Efficient Use 9
y
E
r
s
s
c
i
n
c
.

Areas with a potentially explosive atmosphere are often, but
not always, clearly marked. They include fuelling areas,
below deck on boats, fuel or chemical transfer or storage
facilities, and areas where the air contains chemicals or
particles, such as grain, dust, or metal powders.
Do not transport or store flammable gas, liquid, or
explosives in the same compartment of your vehicle that
contains your mobile phone and accessories.
Power Supply
Connect the AC power adapter only to designated power
sources as marked on the product.
To reduce risk of damage to the electric cord, remove it
from the outlet by holding onto the AC adapter rather than
the cord.
Make sure the cord is positioned so that it will not be
stepped on, tripped over or otherwise subjected to damage
or stress.
To reduce risk of electric shock, unplug the unit from any
power source before attempting to clean it.
The AC power adapter must not be used outdoors or in
t
damp areas.
o
N
10 Guidelines for Safe and Efficient Use
c
r
o
f
o
m
m
e
c
r
u
l
a
i
DANGER - Never alter the AC cord or plug. If the plug
will not fit into the outlet, have a proper outlet installed by
a qualified electrician. Improper connection can result in
risk of electric chock.
Children
DO NOT ALLOW CHILDREN TO PLAY WITH
YOUR MOBILE PHONE OR ITS ACCESSORIES.
THEY COULD HURT THEMSELVES OR OTHERS,
OR COULD ACCIDENTALLY DAMAGE THE
MOBILE PHONE OR ACCESSORY. YOUR MOBILE
S
PHONE OR ITS ACCESSORY MAY CONTAIN
–
SMALL PARTS THAT COULD BE DETACHED AND
e
CREATE A CHOKING HAZARD.
s
Disposing of the Product
Your mobile phone should never be placed in municipal
waste. Please check local regulations for disposal of
electronic products.
o
n
y
E
c
i
r
s
s
o
n
.
c
n
I

Emergency Calls
IMPORTANT!
This mobile phone, like any mobile phone, operates using
radio signals, cellular and landline networks as well as userprogrammed functions, which cannot guarantee connection
under all conditions. Therefore you should never rely solely
upon any mobile phone for essential communications (e.g.
medical emergencies).
Remember, in order to make or receive calls, the mobile
phone must be switched on and in a service area with
adequate cellular signal strength. Emergency calls may not
be possible on all cellular phone networks or when certain
network services and/or mobile phone features are in use.
Check with your local service provider.
c
r
e
u
l
a
i
m
m
o
c
r
o
f
t
o
N
Battery Information
Charging the Battery
The battery delivered with your mobile phone is not fully
charged. We recommend that you charge the battery for
12 hours before you use your mobile phone for the first
time. If you are charging a new battery, or a battery that has
run out completely, it may take a while (up to 30 minutes)
before you get any indication (the battery meter appears in
the display) that the battery is being charged.
Please note that you cannot turn on your mobile phone
–
before the battery meter appears in the display.
e
s
The battery can only be charged in temperatures between
+5°C (+41°F) and +45°C (+113°F).
Battery Use and Care
A rechargeable battery has a long service life if treated
properly. A new battery or one that has not been used for a
long time could have reduced capacity the first few times it
is used.
The talk and standby times depend on the actual
transmission conditions when using the mobile phone. If
the mobile phone is used near a base station, less power is
required and talk and standby times are prolonged.
S
o
n
r
E
y
Battery Information 11
s
s
c
i
o
n
I
n
c
.

Use only Sony Ericsson or Ericsson branded original
batteries and chargers intended for use with this product.
Using other batteries and chargers could be dangerous, and
the warranty does not cover product failures which have
been caused by use of other batteries and chargers.
• Do not expose the battery to extreme temperatures, never
above +60°C (+140°F). For maximum battery capacity,
use the battery in room temperature. If the battery is
used in low temperatures, the battery capacity will be
reduced.
• Turn off your mobile phone before removing the battery.
• Use the battery for the intended purpose only.
• Do not attempt to take the battery apart.
• Do not let the metal contacts on the battery touch
another metal object. This could short-circuit and
damage the battery.
o
m
m
• Do not expose the battery to open flames. This could
cause the battery to explode.
• Do not expose the battery to liquid.
• Do not allow the battery to be put into the mouth.
t
Battery electrolytes may be toxic if swallowed.
o
N
12 Battery Information
c
r
o
f
e
c
r
u
l
a
i
Disposing of the Battery
The battery should never be placed in municipal waste.
Please check local regulations for disposal of batteries or call
your local Sony Ericsson Contact Center for information.
FCC Statement
• This device complies with Part 15 of the FCC rules.
Operation is subject to the following two conditions:
• (1) This device may not cause harmful interference, and
• (2) This device must accept any interference receive,
S
including interference that may cause undesired
–
operation.
e
s
For Canadian Customers
“IC:” before the radio certification number only signifies
that Industry Canada technical specifications were met.
o
n
y
E
c
i
r
s
s
o
n
.
c
n
I

Limited Warranty
Sony Ericsson Mobile Communications (USA) Inc. (Sony
Ericsson), provides this Limited Warranty for your mobile
phone and any Ericsson or Sony Ericsson branded original
accessory delivered with your mobile phone (hereinafter
referred to as “Product”).
To get maximum use of your new Product, we recommend
that you follow a few simple steps:
Read the Guidelines for Safe and Efficient Use.
Read all the terms and conditions of this Sony Ericsson
Warranty.
Save your original receipt. You will need it for warranty
repair claims. Should your Product need warranty service,
please return it to the dealer from whom it was purchased,
or contact your local Sony Ericsson Contact Center or visit
www.SonyEricsson.com
Our Warranty
Subject to the conditions of this Limited Warranty, Sony
Ericsson warrants this Product to be free from defects in
material and workmanship at the time of its original
purchase by a consumer, and for a subsequent period of
N
one (1) year.
o
f
t
to get further information.
m
o
c
r
o
m
e
c
r
u
l
a
i
What We Will Do
If, during the warranty period, this Product fails to operate
under normal use and service, due to defects in materials or
workmanship, Sony Ericsson subsidiaries, authorized
distributors or service partners will, at their option, either
repair or replace the Product in accordance with the terms
and conditions stipulated herein.
Conditions
1 The warranty is valid only if the original receipt issued to
the original purchaser by the dealer, specifying the date
of purchase and serial number, is presented with the
–
Product to be repaired or replaced. Sony Ericsson
e
reserves the right to refuse warranty service if this
s
information has been removed or changed after the
original purchase of the Product from the dealer.
2 If Sony Ericsson repairs or replaces the Product, the
repaired or replaced Product shall be warranted for the
remaining time of the original warranty period or for
ninety (90) days from the date of repair, whichever is
longer. Repair or replacement may involve the use of
functionally equivalent reconditioned units. Replaced
parts or components will become the property of Sony
Ericsson.
S
o
n
y
E
r
s
s
c
i
Limited Warranty 13
o
n
I
n
c
.

3 This warranty does not cover any failure of the Product
due to normal wear and tear, or due to misuse, including
but not limited to use in other than the normal and
customary manner, in accordance with the Sony Ericsson
instructions for use and maintenance of the Product. Nor
does this warranty cover any failure of the Product due to
accident, modification or adjustment, acts of God or
damage resulting from liquid.
4 Since the cellular system on which the product is to
operate is provided by a carrier independent from Sony
Ericsson, Sony Ericsson will not be responsible for the
operation, availability, coverage, services or range of that
system.
5 This warranty does not cover Product failures caused by
software installations, modifications, service or repair or
opening of the Product performed by a non-Sony
Ericsson authorized person.
6 The warranty does not cover Product failures which have
been caused by use of accessories or other peripheral
devices which are not Ericsson or Sony Ericsson branded
original accessories intended for use with the Product.
7 Tampering with any of the seals on the Product will void
the warranty.
t
8 THERE ARE NO EXPRESS WARRANTIES,
o
WHETHER WRITTEN OR ORAL, OTHER THAN
N
14 Limited Warranty
c
r
o
f
o
m
m
e
c
r
u
l
a
i
THIS PRINTED LIMITED WARRANTY. ALL
IMPLIED WARRANTIE S, INCLUDING WITH OUT
LIMITATION THE IMPLIED WARRANTIES OF
MERCHANTABILITY OR FITNESS FOR A
PARTICULAR PURPOSE, ARE LIMITED TO THE
DURATION OF THIS LIMITED WARRANTY. IN
NO EVENT SHALL SONY ERICSSONOR ITS
LICENSORS BE LIABLE FOR INCIDENTAL OR
CONSEQUENTIAL DAMAGES OF ANY NATURE
WHATSOEVER, INCLUDING BUT NOT
LIMITED TO LOST PROFITS OR COMMERCIAL
S
LOSS, TO THE FULL EXTENT THOSE DAMAGES
–
CAN BE DISCLAIMED BY LAW.
e
Some countries/states do not allow the exclusion or
s
limitation of incidental or consequential damages, or
limitation of the duration of implied warranties, so the
preceding limitations or exclusions may not apply to you.
The warranty provided does not affect the consumer’s
statutory rights under applicable national legislation in
force, nor the consumer’s rights against the dealer arising
from their sales/ purchase contract.
o
n
y
E
i
r
c
s
s
o
n
.
c
n
I
Getting Started
SIM
About this user’s guide
For ease of reference, see “Getting To Know Your Phone”
on page 18 for a quick overview of the main functions of
the phone, shortcuts and general information.
Available services
Some services and functions described in this user’s guide
are network- or subscription-dependent. Because of this, all
menus may not be available in your phone.
This symbol indicates that a service or function is
network- or subscription-dependent.
Please consult your service provider for more
information about your subscription.
The SIM card
When you register as a subscriber with a service provider,
you get a SIM (Subscriber Identity Module) card. The SIM
card contains a computer chip that keeps track of your
phone number, the services included in your subscription,
and your phonebook information, among other things.
N
o
t
c
r
o
f
o
m
m
e
c
r
u
l
a
i
Assembly
Before you can use your phone, you need to:
1 Install your SIM card and lock it in place.
2 Attach and charge your battery.
3 Put your back cover on.
Always turn off the phone and detach the charger
Note!
before you insert or remove a SIM card.
Insert the SIM card and charge the battery before
Note!
using the phone.
S
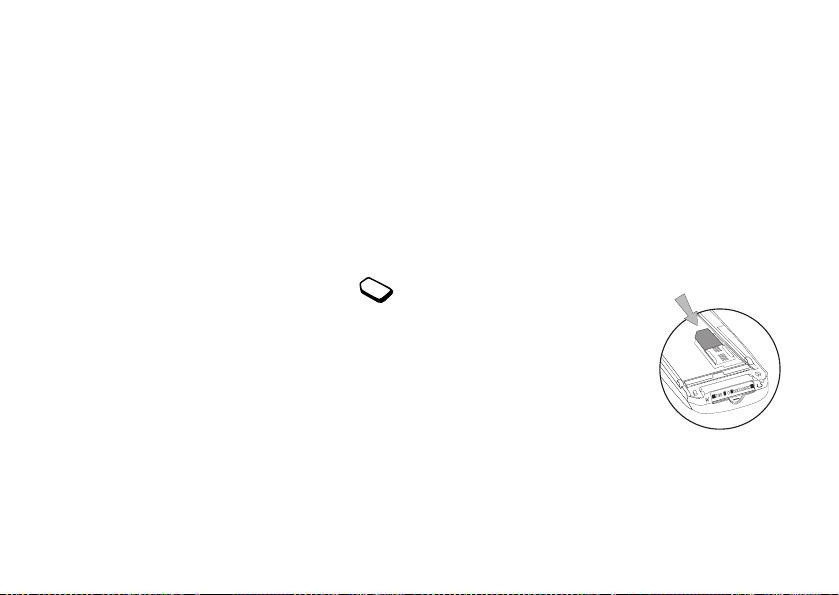
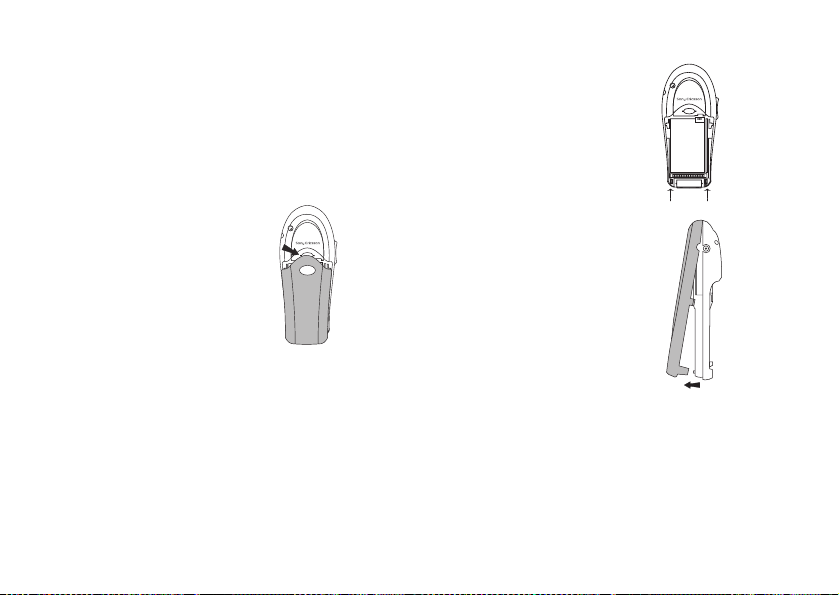
Installing Your SIM Card
–
Insert the SIM card by doing the following:
e
s
1 Slide the SIM card into the slot
formed by the silver holders on the
back of your phone. From the
bottom, make sure that the notch
is on the top left corner.
2 Lock the SIM in place by sliding it
into the slot until you hear a click.
Note! There is a safety switch on the back of your phone
(under the back cover) that powers off the phone
when it is released (when the back cover and/or
battery is removed). This button will power off your
phone so be careful when opening the back cover.
o
n
y
E
i
r
o
s
s
c
Getting Started 15
n
.
c
n
I
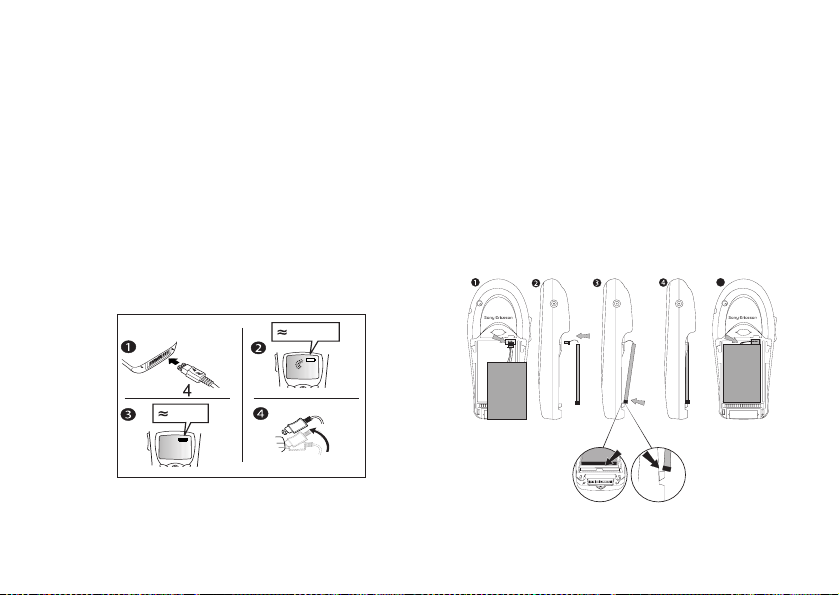
Charging Your Battery
ide up
To charge your battery for the first time, attach the phone’s
battery to the back of your phone under the back cover.
Then, replace the back cover.
Once you install your battery, you should not need to
remove it.
1 Connect the charger to the phone at the flash symbol.
The flash symbol on the charger plug must face upward.
2 It may take up to 30 minutes before the battery charging
icon appears in the display.
3 Wait approximately 12 hours or until the icon indicates
that the battery is fully charged.
4 Remove the charger by tilting the plug upward.
30 min.
a
i
c
r
e
m
m
12 h.
o
c
r
o
f
t
o
N
16 Getting Started
Attaching Your Battery
1 Hold the battery over the back of the phone (label
side down).
2 Locate the connector at the end of the blue, red,
and black wires and insert the plug. It will only fit
one way. Do not force it.
3 Holding the battery at a perpendicular angle (label
side up), place the bottom part of the battery into
the cavity.
y
n
4 Lower the top part of the battery until it lays flat.
o
S
–
e
s
u
l
This side up
E
c
i
r
s
s
o
n
.
c
n
I
5
This side up
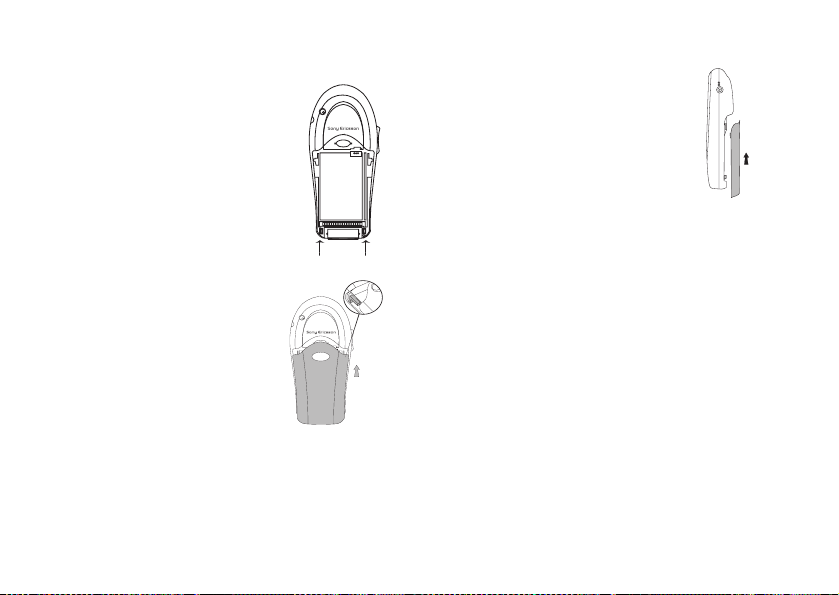
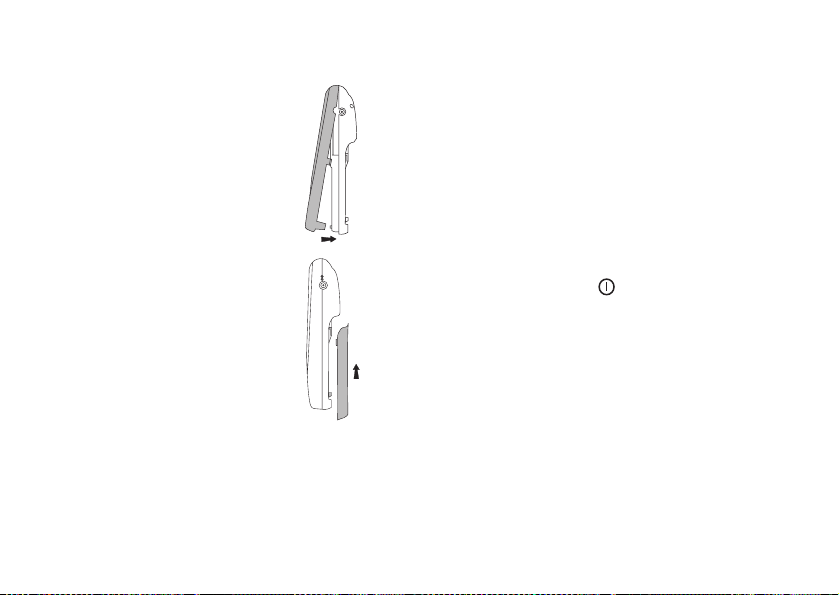
Replacing the Back Cover
1 Locate the notches along
each side of the back of the
phone.
2 Using the notches as a
guide, slide the back cover
upward. Press the back
cover latch to allow the back
cover to fully insert.
o
c
r
o
f
t
o
N
m
m
e
3 Click the back cover into
place.
n
o
s
s
c
i
r
E
y
Note! Never use your phone with the front or back
–
e
s
u
l
a
i
c
r
n
o
cover removed.
S
Getting Started 17
.
c
n
I
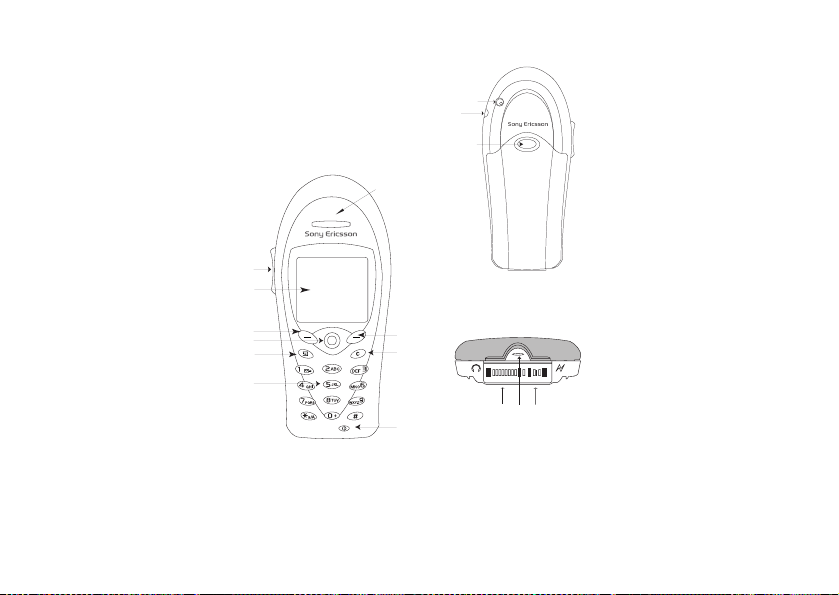
Getting To Know Your Phone
Phone Views
The following diagrams illustrate the front, back, and
bottom views of your phone.
1Earpiece
2Side volume keys
3Display
4 Left softkey
5 Joystick (4-way
navigation with
center push key)
6Options key
7Keypad
8 Power On/Off key
9Clear key
10 Right softkey
c
r
o
f
t
o
N
18 Getting To Know Your Phone
o
m
2
3
4
5
6
7
m
e
l
a
i
c
r
11 External antenna connector
11
12
13
1
y
n
o
S
–
e
s
u
10
9
15
14
8
16
12 Headset jack
13 Back cover latch
s
c
i
r
E
14 Accessory Connector
(Handsfree, Charger, FM
radio, MP3, Chatboard, etc.)
15 Microphone
16 Charging connector
s
o
n
.
c
n
I
Changing Front Covers
Removing Your Phone’s Covers
Your phone is equipped with replaceable covers. For more
information on ordering additional covers, see “Ordering
Accessories” on page 87. Never use your phone with the
front or back cover removed.
1 Remove the back cover. Use one
hand to press down on the back
cover latch and the other hand to
slide the cover off the phone.
l
a
i
c
r
e
m
m
o
c
r
o
f
t
o
N
2 Locate the latches at the bottom
of the phone.
3 Press down on the latches while
lifting the front cover away from
the phone (remove from the
–
bottom).
e
4 Remove the keypad from the
s
u
cover.
S
o
n
n
o
s
s
c
i
r
E
y
Changing Front Covers 19
.
c
n
I
Replacing Your Phone’s Covers
1Place the keypad in the new
cover, pressing firmly until the
keys are properly in place.
2 Locate the tab on the top of the
cover.
3 Holding the front cover at an
angle, as shown in the
illustration, insert the tab into
the notch on the phone.
4 Slide the cover up and snap it
into place.
5 To replace the back cover, see
“Replacing the Back Cover” on
page 17.
c
r
o
f
Help Texts
t
To help you use the menus and functions, your phone has
o
pop-up help texts that explain the menus.
N
20 Changing Front Covers
o
m
m
e
c
r
u
l
a
i
These help texts are set to
but you can turn them off at any time.
To turn off the help texts, scroll to
Help
and select On or Off.
Delete, edit and rename
If you add items, for example, a contact, a note, or an
appointment, it can be deleted, edited or renamed. To
delete an item, select the item and press
deletion.
S
Making and receiving calls
–
1 Press and briefly hold to turn on your phone.
e
s
2 Enter your PIN (Personal Identity Number), if you have
one for your SIM card. Your PIN is provided by your
service provider.
Note! If you make a mistake while entering your PIN,
Note! If you enter the wrong PIN three times in a row,
y
n
o
delete the wrong number by pressing
the SIM card is blocked and the message
blocked
enter your PUK (Personal Unblocking Key). Your
PUK is provided by your service provider.
On when you buy your phone,
Settings, Display, Menu
n
o
s
s
c
i
r
E
appears. To unblock it, you need to
C. Confirm your
.
c
n
I
C.
PIN

3 Enter the area code (if necessary) and phone number and
press Call to make the call.
4Press End to end the call.
5 When the phone rings, press Answer to answer the call.
Your mobile phone is equipped with an internal
Note!
antenna located inside the back of your phone,
above the back cover. For best reception, hold the
phone as you would any other telephone, but be
careful not to cover this area with your hand.
u
l
a
i
c
r
e
m
m
o
c
r
o
f
t
o
N
Calling
Before you can make or receive any calls, you must turn on
the phone and be within range of a network. See “Making
and receiving calls” on page 20.
Making calls
1 Enter the area code (if necessary) and the phone number.
2Press Call to make the call.
3Press End to end the call.
Note! You can call numbers from the Call List and the
–
e
s
To change the earpiece volume during a call
Press the upper or lower side volume key to increase or
decrease the earpiece volume during a call.
n
o
S
phonebook. For more information, see “Call
List” on page 23 and “Phonebook” on page 23.
You can also use your voice to make calls. For
more information, see “Voice Control” on
page 39.
y
E
r
s
s
c
i
I
n
o
Calling 21
n
c
.

To mute the microphone during a call
Press and hold
hold
Automatic redialing
If the connection of the call failed and the display shows
Retry?, press Yes. The phone redials the number (up to
10 times):
• until the call is connected.
• until you press a key or receive a call.
Note! Do not hold the phone to your ear while waiting.
Making international calls
1 Press and hold until a + sign appears in the display.
The + replaces the international prefix number of the
country from which you are calling.
2 Enter the country code, area code (without the leading
zero) and phone number, press Call.
o
N
22 Calling
C until the display shows Muted. Press and
C again to resume the conversation.
When the call is connected, the phone gives a
loud signal. Automatic redialing is not available
for fax and data calls.
e
a
i
c
r
m
m
o
c
r
o
f
t
u
l
Making emergency calls
To make an emergency call, enter your local emergency
number and press Call.
Your mobile phone supports the international emergency
numbers, 112, 911, or 08. This means that these numbers
can normally be used to make an emergency call in any
country, with or without a SIM card inserted, if a GSM
network is within range.
Note! Some service providers may require that a SIM
S
–
e
s
In some countries, other emergency numbers may also be
promoted. Your service provider may therefore have saved
additional local emergency numbers on the SIM card.
Viewing your local emergency numbers
Scroll to
Numbers
y
n
o
card is inserted, and in some cases that the PIN
has been entered as well.
Phonebook, Spec ial Numb ers, Emergency
.
E
c
i
r
s
s
o
n
.
c
n
I

Receiving calls
When you receive a call, the phone rings and the display
shows the number that is calling you. If your subscription
includes Caller ID service and the caller’s number is
identified, the number is displayed. If you have saved the
number in your phonebook, the name associated with that
number is displayed. If the number is a restricted number,
the display shows
Answering a call
•Press Answer.
Rejecting a call
•Press Busy, or
• Press the upper or lower side volume key.
Note! You can also use your voice to answer or reject
Missed calls
If you have missed a call,
standby mode, indicating the number of missed calls.
Checking your missed calls
o
N
1Press Call List to display the missed calls ( ).
Withheld.
c
r
calls. See “Voice Control” on page 39.
m
o
c
Missed Calls: 1 appears in
r
o
f
t
e
m
u
l
a
i
2 To call a number from the list, scroll to the number and
press Call.
I
Call List
The numbers of all calls made and received are saved in
Call List. If you have Calling Line Identification (CLI)
your
service, the caller’s name and number will also be identified.
Calling a number from the call list
1 To enter the call list, press Call List from standby.
2 Scroll to the number you want to call, press Call.
–
Clearing the Call List
e
Scroll to
s
Turning the Call List on or off
Scroll to
Phonebook
Adding a contact
1Scroll to
2 Scroll to the field you want to fill in, press Edit.
3 Enter the information.
4Press OK.
n
o
S
Call Info, Options, Clear Call Lists.
Call Info, Options, Set Call List, On or Off.
Phonebook, Add Contact.
y
E
r
s
s
c
i
n
o
Calling 23
n
c
.

5 Select the next field and so on.
6 When you have entered the information, scroll to
and exit?
Copy contacts
You can copy the contacts between your phone’s memory
and the SIM card. The number of contacts that can be
saved depends on the type of SIM card.
To copy contacts to the SIM card, scroll to
Options, Copy all to SIM.
If you insert a SIM card with saved contacts in your phone,
you can call a contact by selecting
Phonebook menu. If you want to edit a contact saved on
the SIM card, you first need to copy the contact to the
phone.
To copy contacts to the phone, scroll to
Options, Copy from SIM.
o
N
24 Calling
and press Proceed.
The total number of contacts varies according to
Note!
the amount of stored information for each
contact. You can check the number of available
contacts under
Phonebook, Memory Status.
c
r
Call from SIM in the
e
m
m
o
c
r
o
f
t
Phonebook,
Save
Phonebook,
u
l
a
i
Speed dialing
You can save the phone numbers that you want to reach
easily in positions 2-9 on your SIM card.
s
s
o
n
Calling any of these phone numbers from standby:
• Enter the position number.
•Press .
•Press Call.
Changing position numbers
S
1 Scroll to
–
2 Select the phone number you want to move.
e
3 Select the position to which you want to move the phone
s
number.
4 When you have finished press Back.
Changes will apply when PB is copied. Copy to SIM?
5
appears in the display. Press Yes to copy your changes to
your SIM.
Checking the memory
With the Memory status function in your phonebook, you
can check how many positions you have left in your
memory.
y
n
o
Phonebook, Options, Position List.
E
c
i
r
.
c
n
I

To check the phonebook memory, scroll to Phonebook,
Memory Status.
The total number of contacts varies according to
Note!
the amount of stored information for each
contact.
Adding voice commands to contacts
You can add a voice command to a contact.
Edit Contact from the Phonebook menu.
•Select
• Find the contact you want to edit by entering the first
few letters of the contact name.
Edit Voice to add a voice command for the
•Select
selected contact.
•Press Yes when prompted to
Calling a contact
1 From standby, press and hold one of the number keys
to find a contact beginning with the first letter on that
key (or closest following).
For example, press and hold
beginning with “J”. To go to a contact beginning with “L”
press
t
o
5 twice after you have entered the list of contacts.
N
r
o
f
Add a voice command?
e
m
m
o
c
5 to go to the first contact
c
r
u
l
a
i
2-9
2 When the contact you want to call is highlighted, press
Call.
I
You can also use the Call Contact option in the
Note!
Phonebook menu to call a contact.
Updating the phonebook
When needed, you can easily update or delete any contact
information.
n
Editing a contact
1Scroll to
2 Enter the first letter of the contact.
e
3 When the contact is highlighted, press Edit.
s
4 Scroll to the field you want to edit, Select.
5 Enter the information.
6 Select the next field and so on.
7 When you have entered the information, scroll down to
Save and exit? and press Proceed.
Deleting a contact
1Scroll to
2 Enter the first letter of the contact.
3 When the contact is highlighted, press
4 You will be prompted to confirm your deletion.
o
S
Phonebook, Edit contact.
–
Phonebook, Edit Contact.
y
E
r
s
s
c
i
n
o
C.
Calling 25
n
c
.

Deleting all contacts
Phonebook, Options, Delete All.
Scroll to
Contacts that are saved on the SIM card are not
Note!
deleted.
Copying the contacts stored on your SIM card
1Scroll to
2Press Select.
3
4Press Yes.
Default (standard) number
Each contact has a default phone number. The first phone
number you link to a contact automatically becomes the
default number. If you scroll to a certain contact in the
Contact
dialed.
Setting the default number
1Scroll to
2 Enter the first letter of the contact and press OK.
3 When the contact is highlighted, press Edit.
4Select
N
26 Calling
Phonebook, Options, Copy from SIM.
Copy from SIM may take a few minutes. Copy now?
appears on your display.
u
l
a
i
c
r
list and then press Call, the default number is
e
m
m
o
c
r
Phonebook, Edit Contact.
o
f
t
o
Default Number and press Select.
5 Scroll to the number you want to be the default number
and press Select.
Groups
You can create a group of contacts. By doing so you can
send text messages to several recipients at the same time. See
“Text messages” on page 60.
Creating a group of contacts
1 Scroll to
2 Enter a name for the group.
S
3 Select
–
4 Enter the first letters of the contact you want to add.
e
5 Select the contact by pressing Select.
s
6 Select a phone number.
7 Repeat steps 3-5 to add more members.
Call
Entering letters
You can enter letters, for example, when you add names to
the phonebook, write text messages or enter WAP addresses.
There are two ways to enter text, the multiptap method
(default) or by using T9™ Text Input. T9™ Text Input is
a predictive input method and can be a quicker way to write
texts. See “T9™ Text Input” on page 29 for more
information.
y
Phonebook, Groups, Add Group.
n
o
Add Member.
E
c
i
r
s
s
o
n
.
c
n
I

Switching between input methods
Press and hold during text entry to toggle between
Multitap and T9.
Input languages
Before you start entering letters, you need to select the input
languages that you want to use when writing.
Selecting input languages
1Scroll to
2 Scroll through the list of languages by tilting the joystick
3 Select or deselect a language by pressing , , or by
4Press Exit to exit the menu.
Multitap text input
When saving names in the phonebook or when writing
WAP addresses, you enter letters using multitap text input.
You press each key as many times as needed to show the
letter you want.
Entering letters using multitap text input
Press the appropriate key,
the character you want appears in the display. Be sure to
Settings, Language, Input Language.
up or down.
Check/Uncheck.
m
o
c
r
o
f
N
o
t
1 – 9, 0 or repeatedly until
m
e
u
l
a
i
c
r
briefly pause between each letter if they are both on the
same key. See the table of the Latin alphabet below:
Press… to get…
1
2
3
4
5
S
6
–
e
7
s
8
9
0
C
0 - 9
Space - ? ! ‚ . : ; " ’ < = > ( ) _ 1
A B C Å Ä Æ À Ç 2 Γ
D E F È É 3 δ Φ
G H I Ì 4
y
n
J K L 5 Λ
o
M N O Ñ Ö Ø Ò 6
P Q R S ß 7 Π Σ
T U V Ü Ù 8
W X Y Z 9
+ & @ / ¤ % $ € 3£ ¥ \ § ¿ ¡ 0 Θ Ξ Ψ Ω
# @ ↵ & ~ % $ ^
to delete letters and numbers
to shift between capital and lowercase letters
press and hold to enter numbers
E
c
i
r
o
s
s
Calling 27
n
.
c
n
I

Options during multitap text input
When you press during multitap text input, you can
choose from the following list of things to do:
Symbols – Symbols and punctuation marks such as ?
•
and , are shown. Move between the symbols by tilting
the joystick to the left or to the right. Select a symbol.
Insert Object – You can attach a picture, sound, melody,
•
or animation.
Te xt F or m at – You can choose how your text will display
•
by altering the
New Paragraph submenus.
Caps Lock – Switch to all capital letters.
•
Language – You can change your input language.
•
Input method – A list of input methods is shown.
•
Help – a help screen is displayed.
•
Text Size, Text Style, Alignment, or
u
l
a
i
c
r
e
m
m
o
c
r
o
f
t
o
N
28 Calling
Example:
•To enter an ‘A’, press
•To enter a ‘B’, quickly press
• To shift between capital and lowercase letters, press ,
then enter the letter.
You can also use the volume key as a shortcut to
Note!
certain letters. To enter a ‘B’, press the upper side
volume key up and press
n
the lower side volume key down and press
o
S
–
e
s
y
E
2 once.
c
i
r
2 twice.
n
o
s
s
2. To enter a ‘C’, press
.
c
n
I
2.
Entering Text Quick Keys
To... Do this when entering letters
Reach the second
letter or character of
a key
Reach the third
letter or character
of a key
Shift between
capital and
lowercase letters
Enter numbers Press and hold any of the number
Enter a question
mark
Enter the @-sign Press and hold the lower side
Enter a space Press
N
o
t
using multitap text input:
Press and hold the upper side
volume key followed by a digit key
(for example, press the upper side
volume key then press
B. Press the lower side volume key
then press
Press the upper or lower side
volume key and press any of the
number keys
Press .
keys
Press and hold the lower side
volume key down and press
r
o
f
volume key and press
c
o
1
2 to enter a C.)
m
m
2 to enter a
r
e
c
a
i
1
To... Do this when entering letters
Delete letters and
numbers
Shift between input
methods or input
languages
p (pause)
Enter a
when saving codes
S
–
Enter a
p (pause)
e
when composing
s
u
melodies
l
™
T9
Text Input
Apart from the way you normally enter letters in your
phone, using multitap text input, you can use T9™ Text
Input for entering text messages and email.
You can use T9 Text Input when writing, for example, text
messages and email. The T9 Text Input method uses a
built-in dictionary to recognize the most commonly used
word for each sequence of key presses. This way, you press
using multitap text input:
Press C
Press and hold
r
E
y
n
Press and hold
o
Press
s
c
i
I
n
o
s
Calling 29
n
c
.