

Page 1

Sony Ericsson
Mix Walkman
Extended User guide
™
phone
Page 2

Contents
Experience more. Discover how.................................................5
Getting started..............................................................................6
Starting your phone for the first time....................................................6
Getting to know your phone........................................................8
Phone overview...................................................................................8
Charging the battery...........................................................................8
Using the Home key............................................................................9
Home screen......................................................................................9
Application screen ..............................................................................9
Using the touch screen.....................................................................10
Internet and messaging settings........................................................10
Phone settings overview....................................................................11
Music...........................................................................................12
Media Go™ .....................................................................................12
Walkman™ player overview..............................................................12
Updating media.................................................................................13
Karaoke............................................................................................13
ZAPPIN™.........................................................................................14
Walkman™ player widget..................................................................15
Instant messaging......................................................................16
Entering text...............................................................................17
Using the on-screen keypad.............................................................17
Contacts .....................................................................................18
Calling..........................................................................................19
Friends application ....................................................................20
Event filter.........................................................................................20
Connecting your phone to a computer....................................21
Transferring and handling content using a USB cable........................21
Camera........................................................................................22
Camera controls...............................................................................22
2
This is an Internet version of this publication. © Print only for private use.
Page 3

TrackID™ technology................................................................23
PlayNow™...................................................................................24
Multimedia and text messaging................................................25
Email............................................................................................26
Bluetooth™ wireless technology..............................................27
Wi-Fi®..........................................................................................28
Web browser...............................................................................29
Browsing the web.............................................................................29
Voicemail.....................................................................................30
Locking and protecting your phone.........................................31
IMEI number.....................................................................................31
Troubleshooting.........................................................................32
My phone is not working as expected...............................................32
Resetting the phone..........................................................................32
No battery charging icon appears when I start charging the phone...32
I cannot use Internet-based services.................................................32
No network coverage........................................................................32
Emergency calls only.........................................................................32
SIM locked .......................................................................................32
PUK blocked. Contact service provider. ...........................................33
Legal information.......................................................................34
Index............................................................................................35
3
This is an Internet version of this publication. © Print only for private use.
Page 4

Important information
Please read the Important information leaflet before you use your cell phone.
Some of the services and features described in this User guide are not supported in all countries/
regions or by all networks and/or service providers in all areas. Without limitation, this applies to
the GSM International Emergency Number 112. Please contact your network operator or service
provider to determine availability of any specific service or feature and whether additional access
or usage fees apply.
4
This is an Internet version of this publication. © Print only for private use.
Page 5

Experience more. Discover how.
Visit www.sonyericsson.com/support to learn the most from your phone.
5
This is an Internet version of this publication. © Print only for private use.
Page 6
Getting started
Some basic getting started instructions are printed on the box supplied with your phone.
Below you will also find information to help get you started.
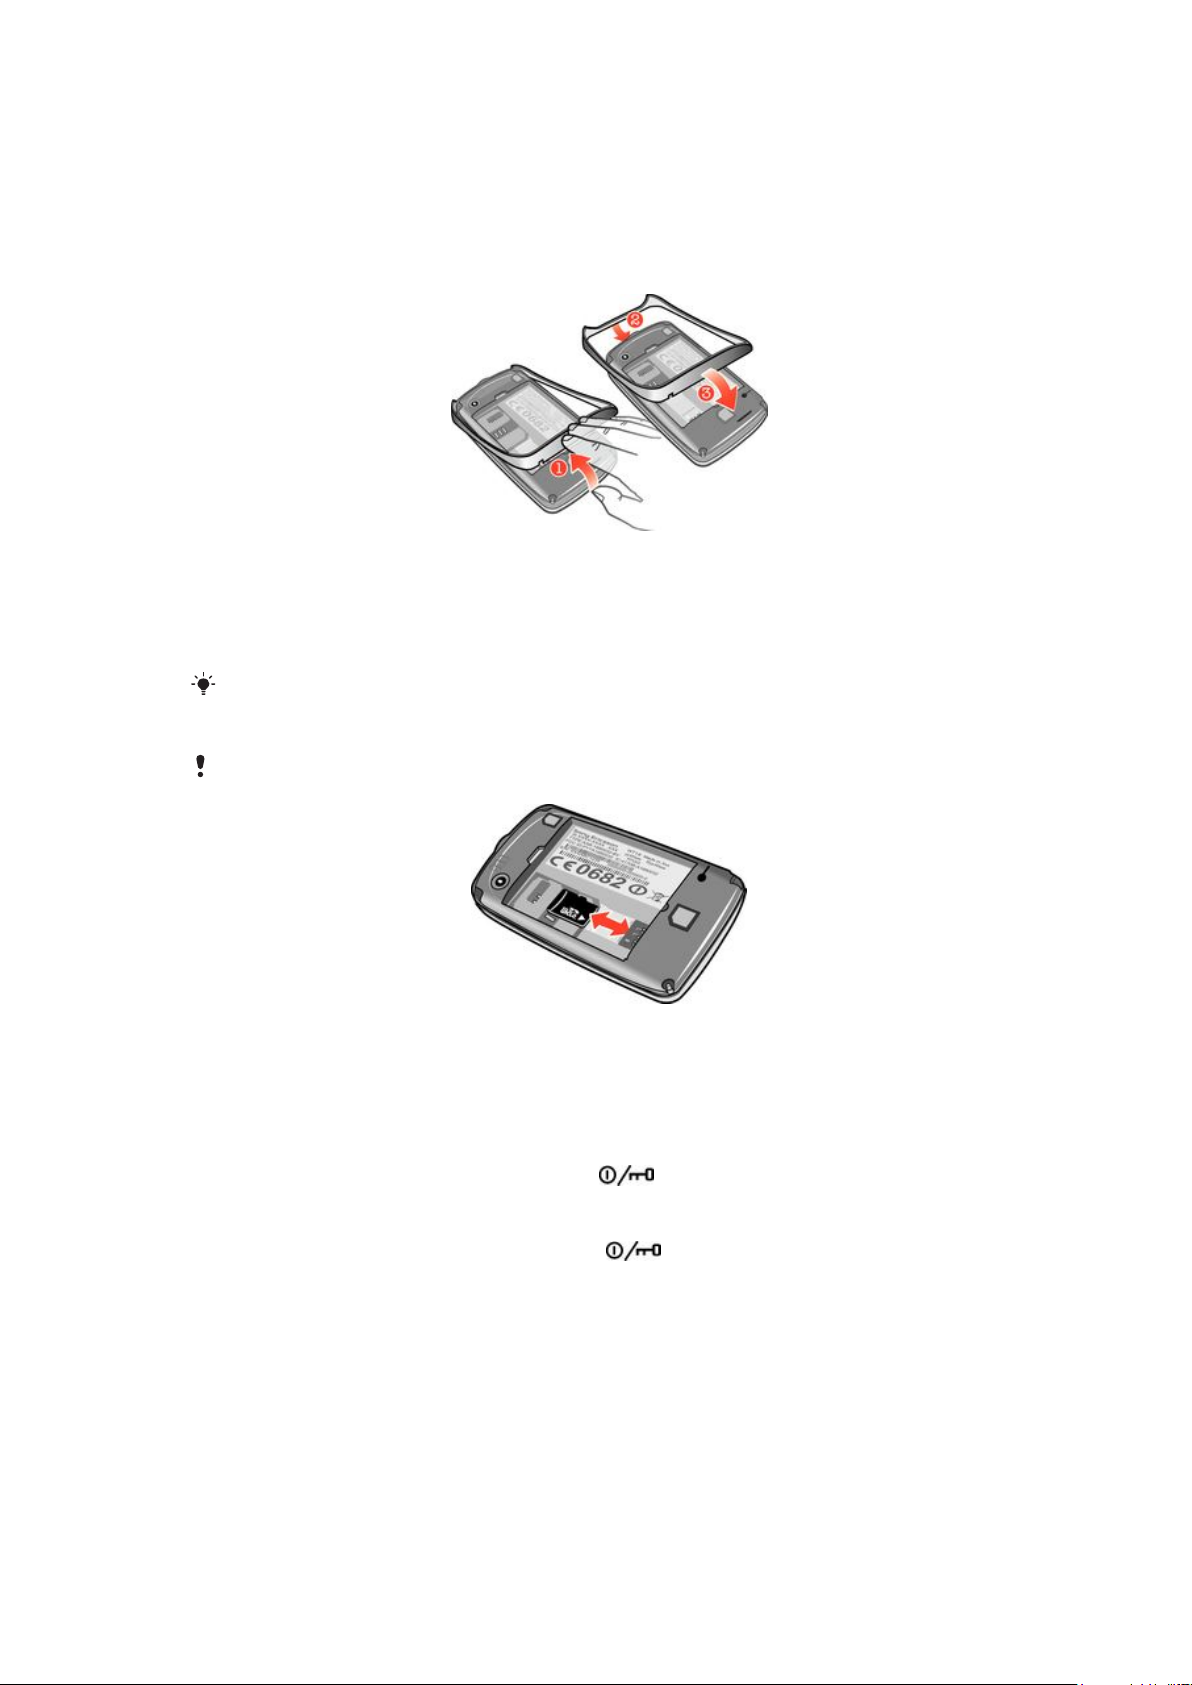
To change phone bands
1
Remove the battery cover.
2
Insert a fingernail into the gap between the band and the bottom of the phone, then
lift up the band and remove it.
3
Insert the top end of the replacement band into the groove on the top of the phone,
then press down the band to attach it.
Instructions on how to remove the battery cover are printed on the box supplied with your phone.
To insert or remove a memory card
You may have to purchase a memory card separately.
1
Remove the battery cover and insert the memory card with the gold-colored
contacts facing down.
2
To remove the memory card, first remove the battery cover, then draw the memory
card outward.
To lock the screen
•
When the screen is active, briefly press the
To unlock the screen
•
When the screen is locked, briefly press the key.
key.
Starting your phone for the first time
The first time you start your phone, a setup guide helps you enter essential phone settings
and import contacts. You can also access the setup guide later from the phone settings.
To set the phone language at startup
1
When you start your phone for the first time, a list of languages appears. Scroll
through the list and select your language.
2
Tap Done.
6
This is an Internet version of this publication. © Print only for private use.
Page 7

To import contacts from a SIM card
•
When you start your phone for the first time with a SIM card inserted, the setup guide
prompts you to import your SIM contacts. Tap Import contacts.
When you copy contacts between two phones using your SIM card, the amount and the type of
information you can transfer for each contact is limited. To get more help on how to copy
contacts between two phones, go to www.sonyericsson.com/support.
To set the time and date at startup
1
When the setup guide prompts you to set the time and date at startup, tap Time &
date.
2
Find and tap Time.
3
Tap the hour and minute fields to adjust the time.
4
When you're done, tap Save.
5
Find and tap Date.
6
Tap the day, month and year fields to adjust the date.
7
When you're done, tap Save.
While setting the time and date, tap Time format or Date format and select your preferred time
and date display formats, respectively.
7
This is an Internet version of this publication. © Print only for private use.
Page 8
Getting to know your phone
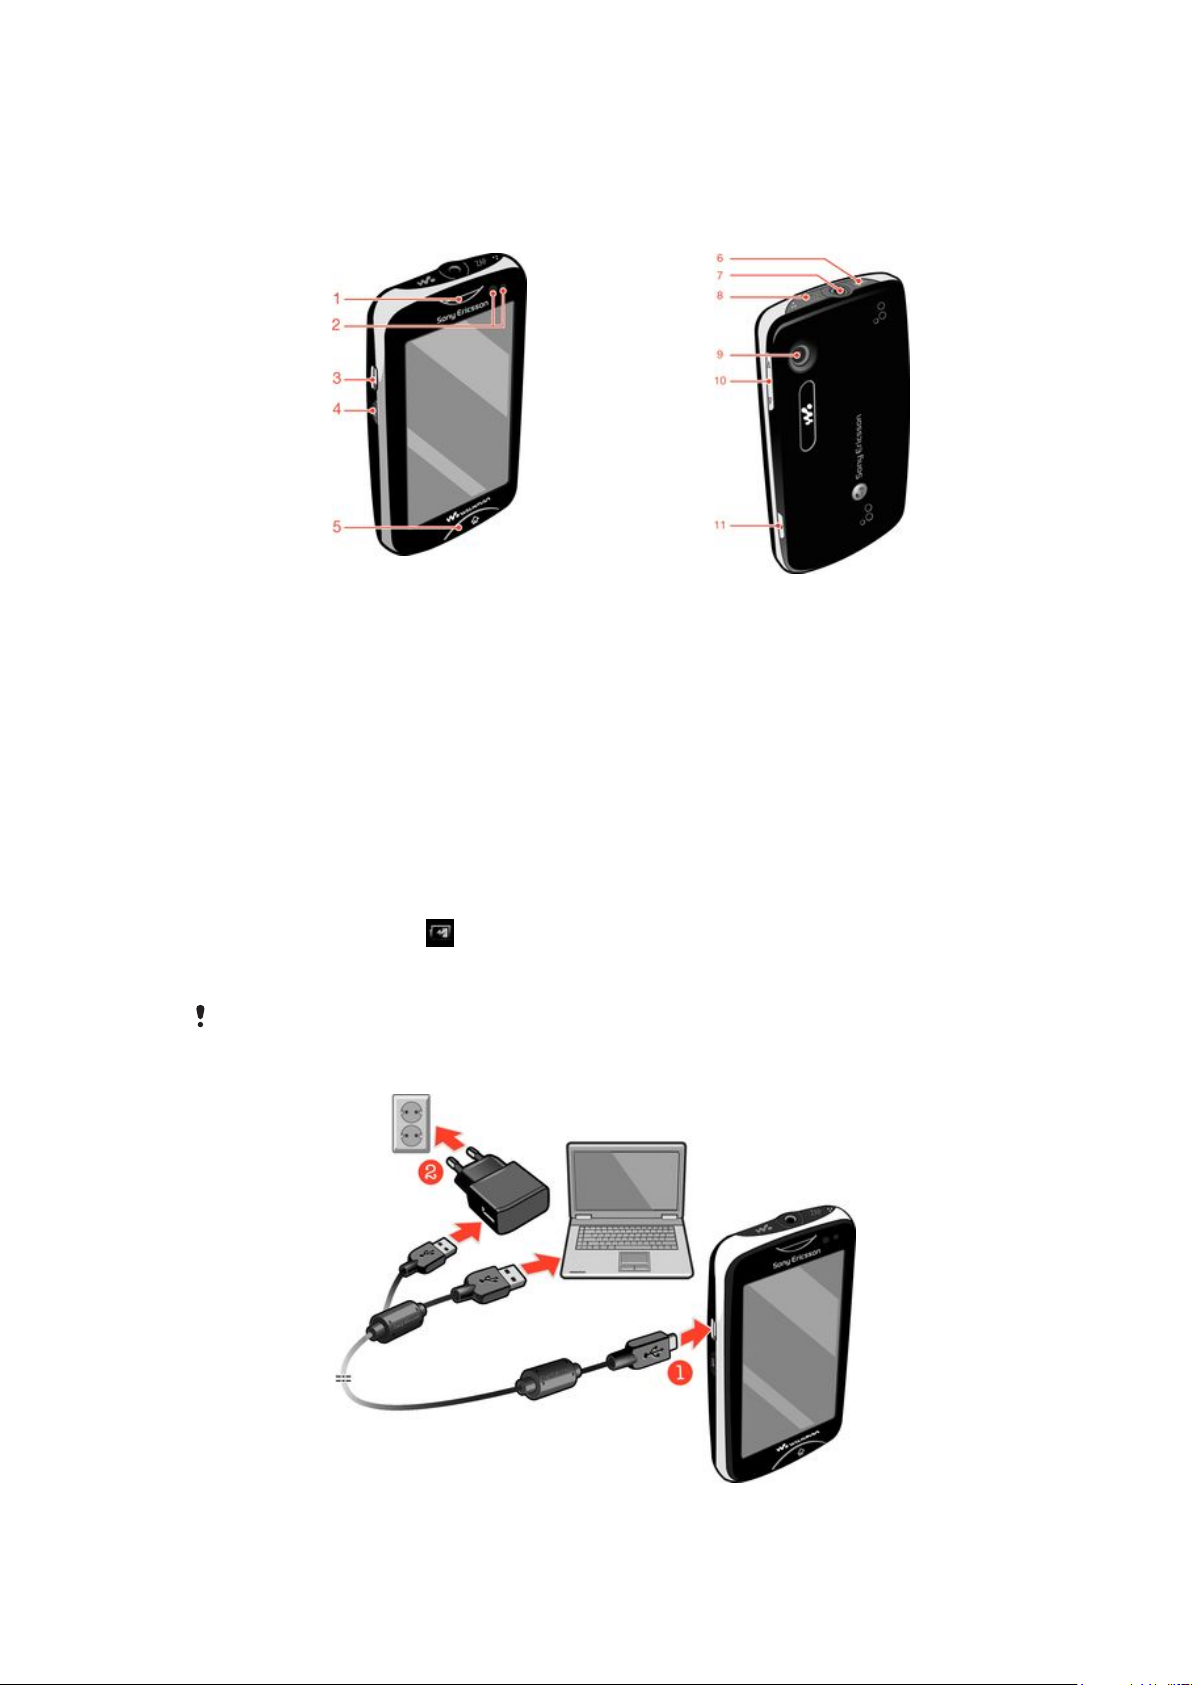
Phone overview
1. Ear speaker
2. Proximity sensor
3. Connector for charger/USB cable
4. Power key/Screen lock
5. Home key
6. Walkman™ key
7. 3.5 mm Audio Plus connector
8. ZAP key
9. Camera lens
10. Volume key
11. Camera key
Charging the battery
Your phone battery is partly charged when you buy the phone. It may take a few minutes
before the battery icon appears on the screen when you connect the phone charger
cable to a power source, such as a USB port or a phone charger. You can still use your
phone while it is charging.
The battery will start to discharge a little after it is fully charged and then it charges again after a
certain time when the phone charger is connected. This is to extend battery life and may result
in the charge status showing a level below 100 percent.
8
This is an Internet version of this publication. © Print only for private use.
Page 9
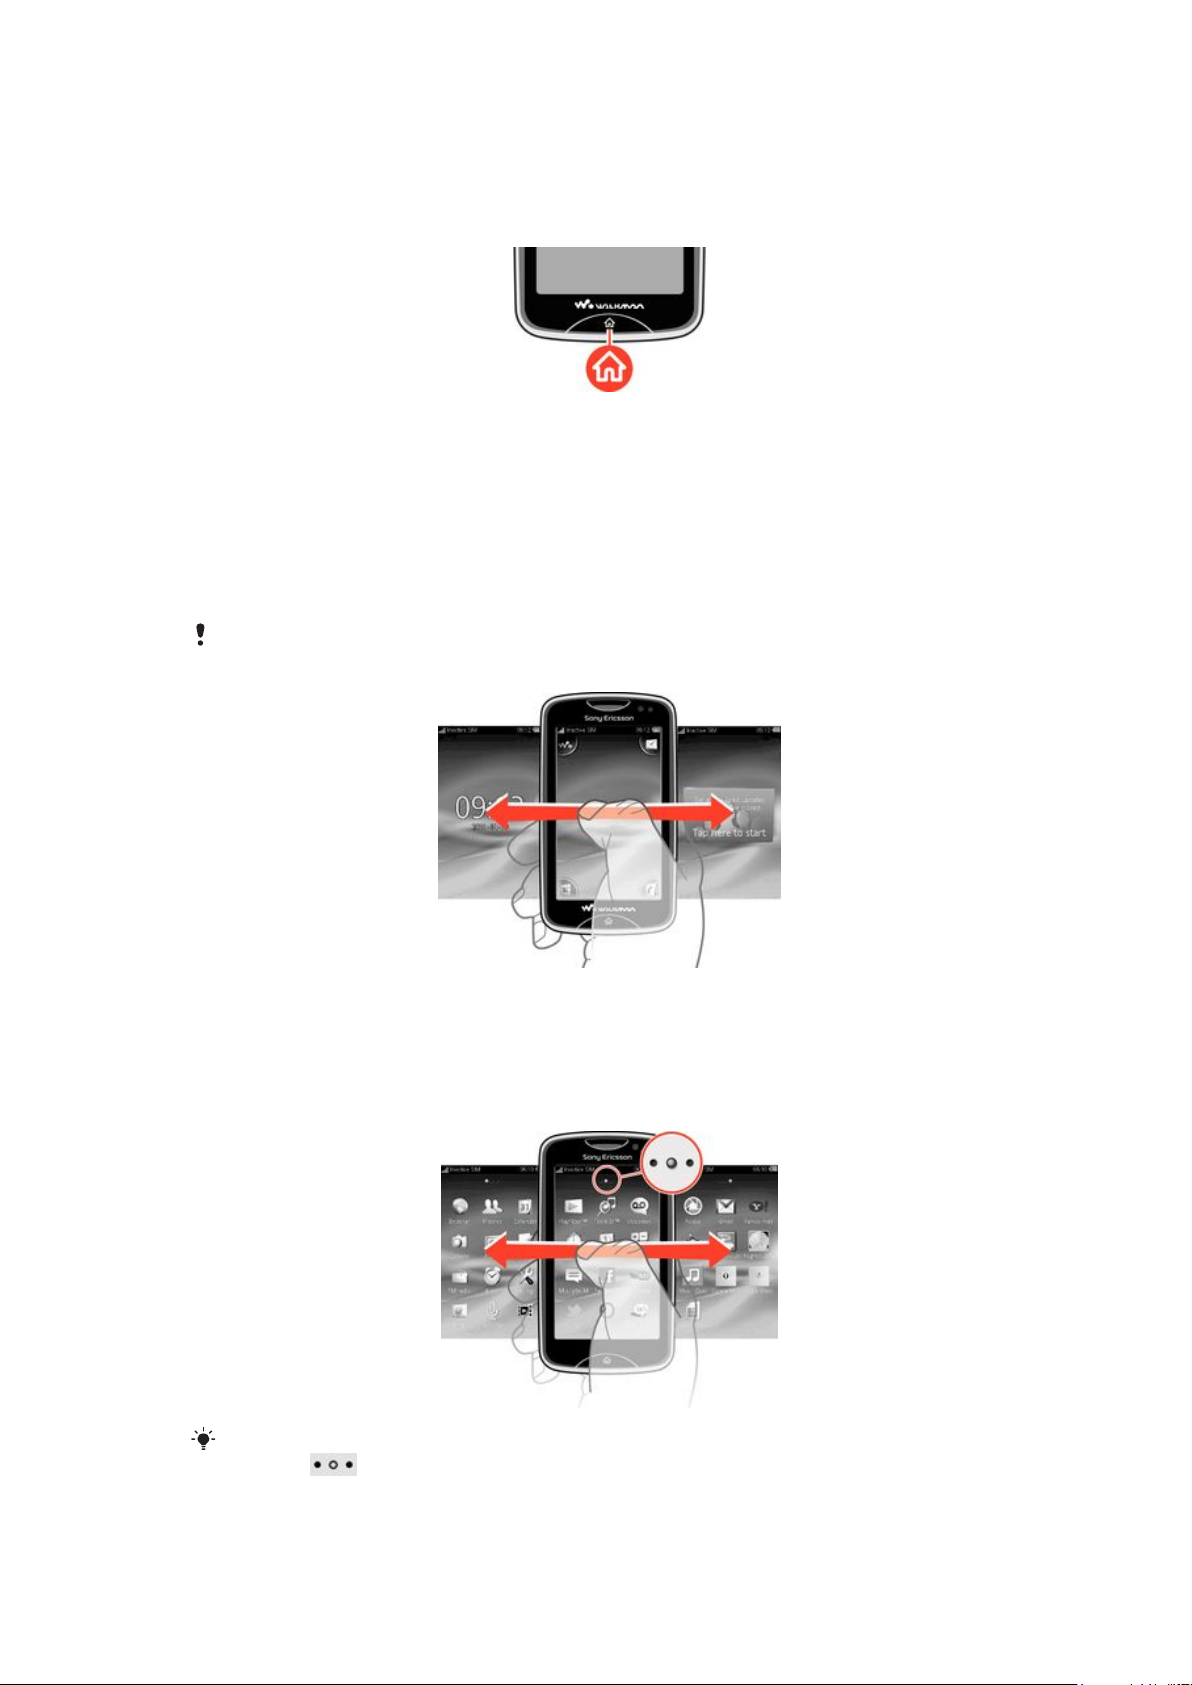
To charge the phone using the power adapter
•
Connect the phone to a power outlet using the USB cable and the power adapter.
Using the Home key
To go to the Home screen
•
Press the Home key.
Home screen
The Home screen is your gateway to the main features in your phone. You can customize
it with different application icons, shortcuts, wallpaper, and more. The Home screen
extends beyond the regular screen display width, giving you more room to play with.
Close your opened applications before going to the Home screen. Otherwise, these applications
may stay running in the background and slow down your phone.
Application screen
The Application screen gives you quick access to applications in your phone. You can also
customize this screen. Remember that the Application screen extends beyond the regular
screen dimensions, so you might have to flick left or right to see everything.
An indicator at the top of the screen shows which part of the Application screen you are in. For
example,
indicates that you are in the middle part of the screen.
9
This is an Internet version of this publication. © Print only for private use.
Page 10

To open the Application screen
There are two ways to open the Application screen:
•
From the Home screen, drag upward.
•
Flick upward from any location on the Home screen.
To browse the Application screen
•
From the Application screen, flick right or left.
To move an application to a corner of the Application screen
1
From the Home screen, drag upward.
2
Touch and hold an item until application icons appear in each corner of the screen.
3
Drag an item into one of the corners.
To move an application on the Application screen
1
From the Home screen, drag
2
Touch and hold an item until application icons appear in each corner of the screen.
3
Drag an item beyond the current screen view into another part of the Application
upward.
screen.
The items on the Application screen and its extensions are the actual applications, and not
shortcuts. So, if you move an item from one part of the Application screen to another part, you
are moving the actual application, and are not creating a shortcut.
Using the touch screen
To open or highlight an item
•
Tap the item.
To mark or unmark options
•
Tap to mark or unmark the relevant checkbox, or in some cases tap the switch
beside the option name.
Marked checkbox
Unmarked checkbox
Switched on
Switched off
To go back to the previous screen
•
Tap , when this option is available.
Scrolling
Scroll by moving your finger up or down on the screen. On some web pages you can also
scroll to the sides.
Dragging or flicking will not activate anything on the screen.
Internet and messaging settings
For most mobile phone networks and operators, messaging and Internet settings come
preinstalled on your phone. In some cases the settings are downloaded the first time you
turn on the phone with your SIM card inserted.
You can manually add and change Internet and messaging settings in your phone at any
time, or you can get the settings sent to your phone automatically. To get more help on
how to manually update the Internet and messaging settings in your phone, go to
10
This is an Internet version of this publication. © Print only for private use.
Page 11

www.sonyericsson.com/support. Contact your network operator if you need more
information about your subscription settings.
Phone settings overview
You can customize some phone settings to suit your preferences. For example, you can
adjust the Time & date and Phone language settings.
To change the phone language
1
From the Home screen, drag upwards.
2
Find and tap Settings > Language and writing > Phone language.
3
Select an option.
If you choose the wrong language and cannot read the menu texts, go to
www.sonyericsson.com/support for help.
To turn on Flight mode
1
From the Home screen, drag upwards.
2
Find and tap Settings > General.
3
Select Flight mode.
11
This is an Internet version of this publication. © Print only for private use.
Page 12
Music
1 8
9
10
3
7
5
6
11
4
2
Get the most out of your Walkman™ player. Listen to music, audio books, and podcasts.
Manage your own playlists, and send your favorite tunes to friends.
Install the Media Go™ application on your computer and transfer content to and from the
memory card in your phone. Media Go™ can be downloaded from
www.sonyericsson.com/support.
Media Go™
Media Go™ is a downloadable computer application that helps you to manage content in
your phone and transfer files between your phone and a computer. To launch the installation
of Media Go™, you need to first connect your phone to a computer with a USB cable. See
Transferring and handling content using a USB cable on page 21 for more information.
Find more info in the help section of the Media Go™ application.
To install Media Go™ on a computer
1
From a computer, go to http://www.sony.com/mediago and download the Media
Go™ application. Once downloaded, run the installation file on the computer.
2
Connect your phone to a computer using a USB cable and follow the instructions
on the computer screen to install Media Go™.
To transfer content using the Media Go™ application
1
When Media Go™ is installed on the computer, connect your phone to the computer
using the USB cable.
2
Phone: Preparing media transfer mode appears on the screen.
3
Computer: Click Media Go™ to start the Media Go™ application, if it does not start
automatically.
4
Drag and drop files between the phone and computer using the Media Go™
application interface.
See Transferring and handling content using a USB cable on page 21 for more information.
Media Go™ supports video file transfer, but some video file types may not play properly on the
phone.
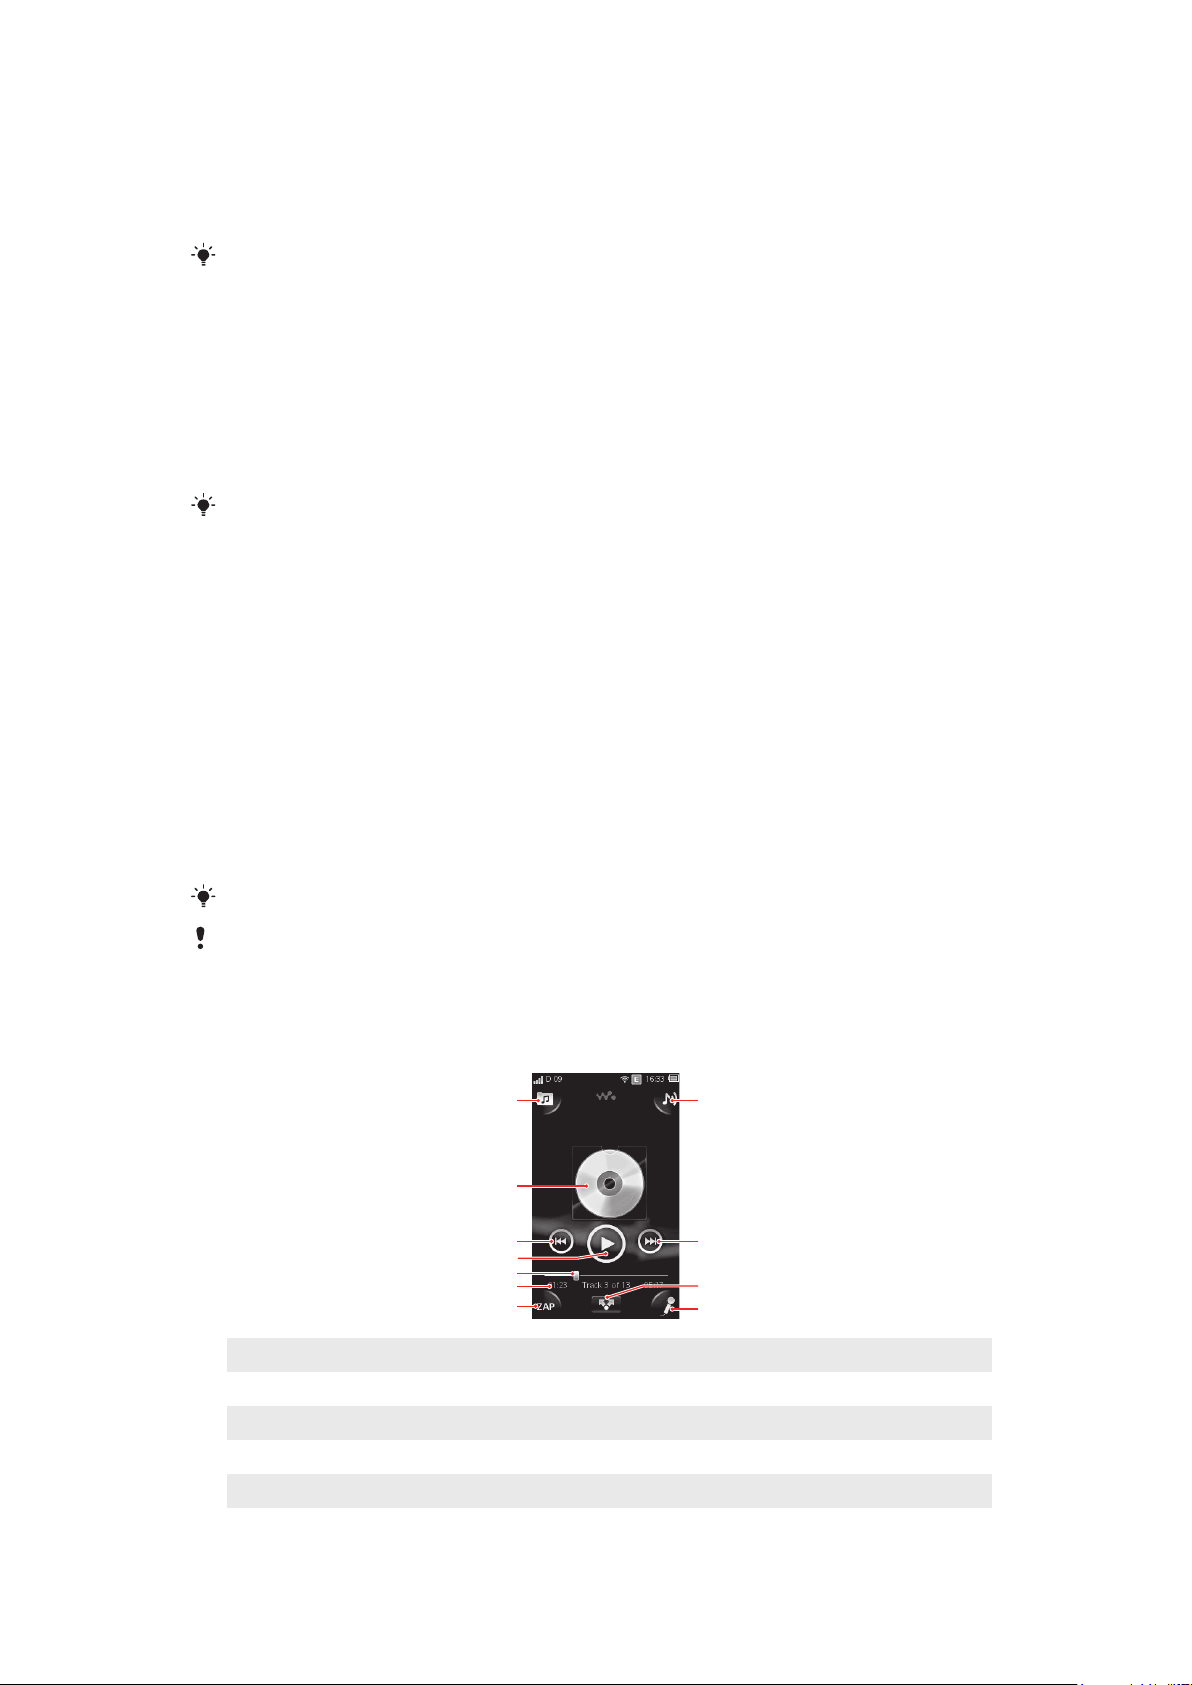
Walkman™ player overview
1
Browse the music on your memory card
2 Cover art (if available)
3 Go to the previous track in the current play queue, or rewind
4 Play/pause button
5 Progress indicator: fast forward or rewind by dragging or tapping
12
This is an Internet version of this publication. © Print only for private use.
Page 13

6 Current track: time remaining
7 Go to the next track in the current play queue, or fast forward
8 View the current play queue
9 Sing a song with the help of on-screen lyrics
10 Share tracks with others by text or email
11 Preview and find your favorite track
To play an audio track
1
From the Home screen, tap > .
2
Tap to browse audio by artist. Tap to browse audio by playlist. Tap to
browse audio by track.
3
Scroll up or down to browse to a track.
4
Tap a track to play it.
You can also press the key on the top of your phone to start the Walkman™.
To pause a track
•
In the Walkman™ player, tap .
To fast forward and rewind music
•
In the Walkman™ player, touch and hold or .
You can also drag the progress indicator marker right or left.
To send or delete a track
1
In the Walkman™ player, tap the cover art for the track you want to send or delete.
2
Select an option.
To play smart playlists
1
In the Walkman™ player, tap
2
Tap .
3
Under Smart playlists, tap a playlist.
4
Tap a track to play it.
.
To adjust the audio volume
•
When the Walkman™ player is playing a track, press the volume key.
Updating media
After you download or transfer new tracks to your phone memory or memory card, you
need to run the Update media function to sync the changes with your phone.
To update media
•
In the Walkman™ player, tap
> Update media.
Karaoke
The Walkman™ player features a Karaoke function. Karaoke is a fun way of enjoying music.
When you play a song, the song lyrics are shown on the screen so that you can sing along.
You can connect a microphone and loudspeakers to share the fun with others.
The Karaoke function only works when song lyric files are available. The most common lyric
file types are .LRC and .TXT. Also, song lyric files need to have the same name as the track
file. You can create your own .LRC files easily.
13
This is an Internet version of this publication. © Print only for private use.
Page 14

To create .LRC files
1
Computer: Open a blank text file using a text editing program such as Notepad.
2
Enter the text of the lyrics, line by line.
3
Play back the audio file to check the timing of each line and when you want to display
it by minutes, seconds, and hundredths of a second.
4
Enter a starting time before each line of text. Here is an example:
If you prefer, enter only the minute and second values.
5
Save your file as an *.LRC file. To do this, click on File, and select Save as. Then
name the file with the same name as the corresponding song track. Select All Files
from the Save as type: dropdown menu and change the default ".TXT" to ".LRC”.
Then select UTF-8 from the Encoding: drop-down menu and click Save.
6
Transfer the song track file and the .LRC file to your phone memory or memory card.
The Walkman™ player can display up to 95 characters of lyrics on one line. Longer lines are
wrapped and displayed as two or three lines on the screen.
To use the Karaoke function
1
From the Home screen, tap
2
Tap Tracks with lyrics and select a track.
3
4
to play the track in Karaoke mode. The lyrics are now displayed on the screen.
Tap
Tap
to turn off the Karaoke function.
> .
When you use a .TXT file for lyrics, you need to manually scroll down the page to follow the lyrics
as the song plays. Lyrics do not appear line by line, even if you have entered timing info in the .TXT
file.
To disable the original vocals of tracks
•
When a track is playing in Karaoke mode, tap
to disable the original vocals.
ZAPPIN™
ZAPPIN™ technology helps you search for your favorite songs in a fun and quick way. With
the press of a button, ZAPPIN™ lets you “ZAP in” to preview the chorus of the next tracks
in a playlist in either 4-second or 15-second segments. Once you find the right tune, you
can tap the ZAP button again to “ZAP out” and play the track from the beginning.
The ZAPPIN™ function is only available when you are playing music.
To search for a track using ZAPPIN™
1
In the Walkman™ player, tap . All tracks in the playlist are previewed in the set
mode.
2
Tap to select a track.
In the Walkman™ player, you can also use the ZAP key on the top of your phone to activate the
ZAPPIN™ feature.
To play a track from the beginning
•
After selecting a track, tap
to play the track from the beginning.
To preview tracks in ZAP short mode
1
In the Walkman™ player, tap
2
Tap Short to play the chorus of each track in 4-second segments.
to preview tracks.
To pause previewing a track
•
When you are previewing a track, tap
.
14
This is an Internet version of this publication. © Print only for private use.
Page 15

To fast-forward or rewind a track being previewed
•
When you are previewing a track, tap or to fast-forward or rewind a track.
To preview tracks in ZAP long mode
1
In the Walkman™ player, tap
2
Tap Long to play the chorus of each track in 15-second segments.
to preview tracks.
Walkman™ player widget
The Walkman™ player widget appears on your Home screen when you minimize the
Walkman™ player, but you might have to flick left or right to find it.
15
This is an Internet version of this publication. © Print only for private use.
Page 16

Instant messaging
Use the IM (Instant Messaging) application to chat with other people and participate in IM
groups to discuss topics that interest you. IM service providers can vary in the features they
offer users.
Before you can use Instant messaging, you need to have the proper settings on your phone.
In some cases, the settings may be already configured on your phone. Or you may receive
the settings in the form of a configuration message from an IM service provider.
16
This is an Internet version of this publication. © Print only for private use.
Page 17

Entering text
You can enter letters, numbers and special characters using either the slideout QWERTY
keyboard or the on-screen keypad.
Using the on-screen keypad
When you start a program or select a field that requires text or numbers, the on-screen
keypad appears by default.
You can use the multitap text input method or quick text input method to enter text.
To display the keypad and enter text
•
Tap a text field to display the keypad, then enter your text.
To shift between upper-case and lower-case letters
•
Before you enter a letter, tap to switch to upper-case , or vice versa.
To turn on the caps lock
•
Before you type a word, tap
To enter numbers using the keypad
•
When you enter text, tap . A keypad with numbers appears.
or until appears.
To insert symbols
•
When you enter text, tap
To change the writing language
1
When you enter text, tap the language icon, for example,
2
Select an option.
To enter text using multitap text input
1
When you enter text, tap the language icon, for example, .
2
Tap Multitap to change to multitap input.
3
To write a word, tap the character key as many times as needed to show the letter
you want.
To enter text using quick text input
1
When you enter text, tap the language icon, for example,
2
Tap Quick text to change to quick text input.
3
To write a word, tap each character key only once, even if the letter you want is not
the first letter on the key.
4
Tap the word that appears or tap
5
If the word you want is not in the list, tap Spell, make any necessary changes, and
tap Save.
. A keypad with symbols appears.
.
.
to select a word from the list.
17
This is an Internet version of this publication. © Print only for private use.
Page 18

Contacts
Use the Contacts application to save information about the people you know. Enter their
phone numbers, email addresses, birthdays and other details. You can keep track of all
communication with a particular contact.
To add a contact
1
From your Home screen, drag upward, and then tap .
2
Tap Add contact.
3
Tap Name, then enter the contact's name and tap Done.
4
Tap Phone number, then enter the number, and tap Done.
5
Add any additional information you want to add for the contact, then scroll up, and
tap Save. To add additional information fields, tap Add more.
You can also add contacts from numbers in your call log.
To back up contacts on a memory card
1
From the Home screen, drag upwards.
2
Tap Settings > Contacts > Back up to memory card.
To restore contacts from a memory card
1
From the Home screen, drag
2
Tap Settings > Contacts > Restore from memory card.
upwards.
18
This is an Internet version of this publication. © Print only for private use.
Page 19
Calling
To make an emergency call
1
From the Home screen, tap .
2
Enter the emergency number and tap . To delete a number, tap .
You can make emergency calls when no SIM card is inserted.
To dial a phone number
1
From your Home screen, drag upward.
2
Find and tap .
3
If the call log appears, tap to enter the dialpad view.
4
Enter the phone number and tap .
To delete a digit entered by mistake, tap .
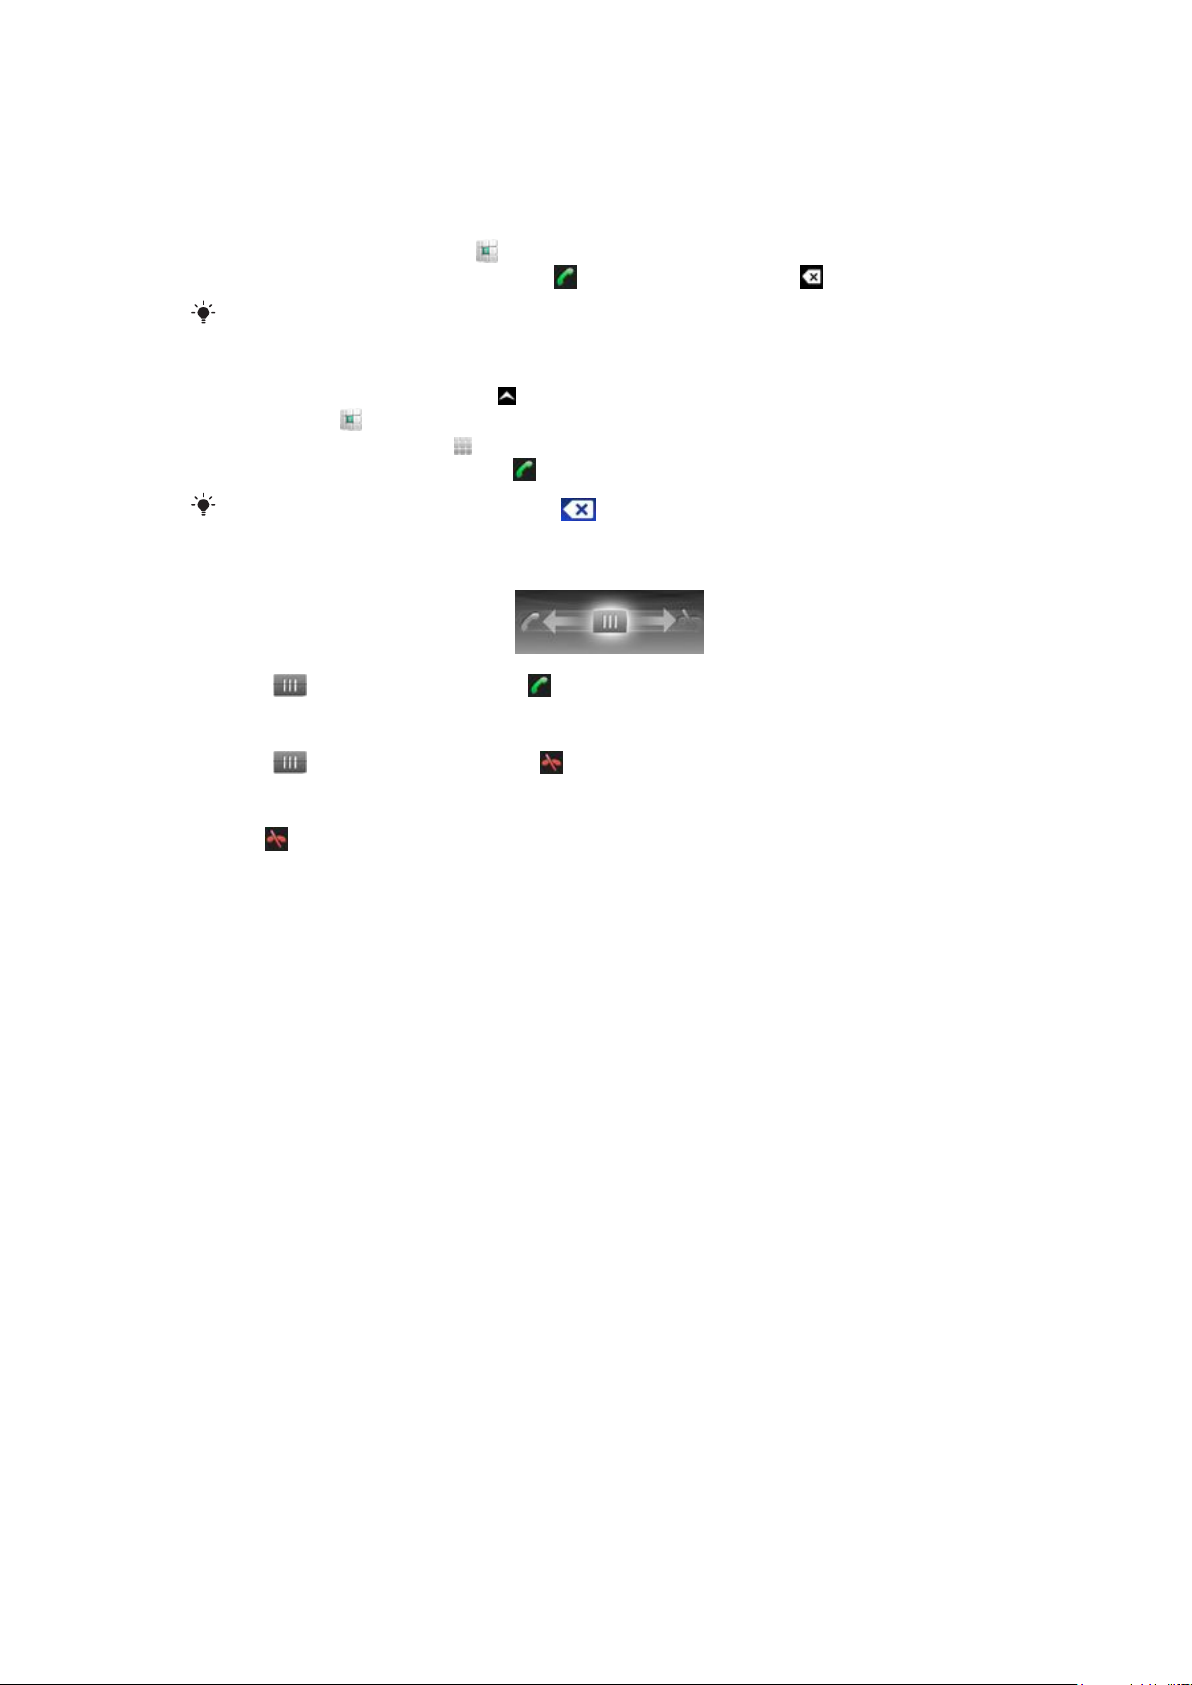
To answer a call
•
Drag
To decline a call
•
Drag to the right until it touches .
To end a call
•
Tap
to the left until it touches .
.
19
This is an Internet version of this publication. © Print only for private use.
Page 20

Friends application
The Friends application collects communications with your top five friends into one view.
All communications – Facebook™ or Twitter™ updates, text and multimedia messages,
missed calls – appear on your Home screen. Just tap a friend’s photo on your Home screen
to view all communications with him or her.
Event filter
Use the calling tab to:
•
View your friends’ phone numbers
•
View missed calls from your friends
•
Make calls
Use the messaging tab to:
•
View and reply to messages from your friends
The profile tab
•
Contact details – View contact details of a friend, and edit or send contact information
•
Facebook™ account – Enter friends’ Facebook™ account details, or import them from
your Facebook™ contacts list
•
Twitter™ account – Enter your friends’ Twitter™ account details, or import him/her from
your Twitter™ contacts list
•
Delete friend - Delete a friend from the Friends application
If you delete one of your five favorite friends from
friend gets deleted from the Friends application.
gives you the following options:
Contacts, all the information related to this
The Facebook™ tab gives the following options:
•
View your friends’ Facebook™ status updates, comments, and tagged photos
•
Account management: enter a friend’s Facebook™ account details, or import him/her from
your Facebook™ contacts
•
Refresh Facebook™ events
The Twitter™ tab
•
Get your friends’ Twitter™ status updates, comments, and tagged photos
•
Account management: enter a friend’s Twitter™ account details, or import him/her from
your Twitter™ contacts
•
Refresh Twitter™ events
The number of new events for each category appears in the upper right corner of the category
tab.
gives the following options:
20
This is an Internet version of this publication. © Print only for private use.
Page 21

Connecting your phone to a computer
Connect your phone to a computer and start transferring pictures, music and other file
types.
You might not be able to transfer some copyright-protected material between your phone and
computer.
Transferring and handling content using a USB cable
The most common way to transfer files between your phone and a computer is using a
USB cable. Once the phone and computer are connected, you can drag and drop content
from one to the other using your computer’s file explorer.
Make sure you place files in the corresponding folder types. For example, put your music files in
the Music folder. Java application files are an exception. You should place them in the Other
folder.
To drag and drop content between your phone and a computer
1
Connect the USB cable to the phone and the computer.
2
Phone: Select Mass storage.
3
Computer: Wait until the phone memory and memory card appear as external disks
in the file explorer.
4
Computer: On the computer desktop, double-click the My Computer icon.
5
Computer: To view the phone memory and memory card folders, double-click the
icon representing your phone.
6
Computer: Copy and paste your file, or drag and drop it, into a corresponding folder
on your computer, in your phone memory, or on your memory card.
You cannot use your phone while transferring files.
To disconnect the USB cable safely
Do not disconnect the USB cable while you are transferring content as this may corrupt the
content.
1
Computer: Use the Safely Remove Hardware function to select the device you want
to unplug, then click Stop.
2
Disconnect the USB cable.
Computer instructions may vary depending on your operating system. See the documentation
of your computer's operating system for more information.
21
This is an Internet version of this publication. © Print only for private use.
Page 22
Camera
Take photos, record videos, view albums and share your favorite clips and pictures with
friends – all with your camera application.
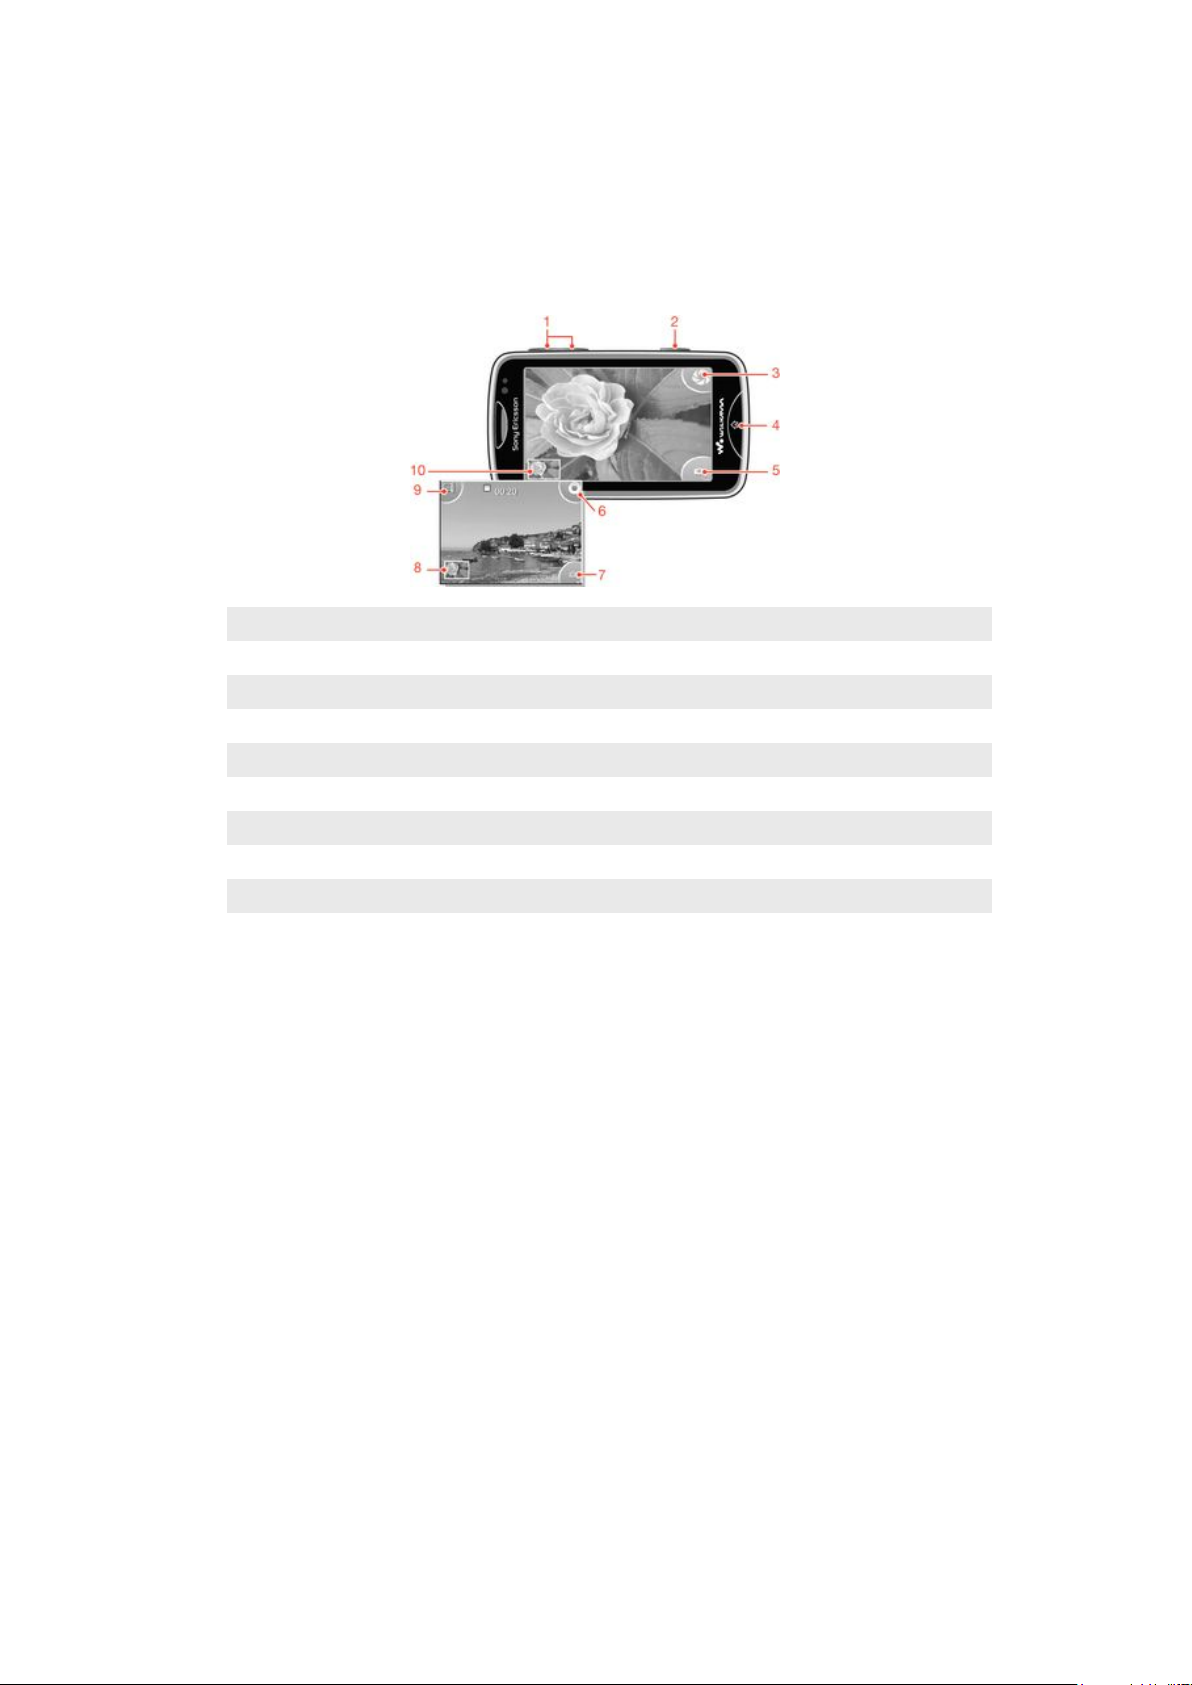
Camera controls
1 Zoom in and out (only available in video mode)
2 Camera key. Press to take a photo or record a video clip.
3 Take photos
4 Exit the camera
5 Switch between still and video camera
6 Record video clips
7 Switch between still and video camera
8 View photos and video clips
9 Select video length
10 View photos and video clips
22
This is an Internet version of this publication. © Print only for private use.
Page 23

TrackID™ technology
Use the TrackID™ music recognition service to identify a music track you hear playing in
your surroundings. Just record a short sample of the song and you’ll get artist, title and
album info within seconds. You can also purchase tracks identified by TrackID™. For best
results, use TrackID™ technology in a quiet area. If you have problems using this
application, see I cannot use Internet-based services on page 32.
The TrackID™ application and the TrackID™ service are not supported in all countries/ regions,
or by all networks and/or service providers in all areas.
To search for track information
1
From your Home screen, drag upward, then find and tap TrackID™.
2
Hold your phone towards the music source, then tap Record. Results are shown
on the result screen.
3
Tap and scroll up or down to view previous search results.
23
This is an Internet version of this publication. © Print only for private use.
Page 24

PlayNow™
Use the PlayNow™ application in your phone to browse, purchase and download the latest
music, games, ringtones, applications, themes and wallpapers.
PlayNow™ is not available in all countries.
To start PlayNow™
1
From the Home screen, drag upwards.
2
Find and tap .
24
This is an Internet version of this publication. © Print only for private use.
Page 25

Multimedia and text messaging
To create and send a message
1
From your Home screen, drag upward, and then tap .
2
Tap New message > Write message. Enter your message text and tap .
3
To add a recipient, select a contact from the list that appears. You can also tap the
text field, enter a number manually, and then tap Done.
4
If you want to add a photo or a video, tap
5
When you are finished, tap Send.
To read a received message
1
From your Home screen, drag
2
Tap a message to view its content.
3
If a message is not yet downloaded, its content is blank. In this case, you need to
tap the message to download and view it.
4
If the received message contains music or a video, tap the item and then tap View
video or Play audio.
upward, and then tap .
and select an option.
25
This is an Internet version of this publication. © Print only for private use.
Page 26

Use your phone to send and receive emails through your regular email account. Before you
get started, you need the correct Internet settings in your phone. See Internet and
messaging settings on page 10.
To set up an email account in your phone
1
From the Home screen, drag
2
Find and tap Email.
3
Select an email account. If the account you want to use is not in the list, tap Other.
4
Enter your Email address and password, then tap Continue.
5
If the phone cannot download your email account settings automatically, enter them
manually.
If you need to enter the settings manually, contact your email service provider for the correct
email account settings. For example, you need to know if the account type is POP3 or IMAP.
To create and send an email message
1
From the Home screen, drag upward.
2
Find and tap Email.
3
Tap Write new.
4
Tap Add recipient and enter the recipient's address, then tap Done. You can add
more recipients the same way, or delete a recipient by tapping
5
Tap Subject and enter the email subject.
6
Tap Write email, then enter your message text.
7
To attach a file, tap Attach, select the file type, and then select the file you want to
send.
8
Tap Send.
upwards.
.
26
This is an Internet version of this publication. © Print only for private use.
Page 27

Bluetooth™ wireless technology
Turn on the Bluetooth™ function in your phone and create wireless connections to other
Bluetooth™ compatible devices such as computers, handsfree accessories, and phones.
Bluetooth™ connections work better within a 10 meter (33 feet) range, with no solid objects
in between. In some cases you have to manually pair your phone with other Bluetooth™
devices. Remember to set your phone to visible if you want other Bluetooth™ devices to
detect it.
To turn on the Bluetooth™ function and make your phone visible
1
From the Home screen, drag upwards.
2
Find and tap Settings > Connectivity > Bluetooth.
3
Tap Bluetooth and tap the on/off button to turn on Bluetooth. appears in the
status bar.
4
Tap Visibility and tap the on/off button to make your phone visible.
27
This is an Internet version of this publication. © Print only for private use.
Page 28

Wi-Fi®
Using Wi-Fi® technology you can access the Internet wirelessly with your phone. To access
the Internet using a Wi-Fi® connection, you first need to search for and connect to an
available Wi-Fi® network. The signal strength of the Wi-Fi® network may differ depending
on your phone's location. Moving closer to the Wi-Fi® access point may increase the signal
strength.
To turn on Wi-Fi®
1
From the Home screen, drag upward.
2
Find and tap Settings > Connectivity > Wi-Fi.
3
Tap Wi-Fi or tap the on/off button to turn on the Wi-Fi function.
It may take a few seconds before Wi-Fi® is enabled.
To enable Wi-Fi® network notifications
1
Make sure Wi-Fi® is turned on.
2
From the Home screen, drag upward.
3
Find and tap Settings > Connectivity > Wi-Fi.
4
Tap Network notification or tap the on/off accordingly to enable Wi-Fi®
notifications. You can now get notifications when new Wi-Fi® networks are within
reach.
To connect to a Wi-Fi® network
1
From the Home screen, drag
2
Find and tap Settings > Connectivity > Wi-Fi.
3
Available Wi-Fi® networks are displayed under Wi-Fi networks. The available
networks may be open or secured. Open networks are indicated by
networks are indicated by next to the Wi-Fi® network name.
4
Tap a Wi-Fi® network to connect to it. If you are trying to connect to a secure WiFi® network, you are asked to enter a password. is displayed in the status bar
once you are connected.
upward.
, and secured
Your phone remembers Wi-Fi® networks you connect to. The next time you come within reach
of a previously connected Wi-Fi® network, your phone automatically connects to it.
In some locations, open Wi-Fi® networks require you to log in to a web page before you can
get access to the network. Contact the relevant Wi-Fi® network administrator for more
information.
To upload photos
1
From the Home screen, drag upward.
2
Find and tap Album
3
Tap a photo thumbnail.
4
Tap the screen to display the controls.
5
Tap
6
Select To Picasa.
.
.
28
This is an Internet version of this publication. © Print only for private use.
Page 29

Web browser
Browsing the web
View and navigate web pages, bookmark your favorites, create shortcuts, and browse with
several windows open at the same time – all with your web browser.
To go to a web page
1
Tap .
2
Tap the text field to activate the keypad.
3
Enter a web address.
4
Tap Go.
29
This is an Internet version of this publication. © Print only for private use.
Page 30

Voicemail
If your subscription includes a voicemail service, callers can leave voice messages for you
when you can't answer calls. Your voicemail service number is normally saved on your SIM
card. If not, you can get the number from your service provider and enter it manually.
To enter your voicemail service number
1
From the Home screen, drag upwards.
2
Select Settings > Calls > Voicemail.
3
Enter your voicemail number and tap Done.
To call your voicemail service
1
From the Home screen, drag upwards.
2
Tap Voicemail.
30
This is an Internet version of this publication. © Print only for private use.
Page 31

Locking and protecting your phone
IMEI number
Every phone has a unique IMEI (International Mobile Equipment Identity) number. You
should keep a copy of this number. If your phone is stolen, your network provider can use
your IMEI number to stop the phone from accessing the network in your country.
To view the IMEI number in your phone
1
From the Home screen, drag upwards.
2
Find and tap Settings > General > About phone.
To change your SIM card PIN
1
From the Home screen, drag upwards.
2
Find and tap Settings > General > Security > Change PIN, then follow the
instructions.
31
This is an Internet version of this publication. © Print only for private use.
Page 32

Troubleshooting
My phone is not working as expected
If you experience problems with your phone, check these tips before you try anything else:
•
Restart your phone.
•
Remove and re-insert the battery and SIM card. Then restart your phone.
•
Update your phone software. Updating your phone ensures optimal performance and
provides the latest enhancements. To get more help on how to update your phone
software, go to www.sonyericsson.com/support.
•
Reset your phone.
Be patient while resetting your phone. Restarting the phone during a reset procedure may
damage the phone permanently.
Resetting the phone
When you reset your phone, you delete all data, including downloaded applications. You
are basically resetting the phone to the state it was in before you first turned it on. So before
you perform a reset, make sure to back up any important data saved on your phone.
To reset the phone
1
From the Home screen, drag upwards.
2
Find and tap Settings > General > Master reset > Reset all .
3
Tap Reset.
No battery charging icon appears when I start charging the phone
It may take a few minutes before the battery icon appears on the screen.
I cannot use Internet-based services
Make sure your subscription covers data downloads and that the Internet settings in your
phone are correct. Contact your network operator for more information about your
subscription settings.
No network coverage
•
Your phone is in Airplane mode. Make sure Airplane mode is turned off.
•
Your phone is not receiving any network signal, or the received signal is too weak. Contact
your service provider and make sure that the network has coverage where you are.
•
The SIM card is not working properly. Insert your SIM card in another phone. If this works,
it is probably your phone that is causing the problem. In this case, contact the nearest
Sony Ericsson service center.
Emergency calls only
You are within range of a network, but you are not allowed to use it. However, in an
emergency, some network operators allow you to call the international emergency number
112.
SIM locked
You have entered your PIN incorrectly three times in a row. To unlock the phone, you need
the PUK (Personal Unblocking Key) provided by your operator.
32
This is an Internet version of this publication. © Print only for private use.
Page 33

PUK blocked. Contact service provider.
You have entered your PUK code incorrectly 10 times in a row. Please contact your service
provider.
33
This is an Internet version of this publication. © Print only for private use.
Page 34

Legal information
Sony Ericsson Mix Walkman™ phone WT13
This User guide is published by Sony Ericsson Mobile Communications AB or its local affiliated company, without any
warranty. Improvements and changes to this User guide necessitated by typographical errors, inaccuracies of current
information, or improvements to programs and/or equipment, may be made by Sony Ericsson Mobile Communications
AB at any time and without notice. Such changes will, however, be incorporated into new editions of this User guide.
All rights reserved.
©Sony Ericsson Mobile Communications AB, 2010
Publication number: 1244-0856.2
Attention: Some of the services and features described in this User guide are not supported by all networks
and/or service providers in all areas. Without limitation, this applies to the GSM International Emergency
Number 112. Please contact your network operator or service provider to determine availability of any specific
service or feature and whether additional access or usage fees apply.
Your mobile phone has the capability to download, store and forward additional content, e.g. ringtones. The use of
such content may be restricted or prohibited by rights of third parties, including but not limited to restriction under
applicable copyright laws. You, and not Sony Ericsson, are entirely responsible for additional content that you
download to or forward from your mobile phone. Prior to your use of any additional content, please verify that your
intended use is properly licensed or is otherwise authorized. Sony Ericsson does not guarantee the accuracy, integrity
or quality of any additional content or any other third party content. Under no circumstances will Sony Ericsson be
liable in any way for your improper use of additional content or other third party content.
All product and company names mentioned herein are the trademarks or registered trademarks of their respective
owners.
This User guide may reference services or applications provided by third parties. Use of such programming or services
may require separate registration with the third party provider and may be subject to additional terms of use. For
applications accessed on or through a third-party website, please review such websites’ terms of use and applicable
privacy policy in advance. Sony Ericsson does not warrant or guarantee the availability or performance of any thirdparty websites or offered services.
This product is protected by certain intellectual property rights of Microsoft. Use or distribution of such technology
outside of this product is prohibited without a license from Microsoft.
Other product and company names mentioned herein may be the trademarks of their respective owners. Any rights
not expressly granted herein are reserved. All other trademarks are property of their respective owners.
All illustrations are for illustration only and may not accurately depict the actual phone.
Microsoft, Windows and Vista are registered trademarks or trademarks of Microsoft Corporation in the United States
and/or other countries.
"Export Regulations: This product, including any software or technical data contained in or accompanying the product,
may be subject to import and export regulations of the European Union, the United States and other countries. The
user and any possessor of the product agrees to comply strictly with all such regulations and acknowledges that it is
their responsibility to obtain any required licenses to export, re-export, or import this product. Without limiting the
foregoing, and as an example, the user and any possessor of the product: (1) must not knowingly export or re-export
Products to destinations identified pursuant to Articles in Chapter II of European Council Regulation (EC) 428/2009;
(2), must comply with U.S. government Export Administration Regulations (“EAR”, 15 C.F.R. §§ 730-774, http://
www.bis.doc.gov/ ) administered by Department of Commerce, Bureau of Industry and Security; and (3) must comply
with economic sanctions regulations (30 C.F.R. §§ 500 et. seq.,., http://www.treas.gov/offices/enforcement/ofac/)
administered by the U.S. Department of Treasury, Office of Foreign Assets Control. The user and any possessor of
the product may not transport or deliver the product, its accessories or separate software to any country, region,
entity or person prohibited by these regulations."
34
This is an Internet version of this publication. © Print only for private use.
Page 35

Index
A
adjusting volume .....................................................13
answering service ....................................................30
applications .............................................................24
audio
adjusting volume .............................................13
playing .......................................................13, 14
B
battery .......................................................................8
Bluetooth™ wireless technology .............................27
browsing - see web browser
C
calls .........................................................................19
charging .....................................................................8
contacts ...................................................................18
G
games ......................................................................24
H
Home screen .............................................................9
I
Internet
web browser ....................................................29
M
Media Go™ .............................................................12
messages
multimedia .......................................................25
picture .............................................................25
text ..................................................................25
MMS ........................................................................25
multimedia messages ..............................................25
music .................................................................12, 13
adjusting volume .............................................13
audiobooks ......................................................12
downloading ....................................................24
karaoke ............................................................13
pausing a track ................................................13
player overview ...............................................12
playing .......................................................13, 14
podcast ...........................................................12
update tracks ..................................................13
music player
smart playlists .................................................13
playlists
smart (auto-generated) ....................................13
PlayNow™ ...............................................................24
PUK .........................................................................31
R
reset .........................................................................32
S
screen lock ..............................................................31
screen lock pattern ..................................................31
searching
music using TrackID™ technology .................23
track information .............................................23
setup guide ................................................................6
SIM ..........................................................................31
smart playlists
playing .............................................................13
SMS .........................................................................25
T
telephony See calls
text messages .........................................................25
TrackID™ technology ..............................................23
searching for track information .......................23
troubleshooting .......................................................32
U
update tracks ..........................................................13
USB connection ......................................................21
V
voicemail .................................................................30
W
Walkman™ player ...................................................12
web browser ............................................................29
Wi-Fi® .....................................................................28
N
navigation ................................................................10
O
overview
Walkman™ player ...........................................12
P
pausing a track ........................................................13
personal information ................................................18
phonebook ..............................................................18
photo sharing services
uploading to ....................................................28
photos
uploading to a web album ...............................28
picture messages ....................................................25
PIN ...........................................................................31
playing
music .........................................................13, 14
This is an Internet version of this publication. © Print only for private use.
35
 Loading...