

Page 1

Contents
Sony Ericsson K818c Additional information
Getting started ................... 4
Assembly, SIM card, battery, turning
on, help, calls.
Getting to
know the phone .................. 8
Phone overview, menus, navigation,
entering letters, activity menu, file
manager, Memory Stick Micro™
(M2™).
Calling ............................... 23
Calls, contacts, voice control, call
options.
Messaging ........................ 38
Text messaging, picture messaging,
voice messaging, email, My friends.
Imaging ............................. 50
Camera, video, pictures, themes.
Entertainment ................... 58
Handsfree, Music and Video player,
radio, PlayNow™, MusicDJ™,
VideoDJ™, games and more.
This
is
the Internet version of the use
Connectivity ..................... 67
Settings, Internet, RSS, synchronizing,
Bluetooth™ technology, infrared, USB
cable, Update service.
More features ................... 79
Alarm clock, calendar, tasks, profiles,
time and date, SIM card lock, etc.
Troubleshooting ............... 86
Why doesn’t the phone work the way I
want it to?
Important information ...... 92
Sony Ericsson Consumer Web
site,safe and efficient use, end user
license agreement,warranty,
declaration of conformity.
Index ............................... 100
r's guide
. © Prin
t only
fo
r p
rivate use.
1Contents
Page 2

Sony Ericsson
GSM 900/1800/1900
This User guide is published by Sony Ericsson
Mobile Communications AB or its local affiliated
company, w ithout any warranty. Improveme nts and
changes to this User guide nece ssitate d by
typograph ical er rors, inaccuracie s of curren t
informat ion, or improvemen ts to progr ams and/or
equipment, m ay be m ade by Son y Er icss on Mo bile
Communica tions AB or its local af filiated company
at any time and withou t notice . Such cha nges wil l,
however, be incorporated into new editions of this
User guide.
©Sony Ericsson Mobile Communications AB,
2007
Publication number: EN/LZT 108 9361 R2A
Please note:
Some of the services in this User guide are not
supported by all networks. This also applies to the
GSM International Emergency Number 112.
Please contact your network operator or service
provider if you are in doubt whether you can use a
particular service o r not.
Please read the Guidelines f or safe and ef ficient use
and the Limited warranty chapters bef ore you us e
your mobile pho ne.
Your mobile phone has the capability to download,
store and f orward ad ditional conten t, for e xample,
ringt ones. The u se of such content may be
restricted or prohi bited by r ights of thi rd parties,
including but not limited to restriction under
applicable copyright laws. You, and not Sony
Ericsson, a re entirely respons ible for add itional
content th at you dow nload to o r forwar d from your
mobile phone. Prior to your use of any additional
content, p lease v erify th at your in tended use is
properly licensed or is ot herwis e author ized. Sony
Ericsson does not gua rantee the accura cy, integr ity
or quality of any additional content or any other
third party content. Under no circumstances will
Sony Ericsson be liable in any way for your
2 Contents
This
is
the Internet version of the use
improper use of additional content or other third
party content.
The marble logo, BestPic, PlayNow, TrackID,
MusicDJ , PhotoDJ and VideoD J are trad emarks or
register ed trade marks of Sony Erics son Mobil e
Communications AB.
Sony, Cyber-shot, Memory Stick Micro and M2 are
trademarks or registered trademarks of Sony
Corporation. Ericsson is a trademark or registered
trademark of Telefonaktiebolaget LM Ericsson.
Bluetoo th™ is a trademark or regis tered tr ademark
of Bluet ooth SIG Inc.
Real is a trademar k or a regis tered tr ademark o f
RealNet works, In c. RealPlayer® f or Mobile is
include d under li cense f rom RealNe tworks, Inc.
Copyright 1995-2004, RealNetworks, Inc. All rights
reserved.
Adobe® Photos hop® Album S tarter Ed ition is a
register ed trade mark of A dobe Syst ems
Incorporated.
Microsof t, Windows and Power Point are either
register ed trade marks or t rademar ks of Micros oft
Corporation in the U.S and other countries/regions.
Mac OS is a trademark of Apple Computer, Inc.,
register ed in the U.S . and other countri es/regi ons.
T9™ Text Input is a trademark or a registered
trademark of Tegic Communications. T9™ Text
Input is license d under on e or more o f the
following: U.S. Pat. Nos. 5,818,437, 5,953,541,
5,187,480, 5,945,928, and 6,011,554; Canadian
Pat. No. 1,331,057, United Kingdom Pat. No.
2238414B; Hong Kong Standard Pat. No.
HK0940329; Republic of Singapore Pat. No. 51383;
Euro.Pat. No. 0 842 463(96927260.8) DE/DK, FI,
FR, IT, NL, PT, ES, SE, GB; and additional patents
are pending world wide.
Smart-Fi t Render ing is a tr ademark o r register ed
trademark of ACCESS CO. LTD. in Japan and other
countries/regions.
r's guide
. © Prin
t only
fo
r p
rivate use.
Page 3

Java and all Java based trademarks and logos are
trademarks or registered trademarks of Sun
Microsystems, Inc. in the U.S. and other countries/
regions.
End-user license agreement for Sun™ Java™
J2ME™.
1 Restrictions: Software is confidential copyrighted
information of Sun and title to all copies is retained
by Sun and/or its licensors. Customer shall not
modify, decompile, disassemble, decrypt, extract,
or otherwise reverse engineer Software. Software
may not be leased, assigned, or sublicensed, in
whole or in part.
2 Export Regulations: Software, including technical
data, is subject to U.S. export control laws,
including the U.S. Export Administration Act and its
associated regulations, and may be subject to
export or import regulations in other countries/
regions. Customers agree to comply strictly with all
such regulations and acknowledges that it has the
responsibility to obtain licenses to export, reexport, or import Software. Software may not be
downloaded, or otherwise exported or re-exported
(i) into, or to a national or resident of, Cuba, Iraq,
Iran, North Korea, Libya, Sudan, Syria (as such
listing may be revised from time to time) or any
country/region to which the U.S. has embargoed
goods; or (ii) to anyone on the U.S. Treasury
Department's list of Specially Designated Nations
or the U.S. Commerce Department's Table of
Denial Orders.
3 Restricted Rights: Use, duplication or disclosure by
the United States government is subject to the
restrictions as set forth in the Rights in Technical
Data and Computer Software Clauses in DFARS
252.227-7013(c) (1) (ii) and FAR 52.227-19(c) (2) as
applicable.
Part of the software in this product is copyright ©
SyncML initiative Ltd. (1999-2002). All rights
reserved.
Other product and company names mentioned
herein may be the trademarks of their respective
owners.
Any rights not expressly granted herein are
reserved.
All illustrations are for guidance only and may not
accurately depict the actual phone.
Note: Sony Ericsson advised users to backup their
personal data infor mation.
All illustrations are for illustration only and may not
accurately depict the actual phone.
Instruction symbols
The following appear in the User
guide:
Note
A service or function is networkor subscription-dependent.
Contact your network operator
for details.
% See also page...
} Use a selection or navigation
key to scroll and select
% 12 Navigation.
Press the navigation key centre.
Press the navigation key up.
Press the navigation key down.
Press the navigation key left.
Press the navigation key right.
This
is
the Internet version of the use
r's guide
. © Prin
t only
fo
r p
rivate use.
3Contents
Page 4

Getting started
Assembly, SIM card, battery, turning
on, help, calls.
More information and downloads are
available at
www.sonyericsson.com/cn.
Assembly
To use your phone
1 Insert the SIM card and the battery.
2 Charge the battery.
3 Turn on your phone.
SIM card
When you register as a subscriber with
a network operator, you get a SIM
(Subscriber Identity Module) card. The
SIM card contains a computer chip
that keeps track of items such as your
phone number, the services included
in your subscription, and names and
numbers in your contacts.
Save contact information on your SIM
card before removing it from another
phone; for example, contacts may be
saved in the phone memory.
PIN
You may need a PIN (Personal Identity
Number) for your SIM card to start
your phone and activate services.
When you enter your PIN, each digit
appears as *, unless the PIN starts
with the same digits as an emergency
number, for example 112. This allows
for emergency calls without entering a
PIN. Press to correct mistakes.
If you enter the wrong PIN three times in
PIN blocked appears. To unblock
a row,
it, you need to enter your PUK (Personal
Unblocking Key)
Battery
Some functions use more battery
power than others and may cause a
need for more frequent re-charging. If
talk time or standby time become
noticeably shorter, you may have to
replace the battery. Only use
approved batteries from Sony
Ericsson
% 84 SIM card lock.
% 93 Battery.
4 Getting started
This
is
the Internet version of the use
r's guide
. © Prin
t only
fo
r p
rivate use.
Page 5
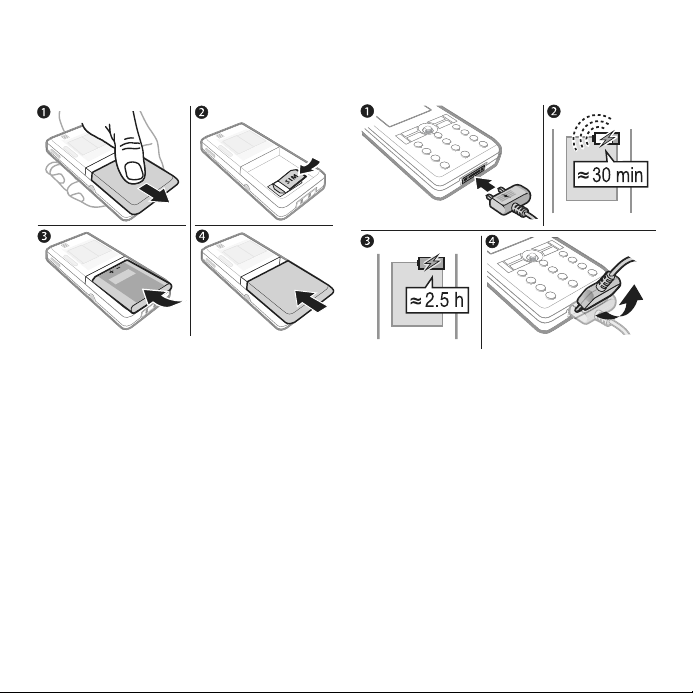
SIM card and battery
To insert SIM card and battery
To charge the battery
1 Remove the battery cover.
2 Slide the SIM card into its holder with
the contacts facing down.
3 Insert the battery with the label side up
and the connectors facing each other.
4 Slide the battery cover into place.
This
is
the Internet version of the use
1 Connect the charger plug to the phone
with the symbol facing upwards.
2 It may take up to 30 minutes before
the battery icon appears.
3 Wait approximately 2.5 hours or until
the battery icon indicates a full charge.
Press a key to activate the screen.
4 Pull out the charger plug by tilting the
plug upwards.
r's guide
. © Prin
t only
fo
r p
rivate use.
5Getting started
Page 6
Turning on your phone
Make sure the phone is charged and a
SIM card inserted before turning it on.
After turning on, use the setup wizard
to quickly and easily prepare for use.
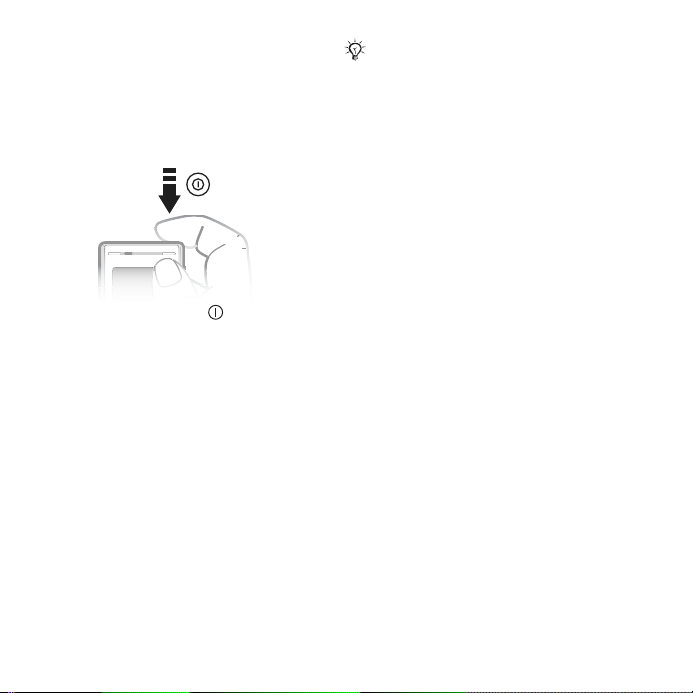
To turn on the phone
1 Press and hold down . The first
startup may take a few minutes.
2 Select to use the phone in:
• Normal mode – full functionality
• Flight mode – limited functionality with
network, FM radio, Bluetooth™
transceivers off
menu.
3 Enter your SIM card PIN, if requested.
4 At first startup, select the language for
your phone menus.
5 } Yes for the setup wizard to help you.
6 Follow the instructions to complete
setup.
% 7 Flight mode
If predefined settings for Internet and
MMS exist in your phone, you may not
need more settings.
Contact your network operator or
service provider for more information.
Help in your phone
Help and information is available in
your phone at any time.
To use the setup wizard
} Settings } the General tab } Setup
wizard and select an option:
• Basic setup
• Tips and tricks
To view information about functions
Scroll to a function } More } Info, if
available.
To view the phone demonstration
} Entertainment } Demo tour.
6 Getting started
This
is
the Internet version of the use
r's guide
. © Prin
t only
fo
r p
rivate use.
Page 7

Flight mode menu
If you turn on the phone and Flight
mode menu is activated, select from
Normal mode with full functionality or
Flight mode with limited functionality.
Network, radio and Bluetooth
transceivers are turned off to prevent
disturbance to sensitive equipment.
You can, for example, play music or
write a text message to send later but
not make calls in an aeroplane.
Follow onboard regulations, flight crew
instructions for use of electronic devices.
To view Flight mode menu options
} Settings } the General tab } Flight
mode and select an option.
Making and receiving calls
The phone must be in normal mode.
To make a call
Enter a phone number (with
international prefix and area code if
applicable) } Call to make the call.
To receive a call
When the phone rings } Answer or
} Busy to reject the call.
To end a call
} End call.
This
is
the Internet version of the use
r's guide
. © Prin
t only
fo
r p
rivate use.
7Getting started
Page 8

Getting to know the phone
Phone overview, menus, navigation, entering letters, activity menu, file manager,
Memory Stick Micro™ (M2™).
Phone overview
1
10
3
4
2
3
4
5
6
7
8
9
Some icons on keys may differ.
8 Getting to know the phone
This
is
the Internet version of the use
11
12
13
14
15
16
17
18
19
12
r's guide
20
. © Prin
t only
15 17
fo
r p
rivate use.
Page 9
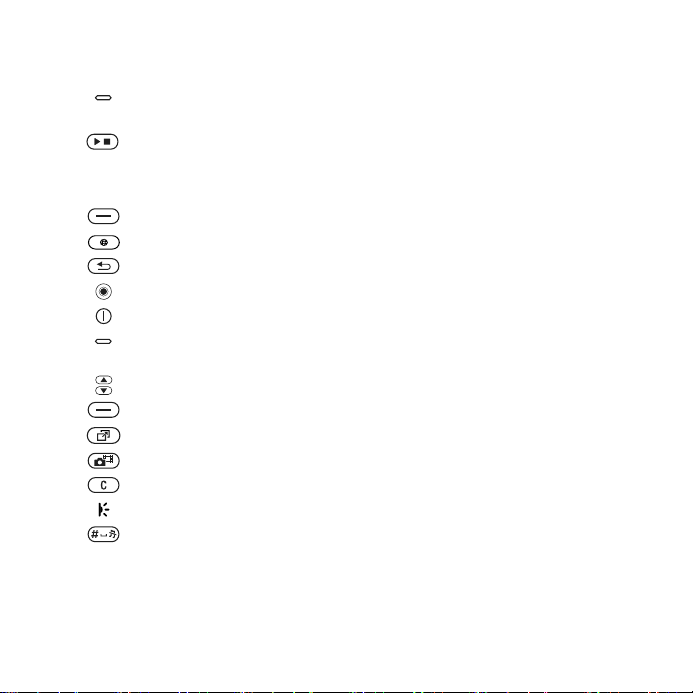
1 Ear speaker
2 Photo key: From standby, view camera album pictures in full view. When
3 Play/stop button
4 Memory Stick Micro™ (M2™) slot
5 Screen
6 Selection key
7 Internet key
8 Back key
9 Navigation key/music player control
10 Power on/off button
11 Photo key: From standby, view camera album thumbnail pictures. When
12 Volume, camera digital zoom buttons
13 Selection key
14 Activity menu key
15 Camera button
16 Clear key
17 Infrared port
18 Silent key
19 Connector for charger, handsfree and USB cable
20 Active camera lens cover
For more information
using the camera, select shoot mode.
using the camera, select scene/video night mode.
% 12 Navigation
This
is
the Internet version of the use
r's guide
. © Prin
t only
fo
r p
rivate use.
9Getting to know the phone
Page 10
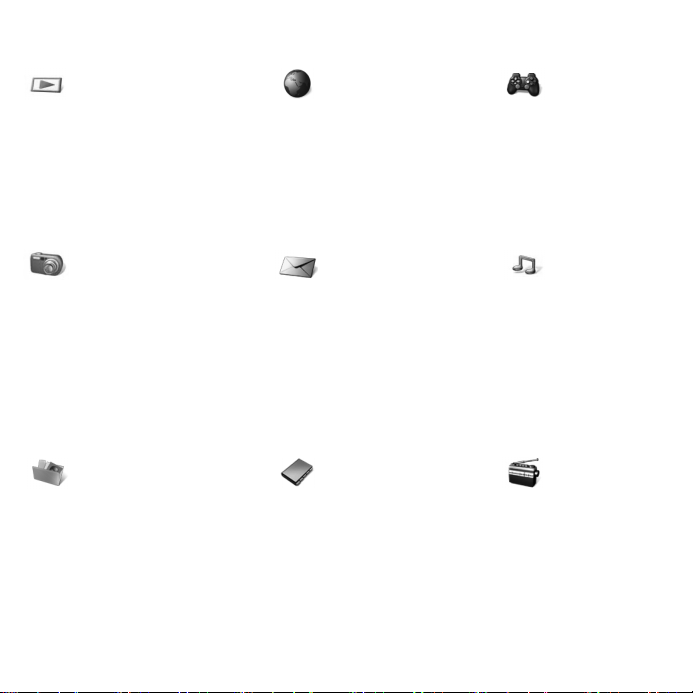
Menu overview
PlayNow™* Internet* Entertainment
Online services*
Games
TrackID™
Video play er
VideoDJ™
PhotoDJ™
MusicDJ™
Remote control
Record sound
Demo tour
Cyber-shot™ Messaging Music player
Write new
Inbox
Email
RSS reader
Drafts
Outbox
Sent messages
Saved messages
My friends*
Call voicemail
Templates
Settings
File manager** Contacts Radio
Camera album
Music
Pictures
Videos
Themes
Web pages
Games
Applications
Other
New contact
Now playing
Artists
Tracks
Playlists
10 Getting to know the phone
This
is
the Internet version of the use
r's guide
. © Prin
t only
fo
r p
rivate use.
Page 11
Calls** Organizer
Alarms
All Answered Dialled Missed
Applications
Calendar
Tasks
Notes
Synchronization
Timer
Stopwatch
Calculator
Code memo
Settings**
t only
Connectivity*
Bluetooth
Infrared port
USB
Synchronization
Device management
Mobile net works
Data communication
Internet settings
Streaming settings
Accessories
fo
r p
rivate use.
General
Profiles
Time & date
Language
Update service
Voice control
New events
Shortcuts
Flight mode
Security
Setup wizard
Phone status
Master reset
* Some menus are operator-, network- and subscription-dependent.
** Use the navigation key right and left to move between tabs in submenus. For more information % 12 Navigation.
This
is
Sounds & alerts
Ring volume
Ringtone
Silent mode
Increasing ring
Vibrating alert
Message alert
Key sound
the Internet version of the use
Display
Wallpaper
Themes
Start-up screen
Screen saver
Clock size
Brightness
Sleep mode clock
Edit line names*
r's guide
Calls
Speed dial
Divert calls
Switch to line 2*
Manage calls
Time & cost*
Show/hide my no.
Handsfree
. © Prin
11Getting to know the phone
Page 12
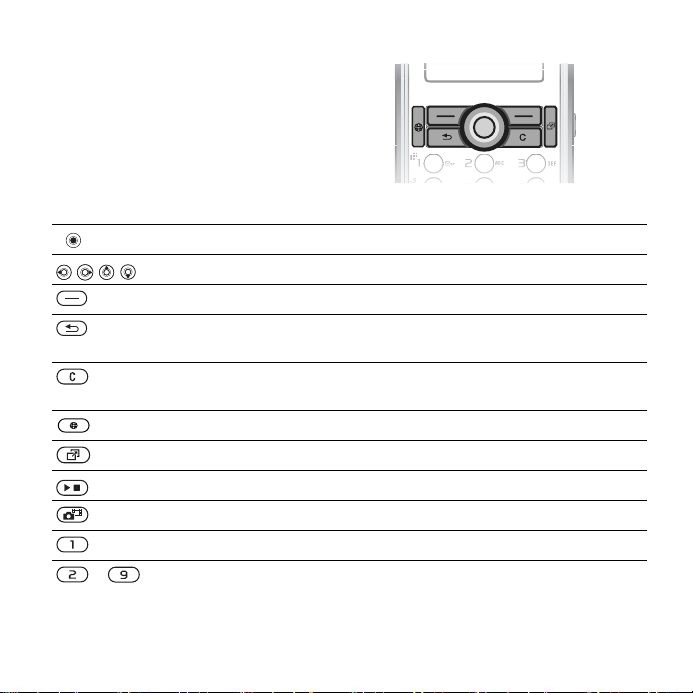
Navigation
The main menus are shown as icons.
Some submenus include tabs. Scroll
to a tab by pressing the navigation key
left or right and selecting an option.
Key
Go to the main menus or select highlighted items.
Move through the menus and tabs.
Select options shown immediately above these keys on the screen.
Go back one level in the menus.
Press and hold down to return to standby or to end a function.
Delete items, such as pictures, sounds and contacts.
During a call, press and hold down to mute the microphone.
Open the browser.
Open the activity menu
Open or pause the music player.
Press and hold down to take a picture or record a video clip.
Press and hold down to call your voicemail service (if set).
- Press and hold down any of these keys to reach a contact beginning
with a specific letter.
Navigation keys
% 21 Activity menu.
12 Getting to know the phone
This
is
the Internet version of the use
r's guide
. © Prin
t only
fo
r p
rivate use.
Page 13
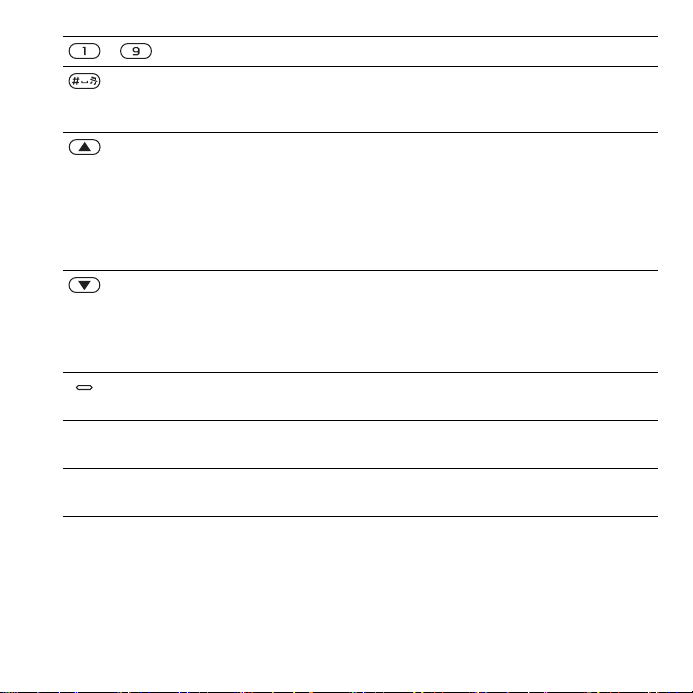
- Press a number key and } Call to speed dial.
Turn off the ringtone when receiving a call.
Press and hold down to set the phone to silent. The alarm sounds
even if the phone is set to silent.
View status information in standby.
Increase the volume during a call, or when using the music player.
Zoom out when using the camera or viewing pictures.
Press and hold down to go back one track.
Press twice to reject a call.
Press and hold down to voice dial, alternatively say your magic word
% 31 Voice dialling.
(if set)
Decrease the volume during a call, or when using the music player.
Zoom in when using the camera or viewing pictures.
Press and hold down to go forward one track.
Press and hold down to voice dial, alternatively say your magic word
% 31 Voice dialling.
(if set)
Use left or right photo keys to view camera album pictures from
standby, for full or thumbnail views.
} Info Find more information, explanations or tips about selected features,
menus or functions available in your phone
} More Enter a list of options. There are different alternatives in the list of
options depending on where you are in the menus.
% 6 Help in your phone.
This
is
the Internet version of the use
r's guide
. © Prin
t only
fo
r p
rivate use.
13Getting to know the phone
Page 14
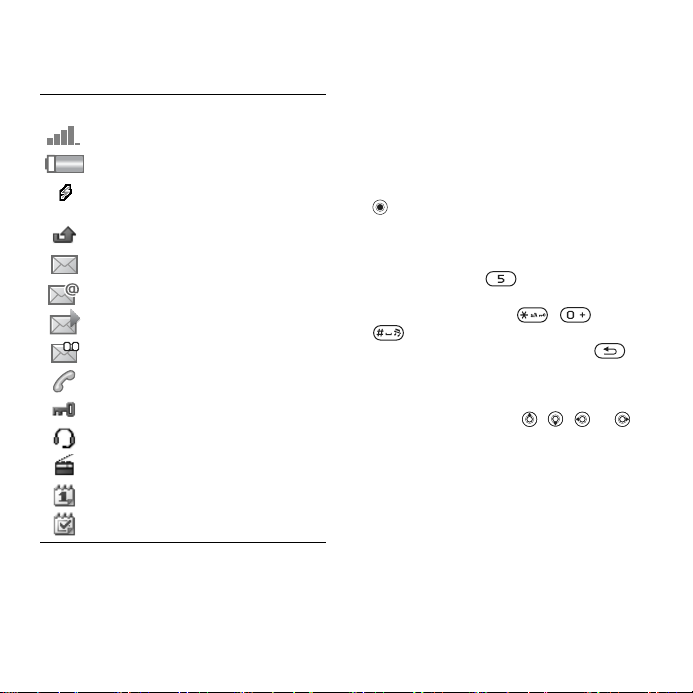
Status bar
Some of the icons that may appear:
Icon Description
GSM network signal strength.
Battery status.
Battery charging, appears with
battery status icon.
Missed incoming call.
Text message received.
Email message received.
Picture message received.
Voice message received.
Ongoing call.
Keylock is on.
Handsfree is connected.
Radio playing in the background.
Calendar reminder.
Task reminder.
Shortcuts
Use keypad shortcuts to quickly go to
menus or navigation key shortcuts to
quickly reach certain functions. You
can edit the navigation key shortcuts
to suit your needs.
Using keypad shortcuts
In standby, go to menus by pressing
and then enter the number of the
menu. Menu numbering starts from
the top left icon and moves across
and then down row by row, for
example, press for the fifth menu
item. For the tenth, eleventh and
twelfth items, press , and
respectively. To go back to
standby, press and hold down .
Using navigation key shortcuts
In standby, go to a shortcuts menu or
function by pressing , , or .
To edit a navigation key shortcut
} Settings } General tab } Shortcuts
and select a shortcut } Edit.
14 Getting to know the phone
This
is
the Internet version of the use
r's guide
. © Prin
t only
fo
r p
rivate use.
Page 15
Phone language
Select the language to use in the
phone menus or when writing text.
To change the phone language
} Settings } General tab } Language
} Phone language. Select a language.
In standby, you can also press
8888 for automatic language.
0000 for English.
0008 for Chinese.
Most SIM cards automatically set the
menu language to the language of the
country/region where you bought your
SIM card. If not, the predefined language
is English.
To select writing language
1 } Settings } the General tab
} Language } Writing language.
2 Scroll to the language to use and mark
it. } Save to exit the menu.
Entering letters
Enter letters in one of the following
ways (text input methods), for
example, when writing messages:
• Multitap text input
• T9™ Text Input
To change the text input method
Before, or when entering letters, press
and hold down to change the
method.
Options list
} More for options when writing a
message.
To enter letters using multitap input
• Press - repeatedly until the
desired character appears.
• Press to shift between capital
and lower-case letters.
• Press and hold down - to
enter numbers.
• Press to delete letters or
numbers.
• Press for the most common
punctuation marks.
• Press to add a space.
T9™ Text Input
The T9™ Text Input method uses a
built-in dictionary to recognize the
most commonly used word for each
sequence of key presses. This way,
you press each key only once, even if
the letter you want is not the first letter
on the key.
This
is
the Internet version of the use
r's guide
. © Prin
t only
fo
r p
rivate use.
15Getting to know the phone
Page 16
To enter letters using T9™ Text Input
1 To enter text, you have to be in a
function where text input is possible,
for example, } Messaging } Write
new } Text message.
2 For example, to write the word “Jane”,
press , , , .
3 If the word shown is the one you want,
press to accept and add a
space. To accept a word without
adding a space, press . If the word
shown is not the one you want, press
or repeatedly to view alternative
words. Accept a word and add a
space by pressing .
4 Continue writing the message. To
enter a punctuation mark, press
and then or repeatedly, press
to accept and add a space.
Multitap input only applies when latin
characters are selected as input
language.
To add words to the T9™ Text Input
dictionary
1 When entering letters } More } Spell
word.
2 Edit the word by using multitap input.
Use and to move the cursor
between the letters. To delete a
character, press . To delete the
entire word, press and hold down
.
When you have edited the word
} Insert. The word is added to the
T9™ Text Input dictionary. Next time
you enter this word using T9™ Text
Input, it appears in alternative words.
Next word prediction
When writing a message, you can use
T9™ Text Input to predict the next
word, if previously used in a sentence.
To turn next word prediction on/off
When entering letters } More
} Writing options } Next word pred..
To use next word prediction
When entering letters, press to
accept or continue.
16 Getting to know the phone
This
is
the Internet version of the use
r's guide
. © Prin
t only
fo
r p
rivate use.
Page 17
Chinese input
This mobile phone has different input
methods for entering Chinese
characters:
• Stroke input
• Pinyin input
You can use these methods, for
example, to enter Chinese names and
Chinese short messages.
Switching between Chinese input methods
In the Chinese editing mode, you can
select and switch quickly to another
input method by pressing and
holding .
General instructions
Regardless of which input method you
choose, your phone has a function to
speed up the entry of Chinese
characters. Whenever you enter a
stroke or a Pinyin letter, a candidate
row of the most frequently used
characters containing that stroke or
relating to that letter appears at the
bottom of the screen.
If the character you want is not
displayed in the candidate row, press
to present another candidate row.
Continue pressing until the
character you want is displayed.
Alternatively, you can enter the next
stroke or Pinyin letter and a new set of
characters will immediately be
displayed in the candidate row. To go
back to the previous row, press .
To select a character in the candidate
row, press the navigation key or press
and hold the key corresponding to the
number above the character you want
to enter.
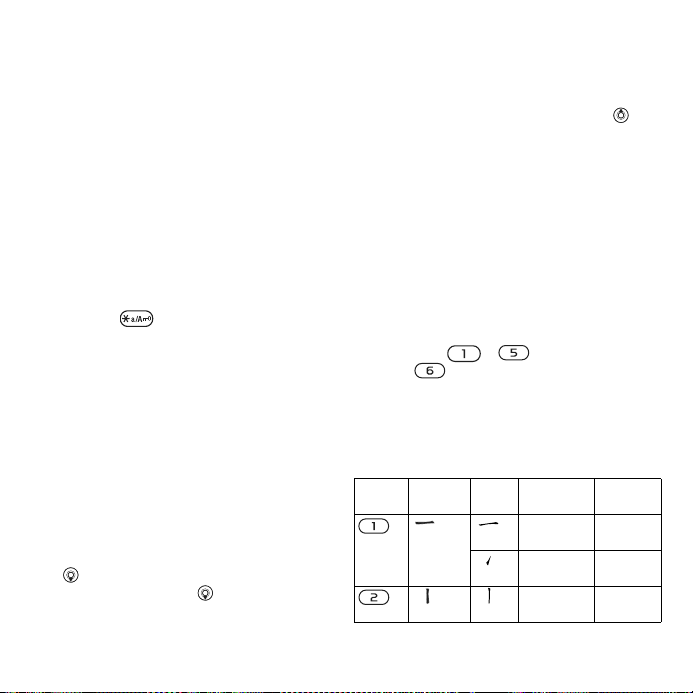
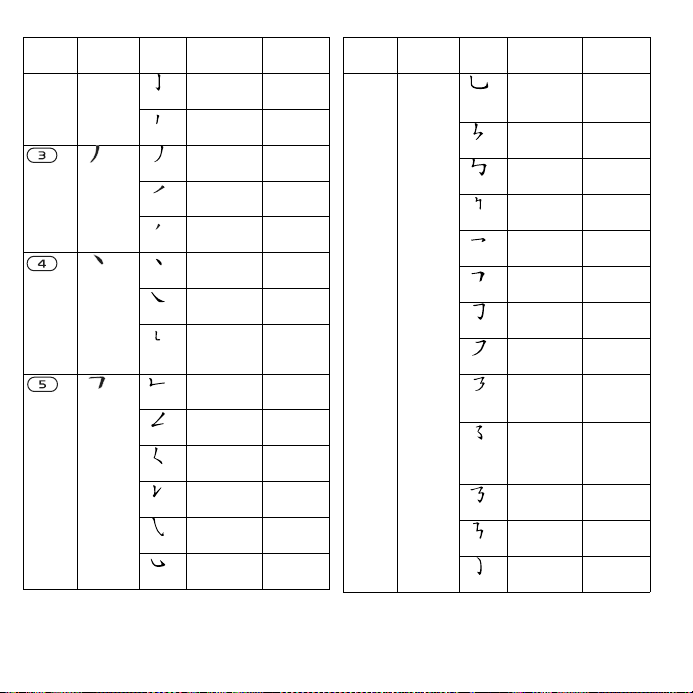
Stroke input
A Chinese character is built up of
strokes. There are more than 30 basic
strokes, which are grouped into 5
stroke categories. Each category is
represented on the keypad by one of
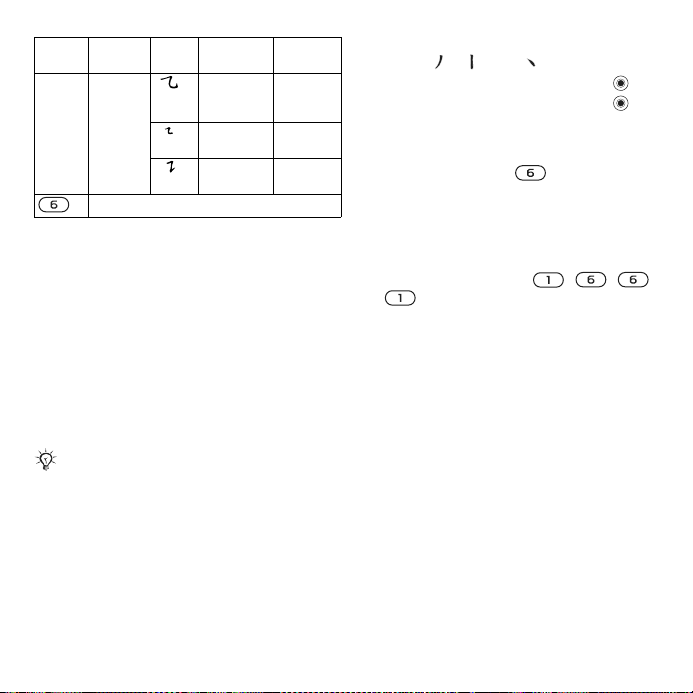
the keys - . The Wild Card
key , is used when you are not
sure of which stroke to use.
Stroke categories
The 5 stroke categories are defined in
the table below:
Number
Key
Stroke
Category
Basic
Stroke
Stroke
Name
Over
Lift
Down
Character
王 十 在
七 天
海 红 牡
状 习
中 业 上
门 丑
This
is
the Internet version of the use
r's guide
. © Prin
t only
fo
r p
rivate use.
17Getting to know the phone
Page 18
Number
Key
Stroke
Category
Basic
Stroke
Stroke
Name
Down-Hook
Short
Slope Down
Long
Left Slope
Over Slope
Short
left Slope
Dot
Right Slope
DownCurvedOver
Down-Over
Left SlopeOver
Left SlopeDot
Down-Lift
Right SlopeHook
Down-OverHook
Character
小 水 打
子 承
直 真 质
草
八 九 丹
风 片
香 千 匕
后 丢
而 页 面
学 殷
六 学 雷
心 性
人 火 又
送 林
四 西 酉
酸
山 巨 屯
母 凶
么 去 公
约 能
女 要 好
巡 巢
衣 以 饭
收 长
我 或 民
成 伐
心 必 思
忘
Number
Key
Stroke
Category
Basic
Stroke
Stroke
Name
Down-OverCurvedHook
Down-OverLeft Slope
Down-OverDown-Hook
Down-OverDown
Over-Hook
Over-Down
Over-DownHook
OverLeft Slope
Over-DownOverLeft Slope
OverLeft SlopeCurvedHook
Over-DownOver-Hook
Over-DownOver-Down
CurvedHook
Character
电 也 毛
兄 孔
专 传 转
马 与 张
号 费
鼎 鼐
写 字 皮
通 免
口 已 户
书 骨
力 习 也
同 永
又 之 登
多 社
及 极 廷
建
阿 队 陈
那 部
乃 透 鼐
隽 杨
凸
狗 豹 家
逐 狂
18 Getting to know the phone
This
is
the Internet version of the use
r's guide
. © Prin
t only
fo
r p
rivate use.
Page 19
Number
Key
Stroke
Category
? (Wild card key)
Basic
Stroke
Stroke
Name
Over-DownCurvedHook
Over-DownOver
Over-DownLift
Components
The basic building units of Chinese
characters are components that are
made up of strokes. After entering the
first two strokes of the desired
character, the component and
character candidates that started with
that stroke are displayed in the
candidate row.
Using components is a fast method
for entering complex characters.
The smaller candidates surrounded by
dotted frames are components, and the
bigger candidates without dotted frames
are characters.
Character
乙 九 瓦
飞 风
投 沿 船
凹
话 计 认
讯
信息
For example, to enter “
”
1 Enter “ ”, “ ” and “ ”.
2 Move the cursor to “ 信 ”, press .
3 Move the cursor to “ 息 ”, press
again to select “ 息 ”.
Example of using the wild card key
The wild card key , is used to
supplement unclear strokes in
entering characters. If you want to
enter “互”, but you only know that “一”
is the first and the last stroke of the
character and that the total number of
strokes is four, enter , , ,
. The character is displayed in the
candidate row.
Pinyin input
Press the keys containing the required
Pinyin letters, and the phone will make
various proposals on the screen,
according to the pronunciation rules
of Mandarin.
This
is
the Internet version of the use
r's guide
. © Prin
t only
fo
r p
rivate use.
19Getting to know the phone
Page 20
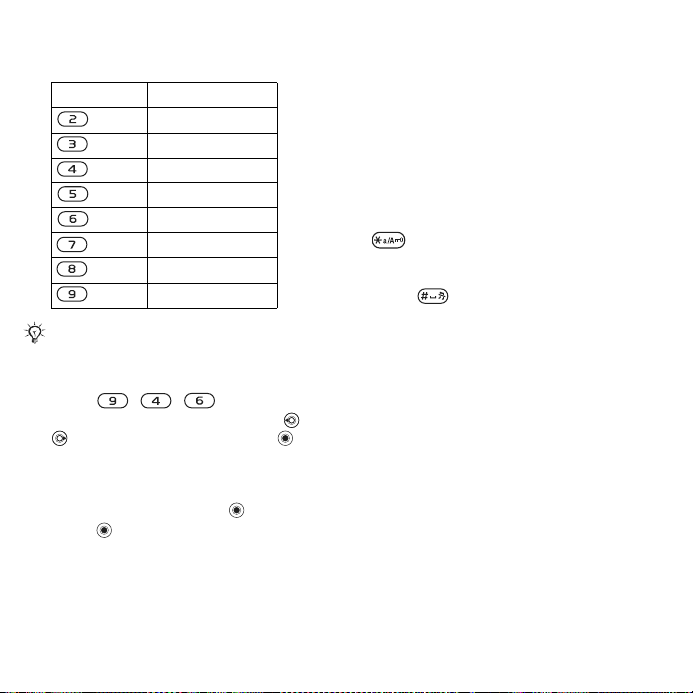
Below is the key mapping of Pinyin
letters on the keypad.
Number Key Pinyin Letter
a b c
d e f
g h i
j k l
m n o
p q r s
t u ü
w x y z
On the keypad, the letter ü is replaced
by v.
For example, to enter “
信息
”
1 Press , , .
2 When “xin” is highlighted, press or
and select “ 信 ”, then press .
(If you want to enter any of the other
suggested Pinyin combinations, scroll
up or down to the desired
combination, then press ).
3 Press again to select “ 息 ”, when
“ 息 ” is highlighted.
Fuzzy Pinyin
Fuzzy Pinyin is an option for the Pinyin
input method, which contains
additional spelling alternatives.
When in Pinyin input mode, press
More } Writing options } Fuzzy
Pinyin } On.
Input punctuation, symbols and smilies
Under any Chinese input mode, press
, to see the table of punctuation
marks, symbols and smilies. Use the
navigation key to make a selection.
Press to enter a space into the
text.
20 Getting to know the phone
This
is
the Internet version of the use
r's guide
. © Prin
t only
fo
r p
rivate use.
Page 21

Activity menu
You can open the activity menu
almost anywhere in the phone to view
and handle new events, and access
bookmarks and shortcuts.
To open and close the activity menu
Press .
Activity menu tabs
• New events – such as missed calls
and messages. When a new event
occurs, the tab appears. Press
to dismiss an event from the event
tab. New events can also be set to
appear as pop-up text instead,
} Settings } the General tab } New
events } Pop-up.
• Running apps – applications that
are running in the background.
Select an application to return to it
or press to end it.
• My shortcuts – add, delete and
change the order of shortcuts.
When you select a shortcut and the
application opens, other programs
are closed or minimized.
• Internet – your Internet bookmarks.
When you select a bookmark and
the browser opens, other programs
are closed or minimized.
File manager
Use the file manager to handle items
such as pictures, videos, music,
themes, Web pages, games and
applications saved in the phone
memory or on a Memory Stick Micro™
(M2™) memory card.
You may have to separately purchase a
memory card for your phone.
Memory Stick Micro™ (M2™)
A memory card adds more storage
space to your phone to save, for
example, pictures or music. It can also
be used as a portable memory,
compatible with other devices like
printers and computers.
To insert and remove a memory card
1 Open the cover and insert as shown
(with the contacts facing up).
2 Press the edge of the memory card to
release and remove it.
This
is
the Internet version of the use
r's guide
. © Prin
t only
fo
r p
rivate use.
21Getting to know the phone
Page 22

You can also move and copy files
between the phone, a computer and a
memory card. If you have a memory
card inserted, files are automatically
saved to it first and then to the phone
memory.
Create subfolders to move or copy
files to. Games and applications can
be moved within the Games and
Applications folders and from the
phone memory to a memory card.
Unrecognized files are saved in the
Other folder. When handling files, you
can select several or all files in a folder
at the same time for all items except
Games and Applications.
All files are automatically saved in the
phone memory. If all available memory
is full, you cannot save any files until
content is removed.
File manager menu tabs
The file manager is divided into three
tabs, and icons are included to
indicate where the files are saved.
• All files – all content in the phone
memory and on a Memory Stick
Micro™ (M2™).
• On Memory Stick – all content on
a Memory Stick Micro™ (M2™).
• In phone – all content in the phone
memory.
File information
View file information by highlighting it
} More } Information. Items that are
downloaded, or received using one of
the available transfer methods, may
be copyright-protected. If a file is
protected, you may not be able to
copy or send it. Such a file has a key
symbol.
To use a file from the file manager
1 } File manager and open a folder.
2 Scroll to a file } More.
To move or copy a file to memory
1 } File manager and select a folder.
2 Scroll to a file } More } Manage file
} Move to move the file or Copy to
copy the file.
3 Select to move or copy the file to
Phone or Memory Stick } Select.
To move or copy files to a computer
% 76 Transferring files using the USB
cable.
22 Getting to know the phone
This
is
the Internet version of the use
r's guide
. © Prin
t only
fo
r p
rivate use.
Page 23

To create a subfolder
1 } File manager and open a folder.
2 } More } New folder and enter a
name for the folder.
3 } OK to save the folder.
To select several files
1 } File manager and open a folder.
2 } More } Mark } Mark several.
3 Scroll to select files } Mark or
Unmark.
To select all files in a folder
} File manager and open a folder
} More } Mark } Mark all.
To delete a file or a subfolder from
the file manager
1 } File manager and open a folder.
2 Scroll to a file } More } Delete.
Memory card options
Check memory status or format
a memory card to delete all
information.
To use memory card options
} File manager and select the On
Memory Stick tab } More for options.
Calling
Calls, contacts, voice control, call
options.
Making and receiving calls
Before you can make or receive any
calls, you must turn on your phone
and be within range of a network.
% 6 Turning on your phone.
Networks
When you turn on the phone, it
automatically selects your home
network if this is within range. If it is
not within range, you may use another
network, provided your network
operator has an agreement that allows
you to do so. This is called roaming.
Select the network to use, or you can
add a network to your preferred
networks. You can also change the
order in which networks are selected
during an automatic search.
To view available network options
} Settings and use or to scroll to
the Connectivity tab } Mobile
networks.
This
is
the Internet version of the use
r's guide
. © Prin
t only
fo
r p
rivate use.
23Calling
Page 24
To make a call
1 Enter a phone number (with
international country/region code and
area code, if applicable).
2 } Call to make a voice call or } More
to view options, such as Save
number.
3 } End call to end the call.
You can call numbers from your contacts
and call list
% 25 Contacts, and
% 29 Call list. You can also use your
voice to make calls
% 30 Voice control.
To make international calls
1 Press and hold down until
a + sign appears.
2 Enter the country/region code, area
code (without the first zero) and phone
number } Call.
To re-dial a number
If a call connection fails and Retry?
appears } Yes.
Do not hold the phone to your ear when
waiting. When the call connects, the
phone gives a loud signal, unless muted.
To answer or reject a call
} Answer or } Busy.
To turn off the microphone
1 Press and hold down .
2 To resume the conversation, press
and hold down again.
To turn the loudspeaker on or off
during a voice call
} More } Turn on speaker or Turn off
speaker.
Do not hold the phone to your ear when
using the loudspeaker. This could
damage your hearing.
To change the ear speaker volume
Press to increase or to
decrease the ear speaker volume
during a call.
Missed calls
When the activity menu is set to
default, missed calls appear in the
New events tab in standby. If pop-up
is set to default, Missed calls: appears
in standby
% 21 Activity menu.
To check missed calls from standby
• If activity menu is set to default:
Press and use or to scroll
to the New events tab and use or
to select a number } Call to call.
24 Calling
This
is
the Internet version of the use
r's guide
. © Prin
t only
fo
r p
rivate use.
Page 25

• If pop-up is set to default:
} Calls and use or to scroll to
the Missed tab. Scroll or to
select a number } Call to call.
Emergency calls
Your phone supports international
emergency numbers, for example,
112, 911. These numbers can
normally be used to make emergency
calls in any country/region, with or
without a SIM card inserted, if a GSM
network is within range.
In some countries/regions, other
emergency numbers may also be
promoted. Your network operator may
therefore have saved additional local
emergency numbers on the SIM card.
To make an emergency call
Enter 112 (the international emergency
number) } Call.
To view your local emergency
numbers
} Contacts } More } Options
} Special numbers } Emergency
nos..
Contacts
You can save your contact information
in the phone memory or on a SIM
card. The following is available:
You can choose which contact
information – Phone contacts or SIM
contacts – is shown as default.
For useful information and settings
} Contacts } More } Options.
Default contacts
If Phone contacts is selected as
default, your contacts show all the
information saved in Contacts. If you
select SIM contacts as default, your
contacts show information depending
on the SIM card.
To select default contacts
1 } Contacts } More } Options
} Advanced } Default contacts.
2 } Phone contacts or SIM contacts.
This
is
the Internet version of the use
r's guide
. © Prin
t only
fo
r p
rivate use.
25Calling
Page 26

Phone contacts
Save contacts in the phone with
names, phone numbers and personal
information. You can also add pictures
and ringtones to contacts. Use , ,
and to scroll between tabs and
their information fields.
To add a phone contact
1 If Phone contacts is selected as
default, } Contacts } New contact
} Add.
2 Enter the name } OK.
3 Enter the number } OK.
4 Select a number option.
5 Scroll between tabs and select the
fields to add information. To enter
symbols such as @, } More } Add
symbol and select a symbol } Insert.
6 When all information is added } Save.
SIM contacts
Save contacts on your SIM card.
To add a SIM contact
1 If SIM contacts is selected as default,
} Contacts } New contact } Add.
2 Enter the name } OK.
3 Enter the number } OK and select
a number option. Add more
information, if available } Save.
To delete a contact
Contacts and scroll to a contact.
1 }
2 Press and select Yes.
To delete all phone contacts
} Contacts } More } Options
} Advanced } Delete all contacts
} Yes and } Yes. Names and numbers
on the SIM card are not deleted.
To automatically save names and
phone numbers on the SIM card
} Contacts } More } Options
} Advanced } Auto save on SIM and
select On.
Memory status
The number of contacts you can save
in the phone or on the SIM card
depends on available memory.
To view memory status
} Contacts } More } Options
} Advanced } Memory status.
26 Calling
This
is
the Internet version of the use
r's guide
. © Prin
t only
fo
r p
rivate use.
Page 27
Using contacts
Contacts can be used in many ways.
Below you can see how to:
• Call phone and SIM contacts.
• Send phone contacts to another
• Copy contacts to phone and SIM
card.
• Add a picture or a ringtone to
a phone contact.
• Edit contacts.
• Synchronize your contacts.
device.
To call a phone contact
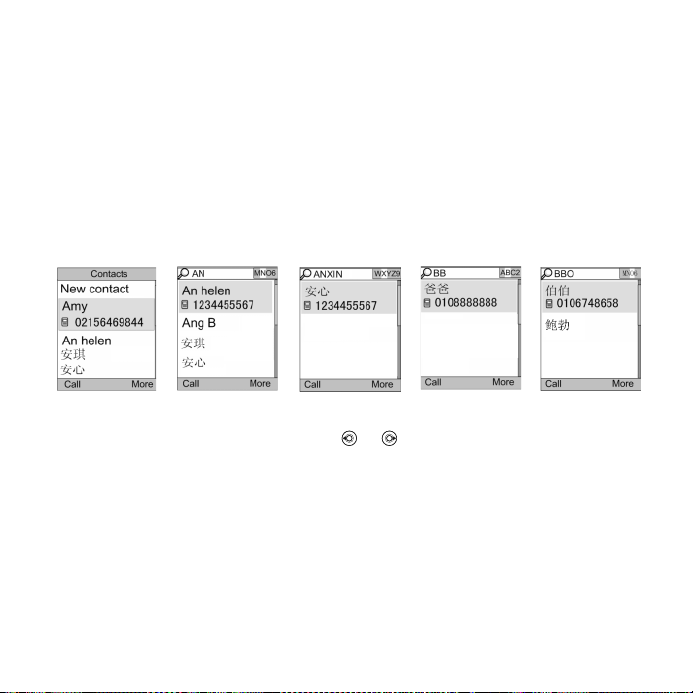
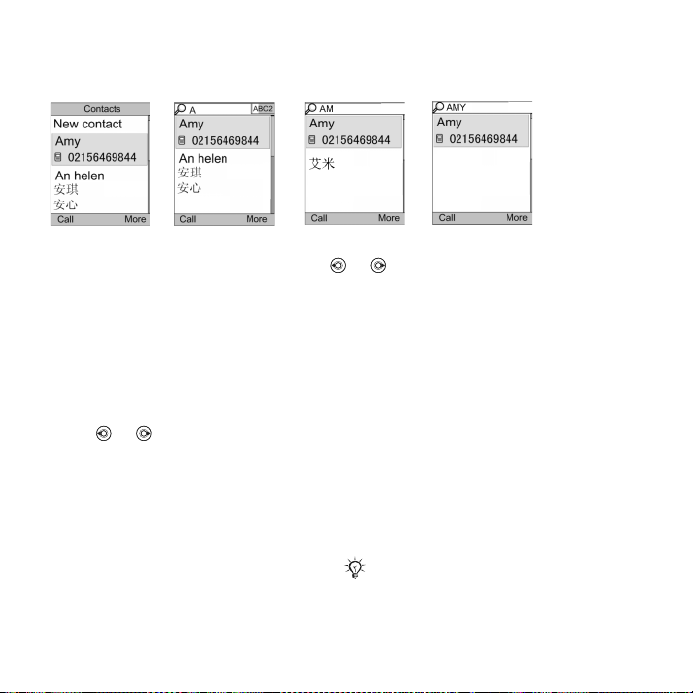
To call a contact written in Chinese characters
1 } Contacts. Then enter the entire multi-letter name, pure initial or mixed initial pinyin
of Chinese contacts you want to call. For example:
Initial status Full name search
Pure initial search Mixed initial search
2 When the contact is highlighted, press or to select a number } Call.
This
is
the Internet version of the use
r's guide
. © Prin
t only
fo
r p
rivate use.
27Calling
Page 28
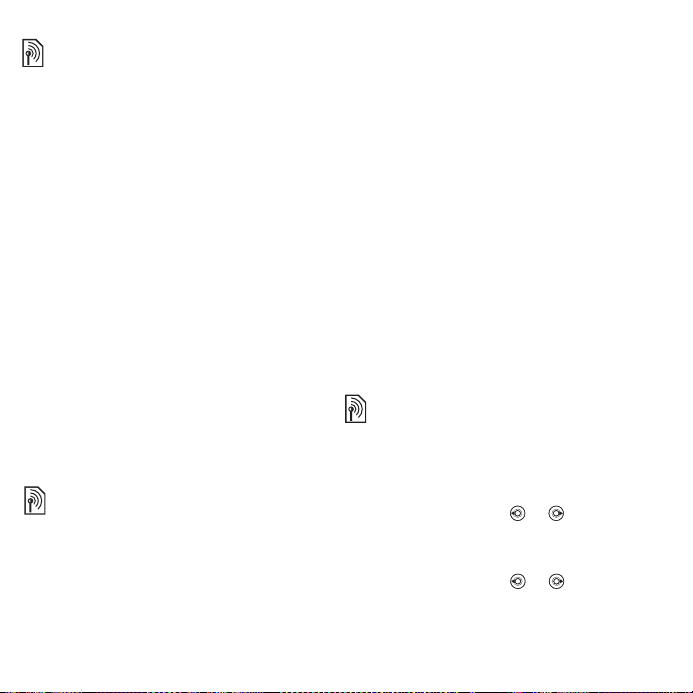
To call a contact written in Latin characters
1 } Contacts. Scroll to, or enter the first letters or all letters of the contact you want to
call (a maximum of 10 letters).
Initial Input 'A' input 'AM' input 'AMY'
2 When the contact is highlighted, press or to select a number } Call.
Note: Phone supports Chinese and English contacts mixed search. When a contact
is written in Latin character, the entered letter can reach the Latin contact you want
to call; When a contact is written in Chinese characters, the entered letter can reach
the pinyin of Chinese contact you want to call.
To call a SIM contact
• If SIM contacts is default } Contacts
and when the contact is highlighted
press or to select a number
} Call.
• If Phone contacts is set as default
} Contacts } More } Options } SIM
contacts and select the contact
} Call.
To send a contact
} Contacts and select a contact
} More } Send contact and select
a transfer method.
To send all contacts
} Contacts } More } Options
} Advanced } Send all contacts and
select a transfer method.
To copy names and numbers to the
SIM card
1 } Contacts } More } Options
} Advanced
} Copy to SIM.
2 Select one of the alternatives.
When copying all contacts from the
phone to the SIM card, all existing SIM
card information is replaced.
28 Calling
This
is
the Internet version of the use
r's guide
. © Prin
t only
fo
r p
rivate use.
Page 29

To copy names and numbers to
phone contacts
1 } Contacts } More } Options
} Advanced } Copy from SIM.
2 Select one of the alternatives.
To add a picture, ringtone sound or
video to a phone contact
1 } Contacts and select the contact
} More } Edit contact.
2 Select the relevant tab and then select
Picture or Ringtone } Add.
3 Select an option and an item } Save.
If your subscription supports Calling Line
Identification (CLI) service, you can
assign personal ringtones to contacts.
To edit a phone contact
1 } Contacts and select a contact
} More } Edit contact.
2 Scroll to the relevant tab and select
the field to edit } Edit.
3 Edit the information } Save.
To edit a SIM contact
1 If SIM contacts is default } Contacts
and select the name and number to
edit. If phone contacts is default
} Contacts } More }
contacts and select the name and
number to edit.
Options } SIM
2 } More } Edit contact and edit the
name and number.
To select the sort order for contacts
} Contacts } More } Options
} Advanced } Sort order.
To save and restore contacts with
a memory card
} Contacts } More } Options
} Advanced } Back up to M.S. or
Restore from M.S..
Synchronizing contacts
You can synchronize your contacts
with a contacts application on the
Web. For more information
% 71 Synchronizing.
Call list
Information about most recent calls.
To call a number from the call list
1 From standby } Calls and select a tab.
2 Scroll to the name or number to call
} Call.
To add a call list number to contacts
1 From standby } Calls and select a tab.
2 Scroll to the number to add } More
} Save number.
This
is
the Internet version of the use
r's guide
. © Prin
t only
fo
r p
rivate use.
29Calling
Page 30

3 } New contact to create a new
contact, or select an existing contact
to add the number to.
To clear the call list
} Calls and select the All tab } More
} Delete all.
Speed dial with pictures
Save numbers in positions 1-9 in your
phone to access them easily. Speed
dial is dependent on your default
contacts
example, you can speed dial numbers
saved on the SIM card.
If you add contacts with pictures to
speed dial positions, the contact
pictures appear for easy reference
% 29 To add a picture, ringtone sound
or video to a phone contact.
To edit speed dial numbers
1 } Contacts } More } Options
} Speed dial.
2 Scroll to the position } Add or } More
} Replace.
To speed dial
From standby, enter the position
number } Call.
% 25 Default contacts, for
Voicemail
If your subscription includes an
answering service, callers can leave
a voicemail message when you cannot
answer a call.
Contact your network operator for your
voicemail number or for more
information.
To call your voicemail service
Press and hold down . If you have
not entered a voicemail number, } Yes
and enter the number.
To edit your voicemail number
} Messaging } Settings } Voicemail
number.
Voice control
Manage calls with your voice by
creating voice commands to:
• Voice dial – call someone by saying
their name.
• Activate voice control by saying
a “magic word”.
• Answer and reject calls when using
a handsfree.
30 Calling
This
is
the Internet version of the use
r's guide
. © Prin
t only
fo
r p
rivate use.
Page 31

Before voice dialling
Activate the voice dialling function and
record your voice commands. An icon
appears next to a phone number that
has a voice command.
To activate voice dialling and
record names
1 } Settings } the General tab } Voice
control } Voice dialling } Activate
} Yes } New voice and select a
contact.
2 If the contact has more than one
number, use and to view the
numbers. Select the number to add
the voice command to. Record a voice
command such as “John mobile”.
3 Instructions appear. Wait for the tone
and say the command to record. The
voice command is played back to you.
4 If the recording sounds OK } Yes. If
not } No and repeat step 3.
To record another voice command for
a contact } New voice } Add again
and repeat steps 2-4 above.
Caller name
Hear your recorded contact name
when you receive a call from that
contact.
To turn the caller name on or off
} Settings } the General tab } Voice
control } Play caller name.
Voice dialling
Start voice dialling from standby using
the phone, a portable handsfree, a
Bluetooth headset or by saying your
magic word.
To make a call
1 From standby, press and hold down
one of the volume keys.
2 Wait for the tone and say a recorded
name, for example “John mobile”. The
name is played back to you and the
call is connected.
To make a call with a handsfree
From standby, press and hold down
the handsfree button, or press the
Bluetooth headset button.
This
is
the Internet version of the use
r's guide
. © Prin
t only
fo
r p
rivate use.
31Calling
Page 32

The magic word
Record and use a voice command as
a magic word to activate voice control
without pressing any keys. The magic
word can only be used with a
handsfree.
Choose a long, unusual word or phrase
that can easily be distinguished from
ordinary background speech.
To activate and record the magic
word
1 } Settings } the General tab } Voice
control } Magic word } Activate.
2 Instructions appear. } Continue. Wait
for the tone and say the magic word.
3 } Yes to accept or } No to record a
new magic word.
4 Instructions appear. } Continue and
select the environments in which your
magic word is to be activated.
Voice answering
Answer or reject incoming calls by
using your voice, when using a
handsfree.
You can use a MIDI, WAV (16 kHz), EMY
or IMY file as a ringtone with voice
answering.
To activate voice answering and
record voice answer commands
1 } Settings } the General tab } Voice
control } Voice answer } Activate.
2 Instructions appear. } Continue. Wait
for the tone and say “Answer”, or
another word.
3 } Yes to accept or } No for a new
recording.
4 Instructions appear } Continue. Wait
for the tone and say “Busy”, or
another word.
5 } Yes to accept or } No for a new
recording.
6 Instructions appear. } Continue and
select the environments in which voice
answering is to be activated.
To answer or reject a call using voice
commands
When the phone rings, say:
• “Answer” to connect the call.
• “Busy” to reject the call.
To edit your voice commands
1 } Contacts and scroll to a contact.
2 } More } Edit contact and scroll to
the relevant tab.
32 Calling
This
is
the Internet version of the use
r's guide
. © Prin
t only
fo
r p
rivate use.
Page 33

To re-record a voice command
1 } Settings } the General tab } Voice
control } Voice dialling } Edit names.
2 Select a command } More } Replace
voice } Yes.
3 Wait for the tone and say the
command.
Diverting calls
Divert calls, for example, to an
answering service.
When the restrict call function is
activated, some divert call options are
not available.
Your phone has the following options:
• Divert always – all calls.
• When busy – if a call is ongoing.
• Not reachable – if turned off or
unreachable.
• No reply – if not answered in
a specified time.
To activate a call divert
1 } Settings } the Calls tab } Divert
calls.
2 Select a call type and divert option
} Activate.
3 Enter the phone number to divert your
calls to, or press Look up to find
a contact } OK.
% 35 Restricted dialling.
To deactivate a call divert
Scroll to the divert option
} Deactivate.
More than one call
Handle more than one call
simultaneously.
Call waiting service
When this is activated you hear a beep
if you receive a second call.
To activate or deactivate the call
waiting service
} Settings } the Calls tab by using
or and } Manage calls } Call
waiting.
To make a second call
1 } More } Hold to hold the ongoing
call.
2 Enter the number to call } More
} Call.
Receiving a second voice call
When you receive a second call, you
can:
} Answer and put the ongoing call on
hold.
} Busy to reject and continue with the
ongoing call.
} Replace active call to answer and
end the ongoing call.
This
is
the Internet version of the use
r's guide
. © Prin
t only
fo
r p
rivate use.
33Calling
Page 34
Handling two voice calls
If you have calls ongoing and on hold,
you can:
} More } Switch to switch between
the two calls.
} More } Join calls to join the two
calls.
} More } Transfer call to connect the
two calls. You are disconnected from
both calls (operator-dependent).
} End call and } Yes to retrieve the
call on hold.
} End call and } No to end both calls.
You cannot answer a third call without
ending one of the first two calls or
joining them into a conference call.
Conference calls
Start a conference call by joining an
ongoing call and a call on hold. You
then put the conference on hold and
add up to five participants, or can
make another call.
There may be additional charges for calls
involving multiple parties, contact your
network operator for more information.
To join the two calls into
a conference call
} More } Join calls.
To add a new participant
1 } More } Hold to put the joined calls
on hold.
2 } More } Add call and call the next
person to add to the conference call.
3 } More } Join calls.
4 Repeat steps 1-3 to add more
participants.
To release a participant
} More } Release part. and select the
participant to release from the
conference call.
To have a private conversation
1 } More } Talk to and select the
participant to talk to.
2 } More } Join calls to resume the
conference call.
Two voice lines
Make separate calls with different
phone numbers if your subscription
supports alternate line service.
To select a line for outgoing calls
} Settings and use or to scroll to
the Calls tab. Select line 1 or 2.
To change the name of a line
} Settings and use or to scroll to
the Display tab } Edit line names.
Select the line to edit.
34 Calling
This
is
the Internet version of the use
r's guide
. © Prin
t only
fo
r p
rivate use.
Page 35
My numbers
View, add and edit your own phone
numbers.
To check your phone numbers
} Contacts } More } Options
} Special numbers } My numbers
and select one of the options.
Accept calls
Only receive calls from certain phone
numbers. If the divert calls option
When busy is activated, calls are
diverted.
To add numbers to the accepted
callers list
} Settings and use or to scroll to
the Calls tab } Manage calls
} Accept calls } Only from list } Edit
} Add. Select a contact or } Groups
% 37 Groups.
To accept all calls
} Settings } the Calls tab } Manage
calls } Accept calls } All callers.
Restricted dialling
Restrict outgoing and incoming calls.
A password from your service provider
is required.
If you divert incoming calls, you cannot
activate some restrict calls options.
The following calls can be restricted:
• All outgoing – all outgoing calls.
• Outgoing intl – all outgoing
international calls.
• Outgoing intl roam. – all outgoing
international calls except to your
home country/region.
• All incoming – all incoming calls.
• Inc. when roaming – all incoming
calls when you are abroad
% 23 Networks.
To activate or deactivate a call
restriction
1 } Settings and use or to scroll to
the Calls tab } Manage calls
} Restrict calls. Select an option.
2 Select Activate or Deactivate, enter
your password } OK.
This
is
the Internet version of the use
r's guide
. © Prin
t only
fo
r p
rivate use.
35Calling
Page 36
Fixed dialling
The fixed dialling function allows calls
to be made to certain numbers saved
on the SIM card. The fixed numbers
are protected by your PIN2.
You can still call the international
emergency number, 112, even when the
fixed dialling function is activated.
Partial numbers can be saved. For
example, saving 0123456 allows calls
to be made to all numbers starting
with 0123456.
When fixed dialling is activated, you may
not be allowed to view or manage any
phone numbers saved on the SIM card.
To activate or deactivate fixed
dialling
1 } Contacts } More } Options
} Special numbers } Fixed dialling
and select Activate or Deactivate.
2 Enter your PIN2 } OK and then } OK
again to confirm.
To save a fixed number
} Contacts } More } Options
} Special numbers } Fixed dialling
} Fixed numbers } New number and
enter the information.
Call time and cost
During a call, the duration of the call is
shown. You can check the duration of
your last call, outgoing calls and the
total time of your calls.
To check the call time
} Settings and use or to scroll to
the Calls tab } Time & cost } Call
timers.
Additional calling functions
Tone signals
Use telephone banking services or
control an answering machine with
tone signals during a call.
To use tone signals
• Press - , or to
send tones.
• } More } Disable tones or Enable
tones to turn the tones on or off during
a call.
• Press to clear the screen after
a call.
36 Calling
This
is
the Internet version of the use
r's guide
. © Prin
t only
fo
r p
rivate use.
Page 37

Notepad
Use the screen as a notepad to enter a
phone number during a call. When you
end the call, the number remains on
the screen for you to call or save in
your contacts.
To call or save a number from the
notepad
• } Call to call the number.
• } More } Save number and select
a contact to save the number to.
• } More } Save number } New
contact to create a new contact to
save the number to.
Showing or hiding your number
If your subscription supports the
Calling Line Identification Restriction
(CLIR) service, you can hide your
phone number when making a call.
To always show or hide your phone
number
1 } Settings } the Calls tab } Show/
hide my no..
2 Select Show number, Hide number or
Network default.
Groups
Create a group of numbers and email
addresses to send messages to
several recipients at the same time
% 38 Messaging. You can also use
groups (with numbers) when you
create accepted callers lists
% 35 Accept calls.
To create a group of numbers and
email addresses
1 } Contacts } More } Options
} Groups } New group } Add.
2 Enter a name for the group
} Continue.
3 } New } Add to find and select a
contact number or email address.
4 Repeat step 3 to add more numbers
or email addresses. } Done.
Business cards
Add your own business card as
a contact.
To add your own business card
} Contacts } More } Options } My
business card and add information for
your business card } Save.
To send your business card
} Contacts } More } Options } My
business card } Send my card and
select a transfer method.
This
is
the Internet version of the use
r's guide
. © Prin
t only
fo
r p
rivate use.
37Calling
Page 38

Messaging
Text messaging, picture messaging,
voice messaging, email, My friends.
Your phone supports various
messaging services. Please contact
your service provider about the
services you can use, or for more
information, visit
www.sonyericsson.com/cn.
Text messaging (SMS)
Text messages can contain simple
pictures, sound effects, animations,
and melodies. You can also create
and use templates for your messages.
If you send a text message to a group,
you will be charged for each member.
Before you start
The number to your service centre is
supplied by your service provider and
is usually set on the SIM card. If not,
you can enter the number yourself.
To set a service centre number
1 } Messaging } Settings } Text
message } Service centre. If the
service centre number is saved on the
SIM card it is shown.
2 If there is no number shown } Edit
} New ServiceCentre and enter the
number, including the international “+”
prefix and country/region code
} Save.
Sending text messages
For information about entering letters
% 15 Entering letters.
To write and send a text message
1 } Messaging } Write new } Text
message.
2 Write your message } Continue. (You
can save a message for later in Drafts
by pressing } Save message.)
3 } Enter phone no. and enter a
number, or } Contacts look-up to
retrieve a number or a group from
Contacts, or } Enter email addr. or
select from last used recipients
} Send.
To send a message to an email address,
you need to set an email gateway
} Messaging } Settings } Tex t
number,
message
is supplied by your service provider.
To copy and paste text in a message
1 When writing your message
} Copy & paste.
} Email gateway. The number
} More
38 Messaging
This
is
the Internet version of the use
r's guide
. © Prin
t only
fo
r p
rivate use.
Page 39

Copy all or } Mark & copy and use
2 }
the navigation key to scroll and mark
text in your message.
More } Copy & paste } Paste.
3 }
To insert an item in a text message
1 When writing your message } More
} Add item.
2 Select an option and then an item, for
example, a picture.
You can convert your text message to
a picture message. When writing your
message
continue creating a picture message,
} More } To p ic t u re m s g and
% 41 Picture messaging (MMS).
Receiving text messages
When you receive a text message, it
appears in the activity menu if New
events is set to Activity menu. } View
to read the message.
If New events is set to Pop-up, you
are asked if you want to read the text
message. } Yes to read the message
or } No to read it la ter. Whe n you have
read the text message } More for
options or press to close the
message.
To call a number in a text message
Select the phone number displayed in
the message, } Call.
Saving and deleting text messages
Received text messages are saved in
the phone memory. When the phone
memory is full, delete messages or
move them to the SIM card to be able
to receive new messages. Messages
saved on the SIM card remain until
they are deleted.
To save a message
1 } Messaging } Inbox and select the
message to save.
2 } More } Save message.
3 } Saved messages to save on the
SIM card or } Templates to save the
message as a template in the phone.
To save an item in a text message
1 When reading a message, select the
phone number, picture or Web
address to save } More.
2 } Use
(the phone number you have
selected appears) } Save number to
save the phone number or } Save
picture to save a picture or } Use (the
bookmark you have selected appears)
} Save bookmark to save a
bookmark.
To delete a message
1 } Messaging and select a folder.
2 Select the message to delete and
press .
This
is
the Internet version of the use
r's guide
. © Prin
t only
fo
r p
rivate use.
39Messaging
Page 40

To save or delete several messages
1 } Messaging and select a folder.
2 Select a message } More } Delete all
msgs to delete all messages in the
folder or } Mark several scroll and
select messages by pressing Mark or
Unmark.
3 } More } Save message to save
messages or } Delete messages to
delete messages.
Long messages
The number of characters allowed in a
text message depends on the
language used for writing. You can
send a long message by linking two or
more messages. You are charged for
each of the messages linked in a long
message. The recipient may not
receive all parts of a long message at
the same time.
Check with your service provider for the
maximum number of messages that can
be linked.
To turn long messages on
} Messaging } Settings } Text
message } Max. msg length } Max.
available.
Templates for text messages
Add a new template or save a
message as a template in your phone
% 39 To save a message.
To add a template
1 } Messaging } Templates } New
template } Text.
2 Insert text } OK.
3 Enter a title } OK.
To use a template
1 } Messaging } Templates select
a template } Use } Text message.
2 Add text or } Continue and select
a recipient to send the message to.
Message options
Set a default value for several
message options or choose the
settings each time you send
a message.
To set default text message options
} Messaging } Settings } Text
message and select the options to
change.
40 Messaging
This
is
the Internet version of the use
r's guide
. © Prin
t only
fo
r p
rivate use.
Page 41

To set message options for a specific
message
1 When the message is written and
a recipient is selected } More
} Advanced.
2 Select an option to change } Edit and
select a new setting } Done.
To check the delivery status of a sent
message
} Messaging } Sent messages and
select a text message } View } More
} View status.
Picture messaging (MMS)
Picture messages can contain text,
pictures, camera pictures, slides,
sound recordings, video clips,
signatures and attachments. You can
send picture messages to a mobile
phone or an email address.
Before you start
• Both you and the recipient must have
subscriptions that support picture
messaging.
If no Internet profile or message server
exists, you can receive all the settings
for MMS automatically from your
network operator or from
www.sonyericsson.com/cn.
• The address of your message server
and an Internet profile are set.
To check the message server
address and Internet profile
1 } Messaging } Settings } Picture
message } MMS profile and select a
profile.
2 } More } Edit } Message server and
} More } Edit } Internet profile.
To create and send a picture
message
1 } Messaging } Write new } Picture
msg. Scroll to use toolbar options.
Scroll or to select an option.
} More for even more options.
2 When ready to send } Continue.
3 } Enter email addr. or } Enter phone
no. or } Contacts look-up
number or group in Contacts or select
from last used recipients } Send.
When writing and editing picture
messages you can use the copy and
paste functionality
paste text in a message
To set default picture message
options
} Messaging } Settings } Picture
message and select options to
change.
to retrieve a
% 38 To copy and
.
This
is
the Internet version of the use
r's guide
. © Prin
t only
fo
r p
rivate use.
41Messaging
Page 42

Additional send options
Request a read report, a delivery
report, and set a priority for a specific
message. You can also add more
recipients to the message.
To select additional send options
1 When the message is created and a
recipient is selected } More.
2 } Add recipient to add another
recipient or } Edit recipients to edit
and add recipients. } Edit subject to
change the message subject or
} Advanced for more send options.
Receiving picture messages
Select how to download your picture
messages and how to save items that
you receive in picture messages.
To set automatic download
} Messaging } Settings } Picture
message } Auto download to view
and select one of the following:
• Always – automatic download.
• Ask in roaming – ask to download
when not in home network.
• Not in roaming – do not download
when not in home network.
• Always ask – to download.
• Off – new messages appear in the
Inbox. Select the message and
} View to download.
To receive picture messages
When you receive an automatically
downloaded picture message, it
appears in the activity menu if New
events is set to Activity menu. } View
to read the message.
If New events is set to Pop-up, you
are asked if you want to read the
picture message, } Yes to read or
play.
} Stop to stop playing or reading,
} Reply or
} More to view options.
Press to close the message.
To save an item in a picture message
When viewing a picture message
} More } Save items and select an
item to save from the list that appears.
Delete picture messages
Picture messages are saved in the
phone memory. When phone memory
is full, you must delete messages to
be able to receive new messages.
Select a message and press to
delete.
42 Messaging
This
is
the Internet version of the use
r's guide
. © Prin
t only
fo
r p
rivate use.
Page 43

Templates for picture messages
Add a new template or use a predefined template.
To add a template
1 } Messaging } Templates } New
template } Picture msg.
2 } More to add new items.
3 } Save, enter a title } OK to save the
template.
To use a template
1 } Messaging } Templates and select
a template from the list } Use to use
the template as it is or } More } Edit
template to edit the template, } Save,
enter a title } OK to save the changes.
2 } Continue and select a recipient to
send the message to or select
a template from the list } Use
} Continue if the template is edited.
Voice messages
Send and receive a sound recording
as a voice message.
The sender and receiver must have a
subscription supporting picture
messaging.
To record and send a voice message
1 } Messaging } Write new } Voice
message.
2 Record your message. } Stop to end.
3 } Send to send the message.
4 } Enter email addr. for an email
recipient or } Enter phone no. for
a recipient phone number or
} Contacts look-up for a number or
group in Contacts or select from last
used recipients } Send.
Receiving voice messages
When you receive an automatically
downloaded voice message, the voice
message appears in the activity menu
if New events is set to Activity menu.
} Play to listen to the message.
If New events is set to Pop-up, you
are asked if you want to listen to the
voice message. } Yes to play the
message or } No if you want to play
the message later. When you have
listened to the voice message } More
to view a list of options. Press to
close the message.
This
is
the Internet version of the use
r's guide
. © Prin
t only
fo
r p
rivate use.
43Messaging
Page 44

Read your email messages in your
phone at any time. Write a message,
attach a high-resolution camera
picture, sound recording or video clip,
and send it to your friends or
colleagues. You can also reply to and
forward email in your phone, just as
you can on your computer.
The email address that you use on
your computer can also be used in
your phone. To do this, your phone
needs the same email settings as used
by your computer for email address.
To use your computer email address
in your phone, do one of the following:
Receive settings automatically
The easiest way is to have settings
sent directly to your phone. Use
Internet on your computer to go to
www.sonyericsson.com/cn.
Entering settings manually
• You can ask your email provider for
settings information. An email
provider is the person or company
who provided your email address,
for example, your IT administrator at
work or an Internet provider.
• You may have a document at home
from your email provider with the
settings information.
• You may find the information in your
computer email program settings.
What information do I need?
The minimum you need is the
following:
Setting types Examples
Connection type POP3 or IMAP4
Email address joe.smith@example
.com
Incoming server mail.example.com
Username jsmith
Password zX123
Outgoing server mail.example.com
There are many different email providers.
Their terminology and required
information may differ. Not all service
providers allow email access.
44 Messaging
This
is
the Internet version of the use
r's guide
. © Prin
t only
fo
r p
rivate use.
Page 45

Help in your phone
There are also setup instructions and
help information as you enter settings.
To enter email settings
1 } Messaging } Email } Settings.
2 After settings are entered, } Inbox
} More } Send & receive to access
your email.
When settings are entered, your
phone can connect to an email server
to send and receive email messages.
For more information, contact your
email provider or see the User guide
with additional information at
www.sonyericsson.com/cn.
To create an email account
1 } Messaging } Email } Settings
} New account.
2 Enter a name for the account } OK.
For help } Setup instructions or press
to a setting } Info.
3 Scroll to a setting and enter the
following minimum required settings:
• Email alert – select the alert sound
for new messages.
• Connect using – select a data
account (provided by your network
operator, } Info).
• Email address – enter your email
address.
• Connection type – select POP3 or
IMAP4.
• Incoming server – enter the server
name.
• Username – enter the username for
the email account.
• Password – enter the password for
the email account.
• Outgoing server – enter the server
name.
To enter advanced email account
settings (optional in most cases)
1 } Messaging } Email } Settings.
2 Select an account to edit } More
} Edit account } Advanced settings.
3 Press to select and enter settings, if
required by your email provider, for
example, Check interval.
To receive and read email messages
1 } Messaging } Email } Inbox
} Send&rec when the inbox is empty
or } Messaging } Email } Inbox
} More } Send & receive to download
new messages. This also sends any
messages in the outbox.
2 Select a message in the inbox } View
to read it.
This
is
the Internet version of the use
r's guide
. © Prin
t only
fo
r p
rivate use.
45Messaging
Page 46

To write and send an email message
1 } Messaging } Email } Write new.
2 } Add to enter the recipient field
} Enter email addr. to type an email
address } OK or } Contacts look-up
to select a recipient from Contacts
} Select or select an email address
from last used recipients } Select.
3 } Edit to enter the recipient field (after
one is added) to add more recipients
select To, Cc or Bcc and select
recipients to add. When you have
selected recipients } Done.
4 Press to select the subject field,
type an email subject } OK. To edit
the subject } Edit.
5 Press to select the text field, write
your message } OK. To edit the
message } Edit.
6 Press to select the attachment
field. } Add and choose the
attachment type to add } Select to
select the attachment to add } Add to
add more attachments.
7 } Continue } Send or More } Save in
Outbox to save and send later.
When writing and editing email
messages you can use the copy and
paste functionality
paste text in a message.
% 38 To copy and
To save an email message
1 } Messaging } Email } Inbox.
2 Select a message } More } Save
message } Saved email.
To reply to an email message
1 Select the message in the inbox to
reply to } More } Reply or open the
message } Reply.
2 } Yes to include the original message
in your reply or } No to exclude the
original message from your reply.
3 Write your message in the text field
} OK. To edit the message } Edit.
4 } Continue } Send.
To view or save an attachment in an
email message
View a message } More
} Attachments }
View to view the
item or select an item to save.
Active email account
If you have several email accounts,
you can change which one is active.
To change the active email account
} Messaging } Email } Settings and
select an account.
46 Messaging
This
is
the Internet version of the use
r's guide
. © Prin
t only
fo
r p
rivate use.
Page 47

Push email
Receive a notification in your phone
from your email server that you have
new email, if supported by your email
provider.
To turn on push email notification
• When using send & receive, } Yes to
turn on, if required or
• } Messaging } Email } Settings.
Select an account to edit } More
} Edit account } Advanced settings
} Push email and select an option.
To delete an email message (POP3)
1 } Messaging } Email } Inbox } More.
2 } Mark for deletion or } Mark several
} Mark or Unmark.
Marked messages will be deleted when
you next connect to your server.
To delete an email message (IMAP4)
1 } Messaging } Email } Inbox } More.
2 } Mark for deletion or
} Mark several
} Mark or Unmark.
3 } More } Clear inbox to delete
messages.
All messages marked for deletion will be
deleted in the phone and on the server.
My friends
Connect and log in to the My friends
server to communicate online with
your favourite friends. If your
subscription supports instant
messaging and presence services,
you can send and receive messages
and see contact status if online. If no
settings exist in your phone, you need
to enter server settings.
Contact your service provider for more
information.
To enter server settings
1 } Messaging } My friends
} Configure.
2 Add username, password, server
information and select an Internet
profile to use. This information is
supplied by your service provider.
To log in to your My friends server
} Messaging } My friends } Log in.
To log out
} More } Log out.
To add a contact to the list
} Messaging } My friends } the
Contacts tab } More } Add contact.
This
is
the Internet version of the use
r's guide
. © Prin
t only
fo
r p
rivate use.
47Messaging
Page 48

To send a chat message from My
friends
1 } Messaging } My friends } the
Contacts tab and select a contact
from the list.
2 } Chat and type your message
} Send.
You can also continue a chat
conversation from the
tab.
Conversations
Status
Show your status to your contacts
only or show it to all users on the My
friends server.
To set status
1 } Messaging } My friends } More
} Settings and select Show my
status.
2 } To all or Only to contacts } Select.
To change your own status
} Messaging } My friends } the My
status tab and update your status
information. Use or to scroll
between status fields.
Chat group
A chat group can be started by your
service provider, by an individual My
friends user or by yourself. You can
save chat groups by saving a chat
invitation or by searching for a specific
chat group.
To start a chat group
1 } Messaging } My friends } the Chat
groups tab } More }
Add chat group
} New chat group.
2 Select who to invite to the chat group
from your contacts list } Continue.
3 Enter a short invitation text } Continue
} Send.
To add a chat group
1 } Messaging } My friends } the Chat
groups tab } More } Add chat group.
2 } By group ID to enter chat group ID
directly or } Search to search for a
chat group.
Conversation history is preserved
between log in and log out to let you
return to chat messages from previous
conversations.
48 Messaging
This
is
the Internet version of the use
r's guide
. © Prin
t only
fo
r p
rivate use.
Page 49

To save a conversation
} Messaging } My friends } the
Conversations tab and open
a conversation } More } Save
conversation.
To view a saved conversation
} Messaging } My friends } the
Conversations tab } More } Saved
conv..
To view watching users
} Messaging } My friends } the
Contacts tab } More } Watching
users. A list of users on the My friends
server watching your status
information appears.
To view or edit settings
} Messaging } My friends } More
} Settings and select an option:
• Show my status:
• Sort contacts:
• Chat alert:
• Server settings:
• Auto-login:
• Allow connection:
Contact your service provider for more
information.
Area and cell information
Information messages may be sent to
network subscribers within a certain
area or cell.
To turn information on or off
} Messaging } Settings } Area info
} Reception or Cell information.
This
is
the Internet version of the use
r's guide
. © Prin
t only
fo
r p
rivate use.
49Messaging
Page 50
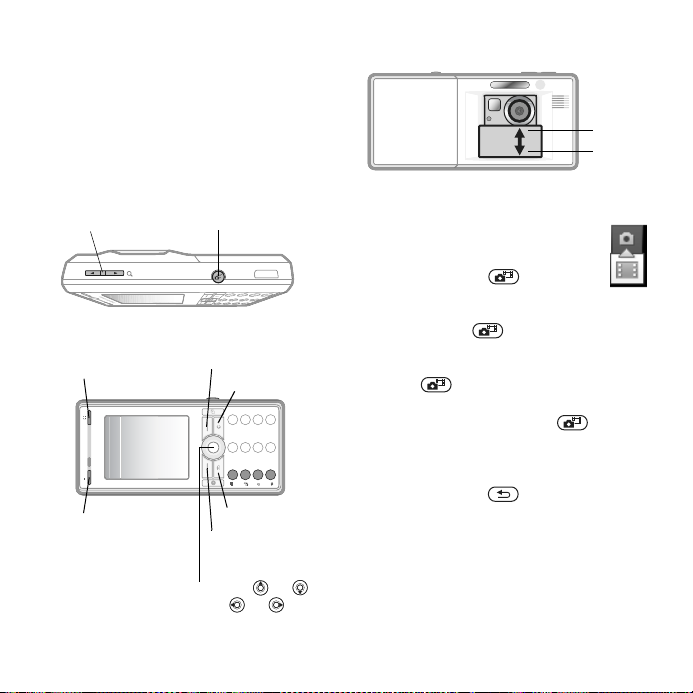
Imaging
Camera, video, pictures, themes.
To take a picture or record video
Camera and video recorder
Take pictures and record video clips
to save, view and send in messages.
Camera buttons and keys
Zoom in
or out
Photo key (upper)
Camera: scenes
Video: night mode
Photo key (lower)
Camera: shoot modes
Video: shoot modes
Switch camera/video
Adjust brightness or
50 Imaging
This
is
the Internet version of the use
Take pictures
Record video
Screen options
(top right)
Delete
Back
Screen options
(bottom right)
or
1 Slide open the lens cover.
2 Use the navigation key to
switch between camera and
video recorder.
3 Camera: Press half way
down to use auto focus and
then fully down to take a picture.
Video: Press half way down to
use auto focus and then fully down to
start recording. To stop recording,
press again.
• To take another picture or record
another video clip, press to
return to the viewfinder.
• To stop using the camera or video
recorder and return to standby, press
and hold down or close the lens
cover.
Pictures and video clips are saved in
File manager } Camera album.
r's guide
. © Prin
t only
fo
r p
rivate use.
Close
Open
Page 51
Camera settings
When you are in the viewfinder
} Settings for options to adjust and
enhance your pictures and video clips
before taking or recording them.
If you try to record with a strong light
source such as direct sunlight or a lamp
in the background, the screen may black
out or the picture may be distorted.
Do not look directly at the camera Xenon
flash in the phone using a magnification
device. Failure to comply with this
warning may damage your eyes.
To use the zoom
Use volume buttons to zoom in and
out.
To adjust brightness
Use the navigation key to increase or
decrease brightness.
To use auto focus
Press half way down. You hear
a beep when auto focus is set within
the frame that appears.
BestPic™
Use BestPic™ to catch the moment
when taking pictures. Capture a range
of nine pictures from just before you
press the camera button down to just
after. You can save the best picture or
more pictures. This is not available
with certain options, such as flash.
To use BestPic™
1 When using the camera, press the
lower photo key twice or } Settings
} Shoot mode } BestPic™.
2 Press half way down to use
Focus and then fully down to take
a picture.
3 Press or to select the best
picture } Save.
Photo fix
If a picture you have just captured
turns out to be under-exposed you
can use Photo fix to improve the
picture.
To use Photo fix
1 With the under-exposed picture on
your screen } More } Photo fix.
2 } OK to save the adjusted picture and
get back to the viewfinder, or } Undo
to get back without saving the picture.
This
is
the Internet version of the use
r's guide
. © Prin
t only
fo
r p
rivate use.
51Imaging
Page 52

Camera and video options
When the camera or video is activated
} Settings for the following options:
• Switch to video camera to record
a video clip or Switch to still camera
to take a picture.
• Shoot mode (camera):
• Normal – no frame.
• BestPic™ – select from nine
pictures.
• Panorama – join several pictures
into one.
• Frames – add a frame to your
picture.
• Shoot mode (video) – select For
picture message or High quality
video.
• Scenes (camera) – select from:
• Auto – automatic settings.
• Twilight landscape – a scenic
picture at night.
• Twilight portrait – for example, for a
subject picture at night.
• Landscape – a scenic picture.
• Portrait – for example, for a subject
picture.
• Beach/Snow – use in bright
environments, for example, at the
beach or when skiing.
• Sports – use for fast-moving
objects.
• Document – use for pictures of text
or drawings.
• Picture size (camera) – select from:
• 3 MP (2048x1536 pixels)
• 2 MP (1632x1224)
• 1 MP (1280x960)
• VGA (640x480)
The 3 MP picture size is 2000x1500 with
image stabilizer on, if available.
• Focus – select from:
• Auto – auto focus for close-ups.
• Macro – use for detailed close-ups.
• Infinite
– use to focus on all
scenery.
• Flash (camera) – select from:
• Off, Auto or Red-eye reduction –
reduce the effect of red eyes in
pictures.
• Turn on image stabilizer (video) –
if available, use to keep the image
steady. In poor lighting conditions it
compensates for small hand
movements.
• Turn on night mode (video) – adapt to
poor lighting conditions.
• Turn on self-timer (camera) – take
a picture a few seconds after pressing
the camera button.
• Effects – select from:
• Off – no effect.
• Black & white – no colour.
• Negative – reversed colours.
52 Imaging
This
is
the Internet version of the use
r's guide
. © Prin
t only
fo
r p
rivate use.
Page 53
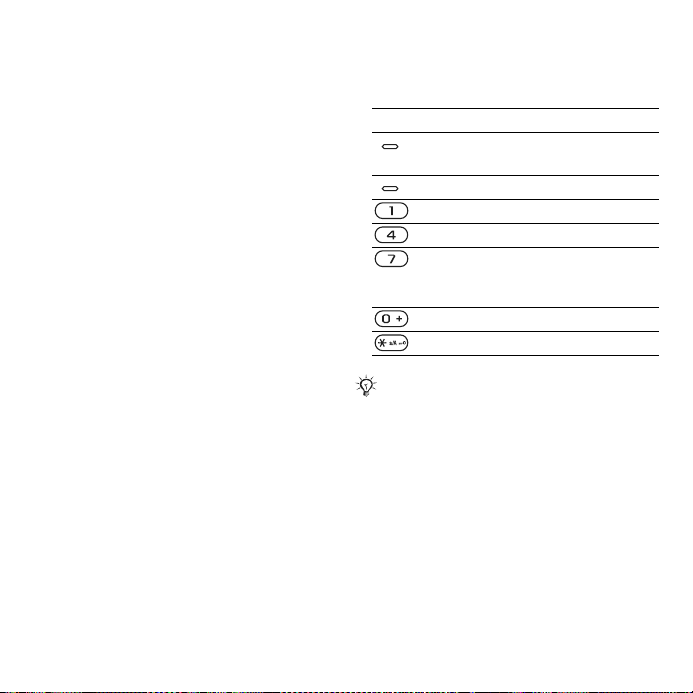
• Sepia – brown tint.
• Solarize – overexposure.
• White balance – adjust colours to
lighting conditions. Select from Auto,
Daylight, Cloudy, Fluorescent or
Incandescent.
• Metering mode – adjust exposure to
the whole or the centre of the picture
or video. Select from Normal or Spot.
• Picture quality (camera) – select
Normal or Fine picture quality.
• Turn off mic. (video) – set microphone.
• Shutter sound (camera) – select
different shutter sounds.
• Turn on time and date (camera) – add
time and date to a picture to appear as
red text in the lower right corner. View
in 1:1 size or use zoom when viewing
a picture to see the text.
• Reset file no. – reset the file number
counter (requires pictures on a
memory card).
• Save to – select to save to Memory
Stick or Phone memory.
Camera shortcuts
When using the camera, you can also
use keys as shortcuts to options:
Key Shortcut
upper Scenes (camera)
Turn on night mode (video)
lower Shoot mode
Picture size (camera)
Focus
Turn on self-timer (camera)
Turn on image stabilizer
(video)
Camera key guide
Flash (camera)
The blue shortcut icons by keys 1, 4, 7
and * are illuminated in camera mode.
This
is
the Internet version of the use
r's guide
. © Prin
t only
fo
r p
rivate use.
53Imaging
Page 54

Transferring pictures
Transfer to your computer
Using the USB cable, you can drag
and drop camera pictures to a
computer
the USB cable.
To further enhance and organize
camera pictures on a computer,
Windows® users can install Adobe®
Photoshop® Album Starter Edition,
included on the CD that comes with
the phone or visit
www.sonyericsson.com/cn.
% 76 Transferring files using
Camera album printing
Camera pictures are saved in } File
manager } Camera album. You can
print camera album pictures in your
phone via the USB cable connected to
a PictBridge™ compatible printer. You
can also save pictures to a Memory
Stick Micro™ (M2™) and print them
later, if your printer supports this.
You can also print using a Bluetooth
compatible printer.
To view your camera pictures
1 Use photo keys or } File manager
} Camera album.
2 The pictures are shown in thumbnail
view. For a full picture view } View.
To print camera pictures via USB
1 } File manager } Camera album.
2 } More } Mark or Mark several or
Mark all pictures for printing.
3 } More } Print and follow instructions.
4 Connect the USB cable to the phone.
5 Connect the USB cable to the printer.
6 Wait for feedback in the phone } OK.
7 Set printer settings, if required } Print.
Disconnect and re-connect the USB
cable if there is a printer error.
To print camera pictures via memory
card
1 Check printer documentation for
information regarding settings,
memory card and PictBridge support.
2 When viewing camera pictures saved
on a memory card, } More } Mark or
Mark several or Mark all pictures for
printing.
More } Print } DPOF (M.S.) } Save.
3 }
A printing instructions file (DPOF) is
created and saved on the memory
card.
4 Remove the memory card from your
phone and insert it into the memory
card slot in your printer.
54 Imaging
This
is
the Internet version of the use
r's guide
. © Prin
t only
fo
r p
rivate use.
Page 55

5 Follow instructions that may appear
on the printer and in printer
documentation.
Pictures and video clips
View and use pictures and video clips.
Handling pictures
View, add, edit or delete pictures in
the file manager. The number of
pictures you can save depends on the
size of the pictures. File types
supported are, for example, GIF,
JPEG, WBMP, BMP, PNG and SVGTiny.
To view and use pictures
1 } File manager } Pictures.
2 Select a picture } View or } More
} Use as and select an option.
To display pictures in a slide show
1 } File manager } Pictures and select
a picture.
2 } View } More } Slide show.
To view information about a file
1 } File manager } Pictures or Videos,
select file.
2 } More } Information.
Using pictures
Add a picture to a contact, use it
during phone start-up, as a wallpaper
in standby or as a screen saver.
An animation of more than 1MB set as
wallpaper may affect performance.
Screen saver
The screen saver is automatically
activated when the phone is idle for
a few seconds. After a few more
seconds, the screen saver changes to
sleep mode to save power. Press any
key or button to activate the screen
again.
To edit pictures
% 57 PhotoDJ™.
Exchanging pictures
You can exchange pictures using one
of the available transfer methods.
You are not allowed to exchange some
copyright-protected material.
A protected file has a key symbol.
For more information on pictures in
messages
% 38 Messaging.
This
is
the Internet version of the use
r's guide
. © Prin
t only
fo
r p
rivate use.
55Imaging
Page 56

To send a picture
} File manager } Pictures and scroll
to a picture. } More } Send
a transfer method.
Some phones do not support picture
sizes larger than 160 x 120 pixels.
To receive a picture
} Settings } Connectivity and select a
transfer method.
To save a picture in a message
and select
% 39 To save an item in a text
message or
picture message or
save an attachment in an email
message.
Saving pictures and video clips
When you have taken a picture or
recorded a video clip, the phone saves
it in the phone memory or on a
memory card, if inserted.
If the phone memory or memory card
is full, you cannot save any more
pictures or video clips unless you
delete or move files,
manager.
% 42 To save an item in a
% 46 To view or
% 21 File
Sending pictures and video clips
When you have taken a picture or
recorded a video clip, you can send it
as a picture message if the file size
has not exceeded the limit. To
exchange pictures and video clips
using other transfer methods
% 55 Exchanging pictures.
To use more video clip or picture
options
Record a video clip or take a picture
} More and select an option, for
example, to take a new picture.
Transferring pictures to your computer
Using the USB cable, you can drag
and drop camera pictures to a
computer,
using the USB cable.
Remote screen
Use a compatible Bluetooth accessory
to view pictures on a remote screen
such as a TV. The accessory is not
included with your phone. For
a complete list of compatible
accessories, please visit
www.sonyericsson.com/cn.
% 76 Transferring files
56 Imaging
This
is
the Internet version of the use
r's guide
. © Prin
t only
fo
r p
rivate use.
Page 57

To connect to a remote screen
} File manager } Pictures } View
} More } Remote screen.
% 73 To add a device to your phone.
PhotoDJ™
Edit pictures using PhotoDJ™.
To edit and save a file
1 } Entertainment } PhotoDJ™ or
} File manager } Pictures and select
a file } More } Edit in PhotoDJ™.
2 Select an option.
3 After you have edited the selected
picture } More } Save picture.
Themes
Change the appearance of the screen,
for example, through items such as
colours and wallpaper, by using
themes. Your phone has some
predefined themes that cannot be
deleted if they are protected. You can
create new themes and download
them to your phone. For more
information, visit
www.sonyericsson.com/cn.
To select or change a theme
} File manager } Themes and select
a theme.
Exchanging themes
Exchange themes using a transfer
method.
To send a theme
1 } File manager } Themes and select
a theme.
2 } More } Send and select a transfer
method.
To receive and save a theme
1 Use a transfer method and open the
message you received the theme in.
2 Follow the instructions that appear.
This
is
the Internet version of the use
r's guide
. © Prin
t only
fo
r p
rivate use.
57Imaging
Page 58
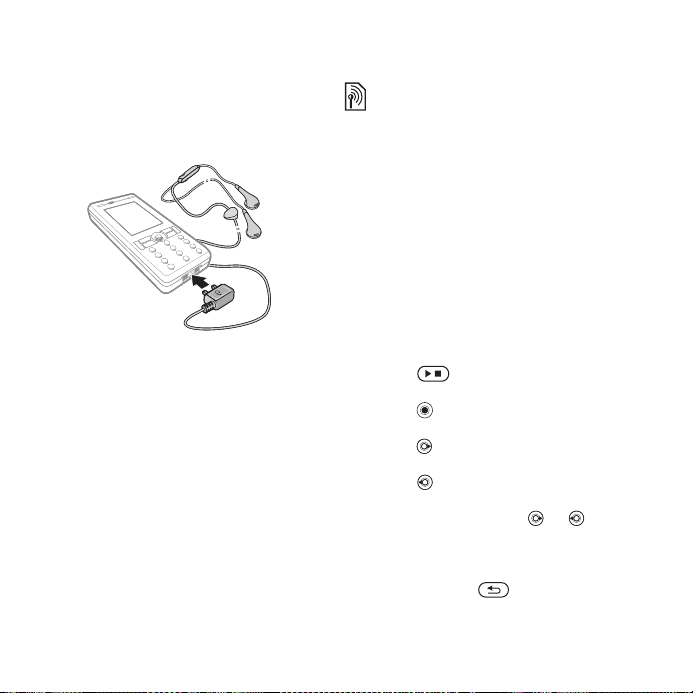
Entertainment
Handsfree, Music and Video player,
radio, PlayNow™, MusicDJ™,
VideoDJ™, games and more.
Stereo portable handsfree
To use the handsfree
Connect the stereo portable handsfree
to your phone to use it for calls,
listening to music, videos or the radio.
If you receive a call and are playing
music, music stops allowing you to
answer the call. Music resumes when
the call is ended or rejected.
Music and Video player
Your phone supports the following file
types: MP3, MP4, M4A, 3GP, AAC,
AAC+, Enhanced AAC, AMR, MIDI,
IMY, EMY and WAV (16 kHz maximum
sample rate). The phone also supports
streamed files that are 3GPP
compatible.
The Real® file type may also be supported by your phone. Contact your network operator for more information.
To play music and videos
1 } Music player or } Entertainment
} Video player. A player browser
opens.
2 In the music player you can browse for
songs by artist or track, or in playlists.
Select a list } Open.
In the video player you can browse for
video clips.
3 Highlight a title } Play.
The following options are available:
• Press to play or stop during
playback.
• Press to stop the playback. Press
again to resume playing.
• Press to go to the next music file or
video clip.
• Press to go to the previous music
file or video clip.
• Press and hold down or to fast
forward or rewind when playing music
files or watching video clips.
• When playing music and in Now
playing, press to go to the music
player browser.
58 Entertainment
This
is
the Internet version of the use
r's guide
. © Prin
t only
fo
r p
rivate use.
Page 59

• When playing music or watching
video, } More for options, for
example, Minimize to use the music
player in the background.
• Press and hold down to exit the
music player or the video player.
Transferring music
Disc2Phone computer software and
USB drivers are included on the CD
that comes with the phone. Use
Disc2Phone to transfer music from
CDs or your computer to the phone
memory or a Memory Stick Micro™
(M2™) in your phone.
Before you start
The following are minimum operating
system requirements for using
Disc2Phone on your computer:
• Windows 2000 SP4 or
• XP Home, or XP Professional SP1.
To install Disc2Phone
1 Turn on your computer and insert the
CD that came with your phone or visit
www.sonyericsson.com/cn. The CD
starts automatically and the
installation window opens.
2 Select a language and click OK.
3 Click Install Disc2Phone and follow the
instructions.
To use Disc2Phone
1 Connect the phone to a computer with
the USB cable that came with your
phone and select File transfer. The
phone turns off and prepares to
transfer files. For more information
% 76 Transferring files using the USB
cable.
2 Computer: Start/Programs/
Disc2Phone.
3 For details on transferring music,
please refer to Disc2Phone Help. Click
in the top right corner of the
Disc2Phone window.
Do not remove the USB cable from the
phone or computer during transfer, as
this may corrupt a Memory Stick Micro™
(M2™) or the phone memory. You cannot
view the transferred files in your phone
until you have removed the USB cable
from the phone.
4 You can obtain CD information (for
example, artist, track) via Disc2Phone
if you are connected to the Internet
and extracting music from a CD.
For safe disconnection of the USB cable
in file transfer mode, right-click the
removable disk icon in Windows Explorer
and select Eject.
This
is
the Internet version of the use
r's guide
. © Prin
t only
fo
r p
rivate use.
59Entertainment
Page 60

More information about moving files to
your phone is available at
www.sonyericsson.com/cn.
To transfer files with the USB cable
provided
% 76 Transferring files using the USB
cable.
Browsing files
Browse music files:
• Artists – lists music files you have
transferred using Disc2Phone.
• Tracks – lists all music files (not
ringtones) in your phone and on
a memory card.
• Playlists – create or play your own
lists of music files.
Playlists
To organize the media files saved in
the file manager, you can create
playlists. Files in a playlist can be
sorted by artist or title. You can add
a file to more than one playlist.
When you delete a playlist or a file
from the playlist, the actual music or
video file is not deleted from the
memory, just the playlist reference to
it. You can still add the file to another
playlist.
To create a playlist
1 } Music player } Playlists } New
playlist } Add. Enter a name } OK.
2 Select from the files that are available
in the file manager. You can add
several files at a time and you can also
add folders. All files in the selected
folders will be added to the playlist.
To add files to a playlist
1 } Music player } Playlists select a
playlist } Open } More } Add media.
2 Select from the files that are available
in the file manager.
3 } Add to add the selected files to the
playlist. The playlist is now saved and
can be used.
To remove files from a playlist
1 } Music player } Playlists select
a playlist } Open.
2 Select the file and press .
To delete a playlist
Music player } Playlists select
}
a playlist and press .
Music player options
} More for options:
• Now playing – go to the Now
playing view.
60 Entertainment
This
is
the Internet version of the use
r's guide
. © Prin
t only
fo
r p
rivate use.
Page 61

• Add media – add files or folders to
the playlist.
• Sort by – sort by artist or title.
• Delete – remove a file from the
playlist. In user-created playlists
only the reference to the file is
removed. In the Tracks list, the file
is permanently deleted from the
memory.
• Minimize – minimize the music
player and return to main menu with
the music still playing.
• Rename – rename user-created
playlists.
• Delete playlist – delete user-
created playlists. Files are not
deleted from the file manager.
• Information – view information
about the current file or video.
• Play mode – change the playback
order of songs and videos. Select
Shuffle to play the playlist files in
random order, or Loop to restart the
playlist when the last file has been
played.
• Equalizer – change treble and bass
settings.
• Send – send a music file or video
clip.
• Stereo widening – change the
output sound.
Online music and videos
View videos and listen to music by
streaming them to your phone from
the Internet. If settings are not already
in your phone
information, contact your network
operator or visit
www.sonyericsson.com/cn.
To select a data account for
streaming
} Settings } the Connectivity tab
} Streaming settings and select the
data account to use.
To stream video and audio
1 } Internet } More } Go to } Enter
address.
2 Enter or choose the address of a Web
page and select a link to stream from.
A player opens automatically when
a link is selected.
To stream saved music and videos
1 } Internet } More } Go to
} Bookmarks.
2 Select a link to stream. A player opens
and plays the music or video.
% 67 Settings. For more
This
is
the Internet version of the use
r's guide
. © Prin
t only
fo
r p
rivate use.
61Entertainment
Page 62
TrackID™
TrackID™ is a free music recognition
service. You can automatically search
for title, artist and album names for
a song you hear playing through
a loudspeaker or on the radio.
To search for song information
• } Entertainment } TrackID™ when
you hear a song.
• } More } TrackID™ when you hear
a song playing on the radio.
For cost information contact your service
provider.
Radio
Listen to the FM radio. Connect the
handsfree to the phone as it works as
the antenna.
Do not use the phone as a radio in places
where this is prohibited.
To listen to the radio
Connect the handsfree to your phone
} Entertainment } Radio.
Radio controls
• Search for a broadcasting frequency.
• Press or to move 0.1 MHz.
• Press or for preset channels.
• More for options.
Saving radio channels
Save up to 20 preset channels.
To save radio channels
} Entertainment } Radio set
frequency } More } Save or press and
hold down - to save in
positions 1 to 9. Press and hold down
to save in position 10.
To select radio channels
Use the navigation key or press -
to select a saved channel.
Radio options
} More for the following options:
• Turn off – turn off the radio.
• Save – save the current frequency
in a position.
• Channels – select, rename, replace
or delete a preset channel.
• Auto save – save tuned channels in
positions 1 to 20. Previously saved
channels are replaced.
• Turn on speaker – use the speaker.
• Set frequency – enter a frequency
manually. Press to go directly
to Set frequency.
• RDS – set options for alternative
frequency (AF) and station
information.
• Turn on Mono – turn on mono
sound.
62 Entertainment
This
is
the Internet version of the use
r's guide
. © Prin
t only
fo
r p
rivate use.
Page 63

• Minimize – return to standby to use
other functions when using the
radio.
To adjust the volume
Press the volume buttons to increase
or decrease volume.
PlayNow™
Listen to music before you purchase
and download it to your phone.
This function is network- or operatordependent. Contact your network
operator for information about your
subscription and PlayNow™. In some
countries/regions you may be able to
purchase music tones from some of the
world’s top musical artists.
This service is not available in all
countries/regions.
Before you start
If the required settings are not in your
% 67 Settings.
phone
To listen to PlayNow™ music
} PlayNow™ and select music from
a list.
Downloading from PlayNow™
The price appears when you select to
download and save a music file. Your
phone bill or prepay card is debited
when a purchase is accepted. Terms
and conditions are also provided in
the phone kit.
To download a music file
1 When you have listened to a music file
preview, you can agree to accept the
conditions } Yes to download.
2 A text message is sent to confirm
payment and the file is made available
to download. Music is saved in File
manager } Music.
Ringtones and melodies
You can exchange music, sounds and
tracks, for example, using one of the
available transfer methods.
You are not allowed to exchange some
copyright-protected material. A
protected file has a key symbol.
To select a ringtone
} Settings } the Sounds & alerts tab
} Ringtone.
This
is
the Internet version of the use
r's guide
. © Prin
t only
fo
r p
rivate use.
63Entertainment
Page 64
To turn the ringtone on or off
Press and hold down from
standby or } Settings } the Sounds &
alerts tab for more options. All signals
except the alarm signal are affected.
To set ringtone volume
1 } Settings } the Sounds & alerts tab
} Ring volume and press or to
decrease or increase the volume.
2 } Save.
To set the vibrating alert
} Settings } the Sounds & alerts tab
} Vibrating alert and select an option.
Sounds and alerts options
From Settings } the Sounds & alerts
tab, you can also set:
• Message alert – select how to be
notified of an incoming message.
• Key sound – select what sound to
hear when you press the keys.
MusicDJ™
Compose and edit your own melodies
to use as ringtones. A melody consists
of four types of tracks – Drums,
Basses, Chords, and Accents. A track
contains a number of music blocks.
The blocks consist of pre-arranged
sounds with different characteristics.
The blocks are grouped into Intro,
Verse, Chorus, and Break. You
compose a melody by adding music
blocks to the tracks.
To compose a melody
1 } Entertainment } MusicDJ™.
2 } Insert, Copy or Paste blocks. Use
, , or to move between the
blocks. Press to delete a block.
} More to view more options.
To edit a MusicDJ™ melody
} File manager } Music and select the
melody } More } Edit.
Exchanging MusicDJ™ melodies
Send and receive melodies using one
of the available transfer methods. You
are not allowed to exchange
copyright-protected material.
You cannot send a polyphonic melody or
an MP3 file in a text message.
To send a melody
1 } File manager } Music and select
a melody.
2 } More } Send and select a transfer
method.
64 Entertainment
This
is
the Internet version of the use
r's guide
. © Prin
t only
fo
r p
rivate use.
Page 65

To receive a melody via a transfer
method
Select a transfer method and follow
the instructions that appear.
VideoDJ™
Compose and edit your own video
clips by using video clips, pictures and
text. You can also use trim away parts
of a video clip to shorten it.
To create a video clip
1 } Entertainment } VideoDJ™.
2 } Add } Video clip, Picture, Text or
Camera } Select.
3 To add more items press } Add.
To edit a selected video clip
} Edit for options:
• Trim – shorten the video clip.
• Add text – add text to the video
clip.
• Delete – remove the video clip.
• Move – move the video clip to
another position.
To edit a selected picture
} Edit for options:
• Duration – select the display time
for the picture.
• Delete – remove the picture.
• Move – move the picture to another
position.
To edit a selected text
} Edit for options:
• Edit text – change the text.
• Colours – select Background to set
background or Text colour to set
font colour.
• Duration – select the display time
for the text.
• Delete – remove the text.
• Move – move the text to another
position.
VideoDJ™ options
More for options:
}
• Play – view the video clip.
• Send – send the video clip.
• Soundtrack – add a soundtrack to
the video clip.
• Transitions – set transitions
between video clips, pictures and
text.
• Save – save the video clip.
• Insert – insert a new video clip,
picture or text.
• New video – create a new video
clip.
This
is
the Internet version of the use
r's guide
. © Prin
t only
fo
r p
rivate use.
65Entertainment
Page 66

To edit video clips in the file manager
1 } File manager } Videos } Open and
select file.
2 } More } VideoDJ™ } Edit.
Sending video clips
You can send a video clip using one of
the available transfer methods. Short
video clips can be sent using picture
messaging. If a video clip is too long,
you can use the trim function to make
a video clip shorter.
To trim a video clip
1 Select a video clip from the storyboard
} Edit } Trim.
2 } Set to set the start point and } Start.
3 } Set to set the end point and } End.
4 Repeat steps 2 and 3 or } Trim.
Sound recorder
With the sound recorder you can
record, for example, a voice memo or
calls. Recorded sounds can also be
set as ringtones. Recording of a
conversation is stopped if a
participant ends the call. Recording of
all sounds stops automatically if you
receive a call.
In some countries/regions or states it is
required by law that you inform the other
person before recording the call.
To record a sound
1 } Entertainment } Record sound.
2 Wait until you hear a tone. When the
recording starts, Recording and
a timer appear.
3 } Save to end, } Play to listen or
} More for options: Record new,
Send, Rename, Delete, Recorded
sounds.
To listen to a recording
} File manager } Music and select
a recording } Play or } Stop.
Games
Your phone contains several games.
You can also download games and
applications directly to the folders in
your phone. Help texts are available
for most games.
To start and end a game
1 } Entertainment } Games, select
game } Select.
2 Press and hold down to end the
game.
66 Entertainment
This
is
the Internet version of the use
r's guide
. © Prin
t only
fo
r p
rivate use.
Page 67

Applications
Download and run Java™
applications, for example, to use
a service. You can view information or
set different permission levels.
To view info for Java applications
1 } File manager } Applications or
} Games.
2 Select an application or a game
} More } Information.
To set permissions for Java
applications
1 } File manager } Applications or
} Games.
2 Select an application or a game
} More } Permissions and set
options.
Java application screen size
Some Java applications are designed
for a specific screen size. For more
information, contact the application
vendor.
To set the screen size for a Java
application
1 } File manager } Applications or
} Games.
2 Select an application or a game
} More } Screen size and select an
option.
Connectivity
Settings, Internet, RSS, synchronizing,
Bluetooth™ technology, infrared, USB
cable, Update service.
Settings
Settings may already be entered when
you buy your phone. If not, make sure
you have a phone subscription that
supports data transfer (GPRS).
You can download settings to your
phone for Internet browsing, email and
picture messaging. This can be done
from a computer at
www.sonyericsson.com/cn.
To download settings via a computer
1 Browse to www.sonyericsson.com/cn.
2 Enter online services.
3 Select the Phone setup tab, and select
a phone model.
4 Select which setting to download to
your phone.
This
is
the Internet version of the use
r's guide
. © Prin
t only
fo
r p
rivate use.
67Connectivity
Page 68

Using Internet
Use Internet to access online services
for example, news and banking,
search and browse the Web.
To start browsing
} Internet Services and select
a service such as } More } Go to
} Enter address to manually enter the
address of a Web page.
To view options
} Internet Services } More.
To stop browsing
} More } Exit browser.
For more information contact your
network operator or visit
www.sonyericsson.com/cn.
Options when browsing
} More to view options. The menu
contains the following but depends on
the Web page you are visiting:
} RSS feeds – select the available
feeds for the Web page.
} Go to for the following:
• Homepage – go to the pre-defined
homepage set for the current
profile.
• Bookmarks – create, use or edit
bookmarks to Web pages.
• Enter address – enter the address
of a Web page.
• History – list of previously visited
Web pages.
• Saved pages – list of your saved
Web pages.
} Tools for the following:
• Add bookmark – add a new
bookmark.
• Save picture – save a picture.
• Save page – save the current Web
page.
• Refresh page – refresh the current
Web page.
• Send link – send a link to the
current Web page.
• Make a call – make a call when
browsing the Internet. } More } End
call to end the call and continue
browsing.
} View for the following:
• Fullscreen – select normal or full
screen (only available with portrait).
• Landscape – select landscape or
portrait screen.
• Text only – select full content or text
only.
68 Connectivity
This
is
the Internet version of the use
r's guide
. © Prin
t only
fo
r p
rivate use.
Page 69

• Zoom – zoom in or out on the Web
page.
• Zoom to normal – set zoom to
default.
} Options } the Browsing tab for:
• Smart-Fit – adjust a Web site to the
screen.
• Show pictures – set on or off.
• Show animations – set on or off.
• Play sounds – set on or off.
• Allow cookies – set on or off.
• Keypad mode – select from:
Shortcuts for browser keys or
Access keys for faster Web site
navigation, if available.
} Options } the Other tab for:
• Clear cookies
• Clear cache
• Clear passwords
• Status – show connection info.
} Exit browser to disconnect.
Using bookmarks
Use, create and edit bookmarks as
quick links to your favourite Web
pages for the browser.
To work with bookmarks
1 } Internet } More } Go to
} Bookmarks and select a bookmark
} More.
2 Select an option, such as sending
a bookmark as a text message.
Internet shortcuts
When using the Internet, you can use
keypad shortcuts to menu options.
To use Internet keypad shortcuts or
access keys
1 When browsing, press and hold down
to select Shortcuts or
Access
keys.
2 If you select Shortcuts, you can press
a key for a function as follows:
Key Shortcut
Bookmarks
Enter address
Not used
History
Refresh page
Forward
Page up
Not used
Page down - one at the time
This
is
the Internet version of the use
r's guide
. © Prin
t only
fo
r p
rivate use.
69Connectivity
Page 70
Fullscreen or Landscape or
Normal screen.
Zoom
Shortcuts
Downloading
Download files, for example, pictures,
themes, games and ringtones from
Web pages.
To download from a Web page
When browsing, select a file to
download and follow the instructions
that appear.
Internet profiles
You can select another Internet profile
if you have more than one.
To select an Internet profile for the
Internet browser
} Settings and use or to scroll
to the Connectivity tab } Internet
settings } Internet profiles and select
a profile.
Internet profile for Java applications
Some Java applications need to
connect to the Internet to receive
information, for example, games that
downloads new levels from a game
server.
Before you start
If settings are not in your phone
% 67 Settings.
To select a profile for Java
} Settings } the Connectivity tab
} Internet settings
} Settings for Java
and select an Internet profile.
Saved information
When browsing, you can save the
following information:
• Cookies – improve Web page
access efficiency.
• Passwords – improve server access
efficiency.
It is advisable to clear all sensitive
information from previously visited
Internet services. This is to avoid misuse
of personal information if your phone is
misplaced, lost or stolen.
To allow cookies
} Internet } More } Options } the
Browsing tab } Allow cookies } On.
To clear cookies, cache or
passwords
} Internet } More } Options } the
Other tab and select an option } Yes.
70 Connectivity
This
is
the Internet version of the use
r's guide
. © Prin
t only
fo
r p
rivate use.
Page 71

Internet security and certificates
Your phone supports secure
browsing. Certain Internet services,
such as banking, require certificates in
your phone. Your phone may already
contain certificates when you buy it or
you can download new certificates.
To check certificates in your phone
} Settings } the General tab
} Security } Certificates.
RSS reader
When browsing, you can receive
frequently updated content, such as
news headlines, as feeds via a Web
site. You can browse to a Web page to
add new feeds, if available. Really
Simple Syndication (RSS) options are
set via the RSS reader and shown in
the Internet browser.
To add new feeds for a Web page
When browsing } More } RSS feeds.
To create a new feed
1 } Messaging } RSS reader } More
} New feed.
2 Enter the address of the new feed.
To set and use RSS reader options
} Messaging } RSS reader } More
and select an option.
Synchronizing
Synchronize phone contacts,
appointments, tasks and notes via
Bluetooth wireless technology, the
infrared port, Internet services or the
USB cable included with the phone.
Synchronization with a computer
Install synchronization software for
your computer found in the Sony
Ericsson PC Suite on the CD included
with the phone. The software includes
help information. You can also visit
www.sonyericsson.com/cn to
download the software or the
document Synchronizing with
a computer.
Remote synchronization via Internet
Synchronize online via an Internet
service.
Before you start
• If settings are not in your phone
% 67 Settings.
• Register a synchronization account
online.
• Enter remote synchronization
settings.
This
is
the Internet version of the use
r's guide
. © Prin
t only
fo
r p
rivate use.
71Connectivity
Page 72

To enter remote synchronization
settings
1 } Organizer } Synchronization } New
account } Yes to create a new
account.
2 Enter a name for the new account
} Continue.
3 Enter the following:
• Server address – server URL.
• Username – account username.
• Password – account password.
• Connection – select an Internet
profile.
• Applications – mark applications to
synchronize.
• App. settings – select an
application and enter a database
name, and if required, username
and password.
• Sync. interval – set how often to
synchronize.
• Remote initiation – select to always
accept, never accept or always ask
when starting synchronization from
a service.
• Remote security – insert a server ID
and a server password.
4 } Save to save your new account.
To start remote synchronization
} Organizer } Synchronization and
select an account } Start.
Bluetooth™ wireless technology
The Bluetooth function makes wireless
connection to other Bluetooth devices
possible. You can:
• Connect to handsfree devices.
• Connect to stereo headsets.
• Connect to several devices at the
same time.
• Connect to computers and access
the Internet.
• Synchronize information with
computers.
• Use remote control computer
applications.
• Use media viewer accessories.
• Exchange items and play
multiplayer games.
We recommend a range within
10 metres, with no solid objects in
between, for Bluetooth communication.
72 Connectivity
This
is
the Internet version of the use
r's guide
. © Prin
t only
fo
r p
rivate use.
Page 73

Before you start
• Turn on the Bluetooth function to
communicate with other devices.
• Add the Bluetooth devices to
communicate with to your phone.
Please check if local laws or regulations
restrict the use of Bluetooth wireless
technology. If Bluetooth wireless
technology is not allowed, you must
ensure that the Bluetooth function is
turned off. The maximum allowed
Bluetooth radio output power in the
phone is automatically adjusted
according to possible local restrictions.
This means range may vary.
To turn the Bluetooth function on
} Settings } the Connectivity tab
} Bluetooth } Turn on.
Adding devices to your phone
Enter a passcode to set up a secure
link between your phone and the
device. Enter the same passcode on
the device when prompted. A device
with no user interface, such as a
handsfree, will have a predefined
passcode. Consult the device User
guide for more information.
Make sure that the device you want to
add has the Bluetooth function activated
and visible.
To add a device to your phone
1 } Settings } the Connectivity tab
} Bluetooth } My devices } New
device to search for available devices.
Make sure the other device is visible.
2 Select a device from the list.
3 Enter a passcode, if required.
To allow connection or edit your
device list
1 } Settings } the Connectivity tab
} Bluetooth } My devices and select
a device from the list.
2 } More to view a list of options.
To add a Bluetooth handsfree
1 } Settings } the Connectivity tab
} Bluetooth } Handsfree.
} Yes if you are adding a Bluetooth
2
handsfree for the first time or } My
handsfree } New handsfree } Add if
you are adding another Bluetooth
handsfree. Ensure that your handsfree
is in the correct mode. Consult the
device User guide for more
information.
This
is
the Internet version of the use
r's guide
. © Prin
t only
fo
r p
rivate use.
73Connectivity
Page 74

Power save
Turn on to reduce power consumption
by optimizing your phone for use with
a single Bluetooth device. Turn off to
connect with several Bluetooth
devices at the same time.
To save power
} Settings } the Connectivity tab
} Bluetooth } Powersave } On.
Phone name
Enter a name for your phone to be
shown when other devices find it.
To enter a phone name
} Settings } the Connectivity tab
} Bluetooth } Phone name.
Visibility
Choose to make your phone visible to
other Bluetooth devices. If your phone
is set to hide, only devices in
} Settings } the Connectivity tab
} Bluetooth } My devices are able to
find your phone via Bluetooth wireless
technology.
To show or hide your phone
} Settings } the Connectivity tab
} Bluetooth } Visibility } Show phone
or Hide phone.
Exchanging items
Send or receive items using Bluetooth
wireless technology as the transfer
method. Choose a device from the list
of found devices.
To send an item
1 Select an item, for example
} Contacts and select a contact.
2 } More } Send contact } Via
Bluetooth.
3 Select the device to send the item to
} Select.
To receive an item
1 } Settings } the Connectivity tab
} Bluetooth } Turn on.
2 } Visibility } Show phone.
3 When you receive an item, follow the
instructions that appear.
Transferring sound
Transfer the sound for calls when
using a Bluetooth handsfree.
You can also transfer the sound for
calls using the keypad or the
handsfree button as follows:
• Press the handsfree button for sound
in handsfree.
• Press a phone button or key (if set to
In phone) for sound in phone.
74 Connectivity
This
is
the Internet version of the use
r's guide
. © Prin
t only
fo
r p
rivate use.
Page 75

• Press any button (if set In handsfree)
for the sound in handsfree.
To transfer sound when using
a Bluetooth handsfree
During a call, } More } Transfer
sound and select a device.
To transfer sound when answering
a call with a handsfree
1 } Settings } the Connectivity tab
} Bluetooth } Handsfree } Incoming
call.
2 } In phone to direct to the phone or
} In handsfree to direct to the
handsfree.
Remote control
Use your phone as a remote control
device to control computer
applications such as a media player or
Microsoft® PowerPoint®
presentations or devices that support
Bluetooth HID Profile.
To select remote control
% 73 To add a device to your phone, if
1
required.
2 } Entertainment } Remote control.
3 Select an application to use and the
computer or device to connect to.
File transfer
If your computer supports Bluetooth
wireless technology, you can install
the Sony Ericsson PC Suite to
synchronize, transfer files, use the
phone as modem and more via
Bluetooth communication. Install the
Sony Ericsson PC Suite from the CD
that came with the phone or download
it at www.sonyericsson.com/cn. The
PC Suite also includes help.
Infrared port
If your computer supports infrared,
you can install the Sony Ericsson PC
Suite on your computer to
synchronize, transfer files, use the
phone as modem and more via
infrared. Install the Sony Ericsson PC
Suite from the CD that came with the
phone or download it at
www.sonyericsson.com/cn. The PC
Suite also includes help.
You can also use the infrared port as
a transfer method with compatible
devices, for example, to synchronize
calendar items
Your phone supports infrared speeds up
to 1 Mbps. When connecting to a
computer, refer to the computer’s user
documentation.
% 71 Synchronizing.
This
is
the Internet version of the use
r's guide
. © Prin
t only
fo
r p
rivate use.
75Connectivity
Page 76
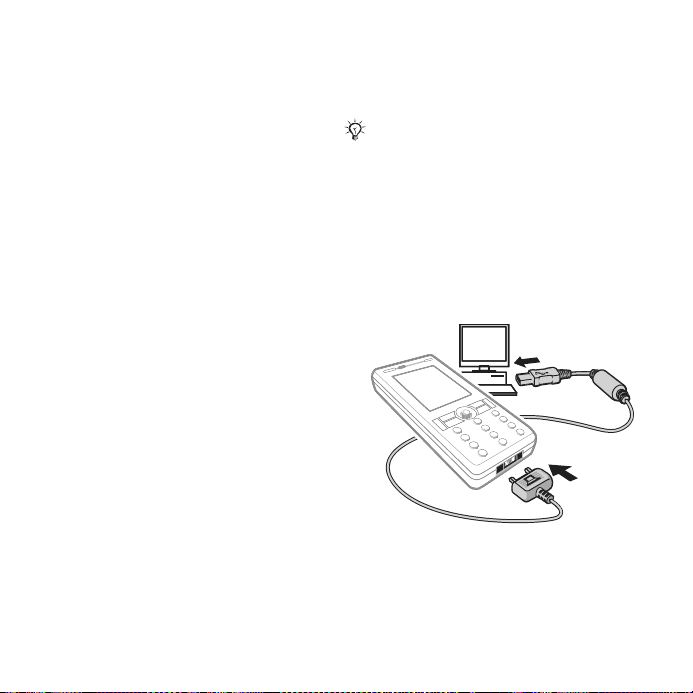
To turn the infrared port on
} Settings } the Connectivity tab
} Infrared port } On or 10 minutes to
turn it on for 10 minutes.
To connect two devices
1 Turn on infrared in both devices.
2 Make sure the infrared port on your
phone is facing the infrared port on the
other device with a maximum distance
of 20 cm.
To send an item using the infrared
port (for example a contact)
1 Turn on infrared in both devices.
} Contacts and select a contact.
2 } More } Send contact } Via infrared.
Transferring files using the USB cable
Connect your phone to a computer,
via the USB cable, to use your phone
in one of the following: File transfer or
Phone mode.
File transfer
Drag and drop files between phone
and computer in Microsoft Windows
Explorer.
Use Sony Disc2Phone (music transfer)
or Adobe Photoshop Album Starter
Edition (picture transfer/storage).
These applications are found on the
CD that comes with the phone, or visit
www.sonyericsson.com/cn and
download the applications.
Only use the USB cable that comes with
the phone, and connect the USB cable
directly to your computer. Do not remove
the USB cable from the phone or
computer during file transfer as this may
corrupt the phone memory or a memory
card.
To use file transfer mode
1 Connect the USB cable to the phone
and the computer.
2 Phone: Select File transfer or
} Settings } the Connectivity tab
} USB } USB connection } File
transfer. The phone shuts down.
76 Connectivity
This
is
the Internet version of the use
r's guide
. © Prin
t only
fo
r p
rivate use.
Page 77

3 Wait until your phone memory and
memory card, if inserted,
appear as
external disks in Windows Explorer.
You can use:
• Windows Explorer to drag and drop
files between phone and computer.
• Sony Disc2Phone to transfer music
to your phone or memory card.
• Adobe Photoshop Album Starter
Edition, to transfer and organize
pictures on your computer.
To disconnect the USB cable safely
1 When using file transfer mode, right-
click the removable disk icon in
Windows Explorer and select Eject.
2 Remove the USB cable from your
phone.
Phone mode
Synchronize contacts and calendar,
transfer files, use the phone as
modem and more from your
computer. Applications supported in
phone mode include: Synchronization,
File manager and Mobile Networking
Wizard. For other applications, use the
file transfer mode.
You need to install and use Sony
Ericsson PC Suite, included on the CD
that came with the phone, or visit
www.sonyericsson.com/cn.
Your computer needs to have one of the
following operating systems to be able
to use this feature: Windows® 2000 with
SP3/SP4, Windows XP (Pro and Home)
with SP1/SP2.
USB drivers are installed automatically
with the PC Suite software.
To use phone mode
1 Computer: Install the Sony Ericsson
PC Suite from the CD that came with
your phone.
2 Computer: Start PC Suite from Start/
Programs/Sony Ericsson/PC Suite.
3 Connect the USB cable to the phone
and the computer.
4 Phone: Select Phone mode or
} Settings } the Connectivity tab
} USB } USB connection } Phone
mode.
5 Computer: Wait while Windows
installs the required drivers.
6 Computer: When PC Suite has found
your phone you are notified.
All applications that you can use with
your connected phone are found in the
Sony Ericsson PC Suite.
This
is
the Internet version of the use
r's guide
. © Prin
t only
fo
r p
rivate use.
77Connectivity
Page 78

Update service
Always keep your phone updated with
the latest software to improve
performance. You do not lose
personal or phone information, for
example messages or settings during
an update.
There are two ways to update your
phone:
• Over the air via your phone.
• Via the provided USB cable and an
Internet-connected computer.
The update service requires data access
(GPRS). Your operator will provide you
with a subscription with data access and
price information.
Before you start
If required settings are not in your
% 67 Settings.
phone
To use Update service over the air
1 } Settings } the General tab } Update
service.
2 } Search for update to search for the
latest available software. Start the
update process by following the
installation instructions, or } Software
version to show the current software
in your phone, or } Reminder to set
when to search for new software.
To use Update service via a
computer
1 Visit www.sonyericsson.com/cn.
2 Select a region and country/region.
3 Enter the product name.
4 Select Sony Ericsson Update Service
and follow the instructions.
78 Connectivity
This
is
the Internet version of the use
r's guide
. © Prin
t only
fo
r p
rivate use.
Page 79

More features
Alarm clock, calendar, tasks, profiles,
time and date, SIM card lock, etc.
Alarms
Set an alarm for a specific time or
specific days to recur on. You can set
the alarm signal as a sound or radio.
To use alarms
1 } Organizer } Alarms and select an
alarm to set } Edit.
2 Time: } Edit and set a time } OK.
Select more options, if required:
• Recurrent: } Edit and set a day or
days } Mark } Done.
• Alarm signal: } Edit and select the
radio or a sound.
• Press to edit text, pictures and
the silent mode for alarms.
3 } Save.
To turn an alarm signal off when it
sounds
Press any key, if radio is selected as
alarm signal } Snooze. If you do not
want to repeat the alarm } Turn off.
To cancel an alarm
} Organizer } Alarms and select an
alarm, } Turn off.
Calendar
You can use the calendar to keep
track of important meetings. The
calendar can be synchronized with
a computer calendar or with
a calendar on the Web
% 71 Synchronizing.
Appointments
Add new appointments or use existing
appointments as templates.
To add a new appointment
1 } Organizer } Calendar and select
a date } Select } New appointment
} Add.
2 Select from the following options and
confirm each entry, if required:
• General tab – subject, start time,
duration, reminder, start date.
• Details tab – location, description,
all day, recurrence.
3 } Save.
To view an appointment
1 } Organizer } Calendar and select
a day (appointment days marked in
bold).
2 Select an appointment } View.
To view a calendar week
} Organizer } Calendar } More
} View week.
This
is
the Internet version of the use
r's guide
. © Prin
t only
fo
r p
rivate use.
79More features
Page 80
To set when reminders should sound
1 } Organizer } Calendar } More
} Advanced } Reminders.
2 } Always for a reminder to sound even
when the phone is turned off or set to
silent. When the reminder sounds
} Yes to read the appointment or } No
to turn off the reminder. A reminder’s
option set in the calendar affects a
reminder’s option set in tasks.
Navigating in your calendar
Use the navigation key to move
between days or weeks. In the
monthly and weekly views, you can
also use the keypad as follows
Back a week Next week
Back a month Next month
Back a year Next year
.
Today’s date
Calendar settings
} Organizer } Calendar } More to
select an option:
• View week – view the week’s
appointments.
• New appointment – add a new
appointment.
• Change date – go to another date in
the calendar.
• Advanced – find an appointment,
set reminders or select a start day
for the week.
• Delete – delete old or all
appointments.
• Help – for more information.
If Chinese is selected as the phone
language, an additional option appears,
Lunar calendar.
Exchanging appointments
Exchange appointments using
a transfer method. You can also
synchronize appointments with
a computer
% 71 Synchronizing.
To send an appointment
Select an appointment in the list for a
certain day } More } Send and select
a transfer method.
Tasks
Add new tasks or use existing tasks as
templates. You can also set reminders
for tasks.
To add a new task
1 } Organizer } Tasks } New task
} Add.
2 } Task or Phone call.
80 More features
This
is
the Internet version of the use
r's guide
. © Prin
t only
fo
r p
rivate use.
Page 81

3 Enter details and confirm each entry.
To view a task
} Organizer } Tasks and select a task
} View.
To set when reminders should sound
1 } Organizer } Tasks and select a task
} More } Reminders.
2 } Always for a reminder to sound even
when the phone is turned off or set to
silent. When the reminder sounds
} Yes to read the task, or to call the
phone number in a phone task. } No
to turn off the reminder. A reminder’s
option set in tasks affects a reminder’s
option set in the calendar.
Exchanging tasks
Exchange tasks using a transfer
method. You can also synchronize
tasks with a computer
% 71 Synchronizing.
To send a task
Select a task in the list of tasks for a
certain day } More } Send and select
a transfer method.
Notes
Make notes and save them in a list.
You can also show a note in standby.
To add a note
} Organizer } Notes } New note
} Add and enter the note } Save.
To edit notes
1 } Organizer } Notes and a list
appears.
2 Select a note } More and select an
option.
Exchanging notes
Exchange notes using one of the
available transfer methods. You can
also synchronize notes with a
computer
To send a note
Select a note } More } Send and
select a transfer method.
% 71 Synchronizing.
Timer
Your phone has a timer. When the
signal rings, press any key to turn it off
or select Restart.
To set the timer
} Organizer } Timer and set the
hours, minutes and seconds for
countdown.
This
is
the Internet version of the use
r's guide
. © Prin
t only
fo
r p
rivate use.
81More features
Page 82
Stopwatch
Your phone has a stopwatch that can
save several laps. The stopwatch
continues to run when you answer an
incoming call.
To use the stopwatch
1 } Organizer } Stopwatch } Start.
2 } Stop or } New lap for a new lap
time.
3 To reset the stopwatch } Stop
} Reset.
Calculator
The calculator can add, subtract,
divide and multiply.
To use the calculator
} Organizer } Calculator.
• Press or to select ÷ x - + . %
=.
• Press to delete the figure.
• Press to enter a decimal point.
Please note that the accuracy of the
calculator is limited.
Code memo
Save security codes, such as for credit
cards, in the code memo. Set
a passcode to open the code memo.
Checkword and security
To confirm that you have entered the
correct passcode you must enter
a checkword.
When you enter your passcode to
open the code memo, the checkword
is shown briefly. If the passcode is
correct, the correct codes are shown.
If you enter the incorrect passcode,
the checkword and the codes that are
shown are also incorrect.
To open code memo for the first time
1 } Organizer } Code memo.
A message with instructions appears
} Continue.
2 Enter a four-digit passcode
} Continue.
3 Re-enter the new passcode to
confirm.
4 Enter a checkword (maximum 15
characters) } Done. The checkword
can consist of both letters and
numbers.
82 More features
This
is
the Internet version of the use
r's guide
. © Prin
t only
fo
r p
rivate use.
Page 83

To add a new code
1 } Organizer } Code memo and enter
your passcode } New code } Add.
2 Enter a name associated with the
code } Continue.
3 Enter the code } Done.
To change the passcode
1 } Organizer } Code memo and enter
your passcode } More } Change
passcode.
2 Enter your new passcode } Continue.
3 Re-enter the new passcode
} Continue.
4 Enter a checkword } Done.
Forgot your passcode?
If you forget your passcode, you must
reset the code memo.
To reset code memo
1 } Organizer } Code memo and enter
any passcode to access the code
memo. The checkword and codes that
are then shown are incorrect.
2 } More } Reset.
3 Reset code memo? appears } Yes
The code memo is reset and all entries
are cleared. The next time you enter
the code memo, you must start at
.
% 82 To open code memo for the first
time.
Profiles
Your phone has predefined profiles
that are set. Some, for example, ring
volume and other options may be
adjusted automatically to suit a certain
environment or an accessory. You can
reset all profile settings to how they
were set when you bought your
phone.
To select a profile
Press and select a profile or
} Settings } the General tab
} Profiles and select a profile.
To view and edit a profile
} Settings } the General tab
} Profiles } More } View and edit.
You cannot rename the Normal profile.
To reset profiles
} Settings } the General tab
} Profiles } More } Reset profiles.
This
is
the Internet version of the use
r's guide
. © Prin
t only
fo
r p
rivate use.
83More features
Page 84

Time and date
The time is always displayed in
standby.
• To set the time } Settings } the
General tab } Time & date } Time.
Enter the time } Save.
• To set the time format } Format and
select an option.
• To set the date and date format
} Settings } the General tab } Time
& date } Date.
SIM card lock
The SIM card lock protects your
subscription, but not the phone itself,
from unauthorized use. If you change
SIM cards, your phone still works with
the new SIM card.
Most SIM cards are locked at the time
of purchase. If the SIM card lock is on,
you have to enter a PIN (Personal
Identity Number) every time you turn
on your phone.
If you enter your PIN incorrectly three
times in a row, the SIM card is
blocked. This is indicated by the
message PIN blocked. To unblock it,
you need to enter your PUK (Personal
Unblocking Key). Your PIN and PUK
are supplied by your network
operator. You can edit your PIN and
select a new four- to eight-digit PIN.
If the message Codes do not match
appears when you edit your PIN, you
entered the new PIN incorrectly.
If the message
followed by
old PIN incorrectly.
Wrong PIN appears,
Old PIN:, you entered your
To unblock your SIM card
1 When PIN blocked appears, enter
your PUK } OK.
2 Enter a new four- to eight-digit PIN
} OK.
3 Re-enter the new PIN to confirm } OK.
To edit your PIN
1 } Settings } the General tab
} Security } Locks } SIM protection
} Change PIN.
2 Enter your PIN } OK.
3 Enter a new four- to eight-digit PIN
} OK.
4 Re-enter the new PIN to confirm } OK.
To turn the SIM card lock on or off
1 } Settings } the General tab
} Security } Locks } SIM protection
} Protection
and select On or Off.
2 Enter your PIN } OK.
84 More features
This
is
the Internet version of the use
r's guide
. © Prin
t only
fo
r p
rivate use.
Page 85

Phone lock
Protect your phone against
unauthorized use if it is stolen and the
SIM card is replaced. You can change
the phone lock code (0000) to any
four- to eight-digit personal code.
Automatic phone lock
If the phone lock is set to automatic,
you do not need to enter your phone
lock code until a different SIM card is
inserted in the phone.
It is important that you remember your
new code. If you forget it, you have to
take your phone to your local Sony
Ericsson retailer.
To set the phone lock
1 } Settings } the General tab
} Security } Locks } Phone
protection } Protection and select an
alternative.
2 Enter the phone lock code } OK.
To unlock the phone
If the phone lock is on, enter your
code } OK.
To edit your phone lock code
} Settings } the General tab
} Security } Locks } Phone
protection } Change code.
Keypad lock
Lock the keypad to avoid dialling
a number by accident.
Calls to the international emergency
number 112 can still be made, even
when the keypad is locked.
Automatic keylock
Use automatic keylock in standby to
lock the keypad soon after the last key
was pressed.
To set the automatic keylock
} Settings } the General tab
} Security } Automatic keylock.
To lock the keypad manually
From standby, press } Lock
keys. You can still answer an
incoming call and the keypad locks
again after the call. The keypad
remains locked until you unlock it
manually.
To unlock the keypad manually
From standby, press } Unlock.
This
is
the Internet version of the use
r's guide
. © Prin
t only
fo
r p
rivate use.
85More features
Page 86

Start-up screen
Select a start-up screen to appear
when you turn your phone on
% 55 Using pictures.
To select a start-up screen
} Settings } the Display tab } Startup screen and select an option.
Brightness
Adjust the brightness of the screen.
To set the brightness
} Settings } the Display tab
} Brightness.
Troubleshooting
Why doesn’t the phone work the way I
want it to?
This chapter lists some problems that
you might encounter when using your
phone. Some problems require you to
call your network operator, but you
can easily correct most of the
problems yourself.
However, if you need to take your
phone in for repair, please note that
you may lose information and content
that you have saved in your phone.
You are advised to make a copy of
such information before taking your
phone in for repair.
For more support go to
www.sonyericsson.com/cn.
I have problems with memory
capacity or the phone is working
slowly
Possible cause: The phone memory is
full or the memory content is not
properly organized.
Solution: Restart your phone every
day to free memory and increase the
capacity of your phone.
86 Troubleshooting
This
is
the Internet version of the use
r's guide
. © Prin
t only
fo
r p
rivate use.
Page 87

You also have the option to do
a Master reset. Some of the personal
data and settings you have made will
be lost when you do this
reset.
No battery icon appears when I start
charging the phone
Possible cause: The battery is empty
or has not been used for a long time.
Solution: It may take up to 30 minutes
before the battery icon appears on the
screen.
Some menu options appear in grey
Possible cause: A service is not
activated or your subscription does
not support the function.
Solution: Contact your network
operator.
Possible cause: Since you cannot
send themes, pictures and sounds
that are copyright-protected, the Send
menu is sometimes unavailable.
I do not understand the language in
menus
Possible cause: The wrong language is
set in the phone.
Solution: Change the language
% 89 Master
% 15 Phone language.
I cannot turn on the phone
Possible cause: The battery is
discharged.
Solution: Recharge the battery
% 5 To charge the battery.
Solution: Turn the phone on with the
charger attached. If the phone can be
turned on, restart the phone with no
charger attached.
I cannot charge the phone or battery
capacity is low
Possible cause: The charger is not
properly connected to the phone.
Solution: Make sure that the charger
connector clicks properly into place
when connected
battery.
Possible cause: The battery
connection is poor.
Solution: Remove the battery and
clean the connectors. You can use
one of the following lightly soaked in
alcohol; a soft brush, a cloth or a
cotton bud. Make sure that the battery
is completely dry before you put it
back. Check that the battery
connectors in the phone are not
damaged.
% 5 To charge the
This
is
the Internet version of the use
r's guide
. © Prin
t only
fo
r p
rivate use.
87Troubleshooting
Page 88

Possible cause: The battery is worn
out and needs to be replaced.
Solution: Try another battery and
charger for the same phone model, or
visit your retailer and ask them to
verify if the battery and charger are
working properly.
The phone turns itself off
Possible cause: The button has
been pushed unintentionally.
Solution: Turn on the automatic key
lock, or lock the keypad manually
% 85 Keypad lock.
Possible cause: The battery
connection is poor.
Solution: Make sure the battery is
inserted correctly
card and battery.
I cannot use SMS/text messages on
my phone
Possible cause: Settings are missing
or incorrect.
Solution: Contact your network
operator to find out the correct SMS
service centre setting
messaging (SMS).
% 5 To insert SIM
% 38 Text
I cannot use MMS/picture messages
on my phone
Possible cause: Your subscription
does not include data capability.
Solution: Please contact your network
operator.
Possible cause: Settings are missing
or incorrect.
Solution:
to www.sonyericsson.com/cn, select
your region and country/region, and
choose Phone setup. Then choose
your phone model, click Read more
under Picture messaging (MMS) and
follow the instructions
I cannot use the Internet
Possible cause: Your subscription
does not include data capability.
Solution: Please contact your network
operator.
Possible cause: Internet settings are
missing or incorrect.
Solution:
to www.sonyericsson.com/cn, select
your region and country/region, and
choose Phone setup. Then choose
your phone model, click Read more
under Mobile Internet (WAP) and
follow the instructions
% 6 Help in your phone or go
% 67 Settings.
% 6 Help in your phone or go
% 67 Settings.
88 Troubleshooting
This
is
the Internet version of the use
r's guide
. © Prin
t only
fo
r p
rivate use.
Page 89

The phone cannot be detected by
other users via Bluetooth wireless
technology
Possible cause: You have not turned
the Bluetooth function on.
Solution: Make sure that the Bluetooth
function is on and visibility is set to
show phone
% 74 To receive an item.
I cannot synchronize or transfer data
between my phone and my
computer, when using the USB cable
provided
Possible cause: The cable has not
been properly installed and detected
on your computer.
The software that came with your
phone has not been properly installed
on the computer.
Solution: Go to
www.sonyericsson.com/cn, select
your region and country/region, and
choose your phone model. Then
choose Learn more – Getting started.
The guide Synchronizing with a
computer contains installation
instructions and a troubleshooting
guide, that may assist you in solving
the problem.
Master reset
The changes that you have made to
settings and the content that you have
added or edited, will be deleted.
If you select Reset settings, the
changes that you have made to
settings will be deleted.
If you select Reset all, in addition to
your changes to settings, all contacts,
messages, personal data, and content
that you have downloaded, received
or edited will also be deleted.
To reset the phone
1 } Settings } the General tab } Master
reset.
2 } Reset settings or } Reset all.
3 When instructions appear } Continue.
If you select Reset all, content such as
melodies and pictures that you have
downloaded, received or edited is also
deleted.
Error messages
Insert SIM
Possible cause: There is no SIM card
in the phone or you may have inserted
it incorrectly.
Solution: Insert a SIM card
% 5 To insert SIM card and battery.
This
is
the Internet version of the use
r's guide
. © Prin
t only
fo
r p
rivate use.
89Troubleshooting
Page 90

Possible cause: The SIM card
connectors need cleaning.
Solution: Remove the SIM card and
clean it. Also check that the card is not
damaged so that you cannot connect
it to the phone connectors. In that
case, contact your network operator
to ask for a new SIM card.
Insert correct SIM card
Possible cause: The phone is set to
only work with certain SIM cards.
Solution: Check if you are using the
correct operator SIM card for your
phone.
Wrong PIN/Wrong PIN2
Possible cause: You have entered
your PIN or PIN2 incorrectly.
Solution: Enter the correct PIN or PIN2
% 84 SIM card lock.
} Yes
PIN blocked/PIN2 blocked
Possible cause: You have entered
your PIN or PIN2 code incorrectly
three times in a row.
Solution: To unblock
lock.
% 84 SIM card
Codes do not match
Possible cause: The two codes that
you have entered do not match.
Solution: When you want to change a
security code (for example your PIN)
you have to confirm the new code by
entering exactly the same code again.
% 84 SIM card lock.
No netw. coverage
Possible cause: Your phone is in flight
mode.
Solution: Restart the phone in normal
% 7 Flight mode menu.
mode
Possible cause: Your phone is not
receiving any radio signal, or the
received signal is too weak.
Solution: Contact your network
operator and make sure that the
network has coverage where you are.
If so, search for a network
view available network options.
Possible cause: The SIM card is not
working properly.
Solution: Insert your SIM card in
another phone. If you still get the same
or a similar message, please contact
your network operator.
% 23 To
90 Troubleshooting
This
is
the Internet version of the use
r's guide
. © Prin
t only
fo
r p
rivate use.
Page 91

Possible cause: The phone is not
working properly.
Solution: Insert your SIM card in
another phone. If this works, it is
probably the phone that is causing the
problem. Please contact the nearest
Sony Ericsson service location.
Emerg. calls only
Possible cause: You are within range
of a network, but you are not allowed
to use it. However, in an emergency,
some network operators allow you to
call the international emergency
number 112.
Solution: You have to move to get a
signal that is strong enough. Contact
your network operator and make sure
you have the right subscription
% 25 Emergency calls.
Phone lock
Possible cause: The phone is locked.
Solution: To unlock the phone
% 85 Phone lock.
Phone lock code:
Possible cause: The phone lock code
is required.
Solution: Enter a phone lock code.
Your phone has a default phone lock
code 0000
PUK blocked. Contact operator.
Possible cause: You entered your
personal unblocking key code (PUK)
incorrectly 10 times in a row.
Solution: Contact your network
operator.
Charging, alien battery
Possible cause: The battery that you
are using is not a Sony Ericssonapproved battery.
Solution:
% 85 Phone lock.
% 93 Battery.
This
is
the Internet version of the use
r's guide
. © Prin
t only
fo
r p
rivate use.
91Troubleshooting
Page 92
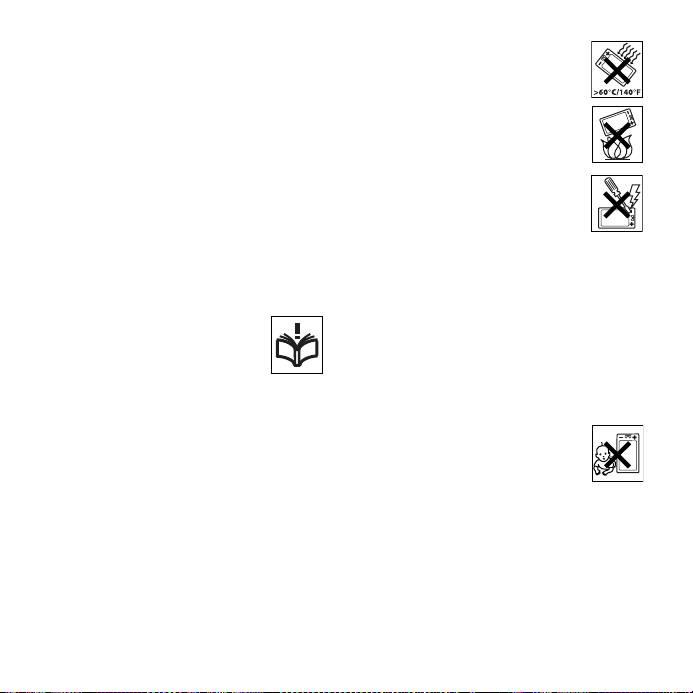
Important information
Sony Ericsson Consumer Web
site,safe and efficient use, end user
license agreement,warranty,
declaration of conformity.
Sony Ericsson Consumer Web site
On www.sonyericsson.com/cn there is
a support section where help and tips
are only a few clicks away. Here you
find the latest computer software
updates and tips on how to use your
product more efficiently.
Guidelines for Safe and Efficient Use
Please read this information before
using your mobile phone.
These instructions are intended for
your safety. Please follow these
guidelines. If the product has been
subject to any of the conditions listed
bellow or you have any doubt of the proper function
make sure to have the product checked by certified
service par tner befo re chargin g or using it. Failure
to do so might lead to risk for product malfunction
or even a potential hazard to your health.
Recommendations for safe use of product (mobile phone, battery, charger and other accessories)
• Always treat your product with care and keep it in a
clean and dust-free place.
• War ning! May explode if disposed of in fire.
• Do not expose your product to liquid or moisture or
humidity.
• Do not expose your product to
extreme high or low temperatures. Do
not expose the battery to
temperatures above +60°C (+140°F).
• Do not expose your product to open
flames or lit tobacco products.
• Do not drop, throw or try to bend your
product.
• Do not paint your product.
• Do not attempt to disassemble or
modify your product. Only Sony
Ericsson authorized personnel should
perform service.
• Do not use your product near medical
equipment or in hospitals without
requesting permission from your treating physician
or authorized medical staff.
• Do not use your product when in, or around
aircraft, or areas showing the sign “turn off two-way
radio”.
• Do not use your product in an area where a
potentially explosive atmosphere exists, for
example, at a petrol station, oil depot or chemical
plant.
• Do not place your product or install wireless
equipment in the area above an air bag in your car.
CHILDREN
KEEP OUT OF CHILDREN’S REACH.
DO NOT ALLOW CHILDREN TO PL AY
WITH YOUR MOBI LE PHONE OR ITS
ACCESSORIES. THEY COULD HURT
THEMSELVES OR OTHERS, OR COULD
ACCIDENTALLY DAMAGE THE MOBILE PHONE
OR ACCESSORY. YOUR MOBILE PHONE OR ITS
ACCESSORY MAY CONTAIN SMALL PARTS THAT
COULD BE DETACHED AND CREATE A CHOKING
HAZARD.
92 Important information
This
is
the Internet version of the use
r's guide
. © Prin
t only
fo
r p
rivate use.
Page 93

Power supply (Charger)
Connect the AC power adapter only to designated
power sources as marked on the product. Make
sure the cord is positioned so that it will not be
subjected to damage or stress. To reduce risk of
electric shock, unplug the unit from any power
source before attempting to clean it. The AC power
adapter must not be used outdoors or in damp
areas. Never alter the cord or plug. If the plug will
not fit into the outlet, have a proper outlet installed
by a qualified electrician.
Use only Sony Ericsson branded original chargers
intended for use with your mobile phone. Other
chargers may not be designed to the same safety
and perfor mance standards.
Battery
We recommend that you fully charge the battery
before you use your mobile phone for the first time.
A new battery or one that has not been used for a
long time could have reduced capacity the first few
times it is used. The battery should only be charged
in temperatures between +5°C (+41°F) and +45°C
(+113°F).
Use only Sony Ericsson branded original batteries
intended for use with your mobile phone. Using
other batteries and c hargers co uld be dang erous.
Talk and standby times depend on several different
conditions such as signal strength, operating
temperature, application usage patterns, features
selected and voice or data transmissions when the
mobile phone is being used. Under normal
conditions, the stand-by time for this battery is up
to 400 hours.
Turn off your mobile phone before removing the
battery. Do not put t he batter y into you r mouth.
Battery electrolytes may be toxic if swallowed. Do
not let the metal contacts on the battery touch
another metal object. Doing this could short-circuit
and damage the battery. Use the battery for the
intended purpose only.
This
is
the Internet version of the use
Personal medical devices
Mobile phones may affect the operation of cardiac
pacemakers and other implanted equipment.
Please avoid placing the mobile phone over the
pacemaker, e.g. in your breast pocket. When using
the mobile phone, use it at the ear opposite side of
the body to the pacemaker. If a minimum distance
of 15 cm (6 inches) is kept between the mobile
phone and the pacemaker, the risk of interference
is limited. If you have any reason to suspect that
interference is taking place, immediately turn off
your mobile phone. Contact your cardiologist for
more information.
For other medical devices, please consult your
physician and the manufacturer of the device.
Driving
Please check if local laws and regulations restrict
the use of mobile phones while driving or require
drivers to use handsfree solutions. We recommend
that you use only Sony Ericsson handsfree
solutions intended for use with your product.
Please note that because of possible interference
to electronic equipment, some vehicle
manufacturers forbid the use of mobile phones in
their vehicles unless a handsfree kit with an
external antenna supports the installation.
Always give full attention to driving and pull off the
road and park before making or answering a call if
driving conditions so require.
Emergency calls
Mobile phones operate using radio signals, which
cannot guarantee connection in all conditions. You
should therefore never rely solely upon any mobile
phone for essential communications (e.g. medical
emergencies).
Emergency calls may not be possible in all areas,
on all cellular networks, or when certain network
services and/or mobile phone features are in use.
Check with your local service provider.
r's guide
. © Prin
t only
fo
r p
rivate use.
93Important information
Page 94

Antenna
This phone contains a built in antenna. Use of
antenna devices not marketed by Sony Ericsson
specifically for this model could damage your
mobile phone, reduce performance, and produce
SAR levels above the established limits (see below).
Efficient use
Hold your mobile phone as you would any other
phone. Do not cover the top of the phone when in
use, as this affects call quality and may cause the
phone to operate at a higher power level than
needed, thus shortening talk and standby times.
Radio frequency (RF) exposure and SAR
Your mobile phone is a low-power radio transmitter
and receiver. When it is turned on, it emits low
levels of radio frequency energy (also known as
radio waves or radio frequency fields).
Governments around the world have adopted
comprehensive international safety guidelines,
developed by scientific organizations, e.g. ICNIRP
(International Commission on Non-Ionizing
Radiation Protection) and IEEE (The Institute of
Electrical and Electronics Engineers Inc.), through
periodic and thorough evaluation of scientific
studies. These guidelines establish permitted levels
of radio wave exposure for the general population.
The levels include a safety margin designed to
assure the safety of all persons, regardless of age
and health, and to account for any variations in
measurements.
Specific Absorption Rate (SAR) is the unit of
measurement for the amount of radio frequency
energy absorbed by the body when using a mobile
phone. The SAR value is determined at the highest
certified power level in laboratory conditions, but
the actual SAR level of the mobile phone while
operating can be well below this value. This is
because the mobile phone is designed to use the
minimum power required to reach the network.
Variations in SAR below the radio frequency
exposure guidelines do not mean that there are
variations in safety. While there may be differences
in SAR levels among mobile phones, all Sony
Ericsson mobile phone models are designed to
meet radio frequency exposure guidelines.
A separate leaflet with SAR information for this
mobile phone model is included with the material
that comes with this mobile phone. This information
can also be found, together with more information
on radio frequency exposure and SAR, on:
www.sonyericsson.com/cn.
Disposal of old electrical and electronic equipment
This symbol indicates that all
electrical and electronic equipment
included shall not be treated as
household waste. Instead it shall be left at the
appropriate collection point for the recycling of
electrical and electronic equipment. By ensuring
this product is disposed of correctly, you will help
prevent potential negative consequences for the
environment and human health, which could
otherwise be caused by inappropriate waste
handling of this product. The recycling of materials
will help to conserve natural resources. For more
detailed information about recycling of this
product, please contact your local city office or
your household waste disposal service.
Disposing of the battery
Please check local regulations for
disposal of batteries or call your local
Sony Ericsson Call Center for
information.
The battery should never be placed in municipal
waste. Use a battery disposal facility if available.
94 Important information
This
is
the Internet version of the use
r's guide
. © Prin
t only
fo
r p
rivate use.
Page 95
Declaration of substances
When t his product is oper ated un der
the conditions in the product manual,
the environmental protection period
(EPUP) is 20 years.
(Note: The environmental protection period (EPUP)
of battery is 5 years. )
Toxic or hazardous substances
Part
Name
Phone
Battery
Access
ories
and
charger
O: Indicates that this toxic or hazardous substance
contained in all of the homogeneous materials for this
part is below the l imi t req uirem ent in SJ /T 11363-2006.
X: Indicates that this toxic or hazardous substance
contained in at least one of the homogeneous materials
used for this part is above the limit requirement in SJ/T
11363-2006.( Currently there are no alternative
technologies avai lable )
Mer
Lead
cury
(Pb)
(Hg)
XO O O O O
XO O O O O
XO O O O O
Cad
mium
(Cd)
5
Hexa
valent
chromiu
m (Cr6+)
Polybro
minated
bipheny
ls
(PBB)
Polybro
minated
dipheny
l ethers
(PBDE)
Memory Card
Your product is equipped with a memory card
reader. Check mem ory card co mpatibili ty befor e
purchase or use.
Memory ca rds are gen erally fo rmatted pr ior to
shippi ng. To reforma t the memory card, u se a
compatible device. Do not use the standard
operat ing system format when formatting the
memory card on a PC. F or details, refer to t he
operating instructions of the device or contact
customer support.
WARNING:
If your de vice requ ires an a dapter f or insertion int o
the handset or another device, do not insert the
card directly witho ut the requ ired ada pter.
Precaution s on memory card Use:
• Do not expose the memory card to moisture.
• Do not touch terminal connections with your hand
or any metal object.
• Do not strike, bend, or drop the memory card.
• Do not attempt to disassemble or modify the
memory card .
• Do not use or store the memory card in humid or
corrosi ve locati ons or in excessi ve heat such as a
closed ca r in summe r, in direc t sunligh t or near a
heater, etc.
• Do not press or bend the end of the memory card
adapter w ith exces sive force.
• Do not let dirt, dust, or foreign objects get into the
insert port of any memor y card adap ter.
• Chec k you have i nserted t he memory c ard
correctly .
• Insert the memory card as far as it will go into any
memory card adapter n eeded. The me mory card
may not op erate properly unless fully i nserted .
• We r ecommend that you m ake a backu p copy of
important data. We are not responsible for any loss
or damage t o content you store on the memo ry
card.
• Recorded data may be damaged or lost when you
remove the m emory card o r memory ca rd adapte r,
turn off the power while formatting, reading or
writing data, or use t he memory c ard in locations
subject t o stati c electric ity or hi gh elect rical fi eld
emissi ons.
This
is
the Internet version of the use
r's guide
. © Prin
t only
fo
r p
rivate use.
95Important information
Page 96

Protection of personal information
To safeguard your privacy and prevent information
being accessible to a third party, you should erase
all personal data before selling or disposing of the
product. To delete personal data, pe rform a master
reset and remove the memory card.
DELETION OF MATERIAL FROM THE PHONE
MEMORY DOES NOT ENSURE THAT SAID
INFORMATION CANNOT BE RECOVERED BY A
SUBSEQUENT USER. SONY ERICSSON DOES
NOT WARRANT AGAINST A SUBSEQUENT USER
OF THE DEVICE ACCESSING YOUR
INFORMATION AND DOES NOT ASSUME ANY
RESPONSIBILITY FOR SUBSEQUENT
DISCLOSURE OF SAID IN FORMATION EVEN IF A
MASTER RESET HAS BEEN PERFORMED. If you
are concerned about such potential disclosure
retain your device or secure its permanent
destruction.
Accessories
Sony Ericsson recommends use of Sony Ericsson
original accessories for safe and efficient use of its
products. Use of third-party accessories may
decrease performance or pose a risk to your health
or safety.
LOUDNESS WARNING:
Please adjust the audio volume cautiously when
using third-party audio accessories to avoid
volume levels that may be harmful to your hearing.
Sony Ericsson does not test use of third-party
audio accessories with this mobile phone. Sony
Ericsson recommends using only Sony Ericsson
original audio accessories.
End User Licence Agreement
This wireless device, including without limitationany
media delivered with the device, ("Device")contains
software owned by Sony Ericsson Mobile
Communications AB and its affiliated companies
("Sony Ericsson") and its third party suppliers and
licensors ("Software").
As user of this Device, Sony Ericsson grants you a
non-exclusive, non-transferable, non-assignable
license to use the Software solely in conjunction
with the Device on which it is installed. Nothing
herein shall be construed as a sale of the Software
to a user of this Device.
You shall not reproduce, modify, distribute, reverse
engineer, decompile, otherwise alter or use any
other means to discover the source code of the
Software or any component of the Software. For
avoidance of doubt, you are at all times entitled to
transfer all rights and obligations to the Software to
a third party, solely together with the Device with
which you received the Software, provided always
that such third party agrees in writing to be bound
by these rules.
You are granted this license for a term of the useful
life of this Device. You can terminate this license by
transferring all your rights to the Device on which
you have received the Software to a third party in
writing. If you fail to comply with any of the terms
and conditions set out in this license, it will
terminate with immediate effect.
Sony Ericsson and its third party suppliers and
licensors are the sole and exclusive owner of and
retain all rights, title and interest in and to the
Software. Sony Ericsson, and, to the extent that the
Software contains material or code of a th ird party,
such third party, shall be entitled third party
beneficiaries of these terms.
The validity, construction and performance of this
license shall be governed by the laws of Sweden.
The foregoing shall apply to the full extent
permitted by, when applicable, statutory consumer
rights.
96 Important information
This
is
the Internet version of the use
r's guide
. © Prin
t only
fo
r p
rivate use.
Page 97

Limited Warranty
Communications AB, SE-221 88 Lund, Sweden,
(Sony Ericsson) or its local affiliated company
provides this Limited Warranty for your mobile
phone and original accessory delivered with your
mobile phone (hereinafter referred to as "Product").
Should your Product need warranty service, please
return it to the dealer from whom it was purchased,
or contact your local Sony Ericsson Call Center
(national rates may apply) or visit
www.sonyericsson.com/cn to get further
information.
WHAT WE WILL DO
If, during the warranty period, this Product fails to
operate under normal use and service, due to
defects in design, materials or workmanship, Sony
Ericsson authorised distributors or service partners,
in the country/region* where you purchased the
Product, will, at their option, either repair or replace
the Product in accordance with the terms and
conditions stipulated herein.
Sony Ericsson and its service partners reserve the
right to charge a handling fee if a returned Product
is found not to be under warranty according to the
conditions below.
Please note that some of your personal settings,
downloads or other information may be lost when
your Sony Ericsson Product is repaired or replaced.
At present Sony Ericsson may be prevented by
applicable law, other regulation or technical
restrictions from making a backup copy of certain
downloads. Sony Ericsson does not take any
responsibility for any lost information of any kind
and will not reimburse you for any such loss. You
should always make backup copies of all the
information stored on your Sony Ericsson Product
such as downloads, calendar and contacts before
handing in your Sony Ericsson Product for repair or
replacement.
CONDITIONS
1 The warranty is valid only if the original proof of
purchase issued to the original purchaser by a
Sony Ericsson authorised dealer, specifying the
date of purchase and serial number**, for this
Product, is presented with the Product to be
repaired or replaced. Sony Ericsson reserves the
right to refuse warranty service if this information
has been removed or changed after the original
purchase of the Product from the dealer.
2 If Sony Ericsson repairs or replaces the Product,
the repaired or replaced Product shall be warranted
for the remaining time of the original warranty
period or for thirty (30) days from the date of repair,
whichever is longer. Repair or replacement may
involve the use of functionally equivalent
reconditioned units. Replaced parts or components
will become the property of Sony Ericsson.
3 This warranty does not cover any failure of the
Product due to normal wear and tear, or due to
misuse, including but not limited to use in other
than the normal and customary manner, in
accordance with the Sony Ericsson instructions for
use and maintenance of the Product. Nor does this
warranty cover any failure of the Product due to
accident, software or hardware modification or
adjustment, acts of God or damage resulting from
liquid.
A rechargeable battery can be charged and
discharged hundreds of times. However, it will
eventually wear out - this is not a defect. When the
talk-time or standby time is noticeably shorter, it is
time to replace your battery. Sony Ericsson
recommends that you use only batteries and
chargers approved by Sony Ericsson.
Minor variations in display brightness and color
may occur between phones. There may be tiny
bright or dark dots on the display. These are called
defective pixels and occur when individual dots
have malfunctioned and can not be adjusted. Two
defective pixels are deemed acceptable.
This
is
the Internet version of the use
r's guide
. © Prin
t only
fo
r p
rivate use.
97Important information
Page 98
Minor variations in the appearance of the camera
image may occur between phones. This is not
uncommon in digital cameras and does not mean
that the camera is defective in any way.
4 Since the cellular system on which the Product is to
operate is provided by a carrier independent from
Sony Ericsson, Sony Ericsson will not be
responsible for the operation, availability, coverage,
services or range of that system.
5 This warranty does not cover Product failures
caused by installations, modifications, or repair or
opening of the Produc t performed by a non-So ny
Ericsson authorised person.
6 The warranty does not cover Prod uct failur es which
have been caused by use of accessories or other
peripheral devices which are not Sony Ericsson
branded original accessories intended for use with
the Produc t.
7 Tampering with any of the seals on the Product will
void the warranty.
8 THERE ARE NO EXPRESS WARRANTIES,
WHETHER WRITTEN OR ORAL, OTHER THAN
THIS PRINTED LIMITED WARRANTY. ALL
IMPLIED WARRANTIES, INCLUDING WITHOUT
LIMITATION THE IMPLIED WARRANTIES OF
MERCHANTABILITY OR FITNESS FOR A
PARTICULAR PURPOSE, ARE LIMITED TO THE
DURATION OF THIS LIMITED WARRANTY. IN NO
EVENT SHALL SONY ERICSSON OR ITS
LICENSORS BE LIABLE FOR INCIDENTAL OR
CONSEQUENTIAL DAMAGES OF ANY NATURE
WHATSOEVER, INCLUDING BUT NOT LIMITED
TO LOST PROFITS OR COM MERCIAL LOSS; TO
THE FULL EXTENT THOSE DAMAGES CAN BE
DISCLAIMED BY LAW.
Some countries/regions/states do not allow the
exclusion or limitation of incidental or
consequential damages, or limitation of the
duration of implied warranties, so the preceding
limitations or exclusions may not apply to you.
The warranty provided does not affect the
consumer's statutory rights under applicable
legislation in force, nor the consumer's rights
against the dealer arising from their sales /
purchase contract.
** In some countries/regions additional information
is requested. If so, this is clearly shown on the valid
proof of purchase.
FCC Statement
This device complies with Part 15 of
the FCC rules. Operation is subject to
the following two conditions:
(1) This device may not cause
harmful interference, and
(2) This device must accept any interference
received, including interference that may cause
undesired operation.
Bluetooth wireless technology
Bluetooth™ Qualified Design ID is B011122.
98 Important information
This
is
the Internet version of the use
r's guide
. © Prin
t only
fo
r p
rivate use.
Page 99
Declaration of Conformity
We, Sony Ericsson Mobile Communications AB of
Nya Vattentornet
SE-221 88 Lund, Sweden
declare under our sole responsibility that our
product
Sony Ericsson type AAB-1022081-BV
and in combination with our accessories, to which
this declaration relates is in conformity with the
appropriate standards 3GPP TS 51.010-1,
EN 301489-7, EN 300328, EN 301489-17 and
EN 60950, following the provisions of, Radio
Equipment and Telecommunication Terminal
Equipment Directive 99/5/EC with requirements
covering EMC Directive
89/336/EEC, and Low Voltage Directive
73/23/EEC.
Lund, February 2007
Shoji Nemoto,
Head of Product Business Group GSM/UMTS
We fulfil the requirements of the R&TTE Directive
(99/5/EC).
This
is
the Internet version of the use
r's guide
. © Prin
t only
fo
r p
rivate use.
99Important information
Page 100

Index
A
Activity menu ....................................... 21
alarms .................................................. 79
animation ............................................. 55
answering service ................................ 30
applications .......................................... 67
appointments ....................................... 79
automatic redialling .............................. 24
B
battery
inserting and charging ................... 5
use and care ................................ 93
Bluetooth™ wireless technology ......... 72
business cards ..................................... 37
buttons ............................................. 8, 12
C
calculator ............................................. 82
calendar ..........................................79–80
call divert .............................................. 33
call list .................................................. 29
call numbers in message ..................... 39
call time ................................................ 36
call waiting ........................................... 33
caller-specific ringtones ....................... 29
100 Index
This
is
the Internet version of the use
calls
accepting ......................................35
answering and rejecting ................24
emergency ....................................25
handling two calls .........................34
international ..................................24
making and receiving ................7, 24
making notes during .....................37
missed ..........................................24
putting on hold ..............................33
recording .......................................66
restricting ......................................35
camera
effects ...........................................52
options ..........................................52
overview ........................................50
settings .........................................51
chinese input .........................................17
code memo ...........................................82
conference calls ....................................34
contacts
adding phone contacts .................26
default contacts ............................25
groups of .......................................37
synchronizing ................................71
r's guide
. © Prin
t only
fo
r p
rivate use.
 Loading...