

Page 1
Help Guide
Wireless Noise Canceling Stereo Headset
LinkBuds S
Model: YY2950
Quick Start Guide
To prevent burning or malfunction due to getting wet
Download the app, and set up the headset
To use all functions and improved performances, update the software of the headset and “Sony | Headphones Connect”
app to the latest version. For details, refer to the following:
https://www.sony.net/elesupport/
Let’s start to use
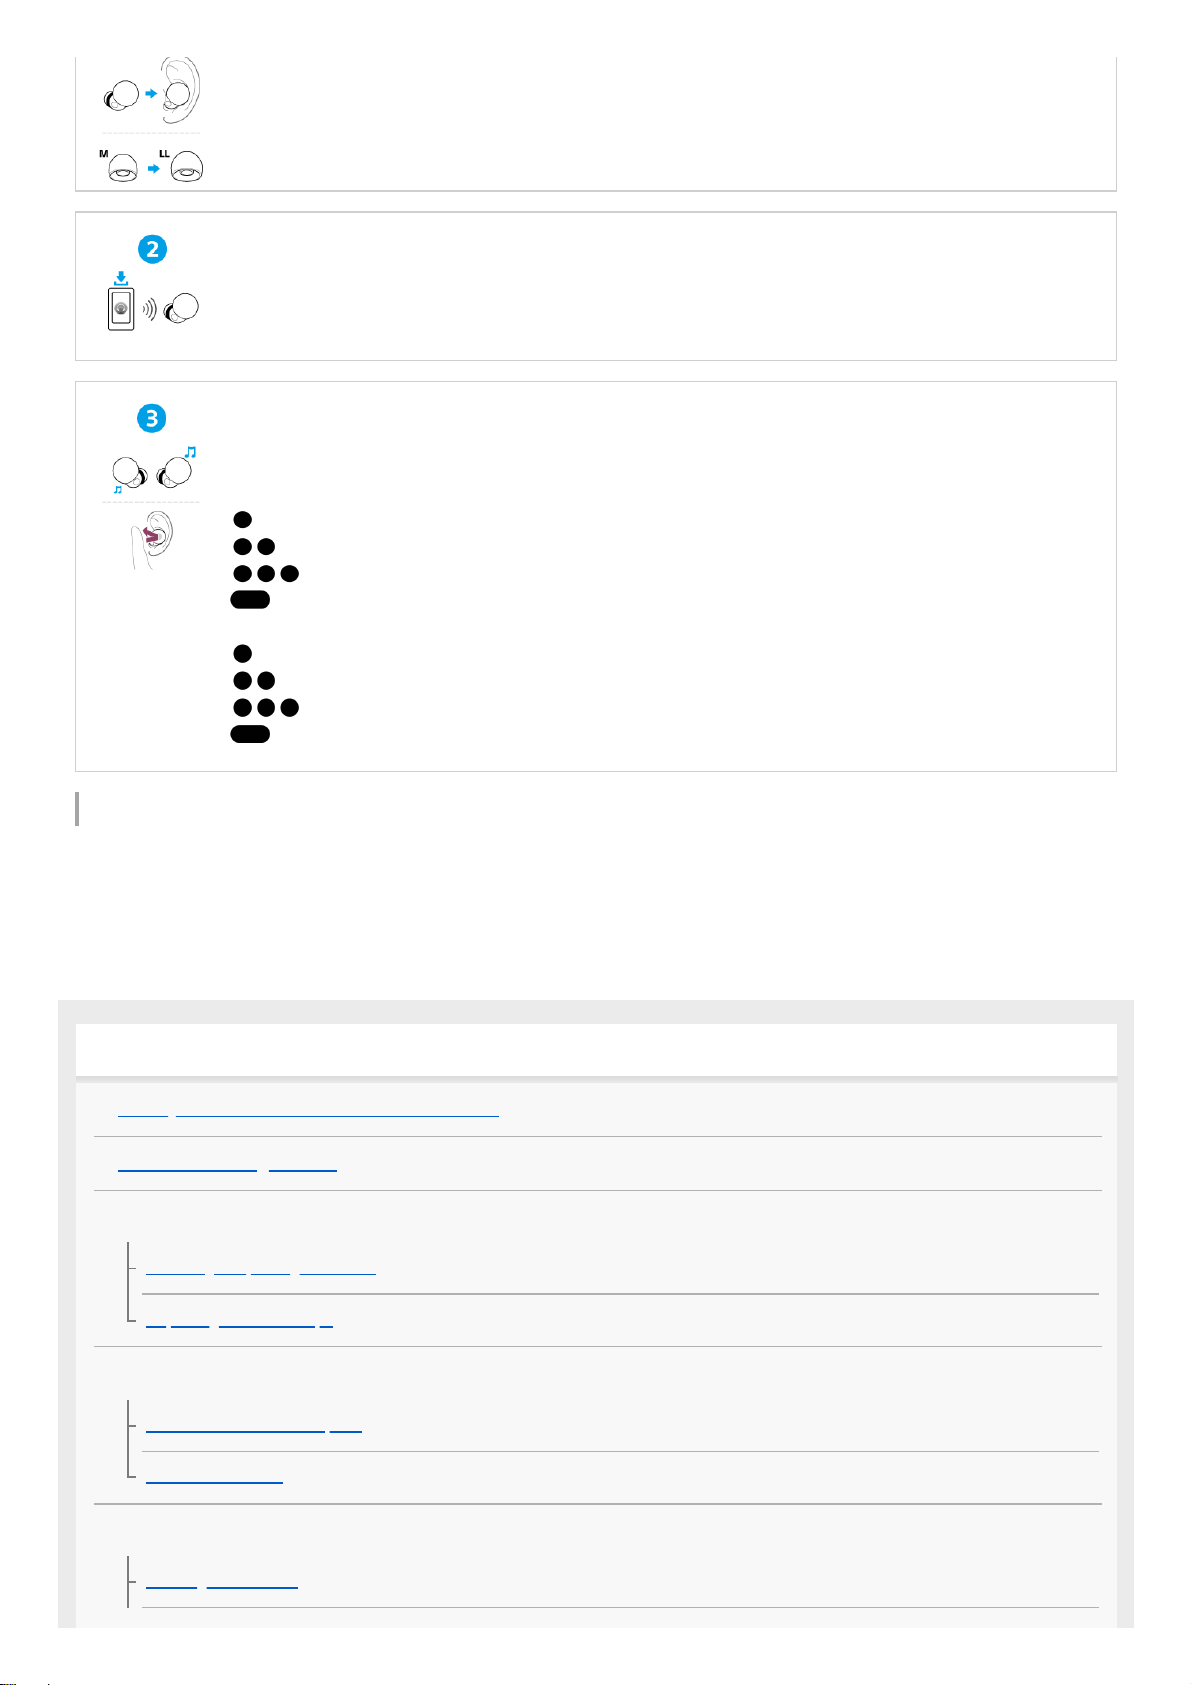
Wearing the headset
1
Page 2
Related information
Establishing a Bluetooth connection manually
Charging the headset
WF-LS900N
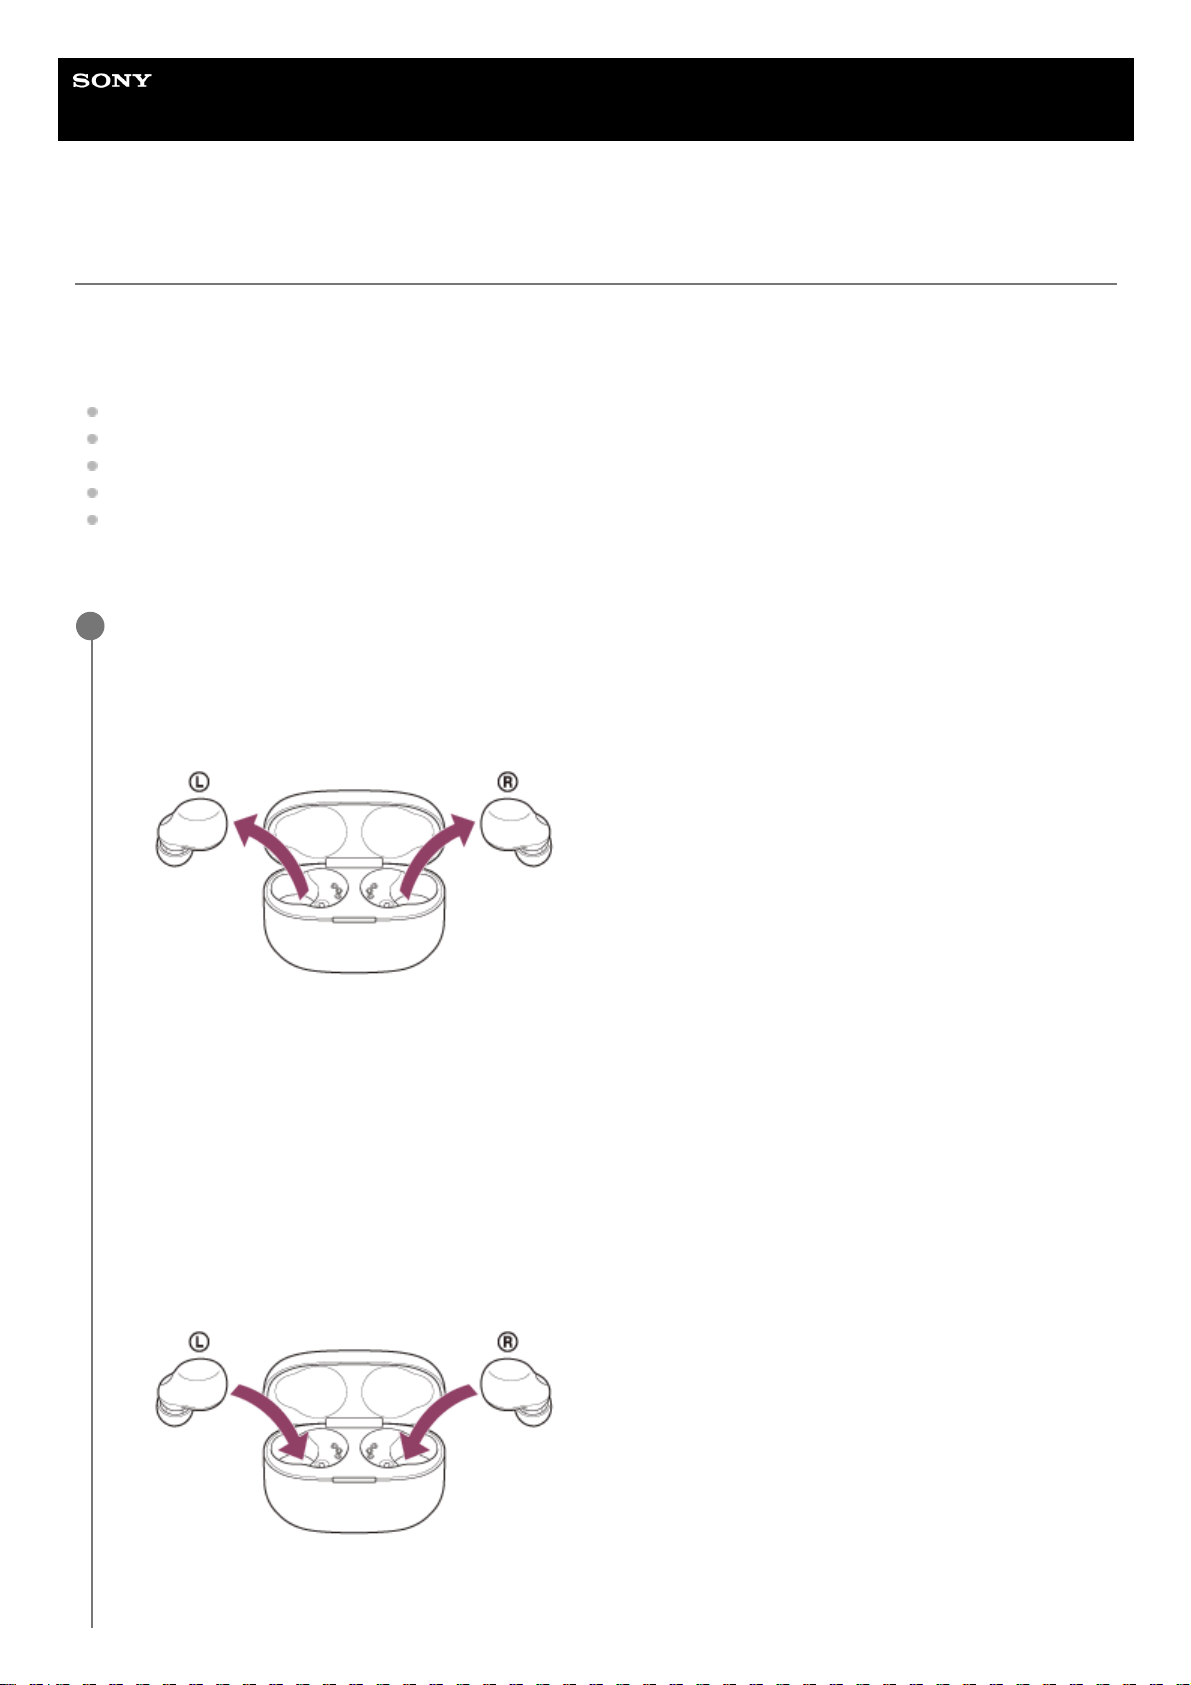
Twist the headset unit to slide the earbud tip deep into your ear canal.
Establishing a BLUETOOTH® connection
The headset is turned on when both headset units are removed from the charging case.
Follow the downloaded “Sony | Headphones Connect” app instructions.
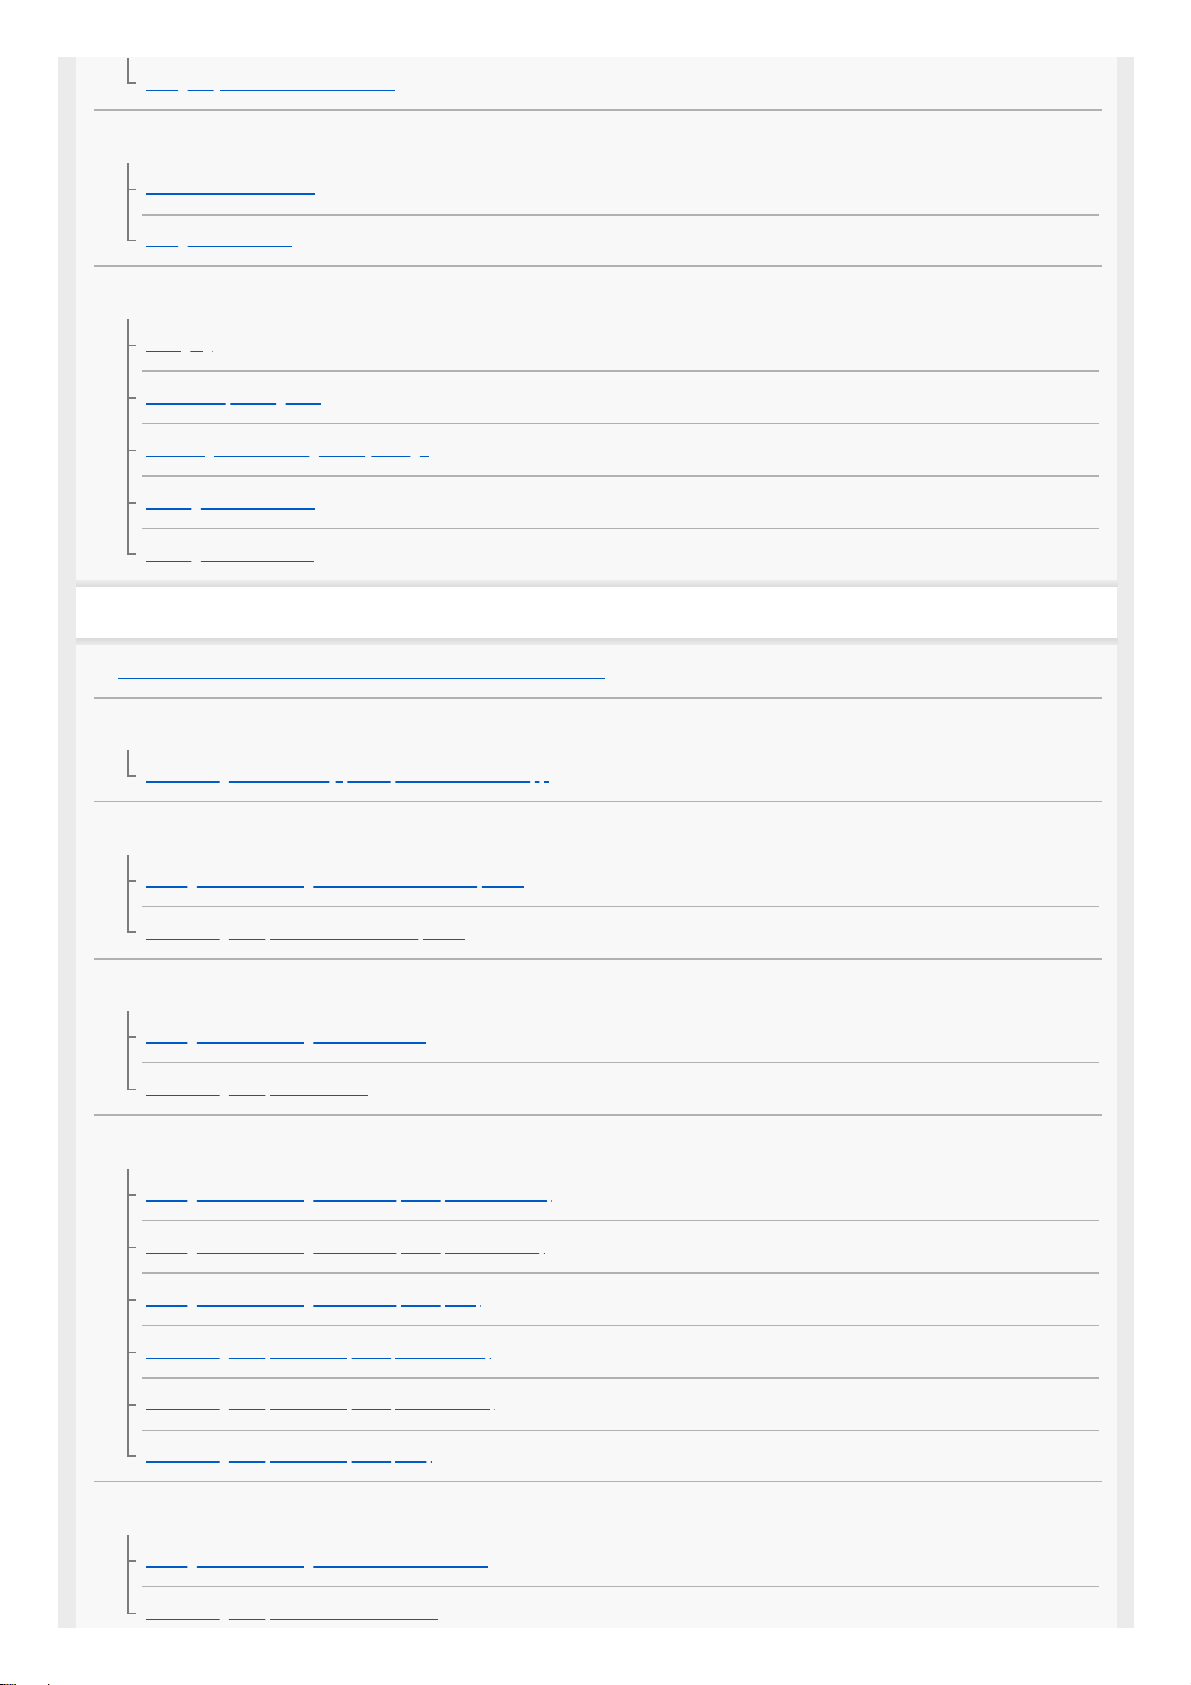
Operating the headset
Tap the touch sensor.
Left
: To switch the noise canceling function and Ambient Sound Mode
: Quick Access (requires settings with the “Sony | Headphones Connect” app)
︓Quick Access (requires settings with the “Sony | Headphones Connect” app)
: To activate the Quick Attention Mode
Right
: To play or pause music
: To skip to the beginning of the next track
: To skip to the beginning of the previous track (or the current track during playback)
: To use or cancel the voice assist function (Google app/Siri)
Getting started
What you can do with the Bluetooth function
About the voice guidance
Supplied accessories
Checking the package contents
Replacing the earbud tips
Parts and controls
Location and function of parts
About the indicator
Wearing the headset
Wearing the headset
2
Page 3
Using only one unit of the headset
Operating the headset
About the touch sensor
Using Quick Access
Power/Charging
Charging
Available operating time
Checking the remaining battery charge
Turning on the headset
Turning off the headset
Making connections
How to make a wireless connection to Bluetooth devices
Easy setup with app
Connecting with the “Sony | Headphones Connect” app
Android smartphone
Pairing and connecting with an Android smartphone
Connecting to a paired Android smartphone
iPhone (iOS devices)
Pairing and connecting with an iPhone
Connecting to a paired iPhone
Computers
Pairing and connecting with a computer (Windows® 10)
Pairing and connecting with a computer (Windows 8.1)
Pairing and connecting with a computer (Mac)
Connecting to a paired computer (Windows 10)
Connecting to a paired computer (Windows 8.1)
Connecting to a paired computer (Mac)
Other Bluetooth devices
Pairing and connecting with a Bluetooth device
Connecting to a paired Bluetooth device
3
Page 4
Switching audio between multiple devices with "audio switch"
Listening to music
Listening to music via a Bluetooth connection
Listening to music from a device via Bluetooth connection
Controlling the audio device (Bluetooth connection)
Disconnecting Bluetooth connection (after use)
About 360 Reality Audio
Noise canceling function
What is noise canceling?
Using the noise canceling function
Listening to ambient sound
Listening to ambient sound during music playback (Ambient Sound Mode)
Listening to ambient sound quickly (Quick Attention Mode)
Speaking with someone while wearing the headset (Speak-to-Chat)
Sound quality mode
About the sound quality mode
Supported codecs
About the DSEE Extreme function
Making phone calls
Receiving a call
Making a call
Functions for a phone call
Making a video call on your computer
Disconnecting Bluetooth connection (after use)
Using the voice assist function
Using the Google Assistant
Using Amazon Alexa
Using the voice assist function (Google app)
Using the voice assist function (Siri)
4
Page 5
Using the apps
What you can do with the “Sony | Headphones Connect” app
Installing the “Sony | Headphones Connect” app
Accessing support information from the “Sony | Headphones Connect” app
How to keep the software up-to-date (for comfortable use of the headset)
What you can do with partner services
What you can do with partner services
Important information
Precautions
When you have finished using the headset
Maintenance
To prevent burning or malfunction due to getting wet
When the headset or charging case gets wet
Licenses
Trademarks
Customer support websites
Troubleshooting
What can I do to solve a problem?
Power/Charging
Unable to turn on the headset.
Charging cannot be done.
The available operating time is short, the battery power does not last long.
Charging time is too long.
Sound
No sound, no sound from one side
Low sound level
Low sound quality, or noise or unusual sound can be heard.
Sound skips frequently.
Noise is heard during music playback.
5
Page 6
5-035-792-11(3) Copyright 2022 Sony Corporation
The effect of noise canceling is not sufficient.
Bluetooth connection
Pairing cannot be done.
Unable to make a Bluetooth connection.
The headset does not operate properly.
Cannot hear a person during a call/low voice from callers, your voice does not reach the person during a call/your voice is low on
the caller’s side.
Others
Earbud tips are damaged or lost.
An earache occurs.
Resetting or initializing the headset
Resetting the headset
Initializing the headset to restore factory settings
Specifications
Specifications
6
Page 7
Help Guide
Wireless Noise Canceling Stereo Headset
LinkBuds S
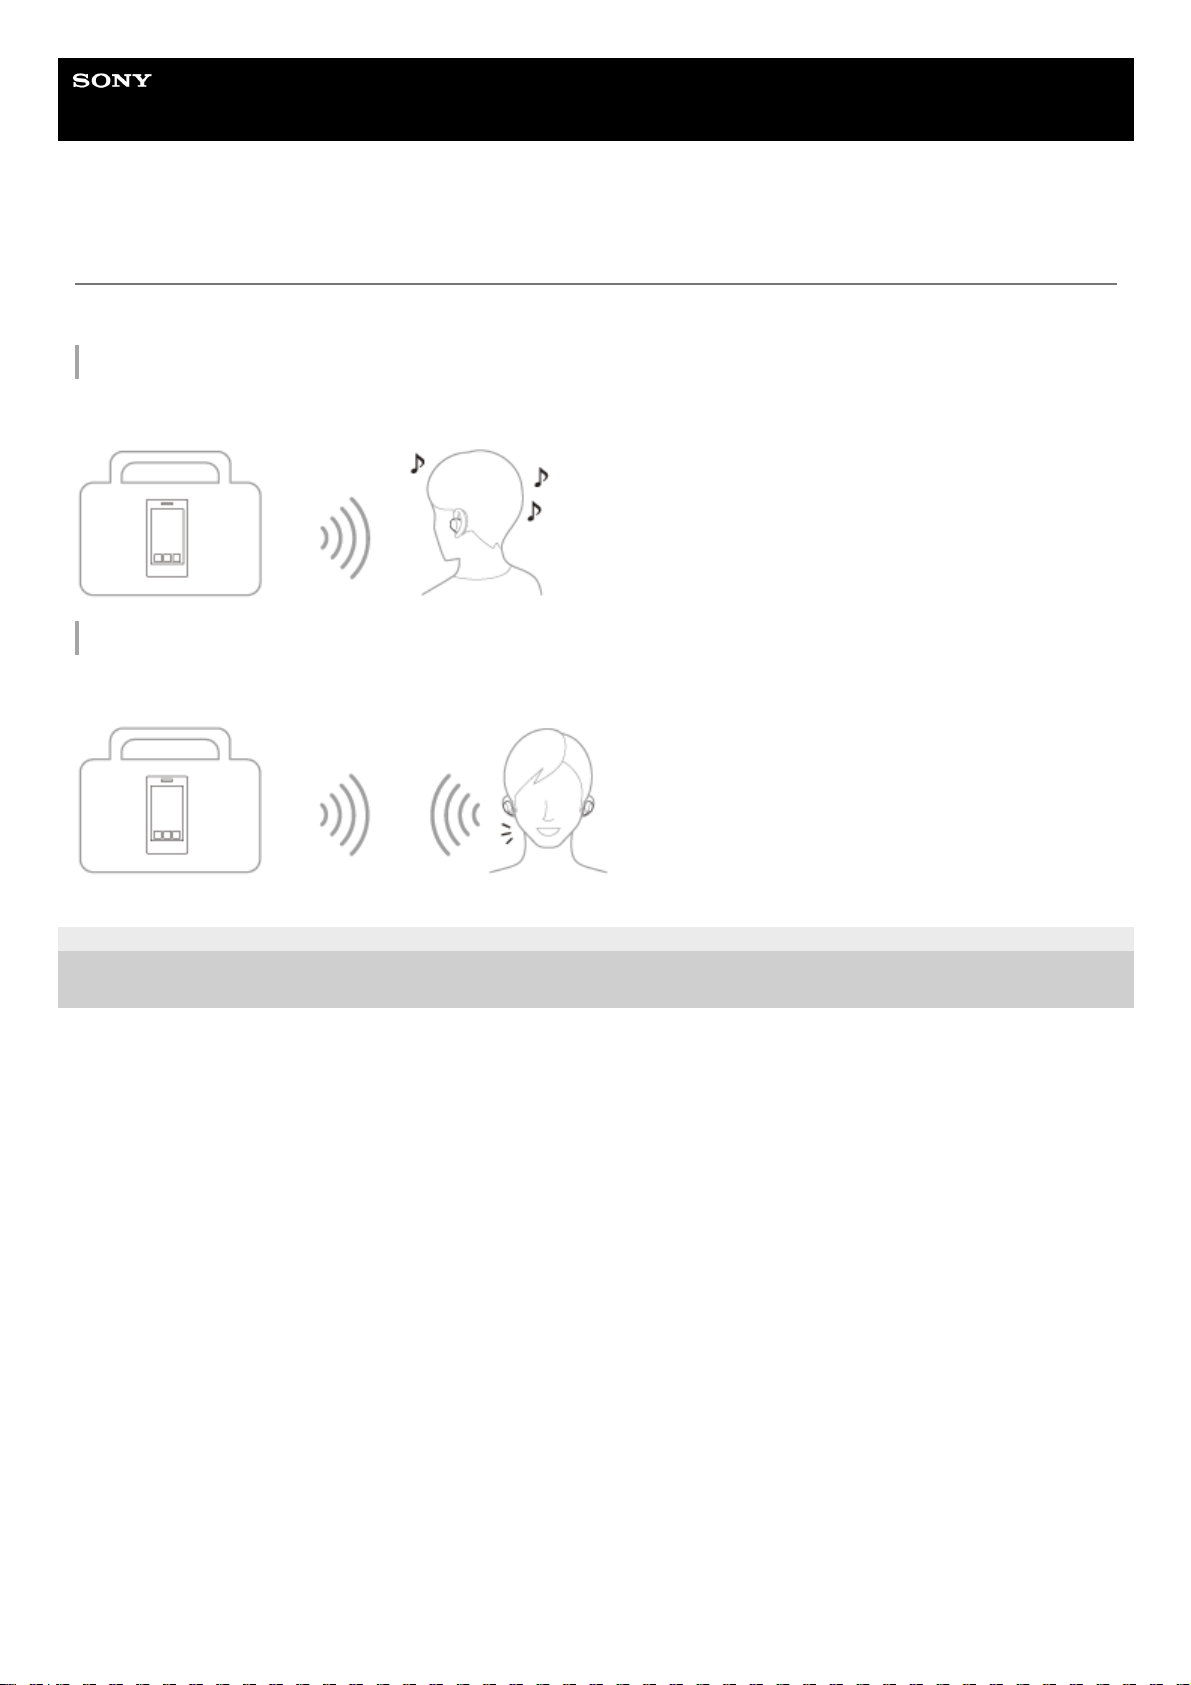
What you can do with the Bluetooth function
The headset uses Bluetooth wireless technology, allowing you to do the following.
Listening to music
You can enjoy music wirelessly from a smartphone or music player, etc.
Talking on the phone
You can make and receive calls hands-free, while leaving your smartphone or mobile phone in your bag or pocket.
5-035-792-11(3) Copyright 2022 Sony Corporation
7
Page 8
Help Guide
Wireless Noise Canceling Stereo Headset
LinkBuds S
About the voice guidance
In the factory settings, when the headset is worn in your ears, you will hear the English voice guidance via the headset.
You can change the language of the voice guidance and turn on/off the voice guidance using “Sony | Headphones
Connect” app. For more details, refer to the “Sony | Headphones Connect” app help guide.
https://rd1.sony.net/help/mdr/hpc/h_zz/
When pairing the headset for the first time after purchase or after initializing the headset (when there is no pairing
information in the headset), when entering pairing mode automatically by removing the headset from the charging
case and putting the headset units into both ears/When pairing the headset manually, when removing the headset
from the charging case and putting the headset units into both ears during pairing mode: “Pairing”
When the remaining battery charge of the headset is low: “Low battery”
When automatically turning off due to low battery of the headset: “Battery is empty”
When the Google™ Assistant is not available during software update: “The Google assistant is not available during
update. Please wait a moment until the update completes.”
When the Google Assistant is not available on the smartphone connected to the headset even when operating the
headset unit to which the Google Assistant is assigned: “The Google Assistant is not connected”
When Amazon Alexa is not available on the smartphone connected to the headset even when operating the headset
unit to which Amazon Alexa is assigned: “Either your mobile device isn’t connected; or you need to open the Alexa
App and try again”
When Quick Access is not available because Service Link is turned off: “Launch Headphones Connect to activate
Service Link”
When Quick Access is not available during software update: “Function is not available during update. Please wait a
moment until the update completes.”
When the corresponding app is not launched even when operating the headset unit to which Quick Access is
assigned: “App assigned to the Quick Access is not launched on the mobile device”
Note
It takes about 20 minutes when you change the language of the voice guidance.
When you initialize the headset to restore to the factory settings after you change the language of the voice guidance, the
language will also return to the factory settings.
If the voice guidance is not heard after changing the voice guidance language or updating the software of the headset, set the
headset into the charging case to turn it off, then remove the headset from the charging case to turn it on again.
Related Topic
Using only one unit of the headset
5-035-792-11(3)
Copyright 2022 Sony Corporation
8
Page 9
Help Guide
Wireless Noise Canceling Stereo Headset
LinkBuds S
Checking the package contents
After opening the package, check that all of the items in the list are included. If any items are missing, contact your
dealer.
Numbers in ( ) indicate the item amount.
Wireless Noise Canceling Stereo Headset
USB Type-C® cable (USB-A to USB-C®) (approx. 20 cm (7.88 in.)) (1)
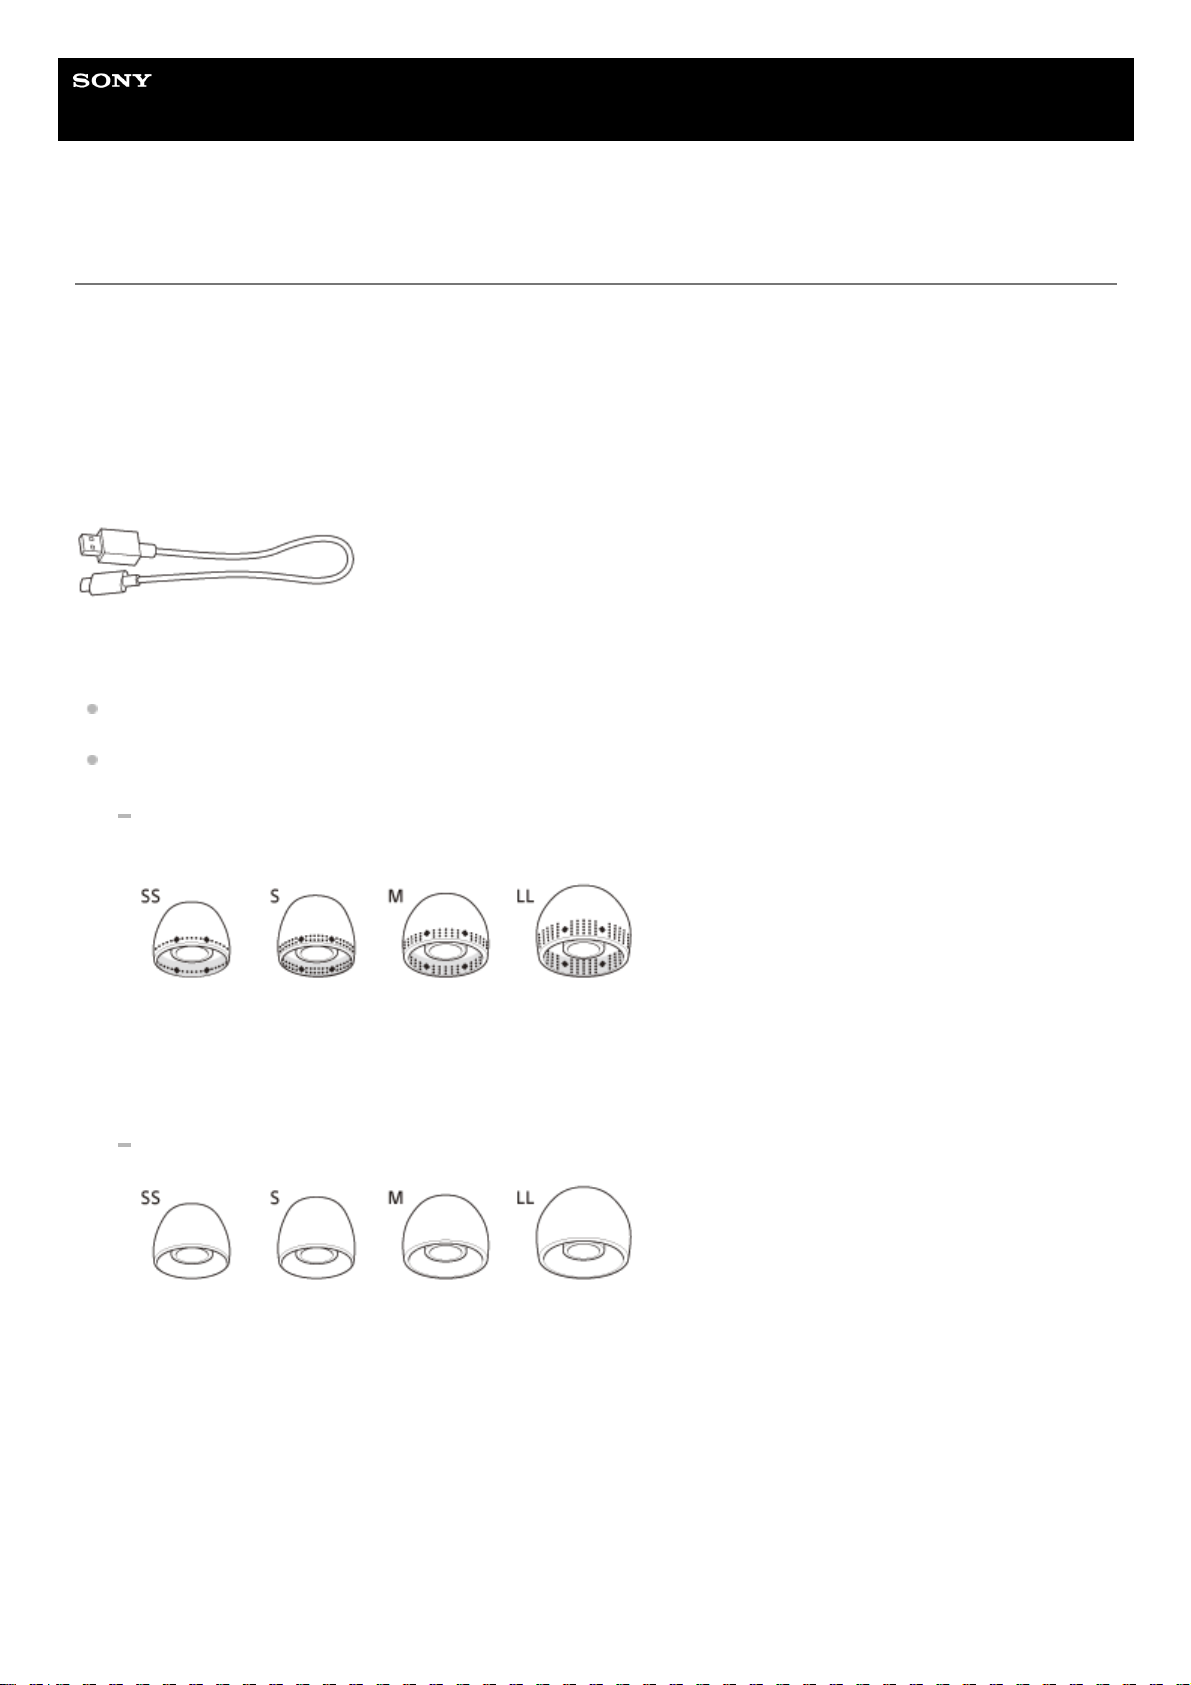
Hybrid silicone rubber earbud tips (SS/S/M/LL 2 each)
M-sized earbud tips come attached to the left and right units of the headset at the time of purchase.
Depending on the color of the headset, a set of one of the following earbud tip types is supplied.
The size of the earbud tips can be determined based on the number of dotted lines inside the bottom of the
earbud tips.
SS size: 1 line
S size: 2 lines
M size: 3 lines
LL size: 5 lines
The size of the earbud tips can be determined based on the color of the inside of the earbud tips.
SS size: red
S size: orange
M size: green
LL size: purple
Charging case (1)
9
Page 10

Note
L-sized earbud tips are not supplied.
L-sized earbud tips (EP-EX11 series) can be purchased at your nearest Sony dealer.
Earbud tips are consumables. If the supplied earbud tips are damaged and need replacing, contact your nearest Sony dealer.
Related Topic
Earbud tips are damaged or lost.
5-035-792-11(3)
Copyright 2022 Sony Corporation
10
Page 11
Help Guide
Wireless Noise Canceling Stereo Headset
LinkBuds S
Replacing the earbud tips
M-sized earbud tips come attached to the left and right units of the headset at the time of purchase.
If the size of the earbud tips does not match the size of your ear canals or the headset is not worn properly in your ears,
tap operations or Speak-to-Chat speech detection may not work correctly, or you may not obtain the correct sound
qualities, noise canceling effects, or call performance.
If any of this is the case, try the following.
Change the earbud tips to ones that fit more snugly in your ears. When changing the earbud tips, try the earbud tip
sizes in order from the larger ones to the smaller ones. The size of the left and right earbud tips may be different.
The “Sony | Headphones Connect” app will help you to determine which earbud tips are most suitable for you to
achieve the optimal noise cancellation effect.
Check that you are wearing the headset properly in your ears. Wear the headset so that the earbud tip is comfortably
situated as deep in the ear canal as possible.
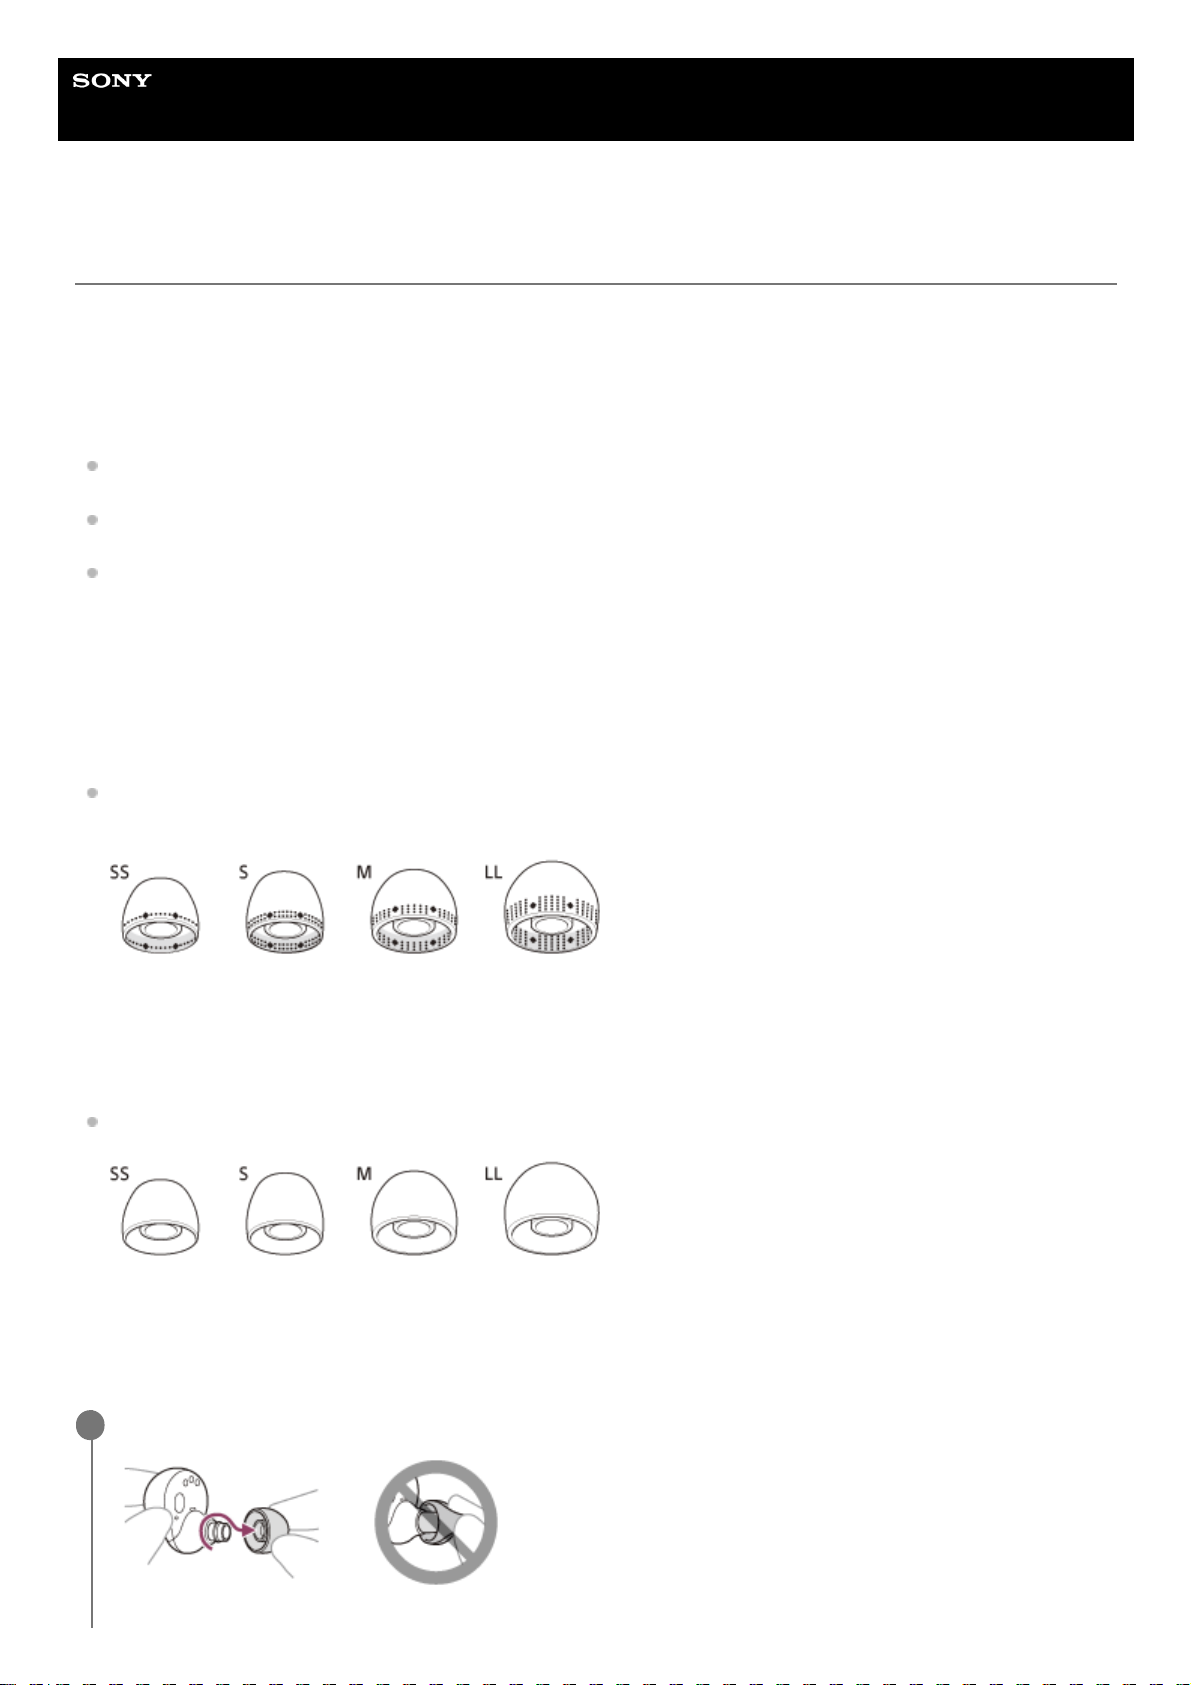
Hybrid silicone rubber earbud tips
Depending on the color of the headset, a set of one of the following earbud tip types is supplied.
The size of the earbud tips can be determined based on the number of dotted lines inside the bottom of the earbud
tips.
SS size: 1 line
S size: 2 lines
M size: 3 lines
LL size: 5 lines
The size of the earbud tips can be determined based on the color of the inside of the earbud tips.
SS size: red
S size: orange
M size: green
LL size: purple
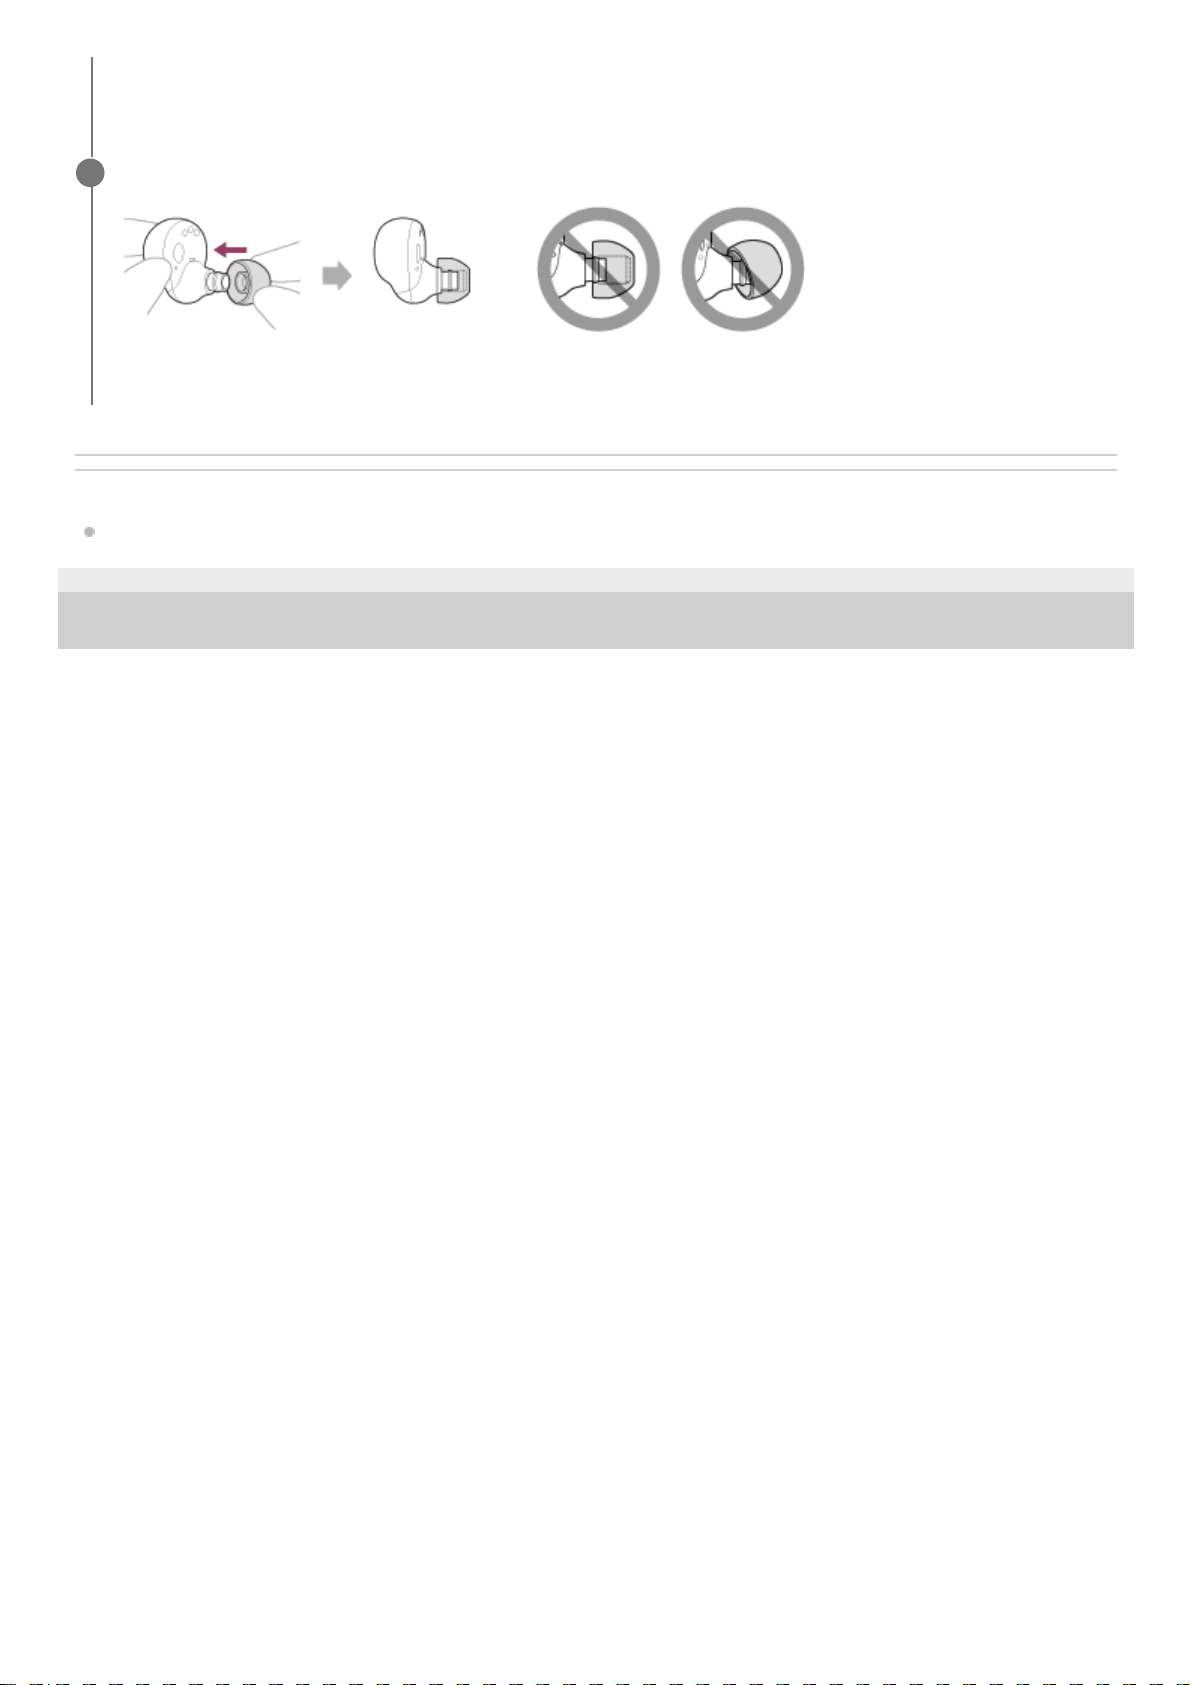
Remove the earbud tip.
1
11
Page 12
Related Topic
Wearing the headset
5-035-792-11(3)
Copyright 2022 Sony Corporation
Hold the headset unit and twist the earbud tip while rotating it to pull it out.
Do not pinch the end of the earbud tip when removing it.
Attach the earbud tip.
Firmly insert the earbud tip all the way. Do not attach the earbud tip in a loose or skewed manner.
2
12
Page 13
Help Guide
Wireless Noise Canceling Stereo Headset
LinkBuds S
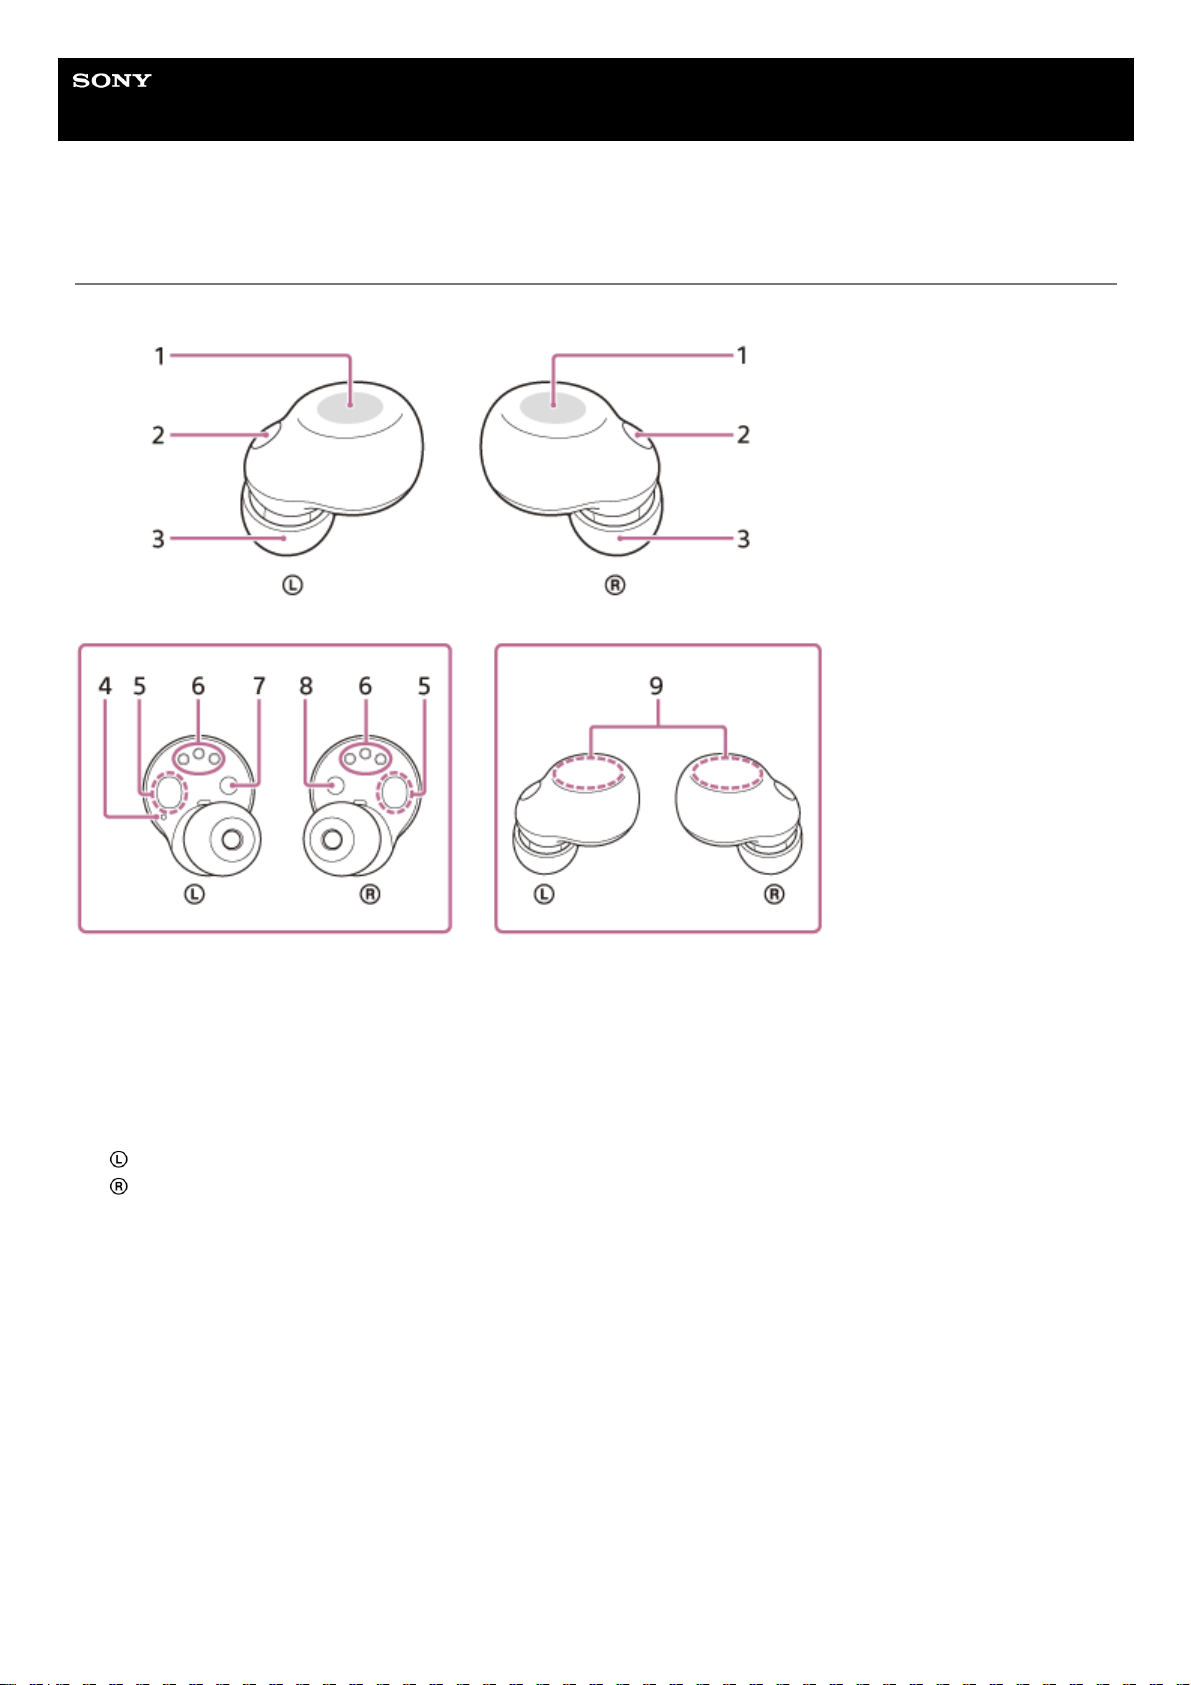
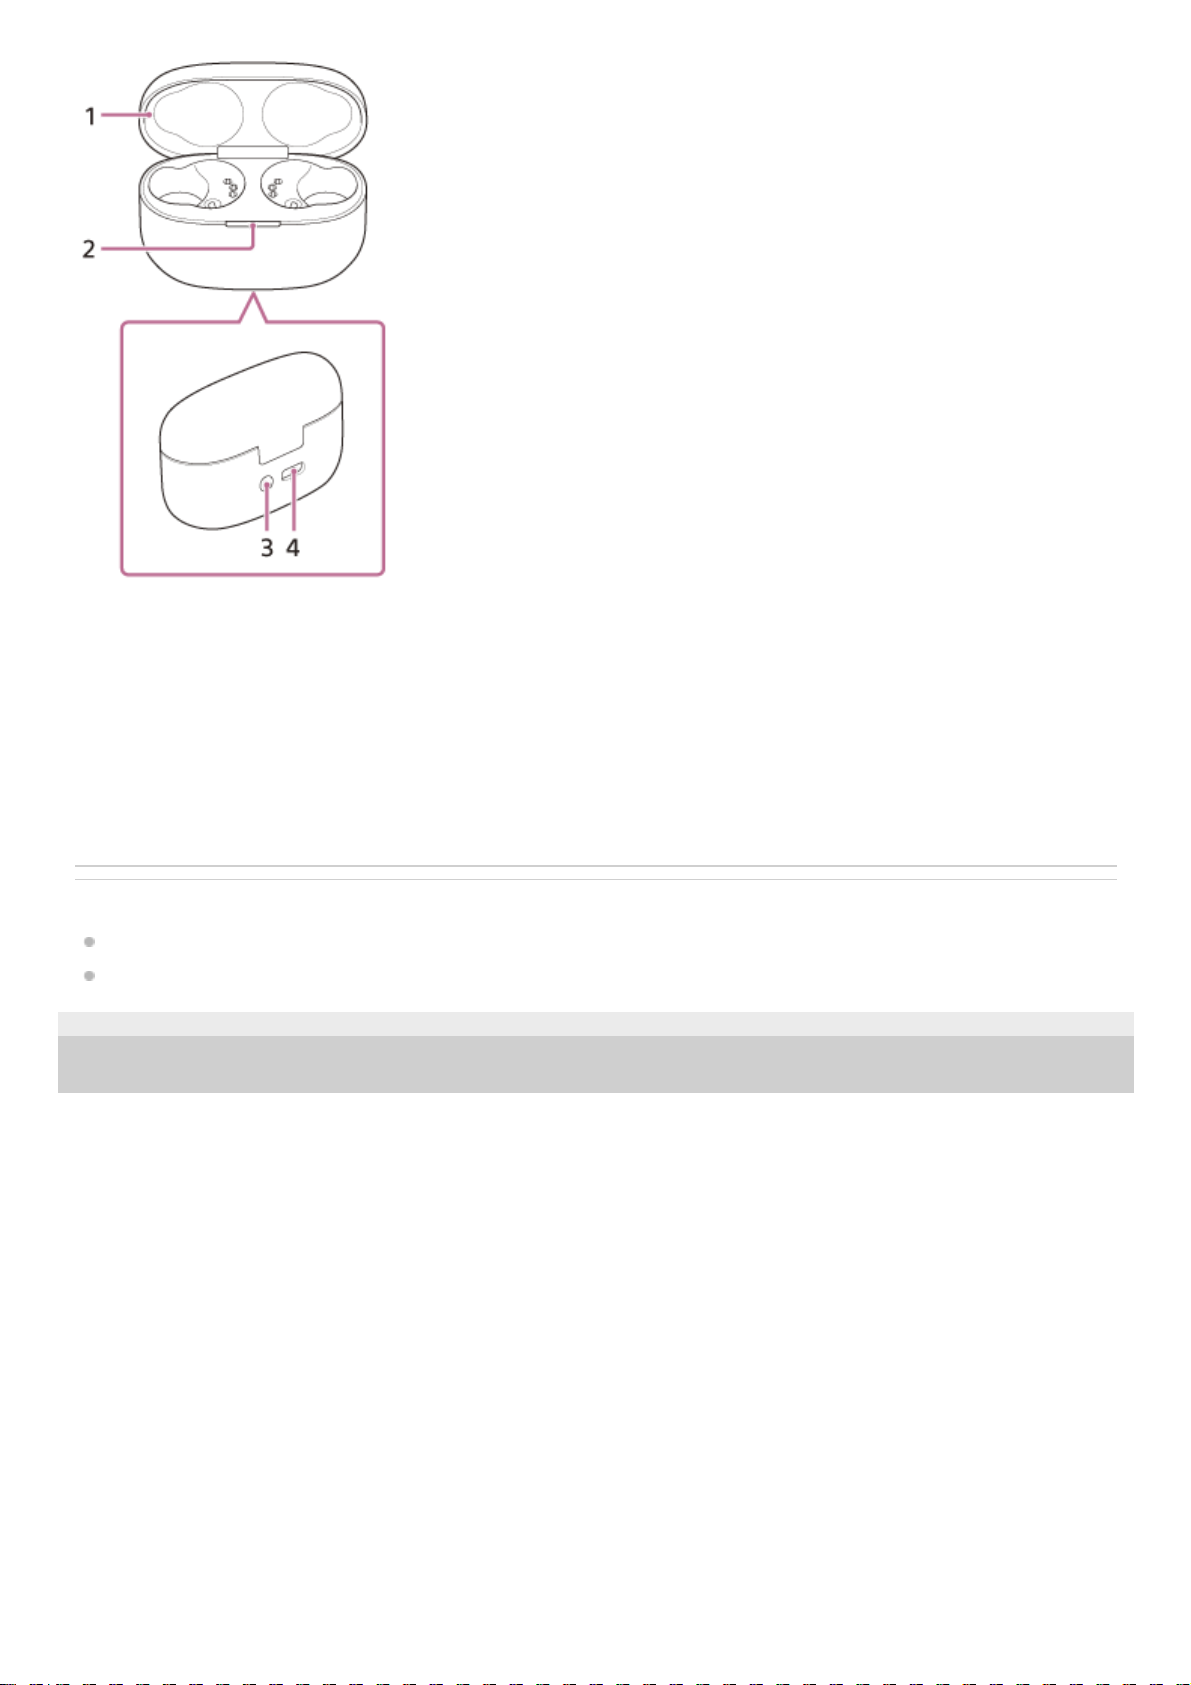
Location and function of parts
Headset
Charging case
Touch sensors (left, right)1.
Microphones (left, right)2.
Earbud tips (left, right)3.
Tactile dot
There is a tactile dot on the left unit of the headset.
4.
IR sensors (left, right)5.
Charging ports (left, right)6.
(left) mark7.
(right) mark8.
Built-in antennas (left, right)
A Bluetooth antenna is built into each left or right unit of the headset.
9.
13
Page 14
Related Topic
About the indicator
Checking the remaining battery charge
5-035-792-11(3)
Copyright 2022 Sony Corporation
Lid1.
Indicator (green/orange/blue)
Indicates the power, communication or charging status of the headset.
2.
Pairing/initialize/reset button
Used when entering pairing mode, initializing or resetting the headset.
3.
USB Type-C port
Using the supplied USB Type-C cable, connect the charging case to a computer or to an AC outlet via a
commercially available USB AC adaptor to simultaneously charge both the headset and the charging case.
4.
14
Page 15
Help Guide
Wireless Noise Canceling Stereo Headset
LinkBuds S
About the indicator
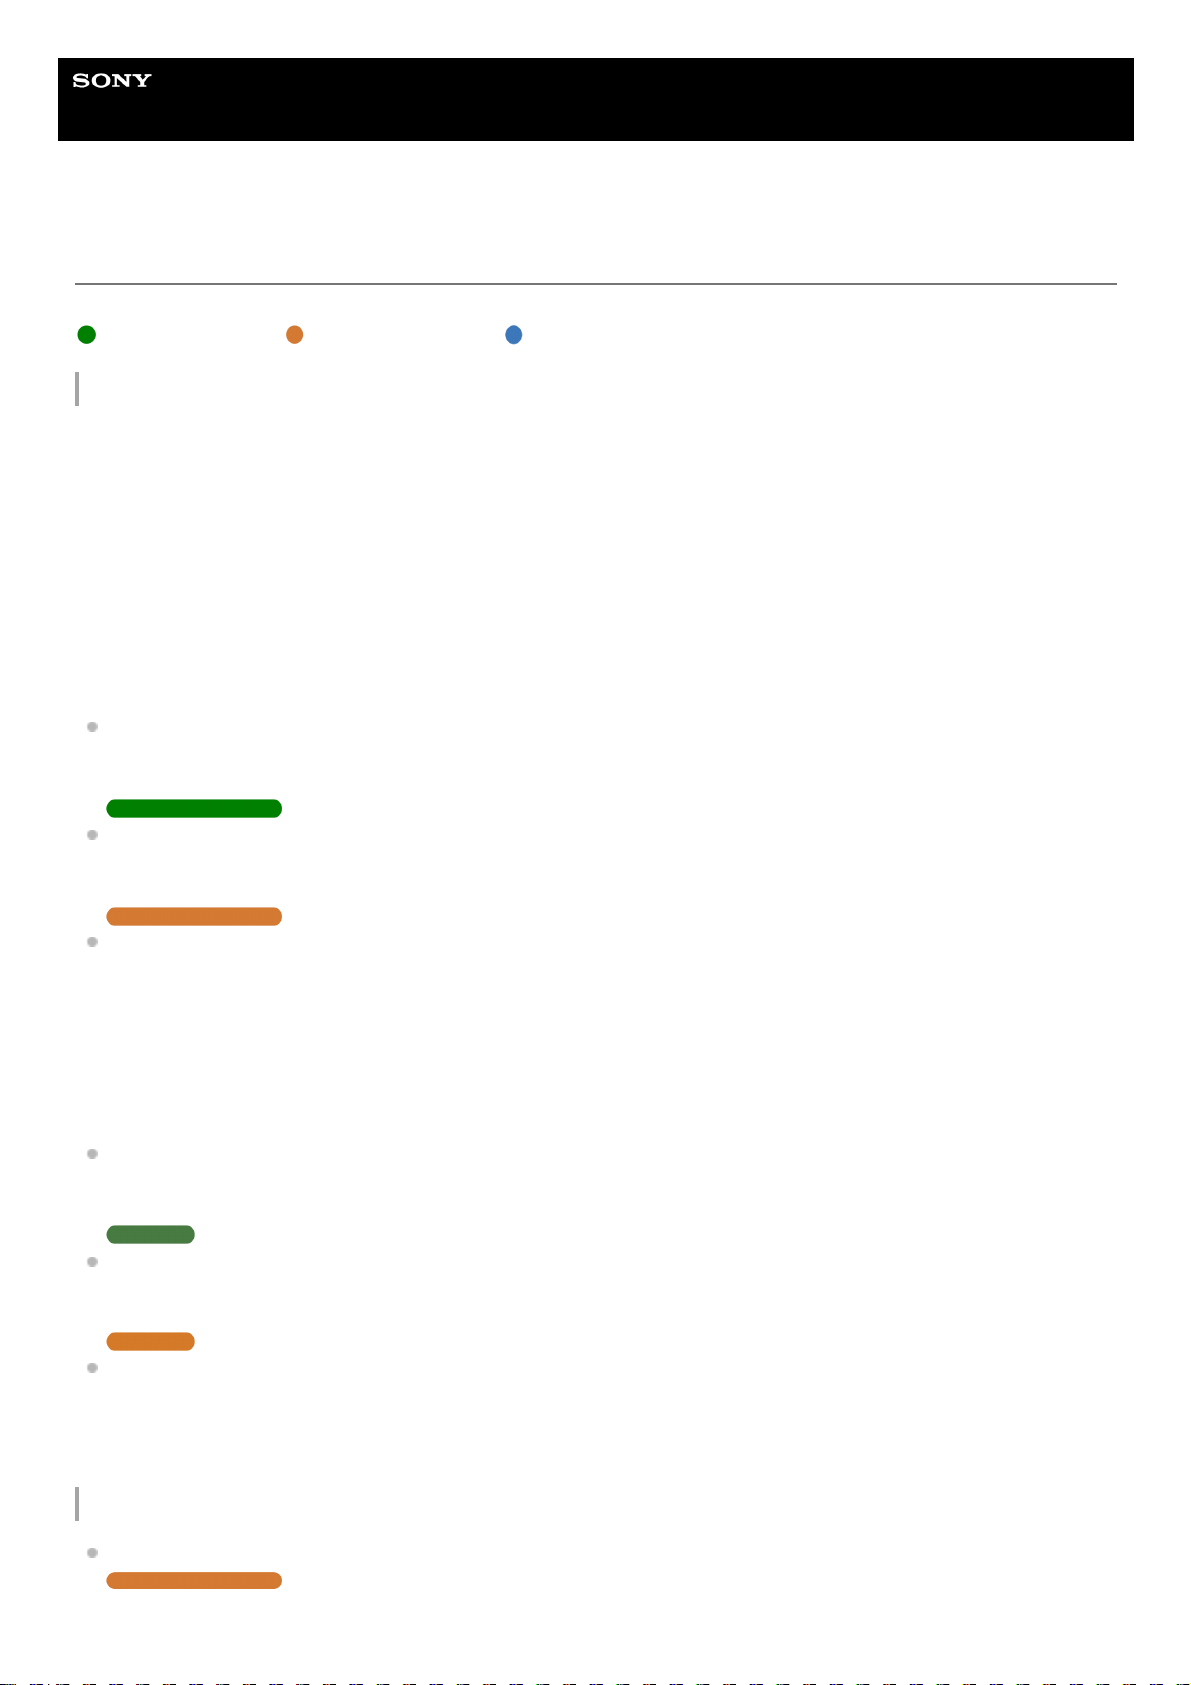
You can check various statuses of the headset/charging case by the indicator on the charging case.
: Turns on in green / : Turns on in orange / : Turns on in blue / -: Turns off
Indication of the remaining battery charge
When both units of the headset are stored in the charging case: Displays the remaining battery charge of the headset
unit with less remaining battery charge between the left and right units of the headset.
When either the left or right unit of the headset is stored in the charging case: Displays the remaining battery charge of
the headset unit stored in the charging case.
When both units of the headset are removed from the charging case: Displays the remaining battery charge of the
charging case.
When the lid of the charging case is opened or closed, or when the USB Type-C cable is removed after charging is
complete, the indicator lights up as follows depending on the remaining battery charge.
When the headset is stored in the charging case and the remaining battery charge of the headset is 95% or higher /
When the headset is not stored in the charging case and the remaining battery charge of the charging case is 31% or
higher
- - - - - - - (lights up in green for about 6 seconds)
When the headset is stored in the charging case and the remaining battery charge of the headset is between 94%
and 1% / When the headset is not stored in the charging case and the remaining battery charge of the charging case
is between 30% and 1%
- - - - - - - (lights up in orange for about 6 seconds)
When the headset is stored in the charging case and the remaining battery charge of the headset is less than 1% /
When the headset is not stored in the charging case and the remaining battery charge of the charging case is less
than 1%
- - - - - - - (turns off)
When the headset is removed from the charging case, or when the headset is stored in the charging case, the indicator
lights up as follows depending on the remaining battery charge.
When the headset is stored in the charging case and the remaining battery charge of the headset is 95% or higher /
When the headset is not stored in the charging case and the remaining battery charge of the charging case is 31% or
higher
- - - - - - - (lights up in green for about 3 seconds)
When the headset is stored in the charging case and the remaining battery charge of the headset is between 94%
and 1% / When the headset is not stored in the charging case and the remaining battery charge of the charging case
is between 30% and 1%
- - - - - - - (lights up in orange for about 3 seconds)
When the headset is stored in the charging case and the remaining battery charge of the headset is less than 1% /
When the headset is not stored in the charging case and the remaining battery charge of the charging case is less
than 1%
- - - - - - - (turns off)
Charging status
While charging the headset / While charging the charging case
(lights up in orange)
15
Page 16
When the battery is fully charged when charging starts on the headset/charging case
- - - - - (lights up in orange for about 1 minute, and then turns off)
When the battery becomes fully charged and charging is complete
- - - - - - - (turns off)
During charging, when the lid of the charging case is opened or closed / When the headset is set to or removed from
the charging case
- - - - - - (turns off for about 0.5 seconds, and then lights up in orange)
Abnormal temperature
- - - - - - - - - - - - - - - (repeatedly flashes twice in orange)
When an error occurs while charging and charging cannot be performed
- - - - - - - - - - (repeatedly flashes slowly in orange)
Abnormal combination of left and right units of the headset
- - - - - - - - - - - - (repeatedly flashes 3 times in orange)
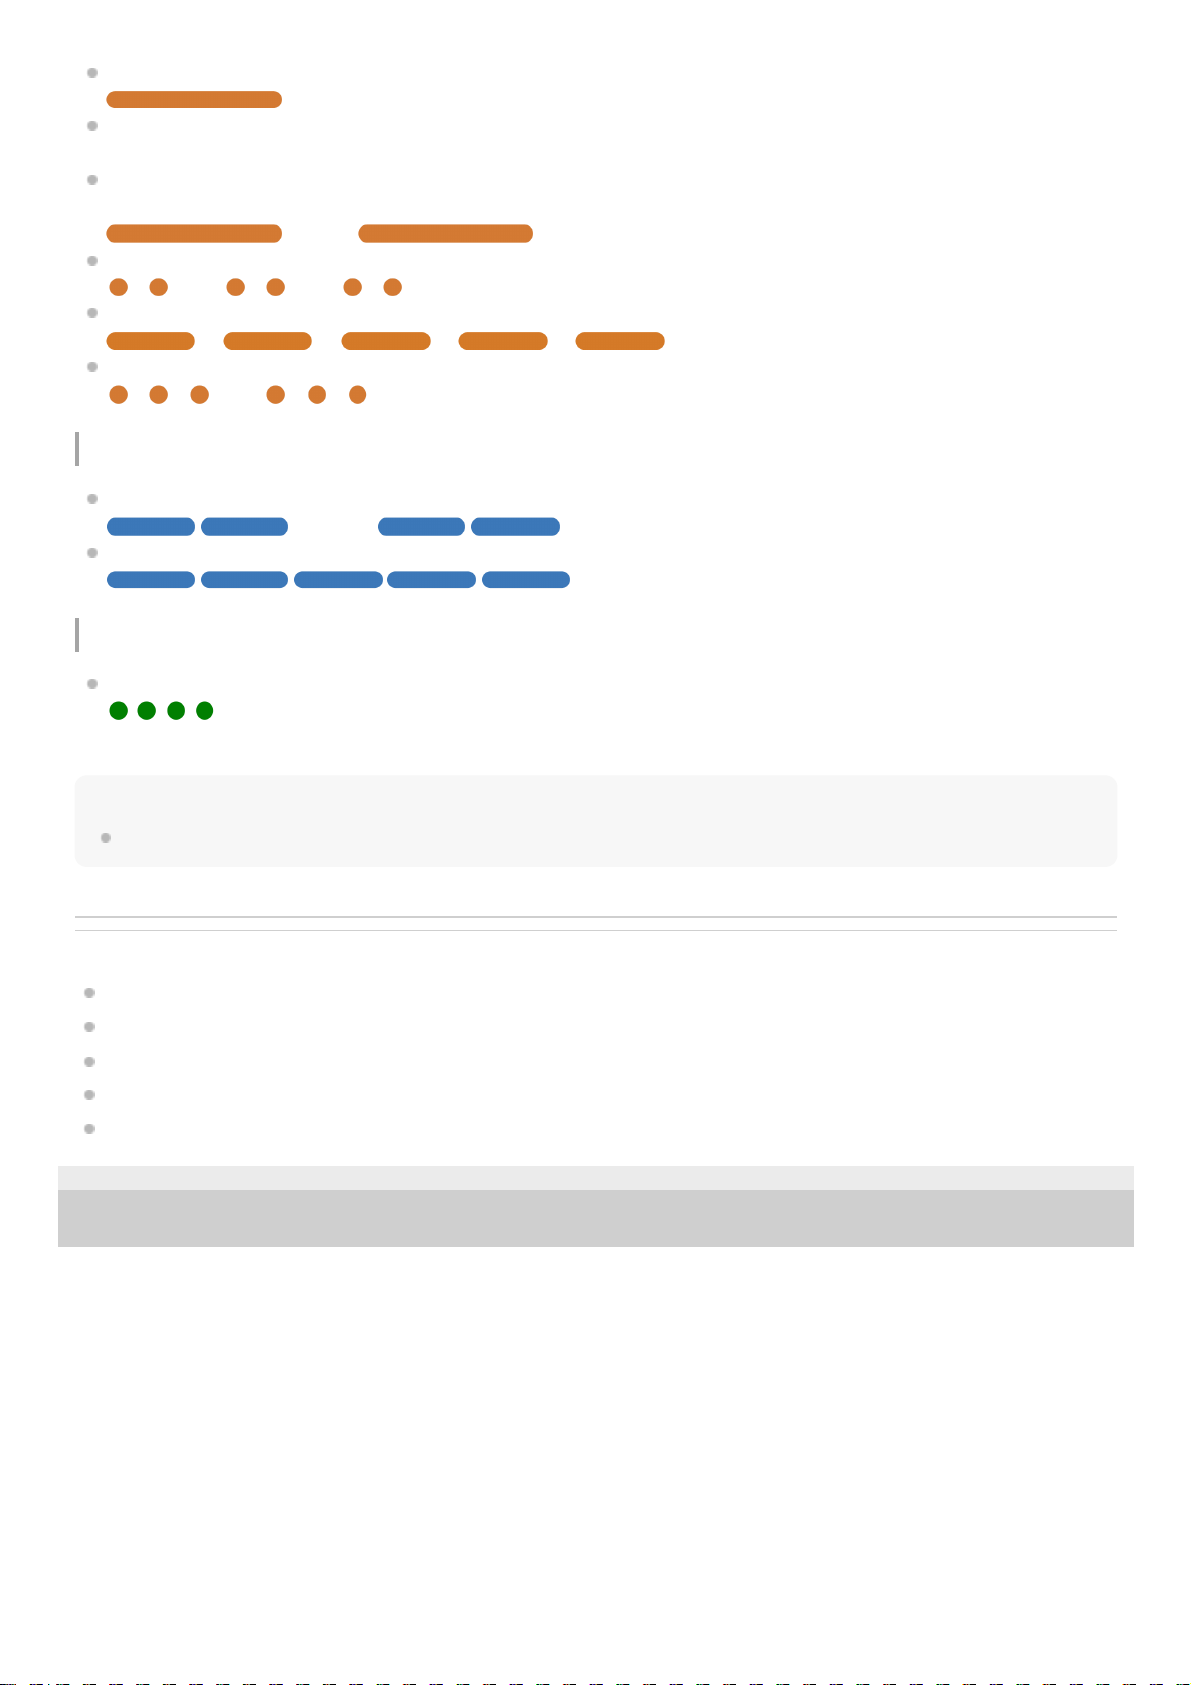
Bluetooth connection status
Pairing mode
- - - - - - - - - - - - - - (repeatedly flashes twice slowly in blue)
Connection process completed
(repeatedly flashes slowly in blue for about 5 seconds)
Other
Initialization completed
(flashes 4 times in green)
For details, see “Initializing the headset to restore factory settings”.
Hint
When the headset is worn, you can check various statuses of the headset by the voice guidance.
Related Topic
Charging
Checking the remaining battery charge
What you can do with the “Sony | Headphones Connect” app
About the voice guidance
Initializing the headset to restore factory settings
5-035-792-11(3)
Copyright 2022 Sony Corporation
16
Page 17
Help Guide
Wireless Noise Canceling Stereo Headset
LinkBuds S
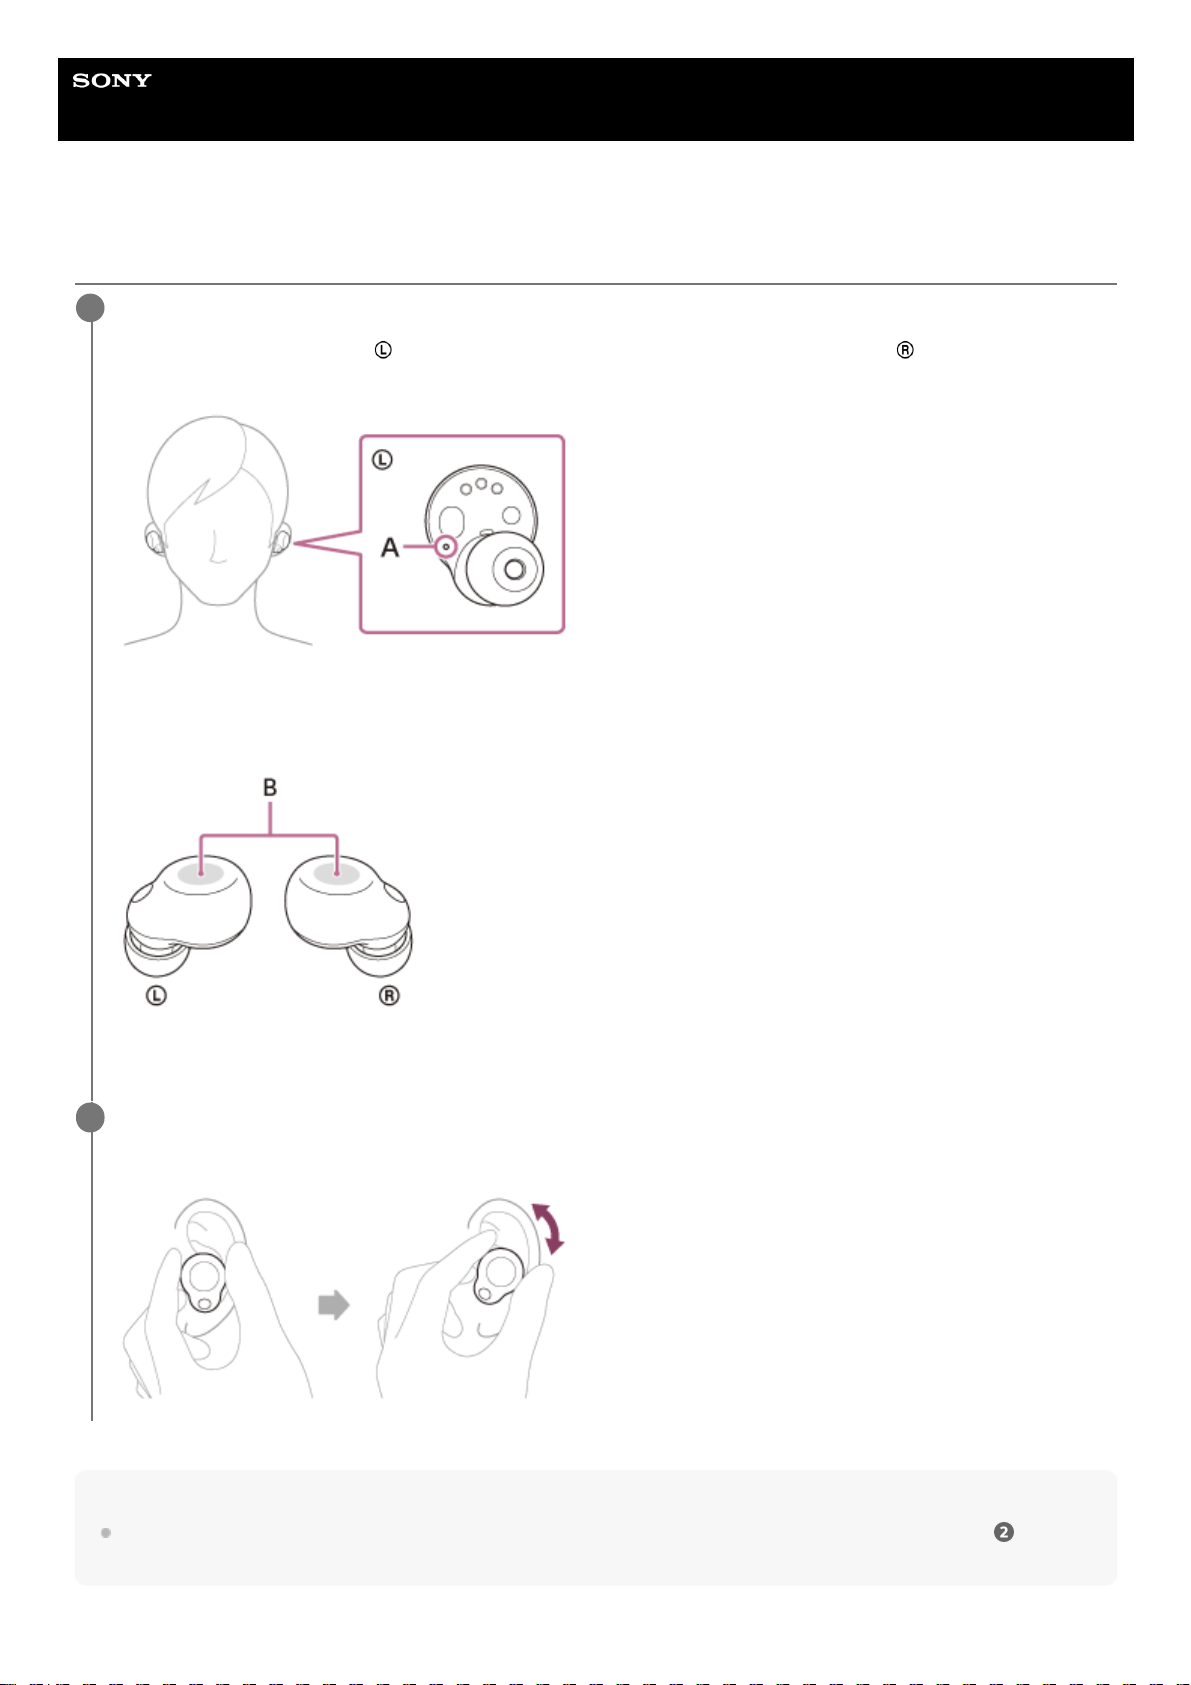
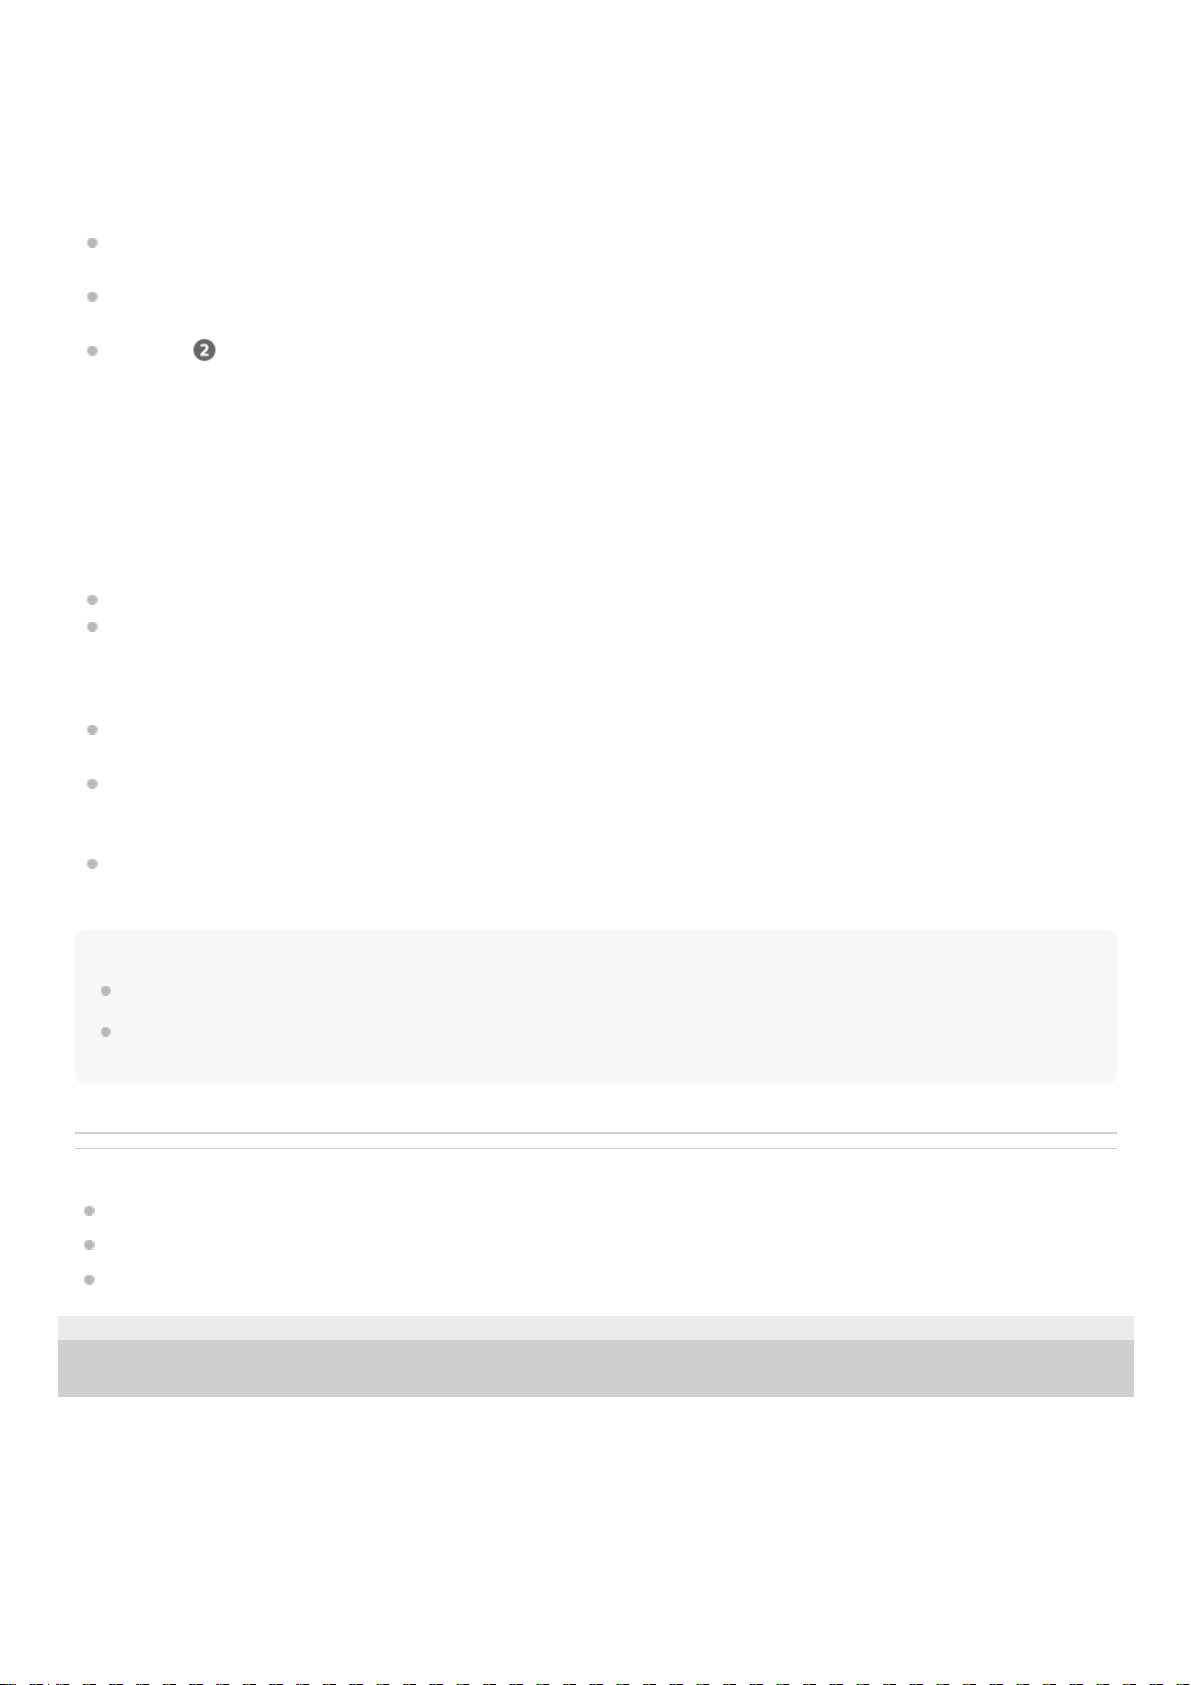
Wearing the headset
Hint
When you put the headset unit into your ear or adjust the positioning of the headset unit, see the illustration in step
for how to
hold the headset unit.
Put the headset units into both ears.
Put the headset unit with the
(left) mark into your left ear and the headset unit with the (right) mark into your
right ear. The left unit has a tactile dot.
A: Tactile dot
Be careful not to come in contact with the touch sensor when you put the headset units into both ears.
B: Touch sensors (left, right)
1
Adjust the fit of the headset to your ears.
Twist the headset unit to slide the earbud tip deep into your ear canal.
2
17
Page 18
For the proper sound quality, noise canceling function, and call sound quality to be effective
If the size of the earbud tips does not match the size of your ear canals or the headset is not worn properly in your ears,
tap operations or Speak-to-Chat speech detection may not work correctly, or you may not obtain the correct sound
qualities, noise canceling effects, or call performance.
If any of this is the case, try the following.
Change the earbud tips to ones that fit more snugly in your ears. When changing the earbud tips, try the earbud tip
sizes in order from the larger ones to the smaller ones. The size of the left and right earbud tips may be different.
The “Sony | Headphones Connect” app will help you to determine which earbud tips are most suitable for you to
achieve the optimal noise cancellation effect.
See step
and check that you are wearing the headset properly in your ears. Wear the headset so that the earbud
tip is comfortably situated as deep in the ear canal as possible.
When attaching and removing the headset
In the factory settings, the built-in IR sensors detect when the headset is inserted in or removed from your ears, enabling
the headset to pause or resume music playback, as well as control the touch sensors and voice guidance.
When the headset is worn
You can use the touch sensors to play music, make and receive calls, etc.
You will hear a voice guidance corresponding to the operation and status.
When the headset is removed
When you listen to music while wearing both headset units in your ears, the headset will pause music playback if one
or both headset units are removed. When the headset is worn again, the headset resumes music playback.
When the headset is not worn for about 15 minutes after being removed from the charging case, the headset turns
off automatically to save the battery. Turn the headset on by tapping the touch sensor or by putting the headset into
your ears.
In order to prevent the headset from reacting incorrectly, music playback, making and receiving calls as well as other
operations cannot be performed by tapping the touch sensors of the headset removed from your ears.
Hint
You can also play music, make and receive calls, etc. when only one unit of the headset is worn in your ear.
By using the “Sony | Headphones Connect” app, you can change the setting of automatically pausing and resuming the music
playback, or automatically turning off the headset.
Related Topic
Replacing the earbud tips
Using only one unit of the headset
What you can do with the “Sony | Headphones Connect” app
5-035-792-11(3)
Copyright 2022 Sony Corporation
18
Page 19
Help Guide
Wireless Noise Canceling Stereo Headset
LinkBuds S
Using only one unit of the headset
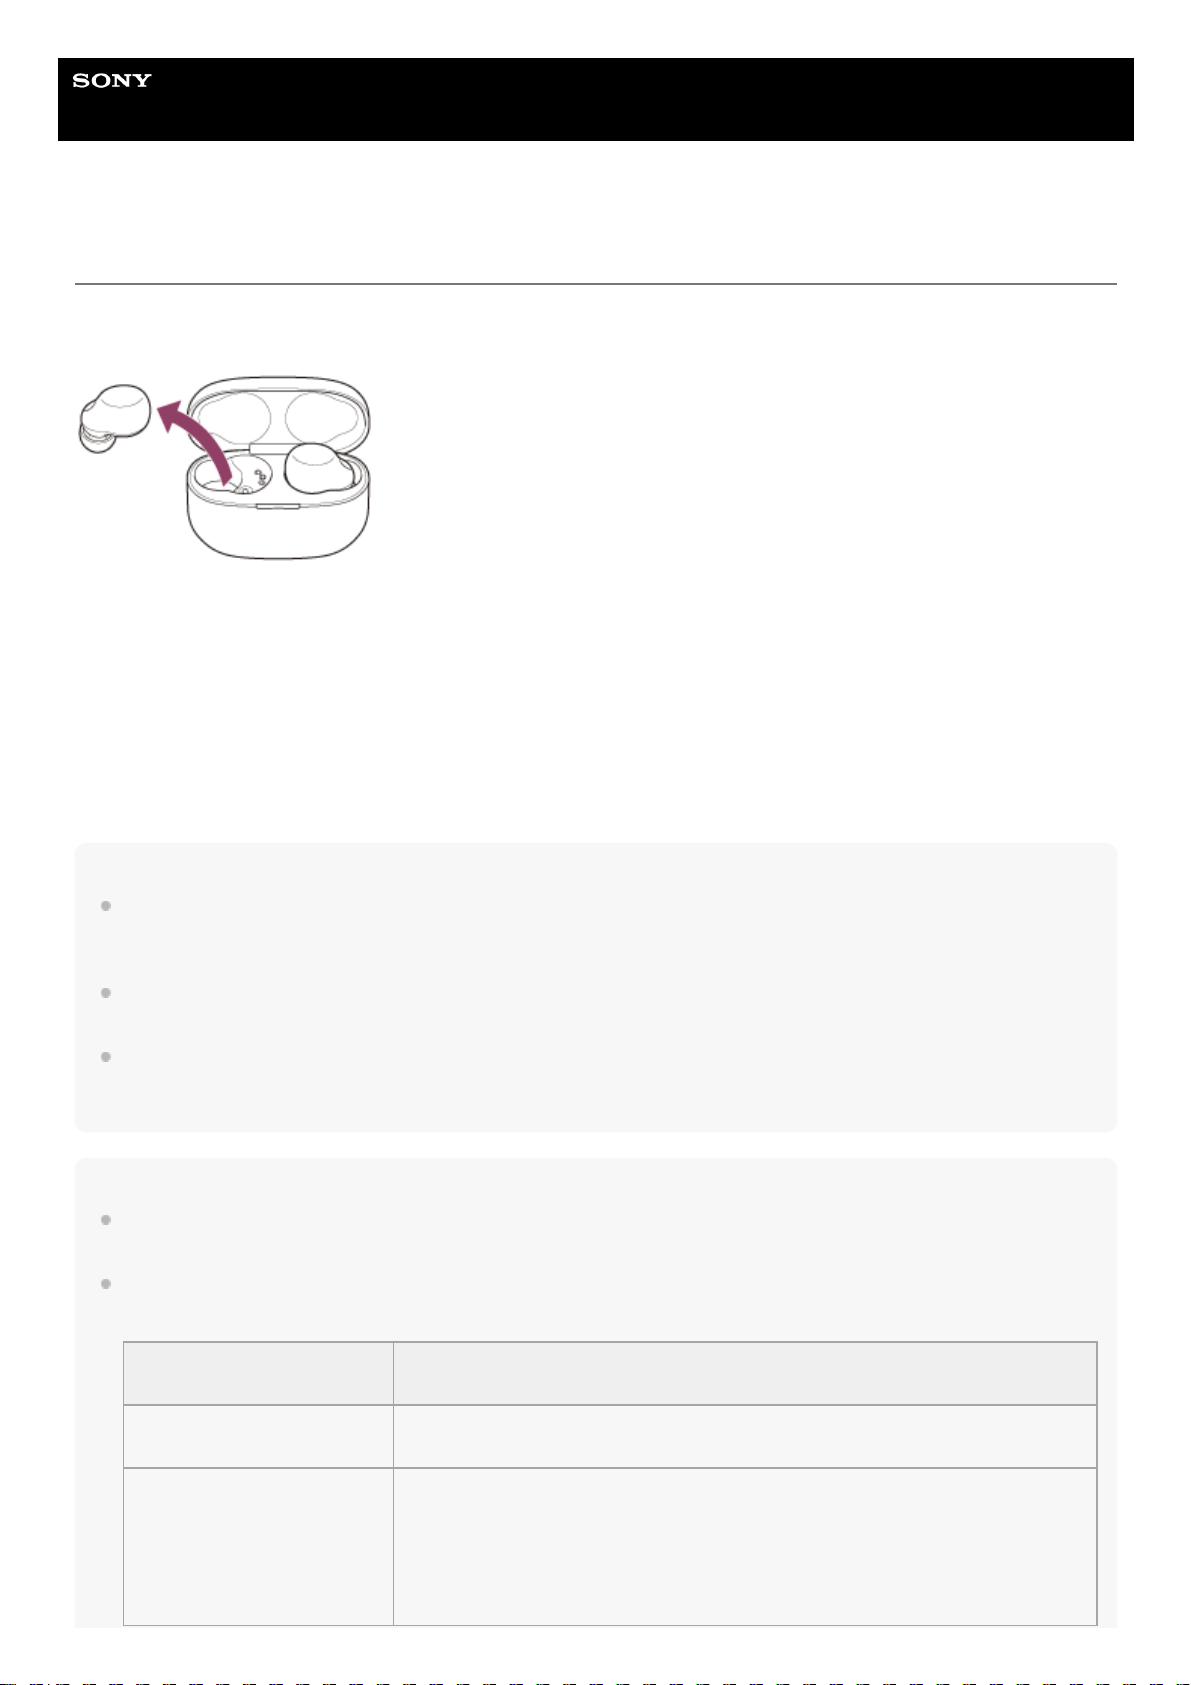
You can remove one unit of the headset from the charging case and use the unit by itself.
In this case, only the unit that has been removed from the charging case will turn on.
When you put on the other unit of the headset
The connection between the left and right units is established automatically, and you will hear the music or other audio
on both units of the headset.
Assigning functions to the touch sensors
Depending on the headset unit you are wearing, some functions may not be available in the factory settings. In this case,
you can change the function assignments to the touch sensors using the “Sony | Headphones Connect” app.
Hint
In the factory settings, the music playback function is assigned to the right unit.
When listening to music with one ear, if only the right unit is worn in your ear, use the touch sensor on the right unit to play music.
When only the left unit is worn in your ear, operate the connected device to play music.
When you play music or other stereo audio while wearing only one unit, you will hear monaural sound with the left and right
channels mixed.
You can also enjoy hands-free calls even when you are wearing only one unit of the headset. When you receive an incoming call,
answer the call using the unit of the headset you are wearing. If you put the other unit into the other ear while you are talking with
only one unit, you can talk with both units.
Note
When Service Link is turned on with the “Sony | Headphones Connect” app, use the right unit of the headset. You cannot use
only the left unit of the headset.
Depending on the assignment of the touch sensors and/or the Voice Assistant setting, you may not be able to use only one unit
of the headset.
Refer to the following and check the setting in the “Sony | Headphones Connect” app.
Voice Assistant setting menu
item
Specification
[Voice Assist Function of Mobile
Device]
Either unit of the headset can be used.
[Google Assistant] or [Amazon
Alexa]
Only the headset unit with the Touch Sensor Control function set to [Playback control] can
be used.
Assign the [Playback control] function to the headset unit you want to use.
In the factory settings, [Playback control] is assigned to the right unit.
When you assign [Playback control] to both headset units, full functionality is only available
on the right unit.
19
Page 20

Related Topic
Controlling the audio device (Bluetooth connection)
Functions for a phone call
What you can do with the “Sony | Headphones Connect” app
5-035-792-11(3)
Copyright 2022 Sony Corporation
Voice Assistant setting menu
item
Specification
[Do not use] Either unit of the headset can be used.
20
Page 21
Help Guide
Wireless Noise Canceling Stereo Headset
LinkBuds S
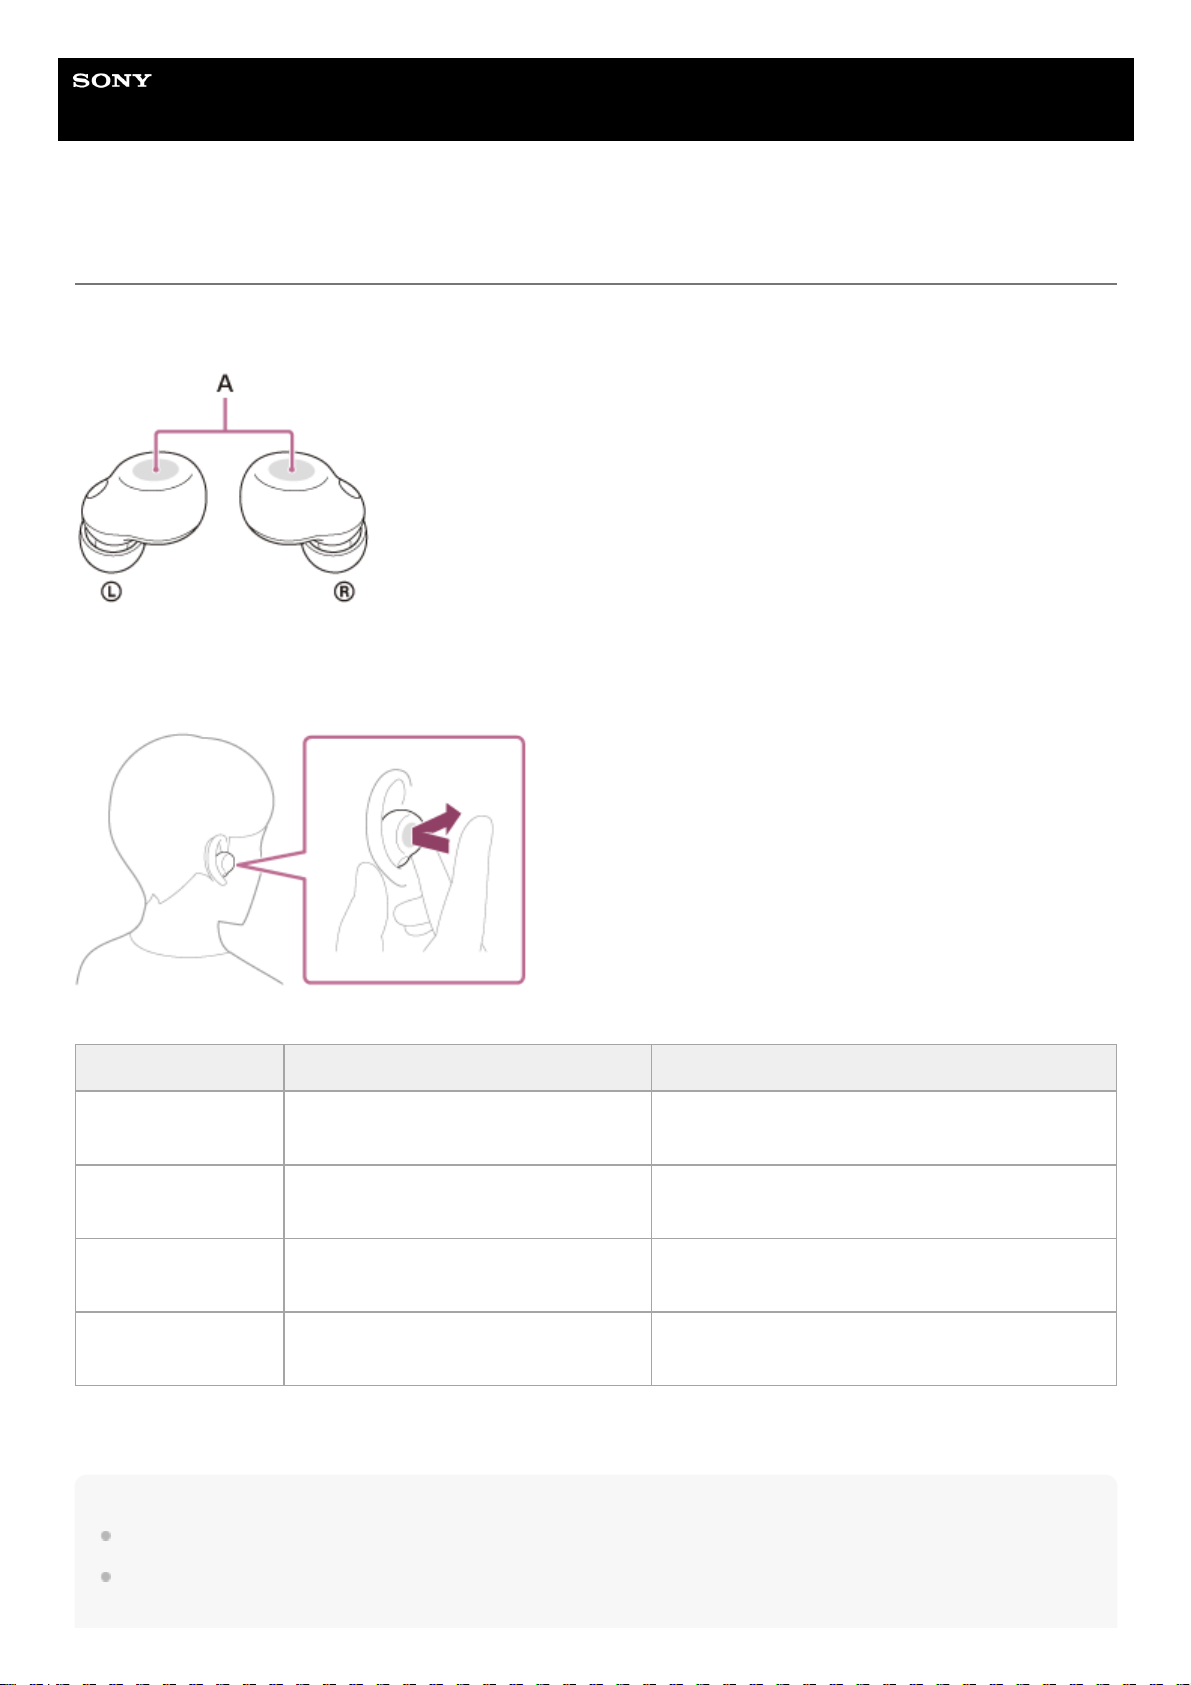
About the touch sensor
Tap the touch sensor for various operations, such as music playback, phone calls, or changing the setting of the noise
canceling function.
A: Touch sensors (left, right)
To operate the touch sensor, tap the touch sensor with your forefinger.
Some available operations
Hint
When tapping the touch sensor 2 or 3 times, tap it quickly with an interval of about 0.3 seconds between taps.
You can change the function assignments to the touch sensors of the left and right units using the “Sony | Headphones Connect”
app. For example, the music playback function that is assigned to the touch sensor of the right unit in the factory settings can be
Left Right
Tap
To switch the noise canceling function
and Ambient Sound Mode
To play or pause music
Tap twice To receive or end a call
To skip to the beginning of the next track
To receive or end a call
Tap 3 times —
To skip to the beginning of the previous track (or
the current track during playback)
Hold your finger to
the touch sensor
To activate the Quick Attention Mode
To use or cancel the voice assist function (Google
app/Siri)
21
Page 22

changed to the touch sensor of the left unit.
You can also change the settings that do not assign the music playback function, noise canceling function, Ambient Sound Mode
and playback volume adjustment function, etc.
Note
You cannot operate the touch sensors when not wearing the headset. If you disable the wearing detection automatic power off
function with the “Sony | Headphones Connect” app, the touch sensors can be operated even when the headset is not worn.
When you make initial settings for the Google Assistant on your smartphone, the function assignments to the touch sensors may
change automatically.
Check the function assignments to the touch sensors with the “Sony | Headphones Connect” app.
When you make initial settings for Amazon Alexa on your smartphone, the function assignments to the touch sensors may
change automatically.
Check the function assignments to the touch sensors with the “Sony | Headphones Connect” app.
Related Topic
What you can do with the “Sony | Headphones Connect” app
Controlling the audio device (Bluetooth connection)
Functions for a phone call
5-035-792-11(3)
Copyright 2022 Sony Corporation
22
Page 23
Help Guide
Wireless Noise Canceling Stereo Headset
LinkBuds S
Using Quick Access
Quick Access is a feature that allows you to play content in the corresponding app by simply tapping the touch sensor of
the headset.
Hint
Quick Access can be used on the headset unit with the touch sensor that has the noise canceling function and Ambient Sound
Mode switching function assigned. In the factory settings, this function is assigned to the left unit. You can change the function
assignments to the touch sensors of the left and right units using the “Sony | Headphones Connect” app.
To use Quick Access, you need to install the corresponding smartphone app and connect to the Internet. Some apps will require
you to sign in.
For details on the latest specifications of Quick Access, refer to the [Services] tab of the “Sony | Headphones Connect” app.
You can also assign the same service to the 2-tap and 3-tap setting of Quick Access.
If the corresponding app is not launched even when tapping the touch sensor of the headset, the voice guidance “App assigned
to the Quick Access is not launched on the mobile device” is heard from both headset units (or from the headset unit you are
wearing).
Note
The services that can be assigned to Quick Access differ depending on the country or region.
Related Topic
What you can do with the “Sony | Headphones Connect” app
What you can do with partner services
5-035-792-11(3)
Copyright 2022 Sony Corporation
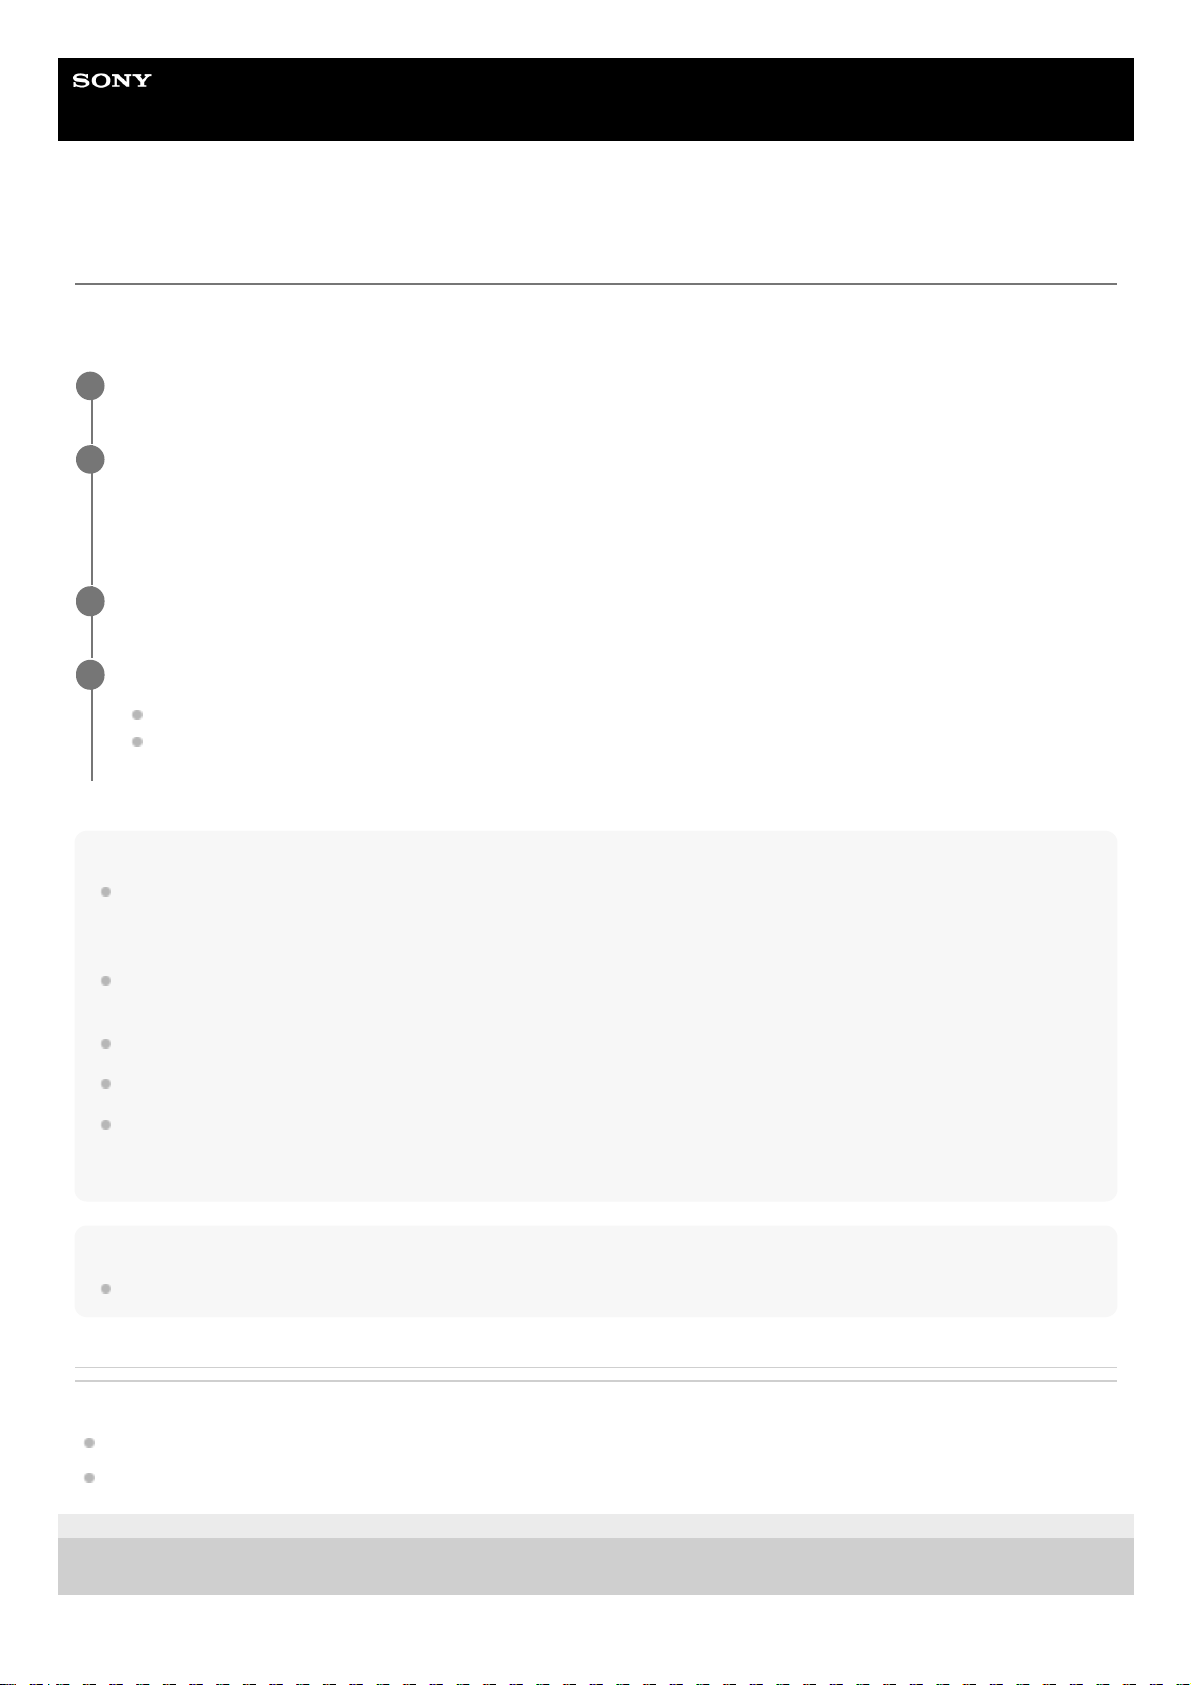
Put the headset units into your ears and connect the headset to the smartphone via Bluetooth connection.
1
Open the “Sony | Headphones Connect” app, and assign the services you want to link to Quick Access.
For details on the “Sony | Headphones Connect” app, refer to the following URL.
https://rd1.sony.net/help/mdr/hpc/h_zz/
2
Launch the app of the service assigned to Quick Access.
3
Tap the touch sensor on the left unit to use Quick Access.
Tap twice: Quick Access
Tap 3 times: Quick Access
4
23
Page 24
Help Guide
Wireless Noise Canceling Stereo Headset
LinkBuds S
Charging
The headset and the charging case contain built-in lithium-ion rechargeable batteries. Use the supplied USB Type-C
cable to charge the headset before use.
About the charging time
The required time for fully charging the headset and the charging case is about 3 hours (*).
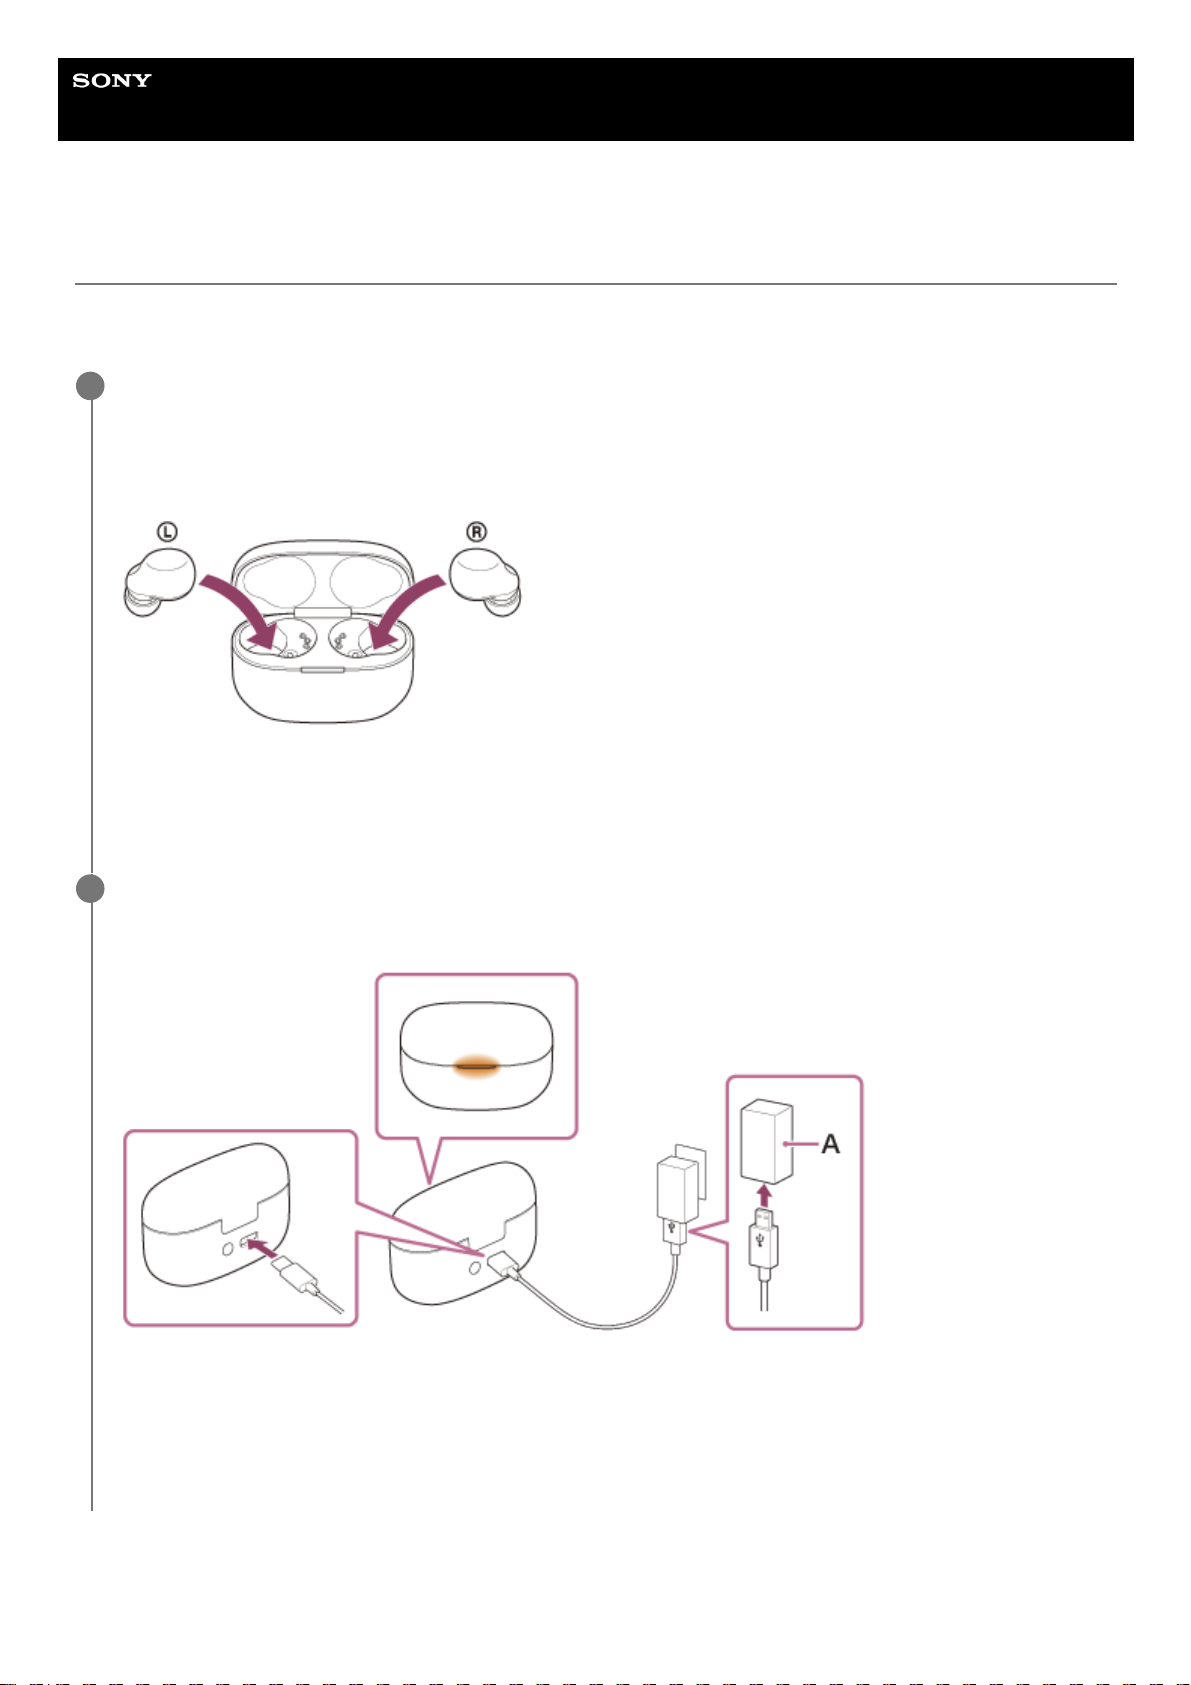
Set the headset into the charging case.
Put the left unit of the headset (the unit with the tactile dot) back into the left hole of the charging case, and put the
right unit of the headset back into the right hole of the charging case. Each unit of the headset will be set to the
correct position in the charging case by the built-in magnet.
When the remaining battery charge of the charging case is sufficient, the indicator (orange or green) on the
charging case lights up for about 3 seconds.
The charging starts on the headset. Close the lid of the charging case.
1
Connect the charging case to an AC outlet.
Use the supplied USB Type-C cable and a commercially available USB AC adaptor.
A: USB AC adaptor
Charging starts on the headset and charging case. The indicator (orange) on the charging case lights up.
After charging is complete, the indicator on the charging case turns off.
Remove the USB Type-C cable.
2
24
Page 25

Charging the headset when you are outside
A rechargeable battery is built into the charging case. If you charge the charging case in advance, you can use it to
charge the headset when you go out without a power supply.
The required time for fully charging the left and right units of the headset is about 2 hours.
System requirements for battery charge using USB
USB AC adaptor
A commercially available USB AC adaptor capable of supplying an output current of 0.5 A (500 mA) or more
Personal computer
Personal computer with a standard USB port
We do not guarantee operation on all computers.
Operations using a custom-built or homebuilt computer are not guaranteed.
Hint
The headset can be also charged by connecting the charging case to a running computer using the supplied USB Type-C cable.
Note
Be sure to use the supplied USB Type-C cable. Otherwise, charging may not be successful.
Charging may not be successful depending on the type of USB AC adaptor.
Depending on the settings for the headset functions and usage conditions, the speed of energy consumption for the rechargeable
battery may vary between the left and right units.
As a result, the charging time of the rechargeable batteries for the left and right units may differ. However, this is not a
malfunction.
The headset cannot be charged when the computer goes into standby (sleep) or hibernation mode. In this case, change the
computer settings, and start charging once again.
When the headset is placed in the charging case, if the indicator (orange) on the charging case lights up for about 3 seconds and
then turns off, the remaining battery charge of the charging case is low. Charge the charging case.
If the indicator on the charging case does not turn on even when the headset is placed in the charging case, the battery charge of
the charging case is empty. Charge the charging case.
If the headset is not used for a long time, the rechargeable battery usage hours may be reduced. However, the battery life will
improve after charging and discharging several times. If you store the headset for a long time, charge the battery once every 6
months to avoid over-discharge.
If the headset is not used for a long time, it may take longer to charge the battery.
Be sure to close the lid of the charging case to prevent the battery of the charging case from being consumed.
If there is a problem with the rechargeable battery of the headset or the charging case and something unusual is detected during
charging, the indicator (orange) on the charging case flashes.
It is recommended to charge in a place with an ambient temperature between 15 °C and 35 °C (59 °F - 95 °F). Efficient charging
may not be possible beyond this range.
If the problem persists, consult your nearest Sony dealer.
If the headset is not used for a long time, the indicator (orange) on the charging case may not immediately light up when
charging. Wait a moment until the indicator (orange) lights up.
If the usage hours of the built-in rechargeable battery decrease significantly, the battery should be replaced. Consult your nearest
Sony dealer.
Avoid exposure to extreme temperature changes, direct sunlight, moisture, sand, dust, and electrical shock. Never leave the
headset in a parked vehicle.
When connecting the charging case to a computer, use only the supplied USB Type-C cable, and be sure to directly connect
them. Charging will not be properly completed when the charging case is connected through a USB hub.
Time required for charging the empty battery to its full capacity. The charging time may differ depending on the conditions of use.
*
25
Page 26

The headset and the charging case may become warm during charging or for a while after charging. However, this is not a
malfunction.
Related Topic
About the indicator
Checking the remaining battery charge
5-035-792-11(3)
Copyright 2022 Sony Corporation
26
Page 27
Help Guide
Wireless Noise Canceling Stereo Headset
LinkBuds S
Available operating time
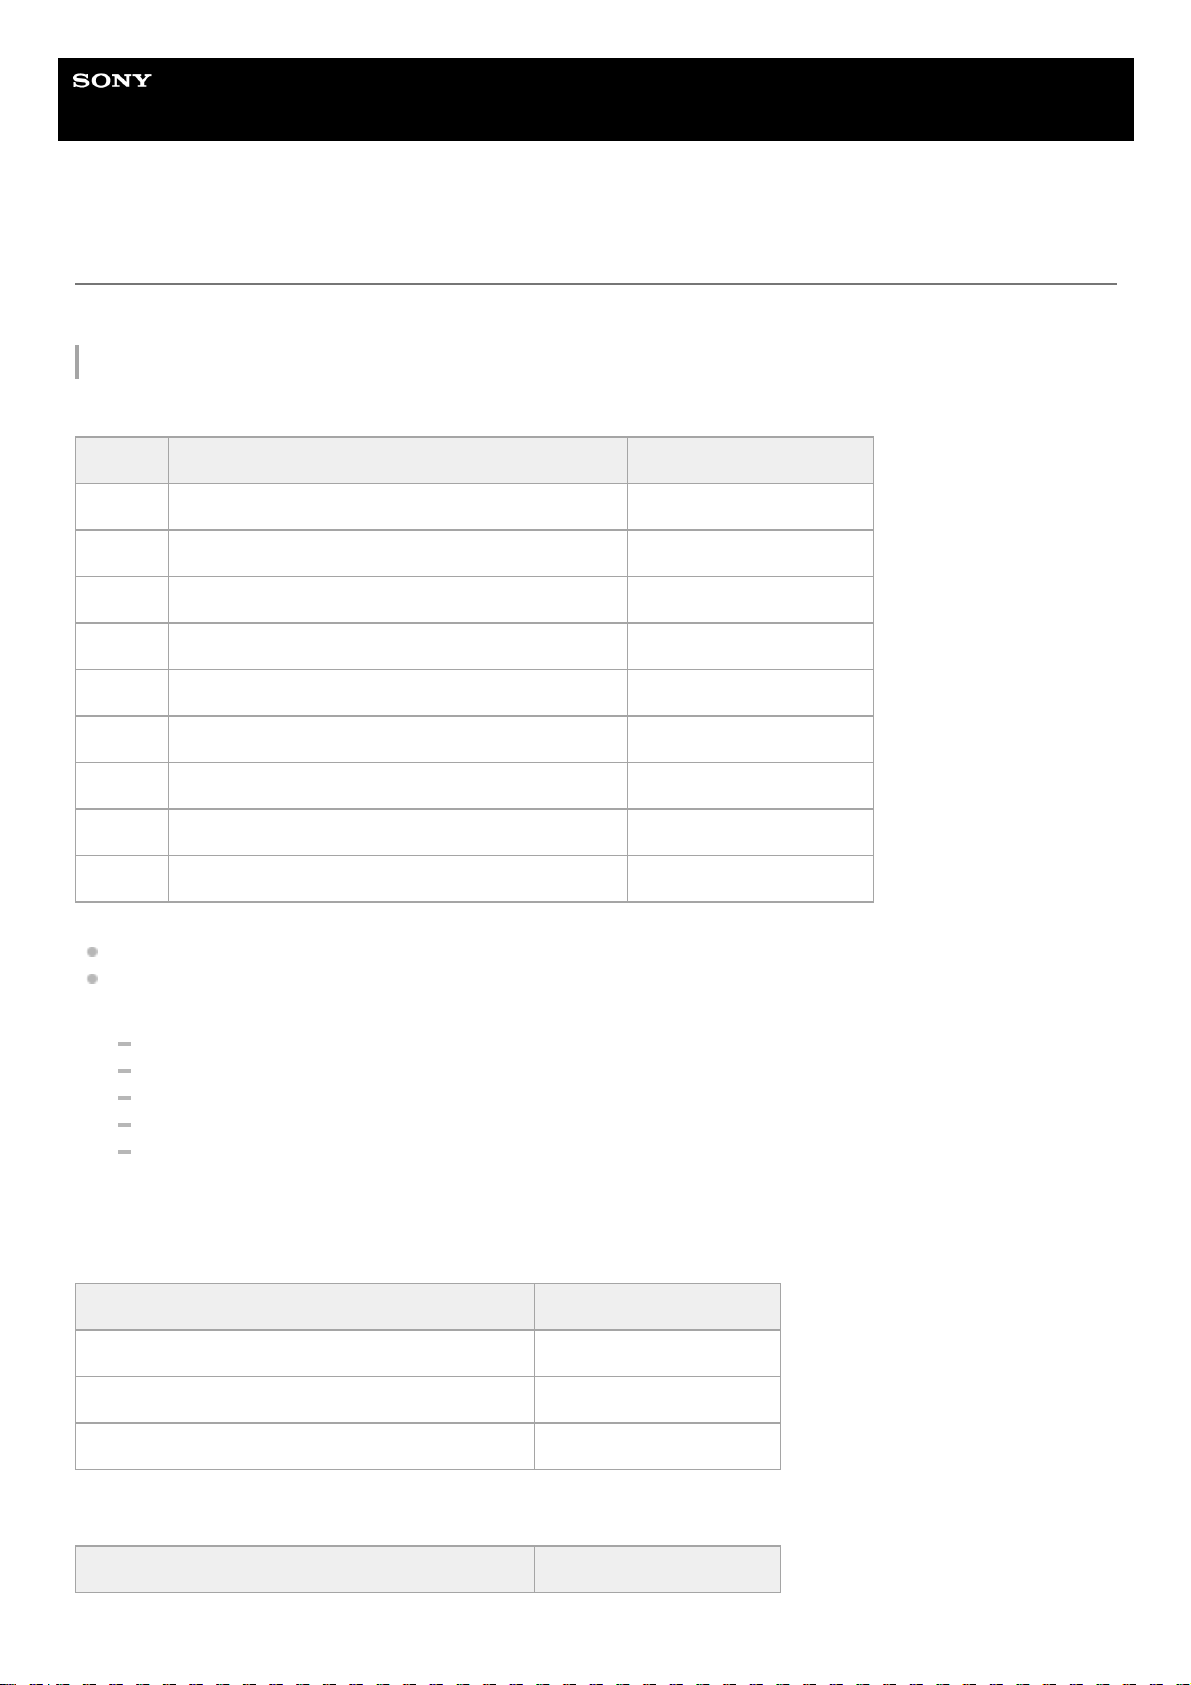
The available operating times of the headset with the battery fully charged are as follows:
Bluetooth connection
Music playback time
About 1 hour of music playback is possible after 5 minutes charging.
If you set the following functions, the available operating time of the battery becomes shorter than the ones described
above.
Equalizer
DSEE Extreme™
Speak-to-Chat
Function to launch the voice assist function by your voice
Service Link
If you run the above settings at the same time, the available operating time of the battery becomes even shorter.
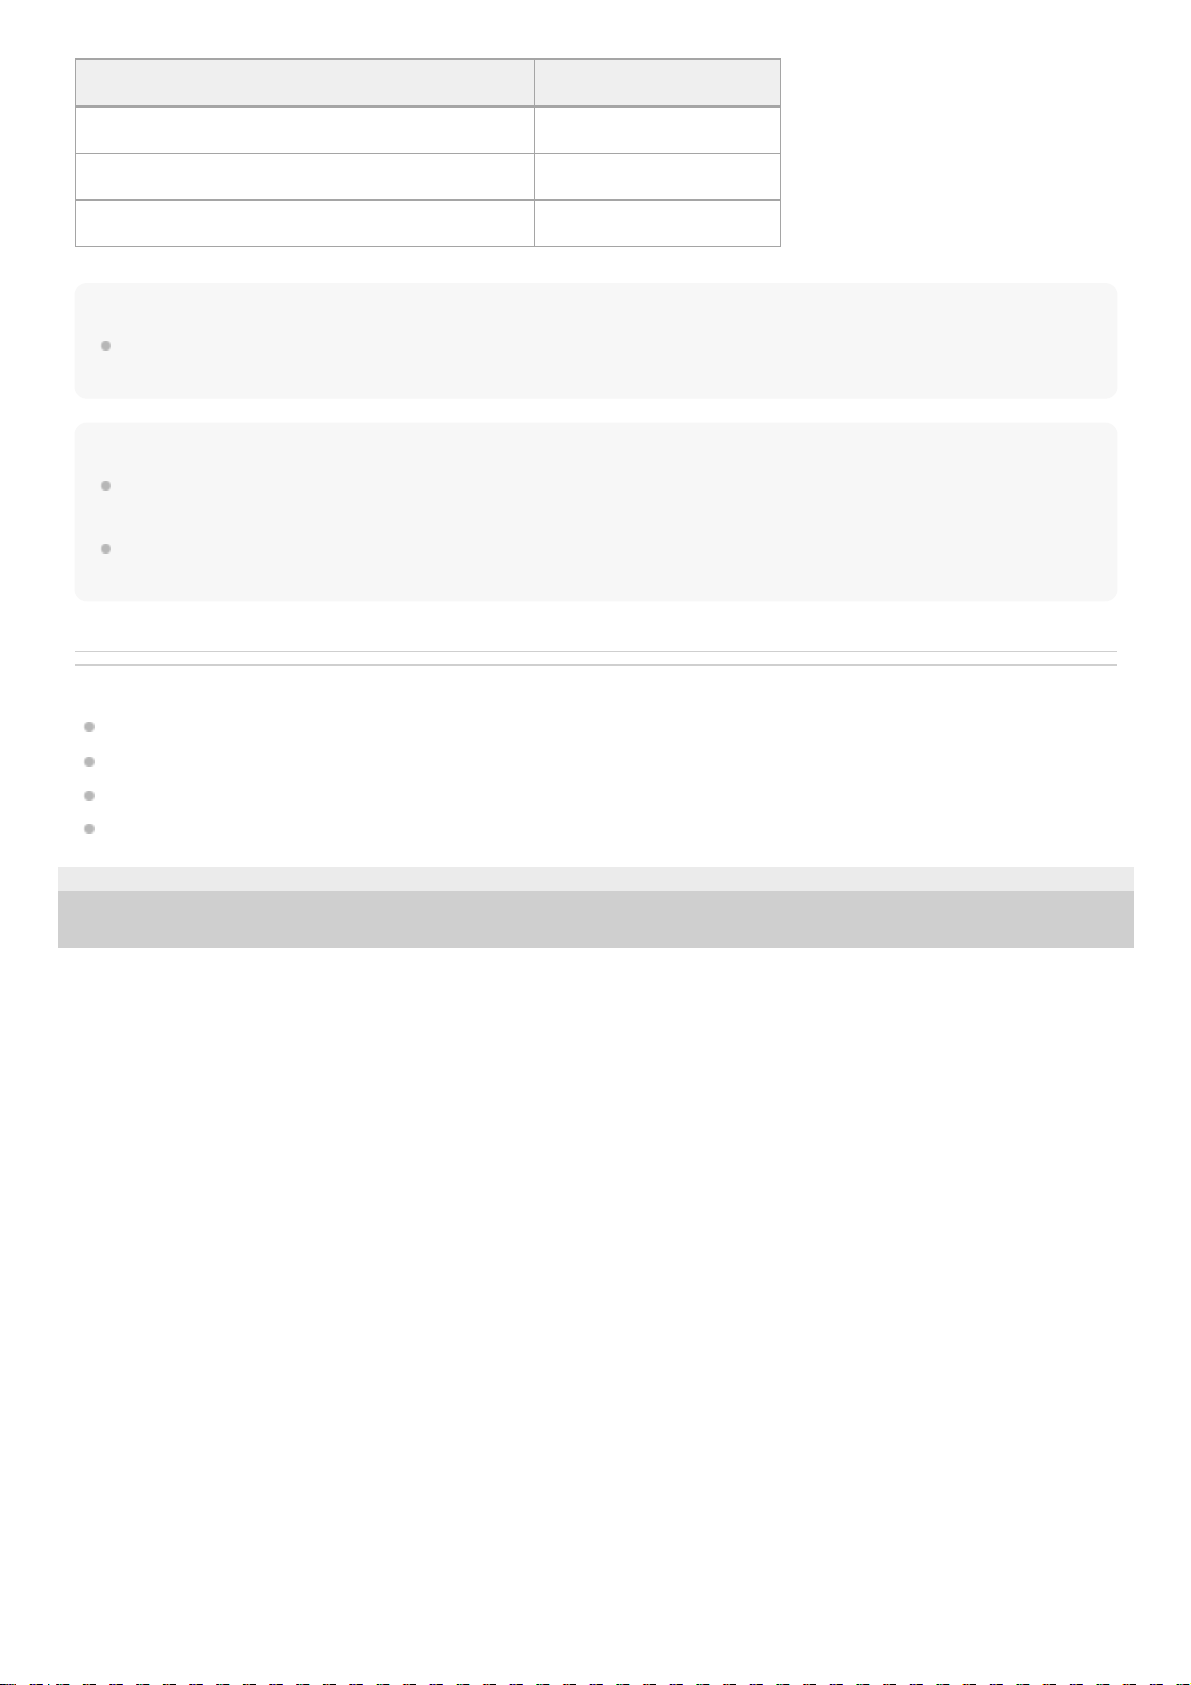
Communication time
Standby time
Codec Noise canceling function/Ambient Sound Mode Available operating time
LDAC™ Noise canceling function: ON Max. 3.5 hours
LDAC Ambient Sound Mode: ON Max. 3.5 hours
LDAC OFF Max. 4.5 hours
AAC Noise canceling function: ON Max. 6 hours
AAC Ambient Sound Mode: ON Max. 6 hours
AAC OFF Max. 9 hours
SBC Noise canceling function: ON Max. 6 hours
SBC Ambient Sound Mode: ON Max. 6 hours
SBC OFF Max. 9 hours
Noise canceling function/Ambient Sound Mode Available operating time
Noise canceling function: ON Max. 3.5 hours
Ambient Sound Mode: ON Max. 3.5 hours
OFF Max. 3.5 hours
Noise canceling function/Ambient Sound Mode Available operating time
27
Page 28
Hint
By using the “Sony | Headphones Connect” app, you can check which codec is used for a connection or switch the DSEE
Extreme function.
Note
Usage hours may be different from the time described above depending on the settings for the headset functions and usage
conditions.
Depending on the settings for the headset functions and usage conditions, the speed of energy consumption for the rechargeable
battery may vary between the left and right units. However, this is not a malfunction.
Related Topic
Supported codecs
About the DSEE Extreme function
Speaking with someone while wearing the headset (Speak-to-Chat)
What you can do with the “Sony | Headphones Connect” app
5-035-792-11(3)
Copyright 2022 Sony Corporation
Noise canceling function/Ambient Sound Mode Available operating time
Noise canceling function: ON Max. 8.5 hours
Ambient Sound Mode: ON Max. 8 hours
OFF Max. 16 hours
28
Page 29
Help Guide
Wireless Noise Canceling Stereo Headset
LinkBuds S
Checking the remaining battery charge
You can check the remaining battery charge of the rechargeable batteries of the headset and the charging case.
If the remaining battery charge of the headset becomes low when you put the headset into your
ears or while using the headset
If a warning beep sounds and the voice guidance says, “Low battery”, charge the headset as soon as possible.
When the battery becomes completely empty, a warning beep sounds, the voice guidance says, “Battery is empty”, and
the headset automatically turns off.
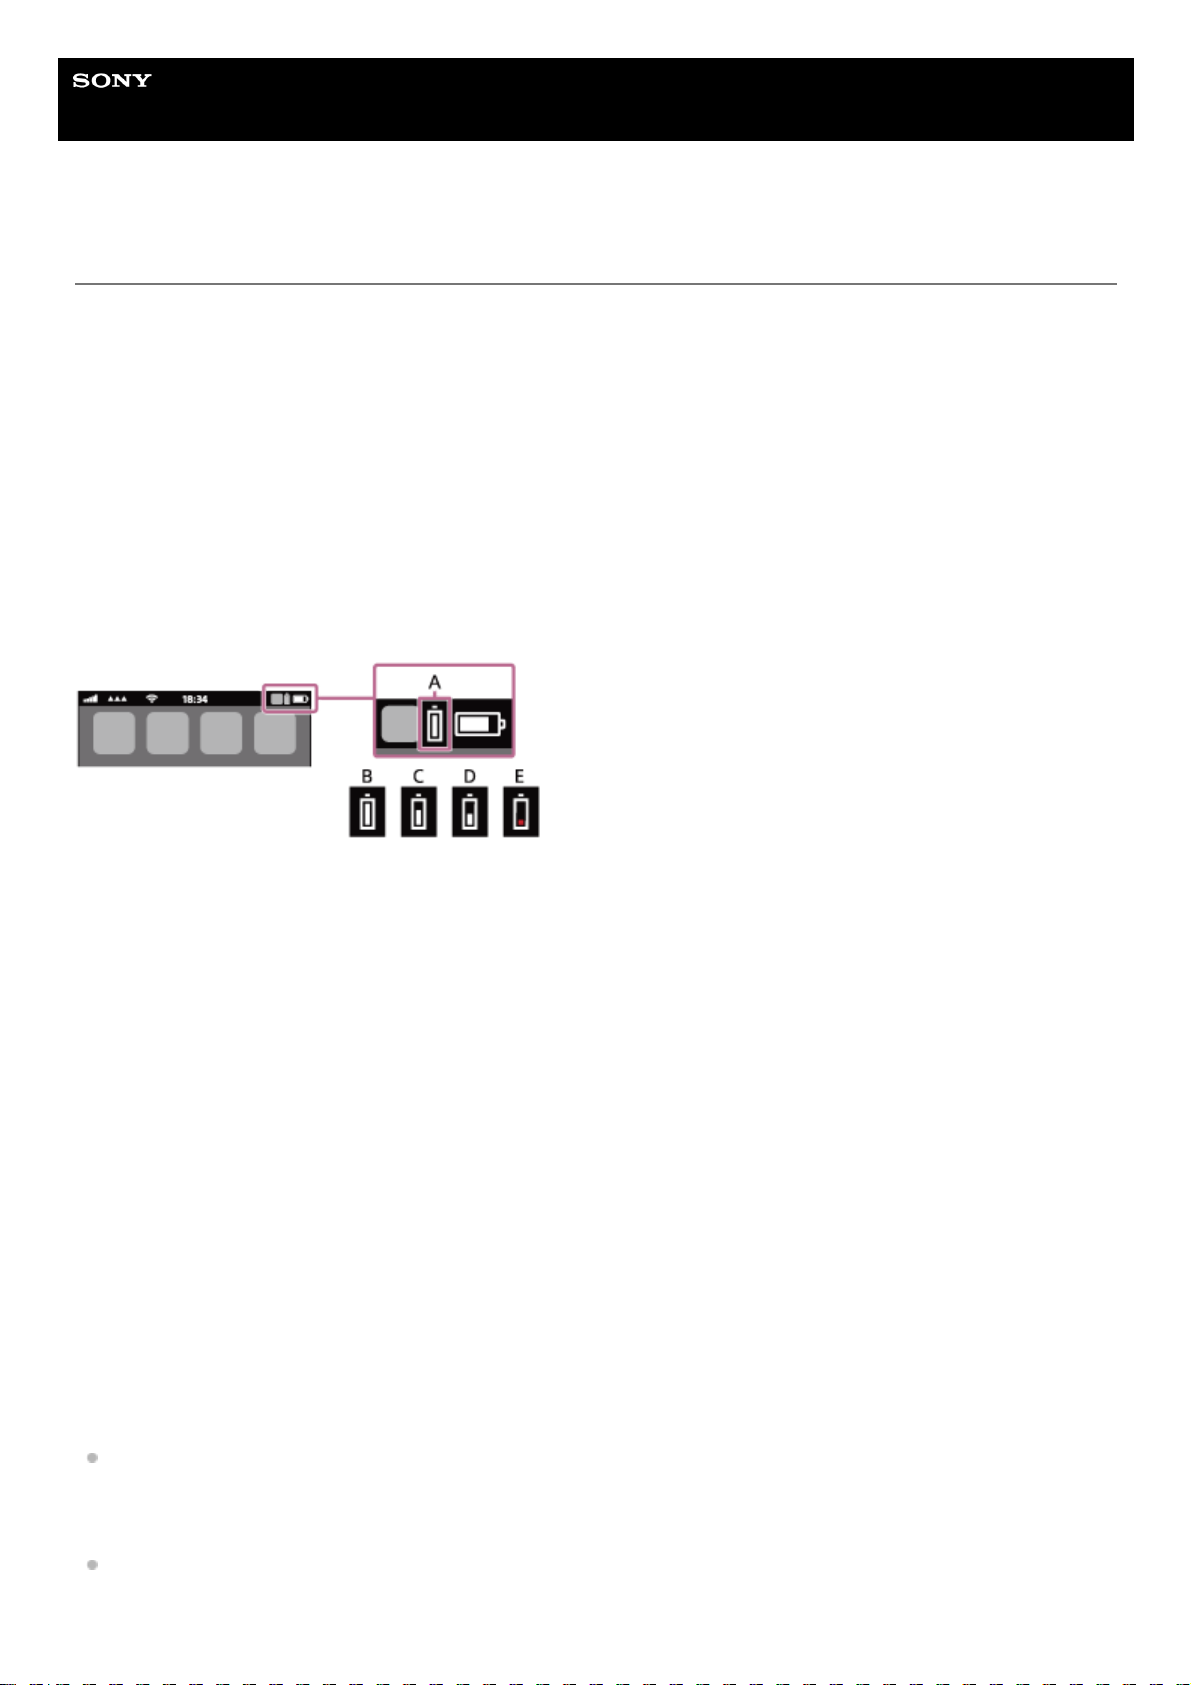
When you are using iPhone or iPod touch
When the headset is connected to an iPhone or iPod touch over an HFP (Hands-free Profile) Bluetooth connection, it will
show an icon that indicates the remaining battery charge of the headset on the screen of the iPhone or iPod touch.
The display position is an example.
A: Remaining battery charge of the headset
The approximate remaining charge is shown at 10 different levels. B through E are display examples.
B: 100%
C: 70%
D: 50%
E: 10% or lower (requires charging)
The remaining battery charge of the headset is also displayed on the widget of an iPhone or iPod touch running iOS 11
or later. For more details, refer to the operating instructions supplied with the iPhone or iPod touch.
The remaining charge which is displayed may differ from the actual remaining charge in some cases. Use it as a rough
estimate.
When you are using an Android™ smartphone (OS 8.1 or later)
When the headset is connected to an Android smartphone via HFP Bluetooth connection, select [Settings] - [Device
connection] - [Bluetooth] to display the remaining battery charge of the headset in 10 different levels such as “100%”,
“70%”, “50%” or “10%” in the connected Bluetooth device column on the smartphone’s screen.
The operation above is an example. For details, refer to the operating instructions of the Android smartphone.
The remaining charge which is displayed may differ from the actual remaining charge in some cases. Use it as a rough
estimate.
Checking the remaining battery charge of the charging case
When the headset is removed from the charging case, or when the lid of the charging case is opened or closed with
no headset units stored, if the indicator (orange) on the charging case lights up, the remaining battery charge of the
charging case is about 30% to 1%. The charging case cannot sufficiently charge the headset with this level of
remaining battery charge.
When the headset is removed from the charging case, or when the lid of the charging case is opened or closed with
no headset units stored, if the indicator on the charging case does not light up, the remaining battery charge of the
29
Page 30

charging case is less than 1%. The headset cannot be charged with the charging case in this case.
Hint
The remaining battery charge of the headset may be different on the left and right sides depending on how you use them.
When using both units of the headset, the remaining battery charge of the unit with less remaining battery charge between the
left and right units is displayed.
When using only one unit of the headset, the remaining battery charge of the unit you are using is displayed.
You can also check the remaining battery charge of the headset unit and the charging case with the “Sony | Headphones
Connect” app. Android smartphones and iPhone/iPod touch both support this app.
Note
If the headset and smartphone are not connected with HFP, the remaining battery charge will not be correctly displayed.
The remaining battery charge may not be properly displayed immediately after a software update or if the headset has not been
used for a long time. In this case, repeatedly charge and discharge the battery multiple times to properly display the remaining
battery charge.
Related Topic
What you can do with the “Sony | Headphones Connect” app
About the indicator
5-035-792-11(3)
Copyright 2022 Sony Corporation
30
Page 31
Help Guide
Wireless Noise Canceling Stereo Headset
LinkBuds S
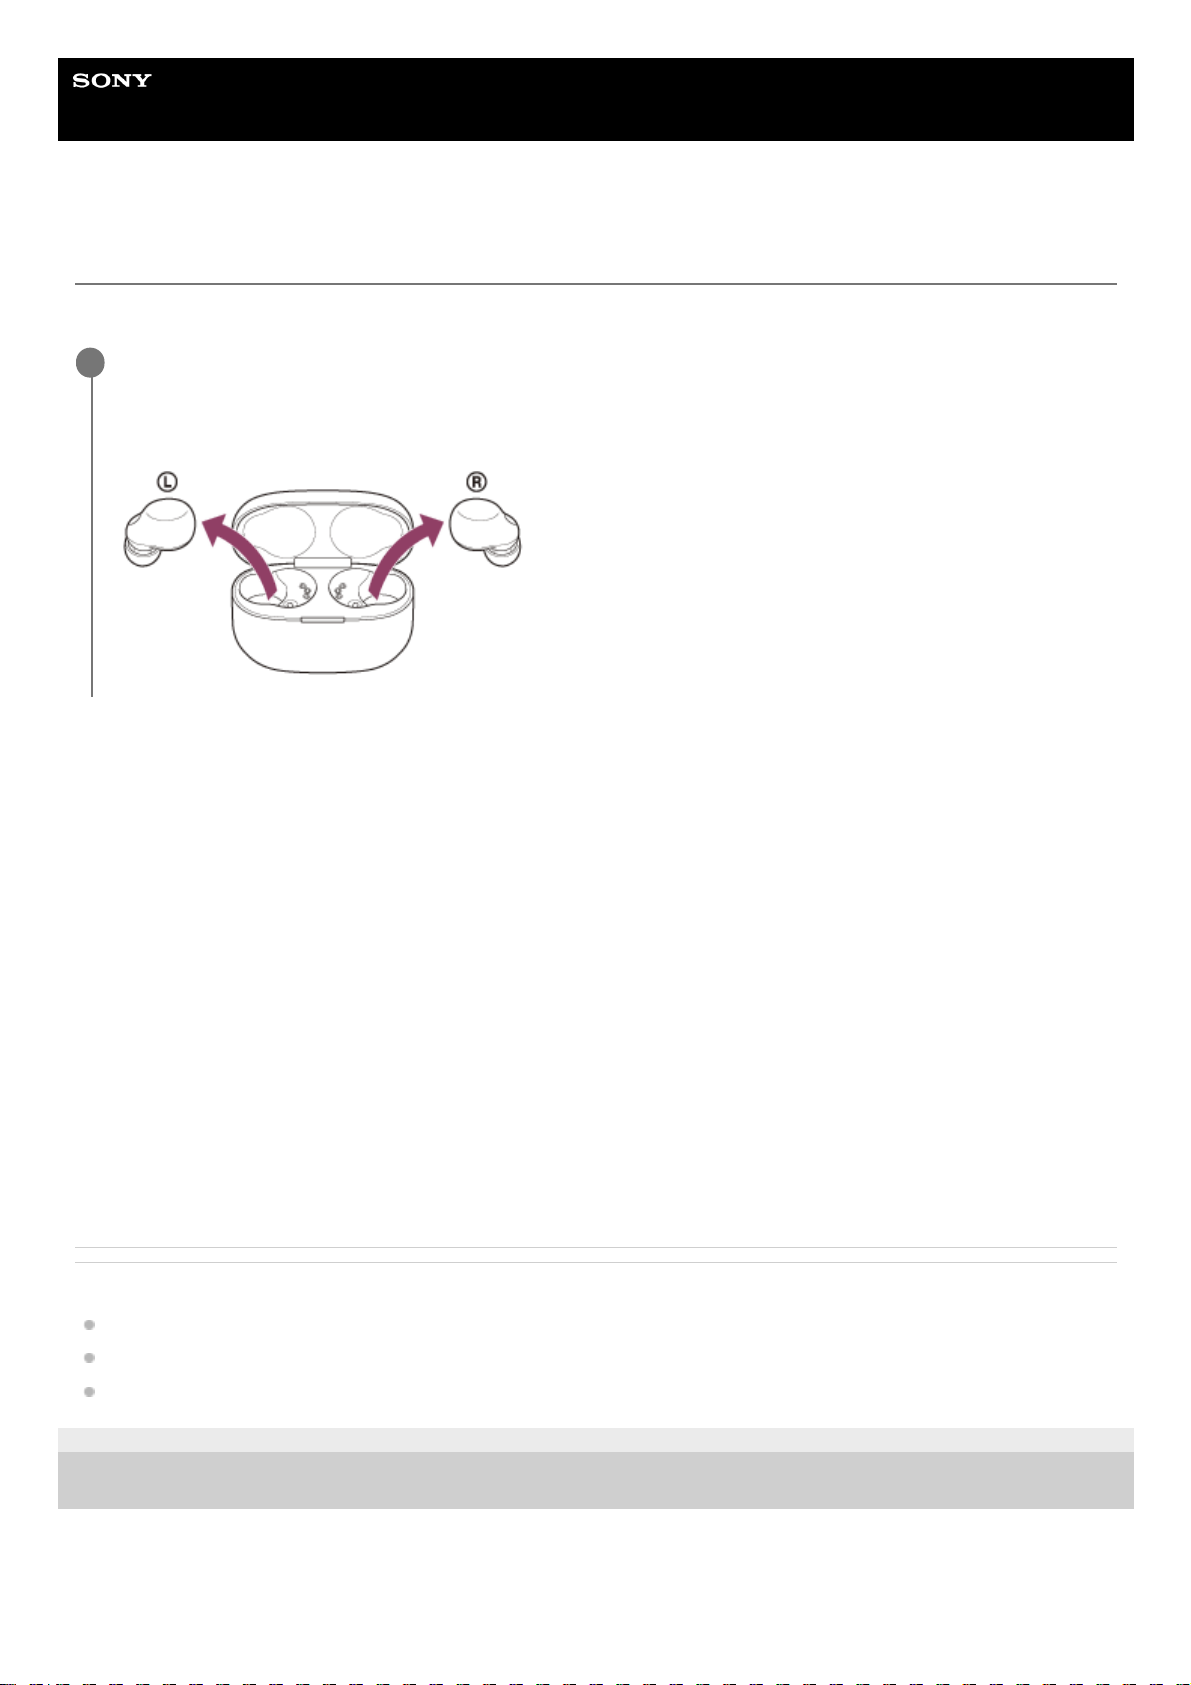
Turning on the headset
When the headset is set into the charging case
When the headset is not set into the charging case
When the headset is not worn in your ears for about 15 minutes after being removed from the charging case, the
headset turns off automatically. In this case, turn the headset on by tapping the touch sensor of the headset or by putting
the headset into your ears. The headset will also turn on when it is set into the charging case and then removed from the
charging case.
By using the “Sony | Headphones Connect” app, you can change the setting of the headset so that it will not be turned
off automatically.
When the headset is turned on
When both headset units are removed from the charging case, the connection between the left and right units of the
headset is established.
When you use the headset for the first time after purchase or just after initializing the headset, the headset goes into
Bluetooth pairing mode automatically when you put the headset units into both ears.
When you use the headset for the first time after purchase or just after initializing the headset, the noise canceling
function is turned on automatically when you put the headset units into your ears. If the noise canceling settings were
changed previously, the settings are retained.
Related Topic
Using only one unit of the headset
Turning off the headset
What you can do with the “Sony | Headphones Connect” app
5-035-792-11(3)
Copyright 2022 Sony Corporation
Remove the headset from the charging case.
The headset turns on automatically.
When you remove only one unit from the charging case, only the removed unit turns on.
1
31
Page 32
Help Guide
Wireless Noise Canceling Stereo Headset
LinkBuds S
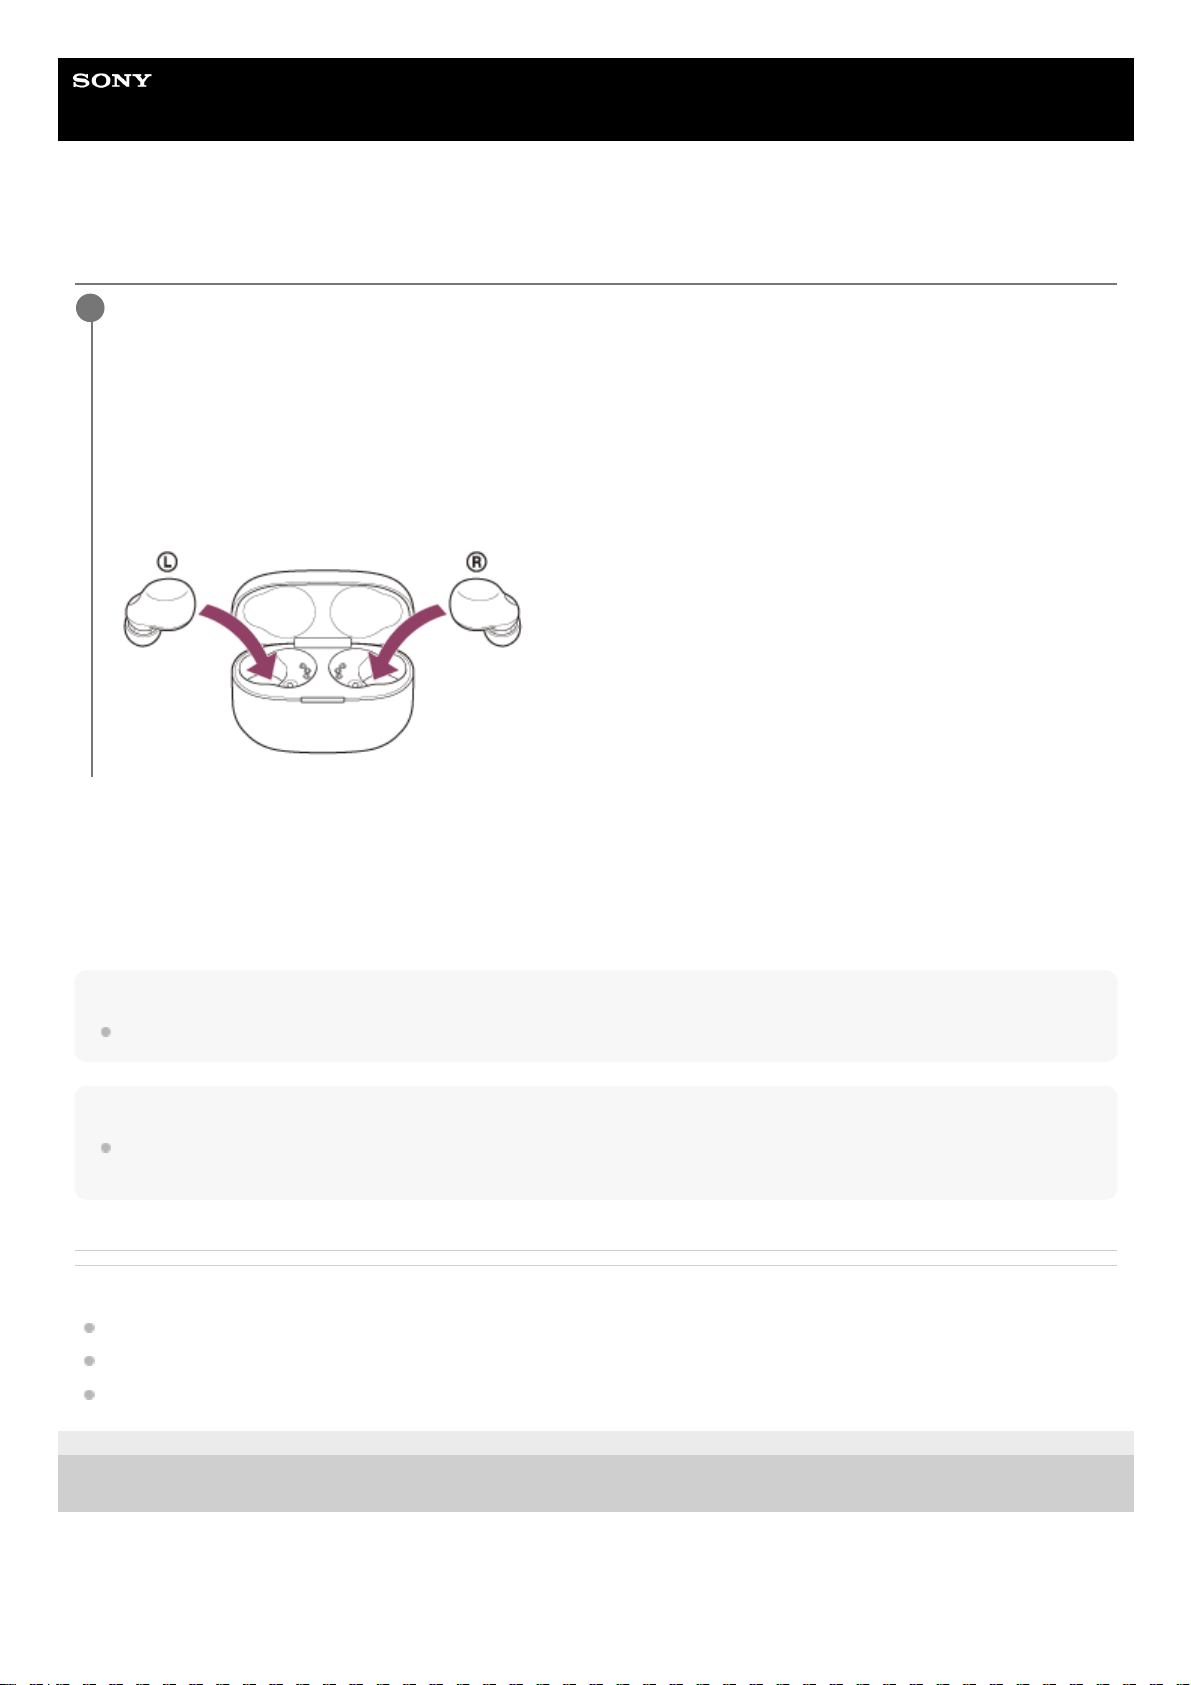
Turning off the headset
When the headset is left removed
When the headset is not worn in your ears for about 15 minutes after being removed from the charging case, the
headset turns off automatically.
To turn off the power before the headset turns off automatically, place the headset into the charging case.
Hint
You can also turn off the headset with the “Sony | Headphones Connect” app.
Note
When the remaining battery charge of the charging case is not sufficient, the charging of the headset will not start. Charge the
charging case.
Related Topic
Charging
Turning on the headset
What you can do with the “Sony | Headphones Connect” app
5-035-792-11(3)
Copyright 2022 Sony Corporation
Set the headset into the charging case.
Put the left unit of the headset (the unit with the tactile dot) back into the left hole of the charging case, and put the
right unit of the headset back into the right hole of the charging case. Each unit of the headset will be set to the
correct position in the charging case by the built-in magnet.
When the headset is set into the charging case, the headset will turn off automatically.
When the remaining battery charge of the charging case is sufficient, the indicator (orange or green) on the
charging case lights up for about 3 seconds.
The charging starts on the headset. Close the lid of the charging case.
1
32
Page 33
Help Guide
Wireless Noise Canceling Stereo Headset
LinkBuds S
How to make a wireless connection to Bluetooth devices
You can enjoy music and hands-free calling with the headset wirelessly by using your Bluetooth device’s Bluetooth
function.
Pairing
To use the Bluetooth function, both of the connecting devices must be registered in advance. The operation to register a
device is called “pairing”.
Pair the headset and the device manually.
Connecting to a paired device
Once a device is paired, it is not necessary to pair it again. Connect to devices already paired with the headset using the
methods necessary for each device.
Related Topic
Pairing and connecting with an Android smartphone
Pairing and connecting with an iPhone
Pairing and connecting with a computer (Windows® 10)
Pairing and connecting with a computer (Windows 8.1)
Pairing and connecting with a computer (Mac)
Pairing and connecting with a Bluetooth device
Connecting to a paired Android smartphone
Connecting to a paired iPhone
Connecting to a paired computer (Windows 10)
Connecting to a paired computer (Windows 8.1)
Connecting to a paired computer (Mac)
Connecting to a paired Bluetooth device
5-035-792-11(3)
Copyright 2022 Sony Corporation
33
Page 34
Help Guide
Wireless Noise Canceling Stereo Headset
LinkBuds S
Connecting with the “Sony | Headphones Connect” app
Launch the “Sony | Headphones Connect” app on your Android smartphone/iPhone to connect the headset to a
smartphone or iPhone. For more details, refer to the “Sony | Headphones Connect” app help guide.
https://rd1.sony.net/help/mdr/hpc/h_zz/
Note
The connection with some smartphones and iPhone devices may become unstable when connecting using the “Sony |
Headphones Connect” app. In that case, follow the procedures in “Connecting to a paired Android smartphone”, or “Connecting
to a paired iPhone
” to connect to the headset.
Related Topic
Connecting to a paired Android smartphone
Connecting to a paired iPhone
What you can do with the “Sony | Headphones Connect” app
Installing the “Sony | Headphones Connect” app
5-035-792-11(3)
Copyright 2022 Sony Corporation
34
Page 35
Help Guide
Wireless Noise Canceling Stereo Headset
LinkBuds S
Pairing and connecting with an Android smartphone
The operation to register the device that you wish to connect to is called “pairing”. First, pair a device to use it with the
headset for the first time.
Before starting the operation, make sure of the following:
The Android smartphone is placed within 1 m (3 feet) of the headset.
The headset is charged sufficiently.
The operating instructions of the Android smartphone is in hand.
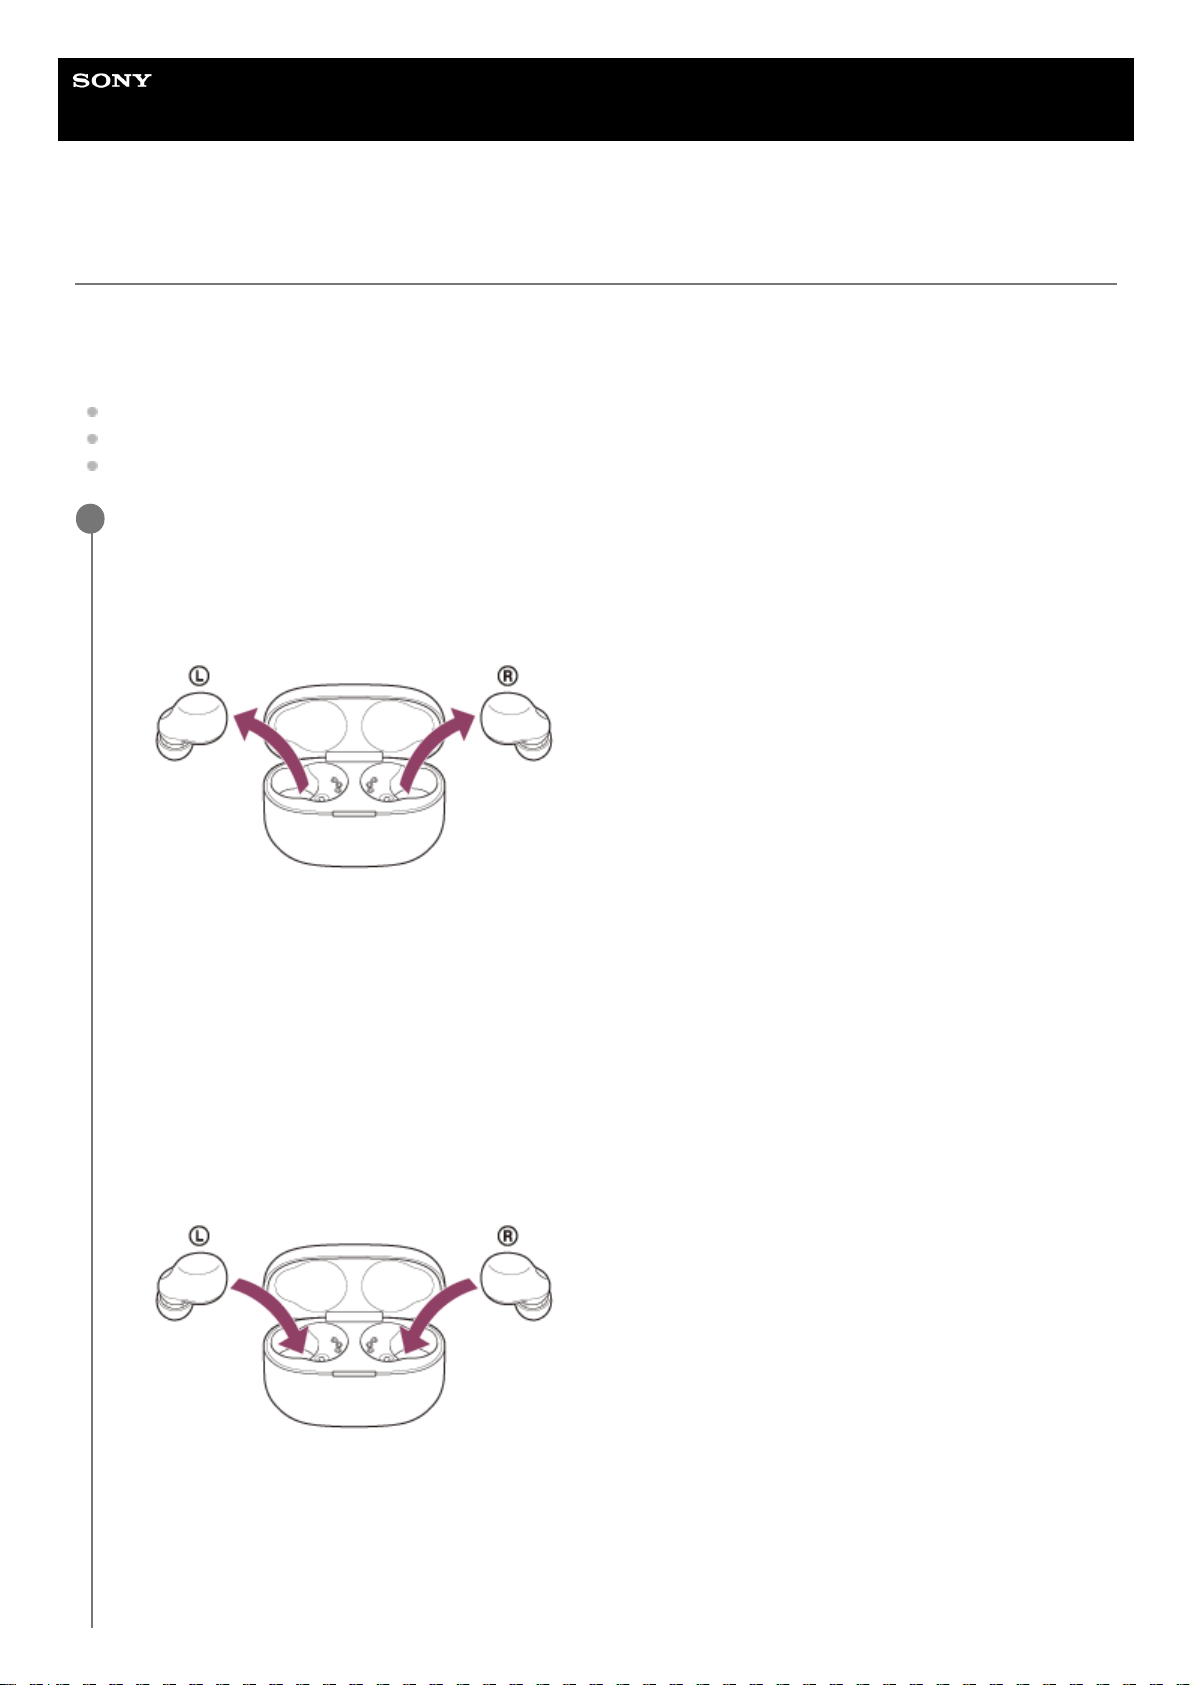
Enter pairing mode on this headset.
When you pair the headset with a device for the first time after purchase or after initializing the
headset (if the headset has no pairing information)
When you pair a second or subsequent device (the headset has pairing information for other
devices)
1
Remove both units of the headset from the charging case.
The headset turns on automatically.
The headset enters pairing mode automatically when you put the headset units into both ears.
You will hear a notification sound and the voice guidance say “Pairing”, from both headset units at the same
time.
1.
Set the headset into the charging case.
Leave the lid of the charging case open.
1.
With the lid of the charging case open, press and hold the pairing button on the back of the charging case for
about 5 seconds or more.
Note: The headset does not enter pairing mode with the lid of the charging case closed.
2.
35
Page 36
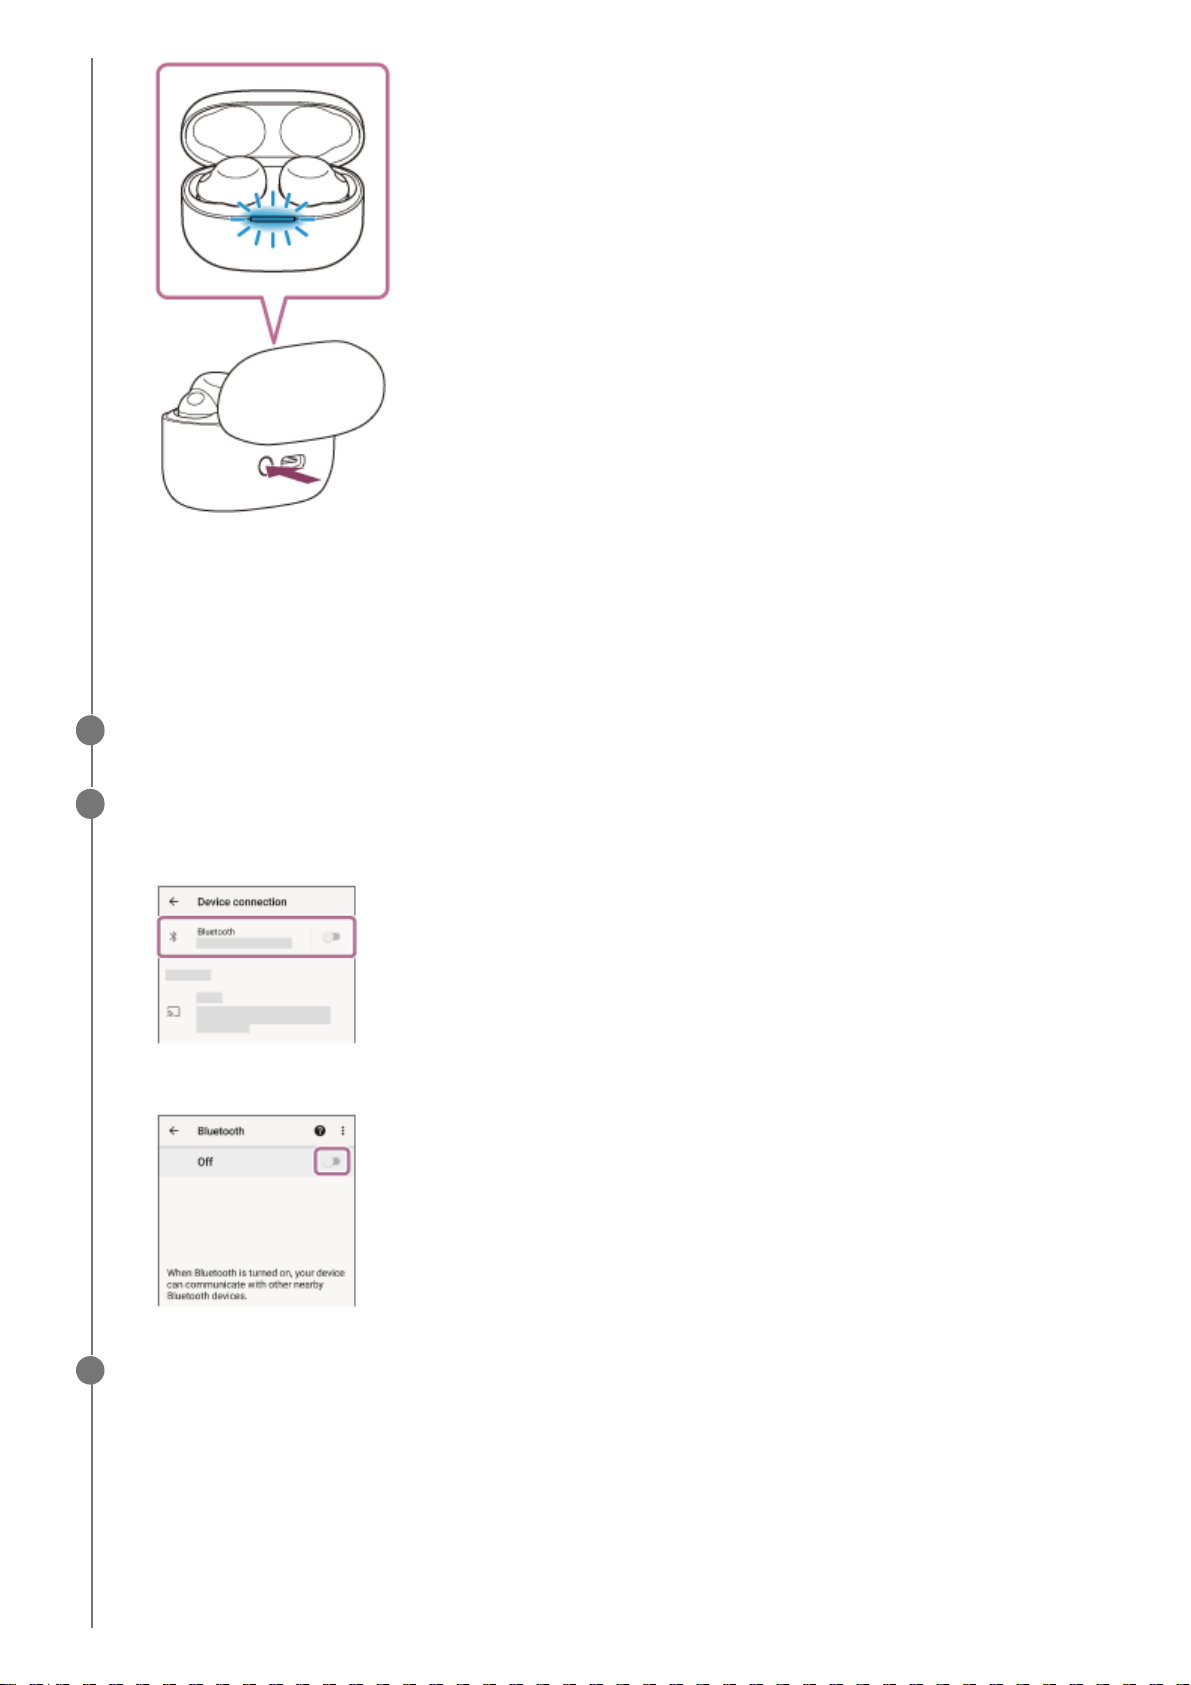
The indicator (blue) on the charging case repeatedly flashes slowly twice in a row and the headset goes into
pairing mode.
You can remove the headset from the charging case after entering pairing mode. When you put the headset
units into both ears, you will hear a notification sound and the voice guidance say “Pairing”, from both headset
units at the same time.
Unlock the screen of the Android smartphone if it is locked.
2
Find the headset on the Android smartphone.
3
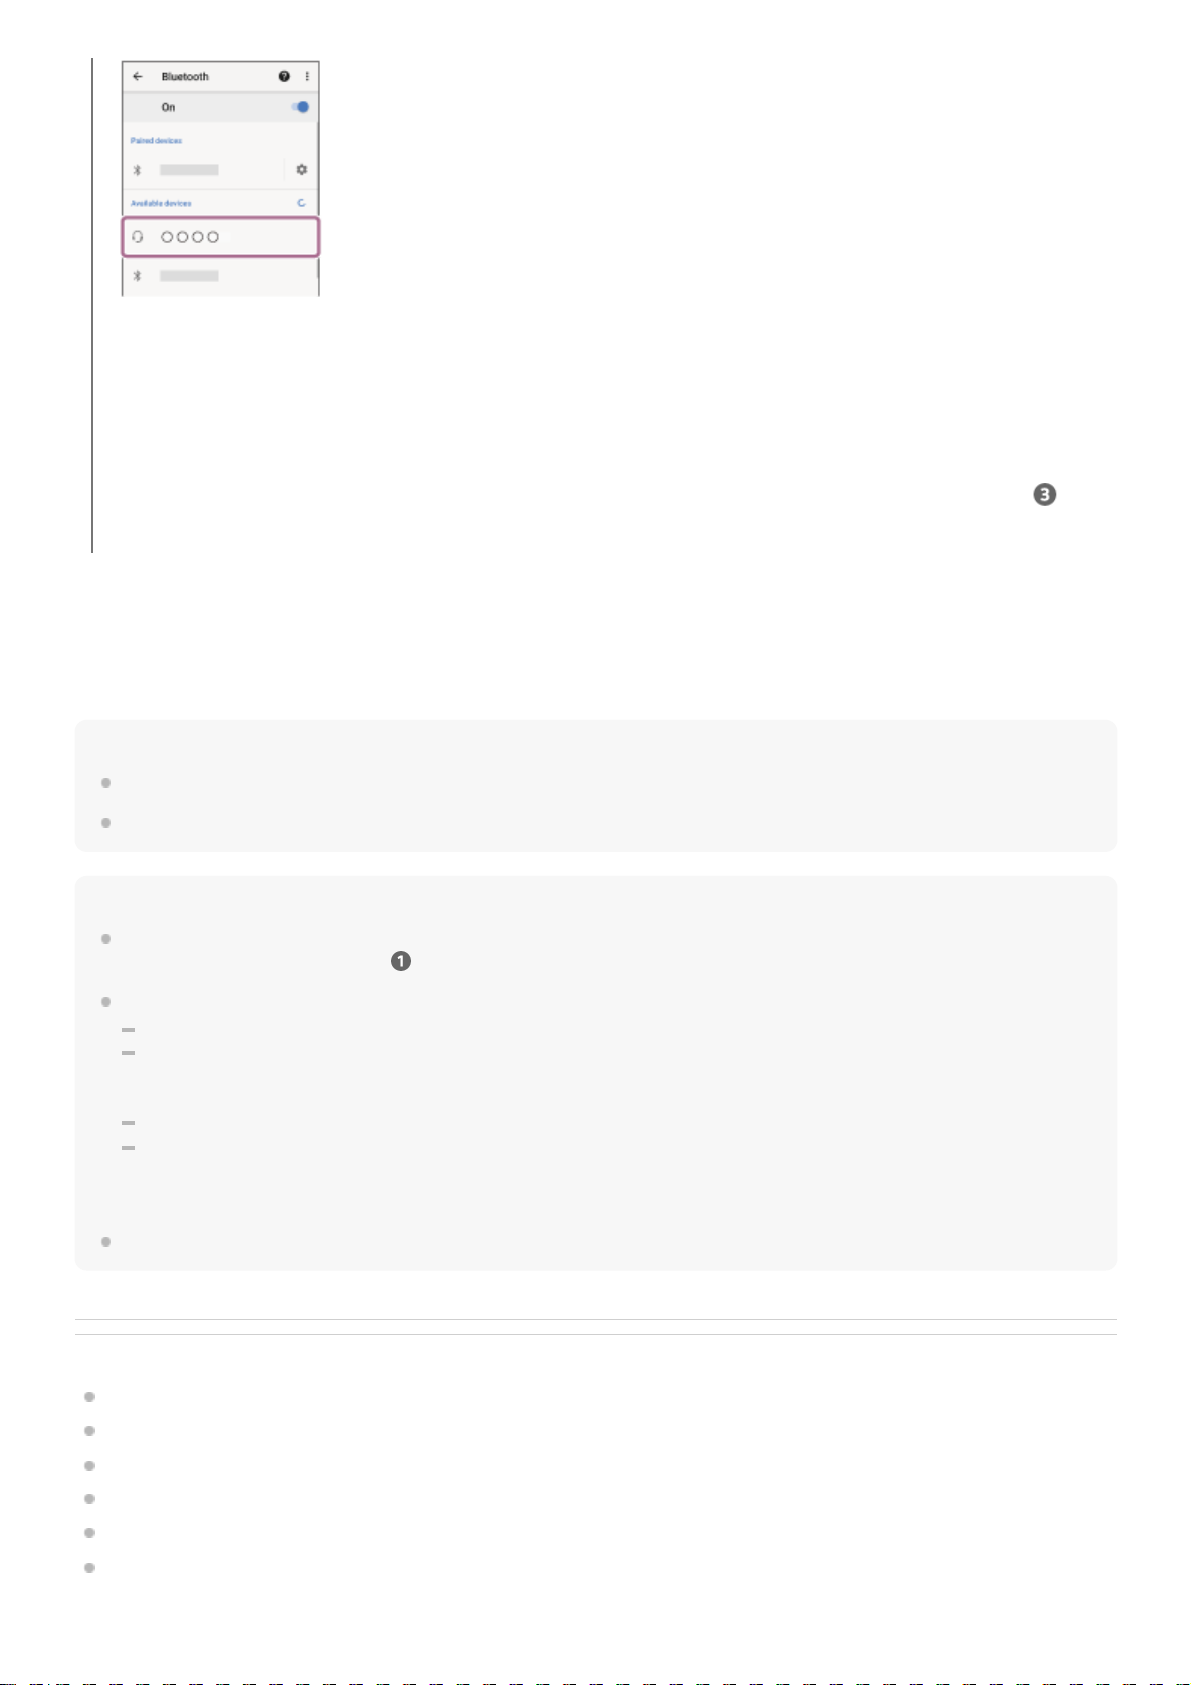
Select [Settings] - [Device connection] - [Bluetooth].
1.
Touch the switch to turn on the Bluetooth function.
2.
Touch [LinkBuds S].
4
36
Page 37
About the instruction manual video
Watch the video to find out how to perform the pairing for the first time.
https://rd1.sony.net/help/mdr/mov0044/h_zz/
Hint
The operation above is an example. For more details, refer to the operating instructions supplied with the Android smartphone.
To delete all Bluetooth pairing information, see “Initializing the headset to restore factory settings”.
Note
If pairing is not established within 5 minutes, pairing mode is canceled. In this case, set the headset into the charging case, and
start the operation again from step
.
Once Bluetooth devices are paired, there is no need to pair them again, except in the following cases:
Pairing information has been deleted after repair, etc.
When a 9th device is paired.
The headset can be paired with up to 8 devices. If a new device is paired after 8 devices are already paired, the registration
information of the paired device with the oldest connection date is overwritten with the information for the new device.
When the pairing information for the headset has been deleted from the Bluetooth device.
When the headset is initialized.
All of the pairing information is deleted. In this case, delete the pairing information for the headset from the connected device
and then pair them again.
The headset can be paired with multiple devices, but can only play music from 1 paired device at a time.
Related Topic
Wearing the headset
How to make a wireless connection to Bluetooth devices
Connecting to a paired Android smartphone
Listening to music from a device via Bluetooth connection
Disconnecting Bluetooth connection (after use)
Initializing the headset to restore factory settings
If Passkey (*) input is required, input “0000”.
The headset and smartphone are paired and connected with each other.
When the headset is stored in the charging case, the indicator (blue) on the charging case flashes slowly for about
5 seconds.
When you are wearing the headset, you will hear a notification sound from both headset units at the same time.
If they are not connected, see “Connecting to a paired Android smartphone”.
If [LinkBuds S] does not appear on your Android smartphone screen, try again from the beginning of step
.
A Passkey may be called “Passcode”, “PIN code”, “PIN number”, or “Password”.
*
37
Page 38

5-035-792-11(3) Copyright 2022 Sony Corporation
38
Page 39
Help Guide
Wireless Noise Canceling Stereo Headset
LinkBuds S
Connecting to a paired Android smartphone
Unlock the screen of the Android smartphone if it is locked.
1
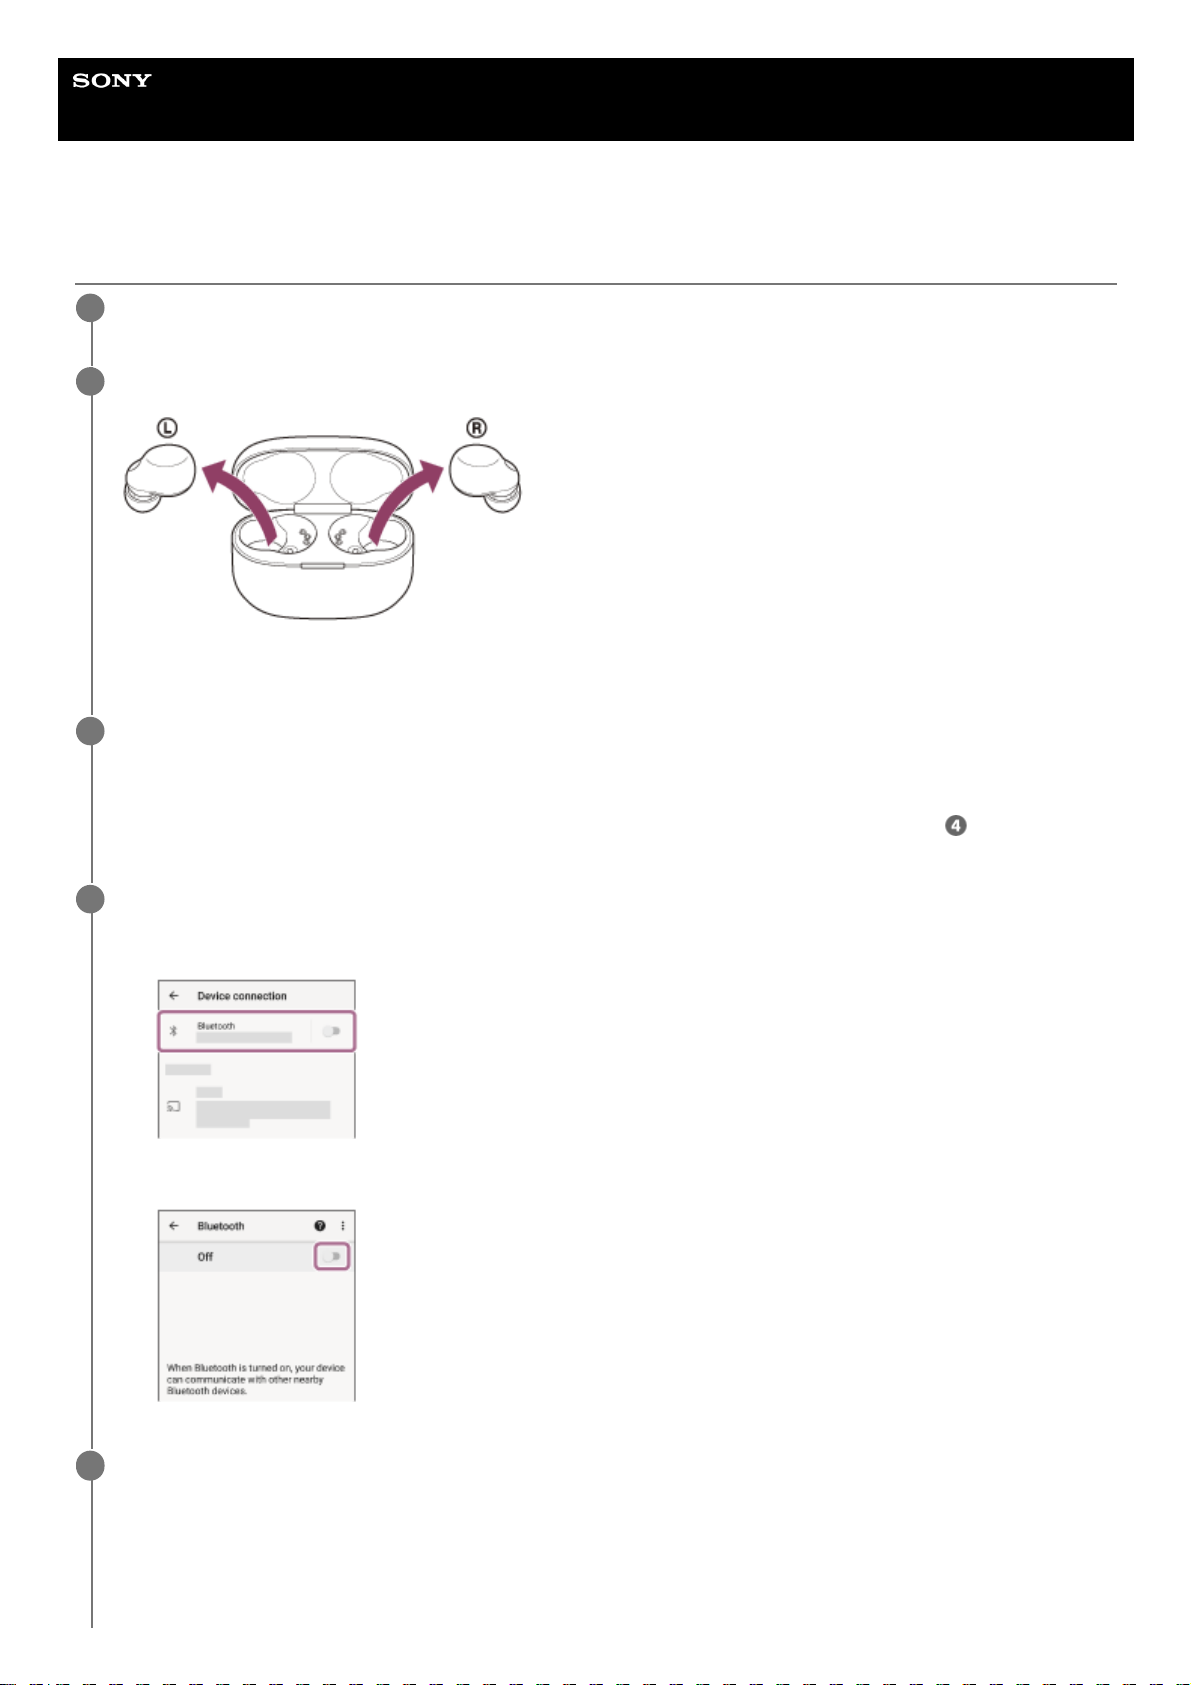
Remove the headset from the charging case.
The headset turns on automatically.
2
Put the headset units into both ears.
When the headset has automatically connected to the last connected device, you will hear a notification sound from
both headset units (or from the headset unit you are wearing) at the same time.
Check the connection status on the Android smartphone. If it is not connected, proceed to step
.
3
Display the devices paired with the Android smartphone.
4
Select [Settings] - [Device connection] - [Bluetooth].
1.
Touch the switch to turn on the Bluetooth function.
2.
Touch [LinkBuds S].
5
39
Page 40
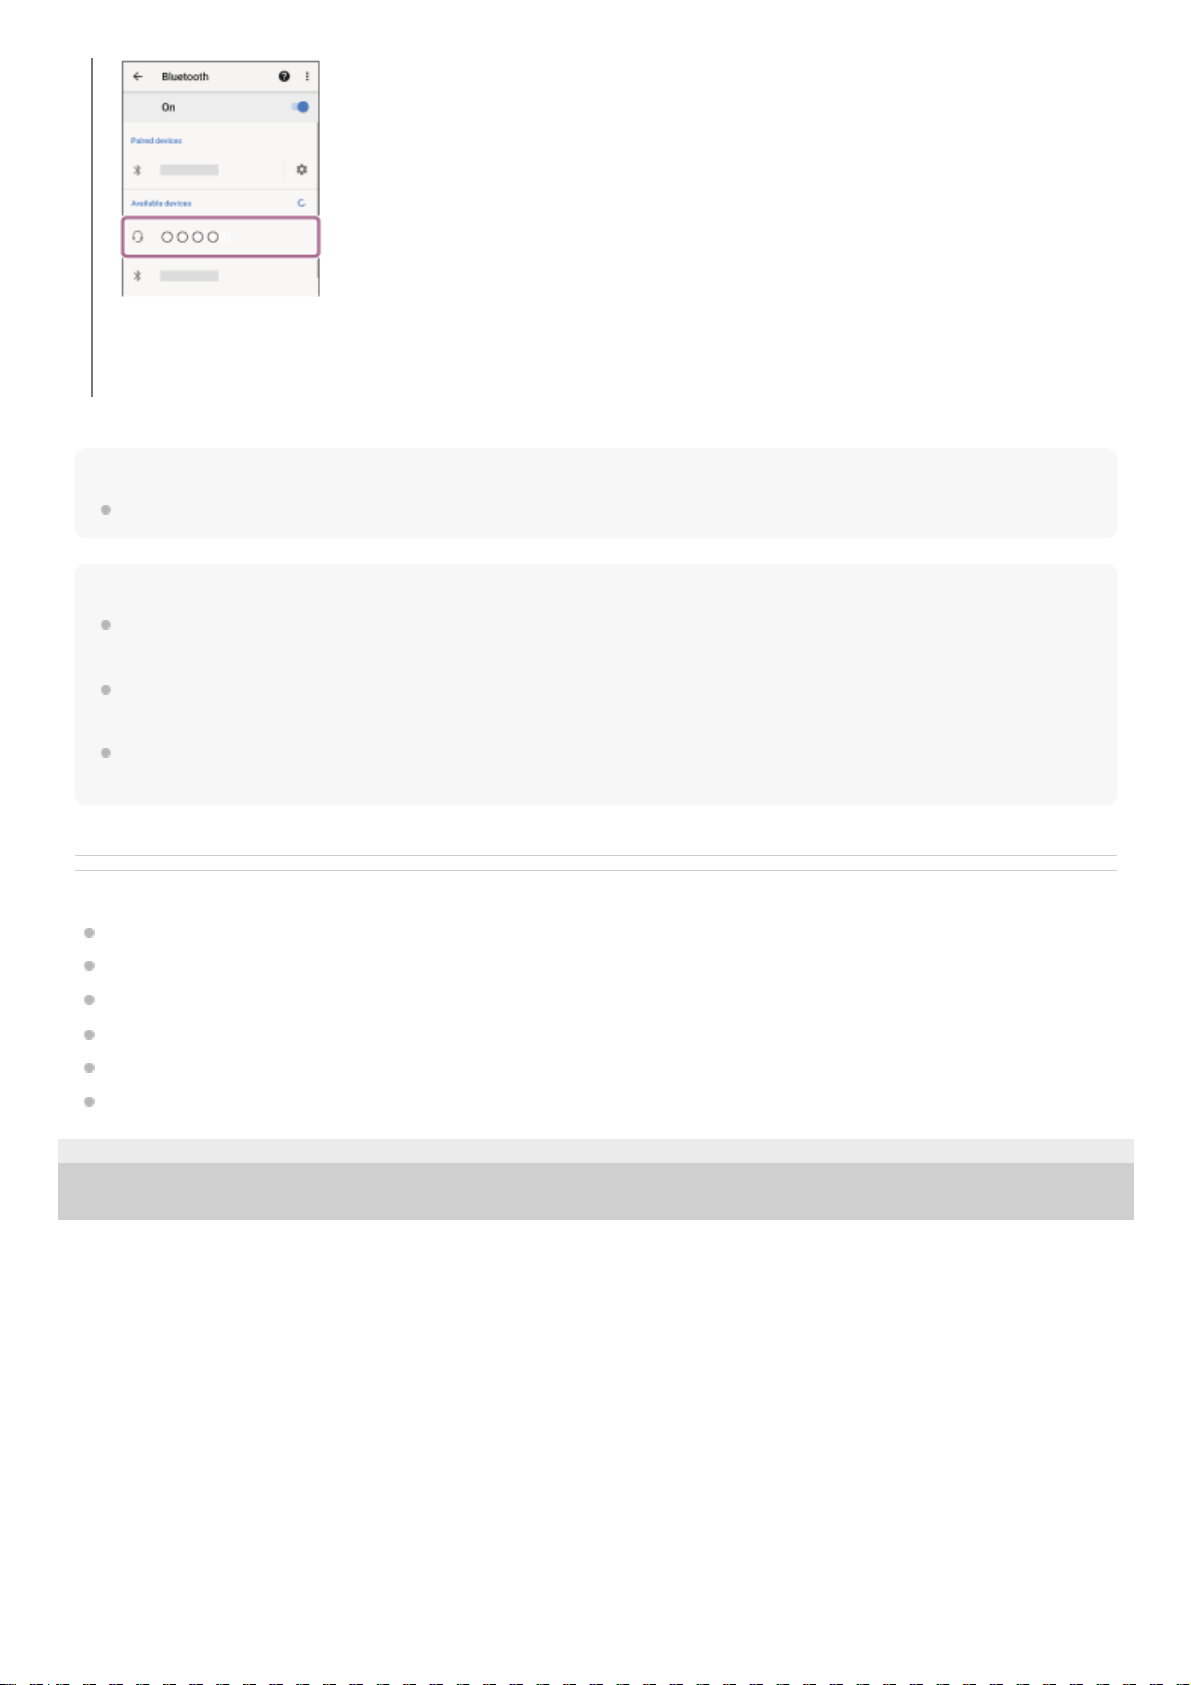
Hint
The operation above is an example. For more details, refer to the operating instructions supplied with the Android smartphone.
Note
When connecting, [LinkBuds S], [LE_LinkBuds S], or both may be displayed on the connecting device. When both or [LinkBuds
S] is displayed, select [LinkBuds S]; when [LE_LinkBuds S] is displayed, select [LE_LinkBuds S].
If the last-connected Bluetooth device is placed near the headset, the headset may connect automatically to the device by simply
turning on the headset. If this is the case, deactivate the Bluetooth function on the last-connected device or turn off the power.
If you cannot connect your smartphone to the headset, delete the headset pairing information on your smartphone and perform
the pairing again. As for the operations on your smartphone, refer to the operating instructions supplied with the smartphone.
Related Topic
Wearing the headset
Using only one unit of the headset
How to make a wireless connection to Bluetooth devices
Pairing and connecting with an Android smartphone
Listening to music from a device via Bluetooth connection
Disconnecting Bluetooth connection (after use)
5-035-792-11(3)
Copyright 2022 Sony Corporation
You will hear a notification sound from both headset units (or from the headset unit you are wearing) at the same
time.
40
Page 41
Help Guide
Wireless Noise Canceling Stereo Headset
LinkBuds S
Pairing and connecting with an iPhone
The operation to register the device that you wish to connect to is called “pairing”. First, pair a device to use it with the
headset for the first time.
Before starting the operation, make sure of the following:
The iPhone is placed within 1 m (3 feet) of the headset.
The headset is charged sufficiently.
The operating instructions of the iPhone is in hand.
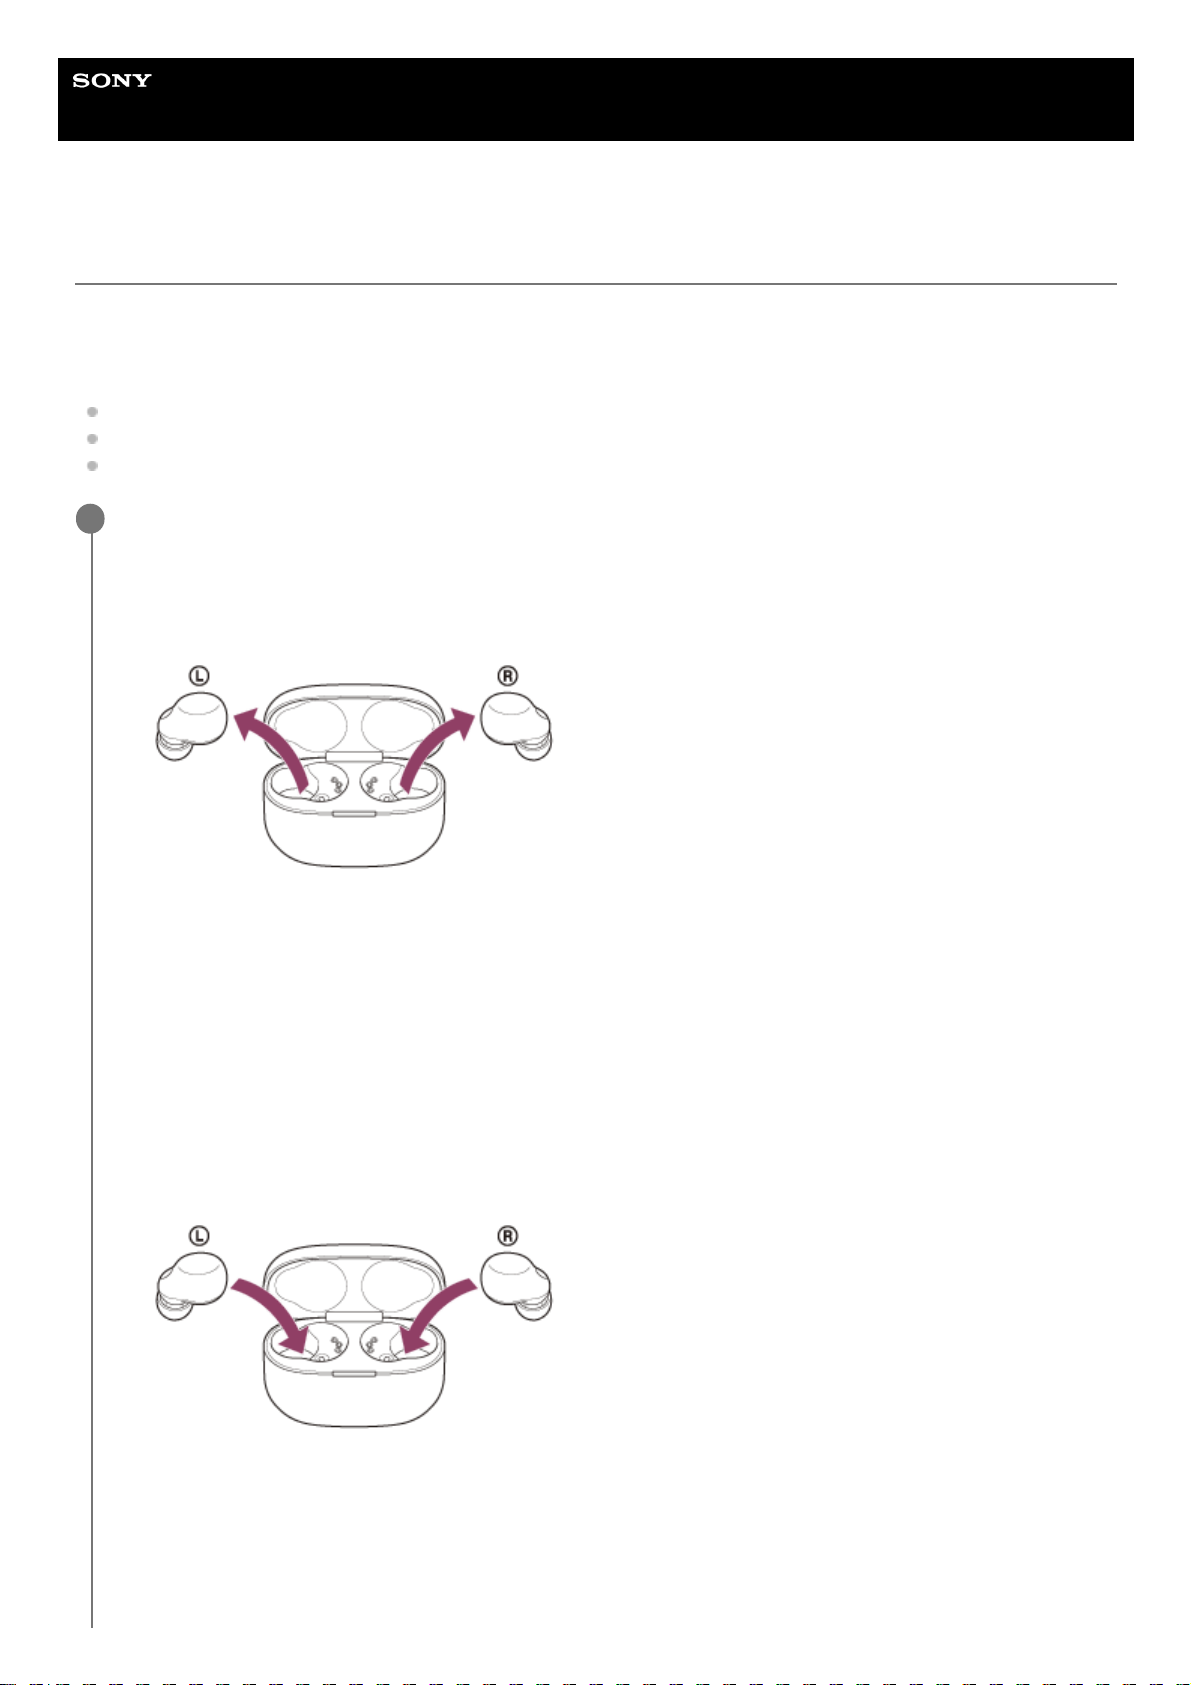
Enter pairing mode on this headset.
When you pair the headset with a device for the first time after purchase or after initializing the
headset (if the headset has no pairing information)
When you pair a second or subsequent device (the headset has pairing information for other
devices)
1
Remove both units of the headset from the charging case.
The headset turns on automatically.
The headset enters pairing mode automatically when you put the headset units into both ears.
You will hear a notification sound and the voice guidance say “Pairing”, from both headset units at the same
time.
1.
Set the headset into the charging case.
Leave the lid of the charging case open.
1.
With the lid of the charging case open, press and hold the pairing button on the back of the charging case for
about 5 seconds or more.
Note: The headset does not enter pairing mode with the lid of the charging case closed.
2.
41
Page 42
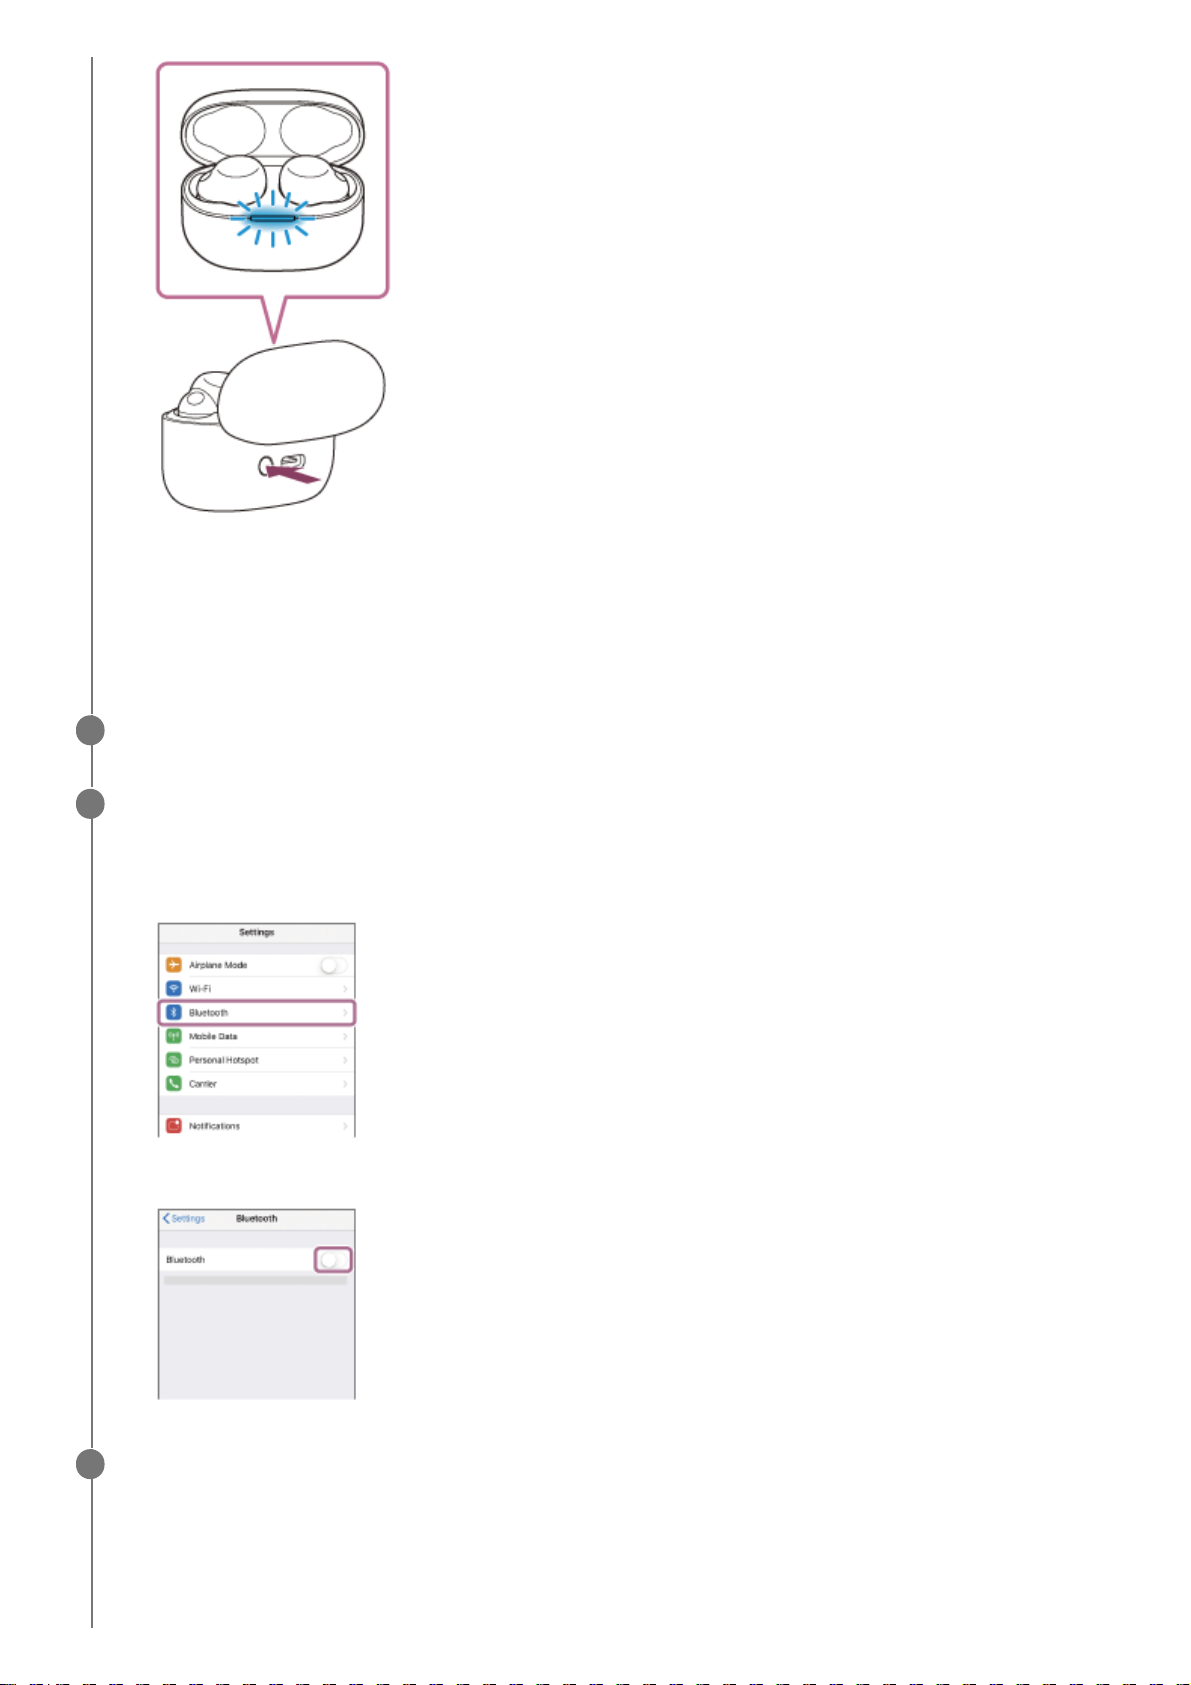
The indicator (blue) on the charging case repeatedly flashes slowly twice in a row and the headset goes into
pairing mode.
You can remove the headset from the charging case after entering pairing mode. When you put the headset
units into both ears, you will hear a notification sound and the voice guidance say “Pairing”, from both headset
units at the same time.
Unlock the screen of the iPhone if it is locked.
2
Find the headset on the iPhone.
3
Select [Settings].
1.
Touch [Bluetooth].
2.
Touch the switch to turn on the Bluetooth function.
3.
Touch [LinkBuds S].
4
42
Page 43
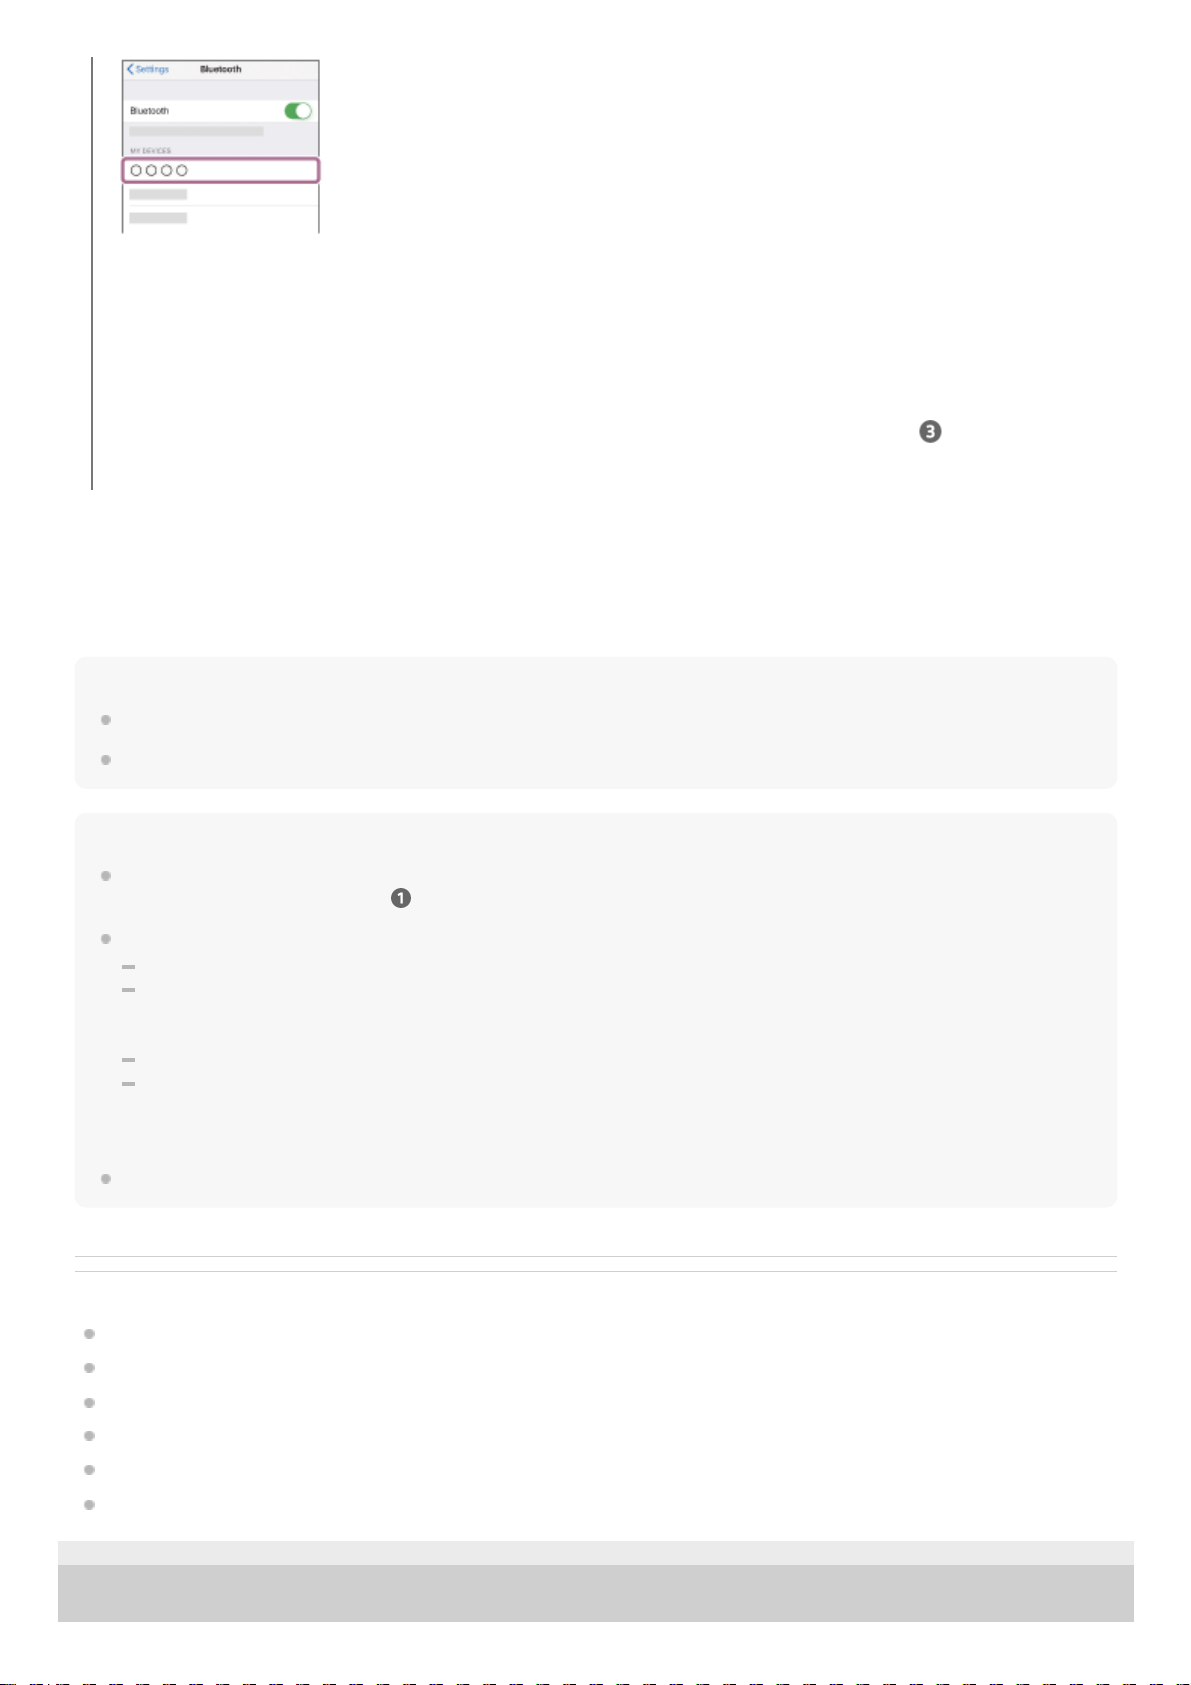
About the instruction manual video
Watch the video to find out how to perform the pairing for the first time.
https://rd1.sony.net/help/mdr/mov0044/h_zz/
Hint
The operation above is an example. For more details, refer to the operating instructions supplied with the iPhone.
To delete all Bluetooth pairing information, see “Initializing the headset to restore factory settings”.
Note
If pairing is not established within 5 minutes, pairing mode is canceled. In this case, set the headset into the charging case, and
start the operation again from step
.
Once Bluetooth devices are paired, there is no need to pair them again, except in the following cases:
Pairing information has been deleted after repair, etc.
When a 9th device is paired.
The headset can be paired with up to 8 devices. If a new device is paired after 8 devices are already paired, the registration
information of the paired device with the oldest connection date is overwritten with the information for the new device.
When the pairing information for the headset has been deleted from the Bluetooth device.
When the headset is initialized.
All of the pairing information is deleted. In this case, delete the pairing information for the headset from the connected device
and then pair them again.
The headset can be paired with multiple devices, but can only play music from 1 paired device at a time.
Related Topic
Wearing the headset
How to make a wireless connection to Bluetooth devices
Connecting to a paired iPhone
Listening to music from a device via Bluetooth connection
Disconnecting Bluetooth connection (after use)
Initializing the headset to restore factory settings
5-035-792-11(3)
Copyright 2022 Sony Corporation
If Passkey (*) input is required, input “0000”.
The headset and iPhone are paired and connected with each other.
When the headset is stored in the charging case, the indicator (blue) on the charging case flashes slowly for about
5 seconds.
When you are wearing the headset, you will hear a notification sound from both headset units at the same time.
If they are not connected, see “Connecting to a paired iPhone
”.
If [LinkBuds S] does not appear on your iPhone screen, try again from the beginning of step
.
A Passkey may be called “Passcode”, “PIN code”, “PIN number”, or “Password”.
*
43
Page 44
Help Guide
Wireless Noise Canceling Stereo Headset
LinkBuds S
Connecting to a paired iPhone
Unlock the screen of the iPhone if it is locked.
1
Remove the headset from the charging case.
The headset turns on automatically.
2
Put the headset units into both ears.
When the headset has automatically connected to the last connected device, you will hear a notification sound from
both headset units (or from the headset unit you are wearing) at the same time.
Check the connection status on the iPhone. If it is not connected, proceed to step
.
3
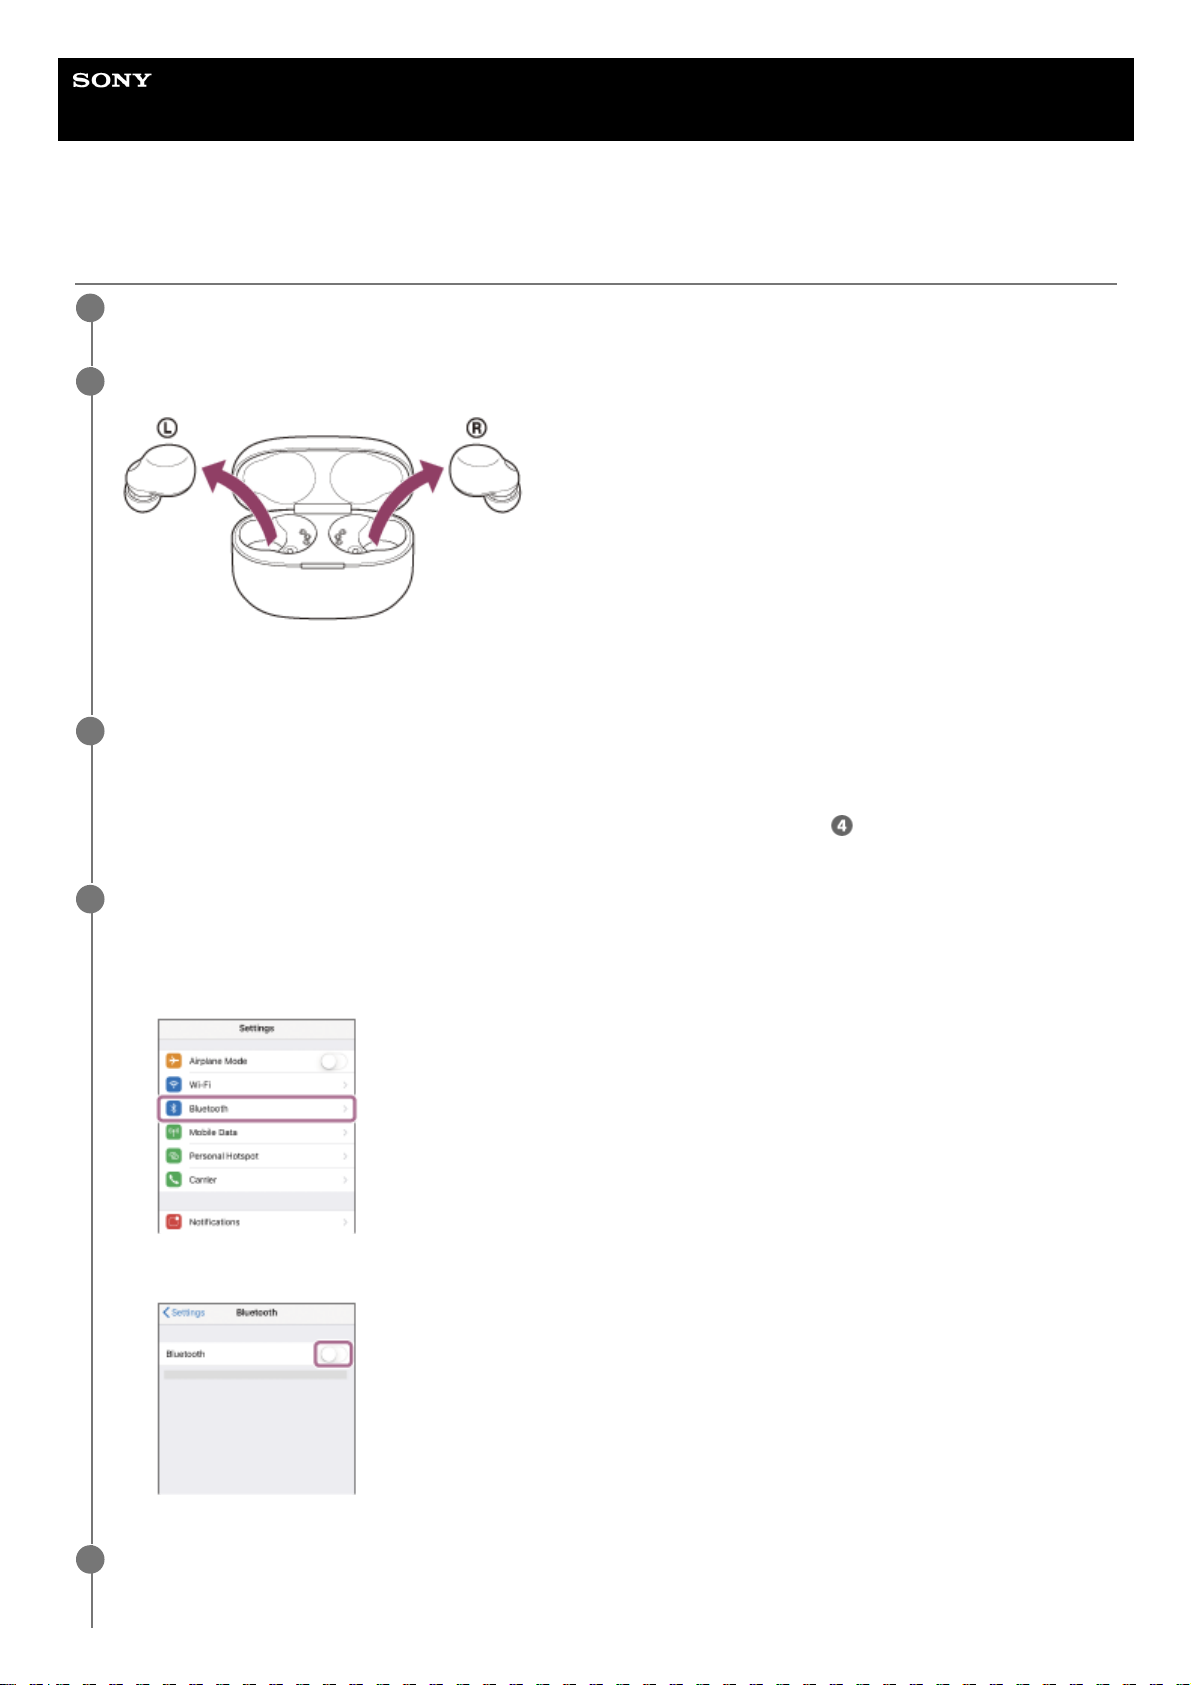
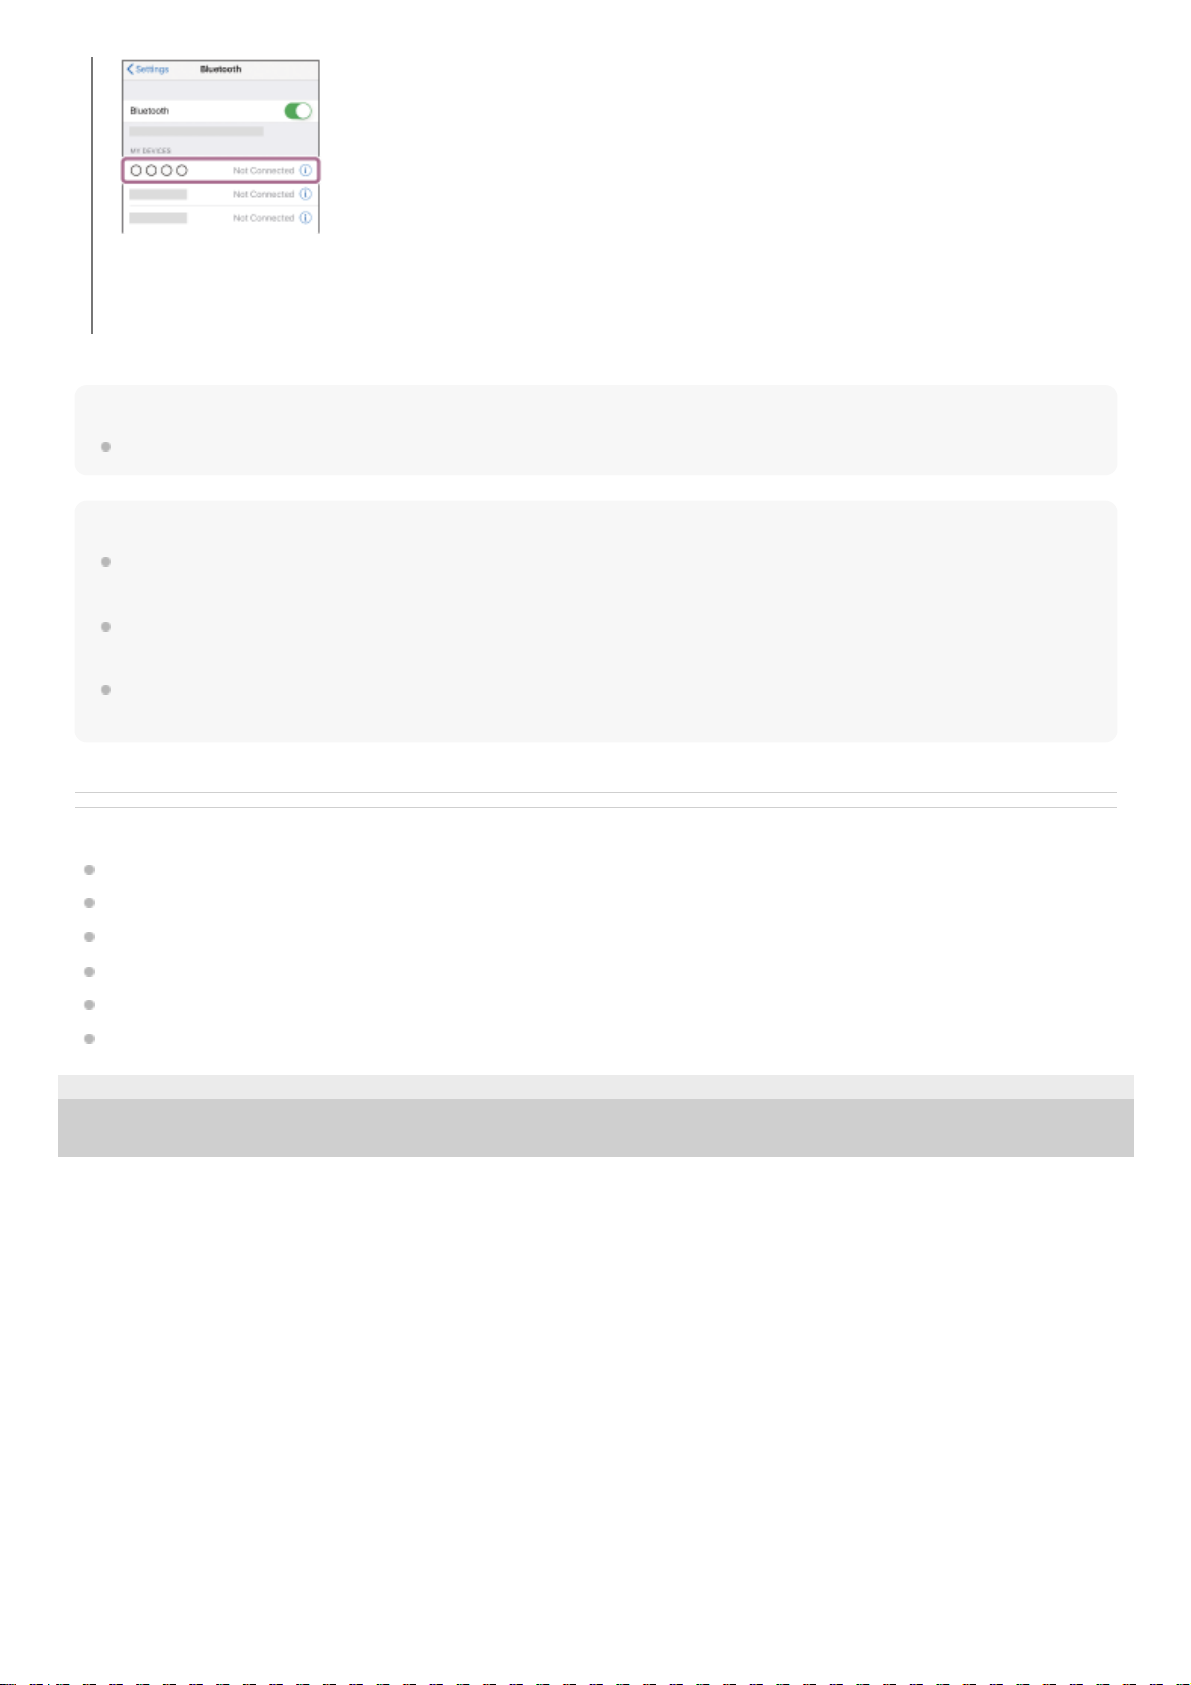
Display the devices paired with the iPhone.
4
Select [Settings].
1.
Touch [Bluetooth].
2.
Touch the switch to turn on the Bluetooth function.
3.
Touch [LinkBuds S].
5
44
Page 45
Hint
The operation above is an example. For more details, refer to the operating instructions supplied with your iPhone.
Note
When connecting, [LinkBuds S], [LE_LinkBuds S], or both may be displayed on the connecting device. When both or [LinkBuds
S] is displayed, select [LinkBuds S]; when [LE_LinkBuds S] is displayed, select [LE_LinkBuds S].
If the last-connected Bluetooth device is placed near the headset, the headset may connect automatically to the device by simply
turning on the headset. If this is the case, deactivate the Bluetooth function on the last-connected device or turn off the power.
If you cannot connect your iPhone to the headset, delete the headset pairing information on your iPhone and perform the pairing
again. As for the operations on your iPhone, refer to the operating instructions supplied with the iPhone.
Related Topic
Wearing the headset
Using only one unit of the headset
How to make a wireless connection to Bluetooth devices
Pairing and connecting with an iPhone
Listening to music from a device via Bluetooth connection
Disconnecting Bluetooth connection (after use)
5-035-792-11(3)
Copyright 2022 Sony Corporation
You will hear a notification sound from both headset units (or from the headset unit you are wearing) at the same
time.
45
Page 46
Help Guide
Wireless Noise Canceling Stereo Headset
LinkBuds S
Pairing and connecting with a computer (Windows® 10)
The operation to register the device that you wish to connect to is called “pairing”. First, pair a device to use it with the
headset for the first time.
Before starting the operation, make sure of the following:
Your computer has a Bluetooth function that supports music playback connections (A2DP).
The computer is placed within 1 m (3 feet) of the headset.
The headset is charged sufficiently.
The operating instructions of the computer is in hand.
Depending on the computer you are using, the built-in Bluetooth adaptor may need to be turned on. If you do not
know how to turn on the Bluetooth adaptor or are unsure if your computer has a built-in Bluetooth adaptor, refer to
the operating instructions supplied with the computer.
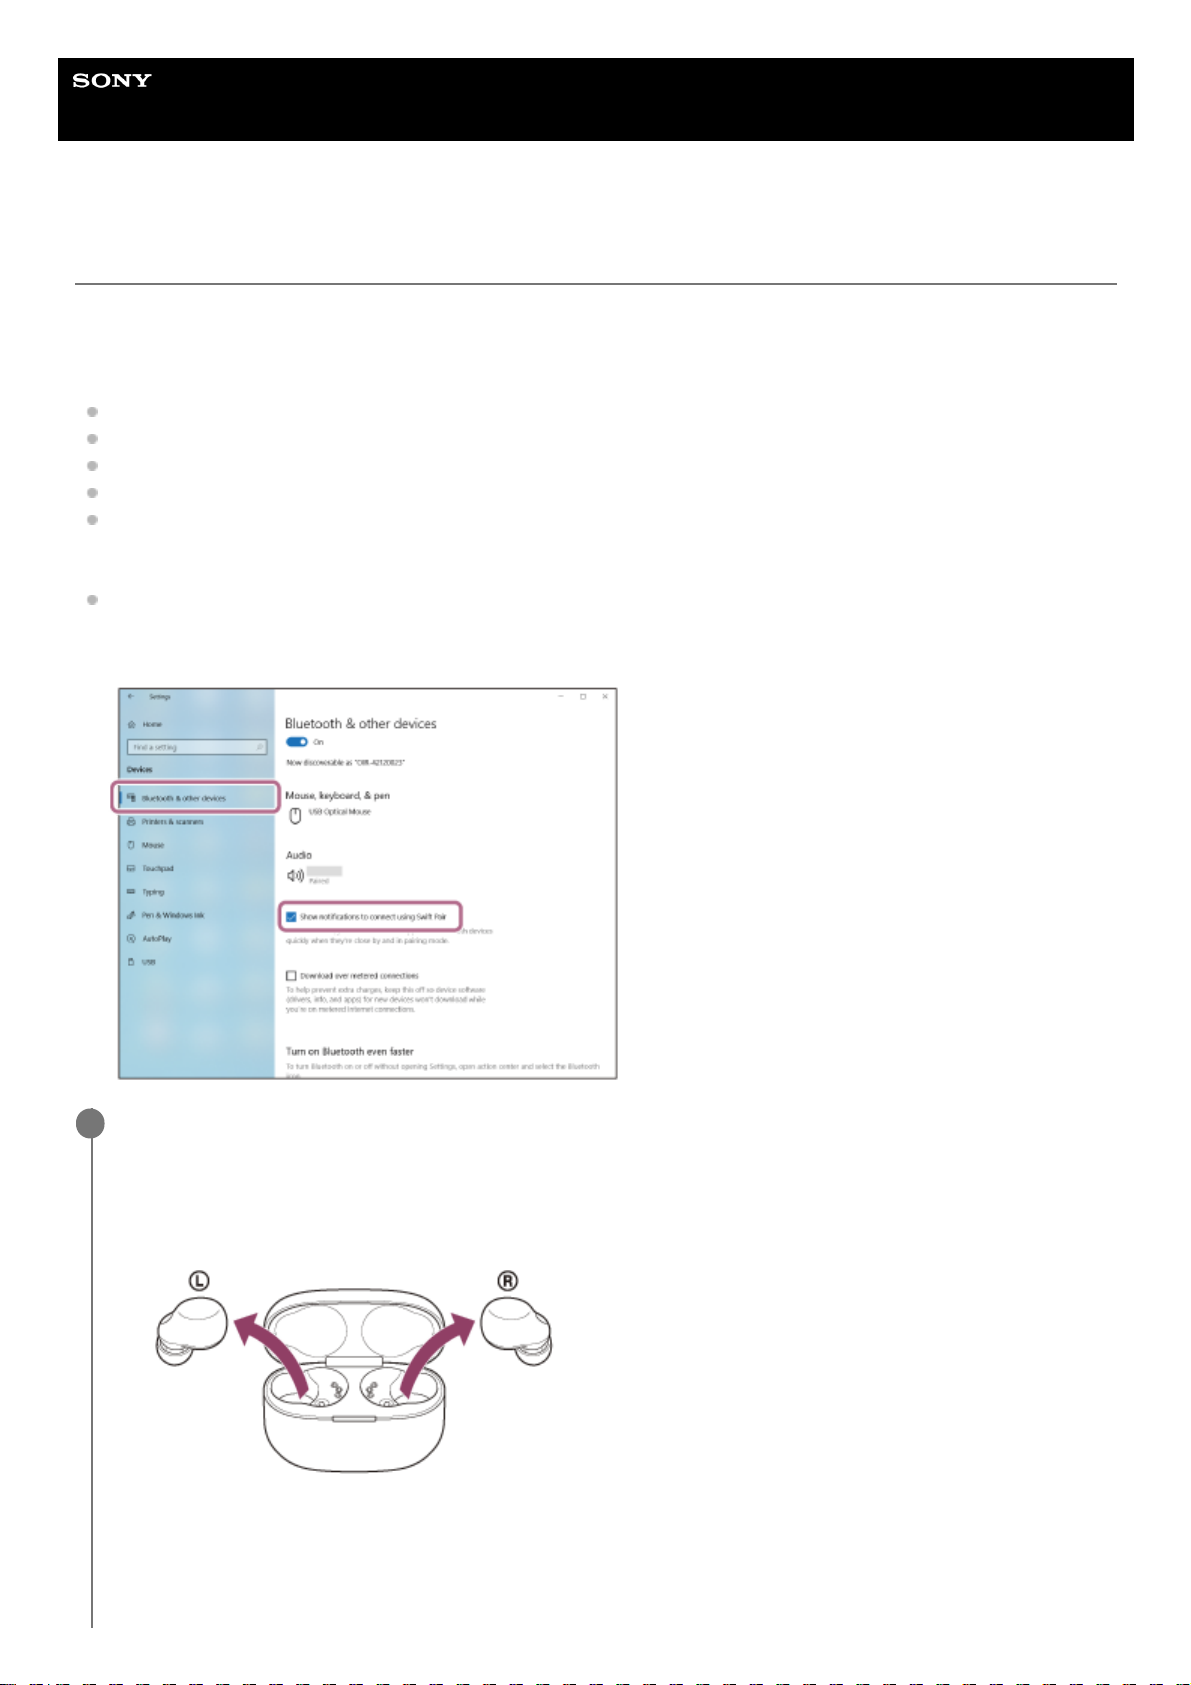
If your OS version is Windows 10 version 1803 or later, the Swift Pair function will make pairing easier. To use the
Swift Pair function, click the [Start] button - [Settings] - [Devices] - [Bluetooth & other devices], and check [Show
notifications to connect using Swift Pair].
Enter pairing mode on this headset.
When you pair the headset with a device for the first time after purchase or after initializing the
headset (if the headset has no pairing information)
1
Remove both units of the headset from the charging case.
The headset turns on automatically.
The headset enters pairing mode automatically when you put the headset units into both ears.
You will hear a notification sound and the voice guidance say “Pairing”, from both headset units at the same
time.
1.
46
Page 47
When you pair a second or subsequent device (the headset has pairing information for other
devices)
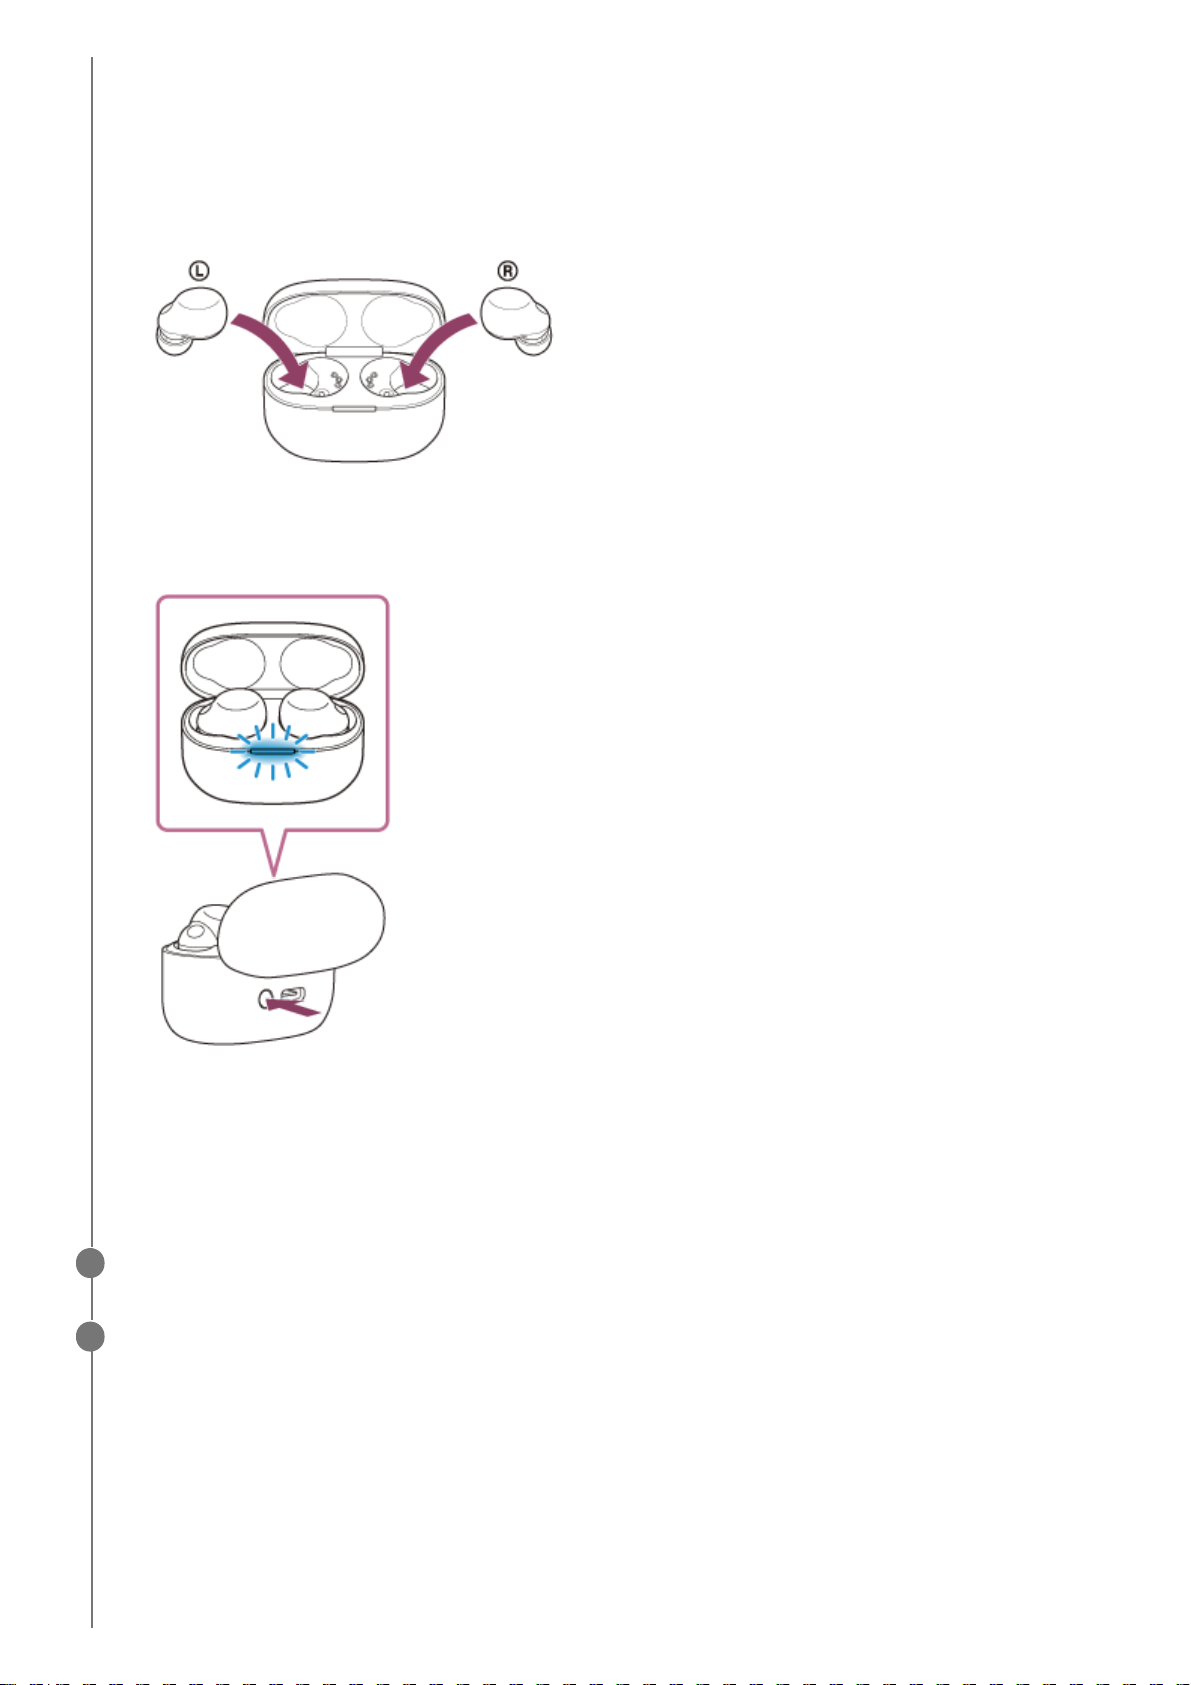
Set the headset into the charging case.
Leave the lid of the charging case open.
1.
With the lid of the charging case open, press and hold the pairing button on the back of the charging case for
about 5 seconds or more.
Note: The headset does not enter pairing mode with the lid of the charging case closed.
The indicator (blue) on the charging case repeatedly flashes slowly twice in a row and the headset goes into
pairing mode.
You can remove the headset from the charging case after entering pairing mode. When you put the headset
units into both ears, you will hear a notification sound and the voice guidance say “Pairing”, from both headset
units at the same time.
2.
Wake the computer up if the computer is in standby (sleep) or hibernation mode.
2
Pair the headset using the computer.
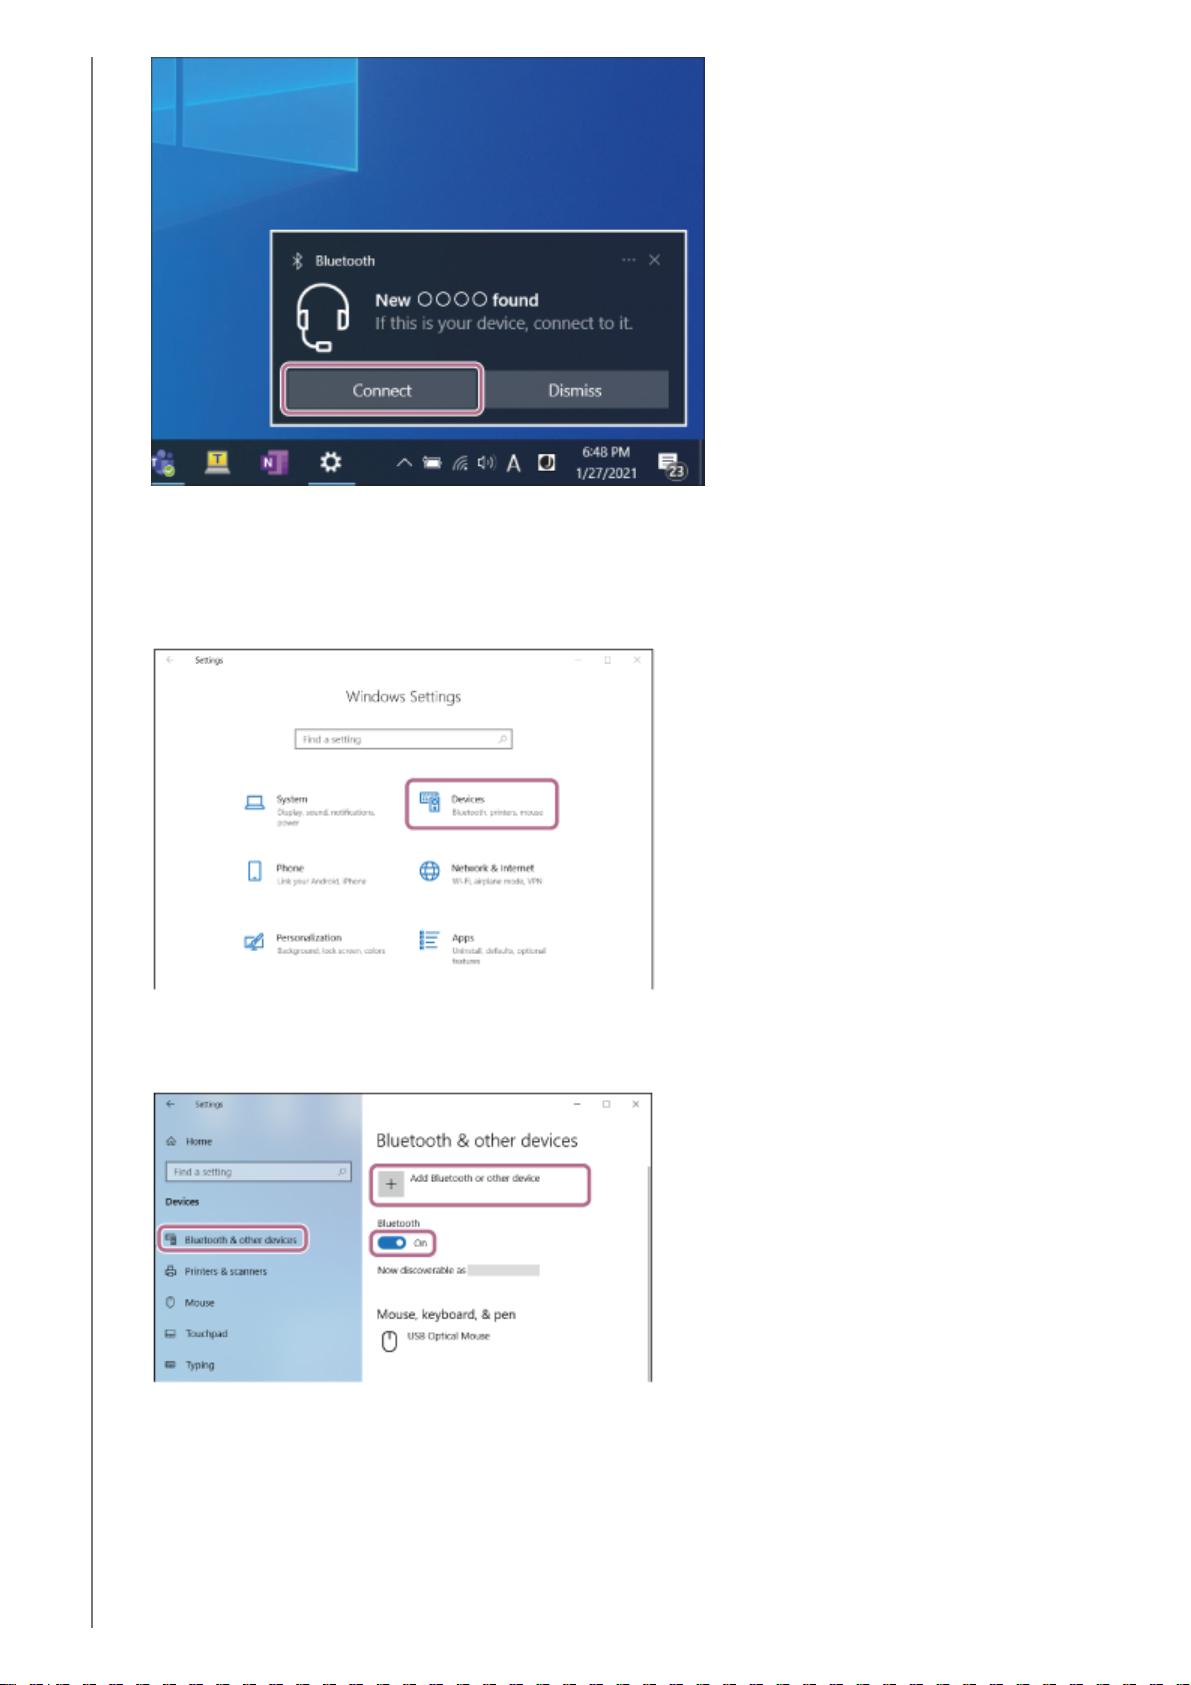
To connect using the Swift Pair function
3
Select [Connect] from the pop-up menu displayed on your computer screen.1.
47
Page 48
To connect without using the Swift Pair function
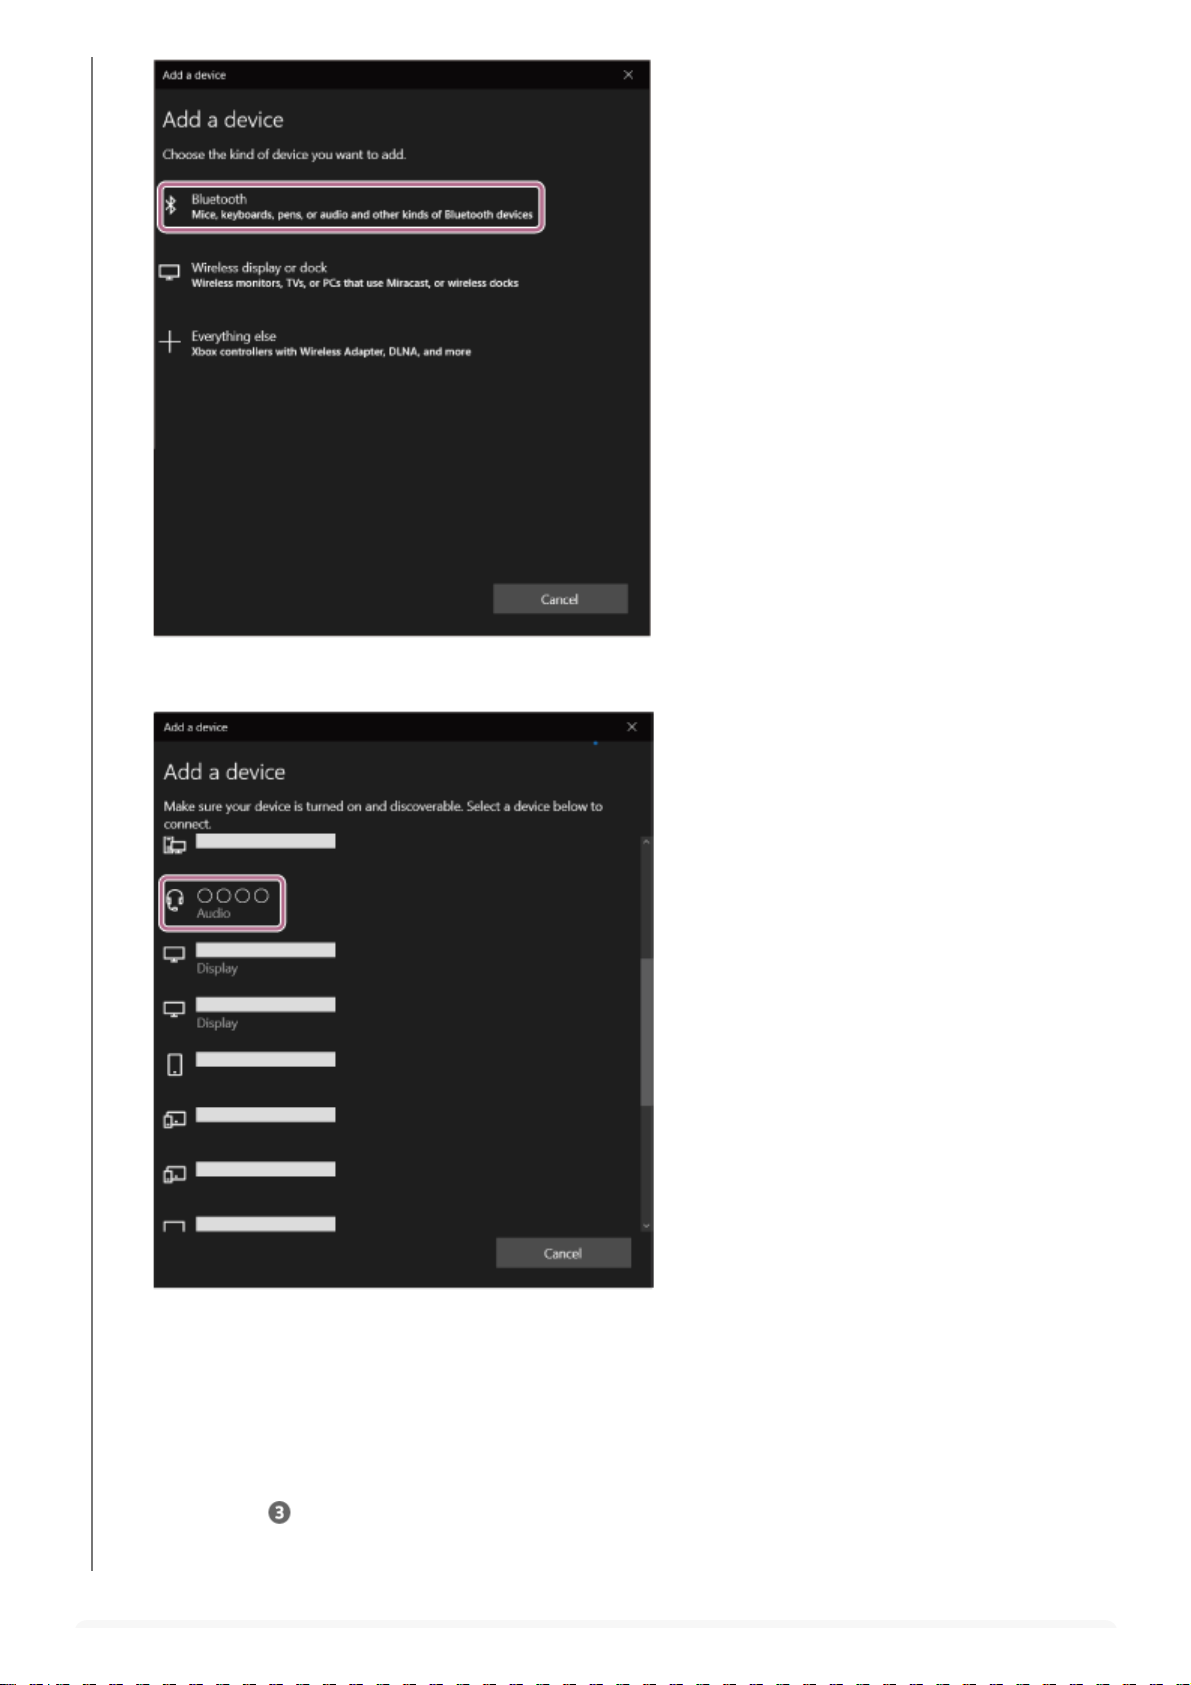
Click the [Start] button, then [Settings].1.
Click [Devices].
2.
Click the [Bluetooth & other devices] tab, click the [Bluetooth] switch to turn on the Bluetooth function, then click
[Add Bluetooth or other device].
3.
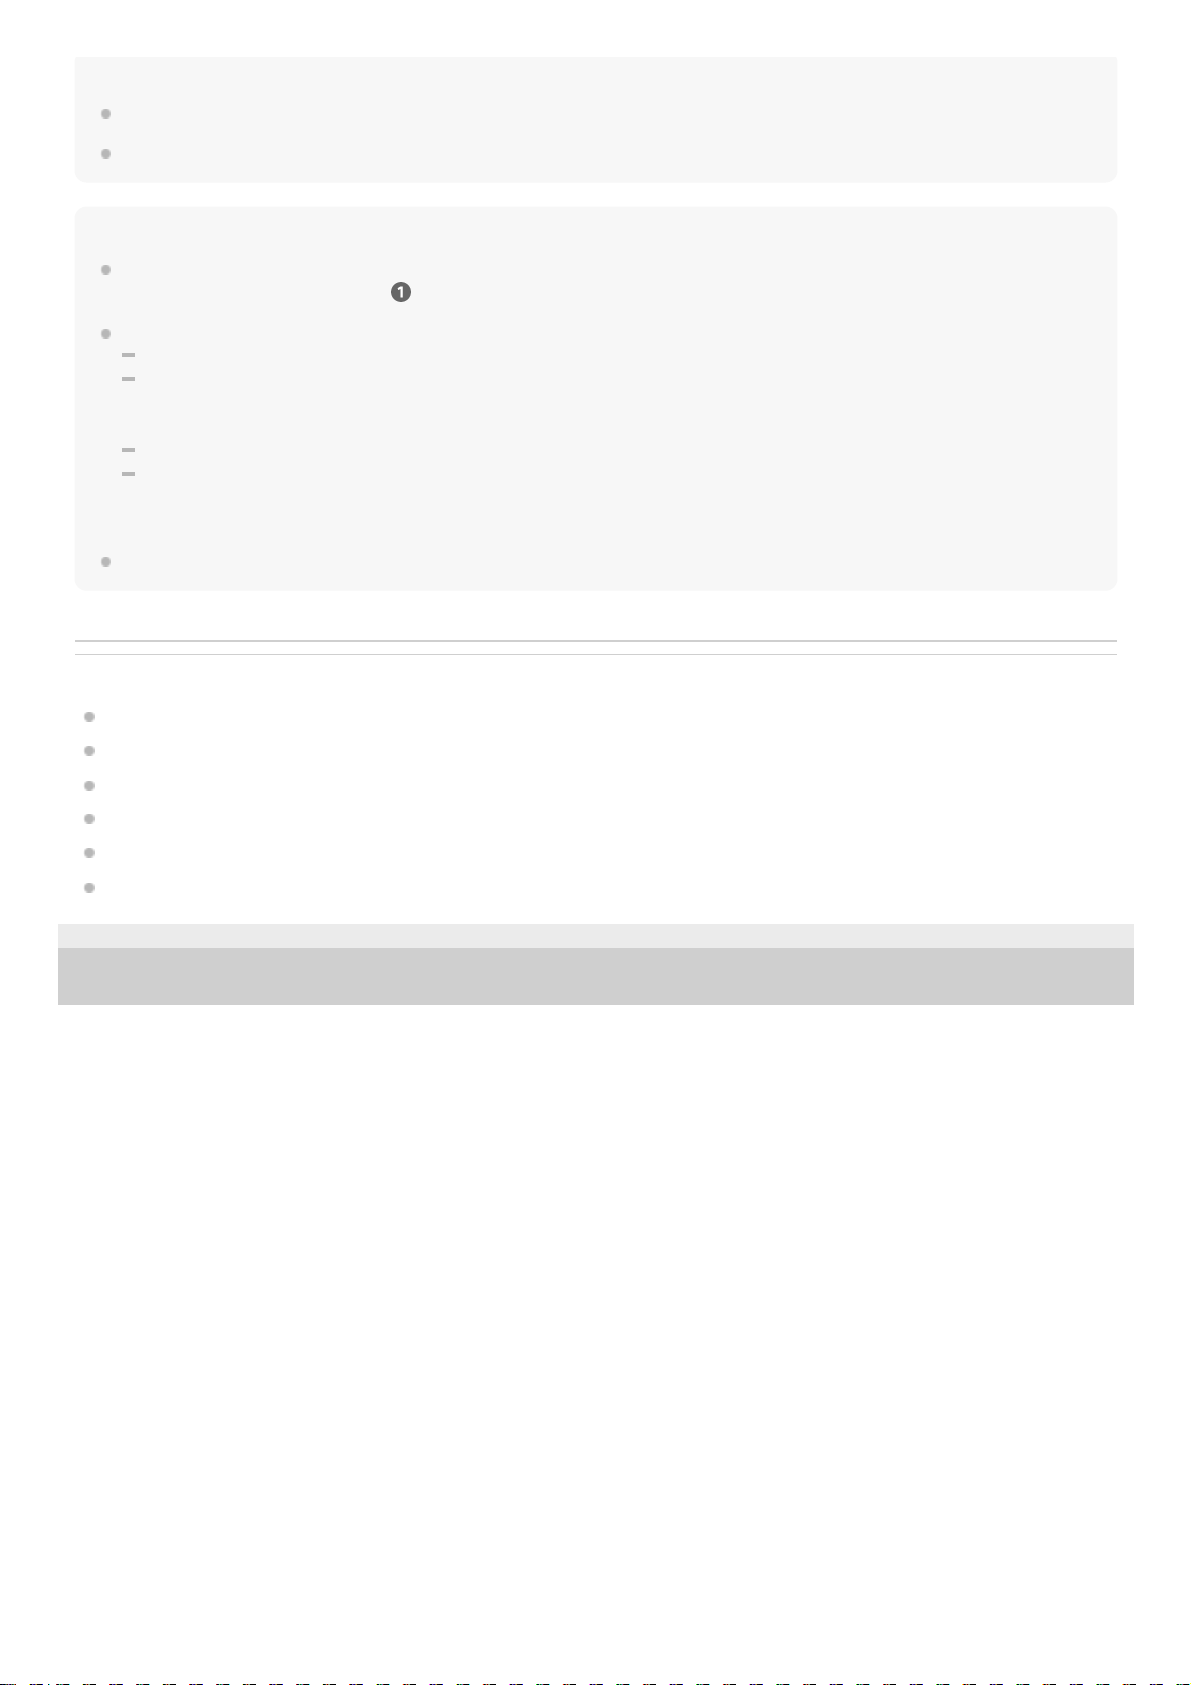
Click [Bluetooth].4.
48
Page 49
If Passkey (*) input is required, input “0000”.
The headset and computer are paired and connected with each other.
When the headset is stored in the charging case, the indicator (blue) on the charging case flashes slowly for about
5 seconds.
When you are wearing the headset, you will hear a notification sound from both headset units at the same time.
If they are not connected, see “Connecting to a paired computer (Windows 10)”.
If [LinkBuds S] does not appear on your computer screen, try again from “To connect without using the Swift Pair
function” of step
.
Click [LinkBuds S].5.
A Passkey may be called “Passcode”, “PIN code”, “PIN number”, or “Password”.
*
49
Page 50
Hint
The operation above is an example. For more details, refer to the operating instructions supplied with the computer.
To delete all Bluetooth pairing information, see “Initializing the headset to restore factory settings”.
Note
If pairing is not established within 5 minutes, pairing mode is canceled. In this case, set the headset into the charging case, and
start the operation again from step
.
Once Bluetooth devices are paired, there is no need to pair them again, except in the following cases:
Pairing information has been deleted after repair, etc.
When a 9th device is paired.
The headset can be paired with up to 8 devices. If a new device is paired after 8 devices are already paired, the registration
information of the paired device with the oldest connection date is overwritten with the information for the new device.
When the pairing information for the headset has been deleted from the Bluetooth device.
When the headset is initialized.
All of the pairing information is deleted. In this case, delete the pairing information for the headset from the connected device
and then pair them again.
The headset can be paired with multiple devices, but can only play music from 1 paired device at a time.
Related Topic
Wearing the headset
How to make a wireless connection to Bluetooth devices
Connecting to a paired computer (Windows 10)
Listening to music from a device via Bluetooth connection
Disconnecting Bluetooth connection (after use)
Initializing the headset to restore factory settings
5-035-792-11(3)
Copyright 2022 Sony Corporation
50
Page 51
Help Guide
Wireless Noise Canceling Stereo Headset
LinkBuds S
Pairing and connecting with a computer (Windows 8.1)
The operation to register the device that you wish to connect to is called “pairing”. First, pair a device to use it with the
headset for the first time.
Before starting the operation, make sure of the following:
Your computer has a Bluetooth function that supports music playback connections (A2DP).
The computer is placed within 1 m (3 feet) of the headset.
The headset is charged sufficiently.
The operating instructions of the computer is in hand.
Depending on the computer you are using, the built-in Bluetooth adaptor may need to be turned on. If you do not
know how to turn on the Bluetooth adaptor or are unsure if your computer has a built-in Bluetooth adaptor, refer to
the operating instructions supplied with the computer.
Enter pairing mode on this headset.
When you pair the headset with a device for the first time after purchase or after initializing the
headset (if the headset has no pairing information)
When you pair a second or subsequent device (the headset has pairing information for other
devices)
1
Remove both units of the headset from the charging case.
The headset turns on automatically.
The headset enters pairing mode automatically when you put the headset units into both ears.
You will hear a notification sound and the voice guidance say “Pairing”, from both headset units at the same
time.
1.
Set the headset into the charging case.
Leave the lid of the charging case open.
1.
With the lid of the charging case open, press and hold the pairing button on the back of the charging case for
about 5 seconds or more.
2.
51
Page 52
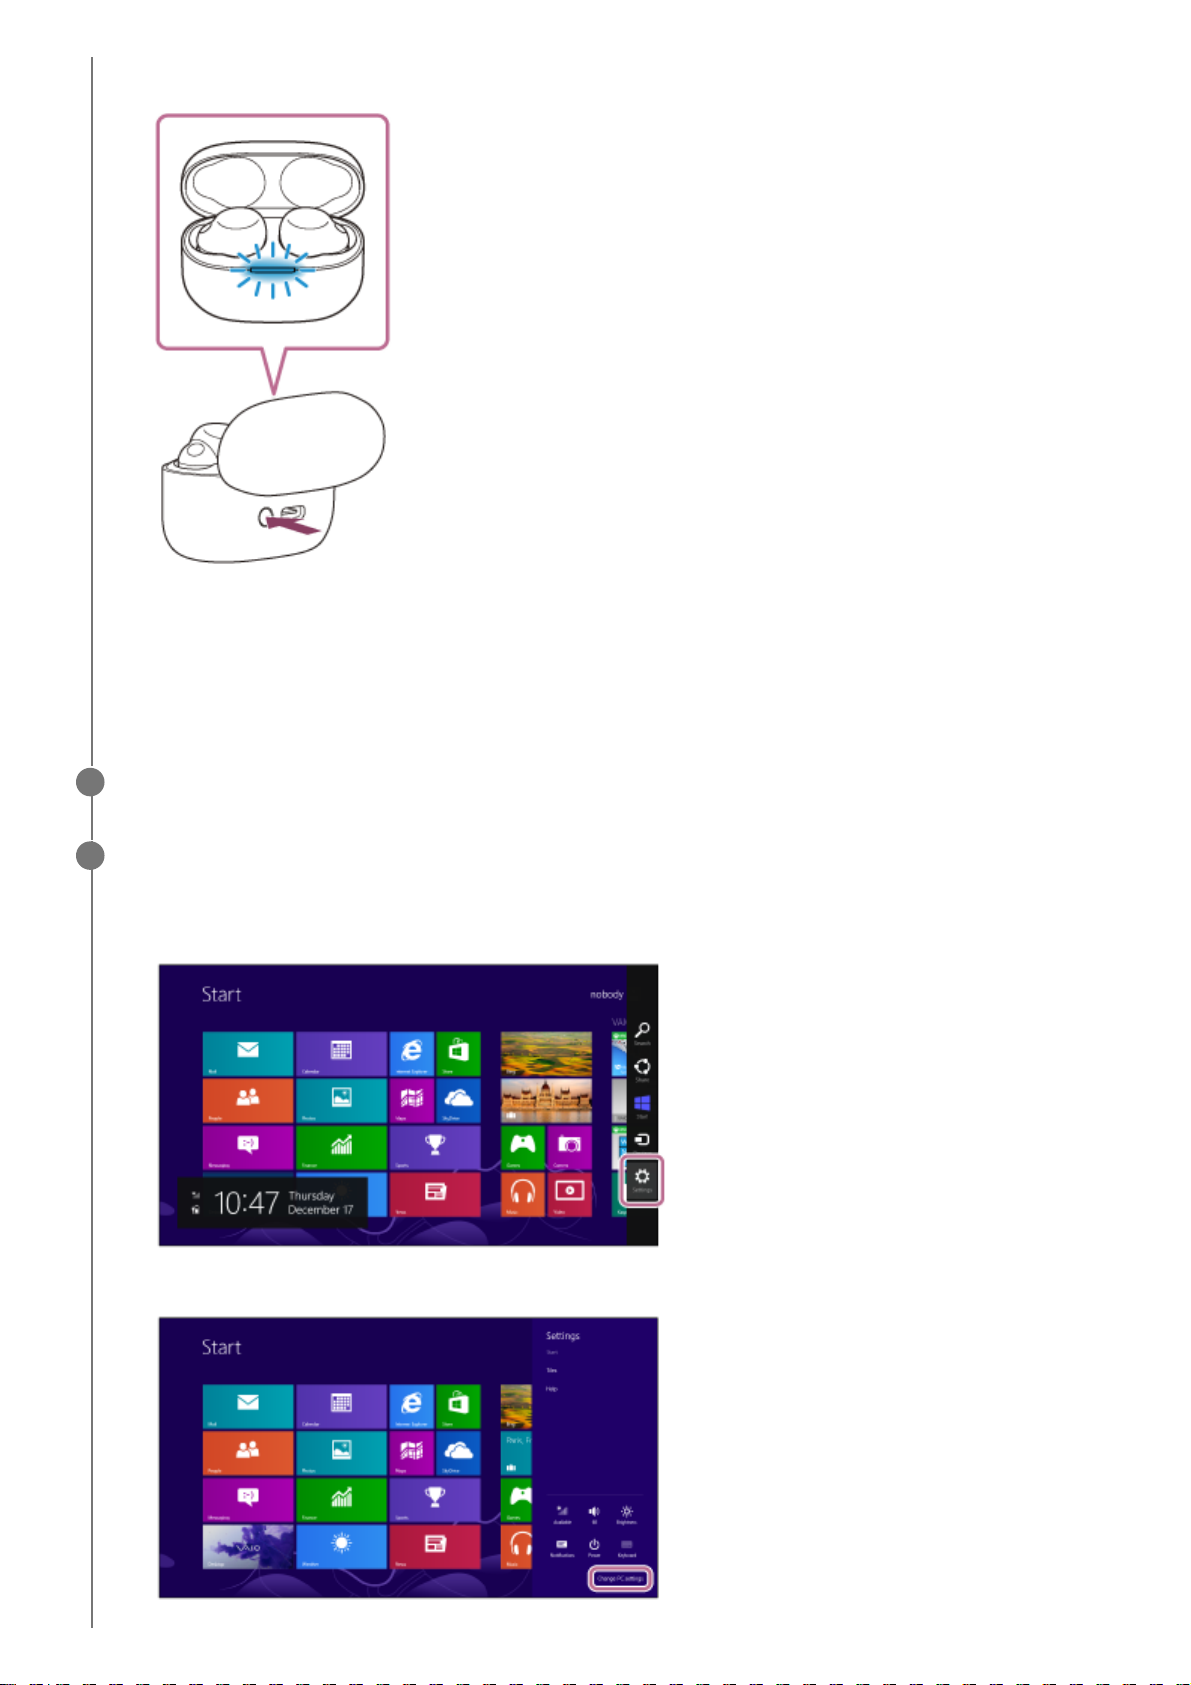
Note: The headset does not enter pairing mode with the lid of the charging case closed.
The indicator (blue) on the charging case repeatedly flashes slowly twice in a row and the headset goes into
pairing mode.
You can remove the headset from the charging case after entering pairing mode. When you put the headset
units into both ears, you will hear a notification sound and the voice guidance say “Pairing”, from both headset
units at the same time.
Wake the computer up if the computer is in standby (sleep) or hibernation mode.
2
Pair the headset using the computer.
3
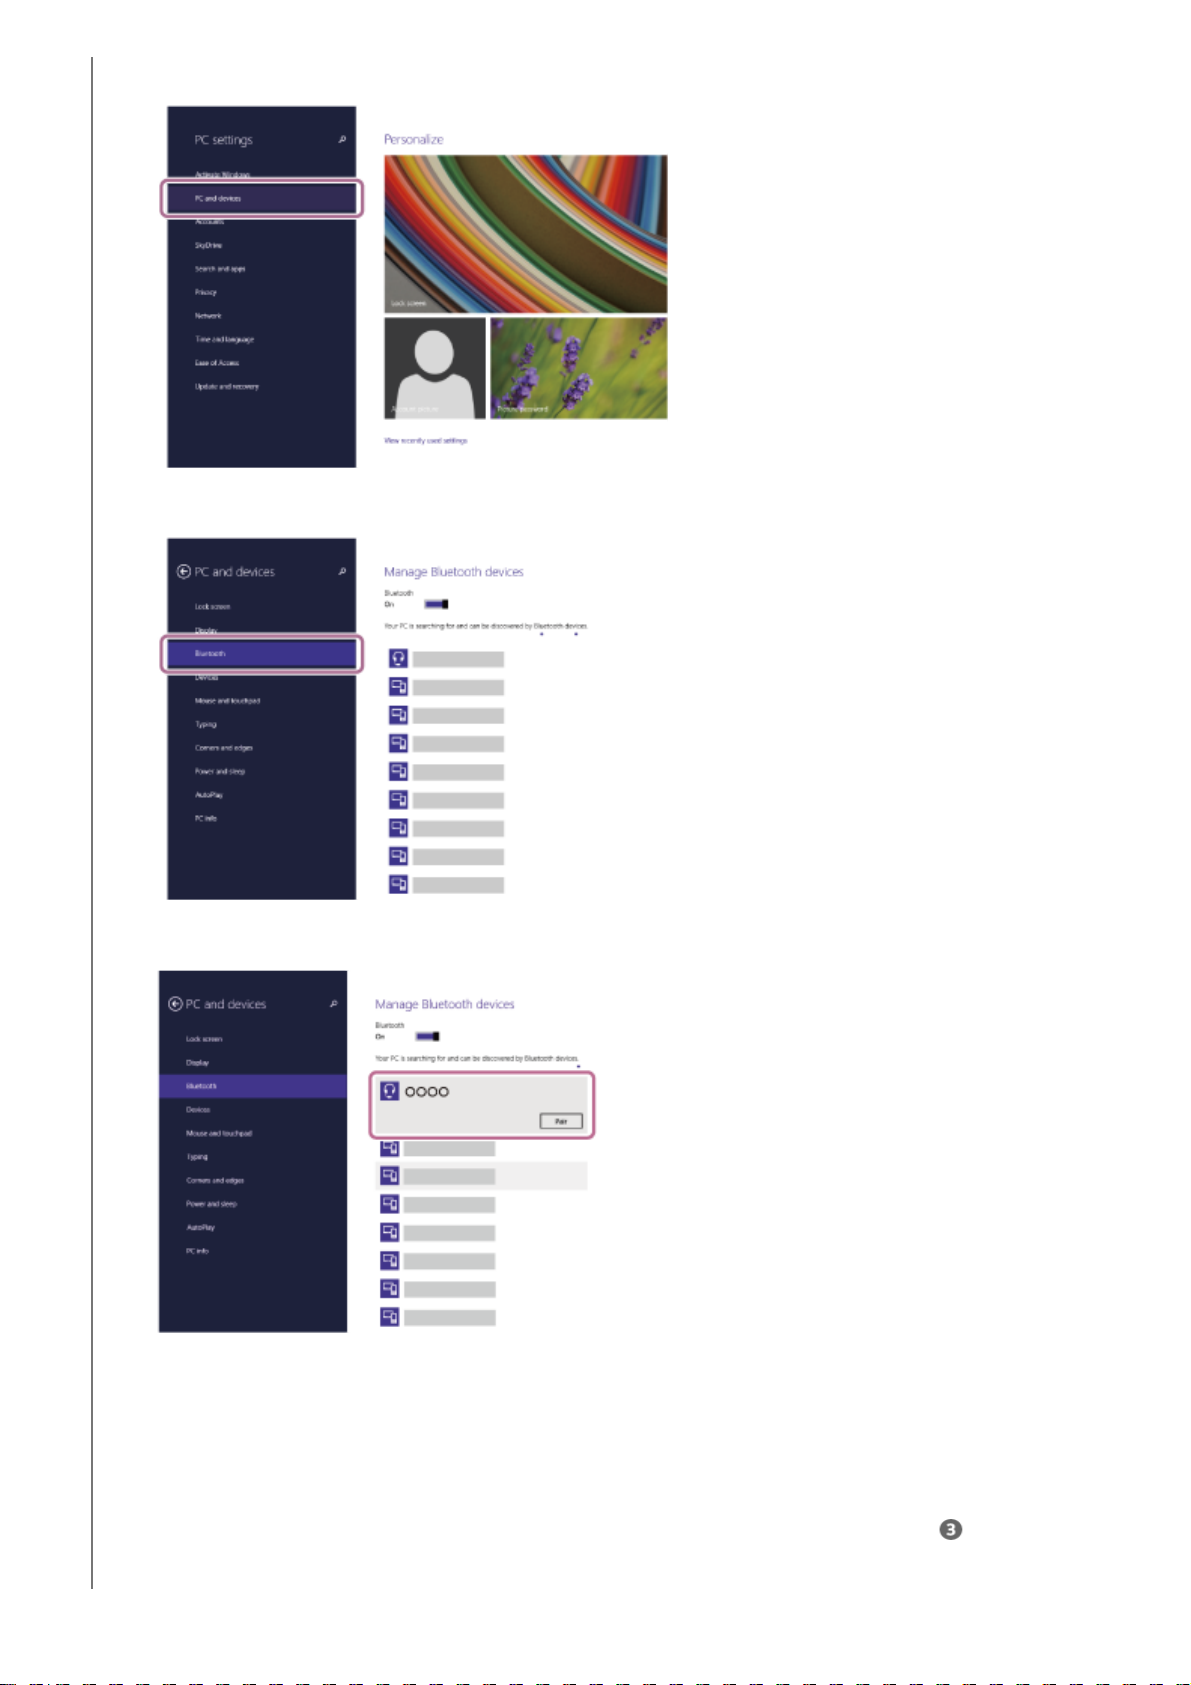
Move the mouse pointer to the top-right corner of the screen (when using a touch panel, swipe from the right
edge of the screen), then select [Settings] from the Charm Bar.
1.
Select [Change PC Settings] of the [Settings] charm.
2.
52
Page 53
If Passkey (*) input is required, input “0000”.
The headset and computer are paired and connected with each other.
When the headset is stored in the charging case, the indicator (blue) on the charging case flashes slowly for about
5 seconds.
When you are wearing the headset, you will hear a notification sound from both headset units at the same time.
If they are not connected, see “Connecting to a paired computer (Windows 8.1)”.
If [LinkBuds S] does not appear on your computer screen, try again from the beginning of step
.
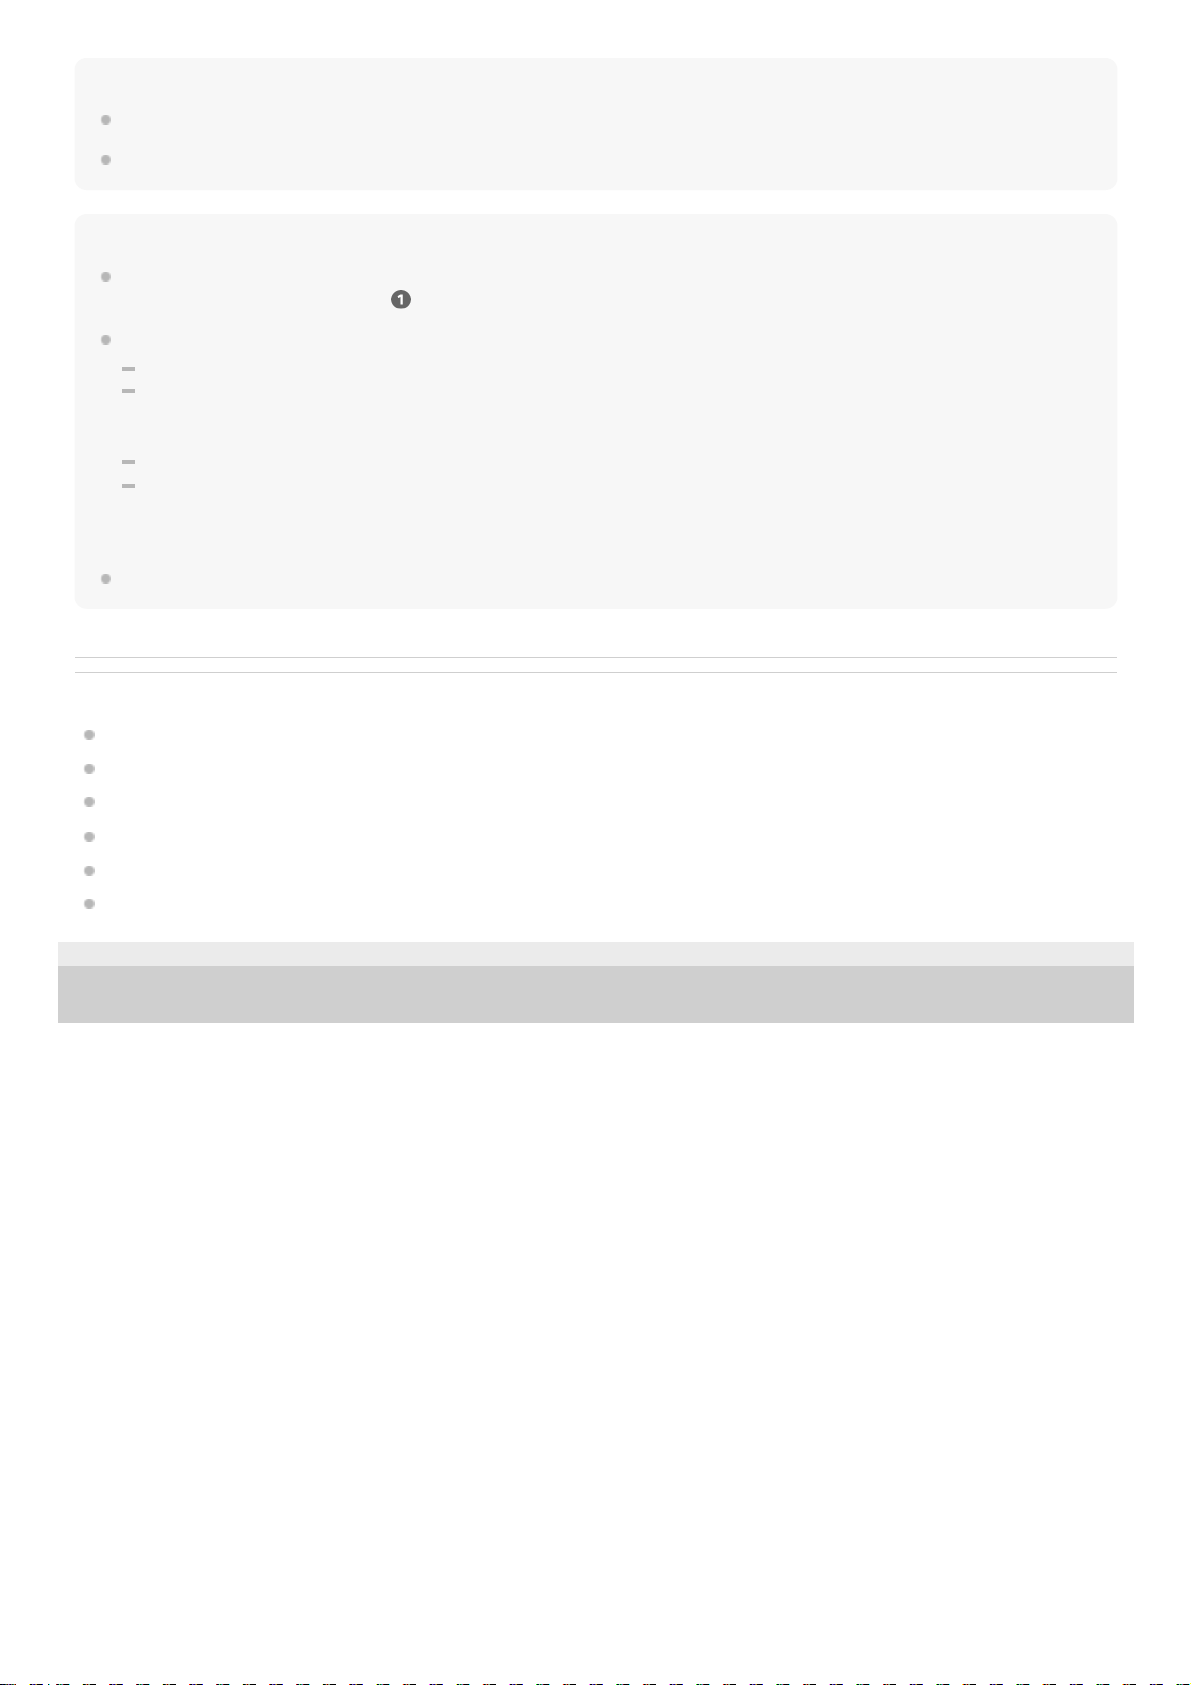
Select [PC and devices] of the [PC Settings] screen.
3.
Select [Bluetooth].
4.
Select [LinkBuds S], then select [Pair].
5.
A Passkey may be called “Passcode”, “PIN code”, “PIN number”, or “Password”.
*
53
Page 54
Hint
The operation above is an example. For more details, refer to the operating instructions supplied with the computer.
To delete all Bluetooth pairing information, see “Initializing the headset to restore factory settings”.
Note
If pairing is not established within 5 minutes, pairing mode is canceled. In this case, set the headset into the charging case, and
start the operation again from step
.
Once Bluetooth devices are paired, there is no need to pair them again, except in the following cases:
Pairing information has been deleted after repair, etc.
When a 9th device is paired.
The headset can be paired with up to 8 devices. If a new device is paired after 8 devices are already paired, the registration
information of the paired device with the oldest connection date is overwritten with the information for the new device.
When the pairing information for the headset has been deleted from the Bluetooth device.
When the headset is initialized.
All of the pairing information is deleted. In this case, delete the pairing information for the headset from the connected device
and then pair them again.
The headset can be paired with multiple devices, but can only play music from 1 paired device at a time.
Related Topic
Wearing the headset
How to make a wireless connection to Bluetooth devices
Connecting to a paired computer (Windows 8.1)
Listening to music from a device via Bluetooth connection
Disconnecting Bluetooth connection (after use)
Initializing the headset to restore factory settings
5-035-792-11(3)
Copyright 2022 Sony Corporation
54
Page 55
Help Guide
Wireless Noise Canceling Stereo Headset
LinkBuds S
Pairing and connecting with a computer (Mac)
The operation to register the device that you wish to connect to is called “pairing”. First, pair a device to use it with the
headset for the first time.
Compatible OS
macOS (version 10.15 or later)
Before starting the operation, make sure of the following:
Your computer has a Bluetooth function that supports music playback connections (A2DP).
The computer is placed within 1 m (3 feet) of the headset.
The headset is charged sufficiently.
The operating instructions of the computer is in hand.
Depending on the computer you are using, the built-in Bluetooth adaptor may need to be turned on. If you do not
know how to turn on the Bluetooth adaptor or are unsure if your computer has a built-in Bluetooth adaptor, refer to
the operating instructions supplied with the computer.
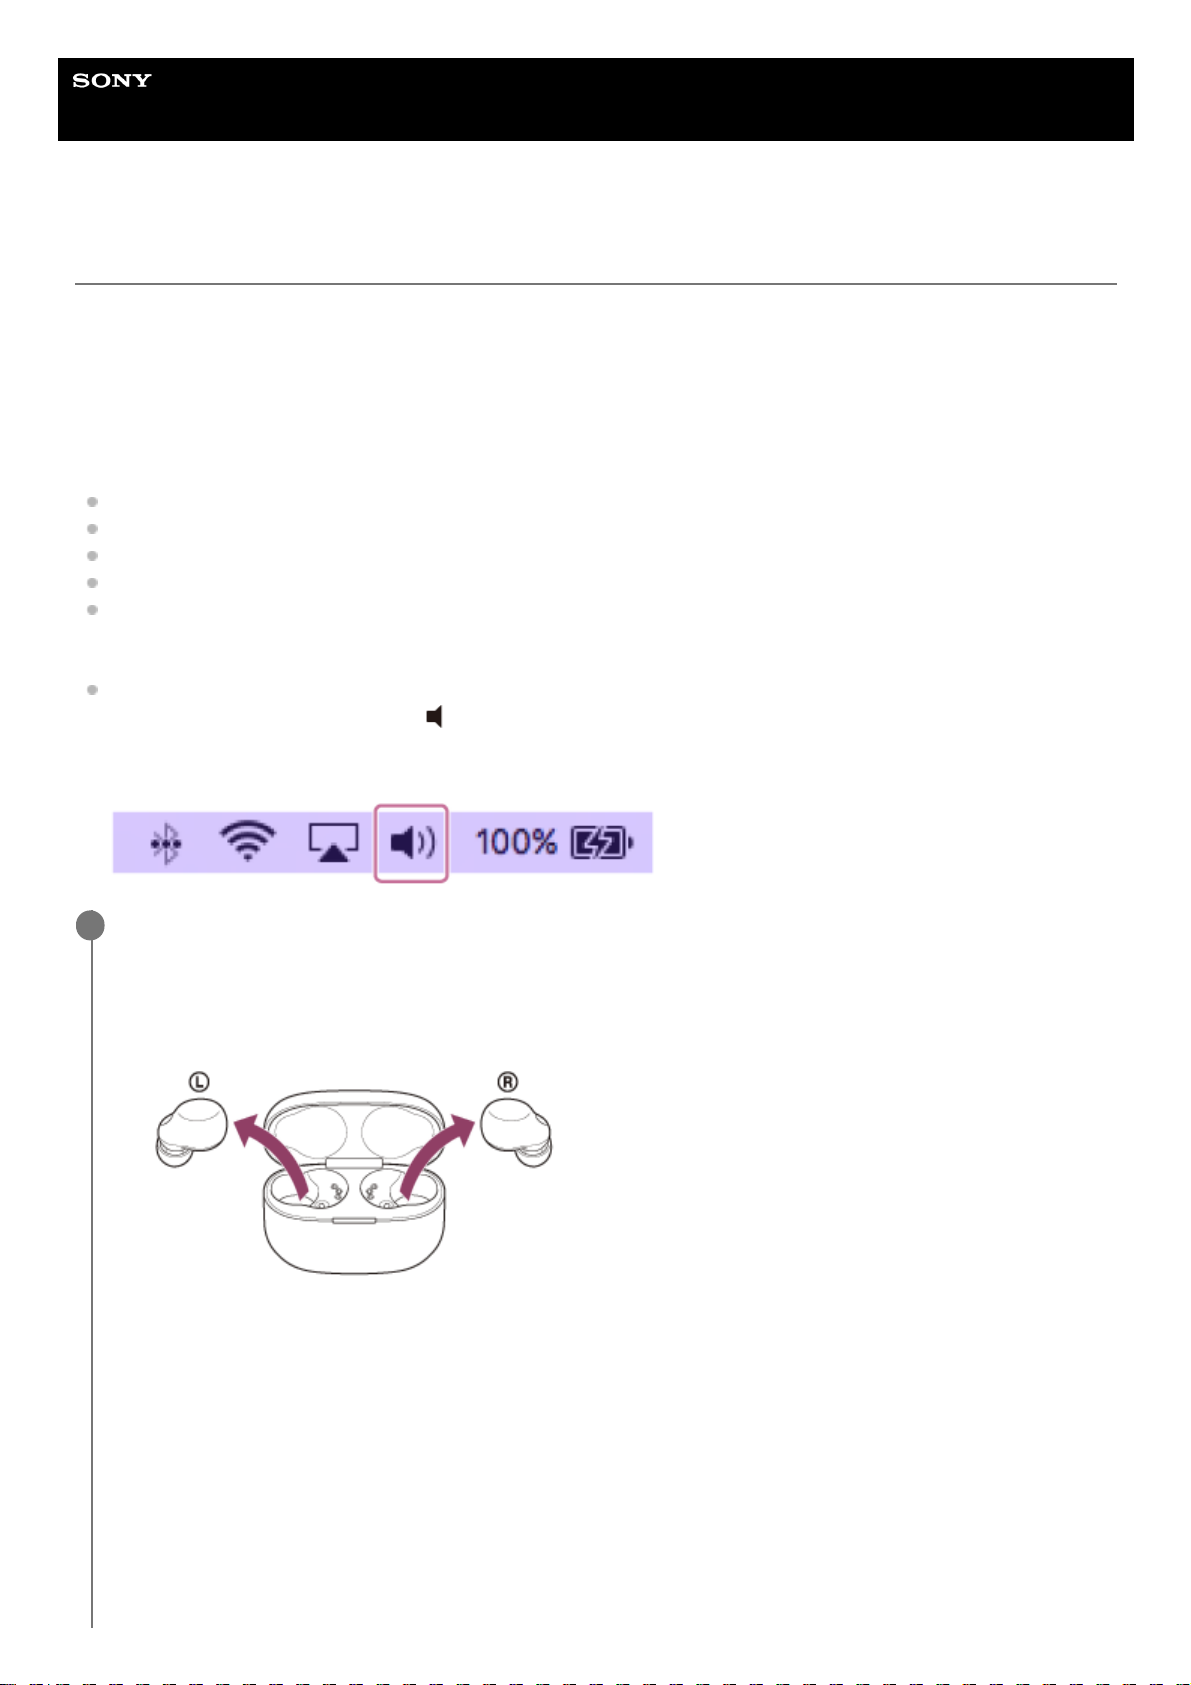
Set the computer speaker to the ON mode.
If the computer speaker is set to the “OFF” mode, no sound is heard from the headset.
Computer speaker in the ON mode
Enter pairing mode on this headset.
When you pair the headset with a device for the first time after purchase or after initializing the
headset (if the headset has no pairing information)
When you pair a second or subsequent device (the headset has pairing information for other
devices)
1
Remove both units of the headset from the charging case.
The headset turns on automatically.
The headset enters pairing mode automatically when you put the headset units into both ears.
You will hear a notification sound and the voice guidance say “Pairing”, from both headset units at the same
time.
1.
Set the headset into the charging case.
Leave the lid of the charging case open.
1.
55
Page 56
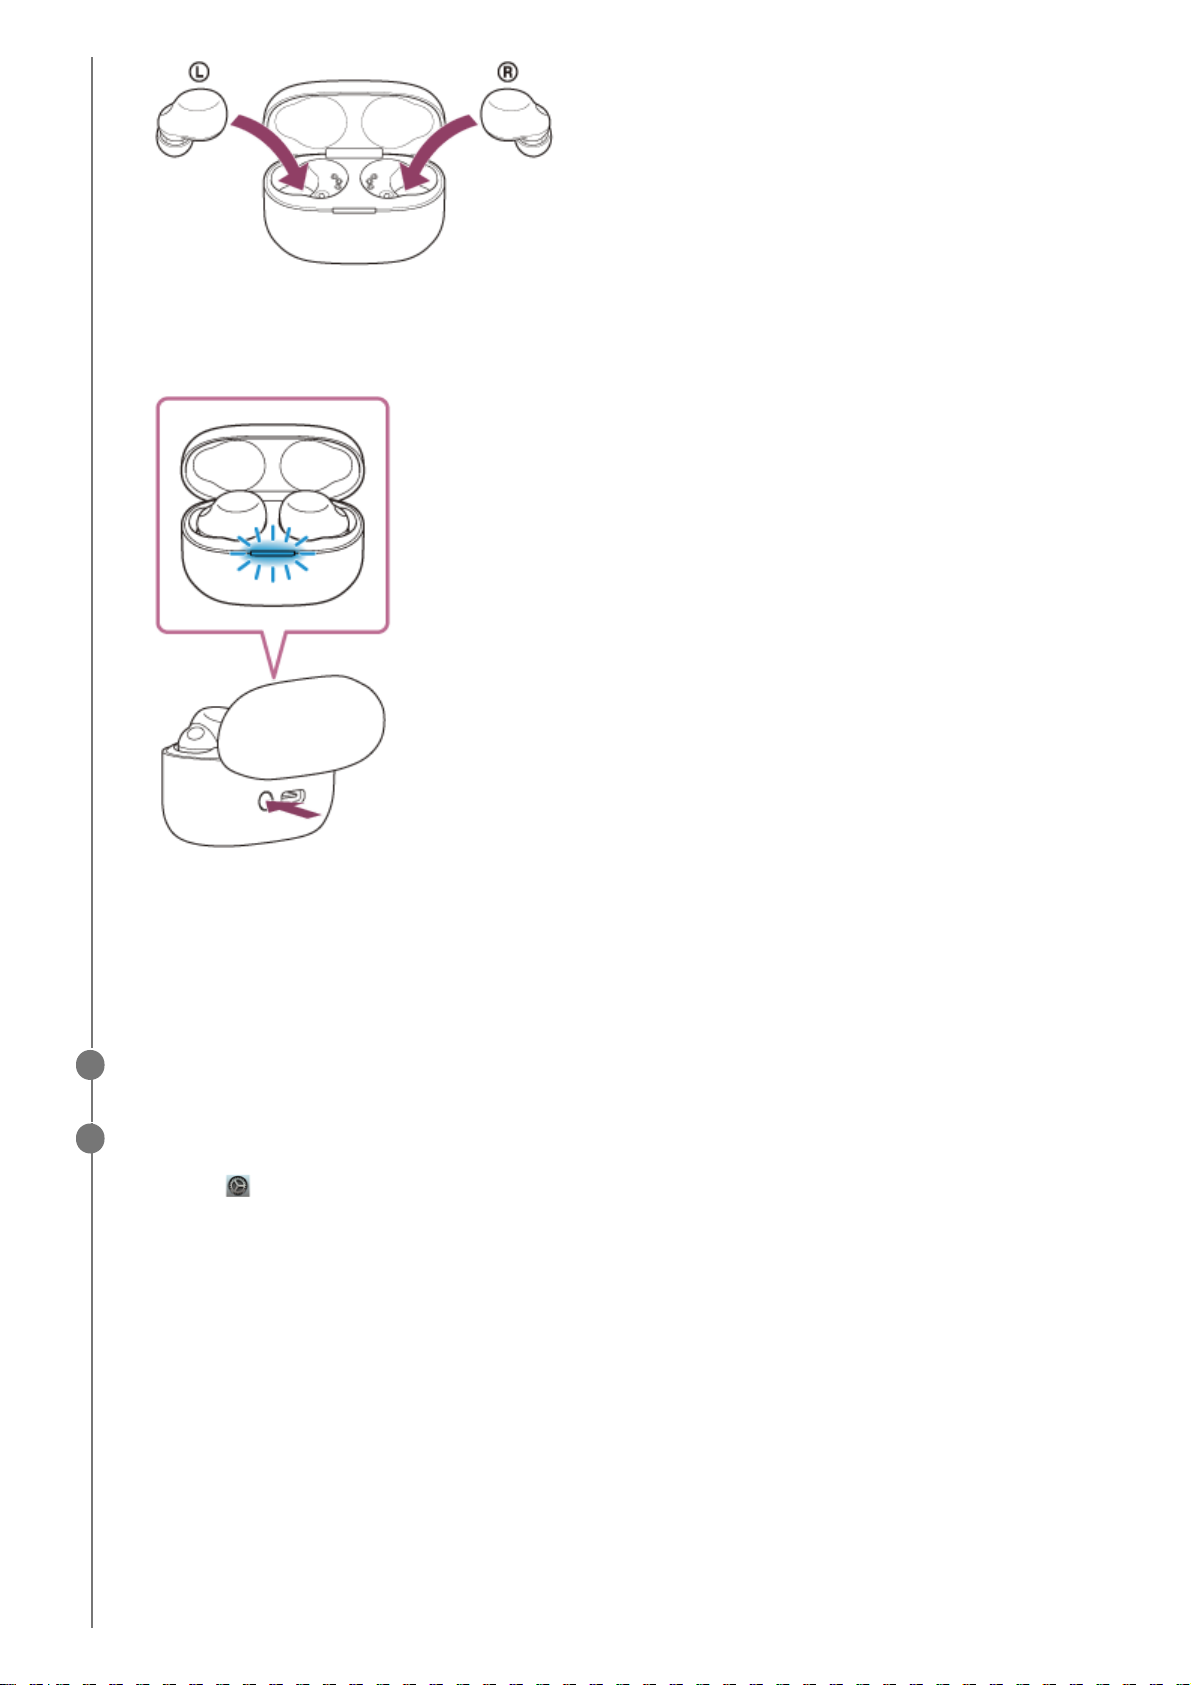
With the lid of the charging case open, press and hold the pairing button on the back of the charging case for
about 5 seconds or more.
Note: The headset does not enter pairing mode with the lid of the charging case closed.
The indicator (blue) on the charging case repeatedly flashes slowly twice in a row and the headset goes into
pairing mode.
You can remove the headset from the charging case after entering pairing mode. When you put the headset
units into both ears, you will hear a notification sound and the voice guidance say “Pairing”, from both headset
units at the same time.
2.
Wake the computer up if the computer is in standby (sleep) or hibernation mode.
2
Pair the headset using the computer.
3
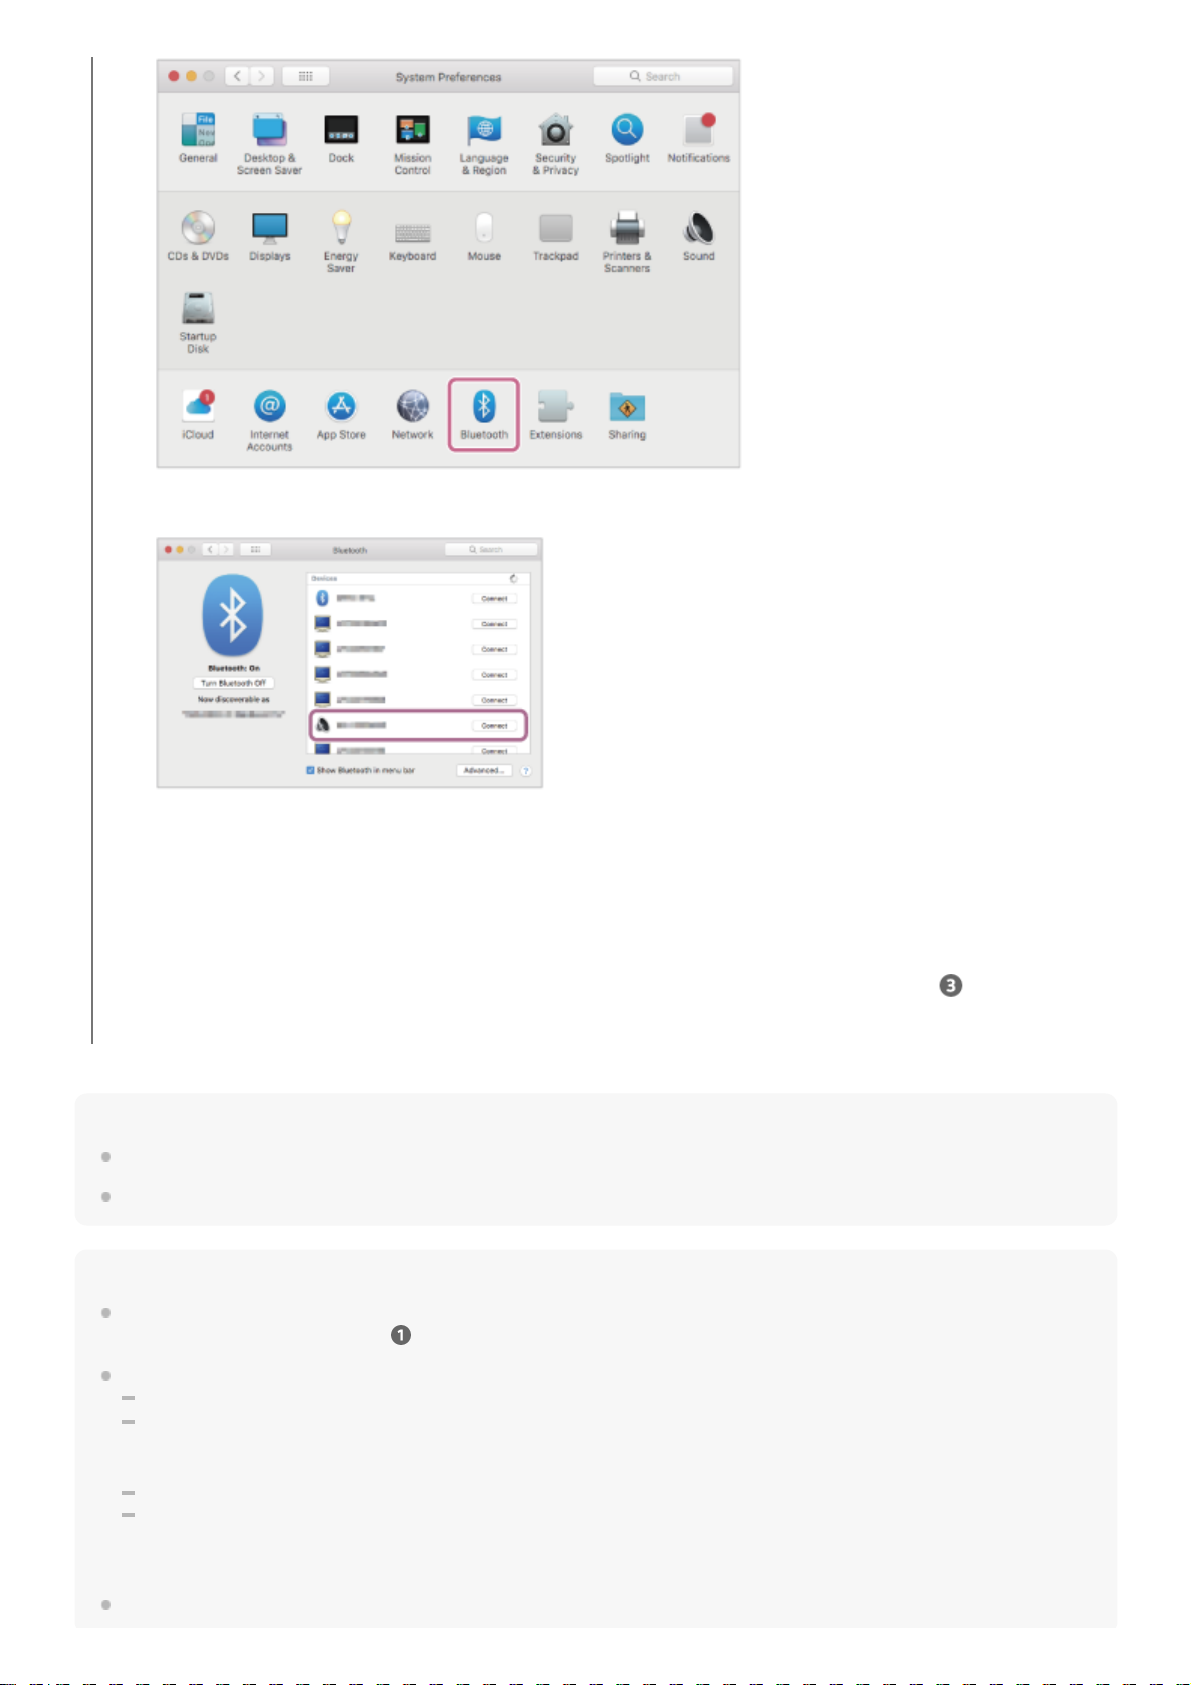
Select [
(System Preferences)] - [Bluetooth] from the Dock at the bottom of the screen.
1.
56
Page 57
Hint
The operation above is an example. For more details, refer to the operating instructions supplied with the computer.
To delete all Bluetooth pairing information, see “Initializing the headset to restore factory settings”.
Note
If pairing is not established within 5 minutes, pairing mode is canceled. In this case, set the headset into the charging case, and
start the operation again from step
.
Once Bluetooth devices are paired, there is no need to pair them again, except in the following cases:
Pairing information has been deleted after repair, etc.
When a 9th device is paired.
The headset can be paired with up to 8 devices. If a new device is paired after 8 devices are already paired, the registration
information of the paired device with the oldest connection date is overwritten with the information for the new device.
When the pairing information for the headset has been deleted from the Bluetooth device.
When the headset is initialized.
All of the pairing information is deleted. In this case, delete the pairing information for the headset from the connected device
and then pair them again.
The headset can be paired with multiple devices, but can only play music from 1 paired device at a time.
If Passkey (*) input is required, input “0000”.
The headset and computer are paired and connected with each other.
When the headset is stored in the charging case, the indicator (blue) on the charging case flashes slowly for about
5 seconds.
When you are wearing the headset, you will hear a notification sound from both headset units at the same time.
If they are not connected, see “Connecting to a paired computer (Mac)”.
If [LinkBuds S] does not appear on your computer screen, try again from the beginning of step
.
Select [LinkBuds S] of the [Bluetooth] screen and click [Connect].
2.
A Passkey may be called “Passcode”, “PIN code”, “PIN number”, or “Password”.
*
57
Page 58

Related Topic
Wearing the headset
How to make a wireless connection to Bluetooth devices
Connecting to a paired computer (Mac)
Listening to music from a device via Bluetooth connection
Disconnecting Bluetooth connection (after use)
Initializing the headset to restore factory settings
5-035-792-11(3)
Copyright 2022 Sony Corporation
58
Page 59
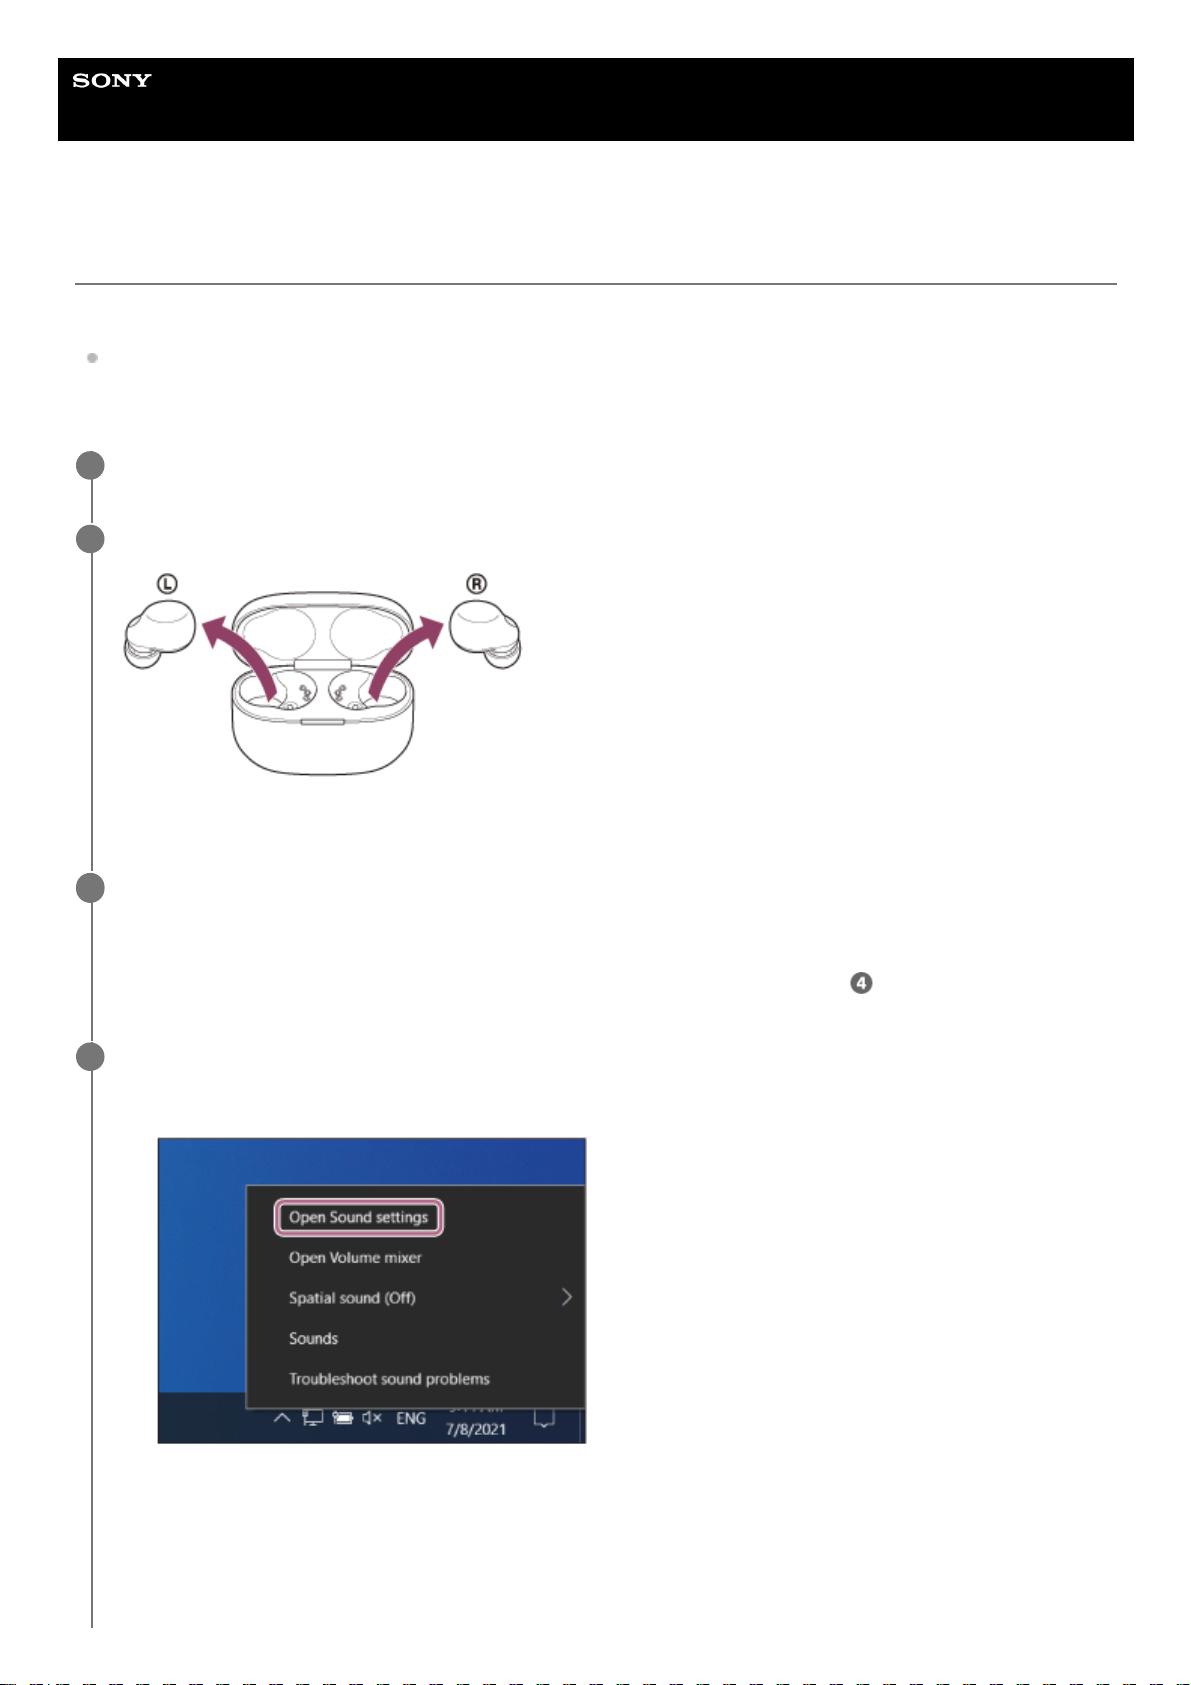
Help Guide
Wireless Noise Canceling Stereo Headset
LinkBuds S
Connecting to a paired computer (Windows 10)
Before starting the operation, make sure of the following:
Depending on the computer you are using, the built-in Bluetooth adaptor may need to be turned on. If you do not
know how to turn on the Bluetooth adaptor or are unsure if your computer has a built-in Bluetooth adaptor, refer to
the operating instructions supplied with the computer.
Wake the computer up if the computer is in standby (sleep) or hibernation mode.
1
Remove the headset from the charging case.
The headset turns on automatically.
2
Put the headset units into both ears.
When the headset has automatically connected to the last connected device, you will hear a notification sound from
both headset units (or from the headset unit you are wearing) at the same time.
Check the connection status on the computer. If it is not connected, proceed to step
.
3
Select the headset using the computer.
4
Right-click the speaker icon on the toolbar, then select [Open Sound settings].
1.
From the [Choose your output device] drop-down menu, select [Headphones (LinkBuds S Stereo)].
2.
59
Page 60
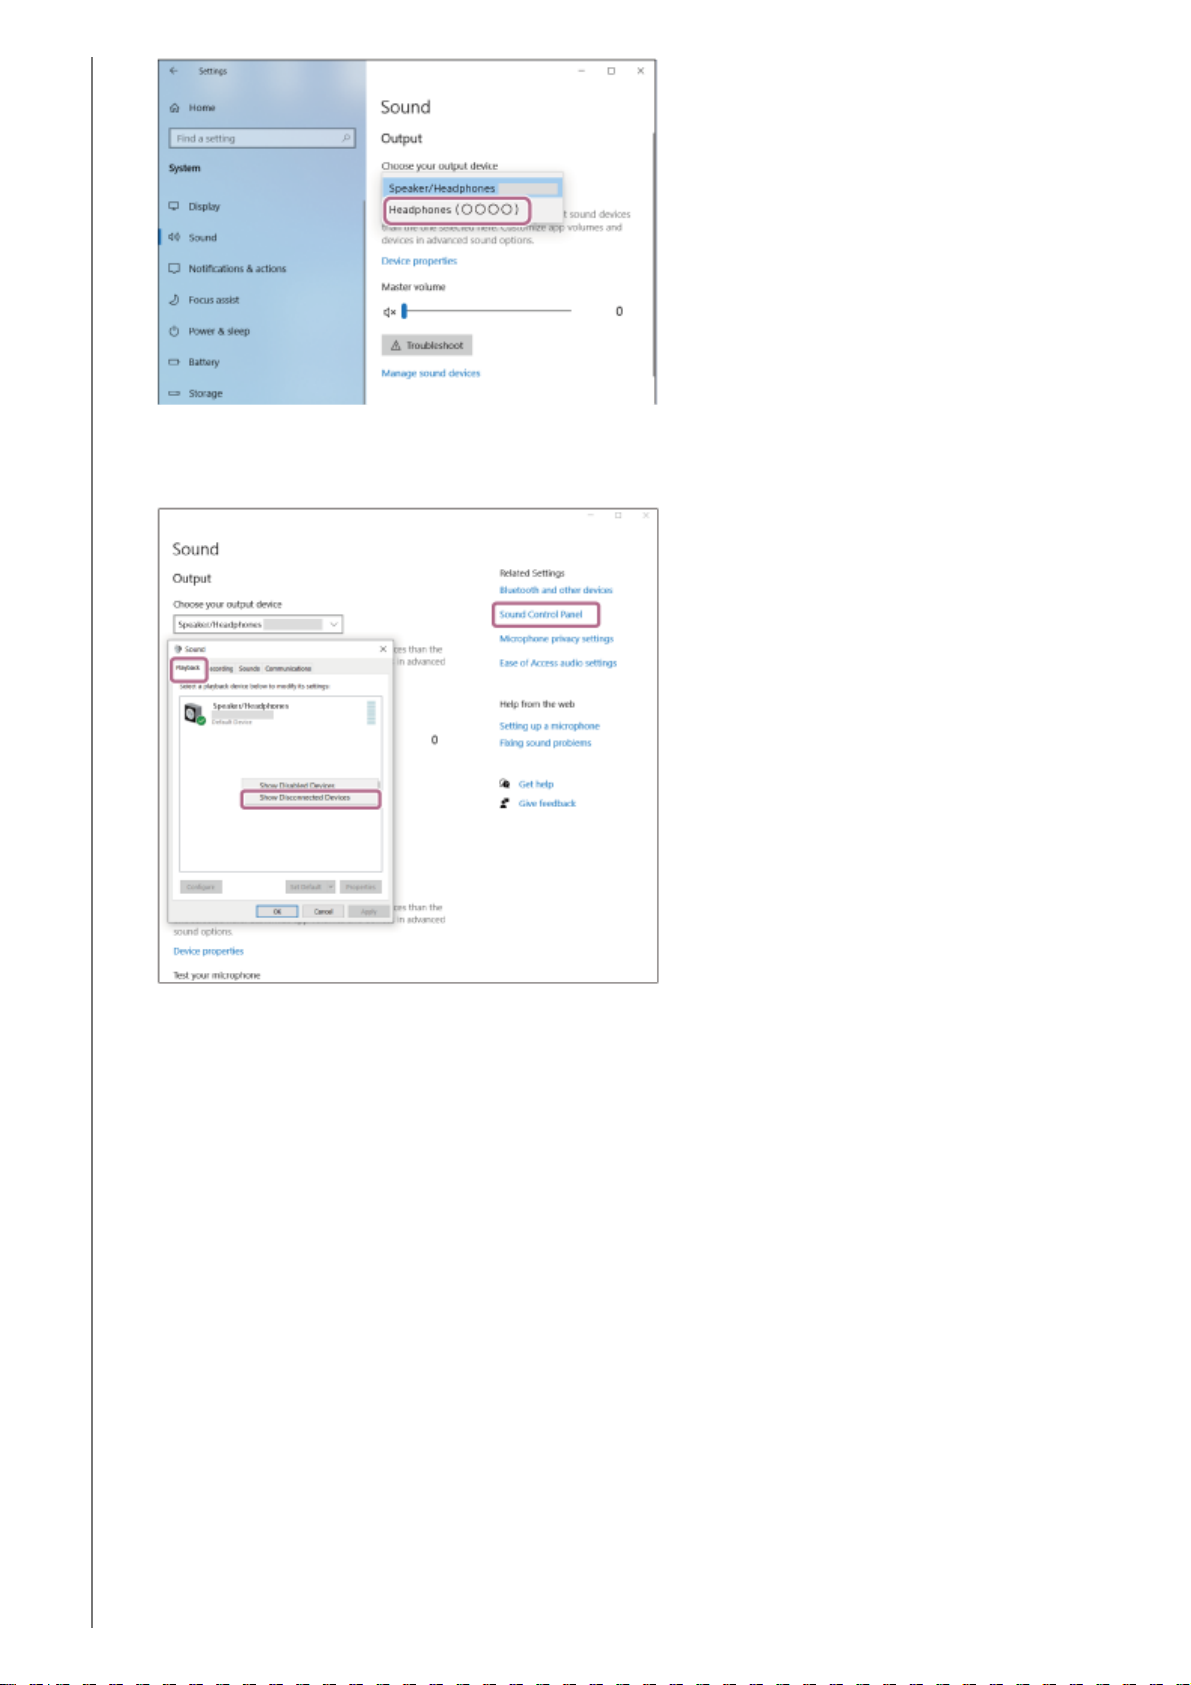
If [Headphones (LinkBuds S Stereo)] is not displayed on the drop-down menu, click [Sound Control Panel] and
then right-click on the [Playback] tab screen of [Sound] to check [Show Disconnected Devices].
Select [Connect] from the displayed menu.
3.
60
Page 61
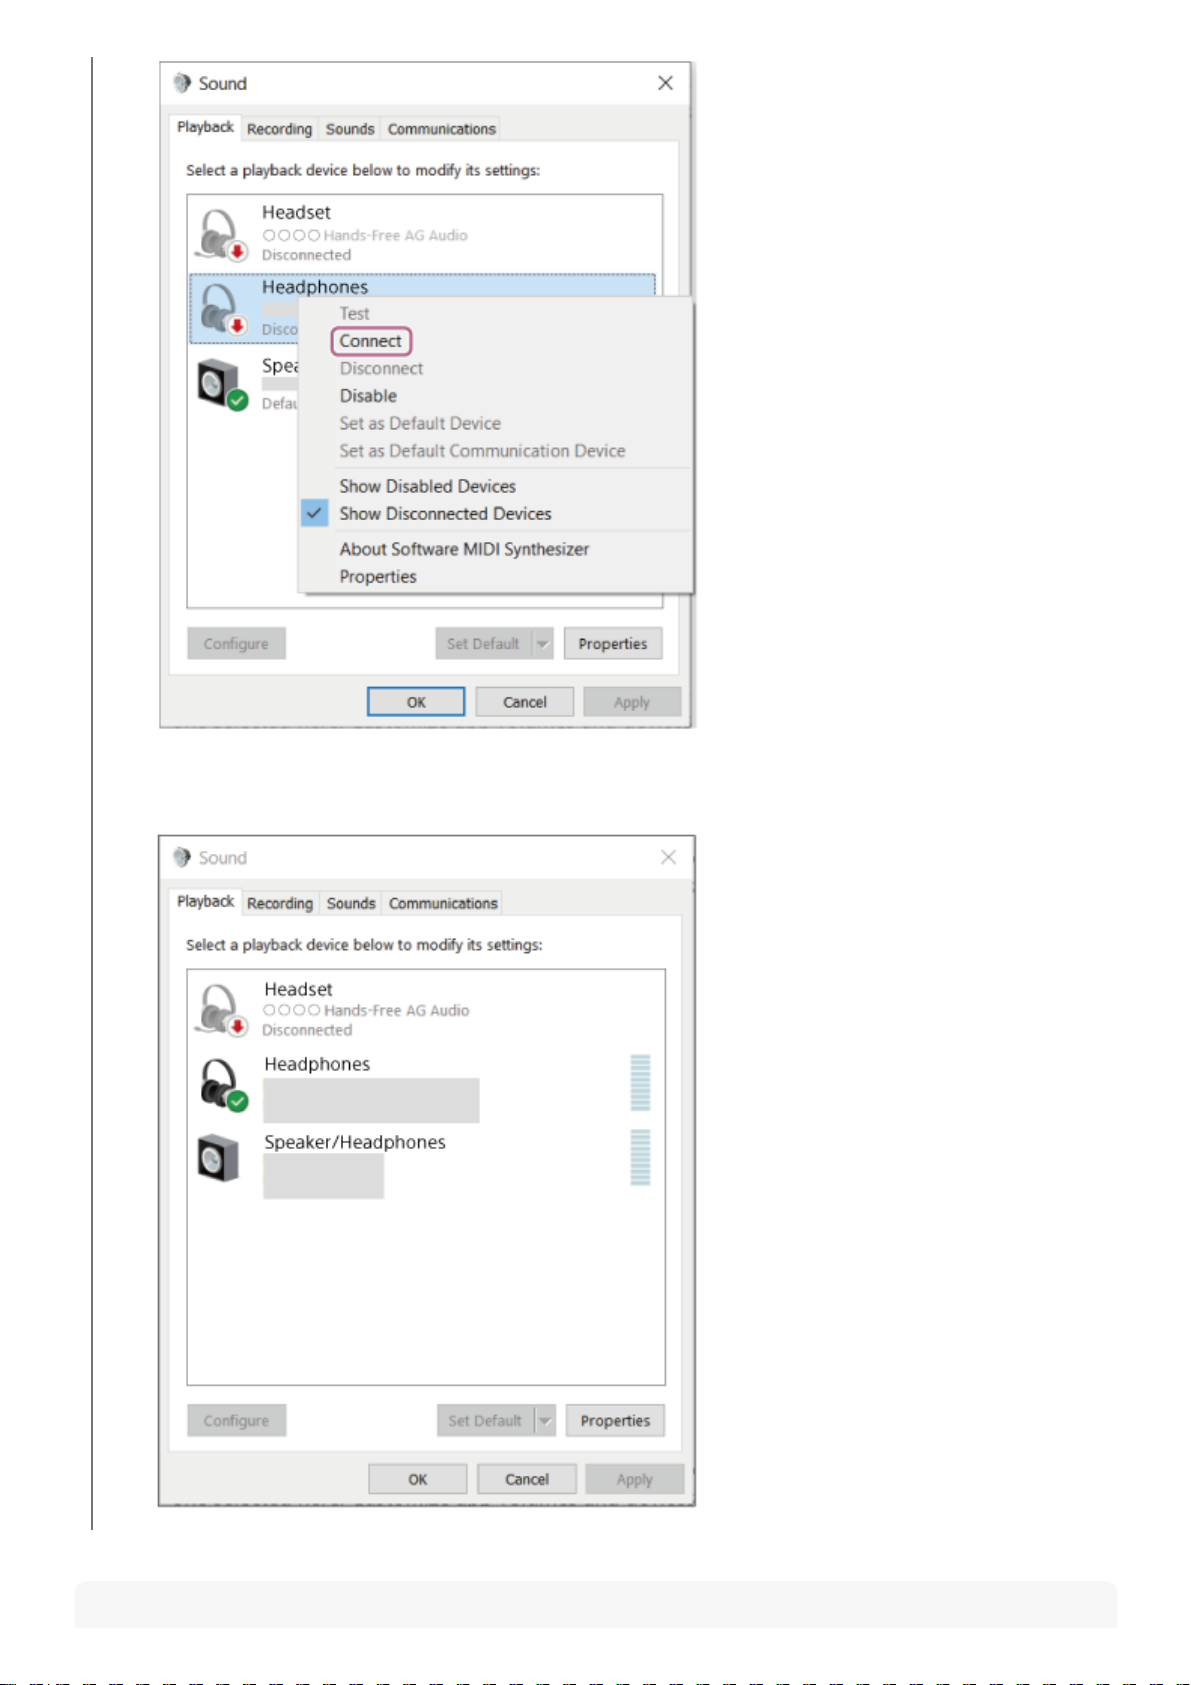
Hint
The connection is established. You will hear a notification sound from both headset units (or from the headset
unit you are wearing) at the same time.
61
Page 62

The operation above is an example. For more details, refer to the operating instructions supplied with the computer.
Note
If the music playback sound quality is poor, check that the A2DP function which supports music playback connections is enabled
in the computer settings. For more details, refer to the operating instructions supplied with the computer.
If the last-connected Bluetooth device is placed near the headset, the headset may connect automatically to the device by simply
turning on the headset. If this is the case, deactivate the Bluetooth function on the last-connected device or turn off the power.
If you cannot connect your computer to the headset, delete the headset pairing information on your computer and perform the
pairing again. As for the operations on your computer, refer to the operating instructions supplied with the computer.
Related Topic
Wearing the headset
Using only one unit of the headset
How to make a wireless connection to Bluetooth devices
Pairing and connecting with a computer (Windows® 10)
Listening to music from a device via Bluetooth connection
Disconnecting Bluetooth connection (after use)
5-035-792-11(3)
Copyright 2022 Sony Corporation
62
Page 63
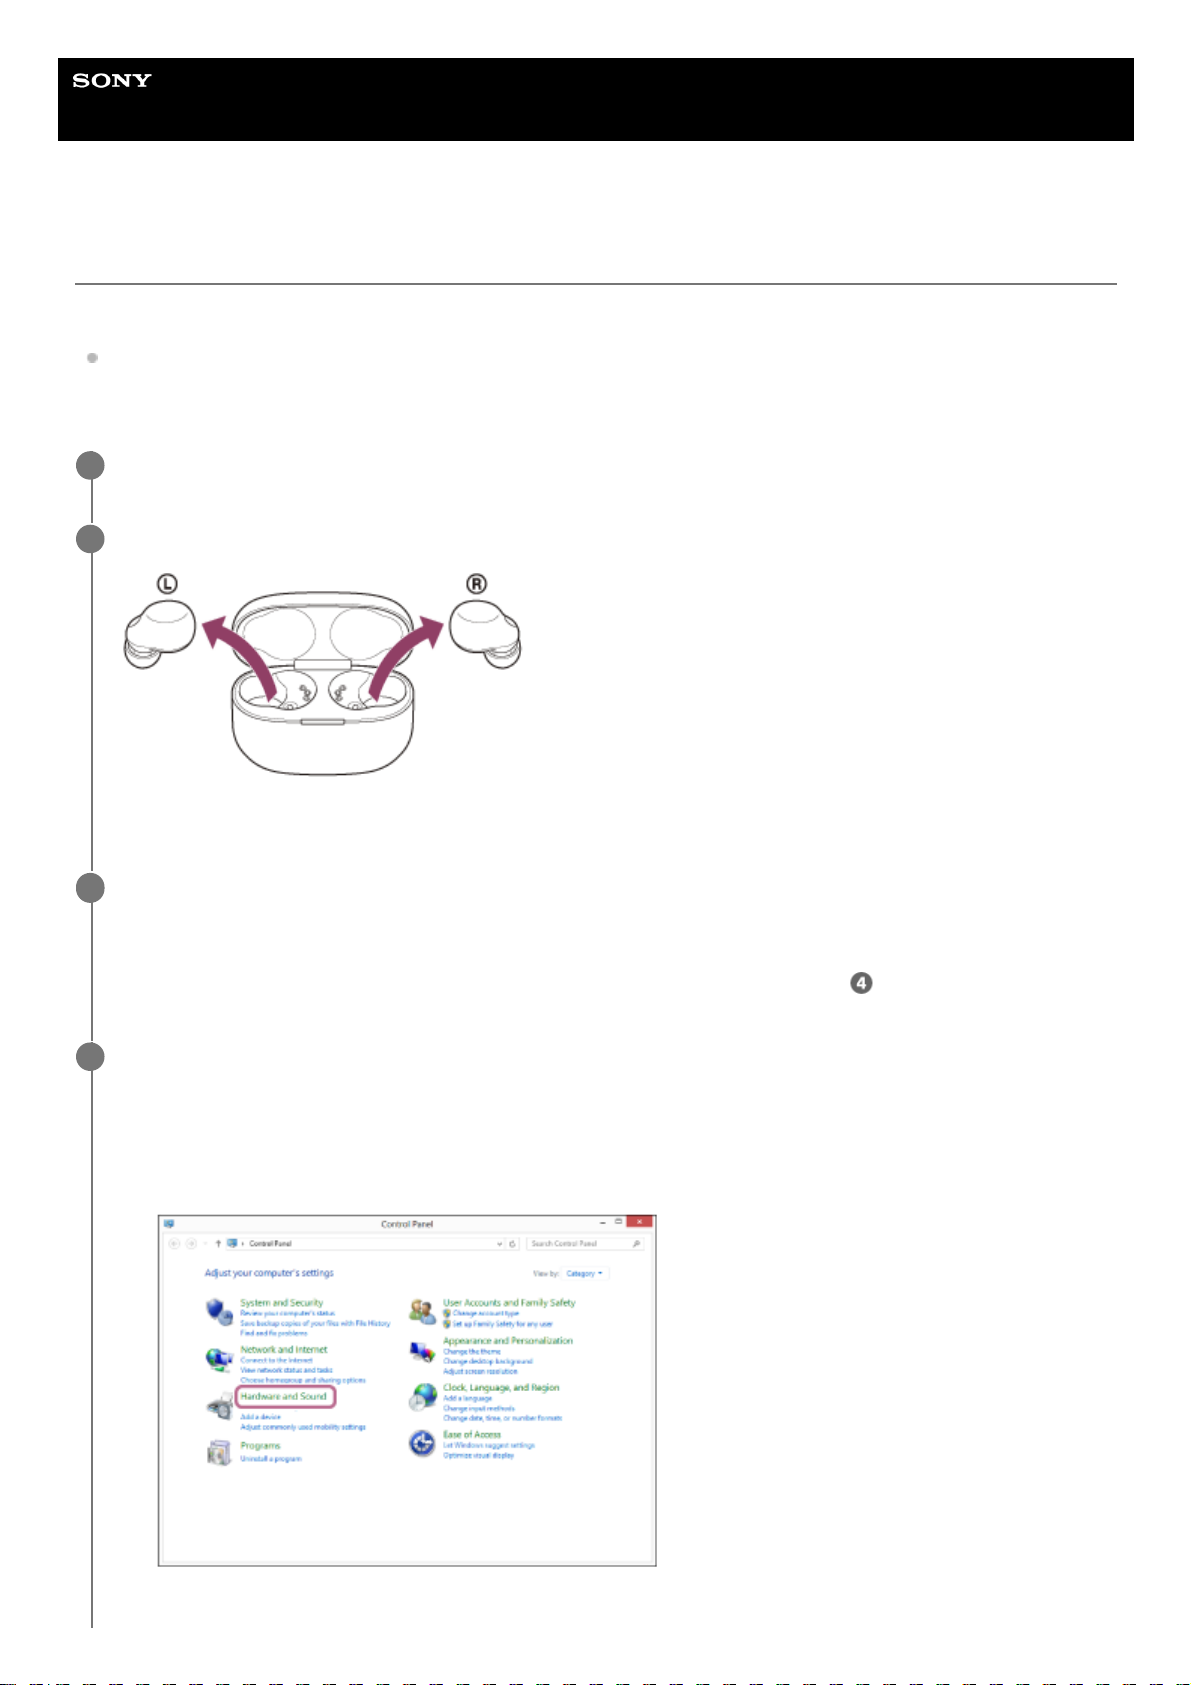
Help Guide
Wireless Noise Canceling Stereo Headset
LinkBuds S
Connecting to a paired computer (Windows 8.1)
Before starting the operation, make sure of the following:
Depending on the computer you are using, the built-in Bluetooth adaptor may need to be turned on. If you do not
know how to turn on the Bluetooth adaptor or are unsure if your computer has a built-in Bluetooth adaptor, refer to
the operating instructions supplied with the computer.
Wake the computer up if the computer is in standby (sleep) or hibernation mode.
1
Remove the headset from the charging case.
The headset turns on automatically.
2
Put the headset units into both ears.
When the headset has automatically connected to the last connected device, you will hear a notification sound from
both headset units (or from the headset unit you are wearing) at the same time.
Check the connection status on the computer. If it is not connected, proceed to step
.
3
Select the headset using the computer.
4
Select [Desktop] on the Start screen.
1.
Right-click the [Start] button, then select [Control Panel] from the pop-up menu.
2.
Select [Hardware and Sound] - [Sound].
3.
63
Page 64
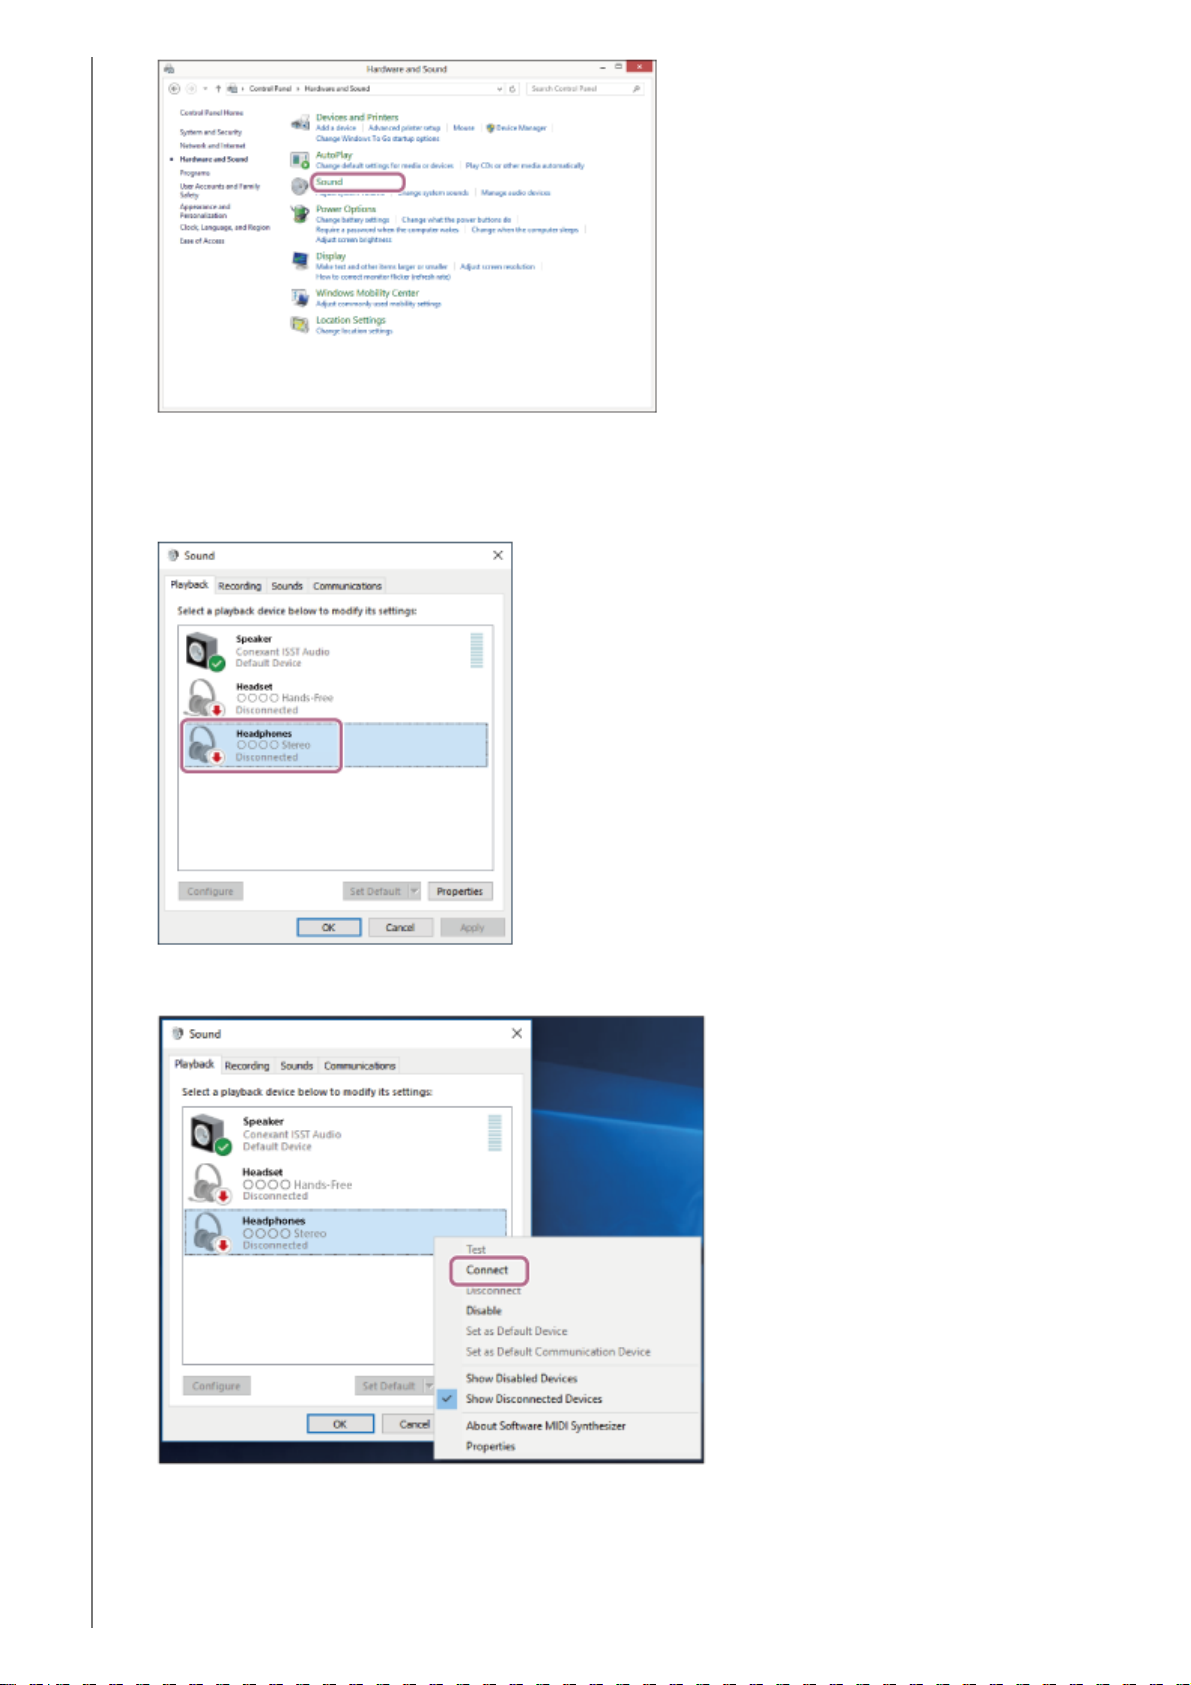
Right-click [LinkBuds S].
If [LinkBuds S] is not displayed on the [Sound] screen, right-click on the [Sound] screen, then check [Show
Disconnected Devices].
4.
Select [Connect] from the displayed menu.
The connection is established. You will hear a notification sound from both headset units (or from the headset
unit you are wearing) at the same time.
5.
64
Page 65
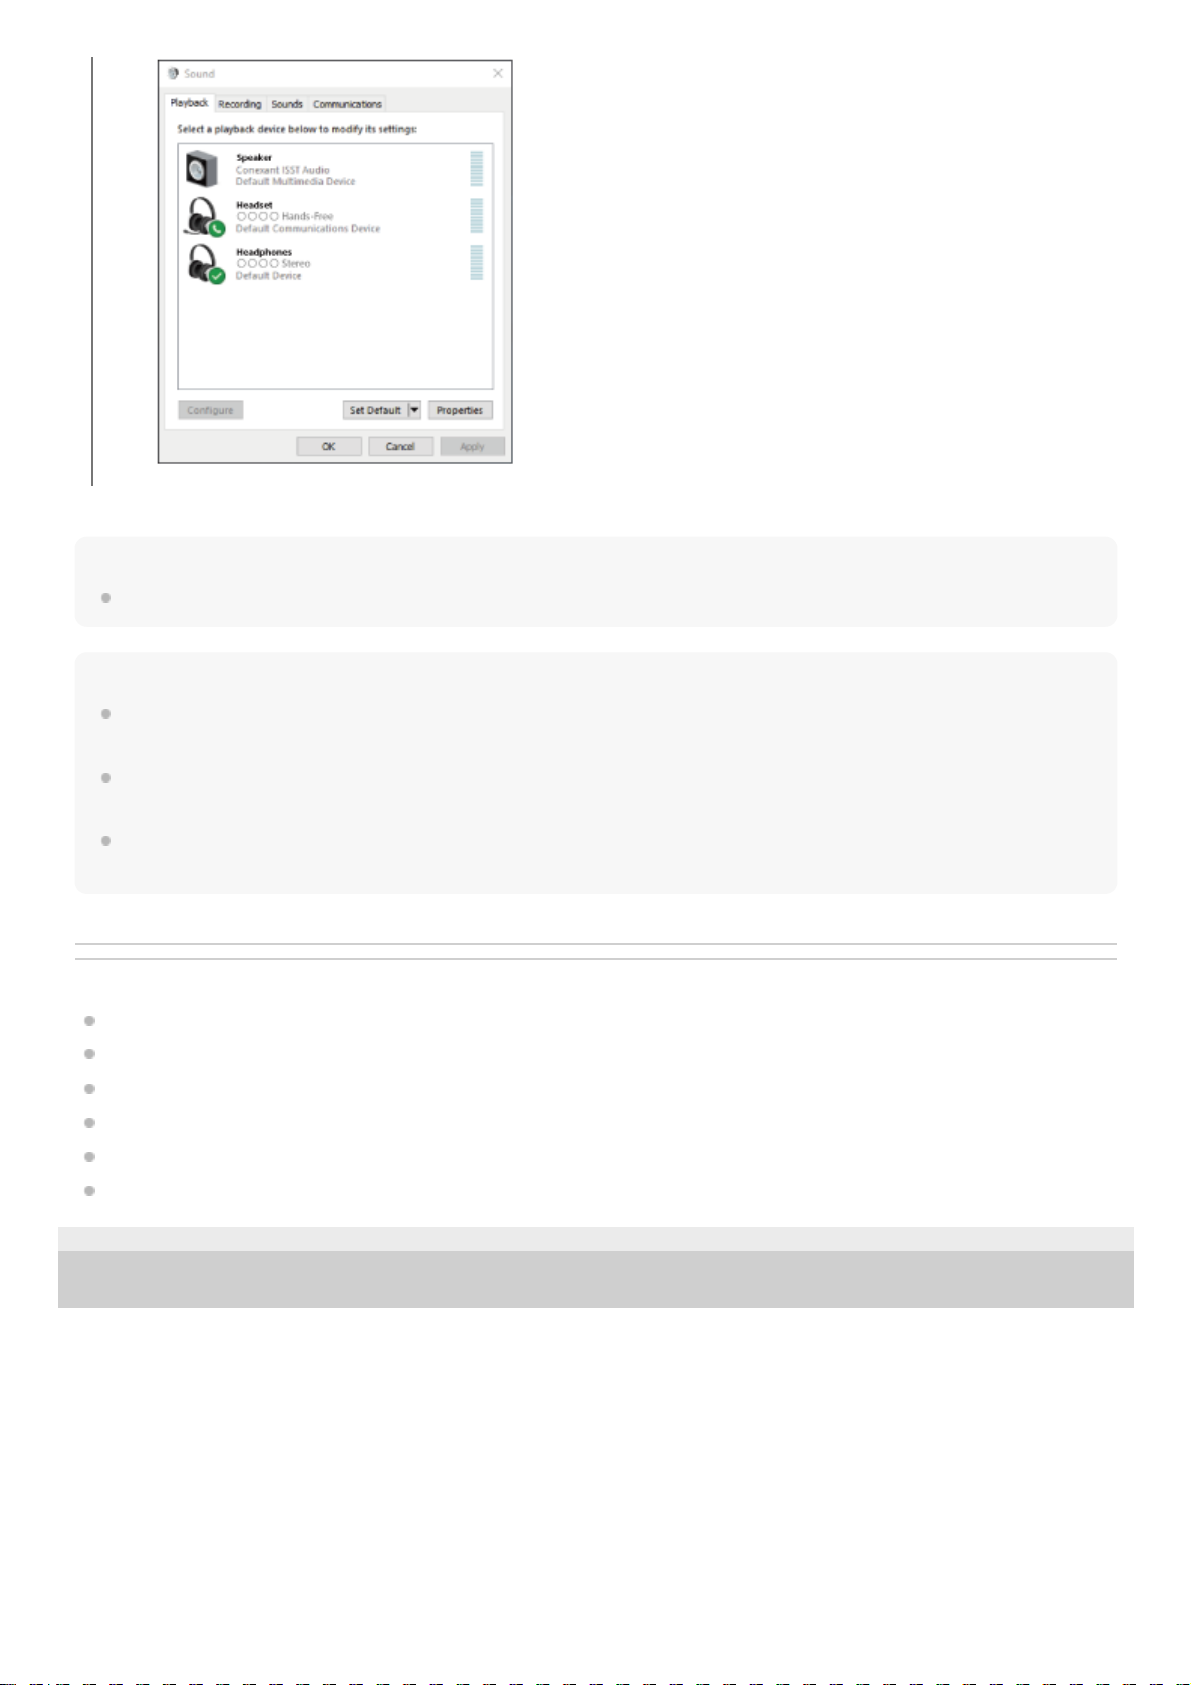
Hint
The operation above is an example. For more details, refer to the operating instructions supplied with the computer.
Note
If the music playback sound quality is poor, check that the A2DP function which supports music playback connections is enabled
in the computer settings. For more details, refer to the operating instructions supplied with the computer.
If the last-connected Bluetooth device is placed near the headset, the headset may connect automatically to the device by simply
turning on the headset. If this is the case, deactivate the Bluetooth function on the last-connected device or turn off the power.
If you cannot connect your computer to the headset, delete the headset pairing information on your computer and perform the
pairing again. As for the operations on your computer, refer to the operating instructions supplied with the computer.
Related Topic
Wearing the headset
Using only one unit of the headset
How to make a wireless connection to Bluetooth devices
Pairing and connecting with a computer (Windows 8.1)
Listening to music from a device via Bluetooth connection
Disconnecting Bluetooth connection (after use)
5-035-792-11(3)
Copyright 2022 Sony Corporation
65
Page 66
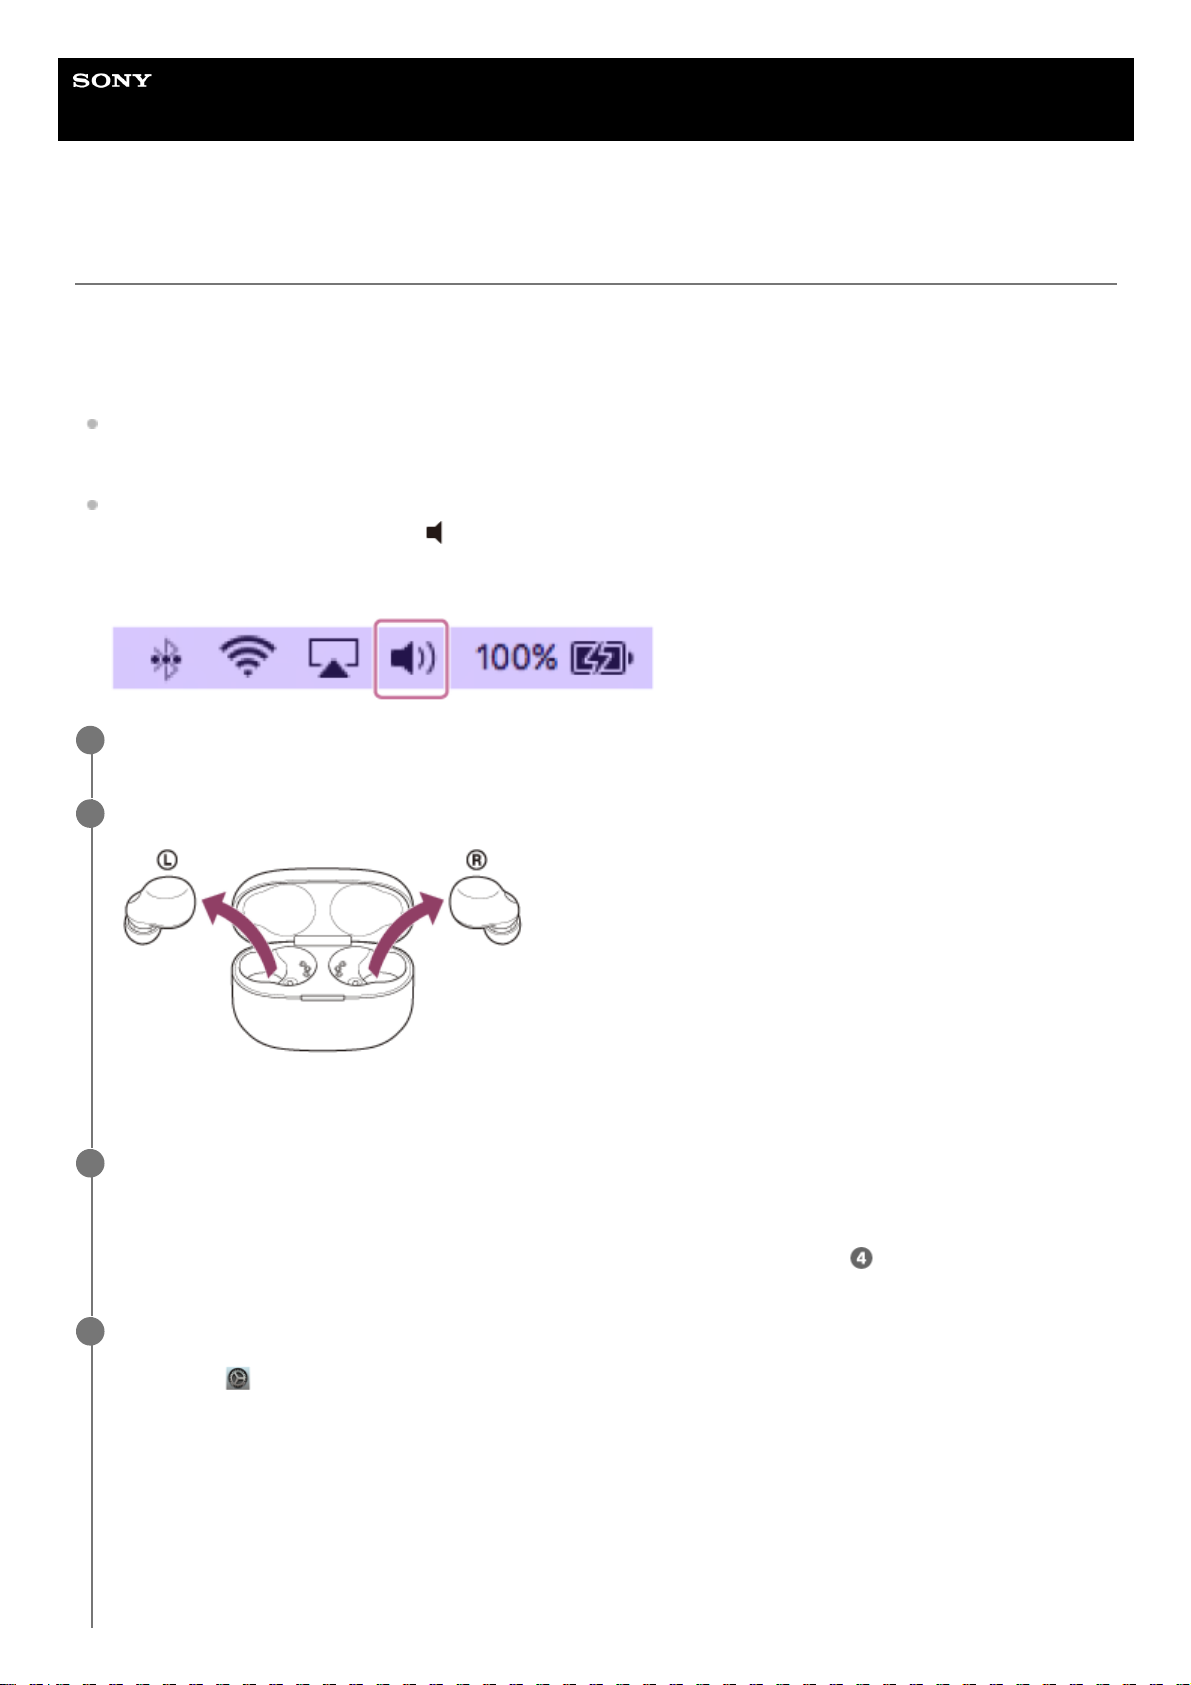
Help Guide
Wireless Noise Canceling Stereo Headset
LinkBuds S
Connecting to a paired computer (Mac)
Compatible OS
macOS (version 10.15 or later)
Before starting the operation, make sure of the following:
Depending on the computer you are using, the built-in Bluetooth adaptor may need to be turned on. If you do not
know how to turn on the Bluetooth adaptor or are unsure if your computer has a built-in Bluetooth adaptor, refer to
the operating instructions supplied with the computer.
Set the computer speaker to the ON mode.
If the computer speaker is set to the “OFF” mode, no sound is heard from the headset.
Computer speaker in the ON mode
Wake the computer up if the computer is in standby (sleep) or hibernation mode.
1
Remove the headset from the charging case.
The headset turns on automatically.
2
Put the headset units into both ears.
When the headset has automatically connected to the last connected device, you will hear a notification sound from
both headset units (or from the headset unit you are wearing) at the same time.
Check the connection status on the computer. If it is not connected, proceed to step
.
3
Select the headset using the computer.
4
Select [
(System Preferences)] - [Bluetooth] from the Dock at the bottom of the screen.
1.
66
Page 67
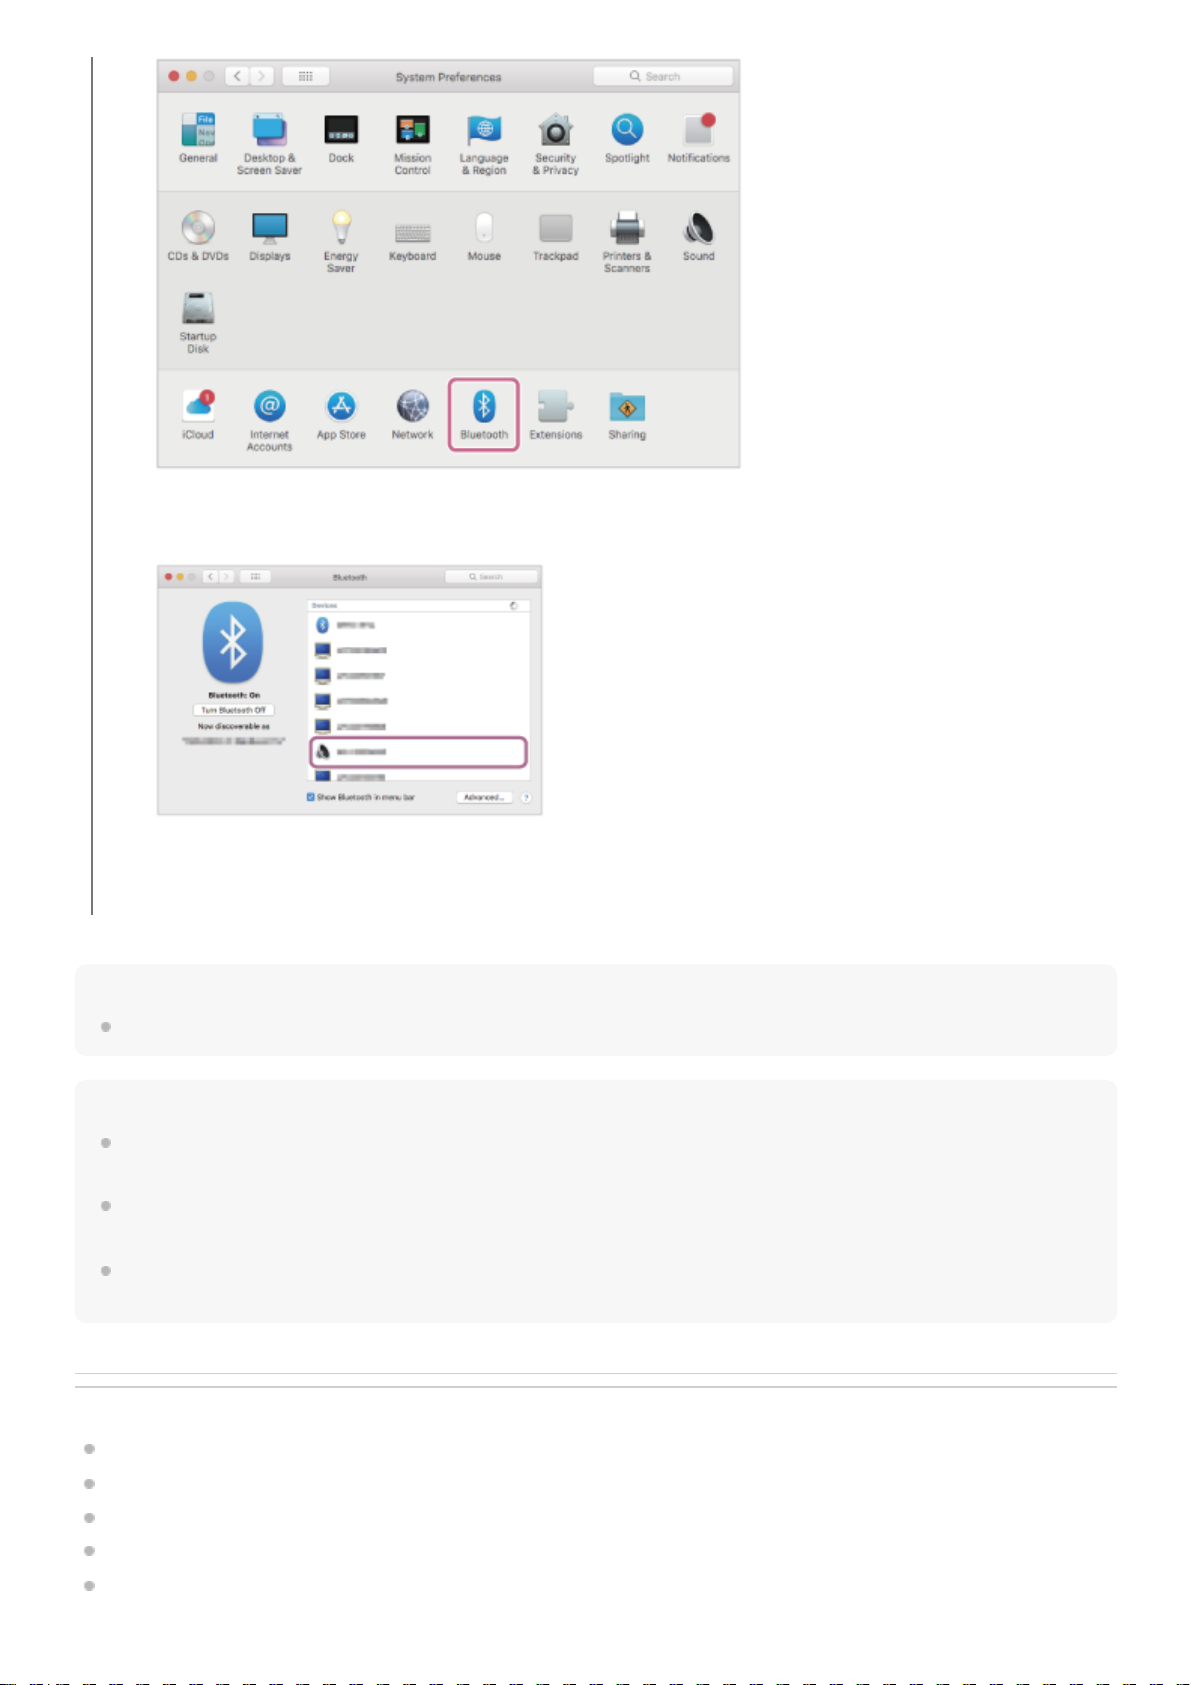
Hint
The operation above is an example. For more details, refer to the operating instructions supplied with the computer.
Note
If the music playback sound quality is poor, check that the A2DP function which supports music playback connections is enabled
in the computer settings. For more details, refer to the operating instructions supplied with the computer.
If the last-connected Bluetooth device is placed near the headset, the headset may connect automatically to the device by simply
turning on the headset. If this is the case, deactivate the Bluetooth function on the last-connected device or turn off the power.
If you cannot connect your computer to the headset, delete the headset pairing information on your computer and perform the
pairing again. As for the operations on your computer, refer to the operating instructions supplied with the computer.
Related Topic
Wearing the headset
Using only one unit of the headset
How to make a wireless connection to Bluetooth devices
Pairing and connecting with a computer (Mac)
Listening to music from a device via Bluetooth connection
Click [LinkBuds S] on the [Bluetooth] screen while pressing the computer Control button and select [Connect]
from the pop up menu.
The connection is established. You will hear a notification sound from both headset units (or from the headset
unit you are wearing) at the same time.
2.
67
Page 68

Disconnecting Bluetooth connection (after use)
5-035-792-11(3)
Copyright 2022 Sony Corporation
68
Page 69
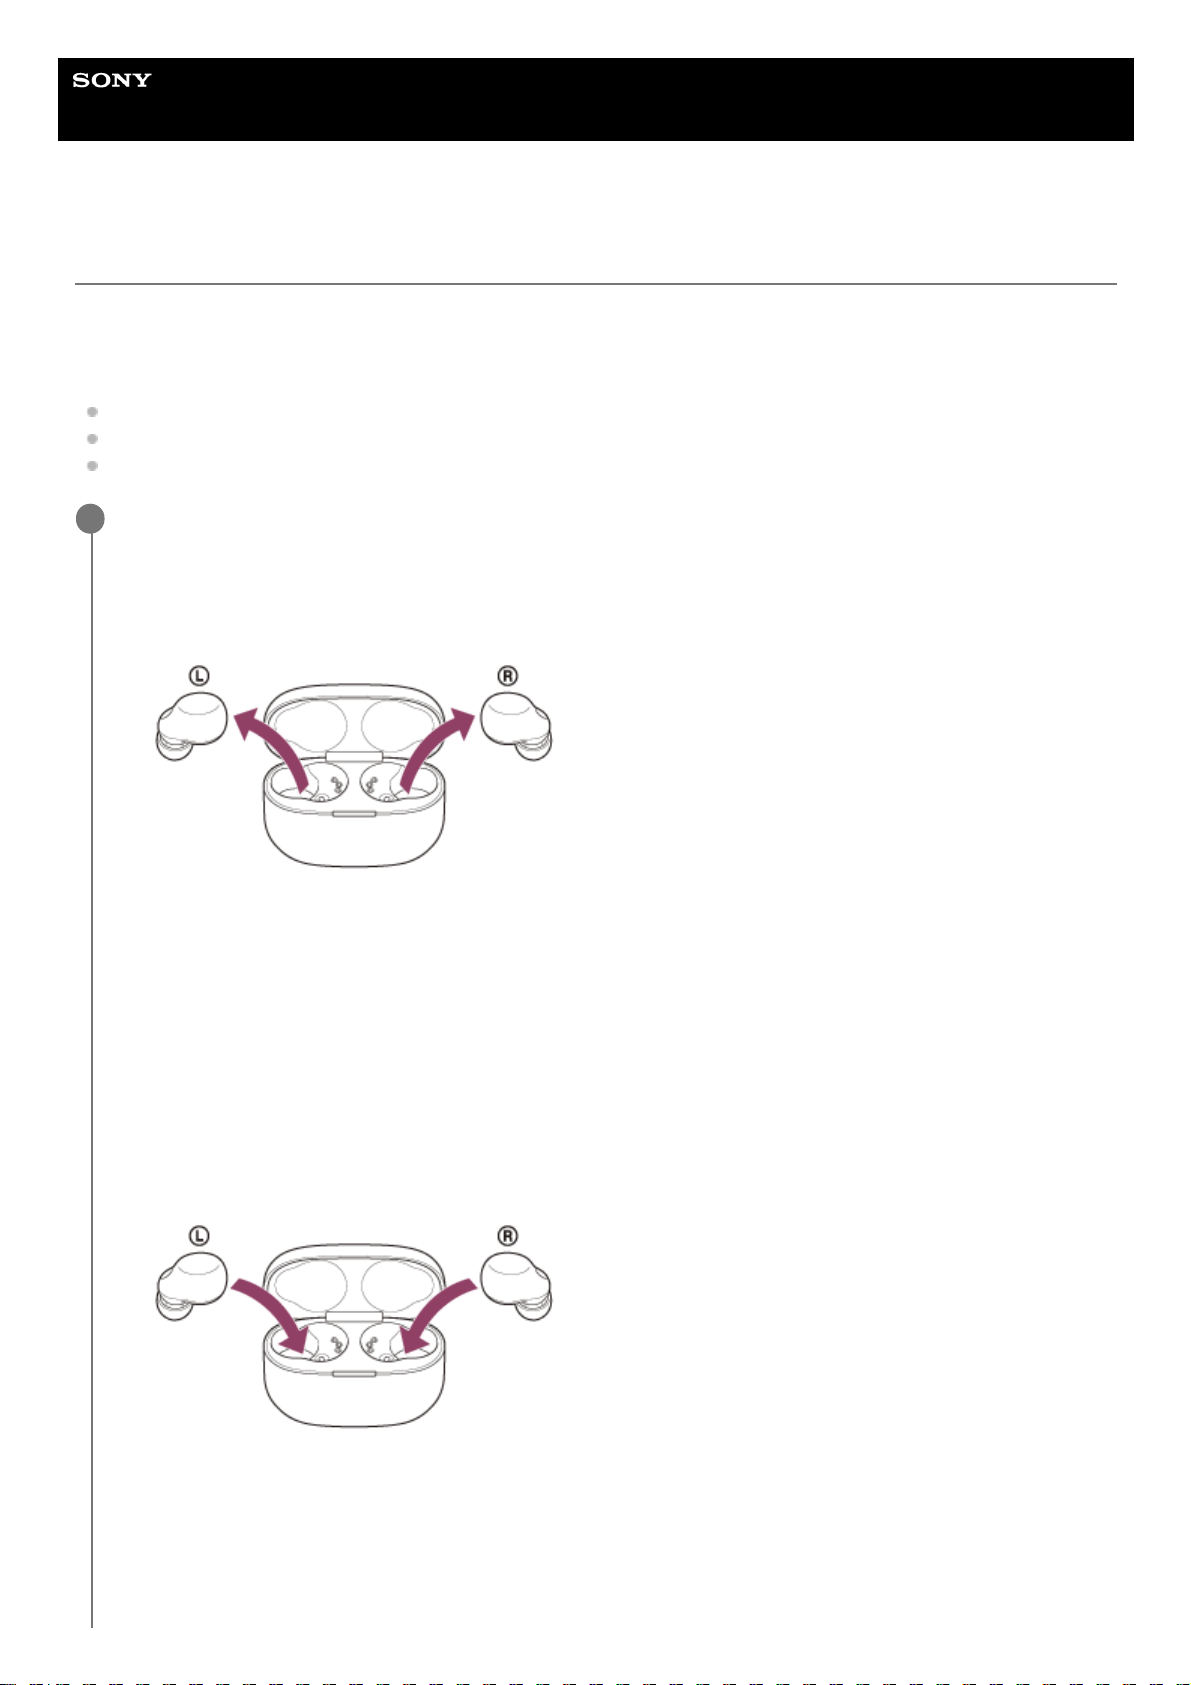
Help Guide
Wireless Noise Canceling Stereo Headset
LinkBuds S
Pairing and connecting with a Bluetooth device
The operation to register the device that you wish to connect to is called “pairing”. First, pair a device to use it with the
headset for the first time.
Before starting the operation, make sure of the following:
The Bluetooth device is placed within 1 m (3 feet) of the headset.
The headset is charged sufficiently.
The operating instructions of the Bluetooth device is in hand.
Enter pairing mode on this headset.
When you pair the headset with a device for the first time after purchase or after initializing the
headset (if the headset has no pairing information)
When you pair a second or subsequent device (the headset has pairing information for other
devices)
1
Remove both units of the headset from the charging case.
The headset turns on automatically.
The headset enters pairing mode automatically when you put the headset units into both ears.
You will hear a notification sound and the voice guidance say “Pairing”, from both headset units at the same
time.
1.
Set the headset into the charging case.
Leave the lid of the charging case open.
1.
With the lid of the charging case open, press and hold the pairing button on the back of the charging case for
about 5 seconds or more.
Note: The headset does not enter pairing mode with the lid of the charging case closed.
2.
69
Page 70
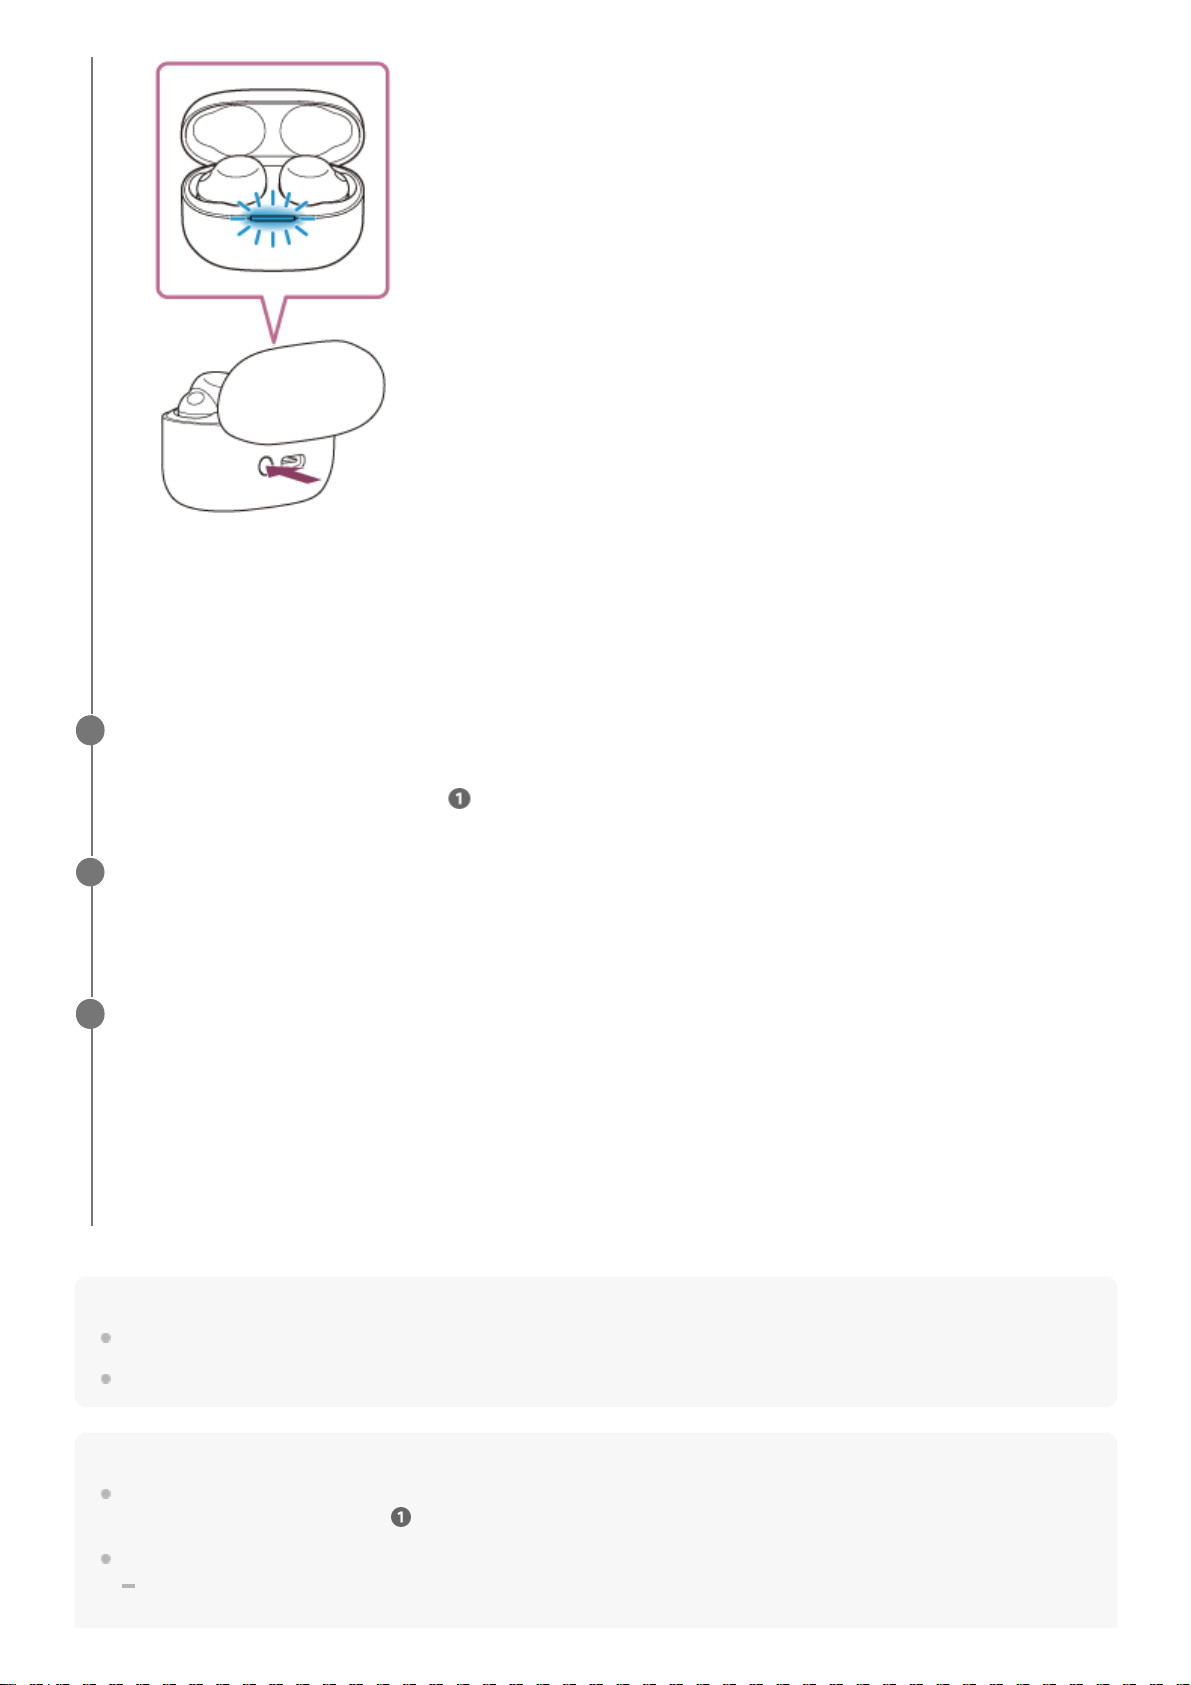
Hint
The operation above is an example. For more details, refer to the operating instructions supplied with the Bluetooth device.
To delete all Bluetooth pairing information, see “Initializing the headset to restore factory settings”.
Note
If pairing is not established within 5 minutes, pairing mode is canceled. In this case, set the headset into the charging case, and
start the operation again from step
.
Once Bluetooth devices are paired, there is no need to pair them again, except in the following cases:
Pairing information has been deleted after repair, etc.
The indicator (blue) on the charging case repeatedly flashes slowly twice in a row and the headset goes into
pairing mode.
You can remove the headset from the charging case after entering pairing mode. When you put the headset
units into both ears, you will hear a notification sound and the voice guidance say “Pairing”, from both headset
units at the same time.
Perform the pairing procedure on the Bluetooth device to search for this headset.
[LinkBuds S] will be displayed on the list of detected devices on the screen of the Bluetooth device.
If it is not displayed, repeat from step
.
2
Select [LinkBuds S] displayed on the screen of the Bluetooth device for pairing.
If Passkey (*) input is required, input “0000”.
3
A Passkey may be called “Passcode”, “PIN code”, “PIN number”, or “Password”.
*
Make the Bluetooth connection from the Bluetooth device.
The headset and Bluetooth device are connected to each other.
Some devices automatically connect with the headset when pairing is complete.
When the headset is stored in the charging case, the indicator (blue) on the charging case flashes slowly for about
5 seconds.
When you are wearing the headset, you will hear a notification sound from both headset units at the same time.
If they are not connected, see “Connecting to a paired Bluetooth device”.
4
70
Page 71

When a 9th device is paired.
The headset can be paired with up to 8 devices. If a new device is paired after 8 devices are already paired, the registration
information of the paired device with the oldest connection date is overwritten with the information for the new device.
When the pairing information for the headset has been deleted from the Bluetooth device.
When the headset is initialized.
All of the pairing information is deleted. In this case, delete the pairing information for the headset from the connected device
and then pair them again.
The headset can be paired with multiple devices, but can only play music from 1 paired device at a time.
Related Topic
Wearing the headset
How to make a wireless connection to Bluetooth devices
Connecting to a paired Bluetooth device
Listening to music from a device via Bluetooth connection
Disconnecting Bluetooth connection (after use)
Initializing the headset to restore factory settings
5-035-792-11(3)
Copyright 2022 Sony Corporation
71
Page 72
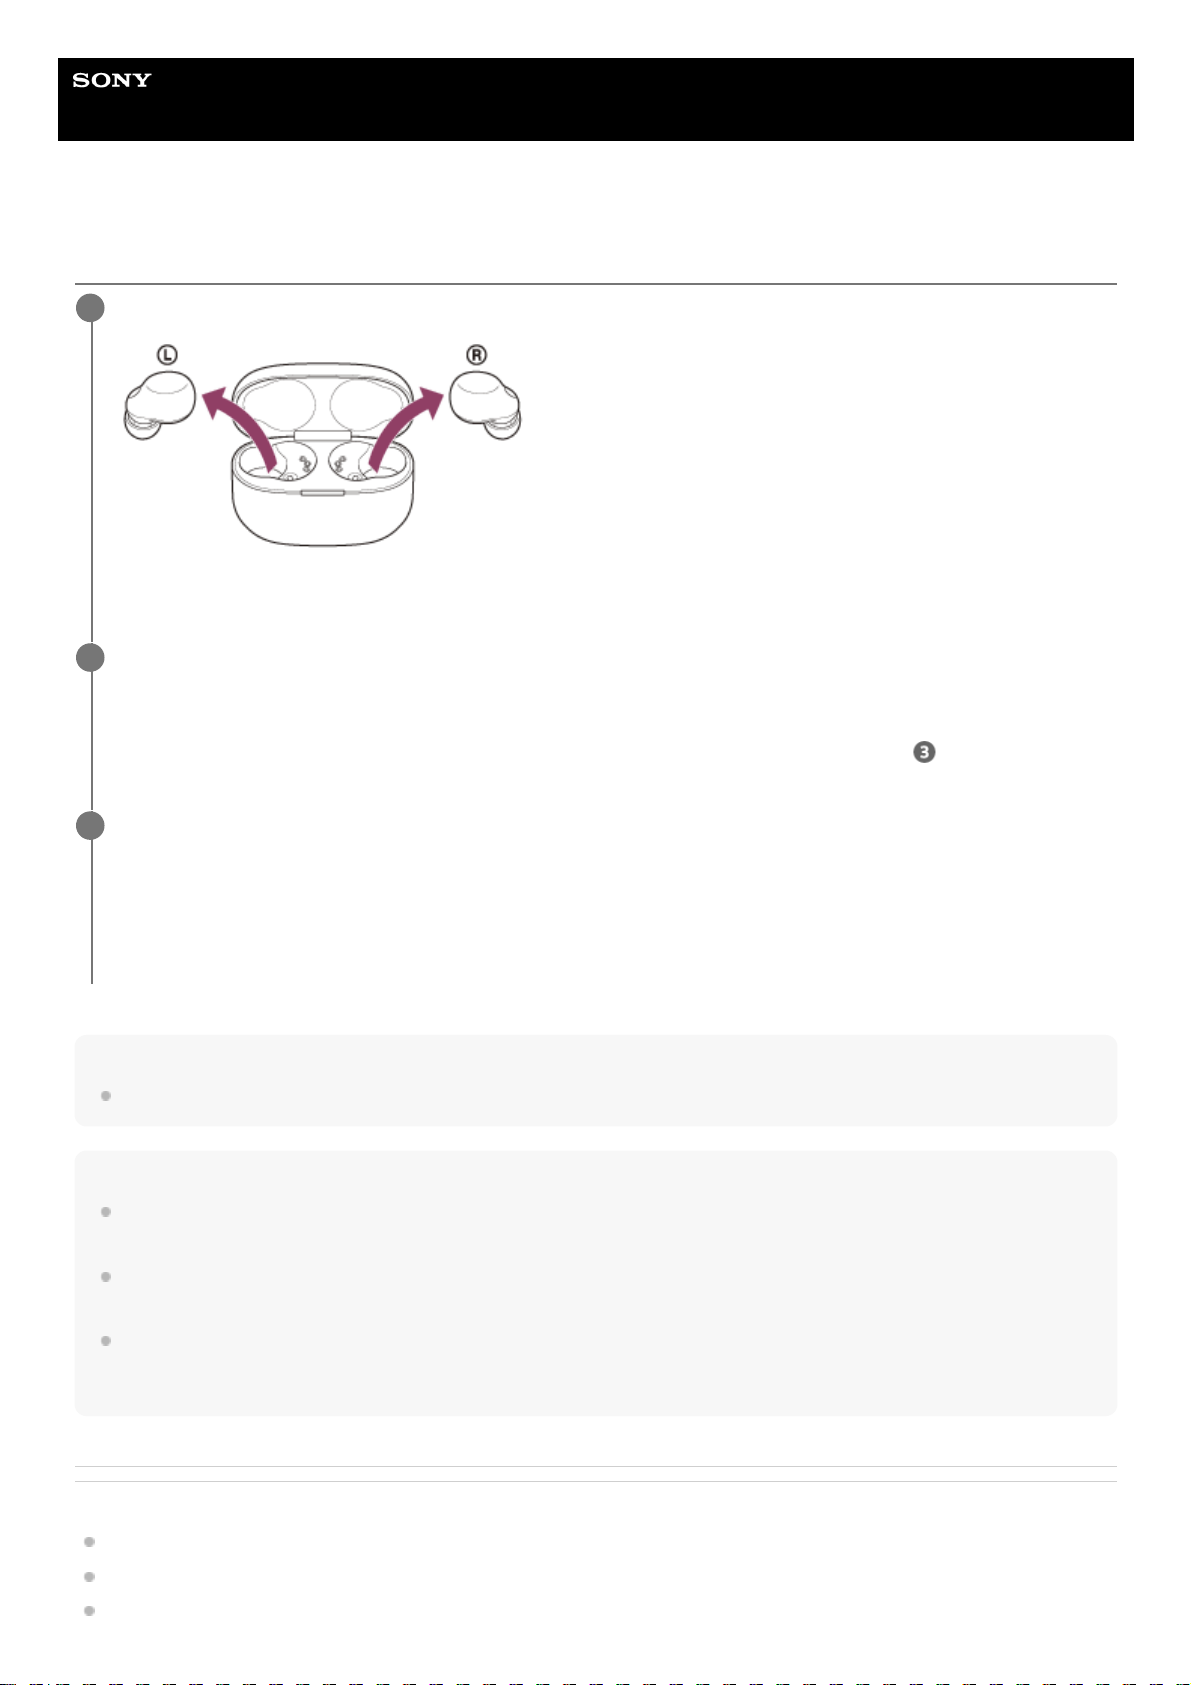
Help Guide
Wireless Noise Canceling Stereo Headset
LinkBuds S
Connecting to a paired Bluetooth device
Hint
The operation above is an example. For more details, refer to the operating instructions supplied with the Bluetooth device.
Note
When connecting, [LinkBuds S], [LE_LinkBuds S], or both may be displayed on the connecting device. When both or [LinkBuds
S] is displayed, select [LinkBuds S]; when [LE_LinkBuds S] is displayed, select [LE_LinkBuds S].
If the last-connected Bluetooth device is placed near the headset, the headset may connect automatically to the device by simply
turning on the headset. If this is the case, deactivate the Bluetooth function on the last-connected device or turn off the power.
If you cannot connect your Bluetooth device to the headset, delete the headset pairing information on your Bluetooth device and
perform the pairing again. As for the operations on your Bluetooth device, refer to the operating instructions supplied with the
Bluetooth device.
Related Topic
Wearing the headset
Using only one unit of the headset
How to make a wireless connection to Bluetooth devices
Remove the headset from the charging case.
The headset turns on automatically.
1
Put the headset units into both ears.
When the headset has automatically connected to the last connected device, you will hear a notification sound from
both headset units (or from the headset unit you are wearing) at the same time.
Check the connection status on the Bluetooth device. If it is not connected, proceed to step
.
2
Make the Bluetooth connection from the Bluetooth device.
As for the operations on your Bluetooth device, refer to the operating instructions supplied with the Bluetooth
device.
You will hear a notification sound from both headset units (or from the headset unit you are wearing) at the same
time.
3
72
Page 73

Pairing and connecting with a Bluetooth device
Listening to music from a device via Bluetooth connection
Disconnecting Bluetooth connection (after use)
5-035-792-11(3)
Copyright 2022 Sony Corporation
73
Page 74

Help Guide
Wireless Noise Canceling Stereo Headset
LinkBuds S
Switching audio between multiple devices with "audio switch"
The "audio switch" function is a Google feature that switches audio between Android devices.
Headsets that support "audio switch" can connect to multiple devices. When you use your headset on the devices with
"audio switch" on, the audio heard from your headset will seamlessly switch between devices. Your device notifies you
when the audio has switched.
Compatible smartphones
Android 8.0 or later
For details on “audio switch”, refer to the following URL.
https://support.google.com/android/?p=switch_audio
To use the "audio switch" function, you need to connect your headset and device via Google Fast Pair.
For details on Google Fast Pair, refer to the following URL.
https://support.google.com/android/answer/9417604
Note
The specifications of “audio switch” are subject to change without notice.
5-035-792-11(3)
Copyright 2022 Sony Corporation
74
Page 75
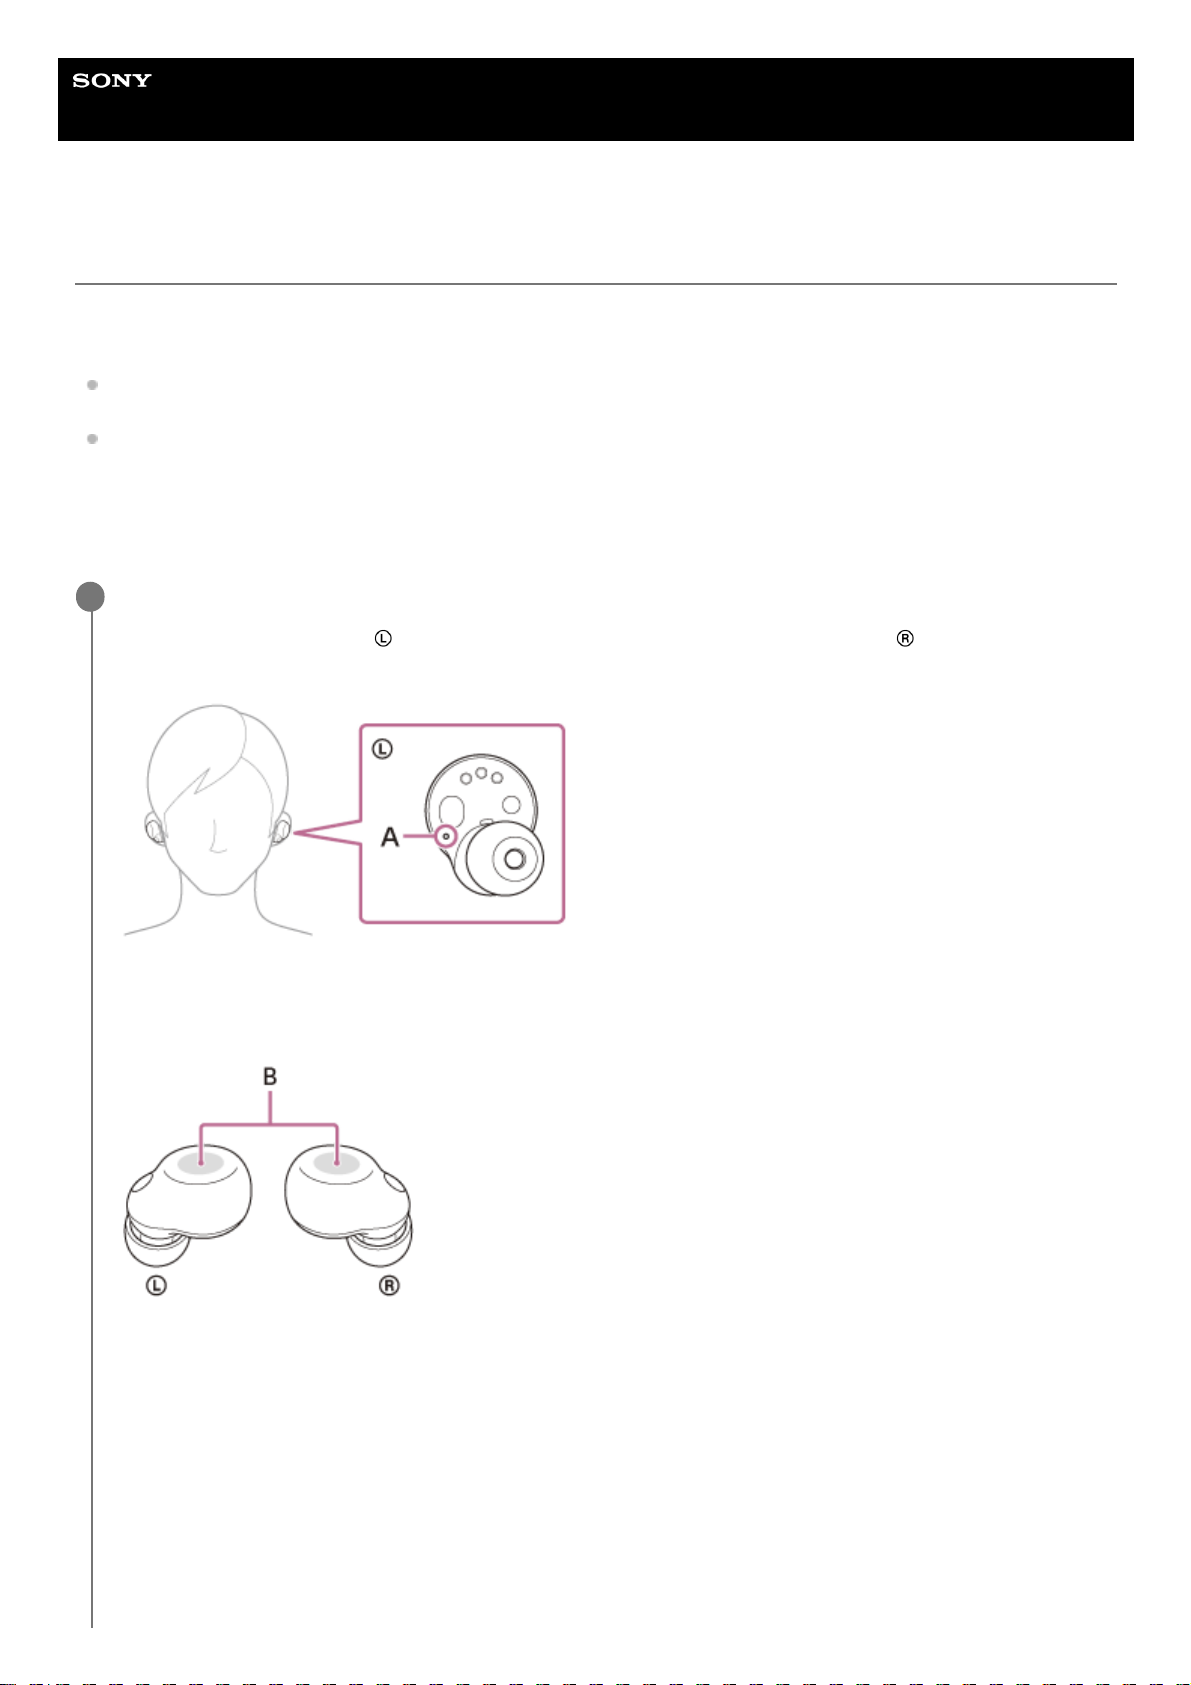
Help Guide
Wireless Noise Canceling Stereo Headset
LinkBuds S
Listening to music from a device via Bluetooth connection
If your Bluetooth device supports the following profiles, you can enjoy listening to music and control the device from your
headset via Bluetooth connection.
A2DP (Advanced Audio Distribution Profile)
You can enjoy high-quality music wirelessly.
AVRCP (Audio Video Remote Control Profile)
You can adjust the volume, etc.
The operation may vary depending on the Bluetooth device. Refer to the operating instructions supplied with the
Bluetooth device.
Put the headset units into both ears.
Put the headset unit with the
(left) mark into your left ear and the headset unit with the (right) mark into your
right ear. The left unit has a tactile dot.
A: Tactile dot
Be careful not to come in contact with the touch sensor when you put the headset units into both ears.
B: Touch sensors (left, right)
Twist the headset unit to slide the earbud tip deep into your ear canal.
1
75
Page 76
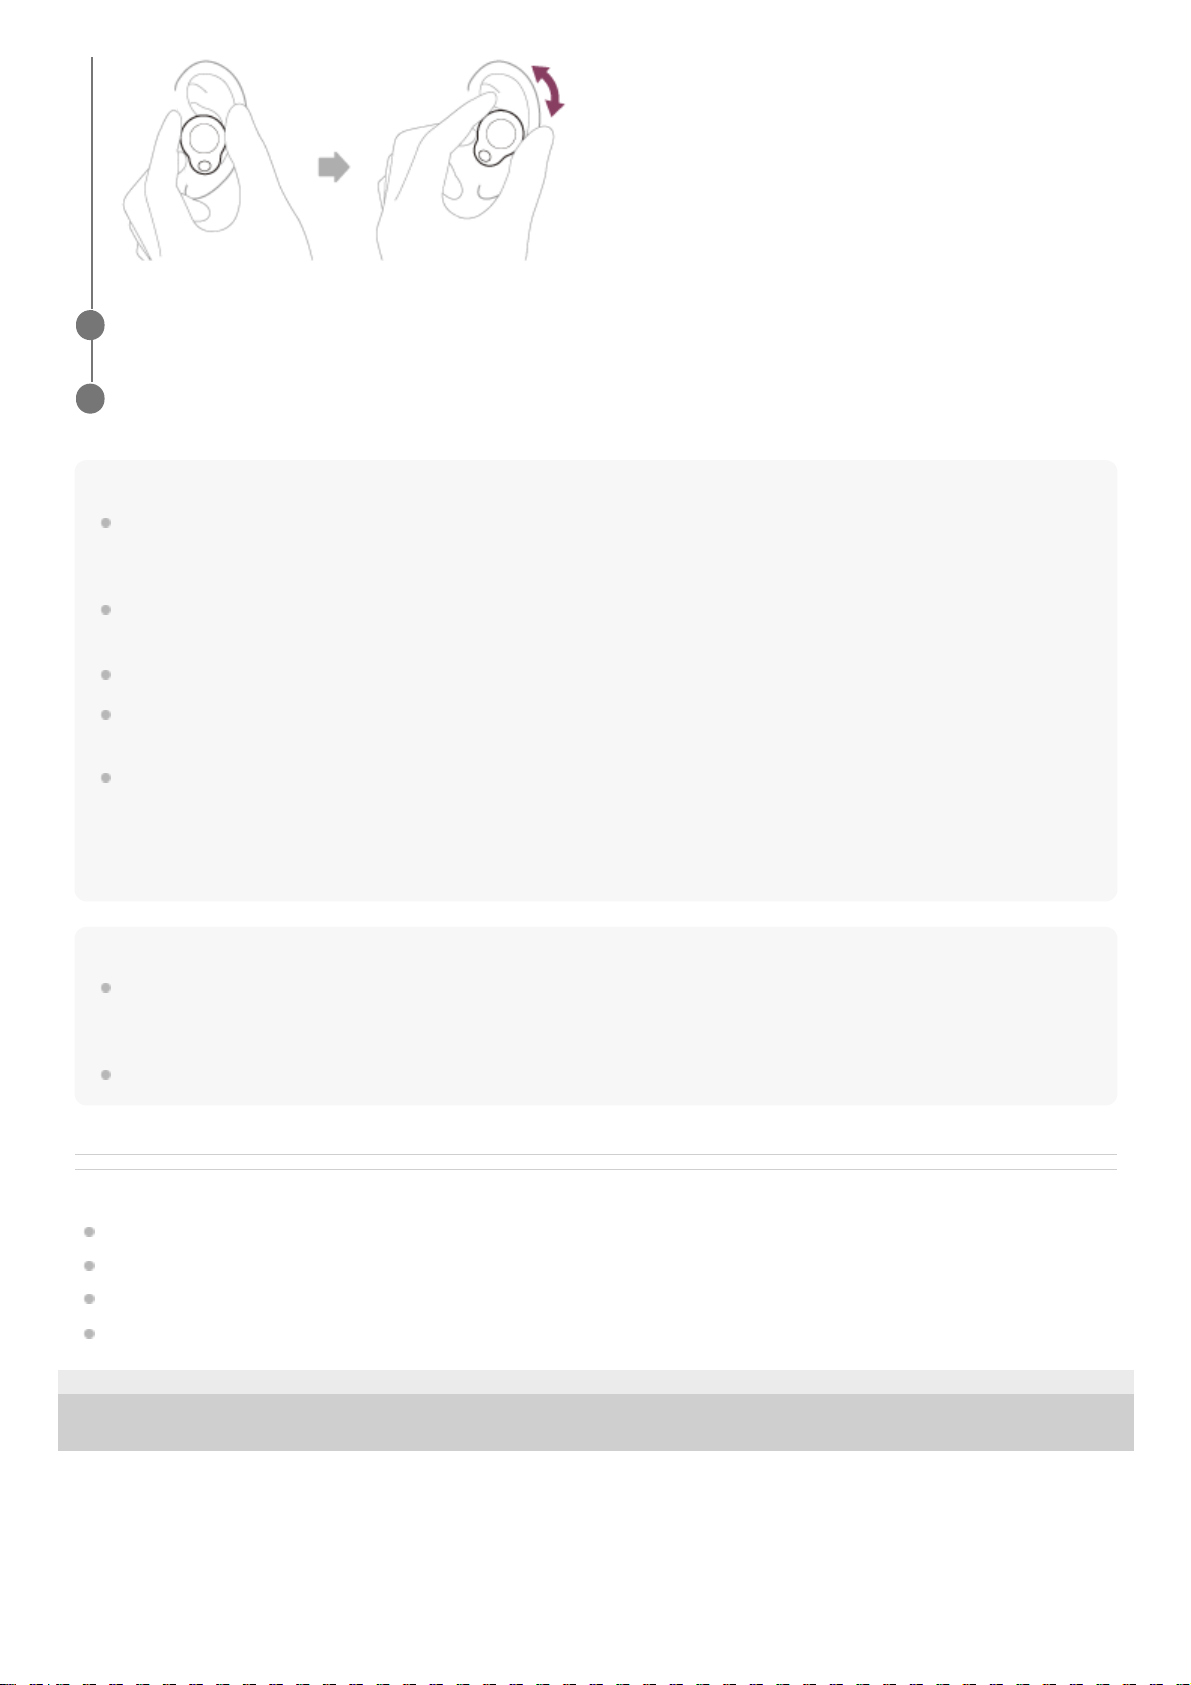
Hint
In the factory settings, when you listen to music while wearing both units of the headset, the headset will pause music playback if
one or both units are removed. When you put the removed headset unit into your ear again, the headset will resume music
playback.
The headset supports SCMS-T content protection. You can enjoy music and other audio on the headset from a device such as a
portable TV that supports SCMS-T content protection.
Depending on the Bluetooth device, it may be necessary to adjust the volume or set the audio output setting on the device.
The headset volume during a call and during music playback can be independently adjusted. Changing the call volume does not
change the volume of music playback and vice versa.
You can also listen to music by removing only one unit from the charging case and putting it into your ear.
When only the right unit is worn in your ear, use the touch sensor on the right unit to play music.
When only the left unit is worn in your ear, operate the connected device to play music.
When you are listening to music with only one unit, if you put the other unit into the other ear, you can listen to music with both
units.
Note
In the factory settings, you cannot adjust the volume on the headset. Adjust the volume on the connected device. If you are
unable to adjust the volume on the connected device, install the “Sony | Headphones Connect” smartphone app and adjust the
volume in the app.
If the communication condition is poor, the Bluetooth device may react incorrectly to the operation on the headset.
Related Topic
Wearing the headset
Using only one unit of the headset
How to make a wireless connection to Bluetooth devices
Controlling the audio device (Bluetooth connection)
5-035-792-11(3)
Copyright 2022 Sony Corporation
Connect the headset to a Bluetooth device.
2
Operate the Bluetooth device to start playback and adjust the volume to a moderate level.
3
76
Page 77
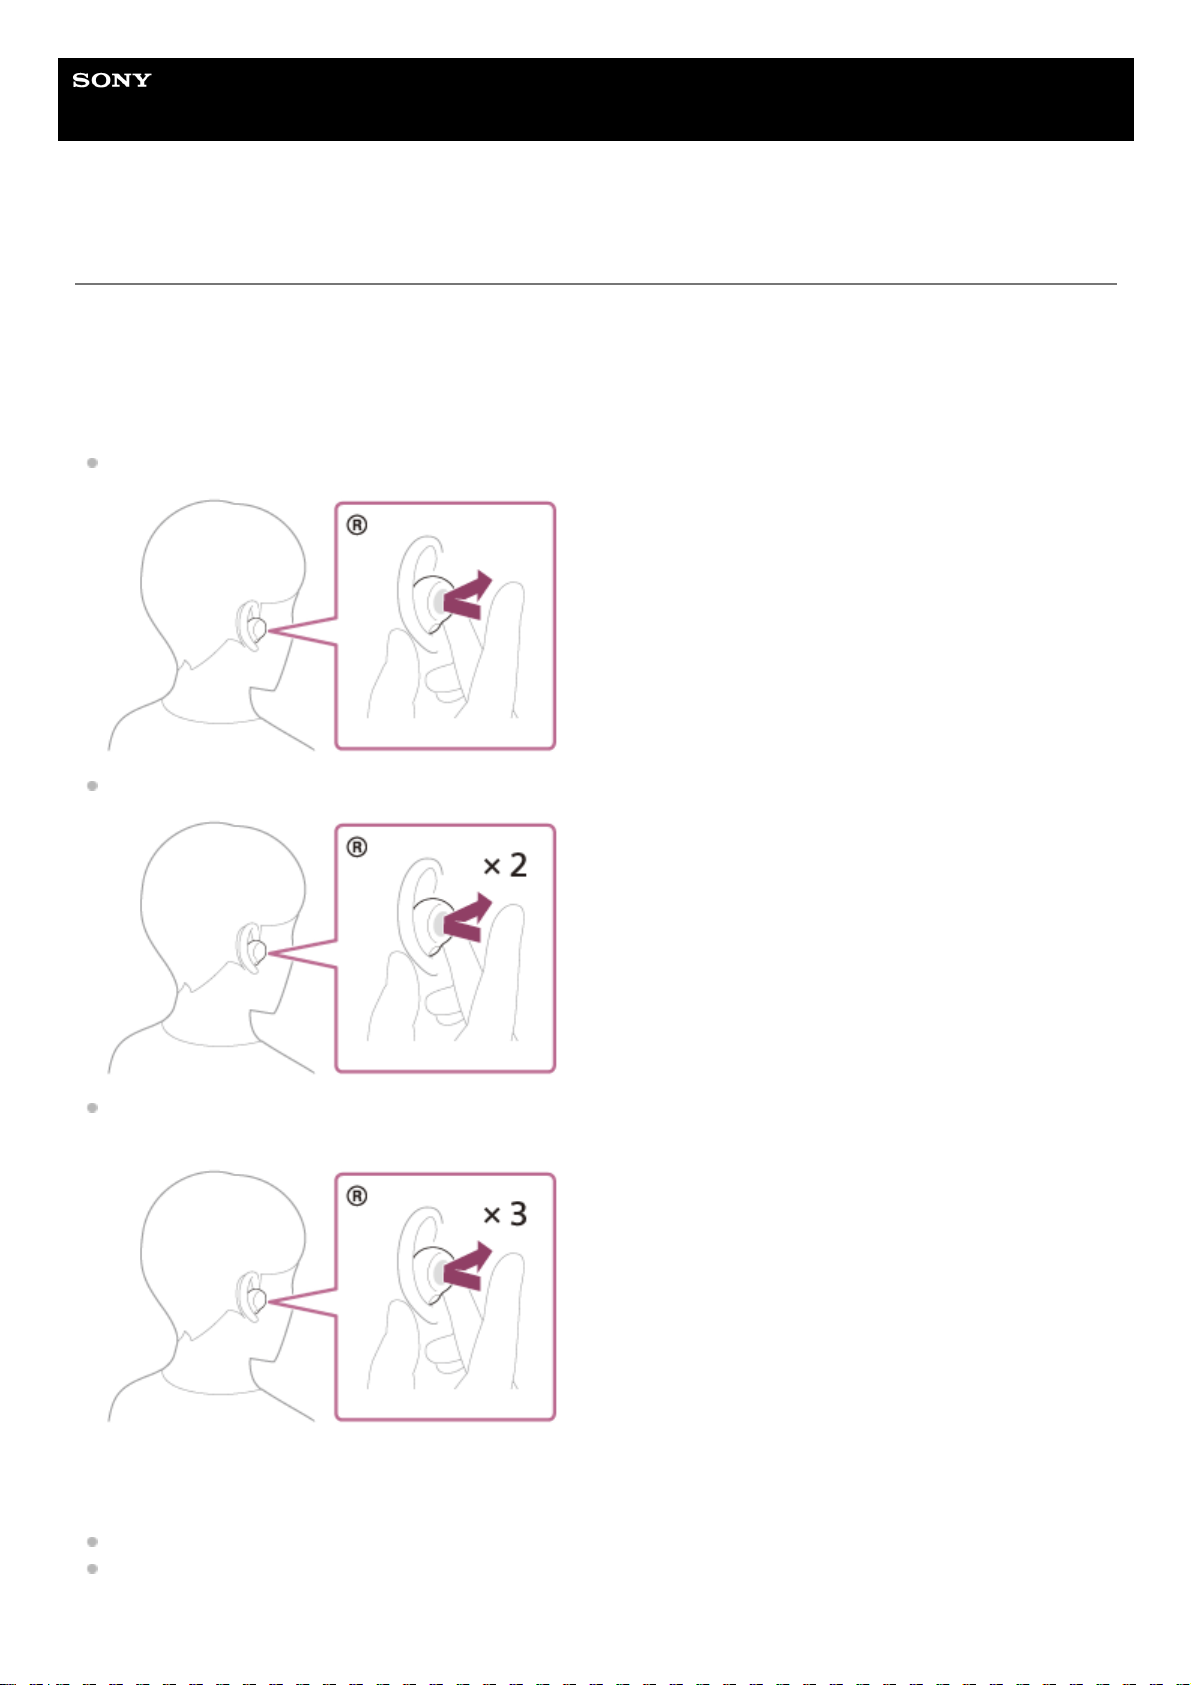
Help Guide
Wireless Noise Canceling Stereo Headset
LinkBuds S
Controlling the audio device (Bluetooth connection)
If your Bluetooth device supports the device operating function (compatible profile: AVRCP), the following operations are
available. The available functions may vary depending on the Bluetooth device, so refer to the operating instructions
supplied with the device.
You can use the touch sensor on the right unit to perform the following operations.
Play/Pause: Tap the touch sensor.
Skip to the beginning of the next track: Tap the touch sensor twice quickly (with an interval of about 0.3 seconds).
Skip to the beginning of the previous track (or the current track during playback): Tap the touch sensor 3 times
quickly (with an interval of about 0.3 seconds).
When the volume adjustment function has been assigned to the touch sensor using the “Sony | Headphones Connect”
app, you can perform the following operations using the headset unit to which the function is assigned.
Increase the volume: Tap the touch sensor during music playback. The volume increases by 1 step.
Decrease the volume: Hold your finger to the touch sensor during music playback. The volume decreases
continuously. Release your finger from the touch sensor at the desired volume level.
77
Page 78

When the volume reaches the maximum or minimum, an alarm sounds.
Note
In the factory settings, you cannot adjust the volume on the headset. Adjust the volume on the connected device. If you are
unable to adjust the volume on the connected device, install the “Sony | Headphones Connect” smartphone app and adjust the
volume in the app.
If the communication condition is poor, the Bluetooth device may react incorrectly to the operation on the headset.
The available operations may vary depending on the connected device, the music software, or app used. In some cases, it may
operate differently or may not work even when the operations described above are performed.
5-035-792-11(3)
Copyright 2022 Sony Corporation
78
Page 79
Help Guide
Wireless Noise Canceling Stereo Headset
LinkBuds S
Disconnecting Bluetooth connection (after use)
Hint
When you finish playing music, the Bluetooth connection may terminate automatically depending on the Bluetooth device.
Related Topic
Turning off the headset
5-035-792-11(3)
Copyright 2022 Sony Corporation
Disconnect the Bluetooth connection by operating the Bluetooth device.
When you are wearing the headset, you will hear a notification sound from both headset units (or from the headset
unit you are wearing) at the same time.
1
Set the headset into the charging case.
The headset turns off.
2
79
Page 80

Help Guide
Wireless Noise Canceling Stereo Headset
LinkBuds S
About 360 Reality Audio
What is 360 Reality Audio?
360 Reality Audio is a new music experience using Sony’s 360 three-dimensional audio technology.
Positional information is attached to each sound source such as vocals, chorus, and musical instruments, and are placed
in a spherical space.
Listeners can experience a three-dimensional sound field as if they are immersed in a live performance of the artists.
Conditions of use
Download and use a music streaming service (charged) app that supports 360 Reality Audio on your smartphone or
tablet equipped with iOS or Android.
By optimizing the sound field and the acoustic feature of headset with the “Sony | Headphones Connect” app, you can
enjoy a more realistic sense of reality.
For details on 360 Reality Audio, refer to the following website:
https://www.sony.net/360RA/
Note
Service is not available in certain countries and regions.
5-035-792-11(3)
Copyright 2022 Sony Corporation
80
Page 81
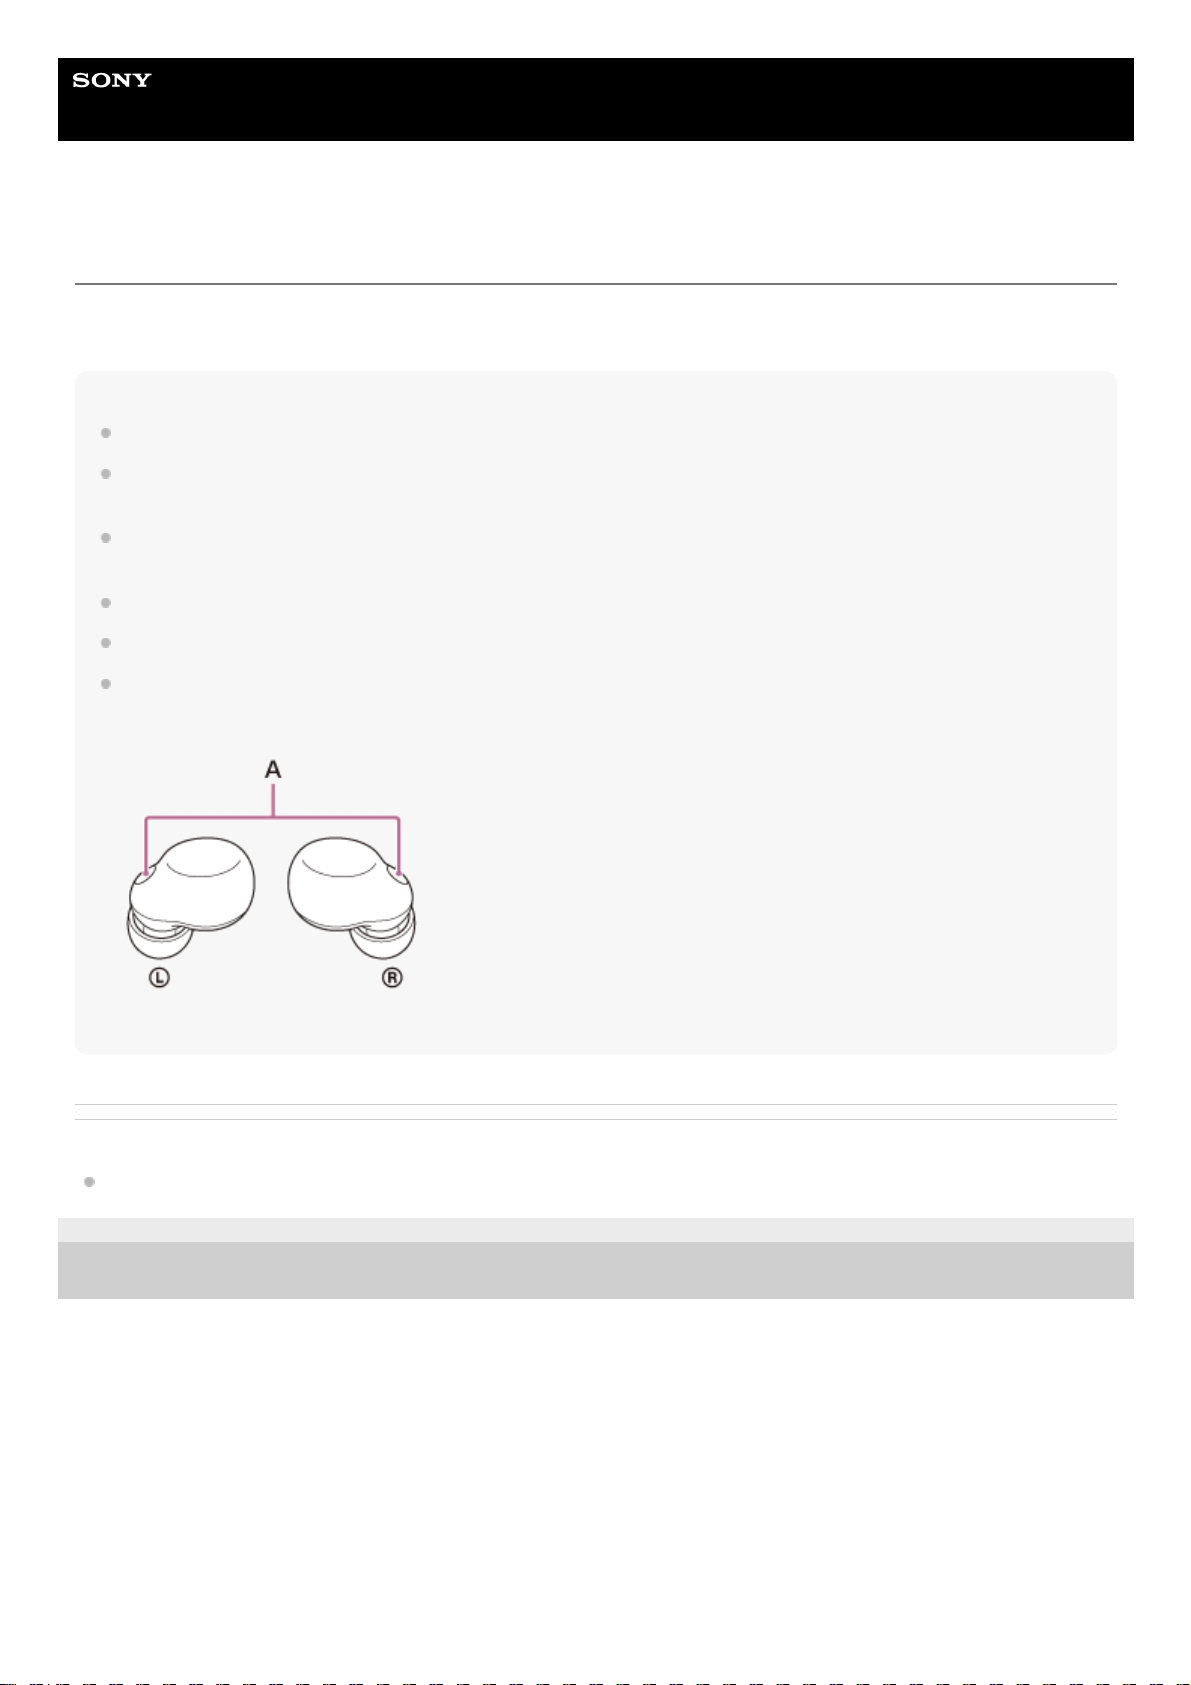
Help Guide
Wireless Noise Canceling Stereo Headset
LinkBuds S
What is noise canceling?
The noise canceling function generates antiphase sound against outside surrounding noises (such as noises in vehicles
or noises from air conditioners indoors) to reduce the surrounding noises by canceling them out.
Note
The effect of noise canceling may not be pronounced in a very quiet environment, or some noise may be heard.
When you are wearing the headset, depending on how you wear the headset, the effect of noise canceling may vary or a beeping
sound (feedback) may be heard. In this case, take off the headset and put it on again.
The noise canceling function works primarily on noise in the low frequency band such as vehicles and air conditioning. Although
noise is reduced, it is not completely canceled.
When you use the headset in a car or a bus, noise may occur depending on street conditions.
Mobile phones may cause interference and noise. Should this occur, move the headset further away from the mobile phone.
Do not cover the microphones on the left and right units of the headset with your hands. The effect of the noise canceling function
or Ambient Sound Mode may not work properly or a beeping sound (feedback) may occur. If any of this is the case, remove your
hands, etc. from the left and right microphones.
A: Microphones (left, right)
Related Topic
Using the noise canceling function
5-035-792-11(3)
Copyright 2022 Sony Corporation
81
Page 82
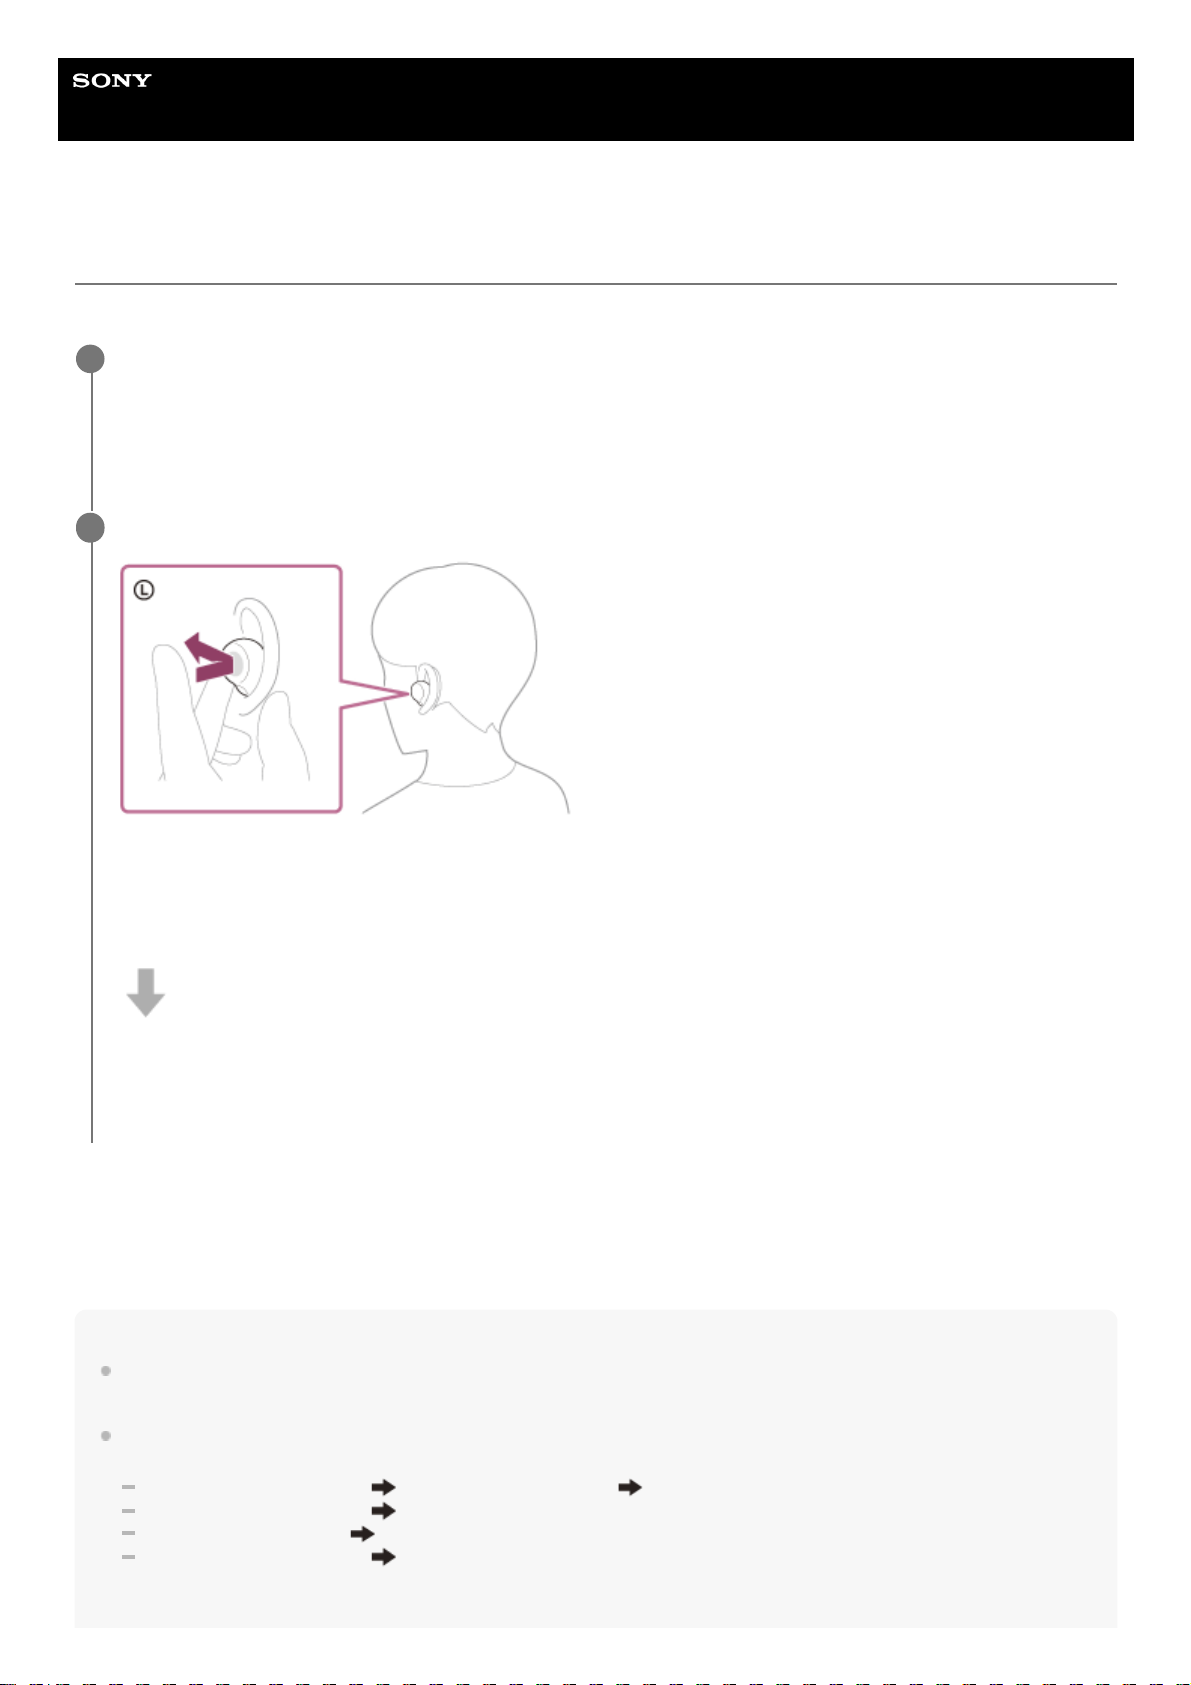
Help Guide
Wireless Noise Canceling Stereo Headset
LinkBuds S
Using the noise canceling function
If you use the noise canceling function, you can enjoy music without being disturbed by ambient noise.
About the instruction manual video
Watch the video to find out how to use the noise canceling function.
https://rd1.sony.net/help/mdr/mov0045/h_zz/
Hint
You can also turn on/off the noise canceling function and change the settings of the noise canceling function and Ambient Sound
Mode with the “Sony | Headphones Connect” app.
You can select one of the following on the “Sony | Headphones Connect” app to set how you want the functions to change when
you tap the left unit of the headset.
Noise canceling function: ON
Ambient Sound Mode: ON Noise canceling function: OFF/Ambient Sound Mode: OFF
Noise canceling function: ON
Ambient Sound Mode: ON
Ambient Sound Mode: ON
Noise canceling function: OFF/Ambient Sound Mode: OFF
Noise canceling function: ON
Noise canceling function: OFF/Ambient Sound Mode: OFF
Remove the headset from the charging case and then put the headset units into your ears.
When you use the headset for the first time after purchase or just after initializing the headset, the noise canceling
function is turned on automatically when you put the headset units into your ears.
Any changes made to the settings are retained from this point on.
1
Tap the touch sensor on the left unit to change the settings of the noise canceling function.
Each time you tap, the function switches as follows.
Ambient Sound Mode: ON
You will hear a notification sound from both headset units (or from the left unit when only the left unit is worn) at the
same time.
Noise canceling function: ON
You will hear a notification sound from both headset units (or from the left unit when only the left unit is worn) at the
same time.
2
82
Page 83

When only one unit of the headset is worn, the Ambient Sound Mode is set to ON, even if the headset was set to the noise
canceling function when you used the headset last. Putting on both headset units will automatically turn on the noise canceling
function.
Note
The headset cannot fully perform the noise canceling function unless the supplied earbud tips are used.
If the headset is not worn properly in your ears, the noise canceling function may not work correctly. Twist the headset to put it
into your ears properly.
Related Topic
Wearing the headset
Turning on the headset
What is noise canceling?
Listening to ambient sound during music playback (Ambient Sound Mode)
What you can do with the “Sony | Headphones Connect” app
5-035-792-11(3)
Copyright 2022 Sony Corporation
83
Page 84
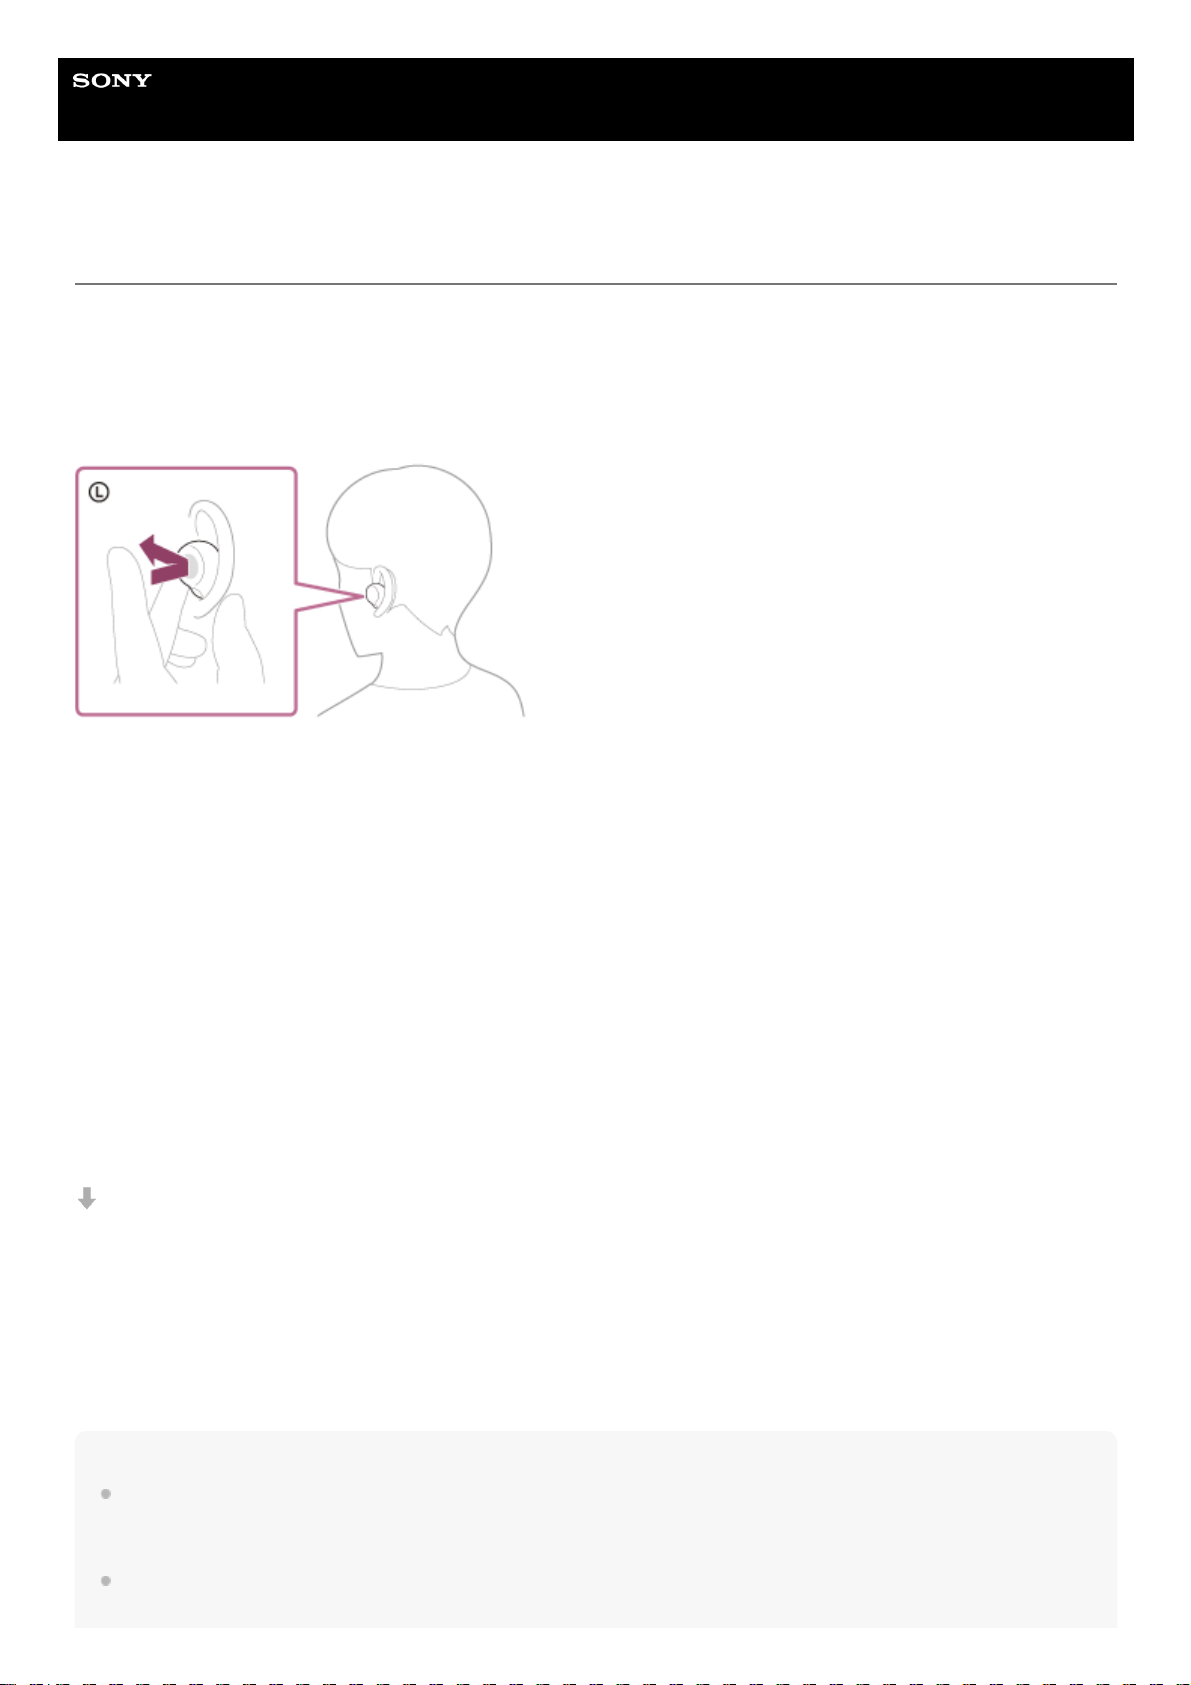
Help Guide
Wireless Noise Canceling Stereo Headset
LinkBuds S
Listening to ambient sound during music playback (Ambient Sound Mode)
You can hear ambient sound through the microphones embedded in the left and right units of the headset while enjoying
music.
To activate the Ambient Sound Mode
Tap the touch sensor on the left unit while the noise canceling function is on.
To change the setting of the Ambient Sound Mode
You can change the settings of the Ambient Sound Mode (Normal mode/Voice mode) by connecting the smartphone
(with the “Sony | Headphones Connect” app installed) and the headset via Bluetooth connection.
Normal mode: While enjoying music, you can hear the surrounding sound as if you were not wearing the headset.
Voice mode: While enjoying music, you can pick up the sound (such as announcements in the train) that you want to
hear.
To turn off the Ambient Sound Mode
Tap the touch sensor on the left unit to turn off the Ambient Sound Mode.
Each time you tap, the function switches as follows.
Noise canceling function: ON
You will hear a notification sound from both headset units (or from the left unit when only the left unit is worn) at the same
time.
Ambient Sound Mode: ON
You will hear a notification sound from both headset units (or from the left unit when only the left unit is worn) at the same
time.
About the instruction manual video
Watch the video to find out how to use the Ambient Sound Mode.
https://rd1.sony.net/help/mdr/mov0045/h_zz/
Hint
Ambient Sound Mode settings changed with the “Sony | Headphones Connect” app are stored in the headset. You can enjoy
music with the stored settings of the Ambient Sound Mode even when the headset is connected to other devices which do not
have the “Sony | Headphones Connect” app installed.
You can select one of the following on the “Sony | Headphones Connect” app to set how you want the functions to change when
you tap the left unit of the headset.
84
Page 85

Noise canceling function: ON Ambient Sound Mode: ON Noise canceling function: OFF/Ambient Sound Mode: OFF
Noise canceling function: ON
Ambient Sound Mode: ON
Ambient Sound Mode: ON
Noise canceling function: OFF/Ambient Sound Mode: OFF
Noise canceling function: ON
Noise canceling function: OFF/Ambient Sound Mode: OFF
Note
Depending on the ambient condition and the type/volume of audio playback, the ambient sound may not be heard even when
using the Ambient Sound Mode. Do not use the headset in places where it would be dangerous if you are unable to hear ambient
sounds such as on a road with car and bicycle traffic.
Depending on the surrounding environment, wind noise may increase when the Ambient Sound Mode is turned on. In that case,
change the settings from Normal mode to Voice mode using the “Sony | Headphones Connect” app. If the wind noise is still
significant, turn off the Ambient Sound Mode.
If the headset is not worn properly, the Ambient Sound Mode may not work correctly. Twist the headset to put it into your ears
properly.
Do not cover the microphones on the left and right units of the headset with your hands. The effect of the noise canceling function
or Ambient Sound Mode may not work properly or a beeping sound (feedback) may occur. If any of this is the case, remove your
hands, etc. from the left and right microphones.
This headset is equipped with the function to detect a beeping sound (feedback) and cancel the sound in a short time.
In rare cases, the noise canceling function or the Ambient Sound Mode may temporarily stop in reaction to a high note such as
an alarm or an electronic sound, but the noise canceling function or the Ambient Sound Mode will automatically return in about a
second.
If the Ambient Sound Mode is enabled in a rather noisy environment, a noise may be heard. This is not a malfunction. In this
case, set the noise canceling function to ON or set the noise canceling function and the Ambient Sound Mode to OFF.
Related Topic
Wearing the headset
Using the noise canceling function
What you can do with the “Sony | Headphones Connect” app
5-035-792-11(3)
Copyright 2022 Sony Corporation
85
Page 86
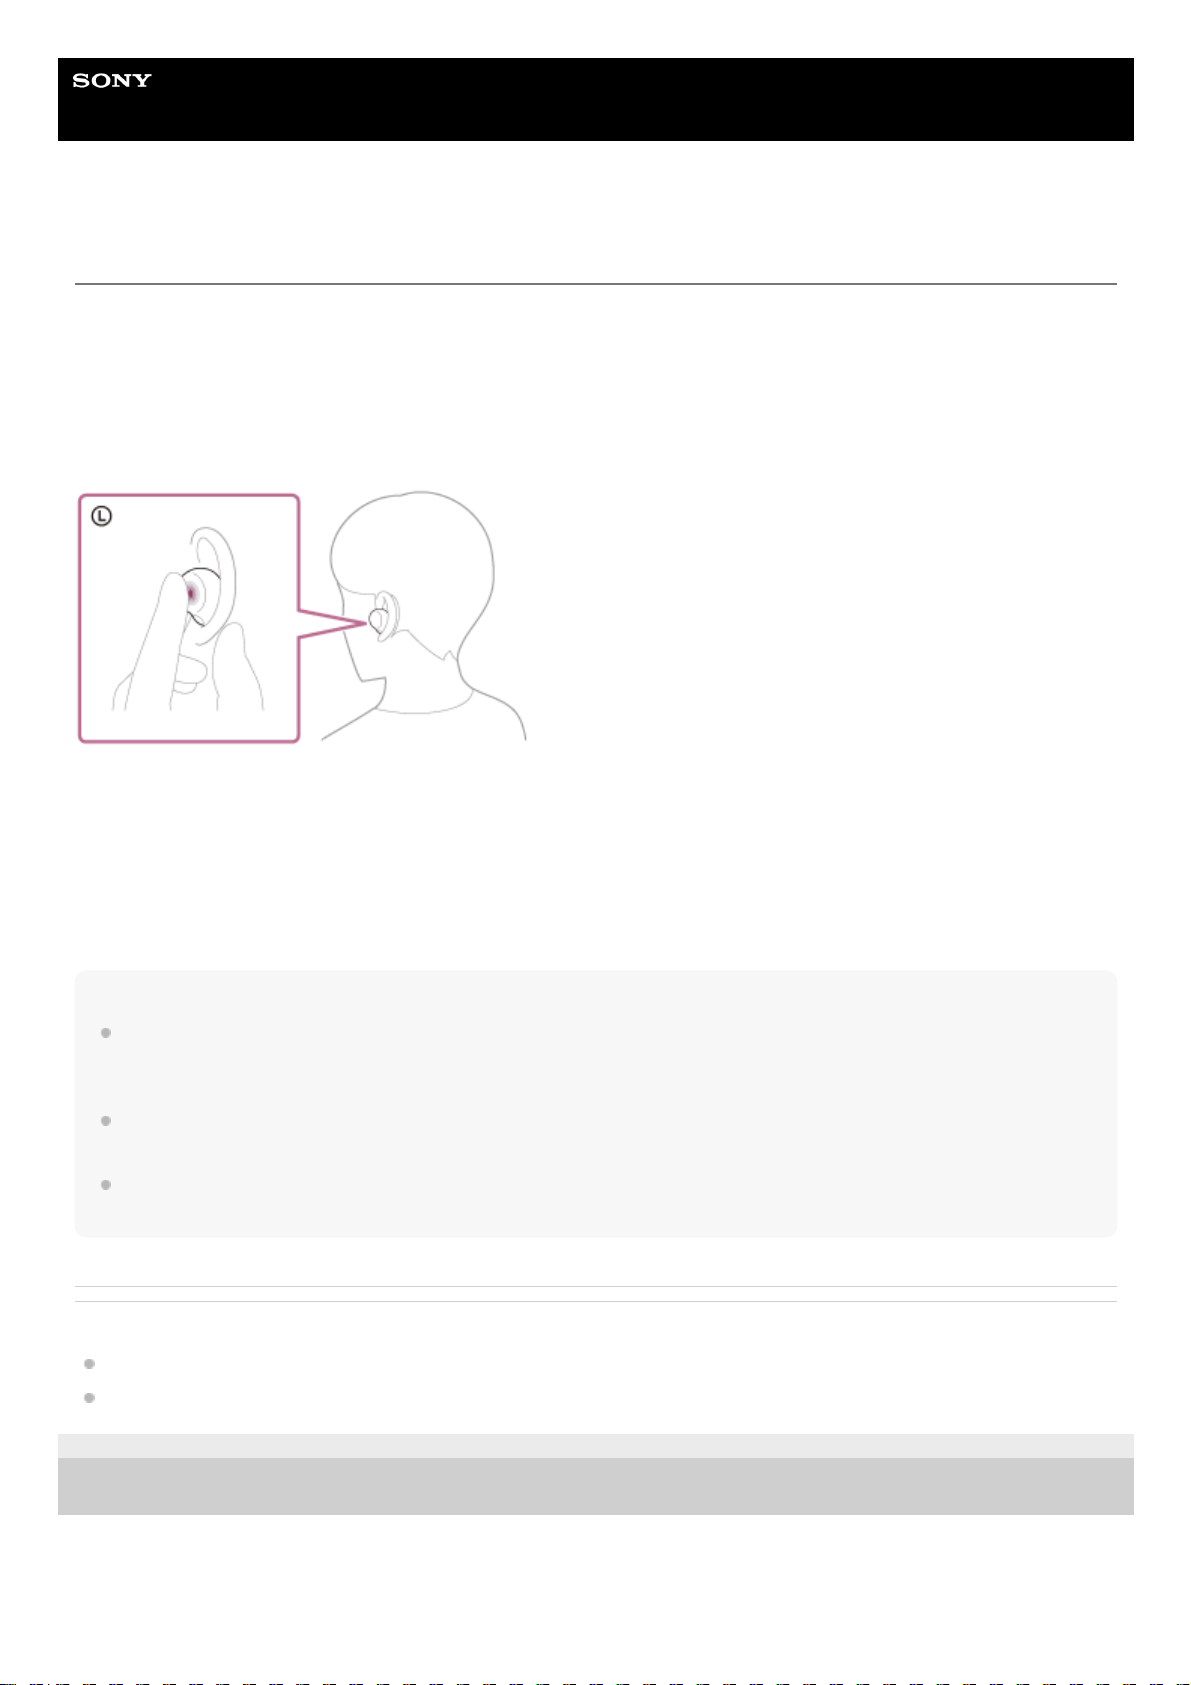
Help Guide
Wireless Noise Canceling Stereo Headset
LinkBuds S
Listening to ambient sound quickly (Quick Attention Mode)
This function turns down music, call sounds, and the ringtone to allow ambient sound to be easily heard. It is useful
when you want to listen to train announcements, etc.
To activate the Quick Attention Mode
Hold your finger to the touch sensor on the left unit. The Quick Attention Mode is activated only when you are touching
the touch sensor.
To deactivate the Quick Attention Mode
Release your finger from the touch sensor.
About the instruction manual video
Watch the video to find out how to use the Quick Attention Mode.
https://rd1.sony.net/help/mdr/mov0046/h_zz/
Note
Depending on the ambient condition and the type/volume of audio playback, the ambient sounds may not be heard even when
using the Quick Attention Mode. Do not use the headset in places where it would be dangerous if you are unable to hear ambient
sounds such as on a road with car and bicycle traffic.
If the headset is not worn properly, the Quick Attention Mode may not work correctly. Twist the headset to put it into your ears
properly.
Depending on the size of the earbud tips you use, the Quick Attention Mode may not be fully effective. Choose the size that
allows you to hear the least ambient sounds.
Related Topic
Replacing the earbud tips
Wearing the headset
5-035-792-11(3)
Copyright 2022 Sony Corporation
86
Page 87
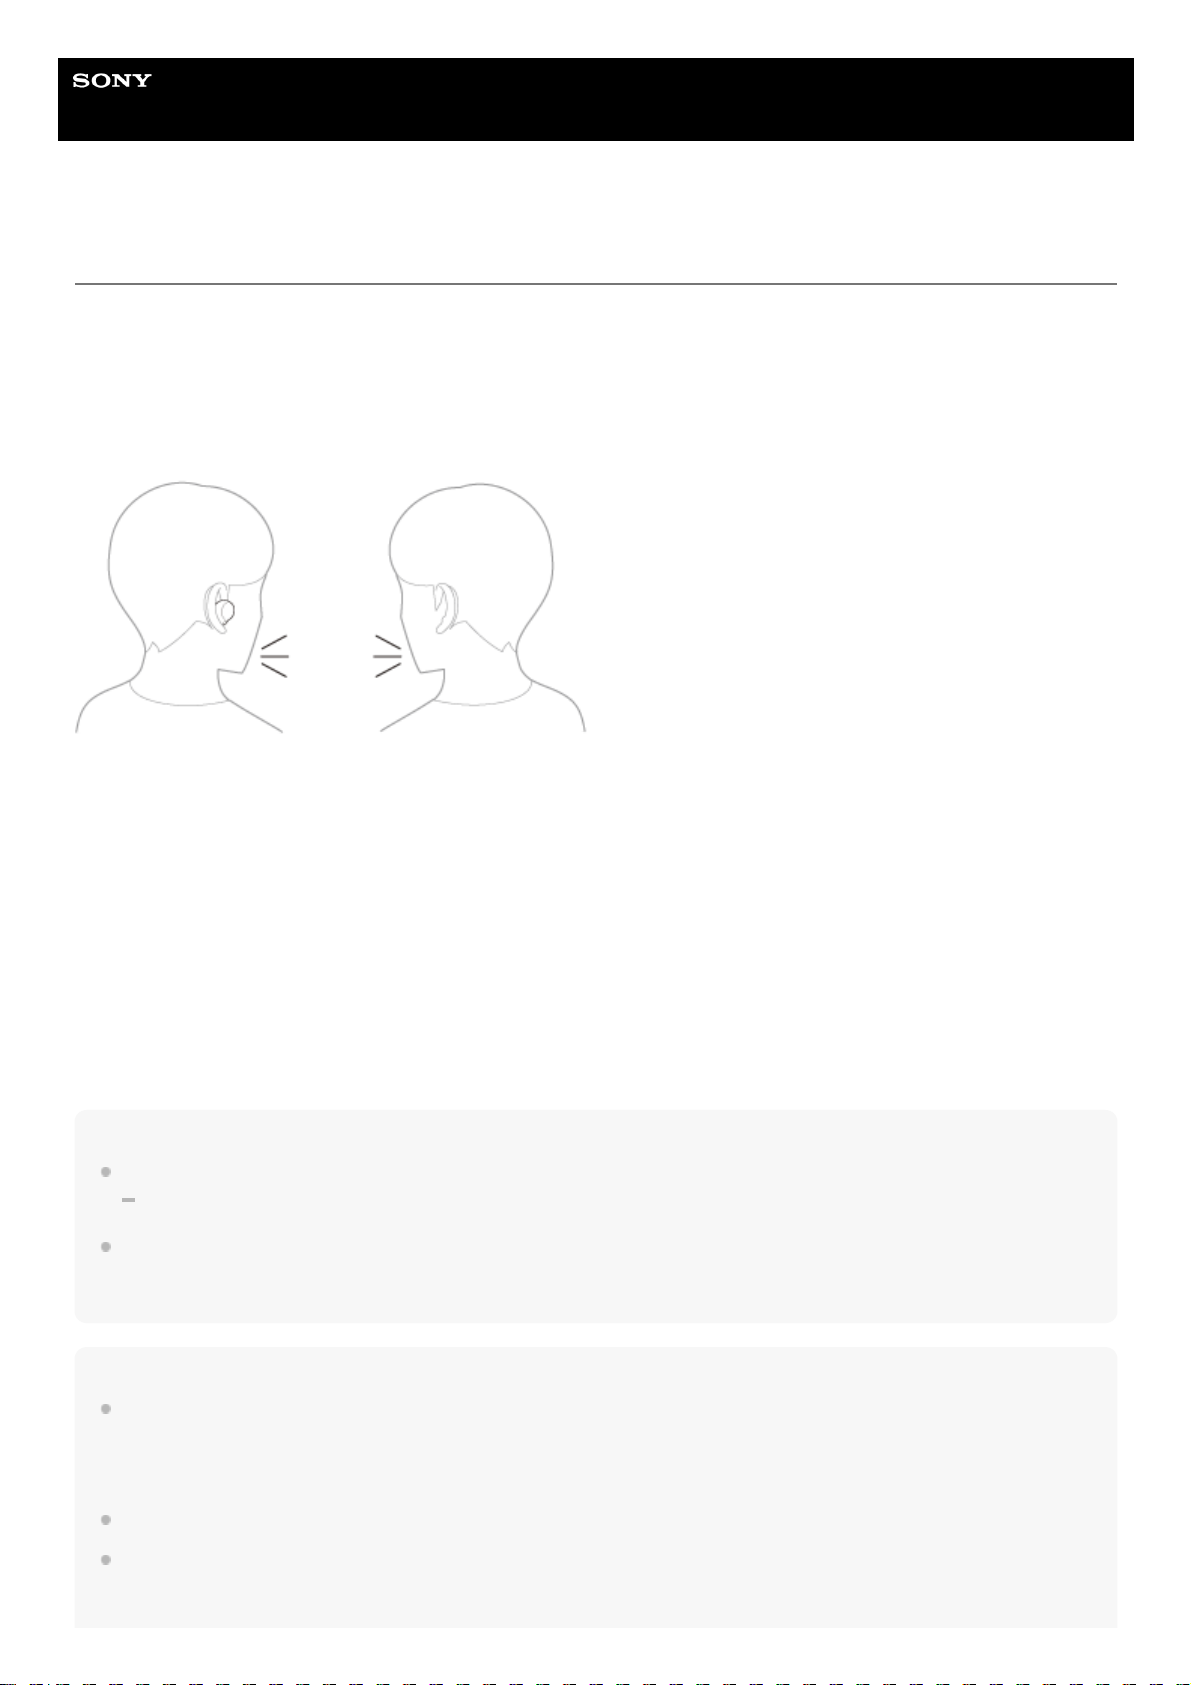
Help Guide
Wireless Noise Canceling Stereo Headset
LinkBuds S
Speaking with someone while wearing the headset (Speak-to-Chat)
If Speak-to-Chat is enabled in advance, the Speak-to-Chat mode starts automatically when you talk to someone.
The headset pauses or mutes the music being played and captures the voice of the person you are conversing with on
the microphones to make it easier to hear.
When the headset does not detect the wearer’s voice for a certain period of time, the Speak-to-Chat mode ends
automatically.
If you want to end the mode before that, tap the touch sensor on the left or right unit of the headset.
To enable Speak-to-Chat
To activate the Speak-to-Chat mode, Speak-to-Chat must be enabled in advance.
In the factory settings, Speak-to-Chat is disabled. To enable, change the setting with the “Sony | Headphones Connect”
app.
To disable Speak-to-Chat
To disable, change the setting with the “Sony | Headphones Connect” app.
About the instruction manual video
Watch the video to find out how to use Speak-to-Chat.
https://rd1.sony.net/help/mdr/mov0047/h_zz/
Hint
The Speak-to-Chat mode also ends in the following instance.
When both units of the headset are removed while the wearing detection automatic power off function is enabled
When you use the “Sony | Headphones Connect” app, you can change the sensitivity of the automatic audio detection and
change the time until the Speak-to-Chat mode ends, in addition to the mode to switch between enabling and disabling. In the
factory settings, the time until the mode ends is set to about 15 seconds.
Note
The Speak-to-Chat mode activates when the headset detects the speech of the person wearing the headset, but in rare cases it
may activate in response to vibrations caused by devices such as electric toothbrushes, electric massagers, and electric shavers,
or by activities such as brushing your teeth, coughing, or humming. In cases where the Speak-to-Chat mode frequently activates
by accident, set Speak-to-Chat to “L Sensitivity”.
Music playback is paused while the Speak-to-Chat mode is active only when connected via Bluetooth connection.
The connected device or playback application you are using may not support the pausing of music or video content playback
when the Speak-to-Chat mode is activated or the resuming of music playback when the Speak-to-Chat mode is deactivated.
87
Page 88

When Service Link is turned on and only the left unit is worn in your ear, the Speak-to-Chat mode will not be activated even if the
headset detects the wearer’s voice.
If the sound volume is loud, the headset is not worn properly, or the volume of the spoken voice is low, the speech of the person
wearing the headset may not be detected, and the Speak-to-Chat mode may not activate.
If this is the case, speech detection may be improved by speaking more slowly or in a louder voice, making sure the headset is in
the correct position, turning down any music playing, or setting Speak-to-Chat to “H Sensitivity”.
Related Topic
What you can do with the “Sony | Headphones Connect” app
5-035-792-11(3)
Copyright 2022 Sony Corporation
88
Page 89
Help Guide
Wireless Noise Canceling Stereo Headset
LinkBuds S
About the sound quality mode
The following 2 sound quality modes during Bluetooth playback can be selected. You can switch the settings and check
the sound quality mode with the “Sony | Headphones Connect” app.
Priority on sound quality: Prioritizes the sound quality.
Priority on stable connection: Prioritizes the stable connection (default).
When you want to prioritize the sound quality, select “Priority on sound quality”.
If the connection is unstable, such as when producing only intermittent sound, select “Priority on stable connection”.
Note
The playback time may shorten depending on the sound quality and the conditions under which you are using the headset.
Depending on the ambient conditions in the area where you are using the headset, intermittent sound may still occur even if
“Priority on stable connection” is selected.
Related Topic
What you can do with the “Sony | Headphones Connect” app
5-035-792-11(3)
Copyright 2022 Sony Corporation
89
Page 90

Help Guide
Wireless Noise Canceling Stereo Headset
LinkBuds S
Supported codecs
A codec is an “audio coding algorithm” used when transmitting sound wirelessly via Bluetooth connection.
The headset supports the following 3 codecs for music playback via an A2DP connection: SBC, AAC, and LDAC.
SBC
This is an abbreviation for Subband Codec.
SBC is the standard audio coding technology used in Bluetooth devices.
All Bluetooth devices support SBC.
AAC
This is an abbreviation for Advanced Audio Coding.
AAC is mainly used in Apple products such as iPhone that can provide a higher sound quality than that of SBC.
LDAC
LDAC is an audio coding technology developed by Sony that enables the transmission of High-Resolution (Hi-Res)
Audio content, even over a Bluetooth connection. Unlike other Bluetooth-compatible coding technologies such as
SBC, it operates without any down-conversion of the High-Resolution Audio content (*).
It allows approximately 3 times more data (**) than those other technologies to be transmitted over a Bluetooth
wireless network with unprecedented sound quality, employing efficient coding and optimized packetization.
When music in one of the above codecs is transmitted from a connected device, the headset switches to that codec
automatically and plays back the music in the same codec.
When you want to play back music with LDAC, set the sound quality mode to “Priority on sound quality” using the “Sony |
Headphones Connect” app. In “Priority on stable connection” (factory settings), music cannot be played back with LDAC.
If the connected device supports a codec of higher sound quality than SBC, you may need to set the device beforehand
to enjoy music with the desired codec from the supported codecs.
Refer to the operating instructions supplied with the device regarding setting the codec.
Note
When Service Link is turned on with the “Sony | Headphones Connect” app, music cannot be played back with LDAC.
Related Topic
About the sound quality mode
5-035-792-11(3)
Copyright 2022 Sony Corporation
excluding DSD format contents.
*
in comparison with SBC when the bitrate of 990 kbps (96/48 kHz) or 909 kbps (88.2/44.1 kHz) is selected for LDAC.
**
90
Page 91
Help Guide
Wireless Noise Canceling Stereo Headset
LinkBuds S
About the DSEE Extreme function
DSEE Extreme uses AI technology to reproduce the frequency responses of the original sound source lost during
compression with high accuracy.
You can switch the settings with the “Sony | Headphones Connect” app.
Note
When DSEE Extreme is set to [Auto], the available operating time is reduced.
Related Topic
What you can do with the “Sony | Headphones Connect” app
Available operating time
5-035-792-11(3)
Copyright 2022 Sony Corporation
91
Page 92
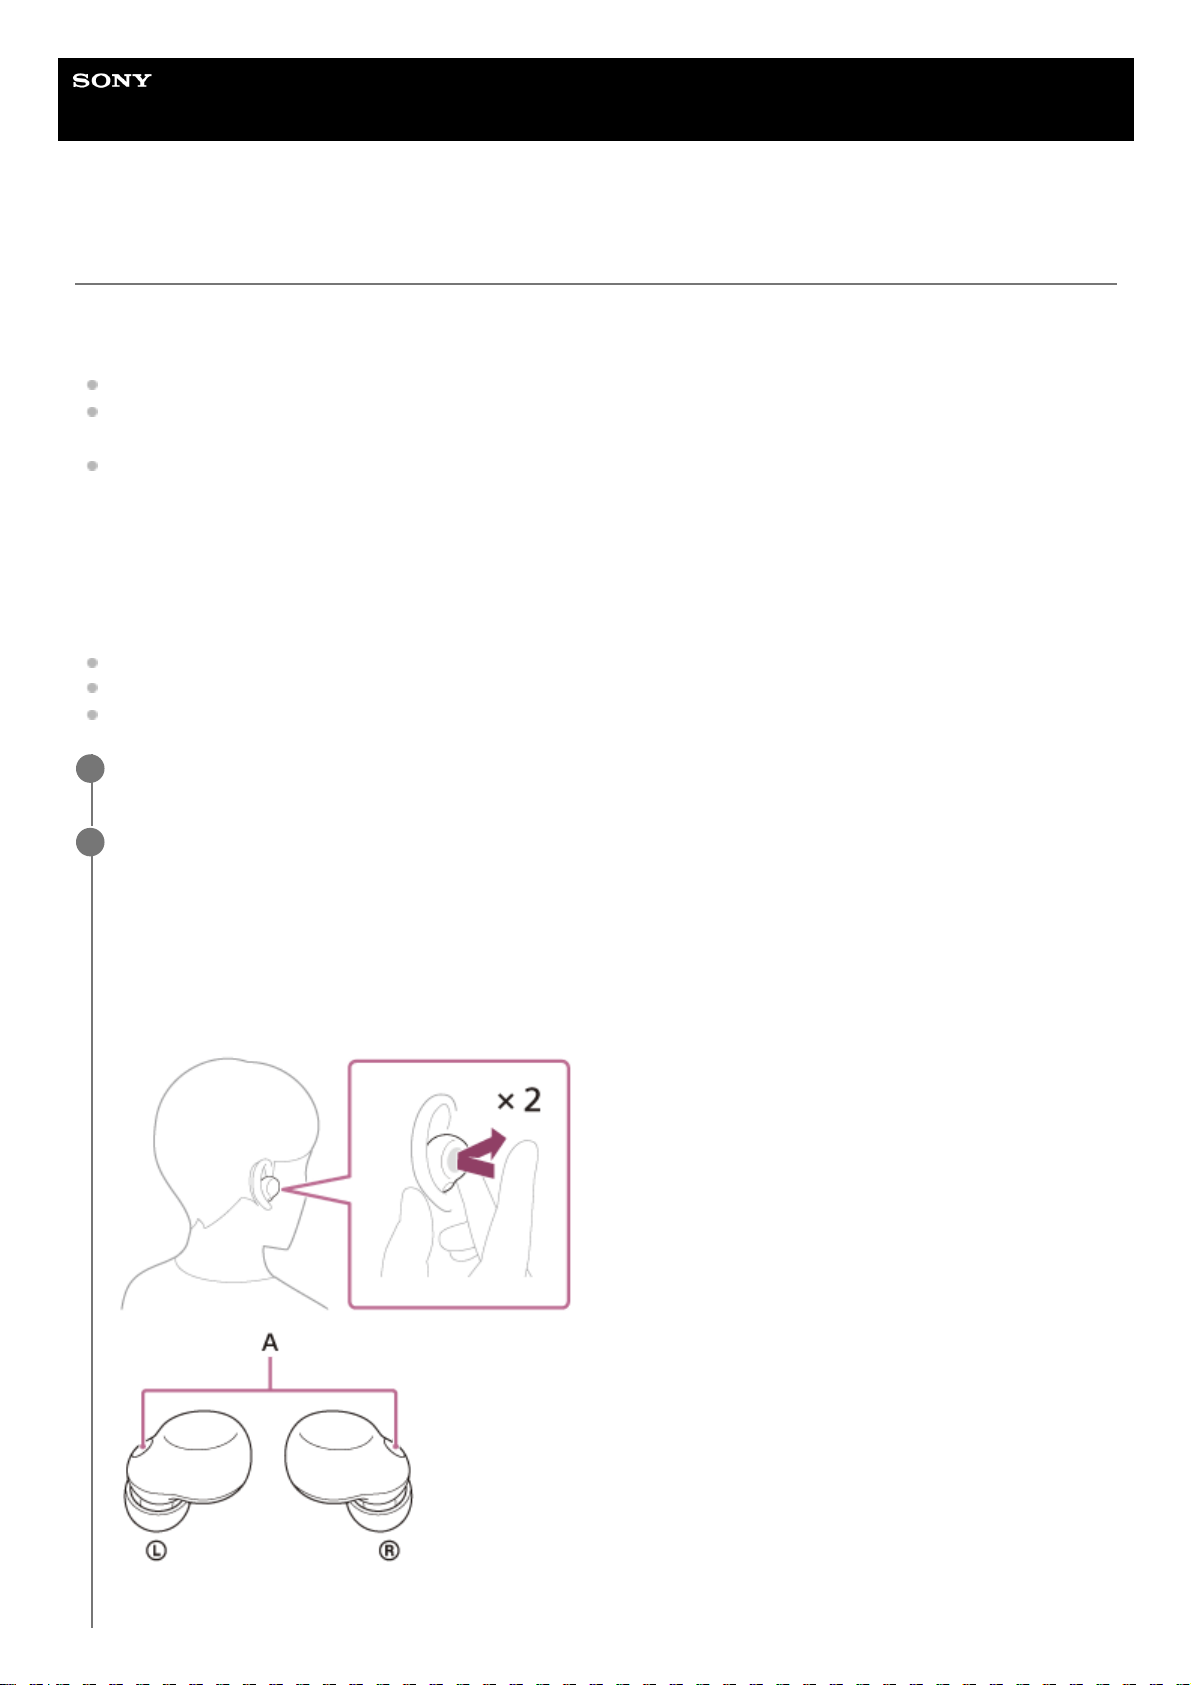
Help Guide
Wireless Noise Canceling Stereo Headset
LinkBuds S
Receiving a call
You can enjoy a hands-free call with a smartphone or mobile phone that supports the Bluetooth profile HFP (Hands-free
Profile) or HSP (Headset Profile), via Bluetooth connection.
If your smartphone or mobile phone supports both HFP and HSP, set it to HFP.
The operation may vary depending on the smartphone or mobile phone. Refer to the operating instructions supplied
with the smartphone or mobile phone.
Depending on the connected device or the application you are using, the functions may not work properly even if you
try to operate them with the headset.
Ring tone
When you receive an incoming call, a ring tone will be heard from the headset.
You will hear either of following ring tones, depending on your smartphone or mobile phone.
Ring tone set on the headset
Ring tone set on the smartphone or mobile phone
Ring tone only for a Bluetooth connection set on the smartphone or mobile phone
Connect the headset to a smartphone or mobile phone via Bluetooth connection beforehand.
1
When you hear a ring tone, tap the touch sensor on the left or right unit of the headset twice quickly (with
an interval of about 0.3 seconds) and receive the call.
A voice will be heard from the headset.
When you receive an incoming call while listening to music, playback pauses automatically and a ring tone will be
heard from the headset.
If playback does not pause, operate the headset to pause playback.
You can talk using the microphones on the headset.
A: Microphones (left, right)
2
92
Page 93
Hint
When receiving a call by operating smartphones or mobile phones, some smartphones or mobile phones may receive a call with
the phone instead of the headset. With an HFP connection, switch the call to the headset by holding your finger to the touch
sensor on the left or right unit of the headset for about 2 seconds or more, or by using your smartphone or mobile phone.
The headset volume during a call and during music playback can be independently adjusted. Even if you change the volume
during a call, the volume of music playback does not change.
You can also enjoy hands-free calls even when you are wearing only one unit of the headset. When you receive an incoming call,
answer the call using the unit of the headset you are wearing. If you put the other unit into the other ear while you are talking with
only one unit, you can talk with both units.
Note
Depending on the connected device or playback application you are using, playback may not pause even when you receive an
incoming call while playing back music. When you receive an incoming call while playing back music, playback may not resume
automatically even if you finish the call.
Use a smartphone or mobile phone at least 50 cm (19.69 in.) away from the headset. Noise may result if the smartphone or
mobile phone is too close to the headset.
Your voice will be heard from the headset through the headset’s microphone (Sidetone function). In this case, ambient sounds or
the sounds of the headset operation may be heard through the headset, but this is not a malfunction.
Even when the volume adjustment function has been assigned to the touch sensor with the “Sony | Headphones Connect” app,
you cannot adjust the volume on the headset during a call. Adjust the volume on the connected device. If you are unable to
adjust the volume on the connected device, adjust the volume in the “Sony | Headphones Connect” app.
Related Topic
Using only one unit of the headset
How to make a wireless connection to Bluetooth devices
Making a call
Functions for a phone call
What you can do with the “Sony | Headphones Connect” app
5-035-792-11(3)
Copyright 2022 Sony Corporation
If no ring tone is heard via the headset
The headset may not be connected with the smartphone or mobile phone over HFP or HSP. Check the connection
status on the smartphone or mobile phone.
Operate the smartphone or mobile phone to adjust the volume.
3
When you finish talking, tap the touch sensor on the left or right unit of the headset twice quickly (with an
interval of about 0.3 seconds) to end the call.
If you received a call during music playback, music playback resumes automatically after ending the call.
4
93
Page 94
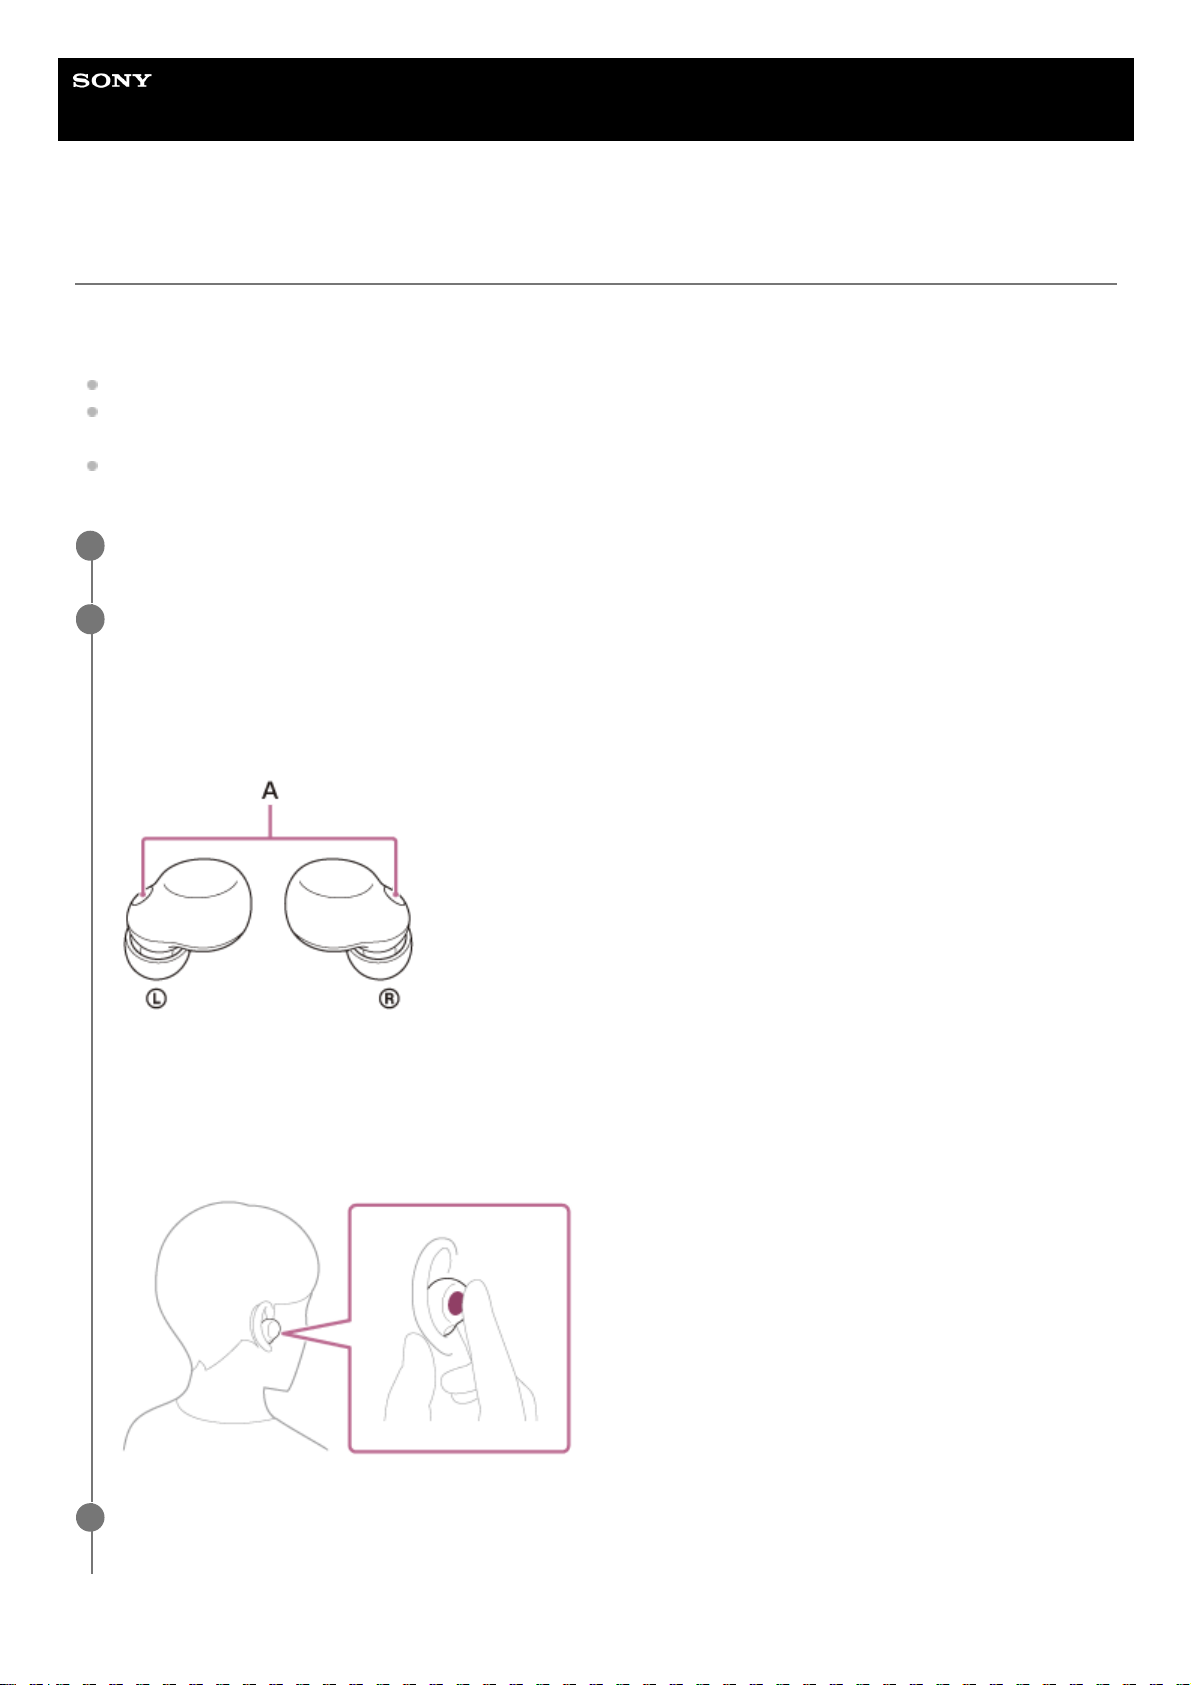
Help Guide
Wireless Noise Canceling Stereo Headset
LinkBuds S
Making a call
You can enjoy a hands-free call with a smartphone or mobile phone that supports the Bluetooth profile HFP (Hands-free
Profile) or HSP (Headset Profile), via Bluetooth connection.
If your smartphone or mobile phone supports both HFP and HSP, set it to HFP.
The operation may vary depending on the smartphone or mobile phone. Refer to the operating instructions supplied
with the smartphone or mobile phone.
Depending on the connected device or the application you are using, the functions may not work properly even if you
try to operate them with the headset.
Connect the headset to a smartphone/mobile phone via Bluetooth connection.
1
Operate your smartphone or mobile phone to make a call.
When you make a call, the dial tone is heard from the headset.
If you make a call while listening to music, playback pauses automatically.
If playback does not pause, operate the headset to pause playback.
You can talk using the microphones on the headset.
A: Microphones (left, right)
If no dial tone is heard via the headset
Use your smartphone or mobile phone to switch the call device to the headset, or hold your finger to the touch
sensor on either the left or right unit of the headset for about 2 seconds or more.
2
Operate the smartphone or mobile phone to adjust the volume.
3
94
Page 95
Hint
The headset volume during a call and during music playback can be independently adjusted. Even if you change the volume
during a call, the volume of music playback does not change.
You can also enjoy hands-free calls even when you are wearing only one unit of the headset. If you put the other unit into the
other ear while you are talking with only one unit, you can talk with both units.
Note
Depending on the connected device or playback application you are using, when you make a call while listening to music,
playback may not resume automatically even after you finish the call.
Use a smartphone or mobile phone at least 50 cm (19.69 in.) away from the headset. Noise may result if the smartphone or
mobile phone is too close to the headset.
Your voice will be heard from the headset through the headset’s microphone (Sidetone function). In this case, ambient sounds or
the sounds of the headset operation may be heard through the headset, but this is not a malfunction.
Even when the volume adjustment function has been assigned to the touch sensor with the “Sony | Headphones Connect” app,
you cannot adjust the volume on the headset during a call. Adjust the volume on the connected device. If you are unable to
adjust the volume on the connected device, adjust the volume in the “Sony | Headphones Connect” app.
Related Topic
Using only one unit of the headset
How to make a wireless connection to Bluetooth devices
Receiving a call
Functions for a phone call
What you can do with the “Sony | Headphones Connect” app
5-035-792-11(3)
Copyright 2022 Sony Corporation
When you finish talking, tap the touch sensor on the left or right unit of the headset twice quickly (with an
interval of about 0.3 seconds) to end the call.
If you made a call during music playback, music playback resumes automatically after ending the call.
4
95
Page 96
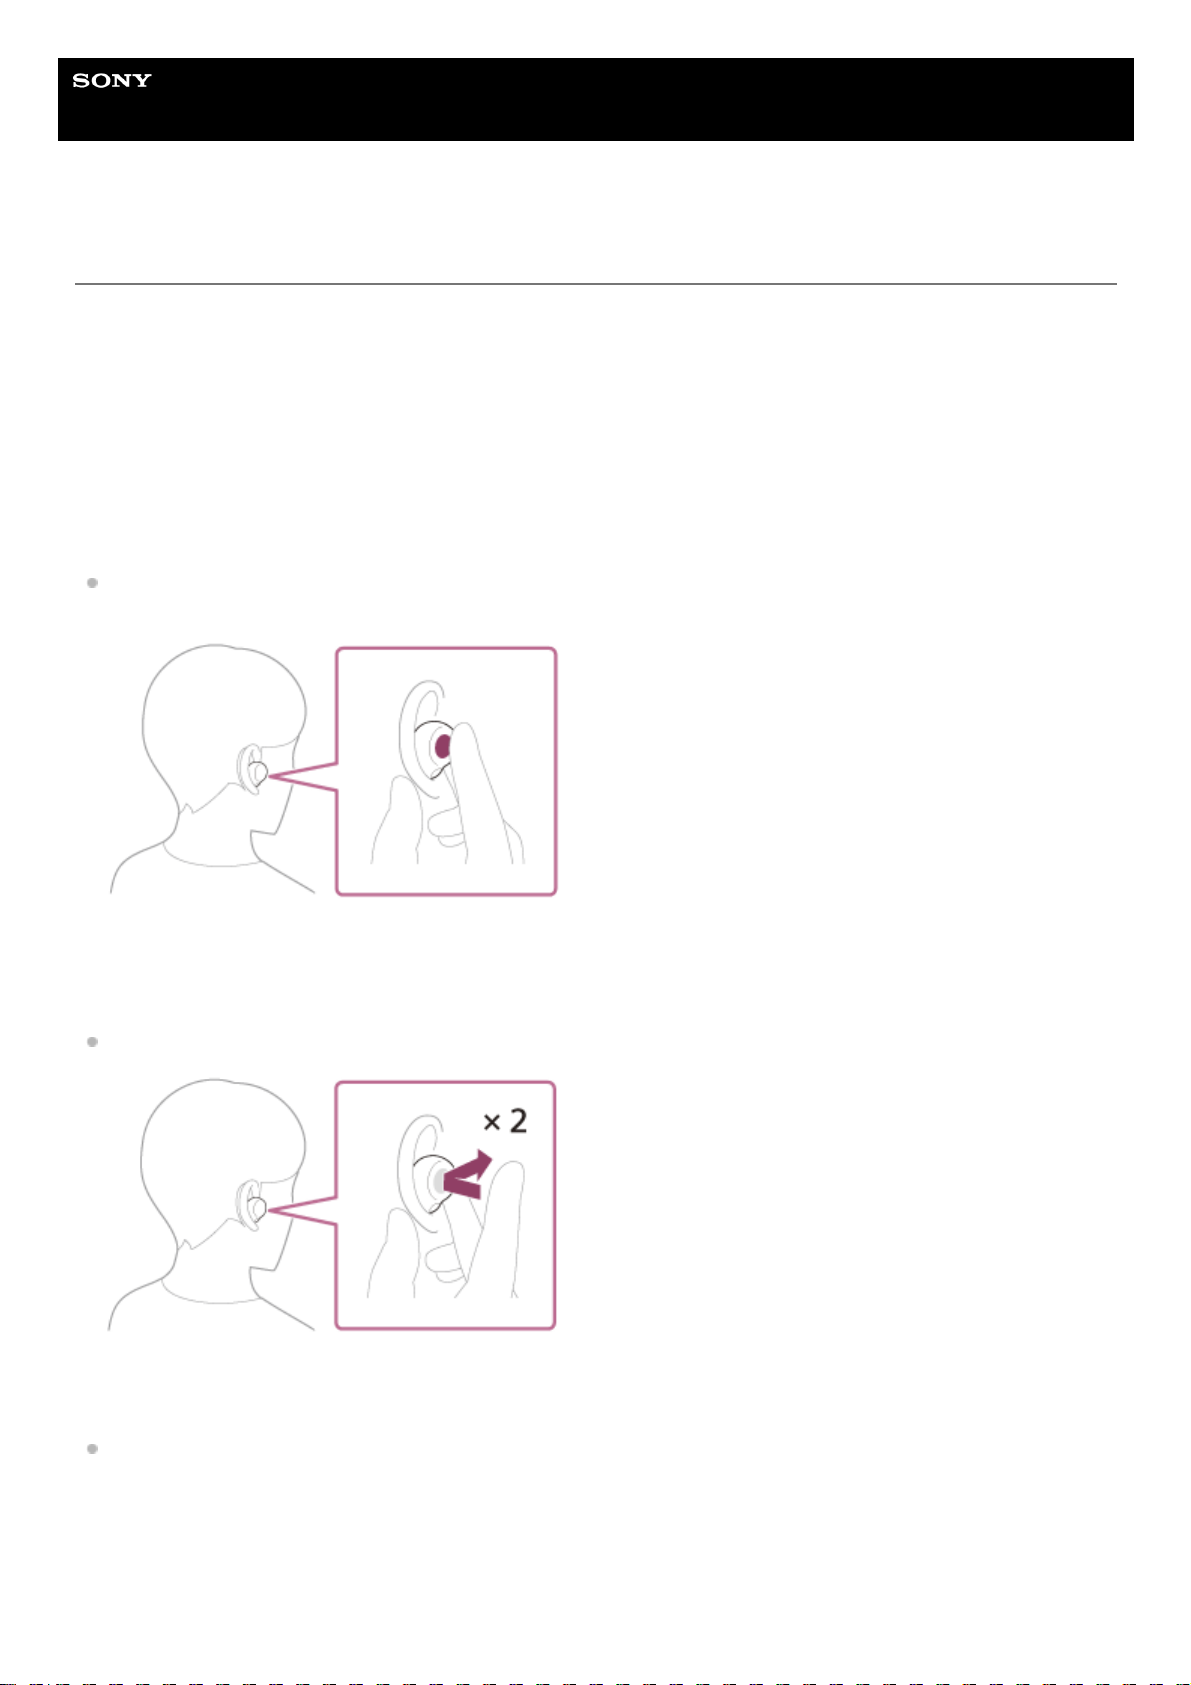
Help Guide
Wireless Noise Canceling Stereo Headset
LinkBuds S
Functions for a phone call
The functions available during a call may vary depending on the profile supported by your smartphone or mobile phone.
In addition, even if the profile is the same, the available functions may vary depending on the smartphone or mobile
phone.
Depending on the connected device or the application you are using, the functions may not work properly even if you try
to operate them with the headset.
Refer to the operating instructions supplied with the smartphone or mobile phone.
Supported profile: HFP (Hands-free Profile)
During standby/music playback
Hold your finger to the touch sensor on the right unit for about 2 seconds or more to start up the voice dial function of
the smartphone/mobile phone, or activate the Google app on an Android smartphone or Siri on an iPhone.
Outgoing call
You can use either the left or right unit to perform the following operations.
When only one unit of the headset is worn in your ear, operate the unit that is worn.
Tap the touch sensor twice quickly (with an interval of about 0.3 seconds) to cancel an outgoing call.
You can perform the following operations on the headset unit to which the noise canceling function is not assigned (the
right unit in the factory settings).
Hold your finger to the touch sensor for about 2 seconds or more to change the call device back and forth between
the headset and the smartphone/mobile phone.
Incoming call
You can use either the left or right unit to perform the following operations.
When only one unit of the headset is worn in your ear, operate the unit that is worn.
96
Page 97

Tap the touch sensor twice quickly (with an interval of about 0.3 seconds) to answer a call.
Hold your finger to the touch sensor for about 2 seconds or more to reject a call.
During call
You can use either the left or right unit to perform the following operations.
When only one unit of the headset is worn in your ear, operate the unit that is worn.
Tap the touch sensor twice quickly (with an interval of about 0.3 seconds) to finish a call.
You can perform the following operations on the headset unit to which the noise canceling function is not assigned (the
right unit in the factory settings).
Hold your finger to the touch sensor for about 2 seconds or more to change the call device back and forth between
the headset and the smartphone/mobile phone.
Supported profile: HSP (Headset Profile)
You can use either the left or right unit to perform the following operations.
When only one unit of the headset is worn in your ear, operate the unit that is worn.
Outgoing call
Tap the touch sensor twice quickly (with an interval of about 0.3 seconds) to cancel an outgoing call.
Incoming call
Tap the touch sensor twice quickly (with an interval of about 0.3 seconds) to answer a call.
During call
Tap the touch sensor twice quickly (with an interval of about 0.3 seconds) to finish a call.
Related Topic
Using only one unit of the headset
Receiving a call
Making a call
5-035-792-11(3)
Copyright 2022 Sony Corporation
97
Page 98
Help Guide
Wireless Noise Canceling Stereo Headset
LinkBuds S
Making a video call on your computer
When you make a video call on your computer, you can talk wirelessly from your headset.
Hint
When the settings of the video calling application cannot be checked or calling connections [Headset (LinkBuds S Hands-Free)]
cannot be selected, select [Headset (LinkBuds S Hands-Free)] on the settings of your computer to make connections. See
“Pairing and connecting with a computer (Windows® 10)”, “Pairing and connecting with a computer (Windows 8.1)” or “Pairing
and connecting with a computer (Mac)”.
Note
While Speak-to-Chat is enabled, if the microphone is not set up correctly, the Speak-to-Chat mode is activated when a voice is
detected, and the sound from the headset may be muted.
Depending on the video calling application you are using, microphone settings may not be available. If this is the case, disable
Speak-to-Chat using the “Sony | Headphones Connect” app.
Depending on the computer or application you are using, the headset may not work properly during a video call. This may be
improved by restarting the computer.
Related Topic
How to make a wireless connection to Bluetooth devices
Pairing and connecting with a computer (Windows® 10)
Connect the headset to your computer via Bluetooth connection.
1
Launch the video calling application on your computer.
2
Check the settings (*) of the video calling application.
When you make a video call on your computer, select calling connections (HFP/HSP) and not music playback
connections (A2DP). If you select music playback connections, a video call may not be available.
On the speaker settings, select calling connections [Headset (LinkBuds S Hands-Free)] (**). ([Headphones
(LinkBuds S Stereo)] (**) is for music playback connections.)
On the microphone settings, select calling connections [Headset (LinkBuds S Hands-Free)] (**). When the
microphone is not set up, the Speak-to-Chat mode activates when the headset detects the speech of the
person wearing the headset, and the sound from the headset is muted.
Depending on the video calling application you are using, calling connections [Headset (LinkBuds S HandsFree)] (**) or music playback connections [Headphones (LinkBuds S Stereo)] (**) may not be selectable on the
speaker or microphone settings, and only [LinkBuds S] may be displayed. If this is the case, select [LinkBuds
S].
As for frequently asked questions and answers, refer to the customer support website.
3
Depending on the video calling application you are using, this function may not be available.
*
Names may vary according to the computer or the video calling application you are using.
**
98
Page 99

Pairing and connecting with a computer (Windows 8.1)
Pairing and connecting with a computer (Mac)
Connecting to a paired computer (Windows 10)
Connecting to a paired computer (Windows 8.1)
Connecting to a paired computer (Mac)
Disconnecting Bluetooth connection (after use)
Speaking with someone while wearing the headset (Speak-to-Chat)
Customer support websites
5-035-792-11(3)
Copyright 2022 Sony Corporation
99
Page 100
Help Guide
Wireless Noise Canceling Stereo Headset
LinkBuds S
Disconnecting Bluetooth connection (after use)
Hint
When you finish playing music, the Bluetooth connection may terminate automatically depending on the Bluetooth device.
Related Topic
Turning off the headset
5-035-792-11(3)
Copyright 2022 Sony Corporation
Disconnect the Bluetooth connection by operating the Bluetooth device.
When you are wearing the headset, you will hear a notification sound from both headset units (or from the headset
unit you are wearing) at the same time.
1
Set the headset into the charging case.
The headset turns off.
2
100
 Loading...