

Page 1

User guide
Xperia XZ3
H8416/H9436/H94
93
Page 2

Contents
Getting started............................................................................. 6
About this User guide......................................................................
Overview.......................................................................................... 7
Assembly - Single SIM..................................................................... 8
Assembly - Dual SIM........................................................................ 9
Screen protection........................................................................... 10
Starting your device for the rst time........................................... 10
Why do I need a Google account?................................................. 11
Device security............................................................................ 13
Making sure your device is protected............................................ 13
Screen lock..................................................................................... 14
Fingerprint Manager ..................................................................... 14
SIM card protection........................................................................ 15
Using multiple SIM cards................................................................ 15
Finding the IMEI number(s) of your device................................... 16
Finding, locking or erasing a lost device ...................................... 17
Using location services.................................................................. 18
6
Learning the basics..................................................................... 19
Using the touchscreen................................................................... 19
Using Side sense............................................................................ 21
Turning the screen on or o.......................................................... 23
Smart backlight control................................................................. 24
Home screen.................................................................................. 24
Application screen......................................................................... 26
Shortcuts for easy actions............................................................. 28
Navigating applications................................................................. 28
Widgets........................................................................................... 31
Shortcuts and folders..................................................................... 31
Background ................................................................................... 33
Taking a screenshot....................................................................... 33
Notications................................................................................... 33
Icons in the status bar................................................................... 36
Battery and maintenance.......................................................... 38
Charging your device..................................................................... 38
Battery and power management................................................. 40
Updating your device.................................................................... 42
Maintenance using a computer.................................................... 43
Storage and memory.................................................................... 44
Backing up and restoring content................................................ 46
2
Page 3

Downloading applications......................................................... 48
Downloading applic
Downloading applications from other sources............................ 48
ations from Google Play............................... 48
Internet and networks................................................................ 49
Browsing the web.......................................................................... 49
Internet and MMS settings ........................................................... 49
Wi-Fi .............................................................................................. 50
Sharing your mobile data connection........................................... 52
Controlling data usage.................................................................. 53
Selecting a SIM card for data trac.............................................. 54
Selecting mobile networks............................................................ 54
Synchronising data on your phone........................................... 56
Synchronising with online accounts............................................. 56
Synchronising with Microsoft Exchange ActiveSync.................... 56
Basic settings............................................................................. 58
Accessing settings......................................................................... 58
Volume, vibration and sound........................................................ 58
Silence your device with Do not disturb....................................... 60
Screen settings............................................................................... 61
Screen pinning............................................................................... 62
Ambient display settings............................................................... 63
Application settings...................................................................... 64
Resetting your applications.......................................................... 65
Language settings......................................................................... 65
Date and time................................................................................ 66
Enhancing the sound output........................................................ 66
Multiple user accounts................................................................... 67
Typing text.................................................................................. 69
On-screen keyboards.................................................................... 69
Editing text..................................................................................... 70
Auto-ll ......................................................................................... 70
Calling.......................................................................................... 71
Making calls.................................................................................... 71
Receiving calls................................................................................ 72
Smart call handling........................................................................ 73
Forwarding calls............................................................................. 74
Blocking a number......................................................................... 74
Contacts...................................................................................... 76
Adding and editing contacts......................................................... 76
Grouping contacts.......................................................................... 77
Transferring contacts..................................................................... 77
Backing up contacts...................................................................... 78
3
Page 4

Messaging and chat................................................................... 80
Reading and sending mes
Messaging settings........................................................................ 81
Video chat...................................................................................... 82
Setting up email............................................................................ 82
sages................................................... 80
Music.......................................................................................... 83
Transferring music to your device ................................................ 83
Listening to music......................................................................... 83
Camera....................................................................................... 86
Getting to know your camera....................................................... 86
Exposure, colour and light conditions.......................................... 90
Setting the right focus................................................................... 93
People, seles and smiling faces.................................................. 94
Moving objects.............................................................................. 95
Using various capturing modes.................................................... 96
Resolution and memory................................................................ 99
Diagnosing your camera............................................................. 100
Additional camera settings.......................................................... 101
Photos and videos in Album.................................................... 103
Viewing photos and videos......................................................... 103
Album home screen menu.......................................................... 104
Sharing and managing photos and videos................................. 105
Hiding photos and videos........................................................... 106
Connectivity.............................................................................. 107
Mirroring the screen of your device wirelessly on a TV.............. 107
Connecting your device to USB accessories................................ 107
NFC (Near Field Communication)................................................ 108
Bluetooth wireless technology.................................................... 110
Smart apps and features that save you time........................... 113
Using your device as a wallet....................................................... 113
Clock and Calendar................................................................... 114
Calendar........................................................................................ 114
Clock.............................................................................................. 114
Accessibility............................................................................... 117
Magnication................................................................................ 117
Font size........................................................................................ 117
Display size.................................................................................... 117
Colour correction........................................................................... 117
TalkBack........................................................................................ 118
Mono audio................................................................................... 118
Switch Access................................................................................ 118
4
Page 5

Support and legal...................................................................... 119
Suppor
Restarting, resetting and repairing.............................................. 119
Warranty, SAR, and usage guidelines......................................... 120
Legal information.......................................................................... 121
t application...................................................................... 119
5
Page 6

Getting started
About this User guide
T
his is the Xperia XZ3 User guide for the Android™ 9.0 software version. If you’re
not sure which software version your device is running, you can check it in the
Settings menu.
Note
System and application updates can present the features in your device in another way than
describe
more information about software updates, see
To check the current software version and model number of your device
• Find and tap Settings > System > About phone. The current software version is
displayed under Build number. The current model number is displayed under
Model.
Limitations to services and features
Some of the services and features described in this User guide may not be
supported in all countries or regions, or by all networks or service providers. The
GSM International Emergency Number can always be used in all countries, regions,
networks and by all service providers, provided that the device is connected to the
mobile network. Please contact your network operator or service provider to
determine the availability of any specic service or feature and whether additional
access or usage fees apply.
The use of certain features and applications described in this guide may require
access to the internet. You may incur data connection charges when you connect
to the internet with your device. Contact your wireless service provider for more
information.
d in this User guide. The Android version might not be aected in an update. For
Updating your device
on page 42.
6
Int
ernet version. For personal use only.
Page 7
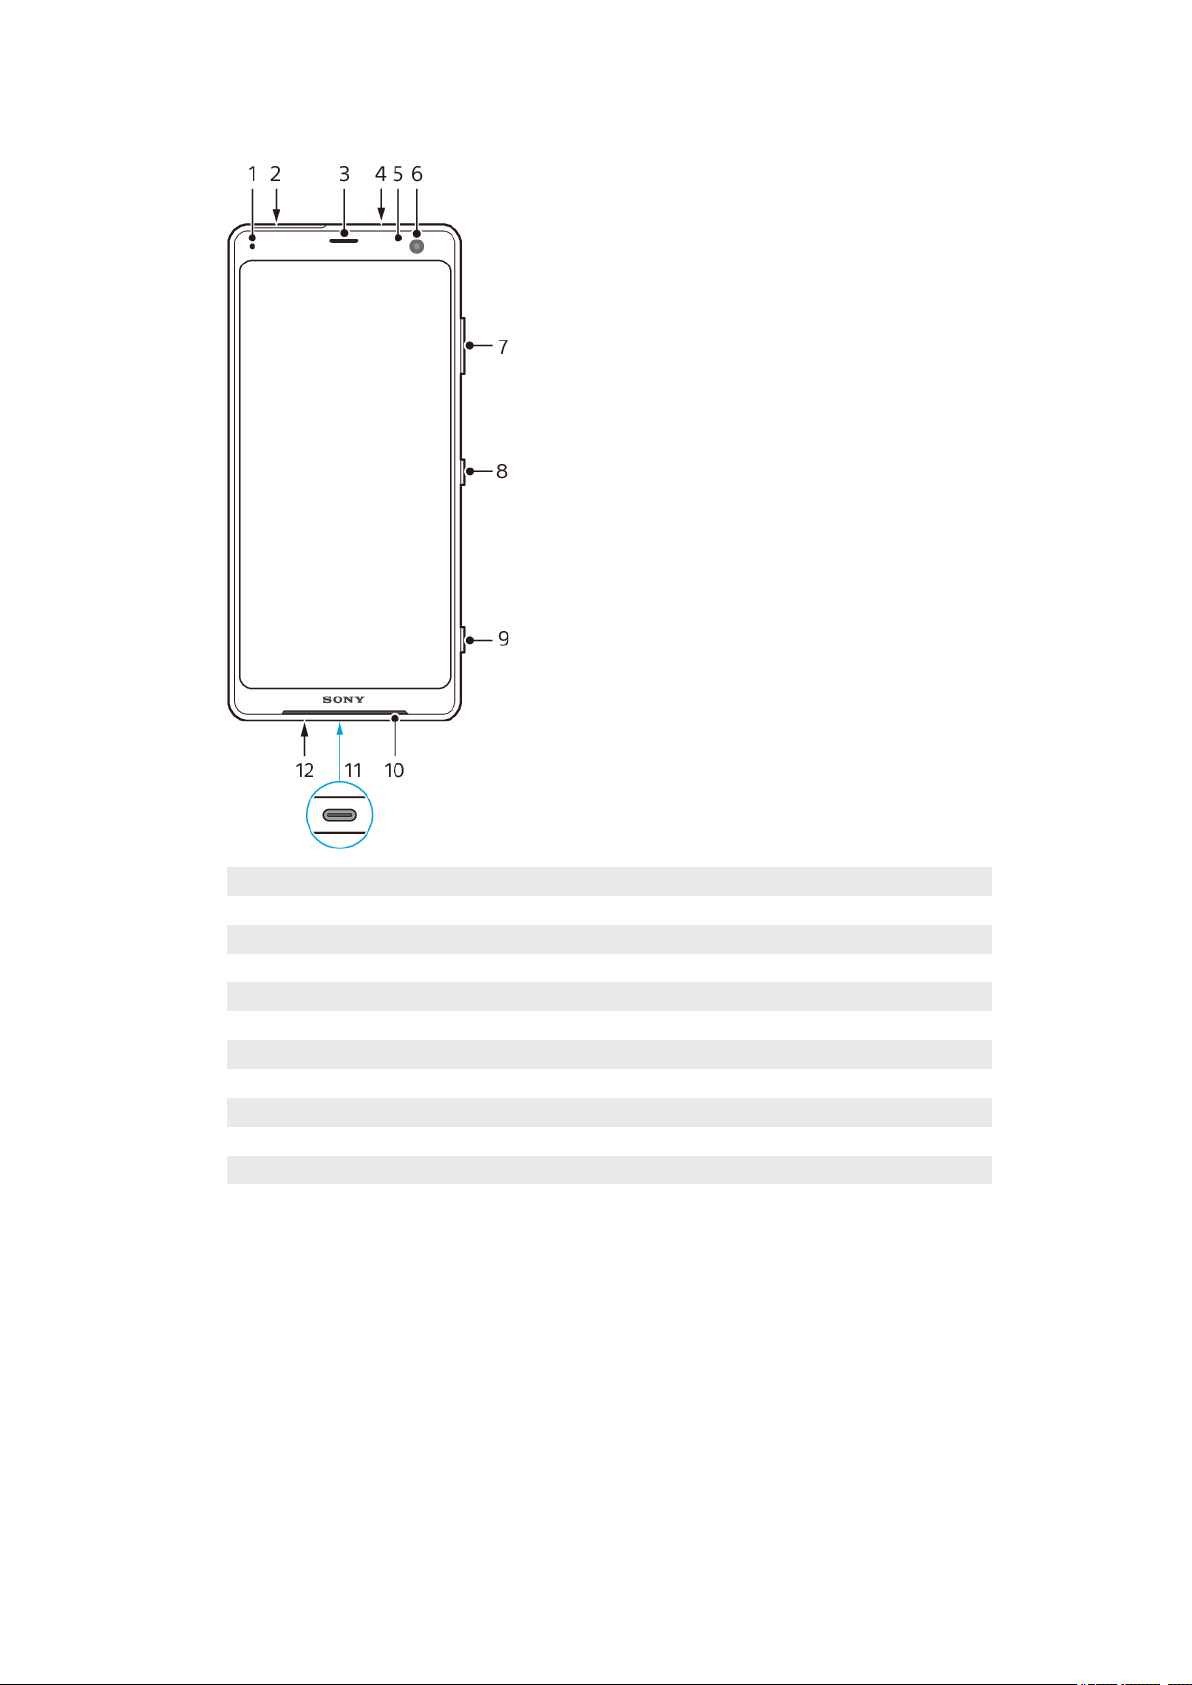
Overview
1 Charging/Notication light
2 Nano SIM/Memory card slot
3 Ear speaker/Second loudspeaker
4 Second microphone
5 Proximity/Light sensor
6 Front camera
7 Volume/Zoom key
8 Power key
9 Camera key
10 Main loudspeaker
11 USB port/Charger/Audio adapter
12 Main microphone
7
ernet version. For personal use only.
Int
Page 8
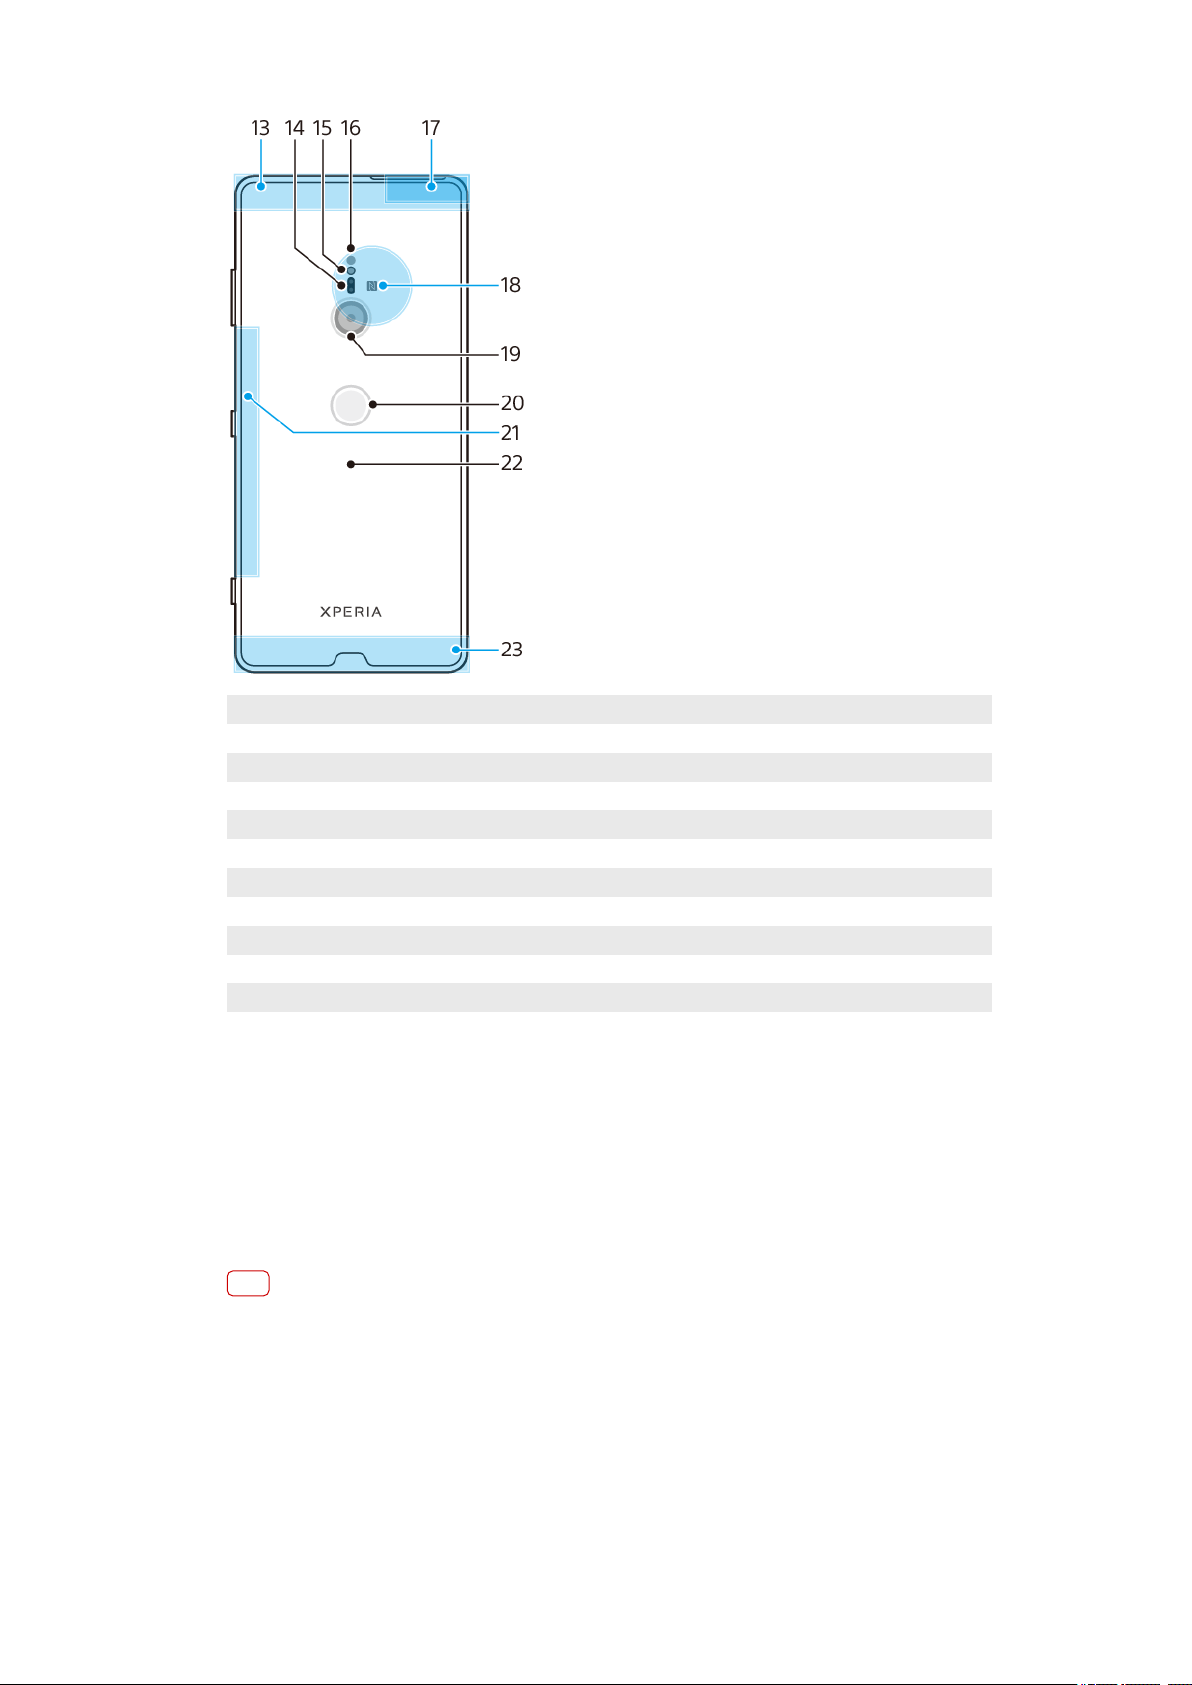
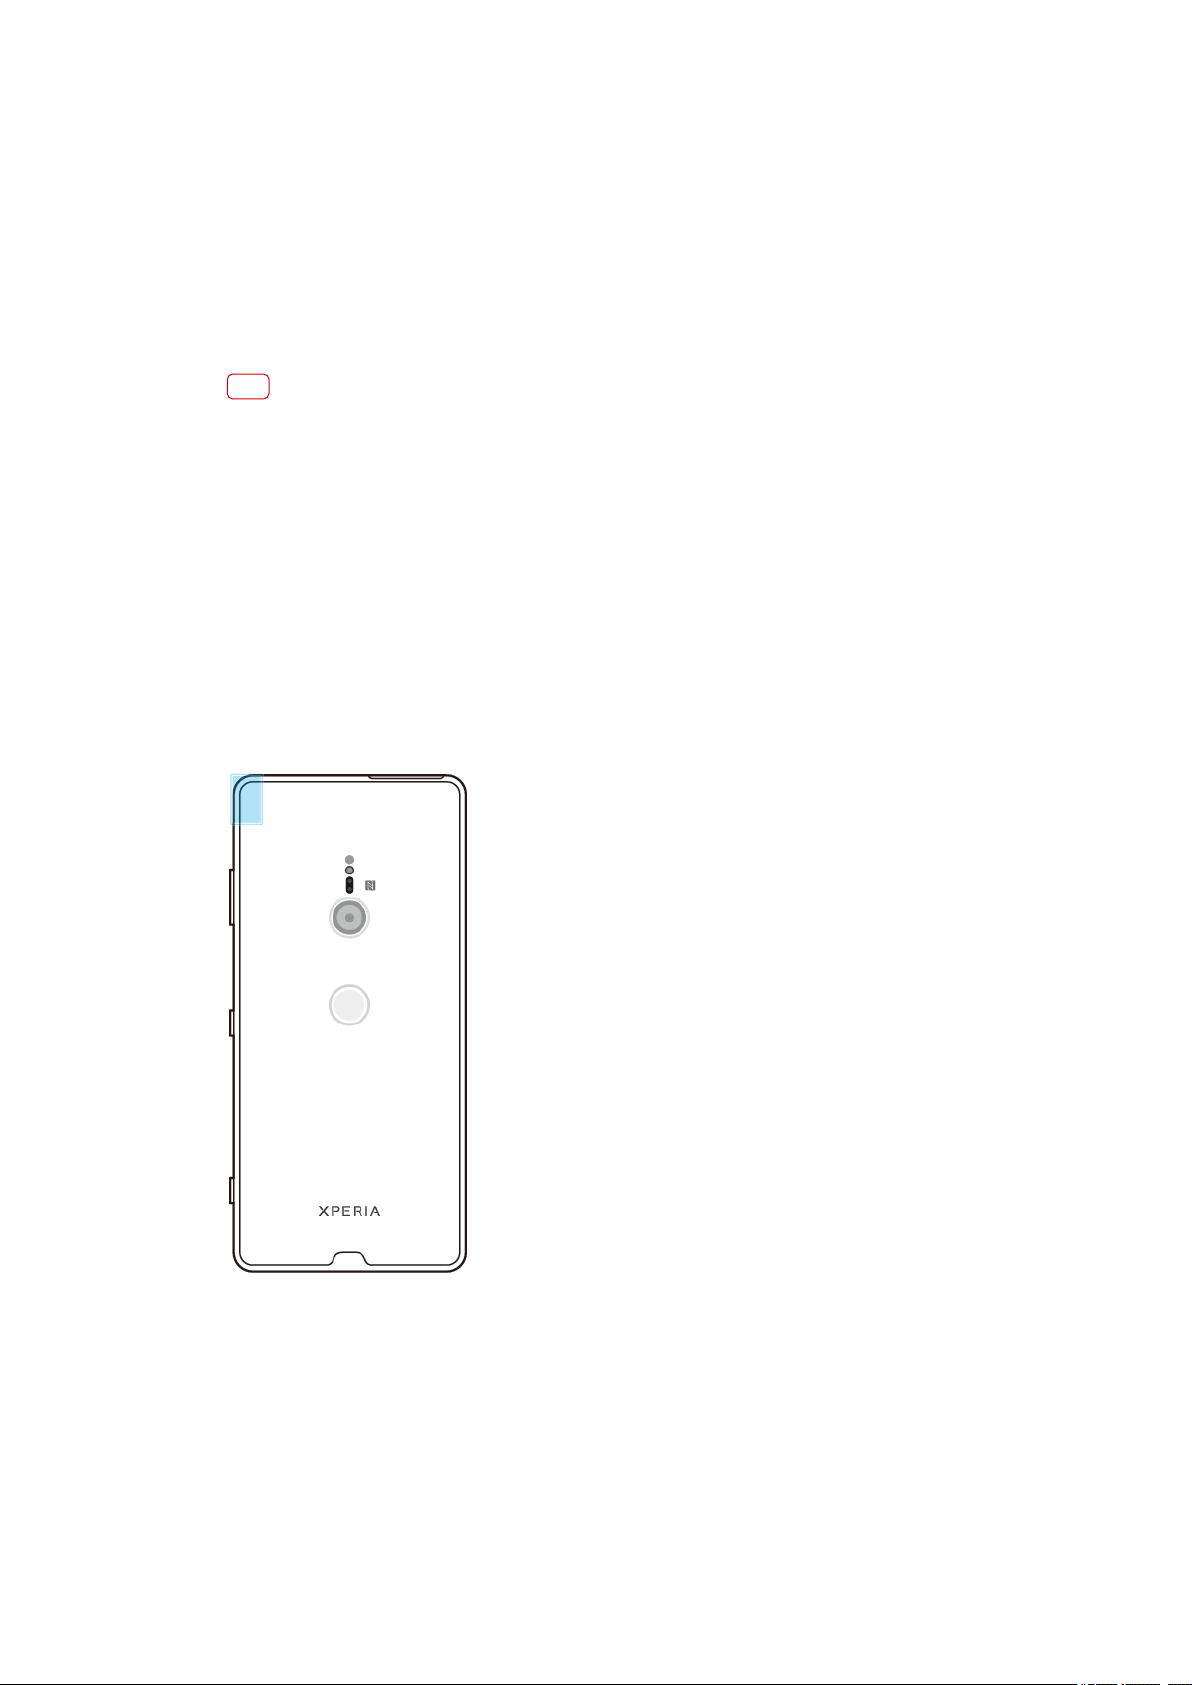
13 Sub cellular antenna area
14 Laser AF sensor
15 Flash LED
16 RGBC IR sensor
17 Wi-Fi®/Bluetooth® antenna area
18 NFC™ detection area
19 Main camera
20 Fingerprint sensor
21 Sub Wi-Fi antenna
22 Wireless charging coil
23 Main cellular antenna area
Assembly - Single SIM
our device only supports nano SIM cards. Single SIM devices allow you to use one
Y
SIM card and a memory card.
The SIM and memory cards go in dierent parts of the nano SIM and memory card
tray. Make sure you don’t confuse the two.
For information on how to check if your device is Single SIM or Dual SIM, see
Finding the IMEI number(s) of your device
Note
To prevent data loss, make sure you turn o your devic
before you drag out the holder to remove the nano SIM card or memory card from the
device.
on page 16.
e or unmount the memory card
8
Int
ernet version. For personal use only.
Page 9
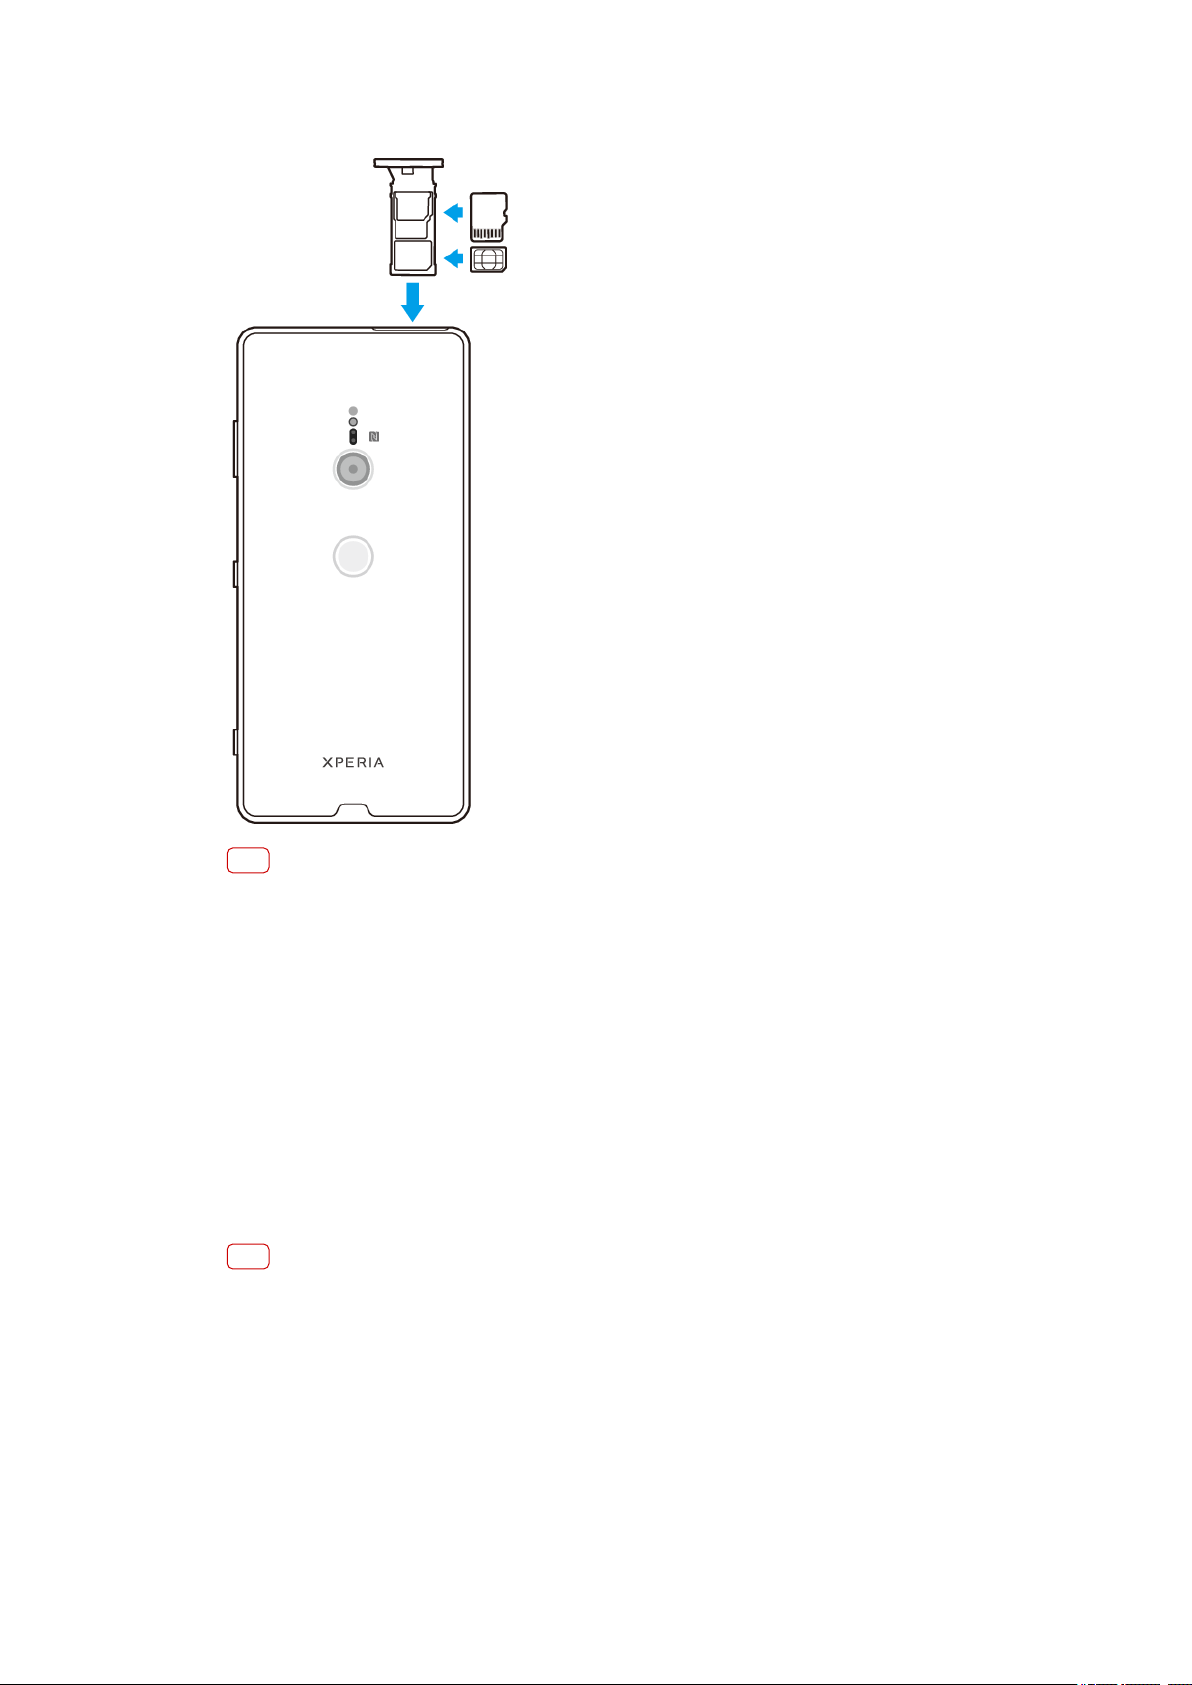
To insert a nano SIM card and a memory card
Note
Do not cut your SIM card, as this may damage your device.
1 Dr
ag out the SIM card tray.
2 Place the SIM card securely in the SIM card tray.
3 Place the memory card securely in the tray, in the correct orientation.
4 Gently push the tray back into the slot until it ts into place.
Assembly - Dual SIM
Your device only supports nano SIM cards. Dual SIM devices support the use of
either two nano SIM cards or a nano SIM card and a memory card.
Dual SIM devices are not available in all markets or from all operators.
For information on how to check if your device is Single SIM or Dual SIM, see
Finding the IMEI number(s) of your device
Note
To prevent data loss, make sure you turn o your devic
before you drag out the holder to remove the nano SIM card (or cards) or memory card from
the device.
on page 16.
e or unmount the memory card
9
Int
ernet version. For personal use only.
Page 10
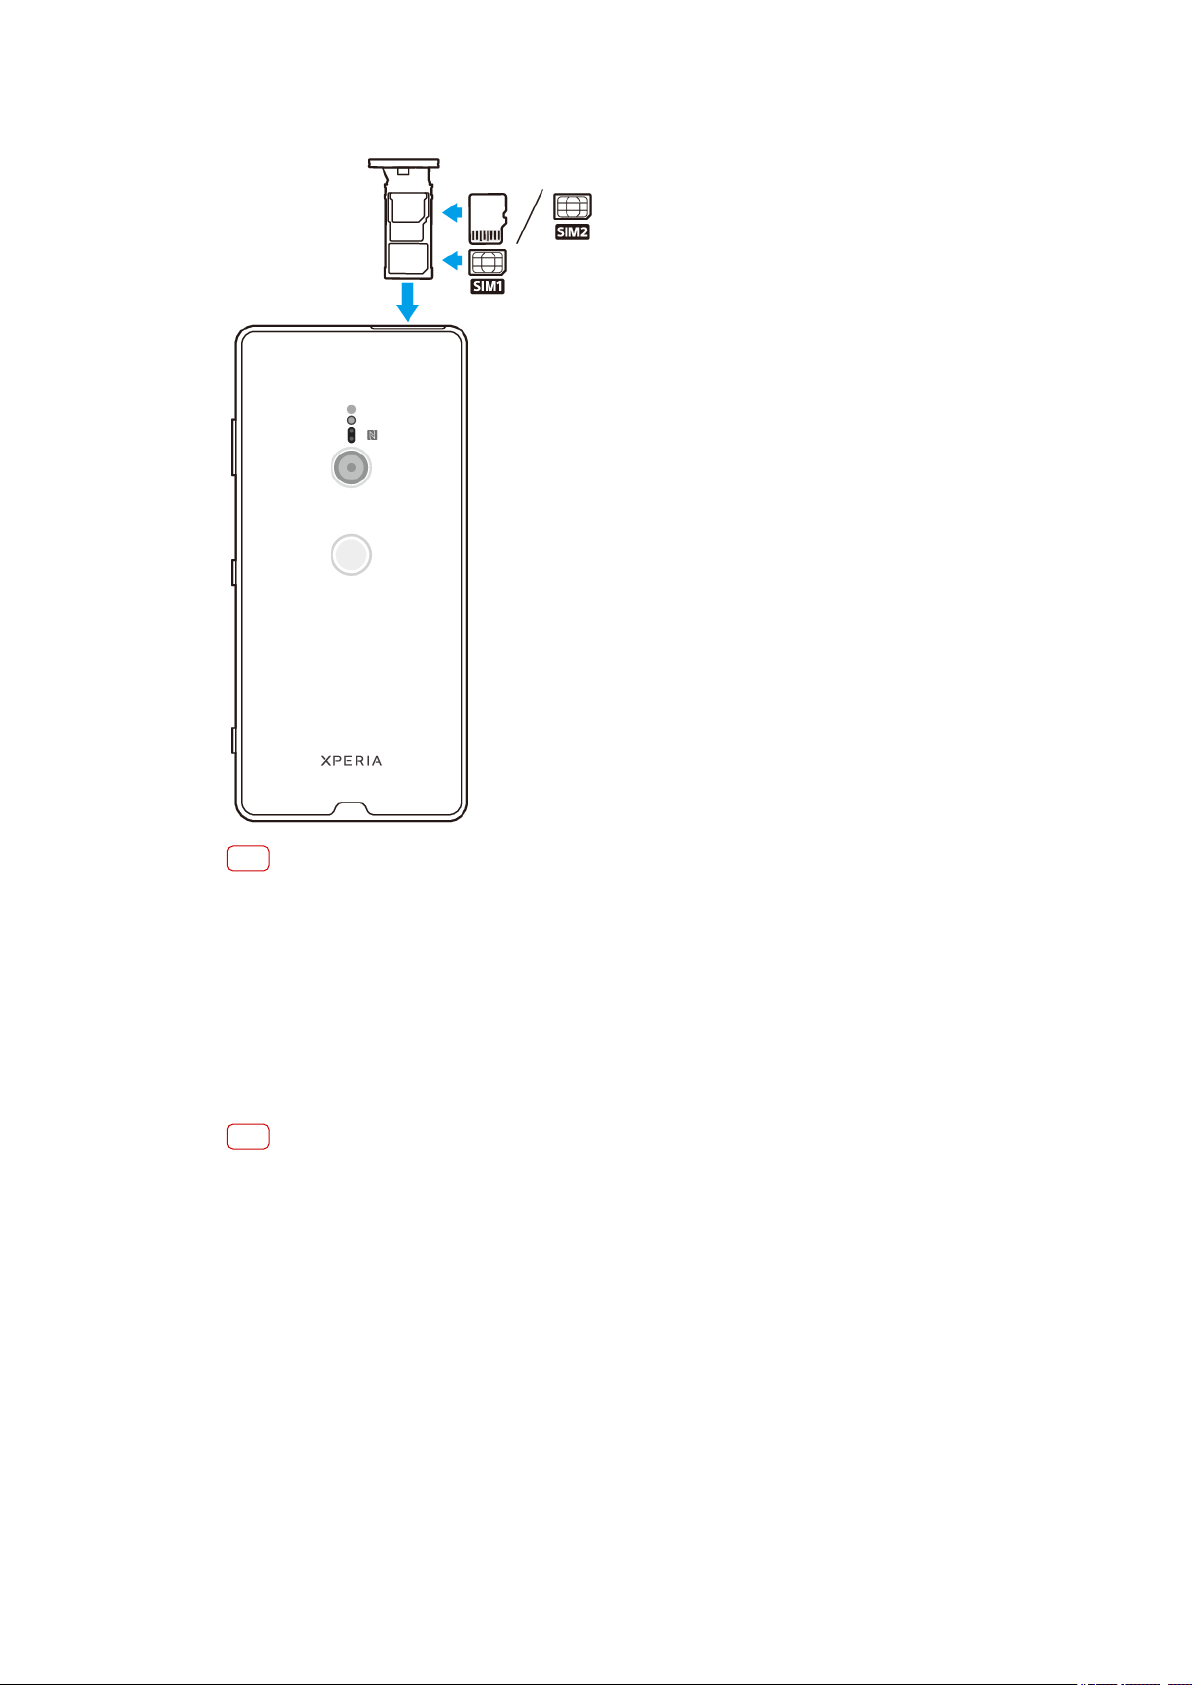
To insert either two nano SIM cards or a nano SIM card and a memory card
Note
Do not cut your SIM card, as this may damage your device.
1 Dr
ag out the SIM card tray.
2 Place the main SIM card securely in position for SIM1.
3 Place either the second SIM card or the memory card securely in the tray, in the
correct orientation.
4 Gently push the SIM card tray back into the slot until it ts into place.
Screen protection
Note
Before using your device, remove all protection lms t
o enable full functionality.
Screen covers and protectors may help you protect your device against damage.
We recommend you use only those screen covers intended for your Xperia device.
The use of third-party screen protection accessories may prevent your device from
working correctly by covering sensors, lenses, speakers, or microphones and can
invalidate the warranty.
Starting your device for the rst time
It is recommended that you charge the battery for at least 30 minutes before
starting up your device for the rst time. You can still use your device while it is
charging. For more information on charging, see
38.
Charging your device
on page
10
Int
ernet version. For personal use only.
Page 11

The rst time you st
art your device, a setup guide helps you to congure basic
settings, personalise your device, and sign in to your accounts, for example a
Google™ account.
To turn on your device
1 Long press the power key until your device vibrates.
2 Enter your SIM card PIN when requested, then tap
3 W
ait a moment for your device to start.
Hint
Your SIM card PIN is initially supplied by your network operator, but you can change it later
fr
om the Settings menu. To correct a mistake made while entering your SIM card PIN, tap
(Backspace icon).
T
o turn o the device
(Done icon).
1 Long press the power key until the options menu opens.
2 Tap Power o.
Note
It may take a while for the device to shut down.
hy do I need a Google account?
W
Your device from Sony runs on the Android platform developed by Google. A range
of Google applications and services is available on your device when you purchase
it, for example, Gmail™, Google Maps™, YouTube™, and the Play Store™
application. To get the most out of these services, you need a Google account. For
example, a Google account enables you to do the following:
• Download and install applications from Google Play.
• Synchronise your email, contacts, and calendar using Gmail.
• Chat with friends using the Google Duo™ application.
• Synchronise your browsing history and bookmarks using the Google Chrome™
web browser.
• Identify yourself as the authorised user after a software repair using Xperia
Companion.
• Remotely nd, lock, or clear a lost or stolen device using the Find my device
services.
For more information about Android and Google, go to
support.google.com
.
http://
Note
It is crucial to remember your Google account user name and password, since in some
tions, you may need it to identify yourself for security reasons. If you fail to give your
situa
Google user name and password in such situations, your device is locked. Also, if you have
more than one Google account, make sure to enter the details for the relevant account.
To set up a Google account on your device
1 Find and tap Settings > Accounts > Add account > Google.
2 Follow the on-screen instructions to create a Google account, or sign in if you
already have an account.
Hint
You can also create a Google account using the setup guide when you rst st
or go online later and create an account at
https://myaccount.google.com/
art your device,
.
To remove a Google account
1 Find and tap Settings > Accounts.
11
Int
ernet version. For personal use only.
Page 12

2 Sele
ct the Google account that you want to remove.
3 Tap Remove account.
4 Tap Remove account again to conrm.
Note
If you remove your Google account, any security features that are linked to your Google
ac
count will no longer be available.
12
Int
ernet version. For personal use only.
Page 13

Device security
Making sur
Your device includes security options, strongly recommended in case of loss or
theft.
Note
When using a security option to protect your device, it is crucial to remember the details
pr
ovided at set up.
e your device is protected
Screen lock
Set a secure screen lock on your device using a PIN, password, pattern, or
ngerprint to prevent others from using your device without permission. Once the
screen lock is set, it is not possible to unlock the screen or erase the content via a
Erase all data (factory reset) without providing the screen lock information.
Hint
If you add your contact information on the screen lock, for example your email, this
ormation can be used to get your device back if you lose it.
inf
Google account
Add a Google account so that you can use the Find my device service. In some
situations, you may also need to identify yourself for security reasons using your
Google account.
Find my device
Use the Find my device service to remotely locate, lock, unlock, or erase the
content on a lost device. After you have signed in to your Google account, Find my
device is turned on by default.
SIM card lock
Lock your SIM cards with a PIN to protect your subscription against misuse. The PIN
is required every time you restart your device.
IMEI number
Keep a copy of the IMEI number. If your device is stolen, some network providers
can use this number to stop the device from accessing the network in your country
or region.
Hint
Dual SIM devices have two IMEI numbers.
Back
up
Back up the content on your device in case your device is damaged, lost or stolen.
See
Backing up and restoring content
on page 46.
13
ernet version. For personal use only.
Int
Page 14

Screen lock
W
hen the screen is locked you have to unlock it with a swipe gesture or with your
personal pattern, PIN, password or ngerprint. Initially, the unprotected screen
swipe is set, but it is recommended to use a more secure screen lock to protect
your device.
The security level of each lock type is listed below in order of weakest to strongest:
• Swipe: no protection, but you have quick access to the Home screen.
• Pattern: draw a simple pattern with your nger to unlock your device.
• PIN: enter a numeric PIN of at least four digits to unlock your device.
• Password: enter an alpha-numeric password to unlock your device.
• Fingerprint: place your registered nger on the sensor to unlock your device.
Fingerprints need to be registered with Fingerprint Manager before use. To
congure the notications on the lock screen, see
Hint
The Smart Lock feature lets you set your device to unlock automatically in certain situations,
such as when c
http://www.support.google.com/
onnected to a Bluetooth device or carrying your device with you. Go to
and search “smart lock” for more information.
To create or change a screen lock
Note
It is very important that you remember your screen lock when using a pattern, PIN or
sword. If you forget this information, it may not be possible to restore important data
pas
such as contacts and messages.
1 Find and tap Settings > Lock screen & security > Screen lock.
2 If requested, conrm your current screen lock.
3 Choose an option and follow the on-screen instructions.
4 When a secure screen lock is used, you can set the power key to lock the screen,
set the screen lock activation time and create a lock screen message by tapping
(Settings icon).
Notications
on page 33.
Hint
If you use a Microsoft® Exchange ActiveSync® (EAS) account, the EAS security settings may
limit the lock scr
check the implemented network security policies.
een type to only a PIN or password. Contact your network administrator to
Fingerprint Manager
Register your ngerprint to use it as an additional security method for unlocking
your device or authenticating purchases. You can register up to 5 ngerprints on
your device.
The pattern, PIN, or password screen lock serves as a backup unlock method when
a ngerprint is used as a screen lock. Before registering your ngerprint, make sure
the sensor is clean and without any visible moisture.
To register a ngerprint for the rst time
1 Find and tap Settings > Lock screen & security > Fingerprint Manager.
2 Tap Next. If prompted conrm your pattern, PIN, or password, or select your
backup screen lock method and follow the on-screen instructions to set it up.
3 Tap Next and follow the on-screen instructions to complete ngerprint registration.
To register additional ngerprints
1 Find and tap Settings > Lock screen & security > Fingerprint Manager.
2 Conrm your pattern, PIN, or password.
3 Tap Add ngerprint, then follow the on-screen instructions.
14
ernet version. For personal use only.
Int
Page 15

To delete a registered ngerprint
1 Find and t
ap Settings > Lock screen & security > Fingerprint Manager.
2 Conrm your pattern, PIN, or password.
3 Tap
(Delete icon) to delete the ngerprint.
T
o rename a registered ngerprint
1 Find and tap Settings > Lock screen & security > Fingerprint Manager.
2 Select a registered ngerprint in the list, then enter a name and tap OK.
SIM card protection
You can lock and unlock each SIM card that you use in your device with a PIN.
When a SIM card is locked, the subscription linked to the card is protected against
misuse, meaning that you have to enter a PIN every time you start your device.
If you enter the PIN incorrectly too many times, your SIM card will get blocked. You
then need to enter your PUK (Personal Unblocking Key) and a new PIN. Your PIN
and PUK are supplied by your network operator.
To set up a SIM card lock
1 Find and tap Settings > Lock screen & security > Advanced > SIM card lock.
2 Dual SIM users, select a SIM card.
3 Tap the Lock SIM card switch to enable.
4 Enter the SIM card PIN and tap OK. The SIM card lock is now active and you will be
prompted to enter your PIN every time you restart your device.
To change the SIM card PIN
1 Find and tap Settings > Lock screen & security > Advanced > SIM card lock.
2 Dual SIM users, select a SIM card.
3 Tap Change SIM PIN.
4 Enter the old SIM card PIN and tap OK.
5 Enter the new SIM card PIN and tap OK.
6 Re-type the new SIM card PIN and tap OK.
To unlock a blocked SIM card using the PUK code
1 Enter the PUK code and tap
(Done icon).
2 Enter a new PIN code and tap (Done icon).
3 Re-enter the new PIN code and tap (Done icon).
Note
If you enter an incorrect PUK code too many times, you need to contact your network
oper
ator to get a new SIM card.
Using multiple SIM cards
Note
This function only applies for Dual SIM devices.
Dual SIM devic
incoming communication to both SIM cards and select which number to place
outgoing communication from. Before using multiple SIM cards, you need to
enable them and select a SIM card which will handle data trac.
You can forward calls that come in on SIM 1 to SIM 2 when SIM 1 is unreachable,
and vice versa. This function is called Dual SIM reachability. You must enable it
manually. See
es work with either one or two SIM cards inserted. You can get
Forwarding calls
on page 74.
15
Int
ernet version. For personal use only.
Page 16

To enable or disable the use of two SIM cards
1 Find and t
ap Settings > Network & Internet > Advanced > Dual SIM.
2 Tap the SIM1 and SIM2 switches to enable or disable the SIM cards.
To rename a SIM card
1 Find and tap Settings > Network & Internet > Advanced > Dual SIM.
2 Select a SIM card and enter a new name for it.
3 Tap OK.
To select which SIM card handles data trac
1 Find and tap Settings > Network & Internet > Advanced > Dual SIM > Mobile
data.
2 Select the SIM card you want to use for data trac.
Hint
For higher data speeds, select the SIM card that supports the fastest mobile network, for
e
xample, LTE.
Finding the IMEI number(s) of your device
Your device has one or two unique identication numbers that are referred to as
IMEI or Product ID. You should keep a copy of this. You may require it if your device
is stolen or when contacting support.
Dual SIM devices only: Your device has two IMEI numbers, one for each SIM card
slot.
To view your IMEI number(s) using the dialpad
1 Find and tap
2 T
3 Ent
(Dialpad icon).
ap
er *#06# into the dialpad. The IMEI number(s) are displayed automatically.
(Phone icon).
16
Int
ernet version. For personal use only.
Page 17
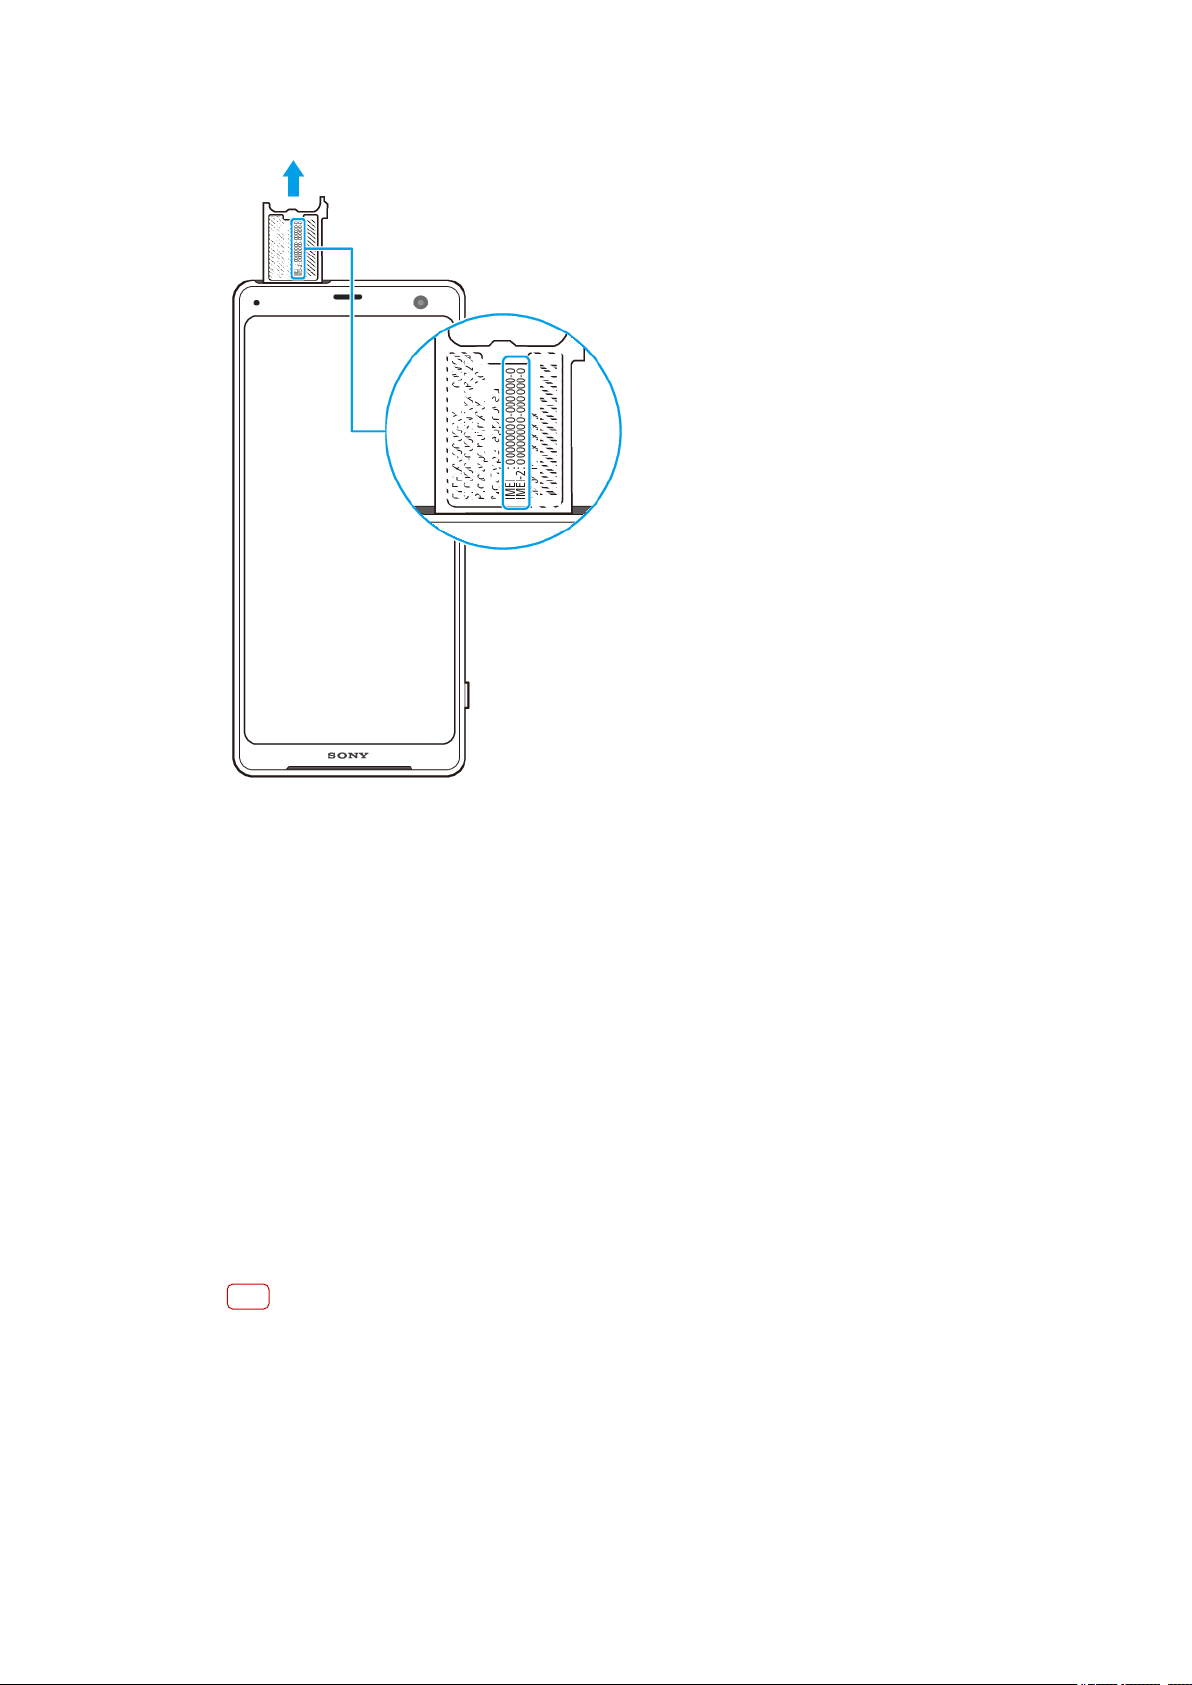
To view your IMEI number(s) on the label strip
1 Dr
ag out the SIM card tray.
2 Drag the strip outwards using your ngernail. The strip displays the IMEI
number(s).
Finding, locking or erasing a lost device
Google oers a location and security web service called Find my device. After you
have signed in to a Google account, Find my device is turned on by default. If you
lose your device, you can use Find my device to:
• Find and show where your device is located on a map.
• Lock your device and present a message on the lock screen.
• Unlock your device and reset it by erasing its content.
• Activate the ringer, even if the sound is turned o.
Your device must be turned on, have an internet connection, and have the location
service activated. The Find my device service may not be available in all countries
or regions.
For additional information about Find my device, go to
support.google.com/
Note
If you erased the content on your device using Find my device, you must enter the
username and pas
any Google account which you have set up on your device as an owner. If you can’t give this
information during the setup, you won’t be able to use your device at all after a reset.
and search for “Find my device.”
sword for a Google account in order to use your device again. This can be
https://
To verify that your device can be found
• Go to
https://www.google.com/android/nd
account.
Int
ernet version. For personal use only.
and sign in using your Google
17
Page 18
Using location services
L
ocation services allow applications such as Maps and the camera to use
information from your mobile or Wi-Fi network as well as GPS (Global Positioning
System) information to determine your approximate location. If you’re not within a
clear line of sight to GPS satellites, your device can determine your location using
the Wi-Fi function. And if you’re not within range of a network, your device can
determine your location using your mobile network.
In order to use your device to nd out where you are, you need to enable location
services.
Note
You may incur data connection charges when you connect to the internet from your device.
T
o enable or disable location services
1 Find and tap Settings > Lock screen & security > Location.
2 Tap the switch to enable or disable location services.
Improving GPS accuracy
The rst time you use the GPS function in your device, it can take a few minutes for
your location to be found. To help the search, make sure you have a clear view of
the sky. Stand still and don’t cover the GPS antenna. GPS signals can pass through
clouds and plastic, but not through most solid objects such as buildings and
mountains. If your location isn’t found after a few minutes, move to another
location.
18
ernet version. For personal use only.
Int
Page 19
Learning the basics
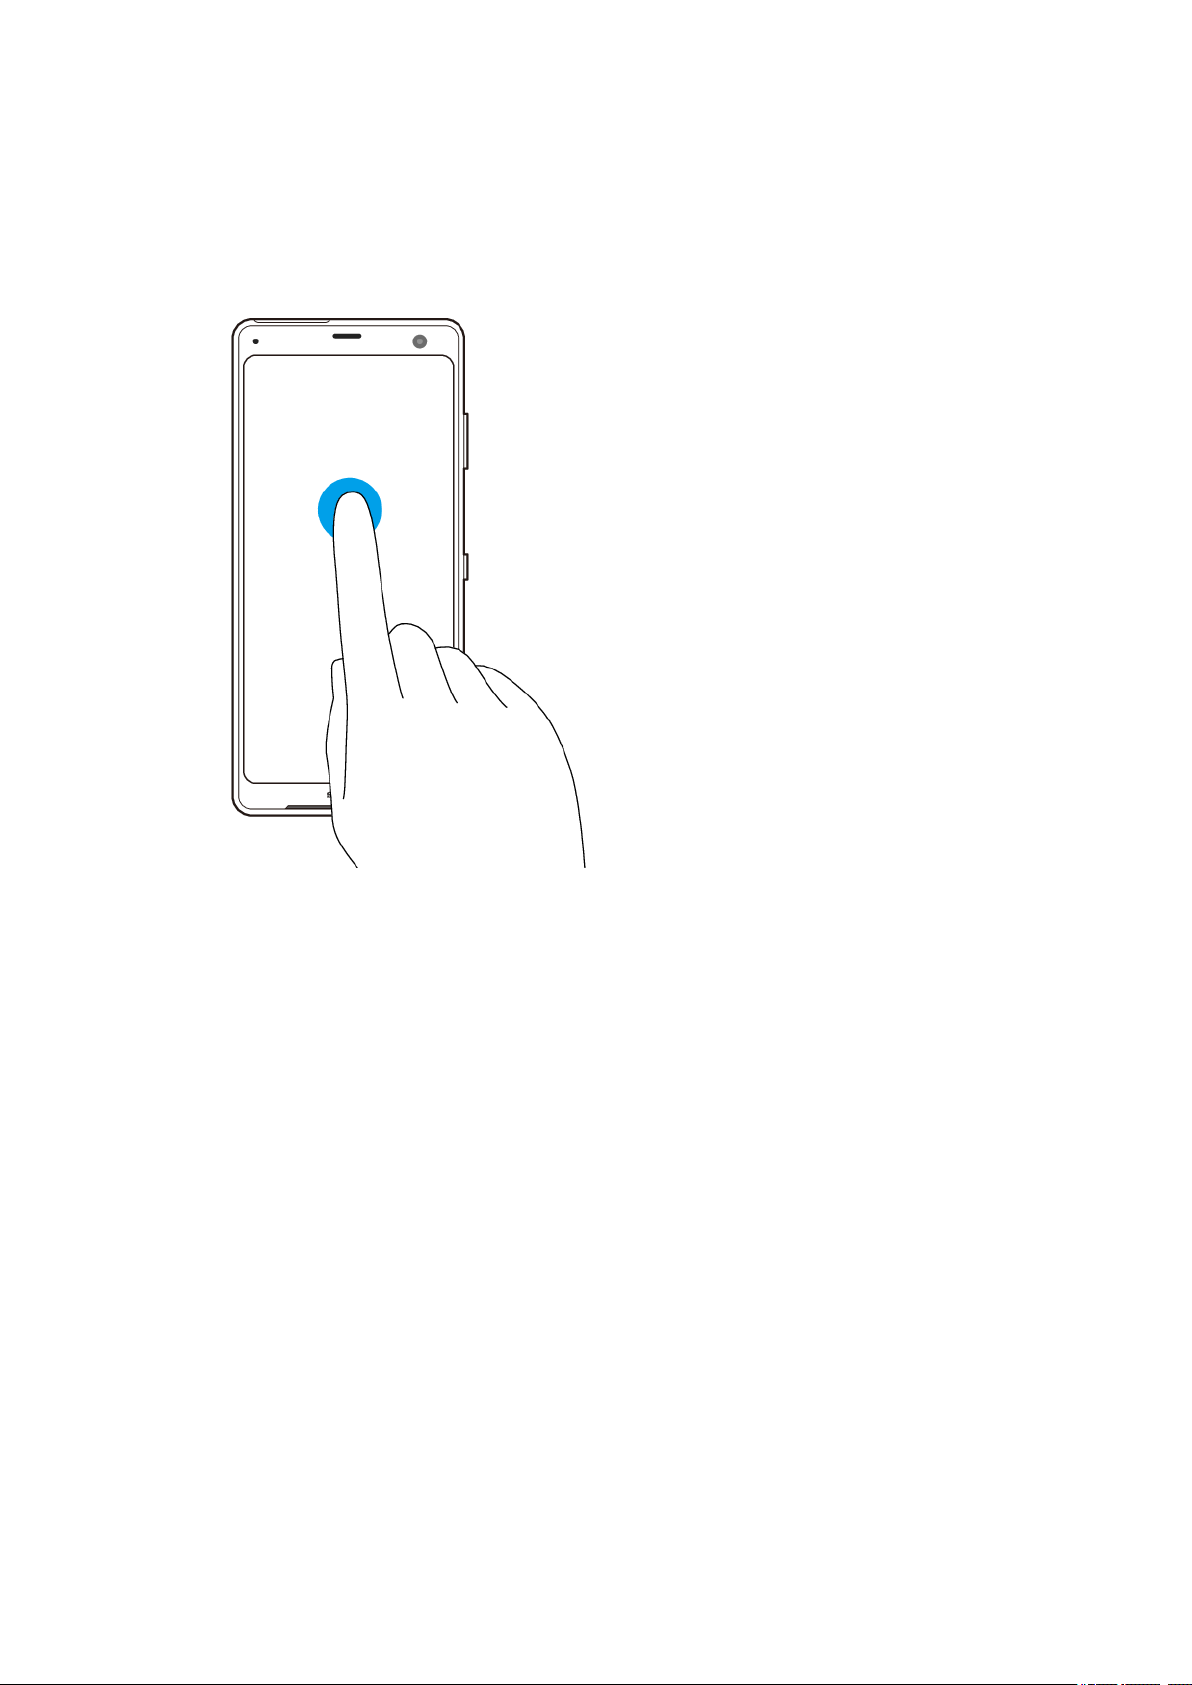
Using the t
Tapping
ouchscreen
• Open or sele
• Mark or unmark a checkbox or option.
• Enter text using the on-screen keyboard.
ct an item.
19
ernet version. For personal use only.
Int
Page 20
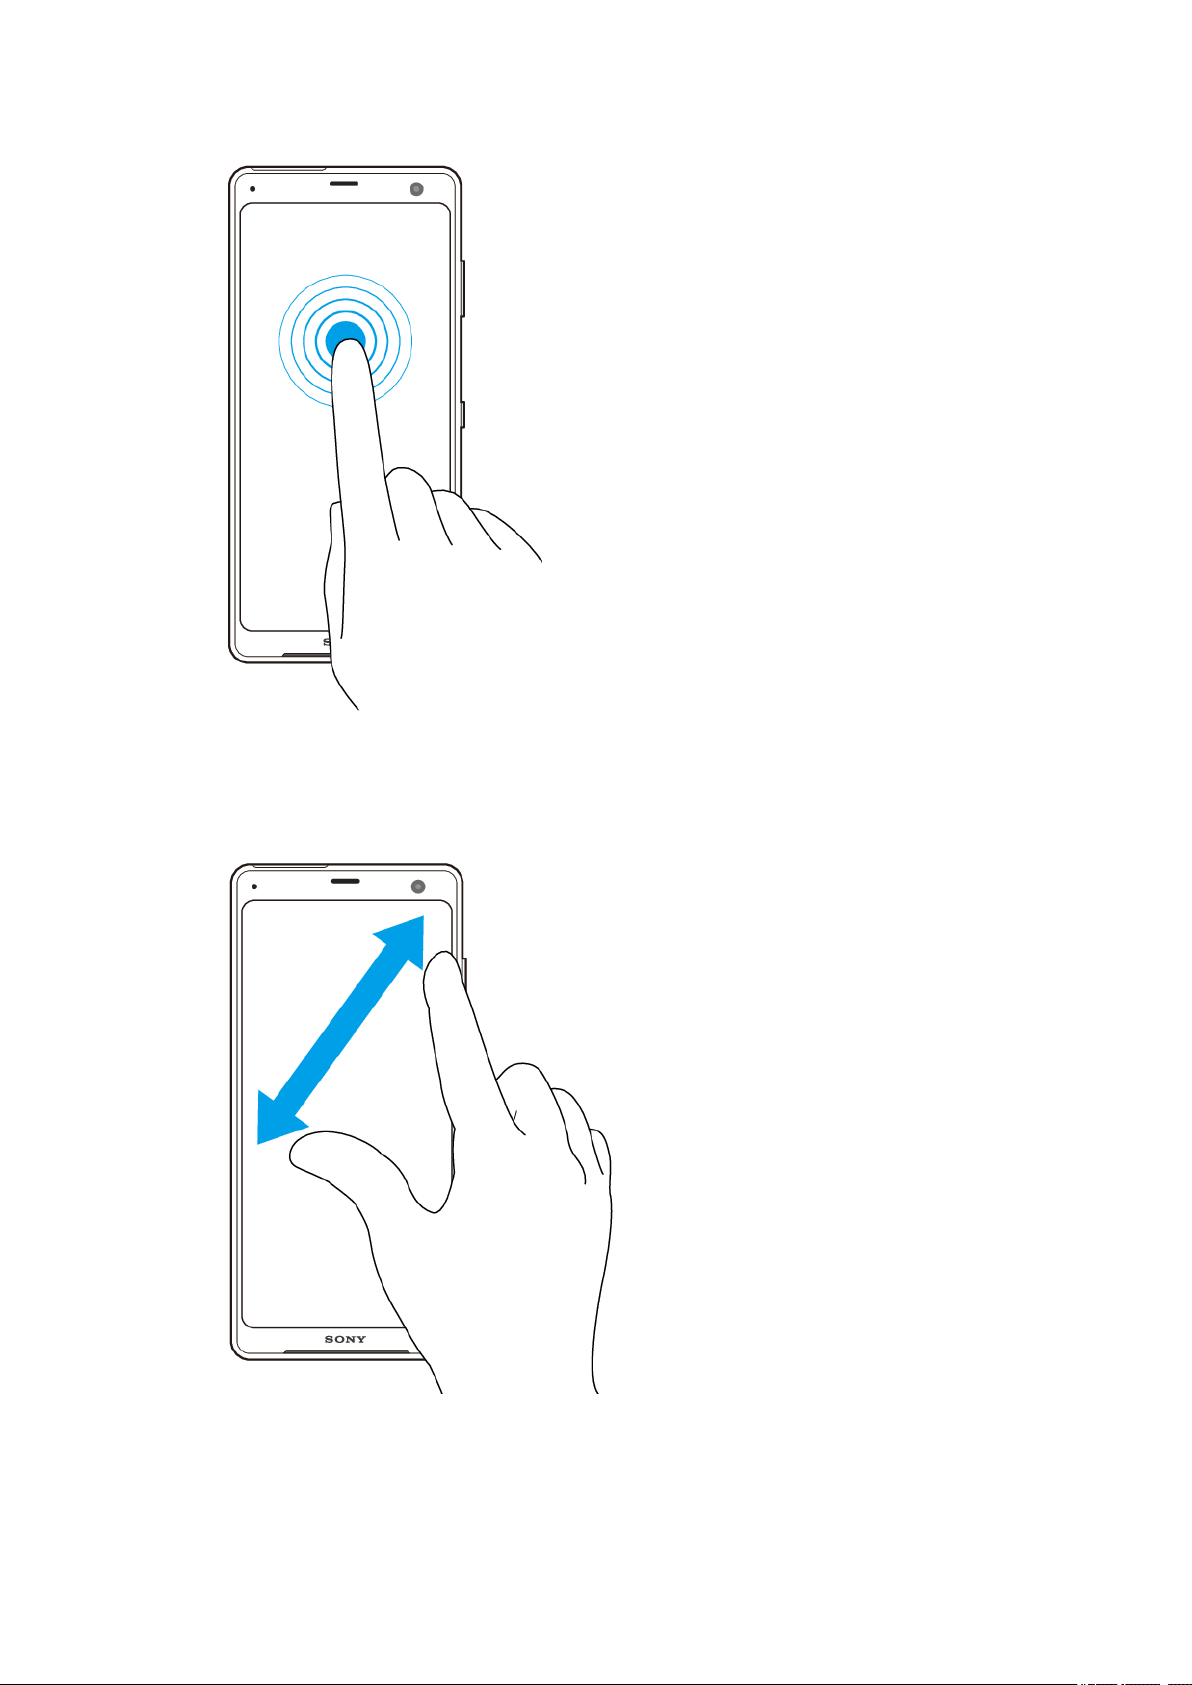
Touching and holding
• Move an it
• Activate selection mode, for example, to select several items from a list.
em.
Pinching in and out
• Pinch in and out on web pages, photos and maps, and when you’re taking photos
or shooting videos.
20
ernet version. For personal use only.
Int
Page 21

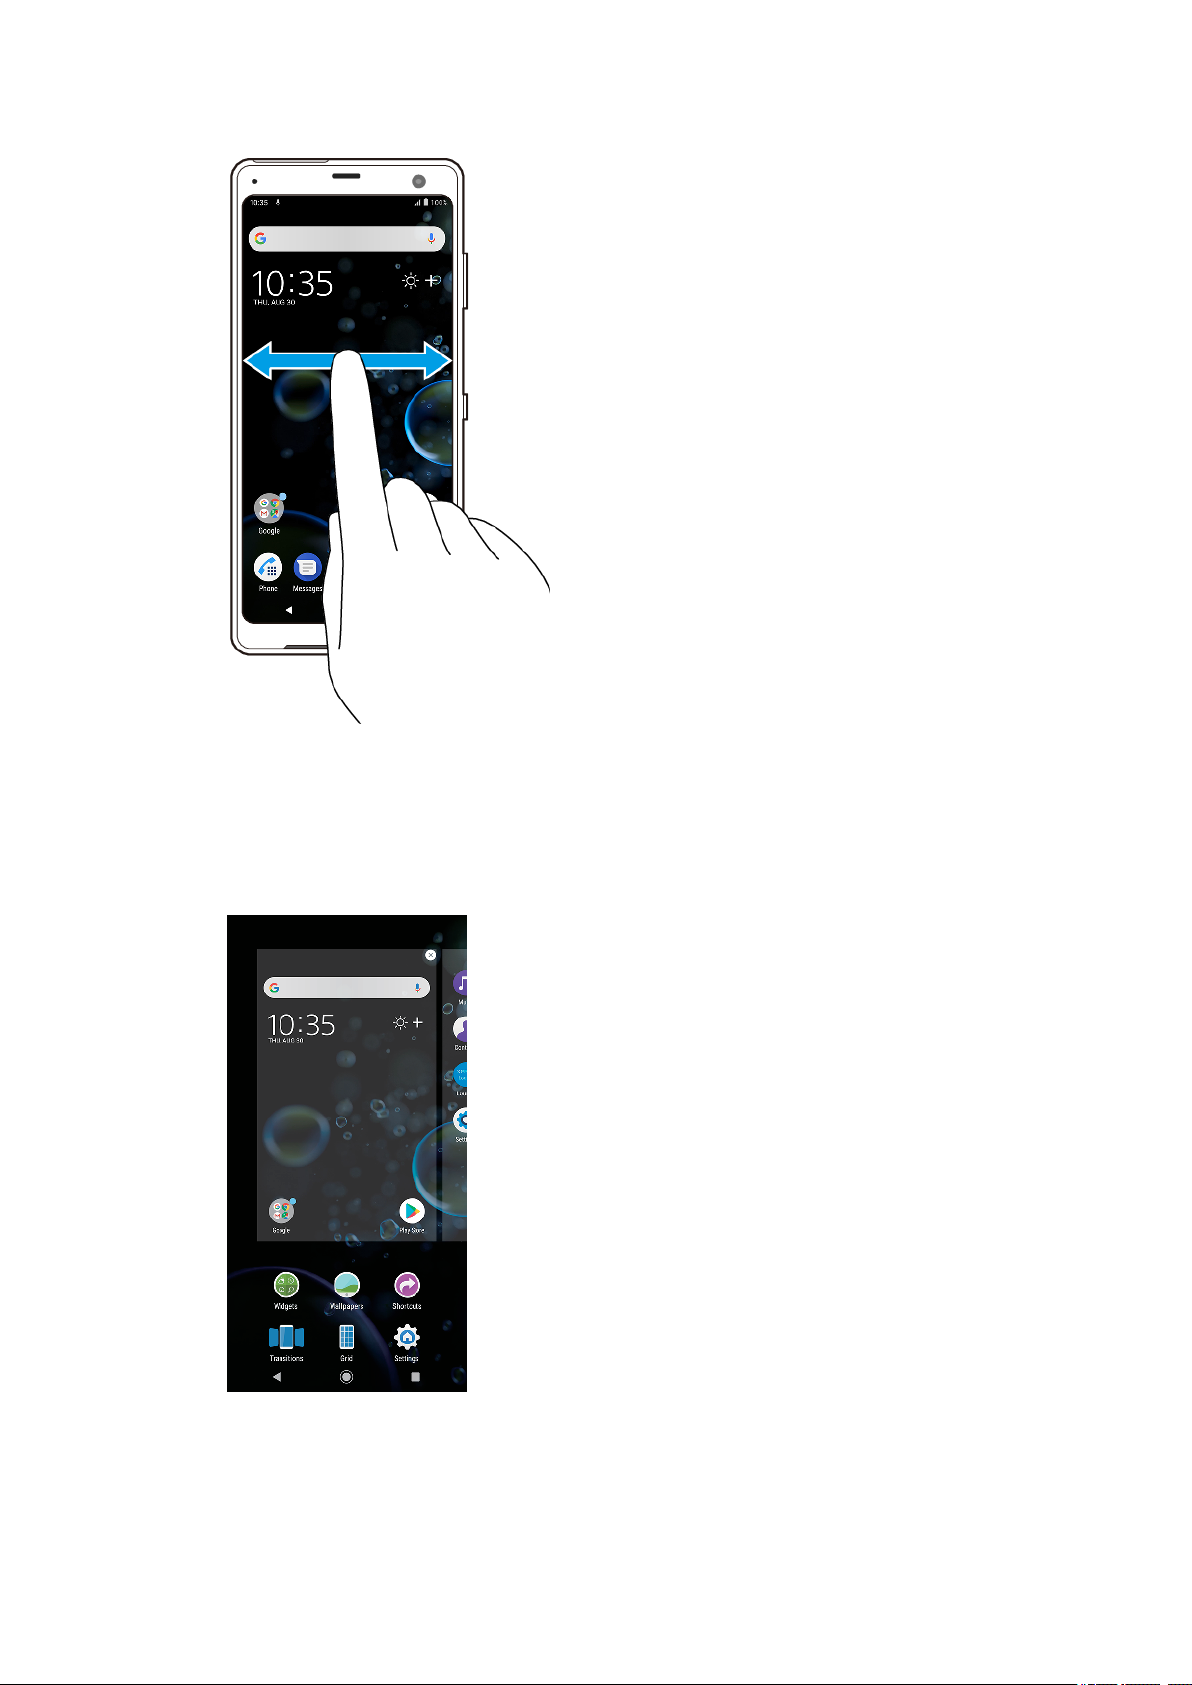
Swiping and scrolling
• Scr
oll up and down, or left and right.
• Swipe left or right, for example, between Home screen panes.
Using Side sense
Your device has sensors on the sides that make it easier to use your device with
one hand. You can display the Side sense menu by double-tapping the sensor area
on the outer edge of the screen, or return to the previous screen by sliding your
nger across the screen.
Make sure to tap or slide your nger within the sensor area.
21
ernet version. For personal use only.
Int
Page 22

Note
Side sense is unavailable in certain situations, such as when using a wireless charger, when
Glove mode or Ultr
a STAMINA mode is activated, or when the screen view is in landscape
orientation.
To display the Side sense menu
• T
o activate the Side sense menu, double-tap the side of the device.
Hint
To exit the Side sense menu, double-tap the side of the device or tap an empty area on the
een.
scr
22
Int
ernet version. For personal use only.
Page 23

To return to the previous screen using the side sensor
• Slide your nger up or down along the side of the devic
screen.
To turn Side sense on or o
1 Find and tap Settings > Display > Advanced.
2 Tap Side sense.
3 Tap the switch to enable or disable the function.
e to return to the previous
Side sense settings
Side sense menu Select the Side sense menu layout and whether to show
the menu on the lock scr
Sensor sensitivity Adjust how to interact with the side sensor.
Sensor enabled Select whether to use Side sense on one or both sides of
your devic
Navigate back Select if you want to use the side sensor to return to the
evious screen.
pr
Apps with Side
sense enabled
Set which apps to use with Side sense.
e.
een.
Turning the screen on or o
W
hen your device is on and left idle for a set period of time, the screen dims and
turns o to save battery power. You can change how long your screen stays active
before it turns o.
When your screen is turned o, your device can be locked or unlocked, depending
on your screen lock setting. See
Int
Screen lock
ernet version. For personal use only.
on page 14.
23
Page 24

To turn the screen on or o
• Briey pr
Hint
If the ambient display is set to Smart activation or Activate when device is lifted, the screen
is turne
page 63.
ess the power key.
d on automatically when you pick up your device. See
Ambient display settings
To adjust the idle time before the screen turns o
1 Find and tap Settings > Display > Sleep.
2 Select an option.
Smart backlight control
The smart backlight control keeps the screen on as long as the device is held in
your hand. Once you put down the device, the screen turns o according to your
sleep setting.
To enable or disable the Smart backlight control function
1 Find and tap Settings > Display > Advanced > Smart backlight control.
2 Tap the switch to enable or disable the function.
Home screen
on
The Home screen is the starting point for using your device. It’s similar to the
desktop on a computer screen. The number of Home screen panes is represented
by a series of dots at the lower part of the Home screen. The highlighted dot
shows the pane that is currently displayed.
Note
If you make the OLED display very bright or display the same image for a long time, an
erimage may remain on the screen. To prevent afterimages, avoid displaying the same
aft
image for a long time.
To go to the Home screen
• Tap
(Home button).
24
ernet version. For personal use only.
Int
Page 25
To browse the Home screen
Home screen panes
ou can add new panes to your Home screen (up to a maximum of twenty panes)
Y
and delete panes. You can also set the pane that you want to use as the main
Home screen pane.
To set a pane as the main Home screen pane
1 T
ouch and hold an empty area on your Home screen until the device vibrates.
25
Int
ernet version. For personal use only.
Page 26

2 S
wipe left or right to browse to the pane that you want to set as your main Home
screen pane, then tap
No
te
When Google Feed is enabled, the left-most pane is reserved for this service and the main
Home scr
een pane cannot be changed.
(Set pane icon).
To add a pane to your Home screen
1 Touch and hold an empty area on your Home screen until the device vibrates.
2 Swipe the panes all the way to the right or left, then tap
No
te
When Google Feed is enabled, the left-most pane is reserved for this service and additional
panes c
annot be added to the left.
(Add pane icon).
To delete a pane from your Home screen
1 Touch and hold an empty area on your Home screen until the device vibrates.
2 Swipe left or right to browse to the pane that you want to delete, then tap
(Delete pane icon) on the top-right corner of the pane.
Home scr
een settings
You can use the Settings shortcut to adjust some basic Home screen settings. For
example, you can adjust the size of icons on your Home screen.
To adjust the grid size of the screen
1 Touch and hold an empty area on your Home screen until the device vibrates.
2 Tap Grid, then select a size.
3 Tap APPLY.
To adjust the size of icons on your Home screen
1 Touch and hold an empty area on your Home screen until the device vibrates, then
tap
(Home screen settings icon).
ap Icon size, then select an option.
2 T
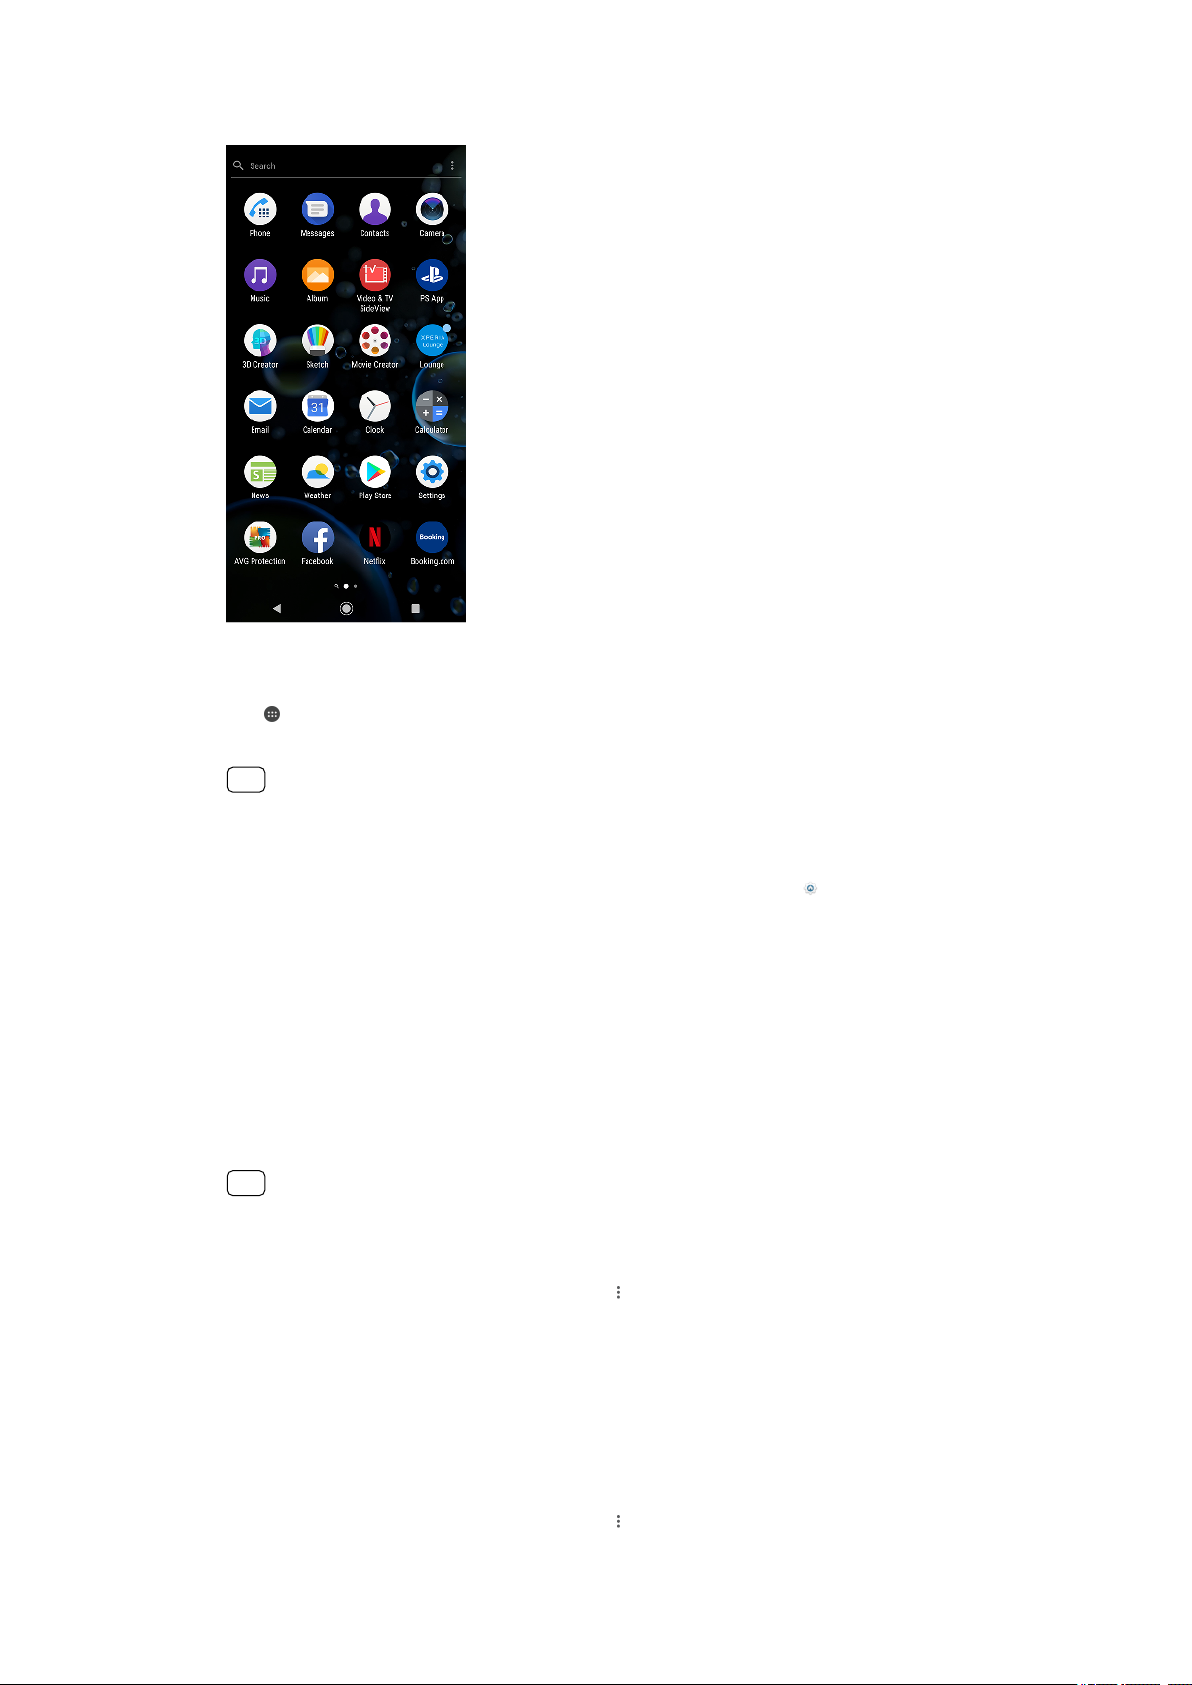
Application screen
The Application screen, which you open from the Home screen, contains the
applications that come pre-installed on your device as well as applications that you
download.
26
Int
ernet version. For personal use only.
Page 27
To view all applications on the Application screen
1 T
2 S
1 Touch and hold an empty area on your Home screen, then tap
(App tray icon).
ap
wipe left or right on the Application screen.
Hint
You can also search for recently viewed apps by swiping left from the Application screen.
T
o enable or disable the recommended apps listings
(Home screen
se
ttings icon).
2 Tap the App recommendations switch.
To open an application from the Application screen
• When the Application screen is open, swipe left or right to nd the application, and
then tap the application.
To search for an application from the Application screen
1 When the Application screen is open, tap Search.
2 Enter the name of the application that you want to search for.
Hint
You can also search for applications by swiping right from the Application screen.
o arrange applications on the Application screen
T
1 When the Application screen is open, tap
ap Sort apps, then select an option.
2 T
(Menu icon).
To add an application shortcut to the Home screen
1 On the Application screen, touch and hold an application icon until the device
vibrates, then drag the icon to the top of the screen. The Home screen opens.
2 Drag the icon to the desired location on the Home screen, then release it.
To move an application on the Application screen
1 When the Application screen is open, tap
(Menu icon).
27
ernet version. For personal use only.
Int
Page 28

2 Mak
e sure that Own order is selected under Sort apps.
3 Touch and hold the application until the device vibrates, then drag it to the new
location.
Shortcuts for easy actions
You can access shortcuts directly from your app icons to uninstall downloaded
apps or reveal more quick options. For example, touch and hold the Calendar icon
to create a new event or set a reminder. All apps have a shortcut to App info,
where you can adjust notication settings and permissions. You can go to App info
by tapping
T
o use shortcuts for easy actions
1 Touch and hold the desired app icon on your Home or Application screen.
2 Select from the options that appear. For example, tap
App inf
Hint
If (Uninstall app icon) is not shown, tap (App info icon) for more options.
T
o disable or uninstall an application from the Application screen
Note
Pre-installed apps cannot be uninstalled, only disabled. Only downloaded apps can be
alled. If you disable a pre-installed app, you can enable it again under Settings > Apps
uninst
& notications.
1 Touch and hold the application you want to disable or uninstall. If it can be
disabled or uninstalled,
ap
2 T
(Uninstall app icon) > DISABLE if the app c
or tap
to uninstall it.
(App info icon).
o, or tap
(Uninstall app icon) to disable or uninstall the application.
(Uninstall app icon) appears.
(Uninstall app icon) > OK if the app w
(App info icon) to go to
ame pre-installed on your device
as downloaded and you would like
Hint
If (Uninstall app icon) is not shown, tap (App info icon) for more options.
Naviga
ting applications
You can navigate between applications using the navigation buttons and the
recently used applications window, which lets you switch easily between all
recently used applications. The navigation buttons are the back button, the home
button, and the recent apps button. You can also pop open two applications on
the screen at once using the Split screen mode, if the application supports multiwindow function. Some applications get closed when you tap
xit while others are paused or continue to run in the background. If an application
e
(Home button) to
is paused or running in the background, you can continue where you left o the
next time you open the application.
28
ernet version. For personal use only.
Int
Page 29
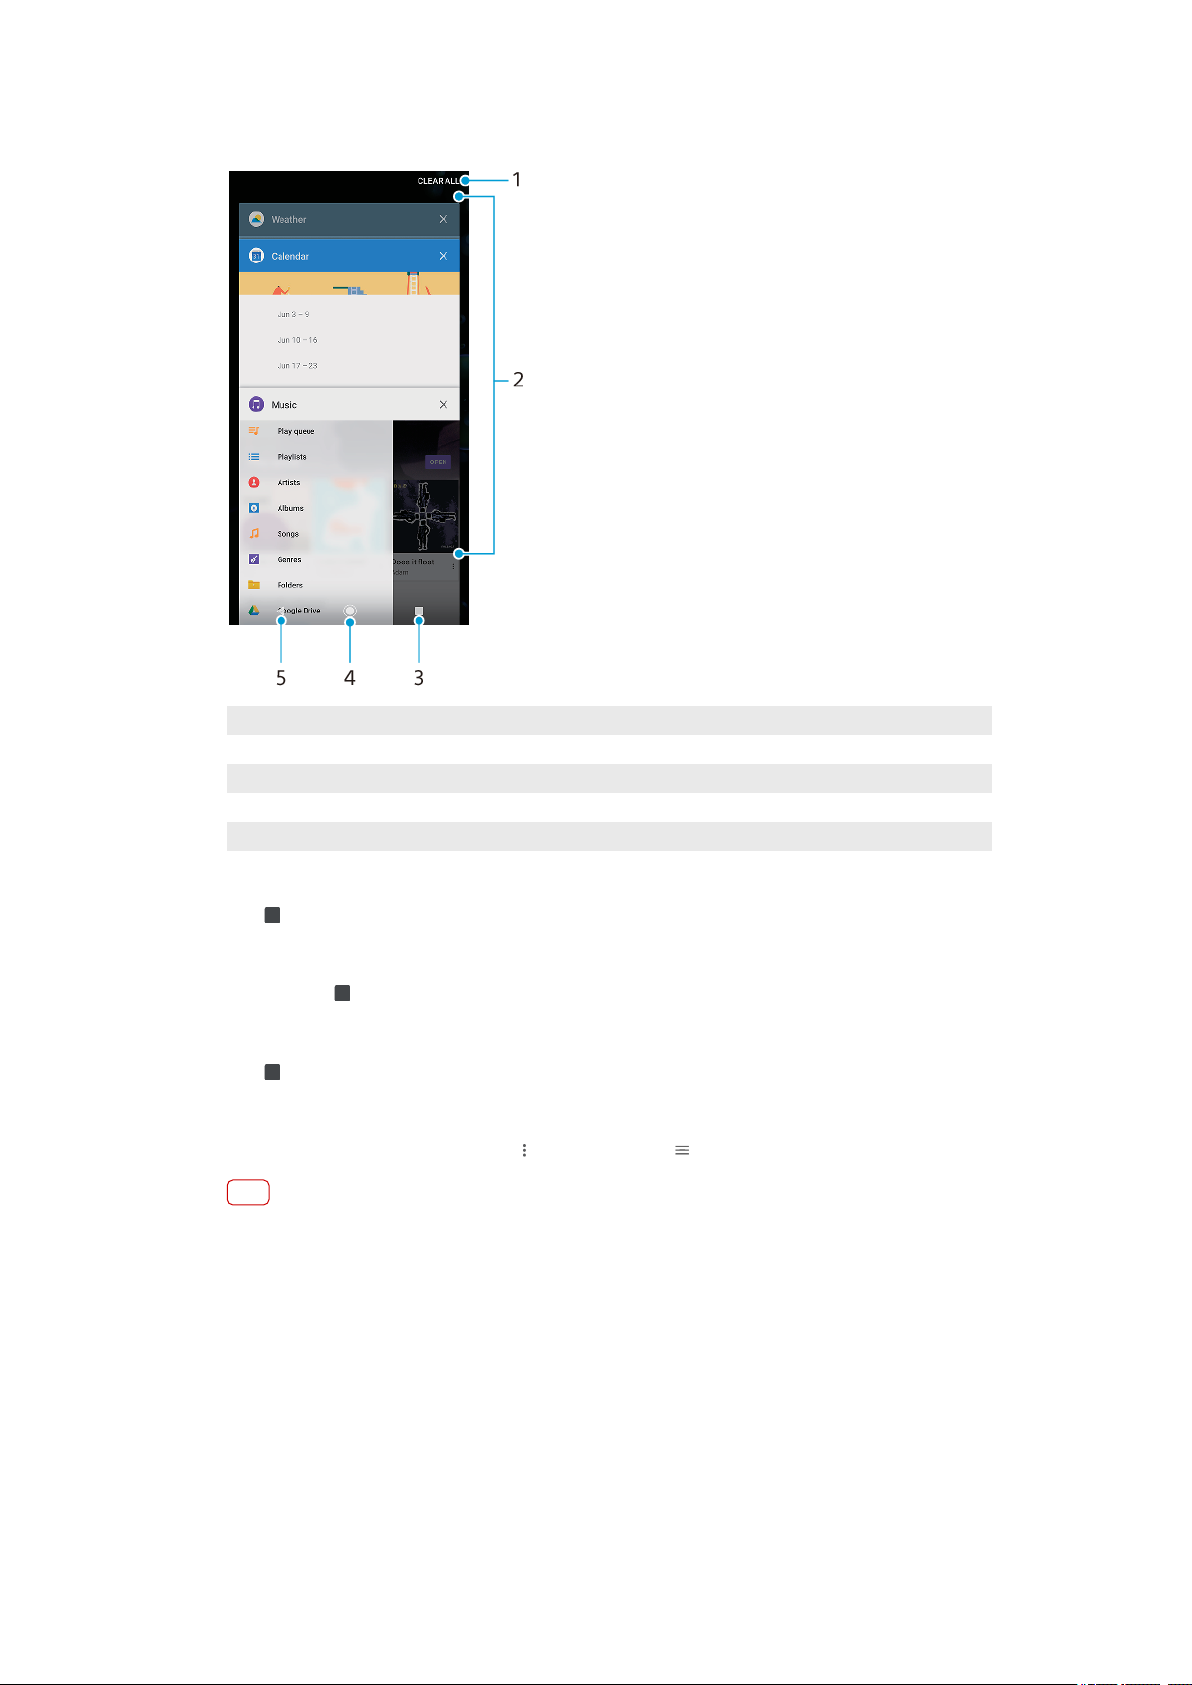
Navigating applications overview
1 Clear all – Close all the recently used applications
2 Recently used applications window – Open a recently used application
3 Recent apps button – Open the recently used applications window
4 Home button – Exit an application and go back to the Home screen
5 Back button – Go back to the previous screen within an application or close the application
To open the recently used applications window
• T
• Quickly tap
• Tap
(Recent apps button).
ap
T
o quickly switch between recently used applications
(Recent apps button) twice.
T
o close all the recently used applications
(Recent apps button) and then tap Cle
ar all.
To open a menu in an application
• While using an application, tap
No
te
A menu is not available in all applications.
Split scr
een mode
(Menu icon) or (Options icon).
Split screen mode enables you to view two applications at once, for example, if
you want to view your email inbox and a web browser at the same time.
29
Int
ernet version. For personal use only.
Page 30
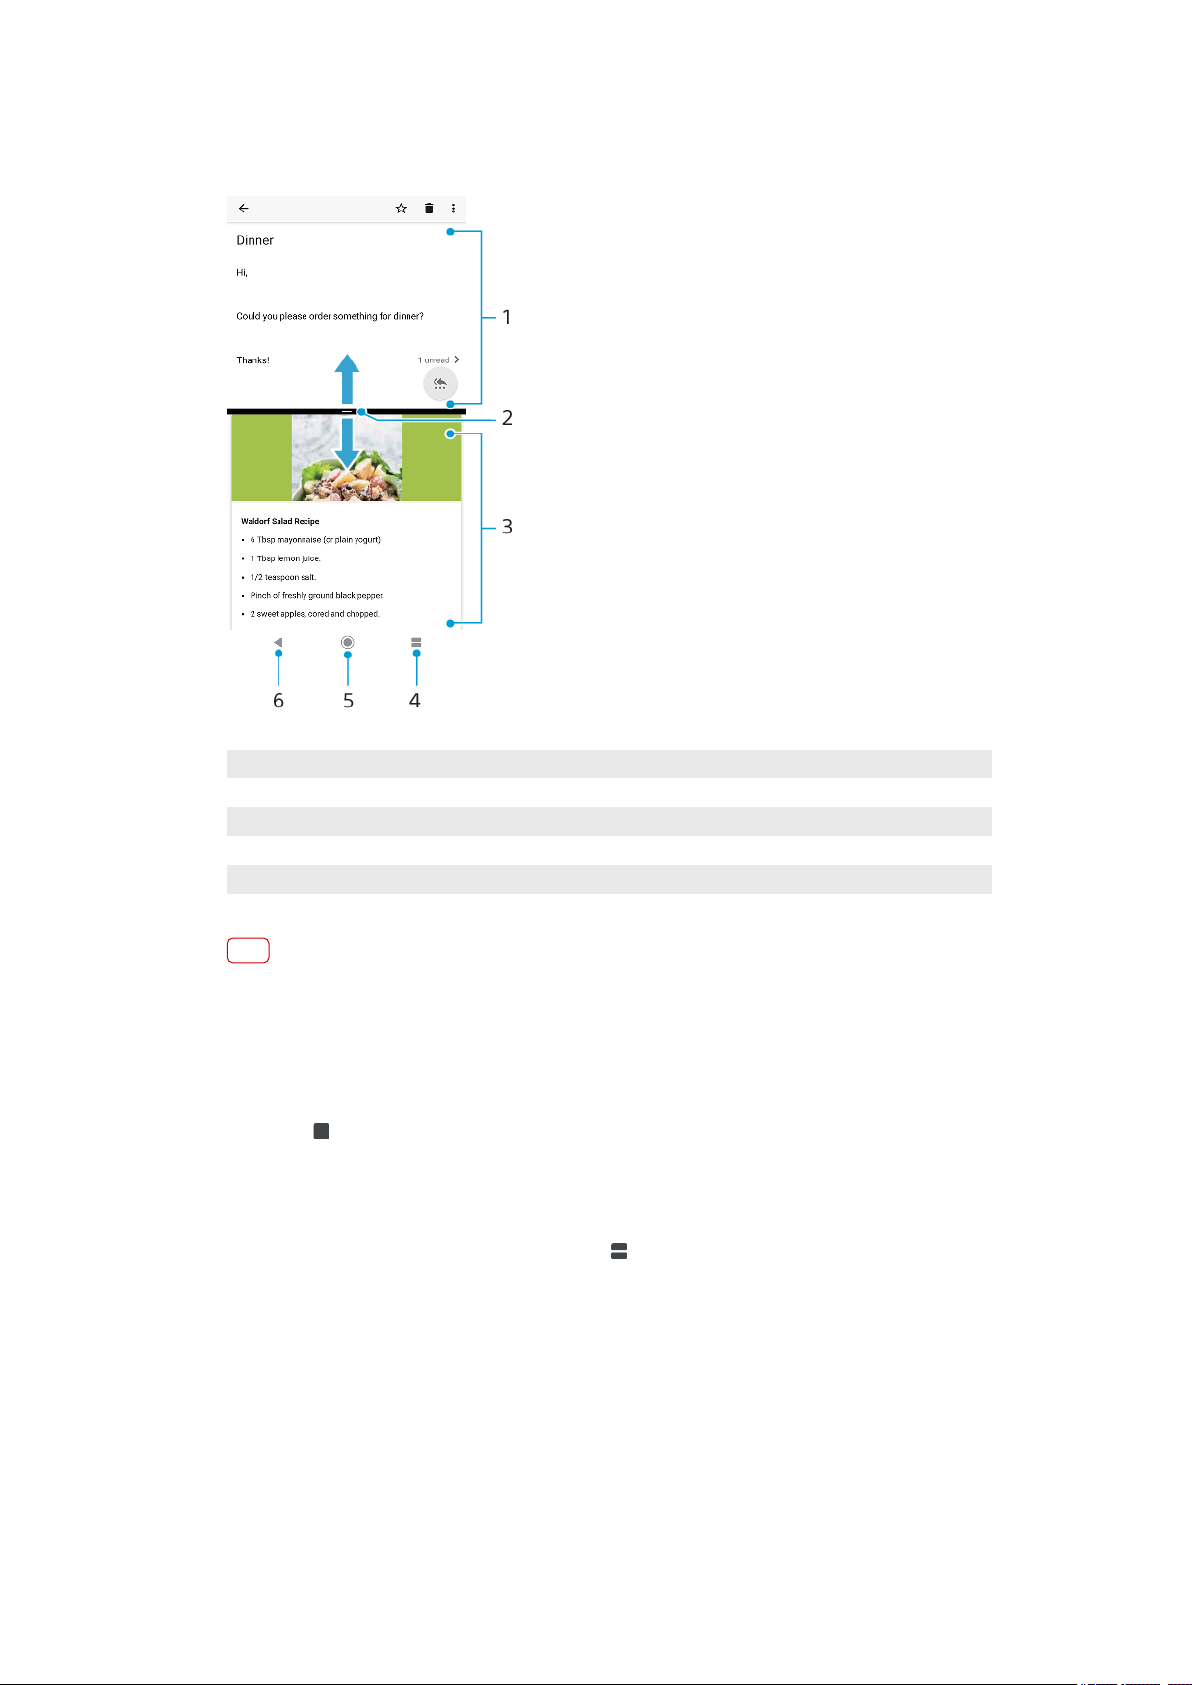
Split screen overview
1 Application 1
2 Split screen border – Drag to resize windows
3 Application 2
4 Split screen button – Select a recently used application
5 Home button – Go back to the Home screen
6 Back button – Go back to the previous screen within an application or close the application
Note
Not all applications support Split screen mode.
T
o use Split screen mode
1 Make sure that the two applications that you want to use in Split screen mode are
open and running in the background.
2 Open the application that you would like to use in Split screen mode, then touch
and hold
(Recent apps button). The application will be assigned to the rst par
of the split screen.
3 Select the second desired application from the thumbnail list.
4 If you want to resize the split screen windows, drag the split screen border in the
centre.
5 To exit Split screen mode, touch and hold
scr
een windows are displayed.
(Split screen button) while the split
One-handed mode
t
Enable One-handed mode to reduce display size so you can type with one hand
more easily. You can adjust the display size as desired.
To enable or disable One-handed mode
1 Find and tap Settings > Display > Advanced > One-handed mode.
2 Tap the One-handed mode switch to enable or disable the function.
3 To shrink the screen, swipe across the navigation bar.
30
Int
ernet version. For personal use only.
Page 31

4 T
o exit One-handed mode, swipe across the screen or tap an empty area on the
screen.
To adjust the position of the screen
1 To move the screen to the left side or to the right side, tap
(Right arrow icon) accordingly.
2 T
o move the screen upwards or downwards, drag the horizontal stripes at the edge
of the resized screen.
3 To resize the screen, drag
Hint
To return to full screen mode, tap an empty area on the screen.
(Resize screen icon) at the edge of the resized screen.
(Left arrow icon) or
Widge
Widgets are small applications that you can use directly on your Home screen.
They also function as shortcuts. For example, the Weather widget allows you to see
basic weather information directly on your Home screen. When you tap the
widget, the full Weather application opens. You can download additional widgets
from Google Play.
To add a widget to the Home screen
1 Touch and hold an empty area on your Home screen until the device vibrates, then
tap Widgets.
2 Find and tap the widget that you want to add.
To resize a widget
1 Touch and hold a widget until the device vibrates, then release it.
2 If the widget can be resized, the Resize option appears. For example, the Calendar
widget is one that can be resized.
3 Tap Resize and drag the dots to shrink or expand the widget.
4 To conrm the new size, tap anywhere on the Home screen.
To move a widget
• Touch and hold the widget until the device vibrates, then drag it to the new
location.
ts
To remove a widget
• Touch and hold the widget until the device vibrates, then drag it to Remove from
home screen.
Shortcuts and folders
Use shortcuts and folders to manage your applications and keep your Home
screen tidy.
31
ernet version. For personal use only.
Int
Page 32

Shortcuts and folders overview
1 Access an application using a shortcut
2 Access a folder containing applications
To add an application shortcut to your Home screen
1 T
ouch and hold an empty area on your Home screen until the device vibrates.
2 In the customisation menu, tap Shortcuts.
3 Scroll through the list and select an application. The selected application gets
added to the Home screen.
To move an item on the Home screen
• Touch and hold the item until the device vibrates, then drag the item to the new
location.
To remove an item from the Home screen
• Touch and hold the item until the device vibrates, then drag the item to Remove
from home screen.
To create a folder on the Home screen
• Touch and hold an application icon or a shortcut until the device vibrates, then
drag and drop it on top of another application icon or shortcut.
To add items to a folder on the Home screen
• Touch and hold an item until the device vibrates, then drag the item to the folder.
To rename a folder on the Home screen
1 Tap the folder to open it.
2 Tap the folder’s title bar to show the Folder name eld.
3 Enter the new folder name and tap DONE.
Hint
You can also use a shortcut for easy action. Touch and hold the folder name and tap
Rename.
32
ernet version. For personal use only.
Int
Page 33

Background
Y
our device comes with a default background, but you can adapt the Home screen
and Lock screen to your own style using wallpapers featuring dierent colours and
patterns.
A wallpaper may be used without changing any of the other elements of your
Home screen and Lock screen. Live wallpapers add visual eects to your
interactions with the touchscreen, letting the display change dynamically.
To change your wallpaper
1 Touch and hold an empty area on your Home screen until the device vibrates.
2 Tap Wallpapers.
3 To set the same wallpaper for the Lock and Home screens, select the wallpaper
and tap APPLY. To set dierent wallpapers, rst tap the Lock or Home screen
preview. Choose a wallpaper for that screen and tap SELECT > APPLY.
Hint
You can also use a photo as your wallpaper. Instead of selecting a wallpaper from the
op
tions shown, tap Photos. Choose a photo and tap SELECT > APPLY.
Taking a screenshot
You can capture still images of any screen on your device as a screenshot.
Screenshots you take are automatically saved in the Album application.
To take a screenshot
1 Long press the power key until the options menu opens.
2 Tap
(Screenshot icon).
Hint
You can also take a screenshot by pressing and holding the power key and volume down
ey at the same time.
k
To view your screenshot
1 Double-tap the status bar to display the Notication panel.
2 Tap the screenshot.
Notications
Notications inform you of events such as new messages and calendar
notications as well as activities in progress such as le downloads. Notications
appear in the following places:
• The status bar
• The notication panel
• The lock screen
• The app icon
33
Int
ernet version. For personal use only.
Page 34

To open or close the No
tication panel
o open the Notication panel, drag the status bar downwards, or simply double-
1 T
tap it.
2 To close the Notication panel, drag or swipe the panel upwards.
Hint
After opening the Notication panel, you can access the Quick settings panel by dragging
the status bar down again.
To take action on a notication in the Notication panel
• Tap the notication.
Hint
You can directly reply to chat or email messages in the No
tication panel.
To dismiss a notication from the Notication panel
• Swipe the notication left or right.
Note
Not all no
Hint
To snooze a no
No
tications can be dismissed.
tication, drag the notication slowly to the side and tap
tications can be snoozed for 15, 30 minutes or 1 or 2 hours.
(Snooze icon).
To expand a notication on the Notication panel
• Tap
(More options icon) to expand and view more information about the
notication without opening the app.
Note
Not all no
tications are expandable.
34
ernet version. For personal use only.
Int
Page 35

To clear all no
tications from the Notication panel
• Tap Clear all.
Hint
If there is a long list of no
tications, scroll down to nd the Clear all button.
To take action on a notication from the lock screen
• Double-tap the notication.
To dismiss a notication from the lock screen
• Swipe the notication left or right.
To expand a notication on the lock screen
• Drag the notication downwards.
Note
Not all no
tications are expandable.
Notication display options on the lock screen
Don't show
tications at
no
You won’t get any notications on the lock screen.
all
Show all
tication
no
content
Get all notications on the lock screen. When you have this
setting turned on, keep in mind that all content (including the
content of incoming emails and chat messages) will be visible
on your lock screen unless you designate the relevant apps as
Hide sensitive content in the Congure notications settings
menu.
Hide sensitive
ontent
c
You must have a PIN, password, or pattern set up as your
screen lock in order for this setting to be available. When you
get a sensitive notication for an incoming email or chat, the
content won’t be visible on your lock screen.
To select the no
tications to display on the lock screen
1 Find and tap Settings > Apps & notications > Congure notications.
2 Tap Show notications.
3 Select an option.
Hint
You can keep no
feature, tap the Keep notications switch under Congure notications.
tications on the lock screen until you swipe to dismiss them. To enable this
Setting the notication level for an app
Allow no
tication dot Show no
Allow interruptions Allow all no
On lock screen Show or hide all no
screen.
Interrupts in Priority only Receive no
disturb is set to On.
Note
You can set no
notication to change the notication categories.
tication channels to categorise notication levels. Touch and hold a
Int
ernet version. For personal use only.
tication dots.
tications from the selected app.
tication content on the lock
tications from this app even when Do not
35
Page 36

To set the no
tication level for an app
1 Find and tap Settings > Apps & notications.
2 Select the desired app, then tap Notications.
3 Tap the switches to adjust notication settings as desired.
Notication light
The notication light informs you about battery status and some other events. For
example, a ashing white light means there is a new message or a missed call. The
notication light is enabled by default but can be disabled manually.
Note
When the no
warning, for example, when the battery level goes below 15 percent.
To enable or disable the notication light
1 Find and tap Settings > Apps & notications > Congure notications.
2 Tap Use LED light to show incoming notications switch to enable or disable the
function.
tication light is disabled, it only lights up when there is a battery status
Icons in the status bar
Status icons
Signal strength
No signal
Roaming
Sending and downloading LTE data
Sending and downloading GPRS data
Sending and downloading EDGE data
Sending and downloading 3G data
Sending and downloading HSPA+ data
A Wi-Fi connection is enabled and data is being transmitted
A Wi-Fi connection is enabled but there is no internet connection.
T
his icon also appears when you are trying to connect to a secured Wi-Fi or captive portal
network. After a successful login, the cross mark disappears.
If Google is blocked in your area, the cross mark may appear even when the device is
connected to a network and there is a Wi-Fi working internet connection.
Battery status
The battery is charging
Airplane mode is activated
The Bluetooth function is activated
The microphone is muted
The speakerphone is on
Do not disturb mode is activated
Mute mode
Vibrate mode
An alarm is set
36
ernet version. For personal use only.
Int
Page 37

GPS is activated
Synchronisation is ongoing
Problem with sign-in or synchronisation
Side sense is activated
Note
Depending on your service provider, network, or region, the functions or services
represented by some icons in this list may not be available.
Notication icons
New text message or multimedia message
Ongoing call
Missed call
Call on hold
Single SIM device: Call forwarding is turned on
Dual SIM device: Call forwarding is turned on
New voicemail message
New email message
Downloading data
Uploading data
Mobile data is disabled
Perform a basic setup of your device
System updates are available
Downloading system updates
Install the downloaded system updates
STAMINA mode is activated
Ultra STAMINA mode is activated
Battery Care is activated
Device is in contact with a wireless charger
Dynamic Vibration is activated
Glove mode is activated
Screenshot captured
Video chat with friends using Duo application
A song is playing
The device is connected to a computer via a USB cable
Internal storage is 75% full — tap to transfer data to a memory card
Warning
More undisplayed no
tications
Note
Not all icons that may appear on your device are listed here. This list is for reference
purposes onl
y, and changes may be made without notice.
To block an application from sending notications
1 Find and tap Settings > Apps & notications.
2 Select the desired application, then tap Notications.
3 Tap the Show notications switch to block application notications.
37
Int
ernet version. For personal use only.
Page 38

Battery and maintenance
Char
ging your device
You can charge your device with either a wireless charger or a wired charger from a
wall socket or computer. You can still use your device while charging.
If the battery is depleted, it may take up to 30 minutes for your device to respond
to the charging. During this time, the screen may remain completely dark, not
showing the charging icon. It can take up to 4 hours for a completely drained
battery to be fully charged. Charging speed may be aected by ambient
temperature.
Note
Your device has an embedded, rechargeable battery that can only be replaced by an
authorise
can cause damage and void your warranty.
Wired charging
Always use the original Sony charger and a USB Type-C cable intended for your
specic Xperia model, since other types of chargers can increase charging time,
not charge at all, or may even damage your device.
Ensure all USB ports and connectors are completely dry before inserting the USB
Type-C cable. If water is detected, a warning notication appears in the Notication
panel.
d Sony repair centre. Never try to open or take apart the device yourself. Doing so
Wireless charging
You can purchase a Sony or third-party brand wireless charger to charge your
device wirelessly.
If you use your device while charging, the charging speed may become slower or
even stop to protect the battery. The use of some applications while charging may
disable charging or aect the charging function. For example, using the camera
during wireless charging may cause static noise on the image.
Be sure to remove any screen or phone covers when using the wireless charging
function.
Note the following:
• Do not put any metal parts between the device and the charger, due to risk of heat
injury.
• Do not put any credit cards on the charger, since they may get demagnetized or
broken.
Note
If your device is incorrectly placed on the wireless charger, charging time will increase
antly.
signic
38
Int
ernet version. For personal use only.
Page 39

To charge your device with a USB cable
1 C
onnect one end of the USB cable to the charger (or to the USB port of a
computer).
2 Connect the other end of the cable to the USB port on your device. The notication
light illuminates when charging begins.
3 When the device is fully charged, disconnect the cable from your device by pulling
it straight outwards. Make sure not to bend the connector.
Note
It is important to use a USB Type-C cable (provided), as other types of USB cables can
damage your devic
Hint
If the battery is completely depleted, it may take a few minutes before the no
illuminates and the charging icon appears.
e.
tication light
To charge your device with a wireless charger
1 P
lace your device on the wireless charger according to the charger’s instructions.
The wireless charging coil on the backside of your device must be in contact with
the charger for charging to work. See
Overview
on page 7.
39
Int
ernet version. For personal use only.
Page 40

2 W
hen charging begins, the notication light illuminates and the charging icon
appears on screen.
3 Once your device is fully charged, remove it from the wireless charger.
Battery notication light status
Green Battery is charging, charge level is greater than 90%
Orange Battery is charging, charge level is 15–90%
Red Battery is charging, charge level is less than 15%
Battery and power management
our device has an embedded battery. To get the most use from it, keep track of
Y
the power consumed by dierent apps and features. You can also use Battery Care
to increase the battery’s lifetime. Background power-saving features are activated
by default to help you further reduce battery consumption, and additional powersaving modes are available to help you reduce battery consumption when
necessary.
Power-saving features lower the priority of certain non-essential device functions.
If you do not want an application to be aected, you can make it exempt in the
Power-saving exceptions menu. Phone calls and SMS are not aected.
Note
• S
ystem updates may change the power-saving features available on your device.
To review your battery consumption
1 Find and tap Settings > Battery to view the estimated remaining battery
percentage and battery time.
2 Tap Advanced for more details about battery usage.
To view battery consumption for applications
1 Find and tap Settings > Apps & notications.
2 Select an application and review its battery consumption under Battery.
General usage tips to improve battery performance
The following tips can help you improve battery performance:
• Lower the screen brightness level, see
Screen settings
• Turn o Bluetooth, Wi-Fi and location services when you don’t need these
features.
• Turn o your device or use Airplane mode if you are in an area with no or low
network coverage. Otherwise, your device repeatedly scans for available networks,
and this consumes power.
• Use a Wi-Fi network instead of roaming when abroad. Roaming is scanning for
your home network and puts additional demands on your battery as your device
must transmit with a higher output power, see
Wi-Fi
• Change the synchronisation settings for your email, calendar and contacts, see
Synchronising with online accounts
on page 56.
• Check the applications that have a high battery consumption and consider the
battery saving tips provided on your device for these applications.
• Change the notication level for an application, see
• Turn o the Ambient display, see
Ambient display settings
• Turn o the location-sharing permission for an application, see
settings
on page 64.
• Uninstall applications that you are not using, see
on page 61.
on page 50.
Notications
on page 33.
on page 63.
Application
Application screen
on page 26.
40
ernet version. For personal use only.
Int
Page 41

• Use a Son
y original handsfree device to listen to music. Handsfree devices
consume less battery than your device’s loudspeakers.
• Restart your device every now and then.
To make specic applications exempt from optimisation
You can make applications exempt from being optimised.
1 Find and tap Settings > Battery.
2 Tap
(Menu icon) and select P
ower-saving exceptions. You will see a list of
applications that are not optimised.
3 To add or remove applications from this exemption list, tap APPS and select or de-
select an application from the list to edit its exception settings.
4 The list of applications that are exempt will get updated according to your settings.
Hint
You can also c
Advanced > Special app access > Power-saving feature.
ongure Power-saving exceptions from Settings > Apps & notications >
STAMINA mode
Depending on the STAMINA level, dierent features will be restricted or disabled in
order to reduce battery consumption. These include rendering performance,
animation and screen brightness, image enhancement, background app data
syncing, vibration except for incoming calls, streaming and GPS while the screen is
(STAMINA mode icon) appears in the status bar.
o.
Hint
The device will suggest that you activate STAMINA mode if the battery is likely to run out
ore the next expected charging session. Tap Settings > Battery > STAMINA mode > Smart
bef
STAMINA notication, and then tap the switch to enable or disable this function.
To activate or deactivate STAMINA mode
1 Find and tap Settings > Battery.
2 Tap STAMINA mode and tap the switch to activate or deactivate the function.
When STAMINA mode is activated you can select additional options, for example
you can adjust the Auto-start percentage according to your preferences.
Hint
You can exempt applications from being optimised by STAMINA mode in the Power-saving
eature menu.
f
Ultra STAMINA mode
Your battery time is extensively prolonged, but available apps are limited and
mobile data and Wi-Fi are disabled. Calling and SMS are still available. Your Home
screen is changed and
te
No
If you are sharing a device with multiple users, you may need to log in as the owner, that is,
the primar
y user, to activate or deactivate Ultra STAMINA mode.
(Ultra STAMINA mode icon) appears in the status bar.
To activate Ultra STAMINA mode
1 Find and tap Settings > Battery.
2 Tap Ultra STAMINA mode and then tap Activate.
3 Tap OK.
Note
You cannot exempt applications from being optimised by Ultra STAMINA mode.
41
ernet version. For personal use only.
Int
Page 42

To deactivate Ultra STAMINA mode
1 Dr
ag down the status bar to access the Notication panel.
2 Tap the notication Ultra STAMINA mode active.
3 Tap OK.
Note
Deactivating Ultra STAMINA mode will restart your device.
Ba
ttery Care
Use Battery Care to increase the lifespan of your battery. This feature detects your
charging patterns and estimates the start and end time of your regular charging
period. The charging rate is controlled so that your battery reaches 100% just
before you disconnect the charger.
Note
Battery Care will not control the charging rate until it detects a regular charging cycle of at
least 4 hours over a period of sever
al days.
To enable or disable Battery Care
1 Find and tap Settings > Battery > Battery Care.
2 Tap the switch to enable or disable Battery Care.
Hint
Learned patterns of the regular charging cycle are saved by Battery Care. Even if the
function has be
again.
en disabled, it adopts to the learned patterns after enabling the function
Updating your device
You should update the software on your device to get the latest functionality,
enhancements, and bug xes in order to ensure optimal performance. When a
software update is available,
an also check for new updates manually, or schedule an update.
c
The easiest way to install a software update is to do it wirelessly from your device.
However, some updates are not available for wireless download. You then need to
use the Xperia Companion software on a PC or on an Apple Mac® computer to
update your device.
Before updating your device, consider the following:
• Ensure you have sucient storage capacity.
• If you are using a device with multiple users, you must log in as the owner, that is,
the primary user.
• System and application updates can present the features on your device in another
way than described in this User guide. The Android version might not be aected
after an update.
To check for new software
1 If you are using a device with multiple users, make sure you are logged in as the
owner.
2 Find and tap Settings > System > Advanced > Software update.
(System update icon) appears in the status bar. You
Updating your device wirelessly
Use the Software update application to update your device software wirelessly. The
updates you can download over a mobile network depend on your operator. It is
42
ernet version. For personal use only.
Int
Page 43

recommended to use a Wi-Fi network instead of a mobile network to download
new softw
are so that you can avoid data trac costs.
To install a system update
1 If you are sharing a device with multiple users, make sure you are logged in as the
owner.
2 Find and tap Settings > System > Advanced > Software update.
3 If a system update is available, tap CONTINUE, then tap Install now.
To set up automatic download of system updates
1 Find and tap Settings > System > Advanced > Software update.
2 Tap
(Menu icon), then tap Se
ttings > Auto update system.
3 Select the preferred option.
To enable or disable automatic updates for applications
1 Find and tap Settings > System > Advanced > Software update.
2 Tap
(Menu icon), then tap Se
ttings > Auto-update apps.
3 Select the preferred option.
To update your device using a computer
1 Connect your device to the computer using a USB cable.
2 Make sure that the screen of your device is unlocked, and tap ALLOW.
3 Open Xperia Companion, if it is not automatically launched.
4 Make sure that the computer can access the internet.
5 Computer: If a new software update is detected, a pop-up window appears.
Follow the on-screen instructions to run the relevant software updates.
Note
If you don’t have the Xperia Companion software installed on the relevant computer,
c
onnect your device to the computer and follow the on-screen installation instructions.
Make sure that you are using the USB Type-C cable that came with your device and that it is
properly connected to the device and computer.
Maintenance using a computer
Xperia Companion
Xperia Companion is a software service which provides a collection of tools and
applications you can use when you connect your device to a computer. With Xperia
Companion, you can:
• Update or repair your device’s software.
• Transfer your content from an old device using Xperia Transfer.
• Back up and restore content on your computer.
• Browse les on your device.
Managing les using a computer
Use a USB Type-C cable connection between a Windows computer and your device
to transfer and manage your les.
Once your device and the computer are connected, you can choose if you want to
charge your device or transfer les. Your computer will detect your device once you
tap ALLOW.
With Xperia Companion, you can access the le system of your device. If you do
not have Xperia Companion installed, you are requested to install it when you
connect your device to the computer.
43
ernet version. For personal use only.
Int
Page 44

Note
Always use a USB cable intended for your spe
completely dry.
cic Xperia model and make sure it is
USB Preferences
USB
controlled
by
Use USB for You can choose the purpose of the USB connection.
You can choose which device controls the other, your device or the
USB-connected device.
ansfer
File tr
Manage les or update the device software. This option is used
with Microsoft® Windows® computers. Charging is enabled by
default.
USB tethering
Your device can function as a tethering device.
MIDI
Your device can function as the MIDI input for musical instrument
apps.
No data transfer
Just charge your device when USB controlled by is set to This
device. When USB controlled by is set to Connected device, you can
use your device as a power supply and charge the other connected
device.
To change USB preferences
1 Att
ach a USB Type-C connector to your device.
2 Drag down the Status bar, and then tap Android system next to
3 T
ap Tap for more options, and then select an option.
Storage and memory
Your device has several dierent storage and memory options:
44
ernet version. For personal use only.
Int
(USB icon).
Page 45

• T
he internal storage stores downloaded or transferred content along with personal
settings and data.
• You can use a removable memory card to get more storage space. Media les can
be moved to this type of memory to free up internal storage.
• The dynamic memory (RAM) cannot be used for storage. RAM is used to handle
running applications and the operating system.
Note
You can purchase a memory card separately.
Impr
oving memory performance
Your device memory tends to ll up as a result of normal usage. If the device starts
to slow down, or applications suddenly shut down, you should consider the
following:
• Always try to keep at least 500 MB of free internal storage available.
• Close running applications that you are not using.
• Clear the cache memory for all applications.
• Uninstall downloaded applications that you don’t use.
• Transfer photos, videos, and music from the internal memory to the memory card.
• If your device can’t read content on the memory card, you may need to format the
card. Note that when you format the card, all content is erased.
Note
If you are sharing a device with multiple users, you must log in as the owner, that is, the
y user, to be able to perform certain actions, such as transferring data to the memory
primar
card and formatting the memory card.
To view the memory status
• Find and tap Settings > Storage.
To clear the cache memory for all applications
1 Find and tap Settings > Storage.
2 Tap FREE UP SPACE. If you have a memory card inserted, select Storage > Internal
shared storage > FREE UP SPACE.
Hint
When you clear the cache memory, you don’t lose any important information or settings.
o transfer media les to the memory card
T
1 Make sure you have a memory card inserted into your device.
2 Find and tap Settings > Storage > Transfer data to SD card.
3 Mark the les that you want to transfer to the memory card.
4 Tap Transfer.
To stop applications and services from running
1 Find and tap Settings > Apps & notications.
2 Select an application or service, then tap FORCE STOP > OK.
To format the memory card
1 Find and tap Settings > Storage.
2 Tap SD card >
(Menu icon), then tap S
torage settings > Format, then perform
formatting on the next conrmation dialog.
45
Internet version. For personal use only.
Page 46

Note
All content on the memory card gets erased when you format it. Make sure you rst mak
backups of all data that you want to save. To back up your content, you can copy it to a
computer. For more information, see
Managing les using a computer
on page 43.
Smart cleaner
Smart cleaner improves the device's performance by automatically optimising
storage and memory based on app usage.
To enable or disable Smart cleaner
1 Find and tap Settings > Xperia Assist.
2 Tap Smart cleaner, then tap the switch to enable or disable the function.
Note
You can also modify, copy or delete les manuall
y if you nd and tap the Files application.
Backing up and restoring content
Generally, you should not save photos, videos, and other personal content solely
on the internal memory of your device. If your device is damaged, lost or stolen,
the data stored on its internal memory may be impossible to recover. It is
recommended to use the Xperia Companion software to make backups which save
your data safely to an external device. This method is especially recommended if
you are updating your device software to a newer Android version.
e
With the Google Backup & restore application, you can back up data to a Google
server.
Backing up data to a computer
Use the Xperia Companion software to back up data from your device to a PC or an
Apple Mac computer.
To back up your data using a computer
1 Connect your device to the computer using a USB cable.
2 Computer: Open the Xperia Companion software if it is not automatically
launched. After a few moments, the computer detects your device.
3 Click Backup on the Xperia Companion main screen.
4 Follow the on-screen instructions to back up data from your device.
To restore your data using a computer
1 Unlock the screen of your device and connect it to the computer using a USB cable.
2 Open the Xperia Companion software on your computer if it is not automatically
launched. After a few moments, the computer will detect your device. Make sure
to select ALLOW on your device to access the data on your device.
3 Click Restore on the Xperia Companion main screen.
4 Select a backup le from the backup records, then click Next and follow the on-
screen instructions to restore data to your device.
Note
If you do not have Xperia Companion installed, you are requested to install it when you
connect your device to the computer.
46
ernet version. For personal use only.
Int
Page 47

Backing up data with the Google Backup & restore application
Using the G
oogle Backup & restore application, you can back up data to a Google
server. You can also turn on the automatic restore function to restore application
data and settings when you reinstall an application.
Hint
You can back up data to a Google account under Settings > System > Advanced > Backup.
47
Int
ernet version. For personal use only.
Page 48

Downloading applications
Downloading applic
ations from Google Play
Google Play is the ocial online Google store for downloading applications,
games, music, movies, and books. It includes both free and paid applications.
Before you start downloading from Google Play, make sure that you have a
working internet connection, preferably over Wi-Fi to limit data trac charges. For
more information, see
Note
To use Google Play, you need to have a Google account. Google Play may not be available in
all c
ountries or regions.
Updating your device
on page 42.
To download an application from Google Play
1 Find and tap
2 Find an it
(Play Store icon).
em you wish to download by browsing categories, or by using the search
function.
3 Tap the item to view its details. Follow the on-screen instructions to complete the
installation.
Note
Some applications may need to access data, settings, and various functions on your device
der to work properly. Only install and give permissions to applications that you trust.
in or
Hint
You can view the permissions granted to a downloaded application by tapping the
ation under Settings > Apps & notications.
applic
Downloading applications from other sources
When your device is set to allow downloads from sources other than Google Play,
you can download applications directly from other websites by following the
relevant download instructions.
Note
Installing applications of unknown or unreliable origin can damage your device. Download
applic
ations only from reliable sources. Contact the application provider if you have any
questions or concerns.
Hint
If you are using a device with multiple users, only the owner, that is, the primary user, can
allow downloads fr
all other users.
To enable or disable the downloading of applications from other sources
1 Find and tap Settings > Apps & notications.
2 Tap Advanced > Special app access > Install unknown apps.
3 Tap the application you want to allow the installing of application from other
sources, then tap the Allow from this source switch to enable or disable.
om sources other than Google Play. Changes made by the owner aect
48
Int
ernet version. For personal use only.
Page 49

Internet and networks
Br
owsing the web
The Google Chrome web browser for Android devices comes pre-installed in most
markets. Go to
information about how to use this web browser.
To browse the web
1 Find and tap
2 If you ar
Google account or browse with Google Chrome anonymously.
3 Enter a search term or web address in the search and address eld, then tap
(Done icon) on the keyboard.
Int
To access the internet, or send multimedia messages without Wi-Fi, you need a
mobile data connection with correct internet and MMS settings. Here are some
tips:
• For most mobile networks and operators, these settings come pre-installed on
your device so you can start using the internet and sending multimedia messages
right away.
• You can manually check for updates to the internet and MMS settings. If you
change or delete an internet or MMS setting by mistake, reset the internet and
MMS settings.
• If the Battery time preferred setting of STAMINA mode is activated to save power,
all mobile data trac gets paused when the screen is o. If this causes connection
problems, try excluding some applications and services from being paused, or
deactivate STAMINA mode temporarily.
• If you are sharing a device with multiple users, only the owner, that is, the primary
user, can download internet and messaging settings from the Settings menu, but
the downloaded settings are applicable to all users.
e using Google Chrome for the rst time, select to either sign in to a
ernet and MMS settings
http://support.google.com/chrome
(Chrome icon).
to get more detailed
To download internet and MMS settings
1 Find and tap Settings > Network & Internet > Internet settings.
2 Tap Accept. Once the settings have been downloaded successfully,
settings downloaded icon) appears in the status bar and mobile data trac is
turned on automatically.
Hint
If the settings cannot be downloaded to your device, check the signal strength of your
mobile or Wi-Fi ne
get close to a window and then try again.
To add internet and MMS settings
1 Find and tap Settings > Network & Internet > Mobile network.
2 Dual SIM users, select a SIM card.
3 Tap Advanced > Access point names >
4 T
ap Name and enter a name of your choice, then tap OK.
5 Tap APN and enter the access point name, then tap OK.
6 Enter all other required information. If you don’t know what information is
required, contact your network operator for more details.
7 When you’re done, tap
twork connections. Move to an open location free from obstructions or
(Add icon).
(Menu icon), then tap Save.
(Internet
49
Int
ernet version. For personal use only.
Page 50

To view downloaded internet and MMS settings
1 Find and t
ap Settings > Network & Internet > Mobile network.
2 Dual SIM users, select a SIM card.
3 Tap Advanced > Access point names.
4 To view more details, tap any of the available items.
To reset the internet and MMS settings
1 Find and tap Settings > Network & Internet > Mobile network > Advanced >
Access point names.
2 Tap
3 Sele
(Menu icon).
ct Reset to default.
Wi-Fi
Use Wi-Fi to surf the internet, download applications, or send and receive emails.
Once you have connected to a Wi-Fi network, your device remembers the network
and automatically connects to it the next time you come within range.
Some Wi-Fi networks require you to log in to a web page before you can get
access. Contact the relevant Wi-Fi network administrator for more information.
Available Wi-Fi networks may be open or secured. Secured networks are indicated
(Wi-Fi lock icon) next to the Wi-Fi network name.
by
No
te
Some Wi-Fi networks do not show up in the list of available networks because they do not
br
oadcast their network name (SSID). If you know the network name, you can add it
manually to your list of available Wi-Fi networks.
To turn Wi-Fi on or o
1 Find and tap Settings > Network & Internet > Wi-Fi.
2 Tap the switch to enable or disable Wi-Fi.
Note
It may take a few seconds before Wi-Fi is enabled.
o connect to a Wi-Fi network
T
1 Find and tap Settings > Network & Internet > Wi-Fi.
2 Tap the switch to turn on Wi-Fi. All available Wi-Fi networks are displayed.
3 Tap a Wi-Fi network to connect to it. For secured networks, enter the relevant
password.
Hint
The list of available Wi-Fi networks refreshes automatically.
o add a Wi-Fi network manually
T
(Wi-Fi icon) is displayed in the status bar once you are connected.
1 Find and tap Settings > Network & Internet > Wi-Fi.
2 Scroll down and tap Add network.
3 Enter the Network name information.
4 To select a security type, tap the Security eld.
5 If required, enter a password.
6 To edit advanced options such as proxy, IP settings and Hidden network, tap
Advanced options and then edit the options as desired.
7 Tap SAVE.
Note
Contact your Wi-Fi network administrator to get the network SSID and password.
50
ernet version. For personal use only.
Int
Page 51

Increasing Wi-Fi signal strength
There are a number of things you can do to improve Wi-Fi reception:
• Move your devic
• Move the Wi-Fi access point away from any potential obstructions or interference.
• Don’t cover the Wi-Fi antenna area of your device.
e closer to the Wi-Fi access point.
Wi-Fi settings
When you are connected to a Wi-Fi network or when there are Wi-Fi networks
available in your vicinity, you can view the status of these networks. You can also
enable your device to notify you whenever an open Wi-Fi network is detected.
To turn Wi-Fi on automatically
1 Make sure that Wi-Fi is turned on for your device.
2 Find and tap Settings > Network & Internet > Wi-Fi.
3 Scroll down and tap Wi‑Fi preferences. Tap the Turn on Wi‑Fi automatically
switch to enable or disable.
To enable or disable Wi-Fi network notications
1 Make sure that Wi-Fi is turned on for your device.
2 Find and tap Settings > Network & Internet > Wi-Fi.
3 Scroll down and tap Wi‑Fi preferences.
4 Tap the Open network notication switch to enable or disable.
To view detailed information about a connected Wi-Fi network
1 Find and tap Settings > Network & Internet > Wi-Fi.
2 Tap the Wi-Fi network that you are currently connected to. Detailed network
information is displayed.
To enable auto network switch
1 Find and tap Settings > Network & Internet > Wi-Fi.
2 Tap Wi‑Fi preferences.
3 Tap Advanced > Auto network switch and tap ENABLE.
51
Internet version. For personal use only.
Page 52

To change the Auto-connect setting for each saved network
1 Find and t
ap Settings > Network & Internet > Wi-Fi.
2 Tap Wi‑Fi preferences > Advanced > Auto-connect.
3 Tap the Wi-Fi network to enable or disable.
To nd the MAC address for your device
1 Find and tap Settings > Network & Internet > Wi-Fi.
2 Tap Wi‑Fi preferences > Advanced.
The MAC address is displayed in the list.
Hint
The Wi-Fi Mac address is also displayed under Settings > System > About phone > Wi‑Fi MAC
addr
ess.
Sharing your mobile data connection
You can share your mobile data connection with other devices in several ways.
• Portable hotspot: share your mobile data connection via Wi-Fi with up to 10 other
devices simultaneously.
• One-touch portable hotspot: touch devices to start sharing your mobile
connection over Wi-Fi.
• USB tethering: share your mobile data connection with a single computer using a
USB cable.
• Bluetooth tethering: share your mobile data connection with up to four other
devices via Bluetooth.
To share your data connection using a USB cable
1 Connect your device to a computer using the USB cable.
2 Find and tap Settings > Network & Internet > Hotspot & tethering.
3 Tap the USB tethering switch, then tap OK if prompted.
displaye
d in the status bar once you are connected.
(USB sharing icon) is
4 To stop sharing your data connection, tap the USB tethering switch or disconnect
the USB cable.
Note
You cannot share your device's data connection and SD card over a USB cable at the same
.
time
To share your mobile connection by One-touch portable hotspot
1 Make sure that both devices have the NFC function turned on, and that both
screens are active.
2 Find and tap Settings > Network & Internet > Hotspot & tethering.
3 Tap One-touch portable hotspot.
4 Hold the devices together so that the NFC detection areas of each device touch,
then tap CONNECT.
Note
This function only works with devices that also support NFC Wi-Fi tethering.
o share your mobile data connection with another Bluetooth device
T
1 Make sure that your device and the other Bluetooth device are paired with each
other and that mobile data trac is activated on your device.
2 Your device: Find and tap Settings > Network & Internet > Hotspot & tethering.
Tap the Bluetooth tethering switch to enable the function.
3 Bluetooth device: Set up the device so that it obtains its network connection using
Bluetooth. If the device is a computer, refer to the relevant instructions to complete
52
ernet version. For personal use only.
Int
Page 53

the setup. If the device runs on the Android operating system, tap the settings icon
beside the name of the devic
e that it is paired with under Settings > Device
connection > Previously connected devices, then tap the Internet access switch.
4 Your device: Wait for
t
o appear in the status bar. Once these icons appear, the setup is complete.
(Bluetooth tethering icon) and (Bluetooth tethering icon)
5 Tap the Bluetooth tethering switch again to disable the function.
Note
The Bluetooth tethering function is turned o ever
the Bluetooth function.
y time you turn o your device or turn o
To use your device as a portable hotspot
1 Find and tap Settings > Network & Internet > Hotspot & tethering.
2 Tap Portable hotspot > Congure hotspot.
3 Enter the Network name information.
4 To select a security type, tap the Security eld. If required, enter a password.
5 Tap SAVE.
6 Tap the switch at the top of the list to enable the function.
7 If prompted, tap OK to conrm.
the por
table hotspot is active.
(Tethering icon) appears in the status bar when
8 To stop sharing your data connection via Wi-Fi, tap the Portable hotspot switch to
disable the function.
To rename or secure your Portable Hotspot
1 Find and tap Settings > Network & Internet > Hotspot & tethering.
2 Tap Portable hotspot > Congure hotspot.
3 Enter the Network name information.
4 To select a security type, tap the Security eld.
If required, enter a password.
5 Tap SAVE.
Controlling data usage
You can keep track of the amount of data transferred to and from your device over
your mobile data or Wi-Fi connection during a given period. For example, you can
view the amount of data used by individual applications. For data transferred over
your mobile data connection, you can also set data usage warnings and limits to
avoid additional charges.
Note
If you are using a device with multiple users, only the owner, that is, the primary user, can
adjust da
over data usage but cannot guarantee the prevention of additional charges.
To help reduce data usage
1 Find and tap Settings > Network & Internet > Data usage > Data Saver.
2 Tap the switch to enable or disable the function.
To turn data trac on or o
1 Find and tap Settings > Network & Internet > Data usage.
2 Tap the Mobile data switch to turn data trac on or o.
Hint
When data tr
connections.
ta usage settings. Adjusting data usage settings can help you keep greater control
ac is turned o, your device can still establish Wi-Fi and Bluetooth
53
ernet version. For personal use only.
Int
Page 54

To set a data usage warning
1 Mak
e sure that mobile data trac is turned on.
2 Find and tap Settings > Network & Internet > Data usage > Data warning & limit.
3 To set the warning level, tap the Set data warning switch.
4 Tap Data warning, enter the desired data limit and tap Set. You receive a warning
notication when the amount of data trac reaches the level you set.
To set a mobile data limit
1 Make sure that mobile data trac is turned on.
2 Find and tap Settings > Network & Internet > Data usage > Data warning & limit.
3 Tap the Set data limit switch, then tap OK.
4 To set the data usage limit, tap Data limit, enter the desired data limit and tap Set.
Note
Once your mobile data usage reaches the set limit, mobile data tr
turned o automatically.
ac on your device gets
To control the data usage of individual applications
1 Find and tap Settings > Apps & notications.
2 Tap the application that you want to control, then tap Data usage.
Hint
The performance of individual applications may be a
usage settings.
ected if you change the related data
To check your data usage
1 Find and tap Settings > Network & Internet > Data usage.
2 To view information about the amount of mobile data transferred by individual
applications, tap App data usage.
3 To view information about the amount of data transferred via Wi-Fi connection, tap
the Wi‑Fi data usage under Data usage.
Selecting a SIM card for data trac
Note
This function only applies for Dual SIM devices.
If you ar
any given time. You can do this during the initial setup of your device, or you can
select or change it later via the Settings menu.
To change the SIM card used for data trac
1 Find and tap Settings > Network & Internet > Advanced > Dual SIM > Mobile
data.
2 Select a SIM card.
Hint
For higher data speeds, select the SIM card that supports the fastest mobile network, for
example, 4G.
e using a Dual SIM device, you can select which SIM card handles data at
Selecting mobile networks
Your device supports the use of up to three dierent networks at the same time.
You can select from the following network mode combinations:
• One WCDMA network
• One GSM network
• One WCDMA and one GSM network
54
ernet version. For personal use only.
Int
Page 55

• One L
TE, one WCDMA, and one GSM network
Your device automatically switches between mobile networks depending on which
mobile networks are available where you are. You can also manually set your
device to use a particular mobile network mode, for example, WCDMA or GSM. If
you are using a Dual SIM device, this applies to each SIM card.
Dierent status icons are displayed in the status bar depending on the type or
mode of network that you are connected to. Refer to
Status icons
on page 36 to
see what the dierent status icons look like.
To select a network mode
1 Find and tap Settings > Network & Internet > Mobile network.
2 Dual SIM users, select a SIM card.
3 Tap Advanced > Preferred network type, then select a network mode.
To select another network manually
1 Find and tap Settings > Network & Internet > Mobile network.
2 Dual SIM users, select a SIM card.
3 Tap Advanced > Automatically select network switch to disable, then tap
Network.
4 Select a network.
Note
If you select a network manually, your device will not search for other networks, even if you
move out of r
ange of the manually selected network.
To activate automatic network selection
1 Find and tap Settings > Network & Internet > Mobile network.
2 Dual SIM users, select a SIM card.
3 Tap Advanced > Automatically select network switch to enable.
55
Int
ernet version. For personal use only.
Page 56

Synchronising data on your phone
S
ynchronising with online accounts
Synchronise your device with contacts, email, calendar events and other
information from online accounts, for example, email accounts such as Gmail™
and Microsoft Exchange ActiveSync. You can synchronise data automatically for
such accounts by activating the auto-sync function, or you can synchronise each
account manually.
To set up an online account for synchronisation
1 Tap Settings > Accounts > Add account, then select the account that you want to
add.
2 Follow the on-screen instructions to create or sign in to an account.
To synchronise manually with an online account
1 Find and tap Settings > Accounts.
2 Tap the name of the account that you want to synchronise with, then tap Account
sync. A list of items appears showing what can be synchronised with the account.
3 Tap the item that you want to synchronise.
To remove an online account
1 Find and tap Settings > Accounts.
2 Select the account, then tap Remove account.
3 Tap Remove account again to conrm.
Synchronising with Microsoft Exchange ActiveSync
If your company uses a Microsoft Exchange ActiveSync account, you can access
your corporate email messages, calendar appointments, and contacts directly on
your device. After setup, you can nd your information in the Email, Calendar, and
Contacts applications.
Hint
If you have set up a Microsoft Exchange ActiveSync (EAS) account on your device, the EAS
se
curity settings may limit the lock screen type to only a PIN or password. This occurs when
your network administrator species a lock screen type for all EAS accounts for enterprise
security reasons. Contact the network administrator of your company or organisation to
check what network security policies are implemented for mobile devices.
To set up an EAS account for synchronisation
1 Tap Settings > Accounts > Add account > Exchange ActiveSync.
2 Enter your corporate email address and password.
3 Tap Next. If a failure occurs, enter the domain and server details for your account
manually and then tap Next.
4 Follow the on-screen instructions to complete the setup.
5 Tap Show more sync options to select a synchronisation method, a
synchronisation interval, and the data that you want to sync with your device.
6 Tap Next, then select how you want to be notied when a new email arrives.
7 Tap Next, enter a name for the corporate account, then tap Finish setup.
8 If prompted, activate the device administrator to allow your corporate server to set
certain security rules on your device, such as disabling voice recording and using
storage encryption.
To remove an EAS account
1 Find and tap Settings > Accounts.
ernet version. For personal use only.
Int
56
Page 57

2 Sele
ct the EAS account that you want to remove.
3 Tap Remove account.
4 Tap Remove account again to conrm.
57
ernet version. For personal use only.
Int
Page 58

Basic settings
Ac
cessing settings
View and change settings for your device from the Settings menu. The Settings
menu is accessible from both the Application screen and the Quick settings panel.
To open the device settings menu from the Application screen
• Find and tap Settings.
To view information about your device
• Find and tap Settings > System > About phone.
To access the Quick settings panel
• Drag the status bar downwards using two ngers.
To select which settings to display on the Quick settings panel
1 Using two ngers, drag the status bar fully downwards, then tap
2 To add a setting to the Quick settings panel, drag and drop the icon into the upper
part of the screen. To remove a setting, drag and drop the icon into the lower part
of the screen.
To rearrange the Quick settings panel
1 Drag the status bar fully downwards, then tap (Edit icon).
2 Touch and hold an icon, then move it to the desired position.
(Edit icon).
To turn on the ashlight
1 Drag the status bar downwards using two ngers.
2 Tap (Torch icon).
olume, vibration and sound
V
The volume and vibration can be changed either by using the volume keys or by
changing a setting. Sounds and tones can only be changed from a setting.
Note
App settings can override the selected volume, vibration and sound settings.
V
olume and vibration
You can change the ring, media, alarm, and in-call volumes. Additionally, you can
set your device to vibrate
T
he ring and notication volume
in-call volume
volume ic
change the volume while watching a video, the media volume is changed. The
alarm volume is indicated with
To change the volume
1 Press the volume key up or down. This changes the media volume.
2 To change the ring, notication, or alarm volumes, tap
slider t
on) aects music, videos, games and other media. For example, if you
o adjust the volume.
(In-call volume icon) a
(Vibrate icon).
(Ringer volume icon) a
ects calls and the media volume
(Alarm no
ects notications, the
tication icon).
(Settings icon). Use each
(Media
Hint
Tap a volume icon to quickly turn the volume on or o
58
Int
ernet version. For personal use only.
.
Page 59

To activate the vibrating mode
1 P
ress the volume key up or down.
2 Tap the icon on the slider until
T
o activate sound with vibration for incoming calls
(Vibrate icon) appears.
1 Find and tap Settings > Sound.
2 Tap the Also vibrate for calls switch to enable the function.
Sounds and tones
To set the ringtone
1 Find and tap Settings > Sound > Phone ringtone.
2 Dual SIM users, select a SIM card.
3 Select an option from the list or tap Add ringtone and select a music le that is
saved on your device.
4 To conrm, tap OK.
Hint
To set a spe
SIM users can set dierent ringtones for each SIM card.
To set the notication sound
1 Find and tap Settings > Sound > Notication sound.
2 Select a sound from the list or select None to turn o all notication sounds and
set your notications to vibrate only.
3 To select a music le that is saved on your device, tap Add ringtone.
4 To conrm, tap OK.
cic ringtone for a contact, see
Adding and editing contacts
on page 76. Dual
Note
You can change your app settings to allow a sound from a spe
notication sound is set to None. See
Notications
on page 33.
cic app even when the
To enable or disable other sounds and tones
1 Find and tap Settings > Sound > Advanced.
2 Tap the switches to enable or disable the dierent sounds and tones.
Dynamic Vibration
The Dynamic Vibration feature enhances your media experience by adding
synchronised vibration when you watch videos or listen to music on your device. To
learn more about this feature, go to Settings > Sound > Dynamic Vibration.
Dynamic Vibration turns o automatically in the following cases:
• The media volume is set to silent.
• The backlight is o.
• The device is being charged wirelessly.
• STAMINA mode is activated.
Note
Dynamic Vibration does not work with all media apps.
Dynamic vibr
ation levels
O No vibration
Mild Less vibration
Normal Well-balanced vibration
59
ernet version. For personal use only.
Int
Page 60

Powerful More vibration
To adjust Dynamic Vibration settings within a media app
1 Open the desired media app, for example, YouTube or the Album app.
2 Start playback of the media contents.
3 Press the volume key to open the volume panel.
4 Drag the slider for Dynamic Vibration to set the preferred level for this app.
5 The Dynamic Vibration setting is saved for the next time you use this app.
Hint
There is no vibration if the media volume is set to silent.
T
o enable or disable Dynamic Vibration
• Find and tap Settings > Sound > Dynamic Vibration.
Silence your device with Do not disturb
Activate Do not disturb to mute sounds and limit vibrations and visual indications
for situations in which you do not want to be disturbed, for example at night.
Setting options
• Notications
• Exceptions
• Duration
• Turn on automatically
To activate or deactivate Do not disturb
1 Drag the status bar downwards using two ngers to access the Quick settings
panel.
2 Tap
(Do not disturb icon).
A
utomatic rules
You can set automatic rules to activate Do not disturb mode for specic times or
events.
To set an automatic rule
1 Find and tap Settings > Sound > Do not disturb > Turn on automatically.
2 Tap an automatic rule, for example Sleeping.
3 Set the time and behaviours as desired. To change the rule name, tap
4 T
ap the switch to activate the rule.
Hint
To create a new rule, tap Add rule and follow the on-screen instructions.
o set the notication sound when Do not disturb mode is activated
T
(Edit icon).
1 Find and tap Settings > Sound > Do not disturb.
2 Tap Notications.
3 Select an option.
To set the exceptions for Do not disturb mode
1 Find and tap Settings > Sound > Do not disturb.
2 Tap the options under Exceptions.
3 Tap the switches to activate one or more options.
60
Int
ernet version. For personal use only.
Page 61

To set when to deactivate Do not disturb mode
1 Find and t
2 Tap Duration.
3 Select a setting, and tap OK. You can adjust hours by tapping + or -.
ap Settings > Sound > Do not disturb.
Screen settings
You can change the screen’s behaviour, brightness, viewing size, and quality. For
example, select a bigger font or display size for easier reading, or select glove
mode to navigate your screen with gloves.
If you want to change your background, see
how long you want to have the screen on before it is turned o, see
screen on or o
To change a screen setting
1 Find and tap Settings > Display.
2 Tap the setting you want to change.
3 Use the sliders, checkboxes or additional menus to adjust.
on page 23.
Background
Brightness level
Adjust the brightness level with the slider. You can also enable Adaptive brightness
to automatically optimise brightness based on surrounding light.
on page 33. To change
Turning the
Note
If you make the OLED display very bright or display the same image for a long time, an
aft
erimage may remain on the screen. To prevent afterimages, avoid displaying very bright
images for a long time.
White balance
Select a preset setting you want. You can also use the sliders to adjust the white
balance if you select Custom. To revert to the default setting, select Standard.
Prevent accidental operations with screen o
Prevent unintentional operations while your device is in a pocket or a bag. Tap the
Prevent accidental operations with screen o switch to enable or disable.
Colour gamut and contrast
Enhance the quality of photos and videos when viewing them on your device. For
example, use Super-vivid mode to make colours appear more vibrant on-screen.
Note
When Professional mode is selected, the HDR converter cannot be used.
uto-rotate screen
A
Set the screen to rotate automatically when the device is turned, or set it to stay in
portrait view.
Night Light
Night Light switches the colour of the screen to amber. This makes it easier to view
the screen in a darker setting, and also makes it easier to fall asleep.
61
Internet version. For personal use only.
Page 62

Screen saver
Se
t up a screen saver that displays colours or a photo slideshow when your device
is charging or the screen is idle. If your device has multiple users, each user can
have individual screen saver settings.
Cover selection
When using a screen cover, adapt your screen to work with the screen cover type.
Video image enhancement
You can use X-Reality with HDR converter to improve the visual quality of videos
when you view them on your device. With this feature, videos recorded in SDR
mode are played with HDR-like quality.
Hint
This feature is applicable only for certain applications.
T
o change a lock screen setting
1 Find and tap Settings > Display > Advanced > Lock screen preferences.
2 Tap the setting you want to change.
3 Use the switches, checkboxes or additional menus to adjust.
Screen pinning
Use screen pinning to set your device to display only the screen for a specic
application. For example, if you are playing a game and you accidentally touch the
home button, the screen pinning feature prevents the active game app screen
from being minimised. You can also use this feature when you lend your device to
another person to make it harder for them to access more than one application.
For example, you can lend your device to somebody to take a photo and pin the
screen to the Camera application so that the person can't easily use other apps
such as Email.
Note
Screen pinning is not a security feature and does not fully prevent other users from
unpinning a scr
device to request a screen lock PIN, password, or pattern before someone can unpin the
screen.
To enable or disable screen pinning
1 Find and tap Settings > Lock screen & security > Advanced > Screen pinning.
2 Tap the switch to enable or disable the function.
Hint
A pattern, PIN or password is not mandatory for screen pinning to work.
o pin a screen
T
1 Make sure that screen pinning is activated on your device.
2 Open an app and go to the screen that you want to pin.
3 Tap
4 T
(Recent apps button).
o display the screen pinning icon, swipe upwards and tap
5 In the window tha
een and accessing your device. To protect your data, you should set up your
(Screen pinning icon).
t appears, tap GOT IT.
To unpin a screen
• On the pinned screen, touch and hold
until the scr
een is unpinned.
Int
ernet version. For personal use only.
(Back button) and (Recent apps button)
62
Page 63

Hint
If you selected a security option when you activated the screen pinning function, you have
t
o enter your pattern, PIN or password to unlock the device before the screen can be
unpinned.
Ambient display settings
The ambient display lets you view information such as time, notications, music, or
photos on the screen when the screen is turned o. The ambient display can also
show album art when playing music, recently taken photos, or photos in Album
taken at your current location. When you are at home, photos to be shown are
selected automatically by your Xperia device.
To adjust the Ambient display settings
ap Settings > Lock screen & security > Lock screen preferences.
1 T
2 Tap Ambient display, and then select the desired setting.
3 Close the setting menu. The setting is saved.
Hint
The default setting is Smart activation, which activates the Ambient display when needed,
or example, when walking with the device in your hand, or when taking the device out of
f
your pocket or bag.
To display an image on the Ambient display
1 Tap Settings > Lock screen & security > Lock screen preferences.
2 Tap Sticker, and then select your desired sticker or photo.
3 Close the setting menu. The setting is saved.
To show photos on the Ambient display
1 Tap Settings > Lock screen & security > Lock screen preferences.
2 Tap Photo playback, and then tap the switch to enable the function.
3 Select Photos on device.
63
Internet version. For personal use only.
Page 64

Application settings
Some apps will ask f
deny permissions individually for each app, either from the Settings menu or from
the Permission conrm dialog. Permission requirements depend on the app’s
design.
or permissions once you start using them. You can allow or
Allowing or denying permissions
You can choose whether to allow or deny permissions when the dialog is shown. If
you have used another Android version previously, most apps will have already
been granted the necessary permissions.
To allow a permission
• To allow a permission, tap ALLOW. You can mark the Don't ask again checkbox if
you wish.
To deny a permission
• To deny a permission, tap DENY when the dialog is shown.
Hint
Some applications can still be used even if you have denied permissions.
Critic
al permissions
Some permissions are mandatory for apps to work as intended. In such cases, a
dialog will inform you.
To congure applications
1 Find and tap Settings > Apps & notications.
2 Select a conguration option. For example, choose an application that you want to
congure.
To allow critical permissions
1 Find and tap Settings > Apps & notications > Advanced > App permissions.
2 Select an option, then tap the relevant switch to adjust permissions.
Allowing or denying automatic application updates
If the automatic update feature is enabled, your applications get updated without
you being asked, so you may not realise that large volumes of data are being
downloaded. In order to avoid potentially high data transfer costs, you can disable
automatic updates or enable automatic updates only over Wi-Fi connection. You
have to disable the automatic update feature in the Play Store app to avoid the
automatic updating of apps.
To enable or disable automatic updates for all applications in the Play Store
1 Find and tap
2 T
3 Select the preferred option.
(Options icon), then tap Se
ap
(Play Store icon).
ttings > Auto-update apps.
Application linking
Your device can determine the default app to handle a particular web link. This
means that if the link is set, you don’t need to select an app each time you open a
link. You can change the default app any time you want.
64
Int
ernet version. For personal use only.
Page 65

To manage app links from the Settings menu
1 Find and t
ap Settings > Apps & notications.
2 Tap Advanced > Default apps > Opening links.
3 Select an app, and adjust the settings as desired.
Resetting your applications
You can reset an application or clear application data if your application stops
responding or causes issues with your device.
To reset application preferences
1 Find and tap Settings > Apps & notications.
2 Tap
1 Find and tap Settings > Apps & notications.
2 Select an application or service, then tap Storage > CLEAR DATA > OK.
(See all apps icon) to see all applications. Tap (Menu icon) > Rese
preferences > Reset apps.
Hint
Resetting application preferences does not delete any application data from your device.
T
o clear application data
Note
When you clear application data, data for the selected application is deleted from your
e permanently. The option to clear application data is not available for every
devic
application or service.
t app
To clear application cache
1 Find and tap Settings > Apps & notications.
2 Select an application or service, then tap Storage > CLEAR CACHE.
Note
The option to clear the application cache is not available for every application or service.
o clear the application default setting
T
1 Find and tap Settings > Apps & notications.
2 Select an application or service, then tap Advanced > Open by default > CLEAR
DEFAULTS.
Note
The option to clear the application default setting is not available for every application or
ser
vice.
Language settings
You can select a default language for your device and change it again at a later
time. You can also change the writing language for text input.
To change the language
1 Find and tap Settings > System > Languages & input > Languages.
2 To change the language, drag and drop the desired language to the top of the list.
If the desired language is not currently listed, tap
(Add icon) to add it.
Note
If you select the wrong language and cannot read the menu texts, nd and t
ic
on) >
rst entr
(System menu icon). Then select the text beside (Keyboard icon) and select the
y in the menu that opens. You can then select the language you want.
65
Int
ernet version. For personal use only.
ap
(Settings
Page 66

Date and time
Y
ou can change the date and time on your device.
To set the date manually
1 Find and tap Settings > System > Date & time.
2 Disable the Automatic date & time function by tapping the switch.
3 Tap Set date.
4 Swipe left or right, or use the arrows to set the desired date.
5 Tap OK.
To set the time manually
1 Find and tap Settings > System > Date & time.
2 Disable the Automatic date & time function by tapping the switch.
3 Tap Set time.
4 Select the relevant values for the hour and minute.
5 Tap OK.
To set the time zone manually
1 Find and tap Settings > System > Date & time.
2 Disable the Automatic time zone function by tapping the switch.
3 Tap Select time zone.
4 Select an option.
Enhancing the sound output
You can enhance the sound of your device by manually enabling individual sound
settings such as Equaliser and Surround sound. You can enable the Dynamic
normaliser to minimise volume dierences between songs or videos.
Note
Enhanced sound e
the USB Type-C to 3.5 mm Audio jack host adapter. They are not available for digital or USB
headphones.
To upgrade the quality of compressed music les
1 Find and tap Settings > Sound > Audio settings.
2 Enable the DSEE HX function by tapping the switch.
Note
Wired headphones that support High-Resolution Audio are needed to play back sound in a
quality e
quivalent to High-Resolution Audio.
To enhance the sound output automatically
1 Find and tap Settings > Sound > Audio settings.
2 Enable the ClearAudio+ function by tapping the switch.
To adjust the sound settings manually using the Equaliser
1 Find and tap Settings > Sound > Audio settings.
2 If the ClearAudio+ function or the DSEE HX function is enabled, tap the switch to
disable it.
3 Tap Sound eects > Equaliser.
4 To adjust the sound manually, drag the frequency band buttons. To choose a
preset arrangement, tap
OK t
o conrm.
ects only work for analog headphones connected to your device with
(More options icon), select an arrangement, then tap
66
Int
ernet version. For personal use only.
Page 67

Hint
The manual adjustment of sound output settings has no e
applications. For example, there is no change in the voice call sound quality.
ect on voice communication
To turn on the Surround sound feature
1 Find and tap Settings > Sound > Audio settings > Sound eects > Surround
sound (VPT).
2 Swipe left or right to display the desired setting, then tap
displaye
d setting is applied.
(Back button). The
To minimise volume dierences using the Dynamic normaliser
1 Find and tap Settings > Sound > Audio settings.
2 Disable the DSEE HX function by tapping the switch, if it is enabled.
3 Enable the Dynamic normaliser function by tapping the switch.
Multiple user accounts
Your device supports multiple user accounts so that dierent users can log in
separately to the device and use it. Multiple user accounts work well in situations
where you share the same device with other people or lend your device to
someone to use for a while. The user who sets up the device for the rst time
becomes the owner of the device. Only the owner can manage the accounts of
other users. Apart from the owner account, there are two dierent types of
accounts:
• Regular User: This account type is suitable for someone who regularly uses your
device.
• Guest User: Enable the guest account option for someone who just wants to use
your device temporarily.
Note
Some features are only available to the owner. For example, only the owner can allow
downloads fr
om sources other than Google Play.
About the Regular User account
By adding Regular User accounts, you can allow dierent users to have dierent
home screens, wallpapers and general settings. They also get separate access to
applications and memory storage for les such as music and photos. You can add
up to seven regular user accounts on your device.
To add a regular user account
1 Make sure you are logged in as the owner, that is, the user who set up the device
for the rst time.
2 Find and tap Settings > System > Advanced > Multiple users > Add user.
3 Tap OK. The new account is created.
4 Tap Set up now. The screen locks and an icon representing the newly added user
appears in the top-right corner.
5 Unlock the screen by swiping upwards.
6 Follow the on-screen instructions to set up the account for the user.
Hint
You can also add a regular user account from the status bar on any screen. Just drag the
status bar fully downwards and tap the user icon, then tap Add user.
To delete a regular user account from your device
1 Make sure you are logged in as the owner.
2 Find and tap Settings > System > Advanced > Multiple users.
67
ernet version. For personal use only.
Int
Page 68

3 T
(Settings icon) beside the name of the user that you want to delete, then tap
ap
Remove user > DELETE.
About the Guest User ac
count
If someone just wants to use your device temporarily, you can enable a guest
account for this user. In guest mode, your device starts up as a freshly installed
system with only the pre-installed apps. Once your guest is nished using your
device, you can wipe the session clean so that the next guest can start fresh. The
guest user account is pre-installed and cannot be deleted.
To activate the guest user account
1 Make sure you are logged in as the owner, that is, the user who set up the device
for the rst time.
2 Find and tap Settings > System > Advanced > Multiple users.
3 Tap
(Guest icon).
Hint
Once you switch to the guest account, you can switch between user accounts from the
st
atus bar on any screen. Just drag the status bar downwards using two ngers and tap
(User icon).
T
o clear the guest session data
1 Make sure you are logged in to the guest account.
2 Find and tap Settings > System > Advanced > Multiple users.
3 Find and tap Remove guest.
4 Tap Remove.
Hint
You can also clear the guest session from the status bar on any screen as long as you are
d in to the guest account. Just drag the status bar downwards using two ngers and
logge
tap
(User icon), then tap Remove guest.
witching between multiple user accounts
S
To switch between multiple user accounts
1 To view the list of users, drag the status bar downwards using two ngers then tap
(User icon).
ap the icon representing the user account that you want to switch to. The lock
2 T
screen for that user account appears.
Hint
When you switch to the guest account, tap Start again if you want to wipe the previous
sion or tap Yes, continue to continue the previous session.
ses
Settings for multiple user accounts
There are three dierent types of settings on devices with multiple users:
• Settings that can be changed by any user and aect all users. Examples include
language, Wi-Fi, Airplane mode, NFC and Bluetooth.
• Settings that only aect an individual user account. Examples include automatic
data syncing, screen lock, various accounts added, and wallpaper.
• Settings that are only visible to the owner and aect all users, for example, VPN
settings.
68
ernet version. For personal use only.
Int
Page 69

Typing text
On-scr
een keyboards
There are a number of pre-installed text entry providers on your device.
Note
The default text entry provider may depend on the regional or language settings you use.
One or mor
e text entry providers might not be available in your region.
SwiftKey® keyboard
You can enter text using the on-screen keyboard by tapping each letter
individually, or you can use the SwiftKey ow feature and slide your nger from
letter to letter to form words.
1 Display numbers and symbols
2 Switch between lower case, upper case and all caps
3 Access emojis
4 Enter a comma
5 Enter a space
6 Enter punctuation
7 Delete
8 Enter a carriage return
Hint
For more information about SwiftKey, go to
https://swiftkey.com/
.
To display the on-screen keyboard to enter text
• Tap a text entry eld.
To use the on-screen keyboard in landscape orientation
• When the on-screen keyboard is displayed, turn the device sideways.
Note
You may need to adjust the settings in some applications to enable landscape orientation.
T
o switch between dierent on-screen keyboard options
1 Find and tap Settings > System > Languages & input > On-screen keyboard.
2 Tap Manage keyboards, then tap the switch to enable or disable the keyboard.
To enter text character by character
1 To enter a character visible on the keyboard, tap the character.
2 To enter a character variant, touch and hold a regular keyboard character to get a
list of available options, then select from the list. For example, to enter "é", touch
69
Int
ernet version. For personal use only.
Page 70

and hold "e" until other options appear, then, while keeping your nger pr
the keyboard, drag to and select "é".
To enter a full stop
• After you enter a word, double-tap the space bar.
To enter text using the gesture input function
1 When the on-screen keyboard is displayed, slide your nger from letter to letter to
trace the word that you want to write.
2 After you nish entering a word, lift up your nger. A word suggestion appears
based on the letters that you have traced.
3 If the word that you want does not appear, tap
op
tions and select accordingly. If the desired option does not appear, delete the
entire word and trace it again, or enter the word by tapping each letter individually.
(Backspace icon) to see other
essed on
Editing text
You can select, cut, copy and paste text as you write. You can access the editing
options by double-tapping the entered text. The editing options then become
available via an application bar.
Application bar
The following actions are available on the selected text:
• Cut
• Copy
• Paste
• Share
• Select all
Note
The Paste option only appears when you have text saved on the clipboard.
T
o select text
1 Double-tap a word to highlight it.
2 You can drag the tabs on both sides of the highlighted word to select more text.
To edit text
1 Double-tap a word to make the application bar appear.
2 Select the text that you want to edit, then use the application bar to make your
desired changes.
Auto-ll
Auto-ll helps you save time when lling out forms. When you enable an Auto-ll
service, information such as names, phone numbers, addresses, credit card
information and more is saved for re-use. Autoll with Google is enabled by
default, but you can disable it or change to another app as desired.
To select an autoll app
1 Find and tap Settings > System > Languages & input.
2 Tap Advanced > Auto-ll service.
3 Select an option or tap
(Add icon) to download a di
70
ernet version. For personal use only.
Int
erent Autoll service.
Page 71

Calling
Making c
You can make a call by dialling a phone number manually, or use the smart dial
function to quickly nd numbers from your contacts list and call logs. To make a
video call, you can use the Duo video chat application on your device.
Dual SIM users can set a default SIM card for placing calls, or have the option to
select the SIM card each time you place a call. Find and tap Settings > Network &
Internet > Advanced > Dual SIM > Calls to select an option.
alls
Making calls overview
1 Display smart dial and options
2 Delete
3 Dialpad
4 Call button
To open the dialpad
1 Find and t
2 If the dialpad does no
T
o dial a phone number
1 Find and tap
2 If the c
3 Ent
4 Dual SIM users, sele
To make a call using smart dial
1 Find and tap
2 If the c
3 Use the dialpad t
want to call. As you enter each letter or number, a list of possible matches appears.
4 Tap the contact that you want to call.
all log appears, tap
er the phone number, and tap
all log appears, tap
(Phone icon).
ap
(Phone icon).
(Phone icon).
o enter letters or numbers that correspond to the contact you
t appear, tap
(Dialpad icon) to display the dialpad.
ct a SIM card if prompted.
(Dialpad icon) to display the dialpad.
(Dialpad icon).
(Call button).
71
ernet version. For personal use only.
Int
Page 72

5 Dual SIM users, sele
ct a SIM card if prompted.
To make an international call
1 Find and tap
2 T
3 T
(Dialpad icon) to display the dialpad.
ap
ouch and hold 0 until a “+” sign appears.
(Phone icon). The call log is displayed.
4 Enter the country code, the area code without the initial zeros, followed by the
phone number. Then tap
5 Dual SIM users, sele
ct a SIM card if prompted.
(Call button).
To add a direct dial number to your Home screen
1 Touch and hold an empty area on your Home screen.
2 In the customisation menu, tap Shortcuts.
3 Scroll through the list of applications and select Direct dial.
4 Select the contact and the number that you want to use as the direct dial number.
To show or hide your phone number during outgoing calls
1 Find and tap
2 T
(Menu icon) > Se
ap
(Phone icon).
ttings.
3 Dual SIM users, tap Calling accounts, and select a SIM card. Single SIM users, tap
Calls.
4 Tap Additional settings > Caller ID, and choose an option.
Note
This option may not be provided by every operator.
Re
ceiving calls
If you receive an incoming call when the device is in sleep mode or the screen is
locked, the phone application opens in full screen format. For Dual SIM devices, the
screen background colour indicates which SIM card the call is for. The background
colour can be changed in Call settings.
If you receive an incoming call when the screen is active, the incoming call is
displayed as a notication that appears on the top of whatever screen is open. For
Dual SIM devices, SIM1 or SIM2 indicates which SIM card the call is for. When the
notication arrives, you can choose to answer the call and open the phone
application screen, or you can reject the call and stay on the current screen.
To answer a call when the screen is inactive
• When a call comes in, swipe
T
o answer a call when the screen is active
(Incoming call icon) up.
• When a call comes in, in the heads-up notication that appears at the top of the
screen, tap ANSWER.
Hint
Instead of answering the call, you can go to the main phone application screen by tapping
the heads-up no
call. For example, you can decide to reject the call with a message.
tication window. Using this method, you get more options to manage the
To reject a call when the screen is inactive
• When a call comes in, swipe
o reject a call when the screen is active
T
(Incoming call icon) down.
• When a call comes in, in the heads-up notication that appears at the top of the
screen, tap DECLINE.
72
Int
ernet version. For personal use only.
Page 73

Hint
Instead of rejecting the call, you can go to the main phone application screen by tapping
the heads-up no
example, you can decide to reject the call with a message.
tication window. This way you get more options to manage the call. For
To mute the ringtone for an incoming call
• When you receive the call, press the volume key.
Rejecting a call with a text message
You can reject a call with a text message, sent automatically to the caller and
stored in the Messaging conversation with the contact.
You can select from a number of predened messages available on your device, or
you can create a new message. You can also create your own personalised
messages by editing the predened ones.
To reject a call with a text message when the screen is inactive
1 When an incoming call arrives, drag
scr
een.
2 Select a predened message or tap Write new message.
To reject a call with a text message when the screen is active
1 When an incoming call arrives, tap the heads-up notication window where the
phone number or the name of the contact is displayed.
2 Drag
3 Sele
(Reject with reply icon) to the centre of the screen.
ct a predened message or tap Write new message.
(Reject with reply icon) to the centre of the
To reject a second call with a text message
1 When you hear repeated beeps during a call, drag
c
entre of the screen.
(Reject with reply icon) to the
2 Select a predened message or tap Write new message.
To edit the text message used to reject a call
1 Find and tap
2 T
(Menu icon) > Se
ap
(Phone icon).
ttings.
3 Dual SIM users, tap Calling accounts, and select a SIM card. Single SIM users, tap
Calls.
4 Tap Reject call with message.
5 Tap the message that you want to edit, then make the necessary changes.
6 Tap OK.
Smart call handling
You can handle incoming calls without touching the screen by turning on the
Smart call handling function. Once activated, you can handle calls in the following
way:
• Answer: bring the device to your ear.
• Reject: shake the device.
• Ringer o: place the device face down.
To enable or disable Smart call handling
1 Find and tap
2 T
ap
> Se
(Phone icon).
ttings.
3 Dual SIM users, tap Calling accounts, and select a SIM card. Single SIM users, tap
Calls.
4 Tap Smart call handling.
73
ernet version. For personal use only.
Int
Page 74

5 T
ap the switch underneath to enable or disable the function.
Forwarding calls
You can direct calls to a dierent recipient, for example, to another phone number
or another device.
If you are using a Dual SIM device, you can also forward calls that come in on SIM
card 1 to SIM card 2 when SIM card 1 is unreachable, and vice versa. This function is
called Dual SIM reachability. You must enable it manually.
To forward calls
1 Find and tap
2 T
(Menu icon) > Se
ap
3 Dual SIM users, tap Calling accounts, and select a SIM card. Single SIM users, tap
Calls.
4 Tap Call forwarding, then select an option.
5 Enter the number you want to forward calls to, then tap Turn on.
To turn o call forwarding
1 Find and tap
2 T
(Menu icon) > Se
ap
3 Dual SIM users, tap Calling accounts, and select a SIM card. Single SIM users, tap
Calls.
4 Tap Call forwarding.
5 Select an option, then tap Turn o.
(Phone icon).
ttings.
(Phone icon).
ttings.
To enable the Dual SIM reachability function
Note
This function only applies for Dual SIM devices.
1 Find and t
ap Settings > Network & Internet > Advanced > Dual SIM > Dual SIM
reachability.
2 Under Dual SIM reachability, tap the switch to enable the function.
3 Follow the on-screen instructions to complete the procedure.
Hint
If the Dual SIM reachability function does not work after you enable it, check that you have
ered the phone numbers correctly for each SIM card. In some cases, the numbers are
ent
detected automatically during setup. Otherwise, you are prompted to enter them manually.
Blocking a number
You can block certain numbers from calling you and from sending you messages.
Select from stored numbers or type in a number yourself.
To block a stored number
1 Find and tap
ouch and hold the number you want to block.
2 T
3 Tap Block number, then tap BLOCK. Calls and texts from this number are blocked.
(Phone icon).
To block a number by typing the number
1 Find and tap
(Menu icon) > Se
ap
2 T
(Phone icon).
ttings > Block numbers > Add a number.
3 Enter the phone number you want to block, then tap BLOCK. Calls and texts from
this number are blocked.
74
Int
ernet version. For personal use only.
Page 75

To unblock a blocked number
1 Find and t
2 T
3 Tap
(Menu icon) > Se
ap
(Cancel icon) next to the phone number you want to unblock, then tap
UNBL
OCK. Calls and texts from this number are no longer blocked.
(Phone icon).
ap
ttings > Block numbers.
75
ernet version. For personal use only.
Int
Page 76

Contacts
Adding and e
diting contacts
You can add, edit or delete contacts on your device and from synchronised
accounts. Add contact pictures or set individual ringtones to personalise contacts.
You can also edit contact information about yourself.
To add a contact
1 Find and tap
2 T
3 If you’r
(Add new contact icon).
ap
e adding a contact for the rst time and have multiple accounts
(Contacts icon).
synchronised to your device, select an account. This becomes the default account
for saving your contacts. Later you can select where to save the contact by tapping
(Add new contact icon) > Saving t
o.
4 Enter or select the desired information for the contact.
5 When you’re nished, tap SAVE.
Note
To change the default setting for saving your contacts, tap (Options icon) and select the
new ac
count. Alternatively, select Phone contact to save contacts only to your device. To
move an existing contact to a new account, you must create the contact again and save it to
the new account.
Hint
If you add a plus sign and the country code before a contact’s phone number, you do not
o edit the number again when you make calls from abroad.
have t
To edit a contact
1 Find and tap
ap the contact that you want to edit, then tap
2 T
3 Edit the desir
(Contacts icon).
(Edit icon).
ed information.
4 When you are nished, tap SAVE.
Note
Some synchronisation services do not allow you to edit contact details.
o add or remove a contact picture
T
1 Find and tap
ap the contact that you want to edit, then tap
2 T
ap
3 T
4 Aft
(Camera icon), then select an option.
er the picture is updated, tap SAVE.
Hint
You can also add a picture to a contact directly from the Album application. If you want to
add a pictur
(Contacts icon).
(Edit icon).
e that is saved to an online account, you must download the picture rst.
To personalise the ringtone for a contact
1 Find and tap
2 T
ap the contact that you want to edit, then tap
3 Select a ringtone or tap
(Contacts icon).
(Add icon) to select a music le save
(Menu icon) > Se
d on your device.
t ringtone.
4 Tap OK.
To send all calls to voicemail for a contact
1 Find and tap
2 Sele
3 Tap
ct the desired contact.
(Menu icon) > Rout
(Contacts icon).
e to voicemail.
ernet version. For personal use only.
Int
76
Page 77

To delete contacts
1 Find and t
2 T
ouch and hold the contact that you want to delete.
3 Tap
4 T
5 Tap
1 Find and tap
2 T
3 Tap
4 W
1 Find and tap
2 T
3 Select an existing contact, or tap Create new contact.
4 Edit the contact information and tap SAVE.
(Delete icon), then tap DELETE.
o delete several or all contacts, mark the checkboxes beside the contacts that you
want to delete.
(Delete icon), then tap DELETE.
T
o edit contact information about yourself
(Options icon) > My inf
ap
(Edit icon), then enter the new information or make the changes you want.
hen you are nished, tap SAVE.
To create a new contact from a text message
ap the icon next to the phone number, then tap Add contact.
(Contacts icon).
ap
(Contacts icon).
(Messages icon).
o.
Grouping contacts
You can create contact labels to organise groups of related contacts. You can name
your groups as "Family" or "Friends" to dierentiate them from your other contacts.
To create a new label for a group
1 Find and tap
2 Tap (Options icon), then tap Create label.
3 Select where to store your contacts.
4 Type a Label name, then tap OK.
To delete a group label
1 Find and tap (Contacts icon).
2 Tap (Options icon), then tap the label you want to delete.
3 Tap (Menu icon), then tap Delete label.
(Contacts icon).
Transferring contacts
There are several ways to transfer contacts to your new device. You can sync
contacts from an online account or import contacts directly from another device.
If you sync the contacts in your old device with an online account, you can transfer
your contacts to your new device using that account.
You can also copy contacts to a memory card, use Bluetooth technology, or save
contacts to a SIM card. For more specic information about transferring the
contacts from your old device, refer to the relevant User guide.
Transferring contacts using an online account
If you sync the contacts in your old device or your computer with an online
account, for example, Google Sync™ or Microsoft Exchange ActiveSync, you can
transfer your contacts to your new device using that account.
To turn auto-sync data on or o
1 Find and tap (Contacts icon).
2 T
ap
(Options icon), then tap Se
Int
ttings.
77
ernet version. For personal use only.
Page 78

3 T
ap Accounts, then tap the Automatically sync data switch to enable or disable
the function.
4 Tap OK.
Note
You need to be signed in to the relevant sync account before you can sync your contacts
with it.
Other me
thods for transferring contacts
There are several other ways to transfer contacts from your old device to your new
device. For example, you can copy contacts to a memory card, or use Bluetooth
technology. For more specic information about transferring the contacts from
your old device, refer to the relevant User guide.
To import contacts from a memory card
1 Find and tap
2 T
(Options icon), then tap Se
ap
(Contacts icon).
ttings > Import > SD card or internal storage
(.vcf le).
3 Select where to store your contacts.
4 Tap
(Options icon), then select SD c
ard.
5 Select the les that you want to import by tapping them.
To import contacts using Bluetooth
1 Tap Settings > Device connection > Pair new device, and make sure that your
device is set to visible.
2 When you are notied of an incoming le to your device, drag the status bar
downwards and tap the notication to accept the le transfer.
3 Tap Accept to start the le transfer.
4 Drag the status bar downwards. When the transfer is complete, tap the
notication.
5 Tap the received le and select where to store your contacts.
To import contacts from a SIM card
1 Find and tap
2 T
(Options icon), then tap Se
ap
(Contacts icon).
ttings > Import.
3 Single SIM users, tap Import from SIM card. Dual SIM users, select a SIM card.
4 Select where to store your contacts.
5 Select contacts to import, then tap Import.
Backing up contacts
You can use internal storage, a memory card or a SIM card to back up contacts.
To export all contacts to a memory card
1 Find and tap
2 T
(Options icon) > Se
ap
le).
3 Tap
(Options icon) > SD c
4 Select a destination folder, then tap SAVE.
To export contacts to a SIM card
Note
When you export contacts to a SIM card, not all information may get exported. This is due to
memor
y limitations on SIM cards.
1 Find and tap
(Contacts icon).
ttings > Export > to SD card or internal storage (.vcf
ard.
(Contacts icon).
78
ernet version. For personal use only.
Int
Page 79

2 T
(Options icon) > Se
ap
ttings > Export.
3 Single SIM users, tap Export to SIM card. Dual SIM users, select a SIM card to
export to.
4 Tap OK.
5 Select contacts to export, then tap Export.
6 Select an option, then tap OK.
To export all contacts to internal storage
1 Find and tap
2 T
(Options icon) > Se
ap
(Contacts icon).
ttings > Export > to SD card or internal storage (.vcf
le).
3 Tap
4 Tap
(Menu icon) > Show int
ernal storage.
(Options icon), then tap your device’s model number beside (Internal
st
orage icon).
5 Select a destination folder or simply tap SAVE.
79
ernet version. For personal use only.
Int
Page 80

Messaging and chat
Reading and sending mes
sages
The Messages application shows your messages as conversations, which means
that all messages to and from a particular person are grouped together.
Note
The number of characters that you can send in a single message varies depending on the
oper
ator and the language you use. The maximum size of a multimedia message, which
includes the size of added media les, is also operator dependent. Contact your network
operator for more information.
Messaging overview
1 Go back to the list of conversations
2 Call the message sender
3 View more options
4 Sent and received messages
5 Send a completed message
6 Add attachments
To create and send a message
(Messages icon).
1 Find and t
2 T
ap
3 Ent
er the recipient’s name or phone number, then select from the suggestions that
ap
(New message icon).
appear. If the recipient is not listed as a contact, enter the recipient’s number
manually.
4 If you want to send a group message, tap
r
ecipients.
5 Enter your message text. If you want to add an attachment, tap
sele
ct the relevant attachment option.
(Add recipient icon) to add more
(Add icon) and
80
Int
ernet version. For personal use only.
Page 81

6 T
o send the message, tap
7 Dual SIM users, t
t
o use.
Hint
If you exit a message before sending, it gets saved as a draft. The conversation gets tagged
with the wor
ap one of the
d Draft.
(Send icon).
(Send icon) according to which SIM card you want
To read a received message
1 Find and tap
2 T
ap the desired conversation.
(Messages icon).
3 If the message is not yet downloaded, tap it.
Hint
All received messages are saved by default to the device memory.
o reply to a message
T
1 Find and tap
ap the conversation containing the message.
2 T
3 Enter your reply and tap
4 Dual SIM users, t
o use.
t
(Messages icon).
(Send icon).
ap one of the
(Send icon) according to which SIM card you want
To forward a message
1 Find and tap
ap the conversation containing the desired message.
2 T
3 Touch and hold the desired message, then tap
4 Sele
ct a recent contact from the list or tap New message and enter the recipient’s
(Messages icon).
(Forward message icon).
name or phone number, then select from the suggestions that appear. If the
recipient is not listed as a contact, enter the recipient's number manually.
5 Edit the message if necessary, then tap
6 Dual SIM users, t
o use.
t
ap one of the
(Send icon) according to which SIM card you want
(Send icon).
To save a le contained in a received message
1 Find and tap
2 If the mes
(Messages icon).
sage has not been downloaded yet, tap it.
3 Touch and hold the le that you want to save, then select the desired option.
Messaging settings
You can change message notication settings and select whether to enable
message delivery reports.
To change your message notication settings
1 Find and tap
ap
2 T
(Menu icon), then tap Se
3 Dual SIM users, tap General.
4 To set a notication sound, tap Notications > Advanced > Sound, then select an
option or tap
5 To conrm, tap OK.
6 To adjust additional notication settings, tap the switches.
To enable or disable delivery reports for outgoing messages
1 Find and tap
2 T
(Menu icon), then tap Se
ap
3 Dual SIM users, select a SIM card. Single SIM users, tap Advanced.
(Messages icon).
ttings.
(Add icon) and select a music le tha
(Messages icon).
ttings.
t is saved on your device.
81
Int
ernet version. For personal use only.
Page 82

4 T
ap the Get SMS delivery reports switch to enable or disable the function.
Note
After delivery reports are turned on, the text “Delivered” is displayed for messages that have
be
en successfully delivered.
Video chat
You can use the Duo video chat application on your device to chat with friends
who also use the application on Android and iOS devices.
Go to
https://support.google.com/duo/
how to use this application.
Note
The video call function only works on devices with a front camera.
o use the Duo application
T
• To use the video chat application, nd and tap
tting up email
Se
Use the email application on your device to send and receive email messages
through your email accounts. You can have one or several email accounts at the
same time, including corporate Microsoft Exchange ActiveSync accounts.
to get more detailed information about
(Duo icon).
To set up an email account
1 Find and tap
ollow the instructions that appear on the screen to complete the setup.
2 F
Note
For some email services, you may need to contact your email service provider for
ormation on detailed settings for the email account.
inf
(Email icon).
To add an extra email account
1 Find and tap
ap
2 T
(Options icon), then tap Se
(Email icon).
ttings > Add account.
3 Follow the on-screen instructions. If the settings for the email account cannot be
downloaded automatically, complete the setup manually.
4 When you are nished, tap Next.
82
ernet version. For personal use only.
Int
Page 83

Music
T
ransferring music to your device
There are two ways to transfer music from a computer to your device:
• Connect your device to a computer using a USB Type-C cable. Select File transfer
on your device and then copy and paste or drag and drop the les using the
computer. See
• You can use Xperia Companion to transfer your media les between the computer
and your device.
Note
The Music application may not support all music le f
Listening to music
Use the Music application to listen to your favourite music.
Music player overview
Managing les using a computer
on page 43.
ormats.
1 Minimise the full screen player
2 Search all songs saved to your device
3 View the play queue
4 View menu options
5 Album art (if available)
6 Add or remove a song as a favourite
7 Elapsed time of current song
8 Add a song to a playlist
9 Progress indicator – drag or tap along the line to fast-forward or rewind
10 Length of current song
11 Repeat the current song or all songs in the play queue
83
ernet version. For personal use only.
Int
Page 84

12 Tap to go to the next song, touch and hold to fast-forward the current song
13 Play or pause a song
14 Tap to go to the previous song, touch and hold to rewind the current song
15 Shue songs in the play queue
Music home screen
1 Tap (Options icon) to open the Music menu
2 Scroll up or down to view content
3 Tap to start playing a song in the play queue
4 Play all songs in shue mode
5 Go to the music player screen
To play a song using the Music application
1 Find and t
ap
2 T
3 Sele
ap
(Music icon).
(Options icon).
ct a music category.
4 Tap a song to play it.
Note
You might not be able to play copyright-protected items. Make sure that you have the
ne
cessary rights for the content you wish to use.
To edit music information and download album art
1 While a song is playing in the Music application, tap the album art in the music
player screen and then tap Edit music info.
2 Edit the information as desired.
3 To set or download album art, tap
4 W
hen you are nished, tap SAVE.
Hint
You can also set album art to download automatically in the Music information menu, under
Se
ttings.
(Edit icon), then select an option.
84
Int
ernet version. For personal use only.
Page 85

To adjust the audio volume
• P
ress the volume key up or down.
Hint
You can also adjust the Dynamic Vibration when listening to music. For more information,
se
e
Dynamic Vibration
on page 59.
To minimise the Music application
• When a song is playing, tap
applic
ation keeps running in the background.
(Home button) to go to the Home screen. The Music
To open the Music application when it is playing in the background
• While a song is playing in the background, drag the status bar downwards and tap
the Music notication.
• Alternatively, nd and tap
(Music icon).
85
Int
ernet version. For personal use only.
Page 86

Camera
G
etting to know your camera
1 Front camera lens
2 Switch between the front and main camera
3 Camera settings
4 Save your location
5 Use the volume keys to zoom in or out
6 Switch between taking photos and videos
7 Use the camera key to activate the camera, take photos, or record videos
8 Tap the thumbnail to view, share, or edit photos and videos
9 Use the shutter button to take photos or record videos
10 Go back or exit the camera
11 Select a capturing mode
12 Shortcut to the capturing mode last selected
13 Self-timer
14 Flash settings
15 Select an aspect ratio
16 Colour and brightness
Basic camera tips
• Mak
• Use the self-timer when you need extra time to prepare, or to avoid blurred
• Check your device’s memory status often. High-resolution photos and videos
• Press the camera key fully down, swipe (Camera icon) from the lock screen or tap
• P
• Point your device at an object while the screen is turned o or the lock screen is
e sure the lens is clean. A ngerprint or a little dirt can diminish photo quality.
photos.
consume more memory.
To launch the camera
(Camera icon) from the Application screen.
ress the power key twice. Tap Settings > System > Power key behaviour >
Launch camera switch to enable this function.
active and the device is in the landscape orientation. When the viewnder
appears, tap it to view the full screen.
86
ernet version. For personal use only.
Int
Page 87

Shutter button
T
he shutter button is used dierently depending on the capturing mode and
activated features.
Shutter button overview
Take a photo
Record a video/Resume recording
Pause a video
Stop recording a video
Self-timer is activated
Touch capture is activated
Touch capture and Self-timer are activated
To change the aspect ratio
1 W
hile using the camera, tap
2 Sele
ct a setting.
To adjust the camera settings
1 While using the camera, tap
2 S
wipe the list to view the available settings and select a setting.
(Aspect ratio icon).
(Settings icon).
Note
Available settings depend on the capturing mode selected.
T
o view, share or edit photos and videos
1 When using the camera, tap the thumbnail to open a photo or video.
2 Swipe left or right to view your photos and videos.
3 Tap the screen to edit a photo or video.
Hint
Your photos and videos are stored in the Album application. See
on page 103 for more options.
Viewing photos and videos
87
Int
ernet version. For personal use only.
Page 88

Smart launch
Y
ou can launch the camera automatically when you point your device at an object.
To use Smart launch
1 While using the camera, tap
2 T
ap the Smart launch and select an option.
(Settings icon).
3 Point your device at an object while the screen is turned o or the lock screen is
active and the device is in the landscape orientation. A viewnder will appear.
4 Tap the viewnder to view the full screen, and then take the photo.
Capturing modes
You can select capturing modes, such as Manual mode, by tapping Mode.
Note
Available settings depend on the capturing mode selected.
Cap
turing modes overview
AR e
ect
Take photos with virtual scenes and characters
Bokeh
ake photos with a blurred eect
T
Creative e
Take photos with eects and colour lters
Panorama
ake wide-angle and panoramic photos
T
Sound Photo
cord a background sound and take a photo at the same time
Re
Manual
ake photos with manually adjusted camera settings
T
Slow motion
Add a slow-mo
Portrait sele
T
ake better-looking seles
ect
tion eect after recording a video
To switch between taking photos and videos
• W
hile using the camera, swipe the screen to select a photo or video mode.
To select a capturing mode
• When using the camera, tap Mode and select a capturing mode.
To switch between the main and front camera
• When using the camera, tap
and fr
ont camera.
Hint
You can also switch between cameras by swiping down the camera screen.
(Switch camera icon) to switch between the main
88
ernet version. For personal use only.
Int
Page 89

To use the zoom
• Pinch in or out on the c
amera screen.
• Use the volume key.
Hint
If you zoom in three or more times, this can a
without zoom, then crop it.
To take a photo
• Press the camera key.
• Tap the shutter button.
• Double-tap the side sensor.
ect image quality. Instead, take the photo
To record a video
1 W
hen using the camera, swipe the screen to select
2 P
ress the camera key or tap the shutter button to start or stop recording.
Note
The maximum recording time is 6 hours.
Hint
You can also record a video by double-tapping the side sensor.
T
o launch the camera and take a photo at the same time
1 When using the camera, tap
(Settings icon), then tap Launch with c
(Record icon).
amera key >
Launch and capture.
2 Close the settings menu and exit the camera. The setting is saved for all capturing
modes.
3 Long press the camera key to launch the camera and take a photo.
To take a photo by tapping the screen
1 When using the camera, tap
(Settings icon), then tap T
ouch capture > On or
Front camera only.
89
ernet version. For personal use only.
Int
Page 90

2 Close the se
ttings menu. The setting is saved in all capturing modes.
3 Tap anywhere on the screen to take a photo.
Hint
This feature can also be used for videos.
T
o take a photo when recording a video
• When recording a video, tap
r
elease the shutter button.
(Camera icon). The photo is taken as soon as you
Self-timer
Use the Self-timer to get more time to prepare for a photo. It also helps to keep
your device steady and avoid blurred photos.
To use the Self-timer with the main camera
1 While using the camera, tap
2 P
ress the camera key or tap the shutter button to take a photo. A series of beeps
(Self-timer icon) and select a delay time.
marks the countdown until the photo is taken.
Exposure, colour and light conditions
Good exposure for your photos requires the right amount of light. The camera
automatically detects and adjusts to ambient light conditions.
Dierent exposures are required, for example, when taking photos of faces,
moving objects or in low light.
You can also record videos in HDR to add brightness and contrast for a more
realistic eect. See
To enable or disable HDR video recording
on page 92.
Optimising light conditions
• Look for light with direction and colour that gives a scene shape and depth. This
type of light occurs just before sunrise and at sunset. Natural light from a window
is also good.
• For higher quality photos in low light, you need to keep the camera steady. You
can place the camera on a solid surface and use the self-timer.
• Even if light conditions are poor, try to take photos with and without the ash.
Sometimes the quality is better without the ash.
To use the ash
1 When using the camera, tap the ash icon displayed on the screen, for example
(Auto ash ic
on).
2 If required, change the ash setting.
3 Press the camera key or tap the shutter button to take a photo or record a video.
Note
Available settings depend on the capturing mode selected.
Hint
When the background is brighter than the object, use Fill ash to remove unwanted dark
shadows.
Colour, brightness and exposure value
Your camera automatically adjusts the colour, brightness and exposure value by
detecting the light conditions and estimating the colour temperature of ambient
90
ernet version. For personal use only.
Int
Page 91

light. Digital cameras can only estimate the colour temperature, so you may need
t
o adjust the settings to get it correct.
If you experience yellow-coloured photos in indoor environments or bluish photos
when using the ash, try adjusting the colour.
To achieve better exposures in low-light environments, change the brightness for
photos and videos. If you are using Manual mode for photos, change the exposure
value.
To adjust the colour and brightness
1 When using the camera, tap
2 Dr
ag the sliders to adjust the colour and brightness.
3 Press the camera key or tap the shutter button to take a photo or record a video.
4 Tap
1 When using the camera, tap Mode >
2 T
3 Close the settings menu. The setting is saved.
4 Press the camera key or tap the shutter button to take a photo.
(Cancel icon) to reset and close the colour setting.
T
o adjust the exposure value
ap EV and drag the slider to adjust the exposure value.
(Colour and brightness icon).
(Manual mode icon).
Shutter speed
Shutter speed refers to how long the shutter is open and the camera sensor is
exposed to light.
A fast shutter speed helps to freeze motion, while a slow shutter speed can create
an eect called "motion blur", where moving objects appear blurred along their
line of motion.
The shutter speed is automatically adjusted in photos and videos.
To adjust the shutter speed
1 When using the camera, tap Mode >
2 T
ap SS and drag the slider to adjust the shutter speed.
3 Close the settings menu. The setting is saved.
4 Press the camera key or tap the shutter button to take the photo.
(Manual mode icon).
ISO
ISO determines how sensitive your camera is to light. A low ISO number means
lower sensitivity, and a high ISO number means higher sensitivity. Higher
sensitivity can add blur to your photos.
Choose a higher ISO value when taking photos of moving objects or when taking
photos in low light without the ash.
If there is too much light, use the lowest ISO setting to achieve a higher image
quality.
ISO is automatically adjusted when taking photos and videos.
To adjust the ISO value
1 When using the camera, tap Mode >
2 T
ap ISO and drag the slider to adjust the ISO value.
3 Close the settings menu. The setting is saved.
4 Press the camera key or tap the shutter button to take a photo.
(Manual mode icon).
91
ernet version. For personal use only.
Int
Page 92

Strong backlight (HDR)
S
trong backlight (HDR) is automatically adjusted when taking photos. You can also
adjust for strong backlight manually in Manual mode.
To adjust towards a strong backlight
1 When using the camera, tap Mode >
2 T
3 P
(HDR icon) and select On.
ap
ress the camera key or tap the shutter button to take a photo.
(Manual mode icon).
HDR video recording
Enable HDR (High Dynamic Range) to make your videos appear more dramatic and
closer to what you see in real life.
To enable or disable HDR video recording
1 When using the camera, swipe the screen to select
2 T
ap HDR (HDR icon), and select On.
Note
This setting is only available when (Settings icon) > Video size is set to 4K or Full HD.
W
hite balance
(Record icon).
White balance is automatically adjusted when taking photos and videos. In Manual
mode, you can adjust the white balance manually.
To adjust the white balance
1 When using the camera, tap Mode >
2 T
ap WB and select one of the pre-dened light conditions, for example
whit
e balance icon).
3 Close the settings menu. The setting is saved.
4 Press the camera key or tap the shutter button to take a photo.
(Manual mode icon).
(Cloudy
White balance settings
Auto
Adjust the c
Cloudy
Adjust the colour balance for a cloudy sky
Daylight
Adjust the c
Fluorescent
Adjust the c
Incandescent
Adjust the c
bulbs
olour balance automatically
olour balance for sunny outdoor conditions
olour balance for uorescent lighting
olour balance for warm lighting conditions, such as under light
Optimising exposure
Exposur
exposure.
Exposure metering is automatically adjusted when taking photos and videos.
e metering measures the amount of light that strikes an object, to optimise
92
ernet version. For personal use only.
Int
Page 93

You can adjust the exposure manually in Manual mode, for example for a spe
part of a photo.
To adjust the exposure with metering
1 When using the camera, tap Mode >
2 T
3 Select an exposure option and close the settings menu. The setting is saved.
4 Press the camera key or tap the shutter button to take a photo.
(Settings icon) > Me
ap
tering.
(Manual mode icon).
Metering settings
Face
Measur
is neither too dark nor too bright
Multi
Divides the image int
exposure
Centre
De
brightness of the object
Spot
Adjusts the e
es the amount of light on a face, and adjusts the exposure so that the face
o several parts, and measures each part to optimise the
termines the centre of the image, and sets the exposure based on the
xposure for a very small part of the object
cic
Setting the right focus
T
he camera automatically sets the focus and detects faces in all capturing modes.
It can also detect and track a moving object. A yellow frame indicates the face or
moving object that is in focus.
One way to change the focus area is to move your camera around with the camera
key half pressed. Once the focus is set, the circular frame turns blue. This technique
can be used, for example, to change the focus to a person who is at the side of a
group photo.
You can also tap the screen to focus on a specic area, or set a specic focus
distance. These options are only available for the main camera and depend on the
capturing mode selected.
To set the focus distance
1 W
hen using the main camera, tap Mode >
2 T
3 Dr
4 Close the settings menu. The setting is saved.
(Set focus icon).
ap
ag the slider to adjust the focus distance.
93
Int
ernet version. For personal use only.
(Manual mode icon).
Page 94

5 P
ress the camera key or tap the shutter button to take a photo.
People, seles and smiling faces
Faces in focus are indicated with a coloured frame. Tap any frame to select a face
to focus on.
Use Smile Shutter to automatically take a photo when a person smiles. If you are
recording a video, a photo is taken each time a smile is detected.
Taking photos and videos of people
onsider the camera orientation. Use portrait for close-up photos, to ll the frame.
• C
Use landscape for close-up group photos, or to capture an object in the
background.
• Place the camera on a solid surface and use the self-timer
tos.
pho
to prevent blurred
To focus on another face
• Before taking a photo or recording a video, tap one of the frames to select a face to
focus on.
To take a photo when someone smiles
1 When using the camera, tap
ap Auto-capturing or Auto-capturing (video) > Smile Shutter.
2 T
(Settings icon).
3 Close the settings menu. The setting is saved for the capturing mode selected.
4 When a smile is detected, the camera automatically takes a photo.
Note
This setting is not available when (Settings icon) > Video size is set to 4K.
T
o take a sele
1 When using the camera, select a photo or video capturing mode for your sele.
2 Tap
3 T
4 P
(Switch camera icon) to activate the front camera.
(Self-timer icon) if you want to use the self-timer.
ap
ress the camera key or tap the shutter button to take a sele.
Hint
Turn on the Soft Skin E
ect to soften skin tones when taking seles.
To activate the sele timer with the palm of your hand
1 When using the camera, tap
2 T
3 T
(Settings icon).
ap
ap Auto-capturing > Hand Shutter and close the settings menu. The setting is
(Switch camera icon) to activate the front camera.
saved.
94
Int
ernet version. For personal use only.
Page 95

4 T
urn your palm with your ngers straight up towards the camera.
5 When the camera detects your hand, the timer starts and a sele is taken.
Moving objects
When taking photos and recording videos of moving objects, timing is important
for good results.
Predictive Capture automatically takes photos the instant an object enters the
camera frame, without you pressing a button. Object tracking can track a moving
object automatically. Use the Burst with camera key feature to take a burst of
images and nd the best shot.
When recording videos, you can use SteadyShot™ to compensate for camera
movements and steady the frame.
Capturing moving objects
• Try not to follow the object. Instead, nd a position where the object has to pass in
front of you.
• Consider changing the exposure to a faster shutter speed or a higher ISO to freeze
motion.
To predict a photo
1 When using the main camera, tap
2 T
ap Predictive Capture > Auto.
3 Close the settings menu. The setting is saved.
4 Press the camera key or tap the shutter button to take a photo.
5 Tap the thumbnail to view the result. Two to four photos are saved depending on
the movement of the object. Predictive Capture can also detect unexpected
smiles.
6 Tap Select the best to save one or more photos.
(Settings icon).
Note
This option is only available when taking photos with the main camera.
To track an object
hen using the main camera, tap
1 W
ap the Object tracking switch to enable.
2 T
(Settings icon).
3 Close the settings menu. The setting is saved.
4 Select an object to track by touching it in the viewnder.
5 Press the camera key or tap the shutter button to take a photo or record a video.
To capture a burst of images
1 When using the camera, tap
ap the Burst with camera key switch to enable.
2 T
(Settings icon).
3 Close the settings menu. The setting is saved.
95
Int
ernet version. For personal use only.
Page 96

4 L
ong-press the camera key or shutter button to take a burst of images. The
number of pictures taken is indicated in the middle of the viewnder.
5 Release the camera key or shutter button to nish the burst. All photos are saved.
6 Tap the thumbnail to view the result, then tap
7 Scr
oll through the pictures taken and select the photo or photos that you want to
(Burst viewer icon).
save, then tap Save.
Hint
This setting is enabled by default when using the shutter button. Touch and hold the shutter
butt
on to take a burst of images.
To record a steady video
1 When using the camera, swipe the screen to select
2 T
3 T
(Settings icon).
ap
ap SteadyShot™ > Intelligent active to compensate for all camera movement, or
(Record icon).
Standard to compensate only for high-frequency camera movement.
4 Close the settings menu. The setting is saved.
5 Press the camera key or tap the shutter button to record a video.
Using various capturing modes
Use the capturing modes to take more creative photos and videos, and share them
with your friends. You can create virtual scenes, panoramic photos, and more. You
can also use capturing modes provided by Google.
AR e
ect
AR eect is the augmented reality app that lets you apply fantastical worlds to
your photos or videos, and to create avatars and stickers.
To take a photo or record a video with an AR eect
1 When using the camera, tap Mode.
2 Tap
(AR e
ect icon) and select a scene.
3 Press the camera key or tap the shutter button to take a photo or record a video.
Bokeh
The Bokeh eect decreases focus in the background of a photo to emphasise
objects in the foreground for an artistic eect.
To take a photo with Bokeh eect
1 When using the camera, tap Mode >
2 T
ap Accept > OK if prompted.
ernet version. For personal use only.
Int
(Bokeh icon).
96
Page 97

3 T
ap an object on the screen to focus, and then tap
pho
to.
4 Tap one of the switches to select the background defocus eect.
5 Drag the slider
str
ength. Then, save the photo.
(Bokeh blur-degree icon) to adjust the background focus
(Shutter button) to take the
Creative eect
With the Creative eect app you can preset eects and colour lters before taking
a photo or recording a video.
To take a photo or record a video with a creative eect
1 When using the camera, tap Mode.
2 Tap
3 Swipe to browse lters, or tap a lter to preview the eect.
4 Tap
5 Press the camera key or tap the shutter button to take a photo or record a video.
6 Tap
(Creative e
(Apply creative e
screen.
(Switch lt
ect icon).
ect icon) to apply the lter and return to the camera
er icon) to switch lters.
Panorama
Use the Panorama app to take wide-angle and panoramic photos.
To take a panoramic photo
1 When using the camera, tap Mode.
2 Tap
3 P
4 Move the camera slowly and steadily in the direction of movement indicated on
(Panorama icon).
ress the camera key or tap the shutter button.
the screen.
Sound Photo
Record a background sound and take a photo at the same time with the Sound
Photo app.
To record a background sound with a photo
1 When using the camera, tap Mode.
2 Tap
3 P
(Sound Photo icon).
ress the camera key or tap the shutter button to start recording and take a photo.
The recording stops automatically.
Portrait sele
Portrait sele allows you to take better-looking seles.
Portrait sele overview
Bokeh
Applies a blurring e
Soft Skin
ens skin tones
Soft
Skin brightness
ens skin tones
Bright
ect around a person
97
Int
ernet version. For personal use only.
Page 98

Eye enlargement
ges eyes
Enlar
Slender face
es your face look slimmer
Mak
To take a sele with P
1 When using the camera, tap Mode >
ortrait sele
(Portrait sele ic
on).
2 Tap the icon for the eect you want to apply, and drag the slider to adjust the
eect. If desired, adjust the other eects in the same way.
3 Press the camera key or tap the shutter button to take a photo.
Hint
You can save your portrait in the same direction as the preview by tapping (Mirroring icon)
> On.
Slow mo
tion videos
Add powerful eects to your videos with Slow motion and Super slow motion
video modes. The Slow motion eect is added after a video is recorded at normal
speed, while Super slow motion can be recorded in two ways. You can either
record separate short videos in Super slow motion, or short sequences embedded
within a video recorded at normal speed. Super slow motion videos can be
recorded in HD or Full HD resolution.
Note
Good lighting conditions are essential when you record slow motion videos.
T
o add slow motion eect after recording a video
1 When using the camera, swipe the screen to select
2 T
ap Mode >
3 T
ap
4 Sele
(Settings icon).
ct Slow motion mode > Slow motion.
(Slow motion icon).
(Record icon).
5 Press the camera key or tap the shutter button to record a video.
6 Tap
7 Dr
8 Tap
(Stop button) to stop recording.
ag the blue circles to where you want the slow motion eect to appear.
(Save slow motion video icon) to save the video(s).
T
o record a super slow motion video
1 When using the camera, swipe the screen to select
2 T
ap Mode >
3 T
ap
4 Sele
(Settings icon).
ct Slow motion mode > Super slow (one-shot).
(Slow motion icon).
(Record icon).
5 Press the camera key or tap the shutter button to record a video in super slow
motion. The recording stops automatically.
Hint
You can record a super slow motion video in HD or Full HD. When using Super slow motion
, tap
mode
o record a super slow motion sequence in a video
T
1 When using the camera, swipe the screen to select
ap Mode >
2 T
ap
3 T
4 Sele
ct Slow motion mode > Super slow motion.
(Settings icon) > Video size and select a resolution.
(Record icon).
(Slow motion icon).
(Settings icon).
5 Press the camera key or tap the shutter button to record a video.
98
Int
ernet version. For personal use only.
Page 99

6 T
7 Tap
(Super slow motion icon) one or more times to record time limited
ap
se
quences in super slow motion. The recording continues.
(Stop button) to stop the recording.
Resolution and memor
The number of photos and videos you can store depends on the resolution or MP
(megapixel) value used and video length.
High-resolution photos and videos take up more memory, so keep in mind that a
lower resolution can be suitable for everyday use.
Check the memory status from time to time. When the memory is full, you can
transfer photos and videos to another storage device to free up memory. See
Managing les using a computer
Choose whether to store photos and videos on your device’s internal storage or on
an SD card using the Data storage option in the camera settings menu.
To change the resolution
1 When using the camera, tap
2 T
ap Still image size or Video size.
3 Select the resolution and close the settings menu. The setting is saved for the
selected capturing mode.
Hint
You can set the resolution separately for each capturing mode.
P
hoto resolutions
y
on page 43.
(Settings icon).
Main camera:
19MP
56×3792 (4:3). 19MP resolution with 4:3 aspect ratio. Suitable for photos you
50
want to view on non-widescreen displays or print in high resolution.
17MP
5504×3096 (16:9). 17MP r
want to view on widescreen displays.
14MP
792×3792 (1:1). 14MP resolution with 1:1 aspect ratio. Suitable for photos that you
3
want to view on non-widescreen displays or print in high resolution.
12MP
000×3000 (4:3). 12MP resolution with 4:3 aspect ratio. Suitable for photos you
4
want to view on non-widescreen displays or print in high resolution.
12MP
4608×25
want to view on widescreen displays.
9MP
3000×3000 (1:1). 9MP r
want to view on non-widescreen displays or print in high resolution.
92 (16:9). 12MP resolution with 16:9 aspect ratio. Suitable for photos you
esolution with 16:9 aspect ratio. Suitable for photos you
esolution with 1:1 aspect ratio. Suitable for photos that you
Front camera:
13MP
4160×3120 (4:3). 13MP r
want to view on non-widescreen displays or print in high resolution.
10MP
esolution with 4:3 aspect ratio. Suitable for photos you
99
Int
ernet version. For personal use only.
Page 100

4192×2358 (16:9). 10MP r
want to view on widescreen displays.
9MP
3000×3000 (1:1). 9MP r
want to view on non-widescreen displays or print in high resolution.
esolution with 16:9 aspect ratio. Suitable for photos you
esolution with 1:1 aspect ratio. Suitable for photos that you
Video resolutions
HD r
efers to High Denition, while fps refers to Frames Per Second. A higher fps
rate provides a smoother video, at the cost of a larger le size. The aspect ratio is
the relationship between the width and the height, where the width is the rst
number.
Main camera:
4K
0×2160 (16:9). 4K format with 16:9 aspect ratio. With 4K you can record videos
384
in four times the resolution of Full HD.
Full HD
1920×1080 (16:9). F
Full HD (60 fps)
1920×1080 (16:9). F
HD
1280×720 (16:9). HD f
VGA
0×480 (4:3). VGA (Video Graphics Array) format with 4:3 aspect ratio.
64
ull HD format with 30 fps and 16:9 aspect ratio.
ull HD format with 60 fps and 16:9 aspect ratio.
ormat with 16:9 aspect ratio.
Front camera:
Full HD
1920×1080 (16:9). F
HD
1280×720 (16:9). HD f
VGA
0×480 (4:3). VGA (Video Graphics Array) format with 4:3 aspect ratio.
64
ull HD format with 16:9 aspect ratio.
ormat with 16:9 aspect ratio.
Diagnosing your camera
If your c
there is a problem with the main camera, front camera, ash, or camera key.
To run a diagnostics test of your camera
1 Make sure you are connected to the internet. When using the camera, tap
(Settings icon).
2 T
ap Help.
3 Select a category, then follow the on-screen instructions.
amera isn’t working properly, you can run a diagnostics test to identify if
100
Int
ernet version. For personal use only.
 Loading...