

Page 1
3-254-962-11 (1)
Overhead Monitor
Operating Instructions
Mode d’emploi
Owner’s Record
The model and serial numbers are located on the top of the unit.
Record the serial number in the space provided below.
Refer to these numbers whenever you call upon your Sony dealer regarding this
product.
Model No. XVM-R70 Serial No.
US
FR
XVM-R70
2003 Sony Corporation
Page 2

Warning
To prevent fire or shock hazard,
do not expose the unit to rain or
moisture.
This symbol is intended
to alert the user to the
presence of uninsulated
“dangerous voltage”
within the product’s
enclosure that may be of
sufficient magnitude to
constitute a risk of electric
shock to persons.
This symbol is intended
to alert the user to the
presence of important
operating and
maintenance (servicing)
instructions in the
literature accompanying
the appliance.
WARNING
This equipment has been tested and
found to comply with the limits for a
Class B digital device, pursuant to Part
15 of the FCC Rules. These limits are
designed to provide reasonable
protection against harmful interference
in a residential installation. This
equipment generates, uses, and can
radiate radio frequency energy and, if
not installed and used in accordance
with the instructions, may cause
harmful interference to radio
communications. However, there is no
guarantee that interference will not
occur in a particular installation. If this
equipment does cause harmful
interference to radio or television
reception, which can be determined by
turning the equipment off and on, the
user is encouraged to try to correct the
interference by one or more of the
following measures:
— Reorient or relocate the receiving
antenna.
— Increase the separation between the
equipment and receiver.
— Connect the equipment into an
outlet on a circuit different from that
to which the receiver is connected.
— Consult the dealer or an experienced
radio/TV technician for help.
You are cautioned that any changes or
modifications not expressly approved in
this manual could void your authority
to operate this equipment.
2
Page 3

Table of contents
Welcome! .............................................................................................................................. 4
Precautions........................................................................................................................... 5
Location of controls ............................................................................................................7
Operation
Opening the display monitor ............................................................................................ 9
Selecting the input source................................................................................................ 10
Setting the screen mode ................................................................................................... 11
Changing the display settings......................................................................................... 12
Adjusting the volume....................................................................................................... 14
Connections
Installation diagram ......................................................................................................... 15
Connection diagram ......................................................................................................... 16
Additional Information
Maintenance ...................................................................................................................... 18
Specifications ..................................................................................................................... 20
Troubleshooting ................................................................................................................ 21
3
Page 4

Welcome!
Thank you for purchasing the Sony Overhead Monitor.
• Reversible picture
• PAL or NTSC color system compatible
• Full, Zoom, and Widezoom screen modes available, in addition to the normal
screen mode
• The low reflection liquid crystal panel reduces the glare from outside lighting
sources.
• Adjustable brightness control, according to lighting conditions
• Backlight dimmer control produces sharp contrast image, free from reversed or
blurred colors.
•3 Audio/Video inputs and 1 Audio/Video output are provided for connecting a
video player, video game, and additional monitor.
• 7.5 V DC output is provided for connecting PS one™.
• Built-in infrared transmitter for cordless headphones (optional)
•2 headphone jacks are provided for connecting wired headphones (optional).
* “PS one” is a trademark of Sony Computer Entertainment Inc.
4
Page 5
Precautions
To avoid the risk of serious injury or accident, read the following precautions before
installing and operating the unit.
On safety
Comply with your local traffic rules and regulations.
• While driving
- The driver must not watch or operate the monitor. It may lead to distraction and
cause an accident.
- The driver must not use the headphones. It may lead to distraction and cause an
accident.
Park the car in a safe place when the driver watch and operate the monitor, or use
headphones.
• After installing
- Do not hang onto the monitor.
- Do not insert your hands, fingers or foreign objects into the unit. It may cause
injury or damage to the unit.
- Take care not to bump your head against the unit when getting up from the back
seat.
- Take extra care not to wind the wire of the headphones around your neck
avoiding injury or suffocation in the event of a sudden movement of the vehicle.
- Keep small articles out of the reach of children.
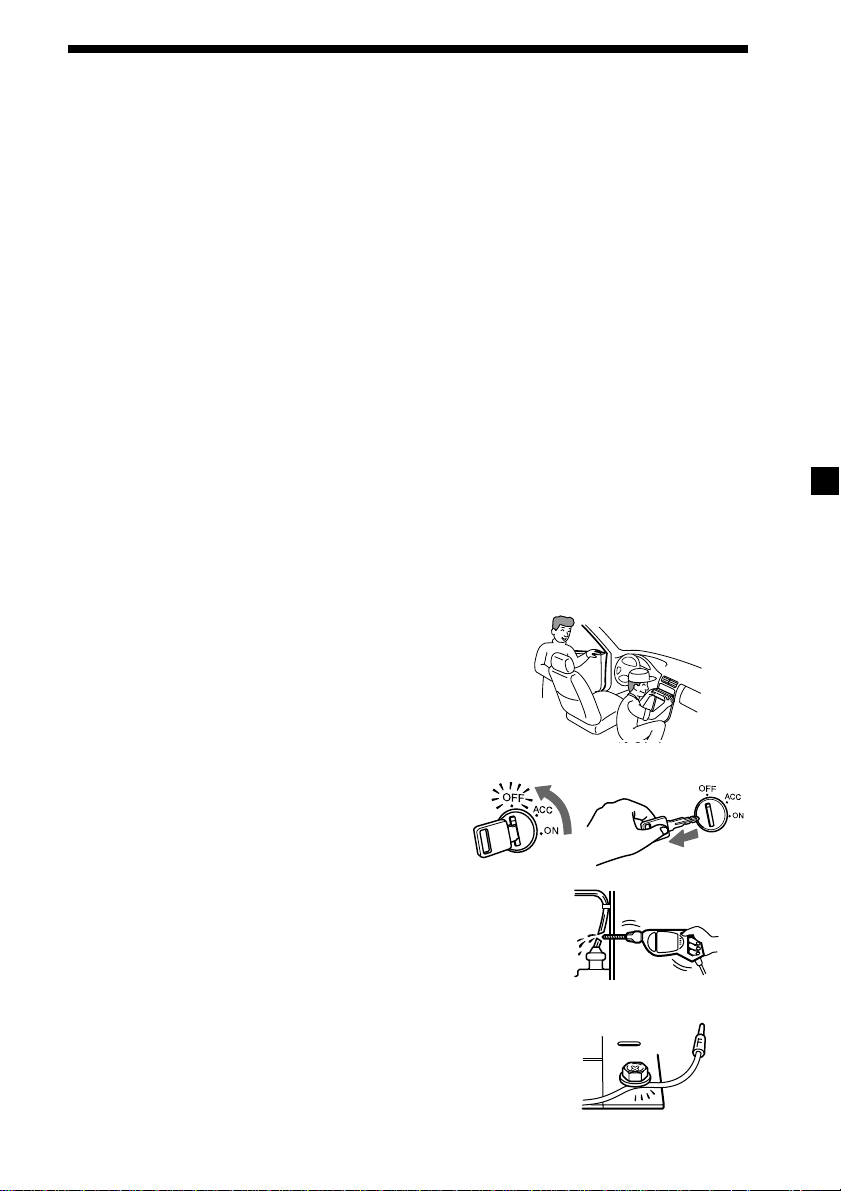
On installation
• Installing this unit requires technical expertise.
This unit should be installed by a qualified
technician or service personnel.
• If you try to install this unit by yourself, do it
properly, referring to the installation and wiring
diagrams in this operating manual. Improper
installation may result in fire or electric shock.
• Before installation, be sure to turn the ignition
switch to the OFF position or take the key out.
Installing this unit with the ignition on may
cause battery drain or a short circuit.
• Do not damage any pipes, tubes, the fuel tank or
electric wiring when installing this unit. This can cause
a fire. If you drill a hole in car panels, make sure that
any hidden car parts will not be damaged.
• Do not use any nuts or bolts for safety devices such as
steering linkage, fuel supply or braking systems. This
can cause a fire or an accident.
• Take care to prevent cords and wires from getting
tangled or crimped in the moving portion of a seat rail.
continue to next page t
5
Page 6
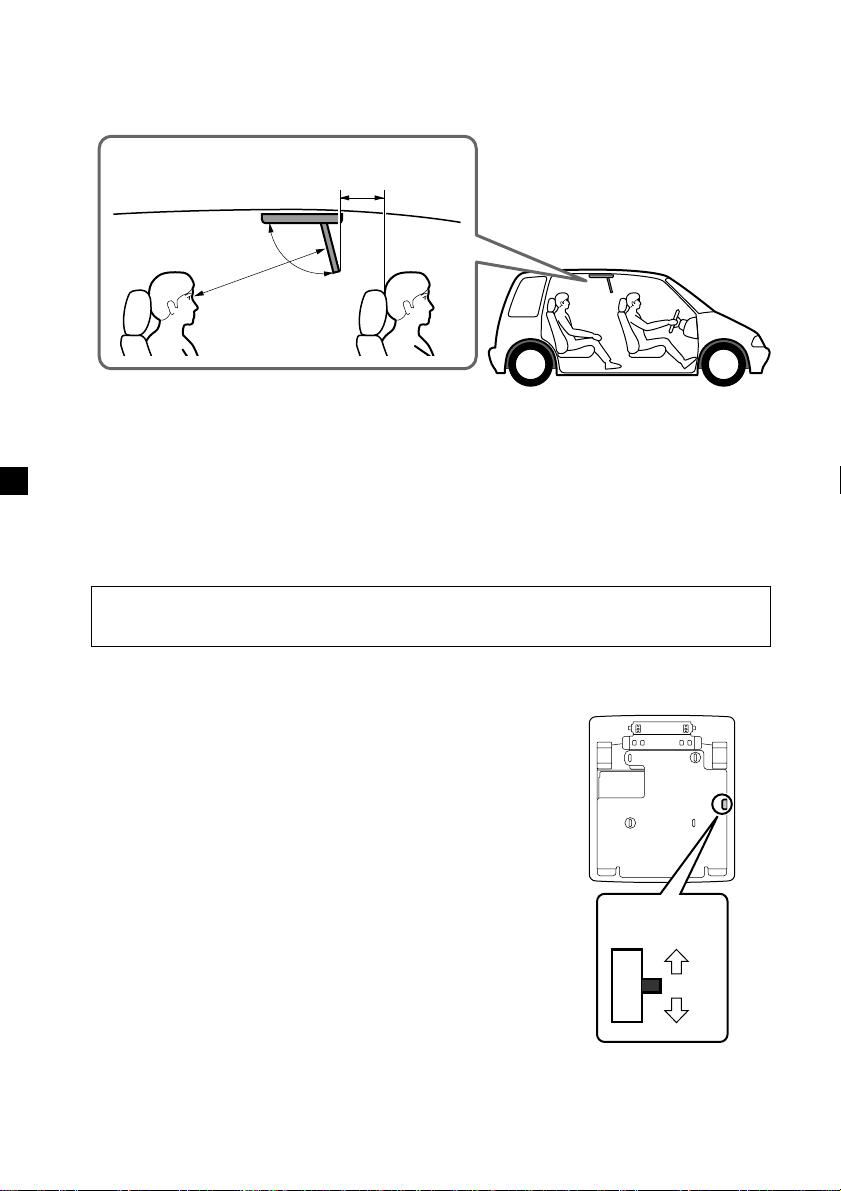
Where to install
Before installing this unit, please check your local traffic rules and regulations.
Follow the diagram below to install this unit in a suitable position in your car.
Approximately
150 mm (5 15/16 in.)
Approximately
300 mm (11 13/16 in.)
Do not install this unit where:
- It will obstruct the driver’s view when the monitor is in
either the open or closed position.
- It will obstruct the operation of the airbag system.
- It will obstruct the operation of the vehicle, especially
the steering wheel, shift lever, or brake pedal.
-A driver or passengers may injure themselves when
getting into or out of the car.
If you have any questions or problems concerning your unit that are not covered
in this manual, please consult your nearest Sony dealer.
Before installing
Make sure that the POWER SELECT switch is set to the
correct position.
A*: If your car has an accessory position on the ignition key.
B : If your car has no accessory position on the ignition key.
* A is the factory preset position.
When the POWER SELECT switch is set to B
Press (POWER) on the monitor to turn on.
The monitor does not turn on by pressing (POWER) on
the card remote commander.
Note
Be sure to turn off the monitor after driving your car.
To turn off the monitor, follow the operations below:
– Press (POWER) on the monitor.
– Press (POWER) on the card remote commander.
– Close the display monitor until it clicks*.
If the power is left on, it will cause battery drain.
* When the display monitor is in the reverse position, the
monitor is not turned off. For details on the reverse
position, refer to page 7.
6
POWER SELECT
switch
A
B
Page 7
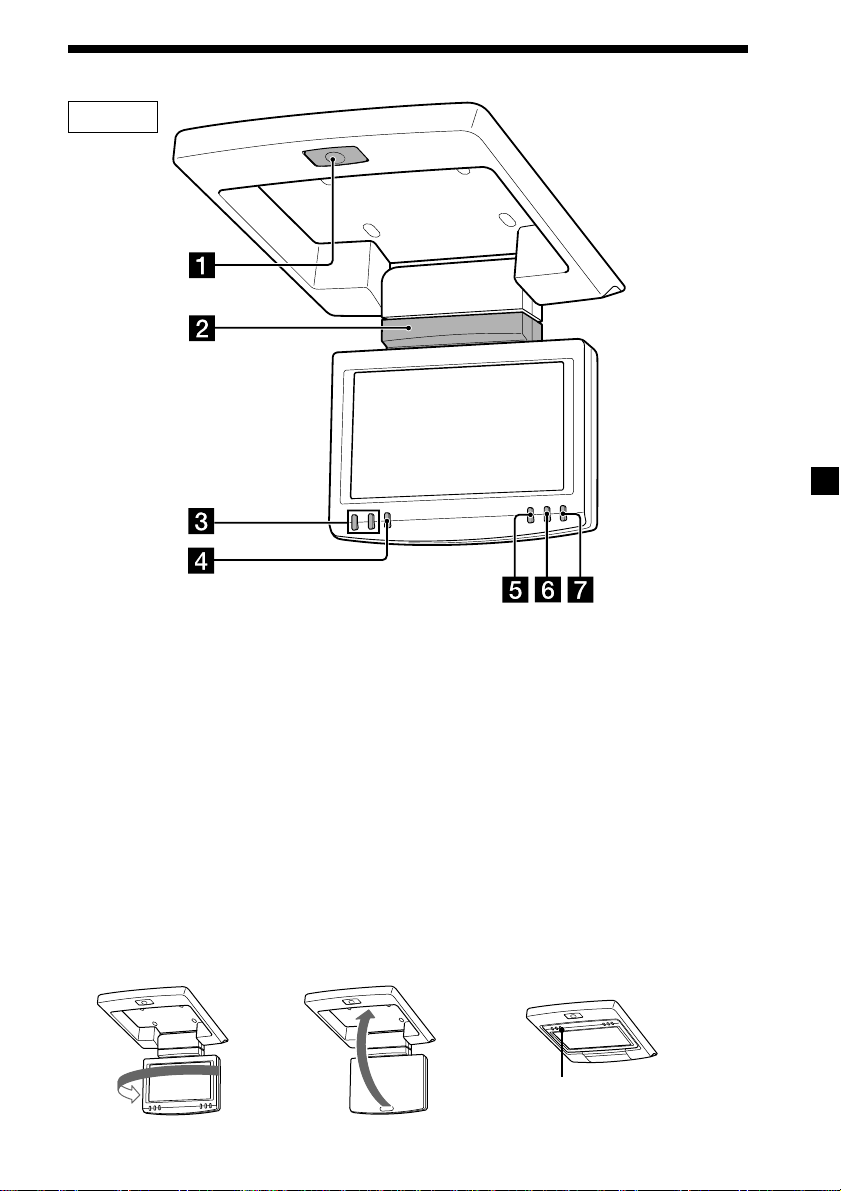
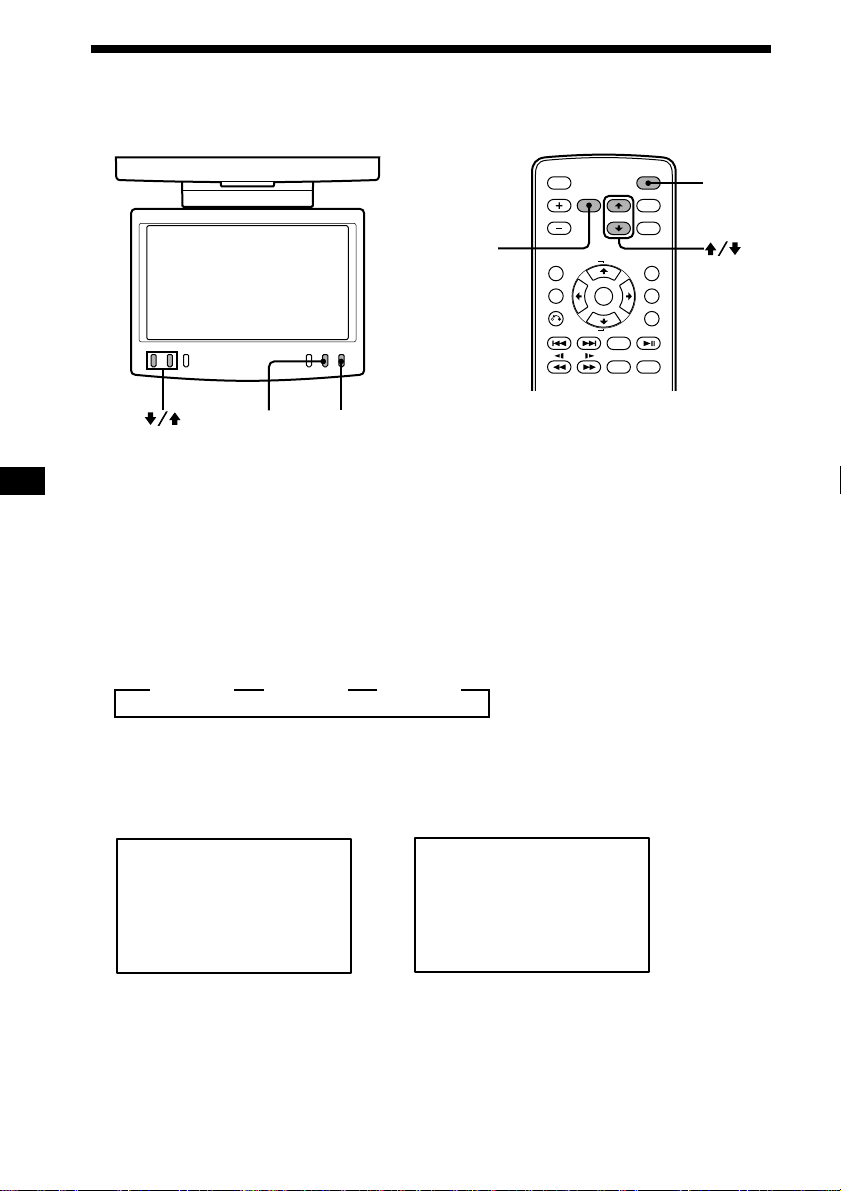
Location of controls
Monitor
1 OPEN button
Press to open the monitor.
2 Receptor for the card remote
commander/Transmitter for the
cordless headphones
3 UP/DOWN (M/m) buttons
Press to select the desired item.
* The reverse position of the display monitor
You can close with the LCD surface out after turning around 180 degrees, and images on
the screen can be turned upside down by pressing (REVERSE) on the monitor. Before
closing the display monitor, make sure that the monitor is turned and facing the
enclosure (you will hear a click). Each time you press (REVERSE) on the monitor, the
reverse screen mode switches between on and off.
180˚
c c
4 MENU button
Press to adjust the various display
settings.
5 REVERSE button*
Press to switch images upside down.
6 INPUT button
Press to select the input source.
7 POWER button
REVERSE
continue to next page t
7
Page 8

Card remote commander RM-X122
ATT POWER
MENUINPUT
VOL
TOP MENU ALBUM
MENU
ALBUM
+
–
ENTER
OFF
AUDIO
MODE
LIST
SETUP
DISPLAY
SUBTITLE
For the monitor operations:
1 ATT button
Press to quickly attenuate the
volume.
2 VOL (volume) +/– buttons
Press to adjust the volume.
3 INPUT button
Press to select the input source.
4 POWER button
5 MENU button
Press to adjust the various display
settings.
6 MODE button
Press to change the screen mode.
7 V/v buttons
Press to select the desired item.
ATT POWER
MENUINPUT
VOL
TOP MENU ALBUM
MENU
ALBUM
+
–
ENTER
OFF
AUDIO
MODE
LIST
SETUP
DISPLAY
SUBTITLE
For DVD operations:
When a Sony mobile DVD player is
connected to this unit, you can control
the basic functions with the card remote
commander.
8 V/v (ALBUM +/–) buttons
9 TOP MENU button
0 MENU button
qa O button
qs ./> buttons
qd m/M (
) buttons
qf B/b buttons
qg LIST button
qh SET UP button
qj ENTER button
qk DISPLAY button
ql u button
w; OFF button
wa SUBTITLE button
ws AUDIO button
• For function details, refer to the
operating instructions supplied with the
DVD player.
• Sony DVD changer DVX-100 is not
controllable with this card remote
commander.
Tip
Refer to “Replacing the lithium battery” for details on how to replace the batteries (page 18).
8
Page 9

Operation
POWER
Opening the display monitor
OPEN
ATT POWER
VOL
TOP MENU ALBUM
+
MENU
ENTER
ALBUM
–
OFF
AUDIO
MENUINPUT
MODE
LIST
SETUP
DISPLAY
SUBTITLE
POWER
Press (OPEN) to open the display monitor,
then press (POWER) to turn on the monitor.
Tip
If your car has no ACC (accessory) position on the ignition key switch, and the POWER
SELECT switch is set to the B position, the monitor does not turn on by pressing
(POWER) on the card remote commander (page 6).
Returning the display monitor to its enclosure
Close the display monitor until it clicks. The monitor turns off automatically.
Notes
• Be careful not to catch your finger in the display monitor when closing.
• Do not put any foreign objects between the LCD panel and the enclosure when closing.
Adjusting the tilt and swivel
This display monitor can be adjusted within the
angles shown.
Tip
Before closing the display monitor, make sure that
the monitor is turned and facing the enclosure
(you will hear a click).
120˚
180˚
30˚
9
Page 10
Selecting the input source
You can select the input source and color system.
ATT POWER
MENUINPUT
INPUT
POWER
INPUT
VOL
TOP MENU ALBUM
MENU
ALBUM
MODE
+
LIST
SETUP
ENTER
DISPLAY
–
OFF
SUBTITLE
AUDIO
1 Press (POWER).
The power is turned on.
Tip
If your car has no ACC (accessory) position on the ignition key switch, and the POWER
SELECT switch is set to the B position, the monitor does not turn on by pressing
(POWER) on the card remote commander (page 6).
2 Press (INPUT) to select the desired input source.
Each time you press (INPUT), the indication changes in the following sequence:
B VIDEO 1 B VIDEO 2 B VIDEO 3
POWER
3 Press V or v to select PAL or NTSC color system.
Press either button while the source indication (such as “VIDEO 1”) is displayed.
When NTSC Video is selected
VIDEO1
NTSC
10
When PAL Video is selected
VIDEO1
PAL
Page 11
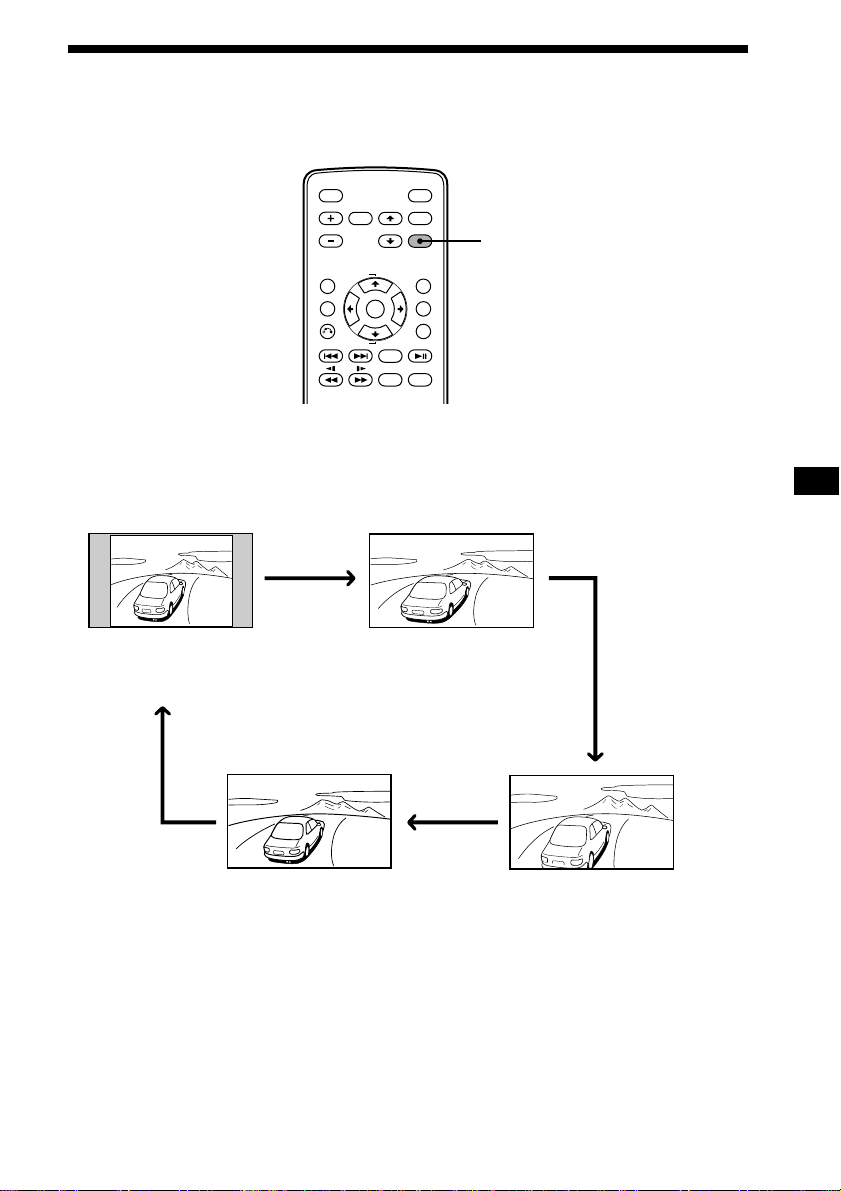
Setting the screen mode
In addition to the normal mode, full, zoom, and widezoom modes are also available.
ATT POWER
MENUINPUT
VOL
TOP MENU ALBUM
MENU
ALBUM
Press (MODE) repeatedly.
The current mode is displayed on the screen first.
Each time the button is pressed, the screen mode switches in the following
sequence:
MODE
+
LIST
SETUP
ENTER
DISPLAY
–
OFF
SUBTITLE
AUDIO
MODE
NormalNormal
Normal (regular)
An image with an aspect ratio
of 4 to 3 (regular image).
WideWide
Widezoom
An image with an aspect ration
of 4 to 3, with only the left and
right sides of the image being
enlarged to fill the screen.
FullFull
Full
An image with an aspect ratio
of 4 to 3 enlarged to the left
and right edges of the screen.
ZoomZoom
Zoom
An image with an aspect ratio of 4
to 3 enlarged to the left and right
edges of the screen, with the
overflowing parts (top and bottom)
cut off to fill the screen.
The screen mode is set after 5 seconds without pressing (MODE).
Tip
Images may appear coarse-grained when viewed in the zoom mode.
11
Page 12

Changing the display settings
Brightness 32
or MENU.Press
Vv,
You can adjust the display settings manually if the display is hard to see from the
position where you are seated.
ATT POWER
MENU
1 Press (MENU).
The “Picture” screen appears.
VOL
TOP MENU ALBUM
MENU
ALBUM
MENUINPUT
MODE
+
SETUP
ENTER
DISPLAY
–
OFF
SUBTITLE
AUDIO
MENU
LIST
Picture 32
Vv,
Each time you press (MENU), the setting screen changes in the following
sequence:
B Picture B Brightness B Color B Hue* B Dimmer
Menu Off b Blue Back b Mode b Video Adjust
* Appears only when the NTSC color system is selected.
2 Press V or v to adjust to the desired setting.
When “Picture” is selected
Picture 32
or MENU.Press
Vv,
Press v to
decrease
the contrast
12
n
Press V to
increase the
contrast
The setting value of the
item selected appears in this
or MENU.Press
area.
When “Brightness” is selected
Press v to
darken the
picture
n
Press V to
brighten the
picture
Page 13

When “Color” is selected
When “Hue” is selected*
1
Color
Press v for
less color
intensity
Vv,
n
32
or MENU.Press
Press V for
more color
intensity
When “Dimmer” is selected
Dimmer; On
Vv,
or MENU.Press
When this function is set to on, the
brightness of the screen will be
adjusted automatically.
When “Mode” is selected
Mode; Zoom
Vv,
or MENU.Press
Hue
Press v to
decrease the
saturation
Vv,
n
CTR
or MENU.Press
Press V to
increase the
saturation
2
*
When “Video Adjust” is selected
Video Adjust;
Vv,
Reset
or MENU.Press
“Picture”, “Brightness”, “Color”,
“Hue” and “Dimmer” settings will
be reset to the factory preset level.
When “Blue Back” is selected
Blue Back; On
Vv,
or MENU.Press
“Normal,” “Full,” “Zoom,” or
“Widezoom” can be set as the screen
mode. For details, refer to page 11.
The blue background screen appears
when no signal, or a weak signal is
received. When a continuously weak
video signal is received, the blue
background may flicker. If this
occurs, set to off.
*1“Hue” is adjustable only when the NTSC color system is selected.
*2“CTR” appears only when is in the center of the bar.
13
Page 14

Adjusting the volume
You can adjust the volume of the wired headphones and the connected equipment
with the supplied card remote commander.
ATT
VOL+/–
ATT POWER
VOL
TOP MENU ALBUM
+
MENU
ENTER
ALBUM
–
OFF
AUDIO
MENUINPUT
MODE
LIST
SETUP
DISPLAY
SUBTITLE
Press (VOL)(+) or (VOL)(–) on the card remote commander.
Quickly attenuating the sound
Press (ATT) on the card remote commander.
ATT On
To restore the previous volume level
Press (ATT) again.
Connecting headphones
There are two output jacks (mini phono plug) for wired headphones on the
connection box. Adjust the volume using (VOL)(+) or (VOL)(–) on the card remote
commander.
Using cordless headphones
You can use infrared cordless headphones, MDR-IF140 (optional) with the unit.
Please refer to the operating instructions for MDR-IF140.
Notes
• The volume of the cordless headphones cannot be adjusted with the supplied card
remote commander. Use the volume control on the cordless headphones.
• For your safety, do not use the headphones while driving your car.
• Do not leave the headphones in a place subject to direct sunlight, or in a high
temperature.
• If the cordless headphones are used while exposed to direct sunlight, sensitivity of the
infrared receptor may deteriorate, and inferior quality sound may result.
14
Page 15

Connections
Installation diagram
Refer to the installation diagram and ask a qualified technician for the installation of
the unit.
Front Left
speaker
Rear Right
speaker
Rear Left
speaker
Overhead
Monitor
Subwoofer
Be sure to securely fasten all
equipment to the car chassis, etc., to
prevent them moving while your car
is in motion.
Note
All equipment other than one Overhead
Monitor and one Connection Box is
optional.
Tweeter
Left
Head unit
Tweeter
Right
Front Right
speaker
Sony mobile DVD player
DVX-11A
Notes on the locations for PS one™
Do not set PS one™:
— on a dashboard, or in a place subject to
direct sunlight.
— in a place near magnetic source such as
magnets, speakers and a TV/Monitor.
— on an unstable or uneven surface.
— in a place subject to excessive vibration.
— in a place subject to excessive dust or
dirt.
— in poorly ventilated or humid place.
— in a place to subject to temperature
extremes (below 5˚C (41˚F) or above 35˚C
(95˚F)).
Refer to the operating instructions
supplied to PS one™.
15
Page 16

Connection diagram
Refer to the connection diagram for the proper connections.
You can make connections shown in A area. Please ask a qualified technician for the
other connections.
Overhead Monitor XVM-R70
(7-inch wide color LCD
Monitor)
Connection box
XA-113
(optional)
Headrest Monitor
XVM-H65 (optional)
Monitor cable
(5 m) (optional)
Connection box XA-115
Headphone jacks
(stereo mini)
Audio L/R/
Video Input 2
Front:
Audio L/R/
Video Input 1
22 Pin connector
Rear:
4 Pin Power
connector
*1Not used in this unit
*2Not applicable to the Sony DVD changer DVX-100
Remote Signal
(IR) Output*
16
7.5 V (max 2 A) DC Output
(for PS one™)
Audio L/R/
Video Input 3
DVD (MV) connector*
2
1
Audio L/R/
Video Outputs
Page 17

Black
Black
GND (1 m)
GND (1 m)
To a metal surface
of the car chassis
Monitor cable
(5 m)
RCA pin cord
(optional)
Connection box
XA-115
To Remote Signal
(IR) Output
Yellow
Filter box
Red
Blue/White striped
4 Pin Power connector
Back-up (5 m)
Fuse (8 A)
ACC (5 m)
Fuse (1 A)
POWER REM (5 m)
Max. supply current 0.3 A
Precautions on PS one™
• Be sure to fasten PS one™ in a safe
place securely.
• For your safety, do not use PS one™
while driving your car.
• Make sure that the operating voltage
of PS one™ is 7.5 V. Other voltages
may cause malfunction, or damage
PS one™.
To Audio L/R/Video Input
To car battery
(12 V)
To ignition switch
(ACC position)
To a power
amplifier
To 7.5 V DC Output
Remote
Commander
Signal receiver
cord (5m)
(Stereo Mini jack)
Sony mobile DVD player DVX-11A (optional)
RCA pin cord
(optional)
AV Cable
(integrated
audio/video)
(optional)
PS one™ (optional)
* “PS one” is a trademark of Sony Computer Entertainment Inc.
DC-DC cord
(3 m)
17
Page 18

Additional Information
Maintenance
Fuse replacement
When replacing the fuse, be sure to use one matching the amperage rating stated on
the original fuse. If the fuse blows, check the power connection and replace the fuse.
If the fuse blows again after replacement, there may be an internal malfunction. In
such a case, consult your nearest Sony dealer.
1
c
2
Warning
Never use a fuse with an amperage rating exceeding the one supplied with the unit
as this could damage the unit.
Replacing the lithium battery
Under normal conditions, batteries will last approximately 1 year. (The service life
may be shorter, depending on the conditions of use.)
When the battery becomes weak, the range of the card remote commander becomes
shorter. Replace the battery with a new CR2025 lithium battery. Use of any other
battery may present a risk of fire or explosion.
+ side up
c
Notes on lithium battery
• Keep the lithium battery out of the reach of children. Should the battery be
swallowed, immediately consult a doctor.
• Wipe the battery with a dry cloth to assure a good contact.
• Be sure to observe the correct polarity when installing the battery.
• Do not hold the battery with metallic tweezers, otherwise a short-circuit may occur.
WARNING
Battery may explode if mistreated.
Do not recharge, disassemble, or dispose of in fire.
18
Page 19

About the liquid crystal display (LCD) panel
Do not press on the LCD panel on the unit as doing so can distort the picture or
cause a malfunction. The picture may become unclear, or the LCD panel may be
damaged.
Notes on cleaning
— Clean the LCD panel with a slightly damp soft cloth.
— Do not use solvents such as benzine, thinner, commercially available cleaners or
antistatic spray.
• Do not use the unit in temperatures under 5 °C (41 °F) or over 45 °C (113 °F).
• If your car was parked in a cold or hot place, the picture may not be clear. The
monitor is not damaged. The picture will become clear after the temperature in
your car becomes normal.
Some stationary blue or red dots may appear on the monitor.
These are called bright spots, and can happen with any LCD.
The LCD panel is highly sophisticated, and more than 99.99 % of the segments used
in the panel are flawless. However, there is a possibility that less than 0.01 % of the
segments are defective and may not light up properly.
19
Page 20

Specifications
Monitor
System Liquid crystal color display
Display Manual flipdown panel
Drive system TFT-LCD active matrix
system
Picture size 7 inches wide screen (16:9)
154 × 87 mm, 176 mm
(6 1/8 × 3 1/2 in., 7 in.)
(w/h, d)
Picture segment
336,960 (w 1440 × h 234) dots
Power requirements
12 V DC car battery
(negative ground)
Current drain Approx. 800 mA
Dimensions 230 × 57 × 270 mm
(9 1/8 × 2 3/8 × 10 3/4 in.)
(w/h/d)
Operating temperature
5 °C – 45 °C
(41 °F – 113 °F)
Mass Approx. 1.5 kg (3 lb 5 oz)
Connection box XA-115
A/V Output
Output Impedance: less than 220 Ω
less than 100 pF
Output Level: 0 dBs ±0.3 dB
(0.775 V rms)
(Vol Max)
Video: 75 Ω 1Vp-p
A/V Input ×3
Input Impedance: more than 10 K Ω
less than 1000 pF
Input Level: ±1.3 dBs +0/–0.3 dB
(0.775 V rms)
Video: 75 Ω 1 Vp-p
DC output 7.5 V (max 2 A)
Dimensions 150 × 42 × 80 mm
(6 × 1 11/16 × 3 1/4 in.)
(w/h/d)
Mass Approx. 260 g (9 oz)
Card remote commander RM-X122
Power requirements
CR2025 lithium battery
Operable range
Approx. 2.5 m (8.22 ft.)
Dimensions 52 × 125 × 10 mm
(2 1/8 × 5 × 13/32 in.)
(w/h/d)
Mass Approx. 40 g (1 oz)
(including batteries)
Supplied accessories
Connection box XA-115 (1)
Card remote commander RM-X122
(with supplied battery) (1)
Monitor cable (5 m) (1)
Power supply cord (1)
DC-DC cord (3 m) (1)
Stereo Mini Plug-to-Plug cable (5 m) (1)
Mounting plate (1)
Screws (4)
Tapping Screws (4)
Operating Instructions (1)
Optional accessories
DVD player DVX-11A, MV-101
Headrest Monitor XVM-H65
Cordless headphones MDR-IF140
PS one™
Design and specifications are subject to
change without notice.
20
Page 21

Troubleshooting
The following checklist will help you solve problems you may encounter with your
unit.
Before going through the checklist below, check the connection and operating
procedures.
General
No picture, no sound
Good picture, but no sound
Dotted lines or stripes
No picture, or no sound when
you connect the optional
equipment
Makes noise when the
ignition key is in the ON, ACC,
or OFF position.
No response when pressing
the buttons on the card
remote commander
•The power cord or battery has been disconnected.
•The fuse has blown.
Press the (VOL)(+) or (ATT) on the card remote commander.
This may be caused by local interference such as a car
engine or motorcycle. Adjust the antennas for minimum
interference.
The cord has been disconnected. Connect the cord securely.
The battery may be exhausted.
21
Page 22

2
Page 23

Table des matières
Félicitations ! ........................................................................................................................ 4
Précautions .......................................................................................................................... 5
Emplacement des commandes ......................................................................................... 7
Fonctionnement
Ouverture de l’écran du moniteur ................................................................................... 9
Sélection de la source ....................................................................................................... 10
Réglage du mode écran.................................................................................................... 11
Modification des réglages de l’affichage ....................................................................... 12
Réglage du volume ........................................................................................................... 14
Connexions
Schéma d’installation ....................................................................................................... 15
Schéma de connexion ....................................................................................................... 16
Informations complémentaires
Entretien ............................................................................................................................. 18
Caractéristiques techniques............................................................................................. 20
Dépannage ......................................................................................................................... 21
3
Page 24

Félicitations !
Merci d’avoir fait l’acquisition du moniteur suspendu Sony.
• Image réversible
• Compatible avec les systèmes couleur PAL et NTSC
• En plus du mode écran normal, les modes plein écran, image agrandie (zoom) et
grand écran (Widezoom) sont disponibles.
• Panneau d’affichage à cristaux liquides à faible coefficient de réflexion minimisant
les reflets de sources lumineuses.
• Luminosité réglable en fonction des conditions d’éclairage
• Gradateur de rétroéclairage offrant des images à contraste marqué, sans inversion
de couleurs et sans flou.
•3entrées audio/vidéo et 1 sortie audio/vidéo sont fournies pour raccorder un
magnétoscope, une console de jeux et un moniteur supplémentaire.
• Une sortie 7,5 V CC est fournie pour raccorder une console PS one™.
• Émetteur infrarouges intégré pour les casques sans fil (en option)
•2 prises de casque sont fournies pour raccorder les casques avec fil (en option).
* « PS one » est une marque de Sony Computer Entertainment Inc.
4
Page 25

Précautions
Pour éviter tout risque de blessure grave ou d’accident, lisez les précautions
suivantes avant d’installer ou d’utiliser l’appareil.
A propos de la sécurité
Conformez-vous au code de la route de votre pays.
• Pendant la conduite
- Le conducteur ne doit pas regarder ni utiliser le moniteur. En effet, cela peut le
distraire et provoquer un accident.
Le conducteur ne doit pas utiliser
provoquer un accident.
Garez votre voiture en lieu sûr pour regarder le moniteur ou utiliser un casque.
• Une fois l’installation terminée
- Ne vous accrochez pas au moniteur.
- N’insérez pas les mains, les doigts, ni aucun corps étranger dans l’appareil. Ceci
risque de provoquer des blessures ou d’endommager l’appareil.
- Prenez garde à ne pas vous cogner la tête contre l’appareil lorsque vous vous
levez du siège arrière.
- Faites particulièrement attention à ne pas enrouler le cordon du casque autour du
cou pour éviter toute blessure ou suffocation en cas de mouvement soudain du
véhicule.
- Tenir les petites pièces hors de la portée des enfants.
A propos de l’installation
• L’installation de l’appareil nécessite des connaissances
techniques approfondies.
Cet appareil doit être installé par un technicien qualifié.
• Si vous tentez vous-même d’installer l’appareil, faites-le en
vous référant aux schémas d’installation et de raccordement
du
mode d’emploi.
provoquer un incendie ou une électrocution.
• Avant de procéder à l’installation, assurez-vous
de régler le contact de la voiture à OFF ou d’ôter
la clé. L’installation de l’appareil avec le moteur
en marche risque de décharger la batterie ou de
provoquer un court-circuit.
• Prenez garde à ne pas endommager les conduits, les buses, le
réservoir ou les fils électriques lors de l’installation de
l’appareil. Cela pourrait provoquer un incendie. Si vous
percez un trou dans les panneaux intérieurs de la voiture,
assurez-vous de n’endommager aucune pièce cachée.
• N’utilisez aucune vis ni aucun écrou réservés aux dispositifs
de sécurité, tels que la tringlerie de direction, le circuit
d’alimentation en carburant ou le dispositif de freinage. Ceci
pourrait provoquer un incendie ou un accident.
• Prenez garde à ne pas emmêler les cordons et les fils dans une
partie mobile des rails de siège.
Une installation incorrecte risque de
de casque. En effet, cela peut le distraire et
Suite à la page suivante t
5
Page 26

Lieu d’installation
Avant d’installer l’appareil, consultez la réglementation en vigueur dans votre région.
Suivez le schéma ci-dessous pour installer l’appareil dans une position appropriée à
votre véhicule.
Environ 150 mm
(5 15/16po)
Environ 300 mm
(11 13/16po)
N’installez pas l’appareil à un endroit où :
- Il risque de gêner la visibilité du conducteur lorsque le
moniteur est en position ouverte ou fermée ;
- Il risque d’entraver l’utilisation du coussin de sécurité gonflable ;
- Il risque d’entraver l’utilisation du véhicule, notamment le
volant, le levier de vitesses ou la pédale de frein ;
- Le conducteur et les passagers risquent de se blesser en
entrant ou en sortant de la voiture.
Si vous avez des questions ou des problèmes concernant le fonctionnement de cet
appareil qui ne sont pas abordés dans ce manuel, consultez le détaillant Sony le
plus proche de chez vous.
Avant l’installation
Assurez-vous que le commutateur POWER SELECT est
réglé à la bonne position.
A*: Si le contact de votre véhicule dispose d’une position
accessoires.
B : Si le contact de votre véhicule ne dispose pas d’une
position accessoires.
* A est la position préréglée par défaut.
Lorsque le commutateur POWER SELECT est réglé à B
Appuyez sur l’interrupteur (POWER) du moniteur, afin
de le mettre sous tension.
Le moniteur ne s’allume pas si vous appuyez sur
(POWER) de la mini-télécommande.
Remarque
Assurez-vous de mettre le moniteur hors tension lorsque
vous quittez votre véhicule. Pour mettre le moniteur hors
tension, procédez comme suit :
– Appuyez sur l’interrupteur (POWER) du moniteur.
– Appuyez sur l’interrupteur (POWER) de la mini-télécommande.
– Fermez le panneau de l’écran jusqu’à ce que vous entendiez un « clic ».*
Si le moniteur est laissé sous tension, la batterie se déchargera.
* Lorsque le panneau d’affichage est en position renversée, cela signifie
que le moniteur est toujours sous tension. Pour obtenir des détails sur
6
la position renversée, reportez-vous à la page 7.
Commutateur
POWER SELECT
A
B
Page 27

Emplacement des commandes
Moniteur
1 Touche OPEN
Appuyez sur cette touche pour
déployer le moniteur.
2 Récepteur pour la mini-
télécommande/Émetteur pour les
casques sans fil
3 Touches UP/DOWN (M/m)
Appuyez sur l’une de ces touches pour
sélectionner le paramètre souhaité.
* Position renversée du panneau
Vous pouvez refermer le moniteur avec l’écran à cristaux liquides tourné vers l’extérieur après
avoir tourné le panneau sur environ 180 degrés. Les images à l’écran peuvent être renversées
par pression sur (REVERSE) du moniteur. Avant de refermer le moniteur, vérifiez que ce
dernier est tourné face au boîtier (vous entendrez un « clic »). À chaque fois que vous appuyez
sur (REVERSE) du moniteur, le panneau d’affichage bascule de la position renversée à la
position normale, et vice versa.
180˚
c c
4 Touche MENU
Appuyez sur cette touche pour régler
les divers paramètres d’affichage.
5 Touche REVERSE*
Appuyez sur cette touche pour
renverser les images.
6 Touche INPUT
Appuyez sur cette touche pour
sélectionner la source d’entrée.
7 Interrupteur POWER
REVERSE
Suite à la page suivante t
7
Page 28

Mini-télécommande RM-X122
ATT POWER
MENUINPUT
VOL
TOP MENU ALBUM
MENU
ALBUM
+
–
ENTER
OFF
AUDIO
MODE
LIST
SETUP
DISPLAY
SUBTITLE
Fonctionnement du moniteur :
1 Touche ATT
Appuyez pour atténuer rapidement
le volume.
2 Touche VOL (volume) +/–
Appuyez sur ces touches pour régler
le volume.
3 Touche INPUT
Appuyez sur cette touche pour
sélectionner la source.
4 Touche POWER
5 Touche MENU
Appuyez sur cette touche pour
régler les divers paramètres
d’affichage.
6 Touche MODE
Appuyez sur cette touche pour
changer le mode écran.
7 Touche V/v
Appuyez sur l’une de ces touches
pour sélectionner le paramètre
souhaité.
ATT POWER
MENUINPUT
VOL
TOP MENU ALBUM
MENU
ALBUM
+
–
ENTER
AUDIO
MODE
LIST
SETUP
DISPLAY
OFF
SUBTITLE
Opérations liées aux DVD :
Lorsqu’un lecteur DVD portable Sony
est raccordé à cet appareil, vous pouvez
contrôler les fonctions de base à l’aide
de la mini-télécommande.
8 Touches V/v (ALBUM +/–)
9 Touche TOP MENU
0 Touche MENU
qa Touche O
qs Touches ./>
qd Touches m/M (
)
qf Touches B/b
qg Touche LIST
qh Touche SET UP
qj Touche ENTER
qk Touche DISPLAY
ql Touche u
w; Touche OFF
wa Touche SUBTITLE
ws Touche AUDIO
• Pour de plus amples informations sur les
fonctions, reportez-vous au mode
d’emploi fourni avec le lecteur DVD.
• Cette mini-télécommande ne peut pas
contrôler le changeur de DVD Sony
DVX-100.
Conseil
Pour les directives de remplacement de la pile, reportez-vous à la section « Remplacement
de la pile au lithium » (page 18).
8
Page 29

Fonctionnement
POWER
Ouverture de l’écran du moniteur
OPEN
ATT POWER
VOL
TOP MENU ALBUM
+
MENU
ENTER
ALBUM
–
OFF
AUDIO
MENUINPUT
MODE
LIST
SETUP
DISPLAY
SUBTITLE
POWER
Appuyez sur (OPEN) pour déployer le moniteur,
puis appuyez sur (POWER) pour mettre le moniteur sous tension.
Conseil
Si le contact de votre véhicule ne possède pas de position ACC (accessoires) et si le
commutateur POWER SELECT est réglé sur la position B, le moniteur ne s’allume pas si
vous appuyez sur (POWER) de la mini-télécommande (page 6).
Fermeture du moniteur
Fermez le moniteur en appuyant jusqu’au déclic. Le moniteur se met
automatiquement hors tension.
Remarques
• Veillez à ne pas vous pincer les doigts dans le moniteur en le refermant.
• Ne placez aucun corps étranger entre le panneau d’écran à cristaux liquides et le boîtier
lorsque vous refermez le moniteur.
Réglage de l’inclinaison et du pivotement
Ce moniteur peut être déployé aux angles
indiqués ci-dessous.
Conseil
Avant de refermer le moniteur, vérifiez que ce
dernier est tourné face au boîtier
(vous entendrez un « clic »).
120˚
180˚
30˚
9
Page 30

Sélection de la source
Vous pouvez sélectionner la source d’entrée et le système couleur.
ATT POWER
MENUINPUT
INPUT
POWER
INPUT
VOL
TOP MENU ALBUM
MENU
ALBUM
MODE
+
LIST
SETUP
ENTER
DISPLAY
–
OFF
SUBTITLE
AUDIO
1 Appuyez sur (POWER).
L’appareil se met sous tension.
Conseil
Si le contact de votre véhicule ne possède pas de position ACC (accessoires) et si le
commutateur POWER SELECT est réglé sur la position B, le moniteur ne s’allume pas si
vous appuyez sur (POWER) de la mini-télécommande (page 6).
2 Appuyez sur (INPUT) pour sélectionner la source d’entrée souhaitée.
À chaque pression sur (INPUT), l’affichage change comme suit :
B VIDEO 1 B VIDEO 2 B VIDEO 3
POWER
3 Appuyez sur V ou v pour sélectionner le système couleur PAL ou NTSC.
Appuyez sur l’une de ces touches pendant que l’indication de la source
(p. ex. « VIDEO 1 ») est affichée.
Lorsque le système NTSC est
sélectionné
VIDEO1
NTSC
Lorsque le système PAL est
sélectionné
VIDEO1
PAL
10
Page 31

Réglage du mode écran
En plus du mode normal, les modes plein écran, image agrandie et grand écran sont
également disponibles.
ATT POWER
MENUINPUT
VOL
TOP MENU ALBUM
MENU
ALBUM
Appuyez plusieurs fois sur (MODE).
Le mode actuel s’affiche d’abord à l’écran.
A chaque pression sur la touche, le mode écran est modifié dans l’ordre suivant :
MODE
+
LIST
SETUP
ENTER
DISPLAY
–
OFF
SUBTITLE
AUDIO
MODE
NormalNormal
Normal (Standard)
L’image s’affiche dans un
rapport d’aspect de 4:3 (image
normale).
WideWide
Widezoom (Grand écran)
Les bords gauche et droit des
images au format 4:3 sont
agrandis pour remplir l’écran.
FullFull
Full (Plein écran)
Les images de format 4:3 sont
agrandies jusqu’aux bords
gauche et droit de l’écran.
ZoomZoom
Zoom (Image agrandie)
Les images de format 4:3 sont
agrandies jusqu’aux bords
gauche et droit de l’écran. Les
parties excédentaires de
l’image (haut et bas) sont
coupées pour que l’image
remplisse l’écran.
Le mode écran est réglé après 5 secondes sans appuyer sur (MODE).
Conseil
Il est possible que les images aient une mauvaise définition en mode zoom.
11
Page 32

Modification des réglages de l’affichage
Vous avez la possibilité de définir manuellement les paramètres d’affichage de
l’écran si l’écran n’est pas visible depuis la position que vous occupez.
ATT POWER
MENU
1 Appuyez sur (MENU).
L’écran « Picture » s’affiche.
VOL
TOP MENU ALBUM
MENU
ALBUM
MENUINPUT
MODE
+
SETUP
ENTER
DISPLAY
–
OFF
SUBTITLE
AUDIO
MENU
LIST
Picture 32
or MENU.Press
Vv,
Chaque fois que vous appuyez sur (MENU), l’écran de réglage change comme
suit :
Picture
B
(image)
Menu Off
(sortie du menu)
Brightness
B
(luminosité)
Blue Back
(Fond bleu)
* S’affiche uniquement lorsque le système couleur NTSC est sélectionné.
Color
B
(couleur)
b
2 Appuyez sur V ou v pour régler le paramètre souhaité.
12
Lorsque « Picture » est
sélectionné
Picture 32
or MENU.Press
Vv,
Appuyez sur
v pour
réduire le
contraste.
n
Appuyez
sur V pour
augmenter
le contraste.
Lorsque « Brightness » est
sélectionné
Brightness 32
Appuyez sur
v pour
assombrir
l’image.
La valeur de réglage du
paramètre sélectionné
s’affiche dans cette zone.
B
Mode
Hue
(teinte)*
B
Video Adjust
(réglage vidéo)
or MENU.Press
Vv,
Appuyez sur
V pour
n
augmenter la
luminosité de
l’image.
Dimmer
(gradateur)
bbb
Page 33

Lorsque « Color » est sélectionné
Lorsque « Hue » est sélectionné*
1
Color
Appuyez sur
v pour
atténuer les
couleurs.
Vv,
n
32
or MENU.Press
Appuyez sur
V pour
augmenter
l’intensité des
couleurs.
Lorsque « Dimmer » est
sélectionné
Dimmer; On
Vv,
or MENU.Press
Lorsque cette fonction est activée, la
luminosité de l’écran est
automatiquement ajustée.
Lorsque « Mode » est
sélectionné
Hue
Appuyez sur
v pour
réduire la
saturation.
Vv,
n
CTR
or MENU.Press
Appuyez sur
V pour
augmenter la
saturation.
2
*
Lorsque « Video Adjust » est
sélectionné
Video Adjust;
Vv,
Reset
or MENU.Press
Les réglages « Picture », « Brightness
», « Color », « Hue » et « Dimmer »
sont ramenés à leurs valeurs par
défaut actuelles.
Lorsque « Blue Back » est
sélectionné
Mode; Zoom
Vv,
or MENU.Press
« Normal », « Full », « Zoom » ou
« Widezoom » peuvent être réglés en
tant que mode d’écran. Pour plus
d’informations, reportez-vous à la
page 11.
Blue Back; On
Vv,
or MENU.Press
Le fond d’écran bleu apparaît en cas
d’absence de signaux ou lorsque le
signal reçu est faible. En cas de
réception continue d’un signal vidéo
faible, le fond d’écran peut se mettre
à scintiller. Si cela se produit,
désactivez ce réglage.
*1Le réglage « Hue » est disponible uniquement lorsque le système NTSC est
sélectionné.
*2« CTR » apparaît uniquement lorsque l’indicateur est au milieu de la barre de
réglage.
13
Page 34

Réglage du volume
La mini-télécommande fournie vous permet de régler le volume du casque et des
appareils raccordés.
ATT
VOL+/–
ATT POWER
VOL
TOP MENU ALBUM
+
MENU
ENTER
ALBUM
–
OFF
AUDIO
MENUINPUT
MODE
LIST
SETUP
DISPLAY
SUBTITLE
Appuyez sur (VOL)(+) ou (VOL)(–) sur la mini-télécommande.
Atténuation rapide du son
Appuyez sur (ATT) sur la mini-télécommande.
ATT On
Pour restaurer le niveau de volume précédent
Appuyez de nouveau sur (ATT).
Raccordement d’écouteurs
Le boîtier de raccordement est doté de deux prises de sortie (mini-prises phono) pour
les casques avec fil. Réglez le volume
télécommande.
à l’aide de
(VOL)(+) ou (VOL)(–) de la mini-
Utilisation du casque sans fil
Vous pouvez utiliser un casque sans fil à infrarouges MDR-IF140 (en option) avec
l’appareil. Reportez-vous au mode d’emploi du MDR-IF140.
Remarques
• Il est impossible de régler le volume du casque sans fil avec la mini-télécommande
fournie. Utilisez la commande de volume située sur le casque sans fil.
• Pour votre sécurité, n’utilisez pas le casque en conduisant.
• Ne laissez pas le casque dans un endroit soumis aux rayons directs du soleil ou à des
températures excessives.
• En cas d’utilisation du casque sans fil dans un endroit exposé aux rayons directs du soleil,
la sensibilité du récepteur de rayons infrarouges peut diminuer et la qualité sonore peut
en être affectée.
14
Page 35

Connexions
Schéma d’installation
Demandez à un technicien qualifié d’installer l’appareil en se reportant au schéma
d’installation.
Moniteur
suspendu
Haut-parleur
avant gauche
Haut-parleur
d’aiguës de
gauche
Appareil
principal
Haut-parleur
d’aiguës de droite
Haut-parleur
avant droit
Haut-parleur
arrière gauche
Caisson de graves
Haut-parleur
arrière droit
Fixez solidement tous ces éléments
au châssis du véhicule ou ailleurs,
afin d’éviter qu’ils ne bougent
pendant que le véhicule est en
mouvement.
Remarque
À l’exception du moniteur suspendu et du
boîtier de raccordement, tous les appareils
mentionnés sont en option.
Lecteur de DVD portable Sony
DVX-11A
Remarques sur les endroits où ne pas
placer la console PS one™
N’installez pas la PS one™ :
— sur un tableau de bord ou à un endroit
exposé aux rayons directs du soleil ;
— près d’une source de rayonnements
magnétiques, telle que des aimants, des
haut-parleurs, un téléviseur et/ou un
moniteur ;
— sur une surface non stable ou non plane
—à un emplacement soumis à des
vibrations excessives ;
— dans un endroit exposé à la poussière ;
—dans un endroit mal aéré ou trop humide
—
dans un endroit soumis à des variations
de températures extrêmes (en dessous de
5°C (41°F) ou au-dessus de 35°C (95°F)).
Reportez-vous au mode d’emploi fourni
avec la console PS one™.
.
;
15
Page 36

Schéma de connexion
Reportez-vous au schéma pour effectuer un raccordement correct.
L’utilisateur peut effectuer lui-même les raccordements de la section A. Consultez
cependant un technicien qualifié pour les autres raccordements.
Moniteur suspendu XVM-R70
(moniteur couleur à cristaux
liquides de 7 pouces)
Boîtier de
raccordement
XA-113
(en option)
Moniteur appuie-tête
XVM-H65 (en option)
Boîtier de raccordement XA-115
Prises de casque
(mini-prises stéréo)
Entrée 2 audio
gauche/droite et vidéo
Avant :
Entrée 1 audio
gauche/droite et vidéo
Connecteur à 22 broches
Arrière :
Connecteur d’alimentation
à 4 broches
*1Non utilisé avec cet appareil
*2Non applicable au changeur de DVD Sony DVX-100
Sortie du signal à infrarouges
de la télécommande*
16
Sortie de 7,5 V CC (max. 2 A)
(pour la PS one™)
Entrée 3 audio
gauche/droite et vidéo
Connecteur DVD (MV)*
2
Sorties audio
gauche/droite et vidéo
Câble du moniteur
(5 m) (en option)
1
Page 37

Noir
Noir
GND (1 m)
GND (1 m)
Vers une surface
métallique de la
carrosserie
Câble du moniteur
(5 m)
Câble à
broche RCA
(en option)
Boîtier de
raccordement
XA-115
Vers la sortie du
signal à infrarouges
de la télécommande
Jaune
Boîtier de filtres
Rouge
Rayé bleu et blanc
Connecteur d’alimentation à 4 broches
Secours (5 m)
à fusible de 8 A
ACC (5 m)
à fusible de 1 A
POWER REM (5 m)
Alimentation maximale en
courant : 0,3 A
Précautions relatives à la PS one™
• Fixez solidement la PS one™ dans un
endroit sécuritaire.
• Pour votre sécurité, n’utilisez pas la PS
one™ en conduisant.
• Vérifiez que la tension de
fonctionnement de la PS one™ est de
7,5 V. L’utilisation de la PS one™ sous
une autre tension peut entraîner un
problème de fonctionnement ou
endommager la PS one™.
Vers la batterie du
véhicule (12 V)
Vers le contact
(position ACC)
Vers un
amplificateur de
puissance
Vers la sortie 7,5 V CCVers l’entrée audio gauche/droite et vidéo
Cordon du récepteur
des signaux de la
télécommande (5 m)
(Mini-prise stéréo)
Lecteur de DVD portable Sony DVX-11A
(en option)
Câble à broche
RCA (en option)
Câble AV
(audio/vidéo
intégrés)
(en option)
PS one™ (en option)
* « PS one » est une marque de Sony Computer Entertainment Inc.
Câble CC à CC
(3 m)
17
Page 38

Informations complémentaires
Entretien
Remplacement du fusible
Lorsque vous remplacez le fusible, veillez à utiliser un fusible dont l’ampérage
correspond à celle indiquée sur le fusible d’origine. Si le fusible fond, vérifiez le
branchement de l’alimentation et remplacez le fusible.
Si le fusible fond de nouveau après avoir été remplacé, cela peut révéler une
défaillance interne de l’appareil. Dans ce cas, consultez le détaillant Sony le plus près
de chez vous.
1
c
2
Avertissement
Ne jamais utiliser de fusible dont l’ampérage dépasse celle du fusible fourni, cela
pourrait endommager l’appareil.
Remplacement de la pile au lithium
En fonctionnement normal, la pile dure environ un an. (La durée de vie de la pile
peut être plus courte selon les conditions d’utilisation.)
Lorsque la pile est faible, la portée de la mini-télécommande diminue. Remplacer la
pile par une nouvelle pile CR2025 au lithium. L’utilisation de tout autre type de pile
peut entraîner un risque d’incendie ou d’explosion.
Côté + vers le haut
c
Remarques sur la pile au lithium
• Tenir la pile au lithium hors de portée des enfants. En cas d’ingestion de la pile,
consulter immédiatement un médecin.
• Essuyer la pile avec un chiffon sec pour assurer un bon contact.
• Veiller à respecter la polarité lors de l’installation de la pile.
• Ne pas tenir les piles avec des pinces métalliques, cela pourrait provoquer un court
circuit.
AVERTISSEMENT
La pile peut exploser en cas d’utilisation inappropriée.
Ne pas recharger la pile, ne pas la démonter et ne pas la jeter au feu.
18
Page 39

À propos de l’écran à cristaux liquides (ACL)
Ne pas appuyer sur l’écran à cristaux liquides car cela risque de déformer l’image ou
provoquer un dysfonctionnement. Il se peut que l’image se trouble ou que l’écran à
cristaux liquides soit endommagé.
Remarques à propos du nettoyage
— Nettoyer l’écran à cristaux liquides avec un chiffon doux humide.
— Ne pas utiliser de solvants tels que la benzine ou des diluants, de nettoyants
ordinaires ni de vaporisateurs antistatiques.
• Ne pas faire fonctionner l’appareil à une température inférieure à 5 °C (41 °F) ou
supérieure à 45 °C (113 °F).
• Si votre voiture est restée stationnée dans un endroit très chaud ou très froid, il se
peut que l’image affichée ne soit pas claire. Le moniteur n’est pas endommagé.
L’image se rétablit lorsque la température du véhicule revient à la normale.
Des points fixes bleus ou rouges peuvent apparaître sur l’écran du moniteur.
Ces points lumineux peuvent apparaître sur n’importe quel écran à cristaux liquides.
Cet écran est le fruit d’une technologie de pointe et plus de 99,99 % des segments qui
le composent sont sans défaut. Cependant, il se peut que moins de 0,01 % des
segments soient défectueux et qu’ils ne s’allument pas correctement.
19
Page 40

Caractéristiques techniques
Moniteur
Système Affichage à cristaux liquides
couleur
Écran Panneau inclinable
manuellement
Système d’affichage
LCD TFT à matrice active
Taille de l’image
Écran de 7 po de largeur
(16:9)
154 × 87 mm, 176 mm
(6 1/8 × 3 1/2 po, 7 po)
(l/h, p)
Taille utile 336 960 points
(1440 hor. × 234 vert. )
Alimentation requise
Batterie de voiture
12 V CC (masse négative)
Consommation électrique
Environ 800 mA
Dimensions 230 × 57 × 270 mm
(9 1/8 × 2 3/8 × 10 3/4 po)
(l/h/p)
Température de fonctionnement
5 °C à 45 °C
(41 °F à 113 °F)
Poids Environ 1,5 kg (3 lb 5 oz)
Boîtier de raccordement XA-115
Sortie AV
Impédance de sortie :
inférieure à 220 Ω
inférieure à 100 pF
Niveau de sortie :
0 dBs ± 0,3 dB
(0,775 V eff.)
(vol. max.)
Vidéo : 75 Ω 1 Vc-c
3 jeux d’entrées AV
Impédance d’entrée :
supérieure à 10 K Ω
inférieure à 1000 pF
Niveau d’entrée :
±1,3 dBs +0/–0,3 dB
(0,775 V eff.)
Vidéo : 75 Ω 1 Vc-c
Sortie CC 7,5 V (max. 2 A)
Dimensions 150 × 42 × 80 mm
(6 × 1 11/16 × 3 1/4 po)
(l/h/p)
Poids Environ 260 g (9 oz)
Mini-télécommande RM-X122
Alimentation requise
Portée Environ 2,5 m (8,22 pi)
Dimensions 52 × 125 × 10 mm
Poids Environ 40 g (1 oz)
Pile au lithium CR2025
(2 1/8 × 5 ×
(l/h/p)
(piles incluses)
13
/32 po)
Accessoires fournis
Boîtier de raccordement XA-115 (1)
Mini-télécommande RM-X122
Câble du moniteur (5 m) (1)
Cordon d’alimentation (1)
Câble CC à CC (3 m) (1)
Câble mini-prise stéréo à prise (5 m) (1)
Plaque de montage (1)
Vis (4)
Vis auto-taraudeuses (4)
Mode d’emploi (1)
(avec pile fournie) (1)
Accessoires en option
Lecteur DVD DVX-11A, MV-101
Moniteur d’appuie-tête XVM-H65
Casque sans fil MDR-IF140
PS one™
La conception et les caractéristiques
techniques sont sujettes à modification sans
préavis.
20
Page 41

Dépannage
La liste de contrôle suivante vous aidera à résoudre les problèmes que vous pourriez
rencontrer avec cet appareil.
Avant de passer cette liste en revue, vérifiez les procédures de raccordement et
d’utilisation.
Généralités
Pas d’image, pas de son
Bonne image, mais aucun son
Lignes pointillées ou rayures
Pas d’image ou pas de son lors
du raccordement d’appareils
en option
Émission de bruits lorsque la
clé de contact est en position
ON, ACC ou OFF
Aucune réponse lorsque vous
appuyez sur les touches de la
mini-télécommande
•Le câble d’alimentation ou la batterie est débranché.
•Le fusible est fondu.
Appuyez sur (VOL)(+) ou (ATT) sur la mini-télécommande.
Ces parasites peuvent être causés par des interférences
locales, par exemple un bruit de moteur d’une voiture ou
d’une motocyclette. Réglez les antennes pour réduire le
niveau d’interférences.
Le câble est débranché. Raccordez solidement le câble.
La pile est peut-être usée.
21
Page 42

Page 43

Page 44

Sony Corporation Printed in Korea
 Loading...