

Page 1
2-696-060-32 (1)
Headrest Monitor
Operating Instructions
Bedienungsanleitung
Mode d’emploi
Istruzioni per l’uso
Gebruiksaanwijzing
Wichtig!
Bitte nehmen Sie sich etwas Zeit, um den Geräte-Pass
vollständig auszufüllen. Dieser befindet sich auf der
hinteren Umschlagseite dieser Bedienungsanleitung.
GB
DE
FR
IT
NL
XVM-H65
2003 Sony Corporation
Page 2
Disposal of Old Electrical &
Electronic Equipment (Applicable in
the European Union and other
European countries with separate
collection systems)
packaging indicates that this product shall not be treated
as household waste. Instead it shall be handed over to the
applicable collection point for the recycling of electrical
and electronic equipment. By ensuring this product is
disposed of correctly, you will help prevent potential
negative consequences for the environment and human
health, which could otherwise be caused by inappropriate
waste handling of this product. The recycling of materials
will help to conserve natural resources. For more detailed
information about recycling of this product, please contact
your local Civic Office, your household waste disposal
service or the shop where you purchased the product.
Applicable accessory: Remote commander
This symbol on the product or on its
2
Page 3

Table of contents
Welcome! .............................................................................................................................. 4
Precautions........................................................................................................................... 5
Attaching and detaching the monitor .............................................................................. 7
Location of controls ............................................................................................................8
Operation
Selecting the input source................................................................................................ 10
Setting the screen mode ................................................................................................... 11
Changing the display settings......................................................................................... 12
Adjusting the volume....................................................................................................... 14
Connections
Installation diagram ......................................................................................................... 15
Connection diagram ......................................................................................................... 16
Additional Information
Maintenance ...................................................................................................................... 18
Specifications ..................................................................................................................... 20
Troubleshooting ................................................................................................................ 21
3
Page 4

Welcome!
Thank you for purchasing the Sony Headrest Monitor.
• PAL or NTSC colour system compatible
• Full, Zoom, and Widezoom screen modes available, in addition to the normal
screen mode.
• The low reflection liquid crystal panel reduces the glare from outside lighting
sources.
• Adjustable brightness control, according to lighting conditions
• Backlight dimmer control produces sharp contrast image, free from reversed or
blurred colours.
•2 Audio/Video inputs and 1 Audio/Video output are provided for connecting a
video player, video game, and an additional monitor.
• 7.5 V DC output is provided for connecting PS one
• Built-in infrared transmitter for cordless headphones (optional)
• MV Interface is provided for single cable connection (AV signal to XVM, supplies
power to MV-101 (optional)).
• Headphone jack is provided for connecting wired headphones (optional).
* “PS one” is a registered trademark of Sony Computer Entertainment Inc.
.
®
4
Page 5
Precautions
To avoid the risk of serious injury or accident, read the following precautions before
installing and operating the unit.
On safety
Comply with your local traffic rules and regulations.
• While driving
- The driver must not watch or operate the monitor. It may lead to distraction and
cause an accident.
- The driver must not use the headphones. It may lead to distraction and cause an
accident.
Park the car in a safe place when the driver watch and operate the monitor, or use
headphones.
• After installing
- Take care not to bump your head against the unit when getting up from the back
seat.
- Take extra care not to wind the wire of the headphones around your neck
avoiding injury or suffocation in the event of a sudden movement of the vehicle.
- Keep small articles out of the reach of children.
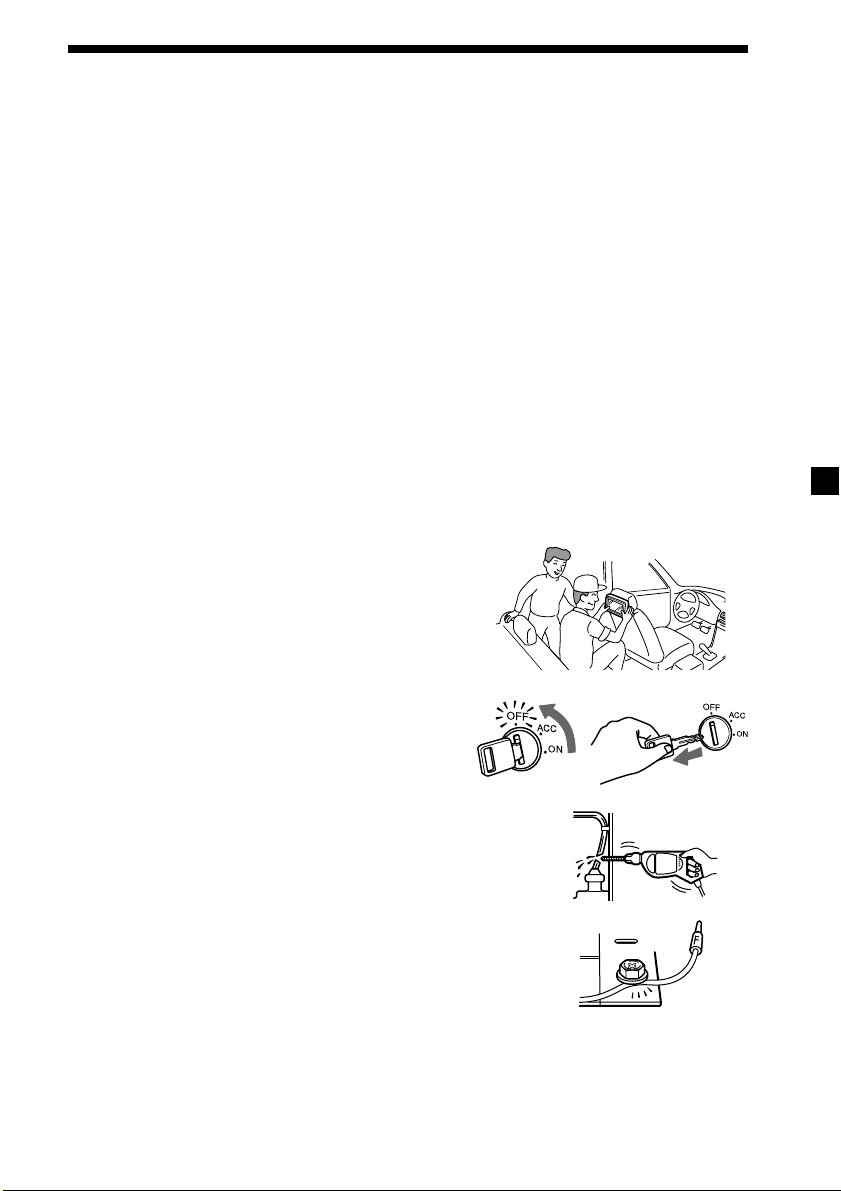
On installation
• Installing this unit requires technical expertise.
This unit should be installed by a qualified
technician or service personnel.
• If you try to install this unit by yourself, do it
properly, referring to the installation and wiring
diagrams in this operating manual. Improper
installation may result in fire or electric shock.
• Before installation, be sure to turn the ignition
switch to the OFF position or take the key out.
Installing this unit with the ignition on may
cause battery drain or a short circuit.
• Do not damage any pipes, tubes, the fuel tank or
electric wiring when installing this unit. This can cause
a fire. If you drill a hole in car panels, make sure that
any hidden car parts will not be damaged.
• Do not use any nuts or bolts for safety devices such as
steering linkage, fuel supply or braking systems. This
can cause a fire or an accident.
• Take care to prevent cords and wires from getting
tangled or crimped in the moving portion of a seat rail.
continue to next page t
5
Page 6
Where to install
Before installing this unit, please check your local traffic rules and regulations.
Do not install this unit where:
- It will obstruct the driver’s view.
- It will obstruct the operation of the airbag system.
- It will obstruct the operation of the vehicle, especially
the steering wheel, shift lever, or brake pedal.
-A driver or passengers may injure themselves when
getting into or out of the car.
If you have any questions or problems concerning your unit that are not covered
in this manual, please consult your nearest Sony dealer.
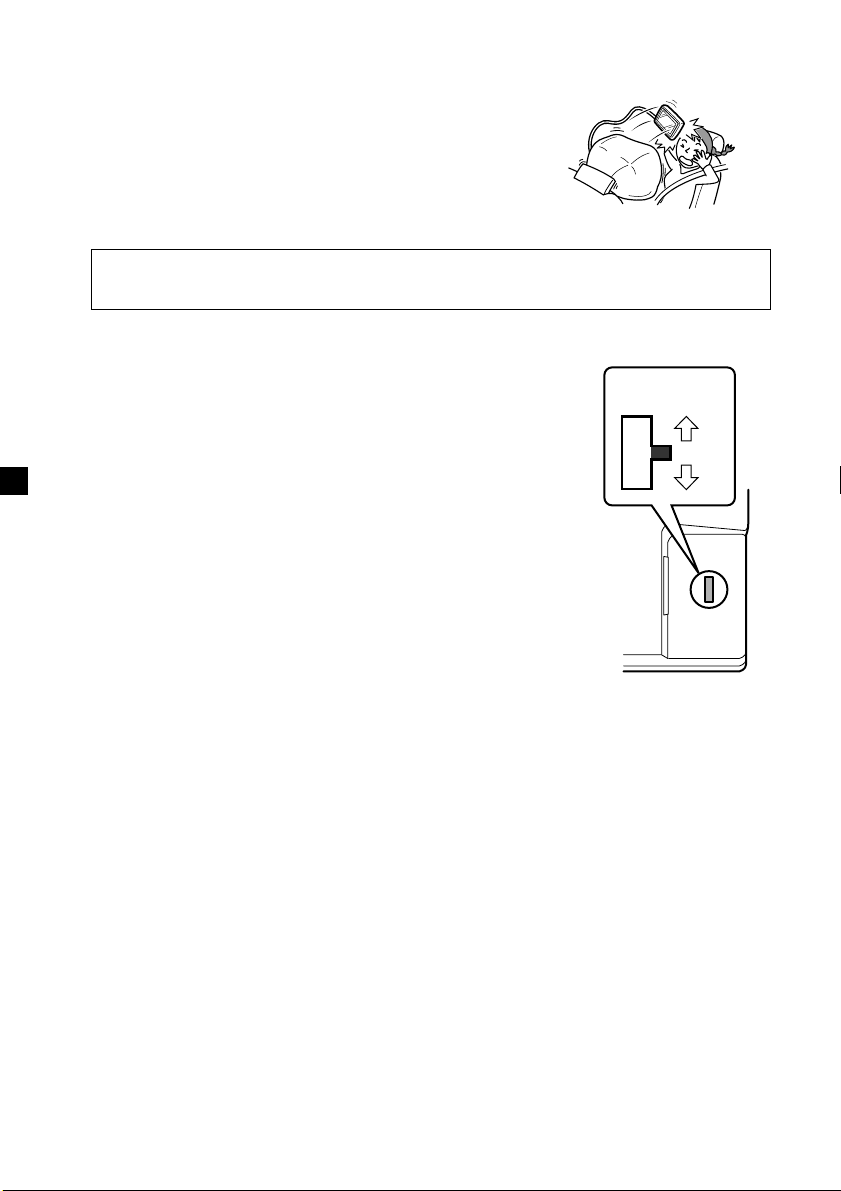
Before installing
Make sure that the POWER SELECT switch is set to the
correct position.
A*: If your car has an accessory position on the ignition key.
B : If your car has no accessory position on the ignition key.
* A is the factory preset position.
When the POWER SELECT switch is set to B
Press (POWER) on the monitor to turn on.
The monitor does not turn on by pressing (POWER) on
the card remote commander.
Note
Be sure to turn off the monitor after driving your car.
To turn off the monitor, follow the operations below:
– Press (POWER) on the monitor.
– Press (POWER) on the card remote commander.
If the power is left on, it will cause battery drain.
POWER SELECT
switch
A
B
6
Page 7
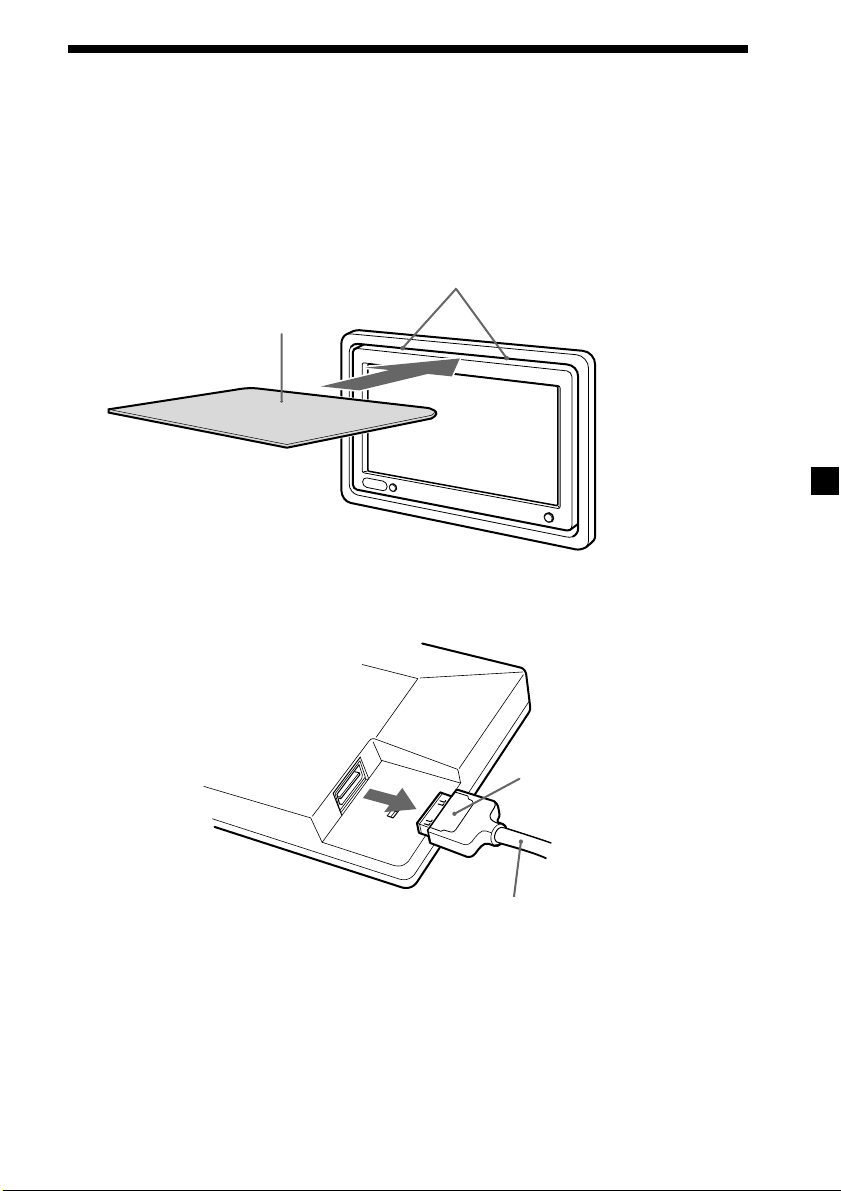
Attaching and detaching the monitor
Detaching the monitor from the case
Note
Be careful not to pull out the cable too much when detaching the monitor from the case.
1 Insert a plastic card between the case and the top of the monitor.
The catches are released, and you can detach the monitor from the case.
Catches
Plastic card
2 Pull out the Monitor cable on the rear while pressing 1.
1
Monitor cable
Attaching the monitor to the case
Set the monitor to the case securely until you hear click sound.
7
Page 8
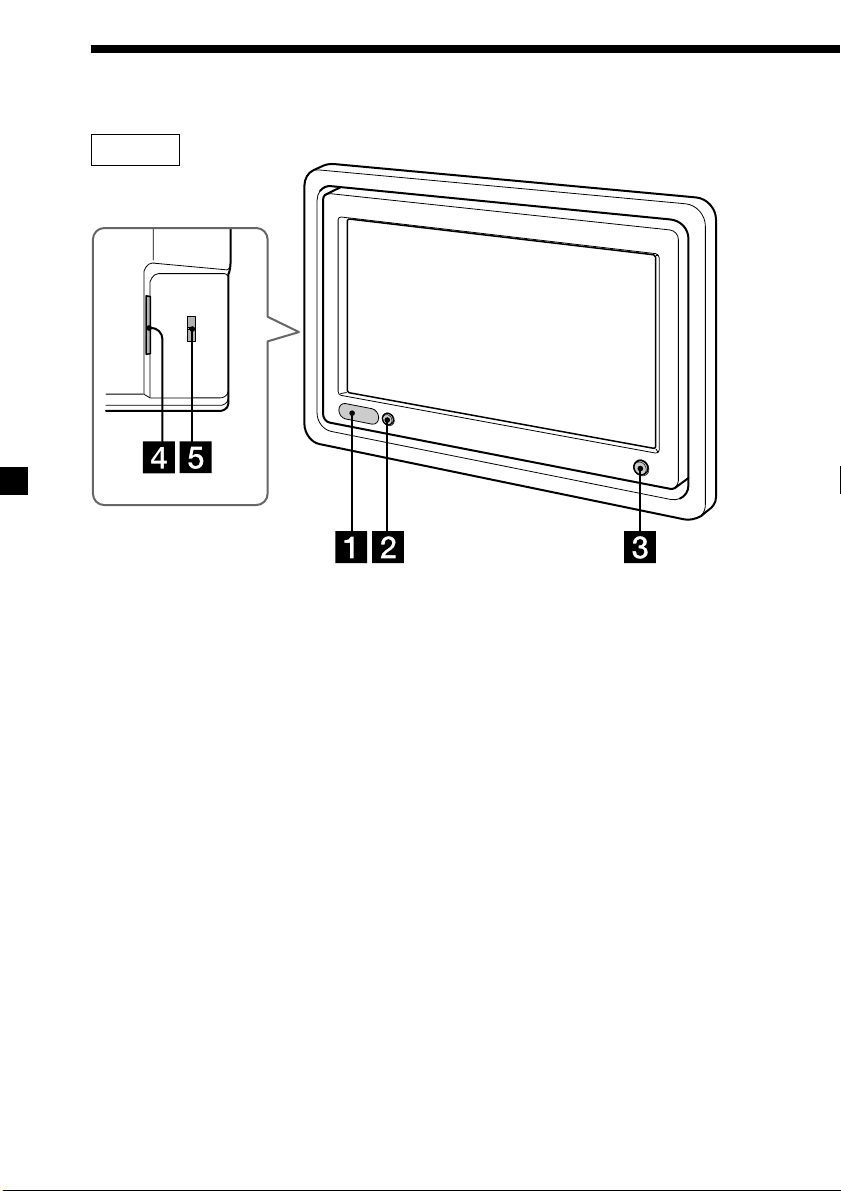
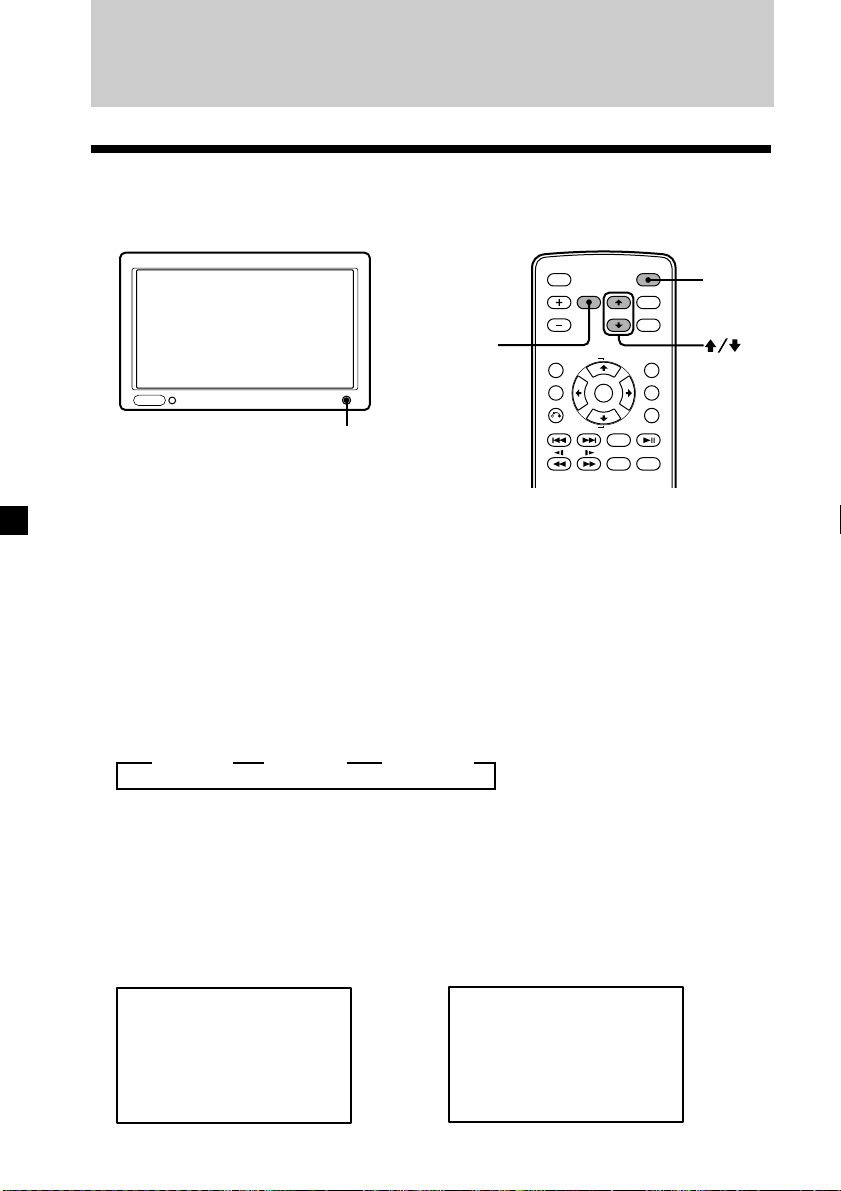
Location of controls
Monitor
1 Receptor for the card remote
commander/Transmitter for the
cordless headphones
2 IR ON/OFF button*
Press to turn on or off the
transmitter for the cordless
headphones.
* If interference occurs while using several cordless headphones
If several monitors are installed, and used simultaneously, interference may occur. In this
case, press (IR on/off) on the unit to turn off the transmitter for the cordless headphones,
and use wired headphones instead.
8
3 POWER button
4 Monitor cable connector
5 POWER SELECT switch
For details, refer to page 6.
Page 9

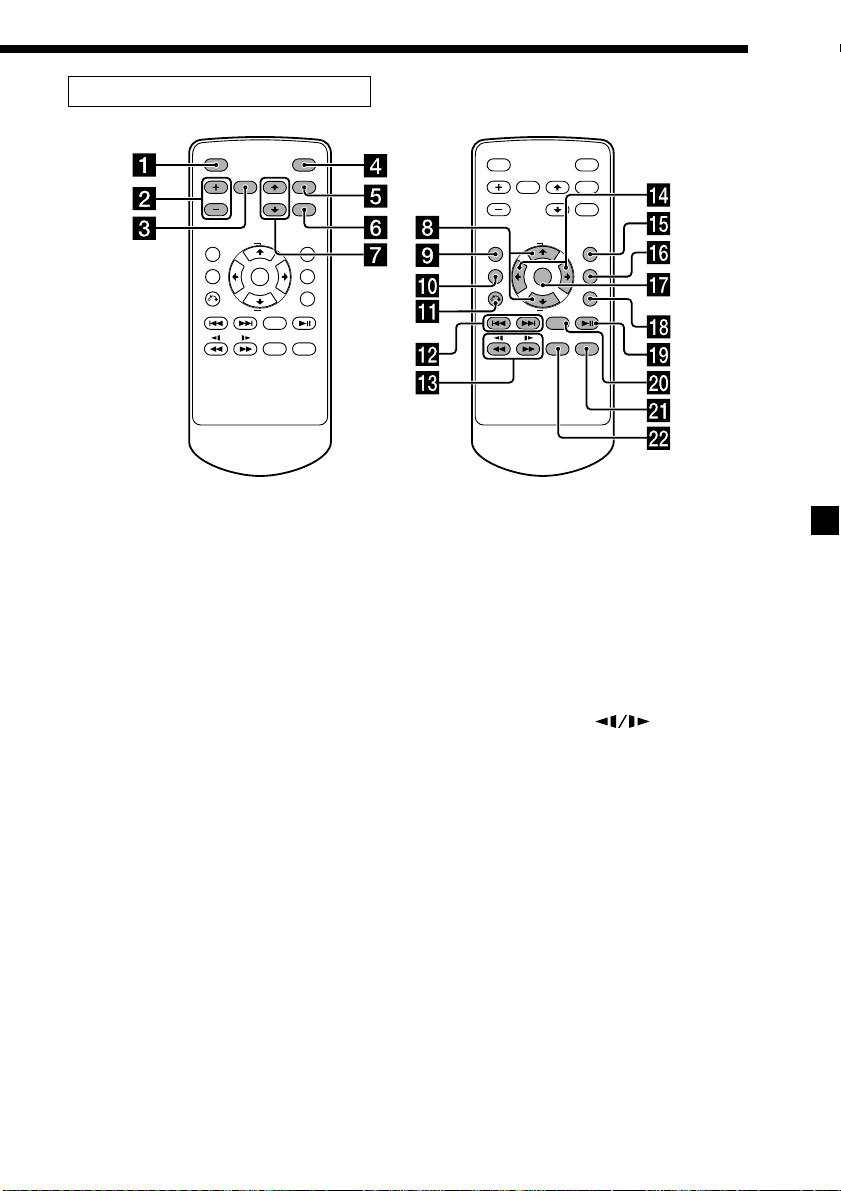
Card remote commander RM-X122
ATT POWER
MENUINPUT
VOL
TOP MENU ALBUM
MENU
ALBUM
MODE
LIST
+
SETUP
ENTER
DISPLAY
–
OFF
SUBTITLE
AUDIO
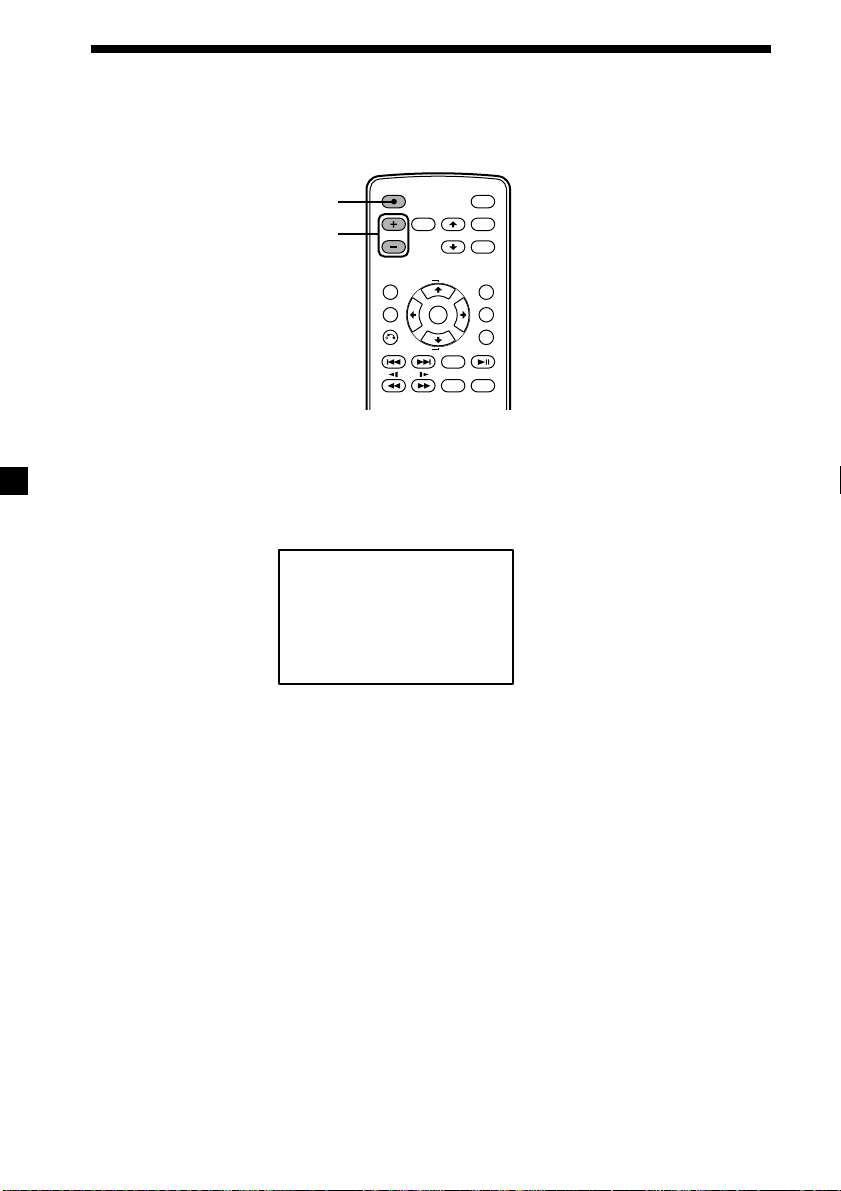
For the monitor operations:
1 ATT button
Press to quickly attenuate the
volume.
2 VOL (volume) +/– buttons
Press to adjust the volume.
3 INPUT button
Press to select the input source.
4 POWER button
5 MENU button
Press to adjust the various display
settings.
6 MODE button
Press to change the screen mode.
7 V/v buttons
Press to select the desired item.
ATT POWER
MENUINPUT
VOL
TOP MENU ALBUM
MENU
ALBUM
MODE
LIST
+
SETUP
ENTER
DISPLAY
–
OFF
SUBTITLE
AUDIO
For DVD operations:
When a Sony mobile DVD player is
connected to this unit, you can control
the basic functions with the card remote
commander.
8 V/v (ALBUM +/–) buttons
9 TOP MENU button
0 MENU button
qa O button
qs ./> buttons
qd m/M (
) buttons
qf B/b buttons
qg LIST button
qh SET UP button
qj ENTER button
qk DISPLAY button
ql u button
w; OFF button
wa SUBTITLE button
ws AUDIO button
• For function details, refer to the
operating instructions supplied with the
DVD player.
• Sony DVD changer DVX-100 is not
controllable with this card remote
commander.
Tip
Refer to “Replacing the lithium battery” for details on how to replace the batteries (page
18).
9
Page 10
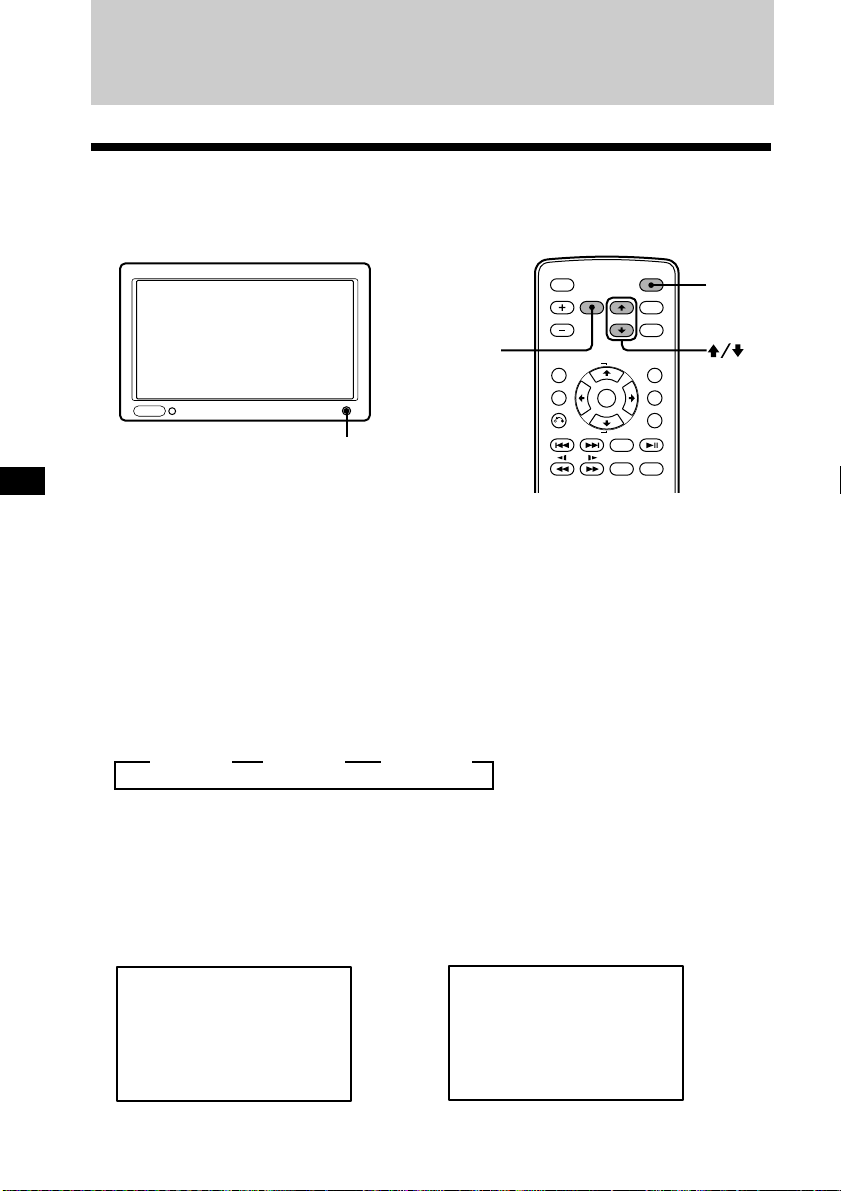
Operation
Selecting the input source
You can select the input source and colour system.
ATT POWER
MENUINPUT
POWER
INPUT
VOL
TOP MENU ALBUM
MENU
ALBUM
MODE
+
LIST
SETUP
ENTER
DISPLAY
–
OFF
SUBTITLE
AUDIO
1 Press (POWER).
The power is turned on.
Tip
If your car has no ACC (accessory) position on the ignition key switch, and the POWER
SELECT switch is set to the B position, the monitor does not turn on by pressing
(POWER) on the card remote commander (page 6).
2 Press (INPUT) to select the desired input source.
Each time you press (INPUT), the indication changes in the following sequence:
B VIDEO 1 B VIDEO 2 B VIDEO 3*
* To select the connected Sony DVD player MV-101
Press (INPUT) repeatedly to select “VIDEO 3.”
POWER
3 Press V or v to select PAL or NTSC colour system.
Press either button while the source indication (such as “VIDEO 1”) is displayed.
When NTSC Video is selected
VIDEO1
NTSC
10
When PAL Video is selected
VIDEO1
PAL
Page 11
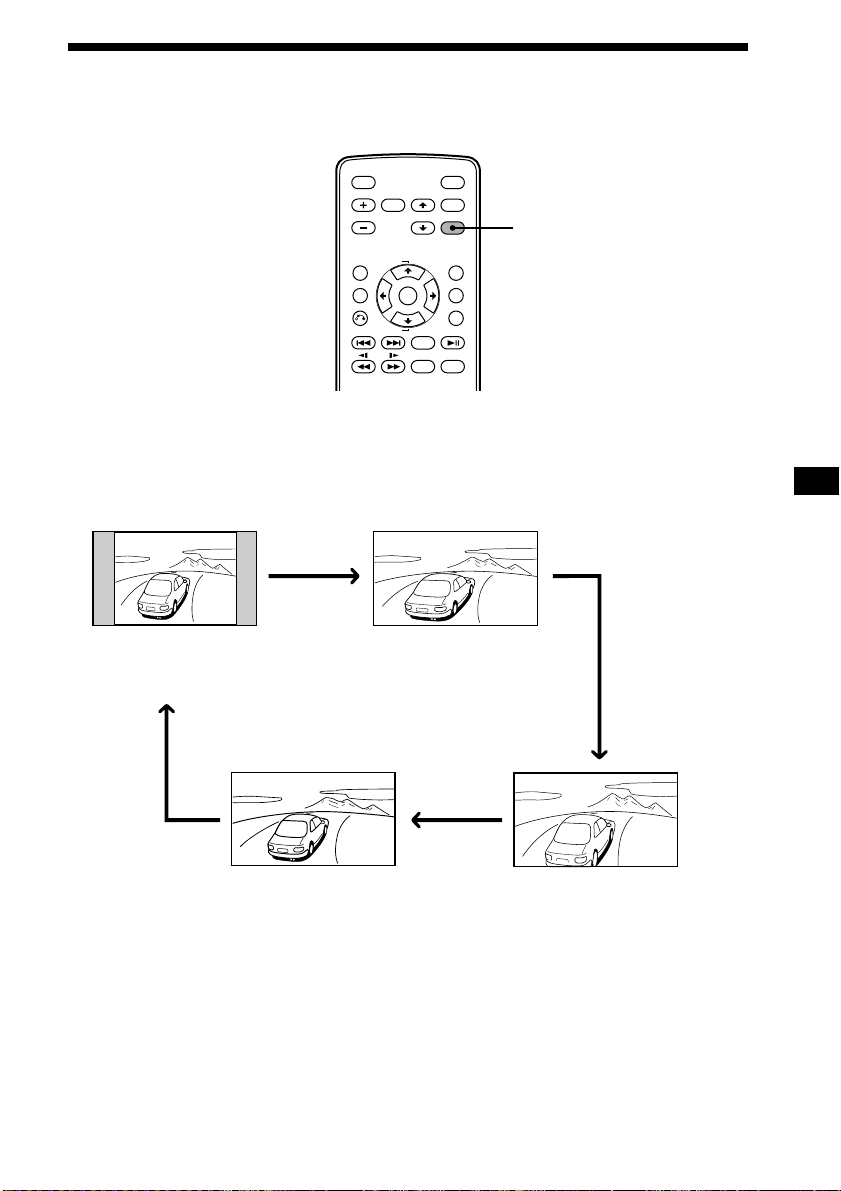
Setting the screen mode
In addition to the normal mode, full, zoom, and widezoom modes are also available.
ATT POWER
MENUINPUT
VOL
TOP MENU ALBUM
MENU
ALBUM
Press (MODE) repeatedly.
The current mode is displayed on the screen first.
Each time the button is pressed, the screen mode swiches in the following
sequence:
MODE
+
LIST
SETUP
ENTER
DISPLAY
–
OFF
SUBTITLE
AUDIO
MODE
NormalNormal
Normal (regular)
An image with an aspect ratio
of 4 to 3 (regular image).
WideWide
Widezoom
An image with an aspect ration
of 4 to 3, with only the left and
right sides of the image being
enlarged to fill the screen.
FullFull
Full
An image with an aspect ratio
of 4 to 3 enlarged to the left
and right edges of the screen.
ZoomZoom
Zoom
An image with an aspect ratio of 4
to 3 enlarged to the left and right
edges of the screen, with the
overflowing parts (top and bottom)
cut off to fill the screen.
The screen mode is set after 5 seconds without pressing (MODE).
Tip
Images may appear coarse-grained when viewed in the zoom mode.
11
Page 12

Changing the display settings
You can adjust the display settings manually if the display is hard to see from the
position where you are seated.
ATT POWER
1 Press (MENU).
The “Picture” screen appears.
VOL
TOP MENU ALBUM
MENU
ALBUM
+
–
ENTER
OFF
AUDIO
MENUINPUT
MODE
SETUP
DISPLAY
SUBTITLE
MENU
LIST
Picture 32
Each time you press (MENU), the setting screen changes in the following
sequence:
B Picture B Brightness B Color B Hue* B Dimmer
Menu Off b Blue Back b Mode b Video Adjust
* Appears only when the NTSC colour system is selected.
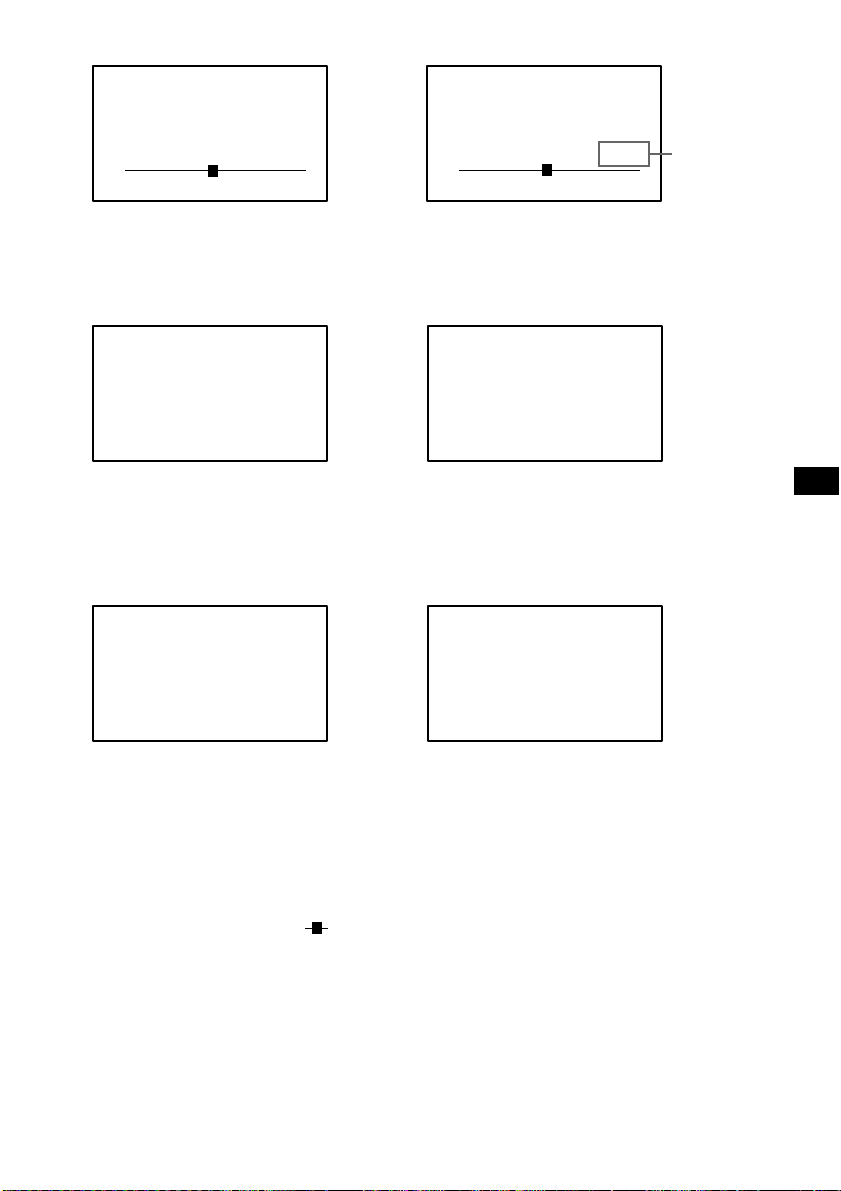
2 Press V or v to adjust to the desired setting.
When “Picture” is selected When “Brightness” is selected
Picture 32
or MENU.Press
Vv,
n
Press V to
increase the
contrast
Press v to
decrease
the contrast
12
Vv,
or MENU.Press
Brightness 32
Vv,
Press v to
darken the
picture
n
The setting value of the
item selected appears in this
area.
or MENU.Press
Press V to
brighten the
picture
Page 13
When “Color” is selected
When “Hue” is selected*
1
Color
Press v for
less colour
intensity
Vv,
n
32
or MENU.Press
Press V for
more colour
intensity
When “Dimmer” is selected
Dimmer; On
Vv,
or MENU.Press
When this function is set to on, the
brightness of the screen will be
adjusted automatically.
When “Mode” is selected
Mode; Zoom
Vv,
or MENU.Press
Hue
Press v to
decrease the
saturation
Vv,
n
CTR
or MENU.Press
Press V to
increase the
saturation
2
*
When “Video Adjust” is selected
Video Adjust;
Vv,
Reset
or MENU.Press
“Picture”, “Brightness”, “Color”,
“Hue” and “Dimmer” settings will
be reset to the factory preset level.
When “Blue Back” is selected
Blue Back; On
Vv,
or MENU.Press
“Normal,” “Full,” “Zoom,” or
“Widezoom” can be set as the screen
mode. For details, refer to page 11.
The blue background screen appears
when no signal, or a weak signal is
received. When a continuously weak
video signal is received, the blue
background may flicker. If this
occurs, set to off.
*1“Hue” is adjustable only when the NTSC colour system is selected.
*2“CTR” appears only when is in the center of the bar.
13
Page 14
Adjusting the volume
You can adjust the volume of the wired headphones and the connected equipment
with the supplied card remote commander.
ATT
VOL+/–
ATT POWER
VOL
TOP MENU ALBUM
+
MENU
ENTER
ALBUM
–
OFF
AUDIO
MENUINPUT
MODE
LIST
SETUP
DISPLAY
SUBTITLE
Press (VOL)(+) or (VOL)(–) on the card remote commander.
Quickly attenuating the sound
Press (ATT) on the card remote commander.
ATT On
To restore the previous volume level
Press (ATT) again.
Connecting headphones
There is an output jack (mini phono plug) for wired headphones on the connection
box. Adjust the volume using (VOL)(+) or (VOL)(–) on the card remote commander.
Using cordless headphones
You can use infrared cordless headphones, MDR-IF0140 (optional) with the unit.
Please refer to the operating instructions for MDR-IF0140.
Notes
• The volume of the cordless headphones cannot be adjusted with the supplied card
remote commander. Use the volume control on the cordless headphones.
• For your safety, do not use the headphones while driving your car.
• Do not leave the headphones in a place subject to direct sunlight, or in a high
temperature.
• If the cordless headphones are used while exposed to direct sunlight, sensitivity of the
infrared receptor may deteriorate, and inferior quality sound may result.
• If interference occurs while using several cordless headphones, press (IR on/off) on the
unit to turn off the transmitter for the cordless headphones, and use wired headphones
instead.
14
Page 15

Connections
Installation diagram
Refer to the installation diagram and ask a qualified technician for the installation of
the unit.
Front Left
speaker
Rear Right
speaker
Rear Left
speaker
Headrest
Monitor
Subwoofer
Be sure to securely fasten all
equipment to the car chassis, etc., to
prevent them moving while your car
is in motion.
Note
All equipment other than one Headrest
Monitor and one Connection Box is
optional.
Tweeter
Left
Head unit
Tweeter
Right
Front Right
speaker
Headrest
Monitor
Sony mobile DVD player
DVX-11A, MV-101
Notes on the locations for PS one
Do not set PS one®:
— on a dashboard, or in a place subject to
direct sunlight.
— in a place near magnetic source such as
magnets, speakers and a TV/Monitor.
— on an unstable or uneven surface.
— in a place subject to excessive vibration.
— in a place subject to excessive dust or
dirt.
— in poorly ventilated or humid place.
— in a place to subject to temperature
extremes (below 5˚C or above 35˚C).
Refer to the operating instructions
supplied to PS one®.
®
15
Page 16
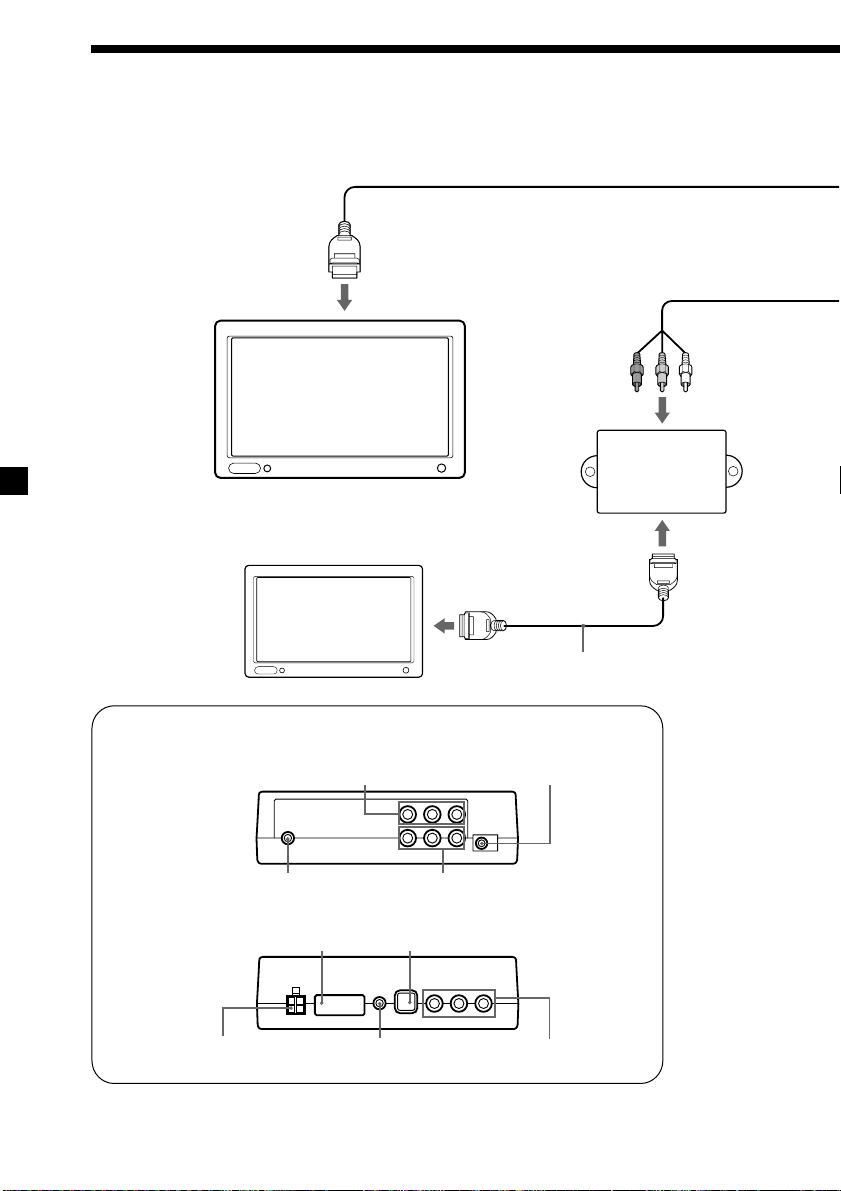
Connection diagram
Refer to the connection diagram for the proper connections.
You can make connections shown in A area. Please ask a qualified technician for the
other connections.
Headrest Monitor XVM-H65
(6.5-inch wide colour LCD
Monitor)
Connection box
XA-113
(optional)
Headrest Monitor
XVM-H65 (optional)
Monitor cable
(5 m) (optional)
Connection box XA-113
Audio L/R/
Video Input 1
7.5 V (max 2 A) DC Output
(for PS one
)
®
Front:
Headphone jack
(stereo mini)
22 Pin connector
Audio L/R/
Video Input 2
DVD (MV) connector*
1
Rear:
4 Pin Power
connector
Remote Signal
(IR) Output*
2
*1DVD (MV) connector is only for MV-101. For details, refer to the Installation/Connections
manual supplied with MV-101.
*2Not applicable to the Sony DVD changer DVX-100
16
Audio L/R/
Video Outputs
Page 17

Black
Black
GND (1 m)
GND (1 m)
To a metal surface
of the car chassis
Monitor cable
(5 m)
RCA pin cord
(optional)
Connection box
XA-113
To Remote Signal
(IR) Output
Yellow
Filter box
Red
Blue/White striped
4 Pin Power connector
Back-up (5 m)
Fuse (8 A)
ACC (5 m)
Fuse (1 A)
POWER REM (5 m)
Max. supply current 0.3 A
Precautions on PS one
• Be sure to fasten PS one® in a safe place
securely.
• For your safety, do not use PS one
while driving your car.
• Make sure that the operating voltage
of PS one® is 7.5 V. Other voltages may
cause malfunction, or damage PS one®.
To car battery
(12 V)
To ignition switch
(ACC position)
To a power
amplifier
®
®
To 7.5 V DC OutputTo Audio L/R/Video Input
Remote
Commander
Signal receiver
cord (5m)
(Stereo Mini jack)
Sony mobile DVD player DVX-11A (optional)
RCA pin cord
(optional)
AV Cable
(integrated
audio/video)
(optional)
PS one
(optional)
®
* “PS one” is a registered trademark of Sony Computer Entertainment Inc.
DC-DC cord
(3 m)
17
Page 18
Additional Information
Maintenance
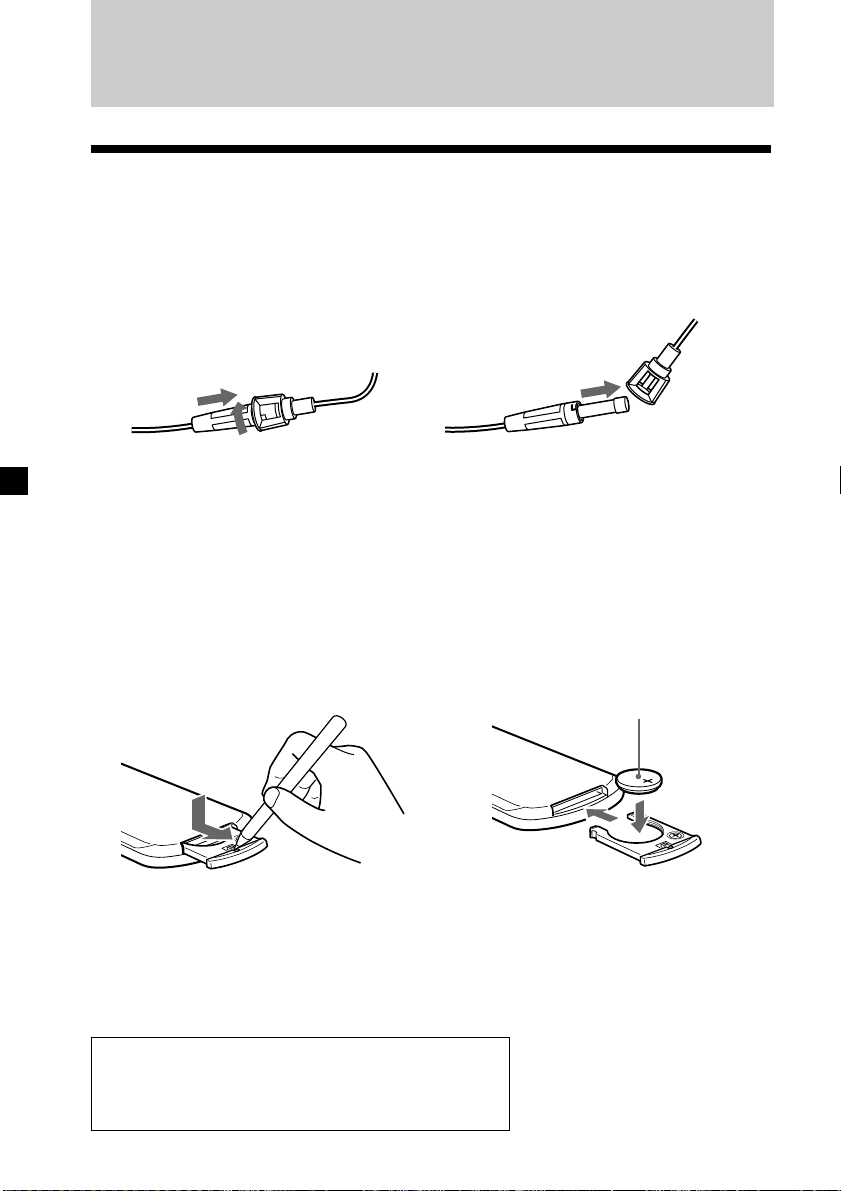
Fuse replacement
When replacing the fuse, be sure to use one matching the amperage rating stated on
the original fuse. If the fuse blows, check the power connection and replace the fuse.
If the fuse blows again after replacement, there may be an internal malfunction. In
such a case, consult your nearest Sony dealer.
1
c
2
Warning
Never use a fuse with an amperage rating exceeding the one supplied with the unit
as this could damage the unit.
Replacing the lithium battery
Under normal conditions, batteries will last approximately 1 year. (The service life
may be shorter, depending on the conditions of use.)
When the battery becomes weak, the range of the card remote commander becomes
shorter. Replace the battery with a new CR2025 lithium battery. Use of any other
battery may present a risk of fire or explosion.
+ side up
c
Notes on lithium battery
• Keep the lithium battery out of the reach of children. Should the battery be
swallowed, immediately consult a doctor.
• Wipe the battery with a dry cloth to assure a good contact.
• Be sure to observe the correct polarity when installing the battery.
• Do not hold the battery with metallic tweezers, otherwise a short-circuit may occur.
WARNING
Battery may explode if mistreated.
Do not recharge, disassemble, or dispose of in fire.
18
Page 19

About the liquid crystal display (LCD) panel
Do not press on the LCD panel on the unit as doing so can distort the picture or
cause a malfunction. The picture may become unclear, or the LCD panel may be
damaged.
Notes on cleaning
— Clean the LCD panel with a slightly damp soft cloth.
— Do not use solvents such as benzine, thinner, commercially available cleaners or
antistatic spray.
• Do not use the unit in temperatures under 5 °C or over 45 °C.
• If your car was parked in a cold or hot place, the picture may not be clear. The
monitor is not damaged. The picture will become clear after the temperature in
your car becomes normal.
Some stationary blue or red dots may appear on the monitor.
These are called bright spots, and can happen with any LCD.
The LCD panel is highly sophisticated, and more than 99.99 % of the segments used
in the panel are flawless. However, there is a possibility that less than 0.01 % of the
segments are defective and may not light up properly.
19
Page 20

Specifications
Monitor
System Liquid crystal colour display
Drive system TFT-LCD active matrix
system
Picture size 6.5 inches wide screen (16:9)
144 × 77 mm, 163 mm
(w/h, d)
Picture segment
336,960 (w 1440 × h 234) dots
Power requirements
12 V DC car battery
(negative ground)
Current drain Approx. 700 mA
Dimensions 164 × 103 × 29 mm
(w/h/d)
Operating temperature
5 °C – 45 °C
Mass Approx. 370 g
Connection box XA-113
A/V Output
Output Impedance: less than 220 Ω
less than 100 pF
Output Level: 0 dBs ±0.3 dB
(0.775 V rms)
(Vol Max)
Video: 75 Ω 1Vp-p
A/V Input ×2
Input Impedance: more than 10 K Ω
less than 1000 pF
Input Level: ±1.3 dBs +0/–0.3 dB
(0.775 V rms)
Video: 75 Ω 1 Vp-p
DC output 7.5 V (max 2 A)
Dimensions 150 × 42 × 80 mm
(w/h/d)
Mass 250 g
Card remote commander RM-X122
Power requirements
Operable range
Dimensions 52 × 125 × 10 mm
Mass Approx. 40 g
CR2025 lithium battery
Approx. 2.5 m
(w/h/d)
(including batteries)
Supplied accessories
Connection box XA-113 (1)
Card remote commander RM-X122
Power supply cord (1)
DC-DC cord (3 m) (1)
Stereo Mini Plug-to-Plug cable (5 m) (1)
Monitor cable (5 m) (1)
Collar (1)
Operating Instructions (1)
(with supplied battery) (1)
Optional accessories
DVD player DVX-11A, MV-101
Cordless headphones MDR-IF0140
PS one
®
Design and specifications are subject to
change without notice.
20
Page 21
Troubleshooting
The following checklist will help you solve problems you may encounter with your
unit.
Before going through the checklist below, check the connection and operating
procedures.
General
No picture
Good picture, but no sound
Dotted lines or stripes
No picture when you connect
the optional equipment
Makes noise when the
ignition key is in the ON, ACC,
or OFF position.
No response when pressing
the buttons on the card
remote commander
•The power cord or battery has been disconnected.
•The fuse has blown.
Press the (VOL)(+) or (ATT) on the card remote commander.
This may be caused by local interference such as a car
engine or motorcycle. Adjust the antennas for minimum
interference.
The cord has been disconnected. Connect the cord securely.
The battery may be exhausted.
21
Page 22

Entsorgung von gebrauchten
elektrischen und elektronischen
Geräten (anzuwenden in den
Ländern der Europäischen Union
und anderen europäischen Ländern
mit einem separaten Sammelsystem
für diese Geräte)
Das Symbol auf dem Produkt oder seiner Verpackung
weist darauf hin, dass dieses Produkt nicht als normaler
Haushaltsabfall zu behandeln ist, sondern an einer
Annahmestelle für das Recycling von elektrischen und
elektronischen Geräten abgegeben werden muss. Durch
Ihren Beitrag zum korrekten Entsorgen dieses Produkts
schützen Sie die Umwelt und die Gesundheit Ihrer
Mitmenschen. Umwelt und Gesundheit werden durch
falsches Entsorgen gefährdet. Materialrecycling hilft, den
Verbrauch von Rohstoffen zu verringern. Weitere
Informationen über das Recycling dieses Produkts
erhalten Sie von Ihrer Gemeinde, den kommunalen
Entsorgungsbetrieben oder dem Geschäft, in dem Sie das
Produkt gekauft haben.
Geeignetes Zubehör: Fernbedienung
2
Page 23

Inhalt
Willkommen! ....................................................................................................................... 4
Sicherheitsmaßnahmen ...................................................................................................... 5
Anbringen und Abnehmen des Monitors ....................................................................... 7
Lage und Funktion der Teile und Bedienelemente ........................................................ 8
Betrieb
Auswählen der Eingangsquelle ...................................................................................... 10
Einstellen des Bildschirmmodus .................................................................................... 11
Ändern der Anzeigeeinstellungen ................................................................................. 12
Einstellen der Lautstärke ................................................................................................. 14
Anschlüsse
Installationsdiagramm ..................................................................................................... 15
Anschlussdiagramm......................................................................................................... 16
Weitere Informationen
Wartung .............................................................................................................................. 18
Technische Daten .............................................................................................................. 20
Störungsbehebung ............................................................................................................ 21
3
Page 24

Willkommen!
Danke, dass Sie sich für den Kopfstützenmonitor von Sony entschieden haben.
• Die Farbsysteme PAL und NTSC werden unterstützt.
• Zusätzlich zum normalen Bildschirmmodus stehen die Modi Vollbild, Zoom und
Breitbild-Zoom zur Verfügung.
• Der LCD-Bildschirm zeichnet sich durch einen besonders geringen Reflexionsgrad
aus, so dass das Bild auch bei hellem Umgebungslicht fast blendfrei zu sehen ist.
• Die Helligkeit lässt sich je nach Umgebungslicht einstellen.
• Die Hintergrundbeleuchtung lässt sich per Dimmer automatisch regeln, so dass
kontrastreiche Bilder ohne verfälschte oder verschwommene Farben erzielt
werden.
•2 Audio-/Videoeingänge und 1 Audio-/Videoausgang zum Anschließen eines
Videowiedergabegeräts, einer Videospielekonsole und eines zusätzlichen Monitors
stehen zur Verfügung.
• Ein 7,5-V-Gleichstromausgang zum Anschließen einer PS one
Verfügung.
• Ein integrierter Infrarotsender für schnurlose Kopfhörer (gesondert erhältlich) ist
vorhanden.
• MV-Schnittstelle steht für Verbindung mit einzelnem Kabel zur Verfügung (AV-
Signal an XVM, Stromversorgung an MV-101 (gesondert erhältlich)).
• Zum Anschließen von Kabelkopfhörern (gesondert erhältlich) steht eine
Kopfhörerbuchse zur Verfügung.
* „PS one“ ist ein eingetragenes Warenzeichen von Sony Computer Entertainment Inc.
steht zur
®
4
Page 25

Sicherheitsmaßnahmen
Um das Risiko schwerer Unfälle und Verletzungen zu vermeiden, lesen Sie vor dem
Installieren und vor der Inbetriebnahme des Geräts bitte die folgenden
Sicherheitsmaßnahmen.
Sicherheit
Beachten Sie die örtlichen Regeln und Bestimmungen für den Straßenverkehr.
• Während der Fahrt
- Der Fahrer darf weder auf den Monitor schauen noch ihn bedienen. Andernfalls
könnte er abgelenkt werden und einen Unfall verursachen.
- Der Fahrer darf keine Kopfhörer tragen. Andernfalls könnte er abgelenkt werden
und einen Unfall verursachen.
Parken Sie das Fahrzeug an einem sicheren Ort, wenn der Fahrer auf den Monitor
schauen, ihn bedienen oder Kopfhörer aufsetzen möchte.
• Nach der Installation
- Achten Sie darauf, den Kopf nicht am Gerät anzustoßen, wenn Sie vom Rücksitz
aufstehen.
- Achten Sie ganz besonders darauf, sich das Kabel der Kopfhörer nicht so um den
Hals zu legen, dass es bei einer plötzlichen Bewegung des Fahrzeugs zu
Verletzungen oder Erstickung kommen kann.
- Bewahren Sie kleine Gegenstände außerhalb der Reichweite von Kindern auf.
Installation
• Zum Installieren dieses Geräts sind technische Kenntnisse
erforderlich. Dieses Gerät muss von qualifzierten Technikern
oder Kundendienstfachleuten installiert werden.
• Wenn Sie versuchen, dieses Gerät selbst zu installieren,
gehen Sie genau nach den Installationsanweisungen
und Anschlussdiagrammen in dieser
Bedienungsanleitung vor. Bei unsachgemäßer
Installation besteht Feuergefahr oder die Gefahr eines
elektrischen Schlags.
• Stellen Sie vor dem Installieren unbedingt den
Zündschlüssel in die Position OFF oder ziehen
Sie den Schlüssel ab. Wenn Sie dieses Gerät bei
eingeschalteter Zündung installieren, wird der
Batterie möglicherweise Strom entzogen oder
ein Kurzschluss kann auftreten.
• Achten Sie bei der Installation dieses Geräts darauf,
keine elektrischen oder sonstigen Leitungen oder Kabel
irgendwelcher Art oder den Treibstofftank zu
beschädigen. Andernfalls besteht Feuergefahr. Wenn
Sie an Fahrzeugteilen Bohrungen anbringen,
vergewissern Sie sich, dass keine verdeckten
Fahrzeugteile beschädigt werden.
• Bringen Sie keine Schrauben, Bolzen oder Muttern an
sicherheitsrelevanten Teilen wie Lenksäule,
Benzinleitung oder Bremssystem an. Andernfalls
besteht Feuer- oder Unfallgefahr.
• Achten Sie darauf, dass keine Kabel zwischen den
beweglichen Teilen einer Sitzschiene eingeklemmt
werden können.
Fortsetzung auf der nächsten Seite t
5
Page 26

Installationsort
Bevor Sie dieses Gerät installieren, informieren Sie sich bitte über die örtlichen
Regeln und Bestimmungen für den Straßenverkehr.
Installieren Sie das Gerät nicht an einer Stelle, an der
- es dem Fahrer die Sicht versperrt.
- die Funktionstüchtigkeit der Airbags beeinträchtigt wird.
- es Sie beim Fahren des Fahrzeugs hindert. Achten Sie
besonders darauf, dass das Lendrad, der Schalthebel und
das Bremspedal nicht blockiert werden.
- sich der Fahrer oder andere Insassen beim Ein- oder
Aussteigen daran verletzen können.
Sollten an Ihrem Gerät Probleme auftreten oder sollten Sie Fragen haben, auf die
in dieser Anleitung nicht eingegangen wird, wenden Sie sich bitte an Ihren SonyHändler.
Vorbereitungen
Vergewissern Sie sich, dass sich der Schalter POWER
SELECT in der richtigen Position befindet.
A*: Wenn Ihr Fahrzeug über ein Zündschloss mit
Zubehörposition verfügt.
B : Wenn Ihr Fahrzeug nicht über ein Zündschloss mit
Zubehörposition verfügt.
* Werkseitig ist der Schalter auf A gestellt.
Wenn der Schalter POWER SELECT auf B steht
Schalten Sie den Monitor mit (POWER) am Monitor ein.
Der Monitor lässt sich nicht mit (POWER) auf der
Kartenfernbedienung einschalten.
Schalter
POWER SELECT
A
B
Hinweis
Schalten Sie den Monitor nach der Fahrt bitte unbedingt aus.
Gehen Sie folgendermaßen vor, um den Monitor auszuschalten:
– Drücken Sie (POWER) am Monitor.
– Drücken Sie (POWER) auf der Kartenfernbedienung.
Wenn das Gerät eingeschaltet bleibt, wird der Autobatterie
Strom entzogen.
6
Page 27

Anbringen und Abnehmen des Monitors
Abnehmen des Monitors vom Gehäuse
Hinweis
Ziehen Sie das Kabel nicht zu weit heraus, wenn Sie den Monitor vom Gehäuse abnehmen.
1 Führen Sie zwischen dem Gehäuse und der Oberkante des Monitors eine
Kunststoffplatte ein.
Die Verriegelungen lösen sich und Sie können den Monitor vom Gehäuse
abnehmen.
Verriegelungen
Kunststoffplatte
2 Drücken Sie 1 und lösen Sie das Monitorkabel an der Rückseite.
1
Monitorkabel
Anbringen des Monitors am Gehäuse
Setzen Sie den Monitor in das Gehäuse ein, bis er mit einem Klicken einrastet.
7
Page 28

Lage und Funktion der Teile und Bedienelemente
Monitor
1 Empfänger für die
Kartenfernbedienung/Sender für
schnurlose Kopfhörer
2 Taste IR ON/OFF*
Zum Ein- und Ausschalten des
Senders für die schnurlosen
Kopfhörer.
* Wenn es bei mehreren schnurlosen Kopfhörern zu Interferenzen kommt
Wenn mehrere Monitore installiert sind und gleichzeitig verwendet werden, kann es zu
Interferenzen kommen. Drücken Sie in diesem Fall (IR on/off) am Gerät, um den Sender
für die schnurlosen Kopfhörer auszuschalten, und verwenden Sie Kabelkopfhörer.
3 Taste POWER
4 Anschluss für Monitorkabel
5 Schalter POWER SELECT
Einzelheiten dazu finden Sie auf
Seite 6.
8
Page 29
Kartenfernbedienung RM-X122
ATT POWER
MENUINPUT
VOL
TOP MENU ALBUM
MENU
ALBUM
MODE
LIST
+
SETUP
ENTER
DISPLAY
–
OFF
SUBTITLE
AUDIO
Zum Steuern des Monitors:
1 Taste ATT
Zum schnellen Dämpfen der
Lautstärke.
2 Tasten VOL (Lautstärke) +/–
buttons
Zum Einstellen der Lautstärke.
3 Taste INPUT
Zum Auswählen der Eingangsquelle.
4 Taste POWER
5 Taste MENU
Zum Vornehmen verschiedener
Einstellungen für die Anzeige.
6 Taste MODE
Zum Ändern des Bildschirmmodus.
7 Tasten V/v
Zum Auswählen der gewünschten
Option.
Zum Steuern eines DVD-Players:
Wenn Sie einen tragbaren DVD-Player
von Sony an dieses Gerät anschließen,
können Sie die Grundfunktionen mit
der Kartenfernbedienung ausführen.
8 Tasten V/v (ALBUM +/–)
9 Taste TOP MENU
0 Taste MENU
qa Taste O
qs Tasten ./>
qd Tasten m/M (
qf Tasten B/b
qg Taste LIST
qh Taste SET UP
qj Taste ENTER
qk Taste DISPLAY
ql Taste u
w; Taste OFF
ATT POWER
VOL
TOP MENU ALBUM
+
MENU
ENTER
ALBUM
–
OFF
AUDIO
MENUINPUT
MODE
LIST
SETUP
DISPLAY
SUBTITLE
)
wa Taste SUBTITLE
ws Taste AUDIO
• Einzelheiten zu den Tastenfunktionen
schlagen Sie bitte in der mit dem DVDPlayer gelieferten Bedienungsanleitung
nach.
• Der DVD-Wechsler DVX-100 von Sony
lässt sich mit dieser Kartenfernbedienung
nicht steuern.
Tipp
Informationen zum Austauschen der Batterien finden Sie unter „Austauschen der
Lithiumbatterie“ (Seite 18).
9
Page 30
Betrieb
Auswählen der Eingangsquelle
Sie können die Eingangsquelle und das Farbsystem auswählen.
POWER
INPUT
ATT POWER
VOL
TOP MENU ALBUM
+
MENU
ENTER
ALBUM
–
OFF
AUDIO
MENUINPUT
MODE
SETUP
DISPLAY
SUBTITLE
POWER
LIST
1 Drücken Sie (POWER).
Das Gerät schaltet sich ein.
Tipp
Wenn Ihr Fahrzeug nicht über ein Zündschloss mit Zubehörposition (ACC oder I) verfügt
und der Schalter POWER SELECT auf B gestellt ist, lässt sich der Monitor nicht mit
(POWER) auf der Kartenfernbedienung einschalten (Seite 6).
2 Wählen Sie mit (INPUT) die gewünschte Eingangsquelle aus.
Mit jedem Tastendruck auf (INPUT) wechselt die Anzeige folgendermaßen:
B VIDEO 1 B VIDEO 2 B VIDEO 3*
* So wählen Sie den DVD-Player MV-101 von Sony aus (sofern angeschlossen)
Drücken Sie mehrmals (INPUT) und wählen Sie „VIDEO 3“.
3 Wählen Sie mit der Taste V oder v das Farbsystem PAL oder NTSC aus.
Drücken Sie eine dieser Tasten, während die Eingangsquelle (wie z. B.
„VIDEO 1“) angezeigt wird.
Wenn NTSC-Video ausgewählt wird
VIDEO1
NTSC
Wenn PAL-Video ausgewählt wird
VIDEO1
PAL
10
Page 31

Einstellen des Bildschirmmodus
Zusätzlich zum normalen Bildschirmmodus stehen die Modi Vollbild, Zoom und
Breitbild-Zoom zur Verfügung.
ATT POWER
MENUINPUT
VOL
TOP MENU ALBUM
MENU
ALBUM
Drücken Sie mehrmals (MODE).
Der aktuelle Modus wird zuerst auf dem Bildschirm angezeigt.
Mit jedem Tastendruck wechselt der Bildschirmmodus in folgender Reihenfolge:
MODE
+
LIST
SETUP
ENTER
DISPLAY
–
OFF
SUBTITLE
AUDIO
MODE
NormalNormal
Normal
Das Bildseitenverhältnis
beträgt 4:3 (normales Bild).
WideWide
Widezoom (Breitbild-Zoom)
Bilder mit einem Bildseitenverhältnis
von 4:3 werden nur links und rechts
vergrößert, so dass sie den Bildschirm
ausfüllen.
FullFull
Full (Vollbild)
Bilder mit einem
Bildseitenverhältnis von 4:3
werden bis zum linken und
rechten Bildschirmrand
vergrößert.
ZoomZoom
Zoom
Bilder mit einem
Bildseitenverhältnis von 4:3 werden
bis zum linken und rechten
Bildschirmrand vergrößert. Am
oberen und unteren Rand wird der
überstehende Bildteil
abgeschnitten.
Der Bildschirmmodus wird eingestellt, wenn Sie (MODE) 5 Sekunden lang nicht
drücken.
Tipp
Im Zoommodus erscheinen die Bilder eventuell grobkörnig.
11
Page 32

Ändern der Anzeigeeinstellungen
Sie können die Anzeigeeinstellungen manuell anpassen, wenn das Bild von Ihrer
Sitzposition aus schlecht zu sehen ist.
ATT POWER
TOP MENU ALBUM
MENU
1 Drücken Sie (MENU).
Der Bildschirm „Picture“ wird angezeigt.
Picture 32
Vv,
MENUINPUT
VOL
ALBUM
+
–
ENTER
OFF
AUDIO
MODE
SETUP
DISPLAY
SUBTITLE
or MENU.Press
MENU
LIST
Der für die ausgewählte Option
eingestellte Wert wird in diesem
Bereich angezeigt.
Mit jedem Tastendruck auf (MENU) wechselt der Einstellbildschirm in folgender
Reihenfolge:
Picture
B
(Bild)
Menu Off
(Menü aus)
Brightness
B
(Helligkeit)
Blue Back
b
(Blauer Hintergrund)
* Wird nur angezeigt, wenn das Farbsystem NTSC ausgewählt ist.
Color
B
(Farbe)
Hue*
B
(Farbton)
Mode
b
(Modus)
2 Nehmen Sie mit V oder v die gewünschte Einstellung vor.
Wenn „Picture“ ausgewählt ist Wenn „Brightness“ ausgewählt ist
Picture 32
Vv,
Mit v
schwächen
Sie den
Kontrast ab.
n
or MENU.Press
Mit V
verstärken
Sie den
Kontrast.
Brightness 32
Mit v wird
das Bild
dunkler.
12
Vv,
n
Dimmer
B
(Bildschirmhelligkeit)
b
Video Adjust
(Bildeinstellung)
or MENU.Press
Mit V wird
das Bild
heller.
b
Page 33

Wenn „Color“ ausgewählt ist
Wenn „Hue“ ausgewählt ist*
1
Color
Vv,
Mit v wird die
Farbintensität
verringert.
n
32
or MENU.Press
Mit V wird die
Farbintensität
verstärkt.
Wenn „Dimmer“ ausgewählt ist
Dimmer; On
Vv,
or MENU.Press
Wenn diese Option auf „On“ gesetzt
ist, wird die Helligkeit des
Bildschirms automatisch eingestellt.
Wenn „Mode“ ausgewählt ist
Mode; Zoom
Vv,
or MENU.Press
Hue
Vv,
Mit v wird die
Farbsättigung
verringert.
or MENU.Press
Mit V wird die
n
Farbsättigung
erhöht.
CTR
2
*
Wenn „Video Adjust“ ausgewählt ist
Video Adjust;
Vv,
Reset
or MENU.Press
Die Einstellungen für „Picture“,
„Brightness“, „Color“, „Hue“ und
„Dimmer“ werden auf die werkseitigen
Standardwerte zurückgesetzt.
Wenn „Blue Back“ ausgewählt ist
Blue Back; On
Vv,
or MENU.Press
Sie können „Normal“, „Full“,
„Zoom“ oder „Widezoom“ als
Bildschirmmodus auswählen.
Einzelheiten dazu finden Sie auf Seite
11.
Ein blauer Hintergrund wird
angezeigt, wenn ein schwaches oder
gar kein Signal empfangen wird.
Wenn kontinuierlich ein schwaches
Videosignal empfangen wird,
flimmert der blaue Hintergrund
möglicherweise. Schalten Sie den
blauen Hintergrund in diesem Fall
aus.
*1„Hue“ lässt sich nur einstellen, wenn das Farbsystem NTSC ausgewählt ist.
*2„CTR“ wird nur angezeigt, wenn sich in der Mitte des Balkens befindet.
13
Page 34

Einstellen der Lautstärke
Sie können die Lautstärke der Kabelkopfhörer und der angeschlossenen Geräte über
die mitgelieferte Kartenfernbedienung einstellen.
ATT
VOL+/–
Drücken Sie (VOL)(+) oder (VOL)(–) auf der Kartenfernbedienung.
Schnelles Dämpfen des Tons
Drücken Sie (ATT) auf der Kartenfernbedienung.
ATT On
ATT POWER
VOL
TOP MENU ALBUM
+
MENU
ENTER
ALBUM
–
OFF
AUDIO
MENUINPUT
MODE
LIST
SETUP
DISPLAY
SUBTITLE
So stellen Sie wieder die vorherige Lautstärke ein
Drücken Sie (ATT) erneut.
Anschließen von Kopfhörern
An der Anschlussdose befindet sich eine Ausgangsbuchse (Mini-Cinchstecker) für
Kabelkopfhörer. Stellen Sie die Lautstärke mit (VOL)(+) oder (VOL)(–) auf der
Kartenfernbedienung ein.
Verwenden schnurloser Kopfhörer
Sie können mit dem Gerät schnurlose Infrarot-Kopfhörer (MDR-IF0140, gesondert
erhältlich) verwenden. Schlagen Sie dazu bitte in der Bedienungsanleitung zu den
MDR-IF0140 nach.
Hinweise
• Die Lautstärke der schnurlosen Kopfhörer lässt sich nicht mit der mitgelieferten
Kartenfernbedienung steuern. Verwenden Sie dazu den Lautstärkeregler an den
schnurlosen Kopfhörern.
• Verwenden Sie Kopfhörer aus Sicherheitsgründen nicht beim Fahren.
• Lassen Sie Kopfhörer nicht an Orten liegen, an denen sie direktem Sonnenlicht oder
hohen Temperaturen ausgesetzt sind.
• Wenn die schnurlosen Kopfhörer direktem Sonnenlicht ausgesetzt sind, verringert sich
möglicherweise die Empfindlichkeit des Infrarotempfängers und die Tonqualität kann
sich verschlechtern.
• Wenn es bei Verwendung von schnurlosen Kopfhörern zu Interferenzen kommt, drücken
Sie (IR on/off) am Gerät, um den Sender für die schnurlosen Kopfhörer auszuschalten, und
verwenden Sie Kabelkopfhörer.
14
Page 35

Anschlüsse
Installationsdiagramm
Ziehen Sie das Installationsdiagramm heran bzw. lassen Sie das Gerät von einem
qualifizierten Techniker installieren.
Hochtonlautsprecher
links
Hauptgerät
Mobiler DVD-Player
DVX-11A, MV-101 von Sony
Hochtonlautsprecher
rechts
Lautsprecher
vorne rechts
Kopfstützenmonitor
Lautsprecher
hinten links
Kopfstützenmonitor
Lautsprecher
vorne links
Tiefsttonlautsprecher
Lautsprecher
hinten rechts
Befestigen Sie unbedingt alle Geräte
an der Autokarosserie usw., damit
sie während der Fahrt nicht
verrutschen.
Hinweis
Alle Teile außer einem Kopfstützenmonitor
und einer Anschlussdose sind gesondert
erhältlich.
Hinweise zur Installation der PS one
Installieren Sie die PS one® nicht an
folgenden Orten:
— auf dem Armaturenbrett oder an einem
Ort, der direktem Sonnenlicht
ausgesetzt ist.
— in der Nähe einer Quelle magnetischer
Felder wie Magneten, Lautsprechern
oder einem Fernsehgerät/Monitor.
— auf einer instabilen oder unebenen
Oberfläche.
— an einem Ort, der starken
Erschütterungen ausgesetzt ist.
— an einem Ort mit übermäßig viel Staub
oder Schmutz.
— an einem schlecht belüfteten oder
feuchten Ort.
— an einem Ort, der extremen
Temperaturen ausgesetzt ist (unter 5 °C
bzw. über 35 °C).
Nähere Informationen finden Sie in der
Bedienungsanleitung zur PS one®.
®
15
Page 36

Anschlussdiagramm
Dem Anschlussdiagramm entnehmen Sie bitte die richtigen Anschlüsse.
Sie können die Anschlüsse im Bereich A vornehmen. Lassen Sie die übrigen
Anschlüsse bitte von einem qualifizierten Techniker vornehmen.
Kopfstützenmonitor
XVM-H65 (6,5-Zoll-LCDBreitbild-Farbmonitor)
Anschlussdose
XA-113
(gesondert
erhältlich)
Kopfstützenmonitor
XVM-H65
(gesondert erhältlich)
Monitorkabel (5 m)
(gesondert erhältlich)
Anschlussdose XA-113
Audio L/R/
Videoeingang 1
Gleichstromausgang (7,5 V,
max. 2 A) für PS one
®
Vorderseite:
Kopfhörerbuchsen
(Stereominibuchse)
22-poliger Anschluss
Audio L/R/
Videoeingang 2
DVD (MV)-Anschluss*
1
Rückseite:
4-poliger
Stromanschluss
Fernbedienungssignalausgang
(Infrarot)*
2
*1DVD (MV)-Anschluss ist nur für den MV-101 geeignet. Einzelheiten dazu finden Sie in
der mit dem MV-101 gelieferten Installations-/Anschlussanleitung.
*2Nicht für den DVD-Wechsler DVX-100 von Sony
16
Audio L/R/
Videoausgänge
Page 37

Schwarz
Schwarz
GND (1 m)
GND (1 m)
an eine
Metalloberfläche des
Fahrzeuggehäuses
Monitorkabel
(5 m)
Cinchkabel
(gesondert
erhältlich)
Anschlussdose
XA-113
an Fernbedienungssignalausgang
(Infrarot)
Gelb
Filterbox
Blauweiß gestreift
4-poliger Stromanschluss
Zusatzleitung (5 m)
Sicherung 8 A
Rot
Sicherung 1 A
Max. Versorgungsstrom 0,3 A
ACC (5 m)
POWER REM (5 m)
Sicherheitsmaßnahmen für die PS one
• Befestigen Sie die PS one® unbedingt
gut an einer sicheren Stelle.
• Verwenden Sie die PS one® aus
Sicherheitsgründen nicht beim Fahren.
• Die Betriebsspannung der PS one® muss
7,5 V betragen. Bei anderen
Spannungen kann es zu Fehlfunktionen
kommen oder die
PS one® kann beschädigt werden.
an Autobatterie
(12 V)
an Zündschloss
(Zubehörposition)
an einen
Endverstärker
®
an 7,5-V-Gleichstromausgangan Audio L/R/Videoeingang
Kabel zum
Empfangen von
Fernbedienungssignal
(5 m)
(Stereominibuchse)
Mobiler DVD-Player DVX-11A von Sony
(gesondert erhältlich)
Cinchkabel
(gesondert
erhältlich)
AV-Kabel
(Audio/video
integriert)
(gesondert
erhältlich)
PS one
(gesondert erhältlich)
®
GleichstromGleichstromKabel (3 m)
* „PS one“ ist ein eingetragenes Warenzeichen von Sony Computer Entertainment Inc.
17
Page 38

Weitere Informationen
Wartung
Austauschen der Sicherung
Wenn Sie eine Sicherung austauschen, achten Sie darauf, eine Ersatzsicherung mit
dem gleichen Ampere-Wert wie die Originalsicherung zu verwenden. Dieser ist auf
der Originalsicherung angegeben. Wenn die Sicherung durchbrennt, überprüfen Sie
den Stromanschluss und tauschen die Sicherung aus. Brennt die neue Sicherung
ebenfalls durch, kann eine interne Fehlfunktion vorliegen. Wenden Sie sich in einem
solchen Fall an Ihren Sony-Händler.
1
c
2
Achtung
Verwenden Sie unter keinen Umständen eine Sicherung mit einem höheren AmpereWert als dem der Sicherung, die ursprünglich mit dem Gerät geliefert wurde.
Andernfalls kann es zu Schäden am Gerät kommen.
Austauschen der Lithiumbatterie
Unter normalen Bedingungen halten die Batterien etwa ein Jahr. Die Lebensdauer
der Batterien kann je nach Gebrauch des Geräts jedoch auch kürzer sein.
Wenn die Batterie schwächer wird, verkürzt sich die Reichweite der
Kartenfernbedienung. Tauschen Sie die Batterie gegen eine neue CR2025Lithiumbatterie aus. Bei Verwendung einer anderen Batterie besteht Feuer- oder
Explosionsgefahr.
Mit der Seite + nach oben
c
Hinweise zur Lithiumbatterie
• Bewahren Sie die Lithiumbatterie außerhalb der Reichweite von Kindern auf. Sollte
eine Lithiumbatterie verschluckt werden, ist umgehend ein Arzt aufzusuchen.
• Wischen Sie die Batterie mit einem trockenen Tuch ab, um einen guten Kontakt
zwischen den Batteriepolen und anschlüssen sicherzustellen.
• Achten Sie beim Einlegen der Batterie auf die richtige Polarität.
• Halten Sie die Batterie nicht mit einer Metallpinzette. Dies könnte zu einem
Kurzschluss führen.
18
Page 39

ACHTUNG
Die Batterie kann bei unsachgemäßem Umgang explodieren.
Laden Sie sie nicht auf, zerlegen Sie sie nicht und werfen Sie sie nicht ins Feuer.
Entsorgungshinweis: Bitte werfen Sie nur entladene Batterien in die Sammelboxen
beim Handel oder den Kommunen. Entladen sind Batterien in der Regel dann, wenn
das Gerät abschaltet und signalisiert „Batterie leer“ oder nach längerer
Gebrauchsdauer der Batterien „nicht mehr einwandfrei funktioniert“. Um
sicherzugehen, kleben Sie die Batteriepole z.B. mit einem Klebestreifen ab oder geben
Sie die Batterien einzeln in einen Plastikbeutel.
Hinweis zum LCD-Bildschirm (Flüssigkristallbildschirm)
Drücken Sie nicht auf den LCD-Bildschirm des Geräts. Andernfalls kann es zu
Bildverzerrungen oder anderen Fehlfunktionen kommen. Das Bild kann unscharf
werden oder der LCD-Bildschirm kann beschädigt werden.
Hinweise zur Reinigung
— Reinigen Sie den LCD-Bildschirm mit einem leicht angefeuchteten, weichen Tuch.
— Verwenden Sie keine Lösungsmittel wie Benzin oder Verdünner und keine
handelsüblichen Reinigungsmittel oder Antistatiksprays.
• Verwenden Sie das Gerät nicht bei Temperaturen unter 5 °C oder über 45 °C.
• Wenn Ihr Auto in sehr warmer oder sehr kalter Umgebung geparkt war, ist das
Bild unter Umständen verschwommen. Das ist keine Fehlfunktion des Monitors.
Sobald sich die Temperatur im Wageninneren normalisiert, wird auch das Bild
wieder scharf.
Auf dem Monitor können unbewegliche blaue oder rote Punkte erscheinen.
Solche so genannten Lichtpunkte können bei allen LCD-Bildschirmen auftreten.
Der LCD-Bildschirm ist ein hochmodernes, technisches Gerät. Der Anteil der korrekt
angezeigten, effektiven Bildpunkte liegt bei über 99,99 %. Es besteht jedoch die
Möglichkeit, dass bis zu 0,01 % der Bildpunkte ausfallen und nicht korrekt angezeigt
werden.
19
Page 40

Technische Daten
Monitor
System Flüssigkristallfarbbildschirm
Anzeigesteuerung
Bildgröße
Bildelemente 336.960 Punkte
Betriebsspannung
Stromentnahme
Abmessungen 164 × 103 × 29 mm
Betriebstemperatur
Gewicht ca. 370 g
TFT-LCD-Aktivmatrix
6,5 Zoll-Breitbildschirm (16:9)
144 × 77 mm, 163 mm
(B/H, D)
(B: 1440 x H: 234)
Autobatterie mit 12 V
Gleichstrom (negative
Erdung)
ca. 700 mA
(B/H/T)
5 °C – 45 °C
Anschlussdose XA-113
A/V-Ausgang
Ausgangsimpedanz:
Ausgangspegel: 0 dBs ±0,3 dB
Video: 75 Ω 1 Vp-p
A/V-Eingang ×2
Eingangsimpedanz: mehr als 10 K Ω
Eingangspegel: ±1,3 dBs +0/–0,3 dB
Video: 75 Ω 1 Vp-p
Gleichstromausgang 7,5 V (max. 2 A)
Abmessungen 150 × 42 × 80 mm
Gewicht ca. 250 g
weniger als 220 Ω
weniger als 100 pF
(0,775 V effektiver
Mittelwert)
(maximale Lautstärke)
weniger als 1000 pF
(0,775 V effektiver
Mittelwert)
(B/H/T)
Kartenfernbedienung RM-X122
Stromversorgung
Reichweite ca 2,5 m
Abmessungen 52 × 125 × 10 mm
Gewicht ca. 40 g
CR2025-Lithiumbatterie
(B/H/T)
(einschl. Batterien)
Mitgeliefertes Zubehör
Anschlussdose XA-113 (1)
Kartenfernbedienung RM-X122
Stromversorgungskabel (1)
Gleichstrom-Gleichstrom-Kabel (3 m) (1)
Kabel mit Stereoministecker-Stecker (5 m) (1)
Monitorkabel (5 m) (1)
Umrandung (1)
Bedienungsanleitung (1)
(mit mitgelieferter Batterie) (1)
Sonderzubehör
DVD-Player DVX-11A, MV-101
Schnurlose Kopfhörer MDR-IF0140
PS one
®
Änderungen, die dem technischen Fortschritt
dienen, bleiben vorbehalten.
20
Page 41

Störungsbehebung
Anhand der folgenden Checkliste können Sie die meisten Probleme, die
möglicherweise an Ihrem Gerät auftauchen, selbst beheben.
Bevor Sie die folgende Checkliste durchgehen, überprüfen Sie bitte zunächst, ob Sie
das Gerät richtig angeschlossen und bedient haben.
Allgemeines
Kein Bild
Gutes Bild, kein Ton
Gepunktete Linien oder
Streifen
Kein Bild, nach Anschluss von
Es kommt zu Störgeräuschen,
wenn sich der Zündschlüssel in
der Position EIN, AUS oder
ACC bzw. I (Zubehörposition)
befindet.
Keine Reaktion beim Drücken
von Tasten auf der
Kartenfernbedienung
•Das Netzkabel wurde gelöst oder die Verbindung zur
Batterie besteht nicht mehr.
•Die Sicherung ist durchgebrannt.
Drücken Sie (VOL)(+) oder (ATT) auf der
Kartenfernbedienung.
Dies kann auf lokale Störquellen wie Automotoren oder
Motorräder zurückgehen. Richten Sie die Antenne so aus,
dass die Störungen möglichst gering ausfallen.
Das Kabel wurde getrennt. Schließen Sie das Kabel korrekt
an.
Die Batterie ist möglicherweise erschöpft.
21
Page 42

Traitement des appareils électriques
et électroniques en fin de vie
(Applicable dans les pays de l’Union
Européenne et aux autres pays
européens disposant de systèmes
de collecte sélective)
Ce symbole, apposé sur le produit ou sur son emballage,
indique que ce produit ne doit pas être traité avec les
déchets ménagers. Il doit être remis à un point de collecte
approprié pour le recyclage des équipements électriques et
électroniques. En s’assurant que ce produit est bien mis au
rebut de manière appropriée, vous aiderez à prévenir les
conséquences négatives potentielles pour l’environnement
et la santé humaine. Le recyclage des matériaux aidera à
préserver les ressources naturelles. Pour toute information
supplémentaire au sujet du recyclage de ce produit, vous
pouvez contacter votre municipalité, votre déchetterie ou
le magasin où vous avez acheté le produit.
Accessoire compatible : Télécommande
2
Page 43

Table des matières
Félicitations ! ........................................................................................................................ 4
Précautions .......................................................................................................................... 5
Installation et retrait du moniteur .................................................................................... 7
Emplacement des commandes ......................................................................................... 8
Fonctionnement
Sélection de la source ....................................................................................................... 10
Réglage du mode écran.................................................................................................... 11
Modification des réglages de l’affichage ....................................................................... 12
Réglage du volume ........................................................................................................... 14
Raccordements
Schéma d’installation ....................................................................................................... 15
Schéma de raccordement ................................................................................................. 16
Informations complémentaires
Entretien ............................................................................................................................. 18
Caractéristiques techniques............................................................................................. 20
Dépannage ......................................................................................................................... 21
3
Page 44

Félicitations !
Merci d’avoir fait l’acquisition du moniteur d’appuie-tête Sony.
• Compatible avec les systèmes couleur PAL et NTSC
• En plus du mode écran normal, les modes plein écran, image agrandie (zoom) et
grand écran (Widezoom) sont disponibles.
• Panneau d’affichage à cristaux liquides à faible coefficient de réflexion minimisant
les reflets de sources lumineuses.
• Luminosité réglable en fonction des conditions d’éclairage
• Gradateur de rétroéclairage offrant des images à contraste marqué, sans inversion
de couleurs et sans flou.
•2entrées audio/vidéo et 1 sortie audio/vidéo sont fournies pour raccorder un
magnétoscope, une console de jeux et un moniteur supplémentaire.
• Une sortie 7,5 V CC est fournie pour raccorder une console PS one
• Emetteur infrarouge intégré pour les casques sans fil (en option).
• Une interface MV est fournie pour le raccordement d’un câble unique (signal AV
transmis vers XVM, alimentation du MV-101 (en option)).
• Prise casque pour les casques avec fil (en option).
* « PS one » est une marque déposée de Sony Computer Entertainment Inc.
.
®
4
Page 45

Précautions
Pour éviter tout risque de blessure grave ou d’accident, lisez les précautions
suivantes avant d’installer ou d’utiliser l’appareil.
A propos de la sécurité
Conformez-vous au code de la route de votre pays.
• Pendant la conduite
- Le conducteur ne doit pas regarder ni utiliser le moniteur. En effet, cela peut le
distraire et provoquer un accident.
-
Le conducteur ne doit pas utiliser
provoquer un accident.
Garez votre voiture en lieu sûr pour regarder le moniteur ou utiliser un casque.
• Une fois l’installation terminée
- Prenez garde à ne pas vous cogner la tête contre l’appareil lorsque vous vous
levez du siège arrière.
- Faites particulièrement attention à ne pas enrouler le cordon du casque autour du
cou pour éviter toute blessure ou suffocation en cas de mouvement soudain du
véhicule.
- Tenir les petites pièces hors de la portée des enfants.
A propos de l’installation
• L’installation de l’appareil nécessite des
connaissances techniques approfondies.
Cet appareil doit être installé par un technicien
qualifié.
• Si vous tentez vous-même d’installer l’appareil,
faites-le en vous référant aux schémas d’installation
et de raccordement du
installation incorrecte risque de provoquer un
incendie ou une électrocution.
• Avant de procéder à l’installation, assurez-vous
de régler le contact de la voiture sur OFF ou
d’ôter la clé. L’installation de l’appareil avec le
moteur en marche risque de décharger la
batterie ou de provoquer un court-circuit.
• Prenez garde à ne pas endommager les conduits, les
buses, le réservoir ou les fils électriques lors de
l’installation de l’appareil. Cela pourrait provoquer un
incendie. Si vous percez un trou dans les panneaux
intérieurs de la voiture, assurez-vous de
n’endommager aucune pièce cachée.
• N’utilisez aucune vis ni aucun écrou réservés aux
dispositifs de sécurité, tels que la tringlerie de direction,
le circuit d’alimentation en carburant ou le dispositif de
freinage. Ceci pourrait provoquer un incendie ou un
accident.
• Prenez garde à ne pas emmêler les cordons et les fils dans une
partie mobile des rails de siège.
mode d’emploi.
de casque. En effet, cela peut le distraire et
Une
Suite à la page suivante t
5
Page 46

Lieu d’installation
Avant d’installer l’appareil, consultez la réglementation en vigueur dans votre
région.
N’installez pas l’appareil à un endroit où :
- Il risque de gêner la visibilité du conducteur ;
- Il risque d’entraver l’utilisation du coussin de sécurité
gonflable ;
- Il risque d’entraver l’utilisation du véhicule, notamment le
volant, le levier de vitesses ou la pédale de frein ;
- Le conducteur et les passagers risquent de se blesser en
entrant ou en sortant de la voiture.
Pour toute question ou problème relatif à votre appareil et dont vous n’avez pas
la solution dans ce manuel, veillez consulter le revendeur Sony le plus proche.
Avant l’installation
Assurez-vous que le commutateur POWER SELECT est réglé
à la bonne position.
A*: Si le contact de votre véhicule dispose d’une position
accessoires.
B : Si le contact de votre véhicule ne dispose pas d’une
position accessoires.
* A est la position préréglée par défaut.
Lorsque le commutateur POWER SELECT est réglé à B
Appuyez sur l’interrupteur (POWER) du moniteur, afin de
le mettre sous tension.
Le moniteur ne s’allume pas si vous appuyez sur (POWER)
de la mini-télécommande.
Commutateur
POWER SELECT
A
B
Remarque
Assurez-vous de mettre le moniteur hors tension lorsque vous quittez
votre véhicule.
Pour mettre le moniteur hors tension, procédez comme suit :
– Appuyez sur l’interrupteur (POWER) du moniteur.
– Appuyez sur l’interrupteur (POWER) de la mini-télécommande.
Si le moniteur est laissé sous tension, la batterie se déchargera.
6
Page 47

Installation et retrait du moniteur
Pour retirer le moniteur du coffret
Remarque
Prenez garde de ne pas tirer excessivement le câble lorsque vous retirez le moniteur du
coffret.
1 Insérez une carte en plastique entre le coffret et le haut du moniteur.
Les pattes sont déverrouillées et vous pouvez alors retirer le moniteur du coffret.
Pattes
Carte en plastique
2 Tirez le câble situé à l’arrière du moniteur tout en appuyant sur 1.
1
Câble du moniteur
Pour installer le moniteur sur le coffret
Placez correctement le moniteur sur le coffret jusqu’à ce que vous entendiez un
déclic.
7
Page 48

Emplacement des commandes
Moniteur
1 Récepteur pour la mini-
télécommande/Emetteur pour les
casques sans fil
2 Touche IR ON/OFF*
Appuyez sur cette touche pour
activer ou désactiver l’émetteur pour
les casques sans fil.
* Si des interférences se produisent lors de l’utilisation de plusieurs casques sans fil
Des interférences risquent de se produire si vous installez plusieurs moniteurs et que vous
les utilisez simultanément. Dans ce cas, appuyez sur (IR on/off) sur l’appareil pour
désactiver l’émetteur pour les casques sans fil et utilisez des casques avec fil.
3 Touche POWER
4 Connecteur du câble du moniteur
5 Commutateur POWER SELECT
Reportez-vous à la page 6 pour plus
d’informations.
8
Page 49

Mini-télécommande RM-X122
ATT POWER
MENUINPUT
VOL
TOP MENU ALBUM
MENU
ALBUM
MODE
LIST
+
SETUP
ENTER
DISPLAY
–
OFF
SUBTITLE
AUDIO
Fonctionnement du moniteur :
1 Touche ATT
Appuyez pour atténuer rapidement
le volume.
2 Touches VOL (volume) +/–
Appuyez sur ces touches pour régler
le volume.
3 Touche INPUT
Appuyez sur cette touche pour
sélectionner la source.
4 Touche POWER
5 Touche MENU
Appuyez sur cette touche pour
régler les divers paramètres
d’affichage.
6 Touche MODE
Appuyez sur cette touche pour
changer le mode écran.
7 Touches V/v
Appuyez sur l’une de ces touches
pour sélectionner le paramètre
souhaité.
Opérations liées aux DVD :
Lorsqu’un lecteur DVD portable Sony
est raccordé à cet appareil, vous pouvez
contrôler les fonctions de base à l’aide
de la mini-télécommande.
8 Touches V/v (ALBUM +/–)
9 Touche TOP MENU
0 Touche MENU
qa Touche O
qs Touches ./>
qd Touches m/M (
qf Touches B/b
qg Touche LIST
qh Touche SET UP
qj Touche ENTER
qk Touche DISPLAY
ql Touche u
w; Touche OFF
wa Touche SUBTITLE
ws Touche AUDIO
• Pour de plus amples informations sur les
fonctions, reportez-vous au mode
ATT POWER
VOL
TOP MENU ALBUM
+
MENU
ENTER
ALBUM
–
OFF
AUDIO
MENUINPUT
MODE
LIST
SETUP
DISPLAY
SUBTITLE
)
d’emploi fourni avec le lecteur DVD.
• Cette mini-télécommande ne peut pas
contrôler le changeur de DVD Sony
DVX-100.
Conseil
Pour les directives de remplacement de la pile, reportez-vous à la section « Remplacement
de la pile au lithium » (page 18).
9
Page 50

Fonctionnement
Fonctionnement
Sélection de la source
Vous pouvez sélectionner la source d’entrée et le système couleur.
ATT POWER
MENUINPUT
POWER
INPUT
VOL
TOP MENU ALBUM
MENU
ALBUM
MODE
+
LIST
SETUP
ENTER
DISPLAY
–
OFF
SUBTITLE
AUDIO
1 Appuyez sur (POWER).
L’appareil se met sous tension.
Conseil
Si le contact de votre véhicule ne dispose pas d’une position ACC (accessoires) et que le
commutateur POWER SELECT est réglé sur la position B, le moniteur ne peut pas être
mis sous tension en appuyant sur (POWER) de la mini-télécommande (page 6).
2 Appuyez sur (INPUT) pour sélectionner la source d’entrée souhaitée.
A chaque pression sur (INPUT), l’affichage change comme suit :
B VIDEO 1 B VIDEO 2 B VIDEO 3*
* Pour sélectionner le lecteur DVD MV-101 de Sony raccordé
Appuyez plesieurs fois sur (INPUT) pour sélectionner « VIDEO 3 ».
POWER
3 Appuyez sur V ou v pour sélectionner le système couleur PAL ou NTSC.
Appuyez sur l’une de ces touches pendant que l’indication de la source
(p. ex. « VIDEO 1 ») est affichée.
Lorsque le système NTSC est
sélectionné
VIDEO1
NTSC
Lorsque le système PAL est
sélectionné
VIDEO1
PAL
10
Page 51

Réglage du mode écran
En plus du mode normal, les modes plein écran, image agrandie et grand écran sont
également disponibles.
ATT POWER
MENUINPUT
VOL
TOP MENU ALBUM
MENU
ALBUM
Appuyez plusieurs fois sur (MODE).
Le mode actuel s’affiche d’abord à l’écran.
A chaque pression sur la touche, le mode écran est modifié dans l’ordre suivant :
MODE
+
LIST
SETUP
ENTER
DISPLAY
–
OFF
SUBTITLE
AUDIO
MODE
NormalNormal
Normal (Standard)
L’image s’affiche dans un
rapport d’aspect de 4:3 (image
normale).
WideWide
Widezoom (Grand écran)
Les bords gauche et droit des
images au format 4:3 sont
agrandis pour remplir l’écran.
FullFull
Full (Plein écran)
Les images de format 4:3 sont
agrandies jusqu’aux bords
gauche et droit de l’écran.
ZoomZoom
Zoom (Image agrandie)
Les images de format 4:3 sont
agrandies jusqu’aux bords gauche
et droit de l’écran. Les parties
excédentaires de l’image (haut et
bas) sont coupées pour que l’image
remplisse l’écran.
Le mode écran est réglé après 5 secondes sans appuyer sur (MODE).
Conseil
Il est possible que les images aient une mauvaise définition en mode zoom.
11
Page 52

Modification des réglages de l’affichage
Vous avez la possibilité de définir manuellement les paramètres d’affichage de
l’écran si l’écran n’est pas visible depuis la position que vous occupez.
ATT POWER
1 Appuyez sur (MENU).
L’écran « Picture » s’affiche.
VOL
TOP MENU ALBUM
MENU
ALBUM
MENUINPUT
MODE
+
SETUP
ENTER
DISPLAY
–
OFF
SUBTITLE
AUDIO
MENU
LIST
Picture 32
or MENU.Press
Vv,
paramètre sélectionné
s’affiche dans cette zone.
Chaque fois que vous appuyez sur (MENU), l’écran de réglage change comme
suit :
La valeur de réglage du
Picture
BB B
(Image)
Menu Off
(Sortie du menu)
Brightness
(Luminosité)
b
Blue Back
(Fond bleu)
Color
(Couleur)
b
Mode
Hue*
B
(Teinte)
b
Video Adjust
(Réglage vidéo)
* S’affiche uniquement lorsque le système couleur NTSC est sélectionné.
Dimmer
B
(Gradateur)
2 Appuyez sur V ou v pour régler le paramètre souhaité.
Lorsque « Picture » est sélectionné
Picture 32
or MENU.Press
Vv,
Appuyez
sur v pour
réduire le
contraste.
n
Appuyez
sur V pour
augmenter
le contraste.
Lorsque « Brightness » est sélectionné
Brightness 32
or MENU.Press
Vv,
Appuyez
sur v pour
assombrir
l’image.
Appuyez sur V
pour augmenter
n
la luminosité de
l’image.
b
12
Page 53

Lorsque « Color » est sélectionné
Lorsque « Hue » est sélectionné*
1
Color
Appuyez sur
v pour
atténuer les
couleurs.
Vv,
n
32
or MENU.Press
Appuyez sur V
pour augmenter
l’intensité des
couleurs.
Lorsque « Dimmer » est
sélectionné
Dimmer; On
Vv,
or MENU.Press
Lorsque cette fonction est activée, la
luminosité de l’écran est
automatiquement ajustée.
Lorsque « Mode » est
sélectionné
Hue
Appuyez sur
v pour
réduire la
saturation.
Vv,
n
CTR
or MENU.Press
Appuyez sur
V pour
augmenter la
saturation.
2
*
Lorsque « Video Adjust » est
sélectionné
Video Adjust;
Vv,
Reset
or MENU.Press
Les réglages « Picture », « Brightness »,
« Color », « Hue » et « Dimmer » sont
ramenés à leurs valeurs par défaut
actuelles.
Lorsque « Blue Back » est
sélectionné
Mode; Zoom
Vv,
or MENU.Press
« Normal », « Full », « Zoom » ou
« Widezoom » peuvent être réglés en
tant que mode d’écran. Pour plus
d’informations, reportez-vous à la
page 11.
Blue Back; On
Vv,
or MENU.Press
Le fond d’écran bleu apparaît en cas
d’absence de signaux ou lorsque le
signal reçu est faible. En cas de
réception continue d’un signal vidéo
faible, le fond d’écran peut se mettre
à scintiller. Si cela se produit,
désactivez ce réglage.
*1Le réglage « Hue » est disponible uniquement lorsque le système NTSC est
sélectionné.
*2« CTR » apparaît uniquement lorsque l’indicateur est au milieu de la barre de
réglage.
13
Page 54

Réglage du volume
La mini-télécommande fournie vous permet de régler le volume du casque et des
appareils raccordés.
ATT
VOL+/–
ATT POWER
VOL
TOP MENU ALBUM
+
MENU
ENTER
ALBUM
–
OFF
AUDIO
MENUINPUT
MODE
LIST
SETUP
DISPLAY
SUBTITLE
Appuyez sur (VOL)(+) ou (VOL)(–) sur la mini-télécommande.
Atténuation rapide du son
Appuyez sur (ATT) sur la mini-télécommande.
ATT On
Pour restaurer le niveau de volume précédent
Appuyez de nouveau sur (ATT).
Raccordement d’écouteurs
Le boîtier de raccordement comporte une prise de sortie (mini prise phono) pour les
casques avec fil. Réglez le volume à l’aide de (VOL)(+) ou (VOL)(–) de la minitélécommande.
Utilisation du casque sans fil
Vous pouvez utiliser un casque sans fil à infrarouges MDR-IF0140 (en option) avec
l’appareil. Reportez-vous au mode d’emploi du MDR-IF0140.
Remarques
• Il est impossible de régler le volume du casque sans fil avec la mini-télécommande
fournie. Utilisez la commande de volume située sur le casque sans fil.
• Pour votre sécurité, n’utilisez pas le casque en conduisant.
• Ne laissez pas le casque dans un endroit soumis à la lumière directe du soleil ou à des
températures excessives.
• En cas d’utilisation du casque sans fil dans un endroit exposé aux rayons directs du soleil,
la sensibilité du récepteur de rayons infrarouges peut diminuer et la qualité sonore peut
en être affectée.
• Si des interférences se produisent lorsque vous utilisez plusieurs casques sans fil, appuyez
sur (IR on/off) sur l’appareil pour désactiver l’émetteur pour les casques sans fil et utilisez
des casques avec fil.
14
Page 55

Raccordements
Schéma d’installation
Demandez à un technicien qualifié d’installer l’appareil en se reportant au schéma
d’installation.
Haut-parleur
arrière gauche
Moniteur
d’appuie-tête
Haut-parleur
avant gauche
Haut-parleur d’aiguës
de gauche
Appareil
principal
Lecteur de DVD portable
Sony DVX-11A, MV-101
Haut-parleur d’aiguës
de droite
Haut-parleur
avant droit
Moniteur
d’appuie-tête
Caisson de graves
Haut-parleur arrière droit
Fixez solidement tous ces éléments
au châssis du véhicule ou ailleurs,
afin d’éviter qu’ils ne bougent
pendant que le véhicule est en
mouvement.
Remarque
Tous les éléments autres que le moniteur
d’appuie-tête et le boîtier de
raccordement sont en option.
Remarques sur les endroits où ne pas
placer la console PS one
N’installez pas la PS one® :
— sur un tableau de bord ou à un endroit
exposé aux rayons directs du soleil ;
— près d’une source de rayonnements
magnétiques, telle que des aimants, des
haut-parleurs, un téléviseur et/ou un
moniteur ;
— sur une surface non stable ou non plane
—à un emplacement soumis à des
vibrations excessives ;
— dans un endroit exposé à la poussière ;
—dans un endroit mal aéré ou trop humide
— dans un endroit soumis à des variations
de températures extrêmes (en dessous
de 5°C ou au-dessus de 35°C).
Reportez-vous au mode d’emploi fourni
avec la console PS one®.
®
;
;
15
Page 56

Schéma de raccordement
Reportez-vous au schéma pour effectuer un raccordement correct.
L’utilisateur peut effectuer lui-même les raccordements de la section A. Consultez
cependant un technicien qualifié pour les autres raccordements.
Moniteur d’appuie-tête
XVM-H65 (Moniteur couleur
à écran LCD 6,5 pouces)
Boîtier de
raccordement
XA-113
(en option)
Moniteur appuie-tête
XVM-H65 (en option)
Câble du moniteur
(5 m) (en option)
Boîtier de raccordement XA-113
Entrée 1 audio
gauche/droite et vidéo
Sortie de 7,5 V CC (max. 2 A)
(pour la PS one
)
®
Avant :
Prise casque
(mini prise stéréo)
Connecteur à 22 broches
Entrée 2 audio
gauche/droite et vidéo
Connecteur du DVD (MV)*
Arrière :
Connecteur
d’alimentation à 4 broches
Sortie du signal à infrarouges
de la télécommande*
2
*1Le connecteur DVD (MV) concerne uniquement le MV-101. Pour plus de détails,
reportez-vous au manuel Installation/Raccordements fourni avec le MV-101.
*2Non applicable au changeur de DVD Sony DVX-100
16
Sorties audio
gauche/droite et vidéo
1
Page 57

Noir
Noir
GND (1 m)
GND (1 m)
Vers une surface
métallique de la
carrosserie
Câble du moniteur
(5 m)
Câble à
broche RCA
(en option)
Boîtier de
raccordement
XA-113
Vers la sortie du
signal à infrarouges
de la télécommande
Jaune
Boîtier de filtres
Rouge
Rayé bleu et blanc
Connecteur
d’alimentation à 4 broches
Secours (5 m)
à fusible de 8 A
ACC (5 m)
à fusible de 1 A
POWER REM (5 m)
Alimentation maximale en
courant : 0,3 A
Précautions relatives à la PS one
• Fixez solidement la PS one® dans un
endroit sûr.
• Pour votre sécurité, n’utilisez pas la
PS one® en conduisant.
• Vérifiez que la tension de
fonctionnement de la PS one® est de
7,5 V. L’utilisation de la PS one® sous
une autre tension peut entraîner un
problème de fonctionnement ou
endommager la PS one®.
Vers la batterie du
véhicule (12 V)
Vers le contact
(position ACC)
Vers un
amplificateur de
puissance
®
Vers la sortie 7,5 V CCVers l’entrée audio gauche/droite et vidéo
Cordon du récepteur
des signaux de la
télécommande (5 m)
(Mini-prise stéréo)
Lecteur de DVD portable Sony DVX-11A
(en option)
Câble à broche
RCA (en option)
Câble AV
(audio/vidéo
intégrés )
(en option)
PS one
(en option)
®
* « PS one » est une marque déposée de Sony Computer Entertainment Inc.
Câble CC à CC
(3 m)
17
Page 58

Informations complémentaires
Entretien
Remplacement du fusible
Lorsque vous remplacez le fusible, veillez à utiliser un fusible dont l’ampérage
correspond à celui indiqué sur le fusible d’origine. Si le fusible fond, vérifiez le
branchement de l’alimentation et remplacez le fusible.
Si le fusible fond de nouveau après avoir été remplacé, cela peut révéler une
défaillance interne de l’appareil. Dans ce cas, consultez le détaillant Sony le plus près
de chez vous.
1
c
2
Avertissement
Ne jamais utiliser de fusible dont l’ampérage dépasse celui du fusible fourni, cela
pourrait endommager l’appareil.
Remplacement de la pile au lithium
En fonctionnement normal, la pile dure environ un an. (La durée de vie de la pile
peut être plus courte selon les conditions d’utilisation.)
Lorsque la pile est faible, la portée de la mini-télécommande diminue. Remplacer la
pile par une nouvelle pile CR2025 au lithium. L’utilisation de tout autre type de pile
peut entraîner un risque d’incendie ou d’explosion.
Côté + vers le haut
c
Remarques sur la pile au lithium
• Tenir la pile au lithium hors de portée des enfants. En cas d’ingestion de la pile,
consulter immédiatement un médecin.
• Essuyer la pile avec un chiffon sec pour assurer un bon contact.
• Veiller à respecter la polarité lors de l’installation de la pile.
• Ne pas tenir les piles avec des pinces métalliques, cela pourrait provoquer un
court circuit.
AVERTISSEMENT
La pile peut exploser en cas d’utilisation inappropriée.
Ne pas recharger la pile, ne pas la démonter et ne pas la jeter au feu.
18
Page 59

A propos de l’écran à cristaux liquides (ACL)
Ne pas appuyer sur l’écran à cristaux liquides car cela risque de déformer l’image ou
provoquer un dysfonctionnement. Il se peut que l’image se trouble ou que l’écran à
cristaux liquides soit endommagé.
Remarques à propos du nettoyage
— Nettoyer l’écran à cristaux liquides avec un chiffon doux humide.
— Ne pas utiliser de solvants tels que la benzine ou des diluants, des nettoyants
ordinaires ni de vaporisateurs antistatiques.
• Ne pas faire fonctionner l’appareil à une température inférieure à 5 °C ou
supérieure à 45 °C.
• Si votre voiture est restée stationnée dans un endroit très chaud ou très froid, il se
peut que l’image affichée ne soit pas claire. Le moniteur n’est pas endommagé.
L’image se rétablit lorsque la température du véhicule revient à la normale.
Des points fixes bleus ou rouges peuvent apparaître sur l’écran du moniteur.
Ces points lumineux peuvent apparaître sur n’importe quel écran à cristaux liquides.
Cet écran est le fruit d’une technologie de pointe et plus de 99,99 % des segments qui
le composent sont sans défaut. Cependant, il se peut que moins de 0,01 % des
segments soient défectueux et qu’ils ne s’allument pas correctement.
19
Page 60

Caractéristiques techniques
Moniteur
Système Affichage à cristaux liquides
couleur
Système d’affichage
LCD TFT à matrice active
Taille de l’image
Écran de 6,5 po de largeur
(16:9)
144 × 77 mm, 163 mm
(l/h, p)
Taille utile 336 960 points
(1440 hor. × 234 vert. )
Alimentation requise
Batterie de voiture
12 V CC (masse négative)
Consommation électrique
Environ 700 mA
Dimensions 164 × 103 × 29 mm
(l/h/p)
Température de fonctionnement
5 °C à 45 °C
Poids Environ 370 g
Boîtier de raccordement XA-113
Sortie AV
Impédance de sortie :
inférieure à 220 Ω
inférieure à 100 pF
Niveau de sortie : 0 dBs ± 0,3 dB
(0,775 V eff.)
(vol. max.)
Vidéo : 75 Ω 1 Vc-c
2 jeux d’entrées AV
Impédance d’entrée :
supérieure à 10 K Ω
inférieure à 1000 pF
Niveau d’entrée : ±1,3 dBs +0/–0,3 dB
(0,775 V eff.)
Vidéo : 75 Ω 1 Vc-c
Sortie CC 7,5 V (max. 2 A)
Dimensions 150 × 42 × 80 mm
(l/h/p)
Poids Environ 250 g
Mini-télécommande RM-X122
Alimentation requise
Portée Environ 2,5 m
Dimensions 52 × 125 × 10 mm
Poids Environ 40 g
Pile au lithium CR2025
(l/h/p)
(piles incluses)
Accessoires fournis
Boîtier de raccordement XA-113 (1)
Mini-télécommande RM-X122
Cordon d’alimentation (1)
Câble CC à CC (3 m) (1)
Câble mini-prise stéréo à prise (5 m) (1)
Câble du moniteur (5 m) (1)
Collier (1)
Mode d’emploi (1)
(avec pile fournie) (1)
Accessoire en option
Lecteur DVD DVX-11A, MV-101
Casque sans fil MDR-IF0140
PS one
®
La conception et les caractéristiques
techniques sont sujettes à modification sans
préavis.
20
Page 61

Dépannage
La liste de contrôle suivante vous aidera à résoudre les problèmes que vous pourriez
rencontrer avec cet appareil.
Avant de passer cette liste en revue, vérifiez les procédures de raccordement et
d’utilisation.
Généralités
Pas d’image
Bonne image, mais aucun son
Lignes pointillées ou rayures
Pas d’image lors du
raccordement d’appareils en
option
Emission de bruits lorsque la
clé de contact est en position
ON, ACC ou OFF
Aucune réponse lorsque vous
appuyez sur les touches de la
mini-télécommande
•Le câble d’alimentation ou la batterie est débranché(e).
•Le fusible est fondu.
Appuyez sur (VOL)(+) ou (ATT) sur la mini-télécommande.
Ces parasites peuvent être causés par des interférences
locales, par exemple un bruit de moteur d’une voiture ou
d’une motocyclette. Réglez les antennes pour réduire le
niveau d’interférences.
Le câble est débranché. Raccordez solidement le câble.
La pile est peut-être usée.
21
Page 62

Trattamento del dispositivo elettrico
od elettronico a fine vita
(applicabile in tutti i paesi
dell’Unione Europea e in altri paesi
europei con sistema di raccolta
differenziata)
Questo simbolo sul prodotto o sulla confezione indica che
il prodotto non deve essere considerato come un normale
rifiuto domestico, ma deve invece essere consegnato ad un
punto di raccolta appropriato per il riciclo di apparecchi
elettrici ed elettronici. Assicurandovi che questo prodotto
sia smaltito correttamente, voi contribuirete a prevenire
potenziali conseguenze negative per l’ambiente e per la
salute che potrebbero altrimenti essere causate dal suo
smaltimento inadeguato. Il riciclaggio dei materiali aiuta a
conservare le risorse naturali. Per informazioni più
dettagliate circa il riciclaggio di questo prodotto, potete
contattare l’ufficio comunale, il servizio locale di
smaltimento rifiuti oppure il negozio dove l’avete
acquistato.
Accessorio utilizzabile: Telecomando
2
Page 63

Indice
Congratulazioni! ................................................................................................................. 4
Precauzioni .......................................................................................................................... 5
Inserimento ed estrazione del monitor ............................................................................ 7
Posizione dei comandi ....................................................................................................... 8
Funzionamento
Selezione della sorgente di ingresso .............................................................................. 10
Impostazione del modo a schermo ................................................................................ 11
Modifica delle impostazioni del display ....................................................................... 12
Regolazione del volume................................................................................................... 14
Collegamenti
Diagramma di installazione ............................................................................................ 15
Diagramma dei collegamenti .......................................................................................... 16
Informazioni aggiuntive
Manutenzione....................................................................................................................18
Caratteristiche tecniche .................................................................................................... 20
Guida alla soluzione dei problemi ................................................................................. 21
3
Page 64

Congratulazioni!
Complimenti per l’acquisto del monitor per poggiatesta Sony.
• Compatibile con i sistemi di colore PAL o NTSC
• Oltre al modo a schermo normale, sono disponibili anche i modi a schermo pieno,
con zoom e con zoom ampio.
• Il pannello a cristalli liquidi a basso riflesso riduce il fenomeno di abbagliamento
prodotto da sorgenti luminose esterne.
• Controllo della luminosità regolabile in base alle condizioni di illuminazione
• Il comando della retroilluminazione consente di ottenere immagini ad elevato
contrasto, prive del fenomeno dei colori invertiti o sfocati.
•2 ingressi Audio/Video e 1 uscita Audio/Video sono forniti per il collegamento di
un lettore video, di una console per videogiochi e di un monitor aggiuntivo.
• Il presente apparecchio viene fornito con uscita da 7,5 V CC per il collegamento di
PS one
• Trasmettitore a infrarossi incorporato per cuffie senza fili (opzionali)
• L’interfaccia MV è fornita per il collegamento ad un solo cavo (trasmissione del
segnale AV al monitor XVM, alimentazione fornita al lettore MV-101 (opzionale)).
• Con l’apparecchio è fornita una presa cuffie per il collegamento di cuffie con filo
(opzionali).
* “PS one” è un marchio di fabbrica registrato di Sony Computer Entertainment Inc.
.
®
4
Page 65

Precauzioni
Per evitare il rischio di incidenti, leggere attentamente le misure precauzionali
riportate di seguito prima di procedere all’installazione e all’uso dell’apparecchio.
Sicurezza
Conformarsi alle regole e alle normative locali sul traffico.
• Durante la guida
- Il conducente non deve guardare né utilizzare il monitor, che potrebbe
distoglierlo dalla guida causando un incidente.
- Il conducente non deve utilizzare le cuffie, che potrebbero distoglierlo dalla guida
causando un incidente.
Se il conducente desidera utilizzare il monitor o le cuffie, parcheggiare l’auto in un
luogo sicuro.
• Dopo l’installazione
- Fare attenzione a non urtare l’apparecchio con la testa quando ci si alza dal sedile
posteriore.
- Fare attenzione a non avvolgere il cavo delle cuffie attorno al collo, onde evitare il
rischio di ferite o soffocamento nel caso di un movimento improvviso del veicolo.
- Tenere gli articoli di piccole dimensioni lontano dalla portata dei bambini.
Informazioni sull’installazione
• L’installazione del presente apparecchio richiede una
competenza tecnica.
Questo apparecchio deve pertanto venire installato da
tecnici o personale di assistenza qualificati.
• Se si desidera installare l’apparecchio personalmente,
farlo in modo corretto, facendo riferimento ai
diagrammi di installazione e dei collegamenti contenuti
nel presente manuale delle istruzioni. Un’installazione
errata potrebbe causare il rischio di incendi o scosse
elettriche.
• Prima dell’installazione, assicurarsi di impostare
l’interruttore di accensione sulla posizione
OFF o di estrarre la chiave. L’installazione del
presente apparecchio con l’accensione attivata
potrebbe causare lo scaricamento della batteria o
un cortocircuito.
• Durante l’installazione dell’apparecchio, fare
attenzione a non danneggiare i tubi, il serbatoio del
carburante o i cavi elettrici, onde evitare il rischio di
incendi. Se si pratica un foro nei pannelli dell’auto,
assicurarsi che le parti non visibili dell’auto non
vengano danneggiate.
• Non utilizzare dadi o bulloni per dispositivi di
sicurezza, quali i sistemi di collegamento dello sterzo,
di alimentazione del carburante o dei freni, onde
evitare di causare un incendio o un incidente.
• Assicurarsi che i fili e i cavi non si aggroviglino o
rimangano incastrati nella sezione mobile della
guida del sedile.
continua alla pagina successiva t
5
Page 66

Dove effettuare l’installazione
Prima di procedere all’installazione dell’apparecchio, verificare le regole e le
normative locali sul traffico.
Non installare l’apparecchio nelle seguenti posizioni:
- In posizioni che ostacolano la visuale del conducente.
- In posizioni che ostacolano il funzionamento del sistema
airbag.
- In posizioni che ostacolano il funzionamento del veicolo,
in particolar modo il volante, la leva del cambio o il
pedale del freno.
- In posizioni che possono causare il ferimento del
conducente o dei passeggeri al momento di salire o
scendere dall’auto.
In caso di domande o problemi riguardanti l’apparecchio non trattati nel presente
manuale, consultare il rivenditore Sony più vicino.
Prima dell’installazione
Assicurarsi che l’interruttore POWER SELECT sia impostato
sulla posizione corretta.
A
*
: se l’auto dispone di una posizione accessoria sulla chiave di
accensione.
B : se l’auto è priva della posizione accessoria sulla chiave di
accensione.
* A corrisponde alla posizione preimpostata in fabbrica.
Se l’interruttore POWER SELECT è impostato su B
Premere (POWER) sul monitor per attivare
l’alimentazione.
Il monitor non si accende premendo (POWER) sul
telecomando a scheda.
Nota
Prima di scendere dall’auto, assicurarsi di spegnere il
monitor.
Per spegnere il monitor, eseguire le operazioni riportate di seguito:
– Premere (POWER) sul monitor.
– Premere (POWER) sul telecomando a scheda.
Se l’alimentazione rimane attivata, la batteria si scarica.
Interruttore
POWER SELECT
A
B
6
Page 67

Inserimento ed estrazione del monitor
Estrazione del monitor dalla custodia
Nota
Prestare attenzione a non estrarre eccessivamente il cavo durante la rimozione del monitor
dalla custodia.
1 Inserire un oggetto di plastica simile a una scheda tra la custodia e la parte
superiore del monitor.
I fermi vengono sbloccati ed è quindi possibile estrarre il monitor dalla custodia.
Oggetto in plastica
simile a una scheda
Fermi
2 Premendo 1, estrarre il cavo situato nella parte posteriore del monitor.
1
Cavo del monitor
Inserimento del monitor nella custodia
Inserire il monitor nella custodia in modo saldo fino ad udire uno scatto.
7
Page 68

Posizione dei comandi
Monitor
1 Sensore del telecomando a
scheda/Trasmettitore per cuffie
senza fili
2 Tasto IR ON/OFF*
Premere per attivare o disattivare il
trasmettitore per le cuffie senza fili.
* Se si verificano interferenze durante l’uso di più cuffie senza fili
Se più monitor sono installati e utilizzati contemporaneamente, potrebbero verificarsi
delle interferenze. In tal caso, premere (IR on/off) sull’apparecchio per disattivare il
trasmettitore per le cuffie senza fili e utilizzare cuffie con fili.
8
3 Tasto POWER
4 Connettore del cavo del monitor
5 Interruttore POWER SELECT
Per ulteriori informazioni, vedere a
pagina 6.
Page 69

Telecomando a scheda RM-X122
ATT POWER
MENUINPUT
VOL
TOP MENU ALBUM
MENU
ALBUM
MODE
LIST
+
SETUP
ENTER
DISPLAY
–
OFF
SUBTITLE
AUDIO
Per utilizzare il monitor:
1 Tasto ATT
Premere questo tasto per ridurre
rapidamente il volume.
2 Tasti VOL (volume) +/–
Premere questi tasti per regolare il
volume.
3 Tasto INPUT
Premere questo tasto per selezionare
la sorgente di ingresso.
4 Tasto POWER
5 Tasto MENU
Premere questo tasto per regolare le
varie impostazioni del display.
6 Tasto MODE
Premere questo tasto per modificare
il modo a schermo.
7 Tasti V/v
Premere per selezionare la voce
desiderata.
ATT POWER
MENUINPUT
VOL
TOP MENU ALBUM
MENU
ALBUM
MODE
LIST
+
SETUP
ENTER
DISPLAY
–
OFF
SUBTITLE
AUDIO
Per utilizzare il DVD:
Se al presente apparecchio è collegato
un lettore DVD portatile Sony, è
possibile utilizzare le funzioni di base
mediante il telecomando a scheda.
8 Tasti V/v (ALBUM +/–)
9 Tasto TOP MENU
0 Tasto MENU
qa Tasto O
qs Tasti ./>
qd Tasti m/M ( )
qf Tasti B/b
qg Tasto LIST
qh Tasto SET UP
qj Tasto ENTER
qk Tasto DISPLAY
ql Tasto u
w; Tasto OFF
wa Tasto SUBTITLE
ws Tasto AUDIO
• Per ulteriori informazioni sulle varie
funzioni, consultare le istruzioni per l’uso
in dotazione con il lettore DVD.
• Mediante il presente telecomando a
scheda, non è possibile controllare il
cambia DVD Sony DVX-100.
Suggerimento
Per ulteriori informazioni sulle modalità di sostituzione delle batterie, fare riferimento alla
sezione “Sostituzione della batteria al litio” (pagina 18).
9
Page 70

Funzionamento
Selezione della sorgente di ingresso
È possibile selezionare la sorgente di ingresso e il sistema di colore.
ATT POWER
MENUINPUT
POWER
INPUT
VOL
TOP MENU ALBUM
MENU
ALBUM
MODE
+
LIST
SETUP
ENTER
DISPLAY
–
OFF
SUBTITLE
AUDIO
1 Premere (POWER).
L’alimentazione viene attivata.
Suggerimento
Se l’auto è priva di posizione ACC (accessoria) sulla chiave di accensione e l’interruttore
POWER SELECT è impostato sulla posizione B, non è possibile accendere il monitor
premendo (POWER) sul telecomando a scheda (pagina 6).
2 Premere (INPUT) per selezionare la sorgente di ingresso desiderata.
Ad ogni pressione di (INPUT), l’indicazione cambia in sequenza come descritto di
seguito:
B VIDEO 1 B VIDEO 2 B VIDEO 3*
* Per selezionare il lettore DVD Sony MV-101 collegato
Premere più volte (INPUT) per selezionare “VIDEO 3”.
POWER
3 Premere V o v per selezionare il sistema di colore PAL o NTSC.
Premere uno dei tasti durante la visualizzazione dell’indicazione della sorgente
(ad esempio “VIDEO 1”).
Se viene selezionato NTSC Video Se viene selezionato PAL Video
VIDEO1
NTSC
VIDEO1
PAL
10
Page 71

Impostazione del modo a schermo
Oltre al modo normale, sono disponibili i modi a schermo pieno, con zoom e con
zoom ampio.
ATT POWER
MENUINPUT
VOL
TOP MENU ALBUM
MENU
ALBUM
Premere più volte (MODE).
Sullo schermo viene visualizzato prima il modo corrente.
Ad ogni pressione del tasto, il modo a schermo cambia come segue:
MODE
+
LIST
SETUP
ENTER
DISPLAY
–
OFF
SUBTITLE
AUDIO
MODE
NormalNormal
Normal (schermo normale
(regolare))
Immagine con rapporto di formato
4:3 (immagine regolare).
WideWide
Widezoom (zoom ampio)
Immagine con rapporto di formato
4:3 ingrandita solo in
corrispondenza dei lati sinistro e
destro per adattarla allo schermo.
FullFull
Full (schermo pieno)
Immagine con rapporto di
formato 4:3 ingrandita in
corrispondenza delle estremità
sinistra e destra dello schermo.
ZoomZoom
Zoom (ingrandimento)
Immagine con rapporto di formato
4:3 ingrandita in corrispondenza
delle estremità sinistra e destra
dello schermo con le parti in
eccesso (superiore e inferiore)
tagliate per adattarla allo schermo.
Il modo a schermo viene impostato dopo 5 secondi senza premere (MODE).
Suggerimento
Nel modo con zoom, le immagini potrebbero apparire a grana grossa.
11
Page 72

Modifica delle impostazioni del display
È possibile regolare manualmente le impostazioni del display se quest’ultimo non è
ben visibile dalla posizione in cui si è seduti.
ATT POWER
VOL
TOP MENU ALBUM
MENU
1 Premere (MENU).
Viene visualizzata la schermata “Picture”.
ALBUM
+
–
ENTER
OFF
AUDIO
MENUINPUT
MODE
SETUP
DISPLAY
SUBTITLE
MENU
LIST
Picture 32
or MENU.Press
Vv,
della voce selezionata viene
visualizzato in questa area.
Ad ogni pressione di (MENU), la schermata di impostazione cambia come segue:
Il valore di impostazione
Picture
B
(immagine)
Brightness
BB
(luminosità)
Menu Off
(menu disattivato)
B
Blue Back
(sfondo blu)
Color
(colore)
b
Hue*
(tinta)
Mode
(modo)
* Visualizzato solo se è stato selezionato il sistema di colore NTSC.
Dimmer
B
(attenuatore)
Video Adjust
(regolazione video)
2 Premere V o v per regolare l’impostazione desiderata.
Se viene selezionato “Picture” Se viene selezionato “Brightness”
Picture 32
Vv,
Premere v
per ridurre il
contrasto
n
or MENU.Press
Premere V
per
aumentare
il contrasto
Brightness 32
Vv,
Premere v
per rendere
più scura
l’immagine
n
or MENU.Press
Premere V per
rendere più
luminosa
l’immagine
bbb
12
Page 73

Se viene selezionato “Color“
Se viene selezionato “Hue“*
1
Color
Premere v
per diminuire
l’intensità del
colore
Vv,
n
32
or MENU.Press
Premere V
per aumentare
l’intensità del
colore
Se viene selezionato “Dimmer”
Dimmer; On
Vv,
or MENU.Press
Se questa funzione è attivata, la
luminosità dello schermo viene
regolata automaticamente.
Se viene selezionato “Mode”
Mode; Zoom
Vv,
or MENU.Press
Hue
Premere v
per
diminuire la
saturazione
Vv,
n
CTR
or MENU.Press
Premere V
per
aumentare la
saturazione
2
*
Se è stato selezionato “Video Adjust“
Video Adjust;
Vv,
Reset
or MENU.Press
Le impostazioni di “Picture”,
“Brightness”, “Color”, “Hue” e
“Dimmer” vengono riportate ai valori
preimpostati in fabbrica.
Se viene selezionato “Blue Back”
Blue Back; On
Vv,
or MENU.Press
È possibile impostare il modo dello
schermo tra “Normal,” “Full”,
“Zoom” o “Widezoom”. Per ulteriori
informazioni, vedere a pagina 11.
La schermata di sfondo blu viene
visualizzata nel caso in cui venga
ricevuto un segnale debole o non
venga ricevuto alcun segnale. Se
viene ricevuto un segnale video
debole in modo continuo, è possibile
che lo sfondo blu appaia disturbato.
In questo caso, disattivare
l’impostazione.
*1“Hue” è regolabile solo se è selezionato il sistema di colore NTSC.
*2“CTR” viene visualizzato solo se si trova al centro della barra.
13
Page 74

Regolazione del volume
È possibile regolare il volume delle cuffie con fili e dell’apparecchio collegato
mediante il telecomando a scheda in dotazione.
ATT
VOL+/–
ATT POWER
VOL
TOP MENU ALBUM
+
MENU
ENTER
ALBUM
–
OFF
AUDIO
MENUINPUT
MODE
LIST
SETUP
DISPLAY
SUBTITLE
Premere (VOL)(+) o (VOL)(–) sul telecomando a scheda.
Attenuazione rapida dell’audio
Premere di nuovo (ATT) sul telecomando a scheda.
ATT On
Per ripristinare il livello di volume precedente
Premere di nuovo (ATT).
Collegamento delle cuffie
L’apparecchio è dotato di una presa di uscita (minispina fono) per il collegamento di
cuffie con fili sulla scatola di connessione. Regolare il volume utilizzando (VOL)(+) o
(VOL)(–) sul telecomando a scheda.
Uso delle cuffie senza fili
Con il presente apparecchio, è possibile utilizzare cuffie senza fili a raggi infrarossi,
MDR-IF0140 (opzionali). Per ulteriori informazioni sul modello MDR-IF0140,
consultare le relative istruzioni per l’uso.
Note
• Per la regolazione del volume delle cuffie senza fili, non è possibile utilizzare il
telecomando a scheda in dotazione. Utilizzare il comando del volume presente sulle
cuffie senza fili.
• Per motivi di sicurezza, non utilizzare le cuffie durante la guida.
• Non lasciare le cuffie in luoghi soggetti alla luce diretta del sole o a temperature elevate.
• Se le cuffie senza fili vengono utilizzate il luoghi esposti alla luce solare diretta, è
possibile che la sensibilità del sensore a raggi infrarossi risulti ridotta, peggiorando la
qualità audio.
• Se si verificano interferenze durante l’uso di più cuffie senza fili, premere (IR on/off)
sull’apparecchio per disattivare il trasmettitore per le cuffie senza fili e utilizzare cuffie
con fili.
14
Page 75

Collegamenti
Diagramma di installazione
Per l’installazione del presente apparecchio, fare riferimento al diagramma di
installazione e consultare un tecnico qualificato.
Diffusore anteriore sinistro
Monitor per poggiatesta
Diffusore
posteriore
sinistro
Subwoofer
Diffusore
posteriore destro
Accertarsi di fissare saldamente tutti
gli apparecchi al telaio dell’auto e così
via, onde evitarne lo spostamento
mentre l’auto è in movimento.
Nota
Tutti gli apparecchi, ad eccezione del
monitor per poggiatesta e della scatola di
connessione, sono opzionali.
Tweeter sinistro
Unità principale
Tweeter destro
Diffusore
anteriore destro
Monitor per
poggiatesta
Lettore DVD portatile
Sony DVX-11A, MV-101
Note relative alla collocazione di PS one
Non posizionare PS one® nei seguenti
luoghi:
— sul cruscotto o in un luogo soggetto a
luce solare diretta.
— in prossimità di sorgenti magnetiche,
quali magneti, diffusori e televisori/
monitor.
— su superfici instabili o irregolari.
— in luoghi soggetti a vibrazioni eccessive.
— in luoghi soggetti a polvere o sporcizia
eccessive.
— in luoghi scarsamente ventilati o umidi.
— in luoghi soggetti a temperature
estreme (inferiori a 5 ˚C o superiori a
35 ˚C).
Consultare le istruzioni per l’uso in
dotazione con PS one®.
®
15
Page 76

Diagramma dei collegamenti
Per eseguire correttamente i collegamenti, fare riferimento al relativo diagramma.
È possibile effettuare i collegamenti come mostrato nella figura A. Per gli altri
collegamenti, consultare un tecnico qualificato.
Monitor per poggiatesta
XVM-H65 (monitor LCD ampio a
colori da 6,5")
Scatola di
connessione
XA-113
(opzionale)
Monitor per
poggiatesta XVM-H65
(opzionale)
Cavo del monitor (5 m)
(opzionale)
Scatola di connessione XA-113
Ingresso video 1/audio
L (sinistro)/R (destro)
Uscita CC da 7,5 V
(massimo 2 A) (per PS one
)
®
Parte
anteriore:
Presa cuffie
(mini stereo)
Connettore a 22 piedini
Ingresso video 2/audio
L (sinistro)/R (destro)
Connettore DVD (MV)*
1
Parte
posteriore:
Connettore di
alimentazione a 4 piedini
Uscita segnale
remoto (IR)*
*1Il connettore DVD (MV) può essere utilizzato solo con il lettore MV-101. Per ulteriori informazioni,
consultare il manuale per l’installazione e i collegamenti in dotazione con l’MV-101.
*2Non applicabile al cambia DVD Sony DVX-100
16
Uscite audio L (sinistra)/
2
R (destra)/video
Page 77

Cavo del monitor (5 m)
Cavo a piedini RCA
(opzionale)
Nero
Nero
Giallo
Fusibile da 8 A
Scatola del filtro
Rosso
Fusibile da 1 A
Rigato bianco/blu
Alimentazione massima fornita 0,3 A
Connettore di alimentazione a 4 piedini
GND (1 m)
GND (1 m)
Cavo della
batteria di
riserva (5 m)
ACC (5 m)
POWER REM (5 m)
ad una superficie
metallica del telaio
dell’auto
alla batteria
dell’auto (12 V)
all’accensione
(posizione ACC)
ad un amplificatore
di potenza
Scatola di
connessione
XA-113
all’uscita del
segnale remoto (IR)
Cavo ricevitore del
segnale del
telecomando (5 m)
(Minipresa stereo)
Precauzioni relative a PS one
• Assicurarsi di fissare correttamente
PS one® su una superficie stabile.
• Per motivi di sicurezza, non utilizzare PS
one® durante la guida.
• Assicurarsi che la tensione operativa di
PS one® sia pari a 7,5 V. Diversamente, è
possibile che si verifichino problemi di
funzionamento o danni a PS one®.
all’ingresso video/audio L (sinistro)/R (destro)
Cavo a piedini
RCA (opzionale)
Cavo AV
(audio/video
integrato)
(opzionale)
®
all’uscita CC da 7,5 V
Cavo da CC
a CC (3 m)
Lettore DVD portatile Sony DVX-11A (opzionale)
PS one
(opzionale)
®
* “PS one” è un marchio di fabbrica registrato di Sony Computer Entertainment Inc.
17
Page 78

Informazioni aggiuntive
Manutenzione
Sostituzione dei fusibili
Per la sostituzione del fusibile, assicurarsi di utilizzarne uno che abbia lo stesso
amperaggio di quello originale. Se il fusibile si brucia, controllare i collegamenti
dell’alimentazione, quindi sostituirlo. Se in seguito alla sostituzione il fusibile si
brucia di nuovo, è possibile che si tratti di un problema di funzionamento interno. In
tal caso, consultare un rivenditore Sony.
1
c
2
Attenzione
Onde evitare di danneggiare l’apparecchio, non utilizzare in nessun caso un fusibile
con amperaggio superiore a quello del fusibile in dotazione.
Sostituzione della batteria al litio
In condizioni normali, le batterie hanno una durata di circa 1 anno. In base alle
condizioni d’uso, la durata effettiva potrebbe tuttavia essere inferiore.
Se la batteria si scarica, il raggio d’azione del telecomando a scheda diminuisce. In tal
caso, sostituire la batteria con una batteria al litio CR2025 nuova. L’uso di altri tipi di
batteria potrebbe comportare il rischio di incendi o esplosioni.
Con il simbolo + verso l’alto
c
Note sulla batteria al litio
• Tenere la batteria al litio fuori dalla portata dei bambini. In caso di ingestione,
consultare immediatamente un medico.
• Pulire la batteria utilizzando un panno asciutto in modo da assicurare un contatto
ottimale.
• Per l’inserimento della batteria, assicurarsi di osservare la polarità corretta.
• Non afferrare la batteria con pinze metalliche, onde evitare che si verifichino
cortocircuiti.
ATTENZIONE
Se non viene maneggiata con cura, è possibile che la batteria esploda.
18
Non ricaricare, disassemblare, né gettare nel fuoco.
Page 79

Informazioni sul pannello LCD (display a cristalli liquidi)
Non esercitare pressione sul pannello LCD dell’apparecchio, altrimenti è possibile che
le immagini risultino distorte o che si verifichino problemi di funzionamento. Inoltre,
le immagini potrebbero perdere nitidezza oppure il pannello LCD danneggiarsi.
Note sulla pulizia
— Pulire il pannello LCD con un panno morbido leggermente umido.
— Non utilizzare solventi quali benzene, diluenti, detergenti disponibili in
commercio o spray antistatici.
• Non utilizzare l’apparecchio a temperature inferiori a 5 °C o superiori a 45 °C.
• Se l’auto è stata parcheggiata in un luogo freddo o caldo, è possibile che le
immagini non vengano visualizzate chiaramente. Non si tratta di un problema di
funzionamento, una volta che la temperatura all’interno dell’auto sarà tornata
normale, le immagini verranno visualizzate in modo chiaro.
È possibile che sul monitor appaiano dei piccoli punti blu o rossi.
Si tratta di piccoli punti luminosi che possono presentarsi con qualsiasi monitor LCD.
Il pannello LCD è estremamente sofisticato e sebbene oltre il 99,99 % degli elementi
in esso utilizzati sia privo di difetti, è possibile che meno dello 0,01 % dei suddetti
elementi sia difettoso e quindi non si illumini adeguatamente.
19
Page 80

Caratteristiche tecniche
Monitor
Sistema Display a colori a cristalli
liquidi
Sistema pilota Sistema a matrice attiva
TFT-LCD
Dimensioni dell’immagine
Schermo ampio da 6,5 pollici
(16:9)
144 × 77 mm, 163 mm (l/a, p)
Elementi dell’immagine
336.960 (l 1440 a 234) punti
Requisiti di alimentazione
Batteria per auto CC da 12 V
(messa a terra negativa)
Flusso corrente Circa 700 mA
Dimensioni 164 × 103 × 29 mm
(l/a/p)
Temperatura di utilizzo
da 5 °C a 45 °C
Peso Circa 370 g
Scatola di connessione XA-113
Uscita A/V
Impedenza di uscita:
inferiore a 220 Ω
inferiore a 100 pF
Livello di uscita: 0 dBs ±0,3 dB
(0,775 V rms)
(Vol Max)
Video: 75 Ω 1 Vp-p
Ingresso A/V ×2
Impedenza di ingresso:
superiore a 10 K Ω
inferiore a 1000 pF
Livello di ingresso: ±1,3 dBs +0/–0,3 dB
(0,775 V rms)
Video: 75 Ω 1 Vp-p
Uscita CC 7,5 V (max 2 A)
Dimensioni 150 × 42 × 80 mm
(l/a/p)
Peso Circa 250 g
Telecomando a scheda RM-X122
Requisiti di alimentazione
Raggio d’azione
Dimensioni 52 × 125 × 10 mm
Peso Circa 40 g
Batteria al litio CR2025
Circa 2,5 m
(l/a/p)
(batteria inclusa)
Accessori in dotazione
Scatola di connessione XA-113 (1)
Telecomando a scheda RM-X122
Cavo di alimentazione (1)
Cavo da CC a CC (3 m) (1)
Cavo da minipresa a minipresa stereo (5 m) (1)
Cavo del monitor (5 m) (1)
Cornice (1)
Istruzioni per l’uso (1)
(con batteria in dotazione) (1)
Accessori opzionali
Lettore DVD DVX-11A, MV-101
Cuffie senza fili MDR-IF0140
PS one
®
Il design e le caratteristiche tecniche sono
soggetti a modifiche senza preavviso.
20
Page 81

Guida alla soluzione dei problemi
In caso di problemi con l’apparecchio, consultare la presente lista di controllo per
tentare di risolverli.
Prima di consultare la seguente lista di controllo, controllare le procedure di
collegamento e uso.
Generali
Assenza di immagini
Presenza di immagini, assenza
di audio
Presenza di linee tratteggiate
o di righe
Assenza di immagini al
momento del collegamento di
apparecchi opzionali
Presenza di disturbi quando la
chiavetta di accensione si
trova sulle posizioni ON, ACC
o OFF.
Nessuna azione alla pressione
dei tasti del telecomando a
scheda
•Il cavo di alimentazione o la batteria non sono collegati.
•Il fusibile è bruciato.
Premere (VOL)(+) o (ATT) sul telecomando a scheda.
È possibile che questo disturbo sia causato da interferenze
locali prodotte ad esempio da motociclette o motori di auto.
Posizionare le antenne in modo da ridurre al minimo le
interferenze.
Il cavo non è collegato. Collegarlo saldamente.
È possibile che la batteria sia completamente scarica.
21
Page 82

Verwijdering van oude elektrische
en elektronische apparaten
(Toepasbaar in de Europese Unie en
andere Europese landen met
gescheiden ophaalsystemen)
verpakking wijst erop dat dit product niet als
huishoudelijk afval mag worden behandeld. Het moet
echter naar een plaats worden gebracht waar elektrische
en elektronische apparatuur wordt gerecycled. Als u
ervoor zorgt dat dit product op de correcte manier wordt
verwijderd, voorkomt u voor mens en milieu negatieve
gevolgen die zich zouden kunnen voordoen in geval van
verkeerde afvalbehandeling. De recycling van materialen
draagt bij tot het vrijwaren van natuurlijke bronnen. Voor
meer details in verband met het recyclen van dit product,
neemt u contact op met de gemeentelijke instanties, het
bedrijf of de dienst belast met de verwijdering van
huishoudafval of de winkel waar u het product hebt
gekocht.
Accessoire waarop dit van toepassing is:
Afstandsbediening
Het symbool op het product of op de
2
Page 83

Inhoud
Welkom................................................................................................................................. 4
Voorzorgsmaatregelen ....................................................................................................... 5
De monitor bevestigen en losmaken ................................................................................ 7
Bedieningselementen ......................................................................................................... 8
Bediening
De invoerbron selecteren ................................................................................................. 10
De schermmodus instellen .............................................................................................. 11
De weergaveopties wijzigen ........................................................................................... 12
Het volume regelen .......................................................................................................... 14
Verbindingen
Installatiediagram ............................................................................................................. 15
Verbindingsdiagram ......................................................................................................... 16
Aanvullende informatie
Onderhoud......................................................................................................................... 18
Technische gegevens ........................................................................................................ 20
Ve rhelpen van storingen .................................................................................................. 21
3
Page 84

Welkom
Dank u voor de aankoop van deze Sony hoofdsteunmonitor.
• Geschikt voor het PAL- en NTSC-kleursysteem.
• Naast de normale schermmodus zijn weergave op volledig scherm, een
zoomscherm en een breedbeeldzoomscherm beschikbaar.
• Door het reflectiearme LCD-scherm hebt u nauwelijks last van lichtschittering van
buitenaf.
• Helderheid kan worden aangepast aan de lichtomstandigheden.
• Regelaar voor tegenlicht (dimmer) zorgt voor scherpe contrastbeelden, vrij van
tegengestelde of wazige kleuren.
•2 audio-/video-ingangen en 1 audio-/video-uitgang om een videorecorder, een
videospelconsole en een extra monitor aan te sluiten.
• Er is een 7,5 V DC uitgang beschikbaar om PS one
• Ingebouwde infraroodzender voor draadloze hoofdtelefoons (los verkrijgbaar)
• De MV-interface wordt geleverd voor aansluiting met één kabel (AV-signaal naar
XVM, levert stroom aan MV-101 (optioneel)).
• Een hoofdtelefoonaansluiting voor het aansluiten van hoofdtelefoons met een snoer
(los verkrijgbaar).
* "PS one" is een gedeponeerd handelsmerk van Sony Computer Entertainment Inc.
aan te sluiten.
®
4
Page 85

Voorzorgsmaatregelen
Lees voordat u het apparaat installeert en ingebruikneemt de volgende
voorzorgsmaatregelen om ernstige verwondingen of ongelukken te voorkomen.
Veiligheid
Handel altijd in overeenstemming met de geldende verkeersregels.
• Tijdens het rijden
- De bestuurder mag niet op de monitor kijken of deze bedienen. Dit kan de
bestuurder afleiden en ongelukken veroorzaken.
- De bestuurder mag de hoofdtelefoon niet gebruiken. Dit kan de bestuurder
afleiden en ongelukken veroorzaken.
Parkeer de auto op een veilige plek als u de monitor of de hoofdtelefoon wilt
gebruiken.
• Na de installatie
-Zorg dat u uw hoofd niet tegen het apparaat stoot als u opstaat van de achterbank.
- Let er vooral op dat u het snoer van de hoofdtelefoon niet om uw nek draait om
verwonding of verstikking te voorkomen als het voertuig een onverwachte
beweging maakt.
- Houd kleine onderdelen buiten het bereik van kinderen.
Bij het installeren
• Installatie van dit apparaat vereist technische kennis.
Dit apparaat moet worden geïnstalleerd door
bevoegd onderhoudspersoneel.
• Wilt u het apparaat zelf installeren, doe dit dan
zorgvuldig op basis van de installatie- en
bedradingsdiagrammen in deze
gebruikershandleiding. Onjuiste installatie kan
leiden tot brand of een elektrische schok.
• Zet het contactslot voor installatie in de positie
OFF of haal de sleutel eruit. Als u dit apparaat
installeert terwijl het contact aan staat, kan de
accu opraken of kan er kortsluiting ontstaan.
• Beschadig geen leidingen, slangen, de brandstoftank of
elektrische bedrading bij het installeren van dit
apparaat. Dit kan brand veroorzaken. Als u een gat in
autopanelen boort, moet u zorgen dat verborgen autoonderdelen niet worden beschadigd.
• Gebruik geen moeren of bouten voor
veiligheidsapparaten, zoals stuurkoppeling,
brandstoftoevoer of remsystemen. Dit kan brand of een
ongeluk veroorzaken.
• Voorkom dat de kabels en draden verward of beklemd
raken tussen het bewegende gedeelte van een
stoelleuning.
vervolg op volgende pagina t
5
Page 86

Locatie voor installatie
Voordat u dit apparaat installeert, moet u de geldende verkeersregels controleren.
U moet het apparaat niet installeren op een locatie waar:
- het apparaat het zicht van de bestuurder belemmert;
- het apparaat de werking van het airbagsysteem belemmert;
- het apparaat de werking van het voertuig belemmert,
vooral het stuur, de versnellingspook of het rempedaal;
- een bestuurder of de passagiers zich kunnen verwonden
wanneer ze in of uit de auto stappen.
Met vragen of problemen met betrekking tot dit toestel die niet aan bod komen
in deze gebruiksaanwijzing, kunt u terecht bij de dichtstbijzijnde Sony dealer.
Voordat u gaat installeren
Controleer of de schakelaar POWER SELECT zich in de juiste
positie bevindt.
A
*
: als de contactsleutel van de auto een stand voor accessoires
heeft.
B : als de contactsleutel van de auto geen stand voor accessoires
heeft.
* Positie A is de fabrieksinstelling.
Als de schakelaar POWER SELECT is ingesteld op B
Druk op (POWER) op de monitor om deze in te schakelen.
De monitor wordt niet ingeschakeld als u op (POWER)
drukt op de kaartafstandsbediening.
POWER SELECT
schakelaar
A
B
Opmerking
Schakel de monitor uit als u in de auto hebt gereden.
Voer de volgende procedure uit om de monitor uit te schakelen:
– Druk op (POWER) op de monitor.
– Druk op (POWER) op de kaartafstandsbediening.
Als u de monitor niet uitschakelt, raakt de accu uitgeput.
6
Page 87

De monitor bevestigen en losmaken
De monitor losmaken van de behuizing
Opmerking
Zorg dat u niet te hard aan de kabel trekt als u de monitor losmaakt van de behuizing.
1 Plaats een plastic kaart tussen de behuizing en de bovenkant van de monitor.
De grepen worden ontgrendeld en u kunt de monitor losmaken van de behuizing.
Grepen
Plastic kaart
2 Houd 1 ingedrukt en trek de monitorkabel uit de achterkant van de
monitor.
1
Monitorkabel
De monitor bevestigen aan de behuizing
Druk de monitor stevig in de behuizing tot u een klik hoort.
7
Page 88

Bedieningselementen
Monitor
1 Ontvanger voor de
kaartafstandsbediening/Zender
voor de draadloze hoofdtelefoons
2 IR ON/OFF toets*
Druk hierop om de zender voor de
draadloze hoofdtelefoons in of uit te
schakelen.
* Als er storing optreedt, terwijl er meerdere draadloze hoofdtelefoons worden gebruikt
Als er meerdere monitors zijn geïnstalleerd die tegelijkertijd worden gebruikt, kan er
storing optreden. In dat geval drukt u op (IR on/off) op het apparaat om de zender voor
de draadloze hoofdtelefoons uit te schakelen en gebruikt u hoofdtelefoons met een
snoer.
3 POWER toets
4 Aansluiting voor monitorkabel
5 POWER SELECT schakelaar
Zie pagina 6 voor meer informatie.
8
Page 89

Kaartafstandsbediening RM-X122
ATT POWER
MENUINPUT
VOL
TOP MENU ALBUM
MENU
ALBUM
MODE
LIST
+
SETUP
ENTER
DISPLAY
–
OFF
SUBTITLE
AUDIO
Voor de bediening van de
monitor:
1 ATT toets
Druk hierop om het volume snel te
dempen.
2 VOL (volume) +/– toetsen
Druk hierop om het volume te
wijzigen.
3 INPUT toets
Druk hierop om de invoerbron te
selecteren.
4 POWER toets
5 MENU toets
Druk hierop om verschillende
weergave-instellingen te wijzigen.
6 MODE toets
Druk hierop om de schermmodus te
wijzigen.
7 V/v toetsen
Druk op deze toetsen om het
gewenste item te selecteren.
ATT POWER
MENUINPUT
VOL
TOP MENU ALBUM
MENU
ALBUM
MODE
LIST
+
SETUP
ENTER
DISPLAY
–
OFF
SUBTITLE
AUDIO
Voor de bediening van de DVDspeler:
Als een draagbare Sony DVD-speler
wordt aangesloten op dit apparaat, kunt
u de basisfuncties bedienen met de
kaartafstandsbediening.
8 V/v (ALBUM +/–) toetsen
9 TOP MENU toets
0 MENU toets
qa O toets
qs ./> toetsen
qd m/M (
) toetsen
qf B/b toetsen
qg LIST toets
qh SET UP toets
qj ENTER toets
qk DISPLAY toets
ql u toets
w; OFF toets
wa SUBTITLE toets
ws AUDIO toets
• Raadpleeg de gebruiksaanwijzing bij de
DVD-speler voor meer informatie over de
functies.
• Sony DVD-wisselaar DVX-100 kan niet
met deze kaartafstandsbediening
Tip
worden bediend.
Zie "De lithiumbatterij vervangen" voor meer informatie over het vervangen van de
batterijen (pagina 18).
9
Page 90

Bediening
De invoerbron selecteren
U kunt de invoerbron en het kleursysteem selecteren.
POWER
INPUT
ATT POWER
VOL
TOP MENU ALBUM
+
MENU
ENTER
ALBUM
–
OFF
AUDIO
MENUINPUT
MODE
SETUP
DISPLAY
SUBTITLE
POWER
LIST
1 Druk op (POWER).
Het apparaat wordt ingeschakeld.
Tip
Als het contactslot van de auto geen ACC-positie (accessoire) heeft en de POWER
SELECT schakelaar op B is gezet, wordt de monitor niet ingeschakeld als u op (POWER)
drukt op de kaartafstandsbediening (pagina 6).
2 Druk op (INPUT) om de gewenste invoerbron te selecteren.
Wanneer u op (INPUT) drukt, wordt de aanduiding als volgt gewijzigd:
B VIDEO 1 B VIDEO 2 B VIDEO 3*
* De aangesloten Sony DVD-speler MV-101 selecteren
Druk herhaaldelijk op (INPUT) om "VIDEO 3" te selecteren.
3 Druk op V of v om het kleursysteem PAL of NTSC te selecteren.
Druk op een van deze toetsen terwijl de bronaanduiding, zoals "VIDEO 1", wordt
weergegeven.
Als NTSC Video is geselecteerd Als PAL Video is geselecteerd
VIDEO1
NTSC
VIDEO1
PAL
10
Page 91

De schermmodus instellen
Naast de normale modus hebt u de beschikking over weergave op volledig scherm,
een zoomscherm en een breedbeeldzoomscherm.
ATT
VOL
TOP MENU ALBUM
MENU
ALBUM
INPUT
POWER
MENU
MODE
+
LIST
SETUP
ENTER
DISPLAY
–
OFF
SUBTITLE
AUDIO
MODE
Druk herhaaldelijk op (MODE).
De huidige modus wordt eerst weergegeven op het scherm.
Wanneer u op de toets drukt, worden de schermmodi als volgt weergegeven:
NormalNormal
Normal (Normaal (standaard))
Een beeld met de breedte/
hoogte-verhouding 4:3
(gewoon beeld).
FullFull
Full (Volledig scherm)
Een beeld met de breedte/
hoogte-verhouding 4:3 vergroot
naar de linker- en rechterzijden
van het scherm.
WideWide
Widezoom
(Breedbeeldzoomscherm)
Een beeld met de breedte-/
hoogteverhouding 4:3 waarbij
alleen de linker- en rechterzijden
van het beeld worden vergroot
om het scherm te vullen.
ZoomZoom
Zoom (Zoomscherm)
Een beeld met de breedte/hoogteverhouding 4:3 vergroot naar de
linker- en rechterzijden van het
scherm, waarbij de overlopende
delen (boven en onder) worden
afgesneden om het scherm te
vullen.
De schermmodus wordt ingesteld na vijf seconden zonder dat u op (MODE) drukt.
Tip
Beelden worden wellicht grofkorrelig weergegeven in het zoomscherm.
11
Page 92

De weergaveopties wijzigen
U kunt de weergave-instellingen handmatig wijzigen als de weergave moeilijk
zichtbaar is vanaf uw zitplaats.
ATT
VOL
TOP MENU ALBUM
MENU
ALBUM
INPUT
+
–
ENTER
AUDIO
POWER
MENU
MODE
SETUP
DISPLAY
OFF
SUBTITLE
MENU
LIST
1 Druk op (MENU).
Het scherm "Picture" wordt weergegeven.
Picture 32
or MENU.Press
Vv,
Wanneer u op (MENU) drukt, worden de scherminstellingen als volgt weergegeven:
Picture
B
(Beeld)
Menu Off
(Menu uit)
Brightness
B
(Helderheid)
Blue Back
(Blauwe achtergrond)
* Deze optie verschijnt alleen als het NTSC-kleursysteem is geselecteerd.
B
Color
(Kleur)
b
De ingestelde waarde voor
het geselecteerde item
wordt in dit gedeelte
weergegeven.
Hue*
B
(Tint)
Mode
(Modus)
Video Adjust
(Video aanpassen)
Dimmer
B
bbb
12
2 Druk op V of v om de gewenste instelling te wijzigen.
Als "Picture" is geselecteerd Als "Brightness" is geselecteerd
Picture 32
Vv,
Druk op v
om het
contrast te
verlagen
n
or MENU.Press
Druk op V
om het
contrast te
verhogen
Brightness 32
Vv,
Druk op v
om het
beeld
donkerder te
maken
n
or MENU.Press
Druk op V
om het
beeld
lichter te
maken
Page 93

Als "Color" is geselecteerd
Als "Hue" is geselecteerd*
1
Color
Vv,
Druk op v
voor minder
kleurintensiteit
n
32
or MENU.Press
Druk op V
voor meer
kleurintensiteit
Als "Dimmer" is geselecteerd
Dimmer; On
Vv,
or MENU.Press
Als deze functie is ingeschakeld,
wordt de helderheid van het scherm
automatisch aangepast.
Als "Mode" is geselecteerd
Mode; Zoom
Vv,
or MENU.Press
Hue
Druk op v
om de
verzadiging
te verlagen
Vv,
n
CTR
or MENU.Press
Druk op V
om de
verzadiging
te verhogen
2
*
Als "Video Adjust" is geselecteerd
Video Adjust;
Vv,
Reset
or MENU.Press
De standaardinstellingen voor "Picture",
"Brightness", "Color", "Hue" en
"Dimmer" worden hersteld.
Als "Blue Back" is geselecteerd
Blue Back; On
Vv,
or MENU.Press
"Normal", "Full", "Zoom" of
"Widezoom" kan worden
geselecteerd als schermmodus. Zie
pagina 11 voor meer informatie.
Het blauwe achtergrondscherm
verschijnt als er geen signaal of een
zwak signaal wordt ontvangen. Als
doorlopend een zwak videosignaal
wordt ontvangen, kan de blauwe
achtergrond gaan flikkeren. Als dit
gebeurt, moet u deze functie
uitschakelen.
*1"Hue" kan alleen worden aangepast als het NTSC-kleursysteem is geselecteerd.
*2"CTR" verschijnt alleen als zich in het midden van de balk bevindt.
13
Page 94

Het volume regelen
U kunt het volume van de hoofdtelefoons met een snoer en de aansloten apparatuur
wijzigen met de bijgeleverde kaartafstandsbediening.
ATT
VOL+/–
ATT
VOL
TOP MENU ALBUM
MENU
ALBUM
INPUT
POWER
MENU
MODE
+
LIST
SETUP
ENTER
DISPLAY
–
OFF
SUBTITLE
AUDIO
Druk op (VOL)(+) of (VOL)(–) op de kaartafstandsbediening.
Het geluid snel dempen
Druk op (ATT) op de kaartafstandsbediening.
ATT On
Het vorige volume herstellen
Druk nogmaals op (ATT).
Hoofdtelefoons aansluiten
De verbindingsdoos heeft een aansluiting (mini phono-aansluiting) voor
hoofdtelefoons met een snoer. Pas het volume aan met (VOL)(+) of (VOL)(–) op de
kaartafstandsbediening.
Draadloze hoofdtelefoons gebruiken
U kunt de draadloze infraroodhoofdtelefoon MDR-IF0140 (los verkrijgbaar) bij dit
apparaat gebruiken. Raadpleeg de gebruiksaanwijzing voor de MDR-IF0140 voor
meer informatie.
Opmerkingen
•U kunt het volume van de draadloze hoofdtelefoon niet aanpassen met de bijgeleverde
kaartafstandsbediening. Gebruik de volumeregelaar op de draadloze hoofdtelefoon.
• Voor uw veiligheid kunt u de hoofdtelefoon het beste niet tijdens het autorijden
gebruiken.
• Laat de hoofdtelefoons niet achter op een plaats waar deze wordt blootgesteld aan
direct zonlicht of hoge temperaturen.
• Als u de draadloze hoofdtelefoon gebruikt terwijl deze wordt blootgesteld aan direct
zonlicht, kan de gevoeligheid van infraroodontvanger afnemen. Dit kan een
verminderde geluidskwaliteit tot gevolg hebben.
• Als er storing optreedt bij het gebruik van meerdere draadloze hoofdtelefoons, drukt u
14
op (IR on/off) op het apparaat om de zender voor de draadloze hoofdtelefoons uit te
schakelen. Gebruik in plaats daarvan hoofdtelefoons met een snoer.
Page 95
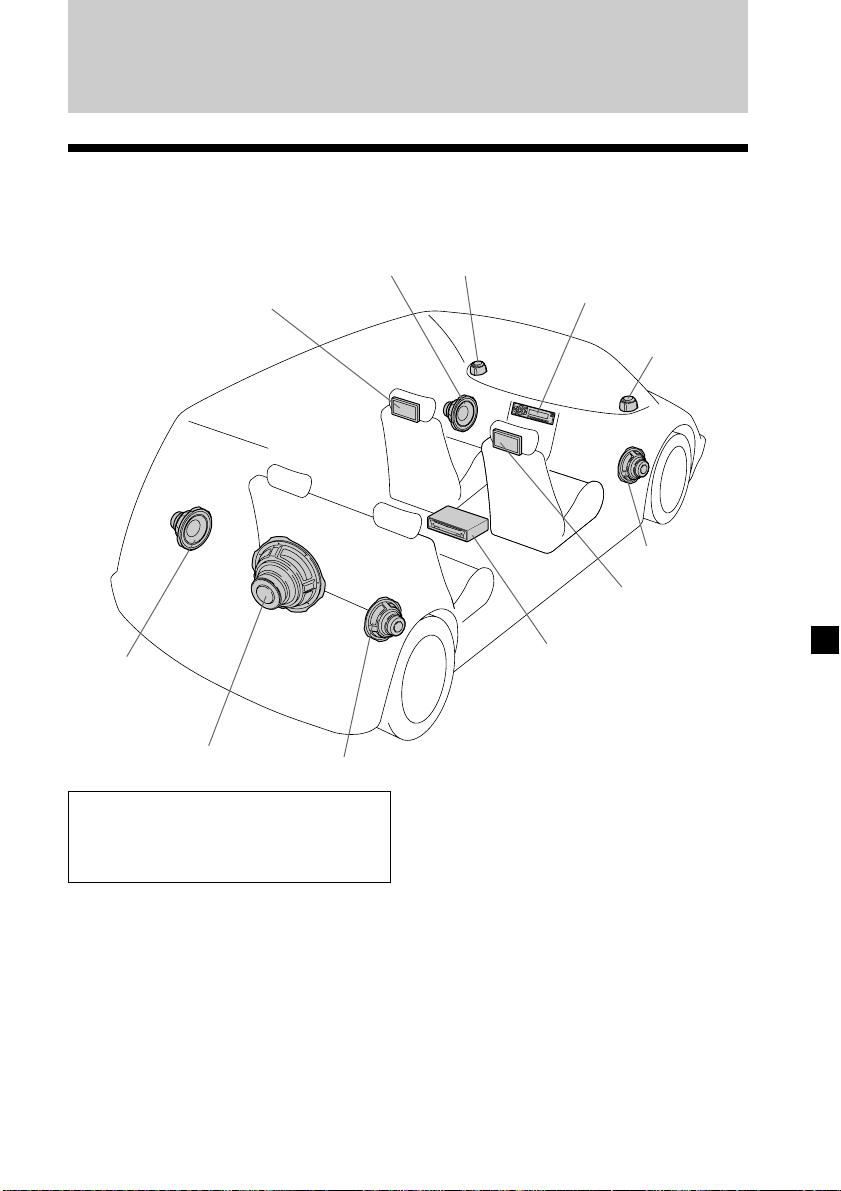
Verbindingen
Installatiediagram
Raadpleeg het installatiediagram en neem contact op met een bevoegde technicus om
het apparaat te installeren.
Hoofdsteunmonitor
Luidspreker
linksvoor
Tweeter
links
Hoofdeenheid
Tweeter
rechts
Hoofdsteunmonitor
Luidspreker
rechtsvoor
Luidspreker
linksachter
Subwoofer
Luidspreker rechtsachter
Bevestig alle apparatuur stevig aan
het chassis van de auto, enzovoort,
om te voorkomen dat de apparatuur
verschuift als de auto in beweging is.
Opmerking
Alle apparaten behalve één
hoofdsteunmonitor en één
verbindingsdoos, zijn los verkrijgbaar.
Draagbare Sony
DVD-speler DVX-11A, MV-101
Opmerkingen over de locaties van PS one
Plaats PS one® niet:
— op een dashboard of een plaats waar
deze wordt blootgesteld aan direct
zonlicht.
— in de buurt van een magnetische bron,
zoals magneten, luidsprekers of een
televisiescherm.
— op een instabiel of ongelijk oppervlak.
— op een plaats waar deze wordt
blootgesteld aan erge trillingen.
— op een plaats waar deze wordt
blootgesteld aan veel stof of vuil.
— op een slechts geventileerde of vochtige
plaats.
— op een plaats waar deze wordt
blootgesteld aan extreme temperaturen
(onder 5˚C of boven 35˚C).
Raadpleeg de gebruiksaanwijzing bij PS
one® voor meer informatie.
®
15
Page 96

Verbindingsdiagram
Raadpleeg het verbindingsdiagram voor de juiste verbindingen.
U kunt de verbindingen in gedeelte A zelf maken. Neem contact op met een
bevoegde technicus voor de andere verbindingen.
Hoofdsteunmonitor XVM-H65
(6,5 inch kleuren-LCD-monitor)
Verbindingsdoos
XA-113
(los verkrijgbaar)
Hoofdsteunmonitor
XVM-H65
(los verkrijgbaar)
Monitorkabel (5 m)
(los verkrijgbaar)
Verbindingsdoos XA-113
Audio L/R/video-ingang 1
(voor PS one
)
®
7,5 V (max. 2 A) DC-uitgang
Voorzijde:
(ministereoaansluiting)
22-pins aansluiting
Audio L/R/video-ingang 2Hoofdtelefoonaansluiting
DVD (MV) aansluiting*
1
Achterzijde:
4-pins
stroomaansluiting
Uitgang
(infraroodsignaal)*
*1De DVD (MV) connector is alleen voor MV-101. Raadpleeg de handleiding Installatie/
aansluitingen bij MV-101 voor meer informatie.
*2Niet van toepassing op de Sony DVD-wisselaar DVX-100
16
Audio L/R/video
2
uitgangen
Page 97

Zwart
Zwart
GND (1 m)
GND (1 m)
Naar een metalen
oppervlak van het
autochassis
Monitorkabel (5 m)
Snoer met RCA-pin
(los verkrijgbaar)
Verbindingsdoos
XA-113
Naar uitgang
(infraroodsignaal)
Geel
Schakelkast
Rood
Blauw/wit gestreept
4-pins stroomaansluiting
Reserve (5 m)
Zekering (8 A)
Zekering (1 A)
POWER REM (5 m)
Maximumvoeding 0,3 A
Voorzorgsmaatregelen voor PS one
• Bevestig PS one® stevig op een veilige
plaats.
• Voor uw veiligheid kunt u de PS one
het beste niet tijdens het autorijden
gebruiken.
• Zorg dat de werkspanning van PS one
7,5 V is. Andere spanningen kunnen
storing veroorzaken of PS one
beschadigen.
ACC (5 m)
Naar 7,5 V DC-uitgangNaar Audio L/R/video-ingang
Naar accu (12 V)
Naar contactslot
(ACC positie)
Naar een versterker
®
®
®
®
Kabel voor de
ontvangst van het
afstandsbedieningssignaal
(5 m) (Kleine aansluiting
stereo)
Draagbare Sony DVD-speler
DVX-11A (los verkrijgbaar)
Snoer met
RCA-pin
(los verkrijgbaar)
AV-Kabel
(audio/video
geïntegreerd)
(los verkrijgbaar)
PS one
(los verkrijgbaar)
®
DC-DC snoer
(3 m)
* "PS one" is een gedeponeerd handelsmerk van Sony Computer Entertainment Inc.
17
Page 98

Aanvullende informatie
Onderhoud
Zekeringen vervangen
Vervang een zekering altijd door een identiek exemplaar. Als de zekering
doorbrandt, moet u de voedingsaansluiting controleren en de zekering vervangen.
Als de zekering vervolgens nogmaals doorbrandt, kan er sprake zijn van een defect
in de speler. Raadpleeg in dat geval de dichtstbijzijnde Sony dealer.
1
c
2
Waarschuwing
Gebruik nooit een zekering die zwaarder is dan de standaardzekering van het
apparaat omdat dit hierdoor beschadigd kan raken.
De lithiumbatterij vervangen
In normale omstandigheden gaan de batterijen ongeveer 1 jaar mee. Afhankelijk van
de gebruiksomstandigheden kan de levensduur korter zijn.
Wanneer de batterij verzwakt, wordt het bereik van de kaartafstandsbediening
kleiner. Vervang de batterij door een nieuwe CR2025-lithiumbatterij. Bij een andere
batterij bestaat er brand- of explosiegevaar.
+ zijde omhoog
c
Opmerkingen bij de lithiumbatterij
• Houd de lithiumbatterij buiten het bereik van kinderen. Raadpleeg meteen een arts
wanneer een batterij wordt ingeslikt.
• Veeg de batterij schoon met een droge doek voor een goed contact.
• Houd bij het plaatsen van de batterij rekening met de juiste polariteit.
• Houd de batterij niet vast met een metalen tang om kortsluiting te voorkomen.
Waarschuwing
Bij verkeerde behandeling kan een batterij
exploderen.
Niet opladen, demonteren of in het vuur gooien.
18
Voor de Klanten in
Nederland
Gooi de batterij niet weg
maar lever deze in als klein
chemisch afval (KCA).
Page 99

LCD-scherm
Druk niet op het LCD-scherm van het apparaat. Als u dit doet, kan het beeld worden
vervormd of een storing optreden. Het beeld kan onduidelijk worden of het LCDscherm kan worden beschadigd.
Opmerkingen over reinigen
— Reinig het LCD-scherm met een vochtige, zachte doek.
— Gebruik geen oplosmiddelen zoals benzine, thinner, in de handel verkrijgbare
reinigingsmiddelen of antistatische spuitbussen.
• Gebruik het apparaat niet bij temperaturen onder 5 °C of boven 45 °C.
• Als u de auto op een koude of hete plaats hebt geparkeerd, is het beeld wellicht niet
duidelijk. De monitor is echter niet beschadigd. Het beeld wordt duidelijk als de
temperatuur in de auto is genormaliseerd.
Er kunnen stilstaande blauwe of rode punten op de monitor worden weergegeven.
Deze worden dode pixels genoemd en kunnen voorkomen op elk LCD-scherm.
Het LCD-scherm is zeer geavanceerd en meer dan 99,99% van de segmenten in het
scherm zijn foutloos. Er is echter een mogelijkheid dat minder dan 0,01% van de
segmenten defect is en niet correct oplicht.
19
Page 100

Technische gegevens
Monitor
Systeem LCD-scherm
Besturingssysteem
Actief TFT-LCDmatrixsysteem
Beeldformaat 6,5-inch scherm (16:9)
144 × 77 mm, 163 mm
(b/h, d)
Beeldsegment 336.960 (b 1440 × h 234) pixels
Stroomvereisten
12 V DC accu
(negatieve aarde)
Stroomverbruik
Ong. 700 mA
Afmetingen 164 × 103 × 29 mm
(b/h/d)
Gebruikstemperatuur
5 °C – 45 °C
Gewicht Ong. 370 g
Verbindingsdoos XA-113
A/V-uitgang
Uitgangsimpedantie:
minder dan 220 Ω
minder dan 100 pF
Uitgangsniveau: 0 dBs ±0,3 dB
(0,775 V rms)
(Vol Max)
Video: 75 Ω 1 Vp-p
A/V-ingang ×2
Ingangsimpedantie: meer dan 10 K Ω
minder dan 1000 pF
Ingangsniveau: ±1,3 dBs +0/–0,3 dB
(0,775 V rms)
Video: 75 Ω 1 Vp-p
DC-uitgang 7,5 V (max 2 A)
Afmetingen 150 × 42 × 80 mm
(b/h/d)
Gewicht Ong. 250 g
Kaartafstandsbediening RM-X122
Stroomvereisten
Werkbereik Ong. 2,5 m
Afmetingen 52 × 125 × 10 mm
Gewicht Ong. 40 g
CR2025-lithiumbatterij
(b/h/d)
(inclusief batterijen)
Bijgeleverde accessoires
Verbindingsdoos XA-113 (1)
Kaartafstandsbediening RM-X122
Netsnoer (1)
DC-DC snoer (3 m) (1)
Kabel voor kleine aansluitingen
Monitorkabel (5 m) (1)
Ring (1)
Gebruiksaanwijzing (1)
(met batterij) (1)
(stereo) (5 m) (1)
Optioneel accessoire
DVD-speler DVX-11A, MV-101
Draadloze hoofdtelefoons MDR-IF0140
PS one
®
Wijzigingen in ontwerp en technische
gegevens voorbehouden zonder
voorafgaande kennisgeving.
20
 Loading...