

Page 1
2-645-712-11 (1)
Mobile Monitor
Operating Instructions
Mode d’emploi
Owner’s Record
The model and serial numbers are located on the bottom of the unit.
Record the serial number in the space provided below.
Refer to these numbers whenever you call upon your Sony dealer regarding this
product.
Model No. XVM-F65WL Serial No.
For installation and connections, see the supplied Installation/Connections manual.
En ce qui concerne l’installation et les connexions, consulter le manuel d’Installation/
Connexions fourni.
US
FR
XVM-F65WL
2005 Sony Corporation
Page 2

WARNING
This equipment has been tested and
found to comply with the limits for a
Class B digital device, pursuant to Part
15 of the FCC Rules. These limits are
designed to provide reasonable
protection against harmful interference
in a residential installation. This
equipment generates, uses, and can
radiate radio frequency energy and, if
not installed and used in accordance
with the instructions, may cause
harmful interference to radio
communications. However, there is no
guarantee that interference will not
occur in a particular installation. If this
equipment does cause harmful
interference to radio or television
reception, which can be determined by
turning the equipment off and on, the
user is encouraged to try to correct the
interference by one or more of the
following measures:
—Reorient or relocate the receiving
antenna.
—Increase the separation between the
equipment and receiver.
—Connect the equipment into an outlet
on a circuit different from that to
which the receiver is connected.
—Consult the dealer or an experienced
radio/TV technician for help.
You are cautioned that any changes or
modifications not expressly approved in
this manual could void your authority
to operate this equipment.
Operation is subject to the following
two conditions;
—this device may not cause
interference.
—this device must accept any
interference, including interference
that may cause undesired operation
of the device.
Properly shielded and grounded cables
and connectors must be used in order to
meet FCC emission limits.
CAUTION
• When installing, be sure to fix the unit
securely.
• While operating, be sure to fasten
seatbelts to avoid injuries caused by a
sudden movement of the vehicle.
2
Welcome!
Thank you for purchasing the Sony
Mobile Monitor.
• Built-in 2.4 GHz Wireless AV receiver.
• PAL or NTSC color system
compatible.
• Full, Wide and Zoom screen modes
available, in addition to the normal
screen mode.
• The low reflection liquid crystal panel
reduces the glare from outside lighting
sources.
• Adjustable brightness control,
according to lighting conditions.
• Backlight dimmer control produces
sharp contrast image, free from
reversed or blurred colors.
•2 Audio/Video inputs and 1 Audio/
Video output are provided for
connecting a video player, video
game, and an additional monitor.
• Built-in infrared transmitter for
cordless headphones.
Declaration of Conformity
Trade Name: SONY
Model No.: XVM-F65WL
Responsible Party: Sony Electronics Inc.
Address: 16450 W. Bernardo
Dr, San Diego, CA
92127 USA
Telephone Number: 858-942-2230
This device complies with Part 15 of the
FCC Rules. Operation is subject to the
following two conditions: (1) This device
may not cause harmful interference, and
(2) this device must accept any
interference received, including
interference that may cause undesired
operation.
Page 3

Table of contents
Welcome! .............................................................................................................................. 2
Precautions........................................................................................................................... 4
Location of controls ............................................................................................................6
Operation
Selecting the input source.................................................................................................. 9
Setting the screen mode ................................................................................................... 10
Changing the menu settings ........................................................................................... 11
Using the headphones...................................................................................................... 13
Additional Information
Maintenance ...................................................................................................................... 18
Specifications ..................................................................................................................... 22
Troubleshooting ................................................................................................................ 23
3
Page 4
Precautions
To avoid the risk of serious injury or accident, read the following precautions before
installing and operating the unit.
On safety
Comply with your local traffic rules and regulations.
• While driving
- The driver must not watch or operate the monitor. It may lead to distraction and
cause an accident.
- The driver must not use the headphones. It may lead to distraction and cause an
accident.
Park the car in a safe place when the driver watch and operate the monitor, or use
headphones.
Watching video pictures
The video pictures appear only after you park the car and set
the parking brake.
When the car starts moving, the video pictures automatically
DRIVE MODE
disappear after displaying the following caution.
Do not operate equipment connected to the monitor or watch
the monitor while driving.
The caution above appears only when the monitor is
connected to the installation cradle.
4
• After installing
- Take care not to bump your head against the unit when getting up from the back
seat.
- Take extra care not to wind the wire of the headphones around your neck
avoiding injury or suffocation in the event of a sudden movement of the vehicle.
- Keep small articles out of the reach of children.
- Do not leave the monitor under direct sunlight for a long period of time.
Page 5
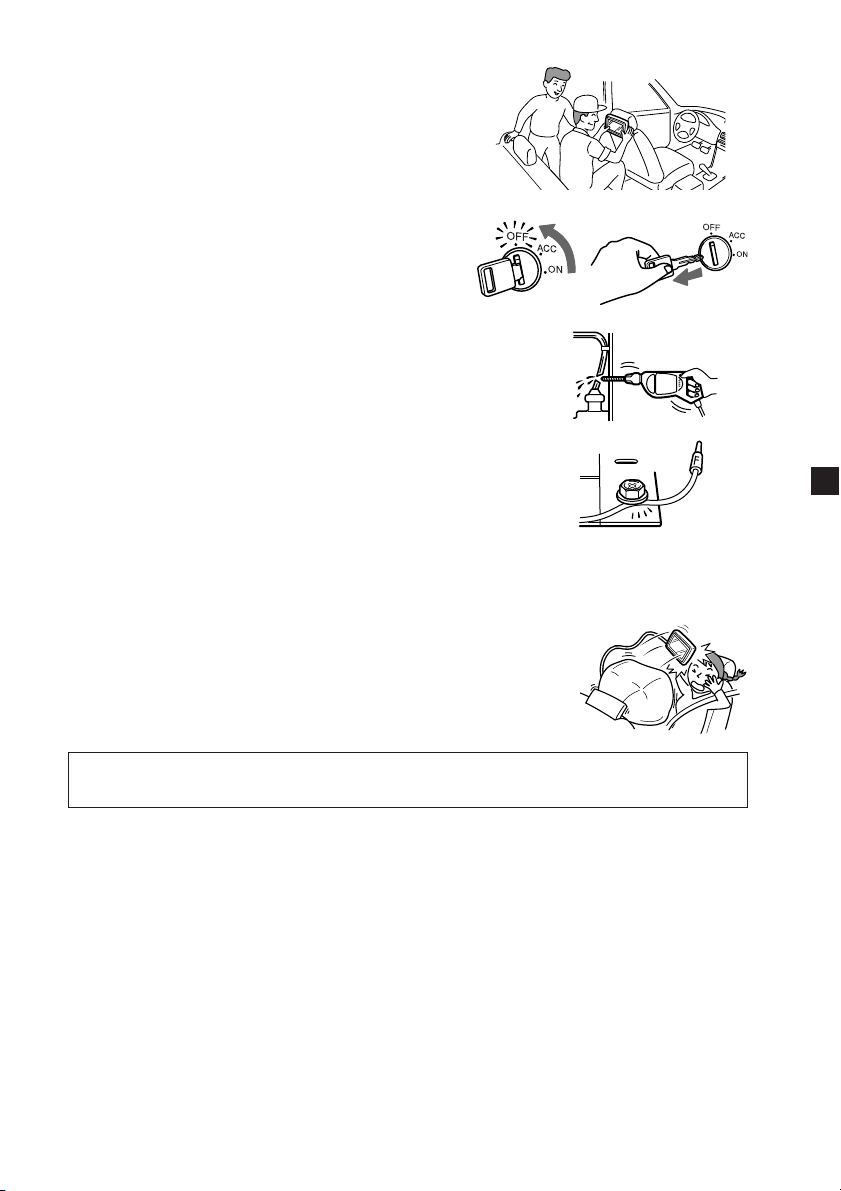
On installation
• Installing this unit requires technical expertise.
This unit should be installed by a qualified
technician or service personnel.
• If you try to install this unit by yourself, do it
properly, referring to the installation and wiring
diagrams in this operating manual. Improper
installation may result in fire or electric shock.
• Before installation, be sure to turn the ignition
switch to the OFF position or take the key out.
Installing this unit with the ignition on may
cause battery drain or a short circuit.
• Do not damage any pipes, tubes, the fuel tank or
electric wiring when installing this unit. This can cause
a fire. If you drill a hole in car panels, make sure that
any hidden car parts will not be damaged.
• Do not use any nuts or bolts for safety devices such as
steering linkage, fuel supply or braking systems. This
can cause a fire or an accident.
• Take care to prevent cords and wires from getting
tangled or crimped in the moving portion of a seat rail.
Where to install
Before installing this unit, please check your local traffic rules and regulations.
Do not install this unit where:
- It will obstruct the driver’s view.
- It will obstruct the operation of the airbag system.
- It will obstruct the operation of the vehicle, especially
the steering wheel, shift lever, or brake pedal.
-A driver or passengers may injure themselves when
getting into or out of the car.
If you have any questions or problems concerning your unit that are not covered
in this manual, please consult your nearest Sony dealer.
5
Page 6
Location of controls
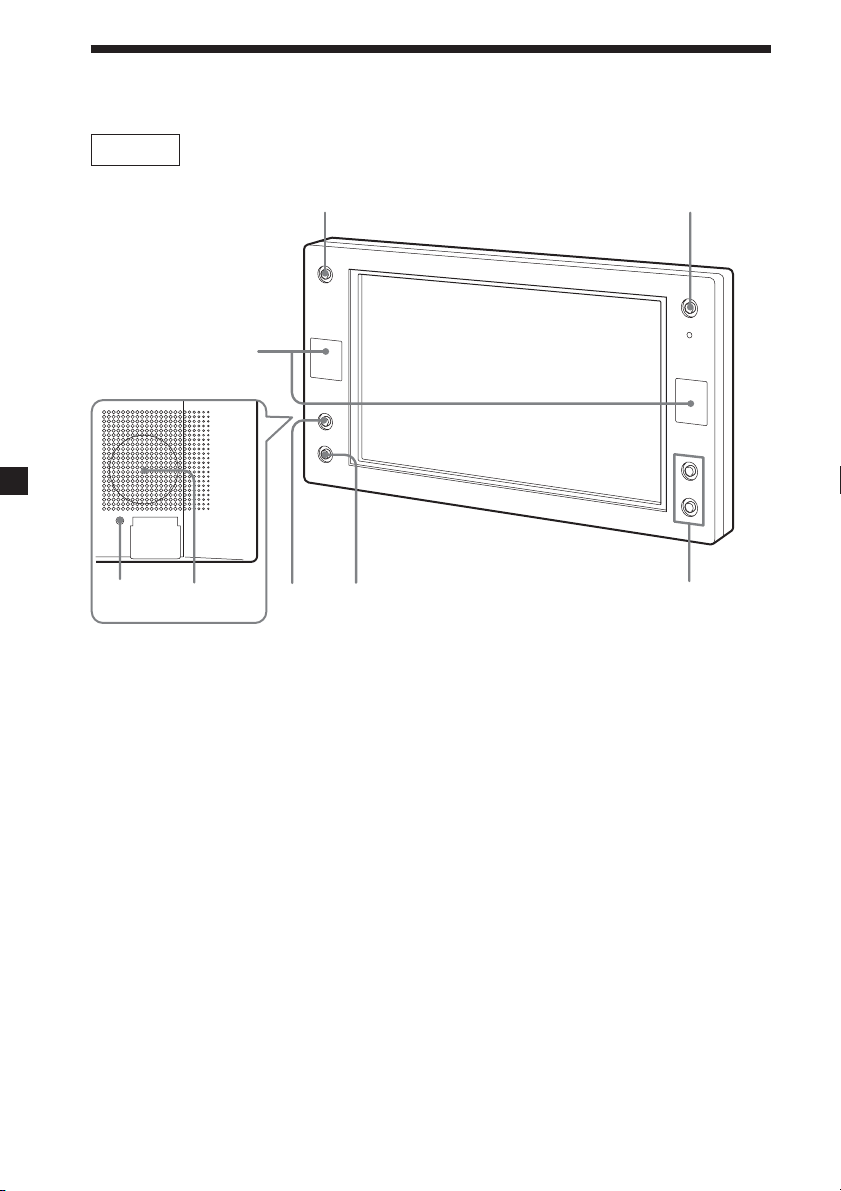
Monitor
15
2
7 8
1 INPUT button
Press to select the input source.
2 Receptor for the card remote
commander/Transmitter for the
cordless headphones*
3 MENU button
Press to make various settings.
4 DIMMER button
Press to switch the dimmer on/off.
(When it is set to On, the display
darkens.)
5 POWER (on/off) button
Press to turn on/off the monitor.
* If interference occurs while using several cordless headphones
If several monitors are installed and used simultaneously, interference may occur.
6
643
6 VOLUME +/– buttons
Press to turn up or down the volume
(The default volume level is 25.) or
to select the item during menu
operation.
7 RESET button
8 Monaural speaker
Page 7
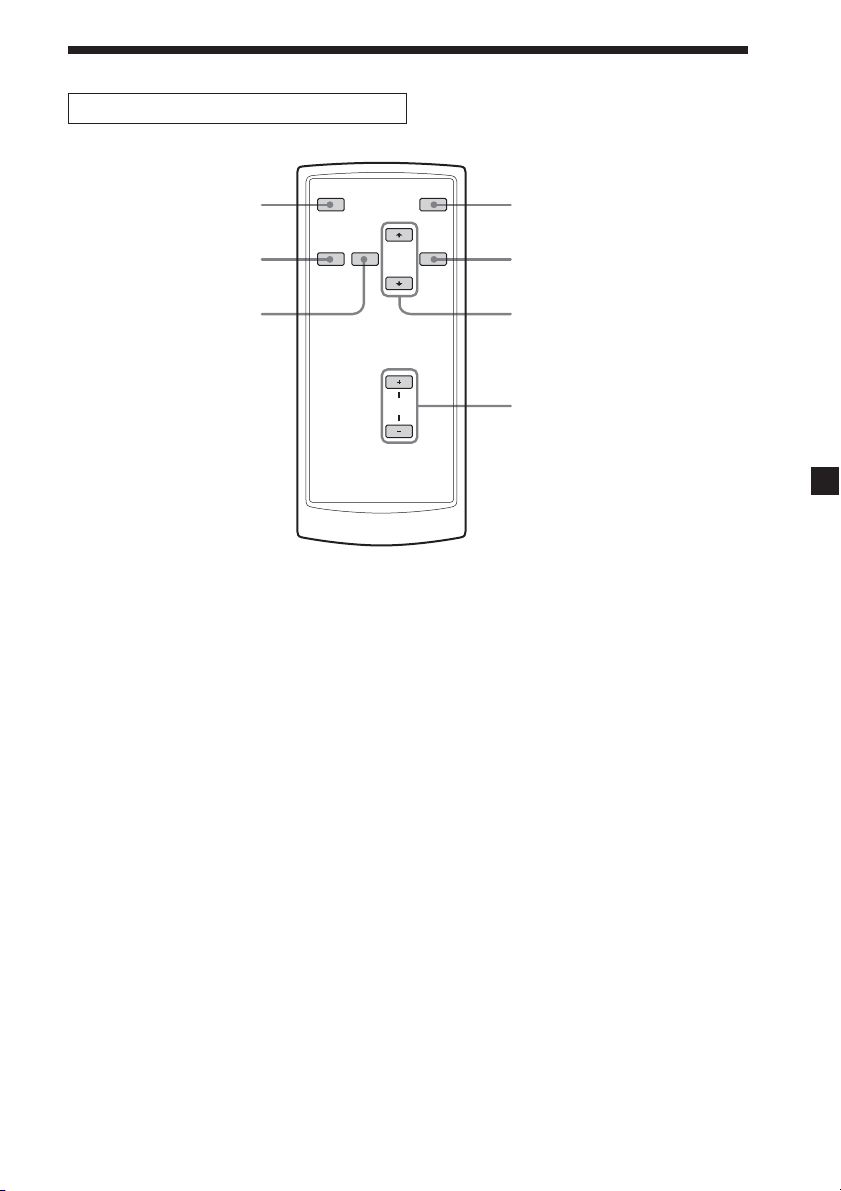
Card remote commander RM-X709
1
2
3
1 ATT button
Press to quickly attenuate the
volume.
To restore the previous volume
level, press (ATT) again or (VOL)
+/–.
2 INPUT button
Press to select the input source.
3 MENU button
Press to select the menu settings.
4 |/1 (power) button
INPUT
ATT
`/1
4
MODEMENU
5
6
VOL
5 MODE button
6 M/m buttons
7 VOL (volume) +/– buttons
7
Press to change the screen mode.
Press to select the desired item.
Press to adjust the volume of the
monitor.
Tip
Refer to “Replacing the lithium battery” for details on how to replace the batteries (page 19).
7
Page 8
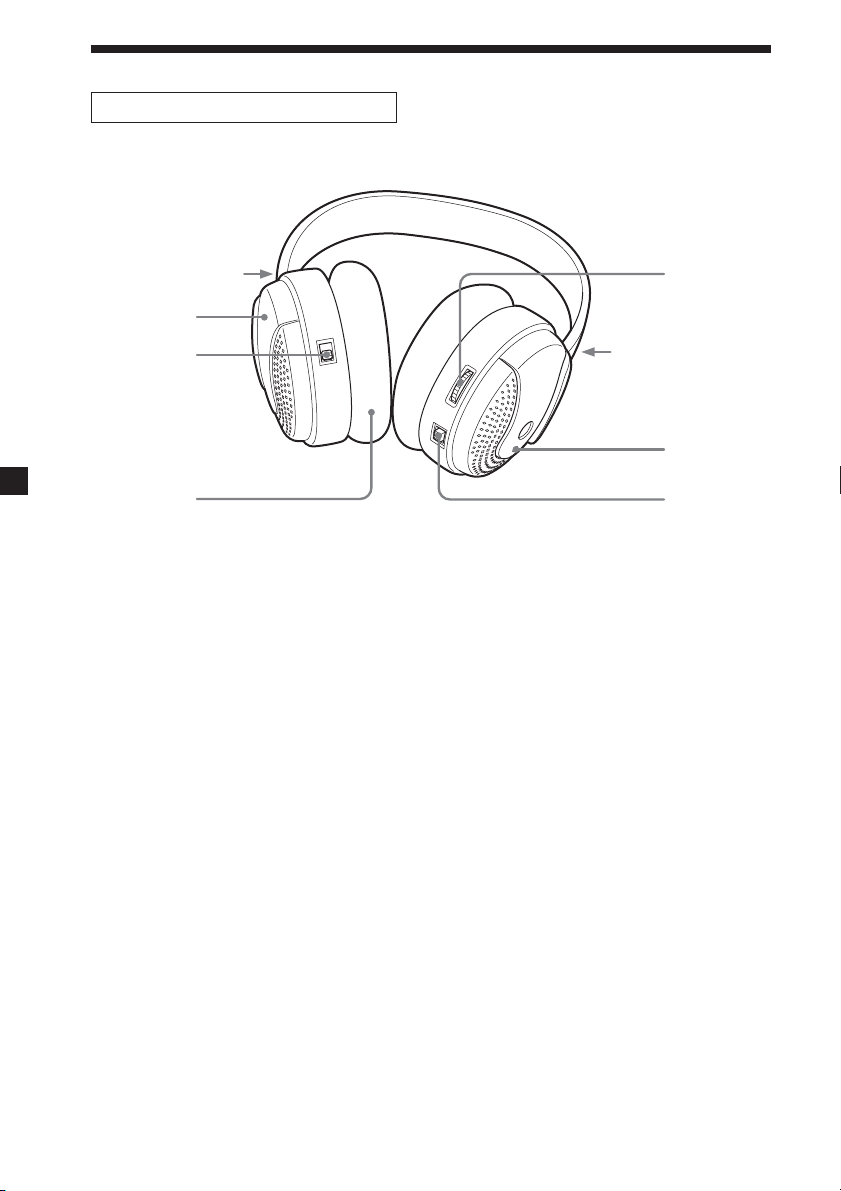
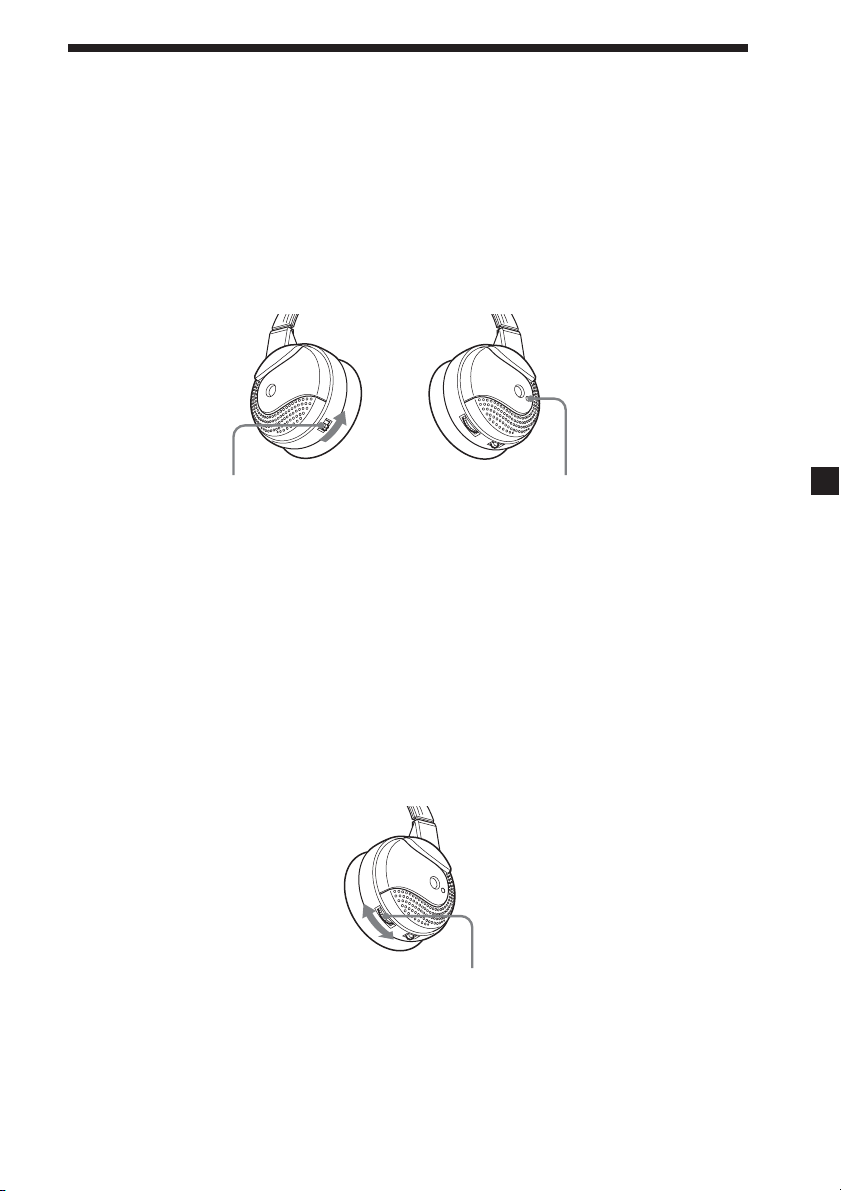
Cordless Headphones MV-02HP
L
1
2
3
1 Lid
2 Power (ON/OFF) switch
Switch to turn on/off the
headphones.
3 Ear pad
4 VOL control dial
Turn to adjust the volume of the
headphones.
Tips
• For replacing the batteries, see “Additional Information” (page 20).
• For replacing the ear pads, see “Additional Information” (page 21).
5 Power indicator
Glows red when turned on.
6 CH1/CH2 switch
Switch to select the audio channel
CH1 or CH2.
4
R
5
6
8
Page 9
Operation
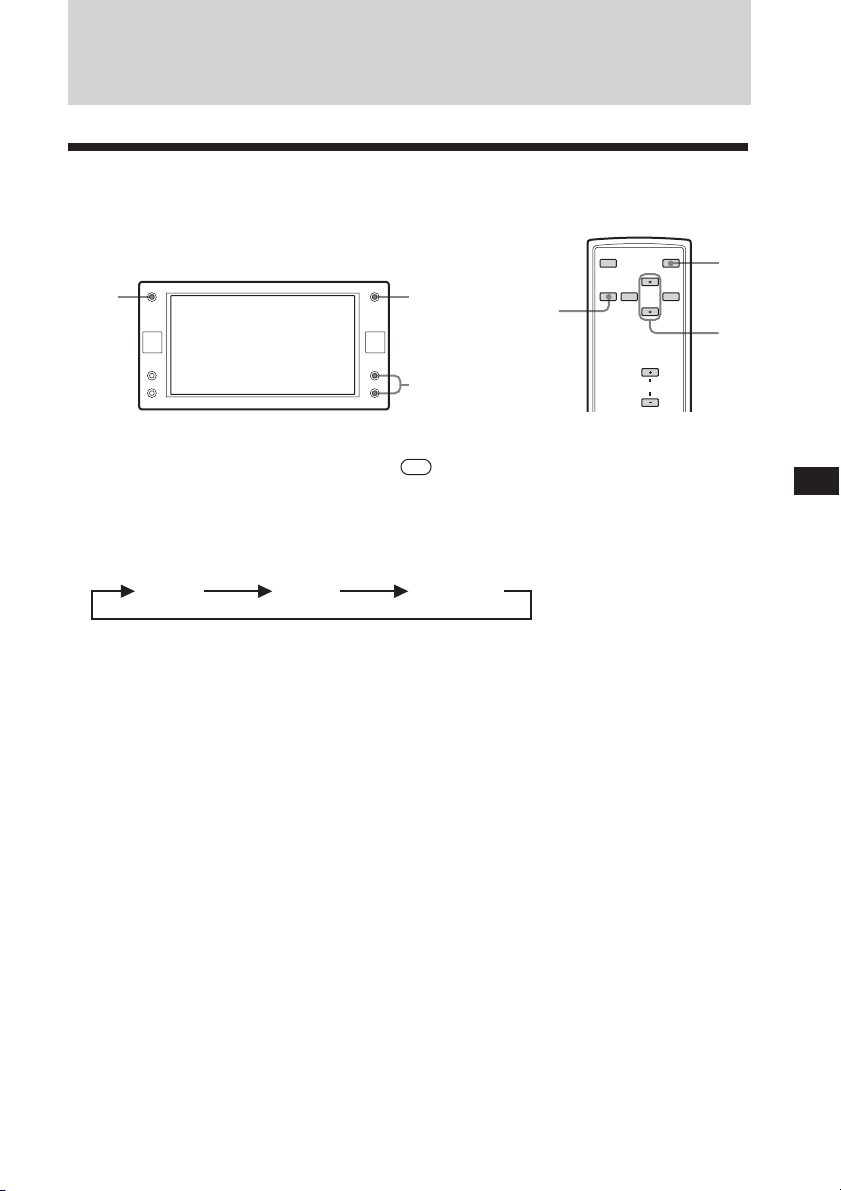
Selecting the input source
You can select the input source.
POWERINPUT
VOLUME
+/−
ATT
INPUT
INPUT
`/1
MODEMENU
VOL
1 Press (POWER).
On the card remote commander, press
The power is turned on.
{/1
.
2 Press (INPUT) to select the desired input source.
Each time you press (INPUT), the indication changes in the following sequence:
VIDEO 1 VIDEO 2
Note
If you use the monitor with the rechargeable battery (MV-100BAT) (optional), the
monitor automatically enters into the receiver mode when turned on. The (INPUT)
button is deactivated and the input source is fixed to the receiver mode. See “Using the
rechargeable battery” (page 15).
* Note on wireless transmission (Receiver mode)
Simultaneous use with other 2.4 GHz equipment may cause image interference or
audio noise. This is not a malfunction, but a result of equipment sharing the same
operating frequency.
RECEIVER
*
`/1
V/v
9
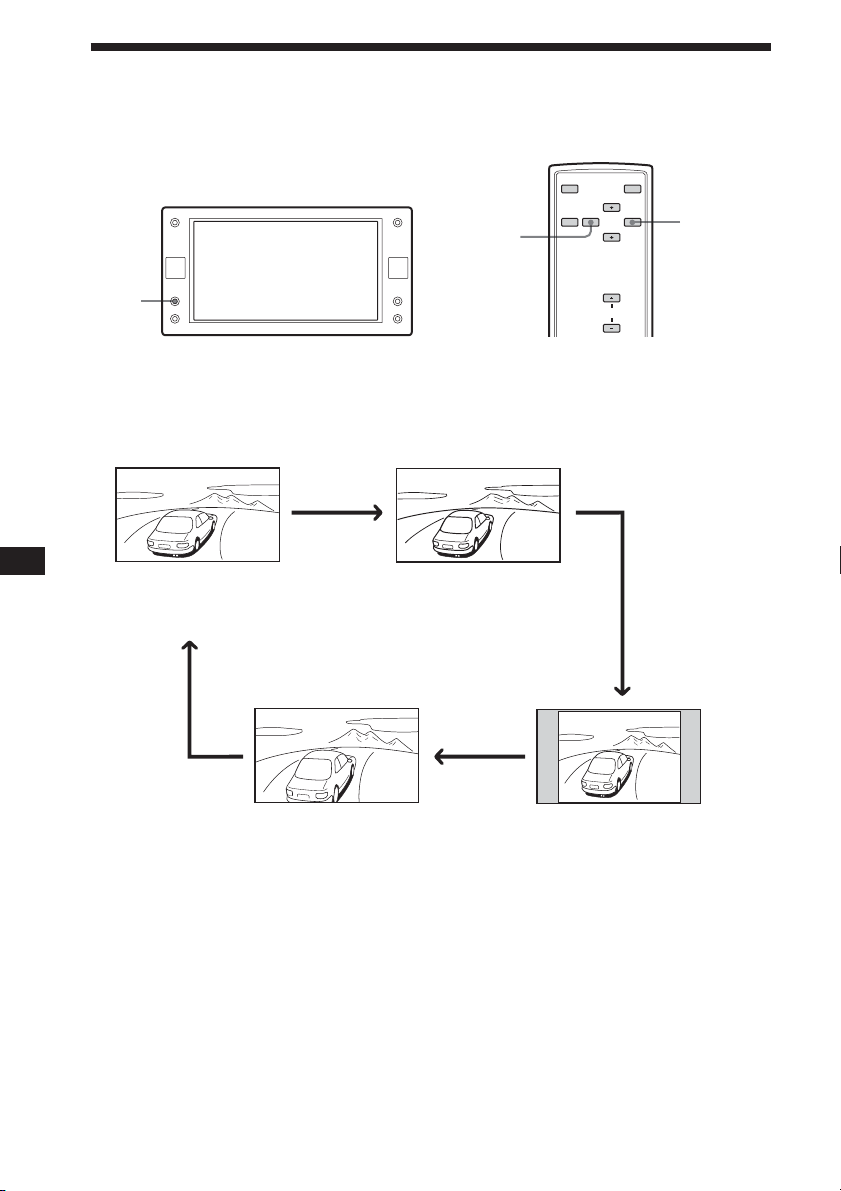
Page 10

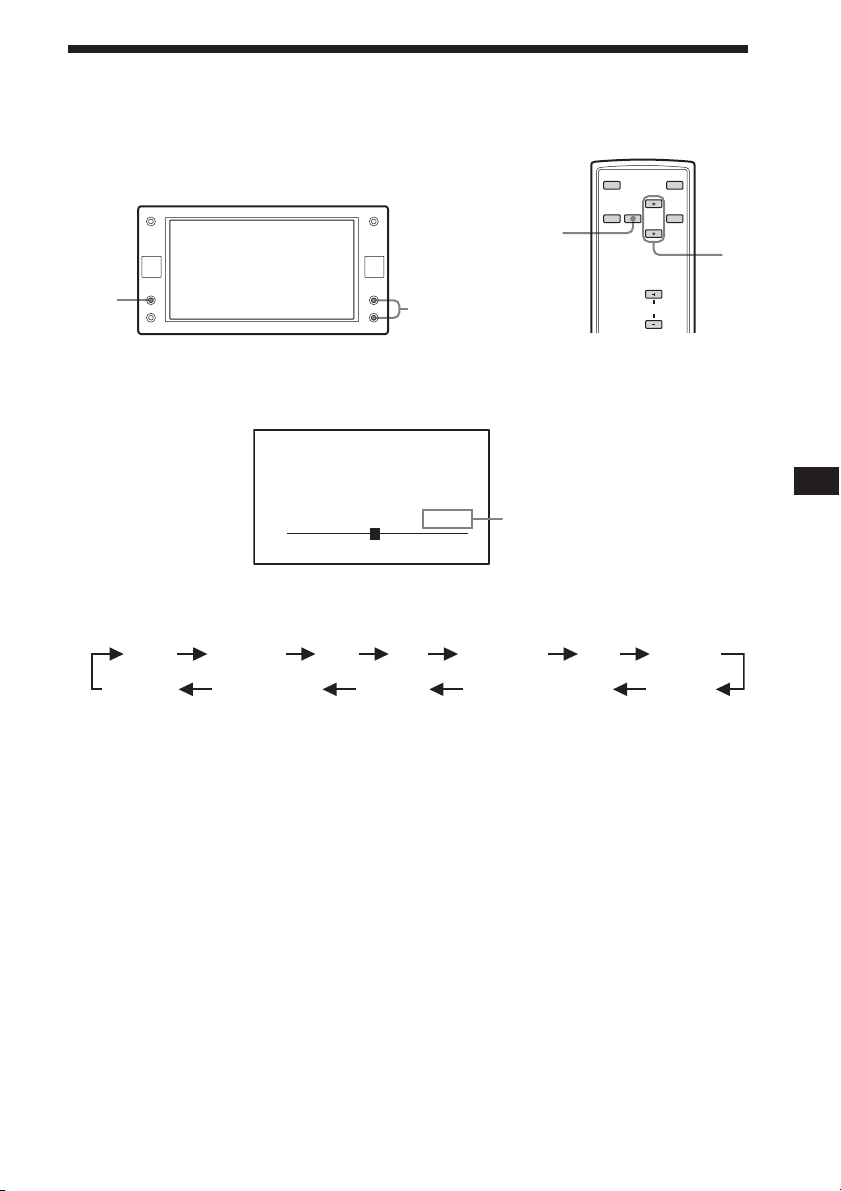
Setting the screen mode
Zoom
Full
Wide
Normal
In addition to the full mode, wide, normal and zoom modes are also available.
ATT
INPUT
`/1
MODEMENU
MENU
MENU
VOL
Press (MODE) repeatedly.
The current mode is displayed on the screen first.
Each time the button is pressed, the screen mode swiches in the following
sequence:
Full
Full
Full (regular image)
An image with an aspect ratio
of 4 to 3 enlarged to the left
and right edges of the screen.
Wide
Wide
Wide
An image with an aspect ratio of
4 to 3, with only the left and
right sides of the image being
enlarged to fill the screen.
MODE
Zoom
Zoom
Zoom
An image with an aspect ratio of 4
to 3 enlarged to the left and right
edges of the screen, with the
overflowing parts (top and bottom)
cut off to fill the screen.
You can also set the screen mode in the menu setting (page 11).
Tip
Images may appear coarse-grained when viewed in the zoom mode.
10
Normal
Normal
Normal
An image with an aspect ratio
of 4 to 3.
Page 11
Changing the menu settings
You can adjust the display settings manually if the display is hard to see from the
position where you are seated.
MENU
MENU
VOLUME
+/−
1 Press (MENU).
The “Picture” screen appears.
Picture 32
Press
+/-
or MENU.
Each time you press (MENU), the setting screen changes in the following
sequence:
Picture Brightness Color Video Adjust Mode
Menu Off Receiver
Select NTSC or
PAL System
* Appears only when the NTSC color system is selected.
Hue*
The setting value of the
item selected appears in this
area.
Cordless Headphones
ATT
INPUT
`/1
MODEMENU
V/v
VOL
Blue Back
Speaker
2 Press M or m ((VOLUME) (+) or (–) on the monitor) to adjust to the desired
setting.
See the next page for the setting options.
11
Page 12

The default settings are underlined.
Settings Setting options
Picture Settable range: 0 to 63 (default setting is “36”)
Brightness Settable range: 0 to 63 (default setting is “30”)
Color Settable range: 0 to 63 (default setting is “36”)
Hue Adjust this if the picture is reddish or greenish. The default setting is
Video Adjust Resetting the picture, brightness and color setting at single operation.
Mode Full, Wide, Normal, Zoom
Blue Back On, Off
Speaker On, Off
Cordless Headphones CH1, CH2, OFF
Receiver CH1, CH2, CH3, CH4
Select NTSC or PAL, NTSC
PAL System Selecting the color system, NTSC or PAL.
Adjusting the contrast.
Adjusting the brightness.
Adjusting the color.
“CTR (center)”.
”Hue” is displayed for NTSC system only.
Note
Input channel, color system for the input video signal (PAL/NTSC),
screen mode, and blue background setting will not be reset when
you reset the adjustments.
Setting the screen mode.
Full: An image with an aspect ratio of 4 to 3 enlarged to the left and
right edges of the screen (regular image).
Wide: An image with an aspect ratio of 4 to 3, with only the left and
right sides of the image being enlarged to fill the screen.
Normal: An image with an aspect ratio of 4 to 3.
Zoom: An image with an aspect ratio of 4 to 3 enlarged to the left and
right edges of the screen, with the overflowing parts (top and
bottom) cut off to fill the screen.
Setting the blue background screen.
Turning on and off the speaker on the backside of the monitor.
Turning on and off the supplied cordless headphones MV-02HP. When
using the headphone, select either “CH1” or “CH2” depending on the
headphone's channel setting.
When using Multi Disc Player MEX-R5 (optional), select the channel
depending on the player’s channel setting.
12
Page 13
Using the headphones
Listening to a program
Before listening
• The transmitter for the headphones is on the display monitor.
• To prevent your ears from being damaged, first lower the volume.
1 Turn on the display monitor.
2 Set the power switch to ON on the left housing of the headphones.
The headphones turn on and the Power indicator glows red.
Power (ON/OFF) switch Power indicator
3 Put on the headphones.
Be sure to put the right housing (R) on your right ear and the left housing (L) on
your left ear.
4 Start playback.
5 Turn the VOL control dial to adjust the volume.
If the infrared sensors of the headphones are covered by your hands when
adjusting the volume, the attenuate function will be activated and volume cannot
be adjusted. To adjust the volume, move closer to the transmitter of the monitor,
or orient the infrared emitters towards the transmitter of the monitor.
VOL control dial
Note
The volume of the headphones cannot be adjusted with the supplied card remote
commander. Use the volume control on the headphones.
13
Page 14

Sound is automatically attenuated if noise increases
— Attenuate function
If the infrared rays are obstructed, or the headphones are used outside their effective
range, noise will increase and sound will diminish. To avoid potential ear damage as
a result of noise, this function attenuates any sound in the headphones. Sound is
automatically restored when you move nearer to the transmitter or remove the
obstruction.
Selecting the audio channel
You can select the audio channel with the CH1/CH2 switch to avoid interference
when using the cordless headphones with other AV equipment. Select the audio
channel according to the monitor’s menu setting of “Cordless Headphones.”
After listening to the program
Take off the headphones, and then turn off the power (Noise may occur if you turn
off the monitor before taking off the headphones).
Precautions
• The driver must not use the headphones. It may lead to distraction and cause an
accident.
• If the headphones are used while exposed to direct sunlight, sensitivity of the
infrared sensors may deteriorate, and inferior quality sound may result.
• When the headphones are not to be used for a long period of time, remove the
batteries to avoid damage caused by battery leakage and subsequent corrosion.
• Do not leave the headphones in a location subject to direct sunlight, heat or
moisture (It is recommended to use the headphones at a of temperature of between
5 ˚C (41 °F) and 35 ˚C (95 °F)).
• Do not drop, hit or otherwise subject the headphones to excessive shock of any
kind, as this could damage the product.
Notes on headphones preventing hearing damage
Avoid using headphones at high volume. Hearing experts advise against continuous,
loud and extended play. If you experience a ringing in your ears, lower the volume
or discontinue use.
Caring for others
Keep the volume at a moderate level. This will allow you to hear outside sounds and
to be considerate to the people around you.
If you have any questions or problems concerning the headphones that are not
covered in this manual, please consult your nearest Sony dealer.
14
Page 15
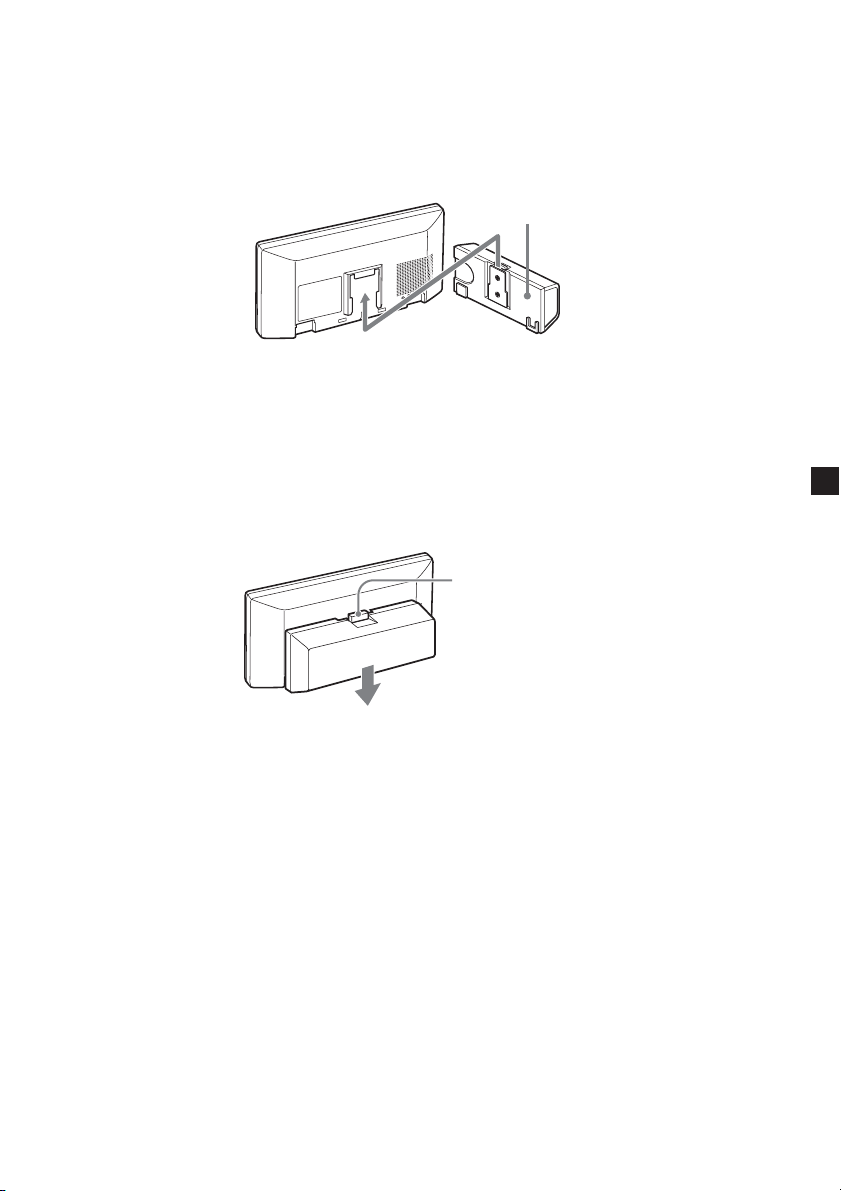
Using the rechargeable battery
You can use the optional rechargeable battery for the remote use.
The rechargeable battery needs to be charged before use.
To attach the rechargeable battery
Rechargeable battery
MV-100BAT (optional)
Slide up the rechargeable battery until you hear the click sound.
Notes when using the rechargeable battery
• When the rechargeable battery is attached, the monitor automatically enters into the
receiver mode. (INPUT) will be deactivated while the battery is attached.
• When the rechargeable battery is attached, the dimmer is automatically switched to On.
You can switch it Off by pressing (DIMMER).
To detach the rechargeable battery
Push to release
Push the release button on the rechargeable battery and slide it off.
15
Page 16
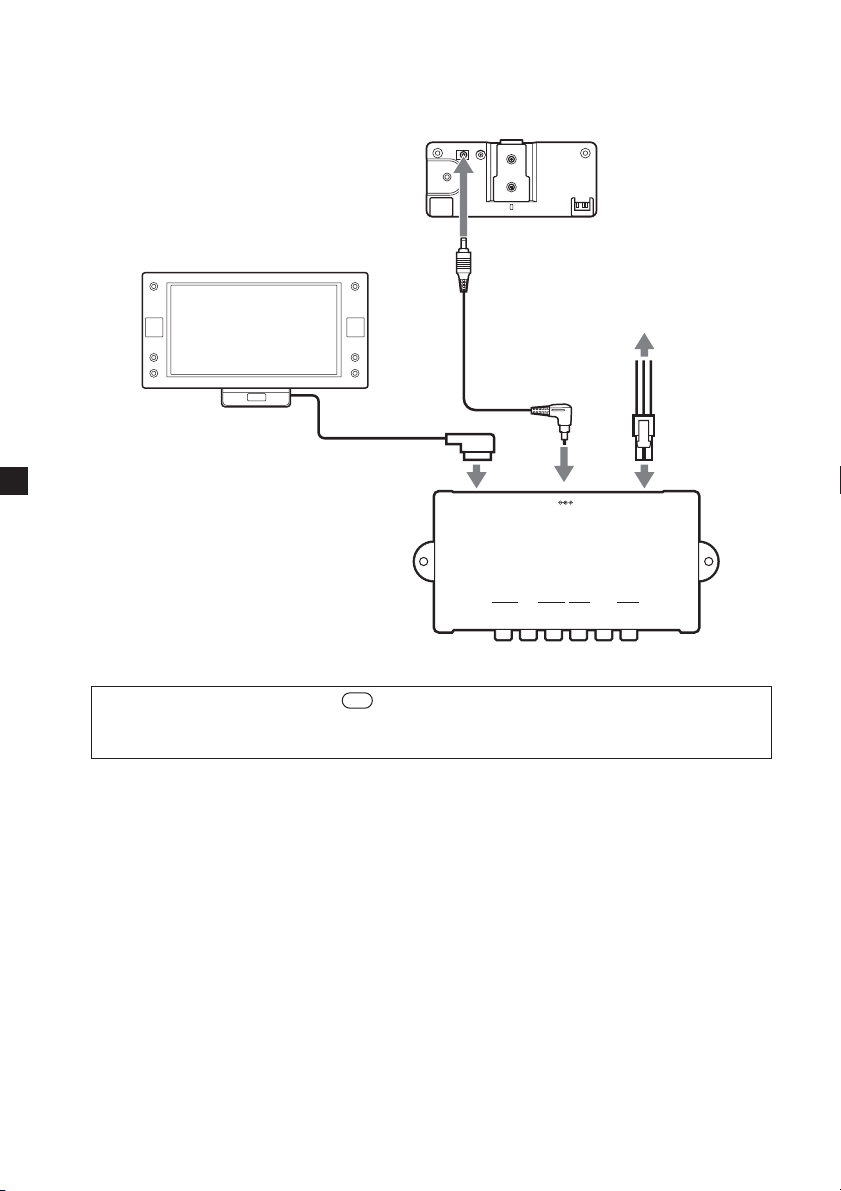
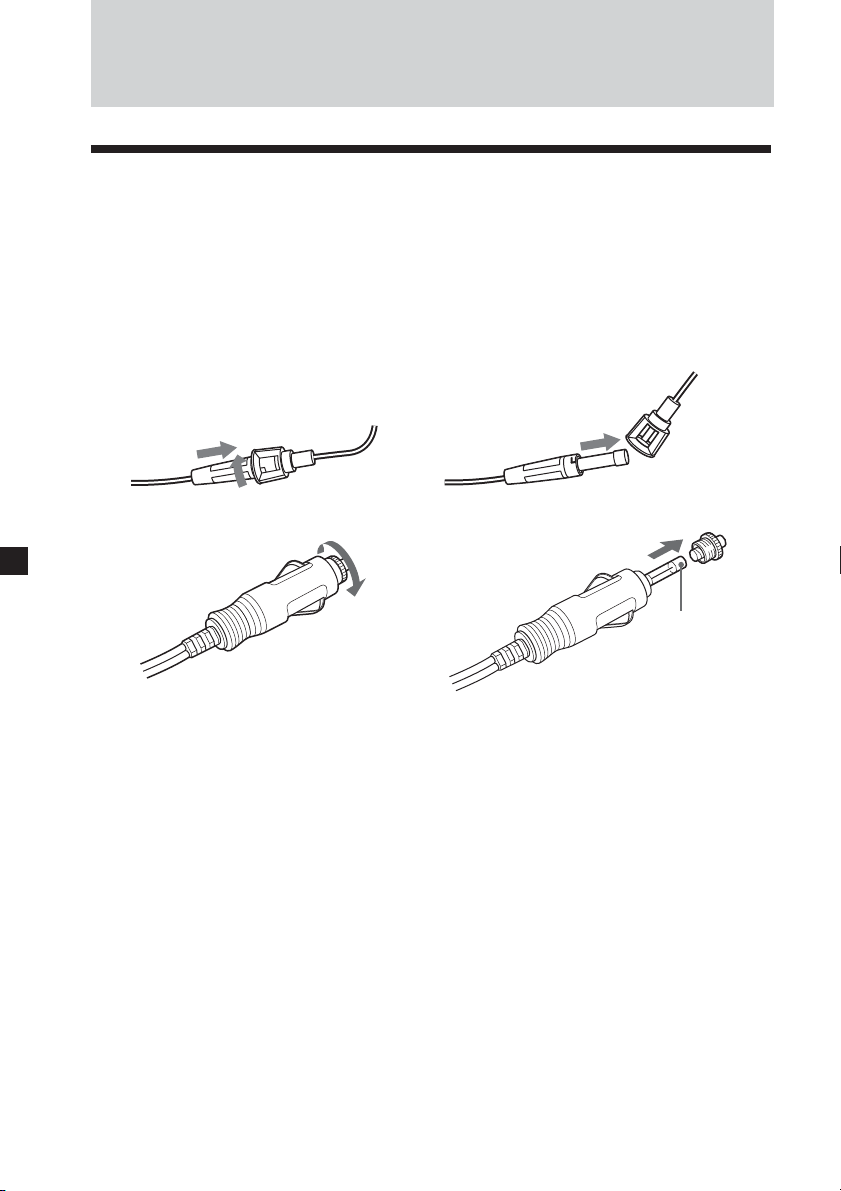
Charging the rechargeable battery (in a car only)
To charge the rechargeable battery, use the supplied Connection box and Battery
rechargeable cable in a car.
To the cigar lighter socket
and parking brake switch cord
Battery
rechargeable cable
(supplied)
Be sure to press (POWER) (or
MONITOR
(XVM)
{/1
on the card remote commander) to turn the
DC OUT 9V
MAX 1A
INPUT
VIDEO 1
VIDEO 2
VLRVLR
OUTPUT
POWER
DC 12V 3A
REAR/FRONT
LOCATION
monitor on after the connection is made. If the monitor is off, the battery will not
be charged.
It usually takes about 6 hours* for an empty battery to complete charging. The lamp
of the rechargeable battery indicates the charging conditions.
While charging: Lights in orange
Charging completed: Lights in green
Charging error: Flashes in green
* The charging time may vary depending on the surrounding temperature.
16
Page 17

Battery duration
Approximately 210 minutes* (fully charged, DIMMER On)
* When used at room temperature.
Notes on charging
• Be sure to use the specific charging device.
• Charge the rechargeable battery at a temperature between 5 °C (41 °F) and 35 °C (95 °F).
• The rechargeable battery may become hot during the charging procedure; this, however
poses no danger.
• Charge the rechargeable battery before use if it has not been used for an extended
period of time.
• Once charging is completed, unplug the power supply from the rechargeable battery. If
you charge the fully charged battery, it will take about 60 minutes for the lamp of the
battery to light in green again.
• While charging, the lamp of the battery remains lit for 30 seconds even after the monitor
is turned off.
17
Page 18

Additional Information
Maintenance
Fuse replacement
When replacing the fuse of the power cord or the cigar lighter socket, be sure to use
one matching the amperage rating stated on the original fuse. If the fuse blows, check
the power connection and replace the fuse. If the fuse blows again after replacement,
there may be an internal malfunction. In such a case, consult your nearest Sony
dealer.
1
c
2
c
Warning
Never use a fuse with an amperage rating exceeding the one supplied with the unit
as this could damage the unit.
18
Fuse
Page 19

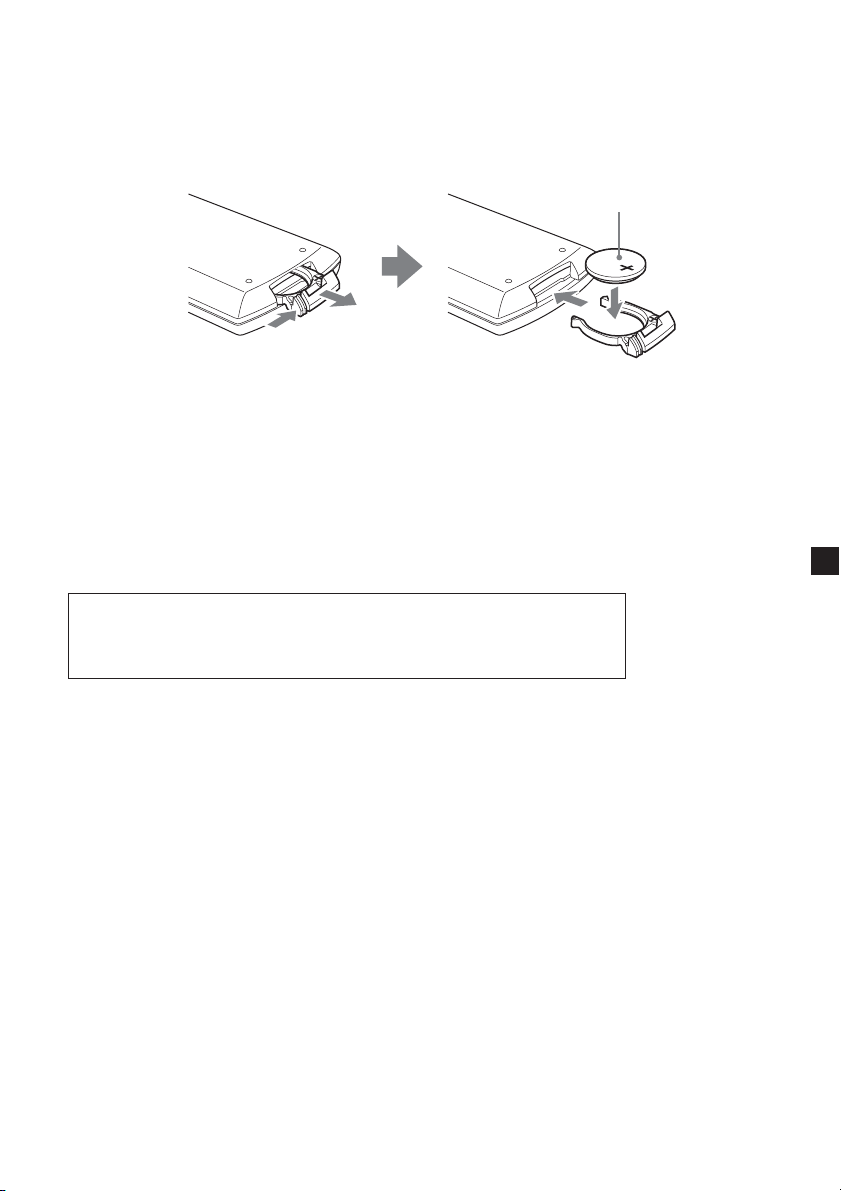
Replacing the lithium battery
Under normal conditions, batteries will last approximately 1 year. (The service life
may be shorter, depending on the conditions of use.)
When the battery becomes weak, the range of the card remote commander becomes
shorter. Replace the battery with a new CR2025 lithium battery. Use of any other
battery may present a risk of fire or explosion.
+ side facing up
2
While pushing the
1
lock lever (1), pull
out the battery
holder (2).
Notes on lithium battery
• Keep the lithium battery out of the reach of children. Should the battery be
swallowed, immediately consult a doctor.
• Wipe the battery with a dry cloth to assure a good contact.
• Be sure to observe the correct polarity when installing the battery.
• Do not hold the battery with metallic tweezers, otherwise a short-circuit may occur.
WARNING
Battery may explode if mistreated.
Do not recharge, disassemble, or dispose of in fire.
19
Page 20
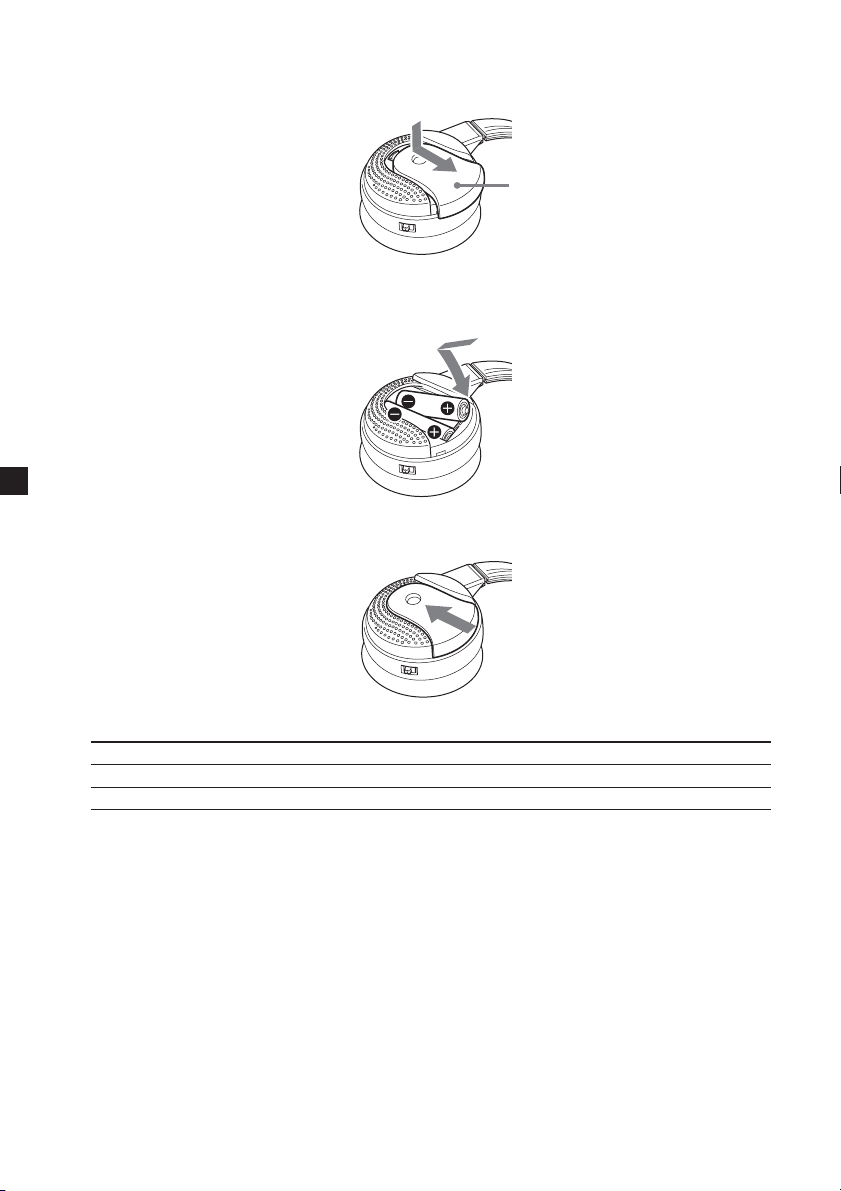
Inserting the batteries to the headphones
1 Open the battery compartment lid (
v
) of the left housing.
Lid (v)
2 Insert size R6 2 dry batteries into the battery compartment, matching the
battery 3 terminals with the 3 marks in the compartment.
3 Close the battery compartment lid.
Battery life
Battery Approx. hours*
Sony alkaline battery LR6/AM-3 (N) 90 hours*
Sony manganese battery R6/SUM-3 (NU) 40 hours*
1
2
2
*1at 1 kHz, 1 mW+1 mW output
*2Time stated above may vary, depending on the temperature or conditions of use.
Notes on Batteries
• Do not attempt to charge dry batteries.
• Do not carry batteries together with coins or other metallic objects. Heat can be
generated if the positive and negative terminals accidentally come into contact with
metallic objects.
• If you are not going to use the unit for a long time, remove the batteries to avoid
damage from battery leakage or corrosion.
When to replace the batteries
When the batteries become weak, the power indicator light dims, or sound becomes
distorted or noisy. Replace the batteries with new ones as soon as possible.
20
Page 21
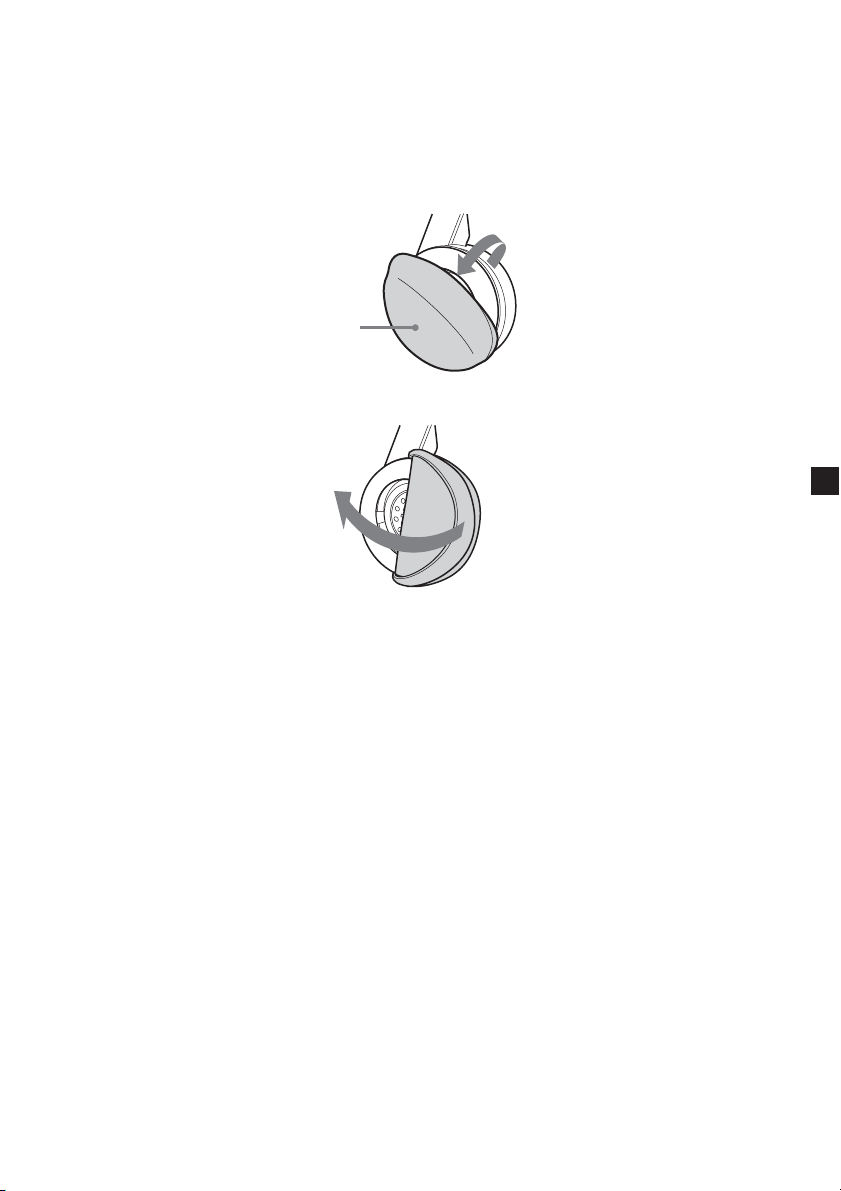
Replacing the ear pads
The ear pads are replaceable. If the ear pads become dirty or worn out, replace them
as illustrated below.
The ear pad is not commercially available.
You can order replacements at your nearest Sony dealer.
1 Remove the old ear pad by pulling it off.
Ear pad
2 Place the new ear pad around the housing.
About the liquid crystal display (LCD) panel
Do not press on the LCD panel on the unit as doing so can distort the picture or
cause a malfunction. The picture may become unclear, or the LCD panel may be
damaged.
Notes on cleaning
— Clean the LCD panel with a slightly damp soft cloth.
— Do not use solvents such as benzine, thinner, commercially available cleaners or
antistatic spray.
• Do not use the unit in temperatures under 0 °C (32 °F) or over 45 °C (113 °F).
• If your car was parked in a cold or hot place, the picture may not be clear. The
monitor is not damaged. The picture will become clear after the temperature in
your car becomes normal.
Some stationary blue or red dots may appear on the monitor.
These are called bright spots, and can happen with any LCD.
The LCD panel is highly sophisticated, and more than 99.99 % of the segments used
in the panel are flawless. However, there is a possibility that less than 0.01 % of the
segments are defective and may not light up properly.
21
Page 22

Specifications
Monitor
System Liquid crystal color display
Drive system TFT-LCD active matrix
system
Picture size 6.5 inches wide screen (16:9)
143.4 × 79.3 mm, 165.1 mm
(w/h, d)
Picture segment
280,800 (w 1,200 × h 234) dots
Power requirements
12 V DC car battery
(negative ground)
Current drain Approx. 1 A
Dimensions 194 × 101 × 27.1 mm
(73/4 × 4 × 11/8 in.)
(w/h/d)
Operating temperature
0 °C – 45 °C (32 °F – 113 °F)
Mass Approx. 424 g (15 oz)
Connection box XA-125
A/V Output
Output impedance: less than 470 Ω
less than 1,000 pF
Output level: 0 dBs ±0.3 dB
(0.775 V rms)
Video: 75 Ω 1 Vp-p
A/V input ×2
Input impedance: more than 10 kΩ
less than 1,000 pF
Input level (max.): 1.3 dBs +0/–0.3 dB
(1 V rms)
Video: 75 Ω 1 Vp-p
Dimensions 147.5 × 40 × 80 mm
(5 7/8 × 15/8 × 31/4 in.)
(w/h/d)
Mass Approx. 282 g (10 oz)
Card remote commander RM-X709
Power requirements
CR2025 lithium battery
Operable range
Approx. 2.5 m (8.2 ft.)
Dimensions 55 × 125 × 15 mm
(21/4 × 5 × 19/32 in.)
(w/h/d)
Mass Approx. 40 g (14 oz)
(including batteries)
Headphones
Modulation system
Frequency modulation
Carrier frequency
Right : 2.8 MHz (CH1)/3.8 MHz
(CH2)
Left : 2.3 MHz (CH1)/3.2 MHz
(CH2)
Frequency response
18 – 22,000 Hz
Power source DC 3.0 V; using R6 dry
batteries (2)
Mass Approx. 230 g (8 oz)
(including batteries)
Supplied accessories
Installation kit (1)
Card remote commander RM-X709
(with supplied battery) (1)
Cordless headphones MV-02HP (1)
Power supply cord (1)
Battery rechargeable cable (1)
Detach cradle (3 m) (1)
Cigar plug (0.3 m) (1)
Operating Instructions (1 set)
22
Optional accessories
Multi Disc Player MEX-R5
Rechargeable Battery MV-100BAT
Design and specifications are subject to
change without notice.
Page 23
Troubleshooting
The following checklist will help you solve problems you may encounter with your
unit.
Before going through the checklist below, check the connection and operating
procedures.
General
No picture
Good picture, but no sound
Dotted lines or stripes
No picture when you connect
the optional equipment.
No response when pressing the
buttons on the card remote
commander.
No picture even when playing
back the connected device
while driving.
The operation buttons on the
monitor do not function. / The
monitor does not turn off. /
Nothing but the white
background appears on the
display.
Image interference or audio
noise occurs while in RECEIVER
mode.
The monitor does not turn on
when using the rechargeable
battery
•The power cord has been disconnected.
•The fuse has blown.
Press (VOL)(+) ((VOLUME)(+) on the monitor) or (ATT) on
the card remote commander.
This may be caused by local interference such as a car
engine or motorcycle. Adjust the antennas for minimum
interference.
The cord has been disconnected. Connect the cord securely.
The battery may be exhausted.
The FRONT/REAR switch on the Connection box is
switched to “FRONT”. If you use the monitor on a
dashboard, you can use only NAVI as an input source
while driving. Playback the connected device when the car
is stopped.
Remove the monitor from the cradle to stop the power
distribution, and press the (RESET) button on the rear side
of the monitor with a pointed object, such as a ballpoint pen
(page 8).
•Simultaneous use with other 2.4 GHz equipment may
cause image interference or audio noise.
•Change the channel (page 11). If there is no improvement,
stop using the other equipment.
•Change the location of the transmitter of the master unit.
, Position the transmitter higher than the unit to
prevent obstruction by the seat or passenger.
, Place the transmitter in a stable place, otherwise its
position and angle may change.
•Interference or audio noise may temporarily occur during
driving as a result of obstacles outside the car.
•When attaching the monitor to the headrest, it is
recommended to attach it on the headrest of the front
passenger seat.
Charge the rechargeable battery (page 16). (Charge it when
“LOW BATTERY” appears in the display.)
23
Page 24

Headphones
No sound/Muffled sound
Distorted sound
Loud background noise
•Turn on the display monitor first, and then put on the
headphones.
•Check that the display monitor is turned on.
•The attenuate function is activated.
, Check if there is any object between the transmitter
and the headphones.
, Use the headphones near the transmitter.
•The headphones’ power indicator light dims, flashes or
goes off.
, Replace the batteries with new ones.
•The headphones’ power indicator light dims, flashes or
goes off.
, Replace the batteries with new ones.
•Move closer to the transmitter. (As you move away from
the transmitter, more noise is likely to be heard. This is
inherent in infrared ray transmission and does not mean
that there is a problem with the headphones.)
•Check that there are no objects between the transmitter
and the headphones.
•Check that the infrared sensors are not obstructed by your
hands or hair.
•Use the headphones away from direct sunlight.
•The headphones’ power indicator light dims, flashes or
goes off.
, Replace the batteries with new ones
If you turn the ignition switch to the OFF position while the Cigar lighter adaptor
of the monitor is plugged, the power of car audio equipments may stay on for a
few seconds. Although this will not cause any problem, you can resolve it by
unplugging the Cigar lighter adaptor.
24
Page 25

Page 26

ATTENTION
• Lors de l’installation, veillez à fixer
fermement l’appareil.
• Pendant le fonctionnement, veillez à
attacher les ceintures pour éviter les
blessures en cas de mouvement
brusque du véhicule.
L’utilisation est autorisée seulement aux
conditions suivantes;
—ce dispositif ne devra pas produire de
brouillage.
—ce dispositif devra accepter tout
brouillage même si ce brouillage est
susceptible de compromettre le
fonctionnement du dispositif.
Félicitations !
Merci d’avoir fait l’acquisition du
moniteur mobile Sony.
• Récepteur AV sans fil 2,4 GHz intégré.
• Compatible avec les systèmes couleur
PAL et NTSC.
• En plus du mode écran normal, les
modes plein écran (Full), grand écran
(Wide) et image agrandie (Zoom) sont
disponibles.
• Panneau d’affichage à cristaux
liquides à faible coefficient de
réflexion minimisant les reflets de
sources lumineuses.
• Luminosité réglable en fonction des
conditions d’éclairage.
• Gradateur de rétroéclairage offrant
des images à contraste marqué, sans
inversion de couleurs et sans flou.
•2entrées audio/vidéo et 1 sortie
audio/vidéo sont fournies pour
raccorder un magnétoscope, une
console de jeux et un moniteur
supplémentaire.
• Emetteur infrarouge intégré pour les
casques sans fil.
2
Page 27

Table des matières
Félicitations ! ........................................................................................................................ 2
Précautions .......................................................................................................................... 4
Emplacement des commandes ......................................................................................... 6
Fonctionnement
Sélection de la source d’entrée .......................................................................................... 9
Réglage du mode écran.................................................................................................... 10
Modification des réglages du menu............................................................................... 11
Emploi du casque ............................................................................................................. 13
Informations complémentaires
Entretien ............................................................................................................................. 18
Caractéristiques techniques............................................................................................. 22
Dépannage ......................................................................................................................... 23
3
Page 28

Précautions
Pour éviter tout risque de blessure grave ou d’accident, lisez les précautions
suivantes avant d’installer ou d’utiliser l’appareil.
A propos de la sécurité
Conformez-vous au code de la route de votre pays.
• Pendant la conduite
- Le conducteur ne doit pas regarder ni utiliser le moniteur. En effet, cela pourrait
le distraire et provoquer un accident.
Le conducteur ne doit pas utiliser
provoquer un accident.
Garez votre voiture en lieu sûr pour regarder le moniteur ou utiliser un casque.
Visionnage d’images vidéo
Les images vidéo apparaissent seulement une fois que la
voiture est garée et que le frein de stationnement est mis.
Quand la voiture commence à bouger, les images vidéo
disparaissent automatiquement après affichage de la mise en
DRIVE MODE
• Une fois l’installation terminée
- Prenez garde à ne pas vous cogner la tête contre l’appareil lorsque vous vous
levez du siège arrière.
- Faites particulièrement attention à ne pas enrouler le cordon du casque autour du
cou pour éviter toute blessure ou suffocation en cas de mouvement soudain du
véhicule.
- Tenez les petites pièces hors de portée des enfants.
- Ne laissez pas le moniteur en plein soleil pendant longtemps.
garde suivante.
N’opérez pas l’équipement connecté au moniteur et ne
regardez pas le moniteur pendant la conduite.
La mise en garde ci-dessus apparaît seulement quand le
moniteur est raccordé au berceau d’installation.
de casque. En effet, cela pourrait le distraire et
4
Page 29

A propos de l’installation
• L’installation de l’appareil nécessite des
connaissances techniques approfondies.
Cet appareil doit être installé par un technicien ou
un agent de service qualifié.
• Si vous tentez vous-même d’installer l’appareil,
faites-le en vous référant aux schémas d’installation
et de câblage du
incorrecte risque de provoquer un incendie ou une
électrocution.
• Avant de procéder à l’installation, assurez-vous
de régler la clé de contact de la voiture sur OFF
ou d’ôter la clé. L’installation de l’appareil avec
le moteur en marche risque de décharger la
batterie ou de provoquer un court-circuit.
• Prenez garde à ne pas endommager les conduits, les
tubes, le réservoir ou les fils électriques lors de
l’installation de l’appareil. Cela pourrait provoquer un
incendie. Si vous percez un trou dans les panneaux
intérieurs de la voiture, assurez-vous de
n’endommager aucune pièce cachée.
• N’utilisez aucune vis ni aucun écrou réservés aux
dispositifs de sécurité, tels que la tringlerie de direction,
le circuit d’alimentation en carburant ou les systèmes
de freinage. Ceci pourrait provoquer un incendie ou un
accident.
• Prenez garde à ne pas emmêler ou coincer les cordons et les
fils dans une partie mobile des rails de siège.
mode d’emploi.
Une installation
Lieu d’installation
Avant d’installer l’appareil, consultez la réglementation routiére en vigueur dans
votre région.
N’installez pas l’appareil à un endroit où :
- Il risque de gêner la visibilité du conducteur ;
- Il risque d’entraver l’utilisation du coussin de sécurité
gonflable (airbag) ;
- Il risque d’entraver l’utilisation du véhicule, notamment le
volant, le levier de vitesses ou la pédale de frein ;
- Le conducteur et les passagers risquent de se blesser en
montant ou sortant de la voiture.
Pour toute question ou problème relatif à votre appareil et dont vous n’avez pas
la solution dans ce manuel, veillez consulter le revendeur Sony le plus proche.
5
Page 30

Emplacement des commandes
Moniteur
15
2
7 8
1 Touche INPUT
Appuyez sur cette touche pour
sélectionner la source d’entrée.
2 Récepteur pour la mini-
télécommande/Emetteur pour les
casques sans fil*
3 Touche MENU
Appuyez sur cette touche pour
effectuer divers réglages.
4 Touche DIMMER
Appuyez sur cette touche pour
aactiver/désactiver le gradateur.
(À l’activation, l’affichage
s’assombrit.)
* Si des interférences se produisent lors de l’utilisation de plusieurs casques sans fil
Des interférences risquent de se produire si vous installez plusieurs moniteurs et que vous
les utilisez simultanément.
6
5 Touche POWER (on/off)
Appuyez sur cette touche pour
mettre le moniteur sous/hors
tension.
6 Touches VOLUME +/–
Appuyez sur ces touches pour
augmenter ou baisser le volume (Le
niveau de volume par défaut est 25.)
ou sélectionner un paramètre
pendant une opération de menu.
7 Touche RESET
8 Haut-parleur monaural
643
Page 31

Mini-télécommande RM-X709
1
2
3
1 Touche ATT
Appuyez sur cette touche pour
baisser rapidement le volume.
Pour rétablir le niveau de volume
précédent, appuyez à nouveau sur
(ATT) ou sur (VOL) +/–.
2 Touche INPUT
Appuyez sur cette touche pour
sélectionner la source d’entrée.
3 Touche MENU
Appuyez sur cette touche pour
sélectionner les réglages du menu.
4 Touche |/1 (alimentation)
INPUT
ATT
`/1
4
MODEMENU
5
6
VOL
5 Touche MODE
6 Touches M/m
7 Touches VOL (volume) +/–
7
Appuyez sur cette touche pour
changer le mode écran.
Appuyez sur l’une de ces touches
pour sélectionner le paramètre
souhaité.
Appuyez sur ces touches pour régler
le volume du moniteur.
Conseil
Pour les détails sur le remplacement de la pile, reportez-vous à la section « Remplacement
de la pile au lithium » (page 19).
7
Page 32

Casque sans fil MV-02HP
L
4
1
2
R
5
3
1 Fente
2 Interrupteur d’alimentation (ON/
OFF)
Commutez pour mettre le casque
sous/hors tension.
3 Coussinet
4 Commande VOL
Tournez-la pour ajuster le volume
du casque.
Conseils
• Voir les « Informations complémentaires » (page 20) pour le remplacement des piles.
• Voir les « Informations complémentaires » (page 21) pour le remplacement des
coussinets.
5 Témoin d’alimentation
S’allume en rouge à la mise sous
tension.
6 Commutateur CH1/CH2
Commutez pour sélectionner le
canal audio CH1 ou CH2.
6
8
Page 33

Fonctionnement
Sélection de la source d’entrée
Vous pouvez sélectionner la source d’entrée.
POWERINPUT
VOLUME
+/−
ATT
INPUT
INPUT
`/1
MODEMENU
VOL
1 Appuyez sur (POWER).
Sur la mini-télécommande, appuyez sur
L’appareil se met sous tension.
{/1
.
2 Appuyez sur (INPUT) pour sélectionner la source d’entrée souhaitée.
A chaque pression sur (INPUT), l’affichage change comme suit :
VIDEO 1 VIDEO 2
RECEIVER
Remarque
Si vous utilisez le moniteur avec une pile rechargeable (MV-100BAT) (en option), il passe
automatiquement en mode récepteur à sa mise sous tension. La touche (INPUT) est
désactivée et la source d’entrée est fixée au mode récepteur. Voir « Emploi de la pile
rechargeable» (page 15).
* Remarque sur la transmission sans fil (mode récepteur)
L’emploi simultané avec un autre équipement 2,4 GHz peut provoquer des
interférences sur l’image ou du bruit audio. Ce n’est pas une anomalie, mais dû au fait
que l’équipement utilise la même fréquence de fonctionnement.
*
`/1
V/v
9
Page 34
Réglage du mode écran
Zoom
Full
Wide
Normal
En plus du mode plein écran les modes grand écran, normal et image agrandie sont
également disponibles.
ATT
INPUT
MENU
MENU
`/1
MODEMENU
MODE
VOL
Appuyez plusieurs fois sur (MODE).
Le mode actuel s’affiche d’abord à l’écran.
A chaque pression sur la touche, le mode écran est modifié dans l’ordre suivant :
Full
Full
Full (Plein écran) (image normale)
Les images de format 4:3 sont
agrandies jusqu’aux bords gauche et
droit de l’écran.
Wide
Wide
Wide (Grand écran)
Les bords gauche et droit des
images au format 4:3 sont
agrandis pour remplir l’écran.
Zoom
Zoom
Zoom (Image agrandie)
Les images de format 4:3 sont
agrandies jusqu’aux bords gauche
et droit de l’écran. Les parties
excédentaires de l’image (haut et
bas) sont coupées pour que l’image
remplisse l’écran.
Vous pouvez aussi régler le mode écran par réglage au menu (page 11).
Conseil
Il est possible que les images aient une mauvaise définition en mode Zoom.
10
Normal
Normal
Normal (Standard)
L’image s’affiche dans un
rapport d’aspect de 4:3.
Page 35

Modification des réglages du menu
Vous avez la possibilité de définir manuellement les paramètres d’affichage de
l’écran si l’écran n’est pas visible depuis la position que vous occupez.
ATT
INPUT
MENU
MENU
VOLUME
+/−
VOL
1 Appuyez sur (MENU).
L’écran « Picture » s’affiche.
Picture 32
Press
+/-
or MENU.
Chaque fois que vous appuyez sur (MENU), l’écran de réglage change comme
suit :
Picture
B
(Image)
Menu Off
(Sortie du
menu)
* S’affiche uniquement lorsque le système couleur NTSC est sélectionné.
Brightness
B
(Luminosité)
Select NTSC or
b
PAL System
(Sélectionnez le
système NTSC
ou PAL)
Color
B
(Couleur)
b
Hue*
B
(Teinte)
Receiver
(Récepteur)
b
La valeur de réglage du
paramètre sélectionné
s’affiche dans cette zone.
Video
B
Adjust
(Réglage
vidéo)
Cordless
Headphones
(Casques sans
fil)
B
Mode
b
Speaker
(Haut-parleur)
B
`/1
MODEMENU
V/v
Blue
Back
(Fond
bleu)
b
2 Appuyez sur M ou m ((VOLUME) (+) ou (–) au moniteur) pour régler le
paramètre souhaité.
Voir la page suivante pour les options de réglage.
11
Page 36

Les réglages par défaut sont soulignés.
Réglages Options de réglage
Picture (Image) Portée réglable : 0 à 63 (le réglage par défaut est « 36 »)
Brightness Portée réglable : 0 à 63 (le réglage par défaut est « 30 »)
(Luminosité) Ajuste la luminosité.
Color (Couleur) Portée réglable : 0 à 63 (le réglage par défaut est « 36 »)
Hue (Teinte) Réglez cette option si l’image est rougeâtre ou verdâtre. Le réglage par
Video Adjust Réinitialise les réglages de l’image, de la luminosité et des couleurs en
(Ajustement
vidéo)
Mode Full, Wide, Normal, Zoom
Blue Back On (Activé), Off (Désactivé)
(Fond bleu) Règle l’écran du rétro-éclairage bleu.
Speaker On (Activé), Off (Désactivé)
(Haut-parleur) Activation et désactivation du haut-parleur à l’arrière du moniteur.
Cordless Headphones CH1, CH2, OFF (Désactivé)
(Casques sans fil) Activation/désactivation du casque sans fil MV-02HP fourni. À
Receiver (Récepteur) CH1, CH2, CH3, CH4
Select NTSC or PAL PAL, NTSC
System (Sélectionnez Sélectionnez le système couleur, NTSC ou PAL.
le système NTSC ou
PAL)
Ajuste le contraste.
Ajuste la couleur.
défaut est « CTR » (centre).
« Hue » (Teinte) ne s’affiche que pour le système NTSC.
une seule opération.
Remarque
Les réglages du canal d’entrée, du système de couleur pour le
signal vidéo reçu (PAL/NTSC), du mode d’écran et du rétroéclairage bleu ne se réinitialisent pas lorsque vous réinitialisez les
ajustement.
Règlent le mode d’écran.
Full (Plein écran): Les images de format 4:3 sont agrandies jusqu’aux
bords gauche et droit de l’écran (image ordinaire).
Wide (Grand écran): Les bords gauche et droit des images au format
4:3 sont agrandis pour remplir l’écran.
Normal (Standard): L’image s’affiche dans un rapport d’aspect de 4:3.
Zoom (Image agrandie): Les images de format 4:3 sont agrandies jusqu’aux
bords gauche et droit de l’écran. Les parties excédentaires
de l’image (haut et bas) sont coupées pour que l’image
remplisse l’écran.
l’emploi du casque, sélectionnez « CH1 » ou « CH2 » selon le réglage
de canal du casque.
A l’emploi d’un lecteur multidisque MEX-R5 (en option), sélectionnez
le canal selon le réglage de canal du lecteur.
12
Page 37

Emploi du casque
Ecoute d’un programme
Avant l’écoute
• L’émetteur pour le casque se trouve sur le moniteur d’affichage.
• Pour éviter tout dommage auditif, baissez d’abord le volume.
1 Mettez le moniteur d’affichage sous tension.
2 Réglez l’interrupteur d’alimentation sur ON sur le logement gauche du
casque.
Le casque se met sous tension et le témoin POWER s’allume en rouge.
Interrupteur
d’alimentation (ON/OFF)
Témoin
d’alimentation
3 Mettez le casque.
Vérifiez bien que le logement droit (R) est sur votre oreille droite et le logement
gauche (L) sur votre oreille gauche.
4 Lancez la lecture.
5 Tournez la commande VOL pour ajuster le volume.
Si les capteurs infrarouges du casque sont couverts par vos mains quand vous
ajustez le volume, la fonction d’atténuation sera activée et le volume ne pourra pas
être ajusté. Pour ajuster le volume, rapprochez-vous de l’émetteur du moniteur,
ou orientez les capteurs infrarouges vers l’émetteur du moniteur.
Commande VOL
Remarque
Il est impossible de régler le volume du casque avec la mini-télécommande fournie. Utilisez
la commande de volume située sur le casque.
13
Page 38

Le son est automatiquement atténué si le bruit augmente
— Fonction d’atténuation
Si les rayons infrarouges sont obstrués, ou si le casque est utilisé en dehors de sa
portée efficace, le bruit augmentera et le son diminuera. Pour éviter des dommages
auditifs potentiels pouvant résulter du bruit, cette fonction atténue tout son dans le
casque. Le son est automatiquement rétabli quand vous vous rapprochez de
l’émetteur ou éliminez l’obstruction.
Sélection du canal audio
Vous pouvez sélectionner le canal audio avec le commutateur CH1/CH2 pour éviter
les interférences à l’emploi du casque sans fil avec un autre appareil AV. Sélectionnez
le canal audio selon le réglage « Cordless Headphones (Casques sans fil) » du menu
du moniteur.
Après l’écoute d’un programme
Retirez le casque et coupez l’alimentation (du bruit est possible si vous coupez le
moniteur avant de retirer le casque).
Précautions
• Le conducteur ne doit pas utiliser le casque. Cela pourrait le distraire et provoquer
un accident.
• Si le casque est utilisé en plein soleil, la sensibilité des capteurs infrarouges peut se
détériorer et une qualité sonore inférieure en résulter.
• Si le casque doit rester utilisé pendant une période prolongée, retirez les piles pour
éviter les dommages causés par une fuite et la corrosion consécutive.
• Ne laissez pas le casque à un emplacement en plein soleil, soumis à une forte
température ou humidité. (Il est recommandé d’utiliser le casque à une
température entre 5 (41) et 35˚C (95 °F).)
• Ne faites pas tomber, ne cognez pas et de soumettez le casque à un impact violent
d’aucune sorte, car cela pourrait endommager le produit.
Remarques sur la prévention des dommages auditifs avec le casque
Evitez d’utiliser le casque à volume élevé. Les experts de l’ouïe déconseillent la
lecture continue, à volume élevé et prolongée. En cas de bourdonnement d’oreilles,
baissez le volume ou interrompez l’emploi.
Considération des autres
Maintenez le volume à un niveau modéré. Cela vous permettra d’entendre les sons
extérieurs et de vous montrer aimable vis-à-vis des personnes autour de vous.
En cas de question ou problème concernant le casque non couvert par ce manuel,
veuillez consulter le revendeur Sony le plus proche.
14
Page 39

Emploi de la pile rechargeable
Vous pouvez utiliser la pile rechargeable (en option) pour la télécommande.
La pile rechargeable doit être chargée avant l’utilisation.
Mise en place de la pile rechargeable
Pile rechargeable
MV-100BAT (en option)
Glissez la pile rechargeable jusqu’au déclic de mise en place.
Remarques sur l’emploi de la pile rechargeable
• Quand la pile rechargeable est installée, le moniteur passe automatiquement en mode
récepteur. (INPUT) est désactivé quand la pile est en place.
• Quand la pile rechargeable est installée, le gradateur est automatiquement activé. Vous
pouvez le désactiver en appuyant sur (DIMMER).
Retrait de la pile rechargeable
Appuyez pour libérer
Appuyez sur la touche de libération sur la pile rechargeable et faites-la glisser.
15
Page 40

Chargement de la pile rechargeable (dans une voiture
seulement)
Pour charger la pile rechargeable, utilisez le boîtier de raccordement ou le câble de
pile rechargeable fournis dans une voiture.
A la douille d'allume-cigare et
au cordon de commutateur de
frein de stationnement
Câble de pile
rechargeable
(fourni)
N'oubliez pas d'appuyer sur (POWER) (ou
MONITOR
(XVM)
{/1
sur la mini-télécommande) pour
DC OUT 9V
MAX 1A
INPUT
VIDEO 1
VIDEO 2
VLRVLR
OUTPUT
POWER
DC 12V 3A
REAR/FRONT
LOCATION
allumer le moniteur après la connexion. La pile ne sera pas chargée si le moniteur
est éteint.
Cela prend environ 6 heures* pour charger complètement une batterie vide. Le
voyant de la pile rechargeable indique l’état du chargement.
Pendant le chargement: S’allume en orange
Chargement terminé: S’allume en vert
Erreur de chargement: Clignote en vert
*La durée du chargement peut varier selon la température environnante.
16
Page 41

Durée de service de la pile
Environ 210 minutes* (entièrement chargée, DIMMER activé)
*A l’emploi à température ambiante.
Remarques sur le chargement
• Veillez à utiliser le dispositif de chargement spécifique.
• Chargez la pile rechargeable à une température entre 5 °C (41 °F) et 35 °C (95 °F).
• La pile rechargeable peut se chauffer pendant le chargement, sans pour cela constituer
un danger.
• Chargez la pile rechargeable avant usage si elle n’a pas été utilisée pendant une période
prolongée.
• Une fois la charge terminée, débranchez l'alimentation de la pile rechargeable. Si vous
chargez la pile entièrement chargée, il faudra environ 60 minutes pour que le témoin de
pile s'allume à nouveau en vert.
• Pendant la charge, le témoin de la pile reste allumé 30 secondes même après l'extinction
du moniteur.
17
Page 42
Informations complémentaires
Entretien
Remplacement du fusible
Au remplacement du fusible du cordon d’alimentation ou de la douille d’allumecigarette, veillez à utiliser un fusible dont l’ampérage correspond à celui indiqué sur
le fusible d’origine. Si le fusible saute, vérifiez le branchement de l’alimentation et
remplacez le fusible. Si le fusible saute de nouveau après avoir été remplacé, cela
peut révéler une défaillance interne de l’appareil. Dans ce cas, consultez le revendeur
Sony le plus près de chez vous.
1
c
2
c
Avertissement
N’utilisez jamais de fusible dont l’ampérage dépasse celui du fusible fourni, cela
pourrait endommager l’appareil.
18
Fusible
Page 43
Remplacement de la pile au lithium
En fonctionnement normal, la pile dure environ un an. (La durée de vie de la pile
peut être plus courte selon les conditions d’utilisation.)
Lorsque la pile devient faible, la portée de la mini-télécommande diminue.
Remplacez la pile par une nouvelle pile CR2025 au lithium. L’utilisation de tout autre
type de pile peut entraîner un risque d’incendie ou d’explosion.
Côté + vers le haut
2
En appuyant sur la
1
manette de
verrouillage (1),
retirez le logement
pile (2).
Remarques sur la pile au lithium
• Tenez la pile au lithium hors de portée des enfants. En cas d’ingestion de la pile,
consultez immédiatement un médecin.
• Essuyer la pile avec un chiffon sec pour assurer un bon contact.
• Veillez à respecter la polarité lors de l’installation de la pile.
• Ne tenez pas la pile avec des pinces métalliques, cela pourrait provoquer un court-
circuit.
AVERTISSEMENT
La pile peut exploser en cas d’utilisation inappropriée.
Ne recharge pas la pile, ne la démontez pas et ne la jetez pas au feu.
19
Page 44

Insertion des piles dans le casque
1 Ouvrez le couvercle du compartiment piles (
v
) dans le logement gauche.
Couvercle (v)
2 Insérez 2 piles sèches R6 dans le compartiment piles, en alignant le pôle 3
des piles sur les marques 3 dans le compartiment.
3 Refermez le couvercle du compartiment piles.
Vie de service des piles
Pile Nbre d’heures approx.
Pile alcaline LR6/AM-3 (N) Sony 90 heures
Pile au manganèse R6/SUM-3 (NU) Sony 40 heures
*1
Puissance de 1 mW + 1 mW, à 1 kHz
*2
Le temps indiqué ci-dessus peut varier selon la température et les conditions
*2
*2
*1
d’utilisation.
Remarques sur les piles
• N’essayez pas de charger des piles sèches.
• Ne portez pas les piles avec des pièces de monnaie ou d’autres objets métalliques.
De la chaleur pourrait être générée si les bornes négatives et positives sont
accidentellement mises au contact d’objets métalliques.
• Si le casque doit rester utilisé pendant une période prolongée, retirez les piles pour
éviter les dommages causés par une fuite ou la corrosion.
Remplacement des piles
Quand les piles s’affaiblissent, le témoin d’alimentation s’atténue, ou le son devient
déformé ou parasité. Remplacez les piles par des neuves le plus tôt possible.
20
Page 45

Remplacement des coussinets
Les coussinets sont remplaçables. Si les coussinets sont sales ou usés, remplacez-les
comme indiqué ci-dessous.
Les coussinets ne sont pas disponibles dans le commerce.
Vous pouvez demander au revendeur Sony le plus proche de les remplacer.
1 Retirez l’ancien coussinet en tirant dessus.
Coussinet
2 Placez le nouveau coussinet sur le logement.
A propos de l’écran à cristaux liquides (ACL)
N’appuyez pas sur l’écran à cristaux liquides car cela risque de déformer l’image ou
de provoquer un dysfonctionnement. Il se peut que l’image se trouble ou que l’écran
à cristaux liquides soit endommagé.
Remarques à propos du nettoyage
— Nettoyez l’écran à cristaux liquides avec un chiffon doux humide.
— N’utilisez pas de solvants tels que la benzine des diluants, des nettoyants
ordinaires ou un vaporisateur antistatique.
• Ne faites pas fonctionner l’appareil à une température inférieure à 0 °C (32 °F) ou
supérieure à 45 °C (113 °F).
• Si votre voiture est restée stationnée dans un endroit très chaud ou très froid, il se
peut que l’image affichée ne soit pas claire. Le moniteur n’est pas endommagé.
L’image se rétablira lorsque la température du véhicule reviendra à la normale.
Des points fixes bleus ou rouges peuvent apparaître sur l’écran du moniteur.
Ces points lumineux peuvent apparaître sur n’importe quel écran à cristaux liquides.
Cet écran est le fruit d’une technologie de pointe et plus de 99,99 % des segments qui
le composent sont sans défaut. Cependant, il se peut que moins de 0,01 % des
segments soient défectueux et qu’ils ne s’allument pas correctement.
21
Page 46

Caractéristiques techniques
Moniteur
Système Affichage à cristaux liquides
couleur
Système d’affichage
LCD TFT à matrice active
Taille de l’image
Écran de 6,5 po de largeur
(16:9)
143,4 × 79,3 mm, 165,1 mm
(l/h, p)
Taille utile 280 800 points
(1 200 hor. × 234 vert. )
Alimentation requise
Batterie de voiture
12 V DC (masse négative)
Consommation électrique
Environ 1 A
Dimensions 194 × 101 × 27,1 mm
(73/4 × 4 × 11/8 po.)
(l/h/p)
Température de fonctionnement
0 °C à 45 °C (32 °F à 113 °F)
Poids Environ 424 g (15 oz)
Boîtier de raccordement XA-125
Sortie AV
Impédance de sortie :
inférieure à 470 Ω
inférieure à 1 000 pF
Niveau de sortie : 0 dBs ± 0,3 dB
(0,775 V eff.)
Vidéo : 75 Ω 1 Vc-c
2 jeux d’entrées AV
Impédance d’entrée :
supérieure à 10 kΩ
inférieure à 1 000 pF
Niveau d’entrée (max.) :
1,3 dBs +0/–0,3 dB
(1 V eff.)
Vidéo : 75 Ω 1 Vc-c
Dimensions 147,5 × 40 × 80 mm
(5 7/8 × 15/8 × 31/4 po.)
(l/h/p)
Poids Environ 282 g (10 oz)
Mini-télécommande RM-X709
Alimentation requise
Pile au lithium CR2025
Portée Environ 2,5 m (8,2 ft.)
Dimensions 55 × 125 × 15 mm
(21/4 × 5 × 19/32 po.)
(l/h/p)
Poids Environ 40 g (14 oz)
(piles incluses)
Casque
Système de modulation
Modulation de fréquence
Fréquence porteuse
Droite: 2,8 MHz (CH1)/3,8 MHz
(CH2)
Gauche: 2,3 MHz (CH1)/3,2 MHz
(CH2)
Réponse en fréquence
18 - 22 000 Hz
Alimentation DC 3,0 V; emploi de piles
sèches R6 (2)
Poids Environ 230 g (8 oz) (piles
incluses)
Accessoires fournis
Kit d'installation (1)
Mini-télécommande RM-X709
(avec pile fournie) (1)
Casque sans fil MV-02HP (1)
Cordon d’alimentation (1)
Câble de pile rechargeable (1)
Berceau détachable (3 m) (1)
Fiche pour allume-cigare (0,3 m) (1)
Mode d’emploi (1 lot)
Accessoires en option
Lecteur multidisque MEX-R5
Pile rechargeable MV-100BAT
La conception et les caractéristiques
techniques sont sujettes à modification sans
préavis.
22
Page 47

Dépannage
La liste de contrôle suivante vous aidera à résoudre les problèmes que vous pourriez
rencontrer avec cet appareil.
Avant de passer cette liste en revue, vérifiez les procédures de raccordement et
d’utilisation.
Généralités
Pas d’image
Bonne image, mais aucun son
Lignes pointillées ou rayures
Pas d’image lors du
raccordement d’appareils en
option.
Aucune réponse lorsque vous
appuyez sur les touches de la
mini-télécommande
Pas d’image même à la lecture
de l’appareil raccordé pendant
la conduite.
Les touches de
fonctionnement du moniteur
sont inopérantes./ Le
moniteur ne s'éteint pas./ Seul
le fond blanc s'affiche.
Interférence sur l'image ou
bruit audio en mode
RECEIVER.
Le moniteur ne s'allume pas à
l'emploi de la pile
rechargeable.
•Le câble d’alimentation est débranché.
•Le fusible a sauté.
Appuyez sur (VOL)(+) ((VOLUME)(+) au moniteur) ou
(ATT) sur la mini-télécommande.
Ces parasites peuvent être causés par des interférences
locales, par exemple le bruit de moteur d’une voiture ou
une motocyclette. Réglez les antennes pour réduire le
niveau d’interférences au minimum.
Le câble est débranché. Raccordez-le solidement.
La pile est peut-être épuisée.
Le commutateur FRONT/REAR sur la boîtier de
raccordement est réglé à «FRONT». Si vous utilisez le
moniteur sur le tableau de bord, seul NAVI est disponible
comme source d’entrée pendant la conduite. Lisez sur
l’appareil raccordé quand la voiture est arrêtée.
Retirez le moniteur de son berceau pour arrêter la
distribution électrique, et appuyez sur la touche (RESET) à
l'arrière avec un objet pointu, comme un stylo à bille
(page 8).
•L’emploi simultané avec un équipement 2,4 GHz peut
provoquer des interférences sur l’image ou du bruit
audio.
•Changez de canal (page 11). S'il n’y a pas d’amélioration,
arrêtez l’emploi de l’autre équipement.
•Changez l’emplacement de l'émetteur de l’unité
principale.
, Placez l’émetteur plus haut que l’appareil pour
éviter l’obstruction par le siège ou le passager.
, Placez l’émetteur à un endroit stable, sinon sa
position et son angle pourraient changer.
•Des interférences ou un bruit audio peuvent survenir
temporairement pendant la conduite à cause d’obstacles à
l’extérieur de la voiture.
•En fixant le moniteur au repose-tête, il est recommandé de
le fixer à celui du siège du passager avant.
Chargez la pile rechargeable (page 16). (Chargez-la quand
«LOW BATTERY» s’affiche.)
23
Page 48

Casque
Pas de son/son assourdi
Son déformé
Bruit de fond important
•Mettez d’abord le moniteur sous tension, puis mettez le
casque.
•Vérifiez que le moniteur est sous tension.
•La fonction d’atténuation est activée.
, Vérifiez qu’il n’y a aucun objet entre l’émetteur et le
casque.
, Utilisez le casque près de l’émetteur.
•Le témoin d’alimentation du casque s’atténue, clignote ou
s’éteint.
, Remplacez les piles par des neuves.
•Le témoin d’alimentation du casque s’atténue, clignote ou
s’éteint.
, Remplacez les piles par des neuves.
•Rapprochez-vous de l’émetteur. (En vous éloignant de
l’émetteur, plus de bruit peut devenir audible. C’est un
problème inhérent à la transmission des rayons
infrarouges et ne signifie pas qu’il y a un problème avec le
casque.)
•Vérifiez l’absence d’objet entre l’émetteur et le casque.
•Vérifiez que les capteurs infrarouges ne sont pas obstrués
par votre main ou vos cheveux.
•N’utilisez pas le casque en plein soleil.
•Le témoin d’alimentation du casque s’atténue, clignote ou
s’éteint.
, Remplacez les piles par des neuves.
Si vous mettez la clé d'allumage sur OFF quand l’adaptateur d’allume-cigare du
moniteur est branché, les équipements audio de la voiture peuvent rester allumés
pendant quelques secondes. Bien que cela ne pose pas de problème, vous pouvez
les éteindre en débranchant l’adaptateur d’allume-cigare.
24
Page 49

Page 50

Page 51

Page 52

Sony Corporation Printed in Korea
 Loading...