

Page 1

2-666-477-11 (1)
Mobile Monitor
Operating Instructions
Mode d’emploi
Owner’s Record
The model and serial numbers are located on the bottom of the unit.
Record the serial number in the space provided below.
Refer to these numbers whenever you call upon your Sony dealer regarding this
product.
Model No. XVM-B62 Serial No.
US
FR
XVM-B62
2006 Sony Corporation
Page 2
Warning
Welcome!
For the customers in the United
States
This product contains mercury.
Disposal of this product may be
regulated if sold in the United States.
For disposal or recycling information,
please contact your local authorities or
the Electronics Industries Alliance
(http://www.eiae.org).
Warning if your car’s ignition has no
ACC position
After turning the ignition off, be sure to press
(POWER) to turn off the unit.
Otherwise, the display does not turn off and
this causes battery drain.
Thank you for purchasing the Sony
Mobile Monitor.
• PAL or NTSC color system compatible
• Wide, Zoom, and Full screen modes
available, in addition to the normal
screen mode.
• The low reflection liquid crystal panel
reduces the glare from outside lighting
sources.
• Adjustable brightness control,
according to lighting conditions
• Backlight dimmer control produces
sharp contrast image, free from
reversed or blurred colors.
•2 Video inputs are provided for
connecting a video player and video
game.
2
Page 3

Table of contents
Warning ................................................. 2
Welcome! ............................................... 2
Precautions............................................ 4
Location of controls ............................. 6
Operation
Changing the menu settings .............. 7
Connections
Installation diagram ............................ 8
Connection diagram ............................ 9
Additional Information
Attaching and detaching the
monitor............................................ 10
Maintenance ....................................... 11
Specifications ...................................... 12
Troubleshooting ................................. 12
3
Page 4
Precautions
To avoid the risk of serious injury or
accident, read the following
precautions before installing and
operating the unit.
On safety
Comply with your local traffic rules and
regulations.
• While driving, the driver must not
watch or operate the monitor. It may
lead to distraction and cause an
accident.
Park the car in a safe place when the
driver watch and operate the monitor.
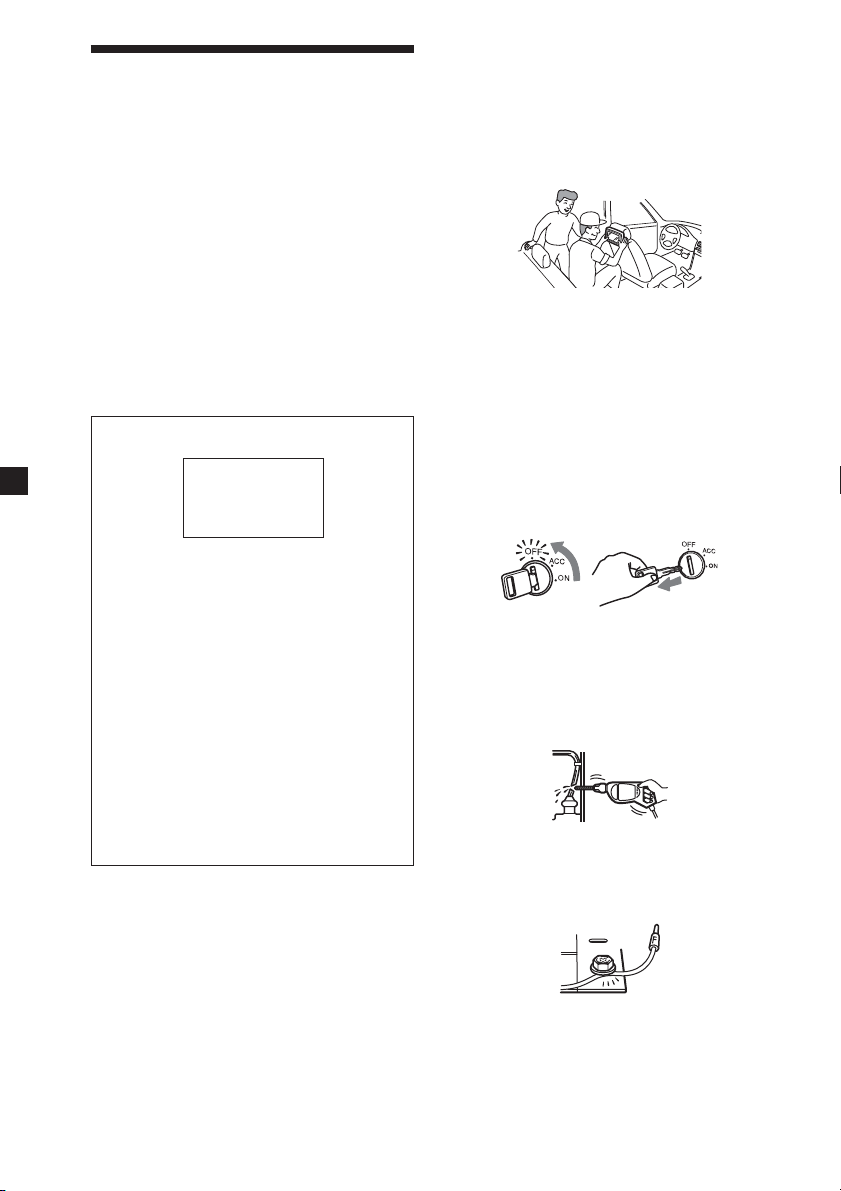
Watching video pictures
DRIVE MODE
The video pictures appear only after
you park the car and set the parking
brake.
When the car starts moving, the
video pictures automatically
disappear after displaying the
following caution.
Do not operate equipment connected
to the monitor or watch the monitor
while driving.
The caution above appears only
when the monitor is installed on the
dashboard.
• After installing
- Take care not to bump your head
against the unit when getting up
from the back seat.
- Do not leave the monitor under
direct sunlight for a long period of
time.
On installation
• Installing this unit requires technical
expertise.
This unit should be installed by a
qualified technician or service
personnel.
• If you try to install this unit by
yourself, do it properly, referring to
the installation and wiring diagrams
in this operating manual. Improper
installation may result in fire or
electric shock.
• Before installation, be sure to turn the
ignition switch to the OFF position or
take the key out. Installing this unit
with the ignition on may cause battery
drain or a short circuit.
• Do not damage any pipes, tubes, the
fuel tank or electric wiring when
installing this unit. This can cause a
fire. If you drill a hole in car panels,
make sure that any hidden car parts
will not be damaged.
• Do not use any nuts or bolts for safety
devices such as steering linkage, fuel
supply or braking systems. This can
cause a fire or an accident.
• Take care to prevent cords and wires
from getting tangled or crimped in the
moving portion of a seat rail.
4
Page 5

Where to install
Before installing this unit, please check
your local traffic rules and regulations.
Do not install this unit where:
- It will obstruct the driver’s view.
- It will obstruct the operation of the
airbag system.
- It will obstruct the operation of the
vehicle, especially the steering
wheel, shift lever, or brake pedal.
-A driver or passengers may injure
themselves when getting into or out
of the car.
If you have any questions or problems
concerning your unit that are not
covered in this manual, please consult
your nearest Sony dealer.
5
Page 6

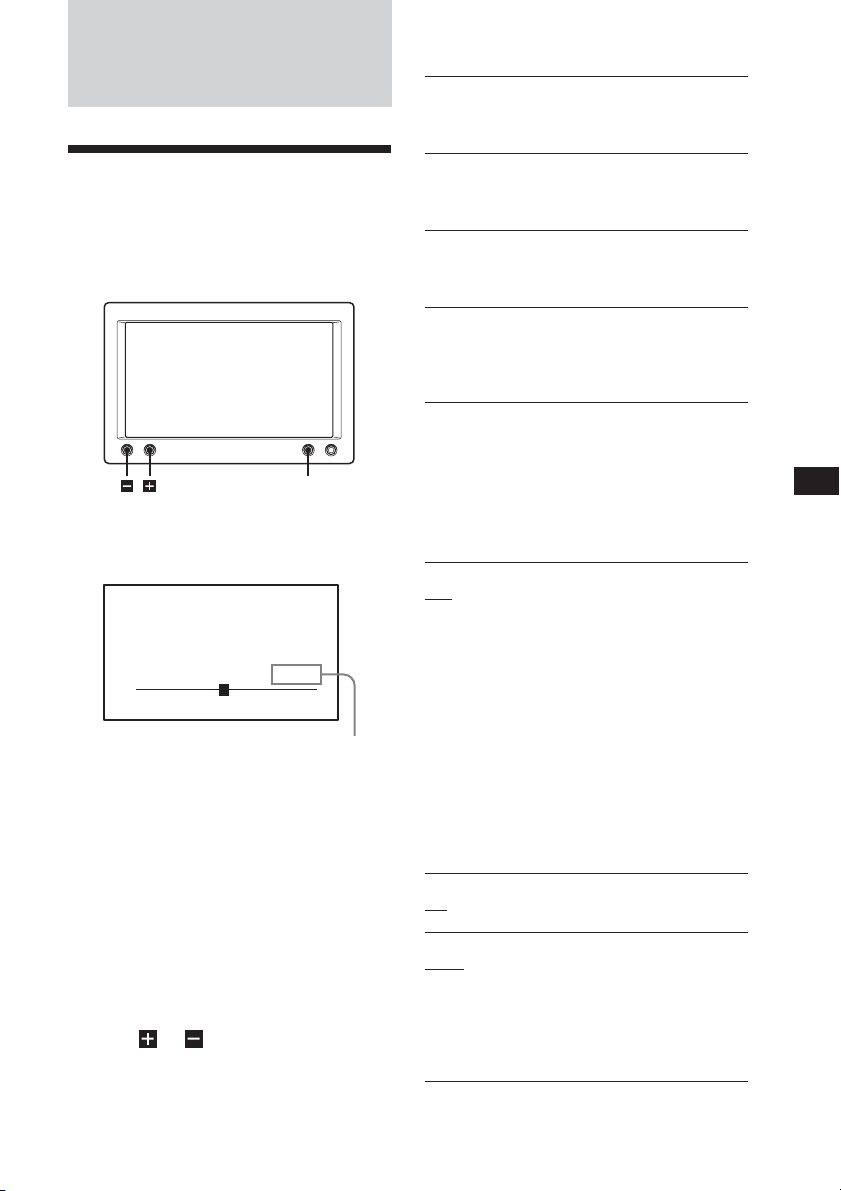
Location of controls
Monitor
2
1
1 INPUT/ button
Press to select the desired input
source, VIDEO 1 or VIDEO 2.
2 DIMMER/
Press to select the dimmer On/Off.
3 MENU button
4 POWER button
button
3
4
6
Page 7
The default settings are underlined.
Operation
Changing the menu settings
You can adjust the display settings
manually.
MENU
1 Press (MENU).
The “Picture” screen appears.
Picture 32
Press+/-,or MENU.
The setting value of the
item selected appears in this
area.
Each time you press (MENU), the
setting screen changes in the
following sequence:
Picture t Brightness t Color t
Hue* t Video Adjust t Mode t
Blue Back t Select NTSC or PAL
System t Menu Off
* Appears only when the NTSC color
system is selected.
2 Press or to adjust to the
desired setting.
See the following for the setting
options.
Picture
Settable range: 0 to 63 (default setting is
“36”)
Adjusting the contrast.
Brightness
Settable range: 0 to 63 (default setting is
“30”)
Adjusting the brightness.
Color
Settable range: 0 to 63 (default setting is
“34”)
Adjusting the color.
Hue
Adjust this if the picture is reddish or
greenish. The default setting is “CTR
(center)”.
”Hue” is displayed for NTSC system only.
Video Adjust
Resetting the picture, brightness and colour
setting at single operation.
Note
Input channel, color system for the input
video signal (PAL/NTSC), screen mode, and
blue background setting will not be reset
when you reset the adjustments.
Mode
Full, Normal, Wide, Zoom
Setting the screen mode.
Full: An image with an aspect ratio of 4
to 3 enlarged to the left and right
edges of the screen (regular image).
Normal: An image with an aspect ratio of 4
to 3.
Wide: An image with an aspect ratio of 4
to 3, with only the left and right
sides of the image being enlarged to
fill the screen.
Zoom: An image with an aspect ratio of 4
to 3 enlarged to the left and right
edges of the screen, with the
overflowing parts (top and bottom)
cut off to fill the screen.
Blue Back
On, Off
Setting the blue background screen.
Select NTSC or PAL System
NTSC, PAL
Usually it is not necessary to change this
setting because this unit automatically
determines the color system depending on
the signal type. Select either NTSC or PAL
depending on the system of your local area
when the picture is distorted.
7
Page 8
Connections
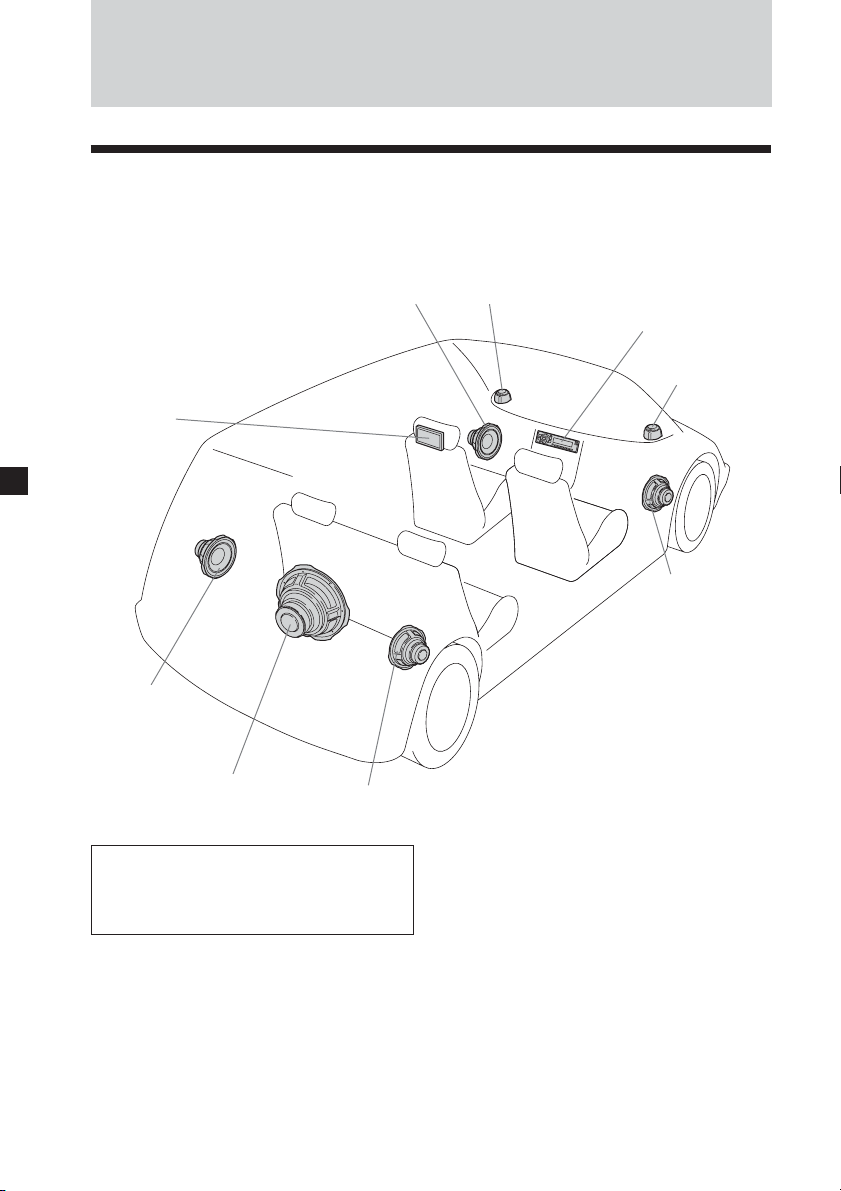
Installation diagram
Refer to the installation diagram and ask a qualified technician for the installation of
the unit.
Front Left
speaker
Mobile
Monitor
Rear Left
speaker
Subwoofer
Rear Right
speaker
Be sure to securely fasten all
equipment to the car chassis, etc., to
prevent them moving while your car
is in motion.
Tweeter
Left
Head unit
Tweeter
Right
Front Right
speaker
Notes
• All equipment other than one Mobile
Monitor is optional.
• To attach the monitor using the supplied
collar, consult the store you purchased
this unit or your nearest Sony dealer.
8
Page 9

Connection diagram
Refer to the connection diagram for the proper connections.
Mobile monitor XVM-B62
(6.2-inch wide color LCD Monitor)
Video in cable (3 m)
To the parking brake switch
cord (see page 10)
(To a metal surface of the car
chassis when you attach the
monitor to the headrest)
To a metal surface of the car
chassis
Black
Black
Light green
To the +12 V power
terminal which is
energized in the
accessory position of
the ignition key switch
DVD player, video CD
player, etc.
Fuse (10 A)Red
L/C filter
VIDEO 1 IN
VIDEO 2 IN
9
Page 10

When installing the
monitor on the dashboard
Be sure to connect the parking cord
(Light green) to the parking brake
switch cord. The mounting position of
the parking brake switch cord depends
on your car. Consult your car dealer or
your nearest Sony dealer for further
details.
Foot brake type
Parking brake
switch cord
Hand brake type
Parking brake
switch cord
Using the tap
Attach the supplied tap to the end of the
parking cord (Light green) and the
parking brake switch cord.
Additional Information
Attaching and detaching the monitor
Detaching the monitor from the
collar
Note
Be careful not to pull out the cable too
much when detaching the monitor from
the collar.
Insert a plastic card (not supplied)
between the collar and the top of the
monitor.
The catches are released, and you can
detach the monitor from the collar.
Plastic card (not supplied)
collar
10
Parking brake
switch cord
Tap (supplied)
Parking cord
(Light green)
x
Note
If the parking brake switch cord is too thin,
connect the parking cord (Light green) to
the parking brake switch cord directly
without using the tap.
Attaching the monitor to the collar
Set the monitor to the collar securely
until you hear click sound.
Page 11

Maintenance
Fuse replacement
When replacing the fuse, be sure to use
one matching the amperage rating
stated on the original fuse. If the fuse
blows, check the power connection and
replace the fuse. If the fuse blows again
after replacement, there may be an
internal malfunction. In such a case,
consult your nearest Sony dealer.
Fuse
Fuse
Warning
Never use a fuse with an amperage
rating exceeding the one supplied with
the unit as this could damage the unit.
About the liquid crystal
display (LCD) panel
Do not press on the LCD panel on the
unit as doing so can distort the picture
or cause a malfunction. The picture may
become unclear, or the LCD panel may
be damaged.
Some stationary green, blue or red dots
may appear on the monitor.
These are called bright spots, and can
happen with any LCD.
The LCD panel is highly sophisticated,
and more than 99.99 % of the segments
used in the panel are flawless. However,
there is a possibility that less than
0.01 % of the segments are defective and
may not light up properly.
Notes on cleaning
— Clean the LCD panel with a slightly
damp soft cloth.
— Do not use solvents such as benzine,
thinner, commercially available
cleaners or antistatic spray.
• Do not use the unit in temperatures
under 0 °C (32 °F) or over 45 °C
(113 °F).
• If your car was parked in a cold or hot
place, the picture may not be clear.
The monitor is not damaged. The
picture will become clear after the
temperature in your car becomes
normal.
11
Page 12

Specifications
Troubleshooting
Monitor
System Liquid crystal color display
Drive system TFT-LCD active matrix
system
Picture size 6.2 inches wide screen (16:9)
137.5 × 77.2 mm
(5 1/2 × 3 1/8 in)
(w × h)
Picture segment
336,960 (w 1440 × h 234) dots
Power requirements
12 V DC car battery
(negative ground)
Current drain Approx. 550 mA
Dimensions 164.2 × 106.6 × 29 mm
(6 1/2 × 4 1/4 × 1 1/16 in)
(w/h/d)
Operating temperature
0 °C – 45 °C
(32 °F – 113 °F)
Mass Approx. 450 g (1 lb)
Supplied accessories
Collar (1)
Power supply cord (1)
Video in cable (3 m) (1)
Tap (1)
Operating Instructions (1)
Optional accessories
Sony Video CD Players
Sony Multi Disc Player MEX-R1
The following checklist will help you
solve problems you may encounter with
your unit.
Before going through the checklist
below, check the connection and
operating procedures.
General
No picture
•The power cord or battery has been
disconnected.
•The fuse has blown.
Picture noise occurs.
When a wireless equipment such as a
transceiver is used near the monitor, a noise
may occur. Keep it away from the monitor.
No picture when you connect the optional
equipment.
The cord has been disconnected. Connect the
cord securely.
12
Design and specifications are subject to
change without notice.
Page 13

Page 14

Avertissement au cas où le contact de
votre voiture ne dispose pas d’une
position ACC
Après avoir coupé le moteur, n’oubliez pas
d’appuyer sur la touche (POWER) pour
couper l’appareil.
Sinon, l’affichage n’est pas désactivé et la
batterie se décharge.
Félicitations !
Merci d’avoir fait l’acquisition du
moniteur mobile Sony.
• Compatible avec les systèmes couleur
PAL et NTSC
• En plus du mode écran normal, les
modes plein écran, image agrandie et
grand écran sont disponibles.
• Panneau d’affichage à cristaux
liquides à faible coefficient de
réflexion minimisant les reflets de
sources lumineuses.
• Luminosité réglable en fonction des
conditions d’éclairage
• Gradateur de rétroéclairage offrant
des images à contraste marqué, sans
inversion de couleurs et sans flou.
•2entrées vidéo sont fournies pour
raccorder un magnétoscope et une
console de jeux.
2
Page 15

Table of contents
Félicitations ! ......................................... 2
Précautions ........................................... 4
Emplacement des commandes .......... 6
Fonctionnement
Modification des réglages du menu ...
Connexions
Schéma d’installation .......................... 8
Schéma de connexion .......................... 9
Informations complémentaires
Installation et retrait du moniteur ... 10
Entretien .............................................. 11
Caractéristiques techniques.............. 12
Dépannage .......................................... 12
7
3
Page 16

Précautions
Pour éviter tout risque de blessure
grave ou d’accident, lisez les
précautions suivantes avant d’installer
ou d’utiliser l’appareil.
A propos de la sécurité
Conformez-vous au code de la route de
votre pays.
• Pendant la conduite, le conducteur ne
doit pas regarder ni utiliser le
moniteur. En effet, cela peut le
distraire et provoquer un accident.
Garez votre voiture en lieu sûr pour
regarder le moniteur.
Visionnage d’images vidéo
A propos de l’installation
• L’installation de l’appareil nécessite
des connaissances techniques
approfondies.
Cet appareil doit être installé par un
technicien qualifié.
• Si vous tentez vous-même d’installer
l’appareil, faites-le en vous référant
aux schémas d’installation et de
raccordement du mode d’emploi. Une
installation incorrecte risque de
provoquer un incendie ou une
électrocution.
DRIVE MODE
Les images vidéo apparaissent
seulement une fois que la voiture est
garée et que le frein de stationnement
est mis.
Quand la voiture commence à
bouger, les images vidéo
disparaissent automatiquement après
affichage de la mise en garde
suivante.
N’opérez pas l’équipement connecté
au moniteur et ne regardez pas le
moniteur pendant la conduite.
La mise en garde ci-dessus apparaît
seulement quand le moniteur est
raccordé au berceau d’installation.
• Une fois l’installation terminée
- Prenez garde à ne pas vous cogner la
tête contre l’appareil lorsque vous
vous levez du siège arrière.
- Ne laissez pas le moniteur en plein
soleil pendant longtemps.
• Avant de procéder à l’installation,
assurez-vous de régler le contact de la
voiture à OFF ou d’ôter la clé.
L’installation de l’appareil avec le
moteur en marche risque de décharger
la batterie ou de provoquer un courtcircuit.
• N’utilisez aucune vis ni aucun écrou
réservés aux dispositifs de sécurité,
tels que la tringlerie de direction, le
circuit d’alimentation en carburant ou
le dispositif de freinage. Ceci pourrait
provoquer un incendie ou un accident.
• Prenez garde à ne pas emmêler les
cordons et les fils dans une partie
mobile des rails de siège.
• Take care to prevent cords and wires
from getting tangled or crimped in the
moving portion of a seat rail.
4
Page 17

Lieu d’installation
Avant d’installer l’appareil, consultez la
réglementation en vigueur dans votre
région.
N’installez pas l’appareil à un
endroit où :
- Il risque de gêner la visibilité du
conducteur ;
- Il risque d’entraver l’utilisation du
coussin de sécurité
gonflable ;
- Il risque d’entraver l’utilisation du
véhicule, notamment le
volant, le levier de vitesses ou la
pédale de frein ;
- Le conducteur et les passagers
risquent de se blesser en entrant ou
en sortant de la voiture.
Si vous avez des questions ou des
problèmes concernant le
fonctionnement de cet appareil qui
ne sont pas abordés dans ce manuel,
consultez le détaillant Sony le plus
proche de chez vous.
5
Page 18

Emplacement des commandes
Moniteur
1
1 Touche INPUT/
Appuyez sur cette touche pour
sélectionner la source d’entrée,
VIDEO 1 ou VIDEO 2.
2 Touche DIMMER/
Appuyez sur cette touche pour
activer/désactiver le gradateur.
3 Touche MENU
4 Touche POWER
2
3
4
6
Page 19

Les réglages par défaut sont soulignés.
Fonctionnement
Modification des réglages du menu
Vous avez la possibilité de définir
manuellement les paramètres
d’affichage.
MENU
1 Appuyez sur (MENU).
L’écran « Picture » s’affiche.
Picture 32
Press+/-,or MENU.
La valeur de réglage du
paramètre sélectionné
s’affiche dans cette zone.
Chaque fois que vous appuyez sur
(MENU), l’écran de réglage change
comme suit :
Picture t Brightness t Color t
Hue* t Video Adjust t Mode t
Blue Back t Select NTSC or PAL
System t Menu Off
* S’affiche uniquement lorsque le
système couleur NTSC est sélectionné.
2 Appuyez sur ou pour régler
le paramètre souhaité.
Voir la page suivante pour les
options de réglage.
Picture (Image)
Portée réglable : 0 à 63 (le réglage par
défaut est « 36 »)
Ajuste le contraste.
Brightness (Luminosité)
Portée réglable : 0 à 63 (le réglage par
défaut est « 30 »)
Ajuste la luminosité.
Color (Couleur)
Portée réglable : 0 à 63 (le réglage par
défaut est « 34 »)
Ajuste la couleur.
Hue (Teinte)
Réglez cette option si l’image est rougeâtre
ou verdâtre. Le réglage par défaut est
« CTR » (centre).
« Hue » (Teinte) ne s’affiche que pour le
système NTSC.
Video Adjust (Ajustement vidéo)
Réinitialise les réglages de l’image, de la
luminosité et des couleurs en une seule
opération.
Remarque
Les réglages du canal d’entrée, du système
de couleur pour le signal vidéo reçu (PAL/
NTSC), du mode d’écran et du rétroéclairage bleu ne se réinitialisent pas
lorsque vous réinitialisez les ajustements.
Mode
Full, Normal, Wide, Zoom
Règlent le mode d’écran.
Full (Plein écran): Les images de format 4:3
sont agrandies jusqu’aux bords
gauche et droit de l’écran (image
ordinaire).
Normal (Standard): L’image s’affiche dans un
rapport d’aspect de 4:3.
Wide (Grand écran): Les bords gauche et
droit des images au format 4:3 sont
agrandis pour remplir l’écran.
Zoom (Image agrandie): Les images de format
4:3 sont agrandies jusqu’aux bords
gauche et droit de l’écran. Les parties
excédentaires de l’image (haut et bas)
sont coupées pour que l’image
remplisse l’écran.
Blue Back (Fond bleu)
On (Activé), Off (Désactivé)
Règle l’écran du rétro-éclairage bleu.
Select NTSC or PAL System
NTSC, PAL
Ordinairement, il est inutile de modifier ce
réglage parce que l’appareil détermine
automatiquement le système couleur selon le
type du signal. Sélectionnez NTSC ou PAL
selon le système de votre région si l’image est
déformée.
7
Page 20

Connexions
Schéma d’installation
Demandez à un technicien qualifié d’installer l’appareil en se reportant au schéma
d’installation.
Haut-parleur
avant gauche
Moniteur
mobile
Haut-parleur
arrière gauche
Caisson de graves
Haut-parleur
arrière droit
Fixez solidement tous ces éléments
au châssis du véhicule ou ailleurs,
afin d’éviter qu’ils ne bougent
pendant que le véhicule est en
mouvement.
Haut-parleur d’aiguës
de gauche
Appareil principal
Haut-parleur
d’aiguës de droite
Haut-parleur
avant droit
Remarques
• Tous les éléments autres que le moniteur
mobile et le boîtier de raccordement sont
en option.
• Pour fixer le moniteur à l’aide du collier,
consultez le magasin où vous avez acheté
cet appareil ou votre détaillant Sony le
plus près de chez vous.
8
Page 21

Schéma de connexion
Reportez-vous au schéma pour effectuer un raccordement correct.
Moniteur mobile XVM-B62
(Moniteur couleur à écran large LCD 6,2 pouces)
Câble d'entrée vidéo (3 m)
Vers l'interrupteur de
freinage de range (voir la
page 10)
(Vers une surface métallique
de la carrosserie si vous
attachez le moniteur à un
appui-tête)
Vert clair
Vers une surface métallique
de la carrosserie
Vers la prise d’alimentation
+12 V parcourue par le
courant quand la clé de
contact est en position
accessoire
Noir
Rouge
Lecteur DVD, lecteur CD
vidéo, etc.
à fusible
de 10 A
Noir
Filtre L/C
VIDEO 1 IN
VIDEO 2 IN
9
Page 22

A l’installation du moniteur
sur le tableau de bord
Veillez à raccorder le cordon du frein
(vert clair) au cordon du capteur du
frein à main. La position de montage du
cordon du capteur du frein à main varie
selon la voiture. Consultez votre
concessionnaire automobile ou votre
revendeur Sony le plus proche pour
obtenir plus de détails.
Type pédale de frein
Cordon du
capteur du
frein à main
Type frein à main
Cordon du capteur
du frein à main
Utilisation de la dérivation
Raccordez la dérivation fournie à
l’extrémité du cordon du frein (vert
clair) et au cordon du capteur du frein à
main.
Cordon du capteur
Dérivation (fournie)
du frein à main
Informations complémentaires
Installation et retrait du moniteur
Pour retirer le moniteur du
collier
Remarque
Prenez garde de ne pas tirer excessivement
le câble lorsque vous retirez le moniteur
du collier.
Insérez une carte en plastique (non
fourni) entre le collier et le haut du
moniteur.
Les pattes sont déverrouillées et vous
pouvez alors retirer le moniteur du
collier.
Carte en plastique
(non fourni)
Pour installer le moniteur sur le collier
Placez correctement le moniteur sur le
collier jusqu’à ce que vous entendiez un
déclic.
Collier
10
Cordon du frein à
main (vert clair)
x
Remarque
Si le cordon du capteur du frein à main est
trop fin, raccordez le cordon du frein (vert
clair) au cordon du capteur du frein à main
directement sans utiliser la dérivation.
Page 23

Entretien
Remplacement du fusible
Lorsque vous remplacez le fusible,
veillez à utiliser un fusible dont
l’ampérage correspond à celle indiquée
sur le fusible d’origine. Si le fusible
fond, vérifiez le branchement de
l’alimentation et remplacez le fusible.
Si le fusible fond de nouveau après
avoir été remplacé, cela peut révéler une
défaillance interne de l’appareil. Dans ce
cas, consultez le détaillant Sony le plus
près de chez vous.
Fusible
Fusible
Avertissement
Ne jamais utiliser de fusible dont
l’ampérage dépasse celle du fusible
fourni, cela pourrait endommager
l’appareil.
À propos de l’écran à
cristaux liquides (ACL)
Ne pas appuyer sur l’écran à cristaux
liquides car cela risque de déformer
l’image ou provoquer un
dysfonctionnement. Il se peut que
l’image se trouble ou que l’écran à
cristaux liquides soit endommagé.
Remarques à propos du nettoyage
— Nettoyer l’écran à cristaux liquides
avec un chiffon doux humide.
— Ne pas utiliser de solvants tels que la
benzine ou des diluants, de
nettoyants ordinaires ni de
vaporisateurs antistatiques.
• Ne pas faire fonctionner l’appareil à
une température inférieure à 0 °C
(32 °F) ou supérieure à 45 °C (113 °F).
• Si votre voiture est restée stationnée
dans un endroit très chaud ou très
froid, il se peut que l’image affichée ne
soit pas claire. Le moniteur n’est pas
endommagé. L’image se rétablit
lorsque la température du véhicule
revient à la normale.
Des points fixes verts, bleus ou rouges
peuvent apparaître sur l’écran du
moniteur.
Ces points lumineux peuvent apparaître
sur n’importe quel écran à cristaux
liquides.
Cet écran est le fruit d’une technologie
de pointe et plus de 99,99 % des
segments qui le composent sont sans
défaut. Cependant, il se peut que moins
de 0,01 % des segments soient
défectueux et qu’ils ne s’allument pas
correctement.
11
Page 24

Caractéristiques techniques
Moniteur
Système Affichage à cristaux liquides
couleur
Système d’affichage
LCD TFT à matrice active
Taille de l’image
Écran de 6,2 po de largeur
(16:9)
137,5 × 77,2 mm
(5 1/2 × 3 1/8 po)
(l × h)
Taille utile 336.960 points
(1440 hor. × 234 vert. )
Alimentation requise
Batterie de voiture
12 V CC (masse négative)
Consommation électrique
Environ 550 mA
Dimensions 164,2 × 106,6 × 29 mm
(6 1/2 × 4 1/4 × 1 3/16 po.)
(l/h/p)
Température de fonctionnement
0 °C à 45 °C
(32 °F à 113 °F)
Poids Environ 450 g (1 livre)
Accessoires fournis
Collier (1)
Cordon d’alimentation (1)
Câble d’entrée vidéo (3 m) (1)
Dérivation (1)
Mode d’emploi (1)
Dépannage
La liste de contrôle suivante vous aidera
à résoudre les problèmes que vous
pourriez rencontrer avec cet appareil.
Avant de passer cette liste en revue,
vérifiez les procédures de raccordement
et d’utilisation.
Généralités
Pas d’image
•Le câble d’alimentation ou la batterie est
débranché.
•Le fusible est fondu.
De l’herbe de bruit se produit.
Quand un appareils sans fil comme un
émetteur-récepteur est utilisé près du
moniteur, du bruit peut se produire.
Maintenez-les éloigné du moniteur.
Pas d’image lors du raccordement
d’appareils en option.
Le câble est débranché. Raccordez
solidement le câble.
12
Accessoires en option
Lecteurs CD vidéo Sony
Lecteur Multi-Disc MEX-R1 Sony
La conception et les caractéristiques
techniques sont sujettes à modification sans
préavis.
Page 25

Page 26

Page 27

Page 28

Sony Corporation Printed in Korea
 Loading...