

Page 1
Mobile Color TV
Operating Instructions
Bedienungsanleitung
Istruzioni per l’uso
Si dichiara che l’apparecchio è stato fabbricato in conformità all’art.1 del
D.M.26.03.1992 e all’art.2, Comma 1 del D.M.28.08.1995 n.548.
For installation and connections, see the supplied installation/connections
manual.
Zur Installation und zum Anschluß siehe die mitgelieferte Installations-/
Anschlußanleitung.
Per l’installazione e i collegamenti, fare riferimento al manuale di istruzioni di
installazione/collegamenti in dotazione.
GB
DE
IT
XTL-6100MK2
1999 by Sony Corporation
Page 2

GB
Welcome!
Thank you for purchasing the Sony Mobile Colour TV.
• This unit can receive the TV broadcasts in the United Kingdom and
other CCIR B/G system areas such as Germany and Italy.
• You can connect both PAL and NTSC video playback units.
• The low reflection liquid crystal panel reduces the glare from outside
lighting sources.
• You can manually adjust the brightness of the display according to the
prevailing light conditions of the surrounding environs.
• The visual off function turns the picture off so that you can listen to the
TV or video sound only.
• The automatic memory function can store up to 12 stations.
• This unit has several input/output terminals for connecting a video
player, navigation system, and rear monitor.
2
Page 3

Table of Contents
Warning and Precautions..................................................................................... 4
Getting Started
Selecting a TV system ........................................................................................ 5
Storing TV stations automatically (Automatic memory function) ............. 6
Watching a TV Programme ................................................................................. 7
Watching a Video .................................................................................................. 8
Listening to the TV/video Sound with the Picture Off
(Visual off function) ........................................................................................... 9
Adjusting the Picture .......................................................................................... 10
Adjusting the Screen Brightness ....................................................................... 12
Using the Navigation System ............................................................................ 13
Listening to the TV/video Sound while Using Navigation System
(Simultaneous play function) ......................................................................... 14
Location of Controls............................................................................................ 15
Additional Information ...................................................................................... 16
Specifications........................................................................................................ 18
Troubleshooting Guide....................................................................................... 19
GB
3
Page 4

Warning and Precautions
Warning
Never use a fuse with an amperage rating exceeding the one supplied
with the unit as this could damage the unit.
Fuse replacement
When replacing the fuse, be sure to use one that matches the
amperage described on the original fuse. If the fuse blows, check the
power connection and replace the fuse. If the fuse blows again after
replacement, there may be an internal malfunction. In such a case,
consult your nearest Sony dealer.
GB
Fuse
Precautions
• Do not mount the monitor where it will obstruct the driver’s view.
• Do not touch the TV aerial and monitor at the same time during
storms. You may get an electric shock.
• If your car was parked in direct sunlight resulting in a considerable
rise in temperature inside the car, allow the unit to cool off before
operating it.
If you have any questions or problems concerning your unit that are
not covered in this manual, please consult your nearest Sony dealer.
Preventing accidents
The TV/video pictures appear only after you park the car and set the
parking brake.
When the car starts moving, the TV/video pictures automatically
disappear for safety reasons,
5 seconds.
Do not operate equipment connected to the TV tuner unit or watch
the monitor while driving. You may cause a traffic accident if your
attention is distracted by the monitor.
after displaying the following caution for
PICTURE OFF
FOR
YOUR SAFETY
Comply with the Road Traffic Laws in your country.
4
Page 5
Getting Started
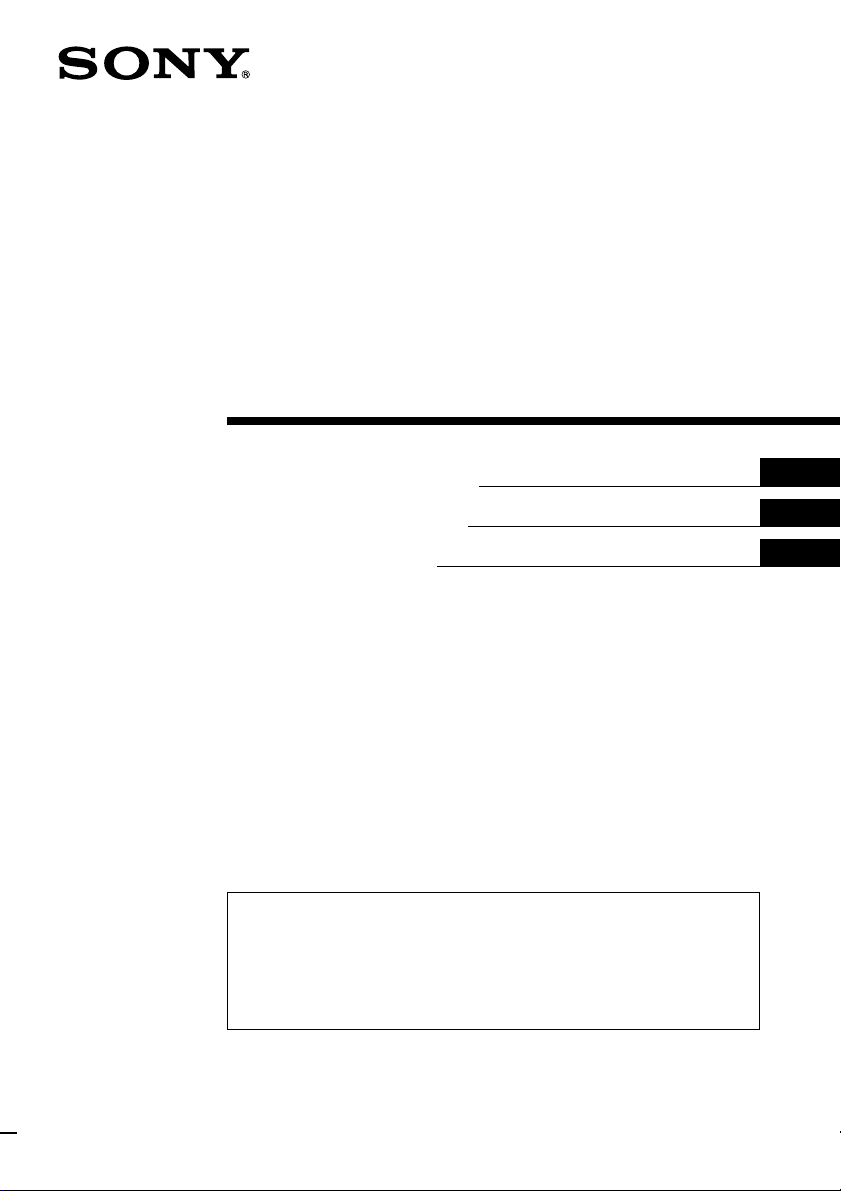
Selecting a TV system
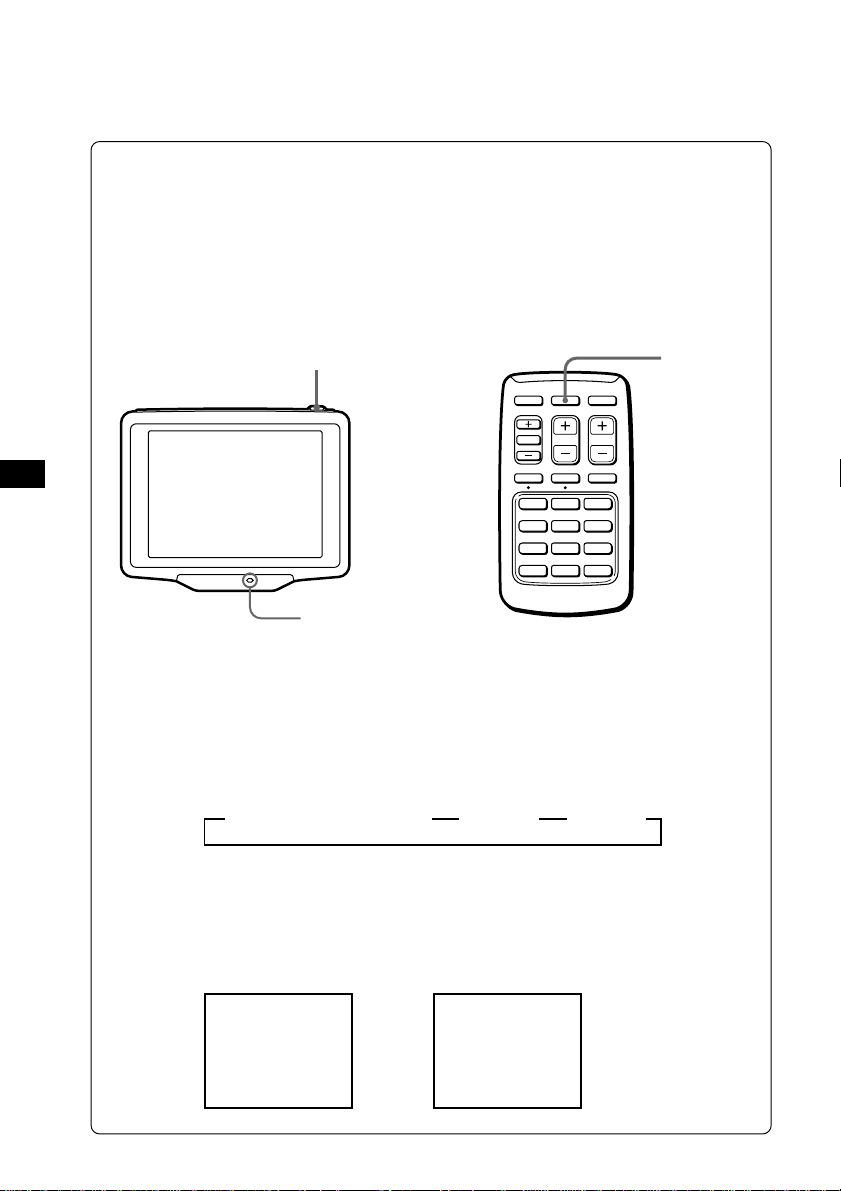
Set the TV system selector on the side of the TV tuner unit, to the
correct position for your area.
CCIR/Italy: set to 1
United Kingdom: set to 2
If you select TV system 1 on the TV tuner unit, press (ITALY) on the
wireless remote. If the picture does not appear, press (ITALY) again.
NAVI
TV/VIDEO
ITALY
SEL
SEEKVOL
A MEMV OFF DSPL
2SEC
123
456
789
10 11 12
TV system selector
ITALY button
1
SYSTEM
TV
2
GB
When you select TV system 1, the TV programme numbers appear as
follows:
VHF (Areas except Italy)
12
VHF (Italy)
UHF (Both areas)
C 35
When you select TV system 2, the TV programme numbers appear as
follows:
UHF (United Kingdom)
B42
continued n
5
Page 6
(Continued)
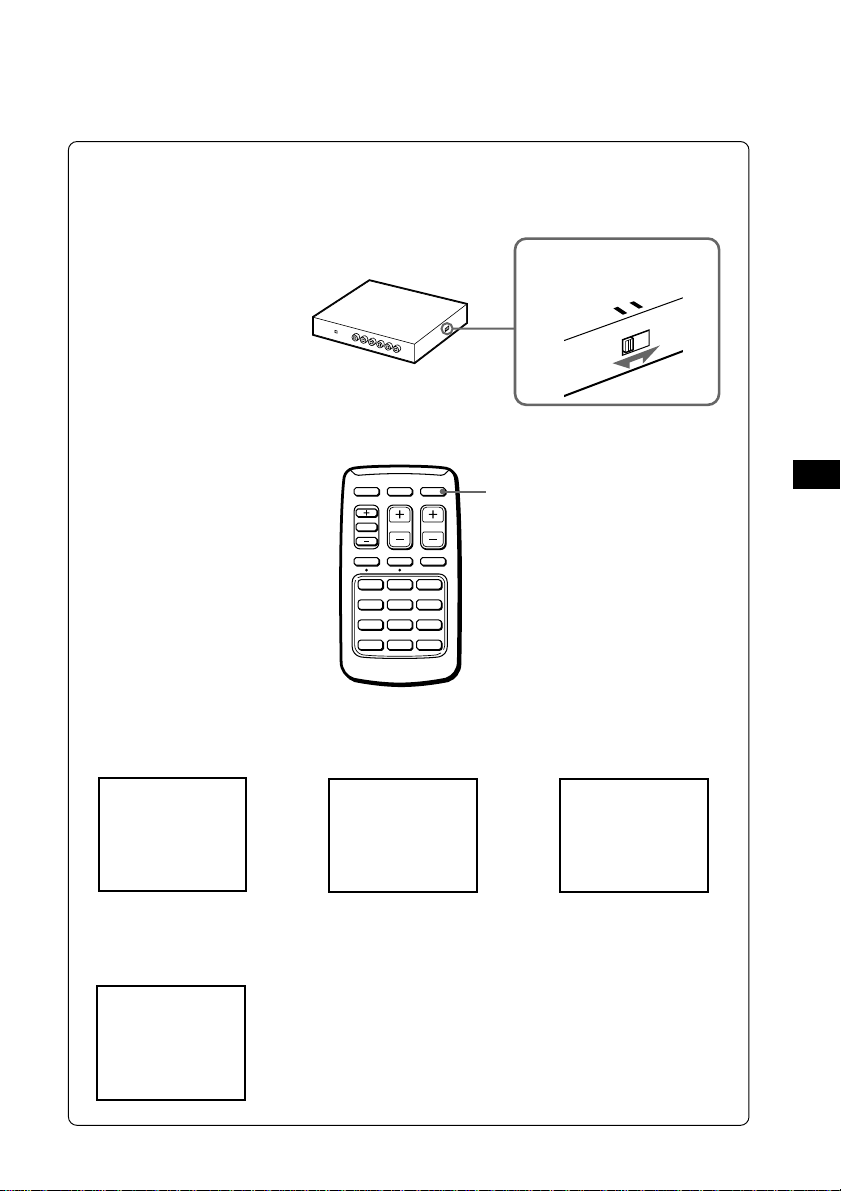
Storing TV stations automatically
(Automatic memory function)
You can store up to 12 VHF/UHF stations.
VHF stations on programme numbers 2 through 12 are stored on the
programme number buttons. UHF stations on programme numbers
21 through 69 are stored in order after the stored VHF stations.
GB
1
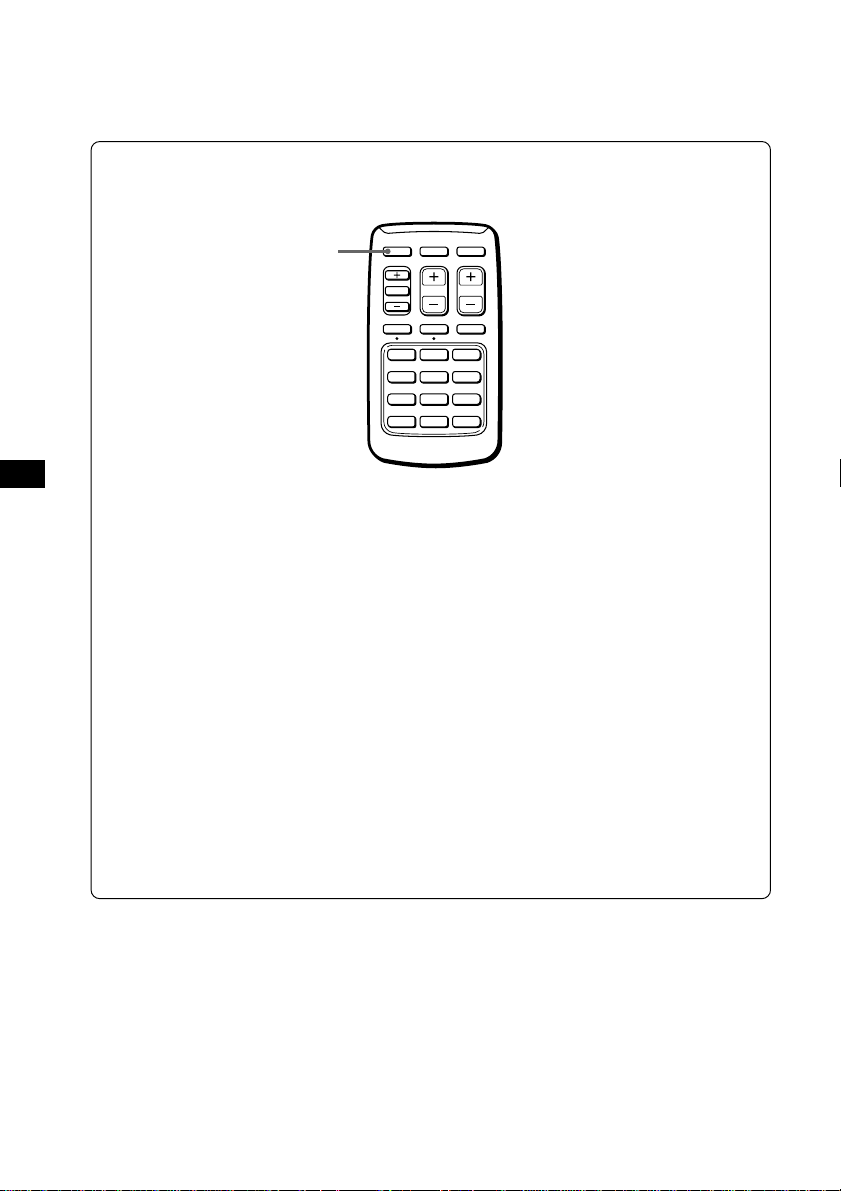
POWER indicator
NAVI
TV/VIDEO
ITALY
SEL
123
456
789
10 11 12
A MEMV OFF DSPL
2SEC
SEEKVOL
2
3
Programme
number buttons
1 Press (POWER) on the TV.
The POWER indicator lights up.
2 Press (TV/VIDEO) repeatedly until a TV
programme appears on the display.
3 Press (AMEM) on the wireless remote for two
seconds.
The wireless remote stores VHF stations on the programme
number buttons corresponding to the VHF station numbers.
UHF stations are stored on the remaining programme number
buttons in order.
Example
Programme number button
VHF station
UHF station
For Italy
1
-
21
-
2
2
-
A
24
4
5
27
D
6
-
6
-
E
3
4
-
-
C
B
32
8
7
-
F
9
8
-
-
34
G
H
10
10
H1
11
12
-
12
48
H2
-
-
-
6
Page 7
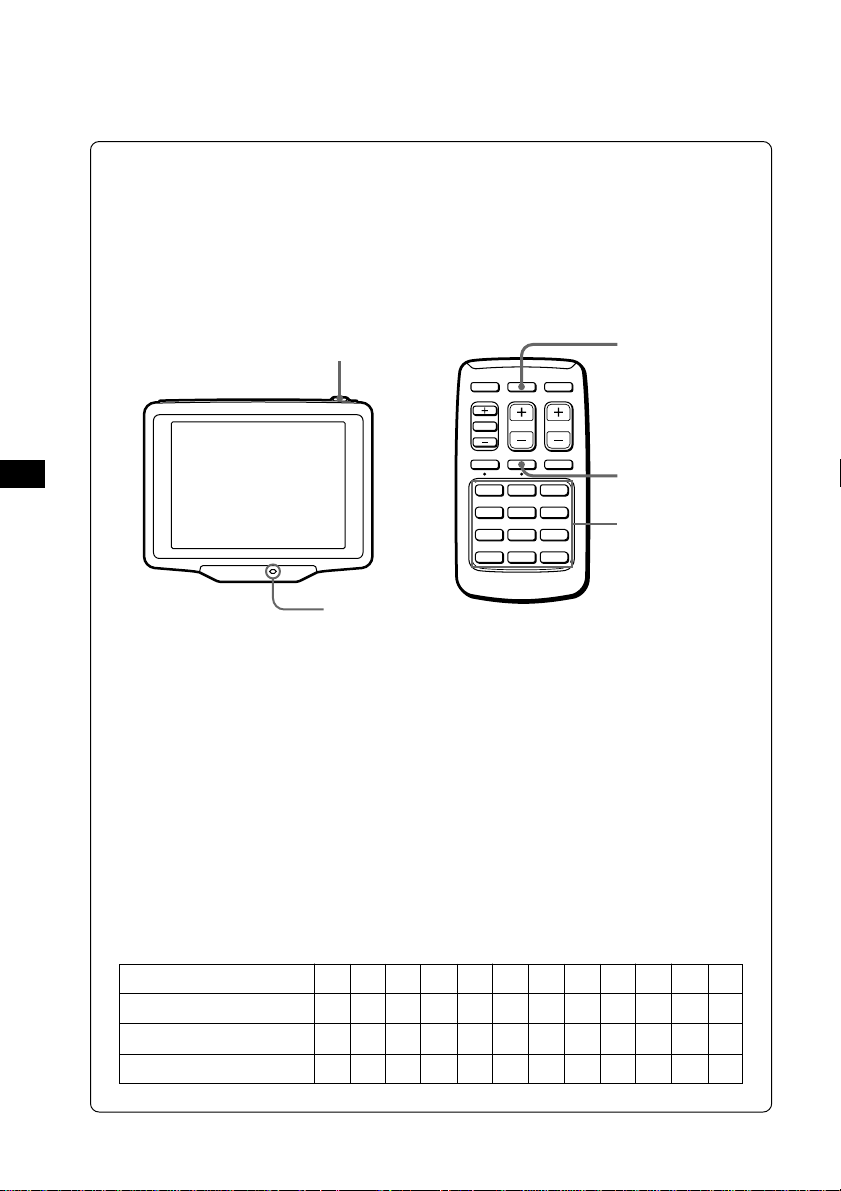
Watching a TV Programme
Note
The TV picture does not appear while the car is moving for safety reasons.
1
3
POWER indicator
NAVI
TV/VIDEO
SEL
123
456
789
10 11 12
A MEMV OFF DSPL
2SEC
SEEKVOL
ITALY
3
SEEK button
DSPL button
2
1 Press (POWER).
The POWER indicator lights up.
2 Press the programme number buttons (1 through
12) to select the desired TV station.
The TV programme number appears for five seconds in
the upper right corner of the display each time you select
a station.
3 Adjust the volume dial.
Turn the VOL dial on the monitor or press (VOL) on the
wireless remote.
Note
Adjust the volume on the monitor before adjusting the volume
on the wireless remote.
GB
Turning on the on-screen display
Press (DSPL).
To turn off the display, press it again.
Turning off the TV
Press (POWER).
If you cannot receive the stored stations while traveling
Press (SEEK) momentarily to search for the station automatically.
When the unit receives a station, it stops scanning. Press the button
repeatedly until the desired station is received.
7
Page 8
Watching a Video
Note
The video picture does not appear while the car is moving for safety
reasons.
You can watch video CDs and cassettes recorded in either the PAL
or NTSC colour system. Make sure you have connected a video
player to the TV tuner unit correctly.
For details, see the Installation/Connections manual.
GB
1
NAVI
TV/VIDEO
ITALY
SEL
123
456
789
10 11 12
A MEMV OFF DSPL
2SEC
SEEKVOL
POWER indicator
1 Press (POWER).
The POWER indicator lights up.
2 Press (TV/VIDEO) to select the input you
connected the
Each time you press (TV/VIDEO), the indication changes
as follows.
z TV programme number z VIDEO 1 z VIDEO 2
video player to, VIDEO 1 or VIDEO 2.
3 Turn the video player on and begin playback.
The unit displays PAL or NTSC colour system video
pictures and the following display appears for five
seconds.
NTSC Video
PAL Video
2
VIDEO 1
NTSC
VIDEO 2
PAL
8
Page 9
Listening to the TV/video Sound
with the Picture Off
NAVI
TV/VIDEO
SEL
A MEMV OFF DSPL
2SEC
123
456
789
10 11 12
(Visual off function)
ITALY
SEEKVOL
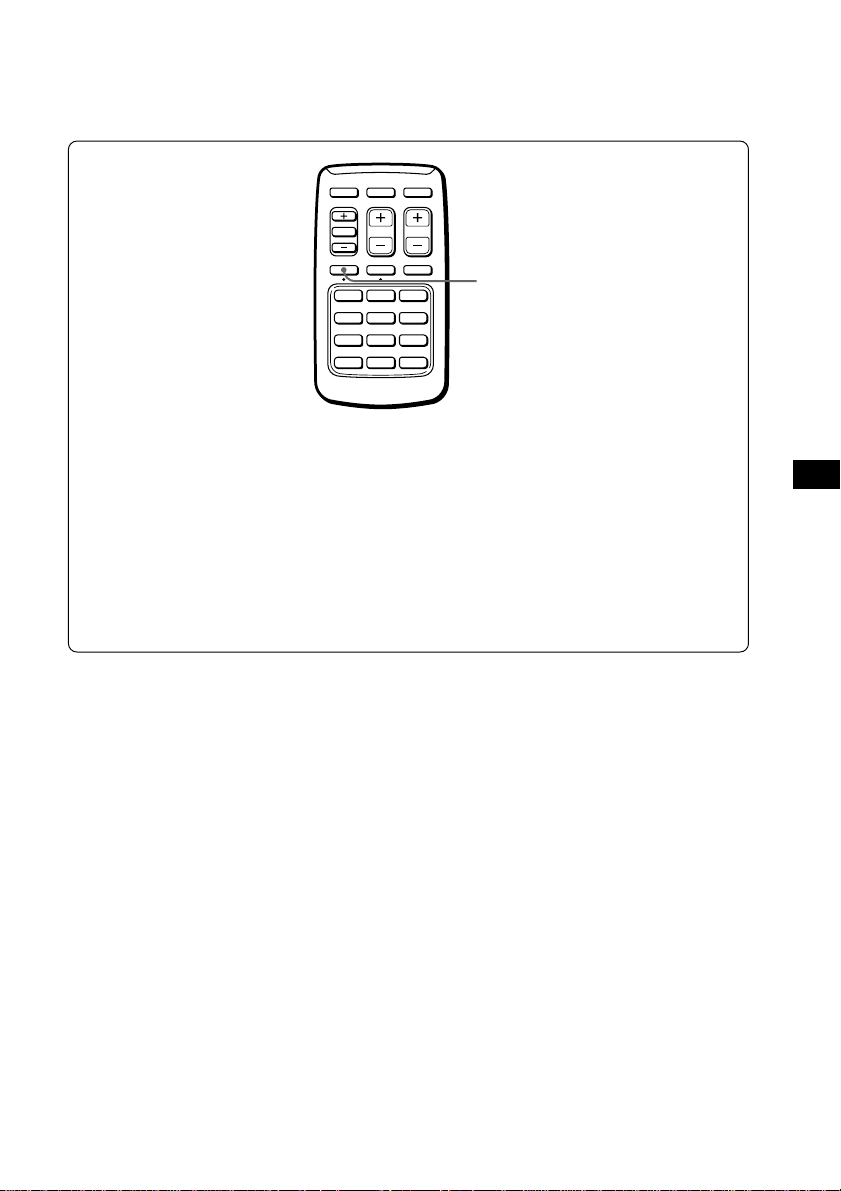
V (visual) OFF button
Press (VOFF) for two seconds.
You only hear the sound of the selected programme.
To cancel the visual off function, press (VOFF) again. If you
turn the unit off or turn the ignition switch to the OFF position,
the visual off function will be cancelled.
The visual off function is also canceled when you select another
TV programme with the programme number buttons (TV only).
GB
9
Page 10
Adjusting the Picture
You can adjust the colour, hue and brightness of the picture.
GB
1
2
POWER indicator
NAVI
TV/VIDEO
SEL
A MEMV OFF DSPL
2SEC
123
456
789
10 11 12
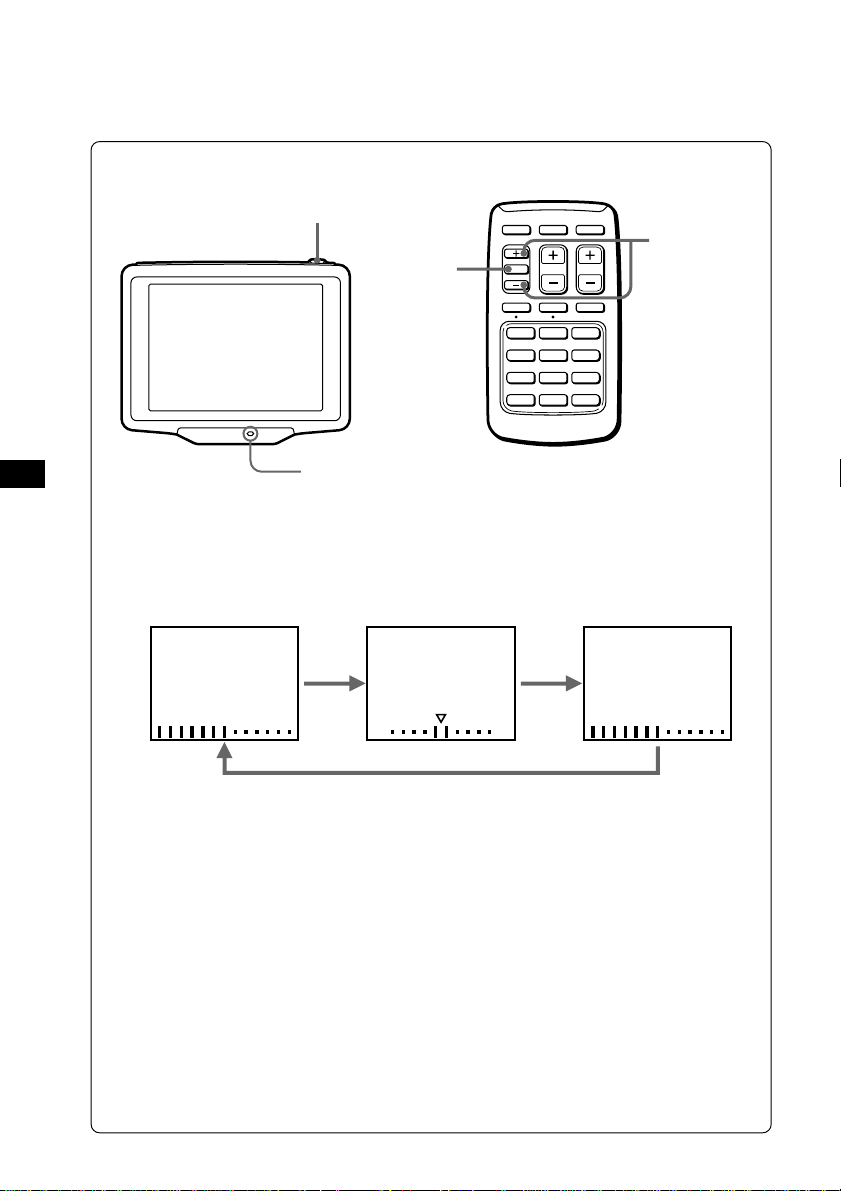
1 Press (POWER).
The POWER indicator lights up.
2 Press (SEL).
Each time you press (SEL), the items change as follows.
COL (colour)
HUE
RG
ITALY
3
SEEKVOL
BRIGHT (brightness)
BRIGHTCOL HUE
10
Note
You do not need to adjust HUE when watching a TV
programme or playing back PAL video sources. When you
press (SEL), only COL and BRIGHT appear.
3 Press either SEL(+) or (–) to adjust.
Press one of these buttons within five seconds. The item
will be cancelled after five seconds if you do not touch the
(+) or (–).
Hue
To make the
picture greenish
<
To make the
picture reddish
(+)
(–)
Colour
For more colour
intensity
<
For less colour
intensity
Brightness
To brighten
the picture
<
To darken the
picture
Page 11

Tips
• To restore the factory settings, press (SEL) for more than two seconds,
VISUAL STD (standard) appears.
• When the picture is too dark or too bright from the viewing position,
press (SEL) to select BRIGHT and press (+) or (–).
GB
11
Page 12
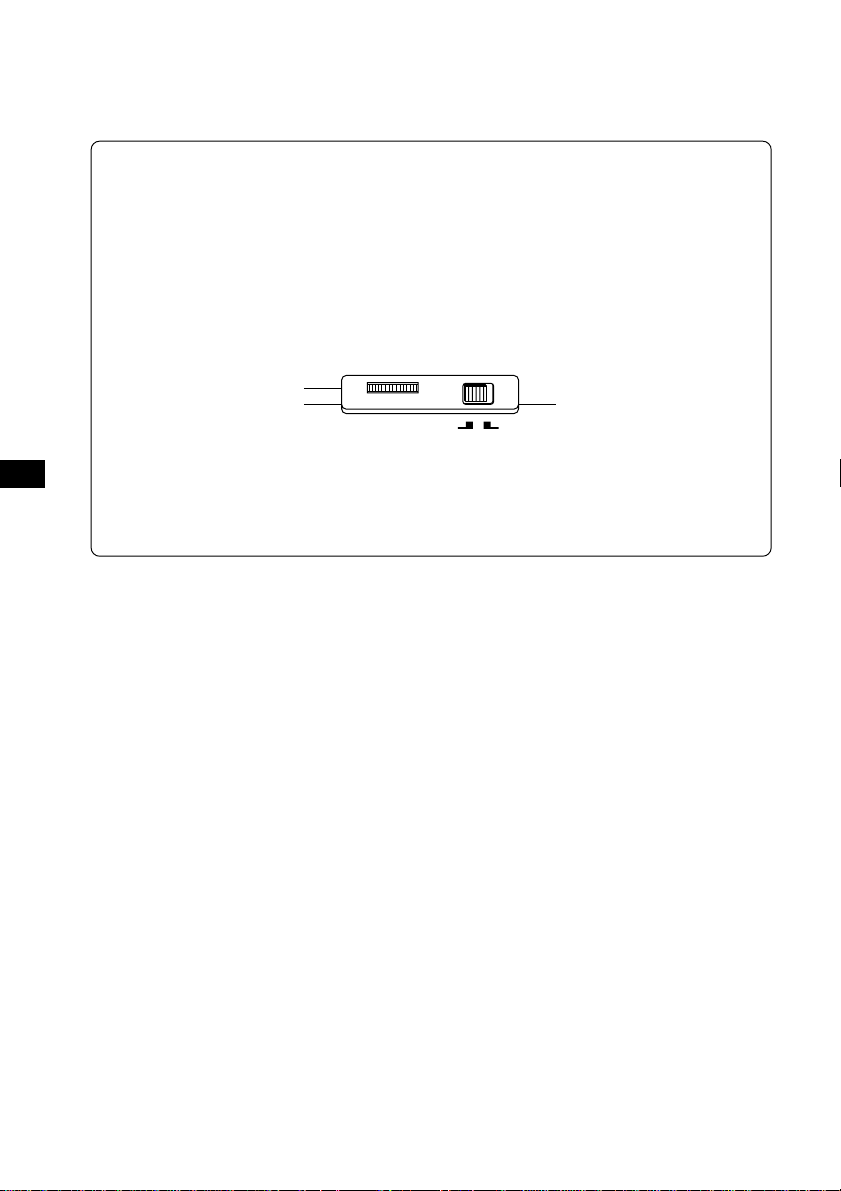
Adjusting the Screen Brightness
Depending on the surrounding light, you can adjust the screen
brightness by controlling the brightness of the fluorescent pipe
installed in the liquid crystal panel.
Change the DIMMER selector located on the side of the monitor to
HIGH or LOW.
To adjust, use BRIGHT dial.
Side of the monitor
LOWHIGH
DIMMERBRIGHT
GB
HIGH: When the surrounding light is bright (daytime).
LOW: When the surrounding light is dark (nighttime).
12
Page 13

Using the Navigation System
You can display navigation information by connecting an optional
navigation system.
1
2
NAVI
TV/VIDEO
SEL
A MEMV OFF DSPL
2SEC
123
456
789
10 11 12
POWER indicator
1 Press (POWER).
The POWER indicator lights up.
2 Press (NAVI) momentarily.
NAVI appears for five seconds in the upper left corner of
the screen.
Note
As of January 1999, the Sony navigation system will be not
available.
ITALY
SEEKVOL
GB
13
Page 14
GB
Listening to the TV/video Sound while Using
the Navigation System
You can listen to the TV or video sound even while the navigation
system is on.
2
(Simultaneous play function)
NAVI
TV/VIDEO
ITALY
SEL
123
456
789
10 11 12
A MEMV OFF DSPL
2SEC
SEEKVOL
1 Press (POWER) and select a TV programme, or
select VIDEO 1 or VIDEO 2 and begin video
playback.
2 Press (NAVI) for two seconds.
The navigation display appears, and the sound of the
selected TV programme or video is heard.
Listening to another TV programme
Press a programme number button or (SEEK).
Changing to the TV or video screen
Press (TV/VIDEO).
Canceling the simultaneous play function
To turn the TV or video sound off, press (NAVI) for two seconds.
14
Page 15
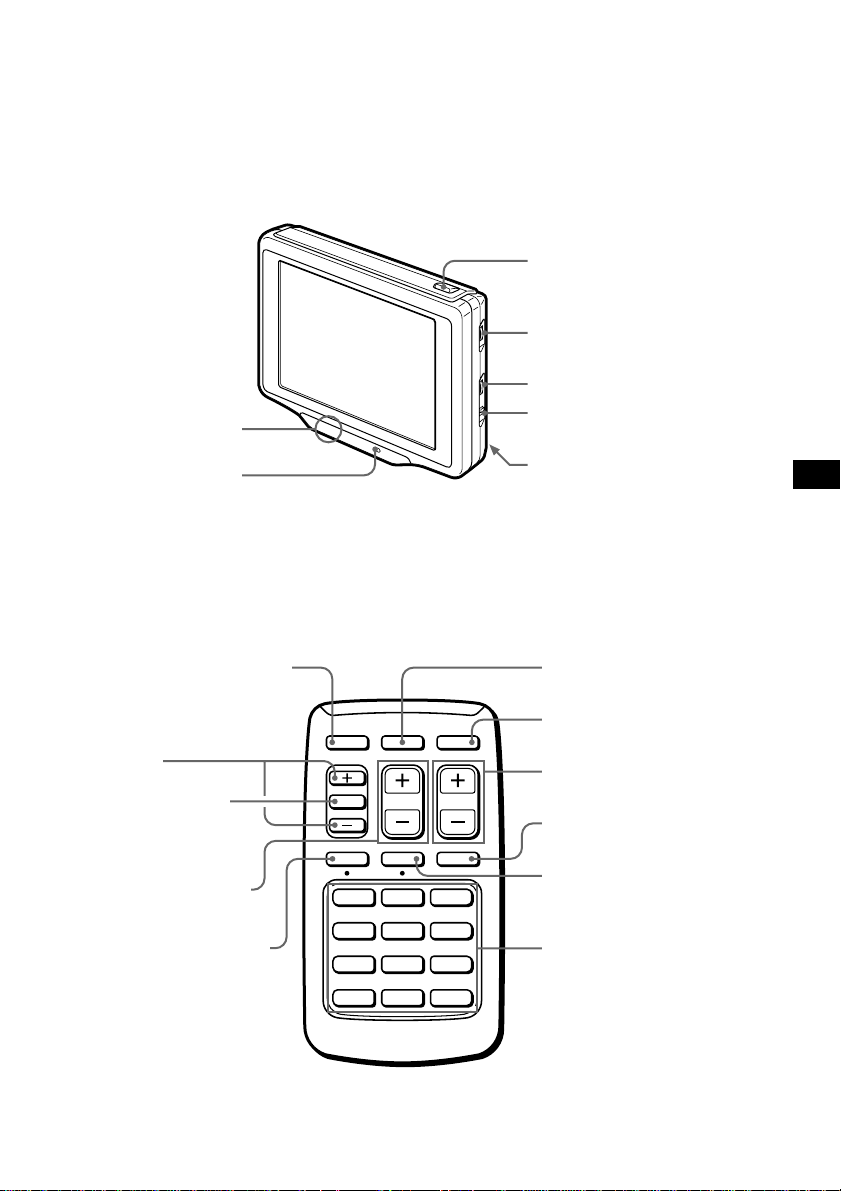
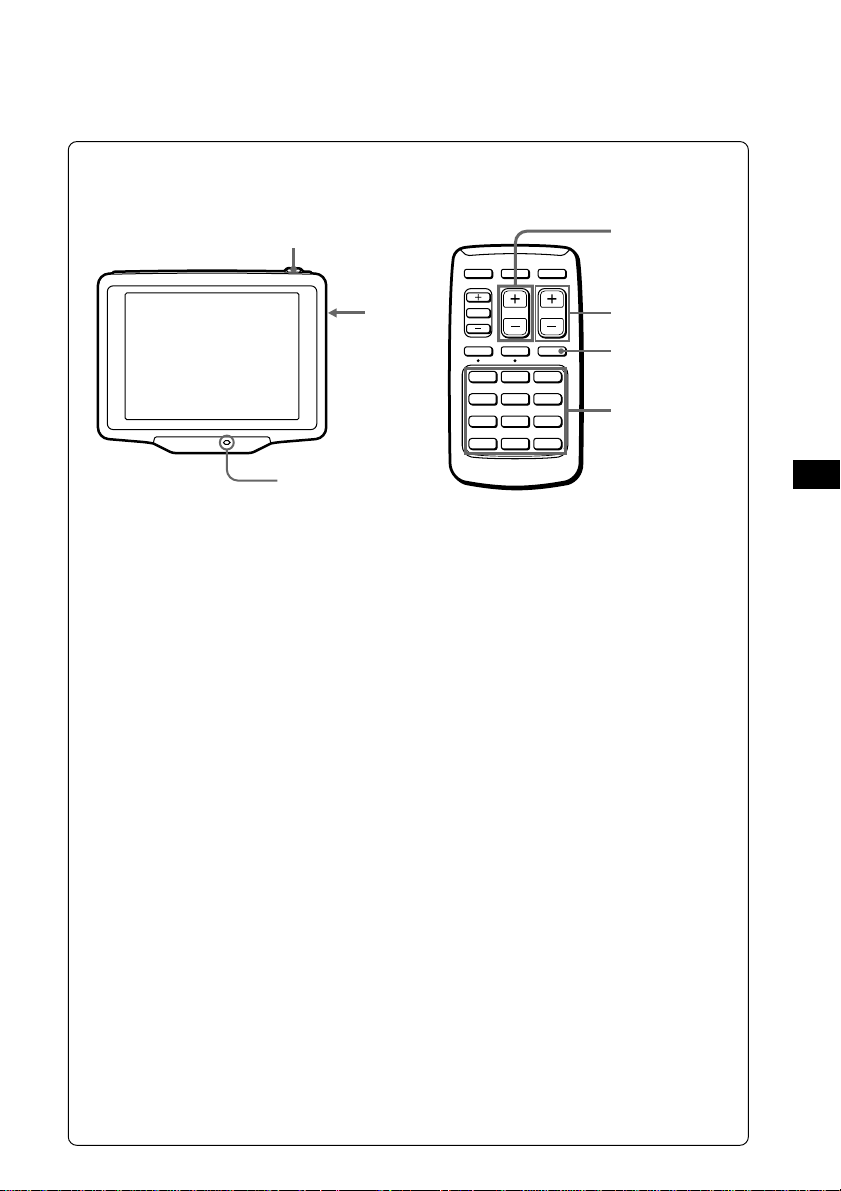
Location of Controls
Monitor
Wireless remote
sensor
POWER indicator
Wireless remote
NAVI (navigation) button
(Press for two seconds for
simultaneous play function.)
NAVI
TV/VIDEO
+/– button
SEL (select) button
VOL (volume) button
V (visual) OFF button
(Press for two seconds.)
SEL
A MEMV OFF DSPL
2SEC
123
456
789
10 11 12
ITALY
SEEKVOL
POWER (on/off) switch
VOL (volume) dial
BRIGHT dial
DIMMER (HIGH/LOW)
selector
Speaker (located on the
back of unit.)
TV/VIDEO button
ITALY button
SEEK button
DSPL (display) button
A MEM (auto memory)
button
(Press for two seconds.)
Programme number
buttons
GB
15
Page 16
GB
Additional Information
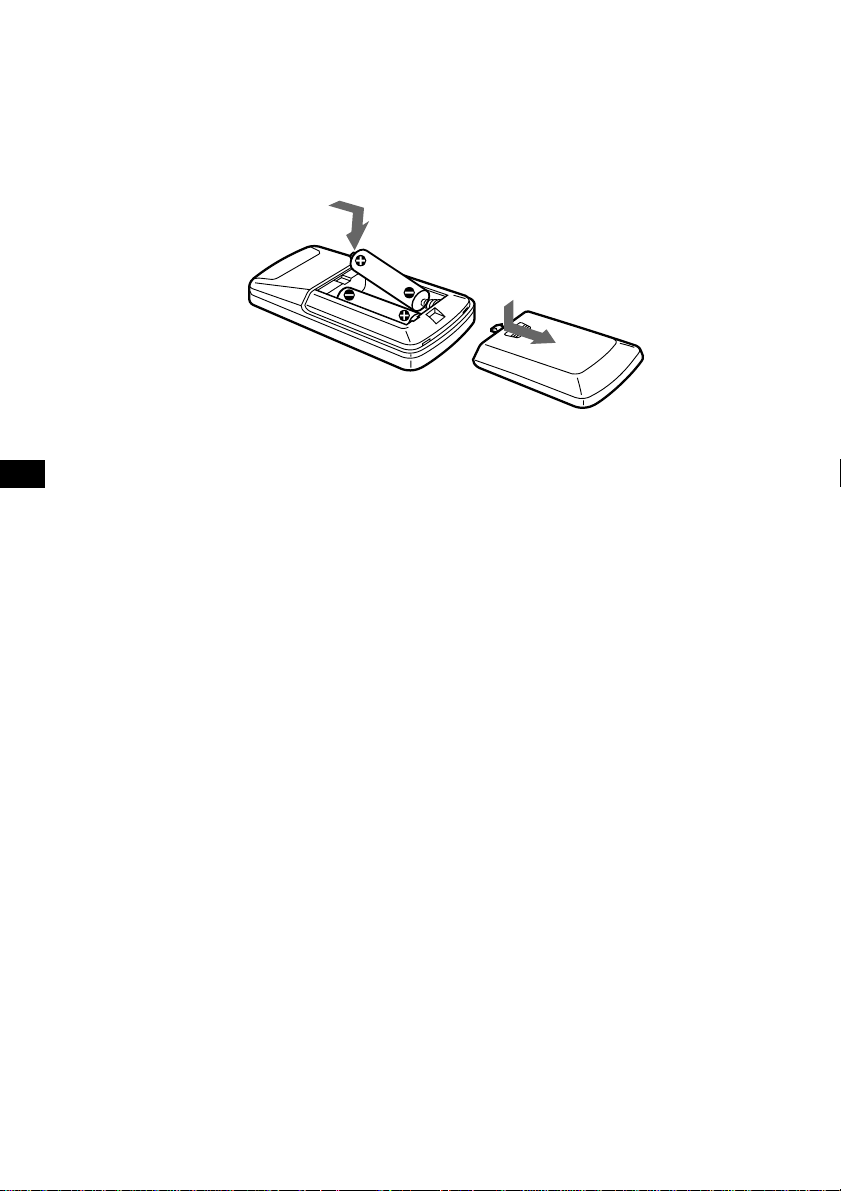
Installing the batteries
Two size AA (R6) batteries
(not supplied)
Battery life is about six months depending on the amount you use
the wireless remote.
Notes on batteries
To avoid damage from battery leakage and subsequent corrosion:
— insert the batteries matching the “+” and “–” ends on the
batteries to the “+” and “–” diagrams inside the battery
compartment
— do not use an old battery with a new one, or different types of
batteries together
— remove the batteries when you do not use the unit for a long
period of time
— do not charge the batteries.
If any battery leakage occurs, replace all the batteries with new ones
after cleaning the battery compartment.
Notes on the wireless remote
• Do not leave the wireless remote near any heat sources, or in a
place subject to direct sunlight (especially on the dashboard).
• When you park your car in direct sunlight, place the wireless
remote in a location such as the glove-box, where it will not be
subjected to direct sunlight.
About wireless radios and portable telephones
When you use a wireless radio or portable telephone near this unit,
picture or sound interference may occur. Do not use such devices near
this unit.
16
Page 17

About the liquid crystal display (LCD) panel
• Do not press on the LCD panel on the monitor unit as doing so
can distort the picture or cause a malfunction. The picture may
become unclear, or the LCD panel may be damaged.
• Notes on cleaning
—Clean the LCD panel with a slightly damp soft cloth.
—Do not use solvents such as benzine, thinner, commercially
available cleaners or antistatic spray.
• Do not use this unit in temperatures under -10° C or over 60° C.
• If your car was parked in a cold or hot place, the picture may not
be clear. The monitor is not damaged. The picture will become
clear after the temperature in your car becomes normal.
Some stationary blue or red dots may appear on the monitor.
These are called bright spots, and can happen with any LCD.
The LCD panel is highly sophisticated, and more than 99.99 % of
the segments used in the panel are flawless. However, there is a
possibility that less than 0.01 % of the segments are defective and
may not light up properly. However, these segments will not
interfere with your viewing.
GB
17
Page 18

GB
Specifications
Monitor
System Liquid crystal colour display
Display Transparent TN LCD panel
Drive systemTFT active matrix system
Picture size 6 in.; 121.9 × 89.2 mm, 151 mm
(w × h, diagonally)
Picture segment
224,640 (w 960 × h 234 )
Speaker type ø 5 cm dynamic speaker
Power requirements
12 V DC car battery
(negative earth)
Current drain
Approx. 0.7 A
Dimensions 162 × 129 × 31 mm (w × h × d)
Operating temperature
-10° C ~ +60° C
Mass Approx. 430 g
TV tuner unit
Television system
CCIR B,G,I,D,K system
Colour system
TV: PAL
Video: PAL, NTSC
Channel converge
VHF: CCIR 2 CH ~ 12 CH
ITALY A CH ~ H2 CH
UHF: 21 CH ~ 69 CH (CCIR/ITALY)
UHF: B21 CH ~ B69 CH (UK)
Power requirements
12 V DC car battery
(negative earth)
Current drain
Approx. 0.5 A
Output terminals
Video output: RCA pin 1 Vp-p, 75 ohm
Audio output: RCA pin -10 dBs, 10 kohm
Monitor output: Square 16 -pin (exclusive)
Input terminals
Video input (2 system): RCA pin 1 Vp-p,
75 ohm
Audio input: RCA pin -10 dBs, 10 kohm
Aerial input (4 system): mini plug
Navigation input: Square 16-pin
(exclusive)
RCA pin:
Video 1 Vp-p, 75 ohm
Audio (monaural)
-10 dBs, 10 kohm
Dimensions 202 × 30 × 140 mm (w × h × d)
Mass Approx. 750 g
Wireless remote
Power requirements
AA (R6) battery × 2
Operable range
Approx. 3 m
Dimensions 62 × 25 × 115 mm (w × h × d)
Mass Approx. 100 g
(including batteries)
TV aerial
Cord 5 m, 75 ohm
Supplied accessories
Wireless remote (1)
Power input cord (1)
Monitor cable (1)
TV aerial (1)
Parts for installation and
connections (1 set)
Mounting kit (1 set)
Optional accessories
Power switch adaptor
XA-15
Design and specifications are subject to change
without notice.
18
Page 19

Troubleshooting Guide
Problem
No picture, no sound
Good picture, but no sound
Dotted lines or stripes
The picture is blurred,
or has double images or
ghosts
No picture, or no sound
when you connect the
optional equipment
Cannot select a channel or
cannot view a TV
programme
Cause/Solution
•The power cord or battery has been
disconnected.
•The fuse has blown.
•Press (TV/VIDEO).
Press the (+) side of the volume button on
the wireless remote, or use the VOL dial on
the monitor.
This may be caused by local interference
such as a car engine or motorcycle. Adjust
the aerials for minimum interference.
Connect the aerials securely.
This may be caused by reflections from
nearby mountains or buildings.
• The cord has been disconnected. Connect
the cord securely.
• Press (TV/VIDEO).
• Select the TV. n Press (TV/VIDEO) and
select the TV mode.
• The wireless remote batteries may be
exhausted.
• Press (AMEM) button for two seconds.
GB
Good sound but no picture
No response when
pressing the buttons on
the wireless remote
• The visual off function is working.
n Press (VOFF).
• Driving while the TV or video player is
on. n For safety, the picture will not
appear.
The wireless remote batteries may be
exhausted.
19
Page 20

DE
Willkommen!
Danke, daß Sie sich für das mobile Farbfernsehgerät von Sony entschieden
haben.
• Mit diesem Gerät können Sie Fernsehsendungen in Großbritannien
sowie in Gebieten, in denen das CCIR-B/G-System verwendet wird,
zum Beispiel in Deutschland und Italien, empfange.
• An das Gerät können Sie PAL- und NTSC-Videowiedergabegeräte
anschließen.
• Der LCD-Bildschirm zeichnet sich durch einen besonders geringen
Reflexionsgrad aus, so daß das Bild auch bei hellem Umgebungslicht
fast blendfrei zu sehen ist.
• Die Bildhelligkeit können Sie von Hand auf das Umgebungslicht
einstellen.
• Das Gerät verfügt über eine Funktion zum Ausblenden des Bildes
(Visual-off-Funktion), so daß Sie die Möglichkeit haben, allein den Ton
einer Fernsehsendung oder eines Videos wiederzugeben.
• Mit Hilfe der Speicherautomatik können Sie bis zu 12 Sender speichern.
• Das Gerät verfügt über mehrere Ein- und Ausgänge, an die Sie ein
Videowiedergabegerät, ein Bordnavigationssystem oder einen weiteren
Monitor anschließen können.
2
Page 21

Inhalt
Warnung und Sicherheitsmaßnahmen .............................................................. 4
Vorbereitungen
Auswählen einer Farbfernsehnorm................................................................. 6
Automatisches Speichern von Fernsehsendern (Speicherautomatik) ......... 7
Fernsehbetrieb........................................................................................................ 8
Videobetrieb ........................................................................................................... 9
Wiedergeben des Fernseh-/Videotons ohne Bild (Visual-off-Funktion) ....... 10
Einstellen der Bildqualität.................................................................................. 11
Einstellen der Bildhelligkeit............................................................................... 13
Das Bordnavigationssystem .............................................................................. 14
Kombinieren von Bordnavigationssystem mit Fernseh-/Videoton
(Simultanwiedergabe) ..................................................................................... 15
Lage der Teile und Bedienelemente ................................................................. 16
Weitere Informationen........................................................................................ 17
Technische Daten................................................................................................. 19
Störungsbehebung .............................................................................................. 20
DE
3
Page 22

DE
Warnung und
Sicherheitsmaßnahmen
Achtung
Verwenden Sie unter keinen Umständen eine Sicherung mit einem
höheren Ampere-Wert als dem der Sicherung, die ursprünglich mit
dem Gerät geliefert wurde. Andernfalls kann es zu Schäden am Gerät
kommen.
Austauschen der Sicherung
Wenn Sie eine Sicherung austauschen, achten Sie darauf, eine
Ersatzsicherung mit dem gleichen Ampere-Wert wie die
Originalsicherung zu verwenden. Dieser ist auf der Originalsicherung
angegeben. Wenn die Sicherung durchbrennt, überprüfen Sie den
Stromanschluß und tauschen Sie die Sicherung aus. Brennt die neue
Sicherung ebenfalls durch, kann eine interne Fehlfunktion vorliegen.
Wenden Sie sich in einem solchen Fall an Ihren Sony-Händler.
Sicherung
Sicherheitsmaßnahmen
• Montieren Sie den Monitor nicht an einer Stelle, an der er die Sicht
des Fahrers behindert.
• Berühren Sie während eines Unwetters nicht gleichzeitig die
Fernsehantenne und den Monitor. Andernfalls besteht die Gefahr
eines elektrischen Schlags.
• Wenn Sie das Fahrzeug längere Zeit in direktem Sonnenlicht
parken, kann die Temperatur im Wageninneren erheblich ansteigen.
Lassen Sie das Gerät in diesem Fall etwas abkühlen, bevor Sie es
einschalten.
Sollten an Ihrem Gerät Probleme auftreten oder sollten Sie Fragen
haben, auf die in dieser Anleitung nicht eingegangen wird, wenden
Sie sich bitte an Ihren Sony-Händler.
4
Page 23

Sicherheitsfunktion zur Vermeidung von Unfällen
Das Fernseh- bzw. Videobild erscheint erst, nachdem Sie das
Fahrzeug geparkt und die Parkbremse betätigt haben.
Sobald sich das Fahrzeug in Bewegung setzt, wird das Fernsehbzw. Videobild aus Sicherheitsgründen automatisch ausgeblendet.
Zuvor wird 5 Sekunden lang die folgende Warnung angezeigt.
PICTURE OFF
FOR
YOUR SAFETY
Bedienen Sie, während Sie fahren, nicht die an den Fernsehtuner
angeschlossenen Geräte, und sehen Sie nicht auf den Monitor. Wenn
Sie sich von dem Bild auf dem Monitor ablenken lassen, besteht
Unfallgefahr!
Beachten Sie auch das Straßenverkehrsgesetz in Ihrem Land.
DE
5
Page 24

DE
Vorbereitungen
Auswählen einer Farbfernsehnorm
Stellen Sie den Wählschalter für die Farbfernsehnorm an der Seite des
Fernsehtuners in die richtige Position für Ihr Land.
CCIR/Italien: Stellen Sie den Schalter auf 1.
Großbritannien: Stellen Sie den Schalter auf 2.
Wenn Sie am Fernsehtuner das Fernsehsystem 1 ausgewählt haben,
drücken Sie (ITALY) auf der drahtlosen Fernbedienung. Erscheint kein
Bild, drücken Sie nochmals (ITALY).
NAVI
TV/VIDEO
SEL
SEEKVOL
A MEMV OFF DSPL
2SEC
123
456
789
10 11 12
ITALY
Taste ITALY
Wählschalter für die
Farbfernsehnorm
SYSTEM
1
TV
2
Wenn Sie das Fernsehsystem 1 wählen, erscheinen die
Fernsehprogrammnummern wie folgt:
VHF (Länder außer Italien) VHF (Italien)
UHF (alle Länder)
12 C 35
Wenn Sie das Fernsehsystem 2 wählen, erscheint die
Fernsehprogrammnummern wie folgt:
VHF (Großbritannien)
B42
6
Page 25

Automatisches Speichern von Fernsehsendern
(Speicherautomatik)
Sie können bis zu 12 VHF/UHF-Sender speichern.
Die VHF-Sender werden unter den Programmnummern 2 bis 12 auf
den Programmnummerntasten gespeichert. Die UHF-Sender werden
unter den Programmnummern 21 bis 69 im Anschluß an die
gespeicherten VHF-Sender der Reihe nach gespeichert.
1
Netzanzeige
POWER
NAVI
TV/VIDEO
ITALY
SEL
123
456
789
10 11 12
A MEMV OFF DSPL
2SEC
SEEKVOL
2
3
Programmnummerntasten
1 Drücken Sie (POWER) am Fernsehgerät.
Die Netzanzeige POWER leuchtet auf.
2 Drücken Sie so oft (TV/VIDEO), bis ein
Fernsehsender auf dem Monitor erscheint.
3 Drücken Sie zwei Sekunden lang (AMEM) an der
drahtlosen Fernbedienung.
Mit der drahtlosen Fernbedienung werden die VHF-Sender auf
den Programmnummerntasten gespeichert, die den VHFProgrammnummern entsprechen.
UHF-Sender werden der Reihe nach auf den restlichen
Programmnummerntasten gespeichert.
Beispiel
Programmnummerntaste
VHF-Sender
UHF-Sender
Für Italien
21
1
2
-
2
-
-
A
24
4
5
27
D
6
-
6
E
3
4
-
-
C
B
32
8
7
-
F
9
8
-
-
34
G
H
10
10
H1
DE
11
12
-
12
48
H2
-
-
-
7
Page 26

Fernsehbetrieb
Hinweis
Aus Sicherheitsgründen erscheint kein Fernsehbild, während sich das
Fahrzeug in Bewegung befindet.
DE
1
3
Netzanzeige
POWER
NAVI
TV/VIDEO
SEL
123
456
789
10 11 12
A MEMV OFF DSPL
2SEC
SEEKVOL
ITALY
3
Taste SEEK
Taste DSPL
2
1 Drücken Sie (POWER).
Die Netzanzeige POWER leuchtet auf.
2 Drücken Sie eine der Programmnummerntasten
(1 bis 12), um den gewünschten Sender
auszuwählen.
Wenn Sie einen Sender auswählen, erscheint in der
rechten oberen Ecke des Monitors fünf Sekunden lang die
Programmnummer.
3 Stellen Sie die Lautstärke ein.
Drehen Sie dazu den Regler VOL am Monitor, oder
drücken Sie (VOL) an der drahtlosen Fernbedienung.
Hinweis
Stellen Sie erst die Lautstärke am Monitor und dann die
Lautstärke an der drahtlosen Fernbedienung ein.
Einschalten des Bildes
Drücken Sie (DSPL).
Wenn Sie das Bild ausblenden wollen, drücken Sie (DSPL) erneut.
Ausschalten des Fernsehgeräts
Drücken Sie (POWER).
Wenn Sie während der Fahrt die gespeicherten Sender
nicht empfangen
Drücken Sie kurz (SEEK). Das Gerät sucht automatisch nach einem
Sender. Der Suchlauf stoppt, wenn ein Sender empfangen wird.
Drücken Sie die Taste so oft, bis das Gerät den gewünschten Sender
empfängt.
8
Page 27

Videobetrieb
Hinweis
Aus Sicherheitsgründen erscheint kein Videobild, während sich das
Fahrzeug in Bewegung befindet.
Sie können Video-CDs und Videokassetten im PAL- oder im NTSCFormat abspielen. Achten Sie darauf, das Videowiedergabegerät
korrekt an den Fernsehtuner anzuschließen.
Näheres dazu finden Sie in der Installations-/Anschlußanleitung.
1
NAVI
TV/VIDEO
ITALY
SEL
123
456
789
10 11 12
A MEMV OFF DSPL
2SEC
SEEKVOL
2
Netzanzeige
POWER
1 Drücken Sie (POWER).
Die Netzanzeige POWER leuchtet auf.
2 Wählen Sie mit (TV/VIDEO) den Eingang (VIDEO 1
oder VIDEO 2) aus, an den Sie das
Videowiedergabegerät angeschlossen haben.
Mit jedem Tastendruck auf (TV/VIDEO) wechselt die
Anzeige folgendermaßen.
z Fernsehprogrammnummer z VIDEO 1 z VIDEO 2
3 Schalten Sie das Videowiedergabegerät ein, und
starten Sie die Wiedergabe.
Das Gerät kann Videosignale im PAL- und im NTSCFormat verarbeiten. Folgende Anzeige erscheint fünf
Sekunden lang.
NTSC-Videoquelle
VIDEO 1
NTSC
PAL-Videoquelle
VIDEO 2
PAL
DE
9
Page 28

Wiedergeben des Fernseh-/Videotons
DE
ohne Bild
(Visual-off-Funktion)
NAVI
TV/VIDEO
ITALY
SEL
123
456
789
10 11 12
A MEMV OFF DSPL
2SEC
SEEKVOL
Taste V (Visual) OFF
Drücken Sie zwei Sekunden lang (VOFF).
Jetzt hören Sie nur noch den Ton. Das Bild wird nicht mehr
angezeigt.
Wollen Sie die Visual-off-Funktion ausschalten, drücken Sie
nochmals (VOFF). Wenn Sie das Gerät ausschalten oder den
Zündschlüssel in die Position OFF drehen, wird die Visual-offFunktion ausgeschaltet.
Die Visual-off-Funktion wird auch dann ausgeschaltet, wenn Sie
mit den Programmnummerntasten einen anderen
Fernsehsender einstellen (gilt nur beim Fernsehen).
10
Page 29

Einstellen der Bildqualität
Sie können Farbe, Farbton und Helligkeit des Bildes einstellen.
1
2
Netzanzeige
POWER
1 Drücken Sie (POWER).
Die Netzanzeige POWER leuchtet auf.
2 Drücken Sie (SEL).
Mit jedem Tastendruck auf (SEL) wechselt die Anzeige
folgendermaßen:
COL (Farbe)
HUE(Farbton)
NAVI
TV/VIDEO
ITALY
SEL
123
456
789
10 11 12
A MEMV OFF DSPL
2SEC
SEEKVOL
BRIGHT (Helligkeit)
3
DE
RG
Hinweis
Den Farbton (HUE) brauchen Sie nicht einzustellen, wenn Sie
eine Fernsehsendung sehen oder eine Videoquelle im PALFormat wiedergeben lassen. Wenn Sie (SEL) drücken, werden
in diesem Fall nur COL und BRIGHT angezeigt.
BRIGHTCOL HUE
3 Stellen Sie das Bild mit SEL(+) oder (–) ein.
Drücken Sie innerhalb von fünf Sekunden eine dieser
Tasten. Wenn Sie (+) oder (–) nicht innerhalb von fünf
Sekunden drücken, wird die Funktion wieder
ausgeschaltet.
Farbe
(+)
(–)
Intensivere
Farben
Weniger
intensive Farben
<
Farbton
Verstärkung des
Grünanteils
<
Verstärkung des
Rotanteils
Helligkeit
Helleres Bild
Dunkleres Bild
<
Fortsetzung n
11
Page 30

DE
(Fortsetzung)
Tips
• Wollen Sie das Bild wieder auf die werkseitigen Einstellungen
zurücksetzen, drücken Sie (SEL) mehr als zwei Sekunden lang.
Daraufhin erscheint VISUAL STD (Standardbildeinstellung).
• Wenn das Bild von der Sichtposition aus zu dunkel oder zu hell wirkt,
wählen Sie mit (SEL) die Option BRIGHT aus und drücken (+) oder (–).
12
Page 31

Einstellen der Bildhelligkeit
Sie können die Bildhelligkeit auf das Umgebungslicht einstellen.
Dabei wird die Helligkeit der Leuchtstoffröhre im LCD-Bildschirm
verändert.
Stellen Sie den Wählschalter DIMMER an der Seite des Monitors
auf HIGH (hell) oder LOW (dunkel).
Regulieren Sie dann die Helligkeit mit dem Regler BRIGHT.
Seite des Monitors
LOWHIGH
DIMMERBRIGHT
HIGH: Bei heller Umgebung (Tag).
LOW: Bei dunkler Umgebung (Nacht).
DE
13
Page 32

Das Bordnavigationssystem
Wenn Sie ein zusätzlich erhältliches Bordnavigationssystem
anschließen, können Sie Navigationsinformationen anzeigen lassen.
DE
1
2
NAVI
TV/VIDEO
SEL
A MEMV OFF DSPL
2SEC
123
456
789
10 11 12
Netzanzeige POWER
1 Drücken Sie (POWER).
Die Netzanzeige POWER leuchtet auf.
2 Drücken Sie kurz die (NAVI).
NAVI erscheint fünf Sekunden lang in der linken oberen
Ecke des Bildschirms.
Hinweis
Zur Zeit (Stand: Januar 1999) ist von Sony noch kein
entsprechendes Bordnavigationssystem erhältlich.
ITALY
SEEKVOL
14
Page 33

Kombinieren von Bordnavigationssystem mit
Fernseh-/Videoton
Sie können den Ton des Fernsehprogramms oder
Videowiedergabegeräts wiedergeben lassen, während das
Bordnavigationssystem eingeschaltet ist.
(Simultanwiedergabe)
NAVI
TV/VIDEO
2
ITALY
SEL
123
456
789
10 11 12
A MEMV OFF DSPL
2SEC
SEEKVOL
1 Drücken Sie (POWER), und wählen Sie ein
Fernsehprogramm aus, oder wählen Sie VIDEO 1
bzw. VIDEO 2, und starten Sie die
Videowiedergabe.
2 Drücken Sie zwei Sekunden lang (NAVI).
Die Navigationsanzeige erscheint, und der Ton des
ausgewählten Fernsehprogramms oder Videos ist zu
hören.
Wechseln zu einem anderen Fernsehprogramm
Drücken Sie eine Programmnummerntaste oder (SEEK).
Aufrufen des Fernseh- oder Videobildes
Drücken Sie (TV/VIDEO).
DE
Ausschalten der Simultanwiedergabe
Um den Ton des Fernsehprogramms oder Videos auszuschalten,
drücken Sie zwei Sekunden lang (NAVI).
15
Page 34

Lage der Teile und Bedienelemente
Monitor
Netzschalter POWER
(ein/aus)
Lautstärkeregler VOL
DE
Sensor für die
drahtlose
Fernbedienung
Netzanzeige POWER
Drahtlose Fernbedienung
Taste NAVI (Navigation)
(zum Einschalten der
Simultanwiedergabe zwei
Sekunden lang drücken.)
NAVI
TV/VIDEO
Taste +/–
Auswahltaste SEL
Lautstärketaste VOL
Taste V OFF (zum
Ausblenden des
Bildes - 2 Sekunden
lang drücken.)
SEL
A MEMV OFF DSPL
2SEC
123
456
789
10 11 12
Helligkeitsregler BRIGHT
Wählschalter DIMMER
(HIGH/LOW)
Lautsprecher (an der
Rückseite)
Taste TV/VIDEO
Taste ITALY
ITALY
Taste SEEK
SEEKVOL
Display-Taste DSPL
Taste A MEM (für die
Speicherautomatik zwei Sekunden lang
drücken)
Programmnummerntasten
16
Page 35

Weitere Informationen
Einlegen der Batterien
Zwei R6-Batterien der Größe
AA (nicht mitgeliefert)
Je nachdem, wie oft Sie die drahtlose Fernbedienung benutzen,
beträgt die Lebensdauer der Batterien etwa 6 Monate.
Hinweise zu den Batterien
Bitte beachten Sie folgende Sicherheitsmaßnahmen, um ein
Auslaufen der Batterien und damit zusammenhängende
Korrosionsschäden zu vermeiden:
— Richten Sie den Pluspol („+“) und den Minuspol („–“) der
Batterien beim Einlegen so aus, wie mit den Kennzeichnungen
„+“ und „–“ im Batteriefach angegeben.
— Verwenden Sie alte Batterien nicht zusammen mit neuen, und
verwenden Sie auch keine unterschiedlichen Batterietypen
zusammen.
— Wenn Sie das Gerät längere Zeit nicht benutzen wollen,
nehmen Sie die Batterien heraus.
— Versuchen Sie nicht, die Batterien aufzuladen.
Falls eine Batterie ausläuft, wischen Sie das Batteriefach zunächst
sorgfältig trocken, und legen Sie dann neue Batterien ein.
DE
Hinweise zur drahtlosen Fernbedienung
• Lassen Sie die drahtlose Fernbedienung nicht in der Nähe von
Wärmequellen oder an Orten liegen, an denen sie direktem
Sonnenlicht ausgesetzt ist. Legen Sie sie insbesondere nicht auf
dem Armaturenbrett ab!
• Wenn Sie das Auto in direktem Sonnenlicht abstellen, legen Sie
die drahtlose Fernbedienung an eine Stelle, an der sie keinem
direkten Sonnenlicht ausgesetzt ist, zum Beispiel ins
Handschuhfach.
Hinweis zu Radios und Mobiltelefonen
Wenn Sie in der Nähe dieses Geräts ein Radio oder ein Mobiltelefon
benutzen, kann es zu Bild- oder Tonstörungen kommen. Verwenden
Sie solche Geräte daher nicht zu nahe bei diesem Gerät.
Fortsetzung n
17
Page 36

DE
(Fortsetzung)
Hinweis zum LCD-Bildschirm (Flüssigkristallbildschirm)
• Drücken Sie nicht auf den LCD-Bildschirm des Monitors.
Andernfalls kann es zu Bildverzerrungen oder anderen
Fehlfunktionen kommen. Das Bild kann unscharf werden, oder
der LCD-Bildschirm kann beschädigt werden.
• Hinweise zur Reinigung
—Reinigen Sie den LCD-Bildschirm mit einem leicht
angefeuchteten, weichen Tuch.
—Verwenden Sie keine Lösungsmittel wie Benzin oder
Verdünner und keine handelsüblichen Reinigungsmittel oder
Antistatik-Sprays.
• Verwenden Sie das Gerät nicht bei Temperaturen unter -10 °C
oder über +60 °C.
• Wenn Ihr Auto in sehr warmer oder sehr kalter Umgebung
geparkt war, ist das Bild unter Umständen verschwommen. Das
ist keine Fehlfunktion des Monitors. Sobald sich die Temperatur
im Wageninneren normalisiert, wird auch das Bild wieder scharf.
Auf dem Monitor können unbewegliche blaue oder rote Punkte
erscheinen.
Solche sogenannten Lichtpunkte können bei allen LCDBildschirmen auftreten.
Der LCD-Bildschirm ist ein hochmodernes, technisches Gerät. Der
Anteil der korrekt angezeigten, effektiven Bildpunkte liegt bei über
99,99 %. Es besteht jedoch die Möglichkeit, daß bis zu 0,01 % der
Bildpunkte ausfallen und nicht korrekt angezeigt werden. Diese
Ausfälle beeinträchtigen die Bildqualität jedoch nicht.
18
Page 37

Technische Daten
Monitor
System Flüssigkristallbildschirm
Display Transparente TN-LCD-Anzeige
Anzeigesteuerung
TFT-Aktivmatrix
Bildgröße 6 in.; 121,9 × 89,2 mm, 151 mm
(B × H, Diagonale)
Bildelemente
224.640 (B 960 × H 234 )
Lautsprechertyp
Dynamischer Lautsprecher,
ø 5 cm
Stromversorgung
+12-V-Autobatterie
(Gleichstrom, negativ geerdet)
Stromentnahme
ca. 0,7 A
Abmessungen
162 × 129 × 31 mm (B × H × T)
Betriebstemperatur
–10 °C ~ +60 °C
Gewicht ca. 430 g
Fernsehtuner
Fernsehnorm
CCIR B,G,I,D,K
Farbsystem
Fernsehgerät: PAL
Video: PAL und NTSC
Empfangbare Kanäle
VHF: CCIR 2 ~ 12
ITALY A ~ H2
UHF: 21 ~ 69 (CCIR/ITALY)
UHF: B21 ~ B69 (UK)
Stromversorgung
+12-V-Autobatterie
(Gleichstrom, negativ geerdet)
Stromentnahme
ca. 0,5 A
Ausgänge
Videoausgang: Cinchbuchse, 1 Vp-p, 75
Ohm
Audioausgang: Cinchbuchse, -10 dBs, 10 k
Ohm
Monitorausgang: Rechteckig, 16polig
(exklusiv)
Eingänge
Videoeingang (2 Systeme) : Cinchbuchse,
1Vp-p, 75 Ohm
Audioeingang : Cinchbuchse, -10 dBs,
10 kOhm
Antenneneingang (4 Systeme) : Ministecker
Cinchbuchse:
Navigationseingang: Rechteckig, 16polig
(exklusiv)
Cinchbuchse:
Video: 1 Vp-p, 75 Ohm
Audio (monaural)
-10 dBs, 10 kOhm
Abmessungen 202 × 30 × 140 mm
(B × H × T)
Gewicht ca. 750 g
Drahtlose Fernbedienung
Stromversorgung
R6-Batterien der Größe AA (2)
Reichweite ca. 3 m
Abmessungen
62 × 25 × 115 mm (B × H × T)
Gewicht ca. 100 g (mit Batterien)
Fernsehantenne
Kabelantenne 5 m, 75 Ohm
Mitgeliefertes Zubehör
Drahtlose Fernbedienung (1)
Netzkabel (1)
Monitorkabel (1)
Fernsehantenne (1)
Montageteile und
Anschlußzubehör (1 Satz)
Montagesatz (1 Satz)
Sonderzubehör
Netzteil XA-15
Änderungen, die dem technischen Fortschritt
dienen, bleiben vorbehalten.
DE
19
Page 38

Störungsbehebung
DE
Problem
Kein Bild, kein Ton
Gutes Bild, kein Ton
Gepunktete Linien oder
Streifen
Bild verschwommen,
Doppelbilder, Nachbilder
Kein Bild, kein Ton nach
Anschluß von
Zusatzgeräten
Kein Kanal wählbar oder
kein Fernsehsender
einstellbar
Ursache/Abhilfemaßnahme
•Das Netzkabel wurde gelöst, oder die
Verbindung zur Batterie besteht nicht
mehr.
•Die Sicherung ist durchgebrannt.
•Drücken Sie (TV/VIDEO).
Drücken Sie die Seite (+) der
Lautstärketaste an der drahtlosen
Fernbedienung, oder drehen Sie den Regler
VOL am Monitor.
Dies kann auf lokale Störquellen wie
Automotoren oder Motorräder
zurückgehen. Richten Sie die Antenne so
aus, daß die Störungen möglichst gering
ausfallen.
Schließen Sie die Antenne korrekt an.
Dies kann auf Reflexionen naher Gebirge
oder Gebäude zurückgehen.
• Das Kabel wurde getrennt. Schließen Sie
das Kabel korrekt an.
• Drücken Sie (TV/VIDEO).
• Aktivieren Sie das Fernsehgerät.
n Drücken Sie dazu (TV/VIDEO), und
stellen Sie den Fernsehmodus ein.
• Die Batterien in der drahtlosen
Fernbedienung sind möglicherweise leer.
• Drücken Sie 2 Sekunden lang die Taste
(AMEM).
Guter Ton, kein Bild
Keine Reaktion, wenn
Tasten auf drahtloser
Fernbedienung gedrückt
werden
20
• Die Visual-off-Funktion wurde aktiviert.
n Drücken Sie (VOFF).
• Das Fernsehgerät oder das
Videowiedergabegerät ist eingeschaltet,
aber das Auto ist in Bewegung.
n Aus Sicherheitsgründen erscheint
dabei kein Bild.
Die Batterien in der drahtlosen
Fernbedienung sind möglicherweise leer.
Page 39

Page 40

Complimenti!
Grazie per aver acquistato il Mobile Colour TV di Sony .
• Questo apparecchio è in grado di ricevere i programmi televisivi nel
Regno Unito e in altre aree con sistema CCIR B/G, come la Germania e
Italia.
• È possibile collegare sia apparecchi di riproduzione video PAL che NTSC.
• Il pannello a cristalli liquidi a bassa riflessione riduce il riflesso provocato
da sorgenti luminose esterne.
• È possibile regolare manualmente la luminosità del display a seconda
delle condizioni di luce dell’ambiente circostante.
• La funzione “visual off” consente di disattivare le immagini in modo da
poter ascoltare solo l’audio del televisore o del video.
• Grazie alla funzione di memorizzazione automatica è possibile
memorizzare fino a 12 stazioni.
• Questo apparecchio è dotato di diversi terminali di ingresso/uscita per il
collegamento del lettore video, del sistema di navigazione e del monitor
IT
posteriore.
QUESTO APPARECCHIO NON È FORNITO DI PRESA DI
PERITELEVISIONE CONFORME ALLA NORMA EN 50049/CEI 60.5, DI
CUI AL DECRETO MINISTERIALE 3 AGOSTO 1984 E NON È
PREDISPOSTO O DOTATO DI TELEVIDEO O DELLA STEREOFONIA
CONFORMEMENTE ALLA NORMATIVA ITALIANA DI CUI AI DECRETI
MINISTERIALI 3 AGOSTO 1984 E AL DECRETO MINISTERIALE 29
MARZO 1985.
2
Page 41

Indice
Avvertenze e precauzioni .................................................................................... 4
Operazioni preliminari
Selezione del sistema TV................................................................................... 5
Memorizzazione automatica delle stazioni televisive
(Funzione di memorizzazione automatica)................................................. 6
Riproduzione di un programma televisivo ....................................................... 7
Riproduzione di un video .................................................................................... 8
Ascolto dell’audio del televisore/video senza visualizzare le immagini
(Funzione “visual off”)...................................................................................... 9
Regolazione dell’immagine ............................................................................... 10
Regolazione della luminosità dello schermo................................................... 12
Uso del sistema di navigazione ......................................................................... 13
Ascolto dell’audio del televisore/video durante l’uso del sistema di
navigazione (funzione di riproduzione simultanea) .................................. 14
Individuazione dei comandi.............................................................................. 15
Informazioni aggiuntive..................................................................................... 16
Caratteristiche tecniche ...................................................................................... 18
Guida alla soluzione dei problemi.................................................................... 19
IT
3
Page 42

Avvertenze e precauzioni
Avvertenza
Non utilizzare mai un fusibile con amperaggio superiore a quello del
fusibile in dotazione, onde evitare di danneggiare l’apparecchio.
Sostituzione del fusibile
Quando si sostituisce il fusibile, utilizzare solo un fusibile con lo stesso
amperaggio del fusibile originale. Se il fusibile salta, controllare il
collegamento dell’alimentazione e sostituire il fusibile. Se dopo la
sostituzione il fusibile salta di nuovo, potrebbe esservi un problema di
funzionamento interno. In tal caso, rivolgersi al rivenditore Sony più vicino.
Fusibile
IT
Precauzioni
• Installare il monitor in modo che non ostacoli la visuale del guidatore.
• Durante i temporali, non toccare l’antenna TV e il monitor
contemporaneamente, onde evitare il pericolo di scosse elettriche.
• Se si parcheggia la macchina sotto la luce diretta del sole e la
temperatura al suo interno aumenta considerevolmente, attendere che
l’apparecchio si raffreddi prima di utilizzarlo.
Per domande o problemi riguardanti l’apparecchio che non sono trattati
nel presente manuale, rivolgersi al rivenditore Sony più vicino.
Prevenzione di incidenti
Le immagini televisive/video vengono riprodotte solo dopo che
l’auto è stata parcheggiata ed è stato tirato il freno a mano.
Per ragioni di sicurezza, quando la macchina inizia a muoversi, viene
visualizzato il seguente messaggio di avvertimento per 5 secondi e le
immagini televisive/video scompaiono automaticamente.
PICTURE OFF
FOR
YOUR SAFETY
Durante la guida, non utilizzare alcun apparecchio collegato all’unità
sintonizzatore TV né guardare il monitor, onde evitare di provocare
incidenti stradali dovuti a distrazioni.
In conformità con il codice stradale del proprio paese.
4
Page 43

Operazioni preliminari
Selezione del sistema TV
Impostare il selettore del sistema TV, situato sul lato dell’unità
sintonizzatore TV, sulla posizione corretta per l’area in cui si utilizza
l’apparecchio.
CCIR/Italia: impostare su 1
Regno Unito: impostare su 2
Se si seleziona il sistema TV 1 sull’unità sintonizzatore TV, premere
(ITALY) sul telecomando senza filo. Se non viene riprodotta alcuna
immagine, premere di nuovo (ITALY).
NAVI
TV/VIDEO
ITALY
SEL
SEEKVOL
A MEMV OFF DSPL
2SEC
123
456
789
10 11 12
Tasto ITALY
Selettore del
sistema TV
SYSTEM
1
TV
2
IT
Quando viene selezionato il sistema TV 1, i numeri dei programmi TV
appaiono come di seguito:
VHF (Italia esclusa) VHF (Italia)
12 C
UHF (entrambe le aree)
35
Quando viene selezionato il sistema TV 2, i numeri dei programmi TV
appaiono come di seguito:
UHF (Regno Unito)
B42
continua n
5
Page 44

(Continua)
Memorizzazione automatica delle stazioni
televisive
(Funzione di memorizzazione automatica)
È possibile memorizzare fino a 12 stazioni VHF/UHF.
Le stazioni VHF sui numeri di programma da 2 a 12 vengono
memorizzate sui tasti numerici dei programmi. Le stazioni UHF sui
numeri di programma da 21 a 69 vengono memorizzate in sequenza
dopo le stazioni VHF memorizzate.
1
NAVI
TV/VIDEO
ITALY
SEL
123
456
IT
Indicatore di
alimentazione
789
10 11 12
A MEMV OFF DSPL
2SEC
SEEKVOL
2
3
Tasti numerici
dei programmi
1 Premere (POWER) Sul televisore.
L’indicatore di alimentazione (POWER) di illumina.
2 Premere ripetutamente (TV/VIDEO) finché sul
display non appare il programma televisivo.
3 Premere (AMEM) sul telecomando senza filo per
due secondi.
Le stazioni VHF vengono memorizzate sui tasti numerici dei
programmi sul telecomando senza filo corrispondenti ai numeri
delle stazioni VHF.
Le stazioni UHF vengono memorizzate in sequenza sui tasti
numerici dei programmi rimanenti.
Esempio
Tasto numerico del programma
Stazione VHF
Stazione UHF
Per l’Italia
21
1
2
-
2
-
-
A
24
4
5
27
D
6
-
6
-
E
3
4
-
-
C
B
32
8
7
-
F
9
8
-
-
34
G
H
10
10
H1
11
12
-
12
48
H2
-
-
-
6
Page 45

Riproduzione di un programma
televisivo
Nota
Per ragioni di sicurezza, le immagini televisive non vengono riprodotte
fintanto che la macchina è in movimento.
1
3
Indicatore di
alimentazione
NAVI
TV/VIDEO
SEL
123
456
789
10 11 12
A MEMV OFF DSPL
2SEC
SEEKVOL
ITALY
3
Tasto SEEK
Tasto DSPL
2
1 Premere (POWER).
L’indicatore di alimentazione (POWER) si illumina.
2 Premere i tasti numerici dei programmi (da 1 a 12)
per selezionare la stazione televisiva desiderata.
Ogni volta che si seleziona una stazione, nell’angolo
superiore destro del display viene visualizzato il numero
del programma per cinque secondi.
3 Regolare la manopola del volume.
Ruotare la manopola VOL sul monitor o premere (VOL)
sul telecomando senza filo.
Nota
Regolare il volume sul monitor prima di regolare il volume sul
telecomando senza filo.
Come attivare le indicazioni a schermo
Premere (DSPL).
Per spegnere il display, premere di nuovo il tasto.
Come spegnere il televisore
Premere (POWER).
Se in viaggio non è possibile ricevere le stazioni
memorizzate
Premere (SEEK) per alcuni secondi per ricercare automaticamente
una stazione. Quando l’apparecchio riceve una stazione, la ricerca si
interrompe. Premere ripetutamente il tasto finché non viene ricevuta
la stazione desiderata.
IT
7
Page 46

Riproduzione di un video
Nota
Per ragioni di sicurezza, le immagini del video non vengono riprodotte
fintanto che la macchina è in movimento.
È possibile riprodurre CD video e videocassette registrate sia nel
sistema di colore PAL che NTSC. Assicurarsi di aver collegato un
lettore video all’unità sintonizzatore TV correttamente.
Per ulteriori informazioni, vedere il manuale per Installazione/
Collegamenti.
1
NAVI
TV/VIDEO
ITALY
2
SEL
123
456
IT
Indicatore di
alimentazione
789
10 11 12
A MEMV OFF DSPL
2SEC
SEEKVOL
1 Premere (POWER).
L’indicatore di alimentazione (POWER) si illumina.
2 Premere (TV/VIDEO) per selezionare l’ingresso a
cui è stato collegato il lettore video, VIDEO 1 o
VIDEO 2.
Ad ogni pressione di (TV/VIDEO), l’indicazione cambia
nel modo seguente.
z Numero del programma televisivo z VIDEO 1 z VIDEO 2
3 Accendere il lettore video, quindi avviare la
riproduzione.
L’apparecchio visualizza le immagini video nel sistema di
colore PAL o NTSC e il seguente display viene
visualizzato per cinque secondi.
Video NTSC
Video PAL
VIDEO 1
NTSC
VIDEO 2
PAL
8
Page 47

Ascolto dell’audio del televisore/video senza
visualizzare le immagini
NAVI
TV/VIDEO
SEL
A MEMV OFF DSPL
2SEC
123
456
789
10 11 12
(Funzione “visual off”)
ITALY
SEEKVOL
Tasto V (visual) OFF
Premere (VOFF) per due secondi.
In questo modo, è possibile ascoltare solo l’audio del
programma selezionato.
Per annullare la funzione “visual off”, premere di nuovo
(VOFF). La funzione di “visual off” viene annullata se si spegne
l’apparecchio o se si gira la chiavetta di accensione su OFF.
La funzione “visual off” viene inoltre annullata se si seleziona
un altro programma televisivo utilizzando i tasti numerici dei
programmi (solo per il televisore).
IT
9
Page 48

Regolazione dell’immagine
È possibile regolare il colore, la tinta e la luminosità dell’immagine.
1
NAVI
TV/VIDEO
ITALY
3
Indicatore di
alimentazione
2
SEL
123
456
789
10 11 12
A MEMV OFF DSPL
2SEC
SEEKVOL
1 Premere (POWER).
L’indicatore di alimentazione (POWER) si illumina.
IT
2 Premere (SEL).
Ad ogni pressione di (SEL), le voci cambiano nel modo
seguente.
COL (colore)
HUE (tinta)
RG
BRIGHT (luminosità)
BRIGHTCOL HUE
10
Nota
Durante la visione di un programma televisivo o la riproduzione di
sorgenti video PAL, non occorre regolare la voce HUE. Se si
premere (SEL), vengono visualizzate solo le voci COL e BRIGHT.
3 Premere SEL(+) o (–) per effettuare le regolazioni.
Premere questi tasti entro cinque secondi. Se non si preme
(+) o (–) entro cinque secondi, la voce viene annullata.
(+)
(–)
Colore
Per una maggiore
intensità del
colore
<
Per una minore
intensità del
colore
Tinta
Per visualizzare
le immagini con
toni verdastri
<
Per visualizzare
le immagini con
toni rossastri
Luminosità
Per rendere le
immagini più
luminose
<
Per scurire le
immagini
Page 49

Suggerimenti
• Per ripristinare le impostazioni di fabbrica, premere (SEL) per più di
due secondi, appare VISUAL STD (standard).
• Se l’immagine appare troppo scura o troppo luminosa, premere (SEL)
per selezionare BRIGHT, quindi premere (+) o (–).
IT
11
Page 50

Regolazione della luminosità dello
schermo
A seconda delle condizioni di luce dell’ambiente circostante, è
possibile regolare la luminosità dello schermo regolando la
luminosità del tubo fluorescente installato nel pannello a cristalli
liquidi.
Impostare il selettore DIMMER, situato sul lato del monitor, su
HIGH o LOW.
Per effettuare le regolazioni, utilizzare la manopola BRIGHT.
Lato del monitor
LOWHIGH
DIMMERBRIGHT
HIGH: Se l’ambiente circostante è luminoso (giorno).
LOW: Se l’ambiente circostante è scuro (notte).
IT
12
Page 51

Uso del sistema di navigazione
È possibile visualizzare le informazioni di navigazione collegando
un sistema di navigazione opzionale.
1
2
NAVI
SEL
2SEC
123
456
789
10 11 12
Indicatore di
alimentazione
1 Premere (POWER).
L’indicatore di alimentazione (POWER) si illumina.
2 Premere (NAVI) per alcuni secondi.
Nell’angolo superiore sinistro dello schermo, viene
visualizzato NAVI per cinque secondi.
Nota
Il sistema di navigazione Sony non è disponibile a partire da
gennaio 1999.
TV/VIDEO
SEEKVOL
A MEMV OFF DSPL
ITALY
IT
13
Page 52

Ascolto dell’audio del televisore/video durante l’uso
del sistema di navigazione
È possibile ascoltare l’audio del televisore o del video anche
quando il sistema di navigazione è acceso.
2
(funzione di riproduzione simultanea)
NAVI
TV/VIDEO
ITALY
SEL
123
456
789
10 11 12
A MEMV OFF DSPL
2SEC
SEEKVOL
1 Premere (POWER), quindi selezionare un
programma televisivo oppure selezionare VIDEO
IT
1 o VIDEO 2 e avviare la riproduzione.
2 Premere (NAVI) per due secondi.
Viene visualizzato il display di navigazione e viene
riprodotto l’audio del programma televisivo o del video
selezionato.
Ascolto di un altro programma televisivo
Premere un tasto numerico di programma o (SEEK).
Come attivare di nuovo le immagini televisive o video
Premere (TV/VIDEO).
Annullamento della funzione di riproduzione simultanea
Per disattivare l’audio del televisore o del video, premere (NAVI)
per due secondi.
14
Page 53

Individuazione dei comandi
Monitor
Interruttore POWER
(acceso/spento)
Manopola VOL
(volume)
Manopola BRIGHT
Telecomando
senza filo
Indicatore di alimentazione
(POWER)
Selettore DIMMER
(HIGH/LOW)
Diffusore (situato sul
retro dell’apparecchio)
Telecomando senza filo
Tasto NAVI (navigazione)
(premere per due secondi
per attivare la funzione di
riproduzione simultanea).
Tasto +/–
Tasto SEL (selezione)
Tasto VOL (volume)
Tasto V (visual) OFF
(premere per due
secondi).
NAVI
SEL
2SEC
123
456
789
10 11 12
TV/VIDEO
ITALY
SEEKVOL
A MEMV OFF DSPL
IT
Tasto TV/VIDEO
Tasto ITALY
Tasto SEEK
Tasto DSPL (display)
Tasto A MEM (memoria
automatica) (premere
per due secondi).
Tasti numerici dei
programmi
15
Page 54

Informazioni aggiuntive
Installazione delle batterie
Due batterie R6 (formato AA)
(non in dotazione)
La durata della batteria è di circa sei mesi a seconda di quanto si
utilizza il telecomando senza filo.
Note sulle batterie
Per evitare danni e corrosioni provocati da perdite di elettrolita
IT
delle batterie:
— inserire le batterie facendo corrispondere i poli “+” e “–” delle
batterie con i poli “+” e “–” dello schema riportato all’interno
dello scomparto per le batterie
— non utilizzare batterie vecchie insieme con batterie nuove né
utilizzare diversi tipi di batterie contemporaneamente
— rimuovere le batterie se si prevede di non utilizzare
l’apparecchio per un lungo periodo di tempo
— non caricare le batterie.
Nel caso in cui si verificassero perdite di elettrolita, sostituire tutte
le batterie con batterie nuove e pulire lo scomparto per le batterie.
Note sul telecomando senza filo
• Non lasciare il telecomando senza filo in prossimità di fonti di
calore o in un luogo esposto alla luce diretta del sole (in
particolare sul cruscotto).
• Se si parcheggia l’auto sotto la luce diretta del sole, riporre il
telecomando senza filo nel vano portaoggetti o in un luogo
riparato dalla luce diretta del sole.
Informazioni sulle radio senza filo e sui
telefoni portatili
Se si utilizza una radio senza filo o un telefono portatile vicino a
questo apparecchio, le immagini o l’audio potrebbero essere
16
disturbati. Non utilizzare tali dispositivi vicino a questo apparecchio.
Page 55

Informazioni sul pannello a cristalli liquidi (LCD)
• Non esercitare pressioni sul pannello a cristalli liquidi del
monitor onde evitare di deformare le immagini o causare un
funzionamento non corretto dell’apparecchio. Le immagini
potrebbero non essere visualizzate chiaramente e si potrebbe
danneggiare il pannello a cristalli liquidi.
• Note sulla pulizia
—Pulire il panello a cristalli liquidi con un panno morbido
leggermente inumidito.
—Non utilizzare solventi quali benzene, diluenti, detergenti o
spray antistatici disponibili in commercio.
• Non utilizzare questo apparecchio con temperature inferiori a
-10° C o superiori a 60° C.
• Se si parcheggia l’auto in luogo freddo o molto caldo, le immagini
riprodotte potrebbero non essere chiare. Il monitor funziona
correttamente. Le immagini diventeranno chiare quando la
temperatura all’interno dell’auto tornerà ai livelli normali.
Sul monitor potrebbero apparire e rimanere visualizzati alcuni
punti blu o rossi.
Tali punti sono chiamati punti luminosi e la loro comparsa è
normale con qualsiasi schermo a cristalli liquidi.
Il panello a cristalli liquidi è altamente sofisticato e oltre il 99,99 %
dei segmenti utilizzati nel pannello sono esenti da difetti. Esiste
tuttavia la possibilità che meno dello 0,01 % dei segmenti
presentino dei difetti e non si illuminino correttamente. Tali
segmenti non interferiscono comunque con la visualizzazione delle
immagini.
IT
17
Page 56

Caratteristiche tecniche
Monitor
Sistema Display a colori a cristalli liquidi
Display Pannello a cristalli liquidi TN
Sistema di pilotaggio
Dimensione dell’immagine
Segmento dell’immagine
Diffusore Diffusore dinamico ø 5 cm
Requisiti di alimentazione
Flusso corrente
Dimensioni 162 × 129 × 31 mm (l × a × p)
Temperatura di utilizzo
Peso Circa 430 g
trasparente
Sistema matrice attiva TFT
6 in.; 121,9 × 89,2 mm, 151 mm
(l × a, diagonale)
224,640 (l 960 × a 234 )
Batteria per auto a CC 12 V
(terra negativa)
Circa 0,7 A
–10° C ~ +60° C
Unità sintonizzatore TV*
Sistema TV
Sistema di colore
TV: PAL
IT
Video: PAL, NTSC
Convergenza canali
VHF: CCIR 2 CH ~ 12 CH
UHF: 21 CH ~ 69 CH (CCIR/ITALY)
UHF: B21 CH ~ B69 CH (UK)
Requisiti di alimentazione
Flusso corrente
Terminali di uscita
Uscita video: piedino RCA 1 Vp-p,
Uscita audio: piedino RCA –10 dBs,
Uscita monitor: Quadrato a 16 piedini
Le prescrizioni alle frequenze sono quelle indicata nel paragrafo 3 dell’allegato A. al D.M.
26.06.85 e nel paragrafo 3 dell’allegato 1 al D.M. 27.08.87 e precisamente:
BANDE DI FREQUENZA
1. Bande di frequenza:
2. Frequenza intermedia: Multi - Standard FI-Video : 38,9 MHz
3. Oscillatore locale: Frequenza oscillatore locale superiore a quella del segnale.
Sistema CCIR B,G,I,D,K
ITALY A CH ~ H2 CH
Batteria per auto a CC 12 V
(terra negativa)
Circa 0,5 A
75 ohm
10 kohm
(esclusivo)
DICHIARAZIONE DI CONFORMITÀ
Low VHF E2 - C Freq. da 48,25 a 82,25 MHz
High VHF E5 - E12 Freq. da 175,25 a 224,25 MHz
UHF E21 - E69 Freq. da 471,25 a 855,25 MHz
Terminali di ingresso
Ingresso video (sistema 2): piedino RCA
1 Vp-p, 75 ohm
Ingresso audio: piedino RCA –10 dBs, 10
kohm
Ingresso antenna (sistema 4): minispina
Ingresso navigazione: Quadrato a 16
piedini
(esclusivo)
Piedino RCA:
Video 1 Vp-p,
75 ohm
Audio (monofonico)
–10 dBs, 10 kohm
Dimensioni 202 × 30 × 140 mm (l × a × p)
Peso Circa 750 g
Telecomando senza filo
Requisiti di alimentazione
Batterie R6 (formato AA) × 2
Raggio di azione
Circa 3 m
Dimensioni 62 × 25 × 115 mm (l × a × p)
Peso Circa 100 g
(comprese le batterie)
Antenna TV
Cavo 5 m, 75 ohm
Accessori in dotazione
Telecomando senza filo (1)
Cavo di ingresso alimentazione
(1)
Cavo del monitor (1)
Antenna TV (1)
Componenti per l’installazione e
i collegamenti (1 set)
Kit di montaggio (1 set)
Accessori opzionali
Adattatore per interruttore
XA-15
Il design e le caratteristiche tecniche possono
subire modifiche senza preavviso.
FI-Audio I : 33,4 MHz
* di cui al par. 3 dell’Allegato A al D.M. 25/06/85 e al par. 3 dell’Allegato 1 al D.M. 27/08/87
18
Page 57

Guida alla soluzione dei problemi
Problema
Immagini e audio assenti
L’immagine viene
riprodotta correttamente
ma non vi è audio
Vengono visualizzate delle
linee formate da puntini o
delle righe
L’immagine è sfocata,
sdoppiata o vi sono delle
immagini residue
Quando si collega
l’apparecchio opzionale,
non viene riprodotta
alcuna immagine o suono
Non è possibile
selezionare un canale o
riprodurre un programma
televisivo
Il suono viene riprodotto
in modo corretto ma non
vi sono immagini
I tasti sul telecomando
senza filo non funzionano
Causa/Soluzione
• Il cavo di alimentazione non è collegato o
le batterie non sono state inserite.
• Il fusibile è saltato.
• Premere (TV/VIDEO).
Premere il lato con (+) del tasto del volume
sul telecomando senza filo, oppure
utilizzare la manopola VOL sul monitor.
Ciò potrebbe essere dovuto a interferenze di
origine locale, come il motore di un’auto o di
una motocicletta. Regolare le antenne in
modo che le interferenze siano ridotte al
minimo.
Collegare saldamente le antenne.
Ciò potrebbe essere dovuto al riflesso
causato da montagne o edifici vicini.
• Il cavo è stato scollegato. Collegare il cavo
saldamente.
• Premere (TV/VIDEO).
• Selezionare il televisore. n Premere
(TV/VIDEO), quindi selezionare il modo
TV.
• Le batterie del telecomando senza filo
potrebbero essere scariche.
• Premere il tasto (AMEM) per due secondi.
• La funzione “visual off” è attivata.
n Premere (VOFF).
• Il lettore video o il televisore sono accesi
durante la guida. n Per ragioni di
sicurezza, le immagini non vengono
visualizzate.
Le batterie del telecomando senza filo
potrebbero essere scariche.
IT
19
Page 58

IT
20
Page 59

IT
21
Page 60

Sony Corporation Printed in Japan
*I-3-867-292-11*(1)
 Loading...