

Page 1
Digital TV Tuner
2-651-675-12 (1)
Digital TV Tuner
Tr agen Sie die Seriennummer (SERIAL NO.)
in dem reservierten Feld ein. Sie finden diese auf
einem Aufkleber, der auf dem Gerätegehäuse
angebracht ist. Nehmen Sie den ausgefüllten GerätePass anschließend unbedingt aus der
Bedienungsanleitung heraus, falls Sie diese im
Fahrzeug aufbewahren möchten. Bitte bewahren Sie
den Geräte-Pass an einem sicheren Ort auf. Er kann
im Falle eines Diebstahls zur ldentifikation lhres
Eigentums dienen.
caraudio
Geräte-Pass
Dieser Geräte-Pass dient als Eigentumsnachweis für
Ihr caraudio-Gerät im Falle eines Diebstahls.
Wir empfehlen, den Geräte-Pass nicht im Fahrzeug
aufzubewahren, um Missbrauch zu verhindern.
Modellbezeichnung
XT-DTV1
Seriennummer (SERIAL NO.)
Operating Instructions
Bedienungsanleitung
Mode d’emploi
Istruzioni per l’uso
Gebruiksaanwijzing
Wichtig!
Bitte nehmen Sie sich etwas Zeit, um den Geräte-Pass
vollständig auszufüllen. Dieser befindet sich auf der
hinteren Umschlagseite dieser Bedienungsanleitung.
For installation and connections, see the supplied Installation/Connections manual.
Zur Installation und zum Anschluss siehe die mitgelieferte Installations-/Anschlussanleitung.
En ce qui concerne l’installation et les connexions, consulter le manuel d’Installation/
Connexions fourni.
Per l’installazione e i collegamenti, fare riferimento al manuale “Installazione/Collegamenti” in
dotazione.
Zie voor het monteren en aansluiten van het apparaat de bijgeleverde handleiding “Installatie/
Aansluitingen”.
GB
DE
FR
IT
NL
Sony Corporation Printed in Thailand
XT-DTV1
2005 Sony Corporation
Page 2

Disposal of Old Electrical & Electronic
Equipment (Applicable in the
European Union and other European
countries with separate collection
systems)
This symbol on the product or on its
packaging indicates that this product
shall not be treated as household waste.
Instead it shall be handed over to the
applicable collection point for the
recycling of electrical and electronic
equipment. By ensuring this product is
disposed of correctly, you will help
prevent potential negative
consequences for the environment and
human health, which could otherwise
be caused by inappropriate waste
handling of this product. The recycling
of materials will help to conserve
natural resources. For more detailed
information about recycling of this
product, please contact your local Civic
Office, your household waste disposal
service or the shop where you
purchased the product.
Welcome!
Thank you for purchasing the Sony
Digital TV Tuner.
• High fidelity DVD quality video
presentation.
• 2,000 programmable favourite
channels.
• EPG function, supports PIG (Picture in
Graphics) display.
• Parental lock option available.
• Last channel memory function.
• Dual tuner options available for
diversity function.
• Mobile reception mode, can receive
several dozens terrestrial digital TV
programmes during moving in high
speed.
Applicable accessory: Remote
commander
2
Page 3

Table of contents
Welcome! .............................................................................................................................. 2
Precautions........................................................................................................................... 4
Location of controls ............................................................................................................6
Operation
Searching channels ............................................................................................................. 8
Receiving channels ........................................................................................................... 10
Using channel manager ................................................................................................... 11
Checking the Programme Guide .................................................................................... 15
Switching the audio channel ........................................................................................... 16
Switching the audio language......................................................................................... 16
Displaying the subtitle and teletext ............................................................................... 17
Changing Setup
Changing the menu settings ........................................................................................... 18
Locking the unit ................................................................................................................20
Additional Information
Maintenance ...................................................................................................................... 22
Specifications ..................................................................................................................... 24
Troubleshooting ................................................................................................................ 25
Messages ............................................................................................................................ 25
3
Page 4
Precautions
To avoid the risk of serious injury or accident, read the following precautions before
installing and operating the unit.
On safety
Comply with your local traffic rules and regulations.
On installation
• Installing this unit requires technical expertise.
This unit should be installed by a qualified
technician or service personnel.
• If you try to install this unit by yourself, do it
properly, referring to the installation and wiring
diagrams in the installation/connections manual.
Improper installation may result in fire or electric
shock.
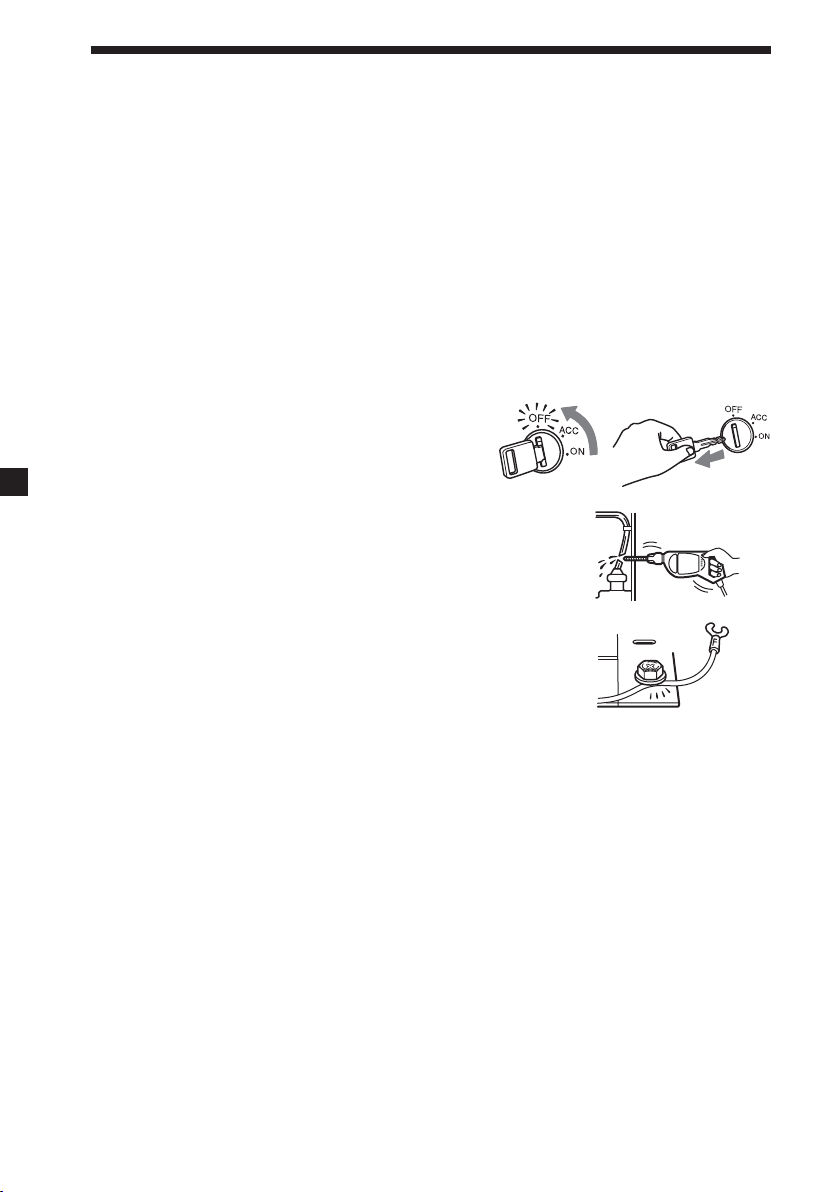
• Before installation, be sure to turn the ignition
switch to the OFF position or take the key out.
Installing this unit with the ignition on may
cause battery drain or a short circuit.
• Do not damage any pipes, tubes, the fuel tank or
electric wiring when installing this unit. This can cause
a fire. If you drill a hole in car panels, make sure that
any hidden car parts will not be damaged.
• Do not use any nuts or bolts for safety devices such as
steering linkage, fuel supply or braking systems. This
can cause a fire or an accident.
• Take care to prevent cords and wires from getting
tangled or crimped in the moving portion of a seat rail.
4
Page 5

Where to install
Before installing this unit, please check your local traffic rules and regulations.
Do not install this unit where:
- It will obstruct the driver’s view.
- It will obstruct the operation of the airbag system.
- It will obstruct the operation of the vehicle, especially
the steering wheel, shift lever, or brake pedal.
-A driver or passengers may injure themselves when
getting into or out of the car.
If you have any questions or problems concerning your unit that are not covered
in this manual, please consult your nearest Sony dealer.
5
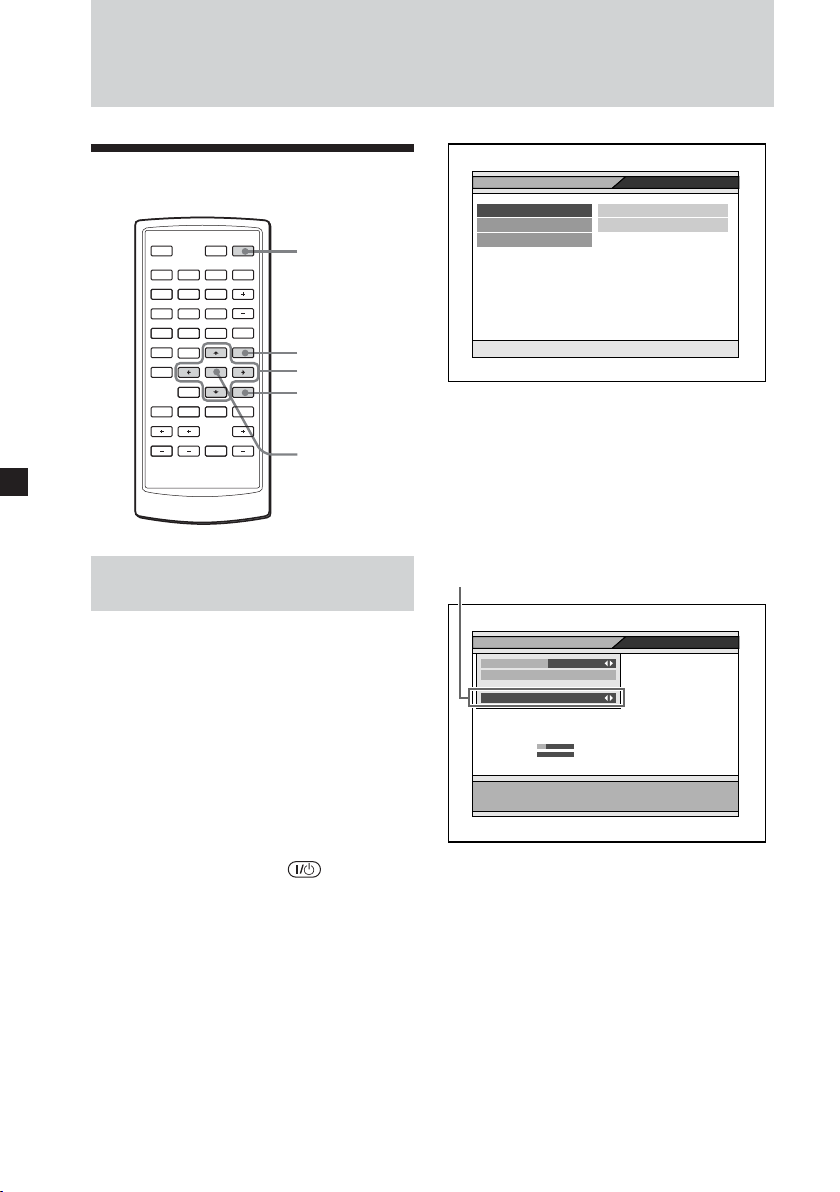
Page 6
1
Location of controls
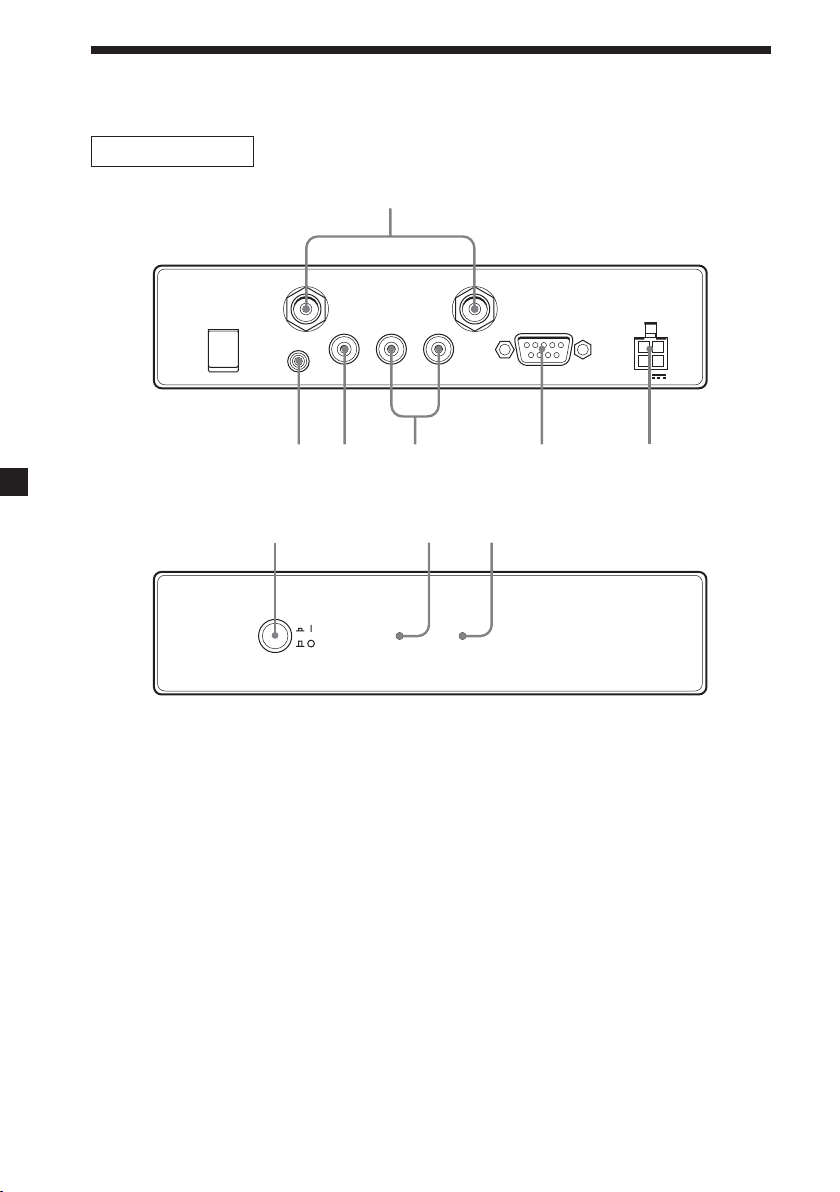
Digital TV Tuner
Rear
ANT 1 ANT 2
REMOTE
Front
1 ANT 1/ANT 2 terminals
Input to connect the antennas.
2 REMOTE jack
Input to connect the remote control
sensor.
3 VIDEO jack
Connect to the video input jack on
your monitor, etc.
4 AUDIO jacks
Connect to the audio input jacks on
your monitor, etc.
5 SERVICE (RS232) terminal
This terminal is for service only.
VIDEO
OUTPUT
L
RAUDIO
432
SERVICE
5 6
POWER
12V
987
SIGNAL@ / 1
6 POWER 12V jack
Connect the power supply cord
here.
7 |/a (power) button*
Turns on or off the unit.
8 |/1 (power) indicator
9 SIGNAL indicator
* When installing in a car without an ACC
(accessory) position on the ignition
switch, be sure to press this button to
turn off the unit when you do not use it.
Otherwise the battery will drain.
6
Page 7
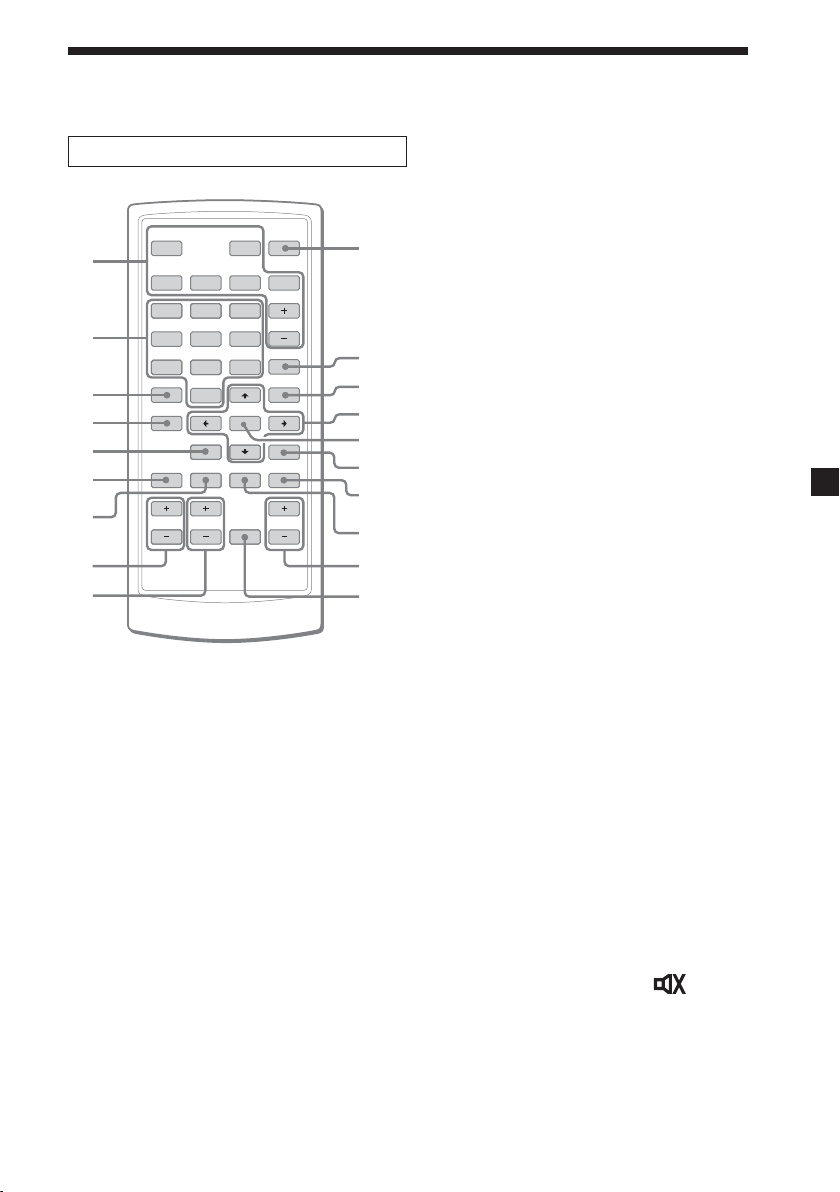
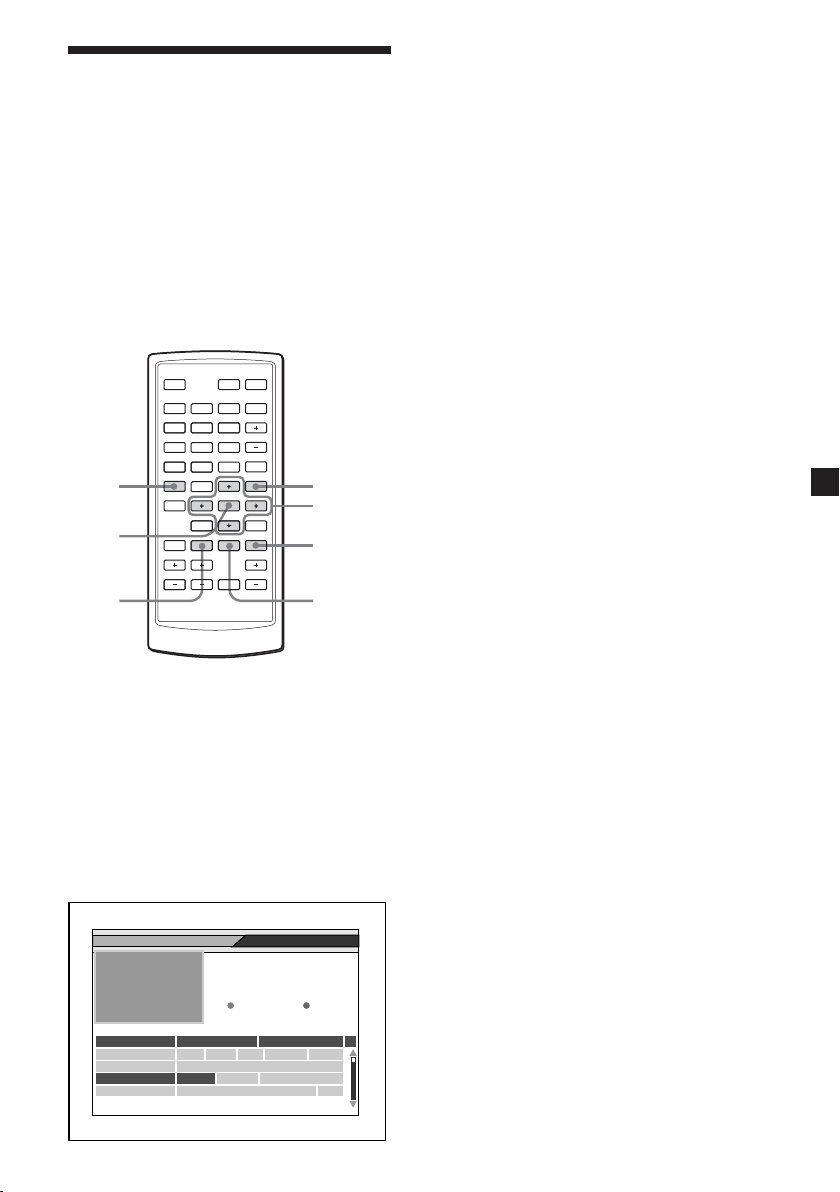
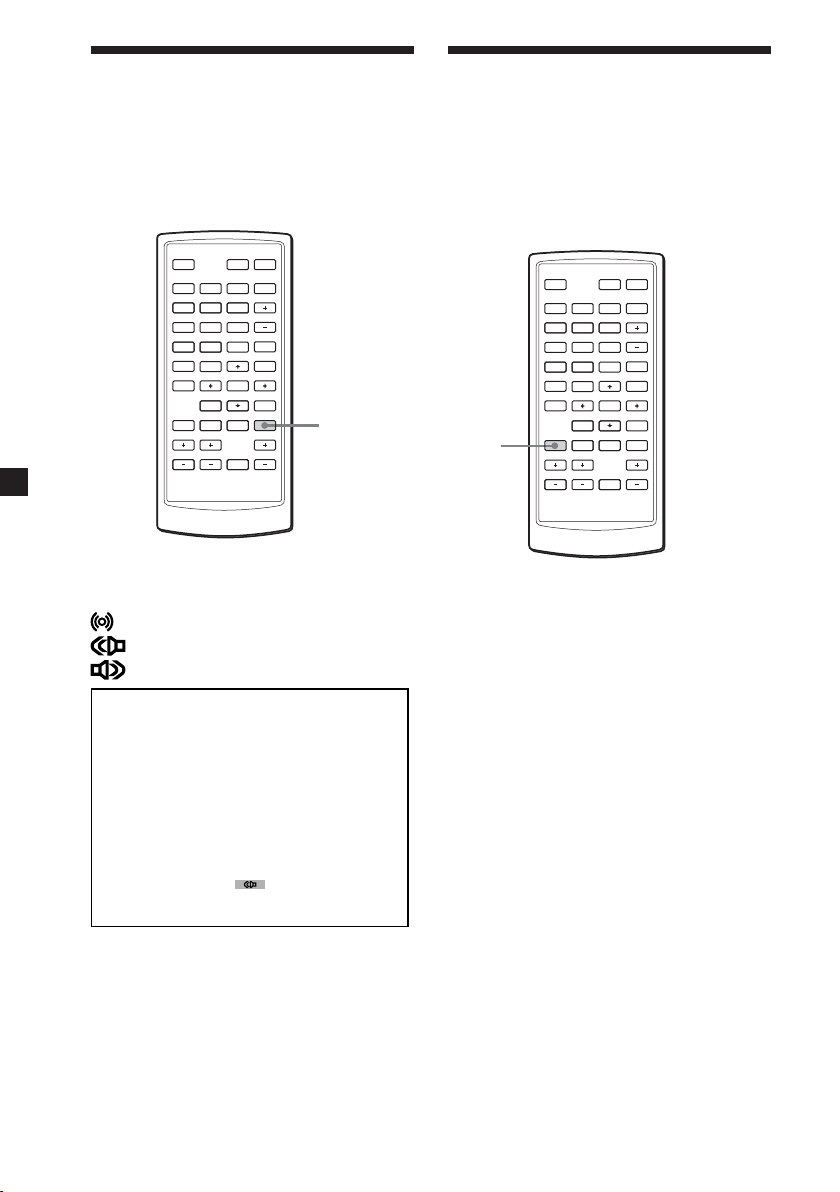
Card remote commander RM-X711
MONITORSOURCE
DIGITAL TV
/
1`/1
1
2
3
4
5
6
7
8
9
.
>
123
456
789
EPG
0
FAV
PAGE VOL CHATT
ENTER
INFO EXIT
`
ux
VOL
RADIO
MENU
L/RTEXTAUDIO
0
qa
qs
qd
qf
qg
qh
qj
qk
ql
Refer to the pages listed for details.
1 These buttons are used when
operating connected Sony
equipments (MV-700HR, XVM-F65/
F65WL).
SOURCE button
To select the input source.
./> (previous/next) buttons
x (stop) button
MONITOR |/1 (power) button
u (play/pause) button
VOL +/– buttons
2 Number buttons 10, 17, 21
3 EPG button 15, 17
To display the Programme guide.
4 FAV button 12
To display the Favorite List or
change the Favorite mode.
5 INFO button 10
To display the channel information.
6 AUDIO (red) button 14, 16
To change the audio language.
To enter the Delete CH mode as the
red button.
7 Green button 12, 15
To enter the Favorite mode.
8 PAGE +/– buttons 10, 12, 13, 14
To change the page list when the
selection has many pages.
9 VOL +/– buttons 11
0 DIGITAL TV |/1 (power) button 8
qa RADIO button 10
To switch between TV and radio
mode.
qs MENU button 8, 11, 13, 14, 15, 18,
20, 21
To display the Main Page.
qd M/m/</, buttons 8, 9, 10, 11,
12, 13, 14, 15, 17, 18, 19, 20, 21
qf ENTER button 8, 9, 10, 11, 12, 13,
14, 15, 17, 18, 19, 20, 21
qg EXIT button 9, 10, 12, 13, 14, 17,
18, 19, 20, 21
qh L/R (blue) button 13, 15, 16
To change the audio channel.
To enter the Lock mode as the blue
button.
qj TEXT (yellow) button 15, 17
To display the subtitle or teletext.
qk CH +/– buttons 10
ql ATT button
Turning off the sound temporarily.
When you press the button, the
sound is turned off and “
”
appears in the display.
To restore the sound, press the
button again (or (VOL) +).
Tip
Refer to “Replacing the lithium battery” for details on how to replace the batteries (page 23).
7
Page 8
Operation
Searching channels
MONITORSOURCE
DIGITAL TV
/1`/
1
`
.
>
0
ENTER
INFO EXIT
ux
VOL
RADIO
MENU
L/RTEXTAUDIO
123
456
789
EPG
FAV
PAGE VOL CHAT T
Searching channels
automatically
If the radio signal is included in the
broadcast, you can also store the radio
stations.
Notes
• Make sure to connect the antennas
correctly.
• When searching channels, make sure to
perform while the car is stopped.
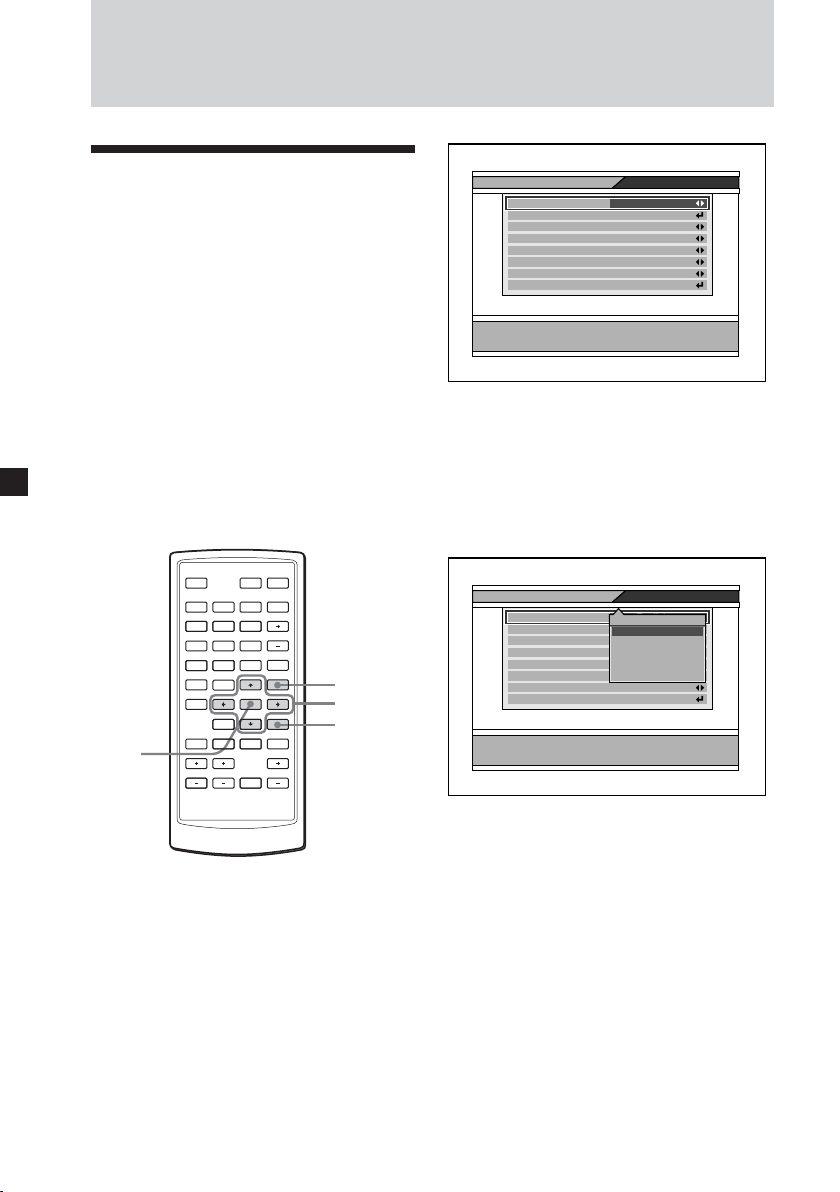
`/1
MENU
B/V/v/b
EXIT
ENTER
Main Page
TV Channel
Program Guide
User Instalation
TV Channel
Radio Channel
2 Press M or m to select “User
Installation”, then press (ENTER).
3 Press M or m to select “Channel
Search”, then press (ENTER).
Channel Search window appears.
4 Press M or m to move the cursor to
the search mode bar.
Search mode bar
Channel Search
Channel
Frequency
Strength 21
Quality 0
177500
Auto Search
5
FFT Mode: 8K
Guard Interval: 1/8
Constellation: QPSK
Hierarchy: None
Code Rate: 1/2
1 Press the power button on the
main unit to turn on the unit.
On the remote, press
When you turn on the unit for the
first time, the Main Page appears. If
the Main Page does not appear when
you turn on the unit, press (MENU)
on the remote.
8
.
5 Press < or , to select “Auto
Search”, then press (ENTER).
6 Press M/m/</, to select “Start
Channel” and “End Channel”.
Select the scanning channel range (5
to 69).
Page 9
7 Press M or m to select “Search”,
then press (ENTER).
The search starts. The scanned
channels are automatically stored in
order. If the broadcasting station is
scanned, a numerical value of
“Strength” and “Quality” will
increase.
To stop searching, press (EXIT).
8 When the search is completed,
press M or m to select “View” or
“Complete”, then press (ENTER).
•If you select “View”, the selected
channel will be received
immediately.
•If you select “Complete”, the
Channel Search window is closed.
You need to close the Main Page by
pressing (EXIT) repeatedly to make
the settings effective.
Channel Search
Channel Search
Channel
Frequency
1. BBC ONE Scot
2. BBC TWO S...
Auto Suarch
3. BBC NEWS 24
4. CBBC Channel
Channel 25 506Mhz 6/6
Strength 21
Scanning 100%
Quality 0
Strength
177500
Quality
5
TV Radio
FFT Mode: 8K
Guard Interval: 1/8
Constellation: QPSK
Hierarchy: None
1. BBC R Scot...
Code Rate: 1/2
2. BBC R n Gn...
View
Complete
2 Press < or , to select the desired
channel.
Select the scanning channel range.
3 Press M or m to move the cursor to
the search mode bar.
4 Press < or , to select “Search
local channels”, then press
(ENTER).
The search starts. The scanned
channels are automatically stored in
order. If a broadcasting station is
scanned, a numerical value of
“Strength” and “Quality” will
increase.
To stop searching, press (EXIT).
5 When the search is completed,
press M or m to select “View” or
“Complete”, then press (ENTER).
•If you select “View”, the selected
channel will be received
immediately.
•If you select “Complete”, the
Channel Search window is closed.
You need to close the Main Page by
pressing (EXIT) repeatedly to make
the settings effective.
•If the reception is poor, the channel
information is displayed as TVch 1,
2... and will not be properly
displayed. In this case, try it again
in a different area.
Notes
• When the unit finds the same broadcast
in the same channel, the broadcast will
be overwritten. When the unit finds the
same broadcast in a different channel,
the broadcast will be additionally stored.
• If you search channels in a different
region (country) again, two or more
same broadcasting stations may be
stored by the same name. In this case, if
you select a channel directly by pressing
the number buttons (page 10), it may
take time until the screen is displayed.
Searching channels
automatically in your local
area
1 Follow steps 1 to 3 in “Searching
channels automatically”.
Searching channels
manually
1 Follow steps 1 to 3 in “Searching
channels automatically”.
2 Press < or , to select the desired
channel.
3 Press M or m to move the cursor to
the search mode bar.
4 Press < or , to select “Search
single channel”, then press
(ENTER).
The search starts.
To stop searching, press (EXIT).
9
Page 10
Receiving channels
MONITORSOURCE
DIGITAL TV
/1`/
`
1
Number
buttons
ENTER
INFO
.
123
456
789
EPG
FAV
>
0
ENTER
INFO EXIT
ux
VOL
RADIO
MENU
L/RTEXTAUDIO
RADIO
V/v
EXIT
Selecting channels from
channel list
You can select channels from the
channel list.
1 While watching TV, press (ENTER).
The channel list appears.
All TV
BBC ONE Scot001
BBC TWO Scot002
CBBC Channel030
BBC NEWß 24040
PA GE +/–
PAGE VOL CHAT T
CH +/–
VOL +/–
Selecting TV or radio mode
While watching TV, press (RADIO).
Each time you press the button, the unit
changes between TV and radio mode.
Changing channels
Press (CH) + or –.
14:00 – 14:30 Country House
12:35 – 14:00
Blood On The Moon
BBC TWO Scot
002
CH: 21
474000 Sep. 8 12 : 58
Using the number button
Select channels directly by pressing
buttons 0 to 9.
English 1/2
2 Press M/m or (PAGE) +/– to select
the channel you want to watch,
then press (ENTER).
To close the channel list
Press (EXIT).
Viewing the channel
information
You can display the channel
information and programme description
you selected.
While watching TV, press (INFO).
Program Information
2818
2819
2816
CH Name : ITV 2
Channel number : 2
Scramble : None
Favorite : None
Lock : None
Quality–1 99
Quality–2 0
Channel : 45
Frequency : 666000
Guard Interval : 1/32
Constellation : 64QAM
Code Rate : 3/4
Video PID
Audio PID
PCR PID
Example:
To select channel 5, press 5.
To select channel 25, press 2 and 5.
To select channel 125, press 1, 2 and 5.
10
To close the channel information, press
(EXIT).
Page 11
Note
The programme description may be
unavailable for some programmes.
Adjusting the volume
Press (VOL) + or –.
Notes
• This unit does not support scrambled
channels.
• This unit does not support data
broadcasts. If the data broadcast is
received, you can hear the audio sound
but the image is not displayed.
When you select the channel
When you select the channel, the
information display appears. Meaning
of the icons indicated in the information
display is as follows:
: TV programme
: Radio programme
: Favorite programme
: Scrambled programme
: Parental lock programme
: Teletext service
: Subtitle service
: Mute status
: Stereo status
: Output left sound
: Output right sound
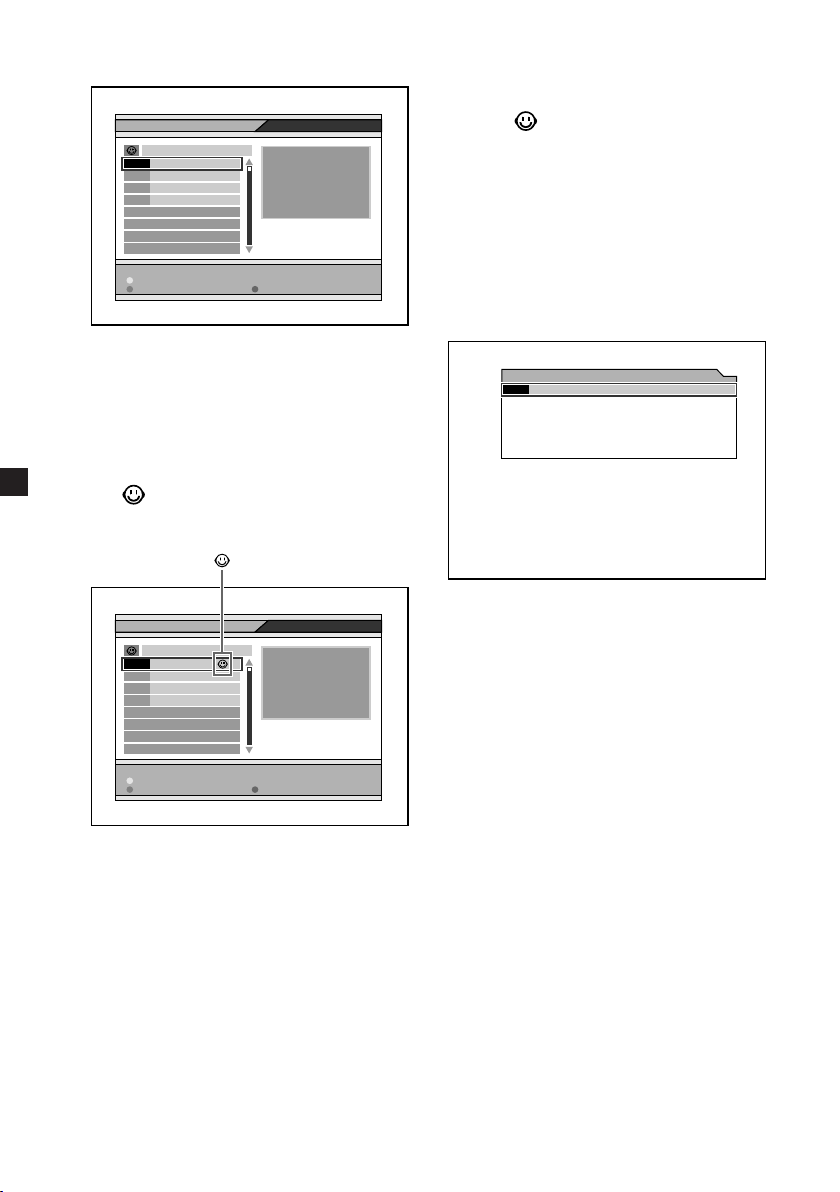
Using channel manager
Channel manager helps you organize
the stored channels.
Channel manager consists of the
following three modes:
• Favorite mode
• Lock mode
• Delete mode
MONITORSOURCE
DIGITAL TV
/1`/
1
`
.
>
0
ENTER
INFO EXIT
RADIO
MENU
ux
VOL
MENU
V/v
L/RTEXTAUDIO
EXIT
Blue
button
Green
button
123
456
789
FAV
EPG
FAV
ENTER
Red
button
PA GE +/–
PAGE VOL CHAT T
Using the Favorite List
You can find the desired channels
quickly and easily while using the
Favorite List.
You can store up to 2,000 broadcasts to
Favorite List.
Use this function when two or more
same broadcasting stations are stored in
a same channel number in a different
region (country).
Storing channels to Favorite List
1 While watching TV, press (MENU).
The Main Page appears.
2 Press M or m to select “TV
Channel”, then press (ENTER).
3 Press M or m to select “TV Channel”
or “Radio Channel”, then press
(ENTER).
The Channel Manager window
appears.
Contiuned
11
Page 12
Using channel manager (contiuned)
TV Channel
Favorite 1
BBC ONE...001
BBC TWO...002
CBBC Ch...030
BBC NEW...040
BBC ONE Scot
Channel : 21
Press 'ENTER' key to select favorite/unfavorite channel
Delete
Favorite Lock
Frequency : 474000
4 Press the green button repeatedly
to select “Favorite 1”, “Favorite 2”
or “Favorite 3”.
5 Press M/m or (PAGE) +/– to select
the desired channel.
6 Press (ENTER).
“
” appears next to your selected
channel name. And the channel is
stored to the Favorite List.
Deleting channels from the
Favorite List
In the step 6, press (ENTER) repeatedly
so that “ ” disappears.
Note
After changing the settings, you need to
close the Main Page by pressing (EXIT)
repeatedly to make the settings effective.
Selecting channels from the
Favorite List
1 While watching TV, press (FAV).
The Favorite List appears.
Favorite 1
BBC TWO Scot002
TV Channel
Favorite 1
BBC ONE...001
BBC TWO...002
CBBC Ch...030
BBC NEW...040
Press 'ENTER' key to select favorite/unfavorite channel
Delete
Favorite Lock
7 Repeat steps 3 to 6 to store
additional channels to the Favorite
List.
8 Press (EXIT) repeatedly to close
the Channel Manager window and
Main Page.
The setting is completed.
12
BBC ONE Scot
Channel : 21
Frequency : 474000
2 Press (FAV) repeatedly to select
“Favorite 1”, “Favorite 2” or
“Favorite 3”.
3 Press M/m or (PAGE) +/– to select
desired channel, then press
(ENTER).
4 Press (EXIT) to close the Favorite
List.
Page 13
Locking channels
You can lock channels using the Lock
mode in the Channel Manager.
When you lock the channel, you have to
enter the password to watch the desired
channel.
To perform this function, make sure to
activate the Parental Lock first (page
20).
Locking the channels
1 While watching TV, press (MENU).
The Main Page appears.
2 Press M or m to select “TV
Channel”, then press (ENTER).
3 Press M or m to select “TV Channel”
or “Radio Channel”, then press
(ENTER).
The Channel Manager window
appears.
4 Press the blue button.
The Lock mode window appears.
In case a password input window is
displayed, enter the 4-digit
password.
5 Press M/m or (PAGE) +/– to select
the desired channel.
6 Press (ENTER).
” appears next to your selected
“
channel name.
7 Repeat steps 3 to 6 to lock
additional channels.
8 Press (EXIT) repeatedly to close
the Channel Manager window and
Main Page.
The setting is completed.
Once this setting is made, you have
to enter the password next time you
select the locked channel.
Unlocking channels
In the step 6, press (ENTER) repeatedly
so that “ ” disappears.
Note
After changing the settings, you need to
close the Main Page by pressing (EXIT)
repeatedly to make the settings effective.
TV Channel
Favorite 1
BBC ONE...001
BBC TWO...002
CBBC Ch...030
BBC NEW...040
BBC NEWS 24
Channel : 21
Press 'ENTER' key to select favorite/unfavorite channel
Delete
Favorite Lock
Frequency : 474000
13
Page 14
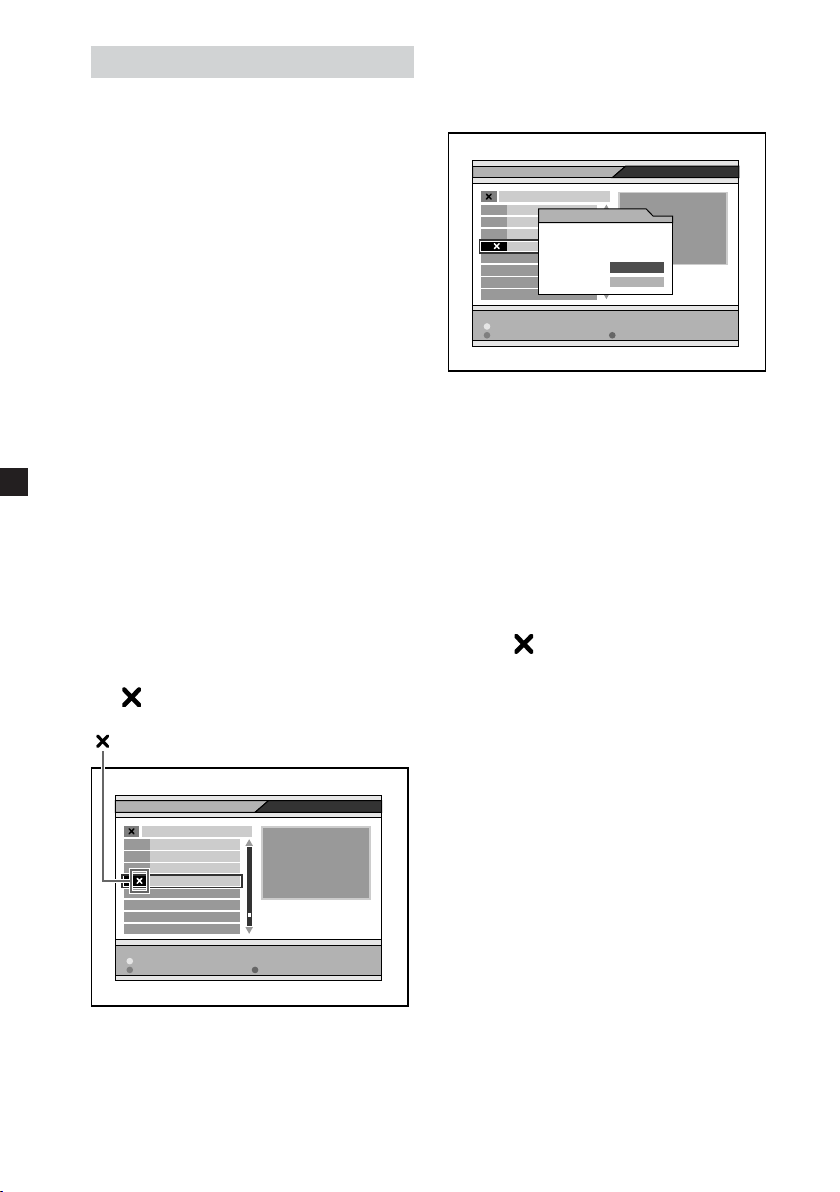
Deleting channels
You can delete the stored channels
using the Delete CH mode in the
Channel Manager.
1 While watching TV, press (MENU).
The Main Page appears.
2 Press M or m to select “TV
Channel”, then press (ENTER).
3 Press M or m to select “TV Channel”
or “Radio Channel”, then press
(ENTER).
The Channel Manager window
appears.
4 Press the red button.
The Delete CH mode window
appears.
5 Press the red button repeatedly to
select “Delete CH”, “Delete
Multiplex” or “Delete all”.
Delete CH: delete the selected
channel
Delete Multiplex: delete all the
channels in the same frequency.
Delete all: delete all stored channels
in the unit
6 Press M/m or (PAGE) +/– to select
the desired channel.
7 Press (ENTER).
” appears on the selected channel
“
name.
TV Channel
DELETE CH
BBC ONE...001
BBC TWO...002
CBBC Ch...030
BBC NEW...
BBC NEWS 24
Channel : 21
Press 'ENTER' key to select favorite/unfavorite channel
Delete
Favorite Lock
Frequency : 474000
8 Press (EXIT) once.
The confirmation window appears.
If you do not want to delete the
channel, select “CANCEL”.
TV Channel
DELETE CH
BBC ONE...001
Message Box
BBC TWO...002
CBBC Ch...030
BBC NEW...
Press 'ENTER' key to select favorite/unfavorite channel
Delete
Favorite Lock
Are you sure to
delete marked channels ?
OK
BBC NEWS 24
CANCEL
Channel : 21
Frequency : 474000
9 Select “OK”, then press (ENTER).
The selected channels are deleted.
10
Repeat steps 3 to 9 to delete
additional channels.
11
Press (EXIT) repeatedly to close
the Channel Manager window and
Main Page.
The setting is completed.
To cancel deleting channels
In the step 7, press (ENTER) repeatedly
so that “
Notes
• After changing the settings, you need to
close the Main Page by pressing (EXIT)
repeatedly to make the settings effective.
• The deleted channels cannot be
recovered unless the search function is
performed again.
” disappears.
14
Page 15
Checking the Programme Guide
This unit provides you EPG function to
access to the TV Guide (or Radio Guide
if you are listening to the radio
channels) that shows titles and other
information of the current and next
programmes on the different channels.
The information is only available from
the network of the channel you are
watching.
MONITORSOURCE
DIGITAL TV
/1`/
`
1
EPG
ENTER
Green
button
.
123
456
789
EPG
FAV
PAGE VOL CHAT T
>
0
ENTER
INFO EXIT
RADIO
MENU
ux
VOL
MENU
B/V/v/b
L/RTEXTAUDIO
Blue
button
Yellow
button
If you want to check the previous or
next information of the channel, press
and hold < or , so that the cursor (V)
moves to the desired time. Or, press the
yellow button (progresses for 6 hours)
or green button (returns for 6 hours).
Viewing the details of the
selected programme
Move the cursor (V) by pressing M/m/
</, to select the programme name,
then press the blue button.
The detail information box appears.
Note
If the selected channel does not provide
EPG data, “No data available” is displayed.
Viewing the Programme Guide
While watching TV, press (EPG).
Selecting from the Main Page
1 While watching TV, press (MENU).
2 Press M or m to select “Program
Guide”, then press (ENTER).
The Programme Guide window
appears.
TV Program Guide
029 UKTV Food
Worrall Thompson
May 27 09:00 ~ 09:30
– 6 : 00
Channel 4 Self The Teen Big From008
price–drop No information yet024
UKTV Food Worrall Food and029
ITV News Live With Alastair Stewa ITV041
+ 6 : 00
10 : 009 : 00May.27
15
Page 16
Switching the audio channel
Switching the audio language
You can select the desired audio
channel from Stereo, Left channel and
Right channel.
MONITORSOURCE
DIGITAL TV
/1`/
1
`
.
>
0
ENTER
INFO EXIT
RADIO
MENU
ux
VOL
L/RTEXTAUDIO
L/R
123
456
789
EPG
FAV
PAGE VOL CHAT T
While watching TV, press (L/R)
repeatedly to select the desired setting.
: Stereo
: Left channel
: Right channel
If you watch the programme that
provides multi-language services, you
can switch the language. This depends
on the transmission of the audio signal.
MONITORSOURCE
DIGITAL TV
/1`/
1
`
.
>
0
ENTER
INFO EXIT
ux
VOL
RADIO
MENU
L/RTEXTAUDIO
AUDIO
123
456
789
EPG
FAV
PAGE VOL CHAT T
While watching TV, press (AUDIO)
repeatedly to select the desired
language.
Note
This setting affects only when the current
broadcasting supports the selected
language in the System Setting (page 19).
When the broadcasting does not support
the selected language, it is output in the
original language.
16
Page 17

Displaying the subtitle and teletext
You can turn on/off the subtitles or
teletext.
MONITORSOURCE
DIGITAL TV
/1`/
`
1
.
Number
buttons
EPG
123
456
789
EPG
FAV
ENTER
PAGE VOL CHAT T
While watching TV, press (TEXT).
The subtitle and/or teletext window
appears to let you select the subtitle
language or teletext if the broadcasting
station is disseminating information.
Follow the displayed contents to
operate.
>
0
ENTER
INFO EXIT
RADIO
ux
VOL
MENU
B/V/v/b
L/RTEXTAUDIO
EXIT
TEXT
Subtitle:
Press M/m/</, to select the items
and press (ENTER).
To cancel the subtitles, press (EXIT).
Note
Depending on the programme, it may take
time until a subtitle is displayed, or the
subtitle may not be displayed.
Teletext:
Press M/m/</, to select the items
and press (ENTER).
You can select it directly by pressing the
number buttons.
To cancel the teletext, press (EXIT).
Note
The colour keys (red/blue/yellow/green)
cannot be used to select the teletext.
Note
When you set "TV Type" to "NTSC", the
subtitle and/or teletext may not be
displayed correctly.
In this case, press 9, 5, 1, 4, 7 and (EPG) to
change the mode to "PAL".
Subtitle
eng
Teletext
17
Page 18
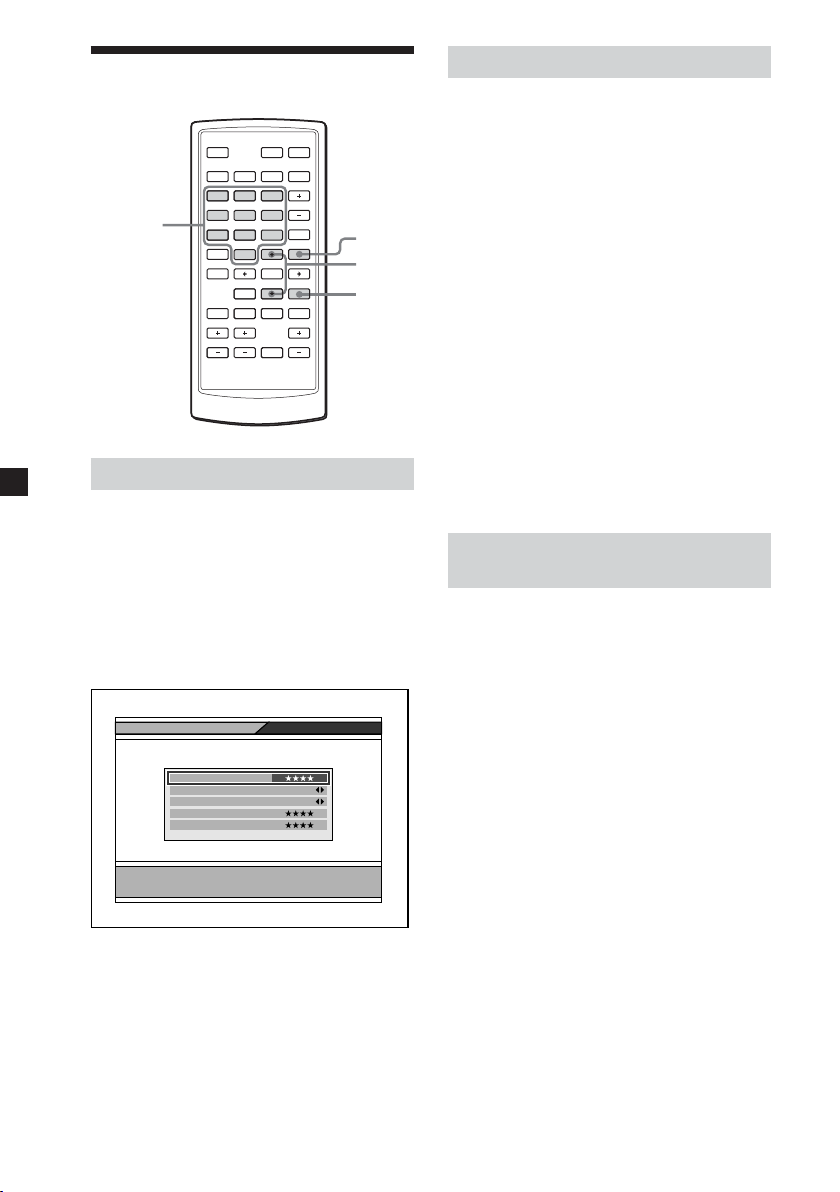
Changing Setup
Changing the menu settings
You can set up this unit using the onscreen System Setting menus. Most
settings need to be set when you first
use this unit.
System Setting menus are:
• OSD Language
• Audio Language
• Set Local Time
• Summer Time
• Antenna feed 5 V
• Screen Format
• TV Type
• Start On Channel
MONITORSOURCE
DIGITAL TV
/1`/
`
1
ENTER
.
123
456
789
EPG
FAV
PAGE VOL CHAT T
>
0
ENTER
INFO EXIT
RADIO
MENU
ux
VOL
MENU
B/V/v/b
L/RTEXTAUDIO
EXIT
System Setting
OSD Language English
Audio Language English
Set Local Time 0:00
Summer Time OFF
Antenna feed 5V ON
Screen Format 16:9
TV Type PAL
Start On Channel None
London, Lisbon, Dublin, Casablanca
Select OSD Language
4 Press M or m repeatedly to select
the desired item.
5 Press < or , repeatedly to
change the selection, or press
(ENTER) to show the Drop-Down
List Box that displays the selection
list.
System Setting
OSD Language English
Audio Language English
Set Local Time 0:00
Summer Time OFF
Antenna feed 5V ON
Screen Format 4:3
TV Type PAL
Start On Channel None
London, Lisbon, Dublin, Casablanca
Select OSD Language
English
Deutsch
Italiano
Français
Nederlands
1 Press (MENU).
The Main Page appears.
2 Press M or m repeatedly to select
“User Installation”, and press
(ENTER).
3 Press M or m repeatedly to select
“System Setting”, and press
(ENTER).
System Setting menu appears.
18
6 Press (ENTER) on the desired
selection.
7 Press (EXIT) repeatedly to close
the Main Page.
See the next page for the System Setting
options.
Page 19
The default settings are underlined.
Settings Setting options
OSD Language Default: English
Audio Language Default: English
Set Local Time Settable time: –12:00 to +12:00 (default setting is “0:00”)
Summer Time ON, OFF
Antenna feed 5 V ON, OFF
Screen Format 4:3, 16:9, 4:3 letter box
TV Type NTSC, PAL, PAL&NTSC
Start On Channel Setting the channel to start when the unit is turned on.
Changing the OSD language.
Changing the audio language.
1 Press (ENTER) on “Audio Language”.
A popup window showing the 4 language priorities appears.
2 Press < or , repeatedly to select the desired audio language for
each priority.
3 Press M or m repeatedly to select “OK” to change the setting or
“CANCEL” to cancel the setting.
Note
You can select the desired audio language priority under the
condition that the selected language is supported by the channel.
Setting the time zone. This will affect the time of the unit and EPR
time.
Setting the Summer Time. Turning on this selection forwards the time
for one hour.
Selecting whether to feed or not 5 volts from the unit to the antenna. If
you use the TV antenna amplifier unit, turn it ON (5 V, 20 mA ANT 1/
ANT 2). If you use a TV antenna without amplifier, turn it OFF.
Setting the screen mode.
4:3: An image with an aspect ratio of 4 to 3.
16:9: An image with an aspect ratio of 16 to 9.
4:3 letter box: An image with an aspect ratio of 4:3 enlarged to the
edges of the screen.
Setting the colour system to NTSC or PAL.
1 Press (ENTER) on “Start On Channel”.
A popup window with a channel list appears.
2 Press M or m repeatedly to select the channel.
3 Press (ENTER).
Note
Once you set the Start On Channel, a message box appears to
confirm if you want to activate the Start On Channel. In this case,
select “OK” to change the setting, or select “CANCEL” to cancel.
Note
After changing the above settings, you need to close the Main Page by pressing (EXIT)
repeatedly to make the settings effective.
19
Page 20
Locking the unit
MONITORSOURCE
DIGITAL TV
/1`/
1
`
.
>
0
ENTER
INFO EXIT
ON
OFF
RADIO
MENU
ux
VOL
MENU
V/v
L/RTEXTAUDIO
EXIT
123
Number
buttons
456
789
EPG
FAV
PAGE VOL CHAT T
Setting the password
1 Press (MENU).
The Main Page appears.
2 Press M or m repeatedly to select
“User Installation”, then press
(ENTER).
3 Press M or m repeatedly to select
“Parental Lock”, then press
(ENTER).
Parental Lock
Current Password
Parental Lock
Install Lock
New Password
Confirm Password
Enter current password
4 Enter the current password.
The default password is 0000.
5 Press (EXIT) repeatedly to close
the Main Page.
Changing the password
1 Press (MENU).
The Main Page appears.
2 Press M or m repeatedly to select
“User Installation”, then press
(ENTER).
3 Press M or m repeatedly to select
“Parental Lock”, then press
(ENTER).
4 Enter the current password.
5 Press M or m repeatedly to select
“New Password”.
6 Enter the new password, then
press m to move the cursor to
“Confirm Password”.
7 Enter the new password again to
confirm.
8 Press (EXIT) repeatedly to close
the Main Page.
Settings for the Parental
Control
You can set the parental control using
the Parental Lock function.
1 Press (MENU).
The Main Page appears.
2 Press M or m repeatedly to select
“User Installation”, then press
(ENTER).
3 Press M or m repeatedly to select
“Parental Lock”, then press
(ENTER).
4 Enter the current password.
5 Press M or m repeatedly to select
“Parental Lock”, then press
(ENTER).
6 Press < or , repeatedly to select
“ON”.
To cancel the Parental Lock, select
“OFF”.
7 Press (EXIT) repeatedly to close
the Main Page.
20
Page 21

Note
After changing the settings, you need to
close the Main Page by pressing (EXIT)
repeatedly to make the settings effective.
Setting the Install Lock
You can protect your installed data and
information using the Install Lock.
1 Press (MENU).
The Main Page appears.
2 Press M or m repeatedly to select
“User Installation”, then press
(ENTER).
3 Press M or m repeatedly to select
“Parental Lock”, then press
(ENTER).
4 Enter the current password.
5 Press M or m repeatedly to select
“Install Lock”.
6 Press < or , repeatedly to select
“ON”.
To cancel the Install Lock, select
“OFF”.
7 Press (EXIT) repeatedly to close
the Main Page.
Note
After changing the settings, you need to
close the Main Page by pressing (EXIT)
repeatedly to make the settings effective.
If you forget the password
While the Main Page is displayed,
press 4, 7, 8, 9 and 3. The Factory
Default window appears. Then select
“OK” and press (ENTER). The
setting of the unit will be set back to
the factory default. To cancel, select
“CANCEL”.
Note
If the unit is set back to the factory
default, all the settings will be lost.
Make the settings again.
21
Page 22
Additional Information
Maintenance
Fuse replacement
When replacing the fuse of the power cord, be sure to use one matching the
amperage rating stated on the original fuse. If the fuse blows, check the power
connection and replace the fuse. If the fuse blows again after replacement, there may
be an internal malfunction. In such a case, consult your nearest Sony dealer.
Fuse
Warning
Never use a fuse with an amperage rating exceeding the one supplied with the unit
as this could damage the unit.
22
Page 23
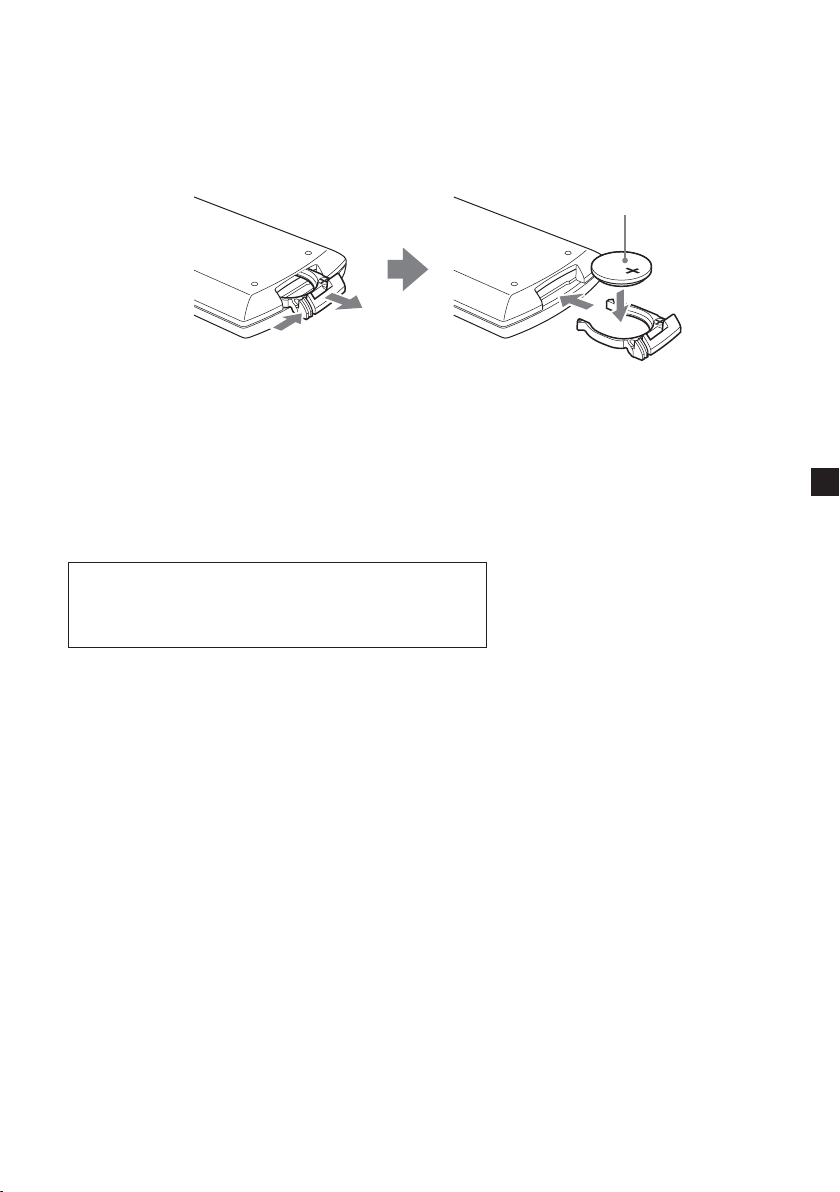
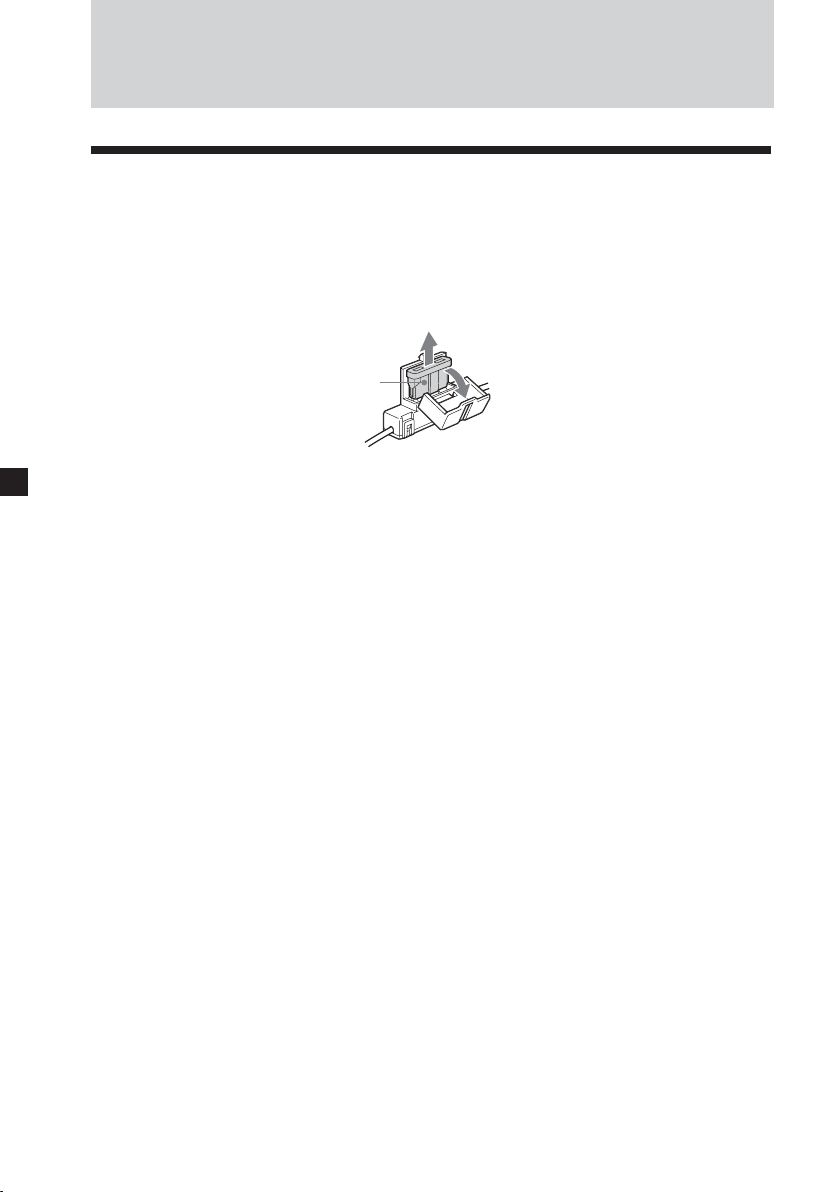
Replacing the lithium battery
Under normal conditions, batteries will last approximately 1 year. (The service life
may be shorter, depending on the conditions of use.)
When the battery becomes weak, the range of the card remote commander becomes
shorter. Replace the battery with a new CR2025 lithium battery. Use of any other
battery may present a risk of fire or explosion.
+ side facing up
2
While pushing the
1
lock lever (1), pull
out the battery
holder (2).
Notes on lithium battery
• Keep the lithium battery out of the reach of children. Should the battery be
swallowed, immediately consult a doctor.
• Wipe the battery with a dry cloth to assure a good contact.
• Be sure to observe the correct polarity when installing the battery.
• Do not hold the battery with metallic tweezers, otherwise a short-circuit may occur.
WARNING
Battery may explode if mistreated.
Do not recharge, disassemble, or dispose of in fire.
23
Page 24

Specifications
Digital TV Tuner
Video decoding
MPEG-2 DVB compliant up to MP@ ML
Video bit rate up to 15 Mbit/sec
Video format 4:3 (letter box if source
is in 16:9) and 16:9
Resolution up to 720 × 576 pixels
Audio decoding
MPEG layer 1/2
Reception format
NTSC/PAL
Input frequency range
VHF: 174 – 230 MHz
UHF: 470 – 862 MHz
IF 36.125 MHz
Power requirement
12 V DC
(negative ground)
Power consumption
1.2 A
Inputs TV antenna (2)
Remote (1)
Service (RS232) (1)
Outputs Video (1)
Audio L/R (1)
Dimensions Approx. 182 × 43 × 174 mm
(including projecting parts
and controls) (W × H × D)
Mass Approx. 920 g
Temperature range
0 – 45 °C
Card remote commander RM-X711
Power requirements
CR2025 lithium battery
Operable range
Approx. 2.5 m
Dimensions 55 × 125 × 15 mm
(W × H × D)
Mass Approx. 50 g
(including batteries)
Supplied accessories
Parts for installation (1 set)
Card remote commander RM-X711
(with supplied battery) (1)
Power supply cord (1)
Remote conrol sensor (1)
Installation/Connections manual (1)
Operating Instructions (1 set)
Optional accessories
TV antenna VCA-130 (left/right) (1 set)
Mobile Monitor XVM-F65/F65WL
Portable DVD Player MV-700HR
Design and specifications are subject to
change without notice.
24
Page 25

Troubleshooting
The following checklist will help you
solve problems you may encounter with
your unit.
Before going through the checklist
below, check the connection and
operating procedures.
General
No picture
•The power cord has been disconnected.
•The signal is weak.
t Check all antenna connections and
make sure they are all firmly pushed
into sockets.
t Move the car to the good position for
receiving.
•The fuse has blown.
•Data broadcasting is received. This unit
does not support data broadcasting.
(Displays “No Video !”.)
•Wrong “TV Type” is selected.
t Press 9, 5, 1, 4, 7 and (EPG) to
change the mode to “NTSC” or
“PAL”.
Good picture, but no sound
•Press (VOL)(+) or (ATT) on the card
remote commander.
•Dolby AC3 signal is received. This unit
does not support the Dolby AC3 signal.
(Displays “AC3”.)
Sometimes see a squared pattern on the
screen, your picture is “freezing” or a
picture showing a TV with a noisy pattern.
•The antenna connection has become
loose or disconnected.
t Check all antenna connections and
make sure they are all firmly pushed
into sockets.
•There could be a transmission problem.
t This normally is only a temporary
situation and should correct itself.
Cannot access a particular channel, even
using the number buttons.
•The parental lock has been activated.
t Enter your password to access the
channel (page 13) or unlock the
channel (page 20).
No response when pressing the buttons
on the card remote commander.
•The battery may be exhausted.
Time or EPG is not displayed
correctly.
•The programme of which time is not
rectified, such as repeat programme, is
received.
t After receiving another programme,
turn off the unit once and turn it on
again.
Messages
The following indications appear when
a problem occurs in the unit.
ANT-1 Antenna feed overloaded
Automatically switched off
ANT-2 Antenna feed overloaded
Automatically switched off
The device will automatically switch off
5V output.
Antenna feed overloaded
Automatically switched off
The ANT-1 and ANT-2 are overloaded.
Program overflow
More than 2,000 channels were about to be
stored. You cannot memorize any more
channels.
HDTV Signal is not Supported
The unit received HDTV signal. This unit
does not support the HDTV signals.
No Video Signal !
No Signal !
No mpeg video data is input to the unit.
Bad Signal !
Mpeg data error occured in the unit.
No Video !
No Video PID is input to the unit.
Scrambled !
The unit received a scrambled programme.
Please wait for saving data.
The unit is saving the data.
25
Page 26

Entsorgung von gebrauchten
elektrischen und elektronischen
Geräten (anzuwenden in den Ländern
der Europäischen Union und anderen
europäischen Ländern mit einem
separaten Sammelsystem für diese
Geräte)
Das Symbol auf dem Produkt oder
seiner Verpackung weist darauf hin,
dass dieses Produkt nicht als normaler
Haushaltsabfall zu behandeln ist,
sondern an einer Annahmestelle für das
Recycling von elektrischen und
elektronischen Geräten abgegeben
werden muss. Durch Ihren Beitrag zum
korrekten Entsorgen dieses Produkts
schützen Sie die Umwelt und die
Gesundheit Ihrer Mitmenschen.
Umwelt und Gesundheit werden durch
falsches Entsorgen gefährdet.
Materialrecycling hilft, den Verbrauch
von Rohstoffen zu verringern. Weitere
Informationen über das Recycling
dieses Produkts erhalten Sie von Ihrer
Gemeinde, den kommunalen
Entsorgungsbetrieben oder dem
Geschäft, in dem Sie das Produkt
gekauft haben.
Willkommen!
Herzlichen Glückwunsch zum Kauf des
Sony Digital TV-Tuners.
• Videopräsentation in High-Fidelity
DVD-Qualität.
• 2.000 programmierbare
Lieblingskanäle.
• EPG-Funktion, unterstützt PIG (Bildin-Grafik)-Anzeige.
• Option für Kindersicherung
verfügbar.
• Speicherfunktion für letzten Kanal.
• Doppel-Tuner-Optionen für DiversityFunktion.
• Mobiler Empfangsmodus, kann
mehrere Dutzend terrestrische digitale
Fernsehprogramme bei Bewegung mit
hoher Geschwindigkeit empfangen.
Geeignetes Zubehör: Fernbedienung
2
Page 27

Inhalt
Willkommen! ....................................................................................................................... 2
Sicherheitsmaßnahmen ...................................................................................................... 4
Lage der Bedienungselemente .......................................................................................... 6
Bedienung
Kanäle suchen ..................................................................................................................... 8
Kanäle empfangen ............................................................................................................ 10
Verwendung des „Programmverwaltung” ................................................................... 11
Prüfen der Programmführung ........................................................................................ 15
Umschalten des Audiokanals ......................................................................................... 16
Umschalten der Audiosprache ....................................................................................... 16
Anzeige von Untertitel und Videotext........................................................................... 17
Einrichtung wechseln
Ändern der Menüeinstellungen ..................................................................................... 18
Sperren des Geräts ............................................................................................................ 20
Weitere Informationen
Wartung .............................................................................................................................. 22
Technische Daten .............................................................................................................. 24
Störungssuche ...................................................................................................................25
Meldungen ......................................................................................................................... 25
3
Page 28

Sicherheitsmaßnahmen
Um das Risiko schwerer Unfälle und Verletzungen zu vermeiden, lesen Sie vor dem
Installieren und vor der Inbetriebnahme des Geräts bitte die folgenden
Sicherheitsmaßnahmen.
Sicherheit
Beachten Sie die örtlichen Regeln und Bestimmungen für den Straßenverkehr.
Installation
• Zum Installieren dieses Geräts sind technische
Kenntnisse erforderlich. Dieses Gerät muss von
qualifzierten Technikern oder
Kundendienstfachleuten installiert werden.
• Wenn Sie versuchen, diese Gerät selber einzubauen,
richten Sie sich nach den Einbau- und
Verdrahtungszeichnungen in der Einbau-/
Anschlussanleitung. Bei unsachgemäßer Installation
besteht Feuergefahr oder die Gefahr eines
elektrischen Schlags.
• Stellen Sie vor dem Installieren unbedingt den
Zündschlüssel in die Position OFF oder ziehen
Sie den Schlüssel ab. Wenn Sie dieses Gerät bei
eingeschalteter Zündung installieren, wird der
Batterie möglicherweise Strom entzogen oder
ein Kurzschluss kann auftreten.
• Achten Sie bei der Installation dieses Geräts darauf,
keine elektrischen oder sonstigen Leitungen oder Kabel
irgendwelcher Art oder den Treibstofftank zu
beschädigen. Andernfalls besteht Feuergefahr. Wenn Sie
an Fahrzeugteilen Bohrungen anbringen, vergewissern
Sie sich, dass keine verdeckten Fahrzeugteile beschädigt
werden.
• Bringen Sie keine Schrauben, Bolzen oder Muttern an
sicherheitsrelevanten Teilen wie Lenksäule,
Benzinleitung oder Bremssystem an. Andernfalls
besteht Feuer- oder Unfallgefahr.
• Achten Sie darauf, dass keine Kabel zwischen den
beweglichen Teilen einer Sitzschiene eingeklemmt
werden können.
4
Page 29
Installationsort
Bevor Sie dieses Gerät installieren, informieren Sie sich bitte über die örtlichen
Regeln und Bestimmungen für den Straßenverkehr.
Installieren Sie das Gerät nicht an einer Stelle, an der
- es dem Fahrer die Sicht versperrt.
- die Funktionstüchtigkeit der Airbags beeinträchtigt wird.
- es Sie beim Fahren des Fahrzeugs hindert. Achten Sie
besonders darauf, dass das Lendrad, der Schalthebel und
das Bremspedal nicht blockiert werden.
- sich der Fahrer oder andere Insassen beim Ein- oder
Aussteigen daran verletzen können.
Sollten an Ihrem Gerät Probleme auftreten oder sollten Sie Fragen haben, auf die
in dieser Anleitung nicht eingegangen wird, wenden Sie sich bitte an Ihren SonyHändler.
5
Page 30

1
Lage der Bedienungselemente
Digitaler TV-Tuner
Hinten
ANT 1 ANT 2
VIDEO
REMOTE
Vorne
1 ANT 1/ANT 2-Klemmen
Eingang zum Anschließen der
Antennen.
2 REMOTE-Buchse
Eingang zum Anschließen des
Fernbedienungssensors.
3 VIDEO-Buchse
Für Anschluss an die VideoEingangsbuchse Ihres Monitors usw.
4 AUDIO-Buchsen
Für Anschluss an die AudioEingangsbuchsen Ihres Monitors
usw.
5 SERVICE (RS232)-Klemme
Diese Klemme dient nur für Service.
OUTPUT
L
RAUDIO
432
SERVICE
5 6
POWER
12V
987
SIGNAL@ / 1
6 POWER 12V-Buchse
Schließen Sie das Betriebsstromkabel
hier an.
7 |/a (Einschalt)-Taste*
Schaltet das Gerät ein oder aus.
8 |/1 (Einschalt)-Anzeige
9 SIGNAL-Anzeige
* Bei Einbau in einem Fahrzeug, das keine
ACC (Zubehör) Stellung des Zündschalters
hat, drücken Sie immer diese Taste zum
Ausschalten des Geräts bei
Nichtverwendung. Andernfalls wird die
Batterie verbraucht.
6
Page 31

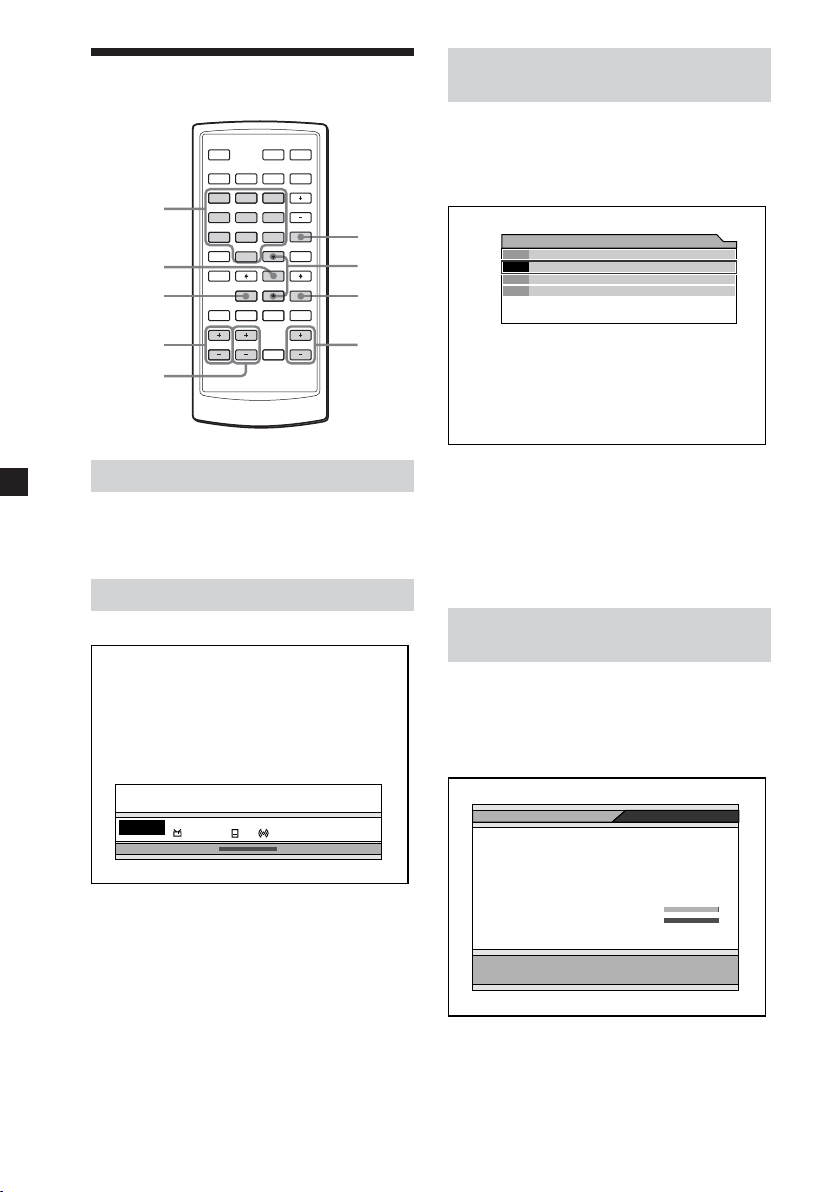
Karten-Fernbedienung RM-X711
MONITORSOURCE
DIGITAL TV
/
1`/1
1
2
3
4
5
6
7
8
9
.
>
123
456
789
EPG
0
FAV
PAGE VOL CHATT
ENTER
INFO EXIT
`
ux
VOL
RADIO
MENU
L/RTEXTAUDIO
0
qa
qs
qd
qf
qg
qh
qj
qk
ql
Einzelheiten siehe aufgeführte Details.
1 Diese Tasten werden beim Betrieb
angeschlossener Sony-Komponenten
verwendet (MV-700HR, XVM-F65/
F65WL).
SOURCE-Taste
Zum Wählen der Eingangsquelle.
./> (Zurück/Weiter)-Tasten
x (Stopp)-Taste
MONITOR |/1 (Einschalt)-Taste
u (Wiedergabe/Pause)-Taste
VOL +/– Tasten
2 Zifferntasten 10, 17, 21
3 EPG-Taste 15, 17
Zur Anzeige der Programmführung.
4 FAV-Taste 12
Zur Anzeige der Favoritenliste oder
Ändern des Favoritenmodus.
5 INFO-Taste 10
Zur Anzeige der Kanal-Information.
6 AUDIO (rot) Taste 14, 16
Zum Ändern der Audio-Sprache.
Zum Einschalten des CH-Löschen-
Modus als rote Taste.
7 Grüne Taste 12, 15
Zum Einschalten des FavoritModus.
8 PAGE +/– Tasten 10, 12, 13, 14
Zum Wechseln der Seitenlist, wenn
die Auswahl mehrere Seiten hat.
9 VOL +/– Tasten 11
0 DIGITAL TV |/1 (Einschalt)-Taste 8
qa RADIO-Taste 10
Zum Umschalten zwischen TV- und
Radio-Modus.
qs MENU-Taste 8, 11, 13, 14, 15, 18,
20, 21
Zur Anzeige der „Hauptmenü”.
qd M/m/</, Tasten 8, 9, 10, 11, 12,
13, 14, 15, 17, 18, 19, 20, 21
qf ENTER-Taste 8, 9, 10, 11, 12, 13,
14, 15, 17, 18, 19, 20, 21
qg EXIT-Taste 9, 10, 12, 13, 14, 17, 18,
19, 20, 21
qh L/R (blaue) Taste 13, 15, 16
Zum Ändern des Audiokanals.
Zum Einschalten des Sperrmodus
als blaue Taste.
qj TEXT (gelbe) Taste 15, 17
Zur Anzeige von Untertitel oder
Videotext.
qk CH +/– Tasten 10
ql ATT-Taste
Kurzzeitiges vollständiges
Ausschalten des Tons.
Wenn Sie diese Taste drücken, wird
der Ton ausgeschaltet, und “
”
erscheint im Display.
Zum Wiederherstellen des Tons
drücken Sie die Taste erneut (oder
(VOL) +).
Tipp
Einzelheiten zum Ersetzen der Batterien siehe “Austauschen der Lithiumbatterie” (Seite 23).
7
Page 32

Bedienung
Kanäle suchen
MONITORSOURCE
DIGITAL TV
/1`/
1
`
.
>
0
ENTER
INFO EXIT
ux
VOL
RADIO
MENU
L/RTEXTAUDIO
123
456
789
EPG
FAV
PAGE VOL CHAT T
Automatisch Kanäle
suchen
Wenn das Radiosignal in der Sendung
enthalten ist, können Sie auch die
Radiosender speichern.
Hinweise
• Stellen Sie sicher, die Antennen richtig
anzuschließen.
• Führen Sie das Suchen von Kanälen nur
bei gestopptem Fahrzeug aus.
1 Drücken Sie die Power-Taste am
Hauptgerät zum Einschalten.
Drücken Sie
Fernbedienung.
Beim ersten Einschalten des Geräts
erscheint die „Hauptmenü”. Wenn
die „Hauptmenü” beim Einschalten
des Geräts nicht erscheint, drücken
Sie (MENU) an der Fernbedienung.
`/1
MENU
B/V/v/b
EXIT
ENTER
an der
Hauptmenü
TV Programme
Programmführer
Installation
TV Programme
Radio Programme
2 Drücken Sie M oder m zum Wählen
der „Installation“, und drücken Sie
dann (ENTER).
3 Drücken Sie M oder m zum Wählen
von „Kanalsuche“, und drücken Sie
dann (ENTER).
Das Kanalsuchfenster erscheint.
4 Drücken Sie M oder m zum
Bewegen des Cursors zur
Suchmodusleiste.
Suchmodusleiste
Kanalsuche
Kanal
Frequenz
Auto Suche
Pegel 21
Qualität 0
177500
5
FftMode: 8K
Begleit Intervall: 1/8
Constellation: QPSK
Hierarchie: Nein
Code Rate: 1/2
5 Drücken Sie < oder , zum
Wählen von „Auto Suche“, und
drücken Sie dann (ENTER).
6 Drücken Sie M/m/</, zum
Wählen von „Start Kanal“ und
„End Kanal“.
Wählen des Abtastkanalbereichs (5
bis 69).
8
Page 33

7 Drücken Sie M oder m zum Wählen
von „Suchen“, und drücken Sie
dann (ENTER).
Die Suche beginnt. Die abgetasteten
Kanäle werden automatisch der
Reihe nach gespeichert. Wenn der
sendende Sender abgetastet ist,
nimmt der Zahlenwert für „Pegel“
und „Qualität“ zu.
Zum Stoppen des Suchlaufs drücken
Sie (EXIT).
8 Wenn der Suchlauf beendet ist,
drücken Sie M oder m zum Wählen
von „Anzeigen“ oder „Fertig“ und
drücken dann (ENTER).
•Wenn Sie „Anzeigen“ wählen, wird
der gewählte Kanal sofort empfangen.
•Wenn Sie „Fertig“ wählen, wird das
Kanalsuchfenster geschlossen.Sie
müssen die „Hauptmenü” durch
wiederholtes Drücken von (EXIT)
schließen, um die Einstellungen
wirksam werden zu lassen.
Kanalsuche
Kanalsuche
Kanal
Frequenz
Hinweise
• Wenn das Gerät die gleiche Sendung im
gleichen Kanal findet, wird die Sendung
überschrieben. Wenn das Gerät die gleiche
Sendung in einem anderen Kanal findet,
wird die Sendung zusätzlich gespeichert.
• Wenn Sie Kanäle in einer anderen Region
(einem anderen Land) erneut suchen,
können zwei oder mehr Sender unter
dem gleichen Namen gespeichert sein.
Wenn Sie in diesem Fall einen Kanal
direkt durch Drücken der Zifferntasten
(Seite 10) wählen, kann es einige Zeit
dauern, bevor das Bildschirmbild
erscheint.
1. BBC ONE Scot
2. BBC TWO S...
Auto Suche
3. BBC NEWS 24
4. CBBC Channel
Kanal 25 506Mhz 6/6
Pegel 21
Suchlauf 100%
Qualität 0
Qualität
Automatisch Kanäle in
Ihrem örtlichen Gebiet
suchen
177500
Pegel
5
TV Radio
FFT Mode: 8K
Guard Interval: 1/8
Constellation: QPSK
Hierarchy: None
1. BBC R Scot...
Code Rate: 1/2
2. BBC R n Gn...
Anzeigen
Fertig
1 Folgen Sie Schritt 1 bis 3 in
„Automatisch Kanäle suchen“.
2 Drücken Sie < oder , zum
Wählen des gewünschten Kanals.
Wählen des Abtastkanalbereichs.
3 Drücken Sie M oder m zum Bewegen
des Cursors zur Suchmodusleiste.
4 Drücken Sie < oder , zum Wählen
von „Suche lokale Kanäle“, und
drücken Sie dann (ENTER).
Die Suche beginnt. Die abgetasteten
Kanäle werden automatisch der
Reihe nach gespeichert. Wenn der
sendende Sender abgetastet ist,
nimmt der Zahlenwert für „Pegel“
und „Qualität“ zu.
Zum Stoppen des Suchlaufs drücken
Sie (EXIT).
5 Wenn der Suchlauf beendet ist,
drücken Sie M oder m zum Wählen
von „Anzeigen“ oder „Fertig“ und
drücken dann (ENTER).
•Wenn Sie „Anzeigen“ wählen, wird
der gewählte Kanal sofort
empfangen.
•Wenn Sie „Fertig“ wählen, wird das
Kanalsuchfenster geschlossen.
Sie müssen die „Hauptmenü”
durch wiederholtes Drücken von
(EXIT) schließen, um die
Einstellungen wirksam werden zu
lassen.
•Bei schlechtem Empfang wird die
Kanal-Information als TVch 1, 2...
angezeigt und erscheint nicht
richtig. In diesem Fall wiederholen
Sie den Vorgang in einem anderen
Gebiet.
Manuell Kanäle suchen
1 Folgen Sie Schritt 1 bis 3 in
„Automatisch Kanäle suchen“.
2 Drücken Sie < oder , zum
Wählen des gewünschten Kanals.
3 Drücken Sie M oder m zum Bewegen
des Cursors zur Suchmodusleiste.
4 Drücken Sie M oder m zum Wählen
von „Suche Single Kanal“, und
drücken Sie dann (ENTER).
Die Suche beginnt.
Zum Stoppen des Suchlaufs drücken
Sie (EXIT).
9
Page 34

Kanäle empfangen
MONITORSOURCE
DIGITAL TV
/1`/
`
1
Zifferntasten
ENTER
INFO
PA GE +/–
VOL +/–
.
123
456
789
EPG
FAV
PAGE VOL CHAT T
>
0
ENTER
INFO EXIT
ux
VOL
RADIO
MENU
L/RTEXTAUDIO
RADIO
V/v
EXIT
CH +/–
Wählen von Kanälen von
der Kanalliste
Sie können Kanäle von der Kanalliste
wählen.
1 Beim Betrachten von TV drücken
Sie (ENTER).
Die Kanalliste erscheint.
Alle TV Prg.
BBC ONE Scot001
BBC TWO Scot002
CBBC Channel030
BBC NEWß 24040
Wählen von TV- oder
Radio-Modus
Beim Betrachten von TV drücken Sie
(RADIO).
Bei jedem Tastendruck schaltet das
Gerät zwischen TV- und Radioempfang
um.
Kanäle wechseln
Drücken Sie (CH) + oder –.
14:00 – 14:30 Country House
12:35 – 14:00
Blood On The Moon
BBC TWO Scot
002
Kanal: 21
474000 Sept. 8 12 : 58
Verwendung der Zifferntaste
Wählen Sie Kanäle direkt durch
Drücken der Tasten 0 bis 9.
Beispiel:
Zum Wählen von Kanal 5 drücken Sie 5.
Zum Wählen von Kanal 25 drücken Sie 2
und 5.
Zum Wählen von Kanal 125 drücken Sie 1,
2 und 5.
10
Englisch 1/2
2 Drücken Sie M/m oder (PAGE) +/–
zum Wählen des zu Betrachten
gewünschten Kanals, und drücken
Sie dann (ENTER).
Zum Schließen der Kanalliste
Drücken Sie (EXIT).
Betrachten der KanalInformation
Sie können die Kanal-Information und
gewählte Programm-Beschreibung
anzeigen.
Beim Betrachten von TV drücken Sie
(INFO).
Programm Information
2818
2819
2816
Programmname : 2
Kanal Nummer : 2
Verschlüsselt : Nein
Favorit : Nein
Sperren : Nein
Qualität–1 99
Qualität–2 0
Kanal : 45
Frequenz : 666000
Begleit Intervall : 1/32
Constellation : 64QAM
CodeRate : 3/4
Video PID
Audio PID
PCR PID
Zum Schließen der Kanal-Information
drücken Sie (EXIT).
Page 35

Hinweis
Die Programm-Beschreibung kann für
manche Programme nicht zur Verfügung
stehen.
Verwendung des „Programmverwaltung”
Einstellen der Lautstärke
Drücken Sie (VOL) + oder –.
Hinweise
• Dieses Gerät unterstützt nicht
verschlüsselte Kanäle.
• Dieses Gerät unterstützt nicht DatenAusstrahlungen. Wenn die DatenAusstrahlung empfangen wird, können
Sie den Ton hören, aber das Bild
erscheint nicht.
Wenn Sie den Kanal wählen
Wenn Sie den Kanal wählen, erscheint
die folgende Informationsanzeige. Die
Bedeutung der Symbole in der
Informationsanzeige ist wie folgt:
: TV-Programm
: Radioprogramm
: Lieblingsprogramm
: Verschlüsseltes Programm
: Kindersicherung-Programm
: Videotext-Dienst
: Untertitel-Dienst
: Stummschalt-Status
: Stereo-Status
: Ausgabe linker Ton
: Ausgabe rechter Ton
Der „Programmverwaltung” hilft, die
gespeicherten Kanäle zu organisieren.
Der „Programmverwaltung” besteht
aus den folgenden drei Modi:
• Favorit-Modus
• Sperr-Modus
• Löschen-Modus
MONITORSOURCE
DIGITAL TV
/1`/
1
`
.
>
FAV
ENTER
Rote
Taste
PA GE +/–
123
456
789
EPG
FAV
PAGE VOL CHAT T
0
ENTER
INFO EXIT
RADIO
MENU
ux
VOL
MENU
V/v
L/RTEXTAUDIO
EXIT
Blaue
Taste
Grüne
Taste
Verwenden der
Favoritenliste
Sie können die gewünschten Kanäle
schnell und leicht mit der Favoritenliste
finden.
Sie können bis zu 2.000 Sendungen zur
Favoritenliste hinzufügen.
Verwenden Sie diese Funktion, wenn
zwei oder mehr Sender in einer anderen
Region (einem anderen Land) unter der
gleichen Kanal-Nummer gespeichert
sind.
Speichern von Kanälen zur
Favoritenliste
1 Beim Betrachten von TV drücken
Sie (MENU).
Die „Hauptmenü” erscheint.
2 Drücken Sie M oder m zum Wählen
von „TV Programm“, und drücken
Sie dann (ENTER).
Fortsetzung
11
Page 36

Verwendung des „Programmverwaltung”
(Fortsetzung)
3 Drücken Sie M oder m zum Wählen
von „TV Programm“ oder „Radio
Programm“, und drücken Sie dann
(ENTER).
Das „Programmverwaltung”-Fenster
erscheint.
8 Drücken Sie (EXIT) wiederholt zum
Schließen des
„Programmverwaltung”-Fensters
und der „Hauptmenü”.
Die Einstellung ist fertiggestellt.
Löschen von Kanälen aus der
Favoritenliste
In Schritt 6 drücken Sie (ENTER)
wiederholt, so dass „
“ verschwindet.
TV Programm
Preferiti 1
BBC ONE...001
BBC TWO...002
CBBC Ch...030
BBC NEW...040
BBC ONE Scot
Kanal : 21
‘ENTER’ : um ein Lieblingsprogramm auszuwählen
Löschen
Favorit Sperren
Frequenz : 474000
4 Drücken Sie die grüne Taste
wiederholt zum Wählen von
„Favorit 1“, „Favorit 2“ oder
„Favorit 3“.
5 Drücken Sie M/m oder (PAGE) +/–
zum Wählen des gewünschten
Kanals.
6 Drücken Sie (ENTER).
„
“ erscheint neben dem gewählten
Kanalnamen. Und der Kanal wird
zur Favoritenliste gespeichert.
TV Programm
Favorit 1
BBC ONE...001
BBC TWO...002
CBBC Ch...030
BBC NEW...040
BBC ONE Scot
Kanal : 21
‘ENTER’ : um ein Lieblingsprogramm auszuwählen
Löschen
Favorit Sperren
Frequenz : 474000
Hinweis
Nach dem Ändern der Einstellungen
mpssen Sie die „Hauptmenü” durch
wiederholtes Drücken von (EXIT)
schließen, um die Einstellungen wirksam
werden zu lassen.
Wählen von Kanälen aus der
Favoritenliste
1 Beim Betrachten von TV drücken
Sie (FAV).
Die Favoritenliste erscheint.
Favorit 1
BBC TWO Scot002
2 Drücken Sie (FAV) wiederholt zum
Wählen von „Favorit 1“, „Favorit 2“
oder „Favorit 3“.
3 Drücken Sie M/m oder (PAGE) +/–
zum Wählen des gewünschten
Kanals, und drücken Sie dann
(ENTER).
4 Drücken Sie (EXIT) zum Schließen
der Favoritenliste.
7 Wiederholen Sie Schritt 3 bis 6 zum
Speichern zusätzlicher Kanäle zur
Favoritenliste.
12
Page 37

Sperren von Kanälen
Sie können Kanäle mit dem
Sperrmmodus im
„Programmverwaltung” sperren.
Wenn Sie den Kanal sperren, muss das
Passwort zum Betrachten des
gewünschten Kanals eingegeben
werden.
Zum Ausführen dieser Funktion stellen
Sie zuerst sicher, dass die
Kindersicherung aktiviert ist (Seite 20).
Sperren der Kanäle
1 Beim Betrachten von TV drücken
Sie (MENU).
Die „Hauptmenü” erscheint.
2 Drücken Sie M oder m zum Wählen
von „TV Programm“, und drücken
Sie dann (ENTER).
3 Drücken Sie M oder m zum Wählen
von „TV Programm“ oder „Radio
Programm“, und drücken Sie dann
(ENTER).
Das „Programmverwaltung”-Fenster
erscheint.
4 Drücken Sie die blaue Taste.
Das Sperrmodus-Fenster erscheint.
Wenn ein Fenster zur
Passworteingabe erscheint, geben Sie
das 4-stellige Passwort ein.
5 Drücken Sie M/m oder (PAGE) +/–
zum Wählen des gewünschten
Kanals.
6 Drücken Sie (ENTER).
“ erscheint auf dem gewählten
„
Kanalnamen.
7 Wiederholen Sie Schritt 3 bis 6 zum
Sperren zusätzlicher Kanäle.
8 Drücken Sie (EXIT) wiederholt zum
Schließen des
„Programmverwaltung”-Fensters
und der „Hauptmenü”.
Die Einstellung ist fertiggestellt..
Wenn die Einstellung vorgenommen
ist, müssen Sie das Passwort beim
nächsten Wählen des gesperrten
Kanals eingeben.
Freigeben von Kanälen
In Schritt 6 drücken Sie (ENTER)
wiederholt, so dass „
Hinweis
Nach dem Ändern der Einstellungen
mpssen Sie die „Hauptmenü” durch
wiederholtes Drücken von (EXIT)
schließen, um die Einstellungen wirksam
werden zu lassen.
“ verschwindet.
TV Programm
Favorit 1
BBC ONE...001
BBC TWO...002
CBBC Ch...030
BBC NEW...040
BBC NEWS 24
Kanal : 21
‘ENTER’ : um ein Lieblingsprogramm auszuwählen
Löschen
Favorit Sperren
Frequenz : 474000
13
Page 38

Löschen von Kanälen
Sie können die gespeicherten Kanäle mit
dem Kanal-Löschen-Modus im
„Programmverwaltung” löschen.
1 Beim Betrachten von TV drücken
Sie (MENU).
Die „Hauptmenü” erscheint.
2 Drücken Sie M oder m zum Wählen
von „TV Programm“, und drücken
Sie dann (ENTER).
3 Drücken Sie M oder m zum Wählen
von „TV Programm“ oder „Radio
Programm“, und drücken Sie dann
(ENTER).
Das „Programmverwaltung”-Fenster
erscheint.
4 Drücken Sie die rote Taste.
Das Kanal-Löschen-Modus-Fenster
erscheint.
5 Drücken Sie die rote Taste
wiederholt, um „Kanal
löschen“,„Lösche Multiplex“ oder
„Alle löschen“ zu wählen.
Kanal löschen: Den gewählten Kanal
löschen
Lösche Multiplex: Löschen Sie alle
Kanäle in der gleichen Frequenz.
Alle löschen: Alle gespeicherten
Kanäle im Gerät löschen
6 Drücken Sie M/m oder (PAGE) +/–
zum Wählen des gewünschten
Kanals.
7 Drücken Sie (ENTER).
„
“ erscheint auf dem gewählten
Kanalnamen.
TV Programm
Kanal Löschen
BBC ONE...001
BBC TWO...002
CBBC Ch...030
BBC NEW...
BBC NEWS 24
Kanal : 21
‘ENTER’ : um ein Lieblingsprogramm auszuwählen
Löschen
Favorit Sperren
Frequenz : 474000
8 Drücken Sie (EXIT) einmal.
Das Bestätigungsfenster erscheint.
Wenn Sie nicht den Kanal löschen
wollen, wählen Sie „Abbruch“.
TV Programm
Kanal Löschen
BBC ONE...001
Info Box
BBC TWO...002
Sind Sie wirklich sicher die
CBBC Ch...030
markierten Programme zu löschen ?
BBC NEW...
OK
BBC NEWS 24
Abbruch
Channel : 21
‘ENTER’ : um ein Lieblingsprogramm auszuwählen
Löschen
Favorit Sperren
Frequenz : 474000
9 Drücken „OK“ und drücken Sie
dann (ENTER).
Die gewählten Kanäle werden
gelöscht.
10
Wiederholen Sie Schritt 3 bis 9 zum
Löschen zusätzlicher Kanäle.
11
Drücken Sie (EXIT) wiederholt zum
Schließen des
„Programmverwaltung”-Fensters
und der „Hauptmenü”.
Die Einstellung ist fertiggestellt.
Zum Löschen von Kanälen
In Schritt 7 drücken Sie (ENTER)
wiederholt, so dass „
Hinweise
• Nach dem Ändern der Einstellungen
mpssen Sie die „Hauptmenü” durch
wiederholtes Drücken von (EXIT)
schließen, um die Einstellungen wirksam
werden zu lassen.
• Die gelöschten Kanäle können nicht
wiederhergestellt werden, wenn nicht
die Suchfunktion erneut ausgeführt wird.
“ verschwindet.
14
Page 39

Prüfen der Programmführung
Das Gerät bietet die EPG-Funktion zum
Zugriff auf die TV-Führung (oder
Radio-Führung, wenn Sie Radio-Kanäle
verwenden) die Titel und andere
Information über das aktuelle und
folgende Programme auf den
verschiedenen Kanälen zeigt.
Die Information steht nur von dem
Netzwerk des betrachteten Kanals zur
Verfügung.
MONITORSOURCE
DIGITAL TV
/1`/
1
`
.
>
EPG
ENTER
Grüne
Taste
123
456
789
EPG
FAV
PAGE VOL CHAT T
0
ENTER
INFO EXIT
RADIO
MENU
ux
VOL
MENU
B/V/v/b
L/RTEXTAUDIO
Blause
Taste
Gelbe
Taste
Das Programmführung-Fenster erscheint.
TV Führer
029 UKTV Food
Worrall Thompson
Mai 27 09:00 ~ 09:30
– 6 : 00
Kanal 4 Self The Teen Big From008
price–drop keine Daten verfügbar024
UKTV Food Worrall Food and029
ITV News Live With Alastair Stewa ITV041
+ 6 : 00
10 : 009 : 00Mai.27
Wenn Sie die zurückliegende oder
nächste Kanalinformation sehen wollen,
halten Sie < oder , gedrückt, so dass
der Cursor (V) zur gewünschten Zeit
weitergeht. Oder drücken Sie die gelbe
Taste (läuft jeweils 6 Stunden weiter)
oder grüne Taste (läuft jeweils 6
Stunden zurück).
Betrachten der Details des
gewählten Programms
Bewegen Sie den Cursor (V) durch
Drücken von M/m/</, zum
Wählen des Programmnamens, und
drücken Sie dann die blaue Taste.
Das Detailinformation-Feld erscheint.
Betrachten der Programmführung
Beim Betrachten von TV drücken Sie
(EPG).
Wählen von der „Hauptmenü”
1 Beim Betrachten von TV drücken Sie
(MENU).
2 Drücken Sie M oder m zum Wählen
von „Programmführung“, und
drücken Sie dann (ENTER).
Hinweis
Wenn der gewählte Kanal nicht EPG-Daten
liefert, erscheint „Keine Daten
verhanden“.
15
Page 40

Umschalten des Audiokanals
Umschalten der Audiosprache
Sie können den gewählten Audiokanal
zwischen Stereo, linker Kanal und
rechter Kanal wählen.
MONITORSOURCE
DIGITAL TV
/1`/
1
`
.
>
0
ENTER
INFO EXIT
RADIO
MENU
ux
VOL
L/RTEXTAUDIO
L/R
123
456
789
EPG
FAV
PAGE VOL CHAT T
Beim Betrachten von TV drücken Sie
(L/R) wiederholt zum Wählen der
gewünschten Einstellung.
: Stereo
: Linker Kanal
: Rechter Kanal
Wenn Sie ein Programm mit
mehrsprachigem Dienst betrachten,
können Sie die Sprache umschalten.
Dies hängt von der Übertragung des
Audiosignals ab.
MONITORSOURCE
DIGITAL TV
/1`/
1
`
.
>
0
ENTER
INFO EXIT
ux
VOL
RADIO
MENU
L/RTEXTAUDIO
AUDIO
123
456
789
EPG
FAV
PAGE VOL CHAT T
Beim Betrachten von TV drücken Sie
(AUDIO) wiederholt zum Wählen der
gewünschten Sprache.
Hinweis
Diese Einstellung ist nur wirksam, wenn
die aktuelle Sendung die gewählte
Sprache in der Systemeinstellung
unterstützt (Seite 19).
Wenn die Sendung nicht die gewählte
Sprache unterstützt, geschieht die
Ausgabe in der Originalsprache.
16
Page 41

Anzeige von Untertitel und Videotext
Sie können die Untertitel oder den
Videotext ein- und ausschalten.
MONITORSOURCE
DIGITAL TV
/1`/
`
1
.
Zifferntasten
EPG
123
456
789
EPG
FAV
ENTER
PAGE VOL CHAT T
Beim Betrachten von TV drücken Sie
(TEXT).
Das Untertitel- und/oder Videotext
Fenster erscheint, um die Wahl von
Untertitelsprache oder Videotext zu
erlauben, falls der Sender solche
Information ausstrahlt.
Folgen Sie den angezeigten Inhalten zur
Bedienung.
>
0
ENTER
INFO EXIT
RADIO
ux
VOL
MENU
B/V/v/b
L/RTEXTAUDIO
EXIT
TEXT
Untertitel:
Drücken Sie M/m/</, zum Wählen
der Gegenstände und drücken Sie
(ENTER).
Zum Aufheben der Untertitel drücken
Sie (EXIT).
Hinweis
Je nach dem Programm kann es einige Zeit
dauern, bis ein Untertitel erscheint, oder
der Untertitel kann überhaupt nicht
erscheinen.
Videotext:
Drücken Sie M/m/</, zum Wählen
der Gegenstände und drücken Sie
(ENTER).
Sie können die Wahl direkt mit den
Zifferntasten vornehmen.
Zum Aufheben des Videotext drücken
Sie (EXIT).
Hinweis
Die Farbtasten (rot/blau/gelb/grün) können
nicht zur Wahl von Videotext verwendet
werden.
Hinweis
Wenn Sie „TV-Garäte-Typ“ auf „NTSC“
stellen, können Untertitel und/oder
Videotext nicht richtig angezeigt werden.
In diesem Fall drücken Sie 9, 5, 1, 4, 7 und
(EPG), um den Modus auf „PAL“
umzustellen.
Untertitel
eng
Videotext
17
Page 42

Einrichtung wechseln
Ändern der Menüeinstellungen
Sie können dieses Gerät mit den Menüs
zur On-Screen-Systemeinstellung
einrichten. Die meisten Einstellungen
müssen eingestellt werden, wenn Sie
dieses Gerät zuerst einrichten.
Die Systemeinstellmenüs sind:
• Sprache
• Audio Sprache
• Zeit einstellen
• Sommerzeit
• Antennen Einspeisung 5 V
• Bildschirmformat
• TV-Geräte-Typ
• Startkanal
MONITORSOURCE
DIGITAL TV
/1`/
`
1
ENTER
.
123
456
789
EPG
FAV
PAGE VOL CHAT T
>
0
ENTER
INFO EXIT
RADIO
ux
VOL
MENU
MENU
B/V/v/b
L/RTEXTAUDIO
EXIT
3 Drücken Sie M oder m wiederholt
zum Wählen der
„Systemeinstellung“, und drücken
Sie dann (ENTER).
Das Systemeinstellmenü erscheint.
Systemeinstellung
Sprache English
Audio Sprache English
Lokalzeit 0:00
Sommerzeit Aus
Antenna feed 5V Ein
Bildformat 16:9
TV-Geräte-Typ PAL
Startkanal Nein
London, Lissabon, Dublin, Casablanca
Wählen Sie die Menüsprache
4 Drücken Sie M oder m zum Wählen
des gewünschten Gegenstands.
5 Drücken Sie < oder ,
wiederholt, um die Wahl zu
ändern, oder drücken Sie (ENTER)
zur Anzeige des DropdownListenfelds, das die Wahllsite zeigt.
Systemeinstellung
Sprache English
Audio Sprache English
Lokalzeit 0:00
Sommerzeit OFF
Antenna feed 5V ON
Bildformat 4:3
TV-Geräte-Typ PAL
Startkanal Nein
London, Lissabon, Dublin, Casablanca
Wählen Sie die Menüsprache
English
Deutsch
Italiano
Français
Nederlands
1 Drücken Sie (MENU).
Die „Hauptmenü” erscheint.
2 Drücken Sie M oder m wiederholt
zum Wählen der „Installaion“, und
drücken Sie dann (ENTER).
18
6 Drücken Sie (ENTER) auf der
gewünschten Wahl.
7 Drücken Sie (EXIT) wiederholt zum
Schließen der „Hauptmenü”.
„Systemeinstellung“ siehe nächste Seite.
Page 43

Die Vorgabeeinstellungen sind unterstrichen.
Einstellungen Einstellungsoptionen
Sprache Vorgabe: English
Audio Sprache Vorgabe: English
Zeit einstellen
Sommerzeit Ein, Aus
Antennen
Einspeisung 5 V
Bildschirmformat 4:3, 16:9, 4:3 letter box
TV-Geräte-Typ NTSC, PAL, PAL&NTSC
Startkanal Einstellung des Kanals zum Start beim Einschalten des Geräts.
Ändern der OSD-Sprache.
Ändern der Audio-Sprache.
1 Drücken Sie (ENTER) bei „Audio Sprache“.
Ein Popup-Fenster, das die 4 Sprachprioritäten zeigt, erscheint.
2 Drücken Sie < oder , wiederholt zum Wählen der Audio-Sprache
für jede Priorität.
3 Drücken Sie M oder m wiederholt zum Wählen von „OK“ zum
Ändern der Einstellung oder „Abbruch“ zum Abbrechen der
Einstellung.
Hinweis
Sie können die gewünschte Audio-Sprachpriorität unter der
Bedingung wählen, dass die gewählte Sprache von dem Kanal
unterstützt wird.
Einstellbare Zeit: –12:00 bis +12:00 (Vorgabeeinstellung ist „0:00“)
Einstellung der Zeitzone. Dies beeinträchtigt die Zeit des Geräts und
die EPR-Zeit.
Einstellung der Sommerzeit. Durch Aktivieren dieser Wahl wird die
Zeit um eine Stunde vorgestellt.
Ein, Aus
Wählen, ob 5 Volt vom Gerät zur Antenne gespeist werden oder nicht.
Wenn Sie den TV-Antennenverstärker verwenden, schalten Sie ihn
„Ein“ (5 V, 20 mA ANT 1/ANT 2). Wenn Sie eine TV-Antenne ohne
Verstärker verwenden, schalten Sie ihn „Aus“.
Einstellung des Bildschirmmodus.
4:3: Ein Bild mit einem Seitenverhältnis von 4 zu 3.
16:9: Ein Bild mit einem Seitenverhältnis von 16 zu 9.
4:3 letter box: Ein Bild mit einem Seitenverhältnis von 4:3, vergrößert
bis zu den Bildschirmrändern.
Einstellung des Farbsystems auf NTSC oder PAL.
1 Drücken Sie (ENTER) bei „Startkanal“.
Ein Popup-Fenster mit einer Kanalliste erscheint.
2 Drücken Sie M oder m wiederholt zum Wählen des Kanals.
3 Drücken Sie (ENTER).
Hinweis
Wenn Sie „Startkanal“ eingestellt haben, erscheint ein
Meldungsfeld zur Bestätigung, ob sie „Startkanal“ aktivieren
wollen. Wählen Sie in diesem Fall „OK“ zum Ändern der
Einstellung oder „Abbruch“ zum Abbrechen der Einstellung.
Hinweis
Nach dem Ändern der obigen Einstellungen müssen Sie die „Hauptmenü” durch
wiederholtes Drücken von (EXIT) schließen, um die Einstellungen wirksam werden zu
lassen.
19
Page 44

Sperren des Geräts
MONITORSOURCE
DIGITAL TV
/1`/
1
`
.
>
0
ENTER
INFO EXIT
Ein
Aus
RADIO
ux
VOL
MENU
MENU
V/v
L/RTEXTAUDIO
EXIT
123
Zifferntasten
456
789
EPG
FAV
PAGE VOL CHAT T
Einstellung des Passworts
1 Drücken Sie (MENU).
Die „Hauptmenü” erscheint.
2 Drücken Sie M oder m wiederholt
zum Wählen der „Installation“, und
drücken Sie dann (ENTER).
3 Drücken Sie M oder m zum Wählen
von „Kindersicherung“, und
drücken Sie dann (ENTER).
Kindersicherung
Kennwort
Kindersicherung
Installation sperren
Neues Kennwort
Kennwort bestätigen
Eingabe des gegenwärtigen Kennwortes
4 Geben Sie das aktuelle Passwort
ein.
Das Vorgabe-Passwort ist 0000.
5 Drücken Sie (EXIT) wiederholt zum
Schließen der „Hauptmenü”.
Ändern des Passworts
1 Drücken Sie (MENU).
Die „Hauptmenü” erscheint.
2 Drücken Sie M oder m wiederholt
zum Wählen der „Installation“, und
drücken Sie dann (ENTER).
3 Drücken Sie M oder m zum Wählen
von „Kindersicherung“, und
drücken Sie dann (ENTER).
4 Geben Sie das aktuelle Passwort
ein.
5 Drücken Sie M oder m wiederholt,
um „Neues Kennwort“ zu wählen.
6 Geben Sie das neue Passwort ein,
und drücken Sie dann m, um den
Cursor zu „Kennwort bestätigen“
zu bewegen.
7 Geben Sie das neue Passwort
erneut zur Bestätigung ein.
8 Drücken Sie (EXIT) wiederholt zum
Schließen der „Hauptmenü”.
Einstellungen für die
Kindersicherung
Sie können die Kindersicherung mit der
Kindersicherung-Funktion einstellen.
1 Drücken Sie (MENU).
Die „Hauptmenü” erscheint.
2 Drücken Sie M oder m wiederholt
zum Wählen der „Installation“, und
drücken Sie dann (ENTER).
3 Drücken Sie M oder m zum Wählen
von „Kindersicherung“, und
drücken Sie dann (ENTER).
4 Geben Sie das aktuelle Passwort ein.
5 Drücken Sie M oder m zum Wählen
von „Kindersicherung“, und
drücken Sie dann (ENTER).
6 Drücken Sie < oder , wiederholt
zur Wahl von „Ein“.
Zum Annullieren der
Kindersicherung wählen Sie „Aus“.
7 Drücken Sie (EXIT) wiederholt zum
Schließen der „Hauptmenü”.
20
Page 45

Hinweis
Nach dem Ändern der Einstellungen
mpssen Sie die „Hauptmenü” durch
wiederholtes Drücken von (EXIT)
schließen, um die Einstellungen wirksam
werden zu lassen.
Einstellung der
Installationssperre
Sie können Ihre installierten Daten und
Information mit der Installationssperre
schützen.
1 Drücken Sie (MENU).
Die „Hauptmenü” erscheint.
2 Drücken Sie M oder m wiederholt
zum Wählen der „Installation“, und
drücken Sie dann (ENTER).
3 Drücken Sie M oder m zum Wählen
von „Kindersicherung“, und
drücken Sie dann (ENTER).
4 Geben Sie das aktuelle Passwort
ein.
5 Drücken Sie M oder m wiederholt
zum Wählen von „Installation
sperren“.
6 Drücken Sie < oder , wiederholt
zur Wahl von „Ein“.
Zum Annullieren der
Installationssperre wählen Sie „Aus“.
7 Drücken Sie (EXIT) wiederholt zum
Schließen der „Hauptmenü”.
Wenn Sie das Passwort
vergessen
Während die „Hauptmenü”
angezeigt wird, drücken Sie 4, 7, 8, 9
und 3. Das Fenster für werkseitige
Vorgabe erscheint. Dann wählen Sie
„OK“ und drücken (ENTER). Die
Einstellung des Geräts wird auf
werkseitige Vorgabe zurückgesetzt.
Zum Annullieren wählen Sie
„Abbruch“.
Hinweis
Wenn das Gerät auf die werkseitige
Vorgabe zurückgesetzt wird, gehen alle
Einstellungen verloren. Nehmen Sie die
Einstellungen erneut vor.
Hinweis
Nach dem Ändern der Einstellungen
mpssen Sie die „Hauptmenü” durch
wiederholtes Drücken von (EXIT)
schließen, um die Einstellungen wirksam
werden zu lassen.
21
Page 46

Weitere Informationen
Wartung
Austauschen der Sicherung
Beim Ersetzen der Sicherung des Stromkabels oder der Zigarettenanzünderbuchse
vergewissern Sie sich, dass eine Sicherung der gleichen Stärke wie auf der
Originalsicherung angegeben verwendet wird. Dieser ist auf der Originalsicherung
angegeben. Wenn die Sicherung durchbrennt, überprüfen Sie den Stromanschluss
und tauschen die Sicherung aus. Brennt die neue Sicherung ebenfalls durch, kann
eine interne Fehlfunktion vorliegen. Wenden Sie sich in einem solchen Fall an Ihren
Sony-Händler.
Sicherung
Achtung
Verwenden Sie unter keinen Umständen eine Sicherung mit einem höheren AmpereWert als dem der Sicherung, die ursprünglich mit dem Gerät geliefert wurde.
Andernfalls kann es zu Schäden am Gerät kommen.
22
Page 47

Austauschen der Lithiumbatterie
Unter normalen Bedingungen halten die Batterien etwa ein Jahr. (Die Lebensdauer
der Batterien kann je nach Gebrauch des Geräts jedoch auch kürzer sein.)
Wenn die Batterie schwächer wird, verkürzt sich die Reichweite der Kartenfernbedienung.
Tauschen Sie die Batterie gegen eine neue CR2025-Lithiumbatterie aus. Bei Verwendung
einer anderen Batterie besteht Feuer- oder Explosionsgefahr.
+ Seite nach oben weisend
2
Drücken Sie den
Sperrhebel (1) ein
1
und ziehen den
Batteriehalter (2)
heraus.
Hinweise zur Lithiumbatterie
• Bewahren Sie die Lithiumbatterie außerhalb der Reichweite von Kindern auf. Sollte
eine Lithiumbatterie verschluckt werden, ist umgehend ein Arzt aufzusuchen.
• Wischen Sie die Batterie mit einem trockenen Tuch ab, um einen guten Kontakt
zwischen den Batteriepolen und anschlüssen sicherzustellen.
• Achten Sie beim Einlegen der Batterie auf die richtige Polarität.
• Halten Sie die Batterie nicht mit einer Metallpinzette. Dies könnte zu einem
Kurzschluss führen.
ACHTUNG
Die Batterie kann bei unsachgemäßem Umgang explodieren.
Laden Sie sie nicht auf, zerlegen Sie sie nicht und werfen Sie sie nicht ins Feuer.
Entsorgungshinweis: Bitte werfen Sie nur entladene Batterien in die Sammelboxen
beim Handel oder den Kommunen. Entladen sind Batterien in der Regel dann, wenn
das Gerät abschaltet und „Batterie leer“ signalisiert oder nach langerer
Gebrauchsdauer der Batterien nicht mehr einwandfrei funktioniert.
Um sicherzugehen, kleben Sie die Batteriepole z. B. mit einem Klebestreifen ab oder
geben Sie die Batterien einzeln in einen Plastikbeutel.
23
Page 48

Technische Daten
Digitaler TV-Tuner
Video-Decodierung
MPEG-2 DVB konform bis zu MP@ ML
Video-Bitrate bis zu 15 Mbit/s
Videoformat 4:3 (Letterbox wenn
Quelle in 16:9 ist) und
16:9
Auflösung bis zu 720 × 576 Pixel
Audio-Codierung
MPEG-Ebene 1/2
Empfangsformat
NTSC/PAL
Eingangsfrequenzbereich
VHF: 174 – 230 MHz
UHF: 470 – 862 MHz
IF 36,125 MHz
Stromanforderungen
12 V Gleichstrom
(negative Masse)
Leistungsaufnahme
1,2 A
Eingänge TV-Antenne (2)
Fernbedienung (1)
Service (RS232) (1)
Ausgänge Video (1)
Audio L/R (1)
Abmessungen Ca. 182 × 43 × 174 mm
(einschließlich
hervorstehende Teile und
Regler) (B × H × T)
Gewicht Ca. 920 g
Temperaturbereich
0 – 45 °C
Kartenfernbedienung RM-X711
Stromversorgung
CR2025-Lithiumbatterie
Reichweite ca. 2,5 m
Abmessungen 55 × 125 × 15 mm
(B × H × T)
Gewicht ca. 50 g
(einschl. Batterien)
Mitgeliefertes Zubehör
Teile für Einbau (1 Satz)
Kartenfernbedienung RM-X711
(mit mitgelieferter Batterie) (1)
Betriebsstromkabel (1)
Fernbedienungssensor (1)
Einbau-/Anschlussanleitung (1)
Bedienungsanleitung (1 Satz)
Sonderzubehör
TV-Antenne VCA-130 (links/rechts) (1 Satz)
Mobiler Monitor XVM-F65/F65WL
Tragbarer DVD-Player MV-700HR
Änderungen, die dem technischen Fortschritt
dienen, bleiben vorbehalten.
24
Page 49

Störungssuche
Anhand der folgenden Checkliste
können Sie die meisten Probleme, die
möglicherweise an Ihrem Gerät
auftauchen, selbst beheben.
Bevor Sie die folgende Checkliste
durchgehen, überprüfen Sie bitte
zunächst, ob Sie das Gerät richtig
angeschlossen und bedient haben.
Allgemeines
Kein Bild
•Das Netzkabel wurde gelöst.
•Das Signal ist schwach.
t Prüfen Sie alle
Antennenverbindungen und stellen
Sie sicher, dass alle fest in die
Fassungen gedrückt sind.
t Fahren Sie das Fahrzeug zu einer
Stelle mit gutem Empfang.
•Die Sicherung ist durchgebrannt.
•Datensendung wird empfangen. Dieses
Gerät unterstützt nicht DatenAusstrahlung. (Zeigt „No Video !“ an.)
• Falscher “TV-Garäte-Typ” ist gewählt.
t Drücken Sie 9, 5, 1, 4, 7 und (EPG),
um den Modus auf „NTSC“ oder
„PAL“ umzustellen.
Gutes Bild, kein Ton
•
Drücken Sie (VOL)(+) oder (ATT) an der
Karten-Fernbedienung.
•Ein Dolby AC3-Signal wird empfangen.
Dieses Gerät unterstützt nicht das Dolby
AC3-Signal. (Zeigt „AC3“ an.)
Manchmal kann ein Rechteckmuster auf
dem Bildschirm erscheinen, Ihr Bild kann
„einfrieren“ oder ein gestörtes Bild kann
erscheinen.
•Die Antennenverbindung hat sich
gelockert oder gelöst.
t Prüfen Sie alle
Antennenverbindungen und stellen
Sie sicher, dass alle fest in die
Fassungen gedrückt sind.
•Es kann ein Übertragungsproblem
vorliegen.
t Dies ist normalerweise nur eine
kurzzeitige Situation und sollte sich
selber korrigieren.
Zugriff zu einem bestimmten Kanal ist
unmöglich, auch bei Verwendung der
Zifferntasten.
•Die Kindersicherung wurde aktiviert.
t Geben Sie das Passwort zum Zugriff
auf den Kanal ein (Seite 13) oder
geben Sie den Kanal frei (Seite 20).
Keine Reaktion beim Drücken der Tasten
an der Karten-Fernbedienung.
•Die Batterie kann verbraucht sein.
Zeit oder EPG wird nicht richtig angezeigt.
•Ein Programm, dessen Zeit nicht
berichtigt ist, wie ein
Wiederholprogramm, wird empfangen.
t Nach dem Empfang eines anderen
Programms schalten Sie das Gerät
einmal aus und dann wieder ein.
Meldungen
Die folgenden Anzeigen erscheinen,
wenn ein Problem am Gerät auftritt.
ANT-1 Antenna feed overloaded
Automatically switched off
ANT-2 Antenna feed overloaded
Automatically switched off
Das Gerät schaltet automatisch den 5-VAusgang aus.
Antenna feed overloaded
Automatically switched off
Die ANT-1 und ANT-2 sind überlastet.
Program overflow
Mehr als 2.000 wurden zu speichern
versucht. Sie können nicht weitere Kanäle
speichern.
HDTV Signal is not Supported
Das Gerät empfängt ein HDTV-Signal.
Dieses Gerät unterstützt nicht das HDTVSignal.
No Video Signal !
No Signal !
Keine mpeg-Videodaten liegen am Gerät
an.
Bad Signal !
Mpeg-Datenfehler im Gerät aufgetreten.
No Video !
Kein Video-PID liegt am Gerät an.
Scrambled !
Das Gerät empfängt ein verschlüsseltes
Programm.
Please wait for saving data.
Das Gerät speichert die Daten.
25
Page 50

Traitement des appareils électriques
et électroniques en fin de vie
(Applicable dans les pays de l'Union
Européenne et aux autres pays
européens disposant de systèmes de
collecte sélective)
Ce symbole, apposé sur le produit ou
sur son emballage, indique que ce
produit ne doit pas être traité avec les
déchets ménagers. Il doit être remis à un
point de collecte approprié pour le
recyclage des équipements électriques
et électroniques. En s'assurant que ce
produit est bien mis au rebut de
manière appropriée, vous aiderez à
prévenir les conséquences négatives
potentielles pour l'environnement et la
santé humaine. Le recyclage des
matériaux aidera à préserver les
ressources naturelles. Pour toute
information supplémentaire au sujet du
recyclage de ce produit, vous pouvez
contacter votre municipalité, votre
déchetterie ou le magasin où vous avez
acheté le produit.
Bienvenue!
Merci d’avoir porté votre choix sur le
syntoniseur TV numérique Sony.
• Présentation vidéo de qualité DVD
haute fidélité.
• 2.000 chaînes préférées
programmables.
• Fonction EPG, supporte l’affichage
PIG (Picture in Graphics).
• Option de verrouillage parental
disponible.
• Fonction de mémoire de la dernière
chaîne.
• Options double syntoniseur
disponibles pour la fonction de
diversité.
• Mode de réception mobile, peut
recevoir plusieurs douzaines de
programmes de télévision numériques
terrestres pendant le déplacement à
grande vitesse.
Accessoire compatible: Télécommande
2
Page 51

Table des matières
Bienvenue! ........................................................................................................................... 2
Précautions .......................................................................................................................... 4
Emplacements des commandes ........................................................................................ 6
Fonctionnement
Recherche de chaînes.......................................................................................................... 8
Réception de chaînes ........................................................................................................ 10
Emploi de «Gestion canal» .............................................................................................. 11
Contrôle du Guide des programmes ............................................................................. 15
Commutation de canal audio .......................................................................................... 16
Commutation de la langue parlée .................................................................................. 16
Affichage de sous-titres et de télétexte .......................................................................... 17
Changement de configuration
Changement des réglages des menus ............................................................................ 18
Verrouillage de l’appareil ................................................................................................ 20
Informations complémentaires
Entretien ............................................................................................................................. 22
Spécifications ..................................................................................................................... 24
Dépannage ......................................................................................................................... 25
Messages ............................................................................................................................ 25
3
Page 52

Précautions
Pour éviter tout risque de blessure grave ou d’accident, lisez les précautions
suivantes avant d’installer ou d’utiliser l’appareil.
A propos de la sécurité
Conformez-vous au code de la route de votre pays.
A propos de l’installation
• L’installation de l’appareil nécessite des
connaissances techniques approfondies.
Cet appareil doit être installé par un technicien ou
un agent de service qualifié.
• Si vous essayez d'installer l'appareil vous-même,
faites-le correctement en suivant les schémas
d'installation et de câblage dans le manuel
d'installation/connexion. Une installation
incorrecte risque de provoquer un incendie ou une
électrocution.
• Avant de procéder à l’installation, assurez-vous
de régler la clé de contact de la voiture sur OFF
ou d’ôter la clé. L’installation de l’appareil avec
le moteur en marche risque de décharger la
batterie ou de provoquer un court-circuit.
• Prenez garde à ne pas endommager les conduits, les
tubes, le réservoir ou les fils électriques lors de
l’installation de l’appareil. Cela pourrait provoquer un
incendie. Si vous percez un trou dans les panneaux
intérieurs de la voiture, assurez-vous de
n’endommager aucune pièce cachée.
• N’utilisez aucune vis ni aucun écrou réservés aux
dispositifs de sécurité, tels que la tringlerie de direction,
le circuit d’alimentation en carburant ou les systèmes
de freinage. Ceci pourrait provoquer un incendie ou un
accident.
• Prenez garde à ne pas emmêler ou coincer les cordons et les
fils dans une partie mobile des rails de siège.
4
Page 53

Lieu d’installation
Avant d’installer l’appareil, consultez la réglementation routiére en vigueur dans
votre région.
N’installez pas l’appareil à un endroit où :
- Il risque de gêner la visibilité du conducteur ;
- Il risque d’entraver l’utilisation du coussin de sécurité
gonflable (airbag) ;
- Il risque d’entraver l’utilisation du véhicule, notamment le
volant, le levier de vitesses ou la pédale de frein ;
- Le conducteur et les passagers risquent de se blesser en
montant ou sortant de la voiture.
Pour toute question ou problème relatif à votre appareil et dont vous n’avez pas
la solution dans ce manuel, veillez consulter le revendeur Sony le plus proche.
5
Page 54

1
Emplacements des commandes
Syntoniseur TV numérique
Arrière
ANT 1 ANT 2
VIDEO
REMOTE
Avant
1 Bornes ANT 1/ANT 2
Entrée pour la connexion des
antennes.
2 Prise REMOTE
Entrée pour la connexion du capteur
de télécommande.
3 Prise VIDEO
Connectez-la à la prise d’entrée
vidéo de votre moniteur etc.
4 Prises AUDIO
Connectez-les aux prises d’entrée
audio de votre moniteur etc.
5 Borne SERVICE (RS232)
Cette borne est réservée à l’entretien.
6 Prise POWER 12V
Raccordez-y le cordon
d’alimentation.
OUTPUT
L
RAUDIO
432
SERVICE
5 6
987
SIGNAL@ / 1
7 Touche |/a (alimentation)*
Met l’appareil sous et hors tension.
8 Témoin |/1 (alimentation)
9 Témoin SIGNAL
* Lors de l’installation dans une voiture
sans position ACC (auxiliaire) sur le
commutateur d’allumage, veillez à
appuyer sur cette touche pour éteindre
l’unité lorsque vous ne l’utilisez pas.
Sinon, la batterie risque de se décharger.
POWER
12V
6
Page 55

Mini-télécommande RM-X711
4 Touche FAV 12
Pour afficher la liste des préférés ou
changer le mode Préféré.
5 Touche INFO 10
Pour afficher les informations
concernant les chaînes.
6 Touche (rouge) AUDIO 14, 16
Pour changer de langue parlée.
Pour passer au mode Effacer CH
quand la touche est rouge.
7 Touche verte 12, 15
Pour passer en mode Préféré.
8 Touches PAGE +/– 10, 12, 13, 14
Pour changer la liste de pages quand
la sélection a beaucoup de pages.
9 Touches VOL +/– 11
0 Touche DIGITAL TV |/1
(alimentation) 8
qa Touche RADIO 10
Pour commuter entre les modes
télévision et radio.
qs Touche MENU 8, 11, 13, 14, 15, 18,
1
2
3
4
5
6
7
8
9
MONITORSOURCE
.
>
123
456
789
EPG
0
FAV
PAGE VOL CHATT
ENTER
INFO EXIT
DIGITAL TV
/
1`/1
`
ux
VOL
RADIO
MENU
L/RTEXTAUDIO
0
qa
qs
qd
qf
qg
qh
qj
qk
ql
20, 21
Pour afficher la «Menu principal».
Consultez les pages indiquées pour les
détails.
qd Touches M/m/</, 8, 9, 10, 11,
12, 13, 14, 15, 17, 18, 19, 20, 21
qf Touche ENTER 8, 9, 10, 11, 12, 13,
1 Ces touches servent à opérer les
équipements Sony raccordés
(MV-700HR, XVM-F65/F65WL).
Touche SOURCE
Pour sélectionner la source d’entrée.
Touches ./> (précédent/
suivant)
Touche x (arrêt)
Touche MONITOR |/1
(alimentation)
Touche u (lecture/pause)
Touches VOL +/–
2 Touches numériques 10, 17, 21
3 Touche EPG 15, 17
Pour afficher le guide des
programmes.
14, 15, 17, 18, 19, 20, 21
qg Touche EXIT 9, 10, 12, 13, 14, 17,
18, 19, 20, 21
qh Touche L/R (bleue) 13, 15, 16
Pour changer de canal audio.
Pour passer en mode Verrouillage
quand la touche est bleue.
qj Touche TEXT (jaune) 15, 17
Pour afficher les sous-titres ou le
télétexte.
qk Touches CH +/– 10
ql Touche ATT
Coupure temporaire du son.
A la pression de la touche, le son est
coupé et «
» s’affiche.
Pour rétablir le son, appuyez à
nouveau sur la touche (ou sur
Conseil
Consultez «Remplacement de la pile au lithium» pour les détails sur le remplacement des piles
(page 23).
(VOL)+).
7
Page 56

Fonctionnement
Recherche de chaînes
MONITORSOURCE
DIGITAL TV
/1`/
1
`
.
>
0
ENTER
INFO EXIT
ux
VOL
RADIO
MENU
L/RTEXTAUDIO
123
456
789
EPG
FAV
PAGE VOL CHAT T
Recherche automatique de
chaînes
Si le signal radio est inclus dans le
programme diffusé, vous pouvez aussi
mémoriser des chaînes de radio.
Remarques
• Connectez correctement les antennes.
• Effectuez bien la recherche de chaînes
quand la voiture est à l’arrêt.
1 Appuyez sur la touche
d’alimentation de l’appareil pour le
mettre sous tension.
Sur la télécommande, appuyez sur
.
A la première mise sous tension de
l’appareil, la «Menu principal»
apparaît. Si elle n’apparaît pas,
appuyez sur (MENU) sur la
télécommande.
`/1
MENU
B/V/v/b
EXIT
ENTER
Menu principal
Canal TV
Guide des Programmes
Menu d’installation
Canal TV
Canal Radio
2 Appuyez sur M ou m pour
sélectionner «Menu d’installation»,
puis sur (ENTER).
3 Appuyez sur M ou m pour
sélectionner «Recherche canaux»,
puis sur (ENTER).
La fenêtre «Recherche de chaîne»
apparaît.
4 Appuyez sur M ou m pour déplacer
le curseur sur la barre de mode de
recherche.
Barre de mode de recherche
Recherche canaux
Chaîne
Fréquence
Recherche automatique
Force 21
Qualité 0
177500
5
FFT Mode: 8K
Guard Interval: 1/8
Constellation: QPSK
Hierarchie: Aucun
Code Rate: 1/2
5 Appuyez sur < ou , , pour
sélectionner «Recherche
automatique», puis sur (ENTER).
6 Appuyez sur M/m/</,, pour
sélectionner «Démarrer chaînes» et
«Eteindre chaînes».
Sélectionnez la plage de balayage des
chaînes (5 à 69).
8
Page 57

7 Appuyez sur M ou m sélectionner
«Rechercher», puis sur (ENTER).
La recherche démarre. Les chaînes
balayées sont automatiquement
mémorisées dans l’ordre. Si une
station d’émission est balayée, la
valeur numérique de «Force» et
«Qualité» augmente.
Pour arrêter la recherche, appuyez
sur (EXIT).
8 A la fin de la recherche, appuyez sur
M ou m pour sélectionner «Visualiser»
ou «Quitter», puis sur (ENTER).
•Si vous sélectionnez «Visualiser», la
chaîne sélectionnée sera
immédiatement reçue.
•Si vous sélectionnez «Quitter», la
fenêtre «Recherche canaux» se ferme.
Vous pouvez fermer la plage d’accueil
en appuyant plusieurs fois sur (EXIT)
pour rendre les réglages efficaces.
Recherche canaux
Recherche canaux
Chaîne
Fréquence
1. BBC ONE Scot
2. BBC TWO S...
Recherche automatique
3. BBC NEWS 24
4. CBBC Channel
Chaîne 25 506Mhz 6/6
Force 21
Qualité 0
Remarques
• Quand l’appareil trouve la même émission
sur la même chaîne, l’émission sera écrasée.
Quand l’appareil trouve la même émission
sur une chaîne différente, l’émission sera
additionnellement mémorisée.
• Si vous cherchez à nouveau des chaînes
dans une région (pays) différente, deux
stations de diffusion identiques ou plus
peuvent être sauvegardées sous le même
nom. Dans ce cas, si vous sélectionnez
directement une chaîne en appuyant sur
les touches numériques (page 10),
l’apparition de l’écran peut exiger un
certain temps.
Scan 100%
Force
177500
Qualité
5
TV Radio
FFT Mode: 8K
Guard Interval: 1/8
Constellation: QPSK
Hierarchy: None
1. BBC R Scot...
Code Rate: 1/2
2. BBC R n Gn...
Visualiser
Quitter
Recherche automatique de
chaînes dans votre région
1 Effectuez les étapes 1 à 3 de
«Recherche automatique de
chaînes».
2 Appuyez sur < ou , , pour
sélectionner la chaîne souhaitée.
Sélectionnez la plage de balayage des
chaînes.
3 Appuyez sur M ou m pour déplacer
le curseur sur la barre de mode de
recherche.
4 Appuyez sur < ou , , pour
sélectionner «Recherche chaînes
locales», puis sur (ENTER).
La recherche démarre. Les chaînes
balayées sont automatiquement
mémorisées dans l’ordre. Si une
station d’émission est balayée, la
valeur numérique de «Force» et
«Qualité» augmente.
Pour arrêter la recherche, appuyez
sur (EXIT).
5 A la fin de la recherche, appuyez
sur M ou m pour sélectionner
«Visualiser» ou «Quitter», puis sur
(ENTER).
• Si vous sélectionnez «Visualiser», la
chaîne sélectionnée sera
immédiatement reçue.
• Si vous sélectionnez «Quitter», la
fenêtre «Recherche canaux» se ferme.
Vous pouvez fermer la plage d’accueil
en appuyant plusieurs fois sur (EXIT)
pour rendre les réglages efficaces.
•Si la réception est mauvaise, les
informations de chaîne sont
affichées sous la forme TVch 1, 2 …
et ne seront pas affichées
correctement. Dans ce cas, essayez à
nouveau dans une zone différente.
Recherche manuelle de
chaînes
1 Effectuez les étapes 1 à 3 de
«Recherche automatique de
chaînes».
2 Appuyez sur < ou , , pour
sélectionner la chaîne souhaitée.
3 Appuyez sur M ou , pour
déplacer le curseur sur la barre de
mode de recherche.
4 Appuyez sur < ou , , pour
sélectionner «Recherche canal
unique», puis sur (ENTER).
La recherche démarre.
Pour arrêter la recherche, appuyez
sur (EXIT).
9
Page 58

Réception de chaînes
MONITORSOURCE
DIGITAL TV
/1`/
1
`
.
>
0
ENTER
INFO EXIT
ux
VOL
RADIO
MENU
L/RTEXTAUDIO
Touches
numériques
ENTER
INFO
PA GE +/–
VOL +/–
123
456
789
EPG
FAV
PAGE VOL CHAT T
RADIO
V/v
EXIT
CH +/–
Sélection de chaînes sur la
liste des chaînes
Vous pouvez sélectionner des chaînes
sur la liste des chaînes.
1 En regardant la télévision, appuyez
sur (ENTER).
La liste des chaînes apparaît.
TV
BBC ONE Scot001
BBC TWO Scot002
CBBC Channel030
BBC NEWß 24040
Sélection du mode
télévision ou radio
En regardant la télévision, appuyez sur
(RADIO).
A chaque pression de la touche,
l’appareil commute entre les modes
télévision et radio.
Changement de chaîne
Appuyez sur (CH)+ ou –.
14:00 – 14:30 Country House
12:35 – 14:00
Blood On The Moon
BBC TWO Scot
002
Canal: 21
474000 Sep. 8 12 : 58
Emploi des touches numériques
Sélectionnez directement les chaînes en
appuyant sur les touches 0 à 9.
Exemple:
Pour sélectionner la chaîne 5, appuyez sur 5.
Pour sélectionner la chaîne 25, appuyez sur 2
et 5.
Pour sélectionner la chaîne 125, appuyez sur
1, 2 et 5.
10
Anglais 1/2
2 Appuyez sur M/m ou (PAGE) +/–
pour sélectionner la chaîne que
vous souhaitez, puis sur (ENTER).
Pour refermer la liste des chaînes
Appuyez sur (EXIT).
Visualisation des
informations sur les
chaînes
Vous pouvez afficher les informations
sur les chaînes et la description des
programmes que vous avez
sélectionnés.
En regardant la télévision, appuyez sur
(INFO).
Information Programme
2818
2819
2816
Nom des canaux : ITV 2
Numéro de chaîne : 2
Cryptage : Aucun
Favori : Aucun
Verrouiller : Aucun
Qualité–1 99
Qualité–2 0
Chaîne : 45
Fréquence : 666000
Guard Interval : 1/32
Constellation : 64QAM
Code Rate : 3/4
PID Vidéo
PID Audio
PCR PID
Pour refermer les informations sur les
chaînes, appuyez sur (EXIT).
Page 59

Remarque
La description des programmes peut ne
pas être disponible pour certains
programmes.
Emploi de «Gestion canal»
Réglage du volume
Appuyez sur (VOL) + ou –.
Remarques
• Cet appareil n’assiste pas les chaînes
brouillées.
• Cet appareil n’assiste pas les émissions de
données. A la réception d’émissions de
données, la langue parlée est audible,
mais les images ne sont pas affichées.
Quand vous sélectionnez la chaîne
Quand vous sélectionnez la chaîne,
l'affichage d'informations apparaît. La
signification des icônes indiquées dans
l'affichage d'informations est comme
suit:
: Programme de télévision
: Programme de radio
: Programme préféré
: Programme brouillé
: Programme verrouillage parental
: Service de télétexte
: Service de sous-titres
: Etat assourdi
: Etat stéréo
: Sortie son droite
: Sortie son gauche
«Gestion canal» vous aide à organiser
les chaînes mémorisées.
«Gestion canal» comprend les trois
modes suivants:
• Mode Préféré
• Mode Verrouillage
• Mode Suppression
MONITORSOURCE
DIGITAL TV
/1`/
1
`
.
>
FAV
ENTER
Touche
rouge
PA GE +/–
123
456
789
EPG
FAV
PAGE VOL CHAT T
0
ENTER
INFO EXIT
RADIO
MENU
ux
VOL
MENU
V/v
L/RTEXTAUDIO
EXIT
Touche
bleue
Touche
verte
Emploi de la Liste des
préférés
Vous pouvez trouver rapidement et
facilement les chaînes souhaitées à l’aide
de la Liste des préférés.
Vous pouvez mémoriser un maximum de
2.000 émissions sur la Liste des préférés.
Utilisez cette fonction quand deux
stations émettrices identiques ou plus
sont sauvegardées sur un même numéro
de chaîne dans une région (pays)
différente.
Mémorisation de chaînes sur la
Liste des préférés
1 En regardant la télévision, appuyez
sur (MENU).
La «Menu principal» apparaît.
2 Appuyez sur M ou m pour
sélectionner «Canal TV», puis sur
(ENTER).
A suivre
11
Page 60

Emploi de «Gestion canal» (suite)
3 Appuyez sur M ou m pour
sélectionner «Canal TV» ou «Canal
Radio», puis sur (ENTER).
La fenêtre «Gestion canal» apparaît.
Canal TV
Favori 1
BBC ONE...001
BBC TWO...002
CBBC Ch...030
BBC NEW...040
BBC ONE Scot
Chaîne : 21
Appuyer sur ENTER pour sélectionner les canaux favoris
Supprimer
Favori Verrouiller
Fréquence : 474000
4 Appuyez plusieurs fois sur la touche
verte pour sélectionner «Favori 1»,
«Favori 2» ou «Favori 3».
5 Appuyez sur M/m ou (PAGE) +/– pour
sélectionner la chaîne souhaitée.
6 Appuyez sur (ENTER).
» apparaît à côté du nom de la
«
chaîne sélectionnée.perion et la
chaîne est mémorisée sur la Liste des
préférés.
Canal TV
Favori 1
BBC ONE...001
BBC TWO...002
CBBC Ch...030
BBC NEW...040
BBC ONE Scot
Chaîne : 21
Appuyer sur ENTER pour sélectionner les canaux favoris
Supprimer
Favori Verrouiller
Fréquence : 474000
Suppression de chaînes de la Liste
des préférés
A l’étape 6, appuyez plusieurs fois sur
(ENTER) pour faire disparaître « ».
Remarque
Après modification des réglages, la «Menu
principal» devra être fermée en appuyant
plusieurs fois sur (EXIT) pour rendre les
réglages efficaces.
Sélection de chaînes de la Liste
des préférés
1 En regardant la télévision, appuyez
sur (FAV).
La Liste des préférés apparaît.
Favori 1
BBC TWO Scot002
2 Appuyez plusieurs fois sur (FAV)
pour sélectionner «Favori 1»,
«Favori 2» ou «Favori 3».
3 Appuyez plusieurs fois sur M/m ou
(PAGE) +/– pour sélectionner la
chaîne souhaitée, puis appuyez sur
(ENTER).
4 Appuyez sur (EXIT) pour fermer la
Liste des préférés.
7 Répétez les étapes 3 à 6 pour
mémoriser d’autres chaînes sur la
Liste des préférés.
8 Appuyez plusieurs fois sur (EXIT)
pour refermer la fenêtre «Gestion
canal» et la «Menu principal».
Le réglage est terminé.
12
Page 61

Verrouillage de chaînes
Vous pouvez verrouiller des chaînes en
utilisant le mode Verrouillage de
«Gestion canal».
Quand vous verrouillez une chaîne,
vous devez entrer le mot de passe pour
pouvoir la regarder.
Pour cette fonction, activez bien d’abord
Verrouillage parental (page 20).
Verrouillage des chaînes
1 En regardant la télévision, appuyez
sur (MENU).
La «Menu principal» apparaît.
2 Appuyez sur M ou m pour
sélectionner «Canal TV», puis sur
(ENTER).
3 Appuyez sur M ou m pour
sélectionner «Canal TV» ou «Canal
Radio», puis sur (ENTER).
La fenêtre «Gestion canal» apparaît.
4 Appuyez sur la touche bleue.
La fenêtre de mode verrouillage
apparaît.
Si une fenêtre d’entrée du mot de
passe s’affiche, entrez le mot de passe
de 4 chiffres.
5 Appuyez sur M/m ou (PAGE) +/–
pour sélectionner la chaîne
souhaitée.
6 Appuyez sur (ENTER).
» apparaît à côté du nom de la
«
chaîne sélectionnée.
7 Répétez les étapes 3 à 6 pour
verrouiller d’autres chaînes.
8 Appuyez plusieurs fois sur (EXIT)
pour refermer la fenêtre «Gestion
canal» et la «Menu principal».
Le réglage est terminé.
Une fois ce réglage fait, vous devrez
entrer le mot de passe à la sélection
suivante de la chaîne verrouillée.
Déverrouillage de chaînes
A l’étape 6, appuyez plusieurs fois sur
(ENTER) pour faire disparaître «
Remarques
Après modification des réglages, la «Menu
principal» devra être fermée en appuyant
plusieurs fois sur (EXIT) pour rendre les
réglages efficaces.
».
Canal TV
Favori 1
BBC ONE...001
BBC TWO...002
CBBC Ch...030
BBC NEW...040
BBC NEWS 24
Chaîne : 21
Appuyer sur ENTER pour sélectionner les canaux favoris
Supprimer
Favori Verrouiller
Fréquence : 474000
13
Page 62

Suppression de chaînes
Vous pouvez supprimer des chaînes
mémorisées en utilisant Supprimer CH
mode de «Gestion canal».
1 En regardant la télévision, appuyez
sur (MENU).
La «Menu principal» apparaît.
2 Appuyez sur M ou m pour
sélectionner «Canal TV», puis sur
(ENTER).
3 Appuyez sur M ou m pour
sélectionner «Canal TV» ou «Canal
Radio», puis sur (ENTER).
La fenêtre «Gestion canal» apparaît.
4 Appuyez sur la touche rouge.
La fenêtre Spprimer CH mode apparaît.
5 Appuyez plusieurs fois sur la
touche rouge pour sélectionner
«Supprimer CH», «Supprimer
Multiplex» ou «Tout Supprimer».
Supprimer CH: supprime la chaîne
sélectionnée
Supprimer Multiplex: supprime
toutes les chaînes de la même
fréquence.
Tout Supprimer: supprime toutes les
chaînes mémorisées dans l’appareil
6 Appuyez sur M/m ou (PAGE) +/–
pour sélectionner la chaîne
souhaitée.
7 Appuyez sur (ENTER).
» apparaît à côté du nom de la
«
chaîne sélectionnée
Canal TV
Supprimer CH
BBC ONE...001
Boîte de messages
BBC TWO...002
Etes-vous sûr de vouloir
CBBC Ch...030
supprimer les canaux
BBC NEW...
Appuyer sur ENTER pour sélectionner les canaux favoris
Supprimer
Favori Verrouiller
sélectionnés?
BBC NEWS 24
Channel : 21
Fréquence : 474000
OK
Quitter
9 Sélectionnez «OK», puis appuyez
sur (ENTER).
Les chaînes sélectionnées sont
supprimées.
10
Répétez les étapes 3 à 9 pour
supprimer d’autres chaînes.
11
Appuyez plusieurs fois sur (EXIT)
pour refermer la fenêtre «Gestion
canal» et la «Menu principal».
Le réglage est terminé.
Annulation de la suppression de
chaînes
A l’étape 7, appuyez plusieurs fois sur
(ENTER) pour faire disparaître « ».
Remarques
• Après modification des réglages, la
«Menu principal» devra être fermée en
appuyant plusieurs fois sur (EXIT) pour
rendre les réglages efficaces.
• Les chaînes supprimées ne peuvent pas
être rétablies à moins de réexécuter la
fonction de recherche.
Canal TV
Supprimer CH
BBC ONE...001
BBC TWO...002
CBBC Ch...030
BBC NEW...
Appuyer sur ENTER pour sélectionner les canaux favoris
Supprimer
Favori Verrouiller
8 Appuyez une fois sur (EXIT).
La fenêtre de confirmation apparaît.
Si vous ne souhaitez pas supprimer
14
la chaîne, sélectionnez «Quitter».
BBC NEWS 24
Chaîne : 21
Fréquence : 474000
Page 63

Contrôle du Guide des programmes
Cet appareil vous fournit la fonction
EPG pour accéder au Guide télé (ou
guide radio si vous écoutez des chaînes
de radio) qui donne les titres et d’autres
informations sur les programmes
actuels et suivants sur les différentes
chaînes.
Les informations sont seulement
disponibles du réseau de la chaîne que
vous regardez/écoutez.
MONITORSOURCE
DIGITAL TV
/1`/
1
`
.
>
0
ENTER
INFO EXIT
RADIO
MENU
ux
VOL
MENU
B/V/v/b
L/RTEXTAUDIO
Touche
bleue
Touche
jaune
123
456
789
EPG
EPG
FAV
ENTER
PAGE VOL CHAT T
Touche
verte
Visualisation du Guide des
programmes
En regardant la télévision, appuyez sur
(EPG).
La fenêtre «Guide des Programmes»
apparaît.
Page guide des programmes TV
029 UKTV Food
Worrall Thompson
Mai 27 09:00 ~ 09:30
– 6 : 00
Channel 4 Self The Teen Big From008
price–drop Pas d’information actuellement024
UKTV Food Worrall Food and029
ITV News Live With Alastair Stewa ITV041
+ 6 : 00
10 : 009 : 00Mai.27
Si vous souhaitez vérifier les
informations précédentes ou suivantes
d’une chaîne, maintenez < ou , ,
pressé de sorte que le curseur (V) passe
à l’heure souhaitée. Ou bien appuyez
sur la touche jaune (avance pendant 6
heures) ou la touche verte (recule
pendant 6 heures).
Visualisation des détails du
programme sélectionné
Déplacez le curseur (V) en appuyant sur
M/m/</,, pour sélectionner le nom
du programme, puis appuyez sur la
touche bleue.
La boîte d’informations détaillées
apparaît.
Remarque
Si la chaîne sélectionnée ne fournit pas de
données EPG, «Pas de données» s’affiche.
Sélection de la «Menu principal»
1 En regardant la télévision, appuyez
sur (MENU).
2 Appuyez sur M ou m pour
sélectionner «Guide des
Programmes», puis sur (ENTER).
15
Page 64

Commutation de canal audio
Commutation de la langue parlée
Vous pouvez sélectionner le canal audio
souhaité entre Stereo, Left Channel et
Right Channel.
MONITORSOURCE
DIGITAL TV
/1`/
1
`
.
>
0
ENTER
INFO EXIT
RADIO
MENU
ux
VOL
L/RTEXTAUDIO
L/R
123
456
789
EPG
FAV
PAGE VOL CHAT T
En regardant la télévision, appuyez
plusieurs fois sur (L/R) pour
sélectionner le réglage souhaité.
: Stereo
: Left Channel
: Right Channel
Si vous regardez un programme
proposant des services en plusieurs
langues, vous pouvez changer de
langue. Cela dépend de la transmission
du signal audio.
MONITORSOURCE
DIGITAL TV
/1`/
1
`
.
>
0
ENTER
INFO EXIT
ux
VOL
RADIO
MENU
L/RTEXTAUDIO
AUDIO
123
456
789
EPG
FAV
PAGE VOL CHAT T
En regardant la télévision, appuyez
plusieurs fois sur (AUDIO) pour
sélectionner la langue souhaitée.
Remarque
Ce réglage est efficace seulement quand
l’émission présente assiste la langue
sélectionnée dans «Installation du
Système» (page 19).
Quand l’émission n’assiste pas la langue
sélectionnée, elle est sortie dans la langue
d’origine.
16
Page 65

Affichage de sous-titres et de télétexte
Vous pouvez activer/désactiver les
sous-titres et le télétexte.
MONITORSOURCE
DIGITAL TV
/1`/
`
1
.
Touches
numériques
EPG
123
456
789
EPG
FAV
ENTER
PAGE VOL CHAT T
En regardant la télévision, appuyez sur
(TEXT).
La fenêtre des sous-titres et/ou du
télétexte apparaît pour vous permettre
de sélectionner les sous-titres et le
télétexte si la station émétrice diffuse des
informations.
Suivez les indications affichées pour
opérer.
>
0
ENTER
INFO EXIT
RADIO
ux
VOL
MENU
B/V/v/b
L/RTEXTAUDIO
EXIT
TEXT
Sous-titres:
Appuyez sur M/m/</, pour
sélectionner les articles et appuyez sur
(ENTER).
Pour annuler les sous-titres, appuyez
sur (EXIT).
Remarque
Selon le programme, il peut falloir un
certain temps avant l’affichage des soustitres, ou bien ils ne seront pas affichés.
Télétexte:
Appuyez sur M/m/</, pour
sélectionner les articles et appuyez sur
(ENTER).
Vous pouvez le sélectionner en
appuyant sur les touches numériques.
Pour annuler le télétexte, appuyez sur
(EXIT).
Remarque
Les touches colorées (rouge/bleue/jaune/
verte) ne sont pas utilisables pour
sélectionner le télétexte.
Remarque
Si vous réglez «Type TV» à «NTSC», les
sous-titres et/ou le télétexte peuvent ne
pas être affichés correctement.
Dans ce cas, appuyez sur 9, 5, 1, 4, 7 et
(EPG) pour passer au mode «PAL».
Sous-titre
eng
Télétexte
17
Page 66

Changement de configuration
Changement des réglages des menus
Vous pouvez configurer cet appareil à
l’aide des menus «Installation du
Système» à l’écran. La plupart des
réglages devront être faits à la première
utilisation de l’appareil.
Les menus «Installation du Système»
sont:
• Langue du système
• Langue Audio
• Régler l’heure locale
• Heure d’été
• Antenne alimentée à 5 V
• Format de l’écran
• Type TV
• Allumer sur la chaîne
MONITORSOURCE
DIGITAL TV
/1`/
`
1
ENTER
.
123
456
789
EPG
FAV
PAGE VOL CHAT T
>
0
ENTER
INFO EXIT
RADIO
ux
VOL
MENU
MENU
B/V/v/b
L/RTEXTAUDIO
EXIT
Installation du Système
Sélectionner la langue du système
4 Appuyez plusieurs fois sur M ou m
pour sélectionner pour
sélectionner le poste souhaité.
5 Appuyez plusieurs fois sur < ou
, , pour modifier la sélection, ou
si c’est indiqué pour le poste,
appuyez sur (ENTER) pour afficher
la boîte liste déroulante qui affiche
la liste des sélections.
Installation du Système
Sélectionner la langue du système
Langue du système English
Langue Audio English
Régler l’heure locale 0:00
Heure d’été NON
Antenna feed 5V OUI
Format de l’écran 16:9
Type TV PAL
Allumer sur la chaîne Aucun
Londres, Lisbonne, Dublin, Casablanca
Langue du système
Langue Audio English
Régler l’heure locale 0:00
Heure d’été F
Antenna feed 5V ON
Format de l’écran 4:3
Type TV PAL
Allumer sur la chaîne Aucun
Londres, Lisbonne, Dublin, Casablanca
English
English
Deutsch
Italiano
Français
Nederlands
1 Appuyez sur (MENU).
La «Menu principal» apparaît.
2 Appuyez plusieurs fois sur M ou m
pour sélectionner «Menu
d’installation», puis sur (ENTER).
3 Appuyez plusieurs fois sur M ou m
pour sélectionner «Installation du
Système», puis sur (ENTER).
Le menu «Installation du Système»
18
apparaît.
6 Appuyez sur (ENTER) à la sélection
souhaitée.
7 Appuyez plusieurs fois sur (EXIT)
pour fermer la «Menu principal».
Voir la page suivante pour les options
de «Installation du Système».
Page 67

Les réglages par défaut sont soulignés.
Réglages Options de réglage
Langue du système
Langue Audio Défaut: English
Régler
l’heure locale
Heure d’été QUI, NON
Antenna
alimentée à 5 V
Format de l’écran 4:3, 16:3, 4:3 letter box
Type TV NTSC, PAL, PAL&NTSC
Allumer sur la chaîne Réglage de la Chaîne de démarrage à la mise sous tension de
Défaut: English
Changement de la langue d’affichage à l’écran.
Changement de la langue parlée.
1 Appuyez sur (ENTER) sous «Langue Audio».
Une fenêtre contextuelle indiquant 4 priorités de langue apparaît.
2 Appuyez plusieurs fois sur < ou , pour sélectionner la langue
parlée souhaitée pour chaque priorité.
3 Appuyez plusieurs fois sur M ou m pour sélectionner «OK» pour
modifier le réglage ou «Quitter» pour l’annuler.
Remarque
Vous pouvez sélectionner la priorité à la langue parlée souhaitée à
condition que la langue sélectionnée soit assistée par la chaîne.
Heure réglable: –12:00 à +12:00 (réglage par défaut: «0:00»)
Réglage du fuseau horaire. Cela affectera l’heure de l’appareil et
l’heure EPR.
Réglage de l’heure d’été. L’activation fait avancer l’heure d’une heure.
QUI, NON
Sélectionne l’alimentation ou non de 5 volts de l’appareil à l’antenne. Si
vous utilisez un amplificateur d’antenne de télévision, réglez à «OUI»
(5 V, 20 mA ANT 1/ANT 2). Si vous utilisez une antenne de télévision sans
amplificateur, réglez à «NON».
Réglage du mode d’écran.
4:3: Image à rapport d’aspect 4:3.
16:9: Image à rapport d’aspect 16:9.
4:3 letter box: Image à rapport d’aspect 4:3 élargie sur les bords de
l’écran.
Réglage du système couleur à NTSC ou PAL.
l’appareil.
1 Appuyez sur (ENTER) sous «Allumer sur la chaîne».
Une fenêtre déroulante avec liste des chaînes apparaît.
2 Appuyez plusieurs fois sur M ou m pour sélectionner la chaîne.
3 Appuyez sur (ENTER).
Remarque
Une fois la «Allumer sur la chaîne» réglée, une boîte de message
apparaît pour confirmer si vous souhaitez activer la «Allumer sur la
chaîne». Dans ce cas, sélectionnez «OK» pour changer de réglage,
ou «Quitter» pour annuler.
Remarque
Après le changement des réglages ci-dessus, vous devrez refermer la «Menu principal» en
appuyant plusieurs fois sur (EXIT) pour valider les réglages.
19
Page 68

Verrouillage de l’appareil
Changement de mot de
passe
MONITORSOURCE
DIGITAL TV
/1`/
1
`
.
>
0
ENTER
INFO EXIT
RADIO
MENU
ux
VOL
MENU
V/v
L/RTEXTAUDIO
EXIT
Touches
numériques
123
456
789
EPG
FAV
PAGE VOL CHAT T
Réglage du mot de passe
1 Appuyez sur (MENU).
La «Menu principal» apparaît.
2 Appuyez plusieurs fois sur M ou m
pour sélectionner «Menu
d'installation», puis appuyez sur
(ENTER).
3 Appuyez plusieurs fois sur M ou m
pour sélectionner «Verrouillage
Parental», puis appuyez sur
(ENTER).
Verrouillage Parental
Mot de Passe actuel
Verrouillage Parental
Verrouillage installation
Nouveau Mot de Passe
Confirmer Mot de Passe
Saisissez votre Mot de Passe actuel
OUI
NON
4 Entrez le mot de passe actuel.
Le mot de passe par défaut est 0000.
5 Appuyez plusieurs fois sur (EXIT)
pour fermer la «Menu principal».
1 Appuyez sur (MENU).
La «Menu principal» apparaît.
2 Appuyez plusieurs fois sur M ou m
pour sélectionner «Menu
d'installation», puis appuyez sur
(ENTER).
3 Appuyez plusieurs fois sur M ou m
pour sélectionner «Verrouillage
Parental», puis appuyez sur
(ENTER).
4 Entrez le mot de passe actuel.
5 Appuyez plusieurs fois sur M ou m
pour sélectionner «Nouveau Mot de
Passe».
6 Entrez le nouveau mot de passe,
puis appuyez sur m pour déplacer
le curseur à «Confirmar Mot de
Passe».
7 Entrez à nouveau le nouveau mot
de passe pour confirmer.
8 Appuyez plusieurs fois sur (EXIT)
pour fermer la «Menu principal».
Réglages pour le contrôle
parental
Vous pouvez régler le contrôle parental
avec la fonction Verrouillage parental.
1 Appuyez sur (MENU).
La «Menu principal» apparaît.
2 Appuyez plusieurs fois sur M ou m
pour sélectionner «Menu
d'installation», puis appuyez sur
(ENTER).
3 Appuyez plusieurs fois sur M ou m
pour sélectionner «Verrouillage
Parental», puis appuyez sur
(ENTER).
4 Entrez le mot de passe actuel.
5 Appuyez plusieurs fois sur M ou m
pour sélectionner «Verrouillage
Parental», puis appuyez sur
(ENTER).
20
Page 69

6 Appuyez plusieurs fois sur < ou
, pour sélectionner «OUI».
Pour annuler le Verrouillage
parental, sélectionnez «NON».
7 Appuyez plusieurs fois sur (EXIT)
pour fermer la «Menu principal».
Remarque
Après modification des réglages, la «Menu
principal» devra être fermée en appuyant
plusieurs fois sur (EXIT) pour rendre les
réglages efficaces.
Réglage du Verrouillage
d’installation
Vous pouvez protéger les données et
informations installées avec le
Verrouillage d’installation.
1 Appuyez sur (MENU).
La «Menu principal» apparaît.
2 Appuyez plusieurs fois sur M ou m
pour sélectionner «Menu
d'installation», puis appuyez sur
(ENTER).
3 Appuyez plusieurs fois sur M ou m
pour sélectionner «Verrouillage
Parental», puis appuyez sur
(ENTER).
4 Entrez le mot de passe actuel.
5 Appuyez plusieurs fois sur M ou m
pour sélectionner «Verrouillage
installation».
6 Appuyez plusieurs fois sur < ou
, pour sélectionner «OUI».
Pour annuler le Verrouillage
d’installation, sélectionnez «NON».
7 Appuyez plusieurs fois sur (EXIT)
pour fermer la «Menu principal».
Si vous avez oublié le mot
de passe
Quand la «Menu principal» est
affichée, appuyez sur 4, 7, 8, 9 et 3. La
fenêtre Factory Default apparaît. Puis
sélectionnez «OK» et appuyez sur
(ENTER). Le réglage de l’appareil
sera remis au réglage usine par
défaut. Pour annuler, sélectionnez
«Quitter».
Remarque
Si l’appareil est remis au réglage usine
par défaut, tous les réglages seront
perdus. Refaites-les.
Remarque
Après modification des réglages, la «Menu
principal» devra être fermée en appuyant
plusieurs fois sur (EXIT) pour rendre les
réglages efficaces.
21
Page 70

Informations complémentaires
Entretien
Remplacement du fusible
Au remplacement du fusible du cordon d’alimentation ou de la douille d’allumecigarette, veillez à utiliser un fusible dont l’ampérage correspond à celui indiqué sur
le fusible d’origine. Si le fusible saute, vérifiez le branchement de l’alimentation et
remplacez le fusible. Si le fusible saute de nouveau après avoir été remplacé, cela
peut révéler une défaillance interne de l’appareil. Dans ce cas, consultez le revendeur
Sony le plus près de chez vous.
Fusible
Avertissement
N’utilisez jamais de fusible dont l’ampérage dépasse celui du fusible fourni, cela
pourrait endommager l’appareil.
22
Page 71

Remplacement de la pile au lithium
En fonctionnement normal, la pile dure environ un an. (La durée de vie de la pile
peut être plus courte selon les conditions d’utilisation.)
Lorsque la pile devient faible, la portée de la mini-télécommande diminue.
Remplacez la pile par une nouvelle pile CR2025 au lithium. L’utilisation de tout autre
type de pile peut entraîner un risque d’incendie ou d’explosion.
Côté + vers le haut
2
En appuyant sur la
1
manette de
verrouillage (1),
retirez le logement
pile (2).
Remarques sur la pile au lithium
• Tenez la pile au lithium hors de portée des enfants. En cas d’ingestion de la pile,
consultez immédiatement un médecin.
• Essuyer la pile avec un chiffon sec pour assurer un bon contact.
• Veillez à respecter la polarité lors de l’installation de la pile.
• Ne tenez pas la pile avec des pinces métalliques, cela pourrait provoquer un courtcircuit.
AVERTISSEMENT
La pile peut exploser en cas d’utilisation inappropriée.
Ne recharge pas la pile, ne la démontez pas et ne la jetez pas au feu.
23
Page 72

Spécifications
Syntoniseur TV numérique
Décodage vidéo
Conforme à DVB MPEG-2 jusqu’à MP @ ML
Débit binaire vidéo jusqu’à 15 Mbits/sec
Format vidéo 4:3 (letter box si la
source est 16:9) et 16:9
Résolution jusqu’à 720 × 576
pixels
Décodage audio
Couche 1/2 MPEG
Format de réception
NTSC/PAL
Plage de fréquences d'entrée
VHF: 174 - 230 MHz
UHF: 470 - 862 MHz
IF 36,125 MHz
Alimentation 12 V CC
(masse négative)
Consommation
1,2 A
Entrées Antenne télévision (2)
Télécommande (1)
Service (RS232) (1)
Sorties Vidéo (1)
Audio L/R (1)
Dimensions Env.182 × 43 × 174 mm
(pièces en saillie et
commandes incluses)
(l × h × p)
Poids Env. 920 g
Plage de températures
0 – 45˚C
Mini-télécommande RM-X711
Alimentation requise
Pile au lithium CR2025
Portée Environ 2,5 m
Dimensions 55 × 125 × 15 mm
(l × h × p)
Poids Environ 50 g
(piles incluses)
Accessoires fournis
Pièces pour l’installation (1 lot)
Mini-télécommande RM-X711
(avec pile fournie) (1)
Cordon d’alimentation (1)
Capteur de télécommande (1)
Manuel d’installation/connexion (1)
Mode d’emploi (1 jeu)
Accessoires en option
Antenne télévision VCA-130 (gauche/droite)
(1 lot)
Moniteur mobile XVM-F65/F65WL
Lecteur DVD portable MV-700HR
La conception et les caractéristiques
techniques sont sujettes à modification sans
préavis.
24
Page 73

Dépannage
La liste de contrôle suivante vous aidera
à résoudre les problèmes que vous
pourriez rencontrer avec cet appareil.
Avant de passer cette liste en revue,
vérifiez les procédures de raccordement
et d’utilisation.
Heure ou EPG ne sont pas affichés
correctement.
•Un programme dont l’heure a été
rectifiée, tel que programme répété, est
reçu.
t Après la réception d’un autre
programme, mettez l’appareil hors
tension, puis à nouveau sous
tension.
Généralités
Pas d’image
•Le câble d’alimentation est débranché.
•Le signal est faible.
t Vérifiez que tous les connecteurs
d’antenne sont fermement enfoncés
dans les douilles.
t Déplacez la voiture à une bonne
position pour la réception.
•Le fusible a sauté.
•Réception de diffusion de données. Cet
appareil ne supporte pas la diffusion de
données. (Affiche «No Video !».)
•Un «Type TV» incorrect est sélectionné.
t Appuyez sur 9, 5, 1, 4, 7 et (EPG)
pour passer au mode «NTSC» ou
«PAL».
Bonne image, mais aucun son
•Appuyez sur (VOL)(+) ou (ATT) sur la
mini-télécommande.
•Réception d’un signal Dolby AC3. Cet
appareil ne supporte pas le signal Dolby
AC3. (Affiche «AC3».)
Un motif carré est parfois visible sur
l’écran, l’image est «gelée» ou l’image
montre un téléviseur avec motif parasite.
•Les connecteurs d’antenne sont desserrés
ou déconnectés.
t Vérifiez que tous les connecteurs
d’antenne sont fermement enfoncés
dans les douilles.
•Un problème de transmission est
possible.
t C’est normalement seulement une
situation temporaire qui devrait se
corriger automatiquement.
L’accès à une chaîne particulière est
impossible, même avec les touches
numériques.
•Le verrouillage parental est activé.
t Entrez votre mot de passe pour
accéder à la chaîne (page 13) ou
déverrouillez la chaîne (page 20).
Pas de réponse à la pression des touches
sur la mini-télécommande.
•La pile est peut-être épuisée.
Messages
Les indications suivantes apparaissent
quand un problème survient sur
l'appareil.
ANT-1 Antenna feed overloaded
Automatically switched off
ANT-2 Antenna feed overloaded
Automatically switched off
L’appareil coupera automatiquement la
sortie 5V.
Antenna feed overloaded Automatically
switched off
ANT-1 et ANT-2 sont surchargés.
Program overflow
Plus de 2.000 chaînes étaient presque
sauvegardées. Vous ne pouvez pas
mémoriser plus de chaînes.
HDTV Signal is not Supported
L’appareil a reçu un signal HDTV. Il ne
supporte pas les signaux HDTV.
No Video Signal !
No Signal !
Aucune donnée vidéo mpeg n’est entrée
dans l’appareil.
Bad Signal !
Erreur de données mpeg sur l’appareil.
No Video !
Aucun PID vidéo n'est entré dans
l'appareil.
Scrambled !
L'appareil reçoit un programme brouillé.
Please wait for saving data.
L'appareil est en train de sauvegarder des
données.
25
Page 74

Trattamento del dispositivo elettrico
od elettronico a fine vita (Applicabile
in tutti i paesi dell’Unione Europea e
in quelli con sistema di raccolta
differenziata)
Questo simbolo sul prodotto o sulla
confezione indica che il prodotto non
deve essere considerato come un
normale rifiuto domestico, ma deve
invece essere consegnato ad un punto di
raccolta appropriato per il riciclo di
apparecchi elettrici ed elettronici.
Assicurandovi che questo prodotto sia
smaltito correttamente, voi contribuirete
a prevenire potenziali conseguenze
negative per l’ambiente e per la salute
che potrebbero altrimenti essere causate
dal suo smaltimento inadeguato. Il
riciclaggio dei materiali aiuta a
conservare le risorse naturali. Per
informazioni più dettagliate circa il
riciclaggio di questo prodotto, potete
contattare l’ufficio comunale, il servizio
locale di smaltimento rifiuti oppure il
negozio dove l’avete acquistato.
Congratulazioni!
Complimenti per l’acquisto del
sintonizzatore TV digitale Sony.
• Presentazione video qualità DVD ad
alta fedeltà.
• 2.000 canali preferiti programmabili.
• Funzione EPG, supporta display PIG
(Picture in Graphics).
• Opzione di protezione disponibile.
• Funzione di memoria dell’ultimo
canale.
• Opzioni sintonizzatore duale
disponibili per la funzione di
diversità.
• Modo di ricezione mobile, può
ricevere varie dozzine di programmi
TV digitale terrestre durante lo
spostamento ad alta velocità.
Accessorio utilizzabile: Telecomando
2
Page 75

Indice
Congratulazioni! ................................................................................................................. 2
Precauzioni .......................................................................................................................... 4
Posizione dei comandi ....................................................................................................... 6
Funzionamento
Ricerca dei canali ................................................................................................................ 8
Ricezione dei canali .......................................................................................................... 10
Uso di “Menu Canali” ...................................................................................................... 11
Controllo della guida dei programmi ............................................................................ 15
Cambio del canale audio ................................................................................................. 16
Cambio della lingua per l’audio ..................................................................................... 16
Visualizzazione dei sottotitoli e del televideo .............................................................. 17
Modifica delle impostazioni
Modifica delle impostazioni del menu .......................................................................... 18
Blocco dell’apparecchio ................................................................................................... 20
Informazioni aggiuntive
Manutenzione....................................................................................................................22
Caratteristiche tecniche .................................................................................................... 24
Soluzione dei problemi .................................................................................................... 25
Messaggi............................................................................................................................. 25
3
Page 76

Precauzioni
Per evitare il rischio di incidenti, leggere attentamente le misure precauzionali
riportate di seguito prima di procedere all’installazione e all’uso dell’apparecchio.
Sicurezza
Conformarsi alle regole e alle normative locali sul traffico.
Informazioni sull’installazione
• L’installazione del presente apparecchio richiede
una competenza tecnica.
Questo apparecchio deve pertanto venire installato
da tecnici o personale di assistenza qualificati.
• Se si cerca di installare questa unità da soli, farlo
correttamente facendo riferimento agli schemi di
installazione e di cablaggio contenuti nel manuale
di installazione/collegamenti. Un’installazione
errata potrebbe causare il rischio di incendi o
scosse elettriche.
• Prima dell’installazione, assicurarsi di impostare
l’interruttore di accensione sulla posizione
OFF o di estrarre la chiave. L’installazione del
presente apparecchio con l’accensione attivata
potrebbe causare lo scaricamento della batteria o
un cortocircuito.
• Durante l’installazione dell’apparecchio, fare
attenzione a non danneggiare i tubi, il serbatoio del
carburante o i cavi elettrici, onde evitare il rischio di
incendi. Se si pratica un foro nei pannelli dell’auto,
assicurarsi che le parti non visibili dell’auto non
vengano danneggiate.
• Non utilizzare dadi o bulloni per dispositivi di
sicurezza, quali i sistemi di collegamento dello sterzo,
di alimentazione del carburante o dei freni, onde
evitare di causare un incendio o un incidente.
• Assicurarsi che i fili e i cavi non si aggroviglino o
rimangano incastrati nella sezione mobile della guida
del sedile.
4
Page 77

Dove effettuare l’installazione
Prima di procedere all’installazione dell’apparecchio, verificare le regole e le
normative locali sul traffico.
Non installare l’apparecchio nelle seguenti posizioni:
- In posizioni che ostacolano la visuale del conducente.
- In posizioni che ostacolano il funzionamento del sistema
airbag.
- In posizioni che ostacolano il funzionamento del veicolo, in
particolar modo il volante, la leva del cambio o il pedale del
freno.
- In posizioni che possono causare il ferimento del
conducente o dei passeggeri al momento di salire o scendere
dall’auto.
In caso di domande o problemi riguardanti l’apparecchio non trattati nel presente
manuale, consultare il rivenditore Sony più vicino.
5
Page 78

1
Posizione dei comandi
Sintonizzatore TV digitale
Parte posteriore
ANT 1 ANT 2
REMOTE
Parte anteriore
1 Terminali ANT 1/ANT 2
Ingresso per il collegamento delle
antenne.
2 Presa REMOTE
Ingresso per il collegamento del
sensore del telecomando.
3 Presa VIDEO
Collegare alla presa di ingresso
video del monitor, ecc.
4 Prese AUDIO
Collegare alle prese di ingresso
audio del monitor, ecc.
VIDEO
OUTPUT
L
RAUDIO
432
SERVICE
5 6
987
SIGNAL@ / 1
5 Terminale SERVICE (RS232)
Terminale di servizio.
6 Presa POWER 12V
Collegare al cavo di alimentazione.
7 Tasto |/a (alimentazione)*
Accende o spegne l’apparecchio.
8 Indicatore |/1 (alimentazione)
9 Indicatore SIGNAL
* Quando si installa in un auto che non
possiede una posizione ACC (accessorio)
nella chiave di accensione, assicurarsi di
premere questo tasto per spegnere
l’apparecchio quando non si sta usando.
Altrimenti la batteria si scaricherà.
POWER
12V
6
Page 79

Telecomando a scheda RM-X711
MONITORSOURCE
DIGITAL TV
/
1`/1
`
1
.
2
3
4
5
>
123
456
789
EPG
0
FAV
INFO EXIT
ux
VOL
RADIO
MENU
ENTER
L/RTEXTAUDIO
6
7
PAGE VOL CHATT
8
9
Per ulteriori informazioni, fare
riferimento alle pagine elencate.
1 Questi tasti vengono utilizzati
quando si mettono in funzione i
dispositivi Sony collegati (MV700HR, XVM-F65/F65WL).
Tasto SOURCE
Consente di selezionare la fonte di
ingresso.
Tasti ./> (avanti/indietro)
Tasto x (arresto)
Tasto MONITOR |/1
(alimentazione)
Tasto u (riproduzione/
interruzione)
Tasti VOL +/–
2 Tasti numerici 10, 17, 21
3 Tasto EPG 15, 17
Consente di visualizzare Programme
guide.
0
qa
qs
qd
qf
qg
qh
qj
qk
ql
4 Tasto FAV 12
Consente di visualizzare Favorite List
o di modificare il modo Favorite.
5 Tasto INFO 10
Consente di visualizzare le
informazioni sul canale.
6 Tasto AUDIO (rosso) 14, 16
Consente di modificare la lingua per
l’audio.
Consente di inserire il modo Delete
CH come tasto rosso.
7 Tasto verde 12, 15
Consente di inserire il modo Favorite.
8 Tasti PAGE +/– 10, 12, 13, 14
Consente di cambiare l’elenco di
pagina quando la selezione dispone
di molte pagine.
9 Tasti VOL +/– 11
0 Tasto DIGITAL TV |/1
(alimentazione) 8
qa Tasto RADIO 10
Consente di passare dal modo TV a
quello radio.
qs Tasto MENU 8, 11, 13, 14, 15, 18,
20, 21
Consente di visualizzare la pagina
“Principale”.
qd Tasti M/m/</, 8, 9, 10, 11, 12,
13, 14, 15, 17, 18, 19, 20, 21
qf Tasto ENTER 8, 9, 10, 11, 12, 13,
14, 15, 17, 18, 19, 20, 21
qg Tasto EXIT 9, 10, 12, 13, 14, 17, 18,
19, 20, 21
qh Tasto L/R (blu) 13, 15, 16
Consente di modificare il canale audio.
Consente di inserire il modo Lock con
il tasto blu.
qj Tasto TEXT (giallo) 15, 17
Consente di visualizzare i sottotitoli
o il televideo.
qk Tasti CH +/– 10
ql Tasto ATT
Disattivazione temporanea del suono.
Quando si preme il tasto, si disattiva
il suono e sul display appare “
”.
Per riattivare il suono, premere di
nuovo il tasto (o (VOL) +).
Suggerimento
Per ulteriori informazioni sulle modalità di sostituzione della pila, consultare la sezione
“Sostituzione della batteria al litio” (pagina 23).
7
Page 80

Funzionamento
Ricerca dei canali
MONITORSOURCE
DIGITAL TV
/1`/
1
`
.
>
0
ENTER
INFO EXIT
ux
VOL
RADIO
MENU
L/RTEXTAUDIO
123
456
789
EPG
FAV
PAGE VOL CHAT T
Ricerca automatica dei
canali
Se nella trasmissione è incluso il segnale
radio, è inoltre possibile memorizzare le
stazioni radio.
Note
• Assicurarsi di collegare correttamente le
antenne.
• Assicurarsi di eseguire la ricerca dei canali
quando l’auto è ferma.
`/1
MENU
B/V/v/b
EXIT
ENTER
Principale
Canali TV
Guida Programmi
Installazione
Canali TV
Canali Radio
2 Premere M o m per selezionare
“Installazione”, quindi premere
(ENTER).
3 Premere M o m per selezionare
“Ricerca Canali”, quindi premere
(ENTER).
Appare la finestra “Ricerca Canali”.
4 Premere M o m per spostare il cursore
sulla barra del modo di ricerca.
Barra modo di ricerca
Ricerca Canali
Channel
Frequenza
Intensita 21
Qualita 0
177500
Auto Search
5
FftMode: 8K
Guard: 1/8
Constellation: XXQPSK
Hierarchy: Nessuno
CodeRate: 1/2
1 Premere il tasto di alimentazione
dell’apparecchio per accenderlo.
Sul telecomando, premere
Quando si accende l’apparecchio per
la prima volta, appare la pagina
“Principale”. Se non appare la pagina
“Principale” quando si accende
l’apparecchio, premere (MENU) sul
telecomando.
8
.
5 Premere < o , per selezionare
“Auto Search”, quindi premere
(ENTER).
6 Premere M/m/</, per selezionare
“Start Channel” ed “End Channel”.
Selezionare la gamma di scansione
del canale (da 5 a 69).
Page 81

7 Premere M o m per selezionare
“Richerca”, quindi premere
(ENTER).
Inizia la ricerca. I canali scansionati
vengono memorizzati
automaticamente in ordine. Se si
scansiona la stazione trasmittente,
incrementa il valore numerico di
“Intensia” e “Qualita”.
Per arrestare la ricerca, premere
(EXIT).
8 Una volta terminata la ricerca,
premere M o m per selezionare
“View” o “Completa”, quindi
premere (ENTER).
•Se si seleziona “View”, il canale
selezionato viene ricevuto
immediatamente.
•Se si seleziona “Completa”, viene
chiusa la finestra “Ricerca Canali”.
È necessario chiudere la pagina
“Principale” premendo più volte
(EXIT) per convalidare le
impostazioni.
Ricerca Canali
Ricerca Canali
Channel
Frequenza
1. BBC ONE Scot
2. BBC TWO S...
Auto Suarch
3. BBC NEWS 24
4. CBBC Channel
Channel 25 506Mhz 6/6
Intensita 21
Scansione 100%
Qualita 0
Intensita
Note
• Quando l’apparecchio trova la stessa
trasmissione nello stesso canale, la
trasmissione viene sovrascritta. Quando
l’apparecchio trova la stessa trasmissione
in un canale differente, la trasmissione
viene memorizzata.
• Se si cercano nuovamente canali in una
regione (un Paese) differente,
potrebbero venire memorizzate due o tre
stazioni con lo stesso nome. In tal caso, se
si seleziona un canale premendo
direttamente i tasti numerici (pagina 10),
occorrerà del tempo prima che venga
visualizzata la schermata.
Ricerca automatica locale
dei canali
177500
Qualita
5
TV Radio
FFT Mode: 8K
Guard Interval: 1/8
Constellation: QPSK
Hierarchy: None
1. BBC R Scot...
Code Rate: 1/2
2. BBC R n Gn...
View
Completa
1 Seguire i punti da 1 a 3 di “Ricerca
automatica dei canali”.
2 Premere < o , per selezionare il
canale desiderato.
Selezionare la gamma di scansione
del canale.
3 Premere M o m per spostare il
cursore sulla barra del modo di
ricerca.
4 Premere < o , per selezionare
“Search local channels”, quindi
premere (ENTER).
Inizia la ricerca. I canali scansionati
vengono memorizzati
automaticamente in ordine. Se si
scansiona la stazione trasmittente,
incrementa il valore numerico di
“Intensia” e “Qualita”.
Per arrestare la ricerca, premere
(EXIT).
5 Una volta terminata la ricerca,
premere M o m per selezionare
“View” o “Completa”, quindi
premere (ENTER).
•Se si seleziona “View”, il canale
selezionato viene ricevuto
immediatamente.
•Se si seleziona “Completa”, viene
chiusa la finestra “Ricerca Canali”.
È necessario chiudere la pagina
“Principale” premendo più volte
(EXIT) per convalidare le
impostazioni.
•Se la ricezione è scarsa, le
informazioni sul canale appaiono
come TVch 1, 2... e non vengono
visualizzate correttamente. In tal
caso, provare di nuovo in una zona
differente.
Ricerca manuale dei canali
1 Seguire i punti da 1 a 3 di “Ricerca
automatica dei canali”.
2 Premere < o , per selezionare il
canale desiderato.
3 Premere M o m per spostare il
cursore sulla barra del modo di
ricerca.
4 Premere < o , per selezionare
“Search single channels”, quindi
premere (ENTER).
Inizia la ricerca.
Per arrestare la ricerca, premere
(EXIT).
9
Page 82

Ricezione dei canali
MONITORSOURCE
DIGITAL TV
/1`/
`
1
Tasti
numerici
ENTER
INFO
.
123
456
789
EPG
FAV
>
0
ENTER
INFO EXIT
ux
VOL
RADIO
MENU
L/RTEXTAUDIO
RADIO
V/v
EXIT
Selezione dei canali da un
elenco
È possibile selezionare i canali dall’elenco.
1 Mentre si osserva la televisione,
premere (ENTER).
Appare l’elenco dei canali.
Tutte Tv
BBC ONE Scot001
BBC TWO Scot002
CBBC Channel030
BBC NEWß 24040
PA GE +/–
PAGE VOL CHAT T
CH +/–
VOL +/–
Selezione del modo TV o
radio
Mentre si osserva la televisione, premere
(RADIO).
Ad ogni pressione del tasto, l’apparecchio
passa dal modo TV a quello radio.
Cambio dei canali
Premere (CH)+ o –.
14:00 – 14:30 Country House
12:35 – 14:00
Blood On The Moon
BBC TWO Scot
002
NO.: 21
474000 Set. 8 12 : 58
Uso del tasto numerico
Selezionare i canali premendo
direttamente i tasti da 0 a 9.
Inglese 1/2
2 Premere M/m o (PAGE) +/– per
selezionare il canale che si desidera
osservare, quindi premere
(ENTER).
Per chiudere l’elenco dei canali
Premere (EXIT).
Visualizzazione delle
informazioni sui canali
È possibile visualizzare le informazioni
sui canali e la descrizione del
programma selezionato.
Mentre si osserva la televisione,
premere (INFO).
Program Information
2818
2819
2816
Nome Canale : ITV 2
Constellation : 2
Codifica : Nessuno
Favoriti : Nessuno
Blocca : Nessuno
Qualita–1 99
Qualita–2 0
Channel : 45
Frequenza : 666000
Guard : 1/32
Constellation : 64QAM
CodeRate : 3/4
PID Video
PID Audio
PCR PID
Esempio:
Per selezionare il canale 5, premere 5.
Per selezionare il canale 25, premere 2 e 5.
Per selezionare il canale 125, premere 1, 2
e 5.
10
Per chiudere le informazioni sui canali,
premere (EXIT).
Page 83

Nota
La descrizione del programma potrebbe non
essere disponibile per alcuni programmi.
Regolazione del volume
Premere (VOL) + o –.
Note
• Il presente apparecchio non supporta
canali criptati.
• Il presente apparecchio non supporta la
trasmissione di dati. Se si riceve la
trasmissione di dati, è possibile sentire
l’audio, ma non visualizzare l’immagine.
Quando si seleziona il canale
Quando si seleziona il canale, appare il
display di informazione. Il significato
delle icone mostrate nel display di
informazione è il seguente:
: programma TV
: programma radio
: programma favorito
: programma codificato
: sprogramma bloccato da codice di
protezione per bambini
: servizio televideo
: servizio sottotitoli
: senza audio
: stereo
: suono da sinistra
: suono da destra
Uso di “Menu Canali”
“Menu Canali” consente di organizzare
i canali memorizzati.
“Menu Canali” consta dei tre seguenti
modi:
• Modo Preferiti
• Modo Blocca
• Modo Cancella
MONITORSOURCE
DIGITAL TV
/1`/
1
`
.
>
0
ENTER
INFO EXIT
RADIO
MENU
ux
VOL
MENU
V/v
L/RTEXTAUDIO
EXIT
Tasto
blu
Tasto
verde
123
456
789
FAV
EPG
FAV
ENTER
Tasto
rosso
PA GE +/–
PAGE VOL CHAT T
Uso di Favorite List
È possibile trovare rapidamente e
facilmente i canali desiderati mentre si
usa Favorite List.
È possibile memorizzare un massimo di
2.000 trasmissioni su Favorite List.
Utilizzare questa funzione quando si
memorizzano due o più stazioni uguali
nello stesso numero di canale per una
regione (un Paese) differente.
Memorizzazione dei canali su
Favorite List
1 Mentre si osserva la televisione,
premere (MENU).
Appare la pagina “Principale”.
2 Premere M o m per selezionare
“Canali TV”, quindi premere
(ENTER).
3 Premere M o m per selezionare
“Canali TV” o “Canali Radio”,
quindi premere (ENTER).
Appare la finestra “Menu Canali”.
11
Page 84

Uso di “Menu Canali” (continua)
Canali TV
Preferiti 1
BBC ONE...001
BBC TWO...002
CBBC Ch...030
BBC NEW...040
BBC ONE Scot
Channel : 21
Premi ‘ENTER’ per creare il Canale favorito
Cancella
Favoriti Blocca
Frequenza : 474000
4 Premere più volte il tasto verde per
selezionare “Preferiti 1”, “Preferiti
2” o “Preferiti 3”.
5 Premere M/m o (PAGE) +/– per
selezionare il canale desiderato.
6 Premere (ENTER).
“
” appare in prossimità del nome
del canale selezionato. Quindi il
canale viene memorizzato su
Favorite List.
Eliminazione dei canali da
Favorite List
Nel punto 6, premere più volte (ENTER)
in modo da far scomparire “
Nota
Dopo aver cambiato le impostazioni, è
necessario chiudere la pagina “Principale”
premendo ripetutamente (EXIT) per
rendere effettive le impostazioni.
”.
Selezione dei canali da Favorite
List
1 Mentre si osserva la televisione,
premere (FAV).
Appare Favorite List.
Preferiti 1
BBC TWO Scot002
Canali TV
Preferiti 1
BBC ONE...001
BBC TWO...002
CBBC Ch...030
BBC NEW...040
Premi ‘ENTER’ per creare il Canale favorito
Cancella
Favoriti Blocca
7 Ripetere i punti da 3 a 6 per
memorizzare altri canali su
Favorite List.
8 Premere più volte (EXIT) per
chiudere la finestra “Menu Canali”
e la pagina “Principale”.
L’impostazione è terminata.
12
BBC ONE Scot
Channel : 21
Frequenza : 474000
2 Premere più volte (FAV) per
selezionare “Preferiti 1”, “Preferiti
2” o “Preferiti 3”.
3 Premere più volte M/m o (PAGE) +/–
per selezionare il canale desiderato,
quindi premere (ENTER).
4 Premere (EXIT) per chiudere
Favorite List.
Page 85

Blocco dei canali
È possibile bloccare i canali con il modo
Blocco di “Menu Canali”.
Quando si blocca il canale, inserire la
password per guardare il canale
desiderato.
Per utilizzare questa funzione,
assicurarsi di attivare dapprima la
protezione (pagina 20).
Blocco dei canali
1 Mentre si osserva la televisione,
premere (MENU).
Appare la pagina “Principale”.
2 Premere M o m per selezionare
“Canali TV”, quindi premere
(ENTER).
3 Premere M o m per selezionare
“Canali TV” o “Canali Radio”,
quindi premere (ENTER).
Appare la finestra “Menu Canali”.
4 Premere il tasto blu.
Appare la finestra del modo Blocco.
Qualora venga visualizzata una
finestra per l’immissione della
password, digitare la password di 4
cifre.
5 Premere M/m o (PAGE) +/– per
selezionare il canale desiderato.
6 Premere (ENTER).
” appare sul nome del canale
“
selezionato.
8 Premere più volte (EXIT) per
chiudere la finestra “Menu Canali”
e la pagina “Principale”.
L’impostazione è terminata.
Una volta eseguita l’impostazione,
inserire la password la volta successiva
che si seleziona il canale bloccato.
Sblocco dei canali
Nel punto 6, premere più volte (ENTER)
in modo da far scomparire “
Nota
Dopo aver cambiato le impostazioni, è
necessario chiudere la pagina “Principale”
premendo ripetutamente (EXIT) per
rendere effettive le impostazioni.
”.
Canali TV
Preferiti 1
BBC ONE...001
BBC TWO...002
CBBC Ch...030
BBC NEW...040
BBC NEWS 24
Channel : 21
Premi ‘ENTER’ per creare il Canale favorito
Cancella
Favoriti Blocca
Frequenza : 474000
7 Ripetere i punti da 3 a 6 per
bloccare i canali aggiunti.
13
Page 86

Eliminazione dei canali
È possibile eliminare i canali
memorizzati con il modo Cancella CH
di “Menu Canali”.
1 Mentre si osserva la televisione,
premere (MENU).
Appare la pagina “Principale”.
2 Premere M o m per selezionare
“Canali TV”, quindi premere
(ENTER).
3 Premere M o m per selezionare
“Canali TV” o “Canali Radio”,
quindi premere (ENTER).
Appare la finestra “Menu Canali”.
4 Premere il tasto rosso.
Appare la finestra del modo Cancella
CH.
5 Premere più volte il tasto rosso per
selezionare “Cancella CH”,
“Cancella Multiplex” o “Cancella
tutto”.
Cancella CH: elimina tutti i canali
selezionati
Cancella Multiplex: elimina tutti i
canali nella stessa frequenza.
Cancella tutto: elimina tutti i canali
memorizzati nell’apparecchio
6 Premere M/m o (PAGE) +/– per
selezionare il canale desiderato.
7 Premere (ENTER).
“
” appare sul nome del canale
selezionato.
Canali TV
Cancella CH
BBC ONE...001
BBC TWO...002
CBBC Ch...030
BBC NEW...
BBC NEWS 24
Channel : 21
Premi ‘ENTER’ per creare il Canale favorito
Cancella
Favoriti Blocca
Frequenza : 474000
8 Premere una volta (EXIT).
Appare la finestra di conferma.
Se non si desidera eliminare il canale,
selezionare “Cancella”.
Canali TV
Cancella CH
BBC ONE...001
Finestra Messaggi
BBC TWO...002
Vuoi cancellare i
CBBC Ch...030
Canali selezionati?
BBC NEW...
OK
BBC NEWS 24
Cancella
Channel : 21
Premi ‘ENTER’ per creare il Canale favorito
Cancella
Favoriti Blocca
Frequenza : 474000
9 Selezionare “OK”, quindi premere
(ENTER).
Vengono eliminati i canali
selezionati.
10
Ripetere i punti da 3 a 9 per
eliminare i canali aggiunti.
11
Premere più volte (EXIT) per
chiudere la finestra “Menu Canali”
e la pagina “Principale”.
L’impostazione è terminata.
Per cancellare l’eliminazione dei
canali
Nel punto 7, premere più volte (ENTER)
in modo da far scomparire “ ”.
Note
• Dopo aver cambiato le impostazioni, è
necessario chiudere la pagina
“Principale” premendo ripetutamente
(EXIT) per rendere effettive le
impostazioni.
• Non è possibile recuperare i canali
eliminati a meno che non si esegua di
nuovo la funzione di ricerca.
14
Page 87

Controllo della guida dei programmi
L’apparecchio dispone della funzione
EPG per accedere alla guida TV (o
radio, se si stanno ascoltando i canali
radio) che mostra i titoli o altre
informazioni dei programmi attuali o
successivi sui diversi canali.
Le informazioni sono disponibili solo
dalla rete del canale che si sta
guardando.
Appare la finestra “Guida Programmi”.
Guida TV
029 UKTV Food
Worrall Thompson
Mag 27 09:00 ~ 09:30
– 6 : 00
Channel 4 Self The Teen Big From008
price–drop No information yet024
UKTV Food Worrall Food and029
ITV News Live With Alastair Stewa ITV041
+ 6 : 00
10 : 009 : 00Mag.27
MONITORSOURCE
DIGITAL TV
/1`/
`
1
EPG
ENTER
Tasto
verde
.
123
456
789
EPG
FAV
PAGE VOL CHAT T
>
0
ENTER
INFO EXIT
RADIO
MENU
ux
VOL
MENU
B/V/v/b
L/RTEXTAUDIO
Tasto
blu
Tasto
giallo
Visualizzazione della guida dei
programmi
Mentre si osserva la televisione, premere
(EPG).
Selezione dalla pagina
“Principale”
1 Mentre si osserva la televisione,
premere (MENU).
2 Premere M o m per selezionare “Guida
Programmi”, quindi premere
(ENTER).
Se si desidera controllare le
informazioni precedenti o successive del
canale, tenere premuto < o , in
modo che il cursore (V) si sposti
all’orario desiderato. Oppure premere il
tasto giallo (avanzamenti di 6 ore) o il
tasto verde (diminuzioni di 6 ore).
Visualizzazione dei dettagli del
programma slezionato
Spostare il cursore (V) premendo M/m/
</, per selezionare il nome del
programma, quindi premere il tasto blu.
Appare la casella delle informazioni
dettagliate.
Nota
Se il canale selezionato non offre dati EPG,
viene visualizzato “Dati non disponibili”.
15
Page 88

Cambio del canale audio
È possibile selezionare il canale audio
desiderato tra Stereo, Left channel e
Right channel.
MONITORSOURCE
DIGITAL TV
/1`/
`
1
.
123
456
789
EPG
FAV
PAGE VOL CHAT T
Mentre si osserva il televisore, premere
più volte (L/R) per selezionare
l’impostazione desiderata.
: Stereo
: Left channel
: Right channel
>
0
ENTER
INFO EXIT
RADIO
MENU
ux
VOL
L/RTEXTAUDIO
L/R
Cambio della lingua per l’audio
Se si guarda un programma che offre
dei servizi multilingua, è possibile
cambiare la lingua. Ciò dipende dalla
trasmissione del segnale audio.
MONITORSOURCE
DIGITAL TV
/1`/
1
`
.
>
0
ENTER
INFO EXIT
ux
VOL
RADIO
MENU
L/RTEXTAUDIO
123
456
789
EPG
FAV
AUDIO
PAGE VOL CHAT T
Mentre si osserva il televisore, premere
più volte (AUDIO) per selezionare la
lingua desiderata.
Nota
Tale impostazione è efficace solo se la
trasmissione attuale supporta la lingua
selezionata in “Impostazione Sistema”
(pagina 19).
Se la trasmissione non supporta la lingua
desiderata, viene trasmessa in lingua
originale.
16
Page 89

Visualizzazione dei sottotitoli e del televideo
È possibile attivare/disattivare i sottotitoli
o il televideo.
MONITORSOURCE
DIGITAL TV
/1`/
`
1
.
Tasti
numerici
EPG
123
456
789
EPG
FAV
ENTER
PAGE VOL CHAT T
Mentre si osserva la televisione, premere
(TEXT).
Appare la finestra dei sottotitoli e/o del
televideo che consente di selezionare la
lingua dei sottotitoli o il televideo, se la
stazione trasmettendo informazioni.
Seguire le informazioni visualizzate per
attivarli.
>
0
ENTER
INFO EXIT
RADIO
MENU
ux
VOL
B/V/v/b
L/RTEXTAUDIO
EXIT
TEXT
Sottotitoli:
Premere M/m/</, per selezionare le
voci, quindi premere (ENTER).
Per annullare i sottotitoli, premere
(EXIT).
Nota
In base al programma, potrebbe occorrere
del tempo prima di visualizzare dei
sottotitoli oppure potrebbero non venire
visualizzati.
Televideo:
Premere M/m/</, per selezionare le
voci, quindi premere (ENTER).
È possibile selezionarlo premendo
direttamente i tasti numerici.
Per annullare il televideo, premere
(EXIT).
Nota
Non è possibile utilizzare i tasti colorati
(rosso/blu/giallo/verde) per selezionare il
televideo.
Nota
Quando si imposta “Tipo TV” su “NTSC”, i
sottotitoli e/o il televideo potrebbero non
venire visualizzati correttamente.
In questo caso, premere 9, 5, 1, 4, 7 e
(EPG) per cambiare la modalità “PAL”.
Subtitle
eng
Teletext
17
Page 90

Modifica delle impostazioni
Modifica delle impostazioni del menu
È possibile impostare questo
apparecchio con i menu su schermo
“Impostazione Sistema”. È necessario
eseguire la maggior parte delle
impostazioni quando l’apparecchio
viene utilizzato per la prima volta.
I menu “Impostazione Sistema” sono:
• Lingua OSD
• Lingua dell’Audio
• Imp. Ora Loc.
• Ora Legale
• Antenna feed 5 V
• Formato Schermo
• Tipo TV
•Canale di partenza
MONITORSOURCE
DIGITAL TV
/1`/
`
1
ENTER
.
123
456
789
EPG
FAV
PAGE VOL CHAT T
>
0
ENTER
INFO EXIT
RADIO
ux
VOL
MENU
MENU
B/V/v/b
L/RTEXTAUDIO
EXIT
Impostazione Sistema
Lingua OSD English
Audio Language English
Imp. Ora Loc. 0:00
Ora Legale Disattivo
Antenna feed 5V Attivo
Formato Schermo 16:9
Tipo TV PAL
Canale di partenza Nessuno
London, Lisbon, Dublin, Casablanca
Lingua OSD
4 Premere più volte M or m per
selezionare la voce desiderata.
5 Premere più volte < o , per
modificare la scelta o, se indicato
nella voce, premere (ENTER) per
mostrare la casella con l’elenco a
discesa che visualizza l’elenco delle
scelte.
Impostazione Sistema
Lingua OSD
Audio Language English
Imp. Ora Loc. 0:00
Ora Legale
Antenna feed 5V ON
Formato Schermo 4:3
Tipo TV PAL
Canale di partenza
London, Lisbon, Dublin, Casablanca
Lingua OSD
English
English
Deutsch
Italiano
Français
Nederlands
Nessuno
1 Premere (MENU).
Appare la pagina “Principale”.
2 Premere più volte M o m per
selezionare “Installazione”, quindi
premere (ENTER).
3 Premere più volte M o m per
selezionare “Impostazione
Sistema”, quindi premere (ENTER).
Appare il menu “Impostazione
Sistema”.
18
6 Premere (ENTER) nella scella
desiderata.
7 Premere più volte (EXIT) per
chiudere la pagina “Principale”.
Vedere la pagina successiva per l’opzione
“Impostazione Sistema”.
Page 91

Le impostazioni predefinite sono marcate.
Impostazioni Opzioni di impostazione
Lingua OSD Predefinito: English
Lingua dell’Audio Predefinito: English
Imp. Ora Loc. Orario impostabile: da –12:00 a +12:00 (l’impostazione predefinita
Ora Legale Attivo, Disattivo
Antenna feed 5 V Attivo, Disattivo
Formato Schermo 4:3, 16:9, 4:3 letter box
Tipo TV NTSC, PAL, PAL&NTSC
Canale di partenza Impostazione del canale che inizia quando si accende l’apparecchio.
Modifica della lingua dell’OSD.
Modifica della lingua per l’audio.
1 Premere (ENTER) su “Lingua dell’Audio”.
Appare una finestra di popup ad indicare le priorità tra le 4 lingue.
2 Premere più volte < o , per selezionare la lingua audio
desiderata per ciascuna priorità.
3 Premere più volte M o m per selezionare “OK” e cambiare
l’impostazione oppure “Cancella” per cancellare l’impostazione.
Nota
È possibile selezionare la priorità della lingua audio desiderata solo
se la lingua selezionata è supportata dal canale.
è “0:00”)
Impostazione della fascia oraria. Ciò influisce sull’orario
dell’apparecchio e dell’EPR.
Impostazione dell’ora estiva. Attivando questa opzione, si manda
avanti l’orario di una ora.
Selezionare se far passare 5 volt dall’apparecchio all’antenna. Se si
utilizza l’amplificatore dell’antenna TV, portarlo su “Attivo” (5 V,
20 mA ANT 1/ANT 2). Se si utilizza un’antenna TV senza
amplificatore, portarlo su “Disattivo”.
Impostazione del modo dello schermo.
4:3: Immagine in rapporto di formato 4 a 3.
16:9: Immagine in rapporto di formato 16 a 9.
4:3 letter box: Immagine in rapporto di formato 4:3 ampliato ai bordi
dello schermo.
Impostazione del sistema del colore, NTSC o PAL.
1 Premere (ENTER) su “Canale di partenza”.
Appare una finestra di popup con un elenco di canali.
2 Premere più volte M o m per selezionare il canale.
3 Premere (ENTER).
Nota
Una volta impostato “Canale di partenza”, appare una casella con
un messaggio per confermare che si desidera attivare “Canale di
partenza”. In tal caso, selezionare “OK” per modificare
l’impostazione o selezionare “Cancella” per cancellarla.
Nota
Dopo aver modificato le impostazioni di cui sopra, è necessario chiudere la pagina
“Principale” premendo più volte (EXIT) per convalidare le impostazioni.
19
Page 92

Blocco dell’apparecchio
MONITORSOURCE
DIGITAL TV
/1`/
1
`
.
>
0
ENTER
INFO EXIT
ux
VOL
RADIO
MENU
L/RTEXTAUDIO
Attivo
Disattivo
MENU
V/v
EXIT
123
Tasti
numerici
456
789
EPG
FAV
PAGE VOL CHAT T
Impostazione della password
1 Premere (MENU).
Appare la pagina “Principale”.
2 Premere più volte M o m per
selezionare “Installazione”, quindi
premere (ENTER).
3 Premere più volte M o m per
selezionare “Controllo Familiare”,
quindi premere (ENTER).
Controllo Familiare
Codice d’accesso
Controllo Familiare
Immetti Blocco
Nuovo Codice
Conferma Codice
Inserisci il Codice attuale per inserire il nuovo codice
4 Inserire la password attuale.
La password predefinita è 0000.
5 Premere più volte (EXIT) per
chiudere la pagina “Principale”.
Cambio della password
1 Premere (MENU).
Appare la pagina “Principale”.
2 Premere più volte M o m per
selezionare “Installazione”, quindi
premere (ENTER).
3 Premere più volte M o m per
selezionare “Controllo Familiare”,
quindi premere (ENTER).
4 Inserire la password attuale.
5 Premere più volte M o m per
selezionare “Nuovo Codice”.
6 Inserire la nuova password, quindi
premere m per spostare il cursore
su “Conferma Codice”.
7 Inserire di nuovo la nuova
password per confermare.
8 Premere più volte (EXIT) per
chiudere la pagina principale.
Impostazioni della protezione
È possibile impostare la protezione con
la funzione “Controllo Familiare”.
1 Premere (MENU).
Appare la pagina “Principale”.
2 Premere più volte M o m per
selezionare “Installazione”, quindi
premere (ENTER).
3 Premere più volte M o m per
selezionare “Controllo Familiare”,
quindi premere (ENTER).
4 Inserire la password attuale.
5 Premere più volte M o m per
selezionare “Controllo Familiare”,
quindi premere (ENTER).
6 Premere più volte < o , per
selezionare “Attivo”.
Per cancellare “Controllo Familiare”,
selezionare “Disattivo”.
7 Premere più volte (EXIT) per
chiudere la pagina “Principale”.
20
Page 93

Nota
Dopo aver cambiato le impostazioni, è
necessario chiudere la pagina “Principale”
premendo ripetutamente (EXIT) per
rendere effettive le impostazioni.
Impostazione di “Immetti
Blocco”
È possibile proteggere i dati installati e le
informazioni con la funzione “Immetti
Blocco”.
1 Premere (MENU).
Appare la pagina “Principale”.
2 Premere più volte M o m per
selezionare “Installazione”, quindi
premere (ENTER).
3 Premere più volte M o m per
selezionare “Controllo Familiare”,
quindi premere (ENTER).
4 Inserire la password attuale.
5 Premere più volte M o m per
selezionare “Immetti Blocco”.
6 Premere più volte < o , per
selezionare “Attivo”.
Per cancellare “Immetti Blocco”,
selezionare “Disattivo”.
7 Premere più volte (EXIT) per
chiudere la pagina “Principale”.
Nota
Dopo aver cambiato le impostazioni, è
necessario chiudere la pagina “Principale”
premendo ripetutamente (EXIT) per
rendere effettive le impostazioni.
Se si dimentica la password
Mentre si visualizza la pagina
“Principale”, premere 4, 7, 8, 9 e 3.
Appare la finestra Factory Default.
Quindi selezionare “OK” e premere
(ENTER). L’apparecchio ritorna alle
impostazioni di fabbrica. Per
cancellare, selezionare “Cancella”.
Nota
Se si riporta l’apparecchio alle
impostazioni predefinite, si perdono le
impostazioni. Eseguire di nuovo le
impostazioni.
21
Page 94

Informazioni aggiuntive
Manutenzione
Sostituzione dei fusibili
Quando si sostituisce il fusibile del cavo di alimentazione o della presa
dell’accendisigari, assicurarsi di utilizzarne uno il cui amperaggio coincida con il
fusibile originale. Se il fusibile si brucia, controllare i collegamenti dell’alimentazione,
quindi sostituirlo. Se in seguito alla sostituzione il fusibile si brucia di nuovo, è
possibile che si tratti di un problema di funzionamento interno. In tal caso, consultare
un rivenditore Sony.
Fusibile
Attenzione
Onde evitare di danneggiare l’apparecchio, non utilizzare in nessun caso un fusibile
con amperaggio superiore a quello del fusibile in dotazione.
22
Page 95

Sostituzione della batteria al litio
In condizioni normali, le batterie hanno una durata di circa 1 anno. (In base alle
condizioni d’uso, la durata effettiva potrebbe tuttavia essere inferiore.)
Se la batteria si scarica, il raggio d’azione del telecomando a scheda diminuisce. In tal
caso, sostituire la batteria con una batteria al litio CR2025 nuova. L’uso di altri tipi di
batteria potrebbe comportare il rischio di incendi o esplosioni.
Con il simbolo + verso l’alto
2
Mentre si preme la
1
leva di blocco (1),
togliere il coperchio
della batteria (2).
Note sulla batteria al litio
• Tenere la batteria al litio fuori dalla portata dei bambini. In caso di ingestione,
consultare immediatamente un medico.
• Pulire la batteria utilizzando un panno asciutto in modo da assicurare un contatto
ottimale.
• Per l’inserimento della batteria, assicurarsi di osservare la polarità corretta.
• Non afferrare la batteria con pinze metalliche, onde evitare che si verifichino
cortocircuiti.
ATTENZIONE
Se non viene maneggiata con cura, è possibile
che la batteria esploda.
Non ricaricare, disassemblare, né gettare nel fuoco.
23
Page 96

Caratteristiche tecniche
Sintonizzatore TV digitale
Codifica video
MPEG-2 conforme con DVB fino a MP@ ML
Velocità di trasmissione video
fino a 15 Mbit/sec
Formato video 4:3 (letter box se la fonte
si trova in 16:9) e 16:9
Risoluzione fino a 720 × 576 pixel
Codifica audio MPEG layer 1/2
Formato ricezione
NTSC/PAL
Intervallo di frequenza d’entrata
VHF: 174 – 230 MHz
UHF: 470 – 862 MHz
IF 36,125 MHz
Alimentazione 12 V CC
(messa a terra negativa)
Consumo 1,2 A
Ingressi Antenna TV (2)
Telecomando (1)
Servizio (RS232) (1)
Uscite Video (1)
Audio L/R (1)
Dimensioni Circa 182 × 43 × 174 mm
(incluso parti sporgenti e
comandi) (l × a × p)
Massa Circa 920 g
Intervallo di temperatura
0 – 45 °C
Telecomando a scheda RM-X711
Requisiti di alimentazione
Batteria al litio CR2025
Raggio d’azione
Circa 2,5 m
Dimensioni 55 × 125 × 15 mm
(l × a × p)
Peso Circa 50 g
(batteria inclusa)
Accessori in dotazione
Parti per l’installazione (1 set)
Telecomando a scheda RM-X711
(con batteria in dotazione) (1)
Cavo di alimentazione (1)
Sensore del telecomando (1)
Manuale di installazione/collegamento (1)
Istruzioni per l’uso (1 set)
Accessori opzionali
Antenna TV VCA-130 (sinistra/destra) (1)
Monitor mobile XVM-F65/F65WL
Lettore portatile DVD MV-700HR
Il design e le caratteristiche tecniche sono
soggetti a modifiche senza preavviso.
24
Page 97

Soluzione dei problemi
In caso di problemi con l’apparecchio,
consultare la presente lista di controllo
per tentare di risolverli.
Prima di consultare la seguente lista di
controllo, controllare le procedure di
collegamento e uso.
L’orario o EPG non sono visualizzati
correttamente.
•Si riceve il programma di cui non si è
rettificato l’orario, per esempio il
programma ripetuto.
t Dopo aver ricevuto un altro
programma, spegnere l’apparecchio
una volta ed accenderlo di nuovo.
Generali
Nessuna immagine
•Il cavo di alimentazione non è collegato.
•Il segnale è debole.
t Controllare tutti i collegamenti
dell’antenna ed assicurarsi che siano
saldamente inseriti nelle prese.
t Spostare l’auto in una posizione
ottimale per la ricezione.
•Il fusibile è bruciato.
•Si riceve la trasmissione di dati. Il
presente apparecchio non supporta la
trasmissione di dati (visualizza “No
Video !”).
•È stato selezionato il “Tipo TV” erroneo.
t Premere 9, 5, 1, 4, 7 e (EPG) per
cambiare la modalità a “NTSC” o
“PAL”.
Presenza di immagini, assenza di audio
•Premere (VOL)(+) o (ATT) sul
telecomando a scheda.
•Si riceve un segnale Dolby AC3. Il
presente apparecchio non supporta il
segnale Dolby AC3 (visualizza “AC3”.)
A volte sullo schermo si nota un quadrato,
l’immagine è “congelata” o è disturbata.
•Il collegamento dell’antenna è allentato
oppure l’antenna è disinserita.
t Controllare tutti i collegamenti
dell’antenna ed assicurarsi che siano
saldamente inseriti nelle prese.
•Vi potrebbe essere un problema di
trasmissione.
t Potrebbe essere un problema
temporaneo che si risolve da solo.
Impossibile accedere ad un canale
particolare, pur usando i tasti numerici.
•Si è attivato il blocco di protezione.
t Inserire la password per accedere al
canale (pagina 13) o per sbloccarlo
(pagina 20).
Nessuna risposta quando si premono i
tasti del telecomando.
•La pila potrebbe essere consumata.
Messaggi
Le seguenti indicazioni appaiono
quando si verifica un problema
nell’unità.
ANT-1 Antenna feed overloaded
Automatically switched off
ANT-2 Antenna feed overloaded
Automatically switched off
Il dispositivo si porta automaticamente su
una emissione di 5V.
Antenna feed overloaded
Automatically switched off
ANT-1 ed ANT-2 sono sovraccarichi.
Program overflow
Stanno per essere memorizzati oltre 2.000
canali. Non è possibile memorizzarne altri.
HDTV Signal is not Supported
L’apparecchio riceve un segnale HDTV. Il
presente apparecchio non supporta il
segnale HDTV.
No Video Signal !
No Signal !
Nessun dato video mpeg viene immesso
nell’apparecchio.
Bad Signal !
Si è verificato un errore di dati mpeg
nell’apparecchio.
No Video !
Nessun Video PID in entrata all’unità.
Scrambled !
L’unità riceve un programma codificato.
Please wait for saving data.
L’unità sta salvando i dati.
25
Page 98

Verwijdering van oude elektrische en
elektronische apparaten (Toepasbaar
in de Europese Unie en andere
Europese landen met gescheiden
ophaalsystemen)
Het symbool op het product of op de
verpakking wijst erop dat dit product
niet als huishoudelijk afval mag worden
behandeld. Het moet echter naar een
plaats worden gebracht waar elektrische
en elektronische apparatuur wordt
gerecycled. Als u ervoor zorgt dat dit
product op de correcte manier wordt
verwijderd, voorkomt u voor mens en
milieu negatieve gevolgen die zich
zouden kunnen voordoen in geval van
verkeerde afvalbehandeling. De
recycling van materialen draagt bij tot
het vrijwaren van natuurlijke bronnen.
Voor meer details in verband met het
recyclen van dit product, neemt u
contact op met de gemeentelijke
instanties, het bedrijf of de dienst belast
met de verwijdering van huishoudafval
of de winkel waar u het product hebt
gekocht.
Welkom!
Hartelijk dank voor de aanschaf van
deze Sony digitale TV-tuner.
• Hi-fi DVD-kwaliteit videoweergave.
• 2000 programmeerbare favoriete
kanalen.
• EPG-functie geschikt voor PIG
(Picture in Graphics) displayweergave.
• Uitgerust met Parental Lock
kinderslotfunctie.
• Geheugen voor het laatste kanaal.
• Uitgerust met dubbele tuneropties
voor een veelzijdig gebruik.
• Mobiele ontvangstmodus voor
ontvangst van tientallen terrestrische
digitale TV-programma’s tijdens het
rijden met hoge snelheid.
Accessoire waarop dit van toepassing is:
Afstandsbediening
2
Page 99

Inhoud
Welkom! ............................................................................................................................... 2
Voorzorgsmaatregelen ....................................................................................................... 4
Bedieningselementen ......................................................................................................... 6
Bediening
Kanalen zoeken ................................................................................................................... 8
Ontvangst van kanalen .................................................................................................... 10
Gebruik van de Channel Manager ................................................................................. 11
De Programma Guide (programmagids) oproepen .................................................... 15
Een ander audiokanaal kiezen ........................................................................................ 16
Een andere gesproken taal kiezen .................................................................................. 16
De ondertiteling en teletekst weergeven ....................................................................... 17
De setup wijzigen
De menu-instellingen wijzigen ....................................................................................... 18
Het apparaat blokkeren ................................................................................................... 20
Aanvullende informatie
Onderhoud......................................................................................................................... 22
Technische gegevens ........................................................................................................ 24
Storingen verhelpen ......................................................................................................... 25
Meldingen .......................................................................................................................... 25
3
Page 100

Voorzorgsmaatregelen
Lees voordat u het apparaat installeert en in gebruik neemt de volgende
voorzorgsmaatregelen om ernstige verwondingen of ongelukken te voorkomen.
Veiligheid
Handel altijd in overeenstemming met de geldende verkeersregels.
Bij het installeren
• Installatie van dit apparaat vereist technische kennis.
Dit apparaat moet worden geïnstalleerd door
bevoegd onderhoudspersoneel.
• Als u het apparaat zelf installeert, moet u dit
zorgvuldig doen zoals aangegeven in de installatieen bedradingsschema’s in de installatie/
aansluitingen-handleiding.
• Zet het contactslot voor installatie in de positie
OFF of haal de sleutel eruit. Als u dit apparaat
installeert terwijl het contact aan staat, kan de
accu opraken of kan er kortsluiting ontstaan.
• Beschadig geen leidingen, slangen, de brandstoftank of
elektrische bedrading bij het installeren van dit
apparaat. Dit kan brand veroorzaken. Als u een gat in
autopanelen boort, moet u zorgen dat verborgen autoonderdelen niet worden beschadigd.
• Gebruik geen moeren of bouten voor
veiligheidsapparaten, zoals stuurkoppeling,
brandstoftoevoer of remsystemen. Dit kan brand of een
ongeluk veroorzaken.
• Voorkom dat de kabels en draden verward of beklemd
raken tussen het bewegende gedeelte van een
stoelleuning.
4
 Loading...