

Page 1
FM/MW/LW
Cassette Car
Stereo
3-856-292-11 (1)
Operating Instructions
Instrukcja ob sugi
Instrukciä za eksploataciä
Haszn·lati ⁄tmutatÛ
Instrukciä po qkspluatacii
For installation and connections, see the supplied installation/connections
manual.
Informacji o instalacji i pod ±czeniu naleøy szukaÊ w za ±czonej instrukcji
instalacji/pod ±czania.
Za instalirane i svßrzvane na aparata, izpolzuvajte priloøeniä
narßhnik.
A kÈsz¸lÈk ¸zembehelyezÈsÈrıl és csatlakoztat·s·rÛl rÈszletes t·jÈkoztat·st
tal·l az ‹zembehelyezÈsi/csatlakoztat·si ˙tmutatÛban.
Pered ustanovkoj i podklœheniämi obratites´ k prilagaemoj instrukcii
po ustanovke i podklœheniœ.
EN
PL
BG
H
RF
XR-3503MK2
1996 by Sony Corporation
Actual total number: Sony XR-3503MK2 (E,Pl,Bg,Hu,R) 3-856-292-11 (1)
Page 2

EN
Features
General
• Detachable-front panel enables you to take
the front panel away with you when you
leave your car (page 4).
• Caution alarm will be activated if you turn
off the ignition key without removing the
front panel from the unit.
• Built-in power amplifier (max. output:
20 W × 4 ch) enables you to enjoy a
4-speaker system.
• Digital 24-hour clock provided (page 5).
Cassette player section
• ATA (Automatic Tuner Activation) for
automatically turning on the tuner while fastforwarding or rewinding a tape (page 6).
Tuner section
• Up to 30 stations can be preset: 18 stations on
FM, 6 stations each of MW and LW.
• Automatic Memory function stores a total
of 30 stations in memory quickly and easily
(page 7).
Precautions
• If your car is parked in direct sunlight
resulting in a considerable rise in
temperature inside the car, allow the unit to
cool off before operating it.
• If no power is being supplied to the unit,
check the connections first. If everything is in
order, check the fuse.
• If no sound comes from the speakers of a
2-speaker system, set the fader control to the
centre position.
• If your car is equipped with a power
antenna, note that it will be automatically
extended while the unit is operating.
If you have any questions or problems
concerning your unit that are not covered in
this manual, please consult your nearest Sony
dealer.
2
Actual total number: Sony XR-3503MK2 (E,Pl,Bg,Hu,R) 3-856-292-11 (1)
Page 3
Notes on Cassettes
Table of Contents
Cassette care
• Do not touch the tape surface of a cassette, as
any dirt or dust will contaminate the heads.
• Keep cassettes away from equipment with
built-in magnets such as speakers and
amplifiers, as erasure or distortion of the
recorded tape could occur.
• Do not expose cassettes to direct sunlight,
extremely cold temperatures, or moisture.
• When the tape is played back for a long
period, the cassette shell may become warm
because of the built-in power amplifier. This
is not a sign of a malfunction.
Notes on Cassette Deck Tape Heads
• Long use of cassette tapes contaminates the
tape head causing poor sound quality or
complete sound dropout. Therefore, we
recommend cleaning the tape head once a
month or so with the separately available
Sony Cassette Cleaning Set. If the sound does
not improve after using a cleaning cassette,
please consult your nearest Sony dealer.
• In case of old or inferior cassette tapes, the
tape head gets contaminated much more
quickly. Depending on the tape, one or two
playbacks may cause poor sound.
Cassettes longer than 90 minutes
The use of cassettes longer than 90 minutes is
not recommended except for long continuous
play. The tapes used for these cassettes are
very thin and tend to be stretched easily.
Frequent playing and stopping of these tapes
may cause them to be pulled into the cassette
deck mechanism.
Detaching and Attaching the Front Panel ............ 4
Setting the Clock ...................................................... 5
Cassette Player Operation
Listening to Tape Playback .................................... 5
Ejecting the Cassette ................................................ 5
Fast-winding the Tape ............................................ 6
Radio Reception during Fast-forwarding or
Rewinding of a Tape
— ATA (Automatic Tuner Activation)
Function .......................................................... 6
Radio Reception
Searching for Stations Automatically
— Automatic Tuning ......................................... 6
If FM Stereo Reception is Poor
— Monaural Mode .............................................. 6
Tuning in by Adjusting the Frequency
— Manual Tuning ............................................... 7
Memorizing Stations Automatically
— Automatic Memory Function ...................... 7
Memorizing Only the Desired Stations ................ 7
Receiving the Memorized Stations ....................... 7
Other Functions
Adjusting the Sound Characteristics .................... 8
Enjoying Bass and Treble at Low Volume
— Loudness Function ......................................... 8
Muting the Beep Tone ............................................. 8
EN
Maintenance ............................................................. 8
Dismounting the Unit ............................................. 9
Button Locations .................................................... 10
Specifications .......................................................... 11
Troubleshooting Guide ......................................... 12
Actual total number: Sony XR-3503MK2 (E,Pl,Bg,Hu,R) 3-856-292-11 (1)
3
Page 4
Detaching and Attaching
the Front Panel
The front panel of this unit can be detached in
order to prevent the unit from being stolen.
Detaching the Front Panel
Before detaching the front panel, be sure to
press the
RELEASE button to open up the front panel
and detach the panel by pulling it towards you
as illustrated.
OFF
button first. Then press the
RELEASE button
• Do not expose the front panel to direct sunlight, heat
sources such as hot air ducts or leave it in a humid place.
Never leave it on the dashboard etc. of a car parked in
direct sunlight where there may be a considerable rise in
temperature inside the car.
Caution alarm
If you turn the ignition key to the OFF position
without removing the front panel, the caution
alarm will be activated and a beep tone will be
heard for a few seconds.
EN
Be sure not to drop the panel after detaching it
from the unit.
Attaching the Front Panel
Apply the right side of the front panel to the
unit by attaching part A of the front panel to
part B of the unit as illustrated, then swing
the left side into the unit until it clicks.
A
B
Notes
• Make sure that the front panel is the right way up when
attaching it to the unit as it cannot be attached upside
down.
• Do not press the front panel hard against the unit when
attaching it to the unit. It can easily be attached by
pressing it lightly against the unit.
• When you carry the front panel with you, put it in the
supplied front panel case.
• Do not press hard or give excessive pressure to the
display windows of the front panel.
• Before removing the front panel, be sure to turn the
power off. However, if you press the RELEASE button to
detach the panel while the unit is still turned on, the
power will be automatically turned off in order to protect
the speakers from being damaged.
4
Actual total number: Sony XR-3503MK2 (E,Pl,Bg,Hu,R) 3-856-292-11 (1)
Page 5
Setting the Clock
The clock has a 24-hour digital indication.
For example, setting it to 10:08
1 Display the time.
(Press the
operation.)
2 Press the
seconds.
The hour digit(s) blinks.
DSPL
button during unit
DSPL
button for more than two
Cassette Player
Operation
Listening to Tape Playback
After inserting the cassette, playback
will start automatically.
Set the hour digits.
SEL
–+
(to go forward)(to go back)
3 Press the
The minute digits blink.
Set the minute digits.
–+
(to go back) (to go forward)
4 Press the
SEL
button momentarily.
SEL
DSPL
button momentarily.
To change the tape direction,
press both the 0 and the ) buttons at the
same time.
Indication of Tape Transport Direction
The side facing up is being played.
The side facing down is being played.
Tape playback automatically changes
direction at the end of the tape.
Note
Before turning off the unit, eject the tape to avoid tape
damage.
Ejecting the Cassette
Press the button to stop playback and eject
the cassette.
EN
Cassette Player Operation
The clock activates.
Note
The clock cannot be set unless the power is turned on. Set
the clock after you turn on the radio, or during tape
playback.
Actual total number: Sony XR-3503MK2 (E,Pl,Bg,Hu,R) 3-856-292-11 (1)
5
Page 6
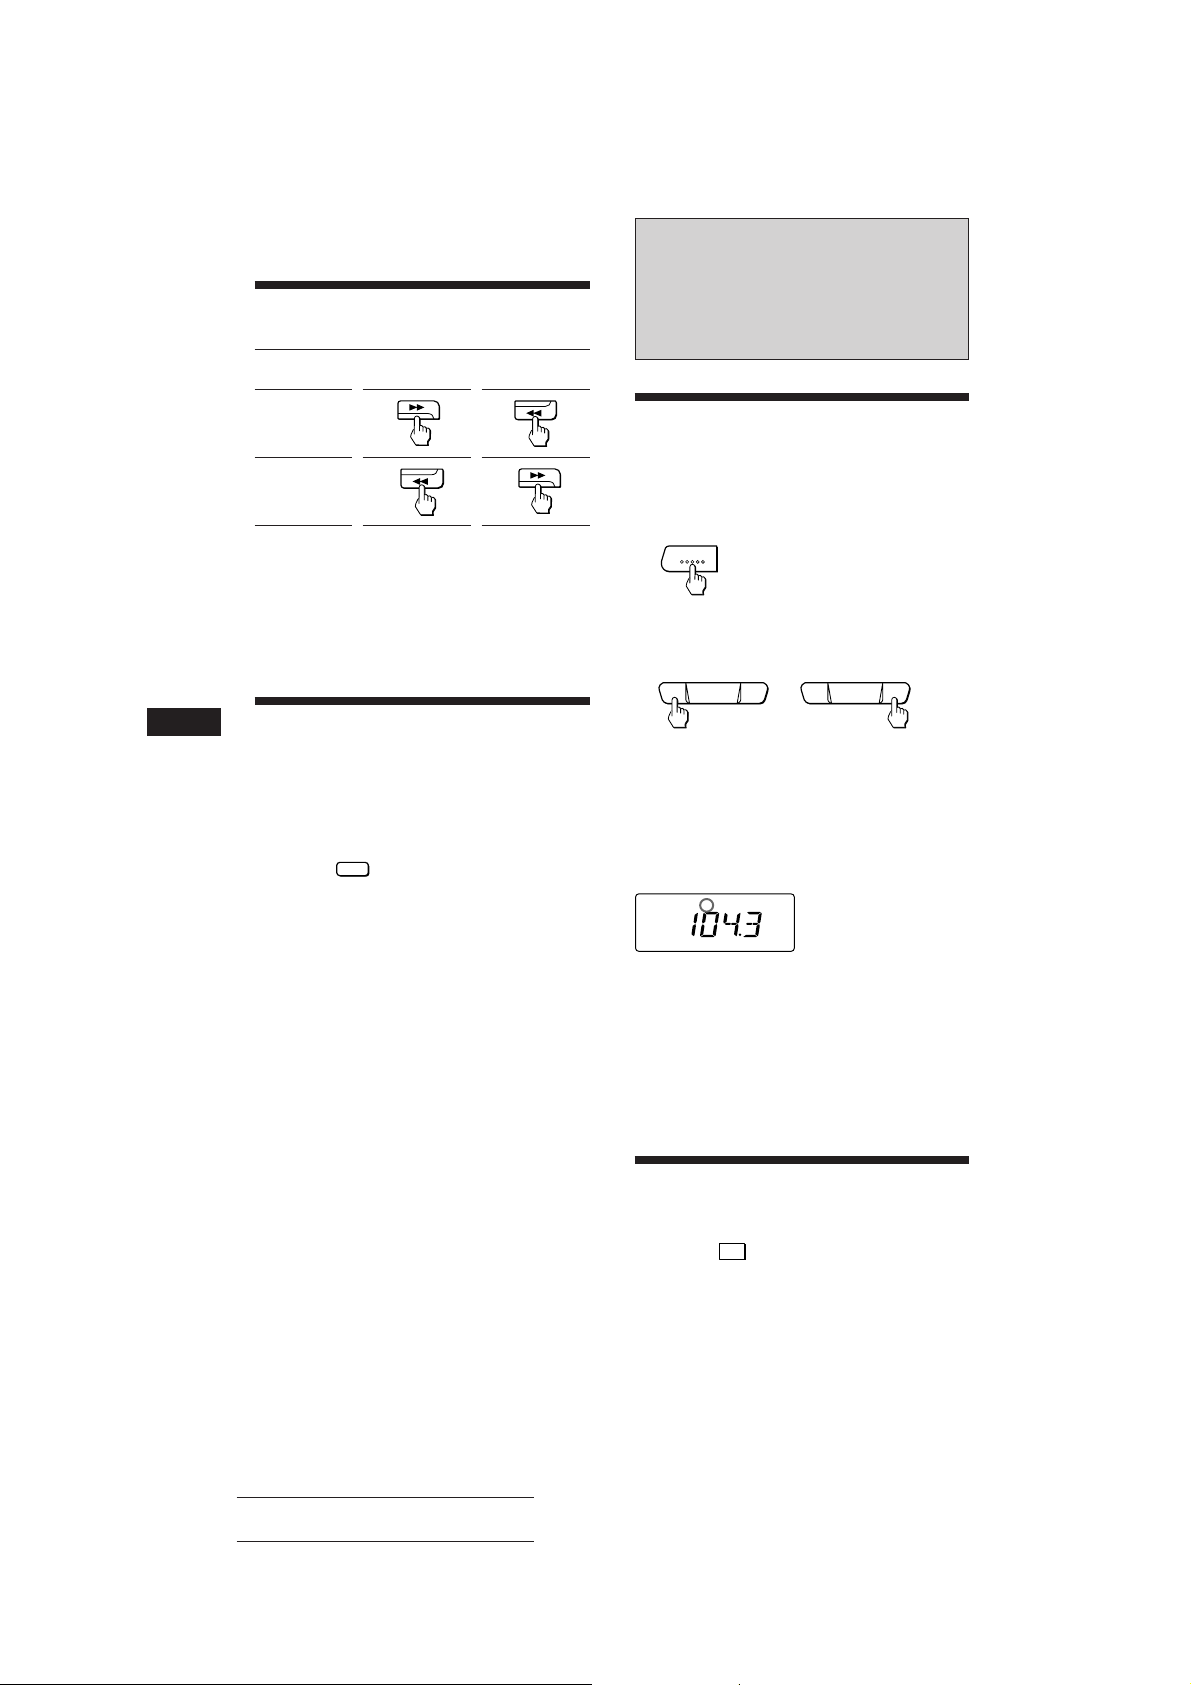
Fast-winding the Tape
TUNER
A.MEM
Direction
indicator*
To advance To rewind
Radio Reception
EN
(
9
To resume playback, press the other fastwinding button partially until the locked
button is released.
* The 9 or ( indicator will flash while fast-winding the
tape.
Radio Reception during
Fast-forwarding or
Rewinding of a Tape
— ATA (Automatic Tuner Activation)
Function
Press the
n “ATA” appears on the display.
When fast-forwarding or rewinding with the
0 or ) button, the tuner will turn on
automatically.
ATA
1
button during playback.
Searching for Stations
Automatically
— Automatic Tuning
1 Select the desired band.
FM1 n FM2 n FM3 n
MW n LW n FM1
2 Press either side of the SEEK/MANU
button momentarily to search for the
next station (automatic tuning).
SEEK/MANU
–+
For lower
frequencies
The scanning stops when a station is received.
Press either side of the button repeatedly until
the desired station is received.
When an FM stereo program with a sufficient
signal strength is tuned in,
ST
the “ST” indication will appear.
To avoid the automatic tuning from stopping on
stations too frequently (local seek mode), press
the SENS button momentarily to get the “LCL”
indication.
Only the stations with relatively strong signals will be
tuned in. The local seek mode functions only when the
automatic tuning is in operation.
SEEK/MANU
–+
For higher
frequencies
If FM Stereo Reception is
Poor
Press the
n “MONO” appears on the display.
The sound will improve, but it will become
monaural.
— Monaural Mode
SENS
button momentarily.
6
Actual total number: Sony XR-3503MK2 (E,Pl,Bg,Hu,R) 3-856-292-11 (1)
Page 7

Tuning in by Adjusting the
Frequency
— Manual Tuning
Memorizing Only the
Desired Stations
1 Select the desired band.
A.MEM
TUNER
FM1 n FM2 n FM3 n
MW n LW n FM1
2 Press and hold either side of the SEEK/
MANU button.
Release the button when the desired station
is received.
SEEK/MANU
–+
For lower
frequencies
PREVENT ACCIDENTS!
When tuning in during driving, use the
automatic tuning and the memory preset
tuning instead of the manual tuning.
SEEK/MANU
–+
For higher
frequencies
Memorizing Stations
Automatically
— Automatic Memory Function
Stations with the clearest reception are
automatically searched and memorized on
each band (FM1, FM2, FM3, MW and LW). Up
to 6 stations on each band can be stored on the
preset number buttons 1 to 6 in the order of
band frequency.
1 Select the desired band.
A.MEM
TUNER
FM1 n FM2 n FM3 n
MW n LW n FM1
2 Press the TUNER/A.MEM button for more
than two seconds.
A.MEM
TUNER
The unit will be start scanning the selected
band and memorize the tuned stations on
the preset number button 1 through 6
automatically.
1 Select the desired band.
A.MEM
TUNER
FM1 n FM2 n FM3 n
MW n LW n FM1
2 Tune in the station which you wish to
store on the preset number button.
3 Press and hold the desired preset
number button (
two seconds until you hear a beep tone.
The number of the pressed preset number
button appears in the display window.
FM
Up to 6 stations on each band (FM1, FM2, FM3, MW and
LW) can be stored on the preset number buttons in the
order of your choice. Therefore, 18 stations can be
memorized on FM.
If you try to store another station on the same preset
number button, the previously stored station will be
erased.
ST
ATA
to 6) for about
1
Receiving the Memorized
Stations
1 Select the desired band.
A.MEM
TUNER
FM1 n FM2 n FM3 n
MW n LW n FM1
2 Press momentarily the preset number
button (
desired station is stored.
Note
If you press the preset number button for more than two
seconds, the currently received station will be memorized.
To receive the previously memorized station, make sure
that the preset number button is pressed only
momentarily.
ATA
to 6) on which the
1
EN
Cassette Player Operation/Radio Reception
Actual total number: Sony XR-3503MK2 (E,Pl,Bg,Hu,R) 3-856-292-11 (1)
7
Page 8
Other Functions
Adjusting the Sound
Characteristics
1 Select the item you want to adjust by
pressing the
VOL (volume) n BAS (bass) n TRE
(treble) n BAL (balance) n FAD (fader)
n VOL (volume)
SEL
button repeatedly.
Maintenance
Fuse Replacement
When replacing the fuse, be sure to use one
matching the amperage rating stated on the
fuse. If the fuse blows, check the power
connection and replace the fuse. If the fuse
blows again after replacement, there may be an
internal malfunction. In such a case, consult
your nearest Sony dealer.
Fuse (15 A)
EN
2 Adjust the selected item by pressing
either the
Adjust within three seconds after selecting.
(After three seconds the button will again
serve as volume control button.)
–
or
+
button.
Enjoying Bass and Treble
at Low Volume
— Loudness Function
Press the
appear on the display.
Bass and treble will be boosted. To cancel,
press again.
LOUD
button. n “LOUD” will
Muting the Beep Tone
Press the 5 button while pressing
SEL
the
To reactivate the beep tone, press these buttons
once more.
button.
Warning
Never use a fuse with an amperage rating
exceeding the one supplied with the unit as
this could damage the unit.
Cleaning the Connectors
The unit may not function properly if the
connectors between the unit and the front
panel are not clean. In order to prevent this,
open the front panel by pressing the RELEASE
button, then detach it and clean with a cotton
swab dipped in alcohol. Do not apply too
much force. Otherwise, the connector may get
damaged.
Main unit
Back of the front panel
8
Actual total number: Sony XR-3503MK2 (E,Pl,Bg,Hu,R) 3-856-292-11 (1)
Page 9
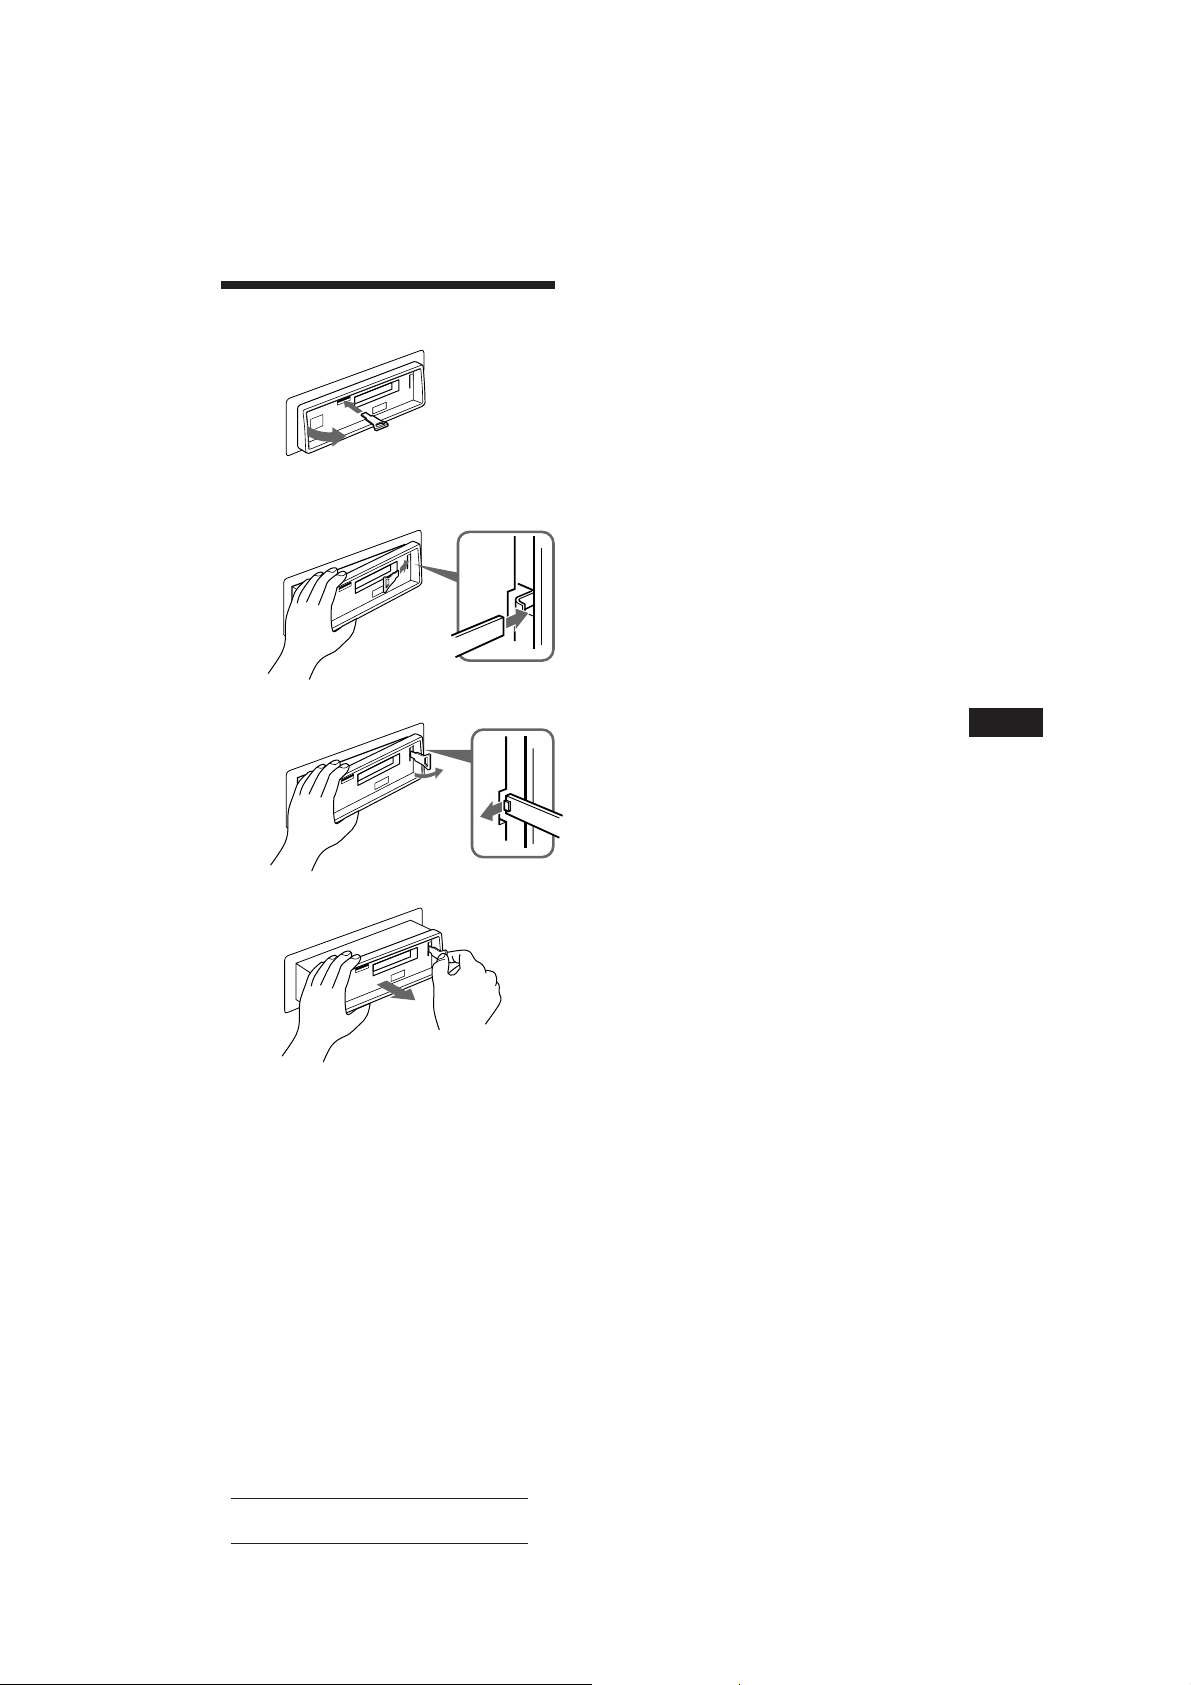
Dismounting the Unit
1
Release key (supplied)
2
3
EN
Other Functions
4
Actual total number: Sony XR-3503MK2 (E,Pl,Bg,Hu,R) 3-856-292-11 (1)
9
Page 10
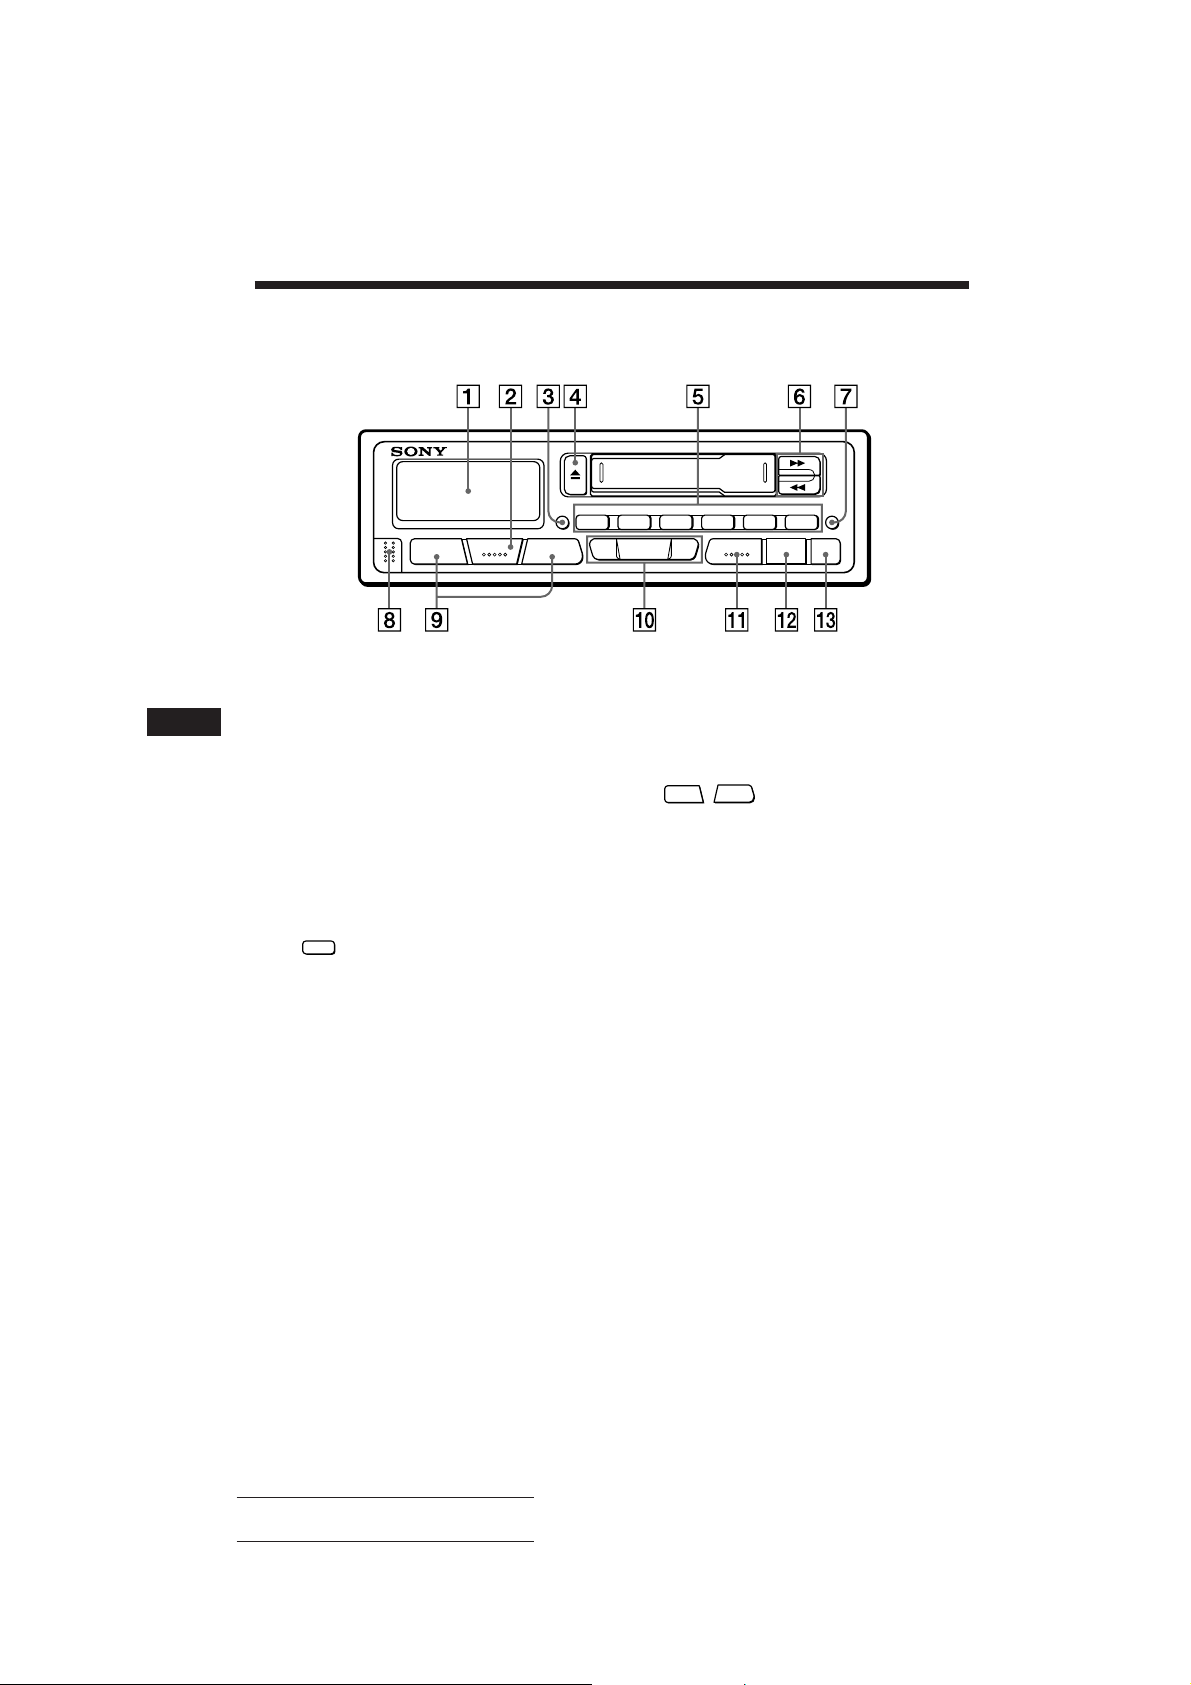
Button Locations
+
RELEASE
–+
SEL
ATA
DSPL
215634
SEEK/MANU
–+
A.MEM
TUNER
LOUD
SENS OFF
EN
Refer to the pages in r for details.
1 Display window
2 SEL (control mode select) button 58
3 DSPL (display mode change/time set)
button 5
4 6 (eject) button 5
5 During radio reception:
Preset number buttons 7
During tape playback:
ATA
1
ATA (Automatic Tuner
Activation) button 6
6 0/) (fast winding)/DIR (tape
transport direction change) buttons
56
7 LOUD (loudness) button 8
8 RELEASE (front panel release) button
48
–
9
(volume/bass/treble/
balance/fader control) buttons 58
0 SEEK/MANU buttons 67
!¡ TUNER/A.MEM (radio on • band select/
automatic memory) button 67
!™ SENS (sensitivity adjust) button 6
!£ OFF button 4
10
Actual total number: Sony XR-3503MK2 (E,Pl,Bg,Hu,R) 3-856-292-11 (1)
Page 11

Specifications
Cassette player section
Tape track 4-track 2-channel stereo
Wow and flutter 0.13 % (WRMS)
Frequency response 30 – 15,000 Hz
Signal-to- noise ratio 55 dB
Tuner section
FM
Tuning range 65.0 – 74.0 MHz
87.5 – 108.0 MHz
Antenna terminal External antenna connector
Intermediate frequency 10.7 MHz
Usable sensitivity 12 dBf
Selectivity 70 dB at 400 kHz
Signal-to-noise ratio 65 dB (stereo),
68 dB (mono)
Harmonic distortion at 1 kHz
0.5% (stereo),
0.3% (mono)
Separation 35 dB at 1 kHz
Frequency response 30 – 15,000 Hz
Capture ratio 2 dB
MW/LW
Tuning range MW: 531 – 1,602 kHz
LW : 153 – 281 kHz
Antenna terminal External antenna connector
Intermediate frequency 450 kHz
Sensitivity MW: 30 µV
LW : 50 µV
Power amplifier section
Outputs Speaker outputs
(sure seal connectors)
Speaker impedance 4 – 8 ohms
Maximum power output 20 W × 4 (at 4 ohms)
General
Output lead Power antenna relay
control lead
Tone controls Bass ±8 dB at 100 Hz
Treble ±8 dB at 10 kHz
Power requirements 12 V DC car battery
(negative ground)
Dimensions Approx. 186 × 57 × 170 mm
(w/h/d)
Mounting dimension Approx. 182 × 53 × 155 mm
(w/h/d)
Mass Approx. 1.2 kg
Supplied accessories Parts for installation and
connections (1 set)
Front panel case (1)
Design and specifications are subject to change without
notice.
EN
Actual total number: Sony XR-3503MK2 (E,Pl,Bg,Hu,R) 3-856-292-11 (1)
11
Page 12

Troubleshooting Guide
The following checklist will assist in the correction of most problems which you may encounter with
your unit.
Before going through the checklist below, refer to the connection and operating procedures.
General
Problem
No sound
Indications do not appear in the
display window.
Tape playback
Problem
Playback sound is distorted.
Cause/Solution
• Adjust the volume with the
• Set the fader control to the centre position for 2-speaker
systems.
Remove the front panel and clean the connectors. See “Cleaning
the Connectors” of “Maintenance” for details.
Cause/Solution
Contamination of the tape head. n Clean the head.
+
button.
EN
Radio reception
Problem
Preset tuning is not possible.
Automatic tuning is not possible.
The “ST” indication flashes.
Cause/Solution
• Memorize the correct frequency.
• The broadcast is too weak.
The broadcast is too weak. n Use the manual tuning.
• Tune in precisely.
• The broadcast is too weak. n Press the SENS button to enter
the MONO mode.
12
Actual total number: Sony XR-3503MK2 (E,Pl,Bg,Hu,R) 3-856-292-11 (1)
Page 13

EN
Actual total number: Sony XR-3503MK2 (E,Pl,Bg,Hu,R) 3-856-292-11 (1)
13
Page 14

Cechy indywidualne
OgÛlne
• Zdejmowana przednia cianka radia daje
siÍ atwo wyj±Ê przy wysiadaniu z
samochodu (strona 4).
• Alarm ostrzegawczy w ±cza siÍ, jeøeli
wy ±czy o siÍ kluczyk zap onu bez wyjÍcia
przedniej cianki urz±dzenia.
• Wbudowany wzmacniacz mocy
(maksymalnie na wyj ciu 20 W × 4 kana y)
pozwala na s uchanie poprzez cztery
g o niki.
• Radio wyposaøone w cyfrowy zegar 24
godzinny (strona 5).
Odtwarzacz kaset magnetofonowych
• Funkcja ATA (AUTOMATIC TUNER
ACTIVATION) w ±czaj±ca automatycznie
radio podczas przewijania ta my w przÛd lub
w ty (strona 6).
Odbiornik radiowy
• Uøytkownik ma moøliwo Ê zaprogramowania
PL
30 radiowych stacji nadawczych: 18 stacji w
zakresie FM i po 6 w zakresie MW i LW.
• Funkcja automatycznej pamiÍci sprzÍtu
pozwala na zapisanie w prosty i szybki
sposÛb w pamiÍci sprzÍtu maksymalnie 30
pozycji stacji radiowych (strona 7).
Zasady bezpieczeÒstwa
• Jeøeli samochÛd by zaparkowany w miejscu
bezpo rednio nas onecznionym, co
spowodowa o znaczny wzrost temperatury w
jego wnÍtrzu, naleøy poczekaÊ, aø
urz±dzenie ostygnie, zanim rozpocznie siÍ
jego uøytkowanie.
• Jeøeli odbiornik nie jest zasilany, naleøy
najpierw sprawdziÊ wszystkie pod ±czenia.
Gdy wszystko jest w porz±dku, proszÍ
sprawdziÊ bezpiecznik.
• Jeøeli w uk adzie dwug o nikowym brak
dºwiÍku z g o nikÛw, naleøy przestawiÊ
regulacjÍ sygna Ûw na po oøenie rodkowe.
• Jeøeli posiadany przez PaÒstwa samochÛd
posiada system elektrycznie wysuwanej
anteny, jest ona automatycznie wysuwana
podczas uøytkowania odbiornika.
Jeøeli wyst±pi± pytania lub problemy innego
rodzaju zwi±zane z uøytkowaniem niniejszego
urz±dzenia, ktÛrych nie opisano w niniejszej
instrukcji obs ugi, naleøy zwrÛciÊ siÍ o poradÍ
do najbliøszego punktu sprzedaøy sprzÍtu
Sony.
2
Actual total number Sony XR-3503MK2 (E,Pl,Bg,H,R) 3-856-292-11 (1)
Page 15

Uwagi odno nie kaset
Spis tre ci
Obchodzenie siÍ z kasetami
• Nie dotykaÊ powierzchni ta my , gdyø brud
lub kurz mog± zanieczy ciÊ g owice.
• Kasety trzymaÊ z daleka od urz±dzeÒ z
wbudowanymi magnesami, jak g o niki lub
wzmacniacze, gdyø nagranie na ta mie
moøe ulec skasowaniu lub zniekszta ceniu.
• Nie naraøaÊ kaset na bezpo redni wp yw
promieni s onecznych, niezmiernie niskich
temperatur lub wilgotno ci.
• Jeøeli odtwarza siÍ ta mÍ przez d uøszy
okres, obudowa kasety moøe ulec nagrzaniu
ze wzglÍdu na wbudowany wzmacniacz
mocy. Nie jest to jednak symptomem
nieprawid owego funkcjonowania urz±dzenia.
Uwagi na temat g owic magnetofonu
kasetowego
• D ugie uøytkowanie kaset magnetofonowych
powoduje zanieszczenie g owic
magnetofonowych, co powoduje nisk±,
niewyraøn± jako Ê odbieranego døwiÍku lub
tez ca kowity zanik døwiÍku. Dlatego teø
zalecamy czyszczenie g owic magnetofonu
kasetowego mniej wiÍcej raz na miesi±c
wykorzystuj±c do tego celu dostÍpny w
handlu komplet firmy Sony do czyszczenia
g owic magnetofonu kasetowego Sony
Cassette Cleaning Set. Jeøeli jednak nie
poprawi siÍ po wykonaniu czyszczenia przy
uøyciu kasety czyszcz±cej, jako Ê
odbieranego døwiÍku, proszÍ zwrÛciÊ siÍ do
nabliøszego punktu sprzedaøy
prowadz±cego produkty firmy Sony.
• W przypadku starych ta m lub ta m o niskiej
jako ci, g owice magnetofonu kasetowego
ulegaj± o wiele szybciej zanieczyszczeniu. W
zaleøno ci od rodzaju ta my, jednokrotne lub
dwukrotne obtworzenie danej ta my moøe
spowodowaÊ nisk±, niewyraºn± niewyraøn±
jako Ê odbieranego døwiÍku.
Kasety o czasie odtwarzania powyøej
90 minut
Nie polecamy uøytkowania kaset o czasie
odtwarzania powyøej 90 minut za wyj±tkiem
sta ego odtwarzania. Ta my uøywane do tego
rodzaju kaset s± bardzo cienkie i maj±
tendencjÍ do atwego wyci±gania siÍ.
CzÍste odtwarzanie i zatrzymywanie takich
ta m moøe spowodowaÊ wci±gniÍcie ich
przez mechanizm odtwarzacza.
Zdejmowanie i zak adanie przedniej cianki .......4
Ustawianie zegara...............................................5
Obs uga odtwarzacza kaset
magnetofonowych
S uchanie ta my .................................................. 5
Wyjmowanie kasety ............................................ 5
Szybkie przewijanie ta my ..................................6
OdbiÛr programu radiowego podczas
przewijania w przÛd lub w ty
ä Funkcja ATA (Automatic Tuner
Activation = automatyczne w ±czanie
programu radiowego) ................................. 6
OdbiÛr Radiowy
Automatyczne szukanie stacji
ä Automatyczne dostrajanie ......................... 6
Jeøeli odbiÛr radiowy na pa mie FM jest s aby
ä Tryb odbioru monofonicznego ................... 7
Strojenie przez regulacjÍ czÍstotliwo ci
ä RÍczne dostrajanie .................................... 7
Automatyczne zapisywanie w pamiÍci sprzÍtu
pozycji stacji radiowych
ä Funkcja automatycznego zapisywania w
pamiÍci sprzÍtu .......................................... 7
ZapamiÍtywanie wy ±cznie wybranych stacji ..... 8
Odbieranie zapisanych w pamiÍci stacji............. 8
Inne funkcje
Regulacja charakterystyki dºwiÍku ..................... 8
Odbieranie niskich i wysokich tonÛw nawet przy
ma ej sile g osu
ä Funkcja LOUDNESS .................................. 8
Wy ±czanie sygna u dºwiÍkowego ..................... 8
Konserwacja .......................................................8
Demontaø urz±dzenia ......................................... 9
Lokalizacja kontrolek ........................................10
Dane techniczne ...............................................11
Usuwanie usterek .............................................12
PL
Actual total number Sony XR-3503MK2 (E,Pl,Bg,H,R) 3-856-292-11 (1)
3
Page 16

Zdejmowanie i
zak adanie przedniej
cianki
Aby zapobiec kradzieøy urz±dzenia, moøna
zdj±Ê jego przedni± ciankÍ.
Zdejmowanie przedniej cianki
Przed zdjÍciem przedniej cianki naleøy
pamiÍtaÊ o naci niÍciu przycisku
NastÍpnie naleøy nacisn±Ê przycisk RELEASE,
aby odblokowaÊ przedni± ciankÍ i wyj±Ê j±
ci±gn±c do siebie jak to zilustrowano poniøej.
Przycisk RELEASE
UwaøaÊ, aby przy zdejmowaniu przedniej
PL
cianki nie upu ciÊ jej.
Zak adanie przedniej cianki
PrzymocowaÊ praw± stronÍ przedniej cianki
do radia przez po ±czenie czÍ ci A przedniej
cianki z czÍ ci± B radia, jak to zilustrowano
poniøej i przycisn±Ê, aø do zaskoczenia.
•
Przed wyjÍciem przedniej cianki naleøy zawsze
wy ±czyÊ zasilanie. Chociaø, gdy naci nie siÍ
przycisk RELEASE, aby odblokowaÊ przedni±
ciankÍ, podczas gdy radio nadal jest w ±czone,
zasilanie wy ±cza siÍ automatycznie, aby zapobiec
uszkodzeniu g o nikÛw.
•
Przedniej cianki urz±dzenia nie poddawaÊ
bezpo redniemu dzia aniu promieni s onecznych
lub ºrÛde ciep a, takich jak gor±ce kana y
wentylacyjne oraz nie pozostawiaÊ w miejscach o
duøej wilgotno ci. Nigdy nie pozostawiaÊ jej na
tablicy rozdzielczej itp. samochodu zaparkowanego
bezpo rednio na s oÒcu, kiedy to moøe doj Ê do
OFF
.
znacznego wzrostu temperatury wewn±trz pojazdu.
Alarm ostrzegawczy
Jeøeli kluczyk zap onu przekrÍci siÍ do
po oøenia OFF bez zdjÍcia przedniej cianki,
w ±cza siÍ alarm ostrzegawczy i sygna
dºwiÍkowy bÍdzie trwa przez parÍ sekund.
A
B
Uwagi
•
UpewniÊ siÍ zawsze, czy przedni± ciankÍ
przyk ada siÍ do radia odpowiedni± stron±, gdyø
odwrÛcona Üdo gÛry nogamiá nie daje siÍ za oøyÊ.
•
Podczas zak adania przedniej cianki nie naleøy jej
mocno przyciskaÊ do radia. Moøna j± atwo za oøyÊ
przez tylko lekkie przyci niÍcie do radia.
•
Jeøeli przedni± ciankÍ zabiera siÍ ze sob±, naleøy
w oøyÊ j± do przeznaczonego na ni± etui.
•
Nie wolno mocno naciskaÊ okienka konsoli
przedniej cianki lub poddawaÊ go zbytniemu
naciskowi.
4
Actual total number Sony XR-3503MK2 (E,Pl,Bg,H,R) 3-856-292-11 (1)
Page 17

Ustawianie zegara
Zegar pos uguje siÍ 24 godzinnym
wy wietlaniem cyfrowym.
Przyk ad: ustawienie godziny
10:08 na zegarze
1 Wy wietlanie czasu.
(Nacisn±Ê przycisk
uøytkowania urz±dzenia.)
2 NaciskaÊ przez ponad dwie sekundy
przycisk
Cyfra wskazuj±ca godziny miga.
UstawiÊ godzinÍ.
(do ty u) (do przodu)
DSPL
SEL
–+
DSPL
podczas
.
Obs uga
odtwarzacza kaset
magnetofonowych
S uchanie ta my
Po w oøeniu kasety w ±cza siÍ
automatycznie odtwarzanie.
Aby zmieniÊ kierunek odtwarzania
ta my
proszÍ nacisn±Ê jednocze nie przycisk 0 i
przycisk ).
PL
Obs uga odtwarzacza kaset magnetofonowych
Wskaºnik kierunku przesuwu ta my
3 Nacisn±Ê przez chwilÍ przycisk
Cyfra wskazuj±ca minuty miga.
UstawiÊ minuty.
SEL
–+
(do ty u) (do przodu)
4 Nacisn±Ê przez chwilÍ przycisk
Zegar ulega w ±czeniu.
Uwaga
Nie moøna ustawiaÊ zegara dopÛki nie w ±czy siÍ
zasilania. ProszÍ ustawiaÊ zegar po uprzednim
w ±czeniu radia lub po rozpoczÍciu odtwarzania
kasety magnetofonowej.
SEL
DSPL
.
Odtwarzana jest przednia strona ta my.
Odtwarzana jest tylna strona ta my.
Kierunek odtwarzania jest automatycznie
zmieniany, gdy zakoÒczy siÍ odtwarzanie
jednej strony ta my.
Uwaga
ProszÍ wyj±Ê ta mÍ przed wy ±czeniem odbiornika,
aby zapobiec jej uszkodzeniu.
.
Wyjmowanie kasety
Nacisn±Ê przycisk w celu zatrzymania
odtwarzania i wyjÍcia kasety.
5
Actual total number Sony XR-3503MK2 (E,Pl,Bg,H,R) 3-856-292-11 (1)
Page 18

Szybkie przewijanie
ta my
OdbiÛr Radiowy
Wskaºnik
kierunku
odtwarzania*
(
9
W celu wznowienia trybu odtwarzania proszÍ
nacisn±Ê drugi przycisk szybkiego przewijania
do momentu zwolnienia wci niÍtego
przycisku.
*
Wskaºnik 9 lub wskaºnik (miga podczas
szybkiego przewijania ta my.
W celu
przej cia do
przodu
PL
OdbiÛr programu
radiowego podczas
przewijania w przÛd lub w
ty
ä Funkcja ATA (Automatic Tuner
Activation = automatyczne w ±czanie
programu radiowego)
Podczas odtwarzania nacisn±Ê przycisk
ATA
1
. n Na wy wietlaczu pojawia siÍ napis
ÜATAá.
Podczas przewijania w przÛd lub w ty przy
pomocy przycisku 0 lub ) odbiÛr
programu radiowego w ±cza siÍ automatycznie.
W celu
przej cia do
tyu
Automatyczne szukanie
stacji
1 WybraÊ poø±dane pasmo.
2 Nacisn±Ê jedn± ze stron przycisku
Przeszukiwanie wy ±cza siÍ po uzyskaniu
odbioru stacji.
Aby nastawiÊ odbiornik na odbiÛr konkretnej
stacji, naleøy wielokrotnie naciskaÊ jedn± ze
stron przycisku.
Jeøeli odbiornik radiowy dostroi siÍ do programu
stereofonicznego w zakresie FM o wystarczaj±co
mocnym sygnale,
w okienku konsoli pojawia siÍ napis ÜSTá.
Aby automatyczne dostrajanie nie zatrzymywa o
siÍ na poszczegÛlnych stacjach zbyt czÍsto (tryb
LOCAL SEEK), naleøy przez chwilÍ nacisn±Ê
przycisk SENS, øeby na wy wietlaczu pojawi siÍ
napis ÜLCLá.
Odbiornik dostraja siÍ tylko do stacji ze stosunkowo
mocnymi sygna ami nadawczymi. Tryb LOCAL SEEK
funkcjonuje tylko wtedy, gdy w ±czy o siÍ
automatyczne dostrajanie.
ä Automatyczne dostrajanie
A.MEM
TUNER
FM1 n FM2 n FM3 n
MW n LW n FM1
SEEK/MANU, aby w ±czyÊ szukanie
stacji (automatyczne dostrajanie).
SEEK/MANU
–+
Dla mniejszych
czÍstotliwo ci
ST
SEEK/MANU
–+
Dla wiÍkszych
czÍstotliwo ci
6
Actual total number Sony XR-3503MK2 (E,Pl,Bg,H,R) 3-856-292-11 (1)
Page 19

Jeøeli odbiÛr radiowy na
pa mie FM jest s aby
ä Tryb odbioru monofonicznego
Nacisn±Ê przez chwilÍ przycisk
n Na wy wietlaczu pojawia siÍ napis
ÜMONOá.
Jako Ê dºwiÍku polepsza siÍ, ale staje siÍ on
monofoniczny.
SENS
.
Strojenie przez regulacjÍ
czÍstotliwo ci
ä RÍczne dostrajanie
1 WybraÊ poø±dane pasmo.
A.MEM
FM1 n FM2 n FM3 n
TUNER
MW n LW n FM1
Automatyczne
zapisywanie w pamiÍci
sprzÍtu pozycji stacji
radiowych
ä Funkcja automatycznego
zapisywania w pamiÍci sprzÍtu
Stacje radiowe o wyraºnym odbiorze s±
automatycznie szukane i zapisywane w
pamiÍci sprzÍtu dla kaødego pasma (FM1,
FM2, FM3, MW i LW). Maksymalnie moøna
zapisaÊ dla kaødego pasma 6 stacji
radiowych, ktÛre bÍd± obs ugiwane przez
przyciski 1 do 6, w kolejno ci odpowiadaj±cej
danym czÍstotliwo ciom radiowym.
1 WybraÊ poø±dane pasmo.
A.MEM
TUNER
FM1 n FM2 n FM3 n
MW n LW n FM1
2 Nacisn±Ê i trzymaÊ przyci niÍtym jedn±
stronÍ przycisku SEEK/MANU.
Pu ciÊ przycisk w momencie uzyskania
odbioru poø±danej stacji.
SEEK/MANU
–+
Dla mniejszych
czÍstotliwo ci
ZAPOBIEGANIE WYPADKOM!
Podczas jazdy samochodem naleøy uøywaÊ
wy ±cznie strojenia automatycznego i
przyciskÛw do prze ±czania stacji zapisanych
w pamiÍci. Nie naleøy dostrajaÊ radia rÍcznie!
SEEK/MANU
–+
Dla wiÍkszych
czÍstotliwo ci
2 NaciskaÊ przycisk TUNER/A.MEM przez
d uøej niø dwie sekundy.
A.MEM
TUNER
Rozpoczyna siÍ automatycznie
przeszukiwanie pasma i w pamiÍci sprzÍtu
zapisywana jest pozycja danego
odbieranego dostrojonego programu
radiowego, pod jednym z przyciskÛw
oznaczonych cyframi 1 do 6.
PL
Obs uga odtwarzacza kaset magnetofonowych/OdbiÛr Radiowy
Actual total number Sony XR-3503MK2 (E,Pl,Bg,H,R) 3-856-292-11 (1)
7
Page 20

ZapamiÍtywanie
wy ±cznie wybranych
stacji
Inne funkcje
1 WybraÊ poø±dane pasmo.
A.MEM
TUNER
FM1 n FM2 n FM3 n
MW n LW n FM1
2 DostroiÊ do stacji, ktÛr± pragnie siÍ
zapisaÊ w pamiÍci pod danym
przyciskiem numerycznym.
3 NaciskaÊ wybrany przycisk numeryczny
Numer wybranego przycisku pojawia siÍ teraz
w okienku konsoli.
PL
W pamiÍci moøna wed ug w asnego wyboru zapisaÊ
pod przyciskami numerycznymi po sze Ê stacji dla
kaødego pasma (FM1, FM2, FM3, MW i LW). W
zakresie FM moøna zatem zaprogramowaÊ 18 stacji.
Jeøeli pod przyciskiem, pod ktÛrym by a juø
zaprogramowana stacja, usi uje siÍ zapisaÊ inn±,
poprzedni zapis ulega skasowaniu.
ATA
1
(od
sekundy, aø us yszy siÍ sygna
dºwiÍkowy.
FM
do 6) przez oko o dwie
ST
Odbieranie zapisanych
w pamiÍci stacji
1 WybraÊ poø±dane pasmo.
A.MEM
TUNER
FM1 n FM2 n FM3 n
MW n LW n FM1
2 Nacisn±Ê krÛtko dany przycisk
numeryczny (od
ktÛrym zapisana zosta a szukana stacja
nadawcza.
Uwaga
Jeøeli naciska siÍ przycisk numeryczny d uøej niø
dwie sekundy, dochodzi do zapisania w pamiÍci
aktualnie odbieranej stacji. Aby w ±czyÊ odbiÛr stacji
uprzednio zaprogramowanej pod danym przyciskiem
numerycznym, naleøy go przycisn±Ê tylko krÛtko.
ATA
do 6) pod
1
8
Regulacja
charakterystyki dºwiÍku
1 WybraÊ parametr, ktÛry chce siÍ
uregulowaÊ, przez wielokrotne
naciskanie przycisku
VOL (si a g osu) n BAS (basy) n TRE
(tony wysokie) n BAL (rÛwnowaga) n
FAD (wzmacnianie sygna u) n VOL (si a
gosu)
2 DokonaÊ regulacji danego parametru
przez naciskanie przycisku
+
.
Regulacji parametru dokonaÊ w ci±gu trzech
sekund po jego wybraniu. (Po trzech
sekundach przycisk bÍdzie znowu s uøy jako
regulator si y g osu.)
SEL
.
–
lub
Odbieranie niskich i
wysokich tonÛw nawet
przy ma ej sile g osu
ä Funkcja LOUDNESS
Nacisn±Ê przycisk
konsoli pojawia siÍ napis ÜLOUDá (g o no).
Basy i tony wysokie ulegaj± wzmocnieniu. Dla
wy ±czenia tej funkcji naleøy ponownie
nacisn±Ê przycisk.
LOUD
. n W okienku
Wy ±czanie sygna u
dºwiÍkowego
Nacisn±Ê przycisk 5 jednocze nie
naciskaj±c przycisk
PrzywrÛcenie sygna u dºwiÍkowego uzyskuje
siÍ przez ponowne naci niÍcie powyøszych
przyciskÛw.
SEL
.
Actual total number Sony XR-3503MK2 (E,Pl,Bg,H,R) 3-856-292-11 (1)
Page 21

Konserwacja
Demontaø urz±dzenia
Wymiana bezpiecznika
Podczas wymiany bezpiecznika naleøy
uwaøaÊ na w a ciw± jego obci±øalno Ê, ktÛra
podana jest na opakowaniu bezpiecznika.
Jeøeli bezpiecznik siÍ spali, proszÍ
skontrolowaÊ pod ±czenie do zasilania i
wymieniÊ bezpiecznik. Jeøeli po wymianie
bezpiecznik siÍ ponownie przepali, w
urz±dzeniu wyst±pi ± usterka. W takim
wypadku proszÍ skontaktowaÊ siÍ z
najbliøszym punktem prowadz±cym produkty
firmy Sony.
Bezpiecznik (15 A)
Uwaga
Nigdy nie stosowaÊ bezpiecznikÛw, ktÛrych
stopieÒ obci±øalno ci pr±dowej przekracza
obci±øalno Ê bezpiecznika umieszczonego
fabrycznie w odbiorniku, gdyø moøe to
prowadziÊ do uszkodzenia sprzÍtu.
Czyszczenie ±cznikÛw
Urz±dzenie moøe nie dzia aÊ poprawnie, jeøeli
±czniki pomiÍdzy korpusem a przedni±
ciank± nie s± czyste. Aby temu zapobiec,
naleøy odblokowaÊ przedni± ciankÍ przez
naci niÍcie przycisku RELEASE, nastÍpnie
zdj±Ê j± i oczy ciÊ ±czniki przy pomocy
wacika, ktÛry by uprzednio lekko zwiløony w
alkoholu. Nie naleøy zbyt silnie dociskaÊ. W
przeciwnym wypadku moøe doj Ê do
uszkodzenia z ±czeÒ.
1
Klucz zwalniaj±cy
(za ±czony)
2
3
PL
OdbiÛr Radiowy/Inne funkcje
4
Korpus radia
Ty przedniej cianki
Actual total number Sony XR-3503MK2 (E,Pl,Bg,H,R) 3-856-292-11 (1)
9
Page 22

Lokalizacja kontrolek
RELEASE
SzczegÛ Ûw szukaÊ na stronach w r.
SEL
–+
ATA
DSPL
215634
SEEK/MANU
–+
A.MEM
TUNER
LOUD
SENS OFF
1 Okienko konsoli
PL
2 Przycisk SEL (wybÛr trybu kontrolnego)
58
3 Przycisk DSPL (zmiana trybu
wy wietlania/ustawianie czasu) 5
4 Przycisk 6 (wysuwanie kasety) 5
5 Podczas odbioru programÛw
radiowych:
Przyciski numeryczne 7
Podczas odtwarzania ta m:
ATA
1
Przycisk ATA (automatyczne
w ±czanie programu radiowego) 6
6 Przyciski 0/) (szybkie przewijanie)/
DIR (zmiana kierunku transportu ta my)
56
7 Przycisk LOUD (g o no Ê) 8
8 Przycisk RELEASE (odblokowanie
przedniej cianki) 48
+
9 Przyciski
–
(Regulacja si y
g osu/basÛw/tonÛw wysokich/
rÛwnowagi/wzmacniania sygna Ûw)
58
0 Przycisk SEEK/MANU 67
!¡ Przycisk TUNER/A.MEM (radio
w ±czona • wybÛr pasma/funkcja
automatycznego zapisywania w
pamiÍci sprzÍtu) 67
!™ Przycisk SENS (czu o Ê odbiornika) 6
!£ Przycisk OFF 4
10
Actual total number Sony XR-3503MK2 (E,Pl,Bg,H,R) 3-856-292-11 (1)
Page 23

Dane techniczne
Odtwarzacz kaset magnetofonowych
¶cieøka ta my odtwarzacz
4- cieøkowy,
2-g o nikowy,
sterofoniczny
Zniekszta cenia dºwiÍku (wskutek nierÛwnomiernego
przesuwu ta my)
0,13% (WRMS)
Odpowiedº czÍstotliwo ciowa
30 â 15.000 Hz
OdstÍp psofometryczny 55 dB
Odbiornik radiowy
FM
Zakres strojenia 65,0 â 74,0 MHz
87,5 â 108,0 MHz
Antena ZewnÍtrzne z ±cze
antenowe
CzÍstotliwo Ê po rednia 10,7 MHz
Czu o Ê uøywalna 12 dBf
Wybiorczo Ê 70 dB przy 400 kHz
OdstÍp psofometryczny 65 dB (stereo),
68 dB (mono)
Harmoniczne zniekszta cenie przy 1 kHz
0,5% (stereo),
0,3% (mono)
Rozdzielanie 35 dB przy 1 kHz
Odpowiedº czÍstotliwo ciowa
30 â 15.000 Hz
WspÛ czynnik przechwytu
2 dB
MW/LW
Zakres strojenia MW: 531 â 1.602 kHz
LW : 153 â 281 kHz
Antena ZewnÍtrzne z ±cze
antenowe
CzÍstotliwo Ê po rednia 450 kHz
CzuoÊ MW: 30 µV
LW : 50 µV
OgÛlne
PrzewÛd wyj ciowy PrzewÛd zasilaj±cy
sterowanie anteny
automatycznej
Regulacja barwy dºwiÍku Basy ±8 dB przy 100 Hz
Tony niskie ±8 dB przy
10 kHz
Zapotrzebowanie mocy 12 V DC z akumulatora
samochodowego (o
uziemieniu ujemnym)
Wymiary ok. 186 × 57 × 170 mm
(d ./wys./szer.)
Wymiary montaøowe ok. 182 × 53 × 155 mm
(d ./wys./szer.)
CiÍøar ok. 1,2 kg
Za ±czone akcesoria Za ±czone elementy
montaøowe (1 komplet)
Etui na przedni± ciankÍ
(1)
Wygl±d i dane techniczne mog± ulec zmianie bez
uprzedzenia.
PL
Wzmacniacz mocy
Wyj cia Wyj cia dla g o nikÛw
(z ±czniki szczelne)
Impedancja go nikÛw 4 â 8 omÛw
Maksymalne wyj cie mocy
20 W × 4 (przy 4 omach)
Actual total number Sony XR-3503MK2 (E,Pl,Bg,H,R) 3-856-292-11 (1)
11
Page 24

Usuwanie usterek
NastÍpuj±ca lista kontrolna moøe okazaÊ siÍ przydatna do rozwi±zania wiÍkszo ci problemÛw,
ktÛre mog± wyst±piÊ podczas uøytkowania urz±dzenia.
Przed przeczytaniem poniøszej listy kontrolnej naleøy przeczytaÊ instrukcjÍ montaøu i obs ugi.
OgÛlne
Usterka
Brak dºwiÍku
W okienku konsoli nie
pojawiaj± siÍ wskaºniki.
Odtwarzanie ta m
Usterka
DºwiÍk odtwarzany z kasety
jest zniekszta cony.
OdbiÛr programÛw radiowych
PL
Usterka
Brak odbioru zapamiÍtanych
stacji.
Automatyczne dostrajanie nie
jest moøliwe.
Wskaºnik ÜSTá miga.
Przyczyna/Usuwanie usterki
• WyregulowaÊ si Í g osu przyciskiem
• ProszÍ ustawiÊ regulator wzmocnienia sygna Ûw w pozycji
rodkowej dwug o nikowego systemu.
Zdj±Ê przedni± ciankÍ i oczy ciÊ ±czniki. SzczegÛ Ûw szukaÊ w
czÍ ci ÜCzyszczenie ±cznikÛw á w rozdziale ÜKonserwacjaá.
Przyczyna/Usuwanie usterki
G owica jest zanieczyszczona. n Naleøy j± oczy ciÊ.
Przyczyna/Usuwanie usterki
• ZapisaÊ w pamiÍci w a ciw± czÍstotliwo Ê.
• Sygna nadawczy jest za s aby.
Sygna nadawczy jest za s aby. n Pos uøyÊ siÍ strojeniem
rÍcznym.
• DostroiÊ dok adnie.
• Sygna nadawczy jest za s aby. n Nacisn±Ê przycisk SENS,
aby przej Ê na tryb odbioru monofonicznego.
+
.
12
Actual total number Sony XR-3503MK2 (E,Pl,Bg,H,R) 3-856-292-11 (1)
Page 25

PL
Actual total number Sony XR-3503MK2 (E,Pl,Bg,H,R) 3-856-292-11 (1)
13
Page 26

Fıbb jellemzık
¡ltal·nos tudnivalÛk
• Levehetı kezelılap, melyet mag·val vihet,
ha kisz·ll autÛj·bÛl (4. oldal).
• Ha kikapcsolja a gy˙jt·st, ·m nem t·volÌtja
el a kÈsz¸lÈk kezelılapj·t, ˙gy aktiviz·lÛdik
a figyelmeztetı funkciÛ.
• A beÈpÌtett erısÌtı (max. teljesÌtmÈny:
20 W × 4 csatorna) lehetıvÈ teszi
4-hangszÛrÛs rendszer alkalmaz·s·t.
• A kÈsz¸lÈk Ûr·ja 24-Ûr·s digit·lis
kijelzıvel rendelkezik (5. oldal).
MagnÛ
• Az ATA (Automatic Tuner Activation =
Automatikus Rádió Aktivizálás) funkciÛ
automatikusan bekapcsolja a r·diÛt, ha ÷n
elıre- vagy h·tracsÈvÈl egy kazett·t
(6. oldal).
HangolÛ
• KÈsz¸lÈkÈn 30 adÛt programozhat be: 18
ultrarˆvidhull·m˙ (FM), 6 kˆzÈphull·m˙
(MW) Ès 6 hossz˙hull·m˙ (LW) adÛt.
• Az Automatikus MemÛria funkciÛ
segÌtsÈgÈvel 30 r·diÛadÛt programozhat be
egyszer˚en Ès gyorsan (7. oldal).
H
Biztons·gi elıÌr·sok
• Ha autÛj·t t˚zı napfÈnynek kitett helyen
hagyta, s az autÛ belsı terÈben
felforrÛsodott a levegı, hagyja leh˚lni a
kÈsz¸lÈket, s csak ezut·n kapcsolja be.
• Ha a kÈsz¸lÈk nem kap ·ramot, kÈrj¸k
ellenırizze elıszˆr a csatlakoz·sokat, s ha
ezeknÈl nem tal·l rendellenessÈget,
ellenırizze a biztosÌtÈkot.
• Ha nem jˆn hang egy 2 hangszÛrÛs
rendszerbıl, ·llÌtsa a hangszab·lyozÛt a
kˆzÈpsı ·ll·sba.
• Ha kÈsz¸lÈke motoros antenn·val
rendelkezik, ˙gy az antenna automatikusan
kiemelkedik Ès kiegyenesedik a kÈsz¸lÈk
bekapcsol·sakor.
Amennyiben olyan kÈrdÈsek vagy problÈm·k
mer¸lnÈnek fel kÈsz¸lÈkÈt illetıen, melyekre
nem ny˙jt eligazÌt·st a haszn·lati ˙tmutatÛ,
˙gy kÈrj¸k forduljon a legkˆzelebbi Sony
m·rkakereskedıhˆz.
2
Actual total number Sony XR-3503MK2 (E,Pl,Bg,Hu,R) 3-856-292-11 (1)
Page 27

TudnivalÛk a kazett·krÛl
TartalomjegyzÈk
A kazett·k kezelÈse
• Ne Èrintse meg a kazett·ban a szalagot, mert
az esetleg r·ker¸lı szennyezıdÈsek Ès a
por hat·s·ra elpiszkolÛdnak a fejek.
• ‹gyeljen arra, hogy kazett·i ne ker¸ljenek
beÈpÌtett m·gnest tartalmazÛ egysÈgek (pl.
hangszÛrÛk vagy erısÌtı) kˆzelÈbe, ellenkezı
esetben ugyanis elıfordulhat, hogy a felvÈtel
letˆrlıdik, ill. eltorzul.
• Ne tegye ki kazett·it kˆzvetlen napfÈnynek,
k¸lˆnˆsen alacsony hımÈrsÈkletnek, ill.
p·r·nak.
• Ha hossz˙ idın kereszt¸l hallgat egy
kazett·t, elıfordulhat, hogy az felmelegszik.
Ez azonban a beÈpÌtett erısÌtı hat·s·ra
tˆrtÈnik, s nem jelent rendellenessÈget.
TudnivalÛ a szalagtov·bbÌtÛ fejek
tisztÌt·s·rÛl
• A szalagtov·bbitÛ fejek a kazett·k
haszn·lata sor·n idıvel elpiszkolÛdnak, s ez
gyenge hangminısÈghez, ill. hangkiesÈshez
vezethet. EzÈrt javasoljuk, hogy tisztÌtsa meg
a szalagtov·bbÌtÛ fejeket kb. havonta
egyszer a szak¸zletekben kaphatÛ Sony
tisztÌtÛkazetta segÌtsÈgÈvel. Ha a
hangminısÈg a tisztÌtÛkazetta haszn·lata
ut·n sem javulna, ˙gy kÈrj¸k forduljon a
legkˆzelebbi Sony m·rkakereskedıhˆz.
• RÈgi, ill. rossz minısÈg˚ kazett·k
haszn·latakor hamarabb elpiszkolÛdnak a
szalagtov·bbÌtÛ fejek. llyen esetben m·r ak·r
egy vagy kÈt lej·tsz·s ut·n is romolhat a
hangminısÈg.
90 percesnÈl hosszabb kazett·k
90 percesnÈl hosszabb kazett·k haszn·lat·t
kiz·rÛlag hossz˙, folyamatos lej·tsz·skor
javasoljuk. Ezek a kazett·k ugyanis k¸lˆnˆsen
vÈkony szalaggal kÈsz¸lnek, mely kˆnnyen
megny˙lhat. Ha az ilyen szalagokat gyakran
elindÌtj·k Ès meg·llÌtj·k, elıfordulhat, hogy a
kÈsz¸lÈk becsÌpi a szalagot.
A kezelılap levÈtele Ès visszahelyezÈse ............. 4
Az Ûra be·llÌt·sa..................................................5
A magnÛ kezelÈse
Kazetta lej·tsz·sa ...............................................5
Kazetta kivÈtele ................................................... 5
GyorscsÈvÈlÈs.....................................................6
R·diÛhallgat·s elıre-, ill. h·tracsÈvÈlÈs kˆzben
ä ATA (Automatic Tuner Activation =
Automatikus R·diÛ Aktiviz·l·s) funkciÛ .....6
R·diÛhallgat·s
Automatikus adÛkeresÈs
ä Automatikus hangol·s ............................... 6
Gyenge FM-vÈtel esetÈn
ääMonÛ vÈtel ............................................... 6
Az adÛk be·llÌt·sa finomhangol·ssal
ä Manu·lis hangol·s ..................................... 6
Az adÛk automatikus beprogramoz·sa
ä Automatikus memÛria funkciÛ ................... 7
Kiv·lasztott adÛk beprogramoz·sa .................... 7
Beprogramozott adÛk hallgat·sa........................7
EgyÈb funkciÛk
HangszÌn-szab·lyoz·s ........................................8
Magas- Ès mÈly hangok kiemelÈse ak·r halk
hangerı esetÈn is
ä Hangerı funkciÛ......................................... 8
A figyelmeztetı jel lekapcsol·sa ......................... 8
A kÈsz¸lÈk karbantart·sa .................................. 8
A kÈsz¸lÈk kiv Ètel e ............................................9
A kÈsz¸lÈk kezelıgombjai ...............................10
M˚szaki adatok ................................................11
HibakeresÈs ...................................................... 12
H
Actual total number Sony XR-3503MK2 (E,Pl,Bg,Hu,R) 3-856-292-11 (1)
3
Page 28

A kezelılap levÈtele Ès
visszahelyezÈse
Az autÛr·diÛ kezelılapj·t leveheti a
kÈsz¸lÈkrıl Ès mag·val viheti, megelızve
ezzel a kÈsz¸lÈk esetleges ellop·s·t.
A kezelılap levÈtele
A kÈsz¸lÈk kezelılapj·nak levÈtele elıtt ne
felejtse el megnyomni az
oldja ki a kezelılapot a RELEASE gomb
megnyom·s·val, majd vegye le a kÈsz¸lÈkrıl
maga felÈ h˙zva, az ·br·nak megfelelıen.
RELEASE gomb
Figyeljen arra, hogy ne ejtse le a kioldott
kezelılapot.
A kezelılap visszahelyezÈse
IgazÌtsa oda a kezelılap jobb oldal·t a
kÈsz¸lÈkhez, ˙gy, hogy a kezelılap A-val
H
jelˆlt pontja a kÈsz¸lÈk B-vel jelˆlt pontj·hoz
illeszkedjen, (l·sd ·bra), majd nyomja a
kezelılapot a kÈsz¸lÈkhez, amÌg be nem
pattan.
OFF
gombot. Ezut·n
•
Figyeljen arra, hogy a kezelılapot csak az OFF
gomb megnyom·sa ut·n vegye le a kÈsz¸lÈkrıl.
Ha azonban errıl elfelejtkezne, ˙gy a kÈsz¸lÈk a
RELEASE gomb megnyom·sakor automatikusan
kikapcsolÛdik, megakad·lyozva a hangszÛrÛk
k·rosod·s·t.
•
Ne tegye ki a kezelılapot kˆzvetlen napfÈnynek,
hıforr·snak, - pl. forrÛ levegı kivezetıcsˆvÈnek Ès ne hagyja nyirkos helyen. Soha ne hagyja a
kezelılapot a m˚szerfalon, ha autÛj·val napfÈnyes
helyen parkol, s annak belsı terÈben felforrÛsodhat
a levegı.
Figyelmeztetı jelzÈsek
Ha kikapcsolja a gy˙jt·st anÈlk¸l, hogy
elt·volÌtan· a kÈsz¸lÈk kezelılapj·t, ˙gy
bekapcsol a figyelmeztetı funkciÛ Ès nÈh·ny
m·sodpercen kereszt¸l figyelmeztetı jeleket
hallat.
4
A
B
TudnivalÛk
•
Figyeljen arra, hogy a kezelılapot a megfelelı
helyzetbe ·llÌtva helyezze vissza, fejjel lefelÈ
ugyanis nem lehet beilleszteni a kÈsz¸lÈkbe.
•
A kezelılap bepattint·sakor ne fejtsen ki erıs
nyom·st - a kezelılap ugyanis akkor is bepattan a
helyÈre, ha egÈszen finoman nyomja hozz· a
kÈsz¸lÈkhez.
•
Ha a kezelılapot kiveszi a kÈsz¸lÈkbıl, helyezze a
kÈsz¸lÈk tartozÈkakÈnt sz·llÌtott tartÛdobozba.
•
A kezelılap kijelzı ablak·ra erıs nyom·st
gyakorolni nem szabad.
Actual total number Sony XR-3503MK2 (E,Pl,Bg,Hu,R) 3-856-292-11 (1)
Page 29

Az Ûra be·llÌt·sa
Az Ûra 24-Ûr·s digit·lis kijelzıvel rendelkezik.
Az Ûra be·llÌt·sa pl. 10:08-ra
1 Az Ûra kijelzÈse.
(Kapcsolja be a kÈsz¸lÈket, majd nyomja
DSPL
meg a
2 Nyomja le a
m·sodpercen kereszt¸l.
Ekkor villogni kezdenek az Ûra karakterhelyei.
gombot.)
DSPL
gombot tˆbb mint kÈt
A magnÛ kezelÈse
Kazetta lej·tsz·sa
A kazetta behelyezÈse ut·n a kÈsz¸lÈk
automatikusan megkezdi a lej·tsz·st.
¡llÌtsa be a helyes Ûr·t.
SEL
–+
(h·tra) (elıre)
3 Nyomja meg rˆviden a
Ekkor villogni kezdenek a perc karakterhelyei.
¡llÌtsa be a helyes percet.
SEL
–+
(h·tra) (elıre)
4 Nyomja meg rˆviden a
Ekkor bekapcsol az Ûra.
TudnivalÛ
Az Ûr·t csak a kÈsz¸lÈk bekapcsol·sa ut·n lehet
be·llÌtani, be·llÌt·sa elıtt teh·t mindig kapcsolja be a
r·diÛt, vagy kezdjen el lej·tszani egy kazett·t.
SEL
DSPL
gombot.
gombot.
A lej·tsz·s ir·ny·nak
megv·ltoztat·s·hoz
nyomja meg egyszerre a 0 Ès a )
gombot.
A szalag lej·tsz·si ir·ny·nak kijelzÈse
A kÈsz¸lÈk a szalag felsı oldal·t j·tsza le.
A kÈsz¸lÈk a szalag alsÛ oldal·t j·tsza le.
Ha a szalag lej·rt, a kÈsz¸lÈk
automatikusan megv·ltoztatja a lej·tsz·si
ir·nyt.
TudnivalÛ
A szalag k·rosod·s·nak elker¸lÈsÈre javasoljuk,
hogy ne hagyja benne a kazett·t a kikapcsolt
kÈsz¸lÈkben.
Kazetta kivÈtele
Nyomja meg a gombot. A kÈsz¸lÈk ekkor
befejezi a lej·tsz·st Ès kiadja a kazett·t.
H
A magnÛ kezelÈse
Actual total number Sony XR-3503MK2 (E,Pl,Bg,Hu,R) 3-856-292-11 (1)
5
Page 30

GyorscsÈvÈlÈs
TUNER
A.MEM
R·diÛhallgat·s
Ir·nyjelzı*
(
9
A norm·l lej·tsz·s folytat·s·hoz nyomja meg
az ellenkezı ir·ny˙ gyorscsÈvÈlı gombot,
amÌg ki nem oldÛdik az elızıleg lenyomott
gyorscsÈvÈlı gomb.
*
GyorscsÈvÈlÈs kˆzben villog az 9, ill. az
ir·nyjelzı.
ElırecsÈvÈlÈs H·tracsÈvÈlÈs
R·diÛhallgat·s elıre-, ill.
h·tracsÈvÈlÈs kˆzben
ä ATA (Automatic Tuner Activation =
Automatikus R·diÛ Aktiviz·l·s) funkciÛ
H
Nyomja meg lej·tsz·s kˆzben az
gombot. n A kijelzın ekkor megjelenik az
ÜATAá felirat.
Ha gyorscsÈvÈlÈsbe kezd a 0 ill. a )
gomb segÌtsÈgÈvel, a r·diÛ automatikusan
bekapcsol.
Automatikus adÛkeresÈs
ä Automatikus hangol·s
1 ¡llÌtsa be a kÌv·nt s·vot.
FM1 n FM2 n FM3 n
MW n LW n FM1
2 Az egyes adÛk bekeresÈsÈhez nyomja
meg a SEEK/MANU (keresÈs/manu·lis)
(
ATA
1
gomb valamelyik szÈlÈt (automatikus
hangol·s).
SEEK/MANU
–+
Alacsonyabb
frekvenci·k ir·ny·ban
A keresÈs azonnal meg·ll, mihelyt be·llÌtÛdik
egy adÛ. Nyomja le a gomb valamelyik szÈlÈt
tˆbbszˆr egym·s ut·n addig, amÌg meg nem
tal·lja a kÌv·nt adÛt.
Ha a kÈsz¸lÈk megfelelı szint˚ FM sztereÛ
programot hangolt be,
ST
megjelenik az ÜSTá kijelzÈs.
Ha el akarja ker¸lni, hogy az automatikus
hangol·s az ˆsszes adÛn·l - beleÈrtve a t˙l
gyengÈn foghatÛ adÛkat - meg·lljon, nyomja meg
rˆviden az LCL gombot, amÌg a kijelzın
megjelenik az ÜLCLá felirat. A kÈsz¸lÈk ekkor
Ühelyi keresı ¸zemmÛdbaá (local seek mode)
v·lt.
A kÈsz¸lÈk ekkor csak azokat az adÛkat hangolja
be, melyektıl viszonylag erıs jelek Èrkeznek. A helyi
keresı ¸zemmÛd csak automatikus hangol·skor
m˚kˆdik.
SEEK/MANU
–+
Magasabb
frekvenci·k ir·ny·ban
Gyenge FM-vÈtel esetÈn
ä MonÛ vÈtel
Nyomja meg rˆviden a
kijelzın ekkor megjelenik a ÜMONOá felirat.
Az ad·st Ìgy ugyan csak monÛban
hallgathatja, ·m javul a hangminısÈg.
SENS
gombot. n A
6
Actual total number Sony XR-3503MK2 (E,Pl,Bg,Hu,R) 3-856-292-11 (1)
Page 31

Az adÛk be·llÌt·sa
finomhangol·ssal
ä Manu·lis hangol·s
1 ¡llÌtsa be a kÌv·nt s·vot.
A.MEM
FM1 n FM2 n FM3 n
TUNER
MW n LW n FM1
2 Nyomja meg Ès tartsa lenyomva a SEEK/
MANU gomb valamelyik szÈlÈt.
Engedje el a gombot a keresett adÛ
vÈtelekor.
SEEK/MANU
–+
Alacsonyabb
frekvenci·k ir·ny·ban
A BALESETVESZ…LY ELKER‹L…S…RE!
Ha vezetÈs kˆzben kÌv·n r·diÛzni, az
automatikus hangol·st, ill. a
programgombokat haszn·lja Ès ne vÈgezzen
manu·lis hangol·st.
SEEK/MANU
–+
Magasabb
frekvenci·k ir·ny·ban
Az adÛk automatikus
beprogramoz·sa
ä Automatikus memÛria funkciÛ
Ez a funkciÛ automatikusan beprogramozza
valamennyi s·von (FM1, FM2, FM3, MW Ès
LW) a legjobban foghatÛ adÛkat. A kÈsz¸lÈk
minden egyes s·von 6 ·llom·st t·rol a
programogombok alatt, az adÛk
frekvenci·j·nak megfelelı sorrendben.
1 ¡llÌtsa be a kÌv·nt s·vot.
A.MEM
TUNER
FM1 n FM2 n FM3 n
MW n LW n FM1
2 Nyomja meg Ès tartsa lenyomva a
TUNER/A.MEM gombot tˆbb mint kÈt
m·sodpercen kereszt¸l.
A.MEM
TUNER
A kÈsz¸lÈk ekkor vÈgigkeresi a be·llÌtott
s·vot Ès automatikusan bet·rolja a
behangolt adÛkat az 1-6-os
programgombok alatt.
Kiv·lasztott adÛk
beprogramoz·sa
1 ¡llÌtsa be a kÌv·nt s·vot.
A.MEM
TUNER
FM1 n FM2 n FM3 n
MW n LW n FM1
2 Hangolja be azt az adÛt, melyet t·rolni
kÌv·n egy programgomb alatt.
3 Tartsa lenyomva a kÌv·nt
programgombot (
m·sodpercen kereszt¸l, amÌg sÌpjelet
nem hall.
A lenyomott programgomb sz·ma ekkor
megjelenik a kijelzıablakban.
FM
A kÈsz¸lÈk minden egyes s·von (FM1, FM2, FM3,
MW Ès LW) max. 6 ·llom·st kÈpes t·rolni a
programgombok alatt, az ÷n ·ltal meghat·rozott
sorrendben. FM s·von teh·t 18 adÛt lehet
beprogramozni.
Ha ˙j adÛt prÛb·l beprogramozni egy m·r Üfoglaltá
programgombon, ˙gy azzal kitˆrli a kor·bban
beprogramozott adÛt.
ST
ATA
1
- 6) kb. kÈt
Beprogramozott adÛk
hallgat·sa
1 ¡llÌtsa be a kÌv·nt s·vot.
A.MEM
TUNER
FM1 n FM2 n FM3 n
MW n LW n FM1
2 Nyomja le rˆviden azt a programgombot
ATA
1
(
- 6), amely alatt beprogramozta
a kÌv·nt adÛt.
TudnivalÛ
Ha tˆbb mint kÈt m·sodpercen kereszt¸l tartja
lenyomva a programgombot, ˙gy a kÈsz¸lÈk
bet·rolja az Èpp vett adÛt. Ha beprogramozott adÛt
kÌv·n hallgatni, ˙gy ¸gyeljen arra, hogy csak
egÈszen rˆvid idıre nyomja meg a programgombot.
H
A magnÛ kezelÈse/R·diÛhallgat·s
7
Actual total number Sony XR-3503MK2 (E,Pl,Bg,Hu,R) 3-856-292-11 (1)
Page 32

EgyÈb funkciÛk
HangszÌn-szab·lyoz·s
1 V·lassza ki a
megnyom·s·val a mÛdosÌtani kÌv·nt
jellemzıt.
VOL (hangerı) n BAS (mÈly hangok) n
TRE (magas hangok) n BAL (balansz) n
FAD (hangszÌn) n VOL (hangerı)
SEL
gomb ismÈtelt
A kÈsz¸lÈk
karbantart·sa
BiztosÌtÈkcsere
Ha kicserÈli a biztosÌtÈkot, ¸gyeljen arra, hogy
az ˙j biztosÌtÈkon felt¸ntetett amper-ÈrtÈk
megfeleljen a rÈgi biztosÌtÈk nÈvleges
·ramerıssÈgÈnek. Ha kiÈgett a biztosÌtÈk,
ellenırizze a t·pvezetÈk csatlakoz·s·t, majd
cserÈlje ki a biztosÌtÈkot. Ha az ˙j biztosÌtÈk is
kiÈgne, ˙gy annak valÛszÌn˚leg a kÈsz¸lÈk
belsı meghib·sod·sa az oka. Ebben az
esetben kÈrj¸k forduljon a legkˆzelebbi Sony
m·rkakereskedıhˆz.
2 A kÌv·lasztott jellemzıt a
+
gomb segÌtsÈgÈvel mÛdosÌthatja.
A mÛdosÌt·st 3 m·sodpercen bel¸l vÈgezze
el, ennek lej·rt·val ugyanis a fenti gombok
ismÈt norm·l hangerıszab·lyozÛ gombkÈnt
m˚kˆdnek.
Magas- Ès mÈly hangok
H
kiemelÈse ak·r halk
hangerı esetÈn is
ä Hangerı funkciÛ
Nyomja meg a
ekkor megjelenik a ÜLOUDá felirat.
A kÈsz¸lÈk kiemeli a mÈly Ès a magas
hangokat. Ha norm·l hangszÌnnel kÌv·nja
folytatni a lej·tsz·st, nyomja le ˙jra a
gombot.
LOUD
gombot. n A kijelzın
A figyelmeztetı jel
lekapcsol·sa
Tartsa lenyomva a
le kˆzben a
Ha ˙jra aktiv·lni kÌv·nja a figyelmeztetı
jeleket, nyomja le ˙jra a fenti gombokat.
5
gombot.
SEL
gombot Ès nyomja
–
, ill. a
BiztosÌtÈk (15 A)
FigyelmeztetÈs
Soha ne haszn·ljon olyan biztosÌtÈkot,
melynek nÈvleges ·ramerıssÈge meghaladja
az eredetileg a kÈsz¸lÈkhez adott biztosÌtÈk
nÈvleges ·ramerıssÈgÈt, ezzel ugyanis
k·rosÌthatja kÈsz˚lÈkÈt.
A csatlakozÛk tisztÌt·sa
A kÈsz¸lÈk Ès a kezelılap kˆzˆtti csatlakozÛk
elpiszkolÛd·sa akad·lyozhatja a kÈsz¸lÈk
rendeltetÈsszer˚ m˚kˆdÈsÈt. Ennek
elker¸lÈsÈre oldja ki a kezelılapot a RELEASE
LOUD
gomb megnyom·s·val, emelje le a
kÈsz¸lÈkrıl, majd tisztÌtsa meg a
csatlakozÛkat egy alkoholba m·rtott f¸ltisztÌtÛ
p·lcika segÌtsÈgÈvel. A tisztÌt·st finom
mozdulatokkal vÈgezze, ellenkezı esetben
ugyanis k·rosodhat a csatlakozÛ.
KÈsz¸lÈk
A kezelılap h·toldala
8
Actual total number Sony XR-3503MK2 (E,Pl,Bg,Hu,R) 3-856-292-11 (1)
Page 33

A kÈsz¸lÈk kivÈtele
1
KioldÛ kulcs (tartozÈk)
2
3
4
H
EgyÈb funkciÛk
Actual total number Sony XR-3503MK2 (E,Pl,Bg,Hu,R) 3-856-292-11 (1)
9
Page 34

A kÈsz¸lÈk kezelıgombjai
+
ATA
DSPL
RELEASE
SEL
–+
A fekete kˆrben r megadott oldalakon rÈszletes t·jÈkoztat·st tal·l.
215634
SEEK/MANU
–+
A.MEM
TUNER
LOUD
SENS OFF
1 Kijelzıablak
2 SEL (vezÈrlÈsi mÛd v·lasztÛ) gomb 58
3 DSPL (kijelzÈs-mÛd v·ltoztatÛ/Ûra
be·llÌtÛ) gomb 5
H
4 6 (kazettakiad·s) gomb 5
5 R·diÛhallgat·s kˆzben:
Programgombok 7
Kazettalej·tsz·s kˆzben:
ATA
1
ATA (automatikus r·diÛ
aktiv·lÛ) 6
6 0/) (gyorscsÈvÈlı)/DIR (lej·tsz·si
ir·ny v·ltÛ) gombok 56
7 LOUD (hangerı) gomb 8
8 RELEASE (kezelılap kioldÛgomb) 48
–
9
(hangerı/mÈly hang/
magas hang/balansz/hangszÌn) gomb
58
0 SEEK/MANU (keresı /manu·lis) gomb
67
!¡ TUNER/A.MEM (r·diÛ bekapcsolÛ •
s·vbe·llÌtÛ/automatikus memÛria)
gomb 67
!™ SENS (ÈrzÈkenysÈg be·llÌtÛ) gomb 6
!£ OFF (KI) gomb 4
10
Actual total number Sony XR-3503MK2 (E,Pl,Bg,Hu,R) 3-856-292-11 (1)
Page 35

M˚szaki adatok
MagnÛ
Szalagrendszer 4 s·vos, 2 csatorn·s
sztereÛ
Ny·vog·s Ès torzÌt·s 0,13% (WRMS)
Frekvencia·tvitel 30 â 15.000 Hz
Jel-zaj viszony 55 dB
HangolÛ
FM
Hangol·si tartom·ny 65,0 â 74,0 MHz,
87,5 â 108,0 MHz
Antenna bemenet K¸lsı antennacsatlakozÛ
KˆzÈpfrekvencia 10,7 MHz
…rzÈkenysÈg 12 dBf
Szelektivit·s 400 kHz-en 70 dB
Jel-zaj viszony 65 dB (sztereÛ),
68 dB (monÛ)
HarmÛnikus torzÌt·s 1 kHz-en
0,5% (sztereÛ),
0,3% (monÛ)
S·vsz˚rÈs 1 kHz-en 35 dB
Frekvencia·tvitel 30 â 15.000 Hz
VÈteli ar·ny 2 dB
MW/LW
Hangol·si tartom·ny MW: 531 â 1.602 kHz
LW: 153 â 281 kHz
Antennabemenet K¸lsı antennacsatlakozÛ
KˆzÈpfrekvencia 450 kHz
…rzÈkenysÈg MW: 30 µV
LW: 50 µV
ErısÌtı
Kimenetek HangszÛrÛkimenetek
(kis ·ramn·l is biztos
kontaktus)
HangszÛrÛ impedancia 4 â 8 ohm
Maxim·lis teljesÌtmÈny 20 W × 4 (4 ohm
impedancia)
¡ltal·nos m˚szaki jellemzık
VezÈrlı pontok Motoros antenna vezÈrlı
pontja
HangszÌnvezÈrlÈs MÈly hangok 100 Hz-en
±8 dB
Magas hangok 10 kHz-en
±8 dB
¡ramell·t·s 12 V egyen·ram˙
autÛakkumul·tor
(negatÌv fˆld)
MÈretek kb. 186 × 57 × 170 mm
(szÈ × ma × mÈ)
BeszerelÈsi mÈretek kb. 182 × 53 × 155 mm
(szÈ × ma × mÈ)
Tˆmeg kb. 1,2 kg
MellÈkelt tartozÈkok SzerelıkÈszlet az
¸zembehelyezÈshez/
csatlakoztat·shoz
(1 kÈszlet)
Kezelılap tartÛ doboz (1)
A formaterv Ès a m˚szaki adatok v·ltoztat·s·nak
jog·t fenntartjuk.
H
Actual total number Sony XR-3503MK2 (E,Pl,Bg,Hu,R) 3-856-292-11 (1)
11
Page 36

HibakeresÈs
+
Az al·bbi lista segÌtsÈget ny˙jt a kÈsz¸lÈke haszn·lata kˆzben esetleg fellÈpı hib·k legtˆbbjÈnek
kik¸szˆbˆlÈsÈhez.
A hibakeresÈsi ˙tmutatÛ elolvas·sa elıtt kÈrj¸k nÈzze ·t a csatlakoztat·si Ès a haszn·lati
˙tmutatÛt.
¡ltal·nos hib·k
HibajelensÈg
Nincs hang
Nem jelennek meg a kijelzÈsek
a kijelzıablakban.
Kazetta lej·tsz·s
HibajelensÈg
Torz a hang.
R·diÛhallgat·s
HibajelensÈg
Nem m˚kˆdnek a
H
programgombok.
Nem m˚kˆdik az automatikus
hangol·s.
A kijelzıablakban villog az ÜSTá
jel.
Ok/Hibaelh·rÌt·s
• ¡llÌtsa be a hangerıt a
• ¡llÌtsa a 2-hangszÛrÛs rendszer hangszab·lyozÛj·t a kˆzÈpsı
pozÌciÛba.
T·volÌtsa el a kezelılapot Ès tisztÌtsa meg a csatlakozÛkat. Errıl
rÈszletesebb ˙tmutat·st tal·l ÜA kÈsz¸lÈk karbantart·saá
cÌm˚ fejezet ÜA csatlakozÛk tisztÌt·saá cÌmszava alatt.
Ok/Hibaelh·rÌt·s
ElpiszkolÛdott a lej·tszÛfej. n TisztÌtsa meg.
Ok/Hibaelh·rÌt·s
• Programozza be a helyes frekvenci·t.
• T˙l gyenge az ad·s.
T˙l gyenge az ad·s. n A kÌv·nt adÛt manu·lisan kell be·llÌtani.
• Hangolja be pontosan.
• T˙l gyenge az ad·s.
n V·ltson ·t MONO-ra a SENS gomb megnyom·s·val.
gomb segÌtsÈgÈvel.
12
Actual total number Sony XR-3503MK2 (E,Pl,Bg,Hu,R) 3-856-292-11 (1)
Page 37

13
H
Actual total number Sony XR-3503MK2 (E,Pl,Bg,Hu,R) 3-856-292-11 (1)
 Loading...