

Page 1
FM/MW/LW
Cassette Car
Stereo
3-810-725-11 (1)
Operating Instructions
Mode d’emploi
Bedienungsanleitung
Istruzioni per l’uso
Gebruiksaanwijzing
For installation and connections, see the supplied installation/connections
manual.
En ce qui concerne l’installation et les connexions, consulter le manuel
d’installation/connexions fourni.
Zur Installation und zum Anschluß siehe die mitgelieferte Installations-/
Anschlußanleitung.
Per l’installazione e i collegamenti, vedere il manuale di installazione/
collegamenti in dotazione.
Zie voor het monteren en aansluiten van het apparaat de bijgeleverde [Montage/
Aansluitingen]-handleiding.
EN
F
D
I
NL
Actual total number
XR-3501MK2
1995 by Sony Corporation
Sony XR-3501MK2 (E,F,G,H,I) 3-810-725-11 (1)
Page 2

EN
Features
General
• Detachable-front panel enables you to take
the front panel away with you when you
leave your car (page 4).
• Caution alarm will be activated if you turn
off the ignition key without removing the
front panel from the unit.
• Built-in power amplifier (max. output:
20 W × 4 ch) enables you to enjoy a
4-speaker system.
•Digital 24-hour clock provided (page 5).
Cassette player section
• ATA (Automatic Tuner Activation) for
automatically turning on the tuner while fastforwarding or rewinding a tape (page 6).
Tuner section
• Up to 30 stations can be preset: 18 stations on
FM, 6 stations each of MW and LW.
• Automatic Memory function stores a total
of 30 stations in memory quickly and easily
(page 7).
Precautions
•If your car is parked in direct sunlight
resulting in a considerable rise in
temperature inside the car, allow the unit to
cool off before operating it.
•If no power is being supplied to the unit,
check the connections first. If everything is in
order, check the fuse.
•If no sound comes from the speakers of a
2-speaker system, set the fader control to the
center position.
•If your car is equipped with a power
antenna, note that it will be automatically
extended while the unit is operating.
If you have any questions or problems
concerning your unit that are not covered in
this manual, please consult your nearest Sony
dealer.
2
Actual total number Sony XR-3501MK2 (E,F,G,H,I) 3-810-725-11 (1)
Page 3
Notes on Cassettes
Table of Contents
Cassette care
•Do not touch the tape surface of a cassette, as
any dirt or dust will contaminate the heads.
•Keep cassettes away from equipment with
built-in magnets such as speakers and
amplifiers, as erasure or distortion of the
recorded tape could occur.
•Do not expose cassettes to direct sunlight,
extremely cold temperatures, or moisture.
•When the tape is played back for a long
period, the cassette shell may become warm
because of the built-in power amplifier. This
is not a sign of a malfunction.
Notes on Cassette Deck Tape Heads
•Long use of cassette tapes contaminates the
tape head causing poor sound quality or
complete sound dropout. Therefore, we
recommend cleaning the tape head once a
month or so with the separately available
Sony Cassette Cleaning Set. If the sound does
not improve after using a cleaning cassette,
please consult your nearest Sony dealer.
•In case of old or inferior cassette tapes, the
tape head gets contaminated much more
quickly. Depending on the tape, one or two
playbacks may cause poor sound.
Cassettes longer than 90 minutes
The use of cassettes longer than 90 minutes is
not recommended except for long continuous
play. The tapes used for these cassettes are
very thin and tend to be stretched easily.
Frequent playing and stopping of these tapes
may cause them to be pulled into the cassette
deck mechanism.
Detaching and Attaching the Front Panel ............ 4
Setting the Clock ...................................................... 5
Cassette Player Operation
Listening to Tape Playback .................................... 5
Ejecting the Cassette ................................................ 5
Fast-winding the Tape ............................................ 6
Radio Reception during Fast-forwarding or
Rewinding of a Tape
— ATA (Automatic Tuner Activation)
Function .......................................................... 6
Radio Reception
Searching for Stations Automatically
— Automatic Tuning ......................................... 6
If FM Stereo Reception is Poor
— Monaural Mode .............................................. 6
Tuning in by Adjusting the Frequency
— Manual Tuning ............................................... 7
Memorizing Stations Automatically
— Automatic Memory Function ...................... 7
Memorizing Only the Desired Stations ................ 7
Receiving the Memorized Stations ....................... 7
Other Functions
Adjusting the Sound Characteristics .................... 8
Enjoying Bass and Treble at Low Volume
— Loudness Function ......................................... 8
Muting the Beep Tone ............................................. 8
EN
Maintenance ............................................................. 8
Dismounting the Unit ............................................. 9
Button Locations .................................................... 10
Specifications .......................................................... 11
Troubleshooting Guide ......................................... 12
Actual total number Sony XR-3501MK2 (E,F,G,H,I) 3-810-725-11 (1)
3
Page 4

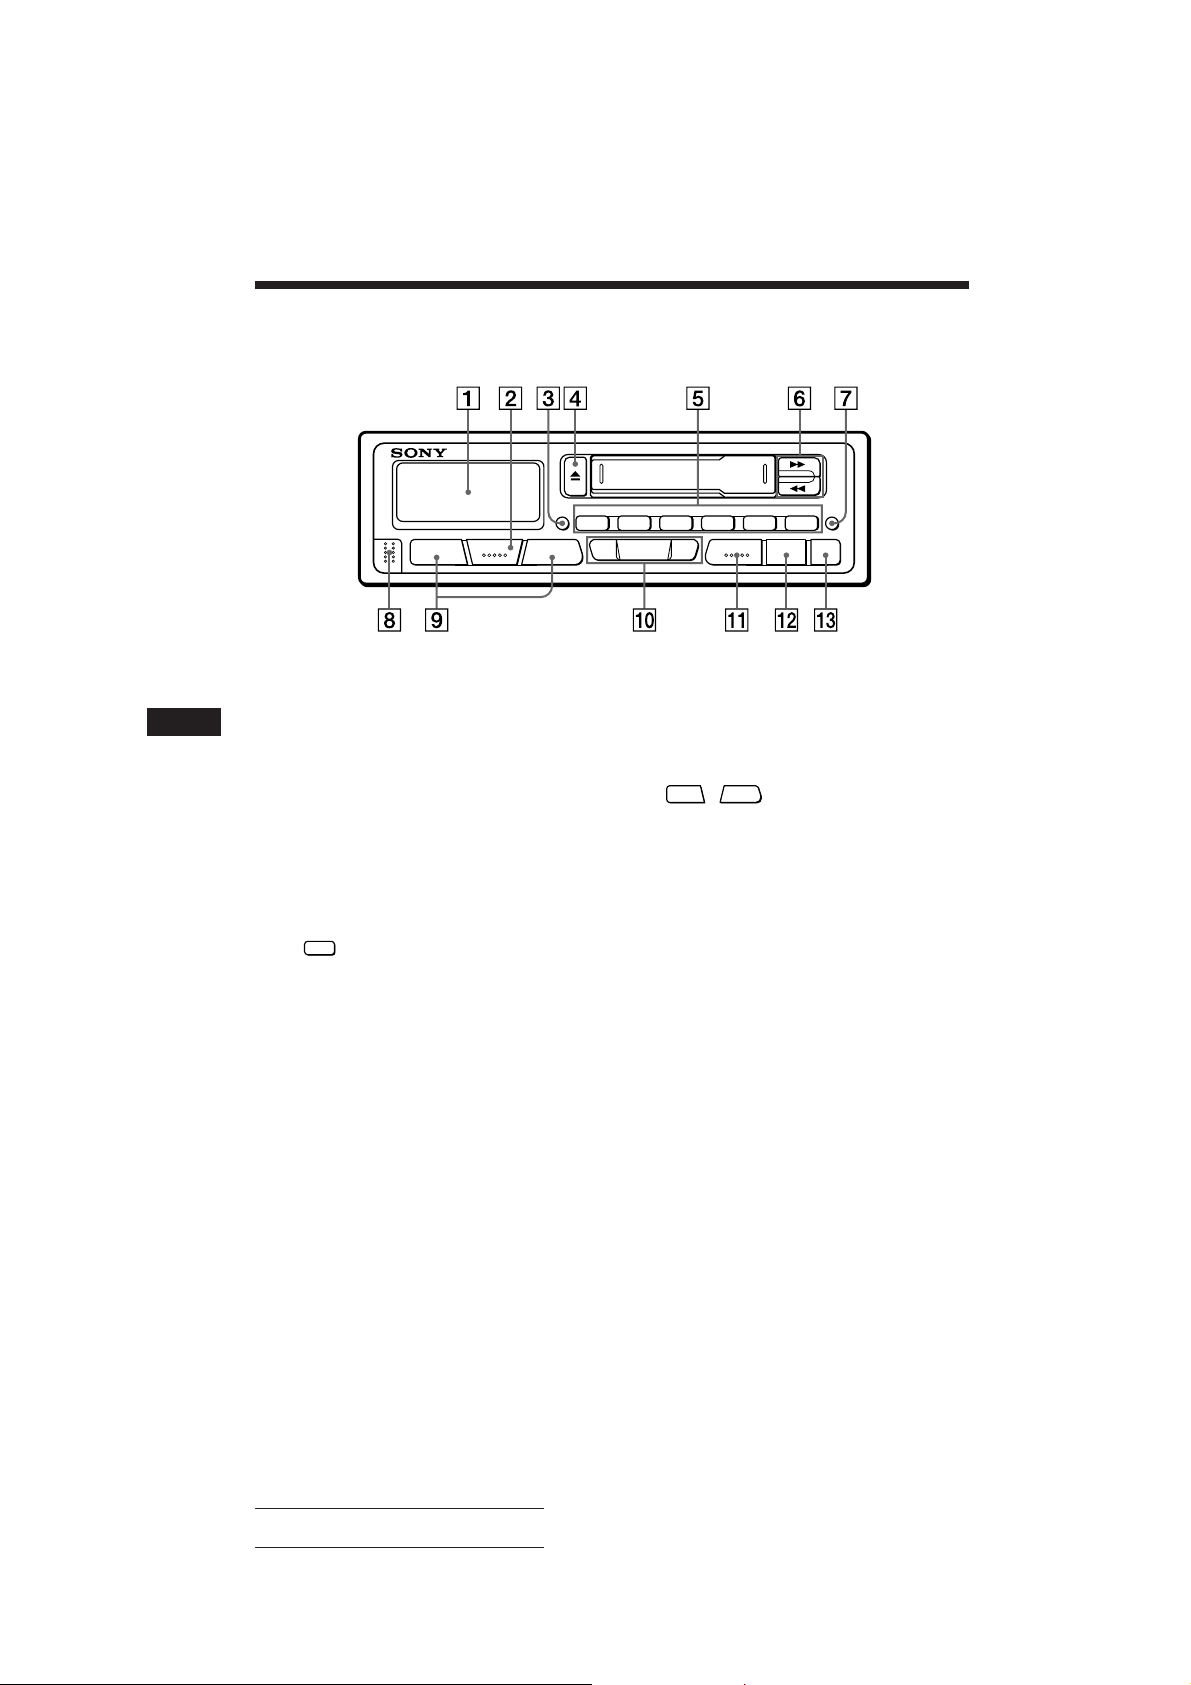
Detaching and Attaching
the Front Panel
The front panel of this unit can be detached in
order to prevent the unit from being stolen.
Detaching the Front Panel
Before detaching the front panel, be sure to
press the
RELEASE button to open up the front panel
and detach the panel by pulling it towards you
as illustrated.
OFF
button first. Then press the
RELEASE button
• Do not expose the front panel to direct sunlight, heat
sources such as hot air ducts or leave it in a humid place.
Never leave it on the dashboard etc. of a car parked in
direct sunlight where there may be a considerable rise in
temperature inside the car.
Caution alarm
If you turn the ignition key to the OFF position
without removing the front panel, the caution
alarm will be activated and a beep tone will be
heard for a few seconds.
EN
Be sure not to drop the panel after detaching it
from the unit.
Attaching the Front Panel
Apply the right side of the front panel to the
unit by attaching part A of the front panel to
part B of the unit as illustrated, then swing
the left side into the unit until it clicks.
A
B
Notes
• Make sure that the front panel is the right way up when
attaching it to the unit as it cannot be attached upside
down.
• Do not press the front panel hard against the unit when
attaching it to the unit. It can easily be attached by
pressing it lightly against the unit.
• When you carry the front panel with you, put it in the
supplied front panel case.
• Do not press hard or give excessive pressure to the
display windows of the front panel.
• Before removing the front panel, be sure to turn the
power off. However, if you press the RELEASE button to
detach the panel while the unit is still turned on, the
power will be automatically turned off in order to protect
the speakers from being damaged.
4
Actual total number Sony XR-3501MK2 (E,F,G,H,I) 3-810-725-11 (1)
Page 5
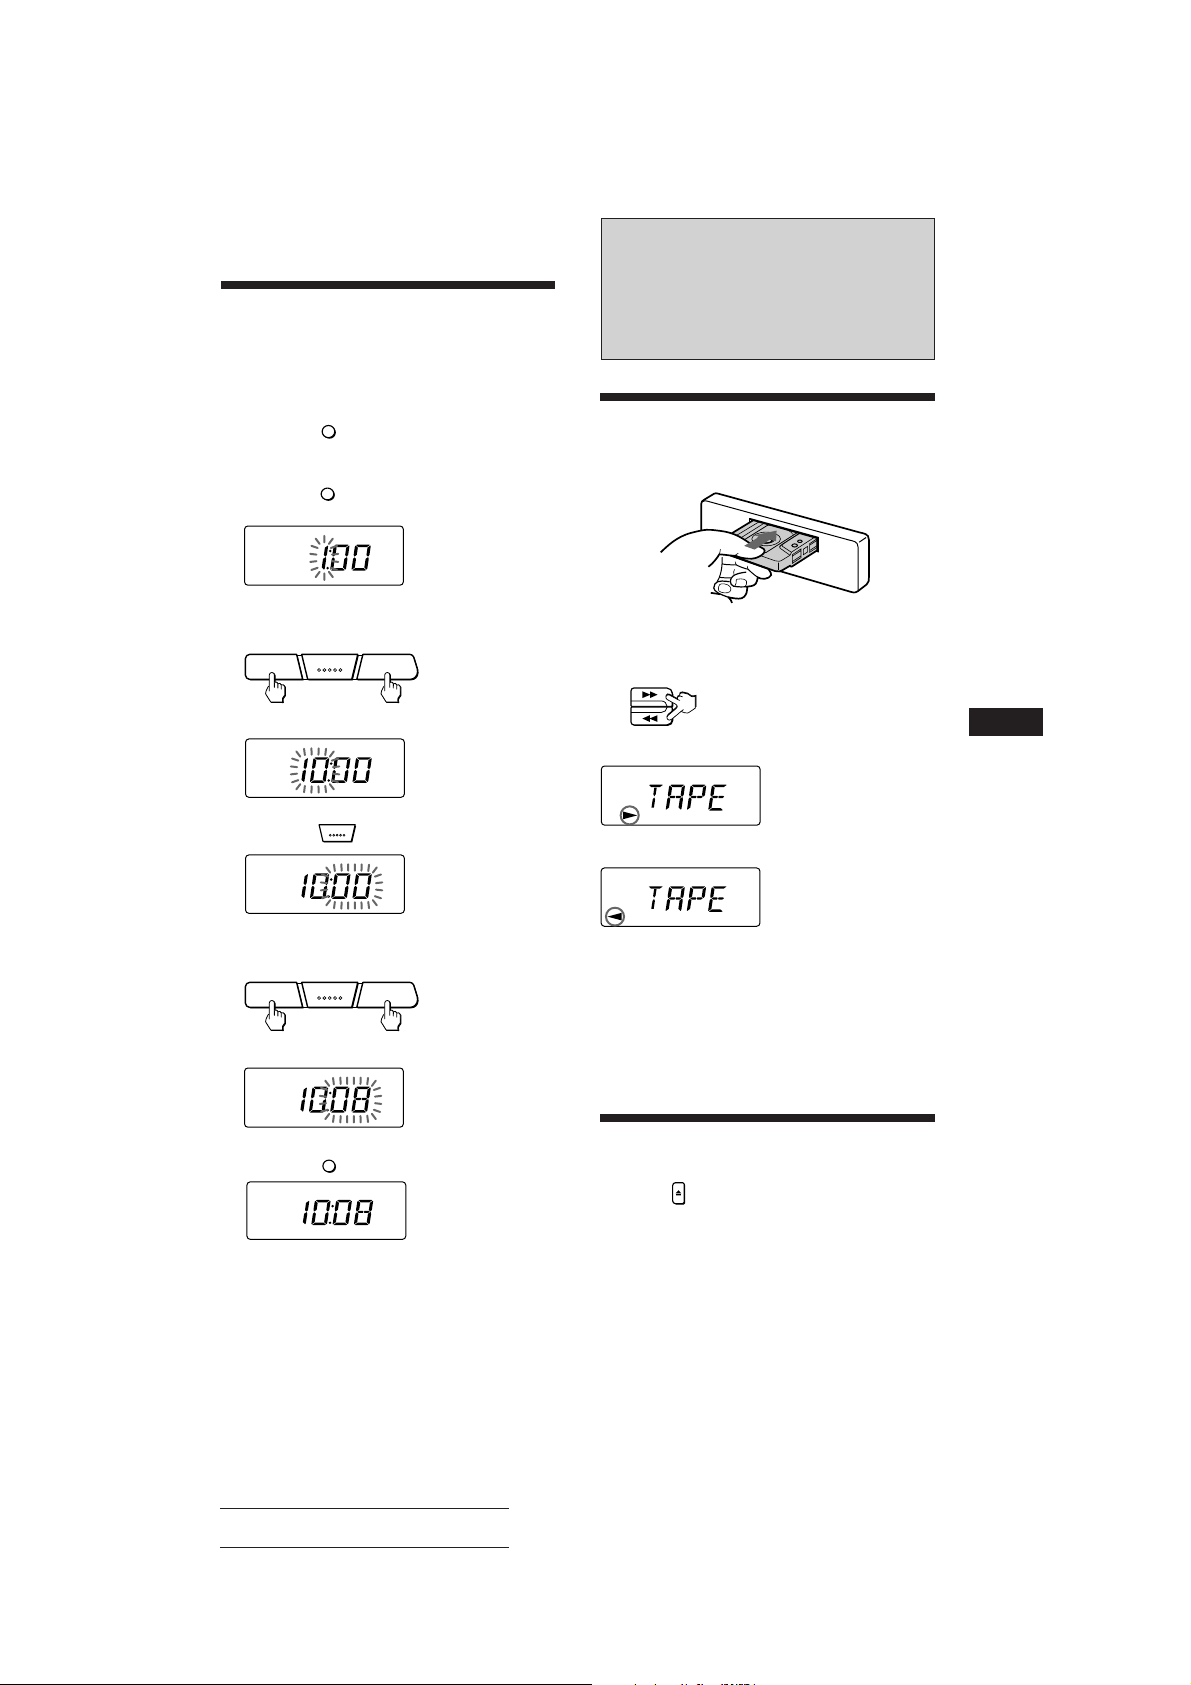
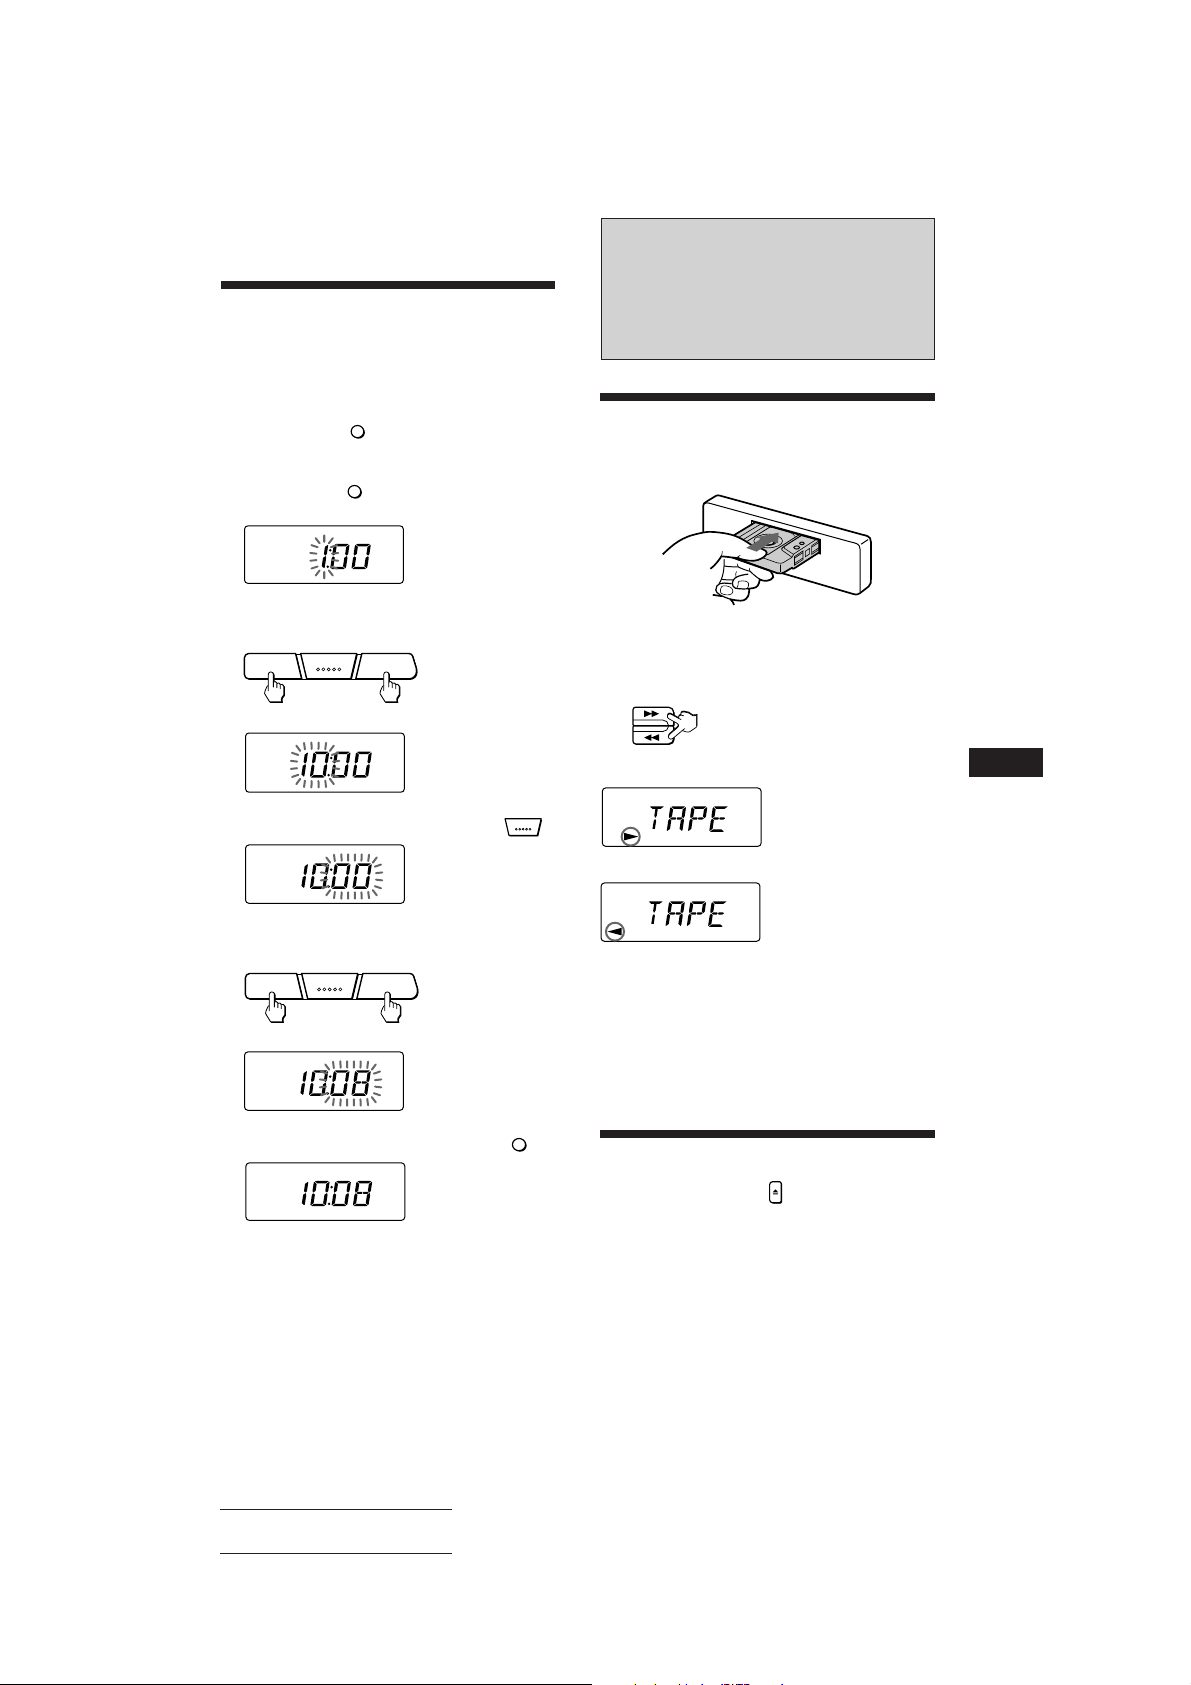
Setting the Clock
The clock has a 24-hour digital indication.
For example, setting it to 10:08
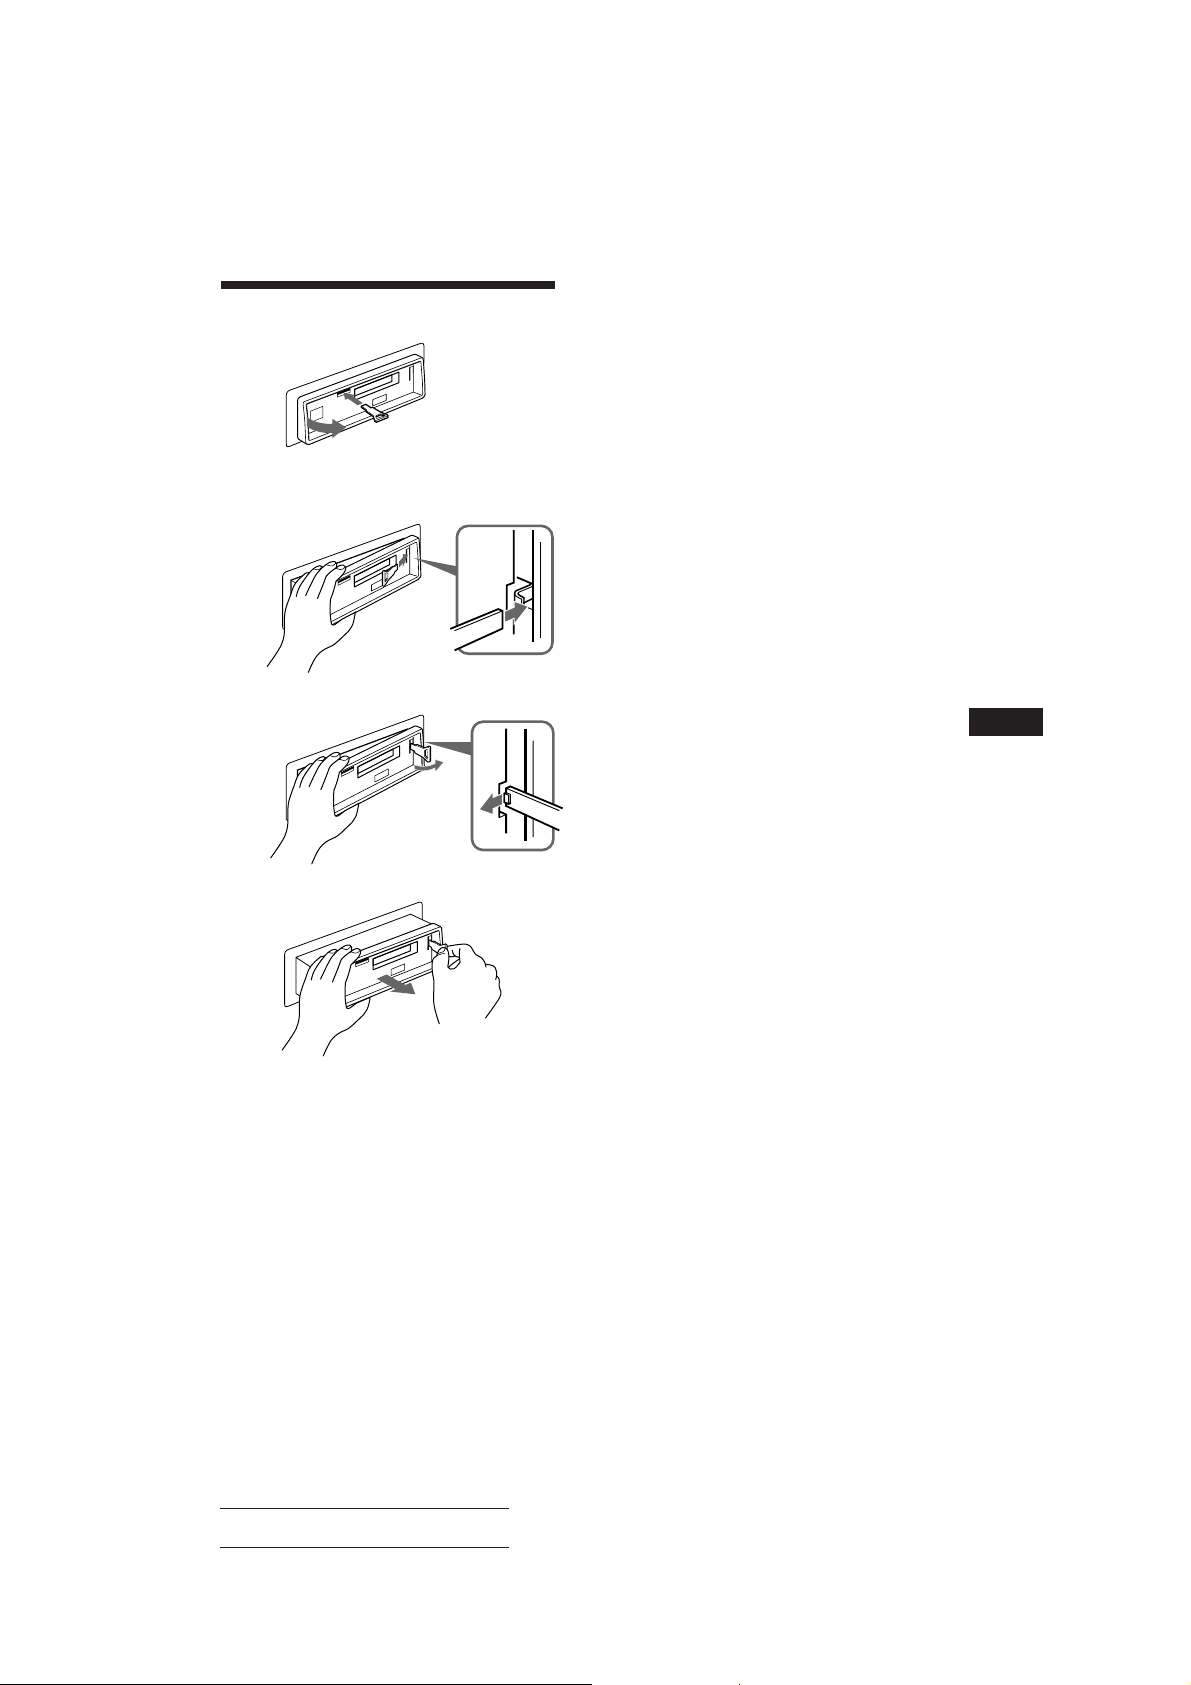
1 Display the time.
(Press the
operation.)
2 Press the
seconds.
The hour digit(s) blinks.
Set the hour digits.
DSPL
button during unit
DSPL
button for more than two
SEL
–+
Cassette Player
Operation
Listening to Tape Playback
After inserting the cassette, playback
will start automatically.
To change the tape direction,
press both the 0 and the ) buttons at the
same time.
(to go forward)(to go back)
3 Press the
The minute digits blink.
Set the minute digits.
–+
4 Press the
The clock activates.
Note
The clock cannot be set unless the power is turned on. Set
the clock after you turn on the radio, or during tape
playback.
SEL
button momentarily.
SEL
(to go forward)(to go back)
DSPL
button momentarily.
Indication of Tape Transport Direction
The side facing up is being played.
The side facing down is being played.
Tape playback automatically changes
direction at the end of the tape.
Note
Before turning off the unit, eject the tape to avoid tape
damage.
Ejecting the Cassette
Press the button to stop playback and eject
the cassette.
EN
Cassette Player Operation
Actual total number Sony XR-3501MK2 (E,F,G,H,I) 3-810-725-11 (1)
5
Page 6
Fast-winding the Tape
TUNER
A.MEM
Direction
indicator*
To advance To rewind
Radio Reception
EN
(
9
To resume playback, press the other fastwinding button partially until the locked
button is released.
* The 9 or ( indicator will flash while fast-winding the
tape.
Radio Reception during
Fast-forwarding or
Rewinding of a Tape
— ATA (Automatic Tuner Activation)
Function
Press the
n “ATA” appears on the display.
When fast-forwarding or rewinding with the
0 or ) button, the tuner will turn on
automatically.
ATA
1
button during playback.
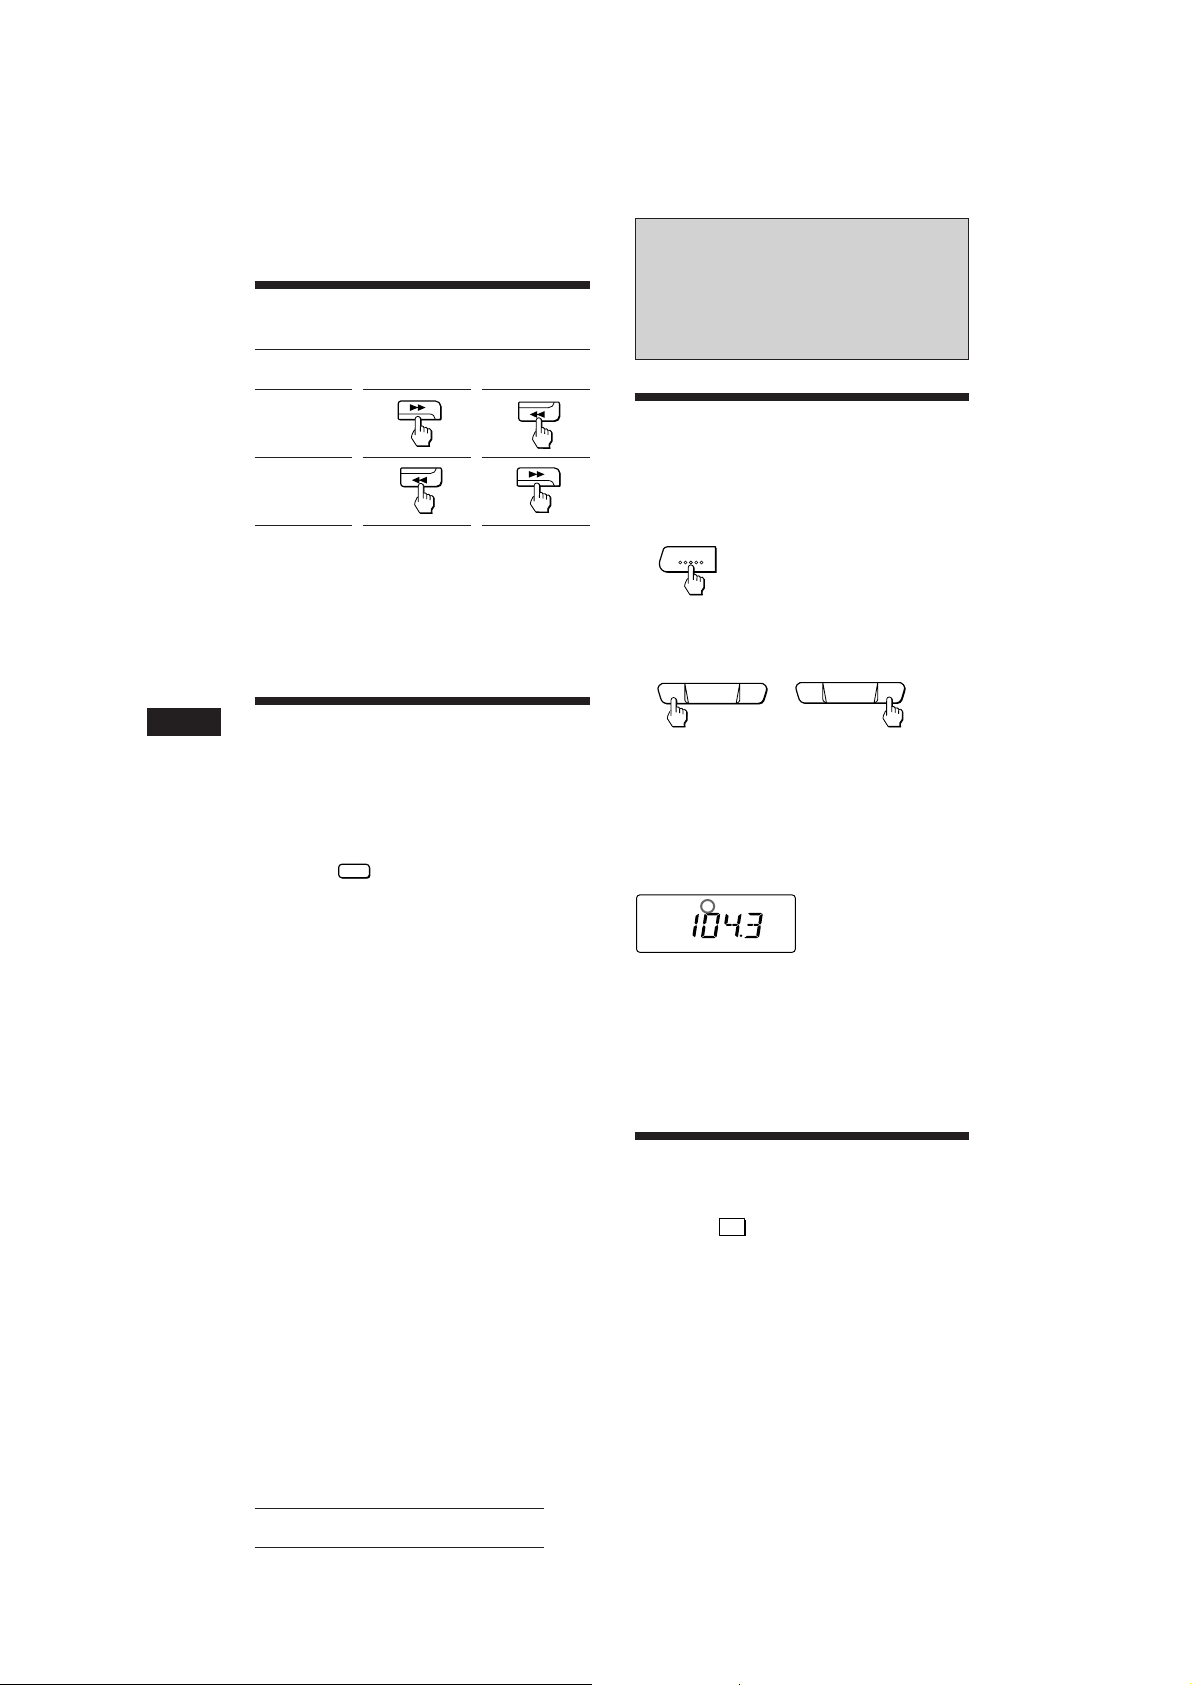
Searching for Stations
Automatically
— Automatic Tuning
1 Select the desired band.
FM1 n FM2n FM3 n
MW n LW n FM1
2 Press either side of the SEEK/MANU
button momentarily to search for the
next station (automatic tuning).
SEEK/MANU
–+
For lower
frequencies
The scanning stops when a station is received.
Press either side of the button repeatedly until
the desired station is received.
When an FM stereo program with a sufficient
signal strength is tuned in,
ST
the “ST” indication will appear.
To avoid the automatic tuning from stopping on
stations too frequently (local seek mode), press
the SENS button momentarily to get the “LCL”
indication.
Only the stations with relatively strong signals will be
tuned in. The local seek mode functions only when the
automatic tuning is in operation.
SEEK/MANU
–+
For higher
frequencies
If FM Stereo Reception is
Poor
Press the
n “MONO” appears on the display.
The sound will improve, but it will become
monaural.
— Monaural Mode
SENS
button momentarily.
6
Actual total number Sony XR-3501MK2 (E,F,G,H,I) 3-810-725-11 (1)
Page 7
Tuning in by Adjusting the
Frequency
— Manual Tuning
Memorizing Only the
Desired Stations
1 Select the desired band.
A.MEM
TUNER
FM1 n FM2n FM3 n
MW n LW n FM1
2 Press and hold either side of the SEEK/
MANU button.
Release the button when the desired station
is received.
SEEK/MANU
–+
For lower
frequencies
PREVENT ACCIDENTS!
When tuning in during driving, use the
automatic tuning and the memory preset
tuning instead of the manual tuning.
SEEK/MANU
–+
For higher
frequencies
Memorizing Stations
Automatically
— Automatic Memory Function
Stations with the clearest reception are
automatically searched and memorized on each
band (FM1, FM2, FM3, MW and LW). Up to 6
stations on each band can be stored on the
preset number buttons 1 to 6 in the order of
band frequency.
1 Select the desired band.
A.MEM
TUNER
FM1 n FM2n FM3 n
MW n LW n FM1
1 Select the desired band.
A.MEM
TUNER
FM1 n FM2n FM3 n
MW n LW n FM1
2 Tune in the station which you wish to
store on the preset number button.
3 Press and hold the desired preset
number button (
two seconds until you hear a beep tone.
The number of the pressed preset number
button appears in the display window.
FM
Up to 6 stations on each band (FM1, FM2, FM3, MW and
LW) can be stored on the preset number buttons in the
order of your choice. Therefore, 18 stations can be
memorized on FM.
If you try to store another station on the same preset
number button, the previously stored station will be
erased.
ST
ATA
to 6) for about
1
Receiving the Memorized
Stations
1 Select the desired band.
A.MEM
TUNER
FM1 n FM2n FM3 n
MW n LW n FM1
EN
Cassette Player Operation/Radio Reception
2 Press the TUNER/A.MEM button for more
than two seconds.
A.MEM
TUNER
The unit will be start scanning the selected
band and memorize the tuned stations on
the preset number button 1 through 6
automatically.
Actual total number Sony XR-3501MK2 (E,F,G,H,I) 3-810-725-11 (1)
2 Press momentarily the preset number
button on which the desired station is
stored.
Note
If you press the preset number button for more than two
seconds, the currently received station will be memorized.
To receive the previously memorized station, make sure
that the preset number button is pressed only
momentarily.
7
Page 8

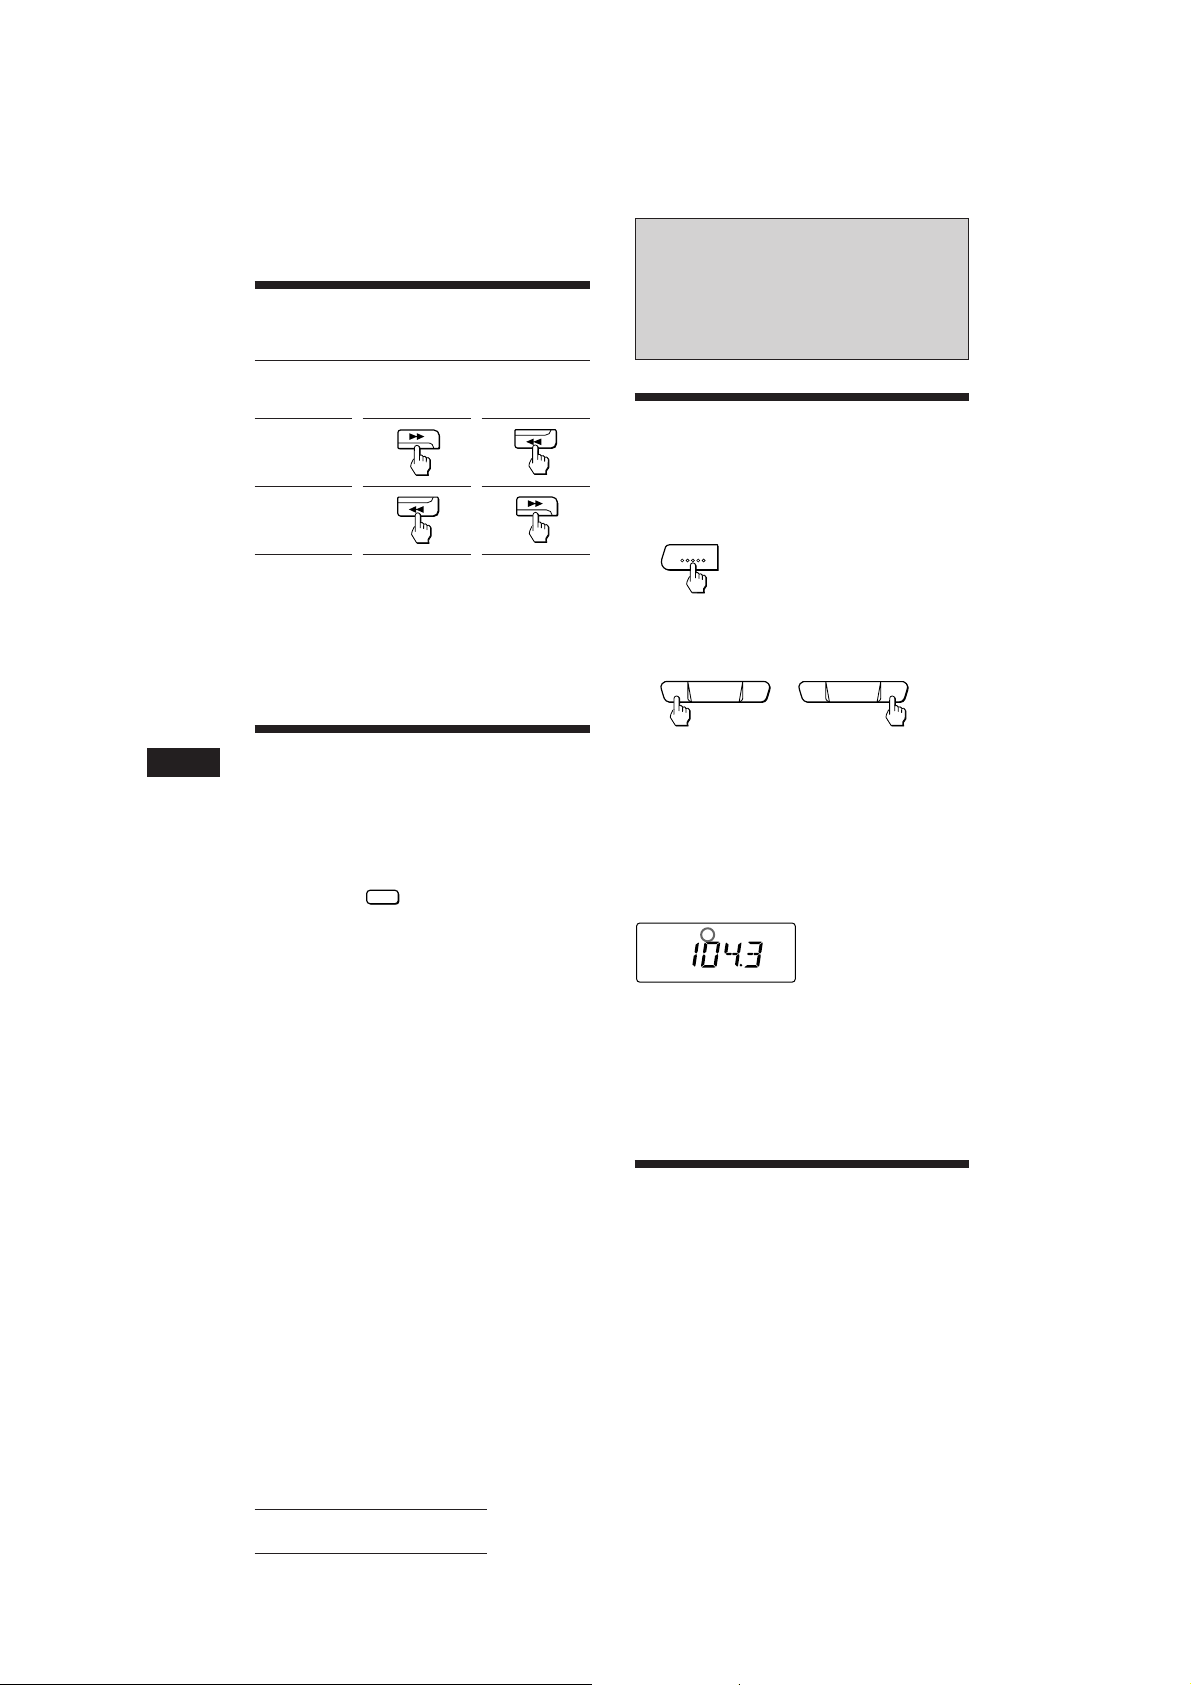
Other Functions
Adjusting the Sound
Characteristics
1 Select the item you want to adjust by
pressing the
VOL (volume) n BAS (bass) n TRE
(treble) n BAL (balance) n FAD (fader)
n VOL (volume)
SEL
button repeatedly.
Maintenance
Fuse Replacement
When replacing the fuse, be sure to use one
matching the amperage rating stated on the
fuse. If the fuse blows, check the power
connection and replace the fuse. If the fuse
blows again after replacement, there may be an
internal malfunction. In such a case, consult
your nearest Sony dealer.
Fuse (15 A)
EN
2 Adjust the selected item by pressing
either the
Adjust within three seconds after selecting.
(After three seconds the button will again
serve as volume control button.)
–
or
+
button.
Enjoying Bass and Treble
at Low Volume
— Loudness Function
Press the
appear on the display.
Bass and treble will be boosted. To cancel,
press again.
LOUD
button. n “LOUD” will
Muting the Beep Tone
Press the 5 button while pressing
SEL
the
To reactivate the beep tone, press these buttons
once more.
button.
Warning
Never use a fuse with an amperage rating
exceeding the one supplied with the unit as
this could damage the unit.
Cleaning the Connectors
The unit may not function properly if the
connectors between the unit and the front
panel are not clean. In order to prevent this,
open the front panel by pressing the RELEASE
button, then detach it and clean with a cotton
swab dipped in alcohol. Do not apply too
much force. Otherwise, the connector may get
damaged.
Main unit
Back of the front panel
8
Actual total number Sony XR-3501MK2 (E,F,G,H,I) 3-810-725-11 (1)
Page 9
Dismounting the Unit
1
Release key (supplied)
2
3
EN
Other Functions
4
Actual total number Sony XR-3501MK2 (E,F,G,H,I) 3-810-725-11 (1)
9
Page 10
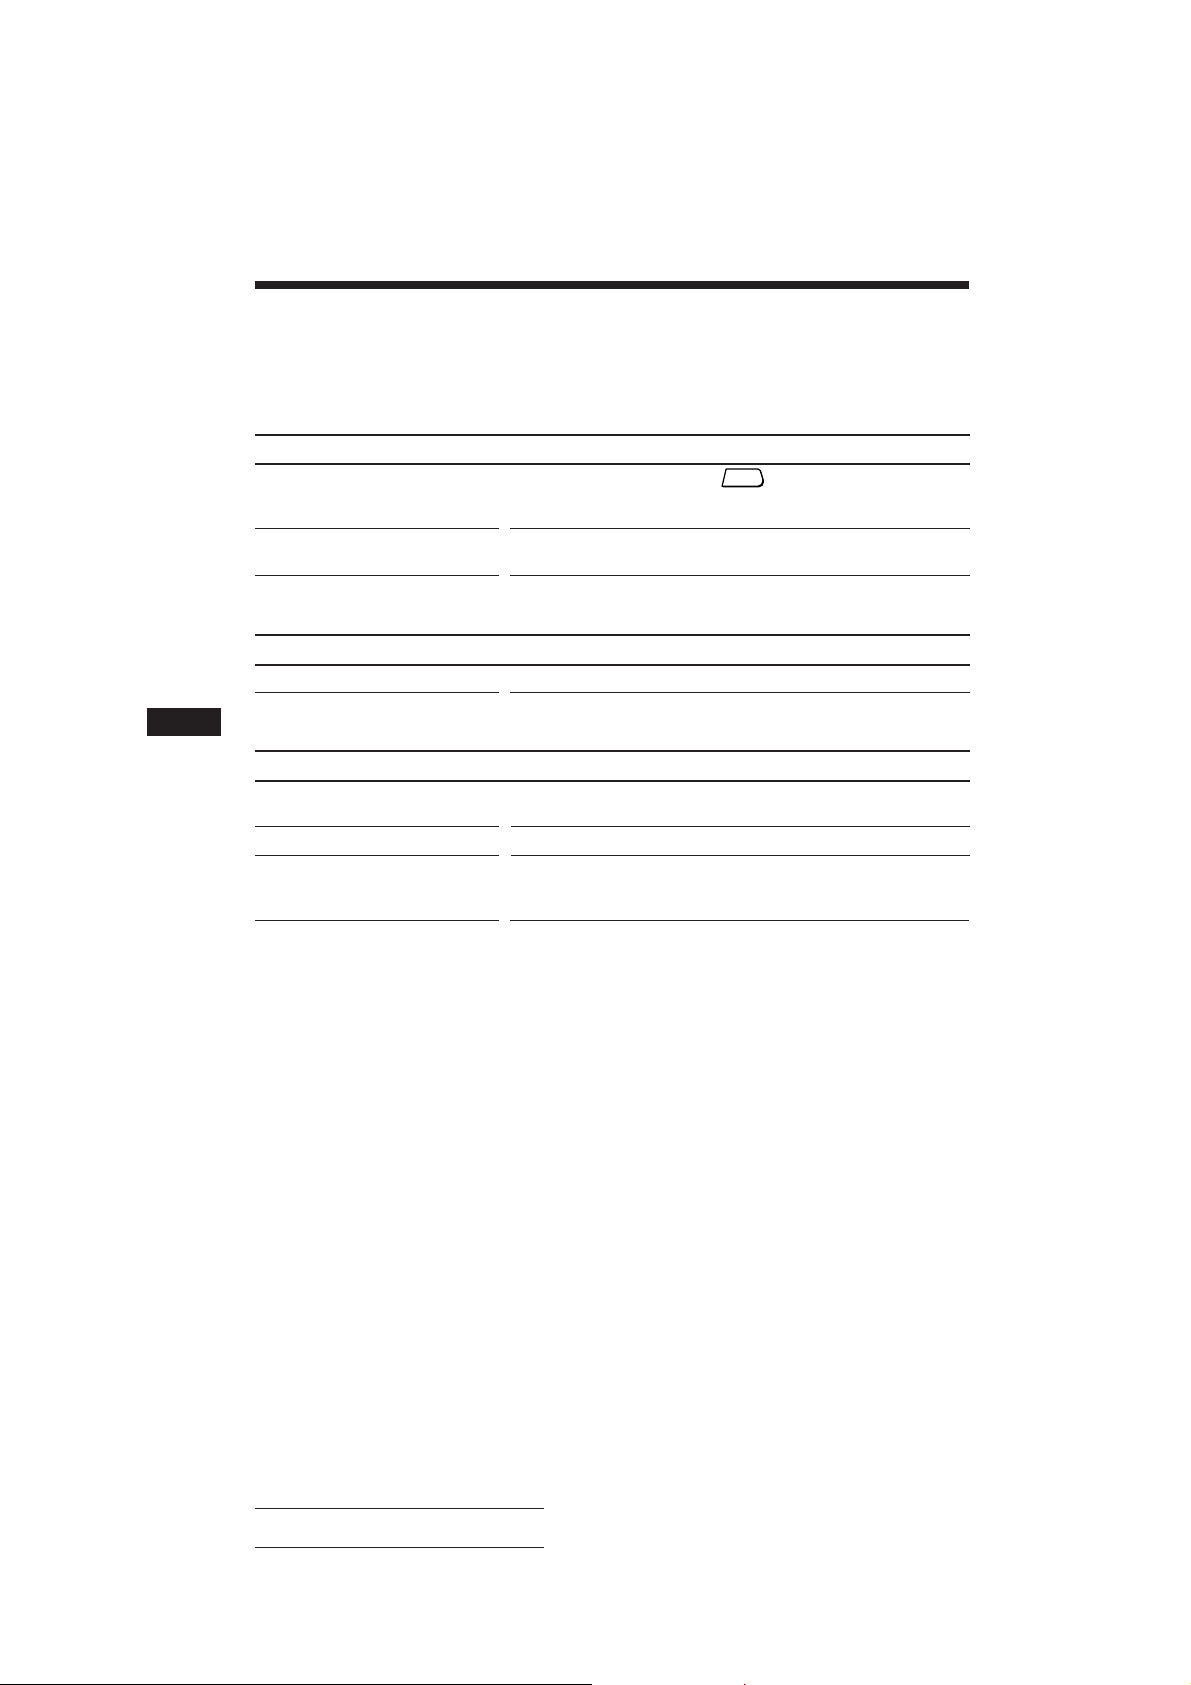
Button Locations
RELEASE
–+
SEL
ATA
DSPL
215634
SEEK/MANU
–+
A.MEM
TUNER
LOUD
SENS OFF
EN
Refer to the pages in r for details.
1 Display window
2 SEL (control mode select) button 58
3 DSPL (display mode change/time set)
button 5
4 6 (eject) button 5
5 During radio reception:
Preset number buttons 7
During tape playback:
ATA
1
ATA (Automatic Tuner
Activation) button 6
6 0/) (fast winding)/DIR (tape
transport direction change) buttons
56
7 LOUD (loudness) button 8
8 RELEASE (front panel release) button
48
–
9
+
(volume/bass/treble/
balance/fader control) buttons 58
0 SEEK/MANU button 67
!¡ TUNER/A.MEM (radio on • band select/
automatic memory) button 67
!™ SENS (sensitivity adjust) button 6
!£ OFF button 4
10
Actual total number Sony XR-3501MK2 (E,F,G,H,I) 3-810-725-11 (1)
Page 11

Specifications
Cassette player section
Tape track 4-track 2-channel stereo
Wow and flutter 0.13 % (WRMS)
Frequency response 30 – 15,000 Hz
Signal-to- noise ratio 55 dB
Tuner section
FM
Tuning range 87.5 – 108.0 MHz
Antenna terminal External antenna connector
Intermediate frequency 10.7 MHz
Usable sensitivity 12 dBf
Selectivity 70 dB at 400 kHz
Signal-to-noise ratio 65 dB (stereo),
68 dB (mono)
Harmonic distortion at 1 kHz
0.5% (stereo),
0.3% (mono)
Separation 35 dB at 1 kHz
Frequency response 30 – 15,000 Hz
Capture ratio 2 dB
MW/LW
Tuning range MW: 531 – 1,602 kHz
LW : 153 – 281 kHz
Antenna terminal External antenna connector
Intermediate frequency 450 kHz
Sensitivity MW: 30 µV
LW : 50 µV
Power amplifier section
Outputs Speaker outputs
(sure seal connectors)
Speaker impedance 4 – 8 ohms
Maximum power output 20 W × 4 (at 4 ohms)
General
Output lead Power amplifier control
lead
Tone controls Bass ±8 dB at 100 Hz
Treble ±8 dB at 10 kHz
Power requirements 12 V DC car battery
(negative ground)
Dimensions Approx. 186 × 57 × 170 mm
(w/h/d) not incl.
projecting parts and
controls
Mounting dimension Approx. 182 × 53 × 155 mm
(w/h/d) not incl.
projecting parts and
controls
Mass Approx. 1.2 kg
Supplied accessories Parts for installation and
connections (1 set)
Front panel case (1)
Design and specifications are subject to change without
notice.
EN
Actual total number Sony XR-3501MK2 (E,F,G,H,I) 3-810-725-11 (1)
11
Page 12
Troubleshooting Guide
The following checklist will assist in the correction of most problems which you may encounter with
your unit.
Before going through the checklist below, refer to the connection and operating procedures.
General
Problem
No sound
Indications do not appear in the
display window.
Tape playback
Problem
Playback sound is distorted.
Cause/Solution
•Adjust the volume with the
•Set the fader control to the center position for 2-speaker
systems.
Remove the front panel and clean the connectors. See “Cleaning
the Connectors”of “Maintenance” for details.
Cause/Solution
Contamination of the tape head. n Clean the head.
+
button.
EN
Radio reception
Problem
Preset tuning is not possible.
Automatic tuning is not possible.
The “ST” indication flashes.
Cause/Solution
•Memorize the correct frequency.
•The broadcast is too weak.
The broadcast is too weak. n Use the manual tuning.
•Tune in precisely.
•The broadcast is too weak. n Press the SENS button to enter
the MONO mode.
12
Actual total number Sony XR-3501MK2 (E,F,G,H,I) 3-810-725-11 (1)
Page 13

Caractéristiques
Généralités
• Vous pouvez emporter la façade détachable
quand vous quittez votre véhicule (page 4).
• Un avertisseur retentit si vous tournez la clé
de contact sans avoir préalablement enlevé la
façade de l’appareil.
• L’amplificateur de haute puissance intégré
(sortie max. 4 ca × 20 W) permet d’utiliser
quatre haut-parleurs.
• Horloge numérique à cycle de 24 heures
(page 5).
Section lecteur de cassette
• Fonction ATA (Automatic Tuner
Activation) pour recevoir automatiquement
la radio pendant l’avance rapide ou le
rebobinage d’une cassette (page 6).
Tuner section
• Possibilité de prérégler jusqu’à 30 stations: 18
stations sur la gamme FM et 6 stations sur les
F
gammes PO et GO.
• Fonction de mémoire automatique pour
présélectionner 30 stations de façon simple et
rapide (page 7).
Précautions
• Si vous avez garé votre voiture en plein soleil
et que la température à l’intérieur a
considérablement augmenté, attendez que
l’appareil se refroidisse avant de vous en
servir.
• Si l’alimentation électrique n’arrive pas à
l’appareil, vérifiez d’abord les connexions. Si
elles sont correctes, vérifiez le fusible.
• Si aucun son ne sort des deux haut-parleurs,
réglez le fader (balance avant-arrière) sur la
position centrale.
• Si votre voiture est équipée d’une antenne
électrique, elle se déploie automatiquement
quand l’appareil est en service.
Pour toute question ou problème au sujet de
cet appareil, dont vous ne trouveriez pas
l’explication dans ce mode d’emploi, consultez
votre revendeur Sony.
2
Actual total number: Sony XR-3501MK2 (E,F,G,I,H) 3-810-725-11 (1)
Page 14

Remarques sur les
cassettes
Entretien des cassettes
• Ne touchez pas la face sensible de la bande;
toute salissure peut se déposer sur les têtes.
• Eloignez les cassettes enregistrées des
appareils contenant des aimants puissants
comme les haut-parleurs ou les
amplificateurs, car le son peut s’effacer
partiellement ou être déformé.
• N’exposez pas vos cassettes en plein soleil,
au froid intense ou à l’humidité.
• Le boîtier de la cassette peut chauffer un peu
si vous écoutez la cassette pendant
longtemps. Cette chaleur provient de
l’amplificateur de puissance de l’autoradio.
Ce n’est pas un signe de mauvais
fonctionnement.
Remarque sur les têtes de lecture
de la platine à cassette
• L’utilisation de cassettes entraîne à la longue
une contamination de la tête de lecture, ce
qui a pour effet une qualité sonore médiocre
ou même une perte de son. Nous vous
conseillons par conséquent de nettoyer la tête
de lecture environ une fois par mois au
moyen du set de cassette de nettoyage Sony.
Si la qualité sonore ne s’est pas améliorée
après avoir utilisé la cassette de nettoyage,
consultez votre revendeur Sony.
• Les cassettes usagées ou de qualité médiocre
contaminent beaucoup plus rapidement la
tête de lecture. Suivant le type de la cassette,
la qualité sonore peut s’avérer médiocre
après une ou deux lectures.
Remarque sur les cassettes de plus
de 90 minutes
L’utilisation de cassettes de plus de 90 minutes
n’est pas recommandée sauf pour une lecture
prolongée et ininterrompue. La bande de ces
cassettes est extrêmement fine et a tendance à
se détendre. Elle s’emmêle facilement dans le
mécanisme de la platine en cas de lecture et
arrêts fréquents.
Table des matières
Retrait et pose de la façade ..................................... 4
Réglage de l’horloge ................................................ 5
Fonctionnement du lecteur de
cassette
Ecoute d’une cassette .............................................. 5
Ejection de la cassette .............................................. 5
Bobinage rapide de la bande .................................. 6
Réception radio pendant l’avance rapide ou le
rebobinage
—
Fonction ATA (Automatic Tuner Activation) ....
Réception radio
Recherche automatique des stations
— Accord automatique ...................................... 6
Si la réception FM stéréo n’est pas bonne
— Réception mono ............................................. 6
Accord par réglage de la fréquence
— Accord manuel ............................................... 7
Mémorisation automatique des stations
— Fonction de mémoire automatique ............. 7
Mémorisation de stations particulières ................ 7
Réception des stations mémorisées ...................... 7
Autres fonctions
Réglage du son ......................................................... 8
Pour obtenir un son équilibré même à faible
niveau
— Correction physiologique ............................. 8
Coupure des bips sonores ...................................... 8
Entretien .................................................................... 8
Retrait de l’autoradio .............................................. 9
Nomenclature des touches ................................... 10
Spécifications .......................................................... 11
Guide de dépannage ............................................. 12
6
F
Actual total number: Sony XR-3501MK2 (E,F,G,I,H) 3-810-725-11 (1)
3
Page 15

Retrait et pose de la
façade
Vous pouvez détacher la façade afin d’éviter
que l’appareil ne soit volé.
Retrait de la façade
Avant de détacher la façade, appuyez sur la
OFF
touche
RELEASE pour ouvrir la façade. Enlevez-la en
la tirant vers vous, comme indiqué sur
l’illustration.
Veillez à ne pas laisser tomber la façade quand
vous la détachez de l’appareil.
F
Pose de la façade
Appliquez la partie droite de la façade sur
l’appareil et fixez la partie A de la façade sur
la partie B de l’appareil, comme indiqué sur
l’illustration, puis poussez de manière à
l’enclencher.
. Appuyez ensuite sur la touche
Touche RELEASE
Avertisseur
Si vous mettez la clé de contact du véhicule sur
la position OFF (arrêt) sans enlever la façade,
l’avertisseur se déclenche et émet un bip
pendant quelques secondes.
A
B
Remarques
• Vérifiez que la façade est dans le bon sens avant de la
fixer, car elle ne peut pas être fixée dans l’autre sens.
• Ne forcez pas pour fixer la façade sur l’appareil.Une
légère pression est suffisante.
• Rangez la façade dans son étui pour la transporter.
• N’appuyez pas avec force sur l’afficheur de la façade.
• Mettez l’appareil hors tension avant de retirer la façade.
Cependant, si vous appuyez sur la touche RELEASE
quand l’appareil est sous tension, il se met
automatiquement hors tension pour protéger les hautparleurs.
• Ne laissez pas la façade en plein soleil, près de sources de
chaleur comme des conduits d’air chaud ou dans un
endroit humide. Ne la laissez jamais sur le tableau de
bord, etc. d’une voiture garée en plein soleil, car la
4
température risque d’augmenter considérablement.
Actual total number: Sony XR-3501MK2 (E,F,G,I,H) 3-810-725-11 (1)
Page 16
Réglage de l’horloge
L’horloge fonctionne sur 24 heures
Par exemple, réglez l’heure sur 10:08.
1 Affichez l’heure
(Appuyez sur
est allumé)
2 Appuyez sur
secondes.
Les chiffres des heures clignotent.
DSPL
pendant que l’appareil
DSPL
pendant plus de deux
Fonctionnement du
lecteur de cassette
Ecoute d’une cassette
Introduisez une cassette, la lecture
commence automatiquement.
Réglez l’heure
SEL
–+
(pour reculer) (pour avancer)
DSPL
SEL
.
3 Appuyez brièvement sur la touche
Les chiffres des minutes clignotent
Réglez les minutes
SEL
–+
(pour reculer)
(pour avancer)
4 Appuyez brièvement sur la touche
L’horloge fonctionne.
Remarque
L’horloge ne peut être mise à l’heure que si l’appareil est
sous tension. Régler l’horloge après avoir mis la radio sous
tension, ou déclenché la lecture d’une cassette.
Pour changer le sens de défilement de
la bande,
appuyez simultanément sur les touches 0 et
).
Indication du sens de défilement de la bande.
.
La face supérieure de la cassette est reproduite.
La face inférieure de la cassette est reproduite.
Le sens de lecture change automatiquement
lorsque la cassette arrive en fin de bande.
Remarque
Avant de mettre l’appareil hors tension, retirez la cassette
pour éviter d’en endommager la bande magnétique.
Ejection de la cassette
Appuyez sur la touche pour arrêter la
lecture et éjecter la cassette.
F
Fonctionnement du lecteur de cassette
Actual total number: Sony XR-3501MK2 (E,F,G,I,H) 3-810-725-11 (1)
5
Page 17
Bobinage rapide de la
bande
Indicateur
de sens de
défilement*
(
Pour avancer
Pour
rebobiner
Réception radio
Recherche automatique
des stations
— Accord automatique
9
Pour reprendre la lecture, appuyez sur l’autre
touche d’avance rapide jusqu’à ce que la
touche verrouillée se libère.
* Le témoin 9 ou ( clignote pendant le bobinage rapide
de la bande.
Réception radio pendant
F
l’avance rapide ou le
rebobinage
— Fonction ATA (Automatic Tuner
Activation)
Appuyez sur
n “ATA” apparaît à l’affichage.
Lors de l’avance ou rebobinage rapide avec la
touche 0 et ), la radio s’allume
automatiquement.
ATA
1
pendant la lecture.
1 Choisissez la gamme d’ondes.
A.MEM
TUNER
FM1 n FM2 n FM3 n
MW n LW n FM1
2 Appuyez brièvement sur l’un des deux
côtés de la touche SEEK/MANU pour
chercher la station (accord automatique).
SEEK/MANU
–+
Pour descendre
de fréquence
L’exploration s’arrête lorsque l’accord se fait
sur une station. Appuyez plusieurs fois de
suite sur l’un des côtés de la touche jusqu’à ce
que vous obteniez la station que vous
cherchez.
Si la réception de la station FM stéréo donne un
signal suffisant,
ST
le témoin “ST” s’allume.
Pour éviter que l’accord automatique s’arrête sur
des stations trop faibles (recherche locale),
appuyez brièvement sur SENS pour obtenir
l’indication “LCL”.
Seules les stations dont le signal est suffisamment intense
seront accordées. Le mode “local” ne fonctionne qu’avec
l’accord automatique.
SEEK/MANU
–+
Pour monter
de fréquence
Si la réception FM stéréo
n’est pas bonne
— Réception mono
Appuyez sur pendant la lecture.
n “MONO” apparaît à l’affichage.
La diffusion sonore comporte moins de souffle
mais elle est en mono.
6
Actual total number: Sony XR-3501MK2 (E,F,G,I,H) 3-810-725-11 (1)
Page 18

Accord par réglage de la
fréquence
— Accord manuel
1 Choisissez la gamme d’ondes
A.MEM
TUNER
FM1 n FM2 n FM3 n
MW n LW n FM1
2 Appuyez sur l’un des deux côtés de la
touche SEEK/MANU et maintenez-le
enfoncé.
Lâchez la touche quand la station désirée
est atteinte.
SEEK/MANU
–+
Vers les fréquences
inférieures
EVITEZ LES ACCIDENTS
Quand vous conduisez, utilisez l’accord
automatique ou les présélections plutôt que
l’accord manuel.
SEEK/MANU
–+
Vers les fréquences
supérieures
Mémorisation
automatique des stations
— Fonction de mémoire automatique
Les stations dont la réception est la plus claire
sont automatiquement recherchées et
mémorisées dans chaque bande (FM1, FM2,
FM3, PO et GO). Six stations peuvent être
mémorisées dans l’ordre de leur fréquence
dans chaque bande sous les touches de
présélection 1 à 6.
1 Choisissez la gamme d’ondes
A.MEM
TUNER
FM1 n FM2 n FM3 n
MW n LW n FM1
2 Appuyez sur la touche TUNER/A.MEM
pendant au moins deux secondes.
A.MEM
TUNER
L’appareil commence à explorer la bande
sélectionnée et mémorise automatiquement
les stations syntonisées sous les touches de
présélection 1 à 6.
Mémorisation de stations
particulières
1 Choisissez la gamme d’ondes.
A.MEM
TUNER
FM1 n FM2 n FM3 n
MW n LW n FM1
2 Accordez la station que vous voulez
mémoriser sous un numéro de
présélection.
3 Appuyez sur la touche de numéro de
présélection (
environ deux secondes jusqu’à ce que
vous entendiez un bip.
Le numéro de la présélection apparaît à la
fenêtre d’affichage.
FM
Six stations peuvent être mémorisées dans chaque gamme
d’ondes (FM1, FM2, FM3, PO et GO) sous les touches de
présélection et dans l’ordre de votre choix. Ainsi, vous
disposez de 18 présélections FM.
Si vous mémorisez une station sous un numéro déjà
occupé, la présélection précédente est effacée.
ST
ATA
1
à 6) pendant
Réception des stations
mémorisées
1 Choisissez la gamme d’ondes.
A.MEM
TUNER
FM1 n FM2 n FM3 n
MW n LW n FM1
2 Appuyez brièvement sur la touche du
numéro sous lequel est mémorisée la
station que vous voulez écouter.
Remarque
Si vous appuyez sur la touche du numéro de présélection
pendant plus de deux secondes, la station sera remémorisée.
Pour recevoir la station mémorisée précédemment, veillez à
ne pas appuyer trop longtemps sur la touche.
F
Fonctionnement du lecteur de cassette/Réception radio
Actual total number: Sony XR-3501MK2 (E,F,G,I,H) 3-810-725-11 (1)
7
Page 19

Autres fonctions
Réglage du son
1 Choisissez le paramètre que vous voulez
régler en appuyant plusieurs fois sur
SEL
.
VOL (volume) n BAS (grave) n TRE
(aigu) n BAL (balance) n FAD (fader) n
VOL (volume)
Entretien
Remplacement du fusible
Si vous devez remplacer le fusible, veillez à
utiliser un fusible dont l’intensité est identique
à celle inscrite sur le fusible usagé. Si le fusible
grille, vérifiez le raccordement de la source
d’alimentation et remplacez le fusible. Si le
fusible grille une nouvelle fois après avoir été
remplacé, cela peut révéler une défaillance
interne de l’appareil. Le cas échéant, consultez
un revendeur Sony.
2 Réglez le paramètre en appuyant sur
–
Faites le réglage dans les trois secondes du
choix du paramètre. (Après trois secondes, ces
touches servent à nouveau au réglage du
volume.)
ou
+
.
F
Pour obtenir un son
équilibré même à faible
niveau
Appuyez sur
l’affichage.
Le grave et l’aigu sont renforcés. Pour annuler,
appuyez à nouveau sur la touche.
— Correction physiologique
LOUD
. n ”LOUD” apparaît à
Coupure des bips sonores
Appuyez sur 5 tout en appuyant sur
SEL
.
Pour rétablir le bip, appuyez à nouveau sur ces
touches.
Fusible (15 A)
Avertissement
N’utilisez jamais de fusible dont l’intensité
dépasse celle du fusible fourni avec l’appareil,
car vous risqueriez d’endommager l’appareil.
Nettoyage des connecteurs
Si les connecteurs situés entre l’appareil et la
façade ne sont pas propres, il peut arriver que
le système ne fonctionne pas bien. Pour éviter
cela, ouvrez la façade en poussant sur la
touche RELEASE, déposez-le ensuite et
nettoyez-le à l’aide d’un Coton-tige imprégné
d’alcool. N’exercez pas une pression trop
importante. Vous risqueriez sinon
d’endommager le connecteur.
Appareil principal
Dos du panneau avant
8
Actual total number: Sony XR-3501MK2 (E,F,G,I,H) 3-810-725-11 (1)
Page 20

Retrait de l’autoradio
1
Clé de dégagement (fournie)
2
3
F
Autres fonctions
4
9
Actual total number: Sony XR-3501MK2 (E,F,G,I,H) 3-810-725-11 (1)
Page 21

Nomenclature des touches
DSPL
RELEASE
Voyez les pages r pour les détails.
SEL
–+
ATA
215634
SEEK/MANU
–+
A.MEM
TUNER
LOUD
SENS OFF
1 Fenêtre d’affichage
F
2 Touche SEL (sélection du mode de
commande) 58
3 Touche DSPL (changement d’affichage/
réglage de l’horloge) 5
4 Touche d’ejection 6 5
5 Pendant la réception radio:
Touches des numéros de présélection
7
Pendant la lecture cassette:
Touche
ATA
1
ATA (Automatic Tuner
Activation) 6
6 Touches 0/) (bobinage rapide)/DIR
(inversion du sens de défilement de la
bande) 56
7 Touche LOUD (Correction
physiologique) 8
8 Touche RELEASE (pour enlever la
façade) 48
–
9 Touches
+
(volume/grave/
aigu/balance/fader) 58
0 Touche SEEK/MANU 67
!¡ Touche TUNER/A.MEM (radio
enclenchée • sélection de gamme
d’ondes/mémoire automatique) 67
!™ Touche SENS (réglage de sensibilité) 6
!£ Touche OFF 4
10
Actual total number: Sony XR-3501MK2 (E,F,G,I,H) 3-810-725-11 (1)
Page 22

Spécifications
Section lecteur de cassette
Pistes 4 pistes 2 canaux stéréo
Pleurage et scintillement 0,13% (Val. eff. pond.)
Réponse en fréquence 30 – 15.000 Hz
Rapport signal/bruit 55 dB
Section tuner
FM
Plage d’accord 87,5 – 108,0 MHz
Entrée d’antenne Connecteur pour antenne
extérieure
Fréquence intermédiaire 10,7 MHz
Sensibilité utile 12 dBf
Sélectivité 70 dB à 400 kHz
Rapport signal/bruit 65 dB (stéréo),
68 dB (mono)
Distorsion harmonique à 1 kHz
0,5% (stéréo),
0,3% (mono)
Séparation 35 dB à 1 kHz
Réponse en fréquence 30 – 15.000 Hz
Taux de capture 2 dB
PO/GO
Plage d’accord PO: 531 – 1.602 kHz
GO: 153 – 281 kHz
Entrée d’antenne Connecteur pour antenne
extérieure
Fréquence intermédiaire 450 kHz
Sensibilité: PO: 30 µV
GO: 50 µV
Section amplificateur de puissance
Sorties Haut-parleurs
(connecteurs de sécurité)
Impédance des haut-parleurs
4 – 8 ohms
Puissance maximum 20 W × 4 (sur 4 ohms)
Généralités
Fil de sortie Fil de commande
d’amplificateur
Réglages de tonalité Graves ±8 dB à 100 Hz
Aigus ±8 dB à 10 kHz
Alimentation Batterie de voiture 12 V
DC (masse négative)
Dimensions env. 186 × 57 × 170 mm
(l/h/p)
parties saillantes et
commandes non comprises
Dimensions de montage env. 182 × 53 × 155 mm
(l/h/p)
parties saillantes et
commandes non comprises
Poids env. 1,2 kg
Accessoires fournis Pièces de montage et de
raccordement (1 jeu)
Etui pour la façade (1)
Conception et spécifications modifiables sans préavis.
F
Actual total number: Sony XR-3501MK2 (E,F,G,I,H) 3-810-725-11 (1)
11
Page 23

Guide de dépannage
Les vérifications suivantes vous aideront à résoudre la plupart des problèmes que vous pourriez
rencontrer avec cet appareil.
Avant de parcourir la liste suivante, consultez à nouveau les procédures de branchement et de
fonctionnement.
Généralités
Problème
Pas de son
Pas d’affichage dans la fenêtre
Lecture de cassette
Problème
Le son est déformé
Réception radio
F
Problème
Impossible de faire une
présélection
Accord automatique impossible
L’indication “ST” clignote
Cause/Solution
• Réglez le volume en appuyant sur la touche
• Si vous avez une installation à deux haut-parleurs, réglez le
fader sur la position centrale.
Enlevez la façade et nettoyez les contacts. Voyez “Nettoyage des
connecteurs” de la section “Entretien”.
Cause/Solution
La tête est sale; n Nettoyez-la.
Cause/Solution
• Mémorisez la fréquence correcte.
• L’émission est trop faible.
L’émission est trop faible; n Faites l’accord manuellement.
• Accordez la station avec plus de précision.
• L’émission est trop faible; n Appuyez sur SENS pour passer
en MONO.
+
.
12
Actual total number: Sony XR-3501MK2 (E,F,G,I,H) 3-810-725-11 (1)
Page 24

Eigenschaften
Allgemeines
• Frontplatte abnehmbar: Zum Schutz gegen
Diebstahl kann die Frontplatte beim
Verlassen des Fahrzeugs mitgenommen
werden (siehe Seite 4).
• Warnton ertönt, wenn beim Ausschalten der
Zündung die Frontplatte nicht abgenommen
wird.
• Eingebauter Verstärker (max.
Ausgangsleistung 20 W × 4) zur
Ansteuerung eines Vier-LautsprecherSystems.
• Digitaluhr mit 24-Stunden-Anzeige (siehe
Seite 5).
Kassettendeck
• ATA-Funktion (Automatic Tuner Activation
- Automatische Tuner-Aktivierung) zum
automatischen Einschalten des Tuners
während des Vorwärts- oder Zurückspulens
eines Bandes (Seite 6).
Tuner
• Bis zu 30 Sender im Stationsspeicher
D
voreinstellbar: 18 UKW-Sender und jeweils 6
MW- und LW-Sender.
• Automatischer Senderspeicher zum
schnellen und mühelosen Speichern von
insgesamt 30 Sendern (Seite 7).
Sicherheitsmaßnahmen
• Wenn Ihr Auto längere Zeit direktem
Sonnenlicht ausgesetzt war, zum Beispiel auf
dem Parkplatz, und die Temperatur im
Inneren sehr hoch ist, lassen Sie das Gerät
zunächst etwas abkühlen, bevor Sie es
benutzen.
• Wenn die Stromversorgung des Geräts
unterbrochen ist, überprüfen Sie zunächst die
Anschlüsse. Sind diese in Ordnung,
überprüfen Sie die Sicherung.
• Wenn bei einem Zwei-Lautsprecher-System
über diese Lautsprecher kein Ton
wiedergegeben wird, stellen Sie den FaderRegler in die mittlere Position.
• Eine Motorantenne am Fahrzeug fährt
automatisch aus, sobald das Gerät in Betrieb
genommen wird.
Wenn Sie Fragen haben oder an Ihrem Gerät
Probleme auftreten, die in dieser
Bedienungsanleitung nicht behandelt werden,
wenden Sie sich bitte an Ihren Sony-Händler.
2
Actual total number: Sony XR-3501MK2 (E,F,G,I,H) 3-810-725-11 (1)
Page 25

Hinweise zu Kassetten
Inhalt
Pflege der Kassetten
• Berühren Sie nicht das Band in einer
Kassette, da Staub oder sonstige
Verunreinigungen die Tonköpfe
verschmutzen.
• Bringen Sie Kassetten nicht in die Nähe von
Geräten, die Magnete enthalten (z. B.
Lautsprecher oder Verstärker), da in diesem
Fall Teile der Bandaufnahme gelöscht oder
verzerrt werden könnten.
• Setzen Sie Kassetten nicht direktem
Sonnenlicht, extremer Kälte oder
Feuchtigkeit aus.
• Wenn eine Kassette längere Zeit abgespielt
wird, kann sich das Kassettengehäuse wegen
des eingebauten Verstärkers erwärmen. Es
handelt sich dabei nicht um eine
Fehlfunktion.
Hinweise zu den Tonköpfen des
Kassettendecks
• Wenn Sie Kassettenbänder lange
wiedergeben, wird der Tonkopf verschmutzt.
Dadurch kann die Tonqualität vermindert
werden oder die Tonwiedergabe ganz
aussetzen. Es empfiehlt sich daher, den
Tonkopf etwa einmal im Monat mit dem als
Sonderzubehör erhältlichen
Kassettenreinigungssatz von Sony zu
reinigen. Verbessert sich die Tonqualität
nach dem Gebrauch der Reinigungskassette
nicht, wenden Sie sich an Ihren SonyHändler.
• Bei alten oder minderwertigen
Kassettenbändern wird der Tonkopf
schneller verschmutzt. Je nach Band kann
schon nach ein- oder zweimaliger
Wiedergabe die Tonqualität vermindert
werden.
Abnehmen und Anbringen der Frontplatte ........ 4
Einstellen der Uhr .................................................... 5
Bedienung des Kassettendecks
Wiedergeben einer Kassette ................................... 5
Auswerfen einer Kassette ....................................... 5
Vorwärts- oder Zurückspulen einer Kassette ..... 6
Radioempfang während des Vorwärts- oder
Zurückspulens einer Kassette
— ATA-Funktion (Automatic Tuner Activation
- Automatische Tuner-Aktivierung) ........... 6
Radioempfang
Automatisches Suchen nach einer Sendestation
— Automatischer Sendersuchlauf ................... 6
Bei schlechtem UKW-Empfang
— Monauraler Modus ........................................ 6
Einstellen einer Sendestation durch Einstellen
der Frequenz
— Manueller Sendersuchlauf ........................... 7
Automatisches Speichern von Sendestationen
— Automatischer Senderspeicher .................... 7
Speichern der gewünschten Sendestationen ....... 7
Empfangen der gespeicherten Sendestationen ... 8
Weitere Funktionen
Einstellen des Klangs .............................................. 8
Gute Tonqualität auch bei geringer Lautstärke
— Loudness-Funktion ........................................ 8
Stummschalten des Signaltons .............................. 8
D
Kassetten mit einer Spieldauer von
über 90 Minuten
Bitte verwenden Sie Kassetten mit einer
Spieldauer von über 90 Minuten - wenn
überhaupt - nur für eine lange
ununterbrochene Wiedergabe. Die Bänder in
solchen Kassetten sind sehr dünn und leicht
dehnbar. Wird die Wiedergabe solcher
Kassetten häufig gestoppt und neu gestartet,
kann das Band im Kassettendeckmechanismus
hängenbleiben.
Actual total number: Sony XR-3501MK2 (E,F,G,I,H) 3-810-725-11 (1)
Wartung .................................................................... 9
Ausbauen des Geräts .............................................. 9
Lage der Bedienelemente ..................................... 10
Technische Daten ................................................... 11
Behebung von Störungen ..................................... 12
3
Page 26

Abnehmen und Anbringen
der Frontplatte
Um einem Diebstahl des Geräts vorzubeugen,
kann die Frontplatte abgenommen und beim
Verlassen des Fahrzeugs mitgenommen
werden.
Abnehmen der Frontplatte
Drücken Sie zuerst die
Gerät auszuschalten. Lösen Sie dann die
Frontplatte durch Drücken der RELEASETaste, und ziehen Sie die Frontplatte, wie in
der Abbildung gezeigt, ab.
RELEASE-Taste
Achten Sie darauf, daß die Frontplatte beim
Abnehmen nicht herunterfällt.
D
Anbringen der Frontplatte
Bringen Sie die rechte Seite der Frontplatte wie
in der Abbildung dargestellt am Gerät an,
indem Sie Teil A der Frontplatte auf Teil B
des Geräts setzen. Drücken Sie dann die linke
Seite an, bis sie mit einem Klicken einrastet.
OFF
-Taste, um das
• Schützen Sie die Frontplatte vor direktem Sonnenlicht,
vor Wärmequellen wie Heizungen oder
Warmluftauslässen und vor Feuchtigkeit. Wenn das
Fahrzeug in der Sonne geparkt ist, legen Sie sie nicht auf
das Armaturenbrett usw., da sie sich sonst zu stark
erhitzen kann.
Warnton
Wenn der Zündschlüssel in die OFF-Position
gestellt wird, ohne die Frontplatte
abzunehmen, ertönt einige Sekunden lang ein
Warnton.
A
B
Hinweise
• Achten Sie beim Anbringen der Frontplatte darauf, daß
sie richtigherum ausgerichtet ist. Die Frontplatte kann
nicht andersherum angebracht werden.
• Wenden Sie beim Festdrücken der Frontplatte keine
Gewalt an. Ein leichter Druck reicht aus, um die
Frontplatte am Gerät zu befestigen.
• Bewahren Sie die Frontplatte beim Transportieren im
mitgelieferten Behälter auf.
• Drücken Sie nicht auf das Display an der Vorderseite des
Geräts.
• Beim Drücken der RELEASE-Taste wird das Gerät
automatisch ausgeschaltet, um eine Beschädigung der
Lautsprecher zu vermeiden. Dennoch wird empfohlen,
4
das Gerät vor Abnehmen der Frontplatte auszuschalten.
Actual total number: Sony XR-3501MK2 (E,F,G,I,H) 3-810-725-11 (1)
Page 27

Einstellen der Uhr
Die Uhr verfügt über eine 24-StundenDigitalanzeige.
Beispiel: Einstellen der Uhr auf 10:08 Uhr
1 Rufen Sie die Uhrzeitanzeige auf.
(Drücken Sie die Taste
Das Gerät muß dabei eingeschaltet sein.)
2 Drücken Sie die Taste
Sekunden.
Die Stundenziffern blinken.
DSPL
.
DSPL
länger als 2
Bedienung des
Kassettendecks
Wiedergeben einer
Kassette
Legen Sie eine Kassette ein. Die
Wiedergabe startet automatisch.
Stellen Sie die Stundenziffern ein.
SEL
–+
(rückwärts) (vorwärts)
DSPL
SEL
.
.
3 Drücken Sie kurz die Taste
Die Minutenziffern blinken.
Stellen Sie die Minutenziffern ein.
SEL
–+
(rückwärts) (vorwärts)
4 Drücken Sie kurz die Taste
Die Uhr beginnt zu laufen.
Hinweis
Die Uhr kann nur bei eingeschaltetem Gerät eingestellt
werden. Schalten Sie also das Radio ein, oder lassen Sie
eine Kassette wiedergeben, wenn Sie die Uhr einstellen
möchten.
So ändern Sie die Bandlaufrichtung
Drücken Sie gleichzeitig die Tasten 0 und
).
Anzeige der Bandrichtung
D
Bedienung des Kassettendecks
Die nach oben zeigende Seite wird wiedergegeben.
Die nach unten zeigende Seite wird wiedergegeben.
Wenn eine Kassettenseite bis zum Ende
abgespielt wurde, ändert sich bei der
Wiedergabe automatisch die
Bandlaufrichtung.
Hinweis
Bevor Sie das Gerät ausschalten, lassen Sie die Kassette
auswerfen. Andernfalls kann das Band beschädigt werden.
Auswerfen einer Kassette
Beenden Sie mit der Taste die Wiedergabe,
und lassen Sie die Kassette auswerfen.
Actual total number: Sony XR-3501MK2 (E,F,G,I,H) 3-810-725-11 (1)
5
Page 28

Vorwärts- oder
TUNER
A.MEM
–+
SEEK/MANU
Zurückspulen einer
Kassette
Radioempfang
Richtungsanzeige
(
9
Soll die Wiedergabe fortgesetzt werden,
drücken Sie die andere Spultaste, bis die
gesperrte Taste wieder freigegeben wird.
* Während des Spulens blinkt die Anzeige 9 oder (.
*
Zum
Vorspulen
Radioempfang während des
Vorwärts- oder
D
Zurückspulens einer
Kassette
— ATA-Funktion (Automatic Tuner Activation
- Automatische Tuner-Aktivierung)
Drücken Sie während der Wiedergabe
die Taste
dem Display.
Beim Vorwärts- oder Zurückspulen mit der
Taste 0 oder ) schaltet sich der Tuner
automatisch ein.
ATA
. n „ATA“ erscheint auf
1
Zum
Zurückspulen
Automatisches Suchen
nach einer Sendestation
— Automatischer Sendersuchlauf
1 Wählen Sie den gewünschten
Frequenzbereich (Band).
FM1 n FM2 n FM3 n
MW n LW n FM1
2 Drücken Sie auf die rechte oder linke
Seite der Taste SEEK/MANU. Der
automatische Sendersuchlauf beginnt.
SEEK/MANU
–+
Niedrigere
Frequenzen
Der Sendersuchlauf stoppt, sobald das Gerät
einen Sender empfängt. Drücken Sie so oft auf
die rechte oder die linke Seite der Taste, bis
das Gerät den gewünschten Sender empfängt.
Wenn das Gerät einen UKW-Stereosender mit
ausreichender Signalstärke findet,
ST
erscheint die Anzeige „ST“.
Damit beim automatischen Sendersuchlauf nicht
zu viele Stationen gefunden werden (lokaler
Suchmodus), drücken Sie kurz die Taste SENS. Die
Anzeige „LCL“ erscheint.
Nur Sender mit relativ starken Signalen können
eingestellt werden. Der lokale Suchmodus funktioniert
nur, wenn der automatische Sendersuchlauf aktiv ist.
Höhere
Frequenzen
Bei schlechtem UKWEmpfang
Drücken Sie kurz die Taste
n „MONO“ erscheint auf dem Display.
Dadurch wird die Tonqualität besser, aber der
Ton wird zugleich monaural („Mono“).
— Monauraler Modus
6
Actual total number: Sony XR-3501MK2 (E,F,G,I,H) 3-810-725-11 (1)
SENS
.
Page 29

Einstellen einer
Sendestation durch
Einstellen der Frequenz
— Manueller Sendersuchlauf
1 Wählen Sie den gewünschten
Frequenzbereich (Band).
A.MEM
TUNER
FM1 n FM2 n FM3 n
MW n LW n FM1
2 Halten Sie die rechte oder linke Seite der
Taste SEEK/MANU gedrückt.
Lassen Sie die Taste los, wenn das Radio
die gewünschte Sendestation empfängt.
SEEK/MANU
–+
Niedrigere
Frequenzen
ACHTUNG - UNFALLGEFAHR!
Wenn Sie während der Fahrt Sender einstellen
wollen, benutzen Sie dazu, um Unfälle zu
vermeiden, bitte den automatischen
Sendersuchlauf oder die Stationstasten.
Versuchen Sie nicht, Sender manuell
einzustellen!
SEEK/MANU
–+
Höhere
Frequenzen
2 Drücken Sie die Taste TUNER/A.MEM
länger als 2 Sekunden.
A.MEM
TUNER
Das Gerät beginnt automatisch, den
ausgewählten Frequenzbereich nach
Sendern zu durchsuchen und speichert
diese auf den Stationstasten 1 bis 6.
Speichern der gewünschten
Sendestationen
1 Wählen Sie den gewünschten
Frequenzbereich (Band).
A.MEM
TUNER
FM1 n FM2 n FM3 n
MW n LW n FM1
2 Stellen Sie die Sendestation ein, die auf
der entsprechenden Stationstaste
gespeichert werden soll.
3 Halten Sie die gewünschte Stationstaste
ATA
1
(
bis 6) etwa 2 Sekunden lang
gedrückt, bis ein Signalton zu hören ist.
D
Bedienung des Kassettendecks/Radioempfang
Automatisches Speichern
von Sendestationen
— Automatischer Senderspeicher
Das Gerät sucht automatisch Sender in
ausreichend guter Empfangsqualität für die
einzelnen Frequenzbereiche (UKW1, UKW2,
UKW3, MW und LW) und speichert sie. Pro
Frequenzbereich können bis zu 6 Sender auf
den Stationstasten 1 bis 6 gespeichert werden,
und zwar in der Reihenfolge ihrer
Sendefrequenz.
1 Wählen Sie den gewünschten
Frequenzbereich (Band).
A.MEM
TUNER
FM1 n FM2 n FM3 n
MW n LW n FM1
Die Nummer der gedrückten Stationstaste
erscheint auf dem Display.
FM
Pro Frequenzbereich (UKW1, UKW2, UKW3, MW und
LW) können bis zu 6 Sender auf den Stationstasten
gespeichert werden, und zwar in der Reihenfolge Ihrer
Wahl. Das heißt, im UKW-Bereich können bis zu 18
Sender gespeichert werden.
Wenn Sie versuchen, einen weiteren Sender auf derselben
Stationstaste zu speichern, wird der zuvor gespeicherte
Sender gelöscht.
ST
7
Actual total number: Sony XR-3501MK2 (E,F,G,I,H) 3-810-725-11 (1)
Page 30

Empfangen der
SEL
gespeicherten
Sendestationen
Weitere Funktionen
1 Wählen Sie den gewünschten
Frequenzbereich (Band).
A.MEM
TUNER
FM1 n FM2 n FM3 n
MW n LW n FM1
2 Drücken Sie kurz die Stationstaste, auf
der der gewünschte Sender gespeichert
ist.
Hinweis
Wenn Sie die Stationstaste mehr als 2 Sekunden lang
drücken, wird die im Augenblick empfangene Sendestation
auf dieser Taste gespeichert. Um sicherzugehen, daß Sie
auf der entsprechenden Stationstaste auch weiterhin die
einmal gespeicherte Sendestation empfangen, drücken Sie
die Taste nur kurz.
D
Einstellen des Klangs
1 Wählen Sie die gewünschte Klangoption,
indem Sie die Taste
drücken.
VOL (Lautstärke) n BAS (Baß) n TRE
(Höhen) n BAL (Balance) n FAD (Fader)
n VOL (Lautstärke)
2 Stellen Sie die gewünschte Klangoption
mit der Taste
Nachdem Sie eine Klangoption ausgewählt
haben, müssen Sie innerhalb von 3 Sekunden
den Einstellvorgang beginnen. Nach 3
Sekunden dient die Taste wieder nur zur
Regelung der Lautstärke.
–
oder
wiederholt
+
ein.
Gute Tonqualität auch bei
geringer Lautstärke
— Loudness-Funktion
Drücken Sie die Taste
erscheint auf dem Display.
Baß und Höhen werden verstärkt. Um die
Funktion wieder auszuschalten, drücken Sie
die Taste nochmals.
LOUD
. n „LOUD“
Stummschalten des
Signaltons
Drücken Sie die Taste 5, und halten
Sie gleichzeitig die Taste
gedrückt.
Um den Signalton wieder einzuschalten,
drücken Sie die Tasten nochmals.
SEL
8
Actual total number: Sony XR-3501MK2 (E,F,G,I,H) 3-810-725-11 (1)
Page 31

Wartung
Ausbauen des Geräts
Austauschen einer Sicherung
Wenn Sie eine Sicherung austauschen, achten
Sie darauf, eine Ersatzsicherung mit dem
gleichen Ampere-Wert zu verwenden. Dieser
ist auf der Sicherung angegeben. Wenn die
Sicherung durchbrennt, überprüfen Sie den
Stromanschluß und tauschen die Sicherung
aus. Wenn auch die neue Sicherung wieder
durchbrennt, kann eine interne Störung
vorliegen. Wenden Sie sich in diesem Fall an
Ihren Sony-Händler.
Sicherung (15 A)
Vorsicht!
Verwenden Sie unter keinen Umständen eine
Sicherung mit einem höheren Ampere-Wert
als dem der Sicherung, die ursprünglich mit
dem Gerät geliefert wurde. Andernfalls kann
es zu Schäden am Gerät kommen.
Reinigen der Anschlüsse
Das Gerät funktioniert unter Umständen nicht
korrekt, wenn die Anschlüsse zwischen dem
Gerät und der Frontplatte verschmutzt sind.
Um dies zu vermeiden, lösen Sie mit der Taste
RELEASE die Frontplatte, dann nehmen Sie sie
ab und reinigen sie mit einem mit Alkohol
getränkten Wattestäbchen. Drücken Sie dabei
nicht zu fest. Andernfalls könnte der Anschluß
beschädigt werden.
1
Freigabeschlüssel
(mitgeliefert)
2
3
D
Radioempfang/Weitere Funktionen
4
am Gerät
Rückseite der
Frontabdeckung
Actual total number: Sony XR-3501MK2 (E,F,G,I,H) 3-810-725-11 (1)
9
Page 32

Lage der Bedienelemente
–
ATA
DSPL
RELEASE
Näheres finden Sie auf den mit r unterlegten Seiten.
SEL
–+
–+
215634
SEEK/MANU
A.MEM
TUNER
LOUD
SENS OFF
1 Display
2 Taste SEL (Auswählen des
D
Einstellmodus) 58
3 Taste DSPL (Änderung des Display-
Modus/Einstellen der Uhr) 5
4 Taste 6 (Auswerfen der Kassette) 5
5 Beim Radioempfang:
Stationstasten 7
Bei der Wiedergabe von Kassetten:
ATA
1
Taste ATA (Automatic Tuner
Activation) 6
6 Taste 0/) DIR (Spulen/Wechseln der
Bandlaufrichtung) 56
7 Taste LOUD (Loudness) 8
8 Taste RELEASE (Entriegelung der
Frontabdeckung) 49
9 Taste
+
(Lautstärke-/Baß-/
Höhen-/Balance-/Fader-Regelung) 58
0 Taste SEEK/MANU 67
!¡ Taste TUNER/A.MEM (Einschalten des
Radios, Frequenzbereichauswahl/
automatischer Senderspeicher) 678
!™ Taste SENS (Einstellen der
Empfindlichkeit) 6
!£ Taste OFF 4
10
Actual total number: Sony XR-3501MK2 (E,F,G,I,H) 3-810-725-11 (1)
Page 33

Technische Daten
Kassettendeck
Bandformat 4 Spuren, 2 Kanäle (stereo)
Gleichlaufschwankungen 0,13 % (WRMS)
Frequenzgang 30 – 15.000 Hz
Signal-Rauschabstand 55 dB
Tuner
UKW
Empfangsbereich 87,5 – 108,0 MHz
Antennenanschluß für Außenantenne
Zwischenfrequenz 10,7 MHz
Nutzbare Empfindlichkeit
12 dBf
Trennschärfe 70 dB bei 400 kHz
Signal-Rauschabstand 65 dB (stereo),
68 dB (mono)
Klirrgrad bei 1 kHz 0,5% (stereo),
0,3% (mono)
Kanaltrennung 35 dB bei 1 kHz
Frequenzgang 30 – 15.000 Hz
Gleichwellenselektion 2 dB
MW/LW
Empfangsbereich MW: 531 – 1.602 kHz
LW: 153 – 281 kHz
Antennenanschluß für Außenantenne
Zwischenfrequenz 450 kHz
Empfindlichkeit MW: 30 µV
LW: 50 µV
Endverstärker
Ausgänge für Lautsprecher
(versiegelte Anschlüsse)
Lautsprecherimpedanz 4 – 8 Ohm
Max. Ausgangsleistung 20 W × 4 (an 4 Ohm)
Allgemeines
Ausgangsleitung Steuerleitung für
Endverstärker
Klangregler Bässe ±8 dB bei 100 Hz
Höhen ±8 dB bei 10 kHz
Stromversorgung 12-V-Gleichstrom-
Autobatterie mit negativer
Erdung
Abmessungen ca. 186 × 57 × 170 mm
(B/H/T) ohne
vorstehende Teile und
Bedienelemente
Einbaumaße ca. 182 × 53 × 155 mm
(B/H/T) ohne
vorstehende Teile und
Bedienelemente
Gewicht ca. 1,2 kg
Mitgeliefertes Zubehör Montageteile und
Anschlußzubehör (1 Satz)
Behälter für
Frontabdeckung (1)
Änderungen an Design und technischen Daten, die dem
technischen Fortschritt dienen, bleiben vorbehalten.
D
Actual total number: Sony XR-3501MK2 (E,F,G,I,H) 3-810-725-11 (1)
11
Page 34

Behebung von Störungen
Die meisten Störungen, die unter Umständen an Ihrem Gerät auftreten, können Sie anhand der
folgenden Checkliste selbst beheben.
Bevor Sie die Liste durchgehen, überprüfen Sie noch einmal, ob alle Anschlüsse korrekt
vorgenommen und das Gerät korrekt bedient wurde.
Allgemeines
Problem
Kein Ton
Im Display-Fenster erscheinen
keine Anzeigen.
Kassettenwiedergabe
Problem
Der Klang ist bei der
Wiedergabe verzerrt.
Radioempfang
D
Problem
Ein gespeicherter Sender wird
nicht korrekt empfangen.
Der automatische Sendersuchlauf
funktioniert nicht.
Die Anzeige „ST“ blinkt.
Ursache/Abhilfe
• Stellen Sie die Lautstärke mit der Taste
• Stellen Sie bei einem Zwei-Lautsprecher-System den Fader-
Regler auf die mittlere Position.
Entfernen Sie die Frontabdeckung, und reinigen Sie die
Anschlüsse (siehe „Reinigen der Anschlüsse“ unter „Wartung“).
Ursache/Abhilfe
Der Tonkopf ist verschmutzt. n Reinigen Sie den Tonkopf.
Ursache/Abhilfe
• Speichern Sie den Sender mit der korrekten Frequenz ab.
• Das Sendesignal wird zu schwach empfangen.
Das Sendesignal wird zu schwach empfangen. n Speichern Sie
den Sender manuell ab.
• Stellen Sie den Sender exakt ein.
• Das Sendesignal wird zu schwach empfangen. n Drücken Sie
die Taste SENS, um in den MONO-Modus zu wechseln.
+
ein.
12
Actual total number: Sony XR-3501MK2 (E,F,G,I,H) 3-810-725-11 (1)
Page 35

Caratteristiche
Generali
• Pannello anteriore staccabile da portare con
sé quando si lascia l’automobile (pagina 4).
• Suoneria di avvertimento che si attiva
quando si spegne il motore senza togliere il
pannello anteriore dall’apparecchio.
• Amplificatore di potenza incorporato
(uscita massima: 20 W × 4 canali) che
consente di impiegare un sistema a 4
diffusori.
• Dotato di orologio digitale a ciclo di 24 ore
(pagina 5).
Sezione piastra a cassette
• Funzione ATA (Automatic Tuner
Activation) per accendere automaticamente
la radio durante l’avanzamento rapido o il
riavvolgimento del nastro (pagina 6).
Sezione sintonizzatore
• Possibilità di preselezionare 30 stazioni: 18 in
FM e 6 in MW e in LW.
• La funzione di memorizzazione
automatica consente di memorizzare fino a
30 stazioni in modo rapido e semplice
(pagina 7).
I
Precauzioni
• Se l’automobile è rimasta parcheggiata al sole
e la temperatura interna è aumentata
notevolmente, lasciar raffreddare
l’apparecchio prima di usarlo.
• Se l’apparecchio non riceve alimentazione,
controllare prima i collegamenti. Se tutto è a
posto, controllare il fusibile.
• Se nessun suono è udibile dai diffusori di un
sistema a 2 diffusori, regolare il comando
dell’attenuatore sulla posizione centrale.
• Se l’auto è dotata di un’antenna automatica,
questa viene automaticamente estratta
quando si fa funzionare l’apparecchio.
In caso di interrogativi o problemi riguardanti
l’apparecchio non contemplati in questo
manuale, rivolgersi al proprio rivenditore
Sony.
2
Actual total number: Sony XR-3501MK2 (E,F,G,I,H) 3-810-725-11 (1)
Page 36

Note sulle cassette
Indice
Cura delle cassette
• Non toccare la superficie del nastro, perché
polvere e sporco contaminano le testine.
• Tenere le cassette lontano da apparecchi
contenenti magneti, come diffusori e
amplificatori, perché si possono verificare
cancellazioni o distorsioni del materiale
registrato.
• Non esporre le cassette alla luce solare
diretta, a temperature estremamente basse o
all’umidità.
• L’involucro della cassetta può riscaldarsi
quando la cassetta viene riprodotta per un
periodo prolungato a causa
dell’amplificatore di potenza incorporato.
Tuttavia, questo non è un indice di problemi
di funzionamento.
Note sulle testine delle piastre per
cassette
• Un uso prolungato delle cassette può
rovinare la testina determinando una suono
di scarsa qualità o addirittura l’assenza di
suono. Si consiglia pertanto di pulire la
testina circa una volta al mese con l’apposito
set di pulizia Sony, da acquistare
separatamente. Se anche dopo avere
utilizzato l’apposito set di pulizia il suono
non migliora, consultare il rivenditore Sony
più vicino.
• Se si utilizzano cassette vecchie o di qualità
scadente, la testina si sporca molto più
rapidamente. A seconda dei nastri utilizzati,
anche solo due o tre riproduzioni possono
essere sufficienti per riprodurre una cattiva
qualità del suono.
Note sulle cassette di durata
superiore a 90 minuti
L’uso di cassette di durata superiore a 90
minuti non è consigliato se non per
riproduzioni lunghe e ininterrotte. I nastri
usati in queste cassette sono molto sottili e
tendono a stirarsi facilmente. Frequenti
operazioni di riproduzione e di arresto
eseguite con queste cassette possono far
impigliare il nastro nel meccanismo di
trascinamento della piastra.
Applicazione e rimozione del pannello
anteriore ............................................................... 4
Regolazione dell’orologio ....................................... 5
Uso della piastra a cassette
Ascolto di nastri ....................................................... 5
Espulsione della cassetta ........................................ 5
Riavvolgimento/avanzamento rapido
del nastro .............................................................. 6
Ascolto della radio durante l’avanzamento
rapido o il riavvolgimento di un nastro
— Funzione ATA (Automatic Tuner
Activation) ...................................................... 6
Ricezione radio
Per cercare automaticamente le stazioni
— Sintonia automatica ....................................... 6
Se la ricezione in FM stereo è di bassa qualità
— Modo monoaurale ......................................... 6
Per sintonizzare regolando la frequenza
— Sintonia manuale ........................................... 7
Memorizzazione automatica delle stazioni
— Funzione di memorizzazione automatica ... 7
Memorizzazione solo delle stazioni desiderate .... 7
Ricezione delle stazioni memorizzate .................. 7
Altre funzioni
Regolazione delle caratteristiche del suono ........ 8
Ascolto dei bassi e degli acuti anche a volume
basso
— Funzione di sonorità ...................................... 8
Disattivazione del segnale acustico ...................... 8
Manutenzione .......................................................... 8
Rimozione dell’apparecchio .................................. 9
Posizione dei tasti .................................................. 10
Caratteristiche tecniche ......................................... 11
Guida alla soluzione di problemi ........................ 12
I
Actual total number: Sony XR-3501MK2 (E,F,G,I,H) 3-810-725-11 (1)
3
Page 37

Applicazione e rimozione
del pannello anteriore
Il pannello anteriore di questo apparecchio
può essere staccato per evitare che
l’apparecchio venga rubato.
Rimozione del pannello anteriore
Prima di staccare il pannello anteriore,
assicurarsi di premere il tasto
premere il tasto RELEASE per far aprire il
pannello e staccarlo tirandolo verso di sé come
mostrato nell’illustrazione.
Tasto RELEASE
Fare attenzione a non far cadere il pannello
quando lo si stacca dall’apparecchio.
Applicazione del pannello anteriore
Applicare il lato destro del pannello anteriore
all’apparecchio innestando la parte A del
I
pannello sulla parte B dell’apparecchio come
mostrato nell’illustrazione, e spingere fino a
sentire uno scatto.
OFF
. Quindi
• Non esporre il pannello anteriore alla luce solare diretta o
a fonti di calore come condotti dell’aria calda e non
lasciarlo in luoghi umidi. Non lasciare mai il pannello
anteriore staccato sul cruscotto o in un altro luogo
all’interno di un’automobile parcheggiata al sole, poiché
la temperatura interna potrebbe aumentare
considerevolmente.
Suoneria di avvertimento
Se si disattiva la chiavetta di accensione
(posizione OFF) senza staccare il pannello
anteriore, si attiva la suoneria di avvertimento
e si sente un segnale acustico per alcuni
secondi.
A
B
Note
• Controllare che il pannello anteriore sia nella posizione
corretta quando lo si applica all’apparecchio, perché non
può essere montato capovolto.
• Non premere con forza il pannello anteriore contro
l’apparecchio quando lo si applica. Il pannello può essere
innestato facilmente premendolo leggermente contro
l’apparecchio.
• Quando si porta via il pannello anteriore, inserirlo
nell’apposita custodia in dotazione.
• Non premere con forza sul display del pannello anteriore.
• Prima di staccare il pannello anteriore, assicurarsi di
spegnere l’apparecchio. Tuttavia, se si preme il tasto
RELEASE per staccare il pannello quando l’apparecchio
è ancora acceso, l’apparecchio si spegnerà
automaticamente per proteggere i diffusori da danni.
4
Actual total number: Sony XR-3501MK2 (E,F,G,I,H) 3-810-725-11 (1)
Page 38

Regolazione dell’orologio
L’orologio indica in modo digitale le 24 ore.
Per esempio, per regolarlo sulle 10:08
1 Visualizzare l’ora.
(Premere il tasto
in funzione).
2 Premere il tasto
secondi.
La cifra delle ore lampeggia.
Regolare la cifra dell’ora.
–+
(per retrocedere) (per avanzare)
SEL
DSPL
quando l’apparecchio è
DSPL
per più di due
Uso della piastra a
cassette
Ascolto di nastri
Inserire una cassetta nel comparto per
avviare la riproduzione.
Per cambiare la direzione di
scorrimento del nastro,
premere contemporaneamente i tasti 0 e
).
Indicazione della direzione di scorrimento del
nastro
DSPL
SEL
.
.
3 Premere brevemente il tasto
La cifra dei minuti lampeggia.
Regolare la cifra dei minuti.
SEL
–+
(per retrocedere) (per avanzare)
4 Premere brevemente il tasto
L’orologio inizia a funzionare.
Nota
L’orologio non può essere regolato se non si accende
l’apparecchio. Regolare l’ora dopo avere acceso la radio o
avere avviato la riproduzione di nastri.
Viene riprodotto il lato rivolto verso l’alto.
Viene riprodotto il lato rivolto verso il basso.
Alla fine della cassetta, la direzione di
riproduzione del nastro cambia.
Nota
Per evitare di danneggiare il nastro, prima di spegnere
l’apparecchio espellere la cassetta.
Espulsione della cassetta
Premere il tasto per interrompere la
riproduzione ed estrarre la cassetta.
I
Uso della piastra a cassette
5
Actual total number: Sony XR-3501MK2 (E,F,G,I,H) 3-810-725-11 (1)
Page 39

Riavvolgimento/
TUNER
A.MEM
avanzamento rapido del
nastro
Direzione
indicatore*
(
9
Per avanzare
Per
riavvolgere
Ricezione radio
Per cercare
automaticamente le
stazioni
— Sintonia automatica
1 Selezionare la banda desiderata.
Per riprendere la riproduzione, premere l’altro
tasto per l’avanzamento veloce finché il tasto
bloccato non viene rilasciato.
* L’indicatore 9 o ( lampeggia durante l’awdgimento
del nastro.
Ascolto della radio durante
l’avanzamento rapido o il
riavvolgimento di un nastro
I
— Funzione ATA (Automatic Tuner Activation)
Premere il tasto
riproduzione. n Sul display appare
“ATA”.
Usando il pulsante 0 o ) per
l’avanzamento rapido o il riavvolgimento, la
radio si accenderà automaticamente.
ATA
1
durante la
FM1 n FM2 n FM3 n
MW n LW n FM1
2 Premere leggermente uno dei due lati
del tasto SEEK/MANU per cercare la
stazione (sintonia automatica).
SEEK/MANU
–+
Per frequenze
inferiori
La ricerca si ferma quando viene ricevuta una
stazione. Premere ripetutamente uno dei due
lati del tasto fino a ricevere la stazione
desiderata.
Quando è sintonizzato un programma FM stereo
con un segnale abbastanza forte,
ST
appare l’indicazione “ST”.
Per evitare che la sintonia automatica si fermi
troppo di frequente sulle stazioni (modo di ricerca
locale), premere leggermente il tasto SENS in
modo da visualizzare l’indicazione “LCL”.
Solo le stazioni dal segnale relativamente forte verranno
sintonizzate. Il modo di ricerca locale è attivabile solo
durante la sintonia automatica.
SEEK/MANU
–+
Per frequenze
superiori
Se la ricezione in FM
stereo è di bassa qualità
— Modo monoaurale
Premere leggermente il tasto
n␣ Sul display appare “MONO”.
Il suono migliorerà, ma diventerà monoaurale.
6
Actual total number: Sony XR-3501MK2 (E,F,G,I,H) 3-810-725-11 (1)
SENS
.
Page 40

Per sintonizzare regolando
la frequenza
— Sintonia manuale
1 Selezionare la banda desiderata.
A.MEM
TUNER
FM1 n FM2 n FM3 n
MW n LW n FM1
2 Tenere premuto uno dei due lati del
tasto SEEK/MANU.
Quando si riceve la stazione desiderata
rilasciare il tasto.
SEEK/MANU
–+
Per frequenze
inferiori
PREVENZIONE DI INCIDENTI!
Durante la guida consigliamo di usare la
sintonia automatica e la sintonia preselezionata
in memoria invece della sintonia manuale.
SEEK/MANU
–+
Per frequenze
superiori
Memorizzazione
automatica delle stazioni
— Funzione di memorizzazione automatica
Le stazioni dalla ricezione più chiara sono
cercate automaticamente e memorizzate su
ciascuna banda (FM1, FM2, FM3, MW e LW). È
possibile memorizzare un massimo di 6
stazioni per ciascuna banda sui tasti di
preselezione da 1 a 6 in ordine di frequenza.
1 Selezionare la banda desiderata.
A.MEM
TUNER
FM1 n FM2 n FM3 n
MW n LW n FM1
Memorizzazione solo delle
stazioni desiderate
1 Selezionare la banda desiderata.
A.MEM
TUNER
FM1 n FM2 n FM3 n
MW n LW n FM1
2 Sintonizzare la stazione che si desidera
memorizzare nel tasto di preselezione.
3 Tenere premuto il tasto di preselezione
desiderato (da
secondi fino a che non si sente un
segnale acustico.
Il numero del tasto di preselezione premuto
appare sul display principale.
FM
Nei pulsanti di preselezione possono essere memorizzate
fino a 6 stazioni su ogni banda (FM1, FM2, FM3, MW e
LW) nell’ordine che si preferisce. Pertanto, sulla banda FM
possono essere memorizzate 18 stazioni.
Se si cerca di memorizzare un’altra stazione sullo stesso
pulsante di preselezione, la stazione memorizzata in
precedenza verrà cancellata.
ST
ATA
1
a 6) per circa due
Ricezione delle stazioni
memorizzate
1 Selezionare la banda desiderata.
A.MEM
TUNER
FM1 n FM2 n FM3 n
MW n LW n FM1
I
Uso della piastra a cassette/Ricezione radio
2 Premere il tasto TUNER/A.MEM per più di
due secondi.
A.MEM
TUNER
L’apparecchio inizierà a effettuare la
scansione della banda di frequenza
selezionata e memorizzerà
automaticamente nei tasti numerici da 1 a 6
le stazioni sintonizzate.
Actual total number: Sony XR-3501MK2 (E,F,G,I,H) 3-810-725-11 (1)
2 Premere leggermente il tasto di
preselezione in cui è memorizzata la
stazione desiderata.
Nota
Se si tiene premuto il tasto di preselezione per più di due
secondi, la stazione attualmente ricevuta viene
memorizzata di nuovo. Per ricevere la stazione
memorizzata precedentemente, fare attenzione a premere il
tasto di preselezione solo leggermente.
7
Page 41

Altre funzioni
Regolazione delle
caratteristiche del suono
1 Selezionare la caratteristica che si
desidera regolare premendo
ripetutamente il tasto
VOL (volume) n BAS (bassi) n TRE
(acuti) n BAL (equilibratura) n FAD
(attenuatore) n VOL (volume)
SEL
.
Manutenzione
Sostituzione del fusibile
Quando si sostituisce il fusibile, assicurarsi che
l’amperaggio sia lo stesso di quello del fusibile
in dotazione. Se il fusibile brucia, controllare i
collegamenti e sostituirlo. Se il fusibile nuovo
dovesse anch’esso bruciare, forse il problema
viene dall’interno dell’apparecchio. In questo
caso contattare il più vicino rivenditore Sony.
Fusibile (15 A)
2 Regolare la caratteristica selezionata
premendo il tasto
La regolazione va effettuata entro tre secondi
dalla selezione (passati i tre secondi il tasto
avrà di nuovo la funzione di controllo del
volume).
I
Ascolto dei bassi e degli
–
o il tasto
acuti anche a volume
basso
— Funzione di sonorità
Premere il tasto
apparirà “LOUD”.
I bassi e gli acuti verranno rafforzati. Per
annullare la funzione, premere di nuovo il
tasto.
LOUD
. n Sul display
Disattivazione del segnale
acustico
Premere il tasto 5 tenere premuto
contemporaneamente il tasto
Per ripristinare il segnale acustico, premere di
nuovo i tasti.
+
.
Attenzione
Non utilizzare un fusibile di amperaggio
superiore a quello in dotazione
all’apparecchio, perché si potrebbe
danneggiarlo.
Pulizia dei connettori
L’apparecchio può non funzionare
correttamente quando i connettori tra
l’apparecchio e il pannello anteriore sono
sporchi. Per evitare ciò, aprire il pannello
anteriore premendo il tasto RELEASE,
toglierlo e pulirlo con un bastoncino di cotone
imbevuto d’alcol. Non premere con forza per
evitare di danneggiare il connettore.
Apparecchio principale
SEL
.
Retro del pannello anteriore
8
Actual total number: Sony XR-3501MK2 (E,F,G,I,H) 3-810-725-11 (1)
Page 42

Rimozione
dell’apparecchio
1
Chiavetta di rilascio
(in dotazione)
2
3
I
Altre funzioni
4
9
Actual total number: Sony XR-3501MK2 (E,F,G,I,H) 3-810-725-11 (1)
Page 43

Posizione dei tasti
ATA
DSPL
RELEASE
SEL
–+
Per i dettagli, fare riferimento alle pagine indicate nei cerchietti r.
215634
SEEK/MANU
–+
A.MEM
TUNER
LOUD
SENS OFF
1 Display principale
2 Tasto di selezione del modo di controllo
(SEL) 58
3 Tasto di cambiamento modo di
I
visualizzazione/regolazione
dell’ora(DSPL) 5
4 Tasto di espulsione cassetta 6 5
5 Durante la ricezione radio:
Pulsanti di preselezione 7
Durante la riproduzione di nastri:
Tasto di attivazione automatica della
ATA
radio
6
1
6 Tasti di avvolgimento rapido/cambio di
direzione di scorrimento del nastro
(0/)/DIR) 56
7 Tasto di sonorità (LOUD) 8
8 Tasto di rilascio pannello anteriore
(RELEASE) 48
9 Tasto di volume/bassi/acuti/
equilibratura/attenuatore
–
+
58
0 Tasto di sintonia automatico/manuale
(SEEK/MANU) 67
!¡ Tasto di accensione radio • selezione
banda/memorizzazione della stazione
selezionata (TUNER/A.MEM) 67
!™ Tasto di sensibilità (SENS) 6
!£ Tasto di spegnimento OFF 4
10
Actual total number: Sony XR-3501MK2 (E,F,G,I,H) 3-810-725-11 (1)
Page 44

Caratteristiche tecniche
Sezione piastra a cassette
Pista del nastro 4 piste, 2 canali stereo
Wow e flutter 0,13 % (WRMS)
Risposta in frequenza 30 – 15.000 Hz
Rapporto segnale-rumore 55 dB
Sezione sintonizzatore
FM
Campo di sintonia 87,5 – 108,0 MHz
Terminale antenna Connettore per antenna
esterna
Frequenza intermedia 10,7 MHz
Sensibilità impiegabile 12 dBf
Selettività 70 dB a 400 kHz
Rapporto segnale-rumore 65 dB (stereo),
68 dB (mono)
Distorsione armonica a 1 kHz
0,5% (stereo),
0,3% (mono)
Separazione 35 dB a 1 kHz
Risposta in frequenza 30 – 15.000 Hz
Rapporto di cattura 2 dB
MW/LW
Campo di sintonia MW:531 – 1.602 kHz
LW :153 – 281 kHz
Terminale antenna Connettore per antenna
esterna
Frequenza intermedia 450 kHz
Sensibilità MW: 30 µV
LW :50 µV
Generali
Cavo in uscita Cavo di comando
amplificatore di potenza
Comandi di tono Bassi ±8 dB a 100 Hz
Acuti ±8 dB a 10 kHz
Alimentazione Batteria d’auto da 12 V CC
(massa negativa)
Dimensioni Circa 186 × 57 × 170 mm
(l/a/p), esclusi
comandi e parti sporgenti
Dimensioni di montaggio Circa. 182 × 53 × 155 mm
(l/a/p), esclusi
comandi e parti sporgenti
Peso Circa 1,2 kg
Accessori in dotazione Componenti per
installazione e
collegamenti (1 serie)
Custodia per il pannello
anteriore (1)
Disegno e caratteristiche tecniche soggetti a modifiche
senza preavviso.
I
Sezione amplificatore di potenza
Uscite Uscite diffusori
(connettori a sigillo sicuro)
Impedenza diffusori 4 – 8 ohm
Potenza di uscita massima
20 W × 4 (a 4 ohm)
11
Actual total number: Sony XR-3501MK2 (E,F,G,I,H) 3-810-725-11 (1)
Page 45

Guida alla soluzione di problemi
La lista seguente può essere di aiuto nella soluzione della maggior parte dei problemi che possono
verificarsi durante l’uso dell’apparecchio.
Prima di scorrere la lista, fare riferimento alle procedure di collegamento e funzionamento.
Generali
Problema
Suono assente
Le indicazioni non appaiono sul
display principale.
Riproduzione di nastri
Problema
Il suono di riproduzione è
distorto.
Ricezione radio
Problema
La sintonia preselezionata non
I
è possibile.
La sintonia automatica non è
possibile.
L’indicazione “ST” lampeggia.
Causa/Soluzione
• Regolare il volume con il tasto
• Regolare il comando dell’attenuatore sulla posizione centrale
in un sistema a 2 diffusori.
Rimuovere il pannello anteriore e pulire i connettori. Fare
riferimento a “Pulizia dei connettori” in “Manutenzione” per i
dettagli.
Causa/Soluzione
Testina del nastro sporca. n Pulire la testina.
Causa/Soluzione
• Memorizzare la frequenza corretta.
• La trasmissione è troppo debole.
La trasmissione è troppo debole. n Usare la sintonia manuale.
• Sintonizzare con precisione.
• La trasmissione è troppo debole. n Premere il tasto SENS per
attivare il modo di ricezione monoaurale.
+
.
12
Actual total number: Sony XR-3501MK2 (E,F,G,I,H) 3-810-725-11 (1)
Page 46

NL
Kenmerken
Algemeen
• Afneembaar voorpaneel, dat u gemakkelijk
kunt verwijderen van het apparaat, wanneer
u de auto verlaat (pagina 4).
• Een pieptoon waarschuwt u als u het
contact afzet en vergeet het voorpaneel van
het apparaat te verwijderen.
• Krachtige ingebouwde eindversterker
max. uitgangsvermogen: 20 Watt × 4 voor
een systeem met 4 luidsprekers.
• Digitale klok met 24-uurs aanduiding
(pagina 5).
Cassettedeck-gedeelte
• ATA (Automatic Tuner Activation) tuner-
inschakelfunctie, voor het automatisch
inschakelen van de radio tijdens het snel
vooruitspoelen of terugspoelen van een
cassette (pagina 6).
Tuner-gedeelte
• Maximaal 30 zenders kunnen worden
vooringesteld: 18 FM-zenders en telkens 6
MG- en LG-zenders.
• Automatische geheugenfunctie om in het
totaal 30 zenders snel en makkelijk in het
geheugen op te slaan (pagina 7).
Voorzorgsmaatregelen
• Als de temperatuur in de auto als gevolg van
parkeren in de volle zon bijzonder hoog is
opgelopen, moet u het apparaat eerst even
laten afkoelen alvorens u het inschakelt.
• Als het apparaat geen stroom
krijgt,controleer dan eerst de aansluitingen.
Is alles in orde, controleer dan de zekering.
• Als een systeem met twee luidsprekers geen
geluid geeft, zet dan de voor/achter-balans
(FAD) in de middenpositie.
• Als uw wagen is uitgerust met een elektrisch
bediende antenne, schuift deze automatisch
uit wanneer het toestel aan staat.
Als u na het lezen van deze
gebruiksaanwijzing nog vragen of problemen
hebt, kunt u altijd contact opnemen met uw
Sony-leverancier.
2
Actual total number: Sony XR-3501MK2 (E,F,G,I,H) 3-810-725-11 (1)
Page 47

Enkele opmerkingen over
cassettes
Omgaan met cassettes
• Raak het bandje in de cassette niet aan, want
zelfs het geringste vuil of stof kan aan de
koppen blijven kleven.
• Leg cassettes nooit in de buurt van
apparatuur die magneten bevat, zoals
luidsprekers en versterkers. Een magnetisch
veld kan de opnamen op het bandje
gemakkelijk vervormen of zelfs wissen.
• Stel cassettes niet bloot aan rechtstreeks
zonlicht, extreme koude of vocht.
• Als een bandje gedurende lange tijd wordt
afgespeeld, kan de cassette in het apparaat
warm worden ten gevolge van de
ingebouwde eindversterker. Dit betekent niet
dat er iets mis is.
Opmerkingen over de koppen van
het cassettedeck
• Bij langdurig gebruik van cassettes raken de
koppen vervuild, waardoor de
geluidskwaliteit achteruitgaat of het geluid
zelfs helemaal wegvalt. Daarom bevelen wij
aan om de koppen ongeveer eenmaal per
maand schoon te maken met de afzonderlijk
verkrijgbare Sony cassettereinigingsset.
Indien het geluid niet verbetert na het
gebruik van de reinigingscassette, raadpleeg
dan uw Sony-dealer.
• Bij gebruik van oude cassettes of cassettes
van minderwaardige kwaliteit raken de
koppen veel sneller vervuild. Bij sommige
cassettes kan de geluidskwaliteit al na een- of
tweemaal afspelen verslechteren.
Cassettes met een speelduur die
langer is dan 90 minuten
Het gebruik van cassettes met een speelduur
die langer is dan 90 minuten, wordt afgeraden,
tenzij de cassette gedurende lange tijd achter
elkaar kan spelen. De bandjes in deze cassettes
zijn zo dun dat ze gemakkelijk kunnen
uitrekken. Veelvuldig afspelen en stoppen van
deze bandjes kan tot gevolg hebben dat ze
verstrikt raken in het mechanisme van het
cassettedeck.
Inhoudsopgave
Verwijderen en aanbrengen van het
voorpaneel ........................................................... 4
De klok instellen ...................................................... 5
Bediening van het
cassettedeck
Cassettes afspelen .................................................... 5
Cassettes uitwerpen ................................................ 5
Snelspoelen ............................................................... 6
Radio-ontvangst tijdens snel vooruitspoelen of
terugspoelen van een bandje
— ATA-functie (Automatic Tuner
Activation) ...................................................... 6
Radio-ontvangst
Automatisch zoeken naar zenders
— Automatische afstemming ........................... 6
Als de stereo-ontvangst op de FM te zwak is
— Monoweergave .............................................. 6
Afstemmen op een bepaalde frequentie
— Handmatige afstemming .............................. 7
Zenders automatisch vastleggen in het geheugen
— Automatische geheugenfunctie ................... 7
Alleen de gewenste zenders vastleggen .............. 7
Afstemmen op vastgelegde zenders ..................... 7
Overige functies
Kenmerken van het geluid instellen ..................... 8
Goede weergave van hoge en lage tonen bij een
laag volume
— Loudness-functie ........................................... 8
De pieptoon onderdrukken .................................... 8
Onderhoud ............................................................... 8
Apparaat verwijderen ............................................. 9
Plaats van de toetsen ............................................. 10
Technische gegevens ............................................. 11
Verhelpen van problemen ......................Achterflap
NL
Actual total number: Sony XR-3501MK2 (E,F,G,I,H) 3-810-725-11 (1)
3
Page 48

NL
Verwijderen en
aanbrengen van het
voorpaneel
Het voorpaneel van dit apparaat kan
verwijderd worden, om diefstal van de
apparatuur te voorkomen.
Verwijderen van het voorpaneel
Vergeet niet, voor u het voorpaneel verwijdert,
eerst op de
vervolgens op de RELEASE toets om het
voorpaneel te openen, en verwijder het
voorpaneel door dit naar u toe te trekken,
zoals afgebeeld.
Pas op dat u het voorpaneel niet laat vallen
wanneer u dit van het apparaat haalt.
Aanbrengen van het voorpaneel
Bevestig de rechterkant van het voorpaneel
aan het apparaat door deel A van het
voorpaneel tegenover deel B van het apparaat
te plaatsen, zoals afgebeeld. Druk vervolgens
de linkerkant van het voorpaneel tegen het
apparaat aan tot u een klik hoort.
OFF
toets te drukken. Druk
RELEASE toets
• Wanneer u het voorpaneel meeneemt, is het aanbevolen
dit in de bijgeleverde beschermhoes te verpakken.
• Voor u het voorpaneel verwijdert, moet u het apparaat
eerst uitschakelen. Als u echter op de RELEASE toets
drukt om het voorpaneel te verwijderen zonder dat het
apparaat is uitgeschakeld, zal de installatie automatisch
worden uitgeschakeld om beschadiging van de
luidsprekers te voorkomen.
• Stel het voorpaneel nooit bloot aan direct zonlicht,
extreme hitte of een hoge vochtigheidsgraad. Laat het
afneembare voorpaneel ook nooit achter op het dashboard,
e.d., wanneer uw wagen in de volle zon staat geparkeerd,
aangezien de temperatuur in de auto bijzonder hoog kan
oplopen.
Waarschuwingstoon
Wanneer u de contactsleutel van de auto in de
“OFF” stand zet zonder eerst het voorpaneel
van het apparaat te verwijderen, zal er ter
waarschuwing enkele seconden lang een
pieptoon klinken.
A
B
Opmerkingen
• Let op dat het voorpaneel met de juiste kant boven wordt
aangebracht, aangezien omgekeerd aanbrengen van het
voorpaneel niet mogelijk is.
• Oefen bij het aanbrengen van het voorpaneel hier niet
teveel druk op uit. Het voorpaneel kan gemakkelijk
bevestigd worden door het lichtjes tegen het apparaat aan
te drukken.
• Oefen nooit grote druk uit op het uitleesvenster van het
voorpaneel.
4
Actual total number: Sony XR-3501MK2 (E,F,G,I,H) 3-810-725-11 (1)
Page 49

De klok instellen
De klok werkt met een digitale 24-uurs cyclus.
Voorbeeld: instellen van de klok op 10:08 uur.
1 Tijdweergave
(Druk op de toets
werkt.)
2 Houd de
ingedrukt.
Het getal voor het uur knippert.
DSPL
terwijl het apparaat
DSPL
toets meer dan 2 seconden
Bediening van het
cassettedeck
Cassettes afspelen
Nadat u een cassette in het apparaat
hebt gestoken, wordt het afspelen
automatisch gestart.
Stel het uur in.
SEL
–+
(achteruit)
3 Druk lichtjes op de
De getallen voor de minuten knipperen.
Stel de minuten in.
–+
(achteruit)
4 Druk lichtjes op de
De klok begint te lopen.
Opmerking
De klok kan enkel worden ingesteld wanneer het apparaat
ingeschakeld is. Stel de klok dus in nadat u de radio of
cassettespeler al ingeschakeld heeft.
SEL
(vooruit)
(vooruit)
DSPL
SEL
toets.
toets.
Om de bandlooprichting te wijzigen:
druk tegelijk op de toets 0 en de toets ).
Aanduiding van de bandlooprichting
De bovenkant van de cassette wordt afgespeeld.
NL
Afspelen van cassettes
De onderkant van de cassette wordt afgespeeld.
Bij weergave wordt de bandlooprichting
aan het eind van de band automatisch
omgekeerd.
Opmerking
Voor u het toestel afzet, haalt u best de cassette eruit om
beschadiging van de cassette te voorkomen.
Cassettes uitwerpen
Druk op de toets om het afspelen te
stoppen en werp de cassette uit.
Actual total number: Sony XR-3501MK2 (E,F,G,I,H) 3-810-725-11 (1)
5
Page 50

Snelspoelen
SENS
TUNER
A.MEM
Bandlooprichtingaanduiding
*
Vooruitspoelen
Radio-ontvangst
Terugspoelen
NL
(
9
Om het afspelen voort te zetten drukt u
gedeeltelijk op de andere .snelspoeltoets tot de
vergrendelde toets vrijkomt.
* Tijdens het snelspoelen van de band knippert de 9 of
( aanduiding.
Radio-ontvangst tijdens
snel vooruitspoelen of
terugspoelen van een
bandje
— ATA-functie (Automatic Tuner Activation)
Druk tijdens het afspelen op de toets
ATA
. n In het uitleesvenster verschijnt
1
“ATA”.
Als u snel vooruitspoelt of terugspoelt .met de
toets 0 of ), zal automatisch de radio
worden ingeschakeld.
Automatisch zoeken naar
zenders
— Automatische afstemming
1 Kies de gewenste afstemband.
FM1 n FM2 n FM3 n
MW n LW n FM1
2 Druk kort op een van beide zijden van de
toets SEEK/MANU om een volgende
zender te zoeken (automatische
afstemming).
SEEK/MANU
–+
Lagere frequenties
zoeken
Het zoeken stopt als een zender wordt
ontvangen. Blijf op een van beide zijden van
de toets drukken tot de gewenste zender
wordt ontvangen.
Als op de FM een zender met een stereosignaal
van voldoende sterkte wordt gekozen,
ST
verschijnt de aanduiding “ST” in het uitleesvenster.
Om te voorkomen dat de automatische
afstemming te vaak stopt, kunt u even op de toets
SENS drukken. In het uitleesvenster verschijnt de
aanduiding “LCL” (local seek mode).
De automatische afstemming stopt dan alleen bij zenders
met een relatief sterk signaal. Deze functie werkt alleen bij
automatische afstemming.
SEEK/MANU
–+
Hogere frequenties
zoeken
Als de stereo-ontvangst
op de FM te zwak is
— Monoweergave
Druk even op de toets
uitleesvenster verschijnt “MONO”.
De kwaliteit van het geluid verbetert, maar het
wordt wel mono.
6
Actual total number: Sony XR-3501MK2 (E,F,G,I,H) 3-810-725-11 (1)
. n In het
Page 51

Afstemmen op een
6
bepaalde frequentie
— Handmatige afstemming
1 Kies de gewenste afstemband.
A.MEM
TUNER
FM1 n FM2 n FM3 n
MW n LW n FM1
2 Druk op een van beide zijden van de toets
SEEK/MANU en houd de toets ingedrukt.
Laat de toets los als de gewenste zender
wordt ontvangen.
SEEK/MANU
–+
Lagere frequenties
zoeken
VERKEERSVEILIGHEID!
Wanneer u tijdens het rijden wilt afstemmen,
gebruik dan de automatische afstemming en
de voorinstelnummertoetsen in plaats van de
handmatige afstemming.
ebruik tijdens het rijden de automatische
afstemming en de geheugentoetsen in plaats
van handmatige afstemming.
SEEK/MANU
–+
Hogere frequenties
zoeken
Zenders automatisch
vastleggen in het geheugen
— Automatische geheugenfunctie
De zenders die het best worden ontvangen
worden automatisch gezocht en opgeslagen
per afstemband (FM1, FM2, FM3, MG en LG).
Per afstemband kunnen maximaal 6 zenders in
volgorde van frequentie worden opgeslagen
onder de voorinstelnummertoetsen 1 tot 6.
1 Kies de gewenste afstemband.
A.MEM
TUNER
FM1 n FM2 n FM3 n
MW n LW n FM1
2 Houd de toets TUNER/A.MEM meer dan
twee seconden ingedrukt.
A.MEM
TUNER
Het apparaat begint te zoeken in de
gekozen afstemband en slaat de ontvangen
zenders automatisch op onder de
voorinstelnummertoetsen 1 tot 6.
Alleen de gewenste
zenders vastleggen
1 Kies de gewenste afstemband.
A.MEM
TUNER
FM1 n FM2 n FM3 n
MW n LW n FM1
2 Stem af op de zender die u wilt opslaan
onder een voorinstelnummertoets.
3 Houd de gekozen
voorinstelnummertoets (
) ongeveer twee seconden
ingedrukt tot er een pieptoon klinkt.
Het voorinstelnummer van de
voorinstelnummertoets verschijnt in het
uitleesvenster.
FM
Per afstemband (FM1, FM2, FM3, MG en LG) kunnen
maximaal 6 zenders in elke gewenste volgorde worden
opgeslagen onder de voorinstelnummertoetsen. Op de FM
kunnen dus in totaal 18 zenders worden vastgelegd in het
geheugen.
Als u probeert een andere zender op te slaan onder dezelfde
voorinstelnummertoets, gaat een eventuele eerdere
instelling voor die toets verloren.
ST
ATA
tot en met
1
Afstemmen op
vastgelegde zenders
1 Kies de gewenste afstemband.
A.MEM
TUNER
FM1 n FM2 n FM3 n
MW n LW n FM1
2 Druk even kort op de
voorinstelnummertoets voor de
gewenste zender.
Opmerking
Als u een geheugentoets langer dan twee seconden
ingedrukt houdt, wordt de huidige zender opgeslagen. Om
af te stemmen op de in het geheugen opgeslagen zender
moet u dus kort op de geheugentoets drukken.
NL
Afspelen van cassettes/Bediening van de radio
7
Actual total number: Sony XR-3501MK2 (E,F,G,I,H) 3-810-725-11 (1)
Page 52

Overige functies
Kenmerken van het geluid
instellen
1 Kies het kenmerk dat u wilt instellen
door enkele malen op de toets
drukken.
VOL (volume) n BAS (lage tonen) n TRE
(hoge tonen) n BAL (links/rechts-balans)
n FAD (voor/achter-balans) n VOL
(volume)
SEL
te
Onderhoud
Zekering vervangen
Let er bij het vervangen van de zekering op dat
de nieuwe zekering het op de zekering
vermelde ampère heeft. Als de zekering
springt, controleer dan de voedingsaansluiting
en vervang de zekering. Als de zekering weer
springt nadat ze werd vervangen, kan dit
wijzen op een intern defect van het toestel.
Raadpleeg in dit geval een Sony dealer.
Zekering (15 A)
NL
2 Wijzig de instelling van het gekozen
kenmerk door op de toets
+
te drukken.
Wijzig de instelling binnen drie seconden
nadat u het kenmerk hebt gekozen. (Na drie
seconden krijgt de toets zijn functie van
volumeregelaar terug.)
–
of
Goede weergave van
hoge en lage tonen bij een
laag volume
— Loudness-functie
Druk op de
uitleesvenster verschijnt “LOUD”.
De hoge en lage tonen worden extra versterkt.
Druk nogmaals op de toets om de functie te
annuleren.
LOUD
toets . n In het
De pieptoon
onderdrukken
Druk op de 5 toets terwijl de
toets wordt ingedrukt.
Druk nogmaals op deze toetsen om de
pieptoon weer te laten klinken.
SEL
Waarschuwing
Gebruik nooit een zekering met een hoger
aantal ampère dan de bij het apparaat
geleverde zekering, want hierdoor kan het
apparaat beschadigd raken.
Reinigen van de aansluitingen
Het apparaat kan niet naar behoren
functioneren als de aansluitingen tussen het
apparaat en het voorpaneel niet schoon zijn.
Om dat te voorkomen, opent u het voorpaneel
door op de RELEASE toets te drukken, neemt
u het weg en maakt u de aansluitingen schoon
met een in alcohol gedrenkt wattenstaafje.
Oefen niet teveel kracht uit om de stekker niet
te beschadigen.
Apparaat zelf
Achterkant van het
voorpaneel.
8
Actual total number: Sony XR-3501MK2 (E,F,G,I,H) 3-810-725-11 (1)
Page 53

Apparaat verwijderen
1
Vrijmaaksleuteltje
2
3
4
NL
Overige functies
9
Actual total number: Sony XR-3501MK2 (E,F,G,I,H) 3-810-725-11 (1)
Page 54

Plaats van de toetsen
+
RELEASE
Zie de pagina’s in r voor meer informatie.
SEL
–+
ATA
DSPL
215634
SEEK/MANU
–+
A.MEM
TUNER
LOUD
SENS OFF
NL
1 Uitleesvenster
2 Toets SEL (kenmerk kiezen) 58
3 Toets DSPL (uitleesvenster instellen/klok
instellen) 5
4 Toets 6 (uitwerpen) 5
5 Tijdens radio-ontvangst:
Voorinstelnummertoetsen 7
Tijdens afspelen van cassette:
ATA
1
toets ATA (automatische
afstemming) 6
6 Toetsen voor snelspoelen/cassettekant
(0/)/DIR) 56
7 Toets LOUD (loudness) 8
8 Toets RELEASE (voorpaneel verwijderen)
48
–
9
(volume; lage tonen; hoge
tonen; links/rechts-balans; voor/achterbalans) 58
0 Toets SEEK/MANU 67
!¡ TUNER/A.MEM (radio aan · kiezen
afstemband/autom. geheugen) 67
!™ Toets SENS (gevoeligheid instellen) 6
!£ Toets OFF 4
10
Actual total number: Sony XR-3501MK2 (E,F,G,I,H) 3-810-725-11 (1)
Page 55

Technische gegevens
Cassettedeck-gedeelte
Sporensysteem 4 sporen, 2 kanalen stereo
Snelheidsfluctuaties 0,13% (WRMS)
Frequentiebereik 30 – 15.000 Hz
Signaal-ruisverhouding 55 dB
Radio-gedeelte
FM
Afstembereik 87,5 – 108,0 MHz
Antenne-aansluiting Externe antenne-
aansluiting
Tussenfrequentie 10,7 MHz
Bruikbare gevoeligheid 12 dBf
Selectiviteit 70 dB bij 400 kHz
Signaal-ruisverhouding 65 dB (stereo),
68 dB (mono)
Harmonische vervorming bij 1 kHz
0,5% (stereo),
0,3% (mono)
Kanaalscheiding 35 dB bij 1 kHz
Frequentiebereik 30 – 15.000 Hz
Vangverhouding 2 dB
MG/LG
Afstembereik MG: 531 – 1.602 kHz
LG: 153 – 281 kHz
Antenne-aansluiting Externe antenne-
aansluiting
Tussenfrequentie 450 kHz
Gevoeligheid MG: 30 µV
LG: 50 µV
Versterkergedeelte
Uitgangen Luidsprekeruitgangen
(afgeschermde
aansluitingen)
Luidspreker-impedantie 4 – 8 ohms
Maximaal uitgangsvermogen
20 W × 4 (bij 4 ohm)
Algemeen
Uitgangssnoeren Eindversterkerbediening-
ssnoer
Toonregeling Lage tonen ±8 dB bij 100
Hz
Hoge tonen ±8 dB bij
10 kHz
Stroomvoorziening 12 V gelijkstroom van
auto-accu (met negatieve
aarde)
Afmetingen Ongeveer 186 × 57 × 170
mm (b/h/d) exclusief
uitstekende delen en
bedieningsorganen
Inbouw-afmetingen Ongeveer 182 × 53 × 155
mm (b/h/d) exclusief
uitstekende delen en
bedieningsorganen
Gewicht Ongeveer 1,2 kg
Bijgeleverde accessoires Onderdelen voor montage
en aansluiting (1 set)
Beschermhoes voor
voorpaneel (1)
Ontwerp en technische gegevens kunnen zonder
voorafgaande kennisgeving worden gewijzigd.
NL
Actual total number: Sony XR-3501MK2 (E,F,G,I,H) 3-810-725-11 (1)
11
Page 56

NL
+
Verhelpen van problemen
Het volgende overzicht stelt u in staat de meest voorkomende problemen zelf te verhelpen.
Controleer echter eerst of de aansluitingen allemaal in orde zijn en of er geen vergissingen zijn
gemaakt bij de bediening.
Algemeen
Probleem
Geen geluid
Er verschijnen geen
aanduidingen in het
uitleesvenster.
Cassettes afspelen
Probleem
Het geluid klinkt vervormd.
Radio-ontvangst
Probleem
Geheugenafstemming is niet
mogelijk.
Automatische afstemming is
niet mogelijk
De aanduiding “ST” knippert.
Oorzaak/Oplossing
• Wijzig het volume met de
• Stel in het geval van een systeem met twee luidsprekers de
voor/achter-balans in op de middenpositie.
Verwijder het voorpaneel en reinig de aansluitingen. Raadpleeg
“Reinigen van de aansluitingen” bij “Onderhoud” voor meer
informatie.
Oorzaak/Oplossing
De weergavekop is vuil. n Maak de weergavekop schoon.
Oorzaak/Oplossing
• Leg de juiste frequentie vast in het geheugen.
• Het zendersignaal is te zwak.
Het zendersignaal is te zwak. n Gebruik handmatige
afstemming.
• Stem nauwkeuriger af.
• Het zendersignaal is te zwak. n Druk op de toets SENS om
over te gaan op MONO.
toets.
Sony Corporation Printed in Malaysia
12
Actual total number: Sony XR-3501MK2 (E,F,G,I,H) 3-810-725-11 (1)
 Loading...