

Sony Xperia Z3 Compact D5803, Xperia Z3 Compact D5833 User Manual

User guide
Xperia™ Z3 Compact
D5803/D5833

Contents
Getting started...............................................................................6
About this User guide........................................................................6
Overview............................................................................................6
Assembly...........................................................................................7
Starting your device for the first time.................................................9
Why do I need a Google™ account?...............................................10
Charging your device.......................................................................11
Learning the basics......................................................................13
Using the touchscreen.....................................................................13
Locking and unlocking the screen...................................................15
Home screen....................................................................................16
Application screen...........................................................................18
Navigating applications....................................................................20
Small apps.......................................................................................21
Widgets............................................................................................22
Shortcuts and folders......................................................................24
Background and themes..................................................................26
Taking a screenshot.........................................................................27
Recording your screen.....................................................................27
Status and notifications...................................................................29
Icons in the status bar.....................................................................30
Application overview........................................................................31
Downloading applications............................................................34
Downloading applications from Google Play™...............................34
Downloading applications from other sources................................34
Internet and networks..................................................................36
Browsing the web............................................................................36
Internet and MMS settings ..............................................................37
Wi-Fi®..............................................................................................38
Sharing your mobile data connection..............................................41
Controlling data usage.....................................................................43
Selecting mobile networks...............................................................45
Virtual private networks (VPNs)........................................................45
Synchronising data on your device..............................................47
Synchronising with online accounts................................................47
Synchronising with Microsoft® Exchange ActiveSync®.................48
Synchronising with Outlook® using a computer.............................49
Basic settings...............................................................................50
Accessing settings...........................................................................50
2
This is an Internet version of this publication. © Print only for private use.

Sound, ringtone and volume............................................................51
SIM card protection.........................................................................52
Screen settings................................................................................53
Screen lock......................................................................................54
Language settings............................................................................57
Date and time...................................................................................57
X-Reality™ for mobile......................................................................58
Super-vivid mode.............................................................................58
Enhancing the sound output............................................................59
Noise cancellation............................................................................61
Typing text...................................................................................62
On-screen keyboard........................................................................62
Phonepad.........................................................................................64
Entering text using voice input........................................................65
Editing text.......................................................................................65
Personalising the Xperia™ keyboard...............................................67
Calling..........................................................................................68
Making calls.....................................................................................68
Receiving calls.................................................................................70
Smart call handling..........................................................................72
Ongoing calls...................................................................................72
Using the call log.............................................................................73
Forwarding calls...............................................................................74
Restricting calls................................................................................75
Multiple calls....................................................................................76
Conference calls..............................................................................77
Voicemail..........................................................................................78
Emergency calls...............................................................................78
Contacts.......................................................................................80
Transferring contacts.......................................................................80
Searching and viewing contacts......................................................82
Adding and editing contacts............................................................83
Adding medical and emergency contact information......................84
Favourites and groups.....................................................................87
Sending contact information............................................................87
Avoiding duplicate entries in the Contacts application...................88
Backing up contacts........................................................................89
Messaging and chat.....................................................................90
Reading and sending messages......................................................90
Organising your messages..............................................................92
Calling from a message...................................................................93
Messaging settings..........................................................................93
3
This is an Internet version of this publication. © Print only for private use.

Instant messaging and video chat...................................................94
Email.............................................................................................96
Setting up email...............................................................................96
Sending and receiving email messages..........................................96
Email preview pane..........................................................................98
Organising your email messages.....................................................99
Email account settings...................................................................100
Gmail™..........................................................................................101
Music..........................................................................................103
Transferring music to your device.................................................103
Listening to music..........................................................................103
Walkman® home screen menu.....................................................105
Playlists..........................................................................................107
Sharing music................................................................................108
Enhancing the sound.....................................................................109
Visualiser .......................................................................................109
Recognising music with TrackID™................................................110
Music Unlimited online service......................................................112
FM radio.....................................................................................113
Listening to the radio.....................................................................113
Favourite radio channels................................................................114
Sound settings...............................................................................115
Camera.......................................................................................117
Taking photos and recording videos.............................................117
Face detection...............................................................................119
Using Smile Shutter™ to capture smiling faces............................120
Adding the geographical position to your photos.........................120
General camera settings................................................................121
Still camera settings.......................................................................126
Video camera settings...................................................................131
Photos and videos in Album......................................................136
Viewing photos and videos............................................................136
Sharing and managing photos and videos....................................138
Editing photos with the Photo editor application...........................140
Album home screen menu.............................................................142
Viewing your photos on a map......................................................143
Videos........................................................................................146
Watching videos in the Movies application...................................146
Transferring video content to your device.....................................147
Managing video content................................................................148
Video Unlimited service.................................................................149
4
This is an Internet version of this publication. © Print only for private use.

Connectivity...............................................................................150
Mirroring the screen of your device on a TV using a cable............150
Mirroring the screen of your device wirelessly on a TV.................151
Sharing content with DLNA Certified™ devices............................151
Playing games on a TV using a DUALSHOCK™3/
DUALSHOCK™4 wireless controller.............................................155
NFC................................................................................................156
Bluetooth® wireless technology....................................................158
One-touch setup............................................................................162
Smart apps and features that save you time.............................163
Controlling accessories and settings with Smart Connect............163
Using your device as a fitness hub with ANT+™...........................165
Using your device as a wallet........................................................165
Travel and maps.........................................................................167
Using location services..................................................................167
Google Maps™ and navigation.....................................................168
Using data traffic when travelling..................................................169
Using your device with a car infotainment system........................170
Airplane mode................................................................................171
Calendar and alarm clock..........................................................172
Calendar.........................................................................................172
Alarm and clock.............................................................................174
Support and maintenance..........................................................177
Support for your device.................................................................177
Computer tools..............................................................................178
Updating your device.....................................................................179
Finding a lost device .....................................................................181
IMEI number...................................................................................182
Battery and power management...................................................182
Memory and storage......................................................................185
Managing files using a computer...................................................186
Backing up and restoring content.................................................188
Restarting and resetting.................................................................190
Using your device in wet and dusty conditions.............................192
Recycling your device....................................................................193
Limitations to services and features..............................................194
Legal information...........................................................................194
5
This is an Internet version of this publication. © Print only for private use.
Getting started
GUID GUID-939577FB-1BE0-4C23-9106-0910EFDEC761
Title Getting started
Version 2
GUID GUID-939577FB-1BE0-4C23-9106-0910EFDEC761
Title Getting started
Version 2
About this User guide
GUID GUID-3FD60A71-9772-491D-A873-89B3E1008B1F
Title About this User guide
Version 3
This is the Xperia™ Z3 Compact User guide for the Android™ 4.4 software version. If
you're not sure which software version your device is running, you can check it via
the Settings menu. For more information about software updates, see
Updating your
device
on page 179.
GUID GUID-3FD60A71-9772-491D-A873-89B3E1008B1F
Title About this User guide
Version 3
To check the current software version of your device
GUID GUID-7A18A334-C09F-4931-80FD-F9CEF6E518FE
Title To check the current software version of your device
Version 1
1
From your Home screen, tap .
2
Find and tap Settings > About phone > Android version.
GUID GUID-7A18A334-C09F-4931-80FD-F9CEF6E518FE
Title To check the current software version of your device
Version 1
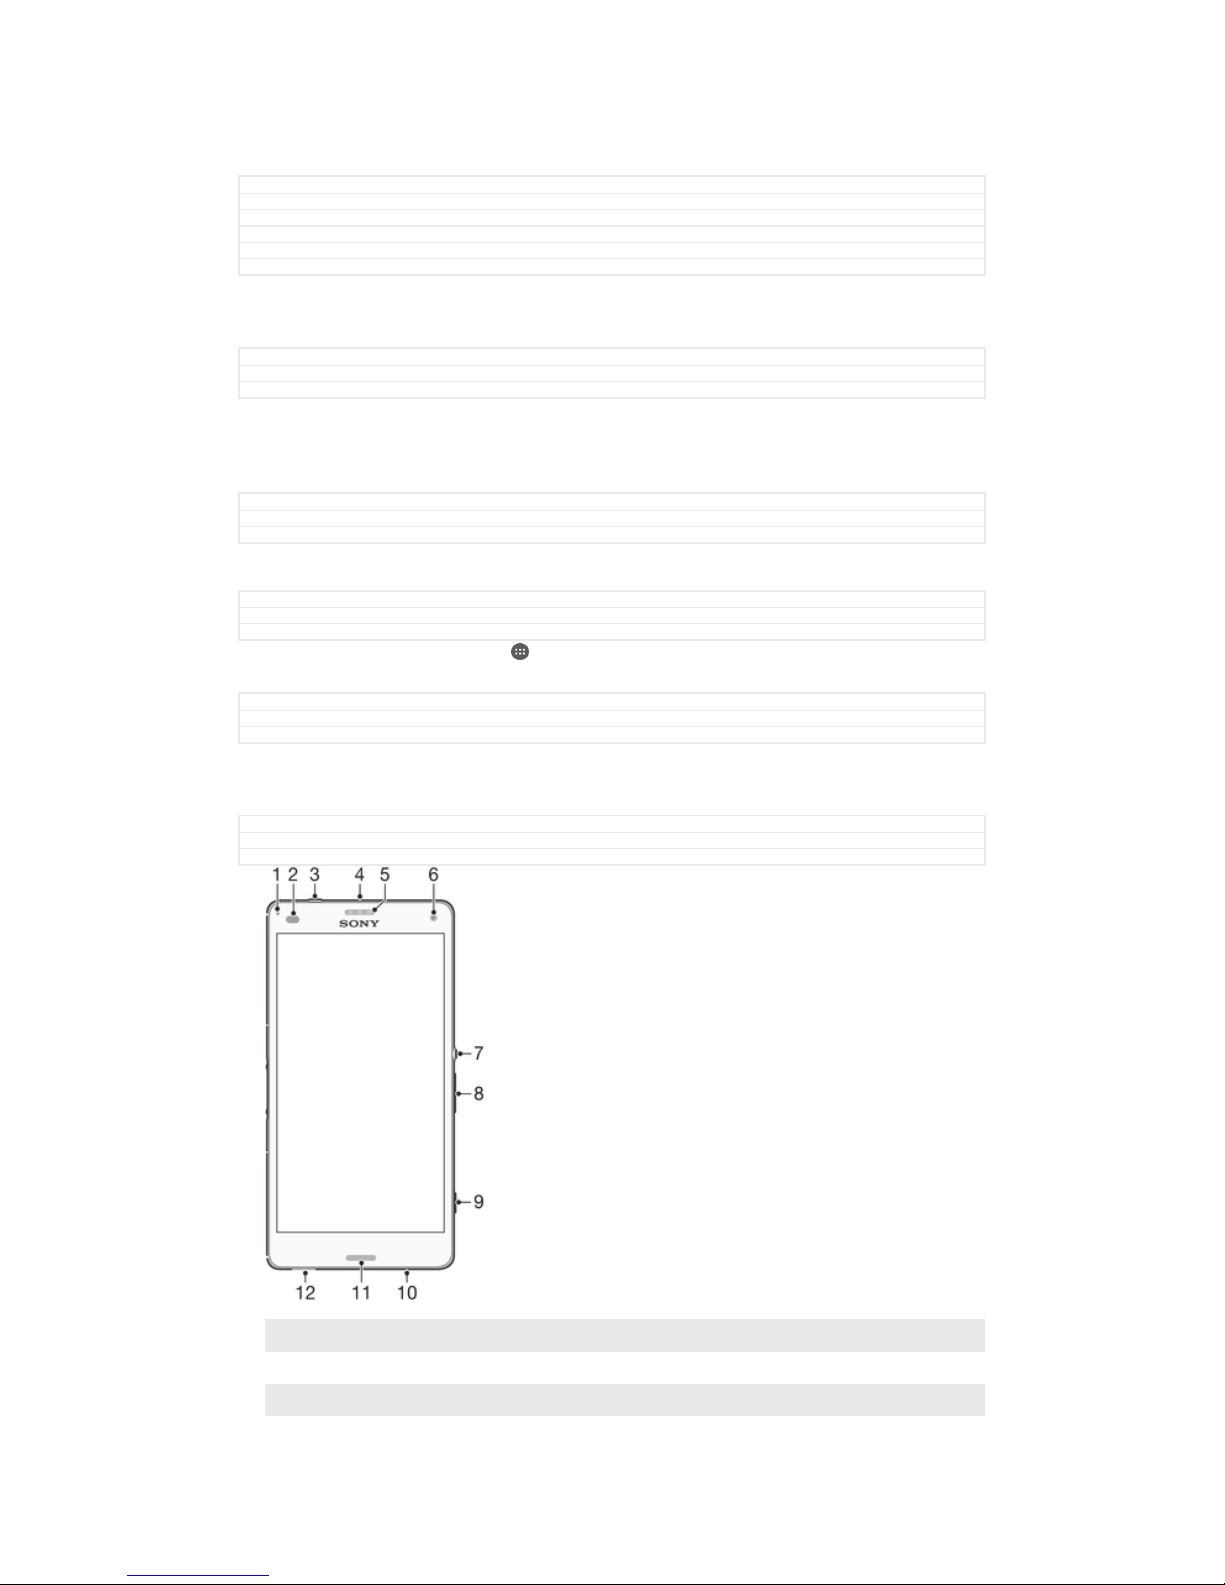
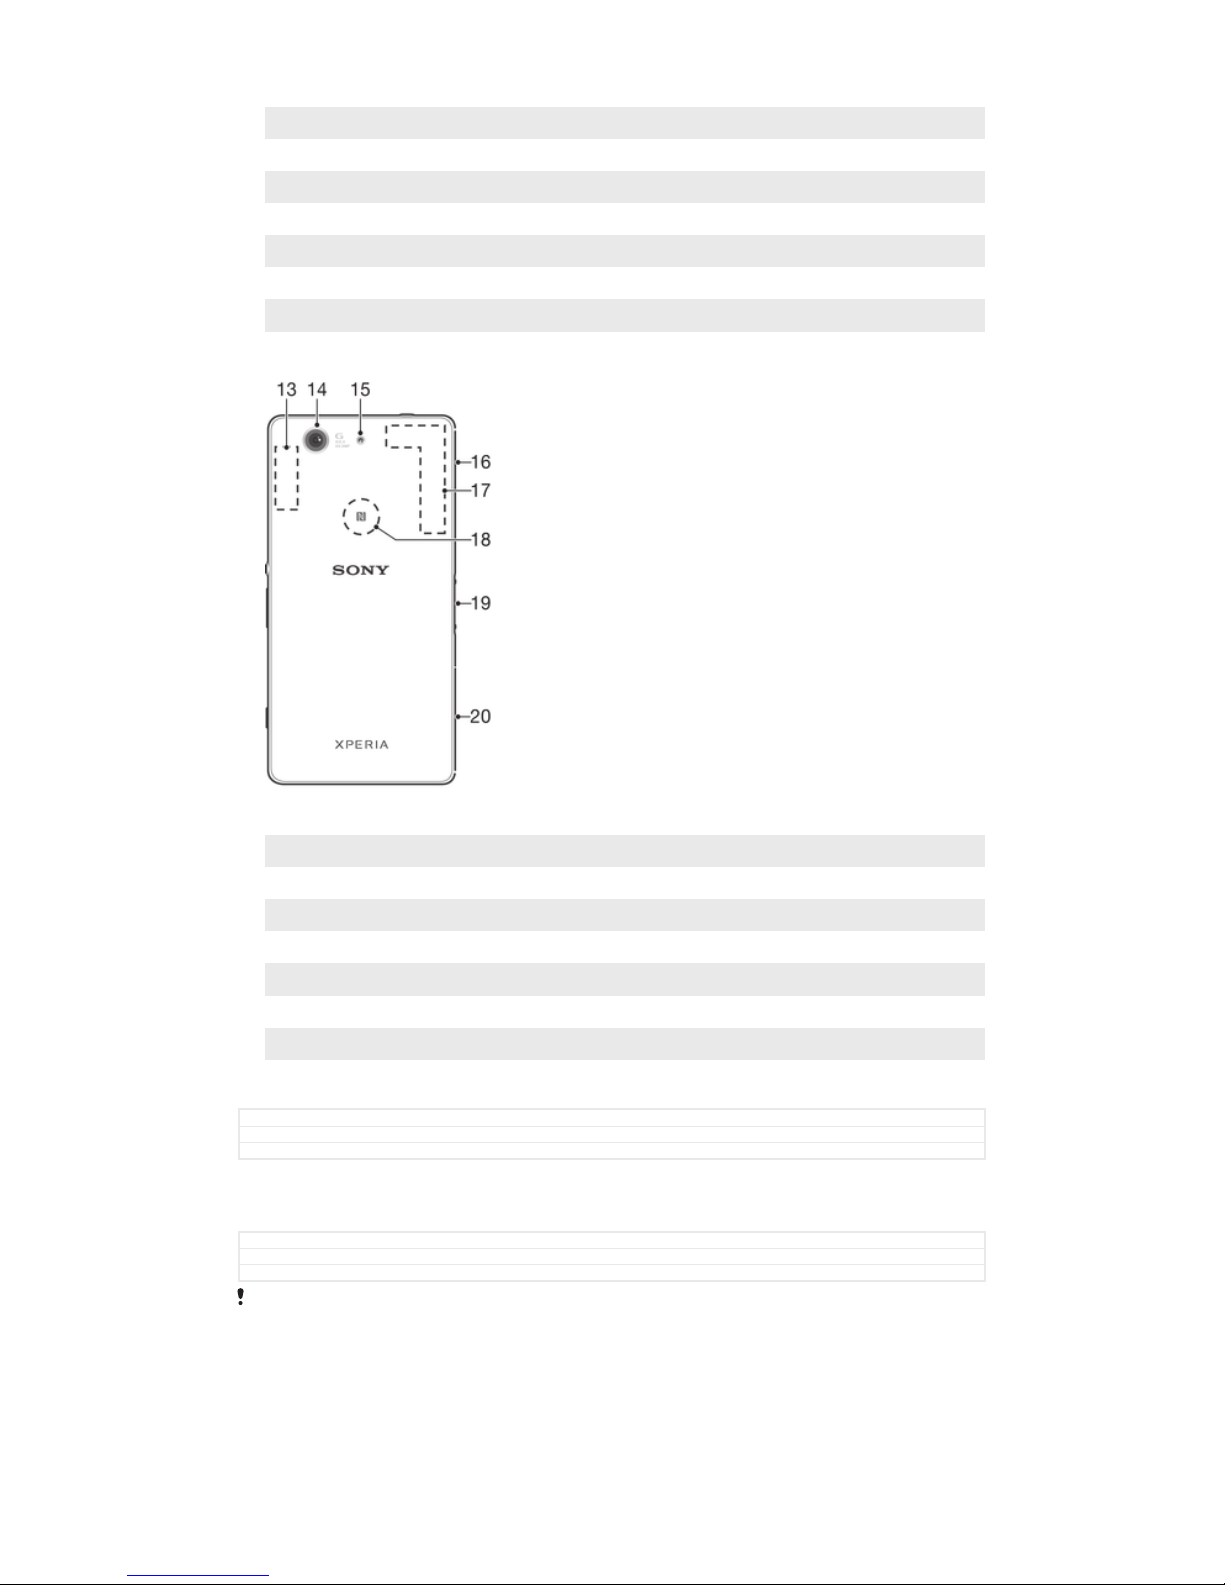
Overview
GUID GUID-90EDD9A0-575D-4837-8BE5-4936A616333C
Title Phone overview - D5803/D5833
Version 2
1 Charging/Notification light
2 Proximity/Light sensor
3 Headset jack
4 Second microphone
6
This is an Internet version of this publication. © Print only for private use.
5 Ear speaker/Second loudspeaker
6 Front camera lens
7 Power key
8 Volume/Zoom key
9 Camera key
10 Main microphone
11 Main loudspeaker
12 Strap hole
13 Wi-Fi/Bluetooth antenna area
14 Main camera lens
15 Camera light
16 Cover for memory card slot and charger/USB cable port
17 GPS antenna area
18 NFC™ detection area
19 Charging dock connector
20 Nano SIM card slot cover
GUID GUID-90EDD9A0-575D-4837-8BE5-4936A616333C
Title Phone overview - D5803/D5833
Version 2
Assembly
GUID
GUID-A00623F6-271A-44C6-BACC-F441DAA2AB8C
Title Assembly
Version 5
Your device only supports nano SIM cards.
7
This is an Internet version of this publication. © Print only for private use.
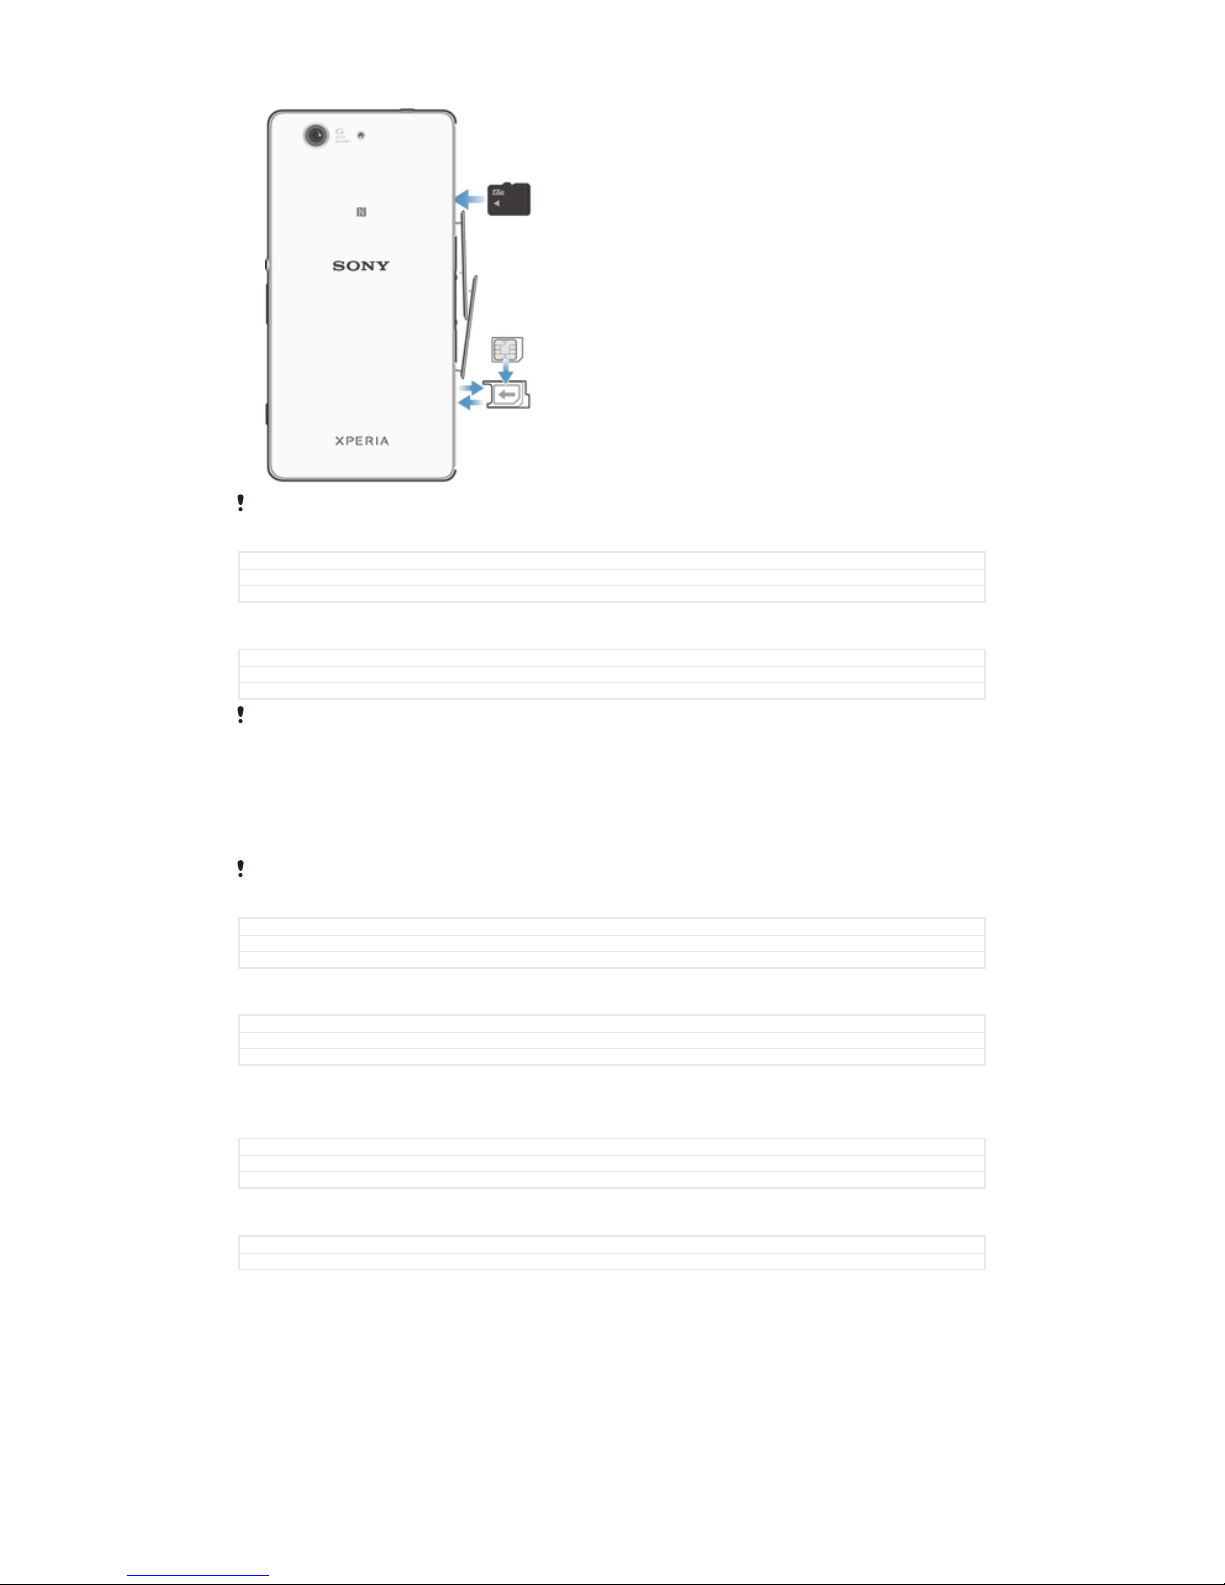
Make sure you insert the nano SIM card into the nano SIM card holder before inserting it into
the device. Also, don’t confuse the nano SIM card slot with the memory card slot.
GUID GUID-A00623F6-271A-44C6-BACC-F441DAA2AB8C
Title Assembly
Version 5
To insert the nano SIM card
GUID GUID-04207303-E7C7-4F97-9A0D-37F562AA2567
Title To insert the SIM card - text only
Version 2
If you insert the nano SIM card while the device is powered on, the device restarts
automatically.
1
Detach the cover for the nano SIM card holder.
2
Using a fingernail or other similar object, drag out the nano SIM card holder.
3
Place the nano SIM card in the nano SIM card holder, then reinsert the holder.
4
Re-attach the cover.
Make sure you reinsert the nano SIM card holder in the correct orientation. When you drag the
holder out to insert the nano SIM card, do not turn the holder around.
GUID GUID-04207303-E7C7-4F97-9A0D-37F562AA2567
Title To insert the SIM card - text only
Version 2
To insert the memory card
GUID GUID-222AAA62-DD21-490F-A594-12B0E61F6788
Title To insert the memory card - text only
Version 2
1
Remove the memory card slot cover.
2
With the gold coloured contacts facing down, insert the memory card into the
memory card slot, then re-attach the memory card slot cover.
GUID
GUID-222AAA62-DD21-490F-A594-12B0E61F6788
Title To insert the memory card - text only
Version 2
To remove the SIM card
GUID
GUID-941B1332-EBE8-4A1C-80F9-4D29EF0F71DD
Title To remove the SIM card - SIM slot outside back cover
8
This is an Internet version of this publication. © Print only for private use.
Version 2
1
Remove the cover of the SIM card slot.
2
Pull out the SIM card holder.
3
Remove the SIM card.
4
Insert the SIM card holder back into its slot.
5
Re-attach the SIM card slot cover.
GUID GUID-941B1332-EBE8-4A1C-80F9-4D29EF0F71DD
Title To remove the SIM card - SIM slot outside back cover
Version 2
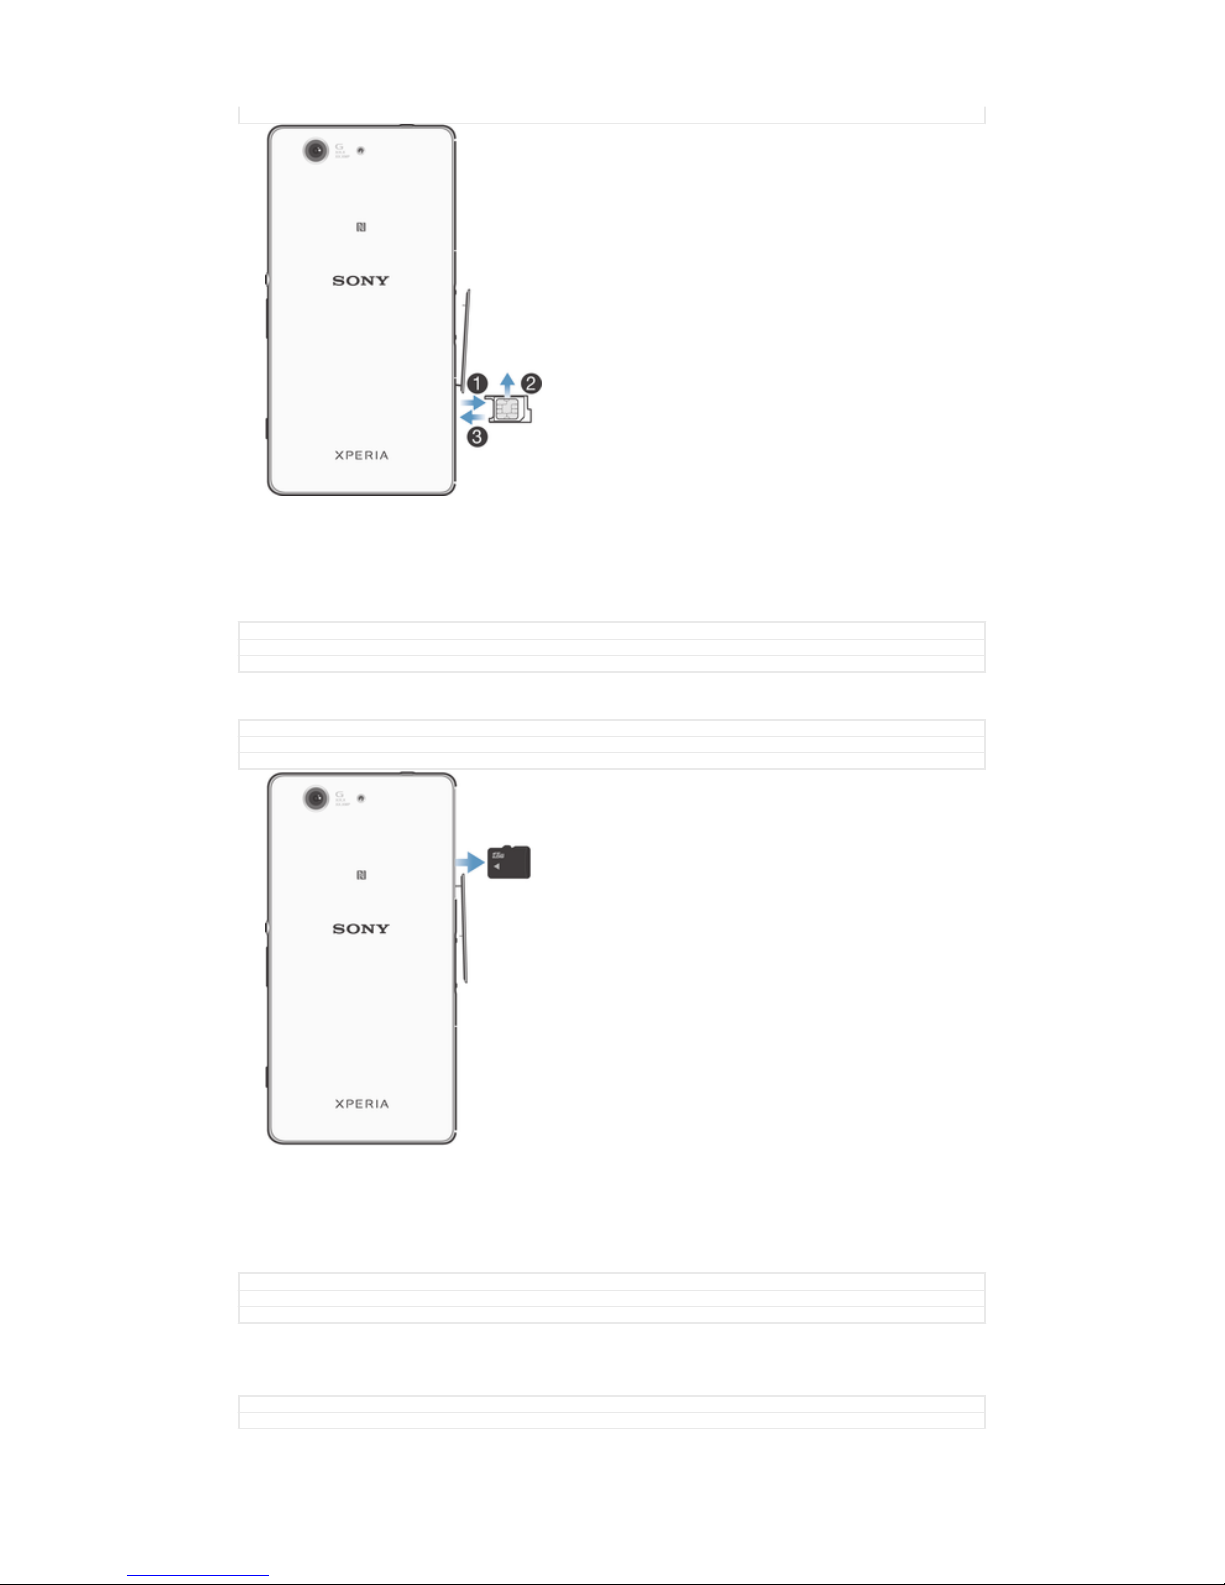
To remove the memory card
GUID GUID-619A5E07-A310-465B-9FE6-414551E614A8
Title To remove the memory card - tablet only
Version 1
1
Turn off the device, or unmount the memory card from Settings > Storage >
Unmount SD card.
2
Remove the cover of the memory card slot, then press against the edge of the
memory card and release it.
3
Draw the card outwards to remove it fully.
GUID
GUID-619A5E07-A310-465B-9FE6-414551E614A8
Title To remove the memory card - tablet only
Version 1
Starting your device for the first time
GUID
GUID-0860E8AA-C816-40B9-96FD-6D1C30464359
Title Starting your device for the first time
9
This is an Internet version of this publication. © Print only for private use.
Version 2
The first time you start your device, a setup guide opens to help you configure basic
settings, sign in to some accounts, and personalise your device. For example, if you
have a Sony Entertainment Network account, you can sign in to it here and get set up
straight away. And you can download Internet settings.
You can also access the setup guide later from the Settings menu.
GUID GUID-0860E8AA-C816-40B9-96FD-6D1C30464359
Title Starting your device for the first time
Version 2
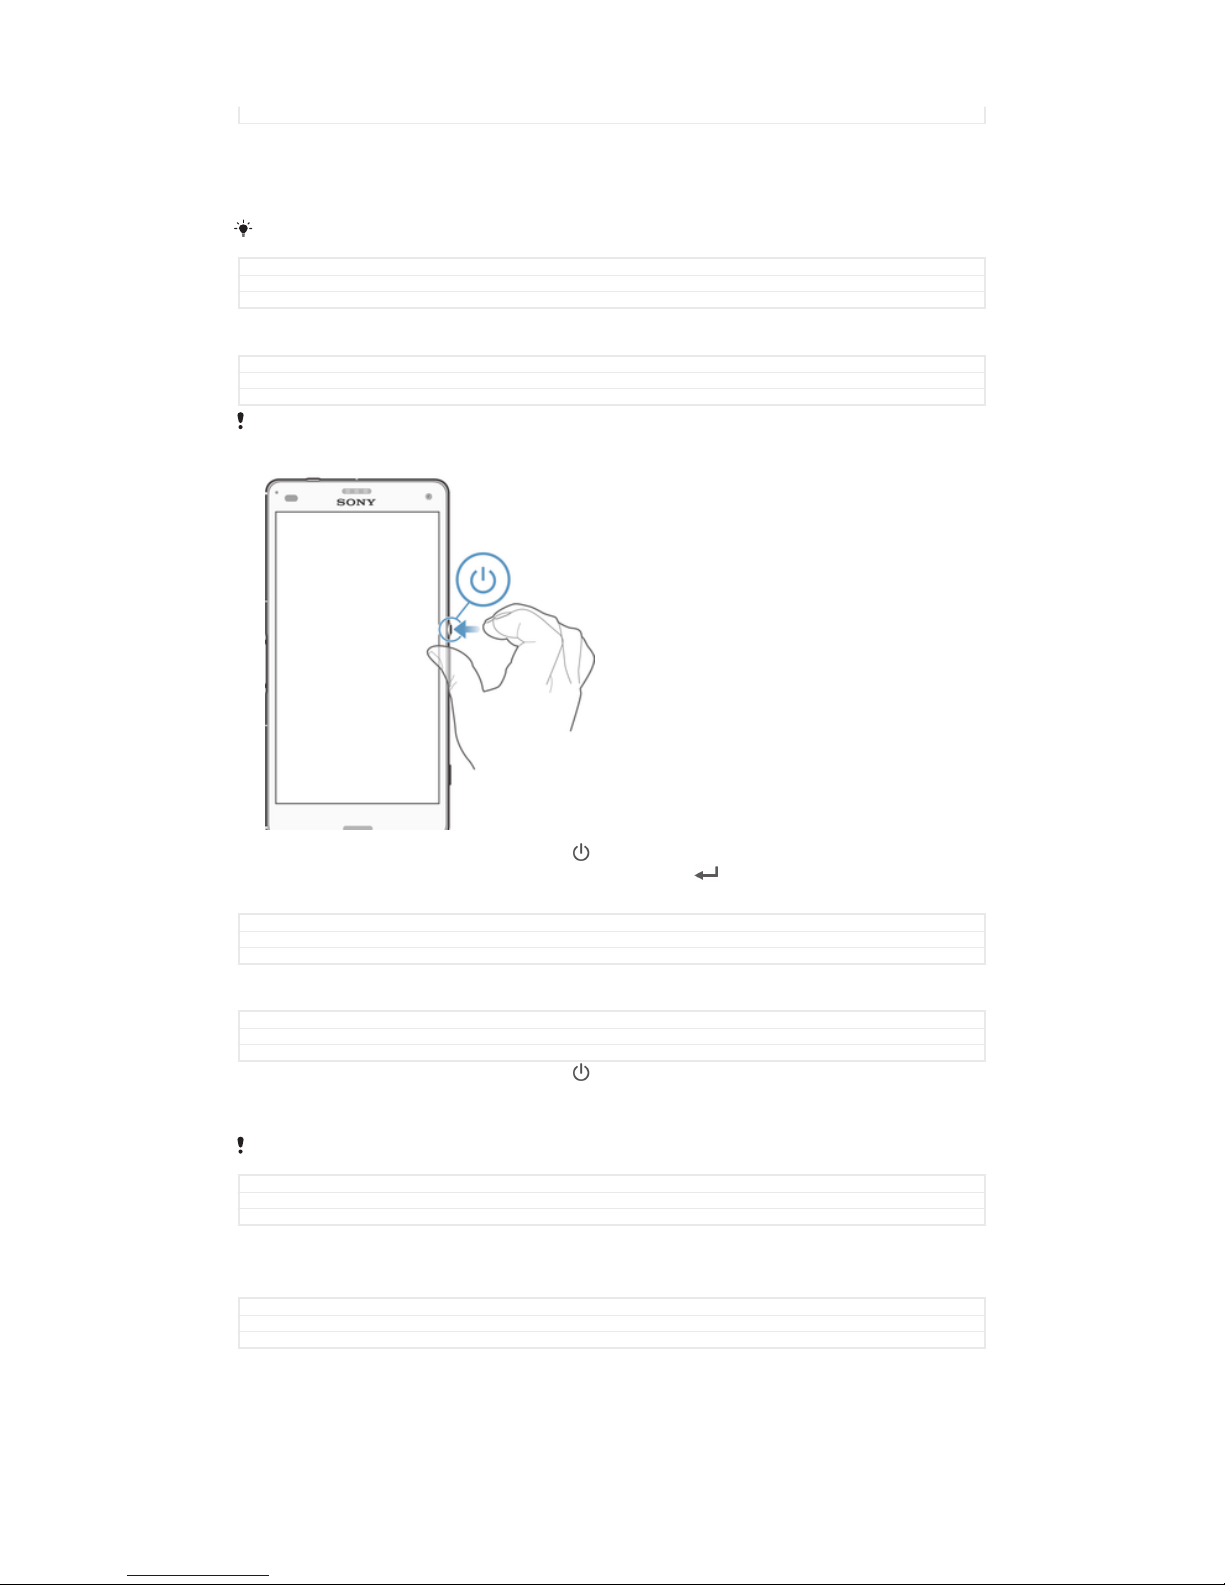
To turn on the device
GUID GUID-69945514-1C19-44BC-A4B6-16499F44D9BB
Title To turn on the device
Version 23
Make sure that the battery is charged for at least 30 minutes before you turn on the device for
the first time.
1
Press and hold down the power key
until the device vibrates.
2
Enter your SIM card PIN when requested, then tap .
3
Wait a while for the device to start.
GUID GUID-69945514-1C19-44BC-A4B6-16499F44D9BB
Title To turn on the device
Version 23
To turn off the device
GUID GUID-18CE50BE-7FF2-40F4-B93F-8CBB76E4AF3C
Title To turn off the device
Version 7
1
Press and hold down the power key
until the options menu opens.
2
In the options menu, tap Power off.
3
Tap OK.
It may take a while for the device to shut down.
GUID GUID-18CE50BE-7FF2-40F4-B93F-8CBB76E4AF3C
Title To turn off the device
Version 7
Why do I need a Google™ account?
GUID
GUID-CE759E13-19AE-4AEC-8E63-215962700E87
Title Why do I need a Google account?
Version 3
Your Xperia™ device from Sony runs on the Android™ platform developed by
Google™. A range of Google™ applications and services is available on your device
when you purchase it, for example, Gmail™, Google Maps™, YouTube™ and Google
Play™, the online store for downloading Android™ applications. To get the most out
10
This is an Internet version of this publication. © Print only for private use.
of these services, you need a Google™ account. For example, a Google™ account is
mandatory if you want to:
•
Download and install applications from Google Play™.
•
Synchronise email, contacts and the calendar.
•
Chat with friends using the Hangouts™ application.
•
Synchronise your browsing history and bookmarks.
For more information about Android™ and Google™, go to
www.sonymobile.com/support
.
GUID GUID-CE759E13-19AE-4AEC-8E63-215962700E87
Title Why do I need a Google account?
Version 3
To set up a Google™ account on your device
GUID GUID-BF97C658-8B71-43CE-B8CF-47DD6D0FC9A6
Title To set up a Google™ account on your device
Version 10
1
From your Home screen, tap .
2
Find and tap Settings > Add account > Google.
3
Follow the registration wizard to create a Google™ account, or sign in if you
already have an account.
You can also sign in to or create a Google™ account from the setup guide the first time you
start your device. Or you can go online and create an account at
www.google.com/accounts
.
GUID GUID-BF97C658-8B71-43CE-B8CF-47DD6D0FC9A6
Title To set up a Google™ account on your device
Version 10
Charging your device
GUID GUID-B501CA3C-BFC1-4AD2-A803-96B32D053043
Title Charging your device
Version 2
Your device has an embedded, rechargeable battery that should be replaced only by
Sony or an authorised Sony repair centre. You should never try to open or take apart
this device yourself. Opening the device can cause damage that will void your
warranty.
The battery is partly charged when you buy the device. You can still use your device
while it is charging. Read more about the battery and how to improve the
performance in
Battery and power management
on page 182.
GUID GUID-B501CA3C-BFC1-4AD2-A803-96B32D053043
Title Charging your device
Version 2
To charge your device
GUID GUID-AB7653A6-94E4-487D-8E13-755BAC8DC744
Title To charge your device
Version 13
11
This is an Internet version of this publication. © Print only for private use.

1
Plug the charger into a power outlet.
2
Plug one end of the USB cable into the charger (or into the USB port of a
computer).
3
Plug the other end of the cable into the micro USB port on your device, with
the USB symbol facing up. The notification light illuminates when charging
begins.
4
When the device is fully charged, disconnect the cable from your device by
pulling it straight outwards. Make sure not to bend the connector.
If the battery is completely discharged, it may take a few minutes before the notification light
illuminates and the charging icon appears.
GUID GUID-AB7653A6-94E4-487D-8E13-755BAC8DC744
Title To charge your device
Version 13
Battery notification light status
GUID GUID-15D5D981-229B-451C-9F58-DEAE6FC82CDD
Title Battery LED status
Version 5
Green The battery charge level is greater than 90%
Flashing red The battery is charging and the battery charge level is less than 15%
Orange The battery is charging and the battery charge level is less than 90%
GUID GUID-15D5D981-229B-451C-9F58-DEAE6FC82CDD
Title Battery LED status
Version 5
12
This is an Internet version of this publication. © Print only for private use.
Learning the basics
GUID GUID-674516E9-7783-4313-A470-21D53828B358
Title Learning the basics
Version 1
GUID GUID-674516E9-7783-4313-A470-21D53828B358
Title Learning the basics
Version 1
Using the touchscreen
GUID GUID-D59D1053-4072-417B-BFE8-E3918A3A263F
Title Using the touch screen
Version 10
GUID GUID-D59D1053-4072-417B-BFE8-E3918A3A263F
Title Using the touch screen
Version 10
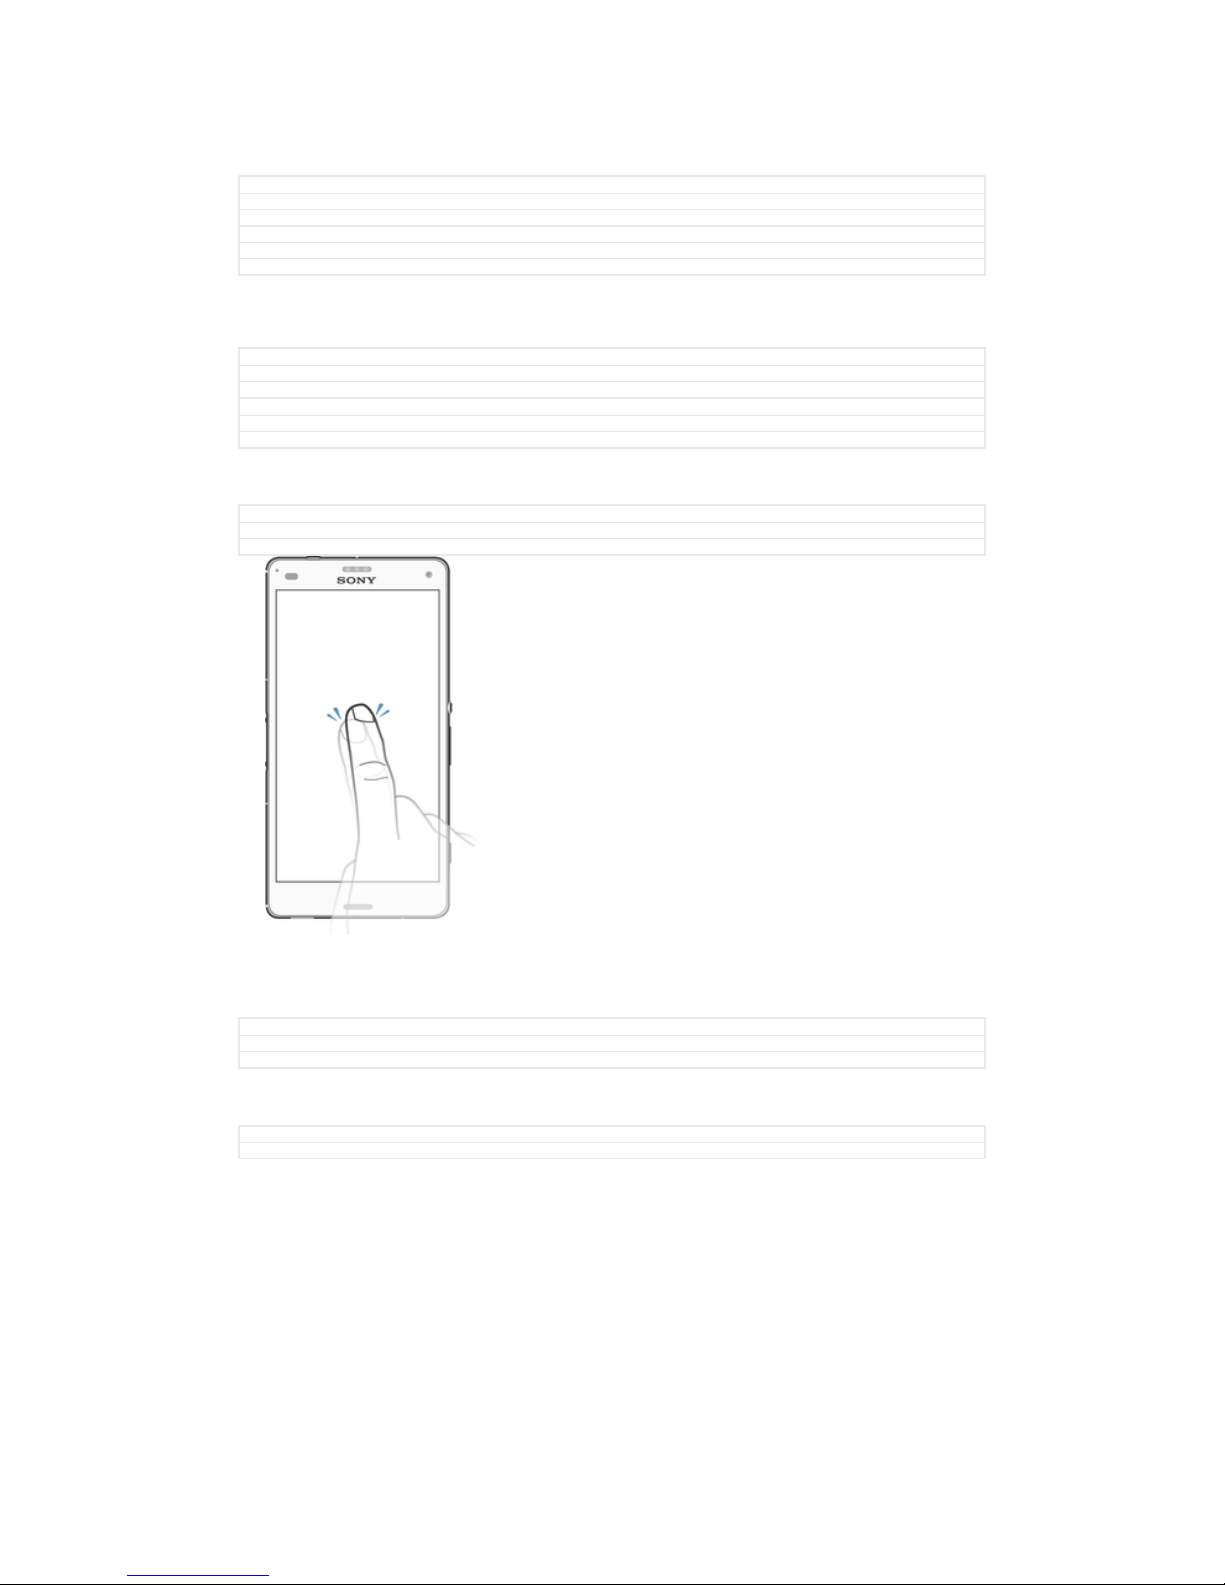
Tapping
GUID GUID-149BDDAC-EA89-4D9A-AAD2-E917F3A290F6
Title Tapping
Version 1
•
Open or select an item.
•
Mark or unmark a checkbox or option.
•
Enter text using the on-screen keyboard.
GUID GUID-149BDDAC-EA89-4D9A-AAD2-E917F3A290F6
Title Tapping
Version 1
Touching and holding
GUID
GUID-DCB7D933-A687-4E9E-B67A-3D1E49F9DB01
Title Touching and holding
13
This is an Internet version of this publication. © Print only for private use.
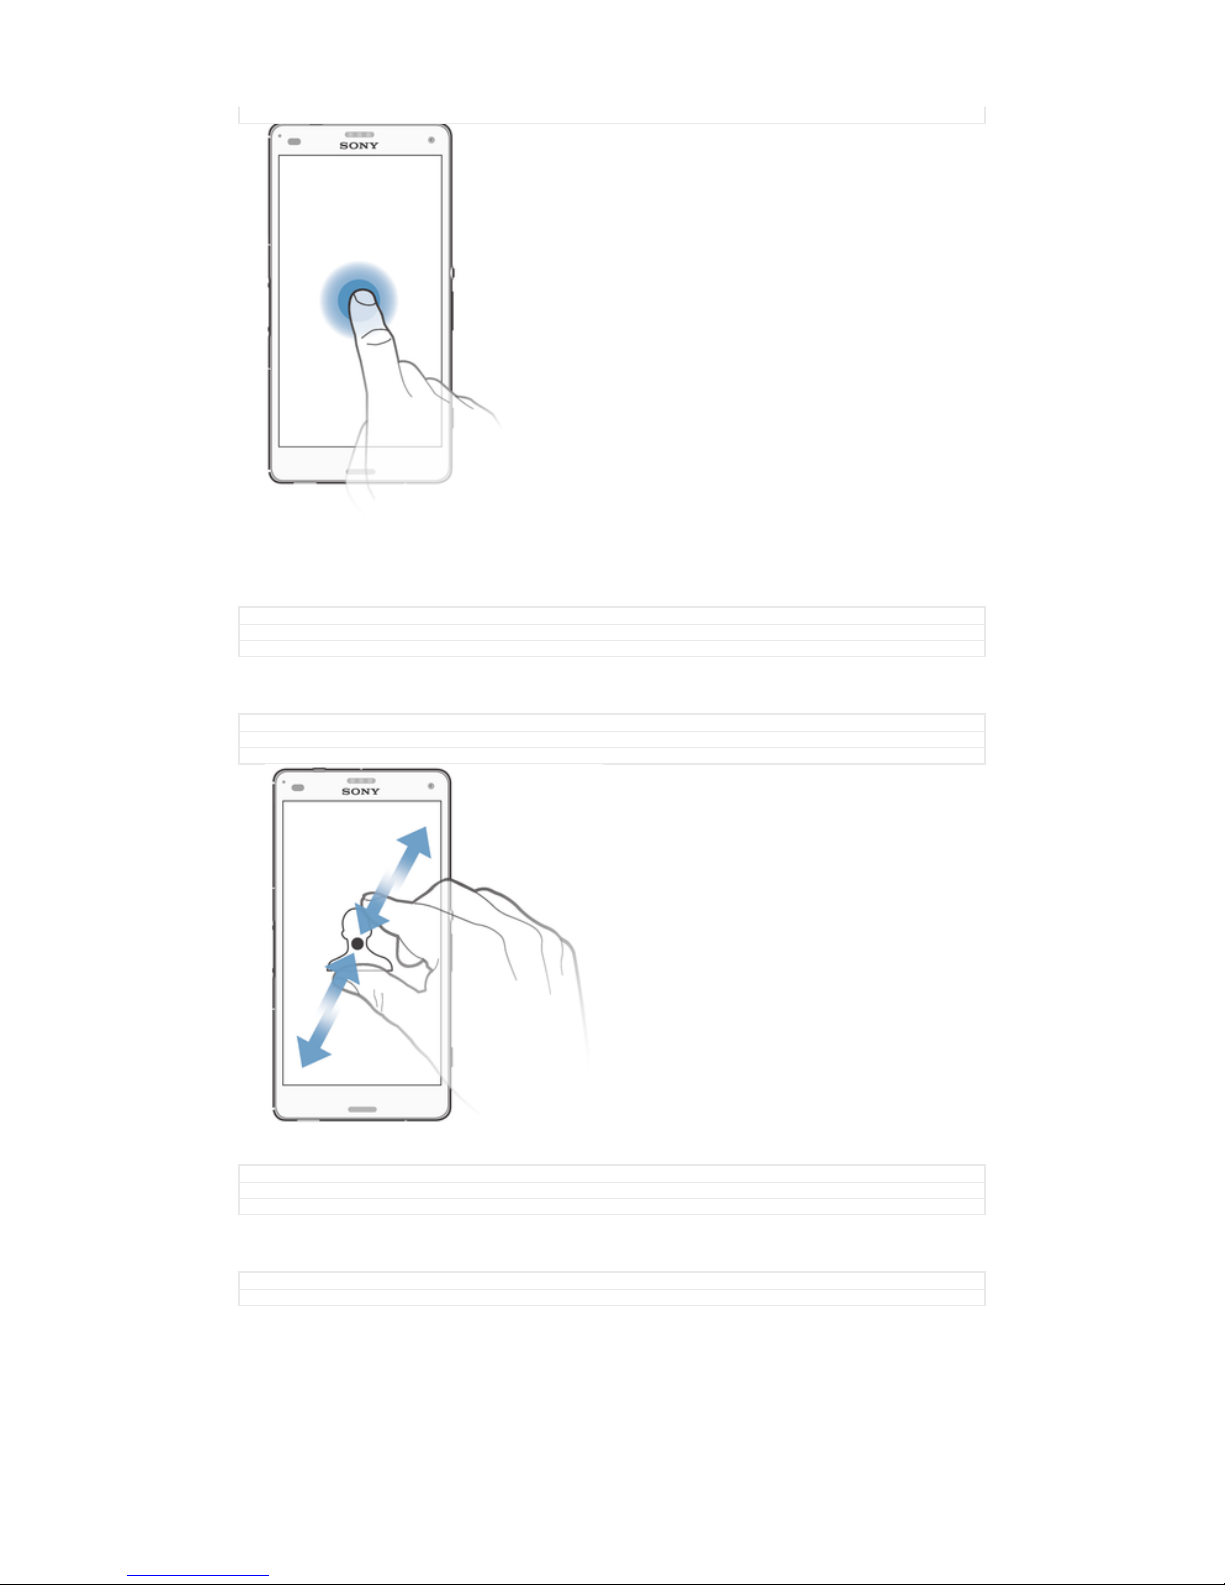
Version 1
•
Move an item.
•
Activate an item-specific menu.
•
Activate selection mode, for example, to select several items from a list.
GUID GUID-DCB7D933-A687-4E9E-B67A-3D1E49F9DB01
Title Touching and holding
Version 1
Pinching and spreading
GUID GUID-48BAA40C-FCA7-4C2C-A69A-C0074A5388CF
Title Pinching and spreading
Version 1
•
Zoom in or out on a web page, a photo or a map.
GUID
GUID-48BAA40C-FCA7-4C2C-A69A-C0074A5388CF
Title Pinching and spreading
Version 1
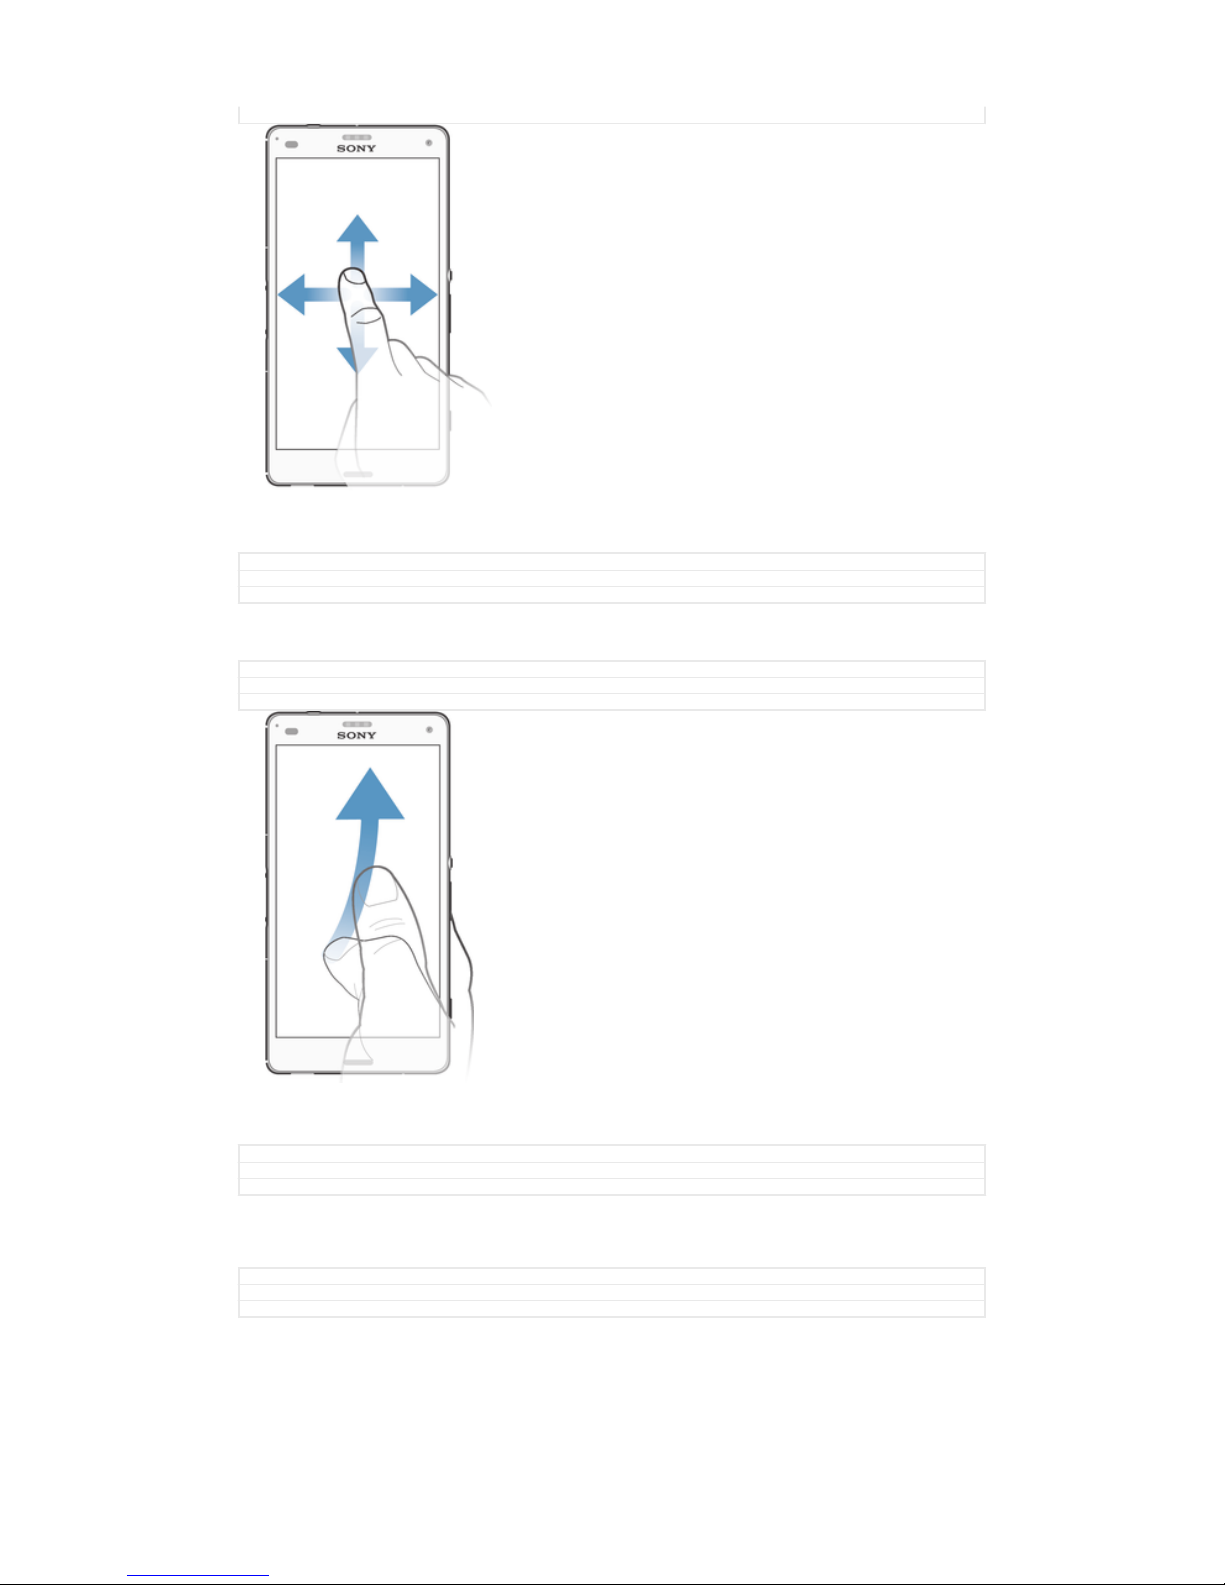
Swiping
GUID
GUID-767BB164-B819-42BD-8754-488381DDAD05
Title Swiping
14
This is an Internet version of this publication. © Print only for private use.
Version 1
•
Scroll up or down a list.
•
Scroll left or right, for example, between Home screen panes.
GUID GUID-767BB164-B819-42BD-8754-488381DDAD05
Title Swiping
Version 1
Flicking
GUID GUID-2B93C7CB-DEFD-4FD4-BA4E-3E712E986029
Title Flicking
Version 1
•
Scroll quickly, for example, in a list or on a web page. You can stop the scrolling
movement by tapping the screen.
GUID
GUID-2B93C7CB-DEFD-4FD4-BA4E-3E712E986029
Title Flicking
Version 1
Locking and unlocking the screen
GUID
GUID-2304F246-AADC-4904-8CB9-8EE55A9F1C21
Title Locking and unlocking the screen
Version 3
When your device is on and left idle for a set period of time, the screen darkens to
save battery power and locks automatically. This lock prevents unwanted actions on
the touchscreen when you are not using it. When you buy your device, a basic screen
swipe lock is already set. This means that you have to swipe in any direction from the
middle of the screen to unlock it. You can change the security settings later and add
other kinds of locks. See
Screen lock
on page 54.
15
This is an Internet version of this publication. © Print only for private use.
GUID GUID-2304F246-AADC-4904-8CB9-8EE55A9F1C21
Title Locking and unlocking the screen
Version 3
To activate the screen
GUID GUID-0C3A14A1-C558-4C86-B6E1-45351B7F553D
Title To activate the screen
Version 7
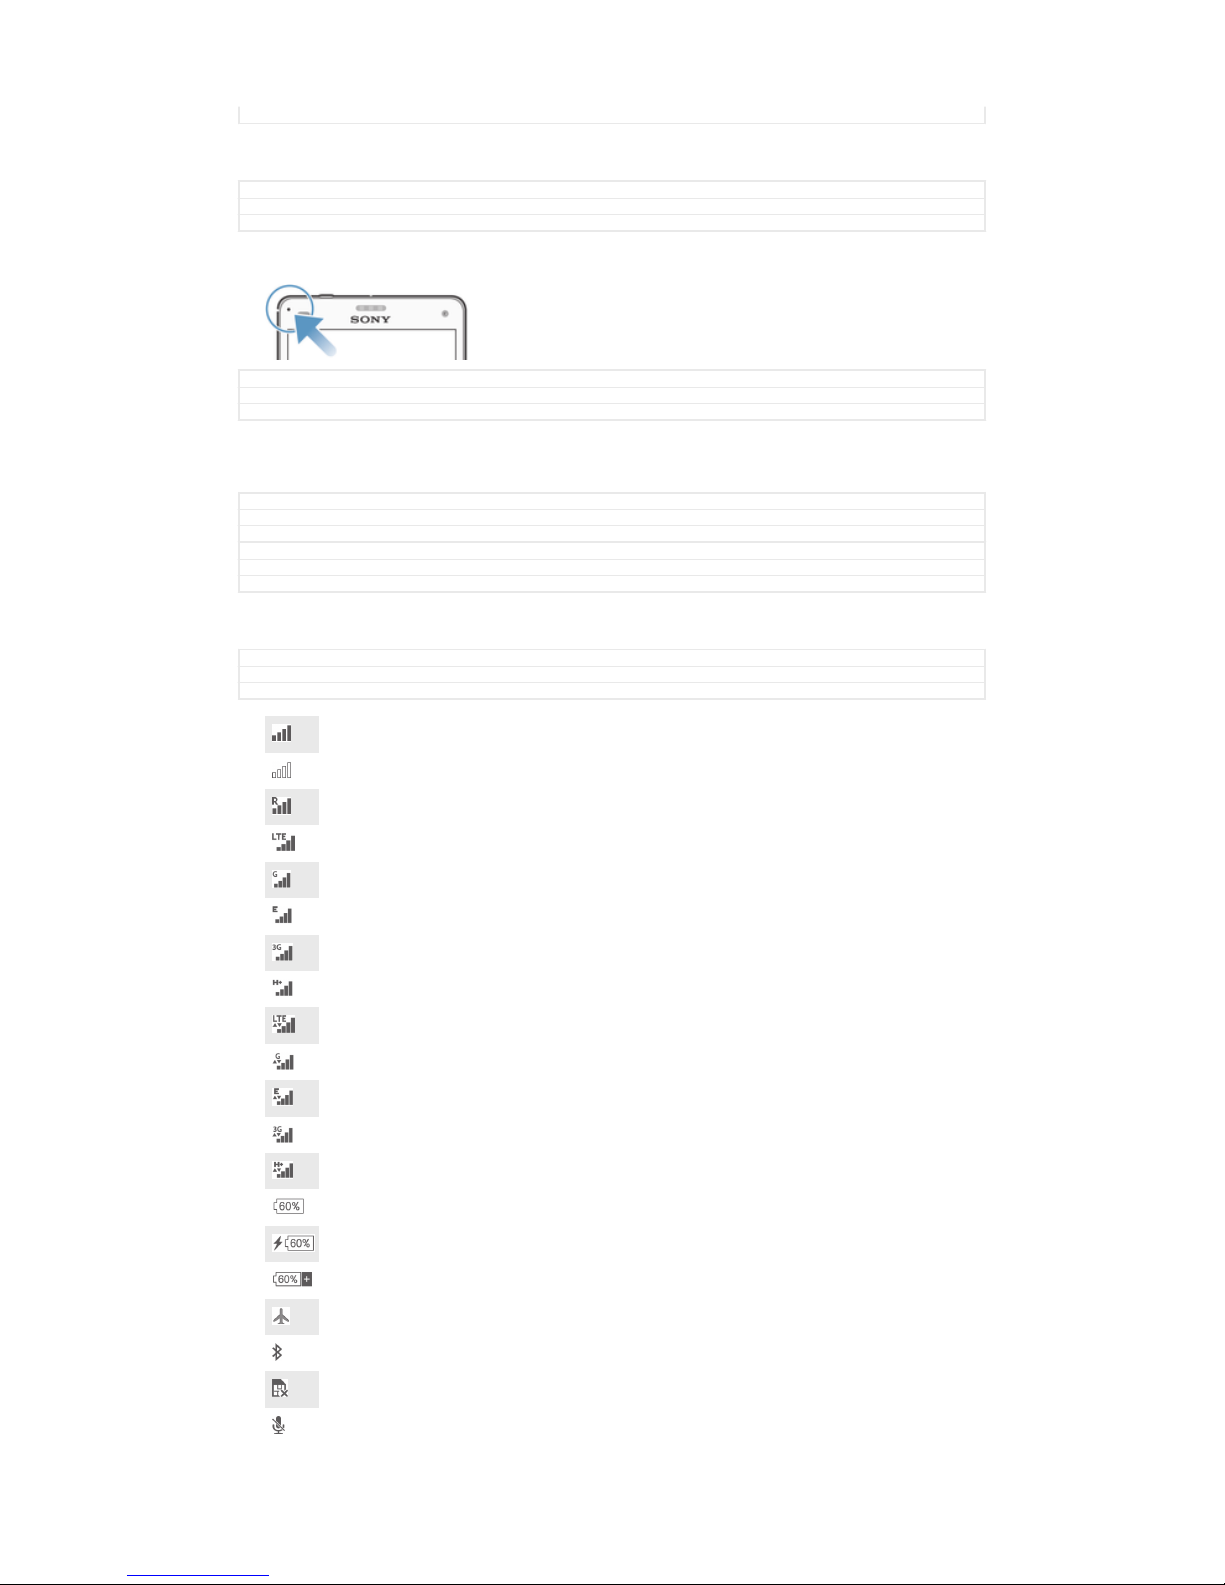
•
Briefly press the power key
.
GUID GUID-0C3A14A1-C558-4C86-B6E1-45351B7F553D
Title To activate the screen
Version 7
To lock the screen
GUID GUID-229DFA2D-0E19-4782-B952-ACEBB0E8C755
Title To lock the screen manually
Version 6
•
When the screen is active, briefly press the power key
.
GUID GUID-229DFA2D-0E19-4782-B952-ACEBB0E8C755
Title To lock the screen manually
Version 6
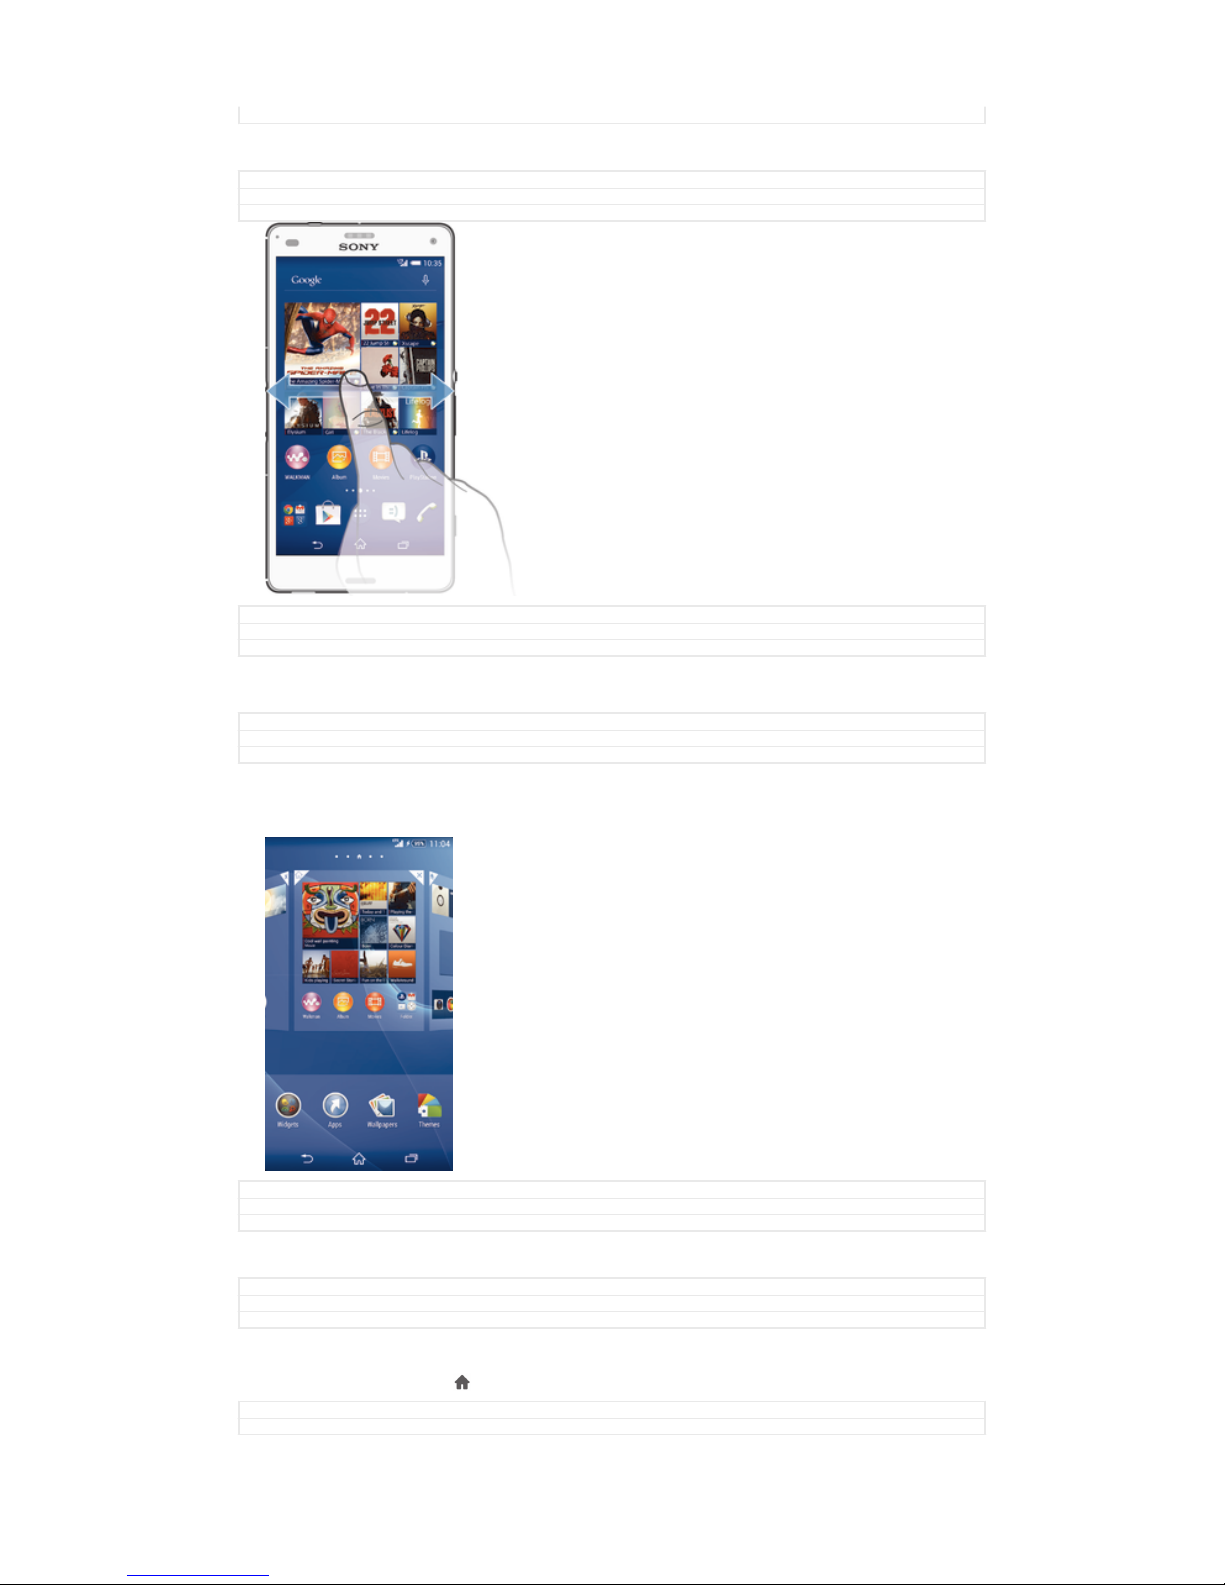
Home screen
GUID GUID-8EB25E2F-8807-407D-B459-A8E350B6D7D8
Title Home screen
Version 11
The Home screen is the starting point for using your device. It's similar to the desktop
on a computer screen. Your Home screen can have up to seven panes, which extend
beyond the regular screen display width. The number of Home screen panes is
represented by a series of dots at the lower part of the Home screen. The highlighted
dot shows the pane that you are currently in.
GUID GUID-8EB25E2F-8807-407D-B459-A8E350B6D7D8
Title Home screen
Version 11
To go to the Home screen
GUID
GUID-05D1C81E-123C-471F-BD70-D65BF2E49B8A
Title To go to the Home screen
Version 1
•
Press .
GUID
GUID-05D1C81E-123C-471F-BD70-D65BF2E49B8A
Title To go to the Home screen
16
This is an Internet version of this publication. © Print only for private use.
Version 1
To browse the Home screen
GUID GUID-A5C4ECEC-DED9-4FCB-B023-22DEA2CF2F2C
Title To browse the Home screen
Version 5
GUID GUID-A5C4ECEC-DED9-4FCB-B023-22DEA2CF2F2C
Title To browse the Home screen
Version 5
Home screen panes
GUID GUID-FC173B6A-92B3-401B-8E4C-873BA14F1B11
Title Home screen panes
Version 1
You can add new panes to your Home screen (up to a maximum of seven panes) and
delete panes. You can also set the pane that you want to use as the main Home
screen pane.
GUID GUID-FC173B6A-92B3-401B-8E4C-873BA14F1B11
Title Home screen panes
Version 1
To set a pane as the main Home screen pane
GUID
GUID-40544E7E-58CD-4F30-8E08-BCFB412676EB
Title To set a pane as the main Home screen pane
Version 3
1
Touch and hold an empty area on your Home screen until the device vibrates.
2
Flick left or right to browse to the pane that you want to set as your main Home
screen pane, then tap at the top corner of the pane.
GUID
GUID-40544E7E-58CD-4F30-8E08-BCFB412676EB
Title To set a pane as the main Home screen pane
17
This is an Internet version of this publication. © Print only for private use.
Version 3
To add a pane to your Home screen
GUID GUID-4E45CAB7-4294-4269-9495-60D6F8413FA3
Title To add a pane
Version 2
1
Touch and hold an empty area on your Home screen until the device vibrates.
2
Flick left or right to browse the panes, then tap
.
GUID GUID-4E45CAB7-4294-4269-9495-60D6F8413FA3
Title To add a pane
Version 2
To delete a pane from your Home screen
GUID GUID-65D63CFF-377E-4ACB-BDCD-456C3CAC3679
Title To delete a pane from your Home screen
Version 1
1
Touch and hold an empty area on your Home screen until the device vibrates.
2
Flick left or right to browse to the pane that you want to delete, then tap
.
GUID GUID-65D63CFF-377E-4ACB-BDCD-456C3CAC3679
Title To delete a pane from your Home screen
Version 1
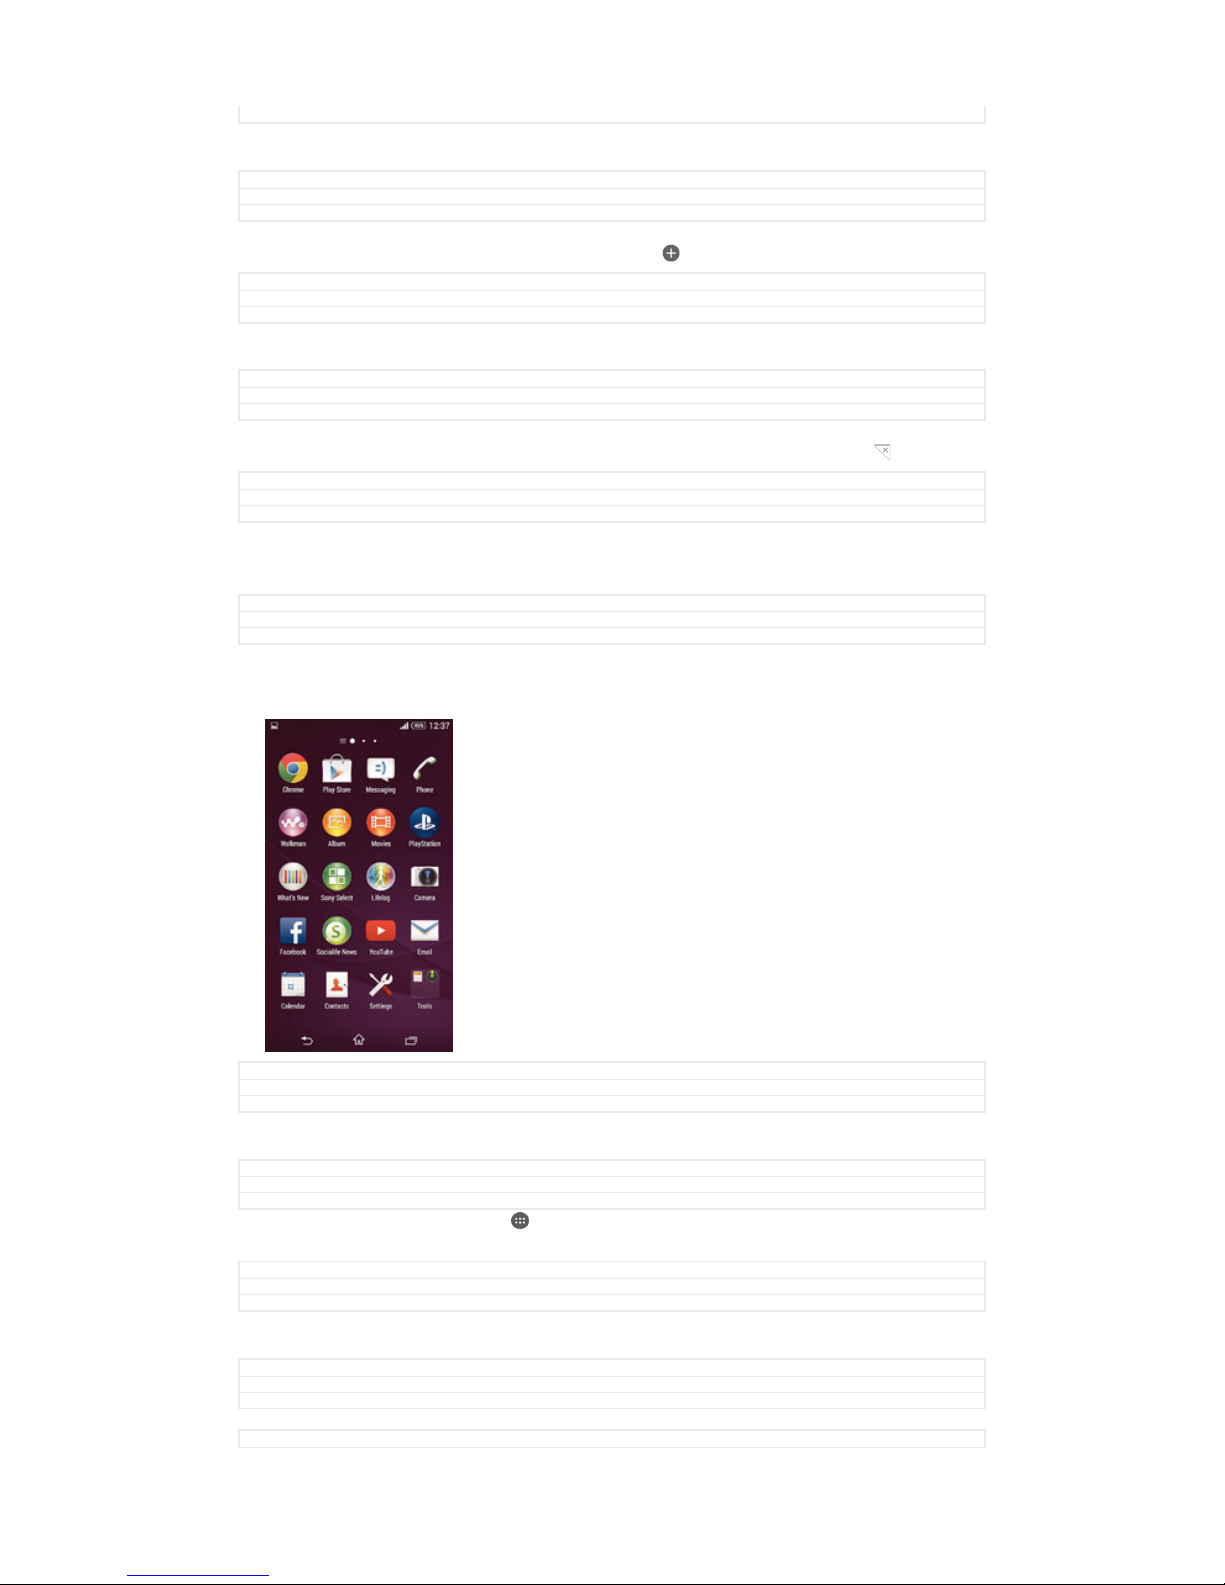
Application screen
GUID GUID-F02CAFC3-E592-4B0D-AA00-E5631B4A9301
Title Application screen
Version 5
The Application screen, which you open from the Home screen, contains the
applications that come pre-installed on your device as well as applications that you
download.
GUID GUID-F02CAFC3-E592-4B0D-AA00-E5631B4A9301
Title Application screen
Version 5
To view all applications on the Application screen
GUID
GUID-88AE7DAF-A5B8-4362-9928-02CC87DCC55E
Title To view all applications
Version 1
1
From your Home screen, tap .
2
Flick left or right on the Application screen.
GUID
GUID-88AE7DAF-A5B8-4362-9928-02CC87DCC55E
Title To view all applications
Version 1
To open an application from the Application screen
GUID
GUID-20B05253-5784-4126-AA6C-9EA9320E7E51
Title To open an application from the Application screen
Version 1
•
Flick left or right to find the application, and then tap the application.
GUID
GUID-20B05253-5784-4126-AA6C-9EA9320E7E51
18
This is an Internet version of this publication. © Print only for private use.

Title To open an application from the Application screen
Version 1
To open the Application screen menu
GUID GUID-2B1A0EBB-A185-43D5-B9FB-CE9EA3005329
Title To open the Application screen menu
Version 1
•
When the Application screen is open, drag the left edge of the screen to the
right.
GUID GUID-2B1A0EBB-A185-43D5-B9FB-CE9EA3005329
Title To open the Application screen menu
Version 1
To move an application on the Application screen
GUID GUID-EE508701-3826-449B-BD0F-61BABEEA74C3
Title To move an application on the Application screen
Version 9
1
To open the Application screen menu, drag the left edge of the Application
screen to the right.
2
Make sure that Own order is selected under SHOW APPS.
3
Touch and hold the application until it magnifies and the device vibrates, then
drag it to the new location.
GUID GUID-EE508701-3826-449B-BD0F-61BABEEA74C3
Title To move an application on the Application screen
Version 9
To add an application shortcut to the Home screen
GUID GUID-1CB2F7C4-2E83-4EAB-AFFB-0957648C639D
Title To add a shortcut to an application on the Home screen
Version 6
1
From the Application screen, touch and hold an application icon until the
screen vibrates, then drag the icon to the top of the screen. The Home screen
opens.
2
Drag the icon to the desired location on the Home screen, then release your
finger.
GUID GUID-1CB2F7C4-2E83-4EAB-AFFB-0957648C639D
Title To add a shortcut to an application on the Home screen
Version 6
To arrange applications on the Application screen
GUID GUID-115D9148-D5DC-49BA-8428-A1AD178487AF
Title To arrange your applications on the Application screen
Version 9
1
To open the Application screen menu, drag the left edge of the Application
screen to the right.
2
Select the desired option under SHOW APPS.
GUID GUID-115D9148-D5DC-49BA-8428-A1AD178487AF
Title To arrange your applications on the Application screen
Version 9
To search for an application from the Application screen
GUID
GUID-1D55A09C-CFE1-4303-803E-7E5CAB836098
Title To search an application from the Application screen
Version 1
1
To open the Application screen menu, drag the left edge of the Application
screen to the right.
2
Tap Search apps.
3
Enter the name of the application that you want to search for.
GUID
GUID-1D55A09C-CFE1-4303-803E-7E5CAB836098
Title To search an application from the Application screen
Version 1
To uninstall an application from the Application screen
GUID
GUID-553D1225-BF53-4ED7-A71D-7D887D7F3D2B
Title To uninstall an application from the Application screen
19
This is an Internet version of this publication. © Print only for private use.
Version 5
1
To open the Application screen menu, drag the left edge of the Application
screen to the right.
2
Tap Uninstall. All uninstallable applications are indicated by .
3
Tap the application that you want to uninstall, then tap Uninstall.
GUID GUID-553D1225-BF53-4ED7-A71D-7D887D7F3D2B
Title To uninstall an application from the Application screen
Version 5
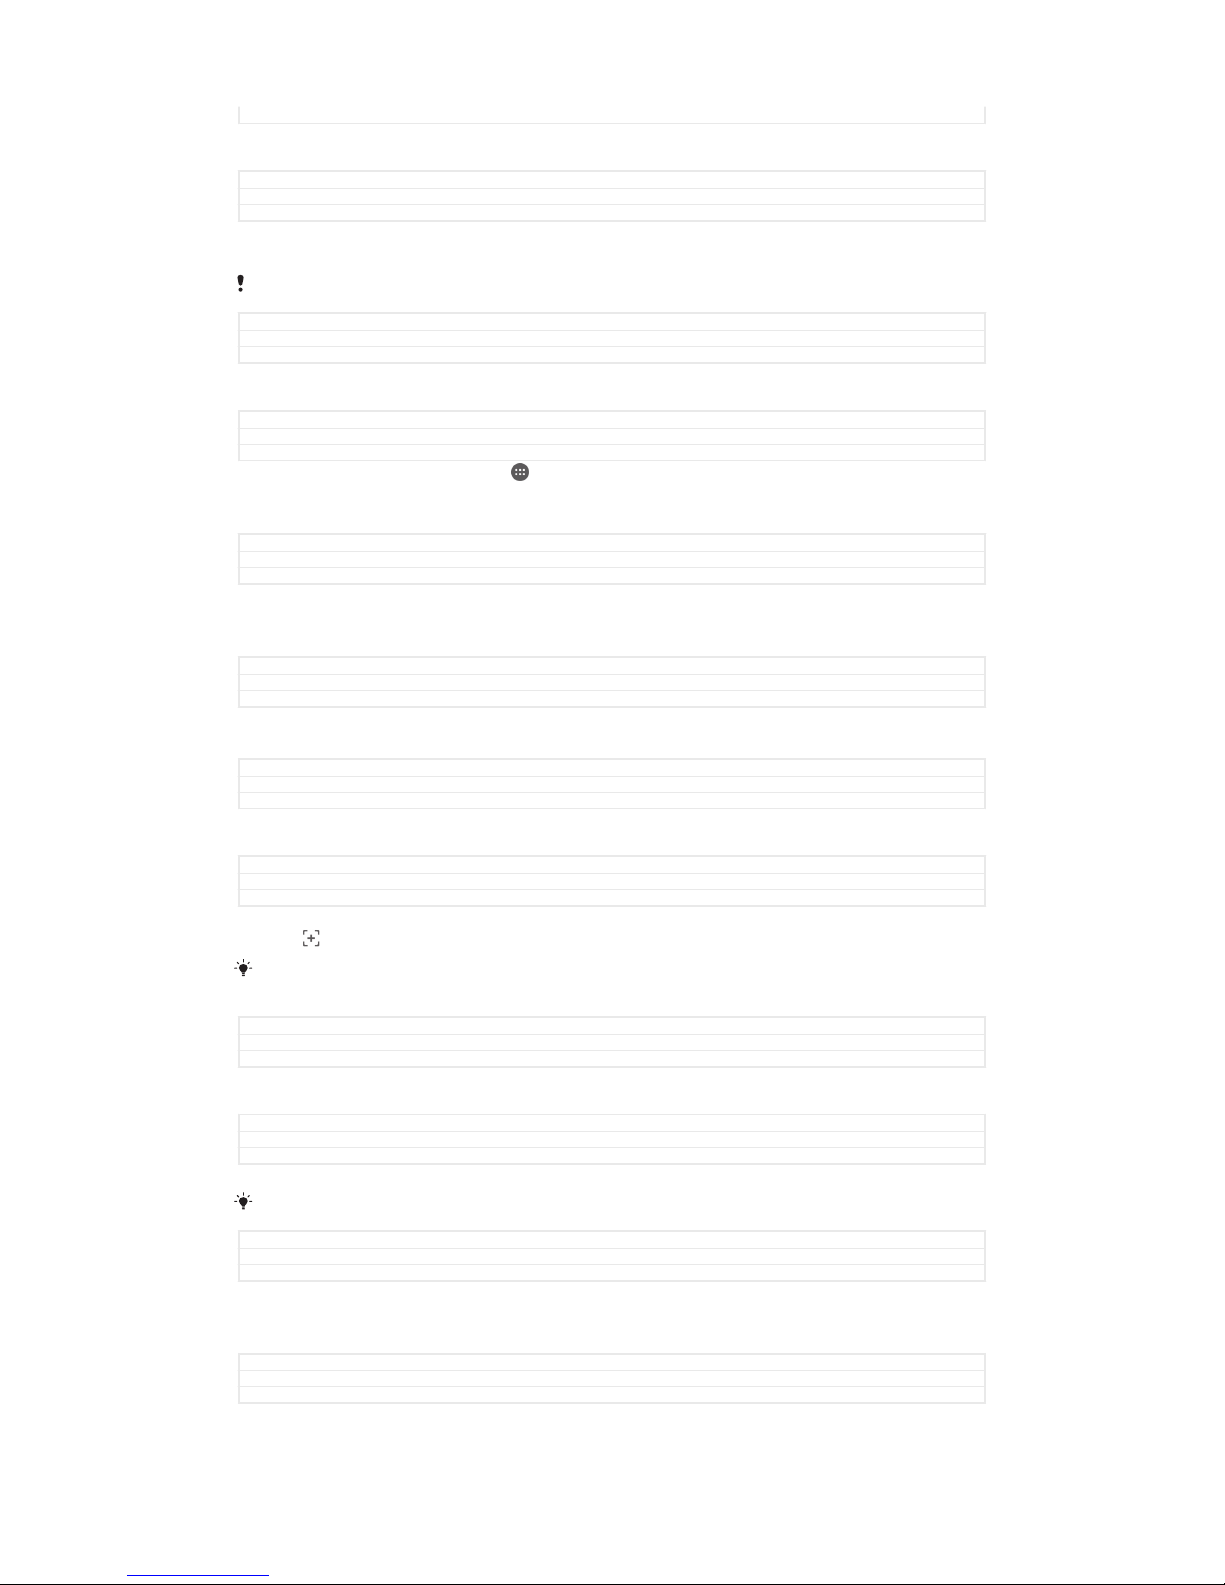
Navigating applications
GUID GUID-3919E91F-54A0-4406-AABF-3DD87635B6FB
Title Navigating applications
Version 3
You can navigate between applications using the navigation keys, the favourites bar,
and the recently used applications window, which lets you switch easily between all
recently used applications. Some applications are closed when you press
to exit
while others are paused or continue to run in the background. If the application is
paused or runs in the background, you can continue where you left off the next time
you open the application.
GUID GUID-3919E91F-54A0-4406-AABF-3DD87635B6FB
Title Navigating applications
Version 3
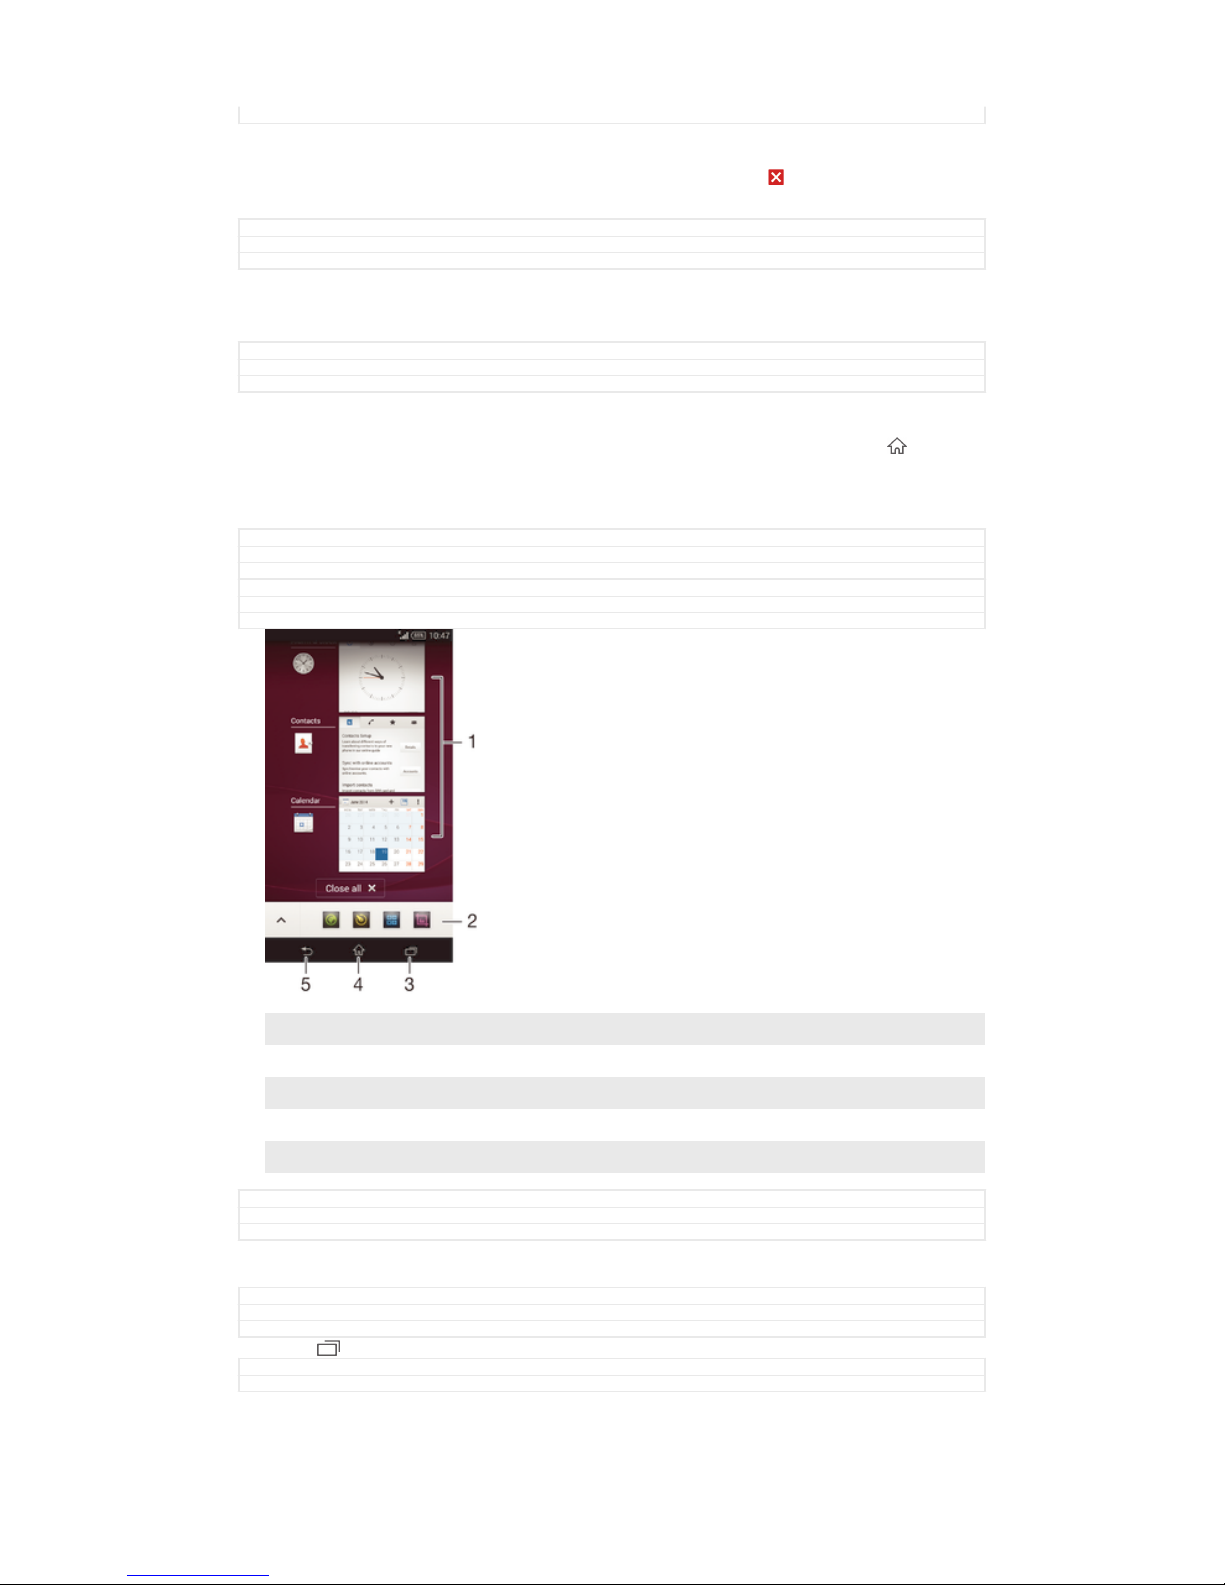
GUID GUID-962D91AD-EBDC-4283-94A2-286CBA9B58CD
Title Navigating applications overview
Version 3
1 Recently used applications window – Open a recently used application
2 Favourites bar – Use a shortcut to access applications or widgets
3 Task navigation key – Open the recently used applications window and the favourites bar
4 Home navigation key – Exit an application and go back to the Home screen
5 Back navigation key – Go back to the previous screen within an application or close the application
GUID GUID-962D91AD-EBDC-4283-94A2-286CBA9B58CD
Title Navigating applications overview
Version 3
To open the recently used applications window
GUID
GUID-A60AC121-B7D1-4A48-859B-F8CA4DC4C077
Title To open the recently used applications window
Version 5
•
Press .
GUID
GUID-A60AC121-B7D1-4A48-859B-F8CA4DC4C077
Title To open the recently used applications window
20
This is an Internet version of this publication. © Print only for private use.
Version 5
To close all the recently used applications
GUID GUID-C1E6FA9A-E606-47A6-8C92-7BC933B2B682
Title To close all the recently used applications
Version 2
•
Tap and then tap Close all.
GUID GUID-C1E6FA9A-E606-47A6-8C92-7BC933B2B682
Title To close all the recently used applications
Version 2
To open a menu in an application
GUID GUID-C5E4E280-0AA6-4076-B7F6-8777FD219744
Title To open a menu in an application
Version 1
•
While using the application, press .
A menu is not available in all applications.
GUID GUID-C5E4E280-0AA6-4076-B7F6-8777FD219744
Title To open a menu in an application
Version 1
Small apps
GUID GUID-BFE28979-864F-4473-A204-362CE5442283
Title Small apps
Version 2
Small apps are miniature apps that run on top of other applications on the same
screen, to enable multi-tasking. For example, you can have a webpage open showing
details of currency exchange rates and then open the Calculator small app on top of
it and perform calculations. You can access your small apps via the favourites bar. To
download more small apps, go to Google Play™.
GUID GUID-BFE28979-864F-4473-A204-362CE5442283
Title Small apps
Version 2
To open a small app
GUID GUID-53383553-C8C3-4EA0-8F4E-DA9CB7757BAE
Title To open a small app
Version 6
1
To make the favourites bar appear, press .
2
Tap the small app that you want to open.
You can open several small apps at the same time.
GUID GUID-53383553-C8C3-4EA0-8F4E-DA9CB7757BAE
Title To open a small app
Version 6
To close a small app
GUID
GUID-99100D9A-1CCC-4DD4-ABC8-2B58F09F39AE
Title To close a small app
Version 1
•
Tap on the small app window.
GUID
GUID-99100D9A-1CCC-4DD4-ABC8-2B58F09F39AE
Title To close a small app
Version 1
To download a small app
GUID
GUID-AE4A69D2-7CB5-44EF-BF20-90B0B35793CB
Title To download a small app
Version 6
1
From the favourites bar, tap , then tap and tap .
2
Search for the small app that you want to download, then follow the
instructions to download it and complete the installation.
GUID
GUID-AE4A69D2-7CB5-44EF-BF20-90B0B35793CB
21
This is an Internet version of this publication. © Print only for private use.
Title To download a small app
Version 6
To move a small app
GUID GUID-E71EDE79-D34F-41C1-9300-ABE639400C0F
Title To move a small app
Version 3
•
When the small app is open, touch and hold the top left corner of the small
app, then move it to the desired location.
GUID GUID-E71EDE79-D34F-41C1-9300-ABE639400C0F
Title To move a small app
Version 3
To minimise a small app
GUID GUID-3FA301BE-1DE5-4200-A944-FD66851191D2
Title To minimise a small app
Version 3
•
When the small app is open, touch and hold the top left corner of the small
app, then drag it to the right edge or to the bottom edge of the screen.
GUID GUID-3FA301BE-1DE5-4200-A944-FD66851191D2
Title To minimise a small app
Version 3
To rearrange the small apps in the favourites bar
GUID GUID-3830D3E3-63FD-4C72-A393-E6F5E8D58EA5
Title To rearrange your small apps
Version 4
•
Touch and hold a small app and drag it to the desired position.
GUID GUID-3830D3E3-63FD-4C72-A393-E6F5E8D58EA5
Title To rearrange your small apps
Version 4
To remove a small app from the favourites bar
GUID GUID-BF1EE6E5-D398-49CC-89A9-CCE7426CFF47
Title To remove a small app from the small apps bar
Version 5
•
Touch and hold a small app, then drag it to .
GUID GUID-BF1EE6E5-D398-49CC-89A9-CCE7426CFF47
Title To remove a small app from the small apps bar
Version 5
To restore a previously removed small app
GUID GUID-1B077C5F-3405-4E30-BC25-453CECB522D9
Title To restore a previously removed small app
Version 5
1
Open the favourites bar, then tap .
2
Touch and hold the small app that you want to restore, then drag it into the
favourites bar.
GUID GUID-1B077C5F-3405-4E30-BC25-453CECB522D9
Title To restore a previously removed small app
Version 5
To add a widget as a small app
GUID
GUID-0263A861-B039-4C87-BB98-4E681AE3F279
Title To add a widget as a small app
Version 2
1
To make the favourites bar appear, press .
2
Tap
> > .
3
Select a widget.
4
Enter a name for the widget, if desired, then tap OK.
GUID
GUID-0263A861-B039-4C87-BB98-4E681AE3F279
Title To add a widget as a small app
Version 2
Widgets
GUID
GUID-31FA03AF-3EA8-4F67-997F-72FC7043FC88
Title Widgets
22
This is an Internet version of this publication. © Print only for private use.
Version 13
Widgets are small applications that you can use directly on your Home screen. They
also function as shortcuts. For example, the Weather widget allows you to see basic
weather information directly on your Home screen. But when you tap the widget, the
full Weather application opens. You can download additional widgets from Google
Play™.
GUID GUID-31FA03AF-3EA8-4F67-997F-72FC7043FC88
Title Widgets
Version 13
To add a widget to the Home screen
GUID GUID-7AA3E1DD-C7DD-47D2-8DB4-4BB05D9E7686
Title To add a widget to the Home screen
Version 12
1
Touch and hold an empty area on your Home screen until the device vibrates,
then tap Widgets.
2
Find and tap the widget that you want to add.
GUID GUID-7AA3E1DD-C7DD-47D2-8DB4-4BB05D9E7686
Title To add a widget to the Home screen
Version 12
To resize a widget
GUID GUID-379CF5F0-A8C7-4D6F-A96C-9D06316E050B
Title To resize a widget
Version 4
1
Touch and hold a widget until it magnifies and the device vibrates, then release
the widget. If the widget can be resized, for example, the Calendar widget,
then a highlighted frame and resizing dots appear.
2
Drag the dots inward or outward to shrink or expand the widget.
3
To confirm the new size of the widget, tap anywhere on the Home screen.
GUID GUID-379CF5F0-A8C7-4D6F-A96C-9D06316E050B
Title To resize a widget
Version 4
To move a widget
GUID
GUID-653F4AD6-41D0-40D5-B41C-A07870088954
Title To move a widget on the Home screen
Version 2
•
Touch and hold the widget until it magnifies and the device vibrates, then drag
it to the new location.
GUID
GUID-653F4AD6-41D0-40D5-B41C-A07870088954
Title To move a widget on the Home screen
Version 2
To delete a widget
GUID
GUID-E28E3921-A869-46FF-94FD-475750F619A5
Title To delete a widget from the Home screen
Version 3
•
Touch and hold the widget until it magnifies and the device vibrates, then drag
it to .
23
This is an Internet version of this publication. © Print only for private use.
GUID GUID-E28E3921-A869-46FF-94FD-475750F619A5
Title To delete a widget from the Home screen
Version 3
To add a widget to the lock screen
GUID GUID-9AEF496D-5818-4AD9-BC93-A8FBFF285E71
Title To add a widget when the screen is locked
Version 5
1
From your Home screen, tap , then find and tap Settings > Security
2
Mark the Allow widgets on lock screen checkbox.
3
To lock the screen, press the power key.
4
To activate the screen, briefly press the power key.
5
Swipe inwards from the upper part of the screen until
appears, then tap it.
6
If required, enter your PIN code, pattern or password to unlock the screen.
7
Find and tap the widget that you want to add.
8
Follow the on-screen instructions, if necessary, to finish adding the widget.
The items that appear when you tap are available by default and cannot be modified.
GUID GUID-9AEF496D-5818-4AD9-BC93-A8FBFF285E71
Title To add a widget when the screen is locked
Version 5
To move a widget on the lock screen
GUID GUID-95B0649E-744E-48AE-81FE-1C479ED4FA5E
Title To move a widget when the screen is locked
Version 1
1
To activate the screen, briefly press the power key .
2
Touch and hold the widget that you want to move, then drag it to the new
location.
GUID GUID-95B0649E-744E-48AE-81FE-1C479ED4FA5E
Title To move a widget when the screen is locked
Version 1
To remove a widget from the lock screen
GUID GUID-50FA6949-2923-44F5-81A5-D68EAB382D8D
Title To remove a widget from the lockscreen pane
Version 3
1
To activate the screen, briefly press the power key .
2
Touch and hold the widget that you want to remove, then drag it to
.
The camera icon at the bottom of the screen is there by default and cannot be removed.
GUID GUID-50FA6949-2923-44F5-81A5-D68EAB382D8D
Title To remove a widget from the lockscreen pane
Version 3
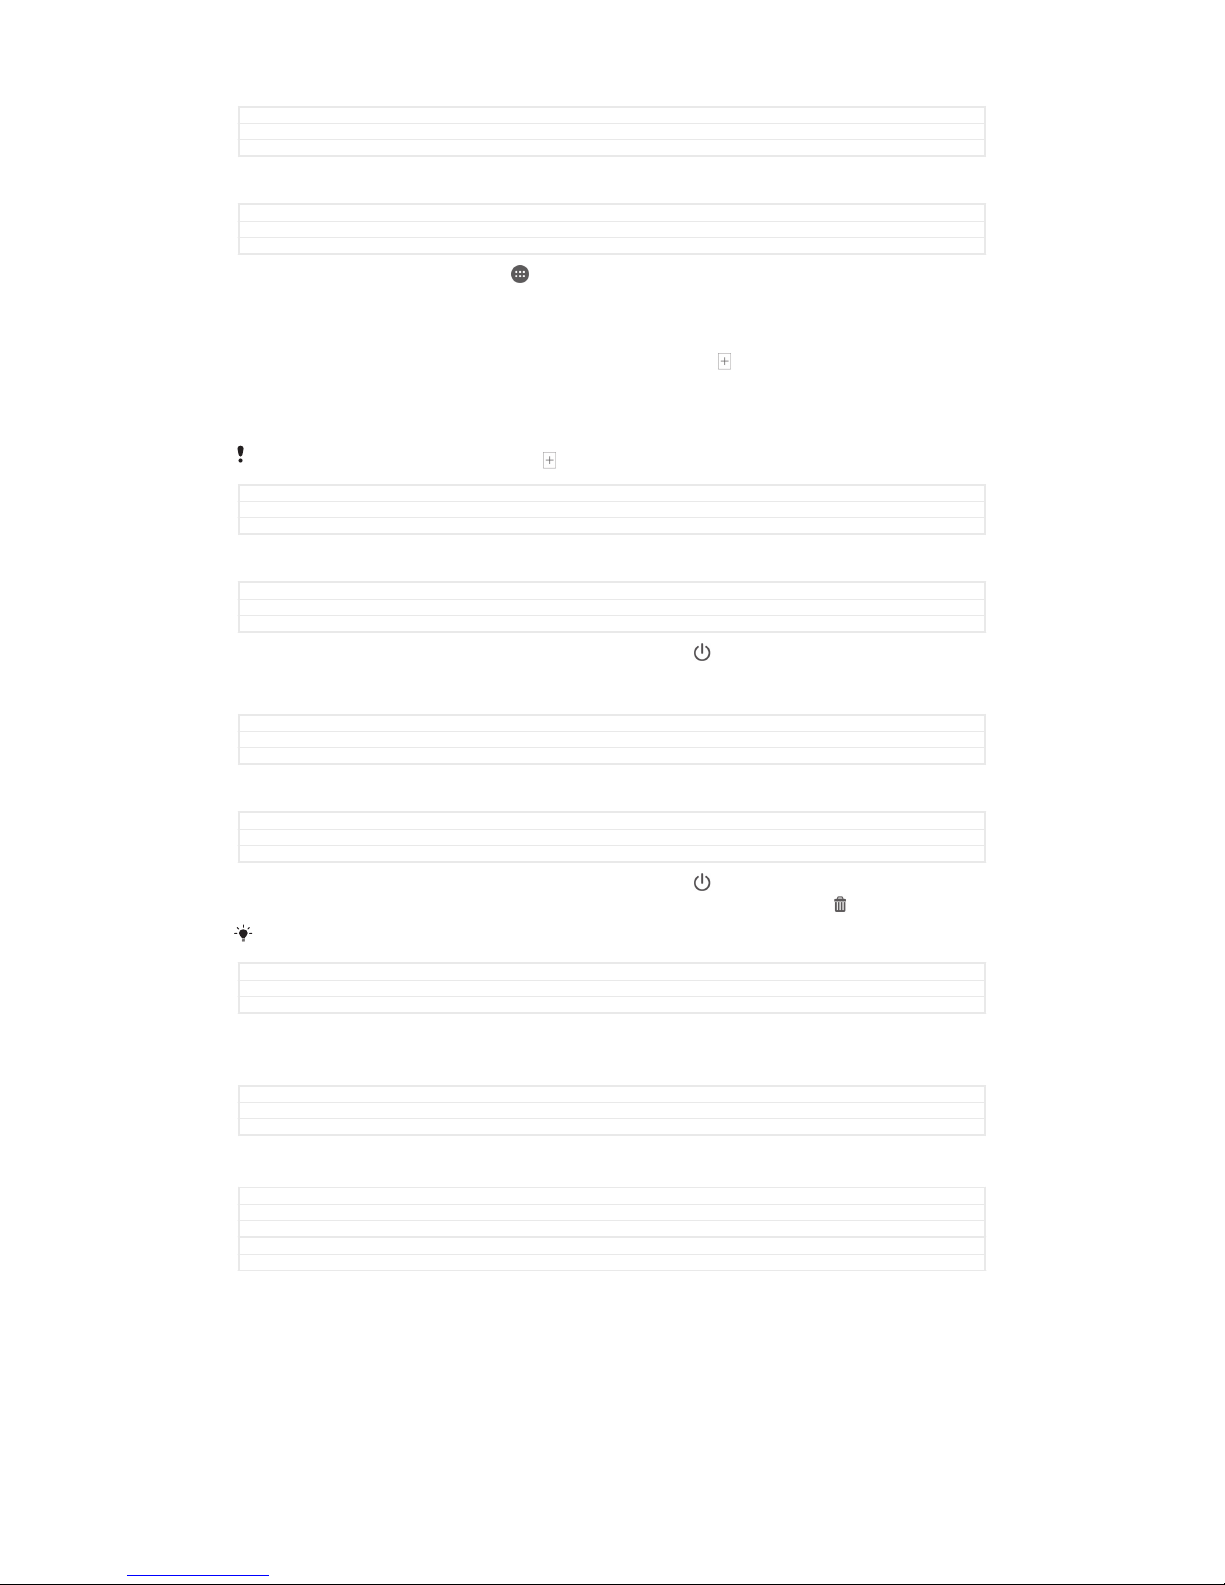
Shortcuts and folders
GUID GUID-5B33567F-6DC3-4C3C-934D-C76C14EA069C
Title Shortcuts and folders
Version 1
Use shortcuts and folders to manage your applications and keep your Home screen
tidy.
GUID
GUID-5B33567F-6DC3-4C3C-934D-C76C14EA069C
Title Shortcuts and folders
Version 1
GUID GUID-AB0711B3-D9D7-430C-9F04-DDEB20092B5C
Title Shortcuts and folders overview
24
This is an Internet version of this publication. © Print only for private use.
Version 1
1 Access a folder containing applications
2 Access an application using a shortcut
GUID GUID-AB0711B3-D9D7-430C-9F04-DDEB20092B5C
Title Shortcuts and folders overview
Version 1
To add a shortcut to your Home screen
GUID GUID-846B78FE-AD6C-47FE-9BF8-715A3CBB7B61
Title To add a shortcut from customization menu to the Home screen
Version 6
1
Touch and hold an empty area on your Home screen until the device vibrates
and the customisation menu appears.
2
In the customisation menu, tap Apps.
3
Scroll through the list of applications and select an application. The selected
application gets added to the Home screen.
In step 3, alternatively, you can tap
Shortcuts and then select an application from the list
available. If you use this method to add shortcuts, some of the applications available allow
you to add specific functionality to the shortcut.
GUID GUID-846B78FE-AD6C-47FE-9BF8-715A3CBB7B61
Title To add a shortcut from customization menu to the Home screen
Version 6
To move an item on the Home screen
GUID GUID-E0065909-6DCC-4137-BC73-976CB447E526
Title To move an item on the Home screen
Version 3
•
Touch and hold the item until it magnifies and the device vibrates, then drag
the item to the new location.
GUID
GUID-E0065909-6DCC-4137-BC73-976CB447E526
Title To move an item on the Home screen
Version 3
To delete an item from the Home screen
GUID
GUID-B9D51246-2767-4FC7-B6A9-7F3A98343A35
Title To delete an item on the Home screen
Version 3
•
Touch and hold an item until it magnifies and the device vibrates, then drag the
item to .
GUID
GUID-B9D51246-2767-4FC7-B6A9-7F3A98343A35
Title To delete an item on the Home screen
Version 3
To create a folder on the Home screen
GUID
GUID-B4485B5D-75F7-46E8-A35F-7833E55CF1DC
Title To create a folder on the Home screen
25
This is an Internet version of this publication. © Print only for private use.
Version 9
•
Touch and hold an application icon or a shortcut until it magnifies and the
device vibrates, then drag and drop it on top of another application icon or
shortcut.
GUID GUID-B4485B5D-75F7-46E8-A35F-7833E55CF1DC
Title To create a folder on the Home screen
Version 9
To add items to a folder on the Home screen
GUID GUID-59731CD1-AB4A-40AE-BCCC-5D64928E2B5E
Title To add items to a folder
Version 3
•
Touch and hold an item until it magnifies and the device vibrates, then drag the
item to the folder.
GUID GUID-59731CD1-AB4A-40AE-BCCC-5D64928E2B5E
Title To add items to a folder
Version 3
To rename a folder on the Home screen
GUID GUID-D78DB4F3-D3D1-495D-B904-21104B8F19CA
Title To rename a folder
Version 5
1
Tap the folder to open it.
2
Tap the folder's title bar to show the Folder name field.
3
Enter the new folder name and tap Done.
GUID GUID-D78DB4F3-D3D1-495D-B904-21104B8F19CA
Title To rename a folder
Version 5
Background and themes
GUID GUID-DA64CC29-770F-4901-ABCB-7A4F380547FE
Title Background and themes
Version 1
You can adapt the Home screen to your own style using wallpapers and different
themes. You can also change the wallpaper on the lock screen.
GUID GUID-DA64CC29-770F-4901-ABCB-7A4F380547FE
Title Background and themes
Version 1
To change your Home screen wallpaper
GUID
GUID-19E276DF-4D6A-44AF-8D86-5CAAFFD4BFDD
Title To change your wallpaper
Version 17
1
Touch and hold an empty area on your Home screen until the device vibrates.
2
Tap Wallpapers and select an option.
GUID
GUID-19E276DF-4D6A-44AF-8D86-5CAAFFD4BFDD
Title To change your wallpaper
26
This is an Internet version of this publication. © Print only for private use.
Version 17
To set a theme
GUID GUID-506DA76F-B990-4363-A85D-2F100F4C36A7
Title To set a theme
Version 10
1
Touch and hold an empty area on your Home screen until the device vibrates.
2
Tap Themes, then select a theme.
When you change a theme, the background also changes in some applications.
GUID GUID-506DA76F-B990-4363-A85D-2F100F4C36A7
Title To set a theme
Version 10
To change the wallpaper for the lock screen
GUID GUID-3471E381-4B73-4ACF-80CC-24E5F3FEEF08
Title To change your wallpaper in the lock screen
Version 2
1
From your Home screen, tap .
2
Find and tap Settings > Personalization> Lock screen.
3
Select an option, then follow the instructions to change your wallpaper.
GUID GUID-3471E381-4B73-4ACF-80CC-24E5F3FEEF08
Title To change your wallpaper in the lock screen
Version 2
Taking a screenshot
GUID GUID-4764F628-1DE0-46FA-8893-8AF9487D3822
Title Taking a screenshot
Version 1
You can capture still images of any screen on your device as a screenshot.
Screenshots you take are automatically saved in Album.
GUID GUID-4764F628-1DE0-46FA-8893-8AF9487D3822
Title Taking a screenshot
Version 1
To take a screenshot
GUID GUID-34F326B7-FFAD-4497-A075-F98085E9E1F3
Title To take a screenshot - 2 methods
Version 2
1
Press and hold down the power key until a prompt window appears.
2
Tap
You can also take the screenshot by pressing the power key and volume down key at the
same time until you hear a clicking sound.
GUID GUID-34F326B7-FFAD-4497-A075-F98085E9E1F3
Title To take a screenshot - 2 methods
Version 2
To view your screenshot
GUID
GUID-21497D3B-8525-4E82-A03C-DCB204468134
Title To view your screenshot
Version 2
•
Drag the status bar fully downwards, then tap the screenshot you want to view.
You can also view your screenshots by opening the Album application.
GUID GUID-21497D3B-8525-4E82-A03C-DCB204468134
Title To view your screenshot
Version 2
Recording your screen
GUID
GUID-40653A7D-482B-48C0-AD18-CDC30F38D0A6
Title Recording screen
Version 1
You can use the screen recording feature to capture videos of what’s happening on
your device’s screen. This feature is useful, for example, when you want to create
27
This is an Internet version of this publication. © Print only for private use.
tutorials or record videos of you playing a game on your device. Recorded video clips
are automatically saved in Album.
GUID GUID-40653A7D-482B-48C0-AD18-CDC30F38D0A6
Title Recording screen
Version 1
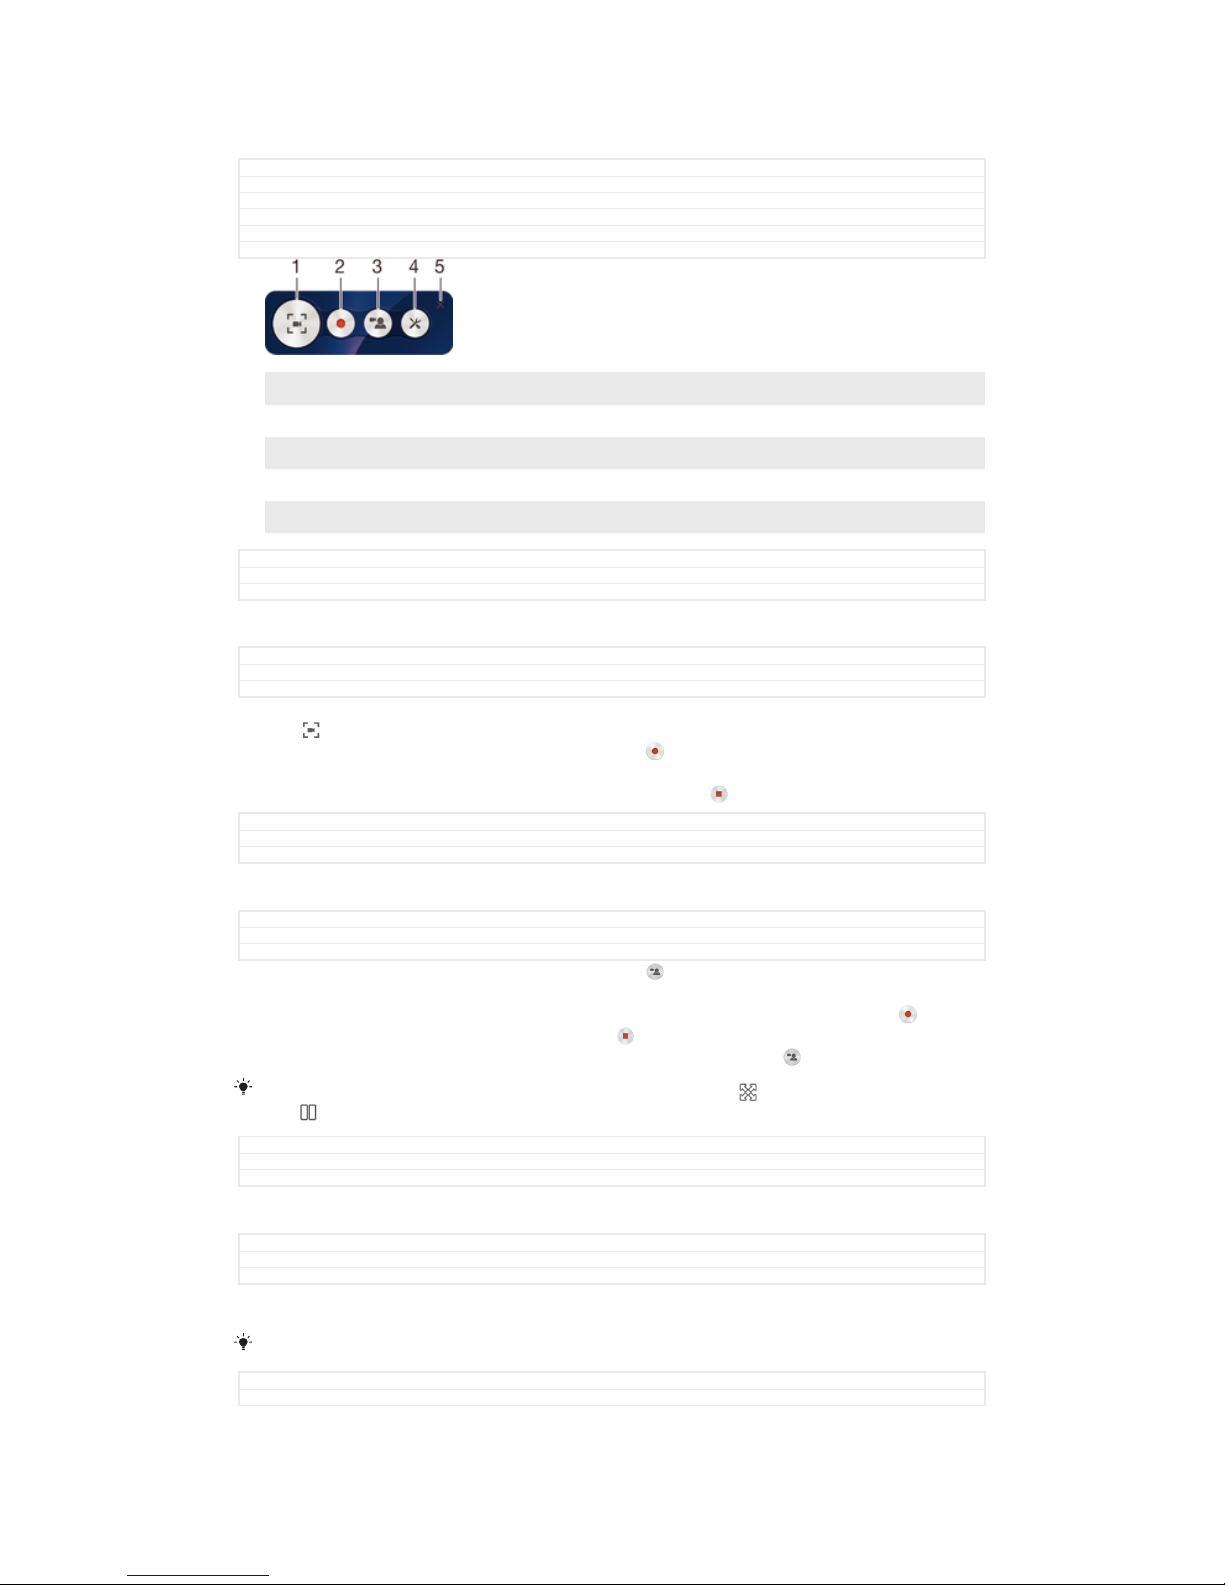
GUID GUID-E7DAE40E-200B-4BE1-B7A2-F0BEF8CF57D8
Title Record screen window overview
Version 1
1 Minimise/Resume the record screen window
2 Record your screen
3 Record your screen when the front camera is activated
4 Access the screen recording settings
5 Close the screen recording window
GUID GUID-E7DAE40E-200B-4BE1-B7A2-F0BEF8CF57D8
Title Record screen window overview
Version 1
To record your screen
GUID GUID-82D317F4-02A5-4B4E-A669-A4FB4DDAFBB3
Title To record your screen
Version 1
1
Press and hold down the power key until a prompt window appears.
2
Tap
.
3
When the record screen window is open, tap . The timer for recording
appears.
4
To stop the screen recording, tap the timer, then tap
.
GUID GUID-82D317F4-02A5-4B4E-A669-A4FB4DDAFBB3
Title To record your screen
Version 1
To record your screen when the front camera is activated
GUID GUID-573F9B90-5553-4848-A60E-7504EFFADBB1
Title To record the screen with the front camera activated
Version 1
1
When the record screen window is open, tap
to make front camera screen
recording window appears.
2
To start recording your screen and video captured by the front camera, tap .
3
To stop recording, tap the timer, then tap .
4
To deactivate the front camera screen recording window, tap
.
When the front camera screen recording window opens, drag
to resize the window, and
tap to record a still picture.
GUID GUID-573F9B90-5553-4848-A60E-7504EFFADBB1
Title To record the screen with the front camera activated
Version 1
To view the recent screen recordings
GUID
GUID-B4D55AD6-F374-4843-8A3B-A7493E0E24A2
Title To find your recorded screen
Version 1
•
After your screen recordings finish, drag the status bar downwards, then tap to
view the most recent recordings of your screen.
You can also view your screen recordings in the Album application.
GUID GUID-B4D55AD6-F374-4843-8A3B-A7493E0E24A2
Title To find your recorded screen
28
This is an Internet version of this publication. © Print only for private use.
Version 1
Status and notifications
GUID GUID-065ACA94-7931-42F2-AEB8-381F304937E1
Title Status and notifications
Version 13
The icons in the status bar inform you of events such as new messages and calendar
notifications, activities in progress such as file downloads, and status information
such as battery level and signal strength. You can drag down the status bar to open
the Notification panel and handle your notifications.
GUID GUID-065ACA94-7931-42F2-AEB8-381F304937E1
Title Status and notifications
Version 13
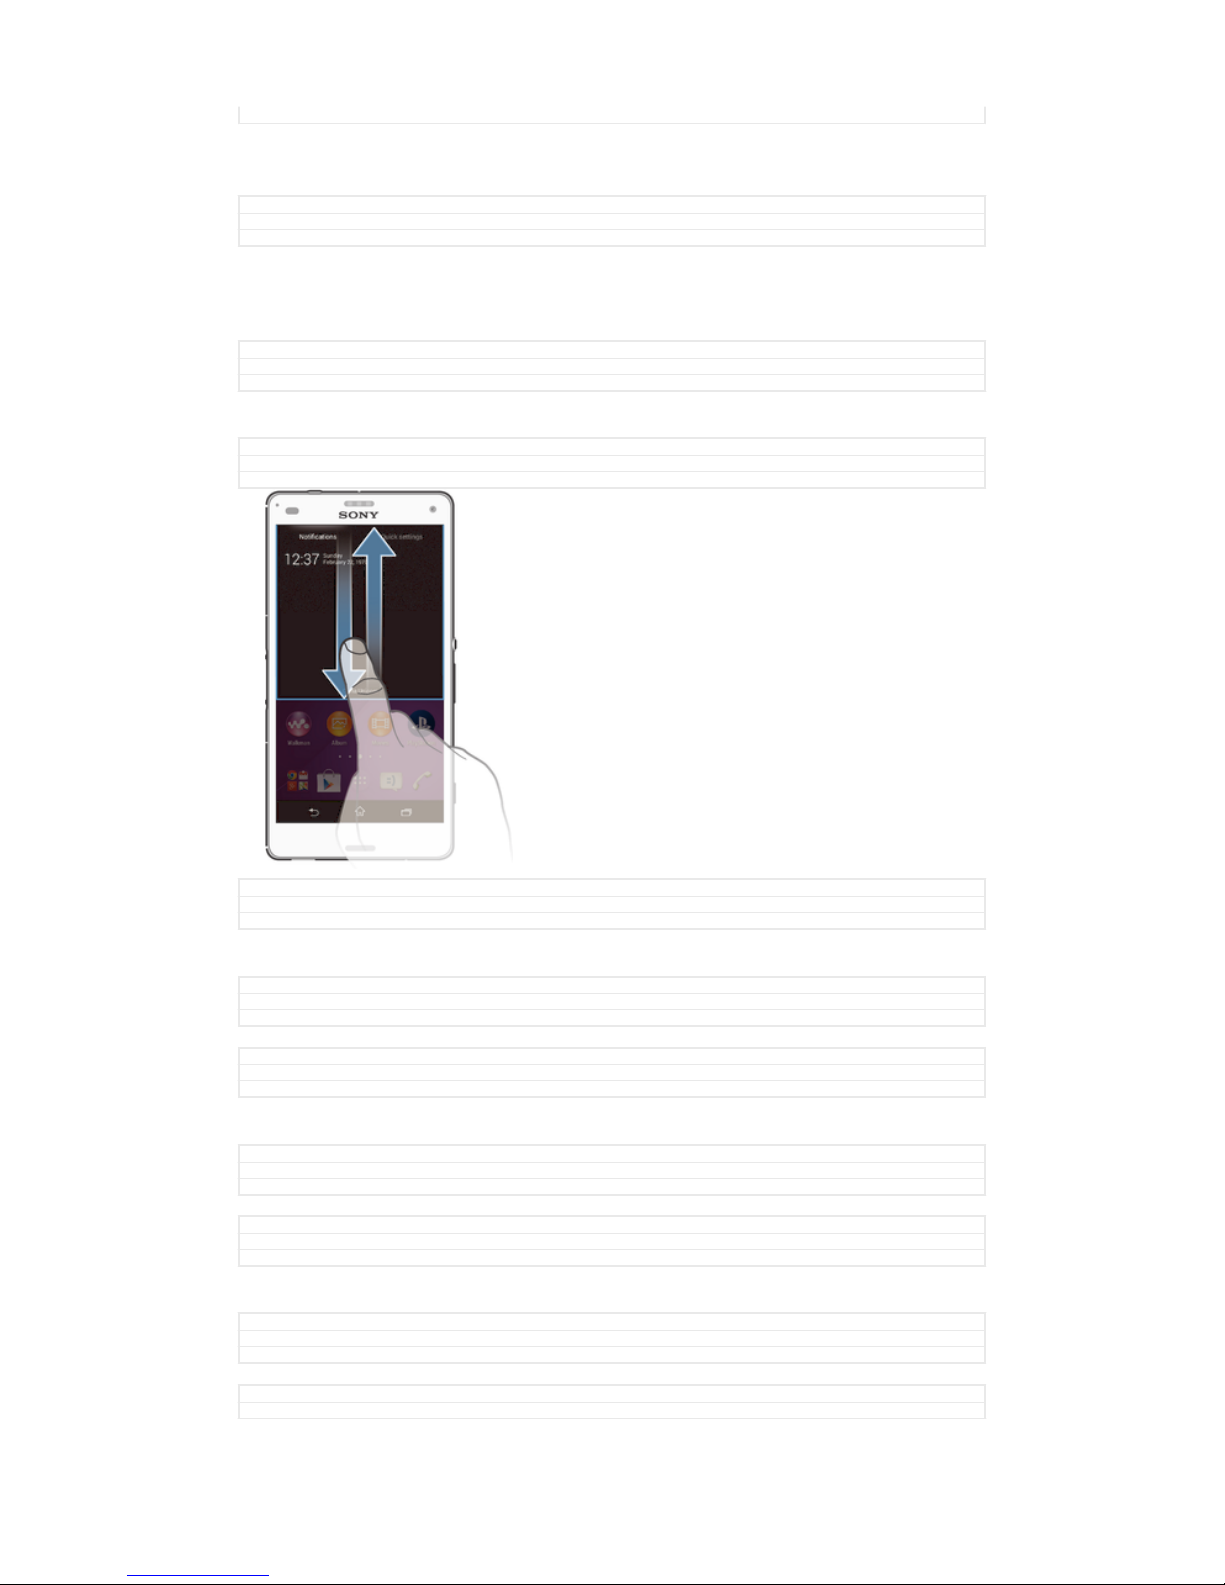
To open or close the Notification panel
GUID GUID-95E1166F-A30C-4DE2-B941-50CA4885E1E3
Title To open or close the Notification panel
Version 1
GUID GUID-95E1166F-A30C-4DE2-B941-50CA4885E1E3
Title To open or close the Notification panel
Version 1
To take action on a notification
GUID GUID-B15C53D1-AD7D-4B24-8254-068E716E8C0D
Title To take action on a notification
Version 1
•
Tap the notification.
GUID GUID-B15C53D1-AD7D-4B24-8254-068E716E8C0D
Title To take action on a notification
Version 1
To dismiss a notification from the Notification panel
GUID
GUID-967CAF72-88E4-4B35-ADD1-2B0EA7CF61A4
Title To dismiss a notification from the Notification panel
Version 1
•
Place your finger on a notification and flick left or right.
GUID
GUID-967CAF72-88E4-4B35-ADD1-2B0EA7CF61A4
Title To dismiss a notification from the Notification panel
Version 1
To clear all notifications from the Notification panel
GUID
GUID-DA62F1FF-BE58-4F3B-B236-8F2F85655D4F
Title To clear the Notification panel
Version 5
•
Tap Clear.
GUID
GUID-DA62F1FF-BE58-4F3B-B236-8F2F85655D4F
Title To clear the Notification panel
29
This is an Internet version of this publication. © Print only for private use.
Version 5
Notification light
GUID GUID-714E4307-9897-4CC8-ACA1-C7E19B4EEB6C
Title Notification light
Version 3
The notification light informs you about battery status and some other events. For
example, a flashing white light means there is a new message or a missed call.
GUID GUID-714E4307-9897-4CC8-ACA1-C7E19B4EEB6C
Title Notification light
Version 3
Icons in the status bar
GUID GUID-22676E23-F5D6-4AA4-96AF-C646852C53C1
Title Icons in the status bar
Version 1
GUID GUID-22676E23-F5D6-4AA4-96AF-C646852C53C1
Title Icons in the status bar
Version 1
Status icons
GUID GUID-608EF053-148E-44EB-8B03-5B0E9CE88C10
Title Status icons
Version 18
Signal strength
No signal
Roaming
LTE is available
GPRS is available
EDGE is available
3G is available
Mobile data network is available
Sending and downloading LTE data
Sending and downloading GPRS data
Sending and downloading EDGE data
Sending and downloading 3G data
Sending and downloading mobile data
Battery status
The battery is charging
STAMINA mode is activated
Airplane mode is activated
The Bluetooth® function is activated
The SIM card is not inserted
The microphone is muted
30
This is an Internet version of this publication. © Print only for private use.
 Loading...