

Sony Xperia Z2 SGP512, Xperia Z2 SGP511, Xperia Z4 SGP712 User Manual

User guide
Xperia™ Z2 Tablet
SGP511/SGP512

Contents
Getting started...............................................................................6
About this User guide........................................................................6
Overview............................................................................................6
Assembly...........................................................................................7
Starting your device for the first time.................................................7
Why do I need a Google™ account?.................................................8
Charging your device.........................................................................8
Multiple user accounts.......................................................................9
Learning the basics......................................................................12
Using the touchscreen.....................................................................12
Locking and unlocking the screen...................................................13
Home screen....................................................................................14
Application screen...........................................................................15
Navigating applications....................................................................16
Small apps.......................................................................................16
Widgets............................................................................................17
Shortcuts and folders......................................................................18
Background and themes..................................................................19
Taking a screenshot.........................................................................19
Recording your screen.....................................................................19
Notifications.....................................................................................20
Icons in the status bar.....................................................................22
Application overview........................................................................23
Downloading applications............................................................25
Downloading applications from Google Play™...............................25
Downloading applications from other sources................................25
Internet and networks..................................................................26
Browsing the web............................................................................26
Wi-Fi®..............................................................................................26
Virtual private networks (VPNs)........................................................27
Synchronising data on your device..............................................29
Synchronising with online accounts................................................29
Synchronising with Microsoft® Exchange ActiveSync®.................29
Synchronising with Outlook® using a computer.............................30
Basic settings...............................................................................31
Accessing settings...........................................................................31
Sound volume..................................................................................31
Managing notifications.....................................................................32
Screen settings................................................................................33
2
This is an Internet version of this publication. © Print only for private use.

Daydream.........................................................................................34
Screen lock......................................................................................35
Language settings............................................................................36
Date and time...................................................................................36
X-Reality™ for mobile......................................................................36
Super-vivid mode.............................................................................37
Enhancing the sound output............................................................37
Noise cancellation............................................................................37
Typing text...................................................................................39
On-screen keyboard........................................................................39
Entering text using voice input........................................................40
Editing text.......................................................................................40
Personalising the on-screen keyboard............................................41
Contacts.......................................................................................43
Transferring contacts.......................................................................43
Searching and viewing contacts......................................................44
Adding and editing contacts............................................................45
Favourites and groups.....................................................................45
Sending contact information............................................................46
Avoiding duplicate entries in the Contacts application...................46
Backing up contacts........................................................................46
Email.............................................................................................48
Setting up email...............................................................................48
Sending and receiving email messages..........................................48
Organising your email messages.....................................................49
Email account settings.....................................................................50
Gmail™............................................................................................50
Music............................................................................................52
Transferring music to your device...................................................52
Listening to music............................................................................52
Music home screen menu................................................................53
Playlists............................................................................................54
Sharing music..................................................................................55
Enhancing the sound.......................................................................55
Visualiser .........................................................................................55
Recognising music with TrackID™..................................................55
FM radio.......................................................................................57
Listening to the radio.......................................................................57
Favourite radio channels..................................................................58
Sound settings.................................................................................58
Camera.........................................................................................59
Taking photos and recording videos...............................................59
3
This is an Internet version of this publication. © Print only for private use.

Face detection.................................................................................60
Using Smile Shutter™ to capture smiling faces..............................60
Adding the geographical position to your photos...........................61
General camera settings..................................................................61
Still camera settings.........................................................................65
Video camera settings.....................................................................68
Photos and videos in Album........................................................72
Viewing photos and videos..............................................................72
Sharing and managing photos and videos......................................73
Editing photos with the Photo editor application.............................74
Editing videos with the Movie Creator application..........................75
Hiding photos and videos................................................................76
Album home screen menu...............................................................76
Viewing your photos on a map........................................................77
Videos..........................................................................................79
Watching videos in the Video application........................................79
Transferring video content to your device.......................................80
Managing video content..................................................................80
Movie Creator..................................................................................80
Video Unlimited service...................................................................81
Connectivity.................................................................................82
Mirroring the screen of your device on a TV using a cable..............82
Mirroring the screen of your device wirelessly.................................82
Sharing content with DLNA Certified™ devices..............................83
Connecting your device to USB mass storage devices..................85
Connecting your device to a DUALSHOCK™ series wireless
controller..........................................................................................86
NFC..................................................................................................86
Bluetooth® wireless technology......................................................88
One-touch setup..............................................................................90
Smart apps and features that save you time...............................91
Controlling accessories and settings with Smart Connect™..........91
Using your device as a wallet..........................................................92
Travel and maps...........................................................................93
Using location services....................................................................93
Google Maps™ and navigation.......................................................93
Using your device with a car infotainment system..........................93
Airplane mode..................................................................................94
Calendar and alarm clock............................................................95
Calendar...........................................................................................95
Alarm and clock...............................................................................96
4
This is an Internet version of this publication. © Print only for private use.

Support and maintenance............................................................98
Support for your device...................................................................98
Computer tools................................................................................98
Updating your device.......................................................................99
Finding a lost device .....................................................................100
Finding the identification number of your device...........................101
Battery and power management...................................................101
Memory and storage......................................................................103
Managing files using a computer...................................................104
Backing up and restoring content.................................................105
Running diagnostic tests on your device.......................................107
Restarting and resetting.................................................................107
Using your device in wet and dusty conditions.............................108
Recycling your device....................................................................110
Limitations to services and features..............................................110
Legal information...........................................................................110
5
This is an Internet version of this publication. © Print only for private use.
Getting started
About this User guide
This is the Xperia™ Z2 Tablet User guide for the Android™ 5.0 software version. If
you're not sure which software version your device is running, you can check it via
the Settings menu. For more information about software updates, see
Updating your
device
on page 99.
To check the current software version of your device
1
From your Home screen, tap .
2
Find and tap Settings > About tablet > Android version.
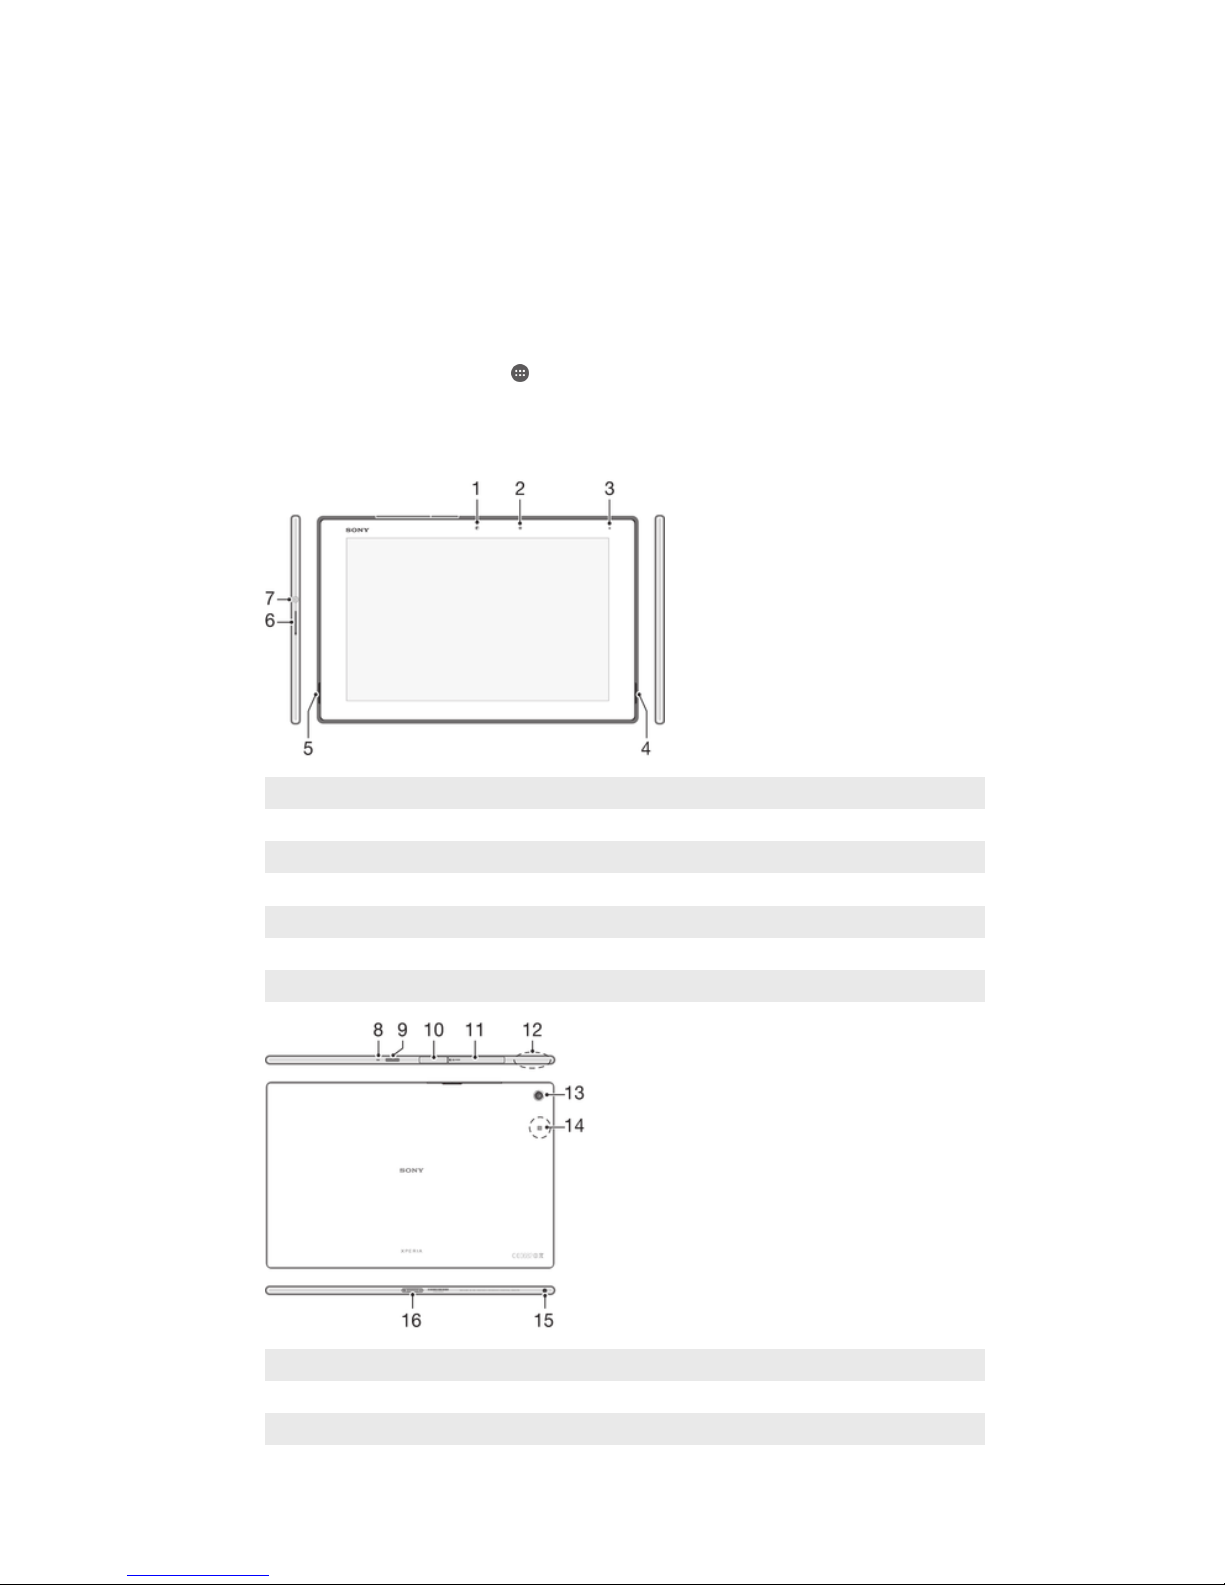
Overview
1 Front camera
2 Light sensor
3 Charging/Notification light
4 Speaker A
5 Speaker B
6 Volume/Zoom key
7 Power key
8 Microphone
9 Infrared sensor
10 Charger/USB port cover
6
This is an Internet version of this publication. © Print only for private use.
11 Memory card slot cover
12 Wi-Fi/GPS/Bluetooth antenna area
13 Main camera
14 NFC™ detection area
15 Headset jack
16 Charging dock connector
Assembly
A protective plastic sheet is attached to the screen. You should peel off this sheet
before using the touchscreen. Otherwise, the touchscreen might not function
properly.
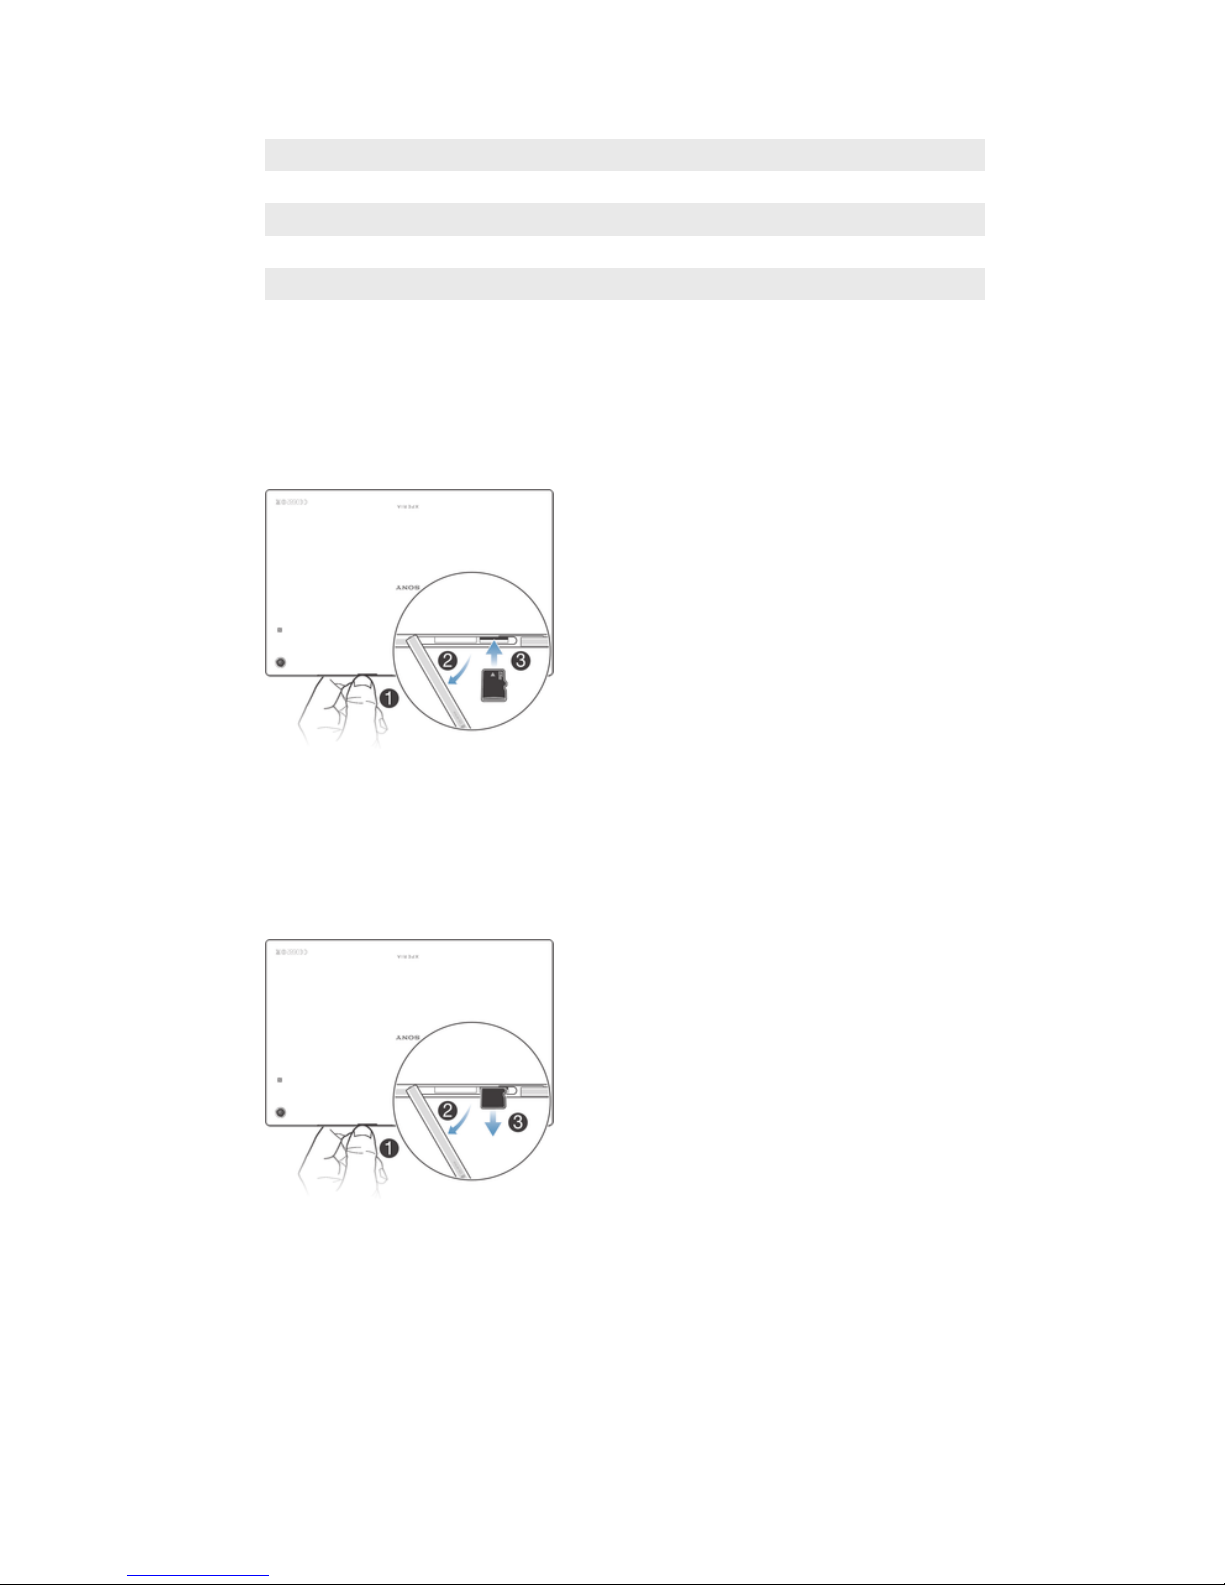
To insert a memory card
1
Insert a fingernail into the gap between the memory card slot cover and the top
side of the device, then detach the cover.
2
Place the memory card in the memory card slot, with the gold-coloured
contacts facing down, then push the memory card all the way into the slot until
you hear a locking sound.
3
Reattach the memory card cover.
To remove the memory card
1
Turn off the device.
2
Remove the cover of the memory card slot, then press against the edge of the
memory card and release it.
3
Draw the card outwards to remove it fully.
Starting your device for the first time
The first time you start your device, a setup guide opens to help you configure basic
settings, sign in to online accounts and personalise your device. For example, if you
7
This is an Internet version of this publication. © Print only for private use.
have a Sony Entertainment Network account, you can sign in to it here and get set up
straight away.
You can also access the setup guide later from the Settings menu. To access the setup guide
on a device with multiple users, you must be logged in as the owner, that is, the primary user.
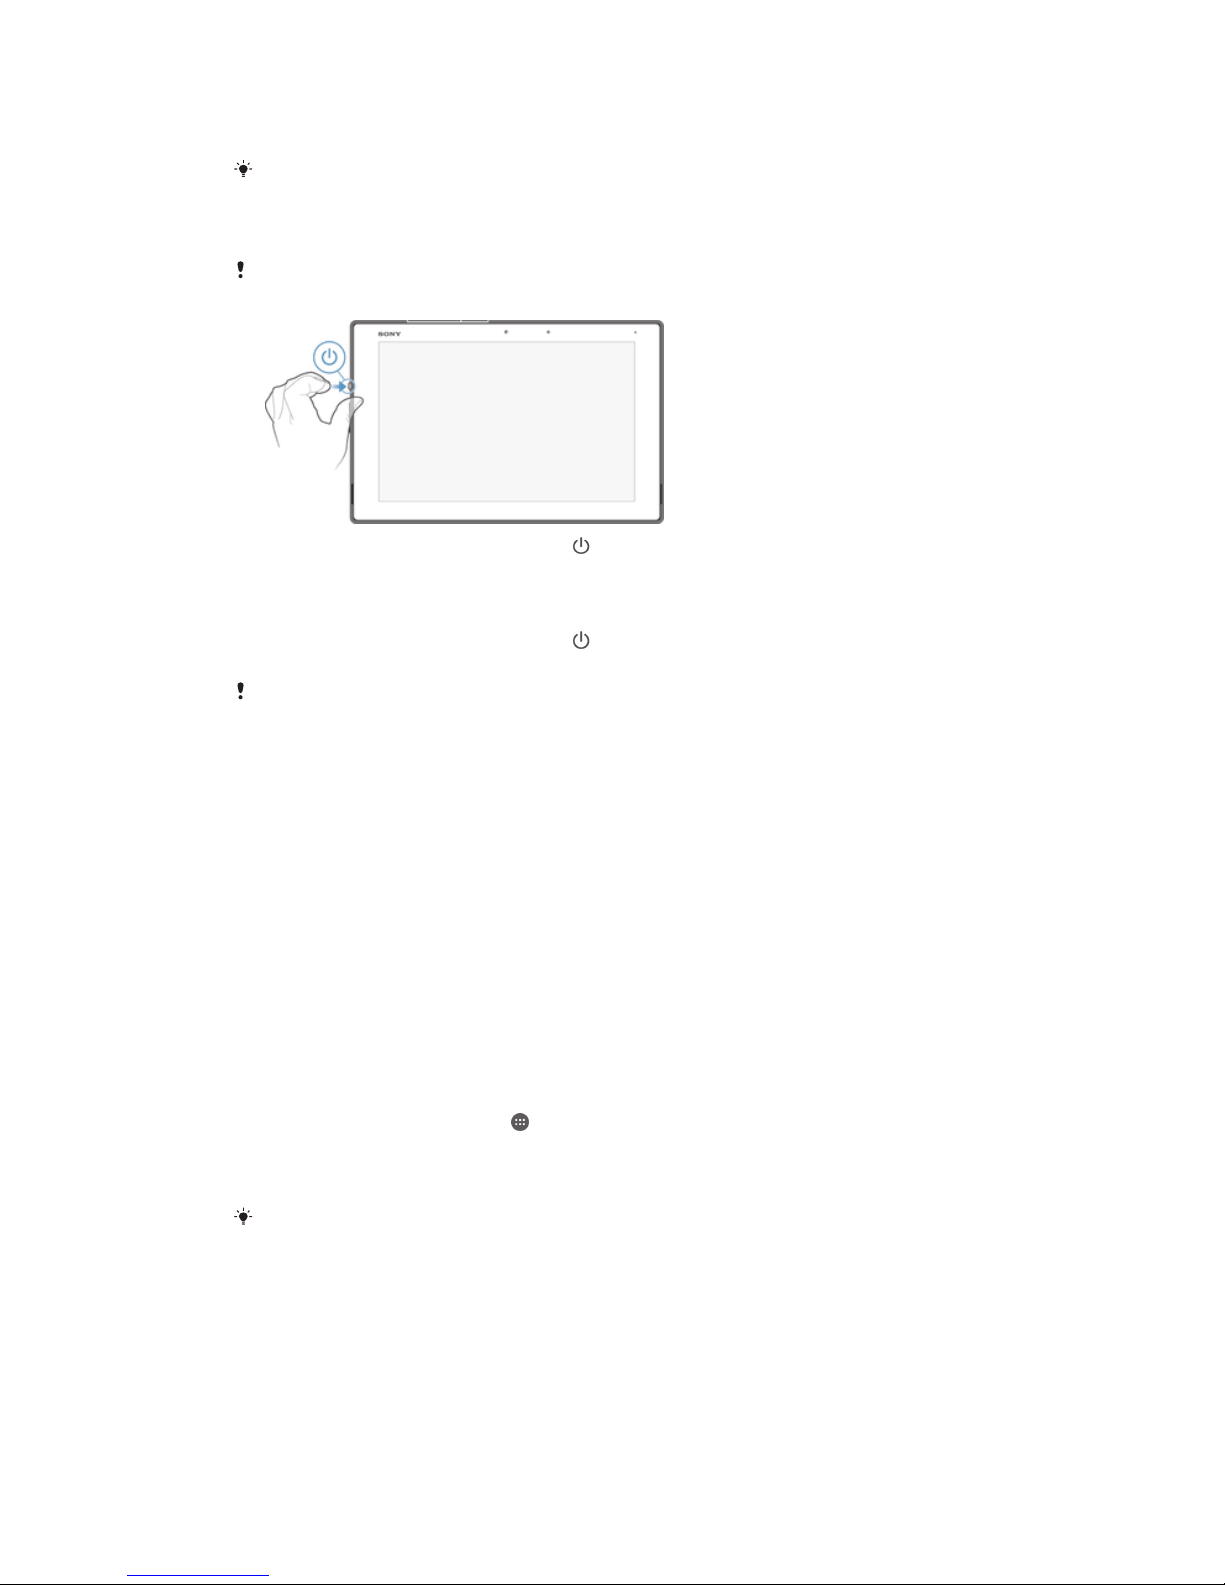
To turn on the device
Make sure that the battery is charged for at least 30 minutes before you turn on the device for
the first time.
1
Press and hold down the power key until the device vibrates.
2
Wait a while for the device to start.
To turn off the device
1
Press and hold down the power key until the options menu opens.
2
In the options menu, tap Power off.
It may take a while for the device to shut down.
Why do I need a Google™ account?
Your Xperia™ device from Sony runs on the Android™ platform developed by
Google™. A range of Google™ applications and services is available on your device
when you purchase it, for example, Gmail™, Google Maps™, YouTube™ and Google
Play™, the online store for downloading Android™ applications. To get the most out
of these services, you need a Google™ account. For example, a Google™ account is
mandatory if you want to:
•
Download and install applications from Google Play™.
•
Synchronise email, contacts and the calendar.
•
Chat with friends using the Hangouts™ application.
•
Synchronise your browsing history and bookmarks.
For more information about Android™ and Google™, go to
www.sonymobile.com/support
.
To set up a Google™ account on your device
1
From your Home screen, tap .
2
Find and tap Settings > Account settings > Add account > Google.
3
Follow the registration wizard to create a Google™ account, or sign in if you
already have an account.
You can also sign in to or create a Google™ account from the setup guide the first time you
start your device. Or you can go online and create an account at
www.google.com/accounts
.
Charging your device
Your device has an embedded, rechargeable battery that should be replaced only by
Sony or an authorised Sony repair centre. You should never try to open or take apart
this device yourself. Opening the device can cause damage that will void your
warranty.
8
This is an Internet version of this publication. © Print only for private use.
The battery is partly charged when the device is shipped from the factory. Depending
on how long it was in the box before you purchased it, the battery level may be quite
low. It is therefore recommended that you charge the battery for at least 30 minutes
before starting up your device for the first time. You can still use your device while it
is charging. Read more about how to improve the battery performance in
Battery and
power management
on page 101.
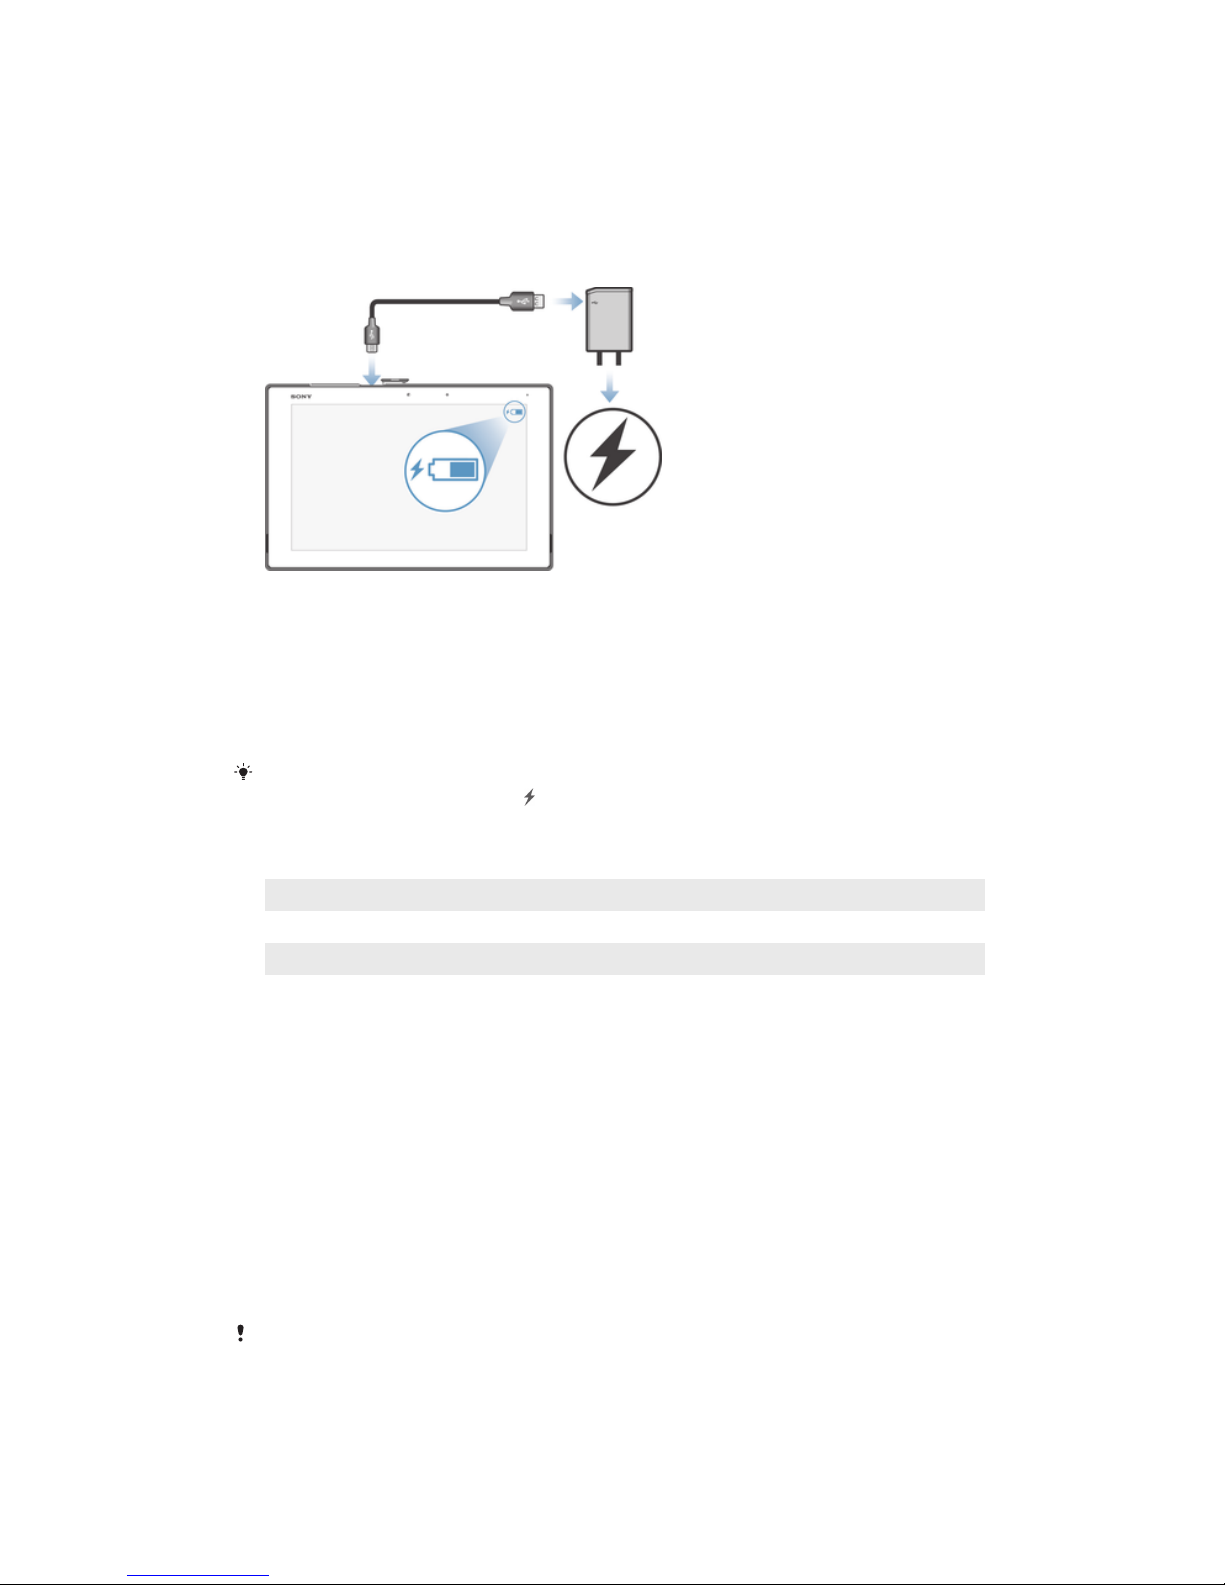
To charge your device
1
Plug the charger into a power outlet.
2
Plug one end of the USB cable into the charger (or into the USB port of a
computer).
3
Plug the other end of the cable into the micro USB port on your device, with
the USB symbol facing up. The notification light illuminates when charging
begins.
4
When the device is fully charged, disconnect the cable from your device by
pulling it straight outwards. Make sure not to bend the connector.
If the battery is completely discharged, it may take a few minutes before the notification light
illuminates and the charging icon appears.
Battery notification light status
Green The battery is charging and the battery charge level is greater than 90%
Red The battery is charging and the battery charge level is less than 15%
Orange The battery is charging and the battery charge level is less than 90%
Multiple user accounts
Your device supports multiple user accounts so that different users can log in
separately to the device and use it. Multiple user accounts work well in situations
where you share the same device with other people or lend your device to someone
to use for a while. The user who sets up the device for the first time becomes the
owner of the device. Only the owner can manage the accounts of other users. Apart
from the owner account, there are three different types of accounts:
•
Regular User: This account type is suitable for someone who regularly uses your
device.
•
Guest User: Enable the guest account option for someone who just wants to use your
device temporarily.
•
Restricted Profile: Use this option if you want to make only a restricted number of
applications available to a person using your device.
Some features are only available to the owner. For example, only the owner can allow
downloads from sources other than Google Play™.
9
This is an Internet version of this publication. © Print only for private use.

About the Regular User account
By adding Regular User accounts, you can allow different users to have different
home screens, wallpapers and general settings. They also get separate access to
applications and memory storage for files such as music and photos. You can add up
to seven regular user accounts on your device.
To add a regular user account
1
Make sure you are logged in as the owner, that is, the user who set up the
device for the first time.
2
From your Home screen, tap .
3
Find and tap Settings > Users > Add user or profile > User.
4
Tap OK > Set up now. The screen locks and an icon representing the newly
added user appears in the top right corner.
5
Unlock the screen, for example, by swiping or entering your PIN.
6
Follow the on-screen instructions to complete the procedure.
You can also add a regular user account from the status bar on any screen. Just drag the
status bar downwards using two fingers and tap the user icon, then tap Add user.
To delete a regular user account from your device
1
Make sure you are logged in as the owner.
2
From your Home screen, tap
.
3
Find and tap Settings > Users.
4
Tap beside the name of the user that you want to delete, then tap Delete.
About the Guest User account
If someone just wants to use your device temporarily, you can enable a guest
account for this user. In guest mode, your device starts up as a freshly installed
system with only the pre-installed apps. Once your guest is finished using your
device, you can wipe the session clean so that the next guest can start fresh. The
guest user account is pre-installed and cannot be deleted.
To set up the guest user account
1
Make sure you are logged in as the owner, that is, the user who set up the
device for the first time.
2
From your Home screen, tap
.
3
Find and tap Settings > Users > Guest.
4
Follow the on-screen instructions to complete the procedure.
You can also set up a guest user account from the status bar on any screen. Just drag the
status bar downwards using two fingers and tap the user icon, then tap Add guest.
To clear the guest session data
1
Make sure you are logged in as a guest user.
2
From your Home screen, tap
.
3
Find and tap Settings > Users.
4
Find and tap Remove guest.
5
Tap Remove.
You can also clear the guest session from the status bar on any screen. Just drag the status
bar downwards using two fingers and tap the user icon, then tap Remove guest.
About the restricted profile
You can add restricted profiles, which only allow restricted access to apps from the
owner account. For example, you can create a restricted profile for children to
prevent them from playing games or viewing mature content from your account. You
can add up to seven restricted profiles on your device.
10
This is an Internet version of this publication. © Print only for private use.

To add a restricted profile
1
Make sure you are logged in as the owner, that is, the user who set up the
device for the first time.
2
From your Home screen, tap .
3
Find and tap Settings > Users > Add user or profile.
4
Tap Restricted profile. A list of available apps appears.
5
To name the profile, tap New profile and enter a name, then tap OK.
6
Drag the relevant slider to the right beside the apps to which you want to grant
access.
If you don’t have a PIN, password, or pattern set up as your screen lock when you are adding
a restricted profile, after tap Restricted profile in step 4, you will be asked to set up a screen
lock and select an option about how to display notifications on your lock screen. Please follow
the on-screen instructions you are prompted with. For more information about notification
display options on the lock screen, see
Notification display options on the lock screen
on
page 33.
To delete a restricted profile from your device
1
Make sure you are logged in as the owner.
2
From your Home screen, tap .
3
Find and tap Settings > Users.
4
Tap
beside the name of the profile that you want to delete, then tap >
Delete .
Switching between multiple user accounts
To switch between multiple user accounts
1
To view the list of users, drag the status bar downwards using two fingers,
then tap the user icon at the top right of the screen.
2
Tap the icon representing the user account that you want to switch to.
3
If a password has been set for the account, enter this password to log in.
Otherwise, just unlock the screen.
When you switch to the guest account, tap
Start over if you want to wipe the previous session
or tap Yes, continue to continue the previous session.
Settings for multiple user accounts
There are three different types of settings on devices with multiple users:
•
Settings that can be changed by any user and affect all users. Examples include
language, Wi-Fi®, Airplane mode, NFC and Bluetooth®.
•
Settings that only affect an individual user account. Examples include automatic data
syncing, screen lock, various accounts added, and wallpaper.
•
Settings that are only visible to the owner and affect all users, for example, VPN
settings.
11
This is an Internet version of this publication. © Print only for private use.
Learning the basics
Using the touchscreen
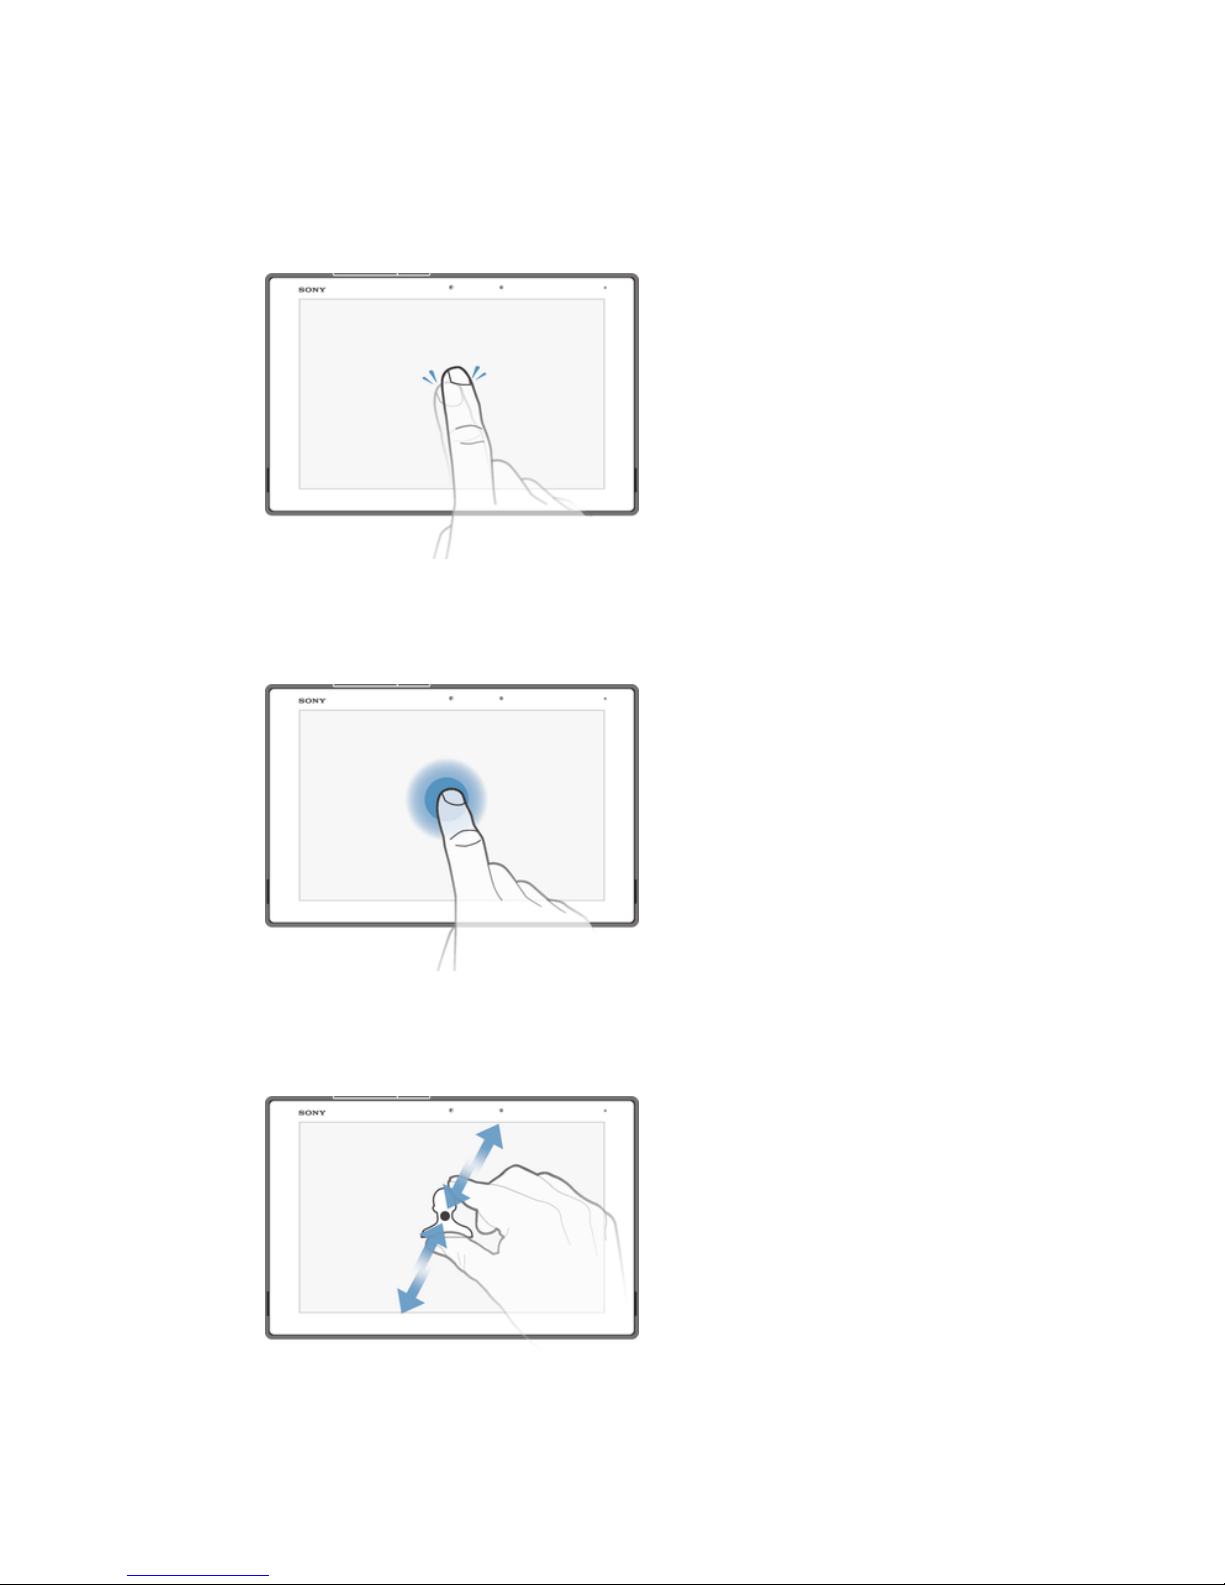
Tapping
•
Open or select an item.
•
Mark or unmark a checkbox or option.
•
Enter text using the on-screen keyboard.
Touching and holding
•
Move an item.
•
Activate an item-specific menu.
•
Activate selection mode, for example, to select several items from a list.
Pinching and spreading
•
Zoom in or out on web pages, photos and maps, and when you’re taking photos or
shooting videos.
12
This is an Internet version of this publication. © Print only for private use.
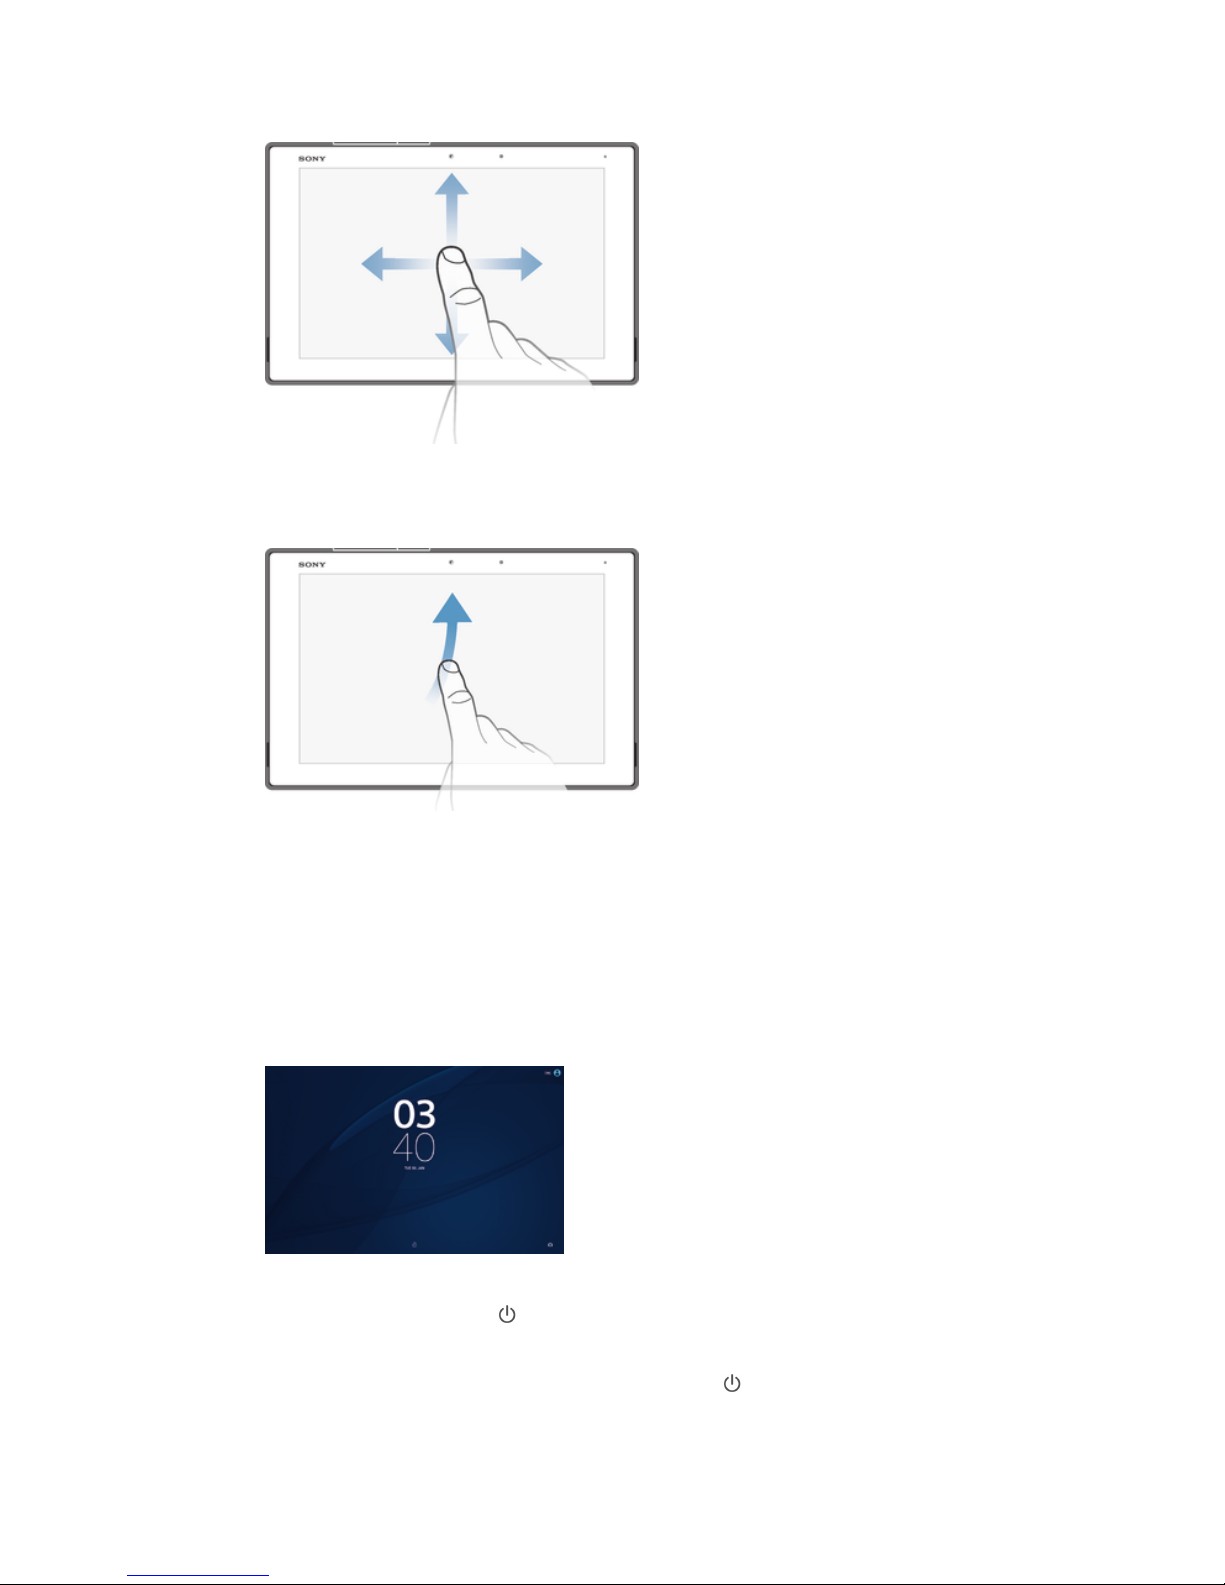
Swiping
•
Scroll up or down a list.
•
Scroll left or right, for example, between Home screen panes.
Flicking
•
Scroll quickly, for example, in a list or on a web page. You can stop the scrolling
movement by tapping the screen.
Locking and unlocking the screen
When your device is on and left idle for a set period of time, the screen darkens to
save battery power and locks automatically. This lock prevents unwanted actions on
the touchscreen when you are not using it. When you buy your device, a basic screen
swipe lock is already set. This means that you have to swipe upwards on the screen
to unlock it. You can change the security settings later and add other kinds of locks.
See
Screen lock
on page 35.
To activate the screen
•
Briefly press the power key .
To lock the screen
•
When the screen is active, briefly press the power key .
13
This is an Internet version of this publication. © Print only for private use.
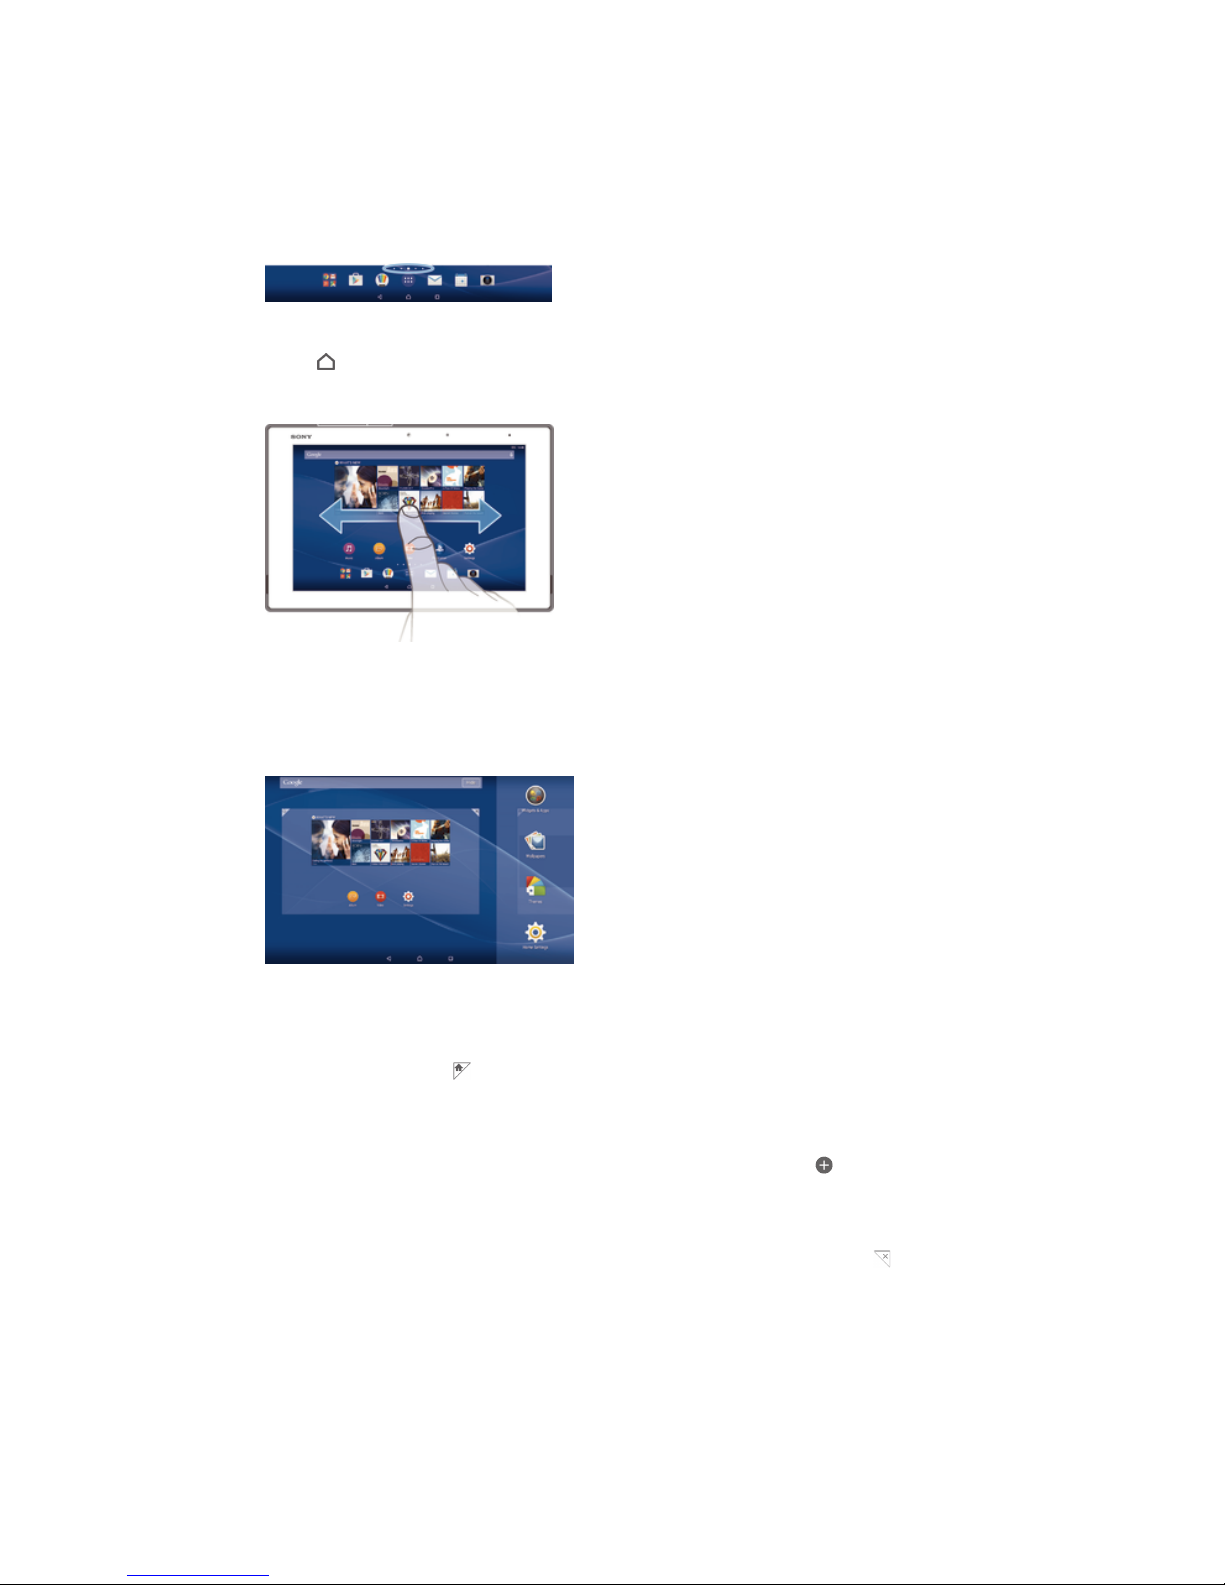
Home screen
The Home screen is the starting point for using your device. It's similar to the desktop
on a computer screen. Your Home screen can have up to seven panes, which extend
beyond the regular screen display width. The number of Home screen panes is
represented by a series of dots at the lower part of the Home screen. The highlighted
dot shows the pane that you are currently in.
To go to the Home screen
•
Press
.
To browse the Home screen
Home screen panes
You can add new panes to your Home screen (up to a maximum of seven panes) and
delete panes. You can also set the pane that you want to use as the main Home
screen pane.
To set a pane as the main Home screen pane
1
Touch and hold an empty area on your Home screen.
2
Flick left or right to browse to the pane that you want to set as your main Home
screen pane, then tap .
To add a pane to your Home screen
1
Touch and hold an empty area on your Home screen.
2
To browse the panes, flick all the way to the right or left, then tap
.
To delete a pane from your Home screen
1
Touch and hold an empty area on your Home screen.
2
Flick left or right to browse to the pane that you want to delete, then tap .
Home screen settings
Use the Home Settings shortcut to adjust some basic settings on your Home screen.
For example, you can set your Home screen to auto rotate and adjust the size of
icons.
14
This is an Internet version of this publication. © Print only for private use.
To set your Home screen to auto rotate
1
Touch and hold an empty area on your Home screen, then tap Home Settings.
2
Drag the slider beside Auto rotation to the right.
To adjust the size of icons on your Home screen
1
Touch and hold an empty area on your Home screen, then tap Home Settings.
2
Tap Icon size, then select an option.
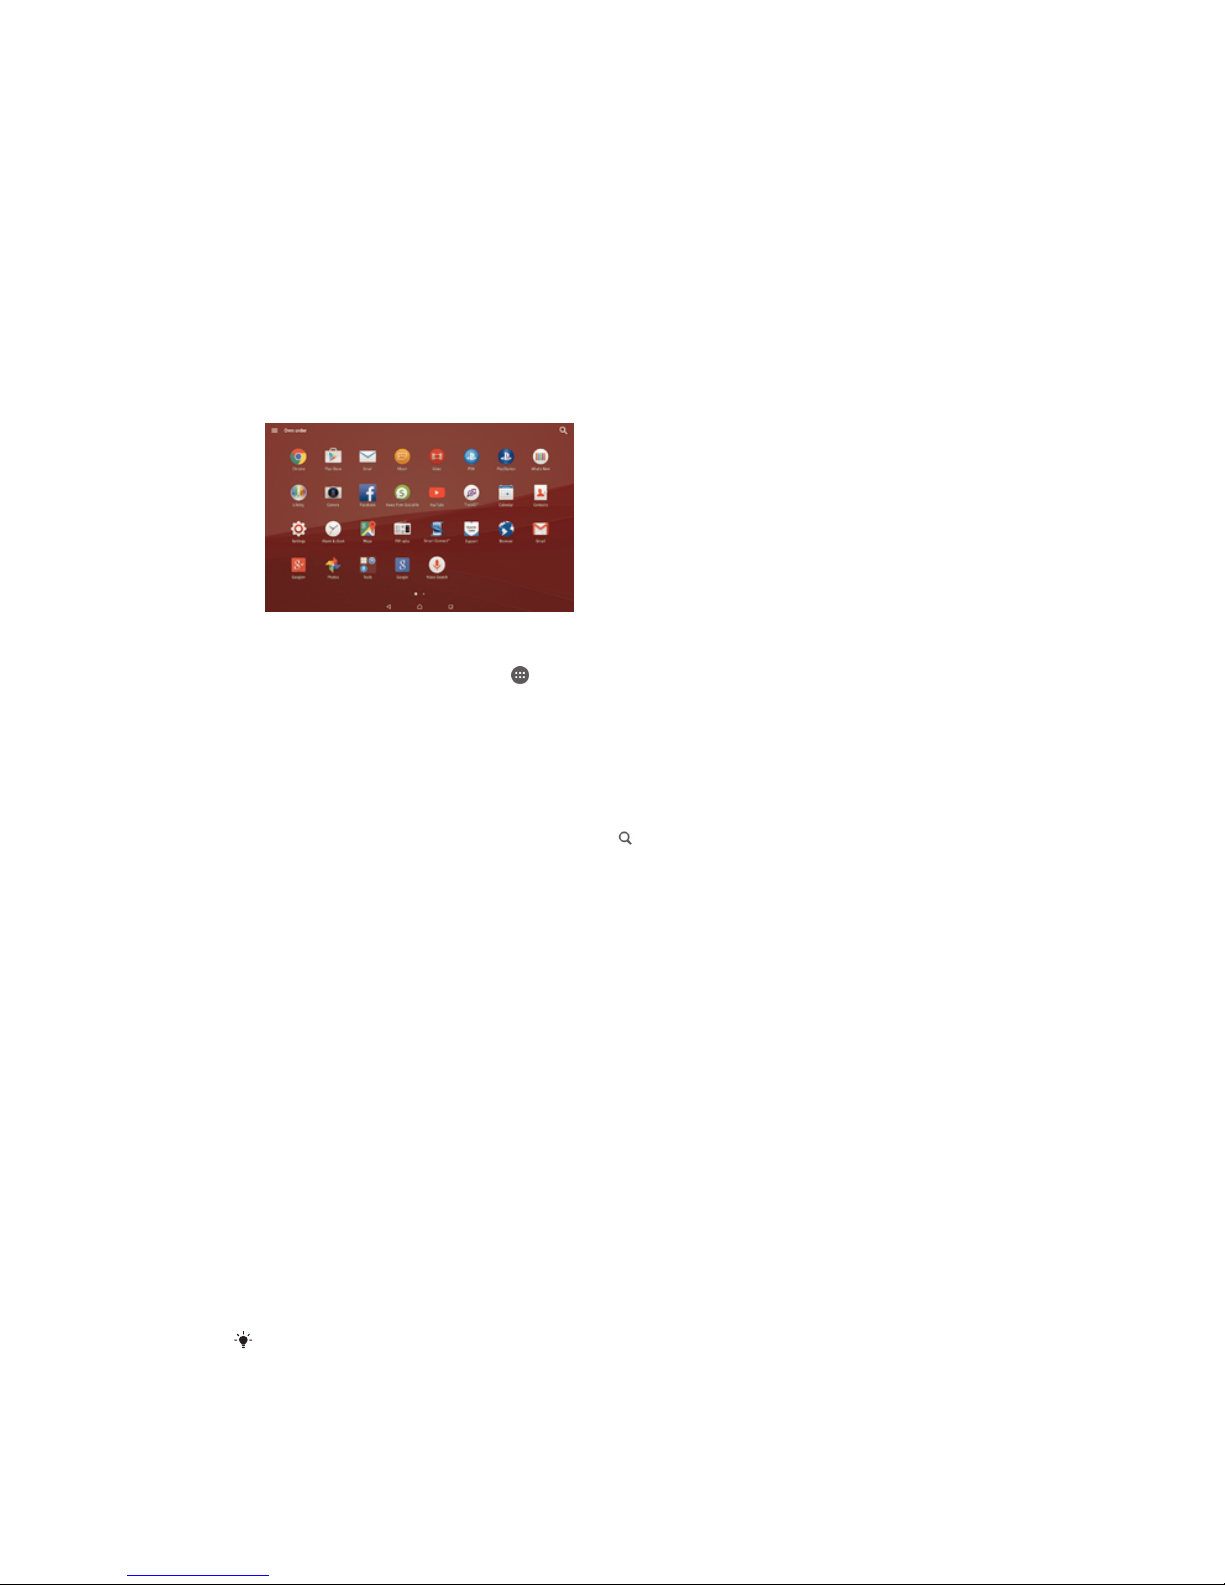
Application screen
The Application screen, which you open from the Home screen, contains the
applications that come pre-installed on your device as well as applications that you
download.
To view all applications on the Application screen
1
From your Home screen, tap .
2
Flick left or right on the Application screen.
To open an application from the Application screen
•
Flick left or right to find the application, and then tap the application.
To search for an application from the Application screen
1
When the Application screen is open, tap
.
2
Enter the name of the application that you want to search for.
To open the Application screen menu
•
When the Application screen is open, drag the left edge of the screen to the
right.
To move an application on the Application screen
1
To open the Application screen menu, drag the left edge of the Application
screen to the right.
2
Make sure that Custom order is selected under SHOW APPS.
3
On the Application screen, touch and hold the application until it becomes
selected, then drag it to the new location.
To add an application shortcut to the Home screen
1
To open the Application screen menu, drag the left edge of the Application
screen to the right.
2
Make sure that Custom order is selected under SHOW APPS.
3
On the Application screen, touch and hold an application icon, then drag the
icon to the top of the screen. The Home screen opens.
4
Drag the icon to the desired location on the Home screen, then release your
finger.
If
Alphabetical or Most used is selected under SHOW APPS instead of Custom order, you can
still add an application shortcut to the Home screen. Just touch and hold the relevant
application icon until the Home screen opens, then drag the icon to the desired location and
release your finger.
15
This is an Internet version of this publication. © Print only for private use.
To arrange applications on the Application screen
1
To open the Application screen menu, drag the left edge of the Application
screen to the right.
2
Select the desired option under SHOW APPS.
To uninstall an application from the Application screen
1
To open the Application screen menu, drag the left edge of the Application
screen to the right.
2
Tap UNINSTALL. All uninstallable applications are indicated by .
3
Tap the application that you want to uninstall, then tap OK.
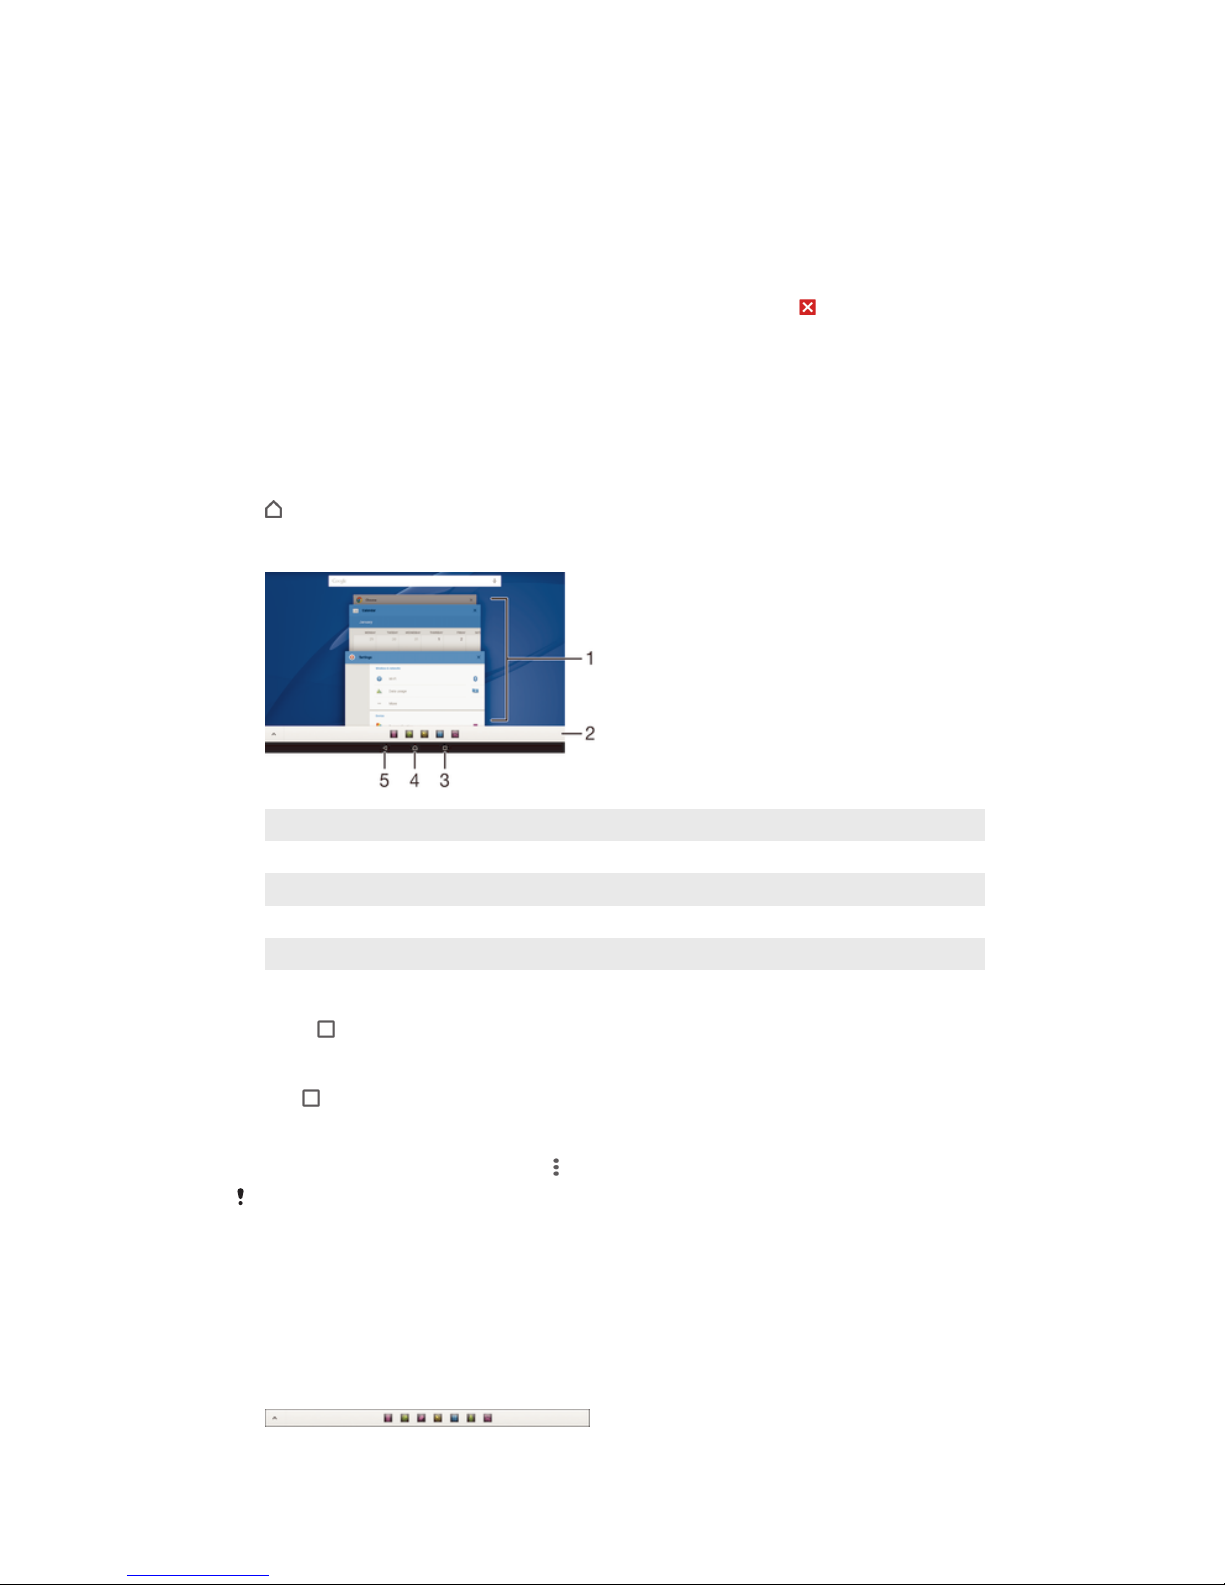
Navigating applications
You can navigate between applications using the navigation keys, the favourites bar,
and the recently used applications window, which lets you switch easily between all
recently used applications. The navigation keys are the Home key, the Recent apps
key and the Back key. Some applications get closed when you press the Home key
to exit while others are paused or continue to run in the background. If an
application is paused or running in the background, you can continue where you left
off the next time you open the application.
1 Recently used applications window – Open a recently used application
2 Favourites bar – Use a shortcut to access applications or widgets
3 Recent apps key – Open the recently used applications window and the favourites bar
4 Home key – Exit an application and go back to the Home screen
5 Back key – Go back to the previous screen within an application or close the application
To open the recently used applications window
•
Press .
To close all the recently used applications
•
Tap and then tap Close all.
To open a menu in an application
•
While using the application, press
.
A menu is not available in all applications.
Small apps
Small apps are miniature apps that run on top of other applications on the same
screen, to enable multi-tasking. For example, you can have a webpage open showing
details of currency exchange rates and then open the Calculator small app on top of
it and perform calculations. You can access your small apps via the favourites bar. To
download more small apps, go to Google Play™.
16
This is an Internet version of this publication. © Print only for private use.

To open a small app
1
To make the favourites bar appear, press .
2
Tap the small app that you want to open.
You can open several small apps at the same time.
To close a small app
•
Tap on the small app window.
To download a small app
1
From the favourites bar, tap , then tap and tap .
2
Search for the small app that you want to download, then follow the
instructions to download it and complete the installation.
To move a small app
•
When the small app is open, touch and hold the top left corner of the small
app, then move it to the desired location.
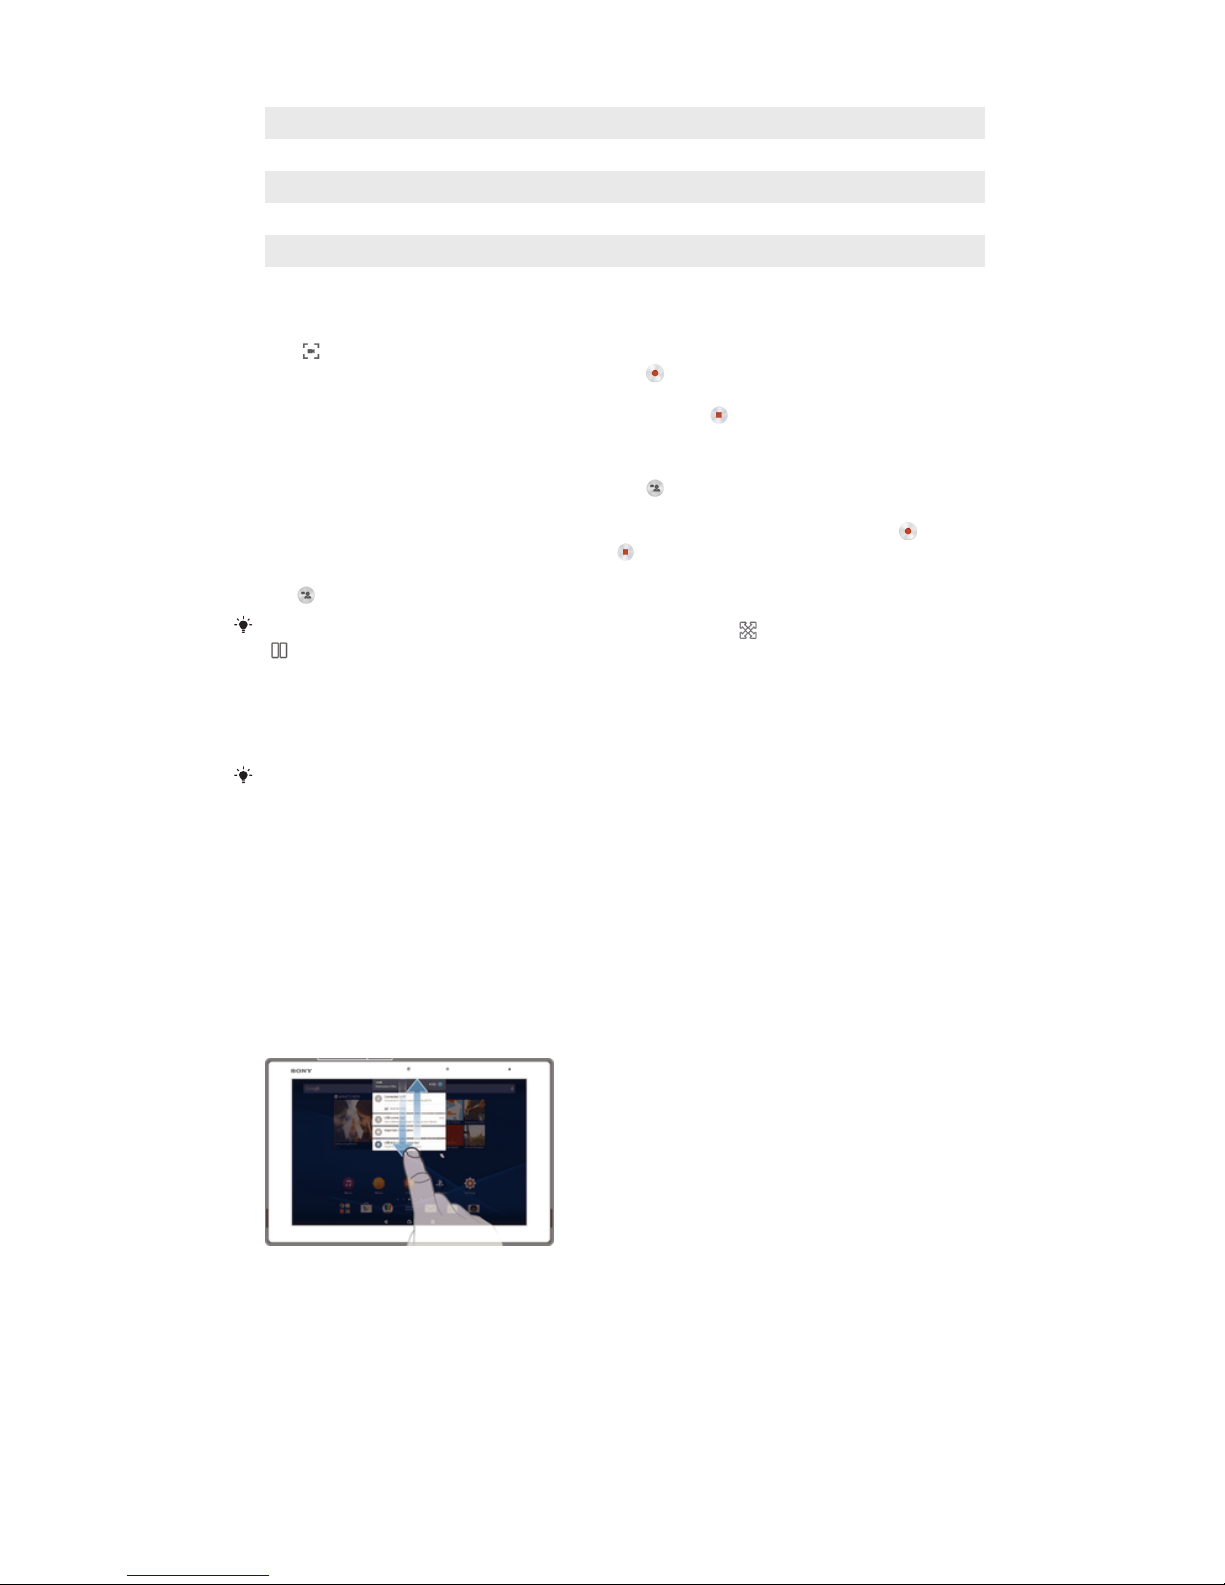
To minimise a small app
•
When the small app is open, touch and hold the top left corner of the small
app, then drag it to the right edge or to the bottom edge of the screen.
To minimise a small app, you can also drag down the status bar to open the Notification panel
and then tap .
To rearrange the small apps in the favourites bar
•
Touch and hold a small app and drag it to the desired position.
To remove a small app from the favourites bar
1
Touch and hold a small app, then drag it to .
2
Tap OK.
To restore a previously removed small app
1
Open the favourites bar, then tap .
2
Touch and hold the small app that you want to restore, then drag it into the
favourites bar.
To add a widget as a small app
1
To make the favourites bar appear, press
.
2
Tap > > .
3
Select a widget.
4
Enter a name for the widget, if desired, then tap OK.
Widgets
Widgets are small applications that you can use directly on your Home screen. They
also function as shortcuts. For example, the Weather widget allows you to see basic
weather information directly on your Home screen. But when you tap the widget, the
full Weather application opens. You can download additional widgets from Google
Play™.
17
This is an Internet version of this publication. © Print only for private use.
To add a widget to the Home screen
1
Touch and hold an empty area on your Home screen, then tap Widgets.
2
Find and tap the widget that you want to add.
To resize a widget
1
Touch and hold a widget until it magnifies, then release the widget. If the
widget can be resized, for example, the Calendar widget, then a highlighted
frame and resizing dots appear.
2
Drag the dots inward or outward to shrink or expand the widget.
3
To confirm the new size of the widget, tap anywhere on the Home screen.
To move a widget
•
Touch and hold the widget until it magnifies, then drag it to the new location.
To delete a widget
•
Touch and hold the widget until it magnifies, then drag it to
.
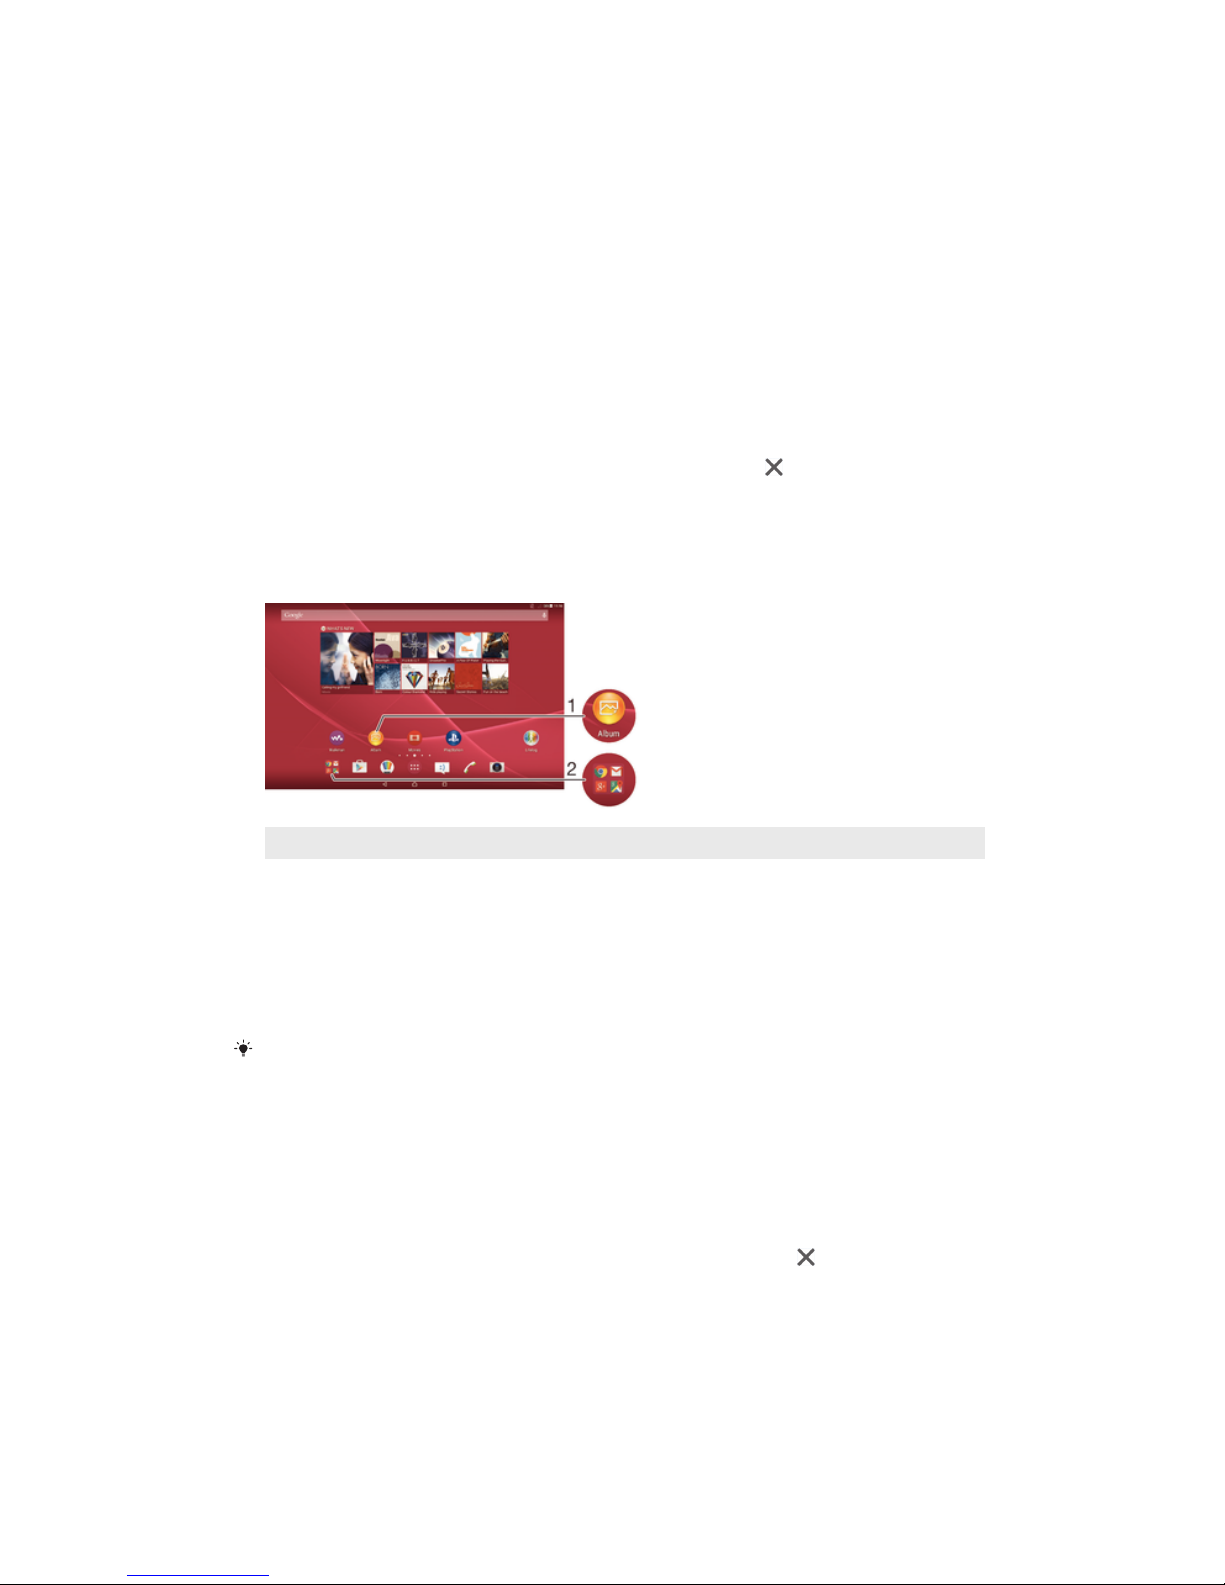
Shortcuts and folders
Use shortcuts and folders to manage your applications and keep your Home screen
tidy.
1 Access an application using a shortcut
2 Access a folder containing applications
To add an application shortcut to your Home screen
1
Touch and hold an empty area on your Home screen.
2
In the customisation menu, tap Widgets.
3
Scroll through the list of applications and select an application. The selected
application gets added to the Home screen.
In step 3, alternatively, you can tap
Shortcuts and then select an application from the list
available. If you use this method to add shortcuts, some of the applications available allow
you to add specific functionality to the shortcut.
To move an item on the Home screen
•
Touch and hold the item until it magnifies, then drag the item to the new
location.
To delete an item from the Home screen
•
Touch and hold an item until it magnifies, then drag the item to .
To create a folder on the Home screen
•
Touch and hold an application icon or a shortcut until it magnifies, then drag
and drop it on top of another application icon or shortcut.
To add items to a folder on the Home screen
•
Touch and hold an item until it magnifies, then drag the item to the folder.
18
This is an Internet version of this publication. © Print only for private use.

To rename a folder on the Home screen
1
Tap the folder to open it.
2
Tap the folder's title bar to show the Folder name field.
3
Enter the new folder name and tap Done.
Background and themes
You can adapt the Home screen to your own style using wallpapers and different
themes.
To change your Home screen wallpaper
1
Touch and hold an empty area on your Home screen.
2
Tap Wallpapers and select an option.
To set a theme
1
Touch and hold an empty area on your Home screen.
2
Tap Themes.
3
Select an option and follow the instructions in your device.
When you change a theme, the background also changes in some applications.
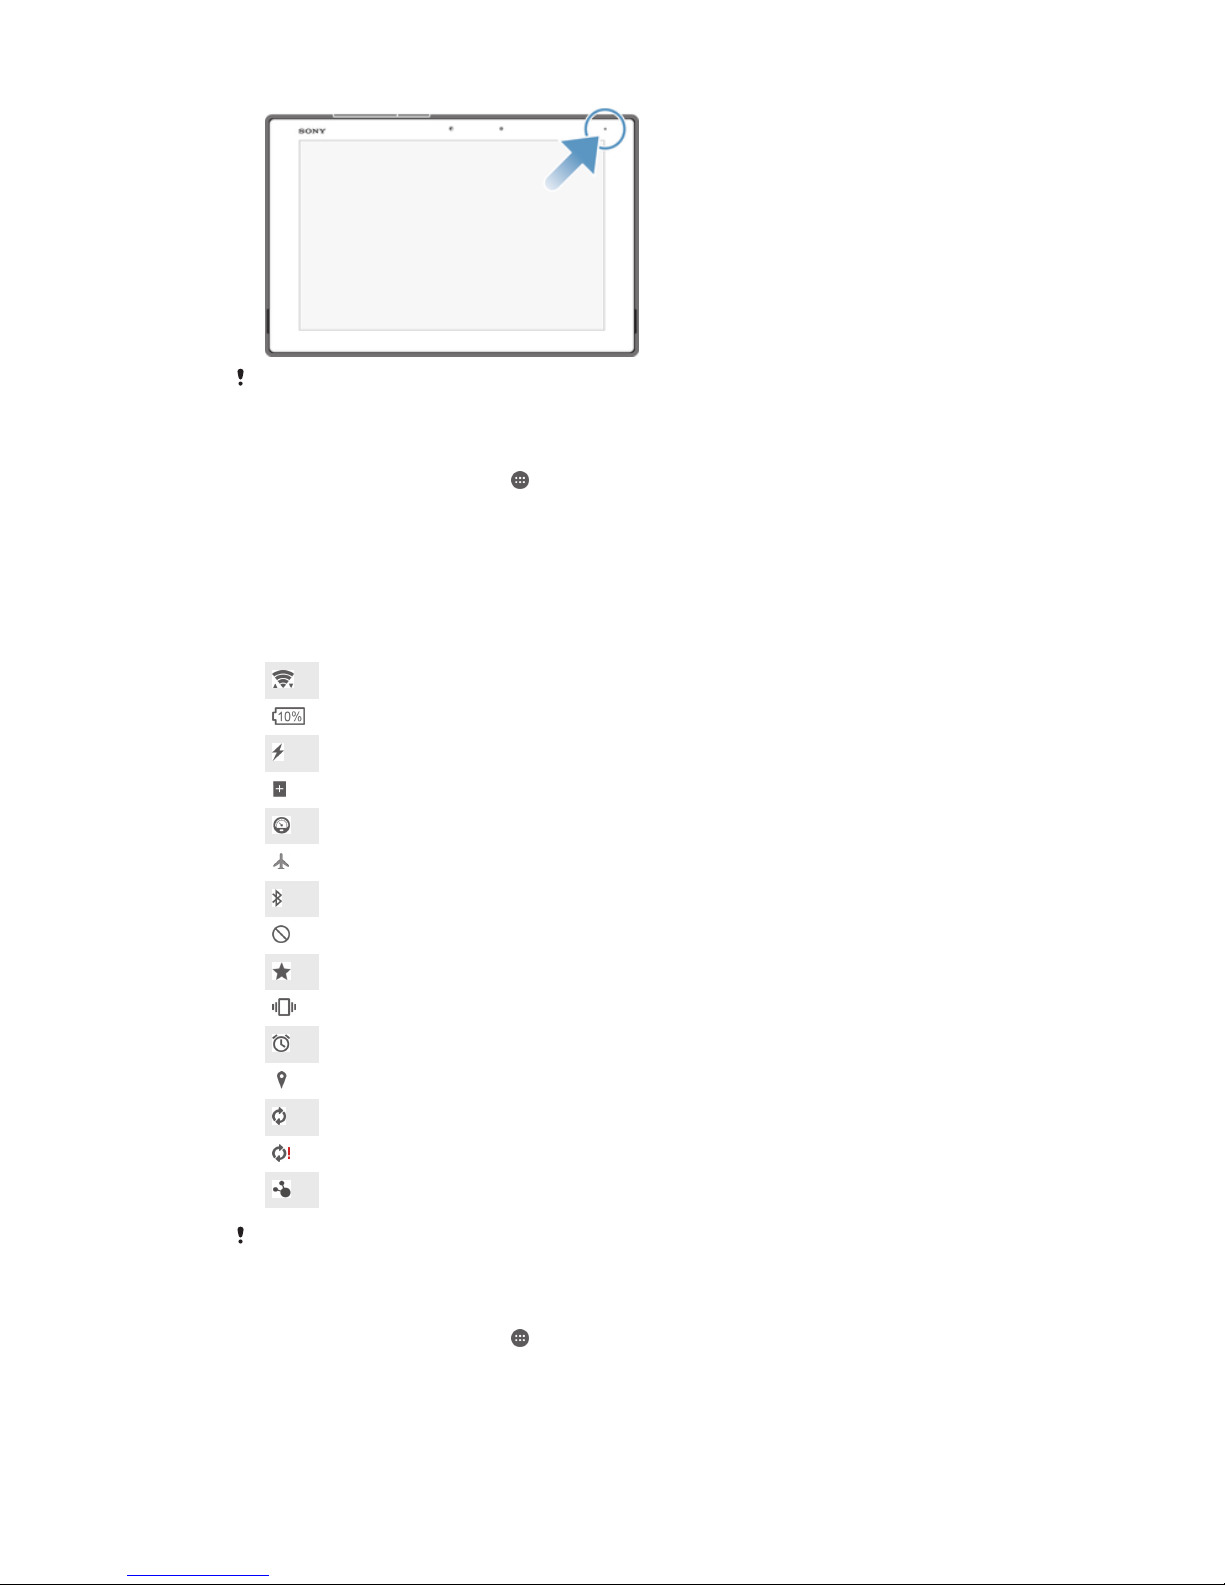
Taking a screenshot
You can capture still images of any screen on your device as a screenshot.
Screenshots you take are automatically saved in Album.
To take a screenshot
1
Press and hold down the power key until a prompt window appears.
2
Tap
You can also take a screenshot by pressing and holding the power key and volume down key
at the same time. Once the screenshot is captured, you can release the keys.
To view your screenshot
•
Drag the status bar fully downwards, then tap the screenshot you want to view.
You can also view your screenshots by opening the Album application.
Recording your screen
You can use the screen recording feature to capture videos of what’s happening on
your device’s screen. This feature is useful, for example, when you want to create
tutorials or record videos of you playing a game on your device. Recorded video clips
are automatically saved in Album.
19
This is an Internet version of this publication. © Print only for private use.
1 Minimise/Resume the record screen window
2 Record your screen
3 Record your screen when the front camera is activated
4 Access the screen recording settings
5 Close the screen recording window
To record your screen
1
Press and hold down the power key until a prompt window appears.
2
Tap
.
3
When the record screen window is open, tap . The timer for recording
appears.
4
To stop the screen recording, tap the timer, then tap
.
To record your screen when the front camera is activated
1
When the record screen window is open, tap to make the front camera
screen recording window appear.
2
To start recording your screen and video captured by the front camera, tap
.
3
To stop recording, tap the timer, then tap
.
4
To deactivate the front camera screen recording window, tap the timer, then
tap .
When the front camera screen recording window opens, drag to resize the window and tap
to record a still picture.
To view the recent screen recordings
•
After your screen recordings finish, drag the status bar downwards, then tap to
view the most recent recordings of your screen.
You can also view your screen recordings in the Album application.
Notifications
Notifications inform you of events such as new messages and calendar notifications
as well as activities in progress such as file downloads. Notifications appear in the
following places:
•
The status bar
•
The Notification panel
•
The lock screen
To open or close the Notification panel
1
To open the Notification panel, drag the status bar downwards.
2
To close the Notification panel, drag the panel upwards.
To take action on a notification in the Notification panel
•
Tap the notification.
To dismiss a notification from the Notification panel
•
Place your finger on a notification and flick left or right.
20
This is an Internet version of this publication. © Print only for private use.
To clear all notifications from the Notification panel
•
Tap .
To take action on a notification from the lock screen
•
Double-tap the notification.
To dismiss a notification from the lock screen
•
Place your finger on the notification and flick left or right.
To expand a notification on the Notification panel
•
Drag the notification downwards.
Not all notifications are expandable.
To expand a notification on the lock screen
•
Drag the notification downwards.
Not all notifications are expandable.
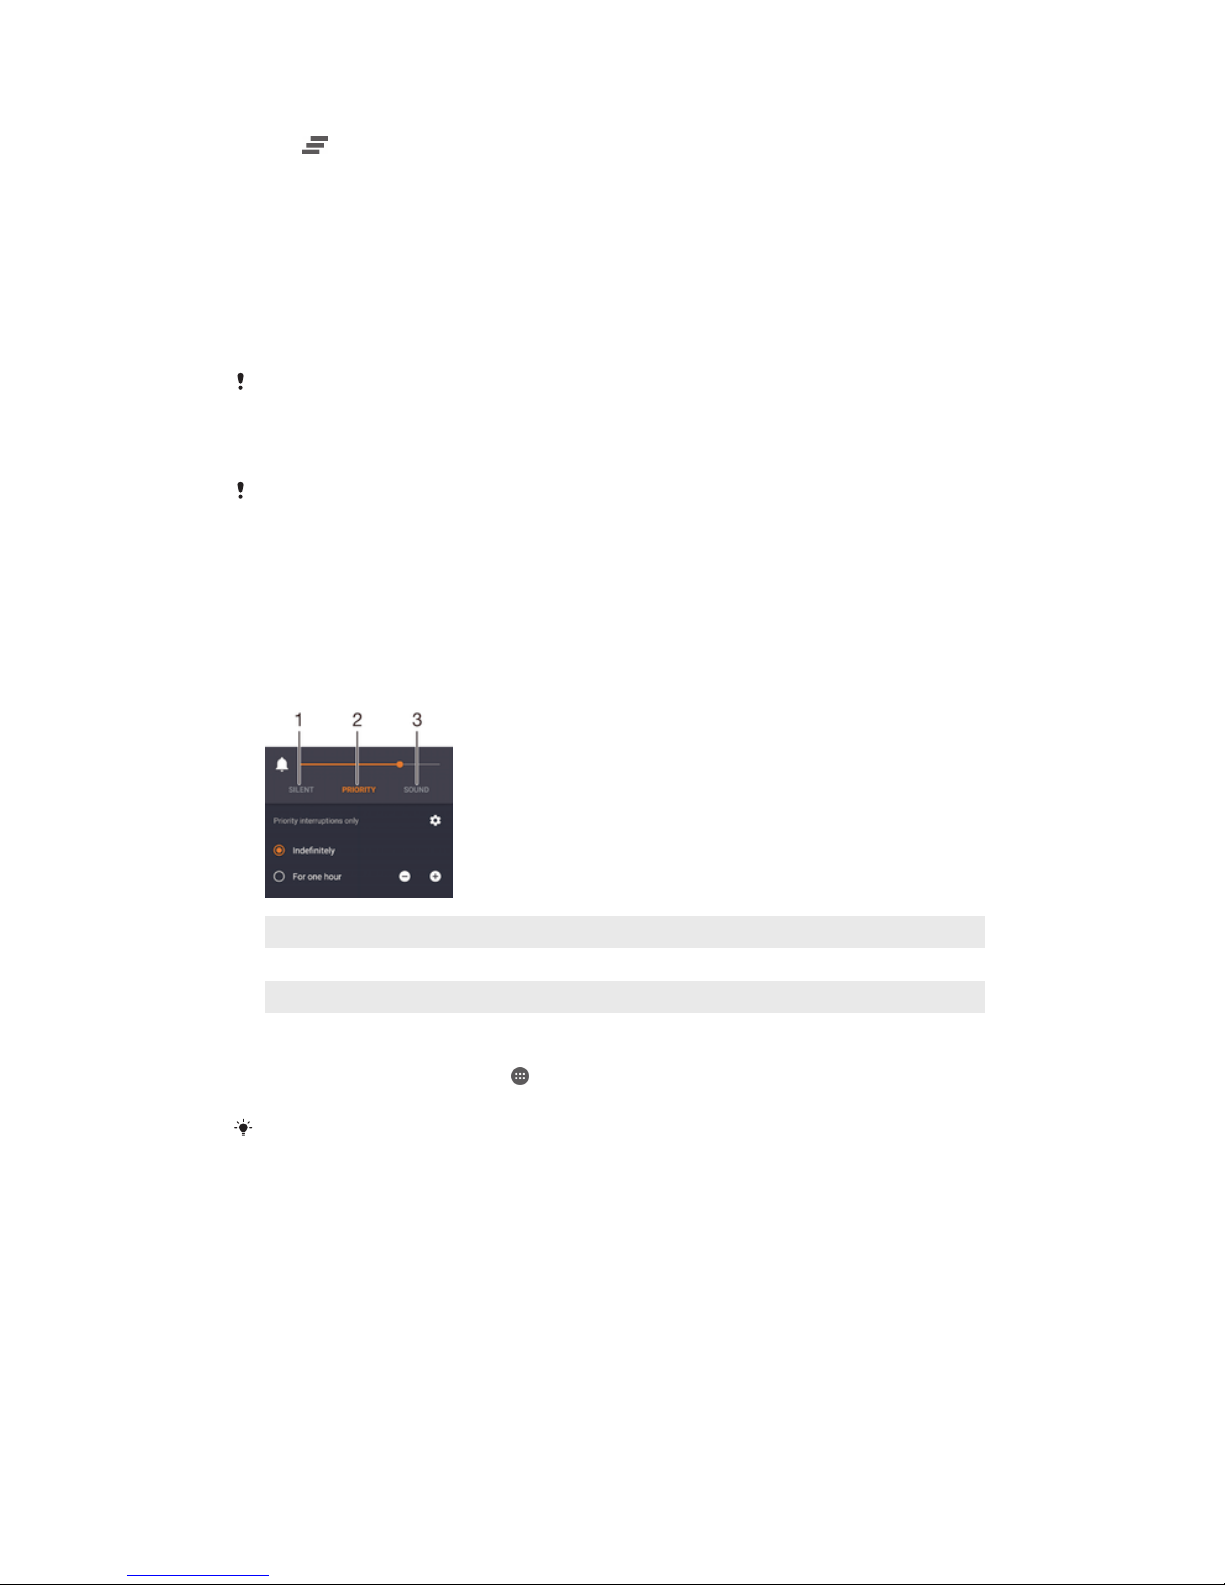
Quick settings for interruptions
There are three modes available for interruptions on your device: Silent, Priority and
Sound. Within each mode, you can determine how and when notifications can
interrupt you, if at all. For example, you can set your device to only show you priority
notifications during the hours you’re at work or block all notifications while you’re
taking a nap. You can get quick access to the basic interruption and sound settings
by pressing the volume key up or down.
1 Silent – All interruptions get blocked, excluding alarms. There is still sound when alarms go off
2 Priority – Only allow priority interruptions
3 Sound – Allow all interruptions
To set priority interruptions
1
From your Home screen, tap .
2
Find and tap Settings > Sound & notification > Interruptions.
For more information about settings for notifications and interruptions, see
Managing
notifications
on page 32.
Notification light
The notification light informs you about battery status and some other events. The
notification light is enabled by default but can be disabled manually.
21
This is an Internet version of this publication. © Print only for private use.
When the notification light is disabled, it only lights up when there is a battery status warning,
for example, when the battery level goes below 15 percent.
To enable the notification light
1
From your Home screen, tap .
2
Find and tap Settings > Sound & notification .
3
Drag the slider beside Notification light to the right.
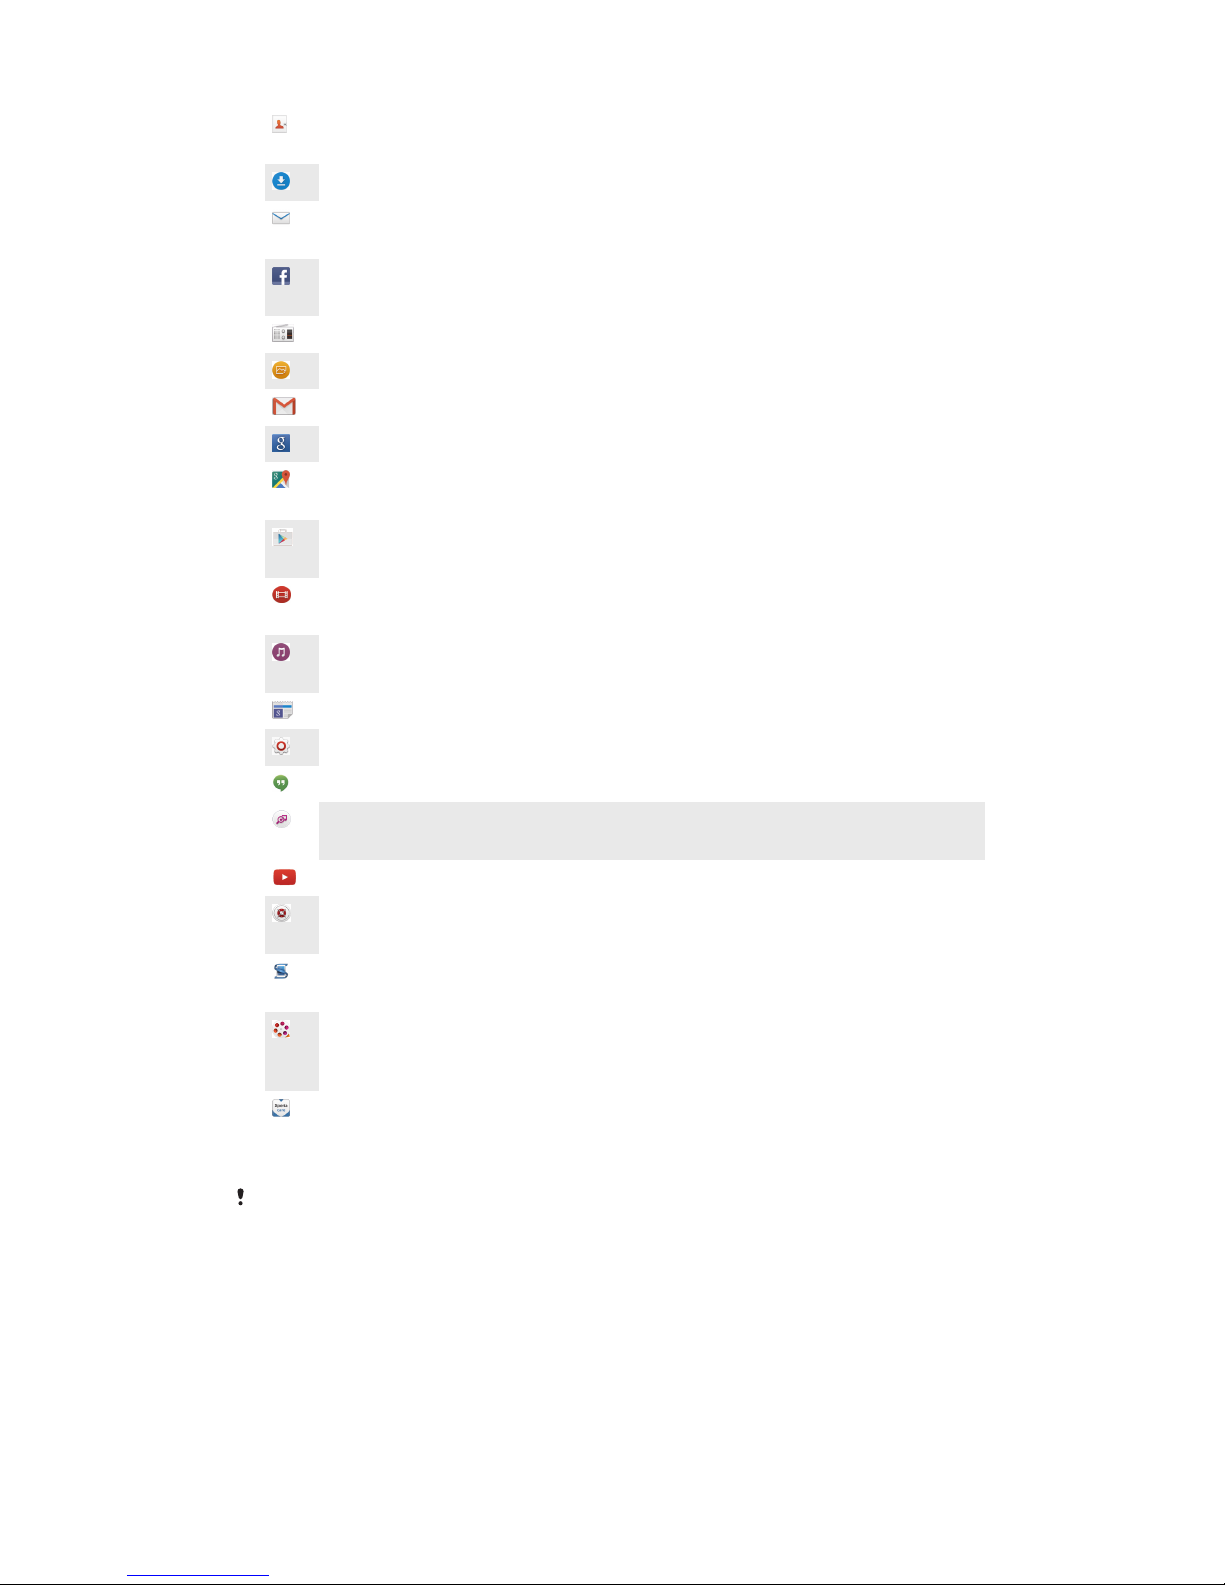
Icons in the status bar
Status icons
A Wi-Fi® connection is enabled and data is being transmitted
Battery status
The battery is charging
STAMINA mode is activated
Low battery mode is activated
Airplane mode is activated
The Bluetooth® function is activated
Silent mode
Only allow priority interruptions
Vibrate mode
An alarm is set
GPS is activated
Synchronisation is ongoing
Problem with sign-in or synchronisation
Your device is ready to connect to supported ANT+™ devices
Depending on your service provider, network and/or region, the functions or services
represented by some icons in this list may not be available.
To manage status bar icons
1
From your Home screen, tap .
2
Find and tap Settings > Personalization> Status bar icons.
3
Mark the checkboxes for the system icons that you want to appear in the
status bar.
22
This is an Internet version of this publication. © Print only for private use.

Notification icons
New email message
Downloading data
Uploading data
Perform a basic setup guide of your device
A software update is available
System updates are available
Downloading system updates
Tap to install the downloaded system updates
Screenshot captured
New Hangouts™ chat message has arrived
Video chat with friends using the Hangouts™ application
Upcoming calendar event
A small app is running
Smart Connect is activated
A song is playing
The radio is playing
The device is connected to a computer via a USB cable
Internal storage is 75% full. Tap to transfer data to the memory card
Warning
Error message
More (undisplayed) notifications
Not all icons that may appear in your device are listed here. These icons are for reference
purposes only, and changes may be made without notice.
To block an application from sending notifications
1
From your Home screen, tap .
2
Find and tap Settings > Sound & notification> App notifications.
3
Select an application.
4
Drag the slider beside Block to the right.
Application overview
Use the Alarm & clock application to set various kinds of alarms.
Use your web browser to navigate and view web pages, manage bookmarks,
text and images.
Use the Calculator application to perform basic calculations.
Use the Calendar application to keep track of events and manage your
appointments.
Use the camera to take photos and record video clips.
23
This is an Internet version of this publication. © Print only for private use.
Use the Contacts application to manage phone numbers, email addresses
and other information related to your contacts.
Access your downloaded applications, documents and pictures.
Use the Email application to send and receive emails through both private
and corporate accounts.
Use the Facebook™ application to engage in social networking with friends,
family members and colleagues around the world.
Browse and listen to FM radio stations.
Use the Album application to view and to work with your photos and videos.
Use the Gmail™ application to read, write and organise email messages.
Search for information in your device and on the web.
View your current location, find other locations and calculate routes using
Google Maps™.
Use the Play Store™ application to download free and paid applications for
your device.
Use the Video application to play videos on your device and share content
with your friends.
Use the Music application to organise and play music, audio books and
podcasts.
View news stories and weather forecasts.
Optimise settings to suit your own requirements.
Use the Hangouts™ application to chat with friends online.
Identify music tracks that you hear playing in your surroundings, and get
artist, album and other info.
Use YouTube™ to share and view videos from around the world.
Use the Backup and restore application to back up or restore content on your
device, such as contacts, bookmarks, calendar data, etc.
Use the Smart Connect™ application to set what happens in your device
when you connect or disconnect an accessory.
The Xperia™ Movie Creator automatically creates short videos of around 30
seconds in length using existing photos and videos. The application
automatically determines the timeline to create its movie.
Use the Support application to access user support in your device. For
example, you can access a User guide, troubleshooting information, plus tips
and tricks.
Some applications are not supported or listed by all service providers in all areas.
24
This is an Internet version of this publication. © Print only for private use.

Downloading applications
Downloading applications from Google Play™
Google Play™ is the official online Google store for downloading applications,
games, music, movies and books. It includes both free and paid applications. Before
you start downloading from Google Play™, make sure that you have a working
Internet connection.
To use Google Play™, you need to have a Google™ account. Google Play™ may not be
available in all countries or regions.
To download an application from Google Play™
1
From the Home screen, tap .
2
Find and tap Play Store.
3
Find an item you wish to download by browsing categories, or by using the
search function.
4
Tap the item to view its details, and follow the instructions to complete the
installation.
Some applications may need to access data, settings and various functions on your device in
order to work properly. Only install and give permissions to applications that you trust.
You can view the permissions granted to a downloaded application by tapping the application
under Settings > Apps.
Downloading applications from other sources
When your device is set to allow downloads from sources other than Google Play™,
you can download applications directly from other websites by following the relevant
download instructions.
Installing applications of unknown or unreliable origin can damage your device. Only download
applications from reliable sources. Contact the application provider if you have any questions
or concerns.
If you are using a device with multiple users, only the owner, that is, the primary user, can
allow downloads from sources other than Google Play™. Changes made by the owner affect
all other users.
To allow the download of applications from other sources
1
From your Home screen, tap .
2
Find and tap Settings > Security.
3
Drag the slider beside Unknown sources to the right.
4
Tap OK.
Some applications may need to access data, settings and various functions on your device in
order to work properly. Only install and give permissions to applications that you trust.
You can view the permissions granted to a downloaded application by tapping the application
under Settings > Apps.
25
This is an Internet version of this publication. © Print only for private use.

Internet and networks
Browsing the web
The Google Chrome™ web browser for Android™ devices comes pre-installed in
most markets. Go to http://support.google.com/chrome and click the "Chrome for
Mobile" link to get more detailed information about how to use this web browser.
To browse with Google Chrome™
1
From your Home screen, tap
.
2
Find and tap .
3
If you are using Google Chrome™ for the first time, select to either sign in to a
Google™ account or browse with Google Chrome™ anonymously.
4
Enter a search term or web address in the search and address field, then tap
Go on the keyboard.
Wi-Fi®
Use Wi-Fi® connections to surf the Internet, download applications, or send and
receive emails. Once you have connected to a Wi-Fi® network, your device
remembers the network and automatically connects to it the next time you come
within range.
Some Wi-Fi® networks require you to log in to a web page before you can get
access. Contact the relevant Wi-Fi® network administrator for more information.
Available Wi-Fi® networks may be open or secured:
•
Open networks are indicated by
next to the Wi-Fi® network name.
•
Secured networks are indicated by
next to the Wi-Fi® network name.
Some Wi-Fi® networks do not show up in the list of available networks because they do not
broadcast their network name (SSID). If you know the network name, you can add it manually
to your list of available Wi-Fi® networks.
To turn on Wi-Fi®
1
From your Home screen, tap .
2
Find and tap Settings > Wi-Fi.
3
Tap the on-off switch to turn on the Wi-Fi® function.
It may take a few seconds before Wi-Fi® is enabled.
To connect to a Wi-Fi® network automatically
1
From your Home screen, tap .
2
Find and tap Settings > Wi-Fi.
3
Tap the on-off switch to turn on the Wi-Fi function. All available Wi-Fi®
networks are displayed.
4
Tap a Wi-Fi® network to connect to it. For secured networks, enter the
relevant password.
is displayed in the status bar once you are connected.
To search for new available networks, tap
, then tap Refresh. If you cannot connect to a Wi-Fi
network successfully, refer to the relevant troubleshooting tips for your device at
www.sonymobile.com/support/
.
26
This is an Internet version of this publication. © Print only for private use.
To add a Wi-Fi® network manually
1
From your Home screen, tap .
2
Find and tap Settings > Wi-Fi.
3
Tap > Add network.
4
Enter the Network name (SSID) information.
5
To select a security type, tap the Security field.
6
If required, enter a password.
7
To edit some advanced options such as proxy and IP settings, mark the
Advanced options checkbox and then edit as desired.
8
Tap Save.
Contact your Wi-Fi® network administrator to get the network SSID and password.
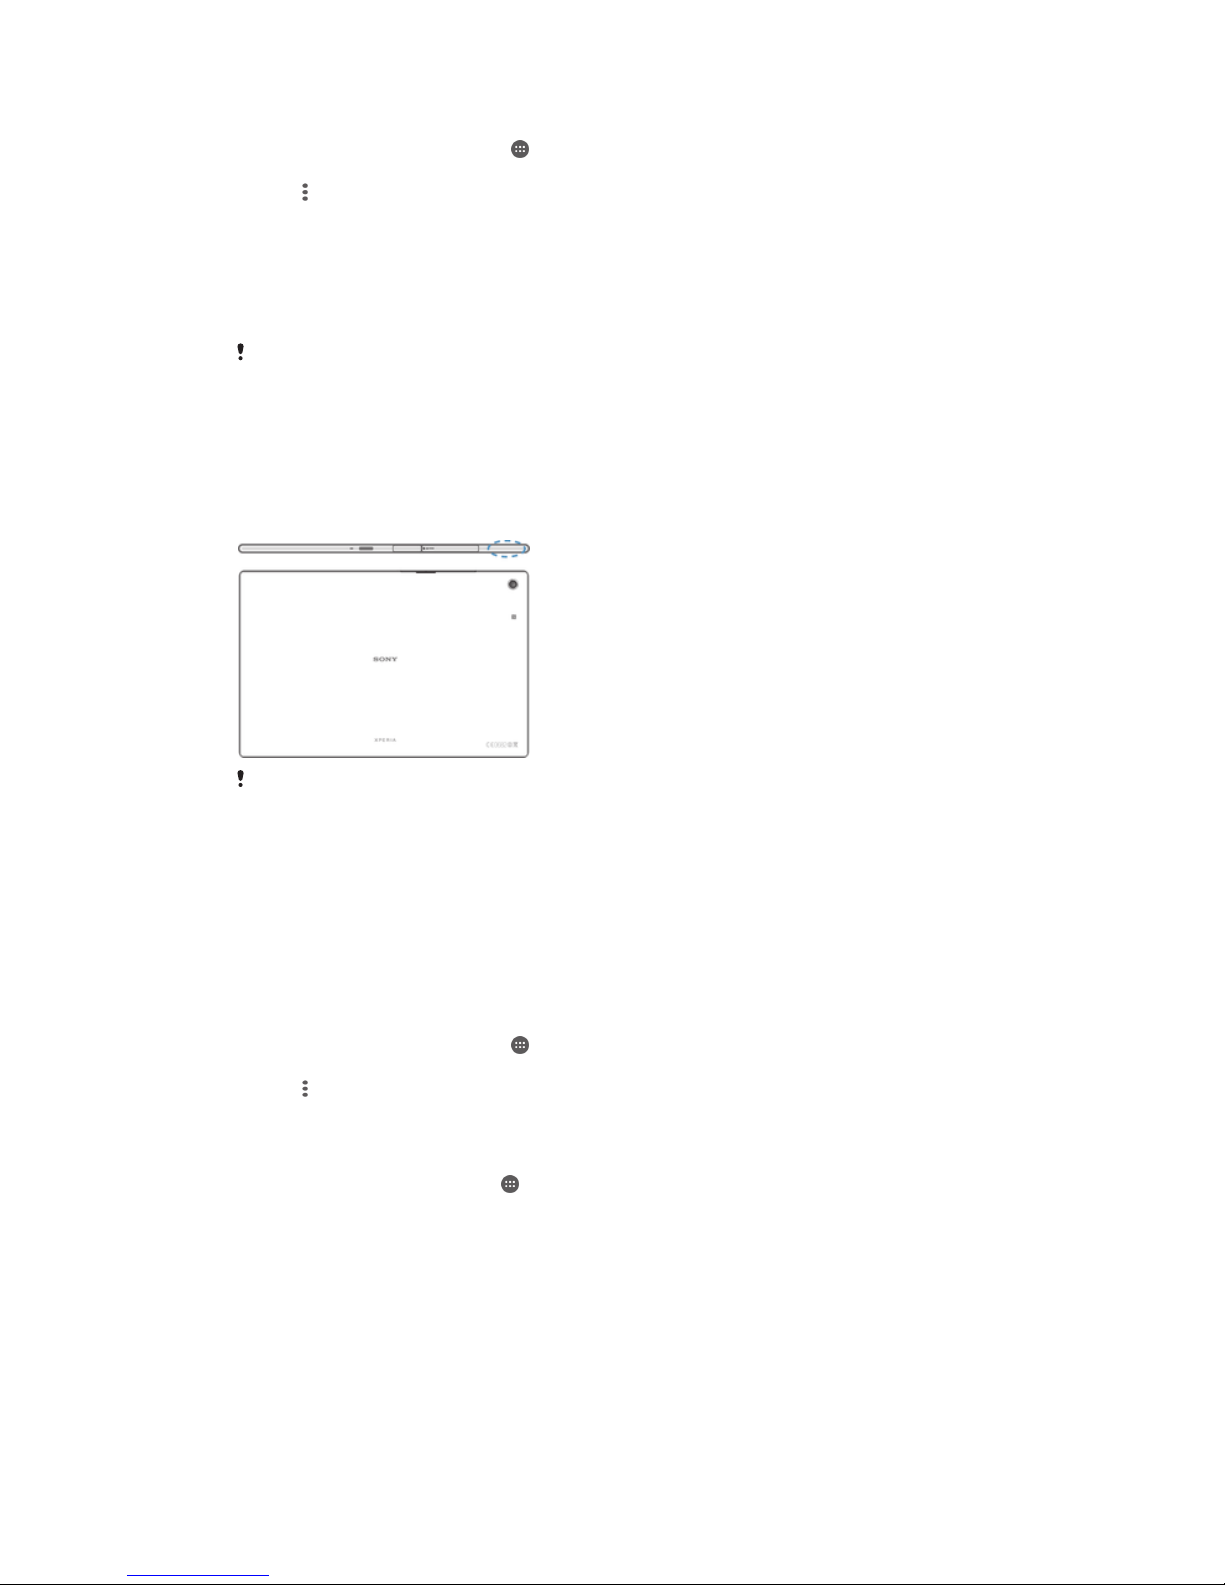
Increasing Wi-Fi® signal strength
There are a number of things you can do to increase the strength of a Wi-Fi® signal:
•
Move your device closer to the Wi-Fi® access point.
•
Move the Wi-Fi® access point away from any potential obstructions or interference.
•
Don’t cover the Wi-Fi® antenna area of your device (the highlighted area in the
illustration).
FCC Caution: Operation in the 5.15 GHz to 5.25 GHz frequency band is only permitted for
indoor use. For indoor and outdoor operation, connect your device to an FCC approved 5 GHz
WLAN access point.
Wi-Fi® settings
When you are connected to a Wi-Fi® network or when there are Wi-Fi® networks
available in your vicinity, it is possible to view the status of these networks. You can
also enable your device to notify you whenever an open Wi-Fi® network is detected.
To enable Wi-Fi® network notifications
1
Turn on Wi-Fi®, if it is not already on.
2
From your Home screen, tap .
3
Find and tap Settings > Wi-Fi.
4
Tap
> Advanced.
5
Drag the slider beside Network notification to the right.
To view detailed information about a connected Wi-Fi® network
1
From the Home screen, tap
.
2
Find and tap Settings > Wi-Fi.
3
Tap the Wi-Fi® network that you are currently connected to. Detailed network
information is displayed.
Virtual private networks (VPNs)
Use your device to connect to virtual private networks (VPNs), which allow you to
access resources inside a secured local network from a public network. For example,
VPN connections are commonly used by corporations and educational institutions for
users who need to access intranets and other internal services when they are outside
of the internal network, for example, when they are travelling.
27
This is an Internet version of this publication. © Print only for private use.

VPN connections can be set up in many ways, depending on the network. Some
networks may require you to transfer and install a security certificate on your device.
For detailed information on how to set up a connection to your virtual private
network, please contact the network administrator of your company or organisation.
To add a virtual private network
1
From your Home screen, tap .
2
Find and tap Settings > More > VPN.
3
Tap .
4
Select the type of VPN to add.
5
Enter your VPN settings.
6
Tap Save.
To connect to a virtual private network
1
From your Home screen, tap
.
2
Find and tap Settings > More > VPN.
3
In the list of available networks, tap the VPN that you want to connect to.
4
Enter the required information.
5
Tap Connect.
To disconnect from a virtual private network
1
Drag the status bar downwards.
2
Tap the notification for the VPN connection to turn it off.
28
This is an Internet version of this publication. © Print only for private use.

Synchronising data on your device
Synchronising with online accounts
Synchronise your device with contacts, email, calendar events and other information
from online accounts, for example, email accounts such as Gmail™ and Exchange
ActiveSync, Facebook™, Flickr™ and Twitter™. You can synchronise data
automatically for all accounts by activating the auto-sync function. Or you can
synchronise each account manually.
To set up an online account for synchronisation
1
From your Home screen, tap
.
2
Tap Settings > Accounts > Add account, then select the account that you want
to add.
3
Follow the instructions to create an account, or sign in if you already have an
account.
To synchronise manually with an online account
1
From your Home screen, tap
> Settings > Accounts.
2
Under Accounts, select the account type, then tap the name of the account
that you want to synchronise with. A list of items appears showing what can be
synchronised with the account.
3
Tap the items that you want to synchronise.
To remove an online account
1
From your Home screen, tap > Settings > Accounts.
2
Under Accounts, select the account type, then tap the name of the account
that you want to remove.
3
Tap , then tap Remove account.
4
Tap Remove account again to confirm.
Synchronising with Microsoft® Exchange ActiveSync®
Using a Microsoft Exchange ActiveSync account, you can access your corporate
email messages, calendar appointments and contacts directly on your device. After
setup, you can find your information in the Email, Calendar and Contacts
applications.
To set up an EAS account for synchronisation
1
Make sure that you have your domain and server details available (as provided
by your corporate network administrator).
2
From your Home screen, tap
.
3
Tap Settings > Accounts > Add account > Exchange ActiveSync.
4
Enter your corporate email address and password.
5
Tap Next. Your device begins to retrieve your account information. If a failure
occurs, enter the domain and server details for your account manually and
then tap Next.
6
Tap OK to allow your corporate server to control your device.
7
Select what data you want to sync with your device, such as contacts and
calendar entries.
8
If desired, activate the device administrator to allow your corporate server to
control certain security features on your device. For example, you can allow
your corporate server to set password rules and set storage encryption.
9
When the setup is done, enter a name for the corporate account.
When you change the login password for an EAS account on your computer, you have to log
in again to the EAS account on your device.
29
This is an Internet version of this publication. © Print only for private use.

To change the settings of an EAS account
1
From your Home screen, tap .
2
Tap Email, then tap .
3
Tap Settings and select an EAS account, then change the settings of the EAS
account as desired.
To set a synchronisation interval for an EAS account
1
From your Home screen, tap
.
2
Tap Email, then tap .
3
Tap Settings and select an EAS account.
4
Tap Check frequency > Check frequency and select an interval option.
To remove an EAS account
1
From your Home screen, tap
> Settings > Accounts.
2
Under Accounts, tap Exchange ActiveSync, then select the EAS account that
you want to remove.
3
Tap , then tap Remove account.
4
Tap Remove account again to confirm.
Synchronising with Outlook® using a computer
You can use the Calendar and Contacts applications within the PC Companion and
the Sony Bridge for Mac computer programs to synchronise your device with the
calendar and contacts from your Outlook account. However, you cannot synchronise
any data from your device to your computer.
For more information on how to install the PC Companion on a PC or the Sony Bridge for Mac
application on an Apple® Mac® computer, see
Computer tools
on page 98.
To synchronise with your Outlook contacts using a computer
1
Make sure that the PC Companion application is installed on the PC or the
Sony Bridge for Mac application is installed on the Apple® Mac® computer.
2
Computer: Open the PC Companion application or the Sony Bridge for Mac
application.
3
Click Start to start the
Contacts
and
Contacts Sync
applications and follow the
on-screen instructions to synchronise your device with your Outlook contacts.
To synchronise with your Outlook calendar using a computer
1
Make sure that the PC Companion application is installed on the PC or the
Sony Bridge for Mac application is installed on the Apple® Mac® computer.
2
Computer: Open the PC Companion application or the Sony Bridge for Mac
application.
3
Click Start to start the
Calendar
and
Calendar Sync
applications and follow the
on-screen instructions to synchronise your device with your Outlook calendar.
30
This is an Internet version of this publication. © Print only for private use.
 Loading...