

Sony XPERIA SERIES User Manual
USER GUIDE
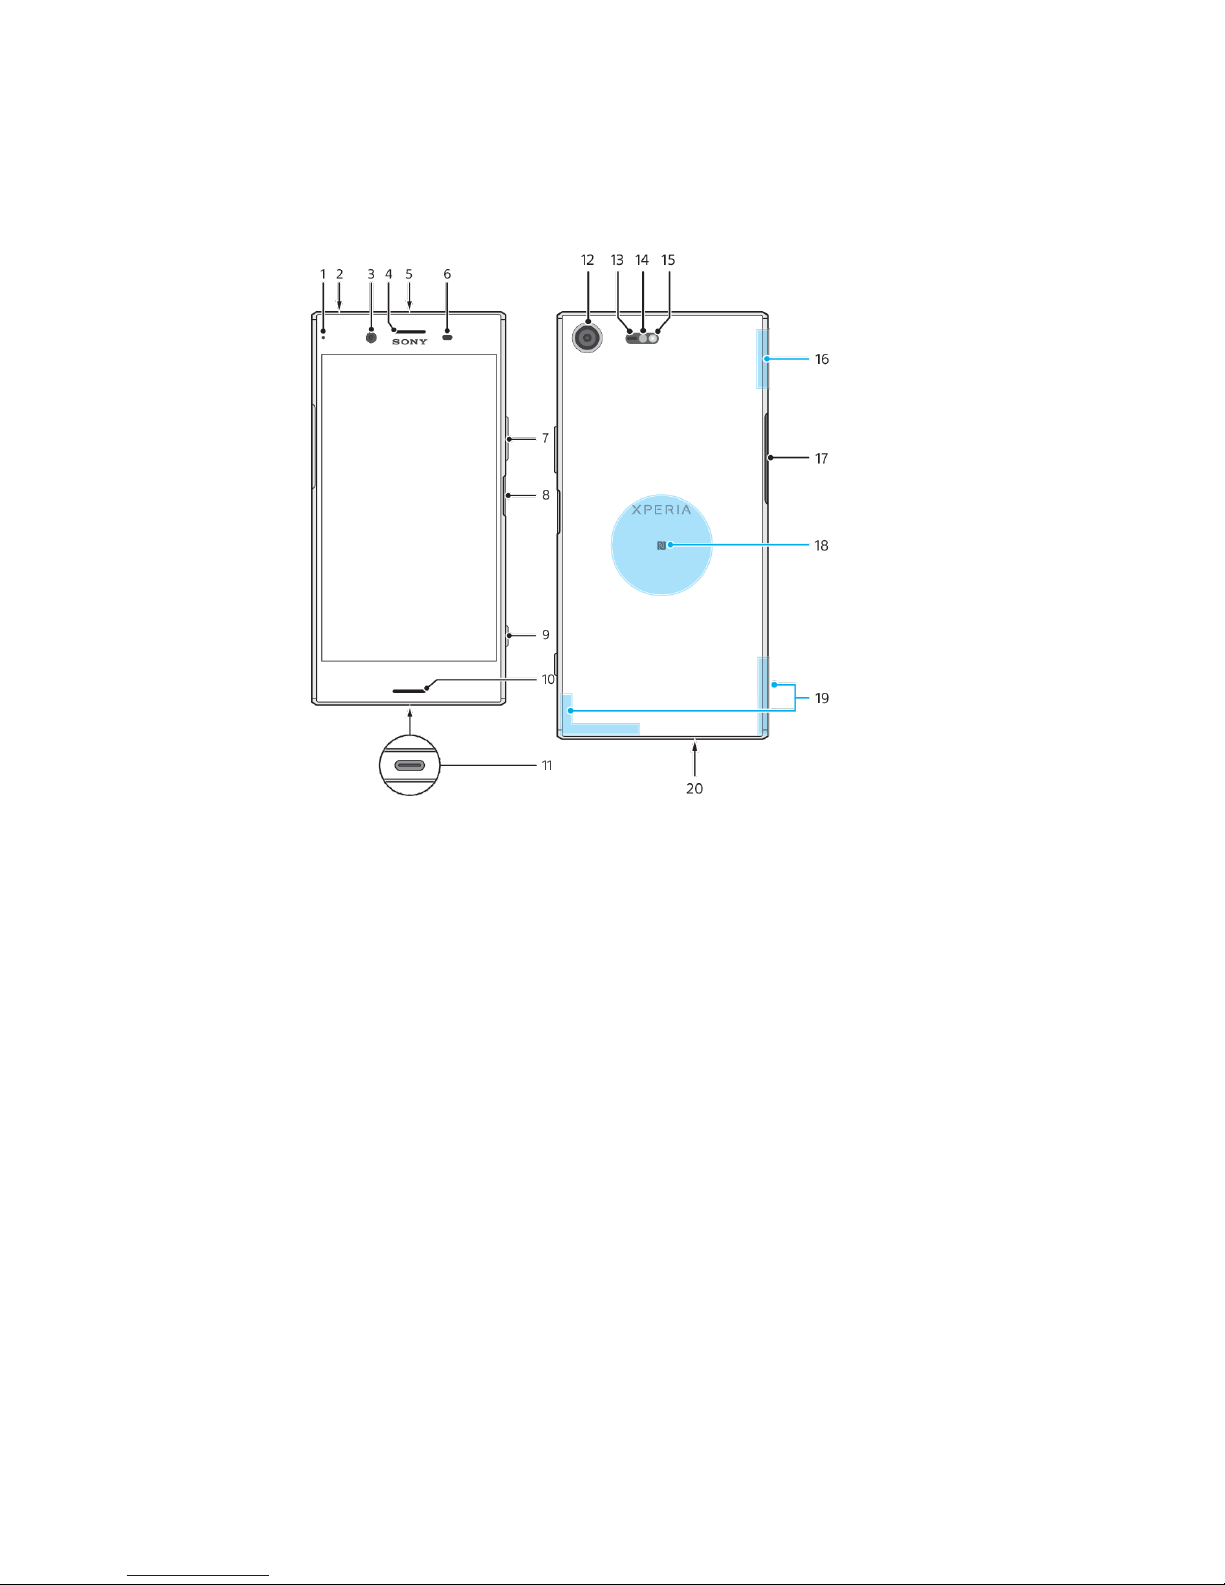
1. Charging/Notification light
2. Headset jack
3. Front camera lens
4. Ear speaker/Second
loudspeaker
5. Second microphone
6. Proximity/Light sensor
7.Volume/Zoom key
8. Power key/Fingerprint sensor
11. Charger/USB Type-C™ cable port
12. Main camera lens
13. Laser AF sensor
14. RGBC-IR sensor
15. Flashlight
16. Wi-Fi/Bluetooth®antenna area
17. Nano SIM/Memory card slotcover
18. NFC detection area
19. Main cellular antennaarea

USER GUIDE
9. Camera key
10. Main loudspeaker
20. Main microphone
Fingerprintfunctionalit
y is not available in the
US market.
To prevent data loss, make sure you turn off your device or unmount the
memory card before you drag out the holder to remove the nano SIM card (or
cards) or memory card from the device.
Do not cut your SIM card, as this may damage your device.
Using two SIM cards and a memory card at the same time is not possible. The
memory card tray allows you to use either a second SIM card or an additional
memory card. Do not cut your SIM card, as this may damage your device.
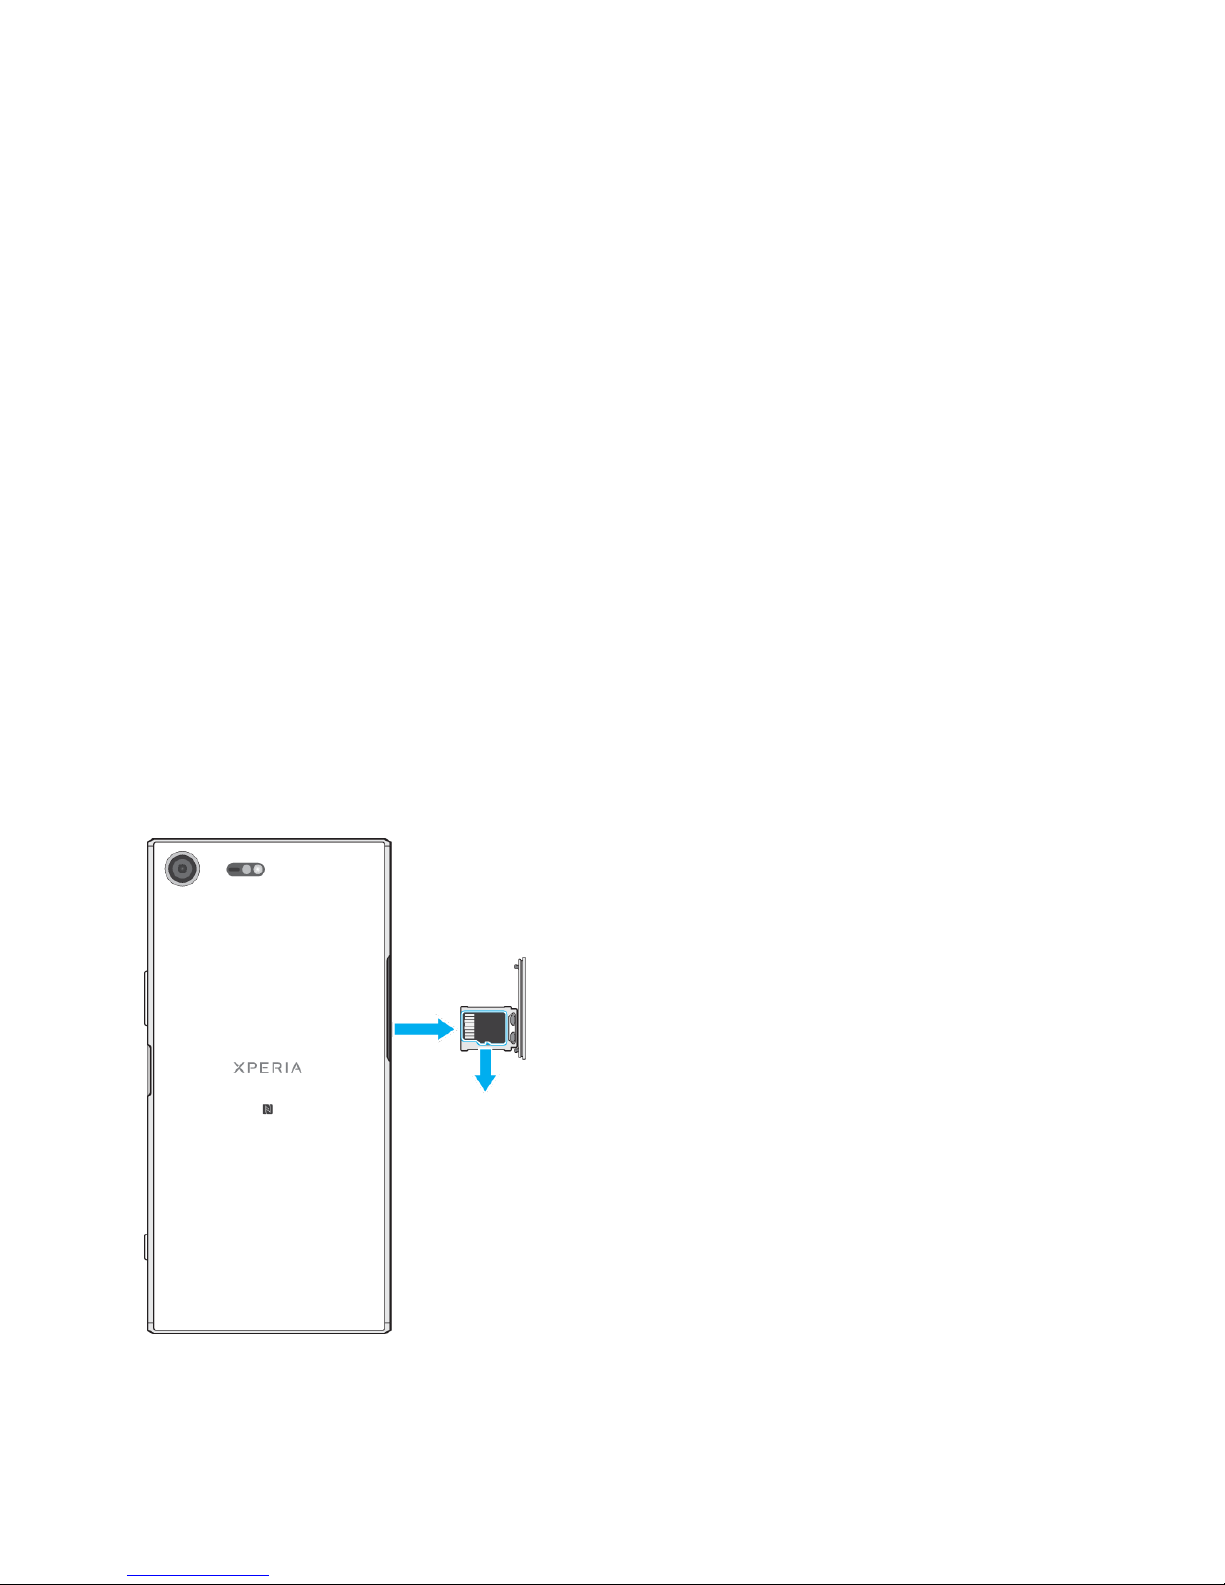
Assembly
Your device only supports nano SIM cards. The nano SIM cards and the memory
card have separate slots. Make sure you don’t confuse the two.
To insert a nano SIM card and a memory card
1. Drag out the memory card tray and the SIM card tray.
2. Place the SIM card securely in the SIM card tray, as shown in the video.
3. Place the memory card securely in the memory card tray, as shown in the
video.
4. Gently push first the SIM card tray, then the memory card tray, back into
their slots until they fit into place.
To insert one or two nano SIM cards
1. Drag out the memory card tray and the SIM card tray.
USER GUIDE
2. Place the main SIM card securely in the SIM card tray, as shown in the
video.
3. Place the second SIM card securely in the memory card tray in the correct
orientation, as shown in the video.
4. Gently push first the SIM card tray, then the memory card tray, back into
their slots until they fit into place.
To remove a nano SIM card
1. Turn off your device.
2. With the screen facing down, open the nano SIM/Memory card slot cover.
3. Drag out the SIM and memory card trays using your fingernail.
4. Remove the nano SIM card. Gently push the SIM and memory card trays
back into their slots until they fit into place.
5. Close the nano SIM/Memory card slot cover.
To remove a memory card
1. Turn off your device.
2. With the device facing down, open the nano SIM/Memory card slot cover.
USER GUIDE
Before using your device, remove the protection film by pulling up on the
protruding tab.
It is important to use the USB Type-C™ cable (provided) when charging your
device, as other types of USB cables can damage your device. It is
recommended to charge the battery for at least 30 minutes before you turn
on the device for the first time.
3. Remove the memory card from the tray.
4. Close the nano SIM/Memory card slot cover.
Screen protection
It is recommended to protect your device with a Sony branded screen cover or a
protector intended for your Xperia™ model. The use of third party screen
protection accessories may prevent your device from working correctly by
covering sensors, lenses, speakers, or microphones and can invalidate the
warranty.
Starting your device for the first time
It is recommended that you charge the battery for at least 30 minutes before
starting up your device for the first time. You can still use your device while it is
charging. For more information on charging, see Charging your device.
The first time you start your device, a setup guide helps you to configure basic
settings, personalise your device and sign in to your accounts, for example a
Google™ account.
To turn on the device
1. Press and hold down the power key until the device vibrates.
USER GUIDE
Your SIM card PIN is initially supplied by your network operator, but you
can change it later from the Settings menu. To correct a mistake made
while entering your SIM card PIN, tap .
It may take a while for the device to shut down.
2. Enter your SIM card PIN when requested, then tap .
3. Wait a moment for the device to start.
To turn off the device
1. Press and hold down the power key until the options menu opens.
2. In the options menu, tap Power off.
Why do I need a Google™ account?
Your Xperia™ device from Sony runs on the Android™ platform developed by
Google. A range of Google applications and services is available on your device
when you purchase it, for example, Gmail™, Google Maps™, YouTube™ and the
Play Store™ application, which gives you access to the Google Play™ online store
for downloading Android applications. To get the most out of these services, you
need a Google account. For example, a Google account enables you to do the
following:
Download and install applications from Google Play.
Synchronise your email, contacts and calendar using Gmail.
Chat with friends using the Duo™ application.
Synchronise your browsing history and bookmarks using the Google
Chrome™ web browser.
USER GUIDE
It is crucial that you remember your Google account username and password.
In some situations, you may need to identify yourself for security reasons
using your Google account. If you fail to give your Google username and
password in such situations, your device is locked. Also, if you have more than
one Google account, make sure to enter the details for the relevant account.
You can also sign in to or create a Google™ account from the setup guide
the first time you start your device. Alternatively, you can go online and
create an account at www.google.com/accounts.
Identify yourself as the authorised user after a software repair using
Xperia™ Companion.
Remotely find, lock or clear a lost or stolen device using the Android Device
Manager services.
For more information about Android and Google, go to
http://support.google.com.
To set up a Google™ account on your device
1. From your Home screen, tap .
2. Find and tap Settings > Accounts & sync > Add account > Google.
3. Follow the registration wizard to create a Google™ account, or sign in if you
already have an account.
To remove a Google™ account
1. From your Home screen, tap .
2. Tap Settings > Accounts & sync > Google.
3. Select the Google™ account that you want to remove.

USER GUIDE
If you remove your Google™ account, any security features that are linked to
your Google™ account will no longer be available.
4. Tap > Remove account.
5. Tap Remove account again to confirm.
Making sure your device is protected
Your device includes security options, strongly recommended in case of loss or
theft:
Set a secure screen lock on your device using a PIN, password or pattern to
prevent anyone from accessing or resetting your device.
Add a Google™ account to prevent others from using your device if it gets
stolen or wiped.
Activate the Android™ Device Manager web service. Using this service, you
can remotely locate, lock or clear a lost device.
Verifying the ownership of your device
Certain protection features require you to either unlock your screen with your
PIN, password, pattern, or enter your Google™ account information. Below are
examples of protection features and their required credentials:
Factory Data Reset protection: You must unlock your screen before you are
allowed to perform a Factory Data Reset.
Android™ Device Manager: If you remotely reset your device using this
service, you must enter the username and password for a Google™
account. The device must be connected to the Internet before the setup

USER GUIDE
For Android Device Manager, it is necessary to enter information from a
Google account. This can be any Google account which you have set up on the
device as an owner. If you cannot provide the relevant account information
during a setup process, you won't be able to use the device at all.
Fingerprint functionality is not available in the US market.
process can be completed. Otherwise, you will not be able to use your
device after the reset.
Xperia™ Companion Software repair: Use the Xperia™ Companion software
to perform software repair.
Screen lock
There are several screen lock options available. The security level of each lock
type is listed below in order of weakest to strongest:
Swipe: no protection, but you have quick access to the Home screen.
Pattern: draw a simple pattern with your finger to unlock your device.
PIN: enter a numeric PIN of at least four digits to unlock your device.
Password: enter an alpha-numeric password to unlock your device.
Fingerprint: place your registered finger on the power key to unlock your
device.
It is very important that you remember your screen lock pattern, PIN or password.
If you forget this information, it may not be possible to restore important data
such as contacts and messages. If you have set up a Microsoft® Exchange
ActiveSync® (EAS) account on your Xperia™ device, the EAS security settings may
limit the lock screen type to only a PIN or password. This occurs when your
network administrator specifies a lock screen type for all EAS accounts for
enterprise security reasons. Contact the network administrator of your company
or organisation to check what network security policies are implemented for
mobile devices.
USER GUIDE
When you have a screen lock selected, tap beside Screen lock for
additional settings.
If you enter an incorrect lock pattern five times in a row, you must wait 30
seconds before trying again.
To change your screen lock type
1. From your Home screen, tap .
2. Find and tap Settings > Lock screen & security > Screen lock.
3. Confirm your current screen lock, choose an option and follow the
instructions on your device.
To create a screen lock pattern
1. From your Home screen, tap .
2. Find and tap Settings > Lock screen & security > Screen lock > Pattern.
3. Choose an option and follow the instructions on your device.
To change the screen lock pattern
1. From your Home screen, tap .
2. Find and tap Settings> Lock screen & security > Screen lock.
3. Draw your screen unlock pattern.
4. Tap Pattern, choose an option and follow the instructions on your device.
To create a screen lock PIN
1. From your Home screen, tap .

USER GUIDE
Fingerprint functionality is not available in the US market.
2. Find and tap Settings > Lock screen & security > Screen lock > PIN.
3. Choose an option. Enter a numeric PIN, then tap CONTINUE.
4. Re-enter and confirm your PIN, then tap OK.
To create a screen lock password
1. From your Home screen, tap .
2. Find and tap Settings > Lock screen & security > Screen lock > Password.
3. Choose an option and follow the instructions on your device.
To activate the Swipe unlock function
1. From your Home screen, tap .
2. Find and tap Settings > Lock screen & security > Screen lock.
3. Draw your screen unlock pattern, or enter your PIN or password depending
on which of these screen lock types is enabled.
4. Tap Swipe, then tap YES, REMOVE.
Fingerprint unlock
You can use your fingerprint to quickly unlock your device. To use this feature,
you need to register a fingerprint and enable this feature in the Fingerprint
Manager first.
The pattern, PIN or password screen lock you set up serves as a backup unlock
method if you enable the Fingerprint unlock option. Selecting other screen lock
types will clear all fingerprint settings.
USER GUIDE
If you fail to unlock the screen using your fingerprint after five attempts,
you can use your backup pattern, PIN or password instead.
Fingerprint functionality is not available in the US market.
Before using the Fingerprint sensor, make sure the sensor is clean and
without any visible moisture.
When registering a fingerprint for the first time, you are also prompted to set
up a pattern, PIN or password as a security backup if you have not already
done so.
To unlock the device using your fingerprint
With the lock screen active, place your finger on the power key so that the
device can scan your fingerprint and unlock the screen. Make sure that you
use a finger that you have registered in Fingerprint Manager.
Fingerprint Manager
Fingerprint Manager registers fingerprint information that can be used as an
additional security method for unlocking your device or authenticating purchases.
You are allowed to register a maximum of 5 fingerprints on your device.
To register a fingerprint for the first time
1. From your Home screen, tap .
2. Find and tap Settings > Lock screen & security > Fingerprint Manager.
3. Tap NEXT, then confirm your pattern, PIN or password if prompted.
4. Follow the on-screen instructions to complete fingerprint registration.
 Loading...