

Page 1
Television
Reference Guide
XBR-65X807C / 65X805C / 55X807C / 55X805C
Sony Customer Support
http://esupport.sony.com/ES/LA/
Please Do Not Return the Product
to the Store
Page 2

Table of Contents
IMPORTANT NOTICE . . . . . . . . . . . . . . . . 2
Safety information . . . . . . . . . . . . . . . . . 3
Precautions . . . . . . . . . . . . . . . . . . . . . . . 4
Parts and Controls . . . . . . . . . . . . . . . .6
Controls and Indicators . . . . . . . . . . . . . 6
Inputs and Outputs . . . . . . . . . . . . . . . . 7
Using Remote Control . . . . . . . . . . . . .9
Remote Control Parts Description. . . . . 9
Connecting the TV . . . . . . . . . . . . . . . 11
Showing a Set Top Box with HDMI
connection . . . . . . . . . . . . . . . . . . . . . . 11
Showing a Set Top Box with
COMPONENT connection. . . . . . . . . . . 12
Cable System or VHF/UHF Antenna
System. . . . . . . . . . . . . . . . . . . . . . . . . . 12
Connecting MHL Device. . . . . . . . . . . . 13
Showing HD BRAVIA® Sync™ Basic
Connection . . . . . . . . . . . . . . . . . . . . . . 14
Showing HD Basic Connection with
Home Theater System . . . . . . . . . . . . . 15
Showing PC Connection with SD
VCR/DVD . . . . . . . . . . . . . . . . . . . . . . . . 16
Installing the TV to the Wall . . . . . . . 17
Detaching the Table-Top Stand from
the TV. . . . . . . . . . . . . . . . . . . . . . . . . . . 17
Installing the TV against a wall or
enclosed area. . . . . . . . . . . . . . . . . . .18
Troubleshooting. . . . . . . . . . . . . . . . .19
Troubles and Solutions . . . . . . . . . . . . 19
Specifications . . . . . . . . . . . . . . . . . . 20
Introduction
Thank you for choosing this Sony product.
Before operating the TV, please read this manual
thoroughly and retain it for future reference.
Note
• Images and illustrations used in Startup Guide and this
manual are for reference only and may differ from actual
product appearance.
The 65 class has a 64.5 inch (163.9 cm)
viewable image size and the 55 class has a
54.6 inch (138.8 cm) viewable image size
(measured diagonally).
Location of the identification label
Labels for the Model No. and Power Supply rating are
located on the rear of the TV.
IMPORTANT NOTICE
Owner’s Record
The model and serial numbers are located at the side
and rear of the TV. Record these numbers in the spaces
provided below. Refer to them whenever you call upon
your Sony dealer regarding this TV.
Model Name
Serial No.
This plug adaptor is not for the use in Chile, Paraguay and
Uruguay. Please use this plug adaptor in the countries
where it is necessary.
ADVERTENCIA
Para reducir el riesgo de incendio o descargas eléctricas, no
exponga este producto a la humedad ni a la lluvia.
This symbol is intended to alert the user to the
presence of uninsulated “dangerous voltage”
within the product enclosure that may be of
sufficient magnitude to constitute a risk of
electric shock to persons.
This symbol is intended to alert the user to the
presence of important operating and
maintenance (servicing) instructions in the
literature accompanying the product.
El producto no debe estar expuesto a goteos ni
salpicaduras, ni se deben colocar sobre él objetos con
líquidos como floreros.
PRECAUCIÓN
Para evitar descargas eléctricas y exposición a contactos
eléctricos, no utilice este enchufe de corriente alterna con
un cable de extensión, receptáculo u otro tomacorriente a
menos que los contactos eléctricos puedan ser
introducidos completamente.
• Operate the TV only on 110 V - 240 V AC
2
Page 3
Seguridad
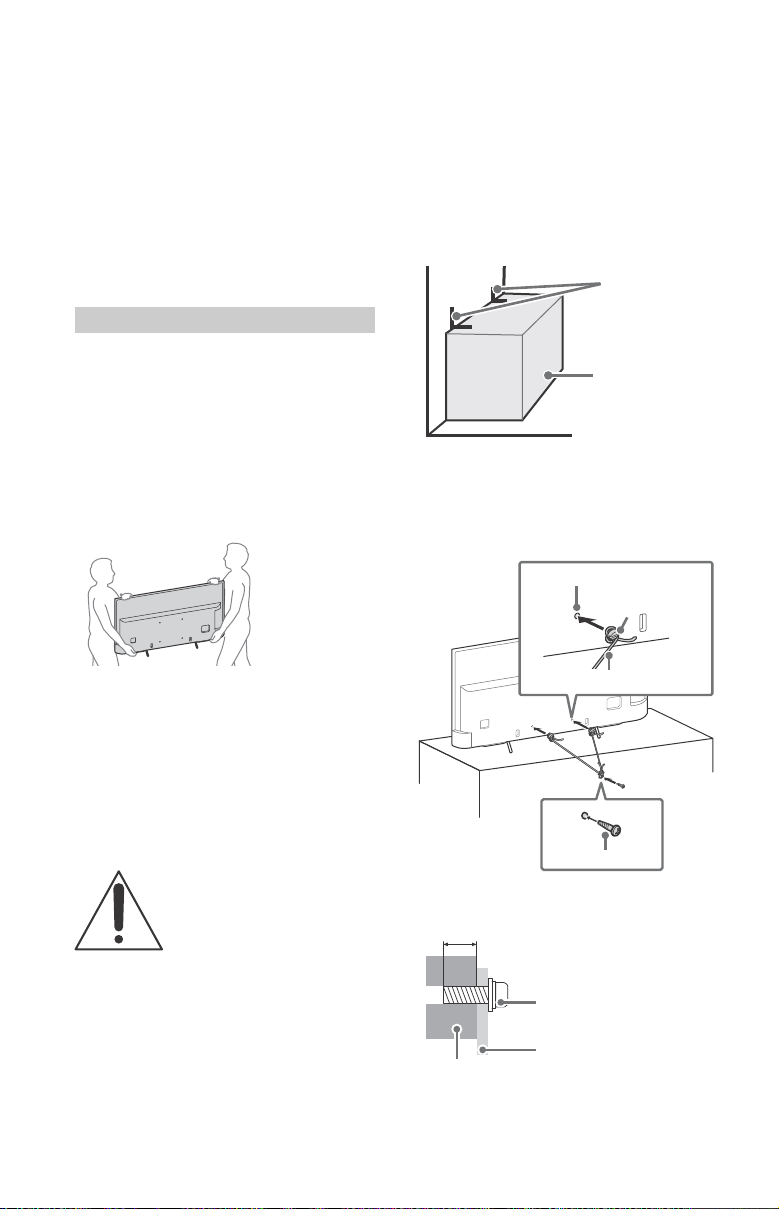
Angle brace
(not supplied)
Stand
Screw hole on the rear cover
M6 machine screw
(not supplied)
Rope or chain (not supplied)
Screw (not supplied)
8 - 12 mm
Screw M6
Rope or chain
TV’s rear cover
• Utilice el cable de alimentación de ca especificado por
Sony y que corresponda al voltaje de la zona donde vaya
a utilizarlo.
• Por razones de seguridad, el enchufe está diseñado de tal
forma que sólo puede conectarse en una dirección en los
tomacorrientes de pared. Si no puede introducir
completamente los contactos del enchufe en el
tomacorriente, póngase en contacto con su distribuidor.
• Si se introduce algún objeto sólido o cae líquido en la
unidad, desenchufe el televisor inmediatamente y haga
que sea revisado por personal especializado antes de
volver a operarlo.
• Desconecte el televisor si no va a utilizarlo durante
algunos días. Para ello, tire del enchufe, nunca del cable.
• Consulte la información sobre seguridad en Folleto de
instrucciones de seguridad.
Safety information
Before setting up your TV
Some TV models are packaged with a detached Table-Top
Stand so you can mount your TV to a wall right away. See
page 17 (Installing the TV to the Wall) if you want to mount
the TV to a wall. If you are not mounting the TV to a wall,
you will need to attach the Table-Top Stand. You will need a
Phillips screwdriver (not supplied) and the supplied screws
to complete the task. Look for the Startup Guide.
Be sure to consider the following while setting up your TV:
• Disconnect all cables when carrying the TV.
• Carry the TV with the adequate number of people; larger
size TVs require two or more people.
• Correct hand placement while carrying the TV is very
important for safety and to avoid damage.
• Route all AC power cords and connecting cables so that
they are not accessible to curious children.
Recommended Measures to Secure the
TV
Consider the following measures when securing your TV to
a Stand (not supplied).
1 Secure the Stand for the TV.
Make sure the Stand can adequately support the weight
of the TV. Use two angle braces (not supplied) to secure
the stand. For each angle brace use the appropriate
hardware to:
• Attach one side of the angle brace to the wall stud.
• Attach the other side to the Stand.
2 Secure the TV to the Stand.
Use the optional hardware listed as follows (not
supplied):
• M6 machine screw (screwed into the TV’s rear cover)
• A screw or similar (attach it to the Stand)
• Rope or chain (strong enough to support the weight of
the TV). Make sure that there is no excess slack in the
rope or chain.
US
• Ensure your TV has adequate ventilation, see page 18.
• For best picture quality, do not expose the screen to direct
illumination or sunlight.
• Avoid installing the TV in a room with reflective wall and
floor materials.
• Avoid moving the TV from a cold area to a warm area.
Sudden room temperature changes may cause moisture
condensation. This may cause the TV to show poor
picture and/or poor color. Should this occur, allow
moisture to evaporate completely before powering the TV
on.
Securing the TV
Sony st rongly recomme nds tak ing
measures to prevent the TV from
toppling o ver.
Unsecured TVs may topple and result
in property damage, serious bodily
injury or even death.
Preventing the TV from Toppling
• Secure the TV to a wall and/or stand.
• Do not allow children to play or climb on furniture and TV
sets.
• Avoid placing or hanging items on the TV.
• Never install the TV on:
slippery, unstable and/or uneven surfaces.
furniture that can easily be used as steps, such as a
chest of drawers.
• Install the TV where it cannot be pulled, pushed, or
knocked over.
The length of the M6 machine screw differs depending
on the rope or chain diameter. Please see below
illustration.
3
Page 4
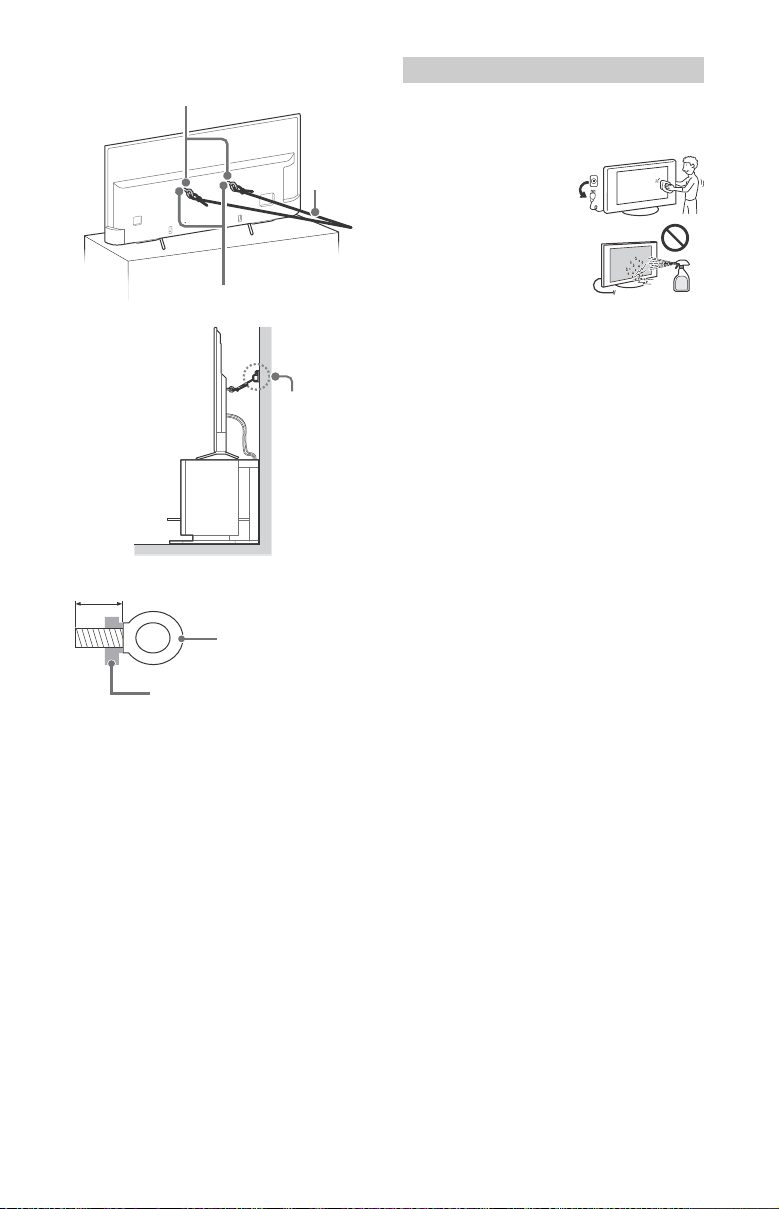
3 Anchor the TV to the wall by using bolts, wall anchor and
M6 eye bolts (not supplied)
Wall-mount holes
Rope or
chain (not
supplied)
Wall-anchor
(not supplied)
8 - 12 mm
M6 eye bolt
TV’s rear cover
chain (or rope).
Please see below illustration for M6 eye bolt length.
Precautions
How to care for your BRAVIA TV
Safety is very important. Please read and follow the safety
documentation (Safety Booklet) separately provided.
Unplug the TV and other
connected equipment from
the wall outlet before you
begin cleaning your TV.
• Wipe the LCD screen gently
with a soft cloth.
• Stubborn stains may be
removed with a cloth
slightly moistened with a
solution of mild soap and
warm water.
• If using a chemically
pretreated cloth, please follow the instruction provided
on the package.
• Never spray water or detergent directly on the TV set. It
may drip to the bottom of the screen or exterior parts and
enter the TV set, and may cause damage to the TV set.
• Never use strong solvents such as a thinner, alcohol or
benzine for cleaning.
• Do not plug in the TV into the wall outlet until the
moisture from cleaning has evaporated.
The TV should also be placed on a stable surface to prevent
it from toppling over
children or pets at home, check regularly to ensure the TV is
securely fastened.
(see page 3). If you have young
Note
• Your TV is shipped with screws attached to the rear of the
TV depending on the TV model. (They are fastened in the
screw holes for wall mounting.) Be sure to remove the
upper two screws prior to anchoring the TV to a wall.
• Securing the TV to the stand without securing the TV and
the stand to the wall provides minimum protection
against the TV toppling over. For further protection, be
sure to follow the three measures recommended.
4
Page 5
La experiencia de TV BRAVIA® 4K
¡Gracias por elegir a Sony! Su nuevo TV BRAVIA® le
brinda una “Experiencia de TV 4K”. Este documento le
ayudará a aprovechar su TV al máximo.
Registre su TV en:
http://esupport.sony.com/LA/perl/registration.pl
Los cuatro pasos para una experiencia
de TV 4K
TV, fuente, sonido y configuración.
1 TV
Ahora que ya hizo la mejor elección en tecnología LCD
TV con retroiluminación LED, retire todos los accesorios
del empaque antes de configurar su TV.
2 Fuente
Para disfrutar los increibles detalles de su TV BRAVIA
debe tener acceso a programación HD, la cual se puede
obtener de las siguientes maneras:
• Solicitando a su proveedor servicio de alta definición
(4K).
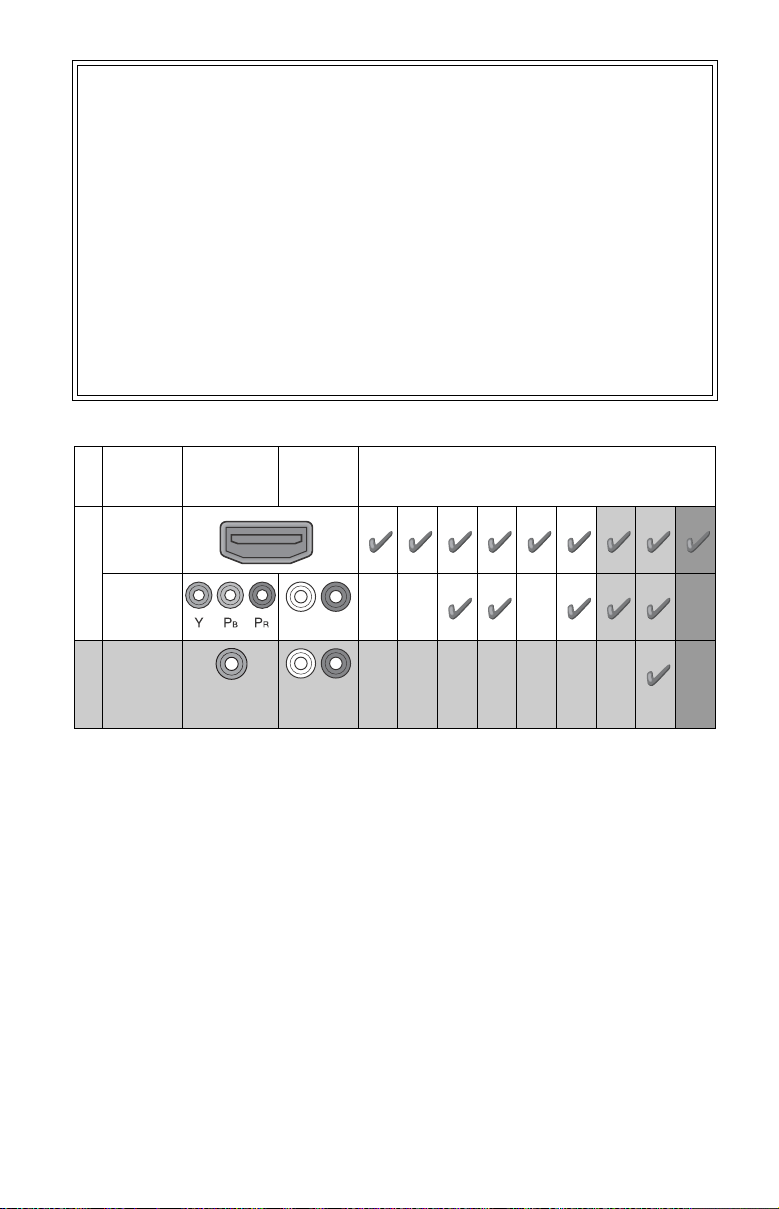
Este TV muestra todas las señales de entrada de video en una resolución de 3 840 puntos × 2 160 líneas.
The following chart shows the high-definition (HD) and standard-definition (SD) video formats supported by your BRAVIA TV
inputs.
• Recibiendo emisiones de HD por aire a través de una
antena para TV de alta definición (HD) conectada
directamente a la parte posterior del TV.
Visite http://www.antennaweb.org para reci bir má s
información sobre la selección y configuración de
antena.
• A través de los reproductores Blu-ray Disc™ de super
alta resolución ó demás equipos HD de Sony.
3 Sonido
Complete la experiencia de alta definición con un
sistema de sonido envolvente BRAVIA Sync™ o un
receptor de audio/video de Sony.
4 Ajustes
Instale su TV y conecte sus fuentes. Consulte la
página 11 para ver ejemplos de diagramas de conexión.
Para obtener la más alta calidad de experiencia 4K,
utilice los cables de HDMI (Interfaz multimedia de alta
definición) de Sony.
SUPPORTED FORMATS
INPUT VIDEO AUDIO
HDMI
4K*11080/
1080p*11080i 720/
24p/
30p
24p/
30p
720p*1480p/
576p*
480i/
PC*
2
2
576i*
4K/
HD
COMPONENT
Audio L/R
US
3
VIDEO
SD
*1 For details of supported formats, refer to the “Specifications” in this manual.
*2 576i, 576p: Not available with X807C model series.
*3 For supported PC formats refer to the Help Guide.
Composite
video
connection
Audio L/R
5
Page 6
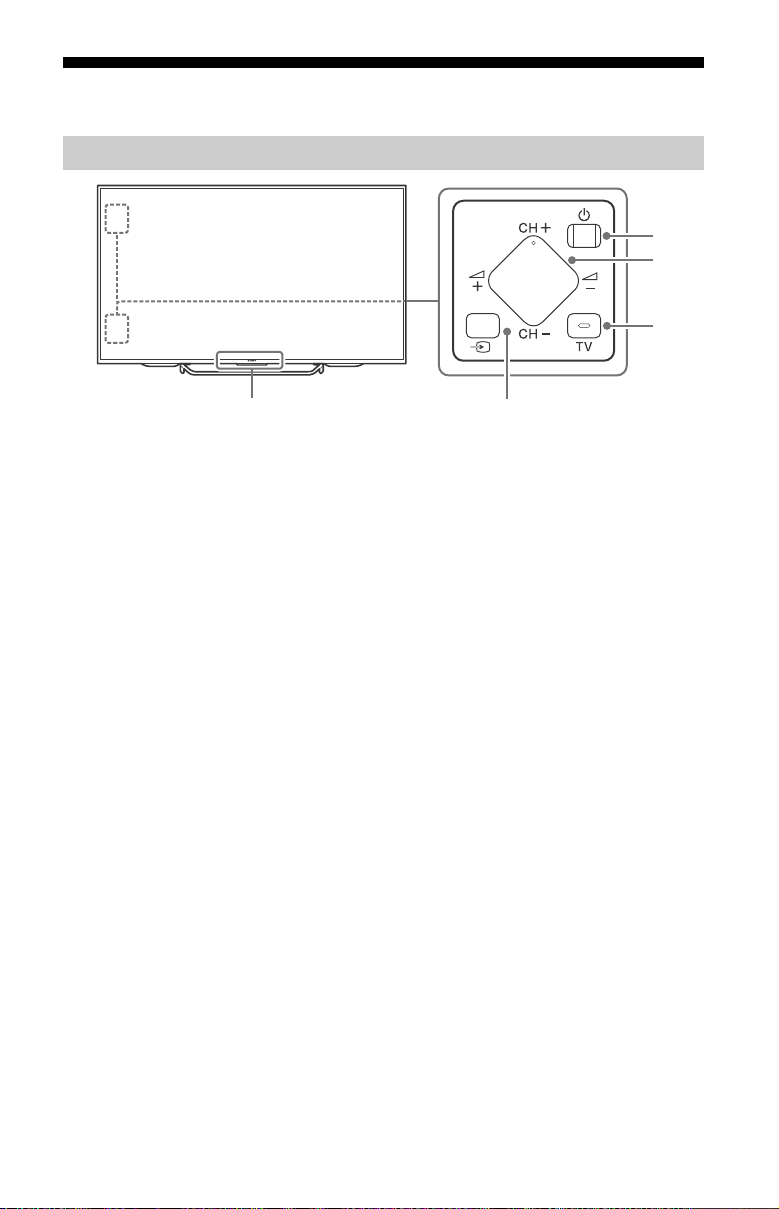
Parts and Controls
Ȫ
ȫ
Ȭ
ȭ
XBR-55X807C / 55X805C
XBR-65X807C / 65X805C
Controls and Indicators
Remote Control sensor* / Light
(Power)
CH +/- (Channel)
TV
(Input select)
* Do not place anything near the sensor.
sensor*
The illumination LED lights up or blinks
according to the status of the TV.
•White
•Cyan
•Amber
+/- (Volume)
Switch to a TV channel or input from
other applications.
Display and select the input source.
/ Illumination LED
When turning on the TV/picture off
mode/software update, etc.
When connecting with a mobile
device wirelessly.
Timer is set.
6
Page 7
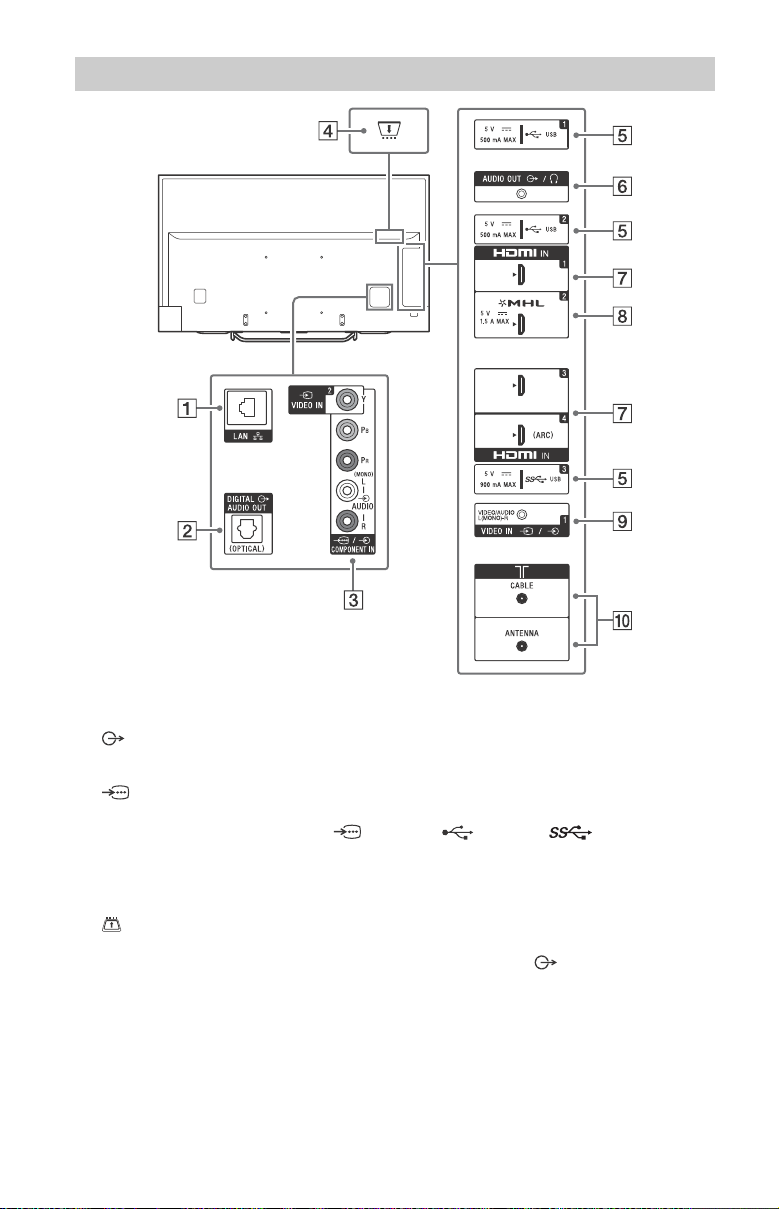
Inputs and Outputs
US
LAN
DIGITAL AUDIO OUT (OPTICAL)
VIDEO IN 2,
/ COMPONENT IN
• For a composite connection:
Use VIDEO IN 2, and (L/R) of /
COMPONENT IN*1.
• For a component connection:
Use Y, PB, PR, and (L/R).
(Conditional Access Module)*
• Provides access to pay TV services.
For details, refer to the instruction
manual supplied with your CAM.
• Do not insert the smart card directly
into the TV CAM slot. It must be fitted
into the Conditional Access Module
provided by your authorized dealer.
• CAM is not supported in some
countries/areas. Check with your
authorized dealer.
• A CAM message may appear when
you switch to a digital program after
using the Internet video.
USB 1/2, USB 3
• Connecting a large USB device may
interfere with other connected
devices beside it.
2
• When connecting a large USB device,
connect to the USB 1 jack.
AUDIO OUT /
• To listen to the TV's sound through
the connected equipment, press
HOME. Select [Settings] [Sound]
[Headphone/Audio out] and then
select the desired item.
7
Page 8

HDMI IN 1/3/4
• If connecting a digital audio system
that is compatible with Audio Return
Channel (ARC) technology, use HDMI
IN 4. If not, an additional connection
with DIGITAL AUDIO OUT (OPTICAL) is
necessary.
HDMI IN 2/MHL
• You can connect your MHL (Mobile
High-definition Link) device using an
HD quality MHL cable.
/ VIDEO IN 1
For a composite connection, use the
supplied Analog Extension Cable*1.
ANTENNA/CABLE
Connect to your cable or antenna.
*1 When connecting mono equipment, connect
to the L (MONO) audio jack.
*2 Only on limited region/country.
8
Page 9

Using Remote Control
Ȫ
ȩ
ȫ
Ȭ
ȭ
Ȯ
ȯ
IR (infrared) Remote Control
Remote Control Parts Description
INPUT
Display and select the input source.
POWER/
Turn on or turn off the TV (standby
mode).
ANT/DIGITAL/ANALOG
Switch between digital and analog
mode.
EXIT/SAIR SALIR
Return to the previous screen or exit
from the menu. When an Interactive
Application service is available, press to
exit from the service.
Number buttons
Use with the 0-9 buttons to select
digital channels.
DISPLAY
Display information about the channel/
program/input you are viewing.
Color buttons
Execute correspondent function at that
time.
WIDE
Change the screen format.
NETFLIX
Access the “NETFLIX” online service.
HELP
Display Help Menu.
ACTION MENU
Display a list of contextual functions.
TV
Switch to a TV channel or input from
other applications.
GUIDE*
Display the digital program guide.
BACK
Return to previous screen.
HOME
Display the TV Home Menu.
DISCOVER
Bring up the Content Bar to search for
content.
//// (Item select/Enter)
VOL +/– (Volume)
Adjust the volume.
JUMP
Jump back and forth between two
channels or inputs. The TV alternates
between the current channel or input
and the last channel or input that was
selected.
MUTING
Mute the sound. Press again to restore
the sound.
US
9
Page 10
CH +/–
Select the channel.
AUDIO
Change the language for the program
currently being viewed.
CC/SUBTITLE
Turn subtitles on or off (when the
feature is available).
//////
Operate media contents on TV and
connected BRAVIA Sync-compatible
device.
SYNC MENU
Display the BRAVIA Sync Menu.
FOOTBALL
Turn Live Football Mode on or off (when
the feature is available).
* The location, availability and function of remote
control button may vary depending on your
country/region/TV model.
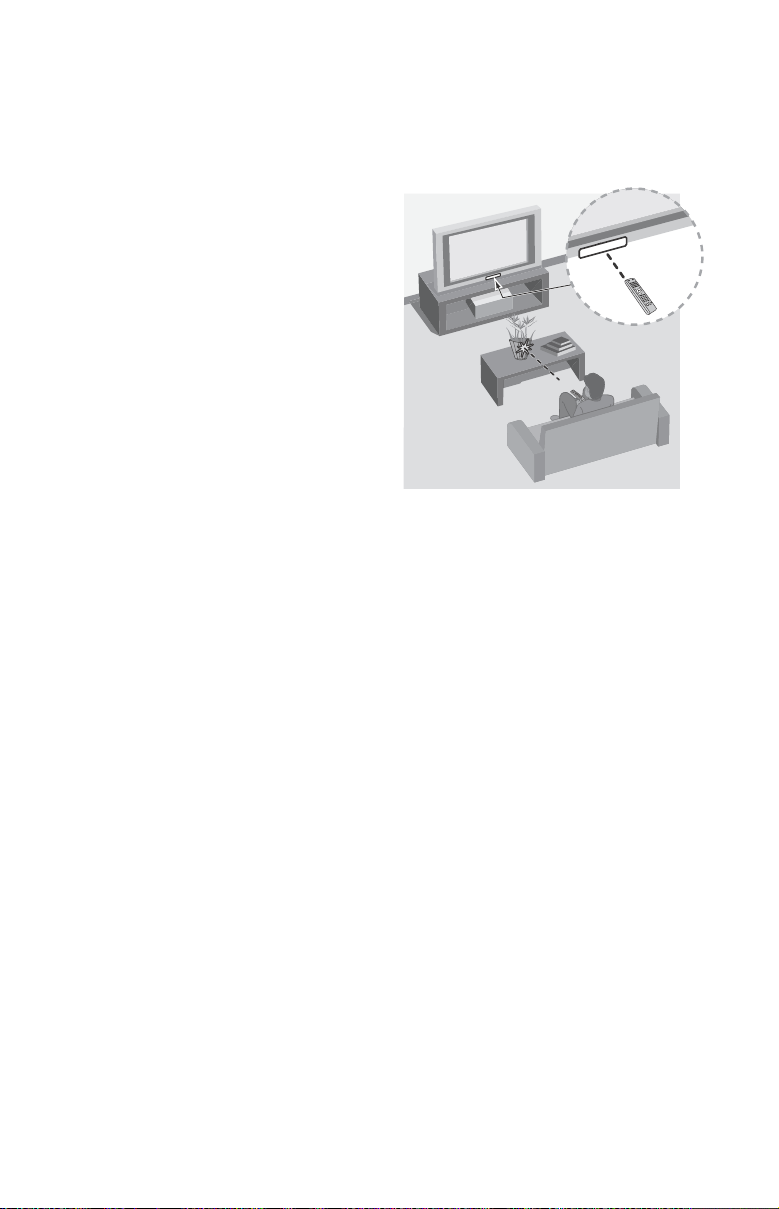
Guidelines for IR Remote Control
• Point your remote control directly at
the IR sensor located on your TV.
• Make sure that no objects are blocking
the path between the remote control
and the IR sensor on your TV.
• Fluorescent lamps can interfere with
your remote control; try turning off the
fluorescent lamps.
• If you are having problems with the
remote control, reinsert or replace your
batteries and make sure that they are
correctly inserted.
10
Page 11

Connecting the TV
(Reference drawing for an F type plug)
1.5 mm max.
7 mm max.
Set Top Box
For more information on connections, refer
to the Help Guide.
Note
• When connecting the cable to the Cable/
Antenna, input finger tighten only, over
tightening the connection can damage the TV.
• To select an input device connected to the TV,
press INPUT.
Recommendation for an F type plug
Projection of the inner wire from the
connection part must be less than 1.5 mm.
Showing a Set Top Box with HDMI connection
US
11
Page 12

Showing a Set Top Box with
Set Top Box
Cable/Antenna
COMPONENT connection
Cable System or VHF/UHF Antenna System
12
Page 13

Connecting MHL Device
Use authorized MHL CABLE with
MHL logo (not supplied)
MHL device
The TV simultaneously charges the MHL-compatible connected device while playing
photo/music/video files. You can use the TV remote control to control the connected
MHL-compatible device.
Note
• If [Charge MHL during power off] is set to [On], you can continue charging the MHL-compatible device
even when the TV is in standby mode.
• Use authorized MHL 3 CABLE with MHL logo for 4K smartphone or mobile devices.
US
13
Page 14
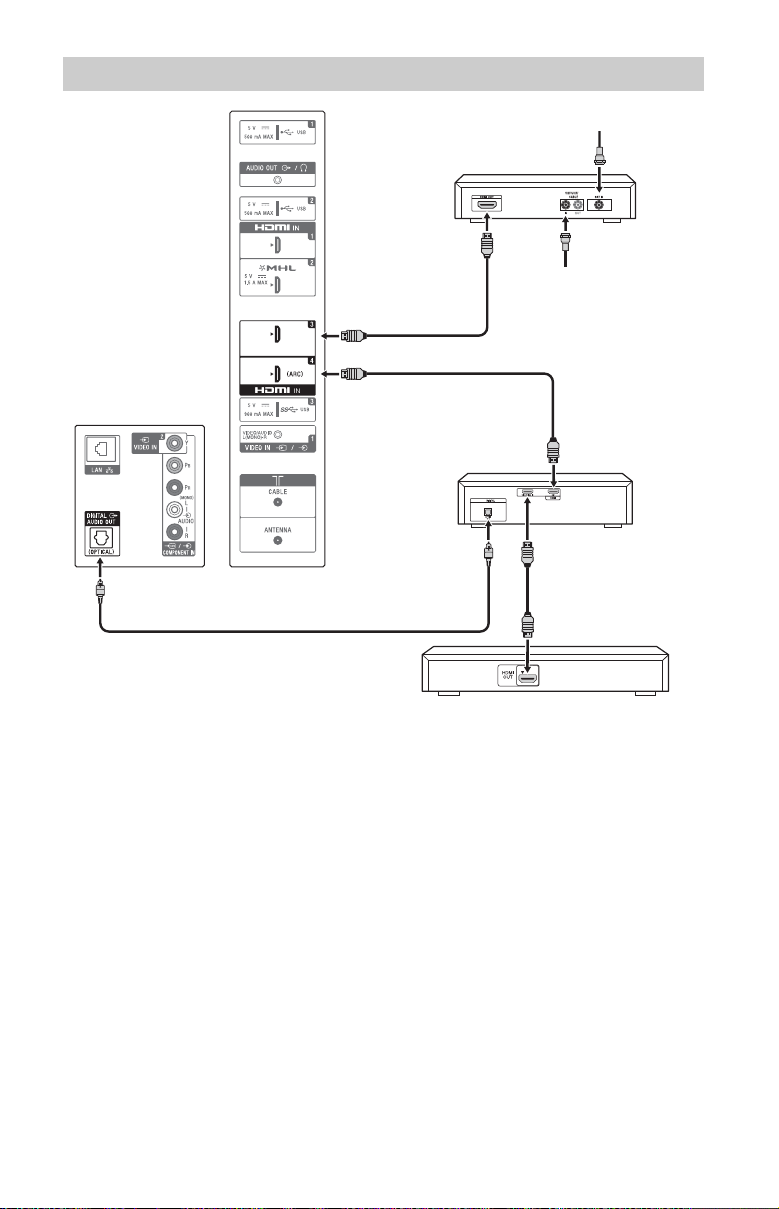
Showing HD BRAVIA® Sync™ Basic Connection
*1Side Panel
*
1
Blu-ray Disc
HD Cable Box or
HD Satellite Receiver
*
1
A/V Receiver
SAT (Dish)
Cable/Antenna
*
2
Optical Connection
*
1
Rear of TV
*1Signifies a BRAVIA Sync capable device.
*2The optical connection is only needed for A/V receivers that do not support ARC (Audio
Return Channel).
Set the speaker settings to audio out, press HOME, then select [Settings] [Sound]
[Speakers] [Audio system].
Set the HDMI CEC settings on the TV and AV receiver to allow for system audio control for
ARC connections.
14
Page 15
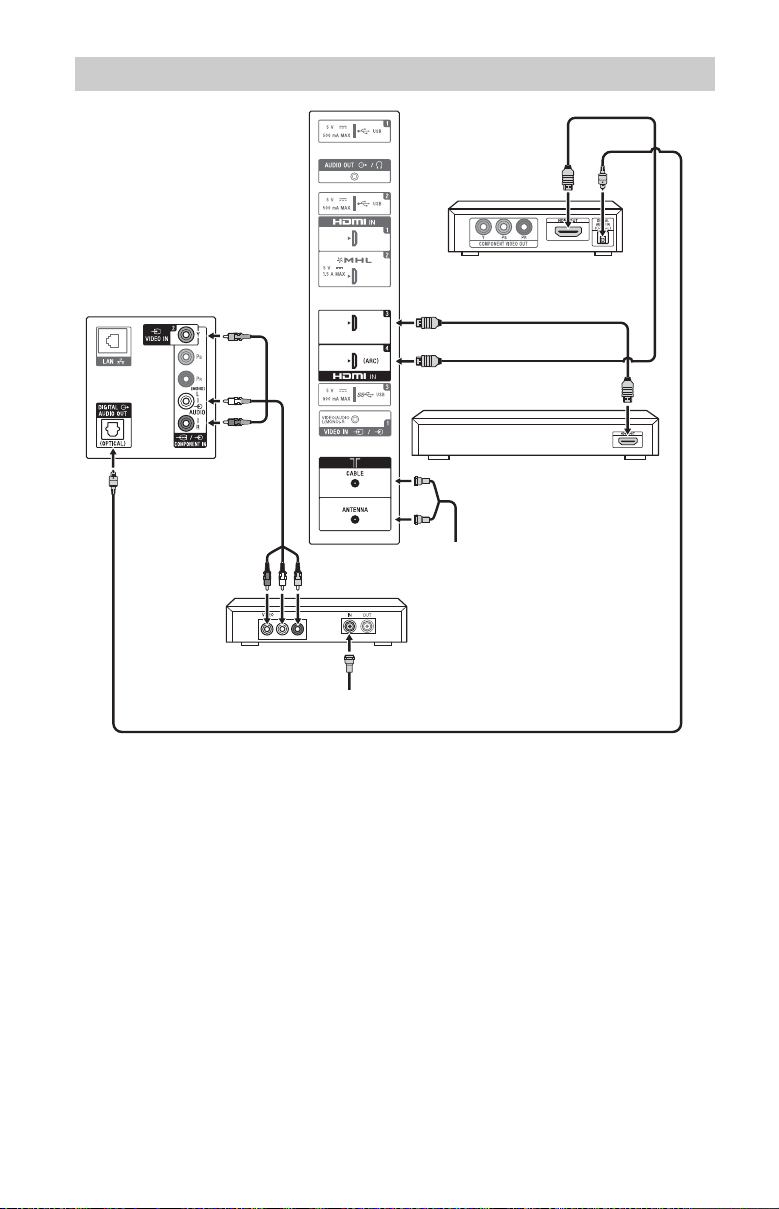
Showing HD Basic Connection with Home Theater System
Cable/Antenna
Blu-ray Disc/DVD
SD Cable Box or
SD Satellite Receiver
Cable/SAT (Dish)
Home Theater System
*Optical Connection
Rear of TV
Side Panel
US
* The optical connection is only needed for home theater system that do not support ARC
(Audio Return Channel) when connecting with HDMI.
Set the speaker settings to audio out, press HOME, then select [Settings] [Sound]
[Speakers] [Audio system].
Set the HDMI CEC settings on the TV and AV receiver to allow for system audio control for
ARC connections.
15
Page 16

Showing PC Connection with SD VCR/DVD
Rear of TV
PC
DVDVCR
Splitter
Cable/Antenna
VCR/DVD
Combo
Notebook PC
Side Panel
*DVI
or
* DVI does not support audio signals. Connect the audio output of the PC to the PC speakers
or an A/V receiver to listen to sound from the PC.
16
Page 17
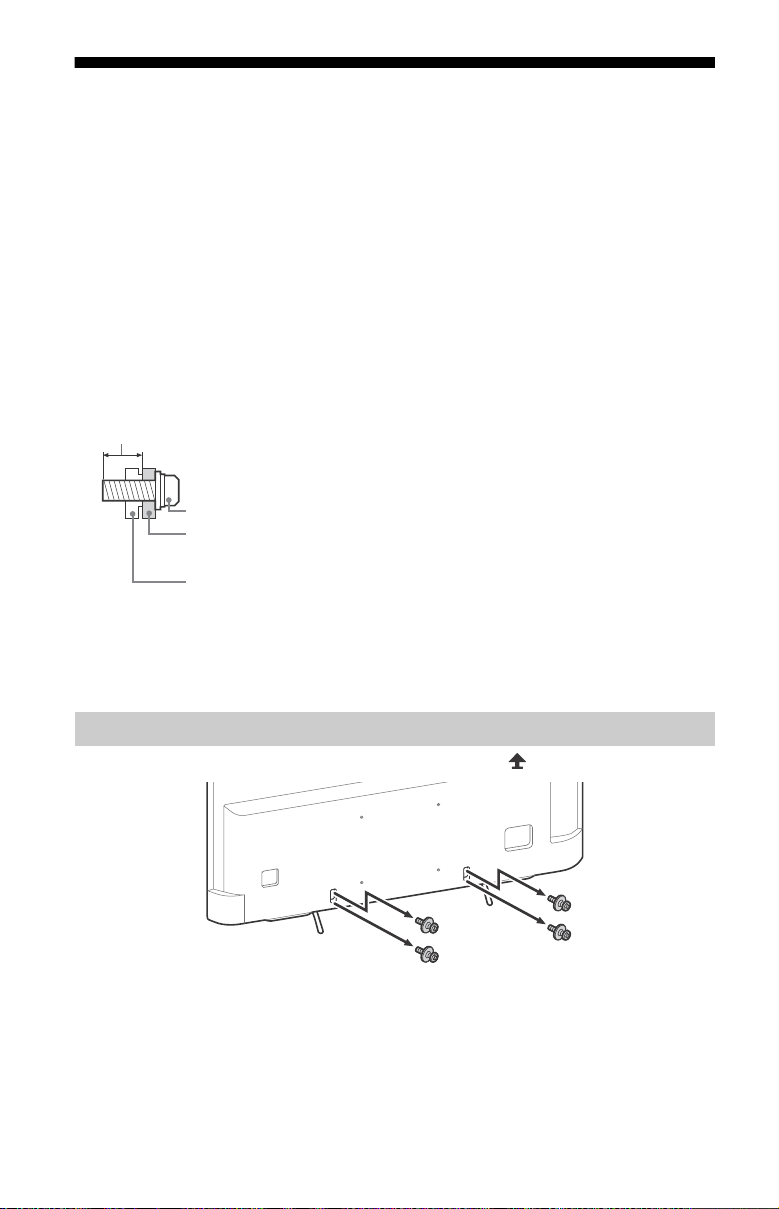
Installing the TV to the Wall
Wall-Mount Bracket
Screw
8 mm - 12 mm
TV’s rear cover
This TV’s instruction manual only shows the steps on preparing the installation of the TV
before installing to the wall.
Your TV can be mounted on a wall using a Wall-Mount Bracket (not supplied) out of the box
as packaged. If the Table-Top Stand is attached to the TV, the TV may require detaching the
Table-Top Stand; see page 17 (Detaching the Table-Top Stand from the TV).
Prepare the TV for the Wall-Mount Bracket before making cable connections.
For product protection and safety reasons, Sony strongly recommends that installation of
your TV on the wall be performed by qualified professionals. Do not attempt to install it
yourself.
• Follow the instruction guide provided with the Wall-Mount Bracket for your model.
Sufficient expertise is required in installing this TV, especially to determine the
strength of the wall for withstanding the TV’s weight.
• The length of the screw for Wall-Mount Bracket differs depending on the Wall-Mount
Bracket thickness. Please see below illustration.
• Be sure to store the unused screws and Table-Top Stand in a safe place until you are
ready to attach the Table-Top Stand. Keep the screws away from small children.
Note
• Read the supplied Safety Booklet for additional safety information.
US
Detaching the Table-Top Stand from the TV
To detach the Table-Top Stand from the TV, remove the screws .
Note
• Do not remove the Table-Top Stand for any reason other than to install corresponding accessories on the
TV.
• Be sure the TV is vertical before turning on. To avoid uneven picture uniformity do not power on the TV
with the LCD panel facing down.
• When attaching the Table-Top Stand again, be sure to fasten the screws (previously removed) to the
original holes on the rear of the TV.
17
Page 18
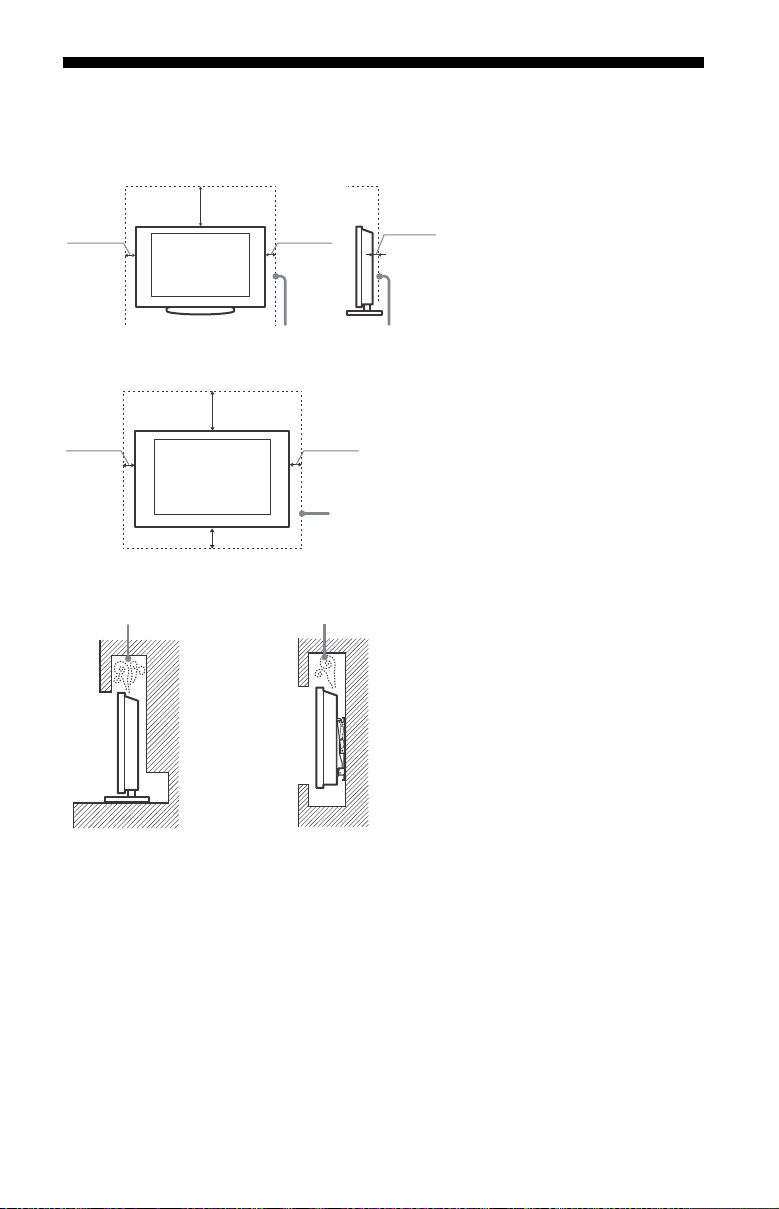
Installing the TV against a wall or enclosed area
Leave at least this much space around the set.
Installed with stand
10 cm
30 cm
10 cm
6 cm
Installed on the wall
Leave at least this much space around the set.
10 cm
10 cm
10 cm
30 cm
Never install the TV set as follows:
Air circulation is blocked. Air circulation is blocked.
Wall Wall
Make sure that your TV has adequate ventilation. Allow enough space around the TV as
shown in the illustration.
Note
• Inadequate ventilation can lead to overheating of the TV and may cause damage to your TV or cause a
fire.
18
Page 19

Troubleshooting
In order to keep your TV software up-todate, it is necessary to download the latest
software information via the digital
broadcasting system or internet and to
update the software. Select [Update Now]
to start a software update. The illumination
LED flashes white while the software is
updating. Do not unplug the AC power cord
during the software update. If you do, the
software update may not finish completely,
and it may cause a software malfunction.
Software updates can take up to 30
minutes. If you do not wish to update the
software automatically, press HOME and
select [Help] [System software update]
[Automatic software download] [Off].
When you plug in TV, the TV may not be
able to turn on for a while even if you press
the power button on the remote control or
the TV, because it takes time to initialize the
system. Wait for about one minute, then
operate it again.
When you turn on by pressing the power
button on the remote control or the TV, it
takes some time to turn on the illumination
LED and for the remote control to be
functional.
When the illumination LED is flashing red,
count how many times it flashes (interval
time is three seconds).
If the illumination LED flashes red, reset the
TV by disconnecting the AC power cord for
two minutes, then turn on the TV.
If the problem persists, contact Sony
Customer Support (information provided
on the front cover) with the number of
times the illumination LED flashes red
(interval time is three seconds). Disconnect
the AC power cord, and contact Sony
Customer Support.
When the illumination LED is not
flashing, check the items as follows.
You can also refer to [Troubleshooting] in
the Help Guide or perform self-diagnosis by
selecting [Help] [Self diagnostics]. If the
problem persists, contact Sony Customer
Support (information provided on the front
cover).
Troubles and Solutions
There is no picture (screen is dark) and no
sound.
Check the cable/antenna connection.
Connect the TV to AC power, and press the
button on the TV or POWER button on the
remote control.
Some programs cannot be tuned.
Check the cable/antenna connection.
The remote control does not function.
Replace the batteries.
The Parental lock password has been
forgotten.
For X805C model series, enter 4357 for the
PIN code. (PIN code 4357 is always accepted.)
For X807C model series, enter 9999 instead.
The TV and its surroundings become
warm.
When the TV is used for an extended period
of time, the TV and its surroundings may
become warm to the touch. This is not a
malfunction of the TV.
How to reset the TV to factory settings
Turn on the TV. You can reset the TV to
factory settings by pressing HOME, then
select [Settings] [Storage & reset]
[Factory data reset].
WARNING: The reset will clear all of your
customized settings including the [Parental
lock] setting.
For security purposes, be sure to remove all
personal and account information before
discarding, selling or passing your TV to
someone else by: unlinking/unregistering,
signing out of and deactivating all network
services as well as factory reset the TV.
Frozen audio or video, a blank screen, or
the TV does not respond to TV or remote
control buttons.
Perform a simple reset of the TV by
unplugging the AC power cord for two
minutes, then plug it in again.
US
19
Page 20

The , CH+/–, +/–, and TV buttons
Rear of TV
XBR-55X807C
/ 55X805C
XBR-65X807C
/ 65X805C
cannot be located on the TV.
See below illustration for location of the
buttons on the TV.
The illumination LED is turned on.
If you do not wish to light up the illumination
LED, you can turn it off.
Press HOME, then select [Settings]
[Illumination LED] [Off].
Cannot connect to a wireless router by
WPS (Wi-Fi Protected Setup).
If you use WEP security, select [Easy]
[Wi-Fi] [Connect by scan list]. Then, select
the network name (SSID) you want to
connect.
Cannot find the required network name
in network setup.
Select [[Manual entry]] and press to enter
network name.
Specifications
System
Television system
Analog:
NTSC 3.58 (for X807C model series)
NT SC 3 .58 / PAL- M / PA L-N (fo r X8 05C mod el
series)
Digital:
DVB-T2/T (for X807C model series)
SBTVD (for X805C model series)
J.83B (Only on limited region/country.)
Channel coverage
Analog: UHF/VHF/Cable, Depending on your
country/area selection.
Digital: UHF/VHF/Cable, Depending on your
country/area selection.
Panel system
LCD (Liquid Crystal Display) Panel, LED
Backlight
Speaker output
10 W + 10 W
Wireless technology
Protocol IEEE802.11ac/a/b/g/n
Bluetooth Version 4.1
Input/Output jacks
ANTENNA/CABLE
75-ohm external terminal for RF inputs
/ VIDEO IN 1
Video / Audio input (mini jack)
COMPONENT IN (for X807C model
series)
YPBPR (Component Video): 1080p (60 Hz),
1080i (60 Hz), 720p (60 Hz), 480p, 480i
Audio input (phono pin jack)
COMPONENT IN (for X805C model
series)
YPBPR (Component Video): 1080p (50, 60 Hz),
1080i (50, 60 Hz), 720p (50, 60 Hz), 576p,
576i, 480p, 480i
Audio input (phono pin jack)
VIDEO IN 2
Video input (common phono pin with Y
input)
20
Page 21

HDMI IN 1/2/3/4 (for X807C model series)
(Support 4K resolution)
Video:
4096 × 2160p (60 Hz) *1*2, 4096 × 2160p
(24 Hz)*2, 3840 × 2160p (60 Hz)*1, 3840 ×
2160p (24, 30 Hz), 1080p (30, 60 Hz), 1080/
24p, 1080i (60 Hz), 720p (30, 60 Hz), 720/
24p, 480p, 480i, PC Formats
*1 YCbCr 4:2:0 / 8bit only
*2 3840 × 2160p is displayed when 4096 ×
2160p is input
Audio: 5.1 channel linear PCM: 32, 44.1, 48,
88.2, 96, 176.4 and 192 kHz, 16, 20 and 24
bits, Dolby Digital and DTS
ARC (Audio Return Channel) (HDMI IN 4 only)
HDMI IN 1/2/3/4 (for X805C model series)
(Support 4K resolution)
Video:
4096 × 2160p (50, 60 Hz)*1*2, 4096 × 2160p
2
(24 Hz)*
, 3840 × 2160p (50, 60 Hz)*1, 3840
× 2160p (24, 25, 30 Hz), 1080p (30, 50,
60 Hz), 1080/24p, 1080i (50, 60 Hz), 720p
(30, 50, 60 Hz), 720/24p, 576p, 576i, 480p,
480i, PC Formats
*1 YCbCr 4:2:0 / 8bit only
*2 3840 × 2160p is displayed when 4096 ×
2160p is input
Audio: 5.1 channel linear PCM: 32, 44.1, 48,
88.2, 96, 176.4 and 192 kHz, 16, 20 and
24 bits, Dolby Digital and DTS
ARC (Audio Return Channel) (HDMI IN 4 only)
MHL (common with HDMI IN 2) (for X807C
model series)
Video:
4096 × 2160p (24 Hz)*, 3840 × 2160p (24,
30 Hz), 1080p (30, 60 Hz), 1080/24p, 1080i
(60 Hz), 720p (30, 60 Hz), 720/24p, 480p,
480i
* 3840 × 2160p is displayed when 4096 ×
2160p is input
Audio: 5.1 channel linear PCM: 32, 44.1, 48,
88.2, 96, 176.4 and 192 kHz, 16, 20 and
24 bits, Dolby Digital and DTS
MHL (common with HDMI IN 2) (for X805C
model series)
Video:
4096 × 2160p (24 Hz)*, 3840 × 2160p (24,
25, 30 Hz), 1080p (30, 50, 60 Hz), 1080/24p,
1080i (50, 60 Hz), 720p (30, 50, 60 Hz), 720/
24p, 576p, 576i, 480p, 480i
* 3840 × 2160p is displayed when 4096 ×
2160p is input
Audio: 5.1 channel linear PCM: 32, 44.1, 48,
88.2, 96, 176.4 and 192 kHz, 16, 20 and
24 bits, Dolby Digital and DTS
DIGITAL AUDIO OUT (OPTICAL)
Digital optical jack (Two channel linear PCM,
Dolby Digital, DTS)
AUDIO OUT / (Stereo mini jack)
Headphone, Audio output, Subwoofer
CAM (Conditional Access Module) slot
(Only on limited region/country.)
1, 2, 3
USB port 1 and 2 support High Speed USB
(USB2.0).
USB port 3 supports Super Speed USB
(USB3.0).
LAN
10BASE-T/100BASE-TX connector
(Connection speed may differ depending on
the network environment. 10BASE-T/
100BASE-TX communication rate and
communication quality are not guaranteed
for this TV.)
Home Network
Refer to the Help Guide for supported
formats.
Others
Optional accessories
Touchpad Remote Control: RMF-TX100U
Wireless Subwoofer: SWF-BR100 (Only on
limited region/country/TV model.)
MHL Cable: DLC-M C10, DLC-MC 20, DLC-MC30
Operating temperature
0 ºC – 40 ºC
Power and others
Power requirement
110 V - 240 V AC, 50/60 Hz
Power consumption
in use
XBR-65X807C / 65X805C: 225 W
XBR-55X807C / 55X805C: 196 W
in standby*
Less than 0.5 W
Screen size (inches measured diagonally)
(Approx.)
XBR-65X807C / 65X805C:
163.9 cm / 64.5 inches (65 class)
XBR-55X807C / 55X805C:
138.8 cm / 54.6 inches (55 class)
Display resolution
3,840 dots (horizontal) × 2,160 lines (vertical)
Output Rating
USB 1
5 V, , 500 mA MAX
USB 2
5 V, , 500 mA MAX
US
21
Page 22
USB 3
5 V, , 900 mA MAX
MHL (HDMI IN 2)
5V, 1.5 A MAX
* Standby power consumption will increase
when your TV is connected to the network.
Dimensions (Approx.)
with stand
XBR-65X807C / 65X805C: 1,463 × 901 ×
306 mm
XBR-55X807C / 55X805C: 1,245 × 770 ×
246 mm
without stand
XBR-65X807C / 65X805C: 1,463 × 852 ×
81 mm
XBR-55X807C / 55X805C: 1,245 × 730 ×
80 mm
wall-mount hole pattern
300 × 300 mm
wall-mount screw size (mm)
M6 (length: see diagram on page 17.)
Mass (Approx.)
with stand
XBR-65X807C / 65X805C: 23.3 kg
XBR-55X807C / 55X805C: 18.4 kg
without stand
XBR-65X807C / 65X805C: 21.8 kg
XBR-55X807C / 55X805C: 17.3 kg
Note
• Do not remove the dummy card from TV CAM
(Conditional Access Module) slot other than to
insert a smart card fitted in CAM.
• Optional accessories availability depends on
countries/region/TV model/stock.
• Design and specifications are subject to change
without notice.
• This TV set incorporates MHL 3.
Licensing Information
• The terms HDMI and HDMI HighDefinition Multimedia Interface, and
the HDMI Logo are trademarks or
registered trademarks of HDMI
Licensing LLC in the United States and
other countries.
• Fergason Patent Properties, LLC:
U.S. Patent No. 6,816,141
• Manufactured under license from
Dolby Laboratories. Dolby and the
double-D symbol are trademarks of
Dolby Laboratories.
•“BRAVIA” and , S-Force,
Motionflow, BRAVIA Sync, and are
trademarks or registered marks of
Sony Corporation.
• Gracenote, Gracenote eyeQ, Gracenote
VideoID, Gracenote Video Explore, the
Gracenote logo and logotype, and the
“Powered by Gracenote” logo are
either registered trademarks or
trademarks of Gracenote in the United
States and/or other countries.
•Opera® Devices SDK from Opera
Software ASA. Copyright 1995-2014
Opera Software ASA. All rights
reserved.
• Wi-Fi, Wi-Fi Direct, Miracast and Wi-Fi
Protected Setup are trademarks or
registered trademarks of Wi-Fi
Alliance.
• MHL, Mobile High-Definition Link and
the MHL Logo are trademarks or
registered trademarks of MHL
Licensing, LLC.
• For DTS patents, see
http://patents.dts.com. Manufactured
under license from DTS, Inc.
DTS, the Symbol, & DTS and the
Symbol together are registered
trademarks, and DTS Digital Surround
is a trademark of DTS, Inc. © DTS, Inc.
All Rights Reserved.
• Designed with UEI Technology™ Under
License from Universal Electronics Inc.
Portions © UEI 2000 - 2014
22
Page 23
• The Bluetooth® word mark and logos
are owned by the Bluetooth SIG, Inc.
and any use of such marks by Sony
Corporation is under license. Other
trademarks and trade names are those
of their respective owners.
• TUXERA is a registered trademark of
Tuxera Inc. in the US and other
countries.
• USB-IF SuperSpeed USB Trident logo is
a registered trademark of USB
Implementers Forum, Inc.
US
23
Page 24
For Your Convenience
Online
Registration:
Software
Updates:
Be sure to register your TV.
http://esupport.sony.com/LA/perl/registration.pl
Your TV is capable of receiving software updates. For the
latest information about software updates for your TV, visit:
http://esupport.sony.com/LA/
NOTE: If your TV is connected to the Internet, you can check
for software updates by selecting [Help], [System software
update] and then [Check for a system software update].
©2015 Sony Corporation Printed in U.S.A. 4-576-187-E2(1)
 Loading...