

Page 1
2-178-013-12(1)
Radio Cassette-Corder
Operating instructions
WM-GX788
©2003 Sony Corporation Printed in China
“WALKMAN” is a registered trademark of Sony Corporation to represent Headphone Stereo
products.
is a trademark of Sony Corporation.
The validity of the CE marking is restricted to only those countries where it
is legally enforced, mainly in the countries EEA (European Economic Area).
WARNING
To prevent fire or shock hazard, do not expose
the unit to rain or moisture.
Do not install the appliance in a confined space, such as a bookcase or
built-in cabinet.
For customers in the United States
Owner’s Record
The model number is located on the front and the serial number is located
inside the cassette holder. Record these numbers in the space provided
below. Refer to them whenever you call upon your Sony dealer regarding
this product.
Model No. WM-GX788
Serial No.
Product registration
Please register this product on line at www.sony.com/productregistration.
<http://www.sony.com/productregistration>
Proper registration will enable us to send you periodic mailings about new
products, services, and other important announcements. Registering your
product will also allow us to contact you in the unlikely event that the product
needs adjustment or modification. Thank you.
INFORMATION
This equipment has been tested and found to comply with the limits for a Class B digital
device, pursuant to Part 15 of the FCC Rules. These limits are designed to provide reasonable
protection against harmful interference in a residential installation. This equipment generates,
uses, and can radiate radio frequency energy and, if not installed and used in accordance
with the instructions, may cause harmful interference to radio communications. However,
there is no guarantee that interference will not occur in a particular installation. If this
equipment does cause harmful interference to radio or television reception, which can be
determined by turning the equipment off and on, the user is encouraged to try to correct the
interference by one or more of the following measures:
– Reorient or relocate the receiving antenna.
– Increase the separation between the equipment and receiver.
– Connect the equipment into an outlet on a circuit different from that to which the receiver is
connected.
– Consult the dealer or an experienced radio/TV technician for help.
This device complies with Part 15 of the FCC Rules. Operation is subject to the following two
conditions:
(1) This device may not cause harmful interference, and
(2) this device must accept any interference received, including interference that may cause
undesired operation.
You are cautioned that any changes or modifications not expressly approved in this manual
could void your authority to operate this equipment.
A
B
C
D
AC-E15HG (not supplied)
CHG
DC IN 1.5 V
E
FWD (forward) side
REV (reverse) side
Plug in firmly.
VOL*
i
SET
MENU
FF/CUE
REW/REVIEW
Y•REPEAT**
x
HOLD
VOL
HOLD
F
ISS
MIC**
MENU
SET
REC
x
G
Side A
Tab for side A
* There is a tactile dot beside VOL on the main unit to show the direction to
turn up the volume.
**The button or jack has a tactile dot.
REW –
FF +
Y•x
Note
Tapes recorded with setting to
“
” cannot be played
properly on a cassette player/
tape recorder without this
function.
• To prevent fire, do not cover
the ventilation of the apparatus
with newspapers, table-cloths,
curtains, etc. And don’t place
lighted candles on the
apparatus.
• To prevent fire or shock
hazard, do not place objects
filled with liquids, such as
vases, on the apparatus.
• Certain countries may regulate
disposal of the battery used to
power this product. Please
consult with your local
authority.
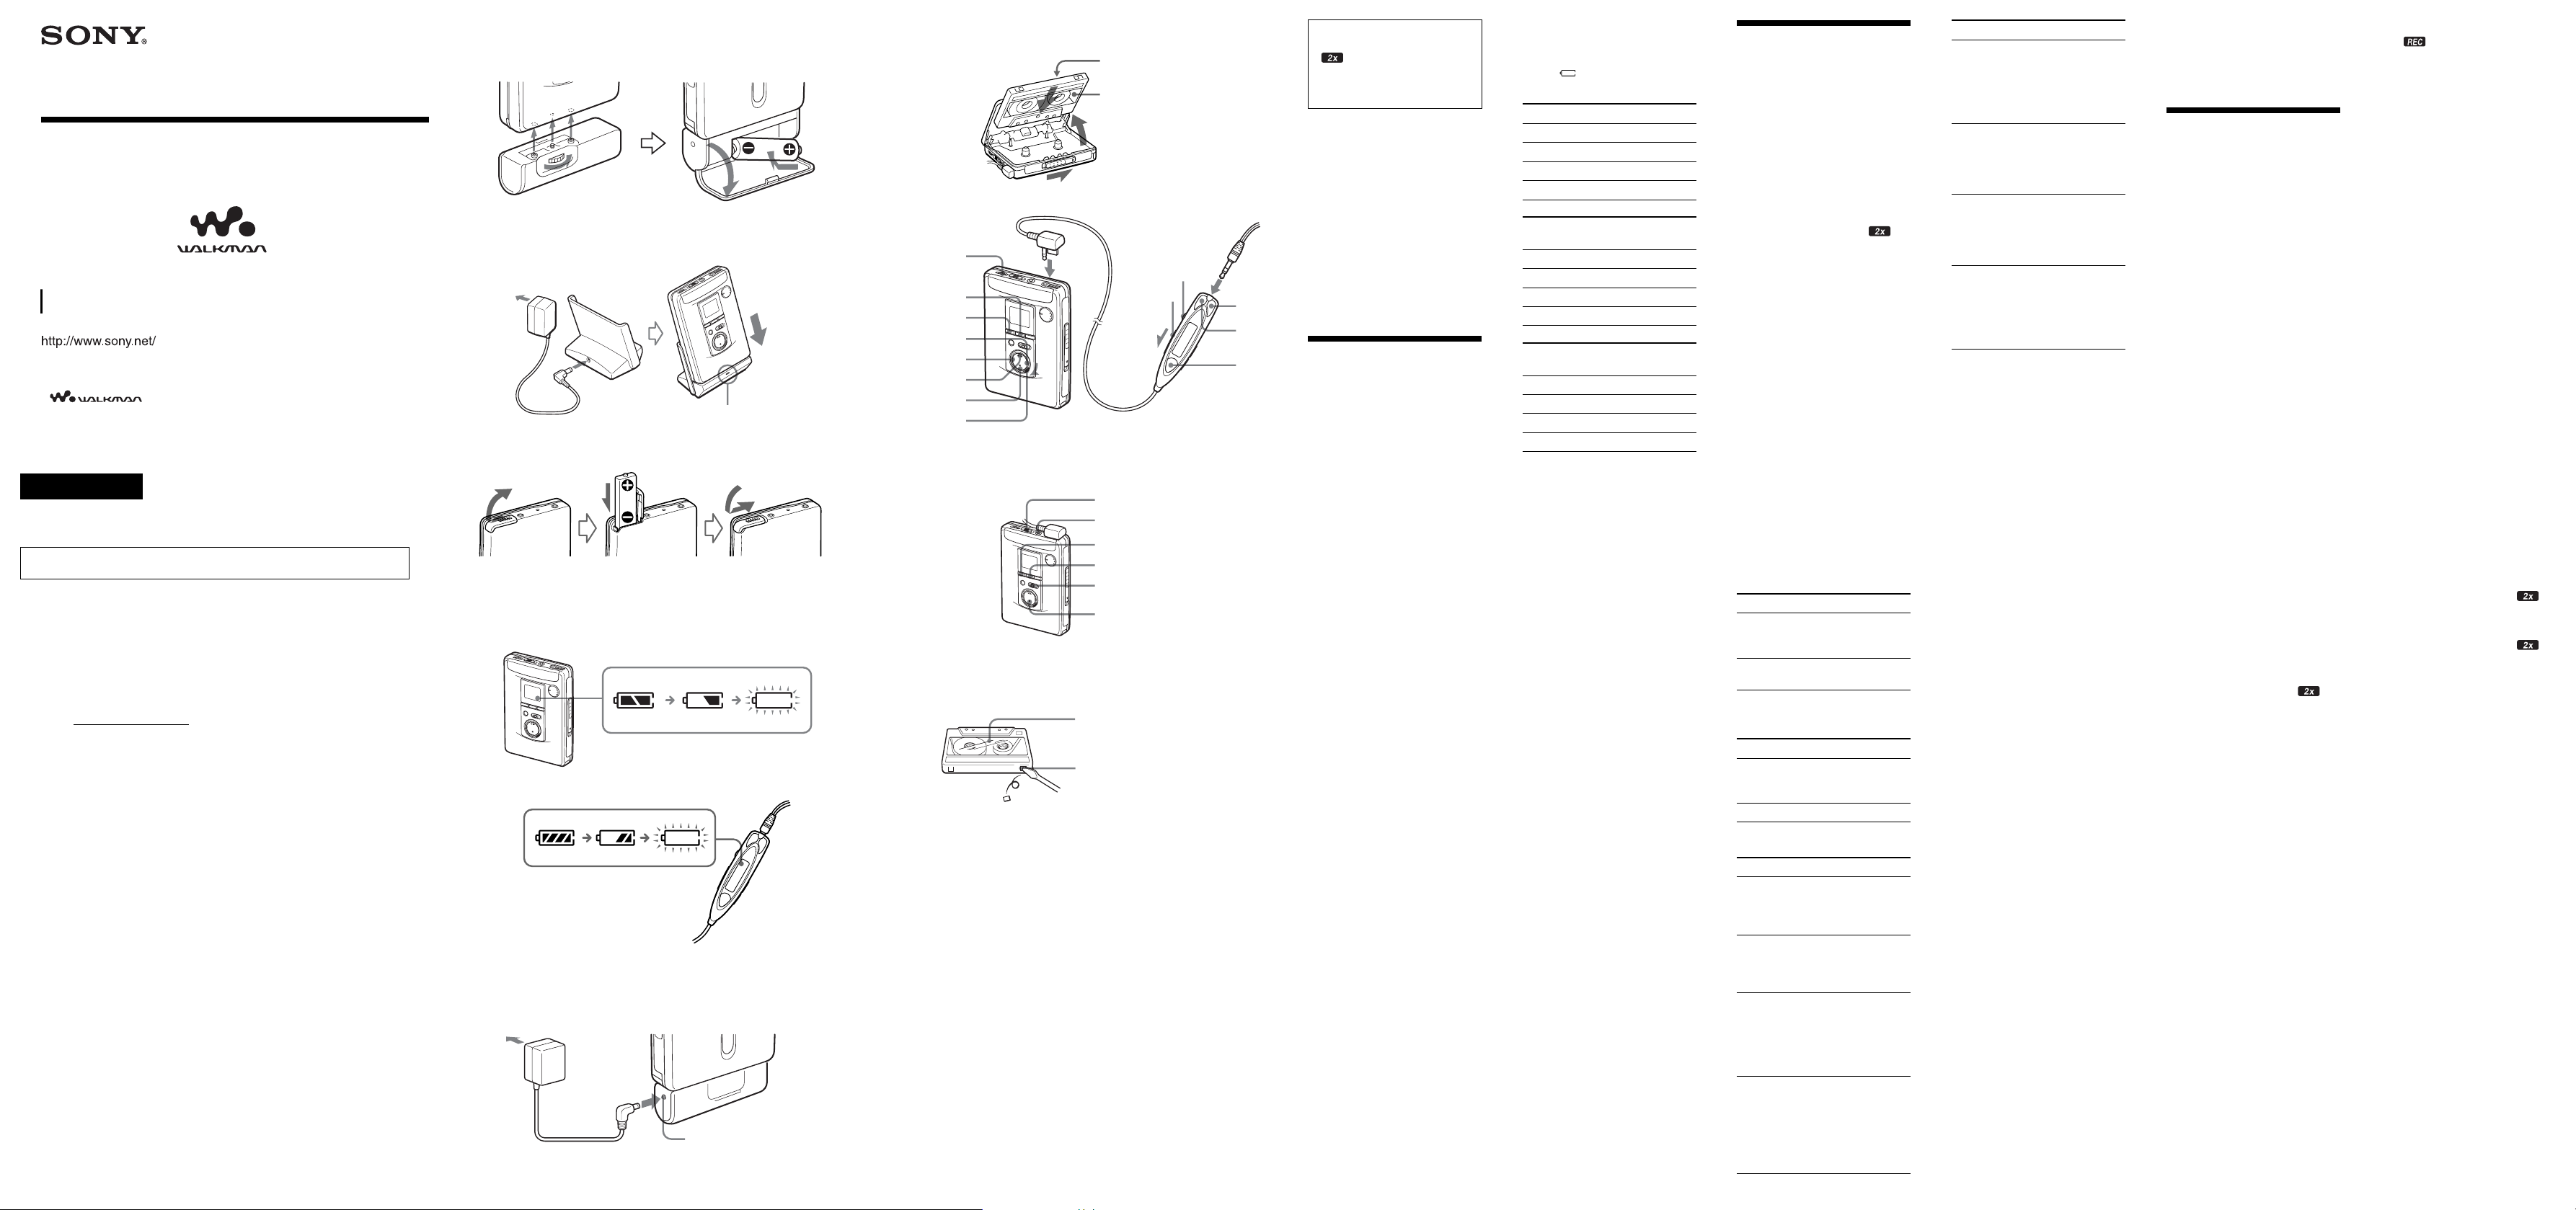
Preparations
Prepare a dry battery (not
supplied) or the rechargeable
battery (supplied).
Dry Battery A
Attach the supplied battery case,
and then insert one R6 (size AA)
battery with correct polarity.
Note
For maximum performance we
recommend that you use a Sony
alkaline battery.
Rechargeable Battery
B
Charge the rechargeable battery
before using it for the first time.
1 Insert the supplied
rechargeable battery NH14WM (A) into the
rechargeable battery
compartment with correct
polarity.
2 Connect the supplied AC
power adaptor to the charging
stand, plug in the AC power
adaptor to the house current
(mains).
If the plug does not fit to your
mains, attach the supplied AC
plug adaptor (Saudi Arabian
model only).
3 Place the main unit on the
charging stand.
The CHG lamp will light up.
Full charging takes about 6
hours.
The CHG lamp will go off
when the battery is fully
charged.
Note
Do not use the unit while charging.
Remove the unit from the charging
stand when using it.
– If you operate the unit while
charging, the battery will not be
charged.
– If you operate the unit while
charging, it may cause
malfunction.
– Do not place the unit on the
charging stand without the
rechargeable battery. Otherwise, it
may cause malfunction.
When to replace/
charge the battery C
Replace or charge the battery
when “ ” flashes in the display.
Battery life* (Approx. hours)
Sony alkaline LR6 (SG)**
Tape playback 44
Radio reception 56
MIC recording 15
Radio recording 12
Rechargeable battery
NH-14WM (A)
Tape playback 26
Radio reception 34
MIC recording 9
Radio recording 7
Sony alkaline LR6 (SG)** and
Rechargeable NH-14WM (A)
Tape playback 70
Radio reception 90
MIC recording 24
Radio recording 19
* Measured value by the standard
of JEITA (Japan Electronics and
Information Technology
Industries Association). (Using a
Sony HF series cassette tape)
** When using a Sony LR6(SG)
“STAMINA” alkaline dry battery
(produced in Japan).
Notes
• The battery life may be shorter
depending on the operating
condition, the surrounding
temperature and battery type.
• The AVLS setting (see “Using the
Menu”) will be cancelled when
you replace the battery.
House Current D
You must purchase an AC power
adaptor AC-E15HG to operate
this unit using house current.
Remove the rechargeable battery
if inserted. Attach the battery case
and connect the AC power
adaptor AC-E15HG (not supplied)
to the DC IN 1.5 V jack of the
battery case and to the wall outlet.
Do not use any other AC power
adaptor.
Specifications for AC-E15HG
vary for each area. Check your
local voltage and the polarity of
the plug before purchasing.
Playing a Tape
E
1 Insert a cassette and if the
HOLD function is on, slide
the HOLD switch in the
opposite direction of the
arrow to unlock the
controls.
2 Press MENU repeatedly to
set “__” (the cursor) in the
display to REC/PB. Then
press SET to select “
or none (normal speed)
which is the same position
as that used for recording.
To playback commercially
available music tape, etc.,
select normal (no
indication).
3 Press Y•REPEAT on the
main unit and adjust the
volume with VOL. (On the
remote control, press
Y(play)•x(stop).)
When adjusting the volume on
the remote control
Set the VOL control on the main
unit to around 6.
When adjusting the volume on
the main unit
Set the VOL control on the remote
control at maximum.
Operation on the remote
control
To P ress
Switch Y•x for 2
playback to seconds or more
the other side during playback
Stop playback Y•x once
during playback
Operation on the main
unit
To P ress
Switch Y•REPEAT
playback to during playback
the other side
Stop playback x (stop)
Other tape operations
To P ress
Fast forward* FF/CUE (FF +
on the remote
control) during
stop
Rewind* REW/REVIEW
(REW – on the
remote contorl)
during stop
Search forward Press and hold
during FF/CUE (FF +
playback on the remote
(CUE) control) and
release it at the
point you want.
Search Press and hold
backward REW/REVIEW
during (REW – on the
playback remote control)
(REVIEW) and release it at
the point you
want.
”
To P ress
Play the next FF/CUE (FF +
track/ on the remote
succeeding 9 control) once/
tracks from the repeatedly
beginning during playback
(AMS**)
Play the current REW/REVIEW
track/previous (REW – on the
8 tracks from remote control)
the beginning once/repeatedly
(AMS**) during playback
Play the other FF/CUE (FF +
side from the on the remote
beginning control) for 2
(Skip Reverse seconds or more
function) during stop
Play the same REW/REVIEW
side from the (REW – on the
beginning remote contorl)
(Rewind Auto for 2 seconds or
Play function) more during
stop
* Press Y•x on the remote
control during fast forward or
rewind to start playback.
**Automatic Music Sensor
A-B Repeat
A-B Repeat plays back repeatedly
any portion of the tape you
specified. Specify by tagging the
beginning (point A) and the end
(point B) of the portion during
playback.
On the main unit
1 Press Y•REPEAT for 2
seconds or more during
playback to tag point A.
“A-” will flash in the display of
the main unit.
2 Press Y•REPEAT again to
tag point B.
“A-B” will flash and the tape
will move rapidly to point A.
Then “REP” appears in the
display and the specified
portion is played repeatedly.
On the remote control
1 Press Y•x twice quickly
during playback to tag point A.
2 Press Y•x once more to tag
point B.
The tape will be rewound to
point A. Then the specified
portion is played repeatedly.
To stop the A-B Repeat
playback
Press Y•REPEAT on the main
unit.
On the remote control, press
Y•x.
To reset A-B Repeat
When you want to change a
specific portion, stop the A-B
Repeat playback and tag point A
and point B again.
Notes
• You cannot specify a repeat
portion that includes both sides of
the tape.
• You cannot specify a repeat
portion shorter than 2 seconds.
• After repeated operation, the
actual portion that is played back
may shift somewhat from the
exact portion specified with the
tags due to tape slack.
• A-B Repeat stops automatically
after repeating 50 times.
• Do not use the A-B Repeat
function with tapes longer than 90
minutes. If you do, the tape may
be damaged.
Recording F
You can record radio programs
from the built-in radio, or record
with the supplied microphone. In
either case, use a new or fully
charged battery.
Note
If the record-protect tab is broken,
you cannot record on that side.
1 Insert a normal (TYPE I)
tape.
To record on both sides
Insert the cassette with the
side to be first recorded on
as the FWD (forward)
side*.
* Make sure that “FWD” is
displayed. If not, press and
hold x until “REV” changes to
“FWD”.
To record on one side
only
Insert the cassette with the
side to be recorded on as
the REV (reverse) side**.
**Make sure that “REV” is
displayed. If not, press and
hold x until “FWD” changes
to “REV”.
Note
When the cassette holder is
opened, the direction of the tape
will be automatically set to
“FWD”.
2 Press MENU repeatedly to
set the cursor in the
display to REC/PB. Then
press SET to select “
or none (normal speed).
Normal (no indication)
(4.8cm/s): for optimum
sound. Recommended for
normal recordings.
2× (2.4cm/s): for double
recording time (for
example, 120 minutes
using both sides of a 60minute cassette). Suitable
for recording conferences,
dictations, etc. Not
recommended for
recording music.
3 Select a recording source:
To record with the
microphone
Connect the supplied
microphone to the MIC
(PLUG IN POWER) jack.
You can attach the
microphone to your
clothes.
To record from the radio
Tune in to the station you
want to record (see
“Listening to the Radio”).
”
4 Slide REC.
” appears in the
“
display and recording
starts after about 2
seconds.
If you have started
recording from the FWD
side, recording will switch
to reverse side
automatically at the end of
the FWD side.
To stop recording
Press x (on the remote control,
press Y•x to stop recording).
To reduce noise while
recording AM programs
Set the ISS (Interference Suppress
Switch) to the position that
reduces noise the most.
To monitor the recording
sound
You can monitor the recording
sound through headphones/
earphones. Adjust monitoring
level using VOL.
Note
You may hear some noise in the
monitor sound in the RV, MB, or
GRV mode (see “Using the Menu”),
but this does not affect recording.
Notes on recording
• The recording level is fixed.
• Sound emphasis (RV, MB, or
GRV) and AVLS settings do not
affect recording.
• Actual recording will start about 2
seconds (3 seconds when “ ”
is selected for recording time)
after you slide the REC button.
Slide the REC button about 2
seconds (3 seconds when “ ”
is selected for recording time)
before the moment you want to
start recording, or you will miss
the beginning of your recording.
• When recording on both sides,
recording will not be made for
about 10 seconds while the tape is
switching sides.
• Do not use a high-position (TYPE
II) or metal (TYPE IV) tape. If you
do, the sound may be distorted
when you play back the tape, or
the previous recording may not be
erased completely.
• Do not connect or disconnect the
headphones/earphones to/from
i while recording from the radio.
The recording condition may
change abruptly, or noise may be
recorded.
• To avoid noise interference, do
not place it near a lamp cord or a
fluorescent lamp when recording
with the microphone.
• If a howling effect occurs, turn
down the volume.
• All other operation cannot be
made while recording. For other
operation, stop recording first.
To prevent a tape from
being accidentally
recorded over
Break off the tabs from side A
and/or B. To reuse the tape for
recording, cover the tab hole with
adhesive tape.
G
(turn over)
Page 2
H
ENTER
SET
MENU
RADIO ON/BAND
TUNE/PRESET –/+
RADIO OFF
I
SPEED
CONTROL
MENU
ENTER/
COUNTER RESET
J
Terminals
HOLD
Terminals
HOLD
RADIO ON/BAND
OFF
Terminals
FF +
REW –
Tape counter
SOUND
MODE
Listening to the
Radio
1 Press RADIO ON/BAND
to turn on the radio.
2 Press RADIO ON/BAND
repeatedly to select AM or
FM.
3 Press MENU on the main
unit repeatedly and set the
cursor in the display to
TUNE MODE.
4 For manual tuning
1 Press SET to choose
2 Press TUNE/PRESET +
For preset tuning
1 Press SET to choose
2 Press TUNE/PRESET +
To turn off the radio
Press RADIO OFF .
To improve the broadcast
reception
• For AM: Reorient the unit
itself.
• For FM: Extend the remote
control cord (antenna). If the
reception is still not good,
press MENU repeatedly to set
the cursor in the display to FM
MODE. Then press SET to
choose from “MONO”
(monaural), “LOCAL*” or none
(stereo) for best reception.
* Excluding European, Saudi
Arabian, and Chinese models
To operate from the
remote control
To turn on the radio, press
RADIO ON/BAND•OFF for
more than 1 second (while the
tape is in stop mode only).
To select the band, press RADIO
ON/BAND•OFF for more than 1
second while the radio is on.
To tune in or recall a preset
station, press FF + or REW –.
To turn off the radio, press
RADIO ON/BAND•OFF.
H
MANUAL.
or – repeatedly to tune
in to the desired station.
Hold down TUNE/
PRESET + or – for a few
seconds to scan for
stations.
PRESET.
or – repeatedly to recall
the desired preset
station.
To use preset tuning,
preset stations first (see
“Presetting Radio
Stations”).
Presetting Radio
Stations
You can preset up to 30 stations—
20 for FM and 10 for AM (for the
JPn area*, up to 16 stations—8 for
FM and 8 for AM).
* Only if available. See “Receiving
Stations Outside Your Country/
Region”.
Presetting
Automatically Scanned
Stations
1 Press RADIO ON/BAND
to turn on the radio.
2 Press RADIO ON/BAND
repeatedly to select AM or
FM.
3 Press and hold ENTER for
more than 3 seconds.
Preset number 1 will flash
in the display and the main
unit starts scanning the
stations from the lower
frequencies and stops for
about 5 seconds when a
station is received.
4 If you wish to preset the
currently received station,
press ENTER while the
preset number is flashing.
The received station is
preset on preset number 1
and the unit starts
scanning for the next
receivable station.
5 Repeat step 4 until all
receivable stations are
preset.
To stop scanning
Press RADIO OFF. The radio is
turned off at the same time.
Notes
• If stations are already stored, the
newly preset stations replace the
old ones when the above
procedure is completed.
• If stations cannot be preset
automatically, preset them
manually.
Presetting Stations
Manually
1 Press RADIO ON/BAND
to turn on the radio.
2 Press RADIO ON/BAND
repeatedly to select AM or
FM.
3 Press ENTER.
The frequency digits will
flash in the display.
4 While the frequency digits
are flashing, tune in to a
station you wish to store
using TUNE/PRESET + or
– and press ENTER.
The preset number will
flash in the display.
H
5 While the preset number is
flashing, select the preset
number you want using
TUNE/PRESET + or – and
press ENTER.
Notes
• If you cannot complete step 4 or 5
while the indicators are flashing,
repeat from step 3.
• If a station is already stored, the
new station replaces the old one.
Playing the Preset
Radio Stations
1 Press RADIO ON/BAND
to turn on the radio.
2 Press RADIO ON/BAND
repeatedly to select AM or
FM.
3 Press MENU repeatedly to
set the cursor in the
display to TUNE MODE.
Then press SET to display
“PRESET”.
4 Press TUNE/PRESET +
or –.
To cancel a stored station
1 Follow the procedure above
and in step 4, select the preset
number you want to cancel and
then press ENTER. The
frequency digits will flash in
the display.
2 Press and hold TUNE/PRESET
+ or –. The frequency digit
starts running up or down.
Keep holding down the button
until “- - - -” is displayed.
3 Press ENTER while “- - - -” is
flashing. A preset number will
flash in the display.
4 Press ENTER to cancel the
stored station.
Scanning the Preset
Radio Stations — DAPS
(Digital Auto Preset Scanning)
1 Press RADIO ON/BAND
to turn on the radio.
2 Press RADIO ON/BAND
repeatedly to select AM or
FM.
3 Press and hold RADIO
ON/BAND for 2 seconds
or more.
The preset stations of the
selected band will be
played for about 5 seconds
each. (During DAPS the
indicators in the display
flash.)
4 Press RADIO ON/BAND
again to select the station
while the desired preset
station is being played.
Notes
• If there are no stations stored, the
DAPS function does not work.
• Until a station is selected in step 4,
the DAPS function turned on in
step 3 will continue.
Receiving
Stations Outside
Your Country/
Region
European, Saudi
Arabian, and Chinese
models)
1 Press RADIO ON/BAND
to turn on the radio.
2 Press ENTER.
The frequency digits will
flash in the display.
3 Press and hold RADIO
ON/BAND until “Eur”,
“USA” or “JPn” flashes.
4 Press RADIO ON/BAND
repeatedly to select “Eur”,
“USA” or “JPn” and press
ENTER.
5 Tune in to and store
stations as necessary
following the procedure of
“Listening to the Radio”
and “Presetting Radio
Stations”.
Area indication and
frequency range
Area* Frequency range
Eur 87.5
USA 87.5
JPn 76.0
* Eur : European and other
USA :USA, Canada, and Central
JPn: Japan
(Excluding
FM (MHz) AM(kHz)
-
108 531
-
108 530
-
90.0 531
countries/regions
and South America
-
-
-
1 602
1 710
1 710
Using the Menu
I
Adjusting Playback
Modes
On the main unit:
Press MENU repeatedly to set
the cursor in the display to PB
MODE. Then press SET to select
the desired mode.
On the remote control:
Press MODE repeatedly. With
each press, the indications
change.
To play Select
both sides repeatedly s
both sides once d
from the FWD side
Emphasizing Sound
On the main unit:
1 Press MENU repeatedly to set
the cursor in the display to
SOUND.
2 Press SET repeatedly to select
the sound emphasis of your
choice.
On the remote control:
1 Press SOUND repeatedly. With
each press, the indications
change.
The indications change as
follows:
RV : Sound Revitalizer
Emphasizes treble sound.
MB : Mega Bass
Emphasizes bass sound
(moderate effect).
GRV : Groove
Emphasizes bass sound
(strong effect).
no message : normal (no effect)
Note
If the sound is distorted with the
mode “GRV”, turn down the
volume of the main unit or select
other modes.
Protecting Your
Hearing — AVLS
(Automatic Volume
Limiter System)
The maximum volume is kept
down to protect your ears.
On the main unit:
Press MENU repeatedly in the
playback, stop or radio mode to
set the cursor in the display to
AVLS. Then press SET to show
“ ”.
On the remote control:
Hold down MODE for more than
10 seconds until “AVLS” appears
in the display.
To cancel the AVLS
function
Press SET so that “ ” disappears
from the display on the main
unit.
On the remote control, hold
down MODE again for more than
3 seconds until “AVLS”
disappears.
Using Other
Functions
Adjusting the Tape
Playback Speed
You can adjust the playback
speed using SPEED CONTROL.
Turn SPEED CONTROL to:
– (slow) to play back at a slower
speed.
Center position to play back at
normal speed.
+ (fast) to play back at a faster
speed.
Note
The SPEED CONTROL works in the
playback mode only. Recording will
be made independent of this
control.
I
Locking the Controls
— HOLD Function
Slide the HOLD switch in the
direction of the arrow to lock the
controls of the main unit (except
SPEED CONTROL) or the remote
control.
Using the Tape
Counter
The tape counter is displayed on
the main unit during playback,
recording, fast forward, rewind,
CUE, REVIEW and stop (except
when the radio is turned on). The
number will increase when
playing back the FWD side, and
decrease when playing back the
REV side. To reset the counter to
“000”, press ENTER/COUNTER
RESET.
Notes
• The tape counter may show some
deviation.
• The tape counter will not be
displayed when the cassette
compartment is empty.
Precautions
For the customers in the USA and
Canada
RECYCLING NICKEL METAL HYDRIDE
BATTERIES
Nickel Metal Hydride batteries
are recyclable.
You can help preserve our
environment by returning your
used rechargeable batteries to
the collection and recycling
location nearest you.
For more information regarding recycling of
rechargeable batteries, call toll free 1-800822-8837, or visit http://www.rbrc.org/.
Caution: Do not handle damaged or leaking
Nickel Metal Hydride batteries.
On charging
• The supplied charging stand can be
used only with this unit. No other
model can be charged using this stand.
• Remove the AC power adaptor from
the wall outlet as soon as possible after
the rechargeable battery has been
charged. Overcharging may damage
the rechargeable battery.
• The charging stand and the
rechargeable battery may become
warm during charging, but this is not a
problem.
• Do not tear off the film on the
rechargeable battery.
• Use only the supplied charging stand to
charge the supplied rechargeable
battery.
• Be sure not to short-circuit the battery.
When you carry it with you, use the
supplied carrying case. If you are not
using the case, do not carry the battery
with other metallic objects such as keys,
rings in your pocket.
• If the rechargeable battery is new or has
not been used for a long time, it may
not be charged completely until you
use it several times.
On batteries
• Do not charge a dry battery.
• Do not carry the dry or rechargeable
batteries with coins or other metallic
objects. It can generate heat if the
positive and negative terminals of the
batteries are accidentally contacted by a
metallic object.
• When you do not use the main unit for
a long time, remove the battery to
avoid any damage caused by battery
leakage and subsequent corrosion.
On AC power adaptor
• Use only the supplied AC power
adaptor (for charging stand) and
recommended AC power adaptor (for
battery case). Do not use any other AC
power adaptor.
Polarity of
the plug
• Connect the AC power adaptor to an
easily accessible AC outlet. Should you
notice an abnormality in the AC power
adaptor, disconnect it from the AC
outlet immediately.
• Do not touch the AC power adaptor
with wet hands.
On handling
• Do not leave the unit in a location near
heat sources, or in a place subject to
direct sunlight, excessive dust or sand,
moisture, rain, mechanical shock, or in
a car with its windows closed.
•We do not recommend the use of tape
longer than 90 minutes. They are very
thin and tend to be stretched easily.
This may cause malfunction of the unit
or sound deterioration.
• The LCD display may become hard to
see or slow down when using the unit
at high temperatures (above 40˚C/
104°F) or at low temperatures (below
0˚C/32°F). At room temperature, the
display will return to its normal
operating condition.
• If the unit has not been used for long,
set it in the playback mode to warm up
for a few minutes before you start using
again.
On the remote control
Use the supplied remote control only
with this unit.
On headphones/
earphones
Road safety
Do not use headphones/earphones while
driving, cycling, or operating any
motorized vehicle. It may create a traffic
hazard and is illegal in some areas. It can
also be potentially dangerous to play
your headphones/earphones at high
volume while walking, especially at
pedestrian crossings.
You should exercise extreme caution or
discontinue use in potentially hazardous
situations.
Preventing hearing
damage
Do not use headphones/earphones at
high volume. Hearing experts advise
against continuous, loud and extended
play. If you experience a ringing in your
ears, reduce volume or discontinue use.
Caring for others
Keep the volume to a moderate level.
This will allow you to hear outside
sounds and to be considerate to the
people around you.
On maintenance
• Clean the tape head and tape path,
using a cotton swab and commercially
available cleaning solvent after every 10
hours of use.
•To clean the exterior, use a soft cloth
slightly moistened in water. Do not use
alcohol, benzine or thinner.
• Clean the headphones/earphones and
remote control plugs periodically.
• Clean the battery case terminals (both
inside and outside) and the terminals
periodically with a cotton swab or soft
cloth as illustrated.
J
Troubleshooting
The sound drops out or comes
with excessive noise.
• Clean the headphones/earphones
and remote control plugs.
The unit does not operate at all.
• Charge the battery or replace the
dry battery with a new one.
• HOLD is activated. Deactivate
HOLD.
Tape operation is not possible.
• Insert a cassette tape.
The volume cannot be turned up.
• If AVLS is on, turn it off.
A beep sounds and recording is
not possible when REC is slid.
• If the tab of the tape is broken off,
cover the tab hole with adhesive
tape.
The display and the operations
are not normal.
• Remove the power sources for 15
seconds or more, and then set
them again.
The radio and playback operates
but recording is not possible.
• This condition may occur when
the battery becomes weak.
Replace or charge the battery.
This warranty is valid only in the United States.
Specifications
Radio section
Frequency range
FM: 76.0 - 90.0 MHz (Japan)
87.5 - 108 MHz (other
countries/regions)
AM: 531 - 1 710 kHz (Japan)
530 - 1 710 kHz (North, Central,
and South America)
531 - 1 602 kHz (other
countries/regions)
Tape section
Frequency response
Playback: 40 - 15 000 Hz
Recording/playback: 100 - 8 000 Hz
Output
Headphones (i) jack
Load impedance 8 - 300 Ω
Input
Microphone (MIC) jack
General
Power requirements
1.5 V
Rechargeable battery
One R6 (size AA) battery
Dimensions (w/h/d)
Approx. 77.1 × 108.0 × 22.5 mm
1
(3
⁄8 × 43⁄8 × 29⁄32 inches) excl. projecting
parts and controls
Mass
Approx. 152 g (5.4 oz) (main unit only)
Supplied accessories
AC power adaptor (1)
Battery case (1)
Stereo headphones or earphones with
remote control (1)
Charging stand (1)
AC plug adaptor (1) (Saudi Arabian
model only)
Rechargeable battery (NH-14WM(A),
1.2 V, 1 350 mAh (min), Ni-MH) (1)
Rechargeable battery carrying case (1)
Carrying pouch (1)
Stereo microphone (1)
Design and specifications are subject to
change without notice.
 Loading...