

Page 1
3-255-271-12 (1)
ラジオカセットコーダー
取扱説明書
Operating Instructions
お買い上げいただきありがとうございます。
電気製品は安全のための注意事項を守らないと、
火災や人身事故になることがあります。
この取扱説明書と別冊の「安全のために」をよくお読みのうえ、製品
を安全にお使いください。
お読みになったあとは、いつでも見られるところに必ず保管してく
ださい。
ウォークマン、
すソニー株式会社の登録商標です。
はソニー株式会社の商標です。
WALKMAN
(page 52)
はヘッドホンステレオ商品を表
WM-GX788
©2003 Sony Corporation
Page 2
安全のために
充電スタンドにコイン、キー、ネックレスなどの金属類を置かないでくださ
•
い。充電スタンドの端子が金属とつながるとショートし、発熱することがあり
ます。
付属の充電式電池を持ち運ぶときは、必ず付属の充電池ケースに入れてくだ
•
さい。ケースに入れずにコイン、キー、ネックレスなどの金属類と一緒に
携帯・保管すると、電池の+と−がショートし、発熱することがあります。
乾電池や乾電池ケースはコイン、キー、ネックレスなどの金属類と一緒に
•
携帯・保管しないでください。乾電池の+と−、または乾電池ケースの端子が
金属でつながるとショートし、発熱することがあります。
ご注意
録り直しのきかない録音の場合は、必ず事前にためし録りをして
•
ください。
ラジオカセットコ−ダ−の不具合により録音されなかった場合の
•
録音内容の補償については、ご容赦ください。
あなたが録音したものは、個人として楽しむなどのほかは、著作
•
権法上、権利者に無断では使用できません。
2
Page 3

目次
主な特長.............................................................................................................
付属品を確かめる ..............................................................................................
準備する.............................................................................................
録音する.............................................................................................
テープを聞く ...................................................................................
ラジオを聞く ...................................................................................
テープを聞く−応用
本体で操作する ..........................................................................................
好きな曲を頭出しする(
テープ走行のしかたを選ぶ(
テープの再生スピードを調節する(スピードコントロール)....................
指定した区間を繰り返し聞く(
テープカウンターを使う............................................................................
ラジオを聞く−応用
自分で周波数を合わせて聞く(マニュアル選局)......................................
いつも聞く放送局を記憶させてから聞く(プリセット)............................
記憶させた放送局を聞く(プリセット選局)..............................................
ラジオを聞くときのご注意 ........................................................................
海外でラジオを聞く ...................................................................................
その他の機能を使う
高音または低音を強調する(
音もれを抑え耳にやさしい音にする(
誤操作を防ぐ(ホールド機能)...................................................................
電源
乾電池・充電式電池の取り替え時期は ......................................................
コンセントにつないで使う ........................................................................
その他
お手入れ .....................................................................................................
使用上のご注意 ..........................................................................................
故障かな? .................................................................................................
保証書とアフターサービス ........................................................................
主な仕様 .....................................................................................................
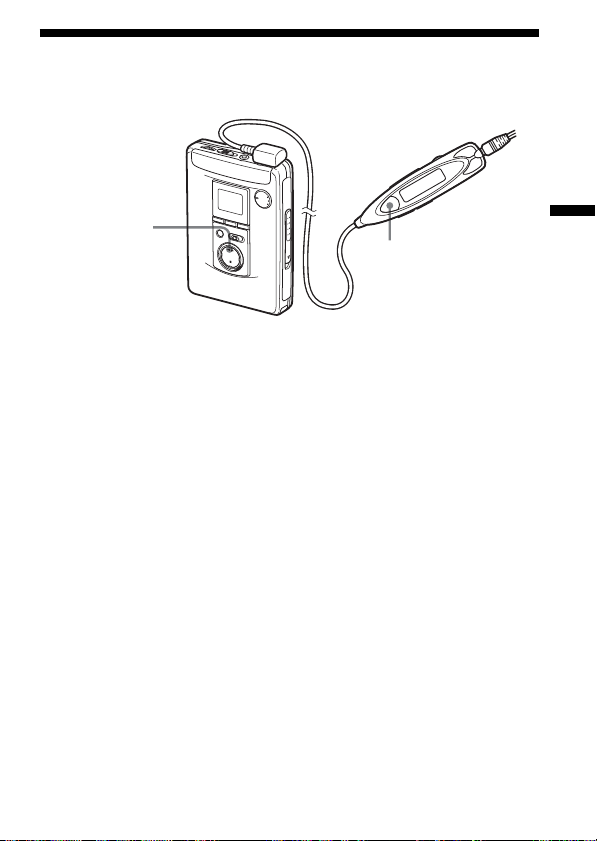
各部のなまえ..............................................................................................
−オートミュージックセンサー)...............
AMS
PB MODE
SOUND
).................................................
区間リピート)...................................
A-B
)....................................................
−快適音量).........................
AVLS
4
5
6
8
13
16
19
20
21
22
23
25
26
27
30
32
33
34
35
36
37
39
40
41
44
46
47
48
3
Page 4
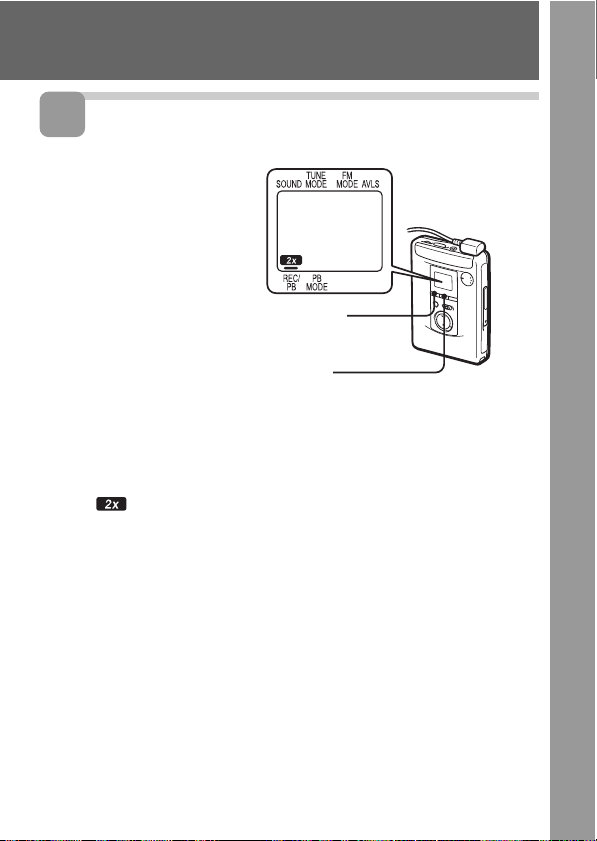
主な特長
テープの再生スピードを約+
•
りできる、再生スピード調整機能(スピードコントロール)。(22ペー
ジ)
テープ速度を半分にしてテープを2倍の時間使える、録音/再生時間2×
•
(2倍)モード。おけいこや、語学学習にたいへん便利です。(9ページ)
聞きたいところをすぐに見つけられる、キュー&レビュー。
•
付属のステレオマイクまたはラジオからの、オートリバース録音機能。
•
(8ページ)
テープに合わせて選べる3種類の音質、
•
グルーブ
GROOVE
•16
充電式電池と乾電池の併用で、約70時間の長時間再生ができる、スタミ
•
ナタイプ。(38ページ)
使いやすい、バックライト付き液晶リモコン。
•
語学学習に威力を発揮する、
•
テープカウンター表示。(25ページ)
•
本機の2倍モード(
カセットプレーヤー/テープレコーダーでは正しく再生できません。
。(34ページ)
倍速の高速サーチで、前後9曲の頭出しをする
2.4cm/s
20%
〜約−
の範囲で速めたり遅めた
15%
リバイブ
メガベース
REVIVE、MEGA BASS
。(20ページ)
AMS
区間リピート機能。(23ページ)
A-B
)で録音したテープは、2倍モードのない
、
4
Page 5

付属品を確かめる
●充電スタンド
●充電池ケース ●乾電池ケース
●キャリングポーチ
●ACプラグアダプター
●ACパワーアダプター
充電スタンド用
(
●ステレオマイク
●取扱説明書
●ソニーご相談窓口のご案内
●保証書
●充電式ニッケル
)
水素電池
NH-14WM (A)
●リモコンつきヘッドホン
(リモコン)
5
Page 6
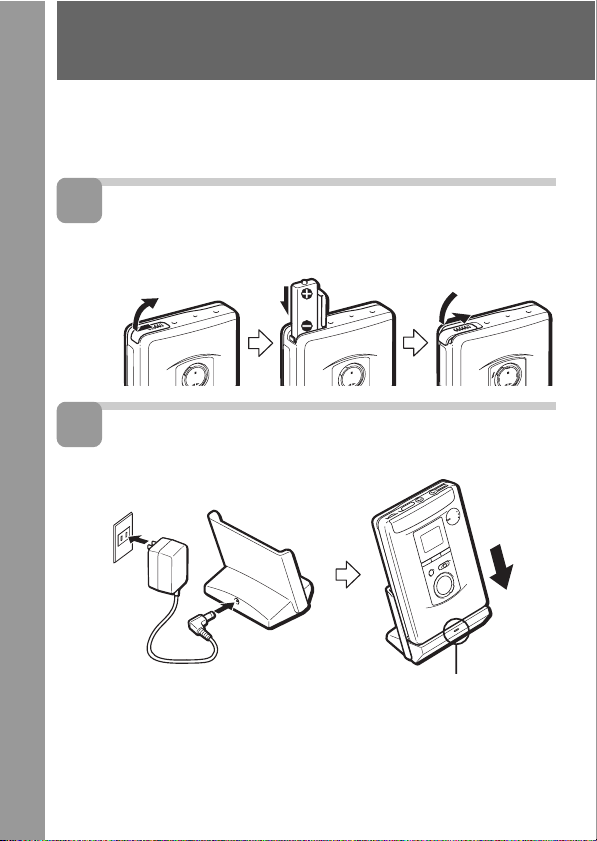
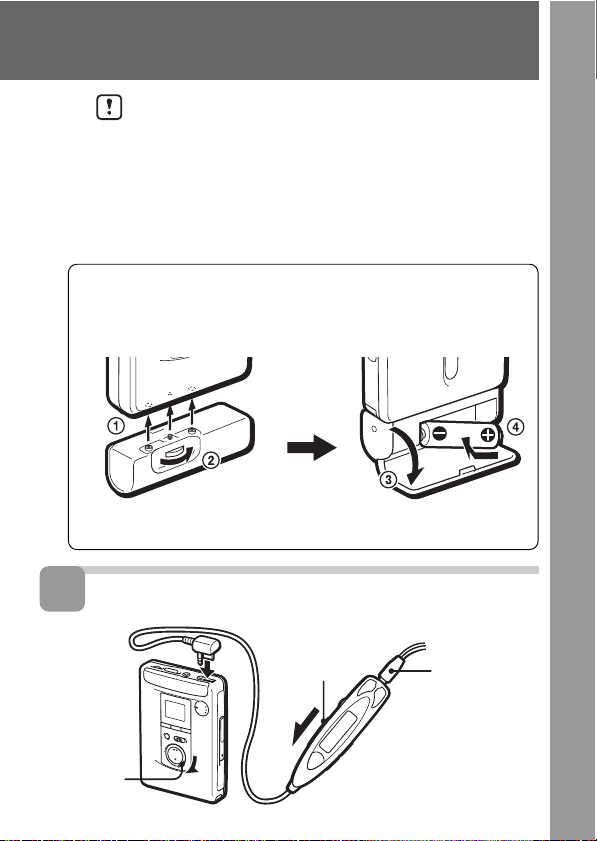
準備する
お買い上げ時には、充電式電池をまず充電してください。
コンセントでの使いかたは、「コンセントにつないで使う」(39ページ)を
ご覧ください。
1
充電式電池を本体に入れる
#側を奥にして
入れる
2
充電する
パワーアダプター(付属)
AC
CHG
ことを確認してください
充電スタンド用ACパワーアダプターがコンセントと合わないと
きは、ACプラグアダプターをお使いください。
約6時間で充電が完了し、ランプが消えます。
6
ランプが点灯した
Page 7
充電中は使用しないでください。ご使用になるときは充電ス
タンドからはずしてください。
充電スタンドにのせたまま操作をすると充電式電池が充電されませ
•
ん。
充電スタンドにのせたまま操作をすると正しく動作しない場合があ
•
ります。
本体に充電式電池を入れずに充電スタンドにのせないでください。
•
正しく動作しない場合があります。
乾電池で使うときは
別売りのソニーアルカリ乾電池(単3形)を1本入れます。
充電式電池と一緒に使うと長時間再生ができます。
乾電池ケースを 図のように必ず#側から
本体に取り付ける 入れてください
3
リモコンをつなぎ、ホールドを解除する
HOLD
i ヘ
HOLD
ヘッドホンの
ステレオミニ
プラグをリモ
コンにしっか
り差し込む
7
Page 8
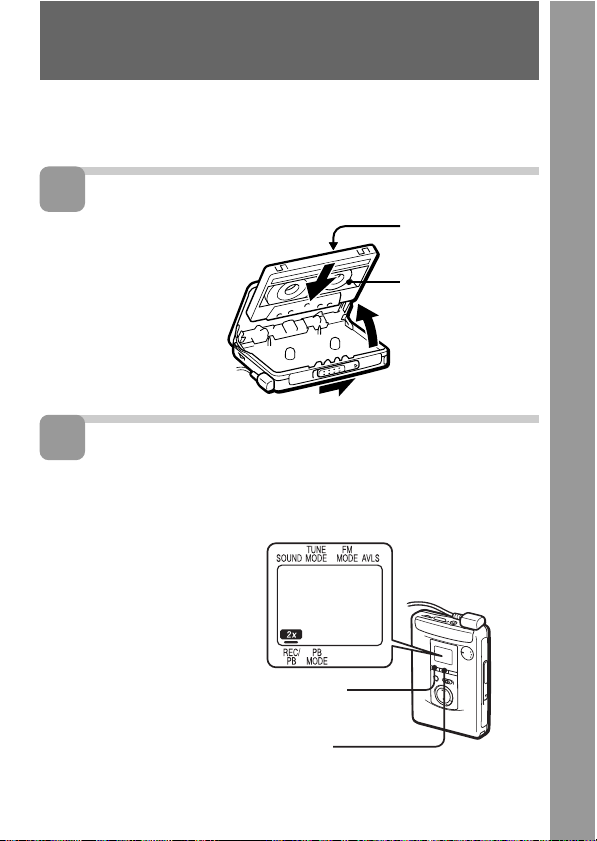
録音する
オートリバース録音ができます。
録音には、
ご注意
ツメが折れている面には録音できません。(「大切な録音を守るには」(12ペー
•
ジ)参照)
録音するときは、なるべく新しい乾電池や充分に充電した充電式電池をお使い
•
ください。
本機の2倍モード(
•
プレーヤー/テープレコーダーでは正しく再生できません。
1
カセットを入れる
1
(ノーマル)テープをお使いください。
TYPE I
2.4 cm/s
つまみを
OPEN
矢印の方向に
ずらす
)で録音したテープは、2倍モードのないカセット
ふた側(
本体側(
FWD
REV
)
)
2ふたが少し開い
たら、手でふた
を開ける
録音する面 カセットの入れかた 走行方向表示
両面を続けて 録音を始めたい面がふた側になる
録音するとき ようにカセットを入れる。
片面だけに録音 録音したい面が本体側になるように
したいとき カセットを入れる。
カセットぶたを開けると、テープの走行方向は自動的に
ます。片面だけに録音するときは、表示が
タンを押したままにします。
FWDからREV
3テープのたるみを
取ってからテープ
側を奥にして奥ま
で確実に入れる
FWD
REV
に設定され
FWD
になるまでxボ
8
Page 9
2
録音時間を選ぶ
1
2
標準(表示なし): 通常の録音をするとき。
(
4.8cm/s
(
2.4cm/s
ボタンを繰り返し押して、
MENU
カーソルを
SET
換える
(2倍モード): テープ速度を半分にして2倍の時間録音をす
REC/PB
ボタンを押して表示を切り
)「
) るとき。
に合わせる
倍モード」のときより良い音で録音できま
2
す。
会議、口述、メモ録音などに適しています。
音楽の録音にはおすすめできません。
(60分テープを使うと、両面で
音ができます。)
120
(次ページへつづく)
分間の録
9
Page 10

録音する(つづき)
3
音源を選ぶ
マイク録音の場合
マイクをつなぐ
ラジオ録音の場合
1リモコンつきヘッドホンの 2受信する(「ラジオを聞く」
コードがFMのアンテナに (16ページ)参照)
なっています。
ENTER
RADIO ON/BAND
MIC
へ
4
録音を始める
スイッチを
REC
ずらす
表示窓に「 」が表示されます。
(リモコンでは、ラジオ録音時は「
されます。)
10
TUNE/PRESET−/
」と周波数が交互に表示
REC
+
Page 11

録音を止めるには
xボタンまたはリモコンのY•xボタンを押します。
を録音中に「ピー」という雑音が聞こえたら
AM
本体側面の
スイッチを、雑音が消える位置(1、2または3)に切り換えます。
ISS
テープが終わりまでくると
ふた側(
り、
REV
み録音)。
側)から録音を始めたときは、自動的に本体側(
FWD
側の面の終わりまで録音して自動的に止まります(両面録音)。また、
REV
側から録音を始めたときはその面の終わりで自動的に止まります(片面の
側)に切り換わ
REV
録音レベルについて
録音レベルは一定です。録音される音は、
の設定に影響されません。* 「その他の機能を使う」(34ページ)参照。
AVLS*
つまみや音質(
VOL
RV/MB/GRV)*
録音中の音を聞くときは
録音中の音はヘッドホンで聞く(モニターする)ことができます。モニター音は
•
つまみで調節できます。
VOL
録音中の音を聞くときは、録音を始める前に音質の設定を通常の音質(表示な
•
し)にしておくことをおすすめします。「RV」、「MB」または「
るとモニター音に雑音が入ることがありますが、録音される音には影響ありま
せん。
GRV
」になってい
録音についてのご注意
停止状態またはラジオ受信状態でないと、録音は始まりません。
•
録音中は録音面を切り換えることはできません。
•
スイッチは録音開始の2秒くらい前に操作してください。直前に操作する
• REC
と最初の部分が録音されません。
電池が消耗すると、録音に雑音が入ったり、性能を充分に発揮できないことが
•
あります。このような場合、なるべく早めに乾電池は新しいソニーアルカリ乾
電池と交換し、充電式電池は充電して録音を開始してください。
録音するテープには
•
ハイポジションテープやメタルテープを使うと、再生する音がひずんだり、前
の録音が消えずに残ったりすることがあります。
(ノーマル)テープをお使いください。
TYPE I
(次ページへつづく)
、
11
Page 12
録音する(つづき)
ラジオから録音するときは、録音中にヘッドホンの抜き差しをしないでくださ
•
い。
両面録音時は、
•
れます。
録音中は、停止とカウンターリセット(25ページ)以外の操作はできません。
•
マイク録音について
ヘッドホンで録音モニター中に音量を上げると、その音をマイクが拾い、
•
ピーッという音(ハウリング)が生じることがあります。この場合には、音量を
下げてください。
付属のマイクは、本機につなぐと電源が本機から供給されるプラグインパワー
•
方式です。
録音中、マイクを電灯線や蛍光灯に近づけすぎると、ノイズを拾うことがあり
•
ます。
マイクのプラグはときどき柔らかい布でからぶきし、清潔に保ってください。
•
プラグが汚れていると雑音の原因になることがあります。
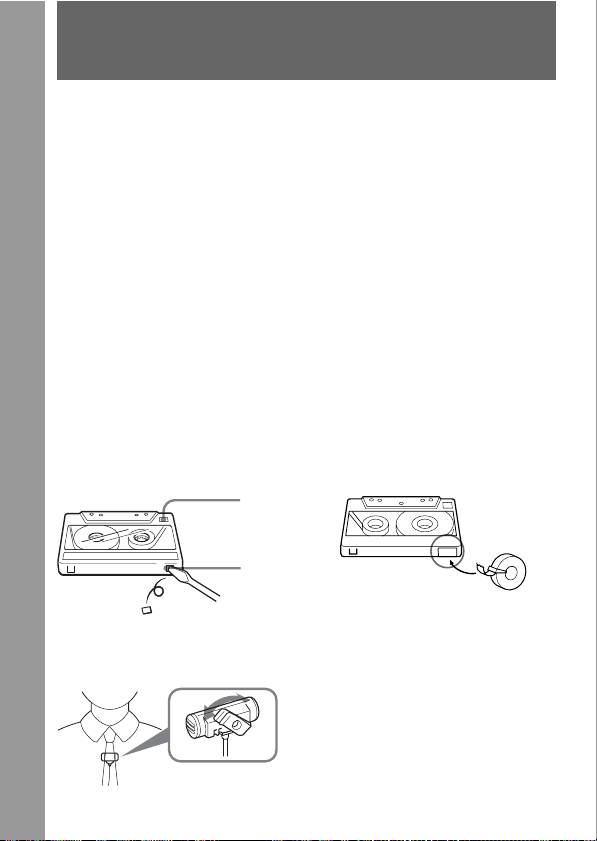
大切な録音を守るには
ツメを折って取り除きます。 再び録音するには、穴をふさぎます。
ツメを折った面には、録音することができません。
付属のマイクを使うには
FWD
側から
側に切り換わる際の10秒程度は、録音がとぎ
REV
面
A
面のツメ
A
セロハンテープ
12
クリップはマイクを付ける場所に
合わせて方向が変えられます。
Page 13
テープを聞く
(ノーマル)、
TYPE I
テープを自動的に判別し、再生します(オートテープセレクター機能)。
1
カセットを入れる
1
2ふたが少し開い
2
再生時間を選ぶ
(録音/再生時間2×(2倍))表示を、録音した時と同じ位置に合わ
REC/PB
せます。市販の録音済みテープを再生するときは標準(表示なし)を選ん
でください。(「録音する」(9ページ)参照)
つまみを
OPEN
矢印の方向に
ずらす
たら、手でふた
を開ける
(ハイポジション)、
TYPE II
(メタル) の
TYPE IV
ふた側(
FWD
本体側(
REV
3テープのたるみを
取ってからテープ
側を奥にして奥ま
で確実に入れる
)
)
1
2
ボタンを繰り返し押して、
MENU
カーソルを
SET
換える
REC/PB
ボタンを押して表示を切り
に合わせる
(次ページへつづく)
13
Page 14

テープを聞く(つづき)
3
再生する(リモコンで操作する)
2
で音量を調節する
VOL
1Y•xを押す
+
FF
−
REW
VOL
リモコンで音量調節するときは、本体の
本体で音量調節するときは、リモコンの
ヘッドホンが耳にぴったり合わないとき
や、音のバランスが不自然なときは、お
さまりのいい位置に調節してください。
14
つまみを6程度にします。
VOL
つまみを最大にします。
VOL
L
R
「L」を左、
「R」を右の耳に
Page 15
その他のテープ操作
操作
再生面の切り換え
停止
早送り
巻き戻し
/
(停止中)
音を聞きながら
早送り/巻き戻し
(キュー/レビュー)
早送りして反対面を再
生(ス キップリバース)
巻き戻して最初から再
生(オ ートプレイ)
*
*
早送り、巻き戻し中にY•xボタンを押すと再生状態になります。
押すボタン
再生中にY
上
再生中にY
停止中に
REW–を1
再生中に
REW–
押し続けている間だけ早
送り/巻き戻しします。
停止中に
停止中に
上
•xを2
•xを1
または
FF+
回
または
FF+
を押し続ける
秒以上
FF+を2
REW–を2
上記以外のテープ操作は、「テープを聞く−応用」(19ページ)をご覧くだ
さい。
カセットぶたを開けるときは、テープが停止していることを確認してくだ
さい。動作中にカセットぶたを開けるとテープがたるみ、テープを傷める
おそれがあります。
動作の確認音
秒以
回
秒以
(ふた側) 面スタート
FWD
ピ
(本体側) 面スタート
REV
ピピ
ピ
ピ
(「FF
点灯)
早送り時
(「FF」が点滅)
巻き戻し時: ピ→ピピ→
ピピ、…(「
ピ→ピ→ピ、ピ、…
(「
」が点滅)
FF
ピ→ピ→ピピ、ピピ、…
(「
REW
(リモコン表示)
」または「
REW
ピ→ピ→ピ、…
:
」が点滅)
REW
」が点滅)
」が
15
Page 16
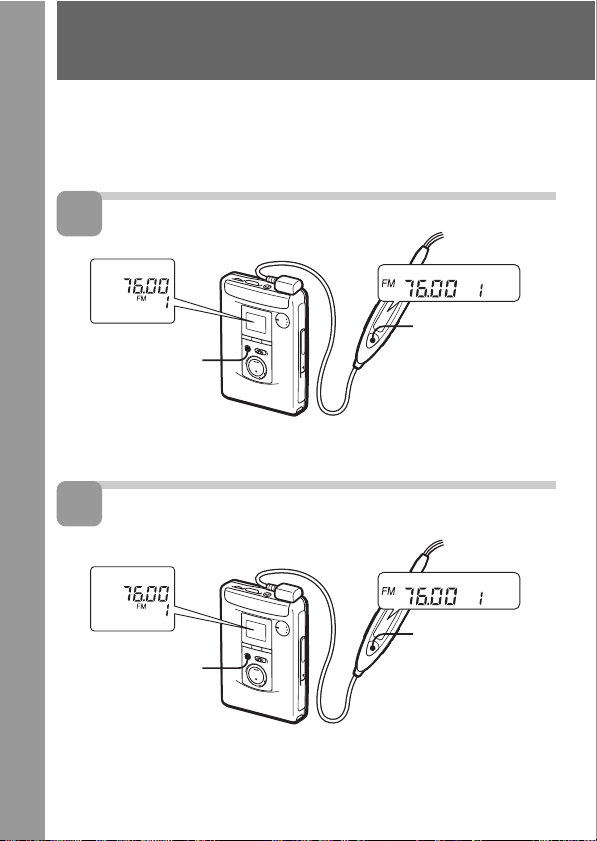
ラジオを聞く
ご使用になる前に、ご使用になる国・地域に合わせて、エリアを設定して
ください。詳しくは、33ページ「海外でラジオを聞く」を参照してくださ
い。以下の説明は、日本でお使いになる場合を例としています。
1
ラジオをつける
テープが停止して
RADIO ON/
を押す
BAND
*
いる状態で
ON/BAND•OFF
を1秒以上押す
テープ再生中の場合は、Y•xを1度押してテープを止めて
から、1秒以上押してラジオをつけてください。
RADIO
*
2
16
または
AM
RADIO ON/
を押す
BAND
FM
を選ぶ
RADIO ON/
BAND•OFF
を1秒以上押す
Page 17
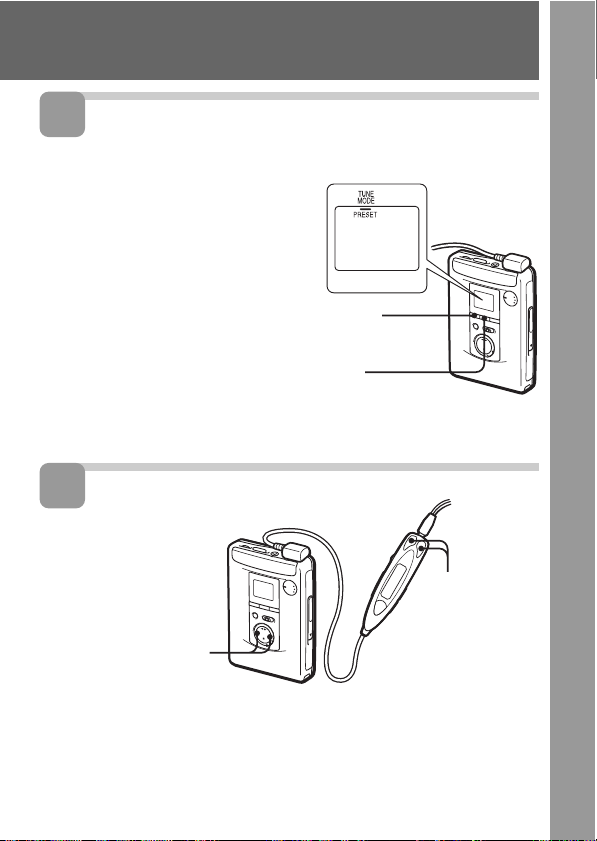
3
マニュアル選局*モードにする、ま
たはプリセット選局
1
2マニュアル選局モード:
*
4
放送局を選ぶ
TUNE/PRESET−/
を押す
マニュアル選局モード:表示窓を見ながら、
または−を繰り返し押して周波数を合わせる
プリセット選局モード:
ボタンを繰り返し押
MENU
してカーソルを
MODE
を押して「
示させる
プリセット選局モード:
を押して「
させる
マニュアル選局/プリセット選局について詳しくは「ラジオを聞く−
応用」(26〜32ページ)をご覧ください。
TUNE
に合わせる
MANUAL
PRESET
+
SET
」を表
SET
」を表示
TUNE/ PRESET
モードにする
*
MENU
SET
+または−を押す
+、−を押す
TUNE/ PRESET
(次ページへつづく)
+
17
Page 18

ラジオを聞く(つづき)
ラジオを消すには
本体の
RADIO OFF
タンを押します。
受信状態をよくするには
放送
AM
アンテナを内蔵しているので、本体の向きや位置を変えて、聞きやすいよ
うに調節します。
放送
FM
リモコンつきヘッドホンのコードがアンテナになっているので、できるだ
けのばして使います。
ボタンまたはリモコンの
RADIO ON/BAND•OFF
ボ
18
Page 19
Bテープを聞く−応用
本体で操作する
Y
•REPEAT
REW/REVIEW
x
操作
再生
再生面の切り
換え
停止
早送り
巻き戻し
/
(停止中)
音を聞きながら
早送り/巻き戻し
(キュー/レビュー)
早送りして反対
面を再生(ス
キップリバース)
巻き戻して最初
から再生(オー
トプレイ)
*
*
早送り、巻き戻し中にリモコンのY•xボタンを押すと再生状態になります。
押すボタン
Y
•REPEAT
再生中にY
x(停止)
停止中に
REW/REVIEWを1
再生中に
REW/REVIEW
続ける
押し続けている間だけ早
送り/巻き戻しします。
停止中に
秒以上
2
停止中に
REVIEW
•REPEAT
FF/CUE
FF/CUE
を押し
FF/CUE
REW/
を2秒以上
または
回
または
を
FF/CUE
動作の確認音
(ふた側)面スタート ピ
FWD
(本体側)面スタート ピピ
REV
(ふた側)面スタート ピ
FWD
(本体側)面スタート ピピ
REV
ピ
ピ
早送り時
巻き戻し時: ピ→ピピ→
ピピ、…
ピ→ピ→ピ、ピ、…
ピ→ピ→ピピ、ピピ、…
ピ→ピ→ピ、…
:
テ
ー
プ
を
聞
く
︱
応
用
19
Page 20
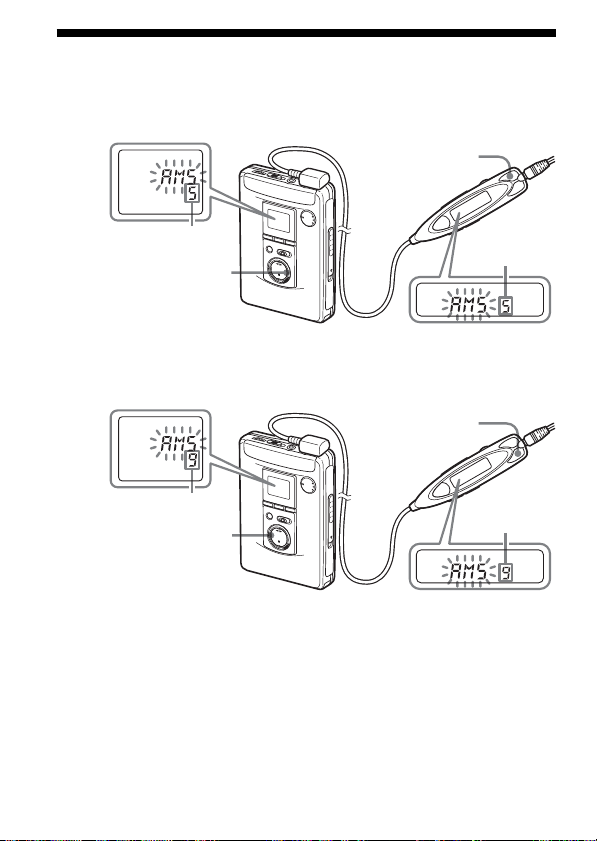
好きな曲を頭出しする
(
AMS
早送りして何曲か先の曲を再生するには
−オートミュージックセンサー)
再生中にFF+を
とばしたい曲の
数だけ押す
とばす曲数を表示
再生中に
とばしたい曲の数だ
け押す
確認音: ピ→ あと1曲になるとピッピー、ピッピー、・・・
FF/CUE
を
とばす曲数
を表示
巻き戻して何曲か前の曲を再生するには
再生中に
をとばしたい曲
の数だけ押す
とばす曲数を表示
再生中に
REW/REVIEW
をとばしたい曲の数だけ
押す
確認音:ピ→ あと1曲になるとピピッピー、ピピッピー、・・・
最大9曲までとばすことができます。
が正しく動作しないことがあります
AMS
では曲間の4秒以上のあき(無音部分)を見つけて頭出しをしています。
• AMS
• AMS
秒未満のときや曲間に雑音があるとき、曲の直前や直後に操作したと
あきが
4
きは、頭出しができないことがあります。また、曲中に音の小さい部分や長い
無音部分があると、そこで頭出しをすることがあります。
の途中で停止することがありますが、故障ではありません。詳しくは「故
障かな?」(
ページ)をご覧ください。
44
REW
−
とばす曲数
を表示
20
Page 21
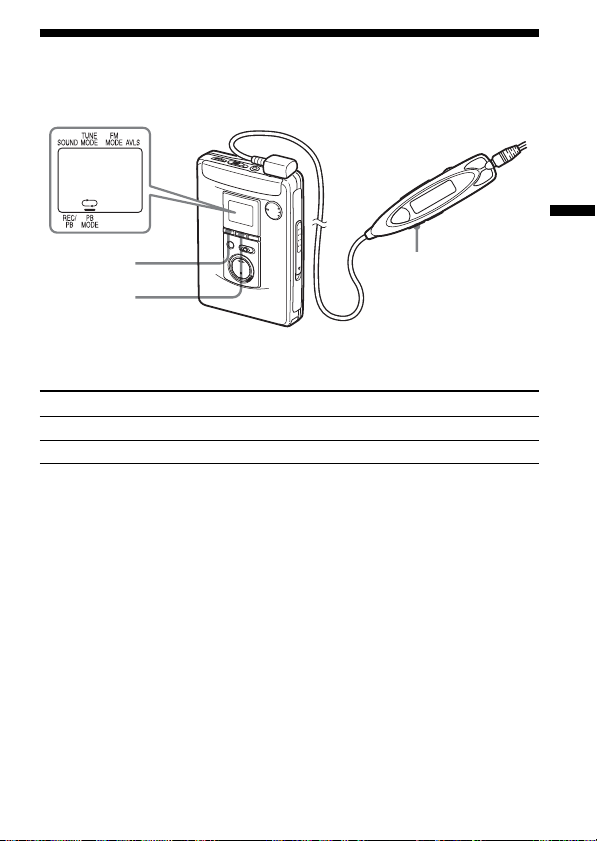
テープ走行のしかたを選ぶ
プレイバックモード
(
PB MODE
MENU
SET
テープ走行のしかたを選べます。
)
MODE
テ
ー
プ
を
聞
く
︱
応
用
リモコン表示 本体表示 (
ss 両面を繰り返し再生
dd 両面を1回再生
面から始めたときは
* REV
REV
PB MODE
面のみを再生して止まります。
) モード
*
リモコンで操作するには
ボタンを繰り返し押して、表示を切り換えます。
MODE
本体で操作するには
ボタンを繰り返し押して、表示窓のカーソルを、
MENU
置に合わせます。
ご注意
設定は、電池を交換しても消えません。
•
ボタンを押して、表示を切り換えます。
SET
PB MODE
の位
21
Page 22
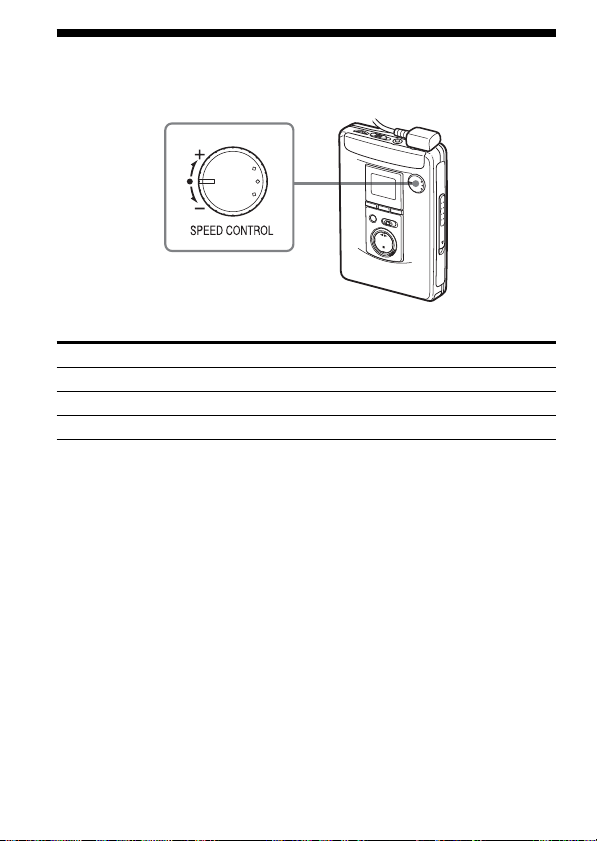
テープの再生スピードを調節する
(スピードコントロール)
スピードコントロールつまみで、再生スピードを調節します。
再生速度 つまみの位置
ゆっくり再生する −方向にまわす。
通常の速度で再生する 中央
速く再生する +方向にまわす。
ご注意
録音中はスピードコントロール機能は使えません。
•
電池が消耗しているときに、スピードコントロールつまみを急に動かすと停止
•
することがあります。ゆっくり動かすか、電池を交換してください。
22
Page 23
指定した区間を繰り返し聞く
(
Y
指定した区間を繰り返し聞くことができます。
テープ再生中、繰り返し聞きたい区間の最初(A点)と最後(B点)を指定
します。
リモコンで操作する
1 テープ再生中にY
2 そのあとでY
本体で操作する
1 テープ再生中にY
2 そのあとでY
区間リピート)
A-B
•REPEAT
xをすばやく2回押して、A点を指定
•
する
xをもう一度押して、B点を指定する
•
指定した区間が繰り返し再生されます。
•REPEATを2
指定する
本体の表示窓に「A–」が点滅します。
•REPEAT
する
本体の表示窓に「
定した区間が繰り返し再生されます。
A–B
をもう一度押して、B点を指定
」が点滅したあと「
Y•x
秒以上押して、A点を
」が表示され、指
REP
(次ページへつづく)
23
テ
ー
プ
を
聞
く
︱
応
用
Page 24

区間リピートを止めるには
A-B
リモコンのY•xまたは本体のY
テープは通常の再生に戻ります。
ご注意
テープの
•
•2
•
• A-B
• A-B
•90
FWD(REV
はできません。
秒以下のリピート区間を設定することはできません。
テープのたるみやテープ操作の繰り返しによって、リピート区間に多少のズ
レが生じることがあります。
区間リピートは、50回繰り返すと、通常の再生に戻ります。
区間リピート中に停止することがありますが、故障ではありません。
詳しくは「故障かな?」(44ページ)をご覧ください。
分を超えるテープでは、
傷めるおそれがあります。
)面から
•REPEAT
REV(FWD
区間リピートはしないでください。テープを
A-B
ボタンを押します。
)面にまたがる
区間リピート
A-B
24
Page 25

テープカウンターを使う
テープ再生中、録音中、早送り、巻き戻し中、キュー、レビュー中、停止
中(ラジオ受信時を除く)に表示されます。
面録音/再生中は数字が増え、
FWD
す。
テープカウンターを「
タンを押します。
」に戻すには、
000
テープカウンター
ENTER/COUNTER RESET
ご注意
テープカウンター表示は少しずれることがあります。
•
カセットテープが入っていないときは、テープカウンターは表示されません。
•
面録音/再生中は数字が減りま
REV
ENTER/COUNTER RESET
ボ
テ
ー
プ
を
聞
く
︱
応
用
25
Page 26

Bラジオを聞く−応用
自分で周波数を合わせて聞く(マニュアル選局)
+
FF
−
SETMENU
RADIO ON/BAND
REW
TUNE/
PRESET
1
RADIO ON/BAND
(リモコンでは、テープが停止している状態で
BAND•OFF
2
RADIO ON/BAND
FM
(リモコンでは、
す)
3 本体の
TUNE MODE
4
SET
5
TUNE/PRESET
窓を見ながら周波数を合わせる
(リモコンでは、FF+または
TUNE/PRESET
が強い放送局を自動的に受信して止まります(オートスキャン)。
電波が弱くて止まらないときは、
タンを繰り返し押して周波数を合わせてください。
26
−/+
ボタンを1秒以上押す)
を選ぶ
RADIO ON/BAND•OFF
MENU
ボタンを押して「
ボタンを繰り返し押して、カーソルを
の位置に合わせる
+または−ボタンを長めに押して離すと、電波
ボタンを押してラジオをつける
ボタンを繰り返し押して、
MANUAL
+または−ボタンを繰り返し押して表示
REW
」を表示させる
−ボタンを繰り返し押す)
TUNE/PRESET
RADIO ON/
BAND•OFF
RADIO ON/
AM
ボタンを1秒以上押
+または−ボ
または
Page 27

いつも聞く放送局を記憶させてから聞く
(プリセット)
いつも聞く放送局をAM、FM各8局、合計16局(海 外 では
局、合計30局)まで記憶させることができます。聞くときは、記憶
AM10
させた番号(プリセット番号)で聞く局を選びます。
ENTER
FM20
局、
RADIO ON/BAND
RADIO ON/
TUNE/PRESET−/
+
BAND•OFF
❐ 放送局を自動で受信して記憶させる
受信状態のよい場所で操作してください。
1
RADIO ON/BAND
(リモコンでは、テープが停止している状態で
BAND•OFF
2
RADIO ON/BAND
を選ぶ
FM
(リモコンでは、
す)
3
ENTER
プリセット番号「1」が点滅し、周波数の低い局から高い局へ受信
状態の良い局を自動的に探し始めます(スキャン)。受信できる放
送局では約5秒間止まります。
ボタンを1秒以上押す)
ボタンを3秒以上押したままにする
ボタンを押してラジオをつける
RADIO ON/
ボタンを繰り返し押して、AMまたは
RADIO ON/BAND•OFF
ボタンを1秒以上押
(次ページへつづく)
27
ラ
ジ
オ
を
聞
く
ー
応
用
Page 28

4 記憶させたい放送局で、
その放送局がプリセット番号「1」に記憶され、次のプリセット番
号の点滅に変わります。そして同時にスキャンが再開されます。
ENTER
5 記憶させたい放送局が受信されるごとに、手順
ボタンを押す
を繰り返
4
す
周波数の高い局までスキャニングが一巡すると、「ピー」と鳴って
終了します。
スキャンを止めるには
本体の
RADIO OFF
を押します。その場合、ラジオも止まります。
記憶させた放送局を受信するには
ページをご覧ください。
30
ご注意
電波が弱いときは記憶できる放送局が少なくなる場合があります。
•
同じプリセット番号に、新たに別の放送局を記憶させると、すでに記憶されて
•
いた放送局は消去されます。
ボタンまたはリモコンの
RADIO ON/BAND•OFF
ボタン
電波が弱く聞きたい放送局でスキャンが止まらなかった
ときや、特定のプリセット番号に記憶させたいときは
1
RADIO ON/BAND
(リモコンでは、テープが停止している状態で
BAND•OFF
2
RADIO ON/BAND
を選ぶ
FM
(リモコンでは、
3
ENTER
周波数表示が点滅します。
ボタンを
ボタンを押す
ボタンを押してラジオをつける
秒以上押す)
1
ボタンを繰り返し押して、
RADIO ON/BAND•OFF
RADIO ON/
AM
ボタンを
または
秒以上押す)
1
28
Page 29

4 周波数の点滅中
*にTUNE/PRESET
繰り返し押して記憶させたい周波数を表示させ、
+または−ボタンを
ENTER
ボタンを押す
プリセット番号が点滅します。
5 プリセット番号の点滅中
*にTUNE/PRESET
+または−
ボタンを繰り返し押して記憶させたいプリセット番号を点
滅させる
6 プリセット番号の点滅中に
これで、選んだ放送局が、選んだプリセット番号に記憶されました。
表示の点滅が止まった場合は、手順3から操作し直してください。
*
記憶させた放送局を受信するには
ページをご覧ください。
30
ENTER
ボタンを押す
ご注意
同じプリセット番号に、新たに別の放送局を記憶させると、すでに記憶されて
•
いた放送局は消去されます。
特定のプリセット番号の記憶を消すには
1
ページの「記憶させた放送局を聞く」の手順1から5を
30
行い、消したい周波数とプリセット番号を表示させる
2
ENTER
3 表示の点滅中に
返し押して「−−−−」
「−−−−」は最大周波数あるいは最小周波数の次に表示されます。
*
4 「−−−−」の点滅中に
プリセット番号表示が点滅します。
5 プリセット番号表示の点滅中に
ボタンを押して周波数表示を点滅させる
TUNE/PRESET
を表示させる
*
ENTER
+または−ボタンを繰り
ボタンを押す
ENTER
ボタンを押す
29
ラ
ジ
オ
を
聞
く
ー
応
用
Page 30

記憶させた放送局を聞く(プリセット選局)
+
FF
−
SETMENU
RADIO ON/BAND
REW
TUNE/
PRESET
1
RADIO ON/BAND
(リモコンでは、テープが停止している状態で
BAND•OFF
2
RADIO ON/BAND
FM
(リモコンでは、
す)
3 本体の
TUNE MODE
4
SET
5
TUNE/PRESET
セット番号を選ぶ
(リモコンでは、FF+または
−/+
ボタンを1秒以上押す)
を選ぶ
RADIO ON/BAND•OFF
MENU
ボタンを押して「
ボタンを繰り返し押して、カーソルを
の位置に合わせる
+または−ボタンを繰り返し押してプリ
ボタンを押してラジオをつける
ボタンを繰り返し押して、AMまたは
PRESET
」を表示させる
−ボタンを繰り返し押す)
REW
30
RADIO ON/
BAND•OFF
RADIO ON/
ボタンを1秒以上押
Page 31

❐ プリセット選局の便利な聞きかた
記憶させた放送局を、プリセット番号1から順に約5秒間ずつ自動受信し
ます。そのときの放送内容をひととおり聞きながら選べるので、聞きたい
放送局が決まっていないときなどに便利です。
RADIO ON/BAND
RADIO ON/
BAND•OFF
1
ページの「記憶させた放送局を聞く」の手順1から4に
30
したがってラジオをつける
2
RADIO ON/BAND
表示窓の表示が点滅し、記憶された局がプリセット番号1から順
に約5秒間ずつ放送されます。
3 聞きたい放送局が放送されている間に
ボタンを押す
BAND
これで、選んだ放送局を受信できます。
ご注意
放送局が1局も記憶されていない場合は、この機能は働きません。
•
• TUNE MODEを「PRESET
ん。
で聞きたい放送局を選択しないと、手順2のままで、記憶させた局を約
•手順3
秒間ずつ放送し続けます。
ボタンを2秒以上押したままにする
RADIO ON/
」に設定していない場合は、この機能は働きませ
ラ
ジ
オ
を
聞
く
ー
応
用
5
31
Page 32

ラジオを聞くときのご注意
受信するとき
本体やリモコンを他のラジオやテレビ、コンピューターなどに近づける
•
と、本機のラジオに雑音が入ることがありますので、離してお使いくだ
さい。
一部が金属製のテープをお使いのとき、受信状態が悪くなることがあり
•
ます。その場合はテープを抜いてラジオをお聞きください。
ステレオ放送を聞くとき
のステレオ放送を聞くときは本体の
FM
表示窓のカーソルを
示なし(ステレオ)にします。電波が強すぎてひずんで聞こえる場合は
「
すると聞きやすくなりますが、ステレオではなくなります。なお、AMは
ステレオにはなりません。
」を表示させます。雑音が多いときは「
LOCAL
FM MODE
の位置に合わせ、
ボタンを繰り返し押して、
MENU
ボタンを押して表
SET
MONO
」(モノラル)に
32
Page 33

海外でラジオを聞く
ENTER
RADIO ON/BAND
TUNE/PRESET
1
RADIO ON/BAND
2
ENTER
ボタンを押して、周波数表示を点滅させる
3 エリア表示(「
まで
RADIO ON/BAND
4 表示の点滅中
−/+
ボタンを押してラジオをつける
JPn
」、「
USA
」または「
ボタンを押したままにする
*にRADIO ON/BAND
Eur
ボタンを繰り返し押
してエリアを選ぶ
表示の点滅が止まった場合は手順2から操作し直してください。
*
受信範囲は下記のようになります。
使う地域 選ぶエリア 受信周波数
日本
アメリカ合衆国、カナダ
中南米諸国
ヨーロッパ、その他
5
ENTER
ボタンを押す
6 「自分で周波数を合わせて聞く」(
も聞く放送局を記憶させてから聞く」(
JPn FM: 76.0 - 90.0 MHz
AM: 531 - 1 710kHz
USA
Eur
FM: 87.5 - 108MHz
AM: 530 - 1 710kHz
FM: 87.5 - 108MHz
AM: 531 - 1 602kHz
ページ)または「いつ
26
27
がって受信する
」)が点滅する
ページ)にした
33
ラ
ジ
オ
を
聞
く
ー
応
用
Page 34

Bその他の機能を使う
サウンド
高音または低音を強調する(
MENU SOUND
SET
リモコンまたは本体で、好みの音質を選べます。
リモコン表示
リバイブ
RV
メガベース
MB
グルーブ
GRV
表示なし
リモコンで操作するには
SOUND
通常の音質を選ぶ場合は、表示なしにしてください。
本体で操作するには
MENU
に合わせます。
場合は、表示なしにしてください。
ご注意
にしたときに音がひずんだように聞こえる曲では、他の音質を選ぶか、
•GRV
または本体の音量を下げてお聞きください。
設定は、電池を交換しても消えません。
•
音質の設定は、録音される音には影響しません。
•
34
音質
高音を強調
再生するとき)
低音を強調
低音をより強調
通常の音質
ボタンを繰り返し押して、音質を選びます。
ボタンを繰り返し押して、表示窓のカーソルを、
SET
(古いテープなど、高音にメリハリがないテープを
ボタンを押して、音質を選びます。通常の音質を選ぶ
SOUND
SOUND
)
の位置
Page 35

音もれを抑え耳にやさしい音にする
(
AVLS
−快適音量)
MENU MODE
SET
リモコン表示 本体表示 (
) モード
AVLS
AVLS AVLS
表示なし 表示なし
AVLS
リモコンで操作するには
表示窓に「
を解除するには
AVLS
「
」の表示が消えるまで
AVLS
」が表示されるまで
AVLS
ボタンを押します。(約10秒)
MODE
ボタンを押したままにします。(約3秒)
MODE
本体で操作するには
ボタンを繰り返し押して、表示窓のカーソルを、
MENU
わせます。
を解除するには
AVLS
ボタンを押して、「 」の表示を消します。
SET
ご注意
• AVLS
• AVLS
ボタンを押して、「 」を表示させます。
SET
の設定は、電池を交換すると解除されます。
の設定は、録音される音には影響しません。
入
切
AVLS
の位置に合
35
そ
の
他
の
機
能
を
使
う
Page 36

誤操作を防ぐ(ホールド機能)
HOLD
HOLD
スイッチを矢印の方向にずらして、誤操作を防ぎます。
HOLD
ご注意
•SPEED CONTROL
36
つまみにはホールド機能は働きません。
Page 37

B電源
乾電池・充電式電池の取り替え時期は
電池が消耗すると、電池交換お知らせ表示が点滅します。テープ走行が不
安定になったり雑音が多くなるので、乾電池は新しいものと交換し、充電
式電池は充電し直してください。
乾電池は、別売りのソニーアルカリ乾電池のご使用をおすすめします。
電池の残量がなくなってくると、表示でお知らせします
リモコン表示
本体表示
意味 残量は充分です。 残量が少なく 電池が消耗しています。
ご注意
%充電されていない充電式電池を入れても残量表示がすべて点灯するこ
• 100
とがありますが、充電量(充電時間)に応じて、持続時間は短くなります。
早送りや巻き戻し中、または極端に温度が低い場所で使用しているときは、残
•
量が少なく表示されることがあります。
なってきました。 しばらくすると、本体の
動作が止まります。
(次ページへつづく)
37
電
源
Page 38

電池の持続時間
使用電池 テープ再生時 ラジオ受信時 マイク録音時 ラジオ録音時
ソニーアルカリ 約
乾電池
LR6(SG)**
充電式ニッケル水素 約26時間 約34時間 約9時間 約7時間
電池
NH-14WM(A
(
100%
充電式ニッケル水素 約
電池とソニーアルカ
リ乾電池の併用
電子情報技術産業協会(
*
リーズカセットテープ使用)
日本製ソニースタミナアルカリ乾電池
**
充電にて)
*
時間 約56時間 約15時間 約12時間
44
)
時間 約90時間 約24時間 約19時間
70
)の測定方法に基づいています。(ソニー
JEITA
)で測定しています。
LR6(SG
HF
ご注意
電池持続時間は、周囲の温度や使用状態、電池の種類により短くなる場合があ
•
ります。
マンガン乾電池でご使用になると、
•
てしまう場合があります。
区間リピートや
A–B
中などに停止し
AMS
シ
38
Page 39

コンセントにつないで使う
コンセントにつないで使うときは、別売りのACパワーアダプター
AC-E15L
(国内用)、または
AC-E15HG
1 乾電池ケースを本体に取りつける
本体に充電式電池が入っていたら取り出してください。
2 別売りの
乾電池ケース側面の
ジャックにつなぐ
3
パワーアダプターをコンセント
AC
につなぐ
ご注意
• AC-E15HG
電圧やプラグの形状をお確かめのうえ、お買い求めください。
パワーアダプターを、
AC
DC IN 1.5V
は、地域により異なる仕様になっています。使用する地域の電源
(海外用)をご用意ください。
DC IN 1.5V
電
源
39
Page 40

Bその他
お手入れ
よい音でテープを聞くために
時間程度使ったら、市販の綿棒とクリーニング液でヘッド、キャプス
10
タン、ピンチローラーをきれいにしてください。
クリーニングカセットは指定のものをお使いください
他のクリーニングカセットを使うと故障の原因となることがあります。
本体表面が汚れたときは
水気を含ませた柔らかい布で軽くふいたあと、からぶきします。シンナー
やベンジン、アルコールは表面の仕上げを傷めますので使わないでくださ
い。
ヘッドホンおよびリモコンのプラグのお手入れについて
常によい音でお聞きいただくために、プラグをときどき柔らかい布でから
ぶきし、清潔に保ってください。汚れていると、雑音の原因になることが
あります。
端子のお手入れについて
定期的に図のように各端子を綿棒や柔らかい布などで、きれいにしてくだ
さい。
端子端子 端子
40
Page 41

使用上のご注意
充電について
付属の充電スタンドは本機専用です。他機の充電はできません。
•
付属の充電スタンドでは指定の電池以外は充電しないでください。
•
お買い上げ時や長い間使わなかった充電式電池は、持続時間が短いことがあり
•
ます。これは電池の特性によるもので、数回使えば充分充電されるようになり
ます。
充電が終わったら、早めに本体を充電スタンドからはずし、ACパワーアダプ
•
ターをコンセントから抜いてください。長時間差したままにすると、電池の性
能を低下させることがあります。
充電中は充電スタンドや充電式電池が熱くなりますが、危険はありません。
•
日本国内での充電式電池の廃棄について
ニッケル水素電池は、リサイクルできます。不要になったニッケル水
素電池は、金属部にセロハンテープなどの絶縁テープを貼ってリサイ
クル協力店へお持ちください。
充電式電池の回収
工業会のホームページ
海外での充電式電池の廃棄について
各国の法規制にしたがって廃棄してください。
パワーアダプターについて
AC
この製品には、付属または指定のACパワーアダプター
•
(極性統一形プラグ:
れ以外のACパワーアダプターを使用すると、故障の原
因になることがあります。
パワーアダプターは容易に手が届くような電源コン
•AC
セントに接続し、異常が生じた場合は速やかにコンセ
ントから抜いてください。
リサイクルおよびリサイクル協力店については社団法人電池
•
http://www.baj.or.jp/
規格)をご使用ください。そ
JEITA
を参照してください。
極性統一形プラグ
(次ページへつづく)
41
そ
の
他
Page 42

パワーアダプターをご使用時は、以下の点にご注意ください。
•AC
− 本機を棚や組み込み式キャビネットなどの狭い場所に置かないでください。
− 火災や感電の危険をさけるために、水のかかる場所や湿気のある場所では
使用しないでください。また、本機の上に花瓶など、水の入ったものを置か
ないでください。
取り扱いについて
落としたり、強いショックを与えたりしないでください。故障の原因になりま
•
す。
リモコンやヘッドホンのコードを強く引っぱらないでください。
•
次のような場所には置かないでください。
•
− 温度が非常に高いところ。
− 直射日光のあたる場所や暖房器具の近く。
−窓を閉めきった自動車内(特に夏季)。
− 風呂場など湿気の多いところ。
− 磁石、スピーカー、テレビなど磁気を帯びたものの近く。
− ほこりの多いところ。
温度が高いところ(40℃以上)や低いところ(0℃以下)では液晶表示が見にく
•
くなったり、表示の変わりかたがゆっくりになることがあります。常温になれ
ばもとに戻ります。
長い間本機を使わなかったときは、1度本機を数分間再生状態にしてからお使
•
い始めください。
動作中はカセットぶたを開けないでください。テープがたるみ、テープを傷め
•
るおそれがあります。テープがたるんでしまったときは、必ずたるみを取って
から使用してください。
長時間テープについて
•
分をこえるテープはなるべくお使いにならないでください。テープが非常
90
に薄いため、動作が不安定になって音がゆれたり、まれに機械に巻き込まれる
場合があります。また、音が小さかったり、高音ののびが悪くなることがあり
ます。
ヘッドホンをご使用中、肌に合わないと感じたときは早めに使用を中止して医
•
師またはお客様ご相談センターにご相談ください。
42
Page 43

ヘッドホンについて
交通安全のために
•
自転車やバイク、自動車などの運転中は、ヘッドホンは絶対に使わないでくだ
さい。
歩行中でも音量を上げすぎるとまわりの音が聞こえなくなり危険です。とく
に、踏切や横断歩道では充分にご注意ください。
耳を守るために
•
耳を刺激するような大きな音量で長時間続けて聞くと、聴力に悪い影響を与
えることがあります。耳を守るため、音量を上げすぎないようにご注意くださ
い。
まわりの人のことを考えて
•
ヘッドホンは、音量を上げすぎると音が外に漏れます。音量を上げすぎて、ま
わりの人の迷惑にならないように気をつけましょう。
雑音の多いところでは音量を上げてしまいがちですが、ヘッドホンで聞くとき
はいつも呼びかけられて返事ができるくらいの音量を目安にしてください。
リモコンについて
付属のリモコンは本機専用です。また、他機種に付属のリモコンで本機の操作
はできません。
万一故障した場合は、内部を開けずにお買い上げ店またはソニーサービス窓口
にご相談ください。
ワールドモデルをお買い上げのお客様へ
海外では保証書に記載の海外ソニーサービス特約店にご相談ください。
43
そ
の
他
Page 44

故障かな?
故障とお考えになる前に、次のような点をご確認ください。
症状
区間リピー
A-B
ト、
り・巻き戻しをす
るとテープが止ま
る
「ピピピピ」とエ
ラー音が鳴り、
操作できない
操作できない
「ピピピピピピピ
ピ」と鳴り、テー
プ操作ができない
雑音が入ることが
ある
音が途切れる
雑音がする
A-B
ができない
や早送
AMS
区間リピート
44
原因
消耗した充電式電池または乾
電池を使っている。マンガン
乾電池を使っている。(
間リピートや
と比べて電流を多く消費する
ためです。)
電池が消耗している。
電池が消耗している。
本体またはリモコンの
ホールド機能が働いている。
カセットが入っていない。
近くで携帯電話などの電波を
発する機器を使用している。
パワーアダプターの近く
AC
で使用している。
ヘッドホンのプラグが汚れて
いる。
電池が消耗している。
A-B
うとした。
AMS
区間を2秒以内で設定しよ
A-B
などは再生
処置
充電式電池を充電する。
乾電池は新しいソニーアル
カリ乾電池と交換する。
区
充電式電池を充電する。
乾電池は新しいソニーアル
カリ乾電池と交換する。
充電式電池を充電する。
乾電池は新しいソニーアル
カリ乾電池と交換する。
ホールドを解除する。「誤操
作を防ぐ」(36ページ)参照
カセットを入れる。
携帯電話などから離して使
用する。
パワーアダプターから
AC
離して使用する。
ヘッドホンのステレオミニ
プラグおよびリモコンのプ
ラグをきれいにクリーニン
グする。
充電式電池を充電する。
乾電池は新しいソニーアル
カリ乾電池と交換する。
区間を2秒以上に設定
A-B
する。
Page 45

症状
スイッチをず
REC
らすと警告音が鳴
り、録音が始まら
ない
音量が大きくなら
ない
低音が強すぎた
り、ひずんだよう
に聞こえる
再生速度が速すぎ
る
遅すぎる
/
再生音がおかしい
動作や表示がおか
しい
表示窓の表示が一
瞬消えることがあ
る
ラジオを聞いたり
テープの再生はで
きるが、録音がで
きない
充電スタンドの
ランプが点
CHG
灯しない
原因
テープの誤消去防止用のツメ
が折れている。
が働いている。
AVLS
音質がRV、MBまたは
になっている。
録音/再生時間 2×(2倍)
モードの設定が、録音時と異
なる。
スピードコントロールつまみ
が中央以外の位置にある。
GRV
——
電池が消耗している。
充電式電池が入っていない。
本体または充電スタンドの端
子が汚れている。
処置
穴をセロハンテープなどで
ふさぐ。「大切な録音を守る
には」(
AVLS
を抑え耳にやさしい音にす
る」(35ページ)参照
音質を通常の設定にする。
「高音または低音を強調す
る」(34ページ)参照
録音した時と同じ設定にす
る。「再生時間を選ぶ」(
ページ参照)
スピードコントロールつま
みを中央(通常のスピード)
の位置にする。「テープの再
生スピードを調節する」
(22ページ参照)
いったん電源・電池(乾電
池、充電式電池)をはずし
て、
れ直す。
充電式電池を充電する。
乾電池は新しいソニーアル
カリ乾電池と交換する。
充電式電池を本体に入れ
る。
端子をきれいにクリーニン
グする。
ページ)参照
12
を解除する。「音もれ
秒以上たってから入
15
13
そ
の
他
45
Page 46

保証書とアフターサービス
保証書
この製品には保証書が添付されていますので、お買い上げの際お買い上げ店で
•
お受け取りください。
所定事項の記入および記載内容をお確かめのうえ、大切に保存してください。
•
保証期間はお買い上げ日より1年間です。
•
アフターサービス
調子が悪いときはまずチェックを
この説明書をもう一度ご覧になってお調べください。
それでも具合の悪いときはサービスへ
お買い上げ店または添付の「ソニーご相談窓口のご案内」にあるお近くのソニー
サービス窓口にご相談ください。
保証期間中の修理は
保証書の記載内容に基づいて修理させていただきます。詳しくは保証書をご覧
ください。
保証期間経過後の修理は
修理によって機能が維持できる場合は、ご要望により有料修理させていただき
ます。
部品の保有期間について
当社ではカセットプレーヤーの補修用性能部品
要な部品)を、製造打ち切り後6年間保有しています。この部品保有期間を修理可
能な期間とさせていただきます。保有期間が経過した後も、故障箇所によっては
修理可能の場合がありますので、お買い上げ店またはサ−ビス窓口にご相談く
ださい。
製品の機能を維持するために必
(
ワールドモデルをお買い上げのお客様へ
海外での保証とアフターサービスについて
保証期間は、日本国内ではお買い上げ日より1年間、海外では90日です。
•
海外での修理やアフターサービスについてご不明な点は、保証書に記載の
•
海外ソニーサービス特約店にお問い合わせください。
46
Page 47

主な仕様
●カセットコーダー部・共通部
トラック方式 コンパクトカセットステレオ
周波数範囲
入力端子 マイク(ステレオミニ)ジャック1個
出力端子 ヘッドホンジャック(専用リモコンジャック)1個
実用最大出力
電源
電池持続時間
本体寸法 約
最大外形寸法 約
質量 約
●ラジオ部
受信周波数
●別売りアクセサリー
AC
AC-E15HG
レシーバー(ヘッドホン)
応)、
トレットコンデンサーマイクロホン
ワールドモデルをお買い上げのお客様へ
国によって扱っているアクセサリーが違います。詳しくはお買い上げ店、ソニー
サービス窓口、海外ソニーサービス特約店にご相談ください。
本機の仕様および外観は、改良のため予告なく変更することがありますが、ご了
承ください。
*
(DC時)* 3 mW + 3 mW (16
*
パワーアダプター
(海外用)、充電式ニッケル水素電池
MDR-Q55SL、MDR-848SP、MDR-E931SP、MDR-EX71SL
再生時:40〜
録音・再生時:
最小入力レベル
負荷インピーダンス
15 000 Hz
100〜8 000Hz
0.4 mV
8〜300
Ω)
Ω
DC 1.5 V
充電式電池(付属:
(min)、Ni-MH
乾電池、充電式電池の持続時間については「電池の持続時間」
(
ページ)をご覧ください。
44
77.1 × 108.0 × 22.5 mm (幅/高さ/
77.7 × 108.7 × 24.0 mm (幅/高さ/
(本体のみ)
152 g
約
(充電式電池含む)
179 g
(ステレオ):
FM
(モノラル):
AM
(日本国内用)、ACパワーアダプター
AC-E15L
** MDR-ED238SP/MDR-ED31SP (GROOVE
NH-14WM (A)、1.2 V、1 350 mAh
)、単3形乾電池1個
奥行き、突起部含まず)
奥行き)
*
76.0〜90.0MHz
531〜1 710kHz
NH-14WM
、ステレオイヤー
*
対
、エレク
ECM-719、ECM-D570P
そ
の
他
電子情報技術産業協会(
*
ヘッドホンは、本体のiジャックに直接つなぐときも、リモコンにつなぐとき
**
も、ステレオミニプラグのものをお求めください。
)規格による測定値です。
JEITA
47
Page 48

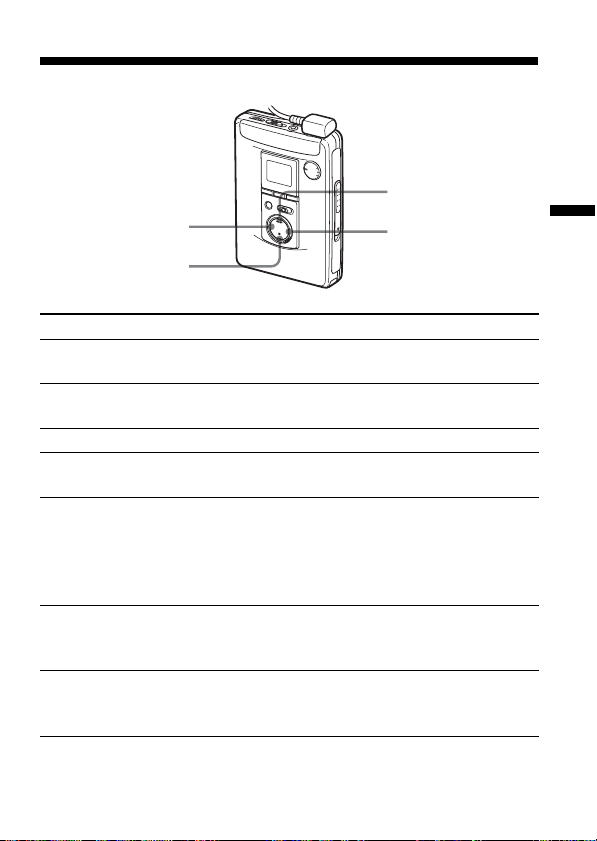
各部のなまえ
●本体
ボリューム
1
(音量調節)つまみ
VOL
2
3
4
5
6
7 テープ時
8
9 乾電池ケース用接点
q; 液晶表示窓
qa
48
放送録音妨害除去)ス
ISS(AM
イッチ
セット
(機能設定)ボタン
SET
メニュー
(機能選択)ボタン
MENU
ラジオ オン
RADIO ON
バンド
BAND(AM、FM
Y(再生)
ラジオ時
電源切)ボタン
ホールド
HOLD
マイク
MIC
(ラジオ電源入)
リピート
•REPEAT
x(停止)ボタン
:
ラジオ オフ
: RADIO OFF
(誤操作防止)スイッチ
ジャック
選択)ボタン
ボタン
(ラジオ
(ヘッドホン、リモコン)ジャック
qs i
スピード コントロール
qd
SPEED CONTROL
qf テープ時:
カウンター リセット
COUNTER RESET
ラジオ時:
エンター
/
qg
qh
qj
(入力)ボタン
ENTER
オープン
(カセットぶた開け)つまみ
OPEN
レコーディング
(録音)スイッチ
REC
テープ時:FF(早送り)
AMS/REW
REVIEW•AMS
ラジオ時
PRESET
(巻き戻し)
レビュー
チューニング
: TUNE
プリセット
+、−(放送局番号選択)
つまみ
ボタン
•CUE•
ボタン
(選局)
キュー
•
/
ボタン
qk 充電式電池入れ
Page 49

本体表示窓
1 選局方法表示
プリセット マニュアル
(
PRESET/MANUAL
2 音質表示(
レコーディング
3
REC
4 テープ走行面表示(
5 録音
6 テープ走行方法表示
(s
RV/MB/GRV
(録音)表示
再生時間表示
/
d)
/
)
)
FWD/REV
7
FM
(
MONO/LOCAL
8
AVLS
9 動作状態
)
q; プリセット番号表示
qa 電池交換お知らせ表示
qs バンド表示(
受信方法表示
モノ ローカル
表示
エリア表示
/
FM/AM
(次ページへつづく)
)
)
そ
の
他
49
Page 50

●リモコンつきヘッドホン
1
2
3
4
5
6
7
(左)
L
R
(右)
8
9
1 ステレオミニプラグ
−(巻き戻し
2
REW
)ボタン
AMS
+(早送り
3
FF
ボタン
ボリューム
4
VOL
5 液晶表示窓
ホールド
6
HOLD
•CUE•AMS
(音量調節)つまみ
*
(誤操作防止)スイッチ
50
•REVIEW•
)
7 テープ時:
Y(再生)
ラジオ時:
RADIO ON
バンド
BAND(AM、FM
オフ
OFF
8
SOUND
モード
9
MODE
液晶バックライトについて
*
リモコン操作時、本体操作時、電池
残量表示が変化したときなどに、自
動的に約5秒間点灯します。
x(停止)ボタン
•
ラジオ オン
(ラジオ電源入)
選択)
(ラジオ電源切)ボタン
サウンド
ボタン
ボタン
•
/
Page 51

リモコン表示窓
1
2 テープ走行方法表示(s
3 バンド表示(
4 テープ操作時:テープ動作状態
表示
AVLS
)
FM/AM
表示
ラジオ操作時:周波数表示
d)
/
5 カセット有/無表示
6 電池交換お知らせ表示
7 音質表示(
RV/MB/GRV
)
そ
の
他
51
Page 52

English
Note
Tapes recorded with setting to
“ ” cannot be played
properly on a cassette player/
tape recorder without this
function.
•To prevent fire, do not cover the
ventilation of the apparatus with
newspapers, table-cloths,
curtains, etc. And don’t place
lighted candles on the apparatus.
•To prevent fire or shock hazard,
do not place objects filled with
liquids, such as vases, on the
apparatus.
•Certain countries may regulate
disposal of the battery used to
power this product. Please
consult with your local authority.
Preparations
Prepare a dry battery (not
supplied) or the rechargeable
battery (supplied).
Dry Battery
Attach the supplied battery case,
and then insert one R6 (size AA)
battery with correct polarity.
Note
For maximum performance we
recommend that you use a Sony
alkaline battery.
52
Rechargeable Battery
Charge the rechargeable battery
before using it for the first time.
1 Insert the supplied
rechargeable battery NH14WM (A) into the
rechargeable battery
compartment with correct
polarity.
2 Connect the supplied AC
power adaptor to the
charging stand, plug in the
AC power adaptor to the
house current (mains).
If the plug does not fit to
your mains, attach the
supplied AC plug adaptor.
3 Place the main unit on the
charging stand.
The CHG lamp will light up.
Full charging takes about 6
hours.
The CHG lamp will go off
when the battery is fully
charged.
Note
Do not use the unit while charging.
Remove the unit from the charging
stand when using it.
– If you operate the unit while
charging, the battery will not be
charged.
– If you operate the unit while
charging, it may cause
malfunction.
Page 53

– Do not place the unit on the
charging stand without the
rechargeable battery. Otherwise,
it may cause malfunction.
When to replace/charge
the battery
Replace or charge the battery
when “ ” flashes in the
display.
Battery life* (Approx.
hours)
Sony alkaline LR6 (SG)**
Tape playback 44
Radio reception 56
MIC recording 15
Radio recording 12
Rechargeable battery
NH-14WM (A)
Tape playback 26
Radio reception 34
MIC recording 9
Radio recording 7
Sony alkaline LR6 (SG)** and
Rechargeable NH-14WM (A)
Tape playback 70
Radio reception 90
MIC recording 24
Radio recording 19
* Measured value by the standard
of JEITA (Japan Electronics and
Information Technology
Industries Association). (Using a
Sony HF series cassette tape)
**When using a Sony LR6 (SG)
“STAMINA” alkaline dry battery
(produced in Japan).
Notes
•The battery life may be shorter
depending on the operating
condition, the surrounding
temperature and battery type.
•The AVLS setting (see “Using the
Menu”) will be cancelled when
you replace the battery.
House Current
You must purchase an AC
power adaptor AC-E15L for
Japan or AC-E15HG for other
countries/regions to operate this
unit using house current.
Remove the rechargeable battery
if inserted. Attach the battery
case and connect the AC power
adaptor AC-E15L for Japan (not
supplied) or AC-E15HG (not
supplied) to the DC IN 1.5V jack
of the battery case and to the
wall outlet.
Do not use any other AC power
adaptor.
Polarity of the plug
53
Page 54

Specifications for AC-E15HG
vary for each area. Check your
local voltage and the polarity of
the plug before purchasing.
Recording
You can record radio programs
from the built-in radio, or record
with the supplied microphone.
In either case, use a new or fully
charged battery.
Note
If the record-protect tab is broken,
you cannot record on that side.
1 Insert a normal (TYPE I) tape.
To record on both sides
Insert the cassette with the
side to be first recorded on as
the FWD (forward) side*.
* Make sure that “FWD” is
displayed. If not, press and
hold x(stop) until “REV”
changes to “FWD”.
To record on one side only
Insert the cassette with the
side to be recorded on as the
REV (reverse) side**.
**Make sure that “REV” is
displayed. If not, press and
hold x until “FWD” changes
to “REV”.
Note
When the cassette holder is
opened, the direction of the
tape will be automatically set to
“FWD”.
2 Press MENU repeatedly to
set the cursor in the display
to REC/PB. Then press SET
to select “ ” or none
(normal speed).
Normal (no indication)
(4.8cm/s): for optimum
sound. Recommended for
normal recordings.
2× (2.4cm/s): for double
recording time (for example,
120 minutes using both sides
of a 60-minute cassette).
Suitable for recording
conferences, dictations, etc.
Not recommended for
recording music.
3 Select a recording source:
To record with the
microphone
Connect the supplied
microphone to the MIC
(PLUG IN POWER) jack.
To record from the radio
Tune in to the station you
want to record (see
“Listening to the Radio”).
54
Page 55

4 Slide REC.
“ ” appears in the display
and recording starts after
about 2 seconds.
If you have started recording
from the FWD side, recording
will switch to reverse side
automatically at the end of
the FWD side.
To stop recording
Press x (on the remote control,
press Y(play)•x(stop) to stop
recording).
To reduce noise while
recording AM programs
Set the ISS (Interference
Suppress Switch) to the position
that reduces noise the most.
To monitor the recording
sound
You can monitor the recording
sound through headphones/
earphones. Adjust monitoring
level using VOL.
Note
You may hear some noise in the
monitor sound in the RV, MB, or
GRV mode (see “Using the
Menu”), but this does not affect
recording.
Notes on recording
•The recording level is fixed.
•Sound emphasis (RV, MB, or
GRV) and AVLS settings do not
affect recording.
•Actual recording will start about
2 seconds (3 seconds when
“ ” is selected for recording
time) after you slide REC. Slide
REC about 2 seconds (3 seconds
when “ ” is selected for
recording time) before the
moment you want to start
recording, or you will miss the
beginning of your recording.
•When recording on both sides,
recording will not be made for
about 10 seconds while the tape
is switching sides.
•Do not use a high-position (TYPE
II) or metal (TYPE IV) tape. If you
do, the sound may be distorted
when you play back the tape, or
the previous recording may not
be erased completely.
•Do not connect or disconnect the
headphones/earphones to/from
i while recording from the
radio. The recording condition
may change abruptly, or noise
may be recorded.
•To avoid noise interference, do
not place it near a lamp cord or a
fluorescent lamp when recording
with the microphone.
•If a howling effect occurs, turn
down the volume.
•All other operation cannot be
made while recording. For other
operation, stop recording first.
To prevent a tape from being
accidentally recorded over
Break off the tabs from side A
and/or B. To reuse the tape for
recording, cover the tab hole
with adhesive tape.
55
Page 56

Playing a Tape
1 Insert a cassette and if the
HOLD function is on, slide
the HOLD switch in the
opposite direction of the
arrow to unlock the controls.
2 Press MENU repeatedly to
set “__” (the cursor) in the
display to REC/PB. Then
press SET to select “ ” or
none (normal speed) which is
the same position as that
used for recording.
To playback commercially
available music tape, etc.,
select normal (no indication).
3 Press Y(play)•REPEAT on
the main unit and adjust the
volume with VOL. (On the
remote control, press
Y•x.)
When adjusting the volume
on the remote control
Set the VOL control on the main
unit to around 6.
When adjusting the volume
on the main unit
Set the VOL control on the remote
control at maximum.
Operation on the remote
control
To Press
Switch Y•x for 2
playback to seconds or more
the other side during playback
Stop playback Y•x once
during playback
Operation on the main
unit
To Press
Switch Y•REPEAT
playback to during playback
the other side
Stop playback x (stop)
Other tape operations
To Press
Fast forward* FF/CUE (FF +
on the remote
control) during
stop
Rewind* REW/REVIEW
(REW – on the
remote contorl)
during stop
Search forward Press and hold
during FF/CUE (FF +
playback on the remote
(CUE) control) and
release it at the
point you want.
56
Page 57

To Press
Search Press and hold
backward REW/REVIEW
during (REW – on the
playback remote control)
(REVIEW) and release it at
the point you
want.
Play the next FF/CUE (FF +
track/ on the remote
succeeding 9 control) once/
tracks from the repeatedly
beginning during playback
(AMS**)
Play the current REW/REVIEW
track/previous (REW – on the
8 tracks from remote control)
the beginning once/
(AMS**) repeatedly
during
playback
Play the other FF/CUE (FF +
side from the on the remote
beginning control) for 2
(Skip Reverse seconds or more
function) during stop
Play the same REW/REVIEW
side from the (REW – on the
beginning remote contorl)
(Rewind Auto for 2 seconds or
Play function) more during
stop
*Press Y•x on the remote
control during fast forward or
rewind to start playback.
**Automatic Music Sensor
A-B Repeat
A-B Repeat plays back
repeatedly any portion of the
tape you specified. Specify by
tagging the beginning (point A)
and the end (point B) of the
portion during playback.
On the main unit
1 Press Y•REPEAT for 2
seconds or more during
playback to tag point A.
“A-” will flash in the display
of the main unit.
2 Press Y•REPEAT again to
tag point B.
“A-B” will flash and the tape
will move rapidly to point A.
Then “REP” appears in the
display and the specified
portion is played repeatedly.
On the remote control
1 Press Y•x twice quickly
during playback to tag point
A.
2 Press Y•x once more to tag
point B.
The tape will be rewound to
point A. Then the specified
portion is played repeatedly.
To stop the A-B Repeat
playback
Press Y•REPEAT on the main
unit.
On the remote control, press
Y•x.
57
Page 58

To reset A-B Repeat
When you want to change a
specific portion, stop the A-B
Repeat playback and tag point A
and point B again.
Notes
•You cannot specify a repeat
portion that includes both sides
of the tape.
•You cannot specify a repeat
portion shorter than 2 seconds.
•After repeated operation, the
actual portion that is played back
may shift somewhat from the
exact portion specified with the
tags due to tape slack.
•A-B Repeat stops automatically
after repeating 50 times.
•Do not use the A-B Repeat
function with tapes longer than
90 minutes. If you do, the tape
may be damaged.
4 For manual tuning
1 Press SET to choose
MANUAL.
2 Press TUNE/PRESET + or
– repeatedly to tune in to
the desired station.
Hold down TUNE/
PRESET + or – for a few
seconds to scan for
stations.
For preset tuning
1 Press SET to choose
PRESET.
2 Press TUNE/PRESET + or
– repeatedly to recall the
desired preset station.
To use preset tuning,
preset stations first (see
“Presetting Radio
Stations”).
Listening to the
Radio
1 Press RADIO ON/BAND to
turn on the radio.
2 Press RADIO ON/BAND
repeatedly to select AM or
FM.
3 Press MENU on the main
unit repeatedly and set the
cursor in the display to
TUNE MODE.
58
To turn off the radio
Press RADIO OFF.
To improve the broadcast
reception
• For AM: Reorient the unit
itself.
• For FM: Extend the remote
control cord (antenna). If the
reception is still not good,
press MENU repeatedly to set
the cursor in the display to FM
MODE. Then press SET to
choose from “MONO”
(monaural), “LOCAL” or none
(stereo) for best reception.
Page 59

To operate from the
remote control
To turn on the radio, press
RADIO ON/BAND•OFF for
more than 1 second (while the
tape is in stop mode only).
To select the band, press RADIO
ON/BAND•OFF for more than
1 second while the radio is on.
To tune in or recall a preset
station, press FF + or REW –.
To turn off the radio, press
RADIO ON/BAND•OFF.
Presetting Radio
Stations
You can preset up to 30
stations—20 for FM and 10 for
AM (for the JPn area*, up to 16
stations—8 for FM and 8 for
AM).
* Only if available. See “Receiving
Stations Outside Japan”.
Presetting Automatically
Scanned Stations
1 Press RADIO ON/BAND to
turn on the radio.
2 Press RADIO ON/BAND
repeatedly to select AM or
FM.
3 Press and hold ENTER for
more than 3 seconds.
Preset number 1 will flash in
the display and the main unit
starts scanning the stations
from the lower frequencies
and stops for about 5 seconds
when a station is received.
4 If you wish to preset the
currently received station,
press ENTER while the preset
number is flashing.
The received station is preset
on preset number 1 and the
unit starts scanning for the
next receivable station.
5 Repeat step 4 until all
receivable stations are preset.
To stop scanning
Press RADIO OFF. The radio is
turned off at the same time.
Notes
•If stations are already stored, the
newly preset stations replace the
old ones when the above
procedure is completed.
•If stations cannot be preset
automatically, preset them
manually.
Presetting Stations
Manually
1 Press RADIO ON/BAND to
turn on the radio.
2 Press RADIO ON/BAND
repeatedly to select AM or
FM.
3 Press ENTER.
The frequency digits will flash
in the display.
59
Page 60

4 While the frequency digits are
flashing, tune in to a station
you wish to store using
TUNE/PRESET + or – and
press ENTER.
The preset number will flash
in the display.
5 While the preset number is
flashing, select the preset
number you want using
TUNE/PRESET + or –.
6 While the preset number is
flashing, press ENTER.
Notes
•If you cannot complete step 4, 5
or 6 while the indicators are
flashing, repeat from step 3.
•If a station is already stored, the
new station replaces the old one.
To cancel a stored station
1 Follow the procedure of
“Playing the Preset Radio
Stations” and in step 5, select
the preset number you want
to cancel and then press
ENTER. The frequency digits
will flash in the display.
2 Press and hold TUNE/
PRESET + or –. The frequency
digit starts running up or
down. Keep holding down the
button until “- - - -” is
displayed.
3 Press ENTER while “- - - -” is
flashing. A preset number will
flash in the display.
60
4 Press ENTER to cancel the
stored station.
Playing the Preset Radio
Stations
1 Press RADIO ON/BAND to
turn on the radio.
2 Press RADIO ON/BAND
repeatedly to select AM or
FM.
3 Press MENU repeatedly to set
the cursor in the display to
TUNE MODE.
4 Then press SET to display
“PRESET”.
5 Press TUNE/PRESET +
or –.
Scanning the Preset
Radio Stations
1 Press RADIO ON/BAND to
turn on the radio.
2 Press RADIO ON/BAND
repeatedly to select AM or
FM.
3 Press and hold RADIO ON/
BAND for 2 seconds or more.
The preset stations of the
selected band will be played
for about 5 seconds each.
(While scanning the preset
radio stations, the indicators
in the display flash.)
4 Press RADIO ON/BAND
again to select the station
while the desired preset
station is being played.
Page 61

Notes
•If there are no stations stored,
this function does not work.
•Until a station is selected in step
4, this function turned on in step
3 will continue.
Receiving Stations
Outside Japan
1 Press RADIO ON/BAND to
turn on the radio.
2 Press ENTER.
The frequency digits will flash
in the display.
3 Press and hold RADIO ON/
BAND until “JPn”, “USA” or
“Eur” flashes.
4 Press RADIO ON/BAND
repeatedly to select “JPn”,
“USA” or “Eur”.
5 Press ENTER.
6 Tune in to and store stations
as necessary following the
procedure of “Listening to the
Radio” and “Presetting Radio
Stations”.
Area indication and
frequency range
Area* Frequency range
FM (MHz) AM (kHz)
JPn 76.0 - 90.0 531 - 1 710
USA 87.5 - 108 530 - 1 710
Eur 87.5 - 108 531 - 1 602
* JPn: Japan
USA : USA, Canada, and
Central and South
America
Eur :European and other
countries/regions
Using the Menu
To select playback
direction mode
On the main unit:
Press MENU repeatedly to set
the cursor in the display to PB
MODE. Then press SET to select
the desired mode.
On the remote control:
Press MODE repeatedly. With
each press, the indications
change.
To play Select
both sides repeatedly s
both sides once d
from the FWD side
61
Page 62

Emphasizing Sound
On the main unit:
1 Press MENU repeatedly to set
the cursor in the display to
SOUND.
2 Press SET repeatedly to select
the sound emphasis of your
choice.
On the remote control:
1 Press SOUND repeatedly.
With each press, the
indications change.
The indications change as
follows:
RV : Sound Revitalizer
Emphasizes treble
sound.
MB : Mega Bass
Emphasizes bass sound
(moderate effect).
GRV : Groove
Emphasizes bass sound
(strong effect).
no message : normal
(no effect)
Note
If the sound is distorted with the
mode “GRV”, turn down the
volume of the main unit or select
other modes.
Protecting Your Hearing
— AVLS (Automatic
Volume Limiter System)
The maximum volume is kept
down to protect your ears.
On the main unit:
Press MENU repeatedly in the
playback, stop or radio mode to
set the cursor in the display to
AVLS. Then press SET to show
“ ”.
On the remote control:
Hold down MODE for more
than 10 seconds until “AVLS”
appears in the display.
To cancel the AVLS
function
Press SET so that “ ”
disappears from the display on
the main unit.
On the remote control, hold
down MODE again for more
than 3 seconds until “AVLS”
disappears.
62
Page 63

Using Other
Functions
Adjust the Tape Playback
Speed
You can adjust the playback
speed using SPEED CONTROL.
Turn SPEED CONTROL to:
– (slow) to play back at a slower
speed.
Center position to play back at
normal speed.
+ (fast) to play back at a faster
speed.
Note
The SPEED CONTROL works in
the playback mode only.
Recording will be made
independent of this control.
Locking the Controls
— HOLD Function
Slide the HOLD switch in the
direction of the arrow to lock the
controls of the main unit (except
SPEED CONTROL) or the
remote control.
Using the Tape Counter
The tape counter is displayed on
the main unit during playback,
recording, fast forward, rewind,
CUE, REVIEW and stop (except
when the radio is turned on).
The number will increase when
playing back the FWD side, and
decrease when playing back the
REV side. To reset the counter to
“000”, press ENTER/COUNTER
RESET.
Notes
•The tape counter may show some
deviation.
•The tape counter will not be
displayed when the cassette
compartment is empty.
63
Page 64

한국어
주의점
“ ” 설정에서 녹음한 테이프는
이 기능이 없는 카세트 플레이어나
테이프 레코더에서 올바르게 재생
할 수 없습니다.
• 본 제품의 환기구는 화재 방지를 위해
서 신문이나 테이블 클로스, 커튼 등
으로 막지 마십시오. 본 제품 위에는
촛불을 올려놓지 마십시오.
• 화재나 감전될 위험이 있으므로 물이
들어있는 꽃병 등은 본 제품 위에 올려
놓지 마십시오.
• 일부 나라에서는 본 제품의 전원으로
사용하는 배터리의 처분 방법에 대해
서 규제하고 있습니다. 현지 관할 기
관으로 문의하여 주십시오.
준비
건전지(별매품)또는 충전식 배터리
(부속품)를 준비합니다.
건전지
부속된 건전지 케이스를 부착한 다음
R6(AA 크기) 배터리 한 개를 극을
맞추어 넣습니다.
주의점
최대 성능을 위해서는 Sony 알칼라인
배터리(전지)를 사용할 것을 권합니다.
충전식 배터리
충전식 배터리는 처음 사용하기 전에
충전하여 주십시오.
1 부속된 충전식 배터리 NH-
14WM(A)를 충전기에 극을 맞
추어 넣습니다.
2 부속된 AC 전원 어댑터를 충전
스탠드에 연결하고 AC 전원 어
댑터를 가정용 전원(주전원) 에
연결합니다.
플러그가 주전선과 맞지 않을 때
에는 부속된 AC 플러그 어댑터
를 부착합니다.
3 본체를 충전 스탠드 위에 올려놓
습니다.
CHG 램프가 점등됩니다.
만충전하려면 약 6시간 걸립니
다.
배터리가 만충전되면 CHG 램프
가 꺼집니다.
주의점
충전 중에는 본 기기를 사용하지 마십
시오. 본 기기를 사용하려면 충전 스탠
드에서 빼 주십시오.
-충전 중에 본 기기를 사용하면 배터리
가 충전되지 않습니다.
-충전 중에 본 기기를 사용하면 고장의
원인이 됩니다.
-충전식 배터리를 넣지 않은 상태에서
는 본 기기를 충전 스탠드에 올려놓지
마십시오. 그렇지 않으면 고장의 원
인이 됩니다.
64
Page 65

배터리 교체/충전 시기
“ ”가 표시화면에서 깜박이면 배
터리를 교체하거나 충전합니다.
전지 수명*(약 시간)
Sony 알칼라인 LR6(SG)**
테이프 재생 44
라디오 수신 56
MIC(마이크)녹음 15
라디오 녹음 12
충전식 배터리 NH-14WM(A)
테이프 재생 26
라디오 수신 34
MIC(마이크)녹음 9
라디오 녹음 7
Sony 알칼라인 LR6(SG)** 및
충전식 NH-14WM(A)
테이프 재생 70
라디오 수신 90
MIC(마이크)녹음 24
라디오 녹음 19
* JEITA(Japan Electronics and
Information Technology
Industries Association)의 기준
에 따라 측정한 값(Sony HF 시리즈
카세트 테이프 사용)
**LR6(SG) Sony STAMINA 알칼
라인 건전지(일본산)를 사용할 경우
주의점
• 사용상태, 주위의 온도나 배터리의
종류에 따라서 배터리의 지속시간이
짧아지는 경우가 있습니다.
• 배터리를 교환하면 AVLS 설정은 취
소됩니다(“메뉴 사용하기”를 참조).
가정용 전원
가정용 전원을 사용해서 본 제품을
조작하려면 일본용 AC 전원 어댑터
AC-E15L 또는 다른 나라/지역용
AC-E15HG를 구입하여 주십시오.
충전식 배터리가 들어 있으면 꺼내
주십시오. 배터리 케이스를 부착하
고 배터리 케이스 DC IN 1.5V 단자
와 콘센트에 일본용 AC 전원 어댑터
AC-E15L(별매품) 또는 ACE15HG(별매품)를 접속합니다.
그 밖의 AC 전원 어댑터는 사용하지
마십시오.
플러그의 극성
AC-E15HG 사양은 지역에 따라 다
릅니다. 사용 지역의 전압과 플러그
의 극성을 확인하신 후에 구입하여
주십시오.
65
Page 66

녹음하기
내장 라디오에서 라디오 프로그램을
녹음하거나 또는 부속된 마이크를 사
용해서 녹음할 수 있습니다. 녹음할
때에는 새 배터리나 만충전된 배터리
를 사용하십시오.
주의점
녹음 보호 탭을 제거했을 때에는 그 면
에는 녹음을 할 수 없습니다.
1 통상(TYPE I) 테이프를 넣으십
시오.
양면에 녹음하려면
먼저 녹음하고 싶은 면을 FWD
(정방향)*으로 하여 카세트를 넣
으십시오.
* “FWD”가 표시되는지 확인하십
시오. 표시되지 않으면, “REV”
가 “FWD”로 바뀔 때까지 x(정
지)를 계속 누릅니다.
한 쪽 면에만 녹음하려면
녹음하고 싶은 면을 REV(역방
향)**으로 하여 카세트를 넣으십
시오.
**“REV”가 표시되는지 확인하십
시오. 표시되지 않으면, “FWD”
가 “REV”로 바뀔 때까지 x를 계
속 누릅니다.
주의점
카세트 홀더를 열면 테이프의 방향
은 자동으로 “FWD” 방향이 됩니
다.
2 MENU를 반복해서 눌러서 표시
창의 커서를 REC/PB로 설정합
니다. 다음에 SET을 눌러서
“ ” 또는 없음( 통상 속도) 을
선택합니다.
통상(표시 없음)(4.8cm/s): 고
음질 통상 녹음으로 권장합니다.
2×(2.4cm/s): 녹음 시간이 2배
(예를 들면 60분 테이프 양면을
사용해서 120분) . 회의 녹음이나
구술용 등에 적절합니다. 음악 녹
음용으로는 권장하지 않습니다.
3 녹음원을 선택합니다:
마이크를 이용하여 녹음하려면
부속된 마이크를 MIC(PLUG
IN POWER) 잭에 연결합니다.
그림에 보이는 예처럼 마이크를
사용자의 옷에 부착할 수 있습니
다.
라디오로부터 녹음하려면
녹음하고 싶은 방송국을 선국합
니다(“라디오 듣기”를 참조).
4 REC를 밉니다.
“ ”가 표시화면에 나타나고
약 2초 후에 녹음이 시작됩니다.
FWD(정방향) 쪽부터 녹음을 시
작했을 때에는 FW D의 마지막
부분에서 자동으로 역방향 쪽으
로 전환되고 녹음이 계속됩니다.
66
Page 67

녹음을 정지하려면
x를 누릅니다(리모컨에서는
Y(재생)•x(정지)를 눌러 녹음을
정지합니다).
AM 프로그램을 녹음하는 동안 잡
음을 감소시키려면
ISS(Interference Suppress
Switch: 간섭 억제 스위치)를 잡음
을 최대로 감소시키는 위치에 놓습니
다.
녹음되는 음을 모니터하려면
헤드폰/이어폰을 통해 녹음되는 음
의 상태를 모니터할 수 있습니다.
VOL을 사용하여 모니터 레벨을 조
정합니다.
주의점
RV, MB나 GRV 모드(“메뉴 사용하기”
를 참조)에서 모니터 음에 일부 잡음이 들
릴 수 있지만, 이것은 녹음에 영향을 미치
지 않습니다.
녹음에 대한 주의사항
• 녹음 레벨이 고정되어 있습니다.
• 음 강조(RV, MB, 또는 GRV) 및
AVLS 설정은 녹음에 영향을 미치지
않습니다.
• 실제 녹음은 REC 버튼을 민 약 2초
(녹음 시간에 “
에는 3초) 후에 시작됩니다. 녹음을
시작하고 싶은 위치의 약 2초( 녹음 시
간에 “
3초) 전에 REC 버튼을 밀지 않으면
첫부분은 녹음할 수 없습니다.
• 양면을 녹음할 때는 테이프가 다른 면
으로 전환되는 약 10초 동안 녹음이
되지 않을 것입니다.
• 하이포지션(크롬)(TYPE II) 테이
프나 금속(TYPE IV) 테이프를 사
용하지 마십시오. 사용하게 되면, 테
이프를 재생할 때 소리가 일그러지거
나 이전에 녹음한 것이 완전히 지워지
지 않을 수 있습니다.
• 라디오로부터 녹음하는 동안 헤드폰/
이어폰을 i에서 연결하거나 빼지 마
십시오. 녹음 상태가 갑자기 바뀌거나
잡음이 녹음될 수 있습니다.
• 잡음 간섭을 피하려면, 마이크로 녹음
시 램프 코드나 형광등 램프 가까이에
두지 마십시오.
• 굉음이 나면, 음량을 낮추십시오.
• 녹음하는 동안에는 모든 다른 작동들
이 이뤄지지 않습니다. 다른 작동을
하려면 우선 녹음을 정지하도록 하십
시오.
”를 선택했을 때
”를 선택했을 때에는
실수로 테이프의 내용을 소거하는
것을 방지하려면
A면 및 또는 B면에서 탭을 떼어내십
시오. 테이프를 녹음에 재사용하려면
탭 구멍을 접착 테이프로 씌웁니다.
67
Page 68

테이프 재생하기
1 카세트를 넣고 HOLD 기능이 켜
져 있을 때에는 HOLD 스위치를
화살표 반대 방향으로 밀어서 컨
트롤 스위치류의 잠금을 해제합
니다.
2 MENU를 반복해서 눌러서 표시
창의 “__”(커서)를 REC/PB로
설정합니다. 다음에 SE T을 눌러
서 “ ” 또는 녹음용으로 사용
하고 싶은 위치인 없음(통상 속
도)을 선택합니다.
시판용 음악 테이프 등을 재생하
려면 통상(표시 없음)을 선택합
니다.
3 본체에서 Y(재생)•REPEAT
를 누르고 VOL 로 음량을 조절합
니다.(리모컨에서는 Y• x를
누릅니다.)
리모컨에서 음량을 조절할 경우
본체의 VOL 컨트롤을 6 정도로 설정해
놓습니다.
본체에서 음량을 조절할 경우
리모컨의 VOL 컨트롤을 최대로 설정
해 놓습니다.
리모컨에서의 조작
목적 누르는 버튼
반대면의 재생 재생 중 Y•x를
으로전환 2초 이 상 누른다.
재생 정지 재생 중 Y•x를
한 번 누른다.
본체에서의 조작
목적 누르는 버튼
반대면의 재생 재생 중
으로전환 Y•REPEAT를
누른다.
재생 정지 x(정지)를 누른다.
그 밖의 테이프 조작
목적 누르는 버튼
고속감기* 정지 중 FF/CUE
(리모컨의 FF +)
를 누른다.
되감기* 정지 중 REW/
REVIEW(리모컨
의 REW -)를 누른
다.
재생 중에 FF/CUE(리모컨
앞방향으로 검색 의 FF +)를 눌렀다
(CUE) 가 원하는 위치에서
놓는다.
68
Page 69

목적 누르는 버튼
재생 중에 REW/REVIEW
뒷방향으로 검색 (리모컨의 REW-)
(REVIEW) 를 눌렀다가 원하는
위치에서 놓는다.
다음 트랙 재생/ 재생중 FF/CUE
처음부터 9트랙을 (리모컨의 FF +)
연속 재생 를 한번/반복하여
(AMS**) 누른다.
다음 트랙 재생/ 재생중 REW/
처음부터 8트랙을 REVIEW(리모컨
연속 재생 의 REW -)를 한
(AMS**)번/반복하여 누른
다.
처음부터 반대 정지중 FF/CUE
면을 재생 (리모컨의 FF +)
(스킵 리버스 를 2초 이상 누른
기능) 다.
처음부터 같은 정지중 REW/
면을 재생 REVIEW(리모컨
(자동 되감기 의 REW -)를 2초
재생 기능) 이상 누른다.
* 고속감기 또는 고속되감기 중에 재생
을 시작하려면 리모컨의 Y•x를 눌
러 주십시오.
**Automatic Music Sensor(자동
음악 센서)
A-B 반복
A-B 반복은 테이프의 지정 부분을
반복해서 재생합니다. 재생 중에 첫
부분(A 위치)와 끝부분(B 위치)에
표시를 해서 재생하고 싶은 부분을
지정합니다.
본체에서
1 재생중 Y•REPEAT를 2초 이
상 눌러 A 위치를 표시합니다.
본체의 표시 화면에 “A-”가 깜박
입니다.
2 Y•REPEAT를 다시 한 번 눌
러 B 위치를 표시합니다.
“A-B”가 깜박이고 테이프가 A
위치로 되감깁니다. 다음에 표시
화면에 “REP”가 나타나고 지정
한 부분이 반복 재생됩니다.
리모컨에서
1 재생 중에 Y•x를 두 번 신속히
눌러서 A 위치를 표시합니다.
2 Y•x를 다시 한 번 눌러서 B 위
치를 표시합니다.
테이프가 A 위치까지 되감깁니
다.다음에 지정한 부분이 반복 재
생됩니다.
A-B 반복 재생을 중지하려면
본체에서는 Y•REPEAT를 누릅
니다.
리모컨에서는 Y•x를 누릅니다.
69
Page 70

A-B 반복 재생을 재설정하려면
지정한 위치를 변경하고 싶을 때에는
A-B 반복 재생을 중지하고 위치 A
와 위치 B를 다시 한 번 지정하여 주
십시오.
주의점
• 테이프의 양면에 걸쳐서 반복 위치를
지정할 수 없습니다.
• 2초 미만의 반복 지정은 할 수 없습니
다.
• 여러 번 조작하면 실제 재생되는 부분
은 테이프의 늘어짐에 의해서 표시해
놓은 정확한 위치에서 약간 어긋나는
경우가 있습니다.
• A-B 반복 재생은 50회 반복 재생 후
자동 정지됩니다.
• 90분을 초과하는 테이프에서는 AB 반복 기능을 사용하지 마십시오. 그
렇지 않으면 테이프가 손상될 염려가
있습니다.
라디오 듣기
1 RADIO ON/BAND를 눌러 라
디오를 켭니다.
2 RADIO ON/BAND를 반복해
서 눌러 AM이나 FM를 선택합
니다.
3 본체에서 MENU를 반복해서 누
르고 본체의 표시화면에 커서를
TUNE MODE로 맞춥니다.
4 수동 튜닝
1 SET를 눌러 MANUAL을 선
택합니다.
2 TUNE/PRESET + 또는 -
를 반복해서 눌러 원하는 방송
국을 맞춥니다.
TUNE/PRESET + 또는 -를
몇 초간 눌러 방송국을 검색합
니다.
사전설정 튜닝
1 SET를 눌러 PRESET를 선
택합니다.
2 TUNE/PRESET + 또는 -
를 반복해서 눌러 원하는 사전
설정 방송국을 호출합니다.
사전설정 튜닝을 사용하려면
우선 방송국을 사전설정하십
시오(“라디오 방송국 사전설
정하기”를 참조).
라디오를 끄려면
RADIO OFF를 누릅니다.
방송 수신을 좋게 하려면
• AM : 본체의 방향을 변경하여 주
십시오.
• FM : 리모컨 코드(안테나)를 길게
연장합니다. 그래도 잘 들리지 않
을 때에는 MENU를 반복해서 눌
러서 표시창에서 커서를 F M
MODE로 설정하여 주십시오. 다
음에 SE T을 눌러서 “MONO”
(모노럴) 또는 “LOCAL” 없음
(스테레오) 중에서 잘 들리는 쪽
을 선택하여 주십시오.
70
Page 71

리모컨에서 작동하려면
라디오를 켜려면 RADIO ON/
BAND •OFF를 1초 이상 누릅니다
(테이프가 정지 모드에 있는 동안).
주파수대를 선택하려면 라디오가 켜
져 있을 때에 RADIO ON/BAND•
OFF를 1초 이상 눌러 주십시오.
사전설정 방송국을 맞추거나 호출하
려면, FF + 또는 REW -를 누릅니다.
라디오를 끄려면 RADIO ON/
BAND•OFF를 누릅니다.
라디오 방송국 사전설정
하기
30개 방송국-FM 20개 방송국과
AM 10개 방송국(JPn지역*에서는
16개 방송국-FM 8개 방송국과 AM
8개 방송국)을 사전 설정할 수 있습
니다.
* 이용 가능한 경우 “일본 국외 방송국
수신하기” 참조
4 현재 수신한 방송국을 사전설정하
고 싶을 때에는 사전설정 번호가
점멸하고 있는 동안에 ENTER를
누릅니다.
수신한 방송국이 사전설정 번호 1
에 사전설정되고 본 제품은 다음
에 수신할 수 있는 방송국의 선국
을 시작합니다.
5 수신 가능한 모든 방송국을 사전
설정할 때까지 순서 4을 반복 조작
합니다.
수신을 중지하려면
RADIO OFF를 누릅니다. 동시에
라디오가 꺼집니다.
주의점
• 방송국이 이미 기억되어 있을 때에는
상기 순서를 종료했을 때 이전의 방송
국이 새로 사전설정한 방송국으로 변
경됩니다.
• 방송국을 자동으로 사전설정할 수 없
을 때에는 수동 조작으로 사전설정하
여 주십시오.
자동으로 선국한 방송국 사전설
정하기
1 RADIO ON/BAND를 눌러서
라디오 전원을 켭니다.
2 RADIO ON/BAND를 반복해
서 눌러서 AM 또는 F M을 선택합
니다.
3 ENTER를 3초 이상 누릅니다.
표시창에서 사전설정 번호 1이 점
멸하고 본 제품은 낮은 주파수부
터 방송국의 선국을 시작하고 방
송국을 수신하면 약 5초 동안 중지
됩니다.
방송국을 수동 조작으로 사전설
정하기
1 RADIO ON/BAND를 눌러서
라디오 전원을 켭니다.
2 RADIO ON/BAND를 반복해
서 눌러서 AM 또는 F M을 선택합
니다.
3 ENTER를 누릅니다.
표시창에서 주파수 숫자가 점멸합
니다.
71
Page 72

4 주파수 숫자가 점멸하고 있는 동
안에 TUNE/PRESET + 또는 를 사용해서 기억시켜 놓고 싶은
방송국에 맞춘 후 ENTER를 누
릅니다.
표시창에서 사전설정 번호가 점멸
합니다.
5 사전설정 번호가 점멸하고 있는
동안 TUNE/PRESET + 또는 를 사용해서 원하는 사전설정 번
호를 선택합니다.
6 사전설정 번호가 점멸하고 있는
동안 ENTER를 누릅니다.
주의점
• 표시가 점멸하고 있는 동안에 순서 4 ,
5 또는 순서 6를 종료하지 못했을 때
에는 순서 3부터 다시 조작하여 주십
시오.
• 방송국이 이미 기억되어 있을 때에는
이전 방송국이 새 방송국으로 변경됩
니다.
기억시킨 방송국을 취소하려면
1 “사전설정한 라디오 방송국 듣기”
와 순서 5의 조작에 따라 취소하고
싶은 사전설정 번호를 선택한 후
ENTER를 누릅니다.
2 TUNE/PRESET + 또는 -를 누
르고 있습니다. 주파수 숫자가 커
지거나 작아지기 시작합니다.
“- - - -”가 표시될 때까지 버튼을 눌
러 주십시오.
3 “- - - -”가 점멸하고 있는 동안
ENTER를 누릅니다. 표시창에
서 사전설정 번호가 점멸합니다.
4 기억시킨 방송국을 취소하려면
ENTER를 누릅니다.
사전설정한 라디오 방송국 듣기
1 RADIO ON/BAND를 눌러서
라디오 전원을 켭니다.
2 RADIO ON/BAND를 반복해
서 눌러서 AM 또는 F M을 선택합
니다.
3 MENU를 반복해서 눌러서 표시
창의 커서를 TUNE MODE로 설
정합니다.
4 다음에 SET 을 눌러서 “PRESET”
를 표시합니다.
5 TUNE/PRESET + 또는 -를 누
릅니다.
사전설정한 라디오 방송국 선국
하기 — DAPS
1 RADIO ON/BAND를 눌러서
라디오 전원을 켭니다.
2 RADIO ON/BAND를 반복해
서 눌러서 AM 또는 F M을 선택합
니다.
3 RADIO ON/BAND를 2초 이상
누릅니다.
선택한 밴드의 사전설정 방송국이
각각 약 5초 동안 재생됩니다.
(사전설정한 라디오 방송국을 선
국하는 동안 표시창의 표시는 점
멸합니다.)
4 원하는 사전설정 방송국을 재생하
고 있는 동안 RADIO ON/
BAND를 다시 한 번 눌러서 방송
국을 선택합니다.
72
Page 73

주의점
• 기억시킨 방송국이 없을 때에는 이 기
능은 작동하지 않습니다.
• 순서 3에서 작동한 이 기능은 순서 4
에서 방송국을 선택할 때까지 작동합
니다.
일본 국외 방송국 수신하기
1 RADIO ON/BAND를 눌러 라
디오를 켭니다.
2 ENTER를 누릅니다.
주파수 숫자가 표시화면에서 깜박
입니다.
3 “JPn” 또는 “USA”, “Eur”가 점
멸할 때까지 RADIO ON/BAND
를 누르고 있습니다.
4 RADIO ON/BAND를 반복해서
눌러서 “JPn”나 “USA” 또는
“Eur”를 선택합니다.
5 ENTER를 누릅니다.
6 “라디오 듣기” 및 “라디오 방송국
사전설정하기” 절차를 따라 필요
에 따라 방송국을 맞추고 저장합
니다.
지역 표시 및 주파수 범위
지역* 주파수 범위
FM(MHz) AM(kHz)
JPn 76.0 ~ 90.0 531 ~ 1 710
USA 87.5 ~ 108 530 ~ 1 710
Eur 87.5 ~ 108 531 ~ 1 602
* JPn : 일본
USA : 미국, 캐나다, 중미 및 남미
Eur : 유럽 및 기타 국가/지역
메뉴 사용하기
재생 모드 조정하기
본체에서:
MENU를 반복해서 눌러 표시화면
에서 커서를 PB MODE 로 설정합니
다. 그런 다음 S ET를 눌러 원하는 모
드를 선택합니다.
리모컨에서:
MODE를 반복해서 누릅니다. 누를
때마다 표시가 바뀝니다.
재생하려면 선택
양면 반복 s
FWD면에서 양면을 d
한 번씩
73
Page 74

음질을 강조하기
본체에서:
1 MENU를 반복해서 눌러 표시화
면에서 커서를 SOUND로 이동
합니다.
2 SET를 반복해서 눌러 원하는 음
강조를 선택합니다.
리모컨에서:
1 SOUND를 반복해서 누릅니다.
누를 때마다 표시가 바뀝니다.
표시는 다음과 같이 바뀝니다:
RV : Sound Revitalizer
(음향 재생기)
고음을 강조
MB :Mega Bass
저음을 강조(일반 효과)
GRV : Groove
저음을 강조(강한 효과)
아무 메시지 없음 : 정상(무효과)
주의점
“GRV” 모드에서 사운드가 왜곡될 때
에는 본체의 음량을 줄이거나 다른 모
드를 선택하십시오.
청각 보호하기 — AVLS
(Automatic Volume Limiter
System)
청력을 보호하기 위하여 최대 음량을
낮게 억제합니다.
본체에서:
재생 중에 또는 정지 중에 라디오 모
드에서 MENU를 반복해서 눌러서
표시창의 커서를 AVLS로 설정합니
다. 다음에 SE T을 눌러서 “ ”를 표
시합니다.
리모컨에서:
표시창에 “AVLS”가 나타날 때까지
MODE를 10초 이상 누릅니다.
AVLS 기능을 취소하려면
SET을 눌러서 본체 표시창의 “ ”
를 지웁니다.
리모컨에서는 “AVLS”가 지워질 때
까지 MODE를 다시 한 번 3초 이상
누립니다.
74
Page 75

다른 기능 사용하기
테이프 재생 속도 조절하기
SPEED CONTROL을 사용해서
재생 속도를 조절할 수 있습니다.
SPEED CONTROL을 다음과 같
은 위치로 돌립니다:
-(저속) 저속으로 재생합니다.
중앙은 통상 속도로 재생합니다.
+(고속) 고속으로 재생합니다.
주의점
SPEED CONTROL 스위치는 재생
중에만 작동합니다. 녹음은 이 속도의
설정과 관계없습니다.
컨트롤을 잠그려면
— HOLD 기능
HOLD 스위치를 화살표 방향으로
밀어서 본체(SPEED CONTROL
은 제외) 또는 리모컨의 컨트롤 스위
치류를 잠가 놓습니다.
테이프 카운터를 사용하려면
테이프 카운터는 재생, 녹음, 빨리 감
기, 되감기, CUE, REVIEW 및 정
지 동안(라디오가 켜져 있는 경우 제
외) 본체상에 화면에 표시됩니다.
FWD(정방향) 쪽을 재생할 때는 숫
자가 증가하며, REV(역방향) 쪽을
재생할 때는 감소합니다. 카운터를
“000”으로 재설정하려면 ENTER/
COUNTER RESET를 누릅니다.
주의점
• 테이프 카운터는 약간의 오차가 생길
수 있습니다.
• 카세트실이 비어있으면 테이프 카운
터는 표시되지 않습니다.
75
Page 76

この説明書は
ゼロ植物油型インキを使用しています。
VOC
Printed in Malaysia
(揮発性有機化合物)
 Loading...