

Sony WM-FX890 User Manual
2-186-432-21(1)
Radio Cassette Player
Operating Instructions
使用說明書
WM-FX890
©2003 Sony Corporation
“WALKMAN” is a registered trademark of Sony Corporation to represent Headphone Stereo
products.
is a trademark of Sony Corporation.
The validity of the CE marking is restricted to only those countries where it
is legally enforced, mainly in the countries EEA (European Economic Area).
CE 標誌的有效性,僅限於那些有法律限制的國家,主要在 EEA(歐洲經濟區)
國家。
WARNING
To prevent fire or shock hazard, do not expose
the unit to rain or moisture.
Do not install the appliance in a confined space, such as a bookcase or
built-in cabinet.
警告
為防火災或觸電危險,切勿讓機器暴露於雨中或潮濕處。
別把機器安裝在例如書櫥或壁櫃等密不通風的地方。
A
B
CHG
C
D
VOL
HOLD
Plug in firmly.
接插穩固。
VOL*
SET
MENU
HOLD
Y•REPEAT**
REW/ REVIEW
FF/ CUE
* There is a tactile dot beside VOL on the main unit to show the direction to
turn up the volume.
** The button has a tactile dot.
* 在主機上 VOL 旁邊有一個觸感圓點,表示轉大音量的方向。
** 按鈕帶有突起期圓點。
x
FWD (forward) side
FWD(正)面
REV (reverse) side
REV(反)面
REW –
FF +
MODE
Y•x
i
BL SKIP
English
• To prevent fire, do not cover
the ventilation of the apparatus
with newspapers, table-cloths,
curtains, etc. And don’t place
lighted candles on the
apparatus.
• To prevent fire or shock
hazard, do not place objects
filled with liquids, such as
vases, on the apparatus.
• Certain countries may regulate
disposal of the battery used to
power this product. Please
consult with your local
authority.
Preparations
Prepare a dry battery (not
supplied) or the rechargeable
battery (supplied).
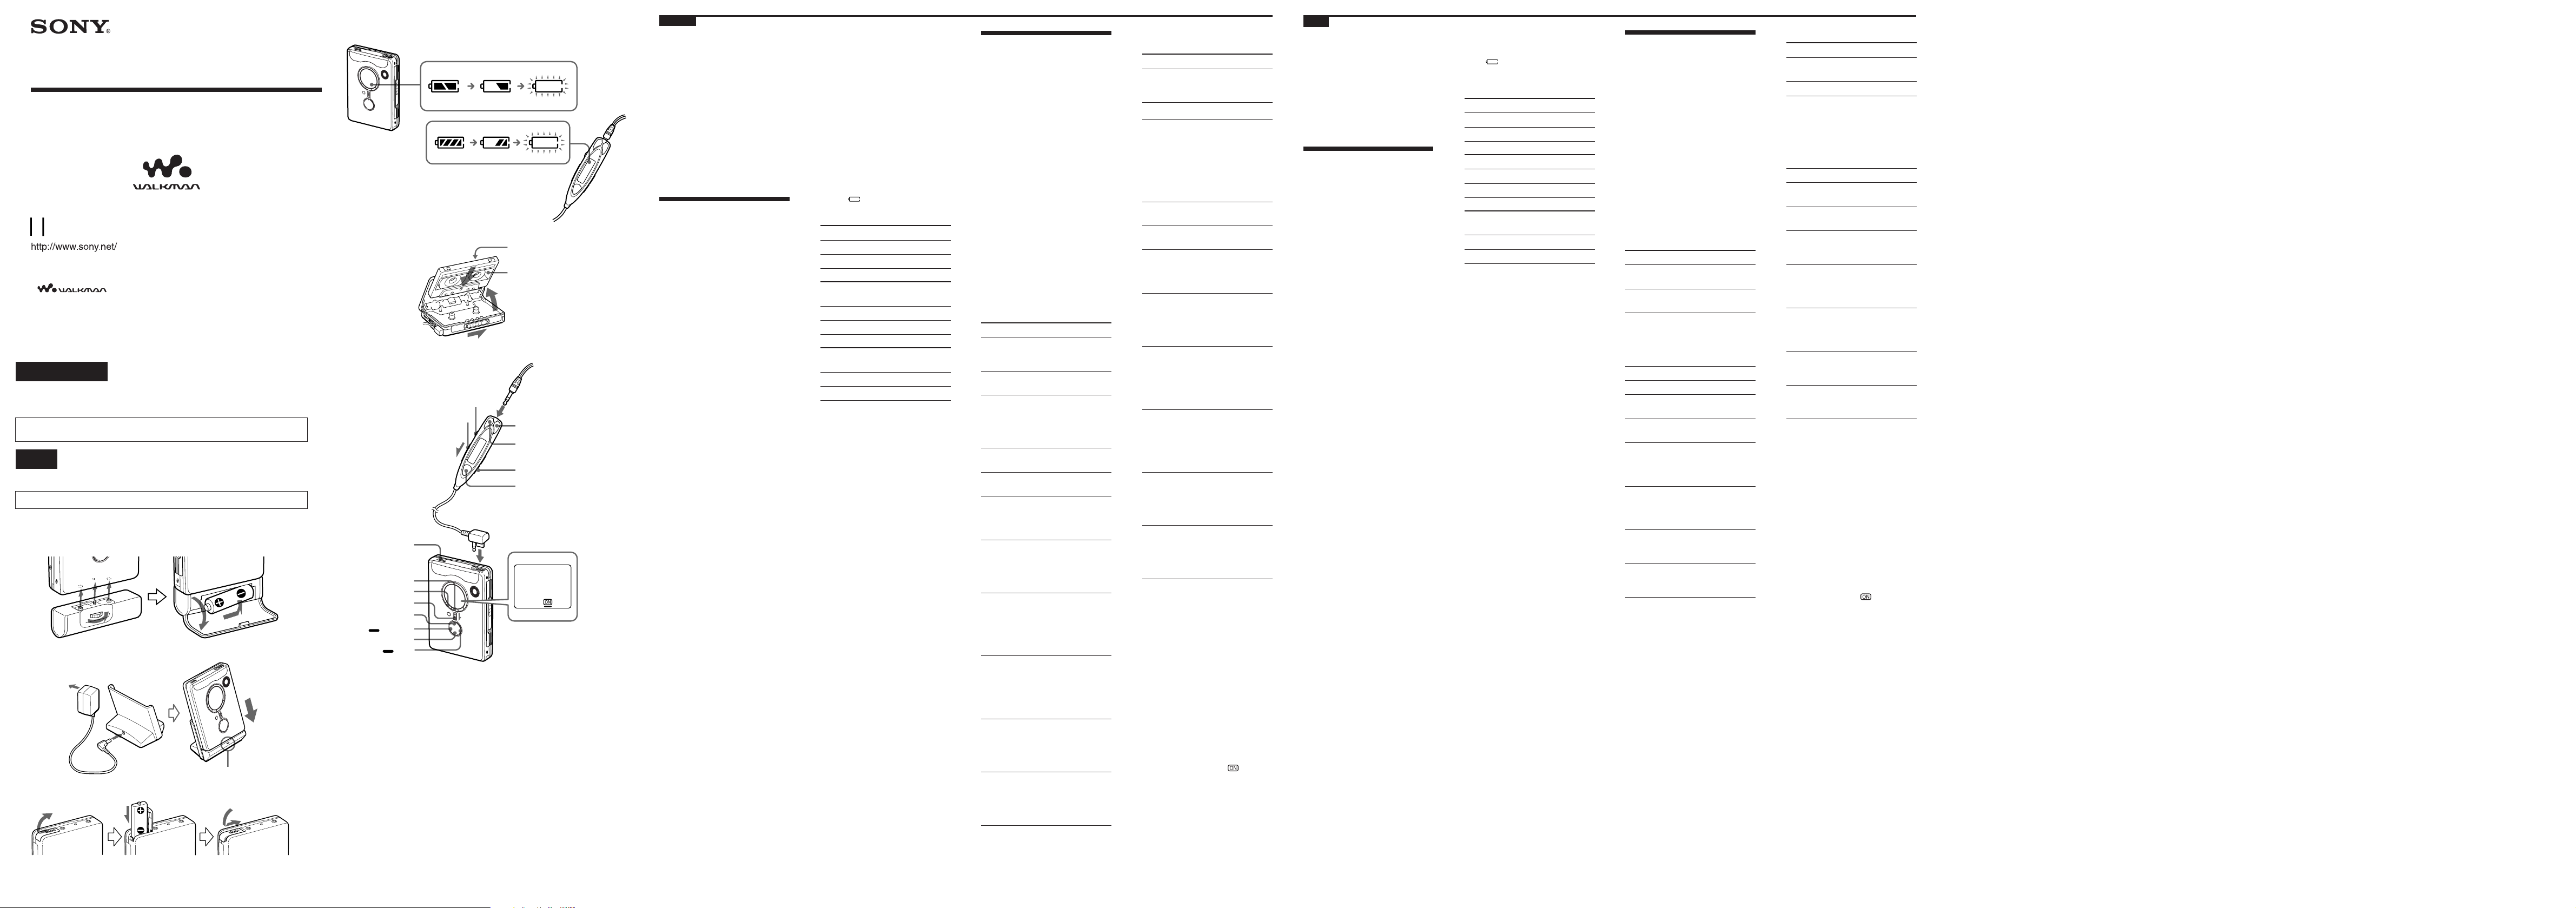
Dry Battery A
Attach the supplied battery case,
and then insert one R6 (size AA)
battery with correct polarity.
Note
For maximum performance we
recommend that you use a Sony
alkaline battery.
Rechargeable Battery
B
Charge the rechargeable battery
before using it for the first time.
1 Insert the supplied
rechargeable battery NH14WM (A) into the
rechargeable battery
compartment with correct
polarity.
2 Connect the supplied AC
power adaptor to the charging
stand, plug in the AC power
adaptor to the house current
(mains).
3 Place the main unit on the
charging stand.
The CHG lamp will light up
during charging.
Full charging takes about 6
hours regardless the battery
power remaining.
The CHG lamp will go off
when the battery is fully
charged.
Notes
• This charging stand charges the
rechargeable battery based on a
timer. If you remove the unit from
the charging stand while it is
charging, the timer will be reset
and full charging will take about 6
hours when you place the unit on
the charging stand again.
•You can use the unit before the
CHG lamp goes off, but in that
case, battery life will be shorter
depending on the charging time.
• Do not use the unit while it is
charging. Remove the unit from
the charging stand when using it.
– If you operate the unit while it
is charging, the battery will not
be charged.
– If you operate the unit while it
is charging, this may cause a
malfunction.
•Do not place the unit on the
charging stand without the
rechargeable battery. Otherwise,
this may cause malfunction.
When to replace/
charge the battery C
Replace or charge the battery
when “ ” flashes in the display.
Battery life* (Approx. hours)
Sony alkaline LR6 (SG)**
Tape playback 50
Radio reception 56
Rechargeable battery
NH-14WM (A)
Tape playback 30
Radio reception 34
Sony alkaline LR6 (SG)** and
Rechargeable NH-14WM (A)
Tape playback 80
Radio reception 90
* Measured value by the standard
of JEITA (Japan Electronics and
Information Technology
Industries Association). (Using a
Sony HF series cassette tape)
** When using a Sony LR6(SG)
alkaline dry battery (produced in
Japan).
Notes
• The battery life may be shorter
depending on the operating
condition, the surrounding
temperature and battery type.
• The AVLS setting (see “Using the
Menu”) will be cancelled when
you replace the battery.
Playing a Tape
D
1 Insert a cassette and if the
HOLD function is on, slide
the HOLD switch in the
opposite direction of the
arrow to unlock the
controls.
2 Press Y•REPEAT on the
main unit and adjust the
volume with VOL. (On the
remote control, press
Y(play)•x(stop).)
When adjusting the volume on
the remote control
Set the VOL control on the main
unit to around 6.
When adjusting the volume on
the main unit
Set the VOL control on the remote
control at maximum.
Operation on the remote
control
To P ress
Switch Y•x for 2
playback to seconds or more
the other side during playback
Stop playback Y•x once
during playback
Repeat the Y•x twice
current track during playback
(Repeat Single To stop a single
Track function) repeat, press
Y•x once.
Fast forward* FF + during
stop
Rewind* REW – during
stop
Search Press and hold
forward during FF + and release
playback (CUE) it at the point
you want
Search Press and hold
backward REW – and
during release it at the
playback point you want
(REVIEW)
Play the next FF + once/
track/ repeatedly
succeeding 9 during playback
tracks from the
beginning
(AMS**)
Play the REW – once/
current track/ repeatedly
previous 8 during playback
tracks from
the beginning
(AMS**)
Play the other FF + for 2
side from the seconds or more
beginning during stop
(Skip Reverse
function)
Play the same REW – for 2
side from the seconds or more
beginning during stop
(Rewind Auto
Play function)
Operation on the main
unit
To P ress
Switch Y•REPEAT
playback to during playback
the other side
Stop playback x (stop)
Repeat the Y•REPEAT
current track for 2 seconds or
(Repeat Single more during
Track function) playback
To stop a single
repeat, press
Y•REPEAT
once.
Fast forward* FF/CUE during
stop
Rewind* REW/REVIEW
during stop
Search Press and hold
forward during FF/CUE and
playback (CUE) release it at the
point you want
Search Press and hold
backward REW/REVIEW
during and release it at
playback the point you
(REVIEW) want
Play the next FF/CUE once or
track/ repeatedly
succeeding 9 during playback
tracks from the
beginning
(AMS**)
Play the REW/REVIEW
current track/ once or
previous 8 repeatedly
tracks from during playback
the beginning
(AMS**)
Play the other FF/CUE for 2
side from the seconds or more
beginning during stop
(Skip Reverse
function)
Play the same REW/REVIEW
side from the for 2 seconds or
beginning more during
(Rewind Auto stop
Play function)
* Press Y• REPEAT (on the
remote control, press Y•x )
during fast forward or rewind to
start playback.
**Automatic Music Sensor
To skip a long blank space
(BL SKIP* function)
On the remote control:
1 Press MODE repeatedly to
show “BL SKIP”.
On the main unit:
1 Press MENU repeatedly to set
“_” (the cursor) in the display
to BL SKIP.
2 Press SET to show “ ”.
* When the BL SKIP function is on,
the tape is fast-forwarded to the
next track if there is a blank space
longer than 12 seconds.
中文
• 為防止火災,請勿讓報紙、桌
布、窗帘等蓋住裝置的通風孔。
也不可把點燃的蠟燭放在裝置
上。
• 為防止火災或觸電的危險,請勿
將裝滿液體的物體,例如花瓶等
放在裝置上。
• 一部份國家對本產品的電源用電
池的處置,可能有所規定。此請
詢問當地有關當局。
準備工作
準備乾電池(無附帶)或充電
式電池(附帶)。
乾電池 A
安裝附帶的電池盒,然後按正
確極性裝入一節 R6 (AA) 電池。
註
為獲得最佳效果,建議您使用 Sony
牌鹼性電池。
充電式電池 B
充電式電池在第一次使用前,
必須加以充電。
1 以正確極性將附帶的充電式電池
NH-14WM(A)裝入充電式電池
室。
2 將附帶的 AC 電源轉接器連接到
充電座,將 AC 電源轉接器接插
到家庭用電源插座(主電源)。
3 將主機放在充電座上。
CHG 燈將在充電時點亮。
無論原有電力多少,完全充電
需時大約 6 小時。
當電池完全充滿電時,CHG 燈
將熄滅。
註
• 充電座以計時方式為充電式電池進
行充電。如果您在充電時將機器由
充電座上卸下,計時器可能會重新
計時;當您將機器重新放回充電座
後,將需要約 6 小時才能完全充
電。
• 在 CHG 燈熄滅前,您可以使用機
器,但是在此情況下,電池壽命將
會變短,視充電時間而定。
• 充電中,請別使用機器。要使用機
器時,須把機器從充電座上卸下
來。
– 充電中,您如果操作機器,電池
便不能進行充電了。
– 充電中,您如果操作機器,便可
能引起故障。
• 別把沒有安裝充電式電池的機器裝
放在充電座上。否則便可能引起故
障。
何時更換電池給電池充電
C
”在顯示窗中閃爍時,即
“
請更換電池或給電池充電。
電池壽命*(大約時數)
Sony 鹼電池 LR6 (SG)**
錄音帶放音 50
聽收音機 56
充電式電池 NH-14WM (A)
錄音帶放音 30
聽收音機 34
同時使用 Sony 鹼電池 LR6 (SG)**
和充電式電池 NH-14WM (A)
錄音帶放音 80
聽收音機 90
* 按 JEITA (Japan Electronics
and Information Technology
Industries Association) 標準測
定的值。(使用 Sony HF 系列磁
帶)
** 使用 LR6(SG)型 Sony 鹼電池
(日本製)時。
註
• 電池壽命可能因操作條件、環境溫
度和電池類型而縮短些。
• 當更換電池時,AVLS 設定(參見
“使用項目單”)將被取消。
播放錄音帶 D
1 裝入卡帶,如果遙控器的
HOLD 功能仍打開著,即請
沿相反於箭頭方向滑動
HOLD 開關以釋放控制鈕。
2 按主機上的 Y•REPEAT 並
用 VOL 調節音量。(在遙控
器上,則請按 Y(放音)
•x(停止)。)
在遙控器上調節音量時
請把主機上的 VOL 控制鈕設定於 6
左右。
在主機上調節音量時
請把遙控器上的 VOL 控制鈕設定於
最大。
在遙控器上的操作
要
換播放另一面
停止播放
從頭播放當前
曲子 (重複單
一曲子功能)
快進繞*
重繞*
在播放中向前
搜尋 (CUE)
在播放中向後
搜尋 (REVIEW)
從頭播放下一
曲子/接下9
首曲子
(AMS**)
從頭播放當前
曲子/前面 8
首曲子
(AMS**)
從頭播放另一
面 (跳躍倒繞
功能)
從頭播放同一
面 (重繞自動
播放功能)
請按
播放中按 Y•x
2 秒以上
播放中按一次
Y•x
在播放中按兩次
Y•x
要停止重複單一
曲子,請按
Y•x 一次。
停止中按 FF +
停止中按 REW -
按住 FF + 然後在
想要的位置鬆開
按住 REW - 然後
在想要的位置鬆開
播放中按一次或
重複按 FF +
播放中按一次或
重複按 REW -
停止中按 FF + 並
保持 2 秒以上或
更久
停止中按 REW - 並
保持 2 秒以上或
更久
在主機上的操作
要
換播放另一面
停止播放
從頭播放當前
曲子 (重複單
一曲子功能)
請按
播放中按
Y•REPEAT
按 x(停止)
在播放中按 Y•
REPEAT 保持 2
秒以後或更久
要停止重複單一
曲子,請按
Y•
REPEAT 一
次
。
快進繞*
重繞*
在播放中向前
搜尋 (CUE)
在播放中向後
搜尋 (REVIEW)
從頭播放下一
曲子/接下9
首曲子
(AMS**)
從頭播放當前
曲子/前面 8
首曲子
(AMS**)
從頭播放另一
面(跳躍倒繞
功能)
從頭播放同一
面(重繞自動
播放功能)
* 在快進繞或重繞時按 Y• REPEAT
(在遙控器上,按 Y•x) 以開始
播放。
**自動樂曲探測
停止中按 FF/CUE
停止中按 REW/
REVIEW
按住 FF/CUE 然後
在想要的位置鬆開
按住 REW/REVIEW
然後在想要的位
置鬆開
播放中按一次或
重複按 FF/CUE
播放中按一次或
重複按 REW/
REVIEW
停止中按 FF/CUE
並保持 2 秒以上
或更久
停止中按 REW/
REVIEW 並保持 2
秒以上或更久
跳過長時間的空白
(BL SKIP* 功能)
在遙控器上︰
1 重複按 MODE 以顯示
“BL SKIP”。
在主機上︰
1 重複按下 MENU 將顯示窗中的
“_”(游標) 設定為
“BL SKIP”。
2 按下 SET 顯示“ ”。
* 當 BL SKIP 功能開啟時,如果有
超過 12 秒的空白,錄音帶會快速
轉到下一首曲子。
(接反面)
(turn over)
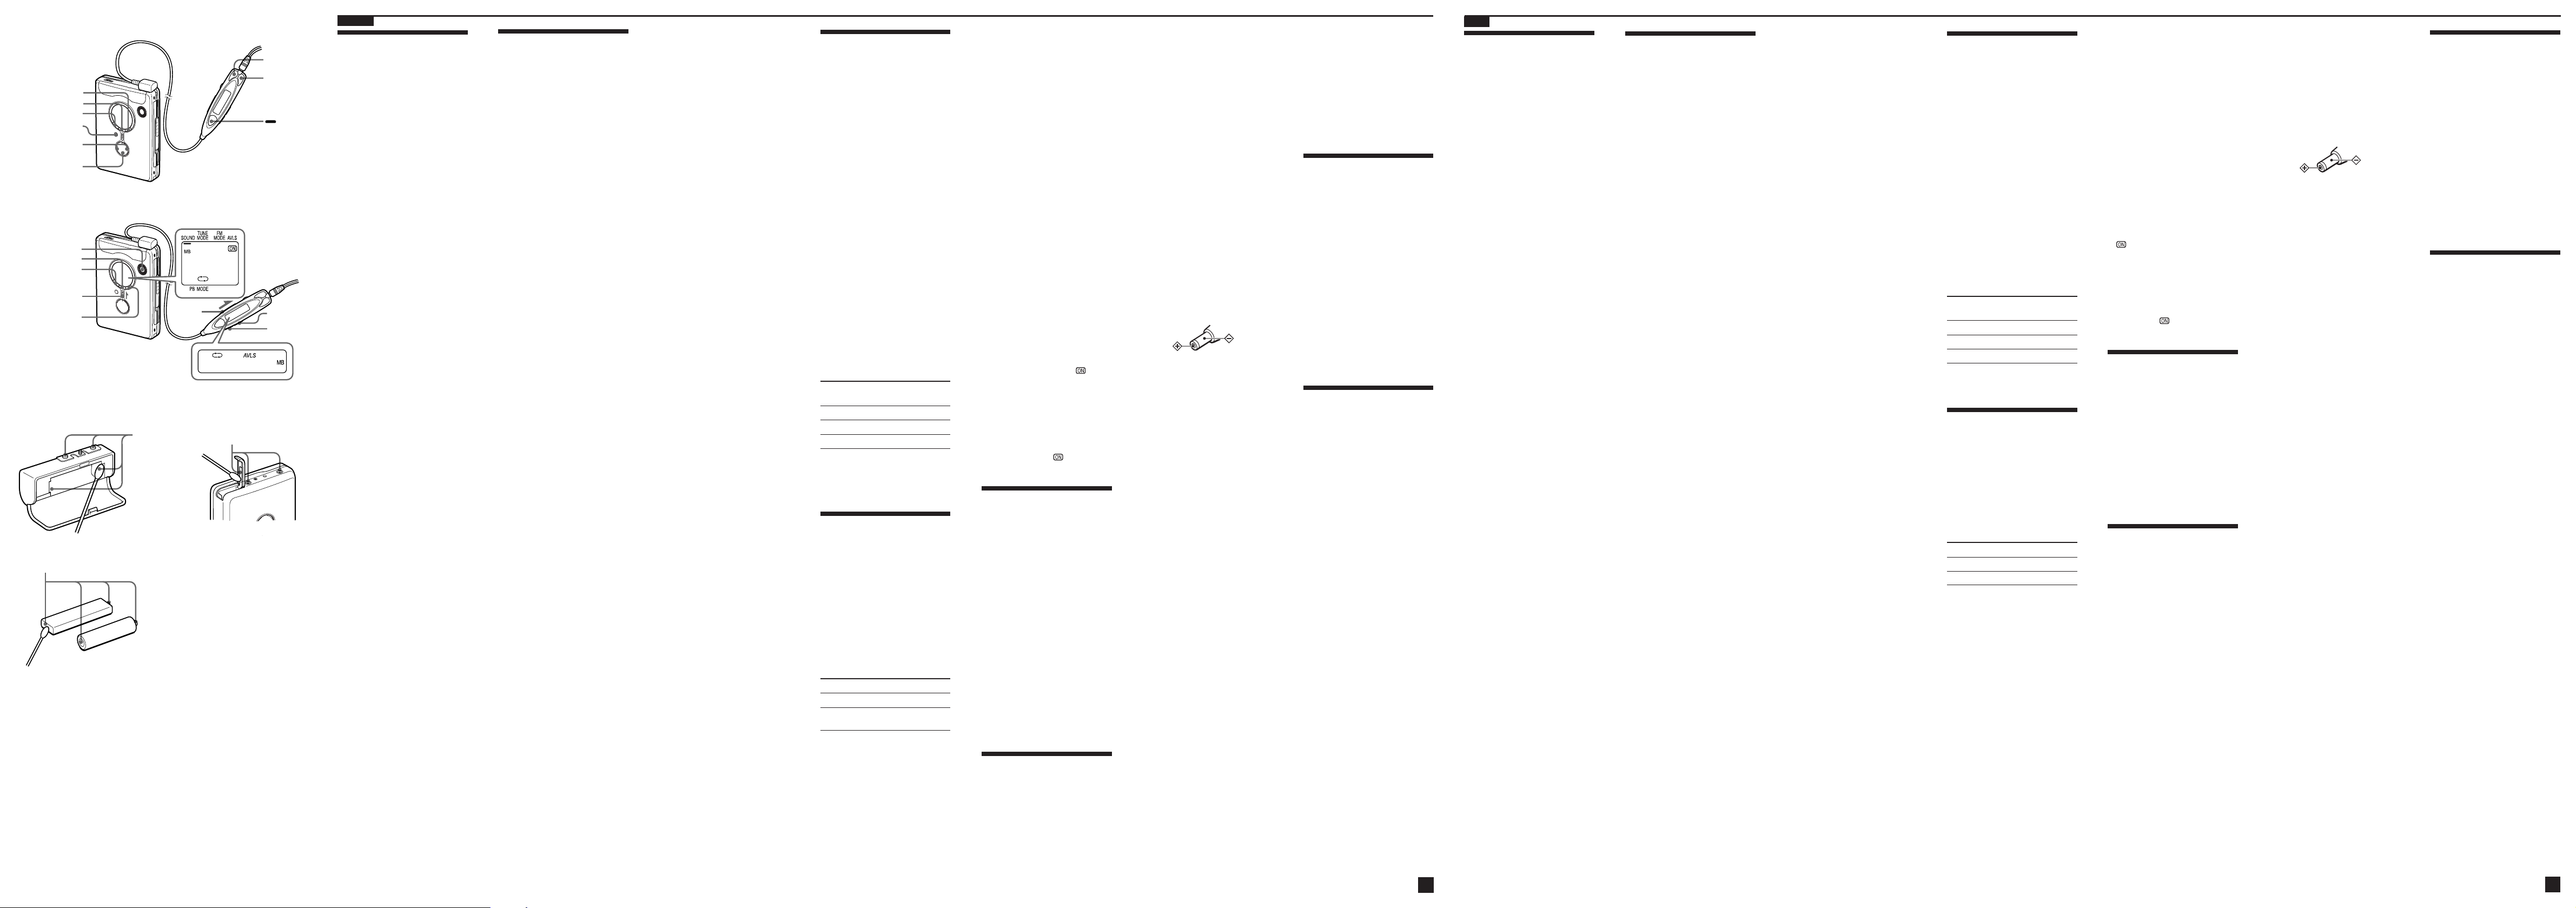
E
ENTER
MENU
RADIO ON/BAND
TUNE/PRESET –/+
RADIO OFF
F
SPEED CONTROL
MENU
HOLD
ENTER
G
Terminals
端子
SET
SET
Terminals
端子
HOLD
Terminals
端子
FF +
REW –
RADIO ON/
BAND
• OFF
SOUND
MODE
English
Listening to the
Radio
1 Press RADIO ON/BAND
to turn on the radio.
2 Press RADIO ON/BAND
repeatedly to select AM or
FM.
3 Press MENU on the main
unit repeatedly and set the
cursor in the display to
TUNE MODE.
4 For manual tuning
1 Press SET to choose
2 Press TUNE/PRESET +
For preset tuning
1 Press SET to choose
2 Press TUNE/PRESET +
To turn off the radio
Press RADIO OFF .
To improve the broadcast
reception
• For AM: Reorient the unit
itself.
• For FM: Extend the remote
control cord (antenna). If the
reception is still not good,
press MENU repeatedly to set
the cursor in the display to FM
MODE. Then press SET to
choose from “MONO”
(monaural), “LOCAL” or none
(stereo) for best reception.
To operate from the
remote control
To turn on the radio, press
RADIO ON/BAND•OFF for
more than 1 second (while the
tape is in stop mode only).
To select the band, press RADIO
ON/BAND•OFF for more than 1
second while the radio is on.
To tune in or recall a preset
station, press FF + or REW –.
To turn off the radio, press
RADIO ON/BAND•OFF.
E
MANUAL.
or – repeatedly to tune
in to the desired station.
Hold down TUNE/
PRESET + or – for a few
seconds to scan for
stations.
PRESET.
or – repeatedly to recall
the desired preset
station.
To use preset tuning,
preset stations first (see
“Presetting Radio
Stations”).
Presetting Radio
Stations
You can preset up to 30 stations—
20 for FM and 10 for AM (for the
JPn area*, up to 16 stations—8 for
FM and 8 for AM).
* Only if available. See “Receiving
Stations Outside Your Country/
Region”.
Presetting
Automatically Scanned
Stations
1 Press RADIO ON/BAND
to turn on the radio.
2 Press RADIO ON/BAND
repeatedly to select AM or
FM.
3 Press and hold ENTER for
more than 3 seconds.
Preset number 1 will flash
in the display and the main
unit starts scanning the
stations from the lower
frequencies and stops for
about 5 seconds when a
station is received.
4 If you wish to preset the
currently received station,
press ENTER while the
preset number is flashing.
The received station is
preset on preset number 1
and the unit starts
scanning for the next
receivable station.
5 Repeat step 4 until all
receivable stations are
preset.
To stop scanning
Press RADIO OFF. The radio is
turned off at the same time.
Notes
• If stations are already stored, the
newly preset stations replace the
old ones when the above
procedure is completed.
• If stations cannot be preset
automatically, preset them
manually.
Presetting Stations
Manually
1 Press RADIO ON/BAND
to turn on the radio.
2 Press RADIO ON/BAND
repeatedly to select AM or
FM.
3 Press ENTER.
The frequency digits will
flash in the display.
4 While the frequency digits
are flashing, tune in to a
station you wish to store
using TUNE/PRESET + or
– and press ENTER.
The preset number will
flash in the display.
E
5 While the preset number is
flashing, select the preset
number you want using
TUNE/PRESET + or – and
press ENTER.
Notes
• If you cannot complete step 4 or 5
while the indicators are flashing,
repeat from step 3.
• If a station is already stored, the
new station replaces the old one.
Playing the Preset
Radio Stations
1 Press RADIO ON/BAND
to turn on the radio.
2 Press RADIO ON/BAND
repeatedly to select AM or
FM.
3 Press MENU repeatedly to
set the cursor in the
display to TUNE MODE.
Then press SET to display
“PRESET”.
4 Press TUNE/PRESET +
or –.
To cancel a stored station
1 Follow the procedure above
and in step 4, select the preset
number you want to cancel and
then press ENTER. The
frequency digits will flash in
the display.
2 Press and hold TUNE/PRESET
+ or –. The frequency digit
starts running up or down.
Keep holding down the button
until “- - - -” is displayed.
3 Press ENTER while “- - - -” is
flashing. A preset number will
flash in the display.
4 Press ENTER to cancel the
stored station.
Scanning the Preset
Radio Stations — DAPS
(Digital Auto Preset
Scanning)
1 Press RADIO ON/BAND
to turn on the radio.
2 Press RADIO ON/BAND
repeatedly to select AM or
FM.
3 Press and hold RADIO
ON/BAND for 2 seconds
or more.
The preset stations of the
selected band will be
played for about 5 seconds
each. (During DAPS the
indicators in the display
flash.)
4 Press RADIO ON/BAND
again to select the station
while the desired preset
station is being played.
Notes
• If there are no stations stored, the
DAPS function does not work.
• Until a station is selected in step 4,
the DAPS function turned on in
step 3 will continue.
Receiving
Stations Outside
Your Country/
Region
European, Saudi Arabian,
and Chinese models)
1 Press RADIO ON/BAND
to turn on the radio.
2 Press ENTER.
The frequency digits will
flash in the display.
3 Press and hold RADIO
ON/BAND until “Eur”,
“USA” or “JPn” flashes.
4 Press RADIO ON/BAND
repeatedly to select “Eur”,
“USA” or “JPn” and press
ENTER.
5 Tune in to and store
stations as necessary
following the procedure of
“Listening to the Radio”
and “Presetting Radio
Stations”.
Area indication and
frequency range
Area* Frequency range
Eur 87.5
USA 87.5
JPn 76.0
* Eur : European and other
USA :USA, Canada, and Central
JPn: Japan
(Excluding
FM (MHz) AM(kHz)
-
108 531
-
108 530
-
90.0 531
countries/regions
and South America
-
-
-
1 602
1 710
1 710
Using the Menu F
Adjusting Playback
Modes
On the remote control:
Press MODE repeatedly. With
each press, the indications
change.
On the main unit:
Press MENU repeatedly to set
the cursor in the display to PB
MODE. Then press SET to select
the desired mode.
To play Select
both sides repeatedly s
both sides once d
from the FWD side
Emphasizing Sound
On the remote control:
1 Press SOUND repeatedly. With
each press, the indications
change.
The indications change as
follows:
RV : Sound Revitalizer
Emphasizes treble sound.
MB : Mega Bass
Emphasizes bass sound
(moderate effect).
GRV : Groove
Emphasizes bass sound
(strong effect).
no message : normal (no effect)
On the main unit:
1 Press MENU repeatedly to set
the cursor in the display to
SOUND.
2 Press SET repeatedly to select
the sound emphasis of your
choice.
Note
If the sound is distorted with the
mode “GRV”, turn down the
volume of the main unit or select
other modes.
Protecting Your
Hearing — AVLS
(Automatic Volume
Limiter System)
The maximum volume is kept
down to protect your ears.
On the remote control:
Hold down MODE for more than
10 seconds until “AVLS” appears
in the display.
On the main unit:
Press MENU repeatedly in the
playback, stop or radio mode to set
the cursor in the display to AVLS.
Then press SET to show “ ”.
To cancel the AVLS function
On the remote control:
Hold down MODE again for
more than 3 seconds until
“AVLS” disappears.
On the main unit:
Press SET so that “ ” disappears
from the display.
Using Other
Functions
Adjusting the Tape
Playback Speed
You can adjust the playback
speed using SPEED CONTROL.
Turn SPEED CONTROL to:
– (slow) to play back at a slower
speed.
Center position to play back at
normal speed.
+ (fast) to play back at a faster
speed.
Locking the Controls
— HOLD Function
Slide the HOLD switch in the
direction of the arrow to lock the
controls of the main unit (except
SPEED CONTROL) or the remote
control.
F
Precautions
On charging
• The supplied charging stand can be
used only with this unit. No other
model can be charged using this stand.
• Remove the AC power adaptor from
the wall outlet as soon as possible after
the rechargeable battery has been
charged. Overcharging may damage
the rechargeable battery.
• The charging stand and the
rechargeable battery may become
warm during charging, but this is not a
problem.
• Do not tear off the film on the
rechargeable battery.
• Use only the supplied charging stand to
charge the supplied rechargeable
battery.
• Be sure not to short-circuit the battery.
When you carry it with you, use the
supplied carrying case. If you are not
using the case, do not carry the battery
with other metallic objects such as keys,
rings in your pocket.
• If the rechargeable battery is new or has
not been used for a long time, it may
not be charged completely until you
use it several times.
On batteries
•Do not charge a dry battery.
• Do not carry the dry or rechargeable
batteries with coins or other metallic
objects. It can generate heat if the
positive and negative terminals of the
batteries are accidentally contacted by a
metallic object.
• When you are not going to use the
main unit for a long time, remove the
battery to prevent any damage from
battery leakage and corrosion.
On AC power adaptor
• Use only the supplied AC power
adaptor (for charging stand). Do not
use any other AC power adaptor.
Polarity of
• Connect the AC power adaptor to an
easily accessible AC outlet. Should you
notice an abnormality in the AC power
adaptor, disconnect it from the AC
outlet immediately.
• Do not touch the AC power adaptor
with wet hands.
the plug
On handling
• Do not leave the unit in a location near
heat sources, or in a place subject to
direct sunlight, excessive dust or sand,
moisture, rain, mechanical shock, or in
a car with its windows closed.
•We do not recommend the use of tape
longer than 90 minutes. They are very
thin and tend to be stretched easily.
This may cause malfunction of the unit
or sound deterioration.
•The LCD display may become hard to
see or slow down when using the unit
at high temperatures (above 40˚C/
104°F) or at low temperatures (below
0˚C/32°F). At room temperature, the
display will return to its normal
operating condition.
• If the unit has not been used for long,
set it in the playback mode to warm up
for a few minutes before you start using
again.
On the remote control
Use the supplied remote control only
with this unit.
On headphones/
earphones
Road safety
Do not use headphones/earphones while
driving, cycling, or operating any
motorized vehicle. It may create a traffic
hazard and is illegal in some areas. It can
also be potentially dangerous to play
your headphones/earphones at high
volume while walking, especially at
pedestrian crossings.
You should exercise extreme caution or
discontinue use in potentially hazardous
situations.
Preventing hearing
damage
Do not use headphones/earphones at
high volume. Hearing experts advise
against continuous, loud and extended
play. If you experience a ringing in your
ears, reduce volume or discontinue use.
Caring for others
Keep the volume to a moderate level.
This will allow you to hear outside
sounds and to be considerate to the
people around you.
On maintenance
• Clean the tape head and tape path,
using a cotton swab and commercially
available cleaning solvent after every
10 hours of use.
•To clean the exterior, use a soft cloth
slightly moistened in water. Do not use
alcohol, benzine or thinner.
• Clean the headphones/earphones and
remote control plugs periodically.
•Clean the battery case terminals (both
inside and outside) and the terminals
periodically with a cotton swab or soft
cloth as illustrated.
G
Troubleshooting
The sound drops out or comes
with excessive noise.
• Clean the headphones/earphones
and remote control plugs.
The unit does not operate at all.
• Charge the battery or replace the
dry battery with a new one.
• HOLD is activated. Deactivate
HOLD.
Tape operation is not possible.
• Insert a cassette tape.
The volume cannot be turned up.
• If AVLS is on, turn it off.
The display and the operations
are not normal.
•Remove the power sources for 15
seconds or more, and then set
them again.
Specifications
Radio section
Frequency range
FM: 76.0 - 90.0 MHz (Japan)
87.5 - 108 MHz (other
countries/regions)
AM: 531 - 1 710 kHz (Japan)
530 - 1 710 kHz (North, Central,
and South America)
531 - 1 602 kHz (other
countries/regions)
Tape section
Frequency response
Playback: 40 - 15 000 Hz
Output
Headphones (i) jack
Load impedance 8 - 300 Ω
General
Power requirements
1.5 V
Rechargeable battery
One R6 (size AA) battery
Dimensions (w/h/d)
Approx. 77.1 × 108.0 × 22.5 mm
1
(3
parts and controls
Mass
Approx. 153 g (5.4 oz) (main unit only)
Supplied accessories
AC power adaptor (1), Battery case (1)
Stereo headphones or earphones with
remote control (1), Charging stand (1)
Rechargeable battery (NH-14WM(A),
1.2 V, 1 350 mAh (min), Ni-MH) (1)
Rechargeable battery carrying case (1)
Carrying pouch (1)
Design and specifications are subject to
change without notice.
29
⁄8 × 43⁄8 ×
⁄32 inches) excl. projecting
中文
聽收音機 E
1 按 RADIO ON/BAND 打開收
音機。
2 反復按 RADIO ON/BAND 選擇
AM 或 FM。
3 反復按主機上的 MENU,將
顯示窗中的游標設為 TUNE
MODE。
4 要手動調臺時
1 按 SET 選擇 MANUAL。
2 反復按 TUNE/PRESET + 或
– 調入所要的電臺。
按住 TUNE/PRESET + 或 –
數秒以掃描電台。
要預設電臺時
1 按 SET 選擇 PRESET。
2 反復按 TUNE/PRESET + 或
– 選出所要的預設電臺。
要使用預設調諧時,請
先預設電臺(參見“預
設電臺”)。
要關掉收音機時
按 RADIO OFF 鍵。
要改善廣播接收效果時
• 收聽 AM 節目時:調轉機器方
位。
• 收聽 FM 節目時:請拉長遙控
器導線(天線)。如果接收效
果仍不好,請反復按 MENU 將
主機顯示窗中的游標設為 FM
MODE。然後按 SET 從“MONO”
(單耳聲)、“LOCAL”或無
(立體聲)方式中進行選擇以
獲最佳接收效果。
要從遙控器進行操作時
要打開收音機時,請按 RADIO
ON/BAND•OFF 1 秒以上(限當錄音
帶處於停止狀態時)。
要選擇波段時,請在打開著收
音機時,按下 RADIO ON/BAND•OFF
1 秒以上。
要調入或選出預設電臺時,按
FF + 或 REW –。
要關掉收音機時,請按 RADIO
ON/BAND•OFF。
預設電臺 E
您可以預設多達 30 個電臺─
20 個 FM 臺,10 個 AM 臺。(在
JPn 地區*,最多可以預設 16 個
臺 8 個 FM 臺,8 個 AM 臺)。
* 如果可以預設,請參見“接收別的
國家地區的電臺”。
自動地預設掃描的電臺
1 按 RADIO ON/BAND 打開收
音機。
2 反復按 RADIO ON/BAND 選擇
AM 或 FM。
3 按 ENTER 3 秒鐘以上。
預設號 1 將在顯示屏上閃
爍。主機開始從低頻段掃描
電臺,在接收到電臺時停止
約 5 秒鐘。
4 如果您要預設接收到的電
臺,請在預設號閃爍著時按
ENTER。
接收到的電臺即被預設於預
設號 1,本機將開始掃描下
一個可接收的電臺。
5 重複步驟 4 直至所有可接收
電台均被預設。
停止掃描
按 RADIO OFF,收音機將同時
關掉電源。
註
• 如果已預設了電臺,當完成上述步
驟時,新預設的電臺將取代原有的
電臺。
• 如果電臺不能自動預設,請用手動
預設電臺。
手動預設電臺
1 按 RADIO ON/BAND 打開收
音機。
2 反復按 RADIO ON/BAND 選擇
AM 或 FM。
3 按 ENTER。
顯示窗中即閃爍著頻率數
字。
4 當頻率數字閃爍時,請用
TUNE/PRESET
入您想儲存的電臺,按
ENTER。
顯示窗中即將閃爍著預設
號。
5 當預設號閃爍著時,請用
TUNE/PRESET + 或 – 選擇
所要預設號並按 ENTER。
註
• 如果上述指示閃爍時您不能完成步
驟 4 或步驟 5,請從步驟 3 開始重
複操作。
• 如果已儲存有電臺,新電臺即將取
代原有的電臺。
+ 或 – 鈕調
播放預設電臺
1 按 RADIO ON/BAND 打開收
音機。
2 反復按 RADIO ON/BAND 選擇
AM 或 FM。
3 反復按 MENU,將顯示器中
的游標設定於 TUNE MODE。
然後按 SET 以顯示
“PRESET”。
4 按 TUNE/PRESET + 或 –。
要取消所儲存的電臺時
1 按照上述方法而在步驟4裡選擇
所要取消的預設號,然後按
ENTER。顯示窗中即閃爍著頻率
數。
2 按住 TUNE/PRESET + 或 -。頻率
數開始增大或減小。按住該按鈕
至顯示了“- - - -”。
3 當閃爍著“- - - -”時按 ENTER。
顯示窗中即閃爍著預設號。
4 按 ENTER 以取消儲存的電臺。
掃描預設電臺 ─ DAPS
(Digital Auto Preset
Scanning)
1 按 RADIO ON/BAND 打開收
音機。
2 反復按 RADIO ON/BAND 選擇
AM 或 FM。
3 按住 RADIO ON/BAND 2 秒
以上。
所選波段的預設電臺即各播
放大約 5 秒。(在 DAPS
當中,顯示窗中將閃爍著指
示燈。)
4 當播放著所要預設電臺時,
再按一次 RADIO ON/BAND 以
選擇電臺。
註
• 如果沒儲存電臺,DAPS 功能將不起
作用。
• 步驟 3 裡的 DAPS 功能將繼續打開
著一直到在步驟 4 裡已選擇了電臺
為止。
接收別的國家地
區的電臺
(歐洲、沙特阿拉伯和中國
型號除外)
1 按 RADIO ON/BAND 打開收音
機。
2 按 ENTER 鍵。
頻率數字將閃爍於顯示窗
中。
3 按住 RADIO ON/BAND 直到
“Eur”,“USA”或“JPn”閃
爍。
4 反復按 RADIO ON/BAND 選
擇“Eur”,“USA”或
“JPn”並按 ENTER 鍵。
5 按照“聽收音機”和“預設
電臺”的步驟操作,調入並
儲存所要的電臺。
地區指示和頻率範圍
地區* 頻率範圍
FM(MHz) AM(kHz)
Eur 87.5
USA 87.5
JPn 76.0
* Eur: 歐洲和其他國家地區
USA: 美國、加拿大和中南美
JPn︰ 日本
-
108 531
-
108 530
-
90.0 531
-
-
-
1 602
1 710
1 710
使用項目單 F
調整放音方式
在遙控器上:
反復按 MODE,每按一下指示
燈即作變化。
在主機上︰
請反復按 MENU 把顯示器中的
游標設定於 PB MODE,然後按 SET
以選擇所要模式。
要 請選擇
反復放雙面 s
從FWD面放一次雙面 d
增強聲音
在遙控器上:
1 反復按 SOUND,每按一下,指示
燈改變。
指示燈改變如下︰
RV:Sound Revitalizer(聲音
再生器)。
增強高音。
MB:Mega Bass(強低音)。
增強低音(中等效果)。
GRV:Groove(最佳狀態)。
增強低音(強烈效果)。
無信息:普通(無效果)。
在主機上:
1 反復按 MENU 把顯示窗中的游標
設定於 SOUND。
2 反復按 SET 以選擇所喜歡的聲
加強模式。
註
“GRV”模式時,如果聲音失真了,即
請轉小主機音量或選其他模式。
保護您的聽覺 — AVLS
(自動音量限制系統)
限制最大音量以保護聽力。
在遙控器上︰
按住 MODE 10 秒以上,直到
顯示窗中出現“AVLS”。
在主機上︰
在播放、停止或收音模式中,
反復按 MENU 把顯示窗中的游標設
為 AVLS。然後按 SET 顯示
“ ”。
要取消 AVLS 功能
在遙控器上:
再次按住 MODE 3 秒鐘以上,直到
“AVLS”消失為止。
在主機上︰
按 SET,使“ ”從顯示窗中消
失。
利用其他功能 F
調節磁帶播放速度
可以使用 SPEED CONTROL 調節播
放速度。轉動 SPEED CONTROL
到︰
–(慢)以較慢的速度播放。
中央位置以正常速度播放。
+(快)以較快的速度播放。
鎖定控制器 — HOLD 功能
按箭頭方向滑動 HOLD 開關以
鎖定主機(SPEED CONTROL 除外)
或遙控器控制鈕。
使用前須注意
充電須知
• 附帶的充電座只能用於本裝置。別的型號
是不能用此充電座充電的。
• 充電式電池充滿電時,即盡速從牆上電源
插座卸下充電座。因為過度的充電可能會
損壞充電式電池。
• 進行充電中,充電座和充電式電池都可能
變熱。這是正常現象不成問題。
• 別撕下充電式電池上的薄膜。
• 限利用附帶的充電座給附帶的充電式電池
進行充電。
• 電池切勿使發生短路。要攜帶電池時,請
用附帶的攜帶盒。如果沒裝在盒裡,則請
不要和其他金屬小件,諸如鑰匙,金屬件
等混合在一起攜帶。
• 全新的,或長期沒用的充電式電池,可能
要經充電使用數次以後才能完全充滿電。
電池須知
• 別試圖給乾電池充電。
• 請勿將乾電池或充電式電池與硬幣或其他
金屬小件混在一起攜帶。如果電池的正極
和負極意外地接觸了金屬小件,將意外生
熱。
• 長時間不使用主機時,請取出電池以避
免電池漏液或腐蝕造成的損壞。
AC 電源轉接器須知
• 限使用充電座附帶的 AC 變壓器,請勿
使用任何其他 AC 變壓器。
插頭的電極
• 將 AC 電源轉接器連接到近旁的 AC 插
座。您如果發現 AC 電源轉接器有異常現
象,即請立即自 AC 插座拔下它。
• 當手潮濕時,切勿觸碰 AC 電源轉接器。
本機須知
• 請勿將本機置於熱源附近,或受陽光直
射、極多塵沙、潮濕、會淋到雨、有機械
衝擊的地方,或緊閉的汽車裡。
• 請不要使用 90 分鐘以上長度的盒帶,這
些盒帶很薄,容易被拉伸。這可能導致本
機故障或音質變差。
• 在高溫(40℃以上)或低溫(0℃以下)
環境使用機器時,液晶顯示器可能變得不
易看清或顯示變慢。但拿到室溫處,即將
恢復正常。
• 如果長時間未使用本機,在重新開始使用
之前,請先將其置於播放模式預熱幾分
鐘。
遙控器須知
本機限使用附帶的遙控器。
頭戴耳機耳機須知
交通安全
請勿在駕車、騎車或操縱任何機動車輛時
使用頭戴耳機耳機,否則可能導致交通
事故,有些地區是違法的。即使在步行
時,特別是在過馬路時,高音量地使用頭
戴耳機耳機也會有潛在的危險。
在可能有危險的情況下,必須非常小心或
暫停使用。
防止損傷聽力
請勿高音量地使用頭戴耳機耳機。耳科
專家告誡不要連續、高音量和長時間使用
耳機。有耳鳴經歷的人也請調低音量或不
連續使用。
為他人著想
請保持適當的音量,使您能聽到外界的聲
音,而且不騷擾周圍的人。
維修須知
• 每使用了 10 個小時,即請用棉棒和市售
清潔液清潔一下磁頭和磁帶通道。
• 請用軟布輕蘸濕清水擦拭機器外殼。切勿
使用酒精,汽油或稀釋劑。
• 請定期地清潔頭戴耳機耳機和遙控器的
插頭。
• 如圖所示,用棉棒或軟布定期地清潔電池
盒的端子(內,外面)和機器上的端子。
G
故障探尋
聲音失落或噪聲很大。
• 請清潔頭戴耳機耳機和遙控器的
插頭。
機器完全不操作。
• 給電池充電或換上新的乾電池。
• HOLD(保持)功能被激活。請關掉
HOLD 功能。
錄音帶操作不能進行。
• 插入卡式錄音帶。
音量不能調大。
• 如果打開著 AVLS 功能,即請關掉
該功能。
顯示和操作不正常。
• 卸下電源經 15 秒或更久些才再裝
上電源。
規格
收音機部分
頻率範圍
FM︰ 76.0-90.0 MHz(日本)
87.5-108 MHz(其他國家地區)
AM︰ 531-1 710 kHz(日本)
530-1 710 kHz(北美洲、中美洲和
南美洲)
531-1 602 kHz(其他國家地區)
錄音帶部分
頻率響應
放音: 40–15 000 Hz
輸出
頭戴耳機 (i) 插孔
負載阻抗 8–300 Ω
一般規格
電源
1.5 V
充電式電池
一節 R6(AA) 電池
尺寸(寬高縱深)
大約 77.1×108.0×22.5 mm 不包括突出
部分和控制器
重量
大約 153 g(僅主機)
附件
AC 電源轉接器 (1)
電池盒 (1)
帶遙控器的立體聲頭戴耳機或耳機 (1)
充電座 (1)
充電式電池(NH-14WM(A),1.2V,
1 350 mAh (min),Ni-MH)(1)
充電式電池攜帶盒 (1)
攜帶軟袋 (1)
設計和規格有所變更時,恕不另行通知。
 Loading...