

Page 1
3-241-713-02 (1)
ラジオカセットプレーヤー
取扱説明書
Operating Instructions (page 42)
お買い上げいただきありがとうございます。
電気製品は安全のための注意事項を守らないと、
火災や人身事故になることがあります。
この取扱説明書と別冊の「安全のために」をよくお読みのうえ、製品
を安全にお使いください。
お読みになったあとは、いつでも見られるところに必ず保管してく
ださい。
WALKMAN
WM-FX888
©2002 Sony Corporation
はソニー株式会社の登録商標です。
Page 2

安全のために
充電スタンドにコイン、キー、ネックレスなどの金属類を置かないでくださ
•
い。充電スタンドの端子が金属とつながるとショートし、発熱することがあり
ます。
付属の充電式電池を持ち運ぶときは、必ず付属の充電池ケースに入れてくだ
•
さい。ケースに入れずにコイン、キー、ネックレスなどの金属類と一緒に
携帯・保管すると、電池の+と−がショートし、発熱することがあります。
乾電池や乾電池ケースはコイン、キー、ネックレスなどの金属類と一緒に
•
携帯・保管しないでください。乾電池の+と−、または乾電池ケースの端子が
金属でつながるとショートし、発熱することがあります。
2
Page 3
目次
主な特長.............................................................................................................
付属品を確かめる ..............................................................................................
準備する.............................................................................................
テープを聞く .....................................................................................
ラジオを聞く ...................................................................................
テープを聞く−応用
本体で操作する ..........................................................................................
好きな曲を頭出しする(
テープ走行のしかたを選ぶ(
長いあきを飛ばす(ブランクスキップ).....................................................
ドルビー
ラジオを聞く−応用
自分で周波数を合わせる(マニュアル選局)..............................................
放送局を自分で設定する............................................................................
ラジオを聞くときのご注意 ........................................................................
海外でラジオを聞く...................................................................................
その他の機能を使う
高音または低音を強調する(
音もれを抑え耳にやさしい音にする(
誤操作を防ぐ(ホールド機能)...................................................................
電源
乾電池・充電式電池の取り替え時期は ......................................................
その他
お手入れ .....................................................................................................
使用上のご注意 ..........................................................................................
故障かな? .................................................................................................
保証書とアフターサービス ........................................................................
主な仕様 .....................................................................................................
各部のなまえ..............................................................................................
で録音されたテープを再生する .......................................
*B NR
−オートミュージックセンサー)...............
AMS
).......................................................
MODE
)....................................................
SOUND
快適音量)........................
AVLS—
4
5
6
8
10
13
14
15
16
18
19
20
23
24
25
26
27
28
30
31
34
36
37
38
3
Page 4

主な特長
テープに合わせて選べる3種類の音質、
•
グルーブ
GROOVE
• 16
充電式電池と乾電池の併用で、約58時間の長時間再生ができる、
•
スタミナタイプ。(29ページ)
使いやすい、バックライト付き液晶リモコン。
•
聞きたい1曲を繰り返し聞ける、曲おぼえ1曲リピート。(13ページ)
•
。(25ページ)
倍速の高速サーチで、前後9曲の頭出しをする
リバイブ メガベース
REVIVE、MEGA BASS
。(14ページ)
AMS
、
4
Page 5
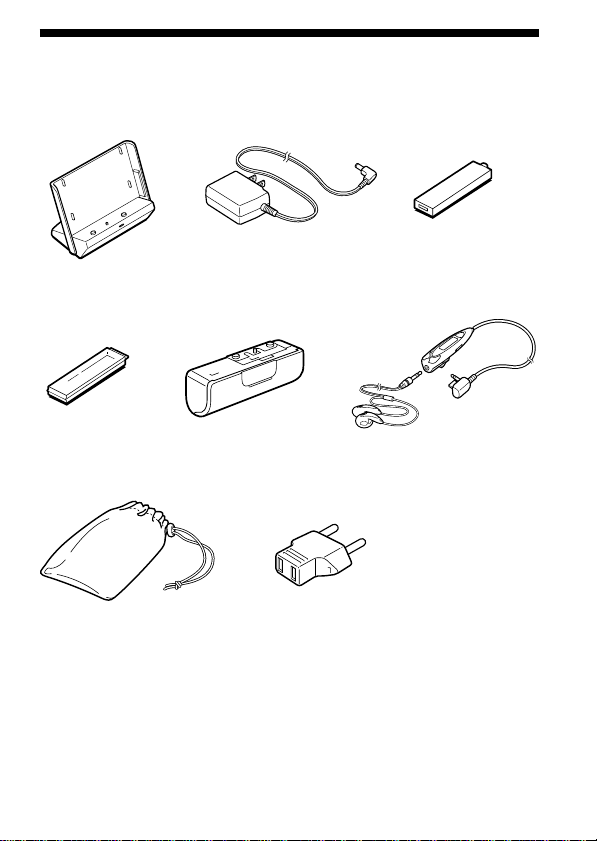
付属品を確かめる
●充電スタンド
●充電池ケース
●キャリングポーチ
●取扱説明書
●ソニーご相談窓口のご案内
●保証書
●ACパワーアダプター
充電スタンド用
(
●乾電池ケース
)
●リモコンつきヘッドホン
(リモコン)
●ACプラグアダプター
●充電式ニッケル
水素電池
NH-14WM (A)
5
Page 6
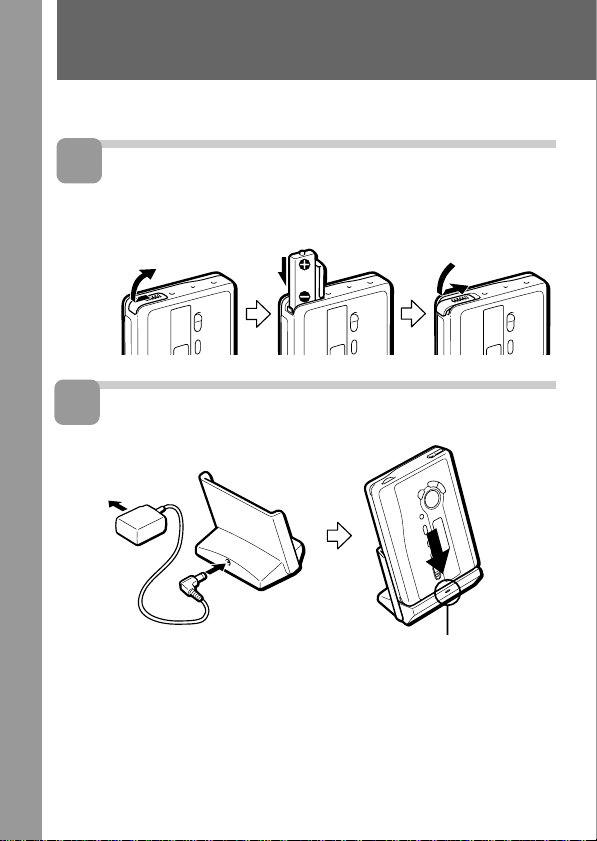
準備する
お買い上げ時には、充電式電池をまず充電してください。
1
充電式電池を本体に入れる
#側を奥にして
入れる
2
充電する
パワーアダプター(付属)
AC
約6時間で充電が完了し、ランプが消えます。
6
CHARGE
ことを確認してください
ランプが点灯した
Page 7
充電中は使用しないでください。ご使用になるときは充電ス
タンドからはずしてください。
充電スタンドにのせたまま操作をすると充電式電池が充電されませ
•
ん。
充電スタンドにのせたまま操作をすると正しく動作しない場合があ
•
ります。
本体に充電式電池を入れずに充電スタンドにのせないでください。
•
正しく動作しない場合があります。
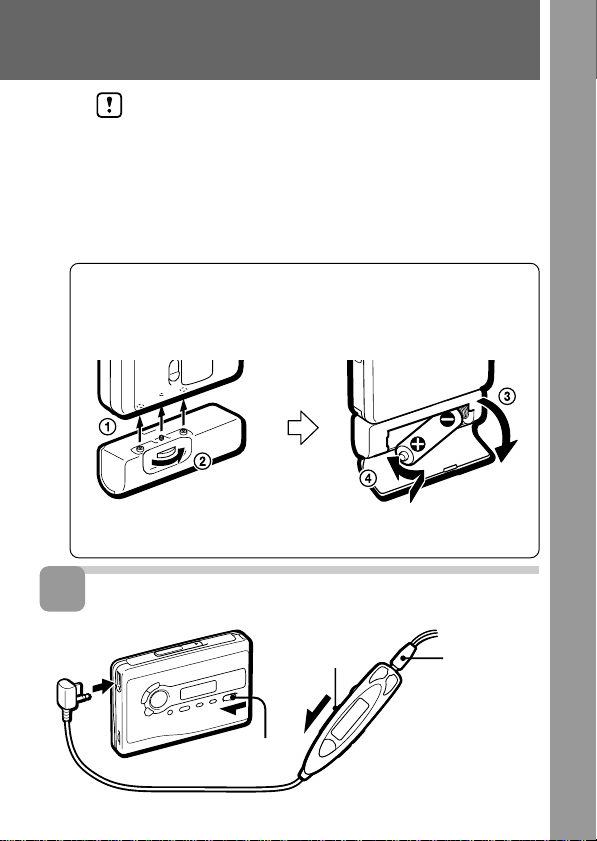
乾電池で使うときは
別売りのソニーアルカリ乾電池(単3形)を1本入れます。
充電式電池と一緒に使うと長時間再生ができます。
乾電池ケースを
本体に取り付ける
3
リモコンをつなぎ、ホールドを解除する
i ヘ
図のように必ず#側から
入れてください
HOLD
ヘッドホンの
ステレオミニ
プラグをリモ
コンにしっか
り差し込む
HOLD
7
Page 8
テープを聞く
(ノーマル)、
TYPE I
テープを自動的に判別し、再生します(オートテープセレクター機能)。
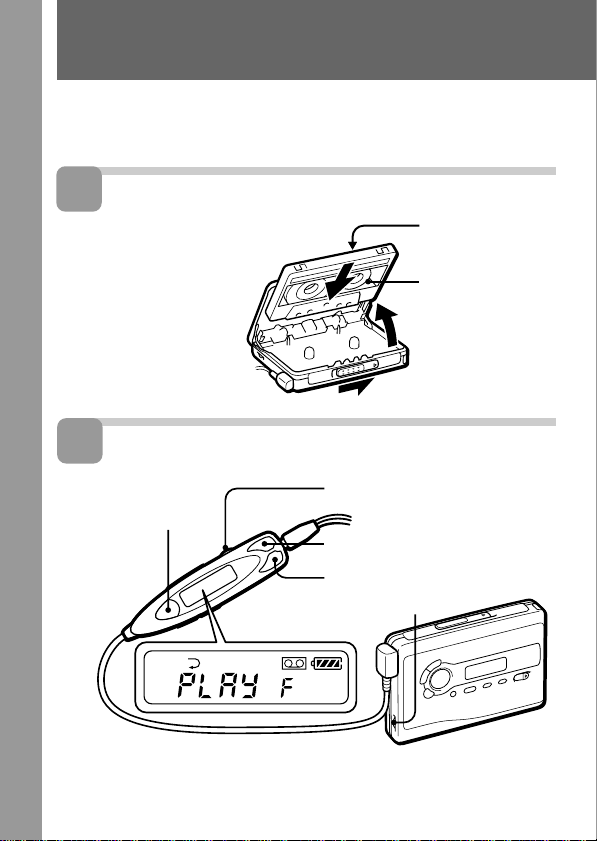
1
カセットを入れる
1
2ふたが少し開い
2
再生する(リモコンで操作する)
1Y•xを押す
つまみを
OPEN
矢印の方向に
ずらす
たら、手でふた
を開ける
(ハイポジション)、
TYPE II
2
で音量を調節する
VOL
(+)
FF
(−)
REW
(メタル) の
TYPE IV
ふた側(
FWD
本体側(
REV
3テープのたるみを
取ってからテープ
側を奥にして奥ま
で確実に入れる
VOL
)
)
リモコンで音量調節するときは、本体の
本体で音量調節するときは、リモコンの
8
つまみを6程度にします。
VOL
つまみを最大にします。
VOL
Page 9
その他のテープ操作
秒以
動作の確認音
FWD
ピ
操作
再生面の切り換え
押すボタン
再生中にY
上
•xを2
REV
ピピ
停止
早送り
巻き戻し
/
(停止中)
聞いている曲を
繰り返し再生
(1曲リピート)
早送りして反対面を再生
(スキップリバース)
巻き戻して最初から再生
(オートプレイ)
*
*
早送り、巻き戻し中にY•xボタンを押すと再生状態になります。
再生中にY
停止中に
を1回
再生中にすばやくY
を
2
(解除するには、1回押す)
停止中にFFを2秒以上
停止中に
回
•xを1
または
FF
REWを2
ピ
回
ピ
REW
秒以上
(「FF
点灯)
ピピーピ、…(「
x
•
灯)
巻き戻し中は「ピピーピ」
を繰り返す(「
滅)
ピ→ピ→ピ、ピ、…
(「
FF
ピ→ピ→ピピ、ピピ、…
(「
REW
上記以外のテープ操作は、「テープを聞く−応用」(13ページ)をご覧くだ
さい。
カセットぶたを開けるときは、テープが停止していることを確認してくだ
さい。動作中にカセットぶたを開けるとテープがたるみ、テープを傷める
おそれがあります。
(リモコン表示)
(ふた側) 面スタート
(本体側) 面スタート
」または「
REW
」が点
REP
」は点
REP
」が点滅)
」が点滅)
」が
9
Page 10
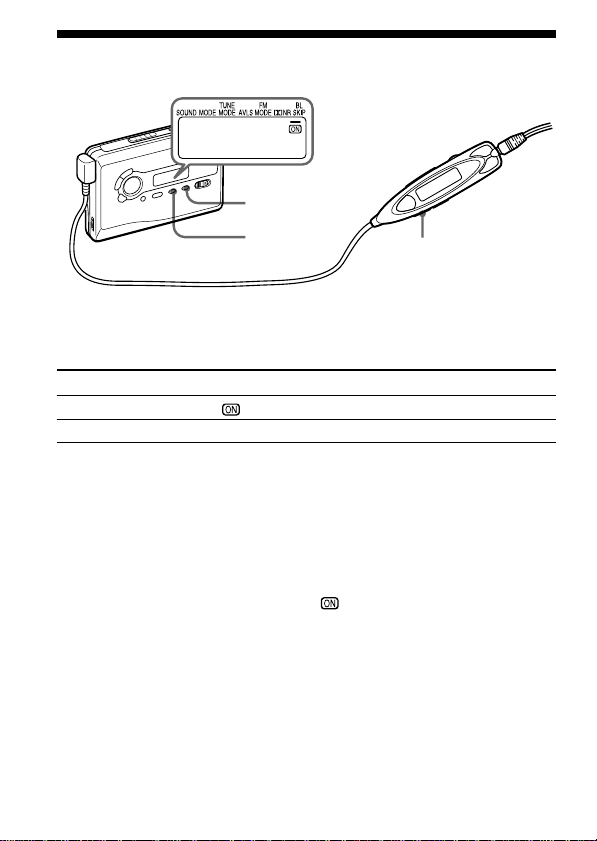
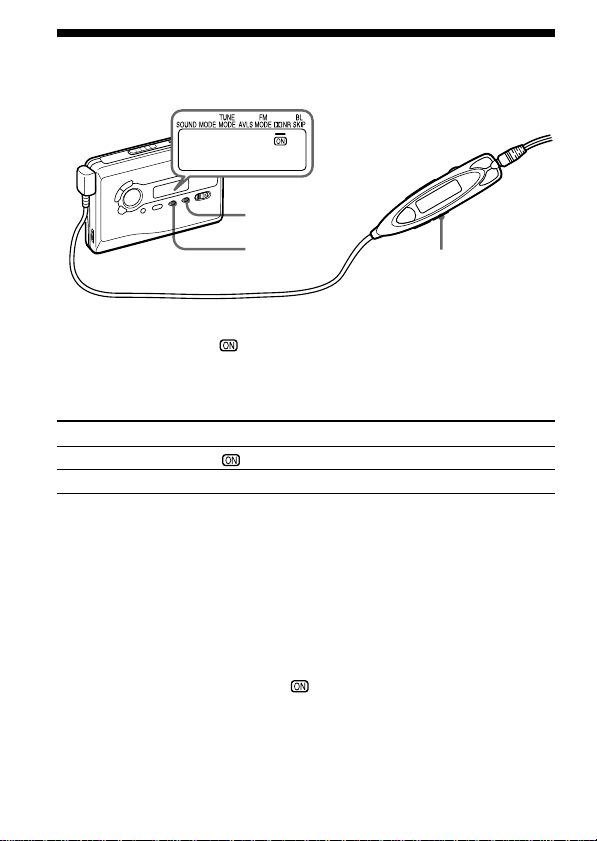
ラジオを聞く
ご使用になる前に、ご使用になる地域(国)に合わせて、エリア番号を設
定してください。詳しくは、24ページ「海外でラジオを聞く」を参照して
ください。以下の説明は、日本でお使いになる場合を例としています。
1
ラジオをつける
10
2
AM
または
BAND•RADIO
を押す
ON
テープ再生中の場合は、Y•xを1度押し
てテープを止めてから、
ジオをつけてください。
を選ぶ
FM
BAND•RADIO
を押す
ON
テープが停止し
ている状態で
RADIO ON/
BAND•OFF
秒以上押す
1
秒以上押してラ
1
RADIO ON/
BAND•OFF
を1秒以上押
す
を
Page 11
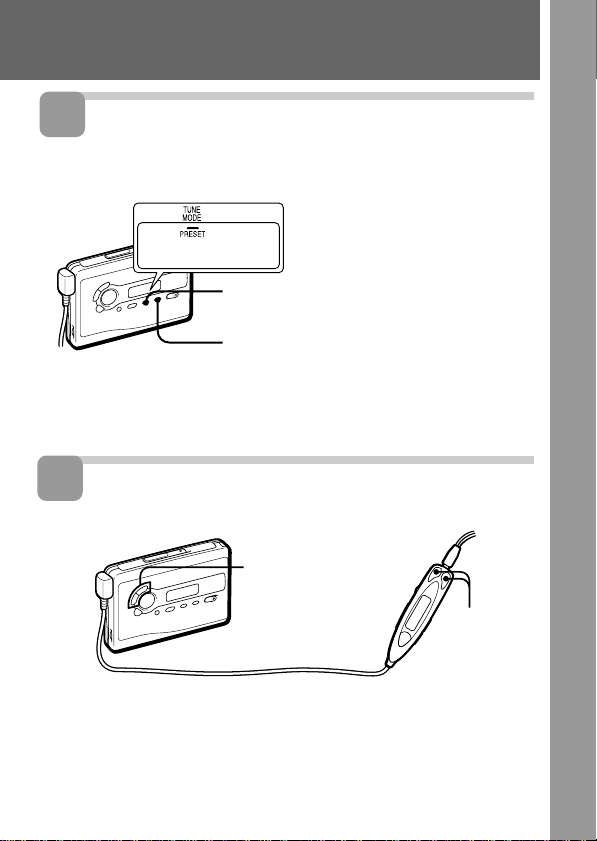
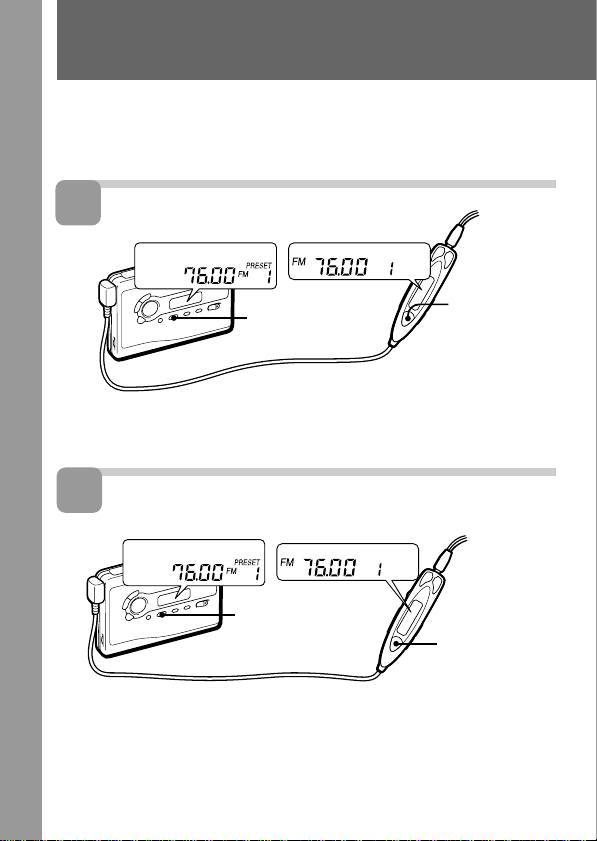
3
マニュアル選局モードにする、ま
プリセット選局モードにする
たは
1
2マニュアル選局モード:
4
放送局を選ぶ
マニュアル選局モード:表示窓を見ながら、−
+を繰り返し押して周波数を合わせる
プリセット選局モード
を繰り返し押してカーソルを
MENU
TUNE MODE
して「
MANUAL
プリセット選局モード
て「
PRESET
−
TUNE/ PRESET
:−
TUNE/ PRESET
に合わせる
SET
」を表示させる
:
」を表示させる
SET
+
TUNE/ PRESET
+を押す
を押
を押し
+、−を押す
11
Page 12

ラジオを聞く(つづき)
ラジオを消すには
本体の
RADIO OFF
タンを押します。
受信状態をよくするには
放送
AM
アンテナを内蔵しているので、本体の向きや位置を変えて、聞きやすいよ
うに調節します。
放送
FM
ヘッドホンのコードがアンテナになっているので、できるだけのばして使
います。
うまく受信できないときは
手動で受信して、記憶させてください。(「自分で周波数を合わせる」(19ページ)
「放送局を自分で設定する」(
ボタンまたはリモコンの
ページ)参照)
20
RADIO ON/BAND•OFF
ボ
12
Page 13
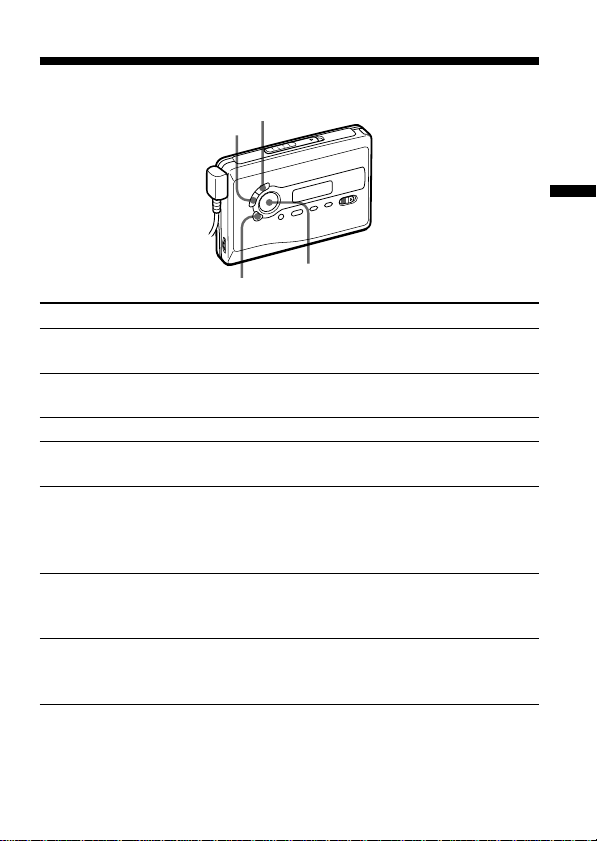
Bテープを聞く−応用
本体で操作する
FF(AMS
REW(AMS
)
x
操作
再生
再生面の切り
換え
停止
早送り
巻き戻し
/
(停止中)
聞いている曲を
繰り返し再生
(1曲リピート)
早送りして反対
面を再生(ス
キップリバース)
巻き戻して最初
から再生(オー
トプレイ)
*
*
早送り、巻き戻し中にリモコンのY•xボタンを押すと再生状態になります。
押すボタン
Y
•REPEAT
再生中にY
x(停止)
停止中に
を1回
再生中にY
を2秒以上
(解除するには、もう一
度押す)
停止中にFF(
秒以上
2
停止中に
を
2
秒以上
•REPEAT
または
FF
•REPEAT
AMS
REW(AMS
)
Y
•REPEAT
動作の確認音
(ふた側)面スタート ピ
FWD
(本体側)面スタート ピピ
REV
(ふた側)面スタート ピ
FWD
(本体側)面スタート ピピ
REV
ピ
ピ
REW
ボタンを押したときと
巻き戻し中に「ピピーピ」(巻き
戻し中は繰り返す)
ピ→ピ→ピ、ピ、…
)を
ピ→ピ→ピピ、ピピ、…
)
テ
ー
プ
を
聞
く
︱
応
用
13
Page 14
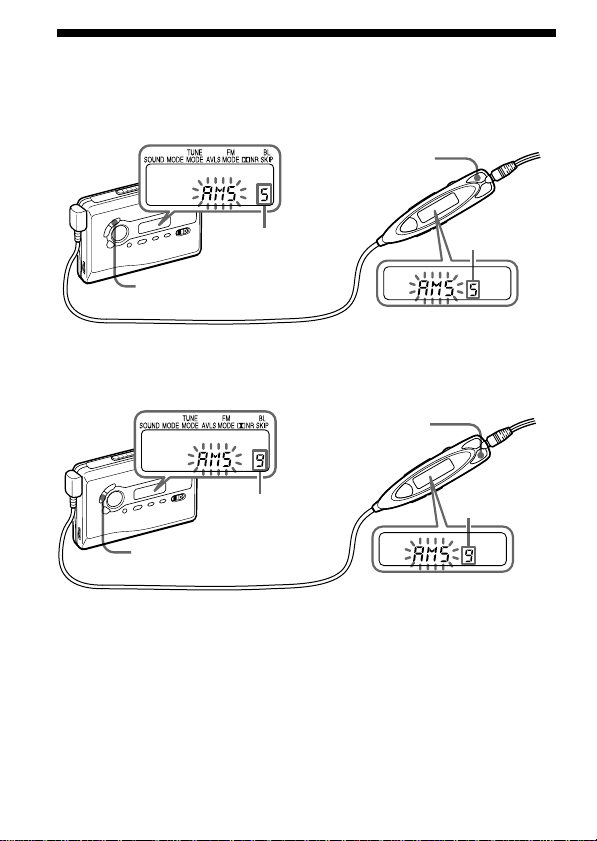
好きな曲を頭出しする
(
AMS
早送りして何曲か先の曲を再生するには
−オートミュージックセンサー)
再生中にFFをと
ばしたい曲の数
だけ押す
とばす曲数を表示
とばす曲数を
表示
再生中にFF(
ばしたい曲の数だけ押す
確認音: ピ→ あと1曲になるとピッピー、ピッピー、・・・
AMS
)をと
巻き戻して何曲か前の曲を再生するには
再生中に
とばしたい曲の数
だけ押す
とばす曲数を表示
再生中に
とばしたい曲の数だけ押す
確認音:ピ→ あと1曲になるとピピッピー、ピピッピー、・・・
最大9曲までとばすことができます。
曲リピートが正しく動作しないことがあります
AMS、1
• AMSや1
• AMSや1
曲リピート機能では曲間の4秒以上のあき(無音部分)を見つけて頭出
しをしています。あきが
直後に操作したときは、頭出しができないことがあります。また、曲中に音の
小さい部分や長い無音部分があると、そこで頭出しをすることがあります。
曲リピートの途中で停止することがありますが、故障ではありませ
ん。詳しくは「故障かな?」(
REW(AMS
4
)を
秒未満のときや曲間に雑音があるとき、曲の直前や
ページ)をご覧ください。
34
REW
を
とばす曲数を
表示
14
Page 15
テープ走行のしかたを選ぶ
モード
(
MODE
テープ走行のしかたを選べます。
)
SET
MENU
MODE
テ
ー
プ
を
聞
く
︱
応
用
リモコン表示 本体表示 (
ss 両面を繰り返し再生
dd 両面を1回再生
面から始めたときは
* REV
面のみを再生して止まります。
REV
MODE
) モード
*
リモコンで操作するには
ボタンを繰り返し押して、表示を切り換えます。
MODE
本体で操作するには
ボタンを繰り返し押して、表示窓のカーソルを、
MENU
合わせます。
ご注意
設定は、電池を交換しても消えません。
•
ボタンを押して、表示を切り換えます。
SET
MODE
の位置に
15
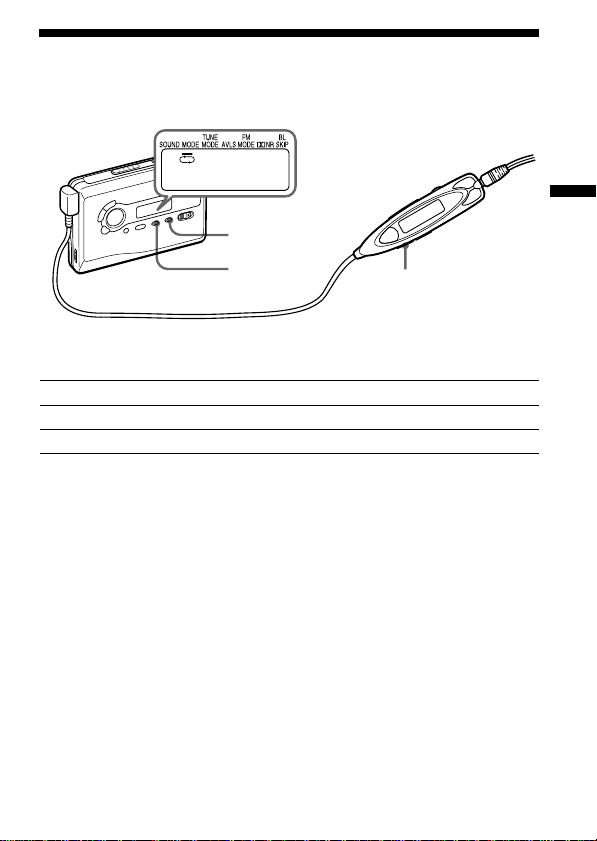
Page 16
長いあきを飛ばす(ブランクスキップ)
SET
MENU
MODE
再生するときに、曲間の長いあきをとばして次の曲の頭出しをします。
リモコン表示 本体表示 (
BL SKIP BL SKIP
表示なし 表示なし
BL SKIP
) モード
BL SKIP
入
切
リモコンで操作するには
ボタンを繰り返し押して、表示を切り換えます。
MODE
本体で操作するには
ボタンを繰り返し押して、表示窓のカーソルを、
MENU
に合わせます。
ボタンを押して、「 」を表示させます。
SET
BL SKIP
の位置
16
Page 17

ブランクスキップが正しく動作しないことがあります
ブランクスキップでは曲間に12秒以上のあきを見つけると、早送りして次の
•
曲を再生しています。録音した機器によっては曲間のあきが完全な無音部分に
ならないために、ブランクスキップが動作しないことがあります。また、小さ
い音が長く続く部分があると、曲の途中でも早送りすることがあります。その
場合には、ブランクスキップを解除してください。
各面の始めの無音部分が10秒以上の場合、最初の曲の頭の部分が飛ばされて
•
しまい、途中から再生が始まることがあります。
ブランクスキップの途中で停止することがありますが、故障ではありません。
•
詳しくは「故障かな?」(
ページ)をご覧ください。
34
ご注意
リモコンでメニュー設定の操作をしている間は、リモコンではテープ操作はで
•
きません。
設定は、電池を交換しても消えません。
•
テ
ー
プ
を
聞
く
︱
応
用
17
Page 18
ドルビー
再生する
*B NR
で録音されたテープを
SET
MENU
SOUND
録音の特性に合わせた再生ができます。ドルビー
れたテープの場合には「 」または「;」を消します。
ドルビーラボラトリーズからの実施権に基づき製造されています。
*
、ドルビー及びダブルD記号はドルビーラボラトリーズの商標です。
Dolby
リモコン表示 本体表示 (;NR) モード
; ドルビー
表示なし 表示なし ドルビー
を使わずに録音さ
B NR
リモコンで操作するには
表示窓に「;」が表示されるまで
ドルビー
SOUND
を使わずに録音されたテープの場合には
B NR
ボタンを押して「;」の表示を消します。
SOUND
ボタンを押し続けます。
本体で操作するには
ボタンを繰り返し押して、表示窓のカーソルを、;NRの位置に合
MENU
わせます。
ご注意
設定は、電池を交換しても消えません。
•
ボタンを押して、「 」を表示させます。
SET
18
B NR
B NR
入
切
Page 19

Bラジオを聞く−応用
自分で周波数を合わせる(マニュアル選局)
SET
MENU
BAND•RADIO ON
−
TUNE/
PRESET
1
BAND•RADIO ON
(リモコンでは、テープが停止している状態で
BAND•OFF
2
BAND•RADIO ON
を選ぶ
FM
(リモコンでは、
す)
3 本体の
ボタンを1秒以上押す)
MENU
TUNE MODE
4
5
ボタンを押して「
SET
TUNE/PRESET
ボタンを押してラジオをつける
ボタンを繰り返し押して、
RADIO ON/BAND•OFF
ボタンを繰り返し押して、カーソルを
の位置に合わせる
MANUAL
+または−ボタンを繰り返し押して表示
+
」を表示させる
RADIO ON/
BAND•OFF
RADIO ON/
AM
ボタンを1秒以上押
窓を見ながら周波数を合わせる
(リモコンでは、+または–ボタンを繰り返し押す)
TUNE/PRESET
が強い放送局を自動的に受信して止まります(オートスキャン)。
電波が弱くて止まらないときは、
タンを繰り返し押して周波数を合わせてください。
+または−ボタンを長めに押して離すと、電波
TUNE/PRESET
+または−ボ
または
19
ラ
ジ
オ
を
聞
く
ー
応
用
Page 20

放送局を自分で設定する
AM
、
FMを各8
局まで記憶できます。
−
TUNE/PRESET
BAND•RADIO ON
ENTER
+
RADIO ON/
BAND•OFF
❐ 自動で受信して記憶させる
(オートメモリースキャン)
受信できる局を自動的に記憶させます。受信状態のよい場所で操作してく
ださい。
1
BAND•RADIO ON
(リモコンでは、テープが停止している状態で
BAND•OFF
2
BAND•RADIO ON
を選ぶ
FM
(リモコンでは、
す)
ボタンを1秒以上押す)
3 本体の表示窓に「
したままにする
受信できる放送局が自動的に記憶されていきます。記憶が完了す
ると、周波数の表示が止まり、プリセット番号が表示されます。
記憶した放送局を受信するには
ページをご覧ください。
22
放送局を記憶している間に電源を抜かないでください
受信した放送局が記憶されないことがあります。
20
ボタンを押してラジオをつける
ボタンを繰り返し押して、
RADIO ON/BAND•OFF
」表示が出るまで
A
ENTER
RADIO ON/
または
AM
ボタンを1秒以上押
ボタンを押
Page 21

ご注意
電波が弱いときは記憶できる放送局が少なくなる場合があります。
•
❐ 手動で受信して記憶させる
(マニュアルメモリー)
1
BAND•RADIO ON
(リモコンでは、テープが停止している状態で
BAND•OFF
2
BAND•RADIO ON
を選ぶ
FM
(リモコンでは、
す)
3
ENTER
周波数表示が点滅します。
4 表示の点滅中
ボタンを1秒以上押す)
ボタンを押す
*にTUNE/PRESET
り返し押して記憶させたい周波数を表示させ、
タンを押す
プリセット番号表示が点滅します。
5 表示の点滅中
*にTUNE/PRESET
り返し押して記憶させたいプリセット番号を点滅させる
6 表示の点滅中に
これで、選んだ放送局が、選んだプリセット番号に記憶されまし
た。
表示の点滅が止まった場合は、手順3から操作し直してください。
*
記憶した放送局を受信するには
ページをご覧ください。
22
ご注意
同じプリセット番号に、新たに別の放送局を記憶させると、すでに記憶されて
•
いた放送局は消去されます。
ボタンを押してラジオをつける
ボタンを繰り返し押して、
RADIO ON/BAND•OFF
+または−ボタンを繰
+または−ボタンを繰
ENTER
ボタンを押す
RADIO ON/
または
AM
ボタンを1秒以上押
ENTER
ボ
ラ
ジ
オ
を
聞
く
ー
応
用
(次ページへつづく)
21
Page 22

放送局の記憶を消すには
1
ページの「手動で受信して記憶させる」の手順1から
21
を行い、周波数表示を点滅させる
2 表示の点滅中に
返し押して「−−−−」
「−−−−」は最大周波数あるいは最小周波数の次に表示されます。
*
3
ENTER
プリセット番号表示が点滅します。
4 表示の点滅中に
返し押して消したい放送局のプリセット番号を選ぶ
5
ENTER
TUNE/PRESET
ボタンを押す
TUNE/PRESET
ボタンを押す
を表示させる
*
+または−ボタンを繰り
+または−ボタンを繰り
❐ 記憶した放送局を受信する
(プリセット選局)
SET
MENU
BAND•RADIO ON
3
−
TUNE/
PRESET
1
BAND•RADIO ON
(リモコンでは、テープが停止している状態で
BAND•OFF
ボタンを1秒以上押す)
ボタンを押してラジオをつける
+
22
RADIO ON/
BAND•OFF
RADIO ON/
Page 23

2
BAND•RADIO ON
を選ぶ
FM
(リモコンでは、
す)
3 本体の
MENU
TUNE MODE
4
5
ボタンを押して「
SET
TUNE/PRESET
ボタンを繰り返し押して、AMまたは
RADIO ON/BAND•OFF
ボタンを1秒以上押
ボタンを繰り返し押して、カーソルを
の位置に合わせる
PRESET
」を表示させる
+または−ボタンを繰り返し押してプリ
セット番号を選ぶ
(リモコンでは、+または–ボタンを繰り返し押す)
ラジオを聞くときのご注意
受信するとき
本体やリモコンを他のラジオやテレビ、コンピューターなどに近づける
•
と、本機のラジオに雑音が入ることがありますので、離してお使いくだ
さい。
一部が金属製のテープをお使いのとき、受信状態が悪くなることがあり
•
ます。その場合はテープを抜いてラジオをお聞きください。
ステレオ放送を聞くとき
のステレオ放送を聞くときは本体の
FM
表示窓のカーソルを
示なし(ステレオ)にします。電波が強すぎてひずんで聞こえる場合は
「
すると聞きやすくなりますが、ステレオではなくなります。なお、AMは
ステレオにはなりません。
」を表示させます。雑音が多いときは「
LOCAL
FM MODE
の位置に合わせ、
ボタンを繰り返し押して、
MENU
ボタンを押して表
SET
MONO
」(モノラル)に
ラ
ジ
オ
を
聞
く
ー
応
用
23
Page 24

海外でラジオを聞く
TUNE/ PRESET
BAND•RADIO ON
ENTER
1
BAND•RADIO ON
2
ENTER
ボタンを押して、周波数表示を点滅させる
3 エリア表示(「
まで
BAND•RADIO ON
4 表示の点滅中
ボタンを押してラジオをつける
JPn
」、「
USA
」または「
ボタンを押したままにする
*にBAND•RADIO ON
」)が点滅する
Eur
ボタンを繰り返し押
してエリアを選ぶ
表示の点滅が止まった場合は手順2から操作し直してください。
*
受信範囲は下記のようになります。
使う地域 選ぶエリア番号 受信周波数
日本
アメリカ合衆国、カナダ
中南米諸国
ヨーロッパ、その他
5
ENTER
ボタンを押す
6 「自分で周波数を合わせる」(
JPn
USA
Eur
19
FM: 76.0 - 90.0MHz
AM: 531 - 1 710kHz
FM: 87.5 - 108MHz
AM: 530 - 1 710kHz
FM: 87.5 - 108MHz
AM: 531 - 1 602kHz
ページ)または「放送局を
自分で設定する」(20ページ)にしたがって受信する
+、−
24
Page 25

Bその他の機能を使う
高音または低音を強調する
サウンド
(
SOUND
リモコンまたは本体で、好みの音質を選べます。
リモコン表示
リバイブ
RV
メガベース
MB
グルーブ
GRV
表示なし
リモコンで操作するには
SOUND
通常の音質を選ぶ場合は、表示なしにしてください。
ボタンを繰り返し押して、設定を選びます。
)
SET
MENU
音質
高音を強調 (古いテープなど、高音にメリハリがないテープを
再生するとき)
低音を強調
低音をより強調
通常の音質
SOUND
そ
の
他
の
機
能
を
使
う
本体で操作するには
ボタンを繰り返し押して、表示窓のカーソルを、
MENU
に合わせます。
場合は、表示なしにしてください。
ご注意
にしたときに音がひずんだように聞こえる曲では、他の設定を選ぶか、
• GRV
または本体の音量を下げてお聞きください。
設定は、電池を交換しても消えません。
•
ボタンを押して、設定を選びます。通常の音質を選ぶ
SET
SOUND
の位置
25
Page 26

音もれを抑え耳にやさしい音にする
(
AVLS—
快適音量)
SET
MENU
リモコン表示 本体表示 (
AVLS AVLS
表示なし 表示なし
) モード
AVLS
MODE
AVLS
リモコンで操作するには
表示窓に「
AVLS
「
AVLS
を解除するには
」が消灯するまで
」が表示されるまで
AVLS
MODE
ボタンを押したままにします。
MODE
ボタンを押します。
本体で操作するには
ボタンを繰り返し押して、表示窓のカーソルを、
MENU
わせます。
を解除するには
AVLS
ボタンを押して、「 」の表示を消します。
SET
ご注意
• AVLS
ボタンを押して、「 」を表示させます。
SET
の設定は、電池を交換すると解除されます。
26
入
切
AVLS
の位置に合
Page 27

誤操作を防ぐ(ホールド機能)
HOLD
スイッチを矢印の方向にずらして、誤操作を防ぎます。
HOLD
HOLD
そ
の
他
の
機
能
を
使
う
27
Page 28

B電源
乾電池・充電式電池の取り替え時期は
電池が消耗すると、電池交換お知らせ表示が点滅します。テープ走行が不
安定になったり雑音が多くなるので、乾電池は新しいものと交換し、充電
式電池は充電し直してください。
乾電池は、別売りのソニーアルカリ乾電池のご使用をおすすめします。
電池の残量がなくなってくると、表示でお知らせします
リモコン表示
本体表示
意味 残量は充分です。 残量が少なく 電池が消耗しています。
ご注意
%充電されていない充電式電池を入れても残量表示がすべて点灯するこ
• 100
とがありますが、充電量(充電時間)に応じて、持続時間は短くなります。
早送りや巻き戻し中、または極端に温度が低い場所で使用しているときは、残
•
量が少なく表示されることがあります。
なってきました。 しばらくすると、本体の
動作が止まります。
28
Page 29

電池の持続時間 (
使用電池 テープ再生時 ラジオ受信時
ソニーアルカリ 約
乾電池
LR6(SG)**
充電式ニッケル水素電池 約22時間 約22時間
時間 約32時間
36
JEITA*
NH-14WM (A)
(
充電にて)
100%
充電式ニッケル水素電池と 約
ソニーアルカリ乾電池
の併用
(電子情報技術産業協会)規格による測定値です。(ソニー
* JEITA
カセットテープ使用)
日本製ソニースタミナアルカリ乾電池
**
時間 約54時間
58
)で測定しています。
LR6(SG
HF
シリーズ
ご注意
電池持続時間は、周囲の温度や使用状態、電池の種類により短くなる場合があ
•
ります。
)
電
源
29
Page 30

Bその他
お手入れ
よい音でテープを聞くために
時間程度使ったら、別売りのクリーニングカセット(
10
CHK-1W
クリーニングカセットは指定のものをお使いください
他のクリーニングカセットを使うと故障の原因となることがあります。
)でヘッド、ピンチローラーをきれいにしてください。
本体表面が汚れたときは
水気を含ませた柔らかい布で軽くふいたあと、からぶきします。シンナー
やベンジン、アルコールは表面の仕上げを傷めますので使わないでくださ
い。
ヘッドホンおよびリモコンのプラグのお手入れについて
常によい音でお聞きいただくために、プラグをときどき柔らかい布でから
ぶきし、清潔に保ってください。汚れていると、雑音の原因になることが
あります。
端子のお手入れについて
定期的に図のように各端子を綿棒や柔らかい布などで、きれいにしてくだ
さい。
C-1KW/
30
端子
端子
端子
Page 31

使用上のご注意
充電について
付属の充電スタンドは本機専用です。他機の充電はできません。
•
付属の充電スタンドでは指定の電池以外は充電しないでください。
•
お買い上げ時や長い間使わなかった充電式電池は、持続時間が短いことがあり
•
ます。これは電池の特性によるもので、数回使えば充分充電されるようになり
ます。
充電が終わったら、早めに本体を充電スタンドからはずし、ACパワーアダプ
•
ターをコンセントから抜いてください。長時間差したままにすると、電池の性
能を低下させることがあります。
充電中は充電スタンドや充電式電池が熱くなりますが、危険はありません。
•
充電式電池は約
•
日本国内での充電式電池の廃棄について
ニッケル水素電池は、リサイクルできます。不要になったニッケル水
素電池は、金属部にセロハンテープなどの絶縁テープを貼って充電式
電池リサイクル協力店へお持ちください。
回充電できます。
300
充電式電池の回収
工業会のホームページ
海外での充電式電池の廃棄について
各国の法規制にしたがって廃棄してください。
リサイクルおよびリサイクル協力店については社団法人電池
•
http://www.baj.or.jp/
を参照してください。
付属の充電スタンド専用のACパワーアダプターについて
この製品には、付属のACパワーアダプター(極性統一
•
形プラグ:
パワーアダプターを使用すると、故障の原因になる
AC
ことがあります。
パワーアダプターは容易に手が届くような電源コン
• AC
セントに接続し、異常が生じた場合は速やかにコンセ
ントから抜いてください。
規格)をご使用ください。それ以外の
JEITA
極性統一形プラグ
31
そ
の
他
Page 32

取り扱いについて
落としたり、強いショックを与えたりしないでください。故障の原因になりま
•
す。
リモコンやヘッドホンのコードを強く引っぱらないでください。
•
次のような場所には置かないでください。
•
ー温度が非常に高いところ(
ー直射日光のあたる場所や暖房器具の近く。
ー窓を閉めきった自動車内(特に夏季)。
ー風呂場など湿気の多いところ。
ー磁石、スピーカー、テレビなど磁気を帯びたものの近く。
ーほこりの多いところ。
温度が高いところ(40℃以上)や低いところ(0℃以下)では液晶表示が見にく
•
くなったり、表示の変わりかたがゆっくりになることがあります。常温になれ
ばもとに戻ります。
長い間本機を使わなかったときは、1度本機を数分間再生状態にしてからお使
•
い始めください。
動作中はカセットぶたを開けないでください。テープがたるみ、テープを傷め
•
るおそれがあります。テープがたるんでしまったときは、必ずたるみを取って
から使用してください。
長時間テープについて
•
分をこえるテープはなるべくお使いにならないでください。テープが非常
90
に薄いため、動作が不安定になって音がゆれたり、まれに機械に巻き込まれる
場合があります。また、音が小さかったり、高音ののびが悪くなることがあり
ます。
付属のヘッドホンをご使用中、肌に合わないと感じたときは早めに使用を中止
•
して医師またはテクニカルインフォメーションセンター、お客様ご相談セン
ターにご相談ください。
℃以上)。
60
ヘッドホンについて
付属のヘッドホンは、音量を上げすぎると音が外に漏れます。音量を上げすぎ
て、まわりの人の迷惑にならないように気をつけましょう。
雑音の多いところでは音量を上げてしまいがちですが、ヘッドホンで聞くとき
はいつも呼びかけられて返事ができるくらいの音量を目安にしてください。
32
Page 33

リモコンについて
付属のリモコンは本機専用です。また、他機種に付属のリモコンで本機の操作
はできません。
万一故障した場合は、内部を開けずにテクニカルインフォメーションセンター
またはお買い上げ店、ソニーサービス窓口にご相談ください。
ワールドモデルをお買い上げのお客様へ
海外では保証書に記載の海外ソニーサービス特約店にご相談ください。
そ
の
他
33
Page 34

故障かな?
故障とお考えになる前に、次のような点をご確認ください。
症状
ブランクスキッ
プ、
ピートや早送り・
巻き戻しをすると
テープが止まる
「ピピピピ」とエ
ラー音が鳴り、操
作できない
操作できない
「ピピピピピピピ
ピ」と鳴り、テー
プ操作ができない
雑音が入ることが
ある
テープ再生中に勝
手に早送りになる
AMS、1
曲リ
原因
消耗した充電式電池または乾
電池を使っている。マンガン
乾電池を使っている。(ブラ
ンクスキップや
再生と比べて電流を多く消費
するためです。)
電池が消耗している。
電池が消耗している。
本体またはリモコンの
ホールド機能が働いている。
カセットが入っていない。
近くで携帯電話などの電波を
発する機器を使用している。
パワーアダプターの近く
AC
で使用している。
ブランクスキップが働いてい
る。
AMS
などは
処置
充電式電池を充電する。
乾電池は新しいソニーアル
カリ乾電池と交換する。
充電式電池を充電する。
乾電池は新しいソニーアル
カリ乾電池と交換する。
充電式電池を充電する。
乾電池は新しいソニーアル
カリ乾電池と交換する。
ホールドを解除する。「誤操
作を防ぐ」(
カセットを入れる。
携帯電話などから離して使
用する。
パワーアダプターから
AC
離して使用する。
ブランクスキップを解除す
る。「長いあきを飛ばす」
(
ページ)参照
16
ページ)参照
27
34
Page 35

症状
音が途切れる
雑音がする
音量が大きくなら
ない
低音が強すぎた
り、ひずんだよう
に聞こえる
動作や表示がおか
しい
表示窓の表示が一
瞬消えることがあ
る
充電スタンドの
CHARGE
が点灯しない
ランプ
原因
ヘッドホンのプラグが汚れ
ている。
電池が消耗している。
が働いている。
AVLS
音質が
になっている。
GRV
RV、MB
または
––––
電池が消耗している。
充電式電池が入っていな
い。
本体または充電スタンドの
端子が汚れている。
処置
ヘッドホンのステレオミニ
プラグおよびリモコンのプ
ラグをきれいにクリーニン
グする。
充電式電池を充電する。
乾電池は新しいソニーアル
カリ乾電池と交換する。
を解除する。「音もれ
AVLS
を抑え耳にやさしい音にす
る」(26ページ)参照
音質を通常の設定にする。
「高音または低音を強調す
る」(
ページ)参照
25
いったん電源・電池(乾電
池、充電式電池)をはずし
て、
秒以上たってから入
15
れ直す。
充電式電池を充電する。
乾電池は新しいソニーアル
カリ乾電池と交換する。
充電式電池を本体に入れ
る。
端子をきれいにクリーニン
グする。
そ
の
他
35
Page 36

保証書とアフターサービス
保証書
この製品には保証書が添付されていますので、お買い上げの際お買い上げ店で
•
お受け取りください。
所定事項の記入および記載内容をお確かめのうえ、大切に保存してください。
•
保証期間はお買い上げ日より1年間です。
•
アフターサービス
調子が悪いときはまずチェックを
この説明書をもう一度ご覧になってお調べください。
それでも具合の悪いときはサービスへ
テクニカルインフォメーションセンターまたはお買い上げ店、添付の「ソニーご
相談窓口のご案内」にあるお近くのソニーサービス窓口にご相談ください。
保証期間中の修理は
保証書の記載内容に基づいて修理させていただきます。詳しくは保証書をご覧
ください。
保証期間経過後の修理は
修理によって機能が維持できる場合は、ご要望により有料修理させていただき
ます。
部品の保有期間について
当社ではカセットプレーヤーの補修用性能部品
要な部品
能な期間とさせていただきます。保有期間が経過した後も、故障箇所によっては
修理可能の場合がありますので、テクニカルインフォメーションセンターまた
はお買い上げ店、サ−ビス窓口にご相談ください。
を、製造打ち切り後6年間保有しています。この部品保有期間を修理可
)
製品の機能を維持するために必
(
ワールドモデルをお買い上げのお客様へ
海外での保証とアフターサービスについて
保証期間は、日本国内ではお買い上げ日より1年間、海外では90日です。
•
海外での修理やアフターサービスについてご不明な点は、保証書に記載の
•
海外ソニーサービス特約店にお問い合わせください。
36
Page 37

主な仕様
●カセットプレーヤー部・共通部
トラック方式 コンパクトカセットステレオ
周波数範囲
出力端子 ヘッドホンジャック(専用リモコンジャック)1個
実用最大出力
電源
電池持続時間
本体寸法 約
最大外形寸法 約
質量 約
●ラジオ部
受信周波数
●別売りアクセサリー
充電式ニッケル水素電池
1W
対応)、
* DOLBY NR OFF時:40〜15 000 Hz
負荷インピーダンス
(DC時)* 4 mW + 4 mW (16
8〜300
Ω)
Ω
DC 1.5 V
充電式電池(付属:
(MIN)、Ni-MH
*
乾電池、充電式電池の持続時間については「電池の持続時間」
(
ページ)をご覧ください。
34
108.4 × 77.7 × 23.0 mm (幅/高さ/
ず)
108.4 × 77.7 × 23.4 mm (幅/高さ/
(本体のみ)
160 g
(充電式電池含む) (
約
187 g
(ステレオ):
FM
(モノラル):
AM
NH-14WM
、ステレオイヤーレシーバー(ヘッドホン)
NH-14WM (A)、1.2 V、1350 mAh
)、単3形乾電池1個
奥行き、突起部含ま
奥行き) (
)
JEITA*
76.0〜90.0MHz
531〜1 710kHz
、クリーニングカセット
C-1KW、CHK-
** MDR-ED238SP (GROOVE
MDR-Q33SL、MDR-E888SP、MDR-848SP、MDR-EX70SL
JEITA*
)
ワールドモデルをお買い上げのお客様へ
国によって扱っているアクセサリーが違います。詳しくはお買い上げ店、ソニー
サービス窓口、海外ソニーサービス特約店にご相談ください。
本機の仕様および外観は、改良のため予告なく変更することがありますが、ご了
承ください。
(電子情報技術産業協会)規格による測定値です。
* JEITA
ヘッドホンは、本体のiジャックに直接つなぐときも、リモコンにつなぐとき
**
も、ステレオミニプラグのものをお求めください。
37
そ
の
他
Page 38

各部のなまえ
●本体
オープン
1
2 テープ時
3 i (ヘッドホン、リモコン)
4 テープ時: x(停止)ボタン
5
6
7
(カセットぶた開け)
OPEN
つまみ
(早送り)
: FF
(巻き戻し)
REW
ラジオ時
プリセット
PRESET
: TUNE
•AMS
チューニング
(選局)
+、−(放送局番号選
択)ボタン
ジャック
ラジオ時
(ラジオ電源切)ボタン
Y(再生)
ボリューム
VOL
エンター
ENTER
ラジオ オフ
: RADIO OFF
リピート
•REPEAT
(音量調節)つまみ
(入力)ボタン
•AMS/
ボタン
/
ボタン
8 液晶表示窓
9 充電式電池入れ
0 乾電池ケース用接点
ホールド
qa
qs
qd
qf
(誤操作防止)スイッチ
HOLD
セット
(機能設定)ボタン
SET
メニュー
(機能選択)ボタン
MENU
バンド
BAND(AM、FM
ラジオ オン
RADIO ON
(ラジオ電源入)
ボタン
選択)
•
38
Page 39

本体表示窓
1 選局方法表示
プリセット マニュアル
(
PRESET/MANUAL
2 テープ走行方法表示
(s / d)
3 音質表示(
4 電池交換お知らせ表示
5 テープ走行面表示
(
FWD/REV
6 動作状態
RV/MB/GRV
)
7
)
)
8FM受信方法表示
9オンドルビー
0オンブランクスキップON表示
qa
qs バンド表示(
表示
AVLS
モノ ローカル
(
MONO/LOCAL
B NR ON
プリセット
PRESET
プリセット番号
表示と
)
表示
)
FM/AM
(次ページへつづく)
そ
の
他
39
Page 40

●リモコンつきヘッドホン
1
2
3
4
5
6
7
L (左)R(右)
8
9
1 ステレオミニプラグ
2
(−)(巻き戻し
REW
ボタン
3FF(+)(早送り
ボタン
ボリューム
4
(音量調節)つまみ
VOL
5 液晶表示窓
ホールド
6
7 テープ時: Y(再生)
(誤操作防止)スイッチ
HOLD
x(停止)ボタン
ラジオ時
バンド オフ
BAND•OFF
ボタン
•AMS
*
ラジオ オン
: RADIO ON/
(ラジオ電源切)
40
•AMS
)
•
サウンド
8
SOUND
)
9
MODE
液晶バックライトについて
*
リモコン操作時、本体操作時、電池
残量表示が変化したときなどに、自
動的に約
ボタン
モード
ボタン
秒間点灯します。
5
Page 41

リモコン表示窓
1
2
3 テープ走行方法表示
4 バンド表示(
5 テープ操作時
表示
AVLS
ブランクスキップ
BL SKIP
(s / d)
表示
FM/AM
:
テープ動作状態表示
ラジオ操作時:周波数表示
6 カセット有/無表示
7 電池交換お知らせ表示
8 音質表示(
9オンドルビー
)
RV/MB/GRV
B NR ON
表示
)
そ
の
他
41
Page 42

English
Preparations
Prepare a dry battery (not
supplied) or the rechargeable
battery (supplied).
Dry Battery
Attach the supplied battery case,
and then insert one R6 (size AA)
battery with correct polarity.
Note
•For maximum performance we
recommend that you use a Sony
alkaline battery.
Rechargeable Battery
1 Insert the supplied
rechargeable battery (NH14WM (A)) into the
rechargeable battery
compartment with correct
polarity.
2 Connect the supplied AC
power adaptor to the
charging stand, plug in the
AC power adaptor to the
house current (mains).
If the plug does not fit to your
mains, attach the supplied
AC plug adaptor.
3 Place the main unit on the
charging stand.
The CHARGE lamp will light
up.
42
Full charging takes about 6
hours.
The CHARGE lamp will go
off when charging is
complete.
You can charge the battery about
300 times.
Notes
•Do not use the unit while
charging. Remove the unit from
the charging stand when using it.
– If you operate the unit while
charging, the battery will not be
charged.
– If you operate the unit while
charging, it may cause
malfunction.
– Do not place the unit on the
charging stand without the
rechargeable battery.
Otherwise, it may cause
malfunction.
•Certain countries may regulate
disposal of the battery used to
power this product. Please
consult your local authority.
Note on the AC power
adaptor
Use only the supplied AC power
adaptor. Do not use any other AC
power adaptor.
Polarity of
the plug
Page 43

When to replace/charge
the battery
Replace or charge the battery
when “e” flashes in the
display.
Note
•The battery life may be shorter
depending on the operating
condition, the surrounding
temperature and battery type.
Battery life
(Approx. hours) (JEITA*)
Sony alkaline LR6 (SG)**
Tape playback 36
Radio reception 32
Rechargeable battery
(NH-14WM (A))
Tape playback 22
Radio reception 22
Sony alkaline LR6 (SG)** and
Rechargeable NH-14WM (A)
Tape playback 58
Radio reception 54
* Measured value by the standard
of JEITA (Japan Electronics and
Information Technology
Industries Association). (Using a
Sony HF series cassette tape)
**When using a Sony LR6 (SG)
“STAMINA” alkaline dry battery
(produced in Japan).
Playing a Tape
1 Insert a cassette and if the
HOLD function is on,
slide the HOLD switch in
the opposite direction of
the arrow to unlock the
controls.
2 Press Y(play)•x(stop)
on the remote control and
adjust the volume with
VOL. (On the main unit,
press Y•REPEAT.)
When adjusting the volume
on the remote control
Set the VOL control on the main
unit to around 6.
When adjusting the volume
on the main unit
Set the VOL control on the remote
control at maximum.
43
Page 44

Operation on the remote
control
To
Switch
playback to
the other side
Stop playback
Repeat the
current track
(Repeat Single
Track
function)
Press
Y•x for
2 seconds or more
during playback
Y•x once
during playback
Y•x twice
during playback
To stop a single
repeat, press
Y•x once.
Operation on the main
unit
To
Switch
playback to
the other side
Stop playback
Repeat the
current track
(Repeat Single
Track
function)
Press
Y•REPEAT
during playback
x (stop)
Y•REPEAT for
2 seconds or
more during
playback
To stop a single
repeat, press it
again.
Other tape operations
To
Fast forward*
Rewind*
Play the next
track/
succeeding 9
tracks from
the beginning
(AMS**)
Play the
current track/
previous 8
tracks from
the beginning
(AMS**)
Play the other
side from the
beginning
(Skip Reverse
function)
Play the same
side from the
beginning
(Rewind Auto
Play function)
* If Y•x on the remote control is
pressed during fast forward or
rewind, the Walkman switches to
playback.
**Automatic Music Sensor
Press
FF
REW
FF once/
repeatedly during
playback
REW once/
repeatedly during
playback
FF for 2 seconds
or more during
stop
REW for 2
seconds or more
during stop
44
Page 45

Listening to the
Radio
1 Press BAND•RADIO ON
to turn on the radio.
2 Press BAND•RADIO ON
repeatedly to select the
band: AM, FM1 or FM2.
3 Press MENU on the main
unit repeatedly and set
“__” ( the cursor) in the
display of the main unit to
TUNE MODE.
4 For manual tuning
1 Press SET to choose
MANUAL.
2 Press TUNE/PRESET +
or – repeatedly to tune
in to the desired
station.
Hold down TUNE/
PRESET + or – for a
few seconds to scan for
stations.
For preset tuning
1 Press SET to choose
PRESET.
2 Press TUNE/PRESET +
or – repeatedly to recall
the desired preset
station.
To use preset tuning,
preset stations first (see
“Presetting Radio
Stations”).
To turn off the radio
Press RADIO OFF .
To improve the broadcast
reception
• For AM: The Walkman has a
built-in antenna. Reorient the
Walkman horizontally to
obtain optimum AM
reception.
• For FM : Extend the remote
control cord (antenna). If the
reception is still not good,
press MENU repeatedly to set
the cursor in the display to FM
MODE. Then press SET to
choose from “MONO”
(monaural), “LOCAL” or none
(stereo) for best reception.
45
Page 46

To operate from the
remote control
To turn on the radio, press
RADIO ON/BAND•OFF for
more than one second (while the
tape is in stop mode only).
To select the band, press RADIO
ON/BAND•OFF for more than
one second while the radio is on.
To tune in or recall a preset
station, press + or –.
To turn off the radio, press
RADIO ON/BAND•OFF.
Presetting Radio
Stations
Once you store your favorite
stations in memory, you can
play them easily. You can preset
up to 32 stations — 8 for AM and
12 each for FM1 and FM2.
Tuning in to and Storing
Radio Stations
Automatically
(Auto-Memory Scanning
function)
1 Press BAND•RADIO ON to
turn on the radio.
2 Press BAND•RADIO ON
repeatedly to select AM, FM1
or FM2.
3 Press ENTER until “A”
appears in the display.
The Walkman starts
searching and storing
stations.
Then the preset number
appears.
Note
•Do not remove the power sources
until all the stations are stored.
Storing Radio Stations
Manually (ManualMemory function)
You can preset the stations in
any order.
1 Press BAND•RADIO ON to
turn on the radio.
2 Press BAND•RADIO ON
repeatedly to select AM, FM1
or FM2.
3 Press ENTER.
The frequency digits will
flash in the display.
4 Press TUNE/PRESET + or –
repeatedly to tune in to the
desired station and press
ENTER.
The preset number will flash
in the display.
46
Page 47

5 Press TUNE/PRESET + or –
repeatedly to select the
desired preset number and
press ENTER.
The station is preset to the
number of your choice.
Notes
•If you cannot complete step 4 or 5
while the indications are flashing,
repeat from step 3.
•If you preset a new station to the
same preset number, the
previously stored station will be
erased.
To cancel the stored
station
Follow the procedure above and
in step 4, instead of tuning in to
a station, press and hold TUNE/
PRESET + or – until “– – – –” is
displayed. Press ENTER while
“– – – –” is flashing. The preset
number will flash in the display.
Press TUNE/PRESET + or –
repeatedly to select the preset
number you want to cancel and
press ENTER.
Using in Foreign
Countries
1 Press BAND•RADIO ON
to turn on the radio.
2 Press ENTER.
The frequency digits will
flash in the display.
3 Press and hold
BAND•RADIO ON until
“JPn”, “USA” or “Eur”
flashes.
4 Press BAND•RADIO ON
repeatedly to select “JPn”,
“USA” or “Eur” and press
ENTER.
5 Tune in to the stations
following the procedure
of “Listening to the
Radio” and “Presetting
Radio Stations”.
Area indication and
frequency range
Area* Frequency range
FM (MHz) AM (kHz)
JPn 76-90 531-1 710
USA 87.5-108 530-1 710
Eur 87.5-108 531-1 602
* JPn: Japan
USA: USA, Canada, and Central
and South America
Eur: European and other
countries
47
Page 48

Using the Menu
Adjusting playback
modes
To select playback
direction mode
Press MENU repeatedly to set
the cursor in the display to
MODE. Then press SET to select
the desired mode.
To play Select
both sides repeatedly s
both sides once d
from the FWD side
To skip a long blank space
— the BL SKIP mode
When the BL SKIP mode is on,
the tape is fast-forwarded to the
next track if there is a blank
space of longer than 12 seconds.
You will hear repeated sets of
three short beeps when skipping
a blank.
On the main unit:
1 Press MENU repeatedly to set
the cursor in the display to BL
SKIP.
2 Press SET to show “ ”.
On the remote control:
1 Press MODE repeatedly to
show “BL SKIP”.
To play a tape recorded
with Dolby* B NR system
Press MENU repeatedly to set
the cursor in the display to ;
NR (Dolby noise reduction).
Then press SET to show “ ”.
* Manufactured under license from
Dolby Laboratories.
“Dolby” and the double-D
symbol are trademarks of Dolby
Laboratories.
Emphasizing Sound
On the main unit:
1 Press MENU repeatedly to set
the cursor in the display to
SOUND.
2 Press SET repeatedly to select
the sound emphasis of your
choice.
On the remote control:
1 Press SOUND repeatedly.
With each press, the
indications change.
The indications change as
follows:
RV : Sound Revitalizer.
Emphasizes treble sound.
48
Page 49

MB : Mega Bass.
Emphasizes bass sound
(moderate effect).
GRV : Groove.
Emphasizes bass sound
(strong effect).
no message : normal (no
effect).
Note
•If the sound is distorted with the
mode “GRV”, turn down the
volume of the main unit or select
other modes.
To cancel the AVLS
function
Press SET so that “ ”
disappears from the display on
the main unit.
On the remote control, hold
down MODE again until
“AVLS” disappears.
Note
•The AVLS setting will be
canceled when you replace the
battery.
Protecting Your Hearing
— AVLS (Automatic
Volume Limiter System)
On the main unit:
Press MENU repeatedly in the
playback, stop or radio mode to
set the cursor to AVLS in the
display. Then press SET to show
“ ”.
On the remote control:
Hold down MODE until “AVLS”
appears in the display.
Locking the
Controls
— HOLD Function
Slide the HOLD switch in the
direction of the arrow to lock the
controls of the Walkman or the
remote control.
49
Page 50

한국어
준비
건전지(별매품) 또는 충전식 배터리
(부속품)을 준비하여 주십시오.
건전지
부속된 건전지 케이스를 부착한 다음
R6(AA 크기) 배터리 한 개를 극을
맞추어 넣습니다.
주의
• 최대 성능을 위해서는 Sony 알칼라
인 배터리(전지)를 사용할 것을 권합
니다.
충전식 배터리
1 부속된 충전식 배터리(NH-
14WM(A))를 충전기에 극을 맞
추어 넣습니다.
2 부속된 AC 전원 어댑터를 충전
스탠드에 연결하고 AC 전원 어
댑터를 가정용 전원(주전원) 에
연결합니다.
플러그가 주전원과 일치하지 않
을 때에는 부속된 AC 플러그 어
댑터를 장착하여 주십시오.
3 본체를 충전 스탠드 위에 올려놓
습니다.
CHARGE램프가 점등됩니다.
만충전하려면 약 6시간 걸립니
다.
충전이 끝나면 CHARGE램프
가 꺼집니다.
배터리는 약 300회 정도 충전할 수
있습니다.
주의점
• 충전 중에는 본 기기를 사용하지 마십
시오. 본 기기를 사용하려면 충전 스
탠드에서 빼 주십시오.
-충전 중에 본 기기를 사용하면 배터
리가 충전되지 않습니다.
-충전 중에 본 기기를 사용하면 고장
의 원인이 됩니다.
-충전식 배터리를 넣지 않은 상태에
서는 본 기기를 충전 스탠드에 올려
놓지 마십시오.
그렇지 않으면 고장의 원인이 됩니
다.
• 일부 국가에서는 본 제품의 전원으로
사용하면 배터리의 처분 방법에 대하
여 규제하고 있습니다. 현지 당국으
로 문의하여 주십시오.
AC 전원 어댑터에 관한 주의
부속된 AC 전원 어댑터 이외에는 사용
하지 마십시오. 그 밖의 AC 전원 어댑
터는 사용하지 마십시오.
플러그의 극성
50
Page 51

배터리 교체/충전 시기
“e”가 표시화면에서 깜박이면 배터
리를 교체하거나 충전합니다.
전지 수명
(약 시간) (JEITA*)
Sony 알칼라인 LR6(SG)**
테이프 재생 36
라디오 수신 32
충전식 배터리(NH-14WM(A))
테이프 재생 22
라디오 수신 22
Sony 알칼라인 LR6(SG)** 및
충전식 NH-14WM(A)
테이프 재생 58
라디오 수신 54
주의
• 사용상태, 주위의 온도나 배터리의
종류에 따라서 배터리의 지속시간이
짧아지는 경우가 있습니다.
테이프 재생하기
1 카세트를 넣고 HOLD 기능
이 켜져 있을 때에는 HOLD
스위치를 화살표 반대 방향으
로 밀어서 컨트롤 스위치류의
잠금을 해제합니다.
2 리모컨에서 Y(재생)• x
(정지)를 누르고 VOL로 음
량을 조절합니다.( 본체에서
는 Y•REPEAT를 누릅니
다.)
리모컨에서 음량을 조절할 경우
본체의 VOL 컨트롤을 6정도로 설정해
놓습니다.
* JEITA(Japan Electronics and
Information Technology Industries
Association: 일본전자기계공업회)
의 기준에 따라 측정한 값.(Sony HF
시리즈 카세트 테이프 사용)
**LR6(SG) Sony “STAMINA” 알칼
라인 건전지(일본산)를 사용할 경우
본체에서 음량을 조절할 경우
리모컨의 VOL 컨트롤을 최대로 설정
해 놓습니다.
51
Page 52

리모컨에서의 조작
목적
반대면의 재생
으로 전환
재생 정지
재생 중인 곡을
반복한다
(1곡 반복 기능)
누르는 버튼
재생 중 Y•x를
2초 이상 누른다.
재생 중 Y•x를
한 번 누른다.
재생 중에 Y•x
를 두 번 누른다.
1곡 반복 재생을
중지하려면
Y•x
른다.
본체에서의 조작
목적
반대면의 재생
으로 전환
재생 정지
재생 중인 곡을
반복한다
(1곡 반복 기능)
누르는 버튼
재생 중
Y•REPEAT를
누른다.
x(정지)
재생 중에
Y•REPEAT를
2초 이상 누른다.
1곡 반복 재생을
중지하려면 다시
한 번 누른다.
를 한 번 누
그 밖의 테이프 조작
목적
고속감기*
되감기*
다음 곡/이후
9곡을 처음
부터 재생
(AMS**)
재생 중인 곡/
이전의 8곡을
처음부터 재생
(AMS**)
반대면을
처음부터 재생
(스킵 리버스
기능)
같은 면을
처음부터 재생
(자동 되감기
재생 기능)
* 고속감기나 되감기중 리모컨에서
Y•x를 누르면, 워크맨은 재생으
로 전환됩니다.
**Automatic Music Sensor(자동
음악 센서)
누르는 버튼
FF
REW
재생중 FF를 한번/
반복하여 누른다.
재생중 REW를 한
번/반복하여 누른
다.
정지중 FF를 2초
이상 누른다.
정지중 REW를 2초
이상 누른다.
52
Page 53

라디오 듣기
1 BAND•RADIO ON을 눌
러 라디오를 켭니다.
2 BAND•RADIO ON을 반
복해서 눌러서 밴드를 선택합
니다: AM 또는 FM1, FM2.
3 본체에서 MENU를 반복해
서 눌러서 본체의 표시화면에
“—”(커서)를 TUNE MODE
로 맞춥니다.
4 수동 튜닝
1 SET를 눌러 MANUAL
을 선택합니다.
2 TUNE/PRESET + 또
는 -를 반복해서 눌러 원
하는 방송국에 맞춥니다.
TUNE/PRESET + 또
는 -를 몇 초간 눌러서 방
송국을 선국합니다.
사전설정 튜닝
1 SET를 눌러 PRESET
를 선택합니다.
2 TUNE/PRESET + 또
는 -를 반복해서 눌러 원
하는 사전설정 방송국을
호출합니다.
사전설정 튜닝을 사용하려
면, 우선 방송국을 사전설
정하십시오(“라디오 방송
국 사전설정하기” 참조).
라디오를 끄려면
RADIO OFF를 누릅니다.
방송 수신을 좋게 하려면
• AM: Walkman에는 안테나가 내
장되어 있습니다. AM 방송이 가
장 잘 들리는 방향으로 Walkman
방향을 변경하여 주십시오.
• FM: 리모컨 코드(안테나)를 길게
늘어 뜨려 놓습니다. 수신이 그래
도 좋지 않으면 MENU를 반복해
서 눌러 표시화면의 커서를 FM
MODE로 설정합니다. 다음에
SET를 눌러서 “MONO”(모노럴),
“LOCAL”, 표시없음(스테레오) 중
에서 가장 잘 들리는 모드를 선택하
여 주십시오.
53
Page 54

리모컨으로 조작하려면
라디오를 켜려면 RADIO ON/BAND•
OFF를 1초 이상 누릅니다(테이프가 정
지 모드에 있는 동안).
주파수대를 선택하려면 라디오가 켜져
있을 때에 RADIO ON/BAND•OFF
를 1초 이상 눌러 주십시오.
사전설정 방송국을 맞추거나 호출하
려면, + 또는 -를 누릅니다.
라디오를 끄려면 RADIO ON/BAND•
OFF를 누릅니다.
라디오 방송국 사전설정하
기
메모리에 원하는 방송국을 기억시켜
놓으면 간단히 들을 수 있습니다. 방
송국은 최대 32개 방송국을-AM에
대하여 8개 방송국, FM1, FM2에 대
하여 각각 12개 방송국-사전설정해
놓을 수 있습니다.
라디오 방송국을 자동으로 맞추
고 저장하기(자동 - 메모리 검색
기능)
1 BAND•RADIO ON을 눌러 라
디오를 켭니다.
2 BAND•RADIO ON을 반복해
서 눌러 AM 또는 FM1, FM2를
선택합니다.
3 표시화면에 “A”가 나타날 때까지
ENTER를 누릅니다.
Walkman이 방송국 검색 및 저
장을 시작합니다.
그다음에, 사전설정된 번호가 나
타납니다.
주의
• 모든 방송국이 저장될 때까지는 전원
을 빼지 마십시오.
라디오 방송국을 수동으로 저장
하기(수동 메모리 기능)
방송국을 어떤 순서로든 사전설정할
수 있습니다.
1 BAND•RADIO ON을 눌러 라
디오를 켭니다.
2 BAND•RADIO ON을 반복해
서 눌러 AM 또는 FM1, FM2를
선택합니다.
3 ENTER를 누릅니다.
표시화면에 주파수 숫자가 깜박
입니다.
4 TUNE/PRESET + 또는 -를
반복해서 눌러 원하는 방송국을
맞추고 ENTER를 누릅니다.
사전설정 번호가 표시화면에서
깜박입니다.
5 TUNE/PRESET + 또는 -를
반복해서 눌러 원하는 사전설정
번호를 선택하고 ENTER를 누
릅니다.
방송국이 선택한 번호에 사전설
정됩니다.
54
Page 55

주의
• 표시등이 깜박이는 동안 단계 4 또는
단계 5를 완료할 수 없으면 단계 3번
부터 반복합니다.
• 새 방송국을 같은 사전설정 번호에 사
전설정하게 되면 이전에 저장되어 있
던 방송국은 지워지게 됩니다.
저장된 방송국을 취소하려면
위의 절차를 따르고 단계 4에서 방송
국을 맞추는 대신 “– – – –”이 화면에
표시될 때까지 TUNE/PRESET +
또는 -를 계속 누릅니다. “– – – –”이
깜박이는 동안 ENTER를 누릅니
다. 사전설정 번호가 표시화면에서
깜박입니다.
TUNE/PRESET + 또는 -를 반복
해서 눌러서 취소하고 싶은 사전설정
번호를 선택한 다음 ENTER를 누릅
니다.
국외에서 사용하기
1 BAND•RADIO ON을 눌
러 라디오를 켭니다.
2 ENTER를 누릅니다.
주파수 숫자가 표시화면에서
깜박입니다.
3 “JPn” 이나 “USA” 또는
“Eur” 가 깜박일 때까지
BAND•RADIO ON을 누
르고 있습니다.
4 BAND•RADIO ON을 반
복해서 눌러서 “JPn” 이나
“USA” 또는 “Eur”을 선택하
고 ENTER를 누릅니다.
5 “라디오를 듣기” 및 “라디오
방송국을 사전설정하기”의
순서에 따라 방송국에 맞춥
니다.
지역 표시 및 주파수 범위
지역* 주파수 범위
FM(MHz) AM(kHz)
JPn 76 - 90 531 - 1 710
USA 87.5 - 108 530 - 1 710
Eur 87.5 - 108 531 - 1 602
* JPn: 일본
USA: 미국, 캐나다, 중미 및 남미
` Eur: 유럽 및 기타 국가
55
Page 56

메뉴 사용하기
재생 모드 조정하기
재생 방향 모드를 선택하려면
MENU를 반복해서 눌러 표시화면
에서 커서를 MODE로 설정합니다.
그런 다음 SET 를 눌러 원하는 모드
를 선택합니다.
재생하려면 선택
양면 반복 s
FWD면에서 양면을 d
한 번씩
긴 공백을 스킵하려면
— BL SKIP 모드
BL SKIP 모드의 작동 중에 12초를
초과하는 공백이 있으면 테이프는 다
음 곡으로 고속감기됩니다. 공백을
스킵하는 동안 3번의 짧은 비프음이
반복해서 들립니다.
본체에서:
1 MENU를 반복해서 눌러서 커서
를 표시창의 BL SKIP에 맞춥니
다.
2 SET를 눌러서 “ ”를 표시합니
다.
리모컨에서:
1 MODE를 반복해서 눌러서 “BL
SKIP”를 나타냅니다.
Dolby(돌비)* B NR 시스템으로
녹음된 테이프를 재생하려면
MENU를 반복해서 눌러 표시화면
에서 커서를 ; NR(돌비 잡음 감소)
로 설정합니다. 그 다음에 SE T를 눌
러 “ ”가 나타나게 합니다.
* Dolby Laboratories의 사용허가
아래 제작되었음.
“Dolby” 및 이중-D 심볼은 Dolby
Laboratories의 상표임.
음질을 강조하기
본체에서:
1 MENU를 반복해서 눌러 표시화
면에서 커서를 SOUND로 이동
합니다.
2 SET를 반복해서 눌러 원하는 음
강조를 선택합니다.
리모컨에서:
1 SOUND를 반복해서 누릅니다.
누를 때마다 표시가 바뀝니다.
표시는 다음과 같이 바뀝니다.
RV : Sound Revitalizer(음향
재생기).
고음을 강조.
MB : Mega Bass.
저음을 강조(일반 효과).
56
Page 57

GRV : Groove.
저음을 강조(강한 효과).
아무 메시지 없음 : 정상(무효과).
주의
• “GRV” 모드에서 사운드가 왜곡될 때
에는 본체의 음량을 줄이거나 다른 모
드를 선택하십시오.
청각 보호하기
— AVLS(Automatic
Volume Limiter System:
자동 음량 제한 시스템)
본체에서:
재생, 정지 또는 라디오 모드에서
MENU를 반복해서 눌러 커서를 표
시화면에서 AVLS로 설정합니다.
그 다음 SET를 누르면 “ ”가 나타
납니다.
리모컨에서:
표시창에 “AVLS”가 나타날 때까지
MODE를 누릅니다.
AVLS 기능을 취소하려면
본체에서 “ ”가 사라질 때까지
SET를 누릅니다.
리모컨에서 “AVLS”가 사라질 때까
지 MODE를 누릅니다.
주의
• 배터리를 교환하면 AVLS 설정은 취
소됩니다.
컨트롤을 잠그려면
— HOLD 기능
HOLD 스위치를 화살표 방향으로
밀어서 워크맨이나 리모컨의 컨트롤
스위치류를 잠급니다.
57
Page 58

585960
Page 59

Page 60

ご案内
ソニーではお客様技術相談窓口として
「テクニカルインフォメーションセンター」
を開設しています。
お使いになってご不明な点、技術的なご質
問、故障と思われるときのご相談は下記まで
お問い合わせください。
テクニカルインフォメーションセンター
電話:
048-794-5194
受付時間:月〜金 午前9時から午後6時まで
(祝日、年末年始、弊社休日を除く)
ご相談になるときは次のことをお知らせくだ
さい。
型名
•
故障の状態:できるだけ詳しく
•
お買い上げ年月
•
VOC(
Printed in Malaysia
揮発性有機化合物)ゼロ植物型インキを使用しています。
 Loading...