

Sony WMFX479, WMFX477 User Manual
3-864-880-41(1)
Radio Cassette Player
Operating Instructions
Инструкция по эксплуатации
Operating Instructions
WALKMAN is a registered trademark of Sony Corporation.
WALKMAN является зарегистрированным товарным знаком
корпорации Sony.
WALKMAN is a registered trademark of Sony Corporation.
WM-FX479/FX477
Sony Corporation © 1998 Printed in Malaysia
The instructions in this manual are for WM-FX479 and WM-FX477. Before you
start reading, check your model number. WM-FX479 is the model used for
illustration purposes. Any differences in operation are clearly indicated in the
text, for example, “FX479 only”.
Инструкции в данном руководстве предназначены для WM-FX479 и
WM-FX477. Перед тем как Вы приступите к чтению проверьте номер
Вашей модели. Модель WM-FX479 использована в иллюстративных целях.
Любые различия в работе четко указаны в тексте, как например, “только
FХ479”.
The instructions in this manual are for WM-FX479 and WM-FX477. Before you
start reading, check your model number. WM-FX479 is the model used for
illustration purposes. Any differences in operation are clearly indicated in the
text, for example, “FX479 only”.
A
a
c
b
1
2
B
2
C
a
b
c
D
a
b
SETMENU
(ST MONO)
FM MODE
MODE
OPEN
FF
REW
œ
p
or/или/or
MENU
SET
d
FX479
p•RADIO OFF
TUNING +/–
VOL
HOLD
RADIO ON/BAND
MENU
SET
SETMENU
(DX LOCAL)
FM SENS
aNR
TAPE
VOL
HOLD
œ
English
”Getting Started
Preparing a Power
Source
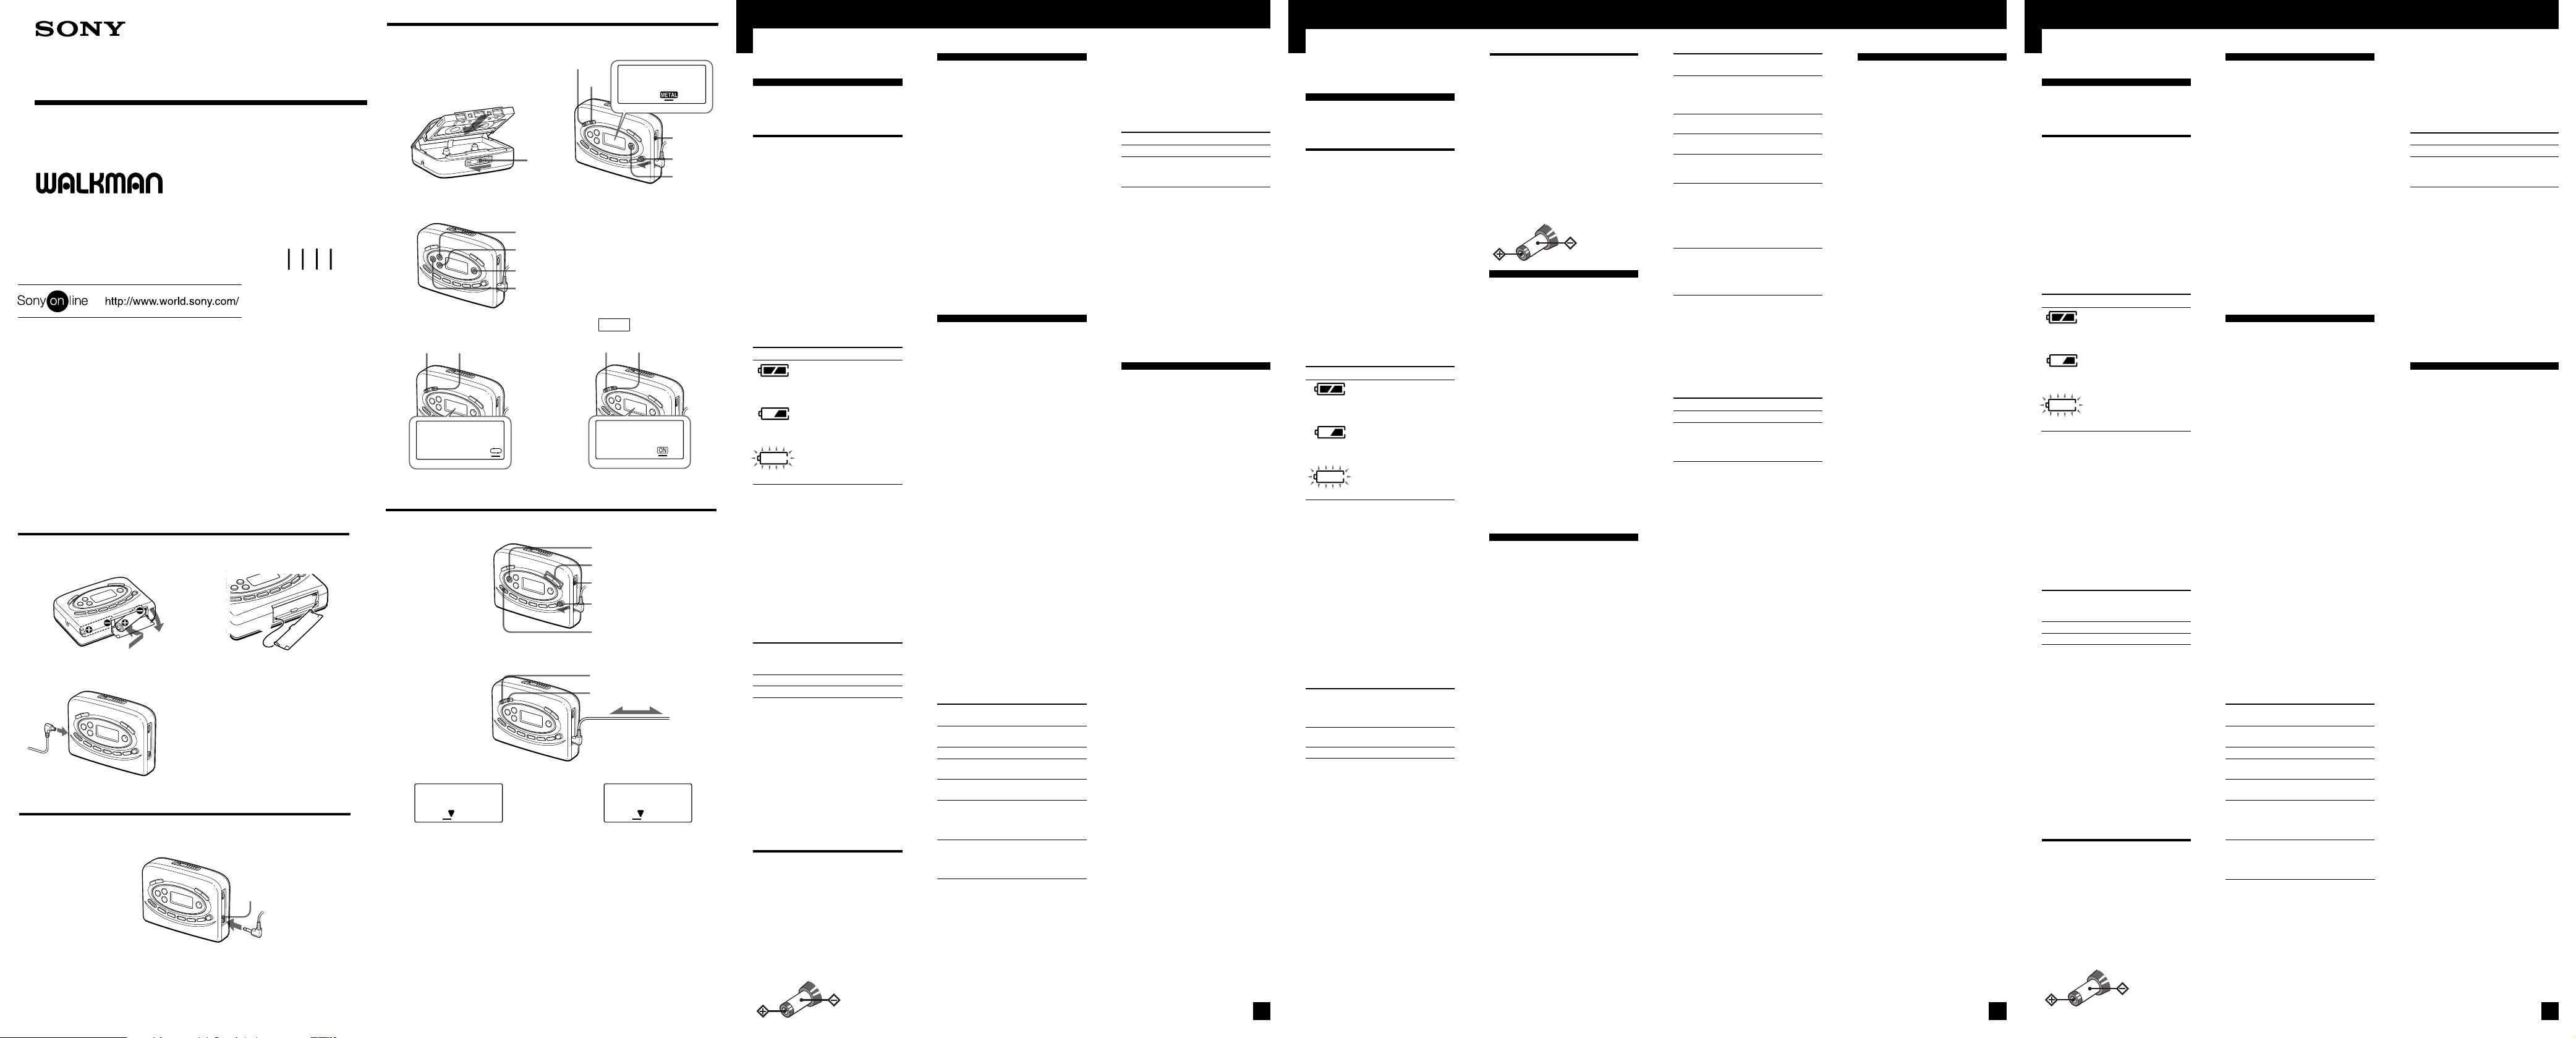
Dry Battery (see Fig. A-a)
Open the battery compartment lid,
and insert two R6 (size AA) dry
batteries with correct polarity.
Note
• For maximum performance we
recommend that you use Sony
alkaline batteries.
When to replace the
batteries
Replace the batteries when “n”
flashes in the display.
The battery remainder mark has 3
steps to show the remaining battery
power.
Display Condition
Notes
• The battery remainder mark may
temporarily show a lower level
during fast forwarding or rewinding
or use in extremely low
temperatures.
• When replacing batteries, replace
both batteries within 30 seconds;
otherwise all the memories
including the preset radio stations
will be canceled.
Battery life
(Approx. hours) (EIAJ*)
Tape playback 24 7.5
Radio reception 40 14
* Measured value by the standard of
EIAJ (Electronic Industries
Association of Japan). (Using a Sony
HF series cassette tape)
Note
• The battery life may shorten
depending on the operation of the
unit.
If the battery compartment lid
comes off
Attach it as shown (see Fig. A-b).
House Current (mains)
(see Fig. A-c)
Connect the AC power adaptor
AC-E30HG (not supplied) to the DC
IN 3V jack and to the mains. Do not
use any other AC power adaptor.
Specifications for AC-E30HG vary
for each area. Check your local
voltage and the shape of the plug
before purchasing.
Polarity of
The battery power is
full.
µ
The battery power is
decreasing.
µ
The batteries are
exhausted.
Replace them with new
ones.
Sony Sony
alkaline R6P
LR6 (SG) (SR)
the plug
Connecting the
Headphones/
Earphones
(see Fig. B)
1 Connect the headphones/
earphones to 2.
2 Wear the “L” marked side to
the left ear and the “R” marked
side to the right ear.
If the earphones do not fit to
your ears or the sound is
unbalalnced, adjust the
earphones to fit to your ears
firmly.
zOperating the
Walkman
Playing a Tape
(see Fig. C-a)
1 Open the cassette holder and
insert a cassette.
2 Make sure the HOLD function
is turned off.
If it is on, slide the HOLD
switch to turn it off.
3 Press MENU repeatedly to set
the cursor to TAPE in the
display.
Then press SET to select the
tape type.
No message: normal (TYPE I)
METAL: CrO2 (TYPE II) or
metal (TYPE IV)
4 Press œ (play) to start playing
then adjust the volume.
Note on the cassette holder
When opening the cassette holder,
press the p (stop) button and make
sure the tape is stopped by checking
through the cassette window, then
slide the OPEN switch.
If the cassette holder is opened before
the tape is stopped, the tape may
loosen and be damaged.
To Press (see
play the other side œ
stop playback p
fast forward FF
rewind REW
play the same side REW
from the beginning during
(Rewind Auto playback
Play function)
play the other side FF
from the beginning during
(Skip Reverse playback
function)
Fig. C-b)
(play)
during playback
during stop
during stop
To select playback mode
(see Fig. C-c)
Press MENU repeatedly to set the
cursor to MODE in the display.
Then press SET to select the desired
mode.
To play Select
both sides repeatedly a
both sides once Å
from the side facing
the cassette holder
To play a tape recorded with
Dolby* NR system (FX479
only) (see Fig. C-d)
Press MENU repeatedly to set the
cursor to a NR (Dolby noise
reduction) in the display. Then
press SET to show “ON”.
* Dolby noise reduction manufactured
under license from Dolby
Laboratories Licensing Corporation.
“DOLBY”and the double-D symbol
a are trademarks of Dolby
Laboratories Licensing Corporation.
Listening to the
Radio
(see Fig. D-a)
1 Make sure the HOLD function
is turned off.
If it is on, slide the HOLD
switch to turn it off.
2 Press RADIO ON/BAND to
turn on the radio.
3 Press RADIO ON/BAND
repeatedly to select AM, FM1,
FM2, FM3, FM4 or FM5.
4 Press TUNING+/– to tune in to
the desired station.
If you hold down TUNING+/–
for a few seconds, the
Walkman will start tuning to
the stations automatically.
To turn off the radio
Press p•RADIO OFF .
To improve the broadcast
reception
•For AM: The Walkman has a
built-in antenna. Reorient the
Walkman horizontally to obtain
optimum AM reception.
•For FM (see Fig. D-b): Extend
the headphones/earphones cord,
which serves as the aerial. If the
reception is still not good, press
MENU repeatedly to set the
cursor to FM MODE or FM SENS
in the display. Then press SET to
choose the mode for best
reception.
(turn over)
Русский
”Подготовка к
эксплуатации
Подготовка
источника питания
Сухие батарейки (см. рис.
A-a)
Откройте крышку батарейного
отсека и вставьте две сухие
батарейки R6 (размера АА) с
правильной полярностью.
Примечание
• Для получения максимальных
рабочих характеристик мы
рекомендуем Вам использовать
щелечные батарейки Sony.
Когда заменять батарейки
Замените батарейки, когда “n”
будет мигать на дисплее.
Указатель оставшеегося
батарейного заряда имеет три
струпени для показания
оставшейся мощности батареек.
Дисплей Состояние
Примечания
• Указатель оставшегося
батарейного заряда может
временно показывать более
низкий уровень во время
ускоренной перемотки вперед или
назад или использования при
слишком низкой температуре.
• При замене батареек их следует
заменить в течение 30 секунд; в
противном случае все
содержащиеся в памяти
установки, включая
предварительно установленные
радиостанции, будут
аннулированы.
Срок службы батареек
(Приблизительно в часах) (EIAJ*)
Воспроизве- 24 7,5
дение ленты
Радиоприем 40 14
* Значение измерено по стандарту
EIAJ (Electronic Industries
Association of Japan). (С
ипользованием кассетной ленты
Sony серии HF)
Примечание
• Срок службы батареек может
стать короче в зависимости от
эксплуатации аппарата.
Если крышка батарейного
отсека отсоединится
Прикрепите ее как показано на
рисунке (см. рис. A-b).
Батарейки полностью
заряжены.
µ
Мощность батареек
ослабла.
µ
Батарейки
разрядились. Замените
их новыми
батарейками.
Щелочные Батарейки
батарейки Sony
Sony R6P (SR)
LR6 (SG)
Внешнее питание
(электрическая сеть)
(см. рис. A-c)
Подсоедините сетевой адаптер
переменного тока AC-E30HG (не
прилагается) к гнезду постоянного тока DC IN 3V и к электрической сети. Не используйте
какой-либо другой сетевой
адаптер переменного тока.
Технические характеристики
адаптера AC-E30HG варьируются для каждой области.
Проверьте Ваше местое напряжение и форму штепсельного
разъема перед покупкой адаптера.
Полярность
разъема
Подсоединение
головных
телефонов/
наушников
1
Подсоедините головные телефоны/наушники к гнезду
(см. рис. B)
2.
2 Используйте сторону со
знаком “L” для левого уха, а
сторону со знаком “R” для
правого уха.
Если наушники не
соответствуют Вашим ушам
или звучание не
сбалансировано,
приспособьте
(отрегулируйте) наушники в
точности к Вашим ушам.
zЭксплуатация
аппарата Walkman
Воспроизведение
ленты
(см. рис. C-a)
1 Откройте держатель
кассеты и вставьте кассету.
2 Убедитесь что функция
HOLD выключена.
Если она включена
передвиньте HOLD для ее
выключения.
3 Повторно нажимайте MENU
для установки курсора в
положение ТАРЕ на дисплее.
Затем нажмите SET для
выбора типа ленты.
Нет сообщения: нормальная
лента (TYPE I)
METAL: Лента CrO2 (TYPE II)
или металлическая (TYPE IV)
4 Нажмите œ (воспроиз-
ведение) для начала
воспроизведения, а затем
отрегулируйте громкость.
Примечание относительно
кассетного держателя
При открывании кассетного
держателя нажмите кнопку p
(остановки) и убедитесь в том, что
лента остановилась, проверив
через окошко кассеты, а затем
передвиньте выключатель OPEN.
Если кассетный держатель
открыть до остановки ленты, то
натяжение ленты может быть
ослаблено и лента повредится.
Для Нажмите
Воспроизведения œ (воспроидругой стороны зведение) во
Останова p
воспроизведения
Ускоренной FF в режиме
перемотки вперед останова
Ускоренной REW в
режиме
перемотки назад останова
Воспроизведения REW во время
той же самой воспроистороны от начала зведения
(функция автоматического воспроизведения после
перемотки назад)
Воспроизведения FF во время
другой стороны от воспроиначала (Функция зведения
реверсирования
с пропуском.
(
см. рис.
C-b
время воспрои-
зведения
Для выбора режима
воспроизведения
(см. рис. C-c)
Повторно нажимайте MENU для
установки курсора в положение
MODE на дисплее.
Затем нажмите SET для выбора
желаемого режима.
Для воспроизведения Выберите
Обеих сторон повторно a
Обеих сторон один раз, Å
начиная с обращенной к
держателю кассеты
стороны.
Для воспроизведения ленты,
записанной с использованием
системы шумоподавления
Долби* (Только FХ479) (см.
рис.C-d)
Повторно нажимайте MENU для
установки курсора в положение
a NR (шумоподавление долби)
на дислпее. Затем нажмите SET
для показания “ON”.
* Система Долби для снижения
шума, изготовленная по лицензии
фирмы Долби Лабораториз
Лайсенсинг Корпорэйшн.
Слово DOLBY, ДОЛБИ, и
состоящий из двух букв D символ
a являются товарными фирмы
Долби Лабораториз Лайсенсинг
Корпорэйшн.
English
)
Прослушивание
радиоприемника
(см. рис. D-a)
1 Убедитесь что функция
HOLD выключена.
Если она включена
передвиньте HOLD для ее
выключения.
2 Нажмите RADIO ON/BAND
для включения
радиоприемника.
3 Повторно нажимайте RADIO
ON/BAND для выбора АМ,
FM1 (ЧМ1), FM2 (ЧМ2), FM3
(ЧМ3), FM4 (ЧМ4) или FM5
(ЧМ5).
4 Нажмите TUNING+/– для
настройки на желаемую
станцию.
Если Вы удерживаете кнопку
TUNING +/– в течение
нескольких секунд, Walkman
автоматически начнёт
настройку на станции.
Для выключения
радиоприемника
Нажмите p•RADIO OFF.
Для улучшения приема
радиопередачи
•Для АМ: Аппарат Walkman
имеет встроенную антенну.
Переориентируйте Walkman
горизонтально для получения
оптимального приема АМ.
•Для ЧМ (см. рис. D-b):
Удлиняйте шнуры головных
телефонов/наушников, которые
служат в качестве антенны.
Если прием все еще нехороший,
повторно нажимайте MENU для
установки курсора в положение
FM MODE или FM SENS на
дисплее. Затем нажмите SET
для выбора режима с
наилучшим приемом.
”Getting Started
Preparing a Power
Source
Dry Battery (see Fig. A-a)
Open the battery compartment lid,
and insert two R6 (size AA) dry
batteries with correct polarity.
When to replace the
batteries
Replace the batteries when “n”
flashes in the display.
The battery remainder mark has 3
steps to show the remaining battery
power.
Display Condition
Notes
• The battery remainder mark may
temporarily show a lower level
during fast forwarding or rewinding
or use in extremely low
temperatures.
• When replacing batteries, replace
both batteries within 30 seconds;
otherwise all the memories
including the preset radio stations
will be canceled.
Battery life
(Approx. hours) (EIAJ*)
Tape playback 00 00
Radio reception 00 00
* Measured value by the standard of
EIAJ (Electronic Industries
Association of Japan). (Using a Sony
HF series cassette tape)
Note
• The battery life may shorten
depending on the operation of the
unit.
For maximum performance we
recommend that you use alkaline
batteries.
If the battery compartment lid
comes off
Attach it as shown (see Fig. A-b).
House Current (mains)
(see Fig. A-c)
Connect the AC power adaptor
AC-E30HG (not supplied) to the DC
IN 3V jack and to the mains. Do not
use any other AC power adaptor.
Specifications for AC-E30HG vary
for each area. Check your local
voltage and the shape of the plug
before purchasing.
The battery power is
full.
µ
The battery power is
decreasing.
µ
The batteries are
exhausted.
Replace them with new
ones.
Sony Sony
alkaline R6P
LR6 (SG) (SR)
Connecting the
Headphones/
Earphones
(see Fig. B)
1 Connect the headphones/
earphones to 2.
2 Wear the “L” marked side to
the left ear and the “R” marked
side to the right ear.
If the earphones do not fit to
your ears or the sound is
unbalalnced, adjust the
earphones to fit to your ears
firmly.
zOperating the
Walkman
Playing a Tape
(see Fig. C-a)
1 Open the cassette holder and
insert a cassette.
2 Make sure the HOLD function
is turned off.
If it is on, slide the HOLD
switch to turn it off.
3 Press MENU repeatedly to set
the cursor to TAPE in the
display.
Then press SET to select the
tape type.
No message: normal (TYPE I)
METAL: CrO2 (TYPE II) or
metal (TYPE IV)
4 Press œ (play) to start playing
then adjust the volume.
Note on the cassette holder
When opening the cassette holder,
press the p (stop) button and make
sure the tape is stopped by checking
through the cassette window, then
slide the OPEN switch.
If the cassette holder is opened before
the tape is stopped, the tape may
loosen and be damaged.
To Press (see
play the other side œ
stop playback p
fast forward FF
rewind REW
play the same side REW
from the beginning during
(Rewind Auto playback
Play function)
play the other side FF
from the beginning during
(Skip Reverse playback
function)
Fig. C-b)
(play)
during playback
during stop
during stop
(перевернуть)
Polarity of
the plug
To select playback mode
(see Fig. C-c)
Press MENU repeatedly to set the
cursor to MODE in the display.
Then press SET to select the desired
mode.
To play Select
both sides repeatedly a
both sides once Å
from the side facing
the cassette holder
To play a tape recorded with
Dolby* NR system (FX479
only) (see Fig. C-d)
Press MENU repeatedly to set the
cursor to a NR (Dolby noise
reduction) in the display. Then
press SET to show “ON”.
* Dolby noise reduction manufactured
under license from Dolby
Laboratories Licensing Corporation.
“DOLBY”and the double-D symbol
a are trademarks of Dolby
Laboratories Licensing Corporation.
Listening to the
Radio
(see Fig. D-a)
1 Make sure the HOLD function
is turned off.
If it is on, slide the HOLD
switch to turn it off.
2 Press RADIO ON/BAND to
turn on the radio.
3 Press RADIO ON/BAND
repeatedly to select AM, FM1,
FM2, FM3, FM4 or FM5.
4 Press TUNING+/– to tune in to
the desired station.
If you hold down TUNING+/–
for a few seconds, the
Walkman will start tuning to
the stations automatically.
To turn off the radio
Press p•RADIO OFF .
To improve the broadcast
reception
•For AM: The Walkman has a
built-in antenna. Reorient the
Walkman horizontally to obtain
optimum AM reception.
•For FM (see Fig. D-b): Extend
the headphones/earphones cord,
which serves as the aerial. If the
reception is still not good, press
MENU repeatedly to set the
cursor to FM MODE or FM SENS
in the display. Then press SET to
choose the mode for best
reception.
(turn over)

E
F
G
a
b
AVLS MB
1~5
RADIO ON/BAND
RADIO ON/BAND
TUNING +/–
HOLD
MENU
SET
English
Presetting Radio
Stations
You can store radio stations into the
unit’s memory. You can preset up
to 30 radio stations, 5 each for the
FM1, FM2, FM3, FM4, FM5, or AM
bands.
(see Fig. E)
1 Tune in the station you wish to
store. (Follow steps 1-4 in
“Listening to the Radio”)
2 Press and hold one of the 1-5
buttons for more than 2
seconds.
The display flashes twice with a
beep sound, and the station is
preset.
If a station is already stored, the
newly preset station replaces
the old one.
To play the preset radio
stations
1 Press RADIO ON/BAND to
select the band.
2 Press the corresponding button
(1-5) on the unit.
Receiving Stations
Outside Your
Country (Excluding
models for Europe,
Saudi Arabia, and
China)
The frequency range differs
depending on the area (see the chart
“Area indication and frequency
range”). If you listen to the radio in
an area with a different frequency
range, change the area indication in
the display.
(see Fig. F)
1 Turn on the radio and press
RADIO ON/BAND for more
than 10 seconds until the area
indication flashes in the
display.
2 While the display is flashing,
press TUNING +/– to select
either the ”U” or ”E”
indication.
3 Press RADIO ON/BAND to set
the area indication.
Note
• If you change the frequency range,
all the preset stations will be
canceled.
Area indication and
frequency range
Area* Frequency range
FM (MHz) AM(kHz)
E 87.5–108 531–1,602
U 87.5–108 530–1,710
* E: European and other countries
U: USA, Canada, and Central and
South America
Using Other
Functions
To lock the controls
(see Fig. G-a)
Set the HOLD switch to the
direction of the arrow to lock the
controls.
To emphasize bass sound
(see Fig. G-b)
Press MENU repeatedly to set the
cursor to “MB” in the display.
Then, press SET to select the
desired mode. With each press, the
indications change as follows.
MB (Mega bass): emphasizes
bass sound
No message: off (normal)
Notes
• If the sound is distorted in the “MB”
mode, select the no message mode.
• Bass emphasis may not show great
effect if the volume is turned up too
high.
To protect your
hearing—AVLS
(Automatic Volume
Limiter System) function
(see Fig. G-b)
When you set the AVLS function to
active, the maximum volume is
kept down to protect your ears.
Press MENU repeatedly to set the
cursor to AVLS in the display. Then
press SET to show “ ”.
Notes
• If the sound is distorted when you
listen to the bass-boosted sound
with the AVLS function activated,
turn down the volume.
• The AVLS setting may be canceled
when you replace the batteries.
z Additional
Information
Precautions
On batteries
•Do not charge a dry battery.
•Do not carry the dry or
rechargeable batteries with coins
or other metallic objects. It can
generate heat if the positive and
negative terminals of the batteries
are accidentally contacted by a
metallic object.
•When you do not use the
Walkman for a long time, remove
the battery to avoid any damage
caused by battery leakage and
subsequent corrosion.
On the unit
•Do not drop the unit or give a
shock to the unit, or it may cause
a malfunction.
•Do not leave the unit in a location
near heat sources, or in a
place subject to direct sunlight,
excessive dust or sand, moisture,
rain, mechanical shock, or in a car
with its windows closed.
•The LCD display may become
hard to see or slow down when
using the unit at high
temperatures (above 40°C/104°F)
or at low temperatures (below
0°C/32°F). At room temperature,
the display will return to its
normal operating condition.
•If the unit has not been used for
long, set it in the playback mode
to warm up for a few minutes
before inserting a tape.
On tapes longer than 90
minutes
We do not recommend the use of
tapes longer than 90 minutes except
for a long continuous playback.
They are very thin and tend to be
stretched easily.
On headphones/earphones
Road safety
Do not use headphones/earphones
while driving, cycling, or operating
any motorized vehicle. It may
create a traffic hazard and is illegal
in some areas. It can also be
potentially dangerous to play your
headphones/earphones at high
volume while walking, especially at
pedestrian crossings.
You should exercise extreme
caution or discontinue use in
potentially hazardous situations.
Preventing hearing damage
Do not use headphones/earphones
at high volume. Hearing experts
advise against continuous, loud and
extended play. If you experience a
ringing in your ears, reduce volume
or discontinue use.
Caring for others
Keep the volume at a moderate
level. This will allow you to hear
outside sounds and to be
considerate to the people around
you.
Maintenance
To clean the tape head and
path
Use the cleaning cassette CHK-1W
(not supplied) every 10 hours of use.
Note
• Use only the recommended cleaning
cassette.
To clean the exterior
Use a soft cloth slightly moistened
with water. Do not use alcohol,
benzine or thinner.
Note
• Clean the headphones/earphones
plug periodically.
Troubleshooting
The volume cannot be turned up.
•If “ ” appears for AVLS display,
press SET so that “ ” disappears.
The unit does not operate at all.
•HOLD is activated. Deactivate
HOLD.
The sound is unstable or no
audio.
•Insert two R6 (size AA) batteries
properly.
•Replace all batteries if they are
weak.
The display shows incorrect
information.
• The batteries are weak. Replace
the batteries with new ones.
Specifications
Radio section
Frequency range
FM: 65–74/87.5–108 MHz (Eastern
Europe)
87.5–108 MHz (Other countries)
AM: 530–1,710 kHz (North, Central
and South America)
531–1,602 kHz (Other
countries)
Tape section
Frequency response
(Dolby NR off)
Playback: 30–14,000 Hz
Output
Headphones/earphones (2 jack)
Load impedance 8–300 ohms
General
Power requirements
3 V DC batteries R6 (AA) x 2/
External DC 3V power sources
Dimensions (w/h/d)
Approx. 115.8 x 85 x 33.4 mm (4
3
x 33⁄8
x 1
⁄8 inches) incl.
projecting parts and controls
Mass
Approx. 175 g (6.2 oz)/Approx.
255 g (9.0 oz) incl. batteries and a
cassette
Supplied accessories
Stereo headphones or Stereo
earphones (1)
Carrying case (1)
Design and specifications are subject
to change without notice.
5
Русский
•Дисплей ЖКД может сделаться
Предварительная
установка радиостанций
Вы можете сохранять
радиостанции в памяти
аппарата. Вы можете
предварительно задать до 30
станций, по 5 на каждый
диапазон FM1 (ЧМ1), FM2 (ЧМ2),
FM3 (ЧМ3), FM4 (ЧМ4), FM5 (ЧМ5)
или AM.
(см. рис. E)
1 Выполните настройку на
нужную станцию. (Выполните
действия пунктов 1-4 в
разделе “Прослушивание
радиоприемника”)
2 Нажмите и держите
нажатыми кнопки 1-5 более 2
секунд.
Индикация мигнет дважды в
сопровождении зуммерного
сигнала, после чего будет
выполнена предварительная
установка станции.
Если новая станция уже есть
в памяти, позже задаваемая
станция заменит её.
Для воспроизведения
предварительно установленных радиостанций
1 Нажмите RADIO ON/BAND.
Для выбора полосы частот.
2 Нажмите соответствующую
кнопку (1-5) на аппарате.
Прием станций
аппаратом за
пределами Вашей
страны (За исключением моделей для
Европы, Саудовской
Аравии и Китая)
рис. F)
⁄8
Диапазон частот отличается в
зависимости от области (см.
таблицу “Указание области и
диапазона частот”). Если Вы
слушаете радио в области с
другим диапазоном частот,
измените индикатор области на
дисплее.
(см.
1 Включете радиоапарата и
натиснете бутона RADIO ON/
BAND, като го задържите
натиснат за повече от 10
секунди, докато индикацията
за областта започне да
примигва на екрана.
2 Докато индикацията на
екрана примигва, натиснете
бутона TUNING +/–, за да
изберете едно от
означенията “U” или “E”.
3 Натиснете бутона RADIO ON/
BAND, за да настроите
индикатора за областта.
Примечание
• Если Вы изменяете диапазон
частот, все предварительно установленные станции будут
отменены.
Указанине области и
диапазон частот
Область*
E 87,5–108 531–1.602
U 87,5–108 530–1.710
* Е: Европейские и другие страны
Диапазон частот
ЧМ (МГц) АМ (кГц)
U: США, Канада и Центральная
и Южная Африка
Использование
других функций
Для блокировки
регуляторов (см. рис. G-a)
Установите выключатель HOLD
в направлении стрелки для
блокировки регуляторов.
Для усиления звучания
баса
(см. рис. G-b)
Повторно нажимайте MENU для
установки курсора в положение
“MB” на дисплее. Затем нажмите
SET для выбора желаемого
режима. При каждом нажатии
индикация изменяется
следующим образом.
МВ (усиление низких частот):
усиление басового звучания
Нет сообщения: выкл. (обычное
звучание)
Примечания
• Если в режиме “MB” ( усиление
низких частот) звуки искажены,
выберите режим без сигналов.
• Усиление баса может не оказать
желаемого эффекта, если
громкость установлена слишком
высоко.
Для защиты Вашего слуха
- Функция AVLS (Система
автоматического
ограничения громкости)
(см. рис. G-b)
Когда Вы активизируете функцию
AVLS, максимальная громкость
автоматически будет поддерживаться ни низком уровне для
защиты Вашего слуха.
Повторно нажимайте MENU для
установки курсора в положение
AVLS на дисплее. Затем нажмите
SET для отображения “ ”.
Примечание
• Если звуки искажены при
прослушивании звука с
усиленными низкими частотами с
включённой функцией AVLS,
уменьшите громкость.
• Настройката AVLS може да бъде
изтрита при смяна на батериите.
z Дополнительная
информация
Предосторожности
О батарейках
•Не заряжайте сухие батарейки.
•Не носите сухие батарейки
вместе с монетами или другими
металлическими предметами.
Это может генерировать тепло,
если положительный и отрицательный контакты батареек
случайно соприкоснутся с
металлическим предметом.
•Если Вы не намереваетесь
использовать Ваш аппарат
Walkman в течение
длительного периода времени,
удалите батарейки для
предотвращения повреждения
вследствие утечки из батареек
и последующей коррозии.
Об аппарате
•Не роняйте аппарат и не стучите
по аппарату или же это может
привести к неисправности.
•Не оставляйте аппарат там, где
вблизи находятся источники
тепла или в месте,
подверженном воздействию
прямых солнечных лучей,
чрезмерного запыления или
песка, влаги, дождя,
механических ударов, или в
машине с закрытыми окнами.
труднопросматриваемым или
медленно действующим во
время использовании аппарата
при высокой температуре
(выше 40°С) или при низкой
температуре (ниже 0°С). При
комнатной температуре
дисплей вернется к
нормальному рабочему
состоянию.
•Если устройство не
использовалось в течение
длительного времени, перед
вставкой кассеты включите его
в режиме воспроизведения на
несколько минут для прогрева.
О лентах продолжительностью свыше 90 минут
Мы не рекомендуем
использовать ленты
продолжительностью свыше 90
минут, за исключением длинного
непрерывного воспроизведения.
Они являются очень тонкими и
имеют тенденцию легко
растягиваться.
О головных телефонах/
наушниках
Дорожная безопасность
Не используйте головные
телефоны/наушники во время
вождения автомобиля,
велосипеда или управления
любым транспортным средством
с мотором. Это может создать
опасность дорожнотранспортного происшествия и в
некоторых областях являетя
противозаконным. Также будет
потенциально опасным
воспроизведение через Ваши
головные телефоны/наушники на
высокой громкости во время
хождения, особенно на
пешеходных переходах. Вы
должны быть предельно
осторожны или прекращать
использование в потенциально
опасных ситуациях.
Предотвращение повреждения
слуха
Не используйте головные
телефоны/наушники на высокой
громкости. Слуховые эксперты
советуют избегать непрерывного,
громкого и продолжительного
воспроизведения. Если Вы
почувствуете звон в ушах,
уменьшите громкость или
прекратите использование.
Забота о других
Поддерживайте громкость на
среднем уровне. Это позволит
Вам слышать окружающие звуки
и быть внимательным по
отношению к людям вокруг Вас.
Уход за аппаратом
Для очистки магнитной головки
и пути перемещения ленты
Используйте очистительную
кассету СНК-1W (не
прилагается) через каждые 10
часов использования.
Примечание
• Используйте только
рекомендованную очистительную
кассету.
Для очистки внешнего вида
Используйте мягкую ткань,
слегка смоченную водой. Не
используйте спирт, бензин или
растворитель.
Примечание
• Периодически очищайте разъем
головных телефонов/наушников.
Устранение
неисправностей
Громкость не может быть
повышена.
•Если индикация “ ”
появляется на дисплее при
использовании AVLS, нажмите
SET, так, чтобы “ ” исчезла.
Устройство совсем не
функционирует.
•Включена функция HOLD.
Выключите функцию HOLD.
Звук является нестабильным
или нет аудиосигнала
•Правильно вставьте две
батарейки размером R6 (АА).
•Замените все батарейки, если
они стали слабыми.
Екранът показва неправилна
информация.
•Батериите са слаби. Подменете
батериите с нови.
Технические
характеристики
Секция радиоприемника
Диапазон частот
ЧМ: 65 – 74/87,5 – 108 МГц
(Восточная Европа)
87,5 – 108 МГц (Другие
страны)
АМ: 530 – 1.710 кГц (Северная,
Центральная и Южная
Америка)
531 – 1.602 кГц (Другие
страны)
Секция ленты
Частотная характеристика
(система шумоподавления Долби
выключена)
Воспроизведение:
30 – 14.000 Гц
Выход
Головные телефоны/наушники
(гнездо 2)
Полное сопротивление нагрузки
8 – 300 Ом
Общее
Требуемое питание
Батарейки 3В постоянного тока
R6 (AA) × 2 / Внешние источники
питания 3В постоянного тока
Размеры (ш/в/г)
Приблиз. 115,8 × 85 × 33,4 мм,
включая выступающие части и
органы управления
Масса
Приблиз. 175 г/приблиз. 255 г,
включая батарейки и кассету
Прилагаемые принадлежности
Стереофонические головные
телефоны или
стереофонические наушники
(1)
Футляр для переноски (1)
Конструкция и технические
характеристики могут быть
изменены без уведомления.
Кассетный плейер с
радиоприемником
Сделано в Малайзии
English
Presetting Radio
Stations
You can store radio stations into the
unit’s memory. You can preset up
to 30 radio stations, 5 each for the
FM1, FM2, FM3, FM4, FM5, or AM
bands.
(see Fig. E)
1 Tune in the station you wish to
store. (Follow steps 1-4 in
“Listening to the Radio”)
2 Press and hold one of the 1-5
buttons for more than 2
seconds.
The display flashes twice with a
beep sound, and the station is
preset.
If a station is already stored, the
newly preset station replaces
the old one.
To play the preset radio
stations
1 Press RADIO ON/BAND to
select the band.
2 Press the corresponding button
(1-5) on the unit.
Receiving Stations
Outside Your
Country (Excluding
models for Europe
and Saudi Arabia)
(see Fig. F)
The frequency range differs
depending on the area (see the chart
“Area indication and frequency
range”). If you listen to the radio in
an area with a different frequency
range, change the area indication in
the display.
1 Turn on the radio and press
RADIO ON/BAND for more
than 10 seconds until the area
indication flashes in the
display.
2 While the display is flashing,
press TUNING +/– to select
either the ”U” or ”E”
indication.
3 Press RADIO ON/BAND to set
the area indication.
Note
• If you change the frequency range,
all the preset stations will be
canceled.
Area indication and
frequency range
Area* Frequency range
FM (MHz) AM(kHz)
E 87.5–108 531–1,602
U 87.5–108 530–1,710
* E: European and other countries
U: USA, Canada, and Central and
South America
Using Other
Functions
To lock the controls
(see Fig. G-a)
Set the HOLD switch to the
direction of the arrow to lock the
controls.
To emphasize bass sound
(see Fig. G-b)
Press MENU repeatedly to set the
cursor to MB in the display. Then,
press SET to select the desired
mode. With each press, the
indications change as follows.
MB (Mega bass) : emphasizes
bass sound
No message: off (normal)
Notes
• If the sound is distorted in the “MB”
mode, select the no message mode.
• Bass emphasis may not show great
effect if the volume is turned up too
high.
To protect your
hearing—AVLS
(Automatic Volume
Limiter System) function
(see Fig. G-b)
When you set the AVLS function to
active, the maximum volume is
kept down to protect your ears.
Press MENU repeatedly to set the
cursor to AVLS in the display. Then
press SET to show “ ”.
Notes
• If the sound is distorted when you
listen to the bass-boosted sound
with the AVLS function activated,
turn down the volume.
• The AVLS setting may be canceled
when you replace the batteries.
z Additional
Information
Precautions
On batteries
•Do not charge a dry battery.
•Do not carry the dry or
rechargeable batteries with coins
or other metallic objects. It can
generate heat if the positive and
negative terminals of the batteries
are accidentally contacted by a
metallic object.
•When you do not use the
Walkman for a long time, remove
the battery to avoid any damage
caused by battery leakage and
subsequent corrosion.
On the unit
•Do not drop the unit or give a
shock to the unit, or it may cause
a malfunction.
•Do not leave the unit in a location
near heat sources, or in a
place subject to direct sunlight,
excessive dust or sand, moisture,
rain, mechanical shock, or in a car
with its windows closed.
•The LCD display may become
hard to see or slow down when
using the unit at high
temperatures (above 40°C/104°F)
or at low temperatures (below
0°C/32°F). At room temperature,
the display will return to its
normal operating condition.
•If the unit has not been used for
long, set it in the playback mode
to warm up for a few minutes
before inserting a tape.
On tapes longer than 90
minutes
We do not recommend the use of
tapes longer than 90 minutes except
for a long continuous playback.
They are very thin and tend to be
stretched easily.
On headphones/earphones
Road safety
Do not use headphones/earphones
while driving, cycling, or operating
any motorized vehicle. It may
create a traffic hazard and is illegal
in some areas. It can also be
potentially dangerous to play your
headphones/earphones at high
volume while walking, especially at
pedestrian crossings.
You should exercise extreme
caution or discontinue use in
potentially hazardous situations.
Preventing hearing damage
Do not use headphones/earphones
at high volume. Hearing experts
advise against continuous, loud and
extended play. If you experience a
ringing in your ears, reduce volume
or discontinue use.
Caring for others
Keep the volume at a moderate
level. This will allow you to hear
outside sounds and to be
considerate to the people around
you.
Maintenance
To clean the tape head and
path
Use the cleaning cassette CHK-1W
(not supplied) every 10 hours of use.
Note
• Use only the recommended cleaning
cassette.
To clean the exterior
Use a soft cloth slightly moistened
with water. Do not use alcohol,
benzine or thinner.
Note
• Clean the headphones/earphones
plug periodically.
Troubleshooting
The volume cannot be turned up.
•If “ ” appears for AVLS display,
press SET so that “ ” disappears.
The unit does not operate at all.
•HOLD is activated. Deactivate
HOLD.
The sound is unstable or no
audio.
•Insert two R6 (size AA) batteries
properly.
•Replace all batteries if they are
weak.
The display shows incorrect
information.
• The batteries are weak. Replace
the batteries with new ones.
Specifications
Radio section
Frequency range
FM: 65–74/87.5–108 MHz (Eastern
Europe)
87.5–108 MHz (Other countries)
AM: 530–1,710 kHz (North, Central
and South America)
531–1,602 kHz (Other
countries)
Tape section
Frequency response
(Dolby NR off)
Playback: 30–14,000 Hz
Output
Headphones/earphones (2 jack)
Load impedance 8–300 ohms
General
Power requirements
3 V DC batteries R6 (AA) x 2/
External DC 3V power sources
Dimensions (w/h/d)
FX479:
Approx. 00 x 00 x 00 mm (0
00⁄
x 00⁄0 inches) incl. projecting
0
parts and controls
FX477:
Approx. 00 x 00 x 00 mm (0
0
00⁄0
x 0
⁄0 inches) incl. projecting
parts and controls
Mass
Approx. 00 g (0.0 oz)/Approx. 00 g
(0.0 oz) incl. batteries and a
cassette
Supplied accessories
Stereo headphones or Stereo
earphones (1)
Carrying case (1)
Design and specifications are subject
to change without notice.
0
⁄
x
0
0
⁄0 x
 Loading...