

Sony WM-FX227, WM-FX229, WM-FX425, WM-FX221, WM-FX421 User Manual
...
3-810-567-14(1)
Featuring
Getting Started
Setting the Clock
Playing Cassette
Radio Cassette Player
WM-FX221/FX227/FX229/FX421/
FX421V/FX423/FX425
Operating Instructions
WALKMAN is a registered trademark of Sony Corporation.
Sony Corporation © 1995
The illustrations in this manual are for the FX425.
The differences in appearance or operation between each
models are described in the respective sections.
OWNER’S RECORD
The model number is located at the bottom and the
serial number is located inside the cassette holder.
Record these numbers in the spaces provided below.
Refer to them whenever you call upon your Sony
dealer regarding this product.
Model No.
Serial No.
Printed in Malaysia
AVLS (Automatic Volume Limiter System)
The AVLS switch allows you to limit the maximum
volume of your Walkman personal stereo without
degrading the sound quality.
•When the AVLS switch is set to ON (around 85 dB), the
volume will be kept at a moderate level without the
degradation of the sound quality, even if you attempt to
turn the volume up higher.
•When the AVLS switch is set to ON, the playback
sound may be distorted or unstable according to the
music (especially bass boosted part). If this happens,
turn down the volume.
•When the AVLS switch is turned off, you will be able to
enjoy the full volume capability of your Walkman
personal stereo.
ON
AVLS
OFF
FX425
Using with Batteries
Insert two AA (R6) batteries in correct polarity.
Notes
•When you are not going to use your Walkman for a long time,
•When the batteries become weak, the sound will be unstable or can
•Replace both batteries while the E indication comes on in the
•Concerning the battery life, see “Specifications”.
DC IN 3V
remove the batteries to prevent damage from battery leakage and
corrosion.
not be heard. In such a case, replace both batteries.
display, or all the memories will be canceled.
AA (R6) x 2
Using External Power Sources
You can connect the following external power sources
through the DC IN 3 V jack located on the right side.
(When you plug a cord into the DC IN 3 V jack, the
internal batteries are automatically bypassed.)
•House current using an AC-E30HG AC power adaptor
Note
Use only the recommended AC-E30HG
AC power adaptor (not supplied). Do
not use any other AC power adaptor.
Polarity of the plug
2
MIN
ENTER
FX425
HOUR
VOL
2
NORM CrO2/METAL
p STOP
0)
9 PLAY
MODE
FX425
DIR
Operating the Cassette Player
To wind the tape Press 0 or ).
To adjust the volume Set the VOL control.
To stop Press p STOP.
To change sides* Set DIR to ª or ·.
To play both sides once* Set MODE to Å.
To play both sides repeatedly* Set MODE to a.
* FX421/FX421V/FX423/FX425 only
Notes on playing cassettes
•Do not use cassettes longer than 90 minutes except for long
continuous playback.
•If the tape is playing but no sound comes out, the batteries may be
weak. Replace all batteries with new ones.
•If your Walkman has not been used for a long time, run the
Walkman for a few minutes before inserting a cassette.
•Do not open the cassette holder while the tape is running.
Using MEGA BASS
(FX227/FX229/FX423/FX425)
Set the MEGA BASS selector to ON to produce deep and
powerful sound.
FX227/FX229/
FX423
ON
OFF
For the customers in the U.S.A.
INFORMATION
This equipment has been tested and found to comply with
the limits for a Class B digital device, pursuant to Part 15 of
the FCC Rules. These limits are designed to provide
reasonable protection against harmful interference in a
residential installation. This equipment generates, uses, and
can radiate radio frequency energy and, if not installed and
used in accordance with the instructions, may cause harmful
interference to radio communications. However, there is no
guarantee that interference will not occur in a particular
installation. If this equipment does cause harmful
interference to radio or television reception, which can be
determined by turning the equipment off and on, the user is
encouraged to try to correct the interference by one or more
of the following measures:
– Reorient or relocate the receiving antenna.
– Increase the separation between the equipment and
receiver.
– Connect the equipment into an outlet on a circuit
different from that to which the receiver is connected.
– Consult the dealer or an experienced radio/TV
technician for help.
This device complies with Part 15 of the FCC Rules.
Operation is subject to the following two conditions:
(1) This device may not cause harmful interference, and
(2) this device must accept any interference received,
including interference that may cause undesired
operation.
You are cautioned that any changes or modifications not
expressly approved in this manual could void your authority
to operate this equipment.
1Press the ENTER
ENTER
button to enter the
current time setting
mode.
2Set the time by
using the HOUR/
HOUR
MINUTE
MINUTE buttons
within ten seconds
of flashing.
To set the hour use the
HOUR button and to set the
minute use the MINUTE
button.
3Press the ENTER
ENTER
button to return to
the current time
display.
Notes
•The hour display does not advance even when the minute display
returns to “00” after “59”.
•The hour display is on a 12-hour cycle (U.S.A., Canada and Central
and South America models).
The hour display is on a 24-hour cycle (other models).
1Insert a cassette.
2Select the NORM or
2/METAL mode to
CrO
match the tape type.
3Press the 9 PLAY
button.
PLAY
NORM
TAPE
CrO2/
METAL
FX425
MAX
MID
NORM
When using MEGA BASS
If the AVLS switch is set to ON, the MEGA BASS effect is
reduced.
Using DOLBY NR (FX425)
Set theDOLBY NR switch to ON to play Dolby NR
processed tapes.
ON
OFF
DOLBY NR
Listening to the Radio
Using the Belt Clip
Precautions
This warranty is valid only in the United States.
FM SENS,
FM MODE,
or LOCAL DX
RADIO ON/OFF
TUNING +/–
ENTER
BAND
VOL
2
FX425
PRESET
1Press the RADIO ON/
OFF button.
2Press the BAND
button to select the
band (FM1, FM2, FM3
or AM).
RADIO ON/OFF
BAND
3Press the TUNING +/–
buttons to tune in
the desired station.
To adjust the volume Set the VOL control.
To turn off Press RADIO ON/OFF.
TUNING
Notes
•If you keep pressing the TUNING + or – button, the frequency
digits go up or down quickly. And when you release, the
frequency digits go up or down step by step. When the desired
station is heard, press the TUNING + or – button again to stop the
tuning.
•The ST (stereo) indication comes on in the display when receiving
an FM stereo broadcast.
•If you press the 9 PLAY, 0 or ) button while listening to the
radio, the tape operation begins.
•If you have inserted a cassette with a metallic shell or label, and
interference in radio reception occurs, remove the cassette.
Presetting Stations
You can preset up to 20 radio stations, 5 for each FM1,
FM2, FM3 and AM bands.
BAND
1
RADIO ON/OFF
b
ENTER
2
3
ENTER
4
TUNING
5
1Press the RADIO ON/
OFF button.
2Tune in the desired
station by using the
BAND and
TUNING +/– buttons.
3Press the ENTER
button to enter the
presetting mode.
The PRESET indication
comes on and starts
flashing.
4Press one of the
PRESET buttons 1 to
5 within ten seconds
of flashing.
The PRESET indication and
the preset number flash.
5Press the ENTER
button within ten
seconds of flashing.
The PRESET indication
and the preset number light.
To recall the preset station
Press the BAND button to select the band, and then press
the corresponding preset button.
Improving Radio Reception
Improving FM reception
Extend the headphones cord or adjust the FM SENS
(FX221 for U.S.A., Canada and Central and South
America/FX227/FX229/FX421/FX421V/FX423), FM
MODE (FX221 for other countries) or LOCAL/DX
(FX425) switch.
FX221 (for U.S.A. and
Canada) FX227/FX229/
FX421/FX421V/FX423
FX425
DXLOCAL
FM SENS
DXLOCAL
FX221 (for other
countries)
ST
FM MODE
MONO
Improving AM reception
Rotate the Walkman.
Listening to the Radio Abroad
The frequency range differs depending on the area. If
you listen to the radio in an area of different frequency
range, change the area indication in the display. To
change it, press the ENTER button while the radio is
turned on. Press and hold the BAND button until the
area indication flashes. Then, press the BAND button
again to change the area indications (“U”: USA, Canada
and Central and South America; “E”: European and other
countries). Press the ENTER button to set the frequency
range.
Notes
•If you change the frequency range, all the preset stations in the
memory will be canceled.
•For E area indication, the hour display is on a 24-hour cycle.
If the display shows incorrect
information
When you use the Walkman for the first time or when
you have left the Walkman without batteries for a long
period of time, the display may show incorrect
information or the preset stations may not be recalled
correctly. If this happens, remove the batteries, and leave
until the display goes off. Then insert the batteries and
turn on again.
The memories of all the preset stations and the current
time will be canceled.
Reset these functions to the desired stations and time.
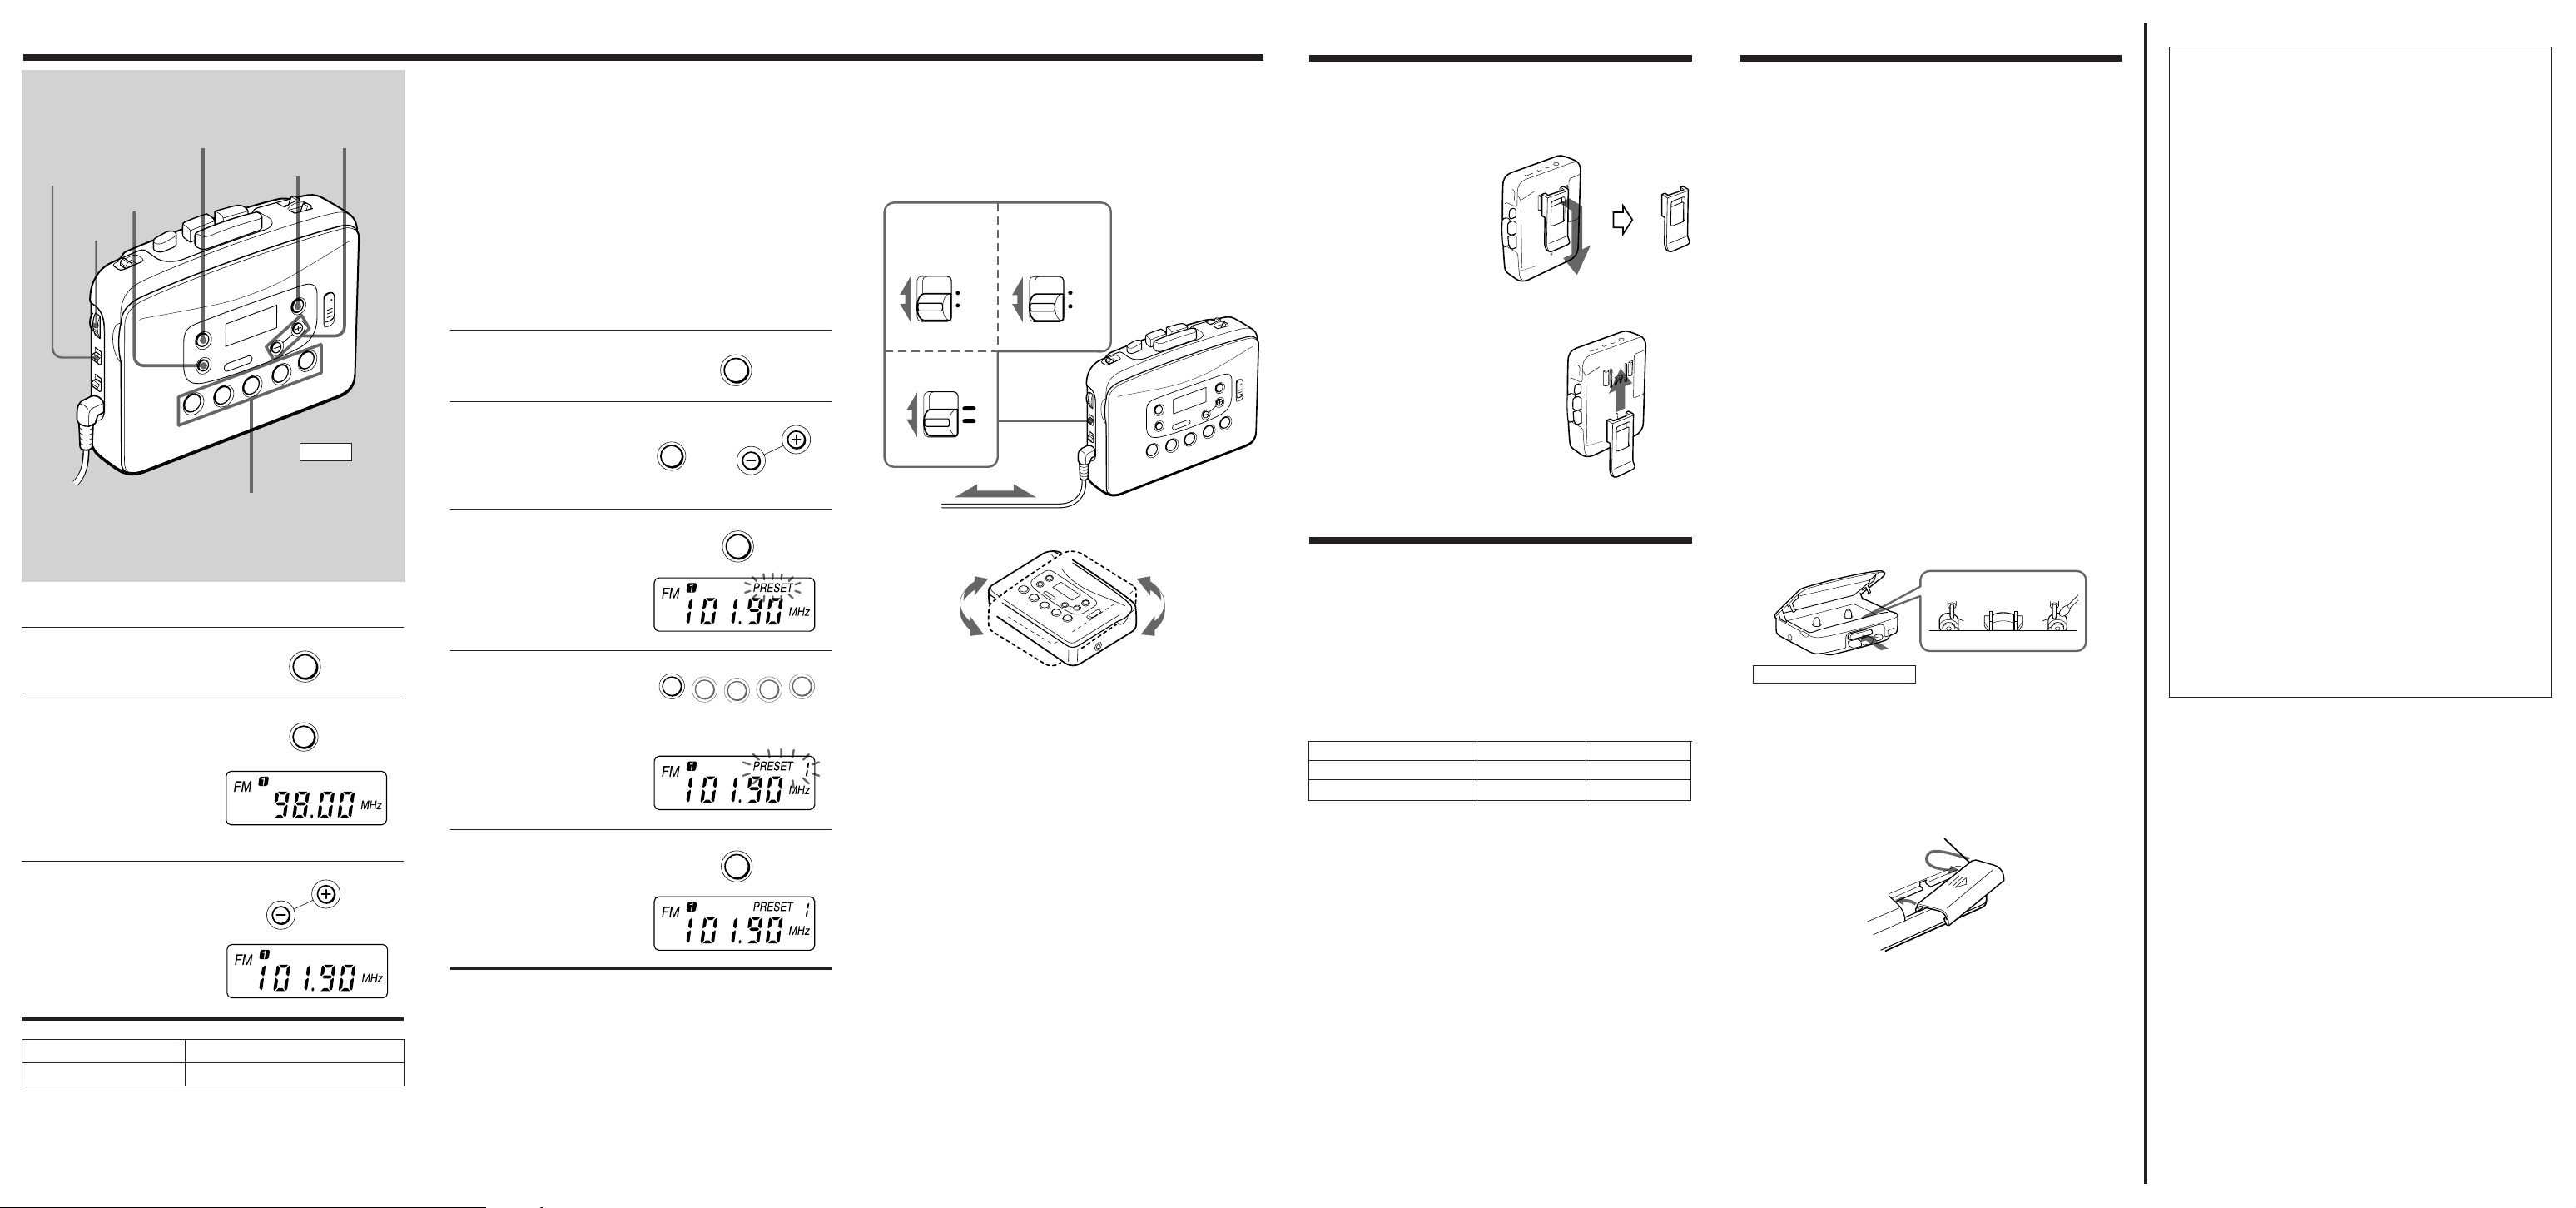
With the supplied belt clip, you can wear your Walkman
on a belt for convenient use.
Removing the Belt Clip
Lift the tab slightly and
push down with your
finger to remove the belt
clip from the Walkman.
Attaching the Belt Clip
Align the belt clip with
the grooves on the back
of the Walkman and
slide the belt clip up
until you hear a click, to
firmly attach it to the
Walkman.
Specifications
Radio Frequency
For U area indication:
FM: 87.5 – 108 MHz (0.1 MHz step)
AM: 530 – 1,710 kHz (10 kHz step)
For E area indication:
FM: 87.5 – 108 MHz (0.05 MHz step)
AM: 531 – 1,602 kHz (9 kHz step)
Power Requirements
3 V DC Batteries AA (R6) × 2
External DC 3 V power sources
Battery Life
(approximate hours when using the batteries specified below)
Battery Playback Radio
Sony Alkaline LR6 (SG) 16 hours 33 hours
Sony R6P (SR) 4.5 hours 13 hours
Dimensions
116.5 x 86.3 x 34.6 mm (45⁄8 x 31⁄2 x13⁄8 in.) (w/h/d)
incl. projecting parts
Mass 210 g (7.5oz) incl. batteries
Supplied Accessories
– Stereo headphones (1)
– Belt clip (1)
Optional Accessories
– AC power adaptor AC-E30HG
Your dealer may not handle some of the optional accessories listed
above. Please ask the dealer for detailed information.
Design and specifications are subject to change without notice.
Dolby noise reduction manufactured under license from Dolby
Laboratories Licensing Corporation.
"DOLBY" and the double-D symbol a are trademarks of Dolby
Laboratories Licensing Corporation.
Notes on headphones
Concerning Road Safety
Do not use headphones while driving, cycling, or operating any
motorized vehicle. It may create a traffic hazard and is illegal in
many areas. It can also be potentially dangerous to play your
headsets at high volume while walking, especially at pedestrian
crossings. You should exercise extreme caution or discontinue
use in potentially hazardous situations.
Preventing hearing damage
Do not use headphones at high volume. Hearing experts advise
against continuous, loud and extended play. If you experience a
ringing in your ears, reduce volume or discontinue use.
Caring for others
Keep the volume at a moderate level. This will allow you to hear
outside sounds and to be considerate to the people around you.
Taking Care of Your Walkman
•Do not expose the Walkman to extreme temperatures, direct
sunlight, moisture, sand, dust or mechanical shock. Never
leave the Walkman in a car parked in the sun.
•Do not wind the headphones cord around the Walkman.
The buttons may be kept pressed, causing unnecessary battery
usage.
•Prolonged use may contaminate the tape head. If sound
drop-out or excessive noise occurs, clean the head and tape
path with alcohol.
FX421/FX421V/FX423/FX425
•Clean the headphones plug periodically for optimum sound.
•Do not use alcohol, benzine or thinner to clean the case.
Cleaning the head and tape path
About the Battery Compartment Lid
If the battery compartment lid is detached by an accidental drop,
excessive force etc., attach it as illustrated in the numbered
order.
2
1
If you have any question or problem concerning your Walkman,
please consult your nearest Sony dealer.
LIMITED WARRANTY
 Loading...