

Page 1

WM-EX7
SERVICE MANUAL
Manufactured under license from Dolby Laboratories
Licensing Corporation.
ÒDOLBYÓ and the double-D symbol a are trademarks
of Dolby Laboratories Licensing Corporation.
U.S and foreign patents licensed from Dolby
Laboratories Licensing Corporation.
US Model
Canadian Model
AEP Model
UK Model
E Model
Tourist Model
Model Name Using Similar Mechanism WM-EX5
Tape Transport Mechanism Type MT-WMEX7-125
SPECIFICATIONS
Tape section
Frequency response
(Dolby NR off) Playback : 30 — 18,000 Hz
Output Headphones (REMOTE 2 jack)
General
Power requirements 1.5 V
Dimensions (w/h/d) Approx. 80.2 · 112.2 · 21.45 mm
Mass Approx. 180 g (6.4 oz.)
Load impedance 8 — 300 W
One rechargeable battery or one R6 (size AA)
battery
1 ·
/
4
(3
4 inches), incl.
projecting parts and controls
Approx. 245 g (8.7 oz) (incl. rechargeable
battery and cassette)
Supplied accessories Battery case (1)
Stereo earphones with remote control (1)
Battery charger (1)
Rechargeable battery
NC-6WM, 1.2 V, 600 mAh, Ni-Cd (1)
(US, Canadian, and Eupopean model)
NH-14WM, 1.2 V, 1,400 mAh, Ni-MH (1)
(Korean and other countries model)
Rechageable battery carrying case (1)
Carrying pouch (1)
AC plug adaptor (1) (Except for US, Canadian,
European, and Korean model)
Design and specification subject to change without notice.
www.electronicsrepair.net
MICROFILM
CASSETTE PLAYER
Page 2

TABLE OF CONTENTS
1. GENERAL ·········································································· 3
2. SERVICE NOTE······························································· 5
3. DISASSEMBLY
3-1. CASSETTE LID ASSY·················································· 7
3-2. REEL ORNAMENT (B) SLIDER··································7
3-3. CASE ·············································································· 8
3-4. REEL ORNAMENT (B) ASSY······································ 8
3-5. AUDIO BOARD ·····························································8
4. MECHANICAL ADJUSTMENT ·································· 9
5. ELECTRICAL ADJUSTMENT ····································9
6. DIAGRAMS
6-1. BLOCK DIAGRAM ····················································· 10
6-2. SCHEMATAC DIAGRAM ··········································· 12
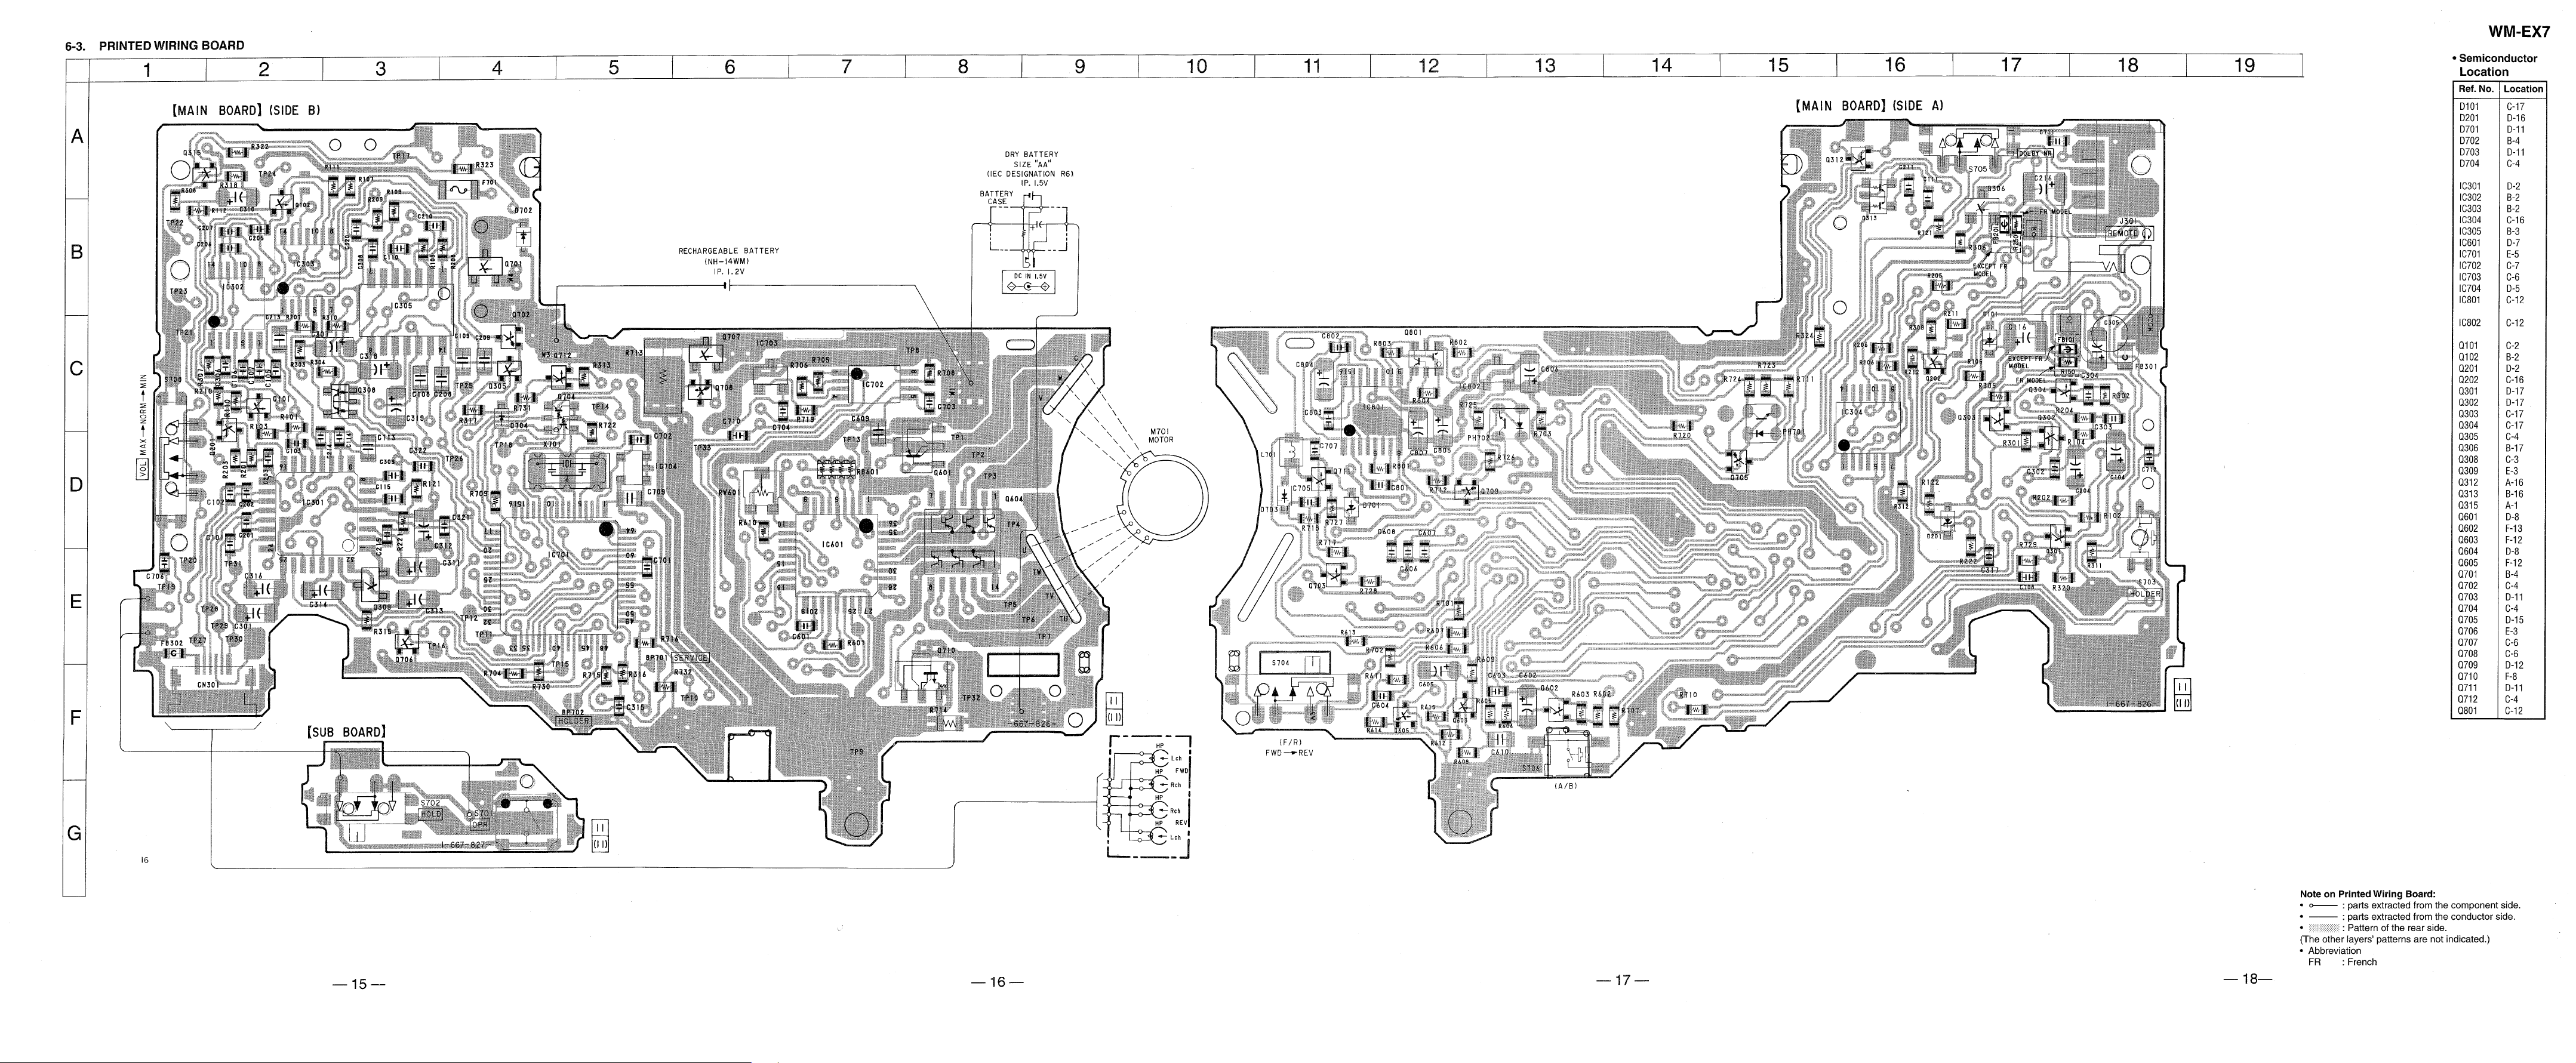
6-3. PRINTED WIRING BOARD······································· 15
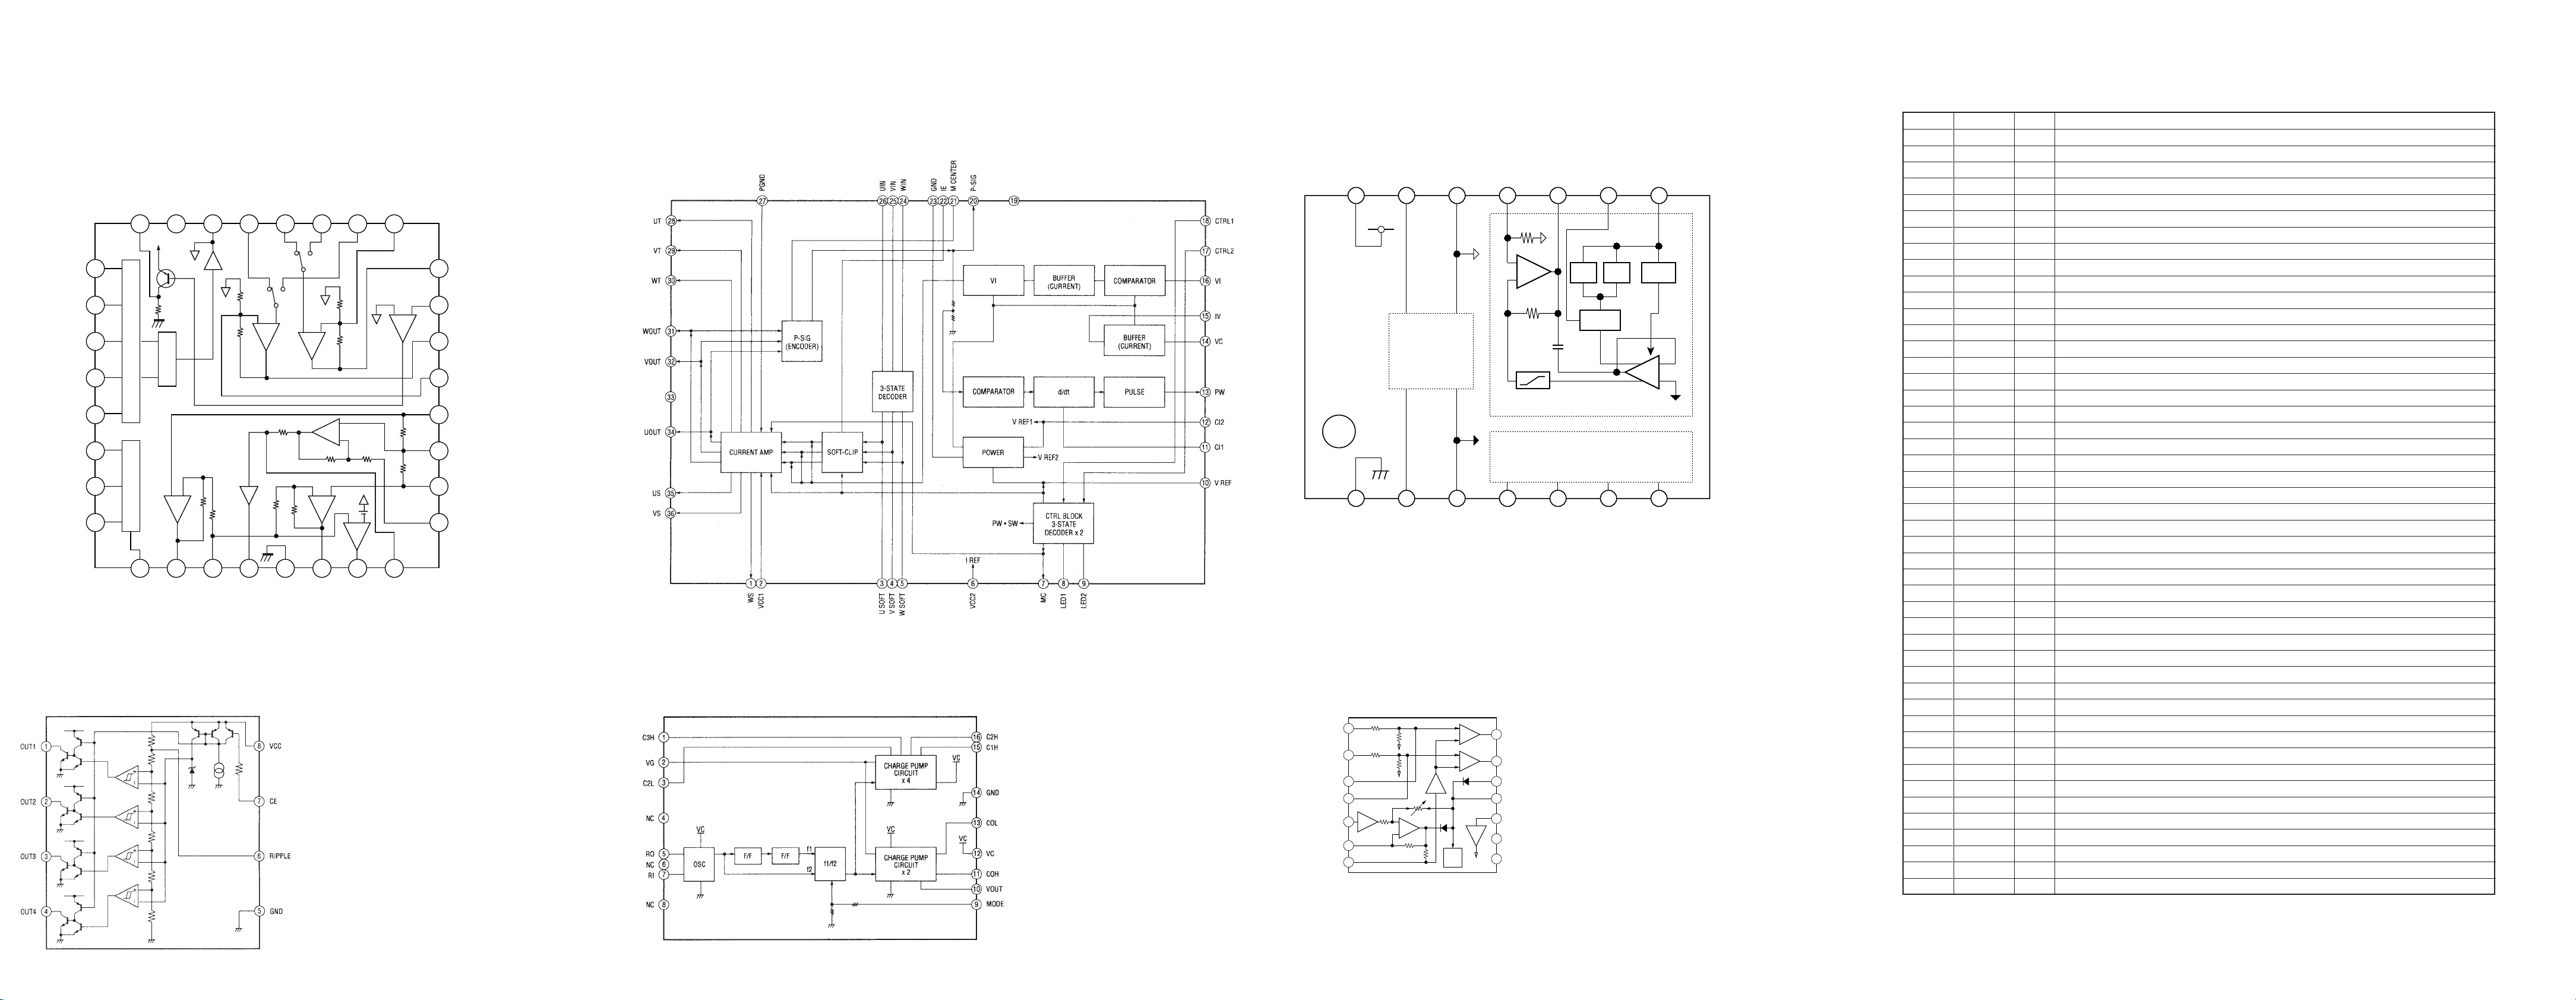
6-4. IC BLOCK DIAGRAMS··············································19
6-5. IC PIN FUNCTION······················································ 22
7. EXPLODED VIEWS
7-1. CABINET BLOCK·······················································24
7-2. AUDIO BOARD BLOCK············································· 25
7-3. MECHANISM DECK BLOCK (MT-WMEX7-125) ···26
8. ELECTRICAL PARTS LIST······································· 27
Notes on chip component replacement
• Never reuse a disconnected chip component.
• Notice that the minus side of a tantalum capacitor may be
damaged by heat.
Flexible Circuit Board Repairing
• Keep the temperature of soldering iron around 270˚C
during repairing.
• Do not touch the soldering iron on the same conductor of the
circuit board (within 3 times).
• Be careful not to apply force on the conductor when soldering
or unsoldering.
SAFETY-RELATED COMPONENT WARNING!!
COMPONENTS IDENTIFIED BY MARK ! OR DOTTED LINE WITH
MARK ! ON THE SCHEMATIC DIAGRAMS AND IN THE PARTS
LIST ARE CRITICAL TO SAFE OPERATION. REPLACE THESE
COMPONENTS WITH SONY PARTS WHOSE PART NUMBERS
APPEAR AS SHOWN IN THIS MANUAL OR IN SUPPLEMENTS
PUBLISHED BY SONY.
— 2 —
ATTENTION AU COMPOSANT AYANT RAPPORT
À LA SÉCURITÉ!
LES COMPOSANTS IDENTIFÉS PAR UNE MARQUE ! SUR LES
DIAGRAMMES SCHÉMATIQUES ET LA LISTE DES PIÈCES SONT
CRITIQUES POUR LA SÉCURITÉ DE FONCTIONNEMENT. NE
REMPLACER CES COMPOSANTS QUE PAR DES PIÈSES SONY
DONT LES NUMÉROS SONT DONNÉS DANS CE MANUEL OU
DANS LES SUPPÉMENTS PUBLIÉS PAR SONY.
Page 3
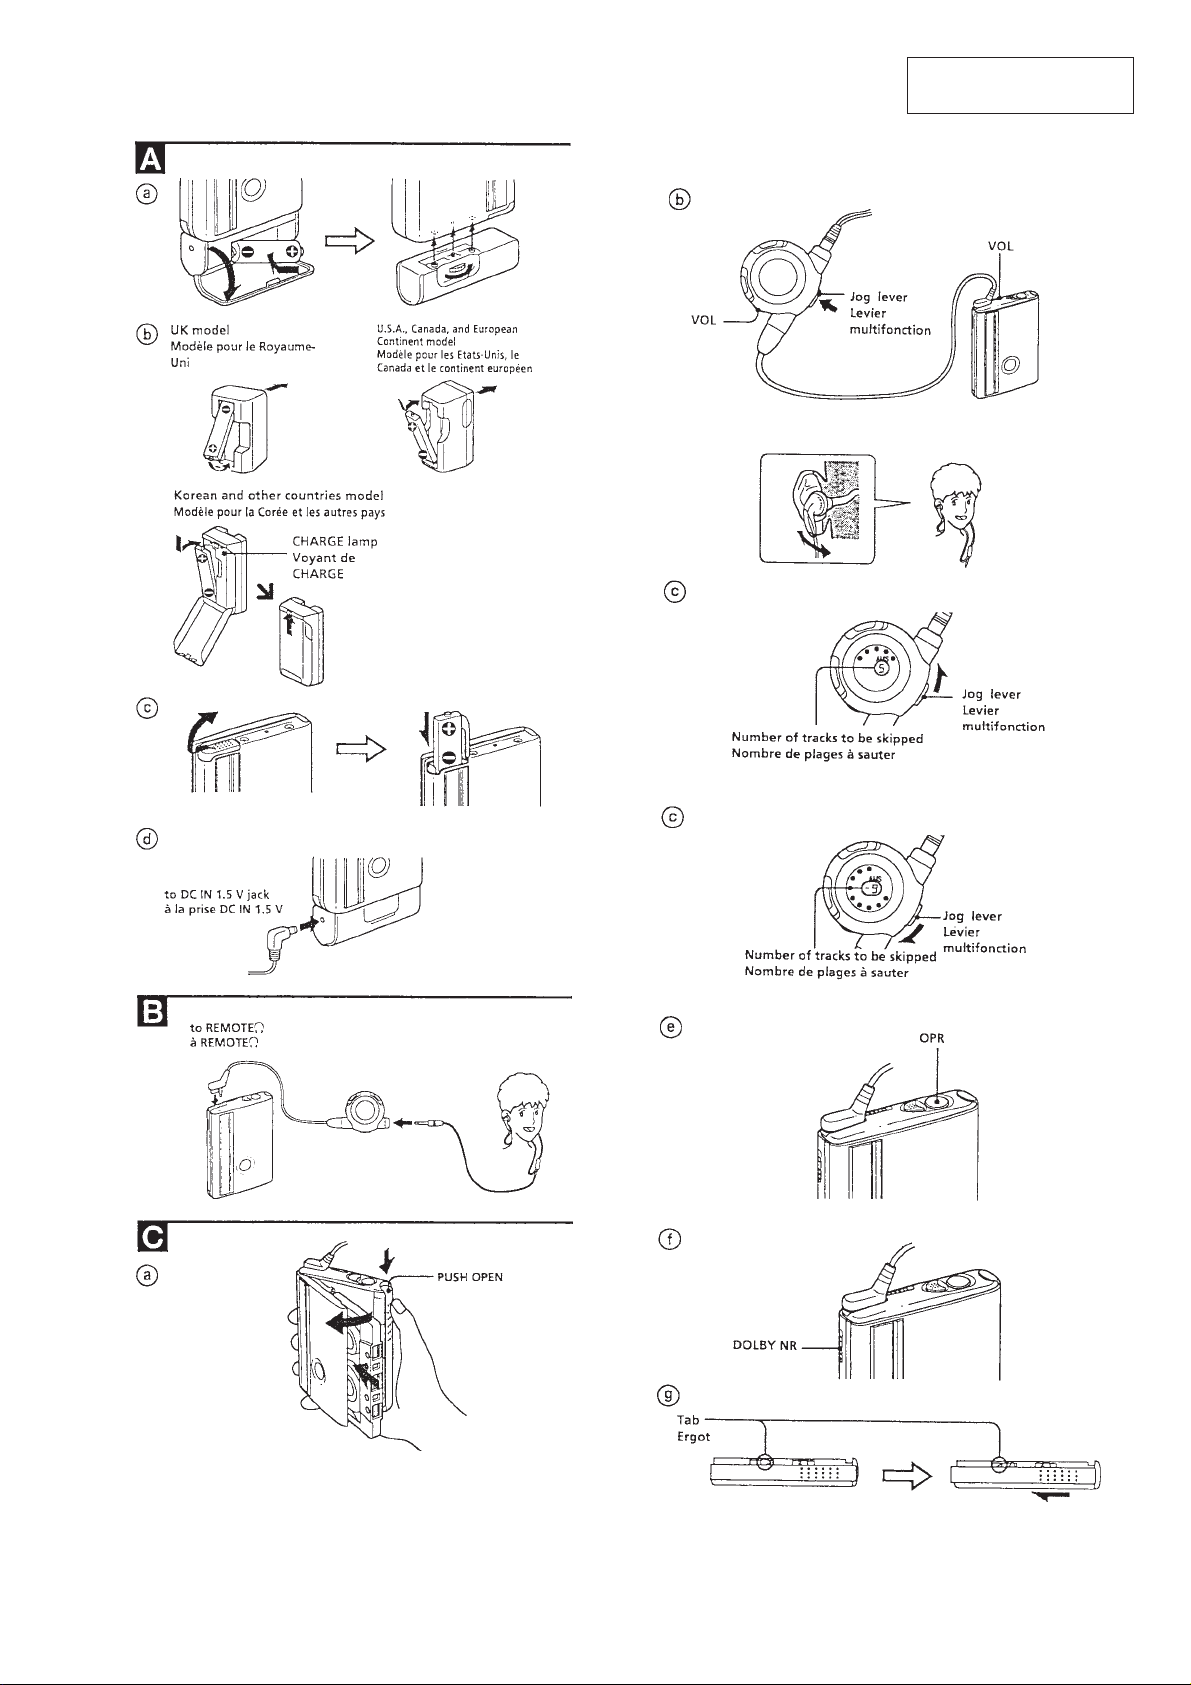
SECTION 1
GENERAL
This section is extracted
from instruction manual.
— 3 —
Page 4
— 4 —
Page 5
SECTION 2
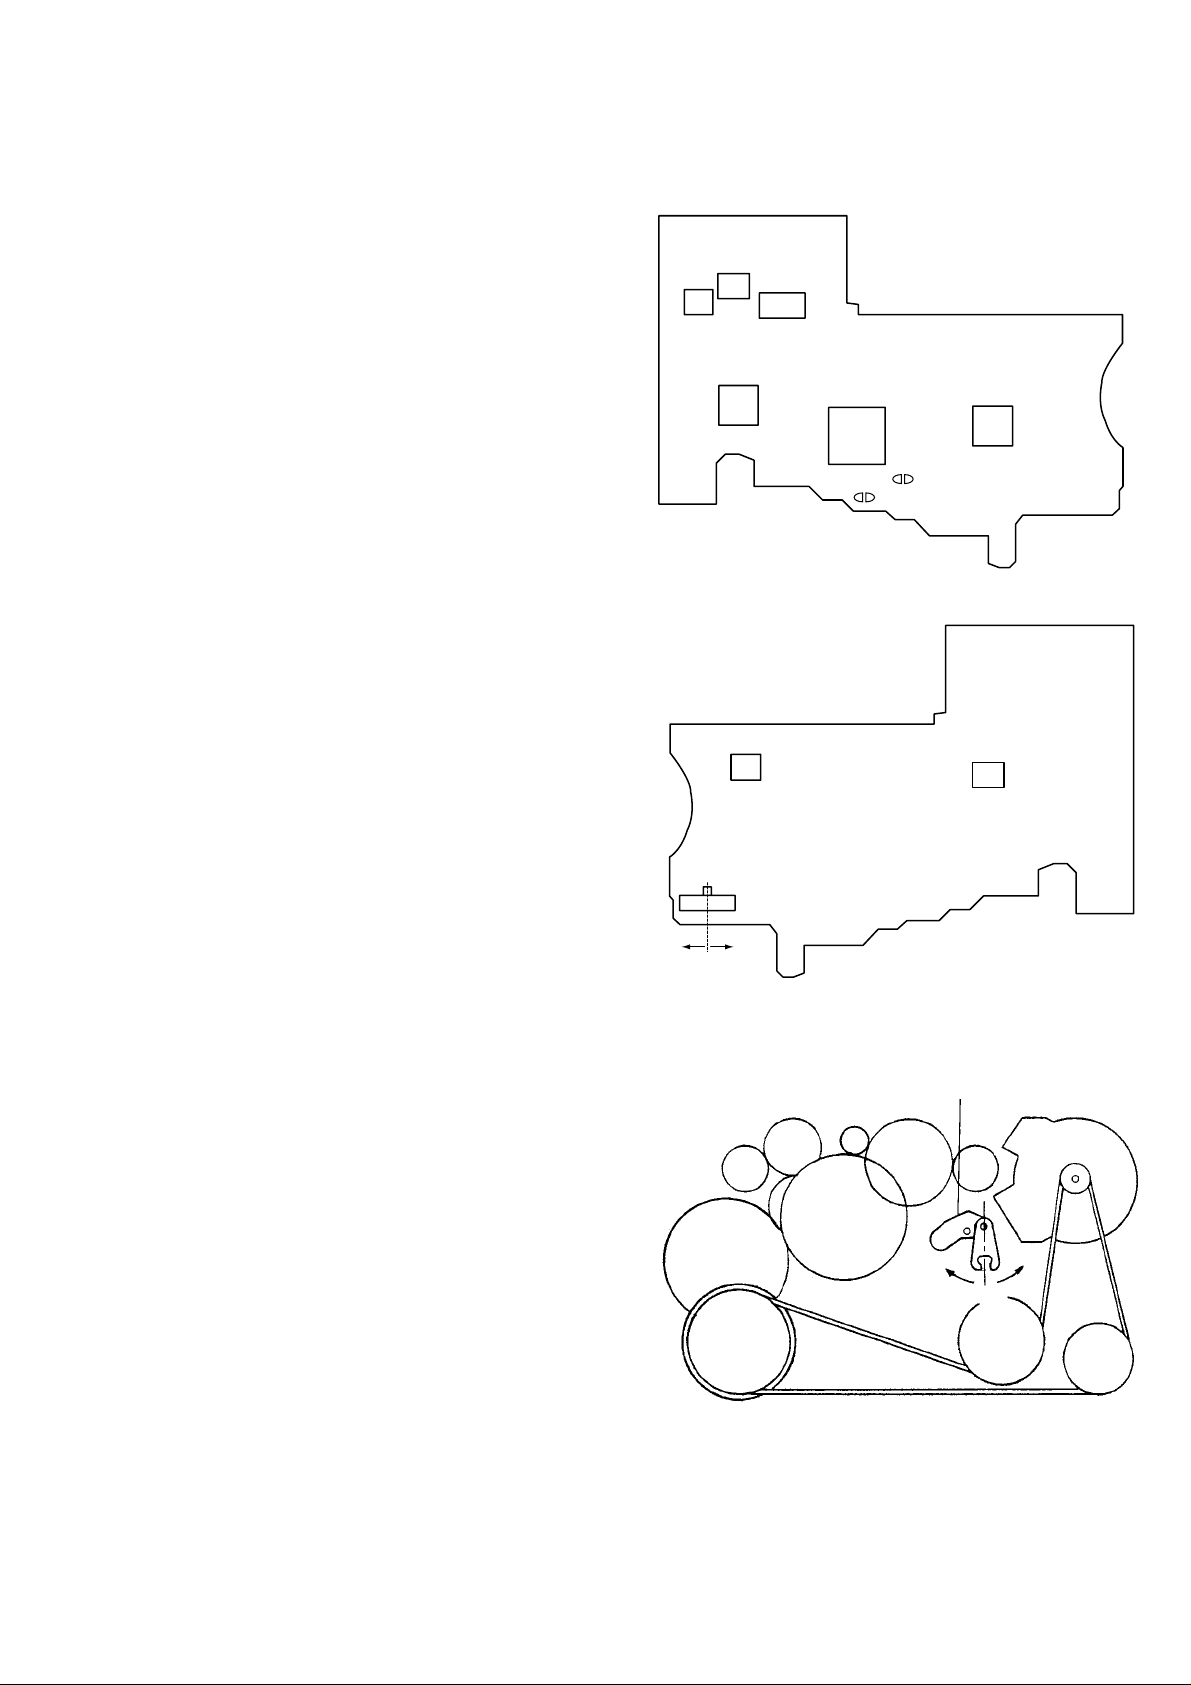
IC601
IC701
BP701
IC301
IC305
IC303
IC302
BP702
IC801
F side
S704
IC304
Center
R side
Lever (SW)
Center
R side
F side
SERVICE NOTE
[Service Mode]
The service mode enables to operate and check the mechanism of
WM-EX7 while the AUDIO board is opened.
1. How to enter the service mode
1) Remove the cabinet referring to section 3 DISASSEMBLY.
Open the AUDIO board.
2) Connect the motor and plunger solenoid to the AUDIO board
using jumper wires. The motor and plunger solenoid can be
easily connected when the extension jig (1-769-143-11) (10
cables are bound as a jig.)
3) Short the service mode land (BP701) and the holder land
(BP702) as shown using soldering.
4) Connect DC 1.3 V from a regulated po wer supply to the ‘ and
’ terminals of battery.
5) Remove soldering from the service mode land (BP701).
2. PRE-SET status
The PLAY, FF and REW mode can be entered only from the PRESET status.
1) Check that the lever (SW) is in the center position, and the F/R
switch (S704) is also I the center position. When these switches
are not in the center position, set them to the center (pre-set)
position as follows.
2) Find the position in which the lever (SW) is set (either F or R
position). Move the F/R switch (S704) into the position in
which the lever (SW) is set.
(3) The lever (SW) can be moved by turning OFF the main power
of the regulated power supply once then back ON. Move the
F/R switch (S704) to the center position in synchronism with
this timing.
[AUDIO board]
— Side A —
— Side B —
3. FF, REW modes
1) After confirming the “2. PRE-SET status”, press the FF switch
or the REW switch.
4. PLAY mode
1) Confirm the “2. PRE-SET status”.
2) When the 9( switch of the remote control is pressed, the
lever (SW moves once to the R side then moves to the F side.
Move the F/W switch (S704) to the R side in synchronism with
the motion of the lever (SW). It enables the system to enter
into the PLAY (R side) mode.
Note 1: When you fail to enter the PLA Y mode, re-start from ste p
1) PRE-SET status.
Note 2: When you operate 9(, p, FF, REW switch, use these
switches of the remote control unit as much as possible.
[Lever (SW)]
— 5 —
Page 6
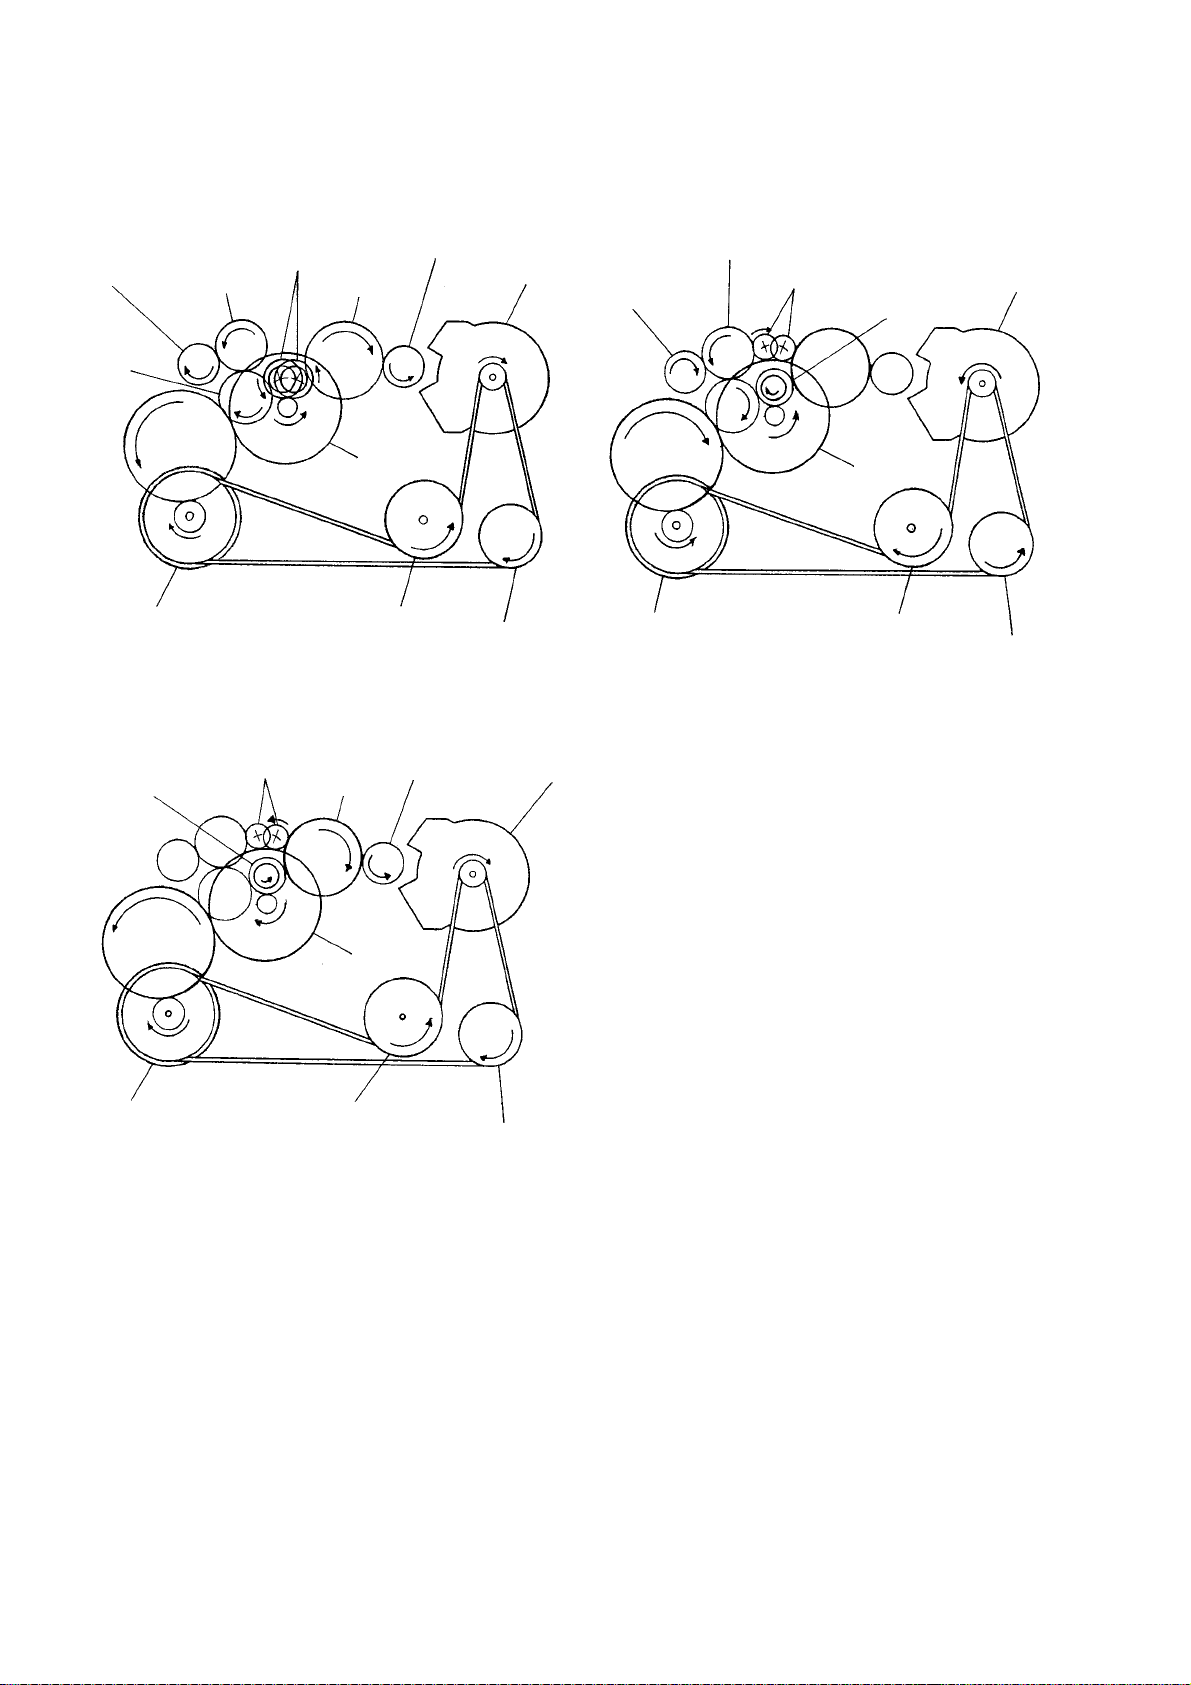
[Tape drive mechanism]
y
y
Tape drive mechanism in PLAY mode
Gear (NR)
Gear (Reel)
T side
Gear (TA)
Gear (Y)
Flywheel (N) Assy
(REW:Right side/
FWD:Left side)
Gear (TB)
Gear (S)
Clutch Assy (M)
Flywheel (R) Assy
Tape drive mechanism in REW mode
Gear (FR)
(REW:Right side)
Gear (NR)
Gear (S)
Gear (Reel)
(S side)
Pulley (Reverse)
Gear (Reel)
(S side)
Motor Pulle
Motor
Pulle
Tape drive mechanism in FF mode
Gear (TB)
Gear (Reel)
(T side)
Gear (Y)
Flywheel (N) Assy
Gear (FR)
(FF:Left side)
Clutch Assy(M)
Flywheel (R) Assy
Motor Pulley
Gear (NR)
Pulley
(Reverse)
Gear (Y)
Flywheel (N) Assy
Clutch Assy(M)
Flywheel (R) Assy
Pulley (Reverse)
— 6 —
Page 7
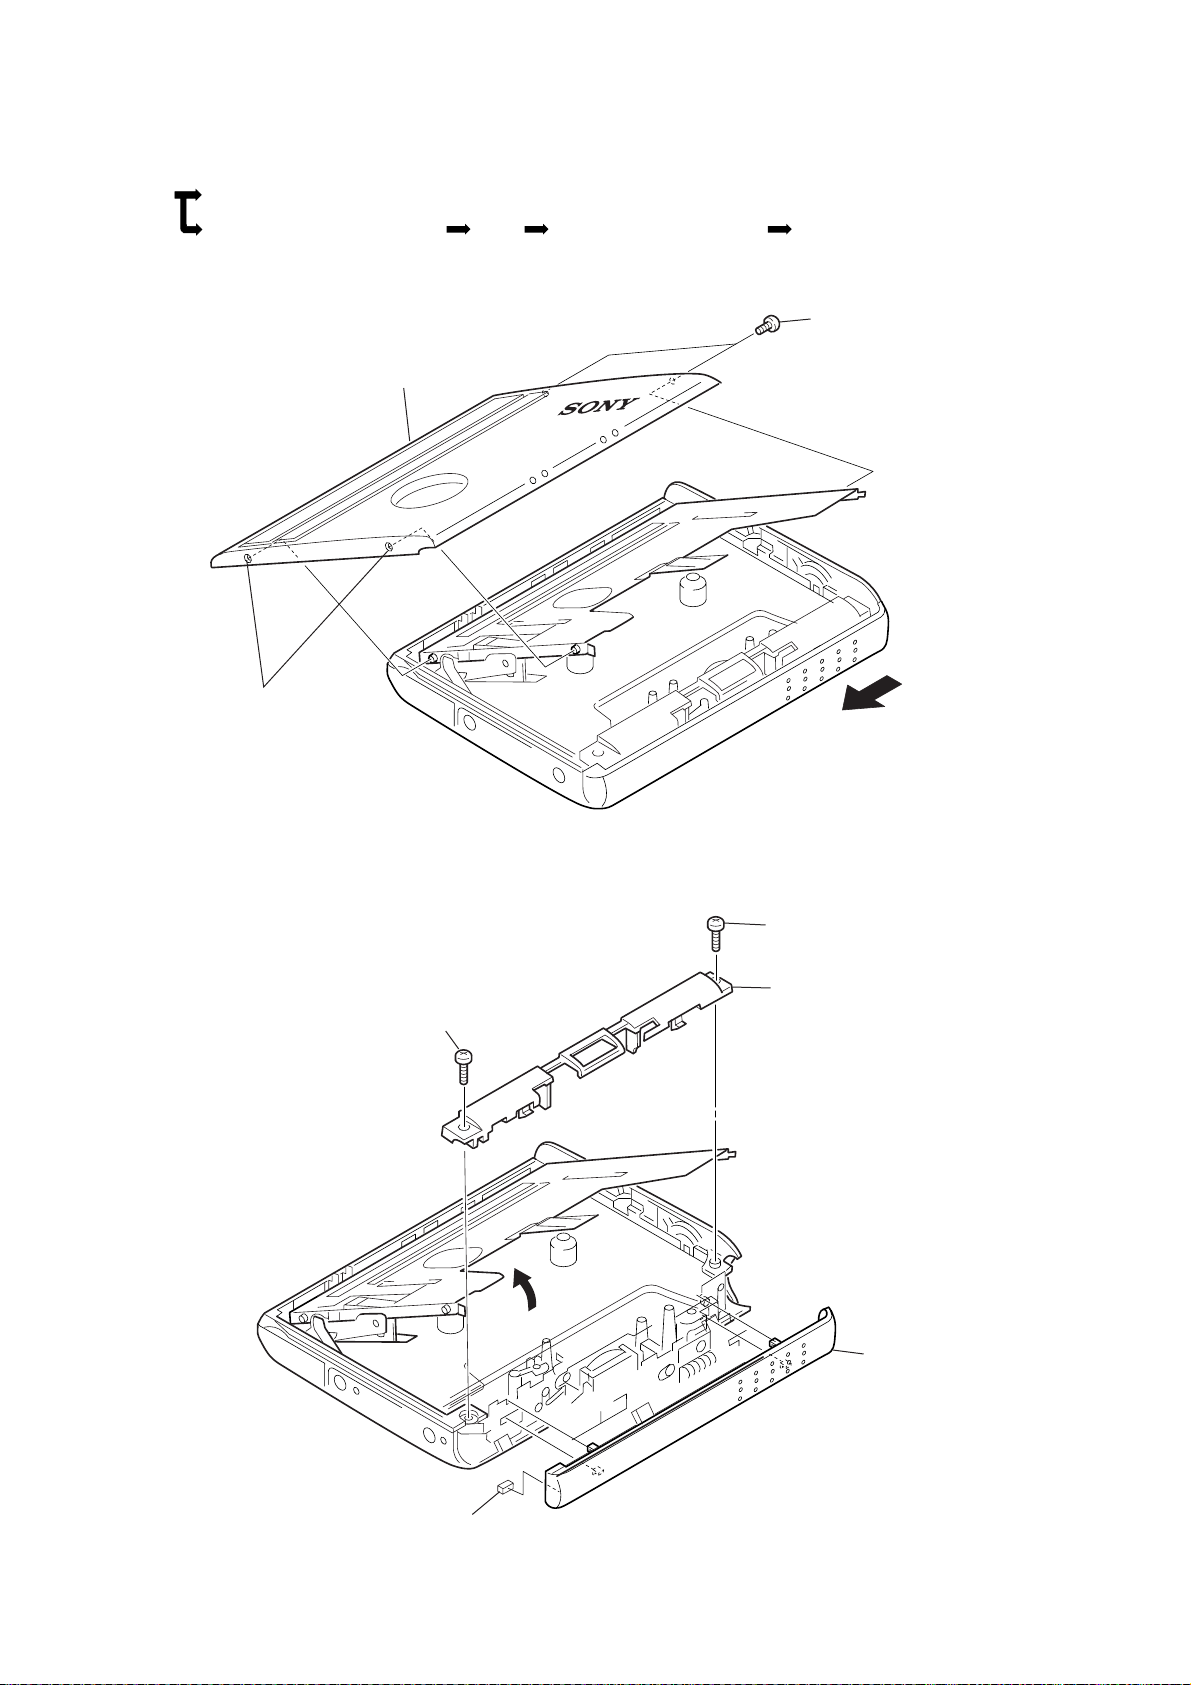
SECTION 3
)
D
DISASSEMBLY
Note : Follow the disassembly procedure in the numerical order given.
SET
CASSETTE LID ASSY
REEL ORNAMENT (B) SLIDER
3-1. CASSETTE LID ASSY
3
Cassette lid assy
2
Remove the lid
from the protrusion
CASE
.
REEL ORNAMENT (A) ASSY AUDIO BOAR
1
Screws, 2 pcs (IB lock)
3-2. REEL ORNAMENT (B) SLIDER
1
Screw, 1 pc (IB lock)
2
Screw, 1 pc (IB lock
3
Reel ornament (B)
5
Slider
4
Remove the CUSHION(7L) with tweezer.(Pull off)
— 7 —
Page 8
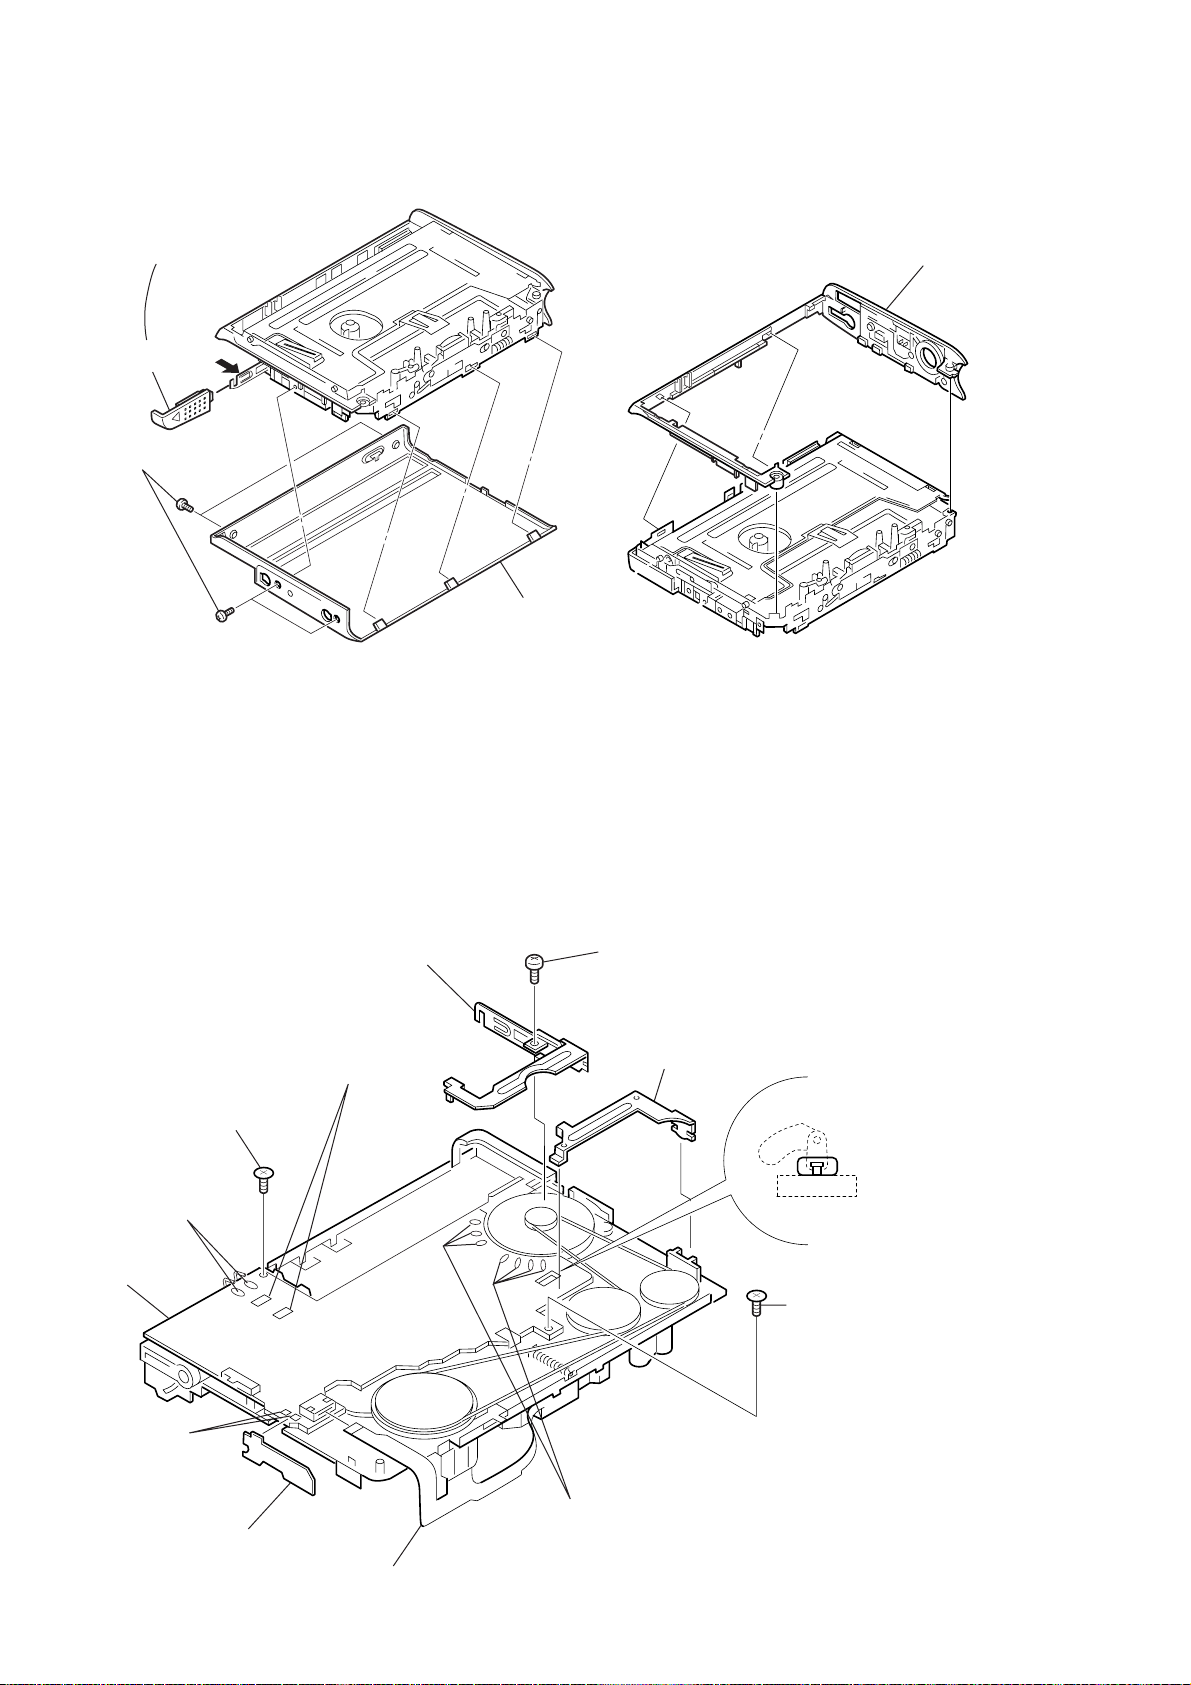
3-3. CASE
y
(
A
Remove it while pressing A.)
3-4. REEL ORNAMENT (A) ASSY
1
Reel ornament (A) ass
1
Battery lid
2
Screws, 4 pc (M1.4 × 1.6)
A
3-5. AUDIO BOARD
3
Case
2
Screw, 1 pc (IB lock)
3
Remove soldering
of the leaf switch at the
two points.
!º
AUDIO board
Remove soldering
at the two points.
!¡
SUB board
7
Battery terminal plate assy
5
Remove soldering of the plunger
solenoid at the two points.
6
Screw, 1 pc
8
Battery terminal plate
(minus - terminal of the size C battery)
Lever (Switch)
4
Remove soldering of the motor terminal
at the seven points.
Note: When re-assembling
the parts, confirm that
the knob of the switch
(S707) has securely
entered into the groove
of the lever (SW).
1
Screw, 1 pc (IB lock)
9
Flexible board
— 8 —
Page 9
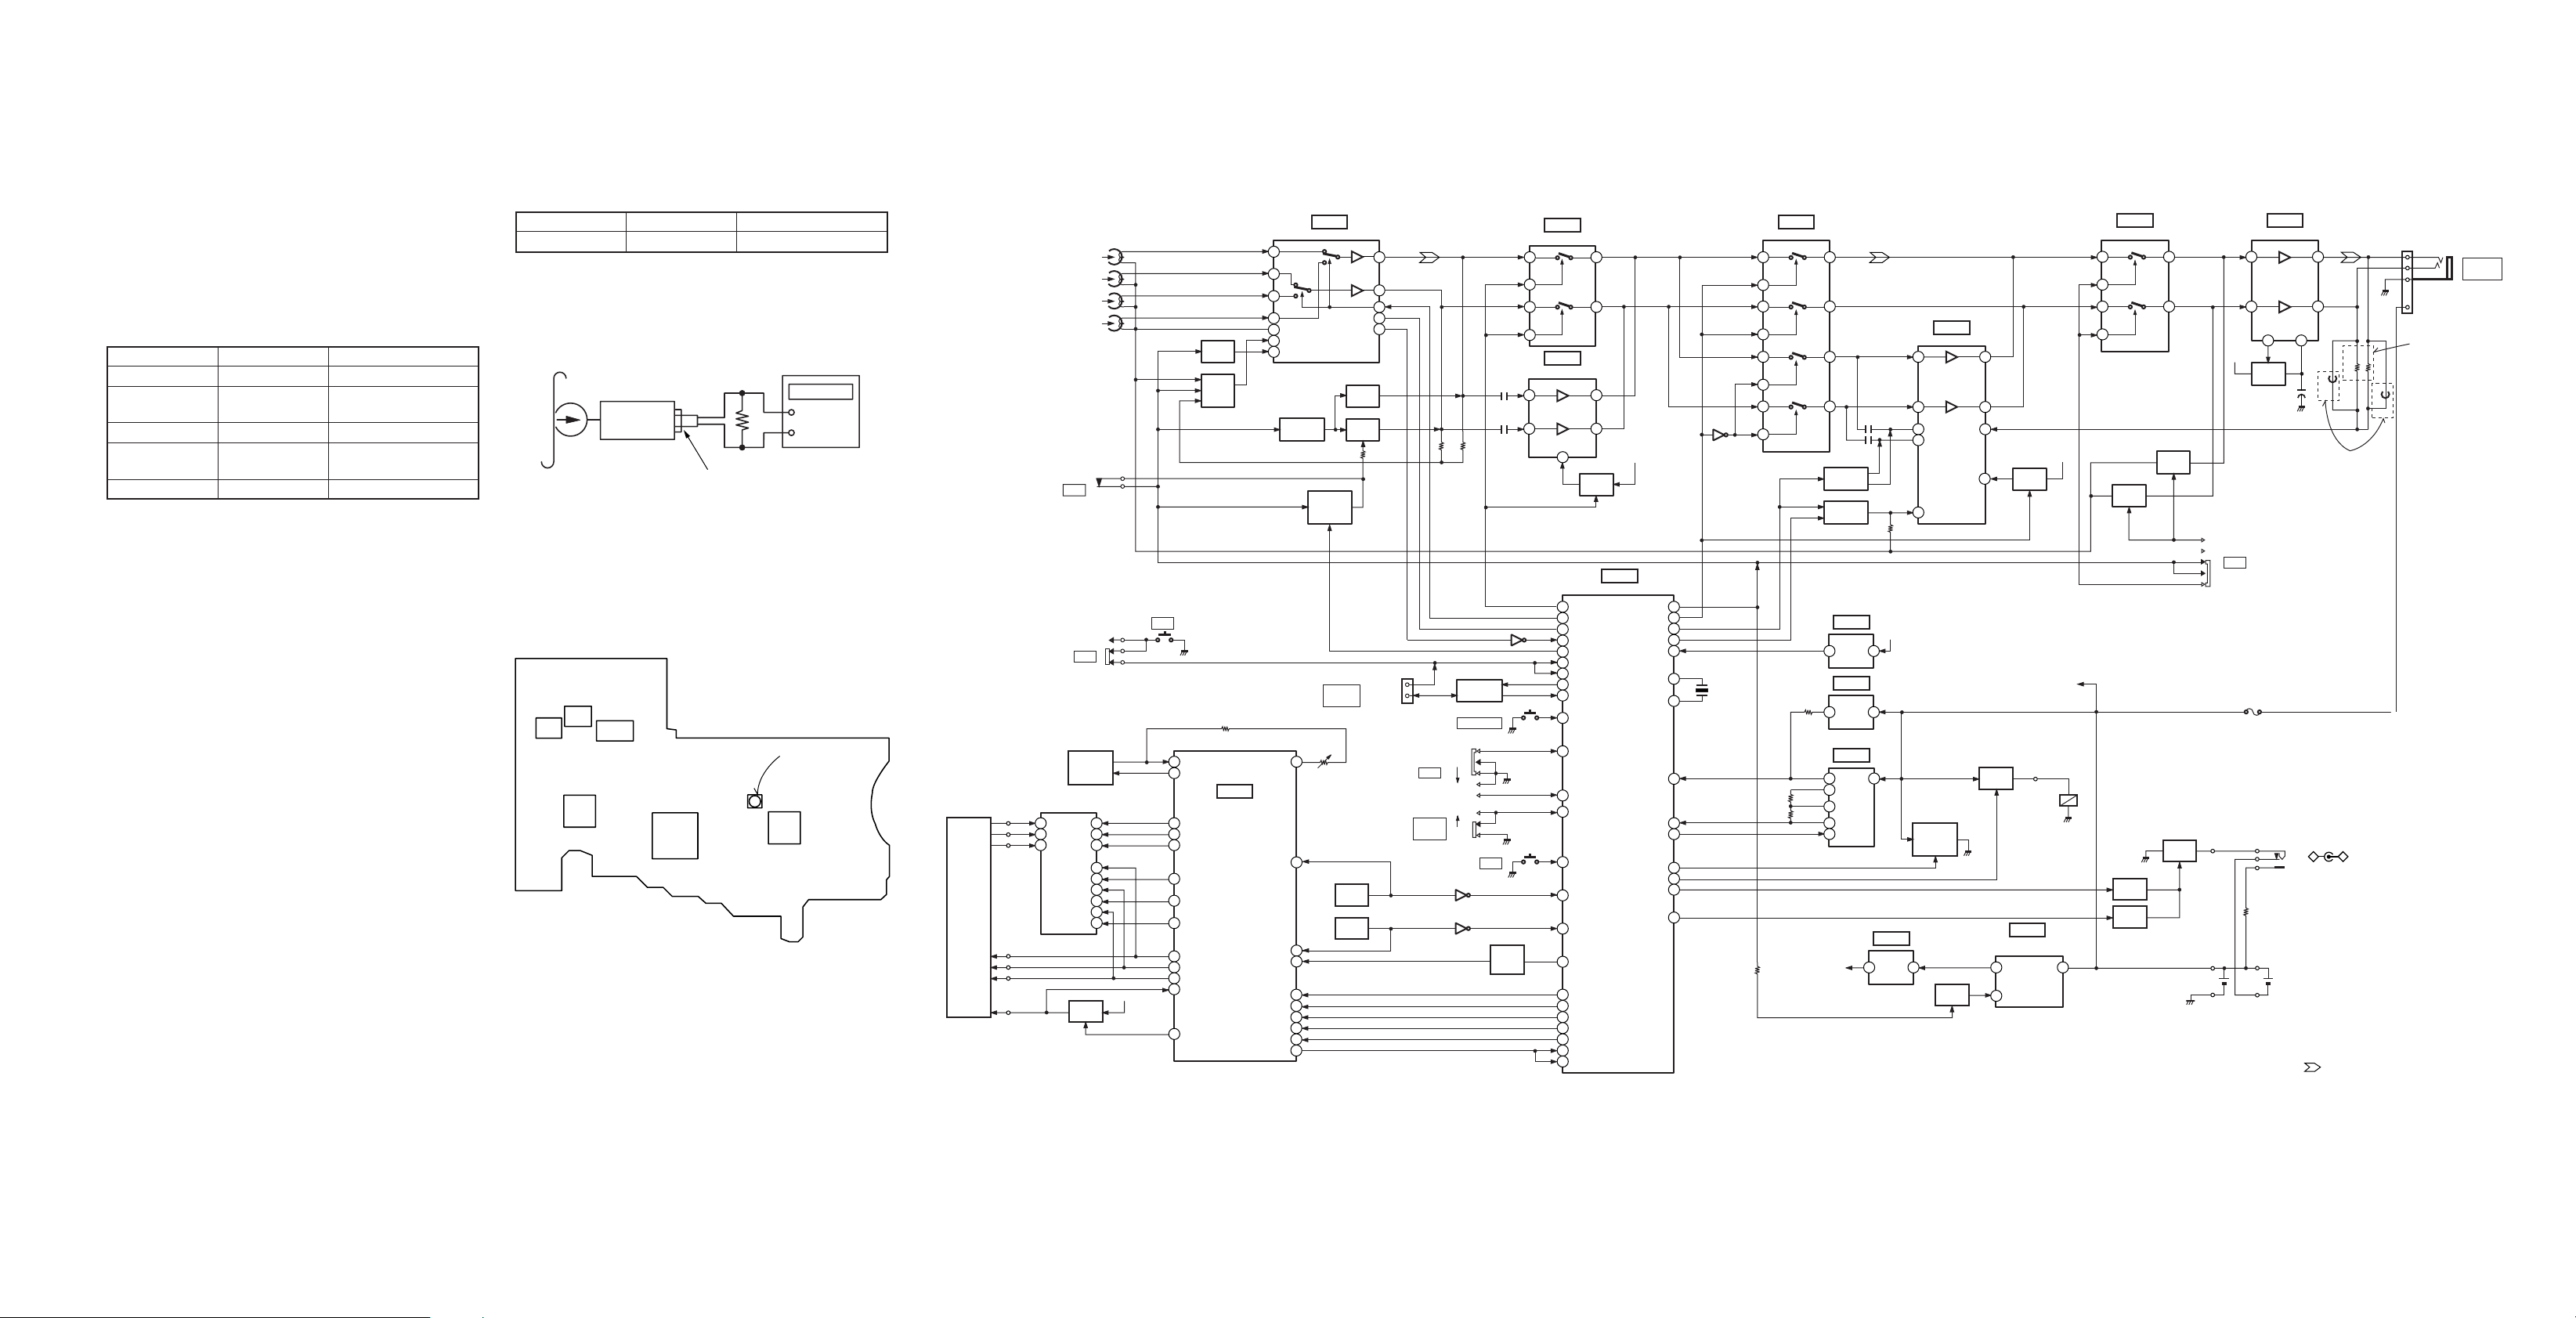
SECTION 4
MECHANICAL ADJUSTMENT
SECTION 5
ELECTRICAL ADJUSTMENT
SECTION 6
WM-EX7
DIAGRAMS
PRECAUTION
1. Clean the following parts with a denatured-alcohol-moistened
swab:
record/playback head pinch roller
rubber belts capstan
2. Demagnetize the record/playback head with a head
demagnetizer.
3. Do not use a magnetized screwdriver for the adjustments.
4. After the adjustments, apply suitable locking compound to the
parts adjusted.
5. The adjustments should be performed with the rated power
supply voltage unless otherwise noted.
• Torque Measurement
Mode
FWD
FWD
Back Tension
REW
REW
Back Tension
FF, REW
Torque Meter
CQ-102D
CQ-102D
CQ-102C
CQ-102C
CQ-201B
Meter Reading
18 to 30 g•cm
0.7 to 2.0g•cm
18 to 30 g•cm
0.7 to 2.0 g•cm
More than 35 g•cm
PRECAUTION
1. Specified voltage: 1.3 V
2. Switch position
F/R select switch: FWD
Test Tape
Tape
WS-48A
Signal
3 kHz, 0 dB
purpose
Tape Speed Adjustment
Tape Speed Adjustment
Procedure:
Test tape
WS-48A
(3kHz, 0dB)
Set
2
PHONES jack
Frequency counter
32
Ω
+
–
1. Playback WS-48A (Tape center part) in the FWD state and
adjust RV601 so that the frequency counter reading becomes
3000 ± 15 Hz.
2. Playback WS-48A (tape center) in the REV state. Check that
frequency counter reading is within 2.5% of reading of step 1.
Adjustment Point:
[AUDIO BOARD] — SIDE B —
IC303
IC302
IC305
RV601
IC301
IC701
IC601
6-1. BLOCK DIAGRAM
HP301
PLAYBACK
S707
ATS
S702
HOLD
Q603,605
MOTOR
SPEED
CONTROL
Q604
MOTOR SWITCH
M901
CAPSTAN/
REEL
TU
12
TV
10
TW
8
W
V
U
C
Q601
MOTOR
SWTICH
13
11
9
1
2
3
4
5
6
1.5V
S701
KEY
12
28
29
30
1
36
35
31
32
34
21
7
FWD L
FWD R
REV R
REV L
Q301
AUDIO
PW SW
Q302-304
CI1
CI2
UT
VT
WT
WS
VS
US
W OUT
V OUT
U OUT
MC ENTER
MC
AMS
AMP
IC601
MOTOR
SERVO
21
20
19
18
22
15
29
VREF
LED1
LED2
W IN
V IN
U IN
CTRL1
CTRL2
PSIG
REF OUT
AMS DET
PW SE
Q315
M/N
CONTROL
1011
8
9
16
VI
24
25
26
18
17
20
IC301
AUDIO AMP
Q312
EQ AMP
CTL
FOR AMS
J701(1/2)
PHONES/
REMOTE
RJ601
MOTOR
SPEED
(1/2)
14 2
16
26
MUTE SW
28
AMS OUT
24
Q101
EQ AMP
CONT
Q201
EQ AMP
CONT
REMO
DATA
S704
F/R
S705
DOLBY
NR
PH701
T REEL
SENS
PH702
S REEL
SENS
FWD
REV
OFF
ON
Q705
Q709
Q704
DATA
CONTROL
S703
HOLDER
S706
A/B
Q602
MOTOR
START
SW
13
10
12
4
11
Q706
IC303
DOLBY SW
IC302
DOLBY AMP
VCC
(1/2)
1 3
11
5
10
14
DOLBY CTL DDC CTL
14
54
F/R CTL
MUTE CTL
53
AMS IN
40
AMS CTL
42
KEY IN
61
50
WAKE UP
23
R DATA
37
RMUM
48
FWD SW
31
FWD SW
33
REV SW
41
DOLBY SW
34
A/B SW
30
PHOTO IN(T)
29
PHOTO IN(S)
MOTOR
63
START
24
MOTOR W
26
MOTOR V
27
MOTOR U
35
CTL1
36
CTL2
51
P-SIG
52
P-SIG
2V
Q306
DOLBY
PW SW
IC701
SYSTEM CONTROL
BOOST CTL
BATT DET1
BATT DET2
BATT CTL
LOAD CTL
PARA CTL
PARA DDC
43
46
SOUND1
19
SOUND2
20
RESET
2 4 5
X0
5
X1
8
60
62
55
22
PM CTL
18
16
15
Q712
X701
4MHz
5
9
6
2
13
10
12
IC304
SOUND SW
4
8
IC305
BOOST AMP
1 2
11
Q313
HIGH
CONTROL
Q308
BOOST
GAIN CONT
IC704
RESET
1
HPL DET
4
3
6
2V
HPR
LP GAIN
IN
VCC
IC703
STOP
1 3
DETECT
IC702
4 8
3
VOLTAGE
2
DET
1
7
Q707,708
LOAD
CONTROL/
DRIVE
IC802
2V
2V
2 3 10 12
REG
Q801
DDC CLT
SW
13
14
12
9
Q701,702
PM
DRIVE
9
Q305
BOOST
PW SW
IC801
DC/DC
CONVERTOR
V OUT VC
MODE
2V
1.5V
PM
IC303
VOL SW
8
6
4
5
Q202
VOL
CONT
Q703
DDC CTL
SW
DC/DC
CONV.
Q711,D701,703
(2/2) (2/2)
9
3
Q102
VOL
CONT
Q710
PARA
SW
RECHARGEABLE
BATTERY
AUDIO AMP
10 6
12
32 31
1.5V
RIPPLE
FILTER
Q309
S708
AVLS
F701
0.25A
IC301
RFOUTRF BASE
DRY BATTERY
SIZE AA
(IEC DESIGNATION R6)
1.5V
• Signal path
2
FB201
FR MODEL
DC IN 1.5V
– +
: PB
R250
EXCEPT
R150
L-CH
R-CH
VCC
FB101
FR MODEL
J301(2/2)
PHONES/
REMOTE
— 9 — — 10 — — 11 —
Page 10
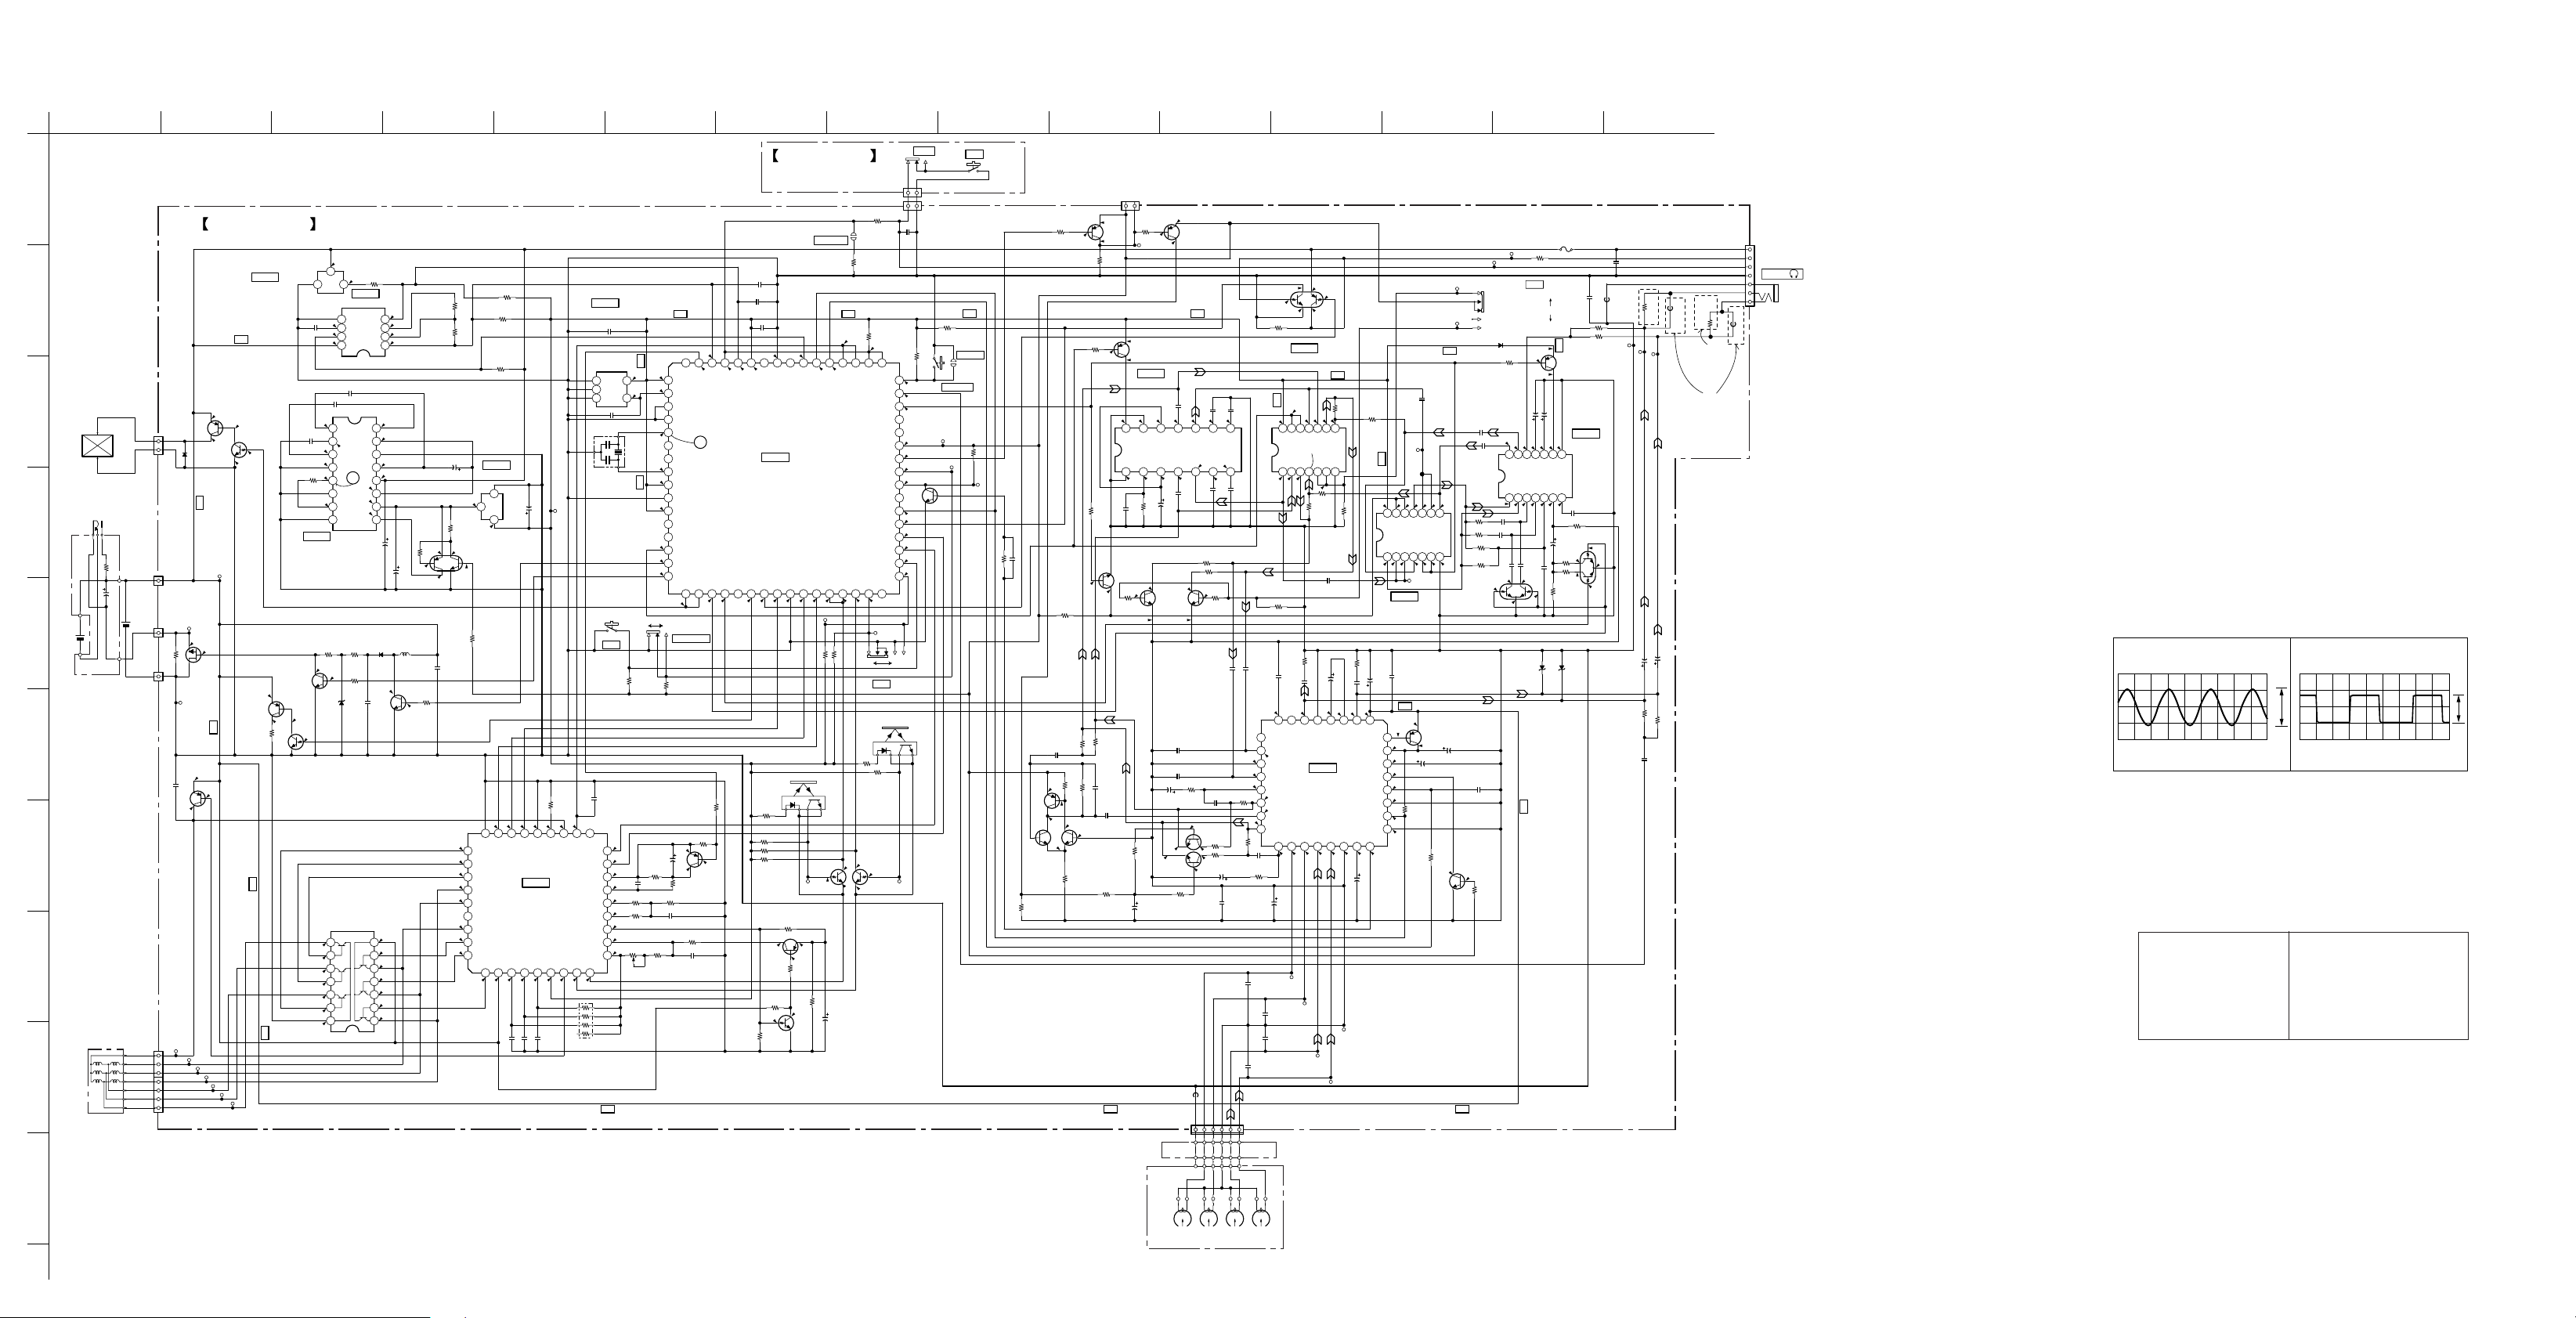
WM-EX7
6-2. SCHEMATIC DIAGRAM
A
B
C
(IEC DESIGNATION R6)
D
E
IEC JIS R6
F
G
H
I
J
12
MAIN BOARD
IC703
STOP DETECT
B+
Q701,Q702
PLUNGER DRIVER
Q701
2SA1362YG
1.5
0
0.9
TP8
VCC
B+
1
UN5215-RS-TX
0
Q601
2SB1386-
T100-R
MOTOR
SWITCH
TP7 TW
LOAD
DRIVE
R713
B+
Q702
0
3.3
PM
DRY BATTERY
SIZE"AA"
1P,1.5V
1.5V
NBL-2061
16
M
C
U
V
W
TU
TV
TW
W4
D702
MA111
Ni-MH NH-14WM
W1
GND-P
W2
R714 1k
W3
2SK2152-TD
GND
C609 1u(B)
TP1
TP32
0
S
Q710
PARA SW
TP9
0.6
C
TP2 U
TP4 W
TP5 TU
TP6 TV
B+
7.5
1.5
TP3 V
IC703
XC61AS0VXXMR
C703 1u(F)
R801 1.5M
Q703
MSD1819A-RT1
DDC CTL SW
Q707
1.5
2SA1362YG
0
UN5215-RS-TX
LOAD CONTROL
B+
3456789101112131415
C801
0.0.47u(B)
IC801
DC/DC
CONVERTOR
1
0
Q708
4.4
0.7
0
0.6
0.6
R717
7.5
UDZ-TE
-17-12B
0.6
0.4
0.6
0.4
0.6
0.4
0
1.5
R719
3
0
100k
12
IC702
VOLTAGE DETECT
GND
OUT4
5
1.2
RIPPLE
OUT3
6
1.4
OUT2
CE
7
1.5
OUT1Vcc
8
MM1305BWBE
C802 0.01u(B)
C803 0.047u(B)
IC801 MPC1850DTBEL
C3H
C2H
1
16
VG
C1H
15
2
5
C2L
GND
14
3
NC
COL
13
4
2
Ro
VC
5
12
1.9
NC
COH
11
6
2.6
Ri
VOUT
7
10
2.5
NC
MODE
9
8
C807
22u 4V
R718
D703
470k
0
R728
470K
C705
0.1u
(B)
Q604
MDC06TR
MOTOR SWITCH
8
9
10
11
12
13
14
MA111
7
6
5
4
3
2
1
1M
D701
0
4
0
3
0
2
0
1
IC702
3.2
1.9
0.6
1.5
C805
15u 6.3V
L701
100uH
1.3
MSD1819A-
Q711
DC/DC
CONVERTOR
1.5
1
0.6
1
0.6
1
0.6
C804 4.7u 6.3V
R804
100k
2.6
2
DDC CTL SW
R727 1k
0
Q711
RT1
2.6
R706
100k
R705
47k
Q801
R720 100k
R703 100k
R708
220K
IC802
REGURATOR
1
22u 4V
2.6
3
2
R803
220k
2
IC802
XC62FP2002MR
0
Q801
XN4601
0.5
R802
220k
C707
1u(F)
1 1 1 10 0.5 0.6
27 26 25 24 23 22 21 20 19
0.4
0.4
0.4
0.6
0.6
0.6
UIN
UT
PGND
VT
WT
WOUT
VOUT
NC
UOUT
34
1
US
35
1
VS
36
Vcc1
WS
123456789
1
C606 0.01(B)
C806
VIN
WIN
GND
IC601
MORTOR SERVO
IC601
LB1899M-TLM
WSOFT
VSOFT
USOFT
1.2 2 11.2 1.5
C608
C607
0.01(B)
TP10 DDC OUT
R601
220k
IE
MC ENTER
MC
Vcc2
1.61.5 1.3
0.01(B)
PSIG
LED1
CTRL1
CTRL2
VREF
LED2
IC704
RESET
C709 2.2uF
IC704
PST9015NL
1
23
C702 1u(F)
X701
4MHz
S706
A/B
R707
470k
C601
1000p
(B)
1.5
NC
1828
1729
VI
1630
1531
IV
1432
VC
1333
PW
12
CI2
CI1
11
10
RB601 100k
B+
B+
1.9
5
1.9
4
B+
ON
Q602
MOTOR START SW
0.3
R604
1.1
100k
1.1
C603 0.1u
R606 100k
1.1
1.1
R607 22k
0
0.3
R610 910k
1.1
RV601 330k
SUB BOARD
C710
0.1u(B)
C704
B+ B+
0
64
61
62
63
0
NC
1.9
123456
1.9
0.7
0.9
1.9
1.9
2
0
0
C602
3.3u
6.3V
7
89
10
111213141516
OFF
R704
470k
R611 1M
0.047u(B)
R608 270k
AVcc
RESET
MODE0
MODE1
X0
NC
NC
X1
Vcc
X0A
NC
NC
X1A
DOLBY CTL
PARA DDC
PARA CTL
0
DOLBY NR
1.1
1
R605
22k
C604
2200p(CH)
KEY IN
BATT DET2
MOTOR START
1
SOUND2
SOUND1
PM CTL
NC
20
19
18
17
0 0 0 1 1 1.8 1.8
S705
R602
470k
R603 1M
1.1
Q602
2SB1218A
-QRS
C610
0.1u(B)
C701
1u (F)
0
57
58
59
60
2
0
NC
AVR
1.9
AVss
BATT DET1
IC701
SYSTEM CONTROL
IC701
MB89135LPFV-G-427BND
RDATA
MOTOR-W
LOAD CTL
NC
24
21
23
22
02 1
PH702 PR-20-T
R725
1k
R726 560k
R711 470k
R712 470k
MOTOR START SW
Q603
2SB1218A-QRS
R609 100k
0.3
R612
470k
R613
1M
0
R614
Q605
220k
UN5215
Q603,Q605
MOTOR SPEED CONTROL
1.4
56
NC
Vss
25
1.1
R615
1M
1.2
55
BATT CTL
MOTOR-V
26
R701
Q709
UN5215
TP13
PHOTO-S
0
BP701
SERVICE
R732
53
54
0.6
F/R CTL
MUTE CTL
MOTOR-U
NC
28
27
TP11
REV SW
470k
1.9
C605
15u
6.3V
15k
1
52
0.8
P-SIG
PHOTO IN(S)
29
R702
1.9
1.7
360(0.5%)
51
P-SIG
BOOST CTL
DOLBY SW
PHOTO IN(T)
30
1.8 1.8
470k
FWD
R723
1k
1.9
1.8
Q705,Q709
INVERTER
S702 HOLD
W9
R710
R716 22k
(0.5%)
2
50
49
NC
HOLDER
WAKE UP
BEEP
NC
NC
DDC CTL
AMS CTL
AMS IN
NC
NC
RMUM
CTL2
CTL1
A/B SW
REV SW
NC
FWD SW
31
32
TP12
FWD SW
REV
S704
F/R
PH701 PR-20-T
R724
560k
Q705
UN5215
1.9
TP14
PHOTO-T
484746
0
0
1.9
45444342
1.9
2
1.8
414039383736353433
0.7
0.6
1.9
2
1.6
0
1.9
C706
0.047u(F)
R715 470k
S703
TP33
DDC CTL
TP15 DOLBY SW
INVERTER
Q706
MSD1819A-
RT1
S701 OPR
Q312
2SB1218A-QRS
EQ AMP CTL FOR AMS
R324 220k
B+ B+
R709 470k
BP702
HOLDER
HOLDER
R730
470k
TP16
AMS
R729 220k
C708 220p (B)
R313
470k
C303
0.047u (B)
2
Q302
1.4
MSB1218A-RT1
0.8
0.3
Q304
2SD1819A-R
R318
470k
2
R323
470k
R30610k
R731
220k
0.5
R204
22k
R301 100k
R302 390
1.4
0.047u(B)
0.8
Q303
2SD1819A-R
Q302,Q303,Q304
AMS AMP
R305
10k
R308 10k
2
R322 47k
1.3
2
2SA1362YG
1.4
2
DOLBY AMP
0.3 0 0.6 0.5
1413121110
Vcc
IC302 NJM2185AV-TE2
GND
1234567
000
C306 1000p
Q712
MSD1819A-RT1
R212
0
22k
0.7 0.7
R104
22k
C304 68p (CH)
C302
C310
4.7u 4V
W8
1.9
MSB1218A-RT1
1.4
M/N CONTROL
1.9
TP17
ATS
Q306
IC302
C205 1u(F)
0.5 0.3
SW
Vext
IN-R
IN-L
Vref
Iref
0.8
0.6
C105
1u(B)
(0.5%)
C305 10u 4V
R307 36k
R211 2.2k
0.8
R110
R111 2.2k
0.7
Q202
MSD1819A
-RT1
MSD1819A
C114 220p (B)
C214 220p (B)
C104
R102
47u 2.5V
150
1
0.5
33k
0.5
Q201
MSD1819A-
RT1
R210
C322
33k
1000p (B)
FB302
16
HP
Q315
C206
0.47(B)
9
DC-R
OUT-R
0.5
DC-L
OUT-L
C106
0.47u(B)
R112 22k
1.3
Q102
-RT1
C103
0.022u(B)
Q101
MSD1819A-
RT1
0.5
R203 10k
0.5
C204 47u 2.5V
1
HP
0.1
8
DET-R
0.1
DET-L
0.4
Q102,Q202
VOL CONT.
C213 2.2u (F)
R101 7.5k
R103 10k
R202 150
C102
470p (B)
HP
FWDREV
R722 100k
C207
0.22u(B)
C107
0.22u(B)
0.7
0.7
0.7
0.5
7.5k
R201
C203
0.022u(B)
C301
47u 2.5V
470p (B)
B+
2
IC303
TC74HC4066AFS
0.5
R312 470k
C113 2.2u (F)
C309 0.1u (F)
0.7
9
BST NF
PW IN-L
10
0.8
LPF1
11
PW IN-R
12
PRE NF-L
13
0.5
PRE OUT-L
14
0.7
AMS DET
15
PRE
OUT-R
16
C201
470p
C101
CN301 6P
HP
LchRchLch Rch
DOLBY,VOL SW
LPF2
TP27
1.5
1.9
0
2
0
0
IC303
B+
R107
2
33k
0.5
0.5
0.7
0.7
8
9
121314
10
11
4ch
3ch
3ch
4ch
Vcc
CTL1
CTL4
0.7
CTL3
CTL2
GND
2ch
2ch
1ch
1ch
2143576
0.5
0.5
0
R206
2.2k
R207
33k
C109 4.7u (F)
R121 2.2
C311 22u 4V
C115 0.1u (B)
0.70.7
0.6
5678
GND
BST OUT
AGC TAU
PW OUT-L
IC301
AUDIO AMP
IC301
BA3632K-E2
NF-R
PRE
0.7
REV-L
FWD IN-L
FWD IN-R
REV IN-R
REV IN-L
0.7 0.7 0.7 0.8 0 2 1
TP28
REV-R
TP31
REF
TP29
FWD-R
TP30
FWD-L
Q704
XN4315
DATA
CONTROL
R106
2.2k
R311 470k
R221 2.2
C215 0.1u (B)
1.5
0.6
1234
RF BASE
PW NF
PW OUT-R
RF OUT
PW SW
MUTE SW
BST SW
F/R SW
AMS OUT
REF OUT
REF IN
2423222120191817
C316 2.2u 10V
B+
2
13
14
Vcc
CTL1
1ch
1ch
2
1
00 0 0
0
DOLBY OUT-L
IC304
SOUND SW
IC304
TC74HC4066AFS
C312
22u
C321
4V
1u (F)
B+
0.9
Vcc
32
1.8
31
1.8
RF IN
30
1.8
29
1.8
28
1
27
26
1
PRE
25
MUTE
0
SW
4.7u (F)
DOLBY OUT-R
0.80.8
00
101112
4ch
4ch
CTL4
CTL2
2ch
2ch
543
TP26
1.5
RIPPLE FILTER
1.4
C314 4.7u 4V
R315
220k
R316
100k
TP20 VOL MAX
TP21
AVLS
B+
C209
TP25
0.8
0.8
0.8
8
9
3ch
3ch
GND
CTL3
7
6
2
HIGH CONTROL
Q309
2SB815B7-TB
C313 22u 4V
AUDIO PW SW
1.8
TP19 REMO
S708
D704
MA111
R317 10k
C108
2.2u (F)
C208
2.2u (F)
IC305
LA3550MTP-1
R208 1k
R108 1k
R209 100k
R109
100k
Q313
XN1217
C315
0.047u(B)
Q301
MSD1819A
-RT1
0.6
R320
220k
B+B+
TP18
0.3
0.3
C210 2200p
C110 2200p
1.7
0
0.3
DATA
VOL
0
0.3
OUT-L
OUT-RIN-R
IN-L
2
1
0.3
0.3
C111 3300p
1.7
D201
UDZ-TE-
17-12B
B+
F701 0.25A
R721 1k
MAX
NORM
MIN
2
1.7
0.3
C319 3.3u 6.3V
C318 10u 4V
0.3
0.3
0.3
1011121314
REF
DET-IN
DET-OUT
LP-IN
HP-L
HP-R
543
0.3
0.3
0.7
(B)
u
C211 3300p
C320 0.033
0
UDZ-TE-
17-12B
!
C711 1u (F)
C712
1u (F)
B+
R205 68k
Q305
2SB1218A-QRS
BOOST PW SW
IC305
BOOST AMP
0.3
8
9
Vcc
GND
LP-OUT
LP-GAIN
7
6
C308 0.022u(B)
0.7
R309 100k
C307
Q308
4.7u
XN1217
4V
R304
0
22k
R303
0
3.9k
R310
220k
D101
0
0
FB301
R105 68k
0.3
C317
1u(F)
C116
100u
2.5V
R122
6.8k
FR
MODEL
FB101
R150 27
MODEL
TP23 Lch
TP22 COM
TP24 Rch
EXCEPT FR
MODEL
Q308 BOOST GAIN CONT.
C216
100u
2.5V
R222
6.8k
R250 27
FR
Vcc
DATA
REMO
GND
COM
Lch
Rch
FB201
J301
REMOTE
• Waveform
4 MHz
0.1µsec/div
1V/div
2.2Vp-p
2 IC801 5
28 kHz
4
W or less unless otherwise
Note:
Les composants identifiés par
une marque ! sont critiques
pour la sécurité.
Ne les remplacer que par une
piéce portant le numéro
spécifié.
1 IC701 5
Note:
• All capacitors are in µF unless otherwise noted. pF: µµF
50 WV or less are not indicated except for electrolytics
and tantalums.
• All resistors are in Ω and 1/
specified.
• % : indicates tolerance.
• C : panel designation.
Note:
The components identified by mark ! or dotted
line with mark ! are critical for safety.
Replace only with part
number specified.
• U : B+ Line.
• H : adjustment for repair.
• Power voltage is dc 1.5 V and fed with regulated dc power
supply from battery terminal.
no mark : PLAY
• Waveforms are taken with a oscilloscope.
Voltage variations may be noted due to normal production tolerances.
• Circled numbers refer to waveforms.
• Signal path.
E : PB
• Abbreviation
FR : French
10µsec/div
1V/div
1.6Vp-p
— 12 — — 13 — — 14 —
Page 11
Page 12
WM-EX7
ON/
OFF
1
40k
8.8k
40k
2
3
4
5
6
7
8
9
10
14
13
12
11
OUT-1
OUT-2
DET IN
DET OUT
REF
VCC
GND
LP-OUT
LP-GAIN
LP-IN
HP-L
HP-R
IN-2
IN-1
8.8k
50k
6-4. IC BLOCK DIAGRAMS
IC301 BA3632K-E2 IC601 LB1899M IC302 NJM2185AV-TE2
V+
AMS OUT
BIAS IN
BIAS OUT
FWD IN1
FWD IN2
REV IN2
REV IN1
PRE NF2
24 23 22 21 20 19 18 17
VCC
PRE MUTE
FWD/REV
LOW BST
25
26
27
200k
25k
25k
–
+
–
+
200k
–
+
COMP
PRE OUT2
16
15
AMS DET
14
PRE OUT1
BIAS
PWR MUTE
28
13
PRE NF1
SYSTEM CONTROLRIPPLE FILTER
PW SW
RF IN
RF OUT
RF BASE
29
30
31
32
–
30k
+
–
210k 3k
+
VDET
–
COMP
90k90k
+
45k
–
+
30k
+
2k
2k
12
11
10
9
PWR IN1
LPF1
PWR IN2
BST NF
1 2 3 4 5 6 7 8
VCC
PWR NF
PWR OUT1
IC702 MM1305BWBE IC801 MPC1850DTBEK IC305 LA3550MT
BST OUT
GND
LPF2
RGC T AU
PWR OUT2
— 19 — — 20 — — 21— — 22 —
14
1
GND
SW
13
Circuit
2
IREF
VEXT12INA
BIAS
VREF3INB
OUTA
1011
+
–
SUM
Ach BLOCK
Bch BLOCK
4
5
OUTB
DCA
9
G1G2 V/I
Weight
(same Ach)
6
DCB
Gm
DETA
8
–
+
7
DETB
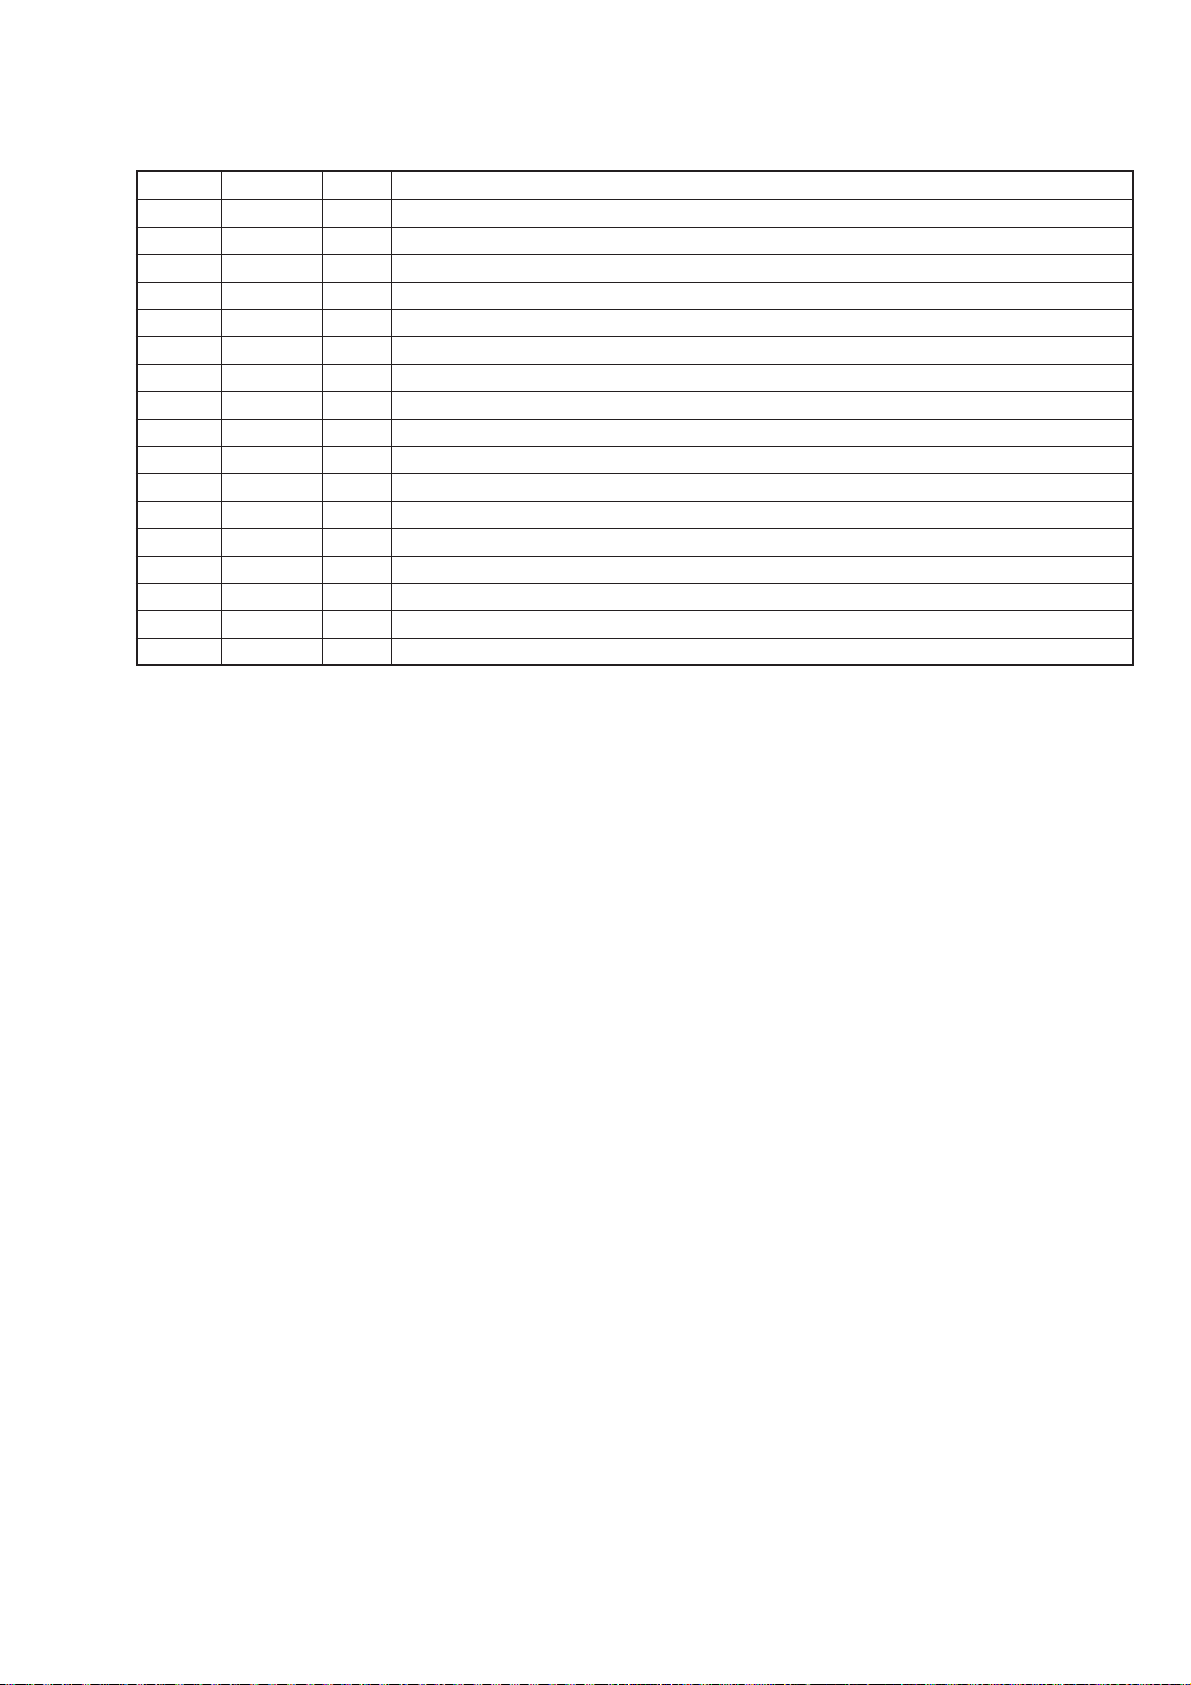
6-5. IC PIN FUNCTION
• IC701 MB89135LPFV-G-427BND (AUDIO BOARD)
Pin No.
1
2
3
4
5
6
7
8
9
10
11
12
13
14
15
16
17
18
19
20
21
22
23
24
25
26
27
28
29
30
31
32
33
34
35
36
37
38
39
40
41
42
43
44
45
46
47
Pin Name
AVCC
RESET
MODE0
MODE1
X0
NC
NC
X1
VCC
X0A
NC
NC
X1A
DOLBY CTL
P ARA DDC
PRA CTL
NC
PM CTL
SOUND1 CTL
SOUND2 CTL
NC
LOAD CTL
RDATA
MOTOR-U
VSS
MOTOR-V
MOTOR-W
NC
PHOTO IN (S)
PHOTO IN (T)
FWD SW
NC
REV SW
A/B SW
CTL1
CTL2
RMUM
NC
NC
AMS IN
DOLBY SW
AMS CTL
DDC CTL
NC
NC
BOOST CTL
BEEP
I/O
—
Power supply terminal of A/D converter.
I
Reset input terminal.
I
Test input terminal. (Connected directly to Vss).
I
Test input terminal. (Connected directly to Vss).
—
Terminal to which external main clock is connected. (4 MHz).
—
Terminal to which external main clock is connected. (4 MHz).
—
Power supply terminal.
—
Terminal to which external sub clock is connected. (32.768 MHz).
—
Terminal to which external sub clock is connected. (32.768 MHz).
O
DOLBY control output. (OFF = H, ON = L).
O
Oscillator circuit control output for power supply voltage selection. (During operation = intermittent output).
O
Control output to power supply selector circuit. (Parallel connection OFF = H, Parallel connection ON = L).
O
Plunger solenoid control output. (OFF = L, ON = H).
O
Sound quality control output. (During MB, GROOVE = H, Other modes = L).
O
Sound quality control output. (During GROOVE = H, Other modes = L).
O
Remaining battery detection output. (When detected = H).
O
Communication data output to LCD remote control.
O
Motor control output. (3-state).
—
Power supply (Ground).
O
Motor control output. (3-state).
O
Motor control output. (3-state).
I
Rotation detection input. (Supply side).
I
Rotation detection input. (Takeup side).
I
Mode status input of MD. (FWD PLAY mode = L).
I
Mode status input of MD. (FWD PLAY mode = L).
I
Input from tape side-A/B detection switch. (When side-A is on top = L, When side-B is on top = H).
O
Mode selector output from servo IC. (3-state)
O
Mode selector output from servo IC. (3-state)
I
Remote control connected or not-connected. (During when issuing request to re-send = L).
I
Input from the present or absence detector of music on tape. (Music present = PULSE, No music = H).
I
Input from DOLBY switch. (OFF = H, ON = L).
O
AMS sensitivity selection output. (During FF/REW mode = L, Other modes = H).
O
DDC oscillating frequency change output. (During STOP = L, During operation = H).
O
Sound quality control output. (During OFF = H, During REVIVE, MB, GROOVE = L).
O
Beep sound output. (f = 1.6 kHz).
Description
Page 13
Pin No.
48
49
50
51
52
53
54
55
56
57
58
59
60
61
62
63
64
HOLDER
NC
WAKE UP
P-SIG
P-SIG
MUTE CTL
F/R CTL
BATT CTL
NC
AVSS
NC
AVR
BATT DET1
KEY IN
BATT DET2
MOTOR START
NC
I/O
I
Input from cassette lid open/close switch. (Close = L, Open = H).
I
Input signal to for the system into the NORMAL mode during FF/REW. (PLAY = L, FF/REW = H).
I
Motor control input. (For controlling the three-phase of motor).
O
Motor control input. (For P-SIG count).
I/O
MUTE control output. (MUTE OFF = INPUT, MUTE ON = L).
I/O
Head selector output. (During FWD = INPUT, During REV = L).
I/O
ON/OFF control of the BATT detector circuit. (Intermittent output during PLAY).
—
Power supply terminal of A/D converter.
—
Reference voltage input terminal of A/D converter.
I
Input from voltage detection. (A/D input). Detects 0.95 V and 1.06 V.
I
Key input terminal. Used as the test mode terminal too.
I
Input from voltage detection. (A/D input). Detects 1.21 V, 1.245 and 1.275 V.
O
Motor startup output. (N-ch open drain output). (During startup = L).
DescriptionPin Name
— 23 —
Page 14
NOTE:
• -XX, -X mean standardized parts, so they may
have some differences from the original one.
• Items marked “*” are not stocked since they
are seldom required for routine service. Some
delay should be anticipated when ordering these
items.
• Color Indication of Appearance Parts Example:
KNOB, BALANCE (WHITE) . . . (RED)
↑ ↑
Parts of Color Cabinet’s Color
SECTION 7
EXPLODED VIEWS
• The mechanical parts with no reference number
in the exploded views are not supplied.
• Hardware (# mark) list and accessories and
packing materials are given in the last of this
parts list.
• Abbreviation
CND : Canadian
FR : French
KR : Korean
JEW : Tourist
When indicating parts by reference number,
please include the board name.
The components identified by mark ! or
dotted line with mark ! are critical for safety .
Replace only with part number specified.
Les composants identifiés par une marque
! sont critiques pour la sécurité.
Ne les remplacer que par une pièce portant
le numéro spécifié.
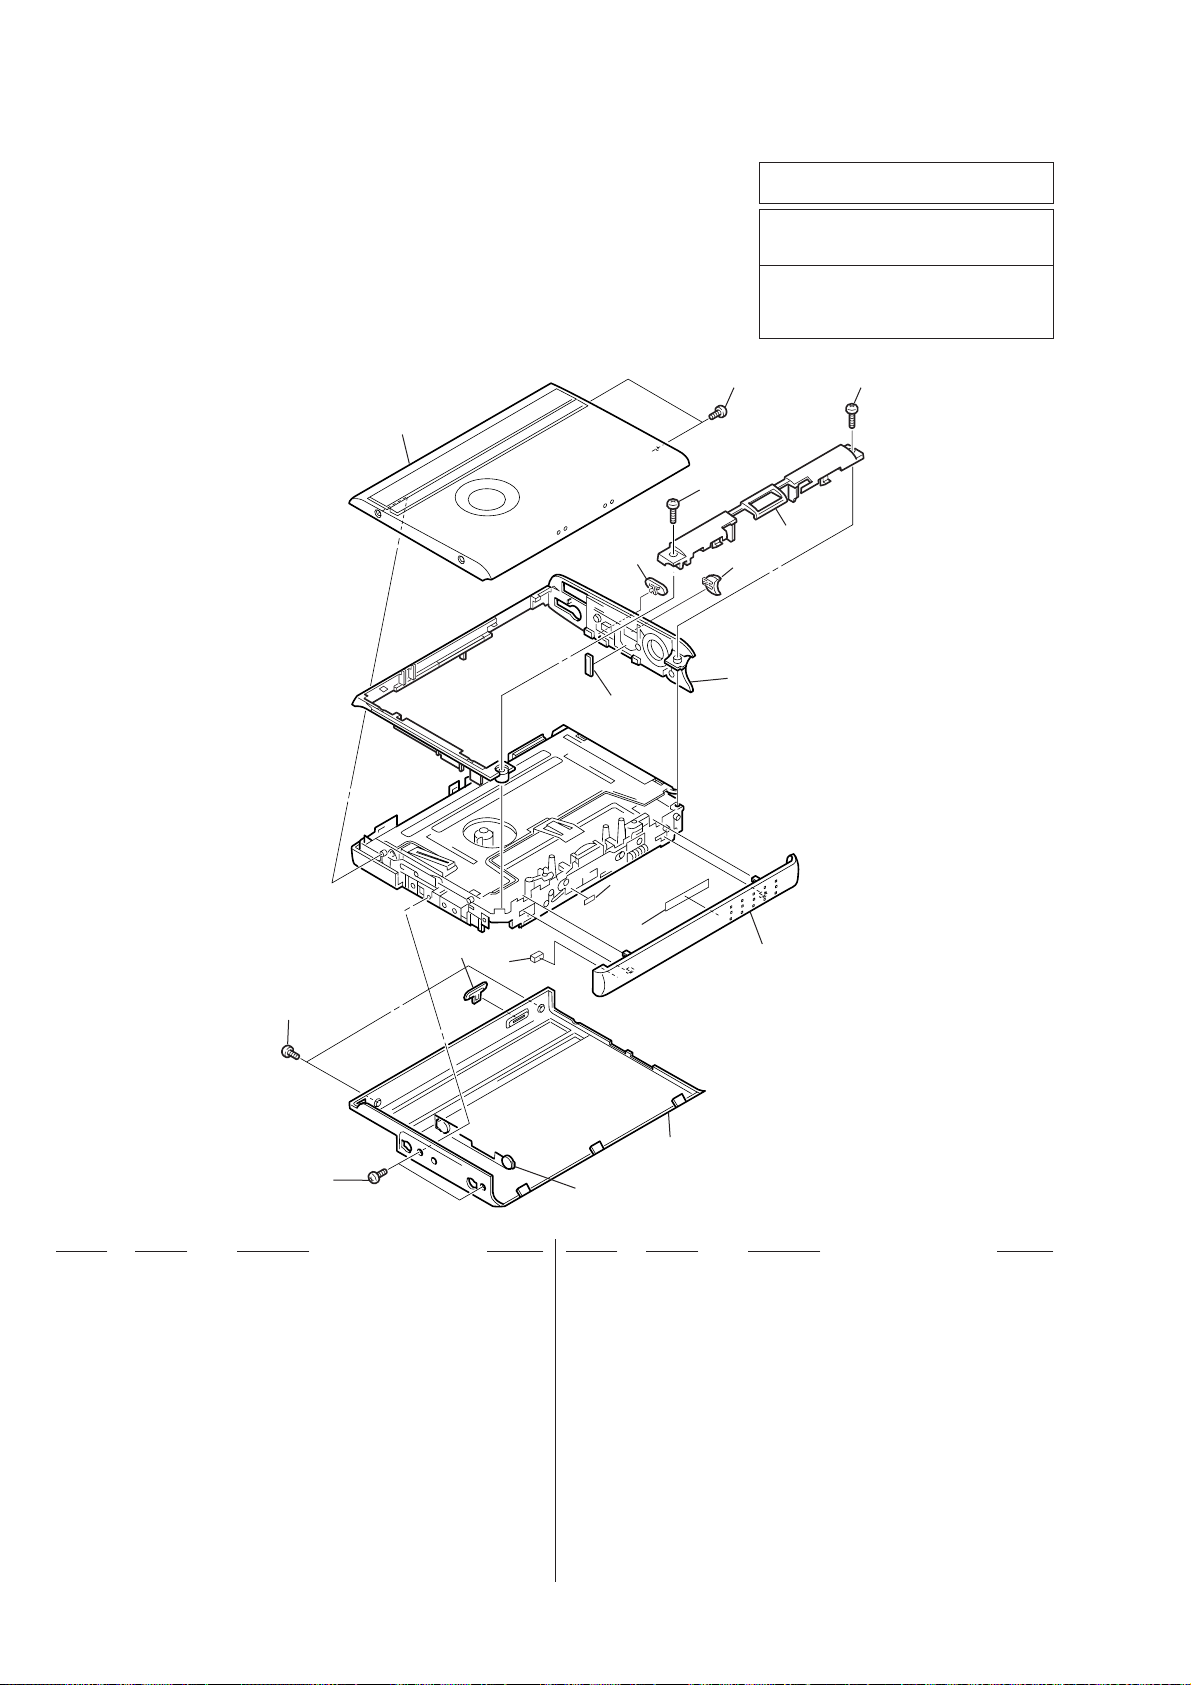
7-1. CABINET BLOCK
11
10
7
9
8
13
12
6
14
15
17
4
16
5
3
1
3
Ref. No. Part No. Description Remarks Ref. No. Part No. Description Remarks
1 3-019-066-01 CASE (SILVER)
1 3-019-066-11 CASE (BLUE) (KR, JEW)
1 3-019-066-21 CASE (ORANGE) (KR, JEW)
1 3-019-066-31 CASE (GREEN) (KR, JEW)
2 3-019-334-01 ORNAMENT (TERMINAL)
3 3-704-197-01 SCREW (M 1.4 × 1.6), LOCKING (SILVER)
3 3-704-197-03 SCREW (M 1.4 × 1.6), LOCKING (KR, JEW)
(BLUE, ORANGE, GREEN)
4 3-019-080-01 KNOB (DOLBY) (SILVER)
4 3-019-080-11 KNOB (DOLBY) (BLUE) (KR, JEW)
4 3-019-080-21 KNOB (DOLBY) (ORANGE) (KR, JEW)
4 3-019-080-31 KNOB (DOLBY) (GREEN) (KR, JEW)
5 3-019-058-01 SLIDER (OPEN)
6 X-3374-500-1 ORNAMENT (A) ASSY, REEL
2
7 X-3374-995-1 CASSETTE LID ASSY (SILVER)
7 X-3374-996-1 CASSETTE LID ASSY (BLUE) (KR, JEW)
7 X-3374-997-1 CASSETTE LID ASSY (ORANGE) (KR, JEW)
7 X-3374-998-1 CASSETTE LID ASSY (GREEN) (KR, JEW)
8 3-019-059-01 ORNAMENT (B), REEL
9 3-939-590-48 SCREW (IB LOCK)
10 3-939-590-35 SCREW (IB LOCK)
11 3-939-590-05 SCREW (IB LOCK)
12 3-019-076-01 KNOB (HOLD)
13 3-019-077-01 KNOB (VOL)
14 3-022-298-01 CUSHION (7F)
15 3-022-024-01 SHEET (7I)
16 3-022-297-01 CUSHION (7L)
17 3-022-381-01 CUSHION (7M)
— 24 —
Page 15
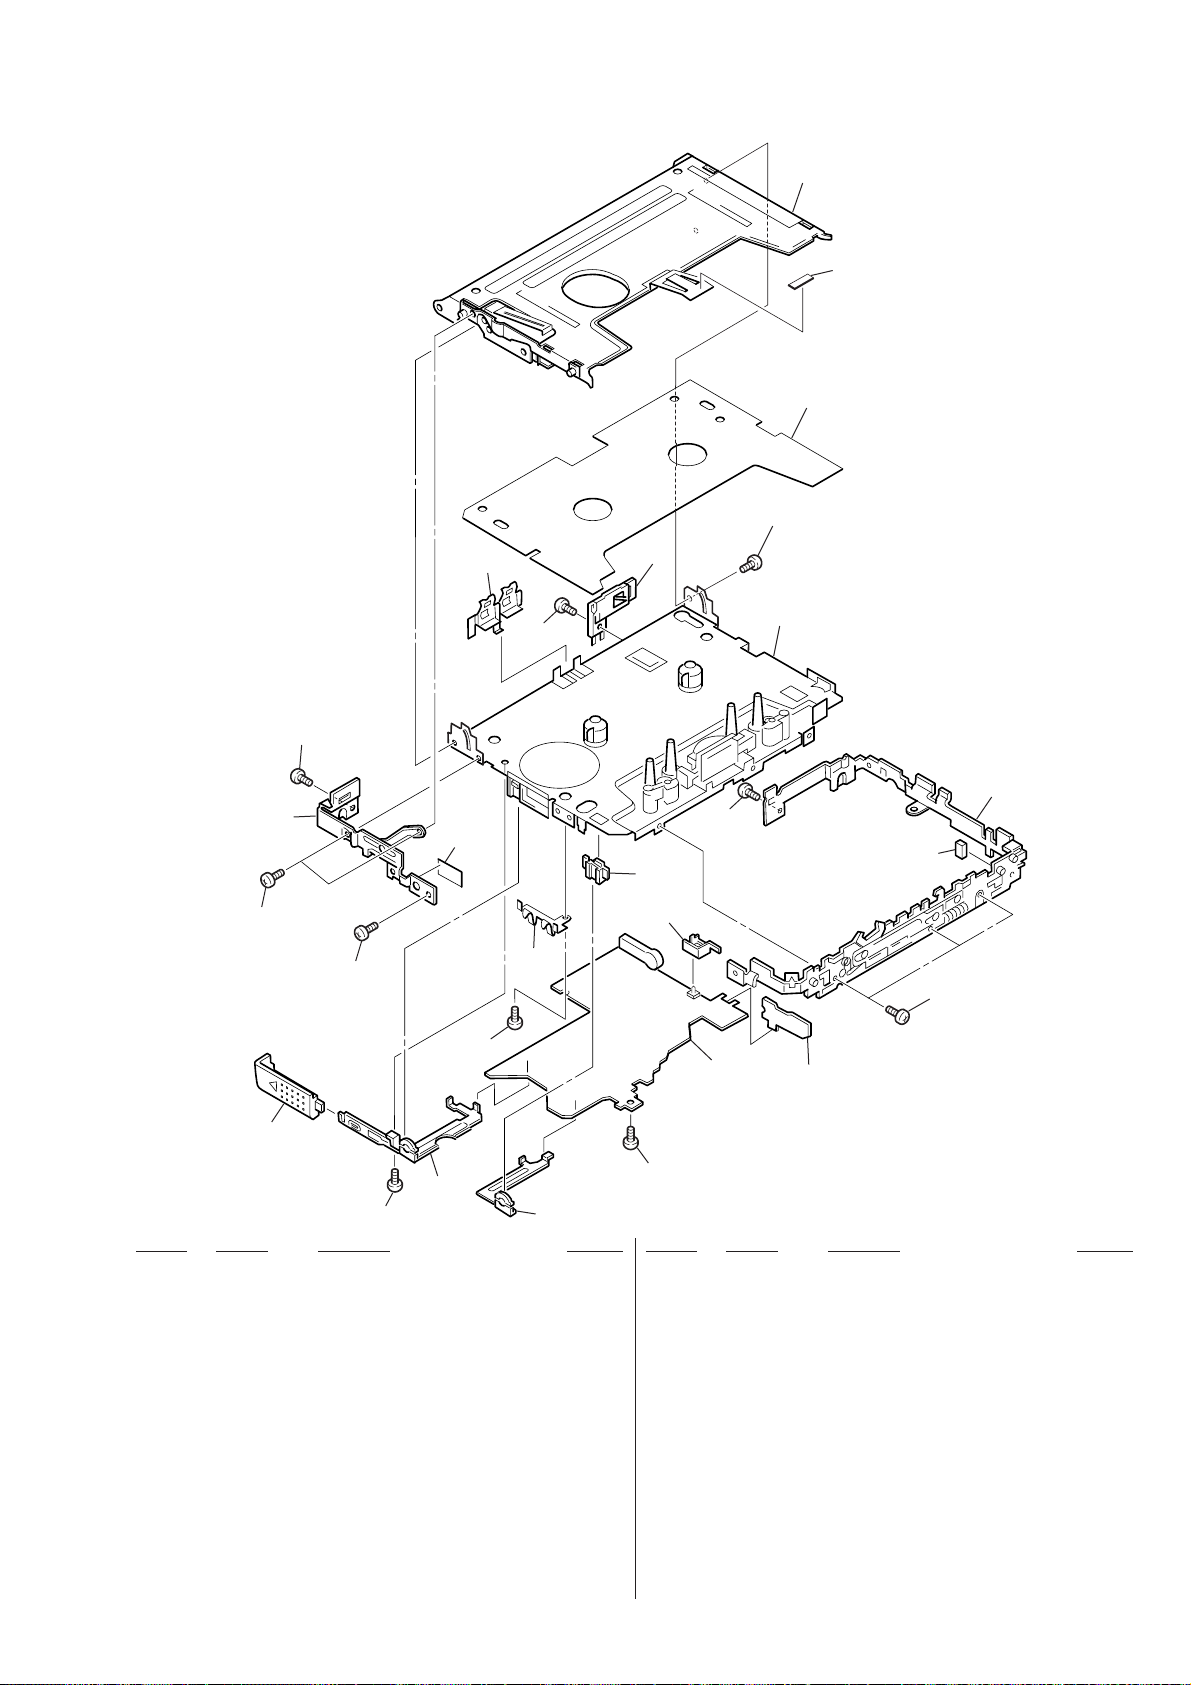
7-2. AUDIO BOARD BLOCK
60
74
62
67
51
59
67
69
75
70
61
73
57
63
58
71
72
55
MT-WMEX7-125
65
76
72
77
54
51
53
70
Ref. No. Part No. Description Remarks Ref. No. Part No. Description Remarks
51 3-939-590-05 SCREW (IB LOCK)
52 3-009-690-01 TERMINAL BOARD, BATTERY
53 X-3374-170-1 TERMINAL BOARD ASSY, BATTERY
54 3-019-057-01 LID, BATTERY CASE (SILVER)
54 3-019-057-11 LID, BATTERY CASE (KR, JEW) (BLUE)
54 3-019-057-21 LID, BATTERY CASE (KR, JEW) (ORANGE)
54 3-019-057-31 LID, BATTERY CASE (KR, JEW) (GREEN)
55 A-3061-570-A MAIN BOARD (US, CND, AEP, UK, E, KR, JEW)
55 A-3061-723-A MAIN BOARD (FR)
57 3-007-282-01 TERMINAL BOARD (MINUS), BATTERY
58 3-020-751-01 CASE (MINUS)
59 X-3374-551-1 BRACKET (B) ASSY
60 X-3374-498-1 HOLDER ASSY
61 3-928-465-01 DETENT, CASSETTE
62 3-020-791-01 COVER (EX7), MD (JEW)
52
62 3-020-791-11 COVER (EX7), MD (AEP, UK, FR)
62 3-020-791-21 COVER (EX7), MD (US, CND, E, KR)
63 1-762-793-22 SWITCH, LEAF
65 X-3374-499-1 BRACKET (A) ASSY
67 3-366-890-01 SCREW (M1.4)
69 3-389-523-16 SCREW (IB LOCK)
70 3-375-114-41 SCREW
71 3-010-520-01 COVER, SW
72 3-389-523-06 SCREW (IB LOCK)
73 3-704-197-01 SCREW (M 1.4 × 1.6), LOCKING
74 3-022-023-01 SHEET (HOLDER SPRING), ADHESIVE
75 3-022-027-01 CUSHION (7K)
76 3-012-226-01 SPACER
* 77 1-667-827-11 SUB BOARD
— 25 —
Page 16
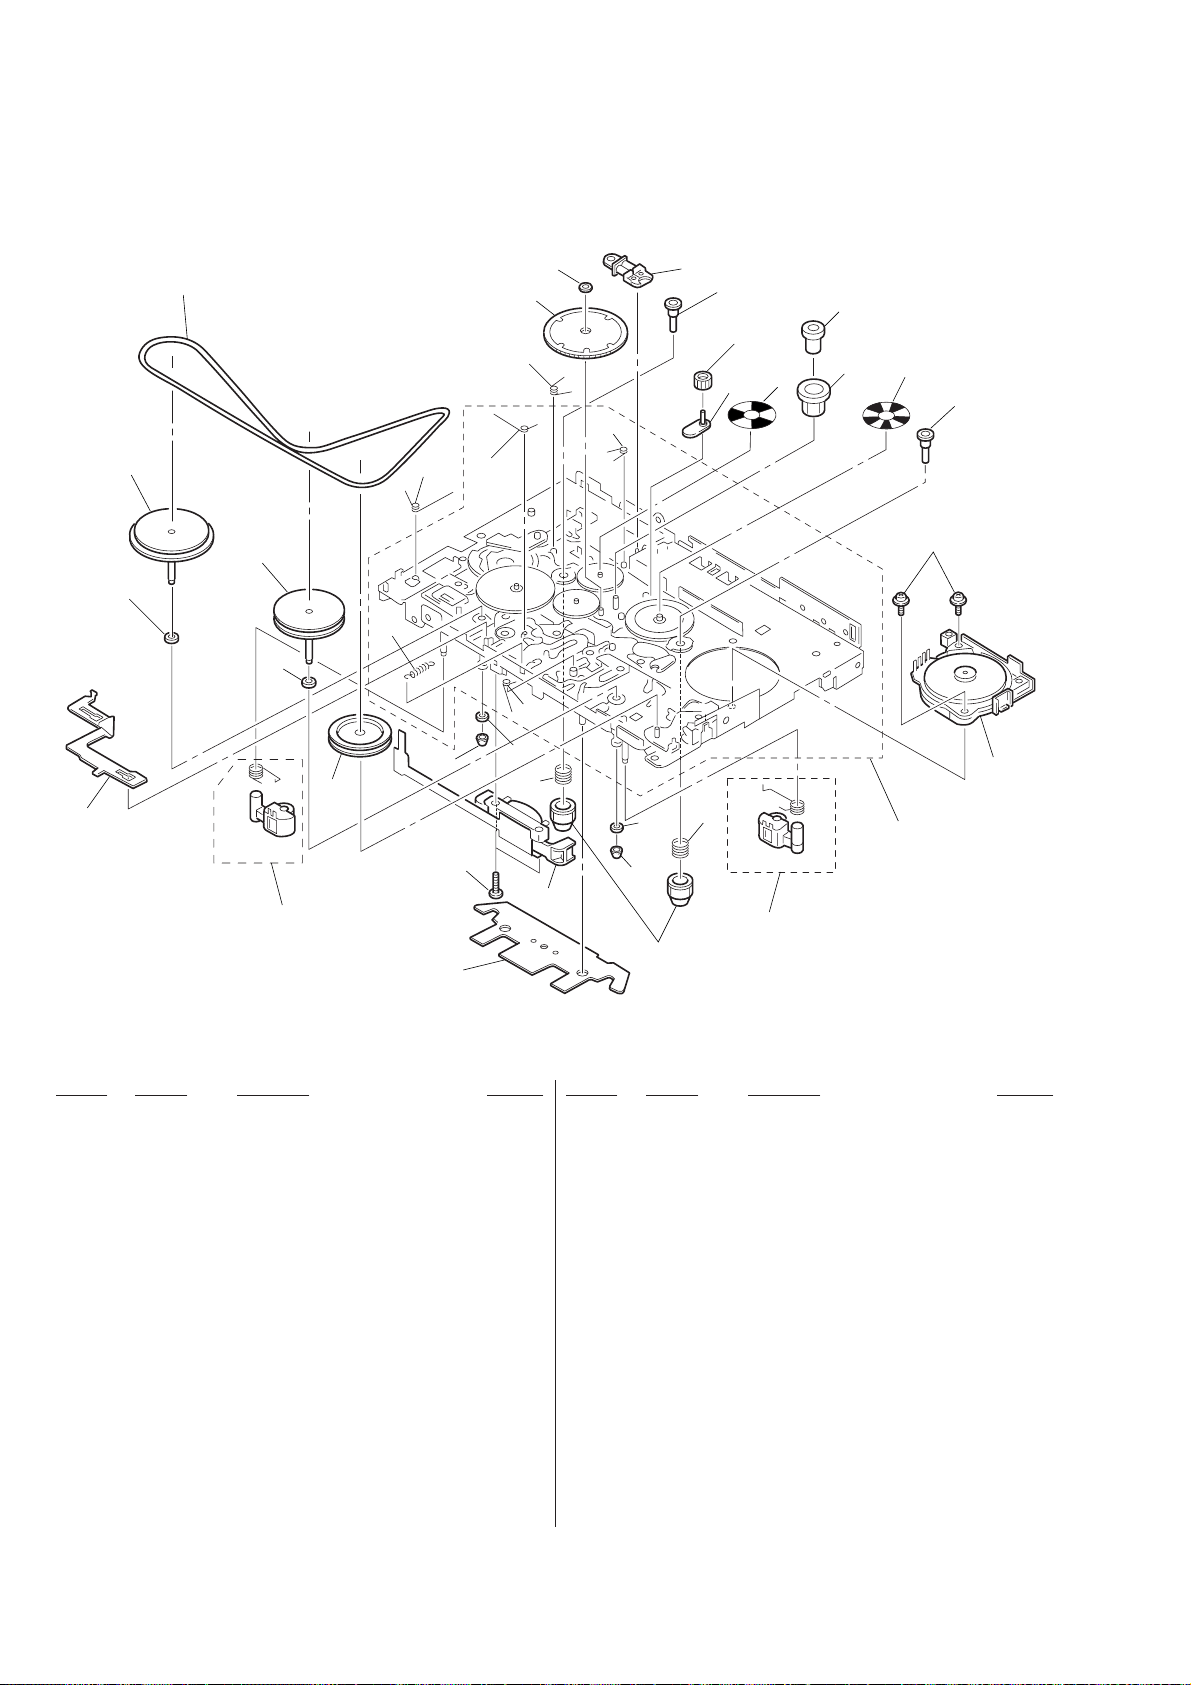
7-3. MECHANISM DECK BLOCK (MT-WMEX7-125)
107
109
108
110
106
105
103
104
123
111
130
102
101
124
115
114
122
131
128
132
HP301
125
129
130
137
PM901
134
128
116
117
118
127
135
136
119
134
120
M901
121
Ref. No. Part No. Description Remarks Ref. No. Part No. Description Remarks
101 3-011-277-11 COVER (B) (Y), MD
102 3-022-104-01 SCREW (M1.4), PRECISION
103 X-3374-675-1 PINCH LEVER (N) ASSY
104 3-007-434-01 PULLEY (REVERSE)
105 3-007-428-01 WASHER (R)
106 X-3374-596-1 FLYWHEEL (R) ASSY
107 3-007-439-01 SLIDER (LOCK)
108 3-386-694-11 WASHER
109 X-3374-595-1 FLYWHEEL (N) ASSY
110 3-018-177-01 BELT
111 3-007-960-01 SPRING (EJECT) (Y), TORSION
114 3-007-436-01 SPRING (TRIGGER), TORSION
115 X-3374-674-1 CLUTCH ASSY (M)
116 3-016-696-01 GEAR (FRN)
117 X-3372-853-1 LEVER (FRG) ASSY
118 3-007-433-01 SHEET (N), REFLECTION
119 3-007-432-01 SHEET (R), REFLECTION
120 3-019-715-01 SCREW (M1.4), LOCK ACE
121 X-3374-339-1 CHASSIS ASSY (S), OUTSERT
122 3-019-710-01 SPRING (R), TORSION
123 3-007-458-01 SPRING (H/B), TENSION
124 3-019-709-01 SPRING (N), TORSION
125 3-007-454-01 SPRING (FR), TORSION
127 X-3374-676-1 PINCH LEVER (R) ASSY
128 3-010-954-01 SPRING (BT), COMPRESSION
129 3-918-943-01 WASHER, STOPPER
130 3-366-017-01 BUSHING (CAPSTAN)
131 3-007-429-01 WASHER (R), STOPPER
132 3-932-724-21 WASHER
134 3-010-273-02 GEAR (REEL)
135 3-018-174-01 BUSHING (NR)
136 3-018-173-01 GEAR (NR)
137 3-010-274-02 TABLE, REEL
HP301 1-505-795-11 HEAD, MAGNETIC (PLAYBACK)
M901 1-763-042-11 MOTOR
PM901 1-454-674-31 SOLENOID, PLUNGER
— 26 —
Page 17

SECTION 8
ELECTRICAL PARTS LIST
MAIN
NOTE:
When indicating parts by reference number,
please include the board name.
The components identified by mark ! or
dotted line with mark ! are critical for safety .
Replace only with part number specified.
Les composants identifiés par une marque
! sont critiques pour la sécurité.
Ne les remplacer que par une pièce portant
le numéro spécifié.
• Abbreviation
CND : Canadian
FR : French
KR : Korean
JEW : Tourist
Ref. No. Part No. Description Remarks Ref. No. Part No. Description Remarks
A-3061-570-A MAIN BOARD (US, CND, AEP, UK, E, KR, JEW)
***********
A-3061-723-A MAIN BOARD (FR)
***********
< CAPACITOR >
C101 1-162-962-11 CERAMIC CHIP 470PF 10% 50V
C102 1-162-962-11 CERAMIC CHIP 470PF 10% 50V
C103 1-164-227-11 CERAMIC CHIP 0.022uF 10% 25V
C104 1-119-663-11 TANTAL. CHIP 47uF 20% 2.5V
C105 1-115-156-11 CERAMIC CHIP 1uF 10V
C106 1-113-619-11 CERAMIC CHIP 0.47uF 10% 6.3V
C107 1-115-467-11 CERAMIC CHIP 0.22uF 10% 10V
C108 1-164-505-11 CERAMIC CHIP 2.2uF 16V
C109 1-117-720-11 CERAMIC CHIP 4.7uF 10V
C110 1-162-966-11 CERAMIC CHIP 0.0022uF 10% 50V
C111 1-162-967-11 CERAMIC CHIP 0.0033uF 10% 50V
C113 1-164-505-11 CERAMIC CHIP 2.2uF 16V
C114 1-162-960-11 CERAMIC CHIP 220PF 10% 50V
C115 1-107-826-11 CERAMIC CHIP 0.1uF 10% 16V
C116 1-117-977-11 TANTAL. CHIP 100uF 20% 2.5V
C201 1-162-962-11 CERAMIC CHIP 470PF 10% 50V
C202 1-162-962-11 CERAMIC CHIP 470PF 10% 50V
C203 1-164-227-11 CERAMIC CHIP 0.022uF 10% 25V
C204 1-119-663-11 TANTAL. CHIP 47uF 20% 2.5V
C205 1-115-156-11 CERAMIC CHIP 1uF 10V
C206 1-113-619-11 CERAMIC CHIP 0.47uF 10% 6.3V
C207 1-115-467-11 CERAMIC CHIP 0.22uF 10% 10V
C208 1-164-505-11 CERAMIC CHIP 2.2uF 16V
C209 1-117-720-11 CERAMIC CHIP 4.7uF 10V
C210 1-162-966-11 CERAMIC CHIP 0.0022uF 10% 50V
C211 1-162-967-11 CERAMIC CHIP 0.0033uF 10% 50V
C213 1-164-505-11 CERAMIC CHIP 2.2uF 16V
C214 1-162-960-11 CERAMIC CHIP 220PF 10% 50V
C215 1-107-826-11 CERAMIC CHIP 0.1uF 10% 16V
C216 1-117-977-11 TANTAL. CHIP 100uF 20% 2.5V
C301 1-119-663-11 TANTAL. CHIP 47uF 20% 2.5V
C302 1-165-176-11 CERAMIC CHIP 0.047uF 10% 16V
C303 1-165-176-11 CERAMIC CHIP 0.047uF 10% 16V
C304 1-162-925-11 CERAMIC CHIP 68PF 5% 50V
C305 1-135-201-11 TANTALUM CHIP 10uF 20% 4V
C306 1-162-964-11 CERAMIC CHIP 0.001uF 10% 50V
C307 1-135-151-21 TANTALUM CHIP 4.7uF 20% 4V
C308 1-164-227-11 CERAMIC CHIP 0.022uF 10% 25V
C309 1-164-156-11 CERAMIC CHIP 0.1uF 25V
C310 1-109-935-11 TANTAL. CHIP 4.7uF 20% 4V
• Due to standardization, replacements in the
parts list may be different from the parts
specified in the diagrams or the components
used on the set.
• -XX, -X mean standardized parts, so they may
have some difference from the original one.
• Items marked “*” are not stocked since they
are seldom required for routine service. Some
delay should be anticipated when ordering these
items.
• CAP A CITORS:
uF: µF
C311 1-104-847-11 TANTAL. CHIP 22uF 20% 4V
C312 1-104-847-11 TANTAL. CHIP 22uF 20% 4V
C313 1-104-847-11 TANTAL. CHIP 22uF 20% 4V
C314 1-135-151-21 TANTALUM CHIP 4.7uF 20% 4V
C315 1-165-176-11 CERAMIC CHIP 0.047uF 10% 16V
C316 1-135-149-21 TANTALUM CHIP 2.2uF 20% 10V
C317 1-115-156-11 CERAMIC CHIP 1uF 10V
C318 1-135-201-11 TANTALUM CHIP 10uF 20% 4V
C319 1-135-180-21 TANTALUM CHIP 3.3uF 20% 6.3V
C320 1-164-677-11 CERAMIC CHIP 0.033uF 10% 16V
C321 1-115-156-11 CERAMIC CHIP 1uF 10V
C322 1-162-964-11 CERAMIC CHIP 0.001uF 10% 50V
C601 1-162-964-11 CERAMIC CHIP 0.001uF 10% 50V
C602 1-135-180-21 TANTALUM CHIP 3.3uF 20% 6.3V
C603 1-107-826-11 CERAMIC CHIP 0.1uF 10% 16V
C604 1-165-176-11 CERAMIC CHIP 0.047uF 10% 16V
C605 1-107-685-11 TANTAL. CHIP 15uF 20% 6.3V
C606 1-162-970-11 CERAMIC CHIP 0.01uF 10% 25V
C607 1-162-970-11 CERAMIC CHIP 0.01uF 10% 25V
C608 1-162-970-11 CERAMIC CHIP 0.01uF 10% 25V
C609 1-109-982-11 CERAMIC CHIP 1uF 10% 10V
C610 1-164-695-11 CERAMIC CHIP 0.0022uF 5% 50V
C701 1-115-156-11 CERAMIC CHIP 1uF 10V
C702 1-115-156-11 CERAMIC CHIP 1uF 10V
C703 1-115-156-11 CERAMIC CHIP 1uF 10V
C704 1-107-826-11 CERAMIC CHIP 0.1uF 10% 16V
C705 1-107-826-11 CERAMIC CHIP 0.1uF 10% 16V
C706 1-164-361-11 CERAMIC CHIP 0.047uF 16V
C707 1-115-156-11 CERAMIC CHIP 1uF 10V
C708 1-162-960-11 CERAMIC CHIP 220PF 10% 50V
C709 1-164-505-11 CERAMIC CHIP 2.2uF 16V
C710 1-107-826-11 CERAMIC CHIP 0.1uF 10% 16V
C711 1-115-156-11 CERAMIC CHIP 1uF 10V
C712 1-115-156-11 CERAMIC CHIP 1uF 10V
C801 1-165-176-11 CERAMIC CHIP 0.047uF 10% 16V
C802 1-162-970-11 CERAMIC CHIP 0.01uF 10% 25V
C803 1-165-176-11 CERAMIC CHIP 0.047uF 10% 16V
C804 1-109-935-11 TANTAL. CHIP 4.7uF 20% 6.3V
C805 1-107-685-11 TANTAL. CHIP 15uF 20% 6.3V
C806 1-104-847-11 TANTAL. CHIP 22uF 20% 4V
C807 1-104-847-11 TANTAL. CHIP 22uF 20% 4V
• RESISTORS
All resistors are in ohms.
METAL: metal-film resistor
METAL OXIDE: Metal Oxide-film resistor
F: nonflammable
• COILS
uH: µH
• SEMICONDUCTORS
In each case, u: µ, for example:
uA...: µA... , uPA... , µPA... ,
uPB... , µPB... , uPC... , µPC... ,
uPD..., µPD...
— 27 —
Page 18
MAIN
Ref. No. Part No. Description Remarks Ref. No. Part No. Description Remarks
< CONNECTOR >
CN301 1-766-336-21 CONNECTOR, FFC/FPC 6P
< DIODE >
Q308 8-729-422-45 TRANSISTOR XN1217
Q309 8-729-800-71 TRANSISTOR 2SB815B7-TB
Q312 8-729-420-24 TRANSISTOR 2SB1218A-QRS
Q313 8-729-422-45 TRANSISTOR XN1217
Q315 8-729-030-54 TRANSISTOR MSB1218A-RT1
D101 8-719-056-89 DIODE UDZ-TE-17-12B
D201 8-719-056-89 DIODE UDZ-TE-17-12B
D701 8-719-056-89 DIODE UDZ-TE-17-12B
D702 8-719-404-49 DIODE MA111
D703 8-719-404-49 DIODE MA111
D704 8-719-404-49 DIODE MA111
< FUSE >
! F701 1-533-792-11 FUSE (SMD)
< FERRITE BEAD >
FB101 1-414-760-21 INDUCTOR CHIP 0UH
(US, CND, AEP, UK, E, KR, JE)
FB201 1-414-760-21 INDUCTOR CHIP 0UH
(US, CND, AEP, UK, E, KR, JE)
FB301 1-500-245-11 INDUCTOR 0UH
FB302 1-414-760-21 INDUCTOR CHIP 0UH
< IC >
IC301 8-759-497-22 IC BA3632K-E2
IC302 8-759-488-80 IC NJM2185AV-TE2
IC303 8-759-066-57 IC TC74HC4066AFS
IC304 8-759-066-57 IC TC74HC4066AFS
IC305 8-759-380-15 IC LA3550MTP-1
IC601 8-759-431-31 IC LB1899M-TLM
IC701 8-759-488-35 IC MB89135LPFV-G-427BND
IC702 8-759-438-27 IC MM1305BWBE
IC703 8-759-445-09 IC XC61AS0VXXMR
IC704 8-759-460-26 IC PST9015NL
IC801 8-759-440-53 IC MPC1850DTBEL
IC802 8-759-488-26 IC XC62FP2002MR
< JACK >
J301 1-779-867-41 JACK (REMOTE 2 )
< COIL >
L701 1-414-008-11 INDUCTOR 100uH
< PHOTO INTERUPTER >
PH701 8-749-014-43 PHOTO REFLECTOR PR-20-T
PH702 8-749-014-43 PHOTO REFLECTOR PR-20-T
< TRANSISTOR >
Q101 8-729-030-53 TRANSISTOR MSD1819A-RT1
Q102 8-729-030-53 TRANSISTOR MSD1819A-RT1
Q201 8-729-030-53 TRANSISTOR MSD1819A-RT1
Q202 8-729-030-53 TRANSISTOR MSD1819A-RT1
Q301 8-729-030-53 TRANSISTOR MSD1819A-RT1
Q302 8-729-030-54 TRANSISTOR MSB1218A-RT1
Q303 8-729-402-32 TRANSISTOR 2SD1819A-R
Q304 8-729-402-32 TRANSISTOR 2SD1819A-R
Q305 8-729-420-24 TRANSISTOR 2SB1218A-QRS
Q306 8-729-230-72 TRANSISTOR 2SA1362YG
Q601 8-729-025-88 TRANSISTOR 2SB1386-T100-R
Q602 8-729-420-24 TRANSISTOR 2SB1218A-QRS
Q603 8-729-420-24 TRANSISTOR 2SB1218A-QRS
Q604 8-729-039-36 TRANSISTOR MDC06TR
Q605 8-729-420-50 TRANSISTOR UN5215
Q701 8-729-230-72 TRANSISTOR 2SA1362YG
Q702 8-729-020-99 TRANSISTOR UN5215-RS-TX
Q703 8-729-030-53 TRANSISTOR MSD1819A-RT1
Q704 8-729-422-18 TRANSISTOR XN4315
Q705 8-729-420-50 TRANSISTOR UN5215
Q706 8-729-030-53 TRANSISTOR MSD1819A-RT1
Q707 8-729-230-72 TRANSISTOR 2SA1362YG
Q708 8-729-020-99 TRANSISTOR UN5215-RS-TX
Q709 8-729-420-50 TRANSISTOR UN5215
Q710 8-729-040-80 TRANSISTOR 2SK2152-TD
Q711 8-729-030-53 TRANSISTOR MSD1819A-RT1
Q712 8-729-030-53 TRANSISTOR MSD1819A-RT1
Q801 8-729-402-84 TRANSISTOR XN4601
R101 1-218-344-11 RES, CHIP 7.5K 5% 1/16W
R102 1-216-811-11 METAL CHIP 150 5% 1/16W
R103 1-216-833-11 METAL CHIP 10K 5% 1/16W
R104 1-216-837-11 METAL CHIP 22K 5% 1/16W
R105 1-216-843-11 METAL CHIP 68K 5% 1/16W
R106 1-216-825-11 METAL CHIP 2.2K 5% 1/16W
R107 1-216-839-11 METAL CHIP 33K 5% 1/16W
R108 1-216-821-11 METAL CHIP 1K 5% 1/16W
R109 1-216-845-11 METAL CHIP 100K 5% 1/16W
R110 1-216-839-11 METAL CHIP 33K 5% 1/16W
R111 1-216-825-11 METAL CHIP 2.2K 5% 1/16W
R112 1-216-837-11 METAL CHIP 22K 5% 1/16W
R121 1-216-789-11 METAL CHIP 2.2 5% 1/16W
R122 1-216-831-11 METAL CHIP 6.8K 5% 1/16W
R150 1-216-802-11 METAL CHIP 27 5% 1/16W
R201 1-218-344-11 RES, CHIP 7.5K 5% 1/16W
R202 1-216-811-11 METAL CHIP 150 5% 1/16W
R203 1-216-833-11 METAL CHIP 10K 5% 1/16W
R204 1-216-837-11 METAL CHIP 22K 5% 1/16W
R205 1-216-843-11 METAL CHIP 68K 5% 1/16W
R206 1-216-825-11 METAL CHIP 2.2K 5% 1/16W
R207 1-216-839-11 METAL CHIP 33K 5% 1/16W
R208 1-216-821-11 METAL CHIP 1K 5% 1/16W
R209 1-216-845-11 METAL CHIP 100K 5% 1/16W
R210 1-216-839-11 METAL CHIP 33K 5% 1/16W
R211 1-216-825-11 METAL CHIP 2.2K 5% 1/16W
R212 1-216-837-11 METAL CHIP 22K 5% 1/16W
R221 1-216-789-11 METAL CHIP 2.2 5% 1/16W
R222 1-216-831-11 METAL CHIP 6.8K 5% 1/16W
R250 1-216-802-11 METAL CHIP 27 5% 1/16W
— 28 —
< RESISTOR >
The components identified by
mark ! or dotted line with mark
! are critical for safety.
Replace only with part number
specified.
(FR)
(FR)
Les composants identifiés par
une marque ! sont critiques
pour la sécurité.
Ne les remplacer que par une
pièce portant le numéro spécifié.
Page 19

MAIN SUB
Ref. No. Part No. Description Remarks Ref. No. Part No. Description Remarks
R301 1-216-845-11 METAL CHIP 100K 5% 1/16W
R302 1-216-852-11 METAL CHIP 390K 5% 1/16W
R303 1-216-828-11 METAL CHIP 3.9K 5% 1/16W
R304 1-216-837-11 METAL CHIP 22K 5% 1/16W
R305 1-216-833-11 METAL CHIP 10K 5% 1/16W
R720 1-216-845-11 METAL CHIP 100K 5% 1/16W
R721 1-216-821-11 METAL CHIP 1K 5% 1/16W
R722 1-216-845-11 METAL CHIP 100K 5% 1/16W
R723 1-216-821-11 METAL CHIP 1K 5% 1/16W
R724 1-216-854-11 METAL CHIP 560K 5% 1/16W
R306 1-216-833-11 METAL CHIP 10K 5% 1/16W
R307 1-218-884-11 RES, CHIP 36K 0.50% 1/16W
R308 1-216-833-11 METAL CHIP 10K 5% 1/16W
R309 1-216-845-11 METAL CHIP 100K 5% 1/16W
R310 1-216-849-11 METAL CHIP 220K 5% 1/16W
R311 1-216-853-11 METAL CHIP 470K 5% 1/16W
R312 1-216-853-11 METAL CHIP 470K 5% 1/16W
R313 1-216-853-11 METAL CHIP 470K 5% 1/16W
R315 1-216-849-11 METAL CHIP 220K 5% 1/16W
R316 1-216-845-11 METAL CHIP 100K 5% 1/16W
R317 1-216-833-11 METAL CHIP 10K 5% 1/16W
R318 1-216-853-11 METAL CHIP 470K 5% 1/16W
R320 1-216-849-11 METAL CHIP 220K 5% 1/16W
R322 1-216-841-11 METAL CHIP 47K 5% 1/16W
R323 1-216-853-11 METAL CHIP 470K 5% 1/16W
R324 1-216-849-11 METAL CHIP 220K 5% 1/16W
R601 1-216-849-11 METAL CHIP 220K 5% 1/16W
R602 1-216-853-11 METAL CHIP 470K 5% 1/16W
R603 1-216-857-11 METAL CHIP 1M 5% 1/16W
R604 1-216-845-11 METAL CHIP 100K 5% 1/16W
R605 1-216-837-11 METAL CHIP 22K 5% 1/16W
R606 1-216-845-11 METAL CHIP 100K 5% 1/16W
R607 1-216-837-11 METAL CHIP 22K 5% 1/16W
R608 1-216-850-11 METAL CHIP 270K 5% 1/16W
R609 1-216-845-11 METAL CHIP 100K 5% 1/16W
R610 1-202-931-11 RES, CHIP 910K 5% 1/16W
R611 1-216-857-11 METAL CHIP 1M 5% 1/16W
R612 1-216-853-11 METAL CHIP 470K 5% 1/16W
R613 1-216-857-11 METAL CHIP 1M 5% 1/16W
R614 1-216-849-11 METAL CHIP 220K 5% 1/16W
R615 1-216-857-11 METAL CHIP 1M 5% 1/16W
R701 1-216-853-11 METAL CHIP 470K 5% 1/16W
R702 1-216-853-11 METAL CHIP 470K 5% 1/16W
R703 1-216-845-11 METAL CHIP 100K 5% 1/16W
R704 1-216-853-11 METAL CHIP 470K 5% 1/16W
R725 1-216-821-11 METAL CHIP 1K 5% 1/16W
R726 1-216-854-11 METAL CHIP 560K 5% 1/16W
R727 1-216-821-11 METAL CHIP 1K 5% 1/16W
R728 1-216-853-11 METAL CHIP 470K 5% 1/16W
R729 1-216-849-11 METAL CHIP 220K 5% 1/16W
R730 1-216-853-11 METAL CHIP 470K 5% 1/16W
R731 1-216-849-11 METAL CHIP 220K 5% 1/16W
R732 1-216-835-11 METAL CHIP 15K 5% 1/16W
R801 1-216-859-11 RES, CHIP 1.5M 5% 1/16W
R802 1-216-849-11 METAL CHIP 220K 5% 1/16W
R803 1-216-849-11 METAL CHIP 220K 5% 1/16W
R804 1-216-845-11 METAL CHIP 100K 5% 1/16W
< CONPOSITION CIRCUIT BLOCK >
RB601 1-236-907-11 NETWORK RESISTOR (CHIP) 100K
< VARIABLE RESISTOR >
RV601 1-225-563-11 RES, ADJ 330K
< SWITCH >
S703 1-762-970-21 SWITCH, PUSH (1 KEY)(HOLDER)
S704 1-572-581-11 SWITCH, SLIDE (F/R FWD REV)
S705 1-572-922-11 SWITCH, SLIDE (DOLBY NR)
S706 1-762-516-11 SWITCH, PUSH (1 KEY)(A/B)
S708 1-692-605-11 SWITCH, SLIDE (VOL)
< VIBRATOR >
X701 1-767-289-11 VIBRATOR, CERAMIC 4MHz
************************************************************
* 1-667-827-11 SUB BOARD
**********
< SWITCH >
R705 1-216-841-11 METAL CHIP 47K 5% 1/16W
R706 1-216-845-11 METAL CHIP 100K 5% 1/16W
R707 1-216-853-11 METAL CHIP 470K 5% 1/16W
R708 1-216-849-11 METAL CHIP 220K 5% 1/16W
R709 1-216-853-11 METAL CHIP 470K 5% 1/16W
R710 1-218-836-11 RES, CHIP 360 0.50% 1/16W
R711 1-216-853-11 METAL CHIP 470K 5% 1/16W
R712 1-216-853-11 METAL CHIP 470K 5% 1/16W
R713 1-218-608-11 METAL CHIP 3.3 5% 1W
R714 1-216-049-91 RES, CHIP 1K 5% 1/10W
R715 1-216-853-11 METAL CHIP 470K 5% 1/16W
R716 1-218-879-11 RES, CHIP 22K 0.50% 1/16W
R717 1-216-857-11 METAL CHIP 1M 5% 1/16W
R718 1-216-853-11 METAL CHIP 470K 5% 1/16W
R719 1-216-845-11 METAL CHIP 100K 5% 1/16W
— 29 —
S701 1-771-053-21 SWITCH, KEY BOARD (OPR)
S702 1-572-922-11 SWITCH, SLIDE (HOLD)
************************************************************
MISCELLANEOUS
***************
63 1-762-793-22 SWITCH, LEAF
HP301 1-505-795-11 HEAD, MAGNETIC (PLAYBACK)
M901 1-763-042-11 MOTOR
PM901 1-454-674-31 SOLENOID, PLUNGER
************************************************************
Page 20
WM-EX7
Ref. No. Part No. Description Remarks Ref. No. Part No. Description Remarks
ACCESSORIES &PACKING MATERIALS
*******************************
1-475-465-11 REMOTE CONTROL UNIT (RM-WME7)
! 1-528-252-11 BATTERY CHARGER (BC-7S) (UK)
1-528-299-41 BATTERY, NI-CD (NC-6WM) (US, CND)
1-528-543-22 BATTERY, NI-CD (NC-6WM) (AEP, UK, FR)
! 1-528-580-21 BATTERY CHARGER (BC-7HT) (E, JEW)
! 1-528-676-21 BATTERY CHARGER (BC-9HR) (KR)
! 1-528-713-21 BATTERY CHARGER (BC-7DC) (US, CND)
! 1-528-744-21 BATTERY CHARGER (BC-7DY) (AEP, FR)
1-528-842-11 BATTERY, NICKEL HYDROGEN (E, KR, JEW)
1-569-007-11 ADAPTOR, CONVERSION 2P (E, JEW)
1-759-213-11 CASE, BATTERY
3-008-521-01 CASE, BATTERY CHARGE
3-861-029-01 MANUAL, INSTRAUCTION (JEW)
(JAPANESE, ENGLISH, KOREAN)
3-861-029-11 MANUAL, INSTRAUCTION
(US/CND/AEP/UK/FR) (ENGLISH, FRENCH)
3-861-029-21 MANUAL, INSTRAUCTION (AEP)
(GERMAN, DUTCH)
3-861-029-31 MANUAL, INSTRAUCTION (AEP)
(SWEDISH, ITALIAN)
3-861-029-41 MANUAL, INSTRAUCTION (AEP)
(SPANISH, PORTUGUESE)
3-861-029-51 MANUAL, INSTRAUCTION (AEP) (FRENCH)
3-861-029-61 MANUAL, INSTRAUCTION (E/KR)
(ENGLISH, KOREAN)
3-861-029-71 MANUAL, INSTRAUCTION (E)
(SPANISH, CHINESE)
3-861-153-11 INSTRUCTION (JEW)
3-929-799-01 CASE, CARRYING
8-953-220-90 HEADPHONE MDR-ED132SP//K SET
The components identified by
mark ! or dotted line with mark
! are critical for safety.
Replace only with part number
specified.
Les composants identifiés par
une marque ! sont critiques
pour la sécurité.
Ne les remplacer que par une
pièce portant le numéro spécifié.
9-923-283-12
Sony Corporation
Personal A&V Products Company
— 30 —
98A1680-1
(Shibaura)
 Loading...