

Page 1
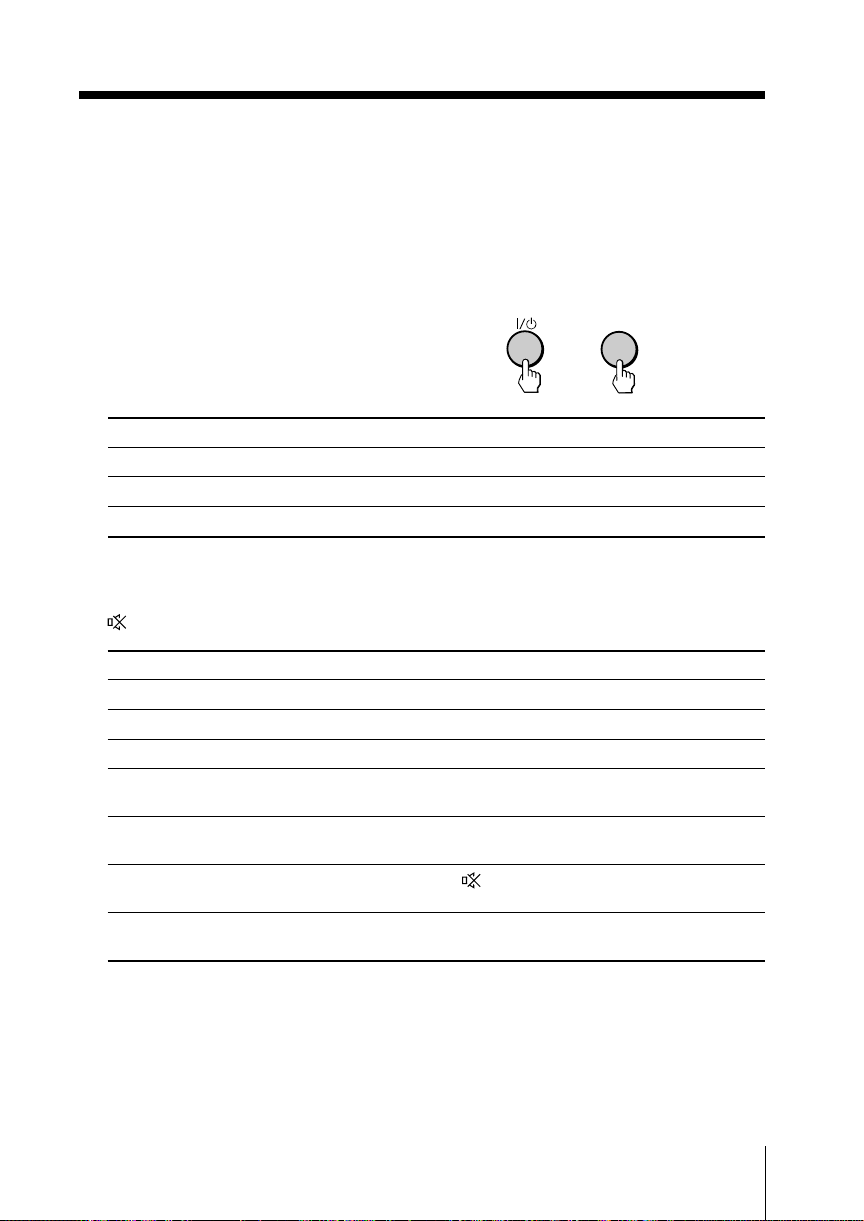
2-318-485-E1 (2)
Tr initron Color TV
Operating Instructions
• Before operating the unit, please read this manual thoroughly and retain
it for future reference.
KV-DA34
KV-DA29
© 2004 Sony Corporation
M80
X80
Page 2
WARNING
• Dangerously high voltages are present inside the TV.
• TV operating voltage: 220 V AC.
• Do not plug in the power cord until you have completed making all other
connections; otherwise a minimum leakage current might flow through the antenna
and other terminals to ground.
•To avoid battery leakage and damage to the remote, remove the batteries from the
remote if you are not going to use it for several days. If any liquid leaks from the
batteries and touches your skin, immediately wash it away with water.
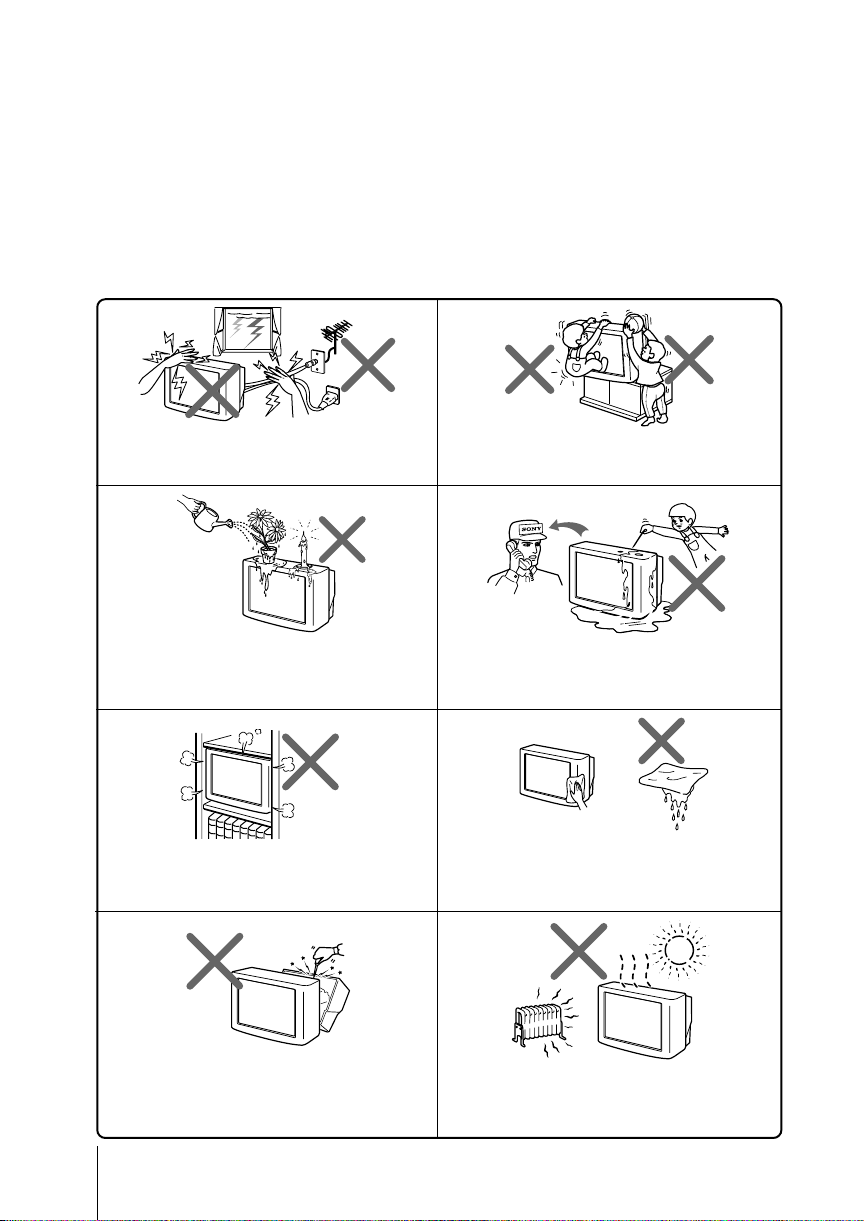
For your own safety, do not touch any part of the
TV, the power cord and the antenna cable during
lightning storms.
Do not place any objects on the TV. The apparatus
shall not be exposed to dripping or splashing and
that no objects filled with liquids, such as vases,
shall be placed on the apparatus.
Do not block the ventilation openings of the TV.
Do not install the TV in a confined space, such as a
bookcase or built-in cabinet.
For children’s safety, do not leave children alone
with the TV. Do not allow children to climb onto it.
Do not operate the TV if any liquid or solid object
falls into it. Have it checked immediately by
qualified personnel only.
Clean the TV with a dry and soft cloth.
Do not use benzine, thinner, or any other chemicals to
clean the TV. Do not attach anything (e.g., adhesive
tape, cellophane tape, glue) on the painted cabinet of
the TV. Do not scratch the picture tube.
Do not open the cabinet and the rear cover of the
TV as high voltages and other hazards are present
inside the TV. Refer servicing and disposal of the
TV to qualified personnel.
2
Your TV is recommended for home use only.
Do not use the TV in any vehicle or where it may be
subject to excessive dust, heat, moisture or
vibrations.
Page 3
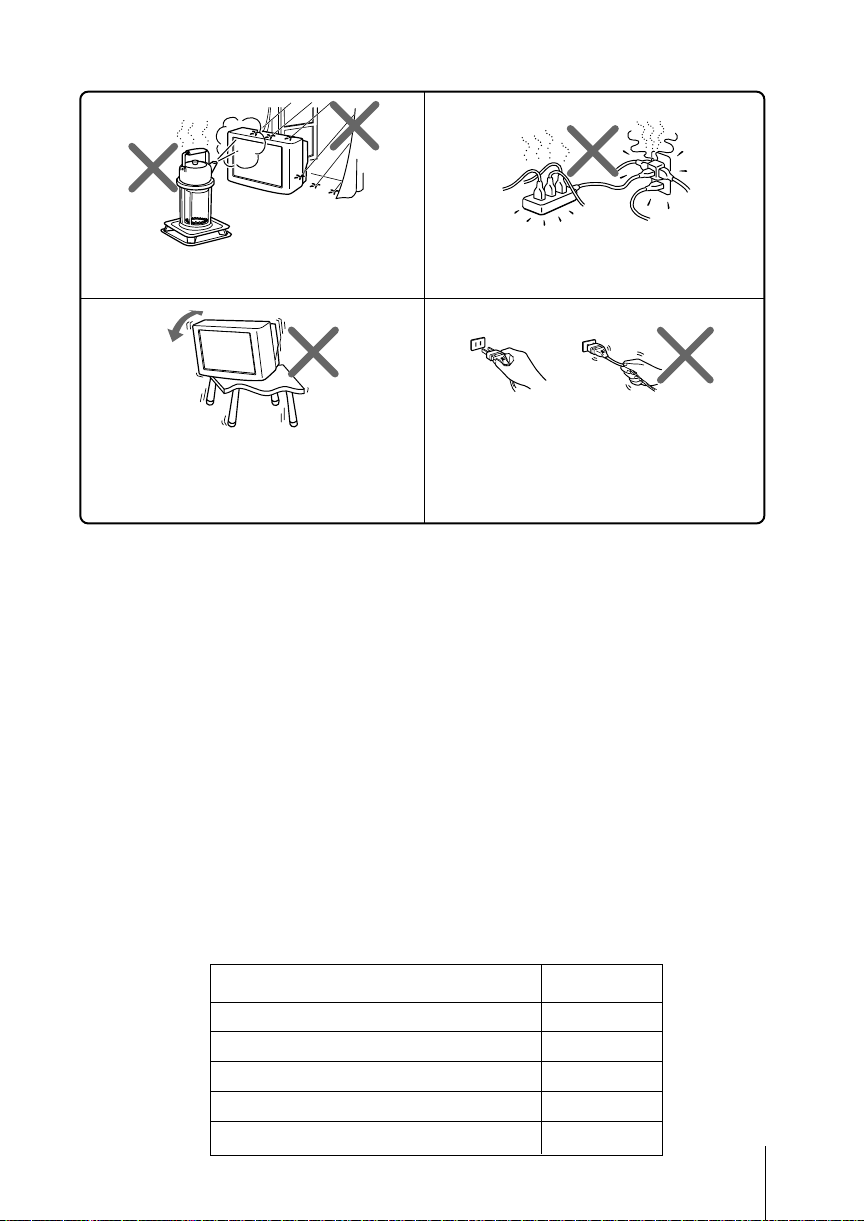
To prevent fire or shock hazard, do not expose the
TV to rain or moisture.
Install the TV on a stable TV stand and floor which
can support the TV set weight. Ensure that the TV
stand surface is flat and its area is larger than the
bottom area of the TV.
Product Overview
• FD Trinitron CRT
• DRC-MF (Digital Reality Creation-Multi Function)
DRC1250
DRC100
Progressive
• New Intelligent Picture
• Intelligent Signal Booster
• Wide Mode
• WEGA Theatre Mode
• DVD signal terminal (with HD signal)
• 5-Band Graphic Equalizer
Do not plug in too many appliances to the same
power socket. Do not damage the power cord.
Pull the power cord out by the plug. Do not pull
the power cord itself. Even if your TV is turned
off, it is still connected to the AC power source
(mains) as long as the power cord is plugged in.
Unplug the TV before moving it or if you are not
going to use it for several days.
Accessories
Remote Commander (RM-W105) 1
Batteries (size 5) 2
Stabilizing band 1
Stabilizing clamp 2
Screw (Dia.3.8 × 20) 3
Accessory Quantity
3
Page 4
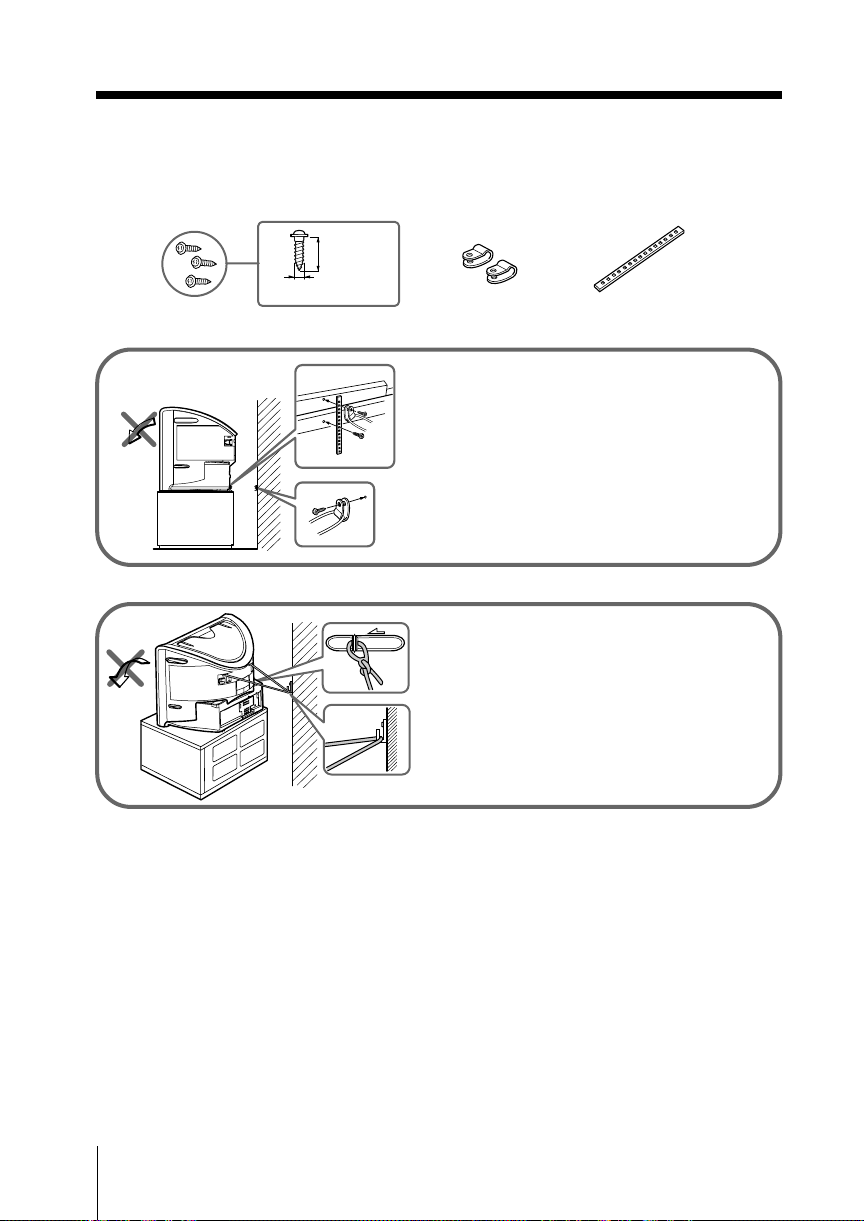
x Securing the TV
To prevent the TV from falling, use the supplied screws, clamps and band to
secure the TV.
20 mm
3.8 mm
screws clamps band
1
(3)
2
(1)
(2)
Note
• Use only the supplied screws. Use of other screws may damage the TV.
(1) Screw the band to the TV stand and to
the provided hole at the rear of your
(1)
(2)
TV.
(2) Screw the band to the TV stand.
(3) Put a cord or chain through bothclamps
and screw the other clamp to a wall or
pillar.
(1) Attach each end of a cord or chain to
the provided holders at the rear of
your TV.
(2) Securely fix the attached cord or chain
to a wall or pillar using an attachment
which can support the TV set weight.
4
Page 5

Table of Contents
Installation
Getting Started ..................................... 6
Setting up your TV
(“Initial Setup”) .................................... 7
Overview of Controls
TV front and rear panels ..................... 9
Using the remote control and
basic functions .................................... 10
Advanced Operations
Selecting the picture and
sound modes ...................................... 12
Viewing higher quality pictures
with DRC-MF ..................................... 13
Enjoying WEGA Theatre Mode
with center speaker ........................... 14
Operating optional components ...... 15
Menu Adjustment
Introducing the menu system .......... 16
Changing the “Picture” setting ........ 18
Changing the “Sound” setting ......... 20
Changing the “Wide Screen” setting
Changing the “Channel Setup”
setting .................................................. 23
Changing the “Setup” setting .......... 25
... 22
Additional Information
Connecting optional components ... 27
Troubleshooting ................................. 30
Specifications ...................... Back cover
GB
5
Page 6
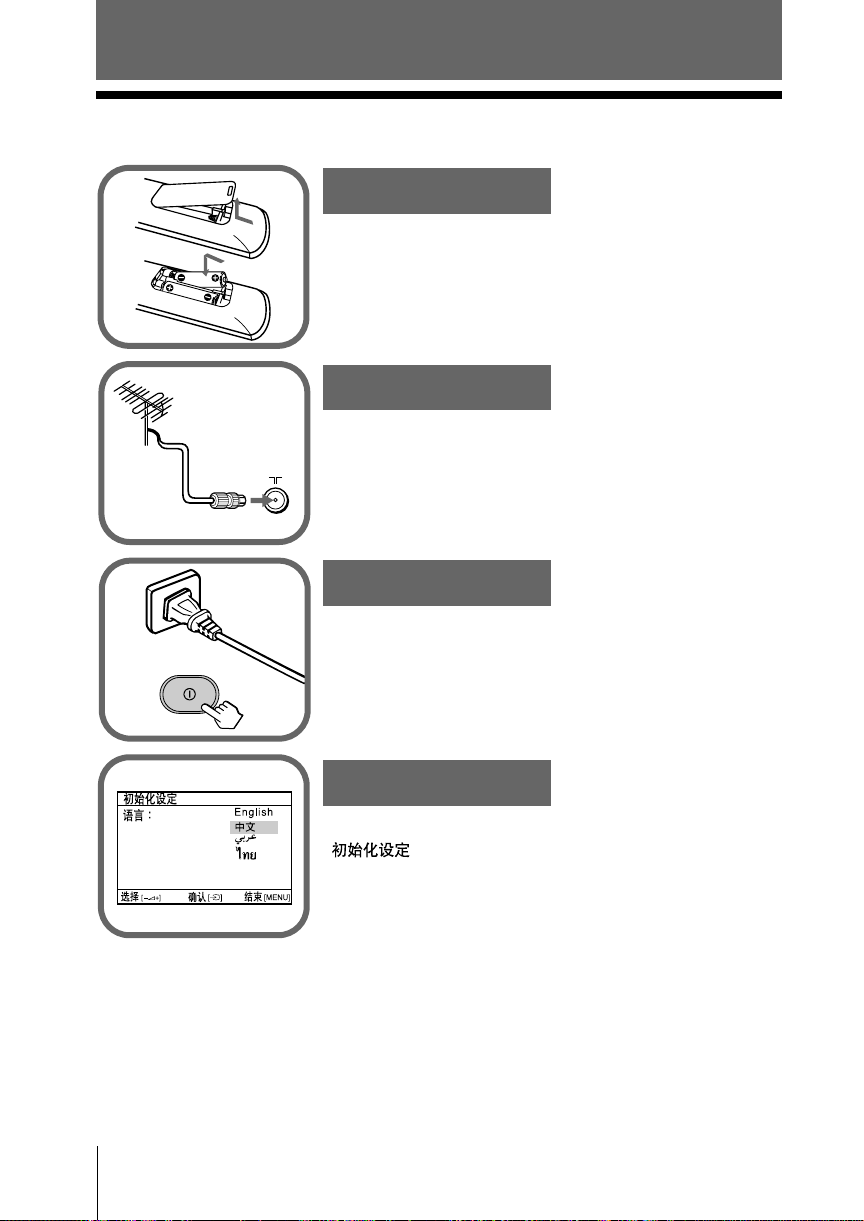
Installation
x Getting Started
1
Step 1
b
b
Insert the batteries (supplied) into the remote.
Note
• Do not use old or different types of batteries together.
Step 2
Connect the antenna cable (not supplied) to 8
(antenna input) at the rear of the TV.
Tip
•You can also connect your TV to other optional components
(see page 27).
Step 3
Plug in the power cord, then press ! on the TV to
turn it on.
Note
• The 1 (standby) indicator flashes green for a few seconds
when turning on the TV. This does not indicate a
malfunction.
Step 4
“ 'l⁄˘‡]'w
6 Installation
Set up the TV by following the instructions of the
“ ” (“Initial Setup”) menu (see page 7).
¿
Page 7
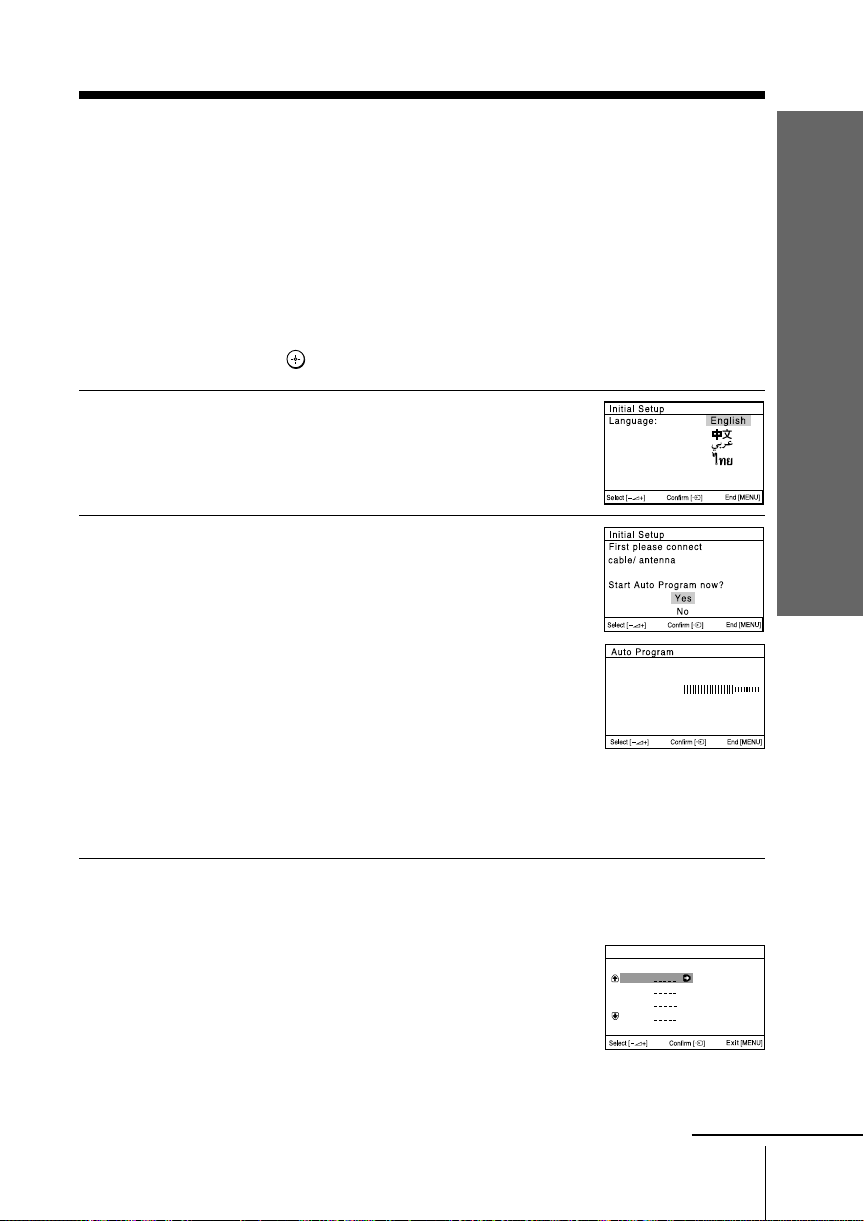
x
Setting up your TV
(“Initial Setup”)
When you turn on your TV for the first time, the “Initial Setup” menu will appear.
You may change the menu language, preset the TV channels automatically, change the
order of TV channels that appear on the screen and adjust the picture position using
the buttons on the TV front panel.
Tip
• For menu operations, the MENU, t and 2 +/– buttons on the TV front panel have the same
function with the MENU,
Press 2 +/– to select the desired menu
1
language, then press t.
The selected menu language appears.
Press 2 +/– to select “Yes”, then press t
2
to preset the channels automatically.
The screen will indicate automatic
presetting in progress.
and V/v buttons on the remote control.
Installation
After all available channels have been tuned
and stored, the “Program Sorting” menu
appears automatically on the screen.
To skip automatic channel presetting, select
“No”, then press t.
If the message “No channel found. Please
connect cable/antenna” appears, check your
TV connections, then press t.
The “Program Sorting” menu enables you
3
to change the order in which the channels
appear on the screen.
a) If you wish to keep the channels in the
tuned order, press MENU.
b) If you wish to store the channels in a
different order:
1) Press 2 +/– to select the program
number with the channel you wish to
rearrange, then press t.
Program:
TV System: D/K
VHF Low
Program Sorting
Program:
01
02
03
04
Select channel
continue
Installation
01
7
Page 8

01
Program Sorting
Program:
01
02
03
04
Select new position
continued
The selected channel will appear on
the screen.
2) Press 2+/– to select the new
program number position for your
selected channel, then press t.
3) Repeat steps b) 1) and 2) if you wish
to change the order of the other
channels.
c) Press MENU to go to the next menu.
Press 2 +/– to adjust the bars on the top
4
and bottom of the menu if they are
slanted, then press t.
“Picture V-Position” menu appears.
If the upper and lower bars are not
5
equally positioned to the top and
bottom of the screen, press 2+/– to
adjust them, then press t.
If no adjustment is necessary, then press t.
Press 2 +/– to select “No”, then press t.
6
This menu will not appear again the next
time you turn on the TV by pressing !.
To allow this menu to appear again, select
“Yes”, then press t.
Picture V-Position
8 Installation
Tips
•You can immediately go to the end of the ”Initial Setup” menu by pressing MENU.
•You can also set up your TV by using the menu system (see page 16).
•You can also preset the channels automatically by pressing the MENU (AUTO PROG) button
on the TV front panel for about five seconds.
Notes
• Before adjusting “Picture Rotation” and Picture V-Position”, keep external speakers or other
electrical equipment away from the TV. The magnetic disturbance from these equipments or
the direction of the earth’s magnetic field may affect the TV.
•You cannot adjust “Picture Rotation” and “Picture V-Position” when high-definition (1080i,
720p) signals are input.
Page 9
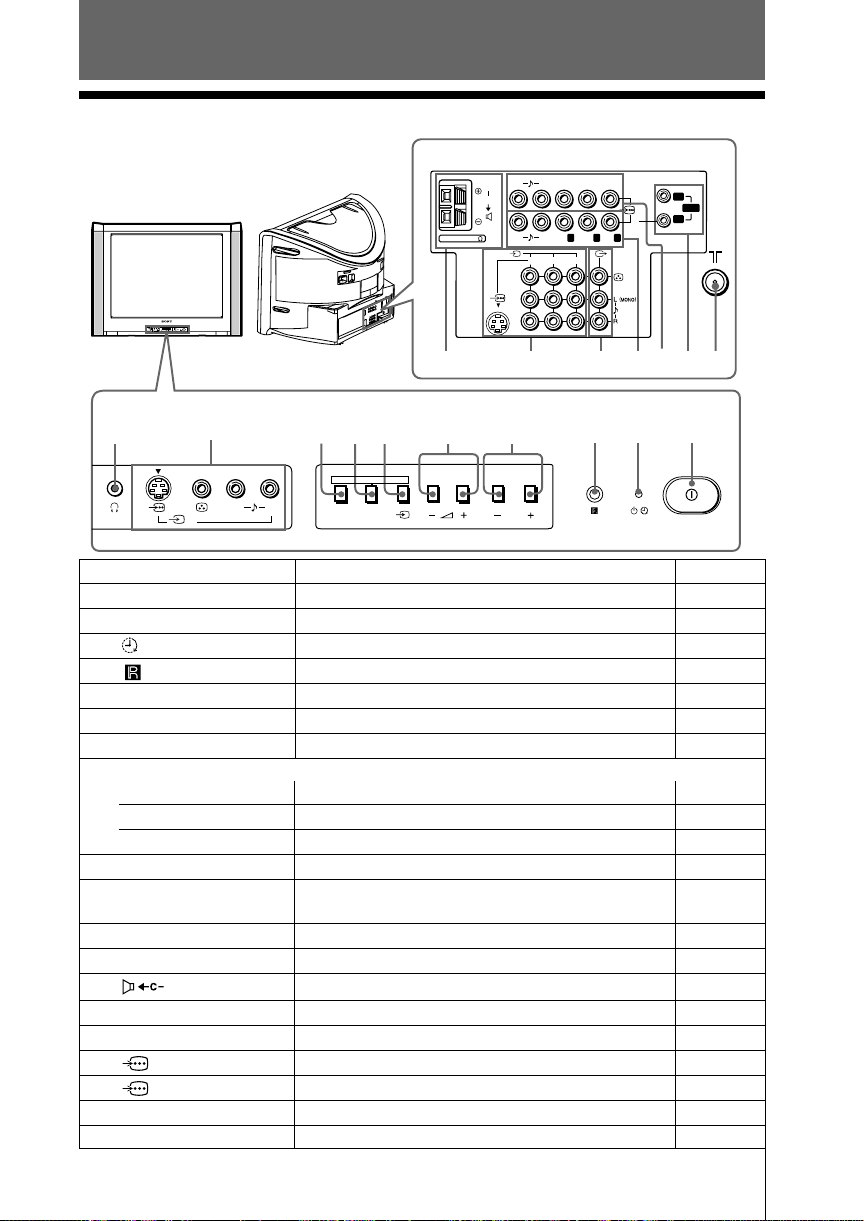
Overview of Controls
x TV front and rear panels
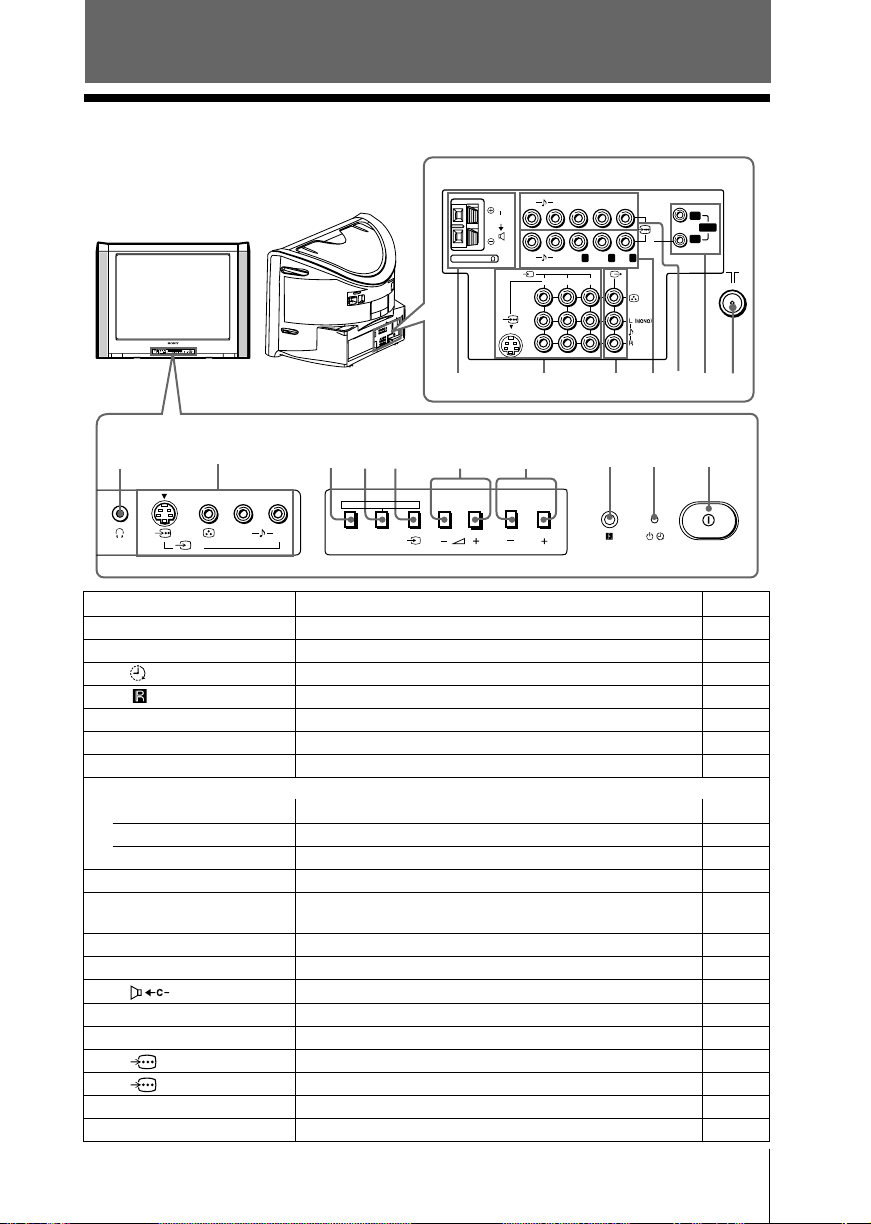
TV rear panel
PR/
1
PB/
Y
C
C
R
B
1
2
PR/
B
/
P
RG B
Y
C
C
R
B
23
qf
qd
2
3
Overview of Controls
qg
HD
VD
qh
SYNC
1
RL
C
120W MAX 8
AUTO PROG:Press [MENU] for 5sec
L(MONO) R
MENU
SOUND
MODE
PROG
4
(AUTO PROG)
qa
RL
qs
TV front panel
0
9
L(MONO) R
4
AUTO PROG:Press [MENU] for 5sec
MENU
SOUND
(AUTO PROG)
MODE
5876
4
PROG
Button/Terminal Function Page
1 ! Turn off or turn on the TV. 6
2 1 Standby indicator. 6
2 Wake Up indicator. 10
3 Remote control sensor. –
4 PROG +/– Select program number. –
5 2 +/– Adjust volume. –
6 t Select TV or video input. 27
Menu operations
5 2 +/– Select and adjust items. –
6 t Confirm selected items. –
7 MENU Display or cancel the menu. –
7 (AUTO PROG) Preset channels automatically. 8
8 SOUND MODE Select sound mode options. 12
5-Band Graphic Equalizer display will appear.
9 t4Video input terminal 4. 27
0 i Headphone jack. –
qa Center speaker input terminal. 29
qs t1, t2, t3Video input terminal 1, 2, 3. 27
qd T Monitor output terminal. 27
qf 2 Component video input terminal 2. 28
qg 1 Component video input terminal 1. 28
qh SYNC HD/VD HD/VD input terminal. 28
qj 8 Antenna input terminal. 27
Overview of Controls
qj
9
Page 10
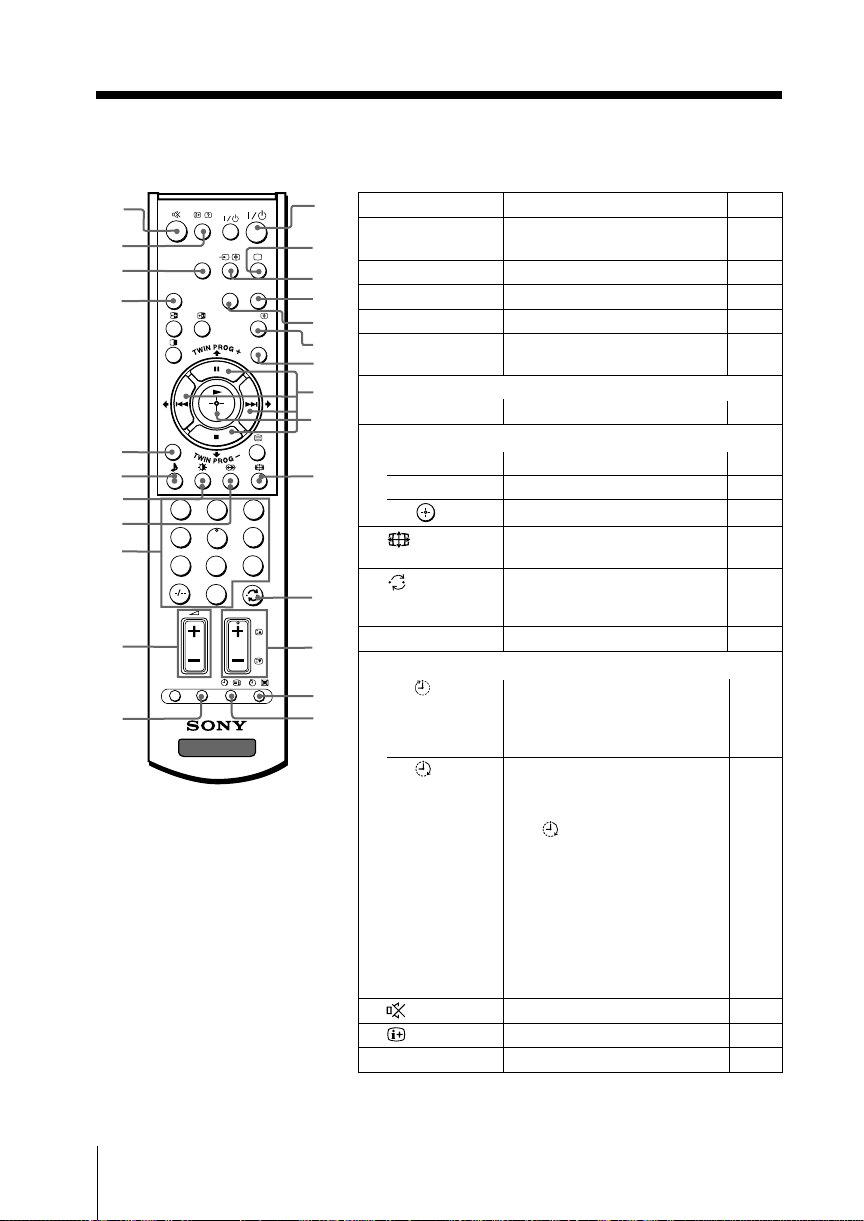
x Using the remote control and basic
functions
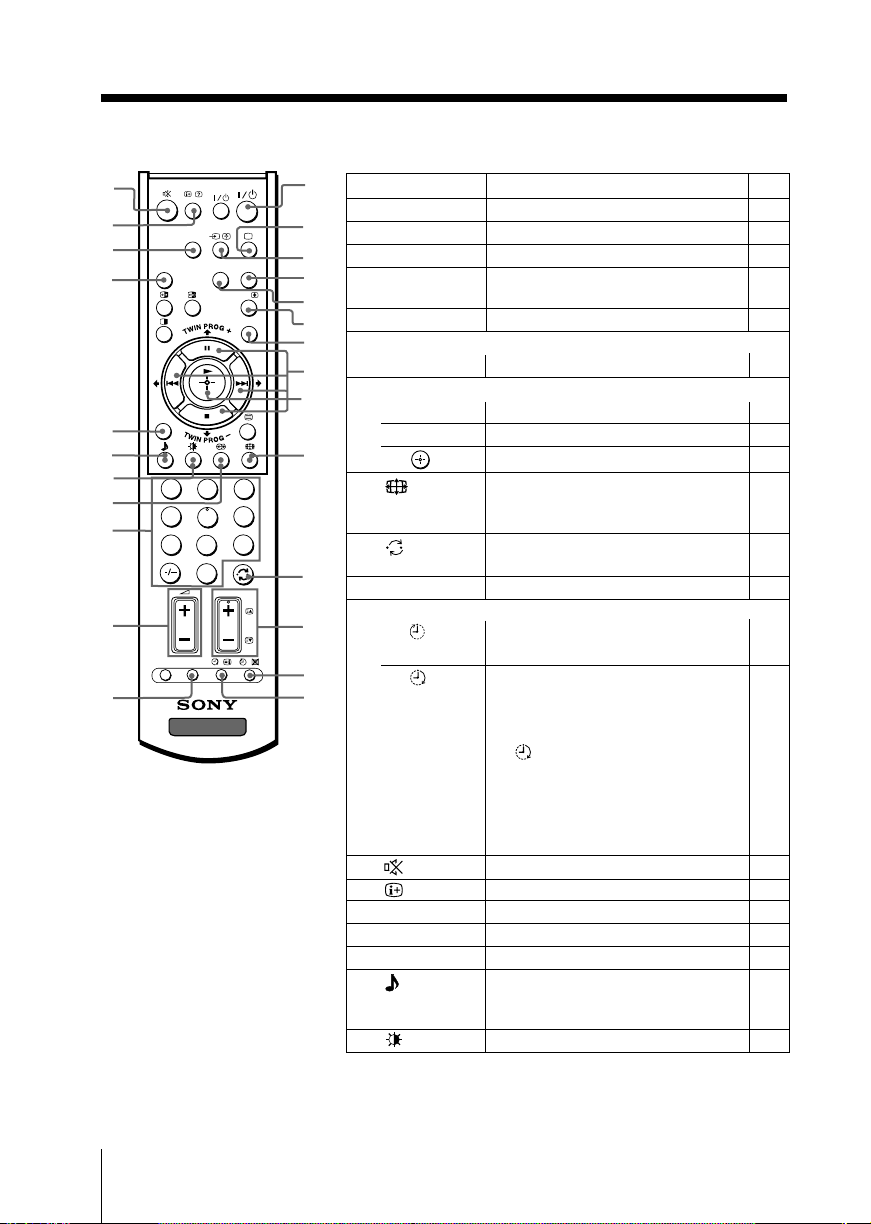
Button Description Page
qg
qh
qj
qk
ql
w;
wa
ws
wd
wf
wg
HD/DVD
DRC-MF
PROG
INDEX
1
4
7
OPTION RESET
VIDEO
CENTERSPWEGA
2
5
8
0
PROG
TV
THEATRE
A/B
MENU
3
6
9
1
1 ?/1 Turn off temporarily or –
2
2 a Display the TV program. –
3
3 t Select video input. 27
4
4
5
6
WEGA THEATRE Select WEGA Theatre Mode.
5 CENTER SP Select TV’s center speaker 14
7
Stereo/bilingual operations
8
9
6 A/B Not function for your TV. –
Menu operations
7 MENU Display or cancel the menu. –
0
8 V, v, B , b Select and adjust items. –
9 Confirm selected items. –
0
qa Jump to last program number
qa
qs PROG +/– Select program number. –
qs
Timer operations
qd
qf
qd
(Sleep Timer) according to the desired period –
qf
(Wake Up Timer) according to the desired period
qg Mute the sound. –
qh
qj HD/DVD
turn on the TV.
mode.
Change the picture size: –
“4:3”, “16:9”(16:9 wide-mode).
that has been watched for at –
least five seconds.
Set TV to turn off automatically
of time (max. of one hour and
30 min.).
Set TV to turn on automatically
of time (max. of 12 hours). –
The indicator on TV lights
up amber once you set
the wake up timer.
If no buttons or controls are
pressed for more than one
hour after the TV is turned on
using the wake up timer, the
TV automatically goes into
standby mode.
Display on-screen information. –
Select component video input. 28
14
10 Overview of Controls
Page 11
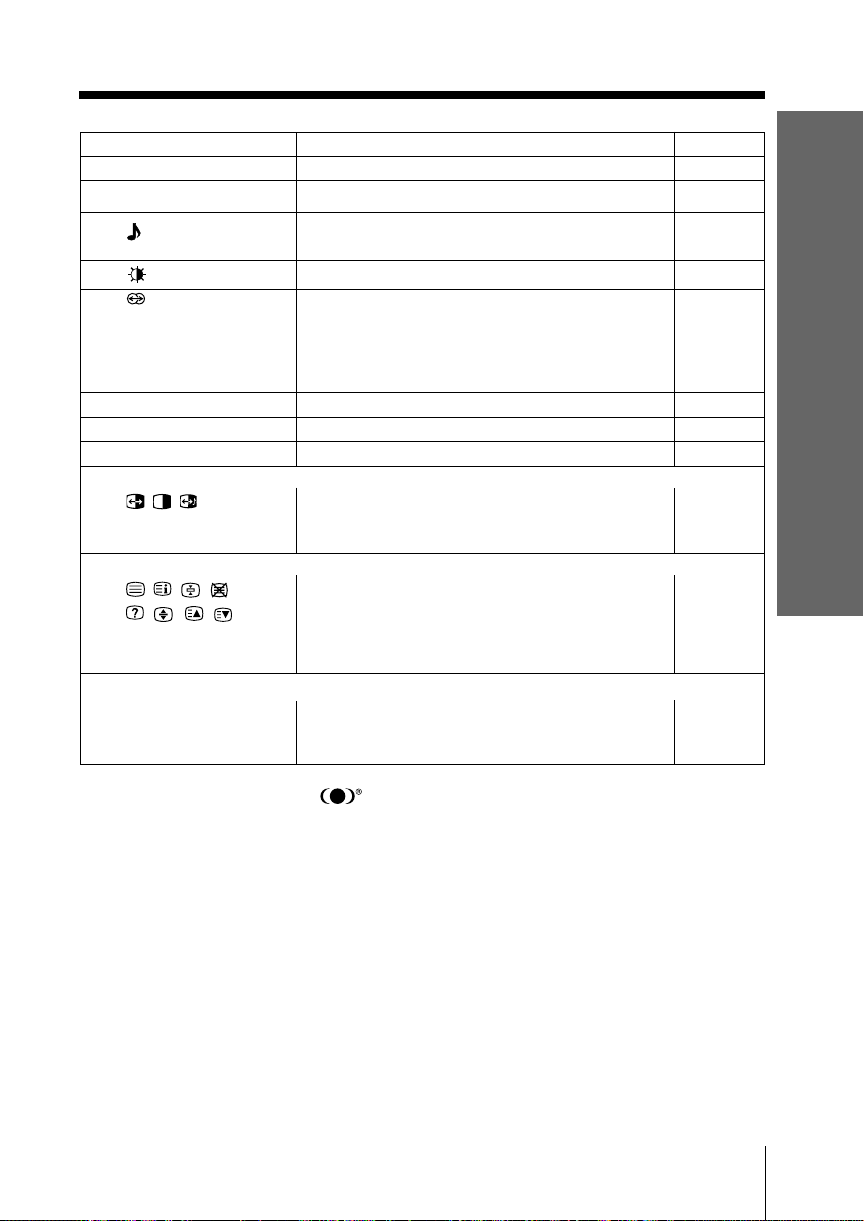
Button Description Page
qk DRC-MF
Select DRC-MF mode. 13
ql PROG INDEX Not function for your TV. –
w; Select sound mode options. 12
5-Band Graphic Equalizer display will appear.
wa Select picture mode options. 12
ws
Select surround mode options:
“TruSurround” (surround sound that spreads out
to the rear of a room), “WOW” (full, –
deep bass sound), “Simulated”(stereo-like
monaural sound), “Off”.
wd 0 – 9, - Input numbers. –
wf 2 +/– Adjust volume. –
wg RESET Set TV to factory setting. 30
TWIN picture operations
, , , Not function for your TV. –
TWIN PROG +/
TWIN PROG –
Teletext operations
, , , , Not function for your TV. –
, , ,
z (red, green,
yellow, blue)
Optional components operations
VIDEO ?/1, OPTION, For details, see “Operating optional components”. 15
N, X, x, ., >,
%, 2 +/–
Overview of Controls
WOW, TruSurround, SRS and symbol are trademarks of SRS Labs, Inc. WOW
and TruSurround technologies are incorporated under license from SRS Labs, Inc.
Licensed by BBE Sound, Inc. under USP4638258, 4482866.
“BBE” and BBE symbol are trademarks of BBE Sound, Inc.
Overview of Controls
11
Page 12
Advanced Operations
x Selecting the picture and sound
modes
You can select picture and sound modes and adjust the setting to your
preference in the “Personal” option.
DRC-MF
HD/DVD
VIDEO
CENTERSPWEGA
THEATRE
A/B
MENU
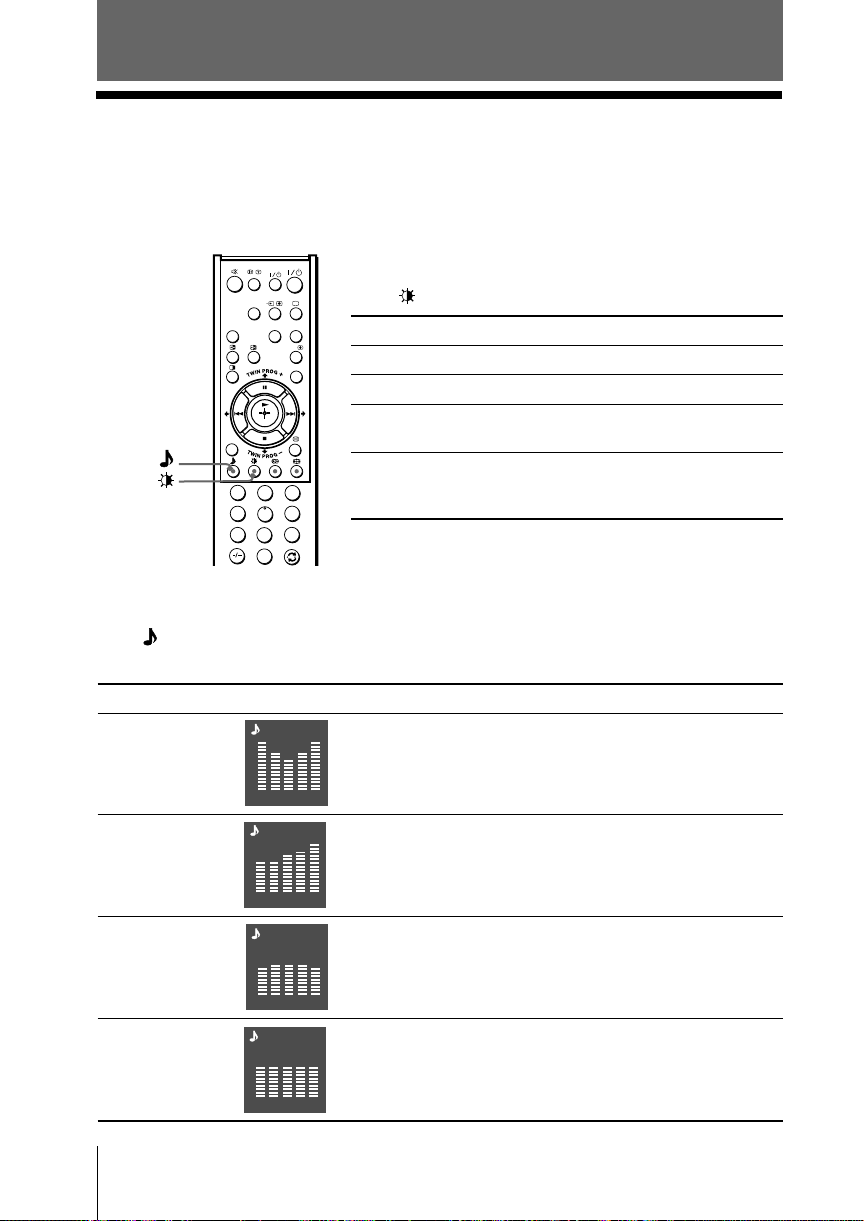
Selecting the picture mode
Press to select the desired picture mode.
Select To view
“Dynamic” high contrast pictures.
“Standard” normal pictures.
PROG
INDEX
“Hi-Fine” higher density pictures with mild
contrast.
“Personal” the last adjusted picture setting
1
3
2
4
6
5
9
8
7
0
from the “Picture Adjustment”
option in the menu (see page 19).
Selecting the sound mode
Press (or SOUND MODE on the front panel) to select the desired sound mode.
5-Band Graphic Equalizer display will appear.
Select To listen to
“Dynamic” dynamic and clear sound that emphasizes both the low
“Drama” sound that emphasizes voice and high tones.
Dynamic
and high tones.
100 300 1k 3k 8k
Drama
100 300 1k 3k 8k
“Soft” soft, natural and relaxing sounds.
“Personal” the last adjusted sound setting from the
Soft
100 300 1k 3k 8k
Personal
“Sound Adjustment” option in the menu (see page 21).
100 300 1k 3k 8k
12 Advanced Operations
Page 13
x Viewing higher quality pictures
with DRC-MF
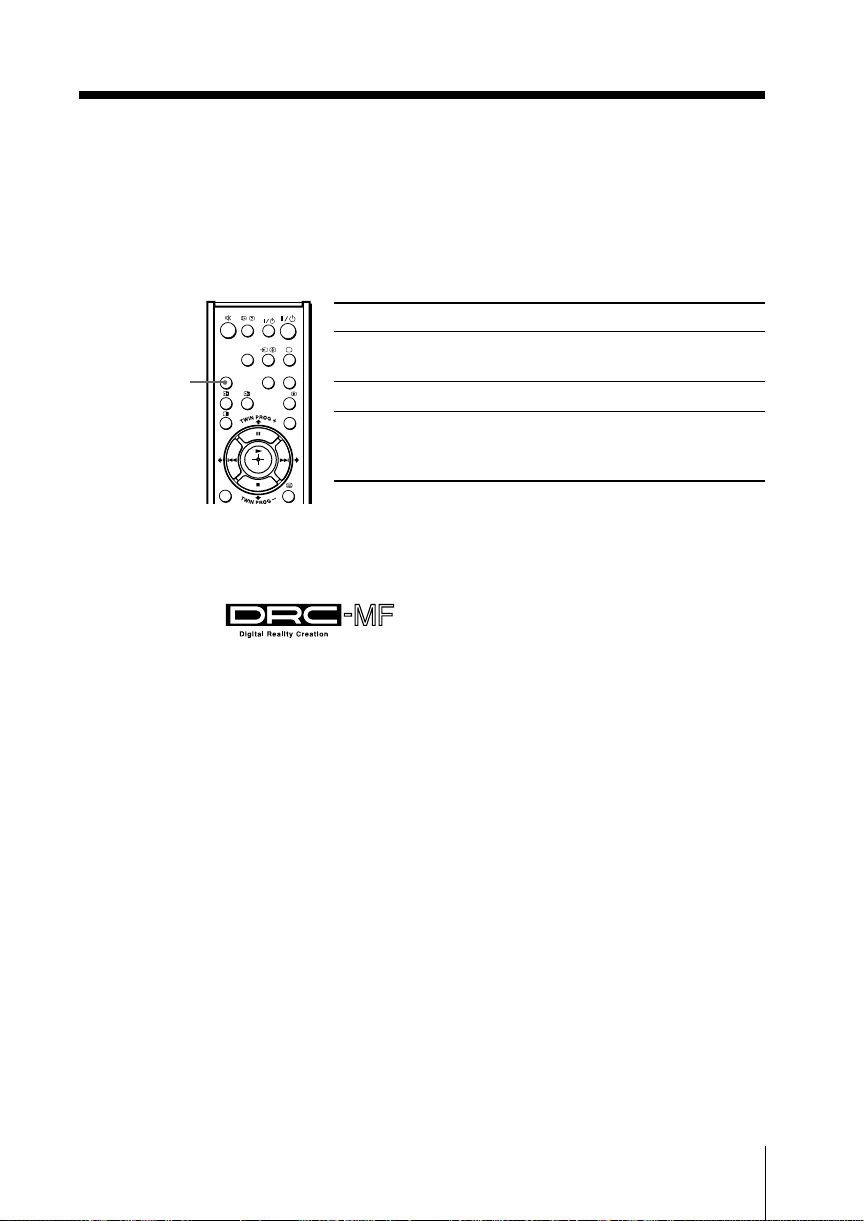
The Digital Reality Creation-Multi Function (DRC-MF) feature allows you to
enjoy higher quality pictures on your TV. You can use the DRC-MF button to
select “DRC1250”, “DRC100” or “Progressive”.
DRC-MF
DRC-MF
VIDEO
HD/DVD
CENTERSPWEGA
Select To
“DRC1250” view super real (higher density)
THEATRE
A/B
“DRC100” reduce flicker on the screen.
MENU
pictures.
“Progressive” reduce jitter of any small areas or
scanning lines (e.g., letters or the
PROG
INDEX
edge of objects) on the screen.
Note
• The DRC-MF mode is not selectable when “Game Mode” mode is turned “On”. The mode is
not available for HD (high-definition) and progressive input signals.
The DRC-MF logo ( ) and “DRC-MF” are trademarks of Sony
Corporation.
Advanced Operations
13
Page 14
x
Enjoying the WEGA Theatre Mode
with center speaker
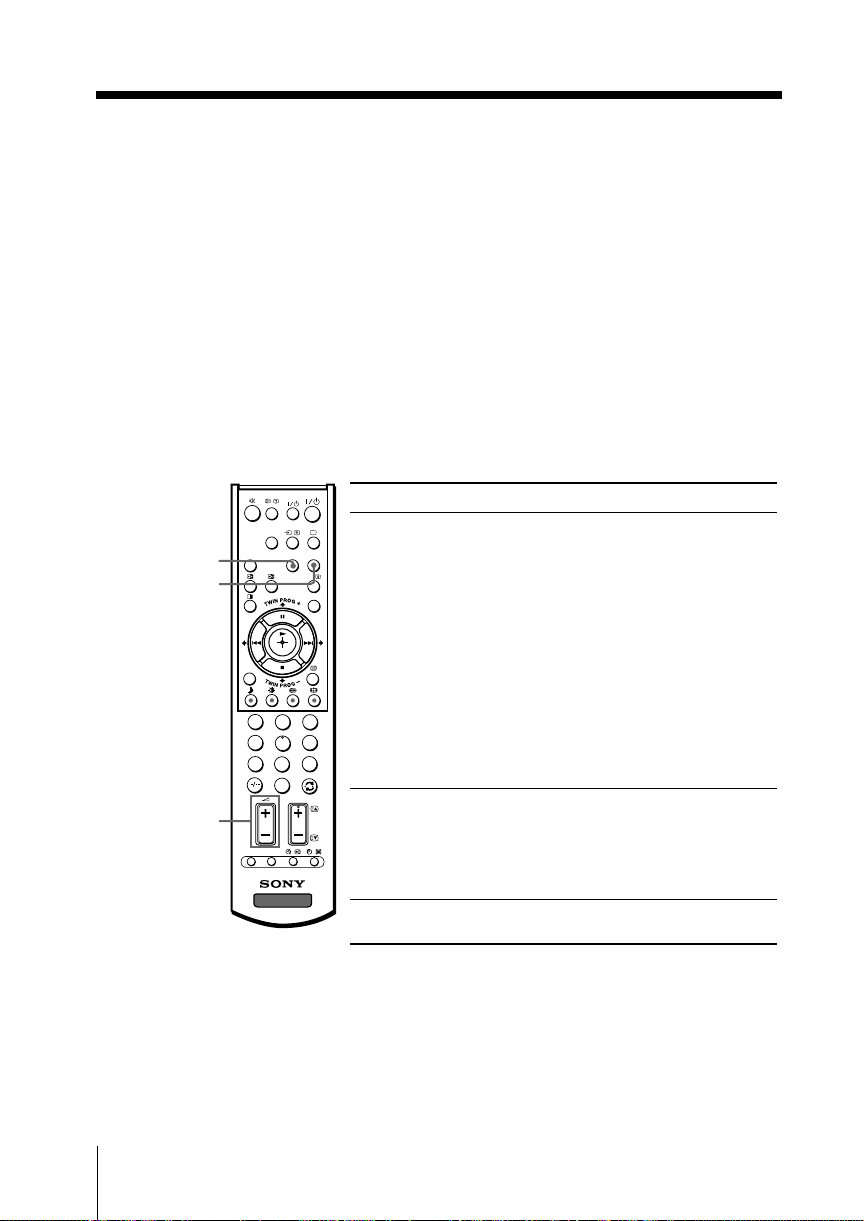
The WEGA Theatre Mode enables you to enjoy the best picture, sound and
surround effect of a cinema from a DVD source. You can use your TV speaker as
the center speaker of your audio system for optimum vocal enhancement and
control its sound volume from the remote of the TV.
Setting up WEGA Theatre Mode
1. Connect the center speaker terminals of the amplifier to the center speaker
input terminal on the TV (see page 29).
2. Select the proper video input from “WEGA Theatre Setup” menu (see page
25) and turn on (main power) the connected equipment.
3. See the table below.
If the connected equipment is a Sony DVD, you can set up the remote to work
with the connected equipment (see page 15).
VIDEO
HD/DVD
CENTERSPWEGA
CENTER SP
DRC-MF
WEGA THEATRE
PROG
INDEX
1
2
4
5
8
7
0
PROG
2 +/–
OPTION RESET
TV
Notes
• Be sure to place your TV and connected Sony equipment adjacent to each other so that you
can control both the TV and the connected equipment by using the TV’s remote control at the
same time (see page 15).
• The WEGA Theatre and center speaker modes are automatically cancelled when you change
the program number, video input or turn the TV off and on again.
• When the TV is in the center speaker mode, you cannot change the surround sound and the
“Intelligent Volume” mode.
• Some Sony equipment might not respond properly when WEGA THEATRE button is pressed.
In this case, use the equipment’s own remote control.
14 Advanced Operations
To P ress
switch to WEGA
Theatre Mode
THEATRE
A/B
MENU
3
6
9
switch to center
speaker mode
adjust center 2 +/–.
speaker volume
WEGA THEATRE.
Be sure to aim the remote control
at the TV set and connected
equipment for about one second
after the button is pressed. The
connected equipment turns on
automatically from standby mode
and will start playing (only for
Sony DVD).
The “Picture Mode” and “Sound
Mode” will switch automatically
to “Personal” and you can adjust
the setting to your personal
preference (see pages 19 and 21).
CENTER SP repeatedly until
“CENTER IN Speaker” appears.
To return to normal speaker
mode, press the button repeatedly
until “MAIN Speaker” appears.
Page 15
x Operating optional components
You can use the supplied remote to operate Sony audio/video equipment.
Setting up the remote to work with other connected equipment
While keeping VIDEO ?/1 For example, to operate a
pressed, press the corresponding Sony 8 mm VCR:
number button for the desired
equipment (see the chart
below).
To control Hold down VIDEO ?/1 and press
Audio System 1, 1x, 2 or 3 0, 1, 2, or 3
DVD 1, 2 or 3 4, 5 or 6
VTR1 (Beta), VTR2 (8 mm) or VTR3 (VHS) 7, 8 or 9
Operating audio/video equipment
Press VIDEO ?/1 or while keeping OPTION pressed, press N, x, ., >, X,
or 2 +/– (see the chart below).
To P ress
turn on/off VIDEO ?/1.
play N while keeping OPTION pressed.
stop x while keeping OPTION pressed.
fast forward/ step forward or rewind/ > or . while keeping OPTION
step backward pressed.
pause X while keeping OPTION pressed.
mute the sound while keeping OPTION pressed.
(Audio System 1, 1x, 2 or 3 only)
adjust volume 2 +/– while keeping OPTION pressed.
(Audio System 1, 1x, 2 or 3 only)
VIDEO
8
+
Press again to resume normal playback.
Notes
• If the equipment does not have a certain function, the corresponding button on the remote
will not operate.
• Some equipment might not respond properly to buttons on TV’s remote. In this case, use the
equipment’s own remote control.
Advanced Operations
15
Page 16
Menu Adjustment
x Introducing the menu system
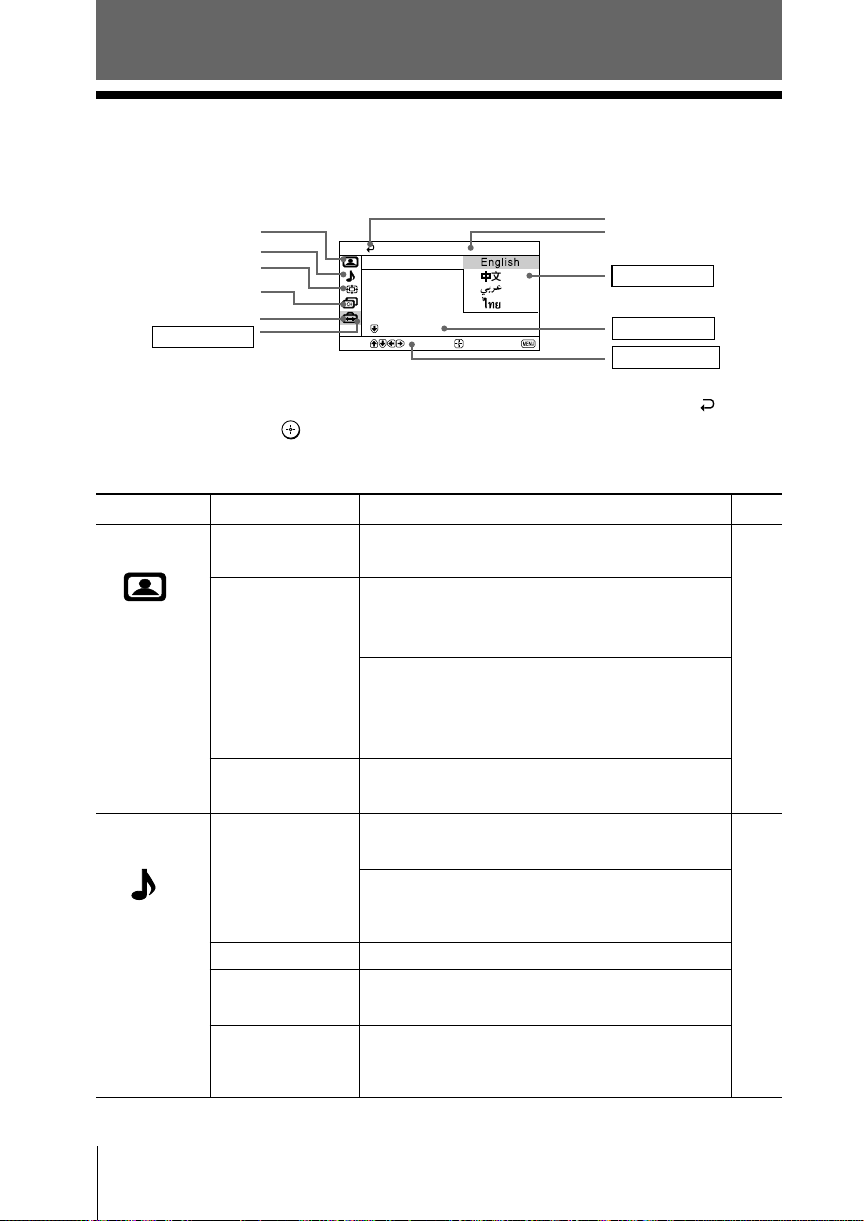
The MENU button lets you open a menu and change the settings of your TV.
The following is an overview of the menu system.
Picture icon
Sound icon
Wide Screen icon
Channel Setup icon
Setup icon
Menu level 1
Setup
Language:
Picture Position
WEGA Theatre Set
Game Mode :
Video Label
Select
Confirm
End
Tip
• If you want to exit from Menu level 2 to Menu 1, press V or v until the return icon (
highlighted, then press
.
Note
• When a feature is dimmed in the menu, it is not selectable.
Return icon
Name of the current
menu
Menu level 3
Menu level 2
User Guidance
) is
Level 1
“Picture”
“Sound”
Level 2/Level 3
“DRC-MF”
“Picture Mode”
“Picture Adjustment”
“Intelligent Picture”
“Sound Mode”
“Sound Adjustment”
“Balance”
“Intelligent Volume”
“Surround”
Level 3/Level 4/Function
Select the “DRC-MF” mode:
“DRC1250” t “DRC100” t “Progressive”
Select the picture mode:
“Dynamic” t “Standard” t “Hi-Fine”
t “Personal”
Adjust the “Personal” option:
“Picture” t “Brightness” t “Color”
t “Hue” t “Sharpness”t “Color Temperature”
t “Reset”
Optimize picture quality:
“On” t “Off”
Select the sound mode:
“Dynamic” t “Drama” t “Soft” t “Personal”
Adjust sound frequency settings of “Personal”
option:
“Adjust” t “Reset”
Select to emphasize the left and right speakers.
Adjust volume automatically:
“On” t “Off”
Select the surround mode:
“TruSurround” t “WOW” t “Simulated”
t “Off”
Page
18
20
16 Menu Adjustment
Page 17
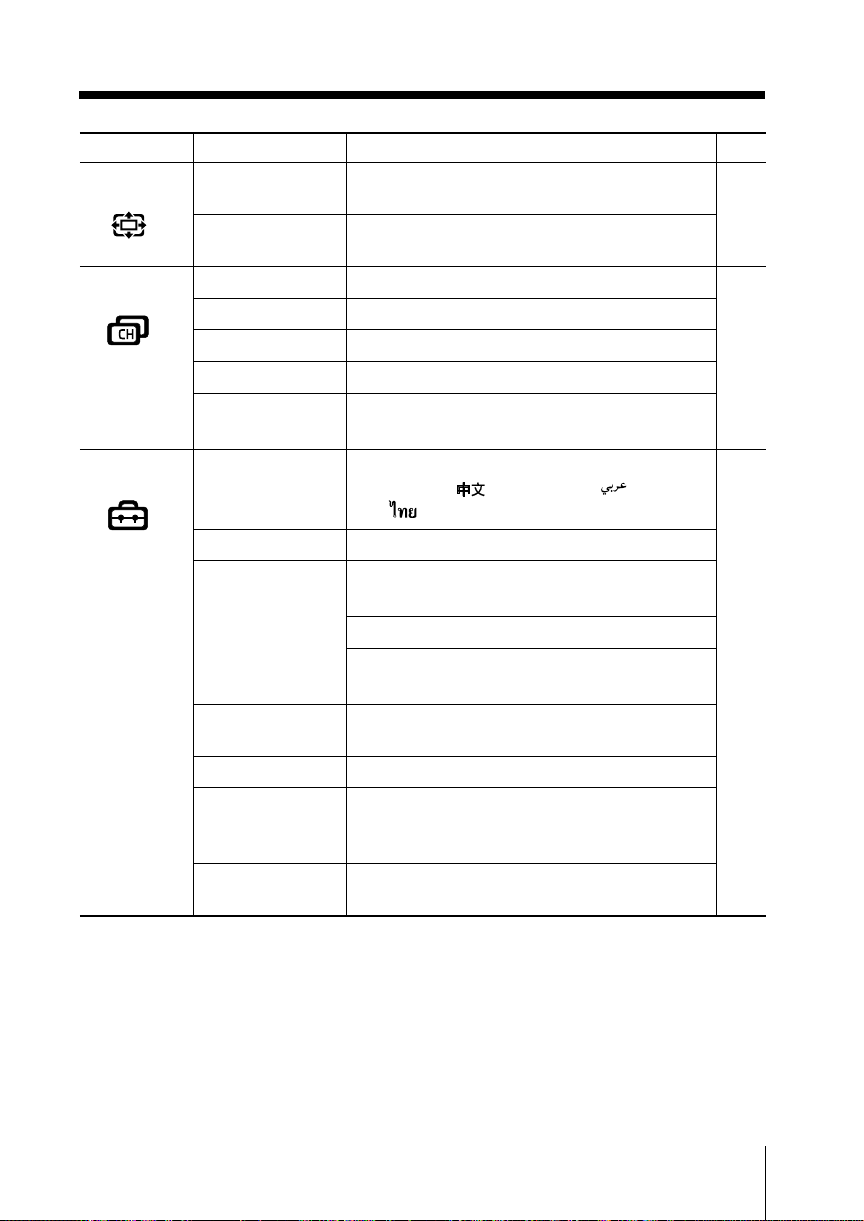
Level 1
“Wide Screen”
“Channel Setup”
“Setup”
Level 2/Level 3
“Wide Mode”
“Auto Wide”
“Auto Program”
“Manual Program”
“Program Label”
“Program Block”
“Program Sorting”
“Language”
“Picture Position”
“WEGA Theatre
Setup”
“Direct Input”
“Speaker”
“Game Mode”
“Video Label”
“Color System”
“Eco Mode”
Level 3/Level 4/Function
Change the picture size:
“16:9” t “4:3”
Optimize wide screen picture:
“On” t “Off”
Preset channels automatically.
Preset channels manually.
Label the program number.
Block unwanted programs.
Change the order in which the channels appear
on the screen.
Change the menu language:
“English” t “
t “ ”(Thai)
Adjust the picture position.
Select the WEGA Theatre Mode.
Select the input for connected equipment.
Select the speaker mode:
“MAIN” t “CENTER IN”
Adjust the picture settings for video games:
“On” t “Off”
Label the connected equipment.
Select the color system:
“Auto” t “PAL” t “SECAM” t “NTSC3.58”
t “NTSC4.43”
Reduce power consumption of your TV:
“On” t “Off”
” (Chinese) t “ ” (Arabic)
Page
22
23
25
Menu Adjustment
17
Page 18
x Changing the “Picture” setting
Select
End
Picture
Picture Mode:
DRC-MF: DRC1250
Dynamic
Confirm
Picture Adjustment
On
Intelligent Picture:
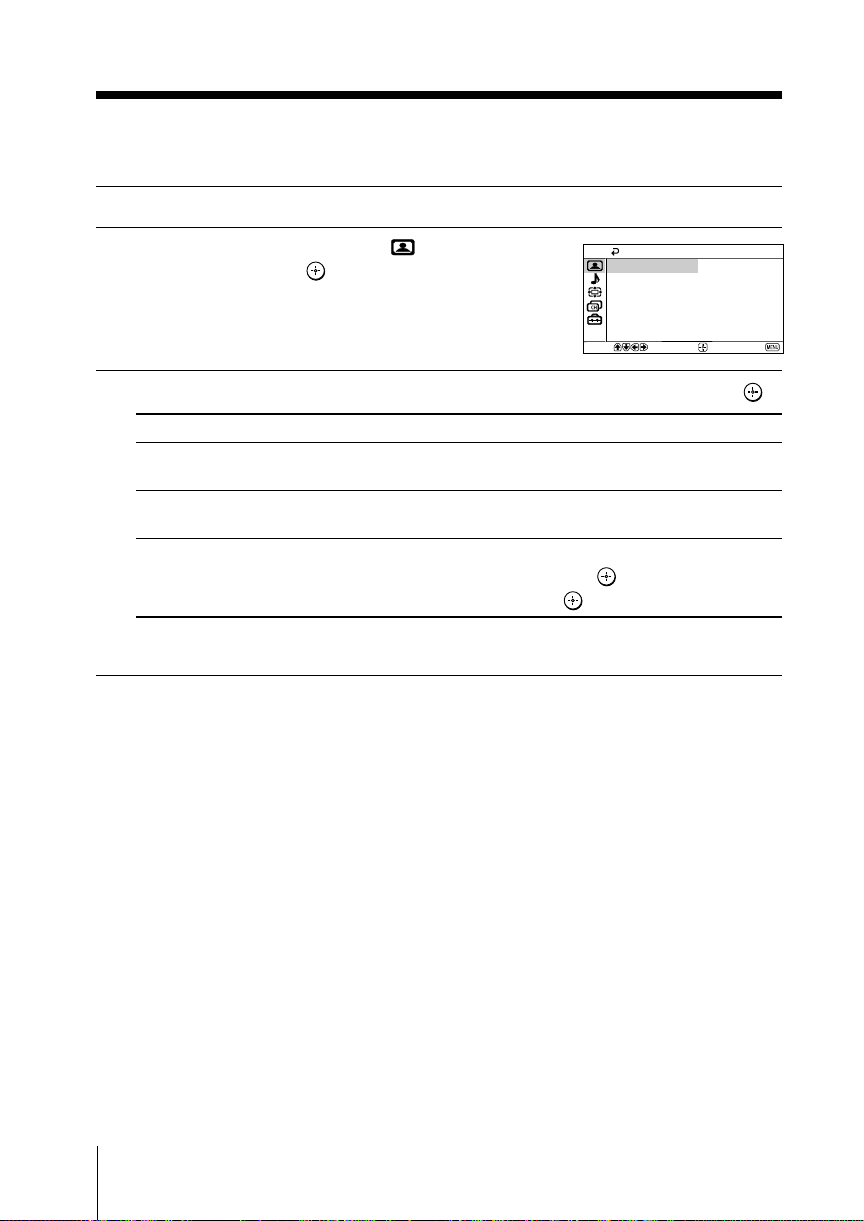
The “Picture” menu allows you to adjust the picture settings.
Press MENU.
1
Make sure the “Picture” icon ( ) is
2
selected, then press
Press V or v to select the desired item (e.g., “Picture Mode”), then press .
3
Select To
“DRC-MF” choose either “DRC1250”, “DRC100” or “Progressive”
“Picture Mode” choose either “Dynamic”, “Standard”, “Hi-Fine” or “Personal”*
“Intelligent Picture” optimize picture quality.
*You can adjust the setting to your personal preference in the “Picture Adjustment”
option only when the “Personal” mode is selected (see page 19).
.
(see page 13).
(see page 12).
Press V or v to select “On”, then press
To cancel, select “Off”, then press .
.
18 Menu Adjustment
Page 19

Adjusting the “Picture Adjustment” items under
“Personal” mode
Press V or v to select either “Picture” (contrast), “Brightness”, “Color”,
1
“Hue” (color tones),“Sharpness” or “Color Temperature” (choose either
“Cool”, “Neutral” or “Warm”), then press .
Selecting “Reset” will set your TV to the factory setting.
Press V,v,B or b to adjust the setting of your selected item, then press .
2
Repeat the above steps to adjust other items.
3
The adjusted settings will be received when you select “Personal”.
Notes
• “Hue” can be adjusted for the NTSC color system only.
• Reducing “Sharpness” can also reduce picture noise.
Menu Adjustment
19
Page 20
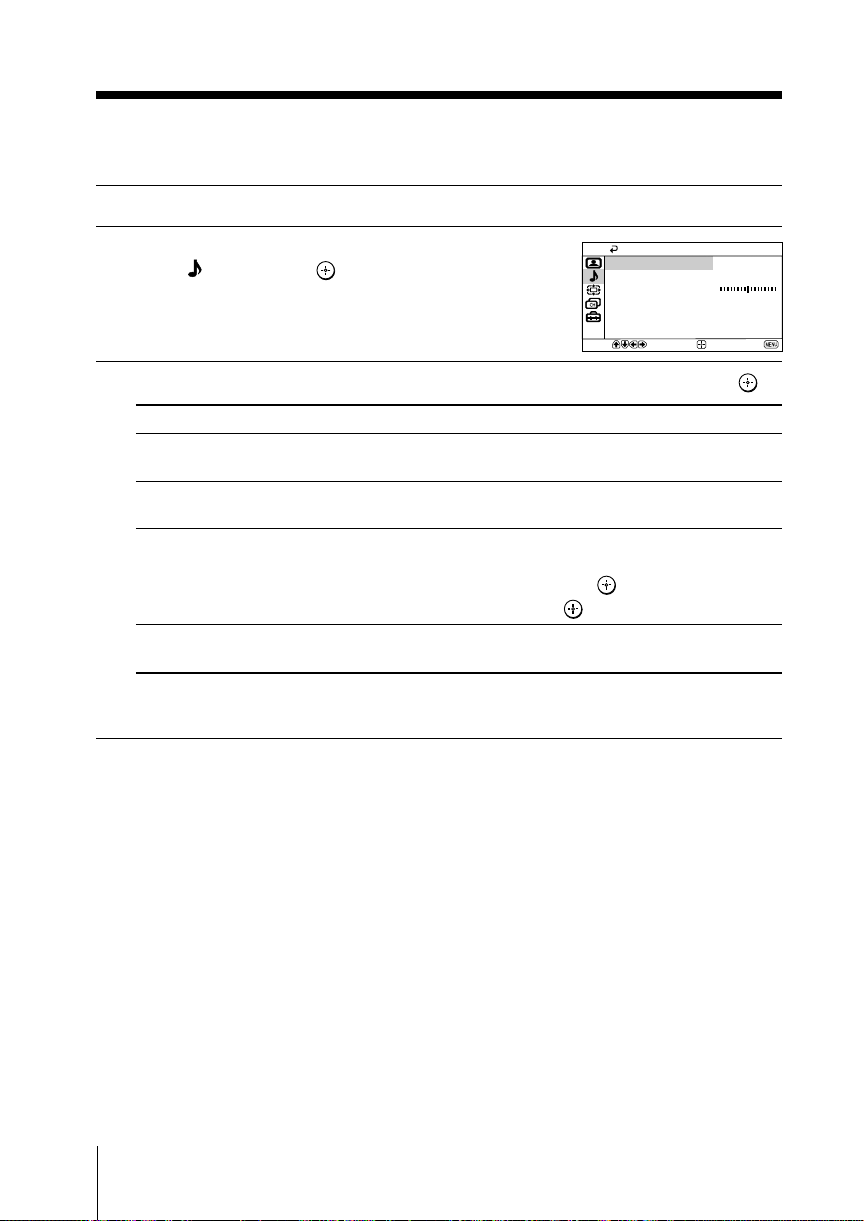
x Changing the “Sound” setting
Select
End
Sound
Balance
Sound Adjustment
Sound Mode: Dynamic
Off
Off
Confirm
Intelligent Volume:
Surround:
The “Sound” menu allows you to adjust the sound settings.
Press MENU.
1
Press V or v to select the “Sound”
2
icon (
Press V or v to select the desired item (e.g., “Sound Mode”), then press .
3
Select To
“Sound Mode” choose either “Dynamic”, “Drama”, “Soft” or “Personal”*
“Balance” Press v or B to emphasize the left speaker.
“Intelligent Volume” adjust the volume of all program numbers and video inputs
“Surround” choose either “TruSurround”, “WOW”, “Simulated” or “Off”
*You can adjust the setting to your personal preference in the “Sound Adjustment”
), then press .
(see page 12).
Press V or b to emphasize the right speaker.
automatically.
Press V or v to select “On”, then press
To cancel, select “Off”, then press .
(see page 11).
option only when the “Personal” mode is selected (see page 21).
.
Note
• “Intelligent Volume” is not selectable when “TruSurround” is selected.
20 Menu Adjustment
Page 21
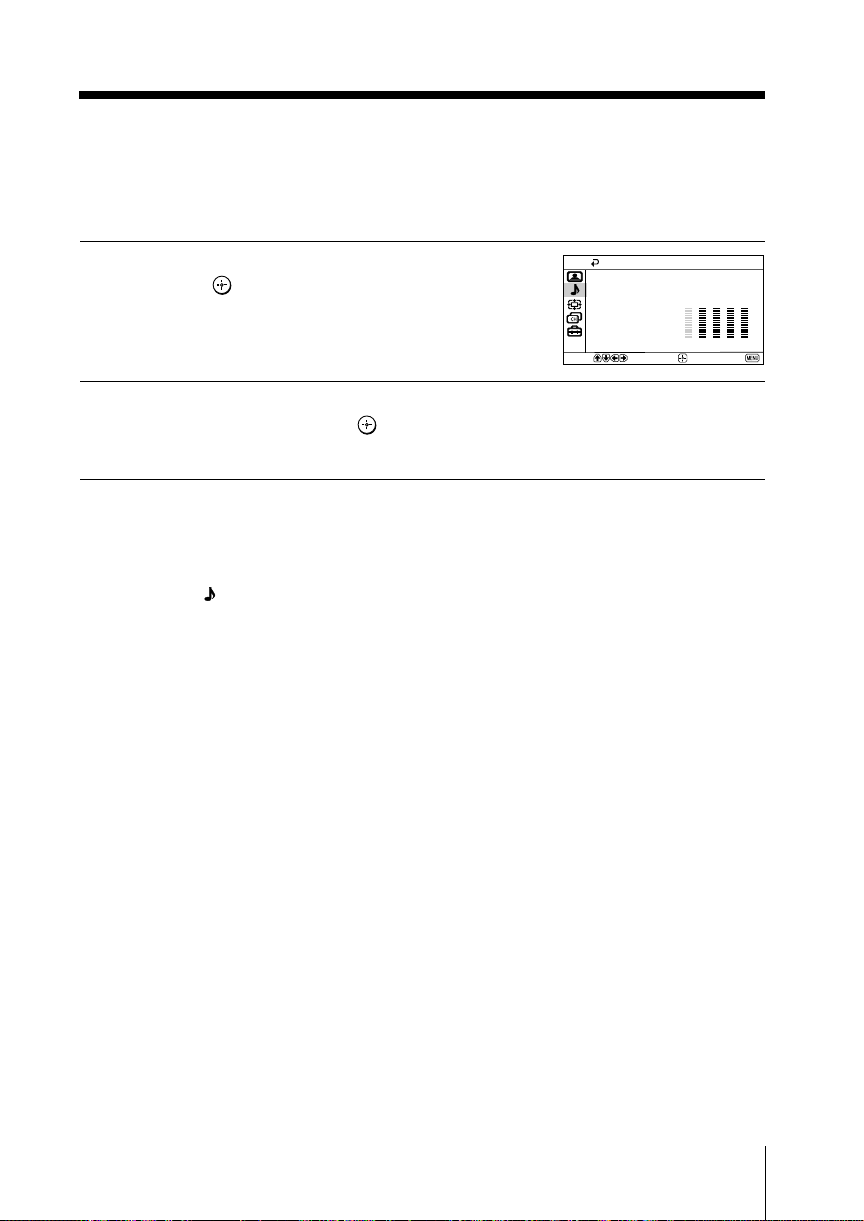
100 300 1k 3k 8k
Select
End
Sound Adjustment
Reset
Adjust
Confirm
Adjusting the “Sound Adjustment” item under
“Personal” mode
The 5-Band Graphic Equalizer feature allows you to adjust sound frequency settings
of “Personal” mode in the menu.
Make sure that “Adjust” is selected,
1
then press
Selecting “Reset” will set your TV to
the factory setting.
Press B or b to select the desired sound frequency, then press V or v to
2
adjust the setting and press
The adjusted settings will be received when you select “Personal”.
Notes
• Adjusting higher frequency will affect higher pitched sound and adjusting lower frequency
will affect lower pitched sound.
•You may display the settings directly using the SOUND MODE button on the TV front panel
(see page 9) or
.
.
button on the remote control (see page 11).
Menu Adjustment
21
Page 22
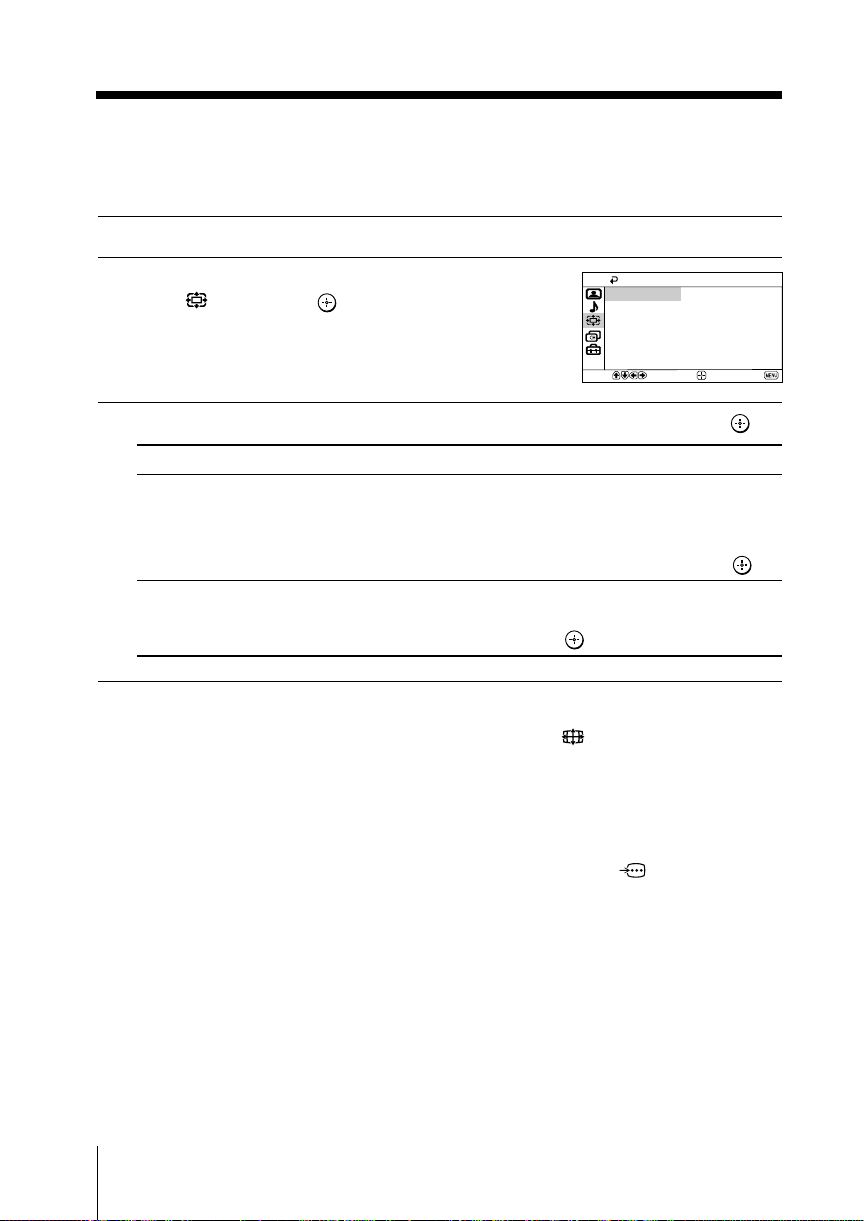
x Changing the “Wide Screen” setting
Select
End
Wide Screen
Auto Wide :
Wide Mode:On4:3
Confirm
The “Wide Screen” menu allows you to view the picture with optimal effect
when receiving wide-mode (16:9) picture signal.
Press MENU.
1
Press V or v to select the “Wide Screen”
2
icon ( ), then press .
Press V or v to select the desired item (e.g., “Wide Mode”), then press .
3
Select To
“Wide Mode” change the size of the picture when receiving wide-mode (16:9)
“Auto Wide” display the picture in optimum wide screen automatically
picture signal.
Choose “16:9”.
To restore the normal picture size, select “4:3”, then press .
when you choose “On”.
To cancel, select “Off”, then press
.
22 Menu Adjustment
Tip
•You can also change to wide-mode picture size by pressing the button on the remote
control (see page 10).
Notes
•“Wide Mode” is not selectable for high-definition (1080i, 720p) input signals. For HD (1080i,
720p) input signals, your TV will always display wide mode picture.
• “Auto Wide” is only available when receiving 576i, 480p and 480i input signals and does not
function when receiving signals through G/B/R/HD/VD terminals of
video input 2).
2 (component
Page 23
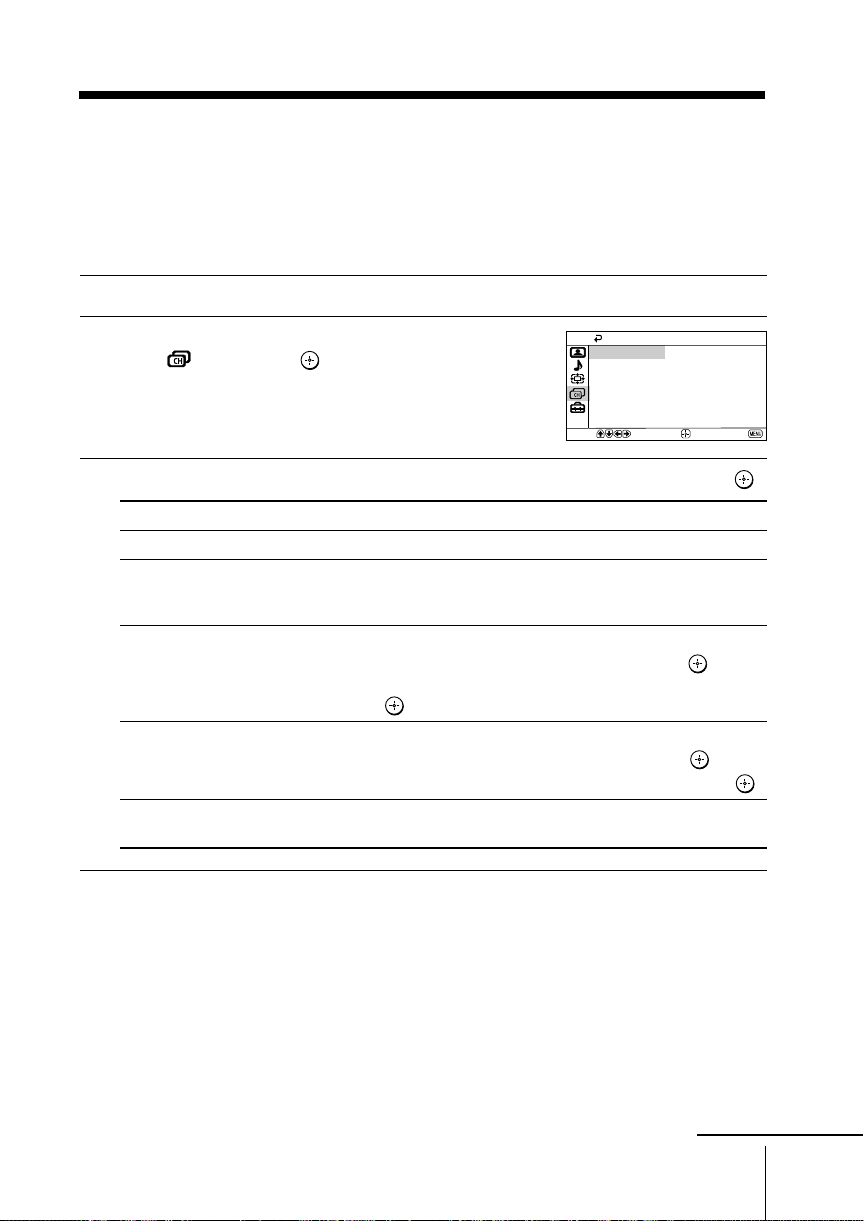
x C
Channel Setup
Program Sorting
Manual Program
Program Block
Program Label
Select
End
Confirm
Auto Program
hanging the “Channel Setup”
setting
The “Channel Setup” menu allows you to preset channels automatically,
manually preset channels, label the program number, block unwanted programs
and change the order of TV channels that appear on the screen.
Press MENU.
1
Press V or v to select the “Channel Setup”
2
icon (
Press V or v to select the desired item (e.g., “Auto Program”), then press .
3
Select To
“Auto Program” preset channels automatically.
“Manual Program” manually preset desired channels and channels that cannot be
“Program Label” label the program number.
“Program Block” block unwanted programs.
“Program Sorting” change the order in which the channels appear on the screen
), then press .
preset automatically (see Presetting channels manually on
page 24).
(1) Press V or v to select the program number, then press .
(2) Press V or v to select alphanumeric characters for the label,
then press .
(1) Press V or v to select the program number, then press
(2) Press V or v to choose either “Allow” or “Block”, then press .
(see step 3 b) of the section “Initial Setup” in page 7).
.
Notes
• If you preset a blocked program number, that program number will be unblocked
automatically.
•You may label the program numbers so that you can see the program labels in the “Program
Sorting” menu.
• If you sort a blocked program, that program will remain blocked.
continue
Menu Adjustment
23
Page 24
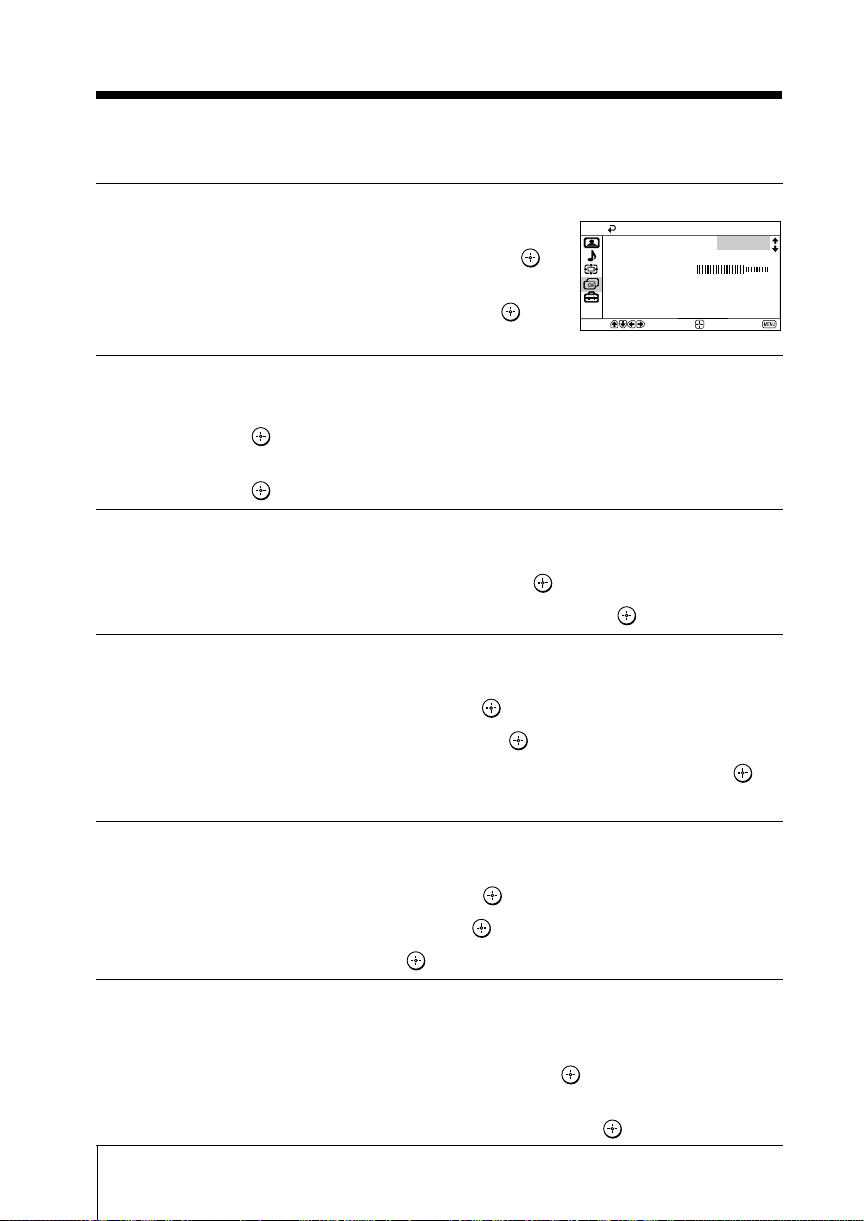
VHF Low
Fine:
Skip:
Signal Booster:
Auto
Off
Auto
Select
End
Confirm
Manual Program
Program:
01
TV System:
D/K
continued
Presetting channels manually
After selecting “Manual Program”, select the program
1
number to which you want to preset a channel.
(1) Make sure “Program” is selected, then press .
(2) Press V or v until the program number you want
to preset appears on the menu, then press
Select the desired channel.
2
(1) Make sure either “VHF Low”, “VHF High” or “UHF” is selected,
then press
.
(2) Press V or v until the desired channel’s broadcast appears on the TV screen,
then press
If the sound of the desired channel is abnormal, select the appropriate TV
3
system.
(1) Press V or v
(2) Press V or v
If you are not satisfied with the picture and sound quality, you may be able
4
to improve them by using the “Fine” tuning feature.
.
to select “TV System”, then press .
until the sound becomes normal, then press .
(1) Press V or v to select “Fine”, then press .
(2) Press V or v
Press V,v,B or b until the picture and sound quality are optimal, then press .
(3)
to select “Manual”, then press .
The + or – icon on the menu flashes while tuning.
.
If you want to skip this program number when using PROG +/–, you can
5
select the “Skip” feature.
(1) Press V or v
(2) Press V or v
To cancel, select “Off”, then press
If the TV signal is too strong (picture distorted; picture with lines; signal
6
interference) or weak (snowy picture), you may be able to improve the
picture quality by setting the “Signal Booster” feature.
(1) Press V or v
24 Menu Adjustment
(2) Press V or v to select “Off” (for picture distorted; picture with lines; signal
to select “Skip”, then press .
to select “On”, then press .
.
to select “Signal Booster”, then press .
interference) or “Auto” (for snowy picture), then press
.
Page 25
x C
hanging the “Setup” setting
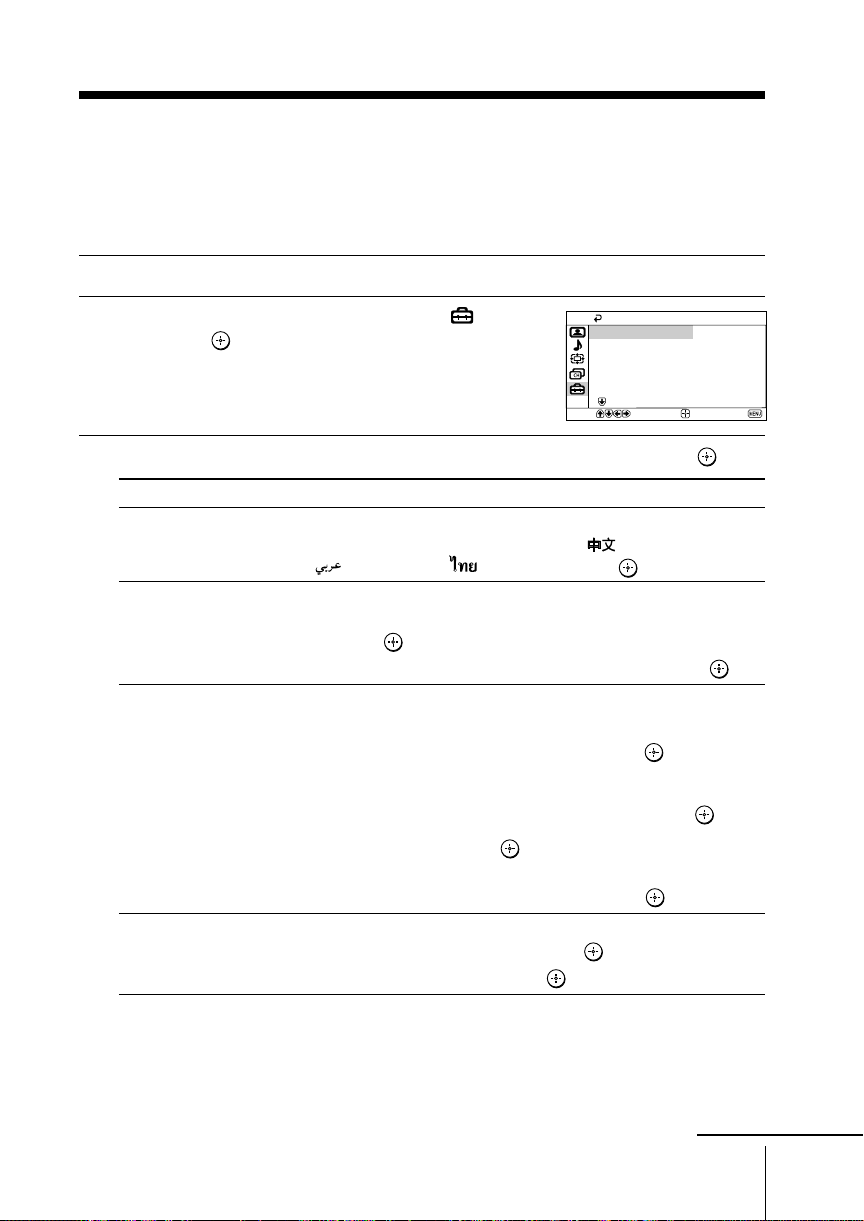
The “Setup” menu allows you to change the menu language, adjust the picture
position, setup WEGA Theatre Mode, adjust suitable picture setting for video
games, label the connected equipment, select the color system and reduce your
TV power consumption.
Press MENU.
1
Press V or v to select the “Setup” icon ( ),
2
then press
Press V or v to select the desired item (e.g., “Language”), then press .
3
Select To
“Language” change the menu language.
“Picture Position”
“WEGA Theatre Setup” setup WEGA Theatre Mode for best picture, sound and
.
Press V or v to select either “English”, “ ” (Chinese),
” (Arabic) or “ ”(Thai), then press .
“
adjust the picture position when it is not aligned with the TV screen.
Press V or v to select “Picture Rotation” or “Picture V-Position”,
then press
Press V,v,B or b to adjust the picture position, then press
surround effect enjoyment of a cinema (see page 14).
Press V or v to select “Direct Input”, then press .
Select either “Video 1”, “Video 2”, “Video 3”, “Video 4”,
“HD/DVD 1” or “HD/DVD 2” for the connected equipment
that you want to view with WEGA Theatre, then press .
.
Setup
Language:
Picture Position
WEGA Theatre Setup
Game Mode:
Video Label
Select
Confirm
English
Off
End
.
Select “Speaker” and press . Normally select “MAIN”.
When you want to use the TV’s speakers as the center speaker,
press V or v to select “CENTER IN”, then press .
“Game Mode” adjust the picture setting that is suitable to view video games.
Press V or v to select “On”, then press
To cancel, select “Off”, then press
.
.
continue
Menu Adjustment
25
Page 26
continued
“Video Label” label the connected equipment.
(1)
Press V or v to select the input you want to label, then press .
(2) Press V or v to select the label options: “Video 1/Video 2/
Video 3/Video 4/HD/DVD 1/HD/DVD 2”, “VCR”, “SAT”,
“Game” or “Edit”*, then press
*You may edit the video label. Press V or v to select
alphanumeric characters for the label, then press
“Color System” select the color system.
“Eco Mode” reduce power consumption of your TV to save energy.
Notes
• “Game Mode” is available only when receiving signals through t (video input),
(S video input) or (component video input) terminals.
• When HD (high-definition) or progressive signals are input, “Game Mode” does not function.
Press V or v to select either “Auto”, “PAL”, “SECAM”,
“NTSC3.58” or “NTSC4.43”, then press
“Auto”.
Press V or v to select “On”, then press .
When you press
will appear on the screen for a while.
To cancel, select “Off”, then press
or turn on the TV, Eco Mode ( ) symbol
.
.
. Normally, set this to
.
26 Menu Adjustment
Page 27
Additional Information
x Connecting optional components
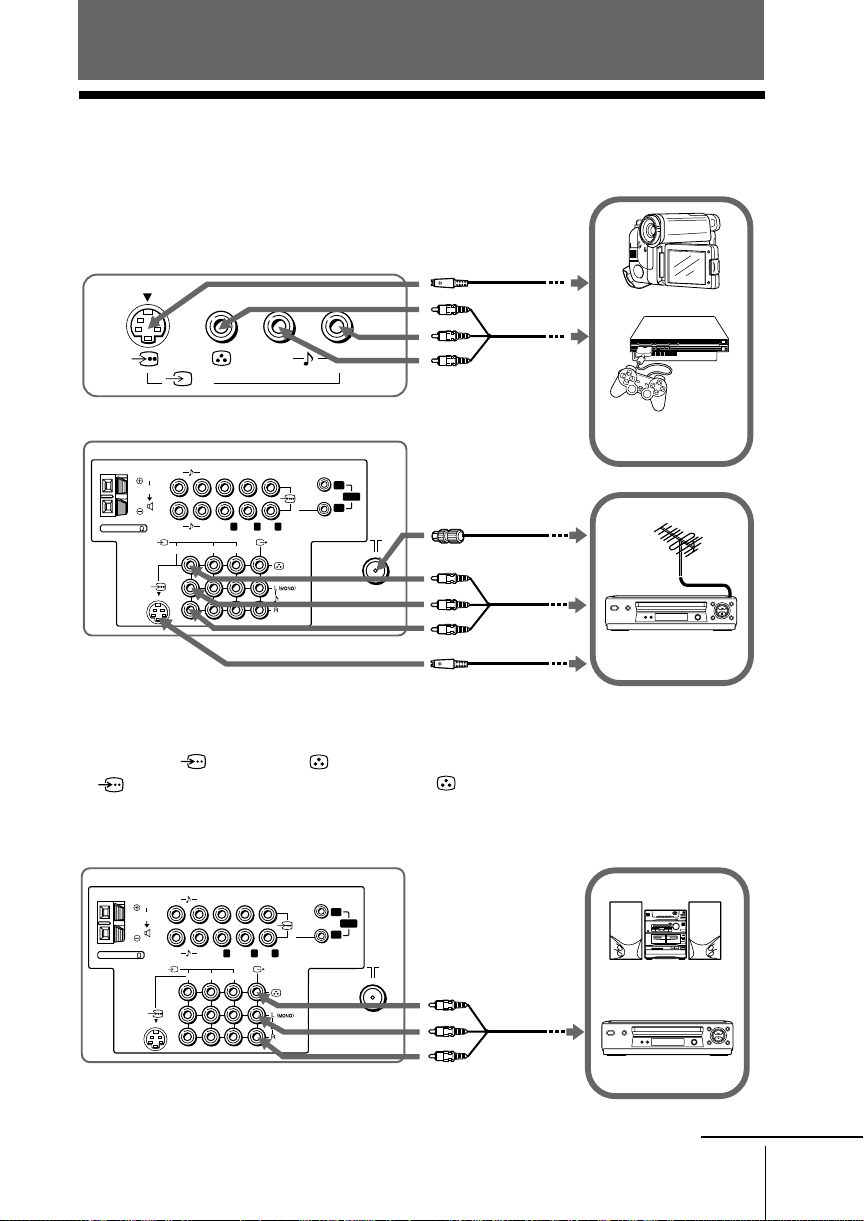
Connecting to the video input terminal ( t )
TV front panel
S Video cable
(not supplied)
Camcorder
Audio/Video
cable
(not supplied)
Video game
equipment
Antenna cable
(not supplied)
Audio/Video
TV rear panel
C
120W MAX 8
4
RL
RL
1
L(MONO)
Y
Y
23
R
PR/
PB/
C
R
B
C
PR/
B
/
P
RG B
C
C
R
B
HD
1
SYNC
VD
2
cable
(not supplied)
S Video cable
(not supplied)
VCR
Notes
• If you connect a VCR to 8 (antenna input), preset the signal output from the VCR to the
program number 0 on the TV (see page 24).
• When both
(S video) and (video) for
t1
or
t4
are connected at the same time,
(S video) is automatically selected. To view (video), disconnect the S video cable.
Connecting to the monitor output terminal ( T )
TV rear panel
C
120W MAX 8
RL
RL
1
23
PR/
PB/
Y
C
C
R
B
P
PR/
B
/
Y
C
C
R
B
HD
1
SYNC
VD
2
RG B
Audio/Video
cable
Audio system
(not supplied)
VCR
continue
Additional Information
27
Page 28
continued
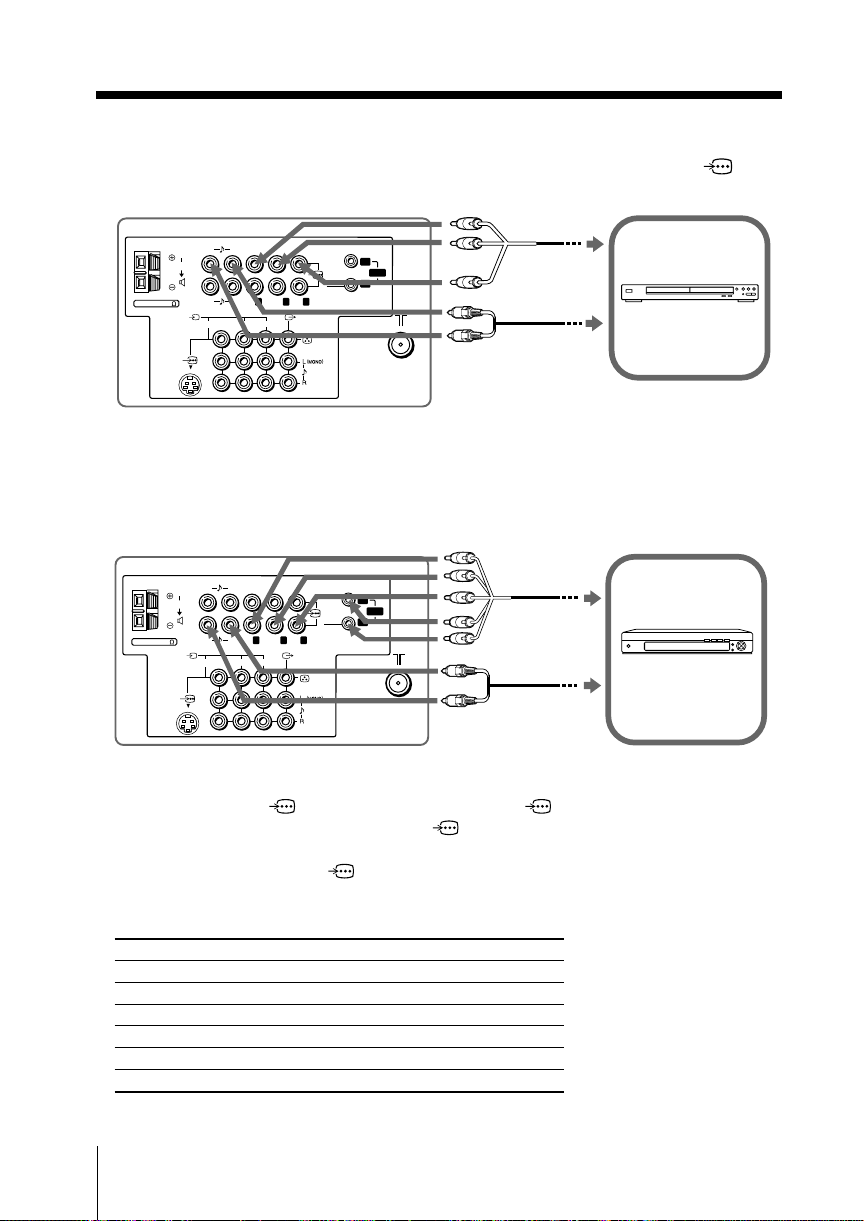
Connecting to the component video input terminal ( )
TV rear panel
P
R
/
L
23
Y
Y
23
PB/
Y
P
Y
C
PB/
C
RCB
PR/
B
/
P
C
C
R
B
HD
1
SYNC
VD
2
RG B
Component
video cable
(not supplied)
DVD player
Audio cable
(not supplied)
P
R
/
CRC
B
PR/
B
/
C
R
B
HD
1
SYNC
VD
2
RG B
Component
video cable
(not supplied)
Digital TV receiver
Audio cable
(not supplied)
RL
C
120W MAX 8
RL
1
Notes
• The component video terminals on your DVD player are sometimes labeled Y/CB/CR, Y/PB/
PR, Y/Cb/Cr or Y/B-Y/R-Y.
• If you select “HD/DVD 1” or “HD/DVD 2” on your TV screen, the signal from the T
(monitor output) terminals will not be output properly. This does not indicate a malfunction.
TV rear panel
RL
C
120W MAX 8
R
1
Note
• If your DTV receiver is equipped with the Y/PB/PR output terminals, connect it to the
B/PR terminals of 1 (component video input 1) or 2 (component video input 2).
Y/P
Connect nothing to the HD/VD terminals of 2 (component video input 2).
If your DTV receiver is not equipped with the Y/P
G/B/R/HD/VD terminals of
2 (component video input 2).
B/PR output terminals, connect it to the
Tip
• The TV accepts the following signal formats:
Total scanning line Effective scanning line fV (Hz)
1125i 1080i 50/60
750p 720p 50/60
625p 576p 50
625i 576i 50
525p 480p 60
525i 480i 60
28 Additional Information
Page 29
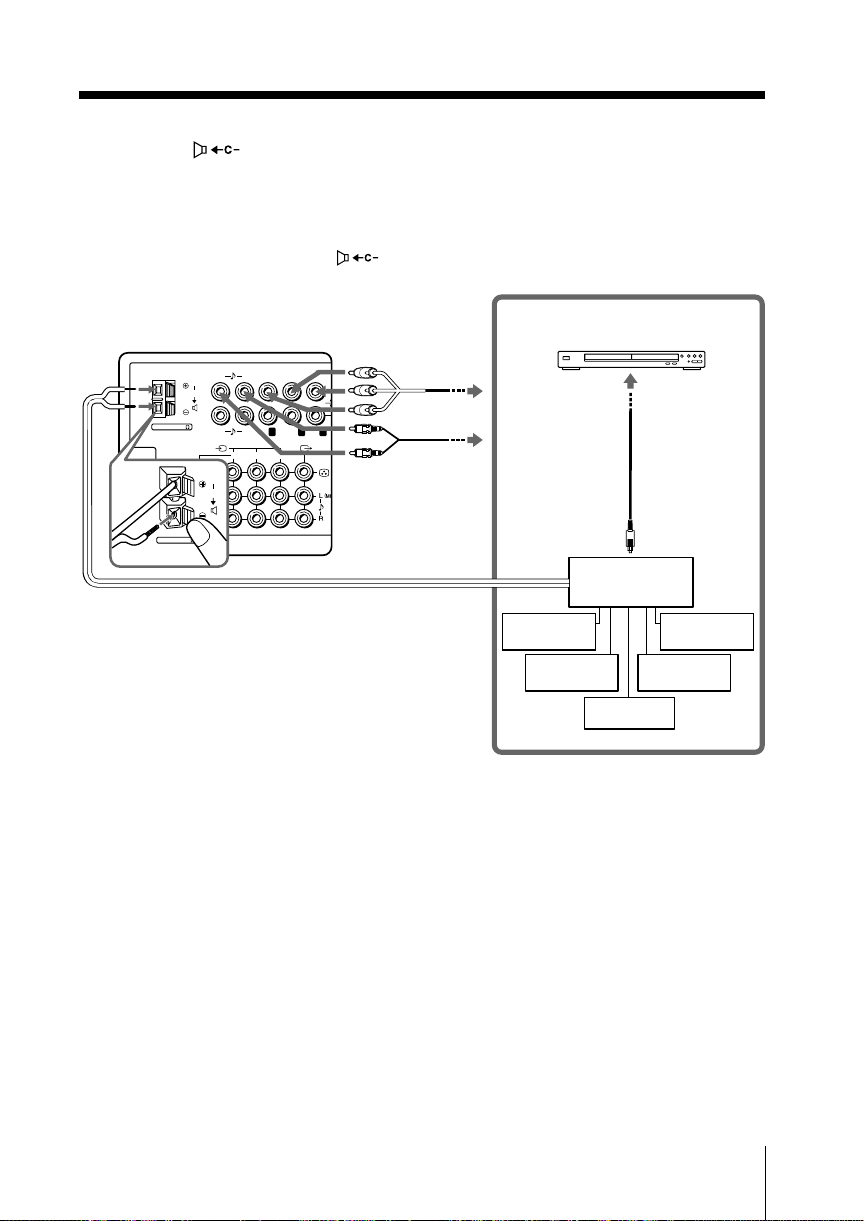
Connecting an amplifier to the center speaker input
1
23
C
R
PR/
C
B
Y
RL
P
B
/
P
R
/
RL
RG B
Y
C
RCB
PB/
terminal (
If you use an amplifier with a Dolby* surround decoder instead of the TV’s audio
system, you can use the TV’s speakers as the center speaker for your audio system.
Using the speaker cords supplied with the amplifier, connect the center speaker
terminals of the amplifier to the
)
(center speaker input) terminals on the TV.
TV rear panel
Component
video cable
DVD player
(not supplied)
C
120W MAX 8
Optical digital
cable
(not supplied)
120W MAX 8
Audio cable
C
C
C
(not supplied)
Amplifier
Front
speaker (L)
Rear
speaker (L)
Front
speaker (R)
Rear
speaker (R)
Woofer
Notes
•To use the TV’s speakers as the center speaker, you can press the CENTER SP button on the
remote control (see page 10) or display the “WEGA Theatre Setup” from “Setup” menu and
select “CENTER IN” for “Speaker” (see page 25).
• If your TV is set to “CENTER IN Speaker”and nothing is connected to the center speaker input
terminals on the rear of TV or the sound source emitted from the amplifier does not contain
the center speaker channel, no sound will be heard from the TV’s speaker.
* “Dolby” is a trademark of Dolby Laboratories.
Additional Information
29
Page 30
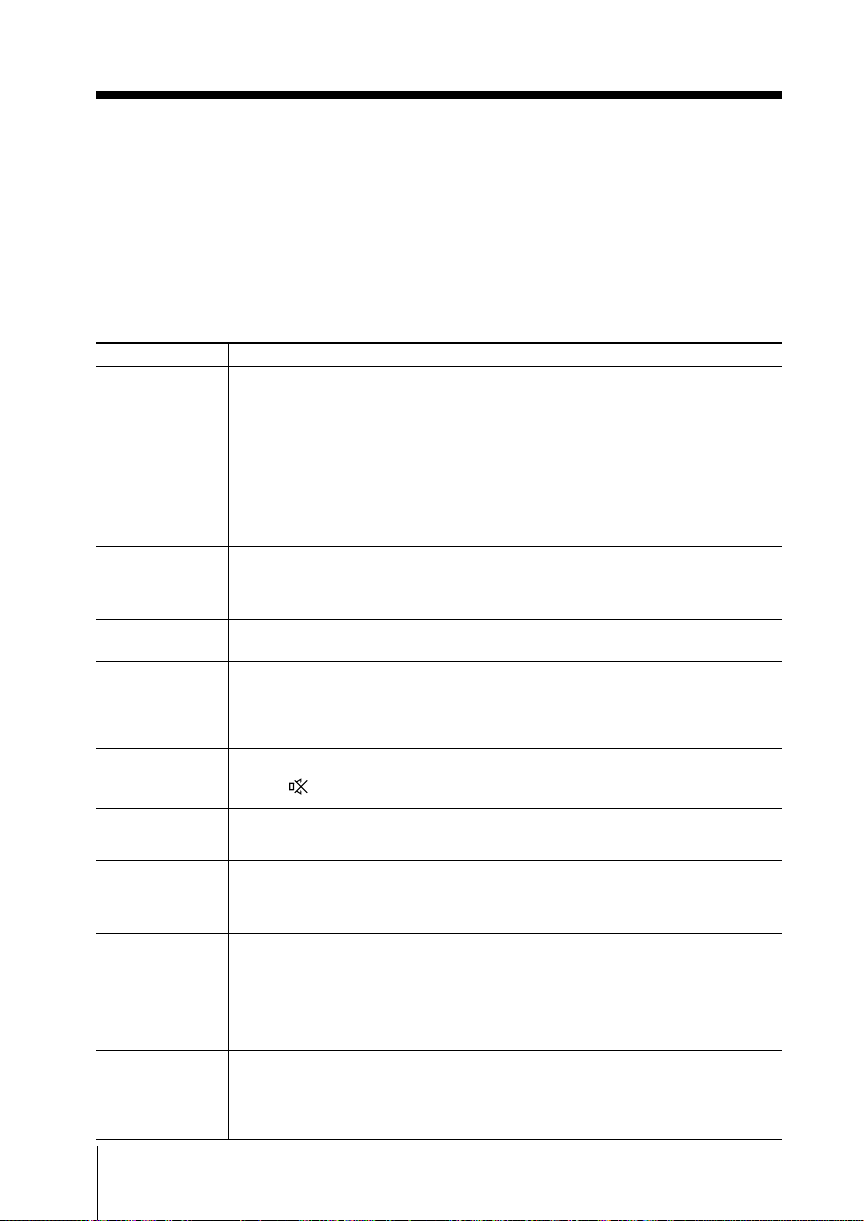
x Troubleshooting
If you find any problem while viewing your TV, you can either use the Reset
function or check the Troubleshooting guide below. If the problem persists,
contact your Sony dealer.
Reset function
Press the RESET button on your remote control. Your TV will go blank for a few
seconds, then the “Initial Setup” menu will appear. Pressing RESET will set your
TV to the factory setting, but certain problems may be solved.
Symptom Solutions
Snowy picture,
noisy sound
Distorted picture,
noisy sound
Good picture,
noisy sound
No picture,
no sound
Good picture,
no sound
• Check the antenna cable and connection on the TV, VCR and at the wall
(see page 27).
• Check the antenna setup. Contact a Sony dealer for advice.
• Display the “Channel Setup” menu and select “Manual Program” to preset
the channel again (see page 24).
• Display the “Channel Setup” menu and set the “Signal Booster” to “Auto”
from “Manual Program” (see page 24).
•Try using an external booster.
•Turn off or disconnect the external booster if it is in use.
• Display the “Channel Setup” menu and set the “Signal Booster” to “Off”
from “Manual Program”(see page 24).
• Display the “Channel Setup” menu and select the appropriate
“TV System” from “Manual Program” (see page 24).
• Check the power cord, antenna and VCR connections (see page 27).
?/1 (power) to turn on the TV (see page 10).
•Press
•Press ! (main power) on the TV to turn off the TV for about five seconds,
then turn it on again (see page 9).
•Press 2 + to increase the volume level (see page 9).
•Press to cancel the muting (see page 10).
Dotted lines or
stripes
Double images or
“ghosts”
No color
Picture slant
• Do not use a hair dryer or other equipment near the TV.
• Check the antenna setup. Contact a Sony dealer for advice.
• Use the fine tuning (“Fine”) function (see page 24).
• Check the antenna setup. Contact a Sony dealer for advice.
•Turn off or disconnect the external booster if it is in use.
Display the “Picture” menu and select “Personal” of “Picture Mode”, then
•
adjust the “Color” level in “Picture Adjustment” (see page 19).
• Display the “Setup” menu and check the “Color System” setting
(usually set this to “Auto”) (see page 26).
• Check the antenna setup. Contact a Sony dealer for advice.
• Keep external speakers or other electrical equipment away from the TV.
• Display the “Picture Position” under “Setup” menu, then adjust “Picture
Rotation” and “Picture V-Position” so that the picture is aligned to the TV
screen (see page 25).
30 Additional Information
Page 31
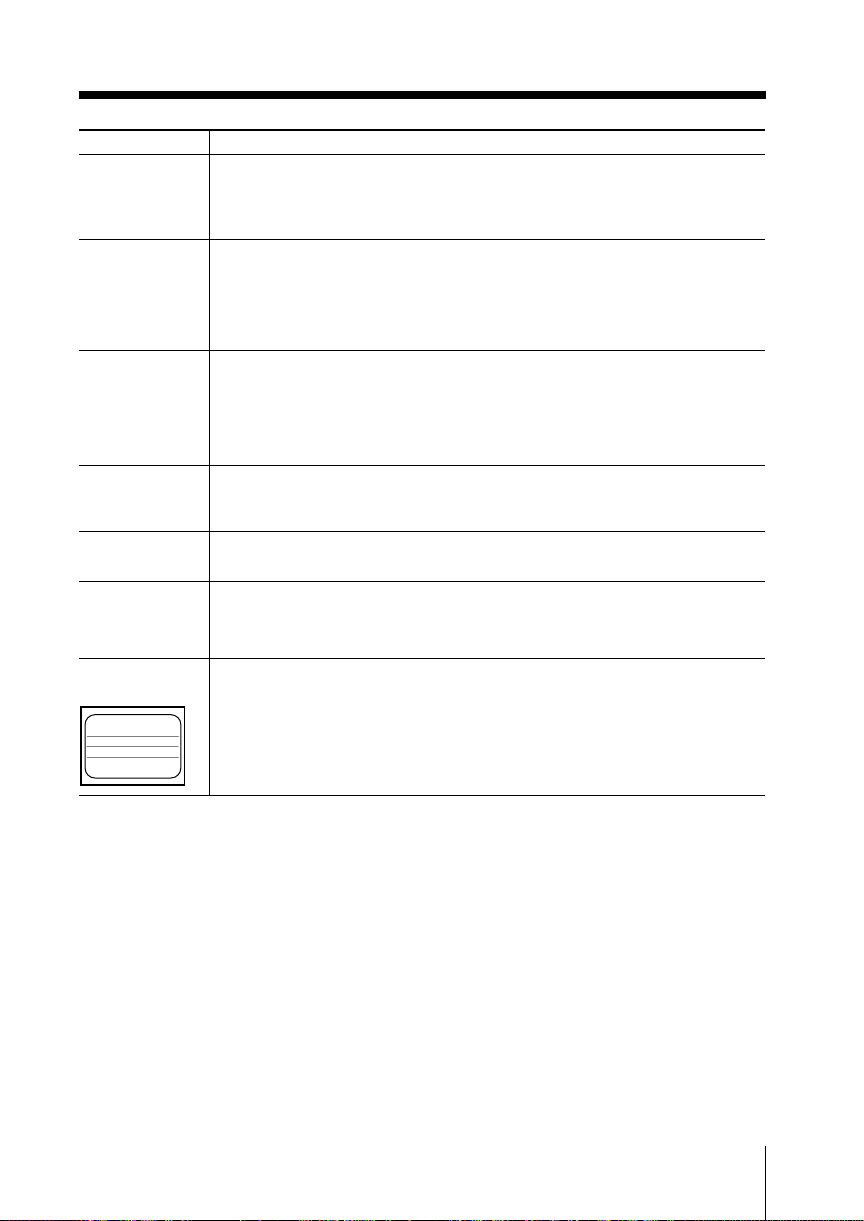
Symptom Solutions
Abnormal color
patches
• Keep external speakers or other equipment away from the TV. Do not
move the TV while the TV is turned on. Press ! (main power) on the TV
to turn off the TV for about 15 minutes, then turn it on again to
demagnetize the TV.
The 1 (standby)
indicator on your
TV flashes red
several times after
every three
seconds.
The TV screen
sometimes goes
blank for
slightly longer
than usual
during channel
change.
Cannot play
shooting games.
• Count the number of times the 1 (standby) indicator flashes.
Press ! (main power) to turn off your TV. Contact your nearest Sony
service center.
• The “Signal Booster” is functioning to detect a weak signal. This does not
indicate a malfunction.
• Some shooting games which involve pointing a light beam at the TV
screen with an electronic gun or rifle cannot be used with your TV. For
details, see the instruction manual supplied with the video game software.
TV cabinet creaks.
• Change in room temperature sometimes make the TV cabinet expand or
contract, causing a noise. This does not indicate a malfunction.
A small “boom”
sound is heard
when the TV is
turned on.
Thin lines appear
on the TV Screen.
• The TV’s demagnetizing function is working. This does not indicate a
malfunction
• The visible lines that sometimes appear on your TV screen are shadows
from the damper wires used to stabilize the aperture grille of the Trinitron
picture tube. This does not indicate a malfunction.
Additional Information
31
Page 32
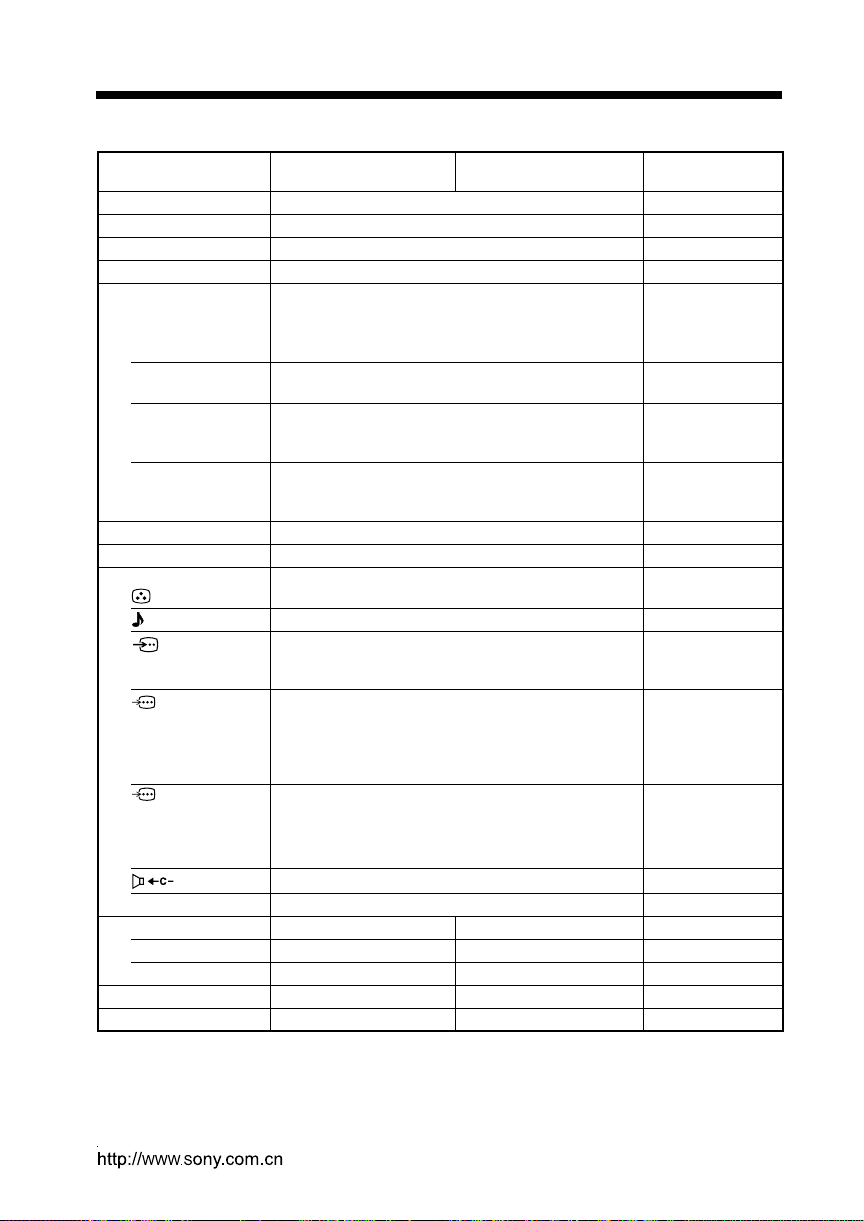
x Specifications
KV-DA34M80
KV-DA34X80
Power requirements
Power consumption (W)
Television system
Color system
Channel coverage
B/G
I
D/K
M
8 (Antenna)
Audio output (Speaker)
Number of terminal
(Video)
(Audio)
(S Video)
(Component
Video)
(G/B/R/HD/
VD Video)
(Center Speaker)
i (Headphone)
Picture tube
Tube size (cm)
Screen size (cm)
Dimensions (w/h/d, mm)
Mass (kg)
Design and specifications are subject to change without notice.
Manufacturer:
SSV Shanghai Suoguang Visual Products Co., Ltd.
3777, Chuan Sha Road,
Pu Dong New District Zip: 201201
32 Additional Information
Sony Corporation
220 V AC, 50 Hz
Indicated on the rear of the TV
B/G, I, D/K, M
PAL, PAL 60, SECAM, NTSC3.58, NTSC4.43
VHF : E2 to E12
UHF : E21 to E69
CATV : S01 to S03, S1 to S41
UHF : B21 to B68
CATV : S01 to S03, S1 to S41
VHF : C1 to C12, R1 to R12
UHF : C13 to C57, R21 to R60
CATV : S01 to S03, S1 to S41, Z1 to Z39
VHF : A2 to A13
UHF : A14 to A79
CATV : A-8 to A-2, A to W+4, W+6 to W+84
75-ohm external terminal
10 W + 10 W (8.5W + 8.5 W for 7% distortion)
Input: 4 Output: 1 Phono jacks; 1 Vp-p, 75 ohms
Input: 6 Output: 1 Phono jacks; 500 mVrms
Input: 2 Y: 1 Vp-p, 75 ohms,
Input: 2 Phono jacks;
Input: 1 Phono jacks;
Input: 1 120 W max., 8 ohms
Output: 1 Stereo minijack
34 type 29 type
86 72
80 68
895 × 679 × 596 765 × 584 × 544
76 49
KV-DA29M80
KV-DA29X80
unbalanced, sync negative
C: 0.286 Vp-p, 75 ohms
Y: 1 Vp-p, 75 ohms,
sync negative
P
B/CB: 0.7 Vp-p, 75 ohms
P
R/CR: 0.7 Vp-p, 75 ohms
G: 0.7 Vp-p, 75 ohms, B: 0.7 Vp-p,
75 ohms, R: 0.7 Vp-p, 75 ohms
HD: 0.7 Vp-p, 75 ohms,
VD: 0.7 Vp-p, 75 ohms
Note
Measured diagonally
Measured diagonally
Page 33
2-318-485-11 (2)
Tr initron Color TV
彩色电视接收机
使用说明书
KV-DA34
KV-DA29
© 2004 Sony Corporation
M80
X80
Page 34
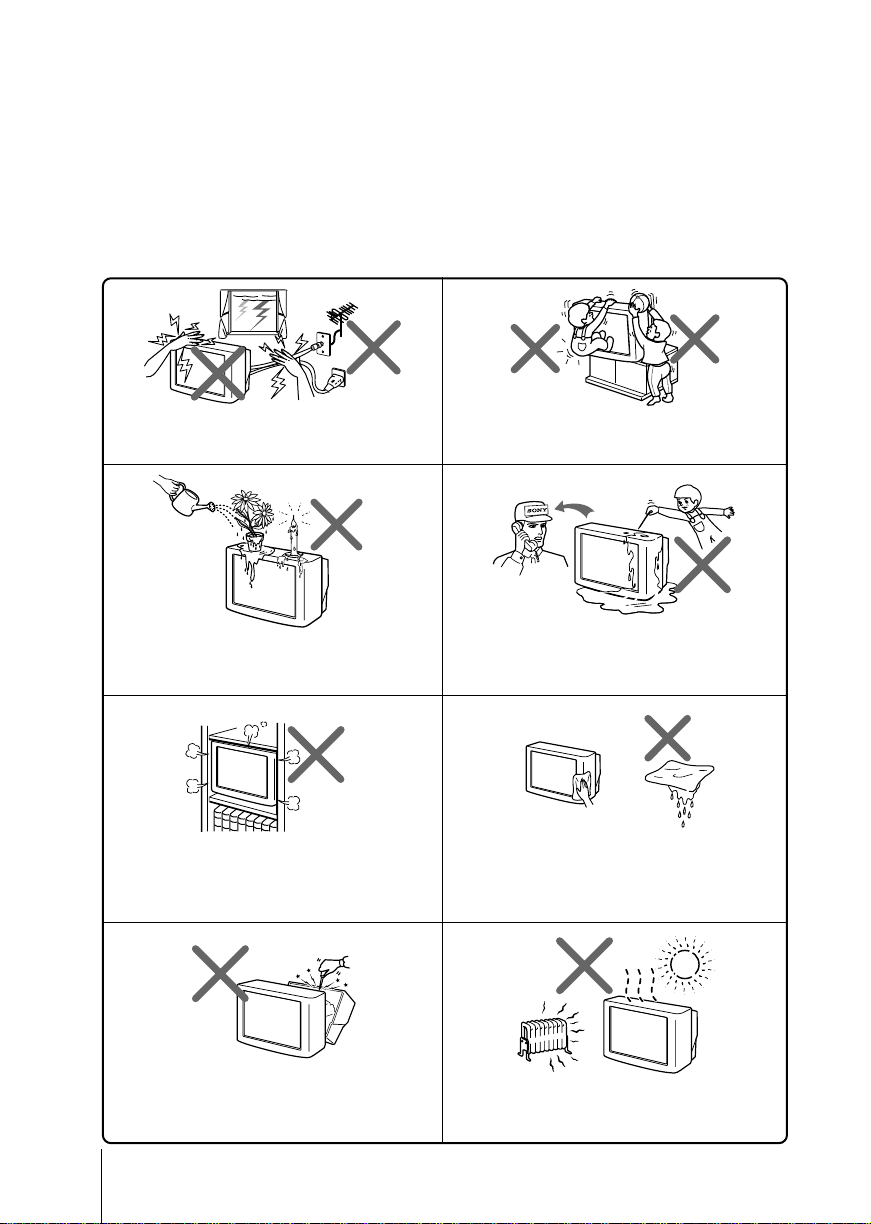
警告
• 本电视机内存在危险性高电压。
• 本电视机仅可在 220 伏特交流电压下操作。
• 若未完成所有连接程序,请勿插入电源线;否则极少量的电流可能经天线或其它端子
外泄。
• 若打算近期内不使用遥控器,请将电池取出,以避免电池泄漏而损坏遥控器。若您不
小心触及电池所泄漏的液体,应立即用水洗净。
为了个人安全起见,雷雨期间,请勿触摸电视机的
任何部分,包括电源线和天线电缆。
请勿放置任何物体于电视机上。请勿使任何液体滴
湿或喷湿本电视机。请勿放置任何装有液体的物体
(如花瓶)于电视机上。
请勿堵塞本电视机的通风口。
请勿将本电视机放置于诸如书架或嵌入式壁橱等封
闭之处。
为了儿童安全起见,请勿让他们独自逗留在电视机
旁。千万别让儿童攀爬本电视机。
若有任何液体流入或固体落入本电视机内时,请勿
操作本电视机。应立即请合格的专业人员检查。
请用干的软布清洁本电视机。请勿使用汽油、稀释
剂或任何其它化学品清洁本电视机。请勿在电视机
壳喷涂表面贴附任何物体(例如,贴纸,透明玻璃
胶纸,胶合剂等)。请勿刮划显像管。
请勿打开本电视机的机壳和后盖,因为电视机内存
在高电压和危险性部件。须由合格的专业人员对电
视机进行检修或弃置。
2
本电视机只适于家庭使用。请勿将本电视机放置于
任何交通工具内或多尘、高温、潮湿或震动频繁之
处。
Page 35
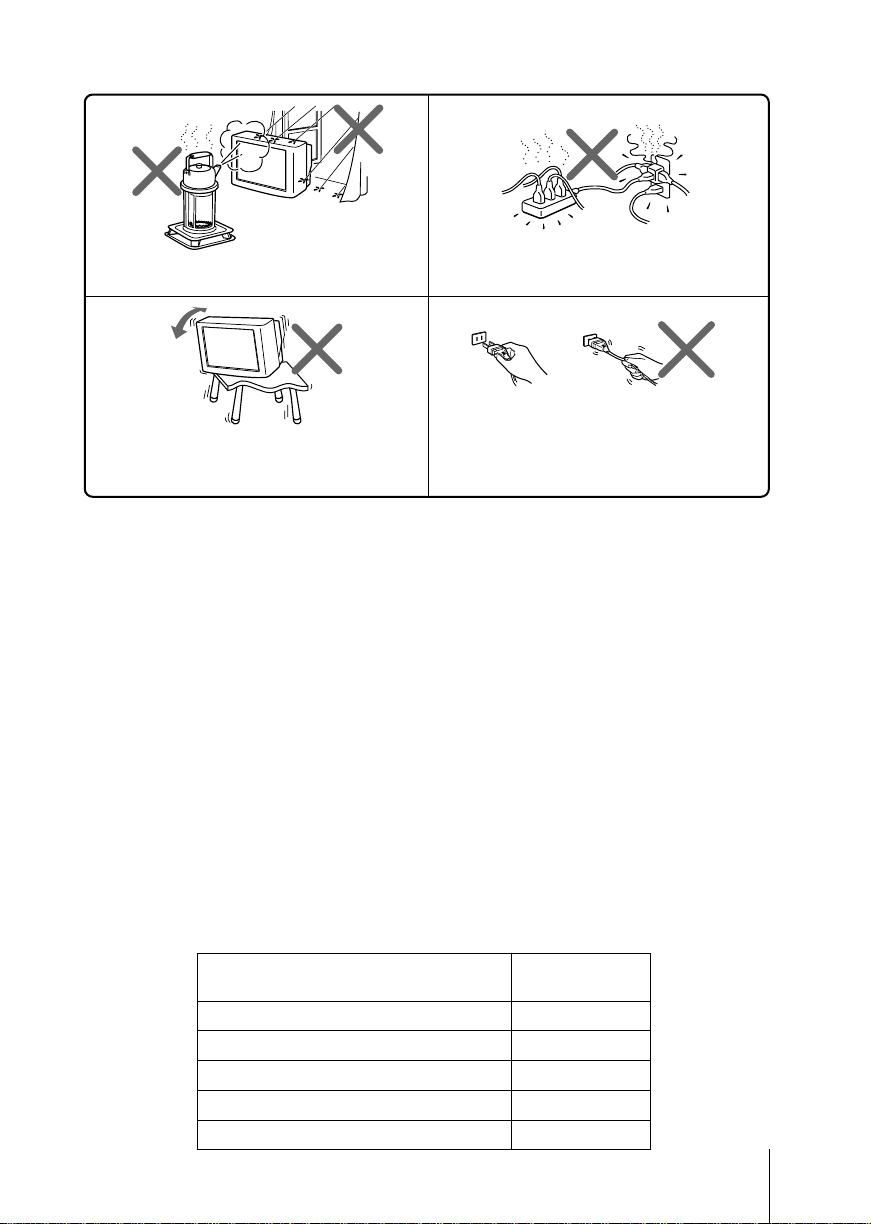
为防止火灾或触电,请勿使本电视机被雨淋或受
潮。
放置电视机于稳定的、并足以支撑电视机重量的电
视支架及地面上。确保电视支架的表面平整且表面
积大于电视机底面。
产品简介
• 平面特丽珑显像管
• DRC-MF 全能数码精密显像
• 新智能图像降噪
• 智能信号增强
• 宽荧幕模式
• 贵翔影院模式
• DVD 分量信号输入端子(可接收高清晰度信号)
•5 波段互动音响均衡器
请勿在同一电源插座上插入太多的电器。请勿损坏
电源线。
捏住插头将电源线拔开。请勿直接拉拔电源线。即
使电视机已断开电源,但只要电源线还在插座内,
它仍接通至交流电源。若想移动本电视机或打算近
期内不使用本电视机时,请将电源线拔开。
DRC1250 4 倍精密显像
DRC100 标准精密显像
DRC 逐行扫描
附件
名称 数量
遥控器 (RM-W105) 1
干电池 (5 号)2
固定条 1
固定夹子 2
螺丝 (DIA.3.8 × 20) 3
3
Page 36
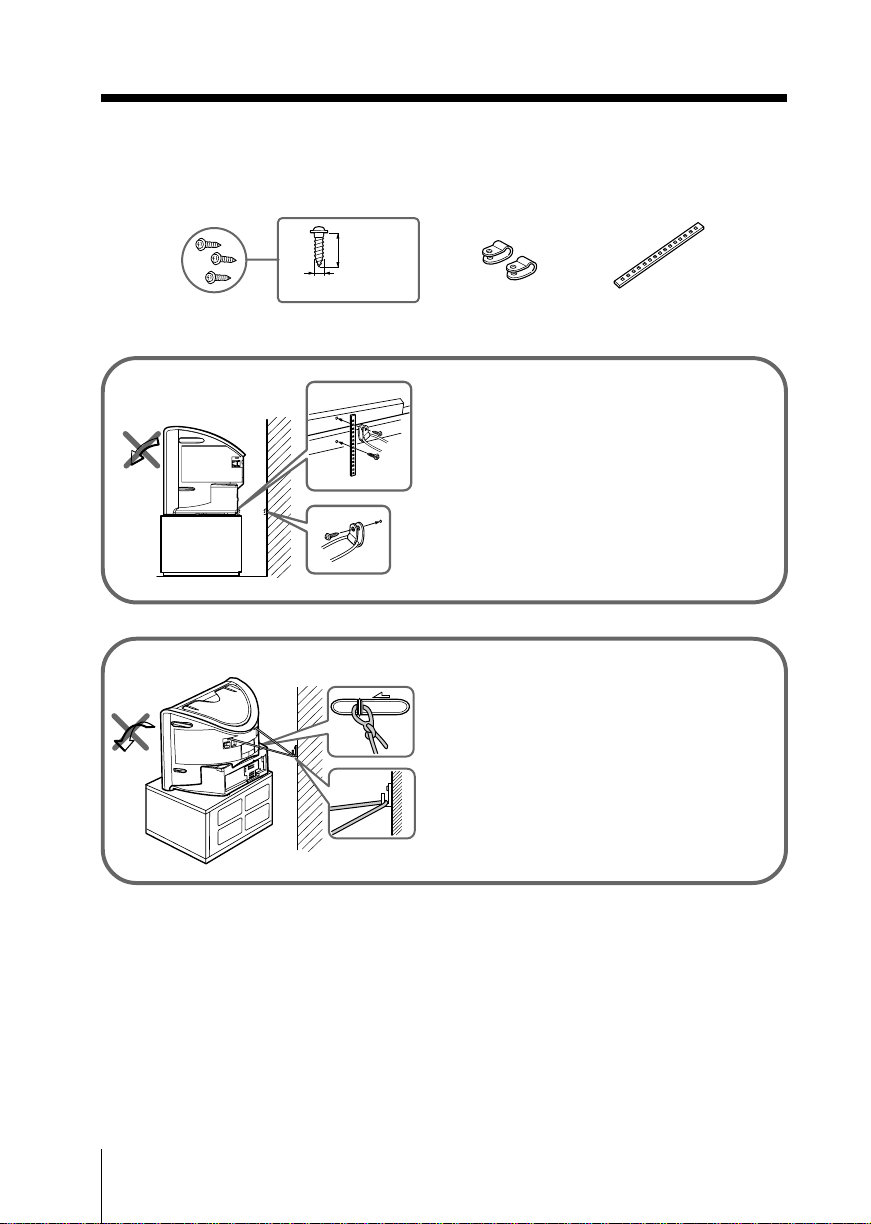
x 固定电视机
为防止电视机摔落,请使用所提供的螺丝、夹子和带条以固定电视机。
20 毫米
3.8 毫米
螺丝
夹子 带条
1
(3)
2
(1)
(2)
注
• 请仅使用提供的螺丝。使用其它螺丝可能会损坏本电视机。
(1) 将带条和其中一个夹子固定至电视机背
后提供的螺丝孔上。
(2) 将带条系到电视机支架上。
(1)
(2)
(3) 将一根绳索或链条穿过两个夹子并固定
其中一个夹子至墙上或柱子上。
(1) 将绳索或链条的末端分别穿过电视机背
后提供的柄上。
(2) 用可支撑电视机重量的连接物将绳索或
链条固定至墙上或柱子上。
4
Page 37

目录
设置您的电视机
准备工作 ............................................. 6
设定您的电视机
(“初始化设定”) .......................... 7
控制键总概况
电视机前面和背后的控制板 ............... 9
使用遥控器和基本功能 .................... 10
高级操作
选择图像和声音模式 ........................ 12
观看全能数码精密显像的
高质量图像 ....................................... 13
欣赏贵翔影院模式和中置扬声器 ..... 14
使用选购的装置 ................................ 15
调整您的设定(MENU)
介绍菜单系统.................................... 16
调整“图像设定” ............................ 18
调整“声音设定” ............................ 20
调整“屏幕显示设置” .................... 22
调整“频道设定” ............................ 23
调整“设定”菜单 ............................ 25
附加信息
连接选购的装置 ................................ 27
故障检修 ........................................... 30
规格................................................封底
CS
5
Page 38
设置您的电视机
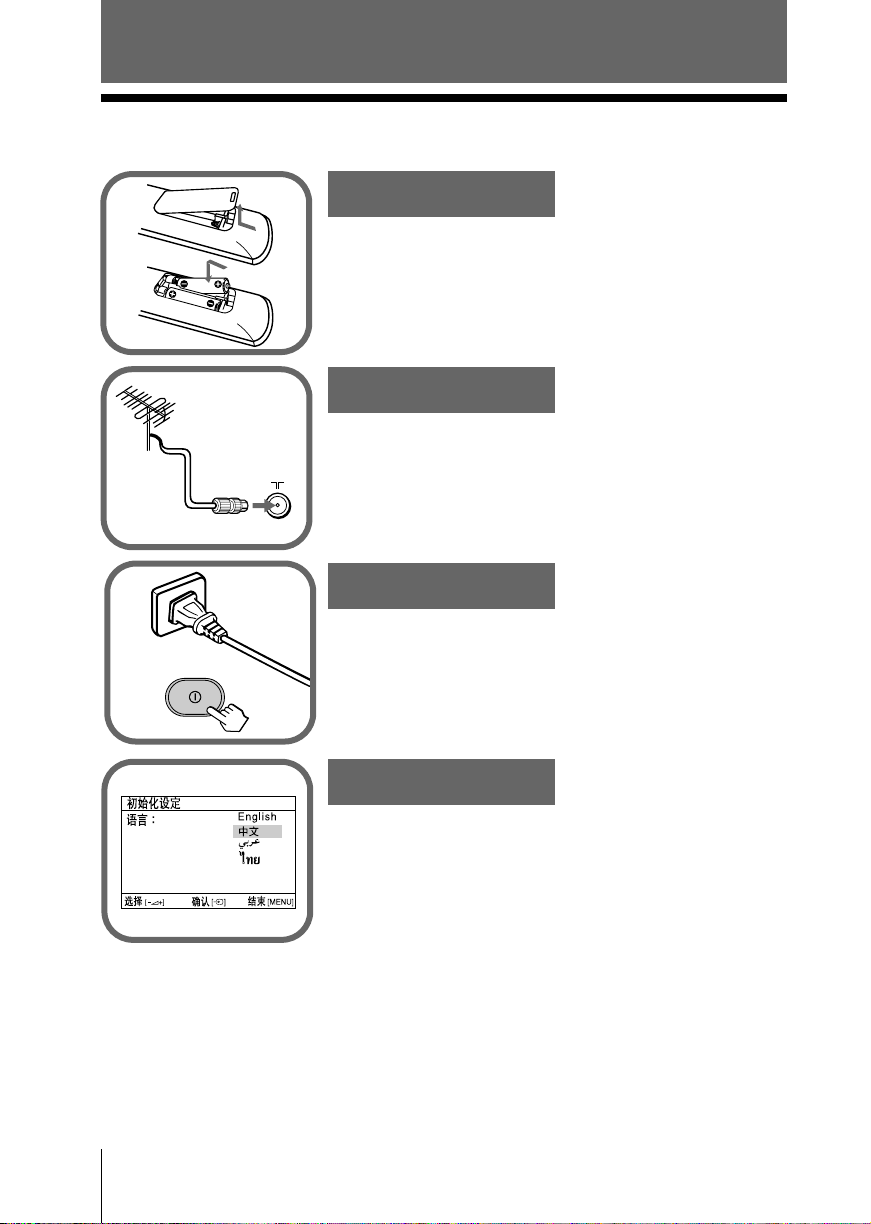
x 准备工作
1
步骤 1
b
b
将所提供的电池装入遥控器。
注
• 请勿使用旧电池或同时使用不同类型的电池。
步骤 2
将天线电缆(未提供)连接至电视机背后的 8 (天线输
入)端子。
提示
• 您也可将本电视机连接至其它选购的装置(参考第 27 页)。
步骤 3
插入电源线,然后按压电视机上的 ! 键以接通电视机的
电源。
注
• 打开电视机时 1(待机)指示灯将闪烁为绿灯数秒钟。 这并
不表示发生故障。
步骤 4
“ 'l⁄˘‡]'w
6 设置您的电视机
按照“初始化设定”菜单的指示以设定您的电视机
(参考第 7 页)。
¿
Page 39
x 设定您的电视机
01
D/K
01
02
03
04
(“初始化设定”)
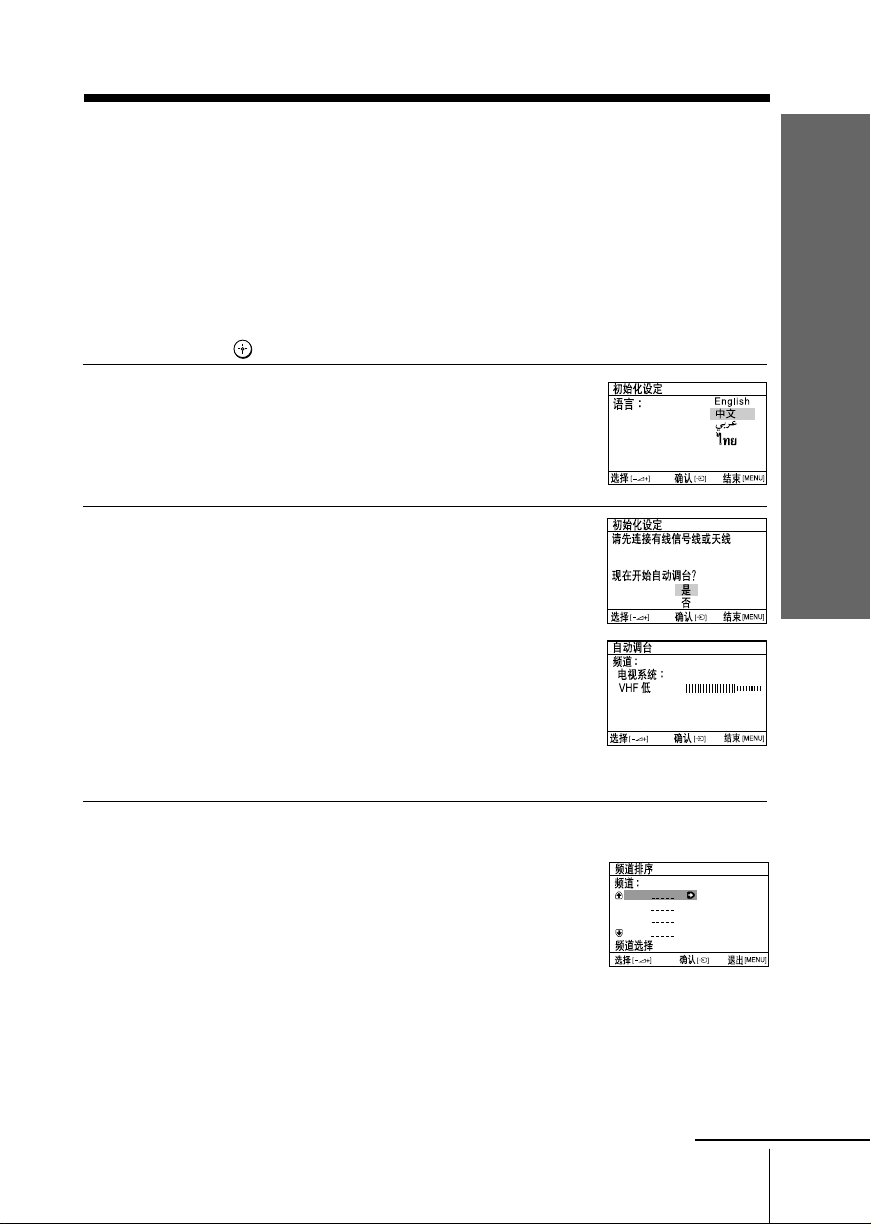
当您第一次打开电视机时,“初始化设定”菜单将会显示在屏幕上。
您可用电视机前面控制板上的按键以改变菜单语言,自动预设电视频道,改变显
示在屏幕上的电视频道顺序和调整图像位置。
提示
• 有关菜单的操作,电视机前面控制板上的 MENU 键,t 键和 2 +/– 键与遥控器上的
MENU 键, 键和 V/v 键有着相同的功能。
按压 2 +/– 键以选择所要的菜单语言,
1
然后按压 t 键。
被选择的菜单语言将显示在屏幕上。
按压 2 +/– 键以选择“是”,然后按压 t
2
键以自动预设频道。
屏幕将显示自动预设频道正在进行中。
当所有可接收的频道已被调谐和储存后,“频
道排序”菜单将会自动显示在屏幕上。
若要略掉自动预设频道,选择“否”,然后按
压 t 键。
设置您的电视机
如果出现“无信号。请连接有线信号线或天线”
的讯息,请检查您的电视连接,然后按压 t 键。
“频道排序”菜单可以让您改变显示在屏幕上
3
的频道顺序。
a) 若您要保留已被调谐的频道顺序,按压
MENU 键。
b) 若您要改变频道的顺序:
1) 按压 2 +/– 键以选择您要重新排序的频
道号码,然后按压 t 键。
续
设置您的电视机
7
Page 40
续
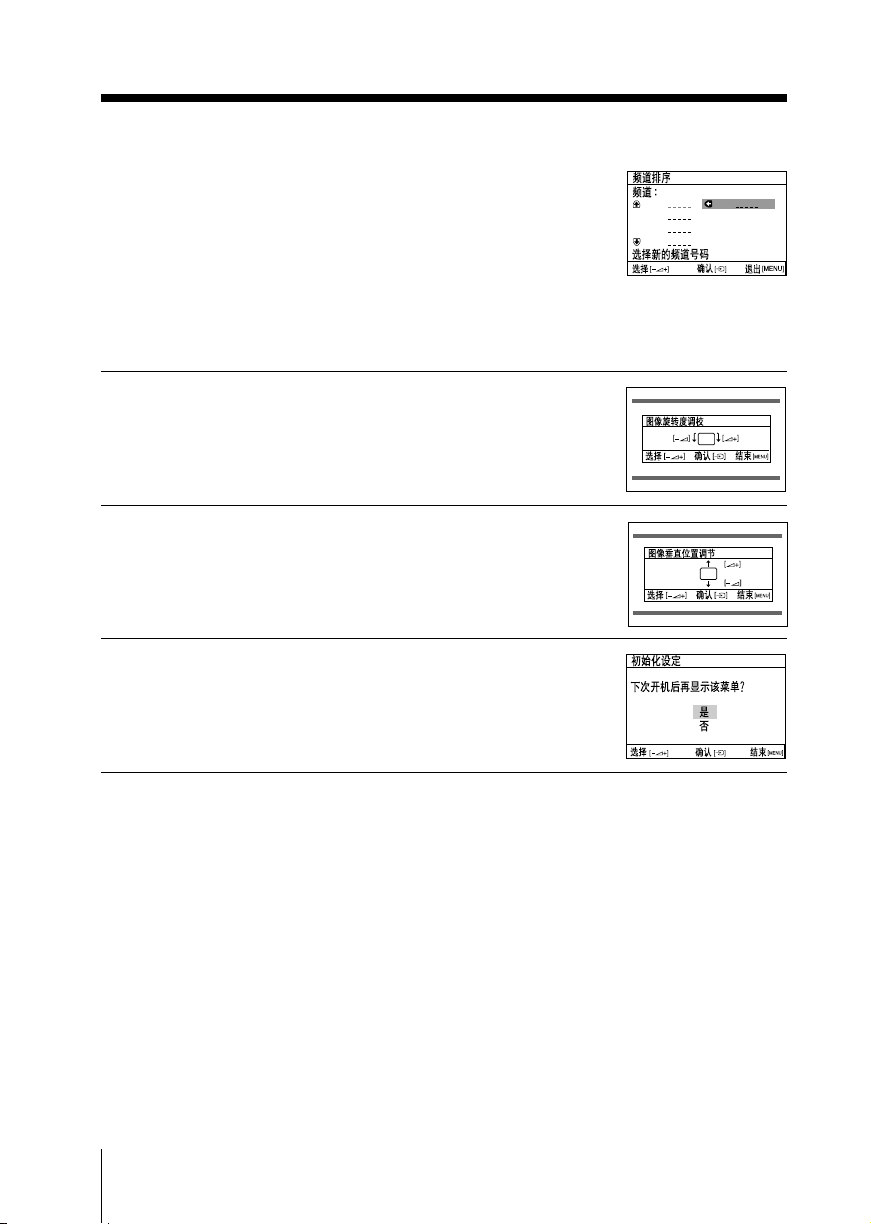
被选定的频道将会显示在屏幕上。
2) 按压 2 +/– 键以选择新的频道位置,
然后按压 t 键。
3) 若您要改变其他频道的顺序,请重复 b)
1) 和 2) 的步骤。
c) 按压 MENU 键以进入下个菜单。
若菜单顶部和底部的线条倾斜,按压 2 +/–
4
键以作出调整,然后按压 t 键。
“图像垂直位置调节” 菜单出现。
若上下线条距离屏幕顶部和底部的位置不相
5
等,按压 2 +/– 键以作出调整,然后按压
t 键。
若不需作出调整, 则按压 t 键。
按压 2 +/– 键以选择“否”,然后按压 t
6
键。则当您再次按压 ! 键打开电视机时,这
菜单将不会再显示在屏幕上。
若要这菜单再次显示在屏幕上,选择“是”,
然后按压 t 键。
01
02
03
04
01
提示
• 您可按压 MENU 键直接进入“初始化设定”菜单最后的设定项目。
• 您也可使用菜单系统设置您的电视机(参考第 16 页)。
• 您也可按压电视机前面控制板的 MENU (AUTO PROG) 键约五秒以自动预设频道。
注
• 在调整“图像旋转度调校”和“图像垂直位置调节”前,请使外部扬声器或其他电器设备远离
电视机。这些设备产生的电磁干扰或地球磁场的方向可能会对电视机造成影响。
• 当 HD(高清晰度)(1080i, 720p)信号输入时,您将无法调整“图像旋转度调校”和“图像垂
直位置调节”。
8 设置您的电视机
Page 41
控制键总概况
x 电视机前面和背后的控制板
电视机背后的控制板
PR/
1
Y
Y
23
PB/
C
P
C
3
B
B
/
B
qd
R
C
1
2
PR/
RG B
C
R
qf
2
HD
SYNC
VD
qg
qh
1
控制键总概况
RL
C
120W MAX 8
AUTO PROG:Press [MENU] for 5sec
L(MONO) R
MENU
SOUND
MODE
PROG
4
(AUTO PROG)
qa
RL
qs
电视机前面的控制板
0
9
L(MONO) R
4
AUTO PROG:Press [MENU] for 5sec
MENU
SOUND
(AUTO PROG)
MODE
5876
4
PROG
按键/端子 功能 页面
1 ! 打开或关闭电视机。 6
2 1 待机指示灯。 6
2 唤醒指示灯。 10
3 遥控传感器。 –
4 PROG +/– 选择频道号码。 –
5 2 +/– 调整音量。 –
6 t 选择电视或视频输入。 27
菜单操作
5 2 +/– 选择和调整项目。 –
6 t 确认被选项目。 –
7 MENU 显示或取消菜单。 –
7 (AUTO PROG) 自动预设频道。 8
8 SOUND MODE 选择声音模式选项。 12
5 波段互动音响均衡器显示将出现在屏幕上。
9 t4 视频输入端子 4。 27
0 i 耳机插口。 –
qa 中置扬声器输入端子。 29
qs t1 , t2, t3 视频输入端子 1,2,3。 27
qd T 监视器输出端子。 27
qf 2 DVD 分量信号输入端子 2。 28
qg 1 DVD 分量信号输入端子 1。 28
qh SYNC HD/VD HD/VD 输入端子。 28
qj 8 天线输入端子。 27
控制键总概况
qj
9
Page 42
x 使用遥控器和基本功能
qg
qh
qj
qk
ql
w;
wa
ws
wd
wf
wg
HD/DVD
DRC-MF
PROG
INDEX
1
4
7
OPTION RESET
VIDEO
CENTERSPWEGA
2
5
8
0
PROG
TV
THEATRE
A/B
MENU
3
6
9
1
按键 说明 页面
1 ?/1 打开或关闭电视机。 –
2
2 a 显示电视节目。 –
3 t 选择视频输入。 27
3
4 WEGA 选择贵翔影院模式。 14
4
5
6
7
8
9
0
qa
qs
qd
qf
THEATRE
5 CENTER SP 选择电视机的中置扬声器模式。 14
立体声或双语言操作
6 A/B 本电视机无此操作。 –
菜单操作
7 MENU 显示或取消菜单。 –
8 V, v, B , b 选择和调整项目。 –
9 确认被选项目。 –
0 改变图像尺寸: –
“4:3”,“16:9”(16:9 宽荧幕
模式)
qa 跳回到之前收看至少五秒的频道号 –
qs PROG +/– 选择频道号码。 –
定時器操作
qd 依照您所要的时间设定电视以自动 –
(睡眠定时器)关闭(最多 1 小时 30 分钟)。
qf
(唤醒定时器)
码。
依照您所要的时间设定电视以自动打 –
开(最多 12 小时)。
一旦您已设定唤醒定时,电视机上
的 指示灯将亮起黄褐色。
10 控制键总概况
用唤醒定时接通电视机电源并超过
一小时后,若您不按压电视机或遥
控器上的任何一个按键或控制键,
则电视机再进入待机状态。
qg 消除声音。 –
qh 显示屏幕上的信息。 –
qj HD/DVD 选择分量信号输入。 28
qk DRC-MF 选择全能数码精密显像模式。 13
ql PROG INDEX 本电视机无此操作。 –
w;
wa 选择图像模式选项。 12
选择声音模式选项。
“5 波段互动音响均衡器”显示将出
现在屏幕上。
12
Page 43
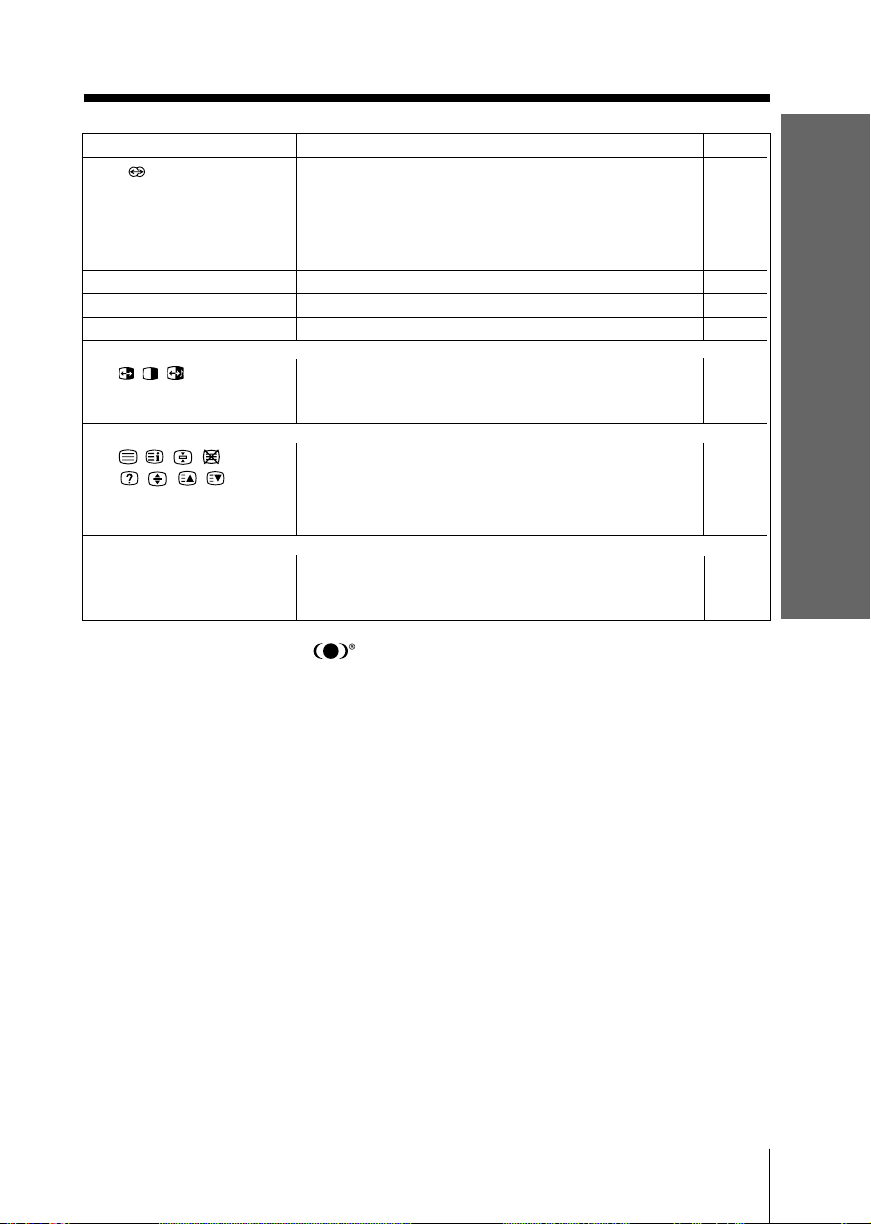
按键 说明 页面
ws 选择环绕声模式: –
“TruSurround”(传遍整个房间的
环绕声),“WOW 环绕声”
(丰富、深沉的低音响),“模拟
立体声”(模拟立体声的单声道音
响),“关”。
wd 0–9, - 输入数字键。 –
wf 2 +/– 调整音量。 –
wg RESET 使电视机恢复到工场设定。 30
双画面分割操作
, , , 本电视机无此操作。 –
TWIN PROG +/
TWIN PROG –
图文电视操作
, , , , 本电视机无此操作。 –
, , ,
z (红色,绿色,
黄色,蓝色)
选购装置操作
VIDEO ?/1, OPTION, 有关详情,请参考“使用选购的装置”。 15
N, X, x, ., >,
%, 2 +/–
WOW, TruSurround, SRS 及 的标识是 SRS Labs, Inc. 登记过的商标。WOW 及
Tr uSurround 科技是登记在 SRS Labs, Inc. 特许证下。
注册于 BBE 音响公司并应用了美国专利号码 4638258, 4482866。
“BBE”与 BBE 符号是 BBE 音响公司的注册商标。
控制键总概况
控制键总概况
11
Page 44
高级操作
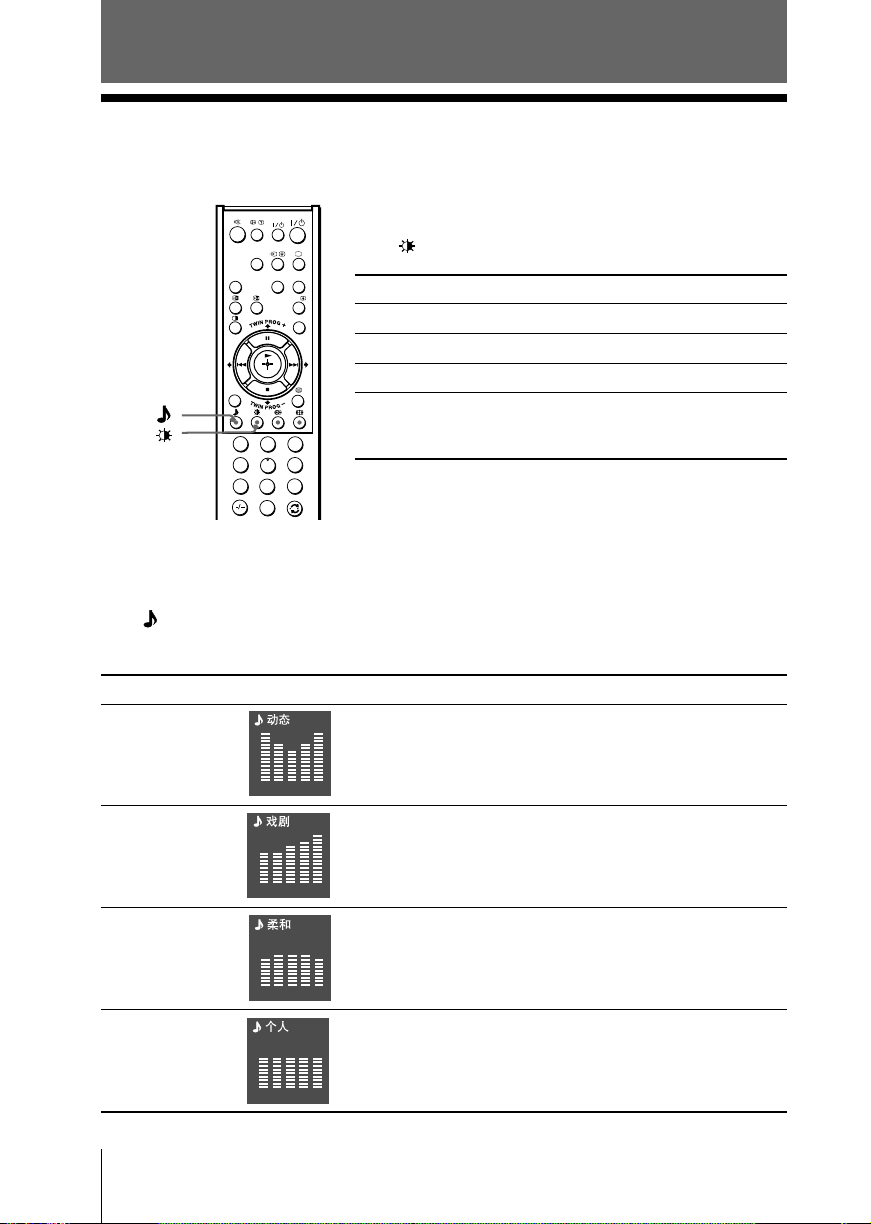
x 选择图像和声音模式
您可选择图像和声音模式并使用“个人”模式来调整您所偏好的设定。
DRC-MF
HD/DVD
VIDEO
CENTERSPWEGA
THEATRE
A/B
MENU
选择图像模式
按压 键直到您所要的图像模式被选定。
选择 以观看
“动态” 对比度强的图像。
“中间” 普通的图像。
PROG
INDEX
“高精度” 更高分解度和柔和对比的图像。
“个人” 菜单中的“图像个人模式设定”
项目所调整的最终图像设定(参
1
3
2
4
6
5
9
8
7
0
考第 19 页)。
选择声音模式
按压 键 (或前面控制板的 SOUND MODE 键) 直到您所要的声音模式被选定。
5 波段互动音响均衡器显示将出现在屏幕上。
选择 以收听
“动态” 强调低音和高音的动态范围宽而清晰的音响。
100 300 1k 3k 8k
“戏剧” 强调人声和高音调的声音。
100 300 1k 3k 8k
“柔和” 柔和、自然、放松的声音。
100 300 1k 3k 8k
“个人” 菜单中的“声音个人模式设定”项目所调整的最终声音设定
(参考第 21 页)。
100 300 1k 3k 8k
12
高级操作
Page 45
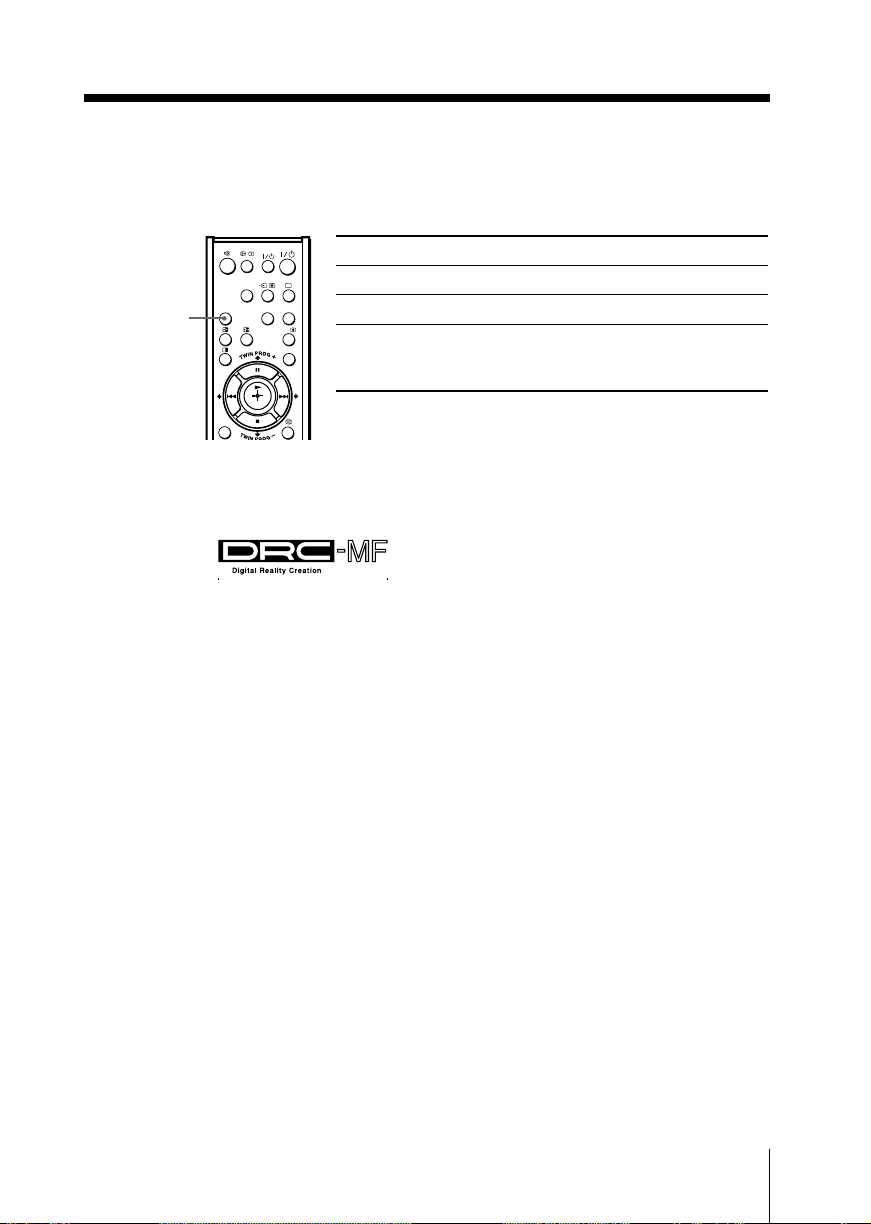
x 观看全能数码精密显像的高质量图像
全能数码精密显像功能可让您享受高质量的电视图像。您可使用 DRC-MF 键以选
择“DRC1250”,“DRC100”或“DRC逐行扫描”。
DRC-MF
DRC-MF
VIDEO
HD/DVD
CENTERSPWEGA
选择 以
“DRC1250” 观看更高精密度的图像。
THEATRE
“DRC100” 减少画面的闪烁感。
A/B
“DRC逐行扫描” 减少屏幕上某些部分或扫描线条
MENU
的跳动(例如,在字母或物体边
沿上)。
PROG
INDEX
注
• 您无法在“游戏模式”功能打开时选择“全能数码精密显像”模式。该模式不适用于 HD(高
清晰度)和逐行扫描输入信号。
DRC-MF 的标识( )和“DRC-MF”是 Sony Corporation 的注册商标。
高级操作
13
Page 46
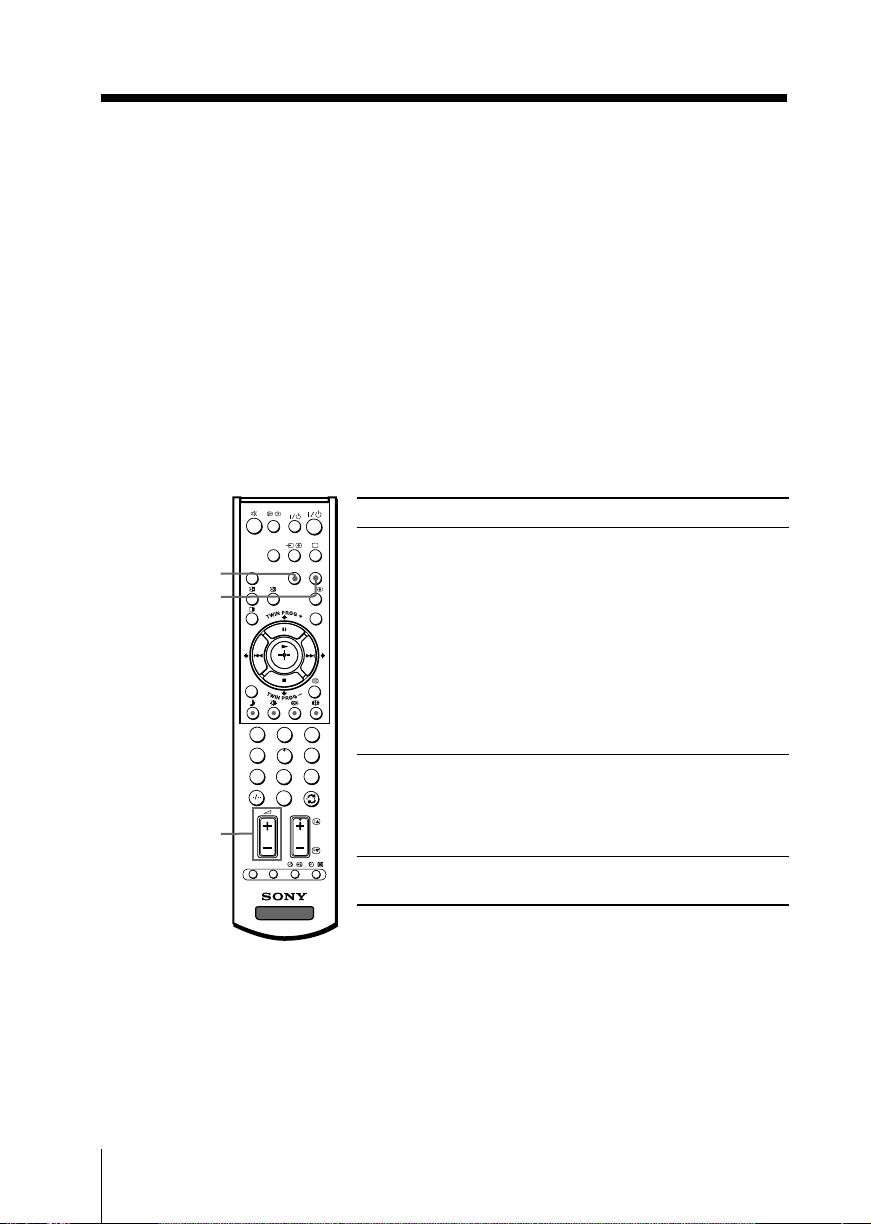
x 欣赏贵翔影院模式和中置扬声器
贵翔影院模式可让您从“DVD”源享受与电影院相同的最佳图像,声音和环绕声
效果。
您可将电视机的扬声器用作音频系统的中置扬声器以强调发音,并通过电视机的
遥控器控制其音量。
设定贵翔影院模式
1. 将放大器的中置扬声器端子连接至电视机的中置扬声器输入端子(参考第 29
页)。
2. 显示“贵翔影院设定”菜单并选择适当的视频输入(参考第 25 页),然后打
开所连接装置的主电源。
3. 请参阅下表。
若您的连接装置是 Sony DVD,您可设定遥控器至与相连接的装置一起操作
(参考第 15 页)。
CENTER SP
WEGA THEATRE
DRC-MF
VIDEO
HD/DVD
CENTERSPWEGA
要按压
切换至贵翔影院模式 WEGA THEATRE.
THEATRE
A/B
MENU
当按压此键后,务必将遥控器瞄
准电视机和所连接的装置约一
秒。所连接的装置自动从待机状
态打开并开始播放(仅于 Sony
DVD)。
PROG
INDEX
“图像模式”和“声音模式”将
自动切换至“个人”,您可随个
人喜好调整设定(参考第 19 和
21 页)。
器”显示在屏幕上。
要切换至普通扬声器模式时,再
按压此键直到“主声道扬声器”
显示在屏幕上。
2 +/–
1
4
7
OPTION RESET
3
2
6
5
8
0
PROG
切换至中置扬声器模式 CENTER SP 直到“中置扬声
9
调整中置扬声器的音量 2 +/–.
TV
注
• 务必将您的电视机和所连接的 Sony 装置并列放置,以便您能使用电视机的遥控器同时操纵它们
(参考第15 页)。
• 当您选择变更频道号码,视频输入或关闭电视机后再打开时,贵翔影院和中置扬声器模式自动
取消。
• 当电视机处于中置扬声器模式时,您无法改变环绕声或“智能音量控制”。
• 当按压 WEGA THEATRE 键后,某些 Sony 装置或许不能正常的响应。在这种情形下,请用装
置本身的遥控器。
14
高级操作
Page 47
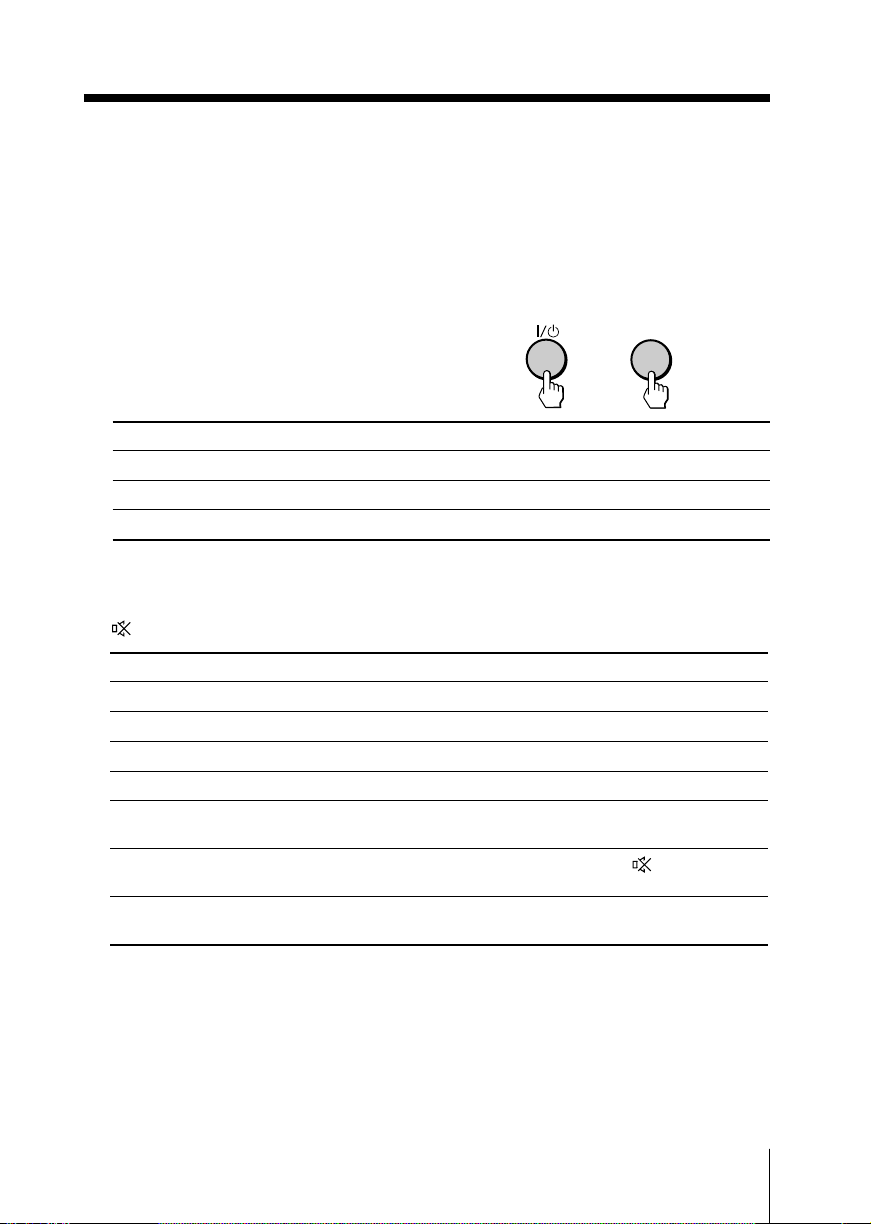
x 使用选购的装置
您可以使用提供的遥控器操作 Sony 音频/视频装置。
将遥控功能设定至与其他相连接的装置一起操作
按住 VIDEO ?/1 键的同时, 例如、要操作一台 Sony 8 mm 盒式
按压与所需装置相对应的数位 录影机时:
键(参考下表)。
要操作 按压 VIDEO ?/1 键并按压
音频系统 1, 1x, 2 或 3 0, 1, 2 或 3
DVD 1, 2 或 3 4, 5 或 6
VTR1 (Beta), VTR2 (8 mm) 或 VTR3 (VHS) 7, 8 或 9
操作音频/视频装置
按压 VIDEO ?/1 键或按住 OPTION 键的同时,按压 N, x, >, ., X,
或 2 +/–(参考下表)。
要按压
打开/关闭 VIDEO ?/1 键。
播放 OPTION 键的同时按压 N 键。
停止 OPTION 键的同时按压 x 键。
快进/向前搜索或倒带/往后搜索 OPTION 键的同时按压 > 或 . 键。
暂停 OPTION 键的同时按压 X 键。
再按压此键恢复普通播放。
暂时消除声音 OPTION 键的同时按压 键。
(仅于音频系统 1, 1x, 2 或 3)
调整音量 OPTION 键的同时按压 2 +/– 键。
(仅于音频系统 1, 1x, 2 或 3)
VIDEO
+
8
注
• 如果该装置不具备某种功能,则遥控器上的相应键不起作用。
• 当按压遥控器上的按键时,某些装置或许不能正常的响应。在这种情形下,请用装置本身的遥
控器。
高级操作
15
Page 48
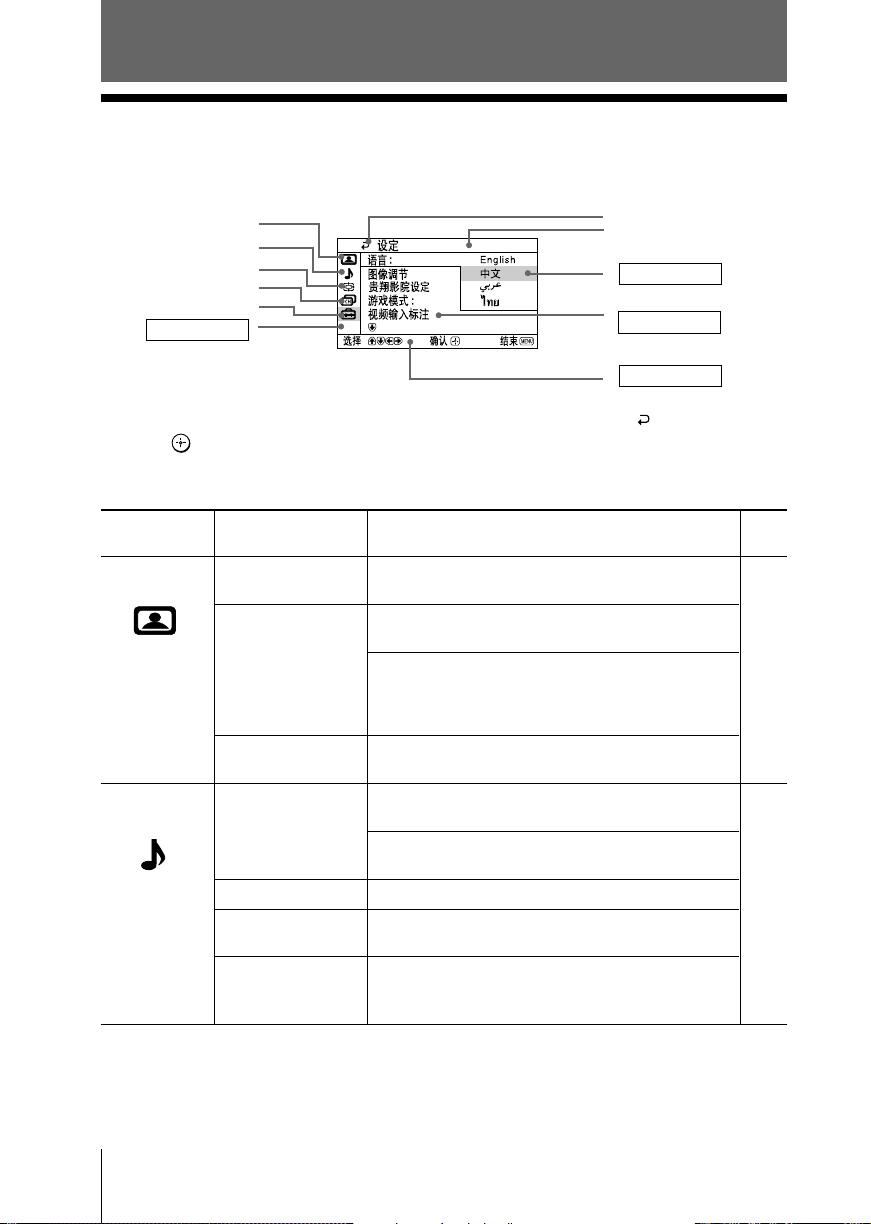
调整您的设定 (MENU)
x 介绍菜单系统
MENU(菜单)键能让您显示菜单和调整电视上的设定。以下是菜单系统的总概
况。
“图像设定”符号
“声音设定”符号
“屏幕显示设置”符号
“频道设定”符号
“设定”符号
第一阶段菜单
提示
• 要从第二阶段菜单回到第一阶段菜单时,请按压 V 或 v 键直到回退符号( )被选中,然
后按压 键。
注
• 当菜单显示的功能呈暗淡色,您将无法选择此功能。
回退符号
当前菜单名称
第三阶段菜单
第二阶段菜单
指引标记符号
第一阶段
“图像设定”
“声音设定”
第二阶段/第三阶
段
“全能数码精密显
像”
“图像模式”
“图像个人模式设
定”
“智能图像降噪”
“声音模式”
“声音个人模式设
定”
“平衡”
“智能音量控制”
“环绕声”
第三阶段/第四阶段/功能 页面
选择“全能数码精密显像”模式: 18
“DRC1250”t “DRC100”t “DRC逐行扫描”
选择图像模式:
“动态”t “中间”t “高精度”t“个人”
调整“个人”项目:
“对比度”t “亮度”t “颜色”t
“色调”t “锐度”t “彩色色调设定”
t “重新设定”
接收最理想的图像效果:
“开”t “关”
选择声音模式: 20
“动态”t“戏剧”t“柔和”t“个人”
调整“个人”项目中的声音频率设定:
“设定”t“重新设定”
选择以强调左右扬声器。
自动调整音量
“开”t “关”
选择环绕声模式:
“TruSurround”t “WOW 环绕声”
t “模拟立体声”t“关”
:
16 调整您的设定 (MENU)
Page 49
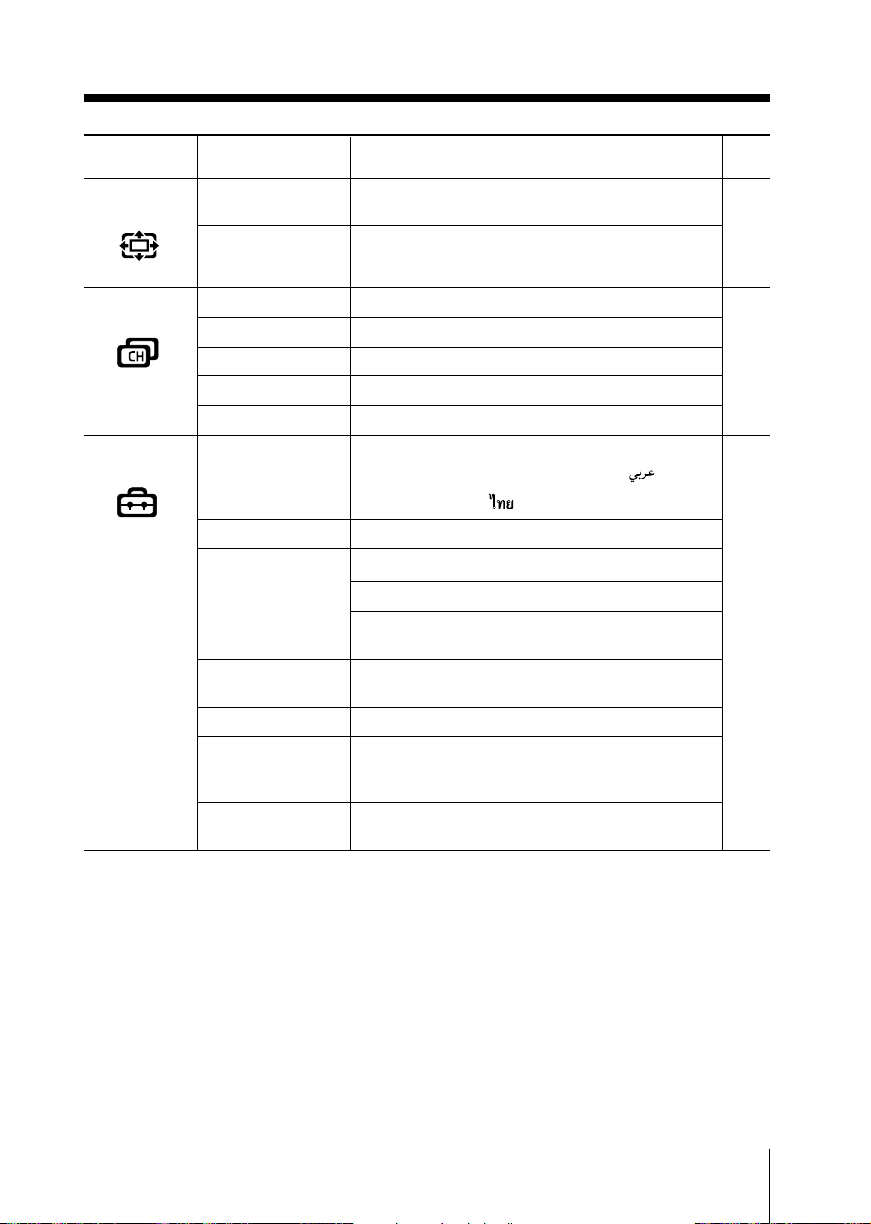
第一阶段
“屏幕显示设置”
第二阶段/第三阶
段
“屏显模式”
“自动屏显模式”
第三阶段/第四阶段/功能 页面
改变图像的尺寸: 22
“16:9”t “4:3”
接收最理想的宽屏显:
“开” t“关”
“频道设定”
“设定”
“自动调台”
“手动调台”
“频道标注”
“童锁”
“频道排序”
“语言/Language”
“图像调节”
“
贵翔影院设定
“
输入信号设定
“
扬声器输入设定
“
游戏模式
“视频输入标注”
“彩色制式”
“生态节能模式”
”
”
”
自动预设频道。 23
手动预设频道。
标注频道号码。
锁定不要的频道。
改变显示在屏幕上的频道顺序。
改变菜单语言: 25
“English”(英文)t“中文”t“ ”
(阿拉伯文)t“ ”(泰文)
调整图像位置。
选择贵翔影院模式。
选择所连接装置的输入。
”
选择扬声器输入设定的模式:
“主声道输入” t“中置输入”
调整图像以观看电视游戏节目:
“开” t“关”
标注所连接的装置。
选择彩色制式:
“自动”t“PA L”t “SECAM”t
“NTSC3.58”t“NTSC4.43”
节省电能:
“开” t“关”
调整您的设定 (MENU)
17
Page 50
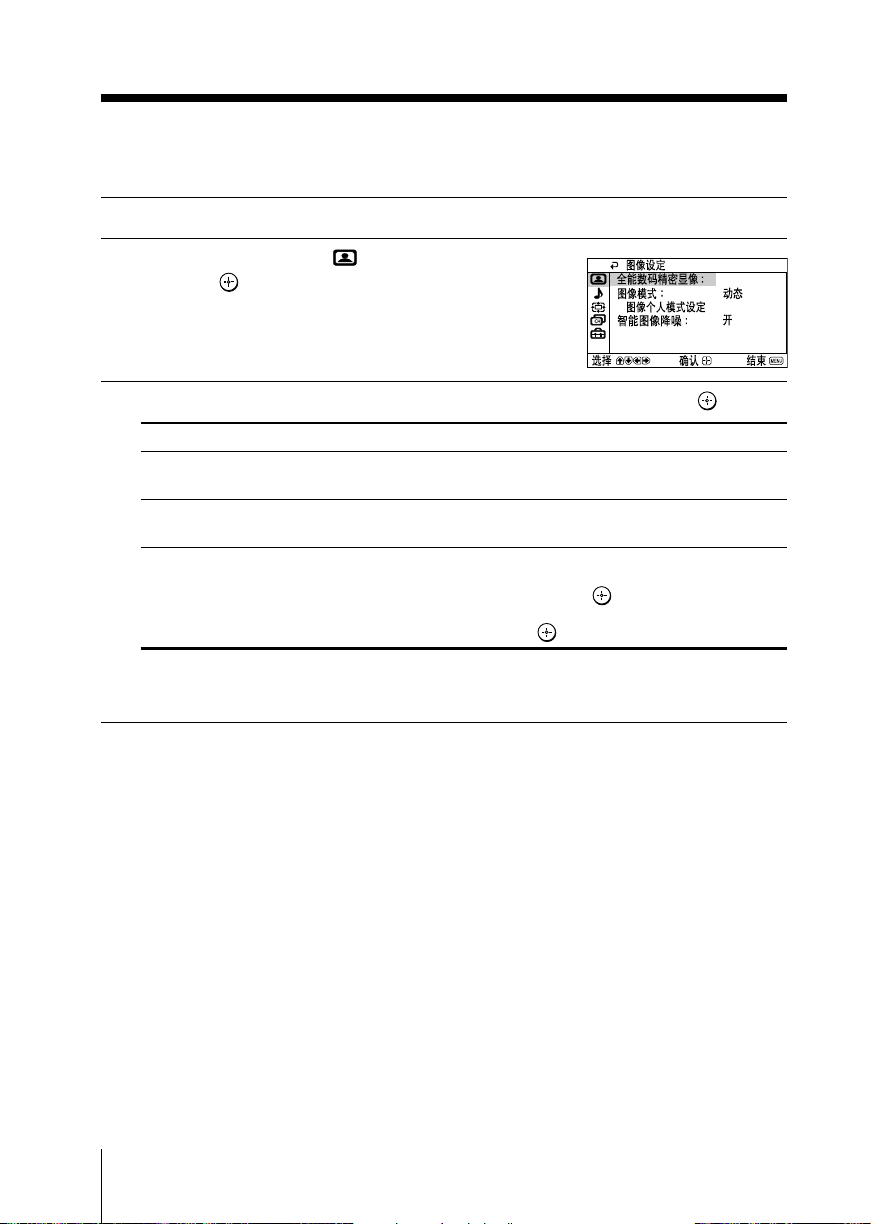
x 调整“图像设定”
DRC1250
“图像设定”菜单可使您调整图像设定。
按压 MENU 键。
1
确认“图像设定”符号 ( ) 已被选择,
2
然后按压
按压 V 或 v 键以选择所要的项目(例如,“图像模式”),然后按压 键。
3
选择 以
“全能数码精密显像” 选择“DRC1250”,“DRC100”或“DRC逐行扫描”(参考第 13
“图像模式”
“智能图像降噪” 接收最理想的图像效果。
* 仅当“个人”模式被选取时方可随个人喜好调整“图像个人模式设定”选项中的设定(参
考第 19 页)。
键。
页)。
选择“动态”、“中间”、“高精度”或“个人”*(参考第 12
页
)。
按压 V 或 v 键以选择“开”,然后按压 键。
要取消时,选择“关”然后按压 键。
18 调整您的设定 (MENU)
Page 51

调整“个人”模式下的“图像个人模式设定”项目
按压 V 或 v 键以选择“对比度”、“亮度”、“颜色”、“色调”(颜色深
1
浅),“锐度”或“彩色色调设定”(选择“冷色调”、“自然色调”或“暖色
调”),然后按压
选择“重新设定”将会使电视机恢复到工厂设定。
按压 V,v,B 或 b 键以调整您所选项目的设定,然后按压 键。
2
重复上述步骤以调整其它项目。
3
当选择“个人”项目时,您可接收已被调整的设定。
注
• 只有当彩色制式为 NTSC 时,您才能调整“色调”设定。
• 您也可减少“锐度”以降低图像噪点。
键。
调整您的设定 (MENU)
19
Page 52
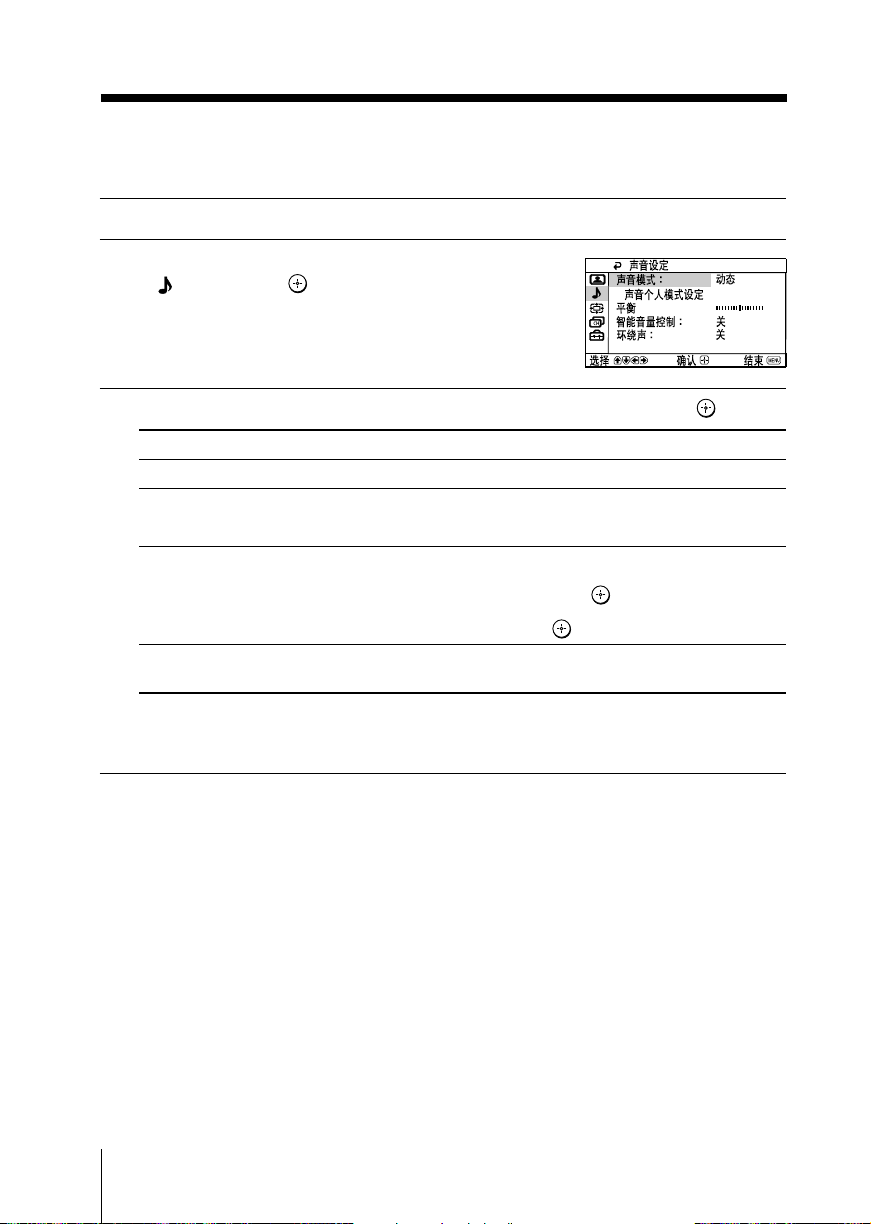
x 调整“声音设定”
“声音设定”菜单可使您调整音响设定。
按压 MENU 键。
1
按压 V 或 v 键以选择“声音设定”符号
2
( ),然后按压 键。
按压 V 或 v 键以选择所要的项目(例如,“声音模式”),然后按压 键。
3
选择 以
“声音模式” 选择“动态”、“戏剧”、“柔和”或“个人”*(参考第 12 页)。
“平衡” 按压 v 或 B 键以强调左扬声器。
按压 V 或 b 键以强调右扬声器。
“智能音量控制” 自动调整所有频道号码和视频输入的音量。
按压 V 或 v 键以选择“开”,然后按压 键。
要取消时,选择“关”,然后按压 键。
“环绕声” 选择“Tr uSurround”、“WOW 环绕声”、“模拟立体声”或
“关”(参考第 11 页)。
* 仅当“个人”模式被选取时方可随个人喜好调整“声音个人模式设定”选项中的设定
(参考第 21 页)。
注
• 当“TruSurround”被选取时,您将无法选择“智能音量控制”。
20 调整您的设定 (MENU)
Page 53

调整“个人”模式下的“声音个人模式设定”项目
5 波段互动音响均衡器可使您在菜单上的“个人”模式调整声音频率设定。
确认“设定”已被选定,然后按压 键。
1
选择“重新设定”将会使电视机恢复到工厂设定。
100 300 1k 3k 8k
按压 B 或 b 键以选择所要的声音频率,然后按压 V 或 v 键以调整设定再按压
2
键。
当选择“个人”模式时,您可接收已被调整的设定。
注
• 调整高频率将影响高音调声音,调整低频率将影响低音调声音。
• 您可直接用电视机前面控制板的 SOUND MODE 键(参考第 9 页)或按压遥控器上的 键
(参考第 11 页)以显示设定。
调整您的设定 (MENU)
21
Page 54
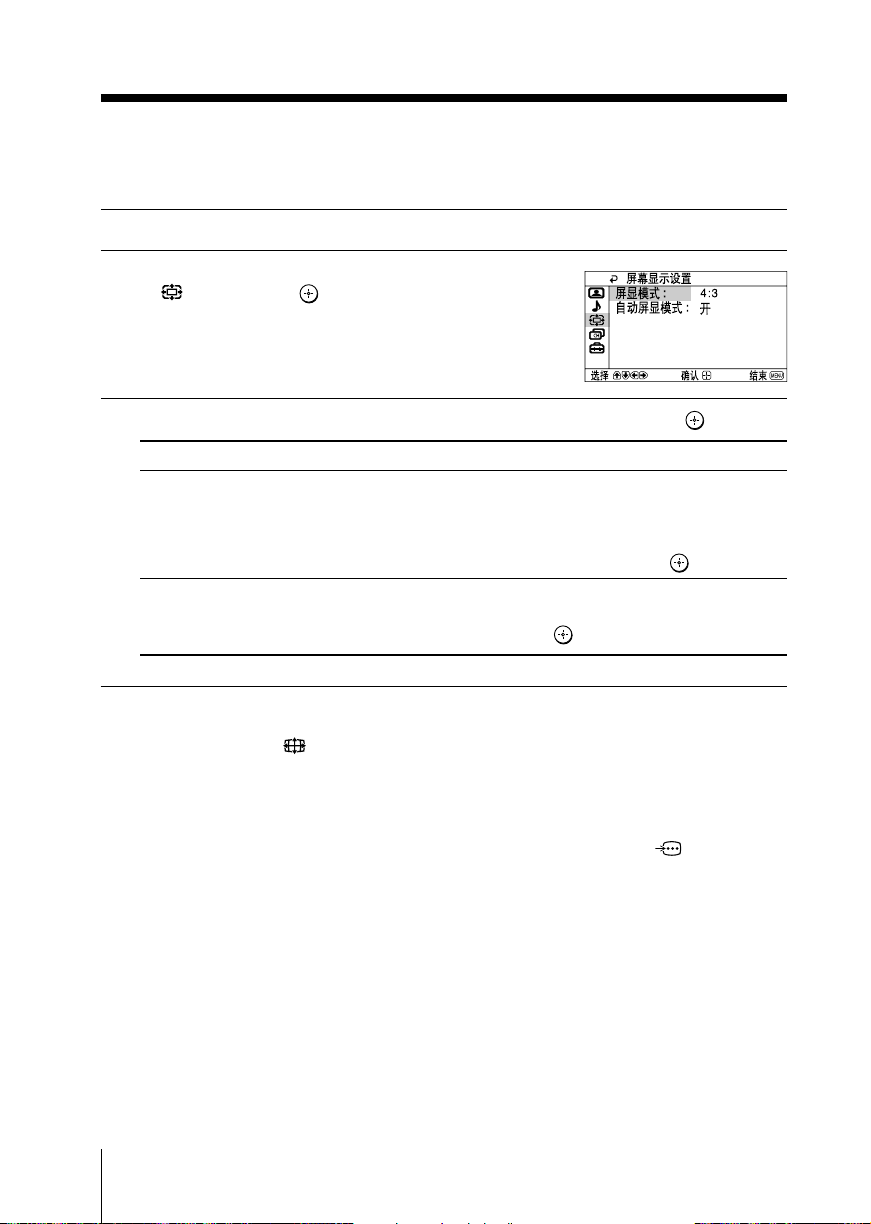
x 调整“屏幕显示设置”
“屏幕显示设置”菜单可使您在接收 16:9 宽屏幕模式信号时观看最佳效果的图
像。
按压 MENU 键。
1
按压 V 或 v 键以选择“屏幕显示设置”符号
2
( ),然后按压 键。
按压 V 或 v 键以选择所要的项目(例如,“屏显模式”),然后按压 键。
3
选择
“屏显模式”
“自动屏显模式”
以
改变宽屏幕模式信号的图像尺寸。
选择“16:9”。
要回到普通图像尺寸时,请选择“4:3”,然后按压 键。
当选择“开”时,将自动显示最佳的屏幕显示设置。
要取消时,选择“关”,然后按压 键。
提示
• 您也可按压遥控器上的 键变为宽屏幕模式图像尺寸(参考第 10 页)。
注
• 您无法选择“屏显模式”于高清晰度(1080i, 720p)输入信号。接收高清晰度(1080i, 720p)
信号时,您的电视机总是显示宽屏幕图像。
• “自动屏显模式”只适用于 576i, 480p 和 480i 输入信号,并不起作用于通过 2(分量信号
输入 2)G/B/R/HD/VD 插口输入的信号。
22 调整您的设定 (MENU)
Page 55
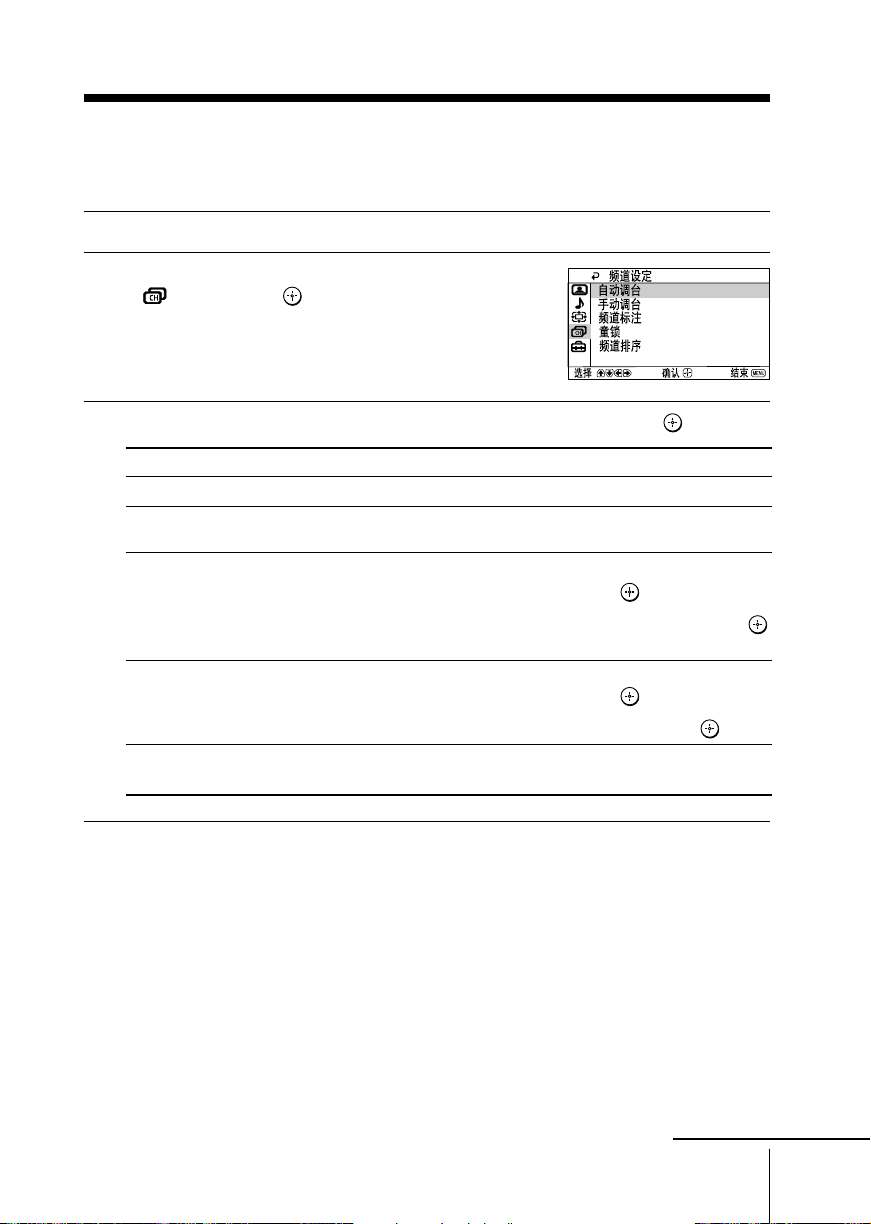
x 调整“频道设定”
“频道设定”菜单可使您自动预设频道,手动预设频道,标注频道号码,锁定不
要的频道和改变显示在屏幕上的频道顺序。
按压 MENU 键。
1
按压 V 或 v 键以选择“频道设定”符号
2
3
),然后按压 键。
(
按压 V 或 v 键以选择所要的项目(例如“自动调台”),然后按压 键。
选择
“自动调台”
“手动调台”
“频道标注”
“童锁”
“频道排序”
以
自动预设频道。
手动预设所要的频道及不能自动预设的频道 (参考第 24 页的手动预
设频道)。
标注频道号码。
(1) 按压 V 或 v 键以选择频道号码,然后按压 键。
(2) 按压 V 或 v 键以选择英文、数字、字符进行标注,然后按压
键。
锁定不要的频道。
(1) 按压 V 或 v 键以选择频道号码,然后按压 键。
(2) 按压 V 或 v 键以选择“加锁”或“解锁”,然后按压 键。
改变显示在屏幕上的频道顺序(参考第 7 页“初始化设定”的 3 b)
步骤)。
注
• 若您预设一个锁定的频道号码,该频道号码将自动解锁。
• 您可标注频道号码以在“频道排序”菜单里观看频道标注。
• 若您排序一个锁定的频道,该频道将保留在锁定状态。
续
调整您的设定 (MENU)
23
Page 56
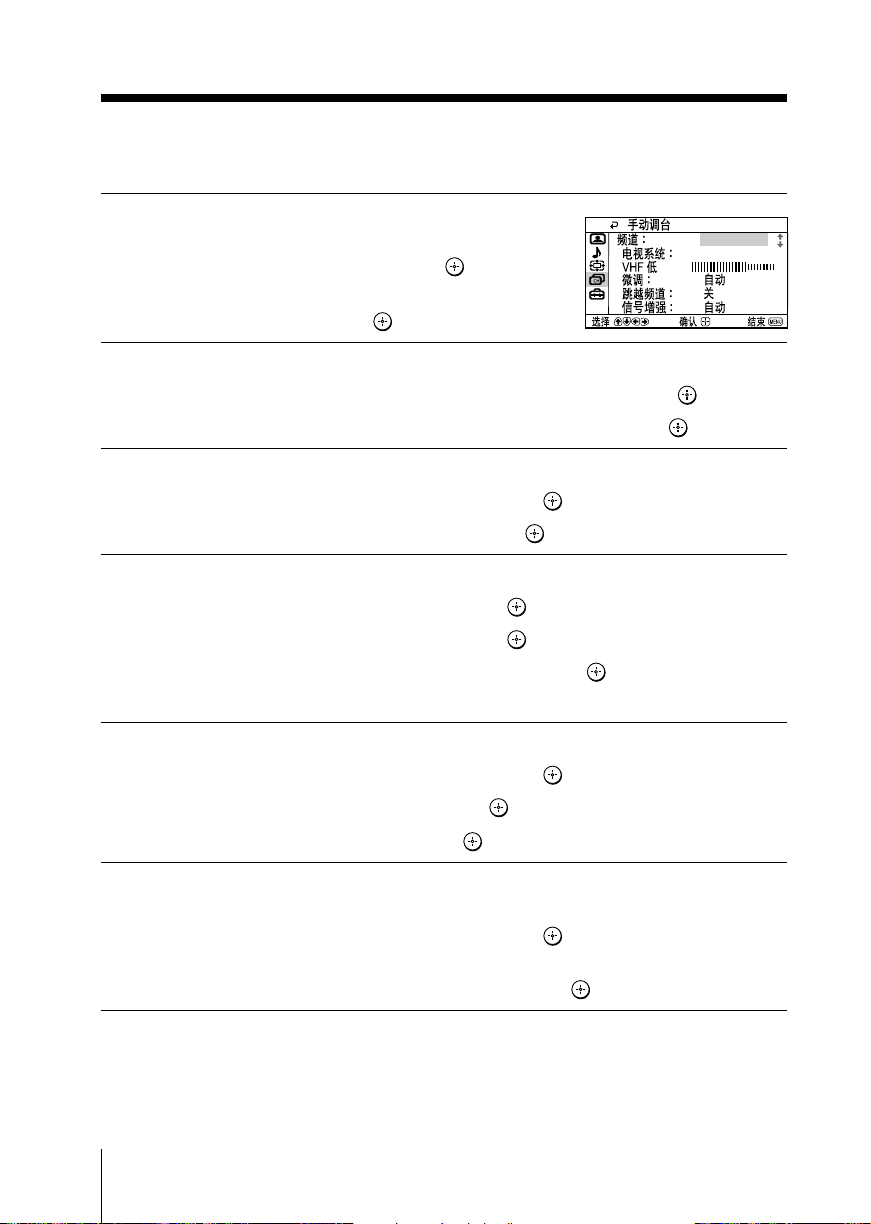
续
手动预设频道
在选择“手动调台”之后,选择您要预设频道
1
的频道号码。
(1) 确认“频道”已被选定,然后按压
(2) 按压 V 或 v 键直到您要预设的频道号码
显示在菜单上,然后按压 键。
选择所要的频道。
2
(1) 确认“VHF 低”、“VHF 高”或“UHF”已被选定,然后按压
(2) 按压 V 或 v 键直到您所要的频道显示在电视屏幕上,然后按压
若所要频道的声音失真,则请选择适当的电视系统。
3
(1)按压 V 或 v 键以选择“电视系统”,然后按压
(2)按压 V 或 v 键直到声音正常为止,然后按压 键。
若您不满意图像和声音质量,您可用“微调”来改善它。
4
(1)按压 V 或 v 键以选择“微调”,然后按压
(2)按压 V 或 v 键以选择“手动”,然后按压
(3)按压 V, v, B 或 b 键直到图像和声音最佳,然后按压 键。
菜单上的 + 或 – 符号将会在调谐时闪烁。
键。
键。
键。
键。
01
D/K
键。
键。
若您在使用 PROG +/– 键时欲跳越此频道号码,您可选择“跳越频道”功能。
5
(1)按压 V 或 v 键以选择“跳越频道”,然后按压
(2)按压 V 或 v 键以选择“开”,然后按压
要取消时,请选择“关”,然后按压
若电视信号太强(图像失真;图像有线条;信号干扰)或微弱(图像有雪花状斑
6
点),您可设定“信号增强”以改善图像质量。
(1)按压 V 或 v 键以选择“信号增强”,然后按压
(2) 按压 V 或 v 键以选择“关”(适用于图像失真;图像有线条;信号干扰)或
“自动”(适用于图像有雪花状斑点),然后按压
24 调整您的设定 (MENU)
键。
键。
键。
键。
键。
Page 57
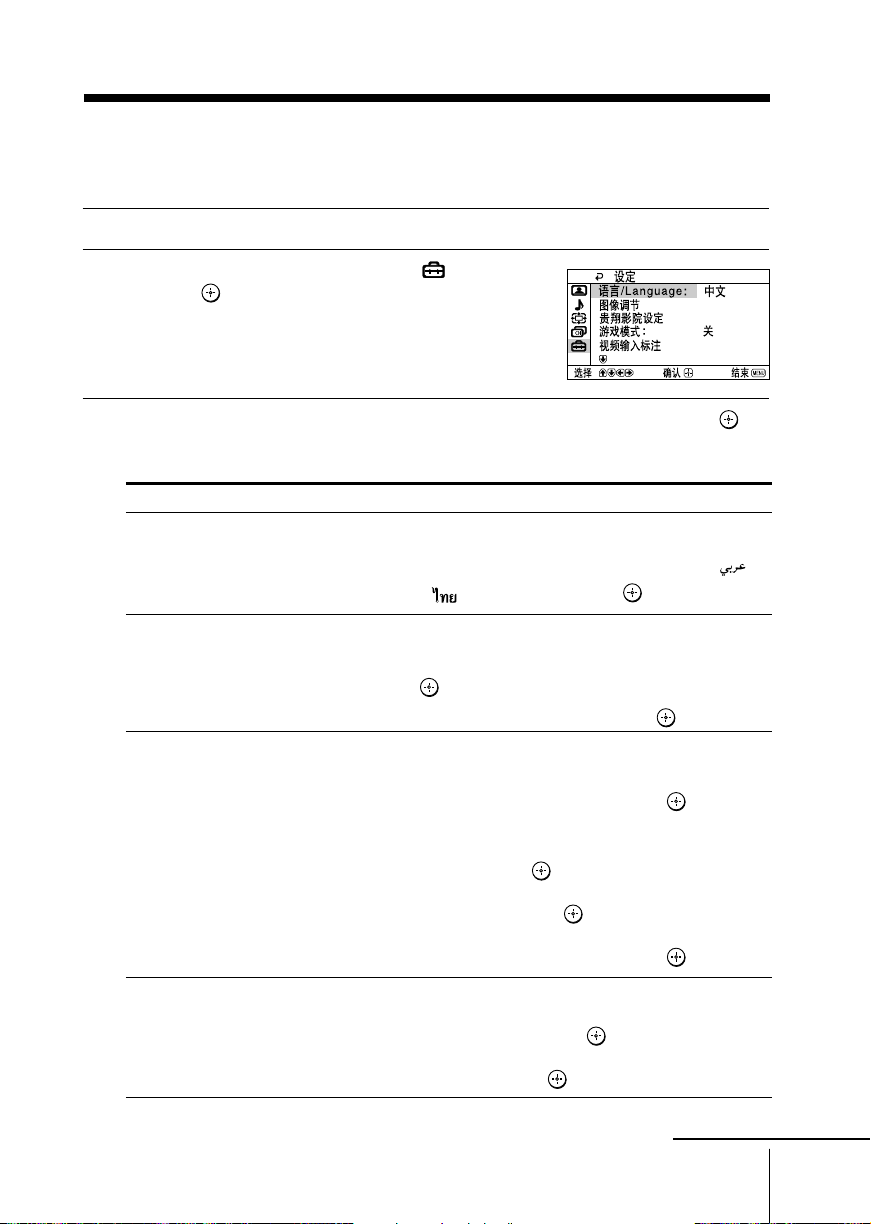
x 调整“设定”菜单
“设定”菜单可使您更换菜单语言,调整图像位置,设定贵翔影院模式,调整图
像设定以适于观看游戏节目,标注所连接的装置,选择彩色制式和节省电能。
按压 MENU 键。
1
按压 V 或 v 键以选择“设定”符号( ),
2
然后按压 键。
按压 V 或 v 键以选择所要的项目(例如,“语言/Language”),然后按压
3
键。
选择
“语言/Language”
“图像调节”
“贵翔影院设定”
“游戏模式”
以
更换菜单语言。
按压 V 或 v 键以选择“English”(英文),“中文”,“ ”
(阿拉伯文)或“ ”(泰文),然后按压 键。
调整电视屏幕上倾斜的图像。
按压 V 或 v 键以选择“图像旋转度调校”或“图像垂直位置调
节”,然后按压 键。
按压 V,v,B 或 b 键以调整图像位置,然后按压 键。
设定贵翔影院模式并享受与电影院相同的最佳图像,声音和环绕声
效果(参考第 14 页)。
按压 V 或 v 键以选择“输入信号设定”,然后按压 键。
选择“视频信号 1”、“视频信号 2”、“视频信号 3”、“视频信
号 4”、“高清晰度/DVD 1”、“高清晰度/DVD 2”于您要使用
贵翔影院的连接装置,然后按压 键。
选择“扬声器输入设定”,然后按压 键。
通常选择“主声道输入”。需要将电视机的扬声器作为中置扬声器
时,按压 V 或 v 键以选择“中置输入”,然后按压 键。
调整图像设定以适于观看电视游戏节目。
按压 V 或 v 键以选择“开”,然后按压 键。
要取消时,选择“关”,然后按压 键。
续
调整您的设定 (MENU)
25
Page 58
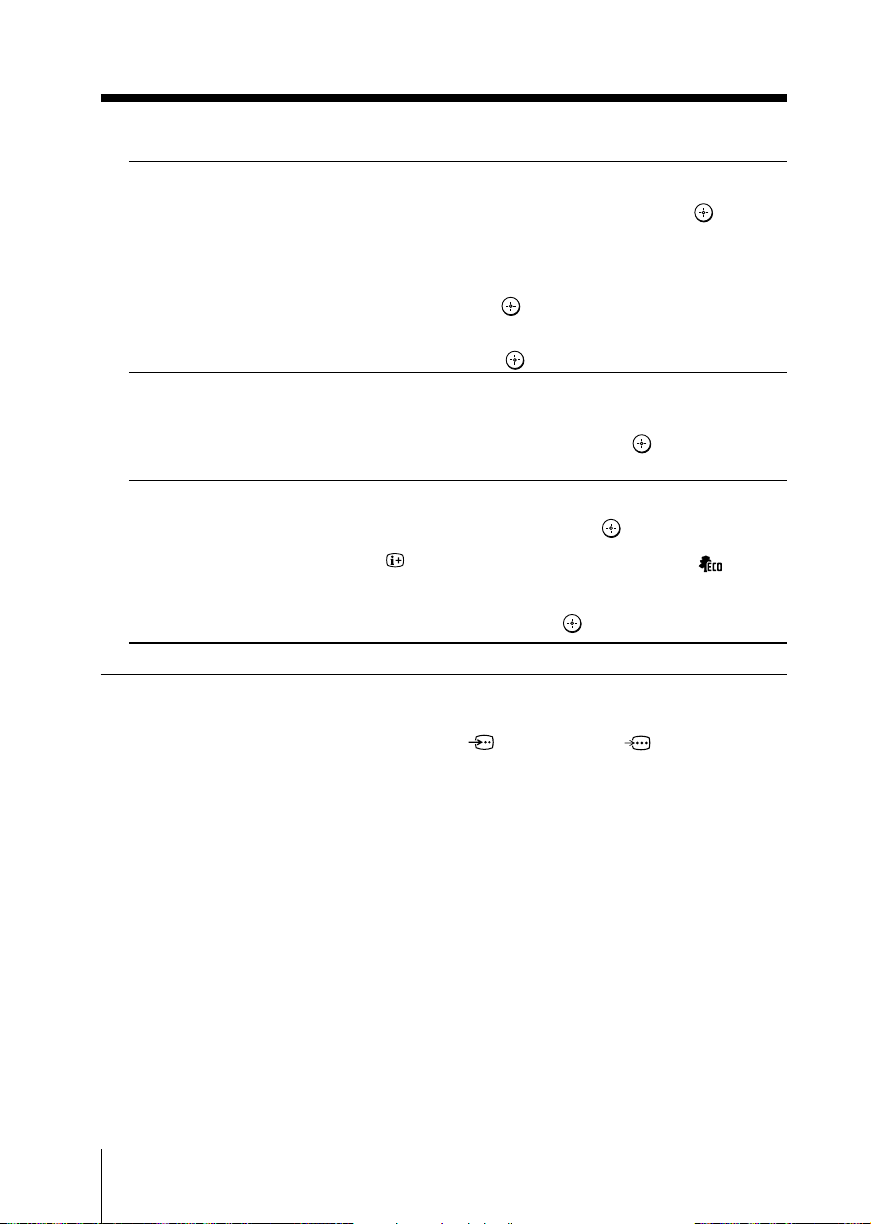
续
“视频输入标注”
“彩色制式”
“生态节能模式”
注
• 只有通过电视机前面或背后的 t(视频输入), (S 视频输入)或 (分量信号输入)
接收的信号时,才能使用“游戏模式”。
• 输入高清晰(HD)信号或逐行扫描信号时,“游戏模式”不起作用。
标注所连接的装置。
(1) 按压 V 或 v 键以选择您要标注的输入,然后按压 键。
(2) 按压 V 或 v 键以选择标注选项:“视频信号 1/视频信号 2/
视频信号 3/视频信号 4/高清晰度/DVD 1/ 高清晰度/
DVD 2”、“录像机”、“卫星节目”、“游戏机”或
“编辑”*
* 您可编辑视频输入标注。按压 V 或 v 键以选择英文、数字、字
符进行标注,然后按压 键。
改变彩色制式。
按压 V 或 v 键以选择“自动”、“PA L”、“SECAM”、
“NTSC 3.58”或“NTSC 4.43”,然后按压 键。
通常将此设定为“自动”。
节省电能。
按压 V 或 v 键以选择“开”,然后按压 键。
当您按压 键或打开电视机时,生态节能模式符号( )将显示
在屏幕上一会儿。
要取消时,选择“关”,然后按压 键。
,然后按压 键。
26 调整您的设定 (MENU)
Page 59
附加信息
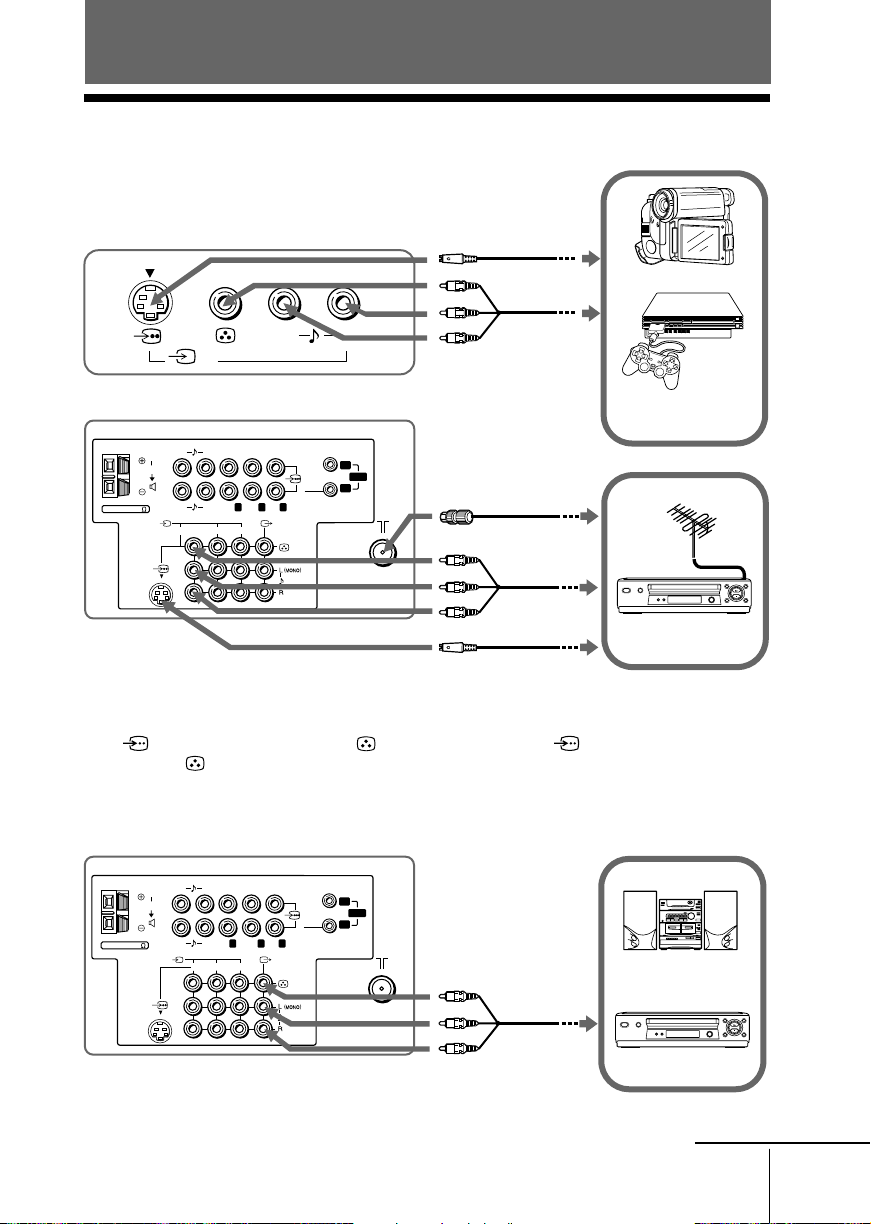
x 连接选购的装置
连接至视频输入端子(t)
电视机前面的控制板
S 视频电缆
(未提供)
音频/视频电缆
摄像机
(未提供)
L(MONO)
R
4
电视机背后的控制板
PR/
Y
Y
23
PB/
C
R
B
C
P
PR/
B
/
RG B
C
C
R
B
HD
1
SYNC
VD
2
天线电缆
(未提供)
120W MAX 8
RL
C
RL
1
音频/视频电缆
(未提供)
S 视频电缆
(未提供)
注
• 若将录像机连接至 8(天线输入)端子,请将录像机输出的信号预设至电视机上的频道号码
“0”(参考第 24 页)。
• 当 (S 视频)和 t1 或 t4 的 (视频)同时被连接时, (S 视频)即自动被选
定。要收看 (视频)时,断开 S 视频电缆即可。
电视游戏机
录像机
连接至监视器输出端子(T)
电视机背后的控制板
RL
C
120W MAX 8
RL
1
Y
Y
23
PR/
PB/
C
C
R
B
P
PR/
B
/
RG B
C
C
R
B
HD
1
SYNC
VD
2
音频系统
音频/视频电缆
(未提供)
录像机
续
附加信息
27
Page 60
续
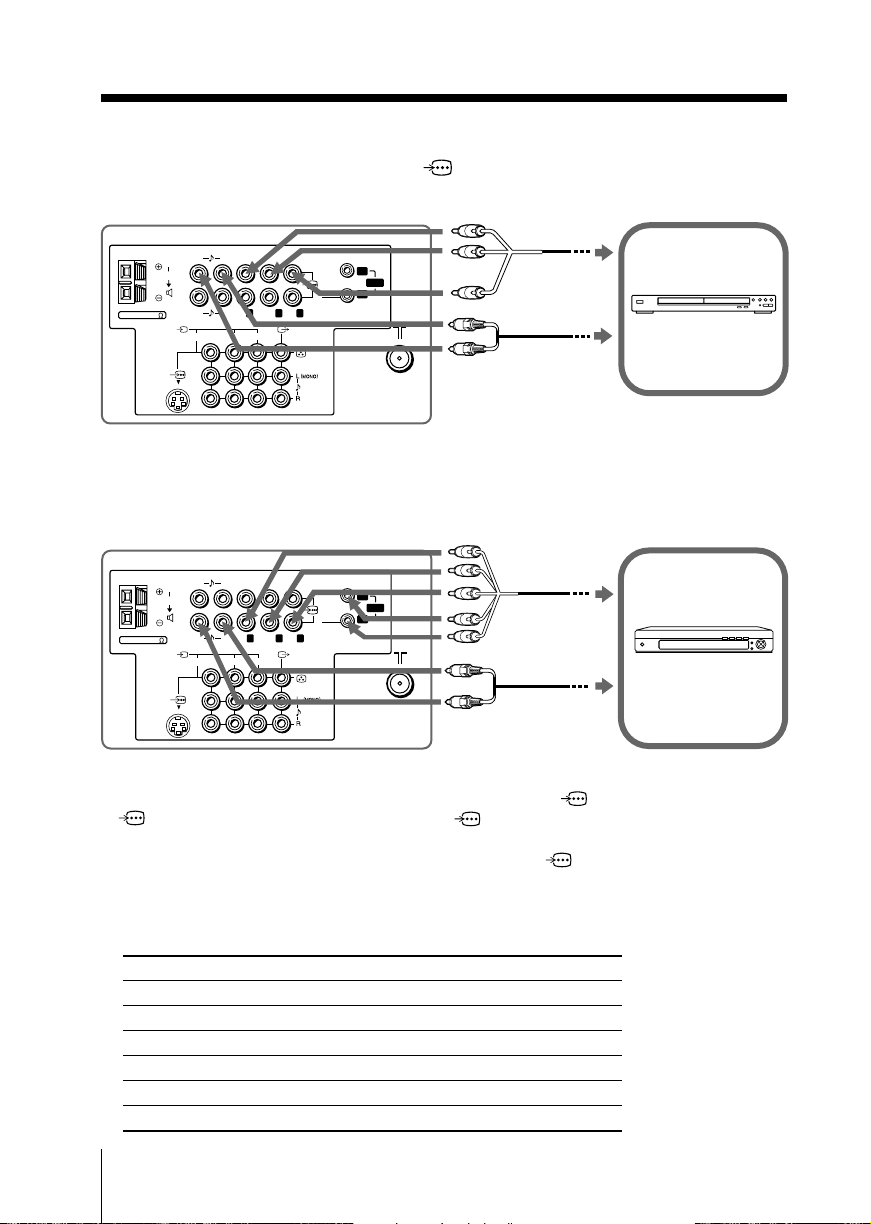
连接至 DVD 分量信号输入端子 ( )
电视机背后的控制板
DVD 分量信号电缆
(未提供)
R
/
PB/
Y
Y
23
P
RCB
C
PR/
B
/
P
RG B
C
C
R
B
HD
1
SYNC
VD
2
音频电缆
(未提供)
DVD 播放机
120W MAX 8
RL
C
RL
1
注
• 某些 DVD 播放机的插口可能标记为 Y/CB/CR, Y/PB/PR, Y/Cb/Cr 或 Y/B-Y/R-Y。
• 若您在电视屏幕上选择“高清晰度/DVD 1”或“高清晰度/DVD 2”, T (监视器输出)将不
能输出正常的信号。这并不表示发生故障。
电视机背后的控制板
DVD 分量信号电缆
(未提供)
音频电缆
(未提供)
数字电视接收机
120W MAX 8
C
RL
R
L
1
Y
Y
23
P
R
/
PB/
CRC
B
P
PR/
B
/
RG B
C
C
R
B
HD
1
SYNC
VD
2
注
• 如果数字电视接收机配备 Y/PB/PR 输出插口,则请将其连接至 1(分量信号输入 1)或
2(分量信号输入 2)的 Y/PB/PR 插口。而 2(分量信号输入 2) 的 HD/VD 插口则
不连接任何装置。
如果数字电视接收机不带 Y/PB/PR 输出插口,请将其连接至 2(分量信号输入 2)的 G/
B/R/HD/VD 插口。
提示
• 电视机接受以下信号格式:
总扫描线数 有效扫描线数 场频 (HZ)
1125i 1080i 50/60
750p 720p 50/60
625p 576p 50
625i 576i 50
525p 480p 60
525i 480i 60
28 附加信息
Page 61

连接放大器至中置扬声器输入端子( )
1
23
C
R
PR/
C
B
Y
RL
P
B
/
P
R
/
RL
RG B
Y
C
RCB
PB/
如果使用带 Dolby* Surround(杜比环绕)解码器的放大器,而不使用电视机的音频系
统,则您可以把电视机的扬声器用作音频系统的中置扬声器。
使用放大器提供的扬声器线时,请将放大器的中置扬声器端子连接至电视机的
(中置扬声器输入)端子。
电视机背后的控制板
DVD 分量信号
DVD 播放机
电缆
(未提供)
音频电缆
(未提供)
光学数码电缆
(未提供)
120W MAX 8
120W MAX 8
C
C
C
C
放大器
前扬声器
(左)
后扬声器
(左)
前扬声器
(右)
后扬声器
(右)
低音扬声器
注
• 若要将电视机的扬声器用作中置扬声器时,您可按压遥控器上的 CENTER SP 键(参考第 10
页)或显示“设定”菜单并选择“贵翔影院设定”,然后在“扬声器输入设定”中选择“中置
输入”(参考第 25 页)。
• 如果您的电视机设为“中置扬声器”,但电视机后面的中置扬声器输入端子却无任何连接或放
大器发出的音源无中置扬声器声道时,电视机的扬声器将听不到任何声音。
* Dolby 是 Dolby 实验室的商标。
附加信息
29
Page 62
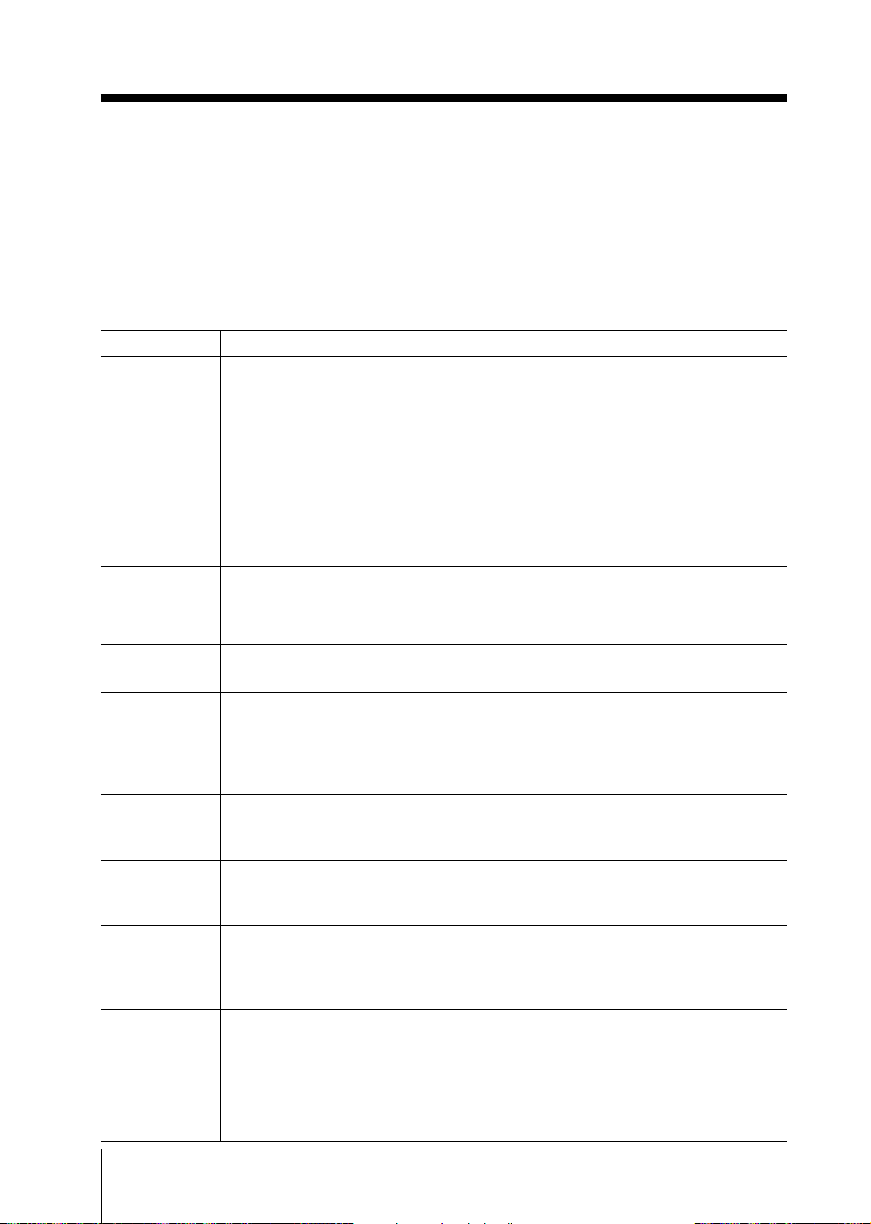
x 故障检修
若在观看电视时遇见任何问题,您可使用重新设定功能以解决问题或参考下列故
障检修指南。若问题仍然存在,请联络 Sony 经销商。
重新设定功能
按压遥控器上的 RESET 键。电视屏幕即呈现空白,约数秒后,“初始化设定”菜
单将会显示在电视屏幕上。
按压 RESET 键使电视机恢复到工厂设定,一些电视故障可能会消失。
症状
图像有雪花状斑点,
有噪声
图像失真,
有噪声
图像良好,
有噪声
没有图像,
没有声音
图像良好,
没有声音
图像有点线或条纹
图像出现双重影像
图像无彩色
解决方法
• 检查天线电缆以及电视机,录像机和墙上的天线连接是否正确(参考第 27
页)。
• 检查天线的装置。请寻求 Sony 经销商的协助。
• 显示“频道设定”菜单并选择“手动调台”以再次预设频道(参考第 24
页)。
• 显示“频道设定”菜单并选择“手动调台”里的“信号增强”为“自动”(参
考第 24 页)。
• 尝试使用外部信号增强器。
• 切断外部信号增强器的电源或拔掉其插头以终止其操作。
• 显示“频道设定”菜单并选择“手动调台”里的“信号增强”为“关”(参考
第 24 页)。
• 显示“频道设定”菜单并在“手动调台”里选择适当的“电视系统”(参考第
24 页)。
• 检查电源线,天线和录像机之连接是否正确(参考第 27 页)。
• 按压 ?/1(电源)键以接通电视机的电源(参考第 10 页)。
• 按压电视机上的 !(主电源)键以切断电视机的电源,五秒左右后再次接通
电源(参考第 9 页)。
• 按压 2 + 键以提高音量水平(参考第 9 页)。
• 按压 % 键以取消静音(参考第 10 页)。
• 不要在电视机旁使用吹风机或其它设备。
• 检查天线的装置。请寻求 Sony 经销商的协助。
• 使用“微调”功能(参考第 24 页)。
• 检查天线的装置。请寻求 Sony 经销商的协助。
• 切断外部信号增强器的电源或拔掉其插头以终止其操作。
• 显示“图像设定”菜单并选择“图像模式”里的“个人”,然后调整“图像个
人模式设定”里的“颜色”水平(参考第 19 页)。
• 显示“设定”菜单及检查“彩色制式”设定(一般将此设定为“自动”)
(参考第 26 页)。
• 检查天线的装置。请寻求 Sony 经销商的协助。
30
附加信息
Page 63
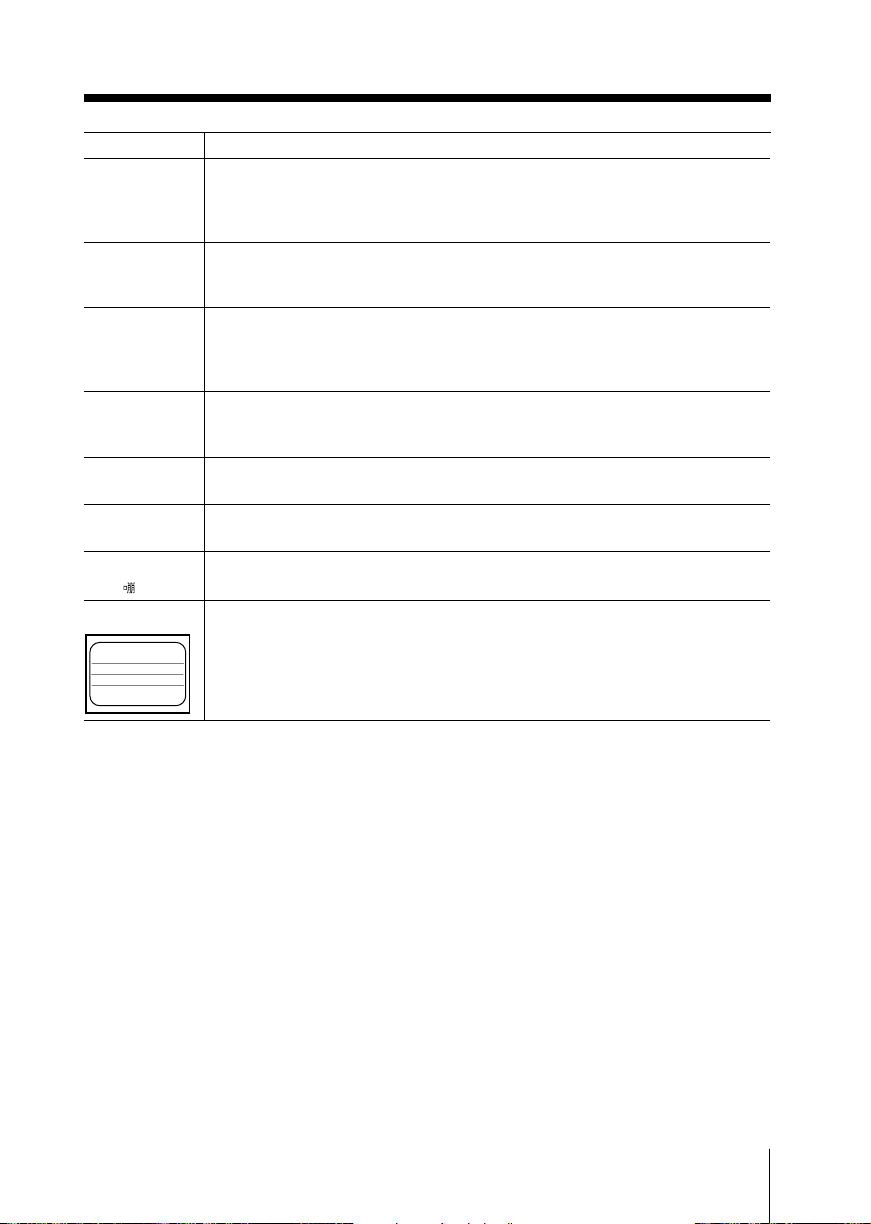
症状
图像倾斜
图像出现反常彩色斑
点
电视机上的 1
(待机)指示灯每隔
三秒闪烁至少一次的
红色亮光。
电视屏幕有时会在更
换频道时呈显空白,
空白时间比一般略长。
不能操作电视游戏。
电视机外壳吱嘎声。
当您接通电视机时,
听到“
”的声音。
屏幕上出现细线。
解决方法
• 将外部扬声器或其它电器放置在离电视机较远的地方。
• 在“设定”菜单下显示“图像调节”并调整“图像旋转度调校”和“图像垂直
位置调节”以使图像与电视屏幕对齐(参考第 25 页)。
• 将外部扬声器或其它电器放置在离电视机较远的地方。请勿在电视机打开时进
行搬移。按压电视机上的 !(主电源)键以切断电视机的电源。约 15 分钟后
再将其打开以使电视机消磁。
• 计算 1(待机)指示灯的亮光次数。按压 !(主电源)键以切断电视机的电
源。通知您邻近的 Sony 维修服务中心。
•“信号增强”正在操作以探测微弱的信号。这并不表示发生故障。
• 本电视机不能用于那些电子枪或莱福枪操纵的电视射击游戏机的操作。详细内
容请参阅电视游戏机软件所附的说明书。
• 室温的变化有时会导致电视机的外壳膨胀或缩小,因而产生噪声。这并不表示
发生故障。
• 电视机自动消磁。这并不表示发生故障。
• 屏幕上有时显示的细线是 Trinitron 显像管用于稳固孔径栅的阻尼器线的投
影。这并不表示发生故障。
附加信息
31
Page 64
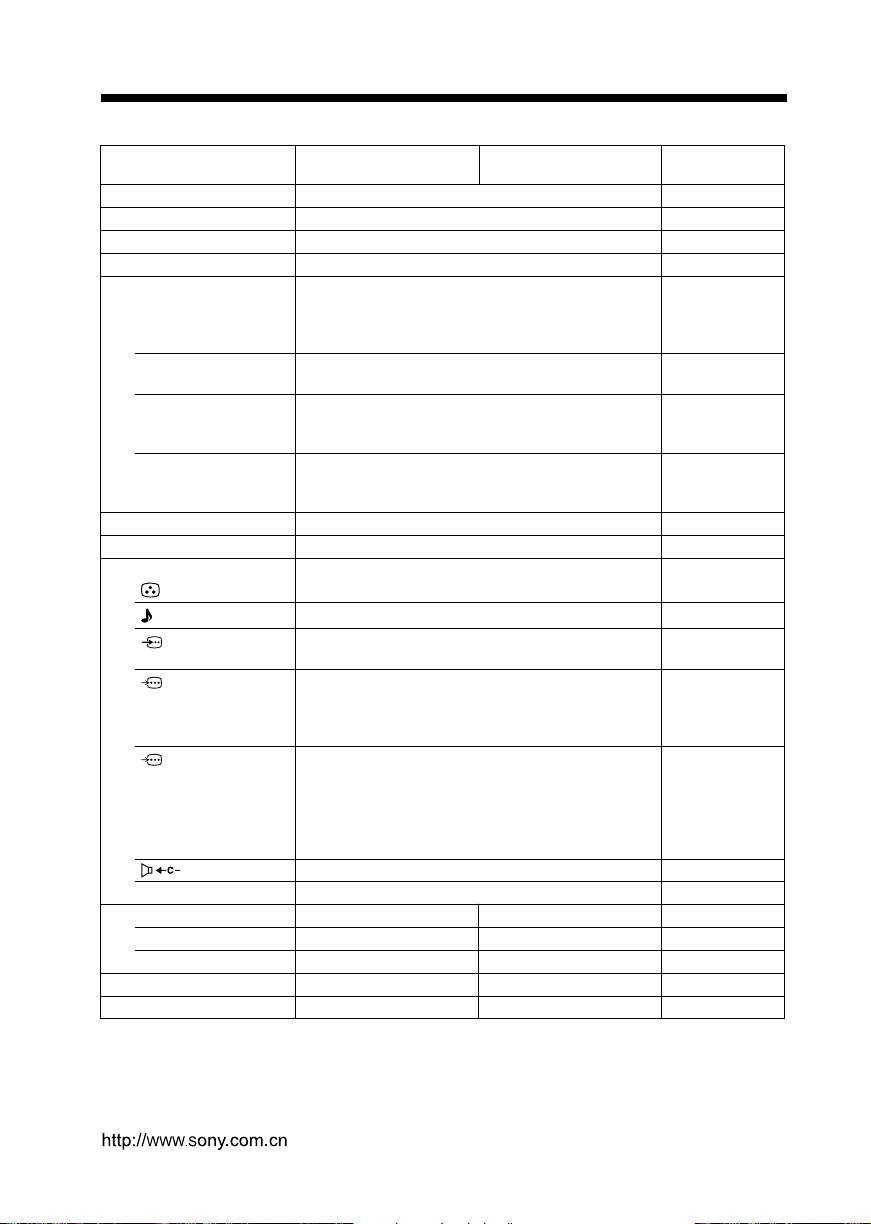
x 规格
KV-DA34M80 KV-DA29M80
KV-DA34X80 KV-DA29X80
电源 220 伏特交流电, 50 赫兹
电力消耗(瓦特) 标示于电视机后
电视系统 B/G, I, D/K, M
彩色制式 PAL, PAL 60, SECAM, NTSC3.58, NTSC4.43
频道范围
B/G VHF : E2 至 E12
I UHF : B21 至 B68
D/K VHF : C1 至 C12, R1 至 R12
M VHF : A2 至 A13
8(天线) 75 欧姆外部端子
音频输出(扬声器) 10 瓦特 + 10 瓦特(8.5 瓦特 + 8.5 瓦特; 7% 声音失真)
插口数量
(视频) 输入:4 输出:1 音频型插口; 1 伏特峰间值, 75 欧姆
(音频) 输入:6 输出:1 音频型插口; 500 毫伏, 连续实效值
(S 视频) 输入:2
(DVD 分量信号) 输入:2 音频型插口;
(G/B/R/HD/VD 输入:1 音频型插口;
视频) G: 0.7 伏特峰间值, 75 欧姆,
(中置扬声器) 输入:1 最大 120 瓦特, 8 欧姆
i(耳机) 输出:1 立体声微型插口
显像管 34 型 29 型
显像管对角线尺寸 86 厘米 72 厘米
可见屏幕对角线尺寸 80 厘米 68 厘米
尺寸(宽 × 高 × 深)
重量 76 公斤 49 公斤
本机设计和规格若有任何更改,恕不另行通知。
制造厂商:
上海索广映像有限公司
上海市浦东新区川沙路 3777 号 邮编:201201
UHF : E21 至 E69
CATV : S01 至 S03, S1 至 S41
CATV : S01 至 S03, S1 至 S41
UHF : C13 至 C57, R21 至 R60
CATV : S01 至 S03, S1 至 S41, Z1 至 Z39
UHF : A14 至 A79
CATV : A-8 至 A-2, A 至 W+4, W+6 至 W+84
Y: 1 伏特峰间值, 75 欧姆, 非平衡, 负同步
C: 0.286 伏特峰间值, 75 欧姆
Y: 1 伏特峰间值, 75 欧姆, 负同步
P
: 0.7 伏特峰间值, 75 欧姆
B/CB
P
: 0.7 伏特峰间值, 75 欧姆
R/CR
B: 0.7 伏特峰间值, 75 欧姆,
R: 0.7 伏特峰间值, 75 欧姆,
HD: 0.7 伏特峰间值, 75 欧姆,
VD: 0.7 伏特峰间值, 75 欧姆
895 × 679 × 596 毫米 765 × 584 × 544 毫米
注
32
附加信息
Sony Corporation
 Loading...