

Page 1
2-059-888-E4 (1)
Plasma TV
Operating Instructions
• Before operating the unit, please read this manual thoroughly and retain it
for future reference.
KE-MX42
KE-MX37
© 2004 Sony Corporation
N1
Page 2
Safety Information
For Safety
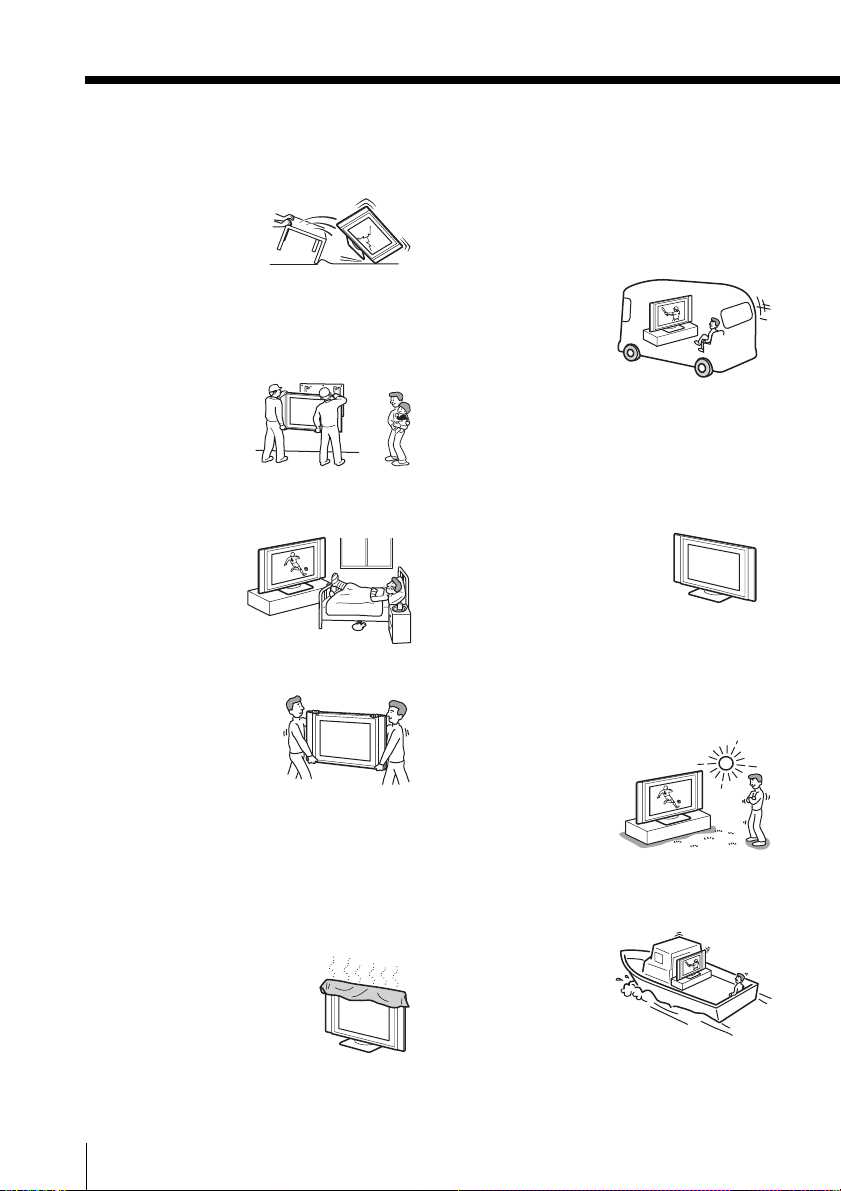
AC power cord
Unplug the AC power
cord when moving the
Plasma TV. Do not move
the Plasma TV with the
AC power cord plugged
in. It may damage the AC power cord and result
in fire or electric shock. If the Plasma TV has
been dropped or damaged, have it checked
immediately by qualified service personnel.
Installation
Installation of the
Plasma TV on the wall
should be carried out by
qualified servicemen.
Improper installation
may render the Plasma
TV unsafe.
Medical institution
Do not place this
Plasma TV in a place
where medical
equipment is in use. It
may cause
malfunction of
medical instruments.
Carrying
Carrying the Plasma TV
requires two or more people.
If you carry the Plasma TV
in a manner other than that
specified, it may drop and a
serious injury may be
caused. Be sure two or more
people carry the Plasma TV. When transporting,
do not subject the Plasma TV to shocks or
excessive vibration. The Plasma TV may fall and
be damaged or cause serious injury.
Installation and moving
Ventilation
Never cover the ventilation holes
in the cabinet. It may cause
overheating and result in fire.
Unless proper ventilation is
provided, the Plasma TV may
gather dust and get dirty. For
proper ventilation, observe the
following:
• Do not install the Plasma TV turned backward
or sideways.
• Do not install the Plasma TV turned over or
upside down.
• Do not install the Plasma TV on a shelf or in a
closet.
• Do not place the Plasma TV on a rug or bed.
• Do not cover the Plasma TV with cloth, such
as curtains, or items such as newspapers, etc.
Vehicle and ceiling
Do not install this Plasma
TV in a vehicle or hang it
from the ceiling. Bumping
of the vehicle may cause
the Plasma TV to fall
down and cause injury.
Water and moisture
Do not use this Plasma TV near water - for
example, near a bathtub or shower room. Also
do not expose to rain. It may result in fire or
electric shock.
Optional accessories
Observe the following when
installing the Plasma TV using a
stand or wall-mount bracket. If
not, the Plasma TV may fall and
cause serious injury.
• Be sure to follow the operating instructions
supplied with your stand when installing the
Plasma TV.
• Be sure to attach the brackets supplied with
your stand.
Outdoor use
Do not install this
Plasma TV outdoors. If
the Plasma TV is
exposed to rain, it may
result in fire or electric
shock. If the Plasma TV
is exposed to direct
sunlight, the Plasma TV
may heat up and it may damage the Plasma TV.
Ship and vessel
Do not install this
Plasma TV in a ship or
vessel. If the Plasma TV
is exposed to seawater,
it may cause fire or
damage the Plasma TV.
Cord arrangement
Arrange the power cords or connecting cords in
a safe place to avoid tripping on them.
2
Page 3
Fall
Place the Plasma TV on a secure,
stable stand. Do not hang
anything on the Plasma TV. The
Plasma TV may fall from the
stand or wall-hanging rack unit,
causing damage or serious injury.
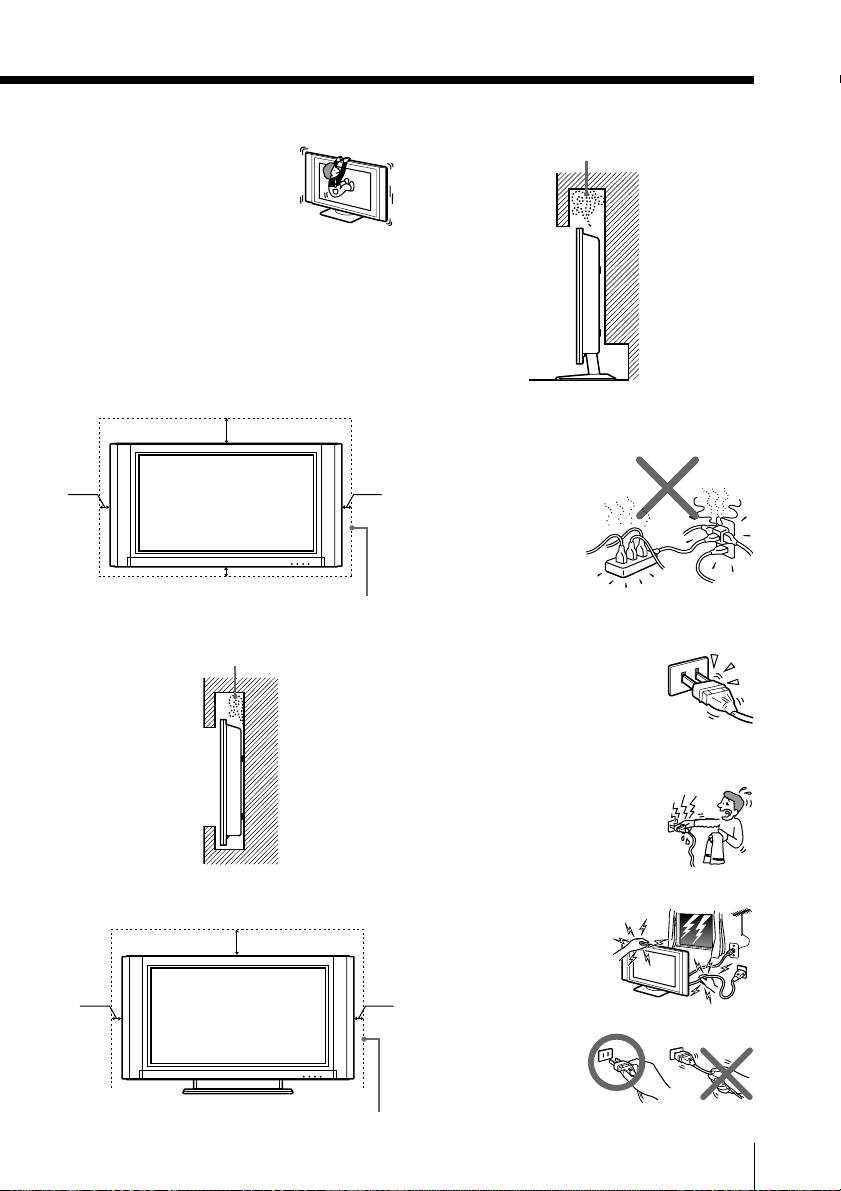
Never install the Plasma TV as follows:
Air circulation is blocked.
Ventilation
Leave space around the Plasma TV. Otherwise,
adequate air-circulation may be blocked causing
overheating and cause fire or damage the Plasma
TV.
When installing the Plasma TV on
the wall
30cm
10cm10cm
10cm
Leave this space at least.
Never install the Plasma TV as follows:
Air circulation is blocked.
Wall
When installing the Plasma TV
using a stand
30cm
10cm
Leave this space at least.
10cm
Wall
Power Sources
Overloading
This Plasma TV is
designed to operate on
a 110V AC supply.
Take care not to
connect too many
appliances to the same
AC power socket as
this could result in fire
or electric shock.
AC power outlet
Do not use a poor fitting AC
power socket. Insert the plug fully
into the AC power outlet. If it is
loose, it may cause arcing and
result in fire. Contact your
electrician to have the AC power
socket changed.
Moisture
Do not touch the AC power cord
with a wet hand. If you plug/
unplug the AC power cord with a
wet hand, it may cause electric
shock.
Lightning storms
For your own safety, do
not touch any part of the
Plasma TV, AC power
cord or antenna lead
during lightning storms.
AC power cord
protection
Pull out the AC power
cord by the plug. Do
not pull on the AC
power cord itself.
3
Page 4
Wiring
Unplug the AC power cord when wiring cables.
Be sure to unplug the AC power cord for your
safety, when hooking up.
Cleaning
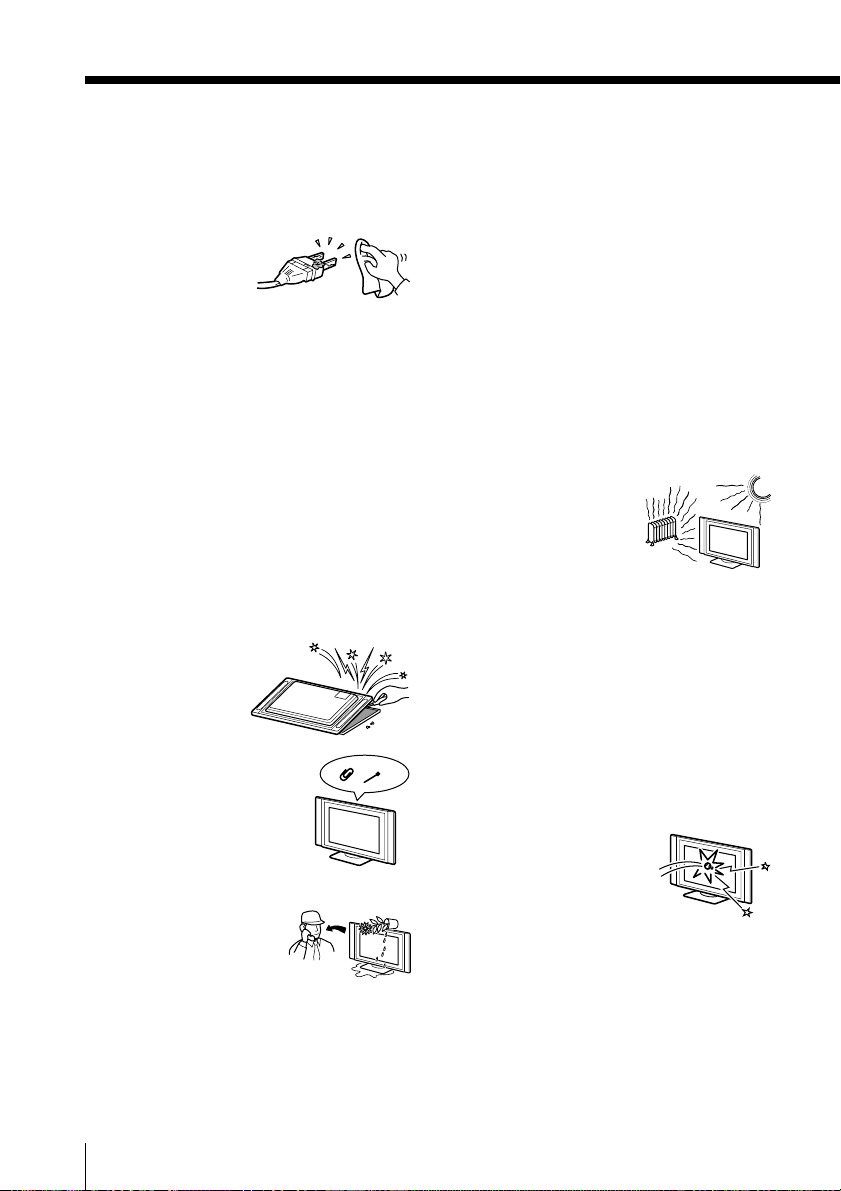
Clean the AC power
plug regularly. If the
plug is covered with
dust and it picks up
moisture, its insulation
may deteriorate and result in fire. Unplug the
AC power plug and clean it regularly.
Grounding
To avoid electric shock, be sure to connect the
supplied AC power cord to a grounded power
outlet.
If the plug fails to fit, contact your electorician to
have the outlet changed.
Use
Damage requiring service
If the surface of the Plasma TV cracks, do not
touch it until you unplug the AC power cord.
Otherwise electric shock may result.
Servicing
Do not open the cabinet
and the rear cover of
the Plasma TV. Refer to
qualified service
personnel only.
Ventilation holes
Do not insert anything in the
ventilation holes. If metal or
something flammable enters, it
may result in fire or electric
shock.
Moisture and flammable
• Do not let this Plasma TV
get wet. Never spill liquid
of any kind on the set. If
any liquid or solid object
does fall through, do not
operate the Plasma TV. It may result in electric
shock or damage to the Plasma TV. Have it
checked immediately by qualified personnel.
•To prevent fire, keep inflammable objects or
naked lights (e.g. candles) away from the
Plasma TV.
Additional Safety
Information
Electric shock
Do not touch the Plasma TV with a wet hand.
Doing so may cause electric shock or damage
the Plasma TV.
Protruding location
Do not install the Plasma TV in protruding
locations. If you install the unit in the following
locations, injury may result.
• Do not install the Plasma TV in a location
where the Plasma TV protrudes, such as
pillars.
• Do not install the Plasma TV in a location
where your face may bump.
Placement
Never place the Plasma TV
in hot, humid or excessively
dusty places. Do not install
the Plasma TV where it may
be exposed to mechanical
vibrations.
Oils
Do not install this Plasma TV in restaurants that
use oil. Dust absorbing oil may enter into the
Plasma TV and damage the Plasma TV.
Accessories
Secure the Plasma TV from falling down.
If the Plasma TV is not secured properly, it may
fall and cause injury. Take measures against it
using a stand or other apparatus on the floor or
wall in the specified manner, referring to the
operating instructions supplied with your stand.
Broken pieces
Do not throw anything at the
Plasma TV. The screen glass
may explode by the impact
and cause serious injury.
Corrosion
If you use this Plasma TV near the seashore, salt
may corrode metal parts of the Plasma TV and
cause internal damage or fire. It may also
shorten the life of the Plasma TV. If the Plasma
TV will be subjected to none of these conditions,
steps should be taken to reduce the humidity
and temperature of the area where the Plasma
TV is located.
4
Page 5
Cleaning
Unplug the AC power cord when cleaning this
Plasma TV. If not, it may result in electric shock.
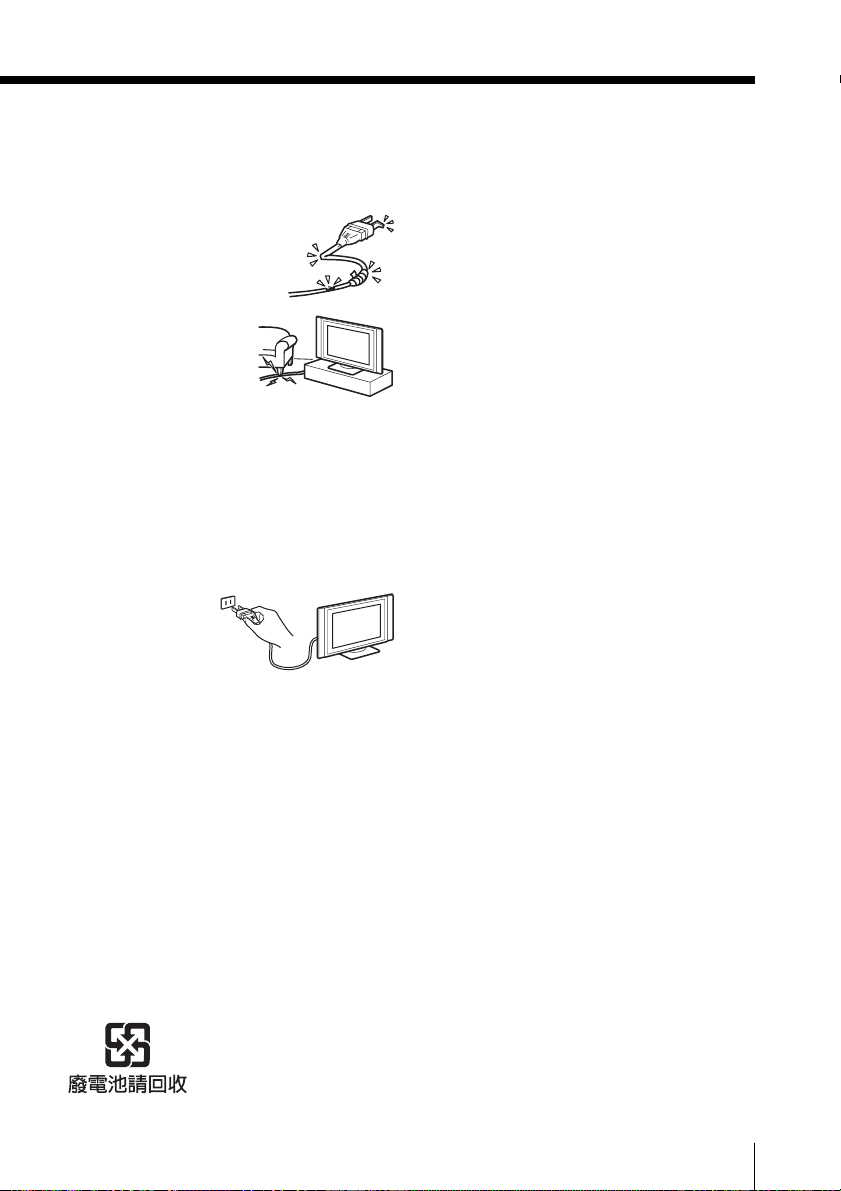
AC power cord
If you damage the AC power
cord, it may result in fire or
electric shock.
• Do not pinch, bend, or twist
the cable excessively. The
core lines may be bared
and cut, and cause shortcircuit, resulting in fire
or electric shock.
• Do not convert or
damage the AC power
cord.
• Do not put anything heavy on the AC power
cord. Do not pull the AC power cord.
• Keep the AC power cord away from heat
sources.
• Be sure to grasp the plug when disconnecting
the AC power cord.
If the AC power cord is damaged, stop using it
and ask your dealer or Sony service center to
exchange it.
Not in use
For environmental
and safety reasons, it
is recommended that
the Plasma TV is not
left in standby mode
when not in use. Disconnect from the AC power
outlet.
Cable wiring
Take care not to catch your feet on the cables. It
may damage the Plasma TV.
Installation
Do not install optional components too close to
the Plasma TV. Keep optional components at
least 30 cm away from the Plasma TV. If a VCR is
installed in front or at the right side of the
Plasma TV, the picture may distort.
Heat
Do not touch the surface of the Plasma TV. It
remains hot, even for some time after the Plasma
TV is turned off.
Precautions
On viewing the Plasma TV
comfortably
•To view the Plasma TV comfortably, the
recommended viewing position is from four
to seven times of the screen’s vertical length
away from the Plasma TV.
•View the Plasma TV in a moderate light room,
as viewing the Plasma TV in poor light taxes
your eyes. And watching the screen continuously long times taxes your eyes, too.
On installing the Plasma TV
• Use the specified wall-mount bracket or
stands.
Leave enough space for ventilation between
the exhaust fan in the rear of unit and the
wall.
• Do not install the Plasma TV in places subject
to extreme temperature, for example in direct
sunlight, or near a radiator, or heating vent. If
the Plasma TV is exposed to extreme
temperature, the Plasma TV may heat up and
it may cause deformations of the casing or
malfunctions.
• Do not install the Plasma TV in a place
exposed to direct air conditioning. If the
Plasma TV is installed in such a location,
moisture may condense on the glass or PDP
panel inside the Plasma TV. It may cause a
malfunction.
• After transporting the Plasma TV directly
from a cold to a warm location, or if the room
temperature has changed suddenly, pictures
may be blurred or show poor color over
portions of the picture. This is because
moisture has condensed on the glass or PDP
panel inside the Plasma TV. Let the moisture
evaporate before using the Plasma TV.
•To obtain a clear picture, do not expose the
screen to direct illumination or direct sunlight.
If possible, use spot lighting direct down from
the ceiling.
On adjustment volume
• Adjust the volume so as not to trouble
neighbours. Sound carries very easily at night
time. Therefore, closing the windows or using
headphones is suggested.
• When using headphones, adjust the volume
so as to avoid excessive levels, as hearing
damage may result.
5
Page 6

On image retention
• If the following images are displayed for an
extended period time, image retention
(afterimage) in areas of the screen may result
due to the characteristics of the Plasma
Display Panel.
– Black bars at the top and bottom that
appear with a wide video source (Letterbox
picture).
– Black bars to the left and right that appear
with a 4:3 video source (conventional TV
broadcasts).
–Video game sources
– PC images
– DVD on-screen menu displays
– On-screen menus, channel numbers, etc., of
connected equipment such as Set top box,
Cable modem, VCR, etc.
The risk of this is higher if the set is in
“Dynamic” mode or has a high contrast
setting. This image cannot be removed once
burnt onto the screen. To avoid the risk of
occurrence do not leave the TV set operating
on such a picture, or program for a long time,
use the “Screen Saver” function or lower the
contrast setting. Repeated extended daily
usage of the same image, or program can also
result in this occurrence. IMAGE RETENTION IS NOT COVERED BY THE SONY
WARRANTY.
•To reduce image retention, this Plasma TV has
the “Screen Saver” function. The default
setting of the “Orbit” function in “Screen
Saver” is “On”.
On the PDP (Plasma Display Panel)
Please note that the PDP screen is made with
high-precision technology. However, black
points or bright points of light (red, blue, or
green) may appear constantly on the PDP screen,
and irregular colored stripes or brightness may
appear on the PDP screen. This is not a
malfunction.
On handling the remote control
• Handle the remote control with care. Do not
drop or step on it, or spill liquid of any kind.
• Do not place the remote control in a location
near heat source, or in a place subject to direct
sunlight, or in a damp room.
On handling and cleaning the
screen surface of the Plasma TV
The screen of this Plasma TV has an antireflection screen coating. To avoid screen
degradation, follow the points mentioned below.
Do not push on or scratch with hard objects, or
throw anything at the screen. The screen may be
damaged.
• Be sure to unplug the AC power cord
connected to the Plasma TV from the AC
power outlet before cleaning.
• Do not touch the display panel after operating
continuously for a long period as the display
panel becomes hot.
• The screen of this Plasma TV has an antireflection screen coating. We recommend not
to touch much of the screen surface.
• Clean the screen with the supplied cleaning
cloth or a soft cloth lightly moistened with a
mild detergent solution.
• Never use any type of abrasive pad, scouring
powder, or solvent, such as alcohol or
benzine. This type of contact may result in
damage to the screen surface.
On cleaning the cabinet
• Be sure to unplug the AC power cord
connected to the Plasma TV from the AC
power outlet before cleaning.
• Clean the cabinet with the supplied cleaning
cloth or a soft cloth lightly moistened with a
mild detergent solution.
• Note that material deterioration or screen
coating degradation may occur if the Plasma
TV is exposed to a volatile solvent, such as
alcohol, thinner, benzine or insecticide, or if
prolonged contact is maintained with rubber
or vinyl materials.
• The ventilation holes can accumulate dust
over a period of time. The accumulate dust
may make the cooling function of the built-in
fan less effective. To prevent this, we
recommended removing the dust periodically
(once a month) using a vacuum cleaner.
6
Page 7

Table of Contents
Safety Information
Precautions
Using Your New TV
Getting Started ............................................................................................. 8
Step 1 Installing the TV......................................................................... 8
Step 2 Connect the antenna ................................................................10
Step 3 Insert the batteries into the remote .......................................12
Step 4 Set up your TV automatically ................................................ 13
Connecting optional components ........................................................... 15
Watching the TV ........................................................................................23
Advanced Operations
Selecting the picture and sound
modes ............................................... 26
Viewing higher quality pictures ...... 27
Customizing the picture Reality and
Clarity levels ................................... 28
Using wide screen mode ..................30
Listening with surround sound ....... 34
Enjoying stereo or bilingual
programs ......................................... 35
Operating optional components ...... 36
Using the TV’s center speaker ......... 39
Using the picture off feature ............ 40
Using the “Memory Stick” viewer ..41
Adjusting Your Setup (MENU)
Introducing the menu system ..........68
Changing the “Picture” setting........72
Changing the “Sound” setting ......... 75
Entering the “Memory Stick”
menu ................................................ 78
Changing the “Wide Screen”
setting...............................................79
Changing the “Features” setting .....81
Changing the “Setup” setting ..........84
Additional Information
Troubleshooting .................................92
Self-diagnosis function......................98
Identifying parts and controls ......... 99
Specifications ................................... 106
Using Your New TV
Table of Contents
7
Page 8
Using Your New TV
Using Your New TV
Getting Started
Step 1
Installing the TV
Connecting the AC power cord
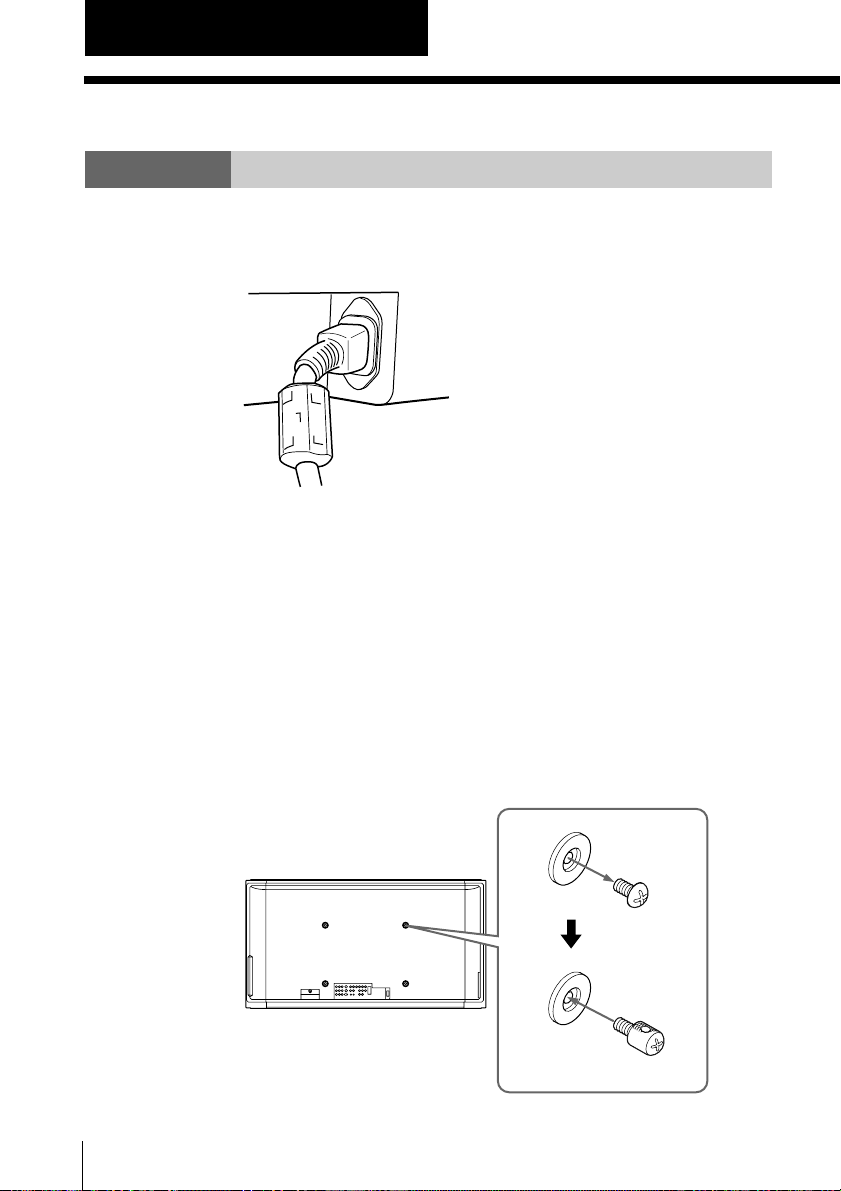
1 Secure the AC power plug to the AC IN jack.
AC power cord (supplied)
2 Connect AC power cord (supplied) to wall outlet.
Note
• When connecting optional components, do not connect the AC power
cord to wall outlet until you have completed making all connection.
Preventing the TV from falling down
After connections with antennas and other equipment are
completed, be sure to attach the anchor attachments to the rear of
the TV, and pass sturdy cord or chain and attach it to a wall or pillar.
1 Remove one of the upper two screws at the rear of the TV, then
attach the anchor attachment to the screw hole.
Rear of TV
Using Your New TV
8
Attached screw
Anchor attachment
(not supplied)
Page 9
2 Repeat step 1 to attach the other anchor attachment.
3 Attach a sturdy cord or chain securely to each anchor attachment,
and attach the cord or chain to a wall or pillar.
Tip
• Anchor attachments are supplied with SU-PT2M Tabletop Stand or SUPF2 Floating Stand
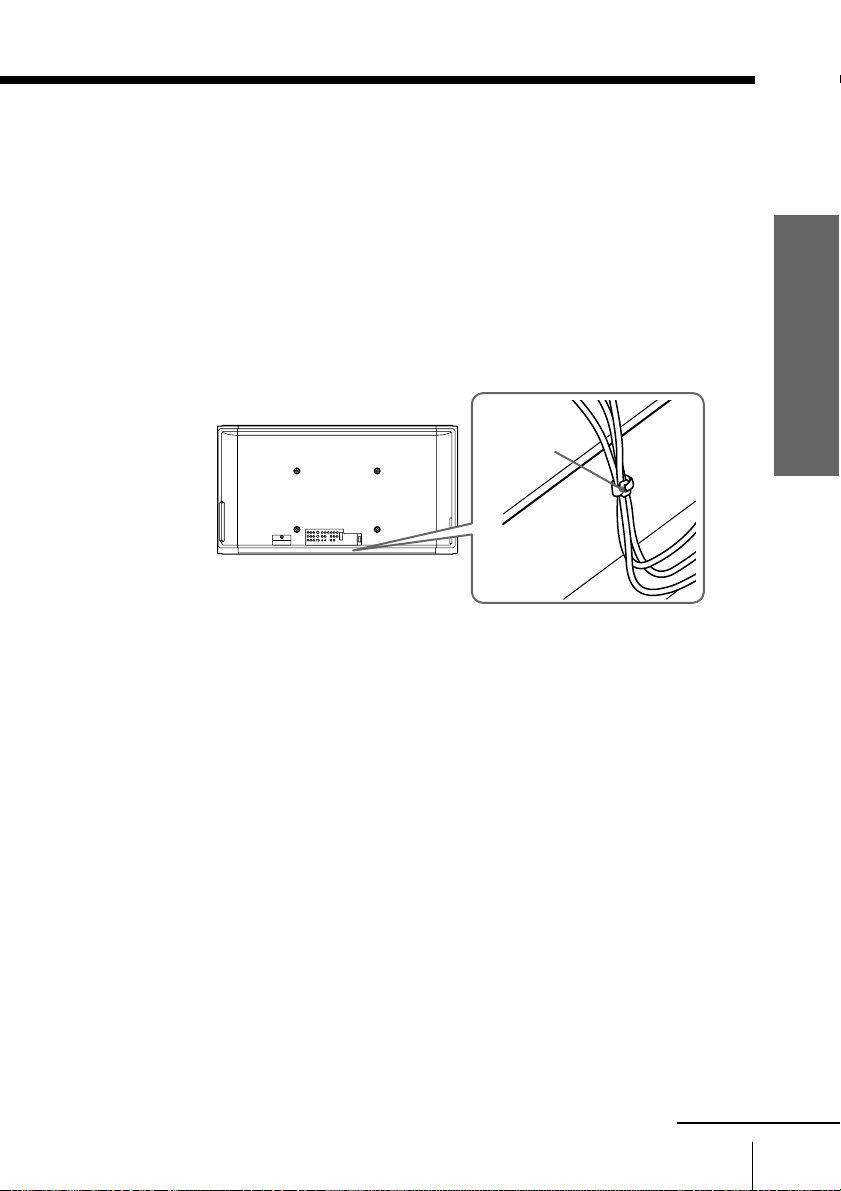
Bundling the connecting cables
You can bundle the connecting cables using the cable tie with Velcro
at the rear or the TV.
Using Your New TV
Rear of TV
Tip
• Cable tie is supplied with SU-PT2M Tabletop Stand.
Cable tie
(not supplied)
continued
Using Your New TV
9
Page 10
Getting Started (continued)
Step 2
Connect the antenna
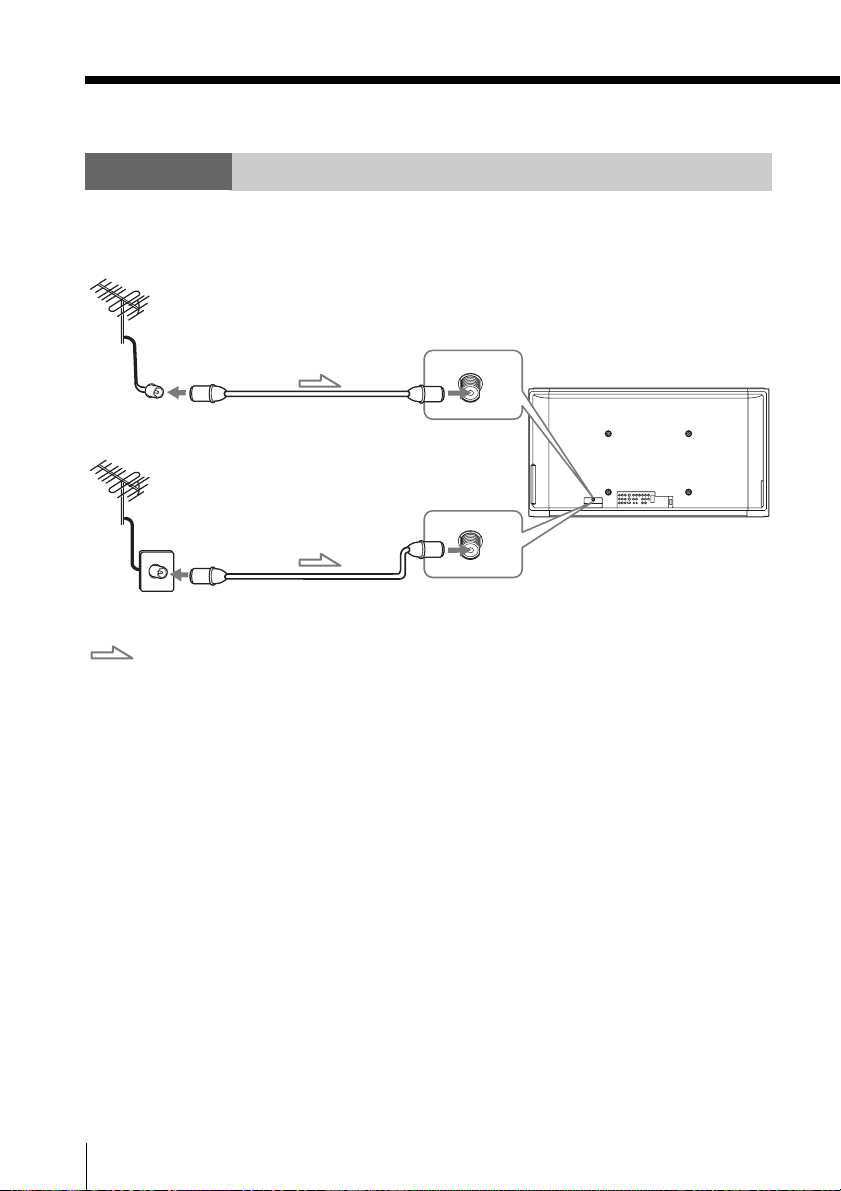
If you wish to connect a VCR, see the “Connect a VCR” diagram on page 11.
or
: Signal flow
8 VHF/UHF
Antenna cable (supplied)
8 VHF/UHF
Antenna cable (supplied)
For optimum Performance
To connect the TV to the antenna or the VCR, use an antenna cable
(supplied).
Note that one end of the cable has a male plug fitted while the other
end is fitted with a female socket. Connect the male plug to the 8
VHF/UHF (antenna) terminal of the TV.
CAUTION
Do not connect the power cord until all other connections are complete;
otherwise, a minimal current leakage through the antenna and/or other
terminals to the ground could occur.
Rear of TV
10
Using Your New TV
Page 11
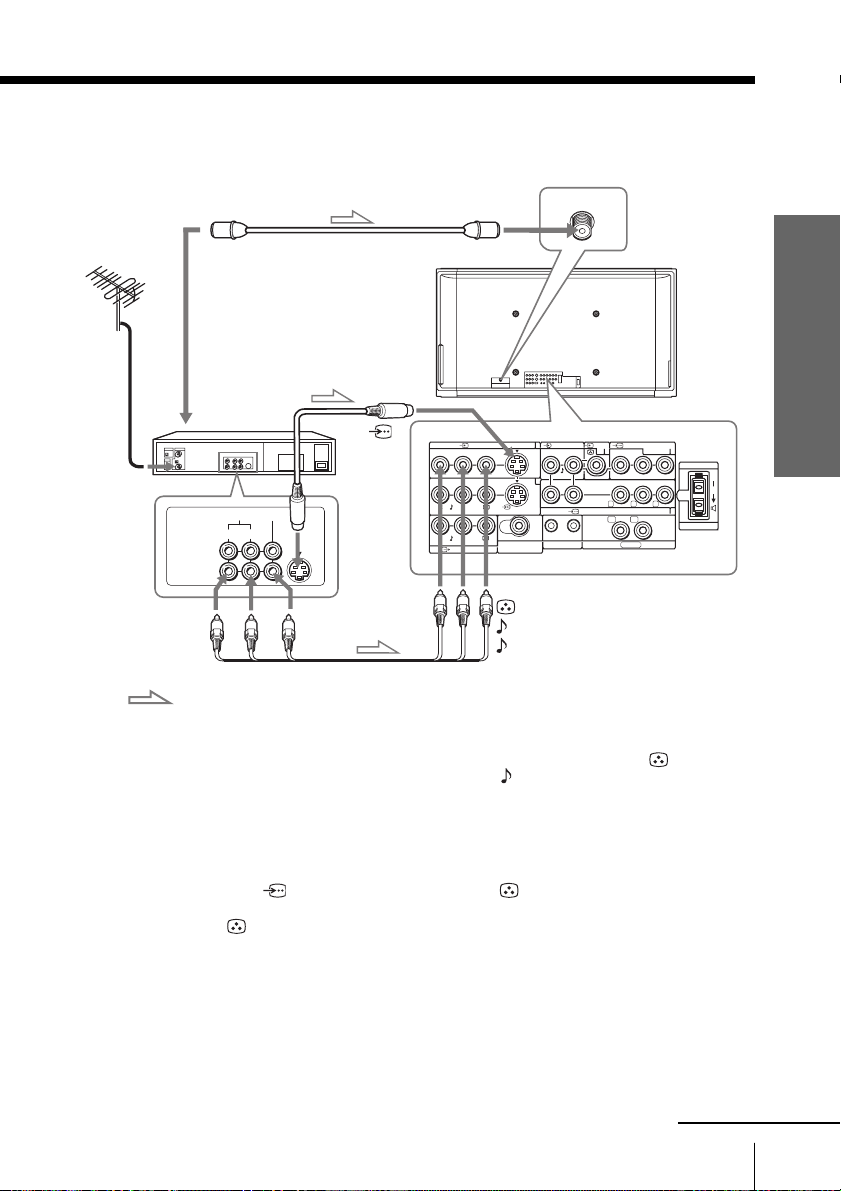
Connect a VCR
To play a video tape, press INPUT SELECT (see page 24).
To 8 VHF/UHF (antenna)
8
VHF/UHF
VIDEO IN
VIDEO OUT
To video and
audio outputs
: Signal flow
Antenna cable (supplied)
Rear of TV
S video cable
To antenna
(not supplied)
output
AUDIO
R L
VCR
VIDEO
To
S VIDEO
(S video
input)
1 or 2
To S
---
R
AUDIO
R L
AUDIO(VAR/FIX)
VIDEO OUT
-
(MONO)
L
(MONO)
VIDEO IN
VIDEO
VIDEO
S VIDEO
WOOFER OUT
(VAR)
1
2
AUDIO IN
VIDEO
31
(MONO)
IN
RL
AUDIO
COMPONENT VIDEO IN
OUT
IN
CONTROL S
COMPONENT
YPB/CBPR/C
YPB/CBPR/C
G B R
HD
VD
SYNC
VIDEO IN
CENTER SP IN
R
3
R
#
2
120W MAX 8Ω
video
output
To t VIDEO IN (video input) 1 or 2
VIDEO (yellow)
AUDIO-L (MONO) (white)
AUDIO-R (red)
Audio/Video cable
(not supplied)
Notes
• If you connect a monaural VCR, connect the yellow plug to VIDEO
(the yellow jack) and the black plug to AUDIO-L (MONO) (the white
jack).
• If you connect a VCR to the 8 VHF/UHF (antenna) terminal, preset the
signal output from the VCR to the program number 0 on the TV.
• When you connect a VCR to the S video input, display the “Setup” menu
and select “Auto” for “S Input” (see page 85). If the signals are input to
both S VIDEO (S video input) and VIDEO (video input), the S
video signal is automatically selected. To view the video signal input to
VIDEO (video input), select “Off” for “S Input”.
Using Your New TV
C
continued
Using Your New TV
11
Page 12
Getting Started (continued)
Step 3
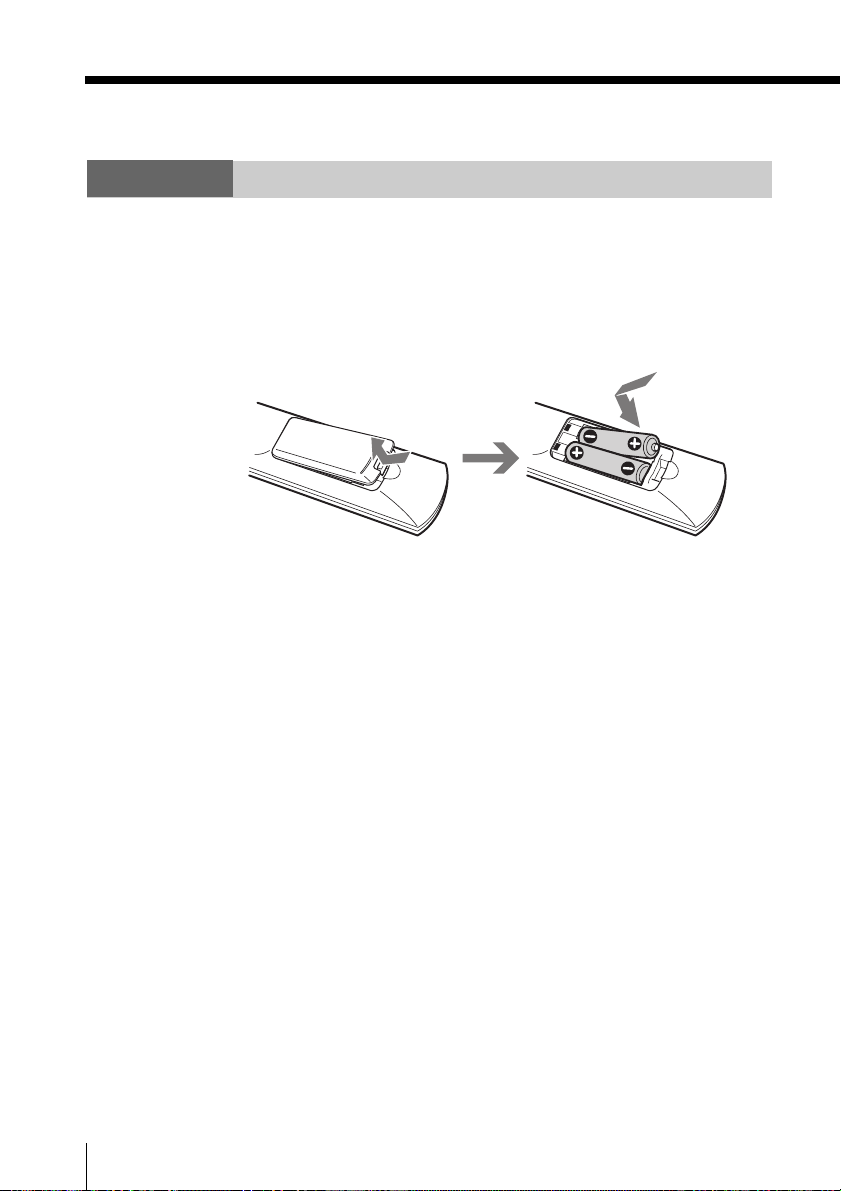
Insert the batteries into the remote
1 Open the battery compartment as illustrated below.
2 Insert two size AA batteries (supplied) by matching the e and E
terminals on the batteries to the diagram inside the battery
compartment.
3 Close the battery compartment.
Notes
• Do not use old batteries or different types of batteries together.
• Remove the batteries to avoid damage from possible battery leakage
whenever you anticipate that the remote control will not be used for an
extended period.
• Handle the remote control with care.
•Avoid dropping it, getting it wet, placing it in direct sunlight, near a
heater, or where the humidity is high.
12
Using Your New TV
Page 13
Step 4
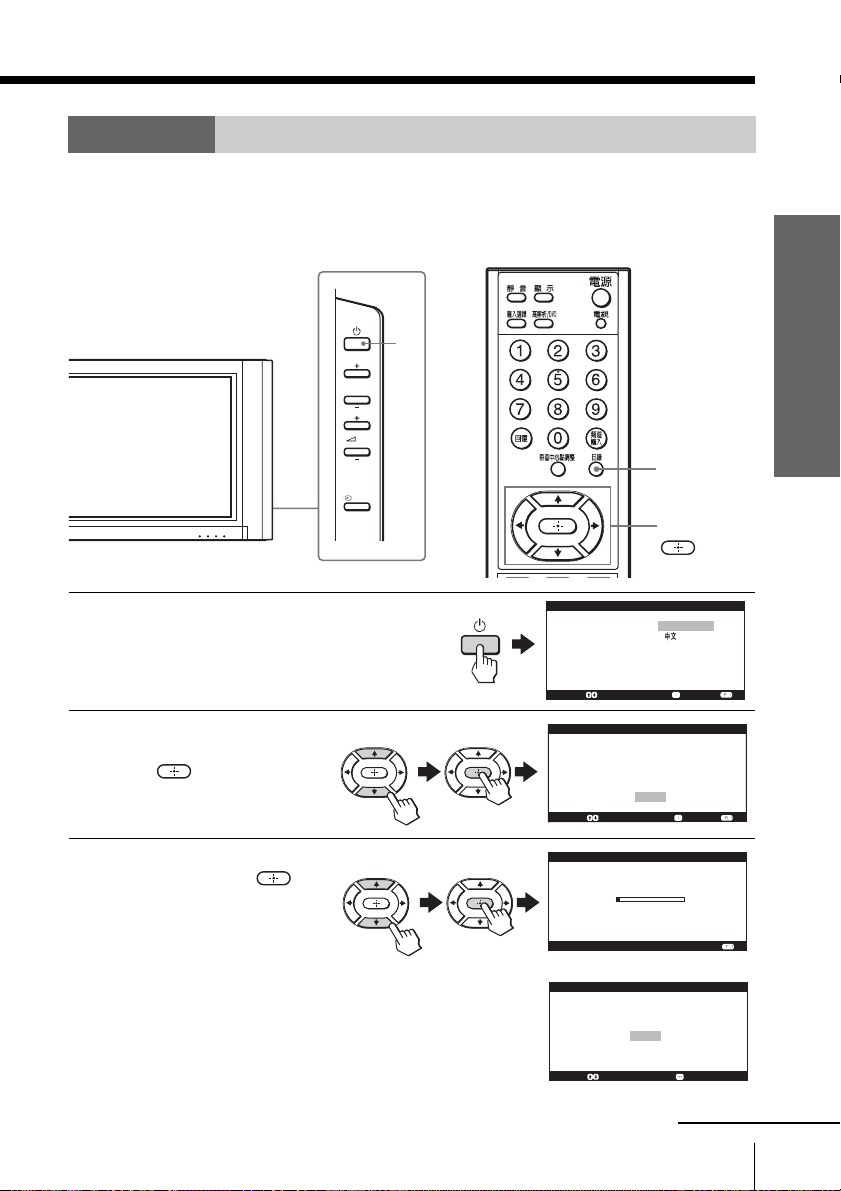
Set up your TV automatically
When you first turned on the TV, the “Initial Setup” menu will appear on the TV
screen. You can set the initial setting of “Language” and preset the channel
automatically.
1
PROG/CH
VOL
MENU
INPUT
M/m/</,/
Right side of TV
M o v e :
I n i t i a l S e t u p
L a n g u a g e :
E n g l i s h
S e l e c t : E n d :
Press 1 to turn on the TV.
1
The “Initial Setup” menu
appears, and you can select
the on-screen language.
Using Your New TV
Press M/m to select the
2
desired language, then
press
.
“Start auto program now?”
appears.
Press M/m to select
3
“Yes”, then press to
preset the channels
automatically.
The screen will indicate
automatic presetting is in
progress. After channel
presetting is complete,
“Display this menu next
time?” appears.
I n i t i a l S e t u p
F i r s t p l e a s e
c a b l e / a n t e n n a
S t a r t a u t o
M o v e : S e l e c t : E n d :
C h a n n e l :
C a b l e :
S e l e c t :
D i s p l a y t h i s m e n u n e x t t i m e ?
c o n n e c t
p r o g r a m n o w ?
Yes
No
A u t o P r o g r a m
0 0 9
O n
C o n f i r m :
I n i t i a l S e t u p
Y e s
N o
E n d :
E n d :M o v e : S e l e c t :
continued
Using Your New TV
13
Page 14

Getting Started (continued)
Press M/m to select “No”, then press .
4
The “Initial Setup” menu will not appear again the next time you turn on
the TV by pressing 1.
To allow this menu to appear again, select “Yes”, then press .
Tips
•You can immediately go to the end of the “Initial Setup” menu by pressing
MENU.
• If your TV has preset an unwanted channel or cannot preset a particular
channel, then preset your TV manually (see page 86).
14
Using Your New TV
Page 15
Connecting optional components
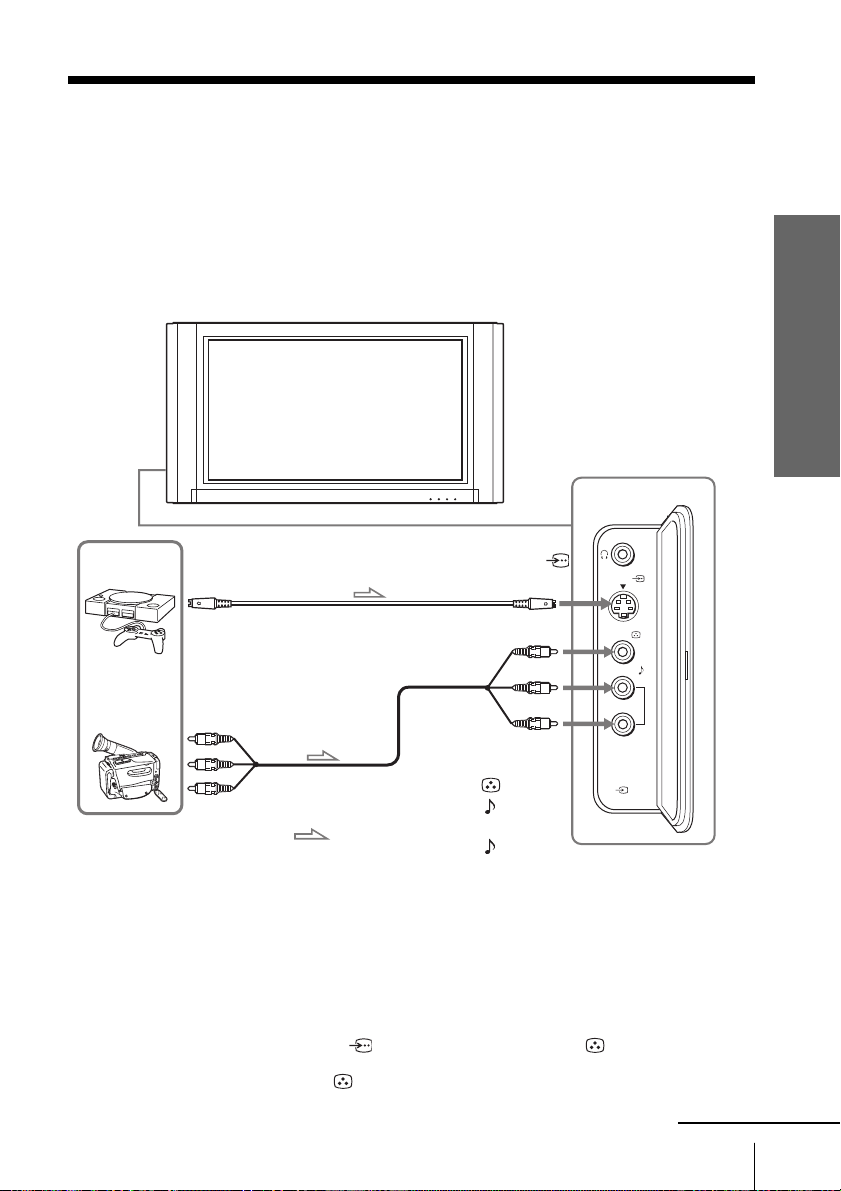
You can connect optional audio/video components, such as a VCR,
a DTV (Digital Television) receiver, multi disc player, camcorder,
video game, or stereo system. To watch and operate the connected
equipment, see page 24.
Connecting a camcorder/video game equipment
using VIDEO IN 4 t (video input 4) jacks
Front of TV
Left side of TV
Video game
equipment
To S video
output
S video cable (not supplied)
To S VIDEO
(S video input)
or
To video and
Camcorder
audio outputs
Audio/Video cable
(not supplied)
: Signal flow
To VIDEO IN 4 t
(video input)
VIDEO (yellow)
AUDIO -L (MONO)
(white)
AUDIO -R (red)
S VIDEO
VIDEO
AUDIO
L
(MONO)
R
VIDEO IN 4
Using Your New TV
Notes
• When connecting video game equipment, display the “Features” menu
and select “On” for “Game Mode” to adjust the picture setting that is
suitable for video games (see page 82).
•You can also connect video equipment to the t VIDEO IN (video input)
1, 2, or 3 jacks at the rear of your TV.
• When you connect video equipment to the S video input, display the
“Setup” menu and select “Auto” for “S Input” (see page 85). If the signals
are input to both S VIDEO (S video input) and VIDEO (video
input), the S video signal is automatically selected. To view the video
signal input to VIDEO (video input), select “Off” for “S Input”.
continued
Using Your New TV
15
Page 16

Connecting optional components (continued)
Connecting audio/video equipment using the T VIDEO OUT
(monitor output) jacks
Rear of TV
8
VHF/UHF
To 8 VHF/UHF
(antenna)
Antenna cable (supplied)
---
R
AUDIO
R L
AUDIO(VAR/FIX)
VIDEO OUT
1
AUDIO IN
VIDEO
COMPONENT
31
(MONO)
IN
YPB/CBPR/C
YPB/CBPR/C
G B R
HD
VD
SYNC
VIDEO IN
RL
AUDIO
2
VIDEO
S VIDEO
VIDEO
WOOFER OUT
(VAR)
IN OUT
CONTROL S
COMPONENT VIDEO IN
-
(MONO)
L
(MONO)
VIDEO IN
To T VIDEO OUT (monitor output)
VIDEO (yellow)
AUDIO (VAR/FIX) -L (MONO) (white)
AUDIO (VAR/FIX) -R (red)
Audio/Video cable (not supplied)
Note
• If you select “HD/DVD 1” or “HD/DVD 2” on your TV screen (see page
24), sound will be heard but no picture will be output from T VIDEO
OUT (monitor output). This does not indicate a malfunction.
CENTER SP IN
R
3
R
#
2
120W MAX 8Ω
C
Audio system
VCR
or
To video
and audio
inputs
To
audio
inputs
Audio cable
(not supplied)
: Signal flow
16
Using Your New TV
Page 17
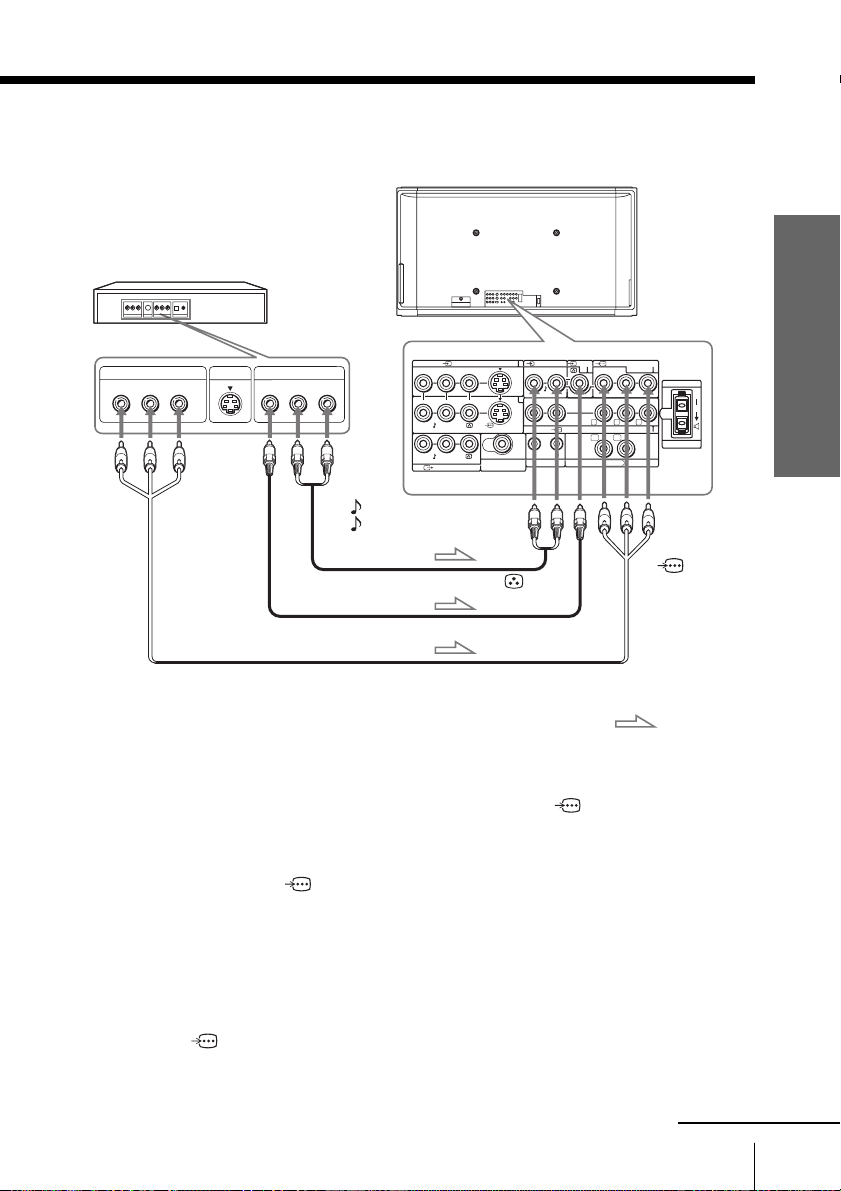
Connecting a DVD player
DVD player
Rear of TV
VIDEO
S VIDEO
VIDEO
WOOFER OUT
(VAR)
To VIDEO
(yellow)
1
2
AUDIO IN
VIDEO
31
(MONO)
IN
RL
AUDIO
COMPONENT VIDEO IN
OUT
IN
CONTROL S
COMPONENT
YPB/CBPR/C
YPB/CBPR/C
G B R
HD
VD
SYNC
VIDEO IN
CENTER SP IN
R
3
R
#
2
120W MAX 8Ω
To
COMPONENT
VIDEO IN
C
COMPONENT VIDEO OUT
Y
CB CR
To
component
video
output
S VIDEO OUT
To
video
output
LINE OUT
R-AUDIO-L
VIDEO
Audio cable
(not supplied)
Video cable
(not supplied)
VIDEO IN
(MONO)
---
L
R
To audio
outputs
AUDIO
R L
AUDIO(VAR/FIX)
VIDEO OUT
-
(MONO)
To AUDIO-L (MONO) (white)
AUDIO-R (red)
(component
video input)
1
Component video cable
(not supplied)
: Signal flow
• If the DVD player has the component video output jacks
Connect the component video cable and audio cable to the COMPONENT
VIDEO IN (component video input) 1* or 2 jacks.
You do not need to connect the video cable.
* The audio in jacks for the COMPONENT VIDEO IN (component video input) 1 jacks
are the o AUDIO IN jacks at the left of the t VIDEO IN (video input) 3 jack. These jacks
are also used for the audio in jacks for the t VIDEO IN (video input) 3 jack.
• If the DVD player does not have the component video output jacks
Connect the video cable and audio cable to the t VIDEO IN (video input) 3* jacks.
* The audio in jacks for the t VIDEO IN (video input) 3 jack are the o AUDIO IN jacks at
the left of the t VIDEO IN (video input) 3 jack. These jacks are also used for the audio in
jacks for the COMPONENT VIDEO IN (component video input) 1 jacks.
Using Your New TV
continued
Using Your New TV
17
Page 18

Connecting optional components (continued)
Notes
• Some DVD player terminals may be labeled differently:
Connect To (on the DVD player)
Y (green) Y
PB/CB (blue) Cb, B-Y or PB
PR/CR (red) Cr, R-Y or PR
• Connect nothing to the HD/VD jacks when connecting a DVD player to
COMPONENT VIDEO IN (component video input) 1 or 2 .
• If you select “HD/DVD 1” or “HD/DVD 2” on your TV screen (see page
24), sound will be heard but no picture will be output from T VIDEO
OUT (monitor output). This does not indicate a malfunction.
• When receiving a progressive signal through COMPONENT VIDEO
IN (component video input) 1 or 2, “DRC-MF”, “DRC Palette” and “Game
Mode” are not selectable.
• Since the high quality pictures on a DVD disc contain a lot of information,
picture noise may appear. In this case, display the “Picture” menu and
select “Personal” for “Picture Mode” (see page 73), then adjust the
sharpness (“Sharpness”) under “Picture Adjustment” (see page 74).
•You can also connect a DVD player to t VIDEO IN (video input) 1 or 2
jacks on the TV.
18
Using Your New TV
Page 19
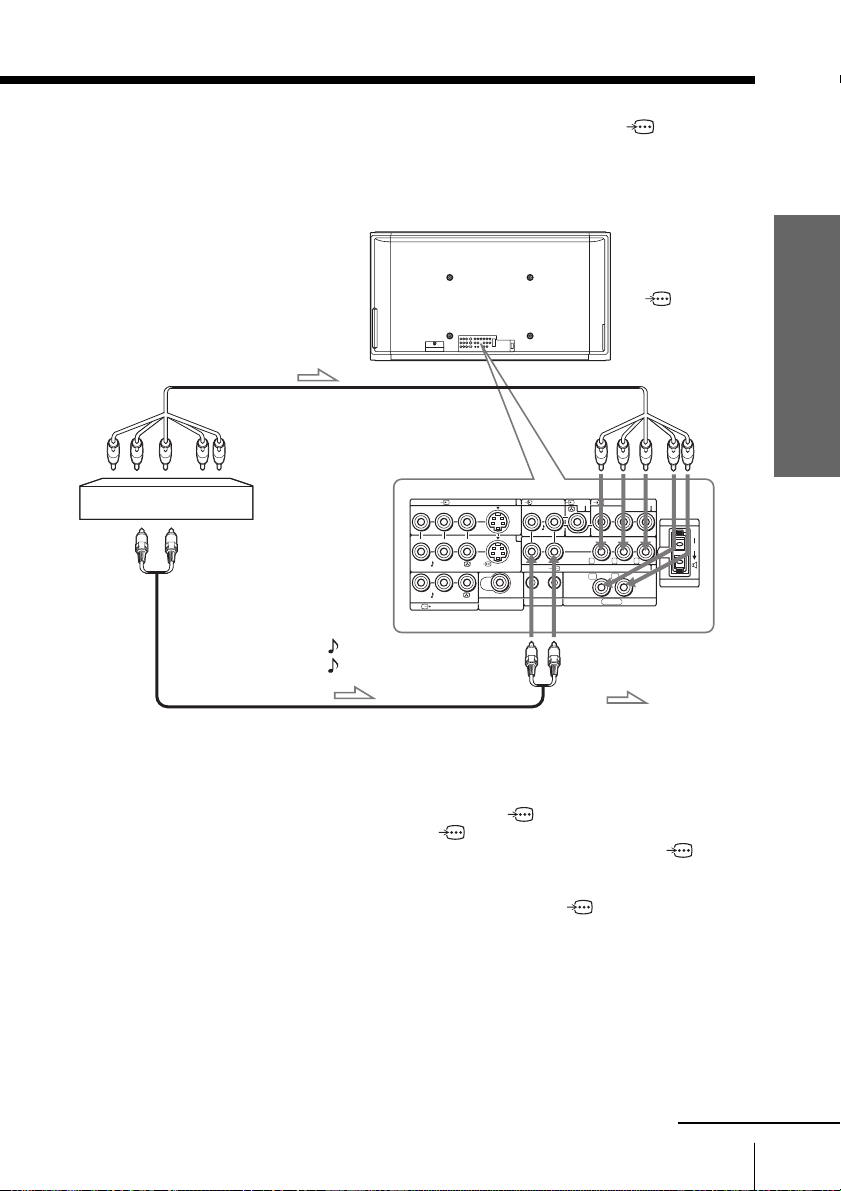
Connecting a DTV (digital television) receiver to
COMPONENT VIDEO IN (component video input) 2 jacks
Rear of TV
To
COMPONENT
VIDEO IN
Component video cable
(not supplied)
To component
video output
(Component
video input) 2
Using Your New TV
Digital TV receiver
To audio
outputs
Audio cable
(not supplied)
Note
• The TV is equipped with the G/B/R/HD/VD inputs.
1
AUDIO IN
VIDEO
COMPONENT
31
(MONO)
IN
YPB/CBPR/C
YPB/CBPR/C
G B R
VD
HD
SYNC
VIDEO IN
CENTER SP IN
R
3
R
#
2
120W MAX 8Ω
C
RL
AUDIO
2
S VIDEO
VIDEO
VIDEO
WOOFER OUT
(VAR)
IN
CONTROL S
COMPONENT VIDEO IN
OUT
---
RL
AUDIO
R L
AUDIO(VAR/FIX)
VIDEO OUT
-
VIDEO IN
(MONO)
(MONO)
To AUDIO-L (MONO) (white)
AUDIO-R (red)
: Signal flow
If your DTV receiver is equipped with the Y/PB/PR output connectors,
connect it to the Y/PB/PR connectors of COMPONENT VIDEO IN
(component video input) 1 or COMPONENT VIDEO IN (component
video input) 2. Connect nothing to the HD/VD connectors of
COMPONENT VIDEO IN (component video input) 2.
If your DTV receiver is not equipped with the Y/PB/PR output connectors,
connect it to the G/B/R/HD/VD connectors of COMPONENT
VIDEO IN (component video input) 2.
continued
Using Your New TV
19
Page 20

Connecting optional components (continued)
Tip
• The TV accepts the following signal formats:
Total scanning line Effective scanning line fV (Hz)
1125i 1080i 50/60
750p 720p 50/60
625p 576p 50
625i 576i 50
525p 480p 60
525i 480i 60
20
Using Your New TV
Page 21
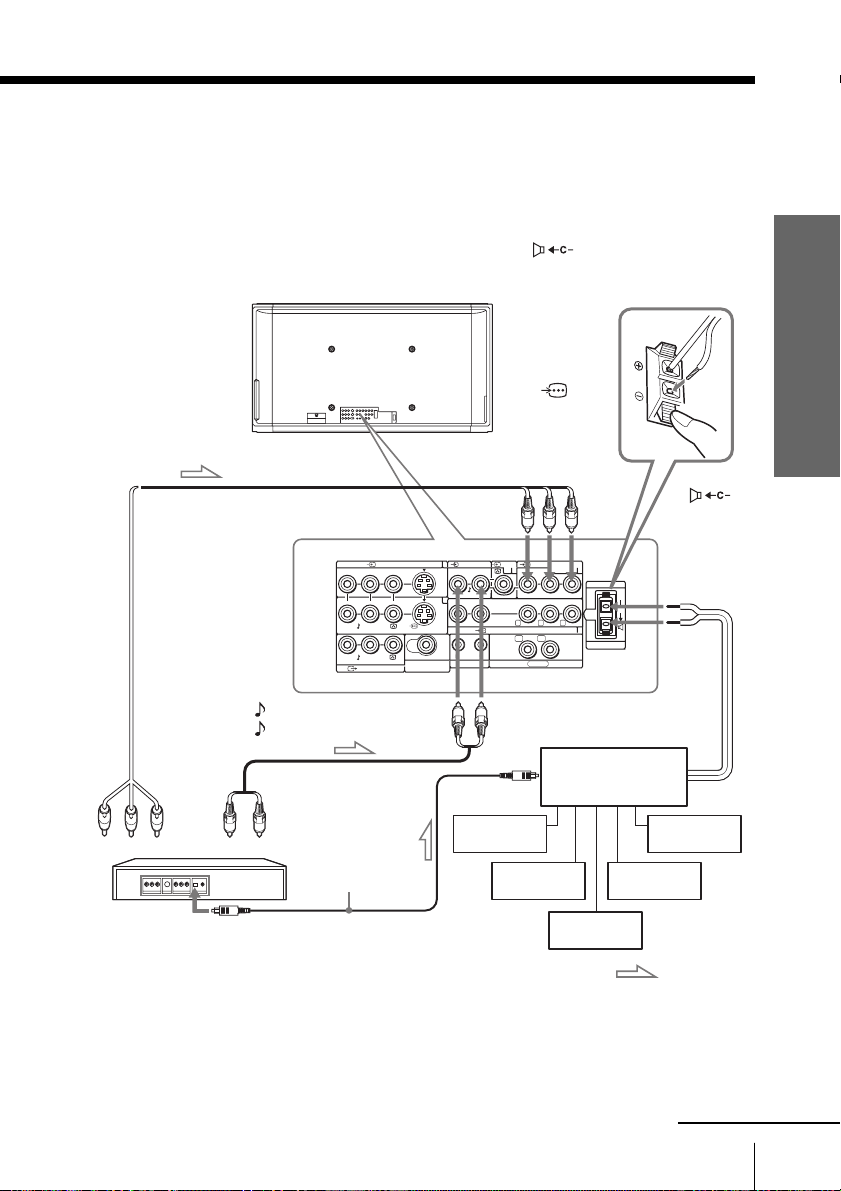
Connecting an amplifier
If you use an amplifier with a Dolby* surround decoder instead of
the TV’s audio system, you can use the TV’s speakers as the center
speaker for your audio system.
Using the speaker cords supplied with the amplifier, connect the
speaker terminals of the amplifier to the
(center speaker input) terminals on the TV.
Component
video cable
(not supplied)
Rear of TV
VIDEO IN
(MONO)
---
L
R
AUDIO
VIDEO
-
(MONO)
R L
AUDIO(VAR/FIX)
VIDEO
VIDEO OUT
S VIDEO
WOOFER OUT
(VAR)
1
2
AUDIO IN
RL
AUDIO
IN
CONTROL S
VIDEO
(MONO)
IN
COMPONENT VIDEO IN
OUT
CENTER SP IN
To
COMPONENT
VIDEO IN
(Component
video input)
1 or 2
COMPONENT
31
VIDEO IN
SYNC
CENTER SP IN
R
3
R
C
#
2
VD
120W MAX 8Ω
YPB/CBPR/C
YPB/CBPR/C
G B R
HD
Using Your New TV
To
CENTER SP
IN
(center
speaker
input)
To component
video output
DVD player
To AUDIO-L (MONO) (white)
AUDIO-R (red)
Audio cable
To audio
(not supplied)
outputs
Optical digital
cable
(not supplied)
To digital audio
output
Note
To digital
audio input
Front
speaker (L)
speaker (L)
Rear
Amplifier
Front
speaker (R)
Rear
speaker (R)
Woofer
: Signal flow
•To use the TV’s speakers as the center speaker, display the “Sound” menu
and select “On” for “Speaker Out” (see page 76) and press CENTER SP to
switch to the center speaker mode (see page 39).
* “Dolby” is a trademark of Dolby Laboratories.
continued
Using Your New TV
21
Page 22
Connecting optional components (continued)
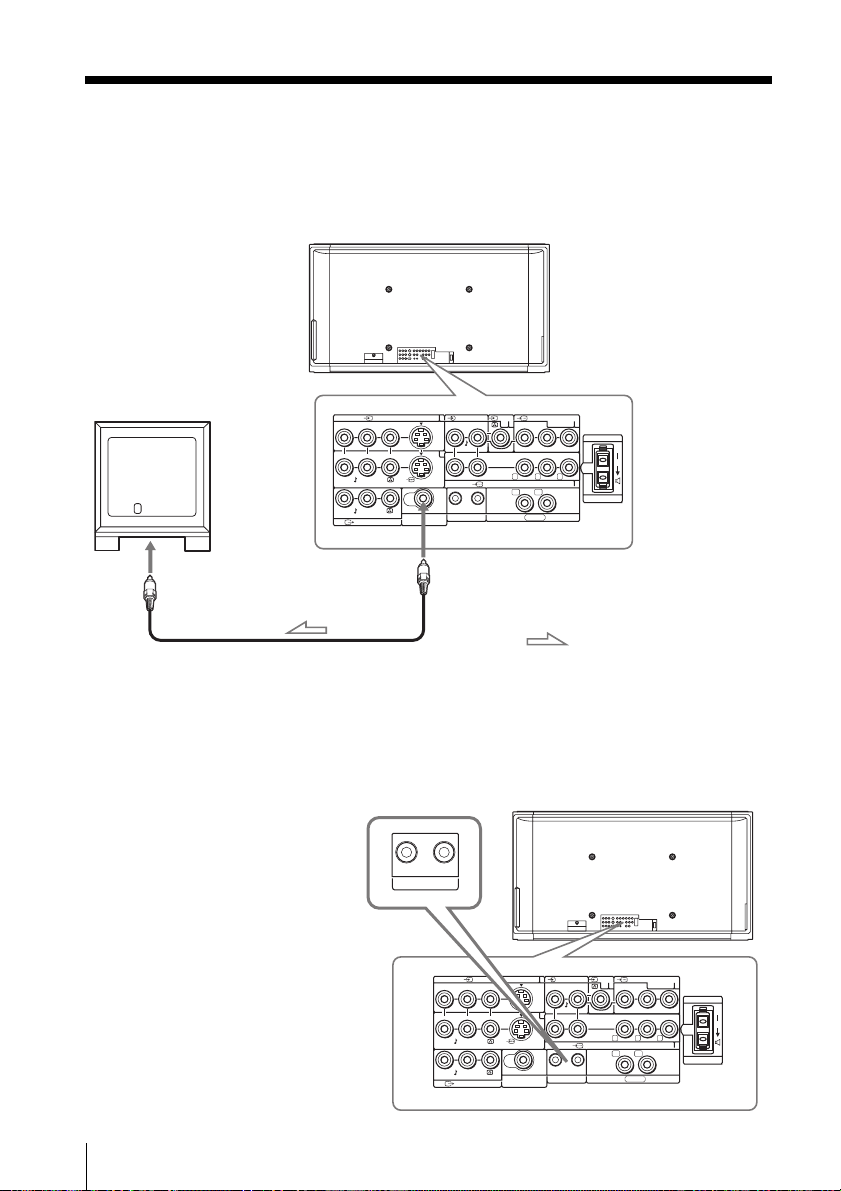
Connecting a sub woofer
Use a monaural audio cable to connect the TV’s WOOFER OUT jack to the sub
woofer’s input jack.
Rear of TV
1
AUDIO IN
VIDEO
COMPONENT
31
(MONO)
IN
YPB/CBPR/C
YPB/CBPR/C
G B R
HD
VD
SYNC
VIDEO IN
CENTER SP IN
R
3
R
#
2
120W MAX 8Ω
C
RL
AUDIO
2
VIDEO
S VIDEO
VIDEO
WOOFER OUT
(VAR)
IN
CONTROL S
COMPONENT VIDEO IN
OUT
---
R
AUDIO
R L
AUDIO(VAR/FIX)
VIDEO OUT
-
(MONO)
L
(MONO)
VIDEO IN
To WOOFER OUT (VAR)
Monaural audio cable
(not supplied)
: Signal flow
Using the CONTROL S Feature
CONTROL S allows you to control your system and other Sony equipment with one
remote control. In addition to allowing you to control multiple devices with one
remote control, the CONTROL S feature allows you to always point your remote
control at your TV, instead of having to point it at the other equipment, which might
be hidden or out of direct line of sight.
Use CONTROL S IN to send
signals to the TV.
Use CONTROL S OUT to send
signals to connected equipment.
IN OUT
CONTROL S
R L
AUDIO(VAR/FIX)
---
R
AUDIO
VIDEO IN
(MONO)
L
-
(MONO)
VIDEO OUT
VIDEO
S VIDEO
VIDEO
WOOFER OUT
(VAR)
1
2
AUDIO IN
RL
AUDIO
IN
CONTROL S
Rear of TV
VIDEO
(MONO)
IN
COMPONENT VIDEO IN
OUT
COMPONENT
31
VIDEO IN
SYNC
CENTER SP IN
R
3
R
C
#
2
VD
120W MAX 8Ω
YPB/CBPR/C
YPB/CBPR/C
G B R
HD
22
Using Your New TV
Page 23
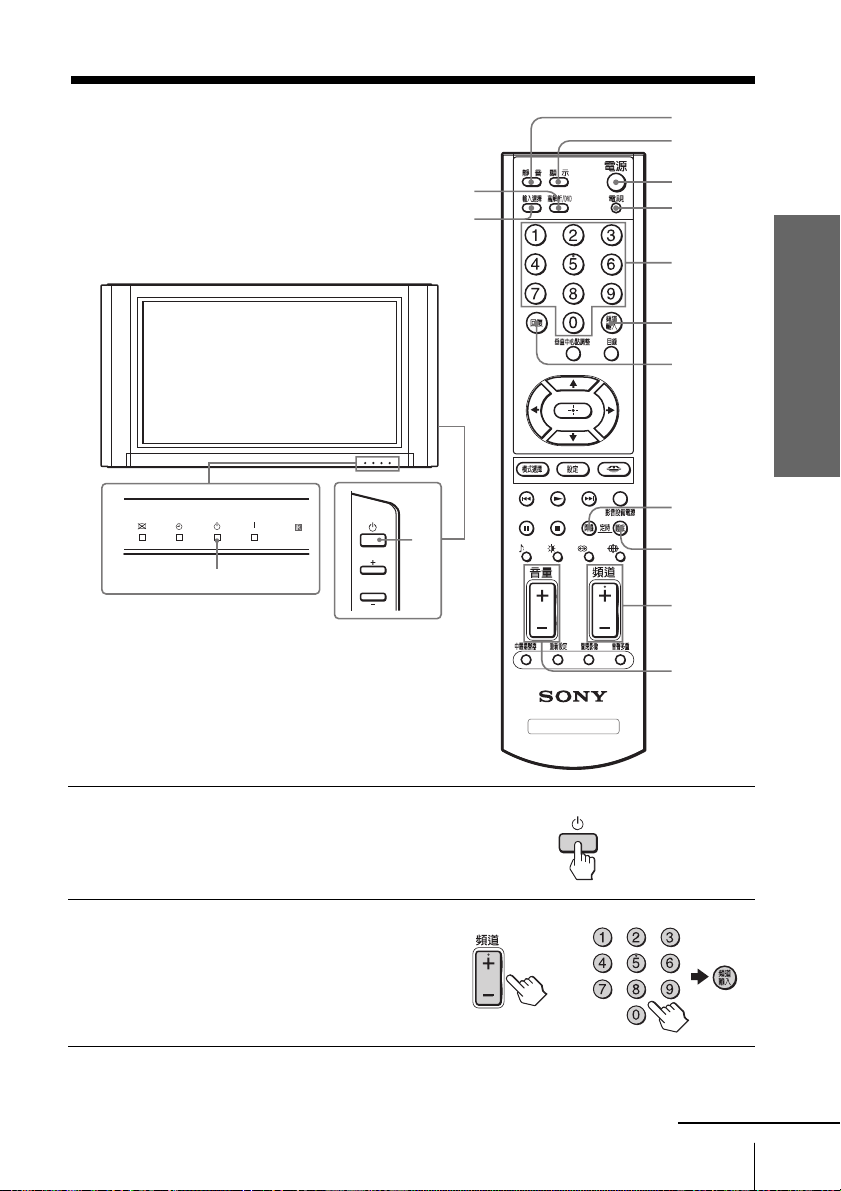
Watching the TV
This section explains various functions
and operations used while watching the
TV. Most operations can be done using
the remote.
PICTURE OFF TIMER STANDBY POWER ON
1 STANDBY indicator
PROG/CH
Right side of TV
HD/DVD
INPUT
SELECT
1
DRC-MF
MEMORY STICK
MUTING
DISPLAY
POWER
TV
Number
buttons
ENTER
JUMP
WAKE UP
SLEEP
CH +/–
VOL +/–
Using Your New TV
Press 1 to turn on the TV.
1
When the TV is in standby mode (the 1
STANDBY indicator on the TV is lit red),
press POWER on the remote.
To select a TV channel, press CH
2
+/–, or press the number
buttons and then ENTER.
TV
or
Using Your New TV
continued
23
Page 24
Watching the TV (continued)
Note
• When you turn on the TV, either the program number or video mode is
displayed for approximately 20 seconds. The ECO MODE ( ) icon will
also appear if “Eco Mode” in the “Features” menu is set to “On” (see page
81).
To select a TV program quickly
1Press and hold CH +/–.
2 Release CH +/– when the desired channel number appears.
Note
• When you select a TV channel quickly, the picture may be disrupted.
This does not indicate a malfunction.
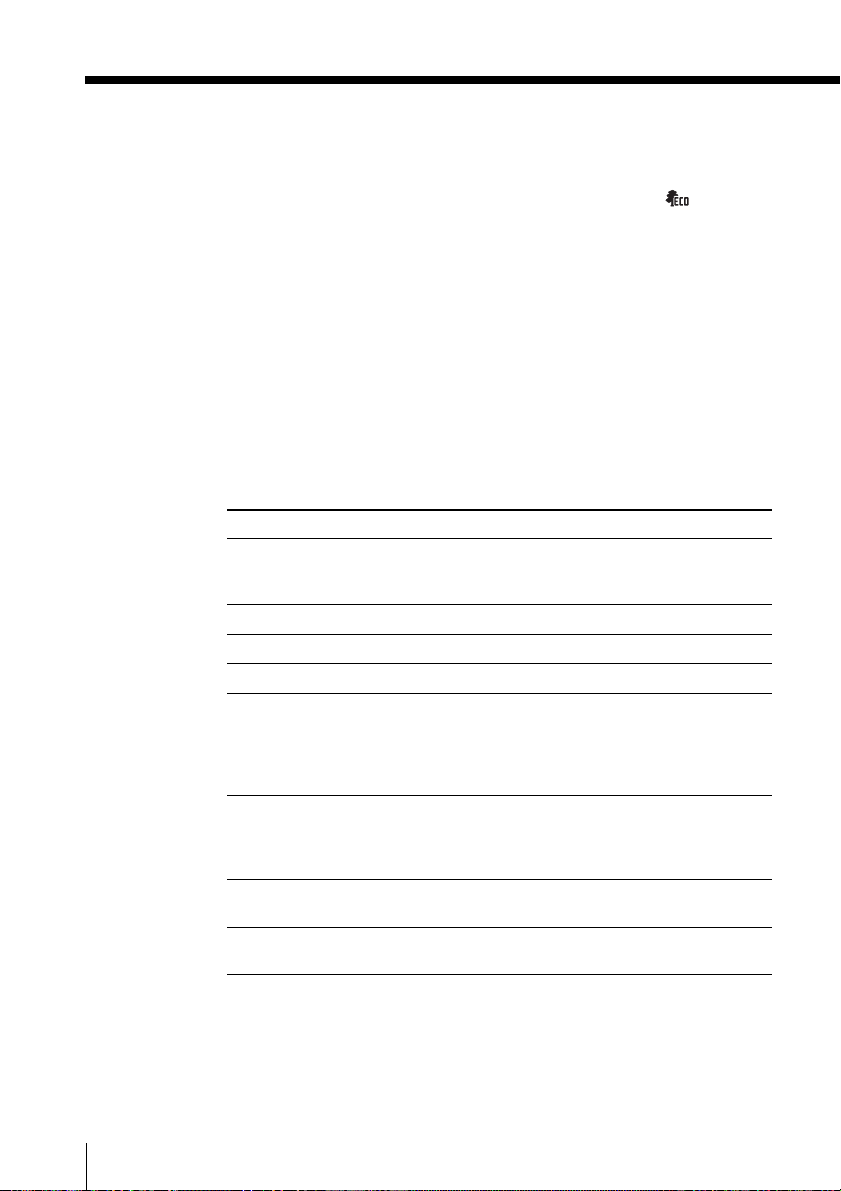
Additional tasks
To P ress
Turn off temporarily
Turn off completely
Adjust the volume
Mute the sound
Watch the video input
(VCR, camcorder, etc.)
Watch the component
input
(DVD, DTV receiver)
Jump back to the
previous channel
Display the on-screen
information*
POWER.
The 1 STANDBY indicator on the TV lights up
red.
1 on the TV.
VOL +/–.
MUTING.
INPUT SELECT (or t INPUT on the TV) to select
“VIDEO 1”, “VIDEO 2”, “VIDEO 3”, “VIDEO 4”,
“HD/DVD 1” or “HD/DVD 2”.
To return to the TV screen, press TV (or t INPUT
on the TV).
HD/DVD to select “HD/DVD 1” or “HD/DVD
2”.
To return to the TV screen, press TV (or t INPUT
on the TV).
JUMP.
DISPLAY.
24
Using Your New TV
* Some picture/sound settings, and either the channel number or video
mode are displayed. The on-screen display for the picture/sound settings
disappears after about 5 seconds.
Page 25
Setting the Wake Up timer
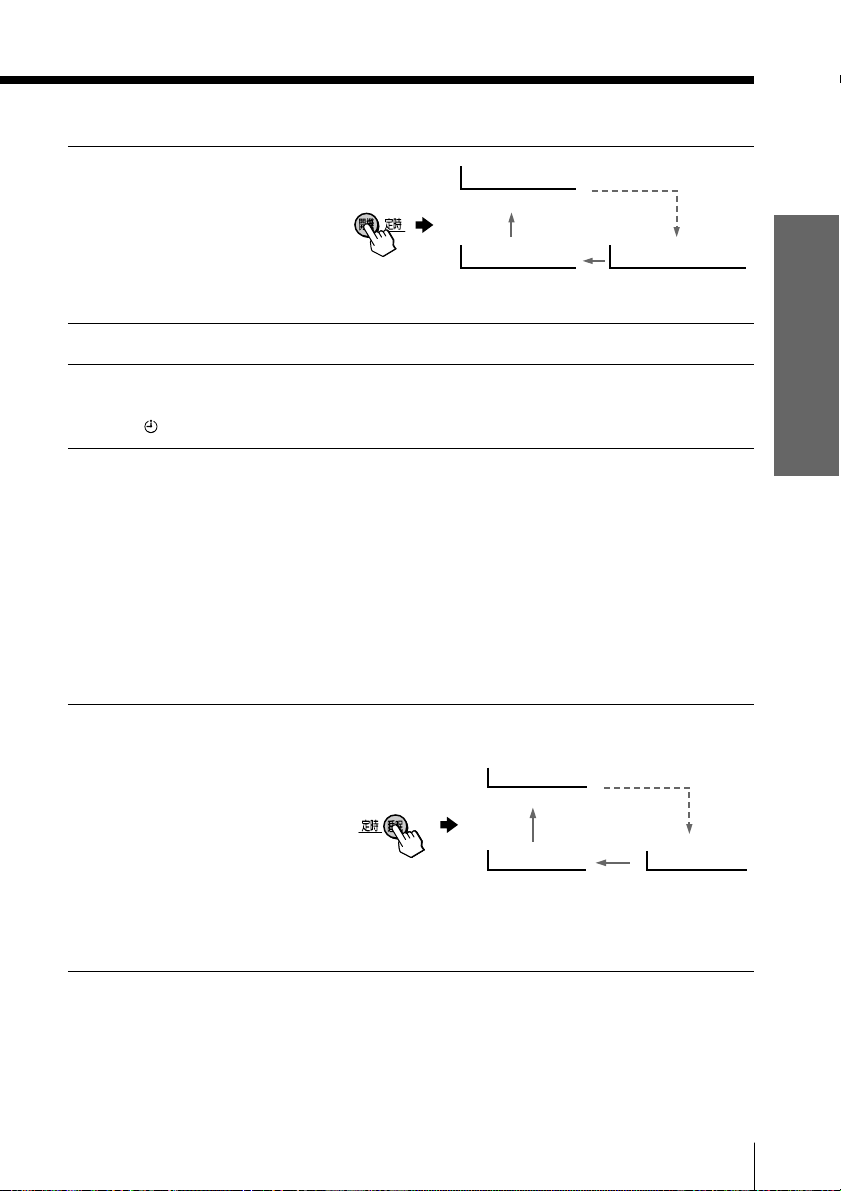
Press WAKE UP until the
1
desired period of time
appears.
Wake Up Timer:10M
After 10 minutes
The Wake Up timer starts
immediately after you
have set it.
Select the TV channel or video mode you want to wake up to.
2
Press POWER, or set the Sleep timer if you want the TV to turn off
3
automatically.
TIMER indicator is lit red.
The
Wake Up Timer:Off
No Wake Up Timer After 12 hours
To cancel the Wake Up timer
Press WAKE UP until “Wake Up Timer: Off” appears, or press 1 on
the TV to turn it off.
Note
• If no buttons or controls are pressed for more than two hours after the TV
is turned on using the Wake Up timer, the TV automatically goes into
standby mode.
Setting the Sleep timer
Wake Up Timer:12H00M
Using Your New TV
Press SLEEP until the
desired period of time
appears.
You can select the period of
time from among 15, 30, 45,
60, 75 and 90 minutes.
The Sleep timer starts
immediately after you
have set it.
To cancel the Sleep timer
Press SLEEP until “Sleep Timer: Off” appears, or turn the TV off.
Sleep Timer:15M
After 15 minutes
Sleep Timer:Off Sleep Timer:90M
No Sleep Timer
After 90 minutes
Using Your New TV
25
Page 26
Advanced Operations
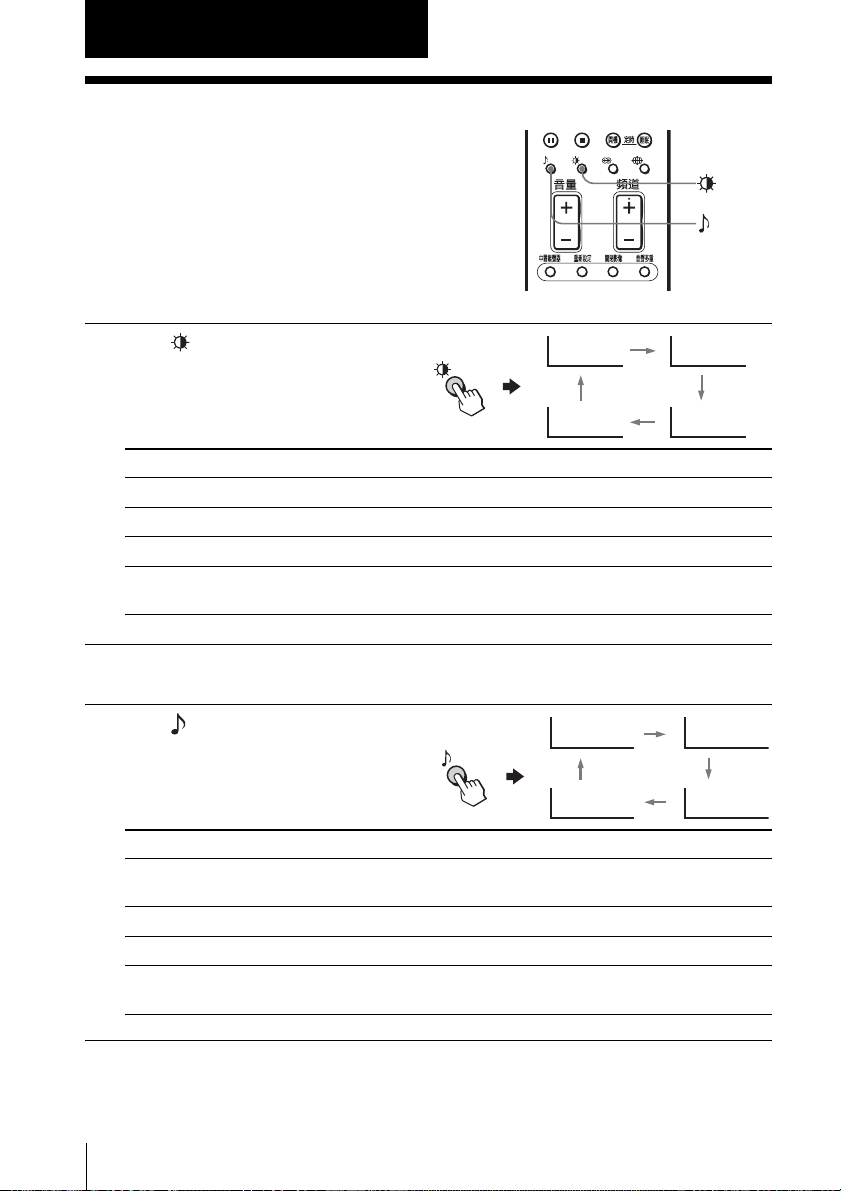
Selecting the picture and sound modes
You can select picture and sound modes
and adjust the setting to your preference
in the “Personal” option.
Selecting the picture mode
Press repeatedly until
the desired picture mode
Dynamic
is selected.
Personal
Select To
“Dynamic” receive high contrast pictures.
“Standard” receive normal pictures.
“Hi-Fine” receive higher resolution pictures with mild contrast.
“Personal” receive the last adjusted picture setting from the “Picture
Adjustment” menu under the “Picture” menu (see page 74).
Selecting the sound mode
Press repeatedly until
the desired sound mode is
selected.
Select To
“Dynamic” listen to dynamic and clear sound that emphasizes both the low
and high tones.
“Drama” listen to sound that emphasizes voice and high tones.
“Soft” receive soft sound.
“Personal” receive the last adjusted sound setting from the “Sound
Adjustment” menu under the “Sound” menu (see page 77).
9
Dynamic
9
Personal
Standard
Hi-Fine
9
Drama
9
Soft
26
Advanced Operations
Tip
•You can also set the picture and sound modes using the menu (see
“Changing the “Picture” setting” on page 72 and “Changing the “Sound”
setting” on page 75).
Page 27

Viewing higher quality pictures
— “DRC-MF MODE”
The Digital Reality Creation-Multi
Function (DRC-MF) feature allows you to
enjoy higher quality pictures on your TV.
You can select from two DRC-MF modes:
“DRC1050” to watch super real (higher
resolution) pictures, or “Progressive” for
still pictures.
DRC-MF
DRC-MF
MODE
MEMORY STICK
Press DRC-MF MODE
repeatedly until you receive
the desired picture quality.
Select To
“DRC1050” select higher resolution pictures.
“Progressive” reduce jitter of any small areas or scanning lines (e.g., letters or the
edge of objects) on the screen.
Tip
• When the broadcast signal is weak, you may see some dots or noise on the
TV screen. To reduce this interference, display the “Picture” menu and
select “Personal” for “Picture Mode” (see page 73), then adjust
“Sharpness” under “Picture Adjustment” to reduce the sharpness (see
page 74).
Note
• The DRC-MF mode is not selectable when the “Game Mode” is turned
“On”. The mode is not available for HD (high-definition) or progressive
input signal, or the picture recorded on a “Memory Stick”.
The DRC-MF logo ( ) and “DRC-MF” are trademarks of
Sony Corporation.
DRC-MF
DRC-MF: DRC1050
DRC-MF: Progressive
Advanced Operations
Advanced Operations
27
Page 28
Customizing the
DRC-MF
MEMORY STICK
picture Reality and
Clarity levels
— “DRC-MF PALETTE”
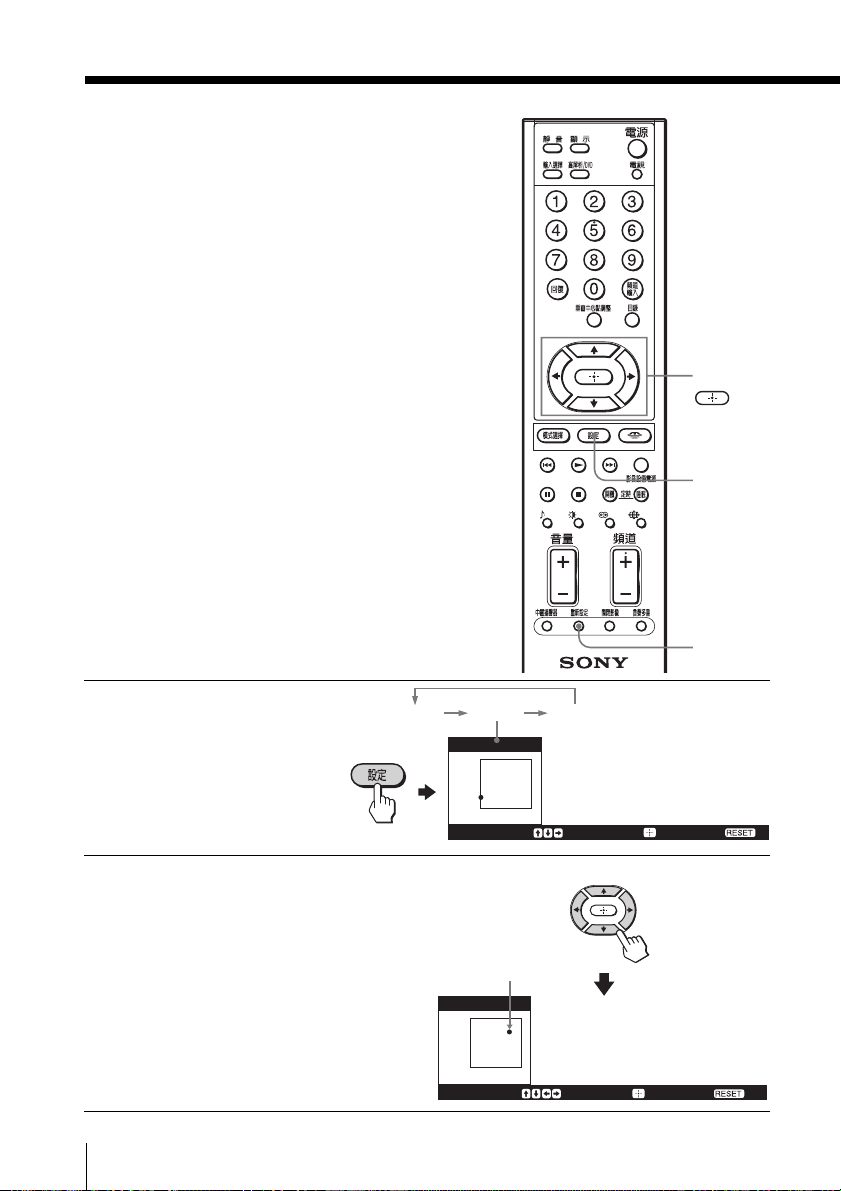
The DRC-MF PALETTE feature allows
you to customize the level of detail
(Reality) and smoothness (Clarity) for
various input sources. For example,
you can create one Custom setting to
optimize your antenna input’s picture,
and create another to optimize your
DVD player’s picture. You can create
up to three Custom settings for each of
the antenna input’s signal, the signals
input to video 1 to 4 inputs, and the
component input signal separately, and
each for the “Dynamic” and “Standard/
Hi-Fine/Personal” picture modes,
separately (max. 18 settings).
M/m/</,/
DRC-MF
PALETTE
RESET
Press DRC-MF PALETTE
1
repeatedly to select
“Custom 1”, “Custom 2”
or “Custom 3” to which
you want to create the
setting.
Press M/m/</, to adjust the position of the marker “•”.
2
As you move “•” higher
along the “Reality” axis,
the picture becomes more
detailed.
As you move “•” to the
right, along the “Clarity”
axis, the picture becomes
smoother.
28
Advanced Operations
DRC-MF
Custom1 Custom2 Custom3
C u s t o m 1
[25]
Reality
[01]Clarity
Adjust : Finish :
Marker
C u s t o m 1
[80]
Reality
[80]Clarity
Adjust : Finish :
Reset:
Reset:
Page 29
Press to return to the
3
normal screen.
To switch to the last adjusted Custom setting
Display the picture and press DRC-MF PALETTE repeatedly to
select your desired Custom setting.
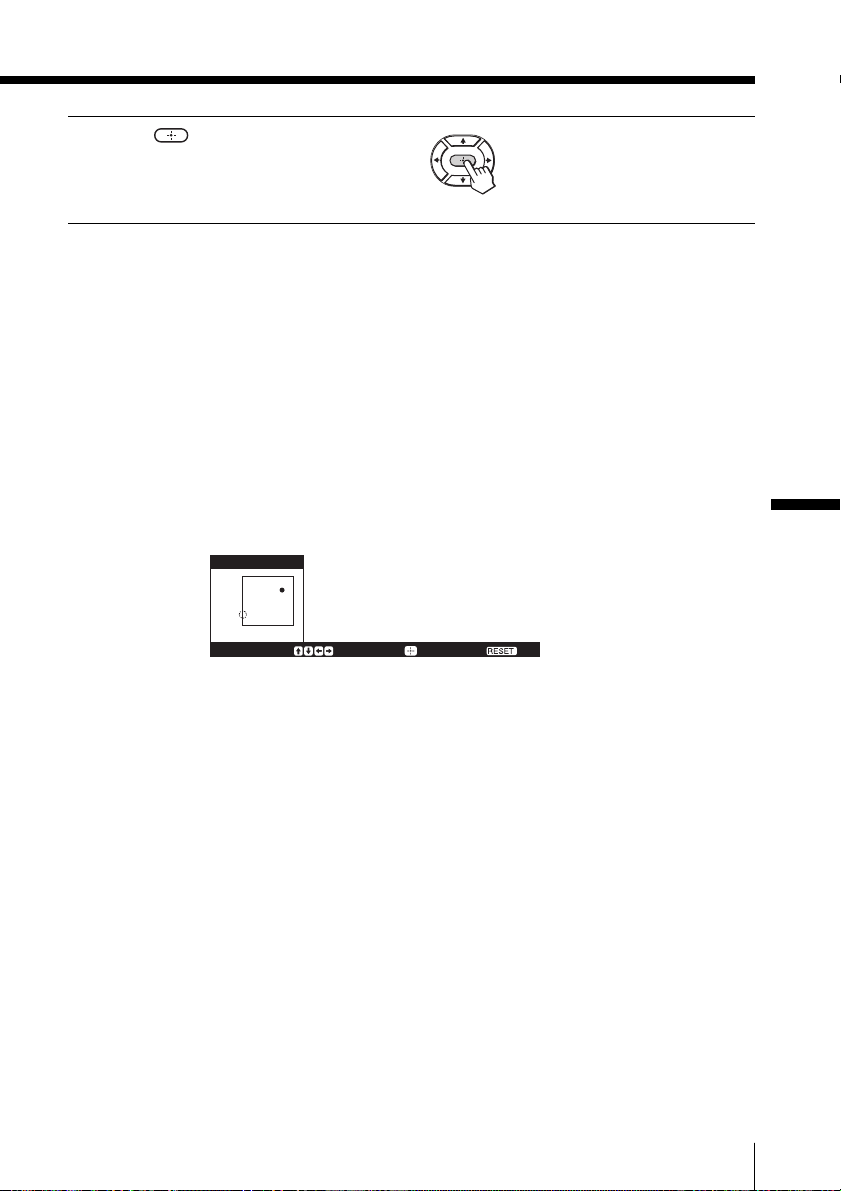
To reset to the factory preset values
Press RESET on the remote.
The dotted-lined circle indicator in the Custom1 mode for the “Standard/Hi-Fine/
Personal” picture mode
This indicates the factory setting.
This position is optimum for a normal TV broadcast in good tuning
condition.
C u s t o m 1
[80]
Reality
[80]Clarity
Adjust :
Note
• The DRC-MF PALETTE is not selectable when the “Game Mode” is
turned “On”. The mode is not available for HD (high-definition) or
progressive input signal, or the picture recorded on a “Memory Stick”.
Finish :
Reset:
Advanced Operations
Advanced Operations
29
Page 30
Using wide screen mode
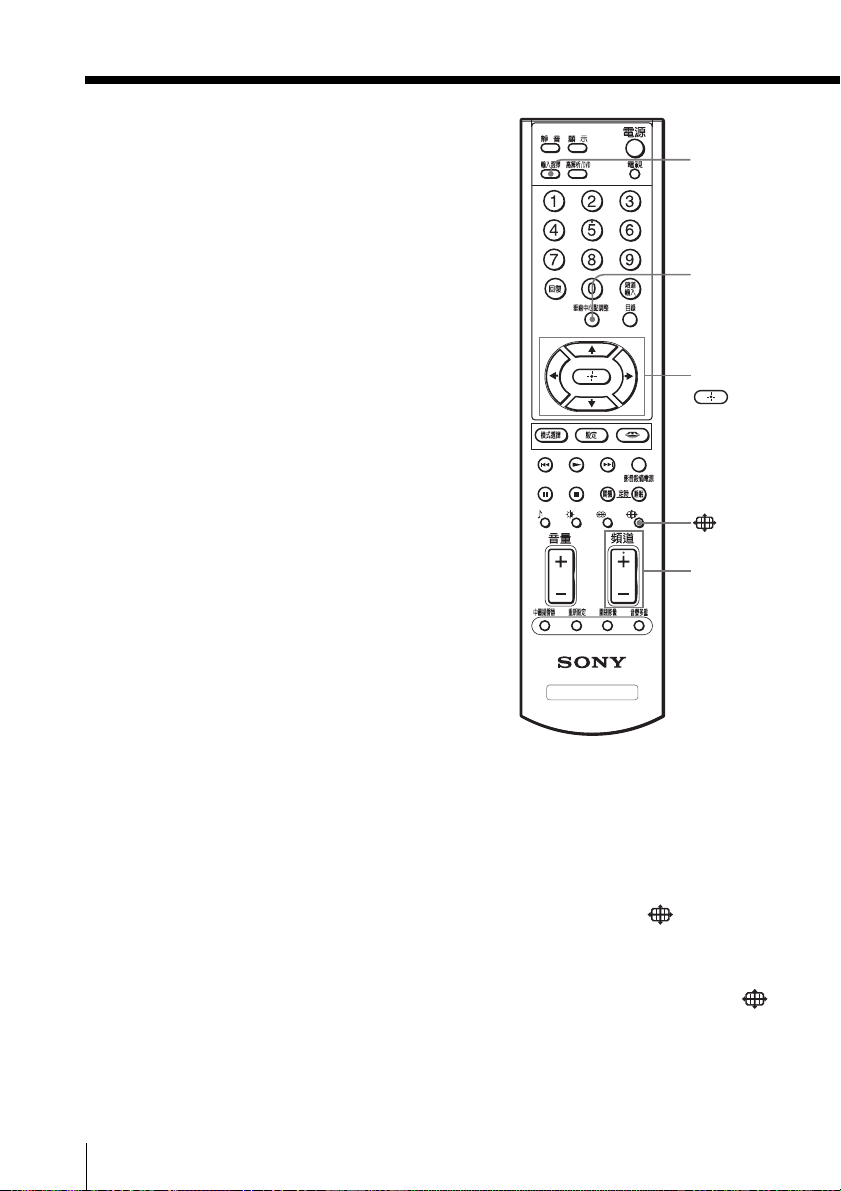
The wide screen mode feature allows
you to watch the picture filling the 16:9
screen of the TV.
DRC-MF
INPUT
SELECT
V CENTER
M/m/</,/
MEMORY STICK
CH +/–
TV
Watching the picture in wide screen mode automatically
— AUTO WIDE
The TV automatically selects optimum wide screen mode according
to the signal input and displays the picture to fill the 16:9 screen.
Tip
•You can select the wide screen mode manually using the button (see
page 32).
Notes
• The AUTO WIDE feature may not work correctly depending on the quality
of signal. In this case, select the wide screen mode manually using the
button (see page 32).
• The examples in the table on page 31 show the settings preset at the
factory; “Auto Wide” is set to “On” and “4:3 Default” is set to “Wide
Zoom” in the “Wide Screen” menu (see pages 80).
30
Advanced Operations
Page 31
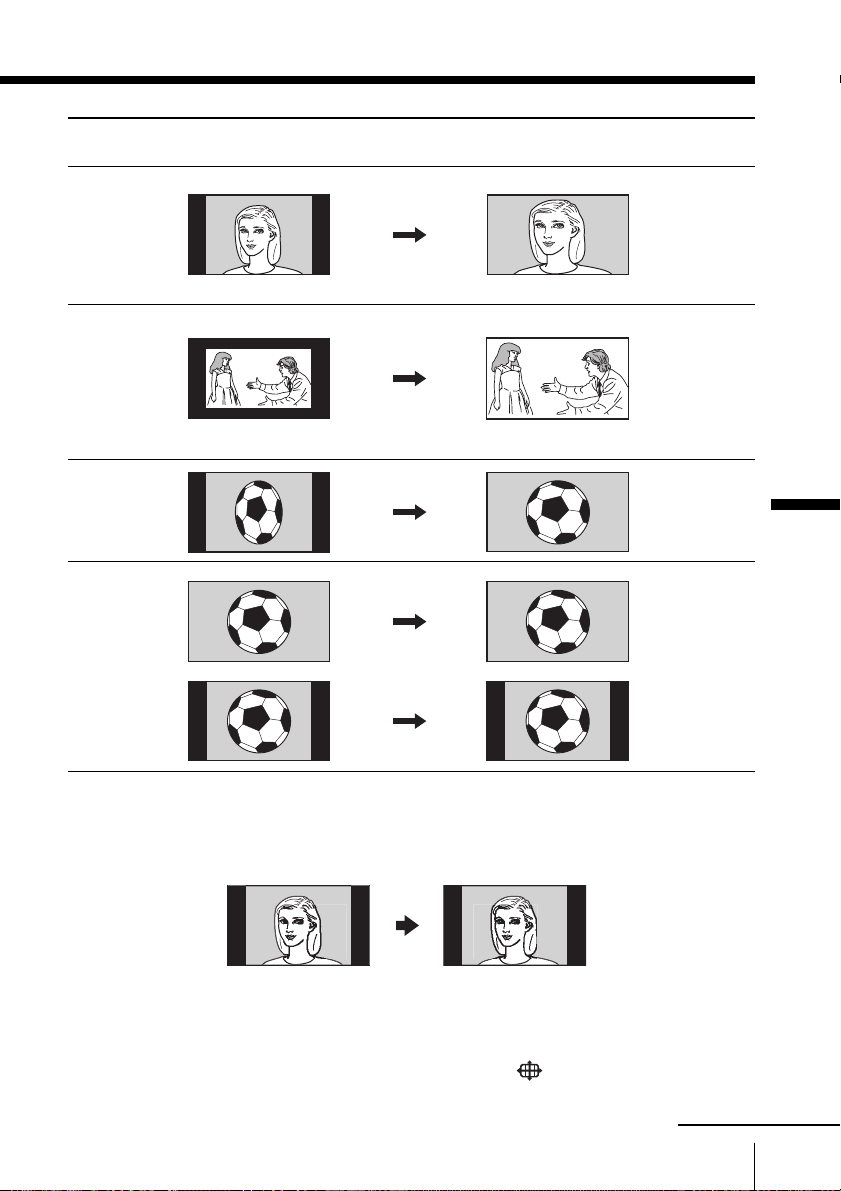
When receiving ...
normal 4:3
aspect ratio
picture with an
ID-1 signal or
a signal
without ID-1.
AUTO WIDE
functions to select ...
Wide
Zoom*
The picture changes to ...
enlarge the 4:3
picture, with
the upper and
lower parts
condensed to fit
the 16:9 screen.
4:3 letter box
movie or a
video or DVD
with an ID-1
signal.
4:3 squeezed
video camera
picture with an
ID-1 signal.
HDTV 16:9
picture
enlarge the
picture
Zoom
Full
Full
Full
* When a normal 4:3 picture is received, “Wide Zoom” mode is
automatically selected with the factory setting. You can display that
picture as it is without enlarging it (“Normal” mode) if you set “4:3
Default” in the “Wide Screen” menu to “Normal” (see page 80).
horizontally
and vertically
in an equal
aspect ratio that
fills the 16:9
screen**.
enlarge the
picture
horizontally
only, to fill the
16:9 screen.
An HDTV 16:9
picture is
displayed in
original size.
Advanced Operations
** Black bands may appear on the top and bottom of the screen.
Note
• If a HD 4:3 picture with the side panel is received, select “Wide Zoom” or
“Zoom” mode manually by pressing the button.
To return the AUTO WIDE mode, change the input by pressing the INPUT
SELECT, CH +/– or POWER button(s).
Advanced Operations
continued
31
Page 32
Using wide screen mode (continued)
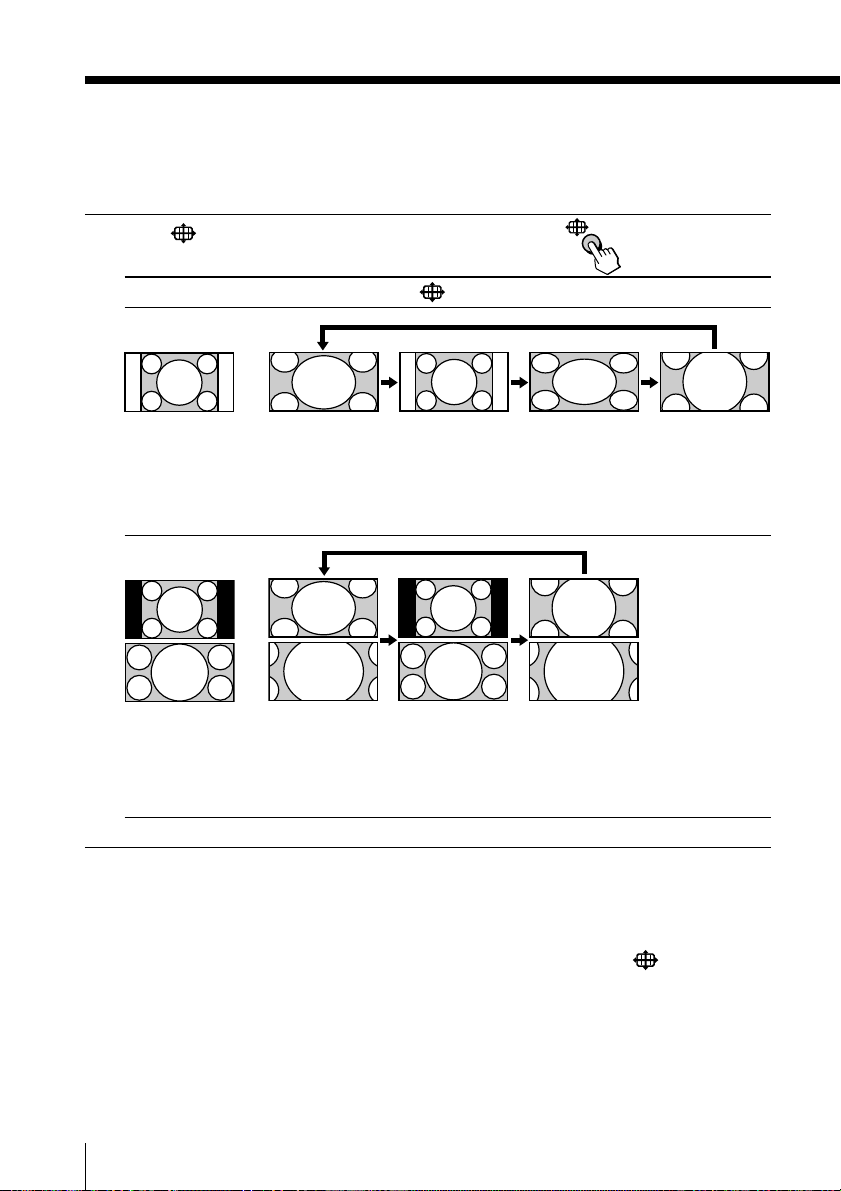
Watching the picture in wide screen mode manually
You can select the desired wide screen mode manually.
Press repeatedly until the mode indication
you want is displayed on the screen.
Original source Each time you press , the wide screen mode changes as follows:
4:3 source (Standard
definition source)
16:9 source (High
definition source)
32
Advanced Operations
Wide Zoom
Enlarge to fill the
screen with
minimum
distortion
Wide Zoom
Enlarge to fill the
screen with
minimum
distortion
Notes
• When TV receives 720p or 1080i signal, “Normal” cannot be selected.
• You can also select the wide screen mode manually using the menu (see
page 79).
• When the wide screen mode is selected by pressing the button on the
remote or using the menu, the AUTO WIDE feature does not work
temporarily.
The AUTO WIDE feature functions again when:
– you change a TV channel with CH +/–.
– you change the video input with INPUT SELECT.
– the TV is turned off and on again.
• You can adjust the vertical position of the picture when wide screen mode
is set to “Wide Zoom” or “Zoom” (see page 33).
Normal
Display 4:3
picture in
original size
Full
Display 16:9
picture in
original size
Full
Enlarge the
original picture
horizontally to
fill the screen
Zoom
Enlarge the
original picture
without
distorting
aspect ratio
Zoom
Enlarge the
original picture
without
distorting
aspect ratio
Page 33
Adjusting the position of the picture
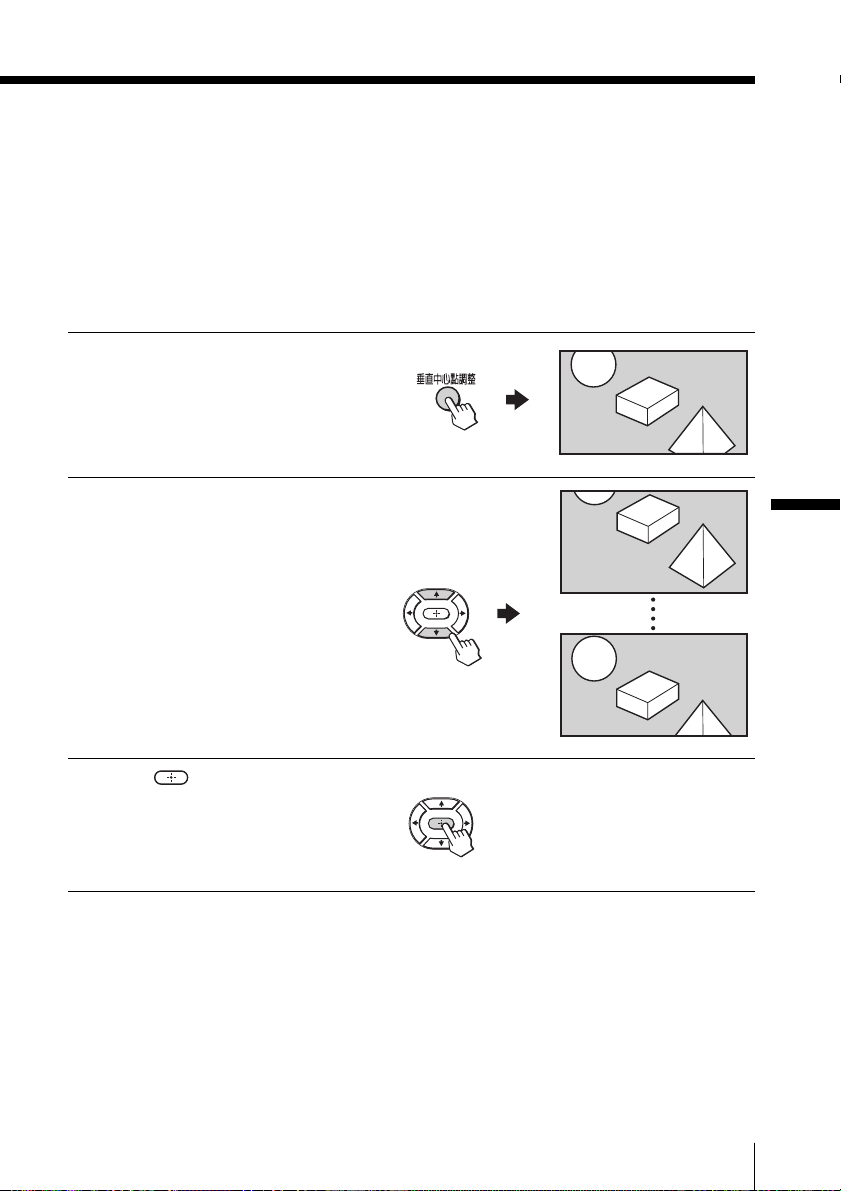
You can adjust the vertical position of the picture when
– the upper or lower part of the picture cannot be seen in “Wide
Zoom” mode.
– you want to adjust the vertical position of the picture in the screen
for “Zoom” mode.
This feature is available only for “Wide Zoom” and “Zoom”
modes.
Press V CENTER.
1
Press M/m to move the
2
picture up or down.
Wide Zoom
V Center: 00
Wide Zoom
V Center: +15
Advanced Operations
3
Press .
Wide Zoom
V Center: –15
Notes
• The adjusted V Center value remains stored even after the TV is turned off.
• You can also adjust the position of the picture in “Wide Zoom” and
“Zoom” modes using the menu (see page 80).
Advanced Operations
33
Page 34
Listening with surround sound
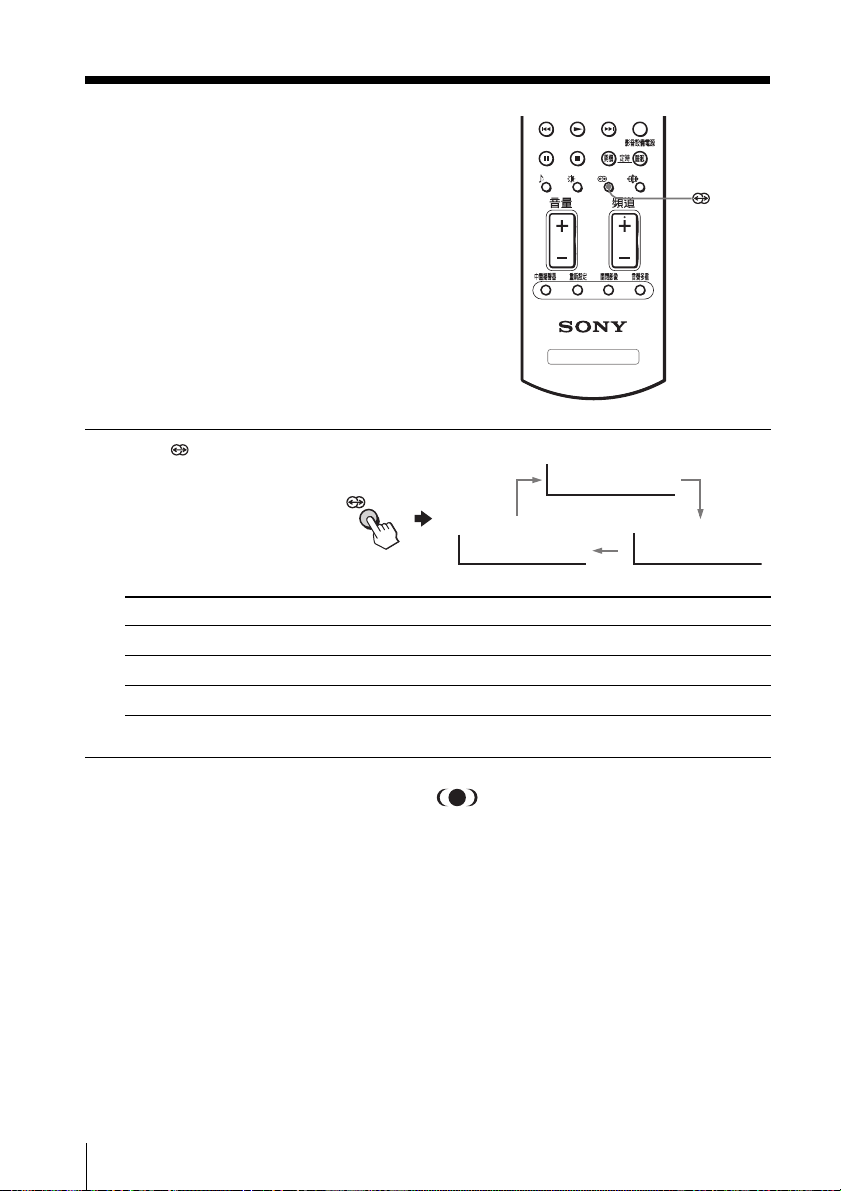
The surround feature enables you to
enjoy the sound effects of a concert hall
or movie theater.
Press repeatedly until
you receive the desired
surround sound.
TV
Surround: TruSurround
Surround: Off
Select To
“TruSurround”* listen to the surround sound that spreads out to the rear of a room.
“Simulated” listen to monaural sound with a stereo-like effect.
“Off” turn off the surround sound.
*TruSurround, SRS and the symbol are trademarks of SRS Labs,
Inc. TruSurround technology is incorporated under license from SRS
Labs, Inc.
Note
•You cannot change the surround sound when the TV is in the center
speaker mode (see page 39).
Surround: Simulated
34
Advanced Operations
Page 35
Enjoying stereo or bilingual programs
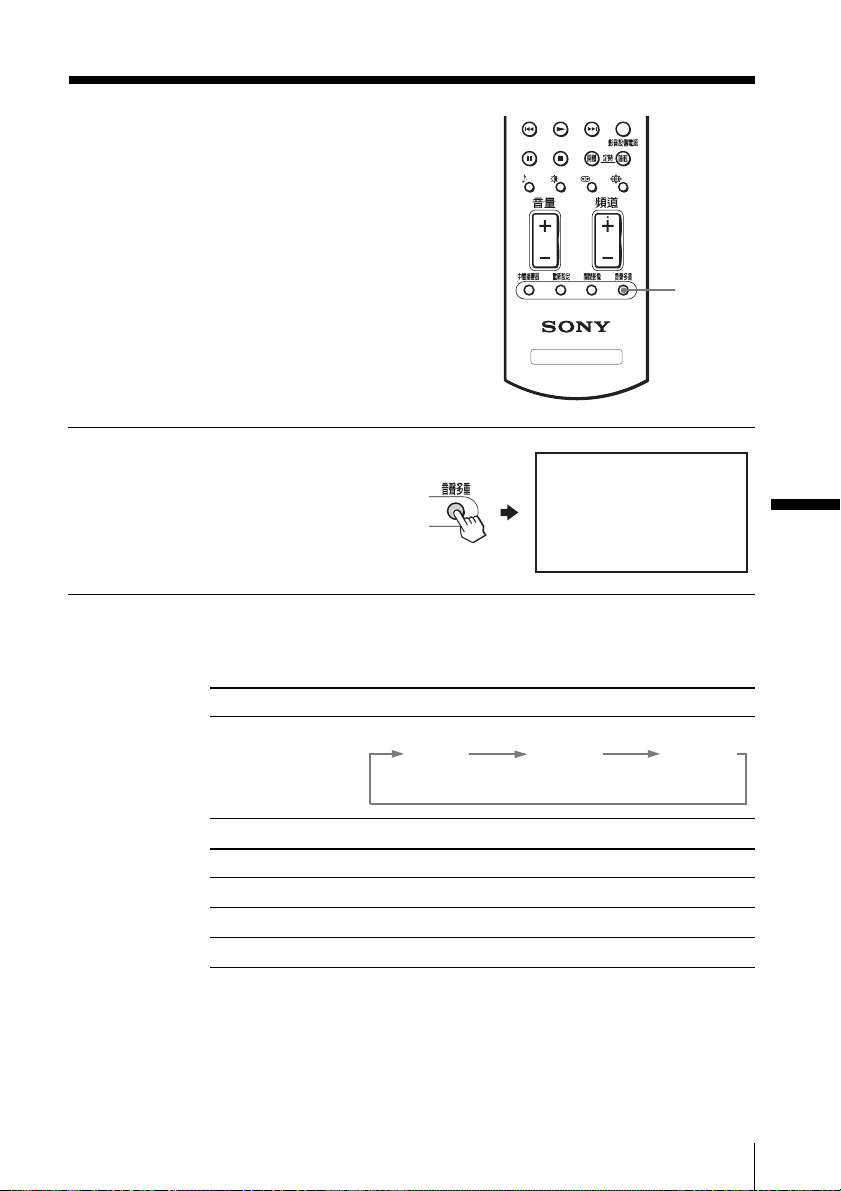
You can enjoy stereo sound or bilingual
programs of Multichannel TV Sound
(MTS) system.
TV
Press MTS repeatedly until
you receive the sound you
want.
When receiving a stereo program, the indication changes as
follows:
Broadcasting On-screen display (Selected sound)
MTS stereo
Stereo
SAP
MTS
Stereo
Advanced Operations
Mono
Select To
“Stereo” listen to a stereo sound.
“SAP” listen to a bilingual broadcast.
“Mono” receive a monaural sound.
Notes
• If no SAP signal is present when SAP is selected, the sound is heard as in
stereo mode .
• If the stereo signal is very weak, the stereo broadcast sound may become
noisy. To reduce the noise, select “Mono”.
Advanced Operations
35
Page 36
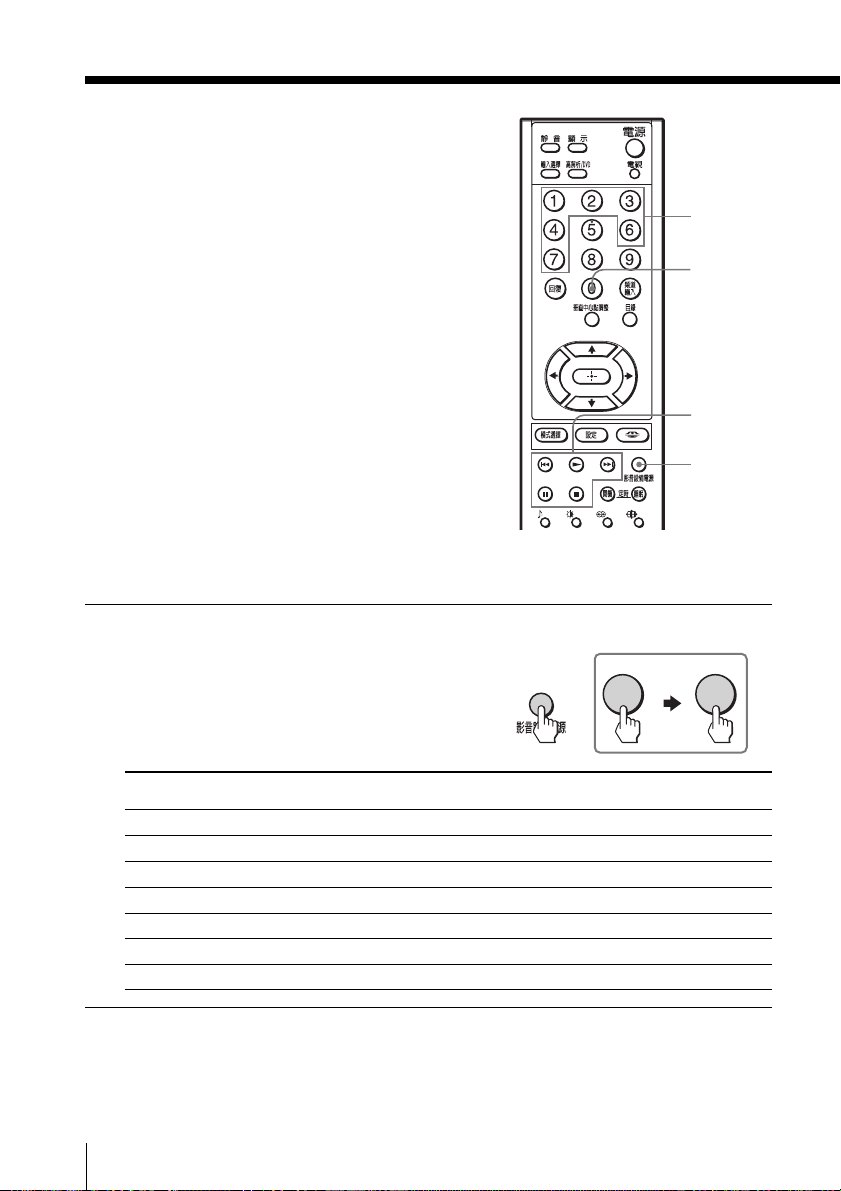
Operating optional components
You can use the supplied remote to
operate Sony video equipment such as
Beta, 8 mm, VHS or DVD.
Setting up the remote to work with
other connected equipment
DRC-MF
MEMORY STICK
Number
buttons 1-7
Number
button 0
./N/
>/X/x
VIDEO
POWER
While keeping VIDEO
POWER pressed, press the
number button 0, then
the corresponding
number button for the
desired equipment (see
the chart below).
To control While holding First press the Next press the
DVD VIDEO POWER 0 0
VTR1 (Beta) VIDEO POWER 0 1
VTR2 (8 mm) VIDEO POWER 0 2
VTR3 (VHS) VIDEO POWER 0 3
MDP VIDEO POWER 0 4
CD VIDEO POWER 0 6
MD VIDEO POWER 0 7
36
Advanced Operations
For example, to operate a
Sony 8 mm VCR:
02
+
down number button number button
Note
• If the equipment does not have a certain function, the corresponding
button on the remote will not operate.
Page 37
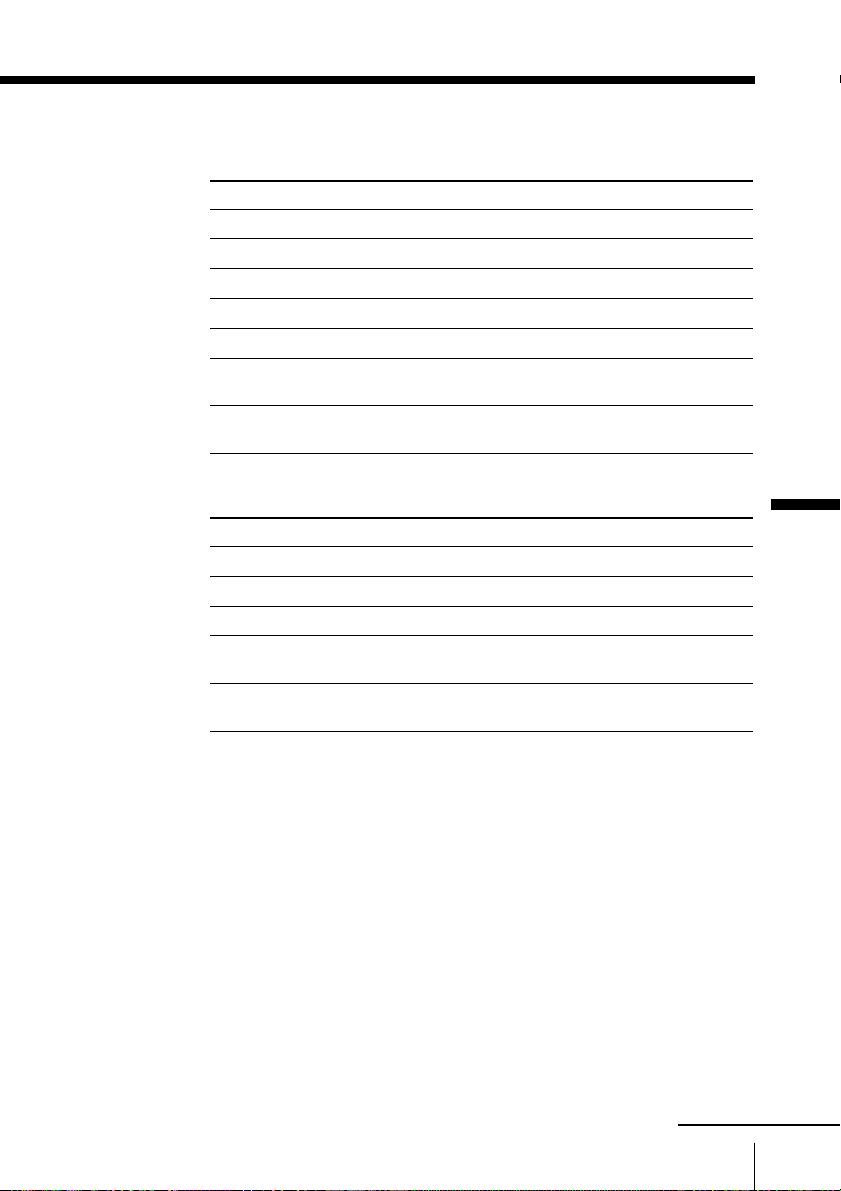
Operating video equipment
Operating a VCR using the remote
To P ress
turn on/off VIDEO POWER
play N
stop x
fast forward (M) >
rewind the tape (m) .
pause X
search the picture forward
(M) or backward (m)
Press again to resume normal playback.
> or . during playback.
Release to resume normal playback.
Operating a DVD player using the remote
To Press
turn on/off VIDEO POWER
play N
stop x
pause X
step through different
tracks of an audio disc
Press again to resume normal playback.
> to step forward or . to step
backward.
Advanced Operations
continued
Advanced Operations
37
Page 38

Operating optional components (continued)
Operating an MDP using the remote
To P ress
turn on/off VIDEO POWER
play N
stop x
pause X
search the picture forward
or backward
Press again to resume normal playback.
> or . during playback.
Release to resume normal playback.
Operating a CD or MD player using the remote
To P ress
turn on/off VIDEO POWER
play N
stop x
pause X
step through different tracks > to step forward or . to step
Press again to resume normal playback.
backward.
38
Advanced Operations
Page 39
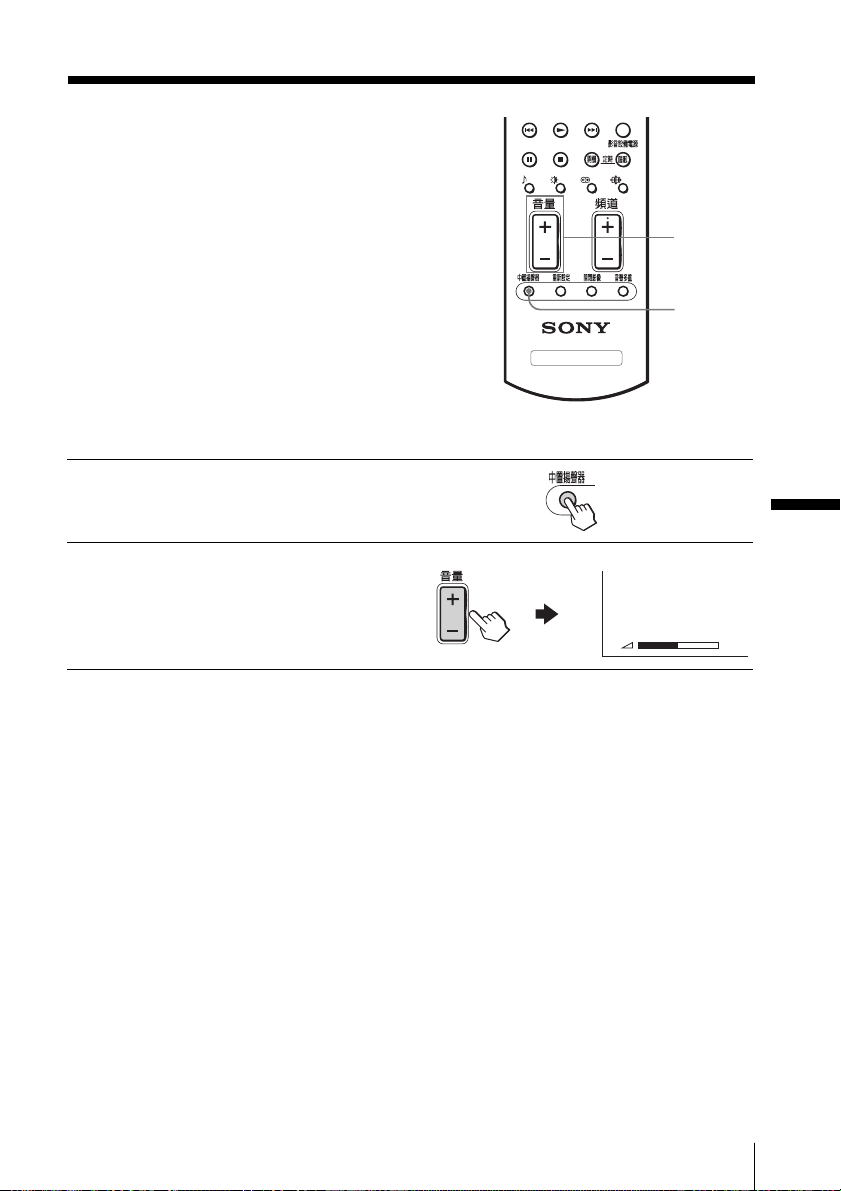
Using the TV’s
center speaker
You can use the TV’s speakers as the
center speaker of your audio system and
control its sound volume from the
remote of the TV.
Note
• For the speaker connection, see
“Connecting an amplifier” on page 21.
To switch to the center speaker mode
Press CENTER SP.
1
Press VOL +/– to adjust
2
the volume of the sound
from the TV’s center
speaker.
To return to the normal speaker mode
Press CENTER SP again.
Tip
• The center speaker mode is automatically cancelled when you select the
video input or the “Memory Stick” viewer, or turn the TV off and on
again.
Notes
• If “Off” is selected for “Speaker Out” in the “Sound” menu (see page 76)
and nothing is connected to the center speaker input terminals on the rear
of the TV, no sound is heard from the TV’s speakers.
• No sound is heard from the TV’s speakers if the sound source emitted
from the amplifier does not contain the center speaker channel.
• When you set to the center speaker mode , you cannot change the
surround sound, the “Intelligent Volume” mode or the “BBE” mode.
TV
VOL +/–
CENTER
SP
CENTER IN Speaker
Advanced Operations
5
0
Advanced Operations
39
Page 40
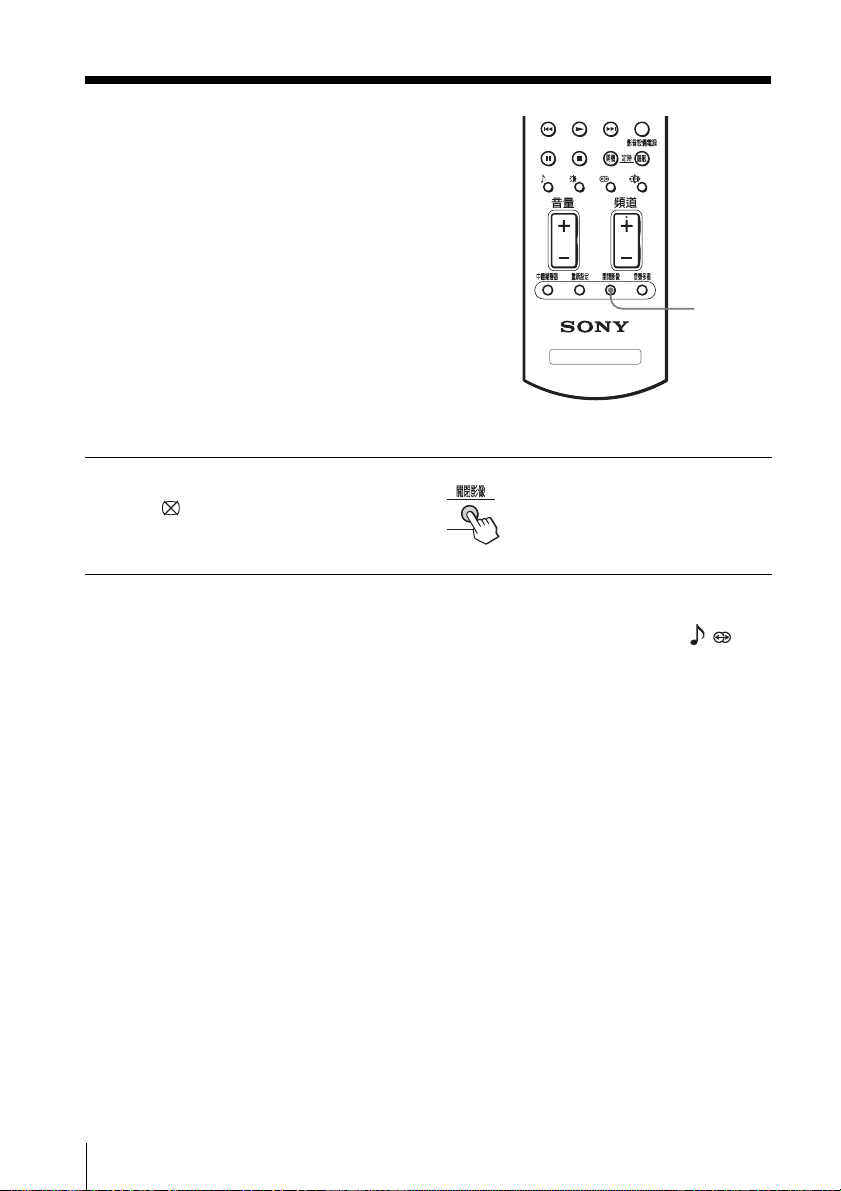
Using the picture off feature
The picture off feature lets you enjoy
music from radio programs of digital
broadcasts or DVD’s with the TV screen
turned off.
To switch to the picture off mode
Press PIC OFF.
The PICTURE OFF
indicator lights up in blue
and the screen turns off.
To return to normal viewing
Press any button except for VOL +/–, POWER, MUTING, , ,
MTS, VIDEO POWER and CENTER SP.
PIC OFF
TV
40
Advanced Operations
Page 41
Using the ”Memory Stick” viewer
About “Memory Stick”
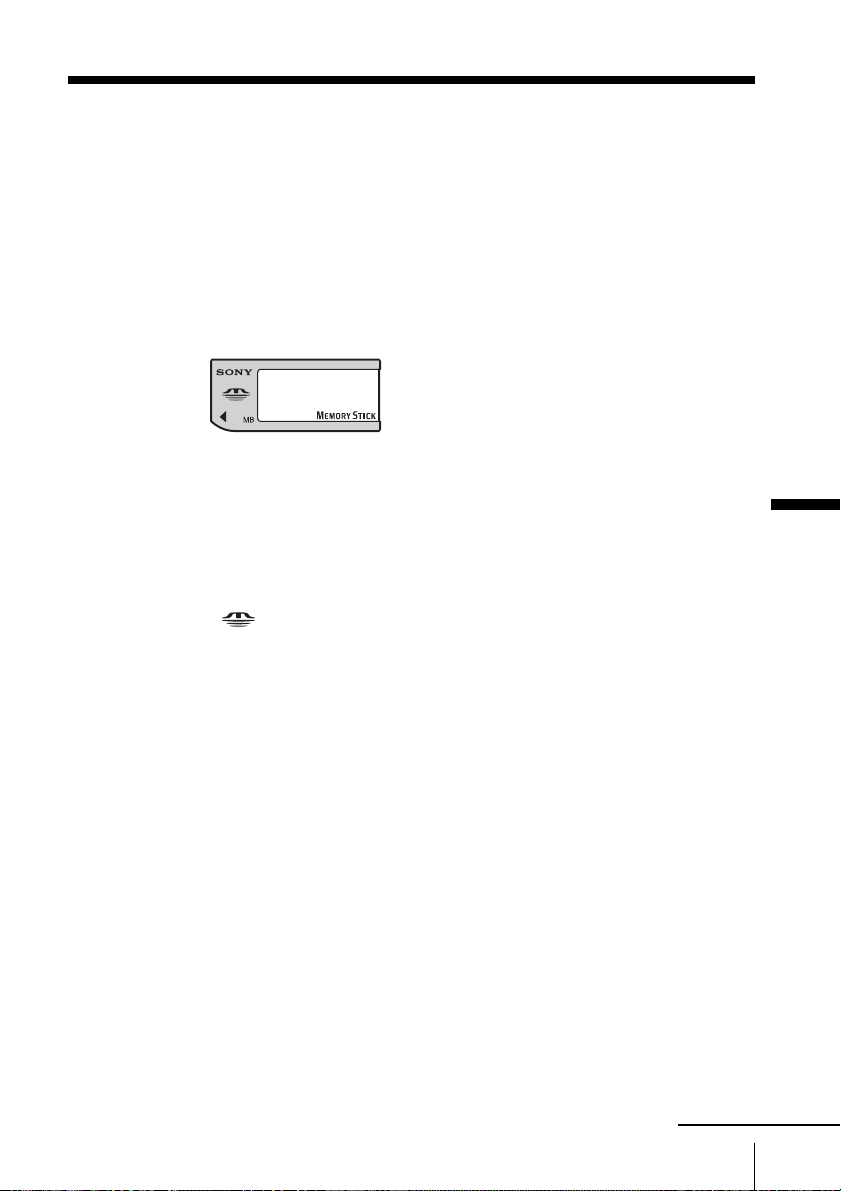
“Memory Stick” (sold separately) is a new, compact, portable, and
versatile Integrated Circuit recording medium with a data capacity
that exceeds that of a floppy disk. “Memory Stick” is specially
designed for exchanging and sharing digital data among “Memory
Stick” compatible products such as digital cameras and digital
video cameras. Because it is removable, “Memory Stick” can also be
used for external data storage.
The “Memory Stick” viewer on your TV allows you to view still
images (JPEG* files) and movies (MPEG1** files) stored on
“Memory Stick” media.
For more information on using “Memory Stick” media, see “Notes
on using “Memory Stick”, “Memory Stick PRO” media” on page 43
and “Notes on “Memory Stick Duo” ” on page 43.
“Memory Stick”, “Memory Stick PRO”, “Memory Stick Duo” and
“
” are registered trademarks of Sony Corporation.
Notes
• The data loading speed may differ depending on the “Memory Stick”.
• When you view a still image stored on “Memory Stick” media, the sound
is not output from the TV’s speakers. Do not attempt to adjust the volume.
•A “Memory Stick” formatted by a computer may not be used with this TV.
• When using the “Memory Stick” viewer, “Orbit” function in “Screen
Saver” is set to “On” automatically to reduce image retention (see page
83).
Advanced Operations
File Compatibility
The “Memory Stick” viewer can display still images and movies
that are stored on “Memory Stick” media using the following
compression format:
– JPEG* files (DCF compliant*) with an extension, .jpg
– MPEG1** files, MPEG MOVIE, MPEG MOVIE AD, MPEG MOVIE
– Images with more than 16 horizontal and/or vertical dots per line
– Images with less than 4096 horizontal and/or vertical dots per
EX, MPEG MOVIE HQ, MPEG MOVIE HQX, MPEG MOVIE CV,
VAIO Giga Pocket MPEG1.
line
continued
Advanced Operations
41
Page 42
Using the “Memory Stick” viewer (continued)
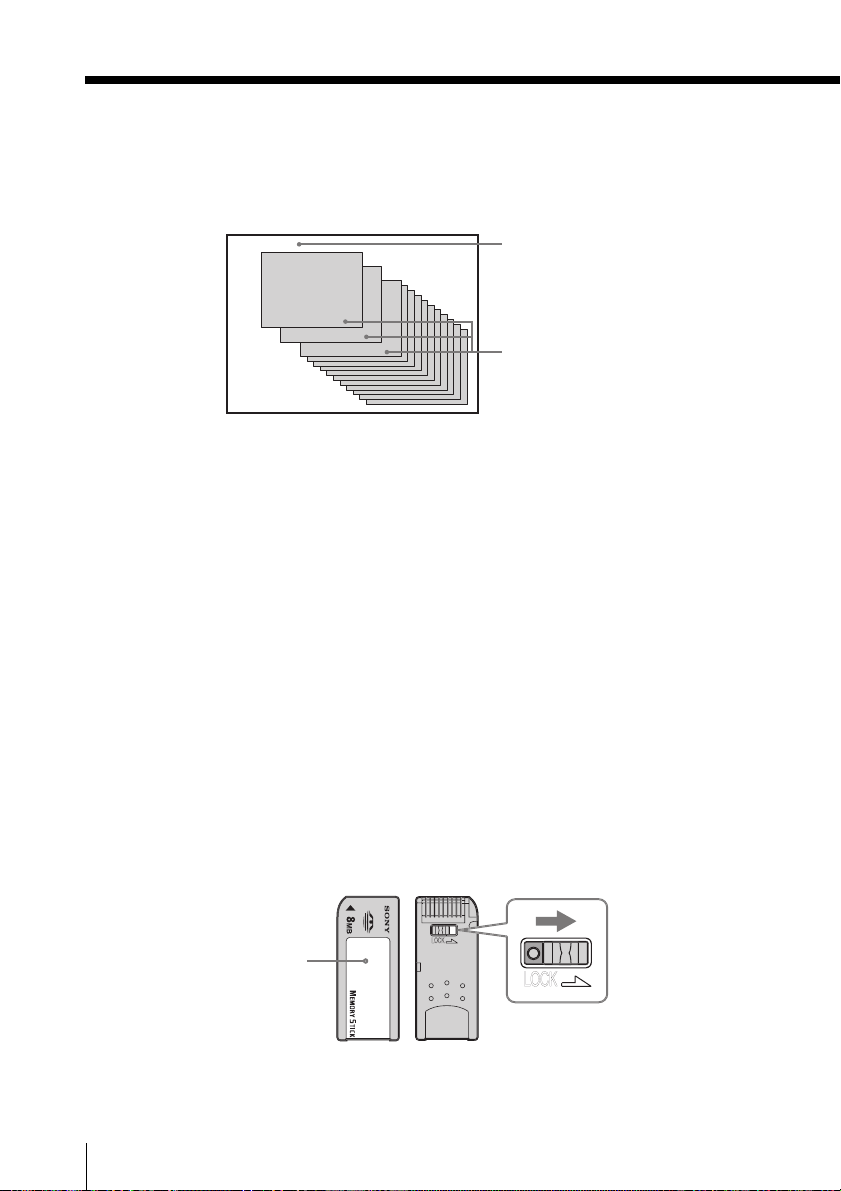
Example: Still images recorded with a Sony digital still camera
Folder name: /DCIM/101MSDCF
File name: DSC00001.JPG
101MSDCF
DSC00001
DSC00002
DSC00003
Image folder name
Image file names
Example: Movie files recorded with a Sony digital still camera
Folder name: /MSSONY/MOML0001
File name: MOV00001.MPG
Note
• The TV’s “Memory Stick” viewer cannot display still images and movies
stored in TIFF or any other non-JPEG or non-MPEG1 compression format.
* JPEG stands for “Joint Photographic Experts Group,” which is the
organization that implemented this format. DCF stands for “Design Rules
for Camera File Systems,” which are specifications established by the
Japan Electronics and Information Technology Industries Association
(JEITA).
** MPEG1 stands for “Motion Picture Experts Group” which is the
organization that implemented this format and is the typical compression
format for movie files.
To prevent accidental erasure of still images and movies
Set the “Memory Stick” erasure prevention switch to “LOCK”.
In this position, you cannot rotate the images (see page 53).
42
Advanced Operations
Label area
Erasure prevention
switch
Front Rear
Tip
• When you set the erasure prevention switch on a “Memory Stick Duo”,
use a sharp object such as a ballpoint pen.
Page 43
Notes on using “Memory Stick”, “Memory Stick PRO” media
When using “Memory Stick,” “Memory Stick PRO” media, follow
these precautions:
•To avoid permanent damage to still image data, do not turn off
the TV or remove “Memory Stick” media from the insertion slot
while data is being read (as indicated by the “Memory Stick”
indicator light being on).
•Avoid touching the terminal of “Memory Stick” media or
bringing it into contact with a metal object.
• Do not drop, bend, or submit “Memory Stick” media to external
shock.
• Do not disassemble or modify “Memory Stick” media.
•Avoid getting liquid on “Memory Stick” media.
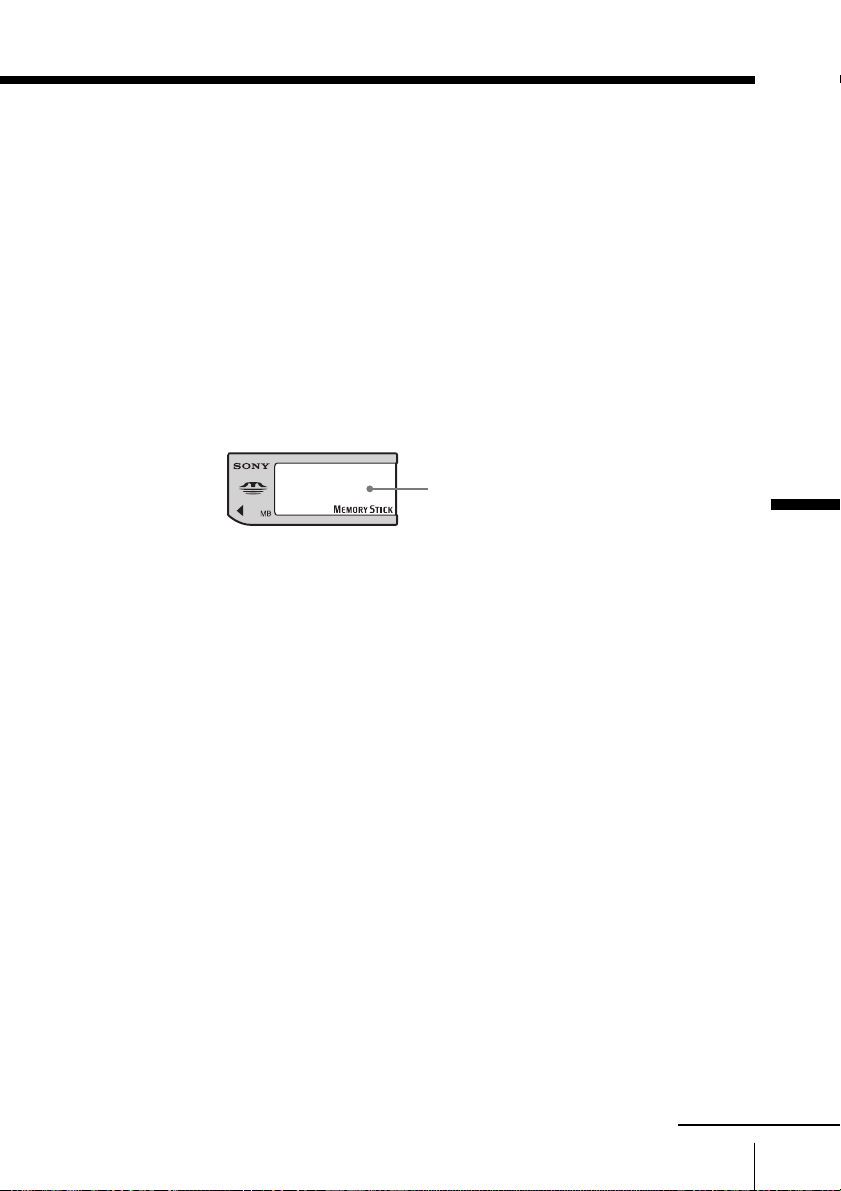
• Apply labels only within the designated label area.
Label area
•To avoid permanent damage to still image data, do not use or
store “Memory Stick” media in a location subject to:
— High temperature (such as near a heater or inside a hot car)
— High humidity
— Direct sunlight
— Corrosive substances
— Magnetic fields
— Excessive dust
— Static electricity or electric noise
— Electric surges
• Store and carry “Memory Stick” media in its original case to
ensure protection of stored data.
• Save a backup of stored data.
Advanced Operations
Notes on “Memory Stick Duo”
“Memory Stick Duo” is a new, compact version of the standardsized “Memory Stick” recording medium. You can use a “Memory
Stick Duo” on your TV by inserting a “Memory Stick Duo” into the
TV.
• Be sure to insert the “Memory Stick Duo” into the “Memory
Stick” slot with the correct orientation. Otherwise, the TV may be
damaged.
• The “Memory Stick Duo” adapter is not necessary.
continued
Advanced Operations
43
Page 44
Using the “Memory Stick” viewer (continued)
Inserting and removing a “Memory Stick”
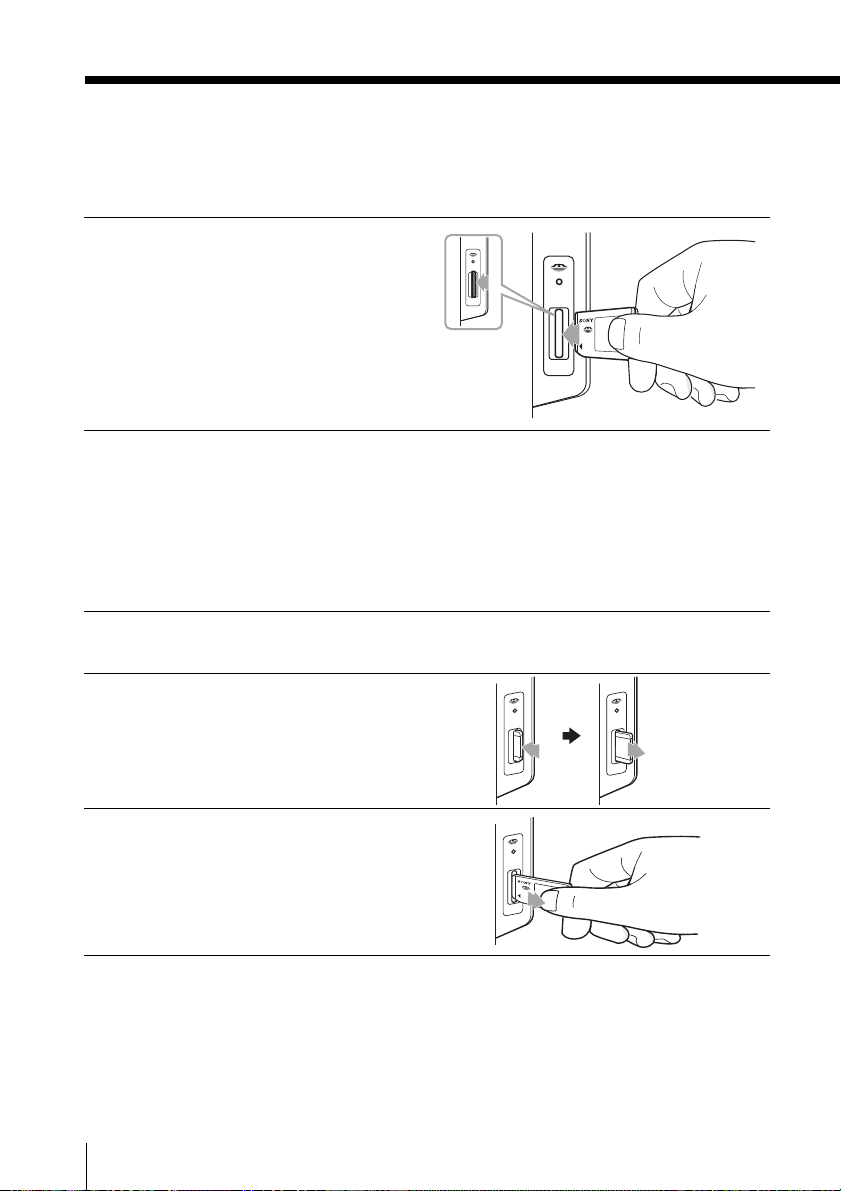
To insert a “Memory Stick”
Locate the “Memory Stick” slot (see
page 100) and insert the “Memory
Standard/Duo
Stick” into the “Memory Stick” slot
as illustrated.
PRO
When inserted properly, it should
slide in with little resistance and click
into place. The “Memory Stick”
indicator flashes and goes off.
Notes
• Be sure to insert the “Memory Stick” in the correct direction. If the
“Memory Stick” is forced in the wrong way, it may become damaged.
• Insert only “Memory Stick” media into the “Memory Stick” slot.
Attempting to insert other objects into the slot may damage the TV.
To remove a “Memory Stick”
Check that the “Memory Stick” indicator is off. (When the light is on, this
1
indicates that the TV is reading data from the “Memory Stick”.)
Push the “Memory Stick” gently
2
into the slot, and then release it.
The “Memory Stick” media is
ejected.
O
R
P
O
R
P
Pull the “Memory Stick”
3
completely out of the slot.
44
Advanced Operations
O
R
P
Tip
• When removing the “Memory Stick”, do not attempt to just pull it from its
slot.
Note
•To protect small children from injury from “Memory Stick” media, remove
all “Memory Stick” media from the TV’s “Memory Stick” slot and store it
in a safe location when it is not in use.
Page 45
Displaying thumbnails of
still images and movie files
You can view up to 20 still images and
movies on the “Memory Stick” index.
DRC-MF
Number
buttons
M/m/</,/
MEMORY STICK
MEMORY
STICK
Advanced Operations
CH +/–
TV
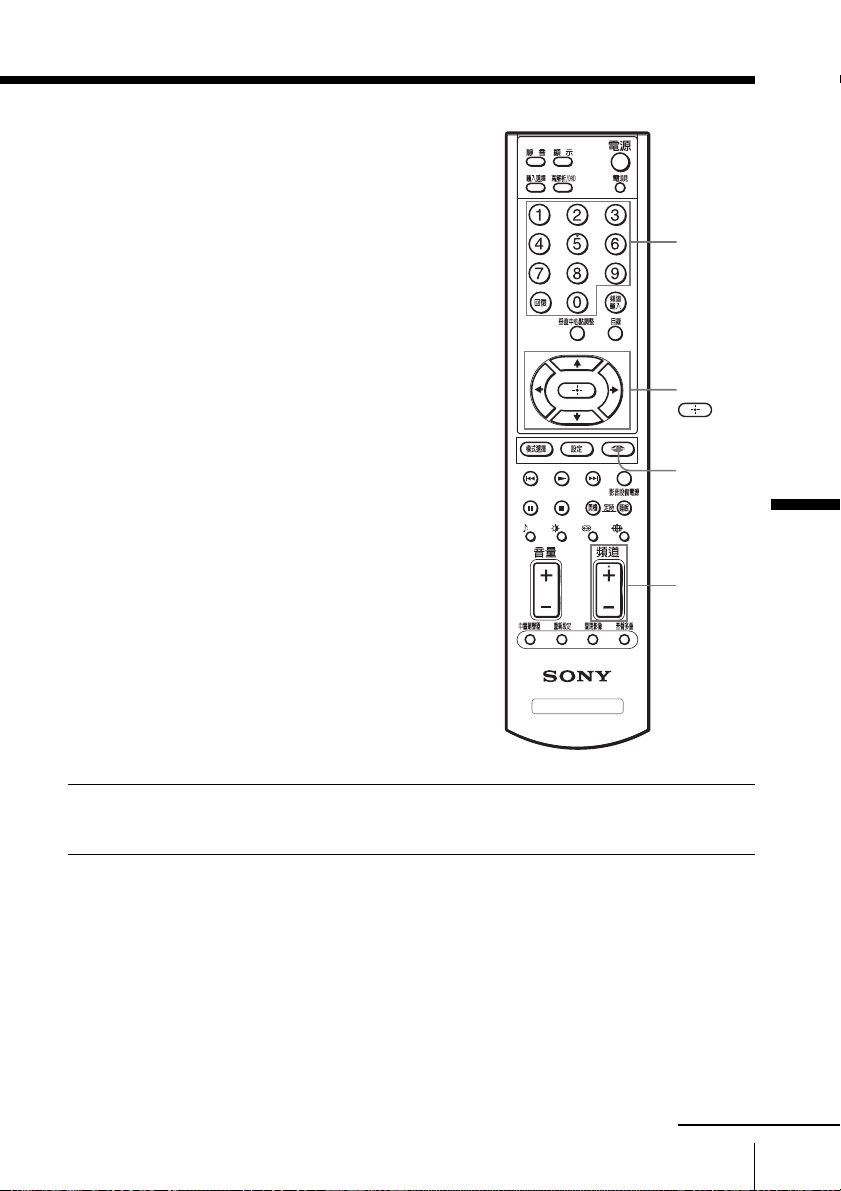
Insert a “Memory Stick” into the “Memory Stick” slot of the TV.
1
For details on inserting a “Memory Stick”, see page 44.
continued
Advanced Operations
45
Page 46
Using the “Memory Stick” viewer (continued)
K
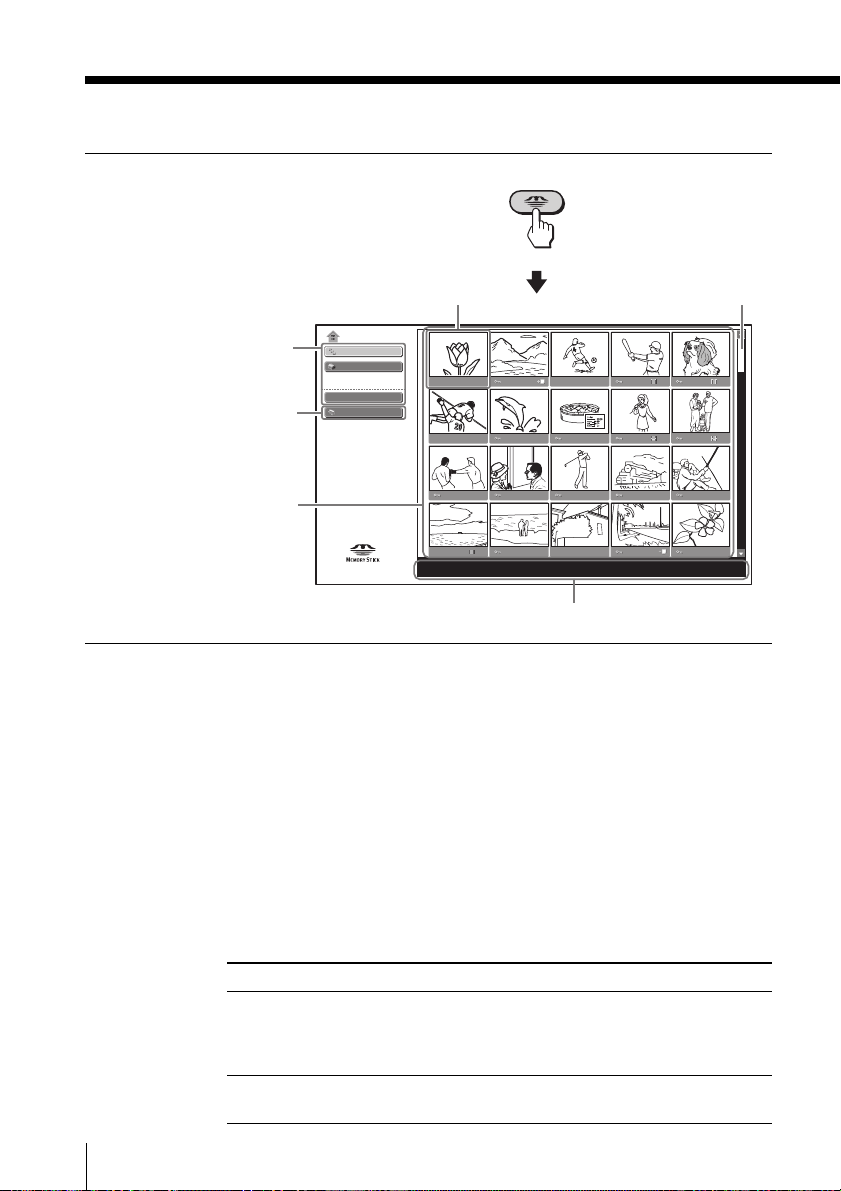
Press MEMORY STICK.
2
The “Memory Stick Home”
appears, which displays
thumbnails of still image
and movie files stored on
the “Memory Stick”.
Highlighted thumbnail
MEMORY STIC
Scroll bar
“Memory Stick” menus
Digi. Cam. Mode (Digital
Camera Mode) indication
First 20 thumbnails
of still images and
movies
Memory Stick Home
Slide Show
Options
Filter : Still
Select Folder
Digi. Cam. Mode
No :
Size :
File :
Date :
Information about the
highlighted image or movie
When there are more than 20 still images and movies
Press , to select the scroll bar at the right end of the “Memory
Stick Home”, then press m to display the next 20 thumbnails.
About the “Digi. Cam. Mode” (Digital Camera Mode)
“Digi. Cam. Mode” displays all JPEG and MPEG1 files recorded
with the DCF compliant digital cameras. When you set the “Digi.
Cam. Mode” to “Off”, only the selected files or all the files with the
extension .jpg and .mpg can be displayed. The “Memory Stick”
viewer of this TV sets “Digi. Cam. Mode” to “On” at the factory. To
set “Digi. Cam. Mode” to “Off”, see page 64.
46
Advanced Operations
Digi. Cam. Mode Viewable images
“On” Still images in DCF compliant JPEG files recorded on a
Sony digital still camera or digital video camera recorder
Movies in MPEG1 files recorded on a Sony digital video
camera.
“Off” JPEG still pictures and MEPG1 movies in the folder
whose name has been changed by a computer.
Page 47
Notes
• When “Digi. Cam. Mode” is “On”, you cannot set “Sort” and “Filter” in
the “Options” menu (see pages 66 and 67).
• When “Digi. Cam. Mode” is set to “On”, the maximum 2,000 pieces of still
images and/or movies can be displayed. When you want to display more
than 2,000 pictures, set “Digi. Cam. Mode” to “Off”.
• When you do not operate for more than 5 minutes, the “Memory Stick”
viewer is canceled automatically to reduce image retention.
To view still images and movies that have been arranged
and saved as in a computer
You need to select the folder. To select the folder, set “Digi. Cam.
Mode” to “Off”.
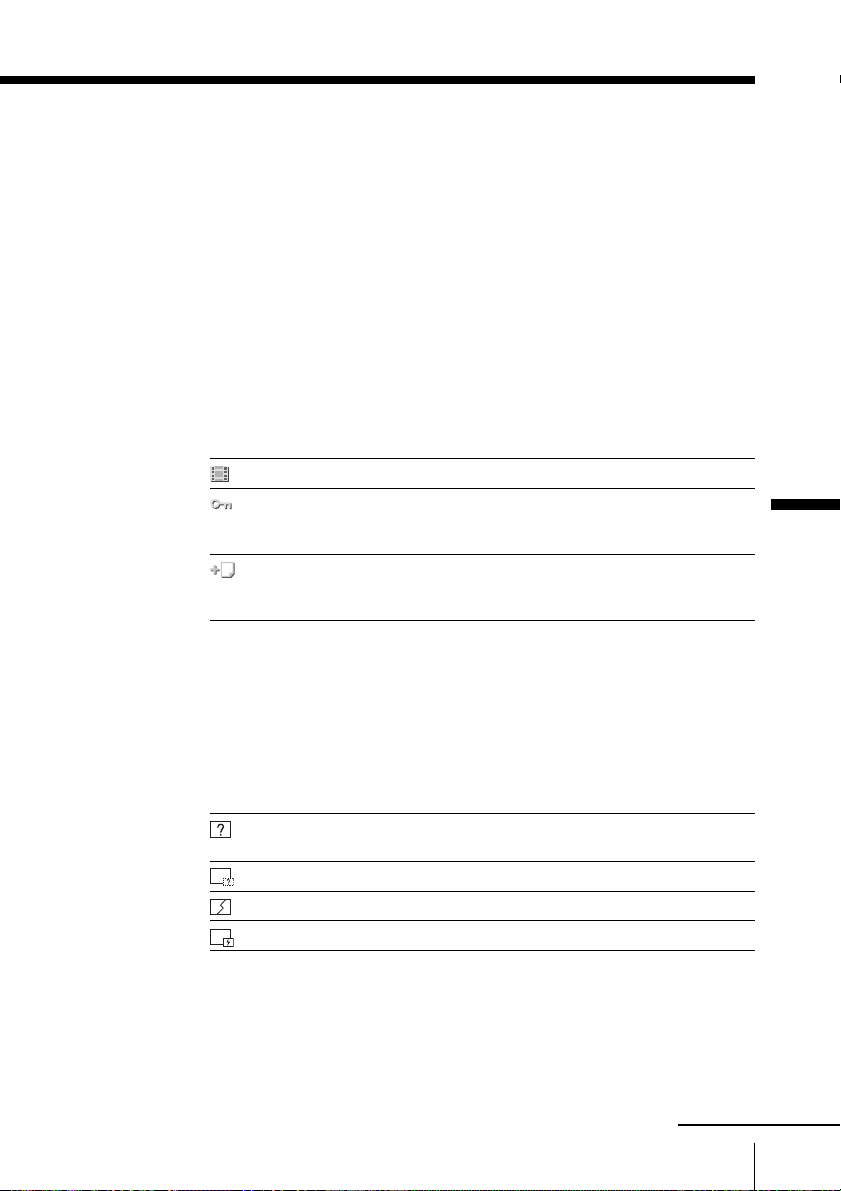
About the icons on the thumbnail images
(Movie) Indicates the thumbnail is a movie (MPEG1) file.
(Protect) Indicates the thumbnail is protected. Protected files
cannot be changed or deleted. For details, see
“Protecting still images or movies” on page 59.
(Relative file) Indicates another file named the same in the last four
digits exists in the “Memory Stick” but is not displayed.
(appears only when the Digi. Cam. Mode is “On”.)
Notes
• The Relative file icon is added with the first file of those in the same file
format (JPEG, MPEG1, and others) and having the file name with the
same last 4-digits.
• If you delete the file with the Relative file icon, the other related files are
all deleted at the same time.
Advanced Operations
About caution displays
To return to the normal screen
Press the number buttons or CH +/–.
Tip
• When you press CH +/–, the last selected channel appears.
This image data is the JPEG or MPEG1 format that is not
compatible.
There is the thumbnail but it is not DCF compliant.
There is the image data but the thumbnail is broken.
The image data is broken.
continued
Advanced Operations
47
Page 48
Using the “Memory Stick” viewer (continued)
Viewing still images and
movies in sequence
— Slide Show
You can view the still images and
movies stored on a “Memory Stick” with
a specified interval.
DRC-MF
Insert a “Memory Stick” into the “Memory Stick” slot of the TV.
1
For details on inserting a “Memory Stick”, see page 44.
Press MEMORY STICK to display the “Memory Stick Home”.
2
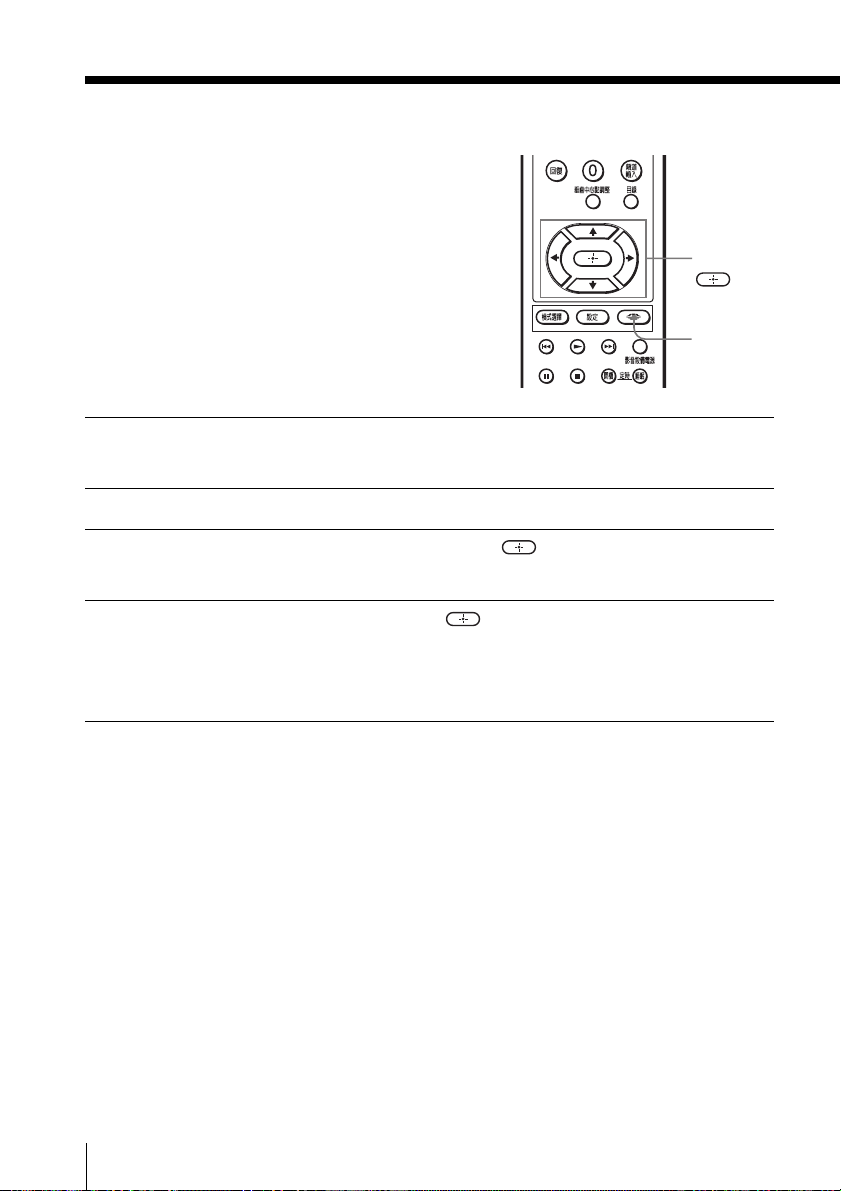
Press M/m to select “Slide Show”, then press .
3
The “Slide Show” menu appears.
Press M/m to select “Start”, then press .
4
Still images and movies are displayed according to the setting.
A movie is played automatically. At the end of the movie, the next
image appears.
MEMORY STICK
M/m/</,/
MEMORY
STICK
48
Advanced Operations
Tip
•You can start the Slide Show even when a still image or movie is selected.
Note
• The still images and movies do not change automatically if “Advance” is
in the “Slide Show” menu is set to “Manual” (see page 49).
Page 49
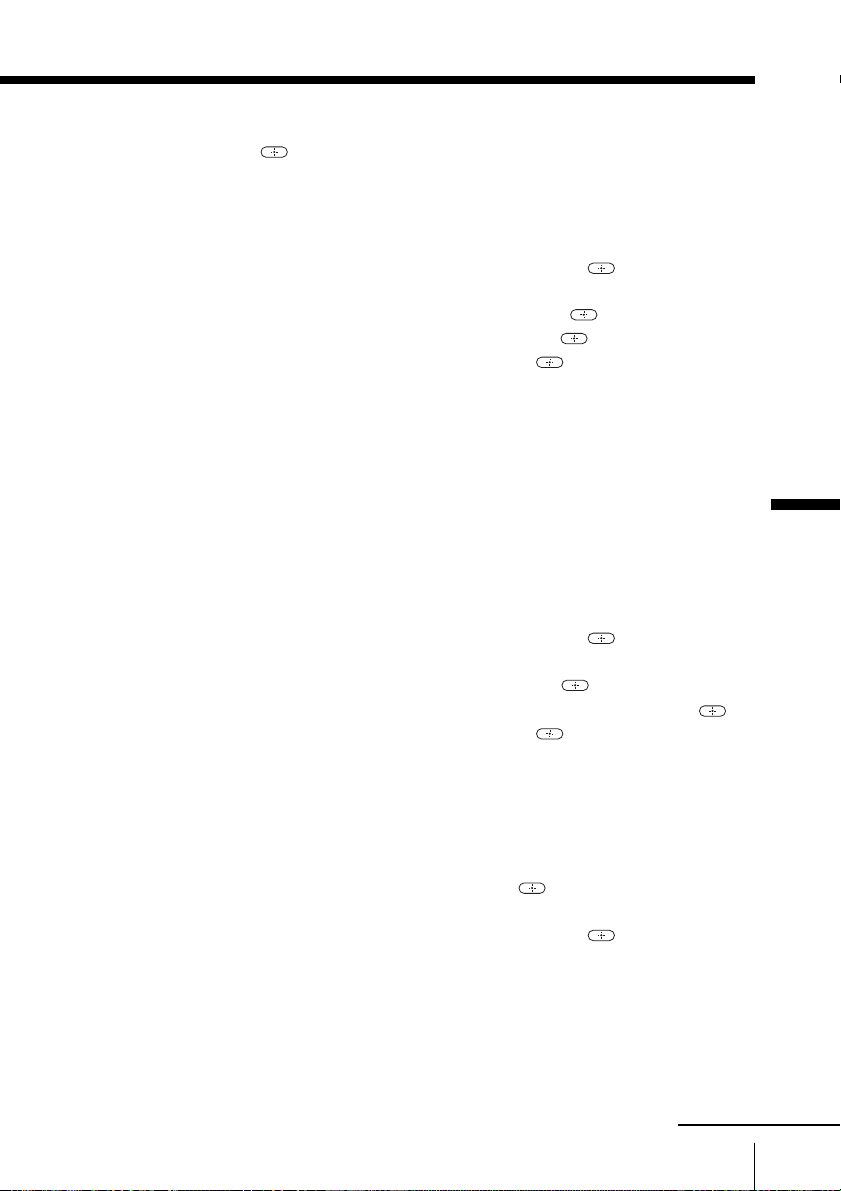
To exit the “Slide Show”
Press on the remote.
To change still images and movies in “Slide Show” manually
1Press MEMORY STICK to display the “Memory Stick Home”.
2Press M/m to select “Slide Show”, then press .
The “Slide Show” menu appears.
3Press M/m to select “Advance”, then press
4Press M/m to select “Manual”, then press .
5Press M/m to select “Start”, then press .
If you press ,, the next still image or movie appears; if you press
<, the previous still image or movie appears.
.
To change the slide advance interval
You can select a time interval with which still images or movies
change, from among “5 sec”, “10 sec”, “30 sec”, “1 min” and “5
min”. The factory setting is “5 sec”.
The interval can be changed when “Advance” in the “Slide Show”
menu is set to “Auto”.
1Press MEMORY STICK to display the “Memory Stick Home”.
2Press M/m to select “Slide Show”, then press
The “Slide Show” menu appears.
3Press M/m to select “Interval”, then press
4Press M/m to select the interval you want to set, then press .
5Press M/m to select “Start”, then press .
The “Slide Show” starts.
.
.
Advanced Operations
To start the “Slide Show” from the specified still image or movie
1Press MEMORY STICK to display the “Memory Stick Home”.
2Press M/m to select the still image or movie from which you want
to start the “Slide Show”, then press
The “Memory Stick Home” (index menu) appears.
3Press M/m to select “Slide Show”, then press .
.
Advanced Operations
continued
49
Page 50

Using the “Memory Stick” viewer (continued)
Notes
• The “Movie Player” (see page 55) cannot be displayed when “Advance” is
set to “Auto”.
•You cannot specify the interval when “Advance” is set to “Manual”.
• When “Advance” is set to “Auto”, a movie file is played to the end
regardless of the specified interval. When playback is finished, the next
image file is displayed.
• The “Interval” setting does not show the exact time, because the time
required for displaying an image depends on its file size.
50
Advanced Operations
Page 51
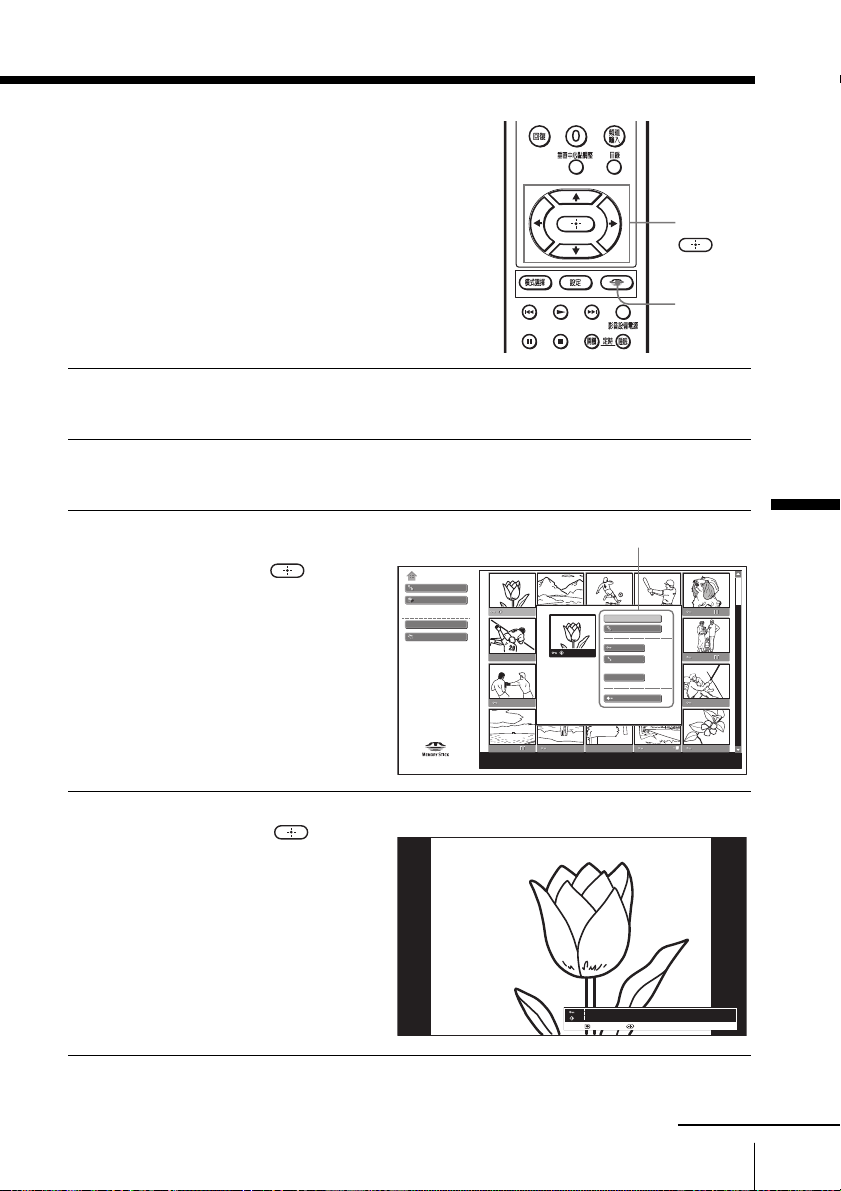
Viewing a still image
on the full screen
DRC-MF
Insert a “Memory Stick” into the “Memory Stick” slot of the TV.
1
For details on inserting a “Memory Stick”, see page 44.
Press MEMORY STICK to display the “Memory Stick Home”.
2
MEMORY STICK
M/m/</,/
MEMORY
STICK
Press M/m/</, to select
3
the still image you want
to view, then press
The still image index menu
appears.
Press M/m to select “Full
4
Screen”, then press .
The selected still image is
displayed on the full
screen.
To go to the previous or
next still image, press </
,.
Advanced Operations
Still image index menu
.
Memory Stick Home
Slide Show
Options
Filter : Still
Select Folder
Digi. Cam. Mode
No : 123/1234
Size : 1024x768
Full Screen
Slide Show
Protect
Rotate
Startup
Delete
Close
File : 100MSDCF/SJP0001.JPG
Date : 2003.MAY.31 1:00PM
No : 1/1234
No : 1/1234
Size : 1024x768
Size : 1024x768
Next : Menu :
Menu :
Next :
File : 100MSDCF/SJP0001.JPG
File : 100MSDCF/SJP0001.JPG
Date : 2003.MAY.31 1:00PM
Date : 2003.MAY.31 1:00PM
continued
Advanced Operations
51
Page 52
Using the “Memory Stick” viewer (continued)
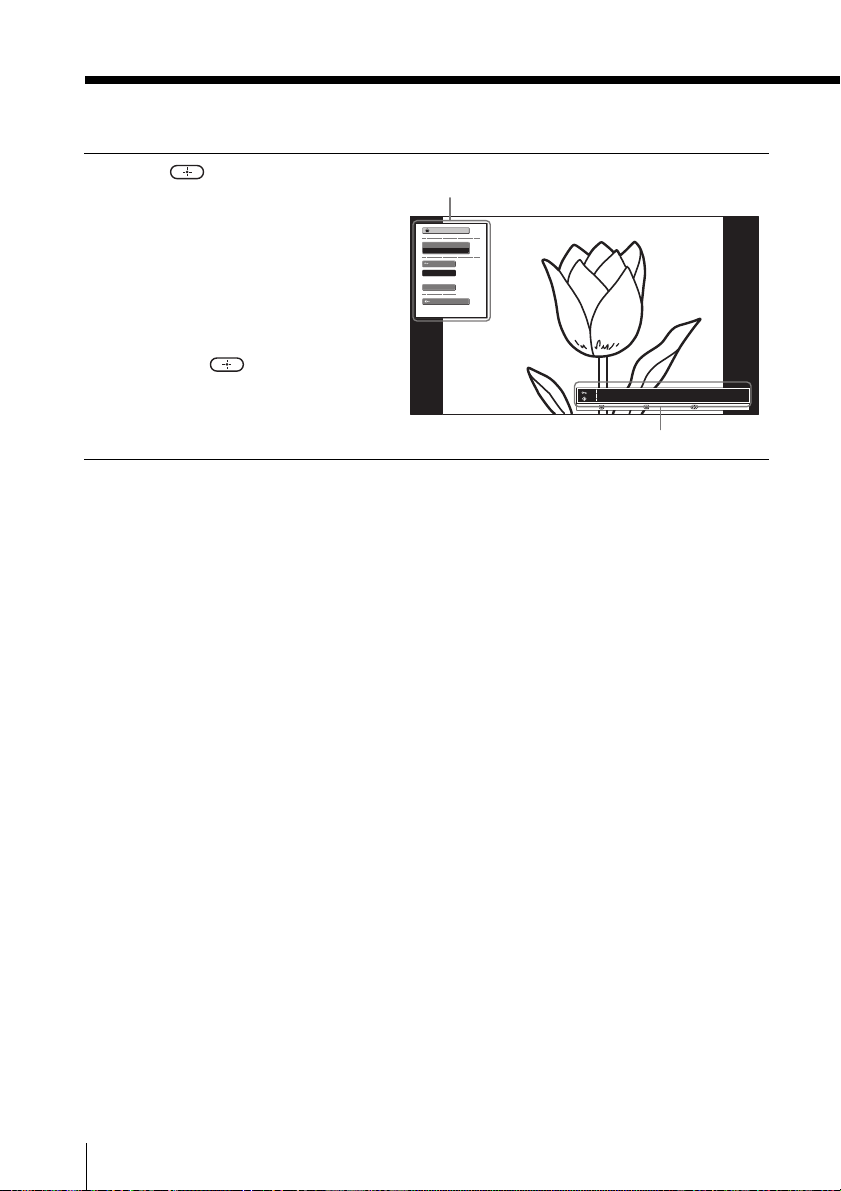
Press .
5
The image setup menu
appears.
To display another still
image that is not the
previous or next image,
press M to select “Return”,
then press
“Memory Stick Home”
appears.
Tip
• The file information automatically appears at the bottom right when a still
Notes
• The full screen display may be rough depending on the still image quality.
• Small size images may not be enlarged on the full screen.
• Displaying a large file will take a longer time.
. The
image is displayed on the full screen. You can turn off the display of file
information by setting “Information” in the image setup menu to “Off”.
Image setup menu
Return
Information
On
Protect
Rotate
Delete
Close
No : 1/1234
Size : 1024x768
Move : Back : Select :
File : 100MSDCF/SJP0001.JPG
Date : 2003.MAY.31 1:00PM
File information
52
Advanced Operations
Page 53
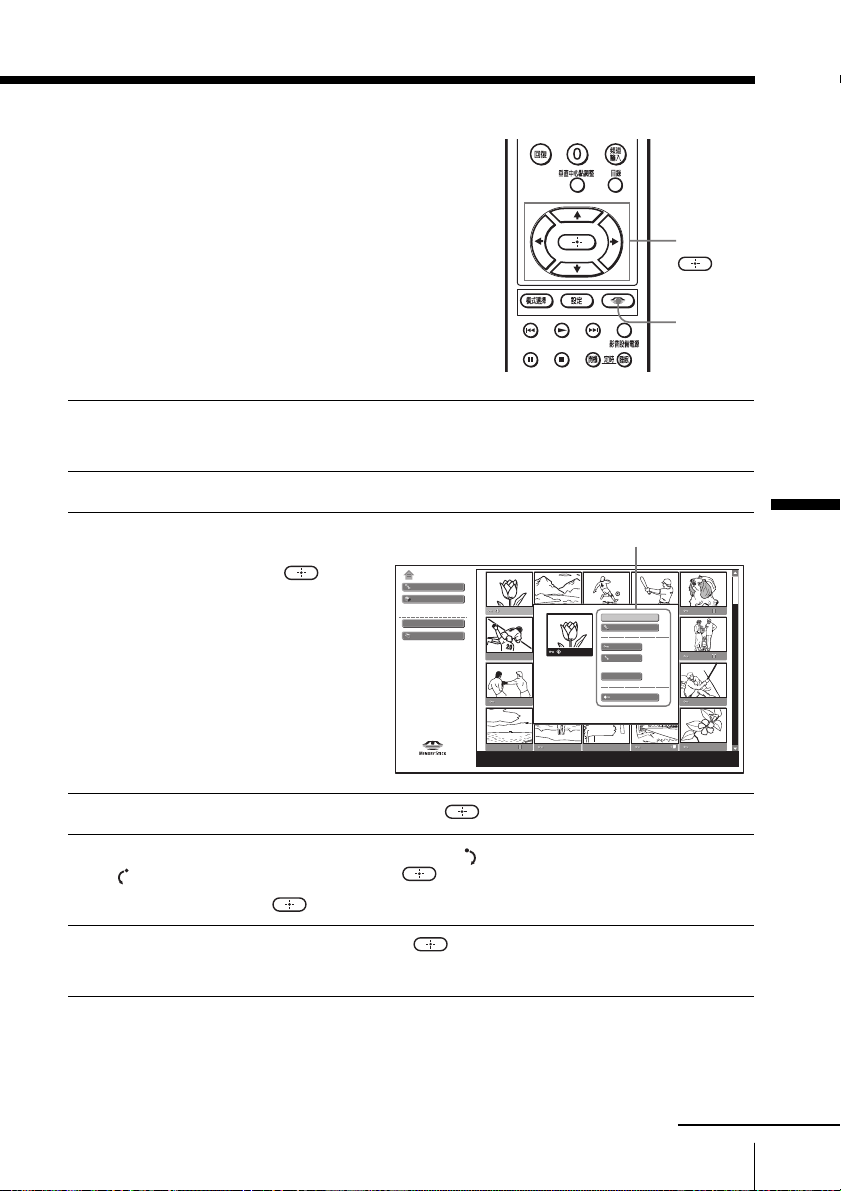
Rotating a still image
You can rotate a thumbnail of the still
image that you have selected from the
“Memory Stick Home” or a still image
displayed on the full screen, in 90
degree increments clockwise or
counterclockwise.
DRC-MF
Insert a “Memory Stick” into the “Memory Stick” slot of the TV.
1
For details on inserting a “Memory Stick”, see page 44.
Press MEMORY STICK to display the “Memory Stick Home”.
2
Press M/m/</, to select
3
the still image you want
to rotate, then press
The still image index menu
appears.
.
Memory Stick Home
Slide Show
Options
Filter : Still
Select Folder
Digi. Cam. Mode
M/m/</,/
MEMORY STICK
MEMORY
STICK
Still image index menu
Full Screen
Slide Show
Protect
Rotate
Startup
Delete
Close
Advanced Operations
No : 123/1234
Size : 1024x768
Press M/m to select “Rotate”, then press .
4
Press M/m to select the rotating direction “ ” (clockwise) or
5
“
”(counterclockwise) , then press .
Each time you press , the still image is rotated 90 degrees.
Press m to select “Close”, then press .
6
The rotated image is stored.
File : 100MSDCF/SJP0001.JPG
Date : 2003.MAY.31 1:00PM
continued
Advanced Operations
53
Page 54

Using the “Memory Stick” viewer (continued)
To rotate a full screen image
1 After displaying an image on the full screen (see page 51), press
.
The image setup menu appears.
2Press M/m to select “Rotate”, then press
3Press M/m to select the rotating direction, then press .
Each time you press , the still image is rotated 90 degrees in
the selected direction.
4Press m to select “Close”, then press
Notes
•You cannot rotate movie files.
•You cannot rotate a still image that has been protected (see page 59).
Confirm the protect icon in the file information and unlock the protect
before rotating.
•You cannot rotate a still image if the “Memory Stick” is locked.
.
.
54
Advanced Operations
Page 55
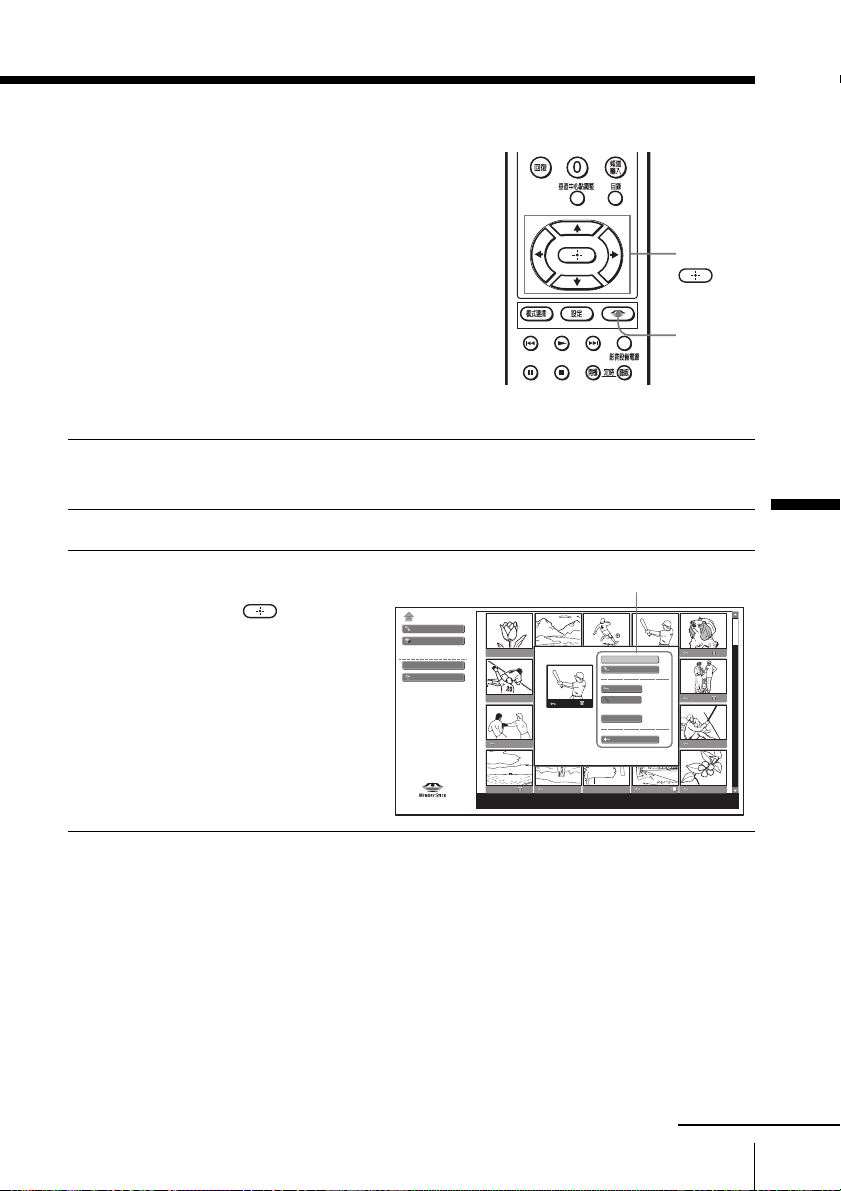
Playing movies
— Movie Player
DRC-MF
Insert a “Memory Stick” into the “Memory Stick” slot of the TV.
1
For details on inserting a “Memory Stick”, see page 44.
Press MEMORY STICK to display the “Memory Stick Home”.
2
Press M/m/</, to select
3
the movie you want to
play, then press
The movie index menu
appears.
.
Memory Stick Home
Slide Show
Options
Filter : Still
Select Folder
Digi. Cam. Mode
M/m/</,/
MEMORY STICK
MEMORY
STICK
Movie index menu
Movie Player
Slide Show
Protect
Rotate
Startup
Delete
Close
Advanced Operations
No : 124/1234
Size : 320x240
File : 100MSDCF/BASEBALL.MPG
Date : 2003.MAY.31 1:00PM
continued
Advanced Operations
55
Page 56
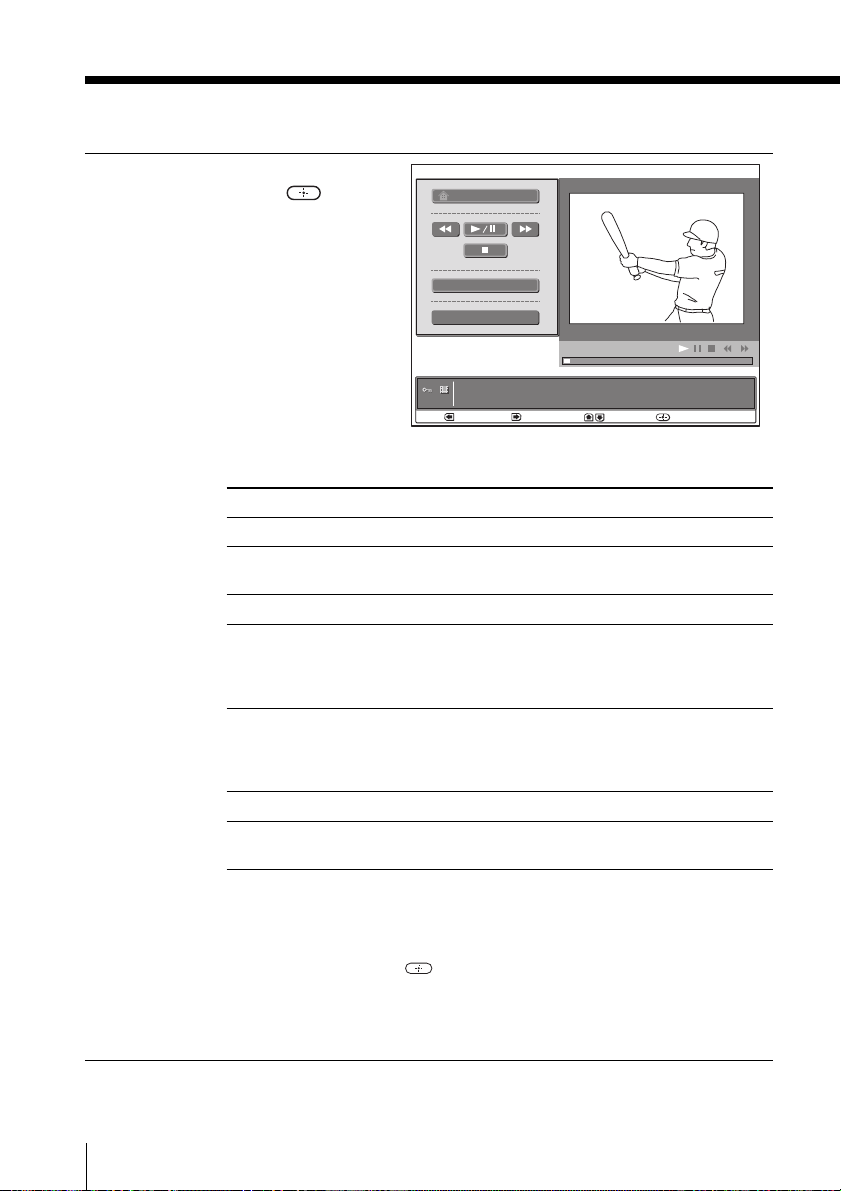
Using the “Memory Stick” viewer (continued)
Press M/m to select “Movie
4
Player”, then press .
The Movie Player appears.
Return
Full Screen
Menu
No : 124/1234
Size : 320x240
File : SJP0001.MPG
Date : 2003.MAY.31 1:00PM
Select : Move : FF : FR :
Movie Player Operation menu
Item To
“Return” return to the “Memory Stick Home”.
“B / X” play the movie. Select this item during playback to
“x” stop playback.
“.”Press < during movie stop mode to display the
“>”Press , during movie stop mode to display the next file
“Full Screen” display the movie full screen.
“Menu” display the movie setup menu to access additional
Notes
• If you select . or > during the movie stop mode, it may take a longer
time to load the previous or next file. During loading the file, “Return”
lights up. If you press when “Return” is lit, the TV returns to the
“Memory Stick Home”.
•“m” (Fast-reverse) and “M” (Fast-forward) may not work due to the
movie file.
pause playing.
previous file on the ”Memory Stick”. During playback,
the control changes to “m” (Fast-reverse) and the
movie is rewound rapidly.
on the ”Memory Stick”. During playback, the control
changes to “M” (Fast-forward) and the movie is
forwarded rapidly.
options.
56
Advanced Operations
Page 57
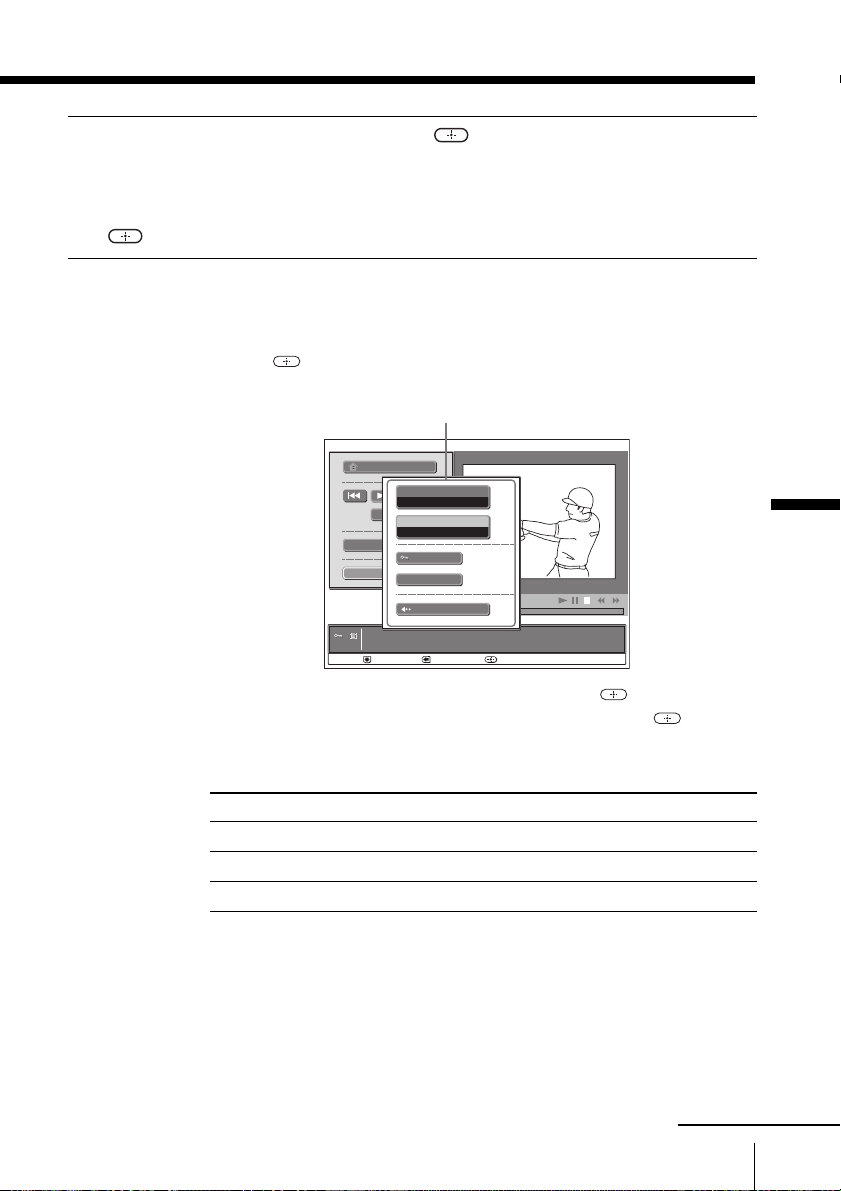
Press M/m to select “B / X”, then press .
5
The movie playback starts. At the end of the movie, it returns to
the beginning and stops.
To stop playback manually, press M/m to select “x” and press
.
To select the sound
1 On the Movie Player screen, press M/m to select “Menu”, then
press .
The Movie setup menu appears.
Movie setup menu
Return
Information
On
Audio Select
Full Screen
Menu
L/R
Protect
Delete
Close
No : 124/1234
Size : 320x240
File : SJP0001.MPG
Date : 2003.MAY.31 1:00PM
Select : Back : Move :
Advanced Operations
2Press M/m to select “Audio Select”, then press
3Press M/m to select the sound to be heard, then press
.
.
Audio Select menu and selectable sounds
Item Stereo program Bilingual program
L/R left and right sounds main and sub sounds
L left sound main sound
R right sound sub sound
Note
• The ”Audio Select” menu is disabled when the movie does not contain
sound.
continued
Advanced Operations
57
Page 58

Using the “Memory Stick” viewer (continued)
To display the movie on the full screen
1 Display the Movie Player, following steps 1 to 4 on pages 55 and
56.
2Press M/m to select “Full Screen”, then press
The movie is displayed on the full screen, and playback starts
automatically.
To return to the Movie Player
During movie playback, press M/m/</, or press
Notes
• Small size movies may not be enlarged on the full screen.
• The full screen display may be rough depending on the movie quality.
• Enlarging a file may take a time and a short file may not be played.
•“m” and “M” are disabled when a movie is displayed on the full
screen.
.
.
58
Advanced Operations
Page 59
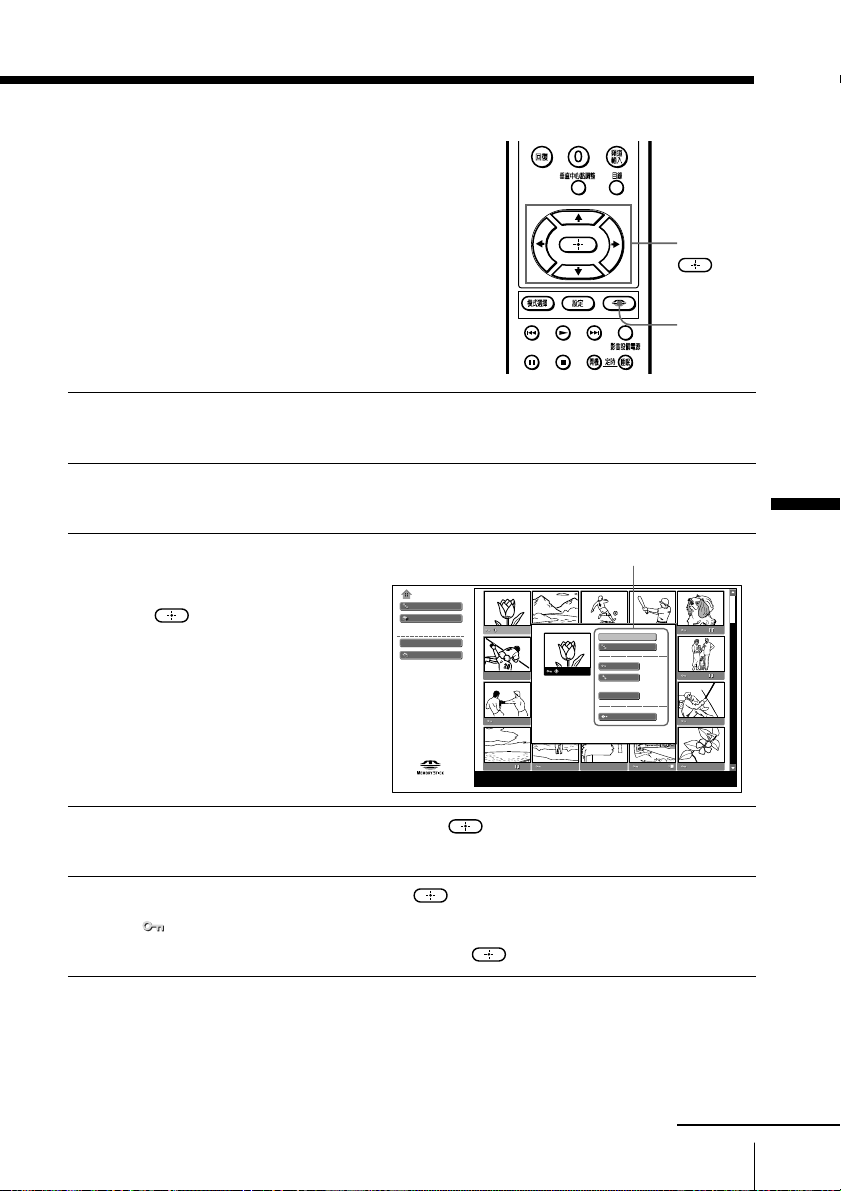
Protecting still images
or movies
You can protect a still image or movie
from accidental erasure. The protect can
be unlocked.
Insert a “Memory Stick” into the “Memory Stick” slot of the TV.
1
For details on inserting a “Memory Stick”, see page 44.
Press MEMORY STICK to display the “Memory Stick Home”.
2
DRC-MF
MEMORY STICK
M/m/</,/
MEMORY
STICK
Advanced Operations
Press M/m/</, to select
3
the still image or movie
you want to protect, then
press
.
The still image or movie
index menu appears.
Press M/m to select “Protect”, then press .
4
Press M/m to select “On”, then press .
5
Memory Stick Home
Slide Show
Options
Filter : Still
Select Folder
Digi. Cam. Mode
The (Protect) icon is displayed.
To unlock the protect, select “Off”, then press .
Still image or movie index menu
Full Screen
Slide Show
Protect
Rotate
Startup
Delete
Close
No : 123/1234
Size : 1024x768
File : 100MSDCF/SJP0001.JPG
Date : 2003.MAY.31 1:00PM
continued
Advanced Operations
59
Page 60

Using the “Memory Stick” viewer (continued)
To protect a full screen image
1 After displaying a still image on the full screen (see page 51),
press .
The image setup menu appears.
2Press M/m to select “Protect”, then press .
3Press M/m to select “On”, then press
To protect a movie on the Movie Player
1 After displaying the Movie Player (see page 55), press M/m to
select “Menu”, then press .
The movie setup menu appears.
2Press M/m to select “Protect”, then press
3Press M/m to select “On”, then press .
Tip
• The property of the protected image is shown as “Read-only” on a
computer.
.
.
60
Advanced Operations
Page 61
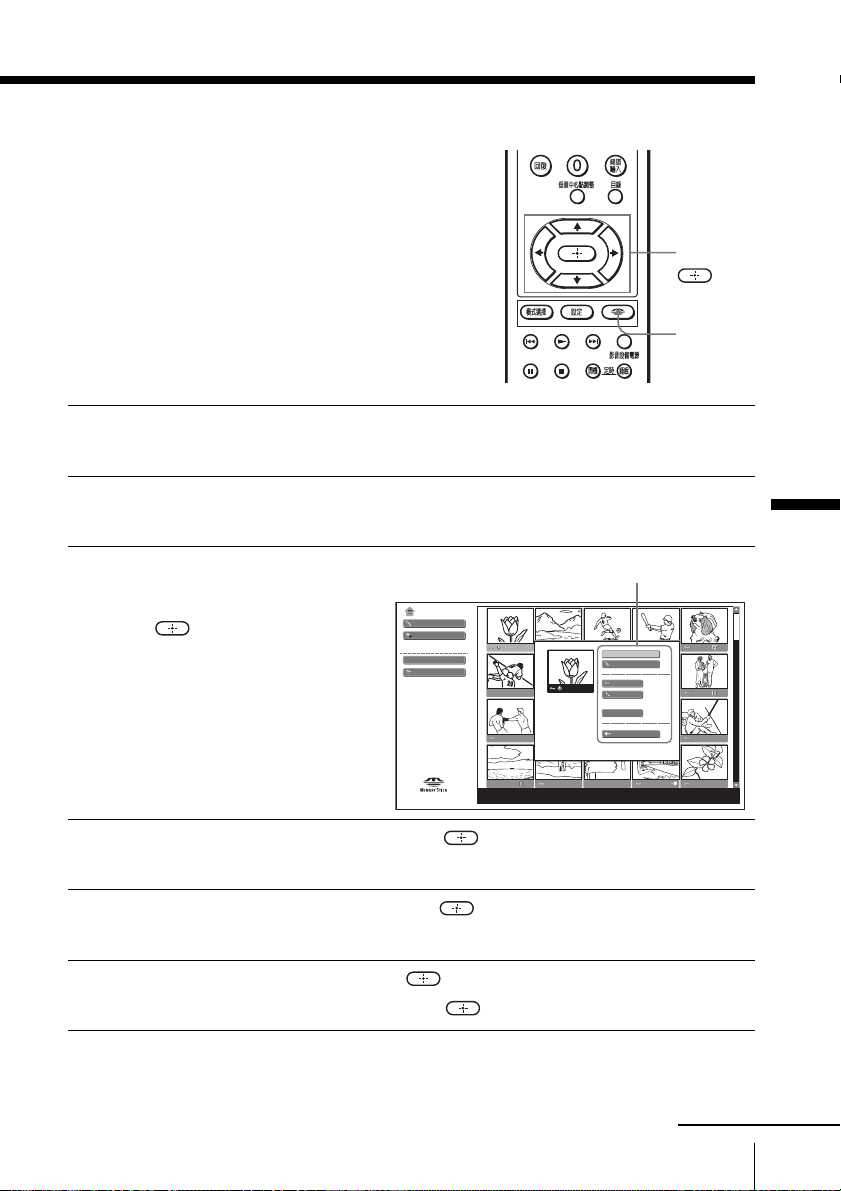
Deleting a still image
or movie
You can delete unnecessary still image
and movie files from the “Memory
Stick”. Before deleting, make sure they
are really unnecessary because the
deleted images cannot be restored.
DRC-MF
Insert a “Memory Stick” into the “Memory Stick” slot of the TV.
1
For details on inserting a “Memory Stick”, see page 44.
Press MEMORY STICK to display the “Memory Stick Home”.
2
M/m/</,/
MEMORY STICK
MEMORY
STICK
Advanced Operations
Press M/m/</, to select
3
the still image or movie
you want to delete, then
press
.
The still image or movie
index menu appears.
Press M/m to select “Delete”, then press .
4
Press M to select “Selected”, then press .
5
A confirmation message appears.
Press < to select “Yes”, then press .
6
To cancel deleting, select “No”, then press .
Memory Stick Home
Slide Show
Options
Filter : Still
Select Folder
Digi. Cam. Mode
Still image or movie index menu
Full Screen
Slide Show
Protect
Rotate
Startup
Delete
Close
No : 123/1234
Size : 1024x768
File : 100MSDCF/SJP0001.JPG
Date : 2003.MAY.31 1:00PM
continued
Advanced Operations
61
Page 62

Using the “Memory Stick” viewer (continued)
Notes
• When “Digi. Cam. Mode” is set to “On”, deleting a file with the Relative
file icon deletes the other related files at the same time (see page 46).
• Before performing deleting, confirm the file information.
•You cannot delete protected image and movie (see page 59). First unlock
the protect.
• If the erasure prevention switch on the “Memory Stick” is in the LOCK
position, you cannot delete the still images and movies in that “Memory
Stick”.
To erase a full screen image
1 After displaying a still image on the full screen (see page 51),
press .
The image setup menu appears.
2Press M/m to select “Delete”, then press .
3Press M to select “Selected”, then press
A confirmation message appears.
4Press < to select “Yes”, then press .
To erase a movie on the Movie Player
1 After displaying the Movie Player (see page 55), press M/m to
select “Menu”, then press .
The movie setup menu appears.
2Press M/m to select “Delete”, then press
3Press M to select “Selected”, then press .
4Press < to select “Yes”, then press .
.
.
62
Advanced Operations
Page 63
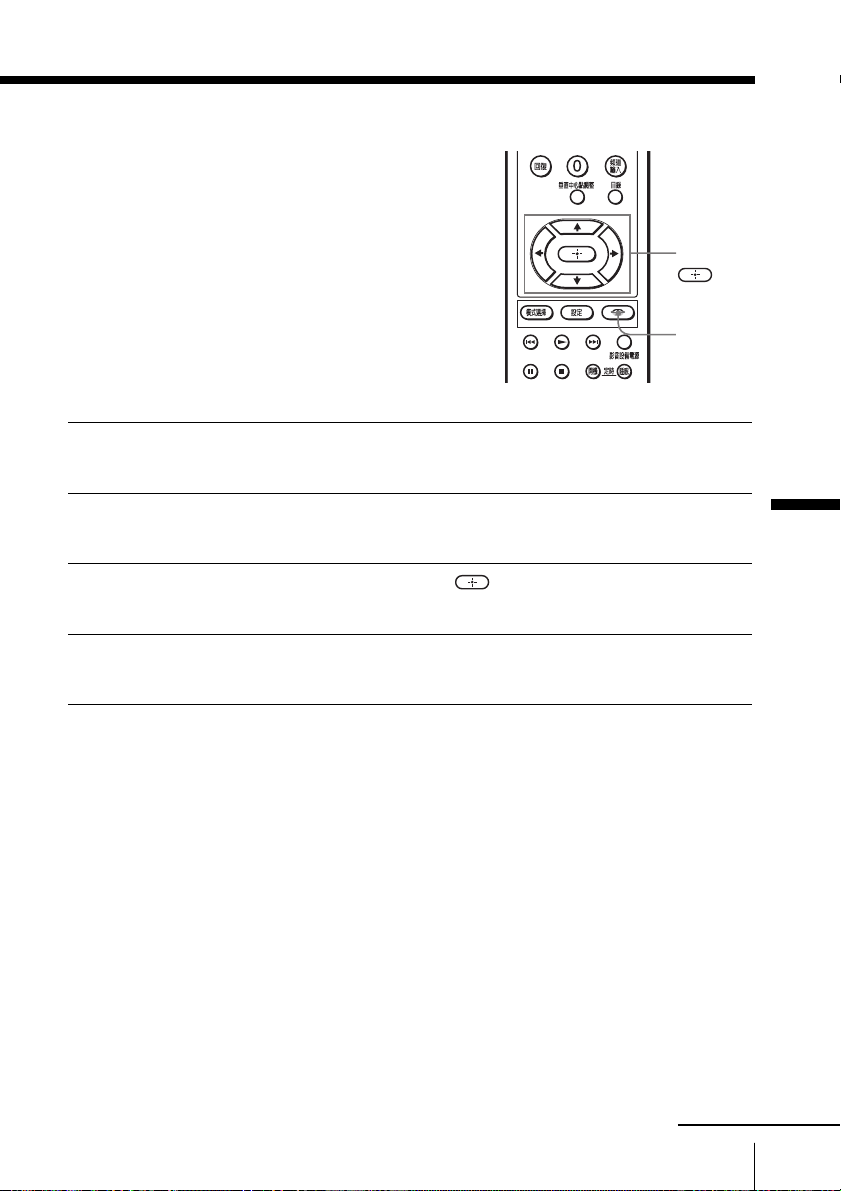
Displaying the current
status of “Memory Stick”
You can display the “Memory Stick”
type, total capacity, used capacity and
free capacity of the “Memory Stick”.
DRC-MF
Insert a “Memory Stick” into the “Memory Stick” slot of the TV.
1
For details on inserting a “Memory Stick”, see page 44.
MEMORY STICK
M/m/</,/
MEMORY
STICK
Press MEMORY STICK to display the “Memory Stick Home”.
2
Press M/m to select “Options”, then press .
3
The “Options” menu appears.
Press M/m to select “Memory Stick”.
4
The current status of the “Memory Stick” appears.
Advanced Operations
continued
Advanced Operations
63
Page 64
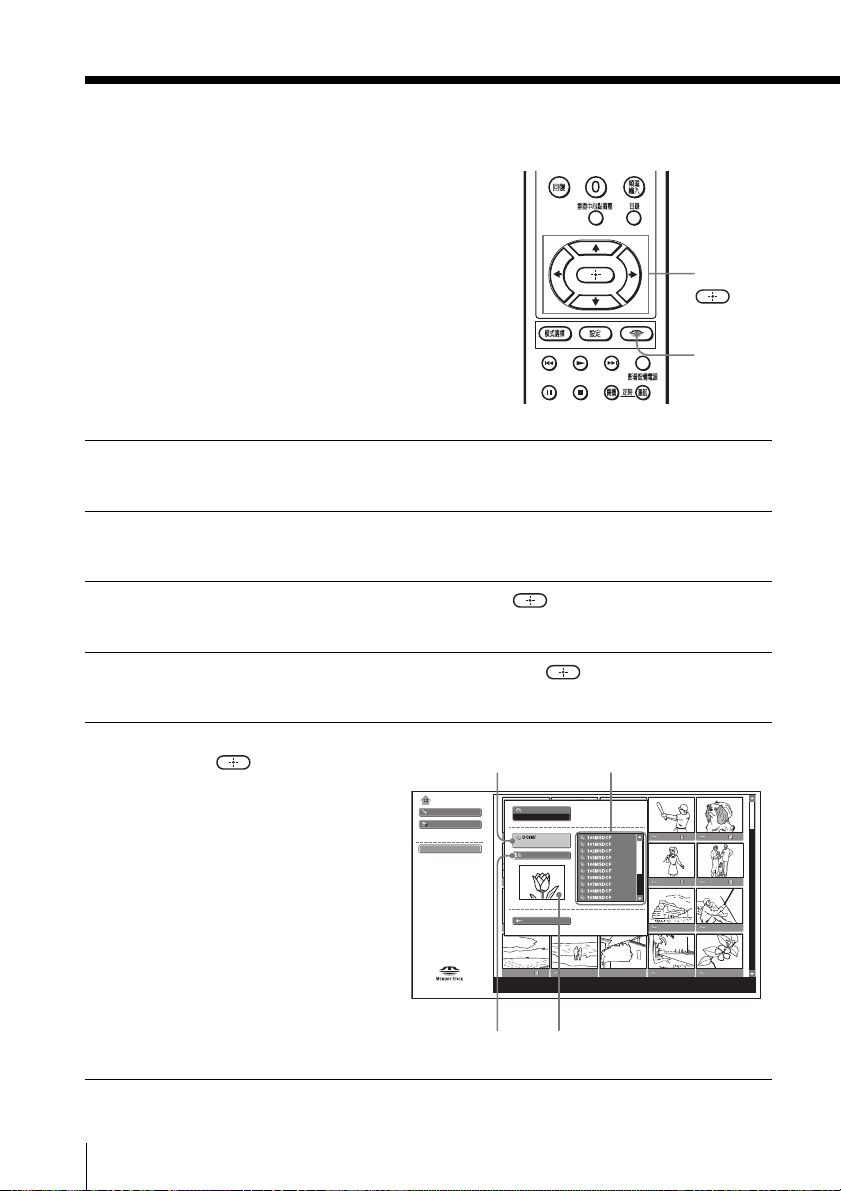
Using the “Memory Stick” viewer (continued)
Selecting folders
To view the still images and movies
stored in different folders using a
computer, you need to select the folder.
Before operating this function, make
sure that “Digi. Cam. Mode” is set to
“Off”.
Tip
• If you set “Digi. Cam. Mode” to “Off”,
you can display more than 2,000 images
and movies on the screen.
Insert a “Memory Stick” into the “Memory Stick” slot of the TV.
1
For details on inserting a “Memory Stick”, see page 44.
Press MEMORY STICK to display the “Memory Stick Home”.
2
Press M/m to select “Select Folder”, then press .
3
The “Select Folder” menu appears.
Press M/m to select “Digi. Cam. Mode”, then press .
4
DRC-MF
MEMORY STICK
M/m/</,/
MEMORY
STICK
Press M/m to select “Off”,
5
then press .
64
Advanced Operations
Current folder Folder list
Memory Stick Home
Slide Show
Options
Filter : Still
Select Folder
To upper stage
No :
Size :
Digi.Camera Mode
Off
Close
File :
Date :
First image or movie file included
in the current folder
Page 65
Press , to select the folder list.
6
Press M/m to select the folder which includes the file you want to view, then
7
press .
Press M/m to select “Close”, then press or press <.
8
The still images and movies included in the selected folder are
displayed on “Memory Stick Home”.
Advanced Operations
continued
Advanced Operations
65
Page 66
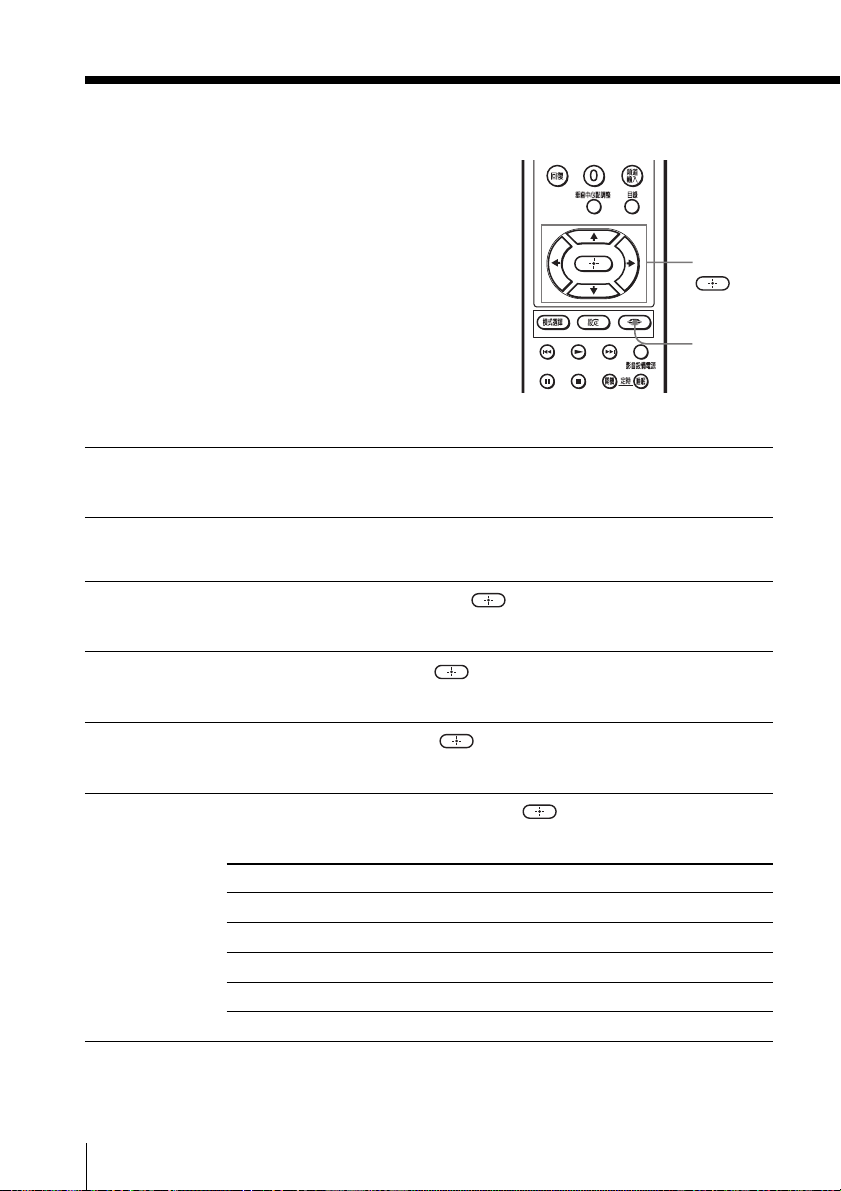
Using the “Memory Stick” viewer (continued)
Sorting images — Options
You can change the displaying order of
the images in a “Memory Stick”, in
alphabetical order by filename, in
chronological order by recording date.
Before operating this function, make
sure that “Digi. Cam. Mode” is set to
“Off”.
Tip
• If you set “Digi. Cam. Mode” to “Off”, you
can display more than 2,000 images and
movies on the screen.
Insert a “Memory Stick” into the “Memory Stick” slot of the TV.
1
For details on inserting a “Memory Stick”, see page 44.
Press MEMORY STICK to display the “Memory Stick Home”.
2
Press M/m to select “Options”, then press .
3
The “Options” menu appears.
Press M/m to select “File”, then press .
4
DRC-MF
MEMORY STICK
M/m/</,/
MEMORY
STICK
Press M/m to select “Sort”, then press .
5
Press M/m to select the desired item, then press .
6
66
Advanced Operations
Sort menu
Item To
Name Order
Name Order
Date Order
Date Order
Note
• If an image file has been processed by a computer, the modified date may
be displayed for that file.
A
sort in alphabetical order (A to Z) by filename
m
Z
Z
sort in reverse alphabetical order (Z to A) by filename
m
A
1
sort in chronological order by recording (1 to 9)
m
9
9
sort in reverse chronological order by recording (9 to 1)
m
1
Page 67
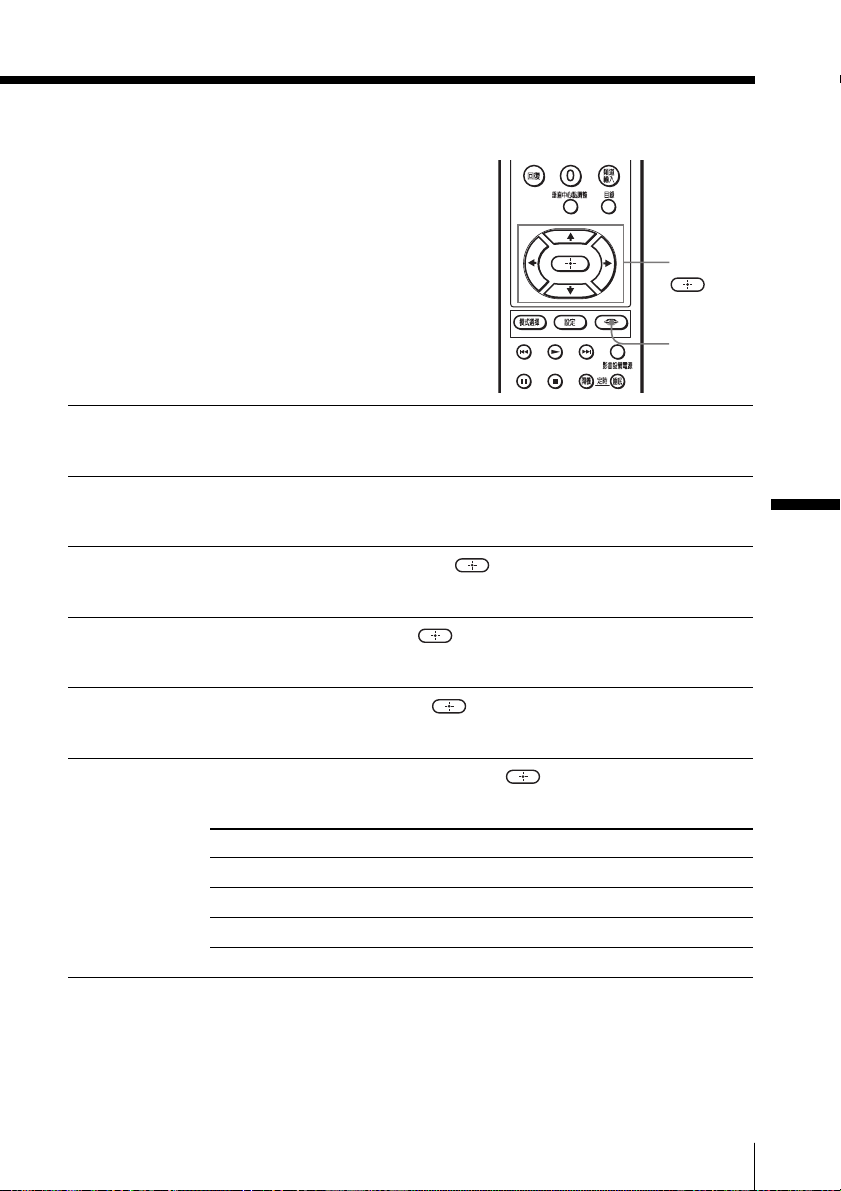
Displaying either still images
or movies — Options
You can display either the still images
or the movies that are stored in a
“Memory Stick”.
Before operating this function, make
sure that “Digi. Cam. Mode” is set to
“Off”.
DRC-MF
Insert a “Memory Stick” into the “Memory Stick” slot of the TV.
1
For details on inserting a “Memory Stick”, see page 44.
Press MEMORY STICK to display the “Memory Stick Home”.
2
Press M/m to select “Options”, then press .
3
The “Options” menu appears.
Press M/m to select “File”, then press .
4
Press M/m to select “Filter”, then press .
5
MEMORY STICK
M/m/</,/
MEMORY
STICK
Advanced Operations
Press M/m to select the desired item, then press .
6
Filter menu
Item Images to be displayed
“Show Stills” Still images only
“Show Movies” Movies only
“Off” Still images and movies
Tip
• If “Show Stills” or “Show Movies” is selected on “Filter”, the selected
image type (still image or movie) is displayed on “Memory Stick Home”.
Advanced Operations
67
Page 68
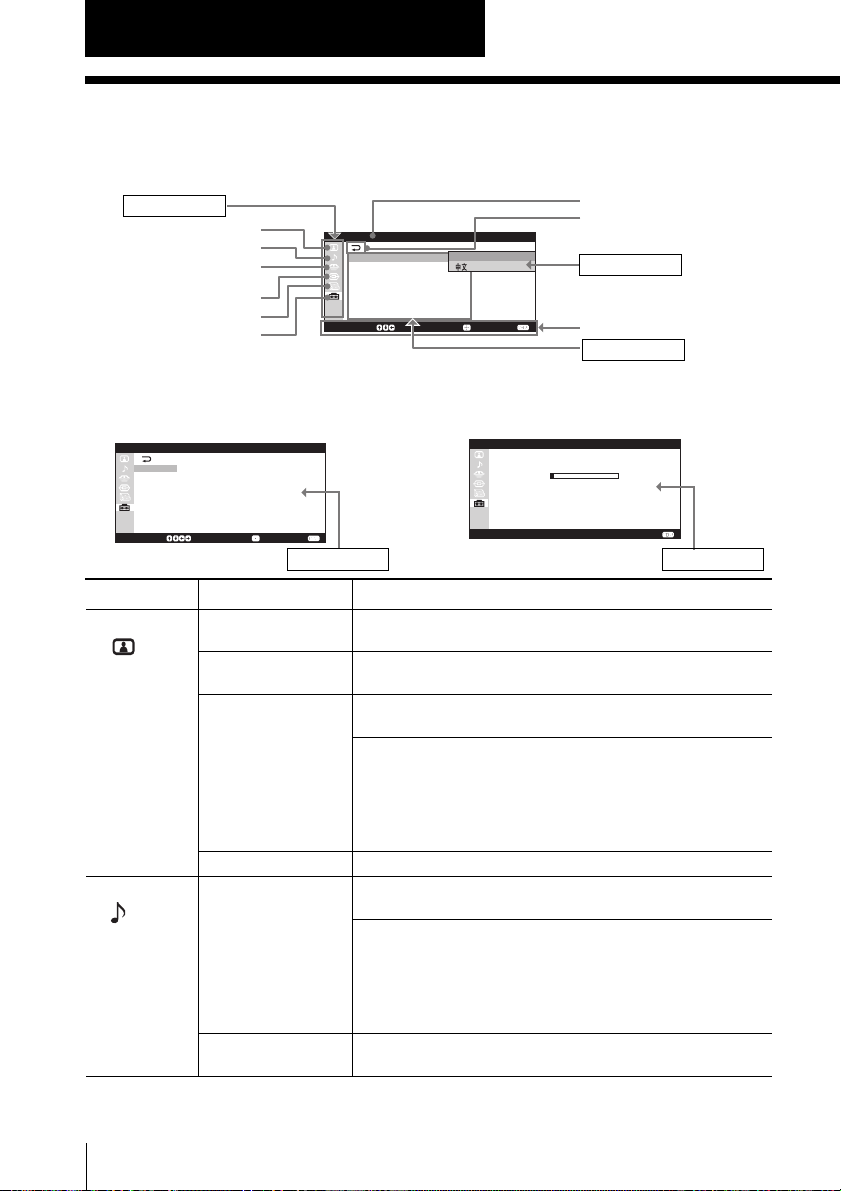
Adjusting Your Setup (MENU)
Introducing the menu system
The MENU button lets you open a menu and change the settings of your TV. The
following is an overview of the menu system.
Menu level 1
Picture icon
Sound icon
Memory Stick icon
Wide Screen icon
Features icon
Setup icon
S e t u p
A u t o
A u t o
N o r m a l
E n g l i s h
L a n g u a g e :
C h a n n e l S e t u p
V i d e o L a b e l
C o l o r S y s t e m :
S I n p u t :
S p e a k e r P h a s e :
M o v e : S e l e c t : E n d :
Selecting some items in Menu level 2 of Setup menu displays another menu (Menu
level 3), and selecting some options in this menu also displays the adjustment menu
(Menu level 4).
C h a n n e l S e t u p
C a b l e : O f f
A u t o P r o g r a m
C h a n n e l S k i p / A d d
C h a n n e l L a b e l
C h a n n e l B l o c k
M o v e : S e l e c t : E n d :
Menu level 3
Level 1
“Picture”
Level 2/Level 3
“DRC-MF”
Level 3/Level 4/Function
Selects the “DRC-MF” mode:
“DRC1050” t “Progressive”
“DRC Palette”
Selects one of the three custom DRC palettes.
“Custom 1” t “Custom 2” t “Custom 3”
“Picture Mode”
Selects the picture mode:
“Dynamic” t “Standard” t “Hi-Fine” t “Personal”
“Picture
Adjustment”
(appears when
Adjusts the “Personal” option:
“Picture” t “Brightness” t “Color” t “Hue” t
“Sharpness” t “Color Temperature” t “Reset”
“Picture
Mode” is set to
“Personal”)
“Sound”
“3D-NR”
“Sound Mode”
Activates or deactivates picture noise reduction mode.
Selects the sound mode:
“Dynamic” t “Drama” t “Soft” t “Personal”
“Sound
Adjustment”
Adjusts the “Personal” option:
“Treble” t “Bass” t “BBE”* t “Reset”
(appears when
“Sound Mode”
is set to
“Personal”)
“Balance”
Adjusts the balance between the left and right speaker
volume.
* Licensed by BBE Sound, Inc. under USP4638258, 4482866.
“BBE” and BBE symbol are trademarks of BBE Sound, Inc.
A u t o P r o g r a m
C h a n n e l :
C ab l e :
Name of the current menu
Return icon
Menu level 3
Navigation Help
Menu level 2
0 0 9
O n
C o n f i r m :S e l e c t : E n d :
Menu level 4
68
Adjusting Your Setup (MENU)
Page 69
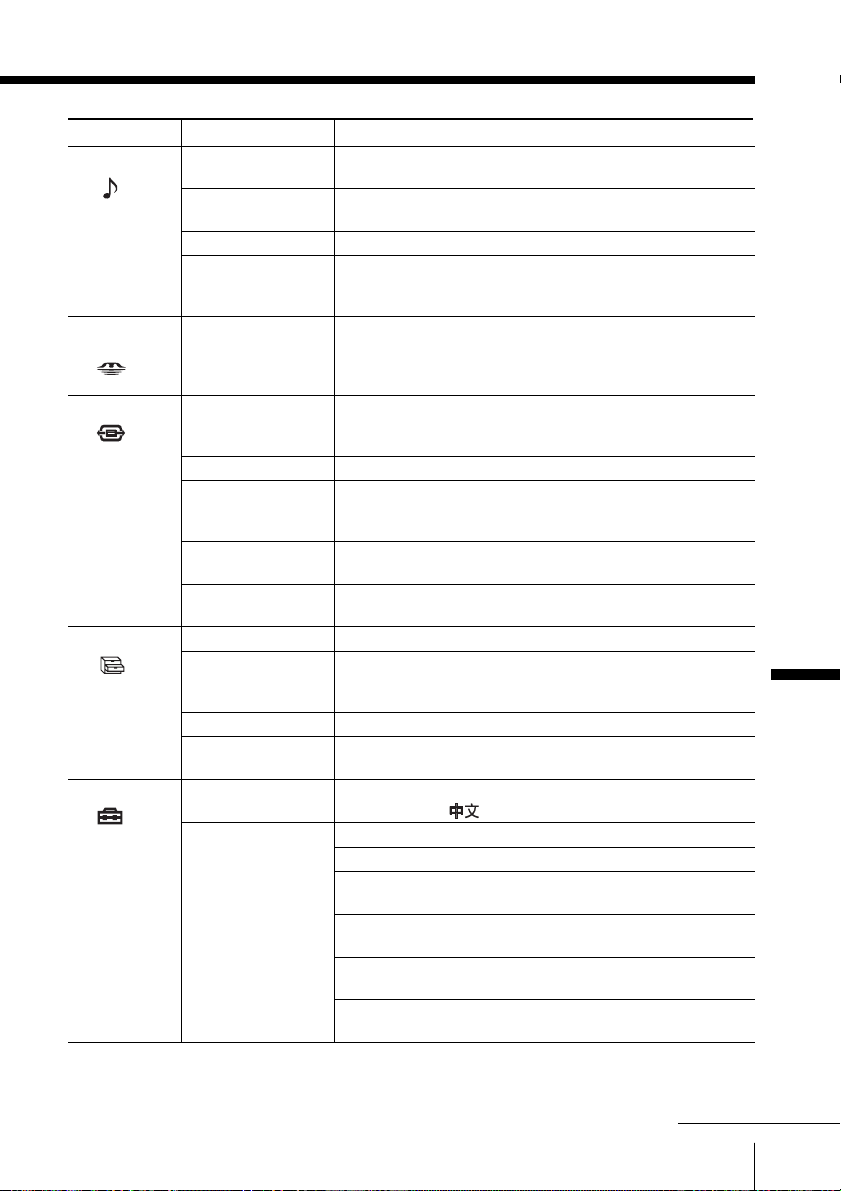
Level 1
“Sound”
“Memory
Stick”
“Wide Screen”
“Features”
“Setup”
Level 2/Level 3
“Intelligent
Volume”
“Surround”
“Speaker Out”
“Audio Out”
“Memory Stick
Menu”
“Wide Mode”
“Auto Wide”
“4:3 Default”
“V Center”
“V Size”
“Eco Mode”
“Screen Saver”
“Game Mode”
“Logo
Illumination”
“Language”
“Channel Setup”
“Cable”
“Auto
Program”
“Channel
Skip/Add”
“Channel
Label”
“Channel
Block”
Level 3/Level 4/Function
Activates or deactivates the Intelligent Volume feature.
Selects the “Surround” mode:
“TruSurround” t “Simulated” t “Off”
Selects to turn on or off the TV speakers.
Allows you to control the audio output from your
external audio system speakers by the TV’s remote
control.
Displays still pictures and movies stored in a “Memory
Stick”.
You can also display this menu by pressing MEMORY
STICK on the remote.
Selects the wide screen mode:
“Wide Zoom” t “Normal”* t “Full” t “Zoom”
* You can select when receiving a normal 4:3 picture.
Selects an optimum wide screen mode automatically.
Changes the picture to “Wide Zoom” or “Normal” when
the normal 4:3 picture with ID-1 or 480i/480p format
signal without ID-1 is received.
Adjusts the vertical position of the picture in “Wide
Zoom” or “Zoom” mode.
Adjusts the vertical size of the picture in “Wide Zoom” or
“Zoom” mode.
Activates or deactivates ECO MODE feature.
Reduces image retention. “Orbit” moves the picture
position to reduce image retention. “All White” displays
a white screen to reduce image retention.
Activates or deactivates GAME MODE feature.
Allows you to illuminate the SONY logo on the front
panel of the TV.
Changes the menu language:
“English” t “ ” (Chinese)
Presets channels, or selects the cable system.
Selects “On” if you are receiving cable channel.
The “Auto Program” menu is displayed.
Presets channels automatically.
The “Channel Skip/Add” menu is displayed.
Adds or erases viewable channels.
Assigns labels (such as station names) to the preset
channels.
Locks out specific channels.
Adjusting Your Setup (MENU)
continued
69Adjusting Your Setup (MENU)
Page 70
Introducing the menu system (continued)
Level 1
“Setup”
Level 2/Level 3
“Video Label”
“Video Input”
“Label”
“Color System”
“S Input”
“Speaker Phase”
To restore the factory settings
Press the RESET button on the remote.
The settings other than the following items in the menu can be reset
by using the RESET button:
– “Language”
– “Cable” in “Channel Setup”
– “Channel Skip/Add” in “Channel Setup”
– “Memory Stick Menu” items
– “Personal” in “Picture Mode” and “Sound Mode“
– “Channel Label”
– “Video Label”
– “DRC Palette“ Custom settings
Level 3/Level 4/Function
Assigns labels to the audio/video equipment connected
to the TV.
Selects the input to which the audio/video equipment is
connected.
“Video 1” t “Video 2” t “Video 3” t “Video 4” t
“HD/DVD 1” t “HD/DVD 2”
Selects one of the prefixed labels or assign your own
label in “Edit” position. When you select “Video 1”, the
displayed label changes as follows:
“Video 1” t “VCR” t “SAT” t “Game” t “Edit”
Selects the color system:
“Auto” t “PAL” t “NTSC3.58” t “NTSC4.43”
Selects the S video input mode: “Auto” or “Off”.
Change the phase of the center speaker’s output.
70
Adjusting Your Setup (MENU)
Page 71
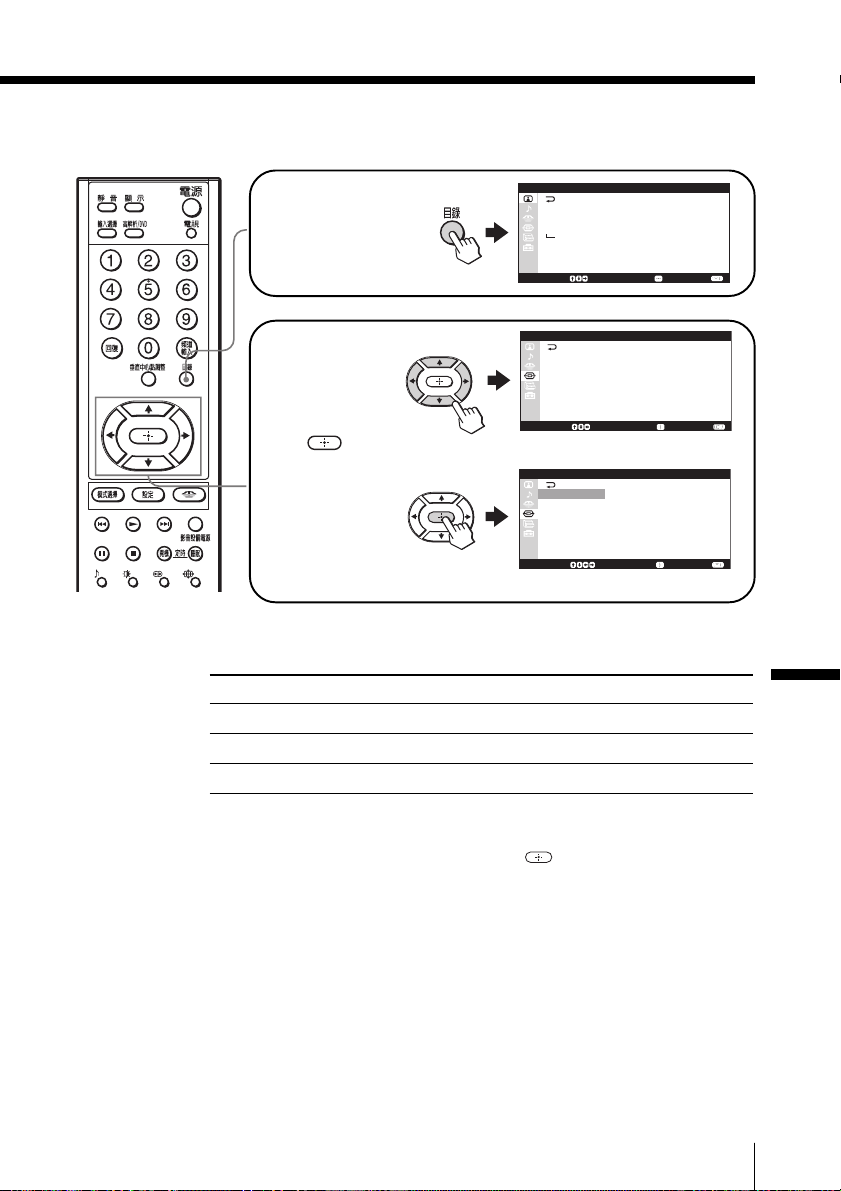
How to use the menu
DRC-MF
Press MENU to
display the menu.
Press M/m/</,
to select the
desired item.
Press
to
confirm the
selection and/or
MEMORY STICK
go to the next
level.
Other menu operations
To
Adjust the setting value
Move to the next/previous menu level
Cancel the menu
P i c t u r e
D R C - M F :
D R C P a l e t t e :
P i c t u r e M o d e :
P i c t u r e A d j u s t m e n t
3 D - N R :
M o v e : S e l e c t : E n d :
W i d e S c r e e n
W i d e M o d e :
A u t o W i d e :
4 : 3 D e f a u l t :
V C e n t e r : 0 0
V S i z e :
M o v e : S e l e c t : E n d :
W i d e S c r e e n
W i d e M o d e :
A u t o W i d e :
4 : 3 D e f a u l t :
V C e n t e r : 0 0
V S i z e :
M o v e : S e l e c t : E n d :
D R C 1 0 5 0
C u s t o m 1
P e r s o n a l
O f f
W i d e Z o o m
O n
W i d e Z o o m
0 0
W i d e Z o o m
O n
W i d e Z o o m
0 0
Press
M/m/</,.
</,.
MENU.
Adjusting Your Setup (MENU)
Tip
• If you want to exit from Menu level 2 to Menu level 1, press M/m until the
return icon (3) is highlighted, then press .
Note
• If more than 60 seconds elapse between entries, the menu screen other
than that for “Memory Stick” menu automatically disappears.
71Adjusting Your Setup (MENU)
Page 72
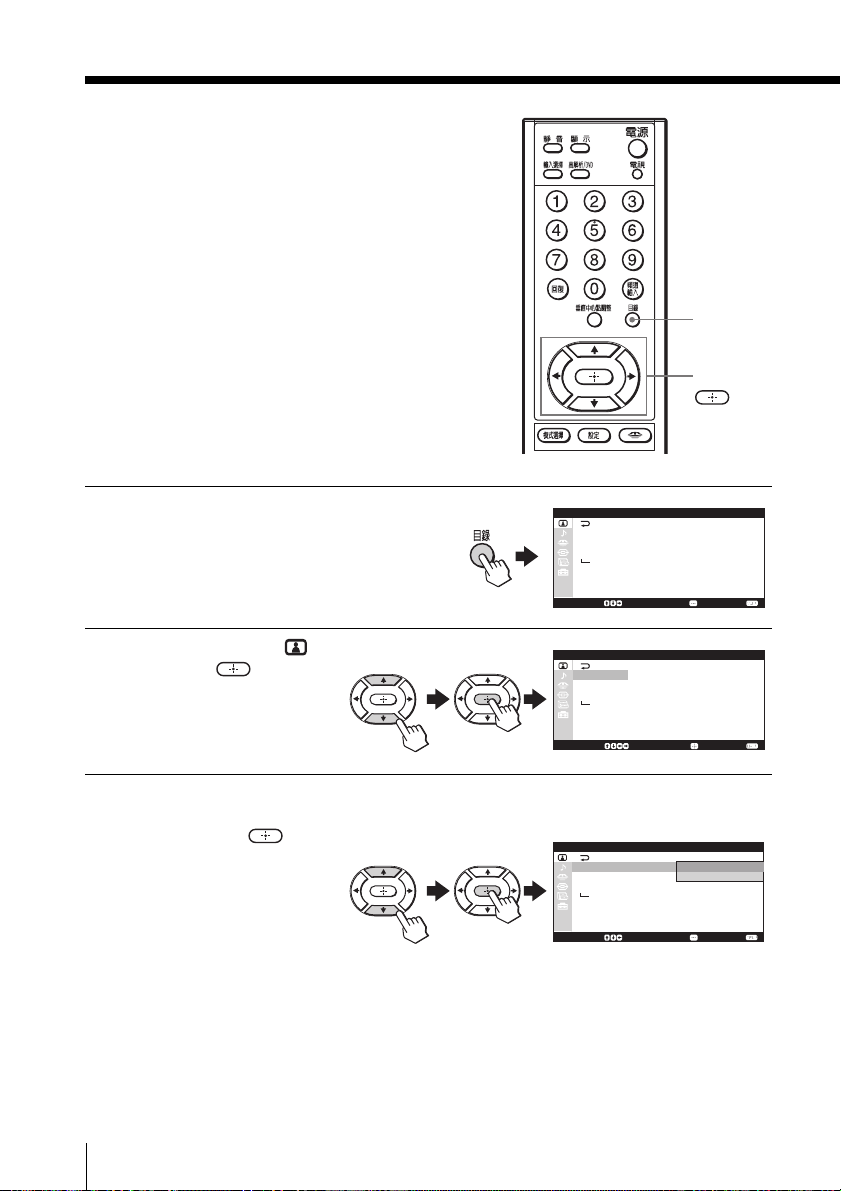
Changing the
“Picture” setting
The “Picture” menu allows you to:
adjust the picture setting, view higher
quality pictures and reduce picture
noise.
DRC-MF
MENU
M/m/</,/
MEMORY STICK
Press MENU.
1
Press M/m to select ,
2
then press .
Press M/m to
3
option (see the table on page
73), then press
select the desired
.
P i c t u r e
D R C - M F :
D R C P a l e t t e :
P i c t u r e M o d e :
P i c t u r e A d j u s t m e n t
3 D - N R :
M o v e : S e l e c t : E n d :
P i c t u r e
D R C - M F :
D R C P a l e t t e :
P i c t u r e M o d e :
P i c t u r e A d j u s t m e n t
3 D - N R :
M o v e : S e l e c t : E n d :
P i c t u r e
D R C - M F :
D R C P a l e t t e :
P i c t u r e M o d e :
P i c t u r e A d j u s t m e n t
3 D - N R :
M o v e : S e l e c t : E n d :
D R C 1 0 5 0
C u s t o m 1
P e r s o n a l
O f f
D R C 1 0 5 0
C u s t o m 1
P e r s o n a l
O f f
D R C 1 0 5 0
P r o g r e s s i v e
C u s t o m 1
P e r s o n a l
O f f
72
Adjusting Your Setup (MENU)
Page 73
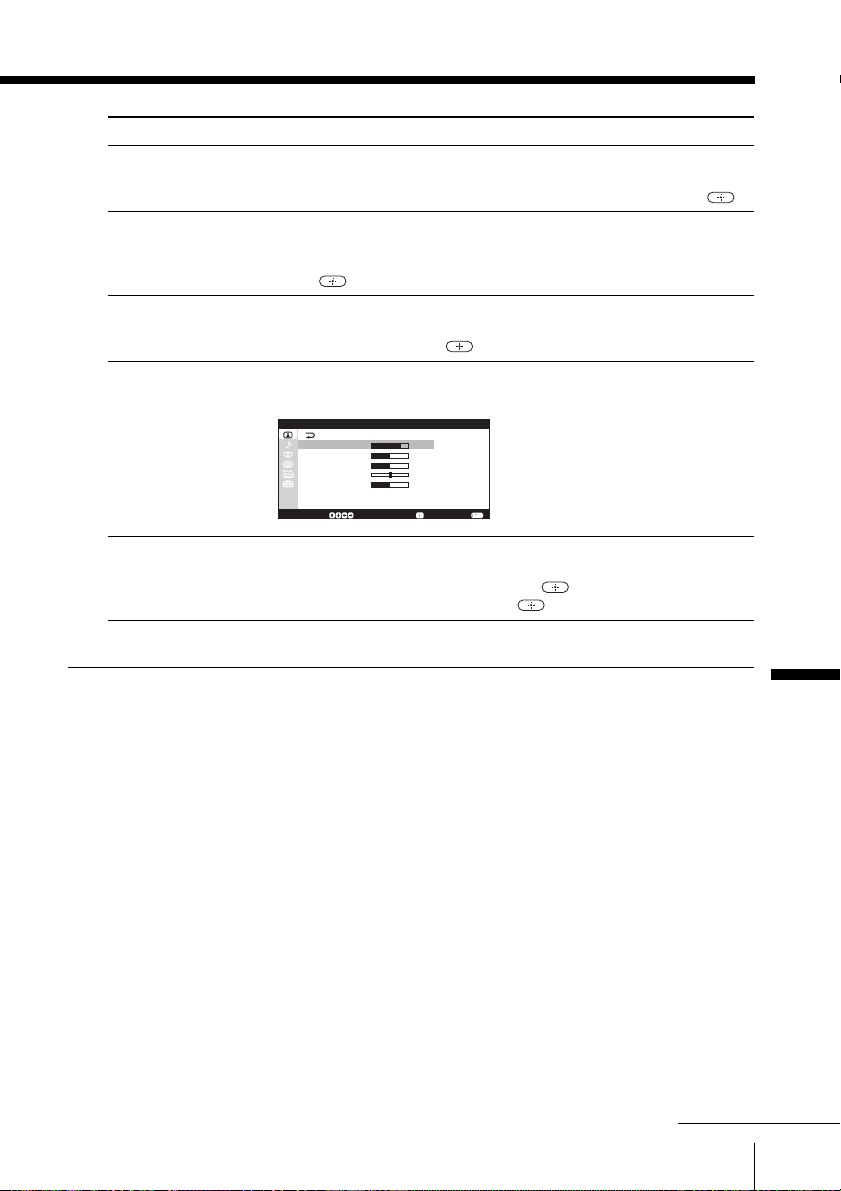
Select To
“DRC-MF” activate the Digital Reality Creation-Multi function feature to
display higher quality pictures.
Press M/m to select “DRC1050” or “Progressive”, then press .
“DRC Palette” select one of the customized settings of the picture Reality and
Clarity levels.
Press M/m to select “Custom 1”, “Custom 2” or “Custom 3”, then
press .
“Picture Mode” receive suitable picture mode.
Press M/m to select “Dynamic”, “Standard”, “Hi-Fine”,
“Personal”*, then press .
“Picture Adjustment” adjust the picture quality when “Picture Mode” is set to
“Personal”*.
A d j u s t m e n t
P i c t u r e
P i c t u r e
B r i g h t n e s s
C o l o r
H u e0 0
S h a r p n e s s
C o l o r T e m p e r a t u r e :N e u t r a l
R e s e t
M o v e : S e l e c t : E n d :
8 0
5 0
5 0
5 0
“3D-NR” improve the picture quality of TV or video if a signal received is
weak.
Press M/m to select “On”, then press .
To cancel, select “Off”, then press .
* When the “Personal” mode is selected, the last adjusted picture
setting in the “Picture Adjustment” menu is received (see page 74).
Tips
• For details on the options under the “DRC-MF” and “DRC Palette”
modes, see pages 27-29, respectively.
• When high-definition (HD) or progressive signals are input, “DRC-MF”
and “DRC Palette” do not function.
• When using the “Memory Stick” viewer, “DRC-MF”, “DRC Palette” and
“3D-NR” do not function.
• Some items of the “Picture Adjustment” menu are not available for the
pictures stored in a “Memory Stick”.
To return to the normal screen
Press MENU.
Adjusting Your Setup (MENU)
continued
73Adjusting Your Setup (MENU)
Page 74
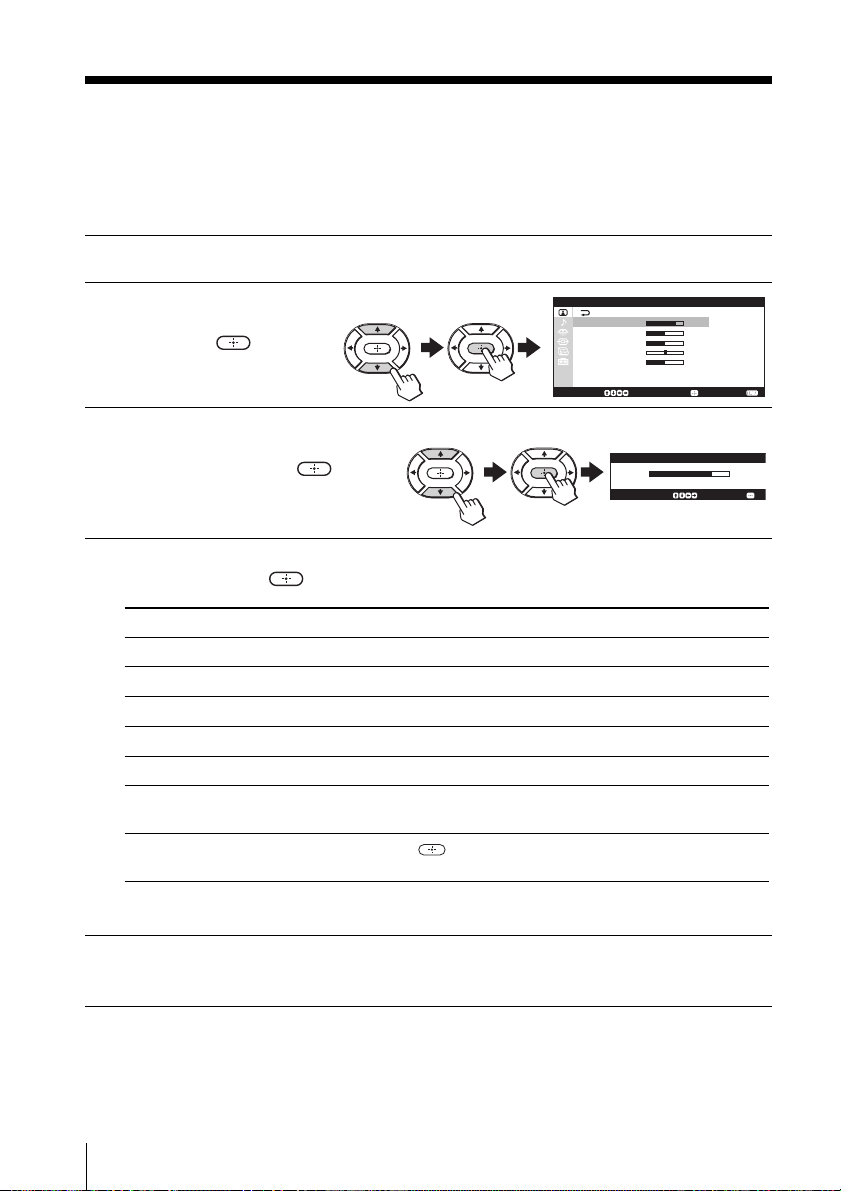
Changing the “Picture” setting (continued)
Adjusting the “Picture Adjustment” options
You can access the “Picture Adjustment” menu only when you have
selected “Personal” for “Picture Mode”.
Display the “Picture” menu and select “Personal” for “Picture Mode”.
1
A d j u s t m e n t
Press M/m to select
2
“Picture Adjustment”,
then press
Press M/m to select the
3
desired item (e.g.,
“Color”), then press
Adjust the value or select the desired option according to the following
4
table, then press
.
.
.
P i c t u r e
P i c t u r e
B r i g h t n e s s
C o l o r
H u e0 0
S h a r p n e s s
C o l o r T e m p e r a t u r e : N e u t r a l
R e s e t
M o v e : S e l e c t : E n d :
Color
A d j u s t : S e l e c t :
8 0
5 0
5 0
5 0
8 0
For
“Picture”
“Brightness”
“Color”
“Hue”*
“Sharpness”
“Color Press M/m to select “Cool”, “Neutral” or “Warm”.
Temperature”
“Reset” Select “Reset” and press to reset the picture to the factory preset
Repeat steps 3 and 4 to adjust other items.
5
The adjusted settings will be received when you select “Personal”.
74
Adjusting Your Setup (MENU)
Press m/< to
decrease picture contrast
darken the picture
decrease color intensity
increase red picture tones
soften the picture
settings.
*You can adjust “Hue” for the NTSC color system only.
Press M/, to
increase picture contrast
brighten the picture
increase color intensity
increase green picture tones
sharpen the picture
Page 75
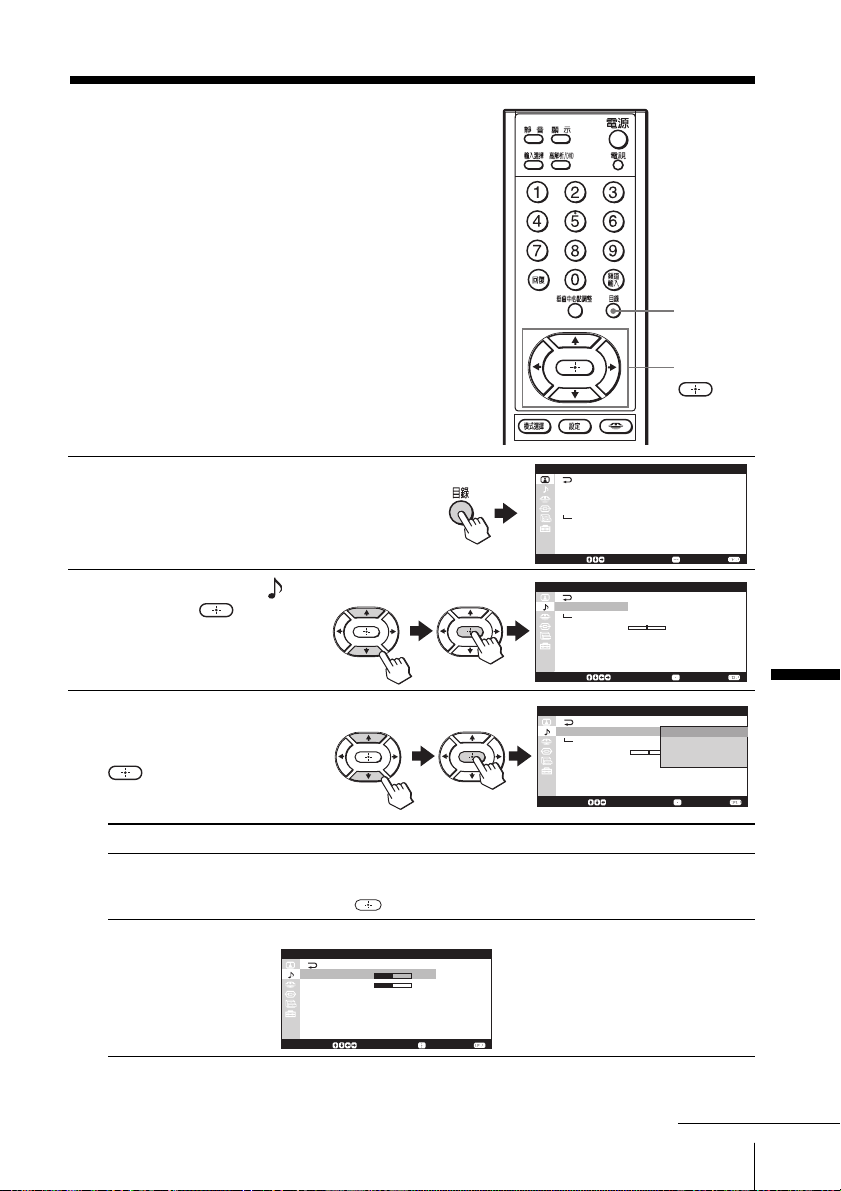
Changing the
“Sound” setting
The “Sound” menu allows you to adjust
the sound setting and adjust the volume
automatically. You can also listen to the
sound with surround effect.
Press MENU.
1
Press M/m to select ,
2
then press .
Press M/m to select the
3
desired option (see the
table below), then press
.
MENU
M/m/</,/
DRC-MF
MEMORY STICK
P i c t u r e
D R C - M F :
D R C P a l e t t e :
P i c t u r e M o d e :
P i c t u r e A d j u s t m e n t
3 D - N R :
M o v e : S e l e c t : E n d :
S o u n d
S o u n d M o d e : P e r s o n a l
S o u n d A d j u s t m e n t
B a l a n c e
I n t e l l i g e n t V o l u m e : O f f
S u r r o u n d :
S p ea k e r O u t :
A u d i o O u t :
M o v e : S e l e c t : E n d :
S o u n d
S o u n d M o d e :
S o u n d A d j u s t m e n t
B a l a n c e
I n t e l l i g e n t V o l u m e : O f f
S u r r o u n d :
S p e a k e r O u t :
A u d i o O u t :
M o v e : S e l e c t : E n d :
D R C 1 0 5 0
C u s t o m 1
P e r s o n a l
O f f
O f f
O n
F i x e d
O f f
O n
F i x e d
0 0
D y n a m i c
D r a m a
5 0
S o f t
P e r s o n a l
Adjusting Your Setup (MENU)
Select To
“Sound Mode” select the suitable sound mode.
Press M/m to select “Dynamic”, “Drama”, “Soft” or “Personal”*,
then press .
“Sound Adjustment” adjust the sound quality when “Sound Mode” is set to “Personal”*.
S o u n d A d j u s t m e n t
T r e b l e
B a s s
B B E :O f f
R e s e t
M o v e : S e l e c t : E n d :
5 0
5 0
* When the “Personal” mode is selected, the last adjusted sound
setting in the “Sound Adjustment” menu is received (see page 77).
continued
75Adjusting Your Setup (MENU)
Page 76
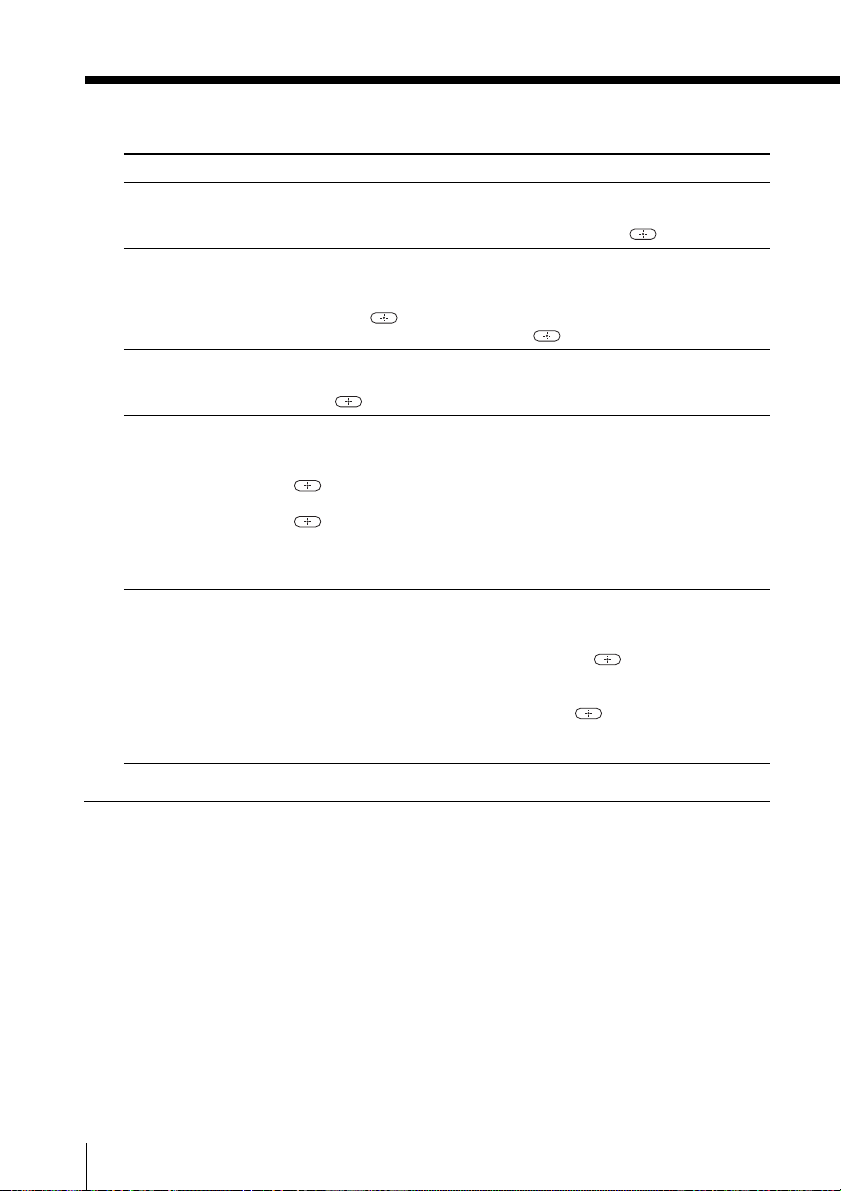
Changing the “Sound” setting (continued)
Select To
“Balance” adjust the balance between the left and right speaker volume.
“Intelligent Volume” adjust the volume of all TV programs and video inputs
“Surround” select the Surround mode.
“Speaker Out” select if you want to listen to the TV’s sound only through your
“Audio Out” select when “Speaker Out” option is set to “Off”, if you want to use
Press m/< to increase the left speaker’s volume, press M/, to
increase the right speaker’s volume, then press .
automatically.
Press M/m to select “On” to activate the Intelligent Volume feature,
then press .
To cancel, select “Off”, then press .
Press M/m to select “TruSurround”, “Simulated” or “Off”, then
press .
external audio system speakers.
Press M/m to select “On”, to turn on the TV speaker, then press
.
Press M/m to select “Off”, to turn off the TV speaker, then press
. You can listen to the TV’s sound only through your external
audio system speakers.
When you select “Off”, you cannot change the surround sound, the
“Intelligent Volume” mode or the “BBE” mode.
the TV’s remote control to control the audio output from your
audio system.
Press M/m to select “Variable”, then press . The audio output
from your audio system can still be controlled by the TV’s remote
control.
Press M/m to select “Fixed”, then press . The audio output of
the TV is fixed. Use your audio receiver’s remote control to adjust
the volume (and other audio settings) through your audio system.
Tip
• For details on the options under the “Sound Mode” and “Surround”
modes, see pages 26 and 34, respectively.
Note
• The “Speaker Out” setting is memorized when you turn off the TV.
To return to the normal screen
Press MENU.
76
Adjusting Your Setup (MENU)
Page 77
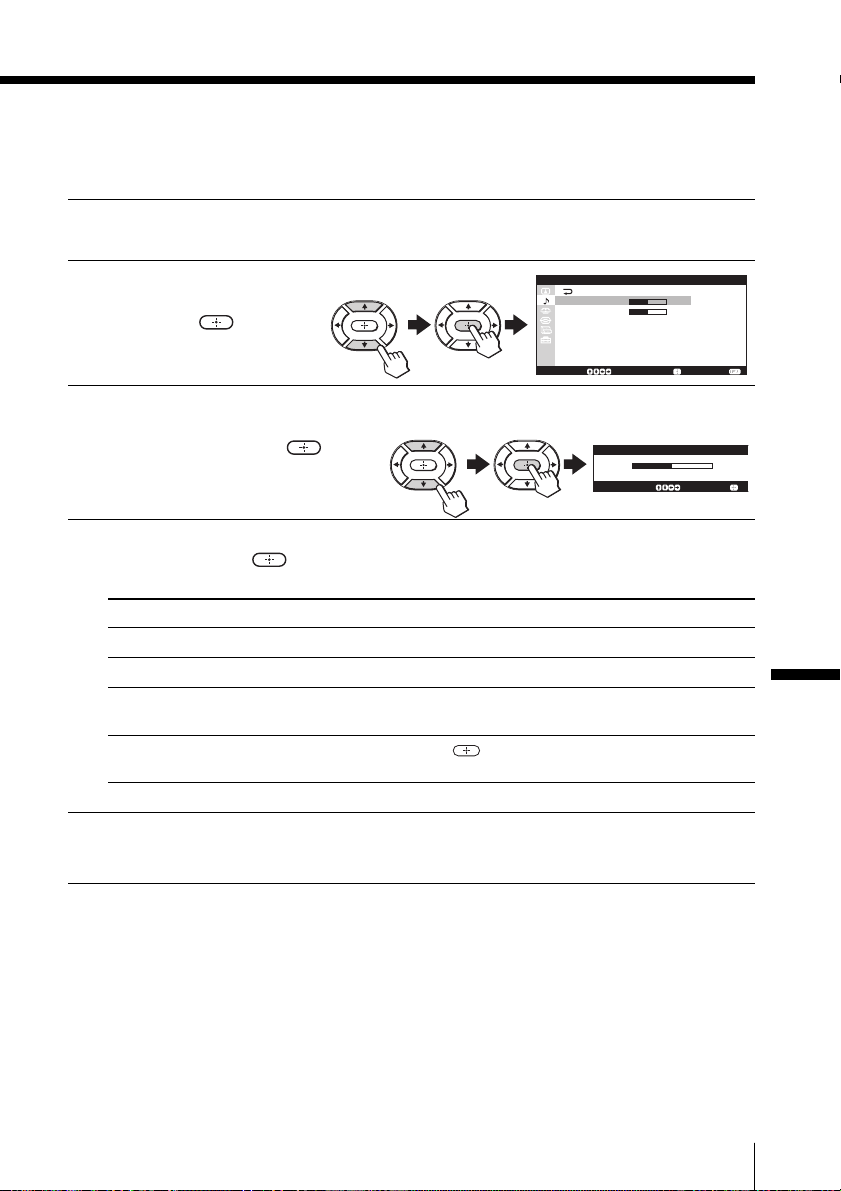
Adjusting the “Sound Adjustment” options
You can access the “Sound Adjustment” menu only when you have
selected “Personal” for “Sound Mode”.
Display the “Sound” menu and select “Personal” for “Sound Mode”.
1
Press M/m to select
2
“Sound Adjustment”,
then press
Press M/m to select the
3
desired item (e.g.,
“Treble”), then press
Adjust the value or select the desired option according to the following
4
table, then press
For Press
“Treble” m/< to decrease the treble, M/, to increase the treble.
“Bass” m/< to decrease the bass, M/, to increase the bass.
“BBE” M/m to select “High”, “Low” or “Off”.
“Reset” Select “Reset” and press to reset the sound to the factory
Repeat steps 3 and 4 to adjust other items.
5
.
.
.
“BBE” can produce clear sound.
preset settings.
S o u n d A d j u s t m e n t
T r e b l e
B a s s
B B E :O f f
R e s e t
M o v e : S e l e c t : E n d :
Treble
A d j u s t : S e l e c t :
The adjusted settings will be received when you select “Personal”.
5 0
5 0
50
Adjusting Your Setup (MENU)
Note
•You cannot change the “BBE” mode when the TV is in the center speaker
mode (see page 39).
77Adjusting Your Setup (MENU)
Page 78
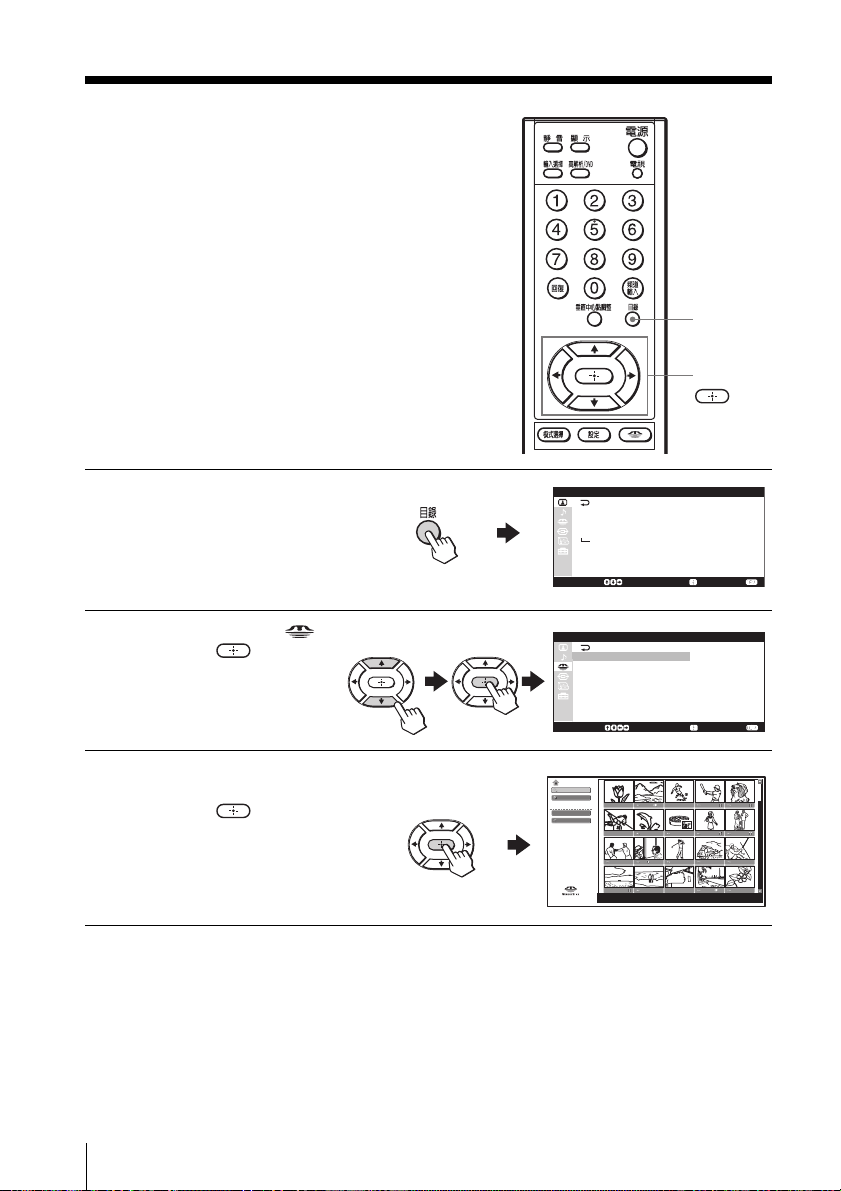
Entering the
“Memory Stick”
menu
The “Memory Stick” menu allows you
to view still pictures and movies stored
in a “Memory Stick”.
Insert a “Memory Stick” into the
“Memory Stick” slot. For details on using
a “Memory Stick”, see pages 41 to 67.
DRC-MF
MENU
M/m/</,/
MEMORY STICK
Press MENU.
1
Press M/m to select ,
2
then press
Make sure that “Memory
3
Stick Menu” is selected,
then press
For details on the options
under the “Memory Stick
Menu”, see pages 45 to 67.
P i c t u r e
D R C - M F :
D R C P a l e t t e :
P i c t u r e M o d e :
P i c t u r e A d j u s t m e n t
3 D - N R :
M o v e : S e l e c t : E n d :
.
.
M e m o r y
M e m o r y S t i c k M e n u
M o v e : S e l e c t : E n d :
Memory Stick Home
Slide Show
Option
Filter : Still
Select Folder
Dig. Cam. Mode
No :
Size :
S t i c k
D R C 1 0 5 0
C u s t o m 1
P e r s o n a l
O f f
File :
Date :
78
Adjusting Your Setup (MENU)
Page 79
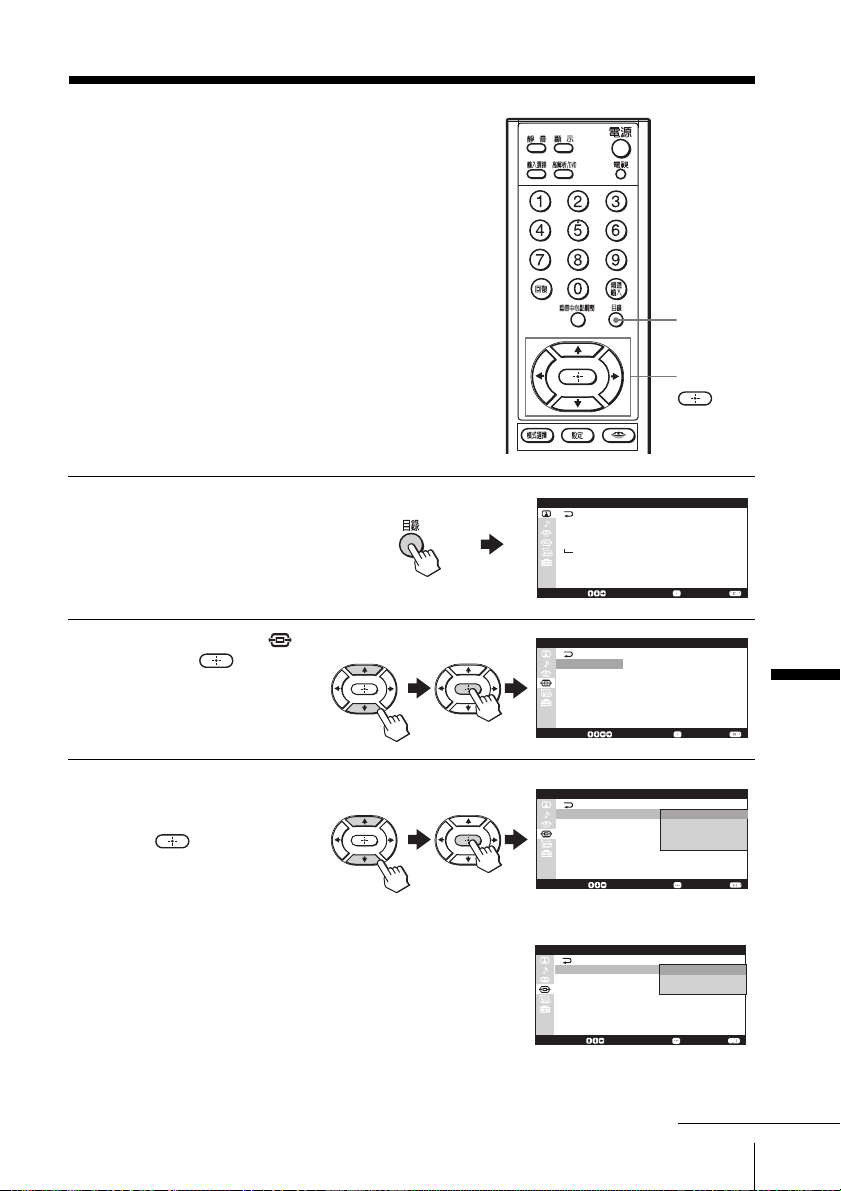
Changing the “Wide
Screen” setting
The “Wide Screen” menu allows
you to watch the picture filling
the 16:9 screen of the TV.
DRC-MF
MENU
M/m/</,/
MEMORY STICK
Press MENU.
1
Press M/m to select ,
2
then press .
Press M/m to select the
3
desired option (see the
table on page 80), then
press
.
P i c t u r e
D R C - M F :
D R C P a l e t t e :
P i c t u r e M o d e :
P i c t u r e A d j u s t m e n t
3 D - N R :
M o v e : S e l e c t : E n d :
W i d e S c r e e n
W i d e M o d e :
A u t o W i d e :
4 : 3 D e f a u l t :
V C e n t e r : 0 0
V S i z e :
M o v e : S e l e c t : E n d :
W i d e S c r e e n
W i d e M o d e :
A u t o W i d e :
4 : 3 D e f a u l t :
V C e n t e r : 0 0
V S i z e :
M o v e : S e l e c t : E n d :
D R C1 0 5 0
C u s t o m 1
P e r s o n a l
O f f
W i d e Z o o m
O n
W i d e Z o o m
0 0
W i d e Z o o m
O n
N o r m a l
W i d e Z o o m
F u l l
Z o o m
0 0
When receiving a normal
4:3 picture
W i d e S c r e e n
W i d e M o d e :
A u t o W i d e :
4 : 3 D e f a u l t :
V C e n t e r : 0 0
V S i z e :
M o v e : S e l e c t : E n d :
W i d e Z o o m
O n
F u l l
W i d e Z o o m
Z o o m
0 0
When receiving an HDTV
16:9 picture
Adjusting Your Setup (MENU)
continued
79Adjusting Your Setup (MENU)
Page 80
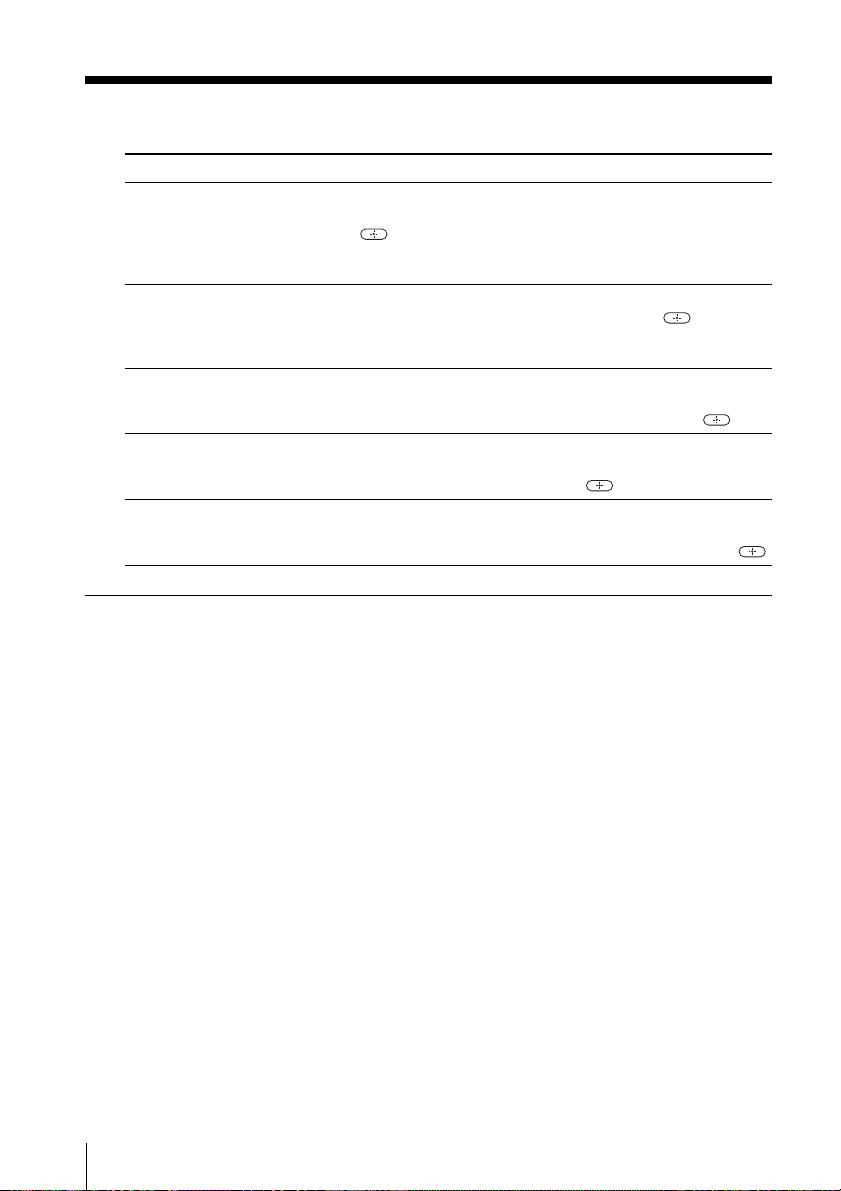
Changing the “Wide Screen” setting (continued)
Select To
“Wide Mode” select the desired wide screen mode to fit the 16:9 screen.
“Auto Wide” automatically display the picture in optimum wide screen mode.
“4:3 Default” display a 4:3 picture in “Wide Zoom” (factory setting) or in
“V Center” adjust the vertical position of the picture within the screen in “Wide
“V Size” adjust the vertical size of the picture within the screen in “Wide
Press M/m to select “Wide Zoom”, “Normal”*, “Full” or “Zoom”,
then press .
For details on each mode, see “Using wide screen mode” on page 30.
* You can select when receiving a normal 4:3 picture.
Press M/m to select “On” (factory setting), then press . Select
“Off” if you want to display any picture in currently selected wide
screen mode.
“Normal” mode.
Press M/m to select “Wide Zoom” or “Normal”, then press .
Zoom” or “Zoom” mode.
Press M/m to move the picture, then press .
Zoom” or “Zoom” mode.
Press M to increase the vertical size, or m to reduce it, then press .
Note
• “4:3 Default” does not function when “Auto Wide” is set to “Off”.
To return to the normal screen
Press MENU.
80
Adjusting Your Setup (MENU)
Page 81
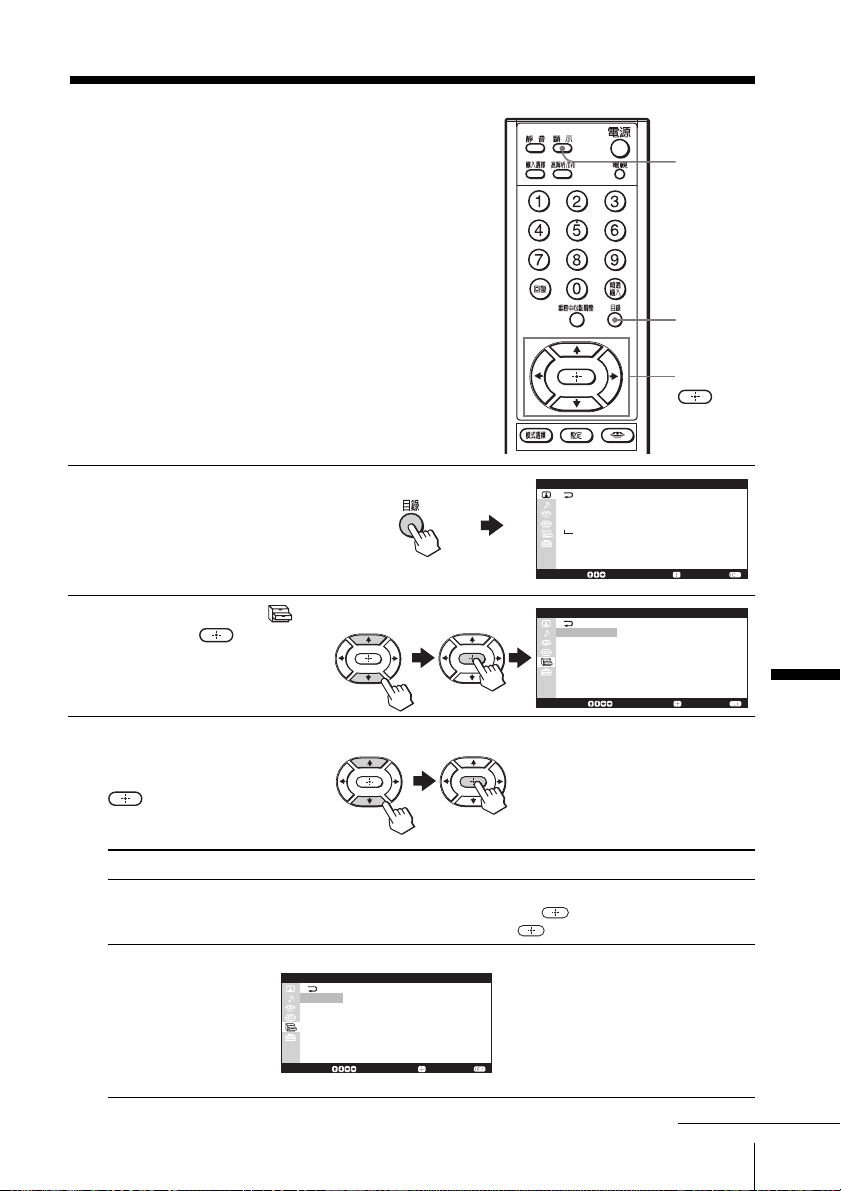
Changing the
“Features” setting
The “Features” menu allows you to use
some of the TV’s features. For example,
you can use the ECO MODE, GAME
MODE, etc.
Press MENU.
1
Press M/m to select ,
2
then press .
DISPLAY
MENU
M/m/</,/
DRC-MF
MEMORY STICK
P i c t u r e
D R C - M F :
D R C P a l e t t e :
P i c t u r e M o d e :
P i c t u r e A d j u s t m e n t
3 D - N R :
M o v e : S e l e c t : E n d :
F e a t u r e s
E c o M o d e :
S c r e e n S a v e r
G a me M o d e :
L o g o
M o v e : S e l e c t : E n d :
D R C 1 0 5 0
C u s t o m 1
P e r s o n a l
O f f
O f f
O f f
I l l u m i n a t i o n :
O n
Adjusting Your Setup (MENU)
Press M/m to select the
3
desired option (see the
table below), then press
.
Select To
“Eco Mode” reduce power consumption of your TV to save energy.
“Screen Saver” reduce image retention.
Press M/m to select “On”, then press .
To cancel, select “Off”, then press .
S c r e e n S a v e r
O n
O r b i t :
A l l W h i t e
M o v e : S e l e c t : E n d :
See “Changing the “Screen Saver” options” on page 83.
continued
81Adjusting Your Setup (MENU)
Page 82
Changing the “Features” setting (continued)
Select To
“Game Mode” adjust the picture setting that is suitable to view video games.
“Logo Illumination ” allow you to illuminate the SONY logo on the front panel of the
Notes
• If “Eco Mode” is on, the ECO MODE ( ) icon will appear at the bottom
• “Game Mode” is available only when receiving signals through the t
• When high-definition (HD) signals or progressive signals are input,
Press M/m to select “On”, then press .
To cancel, select “Off”, then press .
TV.
Press M/m to select “On” to illuminate the SONY logo while the
power is turned on, then press .
To cancel, select “Off”, then press .
right corner of the screen when you turn on the TV or when you press
DISPLAY on the remote.
VIDEO IN (video input), S VIDEO (S video input), or
COMPONENT VIDEO IN (component video input) jacks.
“Game Mode” does not function.
To return to the normal screen
Press MENU.
82
Adjusting Your Setup (MENU)
Page 83
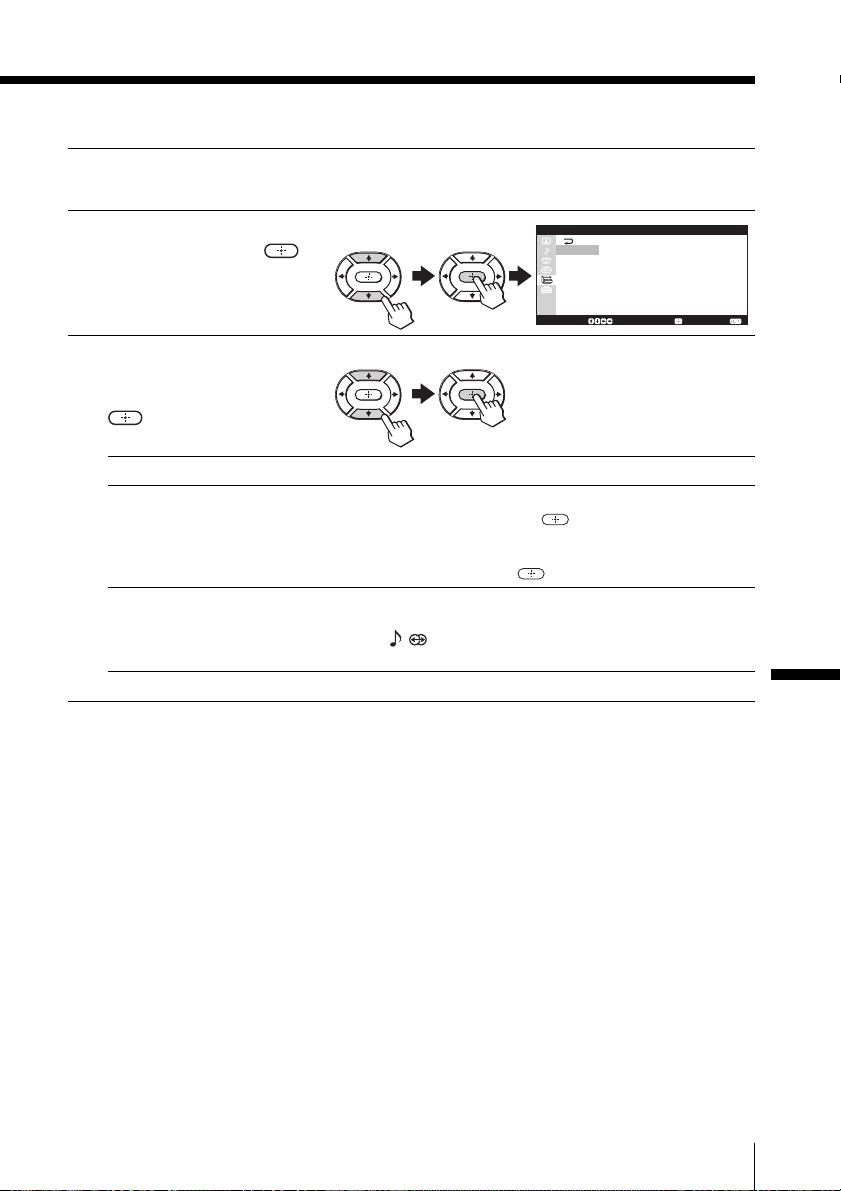
Changing the “Screen Saver” options
Display the “Features” menu.
1
Press M/m to select “Screen
2
Saver”, then press
Press M/m to select the
3
desired option (see the
.
table below), then press
.
Select To
“Orbit” move the picture position to reduce image retention.
“All White” display a white screen to reduce image retention.
Press M/m to select “On”, then press .
This dose not prevent image retention completely if the same
picture is displayed for an extended period of time.
To cancel, select “Off”, then press .
To cancel, press any button of the remote control except for VOL
+/–, MUTING, , , MTS, VIDEO POWER and CENTER SP.
This mode is cancelled automatically after 30 minutes.
S c r e e n S a v e r
O n
O r b i t :
A l l W h i t e
M o v e : S e l e c t : E n d :
Adjusting Your Setup (MENU)
83Adjusting Your Setup (MENU)
Page 84
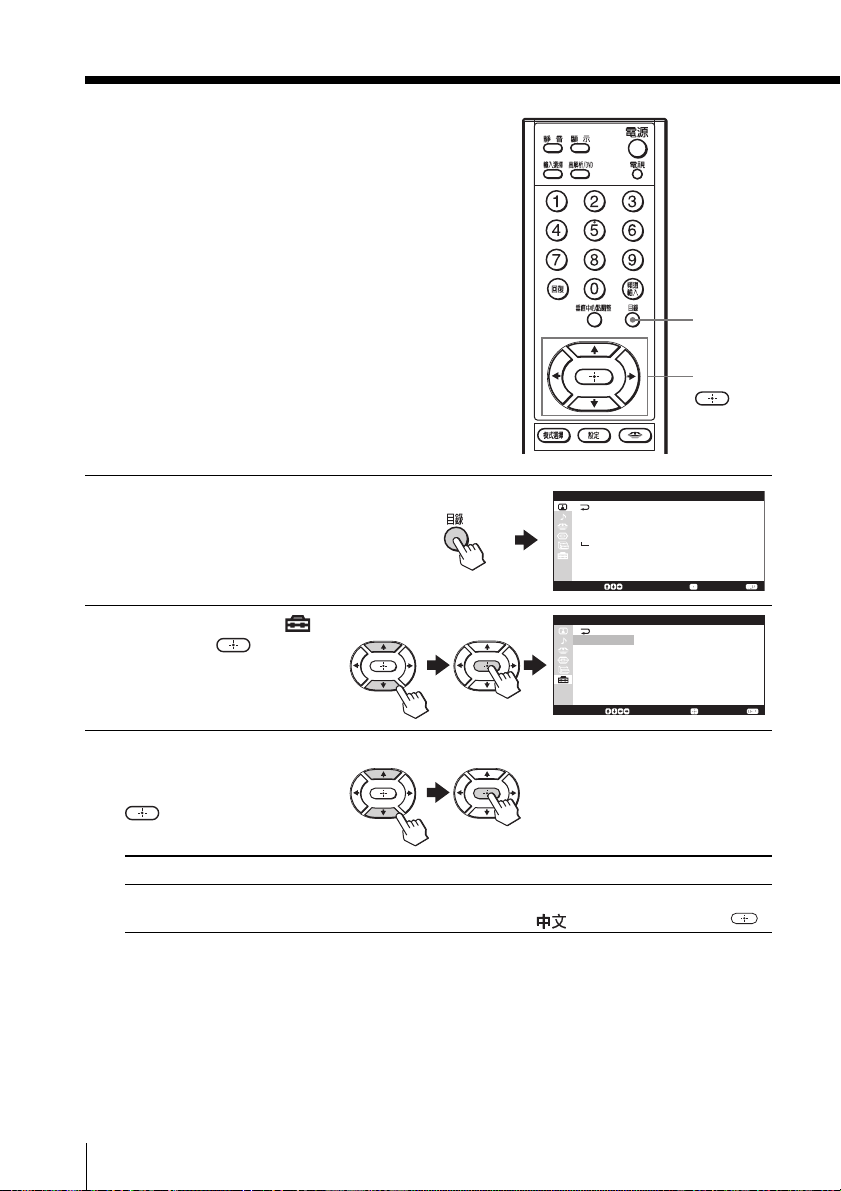
Changing the
“Setup” setting
The “Setup” menu allows you to adjust
the setup of your TV. For example, you
can change the menu language, preset
channels, etc.
DRC-MF
MENU
M/m/</,/
MEMORY STICK
Press MENU.
1
Press M/m to select ,
2
then press
Press M/m to select the
3
desired option (see the
.
table below), then press
.
Select To
“Language” change the menu language.
Press M/m to select “English” or “ ” (Chinese), then press .
P i c t u r e
D R C - M F :
D R C P a l e t t e :
P i c t u r e M o d e :
P i c t u r e A d j u s t m e n t
3 D - N R :
M o v e : S e l e c t : E n d :
S e t u p
L a n g u a g e : E n g l i s h
C h a n n e l S e t u p
V i d e o L a b e l
C o l o r S y s t e m :
S I n p u t :
S p e a k e r P h a s e :
M o v e : S e l e c t : E n d :
D R C 1 0 5 0
C u s t o m 1
P e r s o n a l
O f f
A u t o
A u t o
N o r m a l
84
Adjusting Your Setup (MENU)
Page 85
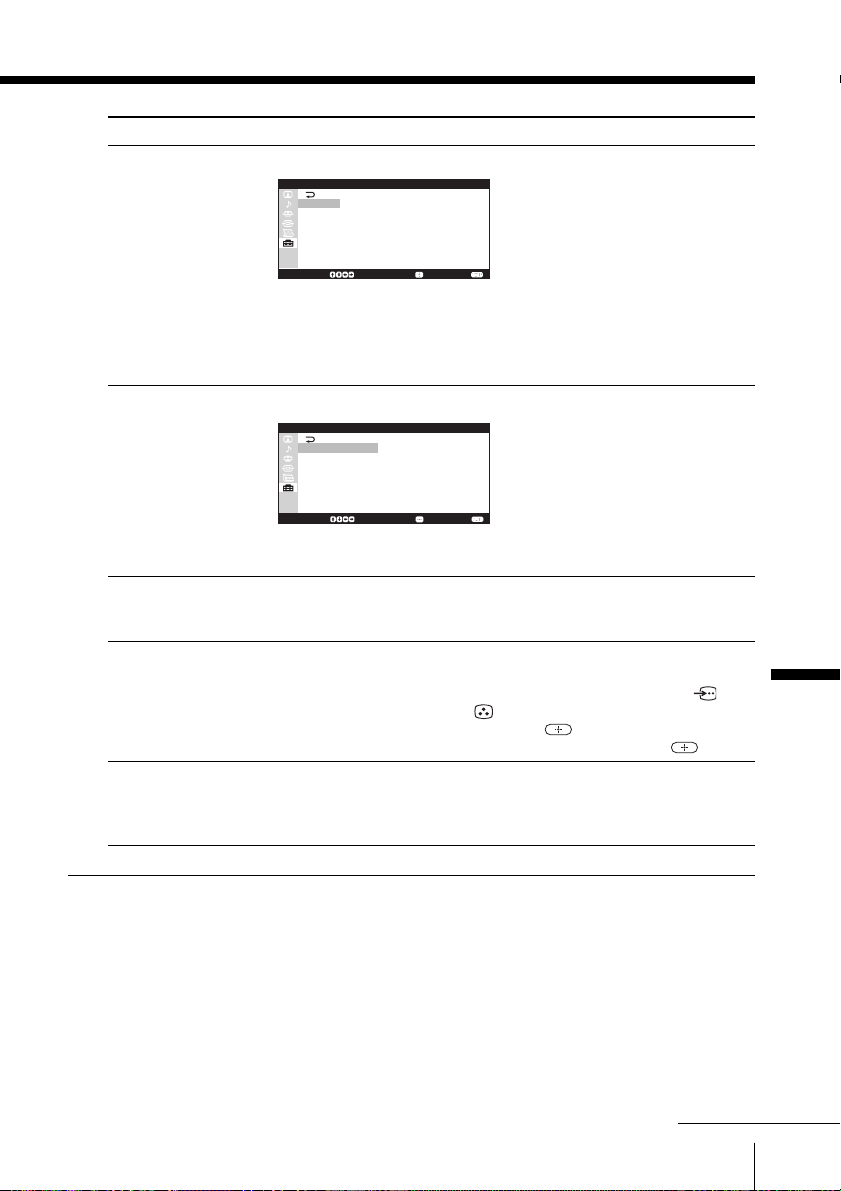
Select To
“Channel Setup” preset channels.
C h a n n e l S e t u p
C a b l e : Of f
A u t o P r o g r a m
C h a n n e l S k i p / A d d
C h a n n e l L a b e l
C h a n n e l B l o c k
M o v e : S e l e c t : E n d :
You can select automatic or manual channel presetting.
See “Presetting channels manually” on page 86.
For “Channel Label” and “Channel Block”, see “Assigning labels
to the preset channels” on page 88 and “Blocking channels” on
page 89, respectively.
“Video Label” assign labels to the connected audio/video equipment.
V i d e o L a b e l
V i d e o I n p u t :
L a b e l :
M o v e : S e l e c t : E n d :
V i d e o 1
V i d e o 1
See “Assigning labels to the connected audio/video equipment”
on page 90.
“Color System” select the color system. Normally, set this to “Auto”.
You can select the color system for each video input.
The color system for TV channels is fixed.
“S Input” select the S video input mode.
Press M/m to select “Auto” to receive the S video signal
automatically when the signals are input through both the S
VIDEO (S video input) and VIDEO (video input) jacks of the
same video input channel, then press .
To deactivate the S video input, select “Off”, then press .
“Speaker Phase” select the phase of sound when using the TV’s speakers as the
center speaker. If sound from the TV’s speaker (as center speaker)
sound unnatural, change the phase of sound.
Select “Normal” or “Reverse”.
Adjusting Your Setup (MENU)
Note
• “Language” selection is disabled when the “Memory Stick” viewer is
displayed.
To return to the normal screen
Press MENU.
continued
85Adjusting Your Setup (MENU)
Page 86
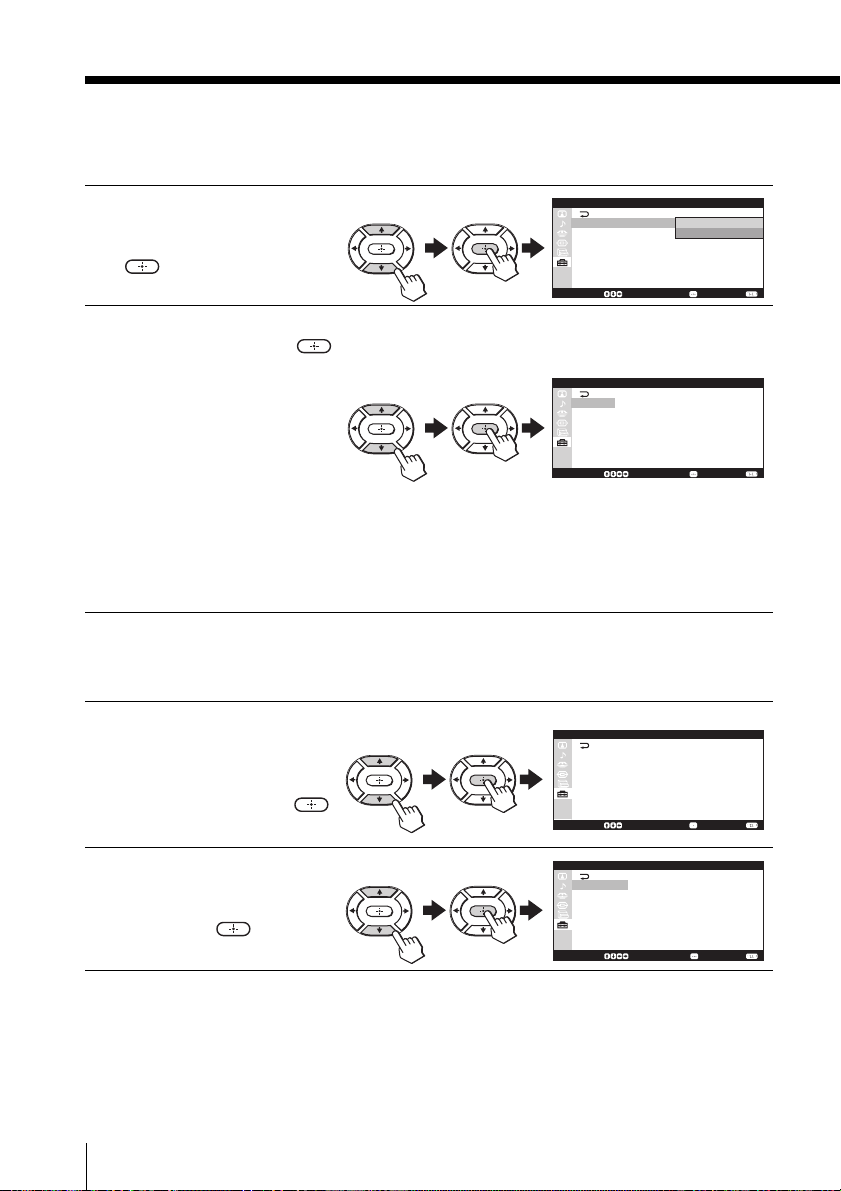
Changing the “Setup” setting (continued)
Selecting the cable system
After selecting “Channel
1
Setup”, press M/m to
select “Cable”, then press
.
Press M/m to select “On”
2
or “Off”, then press .
(1) If you select “Cable: On”,
you will receive cable TV
channels.
If there is no cable TV
reception, you will receive
VHF or UHF broadcast
C h a n n e l S e t u p
C a b l e :
A u t o P r o g r a m
C h a n n e l S k i p / A d d
C h a n n e l L a b e l
C h a n n e l B l o c k
M o v e : S e l e c t : E n d :
C h a n n e l S e t u p
C a b l e :
A u t o P r o g r a m
C h a n n e l S k i p / A d d
C h a n n e l L a b e l
C h a n n e l B l o c k
M o v e : S e l e c t : E n d :
channels.
(2) If you select “Cable: Off”,
you will receive VHF or
UHF broadcast channels
only.
Presetting channels manually (“Channel Skip/Add”)
After selecting “Channel
1
Skip/Add” under
“Channel Setup”, make
sure “Channel” is
selected, then press
.
C h a n n e l S k i p / A d d
C h a n n e l :
0 0 9
S k i p / A d d : S k i p
M o v e : S e l e c t : E n d :
O n
O f f
O n
Press M/m until the
2
channel number you want
to add or skip appears,
then press
86
Adjusting Your Setup (MENU)
C h a n n e l S k i p / A d d
C h a n n e l :
01 3
S k i p / A d d : S k i p
.
M o v e : S e l e c t : E n d :
Page 87
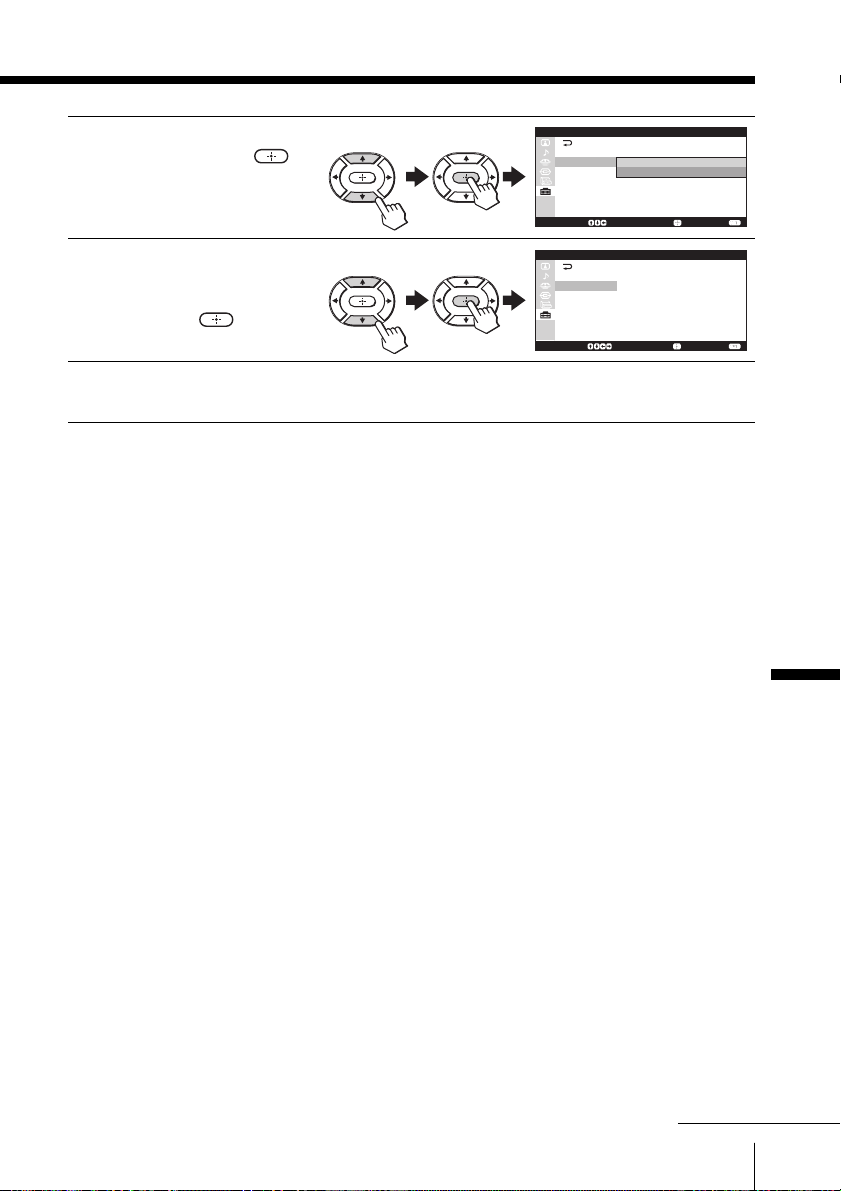
Press M/m to select “Skip/
3
Add”, then press
Press M/m to select “Add”
4
to preset a channel or
.
“Skip” to skip a channel,
then press
To preset other channels, select “Channel Skip/Add”, then
5
repeat steps 2 to 4.
.
To return to the normal screen
Press MENU.
C h a n n e l S k i p / A d d
C h a n n e l :
01 3
S k i p / A d d : S k i p
A d d
M o v e : S e l e c t : E n d :
C h a n n e l S k i p / A d d
C h a n n e l :
01 3
S k i p / A d d : A d d
M o v e : S e l e c t : E n d :
Adjusting Your Setup (MENU)
continued
87Adjusting Your Setup (MENU)
Page 88
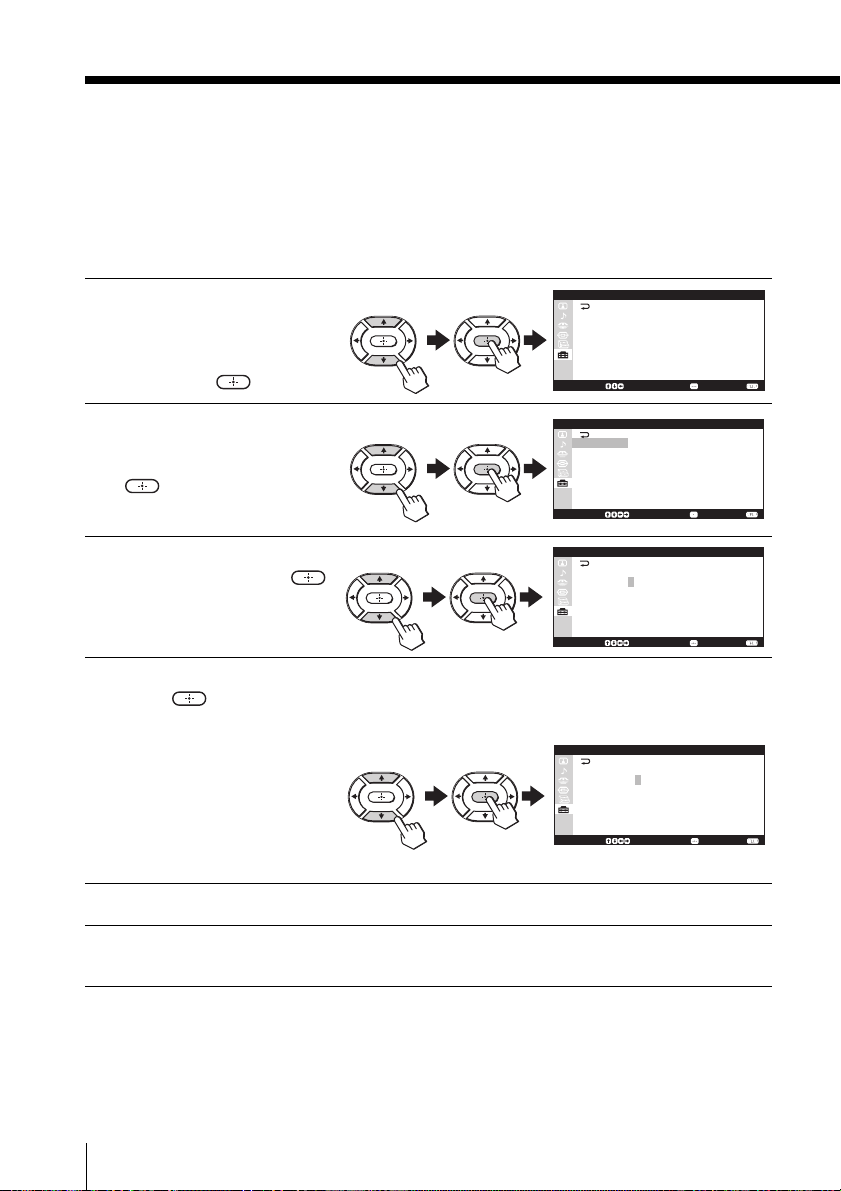
Changing the “Setup” setting (continued)
Assigning labels to the preset channels
(“Channel Label”)
You can assign a label (such as station name) of up to 5 characters to
each preset channel.
After selecting “Channel
1
Label” under “Channel
C h a n n e l L a b e l
C h a n n e l :
0 1 3
_____
L a b e l :
Setup”, make sure
“Channel” is selected,
then press
Press M/m to select the
2
channel you want to
assign a label, then press
.
M o v e : S e l e c t : E n d :
C h a n n e l L a b e l
C h a n n e l :
0 1 0
_____
L a b e l :
.
M o v e : S e l e c t : E n d :
Press M/m to select
3
“Label”, then press .
Press M/m to scroll through the label characters (A to Z, 0 to 9, etc.), then
4
press to confirm the highlighted character.
C h a n n e l L a b e l
C h a n n e l :
0 1 0
_____
L a b e l :
M o v e : S e l e c t : E n d :
To insert a blank, leave “_”
and press ,.
To change the confirmed
C h a n n e l L a b e l
C h a n n e l :
0 1 0
A____
L a b e l :
character, press < to
highlight it, then press M/
m to select the correct
M o v e : S e l e c t : E n d :
character.
Repeat step 4 to add up to 5 characters to the label.
5
To assign labels to other channels, select “Channel”, then repeat steps 1 to
6
5.
To return to the normal screen
Press MENU.
88
Adjusting Your Setup (MENU)
Page 89
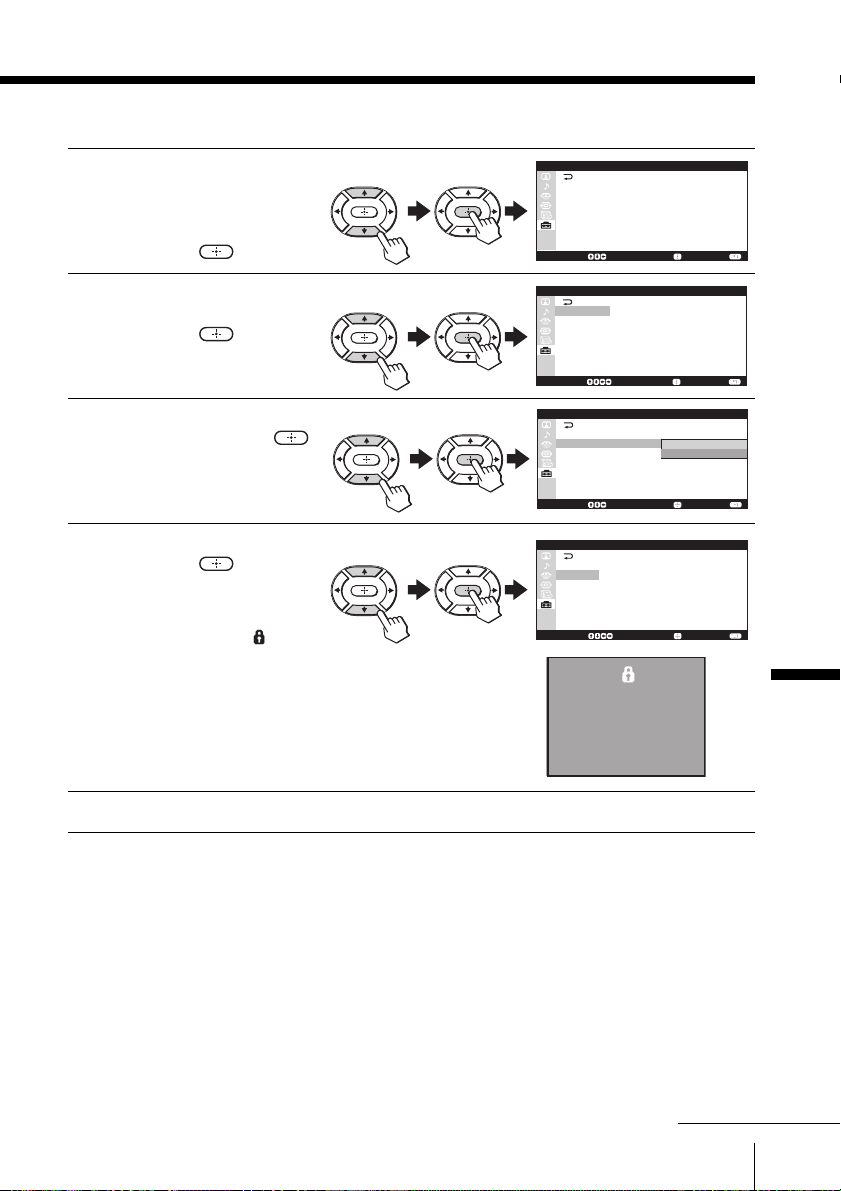
Blocking channels (“Channel Block”)
After selecting “Channel
1
Block” under “Channel
Setup”, make sure
“Channel” is selected,
then press
Press M/m to select the
2
desired channel (e.g. 06),
then press
Press M/m to select
3
“Block”, then press .
Press M/m to select “On”,
4
then press .
.
.
To unlock the channel,
select “Off”.
The lock symbol (
)
appears on the screen when
“On” is selected.
If a locked channel is selected, the lock symbol
appears on the screen.
C h a n n e l B l o c k
C h a n n e l :
0 1 3
O f f
B l o c k :
M o v e : S e l e c t : E n d :
C h a n n e l B l o c k
C h a n n e l :
0 0 6
O f f
B l o c k :
M o v e : S e l e c t : E n d :
C h a n n e l B l o c k
C h a n n e l :
0 0 6
B l o c k :
M o v e : S e l e c t : E n d :
C h a n n e l B l o c k
C h a n n e l :
B l o c k :
M o v e : S e l e c t : E n d :
0 0 6
O n
O n
O f f
6
Adjusting Your Setup (MENU)
To lock other channels, select “Channel”, then repeat steps 2 to 4.
5
To return to the normal screen
Press MENU.
Note
• If you preset a locked channel manually (see page 86), that channel will be
unlocked automatically.
continued
89Adjusting Your Setup (MENU)
Page 90
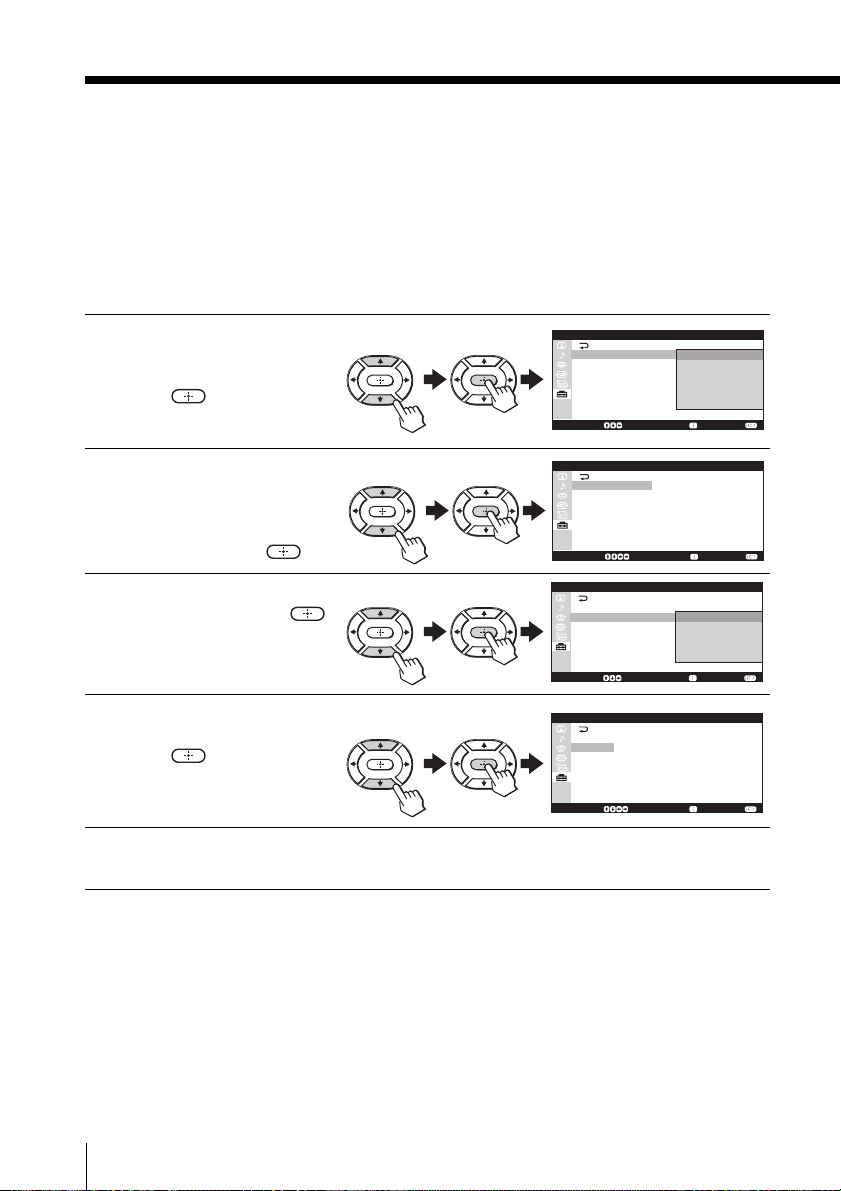
Changing the “Setup” setting (continued)
Assigning labels to the connected audio/video
equipment (“Video Label”)
You can assign one of the prefixed labels (such as VCR, SAT, etc.) or
your favorite label to the audio/video equipment connected to the
video inputs of the TV.
To assign a prefixed label
After selecting “Video
1
Label”, make sure “Video
Input” is selected, then
press
Press M/m to select the
2
video input you have
.
connected the equipment
V i d e o L a b e l
V i d e o I n p u t :
L a b e l : V i d e o 1
M o v e : S e l e c t : E n d :
V i d e o L a b e l
V i d e o I n p u t :
L a b e l :
V i d e o 1
V i d e o 1
you want to assign a
label, then press
Press M/m to select
3
“Label”, then press
Press M/m to select one of
4
the prefixed labels, then
press
.
.
.
M o v e : S e l e c t : E n d :
V i d e o L a b e l
V i d e o I n p u t :
L a b e l :
M o v e : S e l e c t : E n d :
V i d e o L a b e l
V i d e o I n p u t :
L a b e l :
V i d e o 1
V i d e o 1
V CR
To assign your favorite
label, see page 91.
To assign labels to other equipment, select “Video Input”, then repeat steps
5
2 to 4.
M o v e : S e l e c t : E n d :
V i d e o 1
V i d e o 2
V i d e o 3
V i d e o 4
H D / D V D 1
H D / D V D 2
V i d e o 1
VC R
S A T
G a m e
E d i t [
_ _ _ _ _
]
To return to the normal screen
Press MENU.
90
Adjusting Your Setup (MENU)
Page 91
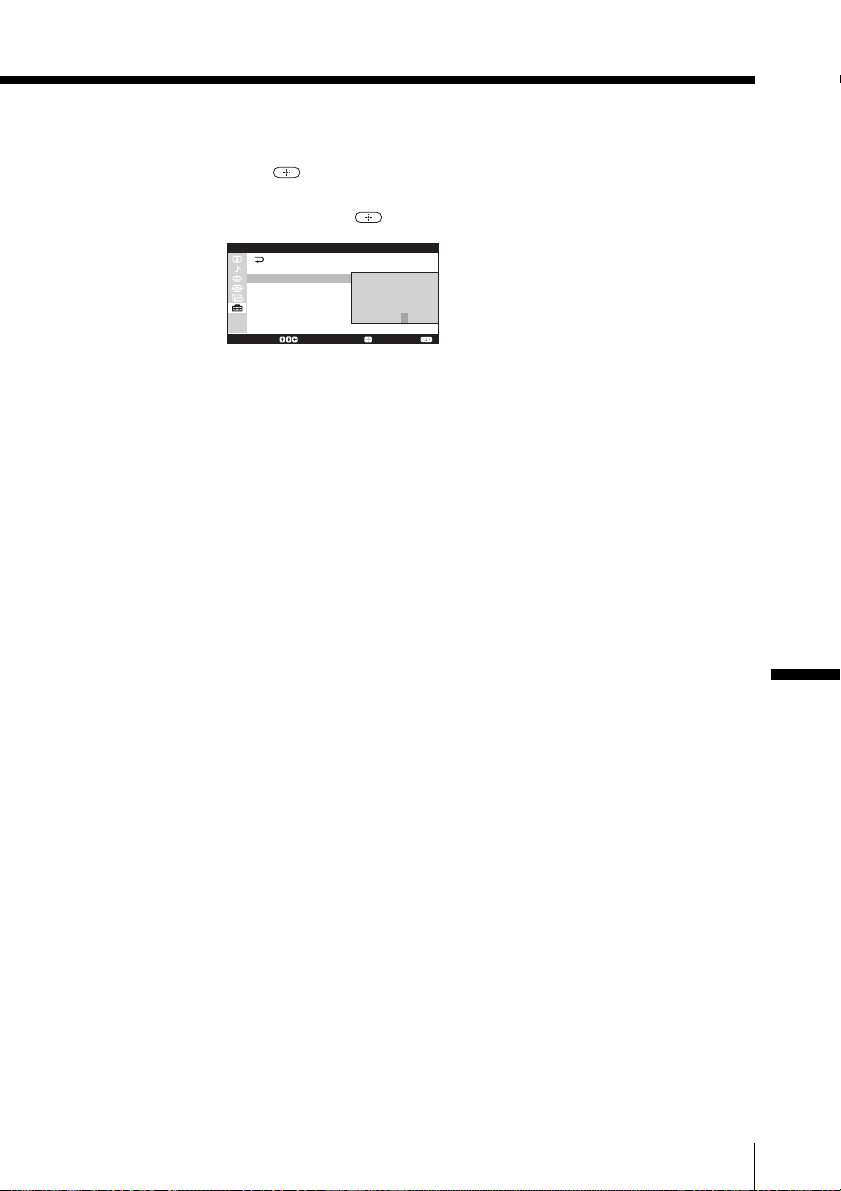
To assign your favorite label
1 Follow steps 1 to 3 on page 90 and select “Edit” in step 4, then
press .
2Press M/m to scroll through the label characters (A to Z, 0 to 9,
etc.), then press
V i d e o L a b e l
V i d e o I n p u t :
L a b e l :
M o v e : S e l e c t : E n d :
To insert a blank, leave “_” and press ,.
To change the confirmed character, press < to highlight it, then
press M/m to select the correct character.
3 Repeat step 2 to add up to 5 characters to the label.
to confirm the highlighted character.
V i d e o 1
V i d e o 1
VC R
S A T
G a m e
V _ _ _ _
E d i t [
]
Adjusting Your Setup (MENU)
91Adjusting Your Setup (MENU)
Page 92
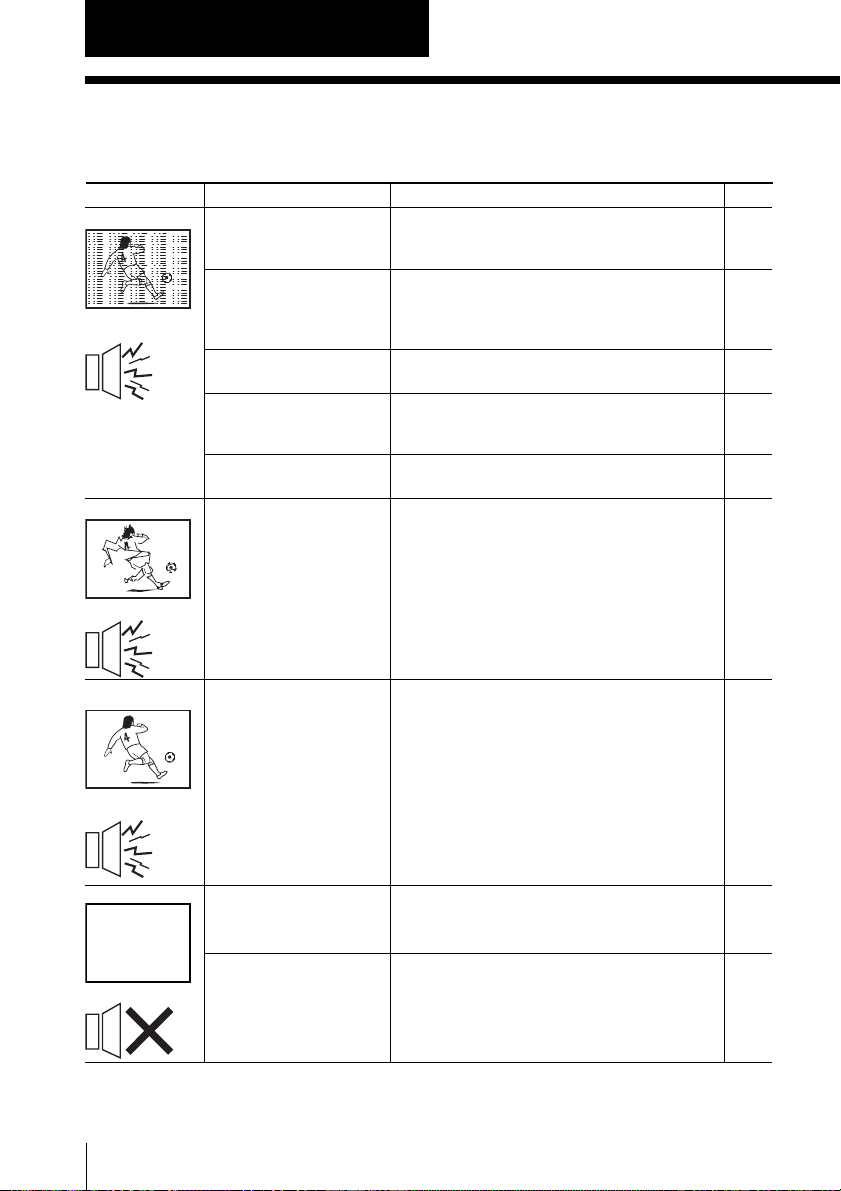
Additional Information
Troubleshooting
If you have any problem while viewing your TV, please check the following
troubleshooting guide. If the problem persists, contact your Sony dealer.
Symptom
Snowy picture
Noisy sound
Distorted picture
Noisy sound
Possible cause
• The connection is
loose or the cable is
damaged.
• Channel presetting
is inappropriate or
incomplete.
• The antenna type is
inappropriate.
• The antenna
direction needs
adjustment.
• Signal transmission
is low.
•Broadcast signals
are too strong.
• Check the antenna cable and
connection on the TV, VCR and on
the wall.
• Display the “Channel Setup” menu
under the “Setup” menu and select
“Channel Skip/Add” to preset the
channel again.
• Check the antenna type (VHF/UHF).
Contact a Sony dealer for advice.
• Adjust the antenna direction. Contact
a Sony dealer for advice.
•Try using a booster.
•Turn off or disconnect the booster if it
is in use.
Solutions
Page
10
86
–
–
–
–
Good picture
Noisy sound
No picture
No sound
92
Additional Information
• The TV system
setting is
inappropriate.
• The power cord,
antenna or VCR is not
connected.
• The TV is not turned
on.
• If the sound of all the channels are noisy,
display the “Channel Setup” menu under
the “Setup” menu and select “Auto
Program” to preset the channels again.
• Check the power cord, antenna and
the VCR connections.
•Press POWER on the remote.
•Press 1 on the TV to turn off the TV
for about five seconds, then turn it on
again.
85
10
23
24
Page 93
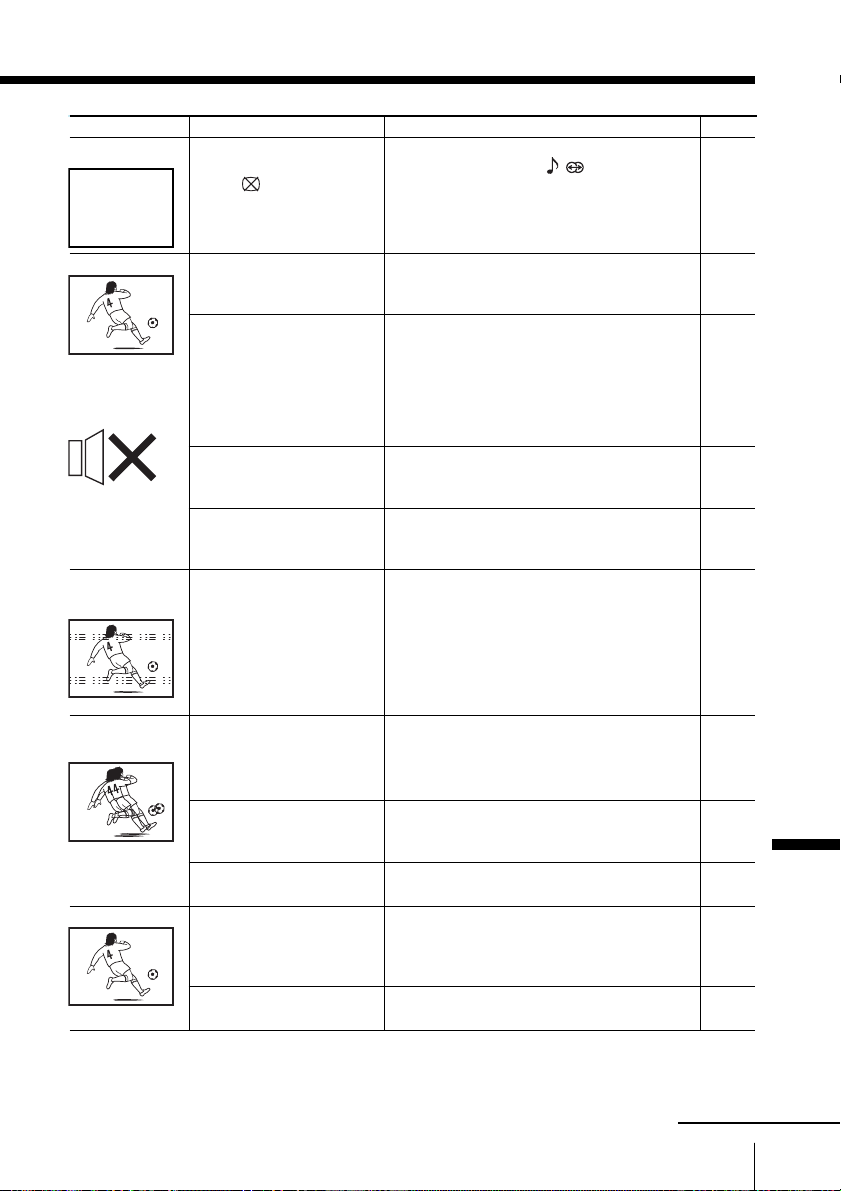
Symptom
No picture
Possible cause
• The picture off
feature is activated.
(The PICTURE
OFF indicator lights
up in blue.)
Solutions
•Press any button except for VOL +/–,
POWER, MUTING, , , MTS,
VIDEO POWER and CENTER SP to
cancel the picture off feature.
Page
40
Good picture
No sound
Dotted lines or
stripes
Double images or
“ghosts”
No color
• The volume level is
too low.
• The sound is muted.
• The broadcast signal
has a transmission
problem.
• “Speaker Out”
setting is set to
“Off”.
• There is local
interference from
cars, neon signs, hair
dryers, power
generators, etc.
•Broadcast signals are
reflected by nearby
mountains or
buildings.
• The antenna
direction needs
adjustment.
• Use of a booster is
inappropriate.
• The color level
setting is too low.
• The antenna direction
needs adjustment.
•Press VOL + to increase the volume
level.
•Press MUTING, POWER and VOL +
to cancel the muting.
• Set “Speaker Out” to “On” in the
“Sound” menu.
•Press CENTER SP to cancel the
center speaker mode.
•Press MTS until a better sound is
heard.
• Set “Speaker Out” to “On” in the
“Sound” menu.
• Do not use a hair dryer or other
equipment near the TV.
• Adjust the antenna direction for
minimum interference. Contact a
Sony dealer for advice.
• Use a highly directional antenna.
• Adjust the antenna direction. Contact
a Sony dealer for advice.
•Turn off or disconnect the booster if
it is in use.
•
Display the “Picture” menu and select
“Personal” of “Picture Mode”, then adjust
the “Color” level under “Picture
Adjustment”.
• Adjust the antenna direction. Contact
a Sony dealer for advice.
24
24
76
39
35
76
–
–
–
–
Additional Information
–
74
–
continued
93Additional Information
Page 94
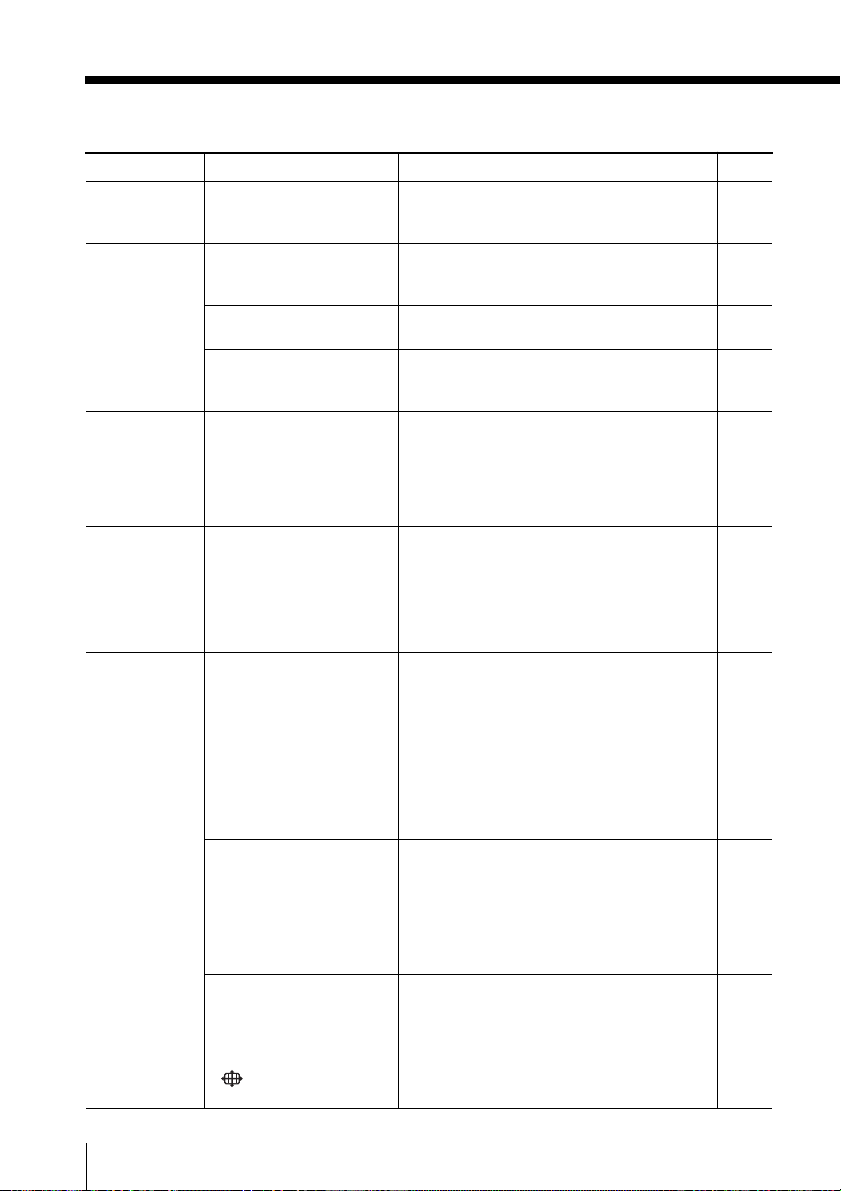
Troubleshooting (continued)
Symptom
TV cannot receive
stereo broadcast
signal.
Stereo broadcast
sound switches on
and off or is
distorted.
or
The sound switches
between stereo and
monaural
frequently.
Lines moving across
the TV screen.
The screen flickers
when turning on TV.
The wide screen
mode changes
spontaneously when
“Auto Wide” is
“On”.
Possible cause
• The stereo reception
setting is
inappropriate.
• The connection is loose
or the cable is
damaged.
• The antenna direction
needs adjustment.
• The broadcast signal
has a transmission
problem.
• There is
interference from
external sources,
e.g., heavy
machineries, nearby
broadcast station.
• This caused by
feature of the
Plasma Display
Panel, and dose not
indicate a
malfunction of the
TV.
•During a transition
between two
programs, the TV
detects the
optimum wide
screen mode.
During this period,
an irregular wide
screen mode may
appear.
• The wide screen
mode is switched
automatically
according to the
received signal
with an ID-1
signal.
• The AUTO WIDE
feature stops
working
temporarily when
you have pressed
, and functions
again after a while.
Solutions
•Press MTS until “Stereo” appears on
the screen.
• Check the antenna cable and
connection on the TV, VCR and on the
wall.
• Adjust the antenna direction. Contact a
Sony dealer for advice.
•Press MTS until a better sound is heard.
—
—
—
—
•To fix in the manually selected wide
screen mode, set “Auto Wide” to
“Off” in the “Wide Screen” menu.
Page
35
10
–
35
–
–
30
31
80
94
Additional Information
Page 95
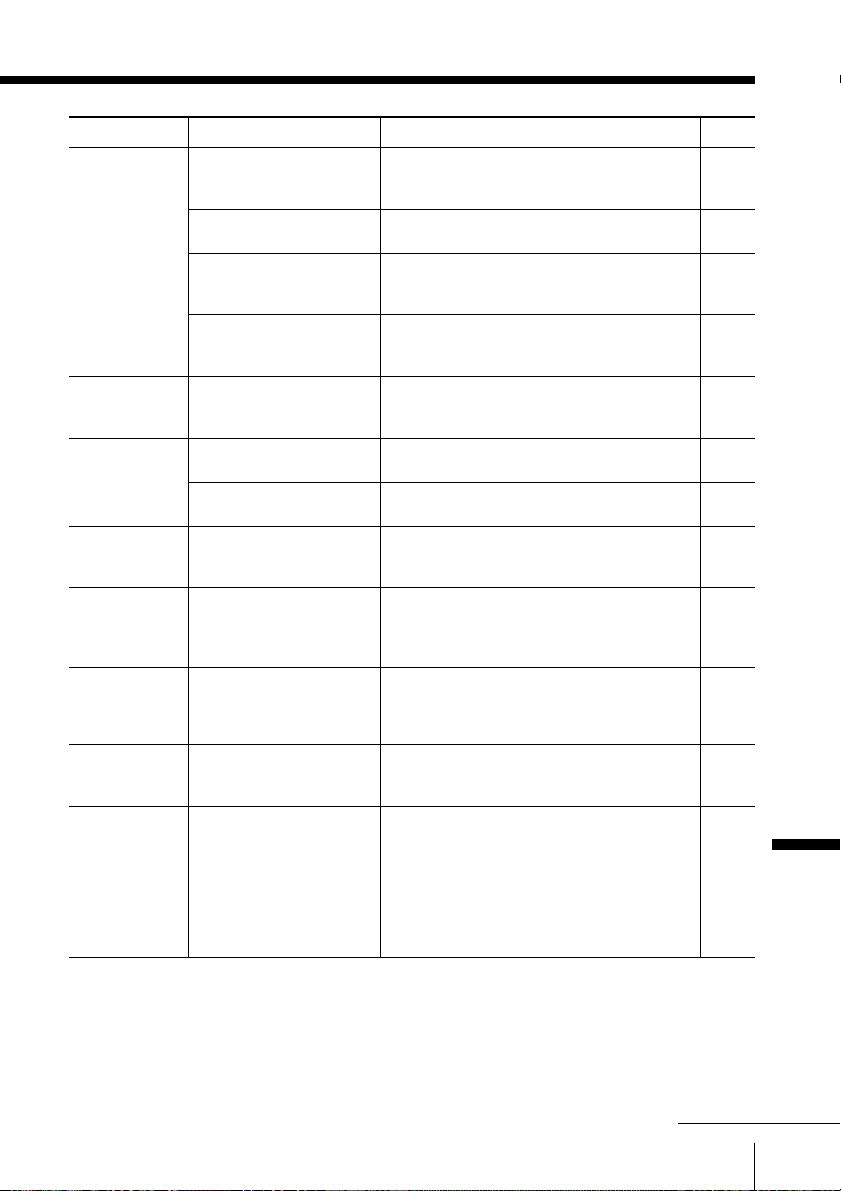
Symptom
The images in the
“Memory Stick” are
not displayed.
“No Memory Stick”
is displayed.
“Memory Stick
error” is displayed.
“File error” is
displayed.
“Format error” is
displayed.
”Too many files.
Cannot enter Digital
Camera Mode.” is
displayed.
“Memory Stick type
error” is displayed.
“No file” is
displayed.
Possible cause
• The “Memory Stick” is
inserted
inappropriately.
• The “Memory Stick”
menu is not displayed.
• No photo or movie
files are contained in
the “Memory Stick”.
• The photo or movie
image is processed by
a computer.
• The “Memory Stick” is
inserted
inappropriately.
• The “Memory Stick”
is irregular.
• The “Memory Stick”
may be broken.
• The name of the
selected file is not
correct.
• The “Memory Stick”
is not formatted
correctly.
• When “Digi. Cam.
Mode” is set to “On”,
2,000 files or less can
be displayed.
• The inserted “Memory
Stick” is not available
for use with this TV.
• No photo or movie
files available for
playback are
contained in the
selected folder of the
“Memory Stick” when
“Digi. Cam. Mode” is
set to “On”.
Solutions
• Insert the “Memory Stick” correctly.
•Press the MEMORY STICK button.
• Insert a “Memory Stick” with photo or
movie files.
• Set “Digi. Cam. Mode” to “Off” and
select the folder.
• Insert the “Memory Stick” correctly.
• Remove the “Memory Stick” and insert
it again.
• Insert another “Memory Stick”.
—
• Format it correctly using a digital
camera or other equipment, or insert
another “Memory Stick” formatted
correctly.
• Set “Digi. Cam. Mode” to “Off” and
select the folder.
• Insert a “Memory Stick” available for
use with this TV.
• Set “Digi. Cam. Mode” to “Off” and
select the folder.
Page
44
46
44
46
44
44
44
42
41
46
44
46
Additional Information
continued
95Additional Information
Page 96

Troubleshooting (continued)
Symptom
“No file” is
displayed.
The file name is not
displayed correctly.
“Memory Stick
locked” is displayed.
“No movie file” is
displayed.
“No still file” is
displayed.
“Playback has been
stopped. The file is
damaged.” is
displayed.
Cannot play
shooting games.
Possible cause
• No photo or movie
files available for
playback are contained
in the selected folder
of the “Memory Stick”
when “Digi. Cam.
Mode” is set to “Off”.
• The file name has been
processed by a
computer.
• The erasure
prevention switch of
the “Memory Stick” is
in the LOCK position.
• “Show Movies” is
selected from “Filter”
of the “Options”
menu and no movie
files are contained in
the selected folder.
• “Show Stills” is
selected from “Filter”
of the “Options”
menu and no still
image files are
contained in the
selected folder.
• The data in the movie
file is broken.
• Some shooting games
which involve
pointing a light beam
at the TV screen with
an electronic gun or
rifle cannot be used
with your TV. For
details, see the
instruction manual
supplied with the
video game software.
Solutions
• Select another folder that contains
photo or movie files.
—
• Unlock the switch.
• Select the folder with movie files.
• Select the folder with still image files.
—
—
Page
46
42
42
67
67
–
–
96
Additional Information
Page 97

Symptom
TV cabinet creaks.
Static discharge is
felt when touching
the TV cabinet.
Stripe during
playback/recording
of a VCR.
Audio noise.
Strange sound.
(The TV whirs.)
Possible cause
• Changes in room
temperature
sometimes make the
TV cabinet expand
or contract, causing
a noise. This does
not indicate a
malfunction.
•
This is the same static
discharge that is felt
when touching metal
door handles or car
doors especially when
the air is dry, for
example in winter.
This does not indicate
a malfunction.
•
Video head
interference.
•
Communication
problems may occur if
the infrared
communication
equipment (e.g.,
infrared cordless
headphones) is used
near the TV.
•
The TV’s fan setting is
working. This dose not
indicate malfunction.
Solutions
—
—
• Keep your VCR away from the TV.
• Leave a space of 30 cm between your
VCR and the display unit to avoid noise.
•Avoid installing your VCR in front of the
display unit or at the side of the display
unit.
• Use headphones other than infrared
cordless headphones. Also, if you use the
infrared communication equipment other
than infrared cordless headphones, move
the infrared transceiver away from the
TV until the noise eliminated, or move
the transmitter and receiver of the
infrared communication equipment
closer together.
—
Page
_
_
_
_
_
_
_
Additional Information
97Additional Information
Page 98
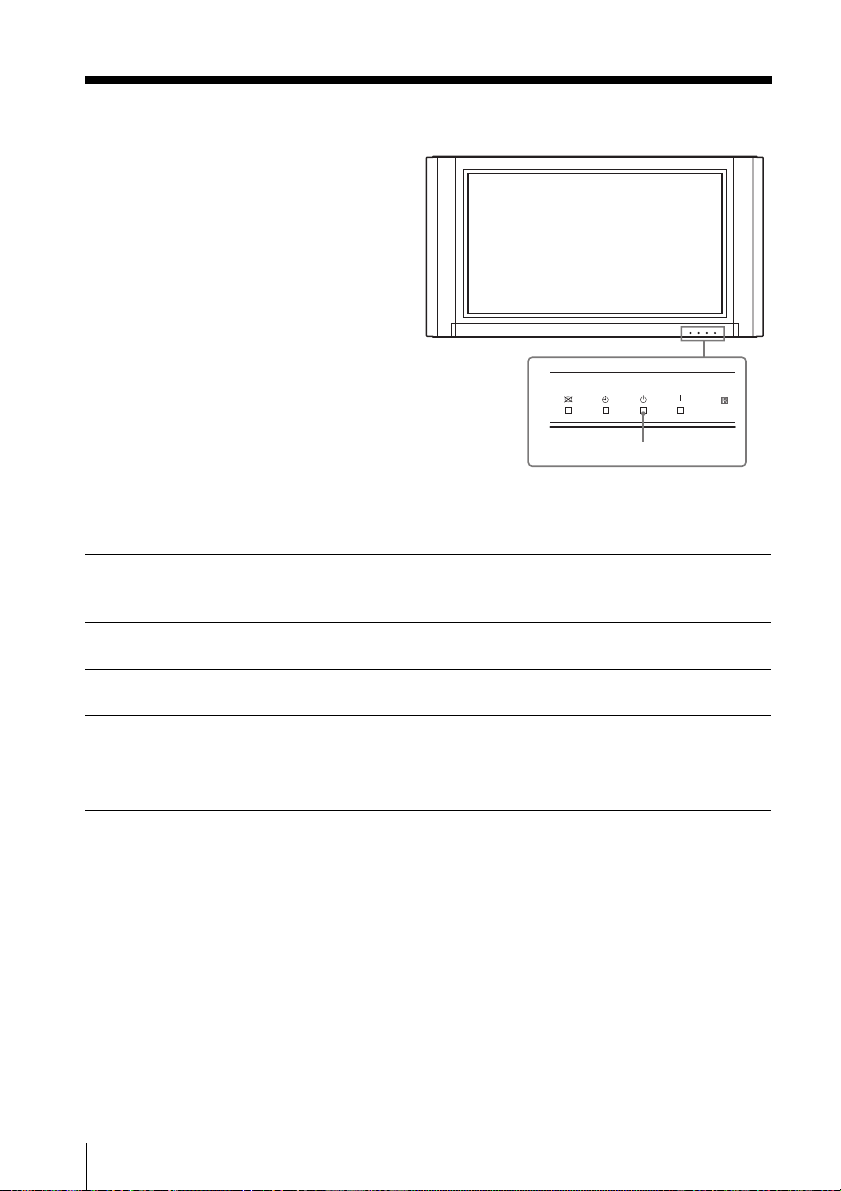
Self-diagnosis function
Your TV is equipped with a selfdiagnosis function. If there is a problem
with your TV, the 1 STANDBY
(standby) indicator flashes red. The
number of times the 1 STANDBY
(standby) indicator flashes indicates the
possible causes.
PICTURE OFF TIMER STANDBY POWER ON
1 STANDBY indicator
1 Check that the 1 STANDBY (standby) indicator flashes red a number of
times between 3-second intervals.
2 Count the number of times the 1 STANDBY (standby) indicator flashes.
3 Press 1 (main power) to turn off your TV.
4 Inform your nearest Sony service center about the number of times the 1
SATNDBY (standby) indicator flashed.
Be sure to note the model name and serial number located on the rear of your TV.
98
Additional Information
Page 99
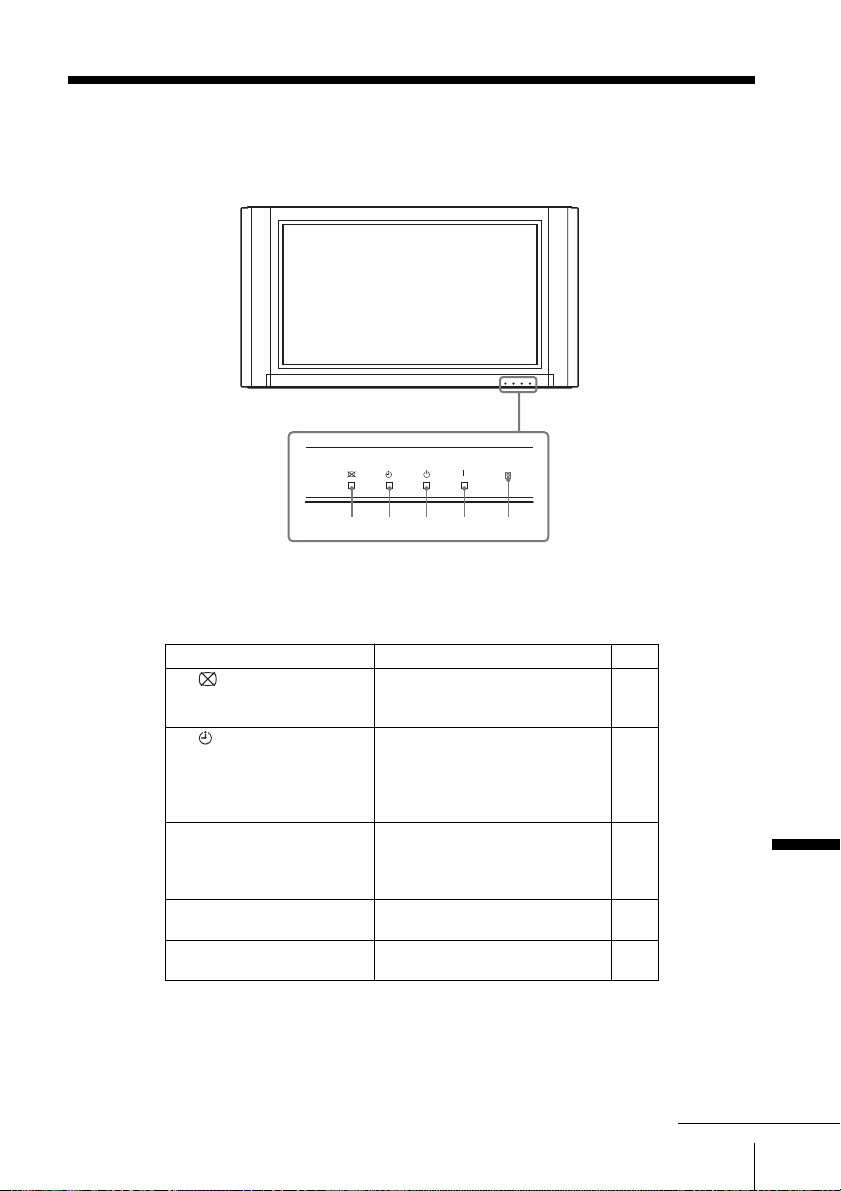
Identifying parts and controls
Front panel
PICTURE OFF TIMER STANDBY POWER ON
4 5321
Indicator
1 PICTURE OFF When lit in blue, indicates that 40
the picture off feature is
activated.
2 TIMER When lit in red, indicates 25
the wake up timer is set. When
the timer is set this indicator
will remain lit even if the TV
set is turned off.
3 1 STANDBY Lights up in red when TV is in 23
standby mode. The indicator
dose not light up when the
main power is turned off.
4 POWER ON Lights up in green when the TV –
set is turned on.
5 Infrared receiver (IR) Receives IR signals from TV’s –
remote control.
Function
Page
Additional Information
continued
99Additional Information
Page 100
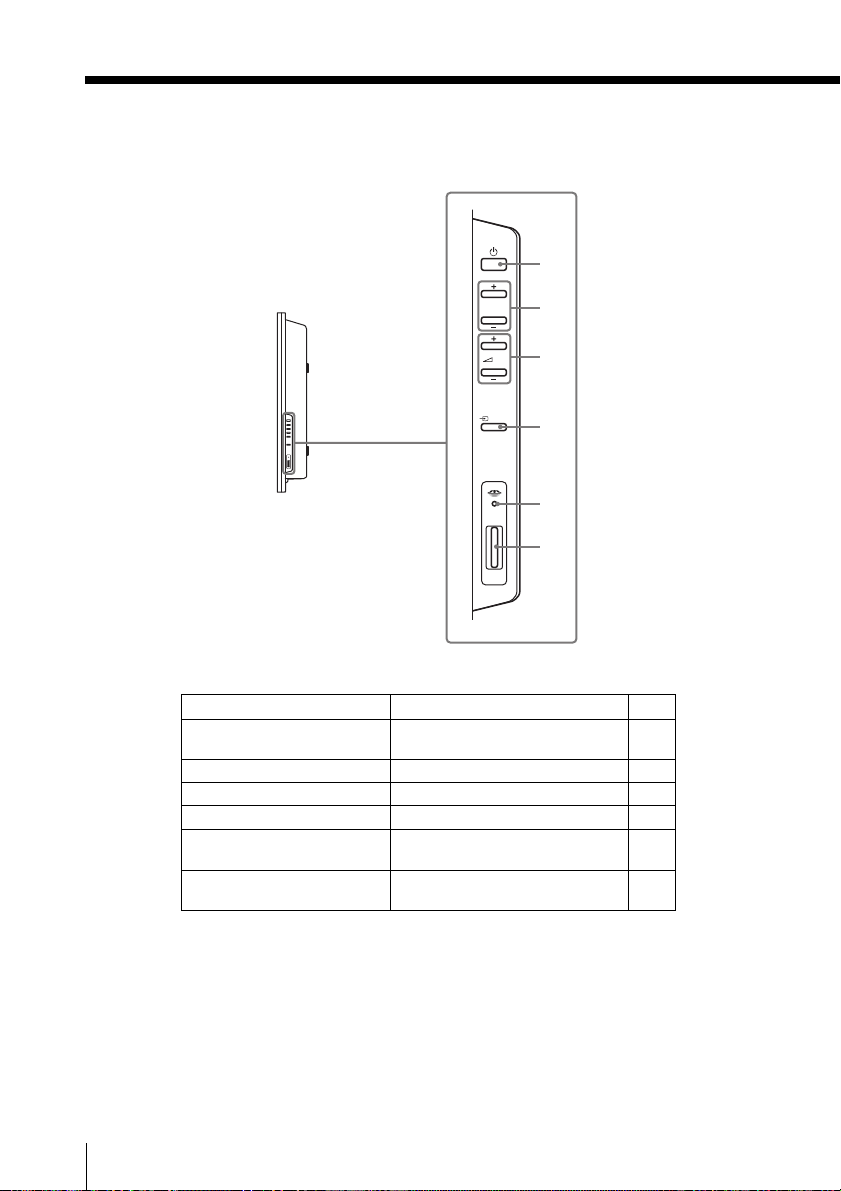
Identifying parts and controls (continued)
Right side
PROG/CH
VOL
INPUT
Standard/Duo
PRO
1
2
3
4
5
6
100
Additional Information
Button/Indicator
Function
Page
1 1 Turn off completely or turn on 24
the TV.
2 PROG/CH +/– Select a TV channel. 23
3 2 VOL +/– Adjust volume. 24
4 t INPUT Select TV or video input. 24
5 “Memory Stick” Flashes when the data is being 44
indicator read from a “Memory Stick”.
6 “Memory Stick” slot Insert a “Memory Stick“ into 44
this slot.
 Loading...