

Sony Walkman MZ-NE410 Operating Instructions Manual
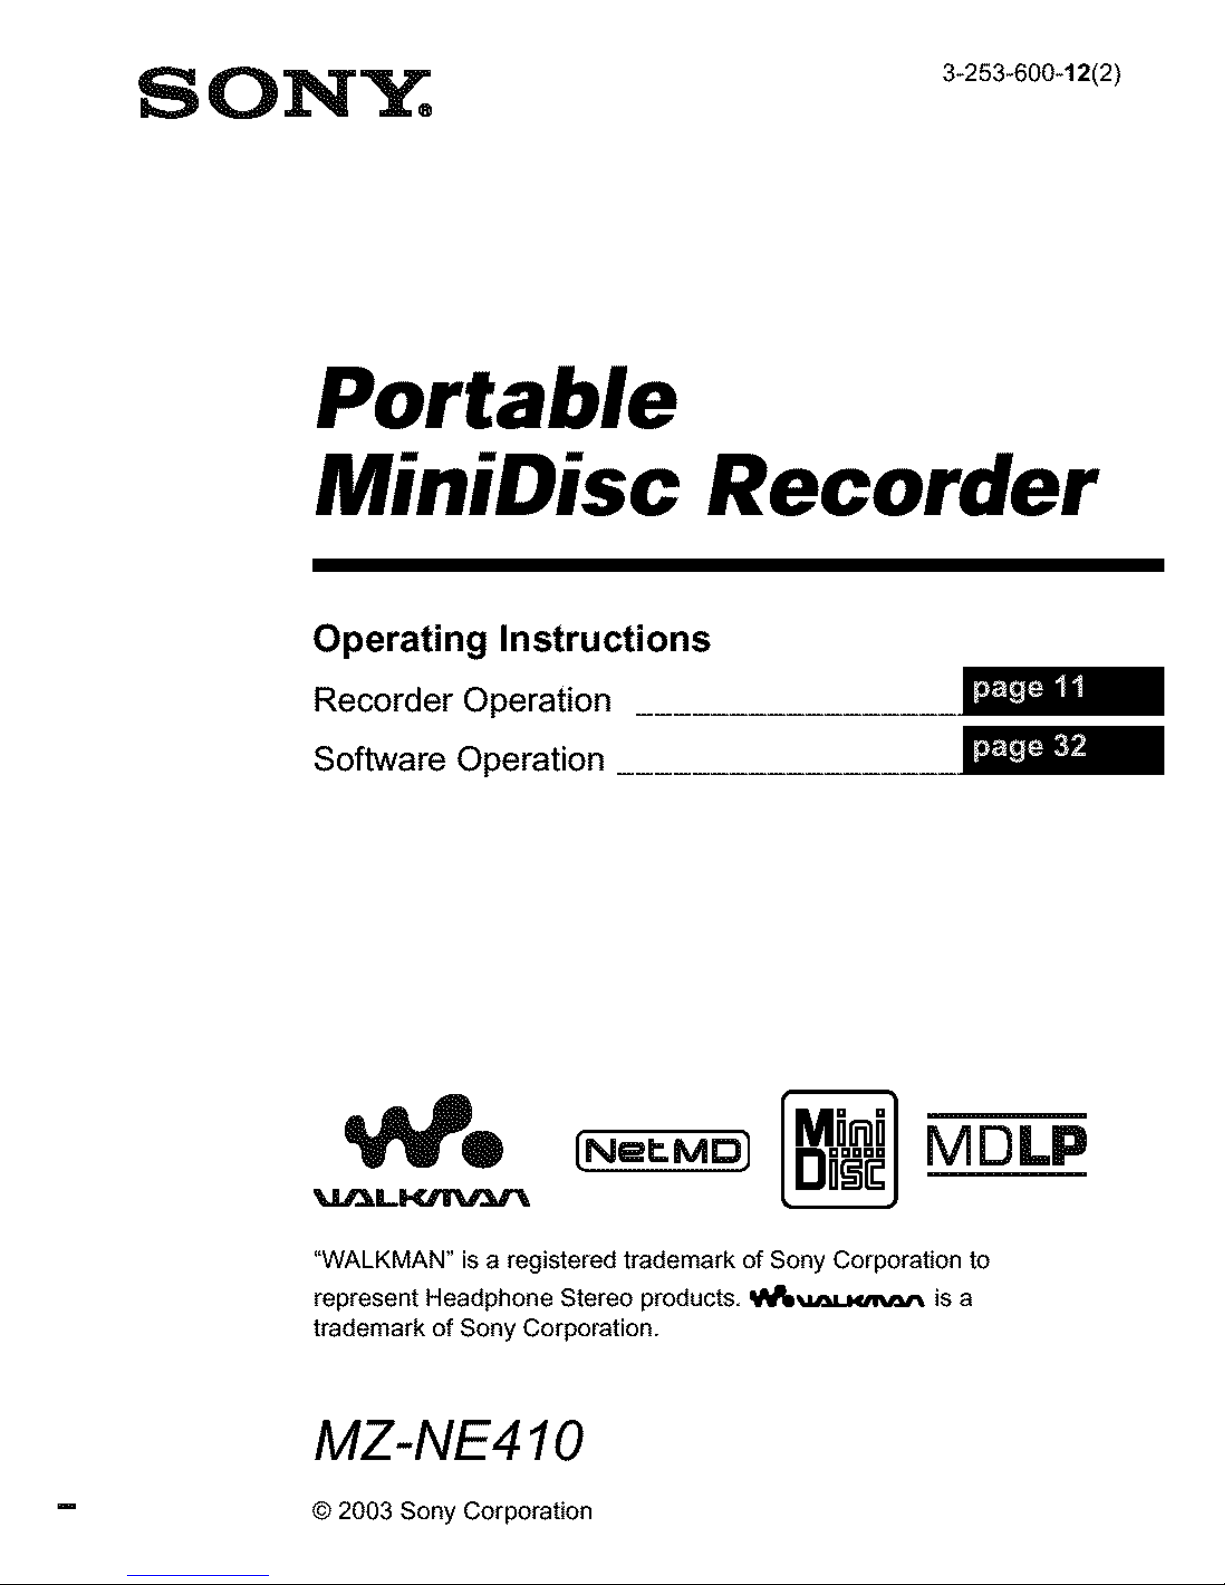
SON'Y;, 3_253.000_1212!
Portable
MiniDisc Recorder
Operating Instructions
Recorder Operation .................
_0 _ [_ MDLP
"WALKMAN" is a registered trademark of Sony Corporation to
represent Headphone Stereo products, _e_z=uvut_ is a
trademark of Sony Corporation.
MZ-NE410
© 2003 Sony Corporation
To prevent fire or shock hazard, do
not expose the unit to rain or
moisture.
Do notinstalllhe appliance in a
confined space, such as a bookcase or
bu t-n cab net.
To prevent fire, do not cover the
ventilation of the apparatus with news
papers, table clolhs, curtains, etc. And
don't place lighled candles on 1he
apparams.
To prevent fire or shock hazard, do not
place objects filled with liquids, such as
vases, on the apparatus.
Certain countries may regulate disposal of
1he battery used to power this product.
Please consult with your local authority.
Caution
The use of optical instruments with this
product will increase eye hazard.
CAUTION INVISIBLE LASER
RADIAPION WHEN OPEN
AVOID EXPOSURE TO BEAM
Information
IN NO EVENT SHALL SELLER BE
LIABLE FOR ANY DIRECT,
INCIDENTAL OR
CONSEQUENTIAL DAMAGES OF
ANY NAT/JRE, OR LOSSES OR
EXPENSES RESULTING FROM
ANY DEFECTIVE PRODUCT OR
TIlE USE OF ANY PRODUC'E
For customers who purchased
this product in the USA
Owner's Record
The serial number is localed at the rear of
the disc compartment lid and 1he model
number is localod at the top and bottom.
Record 1he serial number in the space
provided below. Refer to them whenever
you call upon your Sony dealer regarding
1his product.
Model No. MZ-NE410
Serial No.
Product registration
Please register 1his product on line at
www.sony.com/walkmanreg
<http://www.sony.com/walkmanreg>
Proper registration will enoble us 1o send
you periodic mailings about soflware
upgrades, new products, services and
other important announcements. Thank
yOU.
if you have any questions about
this product, contact:
-- http://www.sony.com/
walkmansupport
-- Sony Network Portable Audio
Support Line
1-(866)-456-7669
-- Sony Customer information
Services Center
12451 Gateway Blvd. Fort Myers,
FL 33913
DeclarationofConformity
Trade Name: SONY
Model No.: MZ-NE410
Responsible Party: Sony Electronics
Inc.
Address: 680 Kinderkamack Road,
Oradell, NJ 07649 USA
Telephone No.: 201-930-6972
This device complies wtih Part 15 of
|he FCC Rules. Operation is subject to
_he following two conditions: (I) This
device may not cause harmful
interference, and (2) _his device must
accept any interference received,
including interl_rence that may cause
undesired operation.
This equipment has been lesled and found
to comply wi|h the limits for a Class B
digital device, pursuant to Par'. 15 oflhe
FCC Rules. These limits are designed to
provide reasonable protection against
harmful interference in a residential
installation. 'iI_is equipment generates,
uses, and can radiale radio frequency
energy and, if not installed and used in
accordance wi_h the instructions, may
cause harmful inlerference to radio
communications. However, tbere is no
guaranlee that inlerference will not occur
in a particular installation. If this
equipment does cause harmful
inlerference to radio or television
reception, which can be determined by
turning the equipment off and on, the user
is encouraged to try to correct the
inlerference by one or more oflhe
lbllowing measures:
Reorient or relocate |he receiving
antenna.
increase _he separation between tbe
equipment and receiver.
Connect |he equipment into an outlet
on a circuit different from lhat m
which _he receiver is connected.
Consult the dealer or an experienced
radio/TV technicim_ lbr help.
You are cautioned that any changes or
modifications not expressly approved in
_his manual could void your aulhority to
operale this equipment.
SONY MZ-NE410
Tested To Comply
With FCC Standards
FOR HOME OR OFFICE USE
• SonicStage, OpenMG and the OpenMG
logo, MagicGate, Memory Stick and the
MagicGate Memory Stick logo,
Memory Stick and the Memory Stick
logo, Net MD and tbe Net MD logo are
trademarks of Sony Corporation.
• Micmsol], Windows, Windows NT and
Windows Media are trademarks or
registered trademarks of Microsol_
Corporation in the United Stales and/or
other countries.
• IBM and PC/AT are registered
trademarks of International Business
Machines Corporation.
• Macintosh is a trademark of Apple
Computer, Inc. in the United States as_d/
or other countries.
• MMX and Pentium are trademarks or
registered trademarks of intel
Corporation.
• All other trademarks and registered
trademarks are trademarks or registered
trademarks of their respective holders.
• "rMand ® marks are omilted in _his
manuals
Notice for users
On the supplied software
• Copyright laws prohibit reproducing the
sotlware or the manual accompanying it
in whole or in p_rt, or renting 1he
software without the permission of the
copyright holder.
• In no event will SONY be liable lbr any
financial damage, or loss of profits,
including claims made by third parties,
arising out of the use of the software
supplied with this recorder.
• In the event a problem occurs with this
software as a result of dellzctive
manufacturing, SONY will replace it.
ltowever, SONY bears no other
responsibility.
• The software provided with this
recorder cannot be used with equipment
other than that which is so designated.
• Please note thai, due to continued efforts
to improve qualily, the software
specifications m_y be changed without
notice.
• Operation of this recorder with soltware
other than that provided is not covered
by the warranty.
Program © 2001, 2002 Sony Corporation
Documentation © 2003 Sony Corporation
4

Table of contents
Recorder Operations
Looking at the controls .................................. 12
Getting started! .............................................. 14
Playing an MD right away! .............................. 16
Various ways of playback .............................. 18
Selecting the play mode ........................................................................ 18
Adjusting treble or bass (Digital Sound Preset) .................................... 19
Selecting the sound quality ............................................................. 19
Adjusting the sound quality ............................................................ 19
Using the group function ................................ 21
What is the group function? .................................................................. 21
Playing a track in group play .......................................................... 21
Selecting the play mode for group play (Group Play Mode) ...........
Other Operations ............................................ 23
Viewing v_rious information ................................................................ 23
Starting the playback quickly (Quick Mode) ........................................ 24
Protecting your heoring (AVLS) ........................................................... 25
Locking the controls (HOLD) ............................................................... 25
Additional information .................................... 26
Precautions ............................................................................................ 26
Specifications ........................................................................................ 28
Troubleshooting and explanations ................. 29
Troubles and solutions .......................................................................... 29
While playing ................................................................................. 29
While using group function ............................................................ 30
Others ............................................................................................. 30
Explanations .......................................................................................... 31
Software Operation
What is a Net MD? .......................................... 33
Basic Operations ............................................ 34
Basic operational flow using the Net MD ............................................ 34
Providing the required system environment ........................................ 35
System requirements ...................................................................... 35
Installing the software onto your computer ......................................... 36
Before installing the software ........................................................ 36
installing SonicStage Ver. 1.5 ........................................................ 37
Connecting the Net MD to your computer ........................................... 39
Storing audio data to your computer .................................................... 40
Starting SonicStage ........................................................................ 40
Recording audio CDs to the hard disk drive .................................. 41
Labeling audio data ........................................................................ 43
Trans fen-ing audio data from your computer to the
Net MD (Check-out) ....................................................................... 44
Checking out audio files to the Net MD ........................................ 44
Listening to an MD .............................................................................. 47
Listening to an MD with the Net MD connected to the
computer ......................................................................... 47
Listening to an MD with the Net MD disconnected from the
computer ......................................................................... 47
Advanced operations ...................................... 48
Using other functions! .......................................................................... 48
Using the SonicStage online help .................................................. 48
7
Other information ........................................... 50
Settings and Precautions ....................................................................... 50
Settings according to OS ................................................................ 50
For users with OpenMG Jukebox, SonicStage, or SonicStage
Premium installed on their computer .............................. 52
Note on hard disk drive space ........................................................ 53
Notes on system suspend/hibernation mode ................................... 53
Backing up the audio data .............................................................. 53
Note on the battery ......................................................................... 53
Uninstalling the SonicStage software ................................................... 54
For Windows XP users ................................................................... 54
For Windows Millennium Edition/Windows 98 Second Edition
users ................................................................................. 54
For Windows 2000 users ................................................................ 55
Troubleshooting .................................................................................... 56
if your computer does not recognize the Net MD .......................... 58
if the installation was not successful .............................................. 58
if check-out (check-in) was not successful .................................... 59
Information and explanations ............................................................... 60
Net MD FAQ .................................................................................. 60
On copyright protection .................................................................. 61
Glossary ................................................................................................ 63
Index ..................................................................................................... 65

9
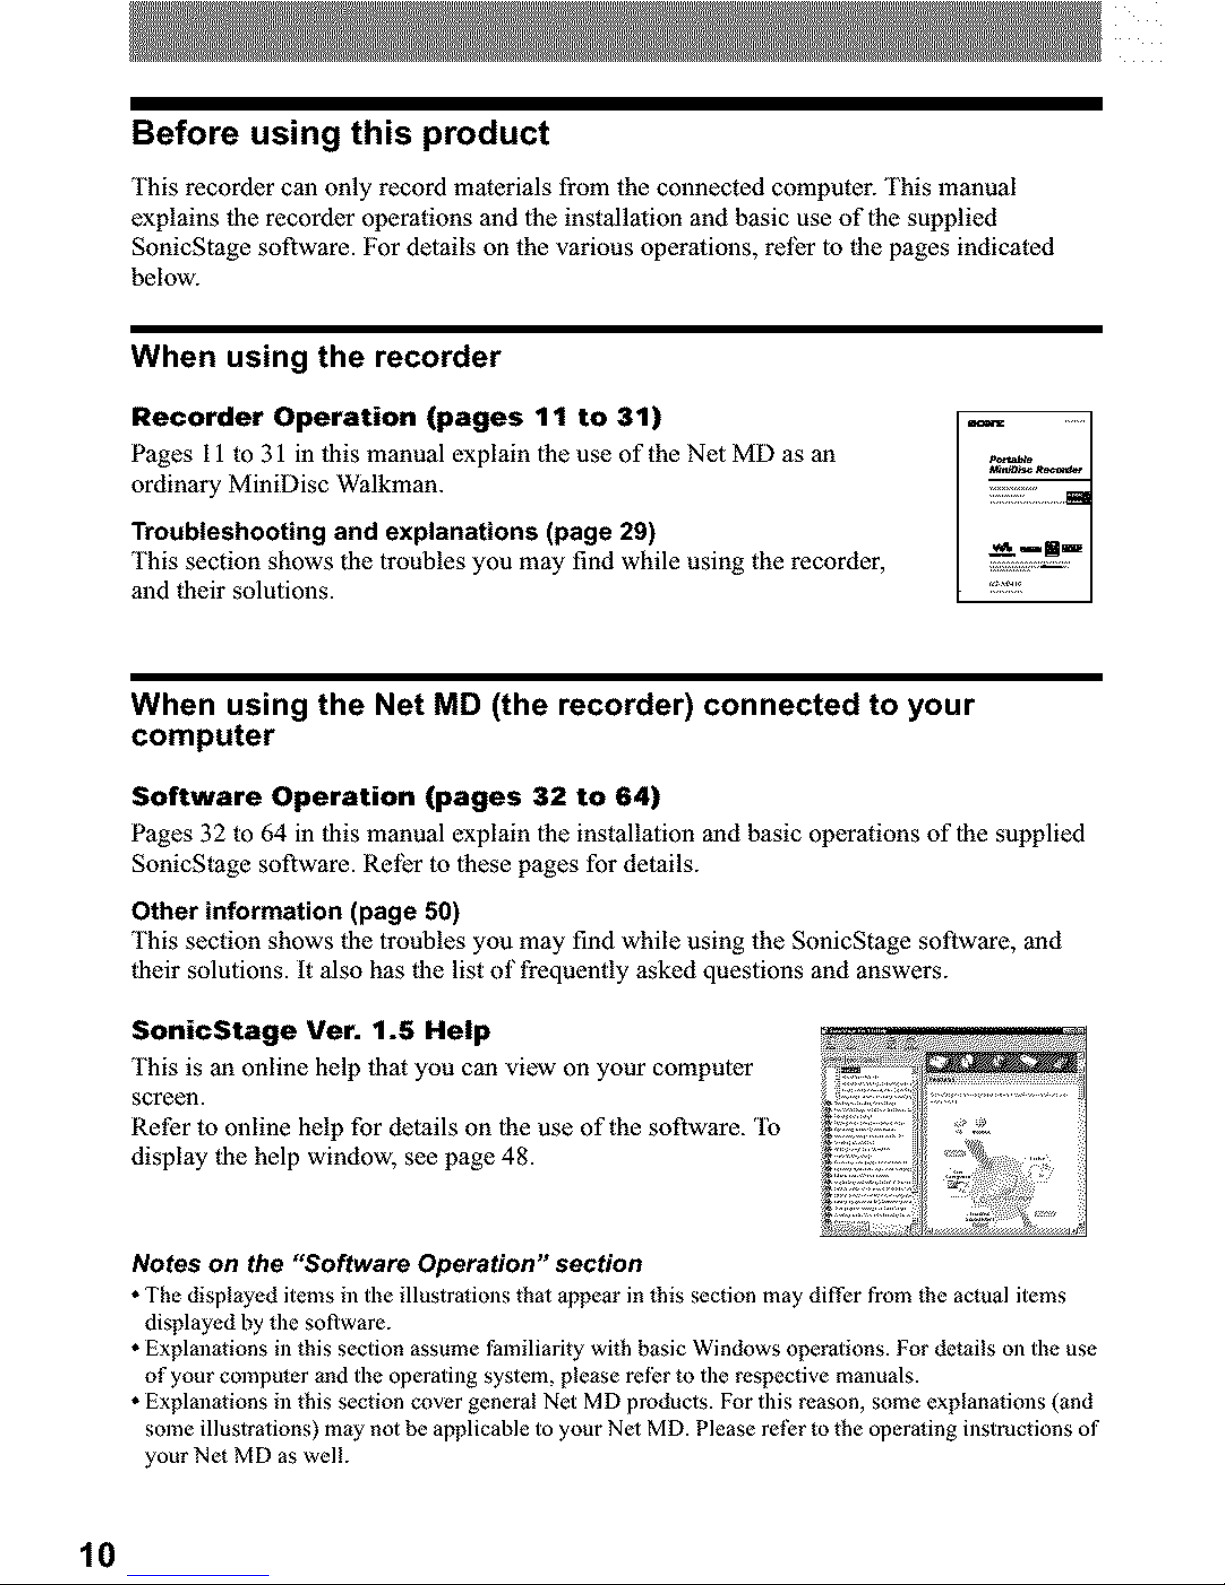
Before using this product
This recorder can only record materials from the connected computer. This manual
explains the recorder operations and lhe installation and basic use oflhe supplied
SonicStage software. For details on the various operations, relhr to the pages indicated
below.
When using the recorder
Recorder Operation (pages 11 to 31)
P_ges 11 to 31 in this manual explain |he use of the Net MD as 3n
ordinary MiniDisc Walkman.
Troubleshooting and explanations (page 29)
This section shows the troubles you may find while using the recorder,
and their solutions.
When using the Net MD (the recorder) connected to your
computer
Software Operation (pages 32 to 64)
P_ges 32 to 64 in this manual explain |he installation and basic operations of the supplied
SonicStage software. Rel_r to lhese pages for details.
Other information (page 50)
This section shows the troubles you may find while using the SonicSt_ge software, and
their solutions. It also has the list of frequently asked questions and answers.
SonicStage Ver. 1.5 Help
This is an online help that you can view on your computer
screen.
Refer to online help for details on the use of the software. 'Ib
display the help window, see page 48.
Notes on the "Software Operation" section
• The displayed items in the illustralions that appear in this section may differ from the actual items
displayed by the software.
• Explmlations ill this section assume Ihmiliarity with basic Windows ope_tions. For details on the use
of your computer and the operattag system, please refer to the respective mmmals.
• Explmlations ill this section cover general Net MD products. For this reason, some explanations (and
some illustrations) may not be applicable to your Nel MD. Please re|_:r to the operaling instructions of
your Net MD as wel!.
Checking the supplied accessories
Headphones/earphones ( 1)
Dedicated USB cable (1)
CD-ROM (SonicStage Ver. 1.5 and Net MD Simple Burner Vet. 1. I) (1)*
*Do nol pl_y a CD-ROM on an audio CD player.
11
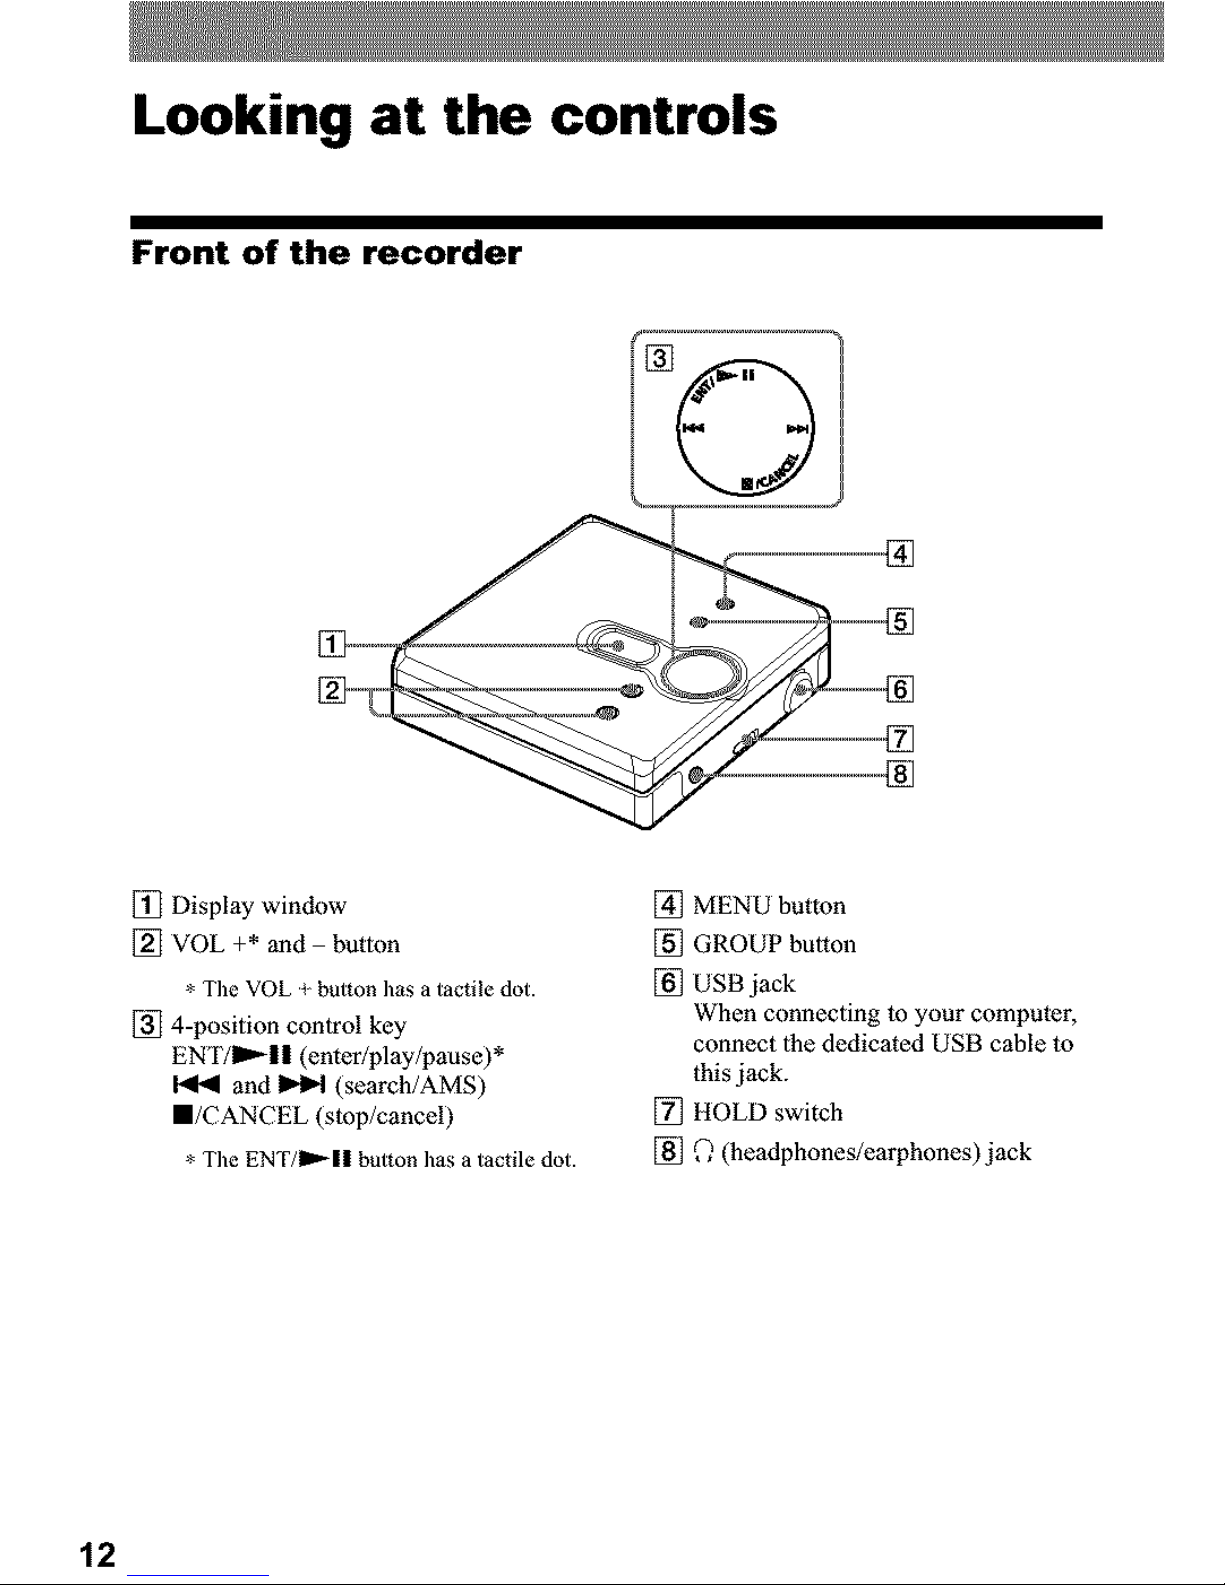
Looking at the controls
Front of the recorder
[] Display window
[] VOL +* and button
* Tile VOL _-button has a tactile dot.
[] 4-position control key
EN'ITIm,_I I (enter/play/pause)*
and _ (search/AMS)
I/CANCEL (stop/cancel)
* Tile ENT/IP,-II button has a tactile dot.
[] MENU button
[] GROUP button
[] USB jack
When connecting to your computer,
connect lhe dedic3ted USB cable to
this jack.
[] HOLD switch
[] _ (he3dphones/earphones) jack
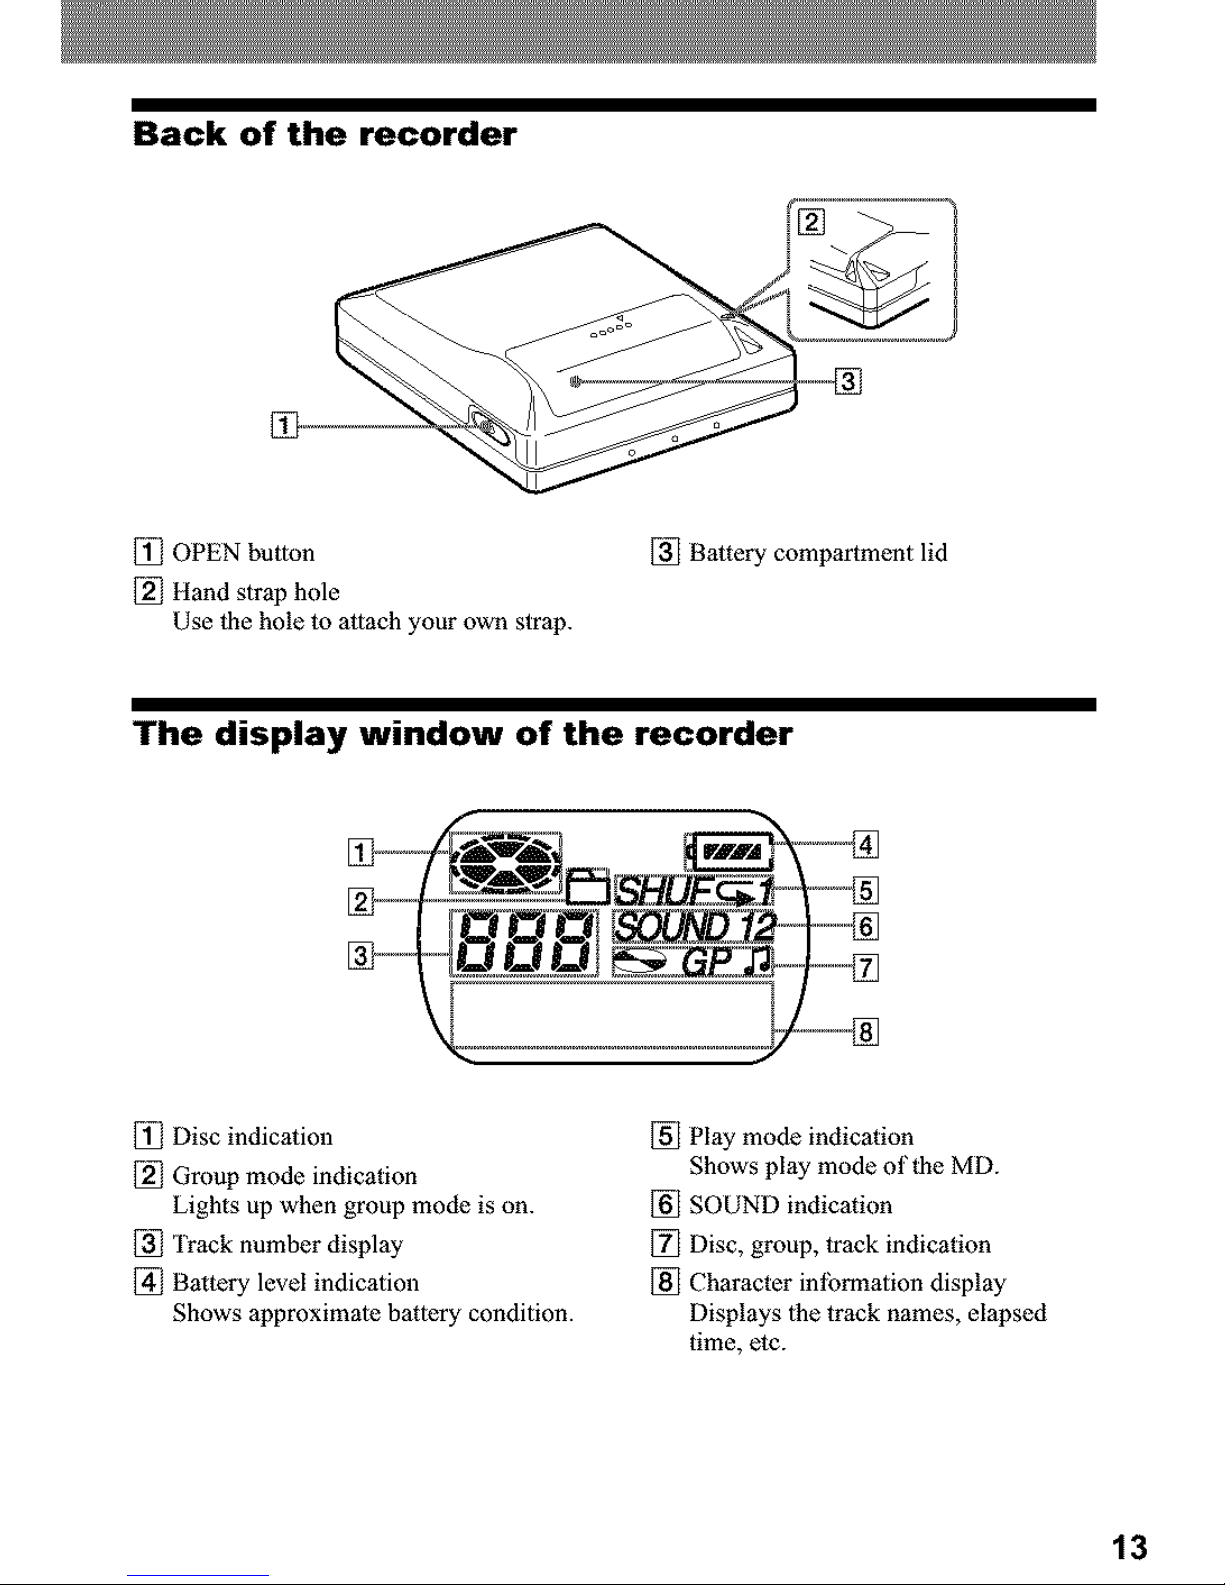
Back of the recorder
[_ OPEN button
[_] Hand strap hole
Use 1he hole 1o attach your own str3p.
[] Battery compartment lid
The display window of the recorder
[_ Disc indicalion
[] Group mode indication
Lights up when group mode is on.
[] Track number displ3y
_] Battery level indication
Shows 3pproximale battery condition.
[] Play mode indicotion
Shows play mode of|he MD.
[] SOUND indic3tion
[] Disc, group, 1rack indication
[] Character inlbnnation display
Displays 1he track names, elapsed
time, etc.
13
Getting started. =
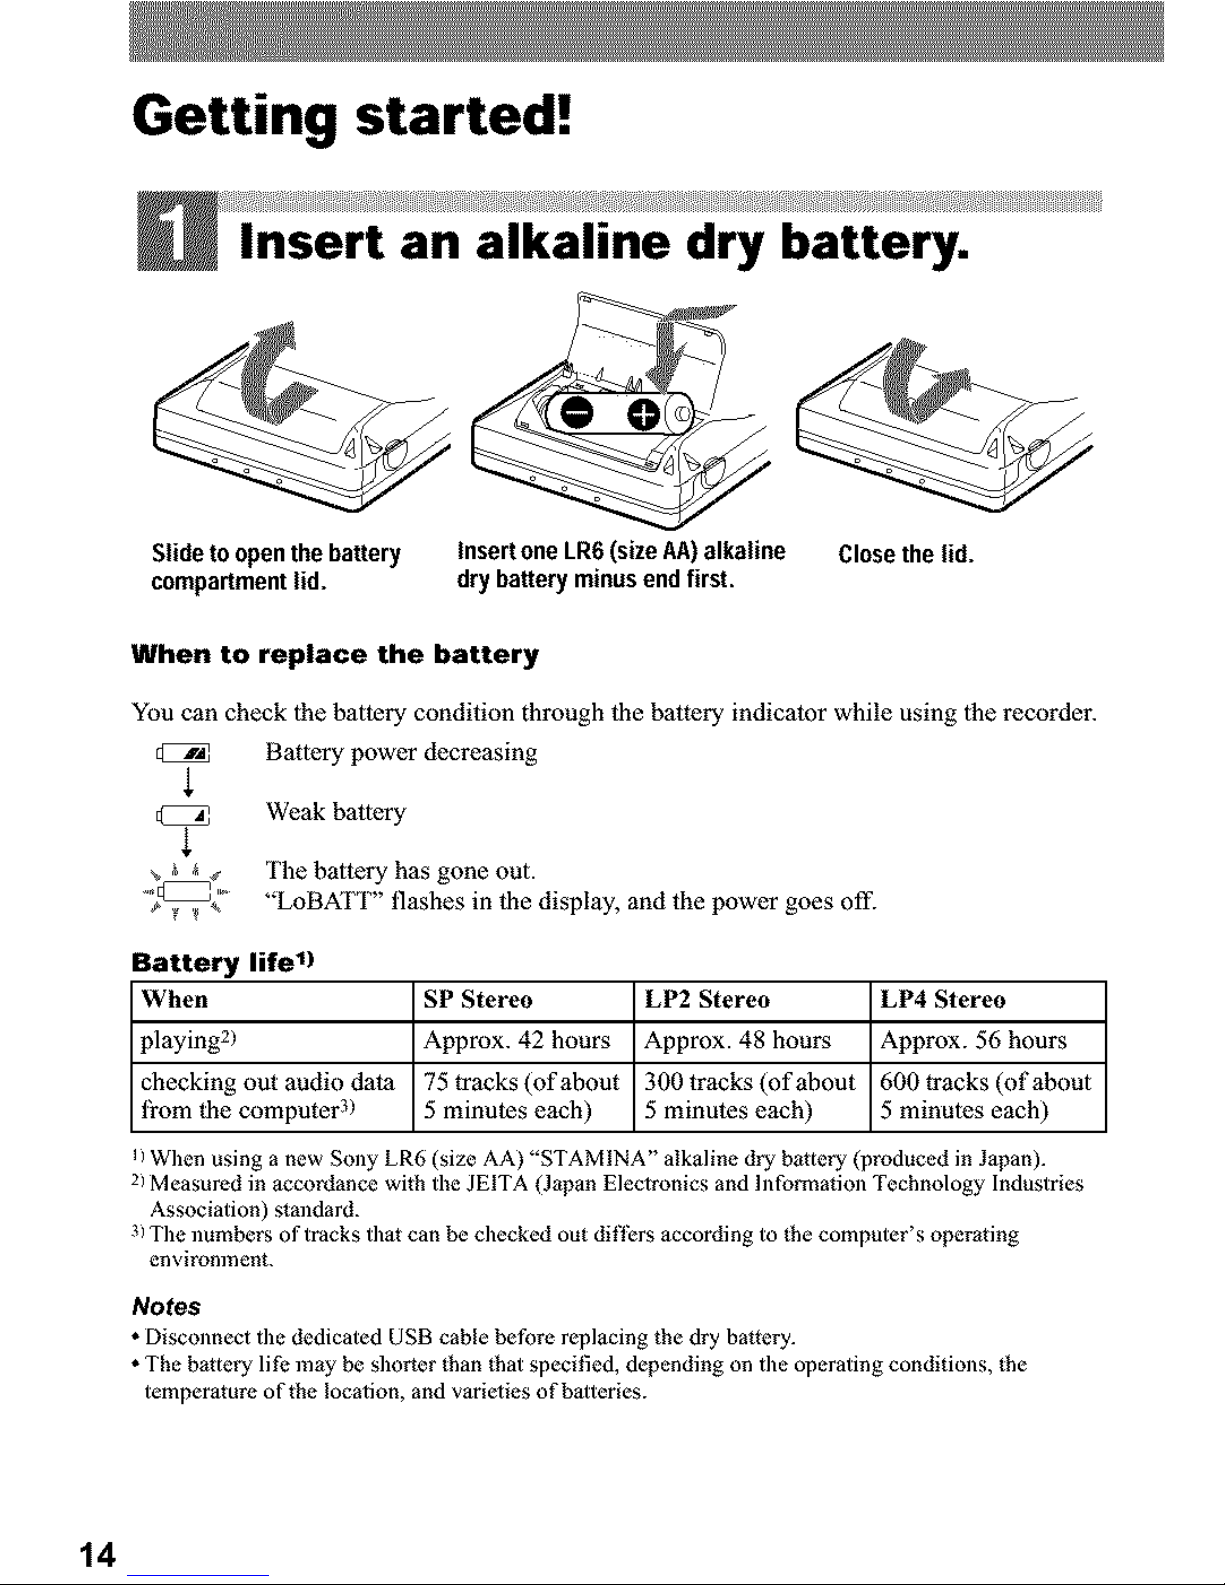
Insert an alkaline dry battery.
Slideto openthebattery
compartment lid.
Insertone LR6(size AA)alkaline Closethe lid.
drybattery minusend first.
When to replace the battery
You can check lhe battery condition through tl_ebattery indicator while using lhe recorder.
Battery power decreasing
Weak battery
The battery has gone out.
"LoBATT" flashes in tl_e display, and the power goes off.
Battery life 1)
When SP Stereo LP2 Stereo LP4 Stereo
playing 2) Approx. 42 hours Approx. 48 hours Approx. 56 hours
checking out audio data 75 tracks (of about 300 tracks (of about 600 tracks (of about
fi'om l_e computer 3) 5 minutes each) 5 minutes each) 5 minu_es each)
li When using a new Sony LR6 (size AA) "STAMINA" alkaline dry battery (produced in J_pan).
2i Measured in accordance with the JEITA (Japan Electronics and lnfornlation Technology Industries
Association) slmldard.
3i The numbers of tracks that can be checked out di|]_rs according to the computer's operating
environment.
Notes
• Disconnect tile dedicated USB cable before replacing the dry battery.
• The battery life may be shorter than that specified, depending on the operating conditions, the
temperature of the location, and varielies of b_lteries.
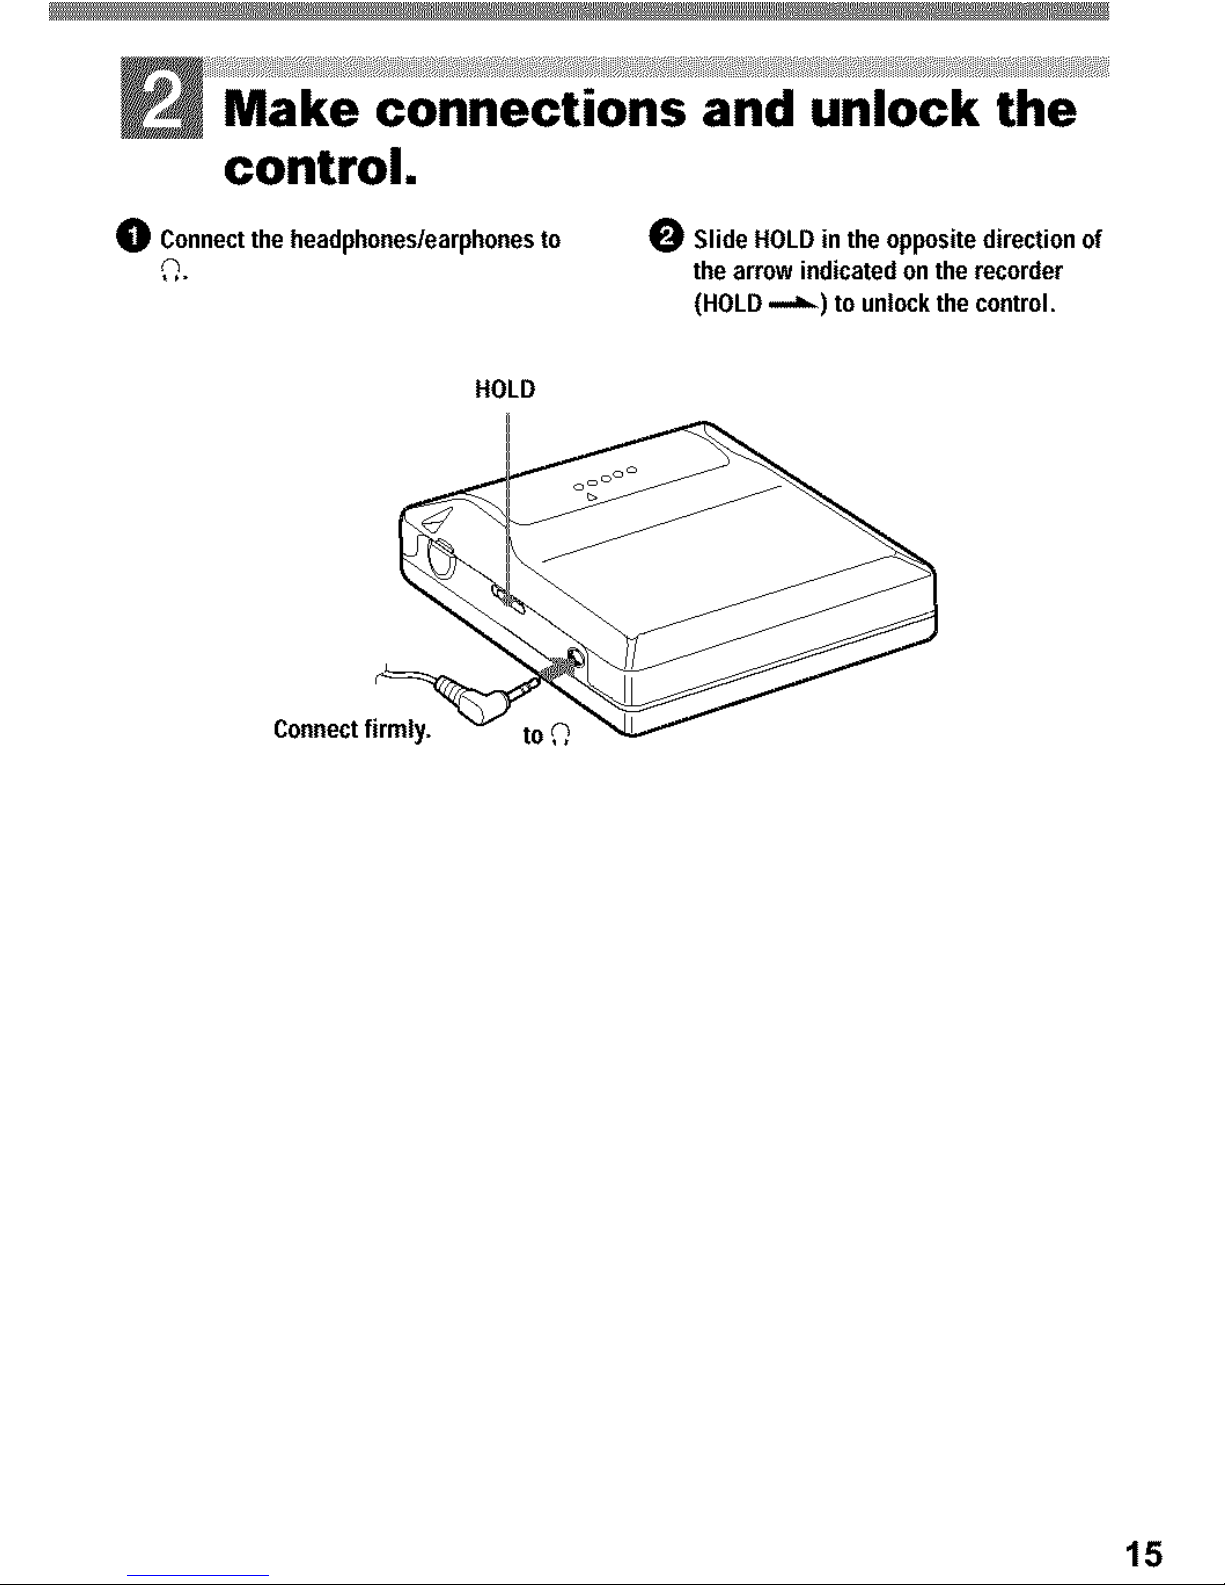
Make connections and unlock the
control.
0 Connecttheheadphones/earphonesto 0 Slide HOLD in the oppositedirection of
the arrow indicatedon the recorder
(HOLD-,,=_ ) to unlockthe control,
HOLD
Connectfirmly.
15
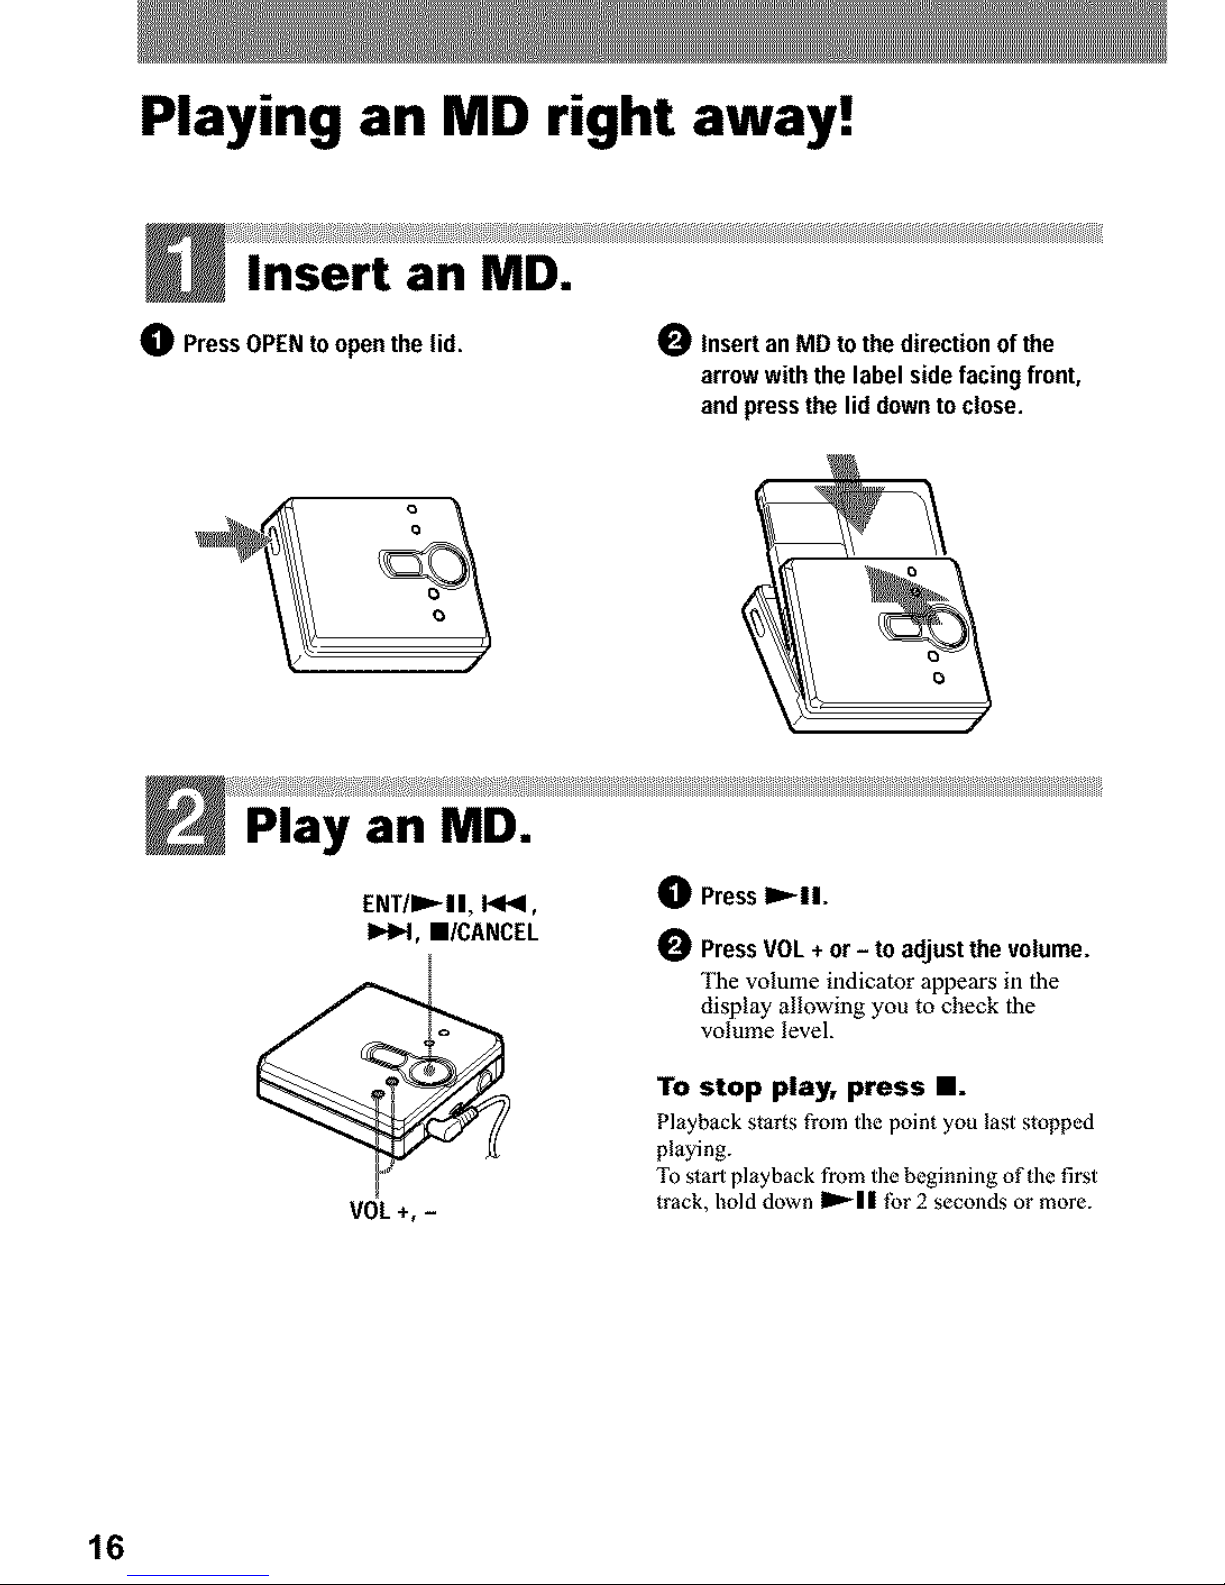
Playing an MD right away!
Insert an MD.
0 PressOPENto open the lid. Insertan MD tothe directionof the
arrow with the label sidefacing front,
and pressthe lid downtoclose.
Play an MD.
ENT/D,,'-II, 14_1,
Iz,_l, I/CANCEL
VOL+, -
0 PressI_11.
_ Press VOL + or - to adjust the volume.
The volume l[ldJcator appears in the
display allowing you to check the
volume level.
To stop play, press II.
Playback starts from the point you last stopped
playing.
To s_art playback from the beginning of the first
track, hold down I_'_11 |br 2 seconds or more.
16
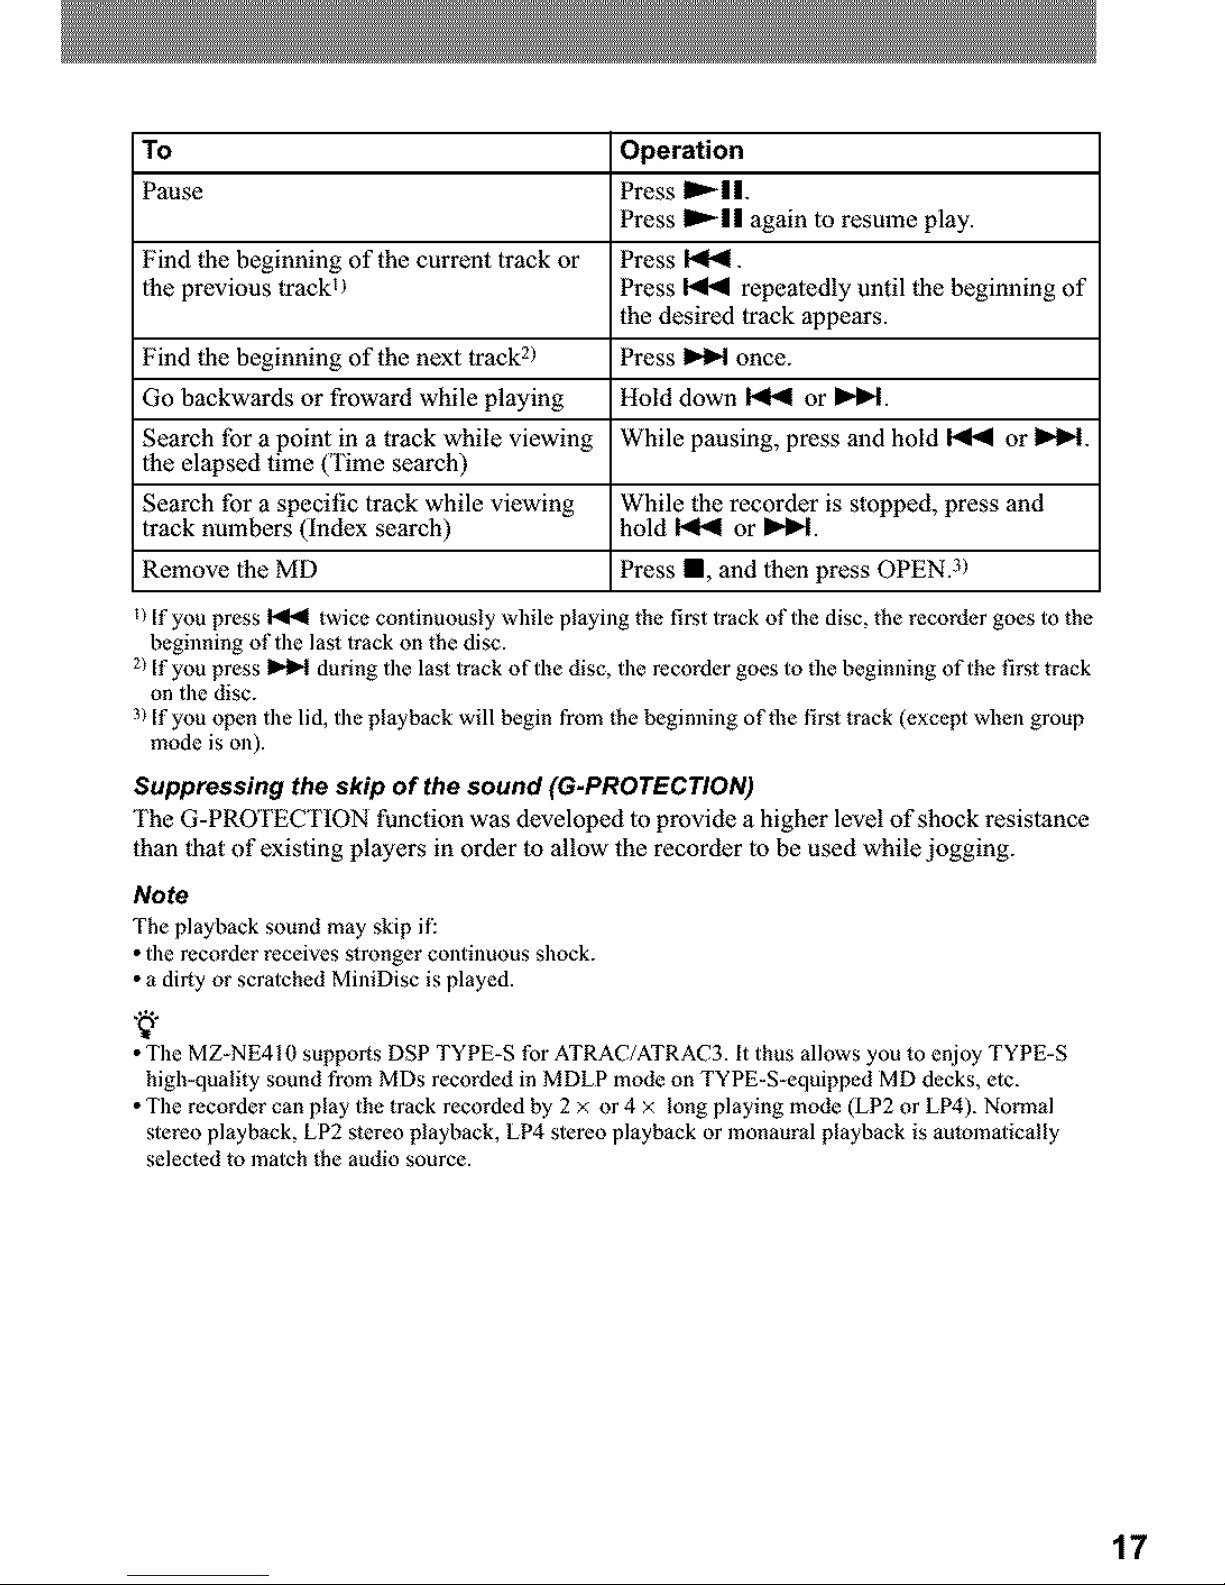
To Operation
Pause Press ID,-I I.
Press ID,-II again to resume play.
Find _l_ebeginning of the current track or Press I<_1.
lhe previous lrackU Press _ repealedly until _l_ebeginning of
the desired track appears.
Find _l_ebeginning of the next track2/ Press _ once.
Go backwards or froward while playing Hold down _ or m_P'l.
Search tbr a point in a track while viewing While pausing, press and hold _ or IH_t.
lhe elapsed time (Time search)
Search for a specific track while viewing While the recorder is stopped, press and
track numbers (index search) hold _ or m_P'l.
Remove lhe MD Press I, and 1hen press OPEN.3/
_/If you press _ twice continuously while playing the first track of the disc, the recorder goes to the
beginning of the lasl track on the disc.
2)If you press _ during the lasl track of the disc, the recorder goes to the beginning of the first track
on the disc.
3)If you open the lid, the playback will begin from the beginning of the tirsl track (except when group
mode is on).
Suppressing the skip of the sound (G.PROTECTION)
The G-PROTECTION function was developed to provide a higher level of shock resistance
than d_at of existing players in order to allow the recorder to be used while jogging.
Note
The playback sound may skip it_
• tile recorder receives s_mnger continuous shock.
• a dirty or scratched MiniDisc is played.
• Tile MZ-NE410 supports DSP TYPE-S for ATRAC/ATRAC3. It thus allows you to enjoy TYPE-S
higb-quali_y sotlnd from MDs recorded in MDLP mode on TYPE-S-equipped MD decks, etc.
• The recorder can play the track recorded by 2 x or 4 x long playing mode (LP2 or LP4). No_nal
stereo playback, LP2 stereo playback, LP4 stereo playback or monaural playback is aulomaiically
selected lo match the audio source.
17
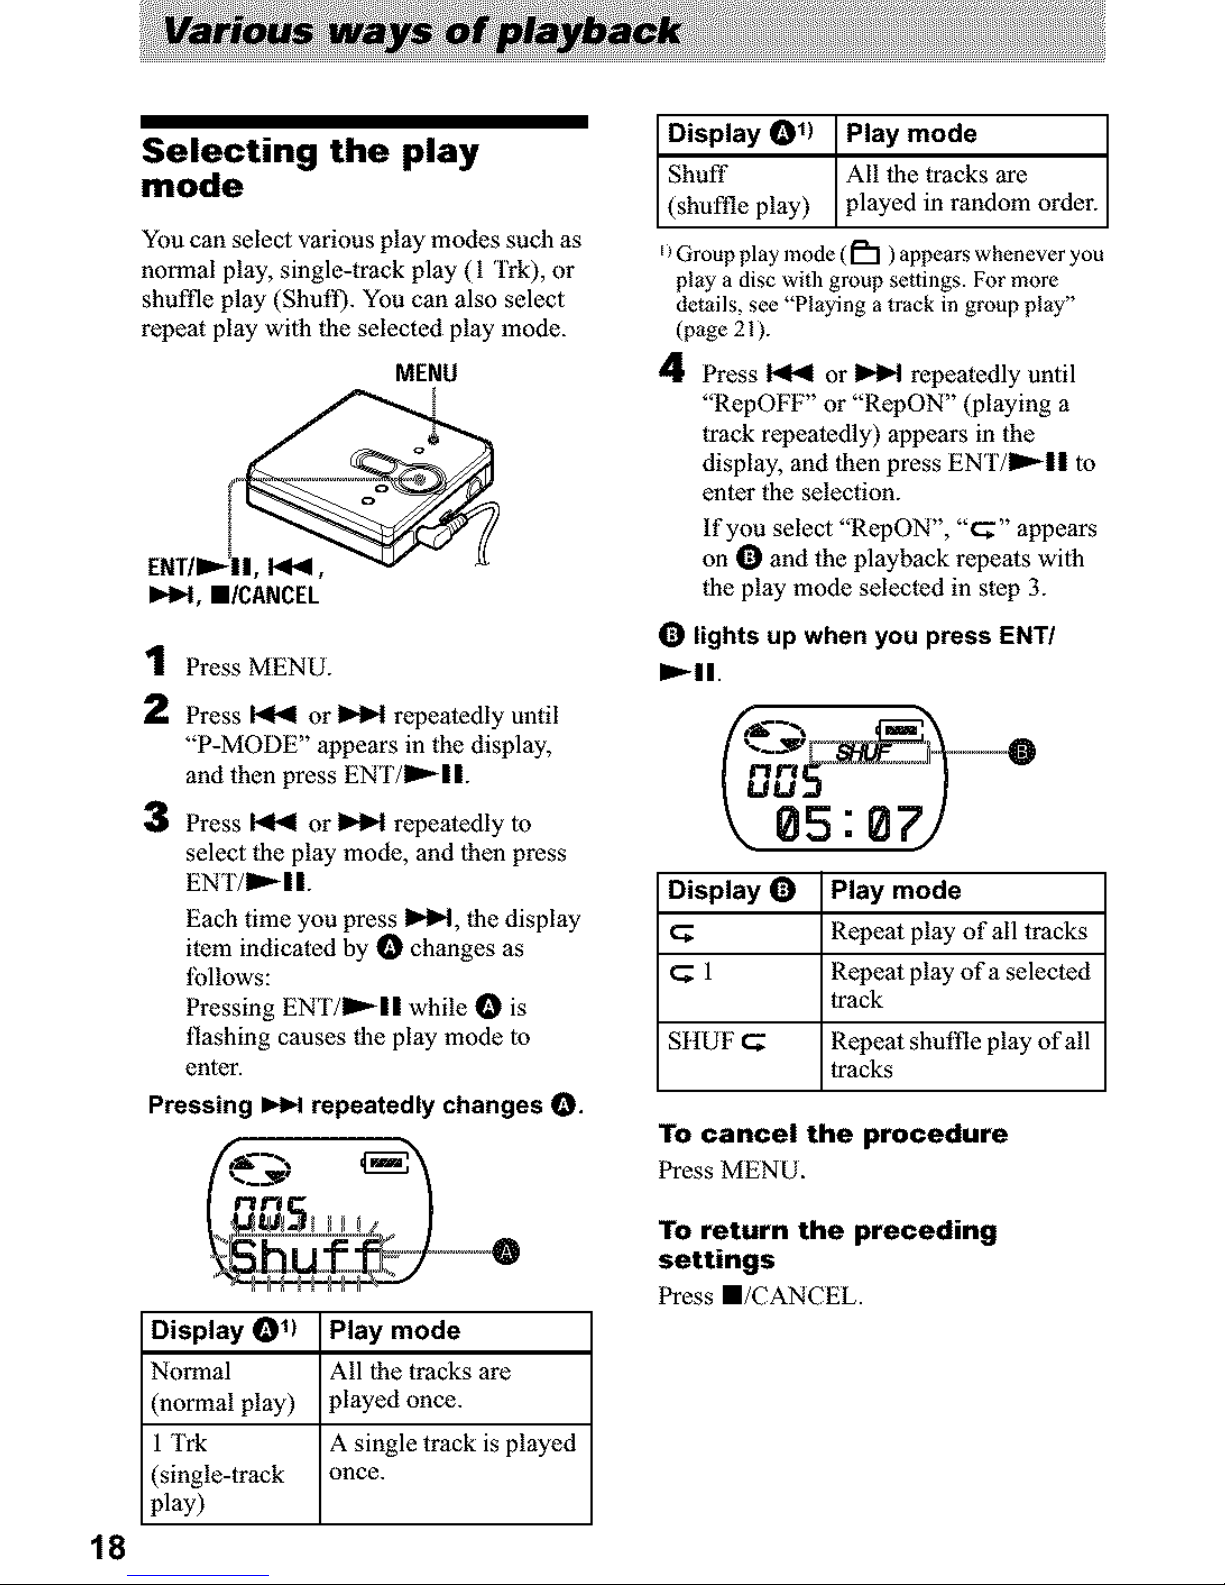
Selecting the play
mode
You can select various play modes such as
normal play, single-track play (I Trk), or
shuffle play (Shull). You can also select
repe3t play wilh _he selected play mode.
MENU
IHH, m/CANCEL
1 Press MENU.
2 Press _ or _ repeatedly until
"P-MODE" appears in the display,
and then press ENT/I_II.
3 Press _ or _ repeatedly to
select _he play mode, and lhen press
EN'I'/II"- I I.
Each time you press I_H, _he display
item indicated by O changes as
lbllows:
Pressing ENT/Im_II while O is
flashing causes _he play mode lo
enter.
Pressing _ repeatedly changes O.
LLLJ_
_---0
Display _11 Play mode
Normal All |he tracks are
(normal play) played once.
1 irk A single track is played
(single-track once.
pl3y)
18
lay) I;l :::: n o order
EiGroup play mode (im'l) appears whenever you
pl_y a disc wid_ group settings. Formore
details, see "Pl_ying a track in group pl_y"
(p_ge 21).
4 Press _ or _ repeatedly until
"RepOFF" or "RepON" (playing a
Irack repeatedly) appeors in the
display, and then press EN'I'/Im_II lo
enter the selection.
If you select "RepON", "c;" appears
on O and the plzyback repeats wilh
_he play mode selected in step 3.
O lights up when you press ENT/
1_11.
Display O Play mode
Repe3t play of all tracks
1 Repeat play of a selected
track
SItUF _ Repe_t shuffle play of all
tracks
To cancel the procedure
Press MENU.
To return the preceding
settings
Press I/CANCEL.
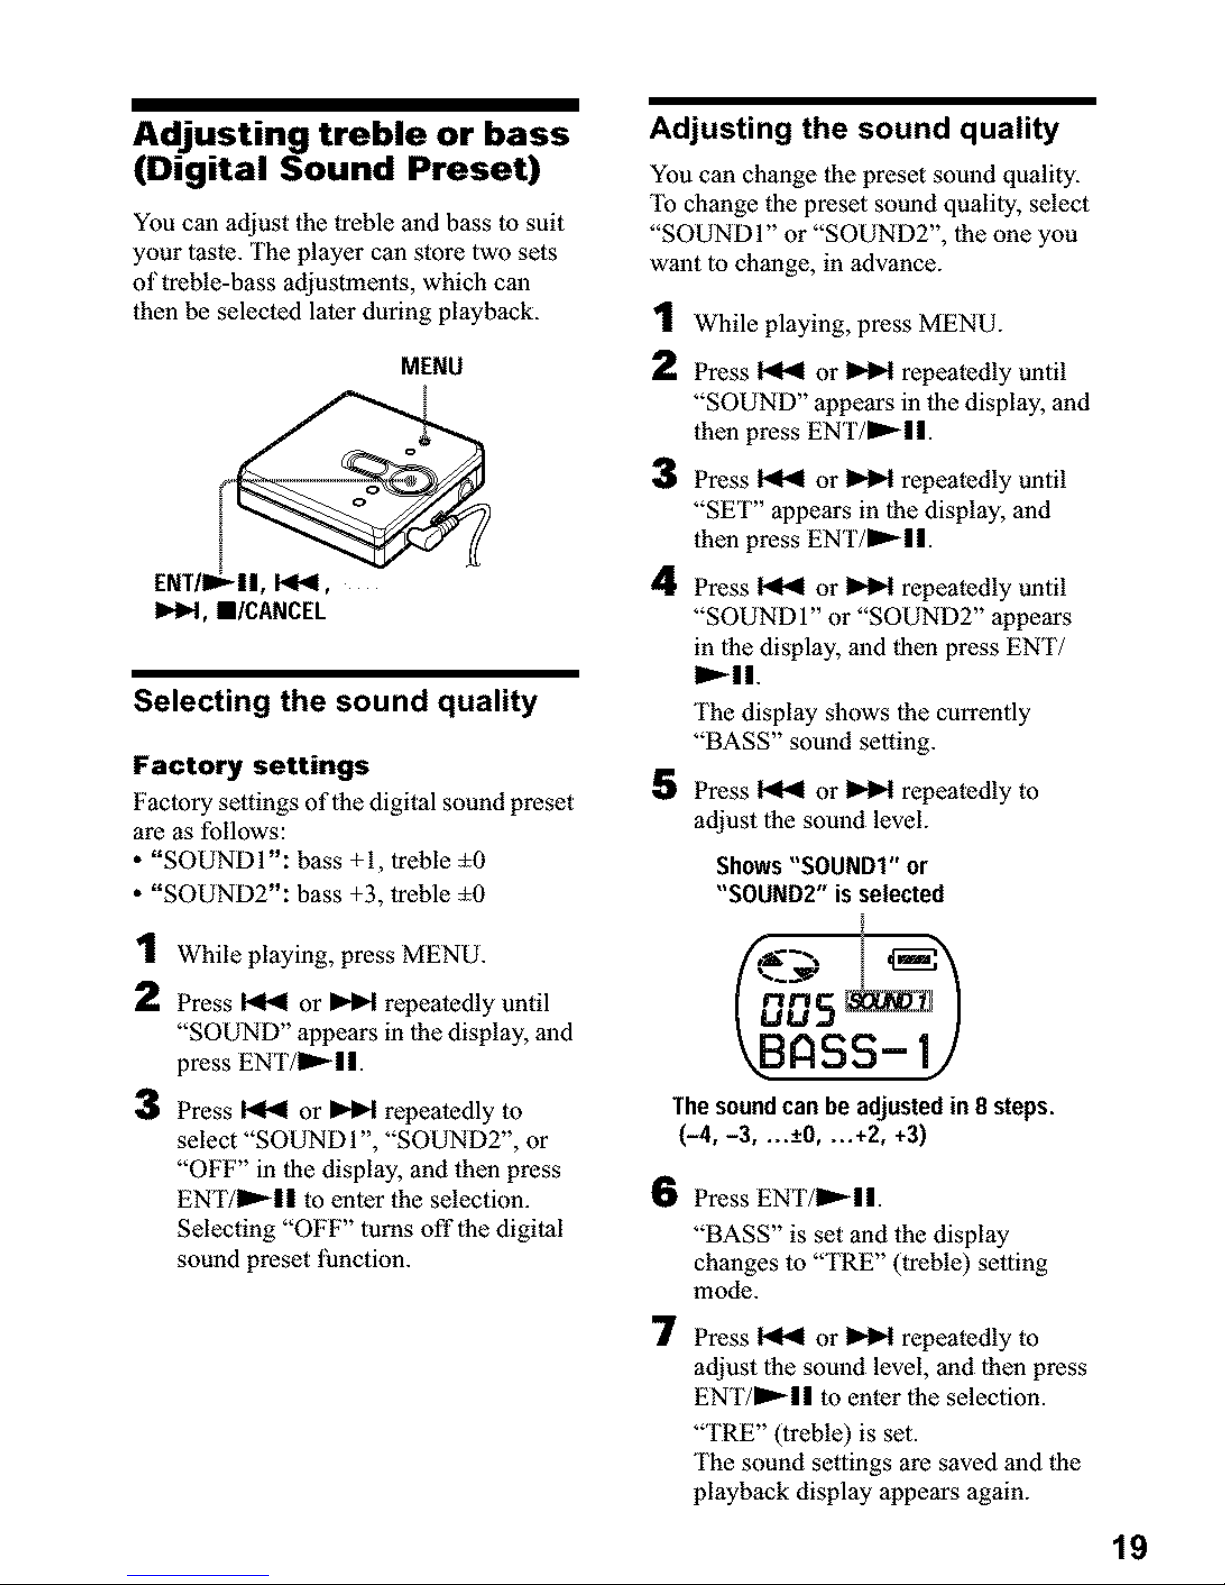
Adjusting treble or bass
(Digital Sound Preset)
You can adjust the treble and bass to suit
your taste. The ployer can store two sets
of treble-bass adjustments, which can
then be selected later during playback.
MENU
[HT/I_||, I_1_1,
IHH, I/CANCEL
Selecting the sound quality
Factory settings
Factory settings of the digital sound preset
are as follows:
• "SOUNDI': bass +I, treble _0
• "SOUND2": bass +3, treble _0
1 While playing, press MENU.
2 Press _ or _ repeatedly until
"SOUND" appears in the display, and
press ENT/I_II.
3 Press 1"<41or _ repeatedly to
select "SOUND 1", "SOUND2", or
"OFF" in the display, and then press
ENT/I_U to enter the selection.
Selecting "OFF" turns off the digital
sound preset function.
Adjusting the sound quality
You can change the preset sound quality.
To change the preset sound quality, select
"SOUNDI" or "SOUND2", the one you
want to change, in advance.
1 While playing, press MEN U.
2 Press _ or _ repeatedly until
"SOUND" oppears in the display, and
then press ENT/D,'-II.
3
4
5
Press _ or _ repeatedly until
"SET" appears in the display, and
then press ENT/D,'-II.
Press _ or _ repeatedly until
"SOUND1" or "SOUND2" 3ppears
in the display, and then press ENT/
I_11.
The display shows the currently
"BASS" sound setting.
Press _ or _ repeatedly to
adjust the sound level.
Shows "SOUND1" or
"SOUND2" is selected
The soundcan be adjusted in 8 steps.
(-4, -3, ...-+0, ...+2, +3)
6
7
Press ENT/II_I I.
"BASS" is set and the display
changes to "TRE" (ireNe) setting
mode.
Press _ or _ repeatedly to
adjust the sound level, ond then press
ENT/mD_II to enter the selection.
"TRE" (treble) is set.
The sound settings are saved and the
playback display appears again.
19
To cancel the procedure
Press MENU.
To return the preceding
settings
Press m/CANCEL.
Note
_Vhen using a digital sound preset, the sound
may break or become distorted if t]le volume is
turned up too high, depending oll the settings or
the track. In this case, change the se_fings of the
sound quality.
20
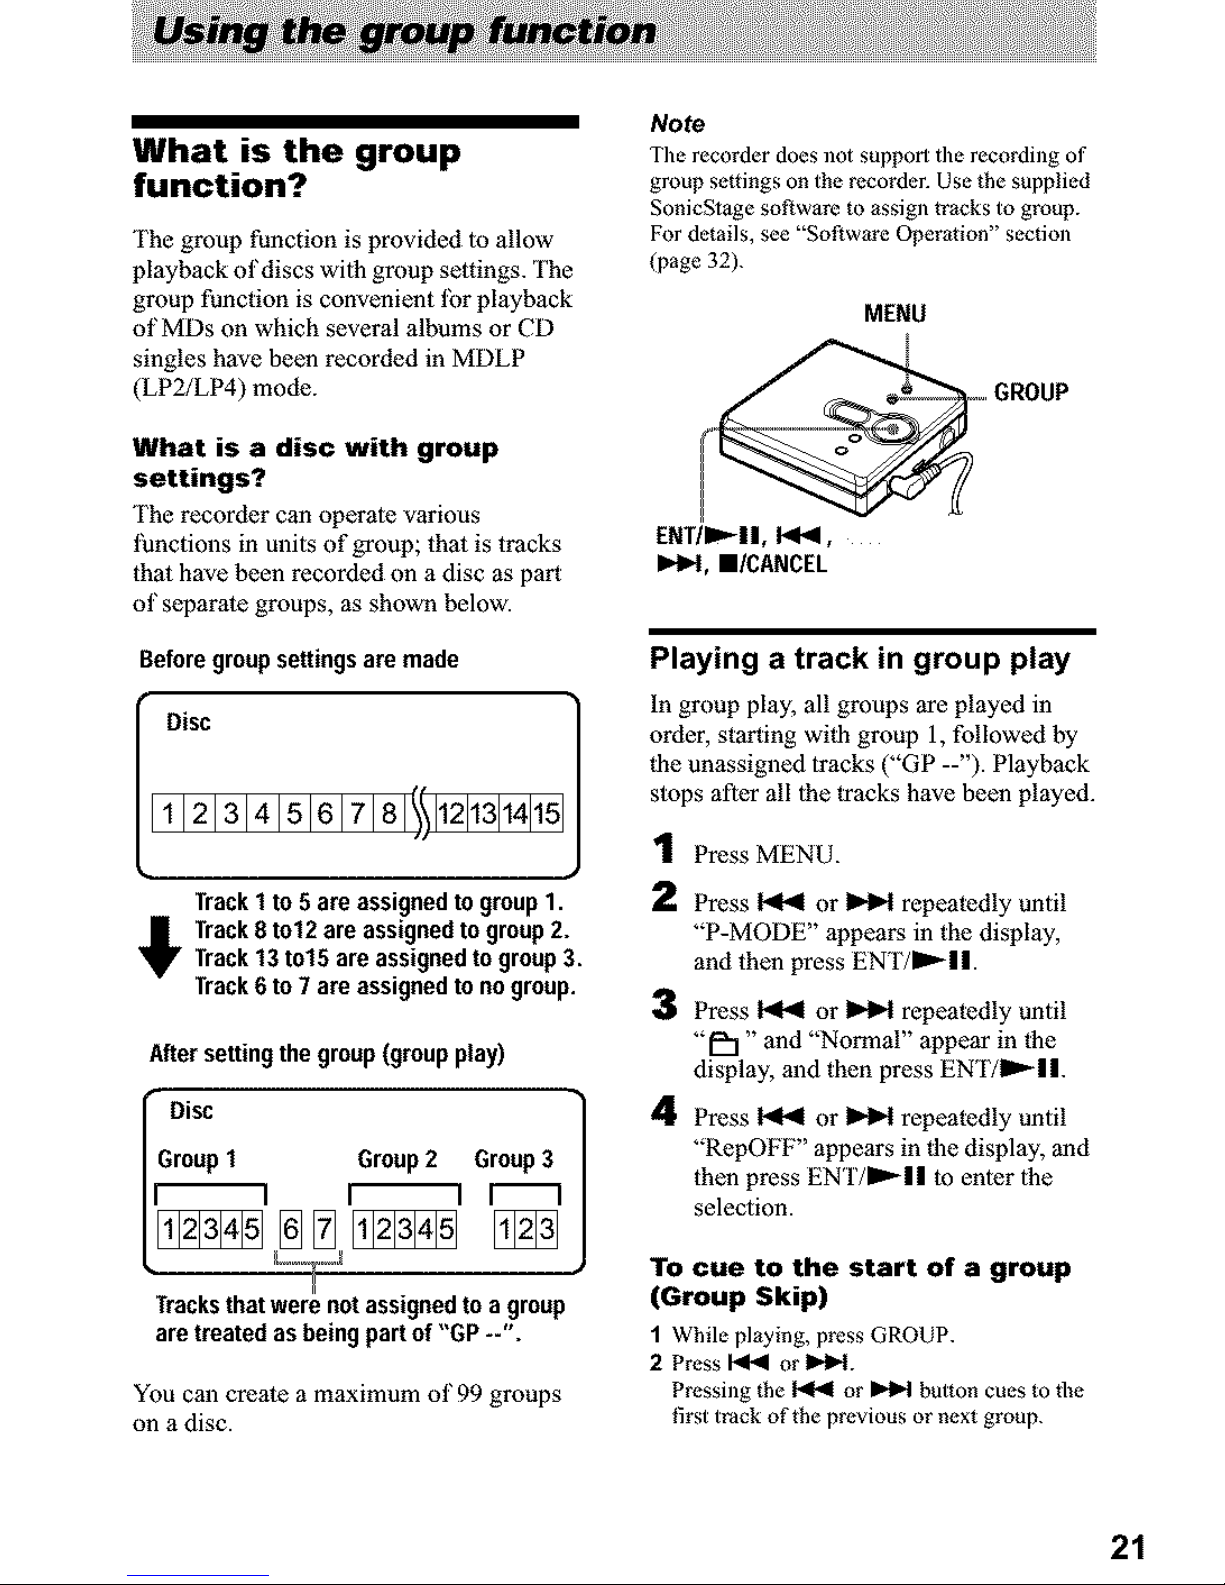
What is the group
function?
The group function is provided 1oallow
playback of discs wilh group settings. The
group function is convenient lbr playback
of MDs on which several albums or CD
singles have been recorded in MDLP
(LP2/LP4) mode.
What is a disc with group
settings?
The recorder can operate various
functions in units of group; thai is tracks
thai have been recorded on a disc as part
of separate groups, as shown below.
Beforegroup settings are made
Disc
11121314151617181111121131141151
!!,
Track1 to 5 are assignedto group1.
Track8 to12 are assignedtogroup2.
Track13 to15 are assignedtogroup3.
Track6 to 7 are assignedto nogroup.
After setting the group (groupplay)
Disc ]
Group1 Group2 Group3
/1_'1 I_1 I" 1
H
Tracksthat were notassignedto a group
are treated asbeing part of "GP --".
You can create a maximum of 99 groups
on a disc.
Note
The recorder does ]lot support the recording of
group se_tings on the recorder. Use the supplied
SonicSlage software to assign tracks to group.
For details, see "Software Operation" section
(page 32).
MENU
,oGROUP
ENT/II="-II, I<_,
I_1, I/CANCEL
Playing a track in group play
In group play, all groups are played in
order, starting wilh group 1, followed by
lhe unassigned tracks ("GP --'). Playback
slops after all lhe tracks have been played.
1
2
3
4
Press MENU.
Press _ or _ repeatedly until
"P-MODE" appears in the display,
and then press ENr/ml,-||.
Press _ or _ repeatedly until
"U'I" and "Normal" appear in the
display, and then press EN'ITI_| |.
Press _ or _ repeatedly until
"RepOFF" appears in|he display, and
then press EN'F/D,'-II to entor lhe
selection.
To cue to the start of a group
(Group Skip)
1 While playing, press GROUP.
2 Press I_ or I_1.
Pressing the _ or _ button cues to the
first track of the previous or next group.
21
 Loading...