

Sony Walkman D-FS601 Operating Instructions Manual
SONY@
3-243-381-l 1 (1)
TV’/WB’FM/AM
Portable
CD Player
Operating Instructions
About the area code
The area code of the location in which you purchased the CD player
is shown on upper left of the bar code label on the package.
For accessoties supplied with your CD player, check the area code
of your model and see “Accessories (supplietioptional).”
D-FS60 I
0 2002 Sony Corporation
To prevent fire or shock
hazard, do not expose the AC
power adaptor to rain or
moisture.
Do not install the appliance in a confined
To prevent fire, do not cover the ventilation
of the apparatus with newspapers, tablecloths, curtains, etc. And don’t place lighted
candles on the apparatus.
To prevent fire or shock hazard, do not place
objects filled with liquids, such as vases, on
the apparatus.
CAUTION
The use of optical instruments with this
product will increase eye hazard.
Owner’s Record
The model and the serial numbers are located
at the rear. Record the serial number in the
space provided below. Refer to these
numbers whenever you call upon your Sony
dealer regarding this product.
Model No. D-F.5601
Serial No.
Certain countries may regulate disposal of
the battery used to power this product. Please
consult with your local authority.
CAUTION
l
INVISIBLE LASER RADIATION
WHEN OPEN
l
DO NOT STARE INTO BEAM OR
VIEW DIRECTLY WlTH OPTICAL
INSTRUMENTS
CC
The CE mark is valid only for
products marketed in the European
Union.
For the customers in the USA
This equipment
has been tested and found to comply
witi the limits for a Class B digital device, p”rsua”t to
Part 15 of the FCC Rules. These limits are desig”ed to
provide reasonable protection against harm&l
interference in a residential in&k&“. ‘I%is eauioment
generates, “ses, and can radiate radio freq”e& &ergy
and, if not installed and used i” accordance with the
instructions, may caue h&l inwference to radio
communications. However, there is no guarantee that
interference will not occur i” a partic”l& installation.
If this ea”iume”t does ca”se ham&l interference to
radio or~el&isio” reception, which can be determined
by t”mi”g the equipment off and o”, the user is
encouraged to try to correct the in&erence by one or
tnore of the following meas”res:
- Reorient
or relocate the receiving antenna,
- Increase the separation behveen the equipment and
receiver.
- Co”“ect the equipment into a” outlet on a circuit
different from that to which the receiver is connected,
- Consult the dealer or a” experienced radio/TV
- technician for hdp.
You ale cautioned that any changes or modiiica&xu not
expressly approved in this manual could void vow
authority to opzate this equipment,
If yo” have a”y questions about this product, yo” may
Cdl:
Sony Direct Response Center l-(800)-222-7669
or write to:
Sony Direct Response Center I2451 Gateway Blvd.
Fort Myers, FL 33913
Declaration of Conformity
Trade Name: SONY
Model No.: D-FS601
Responsible Party: Sony Electronics Inc.
Address: 680 Kinderkmack Road,
Oradell, NJ 07649 USA
Telephone No,: 201-930-6972
This device complies with Part 15 of the FCC Rules,
Opzation is subject to the following hvo conditions:
(1) This device may not cause harmful interference,
a”d (2) this device must accept a”y intxference
received, including interference that may ca”se
undesired operation.
For the customers in the USA
Please register this product on line at www.sony,cornl
productregistration.
Proper regismation will enable “s to send you periodic
mailings about new prcduc& services, and other
impofiant a”no”ncemen&. Registering you product
will also allow us to contact yo” in the unlikely event
that the product needs adjusb”em or modification.
Thank yam
2
Table of Contents
Locating the controls .,..............,...,....,......... 4
1. Connect your CD player. ......................... 6
2. Insert a CD. ............................................. 6
3. Play a CD.
...............................................
7
Playing tracks repeatedly (Repeat play) 10
Playing a single track (Single play) ,.....,.... 10
Playmg tracks in random order
(Shuffle play) . . . . . . . . . . . . . . ~ ,..,.....,...........,..,.
10
Playing tracks in your favorite order
(PGM play) . . . . . . . . . . . . . . . . . . . . . . . . . . . . . . . . . . . . . . . . . . . . 11
Listening to the radio .................................
12
Presetting your favorite radio stations
....... 14
Presetting radio stations
............................. 15
Changing the tuning interval
..................... 16
G-PROTECTION function . . . . . . . . . . . . . . . . 17
Emphasizing the bass sound (SOUND) ,... 17
Protecting your hearing (AVLS) . . . . . . . . . . . . . . . . 18
Locking the controls (HOLD) . . . . . . . . . . . . . . . . . . . 18
Turning off the operation beep sound . . . . . . 19
Connecting a stereo system . . . . . . . . . . . . . . . . . . . . . . . 20
Using the rechargeable batteries . . . . . . . . . . . . . . . 21
Using the dry batteries . . . . . . . . . . . . . . . . . . . . . . . . . . . . . . . 23
Notes on the power source . . . . . . . . . . . . . . . . . . . . . . . . 23
~;~~~~~~~~~~~~~~~~~~~
,. w,:*:: w& >od<dA 8,
Precautions . . . . . . . . . . . . . . . . . . . . . . . . . . . . . . . . . . . . . . . . . . . . . . . . 24
Maintenance . . . . . . . . . . . . . . . . . . . . . . . . . . . . . . . . . . . . . . . . . . . . . . 25
Troubleshooting . . . . . . . . . . . . . . . . . . . . . . . . . . . . . . . . . . . . . . . . . 26
Specifications ..,......................................... 28
Accessories (supplied/optional) . . . . . . . . . . . . . 30
3
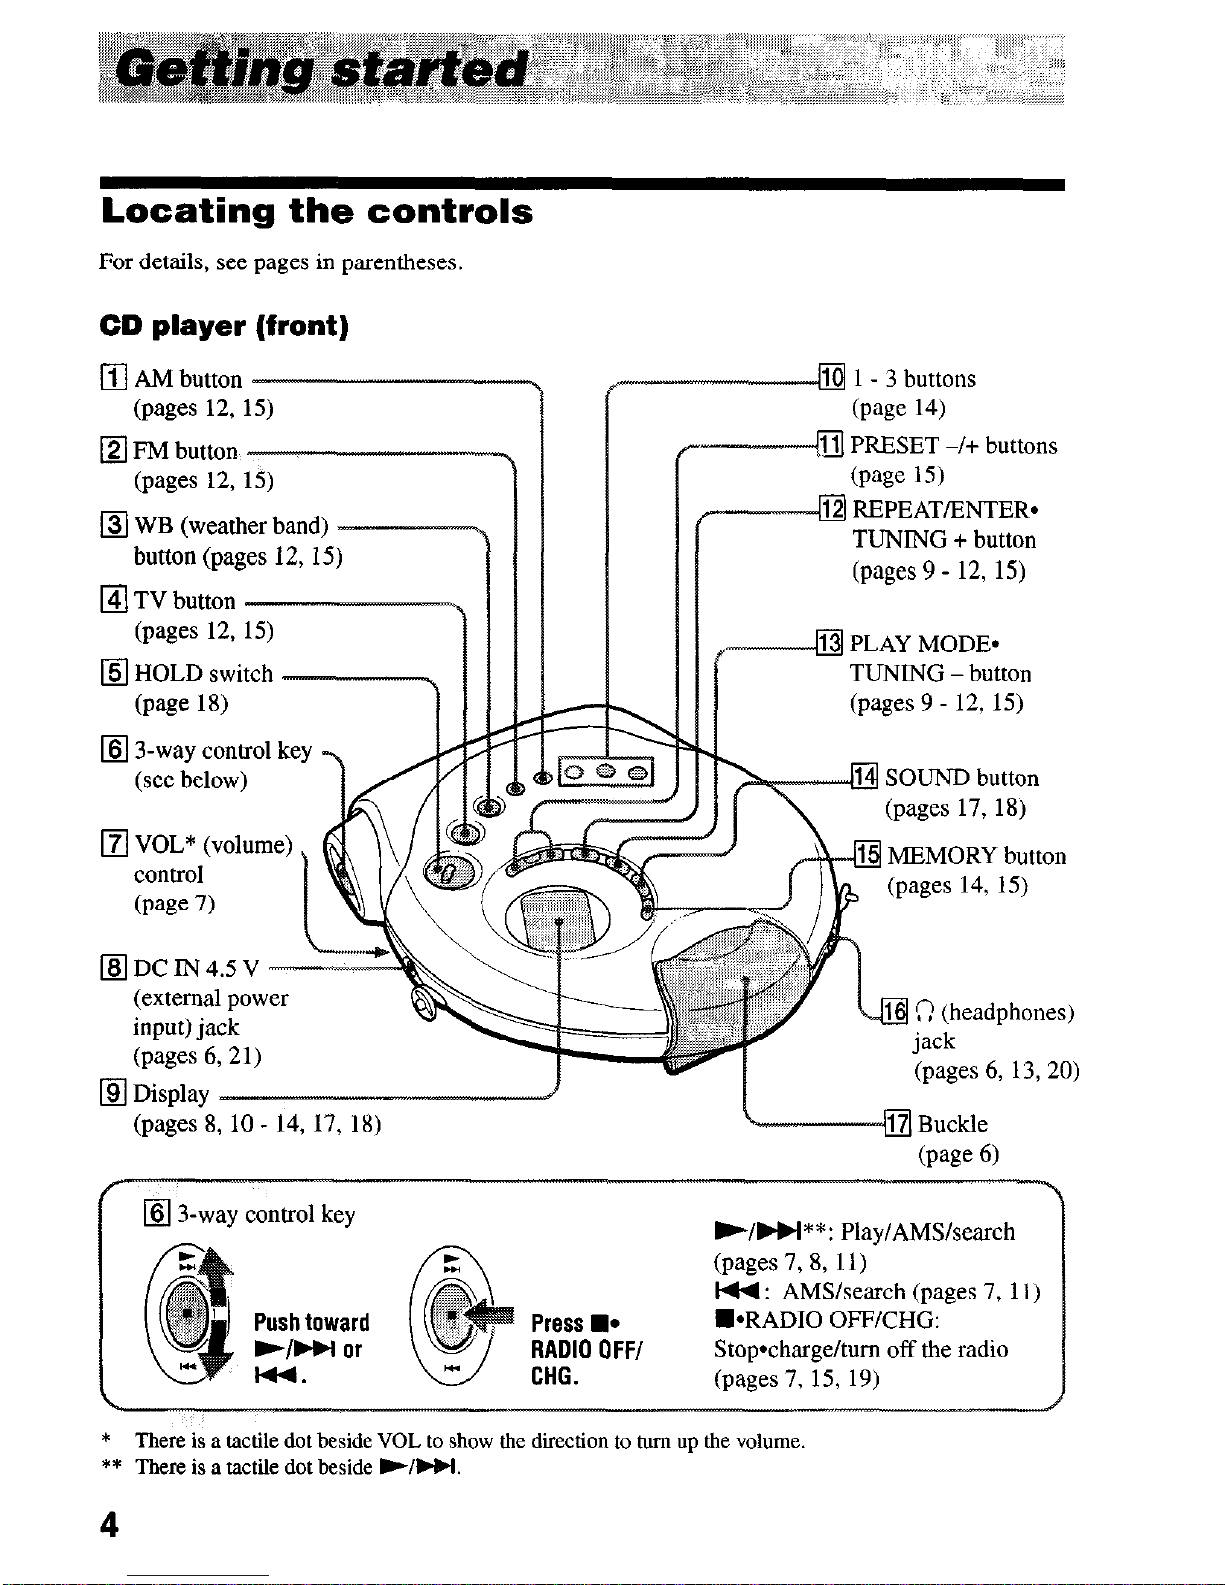
For details, see pages in parentheses
CD player (front)
q
AM button
(pages 12, 15)
q
FM button
@ges
12,
Locating the controls
q
WB (weather band)
button (pages 12, 15
q
3-way control key
(see below)
l7J VOL* (volume)
COtltrOI
&we 7)
1
q
DCIN4.5V w
(external power
input) jack
@ass
6,211
q
Display ----
1 - 3 buttons
(we 14)
a PRESET -/+ buttons
kwze 13
q
REPEAT/ENTER*
TUNING + button
(pages 9 - 12, 15)
PLAY MODE*
TUNING -button
(pages 9 - 12, 15)
SOUND button
MEMORY button
(paies-8, 10 - 14, 17, 1X)
q
3-way control key
Push toward
F/W or
l44.
Press n *
RADID DFF/
CHG.
b/w**: Play/AMS/seaxh
(pages 7,8, 11)
I44 : AMS/search (pages 7, 11)
m-RADIO OFF/CHCi:
Stop*chaxge/tum off the radio
(pages 7, 15, 19)
* There is a tactile dot beside VOL to show the direction to hu-n up the volume.
** There is a tactile dot beside b/w.
4
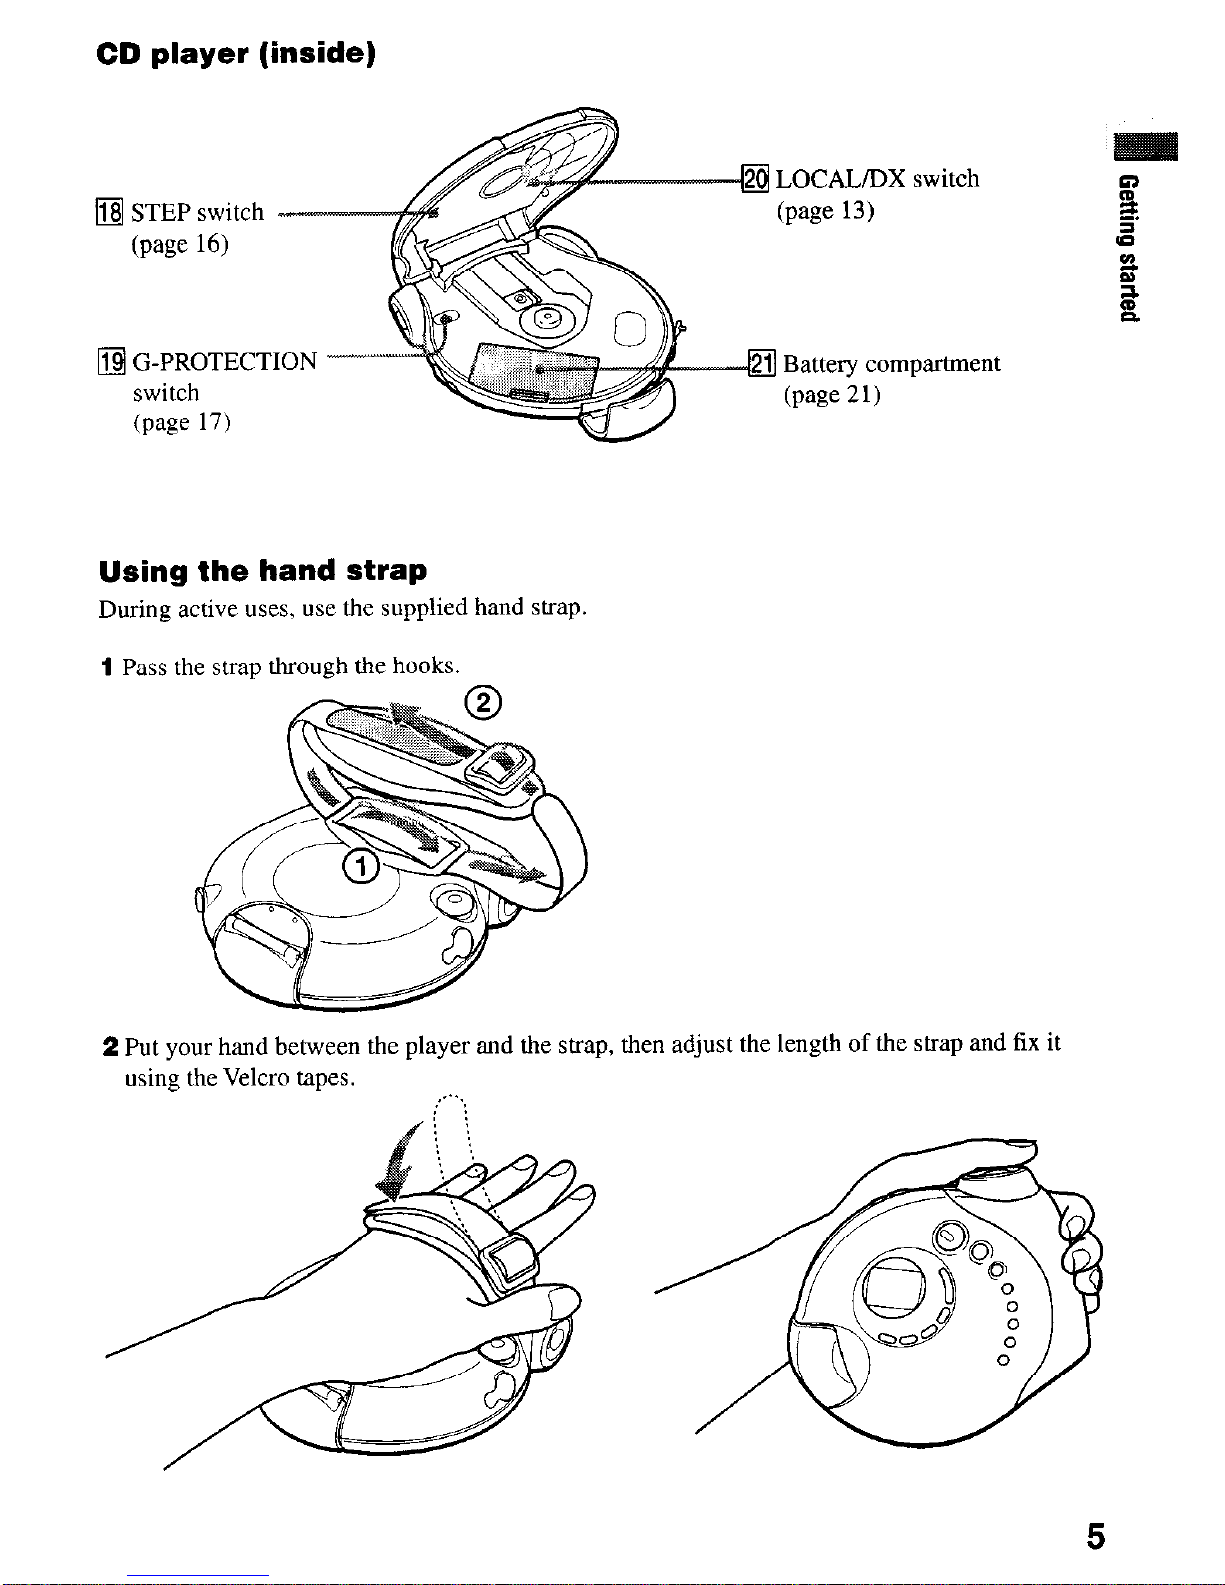
CD player (inside)
LOCAL/DX switch
b-we 13)
q G-PROTECTION
switch
(page 17)
Battery compartment
bw
211
Using the hand strap
During active uses, use the supplied hand strap.
1
Pass the strap through the hooks.
2 Put your hand between the player and the strap, then adjust the length of the strap and fix it
using the Velcro tapes.
,...‘.
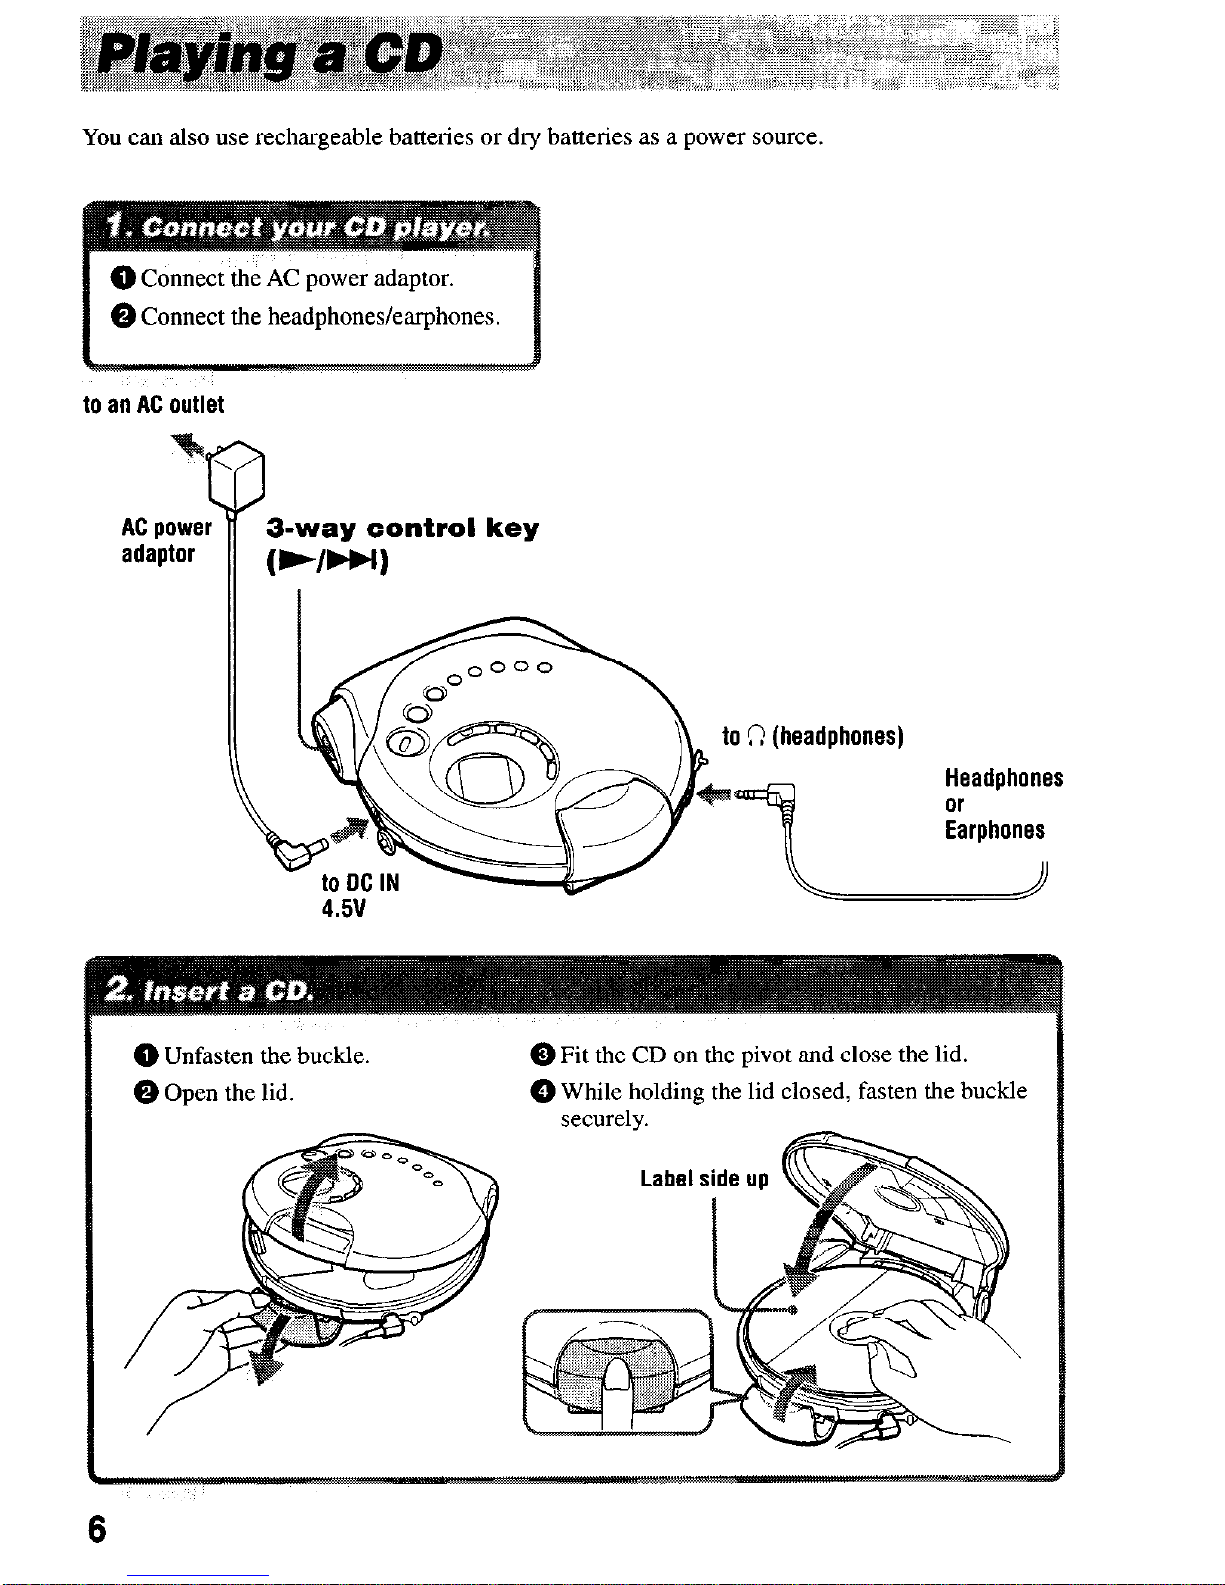
You can also use rechargeable batteries or dry batteries as a power source.
0 Connect the AC power adaptor.
0 Connect the headphones/earphones.
to an AC outlet
3-way control key
@Unfasten the buckle.
0 Open
the lid.
0 Fit the CD on the pivot and close the lid.
@While holding
the lid closed, fasten the bucHe
6
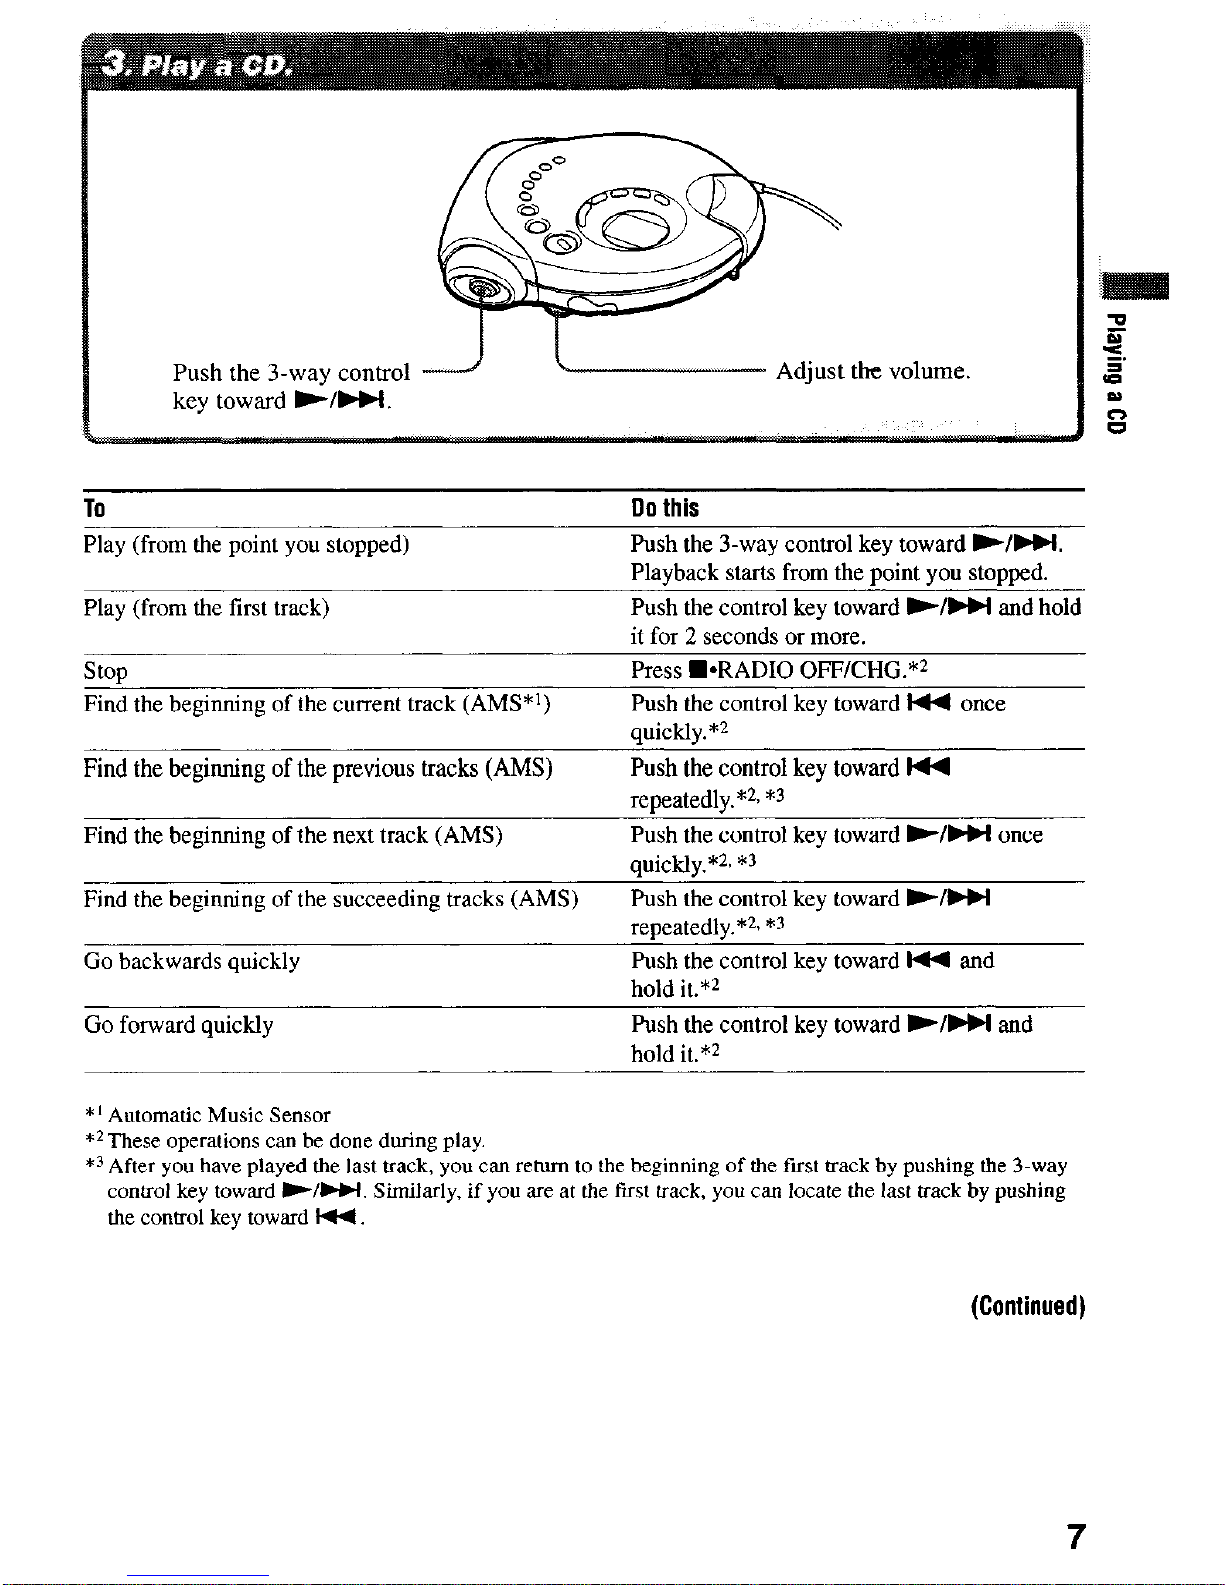
Push the 3-way control Adjust the volume.
To
Play (from the point you stopped)
Play (from the first track)
stop
Find the beginning of the current track (AMS*‘)
DO this
Push the 3-way control key toward b/W.
Playback starts from the point you stopped.
Push the control key toward W/W and hold
it for 2 seconds or more.
Press W-RADIO OFF/CHG.**
Push the control key toward I44 once
quickly.**
Find the beginning of the previous tracks (AMS)
Find the beginning of the next track (AMS)
Find the beginning of the succeeding tracks (AMS)
Go backwards quickly
Push the control key toward I44
repeatedly.**- *3
Push the control key toward b/W once
quickly.*~~ *3
Push the control key toward b/W
repeatedly.**, *3
Push the control key toward I44 and
hold it.**
Go forward quickly
Push the control key toward W/W and
hold it.**
*’ Automatic Music Sensor
**These operations can be done during play.
*3 After you have played the last track, yew can rehun to the &ginning of the fust txack by pushing the 3.way
con&o1 key &ward
W/W. Similarly, if you are at the iirsl track, you can locate the last track by pushing
the contml key towad l44.
(Continued)
About the display
l When you push the 3-way control key toward w/M after changing the CD or turning off
and on the player, the total number of tracks in the CD and total playing time appear for about
two seconds.
l During play, the track number and the elapsed playing time of the current track appear.
If the volume level does not increase
If “AVLY appears in the display, hold down SOUND until “AVIS” disappears from the display.
For details, see “Protecting your hearing (AVIS).”
About CD-Rs/CD-RWs
This CD player can play CD-R&D-RWs recorded in the CD-DA format*, but playback
capability may vary depending on the quality of the disc and the condition of the recording
device.
* CD-DA is the abbreviation for Compact Disc Digital Audio. It is a recording standard used for the Audio
CDs.
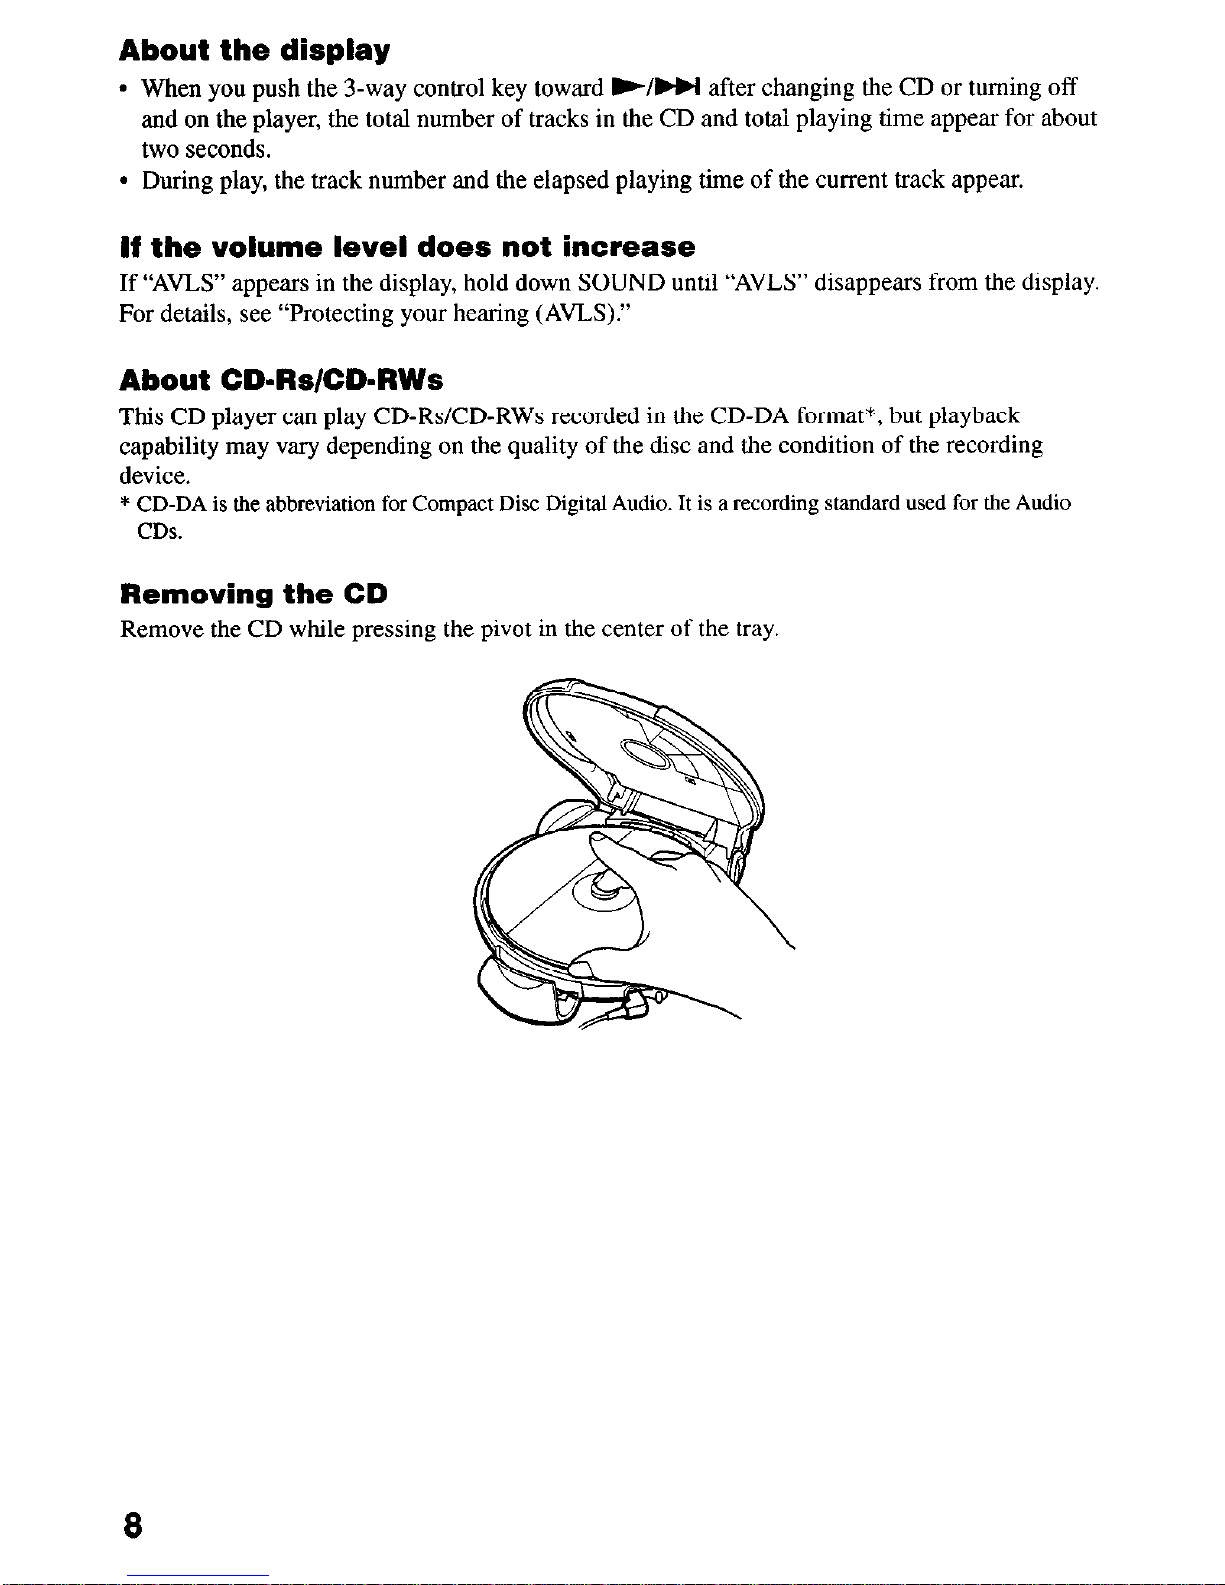
Removing the CD
Remove the CD while pressing the pivot in the center of the tray.
8
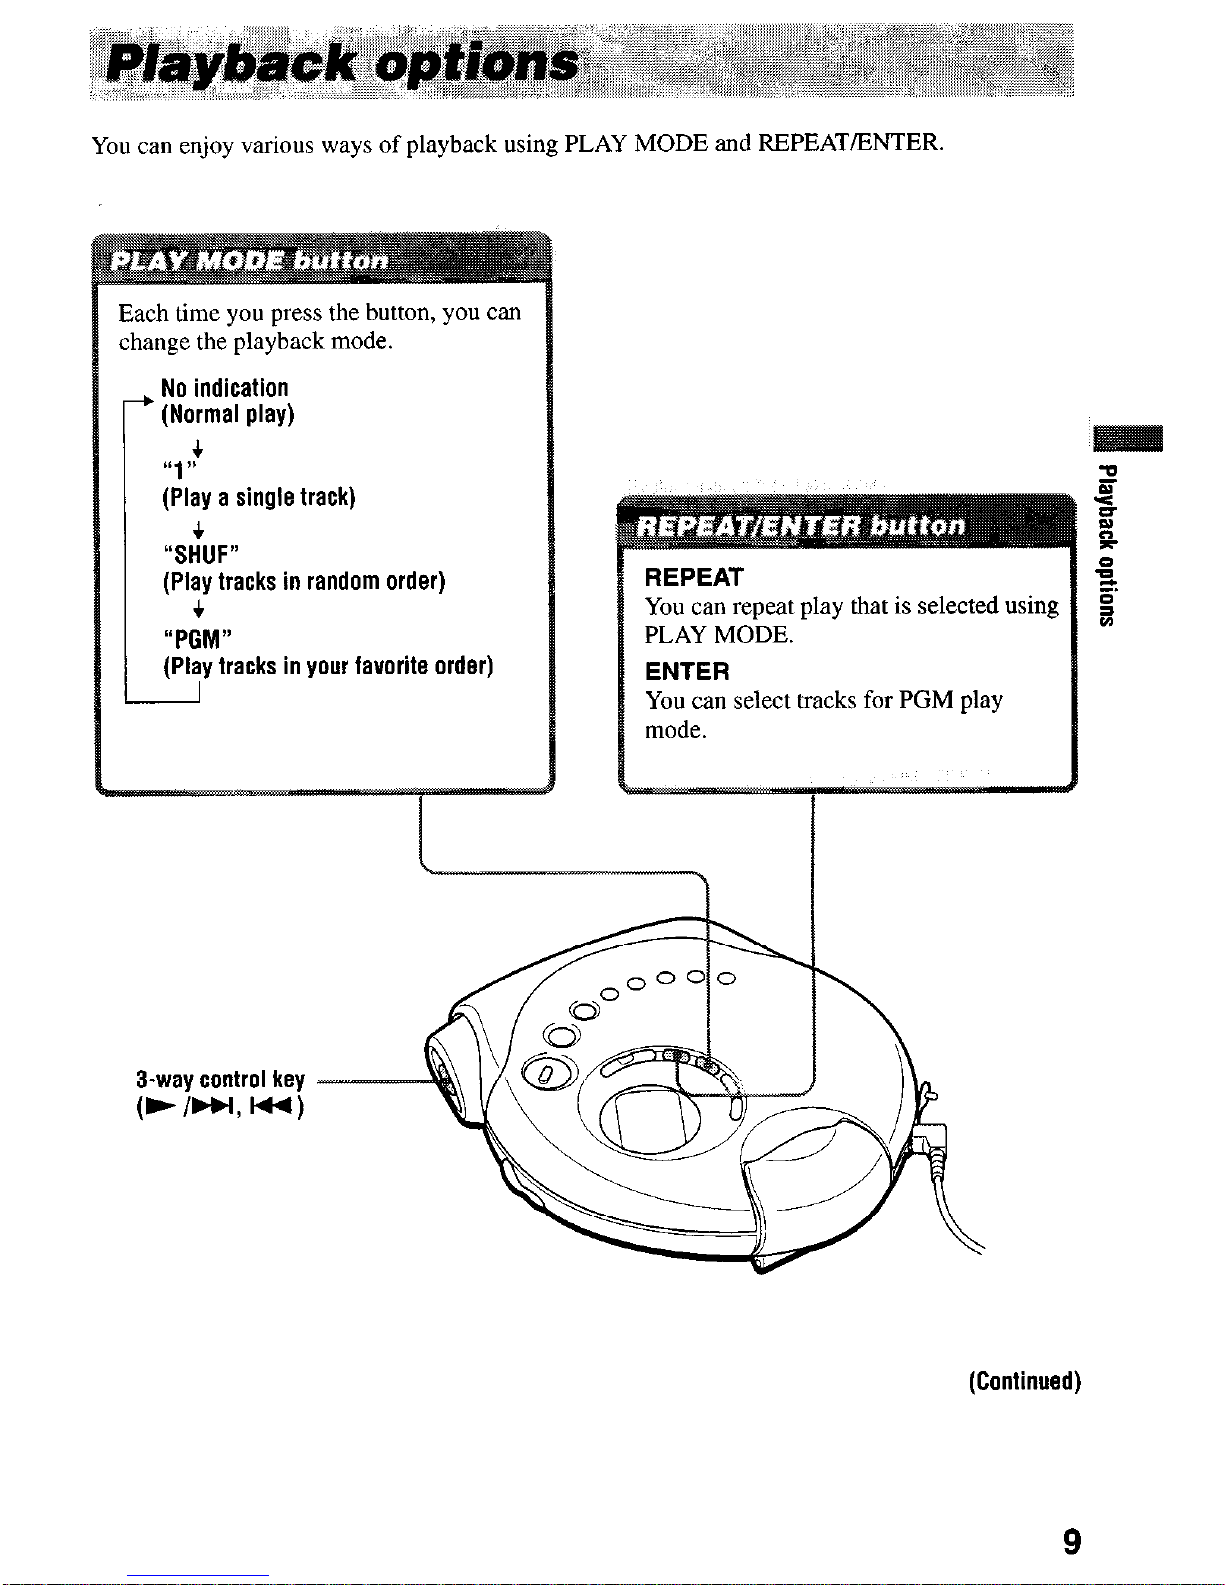
You can enjoy various ways of playback using PLAY MODE and REPEAT/ENTER.
Each time you press the button, you can
change the playback mode.
, No indication
(Normal play)
4
“1”
(Play a single track)
(Play tracks in random order)
4
“PGM”
(Play tracks in your favorite order)
REPEAT
You can repeat play that is selected using
PLAY MODE.
ENTER
You can select tracks for PGM play
mode.
3-way control key
P/-l,l++)
Kontinued)
9
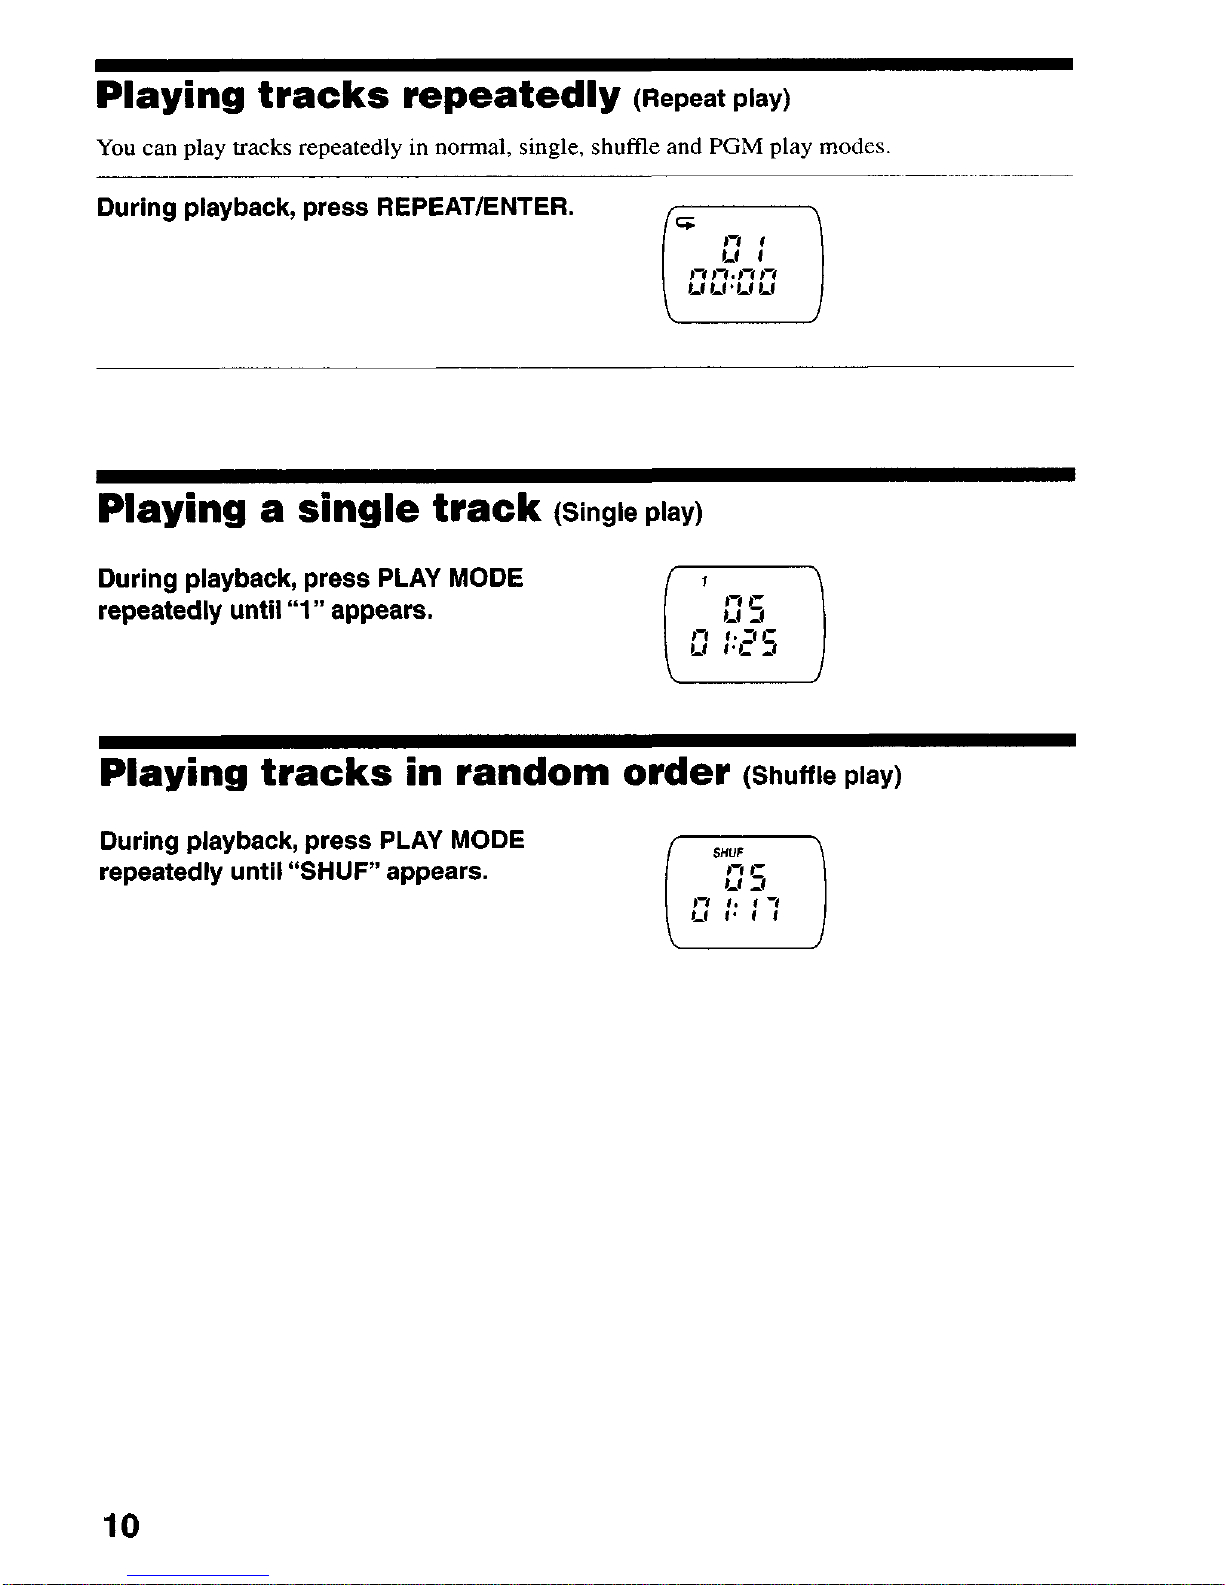
Playing tracks repeatedly (Repeat play)
YOU can play tracks repeatedly in normal, single, shuffle and PGM play modes
During playback, press REPEAT/ENTER.
Playing a single track (Single play)
During playback, press PLAY MODE
repeatedly until “1” appears.
Playing tracks in random order (Shuffle play)
During playback, press PLAY MODE
repeatedly until “SHUF” appears.
10
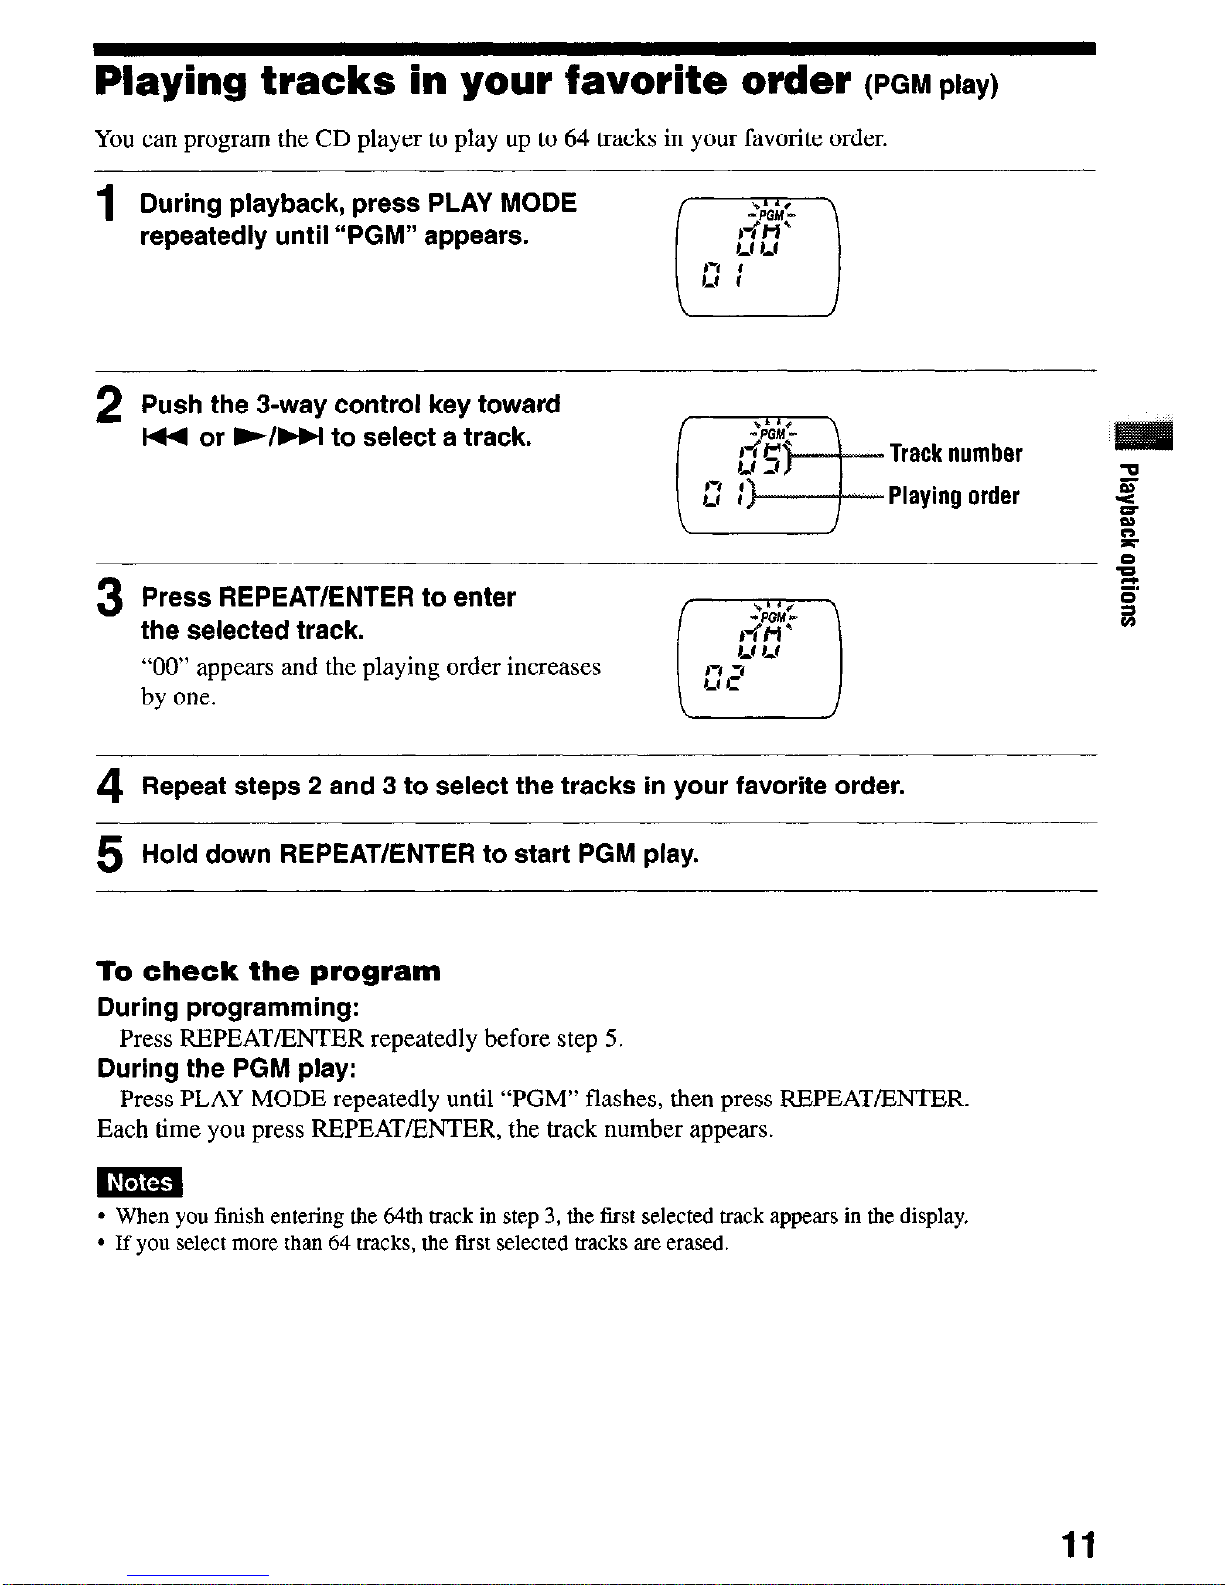
Playing tracks in your favorite order
(PGM ptay)
You can program the CD player to play up to 64 tracks in your favorite order.
1 During playback, press PLAY MODE
repeatedly until “PGM” appears.
2 Push the 3-way control key toward
I44 or W/W to select a track.
-
Track number
Playing order
3
Press REPEAT/ENTER to enter
the selected track.
“00” appears and the playing order increases
by one.
-
4 Repeat steps 2 and 3 to select the tracks in your favorite order.
5 Hold down REPEAT/ENTER to start PGM play.
To check the program
During programming:
Press REPEATENTER repeatedly before step 5.
During the PGM play:
Press PLAY MODE repeatedly until “PGM” flashes, then press REPEAT/ENTER.
Each time you press REPEAT/ENTER, the track number appears.
* When you finish entering the e&h track in step 3, the first selected track appears in the display,
l
If you select tnorc than 64 tracks, the first selected tracks are erased.
11
 Loading...